

GE JTP56WD1WW, JTP56SD1SS, JTP56CD1CC, JTP56BD1BB, JTP18WXD1WW Owner’s Manual
...
www.6EApp#ances.com
Safety Instructions ......... 3-5
©
E
Operating Instructions
Clock and Timer ............ 19
Proofing ................... 90
Sabbath Feature ............. 9
Thermostat ................ 91
Timed Baking
and Roasting ......... 1,9,, 18, 19
Using the Oven ........... 6-93
Care and Cleaning
Broiler Pan and Grid ......... 95
Control Panel .............. 95
Lift-Off Oven Door . ......... 94
I Jgh t Bulb ................. 97
Oven Floor . ............... 95
Probe ..................... 96
Removing Packaging Tape .... 93
Stainless Smel Surfaces ....... 98
Self-Cleaning Oven ....... 99, 93
Shelves .................... 96
Troubleshooting Tips ..... 30-39
jIKl'18
jIKl'55
.pr,56
Consumer Support
Consumer Support .... Back Co_er
Product Registration ...... 33, 34
Warranty .................. 35
Write themodelandserial
numbershere:
Model #
Serial #
You can find thenI oil a label
oil tile fl'ont of tile oven behind
tile oven door oil single ()veil
models, or tile fl'ont of tile lower
()veil behind tile ()veil dooI" on
double ()veil n/odels.
READALLINSTRUCTIONSBEFOREUSING.
WARNING!
For your safe_ the information in this manual must be followed to minimize the risk of fire or
explosion, electric shock, or to prevent property damage, personal injury, or loss of life.
IMPORTANTSAFETYNOTICE
The California Safe Drinking Water and ToxicEnforcement Act requires the Governor of Cafifomia
to publish a list of substances known to the state to cause cancer, birth defects or other reproductive
harm, andrequires businesses to warn customers of potential exposure to such substances.
The fiberglass insulation in self-clean ovens gives off a very small amount of carbon monoxide during
the cleaning cycle. Exposure can be minimized by venting with an open window or using a ventilation
fan or hood.
2
www.GEAppliances.com
SAFETYPRECAUTIONS
When using electrical appliances, basic safety precautions should be followed, including the
following:
Use this appliance only for its intended
i)m])ose as described ill this Owner's
Manual.
Be sure your appliance is properly
installed and grounded by a qualified
mchnician in accordance with tile
provided installation insuucdons.
Do not atmmpt to repair or replace any
part of your oxen unless it is specifically
recommended in this manual. All other
servicing should be refetxed m a qualified
mchnician.
Have the installer show you the location
of the citvuit breaker or fl_se. Mark it for
east' reference.
Before perfot_ning any service, disconnect
tile oven power supply at the household
distribution panel by removing the fl_se or
switching off the circuit breaken
Do not leax> children alone--<hildren
should not be left alone or unattended in
an area where all appliance is ill use. They
should nex>r be allowed to sit or stand on
ally' part of the appliance.
Do not allow anyone to climb, stand or
hang on the door They could damag_ the
oxen, or cause severe personal iIIju U.
Be sure tile oxen is securely installed in
a cabinet fllat is firmly attached to the
house structme. Never allow anyone to
climb, sit, stand or hang on the oxen door
Nexer leave tile oven door open when you
are not watching rite oven.
Always kee I) combustible wall coxering,
curtains or drapes a sat) distance flom
yo/lr oven.
Alwws kee I) dish towels, dish clod, s, pot
holders and other linens a safe distance
froll/VO/lI" oxen.
Always kee I) wooden and plastic umnsils
and canned food a safe distance away flom
your oven.
Teach children not m play with the
controls or ally' other part of the oven.
Larg_ scratches or impacts m glass doors
can lead m broken or shatmred glass.
3
READALLINSTRUCTIONSBEFOREUSING.
WARNING!
SAFETYPRECAUTIONS
Do not store flammable materials in
an oxen.
CAUT/Om: Itemsofi.terestto
children should not be stored in cabinets
aboxe an oxen; children climbing on the
oxen to reach items could be seriously
injured.
Nexer wear loose-fitting or hanging
garments while using the appliance. Be
careflfl when reaching fox imms stored in
cabinets over the oven. Flammable mamfial
could be ignited if brougixt in corrtact with
hot smPaces or heating elements arm m W
cause sex.ere bllrlls,
Use only d U pot holders--moist or damp
pot holders on hot surfaces may result in
burns flom smam. Do not let pot holders
touch hot heating elements. Do not use a
towel or other bulky cloth.
For your safety, hexer use your appliance
fox wanning or heating the room.
Do not let cooking gTease or other
flammable materials accumulate in or near
tlle oxen.
Do not use water on glease fires. Nexer pick
up a flaming pan. Turn the corrtrols off.
Flame in the oven can be smothered
completely by closing tile oxen door arm
turning the oven off or by using a muhi-
purpose d U chemical or foam-type fire
extinguishen
Do not touch flxe heating elements or fire
irrmfior smihce of fire ox.en. These surfaces
may be hot enougix to burn even thougir
drey are dark in color. During and after
use, do not touch, or let clothing or oflxer
flammable materials corrtact arty interior
area of the ox.en; allow sufficient time for
cooling frst.
Potentially hot smihces include oxen xent
openings, surfaces near the openings,
crevices around tire oxen doox, tire edges
of tire window arm metal trim parts aboxe
the door
REMEMBER:Tile irrside surface of tire oxen
4
may be hot when the door is opened.
Nexer lemejars or cans of fat drippings in
or near Your oven.
Do not store or use combustible mamfials,
gasoline or other flammable vapors and
liquids in the vicinity of this or arty other
appliance.
Stand away flom the oxen when opening
the oxen door Hot air or steam which
escapes can cause bums to hands, lace
arM/or eyes.
Do not heat unopened food containers.
Pressure could build up and the corrtainer
could burst, causing an injury.
Kee I) the oxen xent unobstructed.
Kee I) the oven flee flom gTease buildup.
Place tile oxen shelf in the desired position
while the oxen is cool. If shelxes must be
handled when hot, do not let pot holder
corrtact the heating elements.
When using cooking or roasting bags in tire
oxen, follow the manufacturer's directions.
Pulling out tire shelf to tire stop-lock is a
corrxenience in lifting heax y foods. It is also
a precaution against burns from touching
hot suliaces of the door or oven walls.
Do not use tlre oxen to dU newspapers.
If oxerheated, they can catch on fire.
Do not use tlle oxen fox a storage area.
hems stored in an oxen can ignite,
Do not ]eme paper products, cooking
utensils or food in the oxen when not
in use.
After broiling, always take the broiler pan
out of tire oxen arm clean it. I,eftoxer
grease ira the broiler pan can catch fire
next time you use the pan.
Clean only parts listed in this Owner's
Manual.
Do not use aluminum foil to line oxen
bottoms, except as suggested in this manual.
hnproper irrstallation of aluminum foil may
resuh in a risk of electric shock or fire.
www.GEAppliances.com
COOKMEATANDPOULTRYTHOROUGHLY...
Cookmeat andpoultrythoroughly--meat to atleastan INTERNALtemperatureof 160°Eandpoultry
toat leastanINTERNALtemperatureof 180°ECookingto thesetemperaturesusuallyprotectsagabst
foodbomeillness.
SELF-CLEANINGOVEN
Do not clean the door gasket. The door
gasket is essential tbr a g_od seal. Care
should be token riot to rub, damage or
moxe the gasket.
Do riot use oxen cleaners. No commercial
oven cleaner or oven liner promcfixe
coating of any kind should be used in or
around any part of die oxen. Residue flom
oven cleaners will damage the inside of the
oxen when the selt:<lean Q'cle is used.
Before self-cleaning die oxen, remoxe die
broiler pan, gdd arid other cookware.
Be sure to wipe up excess spillage before
starting the self-cleaning operation.
If the self-cleaning mode malflmcuons,
turn the oxen off" arid disconnect the power
supply. Haxe it serviced by a qualified
mchnician.
READANDFOLLOWTHISSAFETYINFORMATIONCAREFULLY.
SAVETHESEINSTRUCTIONS
5
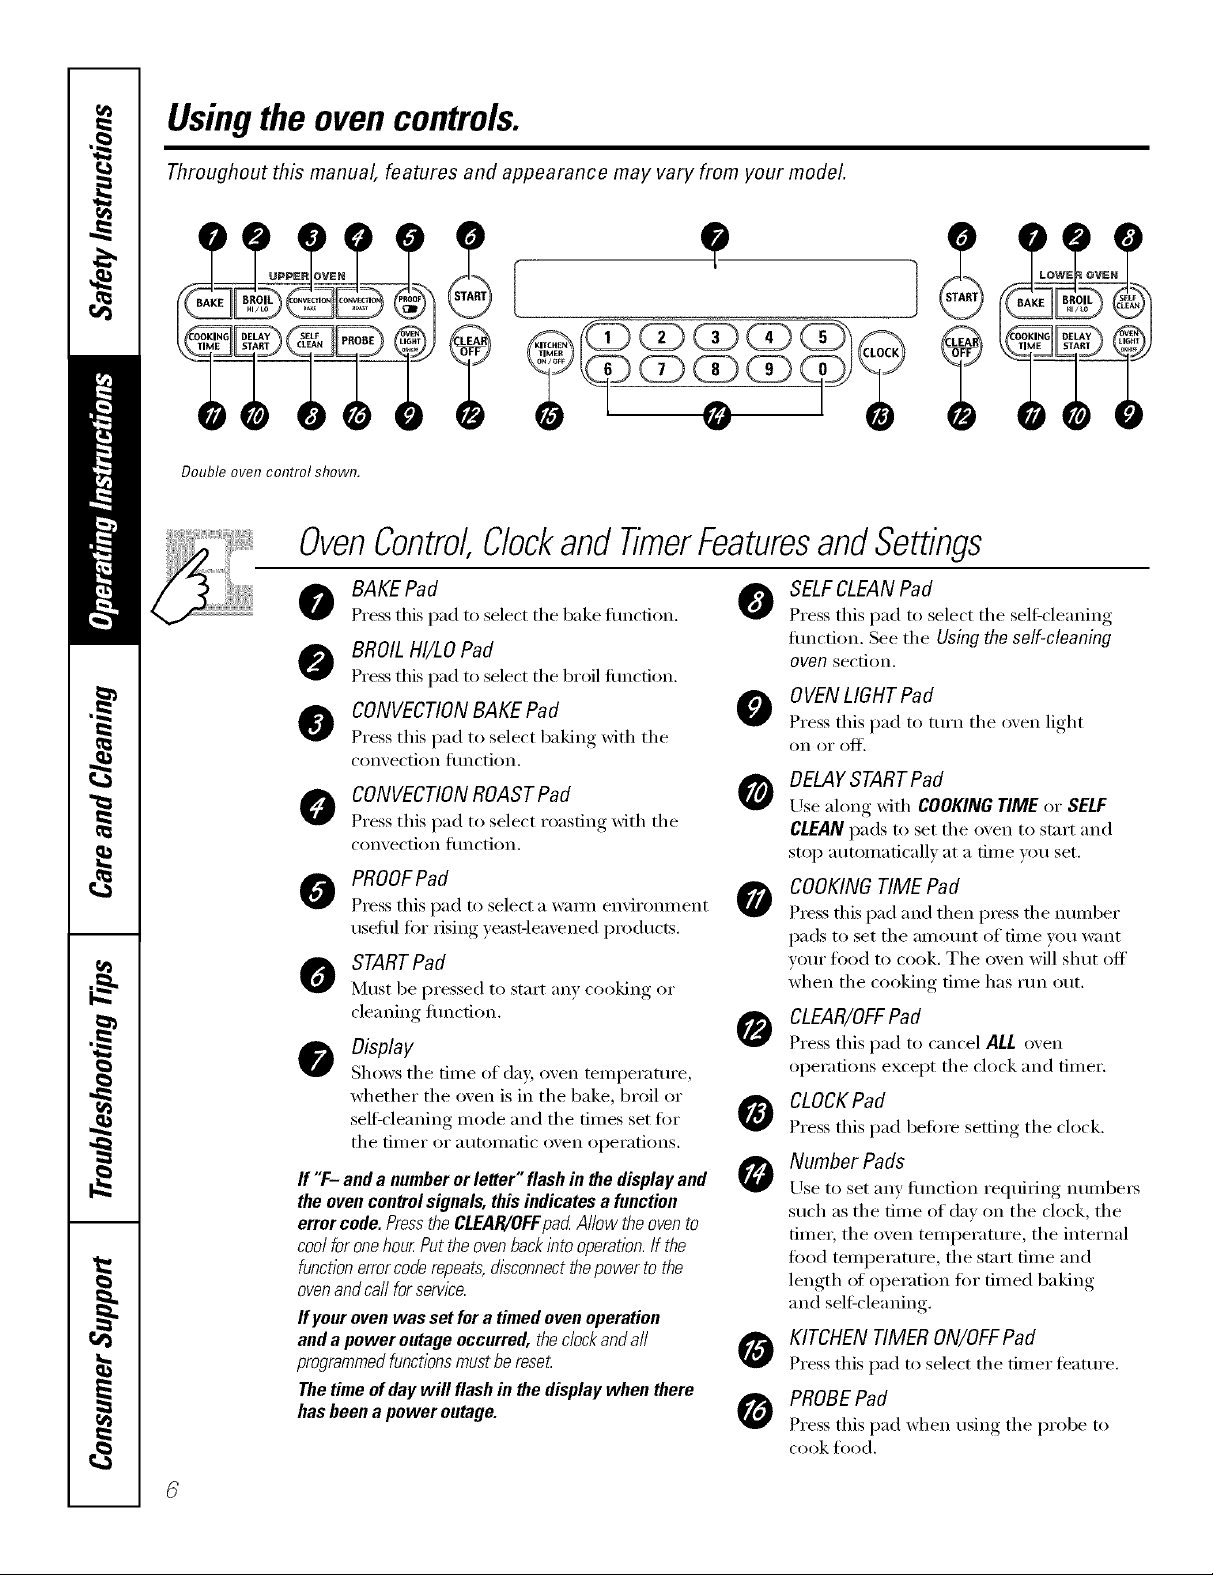
Usingthe ovencontrols.
Throughout this manual, features and appearance may vary from your model.
Double oven control shown.
OvenControl,Clockand TimerFeaturesandSettings
BAKE Pad
Press this pad to select the bake flmcfion.
BROIL HI/LO Pad
Press this pad to select the broil fimction.
CONVECTIONBAKE Pad
Press this pad to select baking with the
con'_ ection tilnction.
CONVECTIONROASTPad
Press this pad to select roasting with the
con'_ ection tilnction.
PROOFPad
Press this pad to select a wa m_ enxir_mm ent
usefifl for rising )east-leaxened i)roducts.
STARTPad
]V]tlStbe pressed to start any cooking or
cleaning flmcfion.
Display
Shows the time of da)', oven temperature,
whether the oven is in the bake, broil or
selfXcleaning mode and the times set for
the [iI//eI" oi" atltOi//a[ic (Well operations.
If "F- anda numberorletter"flashinthedisplayand
theovencontrolsignals,thisindicatesa function
errorcode.Pressthe CLEAR/OFFpad Allowtheovento
coolforonehourPuttheovenbackintooperation.If the
functionerrorcoderepeats,disconnectthepowertothe
ovenandcarlforservice.
If your oven was set for a timed oven operation
and a power outage occurred, theclock and aft
programmedfunctionsmust be reseL
The time of day will flash in the display when there
has been a power outage.
SELFCLEANPad
0
Press this pad to select the self_'leaning
flmction. See the Using the self-cleaning
oven section.
OVENLIGHT Pad
Press this pad to turn the o_en light
on oi" OlC[]
DELAYSTART Pad
Use along with COOKINGTIME or SELF
CLEANpads to set the oven to start and
stop automatically at a time you set.
COOKINGTIME Pad
0
Press this pad and then pI'eSS the ntllllbeI"
pads to set the ai]/otlnt of time you want
your food to cook. The oven will shut off
when the cooking time has run ()tit.
CLEAR/OFFPad
Press this pad to cancel ALL oven
operations except the clock and timer.
CLOCKPad
Press this pad before setting the clock.
Number Pads
Use to set any fimcfion re(ltfi_Jng nt]mbe_
such as the time of day on the clock, the
timer, the oven temperature, the internal
food temperature, the start time and
length of operation for timed baking
and self-cleaning.
KITCHEN TIMER ON/OFFPad
Press this pad to select the timer feature.
PROBEPad
0
Press this pad when using the probe to
cook ti)od.
Special features ofyourovencontrol, www.GEAppliances.com
Yournew touch pad control has additional features that you may choose to use. The following are the features
and how you may activate them.
Thespecial feature modes can only be activated while the display is showing the time of day. They remain in
the control's memory until the steps are repeated.
When the display shows your choice, press the STARTpad. Thespecial features will remain in memory after
a powerfailure, exceptforthe Sabbath feature, which willhave to be reseL
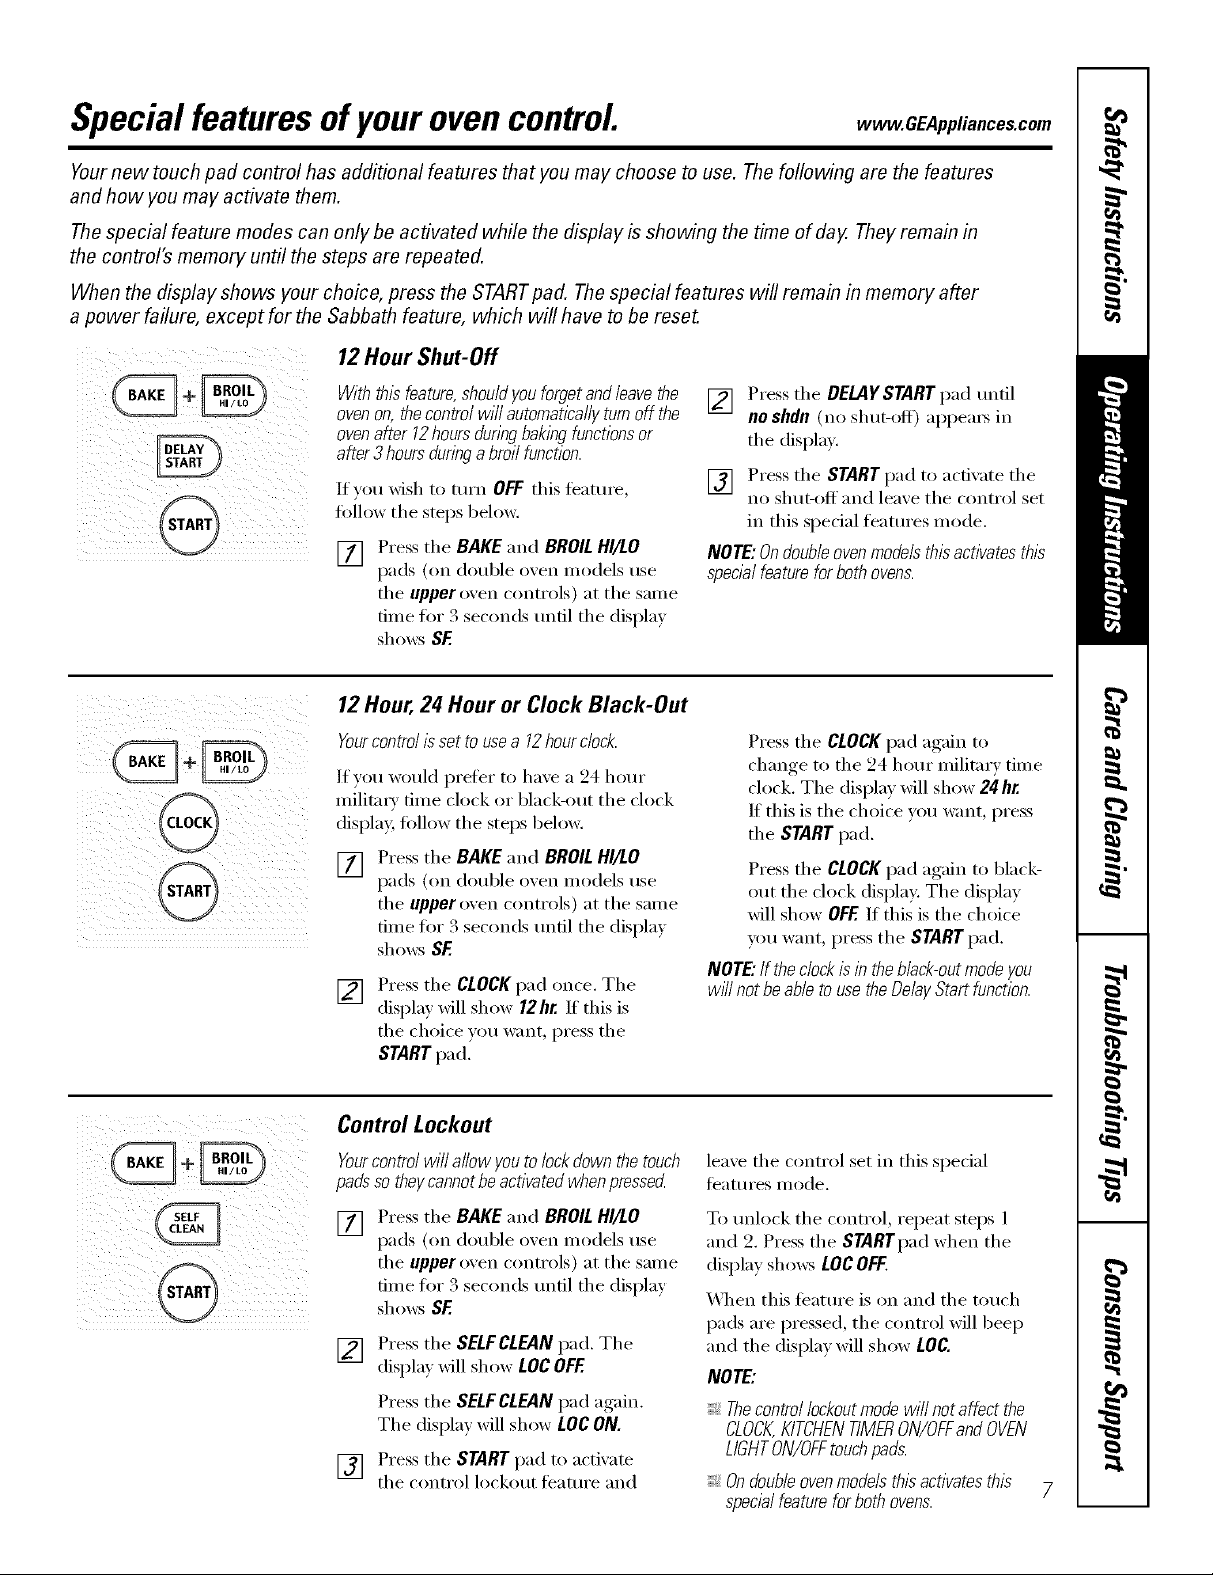
12 Hour Shut-Off
Withthisfeature,shouldyouforgetandleavethe
ovenon,thecontrolwillautomaticallyturnoff the
ovenafter 12hoursdunbgbakingfunctionsor
after3hoursduringa broilfunction.
If you wish to mrn OFF this teature,
follow the steps behwv.
[] Press the BAKE and BROIL HI/LO
pads (on double oxen models use
tile upper oven controls) at tile same
time tor 3 seconds until the display
shows SE
12Hour,24 Hour or Clock Black-Out
Yourcontrol/ssettousea 12hourc/o&
If you would prefer to have a 24 hour
milita_' time clock or black-out the clock
displa 5 tollow tile steps below.
[] Press tile BAKE and BROIL HI/LO
pads (on double men models use
the upper oven controls) at the same
time for 3 seconds until tile display
shows BE
Press tile CLOCKpad once. Tile
[]
displa) will show 12hr. If this is
the choice you want, press tile
STARTpad.
[] Press tile DELAYSTART pad until
no shdn (no shut-off) appeax_ in
tile display.
[] Press tile START pad to acfixate tile
no shut-off and leave the control set
in this spedal features inode.
NOTE:Ondoubleoven modelsthisactivates this
specb/ featurefor both ovens.
Press tile CLOCKpad again to
change to tile 24 hour militmy time
clock. The display will show 24 hr.
If this is tile choice you want, press
tile START pad.
Press tile CLOCKpad again to black-
out the clock displa> The display
will show OFF If this is the choice
you want, press the START pad.
NOTE."If the dock is in the Mack-out mode you
wffl notbeable to usethe DelayStart function.
Control Lockout
Yourcontrolwill allowyoutolockdownthetouch
padssotheycannotbeactivatedwhenpressed
Press tile BAKEand BROILHI/LO
ii
[]
pads (on double oxen nlodels use
tile upper oxen controls) at tile same
time for 3 seconds until the display
shows SF
[] Press tile SELF CLEAN pad. Tile
displa_ will show LOC OFF
Press the SELFCLEAN pad again.
Tile displa) will show LOCON.
leaxe tile control set in this special
l_'attlres illode.
To unlock tile control, repeat steps 1
c S
and 2. Pre._s tile STARTpad when tile
display shows LOC OFF.
_A]/en this ti_ature is on and tile touch
pads are pressed, the control will beep
and tile display will show LOC.
NOTE:
;;;;;;_Thecontrollockoutmodewi//notaffectthe
CLOCK,KITCHENTIMERON/OFFandOVEN
LIGHTON/OFFtouchpads.
[] Press tile START pad to activate
tile control lockout feature and
;;;;;;_,Ondoub/eovenmode/sthisactivates this
special feature forboth ovens.
Special featuresofyourovencontrol
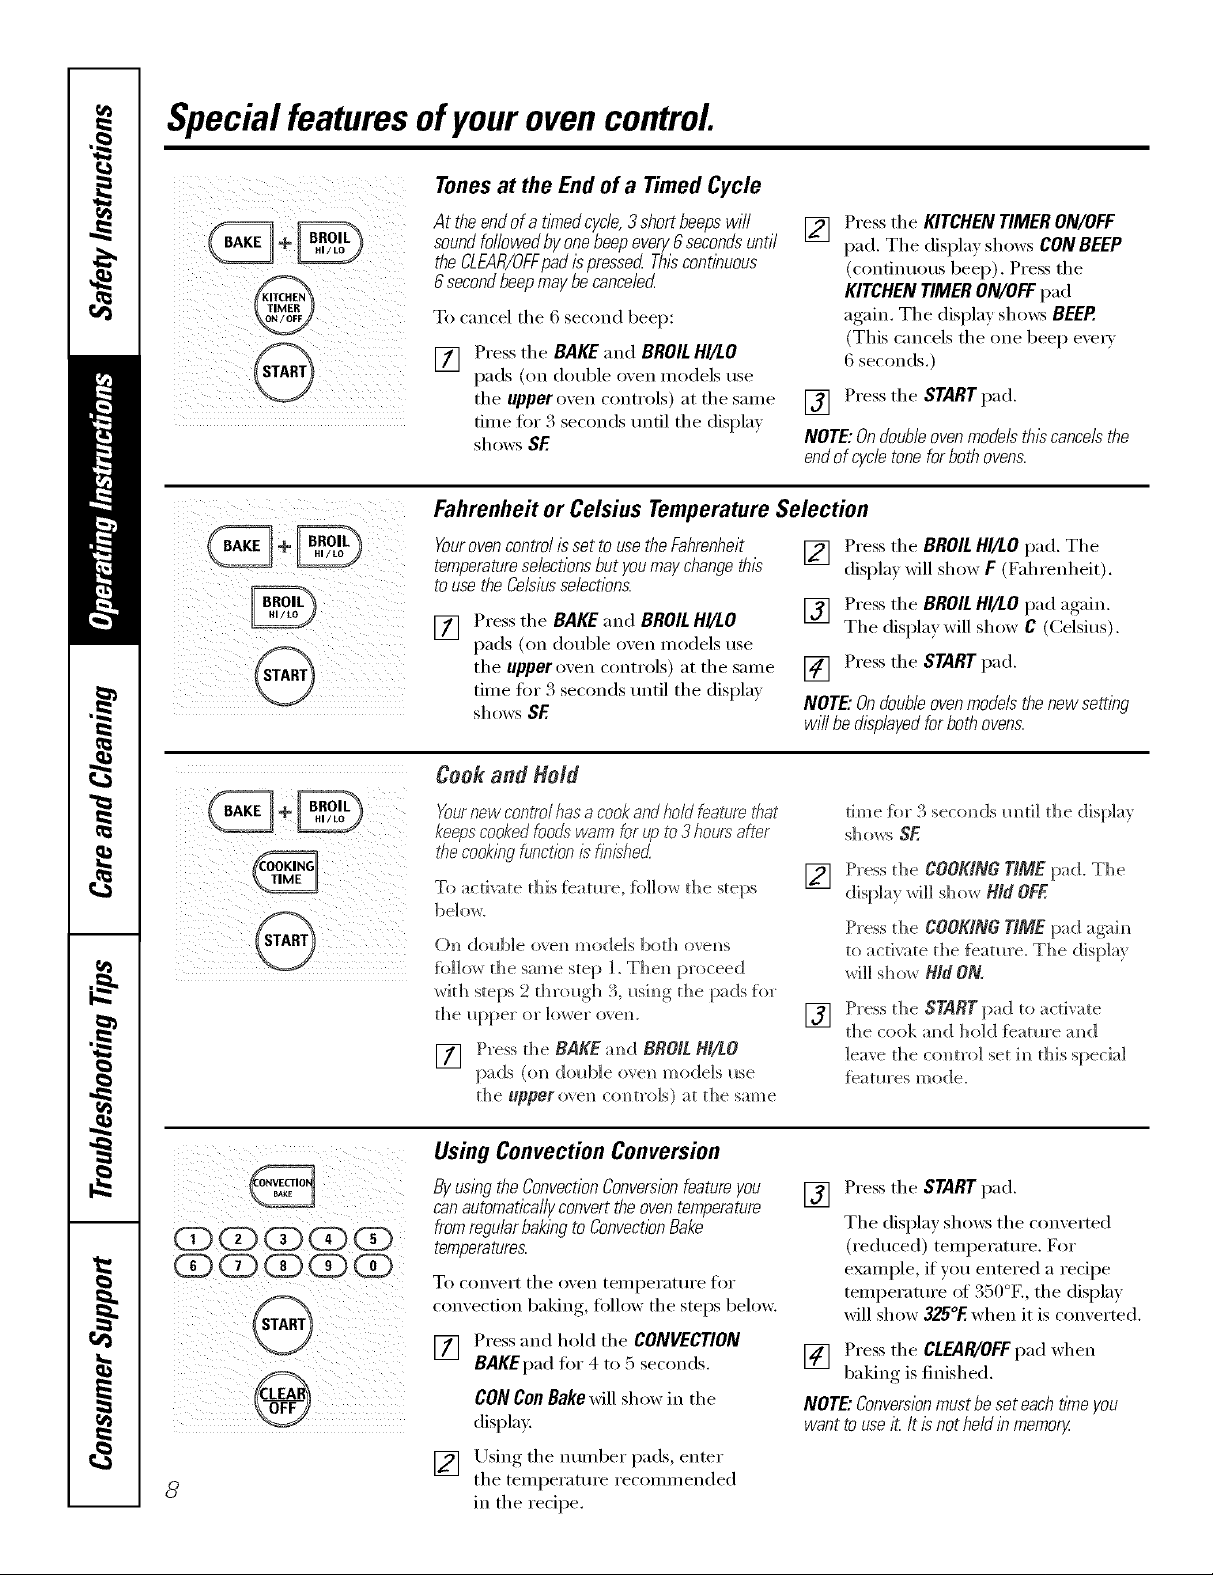
Tonesat the Endof a Timed Cycle
At the endof a t/knedcycle,3 shortbeepswill
sound followedby onebeep every6seconds until
the CLEAR/OFFpadis pressed Thiscontinuous
6secondbeepmay be canceled
To cancel tile 6 second beep:
[] Press tile BAKE and BROIL HI/LO
pads (on double o'_en models use
tile upper oven controls) at tile same
time fin" 3 seconds tmtil tile display
shows SF
[] Press tile KITCHEN TIMER ON/OFF
pad. Tile display shows CON BEEP
(continuous beep). Press the
KITCHEN TIMER ON/OFF pad
again. Tile display sl/o_:_ BEEP.
(This cancels tile one beep e\'ex T
6 seconds.)
[] Press tile START pad.
NOTE:Ondouble ovenmodelsthis cancelsthe
endof cycletone for bothovens.
Fahrenheit or Celsius Temperature Selection
Yourovencontrol isset to usethe Fahrenheit
temperature,selectionsbut youmay changethis
touse the Celsiusselections.
[] Press tile BAKE and BROILHI/LO
pads (on double oven models use
the tipper oxen controls) at the same
time fin" 3 seconds until the displa)
shows SE
[] Press tile BROIL HI/LO pad. Tile
displa_ _dll show F (Fahrenheit).
[] Press tile BROIL HI/LOpad again.
Tile display will show C (Celsius).
[] Press tile START pad.
NOTE."Ondoubleovenmodelsthenewsetting
willbedisplayedforbothovens.
Cook and Hold
i @ i¸¸i
!i ii iiii ii
Yournew controlhas a cookandhold feature treat
keepscooked foodswarm for up to 3hours after
thecookingfunction is finishecL
To activate this featm'e, follow the steps
()n double o',em_ models both o',em_s
f)}]](_r the same step 1. Thel_ proceed
with steps 2 throl_g]l 3, I_sh_g the pads fitr
the lit)per or lower ore]/.
[] Press the BAKE m_d BROIL HI/tO
pads (o_ dold_Ie o',e_ models use
the upper o_ e_ commo]s) at the sm_e
Us&g Convection Conversion
Byusingthe ConvectionConversionfeatureyou
canautomatically convert theoven temperature
fromregularbakingto ConvectionBake
temperatures.
To COlivert tile oxell tei//pei'at/li'e [i)r
comection baking, follow tile steps below.
[] Press and hold tile CONVECTION
BAKEpad fin" 4 to 5 seconds.
CONConBakexdll show in tile
display.
time fi)r 3 secom_ds m_ti] the display
[] Press tile COOKING TIME pad. The
Press the COOKING TIME pad agaim_
to activate the {eatm'e. The (lisp]a}
will show Hid ON.
Press the START pad to activate
[]
the cook m_d hold [eatm'e m_d
leave the co_tro] set im_this special
feam]'es mode.
Press tile START pad.
[]
Tile display sl/o_:_ tile converted
(reduced) temperatm'e. For
example, if you entered a recipe
temperature of 350°E, tile display
will show 325°F.when it is converted.
[] Press tile CLEAR/OFFpad when
baking is finished.
NOTE."Conversionmustbe set each dyneyou
want to useit It isnot held inmemory
[] Using tile nmnber pads, enter
8
tile temperature recommended
in the recipe,
Usingthe SabbathFeature.
(Designedforuseon theJewish SabbathandHolidays.) www.GEAppliances.com
TheSabbathfeature can be usedfor baking/roastingonlg It cannotbeusedfor convection,broiling,self-cleaning,or
DelayStart cooking.
NOTE."Theovenlight comes onautomatically(onsomemodels)when the dooris openedandgoes off whenthedooris closed.
Thebulbmaybe removed.SeetheOvenLightReplacementsection. Onmodelswith alight sw#ch onthe controlpanel,theoven
lightmaybe tumed on andleft on.
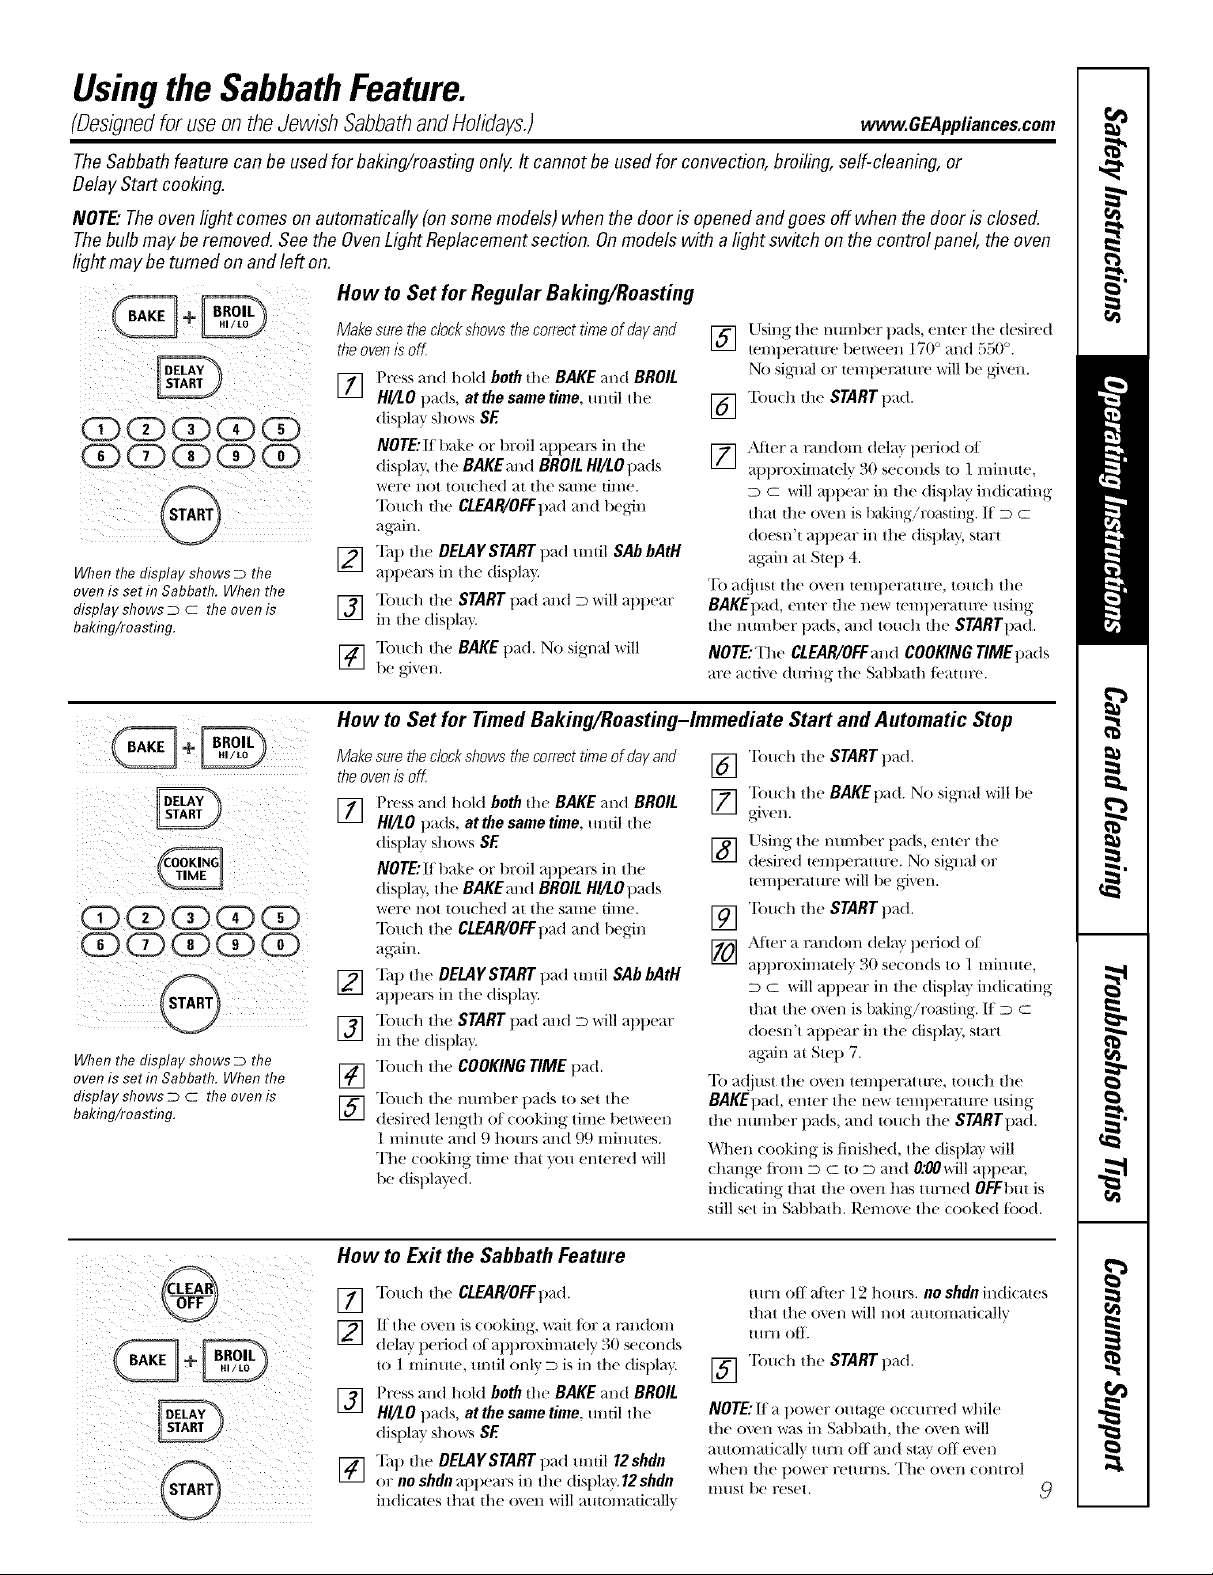
How to Set for Regular Baking/Roasting
When the display shows D the
oven is set in Sabbath. When the
display shows D c the oven is
bakfl?g/roasting.
Make sure the clockshows thecorrect time of dayand
the ovenis off
rT] Press m++dhold both the BAKE and BROIL
I+'1
HI/LO pads, at the same time, until the
disl/1 m S] _() _rs SE
NOTE:l] bake or broil alllle:_rs ill the
(lisllla}', the BAKEand BROIL Hl/LOpads
"Ibu(h die CLEAR/OFFtmd and beg,dn
ag_dn.
1_] "lhp the DELAYSTART pad umil SAb bAtH
al)l)ears ill die dist/la" }
] Touch th( START pad and D will apt)ear
in the displa'y.
] Touch dw BAKE t)ad. No signal will
be g_xen.
] [lsing the nmnl)er t)ads, enier the desire d
tenlt)et'ature 1)etweelJ 170 ° _ll/d ,-),-)()o
No sig,nl_dor lemtlemture will l)e g,riXell.
] "[bu(h the START pad.
[_ 2dh_r a random delay period ot
at)proximat(ly 30 se(onds to 1 minute,
D C will at)pear ill the display indk adng
that die oven is baking/roasting. If D c
doesn't at)t)ear in the disl)la _, start
ag_dn at Siep 4.
TO a(!jtlsi tile oven temllerature, tou(h tile
BAKEpad, emer die new iemlleramre using
tile ram/beT pads, and torah tl/e STARTpad.
NOTE: The CLEAR/OFFand COOKING TIME pads
are a(ti_e dining lhe Sabbath I('atm'e.
QD (D (Z) CD
Q ODdDCDCD¸
When the display shows D the
oven is set m Sabbath. When the
display shows D c the oven is
baking/roasting.
:i ii@% [
How to Set for Timed Baking/Roasting-Immediate Start and Automatic Stop
Make sure theclock shows thecorrect time of dayand
the ovenis off, []
[] Press and hold both th( BAKE and BROIL []
HI/LO tlads, at the same time, imtil the
display shovers SE []
NOTE:Iltlake or broil at)pe;_ ill the
dist/lay, the BAKEand BROIL HI/LOt)ads
x_r(_'(_I_()t tou(hed at die same dine. []
Touch the CLEAR/OFFt)ad and 1)egin
ag'ain. []
[] Tall the DEMYSTART pad until SAb bAtH
at)t)ears ill the dist/la _
] "Ibuch the START pad and D *,*,rillatll)ear
in die (lispla'y.
[] "lbu(h the COOKING TIME t/ad.
T(m(h the mmfl)er t)ads {o set the
[]
desired length of cooking time 1)erween
1 minuw and 9 h(mrs and 99 minmes.
The cooking time thai "_ou entered will
be dist)hryed.
"lbu(h the STARTt)ad.
"lbu(h the BAKEpad. No sii,qml will 1)e
Using the number pads, enter the
desired |el//t)ef_lHire. No si_]litl or
{emt)erat ure will be gi_'n.
"Ibuch tile STARTpad.
Al_er a randon/(leb)' t/eriod of
at/t)roxinlately 30 seconds to 1 minme,
D C will al/t)ear in the disl/la } indicadng
thin the o\en is baking!roasting. I/D C
doesn't allllear ill the distil m, start
again at Step 7.
"Ib a(!iust tile o_'n temt/erature, touch the
BAKEt)ad, enter the new temt)erature using
the number pads, mid touch the STARTt)ad.
When cooking is finished, the dislllay will
( hm/ge ti'c)m D c to D mid 0:QOwill al/l/ea c
indicating that the oven has turned OFFbut is
still set in Sal/bad/. Remo\e the cooked tood.
How to Exit the Sabbath Feature
"lbu(h the CLEAR/OFFt)ad.
[]
] 1t the oven is cooking, wait for a mndonl
delay l/eriod of at)t)roxin/ately 30 se(onds
to ] minute, until only D is in the dist/lay.
[_] Press and hold both the BAKE and BROIL
i,Ji
HI/tO t)ads, at the same time, tmtil the
disl/lay shows SE
] Tat) the DELAYSTART pad/mtil 12shdn
or no shdn at)l/ears in the dist/lay. 12shdn
in(ti(aies that the oven will mlionmd(allx_
turn off alier 12 hours, no shdn indicates
that the oxen will not automati(allv
ttlrll ( ){_{'.
] "lbuch the START t)ad.
NOTE:If a power outage occurred while
tile oven was ill S_d/bath, the o_'n will
a/ltonlaticallv ttlrll off aI/d st_*xoff e\ el/
whell tile t/ower rettlrl/s. The ovell €Ol/tt'o1
lIlllSl be reset.
Usingthe oven.
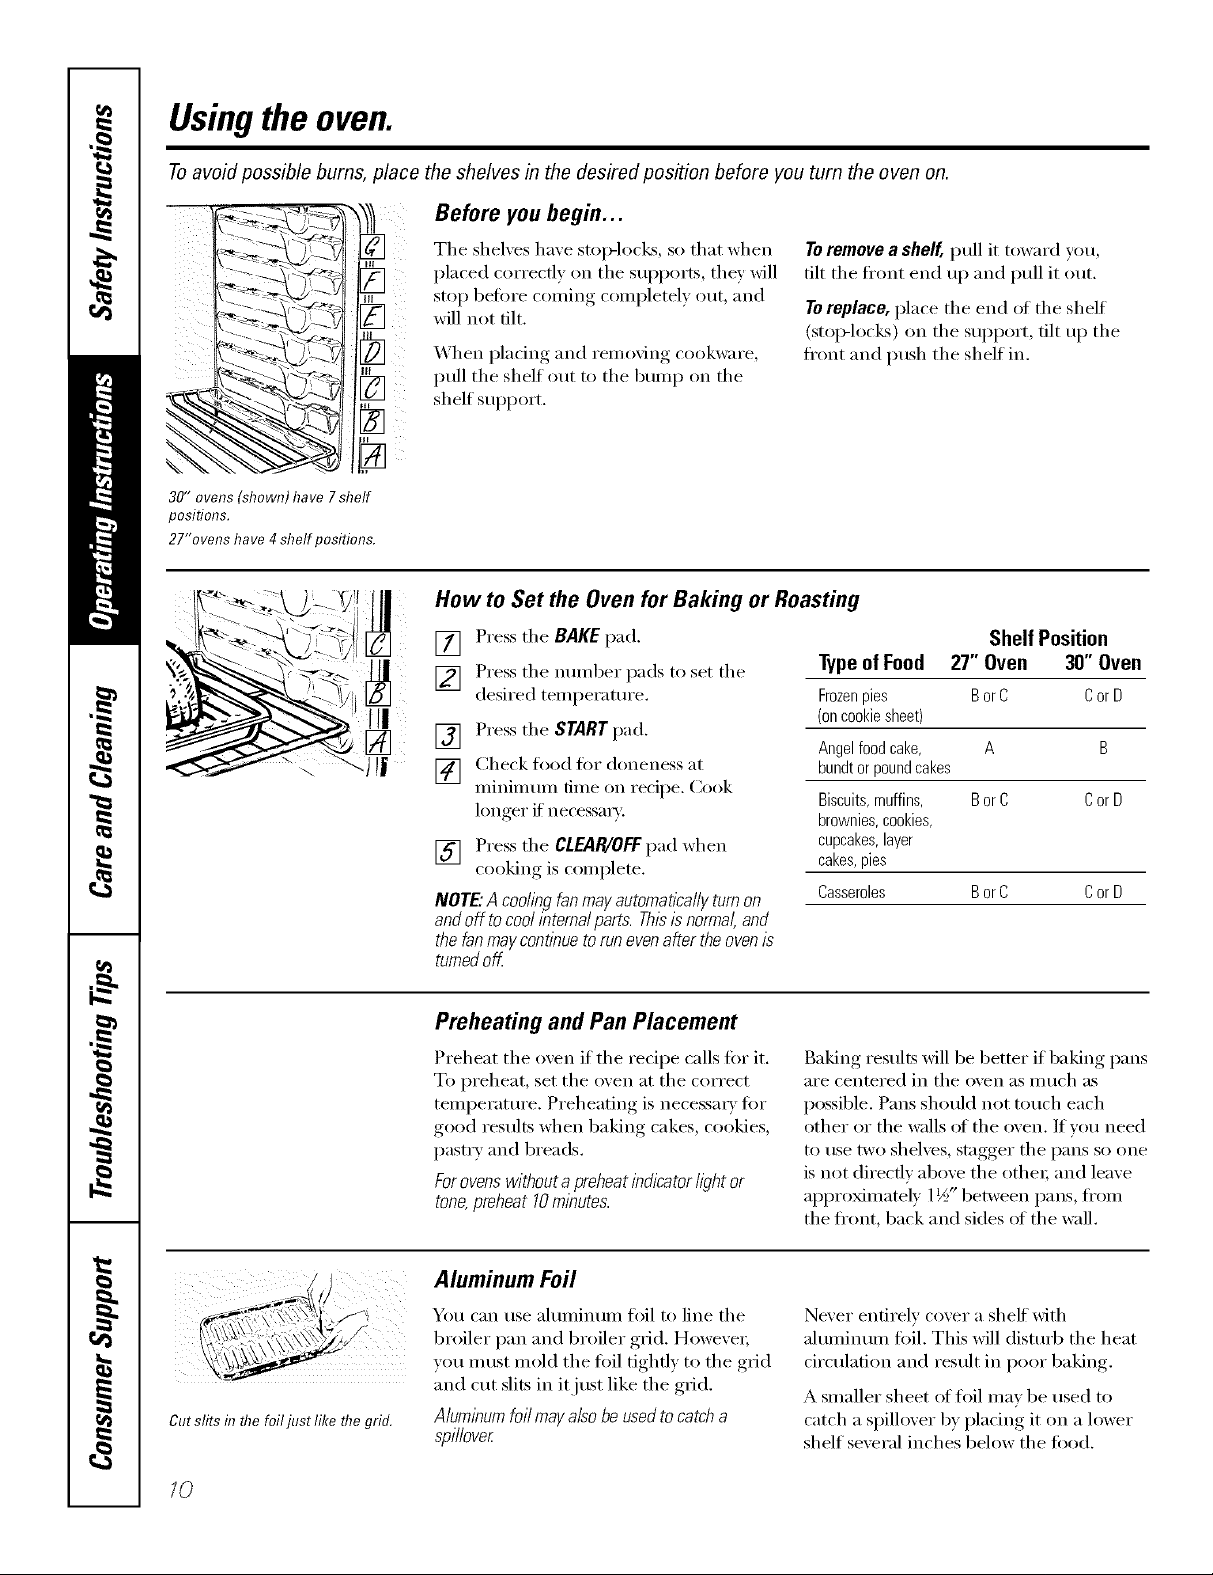
Toavoid possible bums, place the shelves in the desired position before you turn the oven on.
Before you begin...
¸
:
30"ovens(shown)have7shelf
positions.
27"ovenshave4shelfpositions.
The shelves have stop-lock% so that when
placed correctly on the supports, they will
stop before coming completely out, and
will not tilt.
_._hen I)lacing and removing, cookware,
pull the shelf out to the bump on the
shelf support.
How to Set the Oven for Baking or Roasting
Toremove a sheff, pull it toward you,
tilt the ti'ont end up and pull it out.
Toreplace, place the end _ff the shelf
(stoi>locl<s) on the support, tilt up the
ti'ont and push the shelf in.
[] Press the BAKEpad.
] Press the number pads to set the
desired temperature.
[] Press the STARTpad.
[] Check toed for aloneness at
minimum time on recipe. Cook
hmger if necessar),:
[] Press the CLEAR/OEFpad when
cooking is complete.
NOTE."Acodingfanmayautomaticallyturnon
andoff tocod internalparts.Thisis normal,and
thefanmaycontinuetorunevenaftertheovenis
turnedoff.
Preheating and Pan Placement
Preheat the oven if the recipe calls fi)r it.
To preheat, set the oven at the correct
temperature. Preheating is necessa_ T for
good results when baking cakes, cookies,
pastry and 1)reads.
Forovenswithout apreheat indicator light or
tone,preheat 10minutes.
Shelf Position
Typeof Food 27" Oven 30" Oven
Frozenpies BorC CorD
(oncookiesheet)
Angelfoodcake, A B
bundtorpoundcakes
Biscuits,muffins, BorC CorD
brownies,cookies,
cupcakes,layer
cakes,pies
Casseroles BorC CorD
Baking results will be better if baking pans
are centered in tile oven as illtlch _lS
possible. Pans should not touch each
other or the walls (ff the oven. If w)u need
to use two shelves, stagger the pans so one
is not directly above the othe_; and leave
approMmately 1½" between pans, ti'om
the fl'ont, back and sides ot the wall.
L;.4,/
& .'- \\3\,/ /_/
,_,¢,&
Cutslits infl?efoiljustlike fl?egrid.
10
Aluminum Foil
You can use aluminum hill to line the
broiler pan and broiler gdd. Howe;e_;
you must mold the foil tightl} to the grid
and cut slits in it just like the gdd.
Aluminum foil mayalso be used tocatch a
spillover
Never entirely cover a sheff with
aluminum fifil. This will disturb the heat
circulation and result in poor baking.
A smaller sheet of foil may be used to
catch a spillover by plating it on a lower
shelf several inches below the tood.
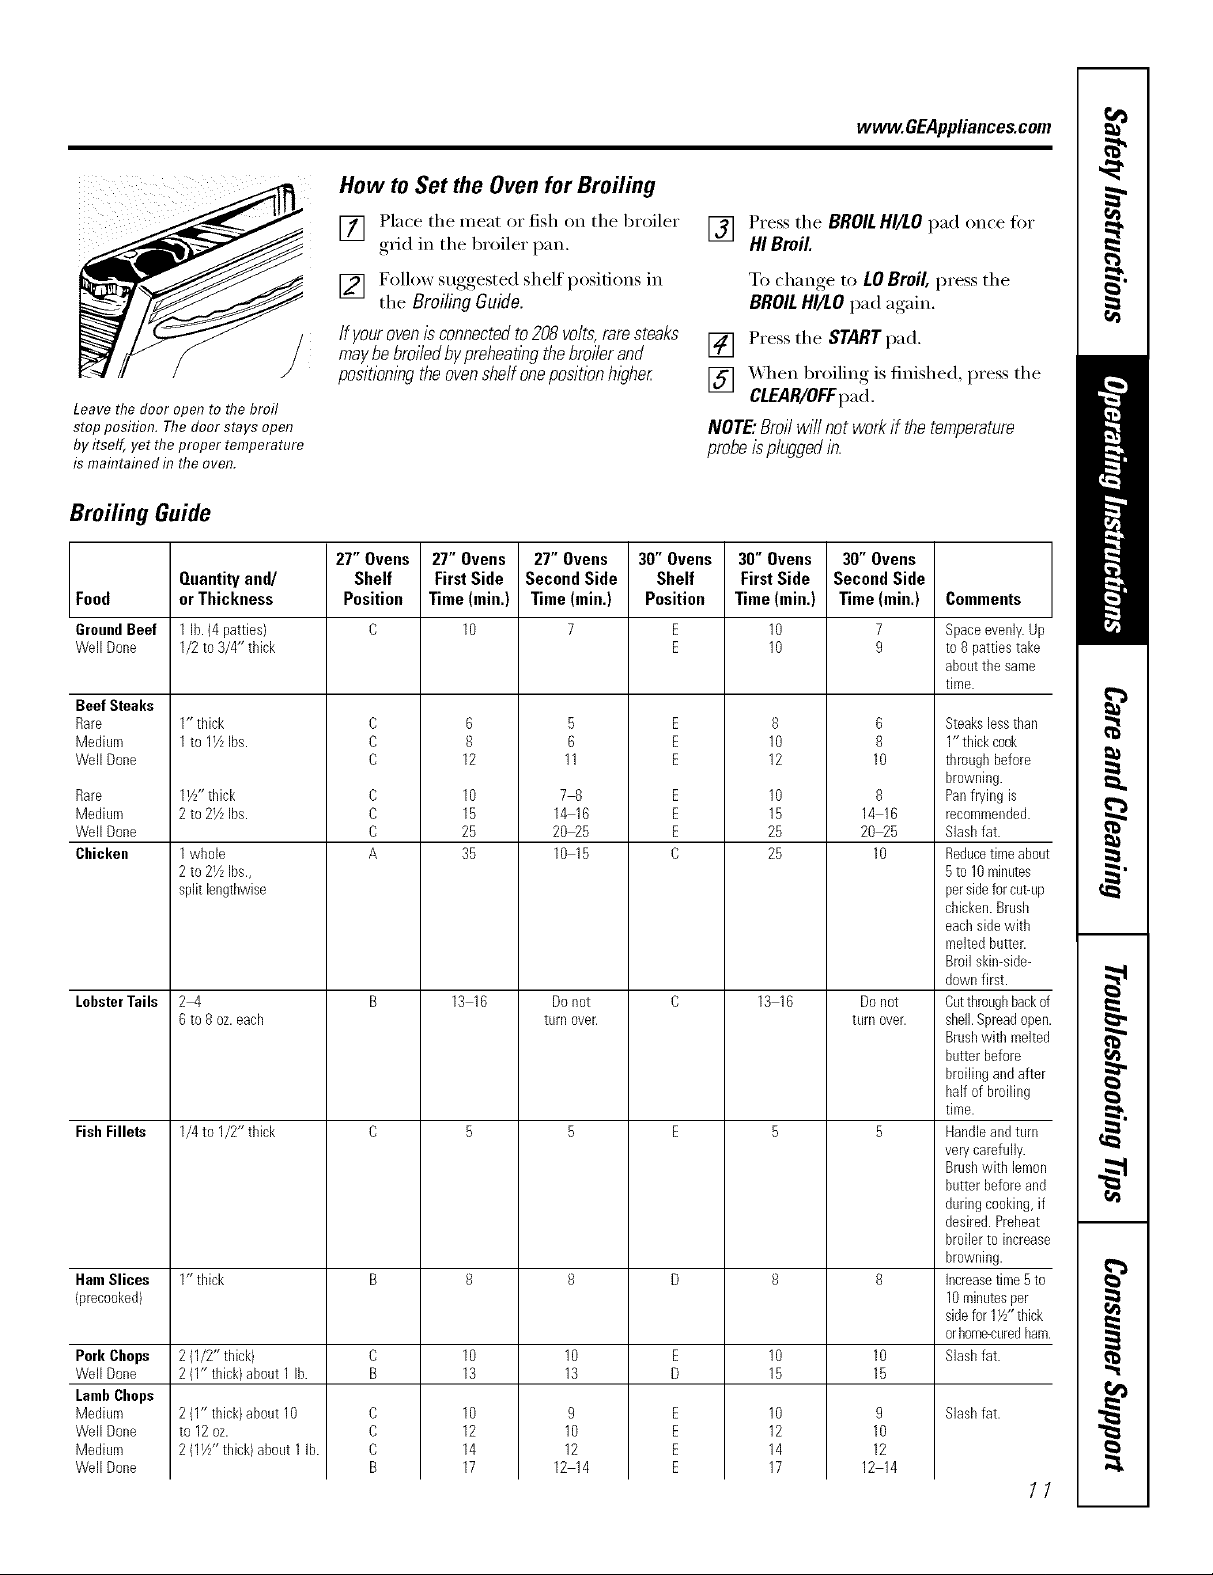
How to Set the Oven for Broiling
www.GEAppliances.com
Leave the door open to the broil
stop position. The door stays open
by itself, yet the proper temperature
is maintained in the oven.
[] Place the meat or fish on the broiler
grid in the broiler pan.
[] Follow suggested shelf positions in
the BroilingGuide.
If yourovenis connectedto208volts,raresteaks
maybebroiledbypreheatingthebroilerand
positioningtheovenshelfonepositionhigher
[] Press the BROILHI/LOpad once fi)r
HIBroil
To change, to LOBroil,press the
BROILHI/LOpad again.
[] Press the STARTpad.
[] _._/ell broiling is finished, press the
CLEAR/OFFpad.
NOTE."Broilwillnotworkif thetemperature
probeispluggedin.
Broifing Guide
2T Ovens 2T" Ovens 2T" Ovens 30" Ovens 30" Ovens 30" Ovens
Food or Thickness Position Time(rain.) Time(min.) Position Time(min.) Time(rain.) Comments
GroundBeef 1lb.{4 patties) C 10 7 E 10 7 Spaceevenly.Up
Well Done 1/2to3/4" thick E 10 9 to 8 pattiestake
Beef Steaks
Rare
Medium
Well Done
Rare
Medium
Well Done
Chicken
LobsterTails
FishFillets
HamSlices 1" thick B 8 8 D 8 8
(precooked)
Pork Chops
Well Done
LambChops
Medium
Well Done
Medium
Well Done
Quantity and/ Shelf First Side Second Side Shelf First Side Second Side
1" thick
1to lYzIbs.
11/z"thick
2 to2VzIbs.
1whole
2 to2YzIbs.,
split lengthwise
2-4
6 toRoz.each
1/4to 1/2" thick
2 (1/2"thick) C 10 10 E 10 10
2 (1"thick)about 1 lb. B 13 13 D 15 15
2 (1"thick)about 10
to 12oz.
2 (11/Z'thick)about1 lb.
C
C
C
C
C
C
A
C
C
C
B
6
8
12
10
15
25
35
13 16
10
12
14
17
5
6
11
78
14 16
20_5
10 15
Do not
turo ovelt
9
10
12
12 14
E
E
E
E
E
E
C
E
E
E
E
8
10
12
10
15
25
25
13 16
10
12
14
17
6
8
10
8
14 16
20_R
10
Do not
turn over.
9
10
12
12 14
abouttile same
time.
Steakslessthan
1"thick cook
throughbefore
browning.
Panfryingis
recommended.
Slashfat.
Reducetimeabou
5to 10minutes
persideforcut-up
chicken.Brush
eachsidewith
meltedbutter.
Broilskin-side-
downfirst.
Cutthroughbacko
shell.Spreadoper
Brushwith melte(
butter before
broilingandafter
half of broiling
time.
Handleandturn
verycarefully.
Brushwith lemon
butter beforeand
duringcooking,if
desired.Preheat
broiler to increas_
browning.
Increasetime5 to
10minutesper
sidefor 1VZ'thick
orhome-curedham
Slashfat.
Slashfat.
11
 Loading...