

GE JTP48WF7WW, JTP48SF6SS, JTP48CF7CC, JTP48BF7BB, JTP28WF7WW Owner’s Manual
...
Safety Instructions ....... 9-4
ge. COrn
Operating Instructions
Clock and Timer ........... 13
Control Lockout ........... 13
Controls ................... 5
Oven ................. 11, 19
Sabbath Feaun_e .......... 9, 10
Self-Cleaning Oven ...... 16, 17
Special Features ........... 6-8
Thermostat ............... 15
Timed Baking and Roasting . .14
Care and Cleaning
Broiler Pan and Grid ........ 19
Control Panel ............. 18
Glass Snrfaces ............. 9]
Heating Element ........... 91
IKa_ol) .................... 18
Lift-Off Oven Door ...... 18, 19
Light Bull) ................ 90
Oven Inmrior. ............. 91
Packaging _pe ............ 18
Painmd Surfaces ........... 91
Shelves ................... 19
Stainless Smel Surfaces ...... 91
JI@20-27" Sir, gle Wall (kJen
JTP20-30" Sirg@ Wall Oven
JI_25-27" Single Wall (kJen
JTP25-3d" Single Wall (kJen
JIGr_28-27" Double Wall (kJen
fl'P28-30" Double Wall (kJen
JIGr_48-27" Double Wall (kJen
fl'P48-30" Double Wall (kJen
JIGrUO-27" Double Wall (kJen
fl'P50-30" Double Wall (kJen
Troubleshooting Tips .... 92-24
Consumer Support
Consumer Support . . Back Cover
Product Registration ..... 95, 96
Vearranty ................. 97
Write the model and serial
numbershere:
Model #
Serial #
You can find them on a label
on the side trim or on the front
of the (lower) oven behind the
oven door.
49-80341 11-05Jfl
iMPORTANTSAFETYiNFORMATiON.
READALLiNSTRUCTiONSBEFOREUSING.
For your safeN the information in this manual must be followed to minimize the risk of fire or
explosion, electric shock, or to prevent property damage, personal injury, or loss of fife.
IMPORTANTSAFETYNOtiCE
The California Safe Drinking Water and ToxicEnforcement Act requires the Governor of California to
publish a list of substances known to the state to cause cancer, birth defects or other reproductive
harm, and requires businesses to warn customers of potential exposure to such substances.
The fiberglass insulation in self-clean ovens gives off a very small amount of carbon monoxide during
the cleaning cycle. Exposure can be minimized by venting with an open window or using a ventilation
fan or hood.
SAFETYPRECAUtiONS
When using electrical appflances, basic safety precaufions should be followed, including the following:
_?{_;Use d/is appliance only %r its intended
purpose as described in tins )wner s
Manual.
_:::Be sure your appliance is properly
installed and grounded by a qualified
technician in accordance with the
provided installation instructions.
_?{::Do not atmmpt to repair or replace any
part of your ox.en unless it is specifically
recommended in tiffs manual. All otimr
servicing should be refeiTed to a qualified
technician.
;_;Haxe tile installer show you the location
of tile circuit breaker or fllse. Mark it for
easy reference.
_i:,:Before performing any service, disconnect
ti_e ox.en power supply at the household
disu-ibudon panel by removing tile fuse or
switching off tile circuit breaken
_?{::Do not lem.e children alone--<hildren
should not be left alone or unattended in
an area where an appliance is in use. They
should nex.er be allowed to sit or stand on
any part of the appliance.
• (
_?{::Do not allow anyone to climb, stand or
hang on the doon They could damag.e the
oven, or cause sex.ei.e personal iIIjni>
_]{:_Be sure tile ox.en is secm.ely installed in a
cabinet that is firmly attached m file house
strnctnre. Never allow anyone m climb, sit,
stand or hang on tile oven door
_:_Nex.er leave tim oven door open when yon
are not watching tile ox.en.
;fi:,:Alwws kee I) combustible wall cox.erings,
curtains or drapes a sad distance flom
yonI" ox.en.
_{;_Alwws kee I) dish towels, dish cloti_s, pot
holders and other linens a sad distance
fFonl vonT ox.en.
_]_;Always kee I) wooden and plastic nmnsils
and canned food a safe distance aw W flom
vonI" ox.en.
q?{::Teach children not to pl W witi_ the
controls or any other part of tile oven.
_fi:,ii,arg.e scratches or impacts m glass doors
can lead to broken or shatmi.ed glass.
2
WARNING!
SAFETYPRECAUTIONS
ge.com
_; Do not store flammable mateiia]s in
an oxen,
_ CAUTION:Items of interest to
children should not be stored in cabinets
above an oven; children climbing on the
oven to reach items could be seIiouslv
ii_nred.
_; Never wear loose-fitting or hanging
gaI_nents while using die appliance. Be
careflll when reaching fbr imn/s stored
in cabinets oxer file oven. Flamnlable
mateiial could be ignited if brought in
contact with hot snrl_aces or heating
elements and may cause sex>re bnrns.
E:,IUse only dU pot llolders--moist or damp
pot holders on hot snil_aces iI_ay Iesult in
bums from smam. Do not let pot holders
touch hot heating elements. Do not use a
towel or other bulky cloth.
q?{:_For your safely, nexer use your appliance
for wam/ing or heating tile room.
_{;:Do not let cooking giease or other
flamnlable mamrials accumulam in
or Ileal tile oxen.
_]{;_Stand away from tile oven when opening
the ox>n doon Hot air or smam which
escapes can cause bnrrls to hands, Pace
and/or eyes.
E:,IDo not heat unopened food containers.
Pressure could build/l I) and the container
could burst, causing an irljni>
_i:,:Kee I) the oxen x_nt nnobstrncted.
E:,IKee I) the oven flee flom gTease buildup.
E:,IPlace the ox>n shelf in tile desired position
while tile oven is cool. If sheh>s must be
handled when hot, do not let pot holder
contact file heating elements.
E:,:_Allen using cooking or roasting bags
in tile oven, follow file manufitcturer's
directions.
;:i_::_!Do not touch die heating elements or the
interior snrl_ace of die oven. These surl_aces
may be hot enougtl to burn even thongtl
they are dark in colon During and after
use, do not touch, or let clothing or other
flammable materials contact any interior
aiea of tile oxen; allow sufficient fin/e for
cooling first.
_{;:Do not use water on gTease fires. Nexer
pick/l I) a flaming pan. Turn tile controls
oK
Flame in die oven can be smothered
completely by closing tile oven door and
turning tile oven off"orby using a mnlfi-
puq)ose dU chemical or foam-type fire
extinguisher
E:,INever leax>jars or cans of fi_t drippings in
or ileal vonr oxen.
_{;_Do not store or use combustible mamrials,
gasoline or other flammable vapors and
liquids in tile vicinity of this or any other
appliance.
Potentially hot surfaces include oven x>nt
openings, surPaces near the openings,
crevices around tile oxen dooi, the edg>s
of tile window and metal trin/parts above
the door
REMEMBER:The inside surPace of tile oxen
may be hot when tile door is opened.
3
IMPORTANTSAFETYINFORMATION.
READALLINSTRUCTIONSBEFOREUSING.
WARNING'!
SAFETYPRECAUTIONS
Pulling out the shelf to rite stop-lock is a
convenience in lifting beax_' %ods. It is
also a precaution against burns from
touching hot snrfaces of the door or
oxen walls.
Do not use the oxen to d_T newspapers.
If oxerheated, they can catch on fire.
Do not use the oxen foi a storage area.
hems stored in an oxen can iga_ite.
Do not leaxe paper products, cooking
utensils or food in the oxen when not
in rise.
_{::After broiling, always rake the broiler pan
out of rim oxen and clean it. Leftoxer
gTease in the broiler pan can catch fire
next time you use the pan.
_:;Clean only parts listed in this Owner's
Manual.
_fi:,iDo not use aluminum foil to line oxen
bottoms, except as suggested in this
manual, hnproper installation of
aluminum foil may result in a iisk
of elecuic shock or fire.
COOKMEATANDPOULTRYTHOROUGHLY...
Cookmeatandpoultry thoroughly--meat to at leastan INTERNALtemperatureof 160°Fandpoultry
toat least an INTERNALtemperatureof 180°ECookingto thesetemperaturesusuallyprotectsagainst
foodboroeillness.
SELF-CLEANINGOVEN
_{_Do not clean rite door gvtsket. The door
gasket is essential for a g_od seal. Care
should be taken not to rub, damage or
moxe the gasket.
_i:,iDo not use oxen cleaners. No commetvial
oxen cleaner or oxen liner protective
coating of arty kind should be used in or
around arty part of the oxen. Residue from
oxen cleaners will damag_ the inside of the
oxen when the self-<iean cycle is used.
_?{:_Before self-cleaning fire oxen, remoxe the
broiler pan, gild attd other cookware.
_fi:,:Be sure to wipe up excess spillage before
starting the selt¥1eaning operation.
_?{:_If the self-cleaning mode malfunctions,
turn the oxen off attd disconnect rite
power supply. Haxe it serviced by a
qualified technician.
READANDFOLLOWTHISSAFETYINFORMATIONCAREFULLY.
SAVETHESEINSTRUCTIONS
4
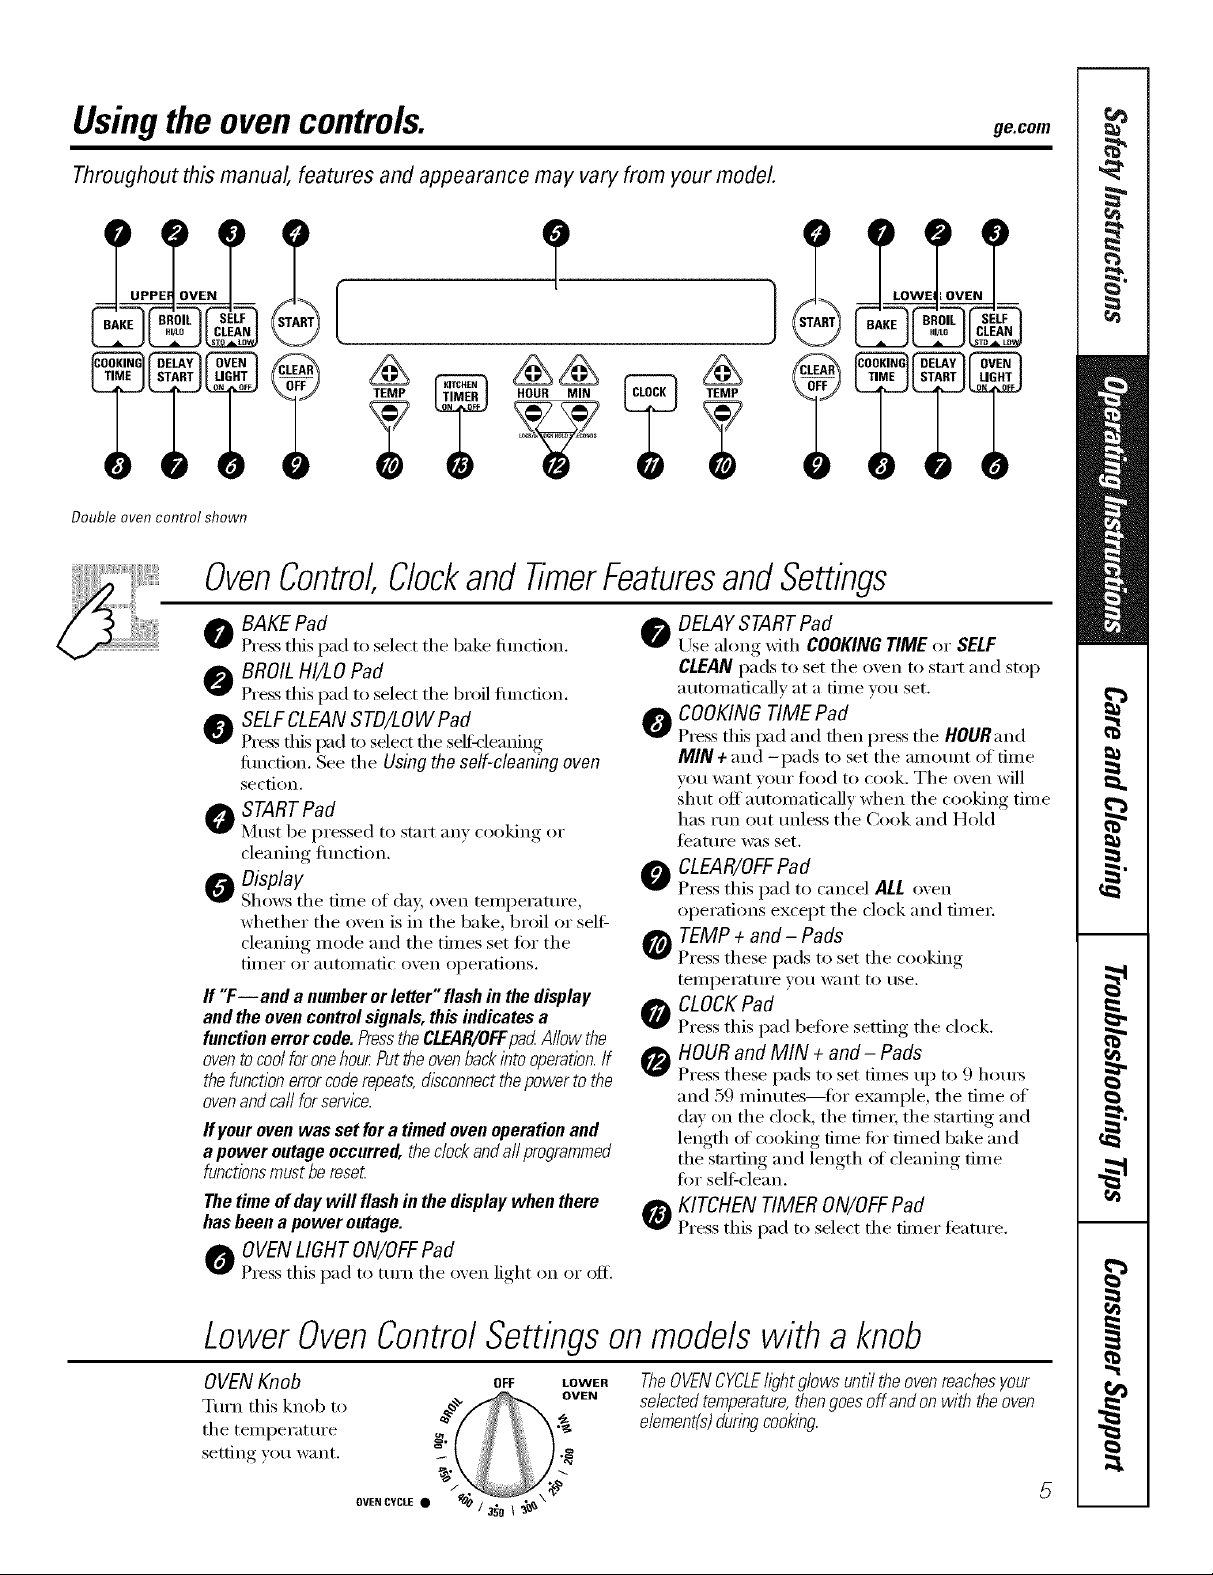
Usingthe ovencontrols, gecom
Throughout this manual, features and appearance may vary from your model.
????
Double oven control shown
OvenControlClockand TimerFeaturesandSettings
0 BAKE Pad
Press this pad to select tile bake function.
A BROILHI/LOPad
Press this pad to select the broil flmcfion.
0 SELFCLEAN STD/LOWPad
Press fl/is pad to select die selfk'leaning
fimction. See tile Using the self-cleaning oven
section.
STARTPad
]_/]t/st be pressed to start an} cooking or
deaning flmction.
Display
Shows the time of day o_en temperature,
whether the oven is in the bake, broil or self:
cleaning mode and tile times set for tile
tiIller or }ltltoii/}ltic oven ol)eI'}ltions.
If "T--and a number or letter" flash in the display
and the oven control signals, this indicates a
function error code.PresstheCLEAR/OFFpad Allow the
oventocool foronehour.Putthe ovenbackinto operation.If
the function errorcoderepeats,disconnectthe power to the
ovenand carl forservice.
If your oven was set for a timedoven operation and
apower outage occurred, theclock and all programmed
functionsmust be reset
The time ofday will flash in the display when there
has been a power outage.
OVENLIGHT ON/OFFPad
Press this pad to turn tile o_en light on or off.
DELAYSTARTPad
Use along _dtl/ COOKING TIME or SELF
CLEAN pads to set tile oxen to start and stop
automatically at a time you set.
J_ COOKINGTIME Pad
Press this pad and then press tile HOURand
MIN + and -pads to set die amount of time
you w;int VOtli" t()od to cook. Tile oven will
shut offautomafically when tile cooking time
has mn out unless the Cook and Hold
t_attlI'e W;IS set.
CLEAR/OFFPad
Press this pad to cancel ALL oxen
operations except tile clock and fime_:
TEMP + and- Pads
Press these pads to set tile cooking
teilll)erattlre yOtl _%'_lilt to tlse.
CLOCKPad
Press this pad before setting tile clock.
HOUR and MIN + and- Pads
Press these pads to set times up to 9 hom_
and 59 minutes--for example, tile time of
day on the dock, the time_; the strafing and
length of cooking time for timed bake and
the sta_ing and length of deaning time
for self-clean.
KITCHEN TIMERON/OFFPad
Press this pad to select tile timer teatm'e.
Lower OvenControl Settings on models with a knob
OVENKnob
Turn this knob to
tile temperature
setting you want.
OVEN CYCLE 0 jF
OFF LOWER TheOVENCYCLEh_?htglows until the ovenreachesyour
selected temperature,thengoesoff and on with theoven
element(s)dunbg cooking.
Special featuresof your ovencontrol.
Yournew touch pad control has additional features that you may choose to use. The following are the features
and how you may activate them.
Thespecial feature modes can only be activated while the display is showing the time of day. They remain
in the control's memory until the steps are repeated.
When the display shows your choice, press the STARTpad. The special features will remain in memory after
a power failure, except for the Sabbath feature, which will have to be reset.
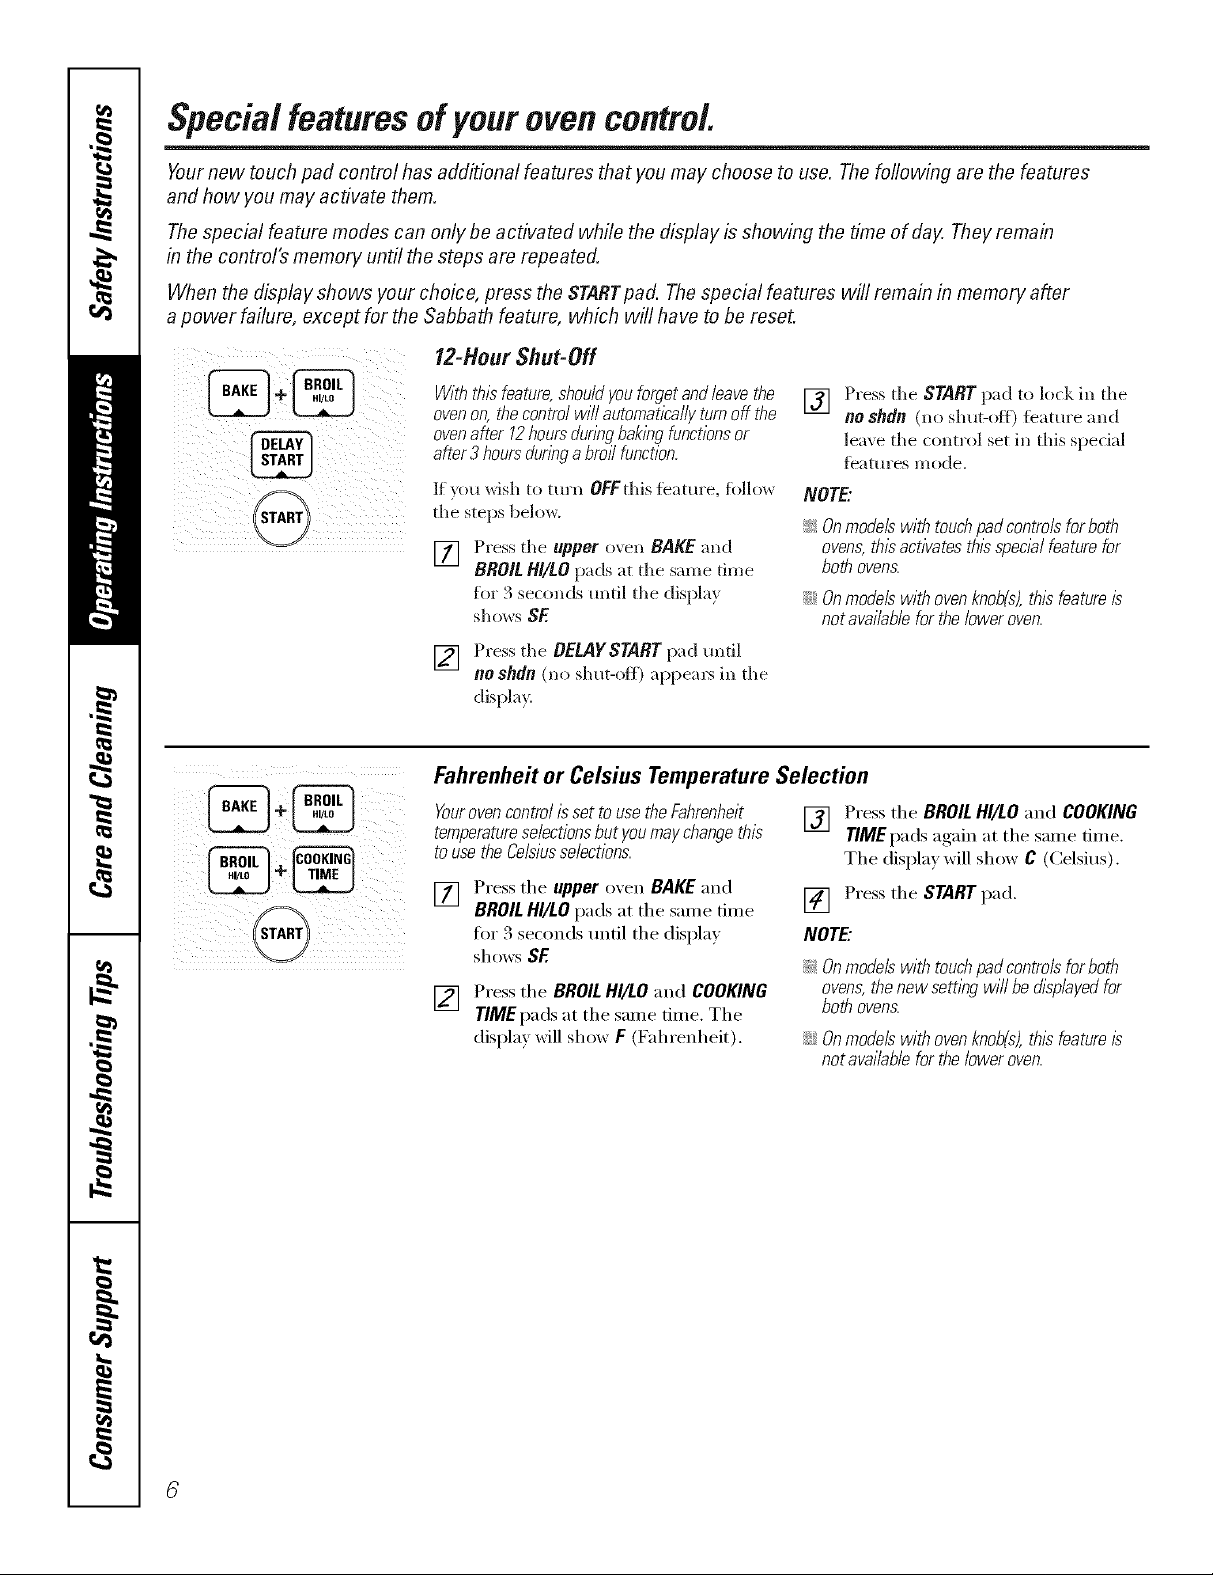
12-Hour Shut-Off
START
VViththisfeature,shouldyouforgetandfe,avethe
ovenon,thecontrolwi//automat/2allyturnoff the
ovenafter12hoursdunbgbak/bgfunctionsor
after3 hoursdunbga broilfunction.
If )ou wish to turn OFFthis feature, fidlow
tile steps below.
[] Press tile upper oxen BAKE mid
BROILI/I/tO p:Ns at tile same time
for 3 seconds until tile displa}
sho_s SF.
[] Press tile BELAYSTARTp;M until
nOshdfl (no shut-oLf) appem5 in tile
displ;_y.
Press tile STARTpad to lock in the
[]
no shdn (no shut-oil) feature and
leave tile control set in this special
f_attlres n/ode.
NOTE'.
!i_:Onmodelswithtouchpadcontrolsforboth
ovens,thisactivatesthisspecblfeaturefor
bothovens.
iJi::Onmodelswithovenknob(s),thisfeatureis
notavai/abfefortheloweroven.
Fahrenheit or Celsius Temperature Selection
Yourovencontrol isset touse the Fahrenheit
temperatureselectionsbut youmay changethis
touse theCelsiusselections.
[] Press the upper oven BAKE "and
BROILHI/LO pads at the same time
for 3 seconds until the displa}
shows SE
[] Press the BROIL HI/LO and COOKING
TIME pads at the saine time. The
display will show F (Fahrenheit).
[] Press the BROILHI/LO"and COOKING
TIME pads again at the same tim e.
The displa)will show C (Celsius).
[] Press the START pad.
NOTE."
!i_:Onmodels with touchpad contro/s for both
ovens,the new sembg will be displayedfor
both ovens.
iJi::Onmodelswithovenknob(s),thisfeatureis
notavai/abfefortheloweroven.
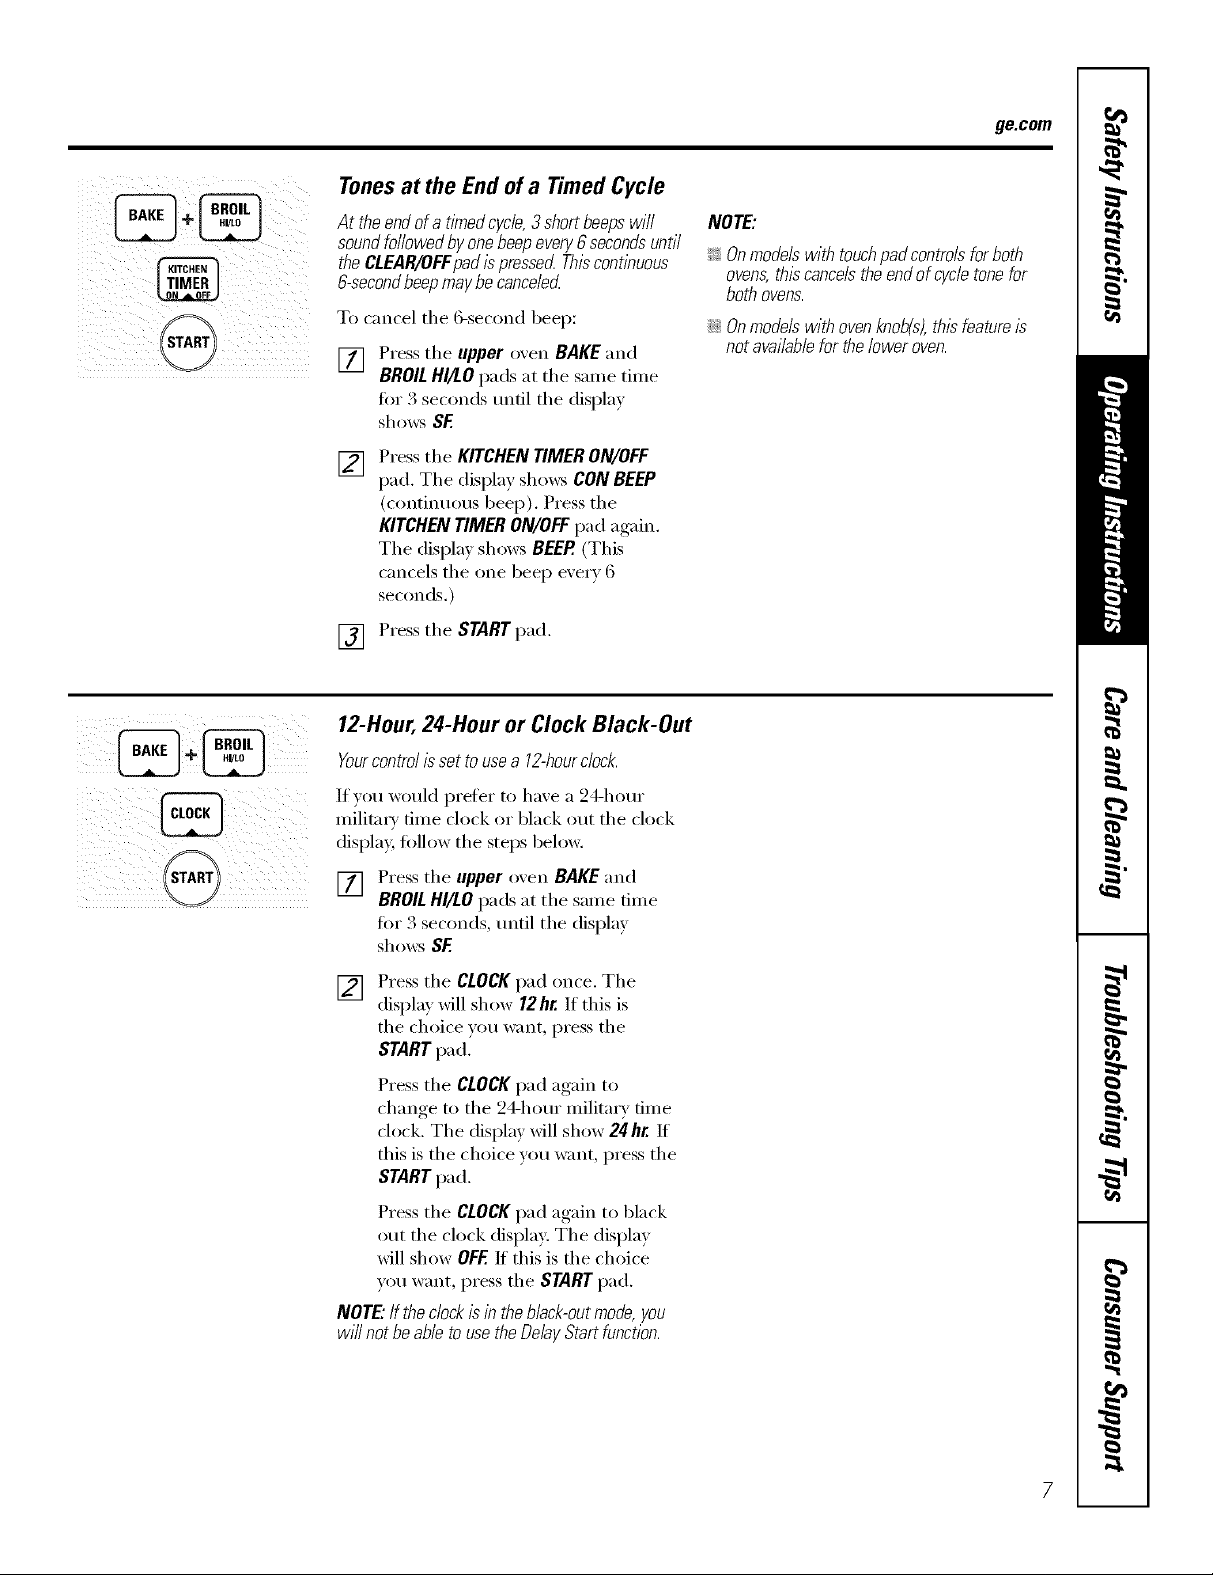
Tonesat the End of a Timed Cycle
At theendofatimedcycle,3shortbeepswill
soundfollowedbyonebeepevery6secondsuntil
theCLEAR/OFFpadis pressedThiscontinuous
6-secondbeepmaybecanceled
To cancel the ()-second beep:
Press tile upper oven BAKE and
[]
BROIL HI/LO pads at the same time
fin 3 seconds until the displa}
shows SF.
Press tile KITCHEN TIMER ON/OFF
[]
pad. The display shows CON BEEP
(continuous beep). Press the
KITCHEN TIMER ON/OFF pad again.
The display shows BEEP.(This
cancels tile one beep every 6
seconds.)
Press the START pad.
[]
ge.com
NOTE:
!i_:Onmodels with touchpad controlsfor both
ovens,this cancels the endof cycletone for
both ovens.
iJi::Onmodelswithovenknob(s),thisfeatureis
notavailablefortheloweroven.
12-Hour, 24-Hour or Clock Black-Out
Yourcontrol is set to usea 12-hourclock.
If you would prefi_r to have a 24-hour
militnx_' time clock or black out the clock
displa 5 follow the steps below.
[] Press the upper o;en BAKE and
BROILHI/LO pads at the same time
for 3 seconds, tmtil the display
sho_:s SF.
Press the CLOCKpad once. The
[]
display will show 12hr. If this is
the choice you want, press the
STARTpad.
Press the CLOCKpad again to
change to the 24-hour military time
clock. The display will show 24 hr. If
this is the choice you want, press the
STARTpad.
Press the CLOCKpad again to black
out the clock displa}: The display
will show OFF If this is the choice
you want, press the START pad.
NOTE."If the clock isin the Mack-outmode, you
will not beable to use the Delay Start function.
Special featuresofyourovencontrol.
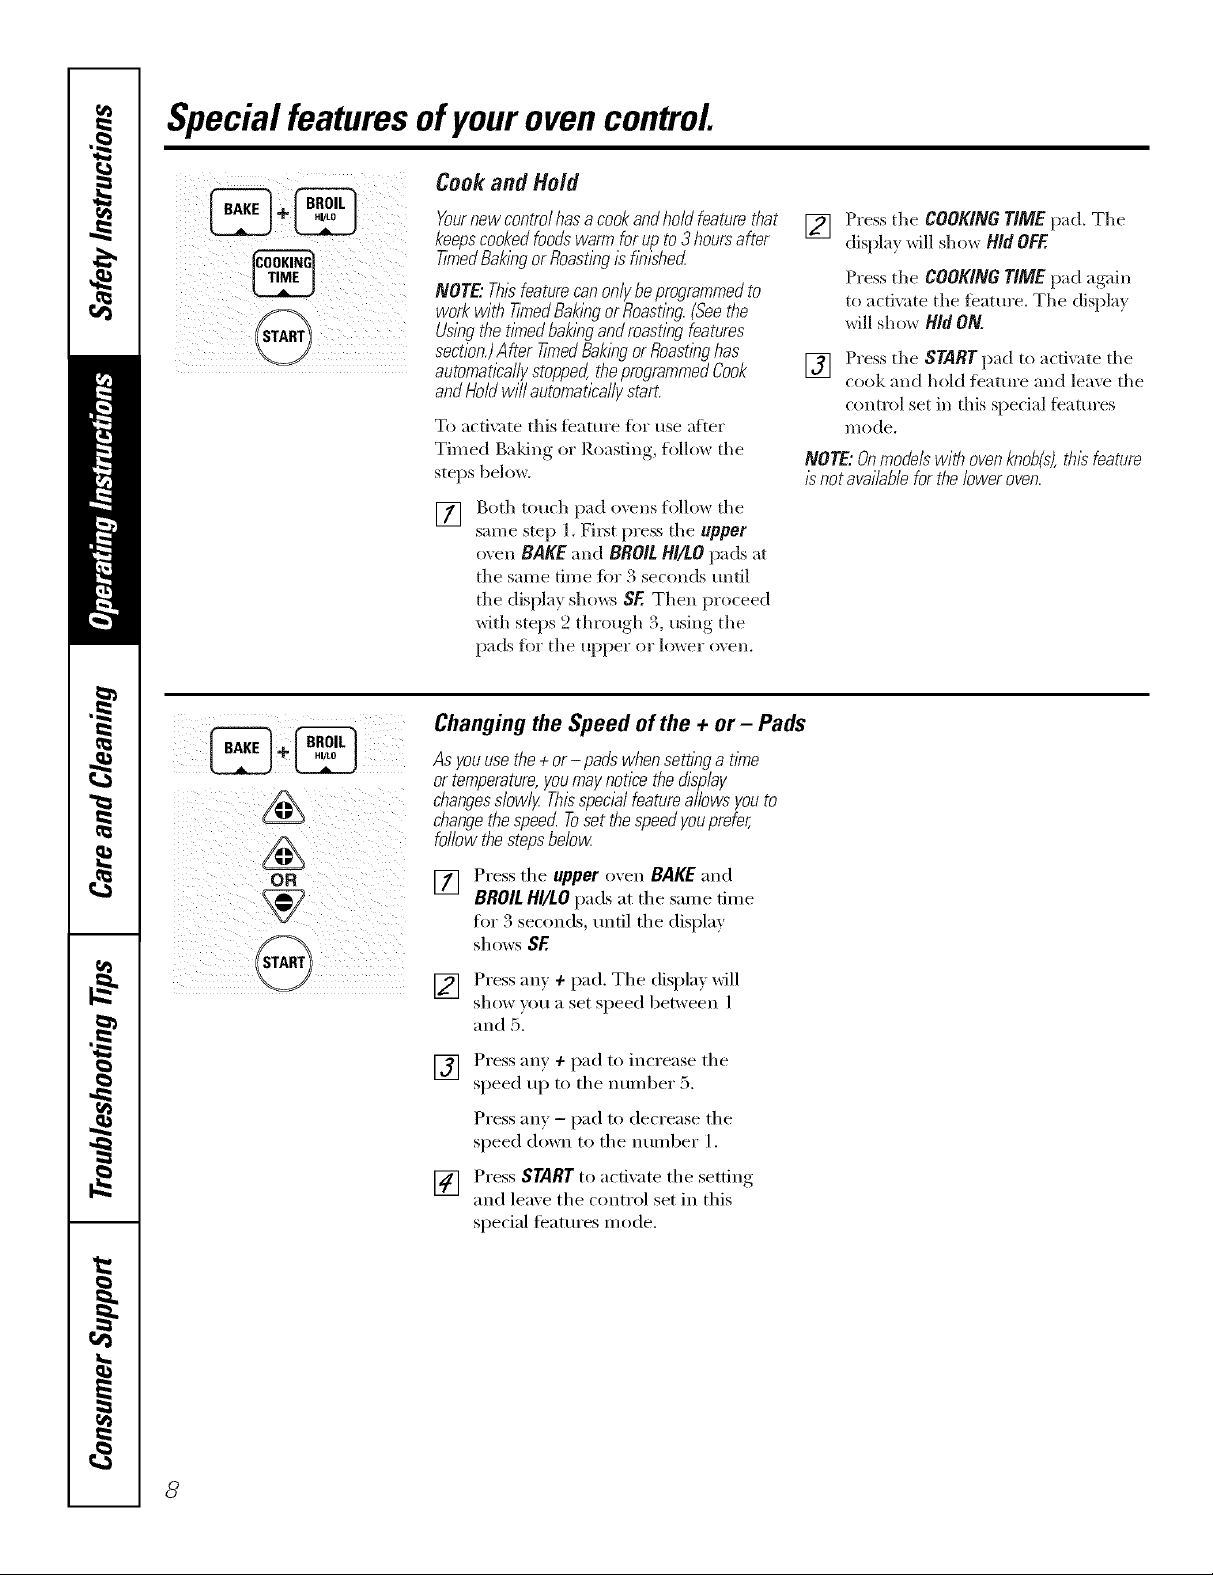
Ceek and Held
&
Yournewcontrolhasacookandholdfeaturethat
keepscookedfoodswarmforupto3hoursafter
TbTedBakingorRoasting/shn/shed.
NOTE"Thisfeaturecanonlybeprogrammedto
workwith TkeedBakingorRoasting.{Seethe
Usingthetintedbakingandroastingfeatures
section.}After timedBakingorRoastinghas
automaticallystopped,theprogrammedCook
andHoldwillautomaticallystart.
To acti_te this feature fbr use after
Timed B'ddno, _ o_ Roasting, follo_ the
steps below.
Both touch pad ovens fi>llow tile
[]
same step l. Filet piess tile upper
()\ell BAKE and BROIL/'///tO pads at
the same time tbr 3 seconds tmtil
the display shows SF. Then proceed
with steps 2 through 3, using the
pads for tile upper or lower _wen,
ChangingtheSpeedofthe + or- Pads
Asyouusethe+or- pads whensetfl)_gatime
or temperature,youmaynoticethedisplay
changesslowlyThbspecialfeatureallowsyouto
changethespeecLTosetthespeedyouprefer,
followthestepsbelow
[] Press tile COOKING TIME pad. Tile
displa} _dll show Hid OEE
Press die COOKING TIME pad again
u> actixate file feature. Tile disp]a}
will show Hid ON.
[] Press tile STARTpad to acdvate tile
cook and hold feature and leaxe tile
control set in this spedal features
l/lode.
NOTE:Onmodelswithovenknob{s},thl} feature
i_notavailablefortheloweroven.
OR
START
[] Press the upper oven BAKE and
BROILHI/LO pads at tile sanle time
for 3 seconds, tmtil the display
shows SE
[] Press any + pad. Tile displa) _dll
show }ou a set speed between 1
and 5.
[] Press any + pad to increase tile
speed up to tile number 5.
Press any - pad to decrease the
speed down to tile number 1.
[] Press START to actixate the setting
and leaxe the control set in this
special teatm'es mode.
8
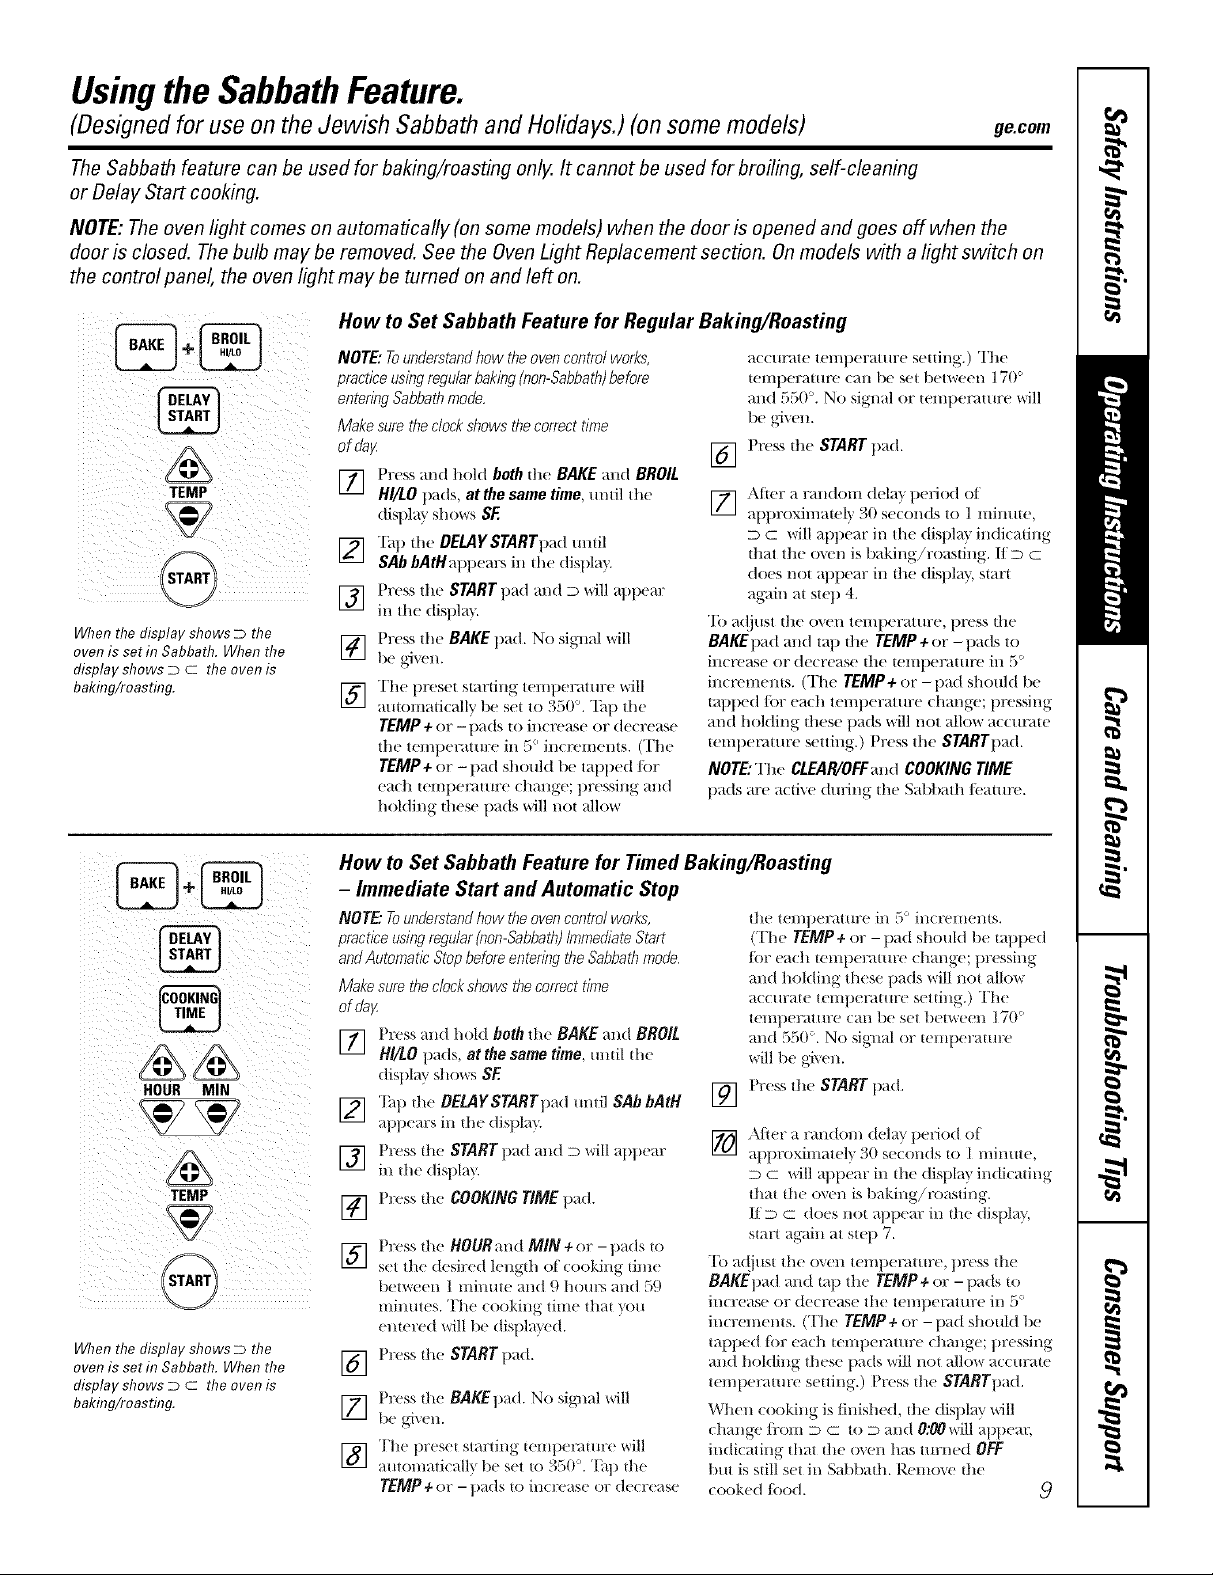
Usingthe SabbathFeature.
(Designed for use on the Jewish Sabbath and Holidays.) (on some models)
The Sabbath feature can be used for baking/roasting only. It cannot be used for broiling, self-cleaning
or Delay Start cooking.
NOTE: The oven light comes on automatically(on some models) when the door is opened and goes off when the
door is closed. Thebulb maybe removed. See the OvenLight Replacement section. Onmodels with a light switch on
the control panel, the oven light may be turned on and left on.
How to Set Sabbath Feature for Regular Baking/Roasting
i i i i
/ii illi!iiifilliP( I!i!ii iiiii
TEMP
When the display shows D the
oven is set in Sabbath. When the
display shows D C the oven is
bakflTg/roasting.
NOTE: Tounderstandflow theoven control works,
practice usingregular baking (non-Sabbath)before
entering Sabbathmode.
Make sure tile clock shows tile correct time
of da;_
] Press and hold both the BAKE and BROIL
HI/LO pads, at the same time, m/dl ttle
display sl/o_s SE
] "[:al) the DELaYSTARTpad/ultil
SAb bAtHapl)ears ill the (tislllay.
] Press the START pad and D will appear
ill the (list)Ira.
] Press the BAKE tlad. No sig31al will
be gi_,en.
] The })reset startillg tel//peratllre will
autolilati(allv lie s t to o50 °. Tap the
TEMP + or - pads to illcrease or decrease
the telnperature in 5 ° illcreHlelltS. (The
TEMP + or -pad should be tapped/klr
ea(h temlle_;mu'e ( hange; pressing and
holding tllese pads will not allow
accurate ten/perattn:e setting.) Tlle
temperature call be set between 170 °
and 550 °. No signal or tenllle_mlre will
be _,rivel 1.
Press tile STARTtlad.
[]
[_ ,\tier a random dehly t)eriod of
approximately 30 se(onds to 1 millute,
D C will appear in the dist)la } illdicatillg
tllat the o_t'n is baking/roastillg. I/D C
does not appear in tile (/isplay, start
again at step 4.
"Ii) adjust tile oven ten/perature, press tile
BAKEpad and tap tlle TEMP + or - pads to
increase or decrease the t('nlperature ill 5'_
increments. (The TEMP+ or- pad should be
tapped J[)l" e;-i(h tel/lpel:atllre (hal/ge; llI'essil/g "
and holding tllese pads will not allow accm_lte
te*lllle_lt/lre settillg.) Press the STARTpad.
NOTE:The CLEAR/OFEand COOKING rIME
pads are active d/uJng the Salfl)ath tcature.
ge.com
HOUR MIN
TEMP
START
Whel7 HTe CIISDlal SlTOWS D [lTo
oven is set in Sabbath. When the
display shows D C the oven is
bakfl?g/roasting.
How to Set Sabbath Feature for Timed Baking/Roasting
- Immediate Start and Automatic Stop
NOTE"Tounderstand how theovencontrol works,
practice usingregular(non-Sabbath)ImmediateStart
andAutomatic Stop before entering the Sabbathmode,
Make sure theclock shows thecorrect time
of fla}z
r_] Press alld hold both th_ BAKE and BROIL
I,,I
HI/LO l/ads, at the same time, until the
dislllay shows SE
_] Tall the OEMYSTARTpad In/Ill SAb bAtH
_l 1earsin ll_ ( stilt }
] Press the STARTIlad anti D will appear
in the disllla }
[] Press the COOKING TIME pad.
Press tile HOUR al/d MIN+ or - pads to
] s(t the desired lellgth of cooking- time
between ] iilinute and 9 hours and 5{)
millutes. Ttle cooking time that )70/1
entered will be displayed.
Press tile STARTllad.
[]
Press the BAKEpad. No sig31al will
[]
be giv_n.
Tile tlreset starlil/g- telllllel;ttltr( will
[]
a/ttomFdicallx b( set to 350:'. "['ap the
TEMP 4-or -liads to 111( Tease or de(r( ase
tile tel//perattlre ill _o i]lcreille_lts.
('File TEMP4.or - pad should be uq)lled
lOT each telni/erature change; l)r_ ssing
and llolding th_se pads will not allow
accurat_ t_mpemtm:e setting.) "Fl/_
temperature call be set between 170'
and 550 °. No sigllal or tenlperature
will be g%en.
Press tile STARTllad.
[]
] ,\ller Ft raIldol//dehly period of
at)i)_ oxilllatelx O0 se(oll(ls to 1 l//ii//lle,
D C will Nlpear in the (lispla} indicating
that the oven is baking/_x/asting.
IfD C does not kq)llear ill the display,
start ag;dn at step 7.
"['t) a([j/lSt tile ox ell tel/ll)el_tttlre, pr(ss tile
BAKEpa(1 and tap tile TEMP4-or -llads to
increase or decrease th( t(l/l]_)(]'_ttlre ill _o
increlnents. (The TEMP4-or-pad sllould be
tapped lilt each t(inp(l;mlre ctlange; pr(ssing
an(1 hol(ling these pads will not allow ace/irate
ten/tlerature setting.) Press tile SYARrpad.
Wllen cooking is finished, the display will
chang,(' l}'om D C to D and 0:00 will ai/t/em;
indicating that the o_en has turned OFF
t)//t is still s(t ill Sal/bath. b'.enlove tile
cooked I_)o(1.
 Loading...