

Page 1
—.-- .-
——
—
—
————
AluminumFoil
1.3
ApplianceRegistration 2
AutomaticTimerand Clock 6
Baking,BakingGuide
8,9
DelayedStart&Stop
TimeBake
h-oiling,BroilingGuide
Careand Gleaning
13-15
20,21
Energy-SavingTips
Features
Light;LightBulbReplacement7,20
MeatThermometer
11,14
ModelandSerialNumbers
Preheating
ProblemSolver
RepairService
Roasting,RoastingGuide
Rotisserie
9,10,15
22,23
23
10-12
16,17
—
SafetyInstructions
3,4
Self-C’leaningInstructions 6,18,19
Shelves
ThermostatAdjustment
8
Warranty
BackCover
‘?
20
8
4
5
2
JKP38G
k.
Page 2

his intendedto helpyouoperate
andmaintainyournewoven
properly.
Keepithandyforanswersto your
questions.
If youdon’tunderstandsomething
or needmorehelp,write(include
yourphone number):
ConsumerAffairs
GEAppliances
AppliancePark
Louisville,KY40225
writedownthe
andserial
Eyou received
a oven.
Immediatelycontactthedealer(or
buikler)thatsoldyoutheoven.
e ●
savetimeandmoney.
Beforeyfourequest
service. e e
ChecktheProblemSolveron
pages22and23.Mlists causesof
minoroperatingproblemsthat you
cancorrectyourself.
.4e3gsis-
)
You’llfindthemona labelonthe
fi-ontoftheovenbehindtheupper
ovendoor.
Thesenumbersarealsoon the
ConsumerProductOwnership
RegistrationCardthatcamewith
youroven.Beforesendingin this
card, pleasewritethesenumbers
here:
Model Number
Serial Number
Usethesenumbersinany
correspondenceor servicecalls
concerningyouroven.
2
Page 3
– When usingelectricalappliances,
—
--basic safetyprectmtionsslmul~
befollowed,includingthe
fbHowing:
a use this only for ik
use as described in this
manual.
@Be sure your appliance is
installedad grumdd
bya qualified technicianin
accordancewith the provided
InstallationInstructions.
*non%
orrephx!anypartofyour
ovenunlessitisspecifically
recommendedinthisbook.AU
otherservicingshouldbereferred
toaqualifiedtechnician.
~Beforeperforminganyservice?
POWERSIJ’PPLYATTHE
PY!JW3LBYREMCYVHW3THE
FUSEORswTWnIW
THECIRCUIT
*Donot leavechik.kenak3ne—
Childrenshouldnotbeleftalone
orunattendedinanareawhere
applianceisinuse.Theyshould
neverbeallowedtositor stand
onanypartoftheappliance.
* Mowanyonetochnb9
standorlhangonthedoor.
They4XXMdamagetheoven.
~ ITEMSOF
SHOULDTWITBE
1?4
m
attempttorepair
THEOVEN
OFF
13REAKER.
m
0r4Tmowvd
m CW.JIJD
BE
@x~yeyVvefaur or
‘whileIiMing
the
‘---materialcouldbe ~gni$edif
Fk2nmmble
broughtin contactwithhot
heatingelementsandmaycause
severeburns.
~Useonlydry pot hoklers—
Moistordamppotholderson.
hotsurfacesmayresultinburns
Ilomsteam.Donotktpot
holderstouchhotheating
elements.Donotusea towelor
otherbulkycloth.
~Neveruse yourappliancefor
Wartingorheatingtheroom.
*$b2qgeinoronappliance—
Donotstoreflammablematerials
intheoven.
@Keephoodandgreasefilters
cleantomaintaingoodventing
andtoavoidgreasefires.
*Donot letcookinggrease
orotherfktmakde materials
accumulateinorneartheoven.
@Donotusewaterongrease
fires.FHarneinovencanbe
smotheredbycoqktely
closingdoorandturning
OVENSETtoOFF*
@Donottouchheatingelements
orinteriorsurfaceofoven.
Thesesurfacesmaybe hot
enoughtoburneventhoughthey
aredarkincolor.Duringand
afteruse,donottouch,orlet
clothingor otherflammable
materialscontactanyinterior
areaoftheoven;allowsufficient
timeforcooling,first.
Potentiallyhotsurfacesinclude
theovenventopeningsand
surfacesneartheopenings,
crevicesaroundtheovendoor
andtheedgesofthedoorwindow.
Theinsidesurface
oftheovenmaybehotwhenthe
dooris opened.
e
when cakingpork?follow
thedirectionsexactlyandalways
cookthemeattoaninternal
temperatureofatleast170”F.
Thisassuresthat,intheremote
possibilitythat trichinamaybe
presentinthemeat,itwillbe
killedandthemeatwillbesafe
toeat.
oven
@Stand
openingovendoor.Thehotair
orsteamwhichescapesCaMl
burnhands,faceandh
eDc9119t
containersintheoven:Pressure
couldbuildupandthecontainer
couldburst9causinganifijurya
@IKeepovenventducts
unobstructed.
@Keepovenfreefromgrease
buildup.
@Place.ovenshdfin desired
positionwhileoveniscd. If
shelvesmustbehandledwhen
hot,donotletpotholdercontact
heatingunitsintheoven.
@filling outsheWtoshelfstop
isacotivenienceinliftingheavy
food$,Itisalsoaprecaution
againstburnsfrom
hotsurfacesofdoororoven
Wau$. ‘
@Whenusingfxding or
roastingbagsinoven9followthe
manufacturer’sdirections.
@IDonot use youroventodry
newspapers.Ifoverheated,they
cancatchfire.
awayfromovenwhen
eyes,
heat food
.=—
.-
3
Page 4
mSTRUCTIONS(contin~d)
~ Do not dean doorgasket,
Thedoorgasketisessentialfora
goodseal.Careshouldbetaken.
nottorub,damageor movethe
gasket.
~
--
0 Preheat.the ovenonlywhen
necessary.Most foods willcook
satisfactorilywithoutpreheating.
Ifyoufindpreheatingisnecessary,
keepaneyeontheindicatorlight,
andputfoodintheovenpromptly
afterthelightgoesout.
@Do not use ovendeanex”$.NO
commercialovencleaner or oven
linerprotectivecoatingofany
kindshouldbeusedinoraround
anypartoftheoven.
am only park listed.inthis
e
and careBook.
use
@Beforeself-dewingtheeve%
removebroiler
pm ad dh!r
utensils.
@Listenforfan—a h noise
shouldbeheardsometimeduring
theckaningcycle.If not,callfor
servicebeforeself-cleaningagain.
@AlwaysturnovenOFFbefore
removingfood.
@Duringbaking,avoidfrequent
dboropenings.Keepdooropenas
shortatimeaspossibleifitis
opened.
e Besuretowipeupexcessspillage
beforeself-cleaningoperation.
~ Cookcompleteovenmealsinstead
ofjust one fooditem.Potatoes,
othervegetablesandsomedesserts
willcooktogetherwitha main-dish
casserole,meatloaf,chickenor
roast.Choosefoodsthatcookat
thesametemperatureandin
approximatelythesametime.
oUseresidualheatin oven
wheneverpossibletofinish
cookingcasseroles,ovenmeals,
etc.Alsoaddrolls or precooked
dessertstowarmoven,using
residualheattowarmthem.
~
~
Page 5
——.. ——-—
i%iiF--
——
..
—-0--- —-——--
(,L“
G
———
—
/
J
-O-nl===O——————
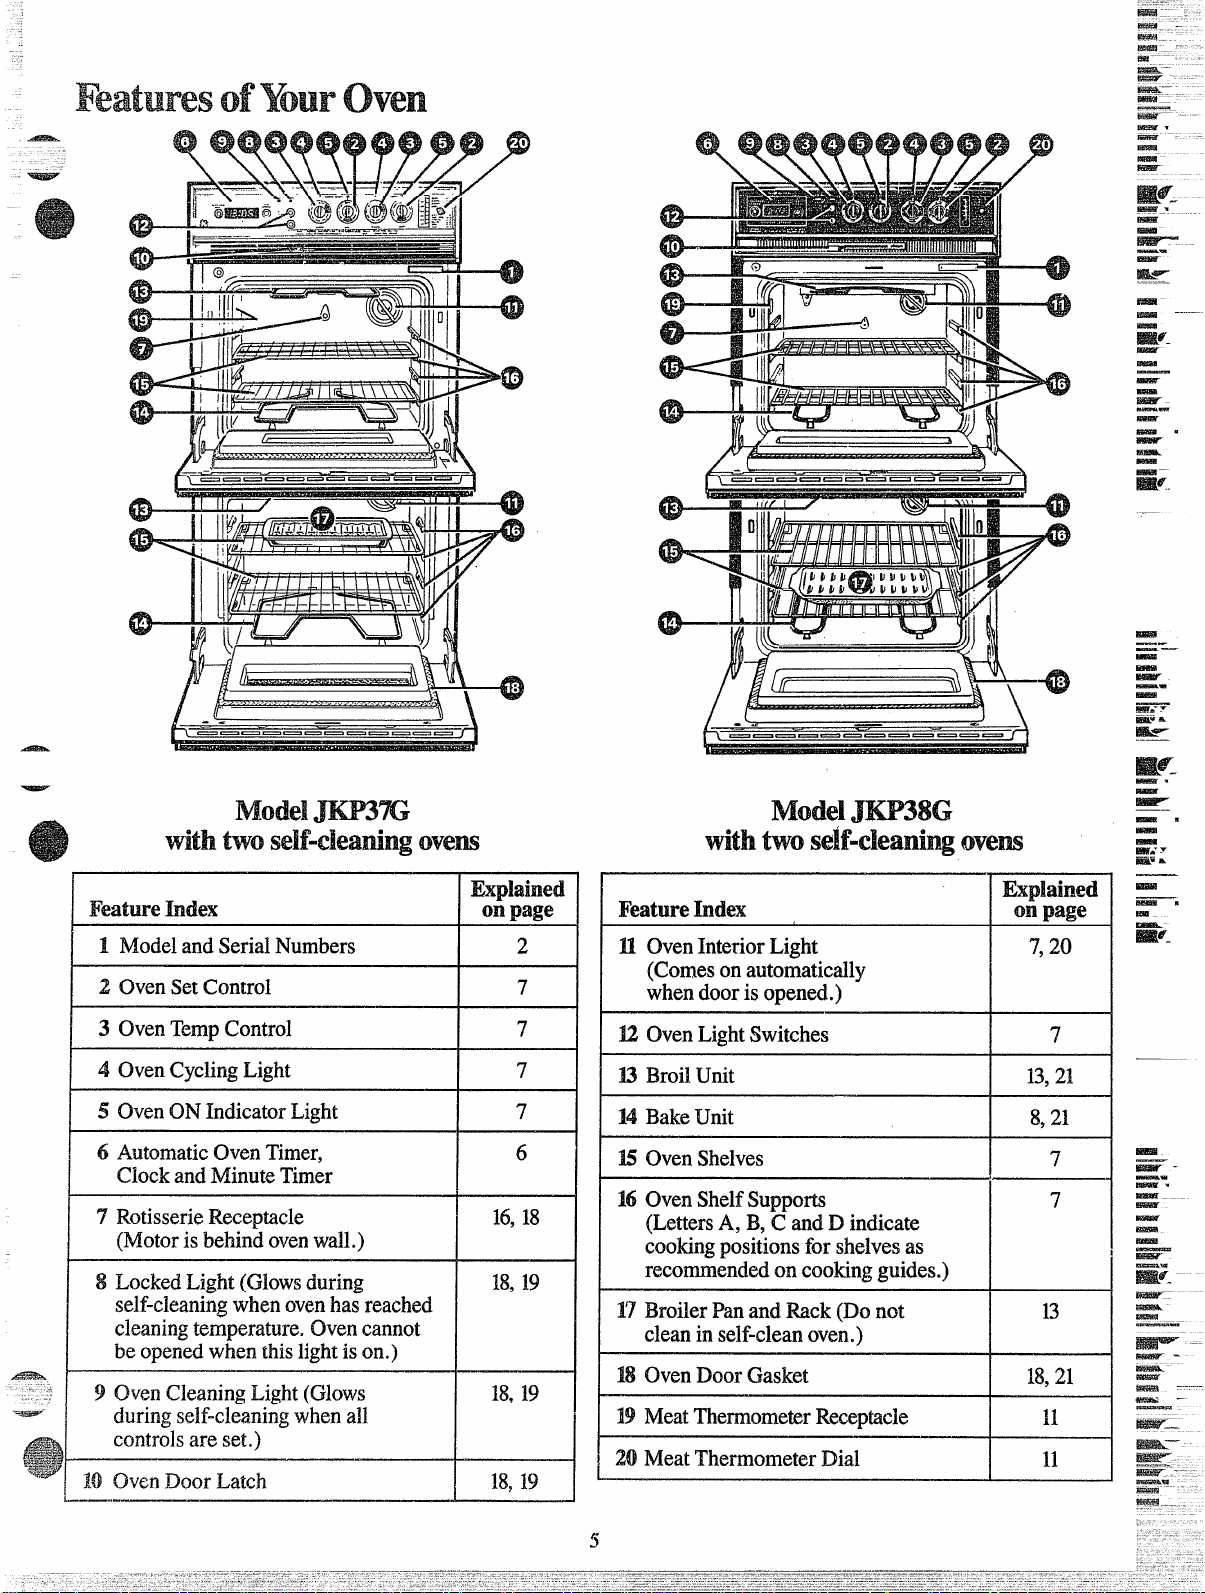
Model
two Ovem
with
~%=”.
@
“w
Feature Index
1 ModelandSerialNumbers
2 OvenSetControl
3 OvenTernpControl
4 OvenCyclingLight
5 OvenONIndicatorLight
6 AutomaticOvenTimer,
ClockandMinuteTimer
7 RotisserieReceptacle
(Motorisbehind ovenwall.)
8 LockedLight (Glowsduring
self-cleaningwhenovenhasreached
cleaningtemperature.Ovencannot
beopenedwhenthislightison.)
9 OvenCleaningLight(Glows
duringself-cleaningwhenall
.-&.
controlsare set.)
10 OvenDoorLatch
——
Exphim?d
on page
2
7
7
7
7
6
16,18
18,19
M,D
18,B
FeatureIndex
II OvenInteriorLight 7,20
(Comesonautomatically
whendoorisopened.)
U!OvenLightSwitches
13BroilUnit B, 21
14BakeUnit
K OvenShelves
16OvenShelfSupports
(LettersA, B,C andD indicate
cookingpositionsforshelvesas
recommendedoncookingguides.)
1’7BroilerPanand Rack(Donot
cleanin self-cleanoven.)
M OvenDoorGasket
19MeatThermometerReceptacle
20 MeatThermometerDial
onpage
7
8,21
7
7
13
18,21
H
H
Explained
—.
-.
mmzs––
~
-––
—.
Rks&z.
Page 6

AIa3$&.
.—
POWWk
tothe
Four8’saredisplayedandsignal
lightsglowoverwordsidentifying
theoperationsyoucanprogramthe
automatictimertocontrol.After15
seconds,the 8’sgooutand “IF’
appearsalongwithaflashingsignal
lightabovethewordCLOCK.Set
theclockand “PI?”isreplacedby
timeofday.Nowyoucanprogram
thetimerwiththetouch ofabutton
anda turnofaknob.
Ifpoweris disruptedatany time,
theabovesequencerecursandyou
mustresettheclockbeforeyoucan
proceedtoprogramthetimer.
Tosettheclock
Push~iid Aease the
1.
PROGRAMSELECI’buttonuntil
thesignallightappearsabovethe
wordCLOCK.
2. TurntheTIMESELECI’knob
ineitherdirectiontosettheClock
numeralstothecorrecttime.Timing
thenbeginsautomatically4 seconds
later,orimmediatelyifyoupushand
releasethePROGRAMSELECT’
button.
To set the
mer
L PushandreleasethePROGRAM
SELECTbutton.untilthesignal
appearsabovethewords
]~ght
MIN/sEc TIMER.
2. TbmtheTIMESELECI’knob
untilthenumberofminutesand
secondsyouwanttotime(upto
99:00)appearsinthedisplay–for
example,
“1:30”for1minuteand
30seconds.
Timerthenbeginscountingdown
automatically4 secondslater,or
immediatelyifyoupushandrelease
thePROGRAMSELECTbutton.
Beepssoundcontinuouslywhenset
timehaselapsed.Tosilencethe
beeps,pushandreleasethe
PROGRAMSELECTbutton.
meBakeuses
UsingtheAutomaticTimer,you
canTIMEBAKEwiththeoven
startingimmediatelyandturning
offatthe STOPTIMEset, starting
immediatelyandcookingforthe
lengthofCOOKTIMEset...oryou
cansetbothCOOKandSTDP
TIMESto automaticallystartand
stopovenat alatertimeofday.R
takestheworryout ofnotbeing
hometo startor stoptheoven.
SettingtheTimerforTIMEBAKE
isexplainedindetailonpage8.
uses
“rinMx
Theself-cleaningfunctiononyour
rangeusestheAutomaticTimerto
setthelengthoftimeneededto
clean,whetheryouwishtoclean
immediatelyordelaytheoperation
tocleanatlowenergytimesduring
thenight.
Anexplanationofsettingthe Timer
forself-cleaningappearsonpages
18and 19.
and.
IHbw’G3mI UiiemyMinute/
Q.
Second
Timertomakemysurface
rookingeasier?
A. YourMinute/SecondTimer
willhelptimetotal cookingwhich
includestimetoboilfoodand
changetemperatures.Donotjudge
cookingtimebyvisiblesteamonly.
Foodwillcookincoveredcontainers
eventhoughyoucan’tseeanysteam.
Must the(XKk Ii setwhen I
Q.
wishtousethe
AutomaticTimer
f-or-baking?
A. Yes,ifyouwishto setthe
Timertoturntheovenonandoff
atpresettimes.
Q. CanI usetheIWinute/SecOn~
Timerduring ovenccmking’?
A. Yes,theMinute/SecondTimer
canbeusedduringanycooking
function.Itdoes notturntheoven
onandoff.
Q. CanIchmgethe (lock while
I’mTimecooking intheoven?
A.No.TheClockcannotbe
changedduringanyprogramthat
usestheAutomaticTimer.You
musteitherstopthose programs
or waituntiltheyarefinished
beforechangingtime.
Q. Howcan 1cancei
atinwd
function?
Pushandreleasethe PROGRAM
A.
SELECTbuttonuntilthe signal
lightappearsovertheappropriate
fimction.Then,to cancela STU?
TIME,turntheTIMESEL.ECI’knob
counterclockwiseuntilpresentTime
ofDayappearsinthedisplay...
orto cancelaMHW.JTEMKXNNII
TIMERsetting,COOKTIMEor
CLEANTIME, turntheTIME
SELECTknobcounterclockwise
until“:00” appearsinthedisplay.
—“
—
—.——.
.—
.rsi%ak
‘w#=
6
Page 7
.~
——..—-—
.—
,,
using oven
L Lookat the controls.Besure
.’OUunderstandhowtosetthem
properly.Readoverthedirections
fortheAutomatic(hen Timerso
youunderstanditsusewiththe
controls.
2. Checkoveninterior.Lookat
theshelves.Takeapracticerunat
removingandreplacingthemproperly,
togive sure, sturdysupport.
3. Readover informationandtips
that follow.
Keepthisbookhandysoyoucan
4.
refertoit, especiallyduringthe
firstweeksofgettingacquainted
withyouroven.
oven Control$
PREHEATINGthe oven,evento
hightemperaturesettings,isspeedy
—rarelymorethanabout10minutes.
Preheattheovenonlywhen
necessary.Most foods willcook
satisfactorilywithoutpreheating.
Ifyoufindpreheatingis necessary,
keepaneye ontheindicatorlight
andputfoodintheovenpromptly
afterlightgoesout.
Alight aboveeachOVENSET
knobglowswhentheknobis turned
toanypositionotherthanOFF.
shelves
Theshelvesaredesignedwith
stop-lockssothatwhenplaced
correctlyontheshelfsupports,
they(a)willstopbeforecoming
completelyfromtheoven,and(b)
WWnottiBtwhenremovingfood
fromorplacingfoodonthem.
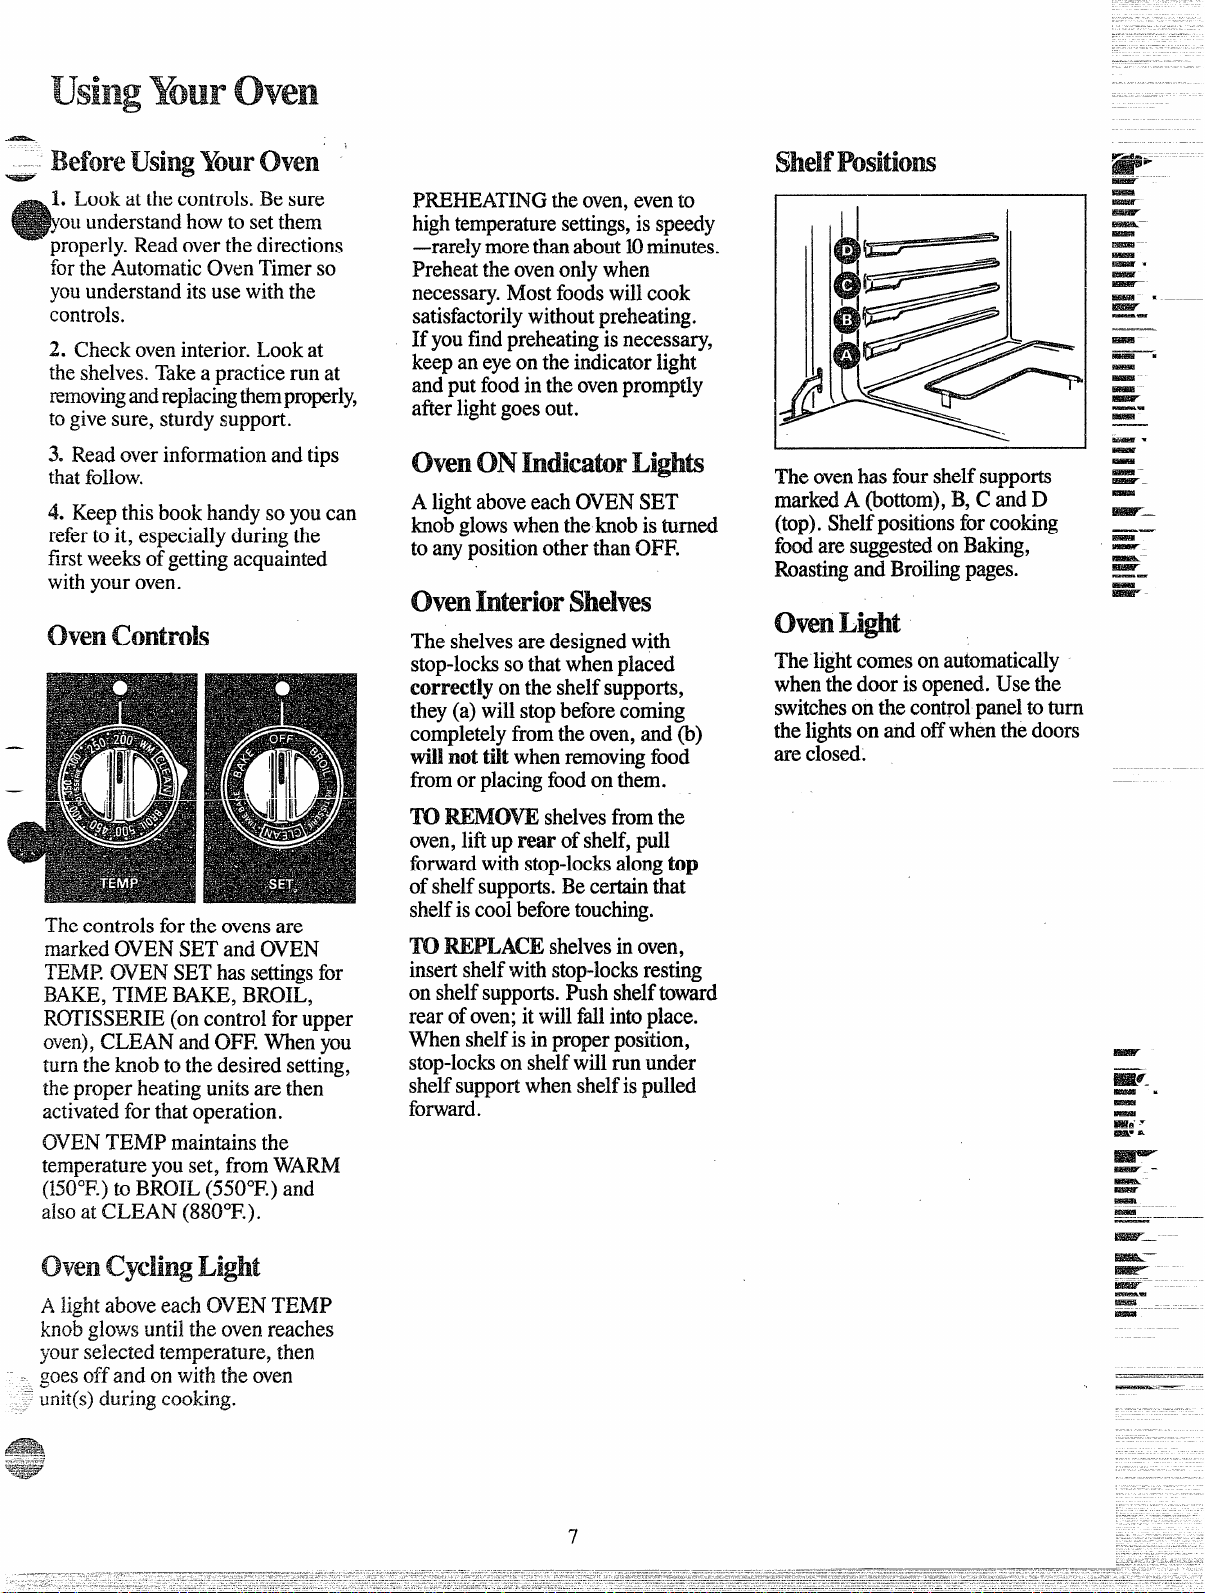
Theoven.hasfourshelfsupports
markedA(bottom),B,C fid D
-
(top).ShelfPositionsforcooking ‘–
foodaresuggestedonBaking,
RoastingandBroilingpages.
—
~
—.
-
~
Thelightcomesonautomatically
whenthedoorisopened.Usethe
switchesonthecontrolpaneltoturn
thelightsonandoffwhenthedoors
areclosed.
The controlsfortheovensare
markedOVENSETandOVEN
TEMl?OVENSEThassettingsfor
BAKE,TIMEBAKE,BROIL,
NYI’RNERIE(oncontrolforupper
oven),CLEANandOFF.Whenyou
turntheknob to thedesiredsetting,
the properheatingunitsarethen
activatedforthatoperation.
OVENTEMPmaintainsthe
temperatureyouset, fromWARM
(H)”F.)to BROIL(550°F.)and
alsoat CLEAN@80°F.).
oven Light
AlightaboveeachOVENTEMP
lambglowsuntiltheovenreaches
yourselectedtemperature,then
goesoffandonwiththeoven
unit(s)duringcooking.
TOREMOVEshelvesfromthe
oven,liftuprear ofshelf,pull
forwardwithstop-locksalongtop
ofshelfsupports.Becertainthat
shelfiscoolbeforetouching.
REPLACEshelvesinoven,
%30
insertshelfwithstop-locksresting
onshelfsupports.Pushshelftoward
rearofoven;itwillfldlintoplace.
Whenshelfisinproperposition,
stop-lockson shelfwillrununder
she~fsupportwhenshelfispulled
forward.
EmT
-
-
,——..
-—
--.—
&&%%&&
——
-—_..-.-
‘@p>
Page 8
(f’?%ensettingStop?bze,tirne-bakedfoodscontinuecookingafter theoventurnsoS)
—
X$%&..
Howto
1. Placefoodin oven,beingsureto
leaveabout1“betweenpansand
ovenwallsforgoodcirculationof
heat.Closeovendoor,andavoid
frequentdooropeningsduring
bakingtopreventundesirableresults.
2. TurnOVEPdSETknobtoBAKE
andOVENTEMPknobtotemperature
cmrecipeor BakingGuide.
3. Checkfoodfordonenessat
minimumtimeonrecipe.Cook
longerif necessary.Switchoffheat
andremovefoods.
How to Bake
Theoventimercontrolsare
designedtoturn theovenonandoff
automaticallyatspecifictimesyou
wantbakingto startandstop.
Howto
Start&AutomaticStopWingthe
StopTimeFeatures.
rightaway,cooksforpresetlength
oftime,andturnsoffautomatically.)
L PushandreleasePIUML4M
SELE~ buttonuntilsignallightin
dis@ayappearsabovethewords
STDPTIME. Displaywillshow
presentTimeofDay—forexample,
“1:00”o’clock.
2. ThrntheTIME SELECTknob
untiltheTimeofDayyouwantfood
tostopcookingappearsinthedisplay;
forexample,“4:00”o’clock.
3. TurnCIVENSETknobto TIME
BAKE.Turn0V13NTIEMPknob
tod6siredoventemperature;for
example,250”F.Foodwillcookfor
3 hours,theovenwillturnoffat
4:00o’clock,and4 beepswillsound.
~. TWnOVENSETtoOFF and
removefood.fromoven.
setTimerforInm’Mxkte
(Oventurnson
Howto
setTimer fork-mediate
ftihrtI&Automatic~tO~~sing
the CookTimeFeatures. (Oven
turnson rightaway,cooksfor
presetlengthoftirne,andturnsoff
automaticallyatpresetStopTime.)
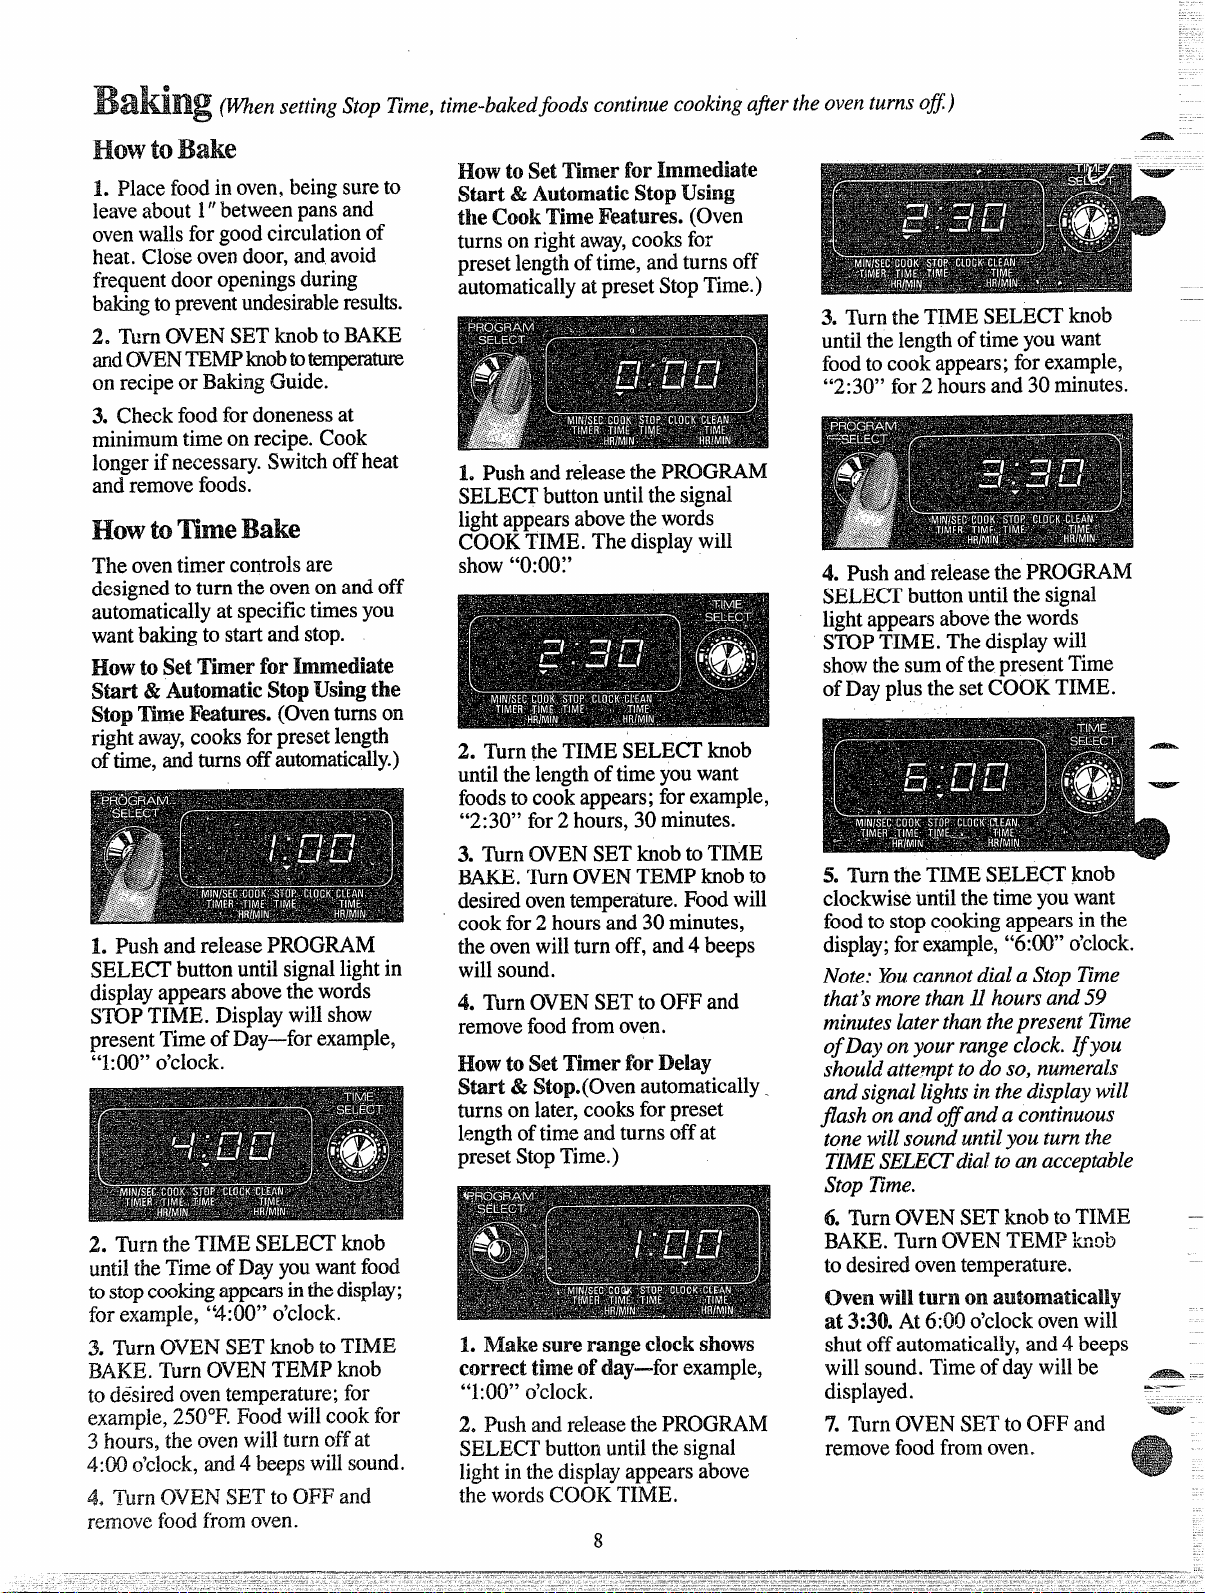
1. Pushandreleasethe PROGRAM
SELECTbuttonuntilthesignal
lightappearsabovethewords
COOKTIME.Thedisplaywill
show“0:00:’
2. TurntheTIMESELECTknob
untilthelengthoftimeyouwant
foodstocookappears;forexample,
“2:30” for2 hours,30minutes.
3. TurnOVENSETknobto TIME
BAKE.TurnOVEN TEMPknobto
desiredoventemperature.Foodwill
cookfor2 hours and30minutes,
theovenwillturnoff, and4 beeps
wiHsound.
4. ThrnOVENSETto OFFand
removefoodfromoven.
Howto Set Timerfor Delay
Start & Stop@ven
turnsonlater,cooksforpreset
lengthoftimeandturnsoffat
presetStopTime.)
automatically.
1.Make surerangedock shows
correct timeof day—forexample,
“1:00”o’clock.
2. PushandreleasethePROGRAM
SELECT’buttonuntilthesignal
lightin thedisplayappearsabove
thewordsCOOKTIME.
8
3. TurntheTIMESELECTknob
untilthelengthoftimeyouwant
foodtocookappears;forexample,
“2:30” for2 hoursand 30minutes.
4. Pushandreleasethe PIU3GRAM
SELECI’buttonuntil the signal
lightappearsabovethewords
STOPTIME.Thedisplaywill
showthesumofthepresentTime
ofDayplusthesetCOOKTIME.
5. TurntheTIMESELECTknob
clockwiseuntilthetimeyouwant
foodto stopcookingappearsin the
display;forexample,“6:00”o’clock.
Note:&u cannotdiala StopTime
tliatkmorethan11hoursand59
minuteslaterthanthepresentTime
ofDayonyourrangeclock.
shouldattempttodo so,numerals
andsignallightsinthedisplaywill
flash onandoflanda continuous
tonewillsounduntilyou turnthe
TIMESELEGdial toanacceptable
StopTime.
6. TurnOVENSETknobto TIME
BAKE.TbrnOVENTENW knob
todesiredoventemperature.
(hen willturnm automatically
at 3:30.At6:00o’clockovenwill
shutoffautomatically,and4 beeps
willsound.Timeofdaywillbe
displayed.
7. TurnOVENSETto OFFand ‘removefoodfromoven.
Ifyou
6@s3ik -
..——
Page 9

_ 1.Aluminumpansconductheat
quickly.Formostconventional
aking,Iight,shinyfinishesgivebest
resultsbecausetheyhelpprevent
overbrowning.Forbestbrowning
resuks,werecommenddullbottom
surfacesforcakepansandpieplates.
glassandPyroceram”cookware,
generallyabsorbheat,whichmay
resultindry,crispcrusts.Reduce
ovenheat25°F.iflightercrusts
aredesired.Rapidbrowningof
somefoodscanbeachievedby
preheatingcastironcookware.
3.Preheatingtheovenisnotalways ‘-2. Darkor non-shinyfinishes,
necessary,e~peciallyforfoods
whichcooklongerthan30to40
minutes.For foodwithshort
cookingtimes,preheatinggives
bestappearanceandcrispness.
4. Opentheovendoor to check
foodaslittleaspossibletoprevent
unevenheatingandtosaveenergy.
.—
Food Container
Bread
Biscuits(%-in.thick)
Coffeecake
Cornbreadormuffins
Gingerbread
Muffins
Popovers
Quickloafbread
Yeastbread(2loaves)
P1ainroHs
Sweetrolls
Cakes
(withoutshortening)
Angelfood
Jellyroll
Sponge
Cakes
Bundtcakes
Cupcakes
Fruitcakes
Layer
Layer,chocolate
Loaf
Cookies
Etrownies
3rop
refrigerator
lolledor sliced
Fruitsj
Mer Desserts
3akedapples
hstard
%ddings,Rice
mdCustard
‘ies
‘rozen
deringue
lnecrust
“WO CNSt
‘astrvshell
fiiwehmms
Bakedpotatoes
_ Sca[]opeddishes
~{)~ffj~s
+%==~—
ShinyCookieSheet
ShinyMetalPanwith
satin-finishbottom
CastIronor Glass
ShinyMetalPanwith
satin-finishbottom
ShinyMetalh4uffinPans
DeepGlassorCastIronCups
MetalorGiassLoafPans
MetalorGlassLoafPans
ShinyOblongor MuffinPans
ShinvOblorworMuffinPans
AluminumTubePan
MetalJellyRollPan
MetalorCeramicPan
MetalorCeramic Pan
ShinyMetalMuffinPans
MetalorGlassLoafor
ThbePan
ShinyMetalPanwith
satin-finishbottom
ShinyMetalPanwith
satin-finishbottom
MetalorGlassLoafPans
MetalorGlassPans
CookieSheet
CookieSheet
CookieSheet
GlassorMetalPan
Glass CustardCupsor Casseroie
(setinpanofhotwater)
Glass CustardCupsor
Casserole
FoilPanon CookieSheet
Spreadtocrustedges
Nassor Satin-finishMetal
Nassor Satin-finishMetal
Glassor Satin-finishMetal
ietonOvenShelf
Glassor MetalI)an
Glass
shelf
I%siticm
B,C
33,A
B
B
A,B
B
B
A,B
A,B
B.A
A
B
A
A,B
B
A,B
B
B
B
B,C
B,C
B,C
B,C
A,B,C
B
B
A
B,A
A,B
B
B
A, B,C
A, B,C
B
Oven
Temperature
400°-4750
350”-400°
400°-4500
350°
400°-4250
375°
350°-3750
375”-425°
375°-4250
350’-375°
325°-375”
375°-4000
325°-3500
325°-3500
350°-3750
275°-3000
350°-3750
350°-3750
350°
325°-3500
350°-4000
400°-425”
375°-4000
350°-4000
300°-3500
325°
400°-4250
325°-3500
400°-4250
400°-4250
450”
325°-4000
325°-3750
300°-3500
Time,
Minutes
15-20
20-30
20-40
45-55
20-30
45-60
45-60
45-60
10-25
20-30
30-55
10-15
45-60
45-65
20-25
2-4hrs.
20-35
25-30
40-60
25-35
10-20
6-12
7-12
30-60
30-60
50-90
45-70
15-25
40-60
40-60
12-15
60-90
30-60
30-75
Comments
Canned,refrigeratedbiscuitstake
2to4 minuteslesstime.
Preheatcastironpanforcrispcrust.
Decrease about5minutesformuffin
mix,orbakeat450”F.for25minutes,
thenat 350°F.for 10to 15minutes.
Darkmetalorglassgivedeepest
browning.
Forthinrolls,ShelfBmaybeused.
Forthinrolls,ShelfB maybeused.
Two-piecepanisconvenient.
Linepanwithwaxedpaper.
Paperlinersproducemoremoist
crusts.
Use300”F.andShelfBforsmallor
individualcakes.
Barcookiesfrommixusesametime.
UseShelfCandincreasetemp.
2YF.to50”F.formorebrowning.
Reducetemp~to300”F.forlarge
custard.Cookbreadorricepudding
withcustardbase80 to90minutes.
Largepiesuse400”F.andincrease
time.
Toquicklybrownmeringue,use
400”F,for8to 10minutes.
Custardfillingsrequirelower
temperature,longertime.
Increasetimeforlargeamount
or size,
9
Page 10

Roastingiscookingbydryheat.
---
Tendermeatorpoultrycanbe
roasteduncoveredinyouroven.
Roastingtemperatures,which
shouldbelowandsteady,keep
spatteringtoaminimum.When
roasting,itisnotnecessaryto
sear,baste,coveror addwater
toyourmeat.
Roastingisreallyabaking
procedureusedforrneats.Therefore,
ovencontrolsaresettoBAKE.(You
mayhearaslightclickingsound,
indicatingtheovenisworking
properly.)Roastingiseasy;just
followthesesteps:
StepL Checkweightofmeat,and
place,fatsideup,onroastingrack
inashallowpan.(Broilerpanwith
rackisagoodpanforthis.)Line
broilerpanwithaluminumfoilwhen
usingpanformarinating,cooking
withfruits,cookingheavilycured
meats,orforbastingfoodduring
cooking.Avoidspillingthese
materialsonovenlinerordoor.
Step2: Placeinovenonshelfin
AorBposition.Nopreheatingis
necessary.
Wep4:Mostmeatscontinueto
cookslightlywhilestanding,after
beingremovedfromtheoven.
Standingtimerecommendedfor
roastsis10to20minutestoaHow
roasttofirmupandmakeit easierto
carve.Internaltemperaturewillrise
about5°to 10”F.;tocompensatefor
temperaturerise,ifdesired,remove
roastfromovenat5°to IO°F.less
thantemperatureinguideonpage12.
NOFE:YoumaywishtouseTIME
BAKE,asdescribedonpage8,to
turnovenonandoffautomatically.
Rernemberthatfoodwillcontinue
tocookinthehotovenandtherefore
shouldbe removedwhenthedesired
internaltemperaturehasbeen
reached.
Roasb
~Frozenroastsofbeef,pork,
lamb,etc.,canbestartedwithout
thawing,butallow10to25minutes
perpoundadditionaltime(10
minutesperpoundforroastsunder
5pounds,moretimeforlarger
roasts).
~Thawmostfrozenpoultrybefore
roastingtoensureevendoneness.
$omecommercialfrozenpoultry
canbecookedsuccessi%llywithout
thawing.Followdirectionsgiven
onpacker’slabel.
,.
,,
Q.Is it necessarytoAd for
Ckmm?ssW&hameatihxmmekr?
A. Checkingthefinishedinternal
temperatureatthecompletionof
cookingtimeis recommended.
TemperaturesareshowninRoasting
Guideonpage12.Forroastsover
8pounds,cookedat300°F.with
reducedtime,checkwith
thermometerathalf-hourintervals
afterha~fthetimehaspassed.
Q.why ismyroast crumbling
WhenI try to carveit?
A. Roastsare easierto sliceif
allowedto cool10to20 minutes
afterremovingfromoven.Besure
tocutacrossthegrainofthemeat.
Q.Do I needto preheat my
Oveneachtime I Cooka roast
or poultry?’
A. It israrelynecessarytopreheat
youroven,onlyforverysmall
roasts,whichcooka short length
oftime.
QeWhenbuyinga roast,are
theremy specialtipsthatWORM
helpmecook it moreevenly?
A. Yes.Buya roastaseven in
thicknessaspossible,or buyrolled
roasts.
Q. Can I seal the sidesof myfoil
“tent”whenroastingaturkey?
A. Sealingthefoil willsteamthe
meat.Leavingitunsealedallowsthe
airto circulateandbrownthemeat. ‘
~-
~
—
S@3: TurnOVEN SET’toBAKE
andOVENTEMPto325°F.SmaH
poultrymay becookedat375°F.
forbestbrowning.
_
--——-
Page 11

~ see Gum?anpageE?.
- Formanyfoods,especiaHy
roastsandpoultry,internalfood
temperatureisthebesttestfor
doneness.Themeatthermometer
takestheguessworkoutofroasting
bycookingfoodstotheexact
donenessyouwant.
Themeatthermometerthatcame
withyourovenwillresembleone
oftheillustrationsbelow.Seethe
cleaninginstructionsonpage21for
thetypeofthermometeryouhave.
Step~:Insertprobe intomeatup
topointmarkedoffwithfingers.
Pointshouldnottouchbone,fator
gristle.Notmorethan2“ofprobe,
notcountinghandle,shouldbe left
exposedoutsideofmeat. ~
@
!&p ~: Refertoguidenear Meat
ThermometerDialtodetermineat
whatinternaltemperaturemeatwill
bedone.Thenturnknobnexttodial
tomovepointertocorrectnumber
(internaltemperature)ondial.
Thermometer with l-prong plug
Thermometer with 2-prong plug
=== The meatthermometerhasa
skewer-likeprobeatoneendofthe
~ cableanda oneor two-pronged
plugattheother.Usehandleof
plugandprobe,ratherthancable,
wheninsertingaridremovingthese
partsfromm;at and/orovenwall
receptacle.Afterpreparingmeat
and~lacingin roastingpanonrack,
fcd16wthestepsbelowforproper
useofmeatthermometer.
StepI&Wheninternaltemperature
ofroastreachesnumberyouhave
set,a buzzersounds.Tostop
buzzer,turnpointertoSIGNAL
OFF.Internaltemperatureofmeat
canbedeterminedatanytime
duringcookingbyturningpointer
downuntilbuzzersounds.
Step3: Plugcableintoreceptacle
onovenwall.Theprongsare
especiallydesignedto onlyplugin
oneway.Be certaintoinsertplug
intoreceptaclealltheway.Close
ovendoor.
Step 7: Whenroastis done,
usecarein removingplugfrom
receptacle.DONCYI’USECABLE.
Removemeatfromoven.Since
mostmeatcontinuescooking,you
maywishtoremove5°to 10°sooner.
Step 1:Togaugeplacementof
probe,layprobeon outsideofmeat
alongtopor sideandmarkwith
fingerwhereedgeofmeatcomes
onprobe.Probeshouldbeplaced
‘--- sopointrestsincenterofthe
—- thickestpart ofroast.
e
Step4: TurnOVENSETknobto
BAKEandOVENTEMPknobto
recommendedoventemperature,
forexample350°F.SeeRoasting
Guideonpage12foroven
temperature.
Step 8:Removeprobefrommeat,
usinghandleofprobenotcable.Most
meatscarveeasierifletstand5to 10
minutes.Letthermometercooland
cleanm directedinCleaningGuide
onpage21.Do not leaveinoven.
H
Page 12

L Positionovenshelfat Bfor
——
small-sizeroasts(3to 7 Ibs.)and
atAforlarger roasts. ‘
2. Placemeatfat-sideup, orpoultry
3.Removefatanddrippingsas
necessary.Basteasdesired.
.
4. Standingtime recommendedfor
roastsisIOto20minutestoallowroast
breast-sideup,onbroilerpanor to firmup andmakeit easierto
othershallowpanwithtrivet.Do
carve.Internaltemperaturewillrise
not cover.Donotstuffpoultryuntil about5°to 10”F.;to compensatefor
justbeforeroasting.LTsemeat
probe formoreaccuratedoneness.
Controlsignalswhenfoodhas
temperaturerise, ifdesired,remove
roastfromovenat5°to 10”F.less
thantemperatureonguide.
reachedsettemperature.(Donot
placeprobeinstuffing.)
5.Frozenroasts canbe
conventionallyroastedbyadding
10to25minutesperpoundn-tore
timethangivenin guidefor
refrigeratedroasts.(10minutes
perpoundforroastsunder5pounds.)
Defrostpoultrybeforeroasting.
Oven
NW
Temperature
Doneness
Meat
Tendercuts;rib,highqualitysirlointip, 325° Rare:
rumportopround*
LambLegorbone-inshoulder*
Vealshoulder,legor loin*
Porkloin,ribor shoulder*
Ham,precooked
325° Rare:
325° WellDone:
325” WellDone:
325°
Medium: 30-35
WellDone:
Medium:
Well Done: 30-35
ToWarm:
ApproximateRoastingTime,
inMinutesperPound
3toS-lbs.
24-30
35-45
21-25
25-30
35-45
35-45 30-40
10minutesperpound(anyweight)
UnderNMbs.
Ham,raw 325°
*Forbonelessrolledroastsover6-inchesthick,add5 to 10minutesperpoundto timesgivenabove.
WellDone: 20-30 17-20
Poultry 3 toWbs.
Chickenor Duck
Chickenpieces 375°
Turkey 325°
325°
WellDone: 35-40
Well Done:
Well Done:
35-40
10
tol$lbs. Over15-lbs.
20-25 15-20
6 to$-lbs.
18-22
22-25
28-33
20-23
24-28
28-33
30-40
10toI$lbs.
Over54bs.
30-35
Internal
Temperature“F
130°-1400
150°-1600
170°-1850
130°-1400
150°-1600
170°-1850
170°-1800
170°-1800
125°-1300
170°
185°-1900
185°-1900
In thigh:
185°-1900
Page 13

- Broiiing is cookingfoodbyin!ense
radiantheat fromthe upperunitin
theoven.iMostfishandtendercuts
ofmeatcan be broiled.Follow
thesestepstokeepspatteringand
smokingtoa minimum.
Step1:Xfmeathasfatorgristlenear
cut verticalslashesthrough
edge,
bothabout 2“apart.If desired,fat
maybe~rimmed,leavinglayer
about1/8”thick.
Step2: Hace meatonbroilerrack
inbroilerpanwhichcomeswith
oven.Alwaysuserack sofatdrips
intobroilerpan;otherwisejuices
maybecomehotenoughtocatchfire.
Step3:Positionshelfonrecommended
shelfpositionassu~estedinBroiling
Guid&onpage15.Mostbroilingis
doneonC position,butifyour
ovenisconnectedto 208volts,you
maywishtousehigherposition.
—
—
—
SteII& Turnfoodonlyonceduring
cooking.Timefoods~orfirstsideperBroilingGuide.
Turnfood,thenusetimesgivenfor
secondsideasa guidetopreferred
doneness.(Wheretwothicknesses
andtimesaregiventogether,use
firstti~es givenforthinnestfood.)
$@ ‘7:TurnOVENSETknob
toOFF.Servefoodimmediately,
andleavepanoutsideovento cool
duringmealforeasiestcleaning.
use Foil
&
Q. whyshouldI km%?thedoor
dosedwhen
A. Chickenistheonlyfood
recommendedforclosed-door
broiling.Thisisbecausechickenis
relativelythickerthanotherfoods
youbroil.Closingthedoorholds
moreheatin theovenwhichallows
chickento cookevenlythroughout.
Q.Whenbroiling,isit necessary
toahvaysusea rackinthepan?
A.Yes.Usingtheracksuspends
themeatoverthepan.Asthemeat
cooks,thejuicesfallintothepan,
thuskeepingmeatdrier.Juices
areprotectedbytherackandstay
cooler,thuspreventingexcessive
spatterand smoking.
Q.ShouldI saltthemeatbefore
broiling?
A.No.Saltdrawsout thejuices
andallowsthemtoevaporate.
Alwayssaltaftercooking.Turn
meatwithtongs;piercingmeat
withafork alsoallowsjuicesto
escape.Whenbroilingpoultry
or fish,brush eachsideoften
withbutter.
-broilingChicken?
—
SteP~: Leavedoorajara fewinches
(ex~eptwhenbroili~gchicken).
Thedoorstaysopenbyitself,yet
thepropertemperatureismaintained
in the oven.
Step5: TurnbothOVENSETand
OVENTEMPknobsto BROIL.
Preheatingunits is notnecessary.
(Seenotesin BroilingGuide.)
1. Ifdesired, broiler panrnaybe
linedwithfoilandbroilerrackmay
becoveredwithfoilforbroiling.
ALWAYSBECERTAINTOMOLD
FOILTHOROIJGHLYTO
BROILERRACK,ANDSLIT
FOILTUCONFORMWITH
SLITSINRACK.Broilerrackis
designedtominimizesmokingand
spattering,andtokeepdrippings
coolduringbroi~ing.Stoppingfat
andmeatjuicesfromdrainingto
the broilerpanpreventsrackfrom
servingitspurpose,andjuicesmay
becomehotenoughtocatchfire.
2. DONOTplaceasheetof
aluminumfoilonshelf.Todoso
mayresultinimproperlycooked
foods,damagetoovenfinishand
increaseinheat.oncutsidesurfaces
oftheoven.
Q.Whyaremymeatsnotturning
outasbrownastheyshould?
A.
Insomeareas,thepower
(voltage)to theovenmaybelow.
In thesecases,preheatthe broil
unit for 10minutesbeforeplacing
broilerpan withfoodin oven.
Checkto seeif youareusingthe
recommendedshelfposition.Broil
forlongestperiodoftimeindicated
intheBroilingGuide.Turnfood
onlyonce duringbroiling.
Q. DoI need.
togreasemybroiler
racktopreventmeatfromsticking?
A.No.Thebroilerrackis designed
to reflectbroilerheat,thuskeeping
thesurfacecool enoughtoprevent
meatstickingtothesurface.However,
sprayingthebroilerracklightlywith
a vegetablecookingspraybefore
cookingwillmakecleanupeasier.
—--–—
13
Page 14

“- ---------
AL–-
Yourn~y use t~~ meatthermometer
forbroiiing,suchassteakor ham
slices.Preparemeatonbroilerrack
andpanasexplainedonpage13,
“HowtoBroil:’SetbothOVEN
SETandOVENTEMPknobsto
BROILandleavedoorajaras
recommended,afterplacingprobe
inmeatandovenasdirectedbelow.
Step 1:Usesteakatleast1to 1%
inchesthick.Layprobeontopof
steaktodeterminetheposition
probeisto beinserted.Gauge
distancefromedgetocenterof
largestmuscle;markwiththumb
whereedgeofmeator fatmeets
probe.BecertainNOTMORE
THAN2 inchesofprobe,not
countinghandle,is leftexposed
outsideofmeat.
,,
SteP~:Forraresteakscookfirst
sid~to90on,meatthermometer
dial; formediumto 100;forweJldoneHO.SetMeatThermometer
Dialtopreferreddoneness.
Step4: Atsoundofbuzzer,turn
steak;checkprobetobecertainit
hasnotmovedoutofposition.
ResetpointeronMeatThermometer
andcooksecondside.Seeguideon
ovennearMeatThermometerDial.
NOTES:
QIIfthereis aquestionabout
whetherprobehasmovedoutof
positionduringcooking,turnknob
sopointermovesdownondialuntil
buzzersounds.Noteindicated
temperatureandresetpointerto
SIGNALOFI?.Pushprobefarther
downintoroast,about1inch,then
aftera fewminutesredetermine
internaltemperatureasabove.If
newtemperatureislower,the probe
wasprobablyoutofposition.If so,
allowmeattocookto proper
internaltemperature.
-
Q.Canthe meatthermometer
remainintheovenifit’snot
insertedinfood?
A. No. Removeprobefrom
receptaclewhennotinuse.You
coulddamagetheprobebyleaving
itinduring cookingoperationsthat
donotrequiretheprobe.
Q.MayI insertthemeat
thermometerintofrozenfoods?
A. No. Foodsmustbecompletely
defrostedbeforeinsertingprobe.
Q.ShouldI
he broilerpanwith
aluminumfoilwhenroasting?
A. Yes,whenusingpanfor
marinating,cookingwithfruitsor
heavilycuredmeats,or forbasting
duringcooking.Avoidspillingthese
materialsonovenlinerordoor.
Q.HowmayI besurethatmy
mastwiHcookthesameeachtime?
A. Whenusingthemeat
thermometerin roasting,theprobe ~
mustbeinsertedproperly.Check
thepositionoftheprobeduring
cooking,Sometimestheprobeslips
or istouchingbone,fatorgristle.
Repositionprobecorrectlyandset
ovenagaintofinishroasting.
Step2:Liftprobe frommeat
keepingthumbinplace onprobe.
Insertprobeasnearas possibleto
centerofthicknessofsteak.Push
probeintosteakto wherethumb
meetsfator meat.
@Let meatthaw enoughtoallow
insertingprobe.Theprobeis
sturdybuttakecarenotto forceit
toohardintoroast.
@Do notdisconnectprobeduring
cooking.Usehotpadswhen
removingprobeatendofcooking.
Donotusetongstopulloncable
sincetheymaydamageit.
DONOTUSETHE MEAT
THERMOMETERWITHTHE
ROTISSERIE.
14
.%@s&h
...-——._
—-..
——-
Page 15

-Wi$w-
L Alwaysusebroilerpanandrack
thatcomeswithyouroven.M.is
designedtornin{mizesmokingand
spatteringbytrappingjuicesinthe
shieldedlowerpartofthepan.
2. Ovendoorshouldbeajarforall
foodsexceptchicken;thereisa
specialpositionondoorwhich
holdsdooropencorrectiy.
~. Forsteaksandchops, slashfat
evenlyaroundoutsideedgesofmeat.
‘l@slash, cutcrosswisethrough
outerfatsurfacejusttotheedgeof
themeat.Usetongstoturnmeat
overtopreventpiercingmeatand
losingjuices.
~~,If desired,marinatemeats‘r
c~ickenbeforebroiling.Orbrush
w#~barbecuesaucelast5 to 10
niinutesonly.
%Whenarrangingfoodonpan,
donotletfattyedgeshangover
sides,whichcouldsoilovenwith
fatdripping.
.- —
b. Broilerdoesnotneedtobe
preheated.However,forverythin
foods,orto increasebrowning,
preheatifdesired.
7.Frozen Steakscanbe
conventionallybroiledby
positioningtheovenshelfatnext
lowestshelfpositionandincreasing
cookingtimegiveninthisguide
I%timesper side.
8.If yourovenisconnectedto
208volts,raresteaksmaybebroiled
bypreheatingbroilheaterand
positioningthe ovenshelfone
positionhigher.
Quantityandlor Shdf FirstSide SecondSide
Food
/
Bacon
GroundBeef
WellDone
Thickness Position Time,Minutes
%-1b.(about8
thinslices)
l-lb.(4patties)
1Ato%-in.thick c
c
3%
7
Time,Minutes Comments
3% Arrangeinsinglelayer.
4-5
Spaceevenly.
Upto8pattiestakeaboutsametime.
BeefSteaks
Rare
Medium
WellDone c
Rare
.Medium
Well Done c
Chicken
BakeryProducts
Bread(Toast)or
Toasler’Pastries
EnglishMuffins
LobsterTails
(6to 8-oz.each)
Fish
HamSlices
(precooked) for I%-inchthickorhomecured.
Porkchops
We]]Done
Lambchops
Medium
Well Done about10to 12OZ,
Medium
WellDone about1lb.
Wienersandsimilar
precookedsausages,
bratwurst
L._—
l-inchthick c
(1to 1%-lbs,) c 9
1%-in.thick c 10
(2to2M-lbs.) c
1whole A
(2to2%-lbs.),
splitlengthwise
2to4 slices c
1pkg.(2)
2(split) c
2-4 B
l-lb.fillets%to c
%-in.thick
l-in.thick B
2(Minch)
2(l-in.thick) B
about1 lb.
2(1 inch) c
2(Ifi inch) c 10
l-lb. pkg.(10)
c 10 10 Slashfat.
c
B
c
7
13
15
25 20-25
35 10-15 Reducetimesabout5to 10minutesper
1%-2
3-4
13-16 Donot Cutthroughbackofshell.Spread
5 5 Handleandturnverycarefully.
8 8 Increasetimes5to 10minutesper side
13 13
8
10 10
17 12-14
—-.
6
7 Steakslessthan1inchcookthrough
9 beforebrowning.Panfryingis
13
7-8 Slashfat.
14-16
‘/2
turnover.
4-7
4-6
1-2 Ifdesired,splitsausagesinhalf
recommended.
sideforcut-upchicken.Brusheachside
withmeltedbutter.Broilwithskin
downfirstandbroilwithdoorclosed.
Spaceevenly.PlaceEnglishmuffins
cut-side-upandbrushwithbutter,if
desired.
open.Brushwithmelted butter
beforeandafterhalftime.
Brushwithlemonbutterbeforeand
duringcookingifdesired.Preheat
broilertoincreasebrowning.
Slashfat,
lengthwise;cutinto5to6-inchpieces,
15
Page 16

i
Foodiscookedbyrevolvingon
aspitunderthe(upper)broil unit.
Asfoodturns, itbastesitselfto
producea succulentbrownand
tenderroast.Meattenderenough
forroastingmayberotissed.
L Assemblerotisserie.Insert
curvedendsofframeintolarge
holesofbroilerpanhandles.Lock
frameinplacebyfittingstraight
endsof supportintoholesincenter
handles.
2. Securefoodon spit.When
securedcorrectly,foodwillbe
locatedincenterareaofspit
leaving4 inchesfreeatthepointed
end(thispartgoes intomotor).
~. Tosecurefoodonspit:Push
2-prongedforkontospitnear
handleend.Tightenwithscrew.
Pushspitthroughfood(tiefood
securelyandcompactly),distributing
weightevenlyoneachsideofspit.
Tocheckweightdistributionon
spit,holdspit(andfood)between
hands,palmsup; spit shouldroll
smoothlyfrompalmsto fingertips
whenpalmsaretippedforward.
Finishsecuringfoodonspitby
glidingsecond2-prongedforkonto
spitwithprongstowardfood.Tighten
screwsto aflatsurfaceonspit.
4. Placespitonframesohandleend
isinnarrowsupport,andpointed
endis inwide U-shapedsupport.
the’Food
1. Putovenshelfinlowest~osition
inoven.Withfoodonspit,place
spit on ovenshelf.
4. Insertspitintomotor:Grasp
handleonspit.Usingpointofspit, =
moveto one sidethecoverover
motoroutletinrear ofoven;push
spit firmlyintomotor outletas far
asit willgo,Removehandle.
S. Checkrotationoffood.Tighten
or adjustforksifnecessary.During
cooking,forksmayneedtightening
duetonormalmeatshrinkage.
6. Asfoodcooks,leavedoorajarin
“Broil”position;doorstaysopen
byitself.
‘7.Bastefoodifdesired.Withpot
holders,pullout panandshelf
togethertoshelfstop. Attach
handletospit torevolvefoodby
handwhilebasting.Tocontinue
cookingpushshelfandbroilerpan
intooven,insertspitintomotor,
removehandle.
Rdi$serieNotes
@Donotuseelectricmeat
thermometerwhileoperatingthe
rotisserie.Aregular,nonelectric
meatthermometermaybeused
whilerotissingprovidingitdoesn’t
touchtheoven,frameor panwhile
meatrevolves.(Or,ifdesired,cook
toestimateddonenessthenpull
meatfromoventoinsertmeat
thermometer.Waitabout2minutes
fortemperaturetoregister.If meat
is not done,removethermometer
andcontinuecookingif necessary.)
@If rotissingturkey,letstandin
warmoven10to20minutesafter
cookingto assurejuicymeat and
completedoneness.
2. SetOVENTE1’W?knobas
suggestedonRotisserieTimeand
TemperatureChartatright.Settings
areXIO-400°F.togetfoodsjuicy
anddone withoutoverbrowning.
~. SwitchOVENSETknobto
ROTISSERIE.Thisstartsbroilunit
androtisseriemotoroperating.Spit
canbeinsertedandremovedmore
easilywhen.nmtorisoperating.
N~E: Makecertainwhentouching
spit thatnopartofbodyor pot
holdertouchescoilsofbroilunit.
@Atendofcookingpulloutpan
andshelftogether,usingpot
holders.TurnOVENSETtoOFF.
Removefoodfromspit. Coolpan
outsideoven;soakf&ksands~rews
foreasiestcleanup.
Page 17

l?ooci
Beef
Rib
Rolled
Ram
Medium
Well Done
Lamb
Leg,bonedandrolled
Pork,fresh
Loin
Spareribs(barbecued)
Spareribs(plain)
Pork,cured
Ham
Cook-Before-Eating
bonein
FullyCooked
Poultry
Capon*(6-8lbs.) 185-190 Brushwithmeltedbutteror margarine,
Chicken*(2-3Ibs.)
ChickenT(1%-2lbs.)
ComishHen*(1lb.)
Duckling*(4-5Ibs.)
Turkey*(8-12Ibs.)
Oven‘Ilemp.
Setting
325
325
325
350
350
350
400
325
325
375
400
400
400
350
350
Approximate
RotissingTime
MinutesPerLb.
22-29
27-31
32-42
24-27
25-34
1%-1%hrs,(totaltime)
%-1hr.
17-20
14-18
26-30
33-42
48-62
About1hr.(totaltime)
31-35
17-27
I
Veal
Shoulder,bonedandrolled
Bologna
CanadianBacon
LuncheonMeat
{12-02.can)
~Wieners,large
~Onsmallpoultry,testdonenessby movingleggentlybackandforth,andpresslegmuscletobecertainitissoft.
*Ready-to-cookweight,IMPORTANT:Tielegsandwingsclosetobodytomakedonenessofbirdas uniformaspossible.Alltimesgivenareforunstuffedbirds.
NOTE:Spiilageofmarinades,fruitjuicesandbastingmaterialscontainingacidsmaycausediscolorationon ovenlinerordoorsoshouldbewipedupimmediately
witha papertowel.Whensurfaceis cool,cleanandrinse.
F
J
350
350
350
350
350
J
30-33
I
23-32(totaltime) Brushwithsauceifdesired.
23-32(totaltime)
P
Meat
Thermometer
Temperatures
130-140
150-160
170-185
175-185 175formedium.
170-195 Buyribssplitdowncenter.Threadon
160
130
185-190
180-185
180
180
160
GeneralDirections
N(YI’E:1.ForroastsOVER10pounds,
cookabout1/2estimatedtime,then
checkat 1/2hour intervalswithmeat
thermometerforinternaldoneness.
2. Thinroasts,3to4 pounds,mayrequire
slightlylongertimesperpoundthan
thosegivenonguide.
185forwelldone.
spit.Tobarbecue,brushwithsauce
every15minutes.
bastingorbarbecuesauceseveral times
duringcooking.
Sameasabove.
‘If desired,thread4to5ofthissizechicken
crosswiseonspit.Letrevolvetowithin
1/2hourofdonenesstime,thenbrush
every10minuteswithbarbecuesauce.
Brushwithbutter,orbutterandlemon
juicemixed.Threadhensonspiteither
lengthwiseor crosswise.
Do notbrushwithfat.
Cookwithoutbrushingwithfat,orbrush
withbutterormargarineasdesired.When
cooked,switchOVENSETtoOFF,close
door,letturkeystand10to20 minutesIN
OVEN.Removefromovenandcarve.
Brushwithsauceifdesired.
Brushwithsauceifdesired.
—--
17
Page 18

fcheck‘These
Note:UpperandLowerOvens
cannotbeself-cleanedat thesame
time.
stepk
Removebroilerpan, broilerrack
andothercookwarefromtheoven.
(Ovenshelvesmaybeleftinoven.
Note:Shelveswilldiscolorafter
theself-cleancycle.)
step2:
Wipeupheavysoilon oven
bottom.
Howtoset
for
stepk
TurrIOVENSET
TEMPknobstoCLEAN.Controls
willsnapintofinalpositionwhen
theCLEANlocationis reached.
step2:
SlidetheLATCHHANDLEtothe
rightas farasitwillgo.
andOVEN
Theself-cleaningoperationvvil~
beginimmediately.
Numerals“S:00”forShours
cleaningtimewillstartcounting
downinthedisplay,andthesignal
lightwillappearoverthewords
CLEANTIME.
Theautomaticallyprogrammed
cleaningtimeforaheavily-soiled
ovenwithheavy,greasyspillsand
spatterisShours.Therecommended
cleaningtimeforamoderately-soiled
ovenwiththinspillsandlightspatter
is2 hours. If lessthan3hours
cleaningtimeisdesired,turnthe
TIMESELECI’knobaccordingly.
c
c)
A.IOVenFrontFrame
B.OvenDoor
Gasket
C OpeningsinDoor
D.RotisserieReceptacle
E.OvenLight
step3:
Cleanspattersor spillson oven
frontframe(A) andovendoor
outsidegasket(B)witha dampened
cloth.Polishwitha drycloth.Do
notcIeangasket(B). Donotallow
watertorundownthroughopenings
intopofdoor(C). Neverusea
commercialovencleanerinor
aroundself-cleaningoven.
step4:
Closerotisseriereceptacle(D)
whenself-cleaningtheupperoven.
step5:
Close ovendoorandmakesure
OV~lllight(~) iSoff.
startsdf-deaninglater,follow
TO
precedinginstructions.Then
programSTOPTIMEasfollows:
step3:
PushandreleasethePROGRAM
SELECI’buttonuntilthesignal
lightappearsabovethewordsS~P
TIME.Nurnertilsinthedisplaywill
bethesumofthepresentTime of
Dayplus thesetCleanTime.
step 4:
TurntheTIMESELECTknob
clockwiseuntilthetimeyouwant
cleaningto stopappears.
IfyouhadsettheTIME
knobfor2 hourscleaningtimeand
programmedcleaningtostopat
midnight,the self-cleaning
operationwouldautomaticallystart
at 10:00p.m.
Note:Whendialinga StopTimeto
delaytheself-cleaningoperation,
youcannotseta StopTimethath
morethanl“hoursand.59minutes
laterthanthe presentTimeofDay
onyourrangeclock.Ifyou.attempt
todoso, numeralsandsignallights
inthedisplaywillflask onandof
anda continuoustom?will sound
untilyouturntheTIMESELECT
dialtoanacceptableStopTime.
SELECT
‘*
18
Page 19

=3=%
=Qg$##F Follow’Thesestepsafter
Aftercleaningiscomplete,the
doorwillstay-lockeduntiltheoven
coolsandtheLOCKEDlightgoes
off.Thistakesabout30 minutes.
Step h
WhenLOCKEDlightisoff, slide
the LAXH HANDLEtotheleftas
~a~asitwillgoandopenthedoor.
—
—
step 2:
TurnOVENSETknobto OFF.
Step~:
TurnOVEN TEMPknobtoW-.
Q. why won’tmyovendean
hmnediatdyeventhoughIset
M thetimeanddean knobs
correctly?
A. Checktobe suretheLATCH
HANDLEis movedtotheright.
Q. I.fmyovenckwkisnotworking,
canI sti!llself-deanmyoven?
A. No.YourAutomaticOven
Timerusestherangeclocktohelp
startandstopyourself-cleaning
cycle.
Q. CanI usecommercialoven
cleanersonanypartofmy
Sdf-ckanhlgoven?
A. Nocleanersorcoatingsshould
beusedaroundanypartofthis
oven.Ifyoudo usethem anddonot
wipetheovenabsolutelyclean,the
residuecanscartheovensurface
anddarnagemetalpartsthenext
timetheovenisautomatically
cleaned.
Q. CanI dean theWovenGasket
aroundtheovendoor?
A. No,this gasketisessentialfor
agood ovenseal,andcaremustbe
takennottorub,damageormove
thisgasket.
Q.Afterhavingjustusedthe
oven,theLOCKEDlightcame
onand!Icouldnotmovethe
LATCHHANDLE.Why?
Afterseveralcontinuoushigh-
A.
temperaturebakingsor broilings,
theLOCKEDlightmaycomeon.
Theovendoorcan’tbelatchedfor
self-cleaningwhiletheLOCKED
lightison. Ifthis happens,letthe
ovencooluntiltheLOCKEDlight
goesoff. Thentheovendoorcan
belatchedforself-cleaning.
Q. WhatshouldI doifexcessive
smokingoccursduring cleaning?
A. Thisiscausedbyexcessivesoil,
andyoushouldswitchtheOVEN
SETknobtoOFF.Openwindows
torid roomofsmoke.Allowthe
oventocoolforat leastoneIhmr
beforeopeningthedoor.Wipeup
theexcesssoilandresettheclean
cycle.
Q. Is the “crackling”soundI
hearduringcleaningnormal?
A. Yes.Thisisthemetalheating
andcoolingduringboththe
cookingandcleaningfunctions.
Q. Shdd
therebeanyodor
duringtheckxming?
A.
Yes,theremaybea slightodor
duringthefirstfewcleanings.
Failuretowipeoutexcessivesoil
mightalsocauseanodorwhen
cleaning.
Q. Whatcausesthehair-like
linesontheenameledsurface
ofmyovum?
A. Thisis anormal condition
resultingfromheatingandcooling
duringcleaning.Theydonotaffect
howyourovenperforms.
Q. Whydo I haveash left inmy
ovenaftercleaning?
A. Sometypes of soilwillleavea
depositwhichis ash.It canbe
removedwitha dampspongeor
cloth.
Q. My ovenshdves do
notshle
easily.Whatisthematter?
A.Aftermanycleanings,oven
shelvesmaybecomesocleanthey
donotslideeasily.If youwish
shelvesto slidemoreeasily,
dampenfingerswitha small
amountofcookingoilandrub
lightlyoversidesofshelfwhere
theycontactshelfsupports.
Myovenshehwshavebecome
Q.
gray aftertheseRlean cycle. k
thisnormal?
A. Yes.Afterthe self-cleancycle,
theshelvesmaylosesomeluster
anddiscolortoa deep graycolor.
m%ar
—.
rmmm
F&zK—
Page 20

\
Propercareandcleaning
proceduresareessentialfora
longandsatisfactorylifeforyour
oven(s).Includedinthissectionare
directionsanda CleaningGuide
(onoppositepage)forcleaningall
partsoftheoven.Whencleaningan
ovenmanually,wearingofrubber
glovesis recommendedtoprotect
thehands.
The porcelainenamelfinishis
essentiallyglassfusedon steelat
hightemperatureandisbreakable
ifmisused.Thisfinishisacidresistant.However,anyacidfoods
spilled(suchaslemonorother
citrusfmitjuices,or mixtures
containingtomatoor vinegar)
shouldbewipedup immediately.
Seeguide forcleaningsuggestions.
CAUTION:BEFORE
REPLACINGANYLAMP,
DISCONNECT’ELECTRIC
l?OWERTOOVENATTHE
MAINFUSEORCIRCUIT
BREAKERPANEL.LETLAMP
(ORBULB)ANDLAMPCOVER
@OL C@IPLETELY.
Theovenlamp(bulb)iscovered
witha glassremovablecoverwhich
isheldinplacewithabail-shaped
wire.
TOremove:
@Holdhandunder coversoit
doesn’tfallwhenreleased.With
fingersofsamehand,firmlypush
backwirebailuntilit clearscover.
Liftoffcover.DONOTR.EMOVE
ANYSCREWSTOREMOVE
COVER.
~Replacebulbwith40-watthome
appliancebulb.
AdjwtingovenThermostat _
Usetimegivenonrecipe when
cookingfor firsttime.Oven
thermostatsmay“drift”fromthe
factorysettingovertheyears,and
Sto 10-minutedifferencesintiming
betweenan oldandanewovenme
notunusual.Yourovenhasbeenset
correctlyatthefactoryandismore
apt to beaccuratethantheoven
whichitreplaced.However,if you
findthatyourfoodsconsistently
brownto~littleor toomuch,you
maymakea simpleadjustmentin
theOVENTEMPthermostatknob.
BEFOREMAKINGANY
ADJUSTMENT,PULLKNOB
OFF SHAFT.LOOKATBACK
OFKNOBAND NOTE
CURRENTSETTING.
Toincreasetemperature,turntoward
III; todecrease,turntowardIX).
Eachnotchchangestemperature
10”F.
~~
TOrep!acecover:
~Placeitintogrooveoflamp
receptacle.Pullwirebailforward
tocenterof coveruntilit snapsinto
place.Wheninplace,wireholds
coverfirmly.Becertainwirebailis
in depressionincenter ofcover.
@Connectelectricpowertooven.
20 ,
I
JKP38G Shown
1. Pulloffknob.Loosenboth
screwsonbackofknob.
2. Movepointeronenotchin
desireddirection.Tightenscrews.
~. Returnknobto oven,matching
flatareaof knobtoshaft.Make
suretheknobwiththe word
R~ISSERIE goesbackonto
theupperovenshaft.
Recheckovenperformancebefore
makinganadditionaladjustment.
I
——
-----
—
Page 21

Note:LetovenpartsICOdbeforetouchingor
Part
Bakehit and
BroilUnit
BroilerPanand
ControlKnobs
Oven
Rack
Outside Finish
Glass
Metal,including
Chrome
PorcelainEnamel*
InsideOvenDoor*
OvenGasket*
OvenLiner*
Materials to Use
Genera!Directions
-’
Do notcleanthebakeunit or broil unit. Any soil will burn off when the unit is
heated. N(YI%: Thebakeunitishingedandcanbeliftedgentlytocleantheoven
floor.lfspillover,residue,orashaccumulatesaroundthebakeunit,gentlywipe
aroundtheunitwithwarmwater.
~Soap
and Water
10Soap-FilledScouringPad
*PlasticScouringPad
Drain fat, cool panand rack slightly. (Do
cool.)Sprinkleondetergent.Fillthepan withwarmwaterandspreadclothor
papertowelovertherack.Letpanandrackstandfor a fewminutes.Wash;scourif
necessary.Rinseanddry.OPTION:Thebroilerpanandrackmayalsobecleaned
inadishwasher.
Mild SoapandWater Pulloff knobs.Washgentlybutdonotsoak.Dryandreturncontrolstooven,
~
makingsuretomatchflatareaontheknobandshaft.
@SoapandWater
Washallglasswithclothdampenedinsoapywater.Rinseandpolishwithadry
cloth.Ifknobsareremoved,donot allowwatertorundowninsidethesurfaceof
glasswhilecleaning.
@SoapandWater Wash,rinse,and thenpolishwithadrycloth.DONOI’USEsteelwool,abrasives,
ammonia,acids,orcommercialovencleanerswhichmaydamagethefinish.
@PaperTowel
Avoidcleaningpowdersorharshabrasiveswhichmayscratchtheenamel.Ifacids
@DryCloth shouldspillintheovenwhileitishot,usea drypapertowelorclothto wipeup
~SoapandWater
rightaway.Whenthesurfacehascooled,washandrinse.Forotherspills,suchas
fatsmatterings,etc., washwithsoapand waterwhencooledandthenrinse.Polish
witha drycloth.
@SoapandWater Onself-cleaningoven,cleanONLYthedoor lineroutsidethegasket.Dooris
automaticallycleanedwhenovenisinself-cleaningcycle.Ifspilloverorspattering
occurswhencooking,wipedoorwithsoapandwater.DONOI’rubordamage
gasket.Avoidgettingsoapandwateron gasketorinslotsondoor.
AvoidgettingANYcleaningmaterialsonthegasket.
SI
SoapandWater
Coolbeforecleaning.Frequentwipingwithmildsoapandwaterwillprolongthe
timebetweenmajorcleanings.Besureto rinsethoroughly.Forheavysoiling,use
yourself-cleaningcycleoften.
CAUTION:Wheninuse,lightbulbscanbecomewarmenoughtob~eakiftouchedwithmoistcloth
ortowel.Whencleaning,avoidwarmlampswithcleaningclothsiflampcoverisremoved.
notletsoiledpanandrackstandinoverito
E#aE$Y.
——
—-
-
-
E3sss—.
—.
-
-
-~—
Erm$sc.
.——
~
—.
—.
—
-
-
-=
-
-
w.- .7
-WA
Shelves
(SeeSelf-Cleaning
~SoapandWater Yourshelvescanbecleanedintheovenwiththeself-cleaningoperation.Forheavy
soil,cleanbyhandandrinsethoroughly.
OvenDirections)
Thermometer
Meat
(withl-prongplug) @Soap-PilledScouringPad
Thermometer
IMeat
(with 2-prong plug)
Rotisserie
Spit, Forks
Screws, Frame
o SoapandWater Coolbeforecleaning.Scourstubbornspotswithsoap-filledscouringpad,rinseand
dry.OPTION:The l-prongmeatthermometermayalsobecleanedina dishwasher.
SoapandWater Coolbeforecleaning.DONOTIMMERSEINWATER.Scourstubbornspotswith
@
@Soap-Filled Scouring Pad soap-filled scouring pad, rinse and
Soak in
@Soap and Water
hot,sudsywater; scour to removecooked-on food or sauces; wash.
@Commercial Oven Cleaner
dry.DONOTSTOREINOVEN.
*Spillageofmarinades,fruitjuices, andbastingmaterialscontainingacidsmaycausediscoloration.Spilloversshouldbewipedupimmediately,
with care being taken to not touch any hot portion of the oven. When the surface is cool, clean and rinse.
21
—
Page 22

.—-.——
.—-
POSSIBLECAUSEAND
OVENDOESNm Difficultymaybeinthemaindistributionpard of’yourhousecausedbya blownoven
V$ORK
circuitfuse,atrippedovencircuitbreaker,themainfuseor themaincircuitbreaker,
dependingonnatureofthepowersupply.Ifa circuitbreakerisinvolved,resetit. If the
controlboxusesfuses,theovenfuse(acartridge-type)shouldbe changedBUTONLY
BYSOMEONEFAMILIARWITHELECTRICALC’HWX.JITS.If, afterperforming
oneoftheseprocedures,thefuseblowsorcircuitbreakertripsagain,callforservice.
NOTE:Apartmenttenantsor co&km3iniurnownersshouldrequesttheirbuilding
managementtoperformthischeckbeforecallingforservice.
Ovencontrolsarenot properlyset.
DoorM in lockedpositionaftercleaning.
AU~MATIC OVI?N Checkto becertainstep-by-stepdirectionswerefollowedcorrectly.Reviewpageson
TIMEI?DOESNm useoftimer.
WORK PROPERLY
FOODDOESNOT OVEN SETknobnotsetatBROIL.
BROILPROPERLY
OVENTEMPknobnotsetatBROIL.
Doornotleftajarasrecommended.
Impropershelfpositionisbeingused.CheckBroilingGuide.
Whenusingspecialmeatthermometer,endnotinsertedfullyintoovenreceptacleor
probengtplacedinfoodproperly.
Necessarypreheatingwasnot done.
Foodisbeingcookedonhotpan.
Cookwareis notsuitedforbroiling.
Ah.miinurnfoilusedonthebroilpanrackhasnotbeenfittedproperlyandslitas
recommended.
—
FOODDOESNOT
ROASTCRBAKE.
PROPERLY
-——
Clocknotset. Clockmustbesetbeforeyoucan programTime Baking/Roasting.
Insufficientcookingtimeprogrammedwhensettingtimerfordelayedbakingor
roasting.TimedifferencebetweenStopTimeandTimeof.Dayonrangeclockmustbe
equaltoor greaterthantheprogrammedCookTime—otherwisetheovenwillnotcook
aslong as youwantitto.
OVENSETknobnotset
on BAKE.
OVENTEMPknobnotsetcorrectly.
Shelfpositionis incorrect.CheckRoastingor BakingGuide.
Ovenshelfis notlevel.
usingmeat t~errno~eter, endnotfullyseatedin ovenreceptacleor probeend
When
notinmeatcorrectly.
Incorrectcookwareor cookwareofimpropersizeisbeing used.
1
A foiltentwasnot usedwhenneecledto slowdownbrowningduringroasting.
—— — .—
Page 23

PwxmfnJE $CAKJSEAND
I
o~~~vm.L pJ(-JT
SELF-CLEW”J
OVEN DOORWON’T
LATCH
OVEN LIGHT
DOESNm WORK
——.
-“---Ifyw needmore Mpo..cdl,
—
GE i!mmwxCenter@
Clock not set.IClockmustbe setbeforeyoucan program cleaningtime.
Insufficientcleaningtimeprogrammedwhensettingtimerfordelayedcleaning.Time
differencebetweenStopTimeandTimeofDaycmrangeclockmustbeequalto or
greaterthantheprogrammedCleariTime—otherwisetheovenwillnotcleanaslongas
youwantitto.
BothOVENSETandOVENTEMPknobsmustbe atCLEANsetting.
Athickpi~eofspilloverwhencleanedleavesa heavylayerofashinspotswhichcould
haveinsulated.theareafromfurtherheat.
Latchnot movedtotheright.
TurnOVENSETknobto CLEAN.GlowingLockedLightafierknobisturned
indicatesovenistoohotfromprevioususeanddoorwon’tlatch.Tocooloven, open
doorwide,thenLatchcanbemoved.
OVENSETknobmustbeat CLEANor QFFbeforeLatchcanbe moved.
Lightbulbisloose.
Bulbisdefective.Replace.
Switchoperatingovenlightisbroken.Callforservice.
I
tonfree:
service
Toobtainservice,seeyourwarranty
onthebackpageofthisbook.
We’reproudofour serviceand
wantyouto bepleased.If forsome
reasonyouarenothappy withthe
serviceyoureceivejherearethree
stepstofollowforfurtherhelp.
FIRST,contactthepeoplewho
servicedyourappliance.Explain
whyyouarenotpleased. In most
cases,thiswillsolvethe problem.
NEXT,ifyouare stillnotpleased, 20NorthWackerDrive
writeallthedetails-including Chicago,Illinois&M06
your phone number—to:
Manager,ConsumerRelations
GEAppliances
AppliancePark
Louisville,Kentucky4022S
FINALLY,ifyourproblemis still
notresolved,write:
MajorAppliance
ConsumerActionPanel
Page 24

.“..—-s — —-——-—--
Saveproofof original purchase datesuchasyoursalessliporcancelledcheck to establish warranty period.
————
——
-.—.—a—
—
—
———
-.
‘
——
!S
Is
Fuu.
Forone year from dateoforigina!
purchase, wewill provide, free of
charge, parts and service labor
in your home to repair or replace
any part of the range that fails
because of a manufacturing defect.
@Service trips to your home to
teach you howto usethe product.
your Use andICaBOematerial.
FMct
if you then haveany questions
about operating the product,
please contact your dealer or our
Consumer Affairs office at the
address below, or call, toll free:
GE Answer Center”
800.626.2000
consumer information service
@Improper installation.
.
This warranty is extended to
the original purchaser and any
succeeding ownerfor products
purchased for ordinary home use
in the 48 mainland states, Hawaii
and Washington, DC. [n Alaska the
warranty is the same exceptthat it is
LIMITED because you must payto
ship the product to the service shop
or for the service technician’s travel
coststo ycmrhome.
All warranty service will be provided
byour FactoryService Centers or
byour authorized Customer Care”
servicers during normal working
hours.
Look inthe White or ‘fellow Pages
of yourtelephone directory for
GENERAL ELECTRICU3MPANY,
GENEHAL ELECTRIC FACV3RY
SERVICE, GENERAL ELECTFilCi-iOTPCNNTFACT0i3YSEiW/lCE or
GENERAL ELECTRICCLJSTCWIER
CARE@SERVICE.
@Replacement of house fuses or
resetting of circuit breakers.
@Faiiure of the product if it is used
for other than its intended purpose
or used commercially.
~ Damage to product caused
byaccident, fire, fioods or acts
of God.
WARRANT(IRiS NOTResponsible
F(3RCONSEQUEiNTiAL DAMAGES.
-2
f!
Some states do not allow the exclusion or limitation of incidental or consequential damages, so the above limitation or exclusion
may not apply to you. This warranty gives you specific legal rights, and you may also have other rights which vary from stateto state.
Toknowwhat your legal rights are in your state, consult your local or stateconsumer affairs office or your state’sAttorney General.
————- ———
-=.—- ==.=.- . . _— -
... .-—-——
. . . . . .
if you have an installation probiem,
contact your deaier or instaiier.
Youare responsible for providing
adequateeiectricai, gas,exhausting
and other connecting facilities.
GeneralIEkmtrk
Mt’wther help is this write:
Affairs, GE KY 40225
——
—————.———..——————.——.———
———.————.——.——
‘
--
—
--
—————-— —-.. -. —... —— ------
 Loading...