

Page 1

GEAppliances.corn
0
®m
0
0
|
Safety Instructions ....... 2-4
Operoting Instructions
Clock and Timer ................. 9
Control Lockout ................ 18
Controls ...................... 5,6
Convection................. 12, 13
Oven ......................... 7,8
Proofing ....................... 11
Sabbath Feature ........... 21,22
Self-Cleaning Oven......... 16, 17
Special Features ........... 18-20
Thermostat .................... 15
Timed Baking and Roasting..... 10
Warming ...................... 11
Care and Cleaning
Aluminum Foil................... 8
Broiler Pan and Grid ............ 24
Control Panel .................. 23
Glass Surfaces ................. 26
Knob .......................... 23
Lift-Off Oven Door.......... 23, 24
Light Bulb...................... 25
Oven Interior ................... 26
Packaging Tape ................ 23
Painted Surfaces ............... 26
Racks .......................... 24
Stainless Steel Surfaces ........ 26
JKP30-27" Single Wall Oven
JTP30-30" Single Wall Oven
JTP31-30" Single Wall Oven
JKP70-27" Single Convection Wall Oven
JTP70-30" Single Convection Wall Oven
JKP35-27" Double Wall Oven
JTP35-30" Double Waft Oven
JKP55-27" Double Wall Oven
JTP55-30" Double Waft Oven
JKP75-27" Double Convection Wall Oven
JTP75-30" Double Convection Wall Oven
Troubleshooting Tips.. 27-29
Accessories ................. 30
Consumer Support
consumer support ............ 52
warranty ...................... 31
Write the model and serial
numbers here:
Model #
Serial #
You can find them on a label
on the side trim or on the front of
the (lower) oven behind the oven
door.
Printed in the United States 49-80643 ii-ii GE
@
Printed on
Recycled Paper
Page 2
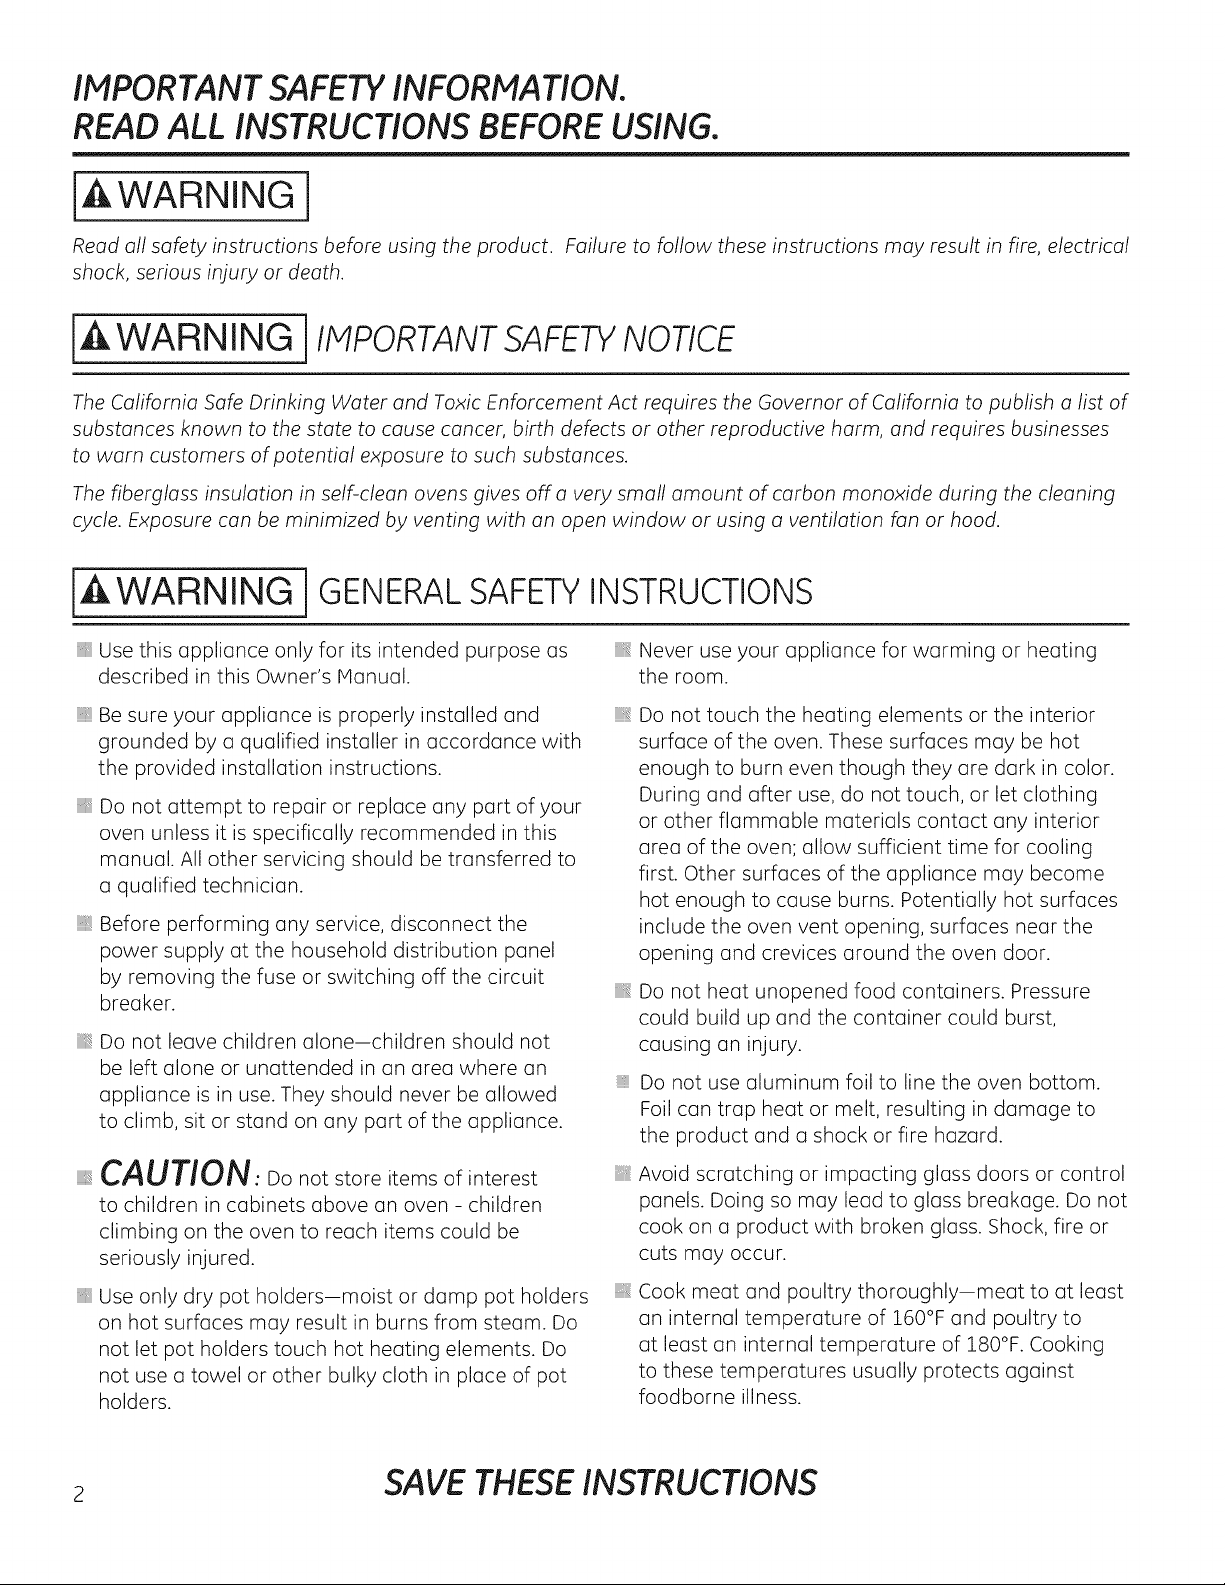
IMPORTANT SAFETY INFORMATION.
READ ALL INSTRUCTIONS BEFORE USING.
IA WARNING 1
Read all safety instructions before using the product.
shock, serious injury or death.
Failure to follow these instructions may result in fire, electrical
[A WARNING i lIvlPORTANTSAFETYNOTICE
The California Safe Drinking Water and Toxic Enforcement Act requires the Governor of California to publish a list of
substances known to the state to cause cancer, birth defects or other reproductive harm, and requires businesses
to warn customers of potential exposure to such substances.
The fiberglass insulation in self-clean ovens gives off a very small amount of carbon monoxide during the cleaning
cycle. Exposure can be minimized by venting with an open window or using a ventilation fan or hood.
[A WARNING i GENERALSAFETYINSTRUCTIONS
_:_Use this appliance only for its intended purpose as
described in this Owner's Manual.
_:_Be sure your appliance is properly installed and
grounded by a qualified installer in accordance with
the provided installation instructions.
::_ Do not attempt to repair or replace any part of your
oven unless it is specifically recommended in this
manual. All other servicing should be transferred to
a qualified technician.
_:_Before performing any service, disconnect the
power supply at the household distribution panel
by removing the fuse or switching off the circuit
breaker.
_:_Do not leave children alone-children should not
be left alone or unattended in an area where an
appliance is in use. They should never be allowed
to climb, sit or stand on any part of the appliance.
_:_Never use your appliance for warming or heating
the room.
Do not touch the heating elements or the interior
surface of the oven. These surfaces may be hot
enough to burn even though they are dark in color.
During and after use, do not touch, or let clothing
or other flammable materials contact any interior
area of the oven; allow sufficient time for cooling
first. Other surfaces of the appliance may become
hot enough to cause burns. Potentially hot surfaces
include the oven vent opening, surfaces near the
opening and crevices around the oven door.
Do not heat unopened food containers. Pressure
could build up and the container could burst,
causing an injury.
Do not use aluminum foil to line the oven bottom.
Foil can trap heat or melt, resulting in damage to
the product and a shock or fire hazard.
CAUTION: no not store items of interest
to children in cabinets above an oven - children
climbing on the oven to reach items could be
seriously injured.
_:_Use only dry pot holders-moist or damp pot holders
on hot surfaces may result in burns from steam. Do
not let pot holders touch hot heating elements. Do
not use a towel or other bulky cloth in place of pot
holders.
Avoid scratching or impacting glass doors or control
panels. Doing so may lead to glass breakage. Do not
cook on a product with broken glass. Shock, fire or
cuts may occur.
Cook meat and poultry thoroughly-meat to at least
an internal temperature of 160°F and poultry to
at least an internal temperature of 180°F. Cooking
to these temperatures usually protects against
foodborne illness.
2 SAVE THESE INSTRUCTIONS
Page 3
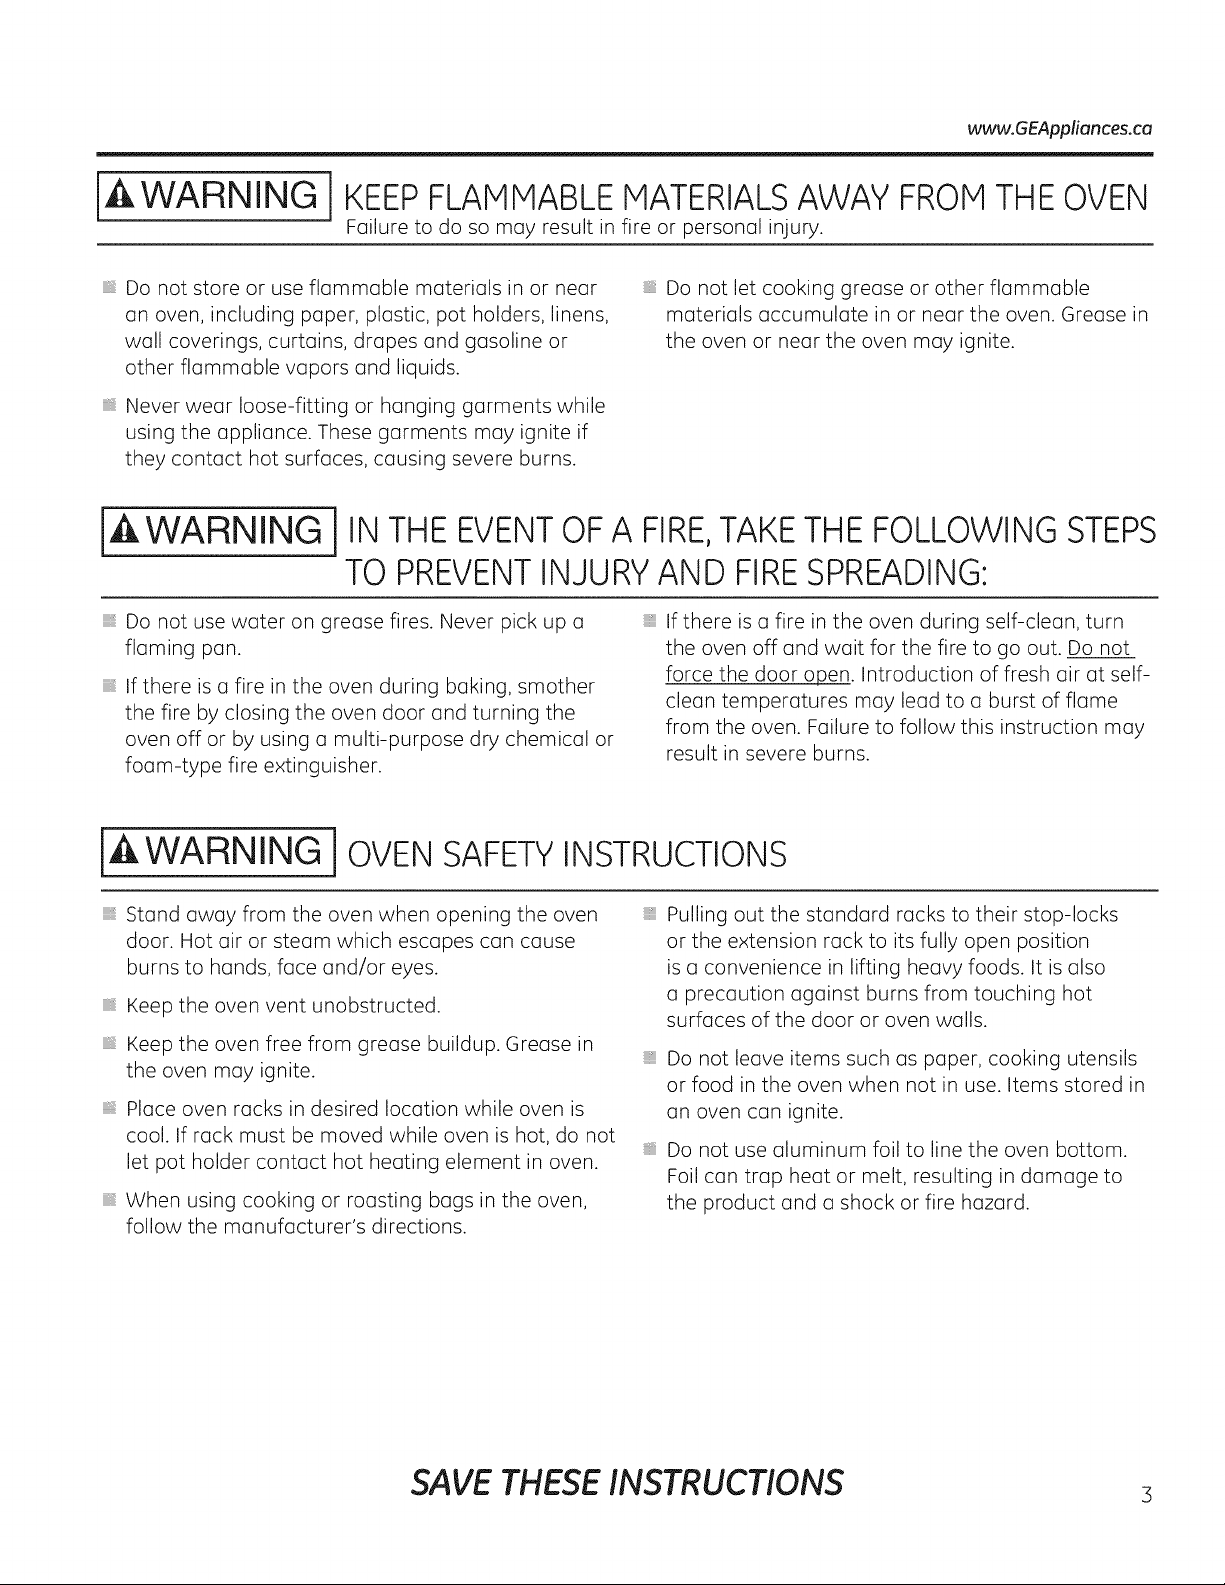
www.GEAppliances.ca
iA WARNING i
iiiiiiiiiiii_i;i
Do not store or use flammable materials in or near
an oven, including paper, plastic, pot holders, linens,
wall coverings, curtains, drapes and gasoline or
other flammable vapors and liquids.
iiiiiiiiiiii_i;i
Never wear loose-fitting or hanging garments while
using the appliance. These garments may ignite if
they contact hot surfaces, causing severe burns.
IA WARNING 1
KEEPFLAMMABLE MATERIALSAWAY FROM THE OVEN
Failure to do so may result in fire or personal injury.
IN THEEVENTOFA FIRE,TAKETHEFOLLOWINGSTEPS
TO PREVENTINJURYAND FIRESPREADING:
iiiiiiiiiiii_i;i
Do not use water on grease fires. Never pick up a
flaming pan.
iiiiiiiiiiii_i;i
If there is a fire in the oven during baking, smother
the fire by closing the oven door and turning the
oven off or by using a multi-purpose dry chemical or
foam-type fire extinguisher.
Do not let cooking grease or other flammable
materials accumulate in or near the oven. Grease in
the oven or near the oven may ignite.
If there is a fire in the oven during self-clean, turn
the oven off and wait for the fire to go out. Do not
force the door open. Introduction of fresh air at self-
clean temperatures may lead to a burst of flame
from the oven. Failure to follow this instruction may
result in severe burns.
IA WARNING 1OVENSAFETYINSTRUCTIONS
Stand away from the oven when opening the oven
door. Hot air or steam which escapes can cause
burns to hands, face and/or eyes.
Keep the oven vent unobstructed.
Keep the oven free from grease buildup. Grease in
the oven may ignite.
Place oven racks in desired location while oven is
cool. If rack must be moved while oven is hot, do not
let pot holder contact hot heating element in oven.
When using cooking or roasting bags in the oven,
follow the manufacturer's directions.
Pulling out the standard racks to their stop-locks
or the extension rack to its fully open position
is a convenience in lifting heavy foods. It is also
a precaution against burns from touching hot
surfaces of the door or oven walls.
Do not leave items such as paper, cooking utensils
or food in the oven when not in use. Items stored in
an oven can ignite.
Do not use aluminum foil to line the oven bottom.
Foil can trap heat or melt, resulting in damage to
the product and a shock or fire hazard.
SAVE THESE INSTRUCTIONS s
Page 4
IMPORTANT SAFETY INFORMATION.
READ ALL INSTRUCTIONS BEFORE USING.
jA WARNING j SELF-CLEANINGOVENSAFETYINSTRUCTIONS(somemodels)
The self-cleaning feature operates the oven at temperatures high enough to burn away food soils in the oven.
Follow these instructions for safe operation.
Before self-cleaning the oven, remove shiny silver
colored oven racks (on some models), the probe, any
aluminum foil, and any broiler pan, grid, and other
cookware. Only porcelain coated oven racks may
be left in the oven.
Before operating the self-clean cycle, wipe grease
and food soils from the oven. Excessive amount of
grease may ignite, leading to smoke damage to your
home.
SAVE THESE INSTRUCTIONS
If the self-cleaning mode malfunctions, turn the
oven off and disconnect the power supply. Have it
serviced by a qualified technician.
Do not clean the door gasket. The door gasket is
essential for a good seal. Care should be taken not
to rub, damage or move the gasket.
Do not use oven cleaners. No commercial oven
cleaner or oven liner protective coating of any kind
should be used in or around any part of the oven.
Page 5
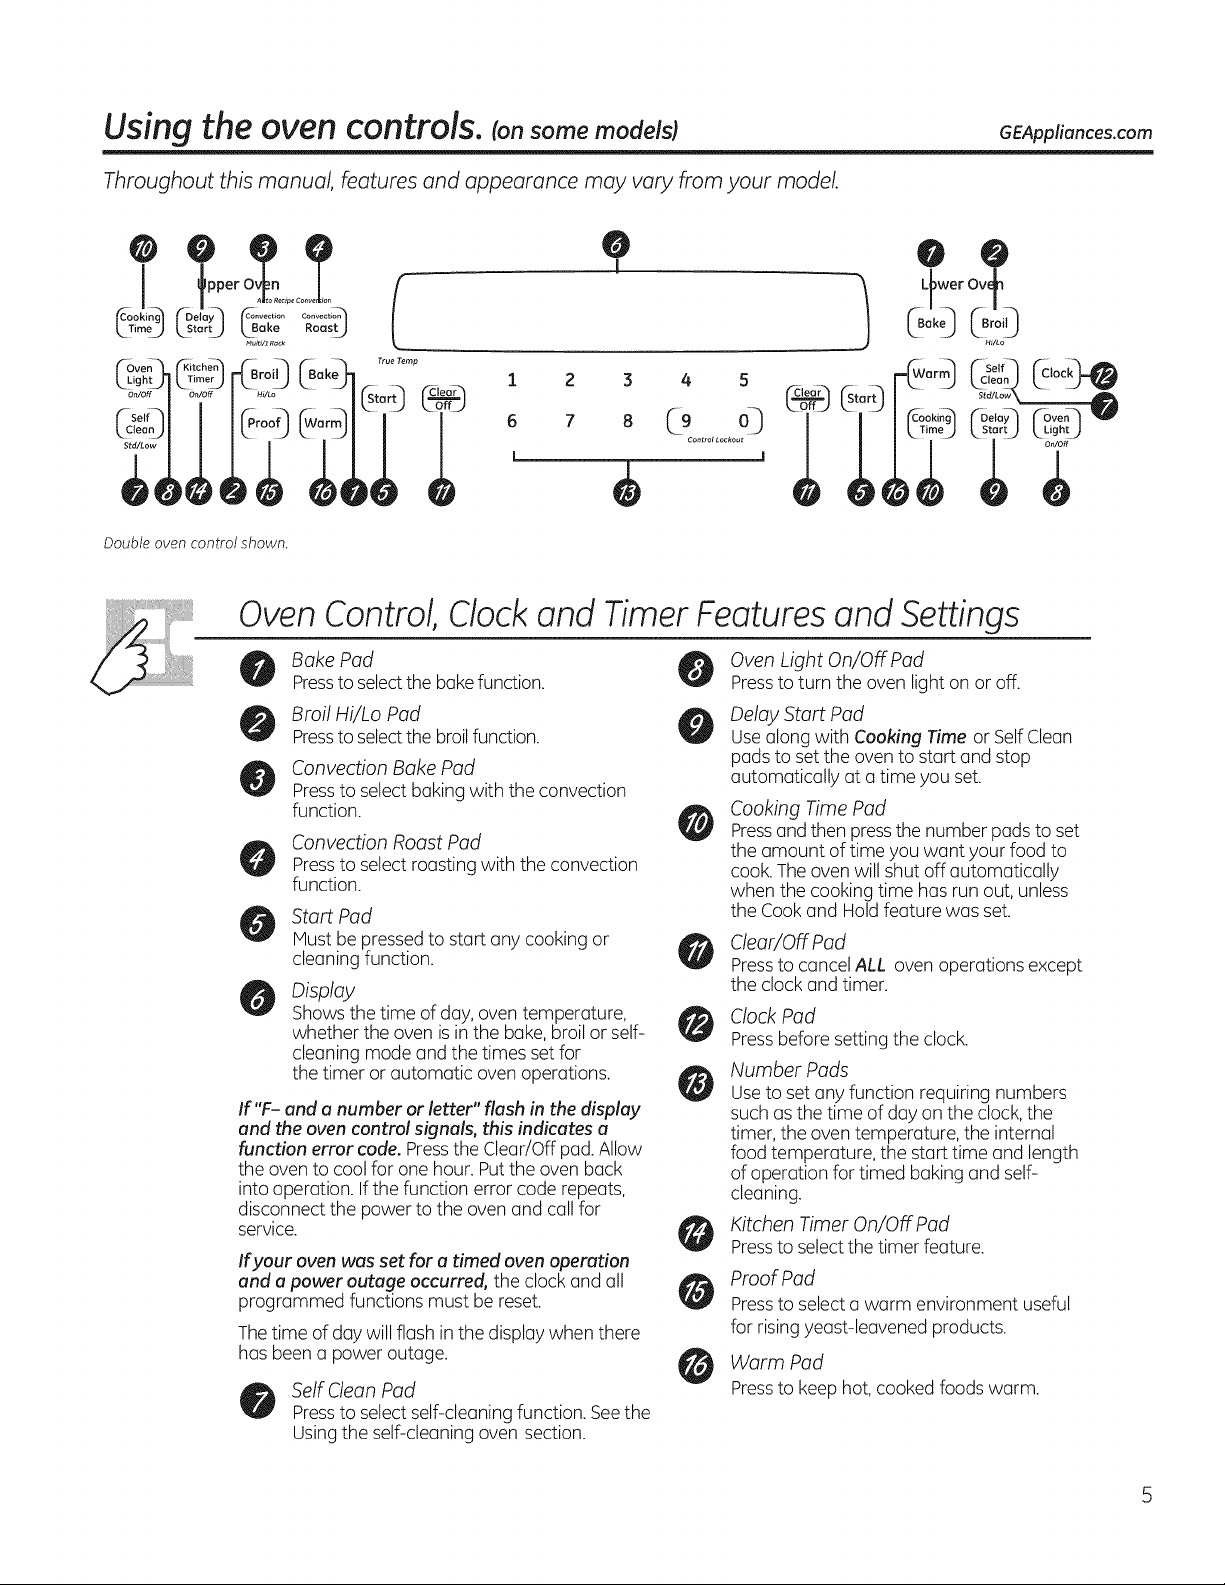
Usingthe oven controls. (onsome models)
Throughout this manual, features and appearance may vary from your model.
GEAppliances.com
I par..............I
Ls,,,r,jL%%Roosu
t/-Oven _ (-_itchen_'_ _. T...... p
LZ,o,,;T;m,;pBrop
Self.....
Double oven control shown.
Oven Control, Clock and Timer Features and Settings
Bake Pad
Pressto selectthe bakefunction.
Broil Hi/Lo Pad
Pressto selectthe broilfunction.
Convection Bake Pad
Pressto select baking with the convection
function.
Convection Roast Pad
Pressto select roasting with the convection
function.
Start Pad
Must bepressed to start any cooking or
cleaning function.
Display
Showsthe time of day, oven temperature,
whether the oven isin the bake,broil or self-
cleaning mode and the times set for
the timer or automatic oven operations.
If "F- and a number or letter" flash in the display
and the oven control signals, this indicates a
function error code. Pressthe Clear/Off pad.Allow
the oven to cool for one hour. Putthe oven back
into operation. Ifthe function error code repeats,
disconnect the power to the oven and call for
service.
Ifyour oven was set for a timed oven operation
and a power outage occurred, the clock and all
programmed functions must be reset.
Thetime of day willflash inthe displaywhen there
has beena power outage.
Self Clean Pad
pressto select self-cleaning function. Seethe
Usingthe self-cleaning oven section.
0
1
2 3 4 5
6
I
8 C9 ©
Control Lockout
Oven Light On/Off Pad
Pressto turn the oven light on oroff.
Delay Start Pad
Usealong with Cooking Time or SelfClean
pads to set the ovento start and stop
automatically at atime you set.
Cooking Time Pad
Pressand then pressthe number pads to set
the amount of time you want your food to
cook.The ovenwill shut offautomatically
when the cooking time hasrun out, unless
the Cookand Holdfeature was set.
Clear/Off Pad
Pressto cancel ALL oven operations except
the clock and timer.
Clock Pad
Pressbefore setting the clock.
Number Pads
Useto set any function requiring numbers
such as the time of day on the clock, the
timer, the oven temperature, the internal
food temperature, the start time and length
of operation for timed baking and self-
cleaning.
Kitchen Timer On/Off Pad
Pressto selectthe timer feature.
Proof Pad
Pressto select a warm environment useful
for risingyeast-leavened products.
Warm Pad
Pressto keep hot, cooked foods warm.
@ 0
L_wer Ov+
Warm] _ilea_ _CI°C_
L_J I /(cooking_ l'-aetay'] _Oven_
1
Page 6

Usingthe oven controls. _onsome models)
Throughout this manual, features and c_ppeoronce may vary from your model.
0
!
kO _roO
Hi/LO
pper 0 i_, T,_p
Lsto_tJ
_itche_
GSo._/
leo_
®
Q
Temp
t_mer)
|Hour .oi_
®
0
Temp
¢
Double oven control shown
OvenControl,Clockand TimerFeaturesand Settings
L )wer
G! Ov,n
H_/Lo
_?ok_ng/Foo'ay-'l-6_
imeJ LstartJ w
, g
Self_'_ ('-Oven_
leanJ k_LightJ
I
0
Bake Pad
Pressthis pad to selectthe bake function.
Broil Hi/Lo Pad
Pressthis pad to selectthe broilfunction.
Self Clean Pad
Pressthis padto selecttheself-cleaningfunction.
Seethe Usingthe self-cleaning oven section.
_ tart Pad
Mustbe pressedto start any cooking or
cleaning function.
Display
Shows the time of day, oven temperature,
whether the ovenisin the bake,broil or self-
cleaning mode and the times set for the timer
or automatic oven operations.
If "F--and a number or letter" flash in the display
and the oven control signals, this indicates a
function error code.Pressthe Clear/Offpad.Allow
the ovento coolfor onehour. Putthe oven back
into operation. Ifthe function error code repeats,
disconnect the power to the oven and call for
service.
Ifyour oven was setfor a timed oven operation
and a power outage occurred, the clock and all
programmed functions must be reset.
Thetime of day will flash in thedisplay when there
has beena power outage.
Oven Light On/Off Pad
Pressthis pad to turn the oven lighton or off.
Delay Start Pad
Usealong with Cooking Time or SelfClean
pads to set the ovento start and stop
automatically at atime you set.
Cooking Time Pad
Pressthis pad andthen pressthe Hour and Hin
+ and- padsto set the amount of time you
want your food to cook.Theoven will shut off
automatically when the cooking time hasrun
out unlessthe Cook and Holdfeature was set.
Clear/Off Pad
Pressthis pad to cancelALL oven operations
except the clock and timer.
Tamp + and - Pads
Pressthese padsto setthe cooking
temperature you want to use.
Clock Pad
Pressthis pad before setting the clock.
Hour and Min + and - Pads
VJ
Pressthese padsto settimes upto 9 hours
and 59 minutes-for example,the time of day
on the clock,thetimer,the starting and length
of cookingtime for timed bakeand thestarting
and length of cleaning time for self-clean.
Kitchen Timer On/Off Pad
Pressthis pad to selectthe timer feature.
Lower Oven Control Settings on models with a knob
OVEN Knob
Turnthis knob to
the temperature
setting you want.
ow_cy_t_ •
TheOven Cyclelight glows until the oven reaches
your selected temperature, then goes off and on
with the ovenelement(s)during cooking.
Page 7
Using the oven. GEAppliances.com
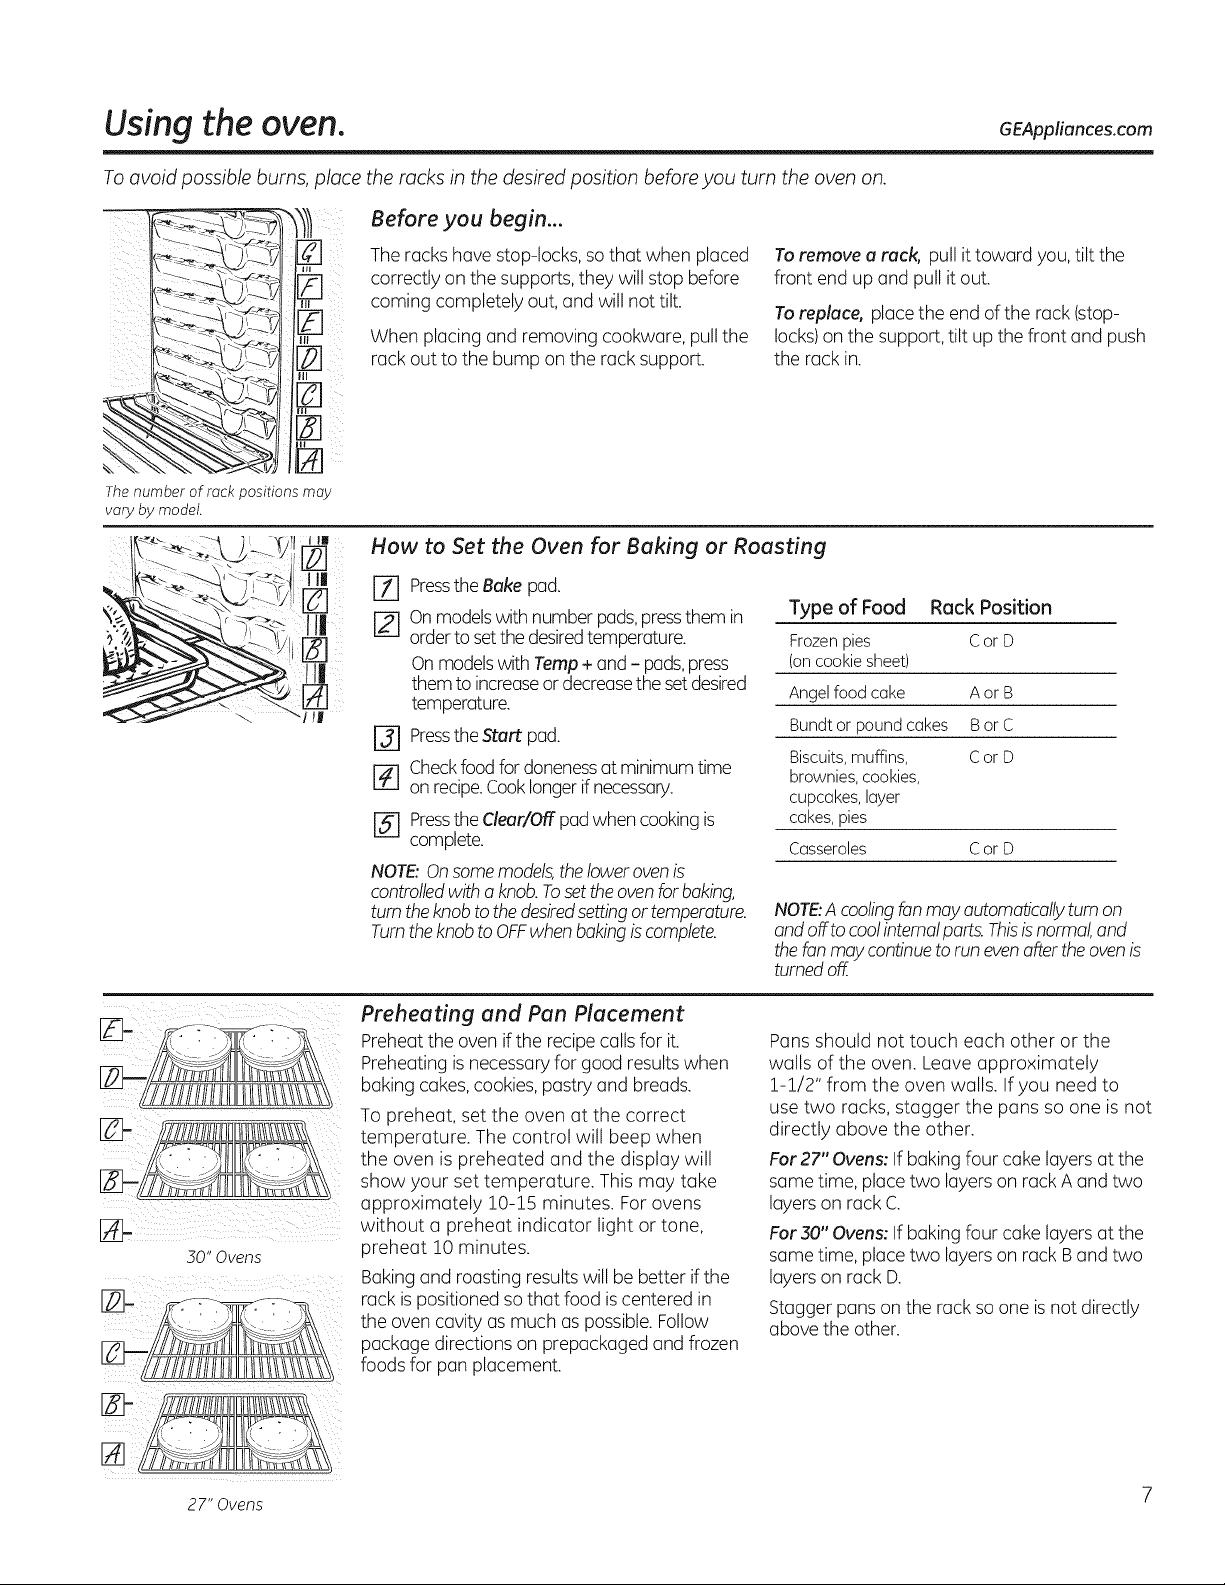
Toavoid possible burns, place the racks in the desired position before you turn the oven on.
Before you begin...
The number of rack positions may
vary by model.
Theracks have stop-locks,so that when placed
correctly on the supports,they will stop before
coming completely out,and will not tilt.
When placing and removing cookwure, pullthe
rack out to the bump on the rack support.
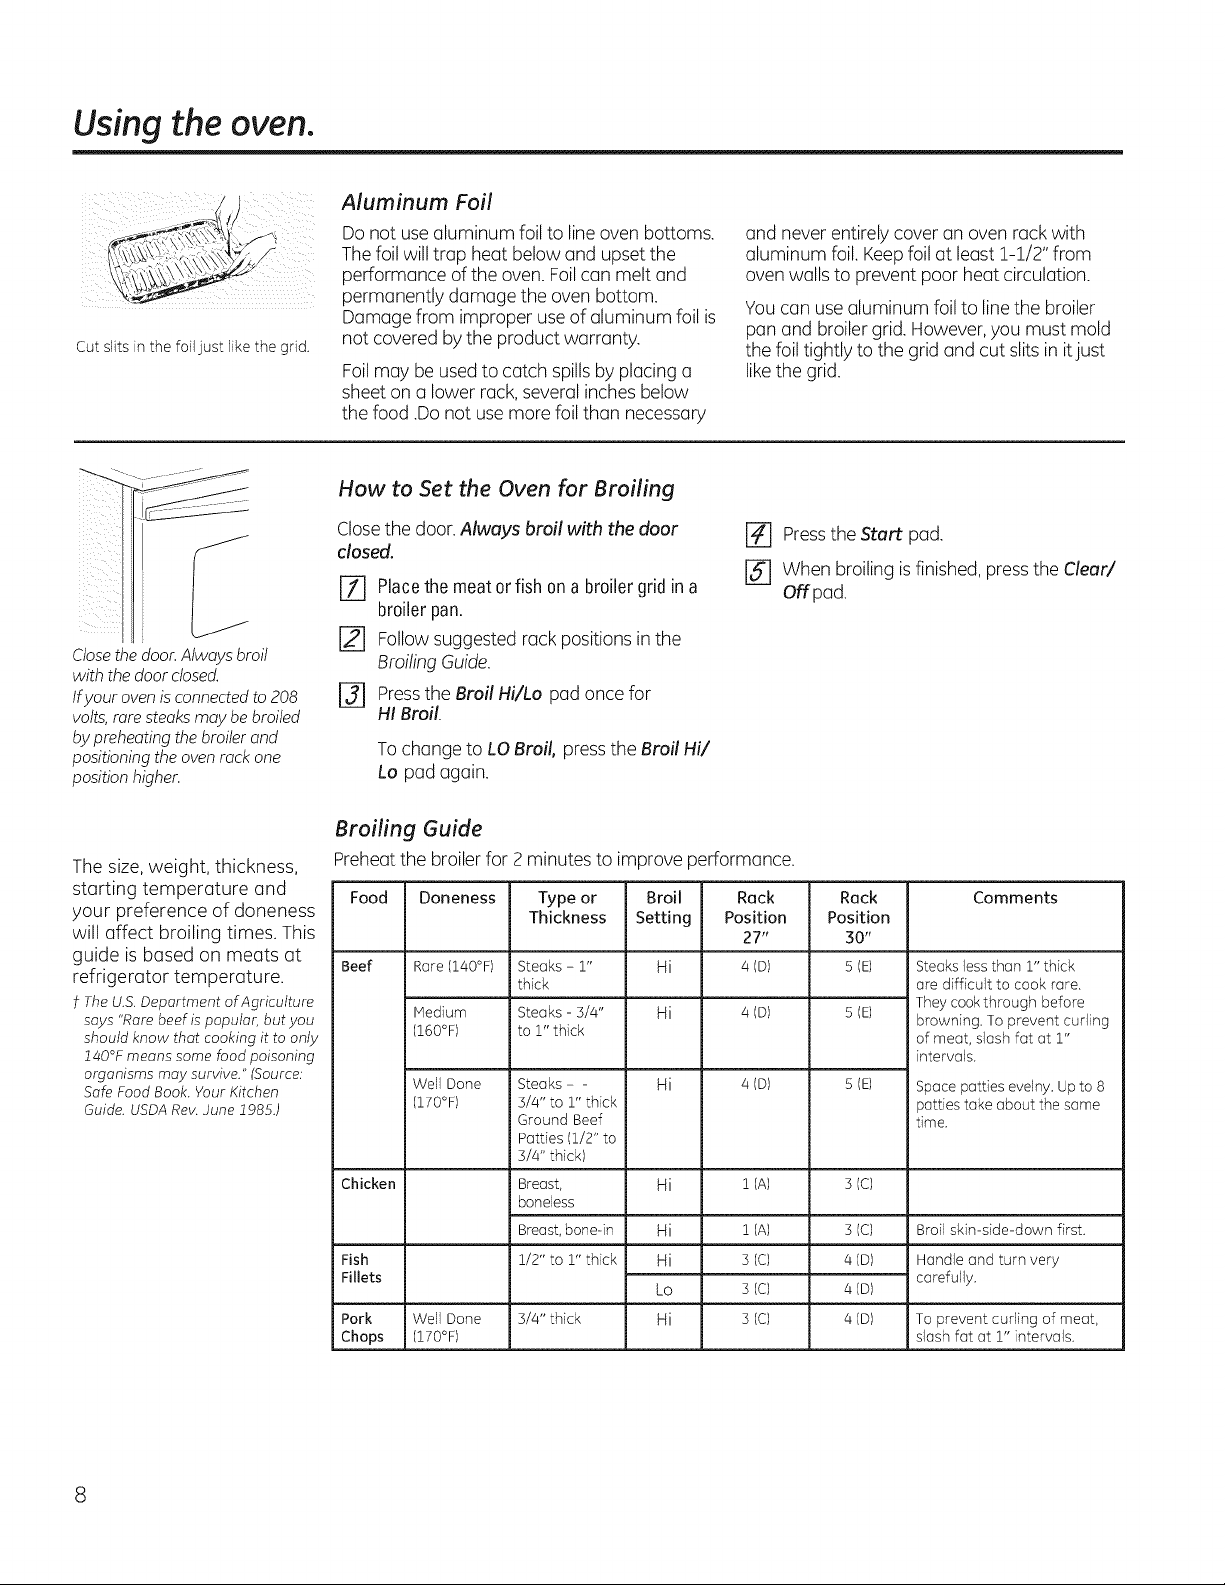
How to Set the Oven for Baking or Roasting
Pressthe Bake pad.
%
On modelswith numberpads,pressthem in
order tosetthe desiredtemperature.
On modelswith Temp+ and - pads,press
them to increaseordecreasethe setdesired
temperature.
r_ Press the Start pad.
[_ Check food fordoneness at minimum time
on recipe. Cooklonger ifnecessary.
Pressthe Clear/Offpad whencookingis
complete.
NOTE: On some models, the lower oven is
controlled with a knob. To set the oven for baking,
turn the knob to the desiredsetting or temperature.
Turnthe knob to OFFwhen baking iscomplete.
Toremove a rack, pull it toward you, tilt the
front end upand pull it out.
To replace, place the end ofthe rack (stop-
locks)on the support,tilt up thefront and push
the rack in.
NOTE:A coolingfanmay automaticallyturn on
andoffto coolinternalparts.Thisisnormal,and
thefan may condnuetorun evenaftertheovenis
turnedoff.
Type of Food Rack Position
Frozenpies Cor D
(oncookiesheet)
Angelfoodcake Aor B
Bundtorpoundcakes Bor C
Biscuits,muffins, Cor D
brownies,cookies,
cupcakes,layer
cakes,pies
Casseroles Cor D
50" Ovens
27" Ovens
Preheating and Pan Placement
Preheat the oven ifthe recipe culls for it.
Preheating is necessary for good results when
baking cakes, cookies, pastry and breads.
To preheat, set the oven at the correct
temperature. The control will beep when
the oven is preheated and the display will
show your set temperature. This may take
approximately 10-!5 minutes. For ovens
without a preheat indicator light or tone,
preheat 10 minutes.
Baking and roasting resultswill be better ifthe
rack ispositioned so that food iscentered in
the oven cavity as much as possible. Follow
package directions on prepackaged and frozen
foods for pan placement.
Pans should not touch each other or the
walls of the oven. Leave approximately
1-1/2" from the oven walls. If you need to
use two racks, stagger the pans so one is not
directly above the other.
For27" Ovens:If baking four cake layersat the
same time, placetwo layers on rack Aand two
layers on rack C.
For30" Ovens: If baking four cakelayers at the
same time, placetwo layers on rack B and two
layers on rack D.
Stagger pans on the rack so one is not directly
above the other.
Page 8
Using the oven.
,_\...... ,.
Cut slits in the foil just like the grid.
Aluminum Foil
Do not usealuminum foil to lineoven bottoms.
Thefoil will trap heat below and upset the
performance of the oven. Foilcan melt and
permanently damage the oven bottom.
Damage from improper useof aluminum foil is
not covered by the product warranty.
Foilmay be usedto catch spillsby placing a
sheet on a lower rack,several inches below
the food .Do not usemore foil than necessary
How to Set the Oven for Broiling
and never entirely cover an oven rock with
aluminum foil.Keepfoil at least1-1/2" from
oven walls to prevent poor heat circulation.
You can use aluminum foil to linethe broiler
pan and broiler grid. However,you must mold
the foil tightly to the grid and cut slits in itjust
likethe grid.
Closethedoor.Alwaysbroil
with thedoordosed.
Ifyour oven isconnectedto208
volts,raresteaksmaybebroiled
bypreheatingthebroilerand
positioningtheovenrackone
positionhigher.
The size,weight, thickness,
starting temperature and
your preference of doneness
will affect broiling times. This
guide is based on meats at
refrigerator temperature.
f The U.S. Department of Agriculture
says "Rare beef is popular, but you
should know that cooking it to only
ffOO°Fmeans some food poisoning
organisms may survive." (Source:
Safe Food Book. Your Kitchen
Guide. USDA Rev. June ff985.)
Closethe door.Always broil with the door
closed.
Press the Start pad.
[_ When broiling is finished, press the Clear/
[Z] Placethe meator fish on a broilergrid in a
Offpad.
broilerpan.
F2l Followsuggested rack positions in the
Broiling Guide.
r31 Pressthe Broil Hi/Lo pad once for
HI Broil.
Tochange to LO Broil, pressthe Broil Hi/
Lo pad again.
Broiling Guide
Preheat the broiler for 2 minutes to improve performance.
Food Doneness
Beef Rare (140°F)
Medium
(160°F)
Well Done
(170°F)
Chicken
Fish 1/2" to 1" thick Hi 3 (C) 4 (D) Handle and turn very
Fillets carefully.
Pork Well Done S/4" thick Hi S (C) 4 (D) To prevent curling of meat,
Chops (170°F) slash fat at 1" intervals.
Type or Broil Rack
Thickness Setting Position
Steaks - Z" Hi a (D)
thick
Steaks - 5/4" Hi a (D)
to Z" thick
Steaks - -
3/4" to 1"thick
Ground Beef
Patties (1/2" to
S/4" thick)
Breast, Hi 1 (A)
boneless
Breast,bone-in Hi 1 (A)
Hi 4(D)
Lo 3 (C) 4 (D)
27"
Rack
Position
30"
s (E)
S(E)
S(E)
3(c)
3(c)
Comments
Steaks less than 1" thick
are difficult to cook rare.
They cookthrough before
browning. To prevent curling
of meat, slash fat at 1"
intervals.
Space patties evelny. Up to 8
patties take about the same
time.
Broil skin-side-down first.
8
Page 9
Using the clock and timer. GEApp,onces.com
To Set the Clock
Make sure the clock is set to the
correct time of day.
On/Off
The timer is a minute timer only.
The timer does not control oven
operations. The maximum setting
on the timer is 9 hours and 59
minutes.
Theclock must be set to the correct time of
day for the automatic oven timing functions
to work properly.Thetime of day cannot be
changed during a timed baking or self-cleaning
cycle.
To Set the Timer
[Z] Pressthe Kitchen Timer On/Off pad.
r_ on modelswith number pads, pressthem
until the amount of time you want shows
in the display.Forexample,to set 2 hours
and 45 minutes, press 2,/4and 5 in that
order.
On models with Hour and Nin + and
- pads,pressthem until the amount of
time you want shows in the display.The
maximum time you can enter in minutes
is59. Cooking times more than 59
minutes should be changed to hours and
minutes. Forexample, enter 90 minutes
as 1 hour, 30 minutes.
Ifyou make a mistake, pressKitchen
Timer On/Off and begin again.
Pressthe Clock pad.
%
On models with number pads,press them
r2]
in order to set the correct time of day.
On models with Hour and l'4in+ and -
pads,pressthem to set the correct time
of day.
[] Press the Startpad.
r_ Press the Startpad.
After pressing the Startpad, SETdisappears;
this tellsyou the time is counting down,
although the display does not change until one
minute has passed.Secondswill not beshown
in the display until thelast minute is counting
down.
[] When the timer reaches :00, the control
will beep 3 times followed by one beep
every 6 seconds until the Kitchen Timer
On/Off pad ispressed.
The6-second tonecan be canceled byfollowing
thesteps in theSpecialfeaturesofyour oven
control sectionunder Tonesat the Endof a
TimedCycle.
To Reset the Timer
Ifthe display isstill showing the time remaining,
you may change it by pressing the Kitchen
Timer On/Off pad,then pressthe number
pads (on some models) or the Hour and Nin +
or - pads (onsome models)until the time you
want appears in the display.
To Cancel the Timer
PressKitchen Timer On/Off pad twice.
If the remaining time is not inthe display (clock,
delaystart or cooking time are in the display),
recallthe remaining time by pressingthe
Kitchen Timer On/Off pad and then pressing
the number pads (onsome models)or the
Hour and l'4in + or- pads(on some models)to
enter the new time you want.
Page 10
Using the timed baking and
roasting features, roesomemode sI
Onmodels with presspad controlsfor both ovens,you can usetimed baking in one ovenwhile usingself-dean in theother;
you can alsousetimed baking in both ovensat thesame time.
NOTE:Foodsthat spoileasily-such as milk eggs,fish,stu_ngs, poultry and pork-should not be allowedto sit for more than
"1hourbeforeor after cooking.Roomtemperaturepromotes the growth ofharmful bacteria.Besurethat the oven light is off because
heatfrom the bulb wil! speedharmful bacteriagrowth.
How to Set an Immediate Start and Automatic Stop
1 2 S 4 5
O[ %
l'emp
depending on model
1 2 3 4 5
(depending On model)
¢a@
Theovenwillturn onimmediatelyandcookfora
selectedlengthoftime.Atthe endofthecooking
timetheovenwillturn off automatically.
Hakesurethe clockshowsthecorrecttime ofday.
[-_ Pressthe Bakepad.
r_ on modelswithnumberpads,pressthem in
ordertosetthe desiredtemperature.On
modelswith Tamp+ and- pads,pressthem
to increaseordecreasethe setdesired
temperature.
[] Pressthe CookingTimepad.
NOTE:Ifyourreciperequirespreheating,youmay
needtoaddadditionaltimetothe lengthofthe
cookingtime.
[] Onmodelswithnumberpads,pressthem
untilthe amountoftimeyouwantshowsin
thedisplay.Forexample,to set2 hoursand
/45minutes,press2,/4and5inthat order.On
modelswith Hourandklin + and- pads,
pressthemtoenter thedesiredbakingtime.
Themaximumtimeyou canenterinminutes
is59.Cookingtimesmorethan59minutes
shouldbechangedto hoursandminutes.For
example,enter90minutesas1 hour,30
minutes.
Theoventemperatureandthe cookingtime
that youenteredwillbedisplayed.
F_ PresstheStart pad.
Thedisplayshowstheoventemperaturethatyou
setandthecookingtimecountdown.Thedisplay
startschangingoncethetemperaturereaches
IO0°F.
NOTE:Whenusingbothovensatthesametime,
thetimesshowingin thedisplaywill beforthe last
ovenset.Todisplaythetimesetforthefirstovenset,
presstheCookingTimepadfor thatoven.
Theovenwillcontinueto cookforthe programmed
amountoftime,thenshutoff automatically,unless
the CookandHoldfeaturewasset.Seethe Special
featuresofyourovencontrolsection.
PresstheClear/Offpadto clearthe display.
1 2 3 4 5
rS°@
OF
(deoendmg on model)
1 2 3 4 5
6 7 8 C9 @
or
.©@
deoending on mode
1 2 3 4 5
6 7 8 _9 O]
or
_aeDendmg on model
G,o,0
10
How to Set a Delayed Start and Automatic Stop
Youcansetthe ovencontrol to delay-startthe
oven,cookfora specificlengthof time and then
turn off automatically.
Hakesurethe clockshowsthecorrecttime ofday.
FT] Pressthe Bakepad.
Onmodelswith numberpads,pressthem in
ordertosetthe desiredtemperature.On
modelswith Tamp+ and- pads,pressthem
to increaseordecreasethe setdesired
temperature.
Pressthe CookingTimepad.
NOTE:Ifyourreciperequirespreheating,youmay
needtoaddadditionaltimetothe lengthofthe
cookingtime.
[_ Onmodelswithnumberpads,pressthem
untilthe amountoftimeyouwantshowsin
thedisplay.Forexample,to set2 hoursand
/45minutes,press2,/4and5inthat order.On
modelswith Hourandkiin+ and- pads,
pressthemtoenter thedesiredbakingtime.
Themaximumtimeyou canenterinminutes
is59.Cookingtimesmorethan 59minutes
shouldbechangedto hoursandminutes.For
example,enter 90minutesas1 hour,30
minutes.
Theoventemperatureandthe cookingtime
Usingthenumberpads(onsomemodels)or
theHour andkiin+ or- pads(onsome
models),enterthe time ofdayyou want the
ovento turn onand startcooking.
PresstheStart pad.
NOTE:Anattentiontonewillsoundifyouareusing
timedbakinganddo notpresstheStart padafter
enteringthe bakingtemperature.
tfyouwould liketocheckthetimesyou haveset,
presstheDelayStart padto checkthe starttime
youhavesetor presstheCookingTimepadto
checkthelengthof cookingtimeyouhaveset.
Whenthe oventurnsonatthetimeof day you
haveset,thedisplaywillshowthechanging
temperature(startingat 100°F)andthecooking
time countdown.Thedisplaystartschangingonce
thetemperaturereaches100°F.
NOTE:Whenusingbothovensatthesametime,
thetimesshowingin thedisplaywill beforthe last
ovenset.Todisplaythetimesetforthefirst ovenset,
presstheCookingTimepadfor thatoven.
Theovenwillcontinueto cookforthe programmed
amountoftime,thenshutoff automatically,unless
the CookandHoldfeaturewasset.Seethe Special
featuresofyourovencontrolsection.
PresstheClear/Offpadto clearthe display.
thatyouenteredwill bedisplayed.
Pressthe DelayStart pad.
Page 11
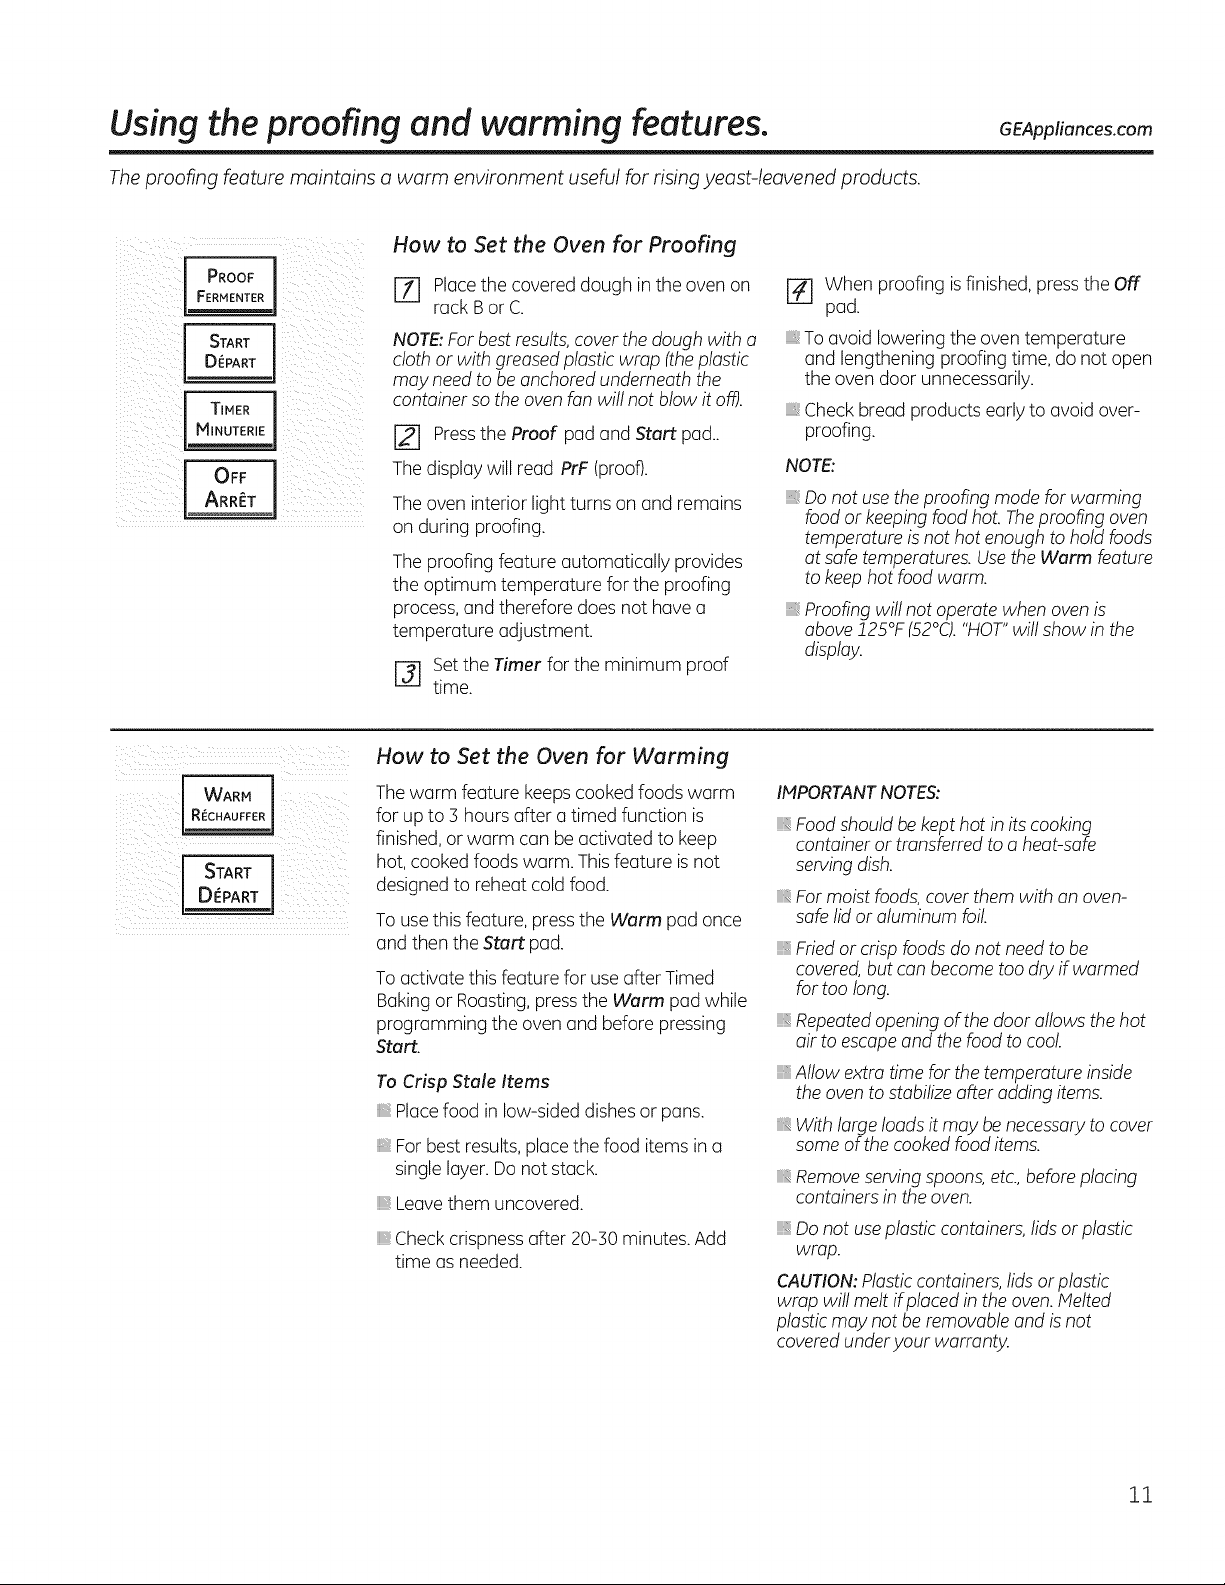
Using the proofing and warming features,
The proofing feature maintains a warm environment useful for risingyeast-leavened products.
How to Set the Oven for Proofing
PROOF
FERMENTER
START
D_PART
TIMER
[ MINUTERIE
I A uOFF........
FT] Placethe covered dough in the oven on
rack B or C.
NOTE:For bestresults,cover thedough with a
cloth or with greasedplastic wrap (theplastic
may need to be anchored underneath the
container so the oven fan will not blow it off).
[] Pressthe Proof pad and Start pad..
Thedisplay will read PrF (proof).
Theoven interior light turns on and remains
on during proofing.
Theproofing feature automatically provides
the optimum temperature for the proofing
process,and therefore does not have a
temperature adjustment.
[-_ Setthe Timer for the minimum proof
time.
[] When proofing isfinished, pressthe Off
pad.
To avoid lowering the oventemperature
and lengthening proofing time, do not open
the oven door unnecessarily.
Checkbread products early to avoid over-
proofing.
NOTE:
,, Donot usethe proofing mode for warming
food or keeping food hot. Theproofing oven
temperature isnot hot enough to hold foods
at safe temperatures. Usethe Warm feature
to keephot food warm.
Proofingwill not operate when ovenis
above!25°F (52°C)."HOT"will show in the
display.
GEAppliances.com
WAR_
How to Set the Oven for Warming
Thewarm feature keepscooked foods warm
for up to 3 hours after a timed function is
finished, or warm can beactivated to keep
hot, cooked foods warm. Thisfeature isnot
designedto reheat cold food.
To usethis feature, pressthe Warm pad once
and then the Start pad.
To activate this feature for useafter Timed
Bakingor Roasting,pressthe Warm pad while
programming the oven and before pressing
Start.
To Crisp Stale Items
Placefood inlow-sided dishesor pans.
Forbest results, place the food items in a
single layer. Do not stack.
Leavethem uncovered.
Checkcrispness after 20-30 minutes. Add
time as needed.
IMPORTANT NOTES:
iiiB_
Foodshould be kept hot in its cooking
container or transferred to a heat-safe
serving dish.
For moist foods,coverthem with an oven-
safe lid or aluminum foil.
Fried or crisp foods do not need to be
covered, but can become too dry if warmed
for too long.
Repeatedopening of the door allows the hot
air to escapeand thefood to cool.
Allow extra time for thetemperature inside
the oven to stabilize after adding items.
With large loads it may be necessary to cover
some of the cooked food items.
Removeservingspoons, etc.,beforeplacing
containers in the oven.
Do not useplastic containers,lidsor plastic
wrap.
CAUTION:Plasticcontainers,lids or plastic
wrap will melt ifplaced in the oven.Melted
plasticmay not be removable and isnot
coveredunderyour warranty.
11
Page 12
Using the convection oven. www.GEAppliances.ca
Convection Bake
NOTE:The convection fan willcycle on and off
while cooking to best distribute hot airin the
oven.
Theconvection ovenfan shuts off when the
oven door isopened. DONOTleave the door
open for long periodsof time while using
convection cooking or you mayshorten the life
ofthe convection heating element.
In u convection oven, u fun circulates hot air
over, under and around the food.
This circulating hot air is evenly distributed
throughout the oven cavity. As u result,
foods are evenly cooked and browned-
often in less time with convection heat.
Multi-Rack Convection Baking
Theconvection fun circulates the heated
air evenly overand around the food. When
convection bakingwith only I rack,follow the
rack position recommended in the Usingthe
Ovensection.
Idealfor evenly browned baked foods
cooked on multiple racks.
Good for large quantities of baked foods.
Good resultswith cookies,biscuits,muffins,
brownies,cupcakes, cream puffs, sweet rolls,
angel food cakeand bread.
SingleBakeConvection: Good resultswith
casseroles.
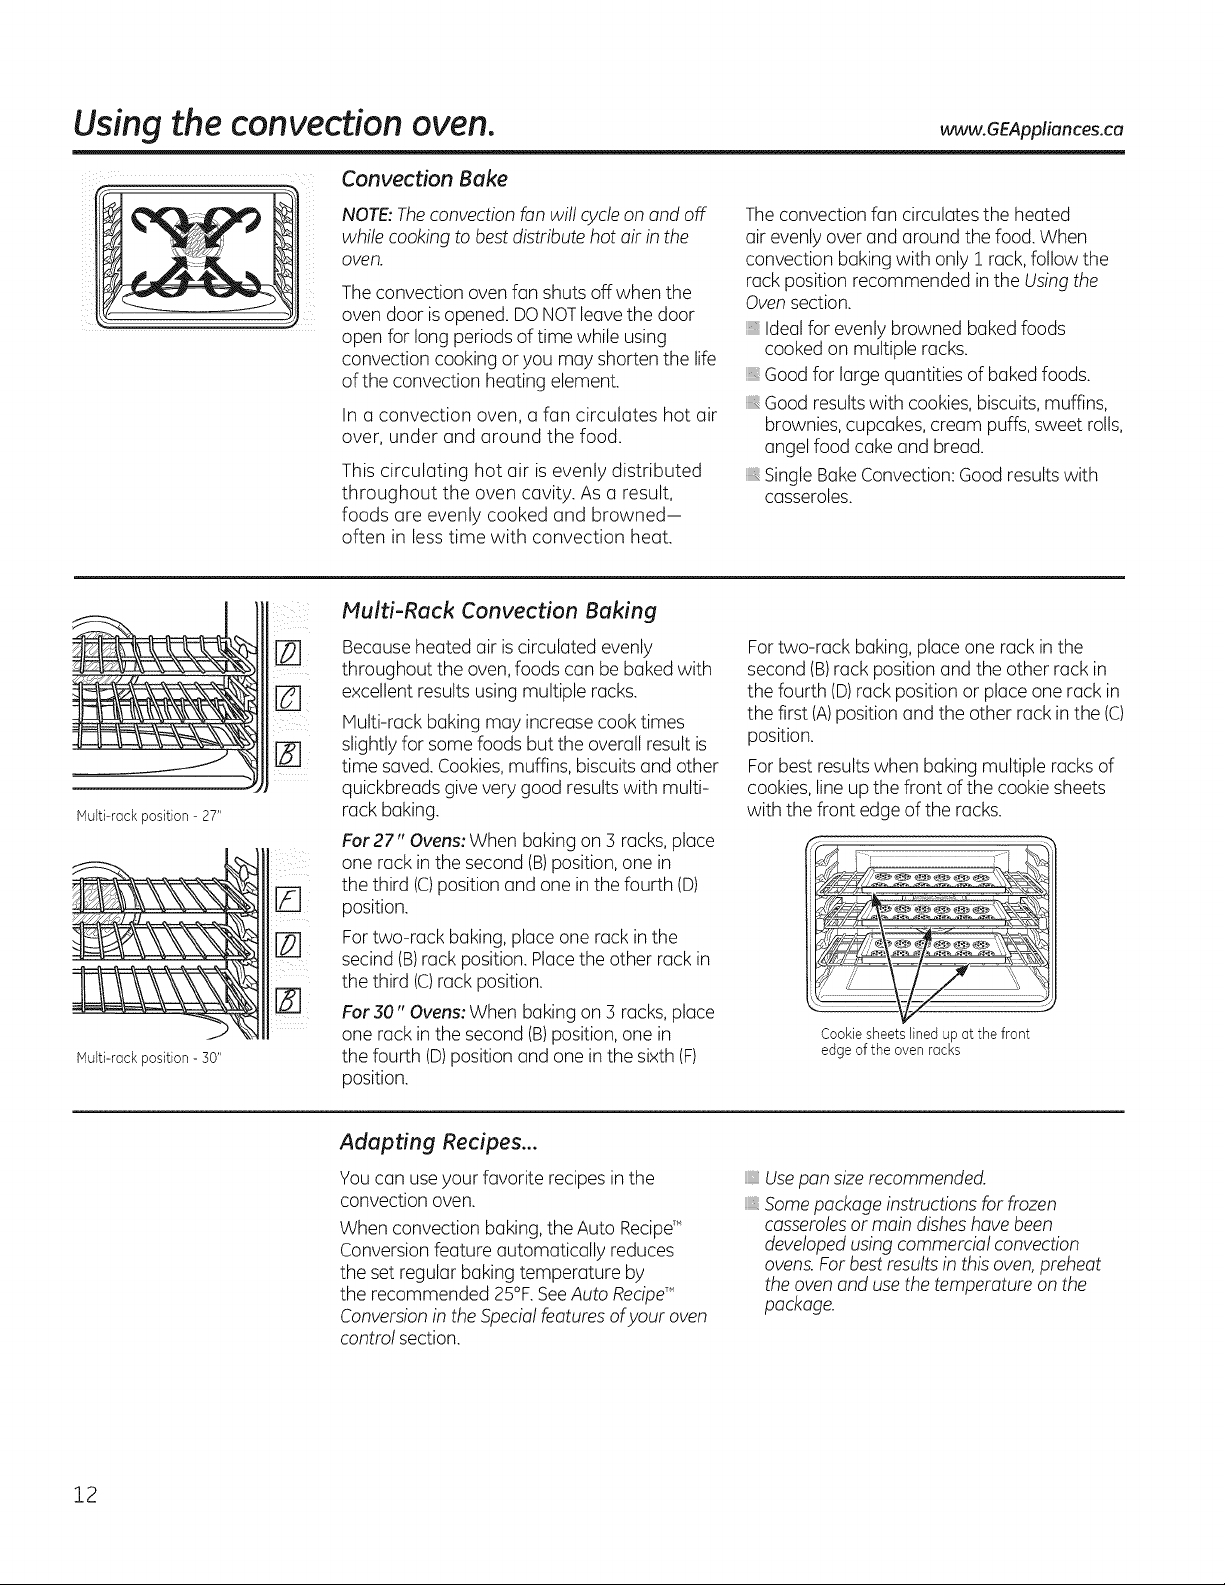
Multi-rock position - 27"
Multi-rock position - 30"
r_
Becauseheated air iscirculated evenly
throughout the oven,foods can be bakedwith
excellent resultsusing multiple racks.
Multi-rack baking may increasecook times
slightlyfor some foods but the overall result is
time saved.Cookies,muffins, biscuits and other
quickbreods givevery good results with multi-
rack baking.
For27" Ovens: When baking on 3 racks, place
one rack in the second (B)position,one in
the third (C)position and one inthe fourth (D)
position.
Fortwo-rack baking, place one rack in the
secind (B)rack position. Placethe other rack in
the third (C)rack position.
For30" Ovens: When baking on 3 racks, place
one rack in the second (B)position,one in
the fourth (D)positionand one in the sixth (F)
position.
Adapting Recipes...
You can use your favorite recipes in the
convection oven.
When convection baking, the Auto Recipe_
Conversionfeature automatically reduces
the set regular baking temperature by
the recommended 25°F.SeeAuto Recipe_"
Conversionin the Specialfeaturesofyour oven
control section.
Fortwo-rack baking,place one rack in the
second (B)rack position and the other rack in
the fourth (D)rack position or placeone rack in
the first (A)position and the other rack in the (C)
position.
Forbest resultswhen baking multiple racks of
cookies, line up the front of the cookie sheets
with the front edge of the racks.
Cookiesheets lined up at the front
edgeof the ovenrocks
Usepan size recommended.
_,Somepackage instructions for frozen
casserolesor main disheshavebeen
developedusing commercial convection
ovens.For best results in this oven,preheat
the ovenand use the temperature on the
package.
12
Page 13
GEAppliances.com
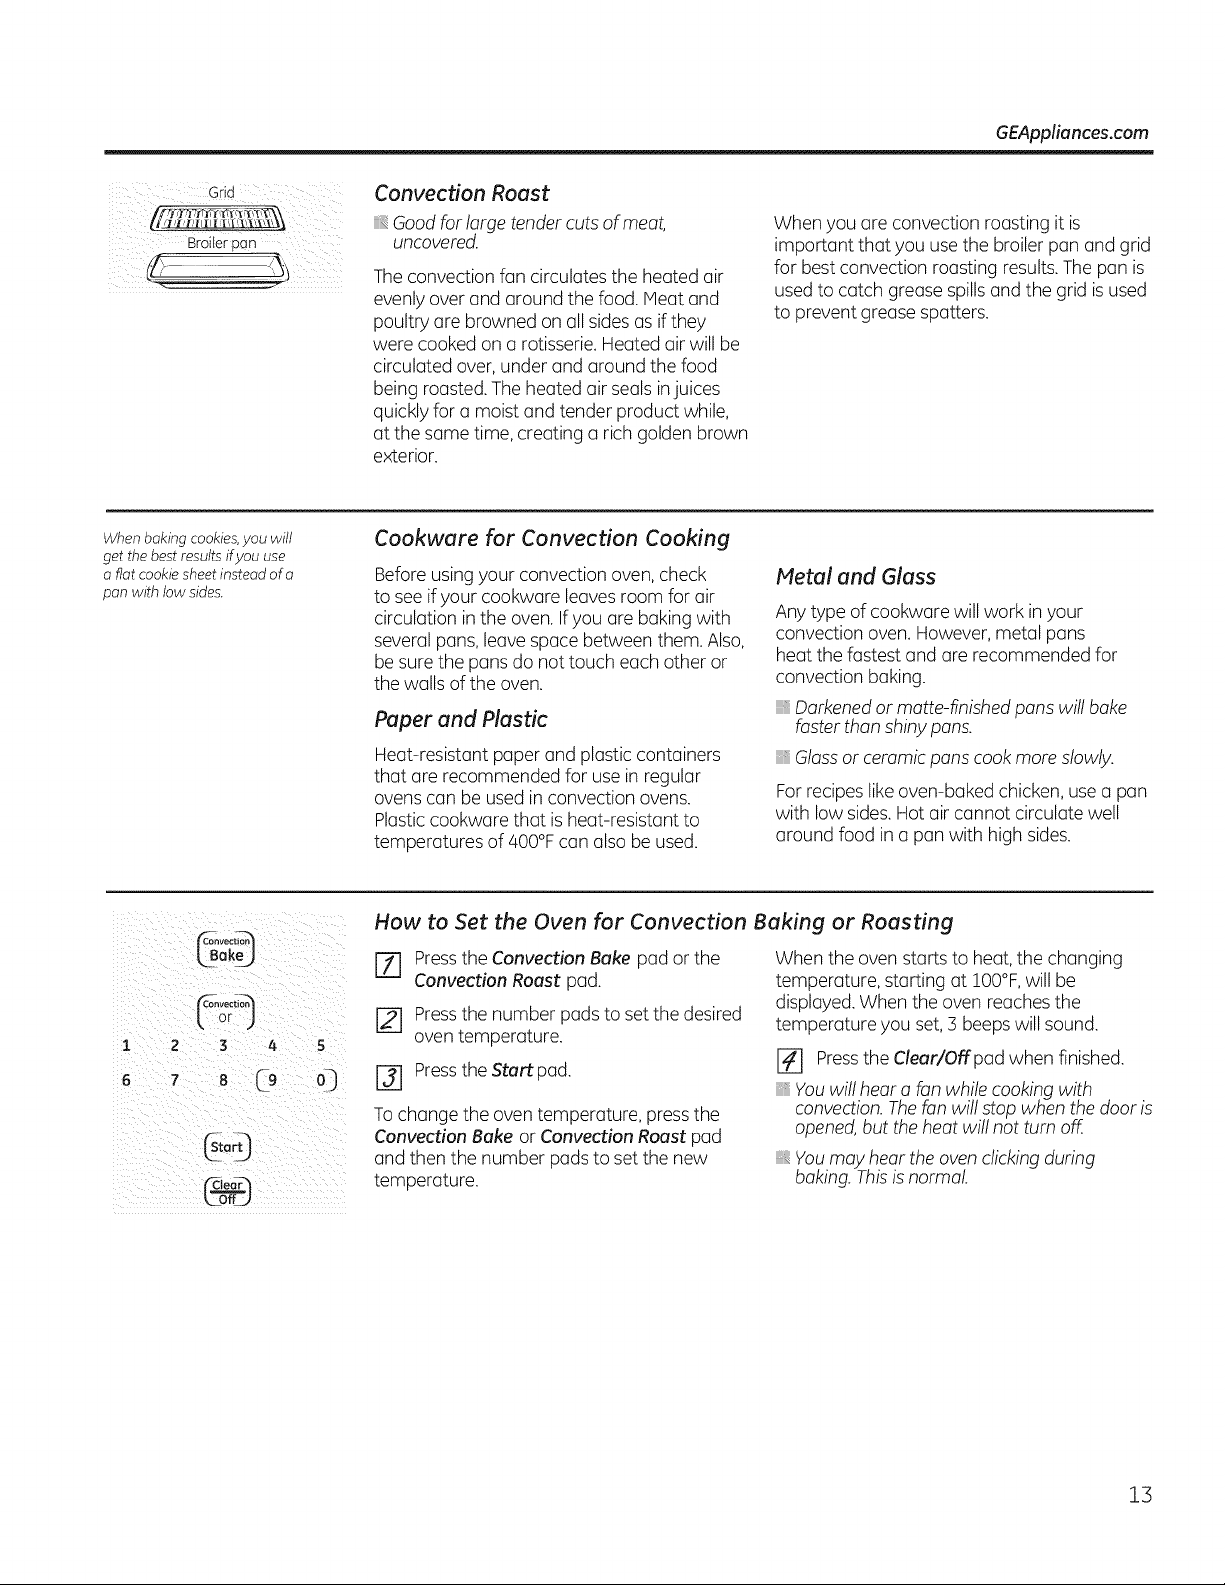
Grid
Broilerpan
When baking cookies,you will
get the best results ifyou use
a flat cookie sheet instead of a
pan with low sides.
Convection Roast
Good for large tendercuts of meat,
uncovered.
Theconvection fan circulatesthe heated air
evenly over and around the food.Heat and
poultry are browned on all sides asif they
were cooked on a rotisserie. Heated air will be
circulated over, under and around the food
being roasted. The heated air seals injuices
quickly for a moist and tender product while,
at the same time, creating a rich golden brown
exterior.
Cookware for Convection Cooking
Beforeusing your convection oven, check
to see if your cookware leaves room for air
circulation in the oven. Ifyou are baking with
several pans,leave space between them. Also,
be surethe puns do not touch each other or
the walls of the oven.
Paper and Plastic
Heat-resistant paper and plastic containers
that are recommended for use in regular
ovens can be used in convection ovens.
Plasticcookware that isheat-resistant to
temperatures of 400°Fcan also be used.
When you are convection roasting it is
important that you use the broiler pan and grid
for best convection roasting results.Thepan is
usedto catch greasespillsand the grid isused
to prevent grease spatters.
Metal and Glass
Any type of cookware will work inyour
convection oven. However,metal pans
heat the fastest and are recommended for
convection baking.
Darkenedor matte-finished pans will bake
fasterthan shiny pans.
_+Glassor ceramicpans cook more slowly.
Forrecipes likeoven-baked chicken, usea pan
with low sides.Hot air cannot circulate well
around food in a pan with high sides.
Lsok+J
_or_C°nvecti°n
I 2
6
3 4 5
7 8 £9 Q
How to Set the Oven for Convection Baking or Roasting
[Z] Pressthe Convection Bake pad or the
Convection Roost pad.
When the oven starts to heat,the changing
temperature, starting at IO0°F,will be
displayed.When the oven reaches the
[] Pressthe number padsto set the desired
oventemperature.
temperature you set,3 beepswill sound.
[] Pressthe Clear/Offpad when finished.
[] Press the Startpad.
Tochange the oven temperature, pressthe
Convection Bake or Convection Roast pad
and then the number padsto set the new
temperature.
Youwill hear a fan while cooking with
convection.Thefan will stop when the door is
opened,but the heat will not turn off.
_+Youmay hear the oven clicking during
baking. Thisis normal.
13
Page 14
Using the timed features for convection cooking.
On double oven models, you can use timed baking or roasting in one oven while using self-clean in the other; you can also
use timed baking or roasting in both ovens at the same time.
You will hear a fan while cooking with these features. The fan will stop when the door is opened, but the heat will not
turn off.
NOTE: Foods that spoil easily-such as milk, eggs, fish, stu_ngs, poultry and pork-should not be allowed to sit for more than
1 hour before or after cooking. Room temperature promotes the growth of harmful bacteria. Be sure that the oven light is off
because heat from the bulb will speed harmful bacteria growth.
How to Set an Immediate Start and Automatic Stop
1 2 3 4 5
i 2 3 4 5
6 7 8 C9 03
_ookin_
k3imtJ
1
2 ] /4 5
6
, 8 o]
['-Delay_
kStart )
1
2 3 4 5
6
C9 03
GtoO
Theovenwillturnon immediatelyandcookforo
selectedlengthoftime.Atthe endofthecookingtime,
theovenwillturn offautomatically.
lake suretheclockshowsthecorrecttimeof day.
[] PresstheStart pad.
Thedisplaywillshowthechangingtemperature
(startingat IO0°F)andthecookingtime.Thedisplay
startschangingoncethetemperaturereachesIO0°F.
rl] PresstheConvectionBakeor ConvectionRoast
pad.
NOTE:Ondoubleovenmodels,whenusingbothovens
atthesametime,thetimesshowinginthedisplaywill
[] Pressthe numberpadsto setthedesiredoven
temperature.
r_ presstheCookingTimepad.
NOTE:Ifyourreciperequirespreheating,youmayneed
tooddadditionaltimetothelengthofthecookingtime.
r_ pressthe numberpadstosetthe desiredlength
ofcookingtime.Theminimumcookingtimeyou
cansetis I minute.Theoventemperaturethat
yousetandthe cookingtimethat youentered
willbeinthedisplay.
beforthelostovenset.Todisplaythetimesetforthe
firstovenset,presstheCookingTimepadforthatoven.
Theovenwillcontinueto cookfortheprogrammed
amountoftime,thenshutoff automatically,unless
the CookandHoldfeaturewasset.SeetheSpecial
featuresofyourovencontrolsection.
r_ PresstheClear/Offpadto clearthedisplayif
necessary.Removethe foodfromtheoven.
Remember,eventhoughtheovenshutsoff
automatically,foodleftinthe ovenwillcontinue
cookingaftertheoventurnsoff.
How to Set a Delayed Start and Automatic Stop
Youcansetthe ovencontrolto delay-starttheoven,
cookfora specificlengthoftimeandthenturnoff
automatically.
Hakesuretheclockshowsthecorrecttimeof day.
[Z] presstheConvectionBakeorConvectionRoast
pad.
Pressthe numberpadstosetthe desiredoven
temperature.
[] PresstheCookingTimepad.
NOTE:Anattentiontonewillsoundifyouareusing
timedbakingorroastinganddonot presstheStart
pod afterenteringthebakingorroastingtemperature.
Whentheoventurnson atthetimeof dayyouhave
set,thedisplaywillshowthe changingtemperature
(startingat IO0°F)andthecookingtime.Thedisplay
startschangingoncethetemperaturereaches:].O0°F.
NOTE:Ondoubleovenmodels,whenusingbothovens
atthesometime,thetimesshowinginthe displaywill
beforthe lostovenset.Todisplaythetimesetfor the
firstovenset,presstheDelayStartor CookingTime
NOTE:Ifyourreciperequirespreheating,youmayneed
tooddadditionaltimetothelengthofthecookingtime.
F_ Pressthe numberpadstosetthedesired
cookingtime.
PresstheDelayStart pad.
[] Pressthe numberpadsto setthetimeofdayyou
want theoventoturn onandstartcooking.
Ifyouwouldliketo checkthetimesyouhaveset,press
theDelayStartpodto checkthestarttimeyou have
pod forthatoven.
Theovenwillcontinueto cookfortheprogrammed
amountoftime,thenshutoff automatically,unless
the CookandHoldfeaturewasset.SeetheSpecial
featuresofyourovencontrolsection.
[-8-1PresstheClear/Offpadto clearthe displayif
necessary.Removethe foodfromtheoven.
Remember,eventhoughtheovenshutsoff
automatically,foodleftinthe ovenwillcontinue
cookingaftertheoventurnsoff.
set,orpresstheCookingTimepod to checkthelength
ofcookingtimeyou haveset.
14
[] PresstheStart pad.
Page 15
Adjust the oven thermostat--Do it yourselfl GEApp,ances.com
Youmay find thatyour new oven cooksdifferently than the oneit replaced.Useyour new ovenfor a few weeks to becomemore familiar
with it. Ifyou still thinkyour new oven is too hot or too cold,you can adjust the thermostatyourself.
Oonot usethermometers,such asthose found in grocery stores,to checkthetemperature setting ofyour oven.Thesethermometersmay
vary 20-40 degrees.
NOTE"Thisadjustmentwill only affect baking and roasting temperatures;it doesnotaffect broiling or self-cleaningtemperatures.The
adjustment wil! beretained in memory after a power failure.
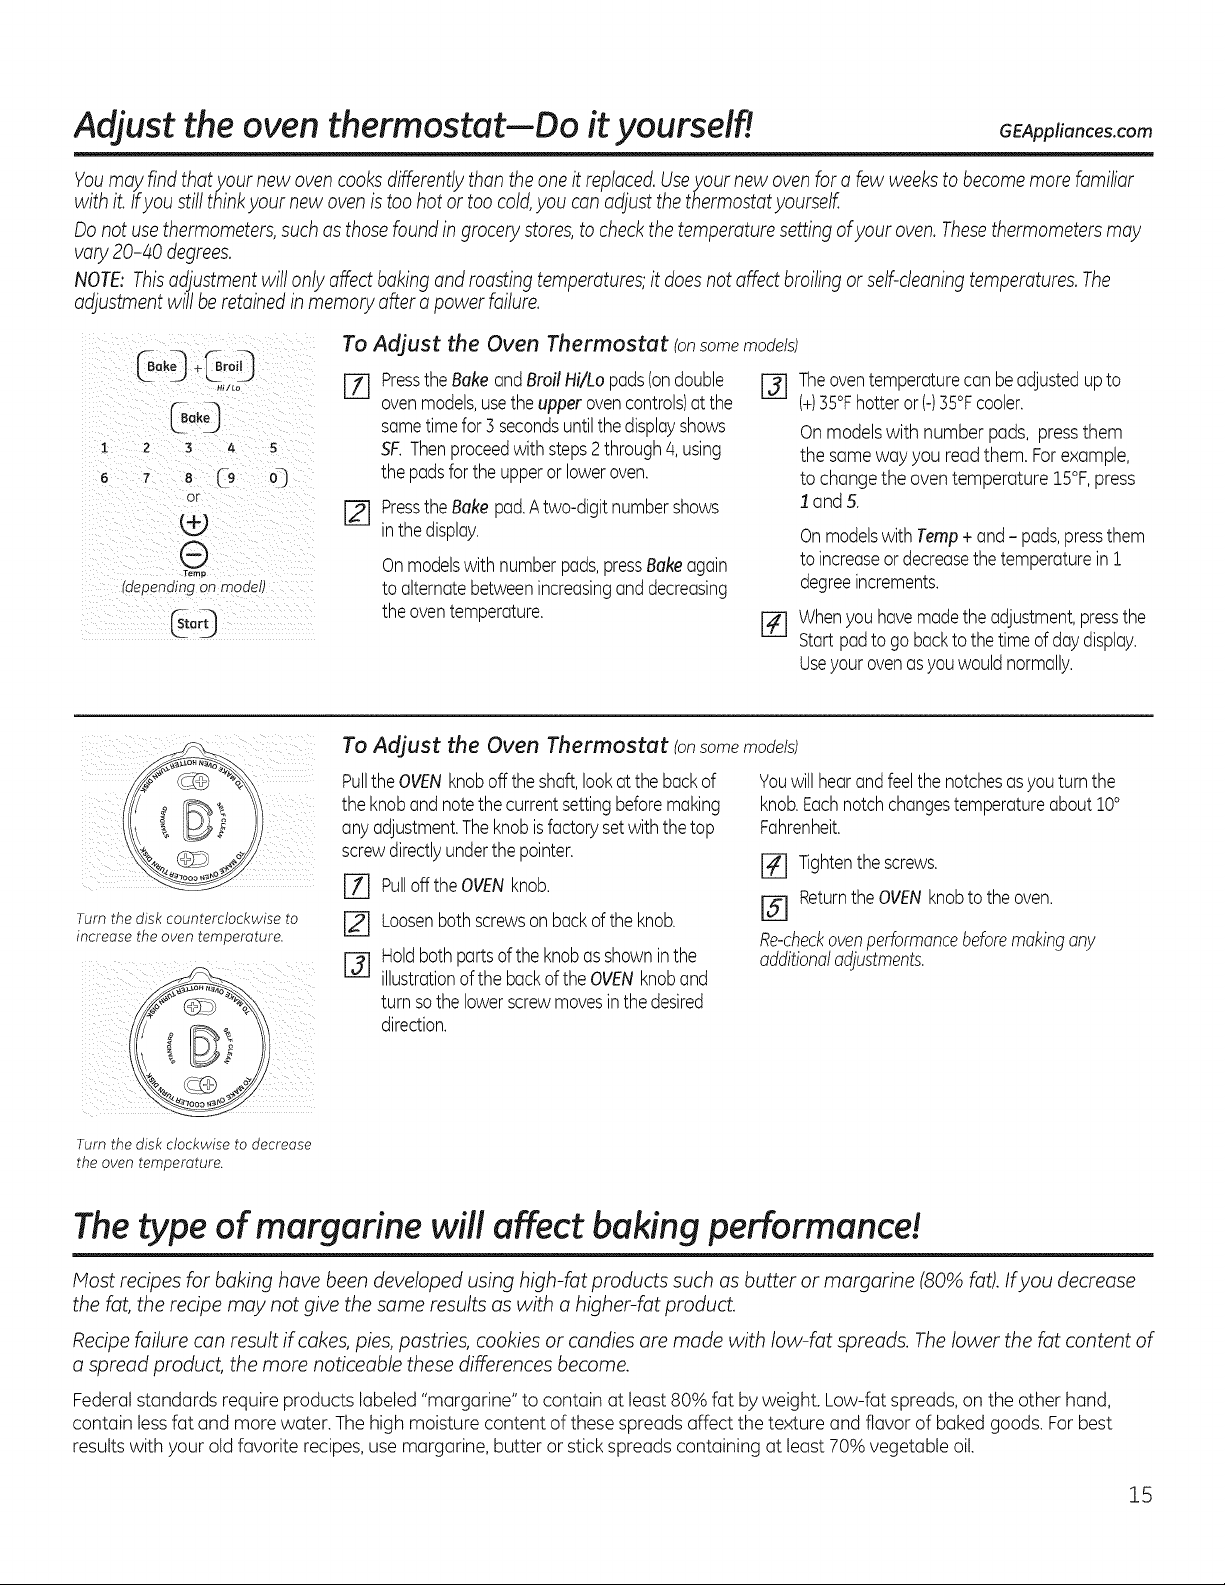
To Adjust the Oven Thermostat (onsomemodels)
Go@
..... [] PresstheBakeandBroilHi/Lopods(ondouble r_
iLak_ ovenmodels,usethe upperovencontrols)at the
L_j
z s 4 s SF.Thenproceedwith steps2through4, using
6 7 8 @ Q
or
@
raepending on moaelt
sometimefor3 secondsuntilthedisplayshows
thepodsforthe upperor loweroven.
[_ PresstheBakepad.Atwo-digitnumbershows
inthedisplay.
Onmodelswith numberpads,pressBakeagain
toalternatebetweenincreasingand decreasing
theoventemperature.
Theoventemperaturecan beadjustedupto
(+)35°Fhotteror(-)35°Fcooler.
Onmodelswith number pads, pressthem
the sameway you readthem. Forexample,
to changethe oventemperature 15°F,press
I and 5.
Onmodelswith Tamp+ and- pads,pressthem
to increaseor decreasethetemperaturein1
degreeincrements.
Whenyouhavemadethe adjustment,pressthe
%
Startpadtogo backto thetimeof daydisplay.
Useyourovenasyouwouldnormally.
To Adjust the Oven Thermostat (onsomemodels)
Turn the disk counterclockwise to
increase the oven temperature.
Turn the disk clockwise to decrease
the oven temperature.
PulltheOVENknoboffthe shaft,lookat thebackof
the knobandnotethecurrentsettingbeforemaking
anyadjustment.Theknobisfactorysetwith thetop
screwdirectlyunderthepointer.
r_ pullofftheOVEN knob.
[] Loosenbothscrewsonbackof theknob.
r_ Holdbothpartsofthe knobasshowninthe
illustrationofthe backoftheOVENknoband
turnsothe lowerscrewmovesinthedesired
direction.
Youwillhearandfeelthenotchesasyouturnthe
knob.Eachnotchchangestemperatureabout10°
Fahrenheit.
r_ Tightenthescrews.
[] ReturntheOVENknobtothe oven.
Re-checkovenperformancebeforemakingany
additionaladjustments.
The type of margarine will affect baking performance!
Most recipes for baking have been developed using high-fat products such as butter or margarine (80% fat). Ifyou decrease
the fat, the recipe may not give the same results as with a higher-fat product.
Recipe failure can result if cakes, pies, pastries, cookies or candies are made with low-fat spreads. The lower the fat content of
a spread product, the more noticeable these differences become.
Federalstandards requireproducts labeled"margarine" to contain at least 80% fat by weight. Low-fat spreads,on the other hand,
contain lessfat and more water. The high moisture content of these spreads affect the texture and flavor of bakedgoods. For best
resultswith your old favorite recipes,use margarine, butter orstick spreads containing at least 70% vegetable oil.
15
Page 16
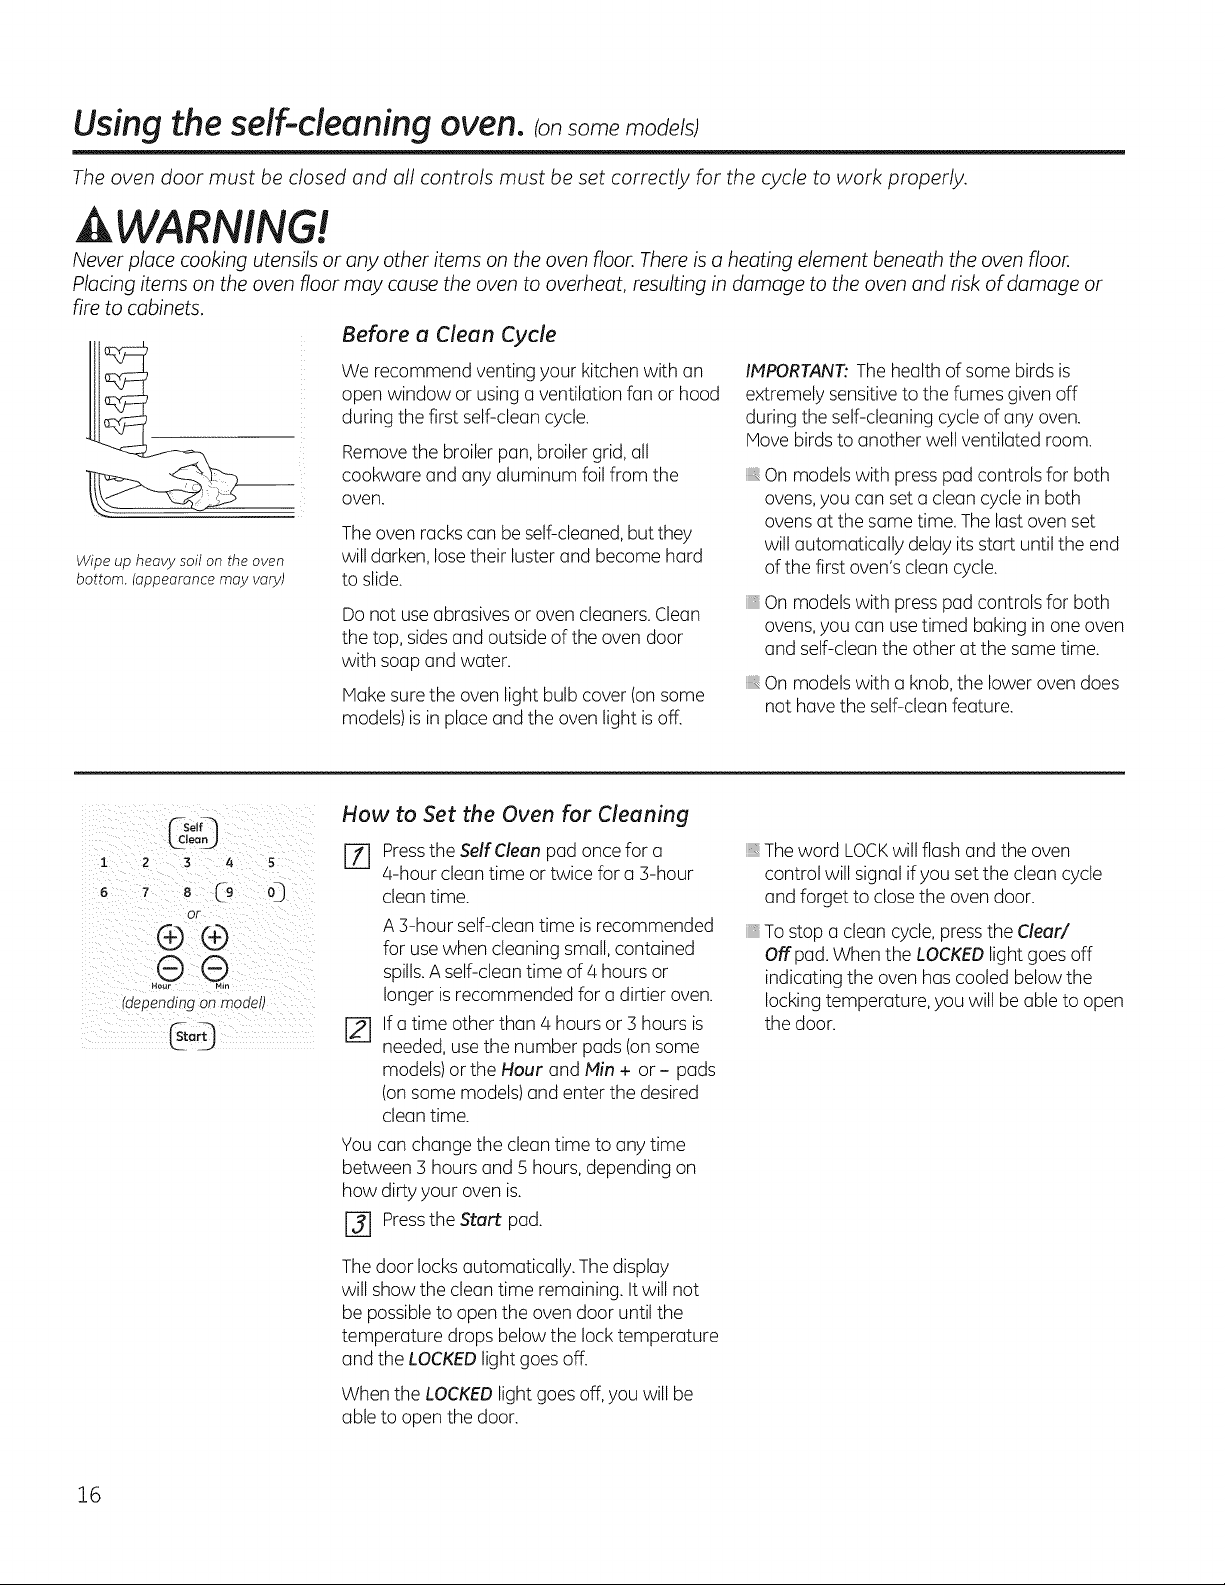
Usingthe sdf-cleaning oven.consomemode s
The oven door must be closed and all controls must be set correctly for the cycle to work properly.
WARNING!
Never place cooking utensils or any other items on the oven floor. There is a heating element beneath the oven floor.
Placing items on the oven floor may cause the oven to overheat, resulting in damage to the oven and risk of damage or
fire to cabinets.
Before a Clean Cycle
IMPORTANT:The health of some birds is
extremely sensitiveto the fumes given off
during the self-cleaning cycle of any oven.
Hove birds to another well ventilated room.
iiiiiiiiii:,
On models with presspad controls for both
ovens,you can set a clean cycle in both
ovens at the same time. Thelast oven set
will automatically delay its start untilthe end
of the first oven's clean cycle.
On models with presspad controls for both
ovens,you can usetimed baking in one oven
and self-clean the other at the same time.
On models with aknob, the lower oven does
not have the self-cleanfeature.
Wipe up heavy soil on the oven
bottom. (appearance may vary)
We recommend ventingyour kitchen with an
open window or using a ventilation fan or hood
during the first self-clean cycle.
Removethe broiler pan, broiler grid,all
cookware and any aluminum foil from the
oven.
Theoven rackscan be self-cleaned,but they
will darken, losetheir luster and become hard
to slide.
Do not useabrasives or oven cleaners.Clean
the top, sides and outside of the oven door
with soap and water.
Hake sure the oven light bulb cover (on some
models)is in place and the oven light isoff.
r-Self _}
Lcleo_
1 2 3 4 5
6 7 8 (-9 O]
Of
®®
rdeoending on moaelJ
How to Set the Oven for Cleaning
[Z] Pressthe Self Clean pad once for a
4-hour clean time or twice for a3-hour
clean time.
A 3-hour self-clean time is recommended
for use when cleaning small, contained
spills.A self-clean time of 4 hours or
longer isrecommended for a dirtier oven.
[] If a time other than 4 hours or 3 hours is
needed,use the number pads (onsome
models)or the Hour and Min + or- pads
(onsome models)and enter the desired
clean time.
You can change the clean time to any time
between 3 hours and 5 hours, depending on
how dirty your oven is.
[-_ Pressthe Start pad.
Thedoor locks automatically. Thedisplay
will show the clean time remaining. Itwill not
be possibleto openthe oven door until the
temperature drops below the lock temperature
and the LOCKEDlight goes off.
When the LOCKEDlight goesoff, you will be
able to open the door.
Theword LOCKwill flash and the oven
control will signal ifyou setthe clean cycle
and forget to close the oven door.
To stop a clean cycle,press the Clear/
Offpad. When the LOCKEDlight goes off
indicating the oven has cooled below the
locking temperature, you will be able to open
the door.
16
Page 17

The oven door must be closed and all controls must be set correctly for the cycle to work properly.
GEAppliances.com
f-Sel_
Lcloo_
1 2 3 4 5
7 8 (-9 O_
cr
®®
depending on moael
1 2 3 4 5
tsr_
6 7 8 C9 O]
cr
®®
®®
Nour _i_
d_ Denci,ng on []7ode_]
How to Delay the Start of Cleaning
[Z] Pressthe Self Clean pad once for a
4-hour clean time or twice for a 3-hour
clean time.
A 3-hour self-cleantime isrecommended
for use when cleaning small, contained
spills.Aself-clean time of 4 hours or
longer is recommended for o dirtier oven.
[] Ifa time other than 4 hours or 3 hours is
needed, usethe number pads (on some
models) or the Hour and Min + or- pads
(on some models) and enter the desired
cleon time.
You con change the cleantime to any time
between 3 hours and 5 hours, depending on
how dirty your oven is.
[] Pressthe Delay Start pad.
[_ Using the number pads (on some models)
or the Hour and Min + or - pads (on
some models), enter the time of day you
want the clean cycle to start.
[_ Press the Start pad.
Thedoor locks automatically. Thedisplay will
show the start time. It will not be possible to
open the ovendoor untilthe temperature
drops below the locktemperature and the
LOCKEDlight goes off.
When the LOCKEDlight goesoff, you will be
able to open the door.
NOTE:Onmodels with press pad controls for
both ovens,you canset a delaycleanin both
ovensat the same time. Thesecondovenset
will automatically delay the start of cleaning
until theend of the first oven'sclean cycle.
Torecall the start time of the second oven set,
press the Delay Start pad on the controls for
the second oven.
After a Clean Cycle
You may notice some white ash in the oven.
Wipe it up with adamp cloth after the oven
cools.
Ifwhite spots remain, remove them with a
soap-filled scouring pad and rinsethoroughly
with avinegar and water mixture.
Thesedeposits are usually a salt
residuethat cannot be removed by
the clean cycle.
Ifthe oven isnot clean affer one clean cycle,
repeat the cycle.
Youcannot setthe oven for cooking until the
oven iscool enough for the door to unlock.
Ifthe racks become hard to slide,wipe the
rack supports with cooking oil.
17
Page 18
Special features ofyour ovencontrol.
Your new press pad control has additional features that you may choose to use. The following are the features and how
you may activate them.
The special feature modes can only be activated while the display isshowing the time of day. They remain in the control's
memory until the steps are repeated.
When the display shows your choice, press the Startpad. The special features will remain in memory after a power failure,
except for the Sabbath feature, which will have to be reset.
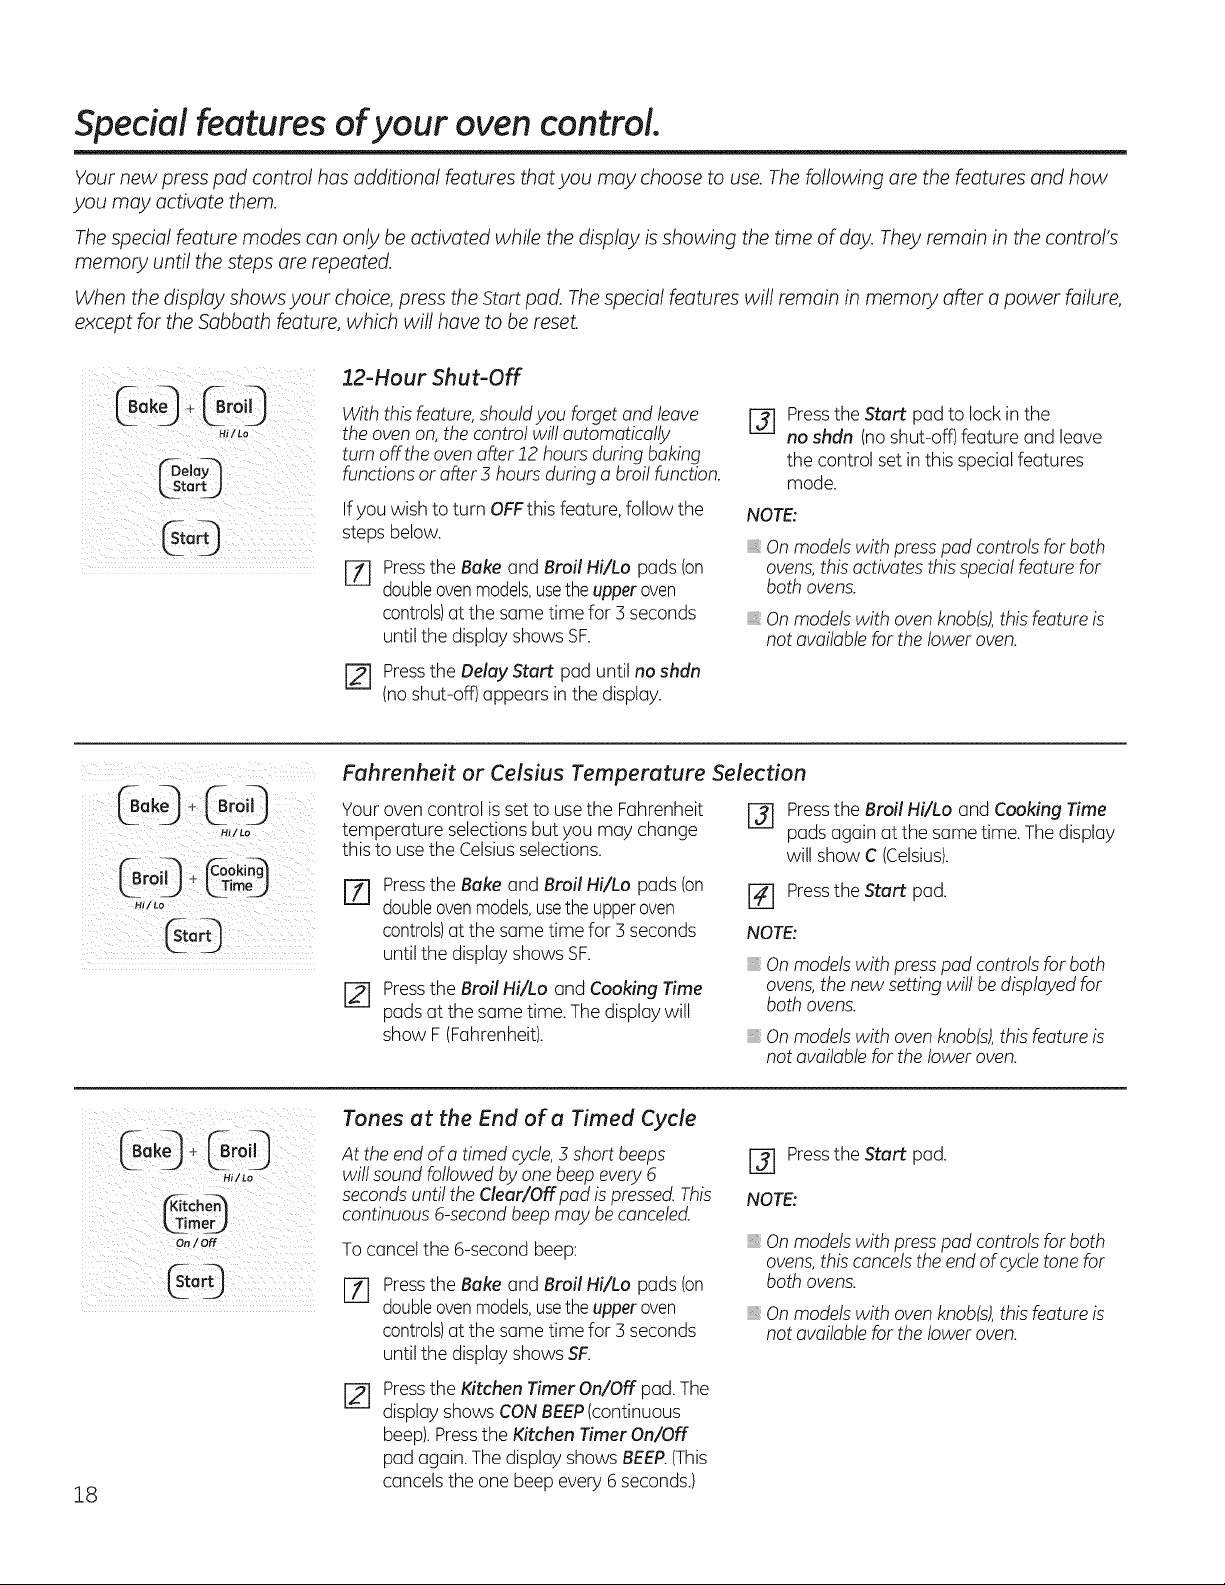
12-Hour Shut-Off
HJ/Lo
Hi/Lo
Hi/Lo
With this feature,shouldyou forget and leave
the ovenon,the control will automatically
[] Pressthe Start pad to lockin the
turn off theoven after 12 hours during baking
functions or after 3 hours during a broil function.
If you wish to turn OFFthis feature, follow the
NOTE:
steps below.
Onmodels with press pod controls for both
[-77 Pressthe Bake and Broil Hi/Lo pads (on
doubleovenmodels,usetheupperoven
controls)at the some time for 3 seconds
until the display shows SF.
ovens,this activatesthis special feature for
both ovens.
_,Onmodels with ovenknob(s),this feature is
not availablefor the lower oven.
[] Pressthe Delay Start pad until no shdn
(noshut-off) appears in the display.
Fahrenheit or Celsius Temperature Selection
Your ovencontrol isset to usethe Fahrenheit
temperature selectionsbut you may change
this to usethe Celsiusselections.
r_ Pressthe Bake and Broil Hi/Lo pads (on
doubleovenmodels,usetheupperoven
controls)at the same time for 3 seconds
until the display shows SF.
Pressthe Broil Hi/Lo andCooking Time
pads at the sametime.The display will
show F (Fahrenheit).
[] Pressthe Start pad.
NOTE:
Onmodels with press pod controls for both
ovens,the new setting will be displayedfor
both ovens.
,, Onmodels with oven knob(s),this feature is
not availablefor the lower oven.
no shdn (noshut-off) feature and leave
the control set in this special features
mode.
Pressthe Broil Hi/Lo and Cooking Time
pads again at the sametime.The display
will show C (Celsius).
18
on/off
Tones at the End of a Timed Cycle
At the end of a timed cycle, 3 short beeps
will sound followed by one beep every 6
seconds until the Clear/Off pad is pressed. This
continuous 6-second beep may be canceled.
To cancel the 6-second beep:
Pressthe Bake and Broil Hi/Lo pads (on
%
doubleovenmodels,usetheupperoven
controls)at the same time for 3 seconds
until the display showsSF.
Pressthe Kitchen Timer On/Off pad.The
display shows CONBEEP(continuous
beep).Pressthe Kitchen Timer On/OFF
pad again. The display shows BEEP.(This
cancelsthe one beep every 6 seconds.)
[-_ Press the Start pad.
NOTE:
Onmodels with presspad controls for both
ovens,this cancelsthe end of cycle tone for
both ovens.
Onmodels with ovenknob(s),this feature is
not availablefor the lower oven.
Page 19
Tone Volume (onsome models)
GEAppliances.com
Hi/Lo
Hi/Lo
iiii_ii__i/ii__ _ /_ii _ ii __
This feature allows you to adjust the tone
volumes to a more acceptable volume. There
are three possible volume levels.
Pressthe Bake and Broil Hi/Lo pads(on
%
double oven models,usethe upper oven
controls)at the same time for 3seconds,
until the display shows SF.
Pressthe Oven Light On/Off pad.The
r2]
display will show 2 BEEP.This isthe middle
volume level.
Pressthe Oven Light On/Off pad again.
Thedisplay will show 3 BEEP.Thisisthe
loudest volume level.
Pressthe Oven Light On/Off pad again.
Thedisplay will show 1 BEEP.This isthe
quietest volume level.
12-Hour, 24-Hour or Clock Black-Out
Your control isset to usea 12-hour clock.
Ifyou would prefer to have a 24-hour military
time clock or black out the clock display,follow
the steps below.
Pressthe Bake and Broil Hi/Lo pads (on
%
doubleovenmodels,usetheupperoven
controls)at the same time for 3 seconds,
until the display shows SF.
Pressthe Clock pad once.Thedisplay will
[]
show 12 hr. If this isthe choiceyou want,
press the Start pad.
Foreach time the levelis changed,
a tone will sound to provide an indication
of the volume level.
Choosethe desired sound level
(1BEEF),2 BEEF),3 BEEP).
[] Pressthe Start pad to activate the desired
levelshown.
NOTE:
On double oven models, this activates this
special feature for both ovens.
On models with oven knob(s), this feature is
not available for the lower oven.
Pressthe Clock pad again to change to
the 24-hour military time clock.The
display will show 24 hr. Ifthis is the choice
you want, pressthe Start pad.
Pressthe Clock pad again to blackout
the clock display.Thedisplay will show
OFF.If this is the choiceyou want, press
the Start pad.
NOTE:Ifthe clockis in the black-out mode,you
will not be able to usetheDelay Start function.
Bro ,,3
Cook and Hold
Yournew control hasa cook and hold feature
that keepscookedfoods warm for up to 5 hours
after TimedBaking or Roasting isfinished.
NOTE:Thisfeature can only be programmed to
work with TimedBaking or Roasting.(Seethe
Usingthe timed bakingand roasting features
section.)After TimedBaking or Roasting has
automatically stopped, theprogrammed Cook
and Hold will automatically start.
Toactivate this feature for useafter Timed
Bakingor Roasting,follow the steps below.
Pressthe Bake and Broil Hi/Lo pads (on
E]
double oven models, usethe upper oven
controls) at the same time for 3 seconds
untilthe display shows SF. Thenproceed
with steps 2through 3, using the pads for
the upper or lower oven.
[_ Pressthe Cooking Time pad. Thedisplay
will show Hid OFF.
Pressthe Cooking Time pad again to
activate the feature. Thedisplay will show
Hid ON.
Pressthe Start pad to activate the cook
and hold feature and leavethe control set
in this special features mode.
NOTE:Onmodels with ovenknob(s),thisfeature
isnot availablefor thelower oven.
19
Page 20
Special features of your oven control.
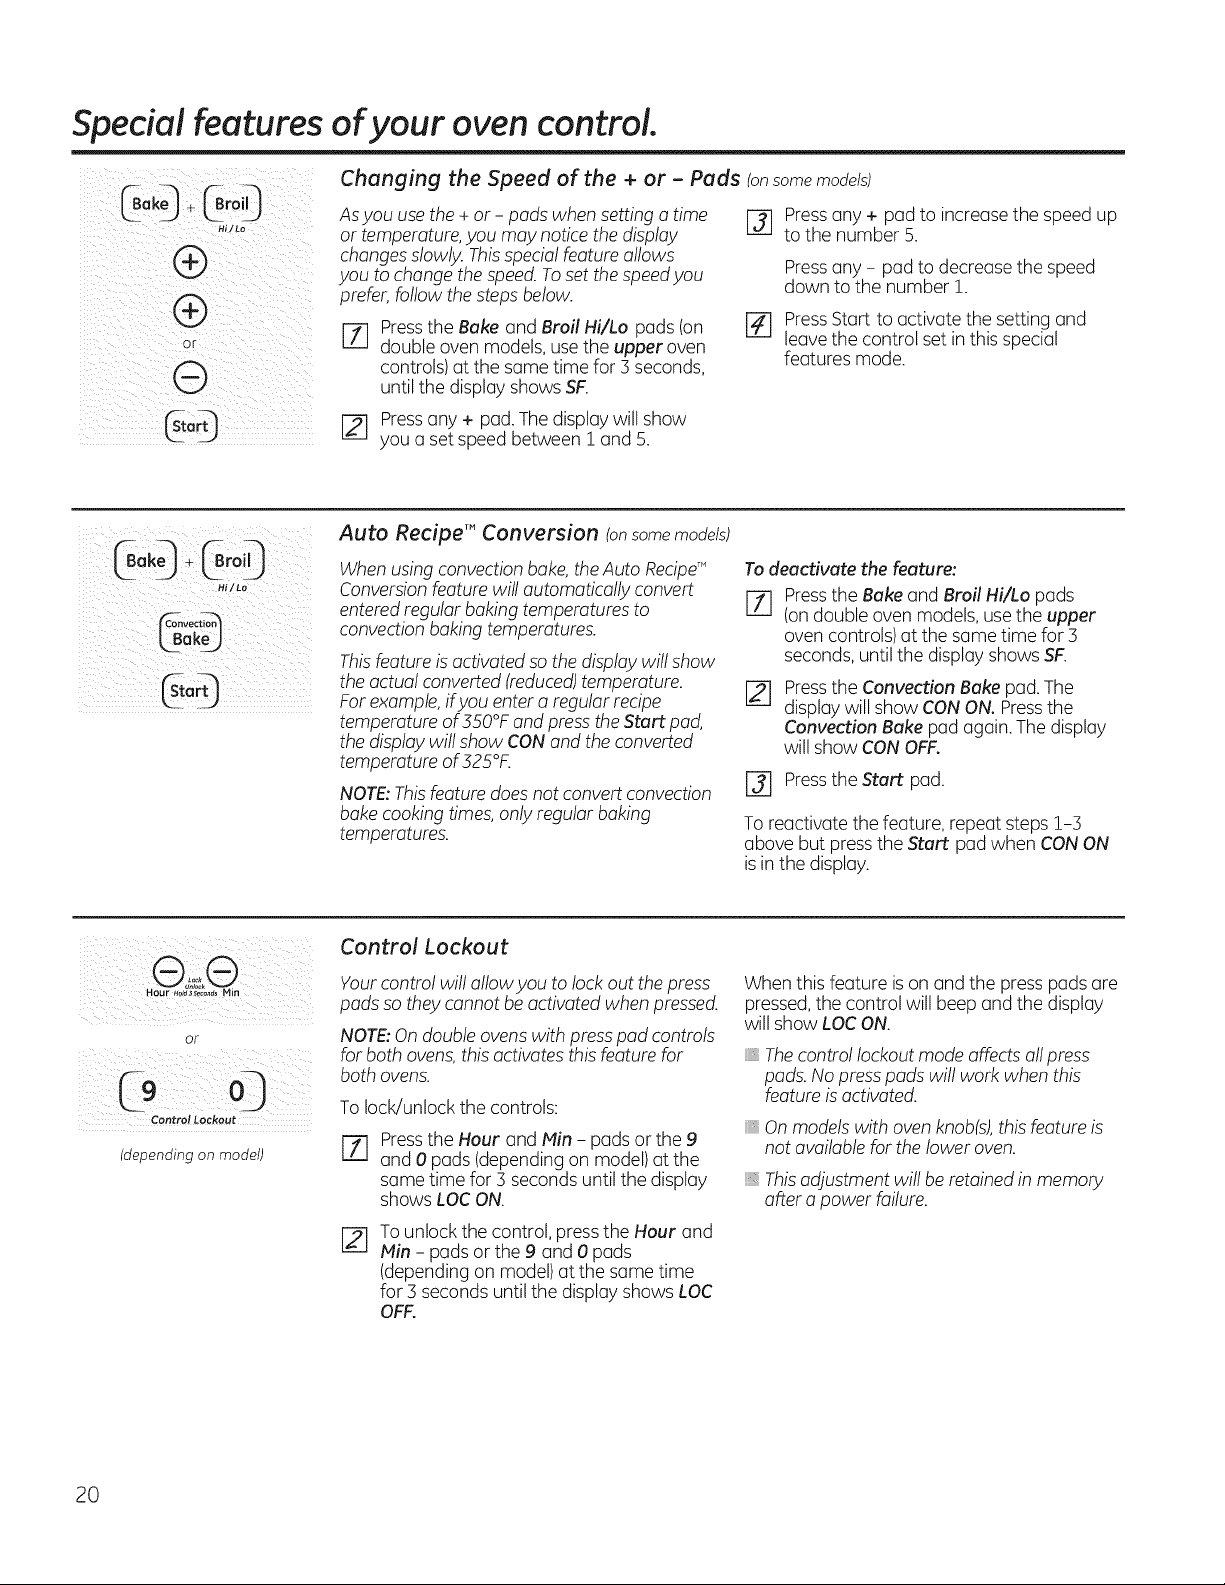
Changing the Speed of the + or - Pads (onsome models)
_ake i _ro!O
Hi/Lo
or
HJ/Lo
Asyou usethe + or - pads when setting a time
or temperature,you may notice the display
changesslowly. Thisspecialfeature allows
you to changethe speed.Toset the speedyou
prefer, follow the steps below.
[Z] Pressthe Bake and Broil Hi/Lo pads (on
double oven models,usethe upper oven
controls)at the same time for 3seconds,
until the display showsSK
r_ Pressany + pad.Thedisplay will show
you a set speed between I and 5.
Auto Recipe'" Conversion (onsomemodels)
Whenusing convection bake,theAuto RecipeT"
Conversionfeature will automatically convert
entered regular baking temperatures to
convection baking temperatures.
Thisfeature is activated so thedisplay will show
the actual converted(reduced)temperature.
For example,if you enter a regular recipe
temperature of 350°F and press the Start pad,
the display will show CON and the converted
temperature of 325°K
NOTE:Thisfeature doesnot convert convection
bakecooking times,only regular baking
temperatures.
r_ Pressany + pad to increasethe speed up
to the number 5.
Pressany - pad to decrease the speed
down to the number 1.
r_ Pressstart to activate the setting and
leavethe control set in this special
features mode.
Todeactivate the feature:
E_ Pressthe Bakeand Broil Hi/Lo pads
(ondouble oven models,usethe upper
oven controls)at the same time for 3
seconds,until the display showsSlr.
[] Pressthe Convection Bake pad. The
display will show CONON. Pressthe
Convection Bake pad again.The display
will show CON OFF.
[] Press the Start pad.
To reactivate the feature, repeat steps 1-3
above but press the Start pad when CON ON
is in the display.
Contro! Lockout
(depending on model)
20
Control Lockout
Yourcontrol will allowyou to lock out the press
pads so they cannot be activated when pressed.
Whenthis feature is on and the presspads are
pressed,the control will beep and the display
will show LOC ON.
OF
NOTE:On double ovens with press pad controls
for both ovens, this activates this feature for
both ovens.
To lock/unlock the controls:
Pressthe Hour and Min - pads or the 9
%
and 0 pads (depending on model)at the
same time for 3seconds until the display
shows LOCON.
Tounlock the control, pressthe Hour and
r21
Min - padsor the 9 and 0 pads
Thecontrol lockout mode affectsall press
pads.No presspads will work when this
feature is activated.
On models with oven knob(s), this feature is
not available for the lower oven.
This adjustment will be retained in memory
after a power failure.
(depending on model)at the same time
for 3 seconds until the display shows LOC
OFF.
Page 21

Using the Sabbath Feature.
(Designedfor use on the Jewish Sabbath and Holidays.) (on some models)
TheSabbath feature can be used for baking/roasting only. It cannot be used for broiling, self-cleaning
or Delay Start cooking.
NOTE: The oven light comes on automatically (on some models) when the door is opened and goes off when the door is
closed. The bulb may beremoved. Seethe Oven Light Replacement section. Onmodels with a light switch on the control
panel, the oven light may be turned on and left on.
How to Set Sabbath Feature for Regular Baking/Roasting
@o@÷@,oO
_iiLo
¢ooloy3
LstoaJ
1 2 3 4 5
7 8 L9 03
or
$
@o0
When the display shows D the
oven is set in Sabbath. When the
display shows PC the oven is
baking/roasting.
NOTE:Tounderstand how the oven control
works,practice using regular baking {non-
Sabbath) before entering Sabbath mode.
lake sure theclock shows the correct time of
day.
[Z] Pressand hold both the Bake and Broil
Hi/Lo pads,at the sametime, until the
display shows SF.
NOTE:If bake or broil appears inthe
display,the Bake and Broil Hi/Lo pads
were not pressed at the same time. Press
the Clear/Offpad and begin again.
[] Tap the Delay Start pad until SAb bAtH
appears in the display.
Pressthe Start padand D will appear in
[-_ the display.
Pressthe Bake pad. Nosignal will be
%
given.
On models with number pads, pressthem
@
in order to set the desired temperature.
On models with Tamp+ and - pads,
the preset starting temperature will
automatically be set to 350°.Tapthe
Tamp + or - padsto increaseor decrease
the temperature in 5° increments. (The
Tamp + or - pad should be tapped for
each temperature change; pressing and
holding these pads will not allow accurate
temperature setting.)Thetemperature
can be set between 170°and ss0°.
No signal or temperature will be given.
[] Pressthe Start pad.
[Z] After a random delay period of
approximately 30 seconds to i minute,
x will appear in the display indicating
that the oven is baking/roasting. Ifpc
doesnot appear in the display,start again
at step 4.
Toadjust the oven temperature, pressthe
Bake pad and enter the new temperature
usingthe number pads(on some models)or
tap the Temp+ or - pads (onsome models)
to increase or decrease the temperature in S°
increments.(TheTemp+ or - pad should be
tapped for eachtemperature change; pressing
and holdingthese padswill not allow accurate
temperature setting.)
Pressthe Start pad.
NOTE:TheClear/Off and Cooking Time pads
are active during the Sabbath feature.
GEAppliances.com
21
Page 22

,Usingthe Sabbath Feature.
How to Set Sabbath Feature for Timed Baking/Roasting - Immediate Start and
Gog÷ ro
1 2 3 4 5
H_ILO
LstorL,J
ffoo_i@
LTi_eJ
or
®®
Idependlng on model,
] Z 3 4 5
2 r
®
@
iaepending on modelt
When the display shows D the
oven is set in Sabbath. When the
display shows PC the oven is
baking/roasting.
Automatic Stop
NOTE:Tounderstand how the oven control
works,practice using regular (non-Sabbath)
Immediate Start and Automatic Stop before
enteringthe Sabbathmode.
Makesure theclockshows the correct time of
day.
Pressand holdboth the Bake and Broil
%
Hi/Lo pads,at the same time, until the
display shows SF.
NOTE:If bake or broil appears in the
display,the Bake and Broil Hi/Lo pads
were not pressed at the same time. Press
the Clear/Off pad and begin again.
Tapthe Delay Start pad until SAbbAtH
r21
appears in the display.
Pressthe Start pad and D will appear in
@
the display.
Press the Cooking Time pad.
%
On models with number pads,press them
@
to set the desiredlength of cooking time
between 1minute and 9 hours and 99
minutes.
On models with Hourand fin + or -
pads,press them to setthe desired length
of cooking time between i minute and 9
hours and 59 minutes.
Thecooking time that you entered will be
displayed.
Pressthe Start pad.
@
P[essthe Bake pad.No signalwill be
Ir I
given.
r_ on modelswith number pads, pressthem
in order to set the desired temperature.
On models with Temp+ and - pads,
the preset starting temperature will
automatically be set to 350°.Tap the
Temp + or - pads to increaseor decrease
the temperature in 5° increments. (The
Temp + or - pad should be tapped for
eachtemperature change; pressing and
holding these pads will not allow accurate
temperature setting.)Thetemperature
can be set between 170°and 550°.
No signalor temperature will begiven.
Pressthe Start pad.
%
After a random delay period of
[]
approximately 30 seconds to i minute,
DC will appear in the displayindicating
that the oven is baking/roasting. IfDe
does not appear in the display,start again
at step 7.
To adjust the oventemperature, pressthe
Bakepad and enter the new temperature
usingthe number pads (onsome models)or
tap the Temp+ or - pads (on some models)
to increase or decrease the temperature in 5°
increments.(TheTemp + or - padshould be
tapped for each temperature change; pressing
and holding these pads will not allow accurate
temperature setting.)
Pressthe Start pad.
When cooking isfinished,the display will
change from DC to D and 0:00will appear,
indicating that the oven hasturned OFFbut is
stillset in Sabbath. Removethe cooked food.
22
Hi/Lo
How to Exit the Sabbath Feature
rl] Pressthe Clear/Off pad.
Ifthe oven iscooking,wait for a random
r21
delay period of approximately 30 seconds
to 1 minute, until only D isin the display.
Pressand hold both the Bake and Broil
@
Hi/Lo pads,at the same time, until the
display shows SF.
Tap the Delay Start pad until 12 shdn
%
or no shdn appears in the display. 12
shdn indicates that the oven will
automatically turn off after 12 hours.
no shdn indicates that the oven will not
automatically turn off.
[] Press the Start pad.
NOTE:Ifa power outage occurred while
the oven was in Sabbath mode,the oven will
automatically turn off and the ovencontrol
must be reset.
Page 23

Care and cleaning of the oven. GEAppliances.com
Be sure electrical power is off and all surfaces are cool before cleaning any part of the oven.
How to Remove Protective Shipping Film and Packaging Tape
Carefullygrasp a corner of the protective
shipping film with your fingers and slowly peel
itfrom the appliance surface. Donot useany
sharp items to remove the film. Removeall of
the film before usingthe appliance for the first
time.
Control Panel
It'sa good idea to wipe the control panel after
each use.Cleanwith mild soup and water or
vinegar and water, rinse with clean water and
polish dry with a soft cloth.
Control Knob (on somemodels)
Thecontrol knobs may be removed for easier
cleaning.
Hake sure the knobs are in the OFFpositions
and pull them straight offthe stems for
cleaning.
To assure no damage is done to the finish
ofthe product, the safest way to remove
the adhesive from packaging tape on new
appliances isan application of a household
liquid dishwashing detergent.Apply with a soft
cloth and allow to soak.
NOTE:The adhesive must be removed from all
parts. It cannot be removed if it is baked on.
Donot use abrasive cleansers,strong liquid
cleansers,plastic scouring pads or oven
cleaners on the control panel-they will
damage the finish. A 50/50 solution of vinegar
and hot water works well.
Theknobs can becleaned in a dishwasher or
they may also bewashed with soap and water.
Hake sure the inside of the knobs are dry
before replacing.
Replacethe knobs in the OFF )osition to ensure
proper placement.
Slot
Pull hinge locks down ta unlock
Removal position
Lift-Off Oven Door
The door is very heavv. Be careful when []
removing and lifting the door.
Do not liftthe door by the handle.
To remove the door'.
[Z] Fullyopen the door.
r_ Pullthe hinge locks down toward
the door frame, to the unlocked position.
A tool, such as a small
flat-blade screwdriver, may be required.
Firmlygrasp both sidesof the door at the r_
r_ top.
[] Closedoor to the door removal position,
which ishalfway between the broilstop r_
position and fully closed.
Liftdoor up and out until the hinge arm is
clear of the slot.
To replace the door'.
Firmlygrasp both sides of the door at the
[Z] top.
With the door at Bottom
Hince arm
the same angle edgeof
asthe removal slot
position,seat the
indentation ofthe
hinge arm into
the bottom edge
of the hinge slot.
Thenotch in the
hinge arm must be fully seated into the
bottom ofthe slot.
Fullyopen the door. If the door will not
fully open,the indentation is not seated
correctly in the bottom edge ofthe slot.
Pushthe hinge locks up against the front
frame of the oven cavity,to the locked
position.
Hinc
arm
Hing
Push hinge lacks up to lock
r_ Closethe oven door.
23
Page 24

Care and cleaning of the oven,
Door (onself-cleanovens)
Toclean the inside ofthe door:
Becausethe area insidethe gasket is
cleaned during the self-clean cycle,you do
not need to clean this by hand.
Thearea outside the gasket and the door
liner can be cleaned with a soap-filled
Donot rub or cleon thedoor gasket-
it hasan extremdy low resistanceto
abrasion.
Ifyou notice the gasketbecoming worn,
frayed or damagedin any way or if it
has becomedisplacedon the door,you
shouldhaveit replaced.
scouring or plastic pad, hot water and
detergent. Rinsewell with a vinegar and
water solution.
Toclean the outsideof the door:
Usesoap and water to thoroughly clean the
top, sidesand front of the oven door. Rinse
well. You may also usea glass cleaner to
cleanthe glass on the outside of the door.
Donot letwater drip into the vent openings.
,, If any stain on the door vent trim is
persistent,use a soft abrasive cleaner and a
sponge-scrubber for best results.
Spillageof marinades, fruit juices,tomato
saucesand basting materials containing
acids may cause discoloration and should
be wiped upimmediately. When surface is
cool,clean and rinse.
Donot useoven cleaners, cleaning powders
or harsh abrasiveson the outsideof the
door.
Do not allow food spills with a
high sugar or acid content (such as
tomatoes, sauerkraut, fruit juices or
pie filling) to remain on the surface.
They may cause a dull spot even
after cleaning.
...... Oven Racks
Door (on models with a knob for the lower oven)
Toclean the inside of the door'.
Soap and water will normally do thejob.
Heavyspattering or spillovers may require
cleaning with a mild abrasive cleaner. Soap-
filled scouring pads may also be used.
If necessary,you may usean oven cleaner.
Follow the package directions.
Cleanthe insideof the oven window with
a mild non-scratching cleaner and a damp
cloth.
Toclean the outside of the door:
Usesoap and water to thoroughly clean the
top, sidesand front of the oven door. Rinse
well. You may also usea glass cleaner to
Cleanthe oven racks with an abrasive cleanser
or soap-filled scouring pad.After cleaning,
rinsethe rackswith cleanwater and dry with a
clean cloth.
clean the glass on the outside ofthe door.
Donot let water drip into the vent openings.
Spillageof marinades, fruit juices, tomato
sauces and basting materials containing
acids may cause discoloration and should
be wiped up immediately. When surface is
cool, clean and rinse.
Donot useoven cleaners,cleaning powders
or harsh abrasiveson the outside of the
door.
NOTE:Theovenracks may be cleanedin the
self-cleaningoven.However, the rackswill
darkenin color,lose their luster and become
hard to slide if cleaned during theself-cleaning
cycle.Youcan wipe the rack supports with
cooking oil after self-cleaningto make the racks
slide more easily.
i . _ i_I
After broiling, remove the broiler
pan from the oven.
Do not store a soiled broiler pan
and grid anywhere in the oven.
24
Broiler Pan & Grid
Do not cleanthe broiler pan or grid in a self-
cleaning oven.
After broiling, remove the broilerpan from the
oven. Removethe grid from the pan. Carefully
pour out the grease from the pan into a proper
container.
Wash and rinse the broilerpan and grid in hot
water with asoap-filled or plastic scouring pad.
Iffood has burned on, sprinkle the grid with
detergent while hot and cover with wet paper
towels or a dishcloth. Soakingthe pan will
remove burned-on foods.
Boththe broiler pan and grid may be cleaned
with a commercial oven cleaner.
Boththe broiler pan and grid can alsobe
cleaned in a dishwasher.
Page 25

GEAppliances.com
iAWARNING
iA CAUTION
Receotacle
on some moaels
SHOCK OR BURN HAZARD: Before replacing oven light bulb, disconnect the electricalpower to the oven at the main fuse or circuit breaker panel. Failure to do so may result
in electric shock or burn.
i URN HAZARD: The gloss cover and bulb should be removed when cool. Touching hot
gloss with bore hands or a damp cloth can cause burns.
Oven Light Replacement
To remove:
To replace:
ocep ac OC O
turn until the tabs of the glass cover clear
r-f1 Turn the glass cover counterclockwise 1/4
the grooves of the socket. Wearing latex
gloves may offer a better grip.
r_ using gloves or a dry cloth, remove the
bulb by pulling it straight out.
[Z] use a new 120/130-volt halogen bulb, not
to exceed 50 watts. Replace the bulb with
the same type of bulb that was removed.
Your model will have one of the two types
shown on the left.To determine the
correct replacement bulb, check the bulb
terminals. Bulbs with 2 straight pin
terminals are G6.35 bulbs. Bulbs with 2
looped terminals are G9 bulbs. (Do not
interchange.) Be sure the replacement
bulb is rated 120 volts or 130 volts (NOT
12 volts).
Usinggloves or a dry cloth, remove the
BE
bulb from its packaging. Do not touch the
bulb with bare fingers. Oilfrom skin will
damage the bulb and shorten its life.
Receptacle
i
gtovesor
cloth
Placethe tabs of the glasscover into the
%
grooves of the socket.Turnthe glass
cover clockwise 1/4 turn.
Forimproved lighting inside the oven,
cleanthe glass cover frequently using a
wet cloth.Thisshould bedone when the
oven iscompletely cool.
[] Reconnectelectrical power to the oven.
(on some models
:i¸!Q!!i!ii
i u
13½" _ '
, P-\ :
'Bulb,
I
n u
Glasscove[
Pushthe bulbstraight into the receptacle
r_ all the way.
Oven Light Bulb (onsomemodels)
Toremove:
Turn the glass cover counterclockwise 1/4
turn until the tabs of the glass cover clear the
grooves of the socket. Remove the bulb.
Toreplace:
Putin a new 40-watt appliance bulb. Placethe
tabs of the glass cover into the grooves of the
socket.Turn the glasscover clockwise 1/4 turn.
NOTE:
A 40-watt appliance bulb is smaller than
a standard 40-watt householdbulb.
Install and tighten the cover clockwise.
Reconnect electrical power to the oven.
For improved lighting inside the oven, clean
the glass cover frequently using a wet
cloth. This should be done when the oven is
completely cool.
25
Page 26

Care and cleaning of the oven,
Non-Self-Clean Oven Interior (onsome models)
With proper care,the porcelain enamel finish
on the insideof the oven-top, bottom, sides,
back and insideof the door-will stay new-
lookingfor years.
Letthe oven cool before cleaning.We
recommend that you wear rubber gloves when
cleaning the oven.
Soapand water will normally do the job. Heavy
spattering or spilloversmay require cleaning
with a mild abrasive cleaner. Soap-filled
scouringpadsmay alsobe used.
Donot allow food spillswith a high sugar or
acidcontent (suchastomatoes, sauerkraut, fruit
juices or pie filling)to remain on the surface.
Theymay cause a dull spot evenafter cleaning.
Household ammonia may make the cleaning
job easier.Place!/2 cup in a shallow glass or
pottery container in a cold oven overnight.
Painted Surfaces
Theammonia fumes will help loosenthe
burned-on grease and food.
If necessary, you may use an oven cleaner.
Follow the package directions.
_,Do not spray oven cleaneron the electrical
controls and switches becauseit could cause
a short circuit and result insparking or fire.
,, Do not allow afilm from the cleaner to build
up on the temperature sensor-it could cause
the oven to heat improperly. (Thesensor is
located at the top of the oven.)Carefullywipe
the sensor clean after each ovencleaning,
beingcareful not to move the sensoras a
change in its position couldaffect how the
oven bakes.
,, Do not spray any oven cleaneron the oven
door, handlesor any exterior surface of
the oven,cabinets or painted surfaces.The
cleaner candamage these surfaces.
Cleanwith soap and water or a vinegar and
water solution.
Glass Surfaces
To cleanthe outside glass finish, use a glass
cleaner. Rinseand polishwith a dry cloth.
Stainless Steel Surfaces (on some models)
Do not usea steel wool pad; it will scratch
the surface.
Toclean the stainless steel surface, use warm
sudsy water or a stainless steel cleaner or
polish.Always wipe the surface in the direction
of the grain. Followthe cleaner instructions for
cleaning the stainlesssteel surface.
Do not usecommercial oven cleaners,
cleansing powders, steel wool or harsh
abrasiveson any painted surface.
Do not allow the water or cleaner to run down
insidethe oven door while cleaning.
Toinquire about purchasing stainlesssteel
appliance cleaner or polish,or to find the
location of a dealer nearest you, pleasecall our
toll-free number:
National Parts Center
1.800.626.2002
GEAppliances.com
26
Page 27

Before you call for service... GEAppliances.com
Troubleshooting Tips
Save time and money! Review the charts on the following pages
first and you may not need to call for service.
Causes What To Do
Control signals after You forgot to enter a , Pressthe Bake pad and desired temperature or the
entering cooking time bake temperature or Self Clean pad and desired clean time.
or delay start cleaning time.
Fooddoes not bake Oven controls improperly set. • Seethe Usingthe oven section.
or roast properly Rackposition isincorrect • Seethe Usingthe oven section.
or the rack is not level.
Incorrect cookware or • Seethe Usingthe oven section.
cookware of improper
size being used.
Oven thermostat . Seethe Adjust the oven thermostat Do it yourselfl
needs adjustment, section.
Fooddoes not Oven controls improperly set. • Hake sureyou press the Broil Hi/Lo pad.
broil properly Improper rack • Seethe Broiling Guide.
position being used.
Foodbeing cooked • Usethe broiling pan and grid that came with your oven.
in a hot pan. Hake sure it is cool.
Cookware not suited • Usethe broiling pan and grid that came with your oven.
for broiling.
Aluminum foil used on the . Seethe Usingthe oven section.
the broiling pan and grid has
not been fitted properly and
slit as recommended.
In some areas the power
{voltage) may be low.
. Preheatthe broil element for 10 minutes.
Broil for the longest period of time recommended in
the Broiling Guide.
Clock and timer A fuse in your home • Replacethe fuse or resetthe circuit breaker.
do not work may be blown or the
circuit breaker tripped.
Oven controls improperly set. . See the Using the clock, timer and control lockout
section.
Oven light does Light bulb islooseor defective. • Tighten or replace the bulb.
not work
Pad operating light is broken. . Call for service.
27
Page 28

Before you call for service...
Troubleshooting Tips
Causes What To Da
Oven temperature too Oven thermostat . Seethe Adjust the oven thermostat Do it yourself!
hot or too cold needs adjustment, section.
Oven will not work A fuse in your home may . Replacethe fuse or reset the circuit breaker.
Oven will not self-clean The oven temperature • Allowthe oven to cool and reset the controls.
"Crackling" or This is the sound of the . This is normal.
"popping" sound metal heating end cooling
Excessive smoking Excessive soil. . Pressthe Clear/Off pad. Open the windows to rid
during clean cycle the room of smoke. Wait until the LOCKEDlight goes
Oven door will not Oven too hot. . Allow the oven to cool below locking temperature.
open after a
clean cycle
Oven notclean aftera Oven controls improperly set • See the Using the self-cleaning oven section.
clean cycle Oven was heavily soiled. . Clean up heavy spillovers before starting the clean
be blown or the circuit
breaker tripped.
Oven controls improperly set. . See the Using the oven section.
is too high to set o
self-clean operation.
Oven controls improperly set. . Seethe Using the self-cleaning oven section.
during both the cooking
and cleaning functions.
off. Wipe up the excess soil and reset the clean cycle.
cycle. Heavily soiled ovens may need to self-clean
again or for u longer period of time.
"LOCK DOOR" flashes The self-clean cycle . Close the oven door.
in the display has been selected but
the door is not closed.
LOCKEDlight is on The ovendoor is locked . Pressthe Clear/Off pad. Allow the oven to cool.
whenyou want to cook because the temperature
inside the oven has not
dropped below the
locking temperature.
28
Page 29

Possible Causes What To Do
"F-- and a number You have a function . Press the Clear/Off pad. Allowthe oven to cool for
or letter" flash error code. one hour. Put the oven back into operation.
in the display ff the function . Disconnect all power to the oven for at least 30
code repeats, seconds and then reconnect power. If the function
error code repeats, call for service.
GEAppliances.com
Display goes blank A fuse in your home may . Replace the fuse or reset the circuit breaker.
Display flashes Power failure. . Reset the clock.
Unable to get the
display to show SF"
Power outage, Power outage or surge. . Reset the clock. Ifthe oven was in use, you must reset
clock flashes it by pressing the Clear/Off pad, setting the clock
"Burning" or "oily" This is normal in a . To speed the process, set a self-clean cycle for a
odor emitting from new oven and will minimum of 3 hours. See the Using the self-cleaning
the vent disappear in time. oven section.
Strong odor An odor from the insulation . This is temporary.
Fan noise A cooling fan may , This is normal. The cooling fan will turn on
be blown or the circuit
breaker tripped.
The clock is in the . See the Special features ofyour oven control section.
black-out mode.
Oven control pads were
not pressed properly.
around the inside of the
oven is normal for the first
few times the oven is used.
automatically turn on. to cool internal parts. It may run for up to 1-!/2
. The Bake and Broil Hi/Lo pads must be pressed
at the same time and held for 3 seconds.
and resetting any cooking function.
hours in 30" models and up to 2 hours in 27" models
after the oven isturned off.
29
Page 30

Accessories.
Looking For Something More? (Not all accessories are available for all modelsJ
You can find these accessories and many more at GEAppliances.com (U.S.) or
www.GEAppliances.ca (Canada), or call 800.626.2002 (U.S.) or 800.66.l.1616 (Canada) (during
normal business hours). Have your model number ready.
Grates Surface Burner Heads and Caps Surface Elements andDrip Pans Knobs
Experiencetheseothergreatproductstokeep your kitchenlookinggreat!
_L,A_./'#_',?,_Ceramic Cooktop Ceramic Cooktop Stainless Steel
__ Cleaning Kit: Cleaning Wipes Appliance Polish
ii {{{ {{ { ¸5¸¸¸¸¸¸¸{¸
Oven Racks Oven Elements
Includes cleaner, Wipes
scraper and pad
WXIOXII7GCS WXIOXS05 WXIOXI0002
Stainless Steel
Appliance
Cleaner
PMlOX511
30
Get the most out of your Broiler Pan! {Not for use with Broiler Drawer models.}
Useyour pan and grid cover to broilhamburgers, seafood,steaks,vegetables,
bacon, chops and so much more! Thepan below catches the excessfats and oils.
. GenuineGEPart
. EasyToClean
• One-YearWarranty
Limited Time Offer! Free Shipping!
Whenyou order your broiler pan within 30 days of purchasing your GEcooking product.
Small Large* ×L**
Part # WB48X!0055 WB48X!0056 WB48X!0057
Dimensions 8-3/4" W x 1-1/4" H x 13-1/2" D 12-3/4" W x 1-1/4" H x 15-1/4" D 15-1/2" W x 1-1/4" H x Z9"D
* The large (standard) broil pan does not fit in 20"/24" ranges.
** TheXL pan does not fit in 24" wall ovens, 27" drop-ins or20"/24" ranges.
To place your order, call 800.626.2002 (U.S.),800.661.1616 (Canada) or mail this form to:
Inthe U.S.:GEParts,P.O.Box221027, IV]emphis,TN 38122-1027. In Canada: GEParts, 1Factory Lane,IV]oncton,N.B.EIC91v]3
-9<-
Broiler Pan Order Form
Quantity
Model Number
FirstName
Address
City
Phone
Check
Call800.626.2002 in the U.S.or 800.661.6161 in Canada for current pricing. All credit card orders must be called in.
Money Order
Serial Number Brand Dote of Purchase
Part Number
Last Name
State Zip Code
F-Mail
Page 31

GEBuilt-In Electric Oven Warranty.
All warranty service provided by our Factory Service Centers, or an
authorized Customer Care ®technician. To schedule service, visit us
on-line at GEAppliances.com, or call 800.GE.CARES (800.432.2737).
Please have serial number and model number available when calling for
service.
GE Will Replace:
Any part of the oven which fails due to a defectin materials or workmanship.
Fromthe date of the During this limited one-year warranty, GEwill also provide,free ofcharge, all labor
origina!purchase and in-home serviceto replacethe defectivepart.
Service trips to your home to teach you how to
usethe product.
Improper installation, delivery or maintenance.
Product damage or failure of the product if it is abused,
misused, modified, usedfor other than the intended
purpose, or used commercially.
Replacement of house fuses or resetting of circuit
breakers.
Damage to the product caused by accident, fire, floods or
acts of God.
Incidental or consequentialdamage caused by possible
defects with this appliance.
Damage caused after delivery.
Product not accessible to provide required service.
Stapleyour receipt here.
Proof of the original purchase
date isneeded to obtain service
under the warranty.
EXCLUSION OF IMPLIED WARRANTIES--Your sole and exclusive remedy is product repair as provided in this Limited
Warranty. Any implied warranties, including the implied warranties of merchantability or fitness for a particular purpose,
are limited to one year or the shortest period allowed by law.
This warranty is extended to the original purchaser and any succeeding owner for products purchased for home
use within the USA.If the product is located in an area where service by a GEAuthorized Servicer isnot available, you
may be responsible for a trip charge or you may be required to bring the product to an Authorized GEService location for
service. In Alaska, the warranty excludes the cost of shipping or service calls toyour home.
Some states do not allow the exclusion or limitation of incidental or consequential damages. This warranty gives
you specific legal rights, and you may also have other rights which vary from state to state. To know what your
legal rights are, consult your local or state consumer affairs office or your state's Attorney General.
Warranton General Electric Company. Louisville, KY 40225
31
Page 32

Consumer Support.
GEAppliances Website GEAppliances.com
Have a question or need assistancewith your appliance?Try the GEAppliancesWebsite 24 hours a day,
any day of the year! Forgreater convenience and faster service,you can now download Owner's Manuals,
order parts or even schedule serviceon-line.
Schedule Service GEAppliances.com
Expert GErepair service is only one step away from your door. Get on-line and schedule your service at
your convenience any day of the year! Or call 800.GECARES (800.432.2737) during normal business hours.
RealLifeDesignStudio GEAppliances.com
GEsupports the Universal Designconcept-products, servicesand environments that can be used by
people of allages,sizesand capabilities. We recognizethe needto design for awide rangeof physicaland
mental abilities and impairments. Fordetails of GE'sUniversalDesignapplications, including kitchen design
ideasfor peoplewith disabilities,check out ourWebsite today. Forthe hearing impaired, please call 800.TDD.
GEAC(800.833.4322).
Extended Warranties
Purchase a GEextended warranty and learn about special discounts that are available while your warranty
isstill in effect. You can purchase it on-line anytime, or call 800.626.2224during normal business hours.
GEConsumer Home Serviceswill still be there after your warranty expires.
Partsand Accessories
Individuals qualified to service their own appliances can have parts or accessoriessent directly to their homes
(VISA,iVlasterCardand Discovercards are accepted).Order on-line today, 24 hours every day or
by phone at 800.626.2002 during normal businesshours.
Instructions contained in this manual cover procedures to be performed byany user.Other servicinggenerally
should be referredto qualified service personnel. Caution must beexercised,since improper servicing may
cause unsafe operation.
Contact Us
If you are not satisfied with the serviceyou receivefrom GE,contact uson our Website with all the details
including your phone number, or write to: General Manager, Customer Relations
GEAppliances,Appliance Park
Louisville,KY40225
GEAppliances.com
GEAppliances.com
GEAppliances.com
"] RegisterYourAppliance GEAppliances.carn
communication and prompt service under the terms of your warranty, should the need arise.
l Registeryour new appliance on-line--at your convenience! Timely product registration will allow for enhanced
You may also mail inthe pre-printed registration card included in the packing material.
32
Page 33

GEAppliances.com
Instrucciones de seguridad ....... 2-4
Instrucciones de operaci6n
Asado y horneado cronometrado ........ 10
BIoqueo de controles .................... 20
Calentamiento .......................... 11
Controles .............................. 5, 6
Convecci6n ......................... 12-14
Funciones especiales ................ 18-20
Homo ................................. 7, 8
Homo autolimpiante ................ 16, 17
Leudado ................................ 11
Modo Sabbath ...................... 21, 22
Reloj y temporizador ..................... 9
Termostato ............................. 15
Calentamiento .......................... ZZ
Cuidados y limpiezu
Asadera y rejilla ........................ 24
Bombilla ............................... 25
Cinta de empaque ...................... 23
Interior del homo ........................ 26
Panel de control ........................ 23
Papel aluminio ........................... 8
Parrillas ................................ 24
Perilla .................................. 23
Puerta del homo de levantar ........ 23, 24
Superficies de acero inoxidable ......... 26
Superficies de vidrio .................... 26
Superficies pintadas .................... 26
YKP30-Horno simple de pared de 27"
JTP30-Homo simple de pared de 30"
JTP31- Homo simple de pared de 30"
JKP70-Homo de pared de convecci6n
simple de 27"
JTP70-Horno de pared de convecci6n
simple de 30"
JKP35-Horno doble de pared de 27"
YTP35-Horno
YKPSS-Horno
YTPgS-Horno
YKP75-Horno de pared de convecci6n
doble de 27"
JTP75-Horno de pared de convecci6n
doble de 30"
doble de pared de 30"
doble de pared de 27"
doble de pared de 30"
Consejos puru resoluci6n
de problemas .................... 27-29
Accessorios .......................... 50
Soporte al consumidor
Garantia ............................... 31
Soporte al consumidor .................. 52
Escriba los n(lmeros de modelo y
serie aqu[:
N° de modelo
N ° de serie
Los puede encontrar en una etiqueta
en la moldura lateral o en la parte
delantera del homo (inferior) detrds
de la puerta del homo.
Impreso en los Estados Unidos 49-80643 11-11 GE
@
Impreso en
papel reciclado
Page 34

INFORMACION IMPORTANTE DESEGURIDAD.
LEA TODAS LASINSTRUCCIONESANTES DE USAR.
iADVERTENCIA! j
si no se sigue exactamente la informaci6n de este manual, puede ocurrir un incendio, una explosi6n o un cortocircuito
que podfia causar dahos a la propiedad, lesiones personales o la muerte.
iADVERTENClA!jAVISO IMPORTANTE DE SEGURIDAD
La Ley de t6xicos y agua potable segura de California (California Safe Drinking Water and Toxic Enforcement Act) exige
al gobernador de California publicar una lista de los sustancias conocidas en el estado que causan cdncer, defectos
de nacimiento u otros dahos, y exige a los empresas que alerten a los clientes sabre la exposici6n potencial a dichas
sustancias.
El aislamiento de fibra de vidrio en los hornos de autolimpieza emite una pequeha cantidad de mon6xido de carbono
durante el ciclo de limpieza. Puede minimizarse la exposici6n permitiendo la ventilaci6n con una ventana abierta o
utilizando un ventilador.
IA iADVERTENClA!j PRECAUCIONESDESEGURIDAD
Use este electrodom6stico s61o con la finalidad
para el cual fue fabricado, segOn se describe en el
Manual del Usuario.
Aseg0rese de que un instalador calificado instale
y conecte el electrodom6stico de forma correcta,
de acuerdo con los instrucciones de instalaci6n
provistas.
No intente reparar o reemplazar cualquier porte del
homo, a menos que se recomiende especificamente
en el manual. Cualquier otro trabajo de reparaci6n
se deber6 transferir a un t@cnico calificado.
Antes de realizar cualquier servicio, desconecte el
cable de corriente del panel del disyuntor, retirando
el fusible o apagando el interruptor.
No deje a los niBos solos- no deber6 dejar a los
niBos solos ni perderlos de vista en un 6rea donde
un electrodom6stico est6 en usa. Nunca se les debe
permitir trepar, sentarse o pararse sabre cualquier
porte del electrodom6stico.
PR ECA U C I O N: No guarde articulos que
sean de inter6s para los niBos sabre un homo, ya
que pueden sufrir lesiones graves si intentan trepar
sabre el homo para Ilegar a dichos artfculos.
} Use s61o manijas de cacerolas secas -los manijas
de cacerolas hOmedas sabre las superficies
calientes pueden producir quemaduras coma
consecuencia del vapor. Evite que los manijas de
las cacerolas tomen contacto con elementos para
calentar que est6n calientes. No use una toalla
ni telas gruesas en lugar de ganchos para colgar
cacerolas.
Nunca use el electrodom@stico para calentar o
calefaccionar la habitaci6n.
s
No toque los elementos para calendar ni la
superficie interior del homo. Estas superficies
podr6n estar Io suficientemente calientes coma
para producir quemaduras, incluso aunque su color
sea oscuro. Durante y despu6s del usa, no toque
ni permita que telas u otros materiales inflamables
tengan contacto con cualquier porte del 6tea
interior; espere el tiempo necesario hasta que
se enfrie. Otras superficies del electrodom6stico
se podr6n calentar Io suficiente para producir
quemaduras. Las superficies potencialmente
calientes incluyen la abertura de ventilaci6n del
homo, superficies cercanas a la abertura y grietas
alrededor de la puerta del homo.
No caliente envases de comida que no est6n
abiertos. Se podr6 acumular presi6n y el envase
podria expiator, ocasionando una lesi6n.
No use papel de aluminio para cubrir el fondo
del homo. El aluminio puede atrapar el color o
derretirse, Io cual puede da_ar el producto y
provocar riesgo de descarga el6ctrica o un incendio.
Evite que se produzcan rayones o golpes sabre los
puertas de vidrio o los paneles de control. Hacer
esto podr6 producir roturas de vidrios. No cocine
sabre un producto con vidrios rotos. Se podr6n
producir descargas el6ctricas, incendios o cortes.
Cocine came vacuna y de ave completamente - la
came vacuna hasta que la temperatura interior
sea par Io menos de 71° C (160 ° F)y la came de
ave hasta que la temperatura interior sea par
Io menos de 82° C (180 ° F).Lo cocci6n hasta
estas temperaturas normalmente evita cualquier
enfermedad generada par la carne.
2 CONSERVE ESTASINSTRUCCIONES
Page 35

GEAppliances.com
[A iADVERTENCIA! i MANTENGA LOS MATERIALES
ALEJADOS DEL HORNO
No guurde ni use muteriules inflamubles en o cerca
de un homo, incluyendo papel, pl6stico, mangos de
cacerolos, ropa, papel de pored, cortinas, ni gasolina
y otros vapores y liquidos inflamables.
Nunca use prendas sueltas o colgando mientras
usa elelectrodom6stico. Estas prendas se pueden
prender fuego si toman contacto con superficies
calientes, provocando quemaduras graves.
j iADVERTENCIA!
j EN CASO DE INCENDIO, SIGA LOS SIGUIENTESPASOS
I
PARA EVITARLESIONESO LA PROPAGACION DEL
MISMO:
No use agua sabre incendios generados con grasa.
Nunca tome una cacerola con llamas.
Sise incendia el horno durante una cocci6n, ahogue
el fuego cerrando la puerta del homo y apagando el
mismo o usando un matafuego de qdmicos secos o
de espuma multiprop6sito.
No permita que se acumule grasa ni materiales
inflamables en o cerca del espacio. La grasa dentro
del homo o cerca del mismo se puede prender
fuego.
iiiiiiiiiiii_i;i
Sise produce el incendio del homo durante la
limpieza autom6tica, apague el homo y espere
a que el fuego se extinga. Nofuerce la puerta
para abrirla. La entrada de aire fresco a la
temperatura de la limpieza autom6tica podr6
provocar la propagaci6n de las llamas en el horno.
Sino se sigue esta instrucci6n se podr6n producir
quemaduras graves.
INFLAMABLES
I_ iADVERTENCIA!j INSTRUCCIONESDESEGURIDADDELHORNO
Mant6ngase alejado del horno al abrir la puerta del
mismo. Elaire caliente o el vapor que se escapa
puede ocasionar quemaduras en las manos, rostra
y/u ojos.
Mantenga la ventilaci6n del horno desobstruida.
Evite que se produzca la acumulaci6n de grasa en el
horno. La grasa del homo se puede prender fuego.
Coloque los estantes del homo en una ubicaci6n
deseada mientras el mismo se enfria. Si se debe
mover un estante mientras el homo est6 caliente,
evite que la manija de la cacerola tome contacto
con el elemento caliente para calentar del horno.
AI usar balsas para cocinar o asar en el homo, siga
las instrucciones del fabricante.
Deslizar los estantes comunes hasta sus topes o
el estante extensible hasta su posici6n mdxima
de abertura es conveniente al levantar comidas
pesadas. Tambi6n previene quemaduras debido al
contacto con superficies calientes del horno olas
paredes del mismo.
No deje articulos tales coma papel, utensilios de
cocina o comida en el horno cuando no est6n en
usa. Los articulos guardados en un horno se pueden
prender fuego.
No use papel de aluminio para cubrir elfondo del
horno. Elaluminio puede atrapar el calor o derretirse,
Io cual puede da_ar el producto y provocar riesgo de
descarga el6ctrica o un incendio.
CONSERVE ESTASINSTRUCCIONES s
Page 36

INFORMACION IMPORTANTE DESEGURIDAD.
LEA TODAS LASINSTRUCCIONESANTES DE USAR.
iADVERTENClA,INSTRUCCIONESIDE SEGURIDAD DURANTE LA
Lafunci6n de limpieza autom6tica hace funcionar al horno a temperaturas Io suficientemente altos como para
quemar restos de comida en el horno. Para un funcionamiento seguro, siga estas instrucciones.
Antes de realizar la limpieza autom6tica del homo, Sise produce un funcionamiento incorrecto del
retire los estantes de color plateado brillante (en
algunos modelos) del homo, la sonda, cualquier
papel de aluminio, y cualquier cacerola para asar, y
otros utensilios. $61o se podr6n dejar en el horno los
estontes recubiertos de porcelana.
Antes de poner en funcionamiento el ciclo de
limpieza autom6tica, limpie la grasa y los restos de
comida que haya dentro del horno. Una cantidad
excesiva de grasa se podr6 prender fuego,
ocasionando dodos en su hogar como consecuencia
del humo.
LIMPlEZAAUTOMATICA DEL HORNO (Algunosmodelos)
modo de limpieza autom6tica, apague el homo y
desconecte el suministro de corriente. Solicite su
reparaci6n a un t6cnico calificado.
iiiiiiiiiiii_i;i
No limpie Iojunta de la puerta. Lajunta de la puerto
es esencial para un buen sellado. Se deber6 tener
cuidado de no frotar, da_ar ni mover lajunta.
iiiiiiiiiiii_i;i
No use limpiadores para horno. No se deber6 usar
ning0n limpiador ni capa protectora para homo de
venta comercial en o alrededor de cualquier porte
del horno.
CONSERVE ESTASINSTRUCCIONES
4
Page 37

Usa de los controles del homo. (analgunosmodelos)
A Io largo de este manual, los caracteristicas y apariencia pueden verier con los de su modelo.
GEAppliances.com
@ 0
5e muestra el control del homo doble.
Controldel homo, caracteristicas y configuraciones del reloj
(Clock)y del temporizador (Timer)
Bot6nBake(Horneado)
Presionepareseleccionarlafunci6nhomeado.
Bot6nBroilHalLo(Asarala ParrillaAlto/Bajo)
Presionepareseleccionarlafunci6nasarala parrilla.
Bot6nConvectionBake
(Homeadopar convecci6n)
Presi6nelopara seleccionar el horneado con
lafunci6n de convecci6n.
Bot6nConvectionRoast
(Asadopar convecci6n)
Presi6nelopara seleccionar el asado con
lafunci6n de convecci6n.
Bot6nStart(Inicio)
Debepresionarseparainiciarcualquierfunci6n
decocci6nolimp_eza.
Pantalla
Muestrala haredeldie,latemperaturedelhomo,
sielhomoestcienelmodode horneado,deasar
ala parrillao deautolimpiezay losharesestablecidaspare
eltemporizadoro losoperacionesautomciticas
delhomo.
Siuna"F-y un n6memo letra" parpadeanenla pantallay las
sefiales de control del homo, esto indica un c6digo de error de la
funci6n. Presioneel bot6n Clear/Off.Permita que elhomo se enfrie
durante una hare. Ponga el homo nuevamente en operaci6n. Si
el c6digo de errorde la fund6n se repite,desconecte el cable de
corrientedelhomoy comuniqueseconelserviciodemantenimiento.
Si su homo fue configumdo pare una opemci6n cmnometrada del
homo y se present6 una interrupci6n en el fluido el_ctrico, el reloj
y todas los funciones programadas @ben restabiecerse.
Lahare deldie (puede ser incorrecta)parpadearci en la pantalla
cuando se haya presentado una interrupci6n en elfluidoel_ctrico.
Bot6n Self Clean (Limpieza automdtica)
Presionepare seleccionar la funci6n de autolimpieza.
Consultela secci6nUsadelhomoautolimpieza.
Bot6nOvenLightOn/Off(Luzdelhomoencender/apagad
Presionepareencenderoapagarla luzdelhomo.
f
0
1
2 3 4 5
6
I
8 L9 ©
controlLockout
@ 0
Ll:_wer Ov_ln
G'es'O
rS,e0_.__S'orOFe'°rg
1
Bot6nDelayStart (Inicbpostergado)
UtilicejuntoconlosbotonesCookingTimeo Selfdean pare
configurarelhomoparequainiciey
sedetengaautomciticamenteenel momentaquausted
programe.
Bot6nCookingTime(Tiempodecocci6n)
Presioney luegopresionelosbotonesnum@icospare
establecerlacantidaddetiempoque@seacocinarsus
alimentos.Elhomose apagarciautomciticamentecuandose
hayaagotado
eltiempodecocci6n,a menosquesehayaconfiguradola
funci6n"CookandHold"
(Cocinary mantener).
Bot6nClear/Off
PresioneparecancelerTODASlosoperaciones
delhomoexceptoelrelojy eltemporizador.
Bot6nClock(Relo])
Presioneantesdeconfigurarelreloj.
Botonesnum_4ficos
Utiliceparaconfigurarcualquierfunci6nque
necesitenOmeroscomalaharedeldie enelreloj,
eltemporizador,latemperaturedelhomo,
latemperatureinternedela comida,la hare
deinicioy la duraci6ndelaoperaci6npare
elhorneadocronometradoy la autolimpieza.
Bot6nKitchenTimerOn/Off
(Temporizadordecocinaencender/apagar)
Presionepareseleccionarlacaracteristicadeltemporizador.
Bot6nProof(Leudado)
Presi6nelopareseleccionarun ambientetibiatitil parelever
losproductosconlevadura.
Bot6nWarm(Calentamiento)
Presi6nelopare mantenerlosalimentoscocidoscalientes.
Page 38

Uso de los controles de! horno. _nalg_no_modelos)
A Io largo de este manual, las caracteristicas y apariencia pueden variar con los de su modelo.
0
_Bak@ _Bro_
Llpper0 i_o Temp
LstorLJ
_so,f_ ro_e_
leon_ [ Light_.)
Semuestra el control del homo doble.
®
@
Temp
_TitChe_
!
® ®
L.ourHo_
®
6_°i_ rso,nrovea
@
Ternp
?_ LcleanJ LLighJ
"_ L)wer
_ook@ _ota_%A
LTimeJ LStortJ _lv
g
Controldelhomo,caracteristicasy configuracionesdelreloj
(CIock)y cleltemporizador(Timer)
Bot4nBake(Homeade)
Presioneparaseleccionarlafunci6nhomeado.
Bot6nBroilHalLo(Asara la ParrillaAlto/Bajo)
Presioneparaseleccionarlafunci6nasar
aia parrilla.
Bot4nSelfClean(kimpieza automdtica)
PresioneparaseleccionarFafunci6n deautolimpieza.
Consultelasecci6nUsodelhomoautolimpieza.
Bot6nStart(Inicio)
Debepresionarseparainiciarcualquierfunci6ndecocci6n
olimpieza.
Pantalla
Muestralahoradeldia,latemperaturadelhomo,
sielhomoest6enelmododehorneado,deasar
ala parrillaode autolimpiezay lashorasestablecidaspara
eltemporizadoro lasoperacionesautom6ticas
delhomo.
Siuna"F-y unnF_rneroo letra" parpadean enlapantalla y
lassefialesdecontrol delhomo,estoindica unc6digode error
dela funci6n.Presioneelbot6nClear/Ofi_Permitaqueel homose
enfrieduranteunahora.Pongaelhomonuevamenteenoperaci6n.
Sielc6digodeerrordelafunci6nse repite,desconecteelcablede
corrientedelhomoy comuniqueseconel serviciodemantenimiento.
Sisuhomo rueconfigurado para una operaci6ncronometrada del
homoy sepresent6unainterrupci6n enelfluido el6ctrico,elrelojy
todaslasfuncionesprogramadasdebenrestablecerse.
Lahoradeldia (puedeserincorrecta)parpadear4enla pantalla
cuandoseha.vapresentadounainterrupci6n ene!fluidoel6ctrica.
Bot6nOvenLightOn/Off(Luzdelhomoencender/apagar)el
homo.
Bot6nDelayStart(Iniciopostergado)
UtilicejuntoconlosbotonesCookingTimeo SelfCleanpara
configurarelhomoparaque iniciey
sedetengaautom6ticamenteenelmomentoqueusted
programe.
Bot4nCookingTime(Tiempodecocci4n)
Presioneestebot6ny luegopresionelosbotones
+y - deHour(Hora)y Min(Min.)paraajustar
lacantidaddetiempoquedeseacocinarsucomida.
Elhomoseapagar6autom6ticamentecuando
sehayaagotadoeltiempodecocci6n,a menos
quese hayaconfiguradolafunci6n"Cookand Hold"
(Cocinary mantener).
Bot4nClear/Off
PresioneparacancelarTODASlasoperaciones
delhomoexceptoelrelojy eltemporizador.
Botones+y- deTemp(Temp.)
Presioneestesbotonesparaajustarlatemperaturade
cocci6nquedeseausar.
Bot4nClock(Reloj)
Presioneantesdeconfigurarelreloj.
Botones+y - deHour(Hora)y Min(Min.)
Presioneestesbotonesparaajustartiempos
debasra9horasy 59minutos;pot ejemplo,la horadel dia
enel reloj,eltemporizador,elcomienzoy
laduraci6ndeltiempodecocci6nparaelhomeado
cronometrado,y elcomienzoy la duraci6ndeltiempode
limpiezaparalalimpiezaautom6tica.
Bot6nKitchenTimerOn/Off
ffemporizadordecocinaencender/apagar)
Presioneparaseleccionarlacaracteristicadeltemporizador.
j Ov_n
e
I On/Off
Configuracionesdecontroldelhomoinferiorenlosmodelosconperilla
Perilla OVEN(Homo)
Gireestaperillahasta
laconfiguraci6ndetemperatura
quedesee.
LaluzOvenCycle(CiclodelHomo)permaneceencendidahastaque
elhomoalcanzalatemperaturaseleccionada,y luegoseapagay
enciendeconel(los)elemento(s)delhomodurantela cocci6n.
Page 39

Usode!homo.
Para prevenir posibles quemaduras, coloque las parrillas en la posici6n deseada antes de encender el homo.
Antes de comenzar...
Lasparrillastienencierresdetope,deformatal que Paraquitar unaparrilla, tfrelahaciausted,incline
cuandoseencuentrencolocadoscorrectamente elfrentehaciaarribaytire laparrillahaciaafuera.
enlossoportes,sedetendr6nantesde salir
La cantidad de posiciones de ]a
bandeja puede variar en relaci6n
al modelo.
completamenteyno seinclinar6n. Parareemplazar,coloqueelextremodela parrilla
Cuandoseencuentrecolocandooquitando
utensiliosdecocina,tirede laparrillahaciaafuera
hastala protuberanciaenelapoyodelaparrilla.
C6mo configurar el homo para hornear o asar
_] presioneelbot6nBake.
Enlosmodelosconbotonesnum@ricos,
apri@telosparaajustarlatemperatura
deseada.
Enlosmodelosconbotones+y - deTemp
ffempJ,apri@telosparaaumentaro disminuir
latemperaturadeseada.
Presioneelbot6nStart.
@
Reviselosalimentosparaelpuntodecocci6n
F71
al mfnimotiempoenlareceta.Cocinedurante
m6stiemposiesnecesario.
r_ Presioneelbot6nClear/Offcuandoest@
completalacocci6n.
NOTA:Enalgunosmodelos,elhomoinferior
secontrolaconperilla.Paraajustarelhomopara
elhomeado,girelaperillaa laconfiguracidnde
temperaturadeseada.Girelaperillaa laposicidnOFF
(Apagado)cuandosehayacompletadoelhomeado
(topesdecierre)enelapoyo,inclineelfrentey
empujedela parrillahaciaadentro.
Tipodecomida Posici6nde la parrilla
Pasteles congelado Co D
(sobreuna bandejaparahomear)
Torta ligera (angel cake) A o B
Tartadelibrao Bundt Bo C
Bizcochos,muffins, Co D
brownies,galletas,
pastelesindividuales
encapa,bizcochos,pasteles
Guiso Co D
NOTA:Esposiblequeseenciendaautomdticamente
unventiladordeenfriamientopararefrigerar/as
partesintemas.Estoesnormal,y elventiladorpuede
continuarandandoincluso@spudsdeapagarel
homo.
Homo de 27"
Precalentamiento y Ubicaci6n de la Cacerola
Precaliente el horno si la receta asi Ioindica. El
precalentamiento es necesario para obtener
buenos resultados cuando horneetortas,
dulces,pastelitos y panes.
Para precalentar,configureel homo ala
temperatura correcta. Elcontrol pitar6 cuando el
homo est_ precalentado y la pantalla mostrar6
sutemperatura configurada. Estopuede tomar
aproximadamente 104S minutos.Enel caso
de hornos sin una luz o un sonidoindicador
de precalentamiento,precaliente durante 10
minutos.
Losresultados al hornear y asar ser6n mejores
siel estante escolocado de modo que la
comida est6 centrada en la cavidad del homo
tanto como sea posible.Sigalas instrucciones
del paquete al ubicar comidas previamente
envasadasy congeladas en cacerolas.
Las cacerolas no se deben tocar entre
sini tocar las paredesdel horno. Deje
aproximadamente 4 cm (1 V2pulgada) entre
lascacerolas y coloque lasmismas a a,cm
(1V2pulgada) de lasparedes del horno. Si
es necesario usar dos estantes, escalone
lascacerolas de modo que una no est6
directamente sobre la otra.
Hornos de 27": Si hornea cuatro capas de
pastel al mismo tiempo, coloque dos capas
en la parrilla A y dos capas en la parrilla C.
Hornos de 30": Si hornea cuatro capas de
pastel al mismo tiempo, coloque dos capas
en la parrilla By dos capas en la parrina D.
Ubique las cacerolas en la parrilla de
tal forma que una no est_ colocada
directamente sobre la otra.
Page 40

Usade!horno.
Papel aluminio
_!,_'_i\t\'\\\, " - ";Y. /-
\& i::(,_%
Realice cortes en el papel de
aluminio con lafarina de la rejilla.
/
Cierre lo _uerto. Siempre ose con lo
puerto cerrodo.
Si su homo estd conectodo o
208 voltios, pueden osorse filetes
jugosos precolentondo el osodor y
colocondo lo bondejo del homo en
uno posicidn rods elevodo.
Eltamaflo, peso,grosor, temperatura
inicial y su preferencia sabre el punto
de cocci6n de los alimentos afectar6n
los tiempos de cocci6n. Estagufa est6
basada en carnes a temperatura de
refrigerador.
tel Departamento deAgriculture de
EEUU.indica que: la came a poco
cocida espopular, peru usted debe
saber que cocinada a solamente JOO
°Fsignifica que algunos organismos
venenosospodrfan sobmvivir't
(Fuente:Safe Food Book.Your Kitchen
Guide.USDAkey.Junio 1985.)
Puedeutilizorseelpopeloluminioporootropor
derromes.
Nuncocubraparcompletounaporrilloconpopel
oluminio.EstoobstruirdIocirculoci6ndelcolory
Puedeutilizarseunapequehahojadepapel
aluminioparaatraparderramescoloc6ndolaenuno
delosparrillasinferioresvoriospulgodospardebojo
delolimento.
obtendr6unosododeficiente.
C6mo configurar el horno para asar a la parrilla
[71 Presioneel bot6n Bake.
[] Presione losbotones num6ricos para
establecer la temperatura deseada.
[] Presioneel bot6n Start.
Guia para asar a la parrilla
precaliente la asadera durante 2 minutos para mejorar el desempeno.
Alimento
Came de
res
Polio
Filetesde
pescado
Chuletas
de cerdo
Nivel de
cocci6n
Jugosa
(140°F)
A punto
(160°F)
Biencocida
(170°F)
Biencocida
(170°F)
Tipo o Broil Posici6n de
grosor Setting la bandeja
Filetes i 1" de HI (alta) 4 (D)
grosor
Filetes i 5/4" a HI (alta) 4 (D)
r' de grosor
Filetes - 5/4" a HI (alta) 4 (D)
F de grosor
Patties de
came picada
(1/2" a 5/4" de
grosor)
Pechuga,sin HI (alta) 1 (A)
hueso
Pechuga, con HI (alta) t (A)
hueso
Grosor de 1/2" HI (alta) ] (C)
a 1"
Grosor de 3/4" HI (alta) ] ICl
LO ] (c)
(baja)
r_ Reviselosalimentos para el punto de
cocci6n al minima tiempo en la receta.
Cocinedurante mds tiempo si es
necesario.
[] Presioneel bot6n Clear/Offcuando est6
completa la cocci6n.
Posici6n
de la
de homo
27"
bandeja
de homo
30
5(E)
5(E)
5(E)
3 (c)
3 (c)
4 (D)
4 (D)
4 (D)
Comentorios
Esdifid que filetes de
menos de 1" de grosor
queden jugosos. Se
cocinan par completo
antes de dorarse. Para
evitar que la came se
enrosque, carte la grasa a
intervalos de r'.
Espacie los patties
uniformemente. Hasta 8
patties tardan cerca del
mismo tiempo.
Asar sabre el lado de la
piel primero.
Manipule y gire con mucho
cuidado..
Para evitar que la came se
enrosque, carte la grasa
Page 41

Uso dd rdoj y el temporizador. GEAppliances.com
Para ajustar el reloj
Aseg4rese de que el reloj sea
ajustado en la hora correcta del
dia.
_ch_
LTi
El temporizador es _nicamente un
tempodzador de minutos.
El temporizador no controla
las operadones del homo.
La configurad6n m6×ima
en el tempodzador es de
9 horas y 59 minutos.
Elreloj debe set ajustado en la hora correcta
del dia para que las funciones autom6ticas
cronometradas delhomo funcionen
apropiadamente, La hora del dia no puede
cambiarse durante un ciclo de horneado
cronometrado o autolimpieza.
Para ajustar el temporizador
Presioneel bot6n Kitchen Timer On/Off
Enlos modelos con botones num@icos,
apri@eloshasta que aparezca en la
pantalla la cantidad de tiempo que desea.
Porejemplo, para ajustar 2 horas y 45
minutos, apriete 2,4 y 5,en eseorden.
Enlosmodelos con botones+ y - de Hour
tHoraJy Nin tNinJ, apri@eloshasta que
aparezca en la pantalla
la cantidad de tiempo que desea.
Eltiempo m6ximo que puede ingresar,en
minutos, es 59.
Lostiempos de cocci6n de m6s
de 59 minutos debenconvertirse
a horasy minutos. Porejemplo, ingrese90
minutos como 1 hora,
30 minutos.
Sicomete un error, apriete Kitchen Timer
On/Offy vuelva a comenzar.
r71
Presioneel bot6n Clock.
Enlosmodelos con botones num@icos,
r21
apri@elospara seleccionar la hora del dia
correcta.
Enlos modelos con botones+ y - de
Hour (Horo)y Plin (NinJ,apri6telos para
seleccionar la hora del d[acorrecta.
r3] Presioneel bot6n StaR.
r-_ Presioneel bot6n Start.
Despuds de presionar el bot6n Start,
SET desaparece; esto le indica que el tiempo
estd en cuenta regresiva,aunque la pantalla no
cambie hasta que haya pasado un minuto. En
la pantalla nosemostrordn lossegundos hasta
que el Oltimominuto estd en cuenta regresiva.
r_ cuando el temporizador alcance :00, el
control pitar6 3 vecesseguidas por un
pitido cada 6 segundos hasta que se
presioneel bot6n Kitchen Timer On/Off.
Eltono de 6 segundospuede cancelarse
siguiendo lospasos en las caroctefisticas
especialesde susecci6nde control del homo
inferior bajo la secci6ntonos al final de un ciclo
cronometrodo.
Para reiniciar el temporizador
Sila pantalla todavia est6 mostrando
el tiempo restante, puede cambiarla
presionando el bot6n Kitchen Timer On/Off,
luego presione los botones num@icos (en
algunos modelos) o los botones + o - de Hour
(Horul y Plin (Nin.) (en algunos modelos) hasta
queen la pantalla aparezca el tiempo que
desea.
Para cancelar el temporizador
Presione el bot6n Kitchen Timer On/Off dos
veces.
Siel tiempo restante no est6 en la pantalla
(en la pantalla est6 reloj,inicio postergado o
tiempo decocci6n)recuerde el tiempo restante
presionando el bot6n Kitchen Timer On/Off y
luego presionando losbotones num6ricos (en
algunos modelos)o los botones + o - de Hour
(HoraJy Min (MinJ (enalgunos modelos) hasta
ingresarel nuevo tiempo que @sea.
Page 42

Usa de ias caracteristicas cronometradas de horneado
y Gsado. (an algunos modelos)
Enlosmodelosconcontrolesdebotonesparaamboshomos,puedeusarelhomeadocronometradoenunhomomientrasusalalimpiezaautomdticaenelotto;
tambi4npuedeusarelhomeadecronometradeenamboshomosalmismotiempo.
NOTA:Nodebepermitiroequalosalimentosquaseechanaperderfdcilmente-comoleche,huevos,pescade,rellenos,avesy cerdo-roposenparrods
de1horaanteso despu4sdela cocci6n.Latemperaturaambientepromueveel crocimientodebacteriaspeligrosas.Aseg4rosedequala luzdelhomoest4apagada
yaqueelcolordelabombillaacelerarfaelcrocimientodebacteriaspeligrosas.
C6mo configurar un Inicio inmediato y una Parada autom6tica
Elhomoseencenderdinmediatamenteycocinarddurante minutos.ParejempIo,ingrese90 minutoscoma 1
1 2 3 4 5
Temp
tdependiendoenmodelo)
(dependiendo en modelo)
el tiemposeleccionado.AIfinaldeltiempode cocci6n,el hora,50minutos.
homoseapagardautomdticamente. AparecercinFatemperaturadelhomoy
Aseg0resede qua elrelojmuestre}ahoracorrectadeld[a. eltiempodecocci6nquaingres6.
[Z] Presioneelbot6nBake. r_ Presioneelbot6nStart.
j-_ EnFosmodeloscon botonesnum@icos,apri@telos
paraajustarFatemperaturadeseada.EnFos
modelosconbotones+y- deTamp_TempJ,
apri@elosparaaumentar odisminuirlatemperatura
deseada.
J-_ Presioneelbot6nCooking Time.
NOTA:Sisu rocetorequierodeprocalentomiento,esposible
quanecesitea_adirrodstiempoal tiempodecoccbn.
I-_ EnFosmodeloscon botonesnum@icos,apri@elos
hastaquaaparezcaenFapantalla
Facantidaddetiempoque@sea.Parejempio,para
ajustar2horasy 45minutos,apriete2,4y 5,en ese
arden.EnFosmodelosconbotones+y - deHour
(Hare)y Min(MinJ,apri@elosparaingresarel tiempo
dehorneadodeseado.Eltiempomciximoquepuede
ingresar,enminutos,es59.Lostiemposdecocci6n
demcisde59minutosdebenconvertirsea horasy
Lapantalh muestraFatemperaturadelhomoqua usted
configur6y lacuentaregresivadeltiempodecocci6n.
Lapantallacomienzaacambiarunavezquala
temperaturaalcanza100°F.
NOTA:Cuandousaamboshornosal mismotiempo,
lostiemposquaaparocenenIopantolloserdnlos
correspondientesal (;Itimohomoconfigurodo.Paramostror
eltiempoestoblecidoparoelprimerhomoeonfigurodo,
aprieteel bot6n Cooking Time para ese homo.
Elhomocontinuar(icocinandodurantela cantidadde
tiempoprogramada,hegoseapagaraautom6ticamente,
amenosqua est@configuradalacaracteristicaCook
andHold.VeaFasecci6ndeCaractedsticasespecialesde
controldesuhomo.
Presioneelbot6nClear/Offparaborrar lapantalh.
1 2: 3 4 5
6 7 8 _9 O_
0
®
®
oeoenalenao en moaelot
I 2 3 /4 5
T_m_
Cooking
,mg
_ 8 @ 03
0
®®
,©Q
oeper_dlendo en moaelo]
Delay
I 2 3 8 5
5 7 8 (9 o21
'aeoenacendoenmodelol
10
o
®®
@©
C6mo configurar un Inicio postergado y una Parada autom(Ttica
Ustedpuedeconfigurarel control de/homo para qua
postergueelinicio,cocineduranteunperiodoespedfico
de tiempoy luegoseapague automdticamente.
Aseg0resede que elrelojmuestre}ahoracorrectadeldh.
ET] Presioneel bot6nBake.
[] Enlosmodelosconbotonesnum@icos,apri@elos
paraajustarla temperaturadeseada.Enlosmodelos
conbotones+y - deTampfTempJ,apri@elospara
aumentaro disminuirlatemperaturadeseada.
F_ Presioneelbot6nCookingTime.
NOTA:Sisu recetarequierodeprecalentamiento,esposible
quanecesitea_adirrodstiempoal tiempodecocci6n.
F_ Enlosmodelosconbotonesnum@icos,apri@elos
hastaqueaparezcaenlapantailalacantidadde
tiempoquedesea.Parejemplo,paraajustar2 horas
y 45minutos,apriete2,4y 5,enesearden.Enlos
moddosconbotones+y- deHour (Hare)y Min
(Min.),apri@elosparaingresarel tiempo
dehomeadodeseado.Eltiempomciximoquepuede
ingresar,enminutos,es59.Lostiemposdecocci6n
demcisde59minutosdebenconvertirsea horasy
minutos.Parejemplo,ingrese90minutoscoma
i hora,50minutos.
Aparecercinlatemperaturadelhomoy eltiempo
de cocci6nque ingres6.
[] PresioneeIbot6nDelay Start.
Utilizandolosbotonesnum@icos(analgunos
modelos)olosbotones+o- de Hour(HomJyMin
(MinJ(anaigunosmodelos),ingresela horadeldia
enla cua}deseaquaelhomoseenciendaeinicie
la cocci6n.
Z] Presioneelbot6nStart.
NOTA:Untonode atenci6nsonardsiestdutilizando
elhorneadocronometrodoy nopresionaelbot6nStart
despu4sde ingrosarIotemperoturodehorneado.
Sideseaverificareltiempoquaha configurado,presione
elbot6nDelayStart paraverificar}ahoradeinicio
quaha configuradoo presioneelbot6nCookingTime
paraverificarladuraci6ndeltiempodecocci6nqueha
configurado.
Cuandoel homose enciendaa lahoradeldiaqueusted
hayaestablecido,la pantaliamostrarcielcambiode
temperatura(comenzandoa 100°F)ylacuentaregresiva
deltiempodecocci6n.Lapantailacomienzaacambiar
unavezquelatemperaturaalcanza100°F.
NOTA:Cuandousaamboshomosal mismotiempo,
lostiemposquaaparocenenla pantalloserdnlos
correspondientesal Oltimohomoconfigurodo.Paromostmr
eltiempoestoblecideparoelprimerhomoconfigurode,
aprieteelbot6n CookingTime (Tiempo de eocci6n) pare
esehomo.
Elhomocontinuarcicocinandodurantela cantidad
detiempoprogramada,luegoseapagara
automciticamente,amenosquaest@configurada
lacaracteristicaCookand Hold.Veala secci6nde
Caracteristicasespecialesdecontroldesu horno.
Presioneel bot6nClear/Offparaborrarla pantalia.
Page 43

Usa de lasfunciones de leudadoy calentamiento. 6EAppliances.com
La funci4n de leudado mantiene un ambiente tibia (4il para levar los productos con levadura.
(Disponible en el homo superior dnicamente).
C6mo configurar el leudado en el homo
PROOFI
FERMENTER J
[ ]
MINUTERIE ]
O:F0,
!I WARM
ii i I i
START
[-71 Coloquelamasacubiertaenelhomo
enlaparrillaBo C.
NOTA:Paraobtenermejoresresultados,cubra
lamasaconunpahoo conpeliculaadherente
engrasada(elpldsticodeberdasegurarsedebajo
de/recipientepara quaelventiladordelaestufa
noIoquite).
[_ Presioneel bot6nProof(leudar)yelbot6n
Start (iniciar).
Enla pantallaapareceraPrF(proof[leudar]).
Laluzdelinteriordelhomoseencender@y
permanecer@encendidaduranteel leudado.
Lafunci6ndeleudadoproporciona
autom6ticamentelatemperatura6ptimapara
elprocesodeleudadoy,par Iotanto,noposee
unajustedetemperatura.
[] Configureeltemporizadordecocina(Kitchen
Timer)eneltiempodeleudadomfnimo.
[] Cuandohayafinalizadoelleudado,presioneel
Paraevitarreducirlatemperaturadelhornoy
extendereltiempodeleudado,noabra lapuerta
delhomosinnecesidad.
Controlelosproductosdepanconanticipaci6n
paraevitarqualeudendemasiado.
NOTA:
Noutiliceelmododeleudadoparacalentar
alimentoso mantener/oscalientes.Latemperatura
deleudadode/homonoesIosuficientementealto
comaparamantenerlosalimentosatemperaturas
seguras.UtilicelafuncidnWarm (Calentar)para
mantenerlosalimentoscalientes.
Lafuncidndeleudadonofuncionardcuando
elhomoestdamdsde125°F.Enlapantalla,
aparecerd"HOT"(Caliente).
C6mo configurar el calentamiento en el homo
Lafunci6nde calentamientomantienelosalimentos
cocidoscalienteshastaunm6ximode3 horasluego
dequehayafinalizadounafunci6ncronometrada.
Obien,elcalentamientopuedeactivarsepara
mantenertibiaslosalimentoscocidoscalientes.Esta
funci6nnoest8dise_adapararecalentaralimentos
fibs.
Parautilizarestafunci6n,presioneelbot6nWarm
unavezy luegoelbot6nStart.
Paraactivarestafunci6nafin deusarlaluego
delasadou horneadocronometrado,presione
elbot6nWorm mientrasprogramaelhomoy antes
depresionarStart.
Paracocinarelementosquanosonfrescoshasta
quaest6ncrocantes
Coloquelosolimentosenfuentesobondejos
de ladosbajos.
Paraobtenermejoresresultados,coloquelos
alimentosenunaOnicacapa.Nolosapile.
Noloscubra.
VerifiquesiestSncrocantesluegode 20a30
minutos.Agregueeltiempoqueseanecesario.
NOTASIMPORTANTES:
Losalimentosdebenmantenersecalientes
ensurecipientedecoccidno@bentransferirse
aunafuenteresistenteal color.
Conrespectoa losalimentoshOmedos,cObralos
conunatapa seguraparahomoo conpapa/de
aluminio.
Losalimentosfritoso crocantesno@bencubrirse,
peropuedensecarseenexcesosiseloscalienta
demasiado.
AIabrirlapuertorepetidamente,elaimcaliente
seescapay losalimentosseenfrfan.
Dejequala temperaturadentrodelhomo
seestabiliceduranteuntiempoadicional@spuds
deagregaralimentos.
Concargosgrandes,puedesernecesariocubrir
portedelosalimentoscocinados.
Retireloscucharasparaservir,etc.,antesde
colocarlosrecipientesenelhomo.
Noutilicerecipientes,toposopelfculasadherentes
pldsticas.
bot6n Clear/Off.
,A,PRECAUCION:Losrecuentes,los
toposo lospelfculasadherentespldsticas
sederretirdnsisecolocanenelhomo.Esposiblequa
elpldsticoderretidonopuedaquitarseydstenoestd
cubiertoparsugarantfa. 11
Page 44

Uso del homo de convecci6n.
Horneado pot convecci6n
NOTA:Elventilador de convecci6nse encenderd
y se apagard en ciclos durante la cocci6n para
distribuir mejor el aim caliente en elhomo.
Elventilador deconvecci6n del homo seapaga
cuando se abre la puerta del homo. NOdeje
la puerta abierta durante periodos largos
mientras utiliza la cocci6n por convecci6n
o podrc_reducir la vida 0til del elemento
calefactor por convecci6n.
Enun homo a convecci6n, un ventilador hace
circular aire caliente sobre, debajo y alrededor
de losalimentos.
Esteaire caliente en circulaci6n se distribuye
de manera uniforme por la cavidad del horno.
Como resultado, los alimentos secocinan y
sedoran de manera uniforme; a menudo, en
menor tiempo con calor de convecci6n.
Horneado pot convecci6n en m_ltiples parrillas
Elventilador de convecci6n hace circular el aire
caliente de manera uniforme sobrey alrededor
de los alimentos. AIhornear pot convecci6n
con s61oI parrilla, siga lasposicionesde la
parrilla recomendadas en la secci6n Usodel
homo.
Ideal para alimentos horneados y dorados
de manera uniforme que se cocinan en
varias parrillas.
Adecuado para grandes cantidades de
alimentos horneados.
Buenosresultados con galletas, panecillos,
bollosdulces, brownies, magdalenas, bollos
de crema, pancitos dulces,pastel de 6ngel
y pan.
Horneado por convecci6n 0nica: Buenos
resultados con guisos.
l-f1¸
21
il _ikl
21
Posici6n de mOJtiples parrillas - 27"
i@
Posici6n de mOJtiples parrillas - 30"
12
Va que se circula aire caliente uniformemente
a Io largo del horno,los alimentos pueden
hornearse con excelentes resultados utilizando
m01tiplesparrillas.
La cantidad de tiempo requerida para
el horneado de m@tiplesparrillas puede
aumentar ligeramente para algunos alimentos,
pero se ahorra el tiempo general ya que
muchos alimentos se cocinan al mismo
tiempo. Galletas,muffins, bizcochosy otros
panecillos rc_pidosdan buenos resultados con
el horneado de m@ltiplesparrillas.
Hornos de 27" : AIhornear con 3 parrillas,
divida el horno en tercios, colocando la
parrilla deslizable en la tercera posici6n(C)y
lasparrillas rectos en la primera (A)y cuarta
posici6n (D).
Para horneado con dos bandejas, coloque una
en la segunda (B)posici6n. Coloquela otra
bandeja en la tercera (C)posici6n.
Hornos de 30": Cuando hornee con 3 parrillas,
coloque una en la segunda (B)posici6n,otra
C6mo adaptar recetas...
Usted puede utilizar sus recetas favoritas en el
homo por convecci6n.
Cuando hornee por convecci6n, reduzca la
temperatura dehorneado en 25 °Fo active
la caracterfstica de conversi6n Auto Recipe_".
Consultela secci6n Conversi6nAuto RecipeTMen
lasCaractefisticasespecialesdel control de su
homo.
en la cuarta (D)posici6ny otra enla sexta (F)
posici6n.
Para horneado con dos bandejas,coloque una
en la segunda (B)posici6n y la otra en la cuarta
(D)posici6n o coloque unaen la primera (A)
posici6ny la otra enla tercera (D)posici6n.
Para mejores resultados cuando hornee
bandejas mOltiplesde galletas,alinee el frente
de las bandejas para galletas con el extremo
frontal delas bandejas.
Bandejaspara galletas alineadasen el
extremo frontal de lasbandejas del homo
iiiB,
Utilicelos tamahos de cacerola
recomendados.
iiiiiiiiii_
Algunas instruccionesdelpaquete para
cacerolascongeladaso platos principales
ban sido desarrolladas utilizando hornos
comercialespot convecci6n.Paramejores
resultadosen estehomo, precalienteel
homoy utilice la temperatura indicada en el
paquete.
Page 45

Bandejaparaasara laparril!a
Asado pot convecci6n
Buenoparagrandescortesdecametierna,destapada.
Elventiladordeconvecci6ncirculaelairecalentado
uniformementesobrey alrededordelosalimentos.La
camerojay ayesse doranpottodoslosladoscomosi
fuerancocinadossobreunrotisserie.Elairecalentado
circulate1sobre,debajoy alrededordelosalimentosque
estcinsiendoasados.Elairecalentadoatrapa Fosjugos
rcipidamenteparaun productomcishLimedoy tiemo
mientras,al mismotiempo,creaun ricoexteriordorado.
GEAppliances.com
AIasar potconvecci6n,esimportanteusarunaasaderay
unarejilJaparaobtenermejoresres@tados.Laasaderase
usapararecogerlosderramesdegrasay Farejillaseusa
paraevitarFassalpicadurasdegrasa.
AI homear galletas, obtendrd
mejores resultados si utiliza
una bandeja de homo plana
en vez de una fuente con lados
b@os.
D
1
2 3 4
6
7 8 (9
@°0
Utensilios de cocina para la cocci6n por convecci6n
Antesdeutilizarsu homopot convecci6n,verifiquesisus
utensiliosde cocinapermitenque
el airecirculedentrodelhomo.Siestcihorneandocon
variasbandejas,dejeespacioentreelias.Tambi@n,
asegOresedequelasbandejasno entrenencontacto
unascon otrasniconFasparedes
delhomo.
Papal y pl6stico
EnFoshornospotconvecci6npuedenutilizarse
Fosrecipientesdepapelypk%ticoresistentes
al calorrecomendadosparaelusoenhomosregulates.
Tambi#npuedenutilizarselosutensiliosdecocinapk%ticos
resistentesal calorhastatemperaturasde400°F.
C6mo configurar el horno para hornear o asar
FT1 Presioneel bot6nConvectionBake
oelbot6nConvectionRoast.
[] Presionelosbotonesnum@icosparaestablecer
latemperaturadelhomodeseada.
5
F31 Presioneelbot6nStart.
©
Paracambiarlatemperaturadelhomo,presione
el bot6nConvectionBakeoConvectionRoasty luegolos
botonesnum@icosparaconfiguraNanuevatemperatura.
Metal y vidrio
Cualquiertipo deutensiliodecocina
funcionarciensuhomopot convecci6n.Sinembargo,
Fasbandejasmet6kas secalientanmOsrOpidoyestOn
recomendadasparaelhomeado
potconvecci6n.
kasbandejasoscurecidaso conacabadomate
homeardnrodsrdpidoquelosbandejasbrillantes.
kasbandejasdevidrioo cerdmicacocinardnrods
lentamente.
Pararecetascomoelpolioalhomo,utilice
unabandejacon Fadosbajos.Elairecaliente
nopuedecircularbienalrededordelosalimentosenuna
bandejaconFadosaltos.
Cuandoelhomocomienceacalentar,aparecercinenla
pantallaloscambiosenlatemperatura,comenzandoen
:!00°F.Cuandoelhomoalcancelatemperaturaqueusted
estableci6,sonarcin3pitidos.
r-_ Presioneelbot6nClear/Offcuandohayaterminado.
_Escuchardunventiladormientrasest4cocinando
pot convecci4n.Elventiladorsecletendrdcuando
lapuertaseabra,peroelcalornoseacabard.
:_Esposiblequeescuchealgunoschasquidosdentro
delhomodumnteelasado.Estoesnormal.
13
Page 46

Uso de las caractedsticas cronometradas
para cocinar por convecci6n.
Enmodelosdehomodoble,puedeutilizar]afund6ndeasadouhorneadocronometradoenunhomomientrasutilizalaIimpiezaautom6ticaenelotro;tambien
puedeusarelasadouhorneadocronometradoenamboshornossimultaneamente.
Escucharaunventiladormientrasestecocinandoconestascaracteristicas.Elventiladorsedetendr6cuandolapuertaseabra,peroelcalorpermanece4.
NOTA:Nodebepermitirsequelosalimentosqueseechanaperderfdcilmente-comoleche,huevos,pescado,rellenos,ayesycerdo-reposenporm6s
de1horaantesodespuesdelacocci6n.Latemperaturaambientepromueveelcrecimientodebacteriaspeligrosas.AsegOresedequelaluzdelhomoeste
apagadayaqueelcalordelabombillaacelerariaelcrecimientodebacteriaspeligrosas.
C6mo configurar un Inicio inmediato y una Parada autom6tica
18lBake]
s 4 S
1 2 3 4 5
Elhomoseencenderdinmediatamentey cocinarddurante
el tiemposdeccionado.AIfinaldel tiempodecocci6n,el
homoseapagardautomdticamente.
Aseg6resede qua elrelojmuestrelahoracorrectadeldia.
Z] Presione el bot6n Convection Bakeo Convection
Roast.
[] Presionelosbotonesnum@icosparaestablecerla
temperaturadelhomodeseada.
o]
[_ Presioneel bot6nCookingTime.
NOTA:Sisu recetarequiemdeprecalentamiento,
esposiblequenecesitea_adirrodstiempoal tiempode
eocei6n.
[] Presionelosbotonesnum@icosparaconfigurar
eltiempodecocci6ndeseado.Elminimotiempode
cocci6nquapuedeconfiguraresdei minuto.
EnFapantaUaaparecer6Fatemperatura
delhomo quaustedconfigurey eltiempo
decocci6nquahayaingresado.
[-_ Presioneelbot6nStart.
Lapantallamostrar6loscambiosdetemperatura
(comenzandoen!00 °F)yeltiempodecocci6n.La
pantallacomienzaacambiarunavezquelatemperatura
alcanza100°F.
NOTA:Enlosmodelosdehomodoble,alutilizarlosdos
homossimultdneamente,lostiemposquaapamcenenla
pantallacorresponderdnal (_ltimohomoconfigurodo.Pard
vereltiempoestablecidoparaelprimerhomoeonfigurodo,
presioneelpanelCookingTimeparaesehomo.
Elhomocontinuar6cocinandodurantela cantidadde
tiempoprogramada,Fuegoseapagar6autom6ticamente,
amenDsquesehayaconfiguradolafunci6n"Cookand
Hold"(Cocinary mantener).Consultelasecci6nFunciones
especialesdeloscontrolesdesuhomo.
j-_ Presioneelbot6nClear/Offparaborrar lapantallasi
esnecesario.Retirela comidadelhomo.Recuerde,
aunqueelhomose@agueautom6ticamente,los
alimentosquase@janenelhomocontinuar6n
cocin6ndosedespu#squaelhomo
seapague.
i 2 3 4 5
Oki@
im_
i
2 3 4 5
6
7 8 @ o]
eley_}
tort)
i
2 3 4 5
5
7 8 (9 ©
14
C6mo configurar un Inicio postergado
Usted puede configurar el control del homo para que
postergue el inicio, cocine durante un periodo especifico
de tiempo y Fuegose apague autom6ticamente.
Aseg6rese de qua el reloj muestre la hora correcta del dia.
r_ Presione el bot6n Convection Bake o Convection
Roast.
Presionelosbotonesnum@icosparaestablecerla
temperaturadelhomodeseada.
J-_ Presioneelbot6nCookingTime.
NOTA:Sisu recetarequiemdeprecalentamiento,esposible
quenecesitea_adirrodstiempoal tiempodecocci6n.
r_ Presionelosbotonesnum@icosparaconfigurar
eltiempodecocci6ndeseado.
[_ Presioneel bot6nDelay Start.
[] Presionelosbotonesnum@icosparaestablecerla
horadeldiaala cualdeseaqueelhomose
encienday comienceacocinar.
Sideseaverificareltiempoquahaconfigurado,presione
elbot6nDelayStartparaverificarla horadeinicio
queha configuradoo presioneelbot6nCookingTime
paraverificarladuraci6ndeltiempodecocci6nqueha
configurado.
Z] Presioneel bot6n Start.
y una Parada autom6tica
NOTA:Sonarduntonodeatenci6nsiestdutilizando
elhorneadooelasadocronometmdoy nopmsiona
elbot6nStartdespu_sdeingmsarlatemperoturode
homeadooasado.
Cuandoel homose enciendaa lahoradeldiaqueusted
hayaestablecido,la pantallamostrar6elcambiode
temperatura(comenzandoa 100°F)yeltiempo
decocci6n.Lapantallacomienzaa cambiarunavezqua
latemperaturaalcancelos100°F.
NOTA:Enlosmodelosdehomodoble,alutilizar
losdosbonDssimultdneamente,lostiemposqueapamcen
enIopantallaeorresponderdnal Oltimohomoeonfigurodo.
Pardvereltiempoestablecidopardelprimerhomo
eonfigurodo,presioneelpanelDelayStart (Retrosarinicio)o
CookingTime(Tiempodeeocebn)pardesehomo.
Elhomocontinuar6cocinandodurantelacantidadde
tiempoprogramada,luegose apagar6autom6ticamente,
amenDsquesehayaconfiguradolafunci6n"Cookand
Hold"(Cocinary mantener).Consulte}asecci6nFunciones
especialesdeloscontrolesdesu homo.
Presioneelbot6nClear/Offparaborrar lapanta}lasi
esnecesario.Retirela comidadelhomo.Recuerde,
aunqueelhomose@agueautom6ticamente,los
alimentosquase@janenelhomocontinuar6n
cocin6ndosedespu@sque elhomo
se@ague.
Page 47

Ajuste del termostato del homo inferion
iH6gulo usted mismo!
Ustedsepuedepercotorquesuhomonuevococinodistintool quereemploz6.Usesuhomonuevopar ratiossemonosporofamiliorizorse
condLSioOnpiensoquesuhomonuevoesdemosiodocolienteo demosiodofifo,ustedpuedeojustoreltermostotoustedmismo.
Nousetermdmetros,comalosquesevendenentiendosdeoprovisionomientoporoinspeccionorIotemperoturodesuhomo.Estostermdmetros
podrfonvoriorde20o 40grodos.
NOTA:Esteojuste861oofectordIotemperoturodehorneodoy osodo;noofectolostemperoturosdeosodooIoporrillo,convecci6no outolimpiezo.El
ojusteseolmocenordenIo memoriodespudsdeunofolioeldctrico.
Pure ujustur el termostuto del horno {enalgunosmodetos)
HilLO
G°@
1 2 3 4 5
o
®
iospencitendo eFl modelC
6@
[Z] AprietelosbotonesBakey BroilHi/Lo(enlos []
modelosde homodoble,useloscontrolesdel
homosuperior)almismotiempodurante3
segundos,hastaquelapantallamuestreSF.
Luego,procedaconlospasos2a4,usandolos
botonesparaelhomosuperioroinferior.
[] Presioneel bot6nBake.Enlapantallase
muestraunn0merode dosdfgitos.
Enlosmodelosconbotonesnum@icos,vuelva
a apretarBakeparaalternarentreaumentary
disminuirlatemperaturadelhomo.
Latemperaturadelhomo puedeajustarse
hasta(+)35°Fm6scalienteo(-)35°Fm6sfrfa.
Enlosmodelosconbotonesnum@icos,
apri@telasdelmismomodoenquelaslee.Par
ejemplo,paracambiarlatemperaturadel
homo15°F,apriete1y 5.
Enlosmodelosconbotones+y - deTemp
(Temp.),apri@telosparaaumentaro disminuir
latemperaturaenincrementosdei grado.
Cuandohayarealizadoelajuste,presioneel
bot6nStartparavolver
ala pantalladelahora deldia.Utilice
suhomocomoIoharianormalmente.
GEAppliances.com
Pure ujustur el termostuto del homo (enalgunosmodelos)
QuitelaperillaOVENdeleje,mirela parteposterior A medidaquegirelaperilla,escuchar@y sentir@
dela perillay recuerdela configuraci6nactual lasmuescas.Cadamuescacambialatemperatura
antesderealizarcualquierajuste.Laperillavienede alrededorde10° Fahrenheit.
fObricaconeltornillosuperiordirectamentedebajo
delindicador, r_ Aprietelostornillos.
Gireeldiscoensentidoantihororioporo
aumentar/atemperaturede/homo.
Gireeldiscoensentidohoratioparo
disminuirlatemperaturedelhomo.
JT] QuitelaperillaOVEN. r_ Vuelvaa colocarlaperillaOVENenelhomo.
[-2-1Aflojeambostornillosde laparteposteriorde realizarcualquierajusteadicional.
laperilla.
Sostengaambaspartesde laperilla,como
@
semuestraenlailustraci6nde laparte
posteriorde laperillaOVEN,y girelade modo
queeltornilloinferiorsemuevaen ladirecci6n
deseada.
Vuelvaaverificareldesempe_odelhomoantesde
iE! tipo de margarine afectar6 el desempefio del horneado!
Lomoyorlodelosrecetosporohorneorsebandesorrollodousondoproductosdealtocontenidoengrosocomamontequilloo morgorino(80%de
groso).SidisminuyeIogroso,esposiblequeIorecetonotengolosmismosresultodosqueconunproductodemayorcontenidodegroso.
Losrecetospuedenfollorsilostortos,posteles,golletosodulcessepreporonconproductosbojosengroso.Mientrosmenosseae/contenidode
grosodeunproductotipomontequillo,mdssenotordnestosdiferencios.
LosestSndaresfederalesexigenquelosproductosmarcadoscomomargarinas,contenganpor Iomenosun80%degrasapor peso.Porotra
parte,losproductostipomantequillabajosengrasacontienenmenosgrasay m6sagua.Elaltocontenidodehumedadde estosproductosafecta
latexturay el sabordelosalimentoshorneados.Paramejoresresultadoscon susviejasrecetasfavoritas,usemargarina,mantequillau otros
productosquecontenganporIomenosun70%deaceitevegetal.
15
Page 48

Uso de!homo autolimpieza, oUuno mod /o l
Lapuerta del homo debe estar cerrada y todos los controles deben estar configurados correct:ament:epara que el
ciclo funcione apropiadament:e.
WARNING!
Nunca coloque los utensilios de cocina ni otros articulos en la base de/homo. Debajo de la base de/homo se encuentra
un elemento de calefacciSn. Colocar elementos sobre la base de/homo puede hacer que el homo se sobrecaliente,
ocasionondo dodos ol homo y riesgo de dodos o incendio de los gabinetes.
Antes de un ciclo de limpieza
Limpie el suelo pesado sobre
la parte inferior del horno.
[apariencia puede variar)
Self_]
leon_,,)
3. 2 3 4 5
_o_
(deoend_endo en modeto
Recomendamos ventilar su cocina dejando
una ventana abierta outilizando un ventilador
o campana extractora durante el primer ciclo
de autolimpieza.
Remuevadel homo cualquiera bandeja para
parrilla, rejillapara parrilla,todos losutensilios
de cocina y cualquier residuo de papel
aluminio.
Lasparrillas del horno pueden limpiarse
autom@icamente, pero se oscurecerc_n,
perderc_nsu lustrey serc_ndificiles de deslizar.
No utilice abrasivos o limpiadores de hornos.
Limpiela parte superior, ladosy parte exterior
de la puerta del homo conjab6n y agua.
Aseg_rese de que est6 puesta la cubierta de la
bombilla el6ctrica (enalgunos modelos)y que
la luzest6 apagada.
C6mo ajustar el horno para limpieza
[] Presione el bot6n Self Clean una vez para
un tiempo de limpieza de 4 horas o dos
vecespara un tiempo de limpieza de 3
horas.
Serecomienda untiempo de autolimpieza
de 3 horas para limpiar pequeflos
derrames contenidos. Paraun homo sucio
se recomienda un tiempo de autolimpieza
de 4 horas o mc_s.
r_ si senecesita un tiempo distinto alas 4
horas o alas :3horas,utilice los botones
num@icos(enalgunos modelos)o los
botones + o - de Hour (Hora)y Min(Min.)
(enalgunos modelos)e ingreseel tiempo
de limpieza deseado.
Usted puede cambiar el tiempo de limpieza
en cualquier momento entre 3 y Shoras,
dependiendo de qu6 tan sucio est6 su horno.
r-_ Presioneel bot6n Start.
IMPORTANTE: la salud de algunas ayes es
extremadamente sensible alas emanaciones
nocivasdespedidas durante el ciclo de
autolimpieza de cualquier homo. iVluevalas
ayes a otto cuarto bien ventilado.
Enlosmodelos con controles debotones
para ambos hornos, puede configurar
un ciclo de limpiezaen ambos hornos al
mismo tiempo. ElOltimohomo configurado
demorar6 autom@icamente sucomienzo
hasta que termine el ciclo de limpiezadel
primer horno.
Enlosmodelos con controles debotones
para ambos hornos, puede usar el horneado
cronometrado en un horno y limpiar
automdTticamenteel otro al mismo tiempo.
Enlosmodelos con perilla,el homo inferior
no tiene lafunci6n de limpieza autom@ica.
La puerta se bloquea automc_ticamente.
La pantalla mostrar(_el tiempo restante de
limpieza.No serc_posible abrir la puerta del
horno hasta que la temperatura seainferior a
la temperatura de bloqueo y se apague la luz
LOCKED.
Cuandose apague la luz LOCKED,podr6 abrir
la puerta del homo.
La palabra LOCK parpadear6 y el control
del horno indicar6 siconfigur6 elciclo de
limpiezay olvid6 cerrar lapuerta del horno.
Paradetener un ciclo de limpieza, presione
el bot6n Clear/Off. Cuandose apague la
luzLOCKEDindicando que el homo se ha
enfriado a una temperatura inferior a la de
bloqueo,podrc_abrir la puerta del homo.
16
Page 49

GEAppliances.com
Lo puerto del homo debe estar cerroda y todos los controles deben estor configurodos correctomente pard que el
ciclo funcione apropiadamente.
_C Self
1 2 3 4 5
6 7 8 & O]
lean_
o
®®
'dependiendo en modeto)
i 2 3 4 5
tart_
0 7 8 (9 O)
0
®®
laeDendlendo ev1 modelc
_tart_
C6mo posponer el inicio de la limpieza
[71 Presioneelbot6n SelfClean una vez para
un tiempo de limpieza de 4 horas o dos
vecespara un tiempo de limpieza de 3
horas.
Se recomienda un tiempo de autolimpieza
de 3 horas para limpiar peque_os
derrames contenidos. Paraun homo sucio
se recomienda un tiempo de autolimpieza
de 4 horas o m6s.
r_ si se necesita un tiempo distinto alas 4
horaso alas 3 horas, utilice losbotones
num6ricos (enalgunos modelos) o los
botones + o - de Hour (Hora)y Min (IVlin.)
(enalgunos modelos)e ingrese el tiempo
de limpieza deseado.
Usted puede cambiar eltiempo de limpieza
en cualquier momento entre 3y 5 horas,
dependiendo de cu6n sucioest6 su horno.
Presione el bot6n Delay Start.
[]
Utilizandolos botones num6ricos (en
%
algunos modelos) o los botones + o - de
Hour (Hora)y Min (IVlin.)(enalgunos
modelos),ingrese la hora del dfa a la coal
deseaque comience el ciclo de limpieza.
La puerta se bloquea autom6ticamente. La
pantalla mostrar6 la hora de inicio.Noset6
posibleabrir la puerta delhomo hasta que la
temperatura sea inferior a la temperatura de
bloqueo y se apague la luz LOCKED.
Cuando se apague IoluzLOCKED,podr6 abrir
la puerta delhorno.
NOTA:En los modelos con controles de
botones pare ambos homos, puede configurar
una limpieza demomda en ambos homos al
mismo tiempo. Elsegundo homo configumdo
demorard automdticamente el comienzo de la
limpieza hasta que termine el ciclo de limpieza
del primer homo.
Pare mcordar el tiempo de iniciodel segundo
homo configumdo, presione el bot6n Delay
Start (Retrasarinicio)en loscontrolespara el
segundo homo.
Presioneel bot6n Start.
Despu#s de un ciclo de limpieza
Esposible que observe algunas cenizas
blancas en el homo. Limpielas con un paho
h6medo despu6s de que el homo se enfrie.
Silas manchas blancaspermanecen,
remu_valas con un estropajo de acero Ileno
dejab6n y enjuague generosamente con una
mezcla de vinagre y agua.
Estosdep6sitos son usualmente residuosde sal
que el ciclo de limpieza no puede eliminar.
Siel homo no queda limpiDdespu6s de un ciclo
de limpieza,repita el ciclo.
Ustedno puede configurar el homo
para cocci6n hasta que el homo est6 Io
suficientemente fifo como para que la
puerta se desbloquee.
Silos parrillassevuelven dificiles de deslizar,
limpie lossoportes de las parrillascon aceite
de cocina.
17
Page 50

Caracteristicas especialesdecontrol desu homo.
Sunuevo control conbotones sensiblestienecaracteristicasadicionalesque puede elegir utilizar.A continuaci6nse describenlos
caracteristicasy c6mopuede activarlas.
Losmodos de caracteristica especials61opuedenactivarse mientras la pantalla estdmostrando la hora del dia. Dichos modos
permanecen en la memoria del control hasta qua los pasossean repetidos.
Cuandola pantalla muestresu elecci6n,presioneel bot6n Start. Loscaracteristicasespecialespermanecerdn en la memoria despuds
de una folio en elsuministro de electricidad,excepto para elmodo Sabbath,quadeberd reestablecerse.
Apagado despu_s de 12 horus
co!::io,
_tart__
Conesta camcteristica, si seolviday deja
el homo encendido,el control apagard elhomo
despudsde 12 hams automdticamente durante
losfunciones de homeado o despudsde 5 horas
dumnte una funci6n de asado a la parrilla.
Sideseaapagar esta caracter[stica, siga los
pasos a continuaci6n.
r-f] Presionelos botones Bakey Broil Hi/Lo NOTA:
(enmodelos de horno doble, use los
controles del homo superior)al mismo
tiempo durante 3 segundos hasta que
la pantalla muestre SF.
r_ Presioneel bot6n Delay Start hasta que
no apagado (no shdn)aparezca en la
pantalla.
[] Presioneel bot6n Start para activar la
funci6n no shdn (noapagar) y deje el
control configurado en el modo de
funciones especiales.
Enlosmodelos con controlesde botones
para ambos homos, esto activa esta funci6n
especial para ambos homos.
Enlosmodelos conperilla(s)dehomo, esta
funci6n no estd disponiblepara el homo
inferior.
Selecci6n de temperatura en grados Fahrenheit o Centigrados
Sucontrol del homo estd configurado para
utilizar las seleccionesde temperatura en
grados Fahrenheit, pero se puede cambiar
utilizando las seleccionesen grados
Centigrados.
Presionelos botones Bakey Broil Hi/Lo
%
(enmodelos de homo doble, use los
controles del homo superior)al mismo
tiempo durante 3 segundos,hasta que la
pantalla muestre SF.
[2] Presionelos botones Broil Hi/Lo y
Cooking Timeal mismo tiempo. La
pantalla mostrara F(Fahrenheit).
Presionelos botones Broil Hi/Lo y
@
Cooking Time nuevamente al mismo
tiempo. Lapantalla mostrara C
(Cent[grado).
Presioneel bot6n Start.
%
NOTA:
Enlosmodelos con controlesde botones
para ambos homos, aparecerd la nueva
configuraci6npara ambos homos.
Enlosmodelos con perilla(s)de homo, esta
funci6n no estd disponiblepara el homo
inferior.
18
Tonos al final de un cic/o cronometrado
Atfinal deun cictocronometrado,sonardn3 pitidos
cortosseguidosparun pitidocoda6segundos
hasta qua se presione el botdn Clear/Off. Este
pitido continua coda 6 segundos puede cancetarse.
Paracancelarelpitidocada 6 segundos:
[] Presionelosbotones Bakey Broil Hi/Lo (an
modelosde homo doble, useloscontroles
del homo superior)al mismo tiempo
durante3 segundoshasta qua la pantalla
muestreSF.
Presioneel bot6n KitchenTimer On/Off.
[]
Lapantalla muestraCONBEEP(pitido
continua).Presionenuevamente
el bot6nKitchen TimerOn/Off. Lapantalla
nuestraBEEP.(Estocancelael pitidocada 5
segundos).
Presioneel bot6nStart.
@
NOTA:
Enlosmodetosconcontrofesdebotonespara
amboshornos,estocancetaeltono defin de
cicfopara am6oshornos.
Enlosmodetosconperitta(s)dehomo,esta
funcidnno estddisponibfepara elhomoinferior.
Page 51

Volumen del sonido (analgunos modelos)
GEAppliances.com
Hi/to
_ight_
On/Off
Beke + B_Oo
Estafunci6nlepermiteajustarlosvolOmenes
delsonidoavaloresm6saceptables.Existentres
nivelesposiblesdevolumen.
PresionelosbotonesBakey BroilHi/Lo(en
%
modelosde homodoble,utiliceloscontroles
delhomosuperior)simult6neamentedurante3
segundos,hastaqueaparezcaSFenla
pantalla.
I-2-1Presioneelbot6nOvenLightOn/Off.
Enlapantallaaparecer62BEEP.
Esteesel nivelmediadelvolumen.
Presioneelbot6nOvenLightOn/Off
nuevamente.Enlapantallaaparecer63BEEP.
Esteeselnivelm6saltodelvolumen.
Presioneelbot6nOvenLightOn/Off
nuevomente.Enlapantollaoparecer61BEEP.
Esteeselnivelm6sbajodelvolumen.
Reloj de 12 horus, 24 horus o supresi6n del reloj
Sucontrolest6configuradoparautilizarunrelojde
12horas.
Siustedpreferirfatenerunrelojde24horaso
suprimirel relojdelapantalla,sigalospasosa
continuaci6n.
PresionelosbotonesBakey BroilHi/Lo(en
Ffl
modelosde homodone,useloscontrolesdel
homosuperior)al mismotiempodurante3
segundoshastaquelapantallamuestreSF.
r21
Presioneunavezel bot6nClock.Lapantalla
mostrar6!2 hr.Si6staesla elecci6nque
desea,presioneelbot6nStart.
Cadovezquesecombieelnivel,seemitir6un
sonidoporoindicorel niveldelvolumen.
[_ EIUoel niveldesonidoquedesee(1BEER
2 BEEP,3 BEEP).
[] Presioneel bot6nStartparaactivarelnivel
deseadoquesemuestra.
NOTA:
Enlosmodelosdehomo doble,estoactivadicha
funcidnespecialparaamboshomos.
Enlosmodelosconperilla(s)de homo, esta
funcidnnoestddisponibleparaelhomoinferior.
Presionenuevamenteelbot6nClockpara
cambiaralrelojde 24horas.Lapantalla
mostrar624hr.Si6staeslaelecci6nque
desea,presioneelbot6nStart.
Presionenuevamenteelbot6nClockpara
suprimirelrelojde lapantalla.Lapantalla
mostrar6OFF.Si6staeslaelecci6nquedesea,
presioneelbot6nStart.
NOTA:Sielrelo]estdenelmodosuprimido,nopodrd
utilizarla funcidnDelayStart.
Cocci6n y muntenimiento
Sunuevocontrolposeeunafuncidn"cookandhold"
quamantienelosalimentoscocidoscalientesdurante
unmdximode3 horasluegodequafinaliceelasado
uhorneadocronometrado.
NOTA:Estafuncidns61opuedeprogramarsecon
elasadouhomeadocronometrado.(Consulte
laseccidnUsadelosfuncionesdeasadouhorneado
cronometrado).Unavezquaelasadouhorneado
cronometradohayafinalizadoautomdticamente,
lafuncidn"cookandhold"programadaseiniciard
automdticamente.
Paraactivarestafunci6nafin de usarlaluegodel
asadouhorneadocronometrado,sigalospasosque
figuranacontinuaci6n.
PresionelosbotonesBakey BroilHi/Lo(en
%
modelosde homodone,useloscontrolesdel
homosuperior)simult6neamentedurante3
segundoshastaqueaparezcaSFenla
pantalla.Luego,procedaconlospasos2 a 3,
usandolosbotonesparaelhomosuperioro
inferior.
[] Presioneel bot6nCookingTime.Enla pantalla
aparecer6HidOFF.
Presioneel bot6nCookingTimenuevamente
paraactivarlafunci6n.Enla pantalla
aparecer8HidON.
[] Presioneel bot6nStartparaactivarlafunci6n
"cookandhold"ydejeelcontrolconfigurado
en estemododefuncionesespeciales.
NOTA:Enlosmodelosconperilla(s)de homo, esta
funciOnnoestddisponibleparaelhomoinferior.
19
Page 52

Caracteristicas especialesdecontroldesu homo.
Cambio de la velocidad de los botones + o - (analgunosmodelos)
Cuandouselosbotones+o- alconfigurarun
tiempoouna temperatura,esposiblequeadvierta
quelapantallacambialentamente.Estafunci6n
especiallepermitecambiarlavelocidad.Para
configurarlevelocidadpreferida,sigaestospasos.
0
[Z] AprietelosbotonesBakey BroilHi/Lo (enlos
modelosde homodoble,useloscontrolesdel
homosuperior)al mismotiempodurante3
segundos,hastaquelapantallamuestreSF.
r21 Aprietecualquierbot6n+.Lapantalla
lemostrar6unavelocidadconfiguradaentre1
y5.
[] Aprietecualquierbot6n+para aumentarla
velocidadhastael n0mero5.
Aprietecualquierbot6n-parddisminuirla
velocidadhastaelnOmeroi.
[] AprieteStartparaactivarlaconfiguraci6ny
dejarelcontrolconfiguradoenestemodode
funcionesespeciales.
Conversi6n Auto Recipe T"(Conversi6n autom6tica de la recetas)
(analgunosmode/as)
Cuandoutiliceelhomeadoparconveccidn,
lacaracteristicaConversidnAuto Recipe_"convertird
automdticamente/astemperaturasdehomeado
regularingresadasen/astemperaturasdehomeado
par convecclon.
Unavezest_activadala caracterfstica,lapantalla
mostrardla temperaturarealconvertida(reducida).
Pare]emplo,siustedingresaunatemperaturade
unarecetanormalde350°Fypresionaelbotdn
Start,lapantallamostrardCONy latemperatura
convertidade325°F.
NOTA:Estacaracterfsticano conviertelostiempos
decoccidnde/horneadoparconveccidn,s6/o
/astemperaturasnormalesdehomeado.
Paraactivar la caracteristica:
[] PresionelosbotonesBakeyBroilHi/Lo(en
modelosdehomodoble,useloscontrolesdel
homosuperior)al mismotiempodurante3
segundoshastaquela pantallamuestreSF.
Presioneel bot6nConvectionBake.
[]
Lapantallamostrar6CONOFF.Presione
nuevamenteel bot6nConvectionBake.La
pantallamostrar@CONON.
[] Presioneel bot6nStart.
Paradesactivarlacaracterfstica,repitalospasos1
al3 anterioresperopresioneelbot6nStartcuando
CONOFFest@enlapantalla.
®,,ii®i ii i i ii i_I i
Hour _ piss ,_ Hln
0
(dependiendo en modelo)
20
Bloqueo del control
Sucontrollepermitirdbloquearlosbotonessensibles
deto/farina quanopuedanseractivadoscuando
seanpresionados.
NOTA:Enloshornosdoblesconcontrolesdebotones
pardamboshomos,estoactivaestafuncidnpard
amboshomos.
bloquear/desbloquearloscontroles:
Presionelosbotones- deHour(Hora)yklin
(Hin.)o losbotones9y 0 (segOnel modelo)al
mismotiempodurante3segundos,hastaque
la pantallamuestreLOCON(Bloqueoactivado).
Paradesbloquearelcontrol,presionelos
botones- deHour(Hora)yHin(Hin.)o los
botones9y0 (segOnelmodelo)almismo
tiempodurante3 segundos,hastaquela
pantallamuestreLOCOFF(Bloqueo
desactivado).
Cuandoestacaracterfsticaest6encendida
yse aprietanlosbotonessensibles,elcontrolpitar8
yla pantallamostrar8LOCON.
Elmododebloqueodelcontrolafectatodos
losbotonessensibles.NingOnbot6nsensible
funcionar8cuandoestacaracterfsticaest@
activada.
Enlosmodeloscon perilla(s)dehomo,esta
funci6nnoest8disponibleparaelhomoinferior.
Elajustequedar@enla memoriadespu@s
de unafallaenelsuministrodeelectricidad.
Page 53

Uso de la caracteristica Sabbath.
(Disehadapara utilizarseenelSabbathjudio y dias festivos).(enalgunosmodelos) GEAppliances.com
ta caractefistica Sabbath puede utilizarseOnicamentepara homeado/asado. Nopuede utilizarsepara asado a la parrilla,
autolimpieza o DelayStart.
NOTA: Laluz del homo se enciende automdticamente (en algunos modelos) cuando la puerta es abierta y se apaga cuando la puerta
es cerrada. Se puede quitar la bombilla. Consulte la secci6n Reemplazo de la luz del homo. En los modelos con un intermptor de luz en
el panel de contro!, la luz del homo puede encenderse y dejarse encendida.
C6mo configurar el horneado/asado regular
H_/LO
roo,o;-]
Lsto_tj
1 2 3 4 5
o
®
®
Cuando la pantalla muestra D
el homo estc_configurado en
Sabbath. Cuando la pantalla
muestra pc el homo est6
horneando/asando.
NOTA:Paraentender c6mo funciona el control []
del homo, practique usando el homeado normal
(no en funcionamiento para Sabbat) antes de [Z]
ingresar en el modo de funcionamiento para
Sabbat.
AsegOresede que el reloj muestrela hora
correctadel dia.
J-f] Presioney mantenga sostenidoslos
botones Bake y Broil Hi/ko, almismo
tiempo, hasta que la pantalla muestre SF.
NOTA:Sien la pantalla aparece bakeo
broil,los botones Bake y Broil Hi/Lo dno
fueron presionados al mismo tiempo.
Presioneel bot6n Clear/Offy comience de
nuevo.
Presioneel bot6n Delay Start hasta que
F-_ SAbbAtH aparezca en la pantalla.
Presioneel bot6n Starty D aparecer(_en
r_ la pantalla.
presioneel bot6n Bake.No se dar(_
r_ ninguna seflal.
Presione el bot6n Start.
Despu@sde un periodo aleatorio
de esperade aproximadamente 30
segundosa 1 minuto, aparecer0 en la
pantalla _c indicando que el homo estd
horneando/asando. Sino aparece _c en la
pantalla, comiencede nuevoen el Paso4.
Para ajustar la temperatura del homo, presione
el bot6n Bake(Hornear)eingrese la nueva
temperatura con los botones num@icos(en
algunos modelos) o toque los botones + o -
de Temp (Temp.)(enalgunos modelos)para
aumentar odisminuir latemperatura
en incrementos de S°.(Sedebe tocar
el bot6n + o - de Temp para cada cambio de
temperatura; apretar y mantener apretadas
estas botones no permitirc_configurar la
temperatura con precisi6n).
Presioneel bot6n Start.
NOTA:Los botones Clear/Off y Cooking Time
estan activos durante lacaracterfstica Sabbath.
r_ Enlos modelos con botones num#ricos,
presionelos para ajustar la temperatura
deseada.
Enlosmodelos con botones+ y - de
Tamp (Temp.),latemperatura de
inicio preconfigurada seconfigurar5
automSticamente en 350°.Toque los
botones + o - de Tamp (Temp.)para
aumentar o disminuir la temperatura en
incrementos de 5°.(Sedebe tocar el bot6n
+ o - de Tamp (Temp.)paracada cambio
de temperatura; apretar y mantener
apretadas estesbotones no permitir@
configurar latemperatura con precisi6n).
Latemperatura puede configurarse entre
170°y 550°.
Nose mostrarc_ninguna seflal ni
temperatura.
21
Page 54

Uso de ia caracteristica Sabbath.
C6mo configurar un horneado/asado cronometrado: Inicio inmediato y Parada
@o@÷@@
1 2 3 4 S
6 _ 8 @ o_
@o,o_
tartJ
_okin_
imeJ
o
-JL_
®®
@:@
Hour .o,g_Lo_, M*n
(deDen@endo en rnodelo)
I 2 3 4 5
6 7 8 [19 n,,o,_,,0_ _,
G
®
@
(deoendiendo en model@
@@
Cuando la pantaila muestra D
el homo est6 configurado en
Sabbath. Cuando la pantalla
muestra ::xz el homo est6
horneando/asando.
autom6tica
NOTA:Paraentender c6mo funciona el control
del homo, practique usando Immediate Start
(Inicioinmediato)y Automatic Stop (Detenci6n
automdtica) normales (noen funcionamiento
para Sabbat)antes de ingresar en el modo de
AsegOresede queelreto]muestretohoro correcta
defdfa.
Presioney mantenga sostenidoslosbotones
rfl
Bakey Broil Hi/Lo,al mismotiempo,hasta
quela pantalla muestreSF.
NOTA:Sien la pantallaaparecebakeo broil,
losbotonesBake bi Broil Hi/Lo no fueron
presionadosal mismotiempo. Presioneel
bot6nClear/Off.ycomience de nuevo.
Presioneel bot6nDelay Start hastaqua
BE
gab bAtHaparezcaen la pantalla.
Presioneel bot6nStarty D aparecer6enla
@
pantalla.
Presioneel bot6nCooking Time.
%
Enlosmodeloscon botonesnum@icos,
@
presionelospara configurar laduraci6ndel
tiempo de cocci6n deseadaentre1 minutoy
9 horasy 99 minutos.
Enlosmodeloscon botones+ o - de
Hour(Hora)y Min(Min.),presionelospara
configurar laduraci6ndeltiempo de cocci6n
deseadaentre 1 minuto y9 horasy 59
minutos.
Aparecer6eltiempo decocci6nque ingres6.
Presioneel bot6nStart.
@
Presioneel bot6nBake.Nose dar6 ninguna
[]
sepal.
Enlosmodeloscon botonesnum@icos,
%
apri@elospara ajustar latemperatura
deseada.
Enlosmodeloscon botones+ y - de Tamp
(Temp.),latemperatura de inicio
preconfiguradaseconfigurar6
autom6ticamenteen 350°.Toque
losbotones+ o - deTamp (Temp.)para
aumentar o disminuirlatemperatura en
incrementosde 5°.(Sedebetocar el bot6n+
o - de Tamp(Temp.)para cadacambio de
temperatura; apretary mantenerapretadas
estesbotonesno permitir6 configurarla
temperatura con precisi6n).Latemperatura
puedeconfigurarseentre 170°y 550°.
Nose mostrarcininguna se_alni
temperatura.
Presioneel bot6nStart.
%
Despu@sde un periodoaleatoriode espera
[]
deaproximadamente 30segundosa 1
minuto,aparecer0en la pantalla_c
indicandoque el homo est6 horneando/
asando.Sino aparece_c en la pantalla,
comiencede nuevoenel Paso7.
Paraajustarla temperaturadel homo,apriete
el bot6nBake(Hornear)e ingresela nueva
temperaturacon losbotonesnum@icos
(analgunosmodelos)otoque losbotones+
o - de Tamp(Temp.)(analgunosmodelos)
para aumentar o disminuirlatemperatura en
incrementosde 5°.(Sedebetocar elbot6n+
o - de Temppara cada cambiode temperatura;
apretary mantenerapretadas estesbotones
no permitir6configurar la temperaturacon
precisi6n).
Presioneel bot6nStart.
Cuandola cocci6nest@terminada,la pantalla
cambiar6 deDC a Dy aparecer60:00,indicando
quael homo se ha apagado perotodavia est6
configuradoen Sabbath.Remuevalacomida
cocinada.
22
C6mo salir de la caracteristica Sabbath
Presioneel bot6n Clear/Off.
Sielhomoest6cocinando,espereduranteun
periodoaleatoriodeaproximadamente30
segundosa iminuto,hastaquesolo_ est_en
lapantalla.
PresioneysostengalosbotonesBake
@
y BroilHi/Lo,almismotiempo,hastaque
lapantallamuestreSF.
Presioneel bot6nDelayStart hastaque
%
aparezcaenla pantalla12shdnono shdn.12
shdnindicaqueel homoseapagar6
autom6ticamentedespu@sde12horas,no
shdnindicaqueel homonoseapagar6
autom6ticamente.
[] Presioneel bot6nStart.
NOTA:Sisepresent6uncarteenelsuministro
el@ctricomientrasel homoestabaenSabbath,el
homose apagar6autom6ticamentey elcontroldel
homodebeser reiniciado.
Page 55

Cuidado y limpieza del homo. GEAppliances.com
Antes de limpiar cualquier parte del homo, asegOrese de que el suministro eldctrico estd desconectado y todas los
superficies estdn frfas.
C6mo retirar la pelicula protectora y la cinta adhesiva de empaque
Tomecuidadosamenteunaesquinadelapelfcula
protectoray desp@uelalentamentede lasuperficie
delaparato.NouseningOnobjetopuntiagudopara
retirarlapelicula.Retiretodalapeliculaantesde
usarelaparatoporprimeravez.
Panel de control
Esbuenaidealimpiarelpanelde controldespu_s
decadauso.Limpieconjab6nsuavey aguao con
unasoluci6ndevinagrey agua,enjuaguecon agua
limpiay lustreensecoconunpasosuave.Cuando
hagalalimpieza,elpaneldecontroldebeestara
temperaturaambientey no bajola luzsolardirecta.
Noutilicelimpiadoresabrasivos,limpiadoresliquidos
Paraasegurarsedenoda_arelacabado
delproducto,lamaneram6sseguraderetirarel
adhesivodelacintadeempaquesobreaparatos
nuevoseslaaplicaci6ndeundetergentedom@stico
liquidoparalavarplatos.Apliqueconunpasosuave
y moje.
NOTA:Oeberetirareladhesivodetodaslospartes.
Nopuederetirarsesisequema.
fuertes,almohadillaspl6sticaspararestregaro
limpiadoresparahornossobreelpaneldecontrol:
estosproductosdar_ar6nelacabado.Unasoluci6n
SO/S0devinagrey aguacalientefuncionabien.
Esti[a mOideada
_Pase la ranura
Ranura
Segurodela bisagra
TireJossegurosdela bisagra
haciaabajo para desbloquearlos
Posici6n de e×tracci6n
Perilla de control (enalgunosmodelos)
Lasperillasdecontroldebenretirarseparafacilitar
lalimpieza.
Aseg0resede quelasperillasest@nenlasposiciones
OFF(Apagado)y tiredeeliasderechohaciaafuera
delosv@stagosparasulimpieza.
Puerta extraible del homo
Lapuertaesmuypesada.Tengacuidado
al quitary levantarlapuerta.
Nolevantelapuertadela manija.
Parequitar lapuerta:
[Z] Abralapuertaporcompleto.
r_ Tirehaciaabajolossegurosde labisagrahacia
el marcodela puerta,ycol6quelosenla
posici6ndedesbloqueo.Podr6set necesario
utilizarunaherramienta,comoun
destornilladorpeque_odehojaplana.
[] sujeteconfirmezaamboslados
de lapuertaenla partesuperior.
j-_ Cierrelapuertahastalaposici6n
de extracci6nde lapuerta(consulte
lailustraci6n).
[] Levantelapuertahastaqueelbrazo
de labisagraseliberedelaranura.
Parevolvera colocarlapuertu
JTI Sujeteconfirmezaamboslados
de lapuertaenla partesuperior.
Lasperillaspuedenlimpiarseenun lavavajillaso
bienlavarseconaguayjab6n.AsegOresedeque las
perillasest@nsecasantesdevolveracolocarlas.
Vuelvaacolocarlasperillasenla posici6n
OFF(Apagado)paraasegurarunacolocaci6n
adecuada.
J-_ Conlapuerta Borde
en el mismo inferior de
Brazo de la bisagra
@nguloquela laranura
posici6nde
extracci6n,
coloquela
muescadel
brazodela Huesca
bisagraenel
bordeinferiordelaranuradelabisagra.La
muescaenel brazodela bisagradebeestar
bienasentadaenla parteinferiordela ranura.
r_ Abralapuertaporcompleto,silapuertanose
abrecompletamente,lamuescanoest6
asentadacorrectamenteenelbordeinferior
dela ranura.
r4] Empujelossegurosdela bisagrahaciaarriba
contraelmarcodelanterodela cavidaddel
homoy col6quelosen laposici6ndebloqueo.
!
Brazo de Ja
bisagra
Seguro de
la bisagra
Empuje los seguros de la bisagra
hacia arriba para bloqueados
r-_ Cierrelapuertadelhomo.
23
Page 56

Cuidado y limpieza dd horno.
Puerto de! homo (enboreas de limpiezo outomdtico)
Nofrote ni limpie lajunta de la puerto;
dstatiene muy pocaresistencia
ala abrasidn.
Siobservaquelajunta seestd
desgastandoo daMndo deolguno
monerao sise hamovido delugar
enIopuerto, hdgalo reporor.
No permita que derramarnientos
de comida con alto contenido de
azOcar o de dcido (coma tomates,
chucrut, jugos de ffutas o rellenos
depasteles) permanezcan sabre la
superficie. Pueden dejar manchas
pdlidas aOn despuds de la limpieza.
PareIimpiarel interiordelapuerto:
Debidoa queel6readentrodelajuntase limpia
duranteelciclode limpiezaautom6tica,noes
necesarioquelalimpiedemaneramanual.
El6reafuerade lajuntay el revestimientointerior
delapuertapuedenlimpiarsecon unaesponja
limpiadorapldsticao Ilenadejab6n,aguacaliente
y detergente.Enjuaguebiencon unasoluci6nde
vinagrey agua.
ParaIimpiarel exteriordela puerta:
Useaguayjab6n paralimpiarbienlaparte
superior,loscostadosy lapartedelanteradela
puertadelhomo.Enjuaguebien.Tambi@npuede
usarunlimpiavidriosparalimpiarelvidrioenel
exteriordela puerta.Nopermitaquesederrame
aguaen losorificiosdeventilaci6n.
Puerta (enlos modelos con peril/o para el homo inferior)
Para limpiar el interior de la puerta:
Agua yjab6n normalmente essuficiente.
Lassalpicaduras oderrames pesados
posiblemente necesiten limpieza con un
limpiador abrasivo suave.Tambi6n se
pueden usar almohadillas de restregar con
jab6n.
Cuandosea necesafio,puede usar un limpiador
de homo. Siga losinstruccionesdel empaque.
Limpieel interior del homo con un limpiador
suave que no rayey un paho h6medo.
Para Iimpiar elexterior de la puerta:
Useagua yjab6n para limpiar bien la parte
superior, loscostados y la parte delantera de
Sipersistealgunamanchaenel ribete
delaventilaci6nde lapuerta,useunlimpiador
abrasivosuavey unaesponjafrotadorapara
obtenermejoresresultados.
Elderramedeadobos,jugosdefrutas,salsasde
tomatey materialespararociarquecontengan
dcidospuedeprovocardecoloraci6ny deber@
limpiarsede inmediato.Cuandolasuperficieest@
fria,limpielay enju6guela.
Nouselimpiadoresparahornos,polvosde
limpiezaniabrasivosfuertesenelexteriorde la
puerta.
la puerta delhomo. Enjuague bien.Tambi@n
puede usar un limpiavidrios para limpiar el
vidrio en el exterior de la puerta. No permita
que se derrame agua en los orificios
de ventilaci6n.
Elderrame de adobos,jugos de frutas,
salsasde tomate y materiales para rociar
que contengan 6cidos puede provocar
decoloraci6n y deber6 limpiarse de
inmediato. Cuando la superficie est6 fria,
limpielay enju6guela.
No uselimpiadores para hornos, polvos de
limpieza ni abrasivos fuertes en el exterior de
la puerta.
Parrillas de homo
____ Limpielas parrillas de homo con un limpiador
abrasivo o estropajo de acero. Despu6sde
limpiar, enjuague las parrillas con agua limpiay
sequecon unpa_o limpio.
Asadera y rejilla
No limpie la asadera o la rejilla de la asadera
en el horno auto-limpiante.
Despuds de asar, quite la asadera
del homo.
No guarde una asadera con rejillas
sucias dentro de la cocina.
24
Despu6sde asar, quite la asadera delhorno.
Quite la rejilla de la asadera. Con cuidado
vierta la grasa de la asadera en un recipiente
adecuado.
Limpiey enjuague la asadera y larejilla con
agua calientejabonosa o esponjilla pl6stica.
NOTA:Losparrillas de homo puedenlimpiarse
en el homo autolimpieza. Sinembargo, los
parfillas se oscurecerdn,perderdn su lustrey
sevolverdn diffcilesde deslizarsi selimpian
durante el ciclo de autolimpieza.Puede
limpiar lossoportes de los parrillas con aceite
comestibledespudsde la limpieza automdtica
para que losparrillas sedeslicenconmayor
facilidad.
Silosalimentos sehan pegado, rode la rejilla
con detergente cuando todavfa est6 caliente y
cubra con toallas de papel o un repasador.AI
sumergir la asadera, se eliminan losalimentos
pegados.
La asadera y la rejilla pueden lavarse con
un limpiador de homo comercial.
Tambi6n pueden lavarse en el lavavajillas.
Page 57

GEAppliances.com
[ ADVERTENCIA i DESCARGA 0 PELIGRO DE QUEMADURAS: Antes de reemplazar Io Ic_mparade luz del homo, desconecte la conexi6n el6ctrica del horno del fusible
principal o del panel del disyuntor. Si esto no se cumple se podr6 producir una
descarga el6ctrica o quemadura.
[APRECAUCION j RIESGODE'NCENDjO:Latapadevidri°ylaIdmparadeluzsedeberdnretirarcuando est6n frias. Tocar el vidrio caliente sin protecci6n en las manos o con
un trapo h0medo puede ocasionar quemaduras.
ReceDtd_ Portal6mpara
de G6.55
en algunas moaelos
Receotdcuto PoRaidmoara
_ Bombilla
de G9
Bulb
Bombilla el_ctrica del horno inferior
Para retirar:
r71 Gire la cubierta de vidrio en sentido contrario a
las manecillas del reloj 1/4 de vuelta hasta que
las lengQetasde la cubierta de vidrio liberen los
surcos del portalamparas. Colocarseguantes
de latex puede brindar un mejor agarre.
[] Utilizando guantes o un patio seco, remueva la
bombillajalandola en linea recta.
Para reemplazar:
r-_ Utiliceuna nueva bombilla hal6gena de
/LZ_J
120/130 voltios,no exceda 50 ratios.
Reemplacela lampara de luz con el mismo tipo
de lampara que se retir6. En su modelo
corresponder@unode los dos tipos que figuran
a la izquierda.Para determinar cual es la
lampara correcta, controle lasterminales de la
lampara. Laslamparas con 2 terminales con
clavijas rectas son 16mparasde G6.55.Las
16mparascon 2 terminales con clavijas con
curvas son 16mparasde G9.(Nolas
intercambie.)AsegLireseal reemplazar la
16mparaque seade 120 volts o 130 volts (NO
de 12volts).
Utilizando guantes o un patio seco, remueva
r21
la bombilla de supaquete. No toque la bombilla
con los dedos desnudos. Elaceite para piel
danar6 la 16mparay acortar6 sutiempo
de cturaci6n.
r-_ Empuje la bombilla en linea recta dentro del
recept6culo hasta eltope.
guantes0
Un pan0
r-_ Coloque las lengQetasde la cubierta de vidrio
dentro de los surcos del portalamparas. Gire la
cubierta de vidrio en sentido de las manecillas
del reloj 1/4 devuelta.
Para una mejor iluminaci6n dentro del homo,
limpie frecuentemente la cubierta de vidrio
utilizando un patio h0medo. Estodeber[a
hacerse cuando el homo esta completamente
fib.
r_ Conecte nuevamente el suministro el@ctricoal
homo.
(enalgunas modelos)
u
u
Cubier_ade vidrio
L6mpara de luz del horno tenalgunosmodelog
Para retirar: NOTA:
Girela cubierta de vidrio 1/4 de vuelta en
sentido opuesto alas agujas delreloj hasta que
las lengQetasde lacubierta de vidrio
se liberen de las ranuras del portalamparas.
Retirela lampara.
Para volver a colocar'.
Coloque una nueva 16mparade40 ratios para
electrodom@sticos.Coloque las lengQetas
de la cubierta de vidrio en las ranuras del
portal6mparas. Gire la cubierta devidrio
1/4 de vuelta en el sentido de las agujas del
reloj.
Una Idmparopara etectrodomdsticosde40
ratios es mds pequeha que una Idmpara
estdndar para uso domdstico de/40 ratios.
Instatey ojuste Io cubierta enel sentido
de los agujas del reloj.
Vuetvoaconectar la energfoetdctrica al
homo.
Pora tener uno mejor iluminaci6n dentro
delhomo, limpie la cubierta de vidrio con
un paho hOmedode manera frecuente. Esto
deberfo realizorsecuando el homo estd
comptetamente fifo.
25
Page 58

Cuidado y limpieza dd horno.
Interior del horno sin auto-limpieza (enalgunosmoddos)
Conel cuidado adecuado, el acabado de esmalte
de porcelana dela parte interior del horno-partes
superior, inferior, laterales e interna de la puerta-
seguirc_como nuevo durante muchos aflos.
Dejeenfriar el homo antes de limpiar.
Recomendamos el uso de guantes de goma
cuando limpie el horno.
Engeneral, con agua yjab6n sepodr@limpiar bien.
Losderrames o salpicaduras rebeldespueden
requerir una limpieza con un producto abrasivo
suave.Tambi6n pueden utilizarse esponjillas
embebidas con jab6n.
No permita que derrames con un alto contenido
de az0car o @cido(como tomates, chucrut, jugos
de fruta o rellenos de pasteles)permanezcan en la
superficie. Puedenprovocar una mancha sin brillo
despu6s de la limpieza.
Elamoniaco dom6stico puede ayudar a realizaruna
limpieza mejor. Coloque 1/2taza en un recipiente
poco profundo de vidrio o cer6mica dentro del
homo fr[o durante toda la noche.
Losgases del amoniaco ayudar6n aaflojar la grasa
y los alimentos quemados.
Sifuera necesario, puede utilizar un limpiador de
horno.Siga lasinstrucciones del paquete.
No rode limpiador de homo sobre los controles e
interruptores eldctricosporque puede provocar un
cortocircuitoy generar chispaso un incendio.
Nopermita que seacumule una pelfcula de
limpiador en elsensor de temperatura, porque
puede hacerque el homo caliente de manera
incorrecta. (Elsensor estd ubicado en la parte
superior del homo).Limpie el sensorcon un paho
despudsde cada limpieza del homo, teniendo
cuidado de no mover elsensorporque un cambio
en suposici6n podrfa afectar el homeado
del homo.
No rode ningOnlimpiador de homos sobre
la puerta, manijas y cualquiersuperficieexterior
del homo, gabinetes o superficiespintadas.El
limpiador puede dahar estas superficies.
Superficies pintadas
Limpie con jab6n y agua o una soluci6n de vinagre
y agua.
Superficies de vidrio
Para limpiar el acabado exterior de vidrio, use un
limpiador de vidrios.Enjuaguey brillecon un paso
seco.
Superficies de acero inoxidable (en otgunos moddos)
No use una almohadilla de lana de acero; rayar6
la superficie.
para limpiar la superficie de acero inoxidable,
useaguajabonosa con poca espuma o bien un
limpiador o abrillantador para acero inoxidable.
Siempre limpie la superficie en la direcci6n de las
vetas. Siga las instrucciones del limpiador para
limpiar la superficie de acero inoxidable.
No use limpiadores de homo comerciales,
limpiadores en polvo, lana de acero niabrasivos
fuertes en ninguna superficie pintada.
No permita que el agua ni el limpiador corran pot el
interior de la puerta delhomo durante la limpieza.
Para averiguar acerca de la compra de un
limpiador o un lustrador de acero inoxidable,o
para encontrar la ubicaci6n de su distribuidor m6s
cercano, por favor Ilame a nuestro n0mero gratuito:
Centro Nacional de Refacciones
(National Parts Centefl 1.800.626.2002
GEAppliances.com
26
Page 59

Antes de llamar para solicitar
un servicio de mantenimiento...
iLosconsejos para resoluci6nde problemas ahorran tiempo y
dinero! Reviseprimerolos grdficas en lossiguientes pdginas
yes posibleque no tenga que Ilamar para solicitor serviciode
mantenimiento.
?u6 hacer
Sefic
despu6s de ingresar
el tiempo de cacci6n
o Delay Start
#nicio postergadoJ
Los alimentos Controles del homo no • Consulte la secci6n Uso del homo.
no se hornean a configurados apropiadamente.
asan apropiadamente
Olvid6 ingresar una
temperaturo de horneado o
el tiempo de limpieza.
La posici6n de la bandeja • Consulte la secci6n Uso del homo.
es incorrecta o no est6 nivelada.
La posici6n de la parriNa es • Consulte la secci6n Uso del homo.
incorrecta o la parrilla no
est6 nivelado.
Eltermostato del homo , Consulte la secci6n Ajuste del termostato del homo:
necesita ajuste, lHdgalo usted mismo!.
, presione el bot6n Bake y la temperatura deseada o
el bot6n Self Clean y el tiempo de Nmpieza deseado.
GEAppliances.com
Los alimentos no Los controles del horno est6n • AsegOrese de presionar el bot6n Broil Hi/Lo.
seasan a la parrilla configurados inadecuadamente.
apropiodamente Seest6 utilizando una posid6n • Consultela Guia para asar a la parrilla.
inadecuada de la parrilla.
Losalimentos se estOn , Para obtener mejores resultados, utilice una fuente
cocinando en una fuente disehada para asar a la parrilla.Aseg0rese de que
caliente, est6fria.
Los utensilios de cocina . Para mejores resultados,utilice una bandeja dise_ada
no son adecuados paro asar para asar a la parrilla.
a la parrilla.
El papel met61ico usodo . Consultela secci6n Usode/homo.
en la osadero y la rejilla
no se han colocado de manera
correcta y nose han realizado
los cortes recomendados.
Enalgunas 6reas
el voltoje puede ser bajo.
Elrelajyel temparizador Un fusible en su caso • Reemplaceel fusible o reinicie el disyuntor.
no funcianan puede estar fundido o
el disyuntor activado.
Loscontroles del homo estc_n , Consultela secci6n Usodel relojy el temporizador.
configurados incorrectamente.
, Precalienteel elemento de asado a la parrilla durante
10 minutos,
, Asea la parrilla durante un periodo mc_sprolongado
que el recomendado en la Guiapara asar a laparrilla.
La luzno funciona La bombilla est6 floja o • Apriete o reemplace la bombilla.
27
defectuosa.
El bot6n de operaci6n , Llame para solicitar servicio de mantenimiento.
de la bombilla est6 roto.
Page 60

Antes de llamar para solicitar
un servicio de mantenimiento...
Consejos para resoluci6n de problemas
Causas posibles Qu6 hacer
La temperatura El termostato del horno , Consultela secci6nAjuste del termostato del homo:
del homo es necesita un ajuste, iHdgalo ustedmismo!
demasiado alto
o demasiado baja
Elhomo Un fusible en su casa puede • Reemplaceel fusible o reinicie el disyuntor.
no funciona estar fundido o el disyuntor
Elhomo no Latemperatura del homo es , Permita que el homo se enfrie y reinicie los
se auto limpiar6 demasiado alto para establecer controles.
activado.
Los controles del homo est6n , Consultela secci6nUso de/homo.
configurados inadecuadamente.
una operaci6n de autolimpieza.
Los controles del horno est6n , Consultela secci6n Uso del homo autolimpieza.
configurados inadecuadamente.
Se escucha un "crujido" Este es el sonido del metal , Esto es normal.
o "estallido .... calent6ndose y enfri6ndose
Humo excesivo
durante el ciclo
de limpJeza
La puerto del horno El horno est6 demasiado
no se abrir6 despu6s caliente.
de un ciclo de limpieza
Elhomo no est6
limpiodespu6s de
un cido de limpieza
"LOCKED" parpadea
en la pantalla
La luz LOCKED est6
encendida cuando
desea cocinar
durante las funciones de
cocci6n y limpieza.
Exceso de mugre. Presione el bot6n Clear/Off. Abra las ventanas para
dejar salir el humo de la habitaci6n. Espere hasta que
la luz LOCKED se apague. Limpie elexceso de mugre y
reinicie el ciclo de limpieza.
Permita que el horno se enfrfe por debajo de la
temperatura de bloqueo.
Loscontroles del homo est6n • Consultela secci6n Uso del homo autolimpieza.
configurados inadecuadamente.
El horno tiene mugre dificil
de eliminar.
Se ha seleccionado el ciclo
autolimpieza pero la puerta
no est6 cerrada.
La puerto del horno
est6 bloqueada porque
la temperatura dentro
del homo no ha caido
por debajo de la temperatura
de bloqueo.
Limpie las sobras pesadas antes de comenzar el ciclo
de limpieza. Esposible que los hornos que tienen
una mugre muy pesada necesiten de autolimpieza
nuevamente o durante un periodo mds prolongado.
. Cierre la puerta del horno.
. Presione el bot6n Clear/Off Deje enfriar el horno.
28
Page 61

"F-- y un n_mero o
letra" parpadean en
pantalla
Causas posiNes Ou6 hacer
Tiene un c6digo de
error de la fund6n.
, Presione el bot6n Clear/Off. Permita que el horno se
enfr[e durante una hera. Ponga el horno nuevamente la
en operaci6n.
Si el c6digo de la fund6n
se repite.
Desconecte la corriente del horno durante
30 segundos y conecte nuevamente la corriente.
Si el funci6n se repite, Ilame para solicitar servicio
de mantenimiento.
GEAppliances.cam
La pantalla se pone
en blanco
Se ha fundido un fusible
en su hogar o bien
• Reemplace el fusible o reajuste el cortacircuitos.
el cortacircuitos no est6
fundonando correctamente.
El reloj est6 en el mode
de apagado.
La pantalla parpadea Folio en el suministro
. Consulte la secci6n Funciones especiales de los
controles de su horno.
. Reinicie el reloj.
de electricidad.
fmpasible Iograr Los botones de control del . Los botones Bake y Broil Hi/Lo deben set presionados
la pantalla muestre "SF" homo no fueron presionados que al mismo tiempo y sostenidos durante
apropiadamente. 3 segundos.
Carte en el suministro
el_ctrico, el reloj
parpadea
Pico o corte del suministro
el6ctrico.
Reinicie el reloj. Si el horno estaba en usa,
debe reiniciarlo presionando el bot6n Clear/Off,
configurando el reloj y reestableciendo cualquier
funci6n de cocci6n.
Olor a "quemado" o
"aceitoso" saliendo
del respiradero
Olor fuerte
Esto es normal en un homo
nuevo y desaparecer6 con
el tiempo.
Un olor del aislamiento
Para acelerar el proceso, configure un ciclo de
autolimpieza durante un minimo de 3 horas.
Consulte la secci6n Uso del homo autolimpieza.
, Esto es temporal.
al rededor del interior del
homo es normal las primeras
veces que se utilize el homo.
Suena un ventilador Un ventilador de enfriamiento
puede encenderse
autom6ticamente.
, Esto es normal. Elventilador de enfriamiento
se encender6 para refrigerar los partes internas.
Puede funcionar durante 1-1/2 heros en modelos
de 30" et durante 2 heros en modelos de 27" despu6s
que elhomo est6 apagado.
29
Page 62

Accesorios.
_LDeseumlgo m6s? (No todos los mccesorios se encuentrmn disponibles pmrmtodos los
modelos.)
Usted puede encontrar estos accesorios y muchos m6s en GEAppliances.com, o Ilame al
800.626.2002 (en horatio de trabajo normal). Tenga listo el n0mero de modelo.
Rejillas
Cobezoleso topos de Elementos de superficie y Perillas
quemodores de supefficie bondejos colectoros
<)
8andejas del homo
Pruebe estos otros excelentes productos para que su cocina se vea estupenda!
_A_K'_,_ Kit de limpieza Toallitas Toallitas para
vitrocer6micos: de anafes de acero
Induye limpiador, vitrocer6micos ino×idable
__ de anafes de limpieza pulir artefactos
rasqueta y patio
WX10Xll7GCS WX10X305 WX10X10001
iAproveche al m6ximo su bandeja para asar! (No para usar con modelos de caj6n asador.)
iUtilicesu bandeja y tapa de rejilla para asar hamburguesas, frutos de mar, filetes,vegetales,panceta,
costilla8y mucho mc_s!La bandeja inferior retiene el exce8ode grasa8 y aceite8.
PiezaGEgenuina
Fdcilde limpiar
Garantia de un aho
iOferta de tiempo limitado! iEnvio sin cargo!
Cuando solicite la bandeja para asar dentro de los 30 d[as de haber adquirido su producto de cocina GE.
Peque_a Grande* Extra grande**
N° de pieza WB48X10055 WB48X10056 WB48X!0057
Dimensiones 8-3/4" A x 1-1/4" A x 13-1/2" P 12-3/4" Ax 1-1/4" A x 15-1/4" P 15-1/2" A x 1-1/4" A x 19" P
Elementos del homo Bombillos de luz
de artefactos
de acero
ino×idable
Limpiador
plv120X322
* La bandeja para asar grande (est6ndar)no entra en cocinas de 20/24 pulgadas.
** La bandeja extra grande no entra en homos de paredes de 24 pdgadas, empotradas de 27 pulgadas o cocinas de 20/24 pulgadas.
Llame al 800.626.2002 o utilice esteformulafio para enviar su solicitud por correo:
GEParts,P.O.Box 221027, Memphis,TN 38122-1027.
Formulario de solicitud de la bandeja para asar
Cantidad
N0mero demodelo
Nombre
Direcci6n
Ciudad
Tel6fono
Check __ Giro postal __
Para consultar sobre los precios actuales Ilame al 800.626.2002. Todas los 6rdenes con tarjeta de cr6dito se deber6n realizar en forma
telef6nica.
N_mero de pieza
NOmero de serie Marco Fecha de compra
Apellido
Estado C6digo Postal
Correo electr6nico
3O
Page 63

Garan6a de GEpara su horno el .ctfico empotrado.
Todos los servicios de garantia los proporcionan nuestros
Centros de Reparaci6n de Fdbrica o nuestros tdcnicos Customer
Core ®outorizodos. Poro concertar uno cito de reparaci6n, en
Ifneo, visfte nos en GEAppliances.com, o Ilame al 800.GE.CARES
(800.432.2737). Cuando Ilome para solicitor servicio, par favor
tenga a mona el nOmero de serie y el nOmero de modelo.
GE reemplazar6:
Cuulquier parte del homo que falle debido a defectos en los materiales o en la fabricaci6n.
Aportirde Io fecha Durante este garun6a limitada de un afro, GEtambidn proporciond, sin costa alguno,
de lo compro original toda la mano de obra y los servicios intemos para reemplazar pares defectuosas.
Viajes de servicioa sucasa para enseffar[e c6mo usar
el producto.
Instalaci6n, entrega o mantenimiento inapropiada.
Daffoo fallas del producto en caso de abuso, uso
inadecuado, modificaci6n, uso pare otros prop6sitos
que no sean el adecuado, o uso comercial.
Reemplazo de fusibles de su casa o reajuste de
interruptores de circuito.
Daffo al pmducto causado par acddente, fuego,
inundadones o actos de Dios.
Daffoincidental o consecuencial causadopar posibles
defectos con el aparato.
Daffo causado despu@s de la entrega.
Producto no accesib[e para faci[itar el servido
requerido.
Pegue aqui su recibo.
Se requiere facilitar prueba
de la fecha de compra original
para obtener un servicio
bajo la garanda.
EXCLUSION DE GARANT[AS IMPL[CITAS--Su _nico y exclusivo derecho es la reparaci6n del
producto, tal y como se indica en esta Garantia limitada. Cualquier garan6a implicita, incluyendo
las garantias implicitas de comerciabilidad o adecuaci6n para un fin determinado, est6n limitadas
a un afro o el periodo de tiempo m6s breve permitido por la ley.
Esto garontio se extiende al comprador original y cuolquier compmdor posterior de productos comprados poro
usa residencial dentro des Estados Unidos. Si el producto estd situodo en un dreo que no dispone de servicio par
porte de un proveedor de servicio outorizodo de GE,podrio tenet que hocerse cargo de los castes de envio o bien
podrio solicitdrsele que Ileve el producto o un centro de servicio de GEoutorizado poro realizar Io repamci6n. En
Alaska, la gamntia excluye el costa de envio o los visitas de servicio o su cosa.
Algunos estodos no permiten Io exclusi6n o los limitociones de dohos incidentoles o consecuencioles. Esto
gamntio do derechos legoles espedficos, y usted podrio tenet arras derechos que voriordn de estado o estodo.
Poro saber cudles son sus derechos legoles, consulte o Io oficino de osuntos del consumidor local o Io oficino del
Prucumdor (Attorney General) en su Iocolidod.
Garante: General Electric Company. Louisville, KY 40225
31
Page 64

Soporteul consumidor.
Pdgina Webde GEAppliances GEAppliances.com
_LTienealguna pregunta sabre suelectrodom6stico? iPruebela p6gina Web de GEAppliances 24 horas al dfa,
cualquier d[a del aBo! Paramayor convenienciay servicio m6s r6pido,ya puede descargar los IVlanualesde los
Propietarios,pedir piezas o incluso hacer unacita en I[neapara que vengan a realizar una reparaci6n.
Solicite una reparaci6n GEAppliances.com
Elservicio de expertos GE est6 a tan s61o un paso de su puerta, iEntre en linea y solicite su reparaci6n cuando le
venga cualquier dia del aho! O Ilame al 800.GECARES(800.432.2737) durante horas normales de oficina.
RealLifeDesignStudio(Estudiodedise_oparalavidareal)GEAppliances.com
GEapoya el concepto de DiseBoUniversal-productos, serviciosy ambientes que pueden usar gente de todas
lasedades, tamaBosy capacidades. Reconocemosla necesidad de diseBar para una gran gama dehabilidades
y dificultades fisicas y mentales. Param6s detalles cobre las aplicaciones de GEDiseBoUniversal,incluyendo
ideas de diseBo para la cocina para personas con discapacidades, mire nuestra p6gina Web hay mismo. Para
personas con dificultades auditivas, favor de Ilamar al 800.TDD.GEAC(800.833.4322).
Garantias ampliadas GEAppliunces.com
Compre una garantia ampliada y obtenga detalles sobre descuentos especiales disponibles mientras su garant[a
est6 aOn activa. Puede comprarla en I[nea en cualquier momento, o Ilamar a1800.626.2224
durante horas normales de oficina. GEConsumer Home Services estar6 a0n ah[ cuando su garant[a termine.
Piezas y accesorios GEAppliunces.com
Aquellos individuos con la calificaci6n necesaria para reparar sus propios electrodom6sticos pueden
pedir que se les manden las piezas o accesorios directamente a sus hogares (aceptamos las tarjetas
VISA,MasterCard y Discover). Haga su pedido en linea hoy, 24 horas cada dia o Ilamar por tel6fono
a1800.626.2002 durante horas normales de oficina.
Lasinstrucciones descritas en este manual cubren los procedimientos a seguir par cualquier usuario.Cualquier
otra reparaci6n deberia,par regla general, referirsea personal calificado autorizado. Debeejercerseprecauci6n
ya que lasreparaciones incorrectas pueden causar condiciones de funcionamiento inseguras.
P6ngase en contacto con nosotros GEAppliances.com
Sino est6 satisfecho con el servicio que recibe de GE,p6ngase en contacto con nosotros en nuestra p6gina
Web indicando todos los detalles as[ como su n0mero de tel6fono o escr[banos a:
General Manager, Customer Relations
GEAppliances,Appliance Park
Louisville,KY40225
Registre su electrodomdstico GEAppliances.com
iRegistre su nuevo electrodom6stico en I[nea-cuando usted prefiera! Elregistrar su producto a tiempo le
proporcionar6, si surgiera la necesidad, una mejor comunicaci6n y un servicio m6s r6pido bajo los t@minos de
su garantfa, mambi6n puede enviar su tarjeta de registro pre-impresa que se incluye en el material
de embalaje.
 Loading...