

Page 1
Safety Information
Oven .................... 3-!5
Safety Precautions ......... 3-!5
Self:Cleaning Oven .......... 5
Operating Instructions
Clock and Time_ ................
Oven ................... 6-16
Oven Thermostat .......... 14
Self:Cleaning ........... 15, 16
Timed Baking and
Roasting .................. 13
Care and Cleaning
Broiler Pan and Grid ........ 18
Conuol Panel and Knobs ...18
(;lass Surfaces ............. 18
Heating Element ........... 18
I.ift-Off Oven Door . ........ 17
Oven Interior . ............. 19
Oven I.ight ................ 19
Painted Surfaces ........... 18
Shelves ................... 17
Stainless Smel Surfaces ..... 20
GEAppliances
./ 45
J!_P24
.]TP27
.]TP45
.]TP47
Troubleshooting Tips .2 -2.
._1_3
Consumer Selwiees
Product Registration . .2, 25, 26
Se_wice Telephone
Numbers .......... Back Cover
Warranty .................. 27
www.geappfiances.com 16404290P002 49-80031 07-00 JR
Page 2

GE& You,A Service Partnership.
IMPORTANT!
Fill out the Consumer Product Registration (ard.
Twoeasy waysto registeryourappliance!
• Through the internet at _v.geappliances.com
• Complete and mail the enclosed Product Registration Card
FORYOURRECORDS
Write the model andserial numbershere:
#
#
You can find them on a label on the fiont of the lower oven behind the oven door.
Staple sales slip or cancelled check here.
Proof of the ori_nal purchase date is needed to obtain secvi( e under the w_uranty.
READTHISMANUAL
Inside you xfillfind many helpflfl hints on how to use and maintain your oven properly.
Just a little preventive (are on your part _an save you agreat deal of time and money over the life
oUvouI" oven.
IFYOUNEEDSERVICE
Y_)u'll lind many answers to common problems in the Before YouCallForService section.
If you review our chmt of Troubleshooting Tipsfirst, you may not need to call tin secvice at all.
Ify_)u do need sevvice, you can relax knowing help is only a phone call away. A list of toll-tiee
customer secvice numbers is included in the back section of this manual.
OR
Visit our Website at: ww_geappliances.cem
2
Page 3
IMPORTANTSAFETYINFORMATION.
READALLINSTRUCTIONSBEFOREUSING.
WARNING!!
Foryoursafe_ theinformationin thismanualmustbefollowed to minimizetheriskof fireor
explosion,electric shock,ortopreventproperty damage,personalinjury,orlossof life.
IMPORTANTSAFETYNOtiCE
The California Safe Drinking Water and ToxicEnforcement Act requires the Governor of Califomb to
publish a list of substances known to the state to cause cancer, birth defects or other reproductive
harm, and requires businesses to warn customers of potential exposure to such substances.
The fiberglass insulation in self-clean ovens gives off a very small amount of carbon monoxide during
the cleaning cycle. Exposure can be minimized by venting with an open window or using a ventilation
fan or hood.
IMPORTAN7?Thehealth of some birds is extremely sensitive to the fumes given off during
the self-cleaning cycle of any oven. Move birds to another well-ventilated room.
SAFETYPRECAUTIONS
When using electrical appliances, basic safe_/ precautions should be followed, including the following:
iJ_i:;Use this appliance only for its intended
purpose as described in dfis Oxmer's
Manual.
_; Be sure your appliance is properly installed
and g¢_mnded by a qualified technician in
accor, lance with the provided installation
instructions.
_; Do not attempt to repair or replace any
part of your oven unless it isspecifically
recommended in tiffsmanual. All other
servicing should be referred m a qualified
teclmician.
_; Have tim installer show you the location
of tim circuit breaker or fuse. Marl< it fbr
easy,eference.
ij_::;Beff)re pe_ibrTning any sersice, disconnect
the oven pox_r supply at the househoM
distribution panel by removing tim fllse or
switclfing off tim circuit breaker.
_; Do not leave children alone-children
shouM not be left alone or unattended in
an area where an appliance isin use. They
should never be allox_ed to sit or stand on
any part of the appliance.
iJ_i:_Do not allow anyone to dimb, stand or
hang on file door. They couM damage the
oven, or cause seve,e personal injuU.
_ Be sure tim oven is seouely installed in a
cabinet that is fimdy attached to the house
stmctu,e. Never allow anyone to climb, sit,
stand or hang on the oven door.
_; Never leave tim oven door open when you
are not watching the oven.
iJ_i:;Ahvays keep combustible wall covering,
o_rtains or drapes a safe distance fi_ma
your oven.
ij_::_Ah_%vskeep dish rowels, dish doths, pot
hoMers madother linens a safe distmace
fiom your oven.
iJ_i:_Ah_vtys keep wooden and plastic utensils
and canned food a safe distance away from
yo/Ir ()veil.
_ Teach children not to play with the
controls or any other part of the oven.
3
Page 4
IMPORTANTSAFETYINFORMATION.
READALLINSTRUCTIONSBEFOREUSING.
WARNING!
SAFETYPRECAUTIONS
_ Do not store flammable materials in
an oven.
CAUTION:.erosofinterestto
children shouM not be stored in cabinets
above an oven; children climbing on tim
oven u) reach items could be seriously
injured.
_; Never wear loose4hting or hanging
garments while using tim appliance. Be
carefl|l when reaching f{_ritems su)red in
cabinets over tim oven. Flammable
material could be ignited if brought in
contact with hot surlaces or heating
elements and may cause severe burns.
ij_::_Use only d U pot holders-moist or damp
pot hoMers on hot surfaces m W result in
bums flom steam. Do not let pot holders
touch hot heating elements. Do not use a
towel or otimr bulky cloti1.
iJ_i:_For >)ur safety, never use >mr appliance
f_r x_rming or heating tire r_om.
_ Do not let cooking g_ease or otimr
flammable materials accumulate in
or near tile oven.
_ Do not use water on g_ease fires. Never pick
up a flaming pan. Turn the controls off.
Flame in tire oven can be smotimred
completely by dosing tim oven (Mor and
mining the oven offor by using a muhi-
purpose dU chemical or f{mm-type fire
exting_fisher.
_; Stand away flx)m tire oven when opening
tire oven door. Hot air or steam which
escapes can cause burns to hands, face
and/or eyes.
N Do not heat unopened f_)od containers.
Pressure could buiM up and tile container
could burst, causing an injury.
@ Keep tim oven vent unobstructed.
N Keep tire oven flee flom g_ease buildup.
iJ_i:;Place tire oven shelf in tire desired position
while tire oxen is cool. If shelves nmst be
handled when hot, do not let pot holder
contact tile healing elemenLs.
iJ_i:;_qren using cooking or roasting bags in tire
oven, fi)llow tire manufacturer's directions.
_ Do not touch tire heating elements or tire
interior smtace of tim oven. These surfaces
may be hot enough u) burn even though
they aye clark in color. During and after
use, do not touch, or let dothing or other
flammable materials contact any interior
area of tim oven; allow sutticient time fi_r
cooling first.
Potentially hot smtaces include oven vent
openings, smi_lces near tire openings,
crevices around tim oven door, tim edges
of tim window and metal trim parts above
tile door.
REMEMBER: Tire inside smthce of tire oven
may be hot when tile door is opened.
_ Never leave jars or cans of fat drippings in
or near your oven.
ij_::_Do not store or use combustible materials,
gasoline or other flammable vapors and
liquids in tim vicinity of tilis or any otimr
appliance.
4
Page 5
_ Pulling out fire shelf to tire stopqock is a
convenience in litdng heax T f()ods. It is also
a precaution against burns fr_mr touching
hot sutt[hces of fire door or oven walls.
_ After broiling, always take the broiler pan
out of tire oven and clean it. I,efiover
gTease in the broiler pan can catch fire
next time you use the pan.
_ Do not use fire oven to dU newspapers.
If overheated, they can catch on fire.
iJ_Z:_Do not use the oxen f(_ra storage area.
Items stor,ed in an oven can ignite.
_ Do not leave paper products, cooking
utensils or f{_odin the oven when not
in use.
_ (]lean only parts listed in this Use and
Care Manual.
Do not use aluminum fk)ilto line oven
bottoms, except as suggested in this
manual. Improper installation of
aluminum f0il mW result in a risk
of electric shock or fire.
COOKMEATANDPOULTRYTHOROUGHLY...
Cookmeat andpoultry thoroughly--meat to atleast anINTERNALtemperatureof 160°Eandpou/try
toat least an INTERNALtemperatureof 180°ECookingto thesetemperaturesusuaflypmtects against
foodbomeillness.
SELF-CLEANINGOVEN
iJ_Z:_Do not clean dre door gasket. The door
gasket is essential f{_ra good seal. Care
should be taken not to rub, damage or
move the gasket.
iJ_Z:_Do not use oven cleaners. No commercial
oven cleaner or oven liner protective
coating of any kind should be used in or
around any part of the oven. Residue from
oven cleaners will damage the inside of the
oven when the self:clean {Tcleis used.
iJ_Z:_l_f()re self:cleaning lhe oven, remove the
broiler pan, gTid and other cookwar,e.
_ l',e sure m wipe up excess spillage bef_r,e
starting the sell:cleaning operation.
iJhZ:;If the sell:cleaning mode malfunctions,
mm the oven off and disconnect the power
supply. Have it sere'iced by a qualified
technician.
READANDFOLLOWTHISSAFETYINFORMATIONCAREFULLY.
SAVETHESEINSTRUCTIONS
Page 6
Usingthe ovencontrols.
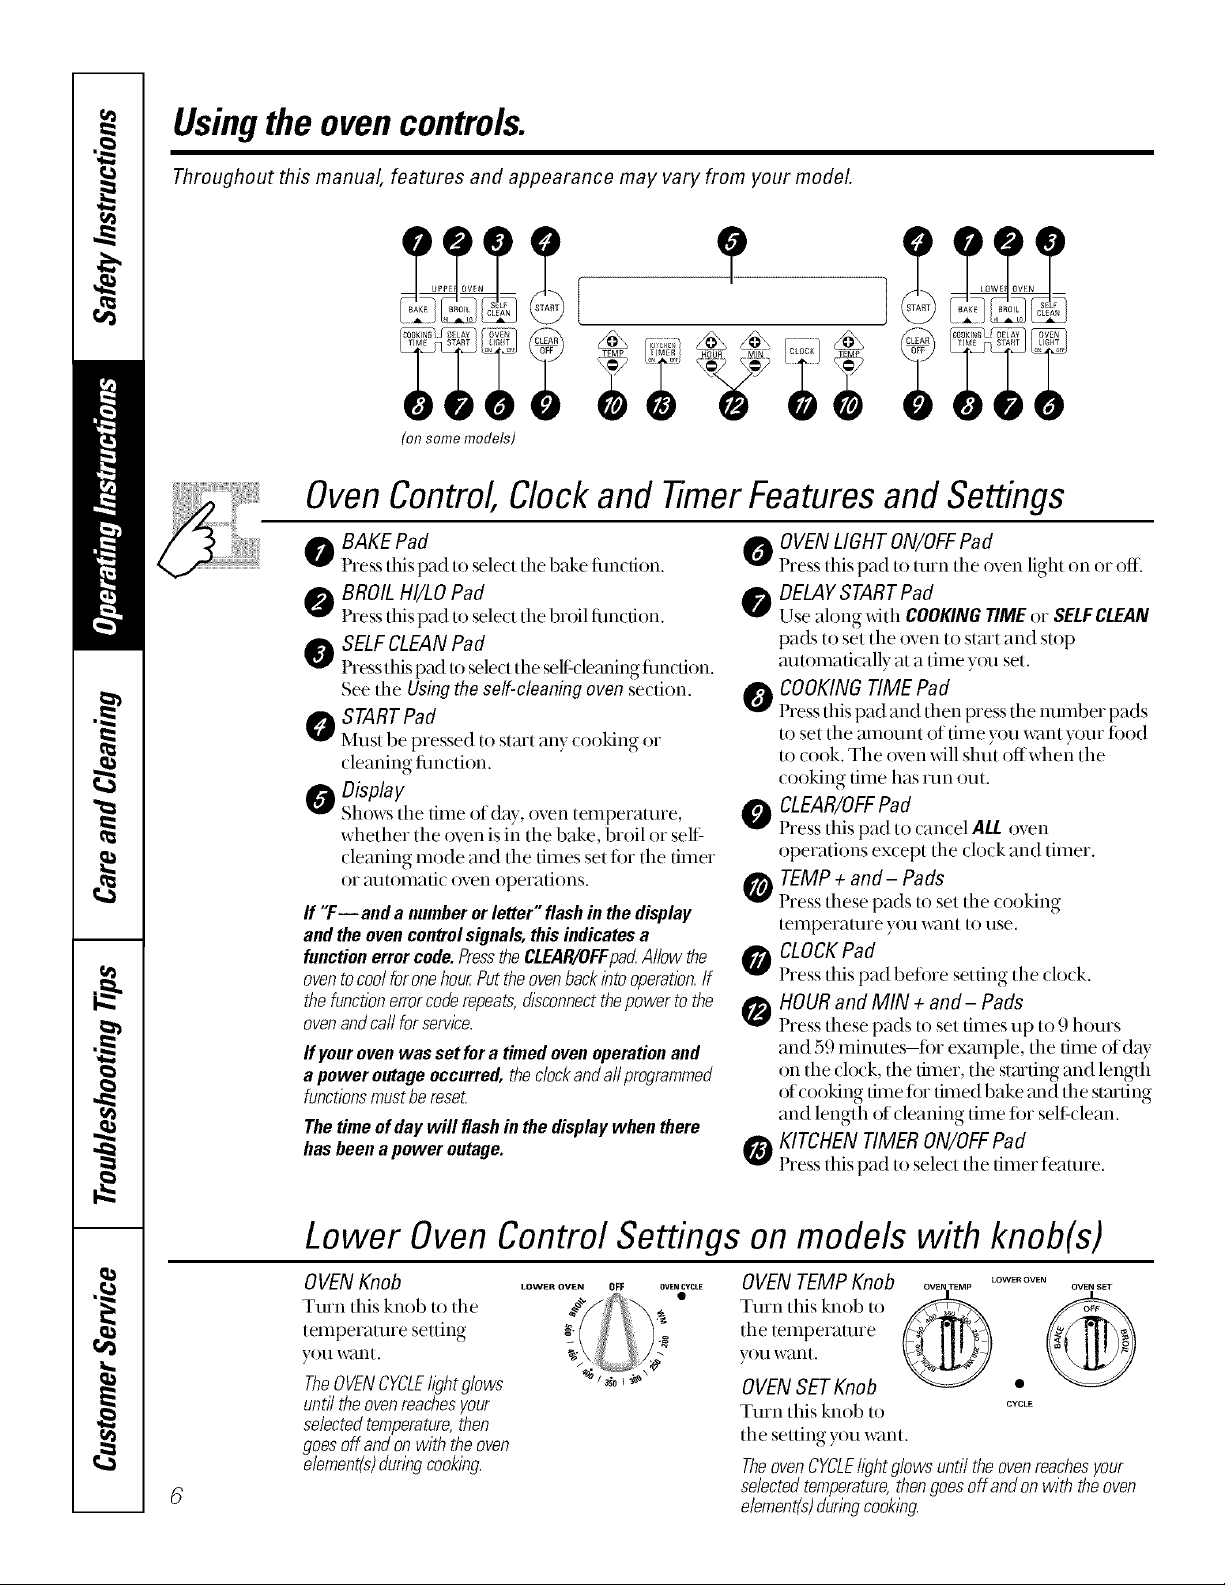
Throughout this manual, features and appearance may vary from your model.
(on some models)
OvenControl, Clock and TimerFeatures and Settings
0 BAKE Pad
Press this pad to select tile bake fimction.
e'_ BROILHI/LOPad
Press this pad to select tile broil fimction.
SELFCLEANPad
Press this pad to sele(t tile self-(leaning tim(Lion.
Seetile Usingthe self-cleaningovensection.
STARTPad
Must be pressed to start any (ooking or
cleaning fimction.
0 Display
Shows tile time of day, oven temperature,
whether the oven is in the bake, broil or sell:
cleaning mode and the times set fi)r the timer
or mnomafic ()yen operations.
ff "F--and a numberorletter"flashinthedisplay
andtheovencontrolsignals, thisindicatesa
functionerrorcode.PresstheCLEAR/OFFpa_Allow the
oventocoolforonehourPuttheovenbackintooperatbn.If
thefunctionerrorcoderepeats,disconnectthepowertothe
ovenandcarlforservice.
fly our oven was set fora timed oven operationand
a power outage occurred, the dock and a//programmed
functionsmust be reseL
Thetime ofdaywill flashin thedisplaywhen there
hasbeena poweroutage.
OVENLIGHT ON/OFFPad
Press this pad to turn tile oven light on or off.
DELAYSTARTPad
Use ahmg widl COOKINGTIMEor SELFCLEAN
pads to set tile oven to start and slop
mltomafically at a time y()u set.
COOKINGTIME Pad
Press this pad and then press tile number pads
to set tile amount of time you want your ti)od
to cook. The oven will shut offwhen the
(ooking time has run out.
CLEAR/OFFPad
Press tllis pad to (ancel ALL oven
operations except the dock and timer.
TEMP ÷ and- Pads
Press these pads to set tile (ooking
telnperamre you want 1orise.
_ CLOCKPad
) y
l ress this pad befi)re setting tile (lo(k.
HOURand MIN + and- Pads
Press these pads to set times up to 9 hours
and 59 minutes--ti)r exmnple, tile time of dW
on the clock, the timer, the stmfing and length
of cooking time ti)r timed bake mM tile stzufing
and length of cleaning time ti)r self clean.
KITCHEN TIMERON/OFFPad
Press this pad to sele(t tile timer featlHe.
Lower Oven Control Settings on models with knob(s)
OVENKnob
Turn this knob to tile
temperature setting
y()tl want,
TheOVENCYCLEh_?htglows
untiltheovenreachesyour
selectedtemperature,then
goesoffandonwith theoven
dement(s)dunbgcooking.
LOWER OVEN OFF OVENCYCLE
OVEN TEMPKnob
LOWER OVEN OVEN SET
Turn this knob to
the temperature
V( )ll _V_IIl[,
OVENSET Knob
Turn this knob to
CYCLE
tile setting y()u want.
TheovenCYCLEhghtglowsuntiltheovenreachesyour
selectedtemperature,thengoesoffandonwith theoven
element(s)duringcooking.
Page 7
Special featuresofyourovencontrol
Yournew touch pad control has additional features that you may choose to use. The following are the features
and how you may activate them.
The special feature modes can only be activated while the display is showing the time of day. Theyremain
in the control's memory until the steps are repeated.
When the display shows your choice, press the STARTpad. Thespecial features will remain in memory after
a power failure.
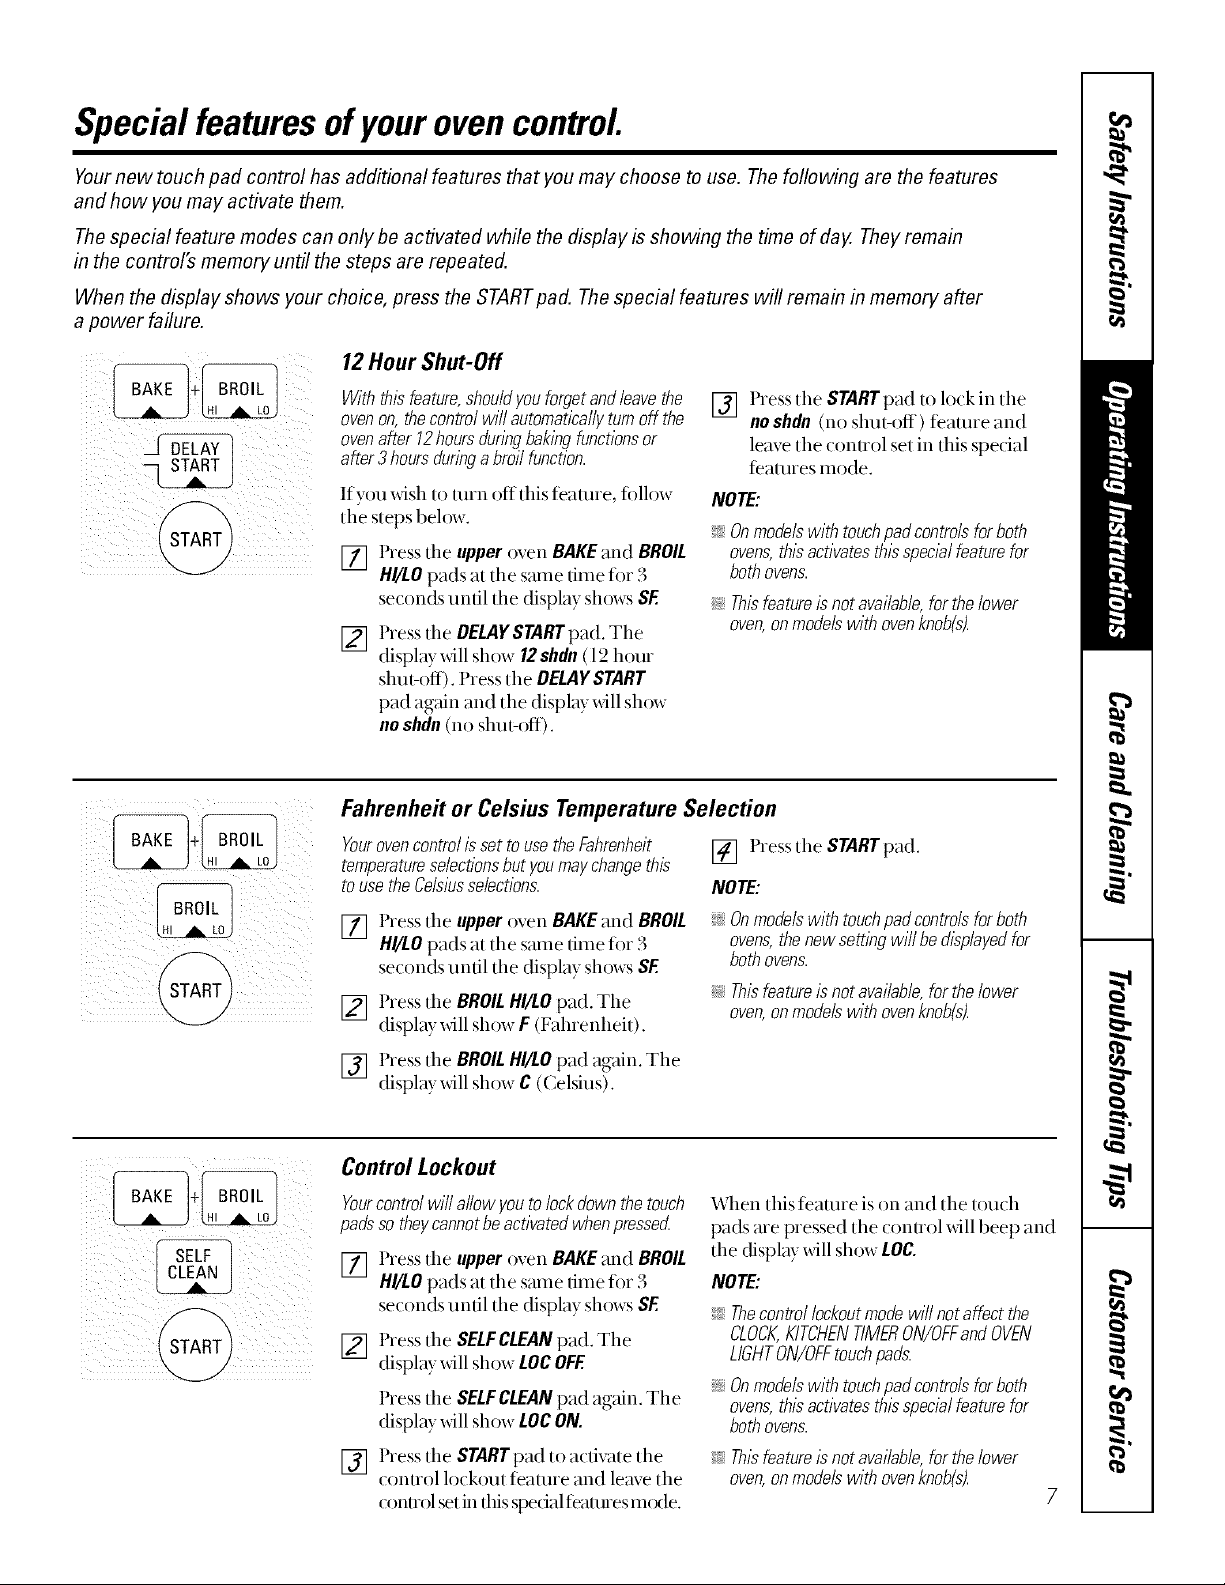
12 Hour Shut-Off
Withthisfeature,shouldyouforgetandleavethe
ovenon,thecontrolwi//automaticallyturnoff the
ovenafter 12hoursflunbgbakingfunctionsor
after3hoursduringa broilfunction.
If yOU wish to tuI'n offthis featuie, folh)w
the steps beh)w.
[] Press the upper oven BAKE and BROIL
HI/LO pads at the same time fi)r 3
seconds until the display shows SF.
Press the DELAYSTARTpad. The
[]
display _dll show 12shdu (12 hour
shut-off). Press the DELAYSTART
pad again and the display will show
no shdn(no shut-off).
Fahrenhe# or Celsius Temperature Selection
Yourovencontrol isset touse theFahrenheit
temperatureselectionsbut you may changethis
to use theCelsiusselections.
Press the upperoven BAKEand BROIL
[]
H!/LOpads at the same time for 3
se(onds until the display shows SF.
[] Press the BROILHI/LOpad. The
display xdll show F (Fahrenheit).
[] Press the STARTpad to lock in the
NOTE:
>_Onmodelswithtouchpadcontrolsforboth
ovens,thisactivatesthisspecialfeaturefor
bothovens.
i:_?Thisfeatureisnotavailable,forthelower
oven,onmodelswithovenknob(s).
[] Pressthe STARTpad.
NOTE:
>_Onmodelswith touchpad controls for both
ovens,the new setting will be displayedfor
both ovens.
i::?Thisfeatureisnotavailable,forthelower
oven,onmodelswithovenknob(s).
no shdu (no shut-off) feattne and
leave the control set in this spedal
featmes mode.
[] Press the BROILHI/LOpad again. The
display _dll show C ((eMus).
Control Lockout
Yourcontrolwill allowyoutolockdownthetouch
padssotheycannotbeactivatedwhenpresser_
[] Press the upper oven BAKE and BROIL
HI/LO pads at the same time for 3
se(onds until the display shows SF.
[] Press the SELFCLEANpad. The
display will show LOCOFF.
Press the SELFCLEANpad again. The
display xdll show LOCON.
[] Press the STARTpad to activate the
control h)ckout feature and leave the
control set in thisspedal teattnes mode.
When this teatme is on and the touch
pads me pressed the conuol will beep and
the display will show LOC.
NOTE:
:i_Thecontrollockoutmodewillnotaffectthe
CLOCK,KITCHENTIMERON/OFFandOVEN
LIGHTON/OFFtouchpads.
i::__Onmodelswith touchpadcontrolsforboth
ovens,thisactivatesthisspecialfeaturefor
bothovens.
>_Thisfeature/snotavailable,forthelower
oven,onmodelswithovenknob(s).
7
Page 8
Special featuresofyouroven control
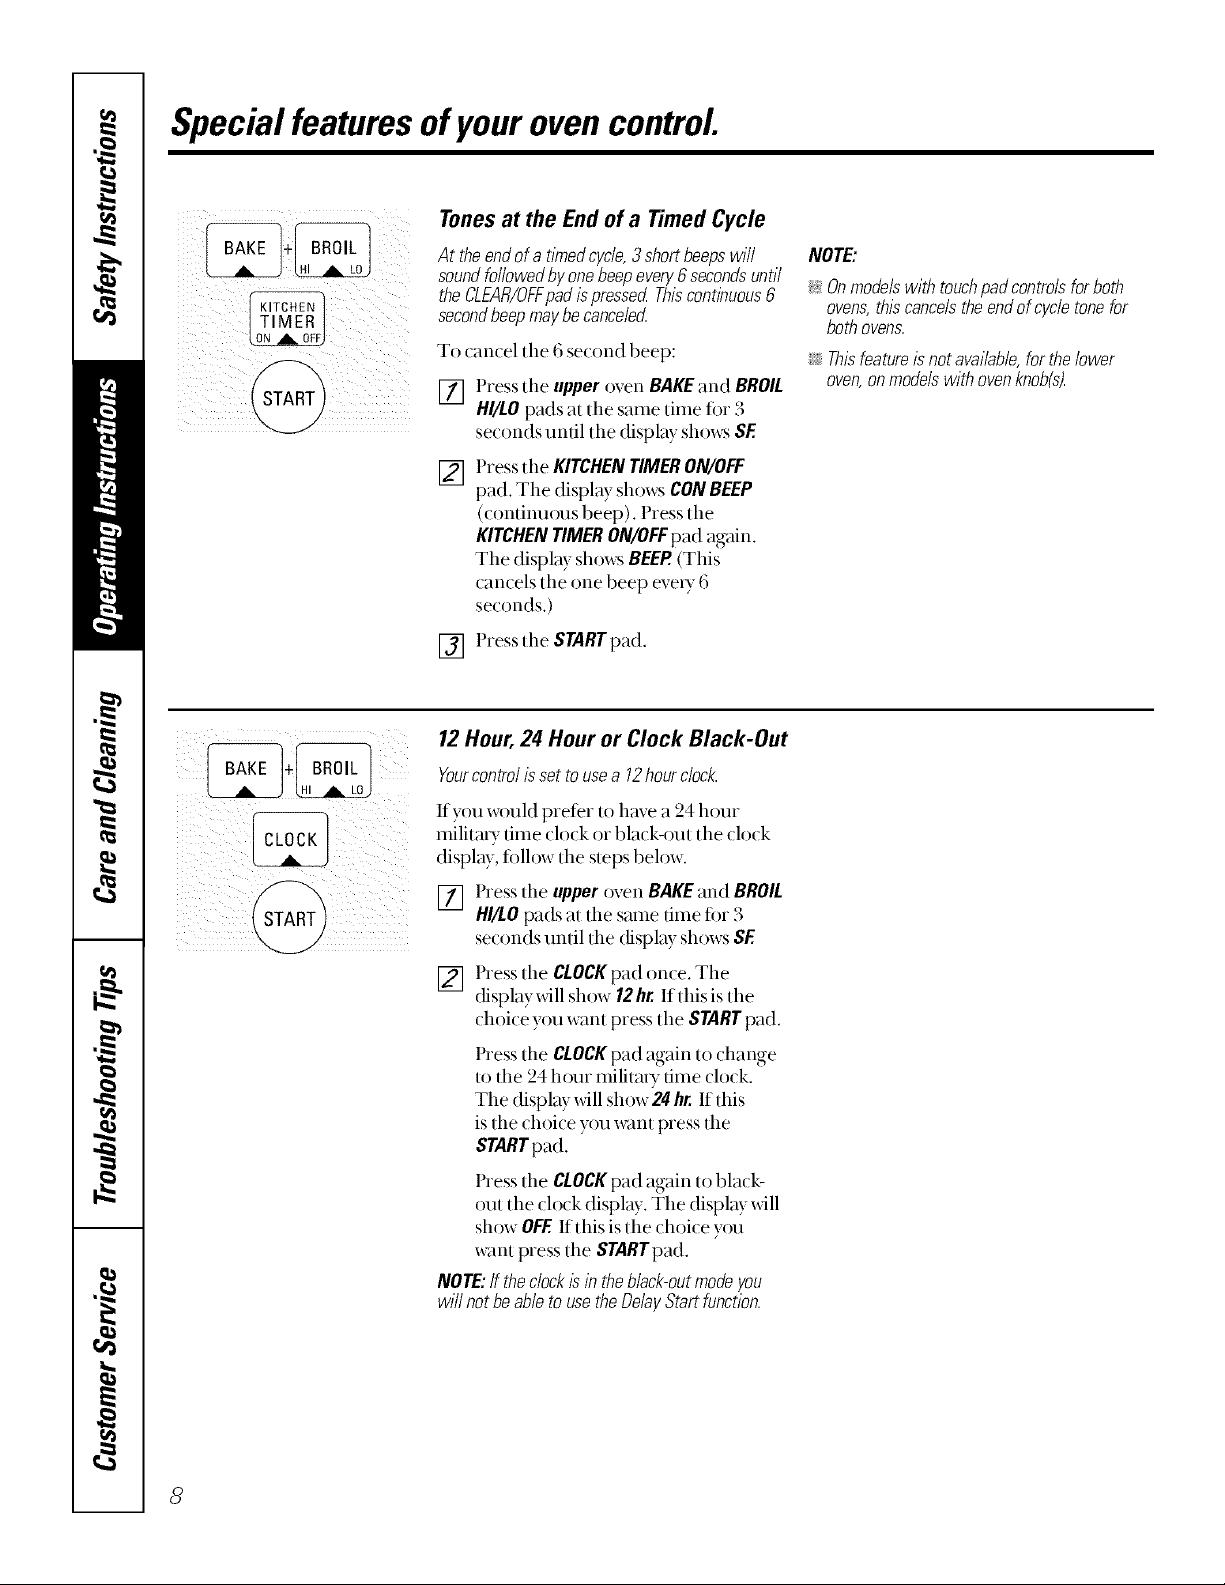
Tonesat the Endof a TimedCycle
At theendofa tYnedcycle,3shortbeepswill
soundfollowedbyonebeepevery6secondsuntil
theCLEAR/OFFpadispressedThiscontinuous6
secondbeepmaybecance/ecL
To cancel tile 6 second beep:
[] Press tlle upperoven BAKEand BROIL
HI/LOpads at tlle same time fi)r 3
seconds until tile display shows SF
Press tlle KITCHENTIMERON/OFF
[]
pad. The display shows CONBEEP
(continuous beep). Press the
KITCHENTIMERON/OFFpad again.
The display shows BEEP.(This
cancels the one beep every 6
seconds.)
[] Press flm STARTpad.
NOTE:
>_& modelswithtouchpadcontrobforboth
ovens,thiscancelstheendofcycletonefor
bothovens.
i:yThisfeatureisnot available,forthelower
oven,onmodelswithovenknob(s).
12Hour,24 Hour or Clock Black-Out
Yourcontrolissettousea 12hourdock.
Ifyou wouM prefer to have a 24 hour
milita U time (lo(k or black-out tile (lo(k
display, tollow tlle steps below.
[] Press the upperoven BAKEand BROIL
HI/LOpads at the same time fi)r 3
se(onds until tile (fisplay shows SF
Press the CLOCKpad once. The
[]
(fisplayxdll show 12hr.If this is the
dloice you want press the STARTpad.
Press the CLOCKpad again to change
to the 24 hour militmy time clock.
The display will show 24 hr.If this
is the choice you want press the
STARTpad.
Press the CLOCKpad again to black-
out the clock display. The display will
show OFF If this is the choice you
want press the START pad.
NOTE:If theclockIsin the black-out modeyou
will not beable to usethe DelayStart function.
8
Page 9
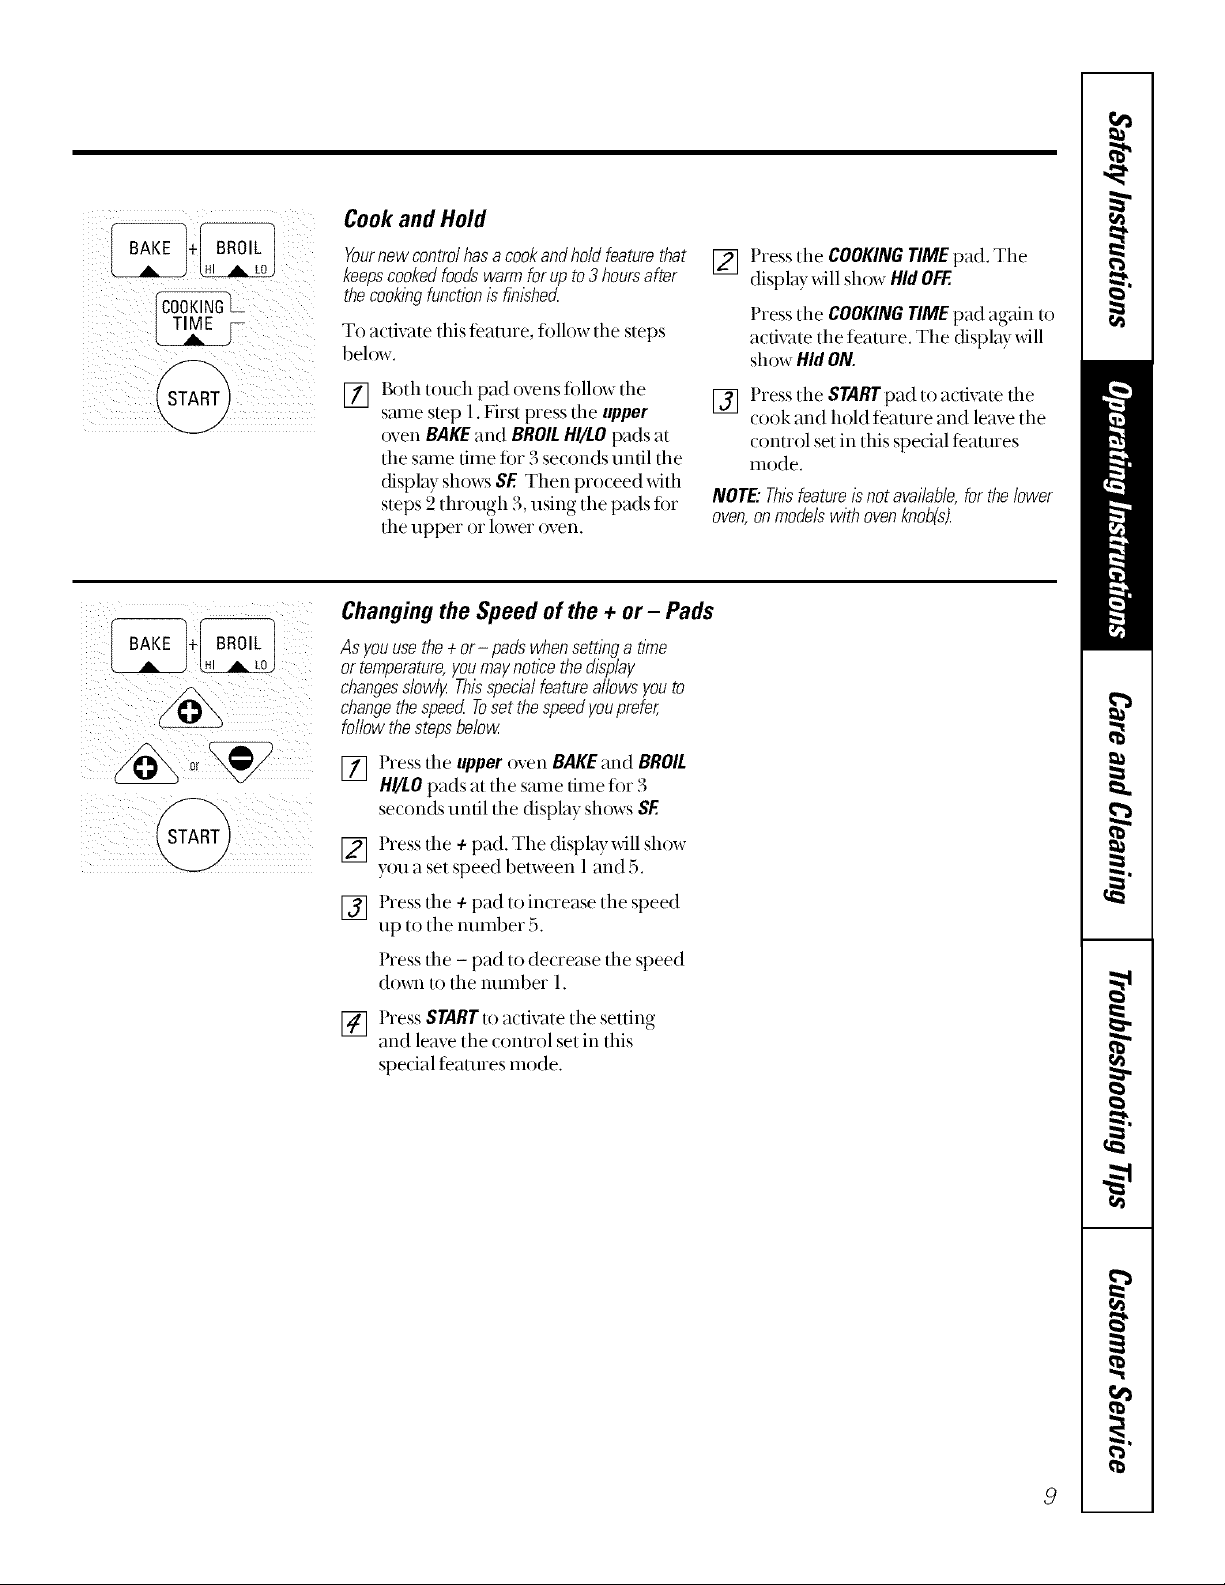
Cook and Hold
iI i! iii
Yournewcontrolhasacookandholdfeaturethat
keepscookedfoodswarmforupto3hoursafter
thecooklhgfunctionisflnlshe_
To a(tivate this teamre, follow tile steps
below.
[] Bofll touOl pad ovens follow tile
same step 1.First press tile upper
oven BAKEand BROILHI/LOpads at
the stone lime tot 3 seconds until the
displ W shows SE Then proceed with
steps 2 through 3, using the pads for
the upper or lower oven.
Changing the Speed of the + or- Pads
As you usethe + or- pads when setting a time
or temperature,youmay notice the display
changesslowly Thisspecialfeature allows you to
changethe speed Toset the speedyouprefer,
follow the stepsbelow
[] Press the upperoven BAKEand BROIL
HI/LOpads at tile same time for 3
se{onds until the display shows SE
[] Press the COOKINGTIMEpad. Tile
display will show Hid OFF.
Press tile COOKINGTIME pad again to
a_tivate tile feature. The display _dll
show HidON.
[] Press tile STARTpad to activate tile
cook and hold feature and leave tile
control set in this special features
inode.
NOTE" Thisfeature isnot available,for thelower
oven,on modelswith ovenknob(s).
Press the + pad. The display xdll show
[]
you a set speed between 1 and 5.
Press tile + pad to increase tile speed
[]
up to tile number 5.
Press tile - pad to decrease tile speed
cl()_l to the number 1.
[] Press STARTto activate the setting
and leave tile control set in tiffs
special Datures mode.
Page 10

Usingthe oven.
Toavoid possible bums, place the shelves in the desired position before you turn the oven on.
Before you begin...
III
[]
The shelves have stop-locks, so that when
pla(ed (one(tly on the supports, they _411
stop before (oming (ompletely out, and
xdll not tilt.
When pladng and removing cookware,
pull the shelf out to the bump on the
shelf support.
How to Set the Oven for Baking or Roasting
[] Press the BAKEpad.
[] Press the TEMP+ or- pads to set the
desired temperature.
[] Press the STARTpad.
[] Check tix_d ti)r doneness at nfininmn_
tune r)nre_ipe. (_r)r)klrrogerif ne(ess uy.
[] Press the CLEAR/OFFpad when
cooking is complete.
NOTE"Onsome models the lowerovenis
controlledwithaknoborknobs.Tosettheoven
forbaklbgturntheknobtothedeskedsettlbg
andtemperature.TurntheknobtoOFFwhen
bakingiscomplete.
If youhaveatwoknobsystem,turnbothknobsto
thedeskeflsettingandtemperaturetobakeand
tothe OFFpositionwhenbakbgiscomplete.
Toremoveashelf,pull it toward you, tilt
the fiont end up and pull it out.
Toreplace,place the end of the shelf
(stop-locks) on the support, flit up the
fiont and push the shelf in.
NOTE:30" ovens(shown}have 7shdf positions.
27"ovenshave4shelfpositions.
TypeofFood 24"& 27" 30"
Frozenpies BorC CorD
(on cookie sheet)
Angelfoodcake, A B
bundtorpoundcakes
Biscuits,muffins, BorC CorD
brownies,cookies,
cupcakes,layer
cakes,pies
Casseroles BorC CorD
NOTE:Acoolingfanmayautomaticallyturnon
andofftocoolinternalparts.Thisisnormal,and
thefanmaycontinuetorunevenaftertheovenis
turnedoff
Oven ShelfPositions
'Z
Cut slits in fl_efoil just like fl_egrid.
10
Preheating and Pan Placement
Preheat the oven if the recipe calls fi)r it.
To preheat, set the oven at the conect
temperature. Preheating is necessm y tot
good resuhs when baking cakes, cookies,
past U and breads.
Forovenswithoutapreheatindicatorfightor
tone,preheat10minutes.
Aluminum Foil
You (an use aluminum fi)il to line the
broiler pan and broiler grid. However,
you must rooM tim foil tightly to the grid
and cut slits in itjust like the grid.
Aluminumfoilmayalsobeusedtocatcha
spillover
l'_&ing resuhs xdll be better if baking pans
are centered in the oven as Illllch as
possible. Pans shouM not [ouch each
other or the walls of the oven. If you need
to use two shelves, stagger the pans st) one
is not directly ab()ve the other, and leave
approximamly 1W' between pans, flom
the flont, back and sides of the wall.
Never entirely cover a shelfxdth
ahmfinum foil. This _filldisturb the heat
dr(ulation and resuh in poor baking.
A smaller sheet offifil may be used to
catch a spillover by pladng it on a h)wer
shelf several in( hes beh)w the food,
Page 11

How to Set the Oven for Broiling
[] Pla(e tile meat or fish on tile broiler
[] Press the STARTpad.
grid in the broiler pan.
[] When broiling is finished, press the
CLEAR/OFFpad.
NOTE"Onsomemodelsthelowerovenis
controlledwithaknoborknobs.Tosettheoven
forbroi/bgturntheknobtoBROIL.Turntheknob
toOFFwhenbroilingiscomplete.
/f youhavea twoknobsystem,turnbothknobsto
theBROILpositiontobroilandtotheOFFposifion
whenbroi/bgiscomplete.
Leave the door open to the broil
stop position. The door stays open
by itself, yet the proper temperature
is maintained in the oven.
[] Follow suggested shelt positions in
tile Broiling Guide.
ff youroven/sconnectedto208volts,raresteaks
maybebroiledbypreheatbgthebroilerand
pos/t/on/bgtheovenshelfonepositionhigher
[] Press the BROILHI/LOpad once for
HI Broil
To dlange to LOBroil,presstile
BROILHI/LOpad again.
Broifing Guide
24" & 27" 24" & 27" Ovens 24" & 27" Ovens 30" Ovens 30" Ovens 30" Ovens
Food or Thickness Position Time(rain.) Time(rain.) Position Time(rain.) Time(rain.) Comments
GroundBeef 1lb.(4 patties) C 10 7 E 10 7 Spaceevenly.Up
Well Done 1/2to 3/4" thick E 10 9 to 8 pattiestake
Beef Steaks
Rare
Medium
Well Done
Rare
Medium
Well Done
Chicken
LobsterTails
FishFillets
HamSlices 1" thick B 8 8 D 8 8
(precooked)
Pork Chops
Well Done
LambChops
Medium
Well Done
Medium
Well Done
Quantity and/ Ovens Shelf First Side Second Side Shelf First Side Second Side
1" thick
1to 1½ Ibs.
11//thick
2 to 2½ Ibs.
1whole
2 to 2½ Ibs.,
split lengthwise
24
6 to 8 oz.each
1/4to 1/2"thick
2 (1/2" thick) C 10 10 E 10 10
2(l'thbk} about1lb. B 13 13 D 15 15
2 (1" thick)about 10
to 12 oz.
2(1½"thick)about1lb.
C
C
C
C
C
C
A
C
C
C
B
6
8
12
10
15
25
35
13 16
turnoven
10
12
14
17 12 14
5
6
11
78
14 16
20 25
10 15
Donot
9
10
12
E
E
E
E
E
E
C
E
E
E
8
10
12
10
15
25
25
13 16
10
12
14
6
8
10
8
14 16
20 25
10
Donot
turn oven
9
10
12
12 14
abouttile same
time.
Steakslessthan
1"thick cook
throughbefore
browning.
Panfrying is
recommended.
Slashfat.
Reducetimeabout
5to 10minutes
persideforcut-up
chicken.Brush
eachsidewith
meltedbutler.
Broilskin-side-
downfirst.
Cutthroughbackof
shell.Spreadopen.
Brusl_with melted
butter before
broilingandafter
I_aifof broiling
time.
Handleandturn
verycarefully.
Brushwitl_ lemon
butter beforeand
duringcooking,if
desired.Preheat
broiler to increase
browning.
Increasetime5 to
10minutesper
sidefor 1½"thbk
orhome-curedham.
Slashfat.
Slashfat.
11
Page 12

Usingthe clock and timer.
ToSet the Clock
Make sure flTeclock is set to the
correct time of da_
[ TIMER
Ttie timer is a minute timer onl_
Ttie timer does not control oven
operations. Ttie maximum setting on
ttie timer is 9hours and 59 mhTutes.
The (h)(k must be setu) the tone( ttime
of day for tile autolIlatic oven tilIling
fln_ctions to work properly. The time of
day ( anno[ be changed during a flirted
baking or self-cleaning Q,cle.
To Set the Timer
[] Presstile KITCHENTIMER
ON/OFFpad.
[] Press tlle HOURand MIN+ or
- pads until tile amount of time
you want shows in the display.
If you make a mistake, press
KITCHENTIMERON/OFFand begin
again.
[] Press the STARTpad.
Atier pressing the STARTpad, SETdisappears,
this tellsyou thetlYneis counting down, although
the displaydoes not changeuntil oneminute
haspassed
[] Press tile CLOCKpad.
[] Press tlle HOURand MIN + or
- pads to set tile time of'(kff.
[] Press tile STARTpad.
[] When the timer reaches :OO,the
control will beep 3 times fi)llowed
by one beep eveU 6 seconds until
the KITCHENTIMERON/OFFpad
is pressed.
The6secondtonecanbecanceledbyfollowIw
thestepsintheSpecialfeaturesofyouroven
controlsectionunderTonesat theEndofa
timedCycle.
To Reset the Timer
If the display is still showing the time
remaining, you may change it by pressing
the KITCHENTIMERON/OFFpad, then
press the HOURand MIN ÷or - pads until
the time you want appears in the displ W.
ToCancel the Timer
Presstim KITCHENTIMERON/OFF
pad tM(e.
If tile relnaining tilne is not in the display
(clock, delay start or cooking time are in
the display), recall the remaining time by
pressing the KITCHENTIMERON/OFFpad
and then pressing the HOURand MIN+
or - pads to enter the new time you want.
72
Page 13

Usingthe timedbakingand masting features.{ovensoperatedwithtouchYsl
Onmodels with touch pad controls for both ovens, you can use timed baking in one oven while using self-clean
in the other; you can also use timed baking in both ovens at the same time.
NOTE:Foods that spoil easily-such as milk, eggs, fish, stuffings, poultry and pork-should not be allowed to s# for
more than 1hour before or after cooking. Room temperature promotes the growth of harmful bacteria. Be sure that
the oven light is off because heat from the bulb will speed harmful bacteria growth.
How to Set an Immediate Start and Automatic Stop
HOUR _ MIN
TEMP
HOUR or MIN
HOUR or MIN
Theovenwillturnonknmedbte/yandcookfora
selectedlengthoft/me.At theendofthecooking
timetheovenw#lturnoffautomatically
Make sure tile dock shams the correct
tilne of day.
[] Press the BAKEpad.
[] Using tile TEMP+or - pads, enter
the desired temperature.
[] Press the COOKINGTIMEpad.
NOTE."If yourreciperequkespreheatingyou
mayneedtoaddaddifionaltimetothelengthof
thecookingtime.
[] Using tile HOURand MIN + or -
pads, enter tile desired baking time.
Tile oven temperature and tile cooking
time that you entered _fillbe displayed.
[] Press tile STARTpad.
Tile display shows tile oven temperature
that you set and the cooking time
c()untdown. Tile displ W stmls changing
once the temperature reaches l/!O°F.
NOTE:Whenusingbothovensat thesame
tkne,thetknesshowlegin thedlspleywill
beforthelestovenseLTodlspleythetime
setforthefirstovenset,presstheCOOKING
TIMEpadforthatoven.
Tile oven xdll continue to cook fi)r tile
pI'OgTalllllled alIlOtln[ of filne, dmn shut
oflautolnatically.
Press tile CLEAR/OFFpad to dear tile (fisplay.
How toSet a Delayed Start and Automatic Stop
Youcansettheovencontroltodeley-startthe
oven,cookforaspecificlengthoftimeandthen
turnoffautomatically
Make sure tile dock shows tile correct
time of day.
[] Press the BAKEpad.
[] Using tile TEMP+ or - pads, enter
tlle desired temperature.
[] Press the COOKINGTIMEpad.
NOTE:Ifyourreciperequirespreheatingyou
mayneedtoaddadditionaltimetothelengthof
thecookingtime.
[] Using tile HOURand MIN + or -
pads, enter tile desired baking time.
[] Press tile DELAYSTARTpad.
[] Using tlle HOURand MIN + or -
pads, enter tile time of day you want
tile _)ven to turn on and start cooking.
[] Pressdle STARTpad.
NOTE:Anattentiontonewi//soundif youare
usingtl_nedbakinganddonotpresstheSTART
padafterentenbgthebakingtemperature.
lfy{m would like to check tile times you
have set press tile DELAYSTARTpad to
check tile start time you have set or press
the COOKINGTIMEpad to check the
length of cooking time you have set.
When tile oven turns on at tile time of day
you have set, tile display _dll sh_)wtile
changing temperaulre (starting at
1()()°F.) and the cooking time countdox_ll.
NOTE:Whenumhgbothovensat thesame
time,thetknesshowlegin thedisplaywill
beforthelestovenseLTodlspleythetkne
setforthefkstovenset,presstheCOOKING
TIMEpadforthatoven.
At tile end oftimed baking, tile oven will
turn pie Tile end of o_(le tone _fillsound.
Press tile CLEAR/OFFpad to dear tile (fispkly.
73
Page 14

Adjust the oven thermostat--Do it yourself!
Youmay find that your new oven cooks differently than the one it replaced. Use your new oven for a few weeks to
become more familiar with it.If youstill think your new oven is too hot or too cold, you can adjust the thermostat yourself.
Do not use thermometers, such as those found in grocery stores, to check the temperature setting of your oven.
These thermometers may vary 20_40 degrees.
TOAdjust the Oven Thermostat (onsomemodels)
[] Both tou(h pad ovens fi)llow tile [] Tile oven temperature can be
same step 1.First press tlle upper ac!justedup to (+) 35°F. hotter or (-)
oven BAKEand BROILHI/tO pads at 35 °F. cooler. Press the TEMP+ pad to
the same time fi)r 3 seconds until the increase the temperature in 1 degree
display shows SE Then proceed with increments. Press the TEMP-pad to
Jg
TEMP
steps 2 through 4, using the pads tot decrease the temperature in 1
the upper or h)wer oven. degree increments.
[] Press tile BAKEpad. A two digit
number shows in tlle display.
[] X,\qmnyou have made tlle a(!justment,
press tile STARTpad to go back to tile
time ofd W (lisplay. Use your oven as
y()u would normally.
NOTE"Th/sadjustmentwillnotaffectthebroihhg
ortheself-cleaningtemperatures.Theadjustment
willberetainedinmemoryafterapowerfailure.
To Adjust the Oven Thermostat (onsomemodels)
TurnflTe disk counterclockwise to
increase the oven temperature.
Turn the disk clockwise to decrease
the oven temperature.
l'ull the OVENknob offthe sh>dl, look at
tile back of the knob and note tile (au'rent
setting befi)re making any a_!justment.
The knob is tilcto_y set with the lop screw
directly under the pointer.
[] l'ull offthe OVEN knob.
] Loosen both screwson back of
tile knol).
Hold both p_uts of the knob as
[]
sho_l in the illustration of the back
of the OVENknob and mrn so the
lower screw moves in tl_e desired
direction.
You will hear and teel the not(rims as you
mrn tile knol). Each notch changes
temperature about l(!° Fahrenheit.
[] Tighten tlle screws.
[] Return tlle OVENknob to tlle oven.
Re-checkovenperformancebeforemakingany
additional adjustments.
Thetypeofmargarine will affect bakingperformanc!!
Most recipes for baking have been developed using high fat products such as butter or margarine (80%fat). If you
decrease the fat, the recipe may not give the same results as with a higher fat product.
Recipe failure can result if cakes, pies, pastries, cookies or candies are made with low fat spreads. The lower the fat
content of a spread product, the more noticeable these differences become.
Federal s/and_uds reqtme products labeled "mmgarine" to contain at least 80% tat by weight. I.ow tilt spreads, on the
other hand, contain less tilt and more water. The high moisture conmnt of these spreads affect the texture and flavor of
baked goods. For best resuhs with y{nn old tiworite redpes, use mmgarine, 1)utter or stick spreads containing at least
70% vegetable oil.
/4
Page 15

Using the self-cleaning oven. (ove,soperatedwithtouchpads)
The oven door must be closed and all controls must be set correctly for the cycle to work properly.
Before a Clean Cycle
Wipe up heavy soil on flTeoven
bottom. (appearance may vary)
Theovenmustbecoolinorderto settheself-
cleancycle.
We recommend venting your kitchen
_dth nil open _dnclow or using a
ventilation tim or hood during the first
sell-clean (ycle.
Remove tile broiler pan, broiler grid, all
(ookware and any ahnninunl fi)il fiom
tile oven,
Tile oven shelves canbe self:cleaned, but
they willdarken, h)se flmir luster and
be( ome haM to slide.
l)o not use abrasives or oven cleaners.
Clean the top, sides and outside of the
oven door vdth soap and water.
Make sure tile oven light bulb cover
(on some models) is in pla(e and tile
oven light is oil
IMPORTANT'.Tile heahh (ffsome biMs
is extremely sensitive to tile finnes given
off during the self cleaning q_(rleof any
oven. Move biMs to another well
ventilated room,
>_Oil models with touch pad controls
fi)r both ovens, yt)u can set a clean
(Tcle in both ovens at the stone time.
The last oven set will mm)mafically
del W its slart until the end of the first
oven's clean _Tcle.
>_Oil models xfith touch pad controls for
both ovens, you (an use timed baking
in one oven and seltk lean tim other at
the sattle time.
HOUR _r MIN
How to Set the Oven for Cleaning
[] Press tile SELFCLEANpad.
[] Using the HOURand MIN + or -
pads, enter tim desired (lean time, if
a time other fllan 4 hours is needed.
(lean _ycle time is normally 4 hours.
Y(tu can change the clean time to any
time between 3 hours and 5 hours,
depending oil h(tw dirty your oven is.
[] Press flm START pad.
Tile door locks mnomafically. The (fisplay
will show tile dean time remaining. It will
not be possible to open tile oven door
until the temperature drops below the
lock temperature and the LOCKEDDOOR
light goes off.
When tile LOCKEDDOORlight is oil open
tile door.
i_YTile woMs LOCKDOORxdll flash and
tile oven (onuol _fillsignal if you set
the clean o<le and fi)rget to ch)se tile
oven door.
>:To stop a clean (Tcle, press the
CLEAR/OFFpad.When tile LOCKED
DOORlight goes offindicating the
oven hascooled below tile locking
temperature, open tile door.
15
Page 16

Usingthe self-cleaning oven. ovensoperatedwithto chpads;
The oven door must be closed and all controls must be set correctly for the cycle to work properly.
How to Delay the Start of Cleaning
HOUR el MIN
MIN
[] Press the SELFCLF_ANpad.
[] Using tile HOURand MIN + or -
pads, enter the desired (lean time.
[] Press the DEIAYSTARTpad.
[] Using tlle HOURand MIN + or -
pads, enter the time of day you want
the clean cyde to slart.
[] Press the STARTpad.
After a Clean Cycle
You inay notke some white ash in the
oven. Wipe it up _4tll a &m_p (loth after
the oven cools.
If whitespotsremain,removethemwithasoap-
filledsteelwoolpadandrinsethoroughlywitha
wnegarandwatermixture.
These deposits are usually asah
residue that cannot be removed by
tile clean _ycle.
If the oven is not (lean af/er one (lean
Q_(le, repeat tile Q_(le.
Tile door locks automatically. The display
will show the stmt time. It will not be
possible to open the oven door until
the temperature drops below the lock
temperature and the LOCKEDDOOR
light goes oil
When tile LOCKEDDOORlight is oil open
tile door.
NOTE:Onmodelswithtouchpadcontro/sfor
bothovens,youcansetadelaydeaninboth
ovensatthesametime.Thesecondovensetwi//
automaticallydelaythestartofcleaninguntilthe
endofthefirstoven'sdeancycle.
TorecallthestarttYneofthesecondovenset,
presstheDELAYSTARTpadonthecontrolsfor
thesecondoven.
}!::You cannot set the oven for cooking
until tile oven is cool enough ti)r the
door to unlo(k.
i_?If the shelves become hard to
slide, wipe tile shelf supports with
cooking oil.
16
Page 17

Careand cleaning of the oven.
Be sure electrical power is off and all surfaces are cool before cleaning any part of the oven.
How to Remove Packaging Tape
Lift the door straight up and off
the Mnges.
Thegasket is designed with a gap at
the bottom to allow forproper air
ciroulatioIT,
Do not rub or clean the door gasket--
it has an extremely low resistance to
abrasion.
If you notice the gasket becomflTg
worn, frayed or damaged f17any way
or if it has become displaced on the
door, 'ou should have it replaced.
To assure no dmnage is clone to tile finish
of the product, the satest way to rem{)ve
the adhesive left fiom packaging tape on
new appliances is an application of a
household liquid dishwashing detergent,
nfineral oil or cooking oil.
Lift-Off Oven Door
The oven door isremovable for easier
ac( ess to the light bulb.
Donotlifi thedoorbythehandle.
Toremove the door, open it to the broil
stop position. Grasp firefly on each side
and lift the door straight up and off
the hinges.
Donotplacehandsbetweenthehingeandthe
ovendoorframe.
D replace the door,make sure tile hinges
me in tile broil stop position. Position the
slots in the bottom of the door squarely
over the hinges and slowly lower it over
both hinges.
D clean the outside of the door:
>:Use soap and water to thoroughly
clean tile top, sides and fiont of the
oven door. Rinse well. Y{)um W also
use a glass cleaner to clean the glass
on the outside of the door. Do not
let water drip into the vent openings.
i_ySpillage of marinades, fl_uitjuices,
tomato smlces and basting materials
containing acids may cruise
cfiscoloration and should be wiped
up immediately. When smtitce is
cool, clean and rinse.
Applywith a soft cloth and allow to soak.
Wipe &y and then apply an appliance
polish to thoroughly clean and protect
tile surface.
NOTE."Theplastictapemustberemovedfrom
all chrometnm.Itcannotberemovedif itis
bakedon.
D clean the inside ofthe door:
(onself-cleaning evens)
>_Because tile area inside tile gasket is
cleaned during tlle selfqlean Q,de,
you do not need to {lean this by hand.
>:Tile area outside the gasket and the
flont fimne can be cleaned xdth a soap-
filled steel wool or plastic pad, hot
water and detergent. Rinse well xdth
a dnegm and water solution.
D clean the inside ofthe door:
(onstandard clean evens)
i_YSoap and water will nomlally do the
.job. Hemy spattering or spilh)vers may
require cleaning xdth a mild abrasive
cleaner. Soap-filled steel w{)ol pads
may also be used.
Donotallowfoodspillswitha highsugaroracid
content(suchas tomatoes,sauerkraut,fruitjuices
orpie fffling)toremainonthesurface.Theymay
causeadullspotevenaftercleaning.
i;_?If necessaD;, you may use an oven
cleaner. Folh)w tile paclqlge (firections.
>_Clean the inside of the oven xdndow
xdth a mild non-s(rat(hing (leaner
and a damp (loth.
i_YDo not use oven cleaners, cleaning
powders or hmsh abrasives on the
outside of tile door.
Oven Shelves
(lean tile oven shelves xdth an abrasive
cleanser or steel wool. After cleaning,
rinse the shelves _dth (lean water and (by
xdth a clean cloth.
NOTE."Theovenshelvesmaybecleanedinthe
serf-cleaningoven.However,theshelveswill
darkenincolor,losethey/usterandbecomehard
toslideifcleanedduringtheserf-cleaningcycle.
Youcanwipetheshelfsupportswithcooking
offafterserf-cleaningtomaketheshelvesslide
more easl/_
17
Page 18

Careand cleaning of the oven.
Broiler Pan & Grid
After broiling remove the broiler
pan from fl?eoven.
Moldedrib Oven Knob (on some models)
Donotc/eanthebroi/erpanorgridinaself-
cleaningoven.
After broiling, renl()ve tile broiler pail
fl'onl tile oven. Renl()ve tile grid fl'onl the
pail. ( mefiflly pour out the grease flom
the pail into a proper container.
Wash and rinse tile broiler pan and grid
in hot water _dtll a soap-filled or plasti(
s_ouring pad.
Control Panel
It's a good idea to wipe the control
panel after each use. Clean with miM
soap and water or vinegar and water,
rinse with clean water and polish (by
with a soft cloth.
Thecontrolknob(lowerovenonly)maybe
removedforeasiercleaning.
lffi)od has burned on, sprinkle the grid
with detergent while hot and c()ver with
wet paper rowels or a dishcloth. Soaking
the pail will remt)ve burned-on fiiods.
Both tile broiler pan and grid may be
deaned with a (olnmeidal oven deaner.
Both file broiler pail and grid can also be
(leaned in a dishwasher,
Donotstoreasoiledbroilerpanandgrid
anywherei#theoven.
Do not use abrasive cleansers, strong
liquid cleansers, plastic scouring pads or
oven cleansers Oilthe control panel-they
will dmnage the finish. A 50/50 solution
ofvinegar and hot water w_)rkswell.
The knob stenl is Dshaped, hlstall tile fiat
of the shaft to the fiat of the knob.
Before renloving tile knob for cleaning,
please note that the knob is in tile OFF
position. When replacing the knob,
check the OFFposition to insure proper
placenlent.
Painted Surfaces
Clean with soap and water or a x4negar
and water solution.
Glass Surfaces
To clean tile outside glass finish, use a
glass (leaner. Rinse and polish with a
(hy (loth.
Oven Heating Elements
Oonot c/eanthebakeelementor thebroi/
e/emen_Anysoi/wi//bumoff whenthe
elementsareheated
Wash tile knob in soap and water or a
xdnegar and hot water solution but do
not soak.
Do not use connnercial oven cleaners,
cleansing powders, steel wool or harsh
abrasives on any painted sm{hce.
Do not allow tile water or cleaner
to run down inside tile oven door
while deaning.
To clean tile oven floor, gently lift
the bake elenlent. Clean with warnl
soapy watei.
18
Page 19

Porcelain Oven Interior (onsomemodels)
Maxirnum(
length _
, Bulb
Glass cover
Socket
}Tab
With proper care, the porcelain enamel
finish on the inside of the oven-top,
bottom, sides, back and inside of the
door-_dll stay ne_qooking tin years.
I,et tile oven cool befi)re cleaning. We
re(olnlnend that you wear robber gloves
when cleaning tile oven.
Soap and water will nomlally do tile,job.
Hem Tspattering or spillovers may require
cleaning with a miM abrasive cleaner.
Soap-filled steel wool pads n_ty also be used.
Donotallowfoodspillswithahighsugaroracid
content(suchastomatoes,sauerkraut,fruitjuices
orpie Piling)toremalbonthesurface.Theymay
causeaduffspotevenaftercleaning.
Household mnmonia may make tile
cleaning job easier. Place 1/2 cup in a
shallow glass or potm U container in a
cold oven overnight.
Oven Light Bulb (onsomemodels)
NOTE."Theglasscovershouldberemovedonly
whencold Wearinglatexglovesmayoffera
bettergrip.
Befine replacing tile bulb, disconnect
electrical power to tile oven at tile main
fllse or drcuit breaker panel. I,et the bulb
cool completely befi ne rem,)ving it. For
your salbly, do not touch a hot bulb with a
dmnp cloth. Ifyou do, the bulb will break.
Toremove:
Turn the glass cover counterclockxdse
1/4 turn until tile tabs of the glass cover
clem the grooves of the socket. Remove
the bulb.
Tile ammonia drams will help loosen tile
burned-on grease and food.
If necessai), }_)11IIl;4y use an ()yen cleaner.
Folh)w the package directions.
>:Donotsprayovencleanerontheelectrical
controlsandswitchesbecauseitcouldcausea
short&cuit andresultinsparklbgor fke.
i:yDo not allow a film from thecleaner tobuild up
on the temperaturesensor--it couldcause the
ovento heat Ynproperly(Thesensoris located
at the top of the oven.)Carefullywipe the
sensordean after each ovencleaning,being
careful not tomove thesensorasachange in
its position couldaffect how the ovenbakes.
>: Do not spray anyoven cleaneron the oven
door,handlesor any exteriorsurfaceof the
oven,cabinets orpainted surfaces.Thecleaner
can damagethesesurfaces.
Toreplace:
l'ut in a new 40-watt appliance bulb.
NOTE:
i_yA 40-wattapphancebulbis smallerthana
standard40-watthouseholdbulb.
i:yInstaflandtightenthecoverclockwise.
>:Reconnectelectricalpowertotheoven.
>:Forirnproved/l_Thtlbginsidetheoven,dean
theglasscoverfrequentlyuslbga wetcloth.
Thisshouldbedonewhentheovenis
completelycool
Wire cover holder
Oven Light Bulb (onsomemodels)
CAUTION:Beforerep/aclbgyourovenlightbulb,
disconnecttheelectricalpowertotheovenat the
mainfuseorcircuitbreakerpanel.
Be sure to let tile light cover and bulb
t:ool completely.
Toremove the cover:
FY] HoM a hand under tile ct)ver soit
doesn't fhll when released. With
fingers of the same hand, fhmly
push back tlle x_4tetover hoMer.
I,ifi offthe cover.
Donot removeanyscrews to removethecover
[] Replace bulb with a 40-watt
appliance bulb.
Toreplace the cover:
[] l'lace it into grooves of the light
receptacle. Pull wire ti)rward to
the center of the cover until it
snaps into place.
[] (_onnect electrical power to
tile oven,
19
Page 20

Careandcleaningoftheoven.
Stainless Steel Surfaces (o,somemodels)
Donot useastee/-wooipad,itwiii scratch
thesurface.
To clean tile stainless-steel surtace,
use a hot, damp cloth x_ith a mild
detergent suitable for stainless-steel
surtaces. Use a clean, hot, damp cloth
to remove soap. Dry x_ith a d_T, clean
cloth.
If food soil remains, try a general
kitchen cleaner, such as Fantastika_
Simple Green:_ or Formula 409:_
For hard-to-clean soil, use a
standard stainless-steel cleaner,
such as Bon-Ami" or Cameo:_
Apply cleaner with a damp sponge.
Use a clean, hot, damp cloth to
remove cleaner. Dry with a d_T, clean
cloth. Ahvays scrub lightly in the
direction of the grain.
Af/er cleaning, use a stainless-steel
polish, such as Stainless Steel Magic';
Revere Copper and Stainless Steel
Cleaner:; or Wenol All Purpose
Metal Polish:7 Follow the product
instructions for cleaning the stainless-
steel surthce.
2O
Page 21

BeforeYouCallForService...
Troubleshooting 77ps
Save time and money! Review the charts on the following
pages first and you may not need to carl for service.
Possible Causes What To Do
Control signals after You forgot to enter a * Press tile BAKE pad and desired temperature or tlle
entering cooking time bake temperature or SELF CLEAN pad and desired clean time.
or delay start cleaning time.
Fooddoes notbake Oven controls improperly set. * See tile Using the oven section.
or roast properly Shelf position is incorrect • See the Using the oven section.
or the shelf is not level.
Incorrect cookware or • See the Using the oven section.
cookware of improper
size being used.
Oven thermostat * See the Adjust the oven thermostat--Do it yourself!
needs adjustment, section.
Fooddoes not Door not open to the * See the Using the oven section.
broil properly broil stop position as
recommended.
Oven controls improperly set. • Make sure y_n_ press the BROILHI/LO pad.
Improper shelf • See the Broiling Guide
position being used.
Food being cooked • Use the broiling pan and grid that came with your oven.
in a hot pan. Make sure it is cool.
Cookware not suited • Use the broiling pan and grid that came with your oven.
for broiling.
Aluminum foil used on the • See the Using the oven section.
the broiling pan and grid has
not been fitted properly and
slit as recommended.
In some areas the power • Preheat the broil element fi)r 10 minutes.
(voltage) may be low.
• Broil tot tile longest period of time recommended in
tile Broiling Guide.
Clock and timer A fuse in your home • Repla( e the tuse or resel the dr( uit breaker.
donotwork maybe blown or the
circuit breaker tripped.
Oven controls improperly set. • See the Using the clock and timer section.
Oven light does Light btdb is loose or defective. • Tighten or replace the bulb.
not work
Pad operating light is broken. • Call tin"service.
2/
Page 22

Before YouCall ForService...
Troubleshooting -tips
Possible Causes What To Do
Oven temperature too Oven thermostat * See tile Adjust the oven thermostat--Do it yourself!
hot or too cold needs adjustment, se(tiou.
Oven will not work A fuse in your home may * Replace tile filse or reset tile (ir(uit breaker.
Oven will not self-clean The oven temperature * Allow tile oven to ('ool to room temperature and reset
"Crackling" or This is the sound of the * This is normal.
"popping" sound metal heating and cooling
Excessive smoking Excessive soil. * Press the CLEAR/OFF pad. Open tlae winch)we to rid
during clean cycle the room of smoke. Wait until the LOCKED DOOR
Oven door will not Oven too hot. " Alh)w the oven to ('ool beh)w h)(kiug temperature.
open after a
clean cycle
Oven not clean after a Oven controls improperlyset. * See tile Using the self-cleaning oven se('tiou.
clean cycle Oven was heavily soiled. * Clean up hea_ T spillovers before st,lrtiu_ the/'lean
be blown or the circuit
breaker tripped.
Oven controls improperly set. * See tile Using the oven se(tiou.
is too high to set a die (ou/rols.
self-clean operation.
Oven controls improperly set. * See tile Using the self-cleaning oven se(tiou.
during both the cooking
and cleaning functions.
light goes off. Wipe up the ex(ess soil and reset tile
(lean (y(le.
cycle. Heavily soiled ovens rnay need to self:clean
again or for a h)uger period of time.
"LOCKDOOR" flashes The self-clean cycle * Ch)se tile oven door.
in the display has been selected but
the door is not closed.
LOCKEDDOOR light The oven door is locked ',l)ressdleCLEAR/OFFpad. Alh)wdwoveutocool.
is on when you want because the temperature
to cook inside the oven has not
dropped below the
locking temperature.
22
Page 23

Possible Causes What To Do
"F--anda number You have a function • Press the CLEAR/OFFp;M. Allow the oven t() (eel fi)r
or letter" flash error code. one hour. Put the oven back into oper;itiou.
in the display If the function * Disconnect M1 power to the oven tbr ;It le;lst 30
code repeats, seconds ;rod then reconnect power. If the fimctiou
error code repems, c,dl for service.
Display goes blank A fuse in your home may * Replace the fi_se or reset the circuit breaker.
Display flashes Power failure. * Resel tlle clock.
Unable to get the Oven control pads were * The BAKE and BROIL HI/LO pads must be pressed
display to show "SF" not pressed properly, at tlae s;/me time and held fi)r 3 seconds.
Power outage, Power outage or surge. * Resel the clock. If the oven w_s in use, you must reset
clock flashes it by pressing the CLEAR/OFF p_M, setting the clock
"Burning" or "oily" This is normal in a * To speed the process, set ,/self:clean cycle fin a
odor emitting from new oven and will nfiuimun_ of 3 hours. See the Using the self-cleaning
the vent disappear in time. oven sectiou.
Strong odor An odor from the insulation "This is temporaly.
Fan noise A cooling fan may * This is normal. The cooling tim will turn off :rod on.
be blown or the circuit
breaker tripped.
The clock is in the * See the Special features of your oven control set lion.
black-out mode.
_md rescuing _my cooking flmc/ion.
around the inside of the
oven is normal for the first
few times the oven is used.
automatically turn
on and off to cool
internal parts.
23
Page 24

m
<j
Notes
m
q
_L_
m
z_
m
w
24
Page 25

GE Service Protection Plus TM
GE, a name recognized worldwide for quality and dependability, ofi>rs you
Service Protection Plus"'-comprehensive protection on all your appliances-
No Matter What Brand!
Benefits Include:
• Backed by GE
• All brands covered
• Unlimited service calls
• All parts and labor costs included
• No out-of-pocket expenses
• No hidden deductibles
• One 800 number to call
You will be completely satisIied with our service protection or you may request your money back
on the remaining value of your (onua(t. No questions asked. It's that simple.
Protect your refligerator, dishwasher, washer and dryer, range, TV, VCR and much more-any brand!
Plus there's no extra charge tot emergemy set_+ice and low monthly financing is available. Even icemaker
coverage and fi)od spoilage protection is ottered. You can rest easy, knowing that all your valuable
household products are protected against expensive repairs.
) T
t la,ey,,u,_,,n*i_en_ein(;Ean_ _anusind,e t.S. t,,ll-*,eeat 800-626-2224
for more inti)rlnation.
*Allbrm(s(oxere( lp o20y!]rs )1(,ii1 h!(ol]itl!n IUS
We71CoverAnyAppliance.
Anywhere. Anytime.*
+_(;ul here
Please place in envelope and mail to:
General Electric Company
Warranty Registration Department
P.O. Box 32150
Louisville, KY 40232-2150
25
Page 26

Consumer Product Ownership Registration
[)ear (_ustomel-:
Thank you for purchasing our product and thank you for placing your confidence in us.
We are proud to have you as a customer!
Follow these three steps to protect your new appliance investment:
Complete and mail
your Consumer
Product Ownership
Registration today.
Have the pea(e of
mind of knowiug we
can conlacI you in Ihe
unlikely event of a
saiHy modilication.
Aher mailing Ihe
registration below,
slore this documen/
in a sati' place, h
con/ains inibrmadon
y!ln will need should
yon require service.
Our seMce number is
800 (',E (;ARES
(800-432-2757).
Model Number Serial Number
Important: If you did not get a registration card with your
product, detach and return the form below to
ensure that your product is registered, or register
online at www.geappliances.com.
Consumer Product Ownership Registration
Read yotlf {)wneF's
Manual careftflly.
h will help you
operale y{)tlF new
appliance properly.
I
._ {;hi here
@ Model Number Serial Number
Nh. NIs. Mrs. Miss
First I I Lasll I
Nam{ I I I I I I I I I Name I I I I I I I I I I I I
Slreet I I
Address I I I I I I I I I I I I I I I I I I I I I I I I
I I I
Apt.# [ I I I I I I I [ [:-mai_Address
()ccasionall), wc ma) all{ w,' sel{ ct{ d c{}mpanic s/o send yon inlorn]a/ion.
D (;]-le(k here if you do n{)t Walll this inti}lmati{}n.
0
GEAppliances
General Electric Company
Louisville, Kentucky
www.geappliances.com
26
Page 27

GEBuilt-In Electric OvenWarranty
All warranty service provided by our Factory Service Centers
or an authorized Customer Care®technician. For service,
carl 800-GE-CARES.
GE Will Replace:
Anypartof the oven which tails due/o a detect in materials or workmanship.
Fromthedateof the During this full one-yearwarranty,(;E _fill also proxdde, freeofcharge,all labor
origina!purchase and in-home servi(e to repla(e the dete(tive part.
i;_:Service trips to your home to teach you how to use
the product.
i_ Improper installation.
i_:Failure of the product if it is abused, misused, or used
for other than the intended purpose or used
commercially.
i;_:Replacement of house fuses or resetting of circuit
breakers.
;i:_Damage to the product caused by accident, fire, floods
or acts of God.
i_:Incidental or consequential damage caused by possible
defects with this appliance.
This warranty is extended to the original purchaser and any succeeding owner for products purchased for
home use within the USA. In Alaska, the warranty excludes the cost of shipping or service calls to your home.
Some states do not allow the exclusion or limitation of incidental or consequential damages. This warranty
gives you specific legal rights, and you may also have other rights which vary from state to state. Toknow
what your legal rights are, consult your local or state consumer affairs office or your state's Attorney General
Warrantor: General Electric Company,Louisville, KY 40225
27
Page 28

ServiceTelephoneNumbers.
GEAnswerCenter®800.626.2000
The (;E Answer (enter Pis open 24 hours a day, 7 days a week.
OR
Visit our Website at: vvvvw.geappliances.com
In-HomeRepairService800-GE-CARES(800-432-2737)
Expert (;E repair serx4(e is only a phone (all away.
SpecialNeedsService800.626.2000
800-TDD-GEAC(800-833-4322)
(;E offers, flee ofcharge, a bro(hure to assist in planning a barrier-liee kit(hen fi)r persons
x_dthlimited mobility.
ServiceContracts800-626-2224
l'ur( hase a (;E servi_ e (ontra( t while your warranty is still in effect and you'll re_ eive a
substantial discount. (;E Consumer Serxdce_dll still be there after your warranty expires.
PartsandAccessories800-626-2002
Individuals qualified to service their own appliances can have parts or accessories sent directly
to their homes (VISA, MasterCard and Disc{)ver cmds me accepted).
Instructions contained in thismanual cover procedures to beperformed by any user. Otherservicing
generally should be referred to qualified service personnel. Cautionmust be exercised, since
improper servicing may cause unsafe operation.
ServiceSatisfaction
If you are not satisfied xdth the service you receive fiom GE:
First,contact the people who serviced your appliance.
Next, if you are still not pleased, x_riteall the details-including your phone number-to:
Manager, Customer Relations
GE Appliances
Appliance Pmk
I,ouisville, KY 40225
2_ Printed in LaFayette, GA
 Loading...