

Page 1
...,... ___ ...
..—
..
.. ... . .
Page 2
AiunlinumFoil . .. . . ...14. i6,25
ApplianceRegistration.. . . . . ...2
Baking;BakingGuide . . . ...10-12
Delaystart/stop . . . . . . . . . . . ~~
TimeBake . . . . . . . . . . . ..lQ. ~~
Broiling;BroilingGuide . ...16-18
CareandCleaning. . . . . ...23. 24
clock . . . . . . . . . . . . . . . . . . ..7. $
ConsumerServices . . . . . . . ...27
ElectronicTouchControlPanel..6
Energy-SavingTips . . . . . . . . ...4
Features . . . . . . . . . . . . . . . . . . ..~
Light;BulbReplacement. ...9.23
Meat Thermometer. . . . . ...14. 17
Minute/SecondTimer . . . . ...7. 8
ModelandSerialNumbers .. ...2
Preheating . . . . . . . . . . . . . . . ..Q
ProblemSolver . . . . . . . ...25.26
Roasting;RoastingGuide. . ..13-15
Rotisserie . . . . . . . . . . . . . ..~9.2~
SafetyInstructions. . . . . . . ...3.4
Self-CleaningOperation.. ..21.22
Shelves. . . . . . . . . . . . . . . . . . ...9
Warranty . . . . . . . . . .. BackCover
Beforellsingyouroven~
readthisbookCarefully.
It is intendedto helpyouoperate
andmaintainyour newoven
properly.
Keepithandyfor answerstoyour
questions.
Ifyoudon’tunderstandsomething
orneedmorehelp,write(include
yourphonenumber):
ConsumerAffairs
GEAppliances
AppliancePark
Louisville,KY40225
writedown themodel
serialnumbers.
and
You’llfindthemon a labelon
thefrontoftheovenbehindthe
ovendoor.
Thesenumbersare alsoonthe
ConsumerProductOwnership
RegistrationCardthatcamewith
youroven.Beforesendinginthis
card,pleasewritethesenumbers
here:
ModelNumber
Serial Number
Usethesenumbersin any
correspondenceor servicecalls
concerningyour oven.
a damagedoven.00
Immediatelycontactthedealer(or
builder)thatsoldyoutheoven.
savetimeandmoney.
Beforeyourequest
service..0
ChecktheProblemSolveron
pages25and26.It listscausesof
minoroperatingproblemsthat
youcancorrectyourself.
If youneedServiceee o
Toobtainservice,seethe
ConsumerServicespageinthe
backofthis book.
We’reproudofourserviceand
wantyoutobepleased.If for some
reasonyouarenothappywiththe
serviceyoureceive,herearethree
stepstofollowforfurtherhelp.
FIRST,contactthepeoplewho
servicedyourappliance.Explain
whyyouarenotpleased.In most
cases,thiswillsolvetheproblem.
NEXT,ifyouarestill notpleased,
writeallthedetails—including
your phonenumber—to:
Manager,ConsumerRelations
GEAppliances
AppliancePark
Louisville,Kentucky40225
FINALLY,if yourproblemis still
notresolved,write:
MajorAppliance
ConsumerActionPanel
20NorthWackerDrive
Chicago,Illinois60606
-
2
Page 3
INIPORTANTSAFETYmSTRUCTIONS
I’ead all imstruetiombefore usingthis appliance
.–-
.-
—--
IMPORTANT
SAFETYNOTICE
TheCaliforniaSafeDrinking
WaterandToxicEnforcement
ActrequirestheGovernorof
Californiatopublishalistof
substancesknowntothestate
tocausebirthdefectsorother
reproductiveharm,andrequires
businessestowarncustomersof
potentialexposuretosuch
substances.
Thefiberglassinsulationin
self-cleanovensgivesoffavery
smallamountofcarbonmonoxide
duringthecleaningc~c~e.
Exposurecanbeminimizedby
ventingwithanopenwindowor
usingaventilationfanorhood.
Whenusingelectricalappliances,
basicsafetyprecautionsshould
befollowed,includingthe
following:
@usethisapplianceonlyforits
intendeduseasdescr~oedinthis
manual.
eBesureyourapplianceis
properlyimtiled and grounded
byaqualifiedtechnicianin
accordancewiththeprovided
InstallationInstructions.
eDon9tattempttorepair
orreplaceanypart ofyour
ovenunlessit isspecifically
recommendedinthisbook.All
otherservicingshouldbereferred
toaqualifiedtechnician.
e Beforeperformingany
DISCONNECT Tm OVEN
P(]WER SUPPLY AT ~m
kIOUSEHOLD
~lsnmo~
service9
PANELBYREMOVINGTHE
~~~~~~~~~~~~~~~~~~
TIiECIRCUIT
BREAKER.
@~~ ~~~~~~~~~~~~~~~~~~~~~.—
Childrenshouldnotbeleftalone
orunattendedinanareawhere
applianceisinuse.Theyshould
neverbeallowedtositorstandon
anypartoftheappliance.
@Don9tallowanyoneto clinlb9
standorhangonthedoor.They
coulddamagetheoven.
o~A~T~Q~:~T~~~ OF
INTEWST m cHILDmN
SHOULDNOTBESTOMD
INCABINE~ ABOVE
ANOWN.CHILDREN
cLIMBING o~ Tm ov~~
To WACHITEMSCOULD
BESERIOUSLYINWM~.
@Never
hanginggarmenk whileusing
theappliance.
materialcouldbeignitedif
broughtincontactwithhot
heatingelementsandmaycause
severeburns.
euse onlydrypotholdeFs—
Moistordamppotholderson.hot
surfacesmayresultinburnsfrom
steam.Donotletpotholders
touchhotheatingelements.Do
notuseatowelorotherbulky
cloth.
@Neveruseyour
warnlingorheatingthe room.
Storageinoronappliance—
@
Do
intheoven.
@Keephood
clea~l
andtoavoidgreasefires.
@Donotletcookinggrease
or other
accumulateinorneartheOvelle
@Donot use wateron grease
wearloose-fittingor
Flammable
appliancefor
notstoreflammablematerials
andgreasefilters
tomaintaingoodventing
flamn~ablematerials
smothered
closing
CLEAR/OFF
@Donot touchheatingelemenk
oril}teriorsurfaceof oven.
Thesesurfacesmaybehot
enoughtoburneventhoughthey
aredarkincolor.Duringand
afteruse,donottouch,orlet
clotl~ingorotherflammable
materialscontactanyinterior
areaoftheoven;allowsufficient
timeforcooling,first.
Potentiallyhotsurfacesinclude
theovenventopeningsand
surfacesneartheopenings,
crevicesaroundtheovendoorand
theedgesofthedoorwindow.
Remember:Theinsidesurface
oftheovenmaybehotwhenthe
doorisopened.
@Whentooting pork9follow
thedirectionsexactlyandalways
cookthemeattoaninternal
temperatureofatleast170°F.This
assuresthat,intheremote
possibilitythattrichinamaybe
presentinthemeat,itwillbe
killedandthemeatwillbesafeto
eat.
bycompletely
doorandtouching
pad.
oven
eStind awayfromovenwhen
openingovendoor.The hot air
or steam whichescapescan
burn hands, faceand/or eyes.
@KeepovenVentduet
unobstructed,
al
3
Page 4
IMPORTmT SMETY
INS’.FRUCTIONS
@Placeovenshelfin desired
positionwhile ovenis Cool.If
she!vesmustbehandledwhen
dO ~Ot ~~t potholder CO~taCt
hot,
(continued)
heatingunitsi~~theoven.
a men UShg COOkhgor
romthg bags b oven9 followthe
manufacturer’sdirections.
self-cleaningoven
@Donotcleandoorgmket.The
door gasketisessentialfora
good seal. Care shodd
nottomb, damageor movethe
gasket.
o Donotuse ovene!emem.No
comercid ovencleaneror oven
linerprotectivecoatingofany
kindshould.beusedin oraround
anypartoftheoven.
be&en
~Preheattheovenonlywhen
necessary.Mostfoodswillcook
satisfactorilywithoutpreheating.
Ifyoufindpreheatingisnecessary,
keepaneyeonthe indicatorlight,
andputfoodintheovenpromptly
aftertheJightgoesout.
@Alwaysturn ovenOFFbefore
removingfood.
@Duringbaking,avoidfrequent
door openings.Keepdooropenas
shorta timeaspossibleifitis
opened.
@Be sureto wipeupexcessspillage
beforeself-cleaningoperation.
@Cookcompleteovenmealsinstead
ofjustonefooditem.Potatoes,
othe~vegetablesandsomedesserts
willcooktogetherwitha main-dish
casserole,meatloaf,chickenor
roast.Choosefoodsthatcookat
thesametemperatureandin
approximatelythesametime.
@Useresidualheatinoven
wheneverpossibleto finish
cookingcasseroles,ovenmeals,
etc.Alsoaddrollsor precooked
dessertstowarmoven,using
residualheat to warmthem.
— .. .
@Listenfor fan—afannoise
shouldbeheardsometimeduring
tilecleaningcycle.Ifnot,callfor
senice before self-cleating again.
SAVETHESE
Ir+JSTRUCTIONS
--
—-
-- -:
Page 5
se>%
—w:—.
FeaturesofYouroven
w
‘-”
————— ————— ——
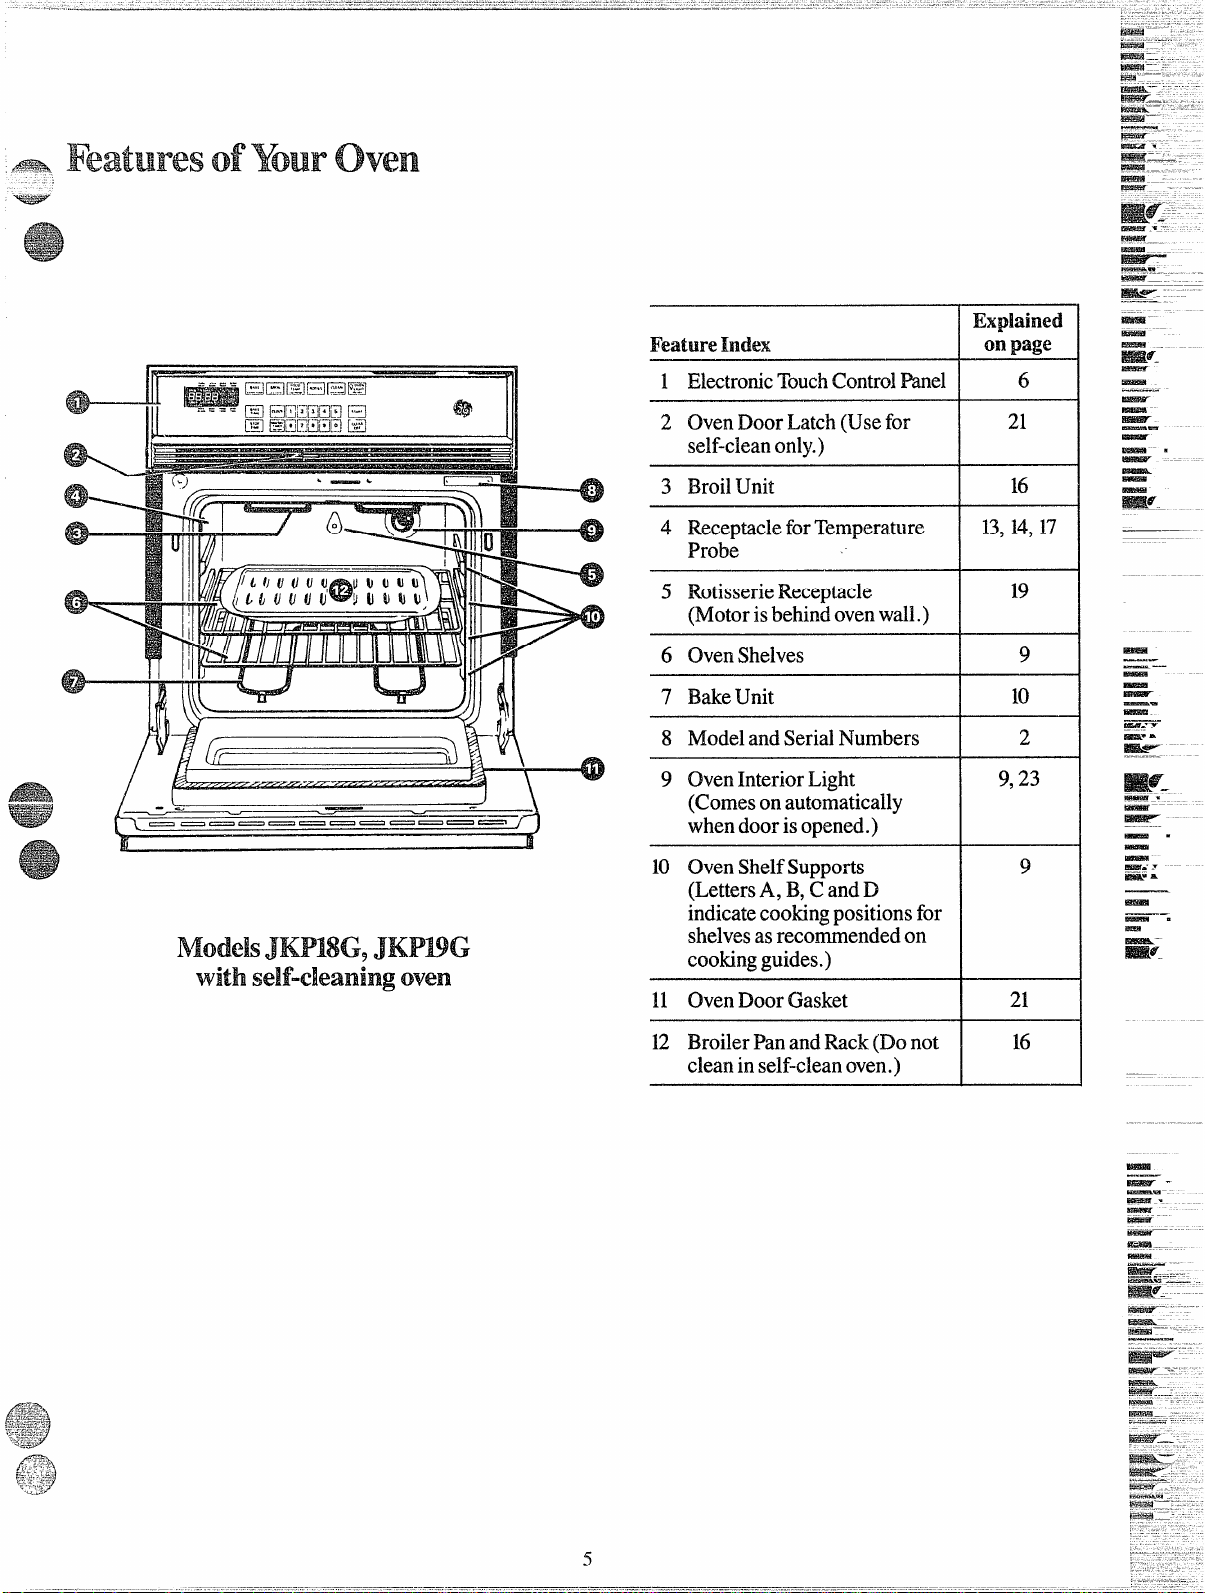
ModelsJKM8G,JKPUG
withself-cleaning
oven
FeatureIndex
1 ElectronicTouchControlMel
2 OvenDoorLatch(Usefor
self-cleanonly.)
3 BroilUnit
4 ReceptacleforTemperature
Probe
5 RotisserieReceptacle
(Motorisbehindoven.wall.)
6 OvenShelves
7 BakeUnit
8 ModelandSerialNumbers
9 OvenInteriorLight
(Comesonautomatically
whendoorisopened.)
10 OvenShelfSupports
(LettersA, B,CandD
indicatecookingpositionsfor
shelvesasrecommendedon
cookingguides.)
11 OvenDoorGasket
.-
Explained
onpage
6
21
16
13,14,1’7
19
9
2
9,23
9
_–
-
=a_-
—-
——
-
12 BroilerPanandRack(Donot
cleaninself-cleanoven.)
-—
-
E==.-..
m?..
5
Page 6
FeaturesofYollrTouchcontrol Panel
.44 T-–T444
OVEN BAKE
LOCKED TIME
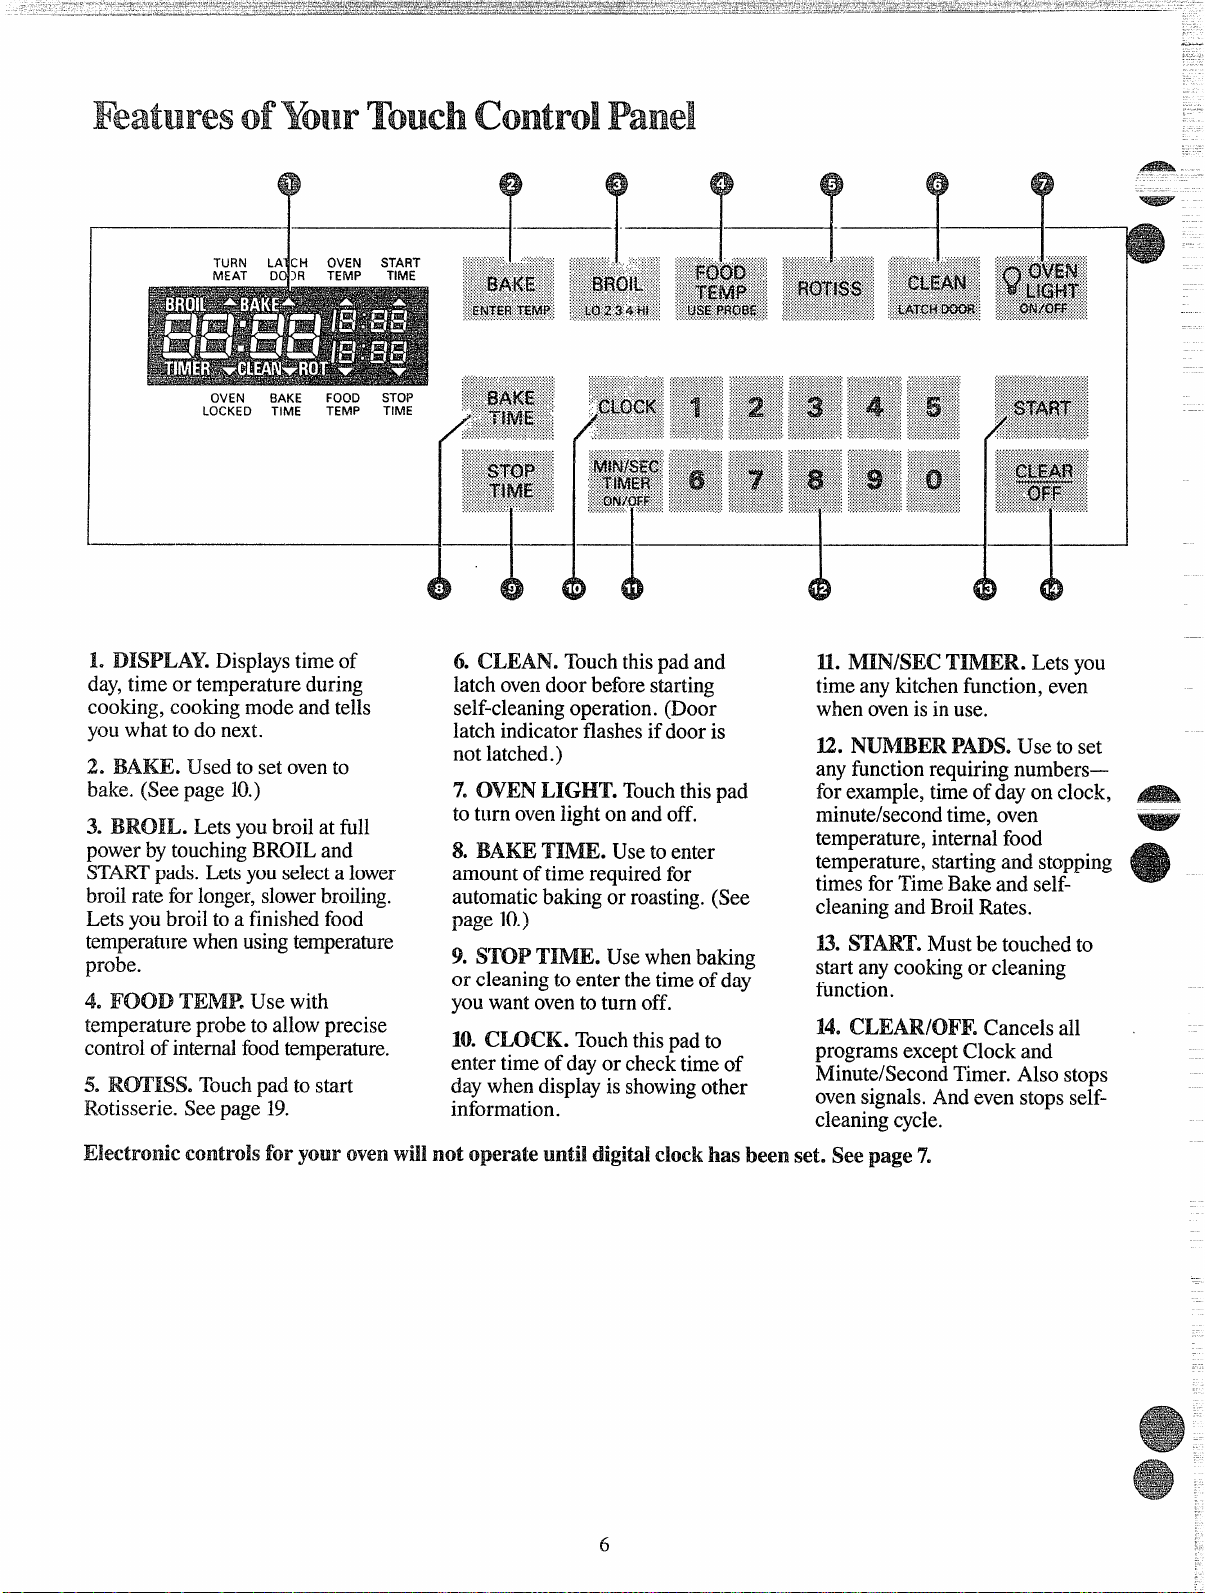
1. DISPLAY. Displaystimeof
day,timeor temperatureduring
cooking,cookingmodeandtells
youwhatto donext.
2. BA~. Usedtosetovento
bake.(Seepage10.)
3. BROIL. Letsyoubroilatfull
powerbytouchingBROILand
STARTpads.b~ youselectalower
broilrateforlonger,slowerbrotiing.
Letsyoubroiltoa finishedfood
temperah]rewhenusingtemperature
probe.
4. FOOD TEMP.Usewith
temperatureprobeto allowprecise
controlofinternalfoodtemperature.
5. R~ISS. Touchpadtostart
Rotisserie.Seepage19.
FOOD STOP
TIME
TEMP
6. CLEAN.Touchthispadand
latchovendoorbeforestarting
self-cleaningoperation.(Door
latchindicatorflashesifdooris
notlatched.)
7. OVENLIGHT. Touchthispad
tot~~rnovenlightonandoff.
8. BAW T’Im. Usetoenter
amountoftimerequiredfor
automaticbakingorroasting.(See
page10.)
9. $TOPTim. Usewhenbaking
or cleaningtoenterthe timeofday
youwantoventoturnoff.
10.CLOCK. Touchthispadto
entertimeofdayorchecktimeof
daywhendisplayisshowingother
information.
&
I
U. MIN/SEC
anytitchenfunction,even
time
whenovenisinuse.
U. NUN4BERPADS.Useto set
anyfinctionrequiringnumbers—
forexample,time ofdayonclock,
minute/secondtime,oven
temper~ture,internalfood
temperature,startingand stopping
timesforTimeBakeandselfcleaningandBroiIRates.
U. START.Mustbetouchedto
startanycookingor cleaning
function.
14.CLEAR/OWF.Cancelsall
programsexceptClockand
Minute/SecondTimer.Alsostops
ovensignals.Andevenstopsselfcleaningcycle.
~ImR. LetsYOU
m-
Electrolliecontrols
foryour ovenWiiinotoperateuntildigibi ‘clockhasbeenset.see page 7.
..
Page 7
&.m
~ TheElectronicDigitalClockon
-you?ovenisanaccurate,solid-state
devicethatservesseveralpurposes.
Asaclock,itdisplaysthetimeof
dayonthedisplaypanel.When
fiinctioningasa minutetimer,it
countsdownthetimeyousetto
“0:00”andsignalswhenitreaches
theendofthetime.
S
4 5 .
9 0 C<i’
1 t.
RT
~’>j>
\
\
CLOCK
MIN/sEc
TiMER
ON/OFF
3
8
NOTE:clock must be set on the
o}zenbeforeelectroniccontro~s
YvillBVorkilltheoven.
To set the clock
Whenyoufirstpluginyour
range,or afterapowerfailureof
anykind,thedigitaldisplayshows
“88:88”forabout 15seconds,then
automaticallychangesto “PF” (for
PowerFailure).YourElectronic
DigitalClockisnowreadytobeset.
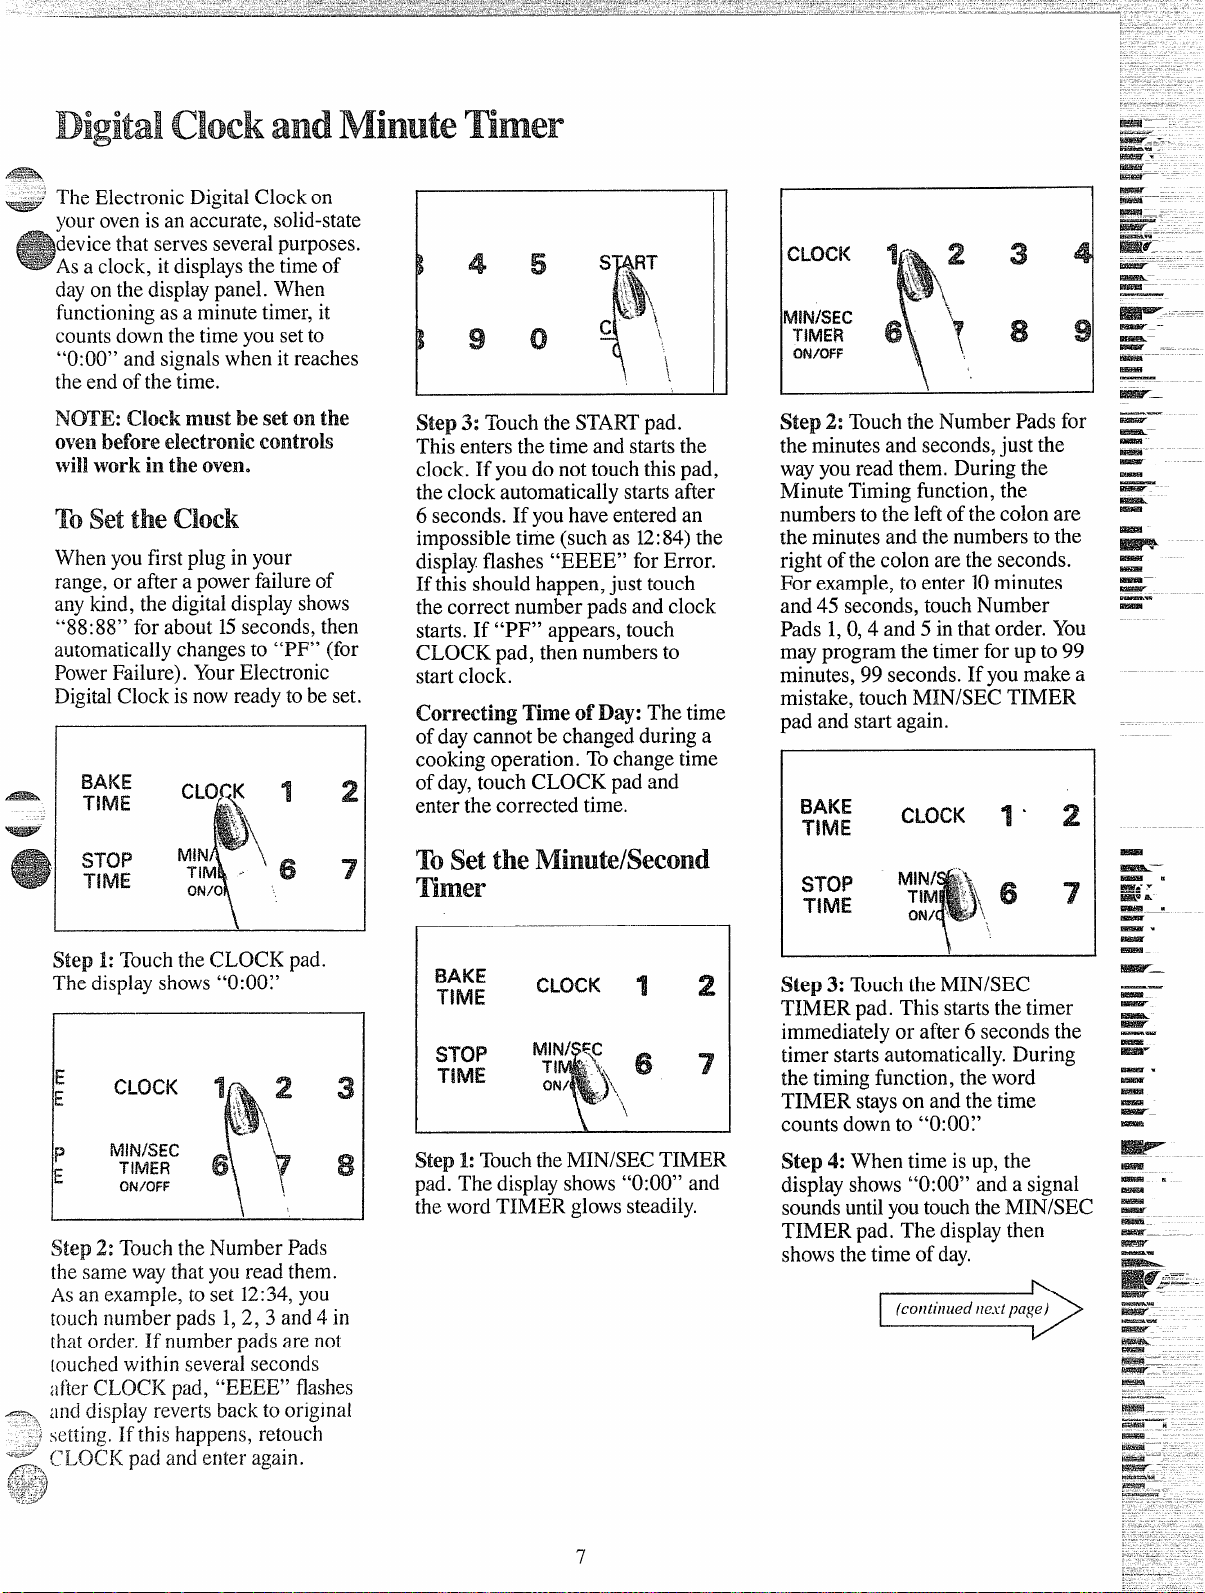
Step 1:Touchthe CLOCKpad.
Thedisplayshows“0:00~’
Step3: TouchtheSTARTpad.
Thisentersthetimeandstartsthe
clock.If youdo nottouchthispad,
theclockautomaticallystartsafier
6 seconds.If youhaveenteredan
impossibletime(suchas 12:84)the
displayflashes“EEEE” forError.
Ifthisshouldhappen,just touch
thecorrectnumberpadsandclock
starts.If “PF” appears,touch
CLOCKpad,thennumbersto
startclock.
Correcting TimeofDay:Thetime
ofdaycannotbechangedduringa
cookingoperation.Tochangetime
ofday,touchCLOCKpadand
enterthecorrectedtime.
TosettheMinute/second
mmer
BAKE
TIME
CLOCK
7 2
Step2: TouchtheNumberPadsfor
theminutesandseconds,just the
wayyoureadthem.Duringthe
MinuteTimingfunction,the
numberstotheleftofthe colonare
theminutesandthenumberstothe
rightofthecolonaretheseconds.
Forexample,to enter10minutes
and45 seconds,touchNumber
Pads1,0,4 and5 inthat order.You
mayprogramthetimerforupto99
minutes,99seconds.Ifyoumakea
mistake,touchMIN/SECTIMER
padandstartagain.
BAKE
T!ME
STOP
T’\ME
CLOCK
MIN/ ‘3..
T!M ‘i”;,6 ~
QN/ “ ‘.
1’ 2
P
Step3: TouchtheMIN/SEC
TIMERpad.Thisstartsthetimer
immediatelyorafter6 secondsthe
timerstartsautomatically.During
thetimingfunction,theword
TIMERstaysonandthetime
countsdownto “0:00~’
Step2:Touchthe NumberPads
thesamewaythatyoureadthem.
Asanexample,toset 12:34,you
touchnumberpads1,2, 3 and4 in
that order.If numberpadsarenot
{ouchedwithinseveralseconds
;]fterCLOCKpad,“EEEE”flashes
.==
:l~]ddisplayrevertsbackto original
. .
setti~~g.If thishappens,retouch
----
<~.<-:w-
(.’LOC1<padandenteragain.
K:?-:.
Step1:Touchthe MIN/SECTIMER
pad.Thedisplayshows“0:00”and
thewordTIMERglowssteadily.
Step 4: Whentimeis up,the
displayshows“0:00”anda signal
soundsuntilyoutouchtheMIN/SEC
TIMERpad.Thedisplaythen
showsthetimeofday.
-Q
Page 8
QuestiomandAmwers
Q. canI cheekthetimeof
daywhilethe display
Minute/second
A. Yes,simplytouchCLOCKpad usedduringanycookingfunction.
andthedisplayshowstime ofday
untilyouremoveyourfinger,then thetimeofdaybymerelytouching
thedisplayrevertsbackto theCLOCKpad.)
Minute/SecondTime.
Q. when I camehomethe other
day,the displayshoJved‘6PF”
instead
happened?
A. Yourhomehadapowerfailure
whileyouweregone.Thereis
nothingwrongwiththeclockon
youroven.Justresettheproper
timeasdescribedonpage7and
thentheovencontrolscanbeused.
ofthe timeofday. Fvhat
isshowing mmerduring ovencooking?
mine?
Q.canI usethe Minute/second
A. TheMIN/SECTimercanbe
(Youcancheck–butnotchange–
Q. If I Stirt
of
day and touchtheCLOCK
pad, then tiscovertnlatthe
shown is rfight9doI havetoreset
theClock?
A, No.Theoriginaltimeofday
willreappearabout15seconds
after“BEHE”flashes.
toChangethe time
time
A. No.Theclockcannotbe
changedduringanyprogramthat
usestheoventimeror thedisplay.
Youmusteitier stopthoseprograms
or waituntiltheyarefinished
beforechangingtime.
.-
-.
8
Page 9
usi~lgYouroven
—.
-
Beforeusingyouroven, look at the
directionsinthisbook for setting
theelectroniccontrols.Thenopen
theovenandtake noteofthe
abbreviatedi~lstructionsonthe
insideofthedoor.Lookatthe
shelves.Takeapracticerunat
remo~ingandreplacingthem.
And,whileyou’reat it, locatethe
broilunitatthetopoftheovenand
bakeunitjustofftheovenfloor.
ovenInteriorLights
Thelightcomeson automatically
whentheovendoorisopened.
TouchOVENLIGHTpadon
controlpaneltoturnthelighton
andoffwhenthedoorisclosed.
—
—
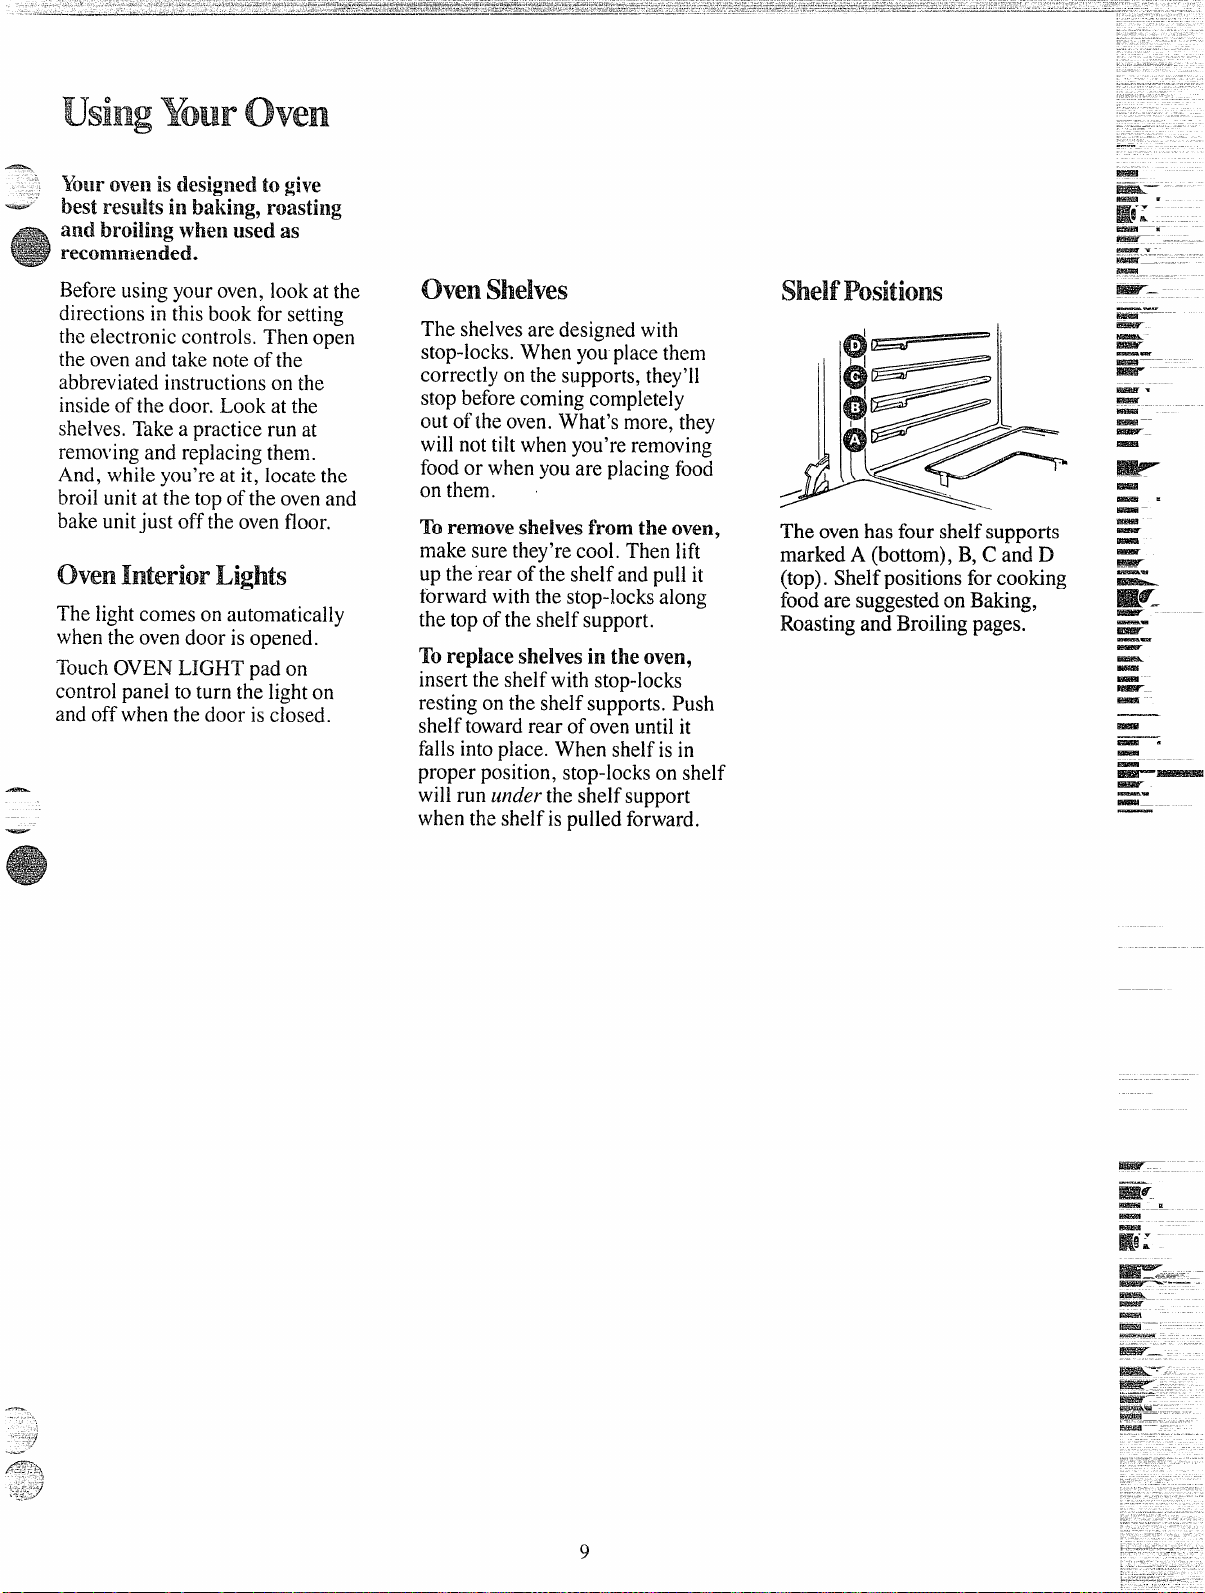
ovenshelves
Theshelvesaredesignedwith
stop-locks,Whenyouplacethem
correctlyonthesupports,they’il
stopbeforecomingcompletely
outoftheoven.What’smore,they
willnottiltwhenyou’reremoving
foodor whenyouareplacingfood
onthem.
Toremoveshe~vesfrom the oven,
makesurethey’recool.Thenlift
uptherearoftheshelfandpullit
forwardwiththestop-locksalong
thetopoftheshelfsupport.
Toreplaceshelvesintheoven,
inserttheshelfwithstop-locks
restingontheshelfsupports.Push
shelftowardrearofovenuntilit
fallsintoplace.Whenshelfisin
properposition,stop-lockson shelf
willrunl~ndertheshelfsupport
whentheshelfispulledforward,
Theovenhasfourshe~fsupports
markedA(bottom),B,C andD
(top).Shelfpositionsforcooking
foodaresuggestedonBaking,
RoastingandBroilingpages.
Page 10

ElowtoBakea~~d~me BakeinYourOven
.—
seeBakingGuideon ptlge n.
$Vheil
by
arebotileilergized(the broil
atredllcedwattage)alntilthe
oventemperatklreyellselect
(froEll150
The
tllrns the ovenheatingu~litsoff
and on
ovente~~~peratureeIna quiet
kitchen,youmayheara slight
theheatingunits areturnedoff
andon.
Theoventemperaturedisplaywill
show-90°F. orhigherthanactual
roomtemperatureuntiltheoven
temper~turereaches150”F.This
isnormal.
Astheovenheats,thetemperature
onthedisplaymayseesawafew
degrees.This,too,isnormal,
becausethe electroniccontrol
accuratelyindicatesslightchanges
inairtemperature.
Mostfoodscooksatisfactorily
withoutpreheatingtheoven.If
preheatingisrequired,putyour
foodintheovenpromptlywhenthe
ovensignalsthatthedesired
temperaturehasbeenreached.
Whencookingfoodforthefirst
time,usethetimegiveninyour
recipeas a guide.
Don’topentheovendoortocheck
onfoodsanymoreoftenthan
necessary—doingsocouldcause
undesirablebakingresults.Check
whenminin~umtimeshownon
recipeis up. Thencookfood
longer,ifnecessary.
Note:Cookingcontrolswillnot
workafterautomaticovencleaning
untiltheovenhascooledandyou
unlatchthedoor.
Step 1:Placeovenshelfon shelf
s~~pportcalled for inBakingGuide,
page12.
settobtlke, the oveIl cooks
dryneat.Bakeand broilMllits
unit
to550”F.)isreached.
texnperatureControlthen
tonlaintaiBlthedesired
“click” sound duringcookingas
Step2: Make suretheovendoor
isclosed.ThentouchBAKEpad.
Displayshows“BAKE”anda
flashingindicatorpointstoOVEN
TEMP.
LATCHDOOR
QN/OFF
Step3: Touchthenumberpads
intheorderthatyoureadthemto
enterthetemperaturecalledfor in
yourrecipe.Thetemperatureyou
~etshow;onthe display.
—
r
—
Step4: TouchSTARTpadtobegin
baking.Displayshows“BAKE”and
actualoventemperatureastheover
heats.Thecontr~l“beeps”sixtimes
whensettemperaturehasbeen
reached.Thedisplaythenshows
thesettemperaturecontinuously.
Step 5: Centerfoodontheshelf.
Makesureatleast1inchofspace
isleftbetweenthe cookingcontainer
andtheovenwallfor properheat
circulation.Closetheovendoor.
Step6:Ifyouwish,youmayset ,*theMinute/SecondTimerto the
desiredcookingtimeas indicated
inyour recipe(seepage7). When
the settimeisup,thecontrolsignals
untiltheMIN/SECTIMERpad
istouchedagain.
Step%Whenbakingisdone,touch
CLEAR/OFFpadtoturntheoven
off.Besurefoodsaredonebefore
takingthemout oftheoven.
Howto mmeBake
Yourovencan! besettoturnon
andoffautomatically.Howevery
foodsWil[‘continuetoCookwhen
leftintheoven,eventhoughit’s
turnedoff.That’swhyyou
shouldnotusetheBakeTimeor
StopTimefeaturewhentimingis
TosetImmediateStart(oven
startsimmediatelyandturnsoff
automaticallyatlatertime):
I OVEN START
STOP
TIME
Step 1:TouchBAKEpad.
1.0234til
Step2:Touchnumberpadsto enter
oventemperature.For example,for
250”F.touch2,5 andO.
LATCH DOOR
.-
---
Page 11

-“
“7
STOP
TIME
Step3: TouchBAKETIMEpad.
r
Step4: Touchnumberpadstoenter
bakingtime.Sethoursandminutes
only—anytimefrom 1minuteto 11
hoursand59minutes.Forexample,
toenter1hourand30minutes,touch
1,3 andO.Theovenautomatically
calculatesthecorrectstoppingtime.
YCHNOR
1
45
90
Step5: TouchSTARTpad. Oven
beginscooking.Displayshowsthe
StopTimeandoventemperature.
Toset DelayStart (ovenstartsat a
latertimeandautomaticallyturns
offwhencookingtimeisup):
DoSteps1,2, 3 and4 as shownfor
lmrned~ateStart.Then:
Step5: TouchSTOPTIMEpad.
Step6:“~ouchnumberpadstoenter
[imeofdayyouwant oventoturn
off.Forexample,to enter6:00,
touchpads6,0 andO.
$;iQp%TouchSTARTpad. Oven
caicu]atescorrectstartingtimeand
~urnsonatthattime.Displayshows
““-’-’on.Thenthe-oventemperatureand
f+topTimeareshown.
8AKE,
TIM , cLocK
$.
)
‘\
\
W/OFP
;k RT
II, ‘
L
f,
[Ii
‘~~lN/SEC
\TIMER
ON/OFF
STO
TIME
YoumayenterStopTimebefore
BakeTimeaftercompletingSteps
1and2. Ovenstillcalculates
“turnon”timecorrectly.
EnterStopTimeinsteadofBake
Timestartstheovenimmediately
andoventurnsoffautomatically
atStopTime.
Tocheekoventemperature that
youset, touchBAKEpadandit
willshowbriefly.
Tocheckbakingtime that youset,
touchBAKETIMEpadandit will
showbriefly.
AttheendofTimeBake,theword
Endis displayedinplaceoftimeof
day,the ovenisturnedoffandthe
controlbeepsoncea minuteuntil
youtouchtheCLEAR/OFFpad,
Example of How to
Bake Brownies
Step 1:Preparebrowniebatter
accordingto yourrecipeor
directionsonpackagedmix. Use
eitherametalor oven-proof8“
glasspan. Placeovenshelfin
Bposition.
Step2: Preheatoven.Closeoven
doorandtouch BAKEpad.Use
numberpadsto setoventemperature
to350”F.ifusinga metalpan,325”F.
ifusinga glasspan. TouchSTART
pad. Preheatingbegins.Display
showsactual oventemperatureas
ovenheats.
Step3: Pourbrowniebatterinto
greasedpan.
Step4: Whenpresettemperatureis
reached,ovensignals.Centerthe
panontheovenshelf.
Step5: TouchMIN/SECTIMER
andnumberpads2, 5,0andOto
enter25minutescookingtime.
Timingbeginsautomaticallyin six
seconds.
Step 6: Whenovensignals,touch
MIN/SECTIMERpadtostop
signal.Checktomakesurebrownies
aredone,Removethepan.Touch
C1.EAR/OFFto turnovenoff.
Step%Letbrowniescoolandthen
cutintosquares.
11
QuestiomandAmwers
Q. why aren’tlmyfoodsdone
eventhough they’veCookedthe
time?
full
A. Therearevariouscausesforthis
problem.You mayhaveopenedthe
ovendoortoooftenduringcooking.
Orperhapsyoudidn’tremoveall
containersotherthanthoseinusefor
baking.Checkfortheseconditions
andfollowthesuggestedbakingtips
toavoidthisproblemin thefuture.
Q. If the displaydoesn’tSklowthe
correct time of day,may I use
BakeHme and StopTime?
A. Yes,buttostartandstopatthe
timeyouwishto serveyourmeal,
youshouldresettheclocktothe
correcttime.Doitbeforeyouenter
BakeTimeandStopTime.
Q. Howdo I bake athigh
altitudes?
A. You’llhavetochangethe
temperatureandtimeofcookingas
wellasalteryourmeasurements.
Forbestresultsandfurther
information,checkyourcookbook
or stateagriculturalstation.
Q. Howdo 1use theautomatic
oventimerif Iwanttobegin
cookingimmediatelybutwant
theoventoshutONwhileI’mgone?
A. TouchBAKEpadandenterthe
desiredoventemperaturebytouching
thenumberpads.Thentouch
STOPTIMEpadandenterthetime
atwhichyouwanttheovento shut
off. TouchSTARTpadtobegin
cooking.
Note:Foodwillcontinueto cookif
leftina hotoven.
Q. he there ee~in foo~ that are
notreeomended forme Bake~~
A. Foodsthatarehighlyperishable
suchasmilk,eggs,fish, stuffings,
poultryandporkshouldnotbe
cookedautomaticallyunlessthe
staridingtimeintheovenis not
morethantwohoursbeforeorafter
cooking,Foodsshouldalwaysbe
chilledintherefrigeratorbefore
cookingwhenyouusea Delayed
Start.
—
—
Page 12

1.Aluminumpans conductheat 2. Darkornon-shinyfinishesand
quic~y.Formostconventional
baking,
light,shinyfinishesgivebest heat, whichmayresultindry,crisp
glasscookwaregenerallyabsorb
resultsbecausetheyhelpprevent crusts.Reduceovenheat25°F.if
overbrowning.Forbestbrowning
lightercrestsaredesired.Wpid
results,werecomend dull bottom browningofsome foodscanbe
surfacesforcke pansandpie plates.
achievedbypreheatingcastiron
cookware.
e - -----
3.Preheatingtheovenisnotalways ‘–~u~
necessary,especiallyforfoods
whichcooklongerthan30to40
minutes.Forfoodwithshort
cookingtimes,preheatinggives
bestappearmceandcrispness.
4. Openhe ovendoortocheck
foodaslittleaspossibletoprevent
unevenheatingandto saveenergy.
—
-.
Food
Bread
Biscuhs(%-in.thick)
Coffeecake
Cornbreadormuffins
Gingerbread
Muffins
Popovers
Quickloafbread
Yeastbread(2loaves)
Plainrolls
Sweetrolls
Cakes
(withoutshortening)
Angelfood
Jellyroll
Sponge
cakes
Bundtcakes
Cupcakes
Fruitcakes
Layer
Layer,chocolate
Loaf
Cookies
Brownies
Drop
Refrigerator
Rolledorsliced
rmi&,
OtherDesse~
Bakedapples
Custard
holdings,Rice
andCustard
Res
Frozen
Meringue
~necrust
Twocrust
bstry shell
Giscellane93us
3akedpotatoes
;caliopeddishes GlassorMetalPan
;o~lffles Glass
Con@iner
ShinyCookieSheet
ShinyMetalPanwith
satin-finishbottom
CastIronor Glass
ShinyMetalPanwith
satin-finishbottom
ShinyMetalMuffinRns
DeepGlassorCastIronCups
MetalorGlassLoafPans
MetalorGlassLoafPans A,B
ShinyOblongorMuffinPans
ShinyOblongor MuffinPans
Aluminum~be Wn
MetalJellyRollPan B
MetalorCeramicPan
MetalorCeramicPan A, B
ShinyMetalMuffinPans
MetalorGlassLoafor A, B 275°-3000 2-4hrs, Use300°F.andShelfBforsmallor
T~bePan
ShinyMetalPanwith
satin-finishbottom
ShinyMetalPanwith B 350°-3750 25-30
satin-finishbottom
MetalorGlassLoafPans B
MetalorGlassPans B,C 325°-3500 25-35 Barcookiesfrommixusesametime.
CookieSheet
CookieSheet
CookieSheet
GlassorMetalPan A,B,C 350°-4000 30-60
GlassCustardCupsor Casserole
(setinpanofhot water)
GlassCustardCupsor
Casserole
FoilPanonCookieSheet A
Spreadtocrustedges
GlassorSatin-finishMetal A, B 400°-4250 40-60 Custardfillingsrequirelower
Glassor Satin-finishMetal
GlassorSatin-finishMetal B 450°
Seton OvenShelf A, B,C
shelf
msition
B,C 400°-4750 15-20
B,A
B 400°-4500 20-40
B
A, B
B
B 350°-3750 45-60
A,B 375°-4250
B,A 350°-3750 20-30
A
A 325°-3500 45-60
B
B 350°-3750 20-35
B,C 350°-4000
B,c 400°-4250
B,C 375°-4000 7-12
B 300°-3500
B 325°
B,A 325°-3500
B 400°-4250
A,B,C 325°-3750 30-60 orsize.
B 300°-3500 30-75
Oven
Temperature Min15tes
350°-4000 20-30
350° 45-55
400°-4250 20-30
950
375°-4250 45-60 Darkmetalorglassgivedeepest
325°-375” 30-55 Two-piecepanisconvenient.
375°-4000 10-15 Linepanwithwaxedpaper,
325°-3500 45-65
350°-3750
350°
400°-4250
325°-4000
~me,
Commenti
Canned,refrigeratedbiscuitst~e
2to4 minuteslesstime.
Preheatcastironpanforcrispcrust.
45-60 mix,orbakeat450”F.for25minutes,
10-25
20-25
40-60
10-20
6-12
30-60
50-90
45-70
15-25
40-60 temperature,longertime.
12.15
60-90 Increasetimeforlargeamount
Decreaseabout5minutesfor muffin
thenat350”F.for 10to 15minutes.
browning.
Forthinrolls,ShelfBmaybeused.
Forthinrolls,ShelfBmaybeused.
Paperlinersproducemoremoist
crusts.
individualcakes.
UseShelfC andincreasetemp.
25”F.to50”F.formorebrowning.
Reducetemp.to300”F.forlarge
custard.Cookbreador ricepudding
withcustardbase80 to90 minutes.
Largepiesuse400°F.andincrease
time.
Toquicklybrownmeringue,use
400°F.for8to 10minutes.
—.—.
-
.-
Page 13

HowtoRoastinYouroven
._ see Roasti13g Gllide on page 15.
“ Roastingiscookingby dry heat.
It’sreallya baking procedure
for meats.That’swhyyou
used
usethe Bake controls
Roastingtemperatures,which
shouldbelowandsteady?keep
spatteringto a minimum.When
roasting9it’snotnecessaryto
sear,baste9coveroraddwaterto
yourmeat.Tendermeatorpultry
canberoasteduncovered.
Checktheweightofther-neatand
placeit, fatsideup,ontherackin
the broilerpanthatcamewithyour
range.Thishelpsthemeattobaste
itself.
Alwaysusearoastingpanthat
fitsthe sizeof your meat.A roast
placedinapantoosmallfor itssize
willdripovertheedge.
Most meats continuetocook
slightlywhilestandingin the
ovenor after beingremovedfrom
it. Takethisintoconsideration
whendeterminingyourcooking
time.
Tocook
withoutthawing,allowmore
cookingtime.Forlargeroasts,add
10to25minutesperpound.For
roastsunder5 pounds,add 10
minutesper pound.
ToSIOWdownsurfacebrowning
onturkeys9youcanusea foil
“tent!’Thetent-shapedfoilshould
belaidlooselyoverthepoultryso
theheat cancircula~eunderthefoil.
NIostfrozenpoultry should be
thawedbeforeCookingtomake
sure it’sdone evenly.Some,
however,canbecookedsuccessfully
withoutthawing.Checkthepacker’s
l:ibelforspecificdirections.
frozen meatroasts
for roasting.
Howto setoven
Roasting
for
Step1:Useshelfpositionindicated
ontheRoastingGuideonpage15.
Forverytallroasts,removethe
secondovenshelf.
Step2:Placemeatinsidetheoven
andclosethedoor.
I OVEN START I
BE
ENT MP
; ,,
.
>’ !,
i
STOP
TIME
Step3:TouchBAKEpad.Display
shows“BAKE”anda flashing
indicatorlight pointstoOVEN
TEMP.
2:,45
78.
Step4:Touchnumberpads3,2 and
5 toenter325”F,oventemperature.
(Theexceptionissmallpoultry
whichisroastedat375”F.)
[
Step5: TouchSTARTpadto begin
roasting.Displayshowsoven
temperatureas it rises, andsignal
soundswhendesiredtemperature
isreached,
Step6: Whenfoodis cooked,
touchCLEAR/OFFpadtoturn
ovenoff.
,!,,
)
.-
“ “\
\
1.
‘b o
\
P
STAR
CLEA
m
\
Howto setovenwhen
usingTemperatureProbe
Formanyfoods,especially
roastsandpoultry,internalfood
temperatureisthebesttestfor
doneness.Thetemperatureprobe
takestheguessworkoutofroasting
bycookingfoodstotheexact
donenessyouwant.Whenthe
internaltemperatureofthefood
reachesthetemperatureyouset,
ovenautomaticallyshutsoff,
“End”appearsondisplayandoven
beepsonce a minuteuntil
CLEAR/OFFpadistouched.
Step 1:Insertprobeintomeat.
Thenplugprobeintoreceptacleon
ovenwall.
Step2: TouchBAKEpad. Display
shows“BAKE”anda flashing
indicatorlightpointstoOVEN
TEMP.Touchnumberpads3,2
and5 toenterthedesiredoven
temperatureof325”F.
IROIL
234HI EUSE ‘~j;
I \,
LOCK f .,, “ ~ ~
Step3: TouchFOODTEMPpad.
FlashingindicatorpointstoFOOD
TEMPon display.Usenumber
padsto enterdesiredfinishedmeat
temperaturefrom90°to 199°F.
Probemustbeinsertedinto
receptacleor “PROB”flasheson
display.
Step4: TouchSTARTpad.Display
showsoventemperaturerisingto
I
presettemperature.Displayalso
showsactual foodtemperature
rising.Whendesiredtemperature
isreachedovenautomaticallyshuts
off, “End” appearsondisplayand
ovenbeepsonce a minute,
Step 5: TouchCLEAR/OFFpadto
turnsignaloff.Removetheprobe.
FOOD
TP~
4
ROTISS
13
Page 14

correctPlacenlelltof
.——
theTelllperatureProbe
fol”Roasting
Thetemperatureprobehasa
skewer-likeprobeatone endanda
plugattheotherendthatgoesinto
a receptacleonthe ovenwall.Use
handlesoftheprobeandplugwhen
insertingandremovingtheseparts
frommeatandwallreceptacle.Do
notusetongstopulloncablewhen
removingprobeatendofcooking—
theymightdamageit.
Afterpreparingmeatandplacing
itontheroastingpanrack,follow
thesestepsforproperprobe
placement.
Step 1:Laytheprobeonthe
outsideofthemeatalongthetop
or sideandmarkwithyourfinger
wheretheedgeofthemeatcomes
toontheprobe.Pointshouldrestin
thecente;ofthethickestmeatypart
oftheroast.
—
Step2: Inserttheprobeintothe
meatuptothepointmarkedoff
withyourfinger.It shouldnot
touchbone,fatorgristle.Nonzore
[Il[[nt}voinchesqft]~eprobe,not
[:ountingthehandie,s/Iouldbe [e@
e.rpose(ioulsidetheI?lelll.
Step3: Plugthe otherendofthe
cableintothereceptacle,making
surethatit issecurelyseated,all
thewayin.Closetheovendoor.
Poultry
Insertprobe intomeatiestpartof
innerthighfrombelowandparallel
tothele{of a wholeturkey.-
casserolesorFish
Insertprobe intocenterofdishes
suchasmeatloafor casseroles.
Whencookingfish,insertprobe
fromjust abovegill intomeatiest
area, paralleltobackbone.
HamorLamb
Insertprobeintocutend, meatiest
partofhamor lambwithouta
bone.Forbone-inhamor lamb,
insertprobeintocenteroflowest
largemuscleorjoint.
Q. When buyinga roast,are
thereanyspecialtipsthatwould
helpmecookitmoreevenly?
A. Yes.Buya roastasevenin
thicknessaspossibleor buya
rolledroast.
Q. CanI seaI!thesidesofmyfoil
“tent”whenroastinga turkey?
A. Youshouldn’t.Sealingitwill
steamthemeat.Leavingthe “tent”
unsealedletsaircirculateand
brownthemeat.
Q. Why does my roast crumble
when1trytocarveit?
A. It’sprobablytoowarm.Roasts
areeasierto sliceifyouletthem
cool for 10to20minutesafteryou
takethemoutoftheoven. Besure
tocutacrossthegrainofthemeat.
Q. Can the temperatureprobe
stayintheovenwhen it9snot
insertedin food?
Itshouldn’t.Removeitfromthe
A.
receptaclewhenit’snotinuse.You
coulddamagetheprobebyleaving
itintheovenduringcooking
oper~tionsthatdonotrequireitsuse.
Q. May I insert the probe into
frozenfoods?
A. No.It couldbreak.Foodsmust
becompletelydefrostedfirst.
.-.
i
“.+--:
v-
14
Page 15

10PositionovenshelfatB for
small-sizeroasts(3 to 7 Ibs.)and
atAforlargerroasts.
2. Placemeatfat-sideup,orpoultry
breast-sideup,onbroilerpanor
othershallowpanwithtrivet.Do
notcover.DonotstLlffpoultryuntil
justbeforeroasting.Usemeat
probe formoreaccuratedoneness.
Control.signalswhenfoodhas
reachedsettemperature.(Donot
placeprobein stuffing.)
3.Removefatanddrippingsas
necessary.Basteasdesired.
4. SWndingtimerecommendedfor
roastsis10to20minutestoallowroast
tofirmup andmakeiteasierto
carve.Internaltemperaturewillrise
about5° to 10”F.;to compensatefor
temperaturerise,if desired,remove
roastfromovenat5°to 10°F.less
thantemperatureonguide.
5.Frozen
conventionallyroastedbyadding __ __
roas@canbe
——
10to 25minutesperpoundmore ==-= timethangiveninguidefor
refrigeratedroasts.(10minutes
-
~–
_-__—--
perpoundforroastsunder5pounds.) =.- —----Defrostpoultrybeforeroasting.
Oven
Type
Meat
Tendercuts;rib,highqualitysirlointip,
rumportopround*
LambLegorbone-inshoulder*
Vealshoulder,legor loin*
Porkloin,riborshoulder*
Ham,precooked 325°
Ham,raw
—
*Forbonelessrolledroastsover6-inchesthick,add5to 10minutesperpoundtotimesgivenabove.
—
Poultry
ChickenorDuck
Chickenpieces
Turkey 325°
Temperature
325°
325°
325°
325°
325°
325°
375° WellDone: 35-40 185°-1900
Doneness
Rare: 24-30 18-22
Medium: 30-35
WellDone: 35-45 28-33
Rare:
Medium: 25-30
WellDone:
WellDone: 35-45 30-40
WellDone: 35-45 30-40 170°-180°
ToWarm: 10minutesperpound(anyweight)
WellDone: 20-30 17-20 170°
Well Done: 35-40 30-35 185°-1900
Well Done: 20-25
ApproximateRoastingTime,
ill Minutes per Pound
3 to 5-lbs.
21-25
30-35 28-33
Under 10-lbs. 10to 15-Ibs.
3
to5-lbs. Over5-lbs.
10
to K-lbs. OverK-lbs. In thigh:
6to$-lbs.
22-25 150°-1600
20-23 130°-1400
24-28
15-20
Internal
Temperature‘F
130°-1400
170°-1850
150°-1600
170°-185°
170°-1800
125°-1300
185°-1900
15
Page 16

HowtoBroilinYouroven
see BroilingGuideon page 18.
Broilingiscookingfoods by
intense radiant heatfrom the
upper heating
when food is broiled, onlyone
ata tinle isexposedtothe
side
heating source. Most fish steaks
or filletsand tender Cuts
such as steak or Chopsare best
broiled.
!Vhen
Yollrovenletsyouchoosebetween
twoconvenientbroilingmethods.
with the first method, youtouch
the BROIL pad, then the START
pad and the ovenbroilsonthe
fastest
The secondmethod, or variable
Broil,givesyouthe
ehoQsiKlg
heat) from
No matterwhichmethodyouuse,
thefollowingsuggestionsapply:
@Place meatonthebroiler rack
onthebroilerpan.Alwaysusethe
racksofatdripsintothepan.
@Placepaninovenonshelf
inpositionC.Ifyourovenis
connectedto208volts,raresteaks
maybebroiledbypreheatingthe
broilheaterandplacingtheoven
shelfonepositionhigher.
@Leavethedoorajara fewinches
(exceptwhenbroilingchicken).
Thedoorstaysopenbyitselfyet the
propertemperatureis maintained
intheoven.
@Turnfoodonlyonceduring
cooking.
rate(HI)automatically.
unit in theoven.
of meat
option of
a lowerbroil rate(less
LO to4.
BroilRatesettings
HI-.High. . . . . . . . . . .100%power
4-MediumFligh. . .. . .W%power
3-Medium . . . . . . . .
2-”MediumLow . . . .
LO-LOW. . . . . . . . . .
..90 %power
. ,84%power
..78 %power
Howb set01’enforBromw
Forregularbroiling,likeyou’ve
alwaysbeenusedto,dothis:
E
EMP
LA7
1
Step 1:TouchtheBROILpad.
Displayshows“BROIL?’
Step2:TouchtheSTARTpadto
be~~ncookin~.Ovenisautomatically
se;to broila~thehighrate,with
100%power.
—
45
Step3: Whencookingisdone,
touchtheICLEAR/OFFpad. Serve
foodimmediately.Leavepanoutside
oventocoolforeasycleaning.
HowtoAdjmtovenfor
abwer BroilRate
Youcan alsOsetyounroven $0
broil at a Iawer
(low)to4 (mediumhigh),Foods
broilslower,andthebroil
develops over a longer time*
START
“i
ratefromLO
flavor
—
Step 1:Placefoodin ovenonshelf ‘*
inCposition.TouchtheBROIL
pad.Displayshows“BROIL:’
Step2:Toucha numberpad—
1(LO),2, 3 or4—forthedesired
BroilRate.Displayshows“BROIU’
andtheselectedcodenumber.
Step3:TouchtheSTARTpadto
begincooking.
Step4:Turnmeatoverwhen
recommendedbroilingtimefor
firstside is up.
Step5:TouchCLEAR/OFFpadto
shutbroilheateroffwhencoobng
isfinished.
/[
--
a-
1. If desired,broilerpanmaybe
linedwithfoilandbroilerrackmay
becoveredwithfoil forbroiling.
ALWAYSBECERTMN~ MOLD
FOILTHOROUGHLYTO
BROILERRACK,ANDSLIT
FOILTOCONFORMWITH
SLITSIN RACK.Broilerrackis
designedto minimizesmokingand
spattering,andtokeepdrippings
cool duringbroiling.Stoppingfat
andmeatjuicesfromdrainingto
thebroilerpanpreventsrackfrom
servingitspurpose,andjuicesmay
becomehot enoughtocatchfire.
2. DCJNOTplace a sheetof
aluminumfoilonshelf.Todo so
mayresultinimproperlycooked
foods,damagetoovenfinishand
increaseinheaton outsidesurfaces
oftheoven.
16
Page 17

BroilingwiththeTemperatureProbe
-
:Avarietyoffoodsmaybebroiled
B.-
usingthetemperatureprobe
ncludirigsteaks,chops,hamsteaks
ndchickenbreastfillets.Foods
broiledusingtemperatureprobe
shouldbeapproximately1“to 1
thick.
Usehotpadswhenremovingprobe
aftercookingisdone.Donotuse
tongstopullonit—theymight
damageit..
Donotunplugprobefromoven
receptacleduringcooking.Cooking
programwillbecancelledifyoudo.
How to set oven
for Broiling a steak using
Temperature Probe
Y2”
Pushprobeintosteaktowhere
thumbmeetsmeator fat.
Step3: Placeovenshelfinposition
Candplacepaninmiddleofshelf.
Plugotherendofprobeinto
receptacleon ovenwall.Leave
doorajarabout 3 inches.
BRol~
L023 ~>.
‘ ~“\
,.
CLEAN
LATCHDOC
‘CiiDOOR
uN/oFF
SteV%TouchSTARTpadtobegin
cooking.Forsixseconds,display
shows“BROIL~’selectedvariable
broil powerlevelandprogrammed
finishedfoodtemperature.
LATCH
TURN
MEAT DOOR
OVEN S;&~T
TEMP
—
—
I
I
,.
tep 1:Place1“to 1%”thicksteak
ontopofrackinbroilerpan. Lay
probeontopofsteaktodetermine
positionofprobeanddistancefrom
~dgetocenieroflargestmuscle.
Markwiththumbwhereedgeof
meator fatmeetsprobe.
Makesurethat no morethan2“of
probe,notcountingthehandle,
willstickoutofthemeat.
I
Step2: Liftprobefrommeat,
keepingthumbinplaceon probe.
Insertprobeasnearaspossibleto
~hecenterofthicknessofsteak.
CLOCK
1’”34
?;
Step4: TouchBROILpad.
BROILwillappearondisplay.
Step5: Toucha numberpad–
1(LO),2,3 or4—forthedesired
broilrate.Displayshowsbroilrate
selected.
I
Step8:Atendoffirstcooking
period,ovensignalsand“TURN
MEAT”indicatorflashes.Turn
meatover.DONOTunplugthe
probe or programwill becancelled.
Leaveov~nd~orajarabout3inches.
I
45
START
Step 9: Whendesiredfinished
temperatureisreached,ovensignals
bydisplayingEND andbeeping,
andturnsoffautomatically.Touch
CLEAROFF to shutoffsignal,
unplugprobeandremovesteak
fromoven.Removeprobe.
(Caution:Probewillbehot.)
-e -—- . _
—— . .
Step 6: Touchtheappropriate
numberpadsin sequencetoenter
thedesiredfoodtemperature.For
example,touch 1,5,and5for steak
medium.
Page 18

1. Alwaysusebroilerpanandrack
.—
that comeswithyouroven.Itis
designedtominimizesmokingand
spatteringbytrappingjuicesin the
shieldedlowerpartofthepan.
2. Ovendoorshouldbeajarforall
foodsexceptchicken;thereisa
specialpositionondoorwhich
holdsdooropencorrectly.
3. For steaksandchops,slashfat
evenlyaroundoutsideedgesofmeat.
Toslash,cut crosswisethrough
outerfatsurfacejust totheedgeof
themeat.Usetongstoturnmeat
overtopreventpiercingmeatand
losingjuices.
4, If desired,marinatemeatsor
chickenbeforebroiling.Orbrush
withbarbecuesaucelast5to 10
minutesonly.
5. Whenarrangingfoodonpan,
donot letfattyedgeshangover
sides,whichcouldsoilovenwith
fatdripping.
6. Broilerdoesnotneedtobe ‘p-
reheated. However,forverythin
foods,or to increasebrowning,
preheatifdesired.
7. FrozenSteak canbe
conventionallybroiledby
positioningtheovenshelfatnext
lowestshelfpositionandincreasing
cookingtimegiveninthisguide
lYztimesper side.
8. If yourovenisconnectedto
208volts,raresteaksmaybebroiled
bypreheatingbroilheaterand
positioningthe ovenshelfone
~ositionhigher.
Food
Bacon
GroundBeef
WellDone
Beef Steaks
Rare
Medium
Well Done
Rare
Medium
Well Done
Chicken 1whole
BakeryProducts
Bread(Toast)or
ToasterPastries
EnglishMuffins
ImbsterTails
to8-oz.each)
(6
Fish
HamS~ices
[precooked)
PorkChops
WellDone
Quantityandlor
Thickness
Ih-lb.(about8 c
thinslices)
l-lb.(4patties)
Y2 to %-in.thick c
l-inchthick
(1to1%-lbs.)
lfi-in. thick
(2to2Yz-lbs.) 3 15 14-16
(2to2fi-lbs.),
splitlengthwise
2to4 slices
1pkg.(2)
2(split) c
2-4 B
l-lb.filletsMto
‘A-in.thick
l-in.thick
i
]B
Shelf
Position
c
c
c
c
c
c
A
c
c
Variabie First Side Second Side
BroilRate
5
1 7
5 7
3 9 9
1
5
1
5
5
5 3-4
4 13-16
4
3
5
1 13 13
Time, Minutes
Y2 3% Arrangeinsinglelayer.
3
I
10
I
25 20-25
35 10-15 Reducetimesabout5to 10minutesper
1~-z
5 5 Handleandturnverycarefully.
8 8 Increasetimes5 to 10minutesper side
Time, Minutes
4-5 Upto 8pattiestakeaboutsametime.
7 Steakslessthan1inchcookthrough
13
I
7-8
I
‘/2
Donot
turnover. open. Brushwithm,eltedbutter
10 10 Slashfat.
Comments
Spaceevenly.
beforebrowning.Panfryingis
I recommended.
Slashfat,
I
sideforcut-upchicken.Brusheachside
withmeltedbutter.Broilwithskin
downfirstandbroilwithdoorclosed.
Spaceevenly,PlaceEnglishmuffins
cut-side-upandbrushwithbutter,if
desired.
Cutthroughbackofshell.Spread
beforeandafterhalftime.
Brushwithlemonbutterbeforeand
duringcookingifdesired.Preheat
broi!ertoincreasebrowning.
for lyz-inchthickor homecured.
I
1-
—
Lamb
chops
Medium
Well Done
Medium
Well Done
Wienersandsimilar
~recookcclsausages,
oratwurst
2(1 inch)
about10to 12oz.
2 (lMinch) c
about1 lb.
l-lb. pkg.(10)
.
—
———..
c
c
B
———
c
I
3
1
3
1 17
5
8 4-7
10
10 4-6
6 1-2 If desired,splitsausagesinhaif
10
12-14
Slashfat.
lengthwise;cutinto5to6-inchpieces.
18
Page 19

Rotisserie
.-
Food is cooked byrevolvingona
spitunde~the broilunit. Asfood
=--
turns,itbastesitselftoproducea
‘uccuientbrownandtenderroast.
l~eat tenderenoughforroasting
mayberotissed.
1. Assemblerotisserie.Insert
curvedendsofframeintolarge
holesofbroilerpanhandles.Lock
frameinplacebyfittingstraight
ends ofsupportinto holesincenter
handles.
Finishsecuringfoodonspitby
glidingsecond2-prongedforkonto
spitwithprongstowardfood.Tighten
screwsto a flatsurfaceonspit.
4. Insertspitintomotor:Grasp
handieonspit.Usingpointofspit,
movetoonesidethecoverover
motoroutletinrearofoven;push
spit firmlyintomotoroutletasfar
asitwillgo.Removehandle.
5. Checkrotationoffood.Tighten
oradjustforksifnecessary.During
cooking,forksmayneedtightening
dueto normalmeatshrinkage.
6. Asfoodcooks,leavedoorajarin
“Broil”position;doorstaysopen
byitself.
7.Bastefoodifdesired.Withpot
holders,pulloutpanandshelf
togethertoshelfstop.Attach
handletospit to revolvefoodby
handwhilebasting.Tocontinue
cookingpushshelfandbroilerpan
intooven,insertspitintomotor,
removehandle.
2. Securefoodonspit.When
securedcorrectly,foodwillbe
locatedincenterareaofspit
!eaving4 inchesfreeatthepointed
-———.-—.
..--—..
end(thispartgoesi~ltomotor).
3. Tosecurefoodonspit:Push
2-prongedforkontospitnear
ha~dle~nd.Tightenwithscrew.
Pushspitthroughfood(tiefood
securelyandcompactly),distributing
weightevenlyoneachsideofspit.
Tocheckweightdistributionon
spit,holdspit(andfood)between
hands,palmsup;spitshouldroll
smoothlyfrompalmstofingertips
whenpalmsaretippedforward.
4. Placespitonframesohandleend
isinnarrowsupport,andpointed
endisinwideU-shapedsupport.
RotissingtheFood
1. Putovenshelfinlowestposition
inoven.Withfoodon spit,place
spitonovenshelf.
2. The oventemperatureis
automaticallysetat400”F.See
approximaterotissingtimesand
meatthermometertemperatures ,
listedinRotisserieGuideonpage
20tohelpyougetfoodsjuicyand
done withoutoverbrowning.
3. TouchROTISSpadandthen
STARTpad. Thisstartsbroilunit
androtisseriemotoroperating.Spit
canbeinsertedandremovedmore
easilywhenmotorisoperating.
N~E: Nlakecertainwhentouching
spitthatnopartofbodyor pot
holdertouchescoilsofbroilunit.
Rotisserie Notes
@Donot useelectricmeat
thermometerwhileoperatingthe
rotisserie.Aregular,nonelectric
meatthermometermaybeused
whilerotissingprovidingit doesn’t
touchtheoven,frameor panwhile
meatrevolves.(Or,ifdesired,cook
toestimateddonenessthenpull
meatfromoventoinsertmeat
thermometer.Waitabout2 minutes
fortemperaturetoregister.Ifmeat
isnot done,removethermometer
andcontinuecookingif necessary.)
~If rotissingturkey,letstandin
warmoven10to20minutesafter
cookingtoassurejuicymeatand
completedoneness.
@Atendofcookingpulloutpan
andshelftogether,usingpot
holders.TouchCLEAR/OFFpad.
Removefoodfromspit. Coolpan
outsideoven;soakforksandscrews
foreasiestcleanup.
Page 20

RotisserieGuide
Food
Beef
RolledRib
Rare
Medium
Well Done
bmb
Leg,bonedand rolled
Pork, fresh
Loin
Spareribs(barbecued)
Spareribs(plain)
Pork, cured
Ham(picnic)
Cook-Before-Eatingbonein
FullyCooked
Poultry
Capon*(6-8lbs.)
Chicken*(2-3lbs.)
Chicken~(lfi-2 lbs.)
CornishHen*(1lb.)
Duckling*(4-5lbs.)
Turkey*(8-12lbs.j
Veal
Shoulder,bonedandrolled
%olo~na
Canadian Bacon
LuncheonMeat
(12-02.can)
Wieners,
large
Approximate
RotissingTime
Minutes Rr Lb.
19-23
22-27
24-29
20-22
20-25
30-35
30-35
13-15
10-13
18-25
20-25
48-62
45-60
15-21
14-20
30-33
18-20
20-23 160
15-20(totaltime)
10-15(totaltime)
Meat
Thermometer
Temperatures
130-140
150-160
170-185
175-185
170-195
160
130
185-190
t
T
t
185-190
180-185
180
130
140
140
GeneralDirections
N~E: 1,ForroastsOVER10pounds,cookabout1/2
estimatedtime,thencheckat 1/2hourintervalswithmeat
thermometerforinternaldoneness.
2.Thinroasts,3to4pounds,mayrequireslightlylonger
timesperpoundthanthosegivenonguide.
175
formedium,
185forwelldone.
Buyribssplitdowncenter.Threadonspit.Tobarbecue,
brushwithsauceevery15minutes.
Brushwithmeltedbutteror margarine,bastingor
barbecuesauceseveral timesduringcooking.
Sameasabove.
Ifdesiti, thread4to5 ofthissizechickencrosswiseon
spit.Letrevolvetowithin1/2,hourofdonenesstime,then
brushevery10minuteswithbarbecllesauce.
Brushwithbutter,orbutterandlemonjuicemixed.
Threadhenson
Spiteitherlengthwiseorcrosswise.
Do notbrushwithfat.
Cookwithoutbrushingwithfat,orbmshwithbutteror
margarineasdesired.Men cooked,pressCLEAR/OFF
pad,closedoor,letturkeystand10to20minute;IN
OVEN.Removefromovenandcarve.
Brushwithsauceifdesired.
‘“w
~Onsmallpotdtry,testdonenessbymovingleggentlybackandforth,andpresslegmuscletobecertainitissoft.
*ReadY-to_cookweight.~MpORTAN~Tielegsandwingsclosetobodytomakedonenessofbirdasuniformas
possible.Alltimesgivenareforunstuffedbirds.
NOTE:Spillageofmarinades,fruitjuices,tomatosaucesand bastingmaterialscontainingacidsmaycausediscolorationonovenlinerordoorsoshouldbewiped
up immediatelywitha papertowel.Whensurfaceiscool,cleanandrinse.
Page 21

operatingthe self-cleaningoven
-—.—
—––.=
“-—.-.———
step 1:
Removebroilerpan,broilerrack
and othercookwarefromtheoven.
(Oven shelvesmaybe leftinoven.
Note:Shelveswilldiscolorafter
theself-cleancycle.)
step 2:
Wipeupheavysoilonoven
bottom.
c
0
A
oven Front Frame
oven DoorGasket
B4
openings in Door
c.
RotisserieReceptacle
D=
oven Light
E.
step 3:
Cleanspattersor spillsonoven
frontframe(,4)andovendoor
outsidegasket(B)withadampened
cloth.Polishwitha dry cloth.Do
not cleangasket(B),Do notallow
watertorundownthroughopenings
intopofdoor(C). Neverusea
commercialovencleanerinor
aroundself-cleaningoven.
ste~ 4:
Cioserotisseriereceptacle(D)
‘whenself-cleaningtheupperoven.
step 5:
Closeovendoorandmakesure
{>venlight(E)isoff.
TosetYouroven
self-cleaning
for
k
HI
step 1:
TouchtheCLEANpad. Display
shows“CLEAN”andflashing
indicatorpointstoDOORLATCH.
Ifdooris notlatchedwithin15
seconds,displayrevertsto“OFF”
andyouhavetostartover.
step 2:
Movedoorlatchallthewaytothe
right as far as itwillgo.
(Iftemperatureprobeisaccidentally
leftpluggedintotheovenreceptacle,
displayshows“PROB”untilyou
removeit. TouchCLBAR/OFFpad,
unlatchdoorandremoveprobe.
Repeatsteps1and2 to reset.)
45
step 3:
TotBch$~ARTto begineieaning
immediately.Cleaningcycletakes
threehoursandDisplayPanelshows
StopTime.
Tochangecleaning
littleas 1%hoursorasmuchas4
time toas
Y2
hours,don’ttouchSTARTpadyet.
@First,touchBAKETIMEpad.
@Next,touchNumberPadstoenter
thecleaningtime,Forexample,to
enter2YZhours,touchpads2, 3
andO.
@NowtouchSTARTtobegin
cleaningimmediately.StopTimeis
calculatedanddisplayeduntil
cleaningends.
Note:Youmightsmella slight
odor,especiallyduringthefirstfew
cleanings.Thisisnormalduring
theself-cleaningcycleandisno
causeforalarm.
Whencleaningtemperatureis
reached,theIndicatorLightpoints
toOVENLOCKEDandthedoor
cannotbeunlatched.
step4:
Whencleaningis done,theoven
turnsoffautomatically.Whenit
coolsdown,whichtakesabout30
minutes,theOVENLOCKED
lightgoesoutandthedoorcanbe
opened.Unlatchthe doorbymoving
ittothe leftas farasit willgo.
Displayshowstimeofday.
To delay startofcleaning:
{I
TouchCLEANpadandlatchdoor. =–
~ --
—.
-%-–
-
..---—.--..
-
.-.-.—.—
-
-
—:
—..-
““.;
21
Page 22

step 2:
——
ThintouchS~P TIMEpad.Display
shows“CLEAN”andflashing
indicatorpointstoStopTime.
step 3:
Us: numberpadstoenterdesired
StopTime.(You mayenterany
timenotmorethan11hoursand59
minutesandnotlessthan3 hours
fromthecurrenttimeofday.)
step 4:
TouchSTARTpadandtheoven
calculatesthe properStartTime
andStopTimeuntilcleaning
begins.ThenonIyStopTimeis
shown.
Whencleaningisdone,theoven
turnsoffautomatically.Step4 on
page21tellsyouwhenandhow to
openthedoor.
QuestiomandAmwers
Q’.why won’tmyovenstart
clea~ningeven thoughI’ve setall
the
ControlsCorrectiy?
A. Checktobesurethedisplay
showsthecorrecttimeofday.Also
checkto be suretheovenlatchis
closedsecurelyandyouhave
touchedthe STARTpad.
Q. IftHledisplaydoesnot show
the time ofday,CanI stillselfCleanmyoven?
A. No.Youmustsetyourclock.
Timeofdaymustbeshowinginthe
displaybecausetheclockstartsand
stopstheself-cleaningcycle.
Q. why can’tI latch the Oven
door to s~rt the self-cleancycle
eventhowghI’vetouchedthe
CLEANpad?
A. Theelectroniccontrolwillnot
letyousetup thecleancyclewhen
theovenishotterthan500°F.Let
theovencoolandtry again.
Q. what should I do if excessive
smokingoccursduringcieaning?
A. Excessivegreaseis thecause.
TouchtheCLEAR/OFFpad.Open
windowsanddoorstoridtheroom
ofsmoke.Lettheovencool for at
leastonehourbeforeopeningthe
door.Unlatchdoor,wipeupexcess
greaseandresetthecleaningcycle.
Q. 1sthe “crackling” sound1
hearduringcleaningnormal?
A. Yes.Metalheatingandcooling
duringcookingandcleaning
functionsmakesthissound.
Q. Whatcausesthehair-like
linesonthe
my oven?
Heatingandcoolingduring
A.
cleaning.It’scommon.Thehair-
likelinesdon’taffectyouroven’s
performance.
Q. why do I haveash left in my
ovenafter cleaning?
A. Sometypes ofsoilleavea
depositofash. Youcanremoveit
withadampspongeor cloth.
enameled surface of
Q. My ovenshelvesdo notslide =
easily.What)s the Bnatter?
--
A. Aftercleaning,ovenshelves
maybesocleanthattheywillnot
slideeasily.
They will again ifYOU
dampenyour fingertipswithalittle
cookingoilandrublightlyoverthe
sidesoftheshelf.
IQ.My ovenshelves havebecome
grayaftertheself-cleancycle.Is
thisnormal?
A. Yes.Aftertheself-cleancycle,
theshelvesmaylosesomeluster
anddiscolortoadeepgraycolor.
Q. CanIstOp anovencieaning
cycleaftercleaninghasbegun?
A. Yes,butyouwon’tbeable
toopenthedooruntiltheoven
coolstoa safetemperature.Touch
CLEAR/OFFpadtocancelthe
cleaningcycle.WhenDoorLocked
indicatorlightgoesout, unlatch
thedoor.
Q. If the insideofmyovendoor
issoiled,willit becleanedduring --
-..
thecleaningcycle?
--
A. Yes.Theraisedsectionofthe
ovendoorinsidethegasketwillbe
cleanedautomatically.Thearea
outsidetheovengasketmustbe
cleanedbyhandas describedin the
CleaningGuideonpage24.
Q. WhywouldIwanttosetmy
oventostirt cleaningatalater
timeof day?
A. Someutilitycompaniesoffer
lowerratesattimeswhenelectrical
consumptionislowest.Sincethese
timesoftenoccurlateat night,you
cm setyourovenbeforegoingtobed
socleaningisdonewtie yousleep.
Q. After interruptingthe self-
cIeaning cyeBein the middle~ I let
the oven COOIbut still eannOt set
seIf-cleancycleagain.Why?
the
A. Youmustudatch thedoor,touch
theCLEANpad,latchthe do~rand
tot]chthe STARTpadbeforethe
self-cleancyclestartsagain.
22
Page 23

careand cleaning
Propercareandcleaning
proceduresareessentialfora
longandsatisfactorylifeforyour
oven=Includedinthissectionare
directionsanda CleaaingGuide
(onnextpage)forcleaningall pafis
oftheoven.Whencleaninganoven
manually,wearingofrubbergloves
isrecomnlendedtoprotectthe.
hands.
Theporcelainenamelfinishis
essentiallyglassfusedon steelat
hightemperatureandisbreakable
ifmisused.Thisfinishisacidresistant.However,anyacidfoods
spilled(suchaslemonor other
citrusfruitjuices,ormixtures
containingtomatoorvinegar)
shouldbewipedupimmediately.
Seeguideforcleaningsuggestions.
Lmp Replacement
Toremove:
@Holdhandunder coversoit
doesn’tfallwhenreleased.With
fingersofsamehand,firdy push
backwirebailuntil it clearscover.
Lifioffcover.DON~ REMOVE
ANYSCREWS~ REMOVE
COVER.
Replacebulbwith40-watthome
@
appliancebulb.
ToreplaceCover:
@Placeitintogrooveoflamp
receptacle.Pullwirebailforward
tocenterofcoveruntilitsnapsinto
place.Wheninplace,wireholds
coverfimly. Becertainwirebailis
indepressionincenterofcover.
@Connectelectricpowertooven.
—.
—.
-
-
-
-
CAUTION: BEFORE
REPLACINGOVENLAMP
BULB,DIscoNNEm ELEmmc
POmR m OWN ATT~ Mm
FUSEORCIRCUITBREAKER
PANEL.LETLAMP(ORBULB)
AJ?lDLAMPCOVERCOOL
COMPLETELY.
Theovenlamp(bulb)iscovered
withaglassremovablecoverwhich
isheldinplacewitha bail-shaped
wire.
—.
23
Page 24

CleaningGuide
Note:tit ovenpartscool beforetouchingor handling.
nrt
Bake Unit and
Broil unit
Broiler WIIand Rack
—
Control
Outside Finish
Glass
Metal,including
Chrome
PorcelainEnamel*
InsideOven
Panel
Door*
Materials to Use
@
Soapand Water
@Soap-Filled Scouring Pad
@Plastic Scouring Pad
General Directions
Do not clean the bake unit or broil unit. Any soil will burn off when the unit is
heated. N~E: The bake unit is hingedand can be lifted gently to clean the oven
floor. If spillover, residue, or ash accumulates around the bake unit, gently wipe
aroundthe unit withwarm water.
Drain fat, cool pan and rack slightly.(Do not let soiled pan and rack stand in ovento
cool.) Sprinkle ondetergent. Fill the pan with warm water and spread cloth or paper
toweloverthe rack. Let pan and rack stand for a few minutes. Wash;
scourif
necessary.Rinseanddry.OPTION:Thebroilerpanandrackmayalsobecleanedin
adishwasher.
DampCloth
@
Wipewithdampclothtoremovesoil.Donotwipewhenovenis inuse.Donotuse
@PaperTowel abrasives,suchascleaningpowdersorsteelorplasticballs.Theywillmarsurface.
@SoapandWater
Washallglasswithclothdampenedinsoapywater.Rinseandpolishwithadry
cloth.
~SoapandWater
Wash,rinse,andthenpolishwithadrycloth.DONOTUSEsteelwool,abrasives,
ammonia,acids,or commercialovencleanerswhichmaydamagethefinish.
@PaperTowel
~Dry Cloth
@SoapandWater
Avoidcleaningpowdersorharshabrasiveswhichmayscratchtheenamel.Ifacids
shouldspillintheovenwhileit ishot,useadrypapertowelorclothtowipeupright
away.Whenthesurfacehascooled,washandrinse.For otherspills,suchas fat
smatterings,etc.,
washwithsoapandwaterwhencooledandthenrinse.Polishwith
adry cloth.
Soapand Water
@
Clean ONLY the door liner outside the gasket. Door is automatically cleaned
when
ovenisinself-cleaningcycle.Ifspilloverorspatteringoccurswhencooking,wipe
doorwithsoapandwater.DONOTrubordamagegasket.Avoidgettingsoapand
wateron gasketorin slotsondoor.
Oven
Oven
Gasket*
Liner*
@
SoapandWater
AvoidgettingANYcleaningmaterialsonthegasket.
Coo!beforecleaning.Frequentwipingwithmildsoapandwaterwillprolongthe
timebetweenmajorcleanings.Besuretorinsethoroughly.Forheavysoiling,use
yourself-cleaningcycleoften.
CAUTION:Wheninuse,alightbulbcanbecomewarmenoughtobreakiftouchedwithmoistcloth
ortowel,Whencleaning,avoidwarmlampwithcleaningclothsiflampcoverisremoved,
Shelves
(SeeSelf-Cleaning
~SoapandWater
Yourshelvescanbecleanedintheovenwiththeself-cleaningoperation.Forheavy
soil,cleanbyhandandrinsethoroughly.
OvenDirections)
‘11’hermometer
Meat
@SoapandWater
*Soap-FilledScouringPad
Rotisserie
Spit,Forks
Screws,Frame
‘fiSpillageof marinades, fruitjuices, and basting materials containing acids maycause discoloration. Spilloversshould bewipedupimmediately,
@Soapand~dter Soakinhot,sudsywater;scourto removecooked-onfoodorsauces;wash.
@CommercialOvenCleaner
Coolbeforecleaning.DONOTlMMERSEINWATER.
soap-filledscouringpad,rinseanddry.DON~ S~RE INOVEN.
Scourstubbornspotswith
withcarebeingtakentonottouchanyhotportionof the oven.Whenthe surfaceiscool,cleanand rinse.
24
Page 25

—-.
—-—-
-—
POSSIBLE CAUSE ANDREMEDY
OVENWILL
NOTOPERATE
OVENLIGHT
DOESNOTWORK
ELEHRONIC
TOUCHPADS
WILLNOTWORK
ELE~RONIC
DISPLAYPANEL
GOESBLANK
ORBLINKS
FOODDOESNOT
BROILPROPERLY
@Difficultymaybe irithemaindistributionpanel ofyourhousebya blownoven
circuitfuse,a trippedovencircuitbreaker,themainfuseor themaincircuitbreaker,
dependingonnatureofthe powersupply.If acircuitbreakerisinvolved,resetit. If the
controlboxusesfuses,theovenfuse(acartridge-type)shouldbechangedBUTONLY
BYSOMEONEFAMILIARWITHELE~RICAL CIRCUITS.If afterdoingoneof
theseprocedures,thefuseblowsorcircuitbreakertripsagain,callforservice.
NOTE:Apartmenttenantsorcondominiumownersshouldrequesttheirbuilding
managementtoperformthischeckbeforecallingforservice.
@Ovencontrolsnotproperlyset.
@Doorleft in locked positionaftercleaning.
@Lightbulb is looseorbulbisburnedout.
@Clocknotset.TouchCLOCKpadandentertimeondisplaypanel.
@Ifitcannotberesetbytouchingpads,electricalservicetoyourresidencehascaused
interferencesignalsonthemainpowerline.Disconnectyourovenatthemainfuseor
circuitbreakerpanel.Waitoneminuteandreconnectpower.Resetclockondisplay
panel.
@BROILandSTARTpadsnottouched.
*If usinga lowerbroilrate,thecorrectsettingfromLOto HI wasnottouched
afterBROIL.
@ProbenotfullyinsertedintotheovenreceptacleorfoodwhenusingFOODTEMPpad.
@Impropershelfpositionisbeingused.
@Foodisbeing cookedonahotpan.
@Utensilsarenotsuitedforbroiling.
@Aluminumfoilusedonthebroil rackhasnotbeenfittedproperlyandslit.
FOODDOESNOT
ROASTPROPERLY
FOOD DOESNOT
BAKEPROPERLY
*BAKEandSTARTpadsnottouched.
@Oventemperaturenotsetcorrectly.Incorrectnumberpadstouched.
@Probenotfilly insertedintotheovenreceptacleor foodwhenusingFOODTEMPpad.
@Shelfpositionisincorrect.CheckRoastingGuide.
@Roastingpanistoosmall.
@Impropercookwareisbeingused.
@Afoil tentwasnotusedwhenneededtoslowdownbrowning.
BAKEandSTARTpads nottouched.
Ovenshelfis notlevel.
Shelfpositionisincorrect.CheckBakingGuide,
Thewrongcookwareisbeingused.
Temperaturesettingisincorrect.
25
Page 26

OVENWILLNOT
SELF-CLEAN
POSSIBLE CAUSEANDREMEDY
@
Oventoohot to acceptcleaninginstruction.
@
LatchisnotinCLEANposition.
@
Excessivespills,spatters,andsoildepositsarenotbeingcleaneduppriorto
self--cleaning.
@CLEANpadnot touched.
@ST.ARTpadnottouched.
OVENWON’T
UNLOCK
@Ovenhasn’tcooledtoa safete~nperature.
GEAnswer Center”
800.626.2000
consumerinfornlationservice
26
Page 27

AGE Consumer Service professional
—
wil]provide expert repair service,
- scheduled at a time that’s convenient
= for you. Many GE Consumer Service
:orn~a~~--operated locations offer you
= service today or tomorrow, or at your
convenience (700 a.m. to 700 p.m.
}~~eekdays,9:00 a.m. to 2:00 p.m. Saturdays).Our factory-trained technicians
know your appliance inside and out—
so most repairs can be handled in just
one visit.
Whatever your cluestion about any GE
m~or appliance, GE Answer Cente@
information service is available to
help. Your call-and your question—
will be answered promptly and
courteously And you can call any
time. GE hswer CenteP service is
open 24 hours a day 7 days a week.
Youcanhavethe securefeelingthat
GEConsumerServicewillstillbe
thereafteryourwarrantyexpires.PurchaseaGEcontractwhileyourwarrantyisstillineffectandyou’llreceive
a substantialdiscount.Withamultiple
yearcontract,you’reassuredoffi~lre
serviceat today’sprices.
Telecommunication Detice for the Deti
hditidu* qumled to sefice thek
ow appliances
parts or accessories sent direcdy to
home,freeofshippingcharge!
their
canhave needed
TheGEpartssystemprovidesaccess
toover47,000parts...anddl GE
GenuineRenewalPartsarefully
wawanted.WSA,MasteXardand
Discovercardsareaccepted.
user maintenanceinstmdiorns
eontied h *is booMetcoverprocedws ~ntendedtobepetiomed by
anyiilse!r.other Seticimggeneray
shouldhe refereedtoquaawledsen””
tice pemonnel.Cauutionmustbe
exercised,sinceimproperSeticing
maycauseUmstieOpemtion.
Uponrequest,GEwfllprovideBraille
controlsforavarietyofGEappliances,
andabrochuretoassistin planninga
barrier-freekitchenforpersonswith
limitedmobility,Toobtaintheseitems,
freeofcharge,cdl 800.626.2000.
Co~lsumerswithimpairedhearing
or speechwhohaveaccesstoaTDD
or aconventionalteletypewritermay
cdl 800-T’DD-GmC(800-833-4322)
torequestinformationor service,
Page 28

Saveproof of original purchase date such as your sales slip or cancelled check to establish warranty period.
WHATisCOVERED
YOURGE ELECTRICRANGE
WARRANTY
IFULLONE-YEARWARRANTY
Forone year from date of original
purchase,we will provide,free of
charge, parts and service labor
inyour home to repair or replace
anypart of the
becauseof a manufacturing defect.
rangethat fails
This
the original ~urchasei’andany
succeeding owner for products
purchased for ordinary home use
inthe 48 mainland states, Hawaii
andWashington, D.C.In Alaskathe
warranty is the same exceptthat it is
shipthe product to the service shop
orfor the service technician’s travel
coststo your home.
All warranty service will be provided
byour FactoryService Centersor
byour authorized Customer Care”
servicersduring normalworking
of your telephone directory for
GENERAL ELECTRICCOMPANY,
GENERAL ELECTRICFACTORY
warranty is extendedto
LIMITED because you must payto
hours.
Lookinthe White or Yellow Pages
SERVICE, GENERAL ELECTRICHOTPOINTFACTORYSERVICEor
GENERAL ELECTRICCUSTOMER
CARE@SERVICE.
WHAT!s NOTCOVERED
Some states do not allow the exclusion or limitation of incidental or consequential damages, so the above limitation or exclusion
may not apply to you. This warranty gives you specific legal rights, and you may also have other rights which vary from stateto state.
Toknow what your legal rights are in your state, consult your local or state consumer affairs office or your state’sAttorney General.
~ Servicetrips to your home to
teach you howto usethe product.
Readyour Useand Care material.
If you then haveanyquestions
about operating the product,
please contact your dealer or our
Consumer Affairs office at the
address below,or call, toll free:
GE Answer Center”
800.626.2000
consumer information service
~ improper installation.
if you have an installation problem,
contact your dealer or installer.
Youareresponsible for providing
adequateelectrical, gas,exhausting
and other connecting facilities.
warrantor: Genera! Electric
company
Iffurtherhelp is neededconcerningthis
Manager—consumer Affairs, GEAppliances, Louisville, KY 40225
——
@Replacement of housefuses or
resetting of circuit breakers.
@Failureof the product if it is used
for other than its intended purpose
or used commercially.
@Damage to product caused
byaccident, fire, floods or acts
of God.
WARRANTORISNOTRESPONSIBLE
FORCONSEQUENTIAL DAMAGES.
warranty, write:
Part No. 164D2092P158
——..
~]ljb, h]o. 49-8119
CG
6-90
——
1
d
 Loading...