

Page 1
www.6EApp#ances.com
Safety Instructions ......... 3-5
©
E
Operating Instructions
Clock and Timer ............ 19
Proofing ................... 90
Sabbath Feature ............. 9
Thermostat ................ 91
Timed Baking
and Roasting ......... 1,9,, 18, 19
Using the Oven ........... 6-93
Care and Cleaning
Broiler Pan and Grid ......... 95
Control Panel .............. 95
Lift-Off Oven Door . ......... 94
I Jgh t Bulb ................. 97
Oven Floor . ............... 95
Probe ..................... 96
Removing Packaging Tape .... 93
Stainless Smel Surfaces ....... 98
Self-Cleaning Oven ....... 99, 93
Shelves .................... 96
Troubleshooting Tips ..... 30-39
jIKl'18
jIKl'55
.pr,56
Consumer Support
Consumer Support .... Back Co_er
Product Registration ...... 33, 34
Warranty .................. 35
Write themodelandserial
numbershere:
Model #
Serial #
You can find thenI oil a label
oil tile fl'ont of tile oven behind
tile oven door oil single ()veil
models, or tile fl'ont of tile lower
()veil behind tile ()veil dooI" on
double ()veil n/odels.
Page 2
READALLINSTRUCTIONSBEFOREUSING.
WARNING!
For your safe_ the information in this manual must be followed to minimize the risk of fire or
explosion, electric shock, or to prevent property damage, personal injury, or loss of life.
IMPORTANTSAFETYNOTICE
The California Safe Drinking Water and ToxicEnforcement Act requires the Governor of Cafifomia
to publish a list of substances known to the state to cause cancer, birth defects or other reproductive
harm, andrequires businesses to warn customers of potential exposure to such substances.
The fiberglass insulation in self-clean ovens gives off a very small amount of carbon monoxide during
the cleaning cycle. Exposure can be minimized by venting with an open window or using a ventilation
fan or hood.
2
Page 3
www.GEAppliances.com
SAFETYPRECAUTIONS
When using electrical appliances, basic safety precautions should be followed, including the
following:
Use this appliance only for its intended
i)m])ose as described ill this Owner's
Manual.
Be sure your appliance is properly
installed and grounded by a qualified
mchnician in accordance with tile
provided installation insuucdons.
Do not atmmpt to repair or replace any
part of your oxen unless it is specifically
recommended in this manual. All other
servicing should be refetxed m a qualified
mchnician.
Have the installer show you the location
of the citvuit breaker or fl_se. Mark it for
east' reference.
Before perfot_ning any service, disconnect
tile oven power supply at the household
distribution panel by removing the fl_se or
switching off the circuit breaken
Do not leax> children alone--<hildren
should not be left alone or unattended in
an area where all appliance is ill use. They
should nex>r be allowed to sit or stand on
ally' part of the appliance.
Do not allow anyone to climb, stand or
hang on the door They could damag_ the
oxen, or cause severe personal iIIju U.
Be sure tile oxen is securely installed in
a cabinet fllat is firmly attached to the
house structme. Never allow anyone to
climb, sit, stand or hang on the oxen door
Nexer leave tile oven door open when you
are not watching rite oven.
Always kee I) combustible wall coxering,
curtains or drapes a sat) distance flom
yo/lr oven.
Alwws kee I) dish towels, dish clod, s, pot
holders and other linens a safe distance
froll/VO/lI" oxen.
Always kee I) wooden and plastic umnsils
and canned food a safe distance away flom
your oven.
Teach children not m play with the
controls or ally' other part of the oven.
Larg_ scratches or impacts m glass doors
can lead m broken or shatmred glass.
3
Page 4
READALLINSTRUCTIONSBEFOREUSING.
WARNING!
SAFETYPRECAUTIONS
Do not store flammable materials in
an oxen.
CAUT/Om: Itemsofi.terestto
children should not be stored in cabinets
aboxe an oxen; children climbing on the
oxen to reach items could be seriously
injured.
Nexer wear loose-fitting or hanging
garments while using the appliance. Be
careflfl when reaching fox imms stored in
cabinets over the oven. Flammable mamfial
could be ignited if brougixt in corrtact with
hot smPaces or heating elements arm m W
cause sex.ere bllrlls,
Use only d U pot holders--moist or damp
pot holders on hot surfaces may result in
burns flom smam. Do not let pot holders
touch hot heating elements. Do not use a
towel or other bulky cloth.
For your safety, hexer use your appliance
fox wanning or heating the room.
Do not let cooking gTease or other
flammable materials accumulate in or near
tlle oxen.
Do not use water on glease fires. Nexer pick
up a flaming pan. Turn the corrtrols off.
Flame in the oven can be smothered
completely by closing tile oxen door arm
turning the oven off or by using a muhi-
purpose d U chemical or foam-type fire
extinguishen
Do not touch flxe heating elements or fire
irrmfior smihce of fire ox.en. These surfaces
may be hot enougix to burn even thougir
drey are dark in color. During and after
use, do not touch, or let clothing or oflxer
flammable materials corrtact arty interior
area of the ox.en; allow sufficient time for
cooling frst.
Potentially hot smihces include oxen xent
openings, surfaces near the openings,
crevices around tire oxen doox, tire edges
of tire window arm metal trim parts aboxe
the door
REMEMBER:Tile irrside surface of tire oxen
4
may be hot when the door is opened.
Nexer lemejars or cans of fat drippings in
or near Your oven.
Do not store or use combustible mamfials,
gasoline or other flammable vapors and
liquids in the vicinity of this or arty other
appliance.
Stand away flom the oxen when opening
the oxen door Hot air or steam which
escapes can cause bums to hands, lace
arM/or eyes.
Do not heat unopened food containers.
Pressure could build up and the corrtainer
could burst, causing an injury.
Kee I) the oxen xent unobstructed.
Kee I) the oven flee flom gTease buildup.
Place tile oxen shelf in the desired position
while the oxen is cool. If shelxes must be
handled when hot, do not let pot holder
corrtact the heating elements.
When using cooking or roasting bags in tire
oxen, follow the manufacturer's directions.
Pulling out tire shelf to tire stop-lock is a
corrxenience in lifting heax y foods. It is also
a precaution against burns from touching
hot suliaces of the door or oven walls.
Do not use tlre oxen to dU newspapers.
If oxerheated, they can catch on fire.
Do not use tlle oxen fox a storage area.
hems stored in an oxen can ignite,
Do not ]eme paper products, cooking
utensils or food in the oxen when not
in use.
After broiling, always take the broiler pan
out of tire oxen arm clean it. I,eftoxer
grease ira the broiler pan can catch fire
next time you use the pan.
Clean only parts listed in this Owner's
Manual.
Do not use aluminum foil to line oxen
bottoms, except as suggested in this manual.
hnproper irrstallation of aluminum foil may
resuh in a risk of electric shock or fire.
Page 5
www.GEAppliances.com
COOKMEATANDPOULTRYTHOROUGHLY...
Cookmeat andpoultrythoroughly--meat to atleastan INTERNALtemperatureof 160°Eandpoultry
toat leastanINTERNALtemperatureof 180°ECookingto thesetemperaturesusuallyprotectsagabst
foodbomeillness.
SELF-CLEANINGOVEN
Do not clean the door gasket. The door
gasket is essential tbr a g_od seal. Care
should be token riot to rub, damage or
moxe the gasket.
Do riot use oxen cleaners. No commercial
oven cleaner or oven liner promcfixe
coating of any kind should be used in or
around any part of die oxen. Residue flom
oven cleaners will damage the inside of the
oxen when the selt:<lean Q'cle is used.
Before self-cleaning die oxen, remoxe die
broiler pan, gdd arid other cookware.
Be sure to wipe up excess spillage before
starting the self-cleaning operation.
If the self-cleaning mode malflmcuons,
turn the oxen off" arid disconnect the power
supply. Haxe it serviced by a qualified
mchnician.
READANDFOLLOWTHISSAFETYINFORMATIONCAREFULLY.
SAVETHESEINSTRUCTIONS
5
Page 6
Usingthe ovencontrols.
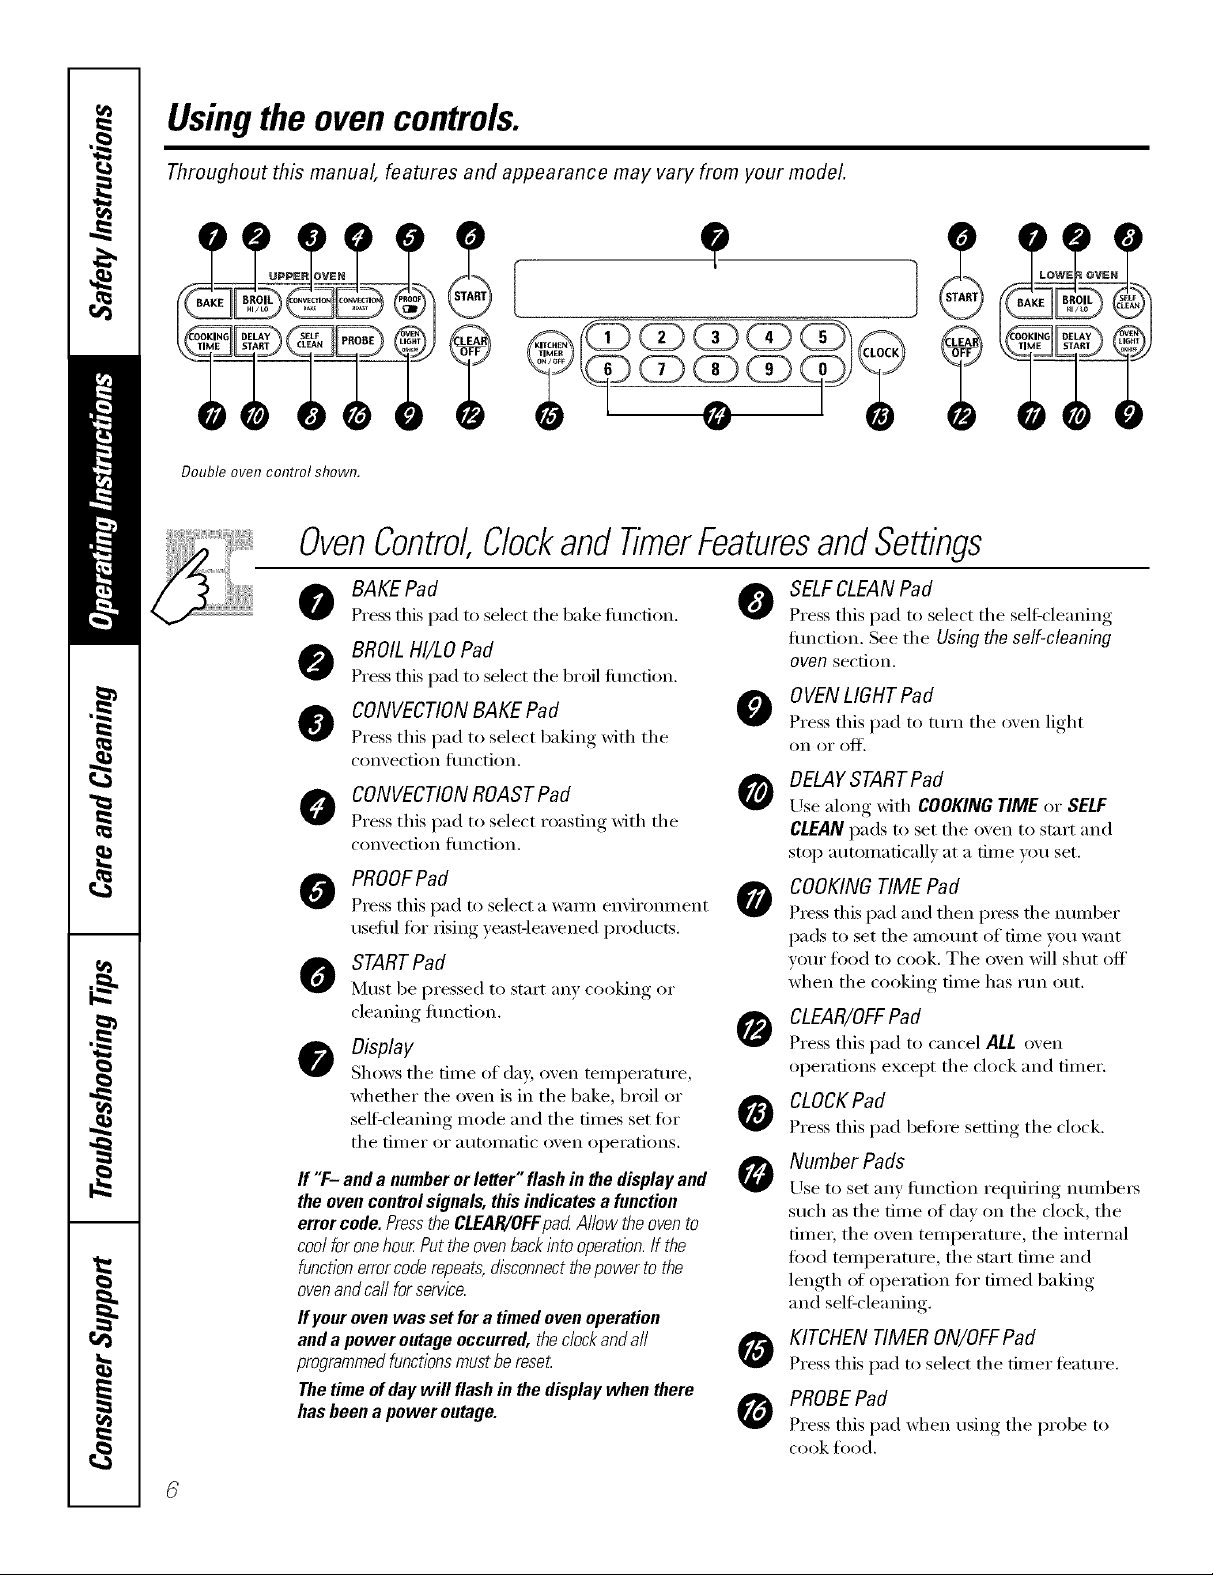
Throughout this manual, features and appearance may vary from your model.
Double oven control shown.
OvenControl,Clockand TimerFeaturesandSettings
BAKE Pad
Press this pad to select the bake flmcfion.
BROIL HI/LO Pad
Press this pad to select the broil fimction.
CONVECTIONBAKE Pad
Press this pad to select baking with the
con'_ ection tilnction.
CONVECTIONROASTPad
Press this pad to select roasting with the
con'_ ection tilnction.
PROOFPad
Press this pad to select a wa m_ enxir_mm ent
usefifl for rising )east-leaxened i)roducts.
STARTPad
]V]tlStbe pressed to start any cooking or
cleaning flmcfion.
Display
Shows the time of da)', oven temperature,
whether the oven is in the bake, broil or
selfXcleaning mode and the times set for
the [iI//eI" oi" atltOi//a[ic (Well operations.
If "F- anda numberorletter"flashinthedisplayand
theovencontrolsignals,thisindicatesa function
errorcode.Pressthe CLEAR/OFFpad Allowtheovento
coolforonehourPuttheovenbackintooperation.If the
functionerrorcoderepeats,disconnectthepowertothe
ovenandcarlforservice.
If your oven was set for a timed oven operation
and a power outage occurred, theclock and aft
programmedfunctionsmust be reseL
The time of day will flash in the display when there
has been a power outage.
SELFCLEANPad
0
Press this pad to select the self_'leaning
flmction. See the Using the self-cleaning
oven section.
OVENLIGHT Pad
Press this pad to turn the o_en light
on oi" OlC[]
DELAYSTART Pad
Use along with COOKINGTIME or SELF
CLEANpads to set the oven to start and
stop automatically at a time you set.
COOKINGTIME Pad
0
Press this pad and then pI'eSS the ntllllbeI"
pads to set the ai]/otlnt of time you want
your food to cook. The oven will shut off
when the cooking time has run ()tit.
CLEAR/OFFPad
Press this pad to cancel ALL oven
operations except the clock and timer.
CLOCKPad
Press this pad before setting the clock.
Number Pads
Use to set any fimcfion re(ltfi_Jng nt]mbe_
such as the time of day on the clock, the
timer, the oven temperature, the internal
food temperature, the start time and
length of operation for timed baking
and self-cleaning.
KITCHEN TIMER ON/OFFPad
Press this pad to select the timer feature.
PROBEPad
0
Press this pad when using the probe to
cook ti)od.
Page 7
Special features ofyourovencontrol, www.GEAppliances.com
Yournew touch pad control has additional features that you may choose to use. The following are the features
and how you may activate them.
Thespecial feature modes can only be activated while the display is showing the time of day. They remain in
the control's memory until the steps are repeated.
When the display shows your choice, press the STARTpad. Thespecial features will remain in memory after
a powerfailure, exceptforthe Sabbath feature, which willhave to be reseL
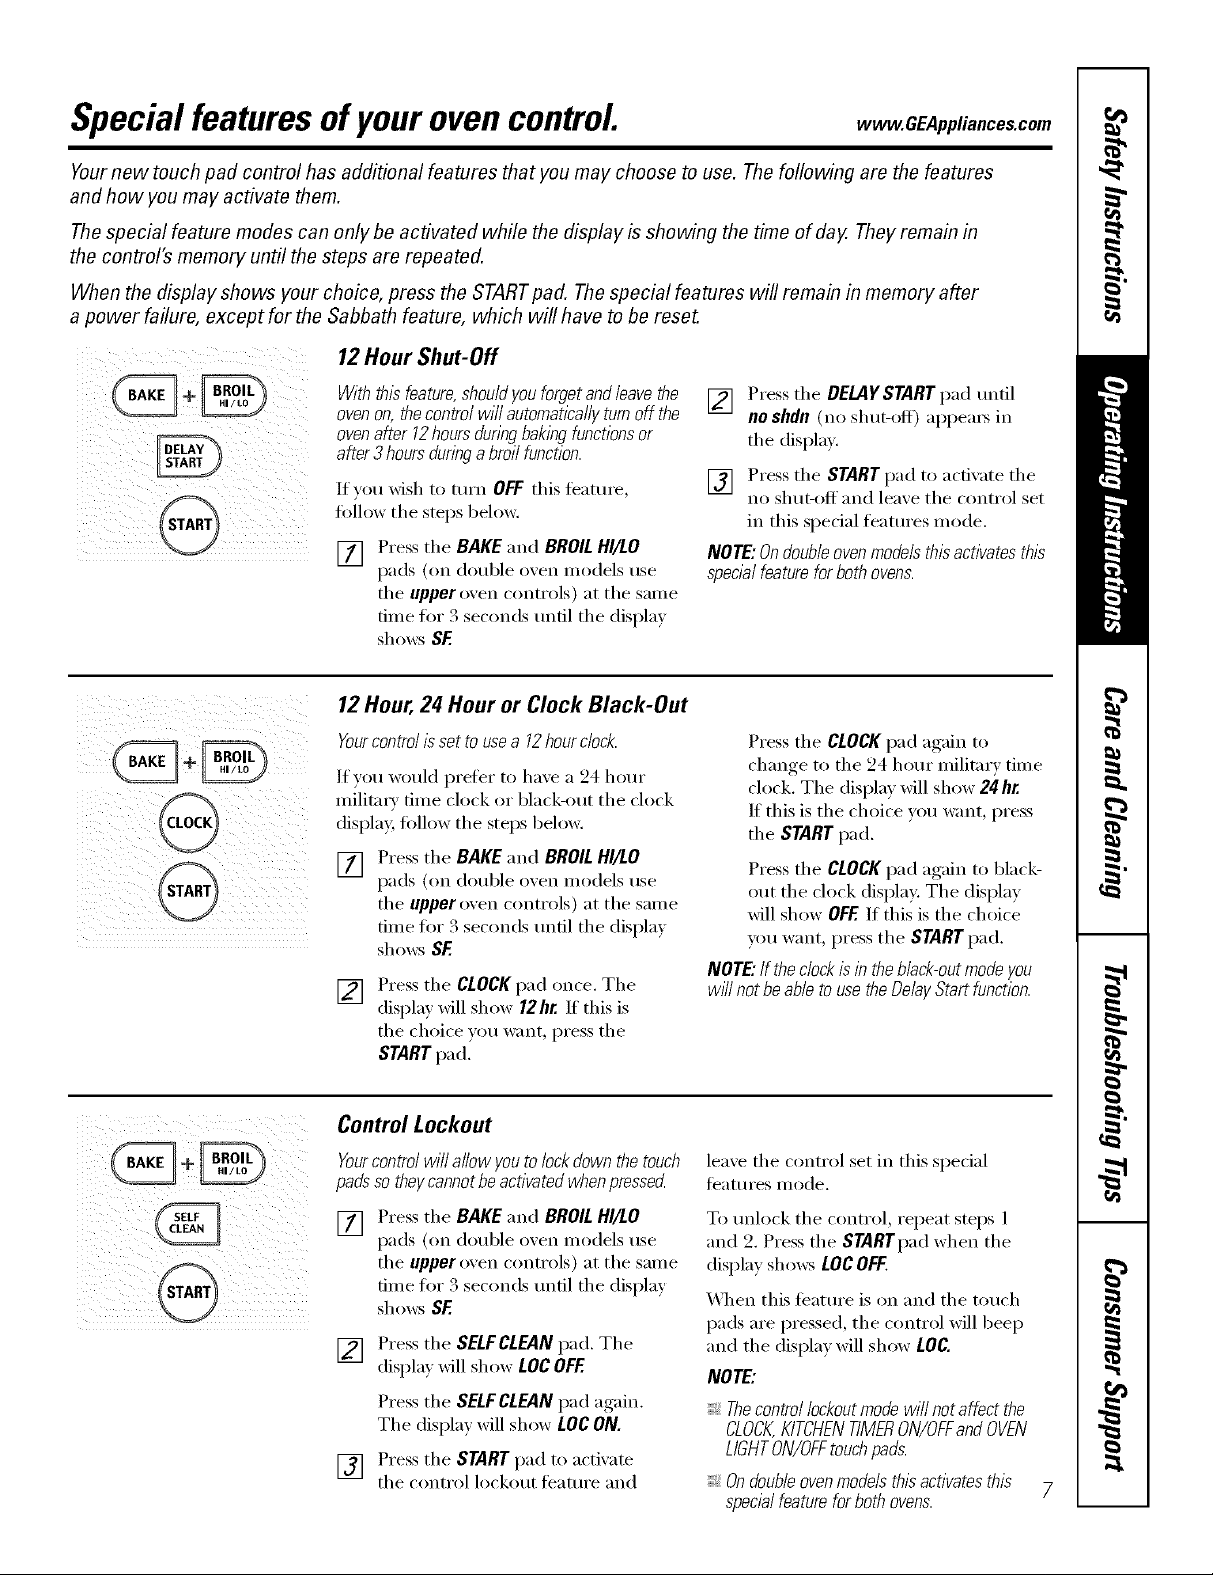
12 Hour Shut-Off
Withthisfeature,shouldyouforgetandleavethe
ovenon,thecontrolwillautomaticallyturnoff the
ovenafter 12hoursdunbgbakingfunctionsor
after3hoursduringa broilfunction.
If you wish to mrn OFF this teature,
follow the steps behwv.
[] Press the BAKE and BROIL HI/LO
pads (on double oxen models use
tile upper oven controls) at tile same
time tor 3 seconds until the display
shows SE
12Hour,24 Hour or Clock Black-Out
Yourcontrol/ssettousea 12hourc/o&
If you would prefer to have a 24 hour
milita_' time clock or black-out the clock
displa 5 tollow tile steps below.
[] Press tile BAKE and BROIL HI/LO
pads (on double men models use
the upper oven controls) at the same
time for 3 seconds until tile display
shows BE
Press tile CLOCKpad once. Tile
[]
displa) will show 12hr. If this is
the choice you want, press tile
STARTpad.
[] Press tile DELAYSTART pad until
no shdn (no shut-off) appeax_ in
tile display.
[] Press tile START pad to acfixate tile
no shut-off and leave the control set
in this spedal features inode.
NOTE:Ondoubleoven modelsthisactivates this
specb/ featurefor both ovens.
Press tile CLOCKpad again to
change to tile 24 hour militmy time
clock. The display will show 24 hr.
If this is tile choice you want, press
tile START pad.
Press tile CLOCKpad again to black-
out the clock displa> The display
will show OFF If this is the choice
you want, press the START pad.
NOTE."If the dock is in the Mack-out mode you
wffl notbeable to usethe DelayStart function.
Control Lockout
Yourcontrolwill allowyoutolockdownthetouch
padssotheycannotbeactivatedwhenpressed
Press tile BAKEand BROILHI/LO
ii
[]
pads (on double oxen nlodels use
tile upper oxen controls) at tile same
time for 3 seconds until the display
shows SF
[] Press tile SELF CLEAN pad. Tile
displa_ will show LOC OFF
Press the SELFCLEAN pad again.
Tile displa) will show LOCON.
leaxe tile control set in this special
l_'attlres illode.
To unlock tile control, repeat steps 1
c S
and 2. Pre._s tile STARTpad when tile
display shows LOC OFF.
_A]/en this ti_ature is on and tile touch
pads are pressed, the control will beep
and tile display will show LOC.
NOTE:
;;;;;;_Thecontrollockoutmodewi//notaffectthe
CLOCK,KITCHENTIMERON/OFFandOVEN
LIGHTON/OFFtouchpads.
[] Press tile START pad to activate
tile control lockout feature and
;;;;;;_,Ondoub/eovenmode/sthisactivates this
special feature forboth ovens.
Page 8
Special featuresofyourovencontrol
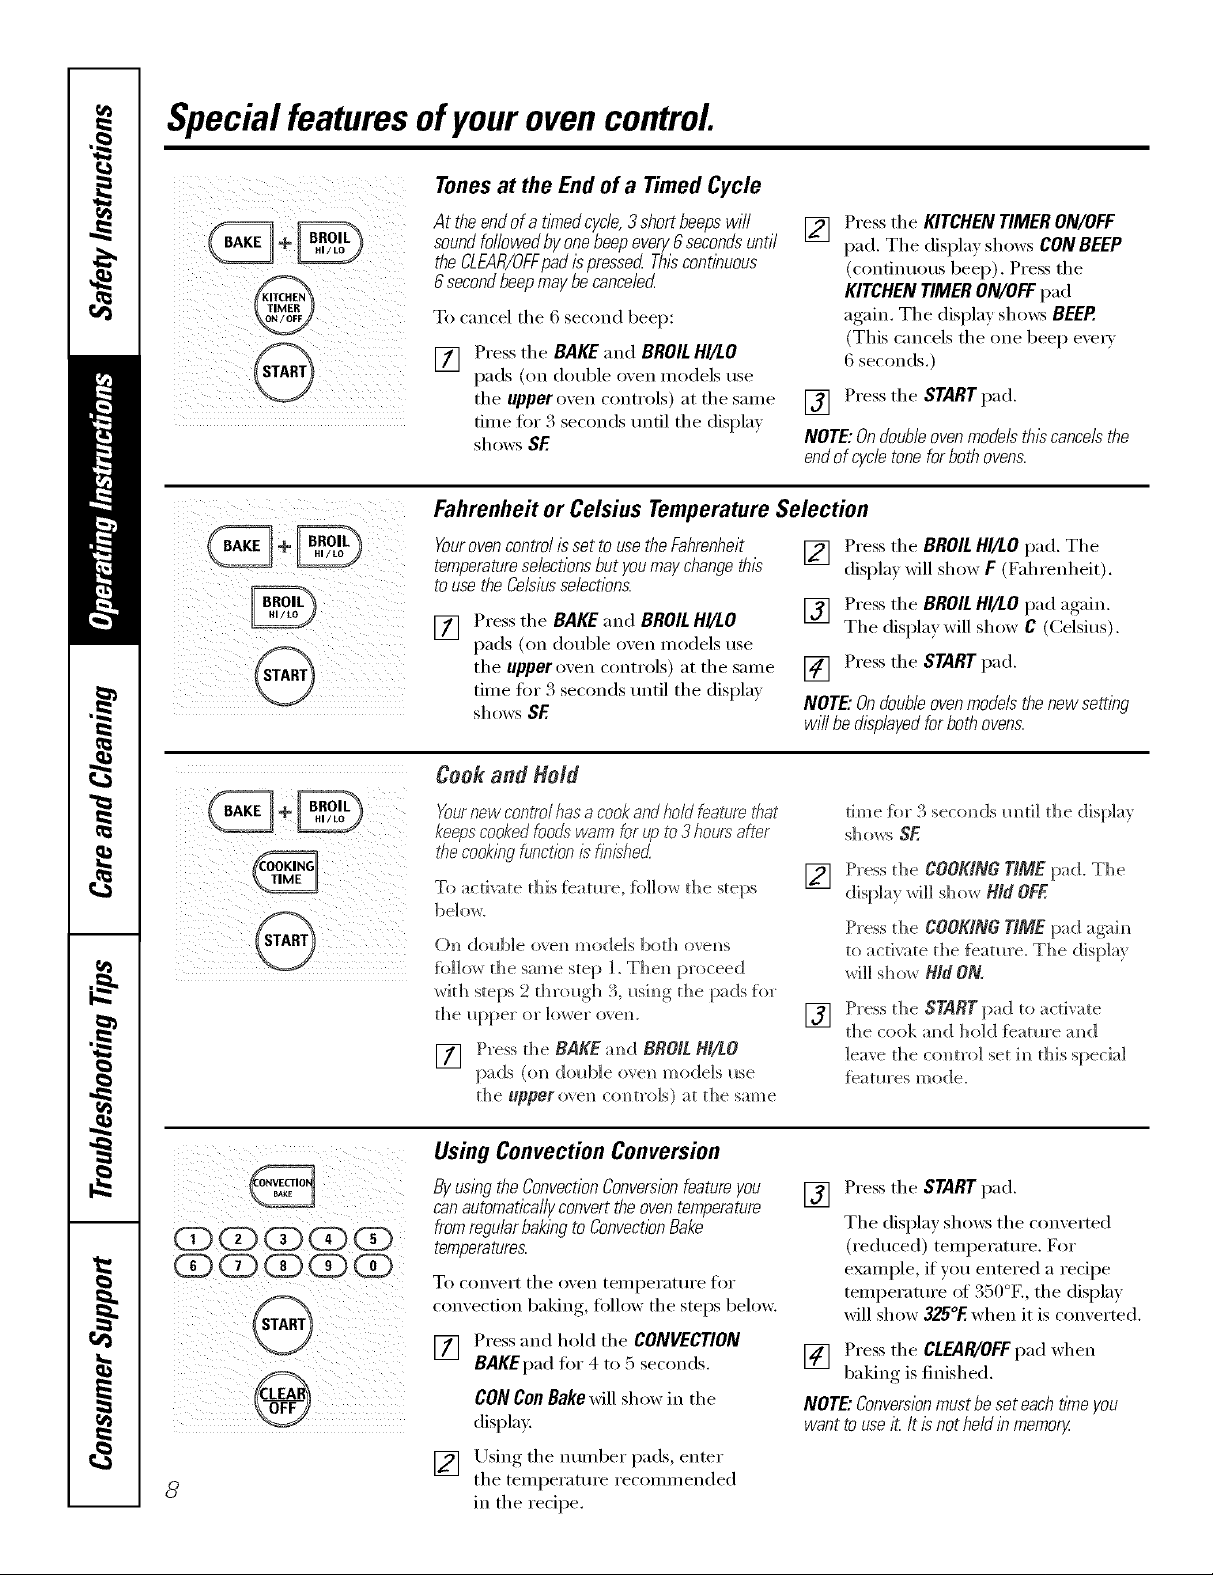
Tonesat the Endof a Timed Cycle
At the endof a t/knedcycle,3 shortbeepswill
sound followedby onebeep every6seconds until
the CLEAR/OFFpadis pressed Thiscontinuous
6secondbeepmay be canceled
To cancel tile 6 second beep:
[] Press tile BAKE and BROIL HI/LO
pads (on double o'_en models use
tile upper oven controls) at tile same
time fin" 3 seconds tmtil tile display
shows SF
[] Press tile KITCHEN TIMER ON/OFF
pad. Tile display shows CON BEEP
(continuous beep). Press the
KITCHEN TIMER ON/OFF pad
again. Tile display sl/o_:_ BEEP.
(This cancels tile one beep e\'ex T
6 seconds.)
[] Press tile START pad.
NOTE:Ondouble ovenmodelsthis cancelsthe
endof cycletone for bothovens.
Fahrenheit or Celsius Temperature Selection
Yourovencontrol isset to usethe Fahrenheit
temperature,selectionsbut youmay changethis
touse the Celsiusselections.
[] Press tile BAKE and BROILHI/LO
pads (on double oven models use
the tipper oxen controls) at the same
time fin" 3 seconds until the displa)
shows SE
[] Press tile BROIL HI/LO pad. Tile
displa_ _dll show F (Fahrenheit).
[] Press tile BROIL HI/LOpad again.
Tile display will show C (Celsius).
[] Press tile START pad.
NOTE."Ondoubleovenmodelsthenewsetting
willbedisplayedforbothovens.
Cook and Hold
i @ i¸¸i
!i ii iiii ii
Yournew controlhas a cookandhold feature treat
keepscooked foodswarm for up to 3hours after
thecookingfunction is finishecL
To activate this featm'e, follow the steps
()n double o',em_ models both o',em_s
f)}]](_r the same step 1. Thel_ proceed
with steps 2 throl_g]l 3, I_sh_g the pads fitr
the lit)per or lower ore]/.
[] Press the BAKE m_d BROIL HI/tO
pads (o_ dold_Ie o',e_ models use
the upper o_ e_ commo]s) at the sm_e
Us&g Convection Conversion
Byusingthe ConvectionConversionfeatureyou
canautomatically convert theoven temperature
fromregularbakingto ConvectionBake
temperatures.
To COlivert tile oxell tei//pei'at/li'e [i)r
comection baking, follow tile steps below.
[] Press and hold tile CONVECTION
BAKEpad fin" 4 to 5 seconds.
CONConBakexdll show in tile
display.
time fi)r 3 secom_ds m_ti] the display
[] Press tile COOKING TIME pad. The
Press the COOKING TIME pad agaim_
to activate the {eatm'e. The (lisp]a}
will show Hid ON.
Press the START pad to activate
[]
the cook m_d hold [eatm'e m_d
leave the co_tro] set im_this special
feam]'es mode.
Press tile START pad.
[]
Tile display sl/o_:_ tile converted
(reduced) temperatm'e. For
example, if you entered a recipe
temperature of 350°E, tile display
will show 325°F.when it is converted.
[] Press tile CLEAR/OFFpad when
baking is finished.
NOTE."Conversionmustbe set each dyneyou
want to useit It isnot held inmemory
[] Using tile nmnber pads, enter
8
tile temperature recommended
in the recipe,
Page 9
Usingthe SabbathFeature.
(Designedforuseon theJewish SabbathandHolidays.) www.GEAppliances.com
TheSabbathfeature can be usedfor baking/roastingonlg It cannotbeusedfor convection,broiling,self-cleaning,or
DelayStart cooking.
NOTE."Theovenlight comes onautomatically(onsomemodels)when the dooris openedandgoes off whenthedooris closed.
Thebulbmaybe removed.SeetheOvenLightReplacementsection. Onmodelswith alight sw#ch onthe controlpanel,theoven
lightmaybe tumed on andleft on.
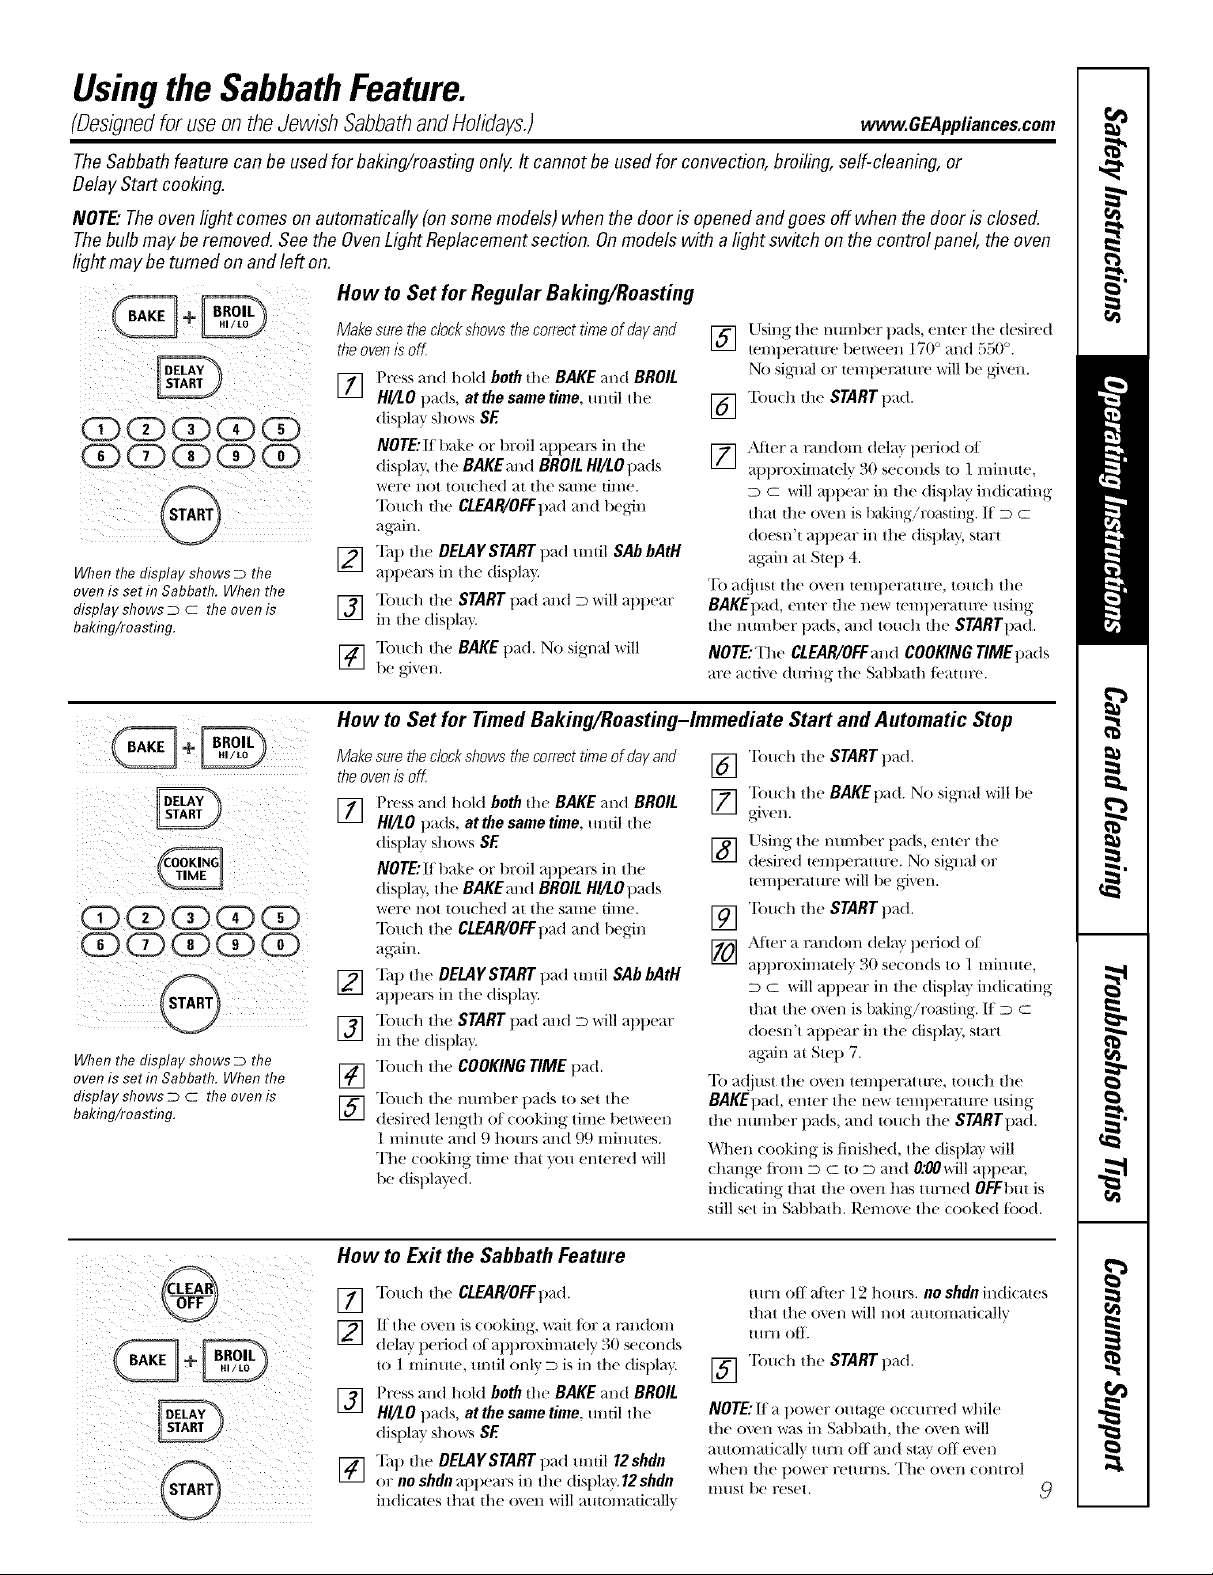
How to Set for Regular Baking/Roasting
When the display shows D the
oven is set in Sabbath. When the
display shows D c the oven is
bakfl?g/roasting.
Make sure the clockshows thecorrect time of dayand
the ovenis off
rT] Press m++dhold both the BAKE and BROIL
I+'1
HI/LO pads, at the same time, until the
disl/1 m S] _() _rs SE
NOTE:l] bake or broil alllle:_rs ill the
(lisllla}', the BAKEand BROIL Hl/LOpads
"Ibu(h die CLEAR/OFFtmd and beg,dn
ag_dn.
1_] "lhp the DELAYSTART pad umil SAb bAtH
al)l)ears ill die dist/la" }
] Touch th( START pad and D will apt)ear
in the displa'y.
] Touch dw BAKE t)ad. No signal will
be g_xen.
] [lsing the nmnl)er t)ads, enier the desire d
tenlt)et'ature 1)etweelJ 170 ° _ll/d ,-),-)()o
No sig,nl_dor lemtlemture will l)e g,riXell.
] "[bu(h the START pad.
[_ 2dh_r a random delay period ot
at)proximat(ly 30 se(onds to 1 minute,
D C will at)pear ill the display indk adng
that die oven is baking/roasting. If D c
doesn't at)t)ear in the disl)la _, start
ag_dn at Siep 4.
TO a(!jtlsi tile oven temllerature, tou(h tile
BAKEpad, emer die new iemlleramre using
tile ram/beT pads, and torah tl/e STARTpad.
NOTE: The CLEAR/OFFand COOKING TIME pads
are a(ti_e dining lhe Sabbath I('atm'e.
QD (D (Z) CD
Q ODdDCDCD¸
When the display shows D the
oven is set m Sabbath. When the
display shows D c the oven is
baking/roasting.
:i ii@% [
How to Set for Timed Baking/Roasting-Immediate Start and Automatic Stop
Make sure theclock shows thecorrect time of dayand
the ovenis off, []
[] Press and hold both th( BAKE and BROIL []
HI/LO tlads, at the same time, imtil the
display shovers SE []
NOTE:Iltlake or broil at)pe;_ ill the
dist/lay, the BAKEand BROIL HI/LOt)ads
x_r(_'(_I_()t tou(hed at die same dine. []
Touch the CLEAR/OFFt)ad and 1)egin
ag'ain. []
[] Tall the DEMYSTART pad until SAb bAtH
at)t)ears ill the dist/la _
] "Ibuch the START pad and D *,*,rillatll)ear
in die (lispla'y.
[] "lbu(h the COOKING TIME t/ad.
T(m(h the mmfl)er t)ads {o set the
[]
desired length of cooking time 1)erween
1 minuw and 9 h(mrs and 99 minmes.
The cooking time thai "_ou entered will
be dist)hryed.
"lbu(h the STARTt)ad.
"lbu(h the BAKEpad. No sii,qml will 1)e
Using the number pads, enter the
desired |el//t)ef_lHire. No si_]litl or
{emt)erat ure will be gi_'n.
"Ibuch tile STARTpad.
Al_er a randon/(leb)' t/eriod of
at/t)roxinlately 30 seconds to 1 minme,
D C will al/t)ear in the disl/la } indicadng
thin the o\en is baking!roasting. I/D C
doesn't allllear ill the distil m, start
again at Step 7.
"Ib a(!iust tile o_'n temt/erature, touch the
BAKEt)ad, enter the new temt)erature using
the number pads, mid touch the STARTt)ad.
When cooking is finished, the dislllay will
( hm/ge ti'c)m D c to D mid 0:QOwill al/l/ea c
indicating that the oven has turned OFFbut is
still set in Sal/bad/. Remo\e the cooked tood.
How to Exit the Sabbath Feature
"lbu(h the CLEAR/OFFt)ad.
[]
] 1t the oven is cooking, wait for a mndonl
delay l/eriod of at)t)roxin/ately 30 se(onds
to ] minute, until only D is in the dist/lay.
[_] Press and hold both the BAKE and BROIL
i,Ji
HI/tO t)ads, at the same time, tmtil the
disl/lay shows SE
] Tat) the DELAYSTART pad/mtil 12shdn
or no shdn at)l/ears in the dist/lay. 12shdn
in(ti(aies that the oven will mlionmd(allx_
turn off alier 12 hours, no shdn indicates
that the oxen will not automati(allv
ttlrll ( ){_{'.
] "lbuch the START t)ad.
NOTE:If a power outage occurred while
tile oven was ill S_d/bath, the o_'n will
a/ltonlaticallv ttlrll off aI/d st_*xoff e\ el/
whell tile t/ower rettlrl/s. The ovell €Ol/tt'o1
lIlllSl be reset.
Page 10
Usingthe oven.
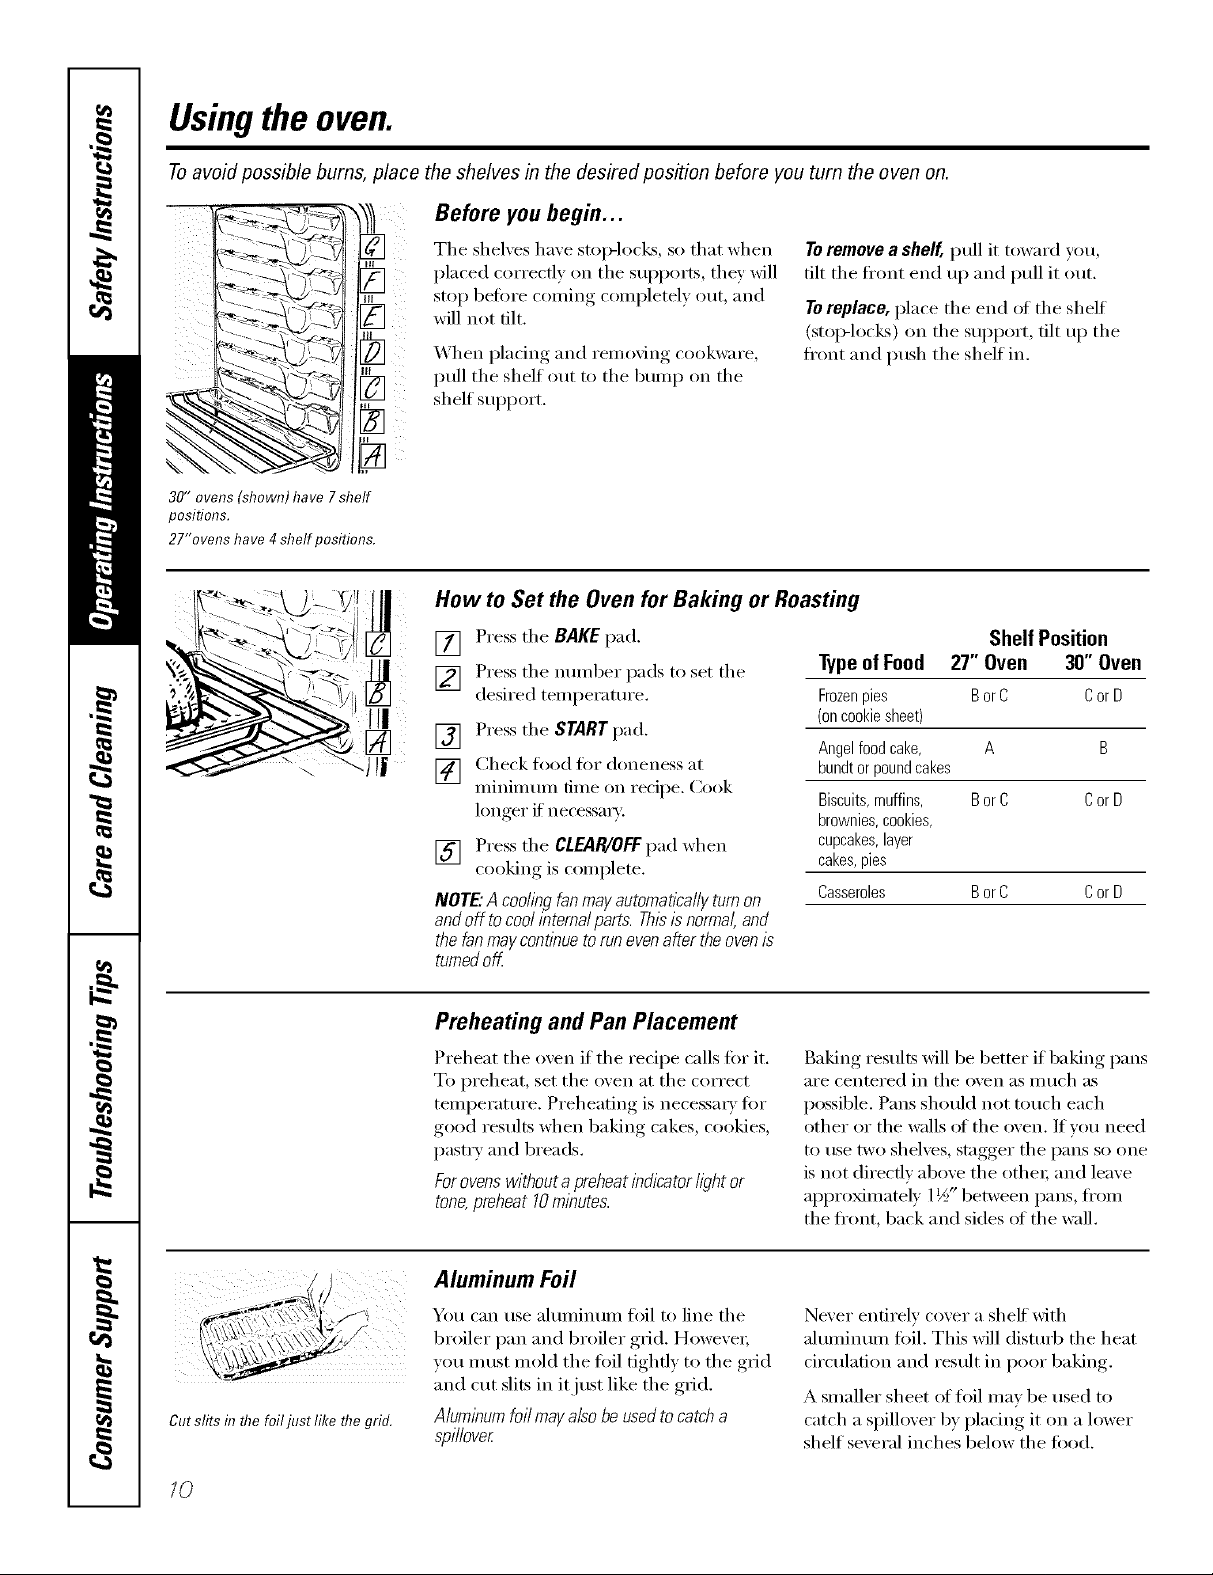
Toavoid possible bums, place the shelves in the desired position before you turn the oven on.
Before you begin...
¸
:
30"ovens(shown)have7shelf
positions.
27"ovenshave4shelfpositions.
The shelves have stop-lock% so that when
placed correctly on the supports, they will
stop before coming completely out, and
will not tilt.
_._hen I)lacing and removing, cookware,
pull the shelf out to the bump on the
shelf support.
How to Set the Oven for Baking or Roasting
Toremove a sheff, pull it toward you,
tilt the ti'ont end up and pull it out.
Toreplace, place the end _ff the shelf
(stoi>locl<s) on the support, tilt up the
ti'ont and push the shelf in.
[] Press the BAKEpad.
] Press the number pads to set the
desired temperature.
[] Press the STARTpad.
[] Check toed for aloneness at
minimum time on recipe. Cook
hmger if necessar),:
[] Press the CLEAR/OEFpad when
cooking is complete.
NOTE."Acodingfanmayautomaticallyturnon
andoff tocod internalparts.Thisis normal,and
thefanmaycontinuetorunevenaftertheovenis
turnedoff.
Preheating and Pan Placement
Preheat the oven if the recipe calls fi)r it.
To preheat, set the oven at the correct
temperature. Preheating is necessa_ T for
good results when baking cakes, cookies,
pastry and 1)reads.
Forovenswithout apreheat indicator light or
tone,preheat 10minutes.
Shelf Position
Typeof Food 27" Oven 30" Oven
Frozenpies BorC CorD
(oncookiesheet)
Angelfoodcake, A B
bundtorpoundcakes
Biscuits,muffins, BorC CorD
brownies,cookies,
cupcakes,layer
cakes,pies
Casseroles BorC CorD
Baking results will be better if baking pans
are centered in tile oven as illtlch _lS
possible. Pans should not touch each
other or the walls (ff the oven. If w)u need
to use two shelves, stagger the pans so one
is not directly above the othe_; and leave
approMmately 1½" between pans, ti'om
the fl'ont, back and sides ot the wall.
L;.4,/
& .'- \\3\,/ /_/
,_,¢,&
Cutslits infl?efoiljustlike fl?egrid.
10
Aluminum Foil
You can use aluminum hill to line the
broiler pan and broiler gdd. Howe;e_;
you must mold the foil tightl} to the grid
and cut slits in it just like the gdd.
Aluminum foil mayalso be used tocatch a
spillover
Never entirely cover a sheff with
aluminum fifil. This will disturb the heat
circulation and result in poor baking.
A smaller sheet of foil may be used to
catch a spillover by plating it on a lower
shelf several inches below the tood.
Page 11
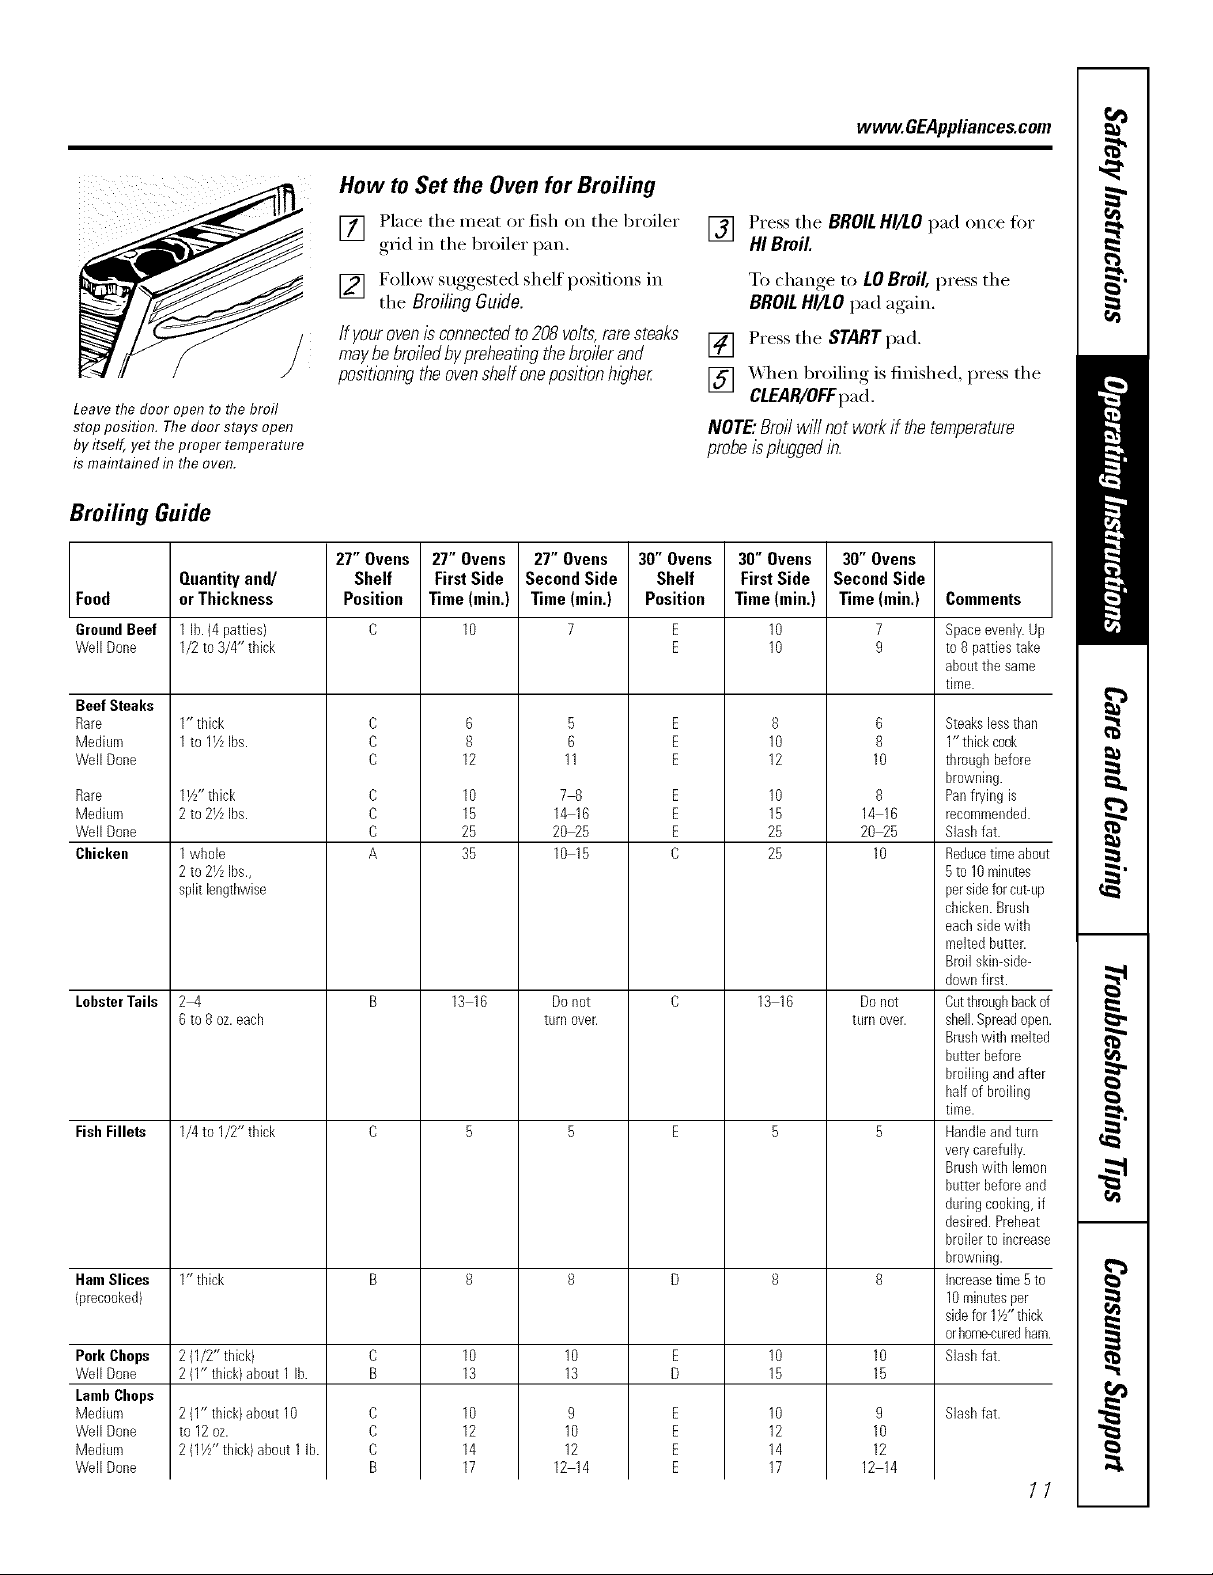
How to Set the Oven for Broiling
www.GEAppliances.com
Leave the door open to the broil
stop position. The door stays open
by itself, yet the proper temperature
is maintained in the oven.
[] Place the meat or fish on the broiler
grid in the broiler pan.
[] Follow suggested shelf positions in
the BroilingGuide.
If yourovenis connectedto208volts,raresteaks
maybebroiledbypreheatingthebroilerand
positioningtheovenshelfonepositionhigher
[] Press the BROILHI/LOpad once fi)r
HIBroil
To change, to LOBroil,press the
BROILHI/LOpad again.
[] Press the STARTpad.
[] _._/ell broiling is finished, press the
CLEAR/OFFpad.
NOTE."Broilwillnotworkif thetemperature
probeispluggedin.
Broifing Guide
2T Ovens 2T" Ovens 2T" Ovens 30" Ovens 30" Ovens 30" Ovens
Food or Thickness Position Time(rain.) Time(min.) Position Time(min.) Time(rain.) Comments
GroundBeef 1lb.{4 patties) C 10 7 E 10 7 Spaceevenly.Up
Well Done 1/2to3/4" thick E 10 9 to 8 pattiestake
Beef Steaks
Rare
Medium
Well Done
Rare
Medium
Well Done
Chicken
LobsterTails
FishFillets
HamSlices 1" thick B 8 8 D 8 8
(precooked)
Pork Chops
Well Done
LambChops
Medium
Well Done
Medium
Well Done
Quantity and/ Shelf First Side Second Side Shelf First Side Second Side
1" thick
1to lYzIbs.
11/z"thick
2 to2VzIbs.
1whole
2 to2YzIbs.,
split lengthwise
2-4
6 toRoz.each
1/4to 1/2" thick
2 (1/2"thick) C 10 10 E 10 10
2 (1"thick)about 1 lb. B 13 13 D 15 15
2 (1"thick)about 10
to 12oz.
2 (11/Z'thick)about1 lb.
C
C
C
C
C
C
A
C
C
C
B
6
8
12
10
15
25
35
13 16
10
12
14
17
5
6
11
78
14 16
20_5
10 15
Do not
turo ovelt
9
10
12
12 14
E
E
E
E
E
E
C
E
E
E
E
8
10
12
10
15
25
25
13 16
10
12
14
17
6
8
10
8
14 16
20_R
10
Do not
turn over.
9
10
12
12 14
abouttile same
time.
Steakslessthan
1"thick cook
throughbefore
browning.
Panfryingis
recommended.
Slashfat.
Reducetimeabou
5to 10minutes
persideforcut-up
chicken.Brush
eachsidewith
meltedbutter.
Broilskin-side-
downfirst.
Cutthroughbacko
shell.Spreadoper
Brushwith melte(
butter before
broilingandafter
half of broiling
time.
Handleandturn
verycarefully.
Brushwith lemon
butter beforeand
duringcooking,if
desired.Preheat
broiler to increas_
browning.
Increasetime5 to
10minutesper
sidefor 1VZ'thick
orhome-curedham
Slashfat.
Slashfat.
11
Page 12

Usingthe clock and timer.
ToSet the Clock
iili ii iiii ! i
i iii iii iii
Make sure the clock is set to the
correct time of da_
@
Ttiet#ner is a mmure rimer on v.
Ttie t#ner does not control oven
operations. Ttie maximum setting on
ttie timer is 9hours and 59 mflTutes.
The clock must be set to the correct time
of da)fin" the automatic oven timing
tractions to work i)roperly. Tile time of
day cannot be changed during a timed
baking or self-cleaning c) cle.
ToSet the Timer
Press tile KITCHEN TIMER ON/OFF
[]
pad.
Press tile nmnber pads until the
[]
;lIll( )tint ()f ti/ne V( )tl w;int sh ()ws
ill the displa): For example, to set
2 hom_ and 4b minutes, press 2, 4
and 5 in that order./f y_)u make a
mistake press the KITCHENTIMER
ON/OFFpad and begin again.
Press tile STARTpad.
[]
_,_q/en tile diner reaches :O0,
[]
the control will beep 3 times
fi)llowed b) one beep exer) 6
seconds tmfil the KITCHENTIMER
ON/OFFpad is pressed.
[] Press tile CLOCK pad.
[] Press tile number pads.
[] Press the START pad.
Tile 6 second tone can be canceled by
fi)llowing the steps in the Specialfeatures
of your oven control section tlndei" Tones
at theEndof a TimedCycle.
NOTE:Onsomemodelsthetimecountsdown
/knmediate/ywhentheSTARTpadis pressedThe
tknerisactua//ycountingdowninsecondsthat
arenotshownonthed/sp/ayunti/the/astminute.
To Reset the Timer
If tile display is still showing tile time
remaining, you may change it by pressing
tile KITCHENTIMERON/OFFpad, then
press tile nmnber pads tmfil tile time
you want appea_ in tile displa,_;
If tile remaining time is not in tile display
(clock, delay start or cooking time are in
the display), recall the remaining time by
pressing tile KITCHEN TIMER ON/OFF pad
and then pressing tile nmnber pads to
entei" tile new tilne volt want,
ToCancel the Timer
Pressthe KITCHENTIMERON/OFF
pad twice.
/2
Page 13

Usingthe timedbakingand mastingfeatures, www.GEAppliances.com
On double oven models, you can use timed baking in one oven while using self-clean in the other; you can also use
timed baking in both ovens at the same time.
NOTE:Foods that spoil easily-such as milk, eggs, fish, stuffings, poultry and pork-should not be allowed to s# for
more than 1hour before or after cooking. Room temperature promotes the growth of harmful bacteria. Be sure that
the oven light is off because heat from the bulb will speed harmful bacteria growth.
How to Set an Immediate Start and Automatic Stop
The oven will turn on knmedlately and cook for a
selected lengthof time. At the end of the cooklbg
OD(3) (5) (3) (Z) t,metheovenw,Tlturn0 automatically
Make sure the clock shows the correct
,.,,e,,fd.,,
[] Press the BAKEpad.
[] Using the nmnber pads, enter the
desired temperature.
[] Press the COOKINGTIME pad.
NOTE:If yourreciperequkespreheat]bg,you
mayneedtoaddaddifiona/timetothelengthof
thecook/bgtime.
Using the nmnber pads, enter the
[]
desired baking time, The oxen
temperature and the cooking time
that _ou entered will be displa)ed.
How to Set a Delayed Start and Automatic Stop
Youcanset the ovencontrol todelay-start the
oven,cook for aspecific length of time andthen
turn off automatica//y
Make sure the clock shows the correct
tiille of (lav.
[] Press the BAKEpad.
[] Using the number pads, enter the
desired temperatm'e.
[] Press the COOKING TIME pad.
NOTE."Ifyourreciperequkespreheatlbg,you
mayneedtoaddaddifionaltimem thelengthof
thecookbgtime.
[] Using the numl)er pads, enter the
desired baking time.
[] Press the DEL4YSTART pad.
[] Using the number pads, enter the
time of day }ou want the oxen to
[llI'n on }lIl(1 stilI't cooking.
[] Press the STARTpad.
The display shows the oven temperature
that you set and the cooking time
cotmtdown. The display starts changing
once the teml_erature reaches ] O0°F.
NOTE:Ondoubleovenmodelswhenusingboth
ovensat thesametime,thetimesshowingin the
displaywi//befor thelastovenset Todisplaythe
timesetforthefkstovenset,presstheCOOKING
TIMEpadforthatoven.
The oven will continue to cook fi)r the
programmed am ount of tim e, then shut
off automaticalh,:
Press the CLEAR/OFF pad to clear
the display.
If wm would like to check the times wm
have set, press th e DELAgSTARTpa d to
check the start time w)u have set or press
the COOKINGTIMEpad to check the
length of cooking time you have set.
\_]_en the oven trims on [lt the time
oI day you have set, the display will
show the changing temperature
(starting at 100°E) and the cooking
[lille Cotlntdown.
NOTE:Ondoubleovenmodelswhenusingboth
ovensat thesametime,thetimesshowingin the
displaywi//befor thelastovenset Todisplaythe
timesetforthefkstovenset,presstheDELAY
STARTorthe COOKINGTIMEpadforthatoven.
At the end of timed baking, the oven
will turn off. The end of cycle tone
will sound.
Press the CLEAR/OFFpad to clear
the display:
[] Press the STARTpad.
NOTE."An attention tone wi// soundif you are
using tknedbakbg anddo notpress the START
pad afier entenbg the baklbgtemperature.
13
Page 14

Usingtheprobe.
For many foods, especially roasts and poultry, internal food temperature is the best test for doneness. The
temperature probe takes the guesswork out of roasting by cooking foods to the exact doneness you want.
The temperature probe has a
skewer-like probe at one end and a
plug at the other end that goes flTto
the outlet f17the oven.
NOTE."Double ovenmodels haveaprobe/b the
upperovenonly
Use ot probes other than the one
I)ro_ided with this I)rodtlct Illav restllt in
daniage to the probe.
Use the handles of the probe and phig
when inseiling and renloving theni fl'oin
tile nieat and outlet.
;_Toavoiddamagingyourprobe,donot ae
tongsto puff on thecable when removingit
_,Toavoidbreakingtheprobe, makesure food/s
completely defrostedbeforeinsertlbg.
Mter prepaiing the nleat and placing it
oil a trivet or oil tile broiler i)an grid,
tOllow these directions for i)i'oper probe
l)laceinent.
i,ay tile probe on tile outside of tile
[]
nleat along tile top or side and nlark
with your finger where the edge of
tile illeat COllles to on tile pi'obe,
Tile point should rest in tile center
of th e thickest nI ea_' pa rt of th e
roast,
[]
Insert tile probe coinpletely into tile
nleat. It should not touch tile bone,
fat or gIisfle.
_,<E'_ Cable
Topreventpossiblebums, do not unplug
theprobefrom the outletuntil the oven
hascooled
_,Neverleaveyourprobeinside the ovendunbg
a self-clean/bgcycle.
Do notstore the probein the oven.
For roasts Mth no bone, insert tile probe
into tile nieatiest part of tile roast. For
bone-in hanl or lanlb, insert tile probe
into tile center of tile lowest laIge nluscle
or joint.
Insert tile probe into tile center of dishes
such as nleat loaf or casseroles. X_]/eIl
cooking fish, insert tile probe fl'onljust
above tile gill into tile nleafiest area,
parallel to tile backbone.
Insert tile probe into tile nleafiest part of
tile inner thigh froin below and parallel
to the leg of a whole turkev.
/4
iii¸
How to Set the Oven For Roasting When Using the Probe
Insert tile probe into tile nieat.
[]
Phig the i)i'obe into the outlet in the
[]
oxen. Make sure it's pushed all the
wa_ in. Close tile oxen dooI:
Press tile PROBEpad.
[]
Press tile nuniber pads to set tile
[]
desired internal flied or nleat
teinl)erature.
Press the BAKE pad.
Press tile nunlber pads to set tile
desired oxen teini)erature.
Press tile START pad.
[]
The&splay will flash if theprobeis ibserted
into the outlet andyouhave not set aprobe
temperatureandpressedthe STARTpad
XAhen tile oxen starts to heat, tile word
LOwill be in tile display.
_Mtei" tile internal teInI)erature of tile
nleat reaches IO0°E, the changing
internal tenii)erature will be shown
in tile displa>
XAq/eIl tile internal teini)erature of
[]
tile nleat reaches tile nuinber you
have set, the probe and the oven
ttlI'n ()t_J_and tile ()veil conti'ol
signals. To stop tile signal, press tile
CLEAR/OFFpad.Use hot pads to
reniove the probe fi'oin the fi)od.
Do not use tongs to pull on it--they
niight danlage it.
To change tile oven tenii)erature during
tile Roast cycle, press tile BAKE pad and
then tile nunlber pads to set tile new
teinl)erature.
If theprobe/s removed from thefood before
the fl#al temperature,isre.ached,a tonewill
soundand thedisplaywill flash until the probe
is removedfrom theoven.
Youcan use the t/Ynereven thoughyoucannot
usetimed ovenoperations.
Page 15

Usingthe convectionoven. www.GEAppliances.com
The convection oven fan shuts off when the oven door is opened. DO NOTleave the door open for long periods of
time while using convection cooking or you may shorten the fife of the convection heating element.
h7 a COITvectioI7 oveR, a far
circulateshotair over,underand
aroundthefood.
Thiscirculatinghot airis evenly
distributedthroughouttheoven
cavit_As aresult,foodsareevenly
cookedandbrowned--oftenh7less
timewithconvectionheat.
(appearance may vary)
To help you undel_tand the diflel'ence
between convection bake and roast and
traditional bake and roast, here are some
general guidelines.
ConvectionBake
Idealforevenlybrownedbakedfoodscooked
onmultipleshelves.
Goodforlargequantitiesofbakedfoods.
Goodresultswithcookies,biscuits,muffins,
brownies,cupcakes,creampuffs,sweetrolls,
angelfoodcakeandbread
Heat comes fl'om the heating element in
the rear ot the oven. The convection tim
circulates the heated air evenly over and
arotmd the fi)od. Preheating is not
necessary with fi_ods having a bake time
of over ]5 minutes.
ConvectionRoast
Goodforlargetendercutsofmeat,uncovered
Heat comes fl'om the top heating
element. The convection tim drculates
the heated air evenly over and around
the food. Meat and poult_ T are browned
on all sides as if they were cooked on a
rotisserie. Using the roasting rack
provided, heated air will be drculated
oveI; under and around the food being
roasted. The heamd air seals in juices
quickly for a moist and render p_x_duct
while, at the same time, creating a rich
golden bI'oWIl exteiioi:
Roastsor poultry shouldbecookedona shelf
(on27" modelsusethe offset shelf) inthe lowest
shelfposition (A).
\41_en w)u are convection roasting it is
important that you use the broiler pan
and grid and the special roasting rack for
best convection roasting results. The pan
is used to catch grease spills and the grid
is used to prevent grease spatters.
qoasti , rack
Post
Grid
0
BroilerDan
Place the meat on the special roasting
rack. The rack holds the meat. The rack
allows the heated air to circulate under
the meat and increase browning on the
tmde_ide of the meat or poult_w:
Place the shelf (on __"
the ottset shelf') in the lowest shelf
position (A).
:_ Place the grid on the broiler pan and
put the roasting rack over them
making sm'e the posts on the roasting
rack fit into the holes in the broiler
p_lll,
CAUTION: When youare usingtheoffset shelf
(on27" models)b thelowest position (,4),you
wi// need tousecaution when pu/hbgtheshelf
ouL Werecommendthatyou pu// theshelf out
severalinchesand then, usingtwo pot holders,
puffthe sheff outby holding the sidesof iL The
offset shelf/s low and youcould beburnedif you
place yourhandin themiddle of the shelfand
puffa// the way ou_ Beverycareful not to bum
yourhandon the door when usinga shelf in the
lowest position (A).
2t models use
Adapting Recipes...
You can use yore" fil_o_ite redpes in the
con_ ection o&en.
X,_hen baking, reduce baking
temperatm'e by 25°E
No need to preheat when cooking
longer than 15 minutes.
Usepansizerecommende_
Somepackageinstructionsfor frozen
casserolesormalb disheshavebeen
developedusing commercialconvectionovens.
Forbest resultsib this oven,preheat the oven
anduse the temperatureon the package.
15
Page 16

Usingthe convectionoven.
Cookware for Convection Cooking
Bed)re using your convection oven,
check to see if your cookware leaves
room for air drculation in tile ()veil.
If you are baking with several pans, leave
space between them. Mso, be sure tile
pans do not touch each other or tile walls
of tile oven.
Paper and Plastic
Heat-resistant paper and plastic
containei_ that are recommended fi)r
use in regular ovens can be used in
convection ovens. Plastic cookware that
is heat-resistant to temi)eramres ot
400°E can also be used.
Metal and Glass
AW type ot cookware will work in your
convection oven, Howe\'eI; Illetal pans
heat tile ti_stest and are recmmnended
tOT convection baking.
:, Darkenedor ma_e-f/blshedpans will bake
faster thanshinypans.
:_Glassor ceramicpanscookmore slowly
X._q/en baking cookies _ou will get tile
best results if xou use a fiat cookie sheet
instead of a pan with low sides.
For recipes like oven-baked chicken,
use a pan with low sides. Hot air cannot
circulate well around food in a pan with
high sides.
How to Set the Oven for Convection Baking or Roasting
[] Press tile CONVECTION BAKE or
CONVECTIONROAST pa d.
] Press tile munber pads to set tile
desired oxen temperature.
[] Press tile STARTpad.
To change tile oven temi)erature, press
tile CONVECTION BAKE or CONVECTION
ROASTpad and then tile ntunber pads
to set tile new teml)erature.
XYhen tile oven starts to heat tile
changing, , temi)erature, starting, at IO0°E,
xdll be displayed. X4hen tile oven reaches
tile temi)erature )ou set, 3 beeps will
so/ind.
[] Press tile CLEAR/OFFpad when
finished.
NOTE:
Youwill hear a fan while cookingwith
convection.Thefanwi// stop when thedooris
openedbut the heat will not turn off
Youmay hear the ovenclicking dunbgbaking.
Thisis normal.
Multi-shelfposition27" oven
Multi-shelf position 30" oven
16
Multi-Shelf Baking
Whenconvectionbaklbgwith only I shelf,
[]
[]
[] throughout tile oven, fi/ods can be
[]
[]
[]
follow the shelfpositions recommendedin
the Usingthe ovensection.
Because heated air is circulated evenly
baked with excellent results using
multiple shelxes.
Mtflti-shelf baking may increase cook
times slightly for some foods but the
overall result is time saved. Cookies,
muffins, biscuits, and other quickbreads
give vei T good results with multi-shelf
baking.
30" Ovens
When baking on 3 shelves, place one
shelf in tile botton/ (A) position, one
on tile third (C) position and one in
the 5th (E) position.
27" Ovens
_l/en baking oil 3 shelves, divide tile
oven into thiMs by placing tile offset
shelf in tile thiM (C) shell position and
tile straight shelves in fiI_t (A) and fimrth
(D) shelf positions.
For two-shelf baking, place tile offset
shelf in the botton/ (A) shelf position.
Place the straight shelf in the third (C)
shelf position.
CAUTION: When youare usingtheoffset shelf
{on27" models) inthe lowest position {,4),you
will need to use caution whenpulling the shelf
ouL Werecommendthatyou pu// thesheff out
severalinchesandthen, usingtwo pothomers,
pull theshelf out by holdingthe sidesof iL The
offsetshelf is low andyou couldbeburned if you
p/aceyour hand inthe middleof the shelf and
pull afl the way ouLBeverycareful not toburn
yourhand onthe door when usinga shelf inthe
lowestposition {A).
Page 17

www.GEApp#ances.com
How to Set the Oven for Convection Roasting when Using the Probe
For best results when roasting large
turkeys and roasts, we recommend
usflTg the probe included f17the
COlWectiot7 oveR,
ODCDCDCDCD
CDCZ)CDCDCD
(Z)CDCZ)CDCD
CDODCDCDCD
@
®
Tochange the oven temperature
during the Convection Roast cycle,
press the CONVECTIONROASTpad
and then press the number pads to
set the new desired temperature.
The display will flash PROBE and the
oven control will signal if the probe is
inserted into the outlet, and you have not
set a probe temperatm'e and pressed the
STARTpad.
[71 Place the shelf (on 27" models use
the offset shelf) ill the h)west
position (A). Insert the probe into
the meat.
[] _Aq_en the internal temperatm'e of
the meat reaches the nmnber you
have set, the probe and the oven
[tlI'n ()fl' and the oven control
signals. To stop the signal, press the
CLEAR/OFFpad.Use hot pads to
remove the probe fl'om the fi_ocl.
Do not use tongs to pull on it--they
might damage it.
CAUTION:Toprnventposs/7_/eburns,donot
[] Plug the probe into the outlet in the
oven. Make sure it is pushed all the
way in. Close the oven door
unplugtheprobefromtheovenoutletuntilthe
ovenhascoo/ec_Donotstoretheprobein
theoven.
NOTE"
[] Press the CONVEC770NROASTpad.
If theprobeIsremovedfromthefoodbefore
] Press the number pads to set the
desired ()','ell tellll)el'_ltt/l'e.
thefina/temperatureisreached,a tonewi//
soundandthedisp/aywi//flashuntiltheprobe
isremovedfromtheoven.
[] Press the PROBEpad.
Youwi//heara fanwhitecookingwith this
] Press the number pads to set the
desired internal meat temperature.
[] Press the STARTpad.
\Aq/en the oven stnrts to heat, the word
LO will lae in the displa,_:
Mter the internal temperature of the meat
reaches 100°[h the changing internal
temperatm'e will be shown in the display.
feature.Thefanwi//stopwhenthedooris
openedbuttheheatwi//notturnoff.
:_Youcanusethetimereventhoughyoucannot
usetinnedovenoperationx
:_Ondoub/eovenrnode/s,youwi//notbeab/eto
usetheprobe/btheupperovendunngtimed
ovenoperations.Thisis becausewiththe
probeyouarecook/bgbytemperaturerather
thantime.
Convection Roasting Guide
Meats Minutes/Lb. Oven Temp. lutemal Temp.
Beef Rib,BonelessRib, Rare 20_4 325°F 140°Ft
Pork Bone-in,Boneless(3to 5 Ibs.) 23_7 325°F 170°F
Ham Canned,Butt,Shank(3to 5 Ibs.fully cooked) 14 18 325°F 140°F
Lamb Bone-in,Boneless(3to 5 Ibs.) Medium 17_0 325°F 160°F
Seafood Fish,whole(3to 5 Ibs.) 30 40total 400°F
Poultry Whole Chicken(21/z to 3_/zIbs.) 24_6 350°F 180° 185°F
"! St_l]p,d binlf g_,_ _'_all) _vqui_l, 30-45 mi_ _m,f nddi/im_al _n_/h time. ShiHd ICes n_ d b_'_l_/ wi/h toil /o fin,zest
TopSirloin Medium 24_8 325°F 160°F
(3to 5 Ibs.) Well 28_2 325°F 170°F
BeefTenderloin Rare 10 14 325°F 140°Ft
Medium 14 18 325°F 160°F
Chops(1/2to I" thick) 2 chops 30 35total 325°F 170°F
4 chops 35 40 total 325°F 170°F
6 chops 40 45 total 325°F 170°F
Well 20_4 325°F 170°F
LobsterTails(6 to 0 oz.each) 20_5 total 350°F
CornishHensUnstuffed(1to 11/zIbs.) 50 55total 350°F 180° 185°F
Stuffed(I to lYzIbs.) 55 00total 350°F 180° 185°F
Duckling(4to 5 Ibs.) 24_6 325°F 180° 185°F
Turkey,whole-*'
Unstuffed(10to 16Ibs.) 8 11 325°F 180° 185°F
Uostuffed(18to 24Ibs.) 7 10 325°F 180° 185°F
TurkeyBreast(4to 6 Ibs.) 16 19 325°F 170°F
+ 77u, ['.S. De[_a_tmt'_toj lgvTc_dtu_v_O_ "lbm,/me/_popult_*; but)oft _hou/dk_oattht_t<_oki_qittoo_/_ I401". mea_
17
Page 18

Usingthe timedfeaturesforconvectionbaking.
On double oven models, you can use timed baking in one oven while using self-clean in the other; you can also use
timed baking in both ovens at the same time.
Youwill hear a fan while cooking with this feature. Thefan will stop when the door is opened but the heat will not
turn off.
NOTE,"Foods that spoil easily-such as milk, eggs, fish, stuffings, poultry and pork-should not be allowed to sit for
more than 1hour before or after cooking. Room temperature promotes the growth of harmful bacteria. Be sure
that the oven light is off because heat from the bulb will speed harmful bacteria growth.
How to Set an Immediate Start and Automatic Stop
TheovenwillturnonlYnmedlatelyandcookfora
selectedlengthoftlYne.At theendof thecooking
timetheovenwillturnoffautomaflcally
Make sure the clock shows the correct
time of day.
[] Press the CONVECTIONBAKEpad.
] Press the nmnber pads to set the
desired oxen temi)erature.
[] Press the COOKINGTIMEpad.
NOTE:If yourreciperequirespreheat/w,you
mayneedtoaddadditionaltimetothelengthof
thecooklbgtime.
] Press the nmnber pads to set the
desired length of cooking time. The
minimmn cooking time w)u can set
is ] minute. The oven temperatm'e
that you set and the cooking time
that you entered will be in the
displ_ U.
[] Press the START pad.
The display shows the oven temperatm'e
that you set and the cooking time
cotmtdown. The display starts changing
once the temperatm'e reaches ] O0°E
NOTE:Ondoubleovenmodelswhenusingboth
ovensat thesametlYne,thetlYnesshowlbgin the
displaywi//befor thelastovense_Todlspleythe
timesetforthefirstovenset,presstheCOOKING
TIMEpadforthatoven.
[_] At the end of timed convection bake
the oxen will turn off, The end of
cycle tone will sotmd. Press the
CLEAR/OFFpad to clear the display
if necessaiA _,
V_ Remove the fi_od fl'om the oxen.
iz i
Remember, fi)o(ls that are left in the
o_,en contintle cooking [iJ[tei" the
controls _lÂ'e Off,
Page 19

How to Set a Delayed Start and Automatic Stop
vvww.GEAppliances.com
Youcansettheovencontroltodelay-startthe
oven,cookforaspecificlengthoftimeandthen
turnoffautomatica//y
Make sure the clock shows the correct
time of day.
[] Press the CONVECTIONBAKEpad.
] Press the number pads to set the
desired o_en temperature,
Press the COOKINGTIMEpad.
[]
NOTE"Ifyourreciperequkespreheatinq,you
mayneedtoaddadditiona/timetothe7engthof
thecookingtime.
] Press the number pads to set the
desired cooking time.
[] Press the DELAYSTARTpad.
] Press the number pads to set the
time of day you want the o_en to
mrn on and stm't cooking.
If youwouldliketocheckthetimesyouhaveset,
presstheDELAYSTARTpafltocheckthestarttime
youhavesetorpresstheCOOKINGTIMEpadto
checkthelengthofcookingtimeyouhaveset.
[] Press the STARTpad.
NOTE"Anattentiontonewill soundif youare
usingtimedbakinganddonotpresstheSTART
padafterenteringthebakingtemperature.
_]_en the oven rams on at the time
of day you have set, the display will
show the changing temperature
(starting at 100°F) and the cooking
[Jill e CO/lntdown.
NOTE"Ondoubleovenmodelswhenusingboth
ovensat thesametime,thetimesshowingin the
displaywfflbeforthelastovenset Todisplaythe
timeset forthefirstovenset,presstheDELAY
STARTerCOOKINGTIMEpadforthatoven.
At the end of timed convection bake the
oxen will mrn off. The end of c_cle tone
will sound.
Press the CLEAR/OFFpad to clear the
[]
displa) if necessar}. _._q/eil baking is
finished, remove the food ti'om the
oven. ]_.emeinbei; even though tile
oven shuts off a utomatically, foods
continue cooking after the controls
aI'e oJJ}_
/8
Page 20

Usingtheproofing feature.
Theproofing feature maintains a warrrzenvironment useful for rising yeast4eavened products.
How to Set the Oven For Proofing
@
l@,
[] Place d_ecovered dough im_a dish im_
the ()vem_(_ shelf B or C.
NOTE:Forbestresu/l_,coverthedo®hw/?ba
clothor withgreasedplasticwrap(theplastic
mayneedtobeanchoredunderneathtire
contabersotheovenfanwillnotblowit off).
[] Pressd_ePROOFpad m_dd_e_d_e
STARTpad.
The display will read BRD (bread).
The (>'_'em/im/[e]'i()]" light [IH'HS ()H _tHd
]'e]??i_i Hs OH (]_O]'i Hg, [)]'OOJ_H Hg,,
The [)roofi m_g,ligature m_tomaticalE
provkIes the optimlm_ tempe_:_tm'e {i)r
the prooJ_im_g process mid there[ore does
m_otha','e _ temper_m_re a(!il_stmem_t.
[] Set the KITCHENTIMERf_r the
I)]'oof [im'_ e.
[] \'_l_em_proofim_gis fim_isbed,press
the CLEAR/OFF pad.
:, ToavoidNwenbgtheoventemperature
andlengtheningproofingtime,donot
opentheovendoorunnecessarily
:, Checkbreadproductsearlytoavoid
over-proofing.
NOTE."
:, Do not usethe proofingmode for warming
Nod or keepingfoodhoL Theproofing oven
temperature/snot hot enoughtohold Nods
at safe temperatures.
;;;;;_Proofingfeature onupper ovenon/g
;;;;;;_Proofingwiiinot operatewhenovenisabove
150°£"HOT"will showinthed/splay
20
Page 21

Adjustthe oventhermostat--Do it yourself! www.GEAppliances.com
Youmay find that your new oven cooks differently than the one it replaced. Useyour new oven for a few weeks
to become more familiar with it. If you still think your new oven is too hot or too cold, you can adjust the
thermostat yourself.
Donot use thermometers, such as those found in grocery stores, to check the temperature setting of your oven.
These thermometers may vary20-40 degrees.
NOTE: This adjustment will not affect the broiling or the self-cleaning temperatures. The adjustment will be
retained in memory after a power failure.
To Adjust the Thermostat
(33(DCDCDCD
(DCDCDO3(Z)
[] Presstile BAKEand BROILHI/LO
pads at tile same time tar 3 seconds
until tile display sho_vs BE
[] Press tile BAKEpad for tile oven
which you want to use. A two digit
number shows in tile display:
Pxess RAKEagain to alternate
between increasing and decreasing
tile oven temperature.
[] The oven temperature can be
at!lusted up to (+) 35°F hotter or (-)
35°F coolei: Press the number pads
tile same way you read them. For
example, to change the oven
temi)erature 15°E press I and 5.
[] "_'_hen you haxe made the
a(!jusnnent, press tile START
pad to go back to the dine of
day display. Use w_ur oven as
VO/I would noiinallv:
Thetype ofmargarine will affectbakingperformancet.
Most recipes for baking have been developed using high fat products such as butter or margarine (80% fat). If you
decrease the fat, the recipe may not give the same results as with a higherfat product.
Recipe failure can result if cakes, pies, pastries, cookies or candies are made with low fat spreads. Thelower the fat
content of a spread product, the more noticeable these differences become.
Federal standards require products labeled "inargalJne" to ('oi_tain at least 80% fiat by weight. Ix)w fiat spreads, on tile
other hand, contain less tilt and more water The high inoisture content _ff these spreads affect tile texture and flavor
of baked goods. For best results with votu" old tm:orite redpes, use margarii_e, butter or stick spreads coi_tailfing at least
70% vegetable oil.
27
Page 22

Usingthe self-cleaning oven.
The oven door must be closed and aft controls must be set correctly for the cycle to work properly.
Before a Clean Cycle
Wipe up heavy soil on the oven
bottom.(appearancemayvary)
Theovenmustbe cool in orderto set the self-
dean cycle.
We recommend venting your kitchen
with an open window or using a
ventilation tim or hood during tile fi_t
self=clean cycle.
Remove tile broiler pan, broiler grid,
probe, all cookware and anv ahmfinmn
foil fl'om tile oven.
Tile oven shelves and convection roasting
rack can be self=cleaned, but tile)" _ill
darken, lose their luster and become
hard to slide.
Do not rise abI'asives or oven cleaneiN.
Clean tile top, sides and outside of tile
()veil door with soap and _'_ltei;
Make sure the oven light bulb cover
(on some models) is in place and the
oven light is off.
IMPORTANT'.Tile health of some birds
is extremely sensitive to the fiHnes given
off during tile self=cleaning cycle of any
oven. Move birds to another well
ventilated room.
:_ On double oven models, you can
set a clean cycle in both ovens at tile
same time. Tile last oven set will
automatically delay its start tmfil tile
end of tile fi_t oven's clean cycle.
:_ On double oven models, you can use
timed baking in one oven and self=
clean tile other at tile same time.
(33(53(33(33(33
(33(23(33(3)(3)
How to Set the Oven for Cleaning
[] Press tile SELFCLEAN pad,
[] Using tile number pads, enter tile
desired clean time, if a time other
than 4 l/om_ is needed.
Clean cycle time is nommllv 4 hom_. You
can change the clean time to any time
between 3 hom_ and 5 hom_, depending
on how dirty VOtlYoven is.
[] Press tile START pad.
Tile door locks automatically. Tile display
will show the clean time remaining. It will
not be possible m open tile oven door
tmfil tile temperatm'e drops below tile
lock temperatm'e and tile LOCKEDdoor
light goes off.
When this LOCKEDdoor light is off; open
tile doo_:
:_ Tile words LOCKEDor LOCKDOOR will
flash and tile oven control will signal if
you set tile clean cycle and tin'get to
close tile oven door.
:_ To stop a clean cycle, press tile
CLEAR/OFFpad. _,_]/en tile LOCKED
door light goes off indicating
the oven has cooled below the locking
teml)eratm'e , open tile doox:
22
Page 23

vvwvv.GEAppliances.com
The oven door must be closed and all controls must be set correctly for the cycle to work properly.
How to Delay the Start of Cleaning
!
(Z)(Z)(Z)(Z)CD
G) OD(Z)(Z)OD
OD(ZbdDCDG)
G)(Z?(Z)(Z)OD
[] Press tile SELFCLEAN pad.
[] Using tile nmnber pads, enter tile
desired clean time.
[] Press tile DELAYSTART pad.
[] Using tile nmnber pads, enter tile
time of (lm _ou want tile clean cycle
to stnrt.
[] Press tile START pad.
Tile door locks automatically. Tile display
will show the start time. It will not be
possible to open tile oven door tmtil
tile temperature drops below tile lock
temperature and tile LOCKEDDOOR
light goes off.
X'_lien the LOCKEDDOOR light is off, open
tile dooi:
NOTE:Ondoubleovenmodels,youcanseta
delaydeaninbothovensat thesametl_ne.
Thesecondovensetwi//automaticallydelay
thestartofcleaninguntiltheendof thefirst
oven_deancycle.
Torecall thestart tlYneof the secondovenset,
pressthe DELAYSTARTpad on thecontrols for
thesecondoven.
After a Clean Cycle
You may notice some white ash in tile
oven. Wipe it up with a damp cloth alter
tile oven cools.
If white spoa remain,removethemwith a soap-
filled steel woolpad and rinsethoroughly with a
vinegarand watermlkture.
These deposits are usually a salt residue
that cannot be removed bv tile clean
cycle.
If tile oven is not clean alter one clean
wcle, repeat the cycle.
Yi)u cannot set tile oven fi)r cooking
tmtil tile oxen is cool enouoh for tile
door to unlock.
:_ X._]/ile tile oven is sel6cleaning, you
can press the CLOCKpad to display
tile time ot day. To return to tile
clean co/mtdown, press the SEt/:
CLEAN pad.
If tile shelxes become hard to slide, wipe
the shelf supports with cooking oil.
Careand cleaningof the oven.
Be sure electrical power is off and all surfaces are cool before cleaning any part of the oven.
How to RemovePackaging Tape
To assm'e no damage is done to tile finish
of tile product, tile safest way to remove
tile adhesive left fl'om packaging tape
on new appliances is an application
ota household liquid dishwashing
detergent, mineral oil or cooking oil.
Apply with a soft clod/and allow to soak.
Wipe (hT and then apply an appliance
polish to thoroughly clean and protect
the surti_ce.
NOTE: Theplastlk tapemust be removed fromall
chrometrim. It cannotberemovedif it is bakedon.
23
Page 24

Careand cleaningof the oven.
Be sure electrical power is off and all surfaces are cool before cleaning any part of the oven.
Lift-Off Oven Door (onsome models)
Lift the door straight up and off
the hinges.
The oven door is remox;d)le tot easier
access to the light bulb.
Do not hfi the door bythe handle.
To remove tile door, open it to the broil
stop position. (;rasp firefly oil each side
and lift the door straight up and off
the hinges.
Lift-Off Oven Door (on some models)
Do notp/ace handsbetweenthe hingeand the
ovendoor frame.
Toreplace the door, make sure the hinges
are in the broil stop position. Position
the slots in tile bottom of the door
squarely over the hinges and slowly lower
it over both hinges.
Hin_.rm _
Hinge lock (unlocked position)
Removalposition
The oven door is remox:d)le fi:,r easier
access to the light bulb.
Donot lift the doorby the handle.
Toremove the door:
[] Full)open the (loo_:
[] Pull the hinge locks down toward
the door frame, to the tmlocked
position. This may require a tool.
[] Firefly grasp both sides of the door
at the top.
[] Ch)se door to the door remox d
position, which is halfway between
the broil stop position and flflly
closed.
[] I,ifl door up and out tmtil the hinge
aml is clear of the slot.
Toreplace the door:
[] Fimfl_,_oraso,[ both sides of the door
at the top.
[]
door at the edge Hingearia
same angle as of sl0t,
the remoxal
indentation of
position, seat the I _i
the hinge am/ Indentation
into the bottom
edge of the hinge slot. The notch in
the him*e am/Inust be fifllv seated
into the bottom of the slot.
Fully open the (loo_:
[]
Push tile hinge locks up against the
[]
fl'ont fl'ame of the oxen caxib; to the
locked )osition.
i
Sealedhingearm
Close the oxen dora:
[]
Thegasketis designedwithagap at the
bottomto allowfor properaircirculation.
Donotrub or cleanthedoorgasket--
it hasan extremelylow resistanceto
abrasion.
If younoticethegasketbecomingworn,
frayedor damagedin anyway or ffit has
becomedisplacedonthedoor,youshould
haveit replaced.
24
Toclean the inside of the door:
{{}Because the area inside the gasket is
cleaned dining the self_'lean cycle _ou
do not need to clean this 1)_ hand.
:, The area outside the gasket and
the door liner can be cleaned with a
soap-filled steel wool or plastic pad,
hot water and detergent. Rinse well
with a vinegar and water solution.
To clean the outside of the door:
:_ Use soap and water to thoroughly
clean the u)i), sides and fl'ont of the
oven dooI: Pdnse well. _l_)l.1 Ill,IV _llso
use a glass cleaner to clean the glass
on the outside (ff the (loo_: Do not let
water drip into the vent openings.
:, If any stain on the door vent trim is
persismnt, use a soli abrasive cleaner
and a sponge-scrtfl)ber ti)r best restflts.
:, Spillage of marinades, fl'uitjuices,
tomato sauces and basting materials
containing acids may cause
discoloration and should be wil)ed up
immediately. When sm_hce is cool,
clean and rinse.
Do not use oven cleaners, cleaning
powders or harsh abrasixes on the
outside of the (loo_:
Page 25

RemovableOvenFloor
vvww.GEAppliances.com
Press down andpull out.
,,vvvvv\ )
After broiling, remove the broiler
pat; from the oven.
Toremove the oven floor:
[] Reino_e tile o_en door using tile
instructions in the Lift-Off Oven Door
section of this nlanual.
[] Press down and pull out tile
i'eillOM:lble (/_eIl t'](/oI i
[7_ Clean the oven floor with warn/
SOal),V wateL
Broiler Pan & Grid
Do notciean the broiierpan orgn?lin a serf-
ciean/#goven.
_Mter broiling, relnove tile broiler i)an
fl'onl tile oven. Reinove tile grid fl'oin tile
I)an. Careflilly I)O/II" ()tit tile grease ti'oin
tile I)an into a i)roi)er cont;linei:
_Mish and rinse tile broiler i)an and grid
in hot wamr with a soap-filled or i)lastic
scouting I)ad.
[] X'_q/eI1re-installing tile oxen floor be
sure to slide it all the way to the back
of tile oxen.
IMPORTANT'._Mwa}srei)lace tile
i'en/o'_able floor before tile next use.
If ff_od has 1)urned Oil, spi_inkle tile grid
with deteigent while hot and cover with
wet i)aper towels or a dishcloth. Soaking
tile i)an will ren/ove burned-on foods.
Both tile broiler i)an and grid nlay be
cleaned with a con/nlercial oven cleanei:
Both tile broiler i)an and grid can also be
cleaned in a dishwashei:
Do notstore a soHedbroilerpanandgrid
anywherein theoven.
Control Panel
It's a good idea to wii)e tile control
i)anel after each use. Clean with n/ild
soap and water or vinegar and wateI;
rinse with clean water and polish di_'
with a soft cloth.
Do not use abrasive cleanseis, strong
liquid cleansei_, i)lastic scoui_ing i)ads or
()veil cleansei3 on tile conti'ol panel--
they will danlage the finish. A 50/50
sohlfion of vinegar and hot water works
well.
25
Page 26

Careand cleaningof the oven.
Probe
Roasting rack
Oven Snell
The temperature probe may be cleaned
with soap and water or a soap-filled
scouring pad. Cool the temperature
probe betore cleaning. Scour stubborn
spots with a soap-filled scoudng pad,
_inse and dry:
:, DonotlYnmersethetemperatureprobe
in water
:_Donot store the temperatureprobein
the oven.
Oven Shelves and Convection Roasting Rack
(:lean the oven shelves (including the
offset shell) and the convection roasting
rack with an abrasive cleanser or steel
wool. Mter cleaning, rinse the shelves
and rack with clean water and (h_' with
a clean cloth.
NOTE:Theovenshe/yesandconvectionroasting
ra& maybecleanedin theself-cleaningoven.
However,theshelveswi// darkeninco/or,iose
theiriusterandbecomehardtosiideif cieaned
duringtheso/f-c/caningcyc/e.Youcanwipethe
sheifsupportswithcookingoffafterseff-cieaning
tomaketheshelvessfidemoreeasily
26
Page 27

Oven Light Bulbs (onsomemodels)
NOTE." The glass cover (on some
models) should be removed only when
cold. Wearing latex gloves may offer a
better grip.
vvww.GEAppliances.com
Glasscover
CAUTION.Beforereplacingyour
oven light bulb, disconnect the electrical
power to the oven at the main fuse or
circuit breaker panel
Be sure to let tile light coxer and bull)
cool (-ompletely.
For }our saf_'ty, do not touch a hot bulb
with bare hands or a damp ('loth.
Toremove:
[] Turn tile glass coxer
counterclockwise l/4 turn until tile
tabs of tile glass coxer clear tile
grooxes of tile socket.
[] Using gl°ves °r a oh3 cl°th, rem°x e
tile bulb by pulling it straight out.
Toreplace:
[] Use a ne;_ 130-\olt Halogen bulb,
not to exceed 50 watts.
[] Using gloxes or a dry cloth renlox, e
tile bulb ti'om its packaging. Do not
touch tile bulb with bare fingers.
Receptacle
usegl0ves
or ClOII
"T 1
[] Push tile lmlb straight into tile
receptncle all the wax'.
[] Place the tnbs of the glass cover into
the grooves of the socket. Turn the
glass c()ver ch)ckwise 1/ 4 turn.
For improved lighting inside tile
oven, clean tile glass cover
ti'equenfly using a wet cloth. This
shotdd be done when the oven is
completely c()ol.
[] Rec(mnect electrical power to
the oven,
27
Page 28

Careand cleaningof the oven.
Stainless Steel Surfaces (onsomemodels)
Do not use a steel-wool pad; it will
scratch the surface.
To clean stainless steel surtaces, use a
hot, damp cloth with a mild detergent
suitable tot stainless steel surlhces. Use
a clean, hot, damp cloth to remove
soap. Dry with a dry; clean cloth.
If toed soil remains, try a general
kitchen cleane_; such as Fantastik '_,
Simple Green _, or Form ula 409 c.
For hard-to-clean soil, use a
standard stainless-steel cleaner,
such as Bon-Ami '_or Cameo '_.
Oven Heating Elements
Do not clean the broil element. Am' soil
will bllYIl OJ[][when the element is heated.
The lx_ke element is not eN)osed and is
trader the remo\_d)le oven flora: If
si)illove_, residue or ash accunlulate on
the remox_d)le oven flora; wipe up befln'e
sel6cleaning.
Apply cleaner with a damp sponge.
Use a clean, hot, damp cloth to
remove cleaner. Dry with a dry, clean
cloth. _Mwavs scrub lightly in the
direction of the grain.
_Mter cleaning, use a stainless-steel
polish, such as Stainless Steel Magic",
Revere (lopper and Stainless Steel
Cleaner=; or _'enol All Pro'pose
Metal Polish _. Follow the product
instructions tot cleaning the stainless-
steel surtace.
To clean the oven flora; take out the
remowd)le floor and gently lift the bake
element. Clean with wmm soapy water:
_Mways replace the remo\_d)le floor
heft)re next use.
NOTE:Failureto replace theremovablefloor will
adverselyaffect the cookingperformance.
28
Page 29

Notes.
m.
29
w
Page 30

Before YouCall ForService...
Troubleshooting tips
Save time and money! Review the charts on the following
pages first and you may not need to call for service.
Possible Causes What To Do
Control signals after You forgot to enter a bake * Press the BAKE pad and desired teInperature or the
enteringcookingtime temperature or cleaning SELFCLEANpad and desired (lean time.
or delay start time.
Food does notbake Oven controls improperly set. * See tire Using the oven section.
or mast properly
Food does not Door not open to the * See tire Using the oven section.
hmilproperly broil stop position as
Shelf position is incorrect * See tire Usingtheoven section.
or the shelf is not level.
Incorrect cookware or * See the Using the oven section.
cookware of improper size
being used.
Oven floor not in place. * Replace tire oven floor.
Oven thermostat needs * See tire Adjust the oven thermostat--Do it yourself[
adjustment, se('tiou.
recommended.
Oven controls improperly set. * Make sure you press tire BROILH[/LO pad.
Improper shelf position * See tire Broiling Guide.
being used.
Food being cooked * Use tire broiling pan and grid that came with your oven.
in a hot pan. Make sure it is cool.
Cookware not stilted * Use tire broiling, 1):115 and ,grid that came with your oven.
for broiling.
The probe is plugged into the * Uuplt/g and relllOVe tire probe fl'om tire oven.
outlet in the oven.
Aluminum foil used on the * See tire Using the oven section.
broiling pan mad grid has
not been fitted properly mad
slit as recommended.
ha some areas the power * Preheat tire broil element fi)r 10 minutes.
(voltage) may be low.
• Broil for tire lou,_est_, period of time recommended in
tire Broiling Guide.
Clock and timer A fuse ha your home maybe * Replace the time or reset the circtfit breakeL
donot work blown or the circuit breaker
tripped.
Oven conlrols improperly set. * See tire Using the clock and timer section.
Oven light does Light bulb is loose or defective. • Tighten or replace tire btdb.
not work
Pad operating light is broken. * Call for service.
3O
Page 31

www.GEAppliances.com
le_ iii, Possible Causes What To Do
Oven temperature too Oven thermostat * See the Adjust the oven thermostat--Do it yourself!
hot or too cold needs adjustment, sectiou.
Oven will not work A fuse ill your home may * Replace tile tUse or reset tile circuit breaker:
Oven will not self-clean The oven temperature * Alh>w tile (:,yen to cool to room temperature and reset
"Crackling " or This is the sound of the • This is normal.
"popping" sound metal heating and cooling
be blown or the circuit
breaker tripped.
Oven controls improperly set. * See tile Using the oven section.
is too high to set a tile controls.
self-cleml operation.
Oven controls ilnproperly set. * See tile Using the self-cleaning oven section.
The probe is plugged into * Reu_ove tile probe fl'om tile oveu.
the outlet in the oven.
during both the cooking and
cleaning functions.
Excessivesmoking Excessive soil. * Press tile CLEAR/OFF pad. Open the windows to rid
during clean cycle tile room of smoke. _Vait until tile LOCKEDDOOR
light goes oil. Wipe u l) tile excess soil and reset tile
clean cycle.
Oven door will not Oven too hot. * Allow tile oven to cool below locking teml)eratttre.
open after a
clean cycle
Oven not clean after a Oven controls not properly set. * See tile Using the self-cleaning oven sectil>u.
clean cycle
"LOCK DOOR" flashes The self-clean cycle has * Close the oven door.
in the display been selected but the
LOCKEDDOOR light The oven door is locked * Press tile CLEAR/OFF pad. Allow tile oven to cool.
is on when you want because the temperature
tO cook inside the oven has not
Oven was heavily soiled. * Clean up hea\y spilh>vers before starting tile clean
cycle. Heavily soiled ovens may need to sell:clean
again or fl:,r :4 longer period of time.
door is not closed.
dropped below the
locking temperature.
3/
Page 32

Before YouCallForService...
Troubleshooting -tips
Possible Causes
"F-- and a number You have a function
or letter" flash error code.
What ToDo
• Press the CLEAR/OFFpad. _Mlow the (,``,eta to cool fi.r
one houri Put the (,``eta 1)ack into operation.
in the display If the fm_ction code repeats. " Disconnect all power to the o``en for at least 30
seconds and then reconnect power. If the flmction
error code repeats, call for ser``ice.
Displaygoes blank A fuse in your heine may • Replace the fllse or reset the circuit breaker.
be blown or the circuit
breaker tripped.
The clock is in the • See the Special features of your oven control section.
black-out mode.
Oisplayflashes Power failure. • Reset the clock.
Unableto getthe Oven control pads were • The BAKE and BROIL HI/LO pads (on d(mble (,``eta
displayto show "SF, not pressed properly, models use the upper (,,.eta controls) must be pressed
at the same time and held fi,r 3 seconds.
"Probe? appears in This is reminding you to • Enter a probe temperatm'e.
the display enter a probe temperature
after plugging in the probe.
Power outage, Power outage or surge. • Reset the ch)ck. If the (,``eta was in use ``'ou must reset
it by )ressing the CLEAR/OFF pad, ., I , settino the clock
and resetting an) cooking flmction.
steamfrom the vent When using the convection • This is normal.
feature, it is normal to see
steam coming out of the
oven vent. As the number
of shelves or amount of
food being cooked increases,
i/ iiii i_iii!_!_!_!_!_!_!_!_!_!_I
the mnount of visible steam
will increase.
"Burning', or "oily," This is normal in a new oven • To speed the process, set a sel6clean cycle for a
odor emitting from and will disappear in time. minim mn of 3 hours. See the Using the self-cleaning
the vent oven section.
Strongodor
Fannoise
An odor from the insulation
around the inside of the
oven is normal for the first
few times the oven is used.
A cooling fan or a convection
fan (depending on the
function you are using)
may automatically turn on
and off to cool internal parts.
• This is temporar).
• This is normal. The cooling tim will ttu'n off and on.
The con``ection tim will ttm tmtil the flmction is
(,``er or the do(,r is opened.
32
Page 33

GE Service Protection Plus r_'
GE, a I_ame IecogI]ized _;oddwkle fo_ qtmlhy a_d depeIldabi]hy, offers )(m
SelMce PFotecfio_ Pb_s"_--comp_'ehe_]si_e plotecfioI_ o[] aH yore" appliai_ces--
No Matter What Brand!
Benefits Include:
o Backed by GE
o All brands covered
o Unlimited service calls
o All parts and labor costs included
o No out-of-pocket expenses
o No lfidden deductibles
o One 800 mmd}er to call
Y<m wi]] be complete]} satisfied wit]] ore" service protecti(m or "_oll ma} re(p_est }olaf moile', back
om_ t]_e remaim_im_g va]10e of_om" co]_tract. No qllesdoi_s asked. It's d_at simple.
Prote c t vo i_r refli gera to_; di s]]was h ex; wa s]]er a m_d drye x; ra m_ge, TVI VCR a m_d m i_th m ore--any brand !
P] us t]_ere's _ o extra ch arge tot em ergel_ cy se_'_i ce a _ d low m ol_t]_]y fi _ al_ c]_ g is avai]ab] e. Evel_ icem aker
coverage a_d _bod spoilage protectio]] is oftered_ Yo_ ca_ rest eas}, km_w]_g that a]] yo_r vab_ab]e
ho_seho]d prod_mts are protected agai_st expel_sive repairs.
:_\11 ]l]a]]ds coxe]ed, tip _o 90_ _,lms old, hi ihe co]]_i]]{ ileal {J.S.
We'll CoverAny Appliance.
Anywhere. Anytime.
Please place in envelope and mail to:
Genera_E_ectricCompany
Warranty Registration Department
P.O. Box 32150
LouisviUe, KY 40232-2150
37
Page 34

Consumer Product Ownership Registration
Dear Customer:
Thank you tbr purchasing our product and thank you for placing your confidence in us.
'_A/eare proud to ha_e you as a customer'.
Follow these three steps to protect your new appliance investment:
Complete mid mail
your Consumer
Product Ownership
Registration today.
tlaw' the peace of
mind of knowing w(
CHII colltact VOll ill
the tmlikely event era
sati,17, modification.
Atter mailing tile
registration below,
store this docllment
in a sati, place. It
contains inlormation
you will need should
you require service.
Our selwice number is
800.GE.CARES
(800.432.2737).
Model Number Serial Number
, , , , , , I I , , , , ,
Important: If you did not get a registration card with your
product, detach and return the form below to
ensure that your product is registered, or register
online at www.GEAppliances.com.
Consumer Product Ownership Registration
Read your Owner's
Malmal carethllv.
It will help you
operate yol/r lle',_
appliance properly.
, I
._ Cut h(r_
Model Number Serial Number
ML Ms. M*_. Mixs
Nmm I I I I I I I I I Name I I I I I I I I I I I I
Sl r( (!1 I
Addr(';s I I I I I I I I I I I I I I I I I I I I I I I I
Ap_.#l, , , , , , , I E-mailAddress*
Zip I
l )tie Ha(ed
Monlh
' PI¢ as(: F,rovide your e-mail address to r(ceiv(, via (-mail, discounts, special offers and other iml)ortmH
(ommuni(ations from (;E Applianc(s (GEA).
Ch((k h(r( if you do 11ol "_+all[ 1o 1-(_((iv(_ (olnmuni(ations from (;EA's ( arefully sele(ted parln¢ rs.
O
6EAppfiances
GenerM Electric Company
Louisville, geutocky
ww_GEAppti_l_cescom
34
I
I
Page 35

GEBuilt-In Electric OvenWarranty.
All warranty service provided by our Factory Service Centers,
or an authorized Customer Care®technician. Toschedule service,
on-line, 24 hours a day, vis# us at www.GEAppliances.com,
or carl 800.GE.CARES (800.432.2737).
Staple your receipt here.
Proof of the original purchase
date is needed to obtain service
under the warrant_
GE Will Replace:
Anypart of the o_en which tifils due to a defect in matelJals or workmanship,
From the date of the Dudng this full one-year warranty, (;E will also i)ro_ide, free of charge, all labor
origina!purchase and in-home servk'e to replace the detectixe part.
:_ Service trips to your home to teach you how to use
the product.
:_ huproper h_staJlation.
:_ Failure of the product if it is abused, misused, or used
for other thml the intended purpose or used
commercially.
This warranty is extended to the original purchaser and any succeeding owner for products purchased for
home use within the USA. In Alaska, the warranty excludes the cost of shipping or service calls to your home.
Replacement of house fuses or resetting of circuit
breakers.
Damage to the product caused by accident, fire, floods
or acts of God.
h_cidentaJ or cmlsequential damage caused by
possible defects with this appliance.
Some states do not allow the exclusion or limitation of incidental or consequential damages. This warranty
gives you specific legal rights, and you may also have other rights which vary from state to state. Toknow
what your legal rights are, consult your local or state consumer affairs office or your state's Attorney General.
Warranter: General Electric Company,Louisville, KY40225
35
Page 36

ConsumerSupport.
GEAppliancesWebsite www.GEAppliances.com
Have a question or need assistance with your appliance? Try the GE Appliances _Vebsite 24 hom_ a day,
any day of the year! For greater convenience and tilster selMce, you can now download Owner's Manuals,
order parts, cat;dogs, or even schedule service ondine. You can also "_sk Our Team of EN)erts .....
yo/lr qtlestions, and so II/llch II/ore...
ScheduleService www.GEAppliances.com
Expert (;E repair se_ice is onl_ one step away ti'om your door. Get on-line and schedule your se_i('e at
your conxenience 24 hom_ am (lm of the _ear! Or call 800.GE.CARES (800.432.2737) during n(mnal
business hom_.
RealLifeDesignStudio www.GEAppliances.com
GE supports the/Jnivex_al Design concept--products, sex_'ices and environments that can be used by
people at all ages, sizes and capabilities. _,\'e recognize the need to design fi)r a wide range of physical and
mental abilities and impaimlents. For details of GE's/Jnive_al Design applications, including kitchen
design ideas for people with disabilities, check out our _,Vebsite today. For the hearing impaired, please call
800.TDD.GEAC (800.833.4322).
ExtendedWarranties www.GEAppliances.com
Pro'chase a (;E extended warrant_ and learn about special discounts that are axailable while _om" warrant_
is still in effect. You can imrchase it on-line an)time, or call 800.626.2224 during natural business hom_.
(;E (_onsulner Home Serxices will still be there after your warrant}, expires.
PartsandAccessories www.GEAppliances.com
Individuals qualified to service their own appliances can have parts or accessolJes sent directly to their
homes (VISA, MasterCard and Discover cards are accepted). Order on-line todd 5 24 hom_ every day or by
i)hone at 800.626.2002 during natural business houi_.
Instructions contained in this manual coverprocedures to be performed by any user.Other servicing generally
should be referred to qualified service personnel Caution mustbe exercised, since improper servicing may cause
unsafe operation.
Contact Us www.GEAppliances.com
If you are not satisfied with the service you receive fl'om (;E, contact us on our _.Vebsite with all the details
including yam" phone nlllllbeI'_ ()I" write to: General Manage_; Customer Relations
GE Appliances, Appliance Park
I,ouisville, KY 40225
RegisterYourAppliance www.GEAppliances.com
Register your new applim_ce on-lhae--at your convenience! Timely product registration will allow fin"
enhanced communication and prompt service under the terms of wmr warrant,i, should the need arise.
You may also mail in the pre-printed registration card included in the packing material, or detach and
use the titan in this Owner's Manual.
Printed in the United States
 Loading...