

GE JTD915WK2WW, JTD915SK3SS, JTD915CK2CC, JTD915BK2BB, JKD915WK2WW Owner’s Manual
...
Safety Instructions ........... 2, 3
Operating Inslruc_tions
Control I_ob .................. 5
Crisping Stale hems ............. 7
Drawer . ...................... 6
Features ...................... 4
Moisture Selector. .............. 5
ON Signal Light ................ 5
Pans ......................... 5
Proofing Yeast Bread
and Dough .................... 7
Rack ......................... 6
Temperature Selection Charts . . .7, 8
"_4'anning Serving Bowl
and Plates ..................... 6
Care and Cleaning ............ 9
ge.com
Installation Instntt¢ions .... 10-15
Troubleshooting Tips ......... 16
Consumer Support
Consumer Support ..... Back Cox>r
Product Regisuafion ........ 19, 20
_A'ananty for Customers
in Canada .................... 93
VVmTantv for Customers
in the U.S.A ................... 92
Write the model and serial
numbers here:
Model #
Serial #
You can find them on a label located
on the bacl_side of the lower drawer
fl'ont.
In Ca ada, contact us at:
n
wwvv.GEAppliances.ca
49-80383 12-05JR
iMPORTANTSAFETYiNFORMAtiON.
READALLiNSTRUCtiONSBEFOREUSING
m
For your safety, the information in this manual must be followed to minimize the risk of fire or
explosion, electric shock, or to prevent property damage, personal injury, or loss of life.
WARNINGANTI-TIPBRACEREOUIRED
All warming drawers can tip and injury could result if net properly installed.
Toprevent accidental tipping of the warming drawer, attach it to the wall with an anti-tip brace
as described in the Installation Instructions.
SAFETYPRECAUTIONS
When using electrical appfiances, basic safety precaufions should be followed, including
the following:
_{_;Use this appliance only %r its intended
purpose as described in this )wrier s
Manual.
Ji:,:Be sure your appliance is properly
installed and grounded by a qualified
technician in accordance with rite
provided installation instructions.
_:;Do not atmmpt to tei)air or replace any
part of your wanning drawer unless it is
specifically recommended in this manual.
All other selxicing should be referred to
a qualified mchnician.
_?{:_Haxe the installer show you the location
of tile citvuit breaker or fl]se. Mark it for
easy' reference.
_i:,:Before performing any service, unplug
or disconnect the power supply at the
household distribution panel by removing
dte fltse or switching off tile circuit
breaker
Ji:,:Do not leme children alone----_hildren
should not be left alone or unattended
in an area where an appliance is in use.
They should hexer be allowed to sit or
stand on any part of the appliance.
• (
_?{:_Do not allow anyone to climb, stand or
hang on d_e drawel: They could damag>
the warming drawer, or cause sex>re
personal injm>
_ti::Be sine the wamfing drawer is securely
installed in a cabinet fltat is firmly attached
to the house structure.
_?{_:Nexer leax> dm drawer open when you
are not watching the warming drawer
_:;Always kee I) combustible wall cox_ring,
curtains or drapes a safe distance from
your wanning drawer
ji:,iAlwWs kee I) wooden and plastic utensils
and canned food a safe distance away
flom your wanning drawer.
_:;Teach children not to pl W with file
controls or any oflter part of tile wanning
drawer
Do not place more than 50 pounds into
the drawer
For your safety, nexer use your appliance
fbr wamfing or heating the room.
2
ge.com
a, WARNING!
SAFETYPRECAUTIONS
The purpose of the warming drawer is to hold hot cooked foods at serving temperature.
Always start with hot food; cold food cannot be heated or cooked in the warming drawer.
_:;Do not waml food ill the wamling drawer _:;Ne_er lemejars or cans of tht diippings in
fox" nlore than two hoIlrS.
or near your warming drawer
_ -g_ CAUTYON:Items of interest to
children should not be stored in cabinets
aboxe the wamfing drawer; children
climbing on file drawer to reach imms
could be seriously itljuled.
_:_Use only d U pot holders--moist or damp
pot holders on hot surfaces may xesult in
bnrlls floxn smam. Do not let pot holders
touch hot heating elements. Do not use
a towel or other bulky cloth.
_7{:_Do not let cooking gxease or other
flammable materials accnmulam in
or near the wanning drawer
E:,:Do not use water on gTease fires.
Nexer pick up a flaming pan. T/lirl
the controls off:
Flame in die wanning drawer can be
smodlered by closing die drawer or
using a multi-puil)ose d_T chemical or
foam-type fire extinguisher
_:;Do not touch the heating element or
die inmfior snrthce of die wamling
drawer These sniP, tces may be hot
enough to bnrn,
REMEMBER: Tile inside snrPace of tile
wanning drawer may be hot when tile
drawer is opened.
E:,:Do not store or use combnsfible mamfials,
gasoline or other flammable vapors and
liquids in tile vicinity of fills or any other
appliance.
_:;Use care when opening tile drawer ()pen
tile drawer a crack and let hot air or steam
escape befoxe xemoving or replacing food.
Hot air or steam which escapes can cause
bnrlls to hands, face and/or eyes.
E:,:Do not heat unopened food containers.
Pressure could build up and tile container
cou]d burst, causing an injm T.
_:;Kee I) file \_nt unobstrucmd.
_fi:,:Do not use tile warming drawer to dU
newspapers. If ox>rheated, riley can catch
on fire.
_{::Do not use tile warming drawer fox a
storag_ area. Imms stored in file wanning
drawer can ignim.
_:;Do not leave paper products, cooking
umnsils or food in the wanning drawer
when not in use.
(:lean only parts listed in the Careand
cleaningof thewarmingdrawersection.
Do not use aluminun/ foil to line die
drawer Foil is an excellent heat insulator
and will uap heat beneath it. This will
upset the performance of tile drawer and
it could damag_ the inmfior finish.
_t{::¼:ear proper apparel. Loose fitting or
hanging gammnts should nex>r be worn
while using this appliance.
READANDFOLLOWTHISSAFETYINFORMATIONCAREFULLY.
SAVETHESEINSTRUCTIONS
3
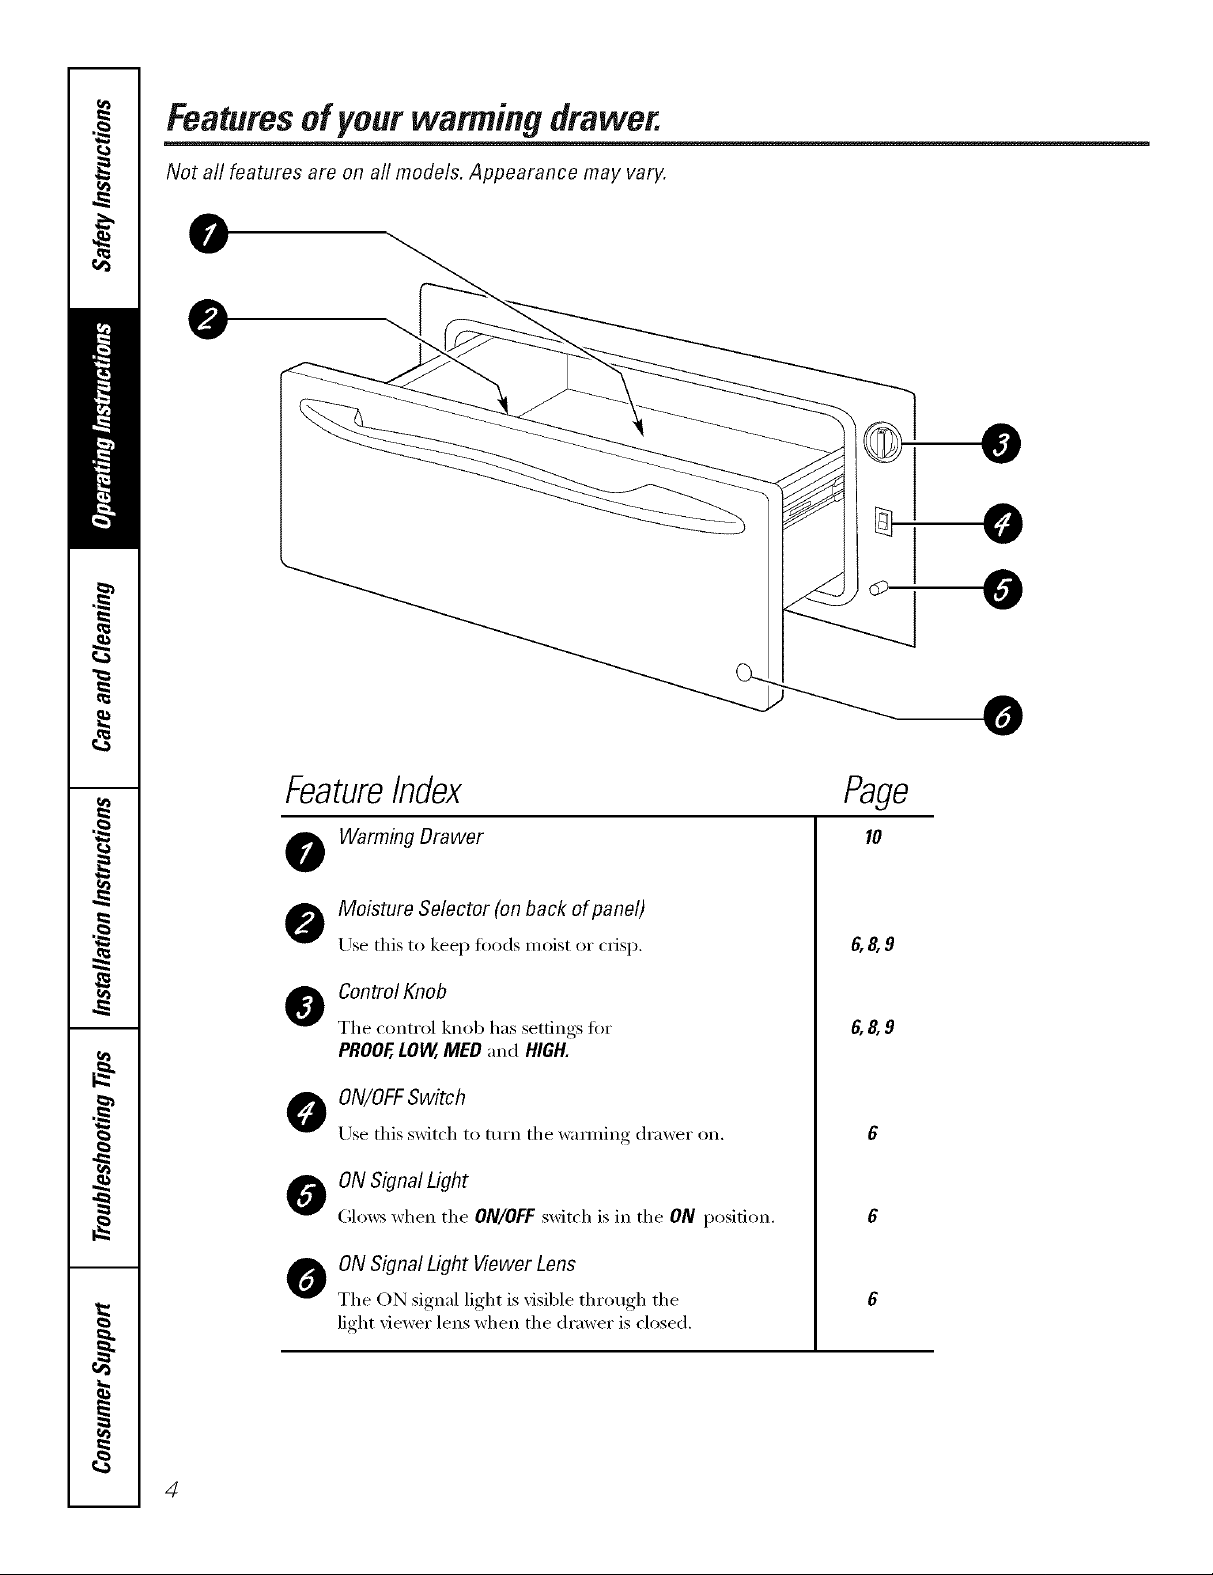
Featuresof your warming drawer.
Not all features are on all models. Appearance may vary.
0
@
FeatureIndex
Warming Drawer
Moisture Selector (on back of panel)
Use this to keep foods moist or crisp.
o Control Knob
The control knob has settings for
PROOF,LOW,MED "and HIGH.
o ON/OFFSwitch
Use this s_dtch to mrn the wamfing drawer on.
O ON Signal Light
(;lows when the ON/OFFswitch is in the ON position.
O ON Signal Light Viewer Lens
The ON signal light is visible through the
light viewer lens when the drmver is closed.
0
Page
I0
6,8,9
6,8,9
4
Usingthe warmingdrawer, ge.com
The warming drawer will keep hot, cooked foods at serving temperature. Always start with hot food. Do not
use to heat cold food other than proofing yeast dough, crisping crackers, chips or dry cereal.
(
PROOF
!),0
MED
H
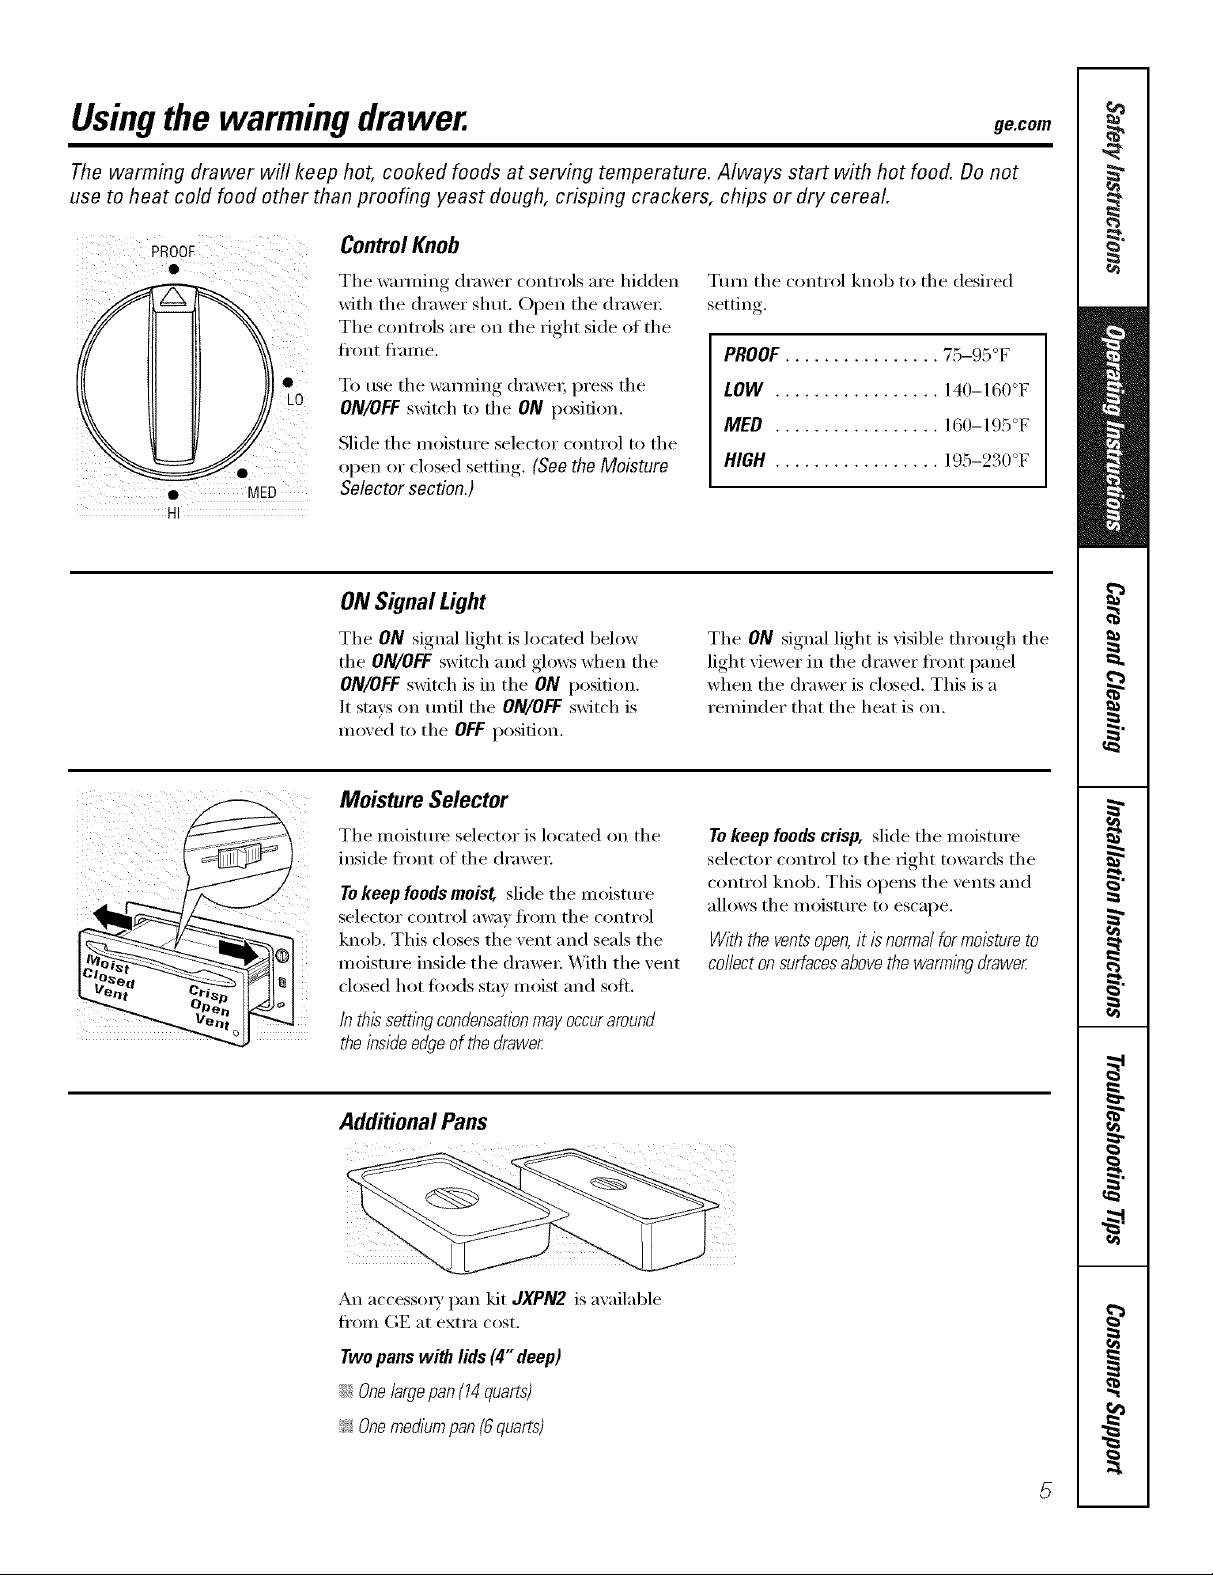
ControlKnob
The wamfing drawer controls are hidden
with the drawer shut, Open the drawe_;
The controls are on the right side of the
fl'ont fl'ame.
To use the wamfing drawer, press the
ON/OFFswitch to tile ON position.
Slide tile moisture selector control to tile
open or closed .setting, (See the Moisture
Selector section.)
ON SignalLight
Tile ON signal light is located below
tile ON/OFFswitch and glows when tile
ON/OFFswitch is ill tile ON position.
It stays on until tile ON/OFFswitch is
moved to tile OFF position.
Moisture Selector
Tile moisture selector is located on tile
inside front of tile drawei:
To keep foods moist slide tile moisture
selector conti'ol }ll_';iy[i'OIl/ tile contI'ol
knob. This closes tile vent and seals tile
moisture inside tile drawe_: With tile vent
closed hot foods stay moist and soil
In this settlbg condensationmay occuraround
the inside edgeof the drawer:
Ttml tile control knob to tile desired
settin ,
PROOF................ 75-95°F
LOW ................. 140-160°F
MED ................. 160-195°F
HIGH ................. 195-230°F
Tile ON signal light is visible through tile
light viewer in tile drawer fl'ont panel
when tile drawer is closed, This is a
reminder that tile heat is on.
To keep foods crisp, slide tile moisture
selector control to tile right towards tile
control knob. This opens tile vents and
allows tile moisture to escape.
With the ventsopen,it isnormal for moistureto
collect onsurfacesabovethe warming drawe_
Additional Pans
An access(ny pan kit JXPN2 is available
fl'om (;E at extra cost.
Twopans with lids (4" deep)
::Ji::Onelargepan (14 quarts)
_ Onemedium pan{6 quarts)
5

Usingthe warming drawer.
Rack
_i; Rack will fit ti'om ti'ont to back.
Preheat with the rack in place.
i:_:Using the rack allows fin" double
stackim, of items.
When using the warming drawer...
Doublestacking items with the rack in position.
Donotlinethewarmingdrawerwith
aluminumfoil.
::Ji::Allow time tin" file drawer to be
preheated:
LOW 8 mimlms
IVIED 1:5 mimltes
HIGH 20 minutes
NOTE."It Isnot necessarytopreheat the drawer
forproofing.
Food in heat-safe glass and glass ceramic
pans may need higher them/ostat setting
as compared to toed in met;d pans.
::Ji::Repeated opening of the drawer allows
the hot air to escape and the ti)o(l to
cool. _Mlow extra time fin" temperature
inside the drawer to stabilize after
adding items.
ToWarm ServingBowl and Plates
Towarm servingbowlsand plates set the
control on LOW
::Ji::Use only heat-sate dishes.
_: Place the empb' dishes on the rack
to raise them off the bottom of the
(lmwe_: If w)u want hotter dishes or
want to heat fine china, please check
with the II/anttfilCttlI'er (ff the dishes
for their maximmn heat tolerance.
::Ji::_4]th large loads it may be necessa_ y to
rise a higher thennostnt setting and
cover some of the cooked toed items.
_: Food should be kept hot in its cooking
container or tI'ansteFI'ed to a heat-sate
serving dish.
::J?::Altmfinum fi)il may be used to cover
toed to prevent it ti'om drying out.
A CAUTION:Pla iccontainers
orplastic wrap will melt if in direct contact
with the drawer. Melted plastic may notbe
removable and is not covered under your
warranty.
::Ji::Remove serving spoons, etc., before
placing containe_ in wamfing (h'awe_:
::Ji::_]/eIl holding hot, cooked toods and
_m_ning empty serving dishes at the
same time, place the serving dishes on
the high rack i)osition and the food on
the bottom of the (h'awe_:
CAUTION:>hes aybe
hoLUsepot holders or mitts when removing
hot dishes.
_: Preheat empD' serving dish while
preheating the drawe_:
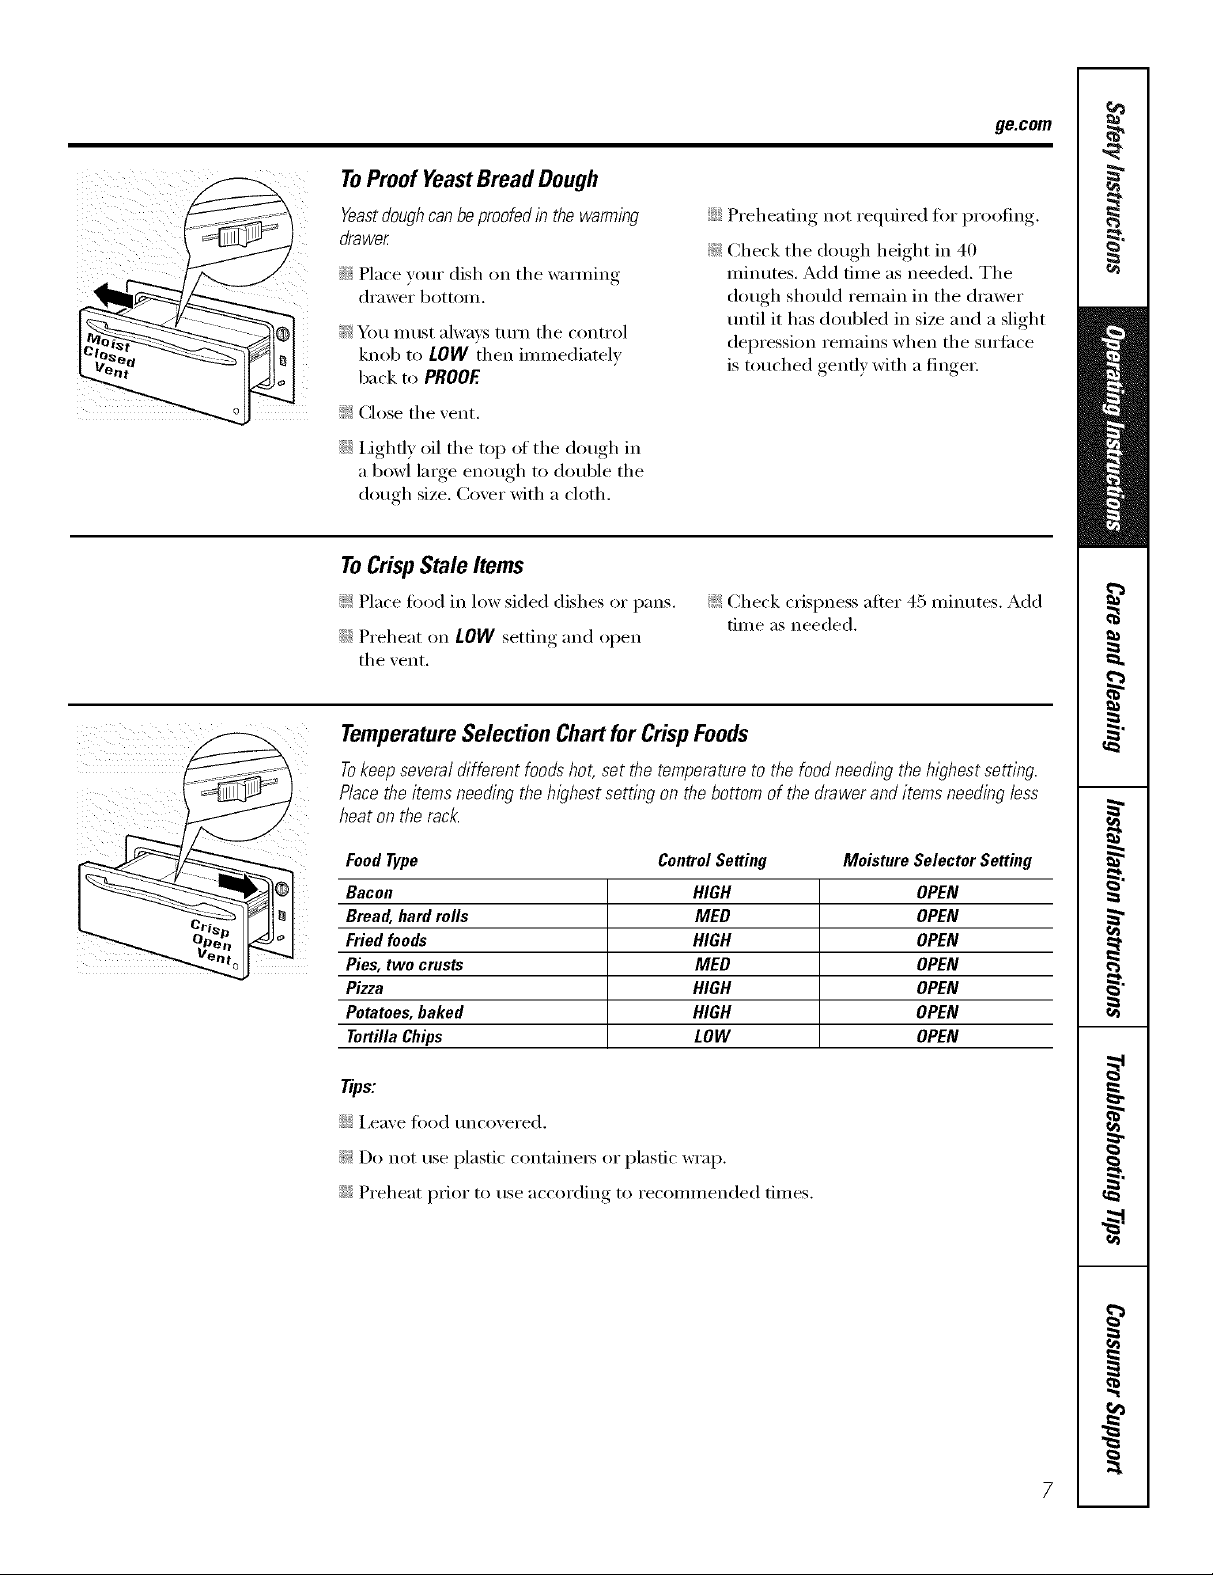
ToProofYeastBread Dough
Yeastdoughcan beproofed in the warming
drawer
{_<_Place v(:,ur dish on the wamfing
di'awer bottOlll.
i_,' You must alwms turn the control
knob to LOW then immediately
back to PROOE
!i_:Close the vent.
iJi::i Jghfl) oil the top of the dough in
a bowl large enough to double the
dough size. Coxer xdth a cloth.
ToCrispStale Items
ge.com
iJi::Preheating, not re(luired fiw I)r°°fing.
!i_:Check the dough height m 4 )
• o" " (
minutes, Add time as needed. The
dough should remain in the drawer
until it has doubled in size and a slight
depression remains when the surlhce
is touched gently with a finge_:
!;_:Place food in low sided dishes or pans.
!i?:Check crispness after 45 minutes. Add
time as needed.
iJi::Preheat on LOW ,settin,,_and open
the _ent.
TemperatureSelectionChartfor CrispFoods
Tokeep several different foods hot, set the temperature to the food needing the highest setting.
Place theitems needing the highest setting on the bottom of the drawer and items needing less
heat on the rack.
Food Type
Bacon
Bread, hard rolls
Fried foods
Pies, two crusts
Pizza
Potatoes, baked
Tortilla Chips
Tips'.
::Ji::i,eave toed uncovered.
_: Do not use plastic containet_ or plastic wrap.
::Ji::Preheat p_ior to use according to recommended times.
ControlSetting
HIGH
MED
HIGH
MED
HIGH
HIGH
LOW
Mo_ture Se_c_rSetting
OPEN
OPEN
OPEN
OPEN
OPEN
OPEN
OPEN
Usingthe warming drawer.
m
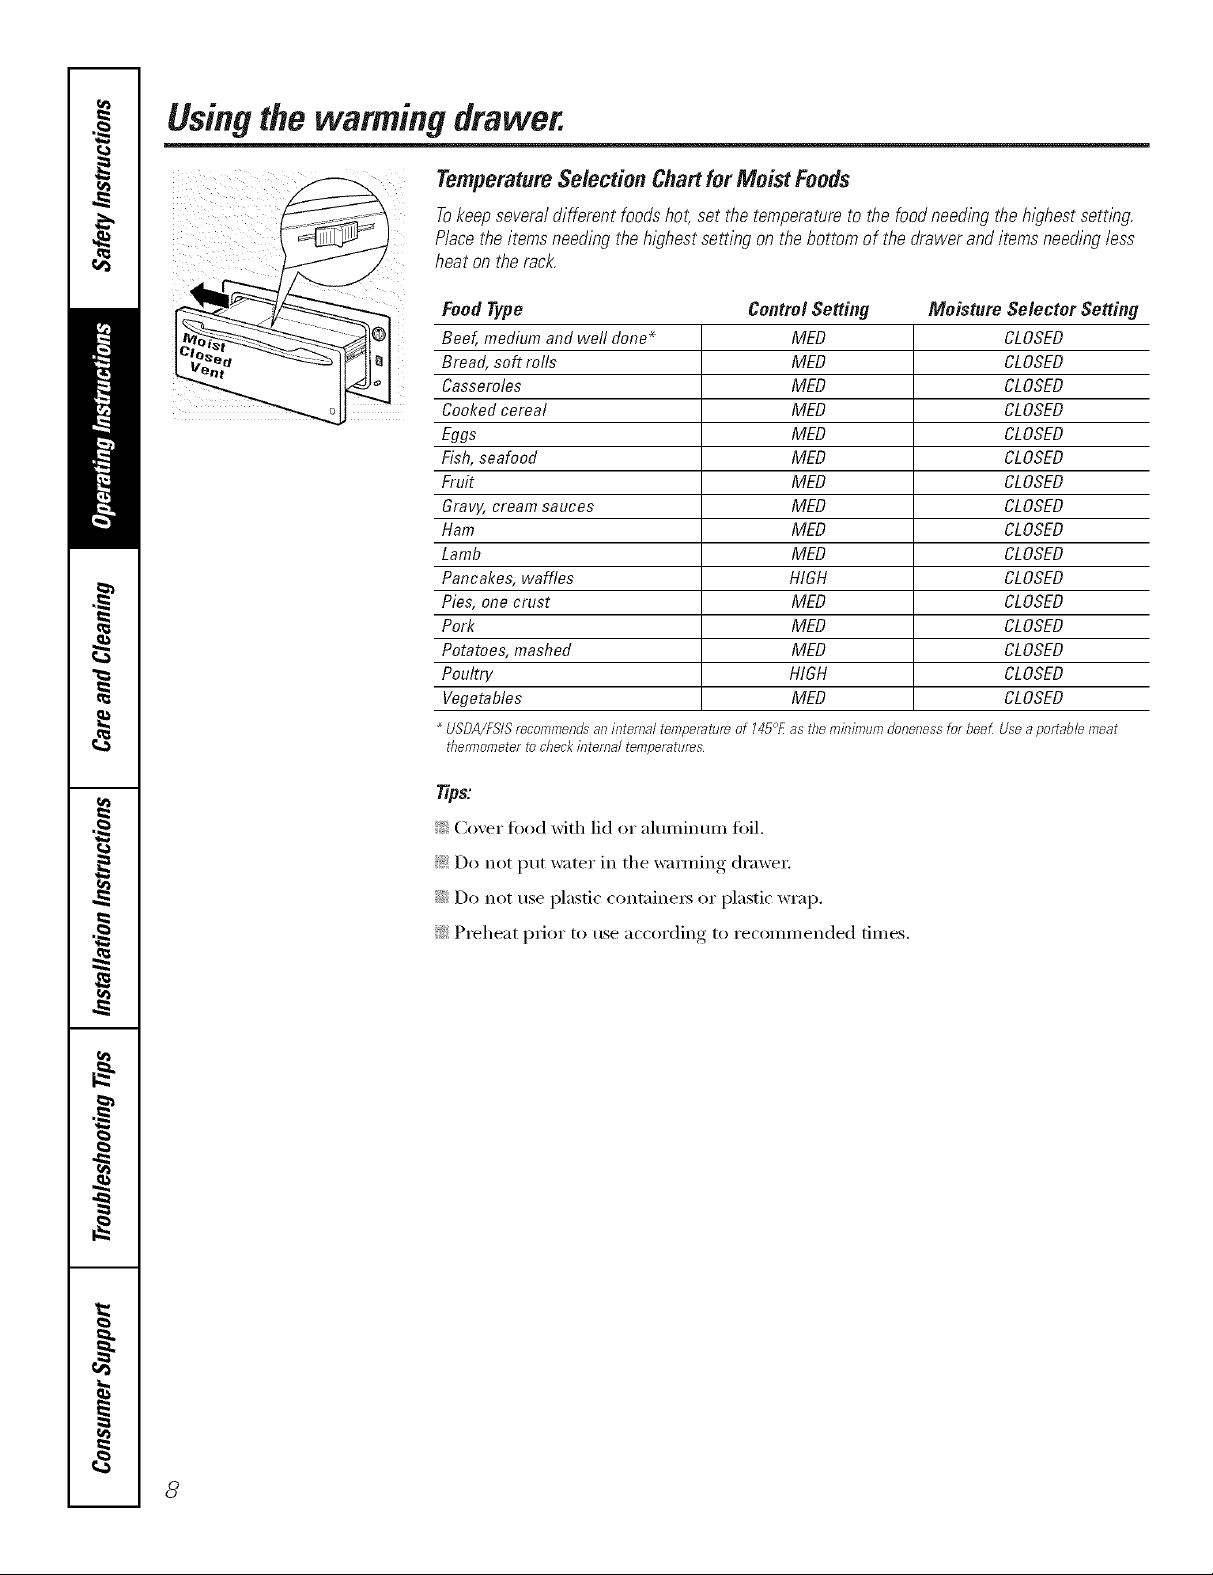
TemperatureSelection Chartfor Moist Foods
Tokeepseveraldifferentfoodshot,setthetemperatureto thefoodnee(hbgthehighestsett/bg
Placetheitemsneedingtheh/_Thestsettingonthebottomof thedraweranditemsneedinglees
heatontherack.
FoodType
Beef, medium and well done*
Bread, soft rolls
Casseroles
Cooked cereal
Eggs
Fish, seafood
Fruit
Gravy, cream sauces
Ham
Lamb
Pancakes, waffles
Pies, one crust
Pork
Potatoes, mashed
Poultry
Vegetables
USDA/FSISrecommends"aninmmal temperatureof 145°£as the
thermometertocheckinternal t_mpemtures
Tips'.
!_'_Cover fi)od with lid or aluminum fifil.
!i_:Do not put water in the wa_]ning (h'awe_:
Control Setting
Moisture Se/ector Setting
MED
MED
MED
MED
MED
MED
MED
MED
MED
MED
HIGH
MED
MED
MED
HIGH
MED
nlfi_fiTlumalonenessfurbee_Usea portablu,meat
CLOSED
CLOSED
CLOSED
CLOSED
CLOSED
CLOSED
CLOSED
CLOSED
CLOSED
CLOSED
CLOSED
CLOSED
CLOSED
CLOSED
CLOSED
CLOSED
iJi::Do not use plastic containers or plastic wrap.
}N Preheat I)Ii°r to rise according, to recommended times.
8
 Loading...