

Page 1
Safety Information
Anti-Tip Device .............. 3
Safety Precautions ......... 3, 4
Operating lnstructions
Control Knob ................ 6
Crisping Stale Items .......... 8
Drawer ...................... 7
Features ..................... 5
Moistm'e Selector. ............ 6
ON Signal Light .............. 6
Pans ........................ 6
Proofing Yeast Bread
and Dough .................. 8
Rack ........................ 7
Temperature Selection
Charts .................... 8, 9
Warming Serving Bowl
and Plates ................... 7
GEAppliances
JKD910
JTD9_O
Care and Cleaning
Control Knob .............. 10
Rack ...................... 10
Stainless Steel .............. 10
Warming Drawer Pan ........ 10
Installation ........... 11-16
Troubleshooting Tips ..... 17
Customer Service
Product Registration .......... 2
Service Telephone
Numbers ........ 2, Back Cover
Warranty for Customers
in Canada .................. 19
Warranty for Customers
in U.S ...................... 18
www.geappliances.com 164D3333P163 49-8933-1 05-00JR
350A4502P201
Page 2
GE& You,A Service Partnership.
IMPORTANT!
Fill out the Consumer Product Regis_adon Card.
Twoeasyways toregisteryour appliance!
_ Through the internet at www.geappliances.com
_ Complete and mail the enclosed Product Registration Card
FORYOURRECORDS
Writethemodelandserialnumbershere:
#
#
You can find them on a label on the light side of the cavity. Remove tim pan to access this label.
Staplesalessliporcancelledcheckhere.
Proof of the original purchase date is needed to obtain service under the wal_'anty.
READTHISMANUAL
Inside you will find many helpful hints on how to u_ and maintain your wanning dFawer
properly.Just a little preventive care on your part can save you a great deal of time and money-
over the life of your warming drawer.
IFYOUNEEDSERVICE
You'll find many answers to common problems in the Before YouCullForService _cdon.
If you review our chart of Troubleshooting tips fiist, you may-not need to call for service at all.
If you do need service, you can relax knowing help is only a phone call away. A list of toll-free
cusu}mer service numbel_ is included in 11aeback secdon of this manual, Or, in the United States,
you can always call the GE An_ei Center , at 800-626-2000, 24 hem ,'sa day, 7 {laysa week.
InCanada, call 1-800-361-3400.
OR
Visit our Website at: www.geappliances.com
®
2
Page 3
IMPORTANTSAFETYINFORMATION.
READALLINSTRUCTIONSBEFOREUSING.
WARNING!
For your safe_ the information in this manual must be followed to minimize the risk of fire or
explosion, electric shock, or to prevent property damage, personal injury, or loss of life.
WARNINGANTI-TIPBRACEREOUIRED
All warming drawers can tip and injurycould resultif not properly installed.
Toprevent accidental tipping of the warming drawer, attach it to the wall with an anti-tip brace
as described in the Installation Instructions.
SAFETYPRECAUTIONS
When using electrical appliances, basic safety precautions should be followed, including the
following."
Use this appliance only for its intended
purpose as described in this Owner's
Manual.
Be sure your appliance is properly installed
and grounded by a qualified technician in
accordance with the provided installation
instructions.
N Do not attempt to repair or replace any
part of your wmxning drawer unless it is
specifically recommended in this manual.
All other selwidng should be refeiTed to a
qualified technician.
N Have the installer show you the location
of the circuit breaker or fuse. Mark it for
easy reference.
N Before perfoiTning any selwice, unplug
or disconnect the power supply at the
household distribution panel by
removing the fuse or switching off
the circuit breaker.
N Do not leave children alone--children
should not be left alone or unattended in
an area where an appliance is in use. They
should never be allowed to sit or stand on
any part of the appliance.
_ Do not allow anyone to climb, stand or
hang on the drawer. They could damage
the wanning drawer, or cause severe
personal injury.
N Be sm'e the wm'rffmg drawer is securely
installed in a cabinet that is fiITnly attached
to the house structure.
N Never leave the drawer open when you
are not watching the wam_ing drawer.
N Always keep combustible wall covering,
curtains or drapes a safe distance from
your walTning drawer.
N Always keep wooden and plastic umnsils
and canned food a safe distance away
from your wmTning drawer.
N Teach children not to play with the
conu'ols or any other part of the wmxning
drawer.
N Do not place more than 50 pounds
into the drawer.
N For your safety, never use your appliance
for warming or heating the room.
3
Page 4
IMPORTANTSAFETYINFORMATION.
READALLINSTRUCTIONSBEFOREUSING.
WARNING!
Thepurpose of the warming drawer is to hold hot cooked foods at serving temperature.
Always start with hot food; cold food cannot be heated or cooked in the warming drawer.
N Do not wm=a food in tile warming drawer
for more than two horn*.
N CAUTION:Imms of interest m children
should not be stored in cabinets above
the warming drawer; children climbing
on the drawer m reach imms could be
seriously injured.
N Use only &7 pot holders-moist or damp
pot holders on hot surfaces may result in
burns from steam. Do not let pot holders
Much hot heating elements. Do not use a
towel or other bulky cloth.
N Do not let cooking ,wease or other
flammable mamrials accumulam in or
near the warTning drawer.
N Do not use water on grease fires. Never pick
up a flarffmg pan. Tm'n the conu'ols off.
Flame in the wazrning &awer can be
smothered by closing the drawer or using
a multi-purpose &y chemical or foam-type
fire extinguisher.
N Do not touch the heating element or the
interior surface of the wazrning drawer.
These surfaces may be hot enough m burn.
REMEMBER: The inside surface of the
wm=_ing drawer may be hot when the
drawer is opened.
N Do not store or use combustible materials,
gasoline or other flammable vapors and
liquids in the vicinity of this or any other
appliance.
N Never leave jars or cans of fat drippings in
or near your win'ruing drawer.
N Use care when opening the drawer. Open
the drawer a crack and let hot air or steam
escape before removing or replacing food.
Hot air or steam which escapes can cause
bums m hands, face and/or eyes.
N Do not heat unopened food containm*.
Pressure could build up and the container
could burst, causing an injm T.
@ Keep the vent unobstructed.
@ Do not use the wmrning drawer m &7
newspapers. @overheated, they can catch
on fire.
@ Do not use the wmrning drawer for a
storage area. Imms stored in the warming
drawer can ignite.
@ Do not leave paper products, cooking
utensils or food in the wm_ffmg drawer
when not in use.
@ Clean only parts listed in the Care and
cleaning of the warming drawer section.
@ Do not use aluminum foil to line the
drawer. Foil is an excellent heat insulator
and will nap heat beneath it. This will upset
the perfommnce of the drawer and it could
damage the interior finish.
READANDFOLLOWTHISSAFETYINFORMATIONCAREFULLY.
THESEINSTRUCTIONS
4
Page 5
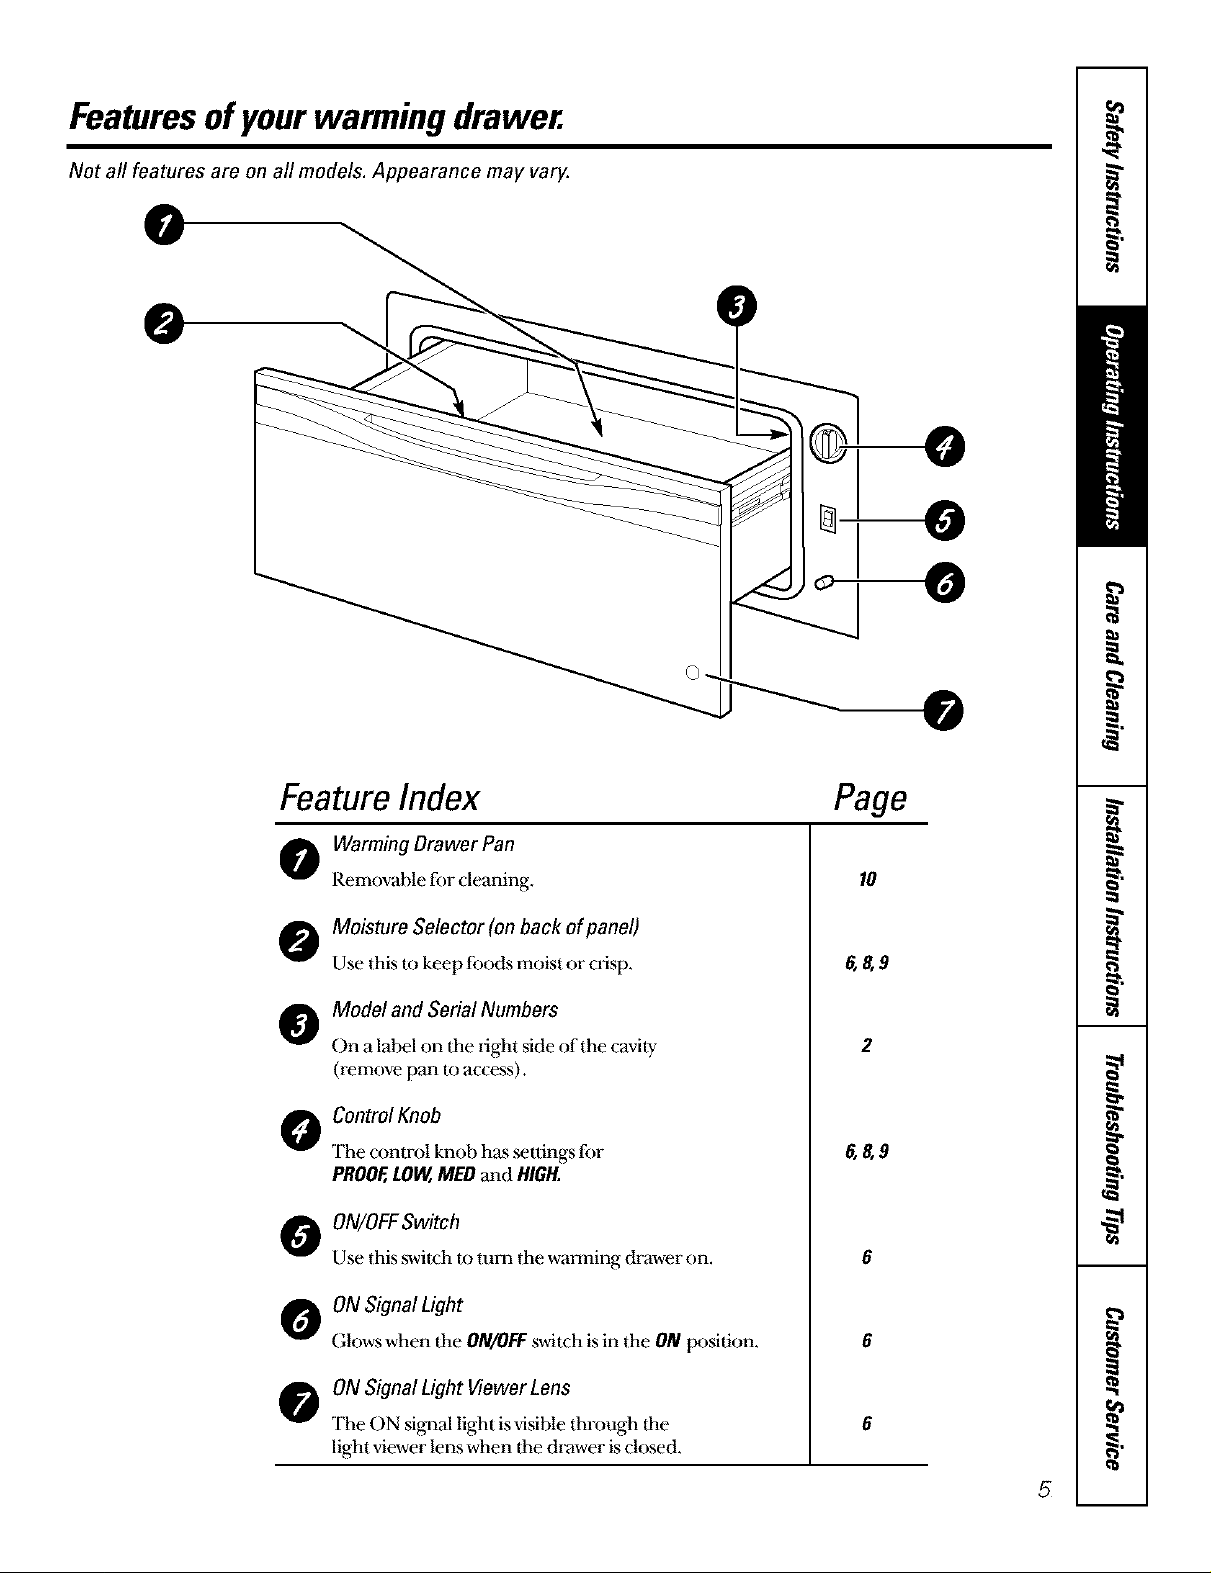
Featuresofyourwanningdrawer.
Not all features are on all models. Appearance may vary.
0
0
O
O
O
©
FeatureIndex
o Warming DrawerPan
Removable for cleaning.
o Moisture Selector (on back of panel)
Use this to keep foods moist or crisp.
o Model and Serial Numbers
On a label on the right side of the cavity
(remove pan to access).
o ControlKnob
The control knob has settings for
PROOF,LOW,MED and HIGH.
o ON/OFFSwitch
Use this switch to turn the warming drawer on.
O ON Signal Light
Glows when the ON/Off switch isin the ON position.
Page
1o
6,8,9
2
6,8,9
6
6
O ON Signal Light Viewer Lens
The ON signal light isvisible through the
light viewer lens when the drawer is closed.
6
5
Page 6
Usingthe warming drawer.
The warming drawer will keep hot, cooked foods at serving temperature. Always start with hot food.
Do not use to heat cold food other than proofing yeast dough, crisping crackers, chips or dry cereal
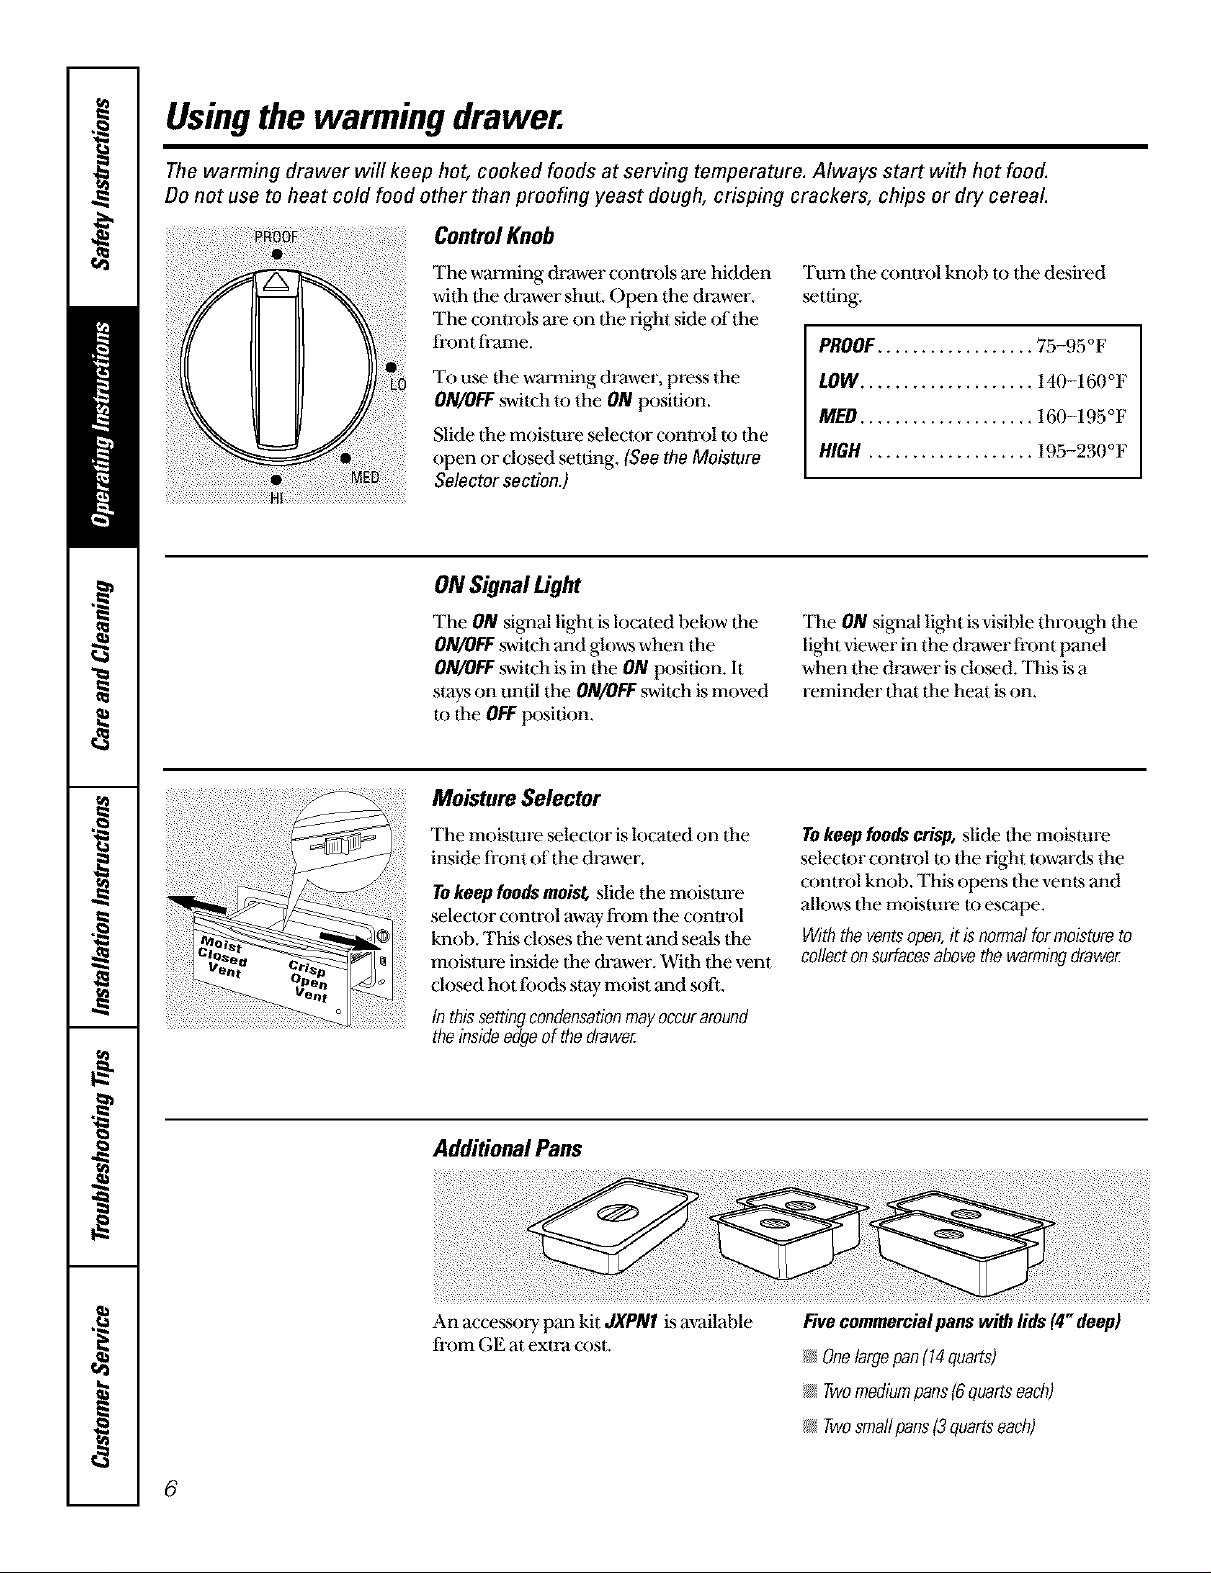
ControlKnob
The wmaning drawer conu'ols we hidden
with lhe dFawer shut. Open the dtawer.
The controls are on the light side of the
front frame.
To use the wmaning drawer, press the
ON/OFFswitch to the ON position.
Slide Ihe moisture selector control It the
()pen or dosed setting. (See the Moisture
Selector section.)
ON Signal Light
The ON signal light is located below the
ON/OFF swilch and glows when the
ON/OFF swilch is in the ON Ix)sition. It
stays on until the ON/OFF switch is moved
m the OFFposition.
Moisture Selector
The moisture _tecmr is located on the
inside front of 11aedrawer.
Tokeep foodsmoisg slide the moisture
selector conu'ol away from the conu'ol
knob. This doses Ilae vent and seals Ilae
moisture inside the drawer. With the vent
closed hot foods stzty moist and soft.
Inthis setting condensationmay occuraround
the insideedgeof the drawer.
Turn Ihe conu'ol knob to the desired
setdng,
PROOF.................. 75-95 OF
LOW.................... 140-160°F
MED.................... 160-195°F
HIGH ................... 195-230°F
tile ON sigqaal light is visible through tlle
light viewer in the drawer front panel
when the drawer is closed, lifts is a
reminder that the heat is on.
Tokeep foods crisp, slide flaemoisture
selector conu'ol to the fight rewards the
conu'ol knob. This ()pens Ihe vents and
allows Ilae moisture It escape.
Withtheventsopen,it isnormalformoistureto
collectonsurfacesabovethewarmingdrawer.
Additional Pans
An accessory pan kit JXPNI is available
from GE at exwa cost.
Fivecommercialpanswith lids (4"deep)
N Onelargepan(14quarts)
_;;Twomediumpans(6quartseach)
I;_Twosmaflpans[3quartseach)
6
Page 7

Rack
Rack will fit fi'om front to back.
Preheat with tlae rock in place.
_/Using the rack allows for double
stacking of items.
When using the wanning drawer,..
Double stackin 9 items with the rack in position.
Donot line thewarmingdrawerwith
aluminumfoil.
_ Allow time for dae drawer u) be
preheated:
LOW 8 minutes
MED 15 minul_s
HIGH 20 minules
NOTE:Itisnotnecessarytopreheatthedrawer
forproofing.
Food in heat-safe glass and glass ceramic
pans may need higher thenTlos{at setting
as compared Io food in metal pans.
_ Repeamd opening of the drawer allows
the hot airto escape and the food It)
cool. Allow exfra time for femperature
inside tl,e drawer It) stabilize after
adding items.
To Warm Serving Bowl and Plates
Towarmservingbowlsandplatessetthe
controlonLOW.
_ U_ only heat-safe dishes.
_ Place the empty- dishes on the rack m
raise them off the bottom of the
drawer. Ifyou want boiler dishes or
want It) heat fine china, please check
with the manufacturer of tlae dishes for
their maximum heat tolerance.
_ With lapge loads it may be necessmy to
u_ a higher thermostat setting and
cover some of the cooked food ifems.
_ Food should be kept hot in ifs cooking
container or tYansferred to a heat-safe
serving dish.
_ Aluminum foil may- be u_d to cover
food m prevent it from (hying out.
CAUTION:Plastic containers orplastic
wrap will melt if in direct contact with
the drawer. Melted plastic may not be
removable and is not covered under
your warranty.
_ Remove _rving spoons, etc., before
placing containers in warming drawer.
_ Preheat empty _lwing dish while
preheating the drawer.
_ When holding hot, cooked foods and
warming empty stowing dishes at the
same time, place the serving dishes on
the high rack position and the food on
the bottom of the drawer.
CAUTION:Dishesmaybehot Usepotholders
ormittswhenremovinghotdishes.
7
Page 8

Usingthe wanning drawer.
To Proof Yeast Bread Dough
Yeastdoughcanbeproofedin the warming
N Preheating not required for proofing.
drawer
N Check Ilae dough height in 40 minutes.
@Place your dish on the warming drawer
pan I_x)ttom.
@You must always turn the control
knob to LOW then immediately back
m PROOF.
@Close the vent.
Add time as needed, The dough
should remain in the drawer until it has
doubled in size and a slight depression
remains when Ilaesurface istouched
genflywith afinger.
@l_ightly oil Ilae mp of the &)ugh in a
tx)wl lm'ge enough to double Ilae
dough size. Cover _dth a cloth.
ToCrispStale Items
_;;;Place food in low sided dishes or pans.
@Preheat on LOWsetting and open
the vent.
Temperature Selection Chart for Crisp Foods
Tokeepseveraldifferentfoodshot,setthetemperaturetothefoodneedingthehighestsetting.
Placetheitemsneedingthehighestsettingonthebottomof thedraweranditemsneedingless
heatontherack.
@Check crispne&safter 45 minutes. Add
time as needed.
FoodType
Bacon
Bread,hardrolls
Friedfoods
Pies,two crusts
Pizza
Potatoes,baked
TortillaChips
ControlSetting
HIGH
MED
HIGH
MED
HIGH
HIGH
LOW
Tips:
@Ix'ave food uncovered.
@Do not use plastic conlaineL's or plastic wrap.
@Preheat prior to use according m recommended times,
MoistureSelector Setting
)PEN
)PEN
)PEN
)PEN
)PEN
)PEN
)PEN
8
Page 9

TemperatureSelection ChartforMoist Foods
Tokeepseveraldifferentfoodshot,setthetemperaturetothefoodneedingthehighestsetting.
Placetheitemsneedingthehighestsettingonthebottomof thedraweranditemsneedingless
heatontherack.
FoodType
Beef,medium and well done*
Bread,softrolls
Casseroles
Cookedcereal
Eggs
Fish,seafood
Fruit
Gravy,creamsauces
Ham
Lamb
Pancakes,waffles
Pies,one crust
Pork
Potatoes,mashed
Poultry
Vegetables
* USDA/FSIS recommends an _ntemal temperature of 145°£ as the minimum ndnoness foz boe_ Use a pertable meat thermometel to chock internal
tsmpefatutos
ControlSetting
MED
MED
MED
MED
MED
MED
MED
MED
MED
MED
HIGH
MED
MED
MED
HIGH
MED
Mo_turoSe_ctorSetting
CLOSED
CLOSED
CLOSED
CLOSED
CLOSED
CLOSED
CLOSED
CLOSED
CLOSED
CLOSED
CLOSED
CLOSED
CLOSED
CLOSED
CLOSED
CLOSED
Tips:
N Cover food with lid or aluminum foil,
Do not put water in 1he walrning pan.
Do not u_ plastic containei ,'sor plastic wrap,
_ Preheat prior to use according to recommended times,
9
Page 10

Careand cleaning of the wanning drawer.
Be sure the controls are in the OFFposition and all surfaces are cool before cleaning any part
of the warming drawer.
Wanning Drawer Pan
Most cleaning can be &)ne Io the pan
with the pan in place in the drawer.
However, the pan may be removed if
further cleaning is needed.
()pen the drawer fully. Using flaefinger
ga'a.sp holds on the side of the drawer, lift
the pan up and out.
Use soap and wman water m thoroughly
clean.
10
Rack
Clean the rack with detergent and water.
Afier cleaning, rinse the rack with clean
wamr and dly with a clean cloth.
Stainless Steel
Donotuseasteelwoolpad;it willscratchthe
surface.
Clean with hot soapy wamr. Rinse and &T.
If food soil remains, uy a general kitchen
cleaner, such a,sFanlastik_ _Simple
Green e_or Fommla 409?_
Control Knob
Thecontrolknobmayberemovedforeasier
cleaning.
I_fore removing the knob for cleaning,
please note that it is in the PROOFposition.
For h_d to clean soil ttse a stand_d
stainless sit'el cleaner such as Bon-Ami _'
or Cameo7 _)ils can also be soaked
several horn ,'swith wet towels. Apply
cleaner with a damp sponge, rinse
thoroughly and (hT. Always scrub lightly
in the direclion of the ga'ain.
Aftercleaning,useastainlesssteelpolishsuch
asStainlessSteelMagic?
Wash the knob in soap and wamr or a
vinegm" and hot water solution but do
not soak.
DITand replace the knob,
Page 11

Installationofthe warming drawer.
Read theseinstructions completely and carefully.
Before YouBegin
IMPORTANT'.Save these instructions for the
local electrical inspector's use.
IMPORTANT'.OBSERVEALL GOVERNINGCODES
AND ORDINANCES.
NOTE TOINSTALLER:Leave these instructions
with the appliance after installation is completed.
ProductDimensions
27"_ _, 23¼"
indudinghandle
NOTE TOCONSUMER:Keep this Owner's
Manual and Installation Instructions for
future use.
NOTE:This appliance must beproperly
grounded.
NOTE:Insure that the power cord does not
contact the hot surfaces on the bottom of
ovens, cooktops, or any other appliance.
DimensionA
27" Drawer 30" Drawer
26_A" I 30"
CustomPanel Kits
ZXD27B--This kit provides for the installation of a
custom front panel on 27" wide models.
ZXD3OB--This kit provides for the installation of a
custom front panel on 30" wide models.
ToolsNeeded
++2 x4 or 2 x 2 lumber for rannei ,'sand brace
+_Wood screws and adhesive or olher hardware
for installing runnei_ or shelf to support
warmer drawer.
Runnersmustbe level rigidlymountedandcapableof
supporting150pounds.
NSaw
Level
++Drill and 1/ 16" bit
+_Phillips screwdriver
11
Page 12

Installation ofthe warming drawer.
Read these instructionscompletely and carefully.
Advance Planning
N The wmaning drawer may be in.smiled directly
into awall or wall oven cabinetly.
N The wanning drawer may Ix'installed below a
countenop, a single or double oven and side by
side using 2 drawei ,'s,
N When installing warming drawer with a cooktop
allow a 2" minimum from [x)ttom ofa c(×)kt_p
burner box to top of cutout.
GroundingtheAppliance
IMPORTANT--(Please read carefully)
FORPERSONALSAFETE THISAPPLIANCE
MUST BEPROPERLYGROUNDED.
Do not use an extension cord or adapter plug
wifh fl_isappliance, leollow National Electrical
codes and ordinances.
3_is warming drawer must be supplied wifh 120V,
60Hz, and connecmd to an individual, properly-
ga'()unded branch circuit, and protected by a 15
or 20 amp circuit breaker or time delay fuse.
N A properly grounded 3-prong receptacle
should be locamd within reach of the drawer's
56" long Ix)wer cord,
@1*)cate the receptacle in an adjacent cabinet.
--wifhin 42" of the iight side or,
--wifhin 16" of fhe left side or
--A recessed receptacle may be located on tlae
right side of the cutout, 7" maximum from the
back of tlae cabinet. In flais location, the excess
Ix)wer cord should be coiled m flae right side
of the unit using the cord clip provided.
N Etecuical power cord is locamd on the fight
side of the wanning drawer. Locate the outlet
wiflain reach of fhe 56" long power cord in
adjacent cabinet, within 42" of the fight side
or 16" @ore the left side of the cutout.
A reces_d receptacle can be installed on
the right side of tlae cufout, 7" maximum
@ore the back of the cabinet.
_---Recessed receptacle
IMPORTANT--(Please read carefully)
3_e Ix)wer cord of this appliance is equipped with
a 3-prong (gTounding) plug flaat males wifh a
stand_d 3-prong grounding wall receptacle to
minimize fhe IX)ssibility of electric shock. The
cusfomer should have the wall receptacle and
circuit checked by a qualified elecuician to make
sure the receptacle is properly grounded and has
the correct polarity.
@Where a standard 2-prong wall receptacle is
encounmred, it is tlae per_)nal responsibility
and obligation of fhe customer fo have it
replaced with a properly grounded 3-prong
wall receptacle.
Do no_ under any circumstances, cut or remove
the third (ground) prong from the power cord.
DONOT USEAN EXTENSION CORD.
7" max fromrear
onrightside
Drill1½"*holefor
powercordfor left
orrightsideoutlet
location
12
Page 13

Read theseinstructions completely and carefully.
RemovePackagingandParts
Partsprovided."
4 Wood screws
] Place carton on a flat surlhce,
[] Open one end of the carton and lift off
the top piece,
[] l,ifi the walrning drawer up and out of
the carton.
InstallationBelowa Countertop
Install2x4or2x2
antbtipblock
againstrear
cabinetwall9"
fromfloorto
bottomofblock
Electtical
outlet16_
max from
leftside
flushwith sideof
cabinet7"max
maxfromrightside
[] Place Ihe drawer on top of the shipping
carton to protect the drawer front and the
finished flooring.
[] Remove all packing mateiials and rope.
[] 1,mate package containing 4 wood screws
and set aside.
25"_
1½"Cabinettop
36't
Countertop
height
J
_ When installed, the front face of the wanning
drawer will be nearly flush with cabineu y dog1 ,'s
or dvawer fronts,
_ Drawer overlaps will conceal cut edges on all
sides of the opening.
Theroughopeningforthedrawermustbe:
--Depth: 23W' minimum from inside back fo
front of cabinet frame.
--Width: 25 k for 27 wide models
--Height: 9 A
1 /t l* .
I /t l* *
28A for30 >ademodels.
• 1 l*
* NOTE: When installing warming drawer with
a cooktop aflow a 2" minimum from bottom of a
oooktop burner box to top of cutout
DimensionA
27" Drawer 30" Drawer
25W" 1 28 W'
_ 5" minimum a[_)ve floor or 1" above mekick.
23W' from floor Io bottom of cutout is
recommended for under countertop
installation.
NOTE:If you are installing in frameless cabinets,
it may be nece_smy m install 1/2" wide cleats Io
accept dI_awermounting screws. See dl_awer to
find exact locations of mounting screws.
Wheninstalledundera cooktop:
Wairning dmweis _e suitable for installation
below only certain specified cookk)p models.
See the label attached Io the mp oflhe
warming drawer for suitable models.
13
Page 14

Installation ofthe warming drawer.
Read these instructionscompletely and carefully.
InstallationBelow WallOvens
Installation below a single oven
23W'
2x2or2x4anti4ip --
blockagainstrear
wall9" fromfloor
tobottomof block
1" Min.abovetoekickoradjust
to oveninstallationheight
Installationbelowadoubleoven
NOTE:Addificealclearancebetweencutoutsmay
berequiredCheckto be surethat ovensupports
abovethe warmingdrawerIocaticedonot obstruct
therequiredinterior23½"depthand9¼" height.
10½
DimensionA DimensionB
27" Drawer 251/i" 26¥¢"
30" Drawer 281//' 30"
14
Abew5/8" ovedap
2x2or2x4anti4ip --
blockagainstrear _'23¼"_
wNI9" fromfloor _t_--_..
tobottomof block
1"Minabovetcekick
%When installed, the front face of the wanning
drawer will be nearly flush with cabineny doors
or drawer fronts.
N Drawer overlaps will conceal cut edges on all
sides of the opening.
The roughopening for the drawer must be:
--Depth: 23_/Z' minimum fi'om inside back to
fi'ont of cabinet frame.
--Width: 25W'for 27"wide models
I l* tt *
28k for30 >ade models,
--Height: 9W"
--Allow 2 minimum be tween oven and drawe_
cutouts for clearance of overlaps.
NOTE:Addificealclearancebetweencutoutsmay
berequiredCheckto be surethat ovensupports
abovethe warmingdrawerIocaticedonot obstruct
therequiredinterior23½"depthand9¼" height.
10½
NOTE:Ifyou are installing in fFameless cabinets,
it may-be necessary to install 1/2" wide cleats to
accept drawer mounting screws. See drawer to
find exact locations of mounting screws,
Wheninstalledundera wall oven:
Wmaning drawei ,'sare suitable for installation
below only-certain specified wall oven models.
See the label attached Io the top of the wmrning
drawer for suitable models,
NOTE: Elecuical receptacle can be installed
as shown for counterlop installations. Do not
install receptacle above the top of the wmrning
drawer cutout,
Page 15

Read theseinstructions completely and carefully.
ProvideCabinetSupport
2" x 4" orequivalentrunners
i
i
i
23W'
i
i
i
i
i
i
i
22"_
27"! 2
IMPORTANt When installed below a single or
&)uble oven, check m be sure that any oven
supports above the cutout do not obstruct the
23_k" reqMred depth of the warming drawer
culout.
_ A 2" minimum clearance between oven
and warming drawer culouks are required,
Additional dear _ance may be required if
2 x 4 blocks are used Io support nmners or
solid floor of the oven above.
2"x4"orequivalentrunners
i
23½"
30'_
_The support must be level and ri_dly
mounted, flush wilh lhe bottom edge
of the cutouL
There is no way to level the drawer once it
has been &staffed. Be sure supports are level
_ The entire weight of the drawer is suppon:ed
by the runners or _)lid floor and must be
capable of supporting 150 lbs.
_ The waruling drawer may be suppon:ed by
either a solid bottom, 2 x 4 or 2 x 2 runners.
Step l--Install Anti-TipBrace
WARNING: ANT1-TIPPRECAUTIONS:
The anti-tip brace must be &staffed to prevent
the drawer from tipping forward when opened
and loaded.
Failure to doso could result in personal injuq.
_.. Install2x4or2x2anti-tipbrace
against rear cabinetwail9"
. fromfloortobottomofbrace
I T
/ i /
-" 2x4or2x2runners
orsolidbottom
15
Page 16

Installation ofthe warming drawer.
Read these instructionscompletely and carefully.
Step2--Install WarmingDrawer
Slide the left corner into opening and push
[]
power cord into the hole leading to Ihe
outlet location. Thread the cord Ihrough as
drawer is being pushed back into the
opening.
If the outlet is installed inside the opening,
plug the cord into Ihe outlet. Coil lx)wer
cord and inslall it in 1he clip on the right side
of the unit. Make sure Ihe cord does not get
trapped by the &_awer.
NOTE: Insure that the tx/wer cord does not
contact the hot surfaces (In the bottom (If
ovens, cooktops, or any other appliance.
[] Push the drawer back until the fi'ont flange
is flush to the cabinet front.
[] ()pen the dFawer fully.
[] Drill pilot holes through Ihe holes in the
overlapping frame, one on each corner.
[] Drive wood screws provided into each
cornel',
16
Page 17

Before YouCall ForService...
Troubleshooting tips
Save time and money! Review the chart on this page
first and you may not need to call for service.
Possible Causes What ToDo
A fuse in your home may • Replace the fuse or re_t the circuit breaker.
be blown or the circuit
breaker tripped.
Wmanil_ drawer not • Plug in.
plugged in.
Controls improperlyset. • See the Using the warming drawer secdon.
Ball bearings out • Fully extend the drawer and push it all the way in.
of aliglmaent. See the Care and cleaning _ction.
Drawer over-loaded or • Reduce weight to less than 50 pounds. Redistlibute
load unbalanced, drawer contents.
Liquid in warming • Remove liquid.
drawer pan.
Uncovered foods. • Cover food will] lid or aluminum foil.
Temperature setting • Reduce temperature _tfing.
too high.
Incorrect Moisture • Set the Moisture Selector to the ()pen vent setting to
Selector setting, allow venting.
Room temperature • Turn the knob to LOW then back to PROOF.
may prevent the
thermostat from
tripping on.
Moisture escaping. • Cover food with lid or aluminum foil.
17
Page 18

GE
Electric Drawer
_ Service trips Io your home to teach you how to /_5_Replacement of hottse fuses or resetting of divuit
use the product, breakei.'s.
Improper installation.
_ Failure of the product if it is abused, misused, or
used for other than the intended propose or used
commercially.
warming vvnrrnnq. (For Customers in the United States)
All warranty service provided by our Factory Service Centers
or an authorized Customer Care®technician. For service,
call 800-GE-CARES.
GE Will Replace, At No Charge To You:
Anypart of tim warming drawer which fails due to a defect in materials or workmanship.
During this full one-year warranty,, GE wilt also provide, free of charge, all labor and
in-home service to replace tim defective part.
/_5_Damage m Ilaeproduct caused by accident, fire,
floods or acts of God.
N Incidental or consequential damage to pel_onal
property caused by Ix)_sible defects with this appliance.
This warranty is extended to the original purchaser and any succeeding owner for products purchased for
home use within the USA. In Alaska, the warranty excludes the cost of shipping or service calls to your home.
Some states do not allow the exclusion or limitation of incidental or consequential damages. This warranty
gives you specific legal rights, and you may also have other rights which vary from state to state. Toknow
what your legal rights are, consult your local or state consumer affairs office or your state's Attorney General
Warrantor'.General Electric Company.Louisville,KY 40225
18
Page 19

GEElectric WarmingDrawer Warranty.(ForCustomersin Canada)
All warranty service provided by our Factory Service Centers
or an authorized Customer Care® technician. For service,
call 1-800-361-3400.
GE Will Replace, At No Charge To You:
Any part of the wan-aing d,_awerwhich fails due to a defect in matefials or worla,,anship.
During this full one-year warrnnty, GE will also provide, #ee of charge, all labor and
in-home service to replace the defective part.
_ Service trips to your home to teach you how to use /7S$Replacement of house fuses or reseRing of circuit
the product, breakers.
Improper installation.
_ Failure of the product if it is abused, misused,
or used for other than the intended purpose or
used commerdally.
Road your Owner's Manual If you then have any questions about operating the product, please contact your
dealer or our Consumer Relations office at:
/_S_Damage to the product caused by accident, Fire,floods
or acts of God.
/7S$Inddental or consequential damage to personal
property caused by possible defects with this appliance.
Manager, Consumer Relations
Camco Inc.
1 Faclory Lane, Suite 310
Moncton, N.B.
E1C9M3
Oi" call, toll free: 1-800-361-3400
]WARRANTOR IS NOT RESPONSIBLE FOR CONSEQUENTIAI, DAMAGES. I
I Warrantor: C.AMCO INC. I
19
Page 20

Service TelephoneNumbers.
GEAnswerCenter®In the U.S.:800-626-2000
The GE Anger C_nter e'is ()pen 24 houi .'sa clay, 7 days a week.
Visit our Website at: www.geappliances.com
In Canada,call 1-800-361-3400.
In-HomeRepairServiceI. meu.$.:800-432-2737
Expert GE repair serv'ce is only a phone call away.
InCanada, call 1-800-361-3400.
SpecialNeedsServiceIntheU.S.:800-626-2000
GE offers, fi'ee of charge, a brochure to a_,_sist in planning a bmTier-fi'ee kitchen for pei.'sons
with limited mobility. In theU.S.,caII8OO-TDD-GEAC1800-833-4322).
In Canada, contact: Manager, Consumer Relations, Camco Inc., 1 Factory Lane, Suite 310,
Moncton, N.B., E1C 9M3.
ServiceContracts/ntheU.S.:800-626-2224
Purchase a GE serwice contract while your waivanly is still in effect and you'lt receive a
substantial discount. GE Consumer Serv'ce will still be there "afteryour wan_anty expires.
In Canada,call 1-80(M61-3636.
PartsandAccessories/ntheU.S.:800-626-2002
Individuals qualified to service Iheir own appliances can have parks or accessories sent directly
to their homes (VISA, MasterCard and Discover cards are accepted).
Instractionscontainedin thismanualcoverprocedurestobeperformedbyanyuser.Otherservicing
generallyshouldbe referredtoqualifiedservicepersonnelCautionmustbeexercised,since
improperservicing maycauseunsafeoperation.
In Canada,pleaseconsultyouryellowpagesforyourlocalCamconumber.
ServiceSatisfaction
If you are not satisfied with the service you receive fi'om GE:
Firs_contact the people who serwiced your appliance.
Nex_if you are soil not pleased, in theU.S.,vaim all the details---including your phone number--
to: Manager, Customer Relations, GE Appliances, Appliance Park, Ixmisville, KY40225; or,
in Canada, to Manager, Consumer Relations, Camco Inc., 1 Factory Iane, Suite 310, Moncton,
N.B., E1C 9M3.
20 Printed in the USA
 Loading...