

Page 1

pERFO~MANcB$~:;--<-
.
SAVE
See energy savingtipscm page 5.
See Section entitkxtl “Before Y’OU(Ml Rx
Service” cm page 18.
.,,..
,.’
.._ ___
.
Page 2
Your
Read -l-his use and C2m? iEkmk
Take the time to read this book and learn how to
enjoyyour newoven. Hcontains detailed operating
instructions and recommended maintenance, as
well as handy tips to help you gain maximum
benefits from your oven. Onceyou have read the
book, keep it handy to answer any questions you
mayhave.
If youhaveany additional questions concerningthe
operation of your oven, write—including your
phone number–to:
ConsumerAffairs
GeneralElectric Company
Appliance Park
Louisville, Kentucky 40225
IF YOURECEIVEDA DAMAGEDOVEN,immediately
contact the dealer(or builder) from whom you purchased it. They have beeninformed of the proper
procedure to take care of such matters and can
handleit for you.
Rf?cx%rd and serial
Your oven has a nameplate on which is stamped
th~ model andserial numbers. (Seepage 4). Model
and serial numbers are also on the Purchase
Record Card which came with your oven. Record
the numbersin the spaces provided below.
Pleaserefer to both mcdel and serial numbers in
anyfuture correspondence or product service calls
concerning your oven.
h’10d81NuMb8r
M!riaiNumb8r
Oat8Purchased
KEEPPURCHASERECEIPTWITH
IJSHTHE WAIU!ANTYPERIOII.
Befcm YOU cd! for SW’vhxx
Check“Before YouCall for Service” section in the
back of the book. Many minor causes of operating
problems that you can correct yourself are
explained. This may save
service call,
— —
THIS MJOKTOE!lTAB-
YOU an unnecessary
Page 3
Have it installe~and. pr;perly gm.mded by a qualified installer.’
Have the instalkw show you the location of the range circuit breaker or fuse, and
rnarkitfor easy reference.
Don’tassumi that ye-uknow how to operateall ~arts of the oven.S~~e features may
work differently froti those onyour previous oven.. ‘“
Dotake the’time to.read oursugg_estions for best use.
DC)NOTTOUCHHEATINGELEMENTSORV!TERIORSURFACEOF OVEN (lvervheating
elements may behot en~ugl! to Burn eventhough they ari dark in’color. ;
~~ring and afteruse, do not tou,ch,Or let clbthihg or, other flafirnable mate~i~is
contact any interior a’reapf oven:until all ot these ar~as:hav’eha(3tifficie@imeto “’ ‘–
cool. other potentially hot surfaces include oven vent openings ands.urfaces near
the openings, crevi,cesafound the oven dooi andthe edges-ofthe door window.
Don’t leave children alone or unattended in the area where oven isin operation.
Don’t allow anyone ~oclimb, stand or hang on the door, or top surface of thb oven.
They could damage it.
!:,
CAUTION:DONOTSTOREITEMSOFINTERESTTOCHILDRENIN CABINETSABOVE
AN OVEN–CHILDREN CLIMBING ON THE OVEN T() REACH ITEMS COULD BE ~~•
SERIOUSLYINJURED.
Never use your appliance for warming or heating the room.
WtXN
propwapparel-loose fitting or hanging garments should never bew~rn while
using the appliance.
%
only dry potholtkws–moist or damp potholders on hot surfaces may result in
Use
burns from steam. Dti-not let potholders touch hot heating elements. Do not use a
towel or other bulky cloth.
Standawayfrom mm whw oponingovendoortolet hot air or steam escape before
removing or placing food inside.
Place oven racks in desired position while oven is cool. If racks must be handled
when hot, do not let potholder contact hot heating element in oven. Pulling out shelf all the way to the shelf stop is aconvenience in lifting heavy foods.
It is also a precaution against burns from touching hot surfaces of the door or oven
walls.
MM unopwm!foodcontiihws hI thoown. Pressure could build up and the con-
Don’t
tainer cou6dburst, resulting in injury. “’”
When using cooking or roasting bags in oven, follow manufacturers directions.
Don’t usealuminum foil anywhere in the oven excepl as described in this booklet.
Improper installation could result in a shock, fire hazard, or damage to the oven.
.——
—
2
—-
..
——
Page 4
Donot store flammable materials in an oven or near the cooktops
DONOTUSEWATERONGREASEFIRES,
Whencooking in the oven, flame can besmothered by completely closing door and
turning OVENSETto OFF.
IK$%pOwmwont!dMct$
Whan pork either conventionally or in the microwave oven, follow our
directions exactly and always ’cook the meat to at least 170°. This assures that,
in tile remote possibility that trichina may bepresent inthe meat, it will be killed
‘,
and meat will besafe to eat.
Read“Before YouCall for Product Service” at rear of’book.
Don’t attempt to repair or replace any part of your oven Unless it is specifically
......
recommended in the book. All other servicing. should be referred to a qualified
technician.
Disconnect oven at oven circuit breaker or main fuse before performing any
ser~ice.
.&+———”——— ———————%
Baking. .. .. .... .. . . . . . .. ... .. .. ... .. ... ... .. . .. .. . .. ... .. .. ... .. ... .. .. ... ... . .
Broiling, Broiling Chart
UsingYourOven
OtherOvenFeatures
Roasting,Cooking Chart
. . . . . . . . . . . . . . . . . . . . . . . . . . . . . . . . . . . . . . . . . . . . . . . . . . . . . . .
... .. .. .. ... .. . .. .. .. ... .... .
.. .. .. ... .. . . . .. .. .. .. ... .. ... .. .. ... ... .. .. .. . .. ... .. ... ..
... .,, ... ..o, ,.. .,. o.*. .., *o. o**. ooos*o*o*. ?$oc?.....,..
... . .. .. . . . .. .. . .. .. ... ... . .... .. ..
11-12
7-8
10
Hwjv -m WM FOR
Broiier Pan,Useof Aluminum Foil
Care of Your NewOven(s)
Cleanin Charts, Parts, All Finishes
!-l
Lamps, ow ToReplace
OvenCare,Contiuous Cleaning Ovens
OvenThermostat, Adjusting
PorcelainEnamel
RemovableOvenDoor
~~https://manualmachine.com/l:jjfi ~
BeforeYouCall ForService
MACAPInformation
ModelandSerial Number Location
Useof Aluminum Foil
Factory Service Centers
h!larrantv.. . ... .. . .. . . . . ... .. ... .. .. .. .r... .. .. .. .. . . . .. .0.0... *....,. Back Cover
... .. .. . . .. . .. .. ... .. ... ... .. .. ... .. ... . . .. . . . .. ... .. .. .. .. .. ..
.. .. ... . . .. . .. .. .. ... .. .. ... .. .. ... .. ... . . .. . .. .. .. .
. . . . . . . . . . . . . . . . . . . . . . . . . . . . . . . . . . . . . . . . . . . . . . . . . . . . . . . . .
. . . . . . . . . . . . . . . . . . . . . . . . . . . . . . . . . . . . . . . . . . . . . . . . . . . . . . . . . .
.. .. .. .. . .. ... . . .. ... .. ... .. ... . ... .. .. ... .. .. .. . .. .. .. .. .. ..
. ... .. .. . .. .. .. . .. ... .. .. ... .. .. .. .. ... .. .. . . . . . ... . .... .. .
. ... .. ... .. .. .. . ... .. .. ... .. .. .. .. ... .. .. . . . . . .. . .. .. .
.., .,, *,*. o*. ... ,.. *oo. . . . . . . . . . . . . . . . . . . . . . . . . .
. ... .. .. ... . . .. . .. .. ... .. ... . ... .. ... .. . . . . . . ..
.. .. ... . .. .. . . . ... .. .. ... . ... .. ... .. .. ... .
.. .. .. ... .. ... . .. ... .. ... .. .. .. .. ... .. ... .. .. . . .. .. ..
.. .. ... .. . . . .. . .. ... .. .. .. .. .. .. ... .. .. . .. .. . .. ... .. ..
.. .. ... . . . .. . . . .. .. .. ... . ... .. .. ... .. .. . . . .. . . . .
13
13-14
17
14
15-16
14
13
13
18
21
13
19,20
!3
6
4
Page 5
@
*
@
9
43$
@
- —— ————-
--,,
1!-
.—
(I3
-— :
0
---@
,:
0
.
@
—.—.
—
iilf
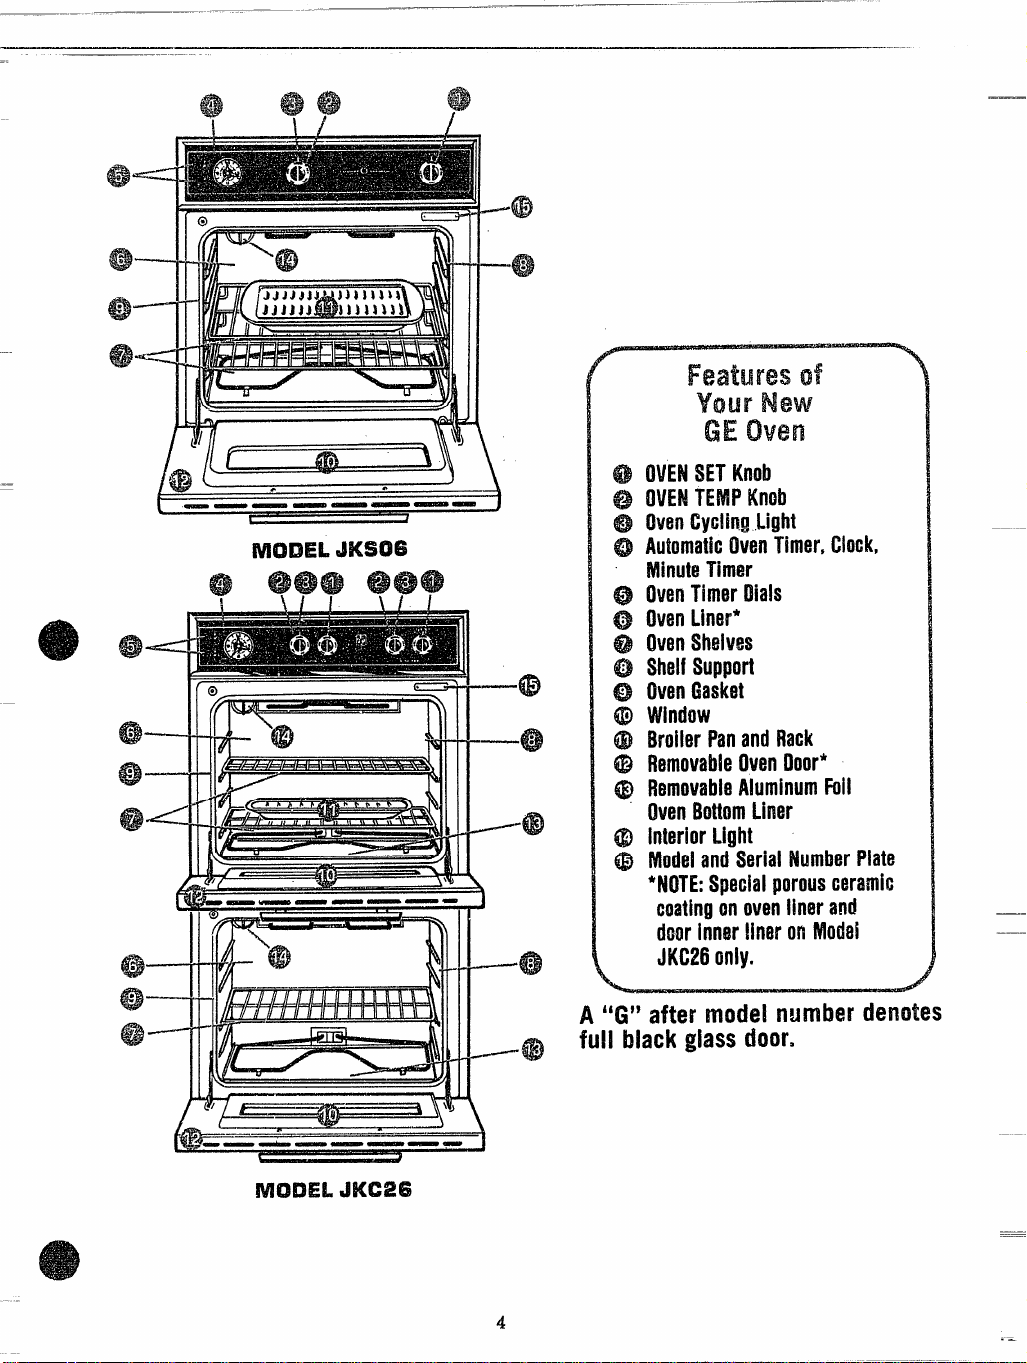
GE
OWENSET Knob
OVENTEiYiPKnob
OvenCyclingLight
AutomaticIIIvenTimer,Clock,
NlinutoTimer
OVMITimorDials
OvenLiner*
Oven$haives
Sh8ifSuoport
OvenGasket
Window
BroiierPanandRack
MmovahieOvenDoor*
Rt?movabioAluminumFoil
OvenBottomLiner
InteriorLight
Modeland SeriaiNumberPiate
*NOTE:Speciaiporousceramic
coatingonovenIinorand
doorinnw’lineronModal
JKC26only.
A ‘W* after model mmihir denotes
full black glass door.
———.
———
4
--
Page 6
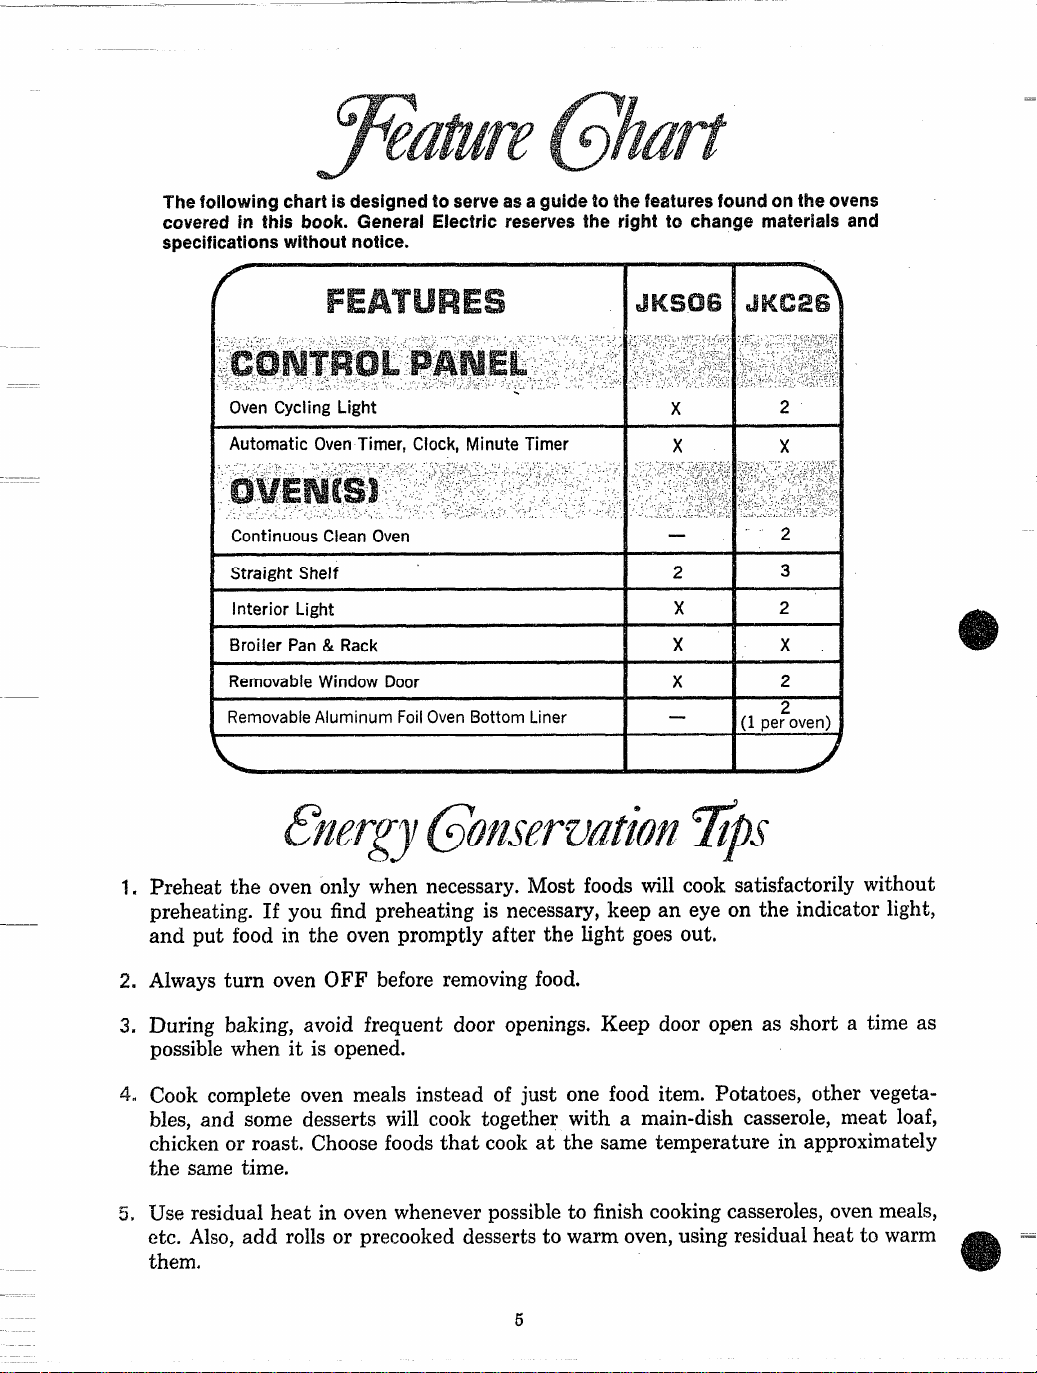
The following chart isdesigned to serveasa guide to the features found on M ovens
covered in this book. General Electrlc reserves the right to change materials and
specificationswithout notice.
I
OvenCycling Light
Automatic OvenTimer, Clock, Minute Timer
ContinuousCleanOven
Straight Shelf
Interior Light
Broiler Pan& Rack
RemovableWindow Door
RemovableAluminum FoilOvenBottom Liner
II
I
lx
2
x
Preheat the ovenonly when necessary.Most foods will cook satisfactorily without
preheating. If you find preheating is necessary,keep an eye on the indicator light,
and put food in the oven promptly after the light goes out.
2*
Alwaysturn oven OFF’before removingfood.
3.
During baking, avoid frequent door openings. Keep door open as short a time as
possiblewhen it is opened.
4.
Cook complete oven meals instead of just one food item. Potatoes, other vegetables, and some desserts will cook together with a main-dish casserole, meat loaf,
chickenor roast, Choosefoodsthat cook at the same temperature in approximately
the same time.
Use residual heat in ovenwheneverpossibleto finishcookingcasseroles,ovenmeals,
etc. Also,add rolk or precooked dessertsto warm oven,using residualheat to warm
them.
Page 7
Your ovenis designedto give you top resultsin
baking, roasting, and broiling when used as
recommended.
1. Look at the controls. Be sureyou understand
how to set them properly. Read over the direc-
tions for the Automatic Oven Timer so you
understand its use with the controls.
2. Check oven interior. Look at the shelves.
Take a practice run at removingand replacing
them properly, to give sure sturdy support.
3. Read over information and tips that follow.
4. Keep thisbook handy so you can refer to it,
especially during the first weeks of getting ac-
quainted with your oven.
The controls for the oven are marked OVEN
SET and OVEN TEMP. OVEN SET has settings for BAKE, BROIL, and OFF, and on
models with an automatic oven timer,
for TIME BAKE. When you turn the knob to
the desiredsetting,the proper heatingunitsare
then activatedfor that operation.
OVEN TEMP maintainsthe temperatureyou
set from WARM (150°) to BROIL (550°). A
light near this control glows until oven reaches
the selected temperature, then goes off and on
with the oven unit(s) during cooking.
HEATING the oven, even to high temperature
settings,is speedy—rarely more than about 10
minutes.Preheatthe oven only when necessary.
Most foods will cook satisfactorily without preheating.If youfindpreheatingisneceiwary,keep
an eye on theindicatorlight,and put food in the
oven promptly after the light goes out.
a setting
PRE-
mm Mc$rmas: JKS315
The shelve(s) are designed with stop-locks so
thatwhenplacedcorrectly ontheshelfsupports,
(a) will stop ‘beforecomingcompletelyfrom ttie
oven, (b) wiZZnot tilt when removingfood nor
whenplacing food on them.
TO REMOVE shelve(s) from the oven,when
cool,lift up rearof shelf,pullforwardwithstoplocks along top of shelf supports.
TO REPLACE shelve(s) & oven, insert shelf
with stop-locks resting on shelf supports. Push
shelf towardrear of oven; it will fall into place.
When shelf is in proper position, stop-locks on
shelf will run under shelf support when shelf
is pulled forward.
Fola MODEL JKC26,
SSe
Instructions m page q5.
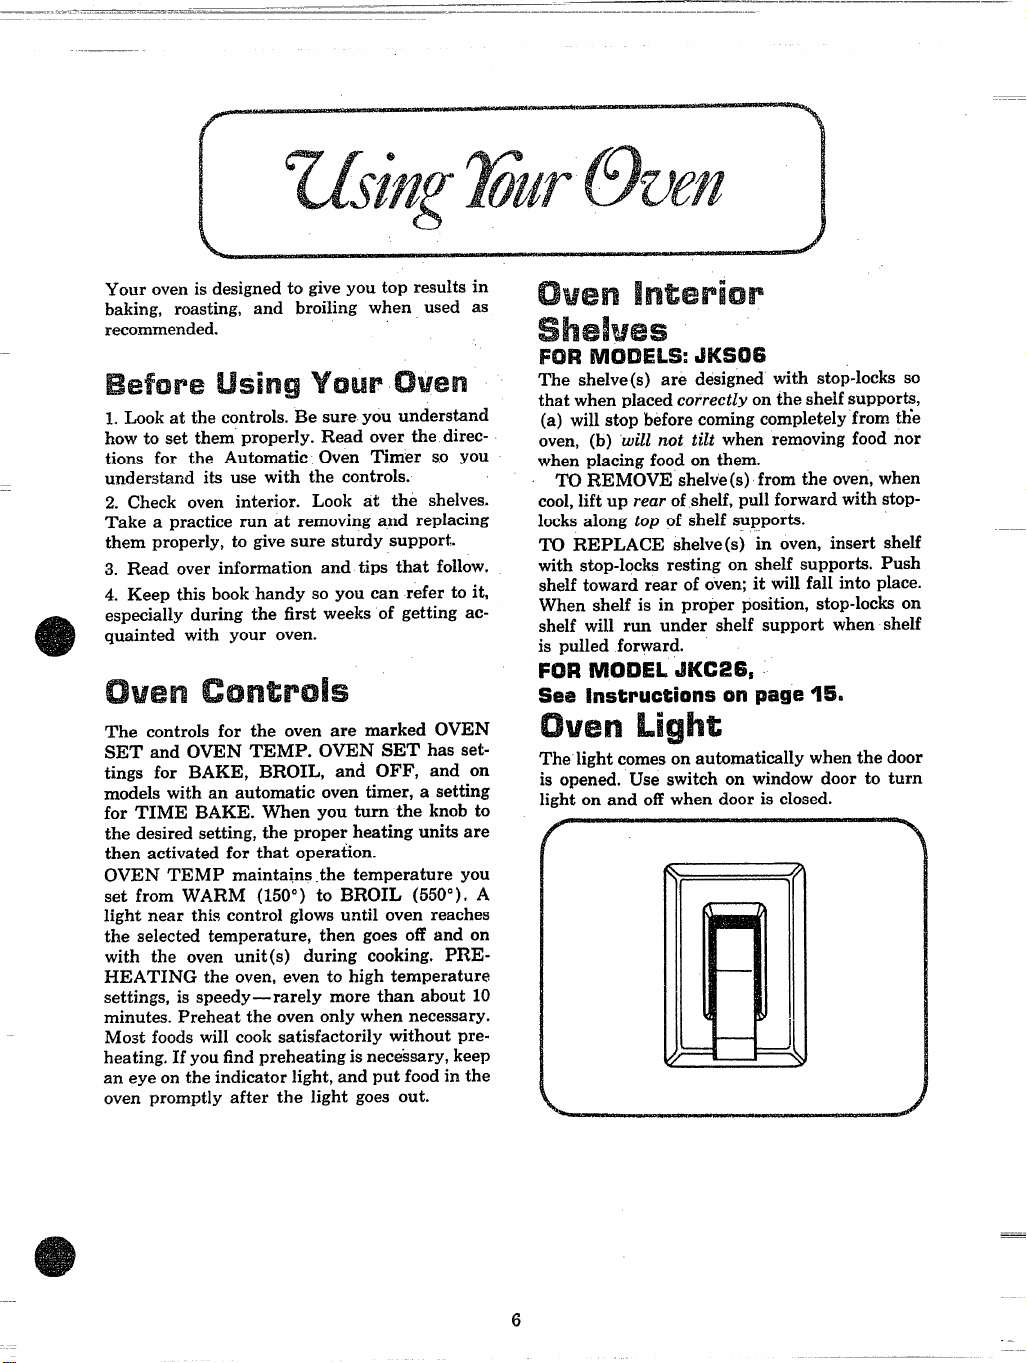
The lightcomes on automaticallywhenthedoor
is opened. Use switch on window door to turn
lighton and off when door is closed.
6
—
.—
Page 8

——
w’ (.J
ck.l%k and
The Minute Timer is combinedwith the oven
clock. Use it to timq all your precise cooking
operations.You’ll recognizethe Minute‘I%ner
as the pointer which is different in color and
shape than the clock hands.
TO SET THE MINUTE TIMER, turn the
center knobcounterclockwise,withoutpushing
in, until pointer reaches number of minutes
you wish to time.
(Minutes are marked, up to 60, in the center
ringon theclock.) At the end of thesettime,a
buzzersoundsto tell you timeisup.Turn knob,
withoutpushingin, untilpointerreachesOFF.
TO SET THE CLOCK, push the center knob
inand turntheclock handsto thecorrect time.,
(If the MinuteTimer pointershouldmove also,
let knob out, turn the Timer pointerto OFF.)
Owen arimfSP
The automaticoven controls,are designed for
thehomemakerwhocan’t be tied downto being
in the kitchenor at home at specific times to
turnanovenor applianceonor off,These controls em be presetto startand stop your oven
for you.Or, if you prefer to startthefood yourself, they will take over the job of turningthe
ovenoff.
To set ~heautomatic
dials next to the clock, marked START and
STOP. Each dial ic marked off in 15 minute
segmentsandnumberedbythehour.The pointerson thesedialscanbe movedonly whenknob
ispushedin. (Whenthepointersareturnedyou
can heara “ratchety” sound.) If pointercan be
turnedit meansknob has been pushedin and
pointerhasbeen set.To becertainknobisin out
position,turnknob so pointerisattimeshowing
on theclock. Knobwillpop out andcannotthen
be turned.(Note: Beforeyou set thesedials, be
surethehandsof theovenclock showthecorrect
timeof day.)
oven timer, use the two
7
—
Page 9

—
A. TO SET THE AUTOMATIC OVEN
TIMER SO IT WILL SWITCH THE OVEN
HEAT ON AND OFF AUTOMATICALLY,
AT A LATER TIME THAN SHOWS ON
THE OVEN CLOCK, DO AS FOLLOWS:
1. Set START time. Push in knob on START
dial and turn pointer to time you want oven to
turn on. The illustrationshowsSTART pointer
at 3:30.
2. Set STOP time.Push in knob on STOP dial
and turn pointer to timeyou want oven to turn
off. The illustration shows the STOP time at
6:00.
AutomaticTimerworksonly if STOPtimeis set
for a latertimethanshowson ovenclock andon
STARTdial,
3. a. On the oven you wish to use, turn OVEN
SET to TIME BAKE.*
b. Turn OVEN TEMP* to proper temperature for food to be cooked. Place food in oven,
close the door and automaticallythe oven will
be turnedon and OHat the times you haveset.
*OVEN INDICATOR LIGHTS at TIME
13AKE settingwork differently than they do at
BAKE setting.Do not be concerned if no light
appears.Carefullyrecheckthe stepsgivenabove.
If all operationsaredoneas explained,ovenwill
operateasit should.
R TO SET THE OVEN TO START IMMEDIATELY AND TO TURN OFF AUTOMATICALLY AT A LATER TIME, follow
onlyA2 andA3 above.
C.Whenfood is removedfrom oventurnOVEN
SET to OFF.
Meats,fruits and vegetablesgenerallytake well
to automatic cooking. You can cook one food,
or severalfoods togetheras longasthey require
the same temperatureand time. Howeuer foods
of a highlyperishablenature,suchasmilk,eggs,
fish,stuffings,poultry, and pork, should not be
cooked automatically unless standing time in
the oven is not more than 2 hours before and
about 2 hours after cooking of these foods. In
all cases,no matterwhatthe natureof the food,
unless cooking is to start immediately, foods
shouldbe thoroughlychilled in the refrigerator
beforeplacingin the oven.
—-
Page 10

When cooking a food /or the first time in your new oven, use time
given on recipes as a guide. Oven thermostats,over a period of years,
may“drift” from the factory settinganddifferences in timingbetween
an old and a new oven of 5 to 10 minutes are not unusualandyou
may be inclined to think that the new oven is not performing correctly. However, your new oven has been set correctly at the factory
and is more apt to be accurate than the oven it replaced.
1. It
is recommended that you operate the
rangefor a numberof weeksto becomefamiliar
with your new oven’s performance.However, if
you find that your foods consistentlybrown too
little or too much, you may make a simple adjustment in the thermostat (OVEN TEMP)
knob. See section titled “Care of Your New
Oven.”
2. Use tested recipes from reliable sources.
Measure ingredients accurately and combine
carefully. Use correct size baking utensil.
3. Place she~fat positionsuggestedon chart below. On modelsso equipped,letters are marked
on wall of large oven. On models where letters
are not marked on oven, lowest position corresponds to A in chart,E is next highestposition,
etc.
4. Preheatthe oven only whennecessary. Most
foods willcook satisfactorilywithoutpreheating.
If you find preheatingis necessary,keep an eye
—------—
———-——L..
.——
:=—-.. .-..—-. ...
——.-.—--=.=...-.. ..,.-—,.: z~.:z~
-.-.----...—.. --. ——. .--.. --.—
-...———
.—-—-. -—-—--.. --.—
BREADS,QUICKJ
Biscuits
Coffee Cake
Corn f3read
Gingerbread
PlainMuffins
Popovers
Quick Loaf Bread
B, C
B,A
A, B
425-475
350-400
425-450
B
B
B
B
350
400-425
375
350-375
BFmms, YEASP
2 loaves
Rolls, plain
Rolls, sweet
CAKES’
(without shortening)
Angel Food
Sponge
Jelly Roll
., A, B
A, B
B, A
375-425
375-425
350-375
325-375
A
325-350
A
375-400
6
CAKES
8undt Cakes
Cupcakes
Fruit Cakes
Layer
Layer, Chocolate
Loaf
1 For best results, use shiny aluminum utensils, with dull finish on bottom. To RAISE YEAST DOUGHS, cover lightly
with cloth and place in your well insulated oven to keep away from drafts. Yeast doughsraise best at 85° to 110°, so
oven lamp should be off during rising. FRUIT CAKES: place large ones on lower shelf position; place small or loaf
pan type on shelf in center of oven.
2 To brown meringue only, use 400, 8-10 rnin; to cook meringue through, use lower temperatures for times given.
NOTE: When two shelf positions are listed, the first one gives well browned and cooked food. If you desire a different
browning, use the second shelf position,the next time ou cook. Foods listed with three shelf positions cook successfully on any position ikted, alone or In an oven mea .
A, B
B
A, B
B
B
B
.————
325-350
350-375
275-300
350-375
350-375
350
---—-..-—
10-20
20-30
25-40
30-45
20-30
45-60
45-60
45-60
10-25
20-30
30-55
45-60
10-15
45-65
20-25
2-4 hrs.
20-35
25-30
40-60
on the indicator lightand put food ir~the oven
promptly after light goesout.
5. To set oven: Close oven door. Turn OVEN
SET to BAKE and OVEN TEMP to temperatureon recipeor on BakingChart.
6. Place food in oven, being certain to leave
about l-inch of space between pans and walls
of oven for good circulationof heat. Closeoven
door. During baking,avoid frequent door open-
ingsto preventundesirableresults.
7. Check foods for doneness at minimumtime
on recipe. Cook longer if necessary. Remove
foods andswitchoffheat.When cookingfood for
first time in this oven, use timeson recipesas a
guide. Be certain foods are done before removing from oven. See Baking,Before YouCallfor
Product Service.
NOTE: Informationabout bakingat high altitudescan usuallybe obtainedat yourstateagriculturalstation.
COOKIES1
Brownies
Drop
Refrigerator
Rolled or Sliced
For best results use satin-finist
glass utensils: place frozen pie
sheet.
Frozen
tvleringue~
One Crust
Pastry Shell
Two Crust
., .
B, C
B, C
B, C
B, C
IL
A, B ,
325-350
350-400 10-20
400-425
375-400
,. .
. ‘. . ,
ahodized)’alurnirium or”
in foil plate, on baking
$100-425
325-350
400=425
El
B
450
400-425
I
MISCELLAI+JEOIJS
Apples, Baked
Custard, Cup
Potatoes,Baked
Puddin s, Rice
and ustard
Scalloped Dishes
Souffles
?
AtB, C
A, B, C
f
A, B, C
350-400
300-350
B
325-400
B
B
325
325-375
300-350
25-35
6-12
I
7-12
1
45-70
15-25 -
45-60 ~
12-15 s
40-60
30-60
30-60
60-90
60-90
30-60
30-75
...——.---.—
—.——-——
,,
>’ .
---
.—..—.....——.
-.-.-—.
9
Page 11

/-%3--’% s
Roastingisovencookingof tendermeat or poultry by dry heat. Roasting temperaturesshould
be steady and low.
(Low temperatures keep
spattering and oven cleaning to a minimum.)
It is
not necessary to sear, cover, baste or add
water.
1. Checkweightof meat,and place,fat side up,
on roastingrack in a shallowpan. (Broiler pan
with rack is a good pan for this.)**
2. Place in oven on shelfin A or B position.No
preheatingisnecessary.
4. The chart below gives approximate time in
minutesper pound. These times should only be
used as a guide. A meat thermometer,inserted
into the center of the thickest part of the meat,
isthe onlYaccurate test for doneness.
.
—.—....————
BEEF2
Standing Rib
Rare
Medium
Well Done
Rolled Rib
LAMB
leg
Shoulder
POFIK, fresh
Loin
Fresh Ham, Shoulder
. .
PORK,cured
Ham, Precooked
Ham, Cookbefore
Eating
Shoulder, Picnic
Add 5-10 min,/pound to times givenfor standing
Forbonedancjrolled shoulder, add 10 min./ pound
3-5 Ibs.
24-30 min.
30-35 min.
35-45 min.
3-5 lbs.
30-35 min.
3-5 Ibs. 6-8 lb%
35-40 min.
14-18 rein, per lb.
Under 10 Ibst 10-15 tbs.
20-30 min.
25-35 min.
5. Most meats continue to cook slightly while
standingafter beingremovedfromtheoven,For
rare or mediuminternaldoneness,if meat is to
stand 10-20minuteswhilemaking gravy or for
easier carving, you may wish to remove meat
from oven when internaltemperatureis 5-10”F
below temperature suggested on chart. If no
standingisplanned,cook meattosuggestedtemperatureon chart.
a, Frozen roastsof beef,pork, lamb,etc., can be
started without thawing, but allow 10-25 min-
utes per pound additional time (10 min. per
pound for roastsunder5 pounds,more time for
largerroasts).
b. Thaw most frozen poultry before roastingto
ensureeven doneness.Some commercial frozen
poultrycan becookedsuccessfullywithoutthawing. Follow directionsgivenon packer’slabel.
T=:=..
_-————-
”..”....
-:::.:--=::::=
=:.”.:=::-—
6-8 Ibs.1
18-22 min.
22-26 min.
28-33 min.
6s8 Ibs.
30-35 min.
30-35 min.
30-40 min.
17-20 min.
rib roasts.
to times E4iVen
—.———-..,—
------ .... . . . ---
............--
—-.—.-...--...-
--.....----------
m-. ,,. mm------- -..
130-140
150-160
170-185
175-185
180-185
170-175
185-190
130
155-160
170
POULTRY
Chicken
Ready-to-Cookwt.
Turkey
ReadY-to-Cookwt.
1
7 For roasts over 8 pounds, roast at 300 and reduce time. Figure the estimated time from the above chart. After VZ
that time has passed, check meat thermometer for internal temperature at half-hour intervals.
2 Tendered beef, found in some markets, may require less cookin time than regular beef, When cookingtendered beef,
estimate cooking time using shortest time given in minutes pound for desired doneness. Also thm type of beef
is usually well-done at 170 internal temperature,
**NOTE: Ljne broiler ~=n wjth aluminum foil when using pan for marinating, cooking with fruits, cooking heavily cured
meats, or for basting food during cooking, Avoid spilling these materials on oven liner or door, See cleaning note, on
charts, Care Section.
3-5 Ibs. Over 5 Ibs,
35-40 min.
Under 10 ibs.
20-30 min.
3.!5 Ibs.
30-40 min. 25-35 min.
30-35 min.
10-15 Ibs, Over 15 Ibs.
20-25 min.
&8 tbs.
f
15-20 min.
n Thigh
185-190
180-185
—— —.——
Stu’f!ing
165
165
170-M30
1.0
.—-————.
—
Page 12

Broilingis cookingfoodsby intense rd.iant heat from the upper unit in the oven.
Most fishand tender cuts of meat can be
broiled. Followthese steps to keep spat-
tering and smoking to
1. If meathas
fat or gristlenear edge,cut
a minimum.
vertical slashes through both about 2-in.
apart. If desiredfat maybe trimmed,leav-
ing a layer about ~8-in.thick.
2. Place meat on broiler rack in broiler
pan which comes with range. Alwaysuse
rack so fat drips into broiler pan; otherwise juices may become hot enough to
catch fire.Aluminumfoilmay be used to
line broiler pan and rack. But, be CERTAIN to cut openings in foil, to correspond with rack so fat drips into pan
below.See note belowbefore marinating
and using barbecue sauce.
3. Letters on ovenwall,and chart below,
indicate where to position shelf for best
browning while cookinginside of food to
desired doneness. Placing food closer to
top of ovenincreasessmoking,spattering,
exteriorbrownon meat and the possibility
of fats on foodscatching fire.
4. LEAVE DOOR AJAR about 3 inches
—door stays open by itself, and keeps
heating unit at proper temperature for
broiling.
5. SWITCH OVEN SET and OVEN
TEMP CONTROLS TO BROIL. Preheating unit is not necessary.~t
6. Turn food only once during cooking.
Time foodsfor firstsideas on chart. Turn
food,then use times givenfor secondside
as a guideto preferred doneness. (Where
two thicknesses and times are given together, use first times given for thinnest
food.)
7. Turn ovenoff,servefoodimmediately,
leavepan
outsideovento coolduringmeal
for easiest cleaning.
Cookingtimes givenare approximateand
should be used only as a guide; they are
basedon meat at refrigeratortemperature
when placed in oven.
t~?+lOl%:If your eve-n is being operated on lowpower (voltage), broiled foods may be
lighterbrownthan expected,eventhoughdirectionshave been carefullyfollowed.
Browningcan be improvedas follows:
Followdirections given on this page for setting up the oven, preparing food,
setting controls and leavingdoor ajar.
Preheat the broilunit f~r
10 minuteswith foodand broilerpan outsidethe oven.
Place foodin oven,leavedoor ajar and time first sideof foodas directed.Turn
foodand time secondside,BUT forthe LONGEST time givenon the chart for
your particular food type, thickness,etc.
Page 13

—.—
~nm..==:=--—.–-—-= &z&-:z=::::=—...-..z—--..-,---::-- -———----
-.:.:,:—
........... . .
—=-—=-—-=-—-————————.,=.-=.—-—-- ——--
.—---—------- _—————..—-------
I I !/ !
lb.about
Bacon
EkwfGMN.Hld
VW3Hnone ~
BeefSteaksz
Thin steaks,y2-~4 inch thick cookthrough very quickly. For best
recommended.See Surface CookingChart. If oven broiling is prc
achieve best browning on second side, cook first side just to c1
ccokto donenesspreft%red.
Rare
Medium
Well Done
Rare
Medium
Well Done
Chicken3
Fish
%
8 thin slices
I
4 patti&s
?4+!44in. (1 lb.)
I
! il
1 in. thick
(1-IY2 Ibs.)
14/2 in. thick
(2-2Y2Ibs.)
.2-2%ibs.,split
c
1
c
1
c
c
c
:
A
A
c
4
7
_Nsidebrowning,pan fryingis
wed, use D shelf position. To
lge meat color then turn and
7
1!
10
;2
35
8
—.—...--
I
-1
2-3
, 4-5
6-9
6-8
8-10
1;:6
20-25
10-15
4-5
LobsterTaiis4
Ham Slices
RawCookBeforeEating
Pork
Chops, Well Done
LambChops
Medium
Well Done
Medium
Well Done
Weirwm
BakeryProducts
Bread(Toast)or
ToasterPastries
EnglishNluff!ns
1-2 slices,
Y2 in.
about1lb.
1?42. in
(1Y2 Ibs.)
2
(Y2 in.)
2(1 in.)
about 1 lb.
2(1
in.)
about 10-12oz.
2
(1?/2in.)
about 1 lb.
1lb,pkg.(10)
2-4slices
1pkg.(2)
2–split
——
c
B
c
El
B
c
c
g
c
D
D
13-16‘
8
12
10
“17 ,
1:
10
17
6
~yz.z
3-4
4“5
9-11
12-14
4-7
8-10
1;:!4
I-2
—
Page 14

Proper care andcleaningproceduresam essential for a long and satisfactory life for your
oven(s). Included in this section are directions
and CleaningChartsfor cleaningall partsof the
oven(s). When cleaning oven(s) manually,
wearingof rubberglovesisrecommendedtoprotect the hands.
TO REMOVE door, open to BROIL position,
whereyou feel hingecatch slightly.Grasp door
at sides; lift door up and away from hinges.TO
REPLACE, grasp door at sides. Line up door
with hingesa-ridpush door firmly into place.
,.
/“iT
1. If desired,broiler pan may be lined withfoil
and broiler rack ma; be covered with foil for
broiling.ALWAYS BE CERTAIN TO MOLD
FOIL THOROUGHLY TO BROILER RACK,
AND SLIT FOIL TO CONFORM WITH
SLITS IN RACK. Broiler rack is designed to
minimizesmoking and spattering,and to keep
drippingscool duringbroiling.Stoppingfat and
meat juices from draining to the broiler pan
preventsrack from servingitspurpose,andmay
letjuices becomehot enoughto catch fire.
The porcelainenamel finish is essentiallyglass
fused on steelat hightemperatureand is breakable if m-sused. This finish is acid resistant.
However,any acid foods spilled (such as lemon
or other citrus fruit juices, or mixturescontaining tomato or vinegar) should be wiped up immediately.Seechartfor cleaningsuggestions,
2. DO NOT place a sheet of aluminumfoil on
shelf,To do so may resultin improperly cooked
foods, damage to oven.finish, and increase in
heaton outside surfacesof the range.
3, If desired, a sheet of aluminumfoil may be — —-=
used on floor of the oven under the bake unit.
BE CERTAIN FOIL DOES NOT TOUCH
BAKE UNIT. Aluminumfoil uswi in this way -—
may affect slightlythe browningof some foods.
Changefoil whenit becomessoiled.
—
Page 15

CAUTION:BEFOREREPLACINGANYLAMP,
DISCONNECTELIZCTRICPO
ATTHE MAINFUSEOR CIRCUITBREAKER
PANEL.LET LAMP (OR BULB) AND LAMP
COVER COOL COMPLETELY.
The oven lamp (bulb) is covered with a glass,
removablecover which is held in place with a
bail-shapedwire.Remove oven door, if desired,
to reachcover easily.
1. TO REMOVE, hold hand under cover so it
doesn’t fall whenreleased.With fingersof same
hand, firmly push back wire bail until it cleara
cover. Lift off cover. DO NOT REMOVE ANY
SCRElf7S TO REMOVE THIS TYPE OF
COVER.
2. Replace lamp with 40-watt home appliance
bulb.
WEIlTOOVEN
3. TO REPLACEcover,place it into grooveof
lamp receptacle.Pullwire bail forwardto center
of cover untilit snapsinto place. Whenin place,
wire holds cover firmly; be certain wire bail is
in depressionin center of cover.
4. Connect electric powerto oven.
When cooking a food for the first time in your
new oven, use time givenon recipe as a guide.
Oven thermostats,over a period of years, may
“drift” from the factory settingantidifferences
in timingbetweenan old and a newovenof 5 to
10minutesare not unusual.Your new ovenhas
beenset correctly at the factory andis moreapt
to be accurate thanthe oven which it replaced.
However,if you findthatyour foods consistently
brown too little or too much, you may make a
simple adjustment in the thermostat (Oven
Temp) knob.
PULL KNOB OFF OF SHAFT, LOOK AT
BACK OF KNOB AND NOTE CURRENT
SETTING, BEFORE MAKING ANY ADJUSTMENT. To increase oven temperature,
adjust toward HI; to decrease temperature,
adjust toward LO. Each notch changes oven
temperature10 degrees.See sketch.
Pull off knob, loosen both screws on back of
knob. Liftpointerandmove one notch indesired
direction.Tightenscrews.Return knob to oven,
matchingflatareaof knob to shaft.
NOTE:Ondouble-ovenmodel, be certainknobs
are returned to shafts from which they were
removed.
—
.—
14
—.———.——
Page 16

——
——.—
—-— —... .
—
—
The top, bottom, sides, and back of the
oven liner, and oven door inner liner,
are finishedwith a
specialcoatingwhich
cannot be cleaned in the usual manner
with soap, detergents, commercial oven
cleaners, coarse abrasive pads or coarse
brushes.Their use and/or the use of oven
sprays willcause permanent damage.
The special coating is a porous ceramic
material
which is dark in colorand feels
slightly rough to the touch. If magnified,
the surface would appear as peaks, valleys, and sub-surface “tunnels.” This
rough finishtends to prevent greasespatters from forminglittle beads or droplets
whichrun down the side walls of a hard-
surface oven liner leaving unsightly
streaks that require hand cleaning. Instead, whenspatter hits the
porousj’inish,
it is dispersed and is partially absorbed.
This dispersal action increases the exposure of oven soil to heated air, which resuRs in oxidationof soil. This finish also
reduces the visual effect of residual soil.
may not disappearcompletelyand after
It
extended usage, stains may appear. See
“To Clean Oven”to minimizethis effect.
specialcoatingworks best on small
The
amounts ofspatter. It doesnot work well
with larger spills, especially sugars, egg
or dairy mixtures. For this reason, the
oven is equipped with a removable, replaceable aluminum foil oven bottom
liner which ~rotects the
wrous finish on
the bottom ‘of the oven~rorn sfiillovers.
Avoid spills on insidesurface of the oven
door. The special oven liner finish is not
used on oven shelves.Shelvesare removable and can be taken to the sink for
cleaning.These parts clean easiest when
soilis still moist, beforeit has carbonized
or burned on. Also, they can be cleaned
with abrasive and commercial oven
cleaners. Follow the manufacturer’s directions regarding use of gloves and eye
protection when using oven cleaners.
Also, these materials must be used with
the parts outsidethe ovento avoid damage to the
1. Let oven parts get cool before handling. It
is recommended that rubber gloves be worn
when cleaning oven parts manually.
2. Remove all cooking utensils including the
broiler pan and rack.
3. Remove oven shelves and clean them
manually with scouring pads or mild
abrasive.
Toremoveshelvesfrom the oven,whencool,
lift up rear of shelf, pull forward with stopIocksalong top of shelf supports, To replace
shelves in oven, reverseprocedures,
specialcoating.
16
Page 17

—
4. Remove excess spills and boilovers
from aluminum foil “oven bottom liner
before removingit fro-moven. This is to
prevent excessliquids from spilling onto
the porousfinish.‘I%enremoveah.uni.num
foil liner manually. (Before cleaning or
removing the album foil l.iner,-lift
bake unit out of the way.)
—,,.—
6. Soilvisibilitymaybe reducedby operating the oven
at 400°F. Closedoor, set
ovenswitchto bakeand oventemperature
control to 400°F. Time for at least 4
hours. Repeated cyclesmay be necessary
beforeimprovementin appearance is apparent, particularly cin oven door. For
moderate to heavy soiling of oven door
use method describedin item (7) below
before running 400°F. cycle. The oven
timer can be used to control the cycle
automatically at a time convenient for
you. Some slight smoking may occur,
similar to that which may occur during
other time bake cooking.
DURING THE
Ol?l?RA-
‘1’IONOF THE OVEN, THE DOOR,
WINDOW AND OTHER RANGE
SURFACES WILL GET HOT
ENOUGH TO CAUSE BURNS. ?)0
BKtT‘KNW1.LETTHERANGECOOL
BEFORE REPLACING ALUMINUM
FOIL OVEN BOTTOMLINER AND
OVEN SHELVES IF THEY WERE
REMOVED.
—
If the aluminum foil is soiled beyond
cleaningwith damp cloth, replaceit with
a replacement sheet. You may make a
new tray by using the old sheet as a pat-
tern and cut the new liner from regular
heavy weight akunin
um foil, then place
on the oven bottom.
5. Cleanovenwindowand insideofupper
oven door. Use mild non-scratching
cleanser and dam-prag, Avoid spilling
water or cleaner on porous surface.
7’.If a spilloveror heavy soiling occurs
onthe
poroussurface,as soonaspractical
aftertheovenhascooled,removeasmuch
ofthesoilas ossibleusingasmallamount
J’of wateran a stiff bristlenylon brush.
Whenusing water,use it sparinglyand
changeit frequently,keepifigit as clean
aspossible,andbe sureto blotit up with
papertowels,cloths, or sponges.Do not
rub or scrub -withpapertowels,clothsor
sponges,since these will leaveunsightly
lint on the ovenfinish.If waterleavesa
whiteringon the finish
as it dries,apply
water again and blot it with a clean
sponge,startingat the edge of the ring
andworkingtowardthe center.
Use carein removing and replacing alu-
minumfoilovenbottom linerand shelves,
and in placing and removing dishes and
food to avoid scratching, rubbing or
otherwise damaging the
porousfinish on
the oven wallsand door.
Do not use soap, detergent,commercial
ovencleaner,siliconeovensprays,coarse
steelpadsorcoarsebrushesonthe
surface,
mar the
Theseproductswillspot,clogand
porous surface and reduce its
porous
abilityto work.
-—
16
Page 18

NOTE: Let ovenpart(s)cool m?fmi)m?ar?ing
lltis that rukm!r ghm?s be Wwo!mlto protect the hands.
Broiler Pan
and Rack
Control Knobs
RotaryOven
Heating Units
(NearFloorand
Top of Oven)
Metal
Porcelain
Enamel
OvenGasket
Silicone Rubber
(Heat Resistant)
Shelves
USE THESE DIRECTIONS FOR STANDARD OVEN ONLY, FOR CONTINUOUS CLEANING OVENS: Refer to
“Oven Caref’ section, pages 15 and 16, for directions on care of special porous ceramic coating,
Oven Door
Inside* (Liner)
Oven Liner*
(CAUTION: When
in use light bulbs
can become warm
enoughto break
if touched with
moist cloth or
towel. When clean
ing, avoid warm
lamps with cleaning cloths if lamp
cover is removed.
See Lamp Rep!ace
men$ Care
SectIon.)
Soapand Water
Soap-Filled
Scouring Pad
Plastic Scouring.Paf
Soapand Water
Soapaiid Water
Paper Towel or
Dry Cloth
Soapand Water
Soap and Water
Soap and Water
So~npg~:lid
Co:~a:~~ai Oven
See Column at right
Soapand Water
Co&~aergjalOven
So~np;F$~:dScour.
SCOUP
— —._-—- —.- ——
(Do not let soiled pan and rack stand in oven to cool,) Drain fat, cool
pan and rack slightiy, Sprinkle on detergent;.fill pan with warm water.
Spread cloth or paper towel over rack, let stand a few minutes. Wash,
scouring if necessary. Rinse and dry. (Or wash in dishwasher,)
Pull off knobs. Wash gently but do not soak. Dry and rkturn controls
to range, matching flat area on knoh-andshaft.
Heating units do not require manual cleaning; soil burns off when
unit is heated. The bake unit is hinged so yOLJcan Iift it to reach oven
floor, The broil unit is permanently attached,
Washall glass with cloth dampened in soapywater,
Wash, rinse, then polish with dry cloth, DO NOT USE
sives, ammonia, acids or commercial oven cleaners which may d@m-
age finish,
Acids—if range is hot, use’dry paper towel or cloth to wipe up right
away. When surface is COOI,wash and rinse. Other—such as fat spatterings, etc., wash with
with dry cloth.
Avoid cleaning powders or harsh abrasives which may cause scratching of surface, See note on porcelain enamel, Care Section.
On edge of oven frame, Clean off soil with sudsy water and rinse
thoroughly.
For cleaning, any and”all mentioned materials can be used. Rinse
thoroughly
NOTE:Somect$mmercialovencleanersOausedarkeningand discolora-
tion. When usin for first time, test cleaner on small part of shelf and
check for
FOR STANDARD OVEN: Rem?ve door; see directions, Care, section, DO
NOT place door under runmng water, or Immerse. Use directions
cleanlng as for Oven Linersbelow,
Cool before cleaning.
FOR LIGHT SOIL: Frequent wiping with mild soap and
Iarly after cooking meat) will prolong the time between major cleaning.
Rinse thoroughly. NOTE: Soap left on liner causes additional stains
when oven is reheated.
FOR HEAVY SOIL: Choose a non-abrasive cleaner and follow label instructions, using thin la er of cleaner, Use of rubber gloves is recom-
Rinse well,. Wipe off any oven cleaner that gets on thermostat bulb:
When rinsing oven after cleaning also wipe thermostat bulb, found
in back, or on side, near top of oven.
to remove all materials after cleaning.
discooration before CCJmpletelYcleaning. .
f
,,
soa~and water when cooled, rinse. Polish
“Kmended: Wipe or rub Ilg tly on stubborn spots.
.,
steel wool, ‘abra-
Water (particI.I-
——
-, -
for
.— —.—
——...—...-.—.—
Page 19

%. —
Readthis bookto be certain you understandhowoven features operate.Throughoutthe book,you will
find points tocheckon howto determineif you needservice.Alsocheckthe listing belowfor further hints
of possiblesourceof the problem.
.
d the Parts
ChMw14‘mmer’
Check to becertain step-by-step directionswere
followedcorrectly.Reviewpagesonuseof timer.
Checkmaterialand sizeof bakingutensil;placement of shelfand food in oven. If the oven was
used for broiling, just before it is preheatedfor
bakinga food, turn the oven completely off and
open the door wide so it can cool (5 to 10 min-
utes). Then close the oven door and preheat as
directed on Baking page.
The difficulty might also be in the main distribution panel of your houseby a blownoven circuit fuse, a tripped oven circuit breaker, the
main fuse, or the main circuit breaker,depending upon the nature of the power supply. If a
circuit breakeris involved, reset it. If the con-
trol box employs fuses, the oven fuse (a cartridge-type) should be changed, BUT ONLY
BY SOMEONE FAMILIAR WITH ELEC-
TRICAL CIRCUITS.
Apartment tenants and condominium owners
should request their building management to
perform thischeck before callingfor service.
If after replacingthe oven circuit fuse or resettingthe circuitbreaker,thefuse blowsor circuit
bre~kertrips open again,
callyour serviceman.
Be sure OVEN TEMP and OVEN SET are set
at BROIL. If there was excessive smoking and
spattering: Were shelf and broiler pan at posi-
tion suggestedon broiling chart? If aluminum
foil was used on broil rack, was it handled ac-
cording to directions?
If lights on oven are workingbut the oven units
do not heat,call.serviceman.
WHEN YOU CALL GENERAL ELECTRIC
FOR SERVICE help them give you prompt
serviceby:
1. Givingan accuratedescriptionof thetrouble.
2. Giving the complete model number of your
oven. Below is an example of name plate. To
locate name plate open oven door and look on
frameaboveoven.Model andserialnumbersare
also on the Purchase Record Card which came
with your oven. If desired, copy the numbers
from card before sendingit in.
o
‘W’’TWE8A1*mc~~iif~~:@
Ux4tw
AC G+t,V
,. W*,Uno
ImmoY tm.xaw
“ItM>W,CW.1
0
L-i ~ i
>
o
,
.-
Page 20

A.LA3AR14A
Birmingham-35210
2500 Crestwood Boulevard
(205) 956-0333
(Decatur-Huntsville)
Huntsville-35805
1209PutnamDrive
(205)830-0150
Mobile-36606
1107BeltlineHighwaySouth
(205)471-1451
ARiZ0t4A
Phoenix-85031
25South51stAvenue
60X 14278
P.O.
(602)272-9345
Tucson-85705
2015North ForbesBoulevard
Suite111
(602)623-8415
i%RWWJSAS
Little Rock-72209
8405NewBentonHighway
(501)568-7630
CALIFOFINiA
(SanBernardino-RiverSide)
Bloomington-92316
10121 CactusAvenue
(714)877-3434
(SanFrancisco)
Buriingame-94010
1649AdrianRoad
(415)981-8760
Fresno-93727
1809North HeimStreet
(209)255-1851
LosAngeies-90058
2815East46thStreet
(213)586-5480
Sacramento-95825
1721BellStl”eet
(916)929-2247
SanDiego-92101
3554KettnerBouievard
(714)297-3221
SanJose-95123
5761-BWinfieidBivd.
(408)629-3500
VanNuys-91405
6843LennoxAvenue
(213)989-5710
~o~o$lo,rxj
CoioradoSprings-80909
1865N.Academy- SuiteB
(303)597-8492
Denver-80207
5390East39th Avenue
(303)320-3301
~fj;j&j~CT’{CLIT
Bridgeport-06604
615NorthWashingtonAve.
(203) 367-5311
East Hartford -06108
265 Prestige Park, Plaza 3
(203) 528--9811
DELAWARE
(Brandywine- Wilmington)
GlenMills,PA-19342
R.i3.##2.Box210
(215)358-1500 .
msw+m-rOFCOLUMBIA
Jessup,MD- 20794-LM1O
8201StaytonDrive
60X 127
P.O.
(301)953-9130
FLORIDA
FortLauderdale-33309
1101WestMeNabRoad
(305)974-6708
FortMeyers-33901
1910CourtneyDrive
(813)939-2812
Jacksonville-32205
5226HighwayAvenue
(904)783-1330
(Pompano-W.PalmBeach)
LakeWorth-33460
1802MadridAvenue
(305)655-7040
Miami-33167
3200N.W.1 IOthStreet
(305)685-5144
Orlando-32807
6545EastColonialDrive
(305)273-6370.
Tallahassee-32301
1205SouthAdamsStreet
(904)222-6931
Tampa-33611
5201S.WestshoreBouievard
Box13708- interbayStation
(813)837-1906
GE0i3GiA
Atianta-30325
1695MariettaBouievard
P,O.Box~9917
(404)352-6000
Savannah-31406
211TelevisionCircie
(912)925-0445
i-iAW/31i
Honoiuiu-96813
404CookeStreet
(808)533-7462
itlAi-fO
~~%?I City-83704
5250ChindenBouievard
(208)376-5880
IL.
Li?401s
Champaign-61820
1205North Hagen
(217)359-4088
Chicago-60638
5600West73rd Street
(312)594-2424
ElkGroveVillage-60007
10KingStreet
(312)593-2525
Lombard-60148
837-B35WestmoreAvenue
(312)629-8010
Peoria-61614
7708North CrestlineDrive
(309)692-5070
Rockford-61107
401North2ndStreet
(815)962-7200
Springfield-62702
2252South15thStreet
(217)753-8088
INDIANA
Evansville-47714
1016-K S.WeinbachAvenue
(812)476-1341
FortWayne-46808
4632NewaygoRoad
(219)484-9005
Gary-46409
5185Broadway
(219)981-2533
Indianapolis-46219
6233BrookvilleRoad
(317)356-8861
SouthBend-46613
1902MiamiStreet
(219)288-0685
iOWA
CedarRapids-52405
118FirstStreet,N,W.
(319)366-8579
Davenport-52802
1074SouthI)ittmer
PO, BOX3188
(319)326-5101
DesMoines-50313
1637N.E.58thAvenue
(515)266-2191
Waterioo-50703
2829FaiisAvenue
(319)236-1393
KANSAS
KansasCity-66115
2949ChrysierRoad
(913]371-2242
Wichita-6721
820EastIndianapolis
(316)267-3366
KENTUCKY
Lexington-40505
1144FioydDrive
(606)255-0848
Louisville-40218
4421Bishop Lane
60X 32130
P.C).
(502)452-3511
LOUISIANA
BatonRouge-70814
2935CraterLakeDrive
(504)926-5062
(NewOrleans)
ilarahan -70123
701EdwardsAvenue
(504)733-7901
Shreveport-71102
1430DalzeIlStreet
(318)425-8654
MAINE
SouthPortland-04106
54DarlingAvenue
(207)775-6385
MARYLAND
Saiisbury-21801
Twilly Centre
329CivicAvenue
(301)742-3900
Jessup-20794-0110
8201StaytonDrive
P.O.60X127
(301)953-9130
MASSACHUSETTS
(CapeCod)
Hyannis-02601
80Enterprise- Unit11
(617)771-5905
Pittsfield-01201
1450EastStreet
(413)499-4391
(Boston-South)
Westwood-02090
346UniversityAvenue
(617)329-1250
(Boston-Ncwth)
Woburn-01801
57CommerceWay
(617)944-7500
MICHIGAN
GrandRapids-49508
35028thStreet,S.E.
(616)452-9754
Lansing-48912
1004E.MichiganAvenue
(517)484-2561
Troy-48084
1150Rankin
(313)583-1616
Westiancl-48185
953Manufacturer’sDrive
(313)584-5190
MiNNEsoTA
(Minneapolis-S!.Paui)
Edirm-55435
7450Metro Bouievard
(612)835-5270
.—
——
Page 21

—
ivfisslssippl
Jackson-39209
32SIndustrialDrive
(601)352-3371
MK%CN.H+!
KansasCity, KS-66115
2949ChryslerRoad
(913)371-2242
St,Louis-63178
1355 WarsonRoad,North
P.o. Box14559
(314)993-6200
Springfield-65807
1334 WestSunshine
(417)831-0511
NEBRASKA
Lincoln-68503
1145North47thStreet
(402)464-9148
Omaha-68117
6636“F” Street
(402)331-4045
NEVADA
LasVegas-89109
3347S.HighlandDrive
Suite1
(702)733-1500
f?eno -89511
6465S.VirginiaStreet
(702)825-7070
NEWJERSEY
MountHollv-08060
ute38&“EaslickAvenue
9) 261-3500
orth Caldwell-07006
5FairfieldRoad
(201)256-8850
(AsburyPark)
Oakhurst-07712
2111Highway35
(201)493-2100
Vineland-08360
749NorthDelseaDrive
(609)696-1506
MEXICO
NEW
Albuquerque-87107
3334PrincetonDrive,N.E.
(505)884-1861
NEWYORK
Albany-12205
2 InterstateAvenue
(518)438-3571
Brooklyn-11234
5402Avenue“N”
(212)253-8181
Buffalo-14225
3637Union Road
(716)686-2268
(WestchesterCountyArea)
Elrnsford-10523
FairviewIndustrialPark
Route#9-A
(914)592-4330
Flushing-11354
133-3039th Avenue
(212)886-5600
(Binghamton)
JohnsonCity-13790
(Nassau-SuffolkCounty)
Melvi{le-11747
336SouthServiceRoad
(516)293-0700
(OrangeCountyArea)
Newburgh-12550
1135UnionAvenue
(914)564-2000
Rochester-14622
1900RidgeRoadEast
(716)544-7100
Ronkonkoma-11779
76UnionAvenue
(516)467-7700
Syracuse-13204
965WestGeneseeStreet
(315)471-9121
NORTHCAFtOLfNA
Charlotte-28234
700TuckaseegeeRoad
P.O.
60X 34396
(704)372-8810
Greensboro-27406
2918BalticAvenue
(919)272-7153
Raleigh-27604
2013NewHope
ChurchRoad
(919)876-5603
Obflo
Akron-44319
2262S.Arlington Road
(216)773-0361
Cincinnati-45242
10001AllianceRoad
(513)745-5500
Cleveland-44142
20600SheldonRoad
(216)362-4200
Columbus-43212
! 155WestFifthAvenue
(614)294-2561
Dayton-45414
5701WebsterStreet
(513)898-7600
Toledo-43611
3300SummitStreet
(419)729-1651
OKLAHOMA
OklahomaCity-73118
3228NorthSantaFe
BOX18669
P,O.
(405)528-2381
Tulsa-74112
6913East13th
(918)835-9526
Ot7EGC)N
(PortlandArea)
Beaverton-97005
14305S,W.MillikanWay
(503)646-1176
Eugene-97402
1492WestSixthStreet
(503)342-7285
PEN?+SYLVAN!A
(Brandywine-Wilmington)
GlenMills -19342
R,D,#2,BOX210
(215)358-1500
Johnstown-15905
214WestwoodShoppingPlaza
(814)255-6721
(Harrisburg)
CampHill -17011
2133MarketStreet
(717)761-8185
Monroeville-15146
150SecoRoad
MonroevilieIndustrial Park
(412)665-3700
Philadelphia-19115
9900GlobalRoad
(215)698-3270
(Allentown)
Whitehall-18052
1906MacArthurRoad
(215)437-9671
RHCIDEISLAND
EastProvidence-02914
1015WatermanAvenue
(401)438-0300
SOUTHCAFWLINA
Columbia-29602
825BluffRoad
Box1210
(803)771-7880
MyrtleBeach-29577
702SeaBoardStreet
SeaBoardIndustrial Park
(803)626-7411
N.Charleston-29405
7325-BAssociateDrwe
PepperdanIndustrialPark
(803)552-5193
(Greenville)
Taylors-29687
25HamptonVillage
(803)292-0830
TENNESSEE
Chattanooga-37403
613East1lth Street
(615)265-8598
JohnsonCity -37601
2912Bristol Highway
(615)282-4545
Knoxville-37919
3250MynattStreet,N,W,
(615)524-7571
Memphis-38118
3770SouthPerkins
(901)363-1141
Nashville.37204
3607Trousdale
(615)834-2150
TEXAS
Austin-78704
2810S.FirstStreet
(512)442-7893
CorpusChristi-78415
3225AyersStreet
(512)884-4897
Dallas-75247
8949DiplomacyRow
BOX47601
P,O,
(214)631-1380
ElPaso-79925
7600BoeingDrive
(915)778-5361
(Brownsville)
Harlingen-78550
1204NorthSeventh
(512)423-1204
Houston-77207
P,O.
BOX26837
2425BroadStreet
(713)641-0311
Lubbock-79490
4623Loop289West
BOX16288
P.0,
(806)793-1620
(Odessa)
Midland-79701
BOX6286
P.0,
MidlandTerminal
(915)563-3483
SanAntonio-78216
7822Jones-Maltsberger
(512)227-7531
UTAH
SaltLakeCity-84125
2425South900West
P.o. Box30904
(801)974-4600
vlFtGlNL4
Fairfax-22031
2810DowAvenue
(703)280-2020
Norfolk-23502
4552E,PrincessAnneDr.
(804)857-5937
Richmond-23228
2910HungarySpringRd.
(804)288-6221
WASHINGTON
~Tr;.’((it/~k 99336
UnionSquare
Suite206
101North UnionStreet
(509)783-7403
Seattle-98188
401TukwilaParkway
(206)575-2711
Spokane-99206
9624E,MontgomerySt,
(509)926-9562
WESTVl~G~NIA
(Charleston)
Huntington-25704
1217AdamsAvenue
BOX7518
P.0,
(304)529-3307
Wheeling-26003
137North RiverRoad
(304)283-8511
WISCONSIN
Appleton-54911
343W.WisconsinAve.
(414)731-9514
Milwaukee-53225
11100 W,SilverSpring Rd.
(414)462-9225
TCH FORWIANGE% Addresses and telephone numbers sometimes change, And new Centers open. H
chanae,
ELEtiWflCFAGTORYSERVICE”.
checkYourtelephonebook, Lookin theWhitePagesunder“GENERALELECTRiCCOMPANY”OR“GENERAL
thenumbers
--
Page 22

—
—
H Y6X! Need SW%mx3
In many cities, there’s a General Electric Factor
Service Center. Call, and a radio-dispatched true
i
will cometo your homeby appointment—morning
or afternoon. Charge the work, if you like. All the
centers accept both Master Cardand Visa cards.
Or look for General Electric franchised Customer
Care@servicers.You’ll find themintheYellow Pages
under “GENERAL ELECTRICCUSTOMERCARE@
SERVICE” or “GENERAL ELECTRIC–HOTpOiNT
CUSTOMERCARE@SERVICE”.
Ifyoun~edserviceliterature,partsoraceessoriwcon-
tact one of the Factory Service Centers, a franchised Customer Care@servicer or your General
Electric dealer.
stepsto forFu!’lhwHelp
Fkst,contact the people who serviced your oven.
Explain why you are dissatisfied. in most cases,
this will solve the problem.
lh?xi,if you arestill dissatisfied, write allthedetails–
including your phonenumber—to:
Manager,ConsumerRelations
GeneralElectric Company
WCE-312
Appliance park
Louisville, Kentucky40225
Finally,if your problem is still not resolved,write:
Major Appliance
ConsumerAction Panel
20North Wacker Drive
Chicago,Illinois 60606
This panel, known as MACAP,is a group of inde-
pendent consumer expwts under the sponsorship
of several industry associations. Its purpose is to
study practices and advise the industry of ways to
improve customer service. BecauseMACAPis free
of industry control and influence, it is ableto make
impartiai recommendationsandconsider eachcase
individually.
.
——
——==
.
Page 23

How m do away vimSWTM’kwrepairbilk.
Your new oven is a well designed and engineered
product. Beforeit left the factory, it went through
rigorous tests, just to makesure it was as defect-
free as possible. And you have a warranty to pro-
tect you against any manufacturing defects during
theearly periodof your oven’s life.
Now you can have the same trouble-free and
surprise-free service for as long as you own your
oven. Youcan buy a GeneralElectric Service Con-
tract. Foronelow fee
.. usually just penniesa day
.GeneralElectric will take care of any repairs
~our oven needs–both parts and labor. You are
protected for the length of your contract. Even
whencosts goup, you pay nothing more.
Wafitmoreinformation?There’snoobligation.Youcan
getinformation onServiceContracts anytime, Just
write your nameand address, dateof installation,
aridthe modelandserial numberof your appliance
andsendto:
Manager,Service Contracts
GeneralElectric Company
WCE-315
Appliance Park
Louisviiie, Kentucky40225
Helps ‘me
If you’re the kind of person who likes to do-it-
yourself–or if you’re interested in saving money
on out-of-warranty repairs—General Electric now
offers somereal help:
Repair
Youcan use this manual to solve common repair
problems. GEmakes it easy becauseyour manual
contains important do-it-yourself information:
o
chartstohelpyoudiagnoseproblems
~
easy10understandinstructions
s~op-by-stepphotoswith repairprocedures
e
@aski[i levelindex
otherecommendedtoolsneededtoperformrepairs
Rq31zKx2m3M Parts
When repairing your appliance, be sure to use
authorized GE replacement parts. Each
packagedin a color coded box with:
~
easypartsidentification
o estimatedtimeof
. stop-by-step
o recommendedtoo~~
where to Purchase step-by-step
repairs
instructions
Repair Manuals and Parts
Youcan purchase GErepair manuals and replacementparts for your appliance from authorized participating GeneralElectric dealers.
NOTE:Of course, repairs should beattempted only
by individuals possessing adequate backgrounds
of electrical, electronic and mechanicalexperience.
Any attempt to repair a major appliance may result
in personal injury and property damage.
part iS
.=
--
Page 24

SaveproofcIforiginalpurchasedatesuch asyour salesslipor cancelledcheckto establishwarrantyperiod.
—
FULL ONE.YEARWARRANTY
For one year from date of original
purchase, we will provide, free of
charge, parts and service labor in
your home to repair or replace any
part of the range that fails because ‘ashingtonI ‘c’ ‘n ‘iaska ‘he
of a manufacturing defect.
!~ ~()~ ~()~]~~~~ e Service trips to your home”to
‘:.
‘&.’
teach you how to use the product.
Readyour Use and Care material.
If you then have any questions
about operating the product,
please contact your dealer or our
Consumer Affairs office at the
address below.
. Improper installation.
If you have an installation problem,
contact your dealer or installer.
Youare responsible for providing
adequate electrical, exhausting
and other connecting facilities.
This warranty is extended to the
original purchaser and anysucceed-
ing owner for products purchased
for ordinary home use in the 48
mainland states, Hawaii and
warranty
is LIMITEDbecause you must pay
to ship the product to the service
shop or for the service technician.’s
travel costs to your hornet
All warranty service will beprovided
by our Factory Service Centers or
by our franchised Customer Care’
servicers during normal working
hours. Check the White Pagesfor
GENERALELECTRICCOMPANY
or GENERALELECTRICFACTORY
SERVICE.Look in the Yellow
Pagesfor GENERALELECTRIC
CUSTOMERCARE@SERVICEor
GENERALELECTRIC-HOTpOINT
CUSTOMERCAREOSERVICE.
e Replacement of house fuses
or resetting of circuit breakers.
@Failure of the product if it is
used for other than its intended
purpose or used commercially.
o Damage to product caused
by accident, fire, fioods or acts
of God.
WARRANTORISNOT f3ESPONSIBLE FORCONSEQUENTIAL
DAMAGES.
IS the same except that it
Somestatesdo
or exclusion may not apply
whichvaryfrom state to state.
affairsoffice or yourstate’sAttorneyGeneral.
Manager–Consumer Affairs, General 13xtric Company,Appliance Park, Louisville,KY 40225
Part
No.862A725 P55
not allow the exclusion or limitation of incidental or consequential damages, so the above limitation
to you.Thiswarrantygivesyouspecificlegalrights,andyou may also haveotherrights
To knowwhatyourlegalrights arein yourstate,consult yourlocalor state consumer
If further helpis needed concerning this warranty,contact:
6/82
b
Warrantor: GeneralElectric Company
 Loading...