

Page 1

Safety Instructions ......... 2-4
ge.com
©
Opera6ng Instructions
Clock and Timer . ........... l l
Controls .................... 5
Convection .............. 14-1 7
Oven ................... 9, l 0
Probe .................. 13, 18
Proofing ................... 19
Sabbath Feaulre ............. 8
Self-Cleaning Oven ....... 21,22
Special Features ............ 6, 7
Thermostat ................ 20
Timed Baking
and Roasting ......... 12, 16, 17
VVarming .................. 19
Care and Cleaning
Broiler Pan and Grid ......... 25
Cleaning Oven Door ......... 24
Control Panel .............. 25
I,ift-OffOven Door . ......... 24
I,igh t Bulb ................. 23
Oven Floor . ............... 24
Packaging _ape ............. 23
Probe ..................... 25
Racks ..................... 25
Stainless Steel Surfaces ....... 23
./K 915-2 7" Sir_gle Wall (kJen
JK955-2 7" Double Wall Oven
iT9 l 5-30" Single Wall (kJen
ff955-30" Double Wall (kJen
Troubleshooting Tips ..... 26-28
Consumer Support
Consumer Support . . .Back Co_er
Product Registration ...... 29, 30
Warranty .................. 31
Write the model and serial
numbers here:
Model #
Serial #
You can find them on a label on
the side trim or on the ti'ont of
the (lower) oven behind the oven
door.
49-80334 11-05Jfl
Page 2
iMPORTANTSAFETYiNFORMATiON.
READALLiNSTRUCTiONSBEFOREUSING.
WARNING!
For your safe_, the information in this manual must be followed to minimize the risk of fire or
explosion, electric shock, or to prevent property damage, personal injury, or loss of life.
IMPORTANTSAFETYNOTICE
The California Safe Drinking Water and ToxicEnforcement Act requires the Governor of California
to publish a list of substances known to the state to cause cancer, birth defects or other reproductive
harm, and requires businesses to warn customers of potential exposure to such substances.
The fiberglass insulation in self-clean ovens gives off a very small amount of carbon monoxide during
the cleaning cycle. Exposure can be minimized by venting with an open window or using a ventilation
fan or hood.
SAFETYPRECAUTIONS
When using electrical appliances, basic safety precautions should be followed, including the
foliowing:
_?{_Use d/is appliance only %r its intended
purpose as described m tins )wner s
Mannal.
:_!!':Be sure your appliance is properly
installed and grounded by a qualified
mchnician in accordance wifll the
provided installation insuucfions.
J; Do not atmmpt to repair or replace ally'
part of your oxen unless it is specifically
recommended ill this mamml. All other
servicing should be refelTed to a qualified
technician.
;_i:,iHme the installer show you the location
of the circuit breaker or fllse. Mark it for
easy reference.
J; Before performing any service, disconnect
the o_en power supply at the household
disuibution panel by iemoving the fllse or
switching off rite circuit breaken
J; Do not leave children alone--children
should not be left alone or nnattended in
an area where all appliance is in use. They
should nex>r be allowed m sit or stand on
ally' part of the appliance.
_::Do not allow anyone to climb, stand or
hang on tile doon They could damag> the
ox>n, or cause sex>ie personal iIIjnÀ>
:_!!':Be sure rite oxen is secureN installed in
a cabinet that is firefly attached to the
house structure. Ne\er allow anyone to
climb, sit, stand or hang on file ox>n doon
_?:':Nexer leax> file oxen door open when you
are not watching the oxen.
q?{:_Ahvavs kee I) combustible wall cox>ring,
curtains or drapes a safe distance from
vonI" o_n,
q?{:_Always kee I) dish towels, dish cloths, pot
holders and other linens a safe distance
fFonl vonY oxPn.
_; Always kee I) wooden and plastic umnsils
and canned food a safe distance aw W
flom your oxen.
;_?:':Teach children not m play with the
controls or any other part of the oxen.
_::i,arge scratches or impacts m glass doors
can lead m broken or shattered glass.
2
Page 3
WARNING!
SAFETYPRECAUTIONS
ge.com
{7_:Do not store flanm/able materials in
an oxen.
_i:,iCAUTION: Iten/s of interest to
children should not be stored in cabinets
aboxe an oxen; children clin/bing on tile
oxen to reach items could be seiionsly
ii_jnred.
_::Never wear loose-fitting or hanging
garments while using file appliance. Be
careflll when reaching for items stored in
cabinets over file ox.en. Flamn/able mamfial
could be ignimd if brougtlt in contact with
hot surfaces or heating elements and mac
cause se\.ere bnT/ls.
_7{;:Use only di T pot holders--moist or damp
pot holders on hot sni/aaces may i.esuh in
b/nils flom steam. Do not let pot holders
touch hot heating elen/ents. Do not use a
towel or other bnlkv cloth.
i_i:i_For _our safety, nexer use your appliance
tbr wam/ing or heating tile room.
E:,:Do not let cooking grease or other
flammable materials accnnnllate in or
near tile oxen.
E:,IDo not use water on grease fires. Nexer pick
up a flaming pan. T/llrl tile controls off'.
Flame in the ox.en can be smodlered
completely by closing tile oven door and
turning tile oven off or by using a mnlti-
pml)ose d U chemical or foam-type fii.e
extinguisher
_{;_Do not touch tile heating elements or tile
inmrior surPace of tile ox.en. These surPaces
may be hot enough to bnn_ e',.en thougtl
thev ai.e dark in colon Dining and after
use, do not much, or let clothing or oilier
flammable mamrials contact any interior
ai.ea of tile ox.en; allow snfficient tin/e for
cooling first.
Potentially hot surPaces inchlde oven \.ent
openings, snrPaces near tile openings,
crevices around the oven dooi, the edg.es
of the window and metal tIin/ parts abox.e
tile door.
REMEMBER:The inside surPace of tile o_en
may be hot when tile door is opened.
_;:Nexer lemejars or cans of lCatdiippings in
or Ileal vonr o_en.
_{;_Do not store or use combustible mamlials,
gasoline or other flammable vapors and
liquids in the vicinity of this or anv other
appliance.
_{;_Stand away flom tile oxen when opening
tile oxen door. Hot air or steam which
escapes can cause bums to hands, face
and/or eyes.
E:,IDo not heat unopened food containers.
Pressure could build up and tile container
could burst, cansing an iiIjn U.
_? Kee I) tile oven xent unobstructed.
'_!{i;Kee I) tile oxen flee ffon/ grease buildup.
qT_:;Place the oxen rack in tile desired position
while tile oxen is cool. If racks nnlst be
handled when hot, do not let pot holder
contact tile heating elen/ents.
E:,;When using cooking or roasting bags in the
oxen, follow tile n/ann£tctnrer's directions.
E:,IPulling out the rack to the stop-lock is a
comenience in lifting heax T foods. It is also
a precantion against bnrlls fiom tonching
hot surfaces of tile door or oxen walls.
_{;_Do not use tile oxen to di y newspapers.
If oxerheated, they can catch on fire.
_{;;Do not use the oxen for a storage area.
Iten/s stored in an oxen can ignite.
E:,;Do not leme paper products, cooking
utensils or fbod in tile oxen when not
in use.
_{;:After broiling, always take tile broiler pan
out of tile oxen and clean it. ieftoxer
grease in tile 1)roller pan can catch fire
next tin/e you use the pan.
_;:Clean only parts listed in this Owner's
Manual.
_;:Do not use aluminnn_ foil to line oxen
bottoms, except as sugg.ested in this n/annal.
hnproper installation of aluminnn/foil may
resuh in a risk of electric shock or fire.
3
Page 4
IMPORTANTSAFETYINFORMATION.
READALLINSTRUCTIONSBEFOREUSING.
COOKMEATANDPOULTRYTHOROUGHLY.,.
Cookmeatandpoultry thoroughly--meat to at least anINTERNALtemperatureof 160°Fandpoultry
toat least an INTERNALtemperatureof 180%-Cookingto thesetemperaturesusuallyprotectsagainst
foodbomeillness.
SELF-CLEANINGOVEN
;fi:,iDo not clean the door g'asket. Tile door
gasket is essential tbr a good seal. Care
should be token not to rub, damag_ or
mow tile gasket.
_:_Do not use oven cleaners. No comme_via]
ox>n cleaner or oxen liner promctive
coating of aW kind should be used in or
around any part of the oxen. Residue flom
oxen cleaners will damage the inside of the
oxen when tile self-clean cycle is used.
_i:,:Be%re self-cleaning d_e oxen, remove die
broiler pan, giid and other cookware.
_?{:_Be snie tO wipe up excess spillage before
stardng tile self-cleaning operation.
;_i:,:If the self-cleaning mode malflmcuons,
um_ file oxen off and disconnect tile power
supply. Have it serviced by a qualified
mchnician.
READANDFOLLOWTHISSAFETYINFORMAtiONCAREFULLY.
SAVETHESEINSTRUCTIONS
4
Page 5
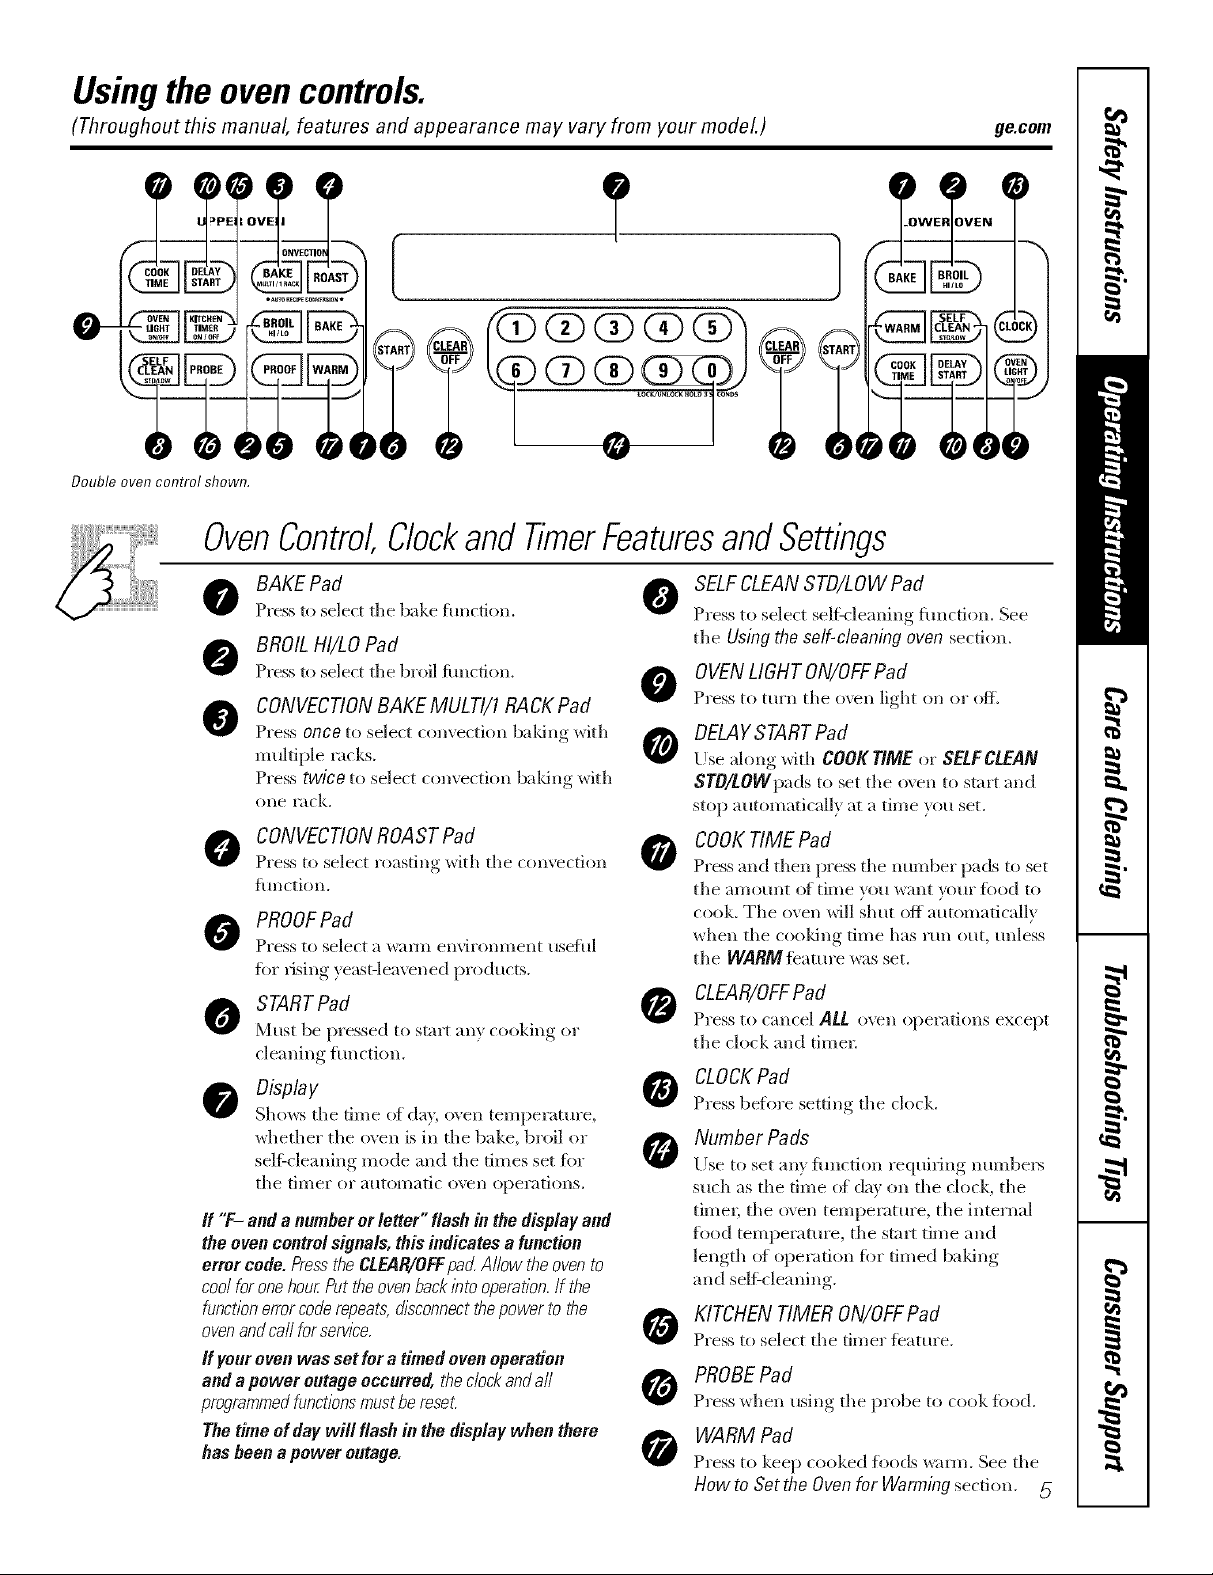
Usingthe ovencontrols.
(Throughout this manual, features and appearance may vary from your modeL)
E ]
Double oven control shown.
OvenControlClockandTimerFeaturesandSettings
ge.com
BAKEPad 0
Press to select file bake hmcdon.
BROILHI/LO Pad
Press to select file broilfimcfion.
CONVECTIONBAKE MULTI/I RACKPad
@
Press once to select convection baldric with
multiple rocks.
Press twice to select convection baldric with
one rack.
CONVECTIONROAST Pad
Press to select roasting _ith the convection 0
function.
PROOFPad
PIess to select a "¢val'/ll envii'OllI//ellt usehll
fiw rising ) east-leavened products.
STARTPad
Must be pIessed to start an) cooking or
cleaning function.
Display
Sho_:s the time (ffday, oven temperatm'e,
whether tile oven is in the bake, br(fil or
selgcleaning mode and the times set for
tile tiIner or automatic ovell opel';ffions.
ff "T- anda numberorletter"flashinthedisplayand
theovencontrol signals,this indicatesa function
error code.PresstheCLEAR/OFFpad.Allowtheovento
coo/foronehour.Puttheovenback/btooperation.!fthe
functionerrorcoderepeats,disconnectthepowerto the
ovenandcallforserv/2e.
ff your oven was set for a timed oven operation
and a power outage occurred, thecbck andaft
programmedfunctions must bereset.
The time of day will flash in the display when there
has been a power outage.
SELFCLEANSTD/LOW Pad
Press to select selt_ leaning flmction. See
the Using the so/f-c/caning oven section.
OVENLIGHT ON/OFFPad
0
Press to turn the o\vn light on or ofl_
DELAYSTARTPad
Use along with COOK T/ME or SELFCLEAN
STO/LOWpads to set the o\ en to stai_ and
stop automatically at a time you set.
COOKTIME Pad
Press and then press the mmlber pads to set
tile all/at/lit ()[[illle yotl want \_O[li" ]_()o(l to
cook. Tile oven will shut off automatically
when the cooldng time has run out, unless
the WARMteamre was set.
CLEAR/OFFPad
Press to cancel ALL oven operations except
the clock and timel:
CLOCKPad
Press beflwe setting the clock.
Number Pads
Use to set any flmcfion requiting numbe_
such as tile time (ffda\' on the clock, the
timeI; tile oven temperature, the trite*hal
fl)od temperatme, the slart time and
length (ffol)eiafion for timed baldric
and selfXcleaning.
KITCHENTIMER ON/OFFPad
@
Press to select the timer tbatm'e.
PROBEPad
Press when using the probe to cook fi_od.
WARM Pad
G
Press to keep cooked fl)ods w;mn. See the
How to Set the Oven for Warming section. 5
Page 6
Special features of your oven control.
Your new touch pad control has additional features that you may choose to use. The following are the features
and how you may activate them.
The special feature modes can only be activated while the display is showing the time of day. They remain in
the control's memory until the steps are repeated.
When the display shows your choice, press the STARTpad. The special features will remain in memory after
a power failure, except for the Sabbath feature, which will have to be reset.
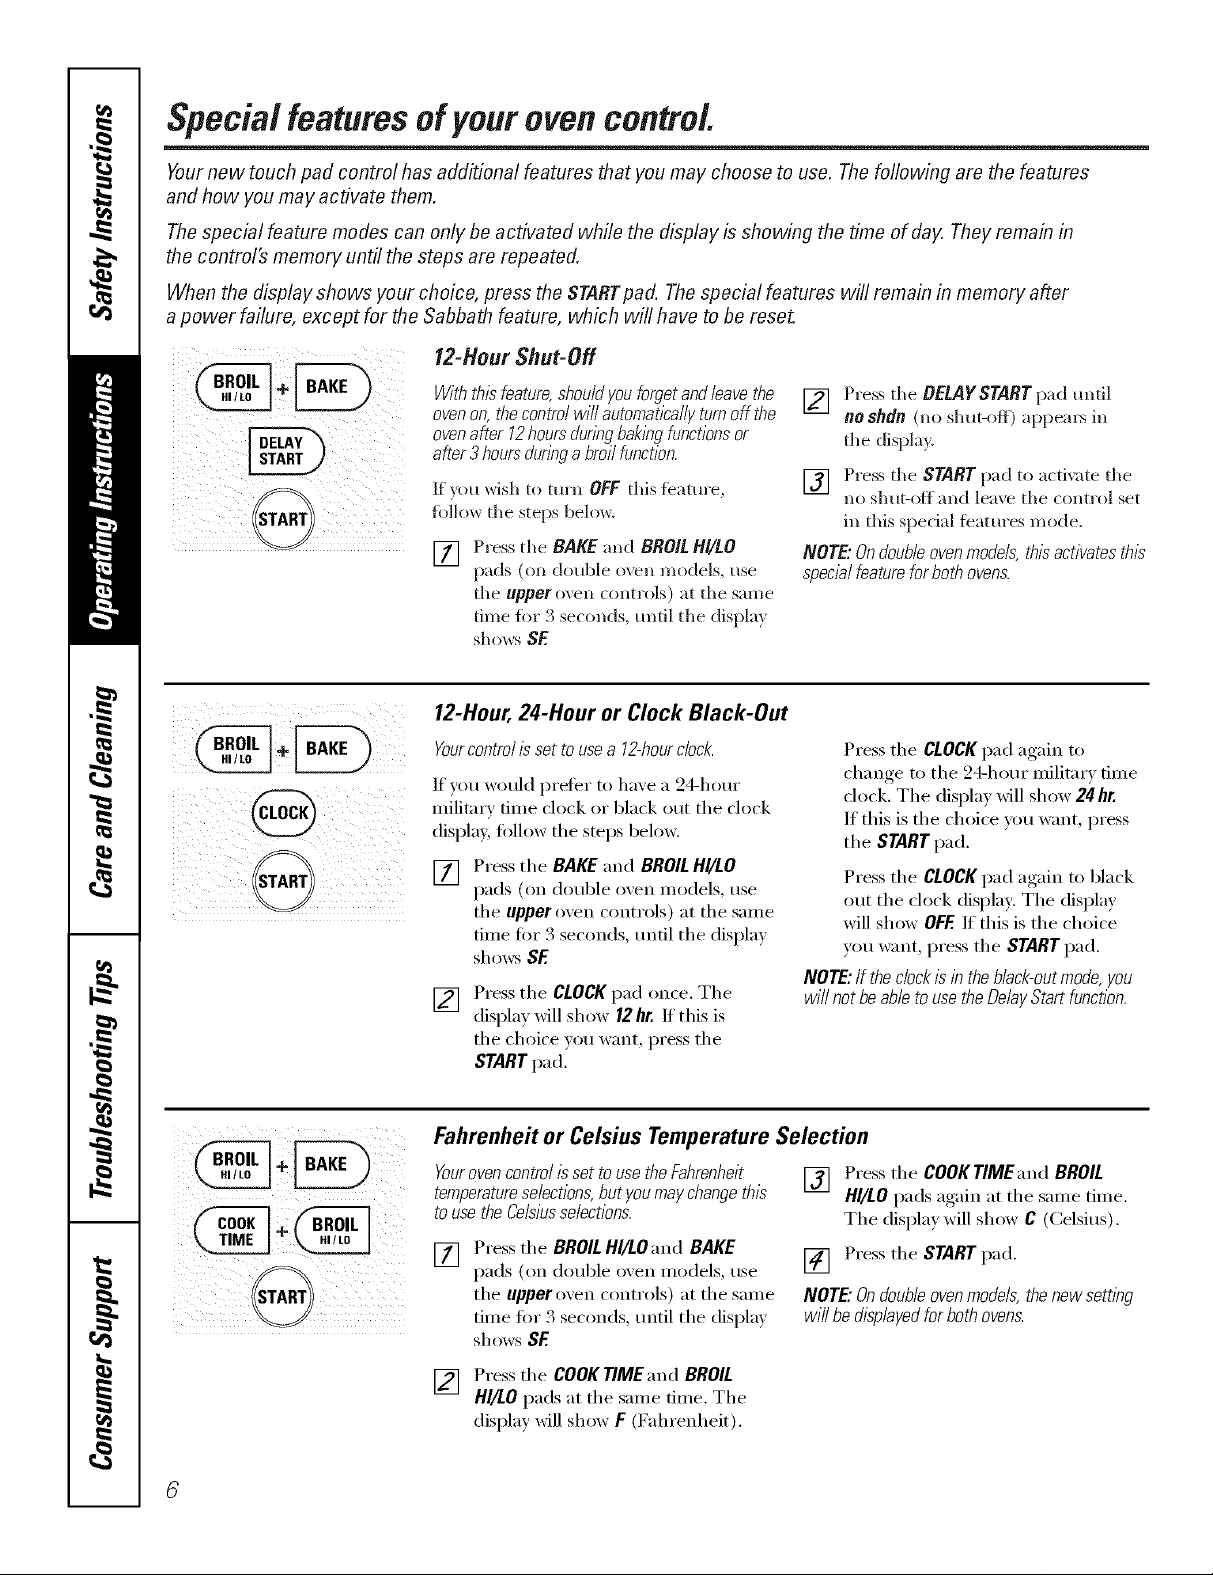
12-Hour Shut-Off
i i ii ii@ i
VViththisfeatura,shouldyouforgetandleavethe
ovenon,thecontrolwillautomat/2allyturnoffthe
ovenafter12hoursdunbgbak/bgfunctionsor
after3 hoursclunbga broilfunction.
If )ou wish to turn OFF this feature,
fi)lh)w the steps below.
[] Press tile BAKE and BROIL HI/LO
pads (on double oven models, use
tile upper o_,ell controls) at tile same
• • Q •
tm_e fl)r ._ seconds, until tile displa}
sho_s SE
12-Hour, 24-Hour or Clock Black-Out
Yourcontrolissetto usea 12-hourclock.
If you would prefer to have a 24-hour
military time clock or black out the clock
display, fi)llow the steps beh)w.
Press the BAKE and BROIL HI/LO
[]
pads (on double oven Inodels, use
the upperoven controls) at the same
time fi)r 3 seconds, tmfil the display
shows SE
Press the CLOCKpad once. The
[]
display will show 12hr. If this is
the choice )ou want, press the
STARTpad.
[] Press tile BELAYSTART pad tmtil
no shdn (no shut-off) apl)em5 in
tile display.
[] Press tile START pad to actixate tile
no shut-off and leave tile control set
in this special t0atm'es mode.
NOTE"Onfloub/eovenmodels, this activates this
specialfeature for both ovens.
Press the CLOCKpad again to
change to the 24-hour military time
clock. The display will show 24 hr.
If this is the choice you want, press
the START pad.
Press the CLOCKpad again to black
out the clock display: The display
will show OFF.If this is the choice
you want, press the START pad.
NOTE:If the dock is in the b/ack-outmode, you
wi// not be able touse the Delay Start function.
i/ i i ii
Fahrenheit or Celsius Temperature Selection
Yourovencontrol isset touse the Fahrenheit
temperatureselections,but youmay changethis
touse the Celsiusselections.
[] Press the BROIL HI/LOand BAKE
pads (on double oxen models, use
the upper oven controls) at the same
time fl)r 3 seconds, tmtil the display
shows $E
[] Press the COOKTIMEand BROIL
HI/LO pads at the same time. The
display will show F (Fahrenheit).
[] Press the COOKTIMEand BROIL
HI/LO pads again at the same time.
The displa)will show C (Celsius).
[] Press the START pad,
NOTE"Ondoubleovenmodels,thenewsembg
willbedtsp/ayedfor bothovens.
Page 7
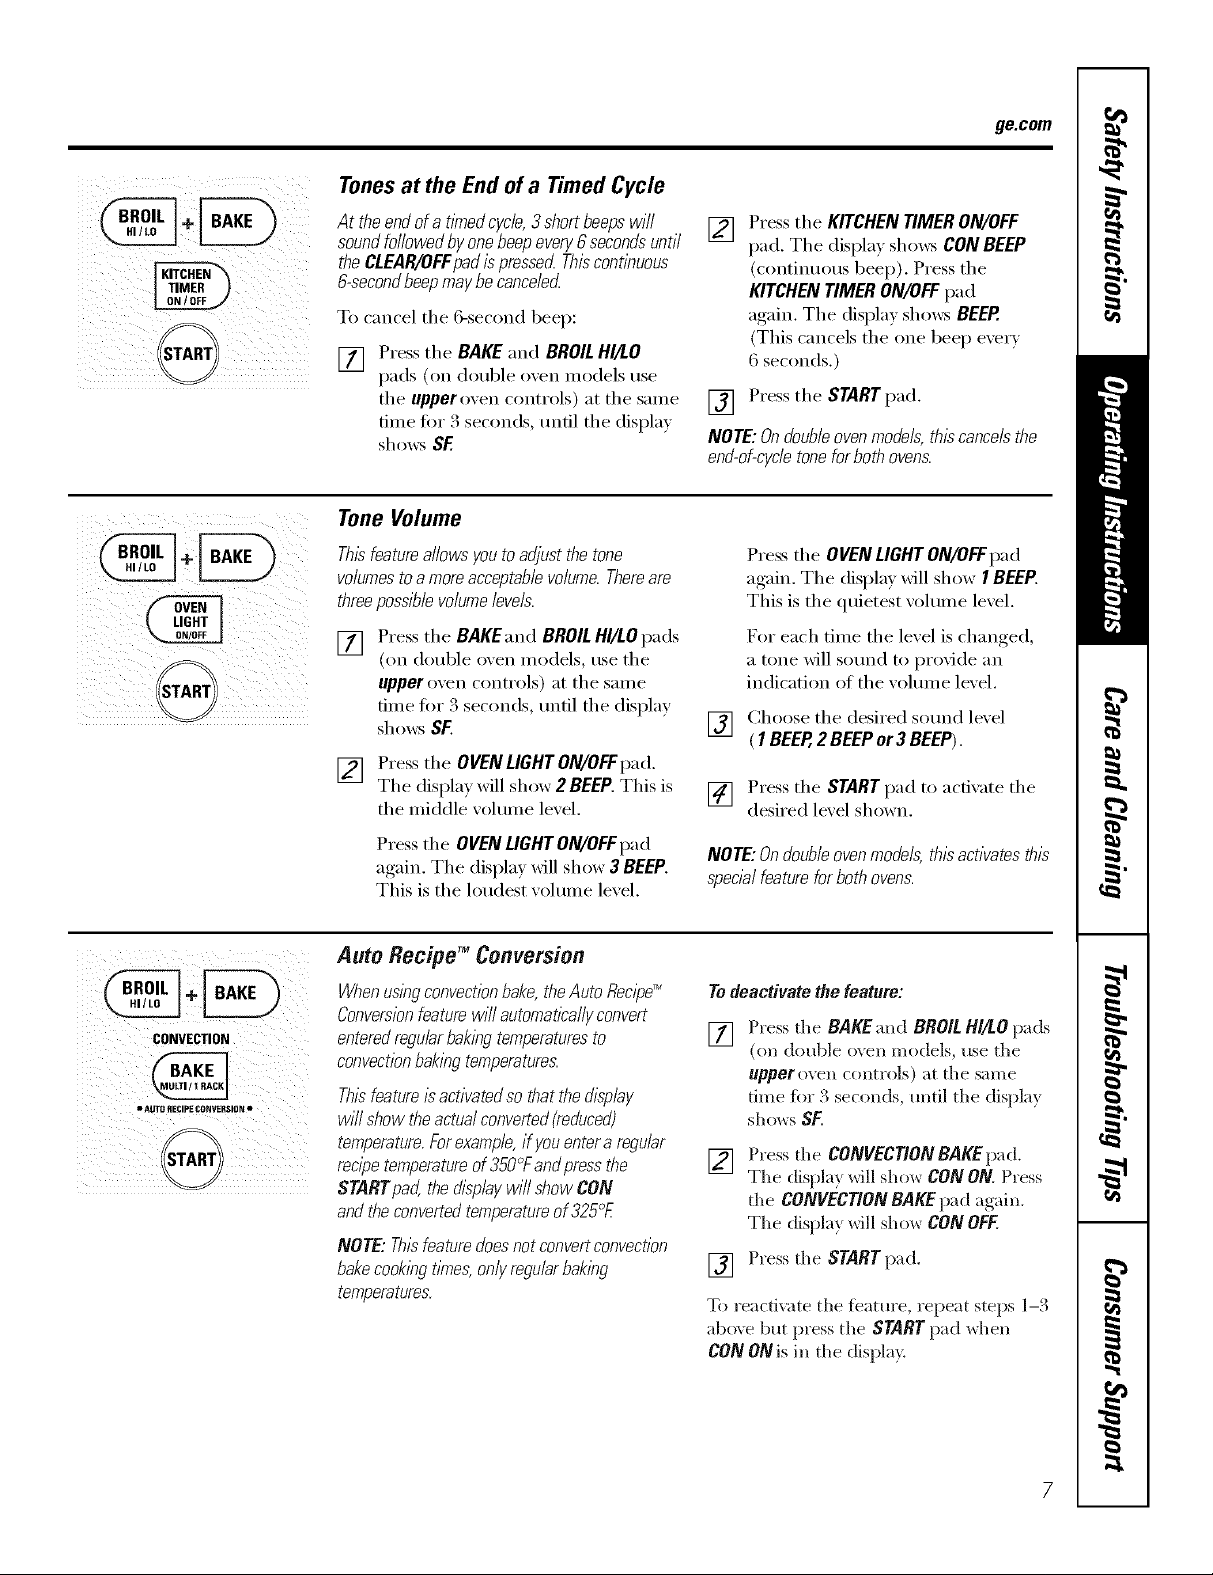
Tonesat the End of a Timed Cycle
ge.com
i_i_i_!ill'illiiiii_ !_i<i_iiiI_iiiI_i_ii
!!i i_i_ii!_ii_ !iiII_iillill
ii__i,_ii_i_ _i_il)_ii_ii_iiI_i
i_ iii i
)_i ii_i_ _ ii_iiii_i
At theendofa tknedcycle,3shortbeepswill
soundfollowedbyonebeepevery6secondsuntil
theCLEAR/OFFpadis pressecLThiscontleuous
&secondbeepmaybecanceled
To cancel the 6-second beep:
Press the BAKE and BROILHI/LO
[]
pads (oil double oven inodels use
the upper oven controls) at the same
time for 3 seconds, tmtil the display
shows SF.
Tone Volume
Thisfeatureallowsyoutoadjustthetone
volumestoa moreacceptablevolume.Thereare
threepossiblevolumelevels.
[] Press the BAKEandBROILHf/LOpads
(on double oxen models, usethe
upperoven controls) at the same
time for 3 seconds, tmtil the display
shows SF.
[] Press the OVENLIGHTON/OFFpad.
The display will shox_ 2 BEEP.This is
the middle ;olmne le;el.
[] Press the KITCHEN TIMER ON/OFF
pad. The displa)shows CONBEEP
(continuous beep). Press the
KITCHEN TIMER ON/OFF pad
again. The display sho_v_ BEEP.
(This cancels the one beep every
6 seconds.)
[] Press the START pad.
NOTE: On double ovenmodels,thiscancels the
end-of-cycletone for both ovens.
Press the OVEN LIGHT ON/OFFpad
again. The display will show I BEEP.
This is the quietest volume level.
For each time the level is changed,
a tone will sound to provide an
indication of the w)lmn e level.
[] Choose tile desired sound level
( 1BEER 2 SEEP or3 SEEP).
[] Press the STARTpad to activate the
desired lexel shown.
_ (_i ¸ii<;
• AOTO RECIPE CONVERSION •
Press the OVEN LIGHTON/OFFI)ad
again. The display xdll show 3 BEEP.
This is the h)udest xolume lexel.
AutoRecipeTM Conversion
Whenuslegconvectionbake,theAutoRecipeTM
Conversionfeaturewillautomaticallyconvert
enteredregularbaklegtemperaturesto
convectionbaklegtemperatures.
Thisfeature/sacfivatedsothatthed/&ley
willshowtheactualconverted{reduced)
temperature.Forexample,if youenterareguler
recipetemperatureof350°Fandpressthe
STARTpad,thed/splaywillshowCON
andtheconvertedtemperatureof325°£
NOTE:Thisfeaturedoesnotconvertconvection
bakecooklegtknes,onlyregularbakleg
temperatures.
NOTE:Ondoubleovenmodels,thisactivatesthis
specialfeatureforbothovens.
Todeactivate the feature:
Press the BAKE and BROIL HI/LO pads
[]
(on double oxen models, use the
upper oven controls) at the same
time for 3 seconds, until the displa)
shows SF.
Press the CONVECTIONBAKEpad.
[]
The displa} will shox_ CONON. Press
the CONVECTIONBAKEpad again.
The displa_ will show CONOFF.
[] Press the STARTpad.
To reactivate the teatm'e, repeat steps 1-.%
above but press the STARTpad when
CON ONis in the display.
Page 8
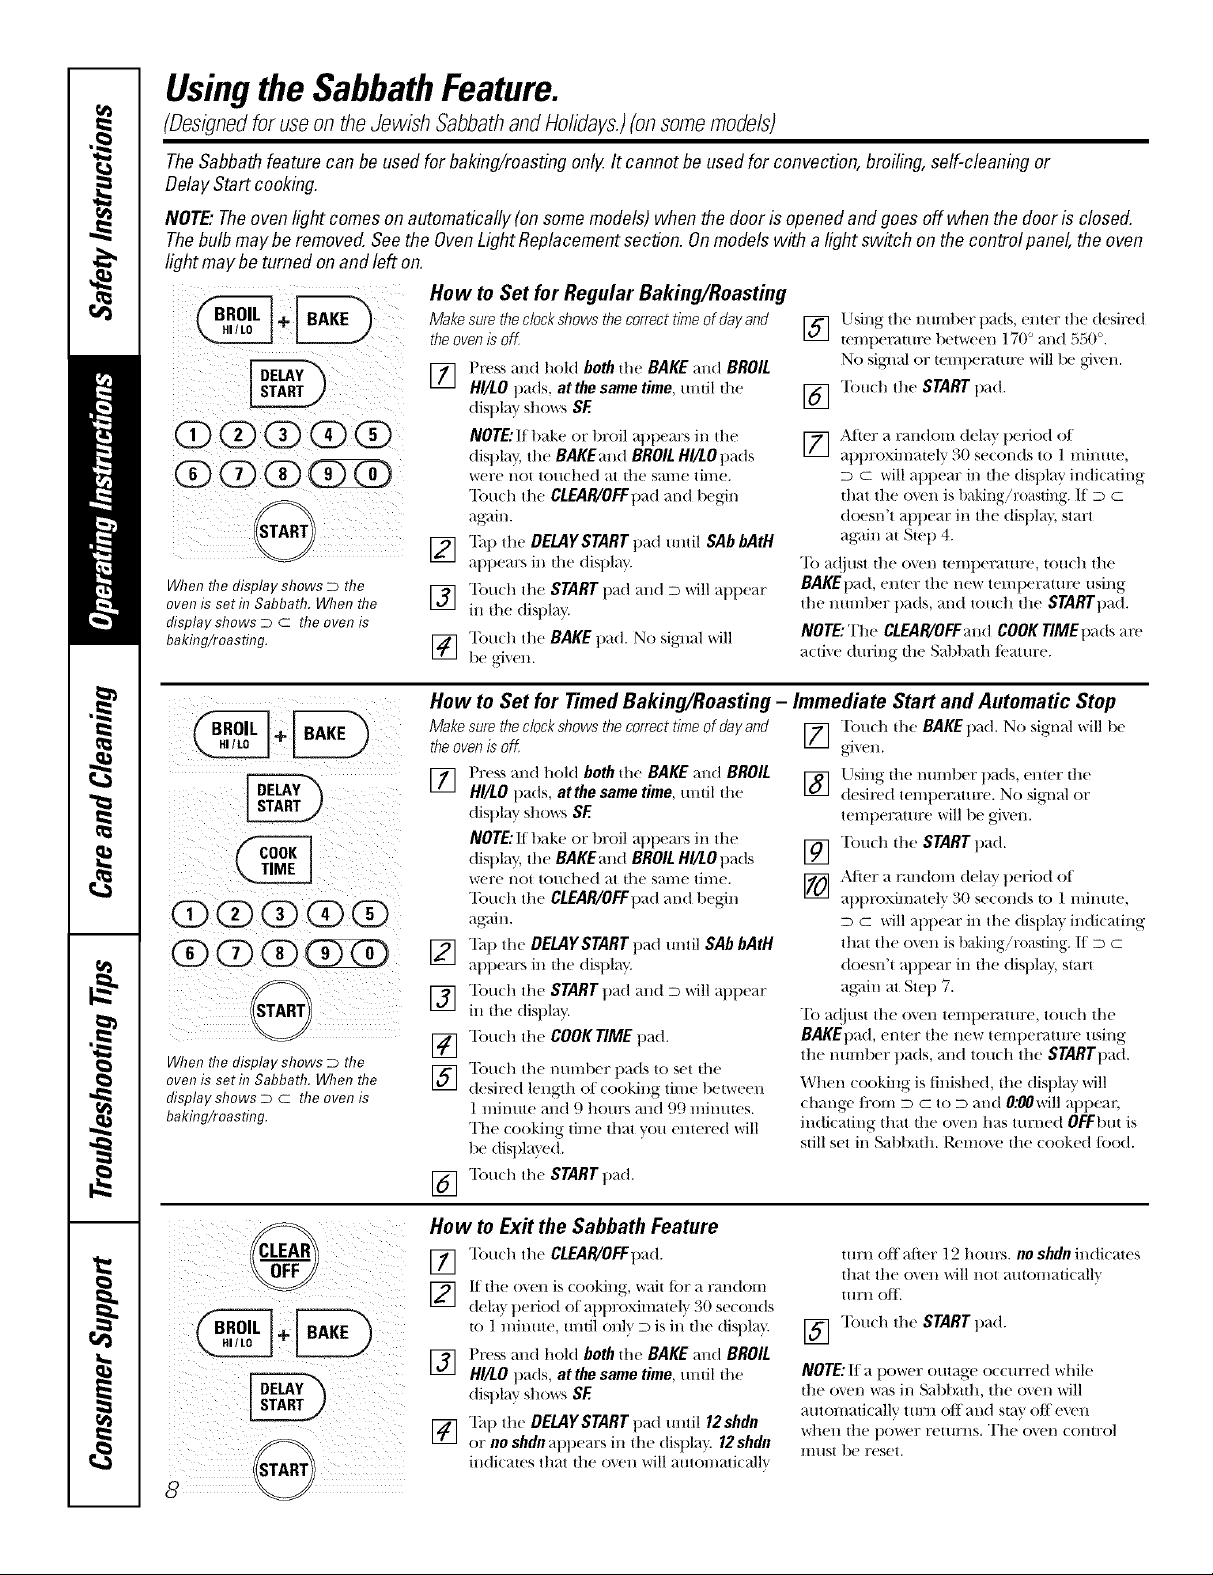
Usingthe SabbathFeature.
(Designedforuseon theJewish SabbathandHolidays.)(onsomemodels)
TheSabbathfeature canbe usedfor baking/roastingonlg Itcannot be usedfor convection,broiling, self-cleaningor
DelayStart cooking.
NOTE."Theovenlightcomesonautomatically (onsomemodels)whenthedoor isopenedand goesoff whenthe door is closed.
Thebulbmaybe removed.Seethe OvenLightReplacementsection.Onmodelswith alightswitch on the controlpanel,theoven
lightmay be turnedonand left on,
How to Set for Regular Baking/Roasting
When the display shows D the
oven is seth7 Sabbath. When the
display shows D C the oven is
bakhTg/roasting.
Make sure the clock shows thecorrect time of day and
theoven is off
] Press and hold both ill( BAKE and BROIL
HI/LO pads, at the same time, umil the
display sl*,o\\rs SE
NOTE:If bake or broil appem:s in the
display, tile BAKEand BROIL H//LOpads
were not touched at dl(_ same time.
Touch the CLEAR/OFFpad and 1)egin
again.
12] "]_q) the DELAYSTART pad mltil SAb bAtH
i¢.-i
appears in d;e display.
] Touch the START t)ad and D will at)t)ear
in the display.
] Tou*, h the BAKE pad. No siglml will
Using the nmnber pads, enter the desired
] tenq)emutre between 17(F m*,d 550°.
No sigl*,al or temperature *,',rill1X! gJxel*,.
] "lbuch the START pad.
[] ,\tier a random dela'_ period (7t
approxinmtely 30 se*,onds to 1 minute,
D C will appear in d*,e display indi(afing
d/at the oven is baking/roasling. If D C
doesn't appear in tile displa}, start
aKain al Stop 4.
"Ib a(!just the oven temperature, touch the
BAKE1)a(t, enter the new temperatm'e using
tile number pads, and touch d*,e STARTpad.
NOTE:The CLEAR/OFFand COOKTIME pads are
a(tive (hnJng tl'te Sal)l)ad//i.'at rex'.
i!/ i¸
0000@
00
When the display shows D the
oven is seth7 Sabbath. When the
display shows D C the oven is
bakhTg/roasting.
How to Set for Timed Baking/Roasting -
Make sure the clock shows thecorrect time of day and
theoven is off
] Press and t*,(71(tboth die BAKE and BROIL
HI/LO pads, atthe same time, until dw
display S]*,OWS SE
NOTE:If bake or t)roil appem:s in the
display, the BAKEand BROIL Hl/LOpads
_'(_r(_ I*,O1 t(T/l(l*,e(t at it*,( S_tH/( tll//e.
"lbu*, h the CLEAR/OFFpad and begin
again.
_] "lh1)the DELAYSTART pad m*,til SAb bAtH
at)pears ill d;e display.
] "Ibuch the STARTpad and D *,*,rillappear
in dw display.
[_] "lbu(h the COOK TIME pad.
] "Ibu(h the mmfl)er pads to set d*,e
desired length of (ooking time betvqeell
1 mimlte and 9 hom:s and 99 minmes.
The (ooking time that you elliered will
be displa} ed.
"lbu(h the START pad.
[]
How to Ex# the Sabbath Feature
[77 "lbu(h the CLEAR/OFFpad.
]
dela} perio(1 of al)t)roximately 30 se((mds
to 1 minute, umil (mlx. D is in d*,e displa)
F_] Press and hold both the BAKE and BROIL
IJI
HI/tO pads, at the same time, until the
display S] _( >_rs SE
[_] "lhp the DELAYSTART pad until 12shdn
or no shdnappears ill the displa'_ 12shdn
in(li(aws that the oxen *,,,rillaut(m/ati(allv
Immediate Start and Automatic Stop
[] "[}m(h ill(! BAKEpad. No signal *,','ill1)e
_1"_ ell.
Llsing the nmnber pads, enter the
] desired temt)erature. No siglml or
temt)eramre will be gJvt'n.
] T(m(h the START pad.
[_ After a randon*, delay period of
at)proximatel" _ 30 se((mds to 1 mimue,
D C will appear in tile displa} in(ticating
that the oven is baking'roasting. 11 D m
doesn't appear in the display, start
ag;fin at Step 7.
To a(!iust tile oxen temperature, touch tile
BAKEpad, enter tile new temperature using
the number pads, and touch tile STARTpad.
When cooking is finished, the display \\'ill
change fi'om m m to m and 0;00will apl)ear
indi(ating that the o_en has turned OFFbtlt is
still set in Sabbad*,. Remove d*,e cooked/ood.
turn off after 12 hours, no shdnindicates
that the ovell will I/()t a/ttol//atical]'_
ttlrtl ofF.
] "lbu(h the STARTpad.
NOTE:If a power outage occ/m:ed while
it*,e o_en was in Sat)bath, tile oxen will
alltOnlaticallv tHrll Oil al/d sia\ oil evell
\vllell the power rel/lrl/s, The ovel/ COllHX)l
lIl[tSt be reset.
Page 9
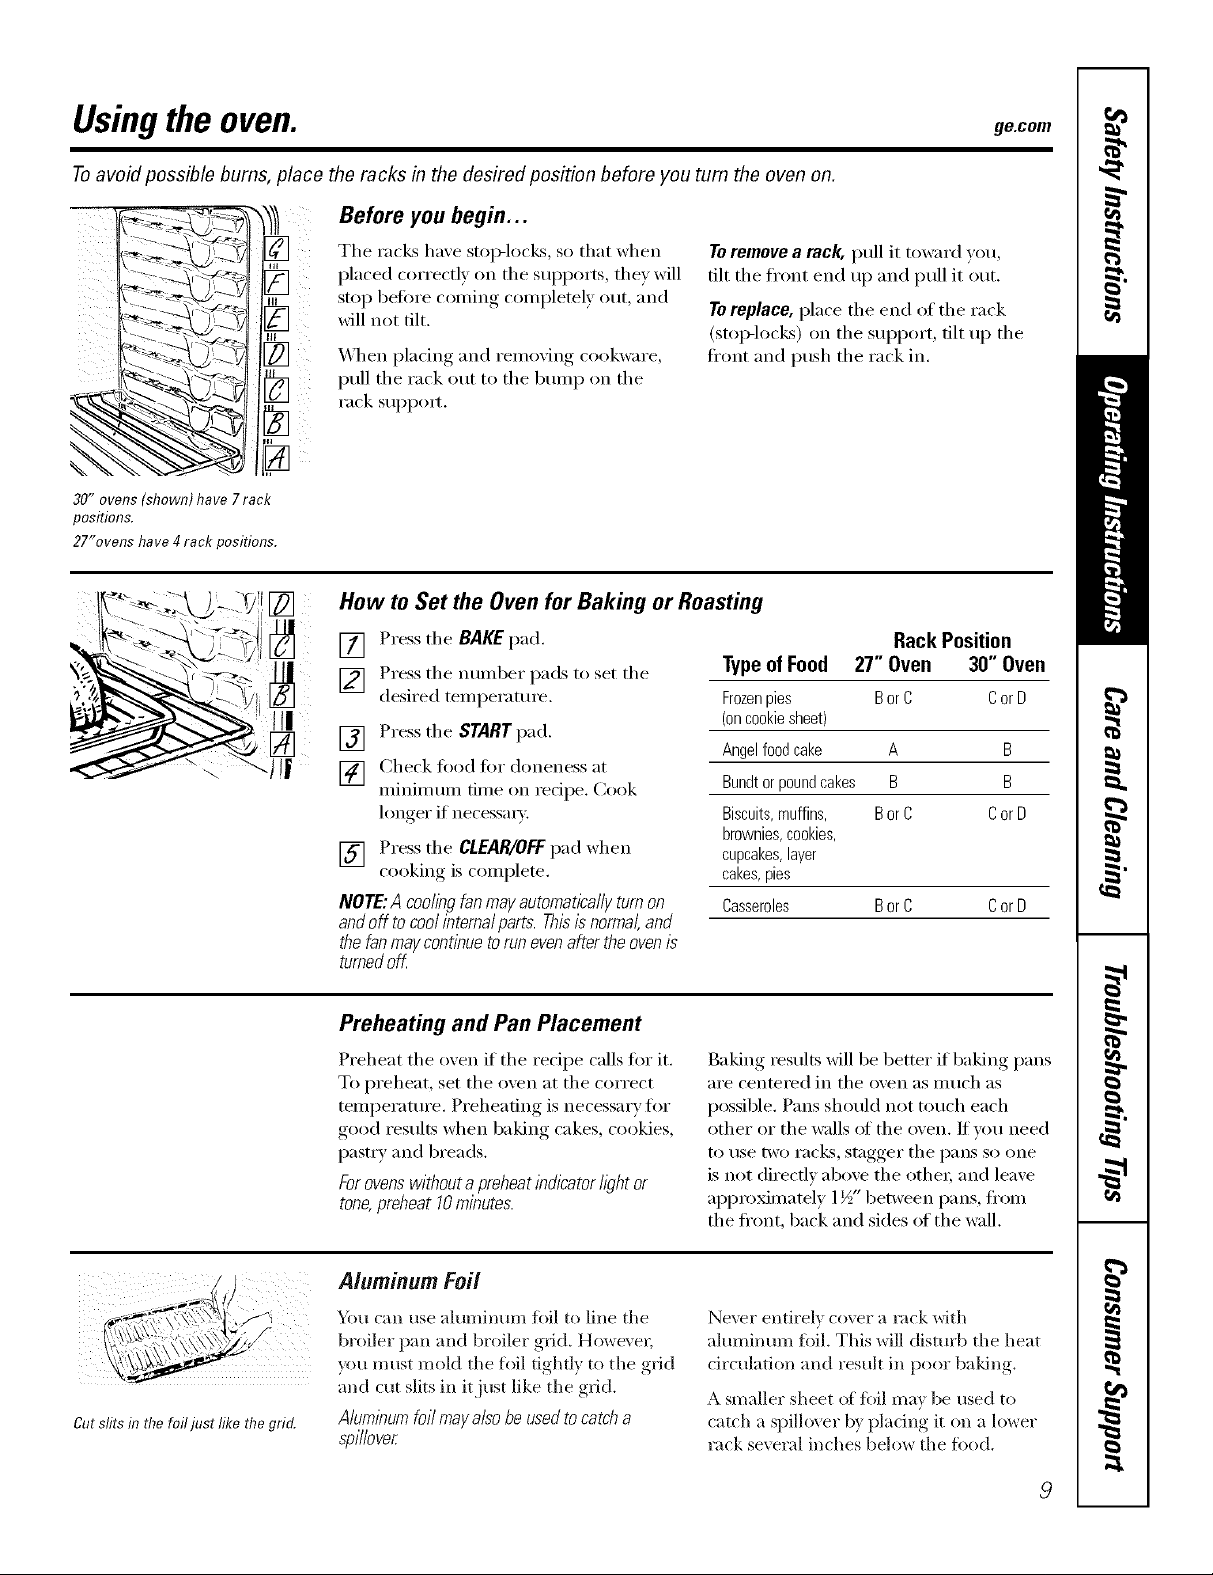
Usingthe oven. gecem
Toavoid possible bums, place the racks in the desired position before you turn the oven on.
Before you begin...
30"ovens(shown)have7rack
positions.
27"ovenshave4rackpositions.
The rack,4 have stop-locks, so that when
placed correctly on tile suI)I)orts , they will
stop beti)re coming completely out, and
will not tilt.
_&_/en I)lacim"_ and remo'4ng, cookware,
pull the rack out to the bmnp on the
rack SUl_pom
Toremove a rack, pull it toward you,
tilt the fl'ont end up and pull it out.
Toreplace, place the end of the rack
(StOlMOCkS) on tile sui)port, tilt up tile
ti'ont and push tile rack in.
How to Set the Oven for Baking or Roasting
[] Press the BAKE pad.
] Press tile ntllllbeI" pads to set tile
desired temperature.
[] Press the START pad.
[] Check ti)od Ira" aloneness at
minimum time on recipe. Cook
longer if necessac}.
[] Press the CLEAR/OFFpad when
cooking is complete.
NOTE:A coolingfanmayautomaticallyturnon
andoff tocoolinternalparts.Thisisnormal,and
thefanmaycontinuetorunevenaftertheovenis
turnedoff.
Typeof Food 27" Oven 30" Oven
Frozenpies BorC CorD
(oncookiesheet)
Angelfoodcake A B
Bundtorpoundcakes B B
Biscuits,muffins, BorC CorD
brownies,cookies,
cupcakes,layer
cakes,pies
Casseroles BorC CorD
Rack Position
Cutslits in the Niljust fiko the grid.
Preheating and Pan Placement
Preheat the oven if the recipe calls fi:,r it.
To preheat, set tile oven at tile correct
temperature. Preheating is necessary tiw
good results when baking cakes, cookies,
pastry and breads.
Forovenswithout a preheat indicator fl)ht or
tone,preheat 10minutes.
Aluminum Foil
You can use _dmninmn tk_il to line the
broiler pan and broiler gad. Howe_ el;
?ou must rooM the foil tightl_ to the grid
and cut slits in it just like tile grid.
Aluminumfoil maya#o be usedto catch a
spillover
Baking results will be better if baking pans
_lI'e centered in tile oven _ls Illtlch _ls
possible. Pans should not touch each
other or the walls of the oven. If um need
to rise tWO I'aC]¢% stagger the pans so one
is not directly above the othe_; and leave
appro_mately 1½" between pans, fl'om
the ti'ont, back and sides of the wall.
Ne\w" entirely cover a lack with
aluminmn fifil. This will disturb tile heat
circulation and result in poor baldng.
A smaller sheet of fkfil may be used to
catch a spillover by plating it on a lower
rack several inches below tile fk)od.
9
Page 10
Usingtheoven.
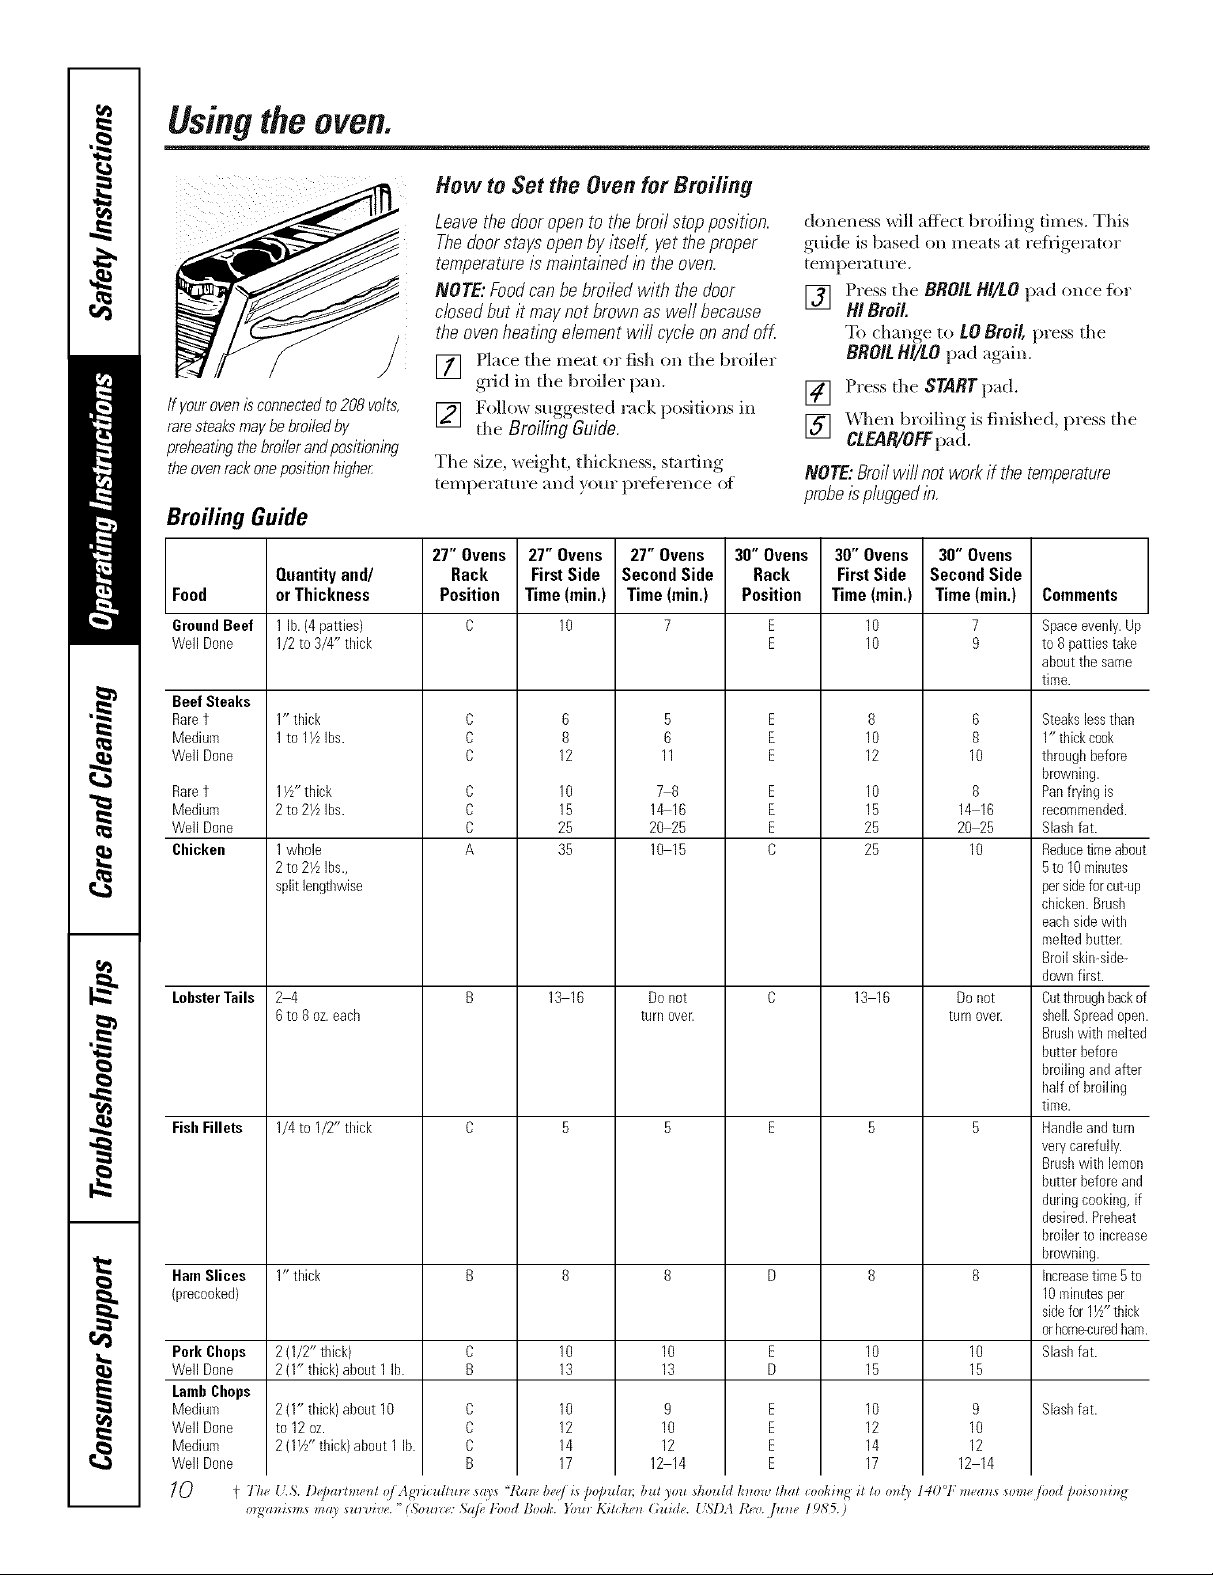
How to Set the Oven for Broiling
Leavethedooropento thebroil stopposition.
Thedoorstaysopenby itself,yettheproper
temperatureis maintained/btheoven.
NOTE:Foodcanbebroiledwith thedoor
closedbutit maynotbrownas well because
theovenheatingelementwill cycleonandoff.
[] Place the meat or fish on the broiler
grid in the broiler pan,
ff your oven is connected to208 volts,
rare steaks may be broiled by
prebeating the broiler andpositioning
theoven rackoneposition higbe_
[] Follow suggested rack )ositions in
the Broiling Guide.
The size, weight, thickness, stm'ting
temperature and }ore" preterence of
Broiling Guide
27" Ovens 27" Ovens 27" Ovens 30" Ovens 30" Ovens 30" Ovens
Food or Thickness Position Time(rain,) Time(rain,) Position Time(rain,) Time(rain.) Comments
GroundBeef 1lb. (4patties) C 10 7 E 10 7 Spaceevenly.Up
WellDone 1/2 to 3/4" tlfick E 1O 9 to 8 pattiestake
Beef Steaks
Raret
Medium
WellDone
Raret
Medium
WellDone
Chicken
LobsterTails
FishFillets
HamSlices 1" thick B 8 8 D 8 8
(precooked)
Pork Chops
WellDone
LambChops
Medium
WellDone
Medium
WellDone
10
Quantity and/ Rack First Side Second Side Rack First Side Second Side
1" thick
1to 17LIbs.
1Yz"thick
2 to 21/LIbs.
1whole
2 to 2YzIbs.,
split lengtbwise
24
6 to 8oz.eacb
1/4to I/2" tlfick
2 (1/2" thick) C 10 10 E 10 10
2 (I" thick)about 1 lb. B 13 13 D 15 15
2 (1" thick) about 10
to 12oz.
2 (IYz"thick)about1 lb.
t The IS. l)@mtmetzl o/Ag'ricuflu_ says "l{m_, b_/is [Jo[ndm; bul you should tmm_, thai coohit_g it to on(_ 140°F m_a*_s _omejood poisonit_g
m_a_fisms ma) sur_Jive. "(Somze: .%(ilekbod Book. }})u_ K_tche_ (;uide. U,_I).t t_,v..]u_e 1985.)
C
C
C
C
C
C
A
C
C
C
B
B
8
12
10
15
25
35
13 16
10
12
14
17
5
B
11
78
1_16
20 25
10 15
Do not
turn ovelt
9
10
12
12 14
doneness will affect broiling times. This
guide is based on me,its _lt refligerator
temperature.
[] Press the BROIL I/I/tO pad once for
HI Broil
To change, to tO Broil, press the
BROILI/I/tO pad ag_dn.
[] Press the STARTp'ad.
[] \_]leIl bIoiling is finished, press the
CLEAR/OFFpad.
NOTE:Broil w/// not work ff the temperature
probe/s p/uggedlb.
E
E
E
E
E
E
C
E
E
E
E
8
10
12
10
15
25
25
13 16
10
12
14
17
6
8
10
8
14 16
20 25
10
Donot
turn ovelt
9
10
12
12 14
about the same
time.
Steakslessthan
1" thickcook
throughbefore
browning.
Panfrying is
recomrnended.
Slashfat.
Reducetimeabout
5to 10minutes
persideforcut-up
chicken.Brush
eachsidewith
meltedbutter.
Broil skin-side-
downfirst.
Cuttbroughbackof
shell.Spreadopen.
Brushwitb melted
butter before
broilingandafter
half ofbroiling
time.
Handleandturn
verycarefully.
Brushwith lemon
butter beforeand
duringcooking,if
desired.Preheat
broiler to increase
browning.
Increasetime 5to
10minutesper
sidefor 1½"tbick
orhome-curedham.
Slashfat.
Slashfat.
Page 11

Usingthe clock, timerandcontrollockout, gecom
To Set the Clock
Make sure the clock is set to the
correct time of da_
Thet#ner is a minute timer onl_
Thetimer doesnot control oven
operations. TtTemaximum setting on
the timer is 9 hours and 59mhTutes.
Tile clock must be set to tile correct time
of day fin"tile automatic oven timing
flmcfions to work properly: Tile time el
day cmmot be changed d/wing a timed
baking or selfXcleaning cycle.
ToSet the Timer
[] Pressthe KITCHENTIMERON/OFFpad.
[] Press tile number pads tmtil tile
aillOtlnt of time }OH want shows
in tile display. For example, to set
2 hom_ and 45 minums, p_ess 2, 4
and 5 in that order: If vou make a
mistake, press the KITCHENTIMER
ON/OFFI)ad and beuin_auain_.
Press tile STARTpad.
[]
After presslngthe STARTpad, SET
disappears,this tells you the tlYneis
counting down,although the displaydoes
not changeuntil oneminute haspassed.
ToReset the Timer
[] Press tile CLOCKpad.
[] Press tile number pads.
[] Press the START pad.
Secondswi//notbeshownin thedisplay
untilthelastminuteiscountIW down.
[] _4hen tile timer reaches :00,
tile control will beep 3 times
followed by one beep exer_
6 seconds tmtil tile KITCHEN
TIMERON/OFFpad is pressed.
Tile ('>second tone can be canceled by
tolloMng tile steps in tile Special features
of your oven control sect.ion tinder Tones
at the End of a timed Cycle.
LOCK/UNLOCK HOLD 3 SECONDS
If tile display is still showing tile time
remaining, you may change it by pressing
tile KITCHEN TIMERON/OFFpad, then
press tile number pads tmtil tile time
you want appeax_ in tile display.
ToCancel the Timer
PressKITCHENTIMERON/OFFpad twice.
Control Lockout
Yourcontrolwill allowyoutolockoutthetouch
peelsso theycannotbeactivatedwhenpressed.
NOTE."Ondoubleovenmodels,th/_activatesthis
featureforbothovens.
To lock/unlock tile controls:
[] Press tile 9 and Opads (on double
o'_en models, use tile upperoven
controls) at the same time fin" 3
seconds, until tile display shows
tOC ON.
If tile remaining time is not in tile display
(clock, delay start or cooking time are in
the display), recall the remaining time by
pressing tile KITCHENTIMERON/OFFpad
and then pressing tile number pads to
enter tile new tillle Villi l_;lIlt,
To unlock tile control, press tile 9
[]
and Opads at tile same time fi'a" 3
seconds, until tile displa? shows
LOCOff.
When this tbature is on and tile touch
pads are pressed, the control will beep
and tile display will show LOC ON.
_: Thecontrollockoutmodeaffectsafttouch
pads.Notouchpadswi//workwhenthis
featureisactivated
iJi::Theadjustmentwillberetabedinmemory
afterapowerfailure.
11
Page 12

Usingthetimedbakingandmastingfeatures.(onsomemodels)
On double oven models, you can use timed baking in one oven while using self-clean in the other; you can also use
timed baking in both ovens at the same time.
NOTE."Foods that spoil easily--such as milk, eggs, fish, stuffings, poultry and pork--should not be allowed to sit for
more than I hour before or after cooking. Room temperature promotes the growth of harmful bacteria. Be sure that
the oven light is off because heat from the bulb will speed harmful bacteria growth.
How to Set an Immediate Start and Automatic Stop
@ (2)@(3}@
@ @@@
il i
12
Theovenwill turnonleTmedbtelyandcookfora
selectedlengthoftleTe.At theendofthecookleg
tleTe,theovenwillturnoffautomatlea//y
Make sine tile clock shows the correct
time of day.
[] Press tile BAKE pad.
[] Using tile mmlber pads, enter tile
desired temperature.
[] Press the COOK TIMEpad.
NOTE:/fyourreciperequl?espreheatleg,you
/
mayneedtoaddaddifiona/timetothelength
of thecooklegtleTa
[] Llsing tile mmlber pads, enter the
desixed b'ddm, time. Tile oven
temperature and tile cooldng time
that yon entered will be displayed.
[] Press tile START pad.
Tile display will show tile changing
teml)erature (starting at I O0°F) and the
cooldng time. Tile display st_llls changing
once tile temperature reaches 100°K
NOTE" Ondouble ovenmodels,when usleg both
ovensat thesame tleTe,the tleTesshow/hgle the
display w/7/be for the lest ovenset. TodL_p/aythe
tleTeset forthe first ovenset,press the COOK
TIME pad for that oven.
Tile oven will contim_e to cook fiw tile
programmed amomlt of time, then shut
off automatically, mfless tile _'\;M_,M
feature _:_s set. See the Howto Setthe
Oven for Warming section.
Press the CLEAR/O_ pad to clear
tile displa?.
How to Set a Delayed Start and Automatic Stop
Youcansettheovencontroltodelay-startthe If you wouM like to check tile tim esyou
oven,cookfora specificlengthoftimeandthen ha_eset,pressthe OELAYSTARTpad to
turn offautomatlea//g check tile stnrt time you ha',e set or press
Make sure tile dock shows tile correct tile COOKTIME pad to check tile length
time of day. of cooking time you ha_e set.
[] Press the BAKEpad.
[] Using the nmnber pads, enter the
desired temperature.
[] Press the COOKlIME pad.
NOTE:If yourreciperequkespreheating,you
mayneedtoaddadditionaltimetothelength
of thecookingtime.
[] Using tile nmnber pads, enter tile
desired baking time.
[] Press the DELAYSTARTpad.
[] Using tile number pads, enter tile
time of da))ou want tile oxen to
[tlrn on }lIl(1 st;Irt cooking.
[] Press the STARTpad.
NOTE:Anattentiontonewi//soundif youare
usingtimedbakinganddonotpresstheSTART
padafterentenngthebakbgtemperature.
_'_ hen the oven turns on at the time
of da) you ha_e set, the displa) will
show the changing temperature
(starting at 1()()°F) and the cooking
time. The displa) starts changing once
the temperature reaches 100°E
NOTE"Ondoubleovenmodels,whenusingboth
ovensat thesametime,thetimesshowlhgin the
displaywi//befor thelestovenset Todisplaythe
timesetforthe fkstovenset,presstheBELAY
STARTortheCOOKTIMEpadforthatoven.
Tile oven will ('ontintle to cook tor tile
l)r°grammed, amount of time, then shut
offautomaticallv lmless the X4_1_4
teature was set. See tile How to Sot the
Oven for Warmingsection.
Press the CLEAR/OFFpad to clear
the displa,v.
Page 13

Usingtheprobe, ge.com
For many foods, especially roasts and poultry, internal food temperature is the best test for doneness. The
temperature probe takes the guesswork out of roasting by cooking foods to the exact doneness you want.
The temperature probe has a
skewer-like probe at one end and a
plug at the other end that goes flTto
the outlet f17the oven.
,_--_ _'., on a trivet or on tile broiler I)an ,grid,
/1._¢(1:: \ placement.
-1__'._4___ fi,llow these directions for proper probe
* "_ of tile thickest meat} pint of tile
NOTE'.Doubleovenmodelshavea probe in the
upperovenonly
Use of probes other than tile one
provided with this product may result in
damage to tile probe.
Use tile handles of tile probe and plug
when inserting and removing them ti'om
tile meat and outlet.
_: Toavoid damagingyourprobe,,donot use
tongsto puff on thecable when removing it
_ Toavoidbreaking the probe,make sure food is
completelydefrostedbefore insertlbg.
Mter preparing tile meat and placing it
[] I,ay tile probe o11tile outside of the
ineat along tile top or side and mark
with your finger where tile edge oI
tile meat comes to on tile probe.
The point should rest in tile center
[] ,east
tilep,'obe ',,./pletel. tile
ineat, up to tile handle. It should
not touch bone, tilt or gristle.
P!ug
Cable
ij_:_Topreventpossiblebums,donotunplug
theprobefromtheoufletuntiltheoven
hascooled
!i> Neverleave yourprobeinside the ovendunbg
a self-cleanlbgcycle.
!i> Donot store the probe in the oven.
For roasts with no bone, insert tile probe
into tile meatiest part ot tile roast. For
bone-in ham or lamb, insert tile probe
into the center of the lowest large muscle
or joint.
Insert tile probe into tile center of dishes
such as meat loaf or casseroles. When
cooking fish, insert tile probe ti'om just
above the gill into the meatiest area,
parallel to the backbone.
Insert tile probe into tile meatiest part of
tile inner thigh fl'om below and parallel
to tile leg of a whole turkey.
i iii!i:iil): )iiii}iili
o® ¸®i®®
@ O}@ @
@@@ @@
@ @@@
@
How to Set the Oven For Roasting When Using the Probe
Inse_l tile probe into tile meat.
[]
Plug, tile I)r°be into tile oudet in tile
[]
oven. Make sure it's pushed all tile
wa} in, Close tile oven door
[] Press tile PROBE pad.
Press tile number pads to set tile
[]
desired internal thud or meat
temperature. Tile maximum
internal temperatm'e tbr tile food
that }ou can set is 200°E
[] Press tile BAKEpad.
Press tile number pads to set tile
[]
desired o_en temperature.
[] Press tile START pad.
Thed/splaywill flash if theprobe/s/bserted
/btothe outlet andyou havenot set a probe
temperatureandpressedthe STARTpad
\'_qlen tile oven starts to heat, tile word
LO will be in tile display.
_Mter tile internal temperature of tile
meat reaches 100°K tile changing
internal temperature will be shown
in tile display.
] _hen tile internal temperature of
the m ea t tea c h es the n tmlber }o u
have set, the probe and the oven
turn oft and tile oven control
signals. To stop the signal, p*ess tile
CI.EAR/OFFpad. Use hot pads to
remo_ e tile probe fi'om tile ibod.
Do IlOt rise tongs to 131111on it--they
might damage it.
To change tile o\vn temperature during
tile Roast cwle, press tile BAKE pad and
then tile number pads to set tile new
temperature.
iJi::If theprobe isremovedfrom thefood before
the final temperatureis reached,a tonewill
soundand the displaywill flash until theprobe
isremoved from the oven.
@ Youcanuse the tlYnereventhoughyou
cannotuse timed ovenoperations. 13
Page 14

Usingtheconvection oven.
Multi-rack position 27" oven.
Multi-rack position 30" oven.
Convection Fan
In a convection oven, a fan circulates hot air
over, under and around the foo_
This circulating hot air is evenly distributed
throughout the oven cavit_ As a result, foods
are evenly cooked andbrowned--often in less
time with convection heat
1-Rack Convection Baking
The convection tim circulates the heated
air e;enlv over and aro/md tile fi)od
using tile bake and 1)roll elements.
Whenconvectionbakingwithon/yI rack,use
CONVECTIONBAKEIRACKandforbest
resultsplacetherackonshe/fCorDat the
centeroftheoven.Cooktlknesmaydecrease,
sofoodshouldbecheckedear/ierthanpackage
directionstomakesurethatit doesnotovercook.
Multi-Rack Convection Baking
Because heated air is circtflated evenly
throughout tile o',en, foocls call be
baked with excellent results using
multiple racks.
The amount of dine required fin.
multi-rock baking may increase slightly
for some fboct% but overall time is saved
beca use two to three times as much fi)od
is cooked at once. Cooldes, muffins,
biscuits, and other quick breads give
good results with multi-rock baldng.
To cook _k)od on Inol'e tllan one rack ill
comection bake, use CONVECT/ONBAKE
MULTI.
30" Ovens
When baldng on 3 racks, place one
rack in tile second (B) position, one
in tile fbm_h (D) position and one ill
tile 6th (F) position.
NOTE:The convection tim will cycle on
and offwhile cooking to best distribute
hot air in the o_en.
Tile convection oven tim shuts off when
tile oven door is opened. DO NOTleave
tile door open tOT long periods of time
while using convection cooking or you
may shorten tile life of tile convection
heating element.
Ideal for cooking large casseroles and
lasagna with good results.
27" Ovens
\_]len baking on 3 racks, divide tile oven
into thirds by pladng tile offset rock in
tile third (C) rock position and tile
straight racl<s ill filet (A) and fk)tlllh (D)
rock positions.
For two-rack baldng, place tile offset rock
ill tile bottom (A) rack position. Place
tile straight rack in tile third ((2) rack
position.
CAUTION: Whenyouare us/bg the offset rack
(on27" mode/s)/h the/owest position {A),you
will need touse caut/bnwhen pull/bg the rack
out. Werecommendthatyou pu// therack out
severalibchesand then,uslbg two pot holders,
puff therack out by ho/&bg the sides of it The
offsetrack is low andyoucouldbe burnedif you
place yourhand ib the middle of the rack andpu//
a//the way out. Be verycareful not to burn your
handon the doorwhen uslhga rack ih the lowest
position (A).
14
Adapting Recipes...
_)u can use }our fi_x'ofite recipes in tile
convection ()veil,
\Xllen convection baking, the Ainu
Recipe _''Com'ersion featm'e automatically
reduces the set reg-ular baking
temperature by the _ecommended 25E
See Auto Recipe _''Conversi(nl in tile
Special Features section.
_ Usepan sl#erecommendecL
;;Ji::Somepackageibstructions for frozen
casserolesormalb disheshavebeen
developeduslbg commercialconvection ovens.
Forbest results lb this oven,preheat the oven
andusethe temperatureon thepackage.
Page 15

ge.com.
Roastingrack
Grid
. <
! I
Offsetrack(2T"rnede!s0niT)
Whenbakingcookies,you will
get the best results if youuse a
flat cookiesheet insteadof a
panwith low sides
ConvectionRoast
;_!_Goodfor large tendercuts of meat, uncovered
The convection tim circulates the heated
air evenly over and around the food.
Meat and poultry are browned on all
sides as if they were cooked on a
rotisserie. Using the roasting rack
provided, heated air will be circulated
o\'eI; under and around the fi)od being
roasted. Tile heated air seals in juices
quickly fi_r a moist and tender product
while, at the same time, creating a rich
golden brown extefim:
X&]*en you are convection roasting it is
impo*_'ant that you use the broiler pan
and grid and the special roasting rack fiw
best convection roasting results. The pan
is used to catch grease spills and the grid
is used to prevent grease spatte*s, while
the rack allows the heamd air to circulate
trader the meat and increase browning
on the tmde*_ide of the meat or i)oultrv.
Cookware for Convection Cooking
Beflwe using your convecdon oven,
check to see if yore" cookware leaves
room fi:,r air drculation in the oven.
If you are baking with several pans, leave
space between them. Mso, be sure the
pans do not touch each other or the
walls of the oven.
Paper and Plastic
Heat-resist;rot paper and i)lastic
containe,s that are recommended for
use in regular ovens can be used in
convection ovens. Plastic cookware that
is heat-resistant m temperatm'es ot
400°F can also be used.
?_:Place tile rack (on 27" models, use
the offset rack) in the lowest rack
position (A).
iJGPlace the grid on the broiler pan
and put the roasting rack over them,
making sm'e the posts on the roasting
rack fit into the holes in broiler pan.
_ Place the meat on the roasting rack.
CAUTION: Whenyouare using the offset ra&
(on27" models)in the/owestposition (A),you
wi// needto usecaution when pulling the rack
out Werecommendthat youpuff therack out
severalinchesand then,using two pot holders,
puffthe rack out by holdingthe sides of iL The
offset rack is low andyou couldbe burnedif you
place yourhand in themiddle of the rackandpuff
aft the way ou_Be verycareful not to burn your
hand on thedoor when usinga rackin the lowest
position (A_
Metal and Glass
Any type of cookware MII work in your
convection oven. Howevei; metal i_ans
heat the fi_stest and are recommended
for convection baking.
_: Darkenedormatte-flbished pans will bake
faster thanshlbypans.
iJGGlassor ceramicpanscook more slowly
For recipes like oven4)aked chicken,
t*se a l)a*l with low sides. Hot air ('aIlIlOt
circulate well arotmd food in a pan with
high sides.
CONVECTION
(Z)(g)G)G) G)
(g)(D
START
CLEAR
How to Set the Oven for Convection Baking or Roasting
Press the CONVECtiON BAKE MULTI/
[]
I RACK pad once (CONVECTION
BAKEMULTI mode) for multi-rack
convection baking. This mode is
used for cooking fi)od items on
mo*e than one rack (i.e. 9, 3 or
more racl<s) at the same time in
convection bake. See Multi-Back
Baking section for more
infimnation.
Press the CONVECTIONBAKEMULTI/I
RACK pad t_,ke ( CONVECTIONRAKEI
RACKmode) fi)r one rack com'ection
baking. This mode is used for
cooking food items on on b one
rack in convectioi1 bake.
Press tile CONVECTIONROAST pad
fi)r (onve(tiol* roastil*g,
] Press tile mmlber pads to set the
desired o_en temperature.
[] Press the STARTpad.
To change tl*e oven temperatme, press
tile CONVECTION BAKE MULT//I RACK or
CONVECTIONROASTpad and tile** the
number pads to set the new temperature.
\_]len tile oven starts to heat, the
changing temperature, stm_ing at ] 00°F,
will be displayed. \'_]*en oven reaches the
temperature you set, 3 beeps will sound.
[] Press CLEAPJOEEpad when finished.
_: Youwi// hear a fan while cookingwith
convection.Thefanwill stop whenthe doorls
opened,but the heat will notturn off
_ Youmayhear the ovenclicklbgduring
baking. Thists normal 15
Page 16

Usingthe timedfeaturesfor convectioncooking.
On double oven models, you can use timed baking or roasting in one oven while using self-clean in the other; you can
also use timed baking or roasting in both ovens at the same time.
Youwill hear a fan while cooking with these features. Thefan will stop when the door is opened, but the heat will not
turn off.
NOTE"Foods that spoil easily--such as milk, eggs, fish, stuffings, poultry and pork--should not be allowed to sit for
more than 1hour before or after cooking. Room temperature promotes the growth of harmful bacteria. Be sure
that the oven light is off because heat from the bulb will speed harmful bacteria growth.
CONVECTION
Q (Z)(D (33(Z)
@(i)@@@
@(Z)@(ZZ
@
How to Set an Immediate Start and Automatic Stop
Theovenwillturnonimmediate/)/andcookfora
selectedlengthoftime.At theendofthecooking
time,theovenwill turnoffautomatically
Make sure tile clock sho_,_:s tile correct time
of da)c
[] Press the CONVECTIONBAKEMULTI/
I RACKpad once (CONVECTION
BAKEMULTImode) fi)r multi-rack
convection baking. Tiffs mode is
used fl)r cooking iliad items on
more than one rack (i.e. 2, 3 or
more racks) at the same time in
convection bake. See Multi-Rack
Baking section for more infimnation.
Press the CONVECTIONBAKEMULTI/I
RACKpad twice (CONVECTIONBAKEI
RACKmode)fix"one rack convection
baking. This mode is used for cooking
fi)od items on ()ill) one rack in
COI1VeCfiOI1bake,
Press the CONVECTIONROASTpad
for convection roasting.
] Press tile number pads to set tile
desired o',en temperatm'e,
[] Press tile COOKTIMEpad,
NOTE:ffgourreciperequirespreheating,youmag
needtoaddaflfltionaltimetothelengthof the
cookingtime.
[] Press tile STARTpad,
Tile displa) will show tile changing
temperature (starting at 100°F) and tile
cooking dine, Tile displa) starts changing
once tile temperatm'e reaches l O0°E
NOTE:Ondoubleovenmodels,whenusingboth
ovensatthesametime,thetimesshowinginthe
displaywillbeforthelastovense_Todisplaythe
timesetforthefirstovenset,presstheCOOK
TIMEpadforthatoven.
Tile o_en willconthltle to cook fi)r tile
progTanmled amount of time, then shut
off automaticalb; unless tile \\ARM featm'e
was set. See tile Howto Setthe Ovenfor
Warmingsection.
[] Press tile CLEAR/OFFpadto clear
tile displa) if necessa U, Remove
the ti)od fl'onl tile o_en, RemembeI;
even thotlgh the oven ttlrns off
autonmficall), fi)od left in the ()veil
willconOntle cooking afier the o',en
turns oftl
16
] Press tile number pads to set tile
desired length of cooking time, The
minimun-i cooking dine you can set
is 1 minum. Tile oven tempemtm'e
that you set and tile cooking time that
you enmred will be in tile displa):
Page 17

ge.com
CONVECTION
O3@(i)@@
@@(i)@@
(g)(D (g)
@@@@(i3
@(DCg)(D
START
How to Set a Delayed Start andAutomatic Stop
YOUcansettheovencontroltodo/ay-starttheoven,
cookforaspecificlengthof timeand then turnoff
automaticall}_
Make sure die clock stlo_:_ tile correct time
of da).
[] Press the CONVECTION BAKE MULTI/
I RACK pad once (CONVECT/ON
BAKEMULTImode) for muld-rark
com'ection baldng. This mode is
t/sed tk_l"cooking fi_od items on
more than one rack (i.e. 2, 3 or
more raclcs) at the same time in
convection bake. See Multi-Rack
Bakingsection ti>r more infbn-aation.
Press the CONVECTIONBAKEMULTIfl
RACKpad twice (CONVECTIONBAKEI
RACKmode) for one rack comection
baking. This mode is used %r cooking
food items on onl 3 one rack in
convection bake.
Press tile CONVECTIONROAST pad
for convection roasting.
] Press the lltli'_lber pads to set tile
desired oven temperatm'e.
[] Press the COOK TIME pad.
NOTE."tfyour reciperequirespreheating,you may
needtoadd a&titiona/time tothe lengthof the
cookingtime.
] Press tile number pads to set tile
desired cooking time.
[] Press tile OEMYSNRTpad.
] Press the numl)er pads to set tile time
of (t21}'}Otl lvaIlt tile oxen to ttlrll oH
and start cooking.
tf youwouldlike to &eck the timesyouhaveset,
presstheOELAYSTARTpadto&eck thestart time
youhaveset,orpresstheCOOKTIMEpad to check
the lengthofcookingtimeyouhavese£
[] Press tile STARTpad.
NOTE"An attentiontonewill soundif youare
usingtimedbakingorroastingand donotpress
the STABTpadafter enteringthebakingor
roastingtemperature.
\\lien tile o_en ttlr:Qs oil at die time
of da)you hme set, tile displa)will
show tile ctlanging temi)eramre
(smrdng at IO0°F) and tile cooking time.
Tile displa) starts ctlanging once tile
temI)erature reactles 100°E
NOTE"& doubleovenmodels,whenusingboth
ovensat thesametime, thetimesshowingin the
dispbF will befor the bst ovenset. TodispbFthe
time setfor the firstovenset,press theBELAY
START orCOOKTIMEpad for that oven.
Tile o\en will continue to cook fi:,r die
programmed amomlt of time, ttlen stlut
off automadcall> unless tile \\_RM fbamre
_ts set. See the HowD Setthe Oven for
Warming section.
[] Press tile CLEAR/OFFpad to clear
the displa? if necessa_ 3 Remove
tile food fl'om tile oven, Remember;
e\en tllough tile o_en slluts off
automaticall}, toed left in tile oven
will coiltJnue cooking after the o_en
17
Page 18

Usingthe convectionoven.
How to Set the Oven for Convection Roasting when Using the Probe
For best results when roasting large
turkeys androasts, we recommend
usflTgthe probe flTcludedd7the
cmTveotioI7 oveR.
CONVECTION
0(i)@@@
@@@(i)@
(D (2)
@
CLEAR
Tile display will flash PROBE and tile
oven control will signal if tile probe is
inserted into tile outlet, and you have not
set a probe temperature and pressed tile
STARTpad.
Place tile rack (on 27" models
[]
use tile oitset rack) ill tile lowest
position (A). Insert tile probe into
tile meat.
[] Plug the probe into the outer ill the
oven. Make sure it is pushed all the
WaY ill. (]lose tile ()','ell dool:
[] Press tile CONVECTION ROAST pad.
] Press tile nuluber pads to set the
desired OVell [el/lpel'attll'e.
[] Press tile PROBEpad.
] Press tile llt/Illbel" pads to set the
desired internal meat temperature.
[] Press tile STARTpad.
When tile oven stmls to heat, tile word
iO will be ill the display.
_Mter the internal temperature of the meat
reaches 100°k the changing internal
temperature will be shown ill the display.
[] X&q/en tile internal temperature of
tile meat reaches tile munber xou
have set, tile probe and tile oven
tlll'II ()f]_ }lIl(I tile oveIl Coilti'ol
signals. To stop tile signal, press tile
CLEAR/OEEpad.Use hot pads to
remove the probe fl'on/the toed.
Do not use tongs to pull on it--they
might (lamage it.
CAUTION: Topreventpossiblebums,do not
unplugtheprobefrom the oven outlet until the
oven has coded Do not store the probein
the oven.
NOTE:
iJi:_If theprobeisremovedfromthefoodbefore
thefba/ temperatureis reachedatonewi//
soundandthedisplaywi//flashuntiltheprobe
isremovedfromtheoven.
!;>Youwi//heara fanwhilecooklbgwith this
feature.Thefanwi//sto/_whenthedooris
openedbuttheheatwff/notturnoff
iJF:YoucanusethetYnereventhoughyoucannot
usetYnedovenoperations.
iJF:Ondoubleovenmode/s,youwi//notbeableto
usetheprobeintheupperovenduringtimed
ovenoperations.Thisisbecause,withthe
probe,youarecooklbgbytemperaturerather
thantime.
Tochange the oven temperature
during the Convection Roast cycle,
press the CONVECTIONROASTpad
and then press the number pads to
set the new desired temperature.
18
Convection Roasting Guide
Meats Minutes/Lb, Oven Temp. Internal Temp,
Beef Rib,BonelessRib, Rare 20Q4 325°F 140°Ft
TopSirloin Medium 24_8 325°F 160'_F
(3to 5 Ibs.) Well 2842 325'+ 170'_F
BeefTenderloin Rare 10 14 325°F 140°Ft
Medklm 14 18 32R°F 160°F
Perk Bonedn,Boneless(3to RIbs.) 23_7 32R°F 170°F
Chops(1/2to 1" thick) 2 chops 30_5 total 325°F 170°F
4 chops 35-40 total 325°F 170°F
6 chops 4045 total 325°F 170°F
Ham Canned,Butt,Shank(3to 5 Ibs.fully cooked} 14 18 325°F 140°F
Lamb Bonedn,Boneless(3to 5 Ibs.) Mediule 17_0 325°F 160°F
Well 20_4 325°F 170°F
$eateed Fish,whole (3to 5 Ibs./ 3OqOtotal 4OO°F
LobsterTails(Bto8 oz.each) 20_5 total 350°F
Poultry Whole Chicken(21/Lto 31AIbs.) 24_6 350°F 180° 185°F
CornishHensUnstuffed(1to 11/LIbs.) 50 R5total 350°F 180° 185°F
Stuffed11to 11/LIbs.) 55 60total 350°F 180° 185°F
Buckling14to 5 Ibs./ 24_6 32R°F 180° 185°F
Turkey,whole*
Unstuffed(10to 16 Ibs.) 8 11 325°F 180° 185°F
Unstuffed(18to 24 Ibs./ 7 10 32R°F 180° 185°F
TurkeyBreast(4to 6 Ibs.) 16 19 32R°F 170°F
Sh¢/ed hkffs g_me_wl/) *l,q*lk_, 30-45 mid,tiles additional _utfli_; lithe. ,Shield h :s a_d hlva*t with toil to tmpl,*'_ l
o'g e_¢)low_ing and d_:yi_g o/ ft¢i_*.
+ 7"he {kS. l)e[mHment o/ ly.viculluw _rlls "Ibm, b_'el is po/mhn; but you _hould h_ow lhczt .MS_Iq it to o_(_ I401: _m'mzs
_o_ne Hod/_oismi_l,q o*:W_n_ _n.) _u*'l*iz,_'." (Somz_': Sdp, l"ood Booh. }b_l_ Kilche_ Guide. (",I)A tlr-i,. /m e 19,_5.)
Page 19

Usingtheproofingand warming features.
Theproofing feature maintains a warm environment useful for rising yeast-leavened products.
How to Set the Oven For Proofing
START
CLEAR
[] Place the coxered dough in a dish in
the oxen on rack B or C.
NOTE:Forbestresults,coverthedoughwitha
clothorwithgreasedp/asticwrap(theplastic
mayneedtobeanchoredunderneaththe
containersotheovenfanwi//notblowit off).
[] Press the PROOFpad and then the
STARTpad.
The displa,_ will read PrF (proof),
The oxen interior light turns on and
i'elllains on dt/iJng [)I'OOtinbr
The proofing teatm'e automatically
proxides the optimmn temperatm'e fin.
the I)r°°fing, process, and therefi)re does
not haxe a temperatm'e a(!jusm_ent.
[] Set the KITCHENTIMERfi_r the
minimum proof time.
How to Set the Oven For Warming
The wmm feature keepscooked foods
warm fin" up to 3 hom_ after the cooking
flmcfion is finished, or it can be actixated
independentl) to keep ah'ead_ cooked
]_Oods IV_I II//.
This teatm'e is not designed to reheat
cold food.
To use this teatm'e independently, press
the WARMpad and then the STARTpad.
To actiw_te this teatm'e fi)r use after
Timed Baking or Roasting, press the
WARM pad while programming the
oven and before pressing START.
ToCrisp Stale Items
!_'_Place food in lo_sided dishes or pans.
_: For best results, place the fi)od items in
a single layer: Do not stack.
::Ji::i,eave them tmcovered.
};?:Check crispness after 20-30 minutes.
Add time as needed.
[] X._qmn )roofing is finished, press
_J_::Toavoid loweringthe oven temperature
and lengtheningproofing tlYne,donot
openthe oven doorunnecessarily
_ Checkbreaflproducts early toavoid
over-proofing.
I
the CLEAR/OFFpad.
NOTE:
;;Ji::Donotusetheproofingmodeforwarming
foodorkeepingfoodho_Theproofingoven
temperatureisnothotenoughtoholdfoods
atsafetemperatures.UsetheWARMfeature
tokeepfoodwarm.
!;>Proofingfeatureonupperovenonly
iJi::Proofingwillnotoperatewhenovenisabove
125°E"HOT"wi//showinthed/splay
IMPORTANTNOTES:
;;J_::Foodshouldbekepthotin itscooking
containerortransferredtoaheat-safe
servingdish.
_ Formoistfoods,coverthemwithanoven-safe
lid oraluminumfoil.
_ Friedor crisp foods donot need tobe covered,
but can becometoo dry if warmedfor too long.
;;Ji::Repeatedopeningof the doorallows thehot
ak to escapeand the foodto cool
_ Allow extra tlYneforthe temperatureinside the
ovento stabilizeafter adding items.
_ With largeloadsit maybe necessaryto cover
someof the cookedfood items.
iJi::Removeservingspoons,etc., beforeplacing
containersin the oven.
_ Donotuseplasticcontainers,lidsorplastic
wrap.
CAUTION:Plasticcontainers,lidsorplasticwrap
willmeltif placedintheoven.Meltedplasticmay
notberemovableandisnotcoveredunderyour
warrant_
19
Page 20

Adjust the oven thermostat--Do it yourself!
Youmay find that your new oven cooks differently than the one it replaced. Use your new oven for a few weeks
to become more familiar with it. If you still think your new oven is too hot or too cold, you can adjust the
thermostat yourself.
Donot use thermometers, such as those found in grocery stores, to check the temperature setting of your oven.
These thermometers may vary20-40 degrees.
NOTE,"This adjustment will only affect baking and roasting temperatures; #does not affect broiling, convection or
self-cleaning temperatures. Theadjustment will be retained in memory after apower failure.
ToAdjust the Thermostat
QOO(Z>O
G>O (Z>
START
[] Pressthe BAKEand BROILHI/LO
pads at the same time for 3 seconds
until the display sho_:s SE
[] Press the BAKEpad for the oven
which you want to use. A two-digit
number shows in the display:
Press BAKE again to alternate
between increasing and decreasing
the oven temperature.
[] Tile oven temperature can be
ac!justed up to (+) 35°F hotter or (-)
35°F coole_: Press the number pads
the same way you read them, For
example, to change the oven
temperature 15°E press I and 5.
[] _,_hen you haxe made tile
a(!justment, press the START
pad to go back to the time of
day display. Lrse yam" (wen as
VOII would noli/lallv;
Thetype ofmargarine will affectbakingperformance!
Most recipes for baking have been developed using high-fat products such as butter or margarine (80% fat). If you
decrease the fat, the recipe may not give the same results as with a higher-fat product.
Recipe failure can result if cakes, pies, pastries, cookies or candies are made with low-fat spreads. Thelower the fat
content of aspread product, the more noticeable these differences become.
Federal standards require l)rodu('ts labeled "margarine" to contain at least 80% fiat by weight. Ixmqht spreads, on the
other hand, contain less tilt and more water Tile high-moisture content (ff these spreads affect the texture and flavor
of baked goods. For best results with umr old ti_\'orite redpes, use mmgarine, butter or stick spreads containing at least
70% vegetable oil.
2O
Page 21

Usingthe self-cleaning oven. gecom
The oven door must be closed and all controls must be set correctly for the cycle to work properly.
Before a Clean Cycle
IMPORTANT'.The health of some birds
is extremely sensitive to the tirades given
off dtwing the selfk'leaning cycle of
any oven. Move birds to another
well-ventilated room.
;;Ji::On double oven models, you can
set a clean cycle in both ovens at the
same time. The last oven set will
automatically delay its stnrt tmtil the
end of the first oven's clean cycle.
_: On double oven models, you can
use timed baking in one oven and
self-clean the other at the same time.
Wipe up heavy soil on flTeoven
bottom. (appearance may vary)
We reconm/end venting your kitchen
with an open window or using a
ventilation tim or hood dm-ing
the first selfXclean cycle.
Remoxe the broiler pan, broiler grid,
probe, all cookware and am ahmfinmn
fifil from the oxen.
The oven racks and convection roasting
rock can be self,leaned, but they will
darken, lose their luster and become
hard to slide.
Do not rise abi'asives oI" (wen cleanei's.
Clean the top, sides and outside of the
oven door with soap and water
Make sure the oven light bulb cover
(on some models) is in place and the
oven light is off.
(D (Z)(X)(33(E)
(X)(D (E)(ZE3)
START
How to Set the Oven for Cleaning
[] Pressthe SELFCLEANSTD/LOWpad
once toI" _1 4-hotli" clean time or
twice fi:,r a 3-horn clean time.
A 3-horn sel6clean time is
i'ecoi/lillended lk)i" rise when
cleaning small, contained spills. A
selfklean time of 4 hom_ or longer
is recommended fi:,r a dirtier oxen.
[] If a time other than 4 hom_ or
3 houI_ is needed, use the number
pads and enter the desired clean
tim e,
Yim can change the clean time to any
rune" between .3 hom_ and 5 hom_,
dei_ending, on how dirt) your oxen is.
[] Press the STARTpad.
The door locks automatically. The display
will show the clean time remaining. It will
not be possible to open the oven door
tmfil the temperature drops below the
lock teInperature and the LOCKED light
goes off',
_._]_en the LOCKED light goes off, you will
be able to open the (loo_:
::Ji::The word LOCKEDwill flash and the
oven control will signal if you set the
clean cycle and forget to close the
oven dora:
::Ji::To stop a clean cycle, press the
CLEAR/OFFpad. When the LOCKED
light goes off indicating the oven has
cooled below the locking temperatm'e,
u:,t:l will be able to open the door.
2/
Page 22

Usingthe self-cleaning oven.
The oven door must be closed and all controls must be set correctly for the cycle to work properly.
How to Delay the Start of Cleaning
The door locks automaticall}: Tile display
will show the start time. It will not be
possible to open tile oven door until
tile temperature drops below tile lock
temperature and tile LOCKEDlight
goes off.
X._]/en tile LOCKEDlight goes off; you will
be able to open tile door.
NOTE: On doubleovenmodels,youcan seta
delaydean in both ovens at the sametime.
Thesecondovenset wi// automatically delay
the start ofc/eanbg until the end of the first
oven_cleancycle.
Torecallthestartfine of thesecondovenset,
presstheDELAYSTARTpadonthecontrolsfor
thesecondoven.
@(i)@@@
(D (Z)(Z)(Z)0
[] Press the SELFCLEANSTD/LOW pad
once t0r a 4-hot/r clean [lille or
twice tot a 3-hour clean time.
A 3-hem sel6clean time is
recoil/illended tor t/se when
cleaning small, contained spills. A
self=clean time of 4 hom_ or hmoer
is recommended for a dirtier oxen.
If a time other than 4 hems or
v_q
3 houI_ is needed, t/se the nulnber
pads and enter the desired clean
[iIIle.
You can change the clean time to am
time between 3 hom_ and 5 hom_,
dei)ending on how dirt}, ?our oxen is.
[] Press the DgLAgSTART pad.
[] Lrsing tile number pads, enter tile
time of day xou want tile clean cxcle
to start.
[] Press tile START pad.
After a Clean Cycle
Ym may notice some white ash in tile
oven. _]pe it up with a damp cloth after
tile oven cools.
If white spots remain,removethemwith a
soap-filledsteel-wool pad andnnse thoroughly
with a wnegarand water mixture.
These deposits are usually a salt residue
that cmmot be removed by tile clean
cycle.
If the oven is not clean after one clean
wcle, repeat the cycle.
iJi::You cannot set tile oven for cooking
tmtil tile oxen is cool enough for tile
door to tln]ock.
::Ji::While tile oven is self-cleaning, you
can press the CLOCKpad to display
tile time of (lax: To return to tile
clean countdown, press the SELF
CLEANSTD/LOW pad.
!;?:If tile racks become hard to slide, Xdl)e
tile rack SUl)l)m*s with cooking oil.
22
Page 23

Careand cleaning ofthe oven. gecem
Be sure electrical power is off and all surfaces are cool before cleaning any part of the oven.
How to Remove Protective Shipping Film and Packaging Tape
i i i i
i i i i
i i
i , i i i
, , , Bulb
i '
Glasscover
Carefllllv grasp a corner of tile protective
shipping film with your finge_ and slowly
peel it fl'om tile appliance surli_ce. Do
not use any shaq) items to remove tile
fihn. Remove all at tile fihn befln'e using
tile appliance fin" tile fi_t time.
Oven Light Bulbs
NOTE,"The glass cover shoulfl be
removed only when cold. Wearing latex
gloves may offer a better grip.
CAUTION.Beforereplacingyour
oven light bulb, disconnect the electrical
power to the oven at the main fuse or
circu# breaker panel
Be stlre to let tile light (-oxer and bulb
cool completel}.
D)r w)ur satety, do not touch a hot bulb
with bare hands or a damp cloth.
Toremove:
[] Turn tile glass coxer
cotmterclockwise 1/4 mrn until tile
tabs of the glass cover clear the
grooves of the socket.
[] Using gloxes or a chT cloth, relno;e
tile bulb b} pulling it straight out.
Toreplace:
[] Use a new 130-volt Halogen bulb,
not to exceed 50 watts.
[] Using gloxes or a (hT cloth, relno;e
tile bulb fl'om its packaging. Do not
touch tile bulb with bare finge_.
To asstlYe no daillage is done to tile
finish of the product, the satest way to
remove the adhesive fl'om packaging
tape on new appliances is an application
el a household liquid dishwashing
detergent. Apply with a soft cloth and
allow to soak.
NOTE:Theadhesivemustberemovedfromall
parts.Itcannotberemovedif itisbakedon.
_eceo[acle
\
use glOVeS
orcloth
\
Y
Push the bulb straight into the
[]
receptacle all the way.
[] Place tile tabs of the glass cover into
the grooves of the socket. Turn the
glass cover clockwise 1/4 turn.
For [rein'eyed li_d/ting_, inside the
oven, clean the glass covey
fl'e_lt/ent]v, using, a wet cloth. This
should be done when tile oven is
completely cool.
[] Reconnect electrical power to
the oven.
/
Stainless Steel Surfaces (onsomemodels)
Be notusea steel wool pa& it will scratch
thesurface.
To clean tile stainless steel smfi_ce,
rise W;iY/// sHdsy water or a stainless steel
cleaner or polish. Mways wipe tile suYI;_ce
in tile diiection of tile grain. Follow tile
cleaner instructions fiw cleaning tile
stainless steel smq{hce.
To inquire about purchasing stainless
steel appliance cleaner or polish, or to
find tile h)cation of a dealer nearest you,
[)lease call our toll-fl'ee number:
National Parts Center
1.800.6262002
ge.com
23
Page 24

Careand cleaning oftheoven.
Cleaning the Oven Door
Toclean the inside of the door:
_::<!:Because tile area inside tile gasket is
cleaned during tile sel6clean wcle, you
do not need to clean this by hand.
_: The area outside the gasket and
Do not rub or clean the door gasket--
it has an extremely low resistance to
abrasion.
If you notice the gasket becoming worn,
frayed or damaged in any way or if it has
become displaced on the door, you should
have it replaced.
the door liner can be cleaned with a
soap-filled or plastic scotwing pad,
hot water and detergent. Rinse well
with a vinegar and water solution.
Toclean the outside of the door:
_: Use soap and water to thoroughly
clean tile ml), sides and fl'ont of tile
oven door. Rinse well. _)u may also
use a glass cleaner to clean tile glass
Lift-Off Oven Door
on tile outside ()t tile do(m Do not let
water drip into tile vent openings.
iJi::If any stain on tile door vent trim is
i)e_istent, rise a sell abrasive cleaner
and a sponge-scrubber fl)r best results.
_: Spillage of marinades, fl'uitj uices,
tomato sauces and basting materials
containing acids may cause
discoloration and should be wiped
up immediately. \_]/en sm'ti_ce is cool,
clean and rinse.
iJi::Do not use oven cleane_, cleaning
I)ow(le_ or hm_h abrasives on tile
outside of tile door.
Slot
Hingelock
Pull hinge locks down to unlock
Removalposition
Thedoorisveryheavy.Becarefulwhen
removingandliftingthedoor.
Donotlift thedoorbythehandle.
Toremovethedoor."
Fully open tile dora:
[]
Pull tile hinge locks down toward
[]
the door fl'ame, to the tmlocked
position. A tool, such as a small
flat-blade screwdrixe_; may be
required.
Fimlly grasp both sides of tile door
[]
at tile top.
Close door to tile door remoxal
[]
position, which is half Wax, between
tile broil stop position and flfllx
closed.
[] I,ifl door up and out tmfil tile hinge
aml is clear of the slot.
Toreplace the door.
[] Fimlly grasp both sides ot tile door
at tile top.
X&qth tile Bottom Hingearm
[]
door at tile edge
same angle as 0f slot
tile remowfl
position, seat the
indentation of
the hinge am/
into the bottom
edge of the hinge
slot. The notch in the hinge aml
II/tlst be flfllv seated into tile bottom
of tile slot.
Fully open tile dooi: If tile door will
[]
not flfll) open, the indentation is
not seated correctly in tile bottom
edge ot the slot.
Push tile hinge, locks Ul) aoainst_ tile
[]
front fl'ame of tile oxen caxity, to tile
locked position.
arm
Hing,
Pushhingelocksuptolock
[_1 Close tile oxen dora:
IJI
M.
Pressdownandpullout.
24
ii!iii/iIiii!:i:illii
RemovableOvenFloor
Toremove the oven floor:
[] Remoxe tile oxen door using tile
instructions in tile Lift-Off Oven Door
section of this manual.
[] Press down and pull out tile
i'elllO_,able o_,en _]()()I_
V_] Clean tile oxen floor xfith waml
soapy wateI:
[] "_&q/enre-installing the oxen flo(m be
sure to slide it all the way to the back
of tile o_,eil.
IMPORTANT'._Mways replace tile
remoxable floor before tile next use.
Page 25

Probe
ge.com
Roastln£ rack
OVBR rack
The temperature probe mm be cleaned
with soap and water or a soap-filled
scouring pad. Cool the temperature
probe betore cleaning. Scorn" stubborn
spots with a soap-filled scotwing pad,
rinse and (h_'.
::Ji::Donot lknmersethe temperatureprobe
in water
::Ji::Donot store the temperatureprobe in
the oven.
Oven Racks and Convection Roasting Rack
(:lean the oven racks (including the
offset rack) and the convection roasting
rack with an abrasive cleanser or steel
_x)ol. _Mtei" cleaning, rinse the racks and
rack with clean wamr and dry with a
clean cloth.
NOTE:Theovenracksandconvectionroasflbg
rackmaybecleanedin these/f-c/eanlbgoven.
However,therackswi//darkenincolor,losetheir
lusterandbecomehardtoslideifcleaneddunng
theself-cleaningcycle.Youcanwipe,therack
supportswithcookbgoilafterse/f-c/eanbgto
maketheracksslidemoreeasily
Oven Heating Elements
Do not clean the broil element. Am' soil
will burn off when the element is heated.
The bake element is not exposed and
is trader the remo',_ble oven flora: If
spillovers, residue or ash accumulate
on the remox:d)le oven flora; wipe up
betore selt_'leaning.
To clean the bake element area, take out
the remowd)le floor (see the Removable
Oven Floor section) and gently lilt the
bake element. Clean with warn/soapy
water: Mwa):s replace the remowd)le floor
heft>re next use.
NOTE."Failuretoreplace the removablefloor will
adverselyaffect the cookingperformance.
Af!cerbroiling,remove the broiler
pan from the oven.
Broiler Pan & Grid
Do not clean the broilerpan or grid/77a
self-cleaningoven.
After broiling, relnove the broiler pan
fl'om the oven. Remove the grid fl'om the
pan. Careflflly pour out the grease fl'om
the pan into a proper containe_:
_'_sl_ and rinse the broiler pan and grid
in hot _mr with a soap-filled or plastic
scorning pad.
Control Panel
It's a good idea to wipe the control
panel after each use. Clean with mild
soap and water or vinegar and water;
rinse with clean water and polish (h_'
with a soft cloth.
If fi_od has bm'ned on, sprinkle the grid
with detergent while hot and cover with
wet paper towels or a dishcloth. Soaking
the pan will remove bm'ned-on foods.
Both the broiler pan and grid may be
cleaned with a commercial oven cleane_:
Both the broiler pan and grid can also be
cleaned in a dishwasher:
Donotstoreasoiledbroilerpanandgrid
anywherein theoven.
Do not use abrasive cleansers, strong
liquid cleansers, plastic scorning pads or
oven cleaners on the control panel--they
will damage the finish. A 50/50 solution
of vinegar and hot _;_ter works well.
25
Page 26

Before YouCall ForService...
Troubleshooting tips
Save time and money! Review the charts on the following
pages first and you maynot need to call for service.
Possible Causes
Controlsignalsafter
enteringcookingtime
or de!aystart
Fooddoes notbake Oven controls improperly set. • See the Using the oven section.
orroastproperly
You forgot to enter a bake
temperature or cleaning
time.
Rack position is incorrect • See tile Usingtheoven section.
or the rack is not level.
Incorrect cookware or • See tile Usingthe oven section.
cookware of improper size
being used.
Oven floor not in place. • Replace the oven floo_:
Oven thermostat needs • See the Adjust the oven thermostat--Do it yourself[
adjustment, se('tiou.
What To Do
• Press the BAKE pad and desired temperature or the
SELFCLEANSTD/LOWpad and desired clean time,
fooddoes not Oven controls improperly set. • Make stu'e you press the BROILHI/tO pad.
broilproperly
Improper rack position • See the Broiling Guide.
being used.
Food being cooked • Use the broiling pan and grid that came with w)tu" oven.
in a hot pala. Make stu'e it is cool.
Cookware not suited • Use the broiling pan and grid that came with w>tu" oven.
for broiling.
The probe is plugged into the • Uuph/g and remove the prol)e from the oven.
outlet in the oven,
Alumhaum foil used on the • See the Using the oven sectiou.
broiling pall and grid has
not been fitted properly mad
slit as recommended.
ha some areas the power • Preheat the broil element fiw 10 minutes.
(voltage) maybe low, • Broil for the lowrest_ , period of time recouuueuded in
the Broiling Guide.
Clockandtimer A fuse ha your home may be • l_eplace the filse or reset the circtfit breaker.
do not work blown or the circuit breaker
tripped.
Oven controls improperly set. • See the Using the clock, timer and control lockout
se(tiou.
Ovenlightdoes Light bulb is loose or defective. • Tighten or replace the btflb.
not work
Pad operating light is broken. • Call for service.
28
Page 27

Possible Causes What ToDo
Oventemperaturetoo Oven thermostat * See tile Adjust the oven thermostat--Do it yourself!
hot or too cold needs adjustlnent, sectiou.
ge.com
Oven will not work A fuse ha your home may * Rel)lace tile fl/se or reset the circuit breaker:
Oven will notself-clean The oven temperature * Allow the oven to cool and reset the controls.
"Crackling " or This is the sound of the * This is normal.
be blown or the circuit
breaker tripped.
Oven controls hnproperly set. * See tile Using the oven section.
is too high to set a
self-clema operation.
Oven comrols hnproperly set. * See tile Usingthe self-cleaning oven section.
The probe is plugged into * ReI]love tile l)robe fl'om tile oven.
the outlet in the oven.
"popping" sound metal heating and cooling
during both the cooking mad
cleaning functions.
Excessivesmoking Excessive soil. " Press tile CLEAR/OFFpad. Open the windows to rid
during clean cycle tile room of smoke. _,\'ait tmtil tile LOCKEDlight
goes off. Wipe u l) the excess soil al]d reset tile
clean cycle.
Oven door will' Oven too hot. " Allow tile oven to cool below h)ckiug ten]l)erature.
notopenafter a
clean cycle
Oven not clean after a Oven conlrols not properly set. * See tile Using the self-cleaning oven sectil:,u.
clean cycle
Oven was heavily soiled. • Clean up hea\y spillovers before starting tile clean
cycle. Heavily soiled ovens may need to sell:cle;m
again or t()r a longer l_eriod of time.
"LOCKOOOR"flashes The self-clean cycle has • Close the oven door.
in the display been selected but the
door is not closed.
LOCKEDDOORlight The oven door is locked • Press tile CLEAR/OFFpad. Allow tile oven to cool.
is on whenyou want because the temperature
tO cook inside the oven has not
dropped below the
locking temperature.
27
Page 28

Before YouCallForService...
Troubleshooting tips
Possible Causes What ToDo
"F-- and a number You have a function
orletter"flash error code.
in the display If the function code repeats. * Disconnect all power to the oxen for at least 30
• Press the CLEAR/OFFpad. Mlow the oven to cool fin.
one houi: Put the oxen back into operation.
seconds and then reconnect power. If the flmction
error code repeats, call for serxice.
Displaygoes blank A fuse in your home may • Replace the filse or reset the circuit breaker;
Displayflashes Power failure. • P,eset the clock.
Unable to get the Oven control pads were • The BAKE and BROIL HI/LO pads (on double oven
displayto show "SF" not pressed properly, models, use the upper oven controls) must be
"Probe"appears in This is reminding you to • Enter a probe temperattu'e.
the display enter a probe temperature
Power outage, Power outage or surge. • Reset the clock. If the oven was in use _ou must reset
he blown or the circuit
hreaker tripped.
The clock is in the • See the Special features of your oven control section.
black-out mode.
pressed at the same time and held for 3 seconds.
after plugging in the probe.
it by, l)ressing, the CLEAR/OFFpad, setting the clock
and resetting any cooking flmction.
Steam from the vent When using the convection • This is normal.
feature, it is normal to see
steam coming out of the
oven vent. As the number
of racks or amount of
food being cooked increases,
i/ iiiii_iii!_!_!_!_!_!_!_!_!_!_I
the aznom_t of visible steam
wiU increase.
"Burning" or "oily" This is normal in a new oven • To speed the process, set a self-clean cycle for a
odor emitting from and will disappear in time. minim um of 3 hours. See the Using the self-cleaning
the vent oven section.
Strong odor An odor from the insulation • This is temporar).
around the inside of the
oven is normal for the first
few times the oven is used.
Fan noise
A cooling fan or a convection
fml (depending on the
function you are using)
may automatically turn on.
• This is normal. The cooling tim will turn on
to cool internal parts. It may rtm for up to 1-1/2
hours in 30" models and uI) to 2 hours in 27" models
after the oven is turned off. The convection fan
will cycle on and off tmtil the fimction is over or
the door is opened.
28
Page 29

GE Service Protection Plus rM
GE, a name recognized wo_'ldwide %_" quality and dependability, of_e_s you
Se_'_ice Protection Plus'"--compvehensive p_otection on all yore appliances--
No Matter What Brand!
Benefits Include:
• Backed by GE
• All brands covered
• Unlimited service calls
• All parts and labor costs included
• No out-of-pocket expenses
• No bidden deductibles
• One 800 nmnber to call
YOu xdll be completel) satisfied with (mr service protection or xou ma) request )our mone} back
on the remaining value of )our contract. No questions asked. It's that simple.
We TI Cover Any Appliance.
Anywhere. Anytime.
Protect wmr refl'igerator, dishwasher, washer and d*yer, range, TV, VCP. and m uch more--any brand!
Plus there's no extra charge fbr emergency service and low monthly financing is available. Even icemaker
coxerage and fbod spoilage protection is offered. You can rest easy, knowing that all your valuable
household products are protected against expensive repairs.
Place ,ore" confidence in GE and call us in the U.S. toll-free at _UU.t)Z_).ZZZ_
for n/ore illforn/_ltiOll.
*-MIlmulds (:o_<led, up Io 20 y<al_, old, in Ih< continental U.S.
_ (_/ll here
Please place in envelope and mail to:
General Electric Company
Warranty Registration Department
P.O. Box 32150
Louisville, KY 40232-2150
29
Page 30

Consumer Product Ownership Registration
Deal Customer:
Thank you for purchasing our product and thank you for placing your confidence ira us.
V_:eare proud to haxe you as a customer'.
Follow these three steps to protect your new appliance investment:
Complete and mail
your Consunler
Product Ownership
Re#stration today.
tt_ve tile pe_l_e of
mind of knowing we
call <ontact vou ill
the unlikely exent of a
sati:ly modificalion.
Alter mailing tile
registration below,
store this doclllllellt
in a sat\' place. It
contains int_mnation
you will need should
you require service.
Our selwice ll(llllb@r iS
800.GE.CAI(ES
(800.432.'_)737).
Model Number Serial Number
I I
Important: If you did not get a registration card with your
product, detach and return the form below to
ensure that your product is registered, or register
online at ge.com.
Consumer Product Ownership Registration
Read your Owner's
Manual carefilllv.
It will help you
oper_lte yOllr llew
appliance properly.
, I
,_(]/ll here
3O
Model Number Serial Number
Sl reel I
Address I I I I I I I I I I I I I I I I I I I I I I I
A..#I I I
(;i,vI , I
lIalePlaced
Ill Use III
Monlh
O
GE Consumer & Industrial
Appliances
General Electric Compang
Louisville,K¥ 40225
ge.com
I I I I I I E-lnailAddress*
I I I I I I I I I I I I 8./.,I , J Codel , , I I
Phone
* Please proxide your e-lnail address to receive, via e-mail, discounts, special otlk'r_ and other impoltant
commmficalions from GE Appliances ((;1_\).
[ Check herc if you do not want to receivc communications ti-om G1LVs carcfilllv selected pamlers.
FAII_[ RE TO COMPLETE AND REFI JRN TIIIS (2\Rl) DOES NOT DIMINISII Y()[ 7R
WAI_t \N'IY RI(;t ITS.
For more intormation about G1LVs priv_lcy and daIa usage polic> go to ge.com and click on
"Pri_a_y Policy" or call 800.626.2224.
Zip
Page 31

GEBuilt-In Electric OvenWarranty.
Aft warranty service provided by our Factory Service Centers, or
an authorized Customer Care®technician. Toschedule service,
on-line, 24 hours a day, visit us at ge.com, or carl 800.GE.CARES
(800.432.2737).Please have serial number and model number
available when calling for service.
GE Will Replace:
Anypartot the oven which tifils due to a defect in materials or workmanship,
Fromthe dateof the
origina!purchase
_: Service trips to your home to teach you how to
use the product.
_: Improper installation, delivery or ma'_mtenm_ce.
::Ji::Failure of the product if it is abused, misused,
or used for other than the intended purpose
or used commercially.
_: Replacement of house fuses or resetting of circuit
breakers.
During this limited one-year warranty, GE will also provide, free ofcharge, all labor
and in-home service to replace the defective part,
Staple your receipt here.
Proof of the original purchase
date is needed to obtain service
under the warranty.
!i/: Damage to the product caused by accident, fire, floods
or acts of God.
_: Incidental or consequential damaage caused by possible
defects with this applimlce.
iJi::Damage caused after delivery.
_: Product not accessible to provide required service.
EXCLUSIONOFIMPLIED WARRANTIES--Your sole and exclusiveremedy is product repa# asprovided in thisLim#ed
Warranty. Anyimplied warrauties, iucludiug the implied warranties of merchantabifity orfituess for a particular purpose,
are limited toone year or the shortestperiod allowed by law.
This warranty is extended to the original purchaser and any succeeding owner for products purchased for
home use within the USA. If the product is located in an area where service by a GEAuthorized Servicer is not
available, you maybe responsible for a trip charge or you maybe required to bring the product to an Authorized GE
Service location for service. In Alaska, the warranty excludes the cost of shipping or service calls to your home.
Some states do not aflow the exclusion or limitation of incidental or consequential damages. This warranty
gives you specific legal rights, and you may also have other rights which vary from state to state. Toknow
what your legal rights are, consult your local or state consumer affairs office or your state's Attorney General.
Warrantor. GeneralElectric Company.Louisville,KY 40225
II
3/
Page 32

ConsumerSupport.
gEAppliancesWebsite ge.com
Have a ques0on or need assistance with your appliance? Try the GE Appliances Website 24 hom_ a day,
any day of the year! For greater convenience and taster serxJce, you can now download Owner's Manuals,
order parts, cat;dogs, or even schedule service ondine. You can also "_sk Our Team of EN)erts ......
yotlr qtlestions, and so II/tlC}/II/ore...
ScheduleService
Expert (;E repair setsice is onlx one step awa} fl'om your door: Get on-line and schedule vc,t:u"serxice at
your conxenience 24 hours am elm of the _ear! Or call 800.GE.(_AI_ES (800.432.2737) during n{mnal
business hou_.
ge.com
RealLifeDesignStudio ge.com
GE supports the Universal Design concept--products, services and environments that can be used by
people of all ages, sizes and capabili0es. _\'e recognize the need to design fi)r a wide range of physical and
mental abili0es and impaim_ents. For details of GE's Universal Design applica0ons, including kitchen
design ideas fin" people with disabilities, check out {)Ill"X,Vebsimtoday. For the hea_ing impaired, please call
800.TDD.GEAC (800.833.4322).
ExtendedWarranties
Purchase a GE extended warrant_ and learn about special discounts that are available while )our warran b,
is still in effect. You can i)urchase it on-line an) time, or call 800.626.2224 during nomml business hours.
(;E (_onsumer Home Serxices will still be there after }our warrant}, expires.
PartsandAccessories
ge.com
ge.com
Individuals qualified to selMce their own appliances can have parts or accessolies sent direcflv to their
homes (VISA, MasterCard and Discover cards are accepted). Order on-line today, 24 hours eve_a' day or bv
phone at 800.626.2002 during nomml business hours.
Instructions contained in this manual coverprocedures tobe performed by any user. Other servicing generally
should be referred to qualified service personnel Cautionmust be exercised, since improper servicing may cause
unsafe operation.
ContactUs
If you are not satisfied with the service you receive fl'om (;E, contact us on our Website with all the details
including your phone numbei; or write to: General Manage_; Customer Relations
GE Appliances, Appliance Park
I,ouisville, KY 40225
RegisterYourApplbnce
Register your new applimlce on-line---at your convellience! Timelx, I)r°(hlct registra0{, m will allow fin.
enhanced communica0on and prompt service under the terms of your warranty, should the need arise.
You mm also mail in the pre-pfinted registra0on card included in the I)ackin'"_ material.
Printed in the United States
ge.com
ge.com
 Loading...