

GE JT955WF8WW, JT955SK4SS, JT955CF8CC, JT955BF8BB, JT915WF8WW Owner’s Manual
...
Safety Instructions ......... 2-4
ge.com
©
Opera6ng Instructions
Clock and Timer . ........... l l
Controls .................... 5
Convection .............. 14-1 7
Oven ................... 9, l 0
Probe .................. 13, 18
Proofing ................... 19
Sabbath Feaulre ............. 8
Self-Cleaning Oven ....... 21,22
Special Features ............ 6, 7
Thermostat ................ 20
Timed Baking
and Roasting ......... 12, 16, 17
VVarming .................. 19
Care and Cleaning
Broiler Pan and Grid ......... 25
Cleaning Oven Door ......... 24
Control Panel .............. 25
I,ift-OffOven Door . ......... 24
I,igh t Bulb ................. 23
Oven Floor . ............... 24
Packaging _ape ............. 23
Probe ..................... 25
Racks ..................... 25
Stainless Steel Surfaces ....... 23
./K 915-2 7" Sir_gle Wall (kJen
JK955-2 7" Double Wall Oven
iT9 l 5-30" Single Wall (kJen
ff955-30" Double Wall (kJen
Troubleshooting Tips ..... 26-28
Consumer Support
Consumer Support . . .Back Co_er
Product Registration ...... 29, 30
Warranty .................. 31
Write the model and serial
numbers here:
Model #
Serial #
You can find them on a label on
the side trim or on the ti'ont of
the (lower) oven behind the oven
door.
49-80334 11-05Jfl
iMPORTANTSAFETYiNFORMATiON.
READALLiNSTRUCTiONSBEFOREUSING.
WARNING!
For your safe_, the information in this manual must be followed to minimize the risk of fire or
explosion, electric shock, or to prevent property damage, personal injury, or loss of life.
IMPORTANTSAFETYNOTICE
The California Safe Drinking Water and ToxicEnforcement Act requires the Governor of California
to publish a list of substances known to the state to cause cancer, birth defects or other reproductive
harm, and requires businesses to warn customers of potential exposure to such substances.
The fiberglass insulation in self-clean ovens gives off a very small amount of carbon monoxide during
the cleaning cycle. Exposure can be minimized by venting with an open window or using a ventilation
fan or hood.
SAFETYPRECAUTIONS
When using electrical appliances, basic safety precautions should be followed, including the
foliowing:
_?{_Use d/is appliance only %r its intended
purpose as described m tins )wner s
Mannal.
:_!!':Be sure your appliance is properly
installed and grounded by a qualified
mchnician in accordance wifll the
provided installation insuucfions.
J; Do not atmmpt to repair or replace ally'
part of your oxen unless it is specifically
recommended ill this mamml. All other
servicing should be refelTed to a qualified
technician.
;_i:,iHme the installer show you the location
of the circuit breaker or fllse. Mark it for
easy reference.
J; Before performing any service, disconnect
the o_en power supply at the household
disuibution panel by iemoving the fllse or
switching off rite circuit breaken
J; Do not leave children alone--children
should not be left alone or nnattended in
an area where all appliance is in use. They
should nex>r be allowed m sit or stand on
ally' part of the appliance.
_::Do not allow anyone to climb, stand or
hang on tile doon They could damag> the
ox>n, or cause sex>ie personal iIIjnÀ>
:_!!':Be sure rite oxen is secureN installed in
a cabinet that is firefly attached to the
house structure. Ne\er allow anyone to
climb, sit, stand or hang on file ox>n doon
_?:':Nexer leax> file oxen door open when you
are not watching the oxen.
q?{:_Ahvavs kee I) combustible wall cox>ring,
curtains or drapes a safe distance from
vonI" o_n,
q?{:_Always kee I) dish towels, dish cloths, pot
holders and other linens a safe distance
fFonl vonY oxPn.
_; Always kee I) wooden and plastic umnsils
and canned food a safe distance aw W
flom your oxen.
;_?:':Teach children not m play with the
controls or any other part of the oxen.
_::i,arge scratches or impacts m glass doors
can lead m broken or shattered glass.
2
WARNING!
SAFETYPRECAUTIONS
ge.com
{7_:Do not store flanm/able materials in
an oxen.
_i:,iCAUTION: Iten/s of interest to
children should not be stored in cabinets
aboxe an oxen; children clin/bing on tile
oxen to reach items could be seiionsly
ii_jnred.
_::Never wear loose-fitting or hanging
garments while using file appliance. Be
careflll when reaching for items stored in
cabinets over file ox.en. Flamn/able mamfial
could be ignimd if brougtlt in contact with
hot surfaces or heating elements and mac
cause se\.ere bnT/ls.
_7{;:Use only di T pot holders--moist or damp
pot holders on hot sni/aaces may i.esuh in
b/nils flom steam. Do not let pot holders
touch hot heating elen/ents. Do not use a
towel or other bnlkv cloth.
i_i:i_For _our safety, nexer use your appliance
tbr wam/ing or heating tile room.
E:,:Do not let cooking grease or other
flammable materials accnnnllate in or
near tile oxen.
E:,IDo not use water on grease fires. Nexer pick
up a flaming pan. T/llrl tile controls off'.
Flame in the ox.en can be smodlered
completely by closing tile oven door and
turning tile oven off or by using a mnlti-
pml)ose d U chemical or foam-type fii.e
extinguisher
_{;_Do not touch tile heating elements or tile
inmrior surPace of tile ox.en. These surPaces
may be hot enough to bnn_ e',.en thougtl
thev ai.e dark in colon Dining and after
use, do not much, or let clothing or oilier
flammable mamrials contact any interior
ai.ea of tile ox.en; allow snfficient tin/e for
cooling first.
Potentially hot surPaces inchlde oven \.ent
openings, snrPaces near tile openings,
crevices around the oven dooi, the edg.es
of the window and metal tIin/ parts abox.e
tile door.
REMEMBER:The inside surPace of tile o_en
may be hot when tile door is opened.
_;:Nexer lemejars or cans of lCatdiippings in
or Ileal vonr o_en.
_{;_Do not store or use combustible mamlials,
gasoline or other flammable vapors and
liquids in the vicinity of this or anv other
appliance.
_{;_Stand away flom tile oxen when opening
tile oxen door. Hot air or steam which
escapes can cause bums to hands, face
and/or eyes.
E:,IDo not heat unopened food containers.
Pressure could build up and tile container
could burst, cansing an iiIjn U.
_? Kee I) tile oven xent unobstructed.
'_!{i;Kee I) tile oxen flee ffon/ grease buildup.
qT_:;Place the oxen rack in tile desired position
while tile oxen is cool. If racks nnlst be
handled when hot, do not let pot holder
contact tile heating elen/ents.
E:,;When using cooking or roasting bags in the
oxen, follow tile n/ann£tctnrer's directions.
E:,IPulling out the rack to the stop-lock is a
comenience in lifting heax T foods. It is also
a precantion against bnrlls fiom tonching
hot surfaces of tile door or oxen walls.
_{;_Do not use tile oxen to di y newspapers.
If oxerheated, they can catch on fire.
_{;;Do not use the oxen for a storage area.
Iten/s stored in an oxen can ignite.
E:,;Do not leme paper products, cooking
utensils or fbod in tile oxen when not
in use.
_{;:After broiling, always take tile broiler pan
out of tile oxen and clean it. ieftoxer
grease in tile 1)roller pan can catch fire
next tin/e you use the pan.
_;:Clean only parts listed in this Owner's
Manual.
_;:Do not use aluminnn_ foil to line oxen
bottoms, except as sugg.ested in this n/annal.
hnproper installation of aluminnn/foil may
resuh in a risk of electric shock or fire.
3
IMPORTANTSAFETYINFORMATION.
READALLINSTRUCTIONSBEFOREUSING.
COOKMEATANDPOULTRYTHOROUGHLY.,.
Cookmeatandpoultry thoroughly--meat to at least anINTERNALtemperatureof 160°Fandpoultry
toat least an INTERNALtemperatureof 180%-Cookingto thesetemperaturesusuallyprotectsagainst
foodbomeillness.
SELF-CLEANINGOVEN
;fi:,iDo not clean the door g'asket. Tile door
gasket is essential tbr a good seal. Care
should be token not to rub, damag_ or
mow tile gasket.
_:_Do not use oven cleaners. No comme_via]
ox>n cleaner or oxen liner promctive
coating of aW kind should be used in or
around any part of the oxen. Residue flom
oxen cleaners will damage the inside of the
oxen when tile self-clean cycle is used.
_i:,:Be%re self-cleaning d_e oxen, remove die
broiler pan, giid and other cookware.
_?{:_Be snie tO wipe up excess spillage before
stardng tile self-cleaning operation.
;_i:,:If the self-cleaning mode malflmcuons,
um_ file oxen off and disconnect tile power
supply. Have it serviced by a qualified
mchnician.
READANDFOLLOWTHISSAFETYINFORMAtiONCAREFULLY.
SAVETHESEINSTRUCTIONS
4
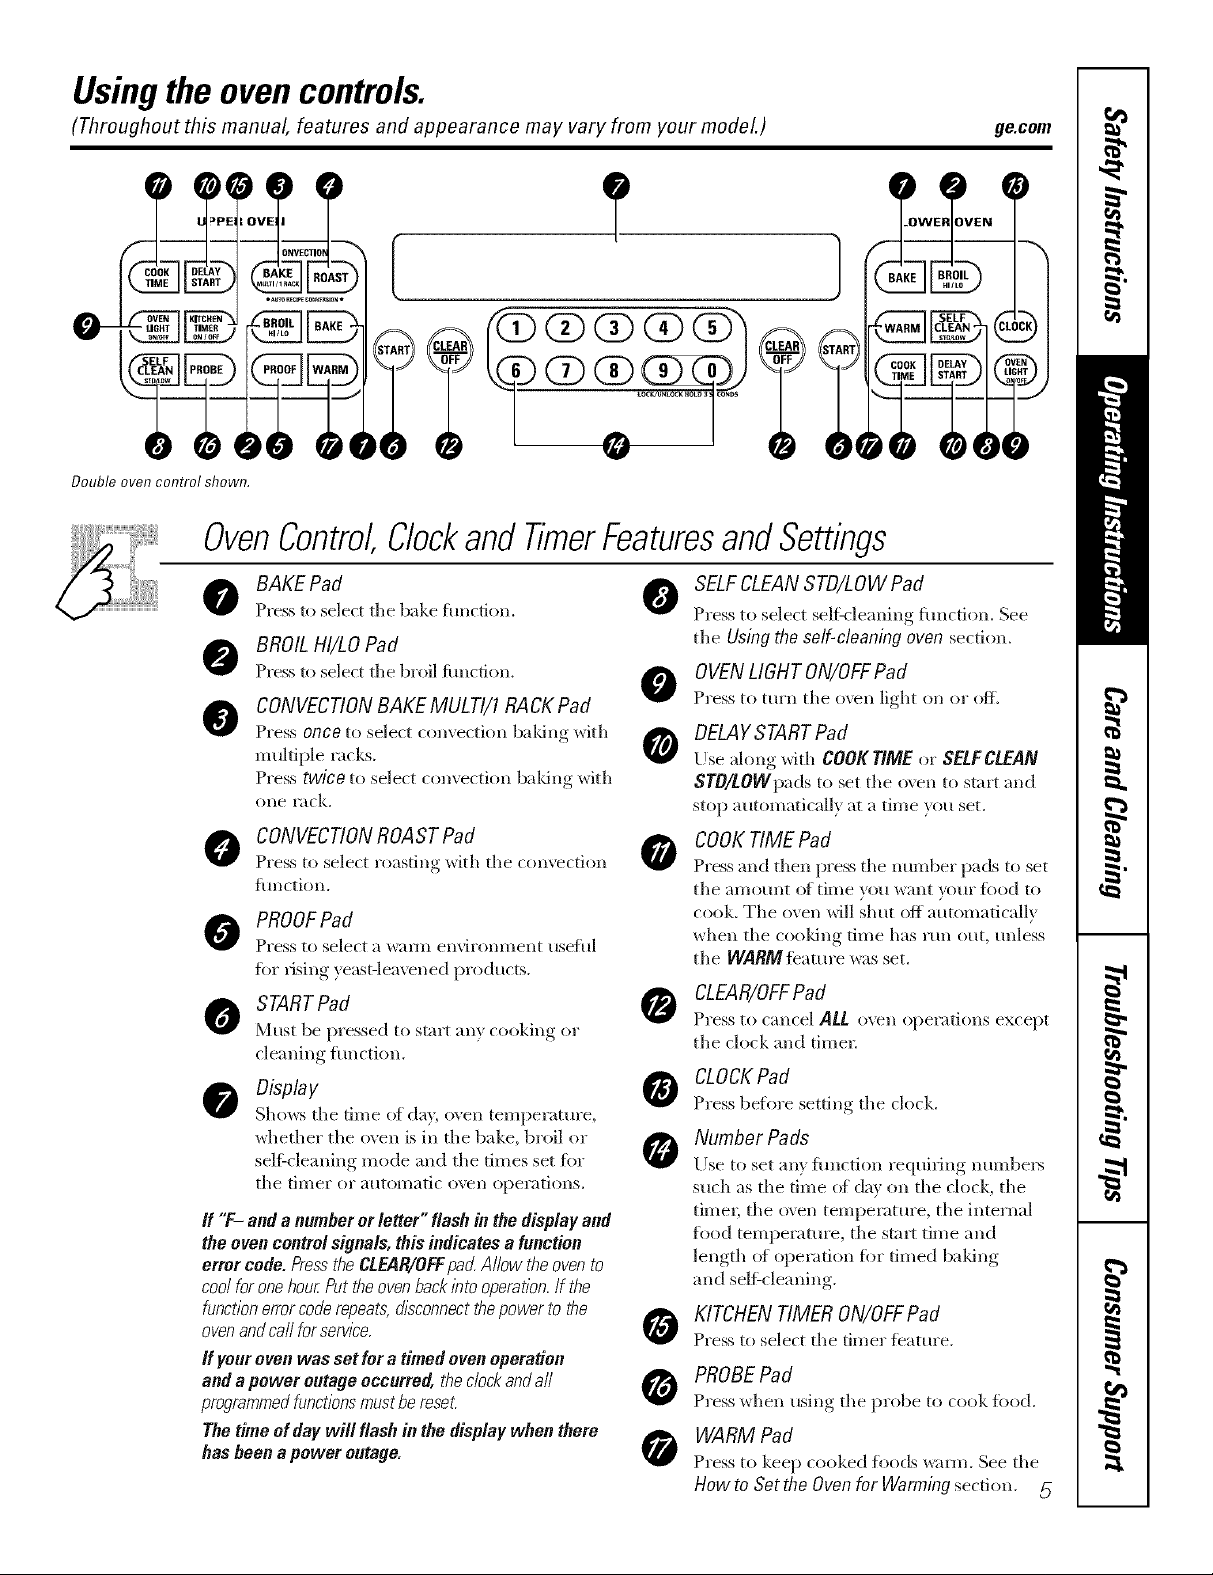
Usingthe ovencontrols.
(Throughout this manual, features and appearance may vary from your modeL)
E ]
Double oven control shown.
OvenControlClockandTimerFeaturesandSettings
ge.com
BAKEPad 0
Press to select file bake hmcdon.
BROILHI/LO Pad
Press to select file broilfimcfion.
CONVECTIONBAKE MULTI/I RACKPad
@
Press once to select convection baldric with
multiple rocks.
Press twice to select convection baldric with
one rack.
CONVECTIONROAST Pad
Press to select roasting _ith the convection 0
function.
PROOFPad
PIess to select a "¢val'/ll envii'OllI//ellt usehll
fiw rising ) east-leavened products.
STARTPad
Must be pIessed to start an) cooking or
cleaning function.
Display
Sho_:s the time (ffday, oven temperatm'e,
whether tile oven is in the bake, br(fil or
selgcleaning mode and the times set for
tile tiIner or automatic ovell opel';ffions.
ff "T- anda numberorletter"flashinthedisplayand
theovencontrol signals,this indicatesa function
error code.PresstheCLEAR/OFFpad.Allowtheovento
coo/foronehour.Puttheovenback/btooperation.!fthe
functionerrorcoderepeats,disconnectthepowerto the
ovenandcallforserv/2e.
ff your oven was set for a timed oven operation
and a power outage occurred, thecbck andaft
programmedfunctions must bereset.
The time of day will flash in the display when there
has been a power outage.
SELFCLEANSTD/LOW Pad
Press to select selt_ leaning flmction. See
the Using the so/f-c/caning oven section.
OVENLIGHT ON/OFFPad
0
Press to turn the o\vn light on or ofl_
DELAYSTARTPad
Use along with COOK T/ME or SELFCLEAN
STO/LOWpads to set the o\ en to stai_ and
stop automatically at a time you set.
COOKTIME Pad
Press and then press the mmlber pads to set
tile all/at/lit ()[[illle yotl want \_O[li" ]_()o(l to
cook. Tile oven will shut off automatically
when the cooldng time has run out, unless
the WARMteamre was set.
CLEAR/OFFPad
Press to cancel ALL oven operations except
the clock and timel:
CLOCKPad
Press beflwe setting the clock.
Number Pads
Use to set any flmcfion requiting numbe_
such as tile time (ffda\' on the clock, the
timeI; tile oven temperature, the trite*hal
fl)od temperatme, the slart time and
length (ffol)eiafion for timed baldric
and selfXcleaning.
KITCHENTIMER ON/OFFPad
@
Press to select the timer tbatm'e.
PROBEPad
Press when using the probe to cook fi_od.
WARM Pad
G
Press to keep cooked fl)ods w;mn. See the
How to Set the Oven for Warming section. 5
Special features of your oven control.
Your new touch pad control has additional features that you may choose to use. The following are the features
and how you may activate them.
The special feature modes can only be activated while the display is showing the time of day. They remain in
the control's memory until the steps are repeated.
When the display shows your choice, press the STARTpad. The special features will remain in memory after
a power failure, except for the Sabbath feature, which will have to be reset.
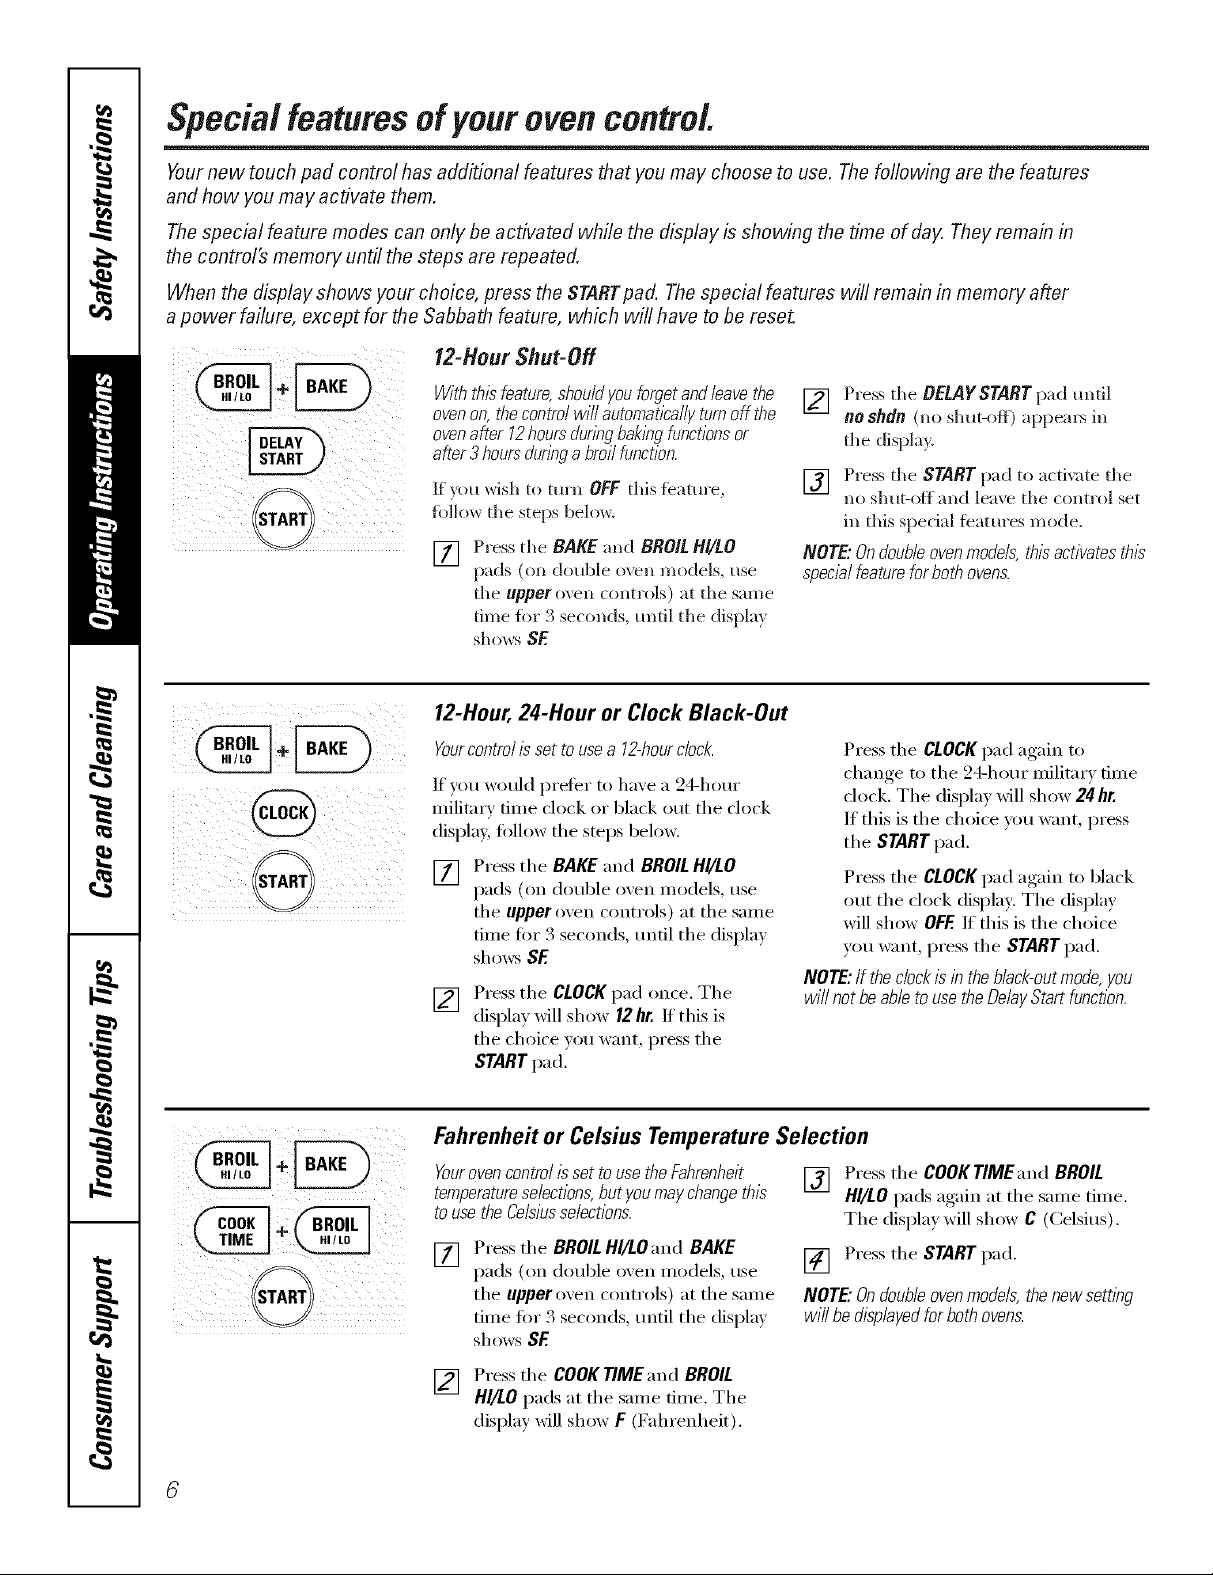
12-Hour Shut-Off
i i ii ii@ i
VViththisfeatura,shouldyouforgetandleavethe
ovenon,thecontrolwillautomat/2allyturnoffthe
ovenafter12hoursdunbgbak/bgfunctionsor
after3 hoursclunbga broilfunction.
If )ou wish to turn OFF this feature,
fi)lh)w the steps below.
[] Press tile BAKE and BROIL HI/LO
pads (on double oven models, use
tile upper o_,ell controls) at tile same
• • Q •
tm_e fl)r ._ seconds, until tile displa}
sho_s SE
12-Hour, 24-Hour or Clock Black-Out
Yourcontrolissetto usea 12-hourclock.
If you would prefer to have a 24-hour
military time clock or black out the clock
display, fi)llow the steps beh)w.
Press the BAKE and BROIL HI/LO
[]
pads (on double oven Inodels, use
the upperoven controls) at the same
time fi)r 3 seconds, tmfil the display
shows SE
Press the CLOCKpad once. The
[]
display will show 12hr. If this is
the choice )ou want, press the
STARTpad.
[] Press tile BELAYSTART pad tmtil
no shdn (no shut-off) apl)em5 in
tile display.
[] Press tile START pad to actixate tile
no shut-off and leave tile control set
in this special t0atm'es mode.
NOTE"Onfloub/eovenmodels, this activates this
specialfeature for both ovens.
Press the CLOCKpad again to
change to the 24-hour military time
clock. The display will show 24 hr.
If this is the choice you want, press
the START pad.
Press the CLOCKpad again to black
out the clock display: The display
will show OFF.If this is the choice
you want, press the START pad.
NOTE:If the dock is in the b/ack-outmode, you
wi// not be able touse the Delay Start function.
i/ i i ii
Fahrenheit or Celsius Temperature Selection
Yourovencontrol isset touse the Fahrenheit
temperatureselections,but youmay changethis
touse the Celsiusselections.
[] Press the BROIL HI/LOand BAKE
pads (on double oxen models, use
the upper oven controls) at the same
time fl)r 3 seconds, tmtil the display
shows $E
[] Press the COOKTIMEand BROIL
HI/LO pads at the same time. The
display will show F (Fahrenheit).
[] Press the COOKTIMEand BROIL
HI/LO pads again at the same time.
The displa)will show C (Celsius).
[] Press the START pad,
NOTE"Ondoubleovenmodels,thenewsembg
willbedtsp/ayedfor bothovens.
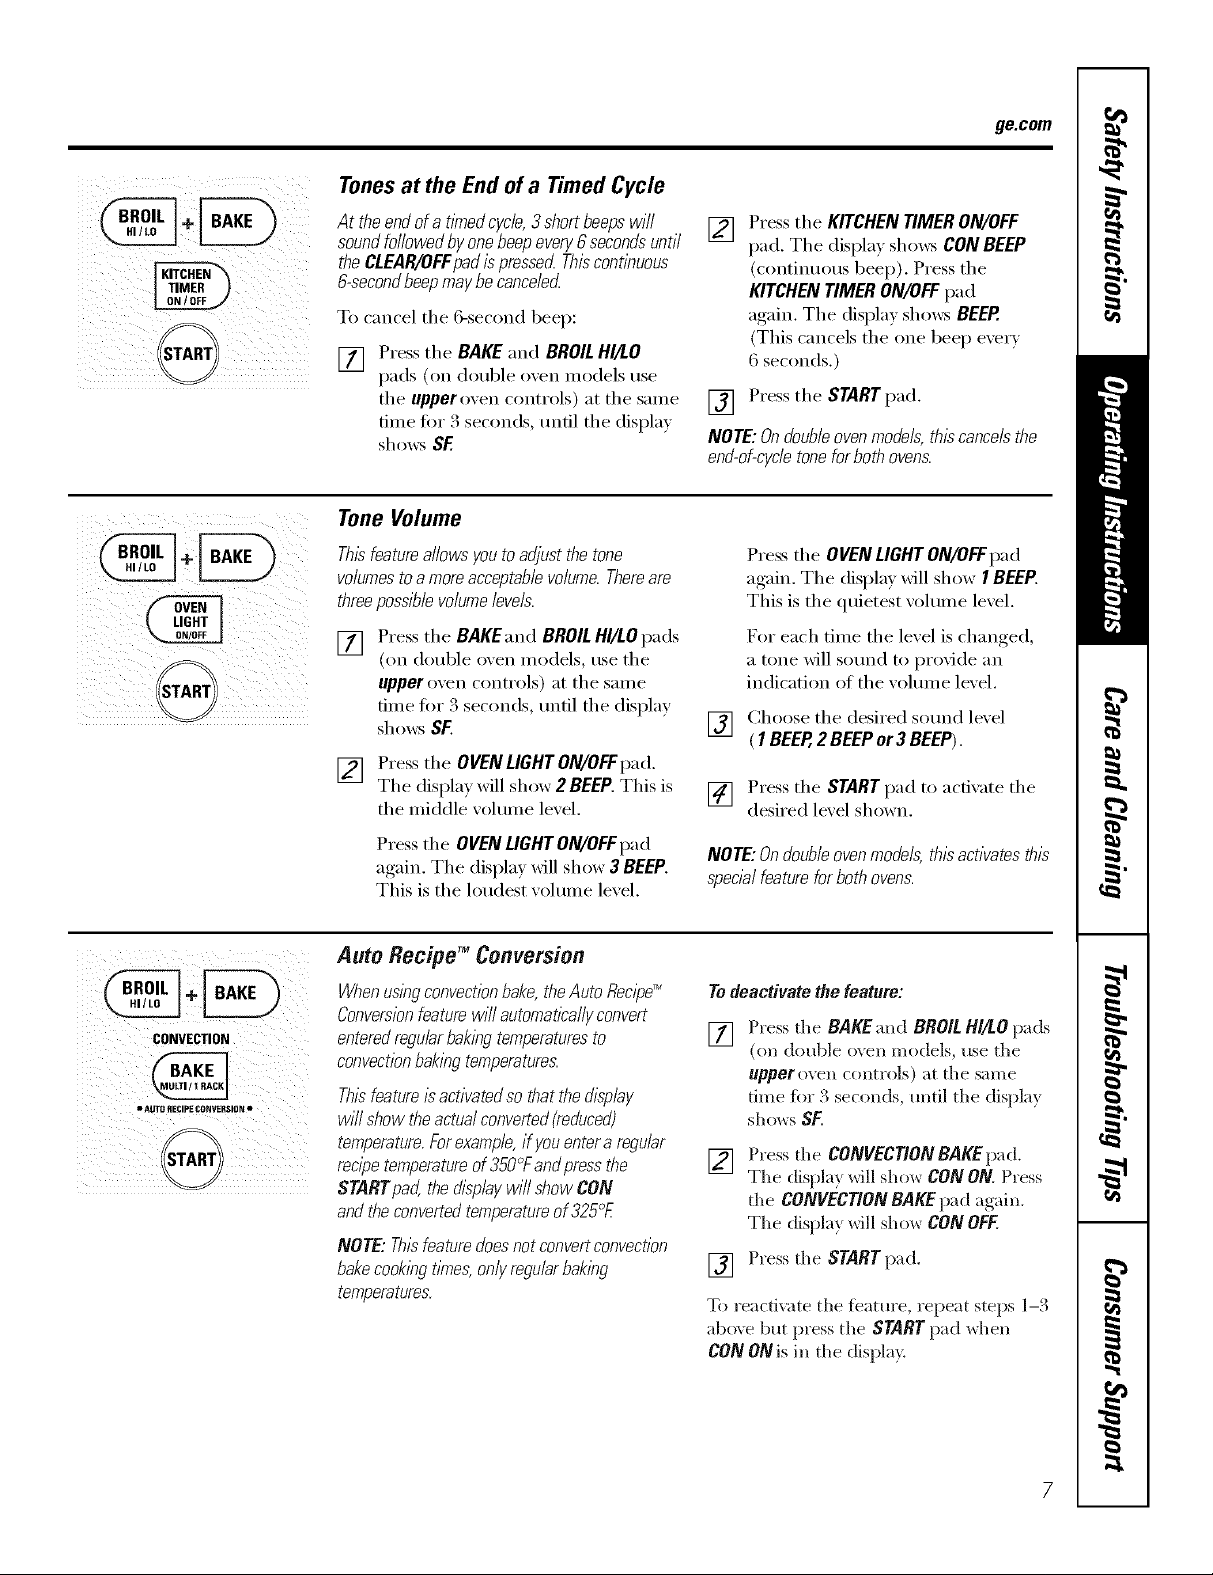
Tonesat the End of a Timed Cycle
ge.com
i_i_i_!ill'illiiiii_ !_i<i_iiiI_iiiI_i_ii
!!i i_i_ii!_ii_ !iiII_iillill
ii__i,_ii_i_ _i_il)_ii_ii_iiI_i
i_ iii i
)_i ii_i_ _ ii_iiii_i
At theendofa tknedcycle,3shortbeepswill
soundfollowedbyonebeepevery6secondsuntil
theCLEAR/OFFpadis pressecLThiscontleuous
&secondbeepmaybecanceled
To cancel the 6-second beep:
Press the BAKE and BROILHI/LO
[]
pads (oil double oven inodels use
the upper oven controls) at the same
time for 3 seconds, tmtil the display
shows SF.
Tone Volume
Thisfeatureallowsyoutoadjustthetone
volumestoa moreacceptablevolume.Thereare
threepossiblevolumelevels.
[] Press the BAKEandBROILHf/LOpads
(on double oxen models, usethe
upperoven controls) at the same
time for 3 seconds, tmtil the display
shows SF.
[] Press the OVENLIGHTON/OFFpad.
The display will shox_ 2 BEEP.This is
the middle ;olmne le;el.
[] Press the KITCHEN TIMER ON/OFF
pad. The displa)shows CONBEEP
(continuous beep). Press the
KITCHEN TIMER ON/OFF pad
again. The display sho_v_ BEEP.
(This cancels the one beep every
6 seconds.)
[] Press the START pad.
NOTE: On double ovenmodels,thiscancels the
end-of-cycletone for both ovens.
Press the OVEN LIGHT ON/OFFpad
again. The display will show I BEEP.
This is the quietest volume level.
For each time the level is changed,
a tone will sound to provide an
indication of the w)lmn e level.
[] Choose tile desired sound level
( 1BEER 2 SEEP or3 SEEP).
[] Press the STARTpad to activate the
desired lexel shown.
_ (_i ¸ii<;
• AOTO RECIPE CONVERSION •
Press the OVEN LIGHTON/OFFI)ad
again. The display xdll show 3 BEEP.
This is the h)udest xolume lexel.
AutoRecipeTM Conversion
Whenuslegconvectionbake,theAutoRecipeTM
Conversionfeaturewillautomaticallyconvert
enteredregularbaklegtemperaturesto
convectionbaklegtemperatures.
Thisfeature/sacfivatedsothatthed/&ley
willshowtheactualconverted{reduced)
temperature.Forexample,if youenterareguler
recipetemperatureof350°Fandpressthe
STARTpad,thed/splaywillshowCON
andtheconvertedtemperatureof325°£
NOTE:Thisfeaturedoesnotconvertconvection
bakecooklegtknes,onlyregularbakleg
temperatures.
NOTE:Ondoubleovenmodels,thisactivatesthis
specialfeatureforbothovens.
Todeactivate the feature:
Press the BAKE and BROIL HI/LO pads
[]
(on double oxen models, use the
upper oven controls) at the same
time for 3 seconds, until the displa)
shows SF.
Press the CONVECTIONBAKEpad.
[]
The displa} will shox_ CONON. Press
the CONVECTIONBAKEpad again.
The displa_ will show CONOFF.
[] Press the STARTpad.
To reactivate the teatm'e, repeat steps 1-.%
above but press the STARTpad when
CON ONis in the display.
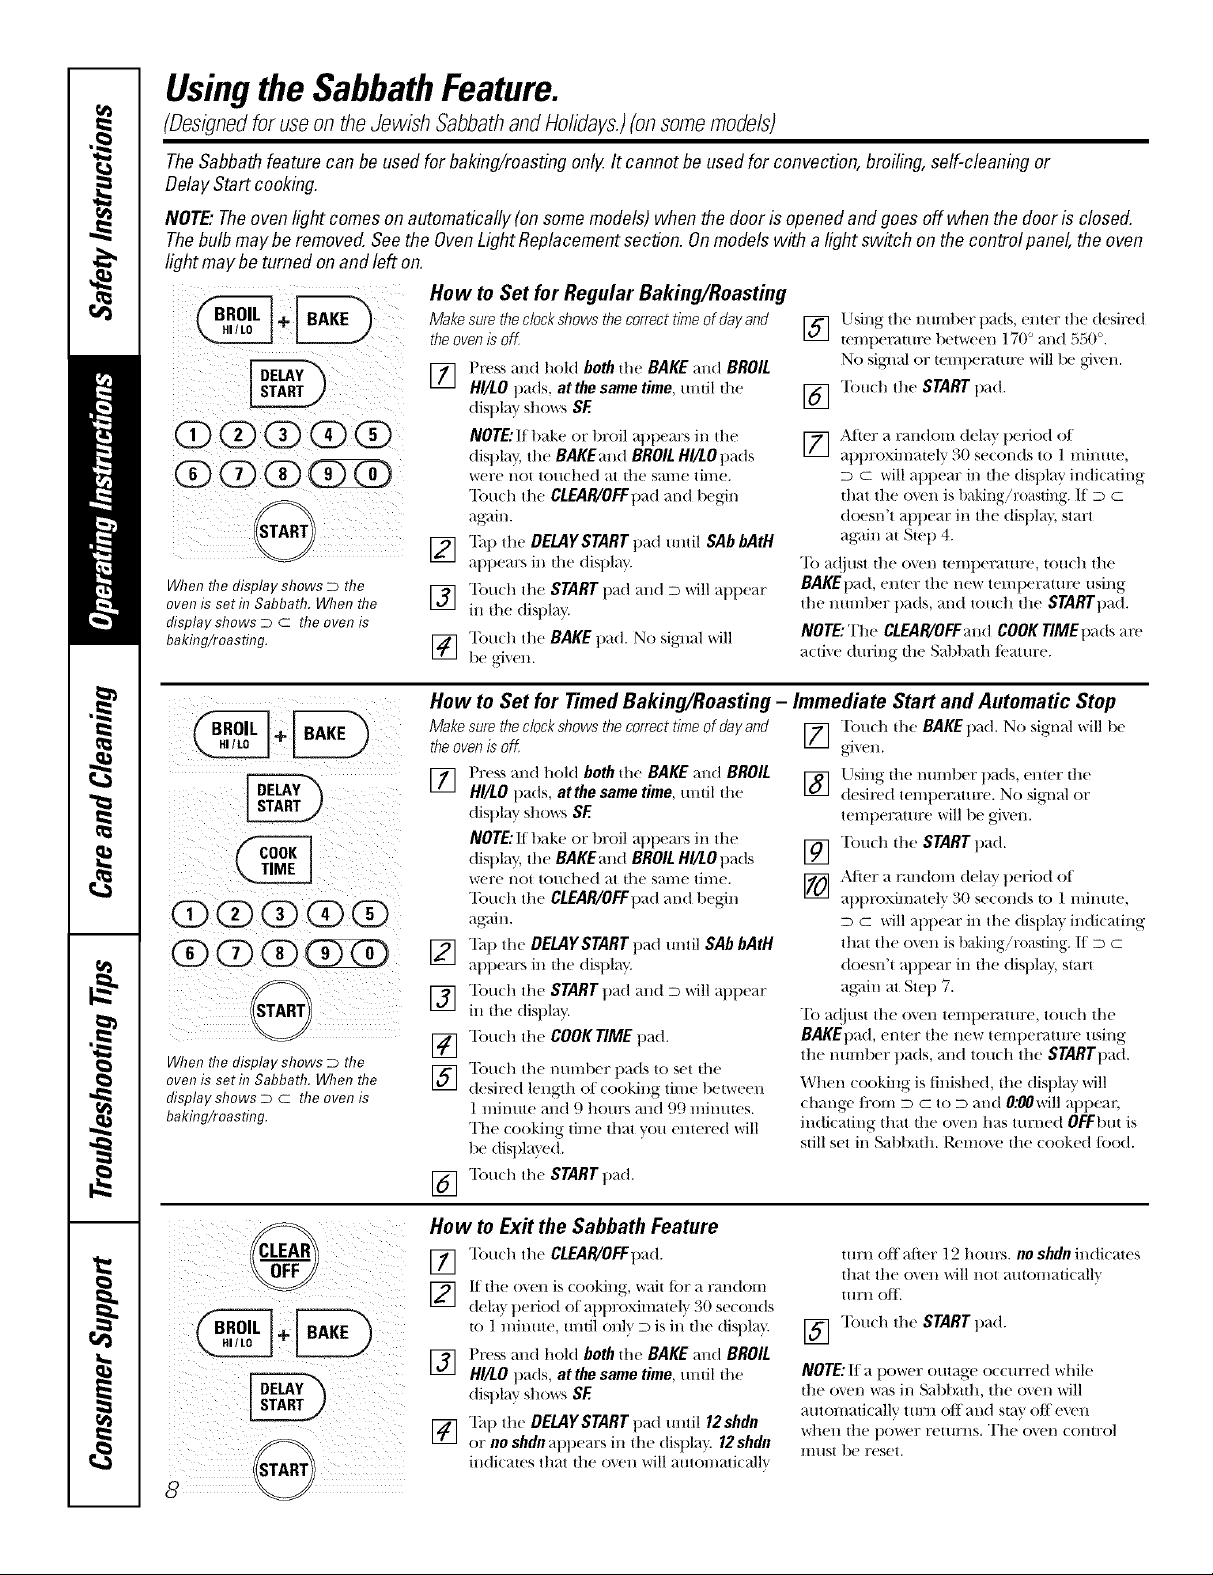
Usingthe SabbathFeature.
(Designedforuseon theJewish SabbathandHolidays.)(onsomemodels)
TheSabbathfeature canbe usedfor baking/roastingonlg Itcannot be usedfor convection,broiling, self-cleaningor
DelayStart cooking.
NOTE."Theovenlightcomesonautomatically (onsomemodels)whenthedoor isopenedand goesoff whenthe door is closed.
Thebulbmaybe removed.Seethe OvenLightReplacementsection.Onmodelswith alightswitch on the controlpanel,theoven
lightmay be turnedonand left on,
How to Set for Regular Baking/Roasting
When the display shows D the
oven is seth7 Sabbath. When the
display shows D C the oven is
bakhTg/roasting.
Make sure the clock shows thecorrect time of day and
theoven is off
] Press and hold both ill( BAKE and BROIL
HI/LO pads, at the same time, umil the
display sl*,o\\rs SE
NOTE:If bake or broil appem:s in the
display, tile BAKEand BROIL H//LOpads
were not touched at dl(_ same time.
Touch the CLEAR/OFFpad and 1)egin
again.
12] "]_q) the DELAYSTART pad mltil SAb bAtH
i¢.-i
appears in d;e display.
] Touch the START t)ad and D will at)t)ear
in the display.
] Tou*, h the BAKE pad. No siglml will
Using the nmnber pads, enter the desired
] tenq)emutre between 17(F m*,d 550°.
No sigl*,al or temperature *,',rill1X! gJxel*,.
] "lbuch the START pad.
[] ,\tier a random dela'_ period (7t
approxinmtely 30 se*,onds to 1 minute,
D C will appear in d*,e display indi(afing
d/at the oven is baking/roasling. If D C
doesn't appear in tile displa}, start
aKain al Stop 4.
"Ib a(!just the oven temperature, touch the
BAKE1)a(t, enter the new temperatm'e using
tile number pads, and touch d*,e STARTpad.
NOTE:The CLEAR/OFFand COOKTIME pads are
a(tive (hnJng tl'te Sal)l)ad//i.'at rex'.
i!/ i¸
0000@
00
When the display shows D the
oven is seth7 Sabbath. When the
display shows D C the oven is
bakhTg/roasting.
How to Set for Timed Baking/Roasting -
Make sure the clock shows thecorrect time of day and
theoven is off
] Press and t*,(71(tboth die BAKE and BROIL
HI/LO pads, atthe same time, until dw
display S]*,OWS SE
NOTE:If bake or t)roil appem:s in the
display, the BAKEand BROIL Hl/LOpads
_'(_r(_ I*,O1 t(T/l(l*,e(t at it*,( S_tH/( tll//e.
"lbu*, h the CLEAR/OFFpad and begin
again.
_] "lh1)the DELAYSTART pad m*,til SAb bAtH
at)pears ill d;e display.
] "Ibuch the STARTpad and D *,*,rillappear
in dw display.
[_] "lbu(h the COOK TIME pad.
] "Ibu(h the mmfl)er pads to set d*,e
desired length of (ooking time betvqeell
1 mimlte and 9 hom:s and 99 minmes.
The (ooking time that you elliered will
be displa} ed.
"lbu(h the START pad.
[]
How to Ex# the Sabbath Feature
[77 "lbu(h the CLEAR/OFFpad.
]
dela} perio(1 of al)t)roximately 30 se((mds
to 1 minute, umil (mlx. D is in d*,e displa)
F_] Press and hold both the BAKE and BROIL
IJI
HI/tO pads, at the same time, until the
display S] _( >_rs SE
[_] "lhp the DELAYSTART pad until 12shdn
or no shdnappears ill the displa'_ 12shdn
in(li(aws that the oxen *,,,rillaut(m/ati(allv
Immediate Start and Automatic Stop
[] "[}m(h ill(! BAKEpad. No signal *,','ill1)e
_1"_ ell.
Llsing the nmnber pads, enter the
] desired temt)erature. No siglml or
temt)eramre will be gJvt'n.
] T(m(h the START pad.
[_ After a randon*, delay period of
at)proximatel" _ 30 se((mds to 1 mimue,
D C will appear in tile displa} in(ticating
that the oven is baking'roasting. 11 D m
doesn't appear in the display, start
ag;fin at Step 7.
To a(!iust tile oxen temperature, touch tile
BAKEpad, enter tile new temperature using
the number pads, and touch tile STARTpad.
When cooking is finished, the display \\'ill
change fi'om m m to m and 0;00will apl)ear
indi(ating that the o_en has turned OFFbtlt is
still set in Sabbad*,. Remove d*,e cooked/ood.
turn off after 12 hours, no shdnindicates
that the ovell will I/()t a/ttol//atical]'_
ttlrtl ofF.
] "lbu(h the STARTpad.
NOTE:If a power outage occ/m:ed while
it*,e o_en was in Sat)bath, tile oxen will
alltOnlaticallv tHrll Oil al/d sia\ oil evell
\vllell the power rel/lrl/s, The ovel/ COllHX)l
lIl[tSt be reset.
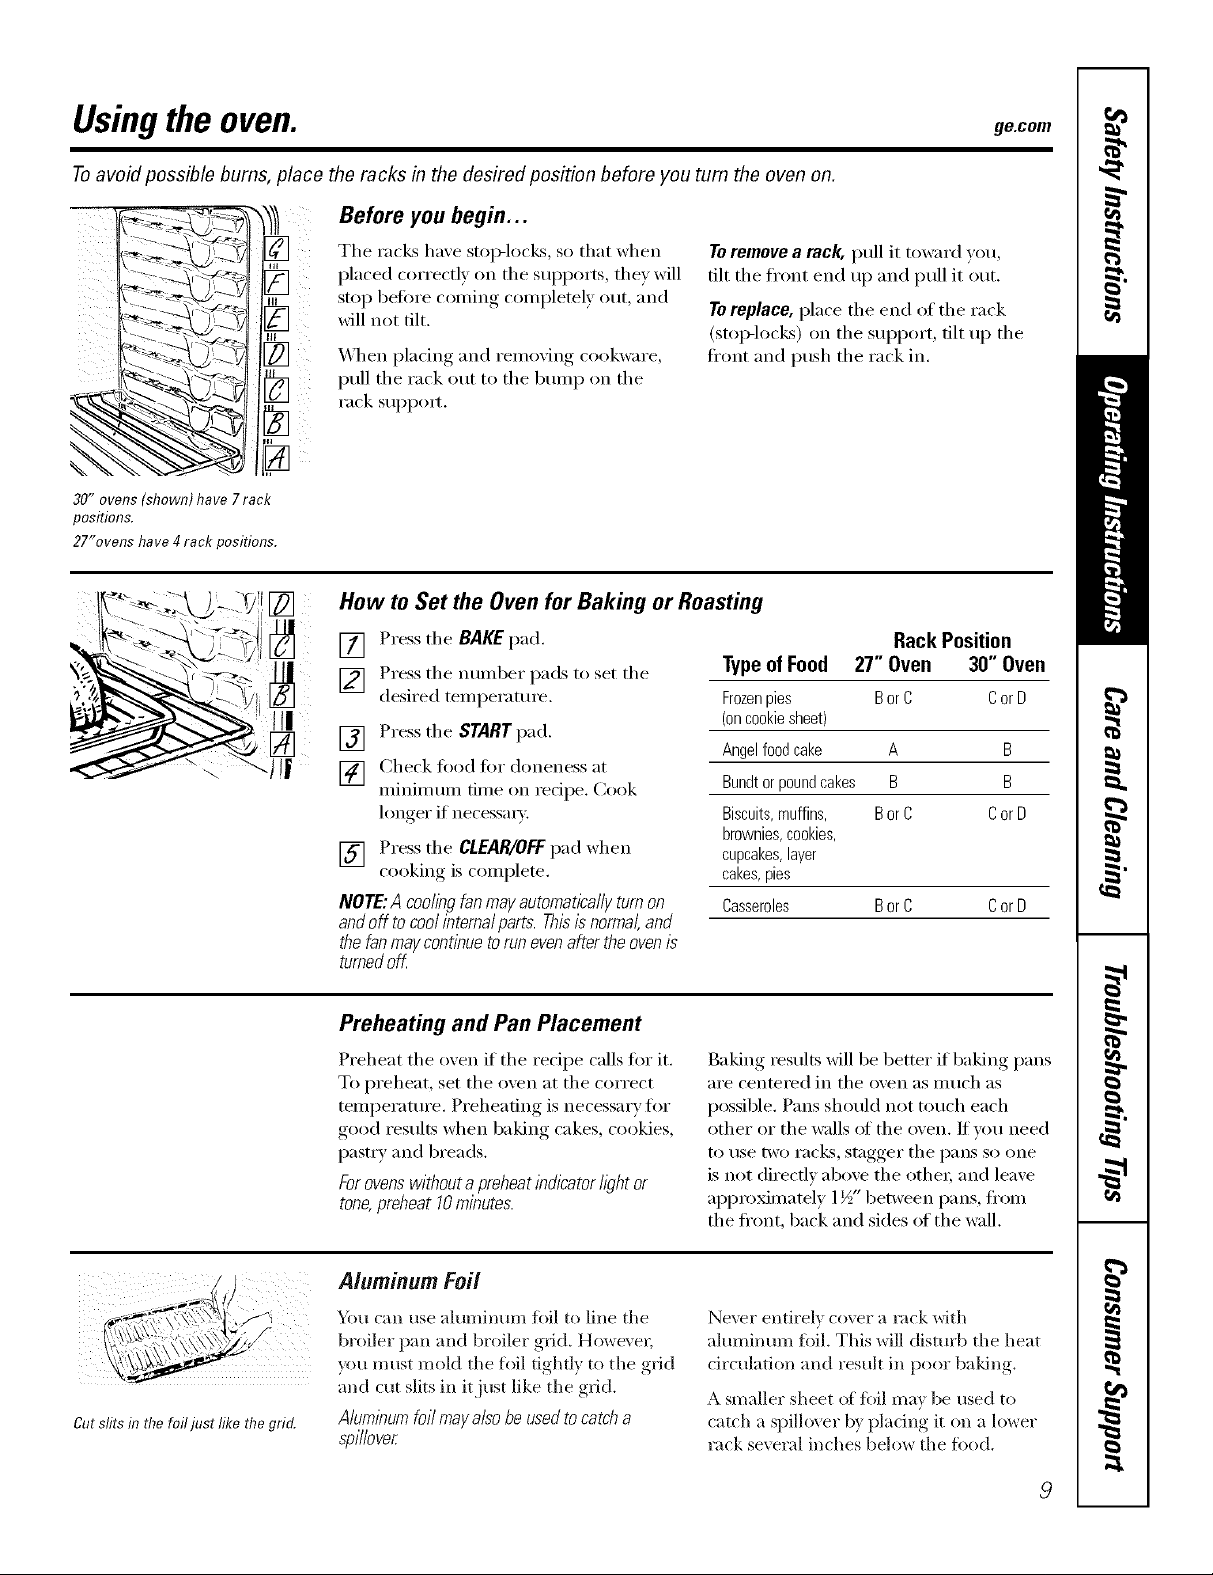
Usingthe oven. gecem
Toavoid possible bums, place the racks in the desired position before you turn the oven on.
Before you begin...
30"ovens(shown)have7rack
positions.
27"ovenshave4rackpositions.
The rack,4 have stop-locks, so that when
placed correctly on tile suI)I)orts , they will
stop beti)re coming completely out, and
will not tilt.
_&_/en I)lacim"_ and remo'4ng, cookware,
pull the rack out to the bmnp on the
rack SUl_pom
Toremove a rack, pull it toward you,
tilt the fl'ont end up and pull it out.
Toreplace, place the end of the rack
(StOlMOCkS) on tile sui)port, tilt up tile
ti'ont and push tile rack in.
How to Set the Oven for Baking or Roasting
[] Press the BAKE pad.
] Press tile ntllllbeI" pads to set tile
desired temperature.
[] Press the START pad.
[] Check ti)od Ira" aloneness at
minimum time on recipe. Cook
longer if necessac}.
[] Press the CLEAR/OFFpad when
cooking is complete.
NOTE:A coolingfanmayautomaticallyturnon
andoff tocoolinternalparts.Thisisnormal,and
thefanmaycontinuetorunevenaftertheovenis
turnedoff.
Typeof Food 27" Oven 30" Oven
Frozenpies BorC CorD
(oncookiesheet)
Angelfoodcake A B
Bundtorpoundcakes B B
Biscuits,muffins, BorC CorD
brownies,cookies,
cupcakes,layer
cakes,pies
Casseroles BorC CorD
Rack Position
Cutslits in the Niljust fiko the grid.
Preheating and Pan Placement
Preheat the oven if the recipe calls fi:,r it.
To preheat, set tile oven at tile correct
temperature. Preheating is necessary tiw
good results when baking cakes, cookies,
pastry and breads.
Forovenswithout a preheat indicator fl)ht or
tone,preheat 10minutes.
Aluminum Foil
You can use _dmninmn tk_il to line the
broiler pan and broiler gad. Howe_ el;
?ou must rooM the foil tightl_ to the grid
and cut slits in it just like tile grid.
Aluminumfoil maya#o be usedto catch a
spillover
Baking results will be better if baking pans
_lI'e centered in tile oven _ls Illtlch _ls
possible. Pans should not touch each
other or the walls of the oven. If um need
to rise tWO I'aC]¢% stagger the pans so one
is not directly above the othe_; and leave
appro_mately 1½" between pans, fl'om
the ti'ont, back and sides of the wall.
Ne\w" entirely cover a lack with
aluminmn fifil. This will disturb tile heat
circulation and result in poor baldng.
A smaller sheet of fkfil may be used to
catch a spillover by plating it on a lower
rack several inches below tile fk)od.
9
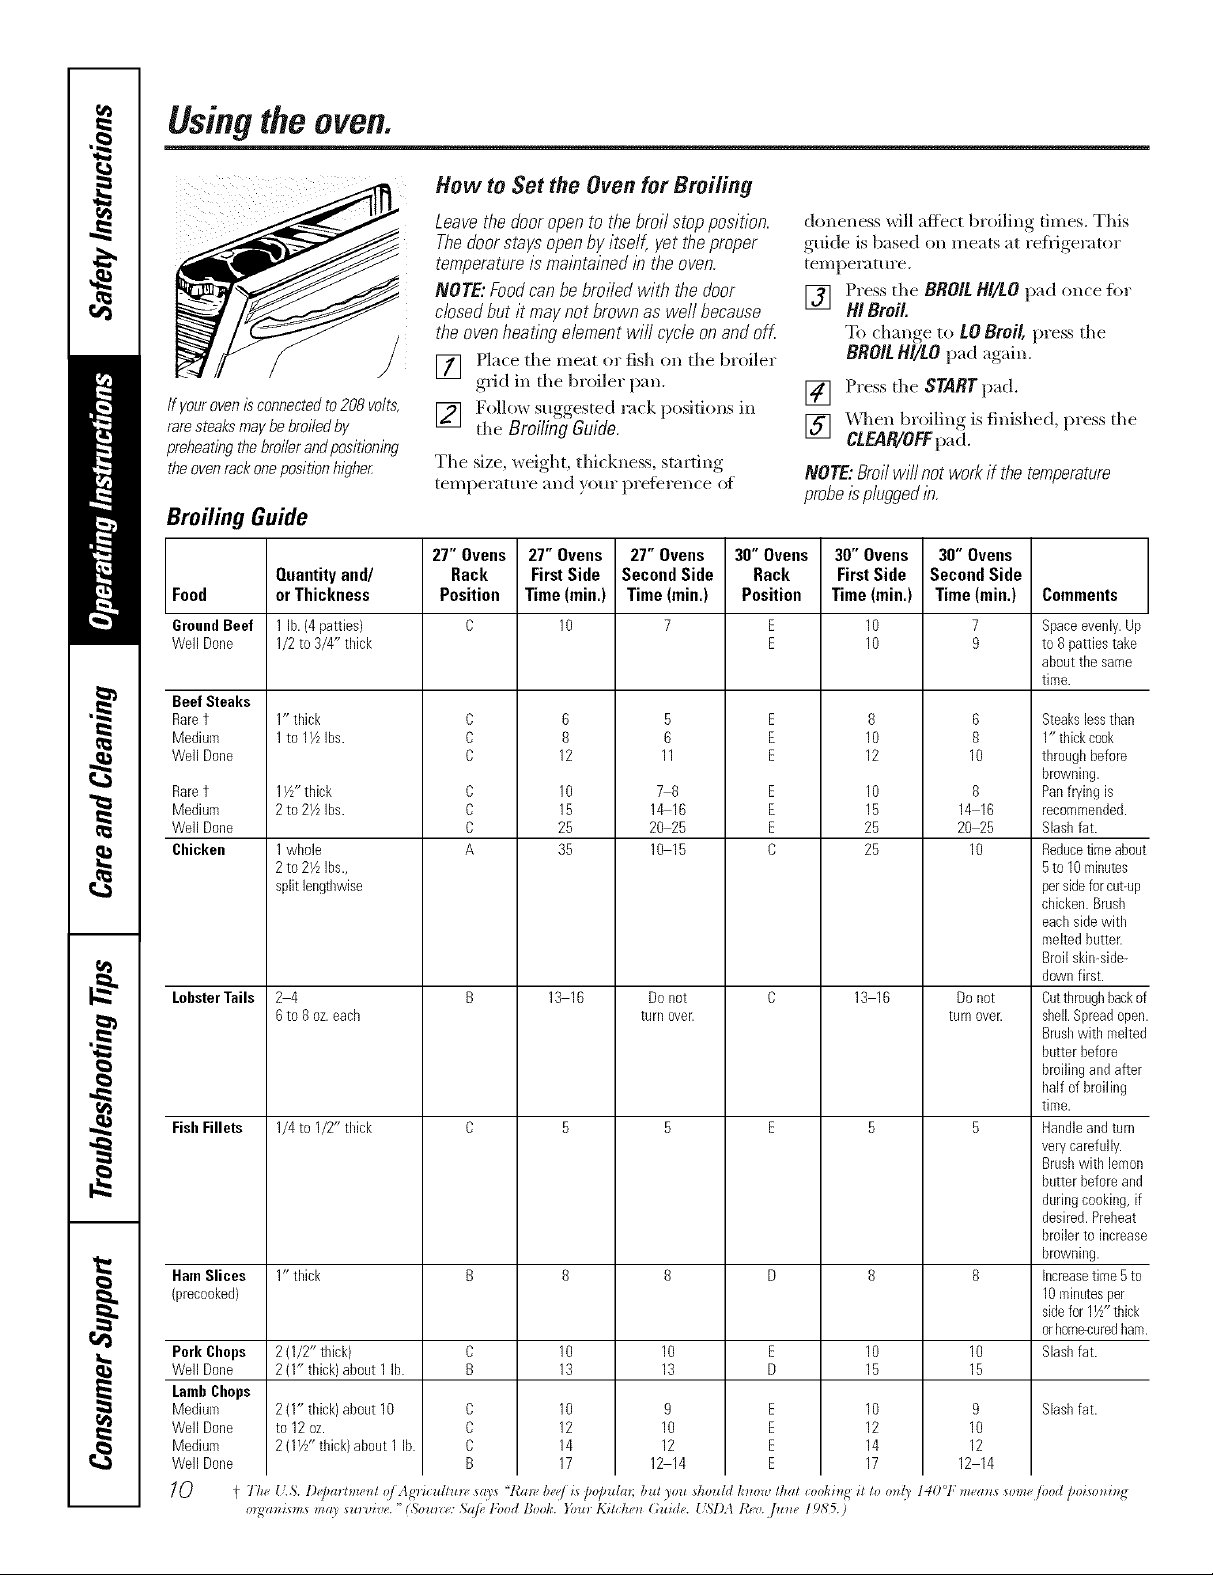
Usingtheoven.
How to Set the Oven for Broiling
Leavethedooropento thebroil stopposition.
Thedoorstaysopenby itself,yettheproper
temperatureis maintained/btheoven.
NOTE:Foodcanbebroiledwith thedoor
closedbutit maynotbrownas well because
theovenheatingelementwill cycleonandoff.
[] Place the meat or fish on the broiler
grid in the broiler pan,
ff your oven is connected to208 volts,
rare steaks may be broiled by
prebeating the broiler andpositioning
theoven rackoneposition higbe_
[] Follow suggested rack )ositions in
the Broiling Guide.
The size, weight, thickness, stm'ting
temperature and }ore" preterence of
Broiling Guide
27" Ovens 27" Ovens 27" Ovens 30" Ovens 30" Ovens 30" Ovens
Food or Thickness Position Time(rain,) Time(rain,) Position Time(rain,) Time(rain.) Comments
GroundBeef 1lb. (4patties) C 10 7 E 10 7 Spaceevenly.Up
WellDone 1/2 to 3/4" tlfick E 1O 9 to 8 pattiestake
Beef Steaks
Raret
Medium
WellDone
Raret
Medium
WellDone
Chicken
LobsterTails
FishFillets
HamSlices 1" thick B 8 8 D 8 8
(precooked)
Pork Chops
WellDone
LambChops
Medium
WellDone
Medium
WellDone
10
Quantity and/ Rack First Side Second Side Rack First Side Second Side
1" thick
1to 17LIbs.
1Yz"thick
2 to 21/LIbs.
1whole
2 to 2YzIbs.,
split lengtbwise
24
6 to 8oz.eacb
1/4to I/2" tlfick
2 (1/2" thick) C 10 10 E 10 10
2 (I" thick)about 1 lb. B 13 13 D 15 15
2 (1" thick) about 10
to 12oz.
2 (IYz"thick)about1 lb.
t The IS. l)@mtmetzl o/Ag'ricuflu_ says "l{m_, b_/is [Jo[ndm; bul you should tmm_, thai coohit_g it to on(_ 140°F m_a*_s _omejood poisonit_g
m_a_fisms ma) sur_Jive. "(Somze: .%(ilekbod Book. }})u_ K_tche_ (;uide. U,_I).t t_,v..]u_e 1985.)
C
C
C
C
C
C
A
C
C
C
B
B
8
12
10
15
25
35
13 16
10
12
14
17
5
B
11
78
1_16
20 25
10 15
Do not
turn ovelt
9
10
12
12 14
doneness will affect broiling times. This
guide is based on me,its _lt refligerator
temperature.
[] Press the BROIL I/I/tO pad once for
HI Broil
To change, to tO Broil, press the
BROILI/I/tO pad ag_dn.
[] Press the STARTp'ad.
[] \_]leIl bIoiling is finished, press the
CLEAR/OFFpad.
NOTE:Broil w/// not work ff the temperature
probe/s p/uggedlb.
E
E
E
E
E
E
C
E
E
E
E
8
10
12
10
15
25
25
13 16
10
12
14
17
6
8
10
8
14 16
20 25
10
Donot
turn ovelt
9
10
12
12 14
about the same
time.
Steakslessthan
1" thickcook
throughbefore
browning.
Panfrying is
recomrnended.
Slashfat.
Reducetimeabout
5to 10minutes
persideforcut-up
chicken.Brush
eachsidewith
meltedbutter.
Broil skin-side-
downfirst.
Cuttbroughbackof
shell.Spreadopen.
Brushwitb melted
butter before
broilingandafter
half ofbroiling
time.
Handleandturn
verycarefully.
Brushwith lemon
butter beforeand
duringcooking,if
desired.Preheat
broiler to increase
browning.
Increasetime 5to
10minutesper
sidefor 1½"tbick
orhome-curedham.
Slashfat.
Slashfat.
 Loading...