

Page 1
.....
K
Page 2
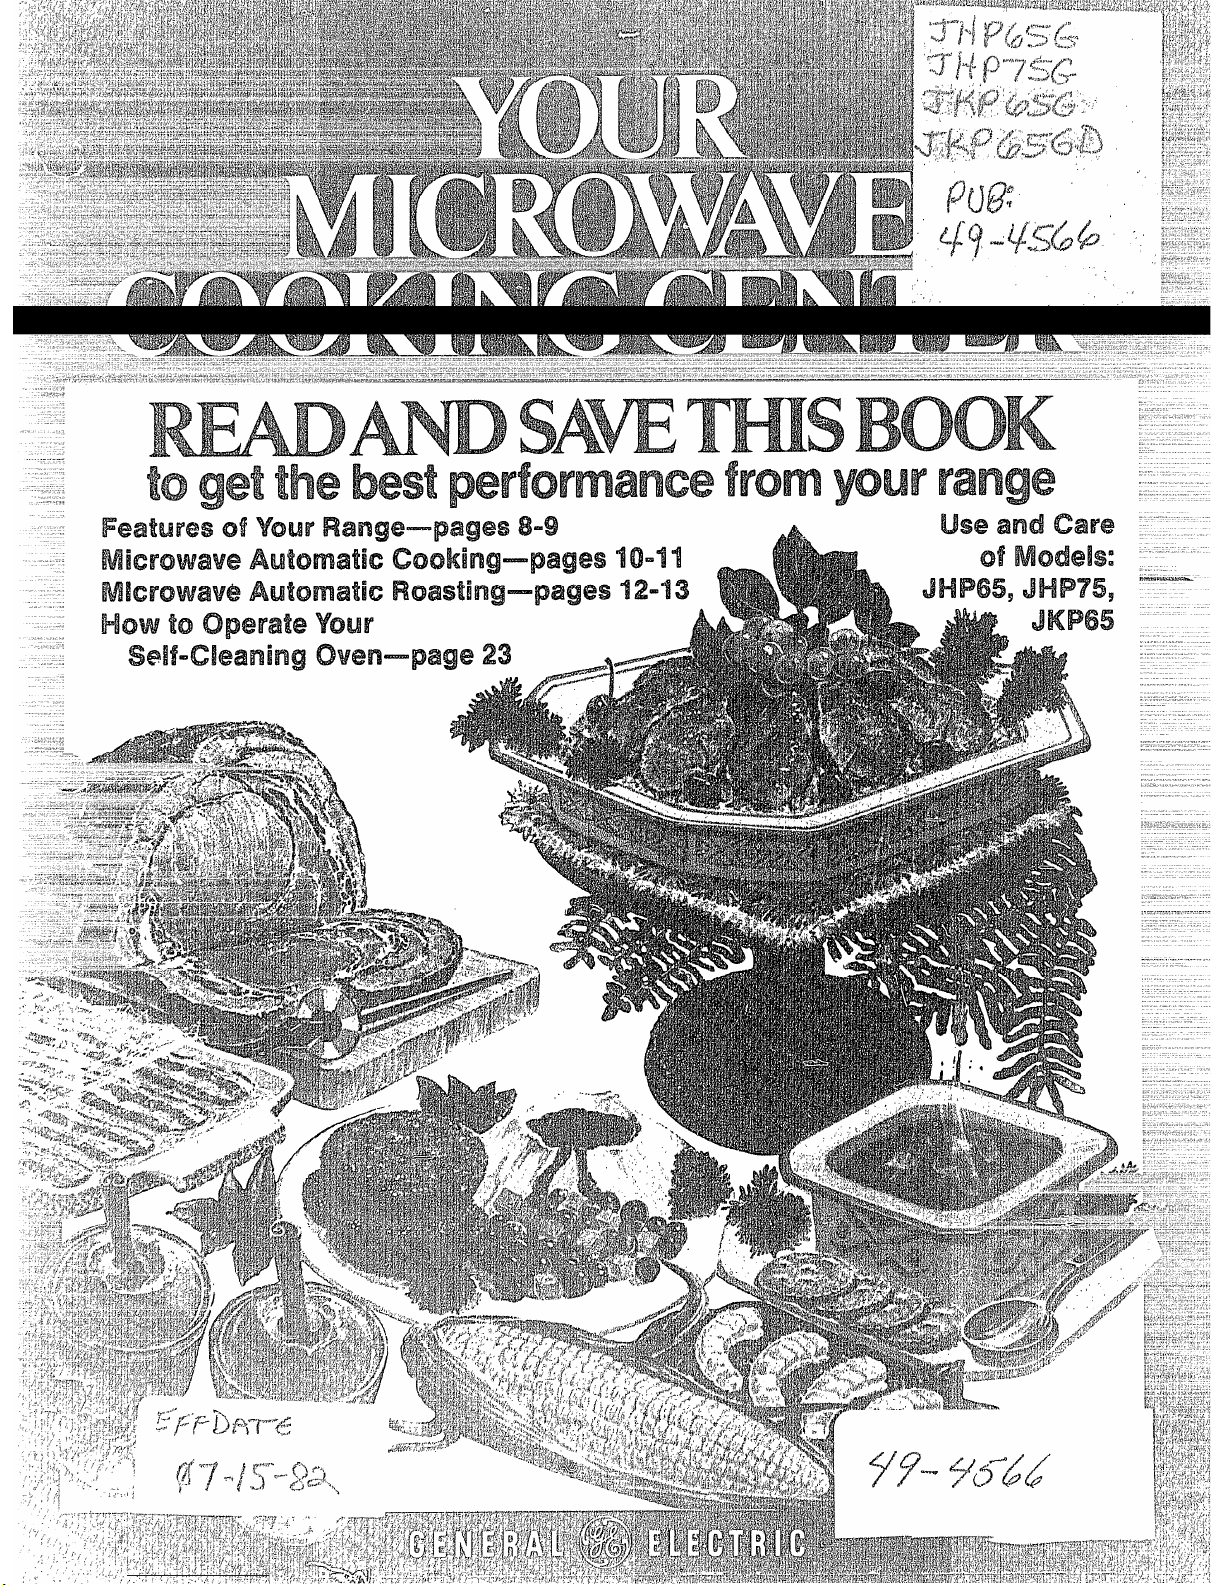
Takethe time to readthis book and learn how to enjoy
your new Microwave Cooking Center. !t contains
detailed operating instructions and recommended
maintenance, as well as handy tips to help you gain
maximum benefits from your Microwave Cooking
Center. Once you havereadthe book, keep it handy to
answer any questions you may have.
if you have any additional questions concerning the
operation of your Microwave Cooking Center, write—
including your phone number—to:
Consumer Affairs
General Electric Company
Appliance Park
Louisville, Kentucky 40225
IFY(XJ RECEIVEDA DAMAGEDCOOKING CENTER,
immediately contact the dealer (or builder) from
whom you purchased it. They havebeen informed of
the proper procedure to take care of such matters and
can handle it for you.
Your General Electric Microwave Cooking Center
has a nameplate on which is stamped the model
number and serial number. (See page 8.)
Model and serial numbers are also on the Purchase
Record Card which came with your Cooking Center.
Before sending in this card, please record the
numbers in the space provided, or get them from
the nameplate described above, and record here.
Please refer to both model and serial numbers in
any future correspondence or product service calls
concerning your Cooking Center.
Mode! Number
serial Number
Date PW%A’msed—
KEEP FWFW’$ASERECEIPT WITH T’Ws WX3K To
ESTABLISH THE PERKID.
Check “The Problem Solver”. (See page 32.) It lists
many minor causes of operating problems that you
can correct yourself and may save you an unneces-
sary service call.
it is impotiant that we, the manufacturer, know the
location of your Microwave Cooking Center should a
need occur for adjustments.
Please check with your supplier to be aure he has
registered you as the owner; also send in your Pur-
chase Record Card. If you move, or if you are not the
original purchaser please write to us, stating model
and serial numbers. This appliance must be regis-
tered. Pleasebe certain thatit is.
Write to:
General Electric Company
Range Product Service
AP2-2f10
Appliance Park
Louisville, Kentucky 40225
@qg~~ ~enera~ Electric Co,, I. J,S.A.All rights reservsdt
..
—
2
Page 3
OVEN
Precautionsfor SafeUse...,... . .... . . ....... . . ... .. 4
SafetyTips. ...... . . . . .... . ...... . ...... . . . .......4-7
Featuresof}’our Oven... . .... . . . ... . . ........ .... . . 8
TouchContra! Panel,. . ... . . .... . . ....... . .. .... .... 9
Automatic Cooking. . . . . ... . ..... . ....... . . . .... 10,11
Automatic Roasting& Charts.. . ...... . . .... .....12,13
CookCode’”Control . .... . . ... . . ..... . . . ....... ... 15
Defrost ..... . ... . . . ..... .=. . ...... . ...... . . . .... . . 15
Time Cook... . ...... . .... . . .... . . . ..... . . . ..... ... 16
TemperatureCook .... . ... . . . .... . . ....... . . . .... .
17
Hold/Timer ..... . . ..... .... . . . ...... . . . . ... . . . .... 18
FL4NGETOP
SafetyTips. ...... ....... .. .. .. .. ... ... O....... ....4-7
Howto Use .... . . .... . . .... . . . ...... . ...... . . .... . 19
CeramicCooktop . . . . .... ...... . ...... . . . . ...... .. 20
Cooking Chart ....... . .... . ...... . . . ...........28,29
CONVENTIONALOVEN
SafetyTips..... . ..
...... ... . . ..... . . . ....!...,... .
4-7
Features. . ..... . . .
.,,..,, .... . . . .... . . . ...... . . .... 8
OvenControls
... . . . .... ....... . . ....... . . . .....,,. 8
OvenLight . . . . ... . . . .... . . ...... . . ...... . . . ..... . . 21
CwenShelves . ....... ..... . ..... ... . . . ...... . .... . 21
MinuteTimerj C!ock,Automatic OvenTimer ...... . . 21
Baking. . ..... . . .... . . . .... . . . .......: . . . .. ..... . .. 21
Broiling ............,.. .... . .... . . . ....... . . . ..... . 22
Roasting,.. .... . . ... . . ..... . . . ..... . ... . ..... ..... 22
BakingChart... .. ......,..,.. .,.,,.., . . ..... . ..... 25
Broiling Chart.,....., ..... . . . ... . . .... ..... . . ..... 26
RoastingChart... . .....,,.,.+ .,.....,
,.s,
. . . . . . . . .
27
CAREOFYORCOOKINGCENTER
Self-CleanOperation . . ..... . . . .... . ... . . ..... . .... 23
OvenVentDuct . . ..... . .... . . ..... . . .... . ..... . ... 24
Careof SurfaceUnits.. . ..... . . . .... . ..... . ..... . .. 24
LampReplacement. ..... . ...... . . . .... ..... . . ... . . 24
OvenThermostatAdjustment ..... . .... . .... . . .... . 24
Careof fvlicrowaveOven&
TemperatureProbe. . . ..... . . . ... . . .... . ....... .. 24
CleaningChart(Ail Parts).... . . . .... . ... . . ...... 30,31
Cleaningof CeramicCooktop .., ... t.,,... . ...... . . 31
GENERAL
BeforeUsingYourRange
....... . ........... . . . .....
2
EnergyConservationTips
...... . . ........... . . . .... .
3
Model&Seriai NumberLocation . ...... .. ... . . ..... . 8
TheProblemSolver
..... .. . .... . . ..... . . ...... . ...
32
AutomaticCooking RecipeGuide . . .... . . .... . . .... 33
Meats
.... ... . . . ..... . . ......... . . ... . . ...... .
34,35
Vegetables..... . . .................,..........36,37
Desserts..... . . ..... . ....... . . . ..... . . .......38,39
Automatic Cooking Chart . ...... . . . .... . . ...... . 40,41
FactoryServiceCenters . .. ...... . ..... . . ....... ... 43
Warranty. . ..... . ... . .. .... . . . . . . ..........Back Cover
A. CAxMng
1. Use proper power level as recommended and
DO NOT OVERCOOK.
2. Do not operate the oven while empty. If by accident the oven should run empty a minute or two,
no harm is done. However, try to avoid operating
the oven empty at all times–saves energy and
also ensures good long term life of oven.
B“ Gxking
Use cooking utensils of medium weight aluminum, tight-fitting covers, and flat bottoms which
completely cover the heated portion of the surface unit.
Cook fresh vegetables with a minimum amount
of water in a covered pan.
“Keep an eye”
on foods when bringing them
quickly to cooking temperatures at HIGH heat.
When food reaches cooking temperature, reduce heat immediately to lowest setting that will
keep it cooking.
use residLJa! heat with surface cooking when-
ever possible. For example, when cooking eggs
in the shell bring water to boil, then turn to OFF
position to complete the cooking.
A\ways turn surface unit OFF before removing
ufensi!.
~Usecorrect heat for cooking task . . . high heats
to start cooking (if time allows, do not u~e HIGH
heal to start), medium high—quick brownings,
3
7’.
medium—slow frying, low—finish cooking most
quantities, simmer–double boiler heat, finish
cooking, and special for small quantities.
When boiling water for tea or coffee, heat only
the amount needed. It is not economical to boil a
container full of water for only one or two cups.
c.
oven cmkh-ml
1.
2.
3.
4.
5.
6.
Preheat the ov& only when necessary. Most
foods will cook satisfactorily without preheating.
[f you find preh~ating is necessary, keep an eye
on the indicator light, and put food in the oven
promptly after the light goes out.
Always turn oven OFF before removing food.
During baking, avoid frequent door openings.
Keep door open as short a time as possible
when it is opened.
For self-cleaning oven, be sure to wipe up excess spillage before self-cleaning operation.
Cook complete oven meals instead of just one
food item. Potatoes, other vegetables, and some
desserts will cook together with a main-dish casserole, meat loaf, chickm or roast. Choose
foods that cook at the same temperature in approximately the same time,
Use residual heat in oven whenever possible to
finish cooking casseroles, oven meal~, etc. Also
add rolls or precooked desserts to warm oven,
using residual heat to warm them.
—-
Page 4
Some
1. Do Not Attempt to operate this oven with the 3, DO Not Operate the oven if it is damaged. K is
door open since open door operation can result in particularly important that the oven door close
harmful exposure to microwave energy. It is impor-
properly and that there is no damage to the (1) door
tant not to defeat or tamper with the safety (bent), (2) hinges and latches (broken or loosened),
interlocks.
(3)door seals and sealing surfaces.
2. Do Not Place any object between the oven front
4. The Oven Should not be adjusted or repaired by
face and the door or allow soil or cleaner residue to
anyone except properly qualified service personnel.
accumulate on sealing surfaces.
CikN
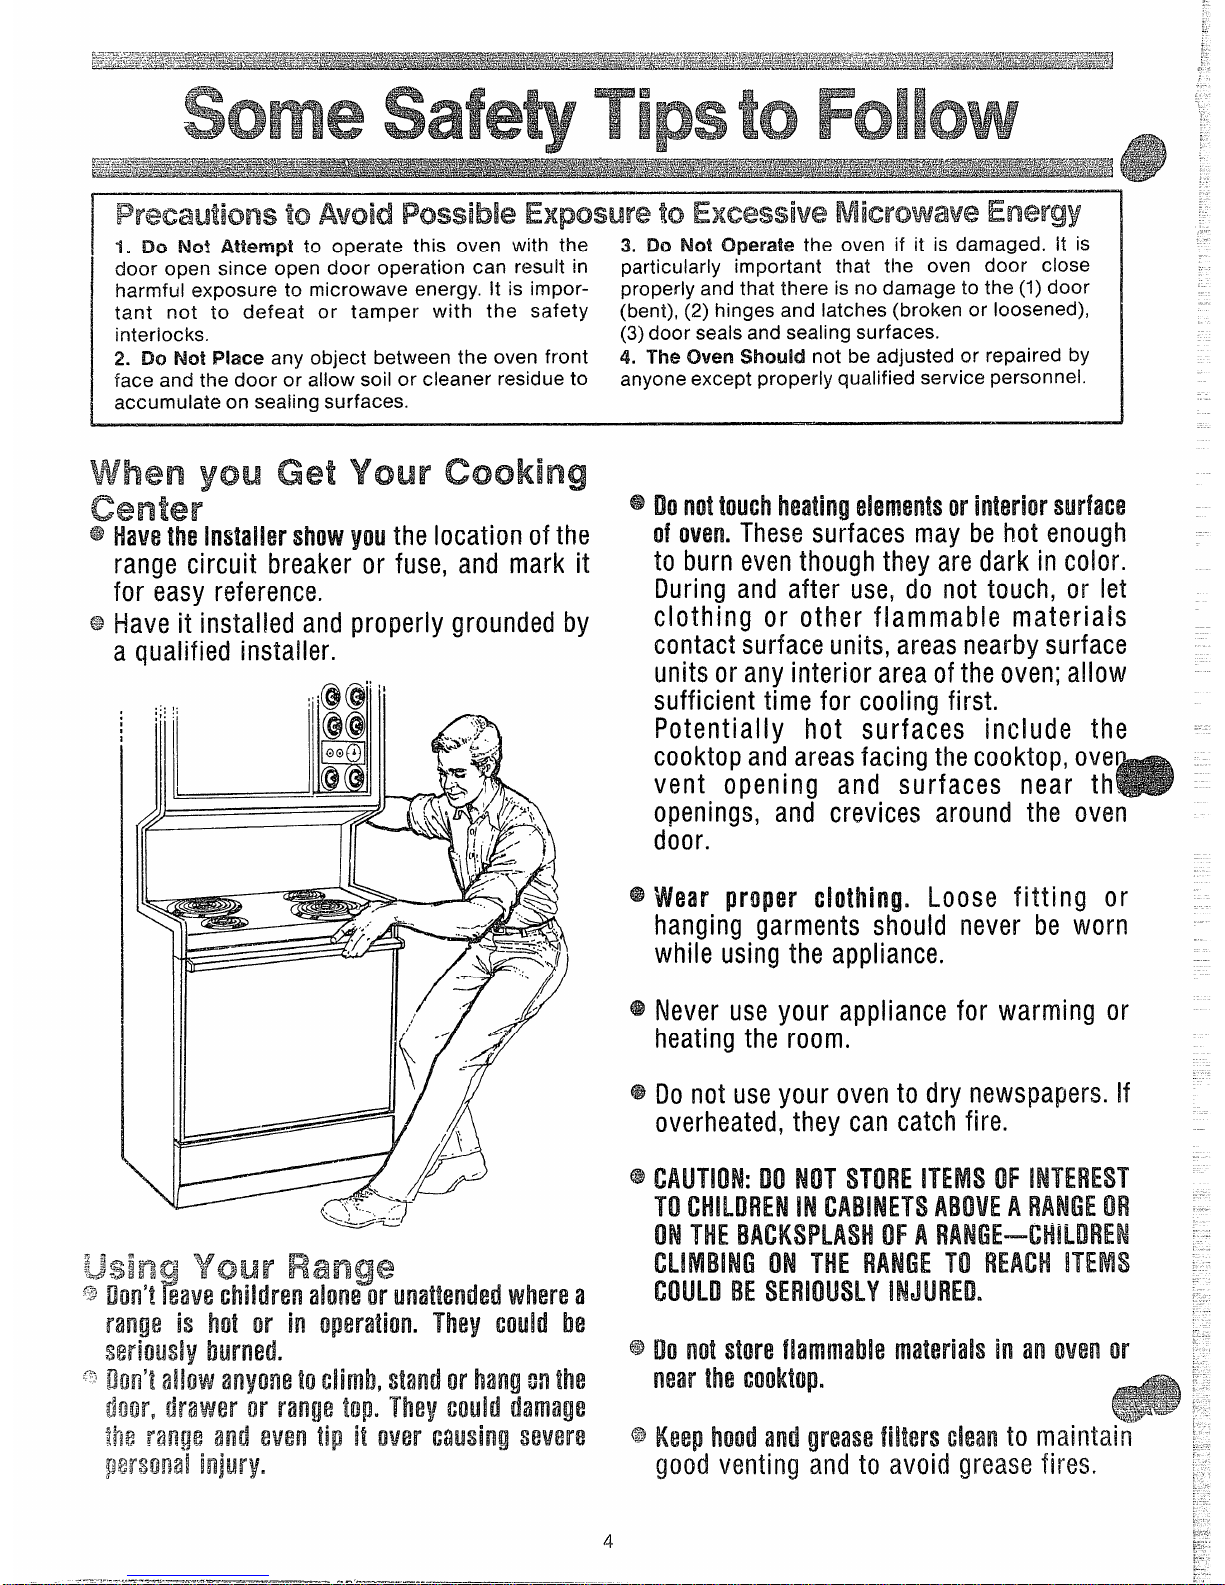
@I+akwjthg showyou the location of the
range circuit breaker or fuse, and mark it
for easy reference,
63Have it inslaiied and
properly grounded by
a qualified instaUer.
of owm. These suFfaces may be hot enough
to burn even though they are dark in color.
During and after use, do not touch, or let
clothing or other flammable materials
contact surface units, areas nearby surface
units or any interior area of the oven; allow
sufficient time for cooling first.
Potentially hot surfaces include the
@
4
cooktop and areas facing the cooktop, ove
vent opening and surfaces near th.
openings, and crevices around the oven
door.
W3ar propw Loose fitting or :
hanging garments should never be worn
while using the appliance.
Never use your appliance for warming or
heating the room.
Do not use your oven to dry newspapers. It
overheated, they can catch fire.
good venting and to avoid grease fires, :
.. .
..
..:..
,.-
Page 5
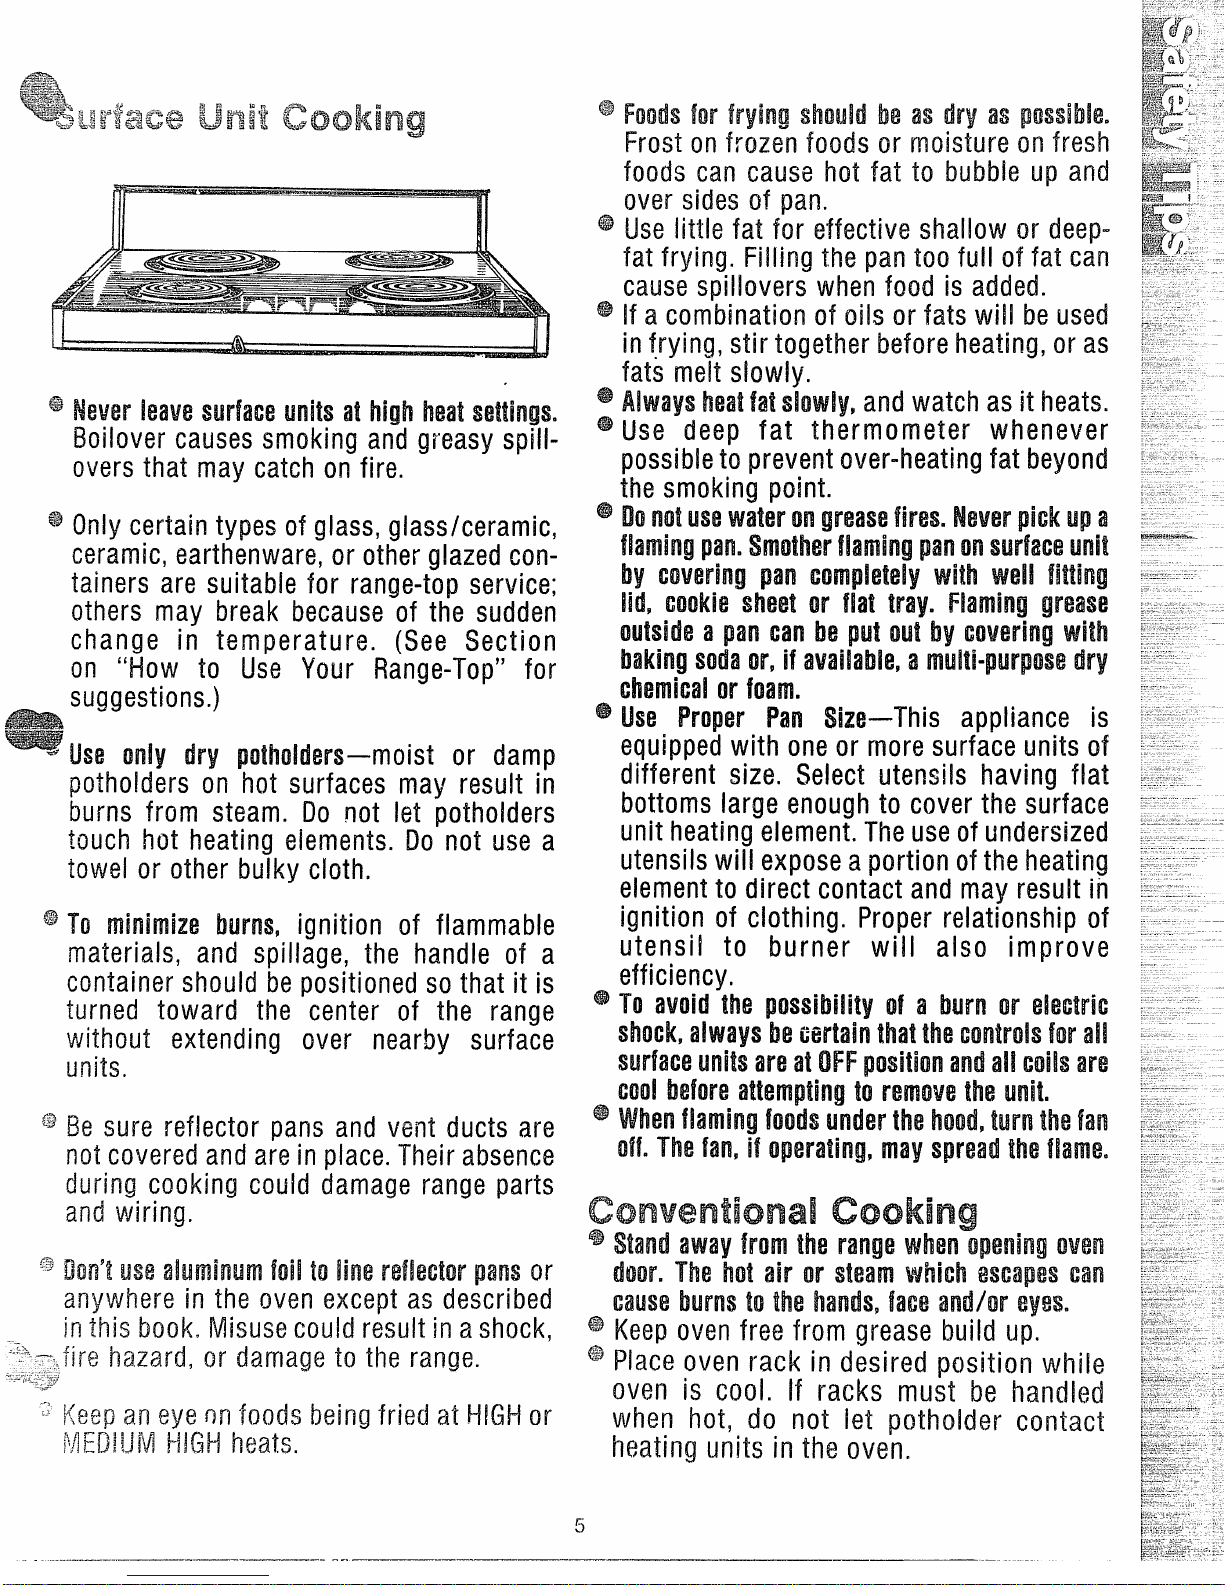
tmitsat heat
EMover causes smoking and greasy spillovers that may catch on fire.
Only certain types of glass, giass/cerarnic,
ceramic, earthenware, or other glazed containers are suitable for range-top service;
others may break because of the sudden
change in temperature. (See
Section
on “1-low to Use Your Range-Top” for
suggestions.)
Use only dry or damp
potholders on hot surfaces may result in
burns from steam. Do not let potholders
t~~ch hot heating e~e~entsa Do not ~~e a
towel or other bulky cloth.
TO burns, ignition of flammable
materials, and spillage, the handle of a
container should be positioned so that it is
turned toward Me center of the range
without extending over nearby surface
units.
Be sure reflector pans and vent ducts are
not covered and are in place. Their absence
during cooking could damage range parts
and wiring.
us~ fo[l to line p3ms or
anywhere in the oven except as described
jn ~~~~~~~~@~i~u~e could result j~ ~~h~c~,
fiw Iuxw.rd, or damage to the ra~ge.
I@’ !&3as dry as
Frost on frozen foods or moisture on fresh
foods can cause hot fat to bubble up and
over sides of pan.
Use little fat for effective shallow or deepfat frying. Filling the pan too full of fat ca~
cause spillovers when food is added.
If a combination of oils or fats will be used
in fyying, stir together before heating, or as
fats melt slowly.
!iwatfat and watch as it heats.
Use deep fat thermometer whenever
possible to prevent over-heating fat beyond
the smoking point.
DonotuseWWNon fires. pickup a
pan, panon unit
by pan with
lid, MM@ shw?t or Hat tray. grwM?
OWW a pan can !h3outout by with
sodaor,if a dry
IOhmkdorham.
Use FYopor Pan Ww-4his appliance is
equipped with one or more surface units of
different size. Select utensils having flat
bottoms large enough to cover the surface
unit heating element. The use of undersized
utensils will expose a portion of the heating
element to direct contact and may result ih
ignition of clothing. Proper relationship of
utensil to burner will also improve
efficiency.
To avoid th of a burn or 13kdrk
shock, IM4iwhki thatthg forall
unitsam atOFF andall coilsare
cool to MBunit.
iumkrth hood,turnMBfan
oven is cool. If racks rnu~t
when hot, do not let potho
heating units in the oven.
5
be hmdkd
der contac-
Page 6
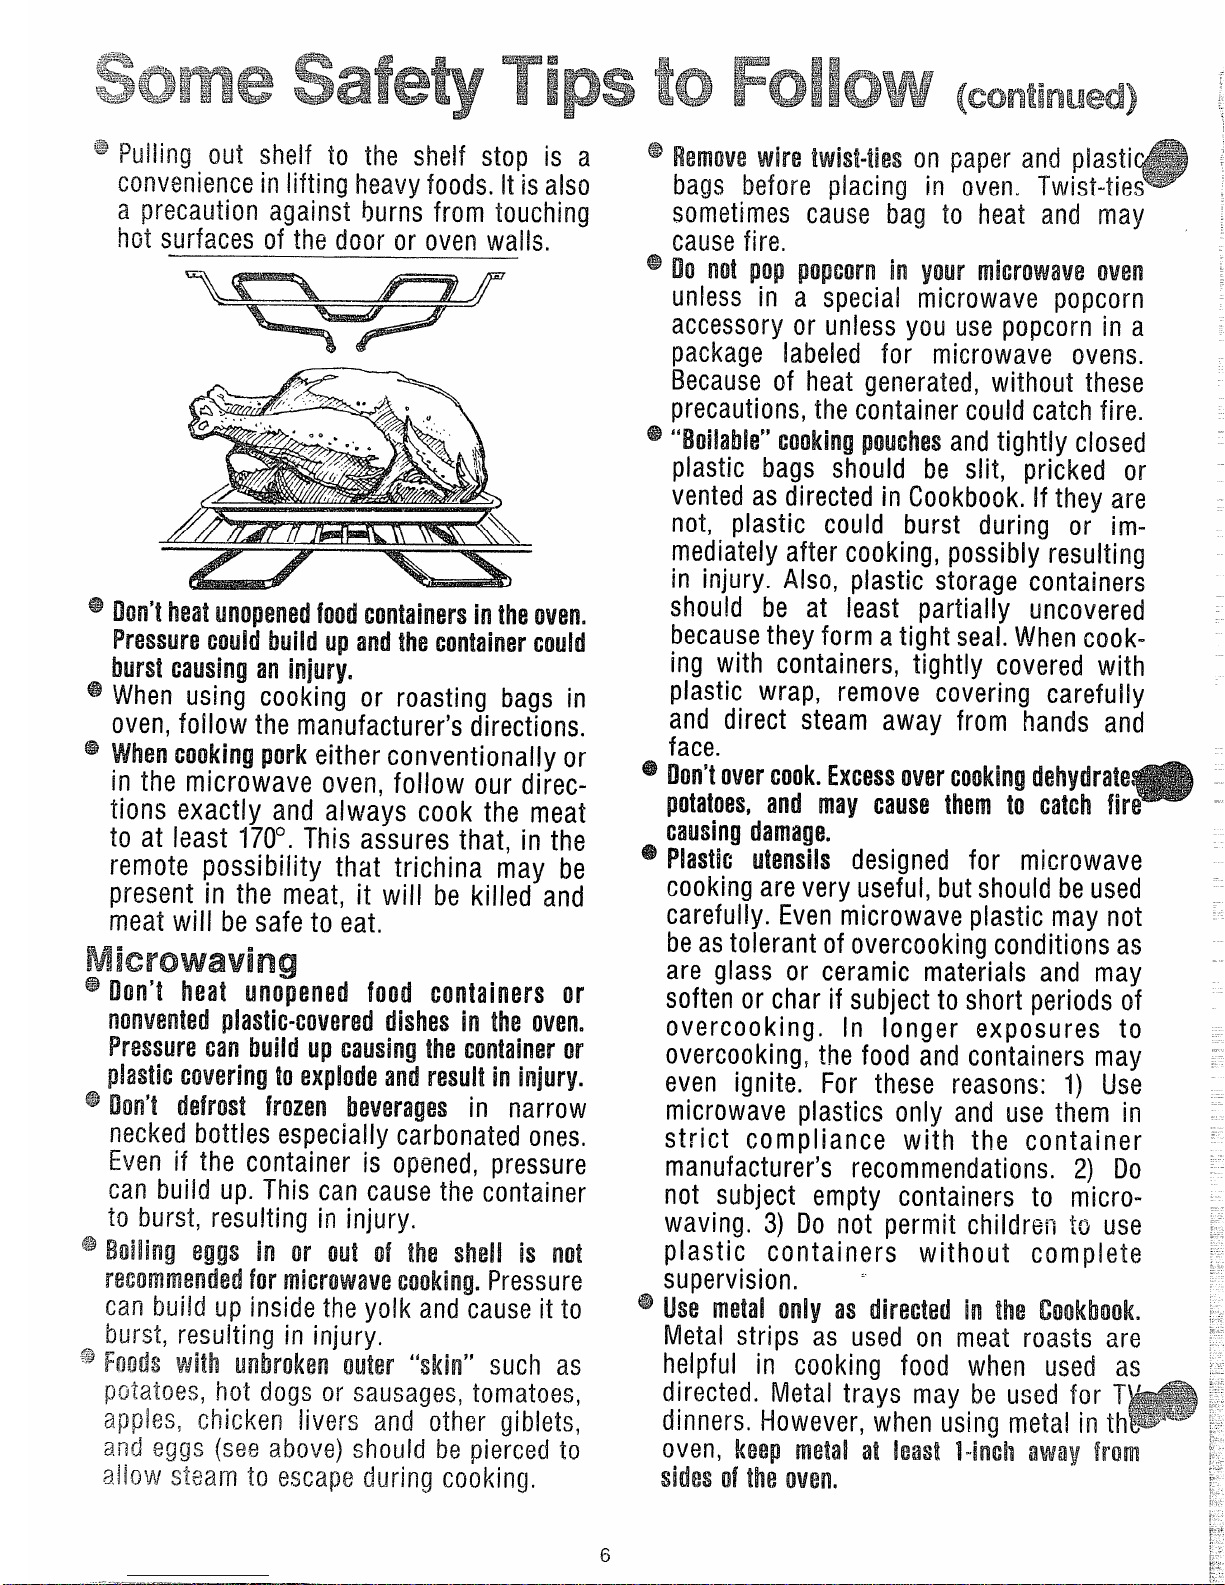
COlwim-uxinlifthg heavy foods. Ilk also
a
precautionagain~t burris from touching
hot surfaces of th~ door or oven walls. -
heal food h
weWm.
buildupandtlu
burst an
When using cooking or roasting bags in
oven, follow the manufacturer’s directions.
pork either conventionally or
in the rnicriwave oven, follow our dikctions exactly and always cook the meat.
to at least 170°. This assures that, in the
remote possibility that trichina may be
present in the meat, it will be killed and
meat will be safe to eat.
~ IICNI food ~~
dishesh the mm.
canINJik!lIJp Me or’
to NM!resulth iin]w’y.
necked bottles especia Hycarbonated ones.
Even if the container is opened, pressure
can buikl up. This can cause the container
to burst, resulting ifl injury
eggs in or out of the SM1 is not
for Pressure
can build up inside the yolk and cause it to
burst, resulting in injury.
Foods wWh “skin” such as
pwtatoes, hot dogs or sausages, tomatoes,
apples, chickm livers and other giblets,
and eggs (see above) should be pierced to
allow steam to escap~ durifig cooking.
@
I
paper and plasti
bags before placing in oven. Twist-ties
sometimes c~use bag to heat and may
cause fire.
Iilo lmlt in
unless
in a special microwave popcorn
accessory or unless you use popcorn in a
package labeled for microwave ovens.
Because of heat generated, without these
precautions, the container could catch fire.
and tightly closed
plastic bags should be slit, pricked or
vented as directed in Cookbook. Hthey are
not, plastic could burst during or immediately after cooking, possibly resulting
in injury. Also, plastic storage containers
should be at least partially uncovered
because they form a tight seal. When cook-
ing with containers, tightly covered with
plastic wrap, remove covering carefully
and direct steam away from hands and
face.
Don’tOw!rcook.IExUXMlOver
and may Causo tkmll to catch fir%’
causing
Plastic designed for microwave
cooking are very useful, but should be used
carefully. Even microwave plastic may not
be as tolerant of overcooking conditions as
are glass or ceramic materials and may
soften or char if subject to short periods of
overcooking. In longer exposures to
overcooking, the food and containers may
even ignite. For these reasons: 1) Use
microwave plastics only and use them in
strict compliance with the
container
manufacturer’s recommendations. 2) Do
not subject empty containers to microwaving. 3) Do not permit childreri W use
plastic containers without complete
supervision. =
lk~ rmtal only as In MO
Metal strips as used on meat roasts are
Ielpful in cooking food when used as
~irected. Metal trays may be used for T ‘ .L~&-=
~inners, Howmmr, ~hen using metal in
IVell, keep al IhMst
Mlls of !INlOvll!n.
—
6
Page 7
@
@
@
k
or
forUsfl inthe
Oflllnot fib toavoid
toW! andm! ofm%.If by
accident the oven should run empty a
minute or two, no harm is done. However,
try to avoid
operating the oven empty at all
times–it saves energy and prolongs life
of
the oven.
may hot because of
heat transferred from the heated food. This
is especiaHy true if plastic wrap has been
covering the top and handles of the utensil.
Pot holders may be needed to handle the
utensii.
the ovenSM1 canI!Mconwtoo hotto
touch. Be careful touching the shelf during
wlwn nol using it to cook with. H you leave
the probe inside the oven without inserting
it in food or liquid, and turn on microwave
energy, it can create electrical arcing in the
oven, and damage oven walls.
Hfood 8W8U’!gnitB: IWp ME!mmnldoor
ckNHMLTurn off IN! Touch
CJJMFUOFF or disconnect power cord or
shut off power at the fuse/circuit breaker
panel.
Do not Usll your to dry
If overheated, they can catch
fire.
!USEof To position shelf so
that it is securely “seated,” insert into the
oven cavity above sheH supports and
cmmp!eteiy to the back oven wM. Drop into
place so that the recessed areas are over
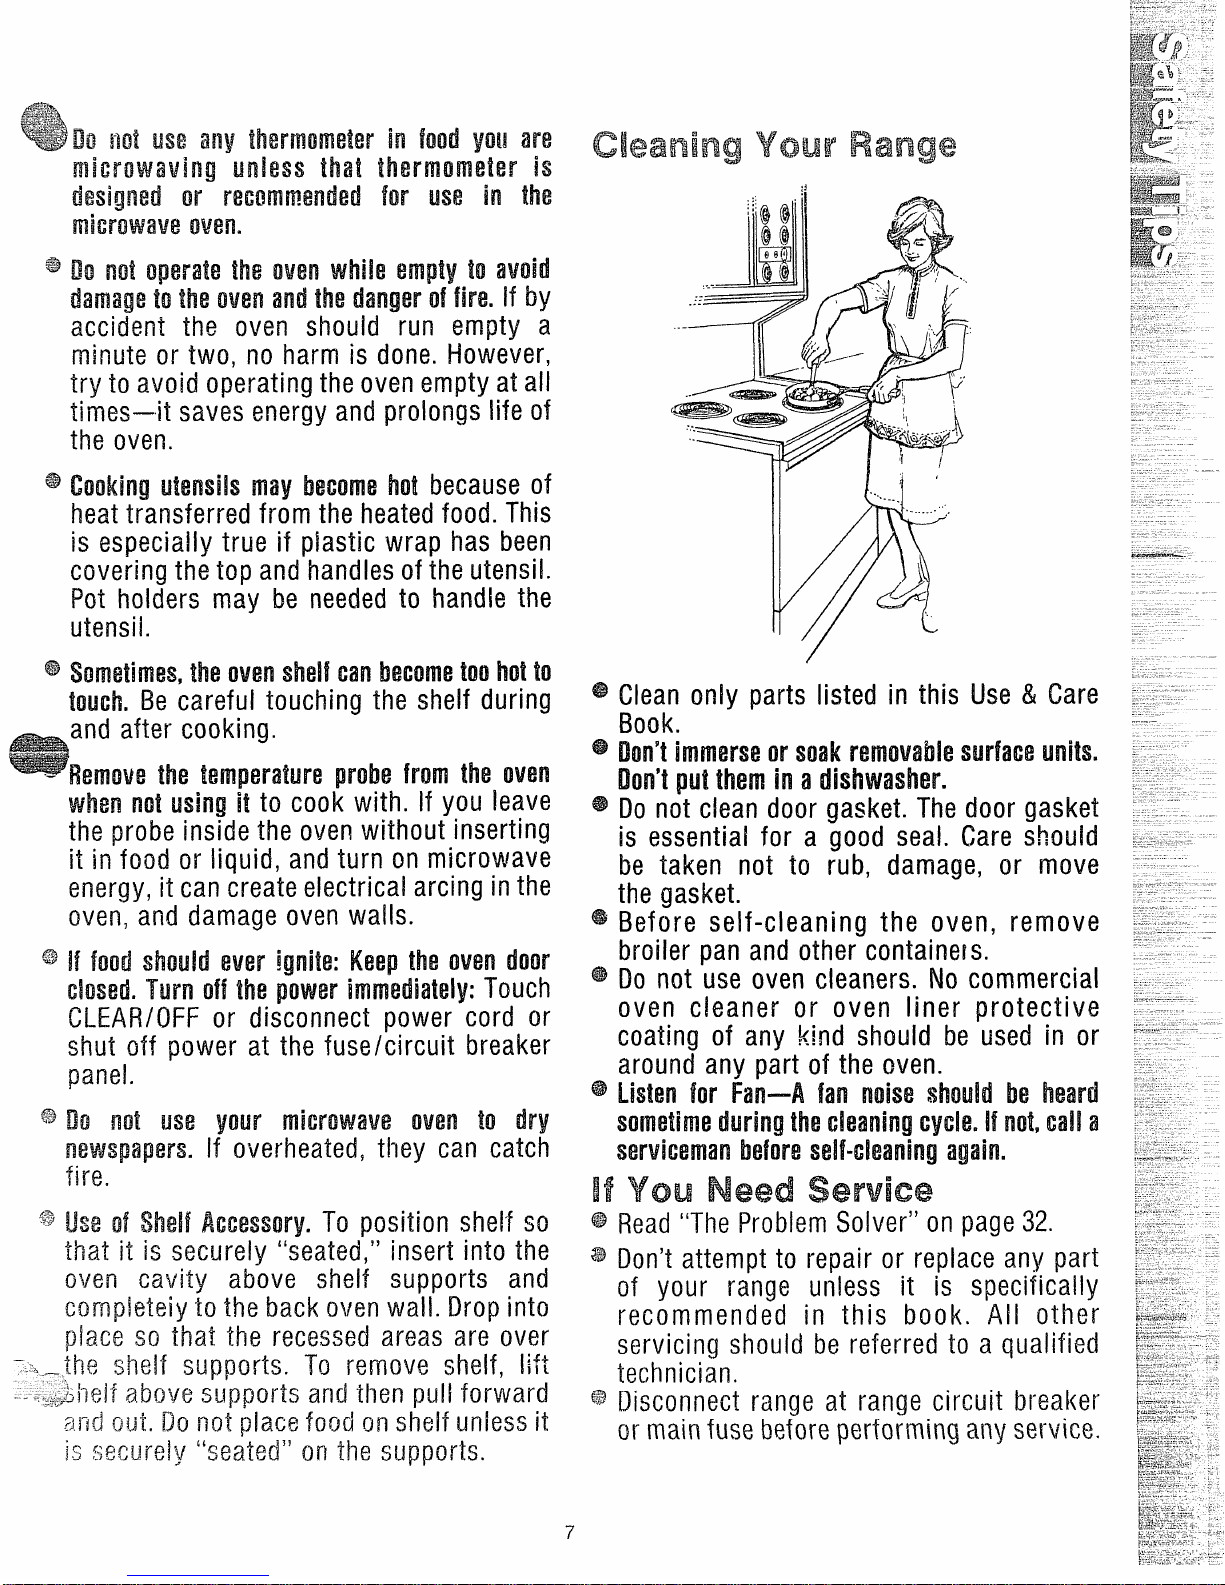
Clean only parts listed in this Use & Care
Book.
IMm’thlmlw”$llor soak UMsm
Don’tput them in a
Do not clean door gasket. The door gasket
is essential for a good seal. Care should
be taken not to rub, damage, or move
the gasket.
Before self-cleaning the oven, remove
broiler pan and other containe~s.
Do not use oven cleaners. No commercial
oven cleaner or oven liner protective
coating of any kind should be used in or
around any part of the oven.
LkWH’11l!or FNE–-AIkln Inoisllshould IMl
@$
43
@
Read ‘The Problem Solver” on page 32.
Don’t attempt to repair or replace any part
of your range
unkss it is specifically
recommended in this book. All other
servicing should be referred to a qualified
technician.
Disconnect range at range circuit breaker
or main fuse More performing any swrvice.
Page 8
Centera
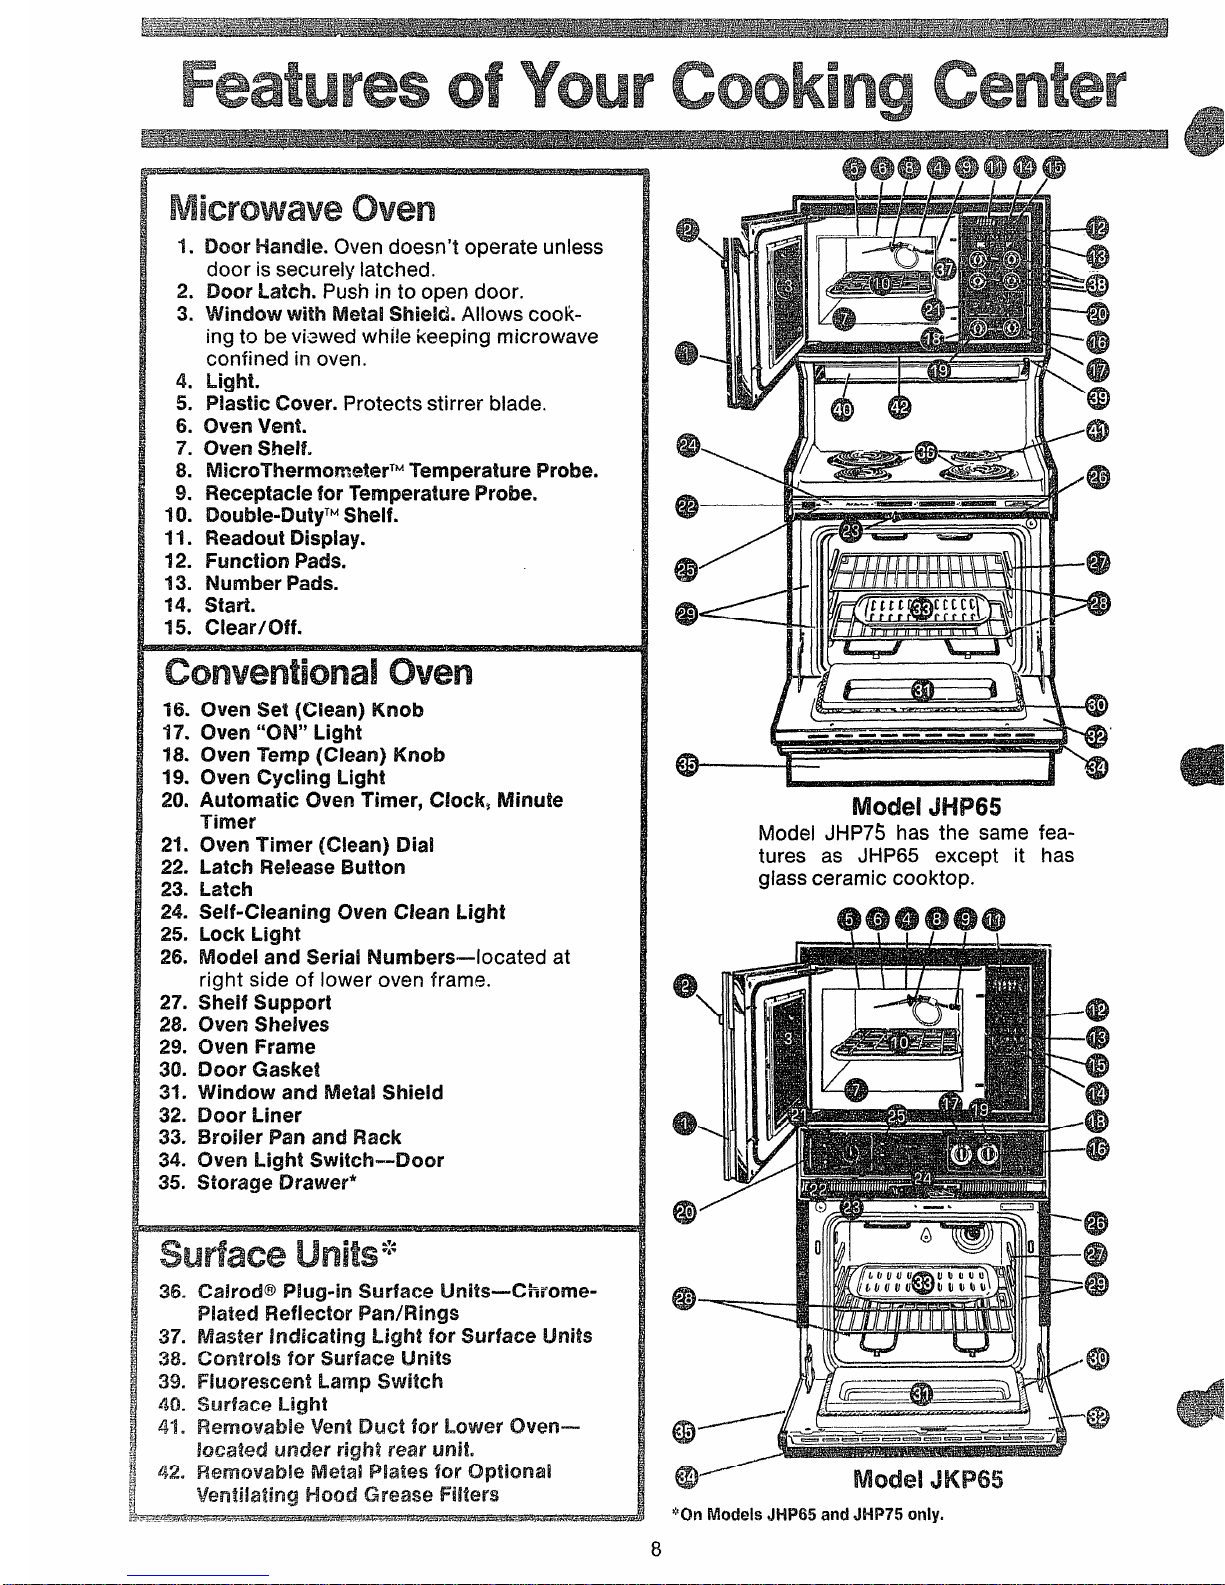
1. Door Handle. Oven doesn’t operate unless
door is securely latched.
2. Door 11-atch.Push in to open door.
3. with Metal Shield. Allows cooking to be viewed while keeping microwave
confined in oven.
4. Light.
5. Plastic Cover. Protects stirrer blade.
6. oven vent.
7. oven
shelf.
8. MicroTherrmrneterTMTemperature Probe.
9. Receptacle for Temperature Probe.
ao. DC9LJklk?-m!tyT”shelf.
dl. Readout Display.
$2. Function Pads.
f13. Number Pads.
14. Start.
15. Clear/Off.
t6.oven set (clean) Knob
17. Oven “ON” Light
18. Oven Temp (Clean) Knob
19. Oven Cycling Light
20. Automatic Oven Timer, Clock, Minute
Timer
2t. Oven Timer [Clean) Dial
22. Latch Release Button
23. Latch
24. Self-Cleaning Oven Clean Light
25. Lock Light
26. Model and Serial Numbers—1ocated at
right side of lower oven frame.
27. Shelf Support
28. (Mm SMwes
29. Oven Frame
30. Door Gaske#
31. Window and Metal Shield
32. Door Liner
33. E3rder Pan arm!Rack
34. Oven Light SwiWw4Xmr
35. Storage Drawer*
26. Cahx@ Plug-in !!ihrfaeeLJnits-ChmmePk$tedFh?fledorParmhlg$
37. Master Light for Surface thits
38. Controls kx Surface Units
39. !FILmrewxmtLm’lp switch
40. SUF%NX!Light
f$-~. Vent Duct for Lower Ch6m—
RxxXd under right rear unite
42. ME&dPk@s for
HQMMGrease Fih?l’%
— - - ———- — ,- —.
MSMMlJHP65
Model JHP7!5 has the same features as JHP65 except it has
glass ceramic cooktop.
$7”- .1
I I
I I
I
I -“+%4 a
-2%5!
.
A
IllINw
@-’-@
“CM Models JBW65 and 4+375 only.
Page 9
—
C
@ @
-
@
@
@
@
o
JHF%5& JHP75
@
—
@-
0
:—
—
@
/’
–@
—
@
=0
6!!9
—d
JKF%5
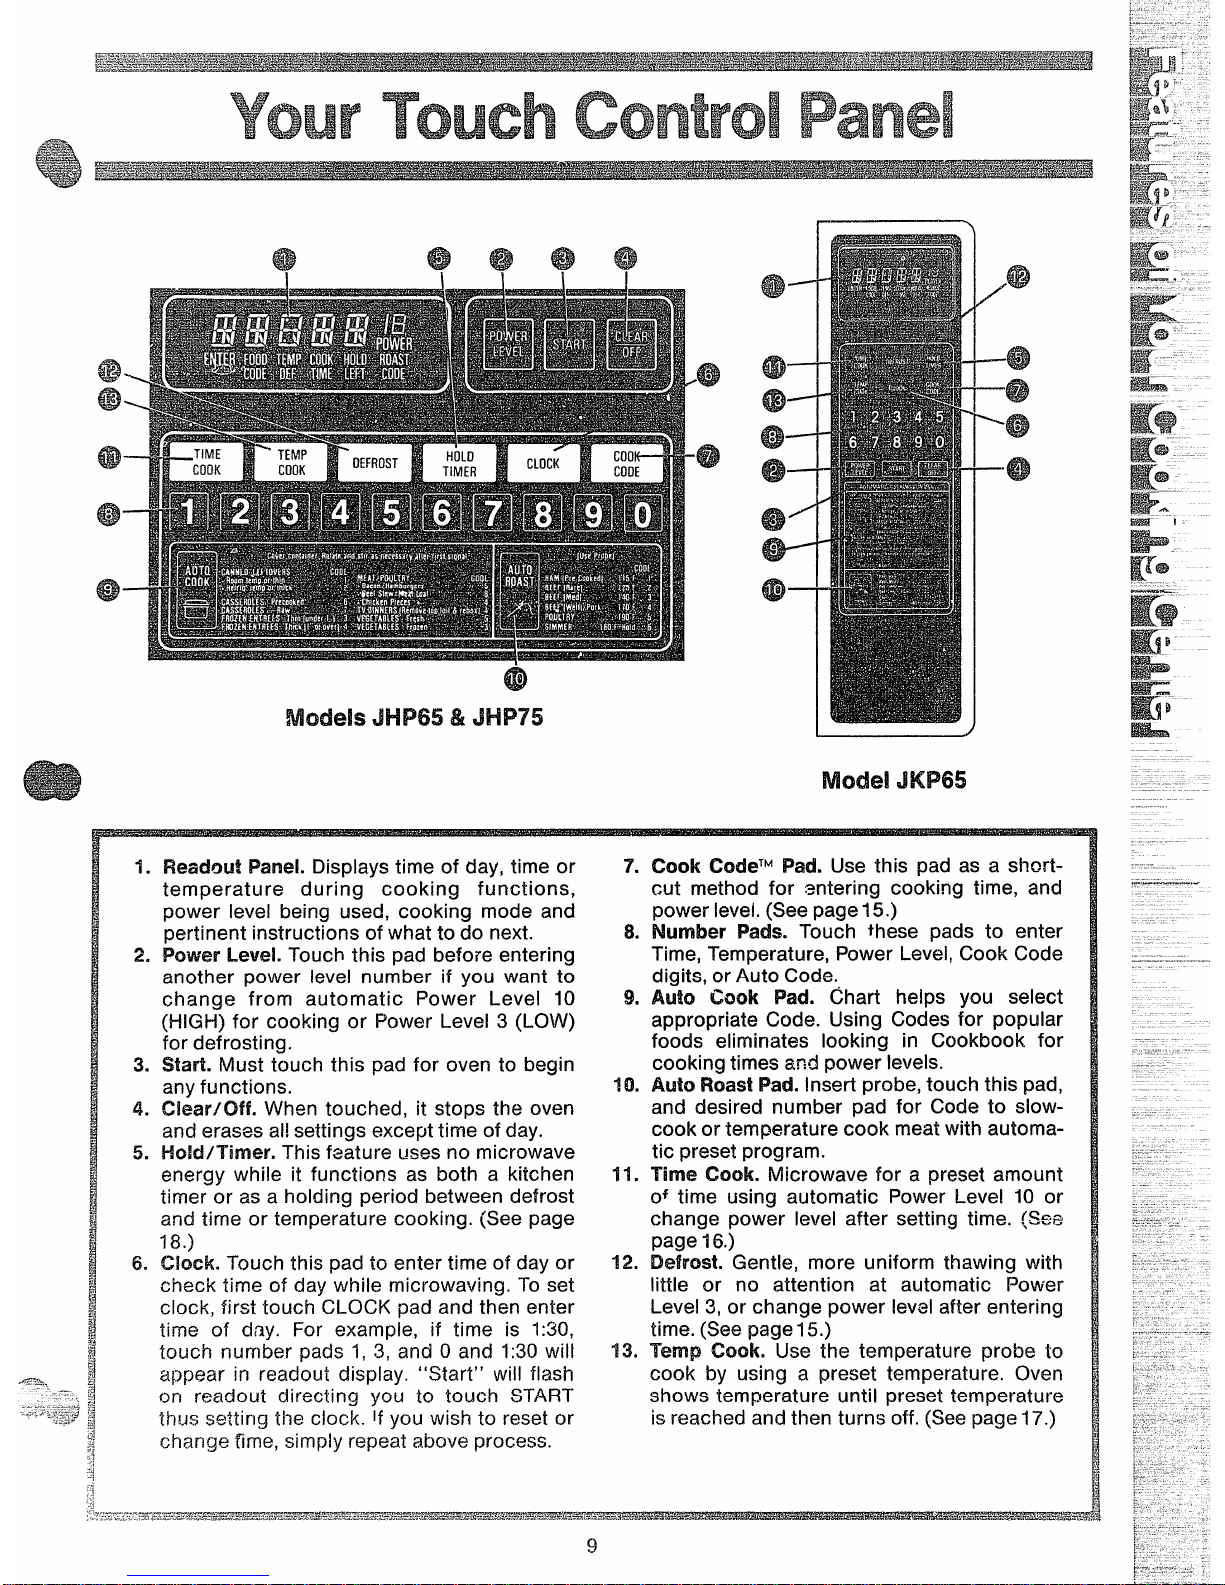
1. Readout PaneL Displays time of day, time or
7. Cook CodeTMPad. Use this pad as a short-
temperature during cooking functions,
cut method for entering cooking time, and
power Ievei being used, cooking mode and
power level. (See page 15.)
pertinent instructions of what to do next.
8. Nl!.mber Pads. Touch these pads to enter
2. !F%werLewd. Touch this pad before entering
Time, Temperature, Power Level, Cook Code
another power level number if you want to
digits, or Auto Code.
change from automatic Power Level 10
9. Auto Cook Pad. Chart helps you select
(HIGH) for cooking or Power Level 3 (LOW)
appropriate Code. Using Codes for popular
for defrosting.
foods eliminates looking in Cookbook for
3. Wart. Must touch this pad for oven to begin
cooking times and power levels.
any functions.
tO. Aulo Roast Pad. Insert probe, touch this pad,
4. Ckar/CMf. When touched, it stops the oven
and desired number pad for Code to slow-
and erases al! settings except time of day.
cook or temperature cook meat with automa-
!5. HoM/Timer. This feature uses no microwave
tic preset program.
energy while it functions as both a kitchen 11. Time Cook. Microwave for a preset amount
timer or as a holding period between defrost
of time using automatic Power Level 10 01”
and time or temperature cooking. (See page
change power level after setting time. (See
18.)
page 16.)
6. Clock. Touch this pad to enter time of day or
f12, Defrost. Gentle, more uniform thawing with
check time of day while microwaving. To set
little or no attention at automatic Power
clock, first touch CLOCK pad and then enter
Level 3, or change power level after entering
time of day. For example, if time is 1:30, time. (See page 15.)
touch number pads 1, 3, and Oand 1:30 will
!3. Temp Cook. Use the temperature probe to
appear in readout display, “Start” will flash
cook by using a preset temperature. Oven
on readout directing you to touch START
shows temperature until preset temperature
thus setting the clock, if you wish to reset or
is reached and then turns off. (See page 17’.)
change time, simply repeat above process.
.—-..—.w==..—
~.T.-~-wrz G3>=.z.+:,L<l&<+cL~&~-.r-%,
---v...=:i~=~=s-”-w.w,.-_.-e-.e--,_=a-_=a—.
------ CS--.-.li-.--==.—,G.>-
....,
-===’--’-
~i.-.,a&raz&z>%.>%
s ..-r&lS&&.k+a=-
—===”=%%?
!3
Page 10
I
——___
The.AutoCook pad may be used to eliminate your
the sensor detects steam from the foods. CMer
need to look up cooking time in the Cookbook,
Or
Auto Cook control settings, which are for fresh or
guessing how long to set cooking time. By actually frozen foods, need additional time after steam has
sensing the s~eam which escapes as food micro- been sensed. For these foods, the oven determines
‘wa%”es,this feature automatically adjusts the oven’s
the amount of additional time needed, then autocooking time to various types and amounts of food. maticaily switches the oven to Time Cook for the
Because cooking containers must be covered, this
necessary cooking time remaining. Oven beeps
feature is best with foods which you wish to steam
when it switches to Time Cook (AUTO on readout is
or t. ~etain moisture. Foods which are best micro- replaced by numbers indicating cooking time), and
waved uncovered or only lightly covered should be
oven door can be opened for stirring or rotating
cooked using time or temperature settings, or Cook
food.
CodeTHcontrol.
Be careful of steam when removing tight covers.
After touching the Auto Cook pad, and pressing
When you remove cover, direct the steam away
Start, you wiil see the word AUTO on the readout,
from hands and face.
which indicates that the sensor has been activated
Be sure the exterior of the cooking container and
to sense steam from the food. To prevent the es-
interior of microwave oven are dry.
cape of steam from the oven, do not open the door
Always cover food containers using lids or plastic
while the word AUTO is on the readout. If door is
wrap. Plastic wrap should be loose over food to
opened, ERROR appears. Close door and touch allow for expansion. S~al by pressing plastic wrap
START immediately.
firmly around edges. For best results, never stretch
Setting 1, which is designed for easy reheating of
plastic wrap tightly over food, or use tight-sealing
foods, automatically turns the oven off as soon as
plastic lids.
Always stir or rotate after beeping signal.
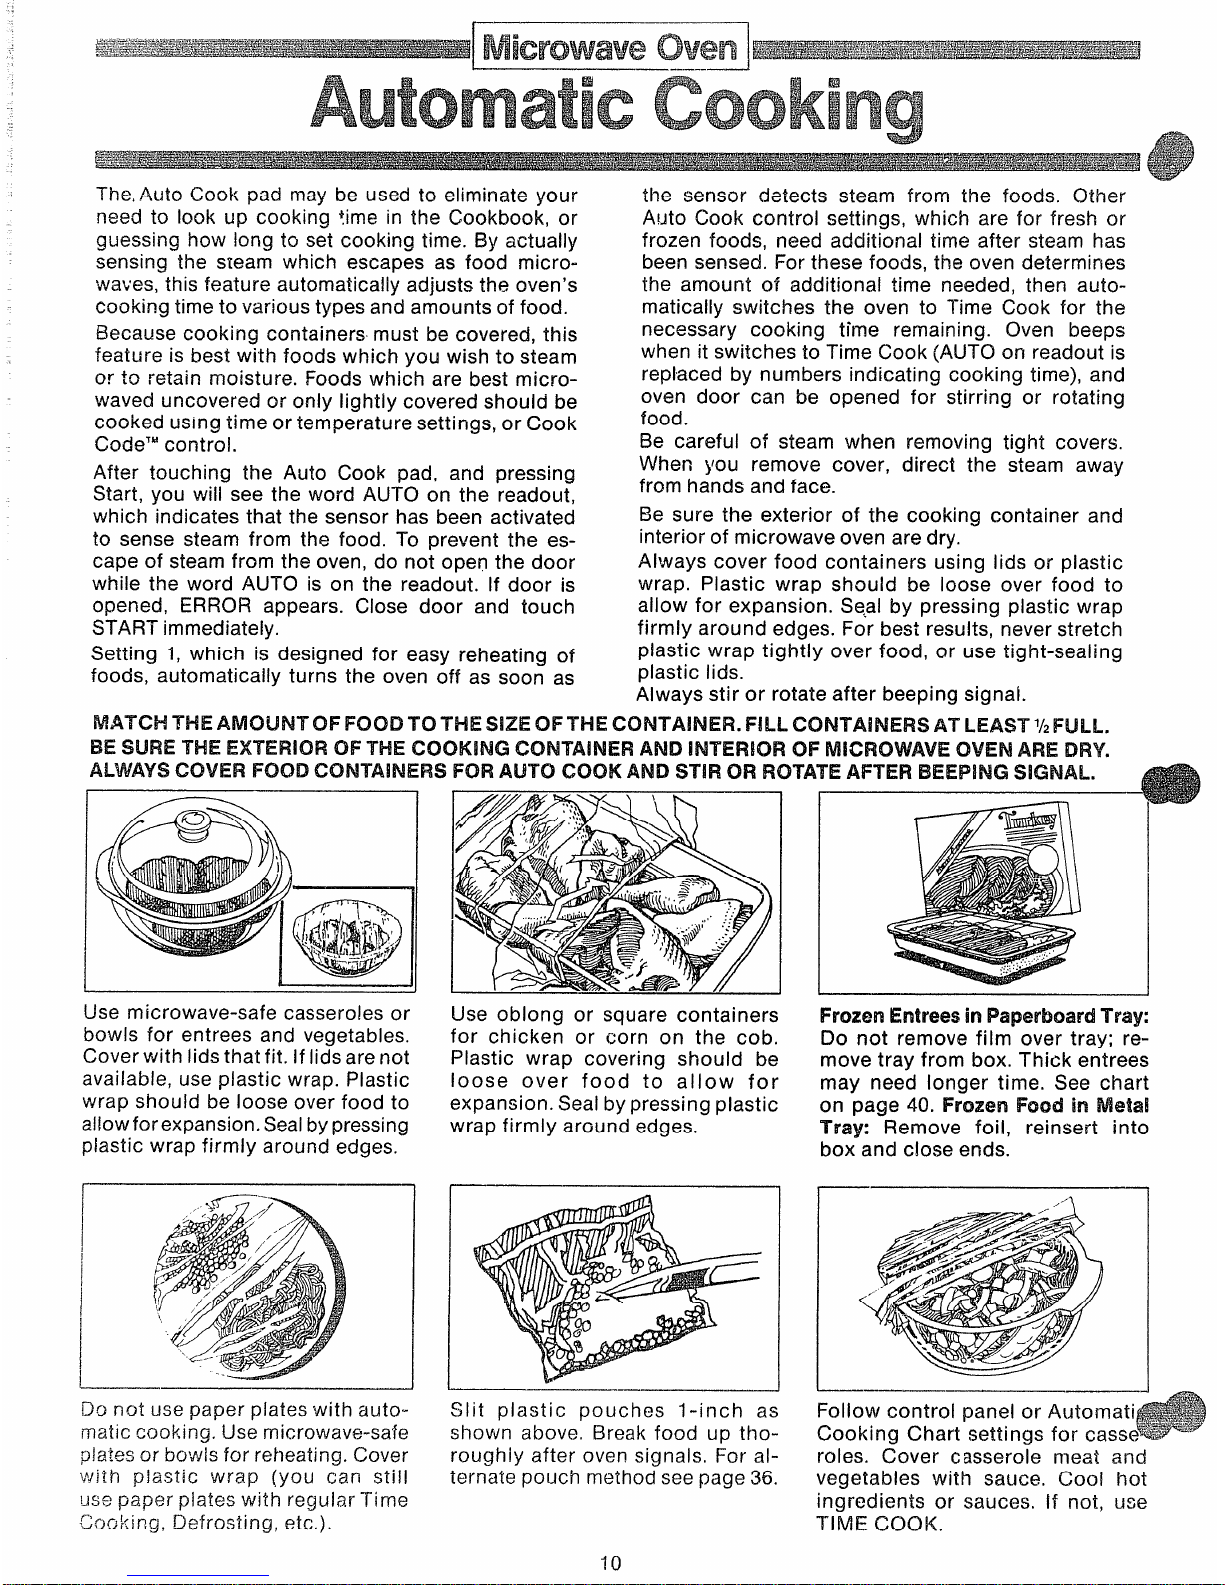
MATCH THE AMOUNT OF FOOD TO THE SKZE OF THE CONT’AINEFI. FILL CO NT’ NNERS AT LEAST 1/2mu.
BE SURE THE OF THE COOK;NG
AND INT’ERK3ROF OVEN ARE DRY.
FOOD
r-m Aul’c) CxxM AND STIFIcm
I
Use microwave-safe casseroles or
bowls for entrees and vegetables.
Cover with lids that fit. If lids are not
available, use piastic wrap. Plastic
wrap should be loose over food to
allow for expansion. Sealbypressing
plastic wrap firmly around edges.
Use oblong or square containers
for chicken or corn on the cob.
Plastic wrap covering should be
loose over food to allow for
expansion. Seal by pressing plastic
wrap firmly arGund edges.
ROTA
i
.—.~
S1it plastic pouches 1-inch as
shown above, Break food up thoroughly after oven signals, For alternate pouch method see page 36.
10
Frozen
Entrees in Paperboard Tray:
Do not remove film over tray; remove tray from box. Thick entrees
may need longer time. See chart
on page 40. Frozen Food in Metal
Tray: Remove foil, reinsert into
box-and close ends.
——
FOIIOWcontrol panel or Automati
Cooking Chart settings for cass
roles. Cover casserole meat and
vegetables with sauce, (loo! hot
ingredients or sauces. [f not, use
TIME COOK.
Page 11
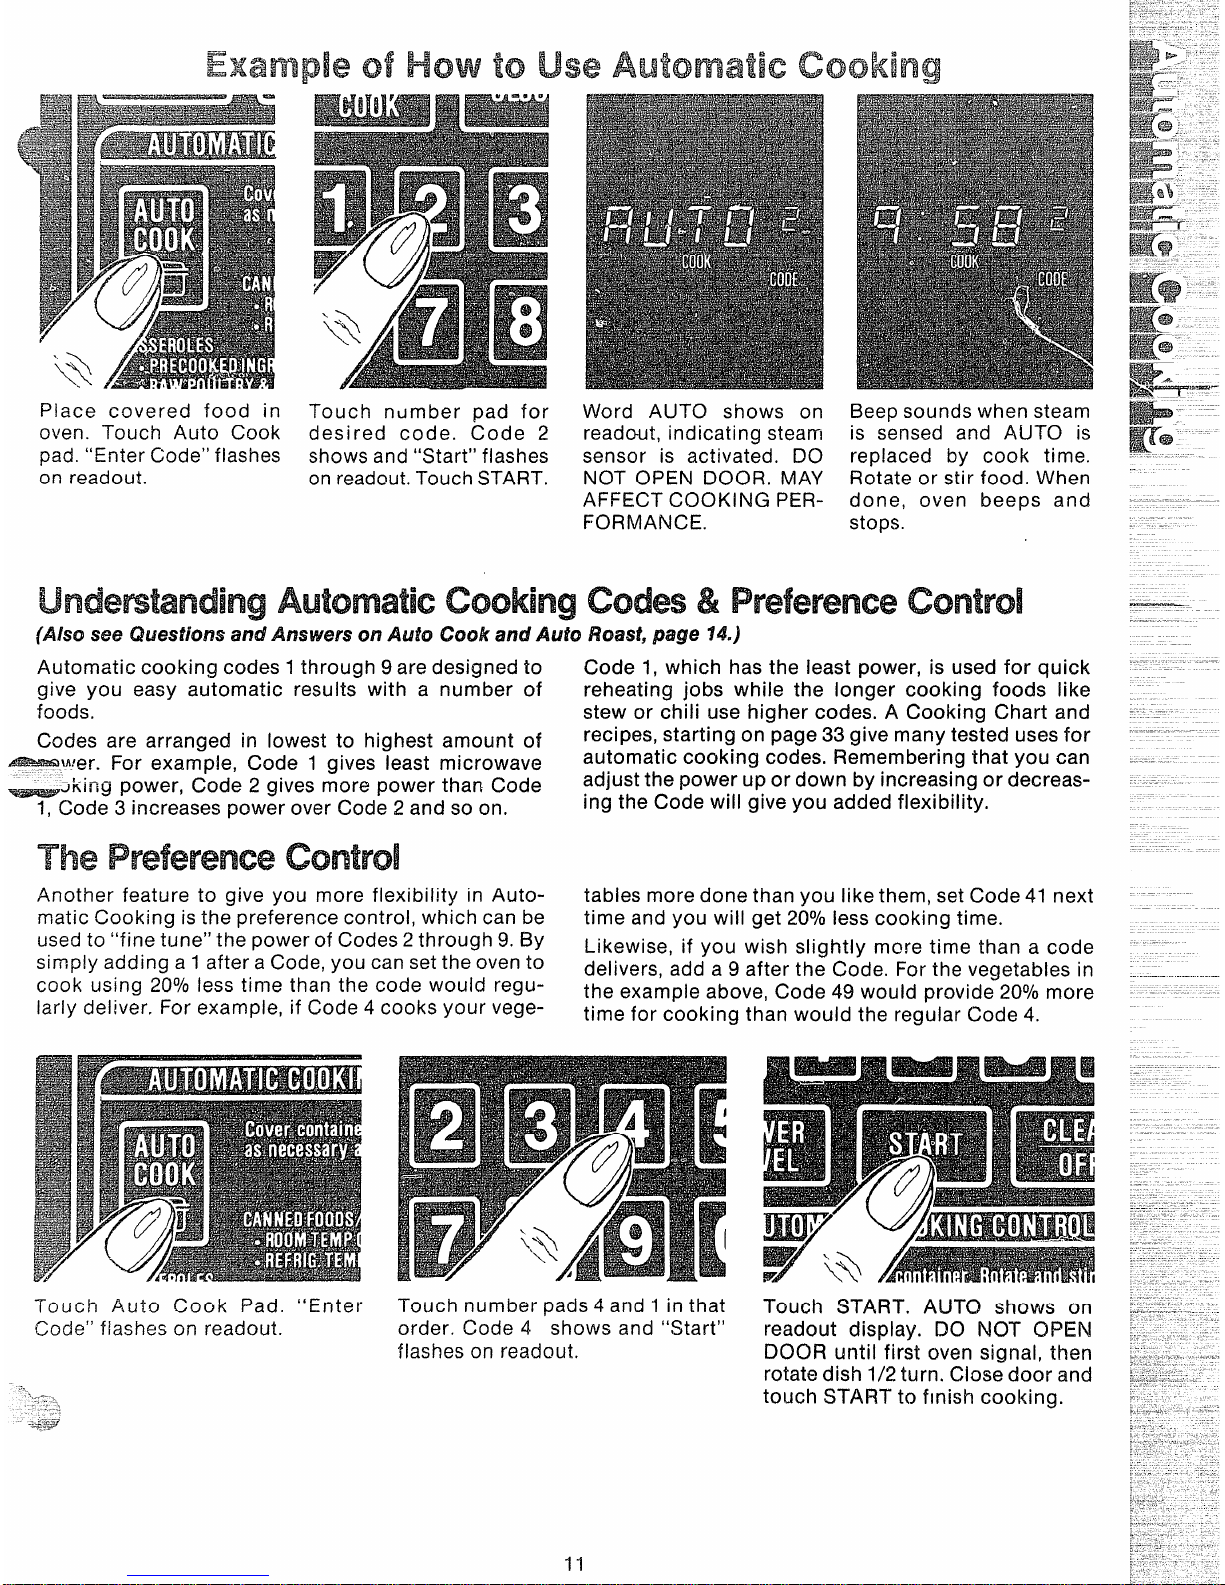
Place covered food in
oven Touch Auto cook
pad. “Enter Code” flashes
on readout.
Touch number pad for
desired code. Code 2
shows and “Start” flashes
on readout. Touch START.
Word AUTO snows on
readout, indicating stearm
sensor is activated. DO
NOT OPEN DOOR. MAY
AFFECT COOKING PERFORMANCE.
Beep sounds when steam
is sensed and ALJTO is
replaced by cook time.
Rotate or stir food. When
done, oven beeps and
stops.
&
(Nsu3see Questions and Afmwws on kiuto Cook amYAuto Roast, page 14.)
Automatic cooking codes 1through 9 are designed to
Code 1, which has the least power, is used for quick
give you easy automatic results with a number of
reheating jobs while the longer cooking foods like
foods. stew or chili use higher codes. A Cooking Chart and
Codes are arranged in lowest to highest amount of
recipes, starting on page 33 give many tested uses for
~W~er. For examp~e, code 1 gives least microwave
automatic cooking codes. Remembering that you can
~Jking power, Code 2 gives more power than Code
adjust the power up or down by increasing or decreas-
1, Code 3 increases power over Code 2 and so on.
ing the Code will give you added flexibility.
The
Another feature to give you more flexibility in Auto-
tables more done than you like them, set Code 41 next
matic Cooking is the preference control, which can be time and you will get
200/o less cooking time.
used to “fine tune” the power of Codes 2through 9. By
Likewise, if you wish slightly more time than a code
simply adding a 1after a Code, you can set the oven to
delivers, add a 9 after the Code. For the vegetables in
cook using
20°/0 less time than the code would regu-
the example above, Code 49 would ~rovide 20°/0more
Iarly deliver, For example, if Code 4 cooks your vege-
time for c“ooking than would the regular Code 4.
Touch Auto Cook Pad. “Enter
Code” fiashes on readout.
Touch number pads 4 and 1 in that
order. Code 4 shows and “Start”
flashes on readout.
11
Touch START. AUTO shows on
readout display. DO NOT OPEN
DOOR until first oven signal, then
rotate dish 1/2 turn, Close door and
touch START to finish cooking.
Page 12

--ci,r~.s,t’. .wisy&T##=..a
~@$7-~,&2-&:T&~+=~+’
lm~~~~w~
R
ALWIRoast uses the temperature probe to cook to
Just as in conventional roasting, only tender roasts
the desired serving temperature. Unlike Temp Cook,
should be Auto Roasted until specified internal tern-
which uses a single power level, Auto Roast uses
peratures are reached. Less tender roasts should
up to 3 power settings which automatically switch
be microwaved by time, according to the Cookbook
during rGasting, thus providing even tender cooking
which comes with your oven: Complete information
results without overcooking.
on preparing roasts for microwaving is in your
Cookbook.
Place tender beef roasts on trivet
in microwave safe dish. Insert
probe from front horizontally into
center meaty area not touching
bone or.fat. Cover with wax paper.
Poultry, pork or ham roasts need
no trivet. Add % cup water to roast
dish, cover with plastic wrap. (For
cooking bag method, see cookbook.) Insert probe into center
Place meat with probe in oven. insert cable end of probe firmly into
receptacle on oven wall.
meaty area.
~0
to
Touch AUTO ROAST Pad. Readout flashes “Enter
Roast Code”. Touch number pad 2. “START” flashes,
Touch START. Readout shows AUTO.
—
At 80°, readout switches to show meat’s internal
temperature. Turn roast over and restart oven by
touching START.
Oven monitors internal temperature, automatically
After temperature is reached, oven switches t
s]?~itchir~g f~ iowe~ power as meat’s
~ernp~r~~ure
t-KX..Dfor 1 hr., then shuts off. Hold prevents ove
riwfi. This prevents toughening or overcooking.
cooking while keeping meat warm.
12
Page 13
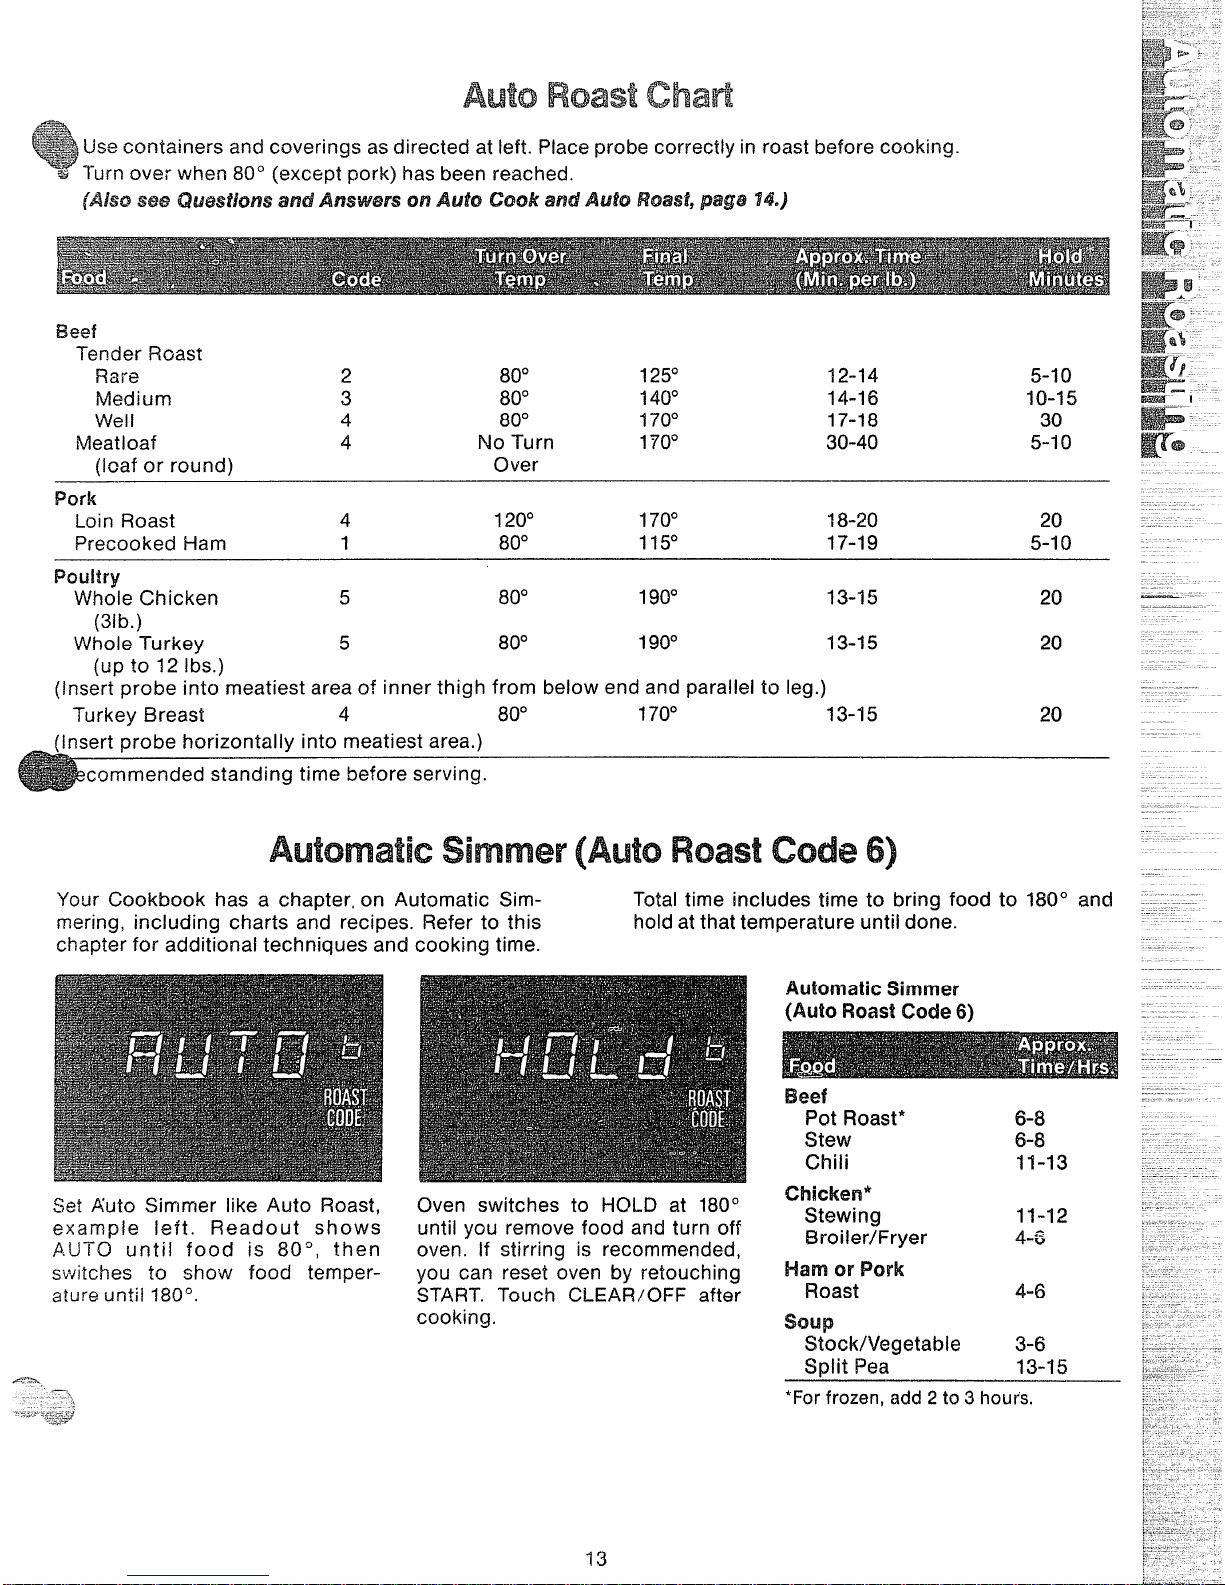
Beef
Tender Roast
Rare
2 80°
125°
12-14 !5-10
Medium 3
80° 140° 14-16 10-15
Well
4
80° 170° 17-18
30
Meatloaf 4 No Turn
1
70°
30-40 5-1o
(loaf or round)
Over
Pork
Loin Roast
4 120° 170°
18..2o
20
Precooked Ham
1
80°
115“ 17-19
5-10
Poultry
Whole Chicken
5 80°
190°
13-15 20
(31b.)
Whole Turkey
5
80°
190°
13-15
20
(UptO 12 ibs.)
(insert probe into meatiest area of inner thigh from beiow end and paraiiei to ieg.)
Turkey Breast
4 80°
170°
13-15
20
(Insert probe horizontally into meatiest area.)
commended standing time before serving.
Your Cookbook has a chapter, on Automatic Sim- Totai time inciudes time to bring food to 180° and
mering, inciuding charts and recipes. Refer to this hoid at that temperature untii done.
chapter for additional techniques and
Set Auto Simmer iike Auto Roast,
exarnpie ieft. Readout shows
AUTO untii food is 80°, then
switches to show food temper-
ature untii 180°.
>ooking time.
1.hh3mafkSimmer
(Auto RoastCode 6)
Oven switches to HOLD at 180°
untii you remove food and turn off
oven. if stirring is recommended,
you can reset oven by retouching
START. Touch CLEAR/OFF after
cooking.
Ek?f
Pot Roast*
Stew
Chiii
chicken’
Stewing
!3roiier/Fryer
Ham
06’ Pork
Roast
soup
Stock/Vegetable
Scdit Pea
6-8
6-8
11-13
11-12
4-6
4-6
343
13-1!5
‘For frozen, add2to 3 hour’s.
Page 14
and
Q. Why does my oven automatically cut off after the
AUTO qmhewhen using Auto Cook Control Code 1
v+henit does not for other settings?
A. when using Code 1,there is no second phase of
minutes counting down, All the cooking is completed in the first phase or AUTO.
Q. if my food is not completely cooked after using
the suggested
Auto (%0!4 ControK Code, what
skwld i do?
A. l-hick starchy or dense foods may require some
adddionai time cooking. Use TIME COOK and
Power Level 10for a few minutes until completion.
Q. DcI a!.! fresh or frozen vege!abks require a
standing period after cooking with AUTO COOK?
A. Most vegetables are cooked to a crisp state dur-
ing Auto Cook, just as in regular microwaving.
Therefore, it is recommended that you let the vegetables stand for up to 5 minutes depending on size
and density of pieces. This standing time also enhances the overall flavor and appearance of most
vegetables.
Q. What if I don’t fully cover the dish in Auto
cook?
A. Oven senses steam too quickly which shortens
the cooking time thus leaving undercooked dish.
Recover tightly and reset Auto Cook.
Q. !30 the shapes and sizes of food make a differ-
ence when using Auto Cook?
A. Yes, in some cases, larger pieces will require additional Time Cooking. Be sure to check suggested
arrangement of pieces in the dish, since proper arrangement is often a successful tip in regular micro-
waving.
Q. Should 1 use Auto Cook to cook pudding or
sauces?
A. Most pudding and sauce recipes require stirring
many times during cooking; therefore, Time Cook is
recommended since you should not open the door
during the AUTO phase of cooking without affecting end cooking results.
Q. My scalloped po@toes were not completely
cooked when i removed the dish after Auto Cook.
What is wrong?
A. if you prepared the sauce in the oven prior to
combining the sauce with potatoes, there may have
been foo much remaining moisture in the oven.
Make sure you dry the oven completely before using Auto Cook since this function operates properly
by sensing steam in the oven, Also, starting Auto
Cook with hot foods creates steam in the oven too
soon, and decreases the first sensing cycle.
Q, Are Mere any other foods which am best Time
;:f-&@~Jy~~~fh~~fg~~~~g~~~Q&@fj?
A, Bakery foods, candies, melted chocolate or
foods when a dry or crisp surface is desirable, are
COOkedbest by Time Ccok.
Q. Da fresh m hxzen vegetabhs require water
when LSfig Auto Cook?
A. Yes. Add water as recommended on chart to the
vegetables and cover well for even, complete
cooking.
(2. Would my pkwtk containers with very tight fit-
ting lids be appropriate for Automatic Choking?
A. No, most types of plastic storage dishes, butter
tubs, etc. with tight fitting lids are not recommended
for microwaving. Also tight fitting plastic lids may
prevent adequate steam from escaping and food
may not cook properly during Automatic Cooking.
Q. 1tried to warm same chow rmin noodles using
Auto Cook. Why didn’t this work?
A. Food must have some moisture in order to create
steam which helps the auto sensor function.
Extremely dry foods such as chow mein noodles,
potato chips and other such foods do not have
enough moisture.
(2. May I use Auto Cook when 1am cooking many
foods in more than me dish or casserole?
A. No, because of different food densities, attention
needed during cooking, and food amounts, it is best
to use TIME COOK when cooking many foods.
Q. Why was my roast not fully cooked even though
the temperature on the readou~ was correct and
AutoRoastcompleted?
.—
A. When cooking with Auto Roast, the temperature
probe must be inserted properly as fully described
in the Cookbook, After turning meat over or rotating, the probe should be checked to make sure it
hasn’t slipped or changed position,
Q. Last !ime I used Auto Roast ilremoved the roast
from the oven to turn it over. When ! replaced roast
in ovum and reconnected the meat probe, AUTO
reappeared, Why?
A. The oven and roast may have cooled to below
80°, or probe may have been repositioned. Continue roasting and numbers will soon reappear.
Q. Are there any particular trivets that work better
than others?
A. Yes, flat glass trivets such as lids or dish covers
give more even cooking results than plastic trivets.
Also, ceramic ridge-bottomed roasting dishes work
well. Plastic trivets require meat to be turned over
more frequently because the grid design and legs
allow the bottom of the meat to stay cooler as it
cooks, than glass trivets do.
.—
Q. Why doesn’t the mast continue cooking during
the standing o?holding time?
A. The oven automatically reaches finished temper-
ature and then decreases to a lower power level to
prevent overcooking, Thus an even temperature is
maintained,
.
Page 15

to
Cook Code control and the highest Power Level is
10 which is represented by ‘$0”. When setting a 2
digit Cook Code control entry, the first is time, the
Cook CodeTMis a short-cut control for entering time
second is power level,
and the Power Level on your microwave oven. Be
Step 1: Touch COOK CODE. “Enter Cook Code”
sure to check your Cookbook for specific codes for
flashes on readout.
specific recipes.
Step 2: Enter the proper code into Cook Code con-
To understand the Cook Code control, it is impor-
trol. For example, a recipe calling for 12 minutes
tant to know what the numbers mean and what the
cooking time at Power Level 10 would be 120. Code
sequence is. The first and second numbers, if set-
number appears and “START” flashes immediately
ting a 3 digit Cook Code, indicate the amount of
after entering a 3-digit code, but when a 2-digit
time you desire; the last control entry number is al-
code is used, there is a delay before “START”
ways the Power Level. For example, 125 means 12
flashes.
minutes at Power Level 5. NOTE: Your oven can
Step 3: Touch START.
“Cook Time Left, time
only be programmed to 99 minutes when using the counting down and Power 10“ show on display.
‘to
The Defrost setting is designed for.
even thawing necessary for large
amounts of food and is one of the
most important advantages of a
microwave oven. Power Level 3 is
somatically set for defrosting,
~ut you may change this for more
flexibility. See your Cookbook for
the complete defrosting chart.
To become better acquainted with
ycur Defrost function, defrost frozen pork chops by following the
steps below.
Step 1: Place package of frozen
chops in the oven and close door.
Step 2: Touch DEFROST. Display
reads :0 and Power 3. “Enter Def
Time” flashes.
Step 3: Touch 8, 0, and Ofor 8 minutes. “Def Time”, 8:00 and Power
3 are displayed.
Step 4: TOUChSTART. “Def Time
Left” shows and tilme counts down
on display. When cycle is completed,
“END” flashes, the oven
signals and automatically shuts
off.
Step 5: Turn package over, close
door and repeat Steps 2,3 and 4.
Step 6: When oven signals, “END”
flashes and oven shuts off. Remove package and separate chops
to finish defrosting.
@ Foods frozen in paper or plastic
can be defrosted in the package.
@ For even defrosting, many foods
need to be turned over, rotated, or
broken up part of the way through
the defrosting time.
@ Homemade dinners can be fro-
zen in shallow foil trays and heated
for later use. Select foods which
microwave well.
@ Pre-packaged frozen dinners
can be defrosted and microwave
cooked.
@Check your Cookbook for other
defrosting tips.
Q. When ! press START, I hear a
ciui]thumping noise. What is it?
+&This sound is normal. It is letting
YQU know the oven is
using a
,povJer L.evei
{ower than HiGH.
zQ,Can ! Defrost small items in a
fi~~ry7
A, Y~S, but
they will need more fre-
qi]ent attention than usual. Raise
,C,x.
-.-fi~~Power Level after entering the
.-.,:.s..,-==—:=7=
‘s by touching POWER LEVEL.
-,.-:-:..“7 or 10. Power Level 7 cuts the
a‘~::
~l,w=lin I/z;pof~er Level ~0 cu~~the
~.,,~,=t. yj. During either, rotate or
3, u
.2;1”ffj~d frequent Iy.
Q. Can I open the door during DE-
FROST to check on the progress
of my food?
A. Yes. You may open the door at
any time during microwaving. To
resume defrosting, close the door
and press START.
Q. Why don’t the defrosting times
in the Cookbook seem right for my
food?
A. Cookbook times are average,
Defrosting time can vary according
to the temperature in your freezer.
Set your oven for the time indicated in your Cookbook, If your
food is still not completely thawed
at the end of that time, re-set your
oven and adjust the time according y.
Q. “WhenI enter the fourth digit using Cook Code control, nothing
happens. What went wrong?
A. The oven will take only 2 or 3
numbers. If more are pressed,
oven does not respond. Touch
Clear/Off and begin again.
~. Can I select a Power Level other
than automatic Power Level 3 for
defrosting?
A. Yes. Some smaller foods may be
defrosted quicker on higher Power
Levels but for even, carefree defrosting, Power Level 3 is suggested. Check the chart in the
Cookbook for specific times and
Power Levels,
Page 16

1
I!!!?!_
~~+~=
Howto Cook
J.,
....
,.
..-,.
—.
Time Cooking, or cooking your food according to a predetermined amount of time, is probably familiar to you from
conventional cooking. With your microwave oven, however,
you preset the time and the oven turns off automatically.
Follow the cooking steps below to
help you learn to Time Cook
properly.
Step 1: Fill a cup % full of water
and 1 teaspoon of freeze dried coffee. Use a cup that has no metal
decoration. Place cup in oven and
close door.
Step 3: Select your time. Touch 1,
2, and O for a minute and 20 seconds. “Cook Time”, Power 10, and
1:20 appears on the display. If another Power Level is desired touch
Power Level and the number although Power Level 10 (HIGH) is
preferred for this cup of coffee.
Step 2: Touch TIME COOK. The
read-out panel shows :0 and
Power 10.
“Enter Cook Time”
f~a~hes.
Step 4: Touch START. “Cook Time
Left”, Power 10, and time counting
down shows on display.
Step 5: When time is up, oven
sounds. Display flashes “END”.
Oven, light, and fan shut off.
-rips
@Make sure all utensils used in
your microwave oven are labeled
“suitable for microwaving”. Check
your Cookbook for specific test to
determine “microwave-safe” utensils.
ISIpaper towels, wax paper, and
plastic wrap can be used to cover
dishes in order to retain moisture
and prevent spattering.
@Most microwaved foods require
stirring, rotating, or rearranging.
Check your Cookbook for specific
instructions for the food you are
microwaving.
@Some foods such as unshelled
eggs and hot dogs must be
pricked to allow steam to escape
during cooking.
Q. I set my oven for the time called
for in the recipe but ~:~the end of
the time allowed, my dish wasn’t
done. What happened?
A. Since hor~se power variefj due
!O time or location, ma~y Time
Cook recipes gi’.:eyo[f a time range
to prevent overcooking. Set the
~v~n for minimum time, test the
fl~od for doneness, and cook your
~ish a little longer, if necessary.
Q. I want to cook my dish on a
Power Leve! oiher thar] HIGH, what
do I need to do?
A. To cna)~ge the Power Level,
tcticn the Power Level pad. “Enter
Power” flashes on the display
panel. Enter the desired number.
Q. Can I interrupt my Time Cook
function to check the food?
A. Yes, To resume cooking, simply
close the door and touch START.
NOTE: Microwave power will not
come on until you are ready. You
must touch START for cooking to
begin.
Q. I touched the number pads and
selected my power level. When I
touched START, however, my oven
didn’t come on. Why not?
A. The TIME COOK pad *must be
touched before setting the number
pads or else your oven will not begin cooking.
Page 17

~.~+=*L=L*>~
=~.~?=T+?*23.m~~~=-+pT.-
For many foods, internal temperature is the best
gauges the internal temperature of your food; it
E#$z‘“
test of doneness.
K
must be used when using TEMP COOK or AUTO -‘ -a- --
Roasts or poultry are cooked to perfection when
ROAST. To utilize your temperature probe properly,
temperature cooking. Heating or reheating foods
follow the directions for use and insertion in this
accurately to a serving temperature you desire is
book in the section entitled “l-low to Auto Roast”. m-
E#?!!!-
simpie and easy.
HANDLE
e-.
TEMP COOK takes the guesswork out of cooking
because the oven shuts off automatically when the
food is done.
T-Tie
SENSOR
The temperature probe is a food thermometer that
CLIP
K
@
Step 1: Insert temperature probe
as directed in Cookbook and attach probe securely in oven wall.
Close the door.
z: Touch TEMP COOK. The
display panel shows F and Power
10. “Enter Temp” flashes.
Step 3: Touch 1, 3, 0 for 130°,
“Temp”, 130 F and Power 10 show
on display.
Step 4: Touch POWER LEVEL pad.
“Enter Power” flashes. Touch 5 for
MEDIUM power. “Temp”, 130 F
and Power 5 shows on display.
Step 5: Touch START. if internal
temperature of the roast is less
than 80°, display will show
“COOL” or if temperature is 80° or
above, display shows temperature
counting up.
Step 6: When 130° is reached, the
oven will sound and automatically
shut off, Remove probe and food
from the oven,
Tips
@ Use a lower power level setting;
it will heat more evenly even
though requiring more time.
I@ Be sure frozen food has been
completely defrosted before inserting probe. Probe may break off if
used in frozen foods.
@ Always insert probe into the
center of meaty areas; take care
not to touch the fat or the bone.
@ Insert probe as horizontally as
possible into foods as directed in
the recipes. Make sure the handle
does not touch the food.
@ Use the clip to keep the probe
in place while heating.
@ Cover foods as directed in
Cookbook for moisture control and
quick, even heating.
——.
-.
—
.-—
-..—....
—-—..—
Q. After ! followed the steps and
touched START, “ERROR” flashed
in the display and a signal
sounded. ‘What is wrong?
A. “ERROR” flashes on display if
yOLIset the temperature either be!OW80” or greater than 199°. The
.-=~)ventells you between the flash-
—J,.-
.:.-(“~;.flIig of
‘‘ERROR”
what the incorrect entry was that you set. To
re-enler, toLIch CLEAR/OFF pad
arid begin steps aga,in.
Cl. Are there any foods \ can’t
TEMP COOK?
A. Yes. Delicate butter icings, ice
cream, frozen whipped toppings,
etc., soften rapidly at warm tem-
peratures. Batters and doughs as
well as frozen foods are also difficult to cook precisely with the
probe. It is best to TIME COOK
these foods,
Q. Why did “PROBE” flash on the
display after Itouched Start?
A. “PROBE” will flash on the display if you have not securely
seated the end of the probe into
the receptacle in the oven wall or if
yOLItouch TEMP COOK and have
forgotten to use the probe.
Q. Can I leave my probe in the
oven if it’s not inserted in the food? -----
A.
NO. If the probe is left inside the ~
oven, touching the oven wall, and : -not inserted in food, you may dam- ~- ‘.
age the oven.
-—
Q. Can I TEMP COOK different ~~~= -portions of food at different X‘---.-
temperatures?
.—..
A. Yes. The temperature probe ‘-=-:‘-”--gives you the fr~edom to cook dif- ~:~..~..-”~
ferent portions of food at different
;=:A--=;---temperatl~res to suit individual eat- .- T-.
ing styies, Simpiy place the probe ~-.:- -. ‘in the food and change the tern- ~. : _
perature setting as needed,
.
-<’,....
Page 18

Your FiC)LD/TIMER, which operates without microwave energy,
has three timing functions.
it operates as a Minute Timer, it
can be set to delay cooking or may
be used as a hold setting after de-
frosting. Hoid/Timer can be set up
?099 minutes.
Step 1: Touch HC)LD/TIMEFl pad.
The read-out panel shows :0, “Enter Time” f!ashes.
Step 2: Select the amount of time
you desire. Touch the appropriate
number pads. if, for example, you
are timing a three minute phone
call, touch 3, 0 and O.The readout
panel shows 3:00 and “1-10L13”
appears on display.
Step 3: Touch START. The readout
display shows the time as it counts
down, and “Hold Time Left”.
Step 4: When time is up, oven
sounds. The readout flashes “END”
and the timer turns off.
The l-10LD/TIMER can also be
used to program “standing time”
between microwave cooking func-
tions. The time can range from one
second to 99 minutes and 99 seconds. A l-iOLD, or “standing” time
may be found in some of your own
recipes or Cookbook.
To set the oven to delay cooking
up to 99 minutes follow Steps 1
and 2 to enter hold time, then set
time or temperature desired before
pressing START.When holding before temperature cooking, be sure
probe is in food before pressing
START.
toDefrost–Hold/Time–Time
To help you become acquainted with the HOLD/TIMER feature as used with Time Cook or Temp Cook
follow Steps below to defrost a frozen casserole for 15 minutes, then hold 10 minutes and then cook 25 minutes.
if using Temp Cook after Hold/Timer, be sure to insert probe correctly as shown in Automatic Roasting
section of this book.
Step 1: Remove casserole from the
freezer and place in oven. Touch
the DEFROST pad. The readout
panel shows “Enter Def Time”, :0,
and Power 3.
Step 3: Set standing or hold time
by touching HOLD/T[MER. “Enter
Time” and :0appear on display.
Step 2: Touch 1, 5, 0 and O for
defrosting time. Def Time, 15:00,
and Power 3 appear on the display
panel, (Defrosting is automatically
set on Power Level 3 but can be
changed by touching POWER
LEVEL pad and the new Power
Level.)
Step 4: Touch 1, 0, 0, and Oto hold
for ten minutes. 10:00and “HOLD”
appear m the display.
Step 5: Touch the TIME COOK
pad. The display shows “Enter
Cook Time”, :0, and Power 10
(HIGH).
Step & Touch 2, 5, 0, and O for
twenty-five minutes of cooking
time. “Cook Time”, 25:00, and
Power 10 appear on the dis-
play panel.
Step 7: Touch START. “Def Time
Left”, Power 3, and 15:00 counting
down show on display. As each
function is automatically performed oven display shows entered information.
and
Q. what WiII happen if \ acciden~allyreverse the instructions?
A. {f you accidentally reverse the
sequence of programming instruc-
tions, your oven autornati cal iy
rearranges your program, Defrost-
ing abwQyscmmes first, then hoid,
and then I!IE+cooking function.
Q. Can I Defrost-Hold only on my
oven?
A. Sometimes you may want to defrost a food, hold it, and refrigerate
it to be cooked later. All you need
to do is program in Defrost and
amount of time. Then pro@am
Hold and amount of time, Put your
thawed dish in the refrigerator and
cook later at a convenient time.
NOTE: Allow foods to remain at
room temperature only as long as
safe. Times will vary,
Q. I programmed my oven for a
specific defrosting time bdt it defrosted longer than necessary.
What happened?
A. When instructions conflict, the
oven carries out the last instruction. You may have set the oven to
—
Defrost for 4 minutes, Hold/Time
for 2 minutes, and then Defrost for
6 minutes. In this case, the oven
would Defrost for 6 minutes and
Hold/Time for 2 minutes,
Page 19

&27-
4
YourRange E
&&-
.SI%F
---
...
,,’---’
...
Your range top is designed to give you the flexibility
-o-
f boiling, steaming, sautbing, browning, frying,
~>>
canning, or pressure cooking. It heats through the
metal coils of four Calrod@units thus giving the correct amount of energy far each setting you choose.
*
k..-.=
You must push the knob in only
when it is set at OFF; this is to prevent you from turning the knob on
accidentally. When the knob is in
any other position, you can turn it
without pushing it in. You will feel it
pop out when you turn it to OFF.
Step I: push in control knob.
SPECIAL NOTE: You may find
foods you boil on the surface units
causing condensation to gather
under the upper microwave oven.
This is especially true of foods
boi!ed with water or naturally high
in moisture.
Steam condensation will not harm
your !ange. However, you may
minimize condensation by:
The lowest setting k between OFF
and WARM. At the HI setting, you
will feel the knob lightly click into
place.
In a quiet kitchen, you may hear
slight “popping” sounds during
cooking, indicating heat settings
are being maintained.
Step 2: Turn the knob in either direction to the heat setting you
want.
@
covering pots
lids, especially
high moisture
range top.
and pans with
when cooking
foods on the
@Selecting a surface unit near the
front of the range for boiling
foods.
@Pots and pans should be flat on
the bottom and match the size of
the surface units, Large containers
should be on large units and small
ones on small units.
@It is important pans fit the units
you are using. A pan that extends
more than one inch beyond the
edge of the trim ring may reach
temperatures that could eventually
harm cooktop surfaces around
units.
@Center pots and pans on a surface unit which closely matches
the bottom of the utensil in size.
@Containers of various materials
may require different heat settings
and/or cooking time. Check the
manufacturer’s instruction before
using.
@Special cooking equipment without flat bottoms, such as the orien-
tal wok, are not recommended and
could shorten the life of the sur-
face unit and/or range top since
high heat temperatures are re-
quired in this type cooking.
Wrong
mm
Concave Bottom
Ro,unded Boltom
)
(
Wrong
Right
~ Keep range and ventilating hood
free from grease accumulation.
@\A/hen cooking is almost com-
.:-+
.—
-:::-~-::ied,use the retained heat to fin-
- --~.”:
.,.=-.-J,
‘==qsh
cxmking. Turn the knob to OFF
and !eave the cooking utensil in
J_}/ace. When surface unit has
ggai~d, remove the utensil and the
‘:;acll’edfood.
@TO prevent certain foods from
foaming, add a tablespoon of
cooking Q!l to the water before
cooking.
@Never leave food unattended
when you are cooking at HI or
iVIED1-iisettings. 130ilovers cause
smoking and grease spillover may
catch fire.
@When canning foods, be sure to
check manufacturer’s instructions
and recipes, Be sure canner is flatbottomed and fits securely over
center of Calrod@unit.
@~ak~ sure calrod~’
p[ug-in unit is
securely plugged in and seated on
ring/pan properly for even heating
results.
“f9
Page 20

ur
.
(ModelJHP75only)
.
nISTHE
OWNER’SRESPONSIBILJTYTo KEEPTHEGLASS
CCIOKTOPFREE FROM DISCOLOFMT!C)NBY PROPER
MAINTENANCEIN
ACCORDANCEWITH THESE i!NSTRLJC‘ncm!$,SINCESOILBUILD-UPIs THE ONLYCAL%!%OFDlsCOLORATION.THE GENERALELE2CTRK2WARRANTYDOES
NOT COVER DISCC)LORATICINOF THE CXXHCKW, CM
SCRATCHINGOR OTHERDAMAGECALK$EDBY IMPROPER
CLEANER%
Your ceramic cooktop controls are
set the same as the range top controls described on the preceding
page. However, instead of metal
coii Calrod@’units, your cooking
surface is an embossed sunburst
pattern on a smooth ceramic top.
The heat is transferred from a
heating element below the surface,
through the ceramic top, to the
bottom of the cooking utensil.
This, in turn, heats the food. As it
heats, the cooking surface turns
yellow. When the control is turned
to OFF, the cooking area cools and
returns to its original white color.
s Do not leave plastic items on
cooking area.
@Do not cook foods packaged
in their aluminum foil trays or
wrapped in aiuminurn foil on glass
ceramic. Foil can melt and fuse to
the unit causing perm an,ent
damage.
@Keep bottom of utensil and
cooking surface clean and dry. In
dusty or sandy areas, wipe the
utensil and cooking surface to prevent scratching the ceramic finish.
@Wipe up spills and spatters when
cooktop is COOIbut before they
bum onto the surface, Be sure to
wipe area next to the unit you have
been using, in case food has spattered on these areas. CAUTlON:
Be careful to avoid steam burns on
your hand when wiping the cook-
top.
@Avoid scratching the cooktop
with rings or other jewelry.
@During cooking, utensil lids coiIect condensed steam. If condensation drips on the cooktop,
mineral deposits in the water or
food can stain the cooking sur-
face. Lift utensil lids so con-
densation drips back into the uten-
sil instead of on the cooktop.
@Use heat settings no higher than
MED or follow manufacturer’s directions when using utensils made
of the following materials: cast
iron, glass ceramic (pyroceram),
and stainless steel. Also, enamelware which under certain conditions could melt and fuse to the
cooking panel when higher heats
are used. Manufacturers of glass
cooking utensils also recommend
using heats no higher than MED.
If not properly cared for, your
ceramic cooktop can become
stained and the original white finish permanently discolored. Since
soil build-up is the only cause of
discoloration, spatters and spills
must be cleaned up properly.
Heavy build-up can cause a yellow
or brownish-grey glass film even
when the cooktop is cool. However, the film is on the surface only
and can be removed.
To keep the ceramic cooktop looking like new, follow these steps.
Before first using the ceramic
cooktop, clean it with the CleanerConditioner packed in your range.
Step 1: Simply put a small amount
of cleaner directly on the center of
each sunburst pattern. Clean with
a damp paper towel. Wipe off with
another clean, damp cloth, Wipe
dry. NOTE: Use the Cleaner-Conditioner each day to remove all visible soil from the ceramic cooktop.
At least once a week, clean the
cooktop with Bar Keepers Friend@
Cleanser which isespecially formulated for cleaning glass-ceramic
appliance tops and cookware.
Step 2: To use, apply Bar Keepers
Friend@ to damp paper towel “and
rub into stain until it is remcved.
Be sure cooking surface is cooled.
(For stubborn stains, apply a paste
of Bar Keepers Friend@and water,
cover with a wet paper towel, and
let stand for about 45 minutes.)
After using Bar Keepers Friend@,
always clean with Cleaner-Conditioner following directions in Step 1.
NOTE: The Cleaner-Conditioner
and Bar Keepers Friend@Cleanser
is sold in many grocery, hardware,
and department stores.
..
Forother specific soils or scratches,
refer to page 31 entitled “GlassCeramic Cooktop.” This chart gives
problems, causes, preventions, and
ways to best remove most stains.
1# Be sure the cooking top and surrounding areas
#
are cool before touching or cleaning, Even if
cooking surface has returned to its original
color, allow a.few minutes for cooling,
@
,= ‘When completely covered, the ceramic cooktop
can be Used as a kitcheri work surface. However,
be ~areful not to scralch the top with sharp
ob-
V“
jecIs or utensiis that do nol have smooth
bottoms,
Never use the ceramic cooktop as a cutting
board.
Dried boilovers can cause permanent damage t
W3
, ,,y~ks~~,
the ceramic cooktop. Take care to clean up boIF~~+%&w,
overs promptly.
if the ceramic cooktop cracks or breaks, do not
use any part of it. Call your service technician
promptly,
20
Page 21

~ Oven
Your oven k designed to giveyou the best results in
baking, broiling, and roasting when used as recommended. Before using your oven, look at the directions for setting and using all of the controls and
timer.
Light comes on automatically when door is opened
or use switch on window door to turn it on when
door is dosed.
When the shelvesare correctly placed on shelf sup-
ports they are designed with stop-locks to prevent
them from coming out of the oven or tilting when
food is placed on them. TO RHvIOVE, lift up rear of
shelf arid pull forward with stop-locks along top of
shelf support. TO REPLACE, insert shelf with stop-
Iocks resting on shelf supports and push toward
rear of oven until it falis into correct position under
sheif support.
oven Timer Controis are designed to automatically
start and stop certain oven functions (TiiME BAKE
or CLEAN). Diais are timed by a special Ciock with
iight grey squares (denoting nurnerais) and hands.
(For iocation see page 8.) TO SET THIS CLOCK,
push in the center knob of Minute Timer and turn
the Ciock hands to correct time, then iet knob out.
TO SET i’MiNLITETiMER, turn knob to desired min-
utes. (Knob must be out to set Minute Timer.) Minute Timer wiii buzz when time has finished and must
be turned off manuaiiy.
Use the Microwave Oven Ciock for easy reference
to time of day.
to for
AhseeBakingCmwf,page 25.)
Step 1: Piace sheif on embossed
sheif support “B” or as indicated
on Baking Chart, page 25.
Wep 2. After making sure that the
oven door is ciosed, turn the Oven
Set Knob to BAKE. Oven “On”
Light comes on and remains on as
iong as Oven Set Knob is on BAKE.
Skp 3: Turn Oven Temp Knob to
the temperature ~alled for in rec.
ipe. Oven Cyciing Light comes on
and remains on untii preset oven
temperature is reached. it reappears each time oven temperature
drOPsbei9w preset temperature.
.-==>+
-S@3 4: You may set your Minute
-—
‘Irner to the desired cuoking time as
+----F-...-——I*-
‘-’+ndicaled in your recipe. If your
ccmking time is ionger than sixty
rninutea, Minute Timer must be
*.@-Q*
!W!J,4
?..
NOTE: Your Cookbook discusses
preheating and cooking resuits.
Most foods cook satisfactorily
without preheating. if preheating is
required, put your dish promptiy in
the range after Oven Cyciing Light
goes out.
Step 5; Piace food inside the oven.
Make sure at ieast 1“ of space is
ieft between the cooi<ing container
and the oven waii for proper heat
circulation. Ciose the oven door.
NOTE: Avoid opening your oven
door frequently. This couid cause
undesirable resuits in your baking.
Oniy check foods at the minimum
time of the recipe. Then cook
ionger if necessary.
Step 6: When the BAKE cycie is
compiete, turn off heat. When
cooking food for the first time in
your oven, use the time on your rec-
ipe as a guide, Be sure foods are
done before removing from oven.
How to set YCNJr
for TiWM2?
V~~jr Aut~rnatic Qven Timer eon.
trois your ‘~iME i3AKE feature.
When you TiiVIEBAKE, your range
can be preset to start and stop
21
automatically if you are not home.
Step 1: Be sure the range Ciock
shows correct time of day : ce
Ciock controis the Oven Timers.
Start diai pointer must indicate
same time of day as on Ciock. if
you want the oven to turn on at a
iater time, set that time by pushing
in knob on Start diai and turn
pointer to time that you want oven
to start. (There’s no need to set
Start diai when starting time is the
present time of day.)
Step 2: To determine Stop time,
add the food’s cooking time to
time set on Start diai. Push in knob
on Stop diai and turn pointer to
time oven is to turn off.
Step 3: Turn Oven Set Knob@ TilvIE
BAKE. Oven “On” Light comes on
immediately even if the Start time is
iater.
Step 4: Turn Oven Temp Knob to
temperature setting. Oven Cyciing
Light comes on even tiIough heat
is not on in the oven if a iater start
time is used. Your oven automat-
ically turns on and off at the times
you set.
Step 5: Remove food and turn
Oven Set Knob to OFF.
Eair
E-”
+-
---
Page 22

(-Ahmsee BmiM-lg ‘chat, page 26.)
S@2
f: Place the meat on the
broiler rack in the broi!er p~n. Al-
ways use the rack so fat drips into
.
the broiler pan.
Step 2: Position Oven Shelf as indicated on Broiling Chart, page 26.
Step 3: Turn the Oven Set Knob
and Oven Temp Knob to BROIL.
Both Oven Indicator Lights come on
Step 4: Leave oven door ajar
about 3 inches (except chicken,
see below). The door will stay open
itself yet the proper temperature
will be maintained in the oven. 6)uring cooking, turn the food only
once.
Step 5: Turn Oven Set Knob to
OFF and serve food immediately.
Leave the pan outside the oven to
cool during the meal for easy
cleaning.
‘s$
@
B
Foil may be used to iine the
broiler pan and rack. However,
be sure to cut openings in the
foii to correspond with the slits
in the broiler rack so fat drips
into the pan below.
For all weights of chicken, broil
with door closed.
Placing food closer to the top
of the oven increases smoking,
spattering,
exterior browning
on the meat and the possibility
of food fat catching on fire. Ai-
ways keep rack 3-5 inches
from the broiling unit.
(Also see Roasting Chart, page 27.)
Step “i: Check the weight of the
meat and place, fat side up, on the
rack in the broiler pan that came
with your range. This helps the
meat to baste itself.
Step 2: Use shelf position “A” or
“B”; or the one indicated on
Roasting Chart, page 27. Place
Oven Shelf on correct embossed
shelf support. For very tall roasts,
remove second oven shelf.
5@P ~: Turn the Oven Temp Knob
to 325’. (The exception is small
poultry which is roasted at 3750,)
~>!5P~1 C/~se the oven door and
,-x.
iurn the Oven Set Knob to BAKE.
Oven “On” Light comes on and
stays on until Oven Set Knob (s
turned to OFF. Oven Cycling Light
comes on and remains on until
temperature is reached.
Step 5: Place your meat inside the
oven, making sure the pan is not
touching the oven walls ~r door,
Step 6: T~Jrnoff the heat when the
roasting cycle is complete,
22
Be sure meat is cooked to your
satisfaction, Most meats continue to cook slightly while
standing after being removed
from the oven. This should be
taken into consideration when
determining your cooking time.
Always use a roasting pan that
fits the size of your meat. A
roast placed in a pan too small
for its size will drip over the
edge.
You may cook frozen meat
roasts without thawing. l-iowever, you must allow more
cooking time for large roasts,
add 10-25 minutes per pound.
For roasts under 5 pounds, add
!0 minutes per pound.
To slow down surface browning
on turkeys, you can use a foil
“tent”.
The tent-shaped foil
should be laid loosely over the
poultry so the heat can circulate
under the foil,
.-–
.
Most frozen poultry should be
thawed before cooking to ensure it is done evenly. Some,
however, can be cooked suc-
—
cessfuliy without thawing.
Check the packer’s label for
specific directions.
. ....
.
.- .-
.
Page 23

Oven
If done properly, it will take only a few moments to
start the self-cleaning cycie on your range. After
setting your range to self-clean, a high heat temper-
ature removes thie soil in the oven cavity. The dirt
will then disappear by turning into an ash waste or
evaporating into an odorless and colorless vapor.
When the cycle is complete, allow your range to
COOIand enjoy combination cooking in a sparkling
clean
OVf?i7.
while ycmare becoming ‘aCqwmlted with your seif-
~i~~~ing ogffjn, we remrmmend 2 hcn.li%W W? WW-
age cleaning function, hut in same cases a $Qrwger
cleaning time, up to 3 hours may be necessary, In
order to judge the degree of soil, look at the oven
floor and walls, Light, spatter and thinner spills
would generally need only 2 hours cleaning. Heavy
greasy spills and spatter on the oven interior would
need up to 3 hours.
~~~~ ~: Fhmove all cookware
NOTE: A slight odor may be de-
and food as well as heavy soil deposits from the oven. Clean spat-
ters or spills around the oven door,
rectangular flanges, and gasket.
Then close the door.
—-————-—————-——
STEP 2:Turn (hen Set Knob
and Oven Temp Knob clockwise to
CLEAN. The control will snap into
final position when the CLEAN position is reached.
STEP3:push and ho!d Clean
Button while sliding the Latch to
CLEAN.
STEP 4:Set The Automatic
OvenTimer:
Push in knob on Stop (Clean)
Dial and turn to the time you
wish oven to stop cleaning. Add
the number of hours needed for
cleaning to the present time of
day.
Cleaning Indicator Lights come
on when all steps are set
properly.
If you wish to clean at a later
time set Start Dial to that time,
tected especially during the first
few cleanings. Do not be alarmed.
m
This is normal during the self- , ~
cleaning cycle.
When cleaning temperature is K =
reached, Lock Lightcomes on and
door cannot be unlatched until
Lock Light goesoff.
E&lEtz+
W%WJ
K
~~~~ ~: When Lock Light goes *
off, push and Iho!dthe Clean Lock
Button while sliding Latch to
OPEN. Turn Oven Set Knob to Y!5-OFF.
i.
Q
——
STEP6:Turn (km Set
(m=.
I
Q. Why did the Lock Light come
Q. Why do I have ash left in my
on when I first set the oven for
oven after cleaning?
CLEAN?
AmSome types of soil will leave a
A. Lock Light glowing indicates
deposit which is ash, It can be re-
that oven is too hot, Turn Oven Set
moved with a damp sponge or cloth,
Cl. What should I do if excessive
Knob to OFF arid open Oven Door
Q. Why is there still some black
smoking occurs during clean ing?
to cool the internal cavity. After a
soil left after cleaning?
A. This is caused by excessive
short period of time, reset controls
A. You did not time the oven to
grease and you should switch the
for cleaning.
clean long enough. This deposit
—
Oven Set Knob to OFF. Open win-
Cl. My oven shelves have become
will be removed in later cleanings,
—:._:=,r,5
:--:CIWSand doors to rid room of
gray after several cleanings. Is this
Q. If my oven clock is not working
‘“=“’~%moke. Allow the oven to cool for
normal?
can I still self-clean myoven?
at /east one hour before opening
A. Yes. After many cleanings, the
A. No, Your Automatic Oven Timer
th e door. W ipe up the excess
shelves may lose some luster and
uses the range clock to help start
f;rease and reset the clean cycie.
discolor to a deep gray color.
and stop your self-cleaning cycle.
-—--- ~-...%....
. ..... ........-AT--..<---
.---,.,,..
-..
s.— ..—.
23
Page 24

i$faw%Fkw3rand Plastic CCNW,$e-
cause there is iittie heat except in
the food, or sometimes in the utensils, spills and spatters are easy to
remove. Some spatter can be removed with a paper towel, others
may require a damp cloth. Remove
greasy spatters with a sudsy cloth,
then rinse, and dry. Do not use
abrasive cleaners on oven walls.
NEVER USE A COMMERCIAL
OVEN CLEANER ON ANY PART
OF THE MICROWAVEOVEN.
SPECIAL NOTE WHEN US!NG
‘N SEAR EW3$+:High heat
generated on bottom of Brown ‘N
Sear Dish can cause scorched appearing stains to bake onto the
oven shelf if grease is present.
These may be removed with
Delete@Polishing Cleanser by the
Drackett Products Co.
After using Delete, rinse and dry
thoroughly, following instructions
on can. Do not use Delete on the
painted surfaces such as the walls,
It will scratch the paint.
Delete may be purchased from
your local dealer or from your GE
Authorized Service Center, Check
the “yellow pages” for location
and phone number.
Delete is sold in grocery, hardware
stores, or in the housewares section of some department stores.
Door-inside. Wipe up spatters
daily, wash when soiled with a min-
imum of sudsy warm water. Rinse
thoroughly and dry.
Door-outside. Wipe frequently with
a damp cloth to remove all soil. DO
NOT USE ABRASIVES, SUCH AS
CLEANING POWDERS OR STEEL
AND PLASTIC PADS. THEY WILL
MAR THE SURFACE,
Temperature Probe. Probe is
sturdy, but care should be taken in
handling. Do not twist, bend or
drop. Clean after using. To clean,
wipe with sudsy cloth, then rub
lightly with plastic scouring bail .if
necessary.
Rinse and dry. (Or
wash in dishwasher.)
DO NOT USE TEMPERATURE
PROBE Ihi OVEN UNLESS IT IS IN-
SERTED INTO FOOD.
Shelfm Use in microwave oven only. Shelf must have
food on it when microwave oven is
in use. Do not use browning dish
on shelf.
Clean shelf in dishwasher or hot
water and mild detergent only.
Oven Lamp. Microwave oven lamp
should last almost as long as the
appliance lasts. To replace it requires a Product Service call.
Control Panel. Clean the control
panel of your microwave only with
Iightiy dampened cioth. DO
NOT USE cieaning sprays or iarge
amounts of soap and water.
These can cause Droblems with
the controi mechan~sms.
oven Thermostat
The temperature on your range
has been accurately set at the fac-
tory. However, if your food con--
sistentiy browns too much or too
Iittie, you may make a simpie ad-
justment on your Oven Temp
Knob. To readjust your thermostat:
@Puii Oven Temp Knob off of the
shaft. Look at the back of knob
and note the current setting be-
fore making any adjustment.
@Loosen both screws on the back
of the knob.
~ Lift the pointer and move it one
notch in the desired direction—
toward H] to increase or toward
LO to decrease temperature.
INQTE:Oven temperatures can be
raised by 20° or iowered by 30°.
& Tighten screws and return the
knob to range by matching the
fiat
area Of the knob to th~ shaft.
gy~~ v~~~Duct ~f+~~~)
O/en is venteci through a duct iO-
calecl under the right rear Gairod”
unit. “T”13clean duct: remove
Gal-
red” unit and refiector pan/ring.
Lift out vent duct. in repiacing,
make sure the duct opening is under the opening in refiector pan.
Correct positioning is important to
aiiow moisture and vapors to be
reieased from oven, Never cover
the hole.
Oven Vent Duct (Mode! JHP75)
Oven is vented through an opening iocated under the center of upper oven. Never cover vent
opening.
IWug-$nSurface Wits
Ciean the area under the refiector
pans often. Buiit-up soii, especially
grease, may catch fire. To make
cieaning easier, the piug-in surface units are removabie,
TCIremove: -
@Be sure the controi for the sur-
face unit is on OFF and the coiis
are cooi before removing the
Cairod%unit.
@Raise the unit coii opposite the
receptacle. Lift about one inch
above the trim r!ng and puii
away from the re.ceptacie.
@After removing the piug-in sur-
face unit, iift the chrome-piated
reflector pan/ring to clean under the unit.
To clean:
@Wipe around the edges of the
surface unit opening in the
range top. Ciean the area beiow
the unit. Rinse all washed areas
with a damp cioth or sponge.
To repiace:
@Piace refiector pan/ring in the
surface unit cavity found on top
of the range. Line up the refiec-
tor pan so the unit receptacle
can be seen.
@insert the terminais of the piug-
in unit through the opening in
the refiector pan/ring and into
the receptacle,
@Guide the surface unit into piace
so it fits eveniy and iocks snugiy.
NOTE: Do not attempt to ciean, ad
just, or in any way repair the piug
in receptacle. if iiquid shouid spiii- and coliect inside the receptacle,
caii your Generai Eiectric service
technician.
-
--
—.
----
24
Page 25

1. Aluminumpans conduct heat quickly. For most conventional
baking light shiny finishes give best
resultsbecause they pre-
vent overbrown ing in the time itta~es for heat to cook the center
areas.
D u I I (satin-finish) bottom surfaces of pans are reCOm-
rnended for cake pans and pie plates to be sure those areas
brown completely.
2. Dark or non-shiny finishes, also glass and pyroceram, absorb
heat which may result in dry, crisp crusts. Reduce oven heat 25°
if lighter crusts are desired. Preheat cast iron for bakina some
3. Preheating the oven is not always necessary, especially for
foods which cook longer than 30 or 40 minutes. For food with
short cooking times, preheating gives best appearance and
crispness.
4. Open the oven door to check food as little as possible to
prevent uneven heating and to save energy.
foods for rapid browning ‘when food is added.
——
Food
Ow’m
%%m’apd
shelf
Ptlsmm’1
The,
!Miiuun
10-14
20-30
20-25
40-50
45-55
40-55
10-20
mmtfrihw
Em?atd
Biscuits (M-in. thick)
Shiny Cookie Sheet B
B
A
B
B
A
A
400°-450”
425°-4500
400°
400°
350°
375°
375°
Canned refrigerated biscuits take 2-4
min. less time,
Coffee cake
(See layer cake)
Corn bread or muffins
Muffins
Cast Iron or Glass
Shiny Metal Muffin Pans
Preheat pan for crisp crust.
Decrease time about 5 minutes for muffin
mix.
Or bake at450°
for25min.,thenat350°
for 10-15 min.
Test with toothpick
incenter,
Darkmetalorglassgivedeepest
browning,
Forthinrolls,ShelfBmaybeus~d,
Popovers 3eep Glass or Cast Iron
cups
Metal or Glass Loaf Pans
bletal or Glass Loaf Pans
Nut bread or fruit bread
Yeastbread (2 loaves)
Plain or sweet rolls
Shiny Oblong or Muffin
Pans
Cakes
Angel food Aluminum Tube Pan
Shiny Metal Muffin Pans
Metal or Glass Loaf or
TubePan
Metal Jelly Roll Pan
Shiny Metal Pan with
Sat/n-finish bottom
Metal or Ceramic Pan
A
B
A or B
B
B
A
350°
350°
275°-3000
375°
350°
s50°
30-40
15-20
2-4 hrs.
10-15
20-30
40-50
Two piece pan is convenient.
Paper liners produce more moist crusts.
Use 300° and Shelf B for small or
individual cakes.
Line pan with waxed paper,
White and yellow cakes may cook faster
than chocolate.
Reduce time 5 to 10 minutes for cakes
from mix,
Cupcakes
Fr~litcake
Je!ly roli
Layer cake, coffee cake
and gingerbread
Fluted tube cake
i%mkies
Bar
Drop or sliced
vletal or Glass Pans
2ookie Sheet
B
B
350°
375°
375°
350°
425°
350”
375°
300”
—
—
375°-4000
3.50°
25-35
10-15
30-40
40-50
50-60
15-20
55-65
~-3 hrs,
-———
60-70
55-65
Use same time for bar cookies from mix,
Use Shelf C and increase temp. 25-50°
for more browning,
FH.8i&f9
Other Ekssevt
Baked apples
Custard
;Iass or Metal
;Iass Custard Cups or
;asserole (set in pan of
lot “water)
A or 3
B
Can also use in oven meals on Shelf C.
Reduce temp. to 300° for large custard.
Cook bread or rice pudding with custard
base 80 to 90 minutes.
‘oil Pan on Cookie Sheet A
B
3
3
,——--——
B
A
For large pies use 400° and increase
time,
To quickly brown meringue use 400° for
8-10 min.
Custard fillings require lower temp.,
longer time.
Or cook at 250° for 5-6 hrs.
Meringue
;pread to crust edges
One or two-crust, quiche ~lassor Satin-finish
fletal
fletal; Pyroceram
~aked potatoes
Scz!loped or saucy
.’z~sseroles
jet on Oven Shelf
;Iass or Metal
increase time for large almount or size.
Move to Shelf 5 or Cfor oven meals,
..-——-
25
Page 26

1. Always we broiler pan and rack that comes with youroven.It
IS designed to minimize smoking and spattering by trapping
juices in the shielded lower part of the pan.
2. Oven door should be ajar for most foods; there is a special
position on door which holds door open correctly.
3. For steaks and chops, s{ash fat evenly around outside edges
of meat. To slash, cut crosswise through outer fat surface just to
the edc?eof the meat. Use tongs to turn meat over to prevent
4, if desired, marinate meats or chicken before broiling. Or,
brush with barbecue sauce last 5 to 10 minutes only.
$%,When arranging foGd on pan, do not let fatty edges hang over
sides, which could soil oven with fat dripping.
6. Broiler does not need tGbe preheated. However, for very thin
foods or tG increase browning, preheat if desired.
7’. Frozen Steaks can be conventionally broiled by positioning the wen shelf at next lowest shelf position and
piercing meat and loosing juices.
increasing cooking time given in this chart 1%times per side.
W9nments
Cm?mtify
amrwf
Thickness
shelf
Position
Ck?ln
izmuw
Ajar
!ml’st side
Time, !wrh
ihxxh?mdSW?
~ime5 Mha
?-3
I-5
10-12
i0-12
I1-13
lrrange in single layer.
%lb, (about 8 thin
slices)
c
Yes 5
7
Rare: 14
Medium: 16
Well
Done: 18
Ground
Beef,
Well done
;pace evenly,
Jpto 8 patties
ake about same time.
Steaksless than 1-in. cook
hrough before browning. Pan fry
x broil on Shelf D. Cook first side
wstto turn meat color then finish
)ther side to doneness desired.
l-lb. (4 patties)
I/zto %-in, thick
c
Yes
Beef Steaks
Terickr am
such as T-bone, rib-eye,
filet mignon, loin or strip,
etc.
l-in. thick
c
B
-.
A
Yes
I kin. thick
Yes Rare: 20
Medium: 25
Well
Done: 30
—
40
2
5-10
total
18-20
ZO.25
z3.27
10-15
Nashfat.
~educe times about
Bed Steaks
No.
Close
door
Chicken
1whole (2 to 2VAbs.),
split lengthwise
3-10min. per side for
]ut-up c!licken.
Breads and pastries
Spaceevenly Place English
nuffins cut-side-up and brush with
rotter, if desired.
D Yes I-2
—
nun 3rush with butter and sprinkle with
xown sugar ifdesired. Turnover,if
~esired,
onlywhole or sliced fruit,
lot halves,
2-8 pieces
c
B
c
Yes
—...
Yes
Lobster
taits
(6 to 8-oz. each)
13-16
[00 not turn
wer)
Gutthrough back of shell, Spread
open. Brush with melted butter
~efore and after half time.
2-4
Yes 8
3-5 Handle and turn very carefully.
Brushw!thlemon butter before and
during cooking if desired. Preheat
broiler to increase browning.
1-lb. fillets
1/4to I/z-in.
thick
1-in. thick
Ham
si;ces
(precooked)
B Yes 12 9 Increase times 5-10
min. per side for 1%-in. thick
or home cured.
Pork C#M3ps
l-in. thick
B
————
c
B
Ye3 Well
Done: 20
15-17 Slash fat.
Yes
Yes
Medium: 12
Well
Done: 15
Medium: 20
Well
Done: 25
10-12
11-13
13-15
17-20
Slash fat.
l-in. thick
2 to 4 chops
1 Yz-in.thick
1-lb.
. -——.
c
—
Yes 6
2-4 If desired, split sausages in half
lengthwise into 5
to G-in. pieces.
26
Page 27

4. Position own shelf at E?for small-size roasts (3 to 7 Ibs.) and
at A for larger roasts.
2, Place meat fat side up or poultry breast-side up on broiler
pan or other shallow pan with trivet. Do not cover. Do not stuff
poultry until just before roasting. Use meat probe, for most
accurate doneness. Control signals when food has reached set
tempera~ure. (Do not place probe in stuff ing.)
3. Remove fat and drippings as necessary. Baste as desired.
Type
%ea~
Tendercuts: rib, high quality
sirloin tip, rump or top round*
Lamb Leg or bone-in shoulder*
Veal shoulder, leg or loin*
Pork loin, rib or shoulder*
Ham, pre-cooked
Ham, raw
●For boneless rolled roasts over 6-in. tl
Pou!iry
Turkey
Owen
Temp.
325°
325°
325°
325°
325°
325°
:, add 5 to 10 m
325°
325°
4. ~inm?recommended for roasts is 10 to 20 min. to
allow roast Lofirm up and make it easier to carve. It will rise
about 5° to 10° internal temperature; to compensate for temperature rise, if desired, remove roast from oven at 5° to 10° less
than temperature on chart.
5, Frozen masts can be conventionally roasted by adding 10
to 25 min. per pound more time then given in chart for refrigerated, (10 min. per lb. for roasts under $lbs.) Defrost poultry
mmene’ss
before roasting.
Rare:
Medium:
Well Done:
Rare:
Medium:
Well Done:
Well Done:
Well Done:
ToWarm:
Well Done:
~erlb. to times giw
Well Done:
Well Done:
Approximate F4txmstimgTimes
inMinutesper Pound
3
towk. 63 toa$lbs.
24-30 18-22
30-35 22-25
35-45
28-33
21-25 20-23
25-30
24-28
30-35 28-33
35-45 30-40
35-45 30-40
10 reins. per lb. (any weight)
under Io=nbs. to to Is”ibss
20-30 17-20
above.
ato%ubs. over5mk%
35-40 30-35
’10to 15=U9S. over f5dbS%
20-25
15-20
Irrl!tem$d
Temp. ‘F
130°-1400
1500-160°
1700-185°
130°-140°
1500-160°
170°-1850
170°-1800
170°-1800
125°-1300
m thigh:
1850-190°
27
Page 28

..
e
---.
“.
.:
..
,..
.
-,.”-.*
.
.“.
1. Use medium or heavy-weight cooking containers. Aluminum coi~tainers conduct heat faster
than other metals. Cast iron and coated cast iron
containers are siow to absorb heat, but generally
cook evenly at LOW or MEi31UM settings. Steel
pans may cook unevenly if not combined with other
metals. Use non-stick coated or coated rnetai containers. Flat ground pyroceram saucepans or skii-
eveniy. Giass saucepans shouid be used with the
heat-spreading trivets avaiiabie for that purpose.
2. To conserve the most cooking energy, pans
shouid be flat on the bottom, have straight sides
and tight fitting iids. Match the size of the saucepan
to the size of the surface unit. A pan that extends
more than one inch beyond the edge of the trim ring
traps heat which causes “crazing” (fine hairiine
lets coated on the bottom with aiurninurn cook
Set&irng%0Complete
f%c$kimg
-.
IDirecticms and Setting
SO
Start Cumkhtg
High. Incovered pan bring
water to boil before adding
cereal,
High. Stir together water or
milk, cocoa ingredients.
Bring just to a boil.
‘amhher
Covered
Saucepan
Uncovered
Saucepan
s8md
cereal
cornmeal, oatmeal
Comments
Low,then add cereal. Finish
timing according to package
directions.
Medium,to cook 1or2 min. to
completely blend ingredients,
Cereals bubble and expand as
they cook; use large enough
saucepan to prevent boilover.
Milk boils over rapidly.Watchas
boiling point approaches.
cocoa
coffee Percolator High, At first perk, switch
heat to Low.
Low to maintain gentle but
steady perk.
Percolate 8 to 10min. for 8 cups,
less for fewer cups.
Eggs
Cooked in shell
Covered
Saucepan
Covered Skillet
Uncovered
Skillet
Covered Skillet
Uncovered
Skillet
High. Cover eggs with cool
water.Coverpan,cookuntil
steaming.
Medium. Melt butter, add
eggs and cover skillet.
High. Melt butter,
Low.Cook only 3 to 4 min. for
soft cooked; 15min. for hard
cooked,
Continue cooking at Medium
untilwhites arejustset,about
3 to 5 more min.
Low,then add eggs. When
bottoms ofeggs havejust set,
carefully turn over to cook
other side.
Low,Carefully add eggs.
Cookuncovered about 5min.
at Medium.
Medium. Add egg mixture,
Cook, stirring to desired
doneness,
Fried sunny-side-up
If you do not cover skillet, baste
eggs with fat to cook tops evenly.
Fried over easy
Poached
High. In covered pan bring
waterto a boil.
High. Heat butter until light
golden in color.
Remove cooked eggs with slotted
spoon or pancake turner,
Scrambled or omelets
Eggs continue to set slightly after
cooking, For omeletdo not stir last
few minutes, When setfold in half,
Fruits
Covered
Saucepan
OoveredSkillet
Jncovered
;killet
-ligh. In covered pan bring
‘ruit and water to boil.
Low,Stir occasionally and
check for sticking.
Fresh fruit: UseV“to
1/2 cup water
per pound of fruit.
Dried fruit: Use water as package
directs, Time depends on whether
fruit has been presoaked. If not,
allow more cooking time.
Meatcan beseasonedandf!oured
before it is browned, if desired,
Liquidvariations for flavor couldbe
wine, fruit or tomato juice or meat
broth.
Timing: Steaks 1to 2-in,: 1to 2 hrs.
Beefstew: 2to3hrs.Potroast: 2M
to 4 hrs.
Pan frying is best for thin steaks
and chops. if rare is desired,
preheat skilletbeforeadding meat,
-.
%%?23%3,Pcmm’y
9raised: Pot roasts of
Eeef, lamb or veal; pork
steaks and chops
-figh. Melt fat then add
neat, Switch to Med-i-4igh
obrown meat. Add wateror
]ther liquid.
Low.Simmer untilforktender.
-
Pan fried: Tender chops;
thin steaks up to 3’4-in,;
minuie steaks;
hamburgers; franks; and
sausage; thin fish fillets
..——
—
-iigh. Preheat skillet, then
]rease lightly.
l’vied-High,Brownand cookto
desired doneness, turning
over as needed,
---
——
28
Page 29

-——
—.—..—
—.—.——.———
W-R(3
cracks) on the porcelain and discoloration ranging
frorrI
blue to dark gray of the trim rings.
3. Frying. DO not overfill kettle with fat that may
spill over- When adding food. Frosty foods bubbie
vigorously. Watch
foods frying at HIGH temperatures and keep range and hood clean from accumuIated grease.
IIWedims and Setting
to SW’it cooking
High. Melt fat, Switch to
Med-1-iighto brownchicken.
%3wiirrag
to complete
@M9kiRagJ
—
Low. Cover skillet and cook
until tender, Uncover last few
minutes.
Container
Covered Skillet
Uncovered
Skillet
Covered Skillet
Covered Dutch
Oven,Kettle, or
Large
Saucepan
Small Covered
saucepan. Use
small surface
unit
Skillet or
Griddle
Covered Large
Kettle or Pot
a%mm’ients
.—
For crisp dry chicken, cover only
after’switchingto Low for 10min.
Uncover and cook turning
occasionally 10to 20 min.
A more attention-free method is to
start and cook at Medium.
Pan broiied bacon
High. In cold skillet arrange
baconslices,Cookjust until
starting to sizzle.
High. Melt fat. Switch to
Medium to brown slowly,
Med+iigh. Cook,turningover
as needed.
Sauteed: Less tender thin
steaks (chuck, round,
etc.); liver; thick or whole
fish
Low. Cover and ccok until
tender.
Meatmay bebreaded or marinated
in sauce before frying,
Simmered or stewed
meat: chicken; corned
beef; smoked pork;
stewing beef; tongue; etc.
High. Cover meat with
water and cover pan or
kettle. Cook until steaming.
Low, Cook until fork tender.
(Water should slowly boil),
For very large loads medium
heat may be needed.
Add saltorother seasoning before
cooking if meat has not been
smoked or otherwise cured.
Me!ting chxxhte,
butter,
rn%a5@nmaih3ws
Warm.Allow 10to15min.to
melt through. Stir to
smooth.
When melting marshmallows, add
milk or water,
Thick batter takes slightly longer
time, Turnover pancakes when
bubbles rise to surface.
Medium. }ieat skillet 8 to 10
mirr,Grease lightly.
Cook
2 to 3 rein, per side,
$%sfia
Noodles or spaghetti
Yigh. In covered kettle,
~ringsalted water to a boil,
Jncover and add pasta
sIowlyso boiling does not
3top.
Meal-High,Cook uncovered
until tender. For large
amounts Ffighmaybe
needed to keep water at
rolling boil throughout entire
cooking time.
Use largeenough kettle to prevent
boilover, Pasta doubles in size
when cooked.
Cooker should jiggle 2 to 3 times
per minute,
Pressure ChdKh-ng Pressure
Cooker or
Canner
+igh. Heat until first jiggle is
~eard.
Meal-Highfor foods cooking
10min. or less. Medium for
foods over 10min.
Pddings9 %m.mes,
U%?mdif?s, Frc$$stings
Uncovered
Saucepan
-!igh. Bring just to boil, Low. Tofinish cooking. Stir frequently to prevent sticking.
Uncovered pan requires more
water and longer time,
Veg.ptames
Fresh
Covered
Saucepan
Oovered
Saucepan
Jncovered
Skillet
;overed
Saucepan
-figh. Measure Wto l-in.
Materinsaucepan, Add salt
md prepared vege@ble. in
:overed saucepan bring to
>oil.
-ligh. Measure water and
;alt as above. Add frozen
]Iock of vegetable. In
:overed saucepan bring to
]oil.
-ligh. In skillet melt fat.
Medium. Cook l-lb. 10to 30
more min., depending on
tenderness of vegetable,
Frozen
Low,Cook according to time
on package,
Break up or stir
asneeti~tiwhile
cooking.
Medium. Add vegetable,
Cook until desired
tenderness is reached.
Turnover or stir vegetable as
necessary for even browning.
—...——
-figh.Bringsalted water toa
]oil.
.—
—
Warm, Cover and cook
according to time,
Triplesin volume after cooking,
Tme at Warm, Rice:”1cup rice and
2cups water—25 min. Grits: 1cup
grits and 4 cups water—4@ min.
29
Page 30

Your Range is cleaned two ways: manual!y and by
using the automatic self-cleaning function. This chart
describes parts of your range, cieaning materials to
use on each part, and general directions for clean-
ing. 13esure to follow these directions carefully to as-
sure maximum use of your range. NOTE: Let range
Parts cOOlbefore cieaning manually,
Bake Unitand
BroilUnit
BroilerPan& Rack
ControlKnobs:Range
TopandOven
OutsideGlassFinish
Metal,including
Chrome Side Trims
and Trim StriRs
Porcelain Enamel*
Inside Oven Door:::
@Soap and Water
@Soap-Filled
Scouring Pad
@Plastic Scouring
Pad
Mild Soap and Water
Soap and Water
Soap
andWater
@ Paper Towel
@ Dry Cloth
@Soap and Water
Soap and Water
Soap and Water
Soap and Water
z?zz.~.~
_.#J~&.-*p~k.-=c&~~
@Soap and Water
@Stiff-Bristled Brush
@Soap-Fi!led
Scouring Pad
--5=:---- ....7.-=z?;’mT.m
~.-cr--
Do not clean the bake unit or broil unit. Any soil will burn off
when the unit is heated. NOTE:The bake unit is not hinged and
cannot be lifted to clean the oven floor. If spiliover, residue, or
ash accumulates around the bake unit, gently wipe around the
unit with warm water.
Drainfat, cool pan and rack slightly. (Do not let soiled pan and
rack stand in oven to cool). Sprinkle on detergent. Fill pan with
warm water and spread cloth or paper towel over the rack. Let
both stand for a few minutes. Wash; scour if necessary. Rinse
and dry. OPTION: The broiler pan and rack may also be cleaned
in a dishwasher.
Pull off knobs. Wash gently but do not soak, Dry and return con-
trols to range making sure to match flat area on the knob and
shaft.
Wash all glass with cloth dampened in soapy water. Rinse and
polish with a dry cloth, If knobs on the control panel are removed, do not allow water to run down inside the surface of
glass while cleaning,
Wash,rinse,andthenpolishwith adrycloth, DO NOT USE steel
wool, abrasives, ammonia, acids, or commercial oven cleaners
which may damage the finish,
Avoid cleaning powders or harsh abrasives which may scratch
the enamel.
If acids should spill on the range while it is hot, use a dry paper
towel or cloth to wipe up right away. When the surface has
cooled, wash and rinse,
For other spills, such as fat smatterings, etc., wash with soap
and water when cooled and then rinse. Polish with a dry cloth.
On this oven, clean ONLY the door liner outside the gasket. The
door is automatically cleaned if the oven is in the self-cleaning
cycle, If spillover or spattering should occur in cooking function, wipe the door with soap and water. DO NOT rub or damage gasket. Avoid getting soap and water on the gasket or in the
rectangular flanges on the door.
Avoid getting ANY cleaning materials on the gasket.
~Q~F&l-
Cool before cleaning. Frequent wiping with mild soap and water
will prolong the time between major cleanings. E3esure to rinse
thoroughly. For heavy soiling, use your self-cleaning cycle often.
Remove the Oven Vent Duct found under the right rear surface
unit. Wash in hot, soapy water and dry and replace. See positioning directions in “Care for Your Range. ”
&%@%w~T~
.,
.. -..
~Z&G-m.zE.m%.m-%wtiw?mG
Clean as described below or in the dishwasher, DO NOT
CLEAN (3N THE SELF-CLEANING FUNCTiON as pans and
rings wiil discoior.
Wipe ali rings after each cooking so unnoticed spatter wiil not
“burn on” next time you cook. To remove “burned-on” spatters
use any or aii cleaning materials mentioned. Rub lightly with
scouring pad to prevent scratching of the surface.
w.a.n*%w.F.:+$Fas~*,si?.%?:,..~4&=&=mm
-+K~.~-*~:z--~:>’”~?””~
Page 31

Y shelves can be cleaned vvith the self-cleaning function in
the oven. For heavy soil, clean by hand using any and all men-
tioned materials. Rinse thoroughly to remove all materials after
cleaning.
Spatfers and spills burn away when the coils are heated. At the
end oi a meai, remove all utensils from the Calrod” unit and
heat the soiled units at hit. Let the soil burn off about a minute
and switch the units to OF%.Avoid getting cleaning materials on
the coils. Wipe off any cleaning materials with a damp paper
towel before heating the Calrocf’l unit.
DO NOThandle the unit before completely cooled.
DONO-rself-clean plug-in units.
DONOT immerse plug-in units in any kind of liquid.
...
,
!,,
... . ,-
‘X ../-
Soap and Water
Cairod’ Surface Unit
Coils
.
.....- .... . .
,.. .
. .
Spi];age of marinades, fruit ~uices, and ~~s~ing ma~e~ials containing a~i~s may cause discoloration. Spillovers sho~ld be
wiped up immediately with a paper towel. When the surface is cool, clean and rinse.
Brown streaks
and specks
Cleaning with a sponge or
dishcloth that has been used
for other kitchen cleaning
tasks and may contain soilIaden detergent water.
Use Cleaner-Conditioner onlv ““ ‘“ “ ““ ““ - “ - ‘“””
usea Ilgntapplication or Gleaner+onamoner
with clean, damp paper towel.
with clean, damp paper towe~.
lhrh~rreverpossible,wipe ‘
Sg?at’ter’sand foodS@iisas
they CXXNr.
Select correct heat settings
arxi largeEWX2ughcookwareto
eliminatefxiffxwrs and
Spattering,
‘,
CAUT1Di4: Be
fxrefuf to-avoid
Stf?wrlburn%
E@sureUniiiscool !M’orw
puttingVk3seitemsan
cookingsurface,
Coarse particles (salt,
sand, sugar or grit)
caught between bottom
of cookware and cooktop
that are not removed
before cooking.
Using incorrect cleaning
materials.
Normal daily use of CleanerConditioner.
In area where there is an
abundance of sand or dust,
be sure to wipe cooktop
before using.
Fine“brown
fines” (tinj/
scratches or
abrasions which
have collected
soil).
lJse only cleaning materials
recommended in this manual.
.
ApplyClearrer-Ccmditiorrerwithdampm-iecippsr
W@ mcooledW.mux3.
While uni?is still hot turn to OFF; wrap several
damp paper towels around spatula or pancake
turner and use to remove sugar syrup spill from
hot cooktop immediate/y.
CAUTION: Sugar syrup is very hot so be careful
not to burn yourself.
Scrape off remainder of burn with single-edge
razor blade while unit is still warm—before
cooling down completely. Hold blade so edge is
completely flat on cooktop and blade is at a 30°
angle
Mix a smali amount 0: CM3ta Wxmser with t+3
water to form a thick, V@ /3ss10.
Apply this rmixtur~@ s&3inafwa,
i-et il stand 4.5rrrinutesa
Scrub with clwm, cj{zrnppapw towwi,
AWX $Mn [s rommxl
!]$ljp+[~gf&fl~~ir\j~]gp~l<te~ljtf~d;:i;~~>~]a.[j[+”
{f-l$’ii&!,
. ,,.
t,
- {’/’-~ ;:[l$~~}iltijtif jlfJAc,[Ac,[’ 2~kd [;oi!f{!l
f\ f-l,1 / y fL~,;+t:; fj y J L ..
. . .
, 1~.f.
,.
i
W I1!? p.;i pr2 f’ l.fjwl[ ;..
Donotsiideracksor othef
%mrprnMa!
Objocta across
Cooktop.
‘Itting or
spalling
Boilover of sugar syrup
and adherence of sugar
syrup to hot cooi<top,
Seiect correct heat setting and
iarge enough cookware to
eiiminate boiiovers and
spattering.
Watch sugar syrup carefuliy
to avoid boiiover.
,----
.. .....
i
3-1
Page 32

-,. -- ~>;L::,L--::%
.~- y.f.-.~,-
~“
,,.
. . . ...
.! .-—J . -: .,= u- ._. >S. $.$cs
.,
. . ... ,;-. . . .
.). “>---- .
$-’:).;.,.% y,~;g”
---~::] ~
“~\:g:; L&;:‘j-j ,
+;.;
L::J d
‘l:.”!-r; .:
Ii? iy,ly lz?~
s. -. .
,
& %; L-C22!2L!USlUL 1! QJU3N:
ivlakesure you touched STARTbutton.
Door is not securely closed.
Another funct!on entered. Touch CL EAR/ OFF to cancel.
Yc)uhave riot entered numbers after Time Cook.
- Finished temperature not entered after Temp Cook.
..
.
CLEAR/OFF wzs touched accidentally.
‘: After touching (look (lode:” Auto Cook, or Auto Roast
.-
pads, no code number was entered.
Not enough time set when using Time Cook function
because of variance of starting food temperatures.
The density and amount of foods will vary and thus may
need more time for completion.
In Auto Cook, dish not completely covered as directed.
Humidity or moisture in oven will lessen the cooking
time in Auto Cook function.
Some standing time is recommended for certain vege-
tables cooked with Auto Cook setting.
Probe not inserted properly into meat or dish. Check
Cookbook or Auto Roast section for probe placement.
Incorrect numbers entered using Cook CodeTMcontrol.
Incorrect Power Level entered.
Disi7not rotated, turned or stirred as given in recipe.
Oven was opened during “AUTO” cycle of Auto Cook
function.
Too many dishes in oven at same time.
Check Cookbcok for food placement when using
Double-Duty’r\l shelf.
Food not thoroughly defrosted.
Improper use of coverings. Check Cookbook and this
book for covering.
r ~Aihenusing Temp Cook function, you have entered a
temperature less than 80° or more than 799°.
- Door is opened during “AU”l_O” cycle of Automatic
Cooking function, Close door and touch START.
,,.j,.
(-’J!~ ~“j‘y {~j gMg(Qna[ f:)wen
{g~}
&-~-j !fy~jIi [$!Cbi VW(3rk:
0 plug onrange notcompletely ir~sertedinoutlet receptacle.
o The circuit breaker tripped in your house.
o A fuse has blown.
0 Oven controls are not properly set.
Range ToJl !$Jot Functioning $%42~.2@@l’:
0 Calrod” units are not plugged in solidly.
o Reflector rings/pans not set securely in range top.
0 Surface unit controls not properly set.
Clwerl Ligwl Does Not W/m’!{:
o Light bulb is loose.
@ Bulb is defective.
o Switch operating oven light is broken,
Foods Al%?Not Cool{ing Prop&Wly DLM%-ilg
Baking, Roasting or Broi!ing:
Makesure Oven Control knobs are properly set.
Improper shelf position is being used.
Thermostat needs adjustment.
Meat thermometer is not positioned correctly in meat.
Not preheating oven when suggested.
Improper size container is being used.
Not enough cooking time allowed for meat’s poundage.
Oven shelf not level.
Too many utensils or foods in the oven.
Aluminum foil not slit when used over broiler rack.
.7.
~7
-+.H.;?.*,
Food being baked on hot pan.
.>+L+,.,+;.+-=.,.
._,,+..,.>.,
.71~~..-53-+’
..3:J=!+.W
In TIME BAKE, Automatic Oven Timers not set properly.
‘“‘-d
Moisture inside and C,htskk?Ym.RrCw?m:
@ Oven vent duct is covered with some material.
Q Oven vent duct is not positioned properly.
self-clean operation:
oven VVon’t Latch:
Q Oven is too hot from prior use, so let cool slightly.
$j Not holding in Latch Release while moving Latch.
G Oven Set Knob not on CLEAN.
Door is improperly locked and latched.
Oven Set Knob is not in CLEAN position.
Oven Temp Knob is not positioned on CLEAN.
Start time/stop time dials are improperly set.
Excessive spills, spatters, and soil deposits are not
being cleaned up prior to self-cleaning.
o Range hasn’t cooled to a
c Not holding down Latch
Latch.
safe temperature.
Release Button while
i~~!~!~-lg
. ,
<
,-)
3“
\
L.
Page 33

Automatic (linking Control is a fully automatic
e~ectronic conirol system that lets your microwave
oven do the cooking for you. The charts and
recipes in ~his section are designed to help you
make the most of this truIy new feature,
.Standard cooking techniques require setting the
oven for a specified cooking time or a selected finished temperature. And that
means looking up
recipes
in a cookbook. . trying to convert old
recipes for microwave cooking. . .or just resorting
to guesswork. This control method works on an
entirely different basis—with a special electronic
sensor that detects steam from cooking food. The
oven “knows” how the food is cooking; so it can
automatically set the correct cooking time and
maintain the proper power level for different types
and amounts of food. And it’s adjustable to suit
your individual taste.
Simply touch two control pads—AUTC) COOK and
the desired Code number—and then START. A
chart on the oven control panel gives a complete
list of Codes for frequently prepared’ foods, The
readout display shows AUTO until steam is s~nsed
nd then signals, and displays time counting down.
During AUTO, oven should not be opened, but
when oven signals, most foods should be turned,
~~jrred, or rotated. Check the ,Automatic Cooking
Chart for suggestions.
Appropriate containers and coverings help assure
good cooking results. Containers should match in
F:oods
size to the size of the food being cooked. Coverings
such as plastic wrap secured on all sides, the lid
that came with t{~e container, or microwave-safe
plastic domes are ideal. For examples of containers
and coverings, see page 10 and the following recipe
section of this book.
With Preference Control, you can adjust the Auto-
matic Cooking Feature to your individual taste by
adding either “l” or “9” after Code number. If after
trying the suggested Code, you would prefer less
cooking time, simply add the number “1” after the
Code and the oven automatically lessens the cook-
ing time by 20°/0.If you wish more cooking time, add
“9” after the Code to increase cooking time by 20°/0,
Automatic Roasting uses the temperature probe
rather than the electronic sensor to cook meats
evenly to the desired degree of doneness. The oven
continually monitors the food’s internal temperature. Unlike ordinary Temperature Cooking, the
oven changes power levels two or three times
depending on the degree of doneness during cook-
ing to give you the best results automatically. Meat
iscooked evenly, without toughening because lower
power levels are used as the meat temperature rises
thus cooking meats evenly while retaining the natural juices. After cooking, the oven switches automatically to Hold for an hour. Food stays warm
without overcooking,
A.
wide Vfi riety of fDods incILId i n g meats, fish, casseroies,
Recipes and foods which must be cooked
,,y]
& ~~ ~ \~~
,leftovers, and convetiience foods can be Auto
.)
uncovered, or which require constant. atten-
—<-.
-.
-.L=s.:; ::)c)k.~d
Pda.tch container size with the food, cover
tion, or adding ingredients during cooking
,., -,
----
..
.,’,<J,r;:~r’~J,/
a
~ic1 d 0 n 01 ape: n clc.Io r c111r in g 1+(JT’C) cyc I0.
should be microwaved by TIME COOK. For
‘.
.’ihen o~sr~oignais, turn, rota.Ie or stir as r“ecornmended in
foods
that microwave best usiI-ICItern kmrature
“:’Jr)kbc;o~(or cha. ri On pages 40 and 41. probe, use TEMP
Foods requiring a
cooking cook
besl
COOK or AUTO ‘ROAST”.
dry or crisp surface after
with T!ME COOK.
Page 34

The benefit is a~t~nlati~ ~etti ng and ~ontroi of cooking, but just [i ke convention! miCrOW~Vi!lg YOU r71L4S~
check the food after the AUTO cycle (oven beeps and cook time begins to count down on display) and turn,
rotate or stir as recommended.
---
Fovmeat and fish kmwes use eitbr
the
round or loaf microwave-safe
containers. Fish loaves made with
precooked or canned fish useAuto
Cook Code 4. Beef loaf uses Auto
Cook Code 8. Cover with plastic
wrap and rotate %turn after oven
signals. See the chart on following
page for recipes.
VVho!e chicken, chicken breasts
and pieces, or turkey parts should
be placed in a microwave-safe 8-in.
square dish, 8 x 12 x 2-in. dish or
3qt. casserole. Cover securely with
plastic wrap or container lid. If
cooking bag is used for whole
chicken, shield breast bone with
small strip of foil, Rotate dish
I/z turn when oven Signals. u ‘e
Auto Cook Code 4.
.
Pork chops automatically cook well
in 8 x 12‘x 2-in. dish, co-veredwith
plastic wrap. Add barbeque sauce
or other sauce on each chop.
Microwave using Auto Cook Code
49 which is Code 4 with the added
digit 9 giving the Code 20°/0more
time. (See page 33.)
Fi3b fi:!ets, whole fish or seafood
pieces should be in single layer in
flat pie plate or oblong dish to fit.
Cover with piastic wrap or con-
tainer iid. Use Auto Cook Code 6
for fiilets and Auto Cook Code 1
for seafood pieces.
Chuck or rump roasts should be
placed in a cooking bag with 1$
CUp water Or mat-i nade (see mari-
nade recipes on page 100 in
Cookbook) and placed in a microwave-safe dish. Cut bag to fit ciose
to the size of the roast and
tie open
Spare ribs and brisket should be
automatically cooked in round
glass container with lid or plastic
wrap. Make sure iiquid covers meat.
After oven signais, turn over or
rearrange meats often.
end secureiy. Cut a 1-1I/l” slit near
the tie. Use Auto Cook Code 9 for
cooking.
Use tine fo!iowing step-by-step instructions and tips when adapting your casserole recipes for Automatic
1.
J,
-,,.
.
-..
topped casseroles, remove cover after oven sig-
nals and add topping, then continue cooking
Meats and vegetables SI1OUICIbe
submerged in
~j~
liquid.
p.:
After oven signals, rotate dish % turn a17ci stir ~.
:,..
~::
covering all ingredients vvitil liquid,
~.
;
::-
~,
{:
;.
.
Page 35

;3;: $7:475-- -,**
~.-w;T&<k>.w.~i&g&’p. ‘@
$+&mlCkM3kCxxk 6 Tim@—35miu%)
Makes 6 to 8 Servings
1 !b. grcmmdchuck . . . . . . . . . . . . . . In large mixing bowl, place meat, bread crumbs, pepper, salt, chiii
1/2 cup dry bread
powder, onion and egg. Mix well and form into 12 balls. Arrange balls
$/8 teaspoon pepper in a circle in 2 qt. casserole. Set aside.
fl/2 teaspoon salt
1 Chiii
2 dFymhmX@lonions
1 egg
“1/2cup .wXJuhm’rice
. . . . . . . . . . . .. . .in small mixing bow! place rice, beans, tomatoes and chili powder.
1 Can(%5%oz.] beans Mix well and pour in center of casserole and over meatballs. Cover
and microwave at Auto Cook Code 6. Rotate 1/2 turn when oven
t can (16 oz.) tomatoes, chopped signals and time remaining appears on readout’.
and undrained
f chili powder
Auto Cm& CkK4e4 Cx90kingT%BM3-29min.)
Makes 4 Servings
a/4 cup soy sauce . . . . . . . . . . . . . . . . .In 2-cup glass measure, place soy sauce, honey and sherry. Stir until
f/3 Cup honey
blended. Add cornstarch; mix well. Microwave at HIGH (10) for 3 to
aA3cup sherry
3-1/2 minutes, stirring every minute until thickened. Tie chicken legs
4 teaspoons cXX’nstarch
and place in 12 X 8 X 2-in. microwave-safe dish, breast side up. Brush
with half of sauce (reserve half for later use,) Microwave on Auto
1 whole chicken (abou# 3 lb.)
Cook Code 4. When oven signals and time remaining appears on
readout, apply remaining sauce, recover and continue cooking.
‘if breast bone seems prominent,
a 1“ strip of foil may be placed over bone to prevent splitting of wrap.
C%W3’CEN Arwcl IFm2Ei
Auto ICtxIk Code 7’(Approx. C3mking Time—f hr. 15 min.)
Makes 6 Servings
1 can (to-fi/2 oz.) condensed . . .In small mixing bowl mix soup and milk; reserve 1/2 cup of the
cream of soup
mixture, Blend remaining soup mixture, rice, mushrooms and half of
1-1/4 cups Wliik (1 soup ‘can‘M) the onion soup mix. Pour into 12 X 8 x 2-in, glass dish.
3/4 cup regular rice, lnwwoked
f can (4 oz.) stems
and pieces
-1pkg. {1”1/2 oz.) dry onion soup mix
1 $X@up chicken (about 3 lb.)
. . .Place chicken pieces on rice mixture, arranging with meatiest pieces
to outside of dish. Pour reserved soup mixture over chicken and
sprinkle with remaining soup mix. Cover with plastic wrap, no vent.
Microwave at Auto Cook Code 7, rotate 1/2 turn when oven signals
and time remaining appears on readout,
.....-—---——-.—
.-.=
- ----- ,.,,..=._-...
111
86
94
93
138
117
129
..,,==.-.
*.em-
8
5
2
~
4
6
r
\)
..-”------- .- .
Recipe
Sweet & Sour t-lam
Chicken & Dressing
Round Salmon
Loaf
Beef Durger Stroganoff
B13C) Franks
cheese Stuffed Meatloaf
polyt~esjan Swiss Steak
Chow hdein
..”,-----..,—,.., ,,-”—. ...._-
!PacJeNo.
~24
138
162
84
129
93
99
1“18
—-———.
‘Auto c(,wk”
GM&i?
5
4
4
7
2
8
8
6
------......“--.e”e.-e”e
35
Page 36

Whdf? or i!arge hahms of Vegma”
bies such as cauliflower or squash
use Auto Cook Code 5. Use round
or square container close to the
size of vegetable. Add %cup water.
Cover with iid or plastic wrap. Turn
cauliflower over after oven signals.
For other vegetables, rotate Mturn
when oven s~gnals.
l%%lzen
iPkms or slices d vegetables vegetables
should be placed in round con-require M to M cup of waler. Use
appropriate size covered container.
Stir or rotate after oven signals.
Use Auto Cook Code 5. -
Pouches of frozen vegetables
should be slit 1“ in center before
placing directly on oven floor. Use
Auto Cook Code 4. After oven signals, rearrange vegetable and rotate
pouch %turn.
tainer similar in size to amount
being cooked (at least half full).
Cover and stir well after AUTO
cycle. Use Auto Cook Code 1.
AitemaWy, frozen vegetables in
pouches can be slit with an “X”
shaped slit and placed
in glass
container with “X” downward, Aftet-
ccmking, pick up pouch and empty
~~
food into dish through “X” opening. ;
Page 37

Auto CXmkck$m—-l%sta‘f (Appmx. Ccmking TmfM?-t3 min.)
spinach1 CCM3WM2JTime”’-’%min.)
!bsagna 2 G30kirngjmm?-’%%
min.] Makes 6-8 Servings
6 lasagna noodles (1/3 pkg.] . . . . . . .Piace noodles, water and oil into a 13 X 9 X 2-in. dish, Cover with
(Xqt?s W2W’ plastic wrap. Microwave on Auto Cook Code 1. Aliow to stand whiie
M preparing remaining ingredients.
pkg. [10 oz.) WXze?n . . . . .Remove paper wrapping from box. Piace unopened box into oven and
spinach microwave on Auto Cook Code 1. Drain weii.
can (8 Oz.)Iomato sauce
. . . . . . . . . in iarge bowi mix together tomato sauce, tomato paste, mushrooms,
can (8 cm.)tomato paste
onion, oregano, basii, sa6tand gariic powder.
jar (4’oz.) sliced mushrooms
(drained)
Cup‘chopped onion
teaspocm leaf oregano
teaspoon basil
iea$poon salt
teaspoon garlic powder
‘cups (-l-pt.) Smah!Curd cottage
. . .in a 13 X 9 X 2-in. dish iayer weii drained iasagna noodies, 1 cup
Cheese
cottage cheese, 1/2 pkg. spinach and 1/2 of tomato sauce. Repeat.
oz. grated mozzarella cheese
Sprinkie mozzarella cheese over top. Cover with piastic wrap. Microwave on Auto Cook Code 2, Rotating and removing wrap when oven
signals and remaining time appears on readout.
Auto Cook Code—See Recipe Cooking Time—22
to 25 min.) Makes 4-6 Servings
1 pkg. (?0 oz.) frozen . . . . . . . . . . . .
. .Place box of spinach in microwave oven and partiaiiy cooif on Auto
spinach
Cook Code 1. Remove from box and drain well. Set aside. in
1/2 cup rice 2 qt. casseroie piace rice and water. Cover. Microwave at Auto Cook
! cup Waiw’
Code 6. To cooked
rice, add butter, onion, miik, egg, sait and cheese.
f/4 cLlp butte?’,melted Mix weii. Cover and microwave at Auto Cook Code 2. Rotate 1/4 turn
1/4 cup finely chopped Onion
wi~erioven signais and time remaining appears on readaut. Let stand
1 cup milk
5 minutes covered before serving.
3 egg, beaten
2/2 %MqN30n!3Z3!t
3 c~p @lr@&?d cheddar c#W@$e
Page 38

Casw3n31e is a tangy
Baked Apples automatic cook w.eli
stewed Fruit and Fruit compotes
dessert or meat accompaniment.
in 12 x 8 x 2-in. dish spread 2 cans
(20 oz. ea.) drained pineapple
chunks, 1 cup sugar and Vi cup
fiour. Cover and microwave on
Auto Cook Code 2. When oven
signais and time remaining appears
on
readout, remove covering and
top with mixture of 2 cups butteryfiavored cracker crumbs and IAcup
rneited butler. Do not recover.
Touch “Start” and finish cooking.
using A~to Cook Code 2. Match
number of appies to size of microwave-safe covered container (see
page 240 in Microwave Guide and
Cookbook}. Use Auto Cook Code
2 for Baked Pears and Applesauce
aiso.
siaouid be stirred weli before microwaving, especially if sugar is added.
Cover; use Auto Cook Code 2 and
stir once or twice after oven sig-
nais and time appears on readout.
Touch “Start” and finish cooking.
After preparing the ingredients for the individual recipe as shown beiow the picture, foiiow these steps
for cooking.
Step f: Cover with piastic wrap and use Auto Cook
S@p 3: When cooking is finished, turn out (upside
Code 3. down) the Nut Cake and Cornbread. Invert Caramei
Sfep 2: When oven signais and time remaining
Biscuit Ring and iet dish stand over ring a few
appears on readout, remove covering and rotate dish
minutes before serving.
1/2turn.
Cook Code 3. Spread Mcup rneited
butter and M cup brown sugar in
8--ir~. round giass dish. Sprinkie
with cinnamon and ki~cup chopped
nuts if des ired. Arrange 1 can
(10oz.) rtifrigerated biscuits around
edg~s and piac~ drinking giass,
open end up, in center. See Steps
Cwamei Biscuit Ring uses Auto
!13accmand cheese Topped corn”
.
bread: Distribute M cup chopped
crisp fried bacon and 1tablespoon
Parmesan cheese in greased tl-iri.
round giass dish. Carefuiiy pour -:,~.,,
-
batter from 1 pkg. (8!h oz.) cor~~~g~~fs~~
bread mix or use batter from cQrtt:~#’++J’
bread ring page 226, over above
ingredients. See Steps abcwe for
Page 39

Auto C%mkCXde?3 Cb3khg T-imi?-18 min.] Makes 1 (10-in.) Tube Cake
~ P@” @-~W~~$~~~)““““ ““‘ ‘ <0““ ‘
In large bowl place cake mix, eggs, vanilla, oil and water. Blend on
fudge cake mix
medium speed of mixer, about 2 minutes, until smooth and creamy.
2 eggs
1 teaspoon vanilla extract
2/3 cup cooking oil
1-5/4 cups water
1/4 Cup finely chopped pecan!3 . . . . .
Lightly grease a 16cup plastic microwave fluted or straight-sided ring
mold. Sprinkle chopped nuts evenly
over bottom. Pour batter over
nuts.
Cover with plastic wrap and microwave on
Auto Cook Code 3. Rotate
dish 1/4 turn and ~emovewrap when oven signals and remaining time
appears on readout. Touch “Start” and continue cooking. Let stand in
dish 5 minutes before turning out.
Auto cook C(xk 3 (Approx. ccloking Time—16 rnin*) Makes 6 to 8 Servings
1 can (20-22 oz.) prepared . .
. . . . .lri 8-in. square glass dish, spread pie fiiiing.
cherry pie Wing
2 cups dry yei!ow Orwhite . . . . . .
.In small bowl, mix together cake mix, butter, nuts, and cinnamon until
cake mix (1 pkg. [9. oz.] or crumbly. Sprinkle evenly over cherries or, in three rows so cherries
-1/2pkg. [17” oz.]] are visible. Cover with plastic wrap.
1/4 cup melted butter
7/2 cup coarsely chopped nuk Microwave on Auto Cook Code 3 rotating dish 1/2 turn and removing
f teaspoon ground cinnamon plastic wrap when oven signals and remaining time appears on
readout. Touch “Start” and continue cooking.
Auto Cook Code 3 (Appmx. Cooking 7%$w—10min.)
Makes 1 (8-in. round) Cake
~/4 cup bufter . . . . . . . . . . . . . . . . . . . .
In 8 in. round dish place butter. Microwave at HIGH (10) for 3/4 to 1
f/3 CUP
brC$Wnsugar (packed)
minute until melted. Sprinkle sugar over butter. Drain pineapple (save
t can ($3-1/4oz.) pineapple slices liquid) on paper towels and arrange in dish. Decorate with cherries.
4 maraschino or candied
Place a 2“ diameter drinking glass (4” tail) open side up
in center of
cherries, cut in Mf
dish.*
3/4
Cx.q3all pwpwe flour . .
. . . . . . . .In small mixer bowl place flour, sugar, baking powder, salt, short-
1/2 cup sugar
ening, egg, liquid and vanilla. Beat 3 minutes on lowest mixer speed,
l-fi/2 teaspoons baking powder
scraping bowl constantly first 1/2 minute. Carefully spread batter over
-f/4 teaspoon Sa!t
fruit in dish. Cover with plastic
wrap—no vent. Microwave on Auto
f/4 cup soff shortening
Cook Code 3. Rotate 1/4 turn and remove wrap when oven signals
1 egg
and time remaining appears on readout. “Touch“Start” and continue
liquid from phmapp!e (1/3 e.)
cooking.
3/4 teaspoon vani!!a ex~ract
‘Tip: Use a small drinking glass like the type you buy containing
cheese spreads.
$%(J6?No.
1
228 3
259 3
259 3
~Q,fJ
9
241 2
Recipe
R
1
Page No.
1
“AU.!WIcook
C23dt?
Basic Bread Pudding
246
3
Steamed Pudding
265
4
Streuseled Apples
240
2
Cornbread Ring
226
3
Steamed Brown Bread
226
7
Page 40

Do not open oven door during AUTO cycle. May
@
effect cooking performance. After first beeping
signal (time appears on i$eadoutfor codes except
Code 1), stir or rotate food.
@
Match the amount of the food to the size of the
container. Fi!l containers at least %full.
@
@
@
63
DC) NQT lJSE PAPER PLATES withAutomatic
cooking.
Be sure the exterior of the cooking container
and interior of
microwave oven are dry.
Stir or rotate after oven signals and time appears
on readout.
Add %-Mcup water to fresh vegetables. Stir or
turn overvegetables and meats after first beeping
signal.
“Auto
cow
code
Approx.
mm?
2-3min./cup
Container
Microwave-safe container matched to size
of food.
11
Cover with plastic wrap or lid to dish.
camec?l Foihki
Room Temp. or thin (small
amounts at refrig. temp.)
Refrig. temp. or thick (large
amounts at room temp.)
Deli Foods
1
2
1
2 or more servings are considered large
amounts. Cover with plastic wrap or lid.
Cover with plastic wrap or lid to dish.
4 min./cup
Microwave-safe container matched to size
of food,
Entrees
Frozen
Thin (under 1“)
Cook in own container, or for quicker cooking,
in glass container. NC)TE:if entree is in aiuminum pan, remove from box, remove lid and put
back in original closed box. If entree is in paperboard container, remove from box and micro-
wave with original plastic covering.
Use bowl with plastic wrap or cover plate with
microwave-safe plastic dome.
d
Cook in container.
(see comments)
12-14 min.
3
4
4
1
Thick (over l“) 10 oz.
Cook in container.
(see comments)
16-18 min.
25-35 min.
21 oz.
Le!govers
Microwave-safe
container matched to
size of food.
2-3 min./cup
---+$1
Remove foil toD and r)ut back in box. If dinner
TVDinner{10-12oz.)
4
5
6
7
Cook in container.
(see comments)
17-19 min.
has cake or brownies, remove before cooking.
—
Cooking:
Bacon
(4slices)
When oven signals, rotate 1Aturn.
12 x 8 x 2-in. glass
dish lined with paper
towels. Cover with
~lastic wraD.
6-8 min.
Casseroles
Precooked ingredients
35-45 min. Make sure iiquid covers all ingredients. When
oven signals, stir well.
2 qt. casserole with lid
or cover with plastic
wrap,
II
II
Flaw meats & Poultry 45-55 min.
22-26 min.
Chicken
Breasts (4)
41
7
4
4
12 x 8 x 2-in. glass
dish. Cover with
piastic wrap,
NOTE: Make sure
meat doesn’t touch
covering.
,,
No additional liquid needed, When oven signals, rotate %turn. Note the preference control
1 is used with breasts to decrease cooking time
f~~ best re~uits,
Casserole
Pieces
$Jhole ( 3 ibs.)
60-70 min.
2-4 min,/piece
When oven signals, stir well and rotate Mturn.
No additional liquid needed. When oven
signais, rotate ‘/2turn.
Put on trivet and sit as straight as possible.
Rotate k turn when oven signals.
,,
12 x 8 x 2-in. glass
dish or cooking bag.
Cover with 2 pieces of
overlapping plastic
wraR.
42-44 min.
9
6
—.—
2
2
13 x 9 x 2-in. glass
dish. Put in cooking
bag and secure with
tie. Slit bag 1“ at top
near tie,
1 hr, 30 min.1 hr. 40 min.
Add IAcup water, When oven signals, rotate
1/2 turn,
~i$il
‘il!ds (1 lb. )
12 x 8 x 2-in. glass ~•••L••‚6
jish. Cove!’ with
)Iastic wrat]l
20 rein,
i3aste with butter and lemon juice. When oven
signals, rotate IAturn,
#
.%
?qt, casserole with
id,
1
14-18 min.
14-18 min.
Core apples. No water needed. When oven
signals, rotate
1/2 turn.
,,
I
Core pears. No water needed, When oven
signals, rotate M turn,
I
--c-x—.=. .....
..-.---=9” -------- J..
;
Page 41

=-w
Comments
oven signals, stir well and rotate %turn.
%cld
~
Casserole
Meatloaf (11/2
Ib.)
“Auto
cook”
Code
Container
7
2 qt. glass dish with
lid.
8 Glass loaf dish. Cover 30-40 min. When oven signals, rotate %turn.
.Apprm,
Time
45-55 min. Make sure liquid covers all ingredients. When
with plastic wrap.
Patties (4-5)
Pork
Sausage Patties
(%’”thick—4)
Chops 49 12x 8 x 2-in, glass 33-38 min. Baste with 1 tbsp. barbeque sauce/chop. When
(3/,-1“ thick)
Spare Ribs
(UPto 3 lb.)
Re
Instant (Minute-1 %cups)
qaw (1 cup)
Seafood
pieces
lb. Shrimp or SCdlOpS)
{1
:asserole 6
SwissSteak
‘1%lb. round steak)
‘resh
artichokes 2
up to 4 med.)
;arrots (1 lb. sliced) 5
Gauliflower (1 med. head) 5
%paragus (1 lb. cut spears)
lrusse! Sprouts (1 lb.) 5
~otatoes *
I
F3iock (10 oz.)
‘rozen
lroccoli
)russel Sprouts 3
eaf Spinach 3
;Ixed Vegetables
“rozen Pouch
iaby Limas 4 Lay pouch in 8-10 min.
‘am 4
~~~
j
~
?
:11 nach 4
,-
Exzess!vely dry
pdat~es may not release enough moisture to activate sensor. Be sure potatoes are fresh not old
5 8“ square dish. Cover
with plastic wrap.
5 8“ glass square dish,
Cover with plastic
wrap.
dish. Cover with oven signals, rotate
piastic wrap.
9 2 qt. glass dish, Cover
with lid or plastic
wrap.
2 2 qt. glass dish with
lid. oven signals, stir.
6
, Ij2 qt. glass
1
lid.
2 qt. casserole with lid
or cover with plastic
wrap.
7
3 qt. casserole with 55-60 min. Cut into pieces. Make sure liquid covers all
lid,
2 qt. glass dish with
lid,
t,
dish with
—
,,
,,
5 12x 8 x 2-in. glass
dish. Cover with M turn.
plastic wrap.
https://manualmachine.com/2~t. glass dish with
lid.
1 qt. glass dish with 6-9 min.
5
lid, hot dish & steam!
5 2 qt. glass dish with
lid.
11/2qt. gla5s dish with
31
lid.
t,
,,
3
microwave-safe dish. break up frozen center, and rotate M turn.
No cover needed,
41
,,
,,
,,
,e
12-14 min.
8 min. When oven signals, rotate %turn.
1 hr. 30 min.- Meat must be covered with liquid. When oven
1 hr. 50 min.
9 min. Follow instructions on package. Cover. When
24 min. Use 1cup rice & 2 cups water. When oven sig-
5-6 min. When oven signals, rotate %turn.
35-45 min. Make sure liquid covers all ingredients. When
10-12 min.
13 miri. Add %cup water. When oven signals, stir well.
15 min. No water needed. Start cooking stem side
14 min. Add %cup water. When oven signals, rotate
11 min.
14-16 min.
18-20 min. Add 2 tbsp. water. When oven signals, stir well.
16-18 min. Add 2 tbsp. water. When oven signals, stir well.
.11-13min.
10-12 min.
8-10 min.
8-10 min. Make a ‘1”slit in pouch, When oven signals,
10-12 min.
When oven signals, rotate %turn.
NOTE: “ThePreference Control 9 is used for
‘/2turn.
chops to increase cooking time for better
results,
signais, rearrange meat making sure it is submerged in liquid. It may be necessary to rearrange another’ time during final cooking.
nals, rotate ‘/2turn.
oven signals, rotate 1/2turn or stir.
meat. When oven signals, stir & rotate 1/2turn.
Place artichokes in dish stem side down. Add
l/qcup water, Rotate dish %
turnafter oven
signals.
down. At signal turn over.
,,
When oven signals, rotate Mturn. NOTE: Watch
,,
NOTE: The Preference Control 1 is used for
broccoli to decrease cooking time for better
results.
,t
,1
Make a 1“ slit in pouch. When oven signals,
NOTE: Watch for hot steam,
break up frozen center, and rotate %turn.
NOT’E:Watch for hot steam, NOTE: Preference
Control 1 is used for peas to decrease cooking
time for best results,
,,
Make a 1“ slit in pouch, When oven signals,
break up frozen center, and rotate % turn.
NOTE: Watch for hot steam,
.—
:f’;d dfjed--out.
41
Page 42

Your ‘new microwave cooking center is a well
desig~~edand engineered product. Before it left the
factory,
it went through rigorous tests, just to make
sure it was as defect-free as possible. And you have
a warranty to protect you against any manufac-
turing defects during the early period of your
microwave cooking center’s life.
Now you can have the same trouble-free and
surprise-free service for as long as you own your
microwave cooking center. You can buy a General
Eiectric Service Contract. For one low fee. . usually
just pennies a day. . .General Electric will take care
of any repairs your microwave cooking center
needs—both parts and labor. You are protected
for
the length of
your contract. Even when costs go up,
you pay nothing
more.
Want more information? There’s no obligation. You
can get information on Service Contracts
any time.
Just write your name and address, date of installa-
tion, and the
model and serial number of your
appiiance and send to:
Manager, Service Contracts
Generai Electric Company
WCE-315
Appliance Park
Louisville, Kentucky 40225
in many cities, there’s a General Electric Factory
Service Center. Call, and a radio-dispatched truck
will come to your home by appointment—morning
or afternoon. Charge the work, if you like. All the
centers accept both Master Card and Visa cards.
(See Inside Back Cover.)
Or look for General Electric franchised Customer
Care” servicers. You’ll find them in the Yellow
Pages under “GENERAL ELECTRIC CUSTC)MER
CARE@SERVICE” or “GENERAL ELECTRIC–
HOTPOINT CUSTOMER CARE@SERVICE”.
M you need senwiceliterature, par% lists, parts or
accessories,contact one of the Factory Service Cen-
ters, a franchised Customer Care@servicer or your
General Electric dealer.
Fhst,-contact the people who serviced your
m~crowave oven. Explain why you are dissatisfied. In most
cases, this will solve the problem.
Next, if you are still dissatisfied, write all the details—
including your phone number—to:
Manager, Consumer Relations
General Electric Company
WCE-312
Appliance Park
!-ouisvilie, Kentucky 40225
Finally,if your problem is still not resolved, write:
Major Appliance Consumer Action Panel
20 North Wacker Drive
Chicago, Illinois 60606
This panel, known as MACAP, is a group of independent consumer experts under the sponsorship of
several industry associations. Its purpose is to study
practices and advise the industry of ways to improve
customer service. Because MACAP is
free of industry
control and influence, it is able to make impartial
recommendations, considering each case individually.
42
Page 43

ALABAMA
53irrningham -35210
250(1Cre$twcod gou[evard
(~~5) 9554333
(Decawr-Huntsville)
Huntsville -35805
1209Putnam Drive
(205) 830-0150
,Mobile - 366ilt3
1107 Beltline Highway So.
[205) 471-1451
M?LZO?4A
PhOenl~- 651)3~
25 South 51st Avenue
P.Cl.
BOX 14278
(602) 272-9345
Tucson -85705
2015 North Forbes Blvd.
Suite 111
(602) 623-8415
ARKANSAS
Little Rock -72209
8405 New Benton Hwy.
[501) 568-7630
CALIFORNIA
(San Bernardino-Riverside)
Bloomington -92316
10121 Cactus Avenue
(714) 877-3434
(San Francisco)
Surlingame -94010
1849 Adrian Road
(415) 981-8760
Fresno -93727
1809 North Helm Street
(209; 255-1851
LosAngeles -90058
2815 East 46th Street
Miami -33167
3200 N.W. 110th Street
(3o5) 685-5144
Orlando -32807
6545 East
ColonialDr.
(305) 273-6370
Wichita -87211
820 East Indianapolis
(316) 267-3366
KENTUCKY
Lexington -40505
1144 Floyd Drive
(606) 255-0848
Louisville -40216
4421 Bishop Lane
P.O.
E)OX 32130
(502) 452-3511
LOUISIANA
Baton Rouge -70814
2935 Crater Lake Drive
(504) 926-5062
(New Orleans)
Harahan -70123
701 Edwards Avenue
(504) 733-7907
Shreveport -71102
1430 Dalzell Street
(318) 425-8654
MAINE
South Portland -04106
54 Darling Avenue
(207) 775-6385
MARYLAND
Salisbury -21801
Twilly Centre
329 Civic Avenue
(301) 742-3900
Omaha -68117
6636 “F” Street
(402) 33”1-4045
NEVADA
Las Vegas -89109
~;~{e~. Highland Dr.
(702) 733-1500
Reno -89511
6465 S. Virginia Street
(702) 852-7070
NEW JERSEV
Mount Holly -08060
Route36 & Easlick Ave.
(609) 261-3500
North Caldwell -07006
5 Fairfield Road
(201) 258-8850
(Asbury Park)
Oakhurst -07712
2111 Highway 35
(201) 493-2100
Vineland -08360
749 North f3elsea Drive
(609) 698-1506
NEW MEXICO
Albuquerque -67107
3334 Princeton Dr., N.E.
(505) 884-1861
NEW YORK
Albany -12205
2 Interstate Avenue
(518) 438-3571
Brooklyn -11234
5402 Avenue ‘“N”
(212) 253-8181
Buffalo -14225
3637 Union Road
(716) 688-2268
(Westchester Co. Area)
Elmsford -10523
Fairview Industrial Pk.
Route #9-A
(914) 592-4330
Flushing -11354
133-30 39th Avenue
(212) 868-5600
Cincinnati -45242
10001 Alliance Road
(513) 745-5500
Memphis -38118
3770 South Perkins
(901) 363-1141
Cleveland -44142
20600 Sheldon Road
(216) 362-4200
Nashville -37204
3607 Trousdale
(615) 634-2150
TEXAS
Austin -78704
2610 S. First Street
(512) 442-7893
Tallahassee -32301
1205 South Adams St.
(904) 222-6!331
Columbus -43212
1155 West Fifth Avenue
(614) 294-2561
Tampa -33611
5201 S. Westshore Blvd.
Box 13708- lnterbay Station
{613) 837-1906
GEORGIA
Atlanta -30325
1695 Marietta Blvd.
P.O. Box 19917
(404) 352-6000
Savannah -31406
211 Television Circle
(912) 925-0445
HAWAII
tlonolulu -96813
404 Cooke Street
(806) 533-7462
IDAf+O
(Boise)
Garden City -83704
5250 Chinden Bivd.
(208) 378-5680
Dayton -45414
5701 Webster Street
(513) 896-7600
Corpus Christi -78415
3225 Ayers Street
(512) 884-4897
Toledo -43611
3300 Summit Street
(419) 729-1651
Dallas -75247
8949 Diplomacy Row
P.O.
Box 47601
(214) 631-1380
OKLAHOMA
Oklahoma City -73118
3228 North Santa Fe
P.O.
BOX 16669
(405) 528-2381
El Paso -79925
7600 Boeing Drive
(915) 778-5361
(Brownsville)
Harlingen -78550
1204 North Seventh
(512) 423-1204
Tu!sa -74112
6913 East 13th
(916) 835-9526
OREGON
(Portland Area)
Beaverton -97005
14305 S.W. Millikan Way
(503) 646-1176
Eugene -97402
1492 West Sixth Street
(503) 342-7265
PENNSYLVANIA
(Brandywine-Wilmington)
Glen Mills -19342
R.D. #2,
BOX 210
(215) 356-1500
Johnstown -15905
Houston -77207
P.O.
BOX 26837
2425 Broad Street
(713) 641-0311
Lubbock -79490
4623 Loop 289 West
P.O.
BOX 16288
(806) 793-1620
(Odessa)
Midland -79701
P.O.
BOX 6286
Midland rerminal
(915) 563-3483
ILLINOIS
Champaign -61620
1205 North Hagen
(217) 359-4088
Jessup -20794-0110
8201 Stayton Drive
P.O.
BOX 127
(301) 953-9130
Chicago -60838
5600 West 73rd Street
(312) 594-2424
MASSACHUSETTS
(Cape Cod)
Hyannis -02601
80 Enterprise - Unit 11
(617) 771-5905
Pittsfield -01201
1450 East Street
(413) 499-4391
(Boston-South)
Westwood -02090
346 University Avenue
(617) 329-1250
(Boston-North)
Woburn -01601
57 Commerce Way
(617) 944-7500
MICHIGAN
Grand RaDids -49508
Elk Grove Village -60007
10 King Street
(312) 593-2525
Lombard -60148
837-B35 Westmore Ave.
(312) 629-8010
214 Westwood Shopping P1.
(814) 255-6721
San Antonio -78216
7822 Jones-Maltsberger
(512) 227-7531
ramento -95625
(Harrisburg)
Camp Hill -17011
2133 Market Street
(717) 761-8185
UTAH
Salt Lake City -84125
2425 South 900 West
P(O. Box 30904
(801) 974-4600
San Diego -92101
3554 Kettner Boulevard
(714) 297-3221
San Jose -95123
5761-B Winfield Blvd.
(408) 629-3500
Van Nuys -91405
6@43Lennox Avenue
(213) 989-5710
CSrLDRAOO
Colorado Springs -80909
1865 N. Academy - Suite B
[303) 597-8492
Denver -80207
5390 East 39th Avenue
(303) 320-3301
C0f4NECT!f3JT
#rldgeport -06604
615 North Washington Ave.
(203) 367-5311
East Hartford -06108
255 Prestige Park, Plaza 3
{203) 528-9811
DELAWARE
(Brandywine - Wilmington)
G!@nMills, pA -15342
Peoria -61614
Monroevil16 -15146
150 Seco Road
Monroeville Industrial Park
(412) 665-3700
7708 North Crestline Drive
(309) 692-5070
VIRGINIA
Fairfsx -22037
2810 Dorr Avenue
(703) 280-2020
Norfolk -23502
4552 E. Princess Anne Dr.
(804) 857-5937
Richmond -23228
2910 Hungary Spring Rd.
(804) 268-6221
WASHINGTON
(Tri-City)
Kennewick -99336
-
Rockford -61107
401 North 2nd Street
(815) 962-7200
Sprin field -62702
~2252 outh 15tli Street
(217) 753-8088
INDIANA
Evansville -47714
(Binghamton)
Johnson City -13790
278 Main Street
(607) 728-9248
Philadelphia -19115
9900 Global Road
(215) 696-3270
(Allentown)
Whitehall -18052
1908 MacArthur Road
(215) 437-9671
(Nassau-Suffolk County)
Melville -11747
336 South Service Road
(516) 293-0700
350 28th Street, S.E.
(616) 452-9754
1016-K S. W9inbach Ave.
(612) 476-1341
RHODE ISLAND
East Providence -02914
1015 Waterman Avenue
(401) 436-0300
SOUTH CAROLINA
Columbia -29602
825 Bluff Road
Box 1210
(803) 771-7880
Myrtle Beach -29577
702 Sea Board Street
Sea Board Industrial Park
(603) 826-7411
Lansing -48912
1004 E. Michigan Ave.
(517) 464-2561
(Orange County Area)
Newt.wrgh -12550
! 135 Union Avenue
(914) 564-2000
Rochester -14622
1900 Ridge Road East
(716) 544-7100
Ronkonkoma -11779
76 Union Avenue
(516) 467-7700
Syracuse -13204
965 West Genesee Street
(315) 471-9121
NORTH CAROLINA
Charlotte -26234
700 Tuckaseegee Road
P.O.
BOX 34396
(704) 372-8810
Greensboro -27406
2918 Baltic Avenue
(919) 272-7153
Raleigh -27604
2013 New Hope
Church Road
(919) 878-5603
OHIO
Akron -44319
2262 S, Arlington Roud
(216) 773-0361
Fort Wavne -46608
4632 Ne’waygo Road
(219) 464-9005
Troy -48084
1150 Rankin
(313) 583-1616
Westland -48185
Union Square
Suite 206
101 North Union Street
(509) 783-7403
Gary -46409
5165 Broadway
(219) 961-2533
Indianapolis -46219
953 Manufacturer’s Drive
(313) 564-5190
Seattle -98166
401 Tukwila Parkway
(206) 575-2711
6233 B~ookville Road
(317) 356-8661
MINNESOTA
(Minneapolis-St. Paul)
Edina -55435
7450 Metro Boulevard
(612) 635-5270
Spokane -99206
9624 E. Montgomery St.
(509) 926-9562
WEST VIRGINIA
(Charleston)
Huntington -25704
1217 Adams Avenue
P.O.
BOX 7518
(304) 529-,33!27
Wheeling -26003
137 North River Road
(304) 283-6511
WISCONSIN
Appleton -54911
343 W. Wisconsin Ave.
(414) 731-9514
Milwaukee -53225
11100 W. Silver Spring Rd.
(414) 462-9225
South Bend -46613
1902 Miami Street
(219) 286-0685
IOWA
Cedar Rapids -52405
118 First Street, N.W.
(319) 368-6579
N, Charleston -29405
7325-B Associate Drive
Pepperdan lndustria! Park
(603) 552-5193
fi D. #2.
$OX 210
(215) 358-1500
MisslsslPfJl
Jackson - 3920!3
325 Industrial Drivo
(601) 352-3371
MISSOURI
Kansas City, KS -66115
2949 Chrysler Road
(913) 371-2242
St.
LOUiS -63178
1355 Warson Road, No,
P.o. Box 14559
(314) 993-6200
Swinofield -65807
Dl$TFt!CT OF COLUMBIA
JaWJp, MD -20794-0110
s?01 Stayton Drive
? O.
BOX 127
(Greenville)
Taylors -29687
25 Hampton Village
(803) 292-0630
TENNESSEE
Chattanooga -37403
613 East 1Ith Street
(615) 265-8596
Johnson City -37601
2912 Bristol Highway
(615) 282-4545
Knoxville -37919
3250 Mynatt Street, N,W,
(615) 524-7571
Davenport -52602
1074 South Dittmer
P.O.
BOX 3168
(319) 328-5101
Des Moines -50313
1637 NE. 58th Avenue
(515) 266-2191
Waterloo -50703
2829 Falls Avenue
(319) 236-1393
KANSAS
Kansas City -66115
2949 Chrysler Road
(913) 371-2242
1334 tiest Sunshine
(417) 831-0511
f’4EEWtASKA
Lincoln -60503
1145 North 47th St.
(402) 464-9’14a
=j‘(~c}j F,aq cF#Af4G~f;. ~~dreS5es and telephone
numbers sometimes change, And new Centers open. If the numbers change, check your
:.,if~?hone
bcok. Look in the Vi!hite Pagesunder “GENERAL ELECTRIC COMPANY” OR “ GENERAL ELECTRIC FACTORY SERVICE. ”
43
Page 44

1S
FULL
.=
:&-t
%1
u= :_—–
.——-—---.— ——.———.. -—
#“k
—
—
This warrantv is extended to the “‘“
For one year
from date of original
purchase, we will provide, free of
charge, parts and
service labor in
your home to repair or replace any
part of the microwave overv’range
that fails because of a manufacturing @efect.
LIMITED
FCNF!-YEAR
For the second through fifth year
from date of original purchase,
we will provide, free of charge, a
replacement magnetron tube if the
magnetron tube fails because of a
manufacturing defect. You pay for
the service trip to your home and
service labor charges.
original purchaser and any succeed-
ing owner for products purchased
for ordinary home use in the 48
mainland states, Hawaii and
Washington, D.C. In Alaska the
warranty is the same except that it
is LIMITED because you must pay
to ship the product to the service
shop or for the service technician’s
travel costs to your home.
All warranty service will be provided
by our Factory Service Centers or
by our franchised Customer Care@
servicers during normal working
hours. Check the White Pages for
GENERAL ELECTRICCOMPANY
or GENERAL ELECTRIC FACTORY
SERVICE. Look in the Yellow
Pages for GENERAL ELECTRiC
CUSTOMERCARE@SERVICE or
GENERAL ELECTRIC-HOTPOINT
CUSTOMERCARE” SERVICE.
@Service trips to your home to
teach you how to use the product.
Read your Use and Care materia!.
If you then have any questions
about operating the product,
please contact your dealer or our
Consumer Affairs office at the
address below.
~ Improper installation.
If you have an installation problem,
contact your dealer or installer.
You are responsible for providing
adequate electrical, exhausting
and other connecting facilities.
@Replacement of house fuses
or resetting of circuit breakers.
~ Failure of the product if it is
used for other than its intended
purpose or used commercially.
~ Damage to product caused
by accident, fire, floods or acts
of God.
WARRANTORIS iVOT RESPON-
SIBLE FOR CONSEQUENTIAL
DAMAGES.
II:=
ll&-
11:=
II
x-
II K=,, —
..—
,,”
11=---
!! ~ --
...,-, ,,
+%-
1,
+4!$i;
,1
~!::-
‘:$$
II : ~
It H. --
Some statesdo not aliow the exciusion or imitation of incidental or consequential damages, so the above imitation or exciusbxi
~~~=
2—%1’
—.
may not appiy to you. This warranty gives you specific legal rights, and you may aiso have other rights wi~ich vary from state to state,
II;:--
:<@;!
To know what your iegal rights are in your state, consuit your iocal or state consumer affairs office or your state’s Attorney Generai.
..—
,,~=..
:-
?+%
Ilt$11:: II E ..-
==--~ j
Ill ,
7< i
warrantor: General Ek?ctric
Ch3mpany
li c&li2%--
-–JC
,,~:,
M fwther help
k needed cmxrning Ws warranty, contact:
~-.
Ii23
l~~z-
-=:1
Affairs, Genera! E%w2tricC%wnpany,Appliance Park, !M3uisvilk, KY 40225
11~-
,.-c-#
!
,,<.1,,
.5-”:
.-)j
-.---.>
--.-—-L_-.. ....
.&%%=gy&
:
———— w.%z%%$,
--
——-.— ——
,,..
.—
 Loading...