

Page 1
GEAppliances.com
Safety Information ........... 2
Im
Warranty ....................... 4
Assistance / Accessories ..... 5
Using The Oven
|
|
m
Im
Oven Controls ..................... 6
Special Features .................. 8
Oven Racks ....................... 9
Aluminum Foil and Oven Liners .... 9
Cookware ......................... 9
Cooking Modes .................. 10
Cooking Guide ................... 11
Care and Cleaning
Control Panel .................... 12
Oven Exterior .................... 12
Stainless Steel Surfaces .......... 12
Oven Interior ..................... 12
Flat Racks ........................ 12
Maintenance ..................... 13
JK3000 - 27" Single Wall Oven
JT3000 - 30" Single Wall Oven
JK3500 - 27" Double Wall Oven
JT3500 - 30" Double Wall Oven
Troubleshooting Tips ........ 15
For a Spanish version of this
manual, visit our Website at
GEApp/iances.com.
Para consu/tar una version
en espaho/ de este manual
de instrucciones, visite
nuestro sitio de internet
GEApp/iances.com.
Printed inthe United States 49-80721 03-14 GE
Write the model and serial
numbers here:
Model #
Serial #
You can find them on a label
on the side trim or on the front of
the (lower) oven behind the oven
door.
Printed on
Recycled Paper
Page 2
Z
©
m
tY
©
EL
Z
m
IMPORTANT SAFETYINFORMATION.
READ ALL INSTRUCTIONS BEFORE USING.
IA WARNING I
Read all safety instructions before using the product. Failure to follow these instructions may result in fire,
electrical shock, serious injury or death.
STATE OF CALIFORNIA PROPOSITION 65 WARNING
t--,
o©
The California Safe Drinking Water and Toxic Enforcement Act requires the Governor of California to
publish a list of substances known to the state to cause cancer, birth defects or other reproductive harm,
and requires businesses to warn customers of potential exposure to such substances.
IAWARNING 1 This product contains one or more chemical known to the State of California to
cause cancer, birth defects or other reproductive harm.
Self-clean ovens can cause low-level exposure to some of these substances, including carbon monoxide,
during the cleaning cycle. Exposure can be minimized by venting with an open window or using a
ventilation fan or hood.
IA WARNING 1GENERAL SAFETY INSTRUCTIONS
[] Use this appliance only for its intended purpose
as described in this Owner's Manual.
[] Be sure your appliance is properly installed and
grounded by a qualified installer in accordance
with the provided installation instructions.
[] Do not attempt to repair or replace any part of
your oven unless it is specifically recommended
in this manual. All other servicing should be
transferred to a qualified technician.
[] Before performing any service, disconnect the
power supply at the household distribution panel
by removing the fuse or switching off the circuit
breaker.
[] Do not leave children alone--children should not
be left alone or unattended in an area where an
appliance is in use. They should never be allowed
to climb, sit or stand on any part of the appliance.
[]A CAUTION.Donotstoreitemsof
interest to children in cabinets above an oven
- children climbing on the oven to reach items
could be seriously injured.
[] Use only dry pot holders--moist or damp pot
holders on hot surfaces may result in burns from
steam. Do not let pot holders touch hot heating
elements. Do not use a towel or other bulky cloth
in place of pot holders.
[] Never use your appliance for warming or heating
the room.
[] Do not touch the heating elements or the interior
surface of the oven. These surfaces may be hot
enough to burn even though they are dark in color.
During and after use, do not touch, or let clothing
or other flammable materials contact any interior
area of the oven; allow sufficient time for cooling
first. Other surfaces of the appliance may become
hot enough to cause burns. Potentially hot surfaces
include the oven vent opening, surfaces near the
opening and crevices around the oven door.
[] Do not heat unopened food containers. Pressure
could build up and the container could burst,
causing an injury.
[] Do not use any type of foil or liner to cover the
oven bottom or anywhere in the oven, except as
described in this manual. Oven liners can trap
heat or melt, resulting in damage to the product
and risk of shock, smoke or fire.
[] Avoid scratching or impacting glass doors or
control panels. Doing so may lead to glass
breakage. Do not cook on a product with broken
glass. Shock, fire or cuts may occur.
[] Cook meat and poultry thoroughly--meat to
at least an internal temperature of 160°F and
poultry to at least an internal temperature of
180°F. Cooking to these temperatures usually
protects against foodborne illness.
SAVE THESE INSTRUCTIONS
49 80721
Page 3
L-=iAWARNING i KEEPFLAMMABLEMATERIALSAWAY FROMTHEOVEN
• Do not store or use flammable materials in or near
an oven, including paper, plastic, pot holders,
linens, wall coverings, curtains, drapes and gasoline
or other flammable vapors and liquids.
i WARNING
I
Failure to do so may result in fire or personal injury.
• Never wear loose-fitting or hanging garments while
using the appliance. These garments may ignite if
they contact hot surfaces, causing severe burns.
• Do not let cooking grease or other flammable
materials accumulate in or near the oven. Grease
in the oven or near the oven may ignite.
i IN THE EVENTOF A FIRE,TAKE THE FOLLOWING
I
STEPS TO PREVENTINJURY AND FIRESPREADING
-<
m
Z
"T1
O
n
O
Z
• Do not use water on grease fires. Never pick up
a flaming pan.
• If there is a fire in the oven during baking,
smother the fire by closing the oven door and
turning the oven off or by using a multi-purpose
dry chemical or foam-type fire extinguisher.
• If there is a fire in the oven during self-clean, turn
the oven off and wait for the fire to go out. Do
not force the door open. Introduction of fresh air
at self-clean temperatures may lead to a burst
of flame from the oven. Failure to follow this
instruction may result in severe burns.
[_ WARNING i OVEN SAFETYINSTRUCTIONS
• Stand away from the oven when opening the
oven door. Hot air or steam which escapes can
cause burns to hands, face and/or eyes.
• Keep the oven vent unobstructed.
• Keep the oven free from grease buildup. Grease
in the oven may ignite.
• Place oven racks in desired location while oven is
cool. If rack must be moved while oven is hot, do not
let pot holder contact hot heating element in oven.
• When using cooking or roasting bags in the
oven, follow the manufacturer's directions.
IA WARNING
ISELF-CLEANING OVEN SAFETYINSTRUCTIONS
• Pulling out the standard racks to their stop-locks
or the extension rack to its fully open position is
a convenience in lifting heavy foods. It is also
a precaution against burns from touching hot
surfaces of the door or oven walls.
• Do not leave items such as paper, cooking
utensils or food in the oven when not in use.
Items stored in an oven can ignite.
[] Never place cooking utensils, pizza or baking stones,
or any type of foil or liner on the oven floor. These
items can trap heat or melt, resulting in damage to
the product and risk of shock, smoke or fire.
The self-cleaning feature operates the oven at temperatures high enough to burn away food soils in the
oven. Follow these instructions for safe operation.
• Do not touch oven surfaces during self-clean
operation. Keep children away from the oven
during self-cleaning. Failure to follow these
instructions may cause burns.
• Before self-cleaning the oven, remove shiny
silver colored oven racks (on some models), the
probe, any aluminum foil, and any broiler pan,
grid, and other cookware. Only porcelain coated
oven racks may be left in the oven.
• Before operating the self-clean cycle, wipe
grease and food soils from the oven. Excessive
amount of grease may ignite, leading to smoke
damage to your home.
SAVE THESE
49 80721
• If the self-cleaning mode malfunctions, turn the
oven off and disconnect the power supply. Have
it serviced by a qualified technician.
• Do not clean the door gasket. The door gasket is
essential for a good seal. Care should be taken
not to rub, damage or move the gasket.
• Do not use oven cleaners. No commercial oven
cleaner or oven liner protective coating of any
kind should be used in or around any part of the
oven.
INSTRUCTIONS
Page 4
>.,
p-
Z
Thank You! ... for your purchase of a GEBrand appliance.
Register Your Appliance: Register your new appliance on-line at your convenience!
tY
tY
09
tu
O
v _
"50_
_-- 03
G) C
_o
o "o
www.geappliances.com/service_and_support/register/
Timely product registration will allow for enhanced communication and prompt service under the terms of your warranty,
should the need arise. You may also mail in the pre-printed registration card included in the packing material.
GE Electric Range Warranty
GEAppliances.com
All warranty service is provided by our Factory Service Centers, or an authorized Customer Care®technician•
To schedule service on-line, visit us at www.geappliances.com/service_and_support/, or call 800.GE.CARES
(800•432•2737)• Please have serial number and model number available when calling for service.
Servicing your appliance may require the use of the onboard data port for diagnostics• This gives a GE factory
service technician the ability to quickly diagnose any issues with your appliance and helps GE improve its products
by providing GE with information on your appliance. If you do not want your appliance data to be sent to GE, please
advise your technician not to submit the data to GE at the time of service•
For the period of one year from the date of the original purchase• GE will provide any part of the range which fails due
to a defect in materials or workmanship• During this limited one-year warranty, GE will also provide, free of charge, all
labor and in-home service to replace the defective part.
What GE will not cover:
[] Service trips to your home to teach you how to use
the product•
[] Improper installation, delivery or maintenance•
[] Failure of the product if it is abused, misused,
modified or used for other than the intended purpose
or used commercially•
[] Replacement of house fuses or resetting of circuit
breakers•
EXCLUSION OF IMPLIED WARRANTIES
Your sole and exclusive remedy is product repair as provided in this Limited Warranty. Any implied warranties,
including the implied warranties of merchantability or fitness for a particular purpose, are limited to one year or the
shortest period allowed by law•
This warranty is extended to the original purchaser and any succeeding owner for products purchased for home use
within the USA• If the product is located in an area where service by a GE Authorized Servicer is not available, you
may be responsible for a trip charge or you may be required to bring the product to an Authorized GE Service location
for service. In Alaska, the warranty excludes the cost of shipping or service calls to your home.
Some states do not allow the exclusion or limitation of incidental or consequential damages. This warranty gives you
tt_
specific legal rights, and you may also have other rights which vary from state to state. To know what your legal rights
are, consult your local or state consumer affairs office or your state's Attorney General.
Warrantor: General Electric Company. Louisville, KY 40225
[] Damage to the product caused by accident, fire,
floods or acts of God.
[] Incidental or consequential damage caused by
possible defects with this appliance.
[] Damage caused after delivery.
[] Product not accessible to provide required service.
[] Service to repair or replace light bulbs, except for LED
lamps.
Extended Warranties: Purchase a GE extended warranty and learn about special discounts that are available while
your warranty is still in effect. You can purchase it on-line anytime
tlJ
www.geappliances.com/service_and_support/shop-for-extended-service-plans.htm
or call 800•626•2224 during normal business hours. GE Consumer Home Services will still be there after your
warranty expires.
49 80721
Page 5

Have a question or need assistance with your appliance?
Try the GE Appliances Website (www.geappliances.comlservice_and_supportl) 24 hours a day, any day of the
year! For greater convenience and faster service, you can now download Owner's Manuals, order parts or even
schedule service on-line.
bO
m
Schedule Service: Expert GE repair service is only one
step away from your door. Get on-line and schedule your
service at www.geappliances.com/service_and_support/
Or call 800.GE.CARES (800.432.2737) during normal
business hours.
Parts and Accessories: Individuals qualified to service
their own appliances can have parts or accessories sent
directly to their homes (VISA, MasterCard and Discover
cards are accepted).Order on-line today, 24 hours every
day or by phone at 800.626.2002 during normal business
hours.
Instructions contained in this manual cover procedures
to be performed by any user. Other servicing generally
should be referred to qualified service personnel. Caution
must be exercised, since improper servicing may cause
unsafe operation.
Real Life Design Studio: GE supports the Universal
Design concept of products, services and environments
that can be used by people of all ages, sizes and
capabilities. We recognize the need to design for a wide
range of physical and mental abilities and impairments.
For details of GE's Universal Design applications, including
kitchen design ideas for people with disabilities, check out
our Website today. For the hearing impaired, please call
800.TDD.GEAC (800.833.4322).
Contact Us: If you are not satisfied with the service you
receive from GE, contact us on our Website with all the
details including your phone number, or write to:
General Manager, Customer Relations
GE Appliances, Appliance Park Louisville, KY 40225
Accessories
Looking For Something More?
GE offers a variety of accessories to improve your cooking and maintenance experiences!
To place an order visit us online at:
www.GEApplianceParts.com (U.S.) or www.GEAppliances.ca (Canada)
or call 800.626.2002 (U.S.) 800.661.1616 (Canada)
The following products and more are available:
Accessories
Small Broiler Pan (8 ¾" x 1 _¼"x 13 ½ ")
Large* Broiler Pan (12 ¾ "x 1 _¼"x 16 ½ ")
XL** Broiler Pan (17 "x 1 _¼"x 19 1/4")
WB48X10055 (US) 222D2097G001 (Canada)
WB48X10056 (US) 222D2097G002 (Canada)
WB48X10057 (US) Not available inCanada
Z
¢')
r-t3
1./3
¢/)
O
m
r-t3
bO
Parts
Oven racks Part numbers vary by model
Oven elements Part numbers vary by model
Light bulbs Part numbers vary by model
Cleaning Supplies
CitruShine Stainless Steel Wipes WX10X10007
CeramaBryte Stainless Steel Appliance Cleaner PM10X311
*The large broiler pan does not fit in 20"/24" ranges.
**The XL broiler pan does not fit in 24" wall ovens, 27"drop ins or 20'724" ranges
How to Remove Protective Shipping Film and Packaging Tape
Carefully grasp a corner of the protective shipping film
with your fingers and slowly peel it from the appliance
surface. Do not use any sharp items to remove the film.
Remove all of the film before using the appliance for the
first time.
To assure no damage is done to the finish of the
49 80721 5
product, the safest way to remove the adhesive from
packaging tape on new appliances is an application of
a household liquid dishwashing detergent. Apply with a
soft cloth and allow to soak.
NOTE: The adhesive must be removed from all parts. It
cannot be removed if it is baked on.
Page 6
(/3
©
L._
4-J
O
LD
r-
Q
>
O
LIJ
©
l,L!
:C
t.--
©
Z
m
Single Wall Oven
_B keCOOking (_
Gr[]oil -L]
.
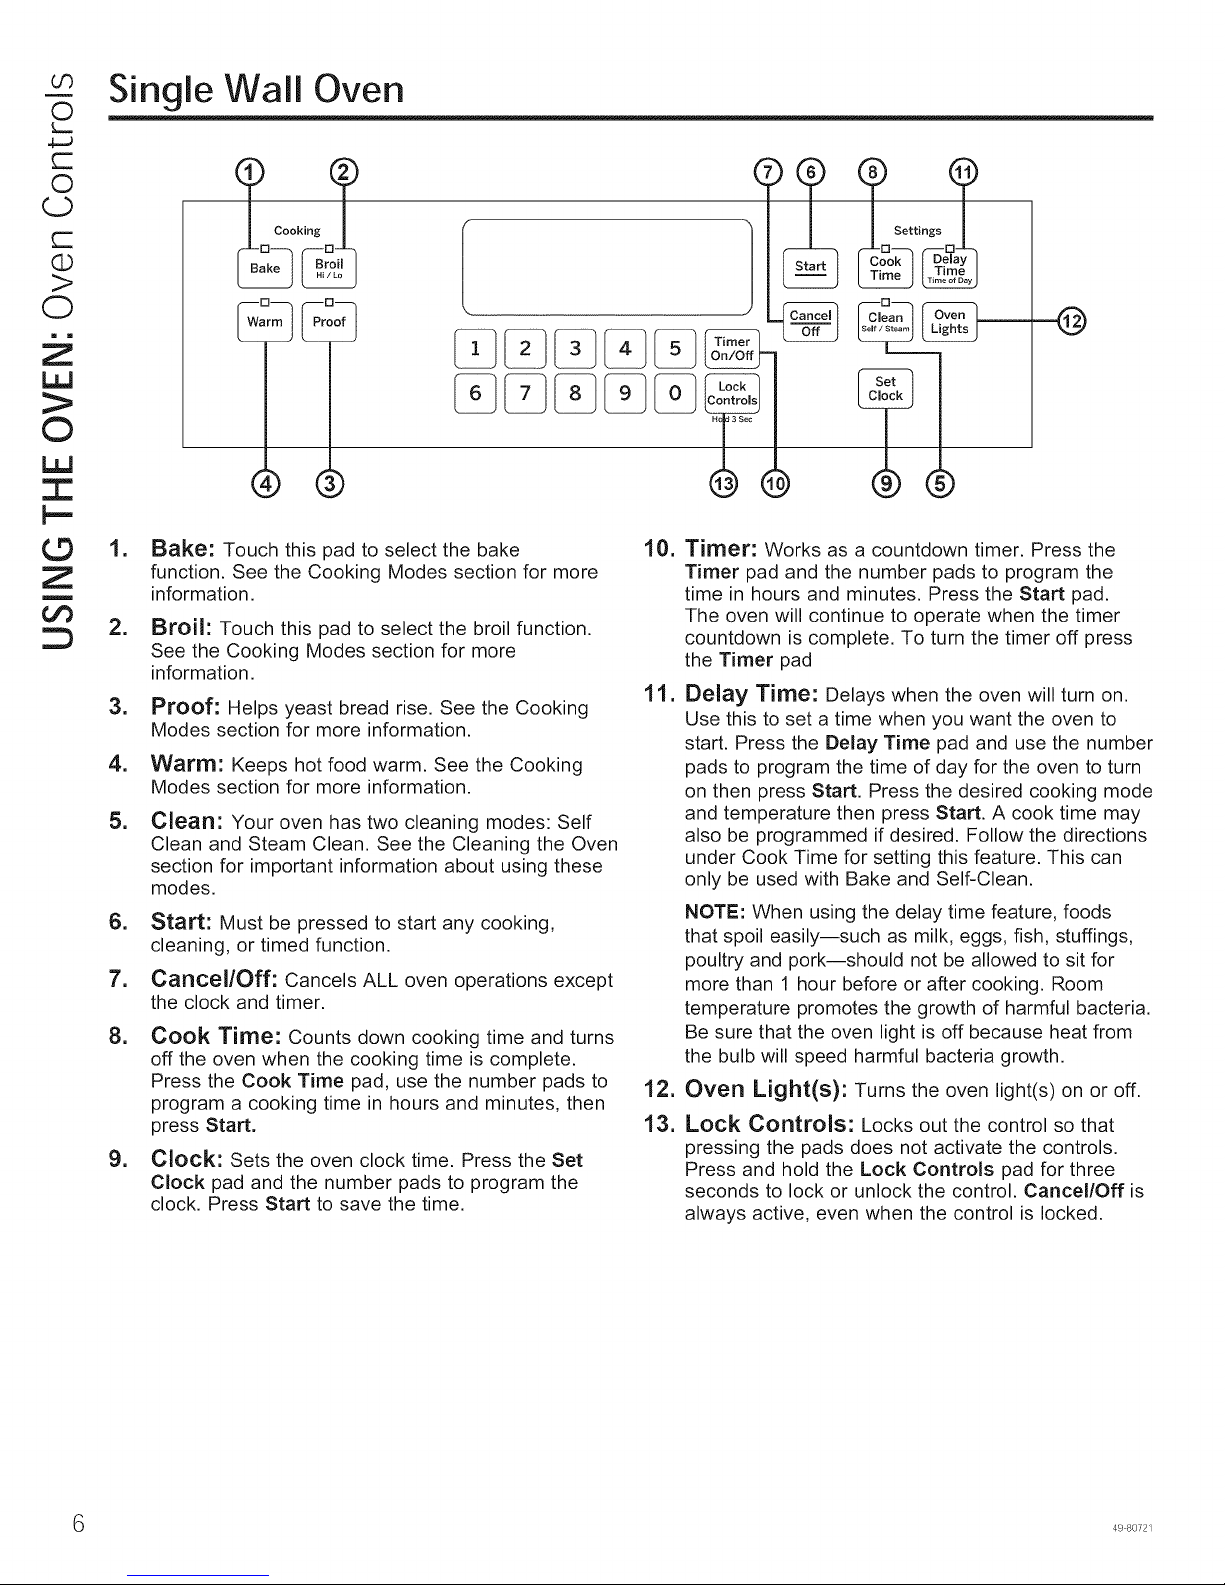
Bake: Touch this pad to select the bake
function. See the Cooking Modes section for more
information.
.
Broil: Touch this pad to select the broil function.
See the Cooking Modes section for more
information.
.
Proof: Helps yeast bread rise. See the Cooking
Modes section for more information.
4.
Warm" Keeps hot food warm. See the Cooking
Modes section for more information.
5.
Clean: Your oven has two cleaning modes: Self
Clean and Steam Clean. See the Cleaning the Oven
section for important information about using these
modes.
.
Start: Must be pressed to start any cooking,
cleaning, or timed function.
7.
Cancel/Off: Cancels ALL oven operations except
the clock and timer.
8.
Cook Time: Counts down cooking time and turns
off the oven when the cooking time is complete.
Press the Cook Time pad, use the number pads to
program a cooking time in hours and minutes, then
press Start.
.
Clock: Sets the oven clock time. Press the Set
Clock pad and the number pads to program the
clock. Press Start to save the time.
_ Settings ?
[]
• Time
-I@
10. Timer: Works as a countdown timer. Press the
Timer pad and the number pads to program the
time in hours and minutes. Press the Start pad.
The oven will continue to operate when the timer
countdown is complete. To turn the timer off press
the Timer pad
11. Delay Time: Delays when the oven will turn on.
Use this to set a time when you want the oven to
start. Press the Delay Time pad and use the number
pads to program the time of day for the oven to turn
on then press Start. Press the desired cooking mode
and temperature then press Start. A cook time may
also be programmed if desired. Follow the directions
under Cook Time for setting this feature. This can
only be used with Bake and Self-Clean.
NOTE: When using the delay time feature, foods
that spoil easily--such as milk, eggs, fish, stuffings,
poultry and pork--should not be allowed to sit for
more than 1 hour before or after cooking. Room
temperature promotes the growth of harmful bacteria.
Be sure that the oven light is off because heat from
the bulb will speed harmful bacteria growth.
12. Oven Light(s): Turns the oven light(s) on or off.
13. Lock Controls: Locks out the control so that
pressing the pads does not activate the controls.
Press and hold the Lock Controls pad for three
seconds to lock or unlock the control. Cancel/Off is
always active, even when the control is locked.
49 80721
Page 7
Doub(e Wa(( Oven
®
®
lm
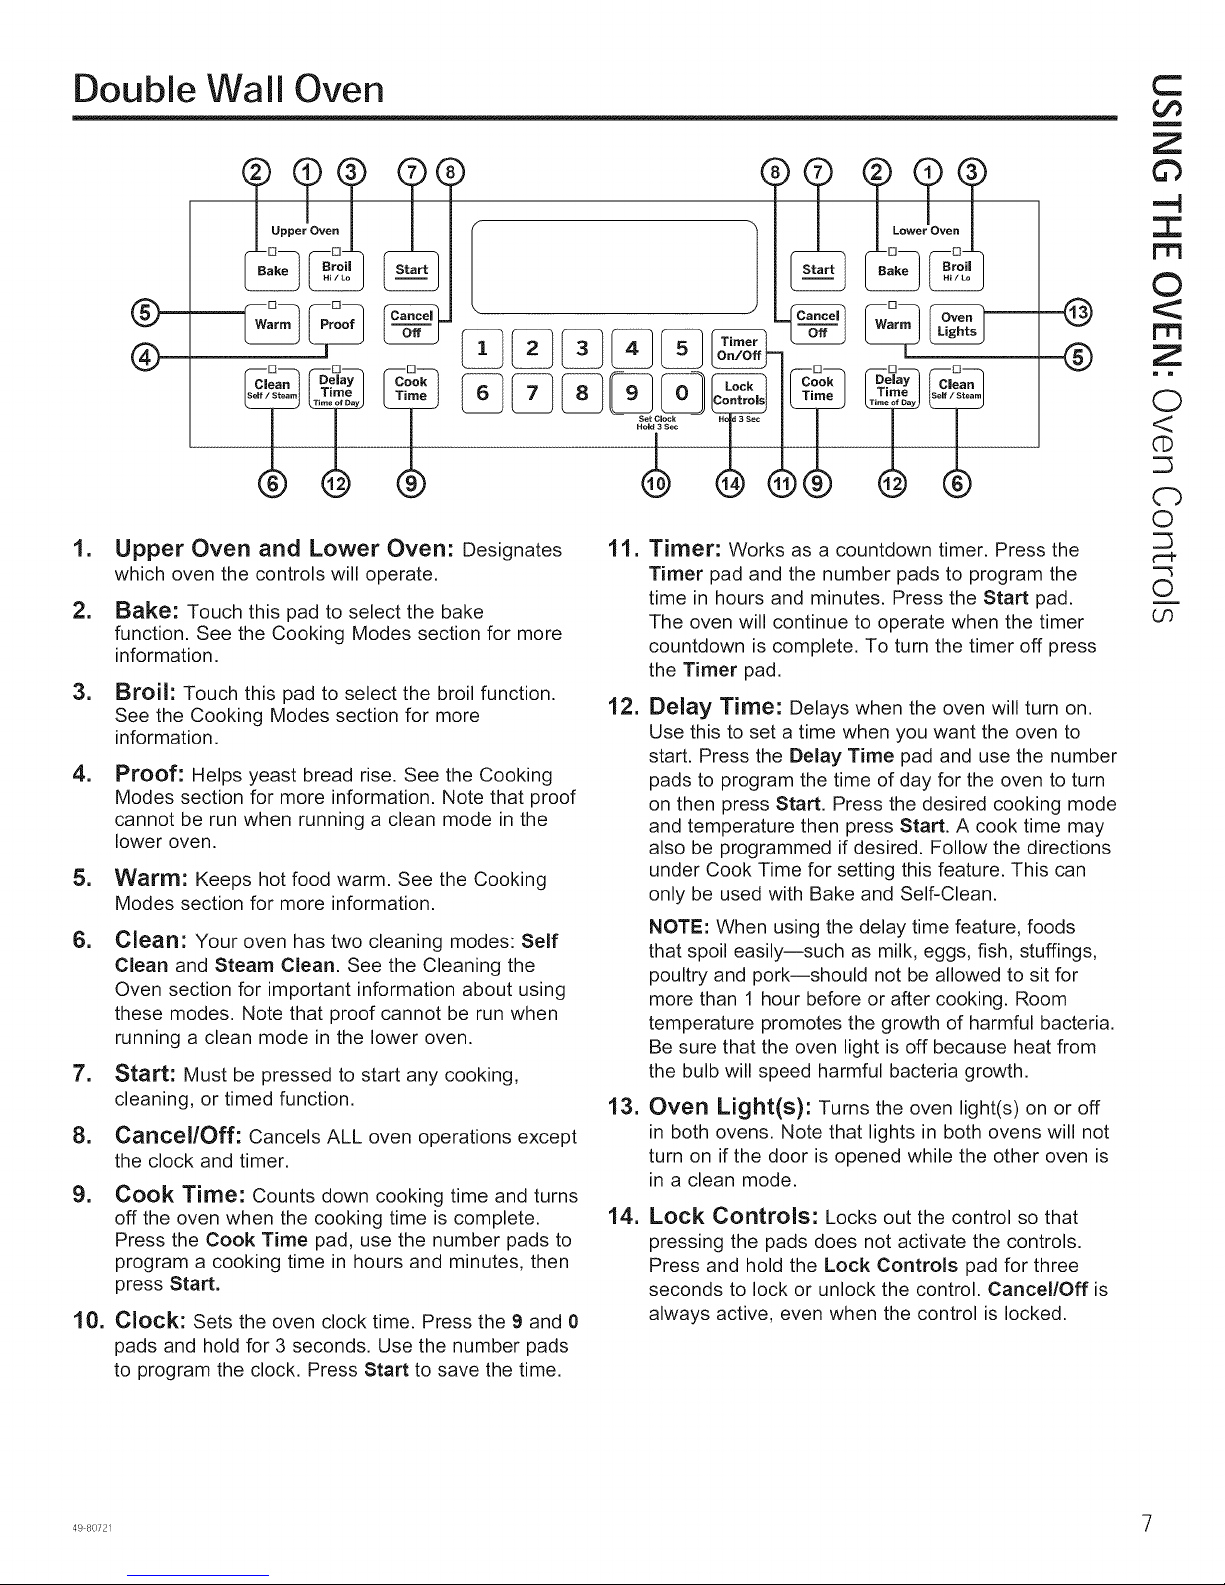
Upper Oven and Lower Oven: Designates
which oven the controls will operate.
m
Bake: Touch this pad to select the bake
function. See the Cooking Modes section for more
information.
m
Broil: Touch this pad to select the broil function.
See the Cooking Modes section for more
information.
m
Proof: Helps yeast bread rise. See the Cooking
Modes section for more information. Note that proof
cannot be run when running a clean mode in the
lower oven.
m
Warm: Keeps hot food warm. See the Cooking
Modes section for more information.
m
Clean: Your oven has two cleaning modes: Self
Clean and Steam Clean. See the Cleaning the
Oven section for important information about using
these modes. Note that proof cannot be run when
running a clean mode in the lower oven.
m
Start: Must be pressed to start any cooking,
cleaning, or timed function.
m
Cancel/Off: Cancels ALL oven operations except
the clock and timer.
m
Cook Time: Counts down cooking time and turns
off the oven when the cooking time is complete.
Press the Cook Time pad, use the number pads to
program a cooking time in hours and minutes, then
press Start.
10.
Clock: Sets the oven clock time. Press the 9 and 0
pads and hold for 3 seconds. Use the number pads
to program the clock. Press 8tart to save the time.
11.
Timer: Works as a countdown timer. Press the
Timer pad and the number pads to program the
time in hours and minutes. Press the Start pad.
The oven will continue to operate when the timer
countdown is complete. To turn the timer off press
the Timer pad.
12.
Delay Time: Delays when the oven will turn on.
Use this to set a time when you want the oven to
start. Press the Delay Time pad and use the number
pads to program the time of day for the oven to turn
on then press Start. Press the desired cooking mode
and temperature then press Start. A cook time may
also be programmed if desired. Follow the directions
under Cook Time for setting this feature. This can
only be used with Bake and Self-Clean.
NOTE: When using the delay time feature, foods
that spoil easily--such as milk, eggs, fish, stuffings,
poultry and pork--should not be allowed to sit for
more than 1 hour before or after cooking. Room
temperature promotes the growth of harmful bacteria.
Be sure that the oven light is off because heat from
the bulb will speed harmful bacteria growth.
13.
Oven Light(s): Turns the oven light(s) on or off
in both ovens. Note that lights in both ovens will not
turn on if the door is opened while the other oven is
in a clean mode.
14.
Lock Controls: Locks out the control so that
pressing the pads does not activate the controls.
Press and hold the Lock Controls pad for three
seconds to lock or unlock the control. Cancel/Off is
always active, even when the control is locked.
C
Oo
m
Z
6"3
.-..4
Z
rT1
©
rT1
Z
m m
O
<
("D
Cb
0
¢"-h
0
i
Us
49 80721 7
Page 8
OO
(13
L._
4-J
G3
(13
LJ._
i
G3
LD
(13
Cz.
oO
ill
©
ill
3::
t.-,
©
Z
m
Special Features
There are several different special features on your wall oven. To change the settings of these special features,
press the BAKE and BROIL pads at the same time and hold for three seconds. "SF" will appear in the display.
Select the feature you want to change. When the change has been made, press the START key to save the change
and return to the time of day.
Adjust the Oven Temperature
This feature allows the oven baking temperature to be
adjusted up to 35°F hotter or down to 35°F cooler. Use
this feature if you believe your oven temperature is too
hot or too cold and wish to change it. For double oven
models, the upper and lower ovens are adjusted
separately.
Press the Bake pad to select the oven to be adjusted.
Press the Bake pad again to enter the temperature
adjustment mode. A number between 35 and - 35
will display. Use the number pads to set the desired
temperature adjustment and use the Bake pad to
change between negative and positive.
Press the Start pad to save the temperature adjustment.
End of Timer Signals
This is the tone that signals the end of a timer. The tone
can be continuous (Con bEEP) or one repeating beep
(bEEP). A continuous setting will continue to sound atone
until a button on the control is pressed. Press the Broil pad
to view the current setting and then to change the setting.
Fahrenheit or Celsius Temperature Display
The oven control is set to use Fahrenheit temperatures
(F), but you can change it to use Celsius temperatures
(C). Press the Broil and Cook Time pads at the same
time to view the current setting, press again to change
the setting.
Clock Display
This feature specifies how the time of day will be
displayed or if no time of day will be displayed. You can
select a standard 12-hour clock (12 H), 24-hour military
time display (24 H), or no clock displayed (oFF). Press
the Clock pad to view the current setting, press again to
change the setting.
Sound Volume
This feature allows the oven tone volume to be adjusted
between high (HI bEEP H!), medium (Std bEEP Std), low
(Lo bEEP Lo) and off (oFF bEEP oFF). Press the Cook
Time pad to view the current setting or to change the
setting. The control will sound the oven tone at the new
volume level each time the sound level is changed.
12-hour auto shut-off and Sabbath
Options for this feature are "12 SHdn", "no SHdn" and
"SAbbAtH".
12-hour auto shut-off turns off the oven after 12 hours of
continuous operations.
Sabbath mode disables the oven lights (the oven light
will not turn on when the door is opened), all sounds (the
control will not beep when a button is pressed), Broil,
Warm, Proof, Cook Time, Timer, Clock, and Delay Time
functions. Sabbath mode can only be used with Bake.
This feature conforms to the Star-K Jewish Sabbath
requirements.
Press and hold the Bake and Broil pads for 3 seconds
to enter special features.
Press the Delay Time pad to view the current setting
and then to change the setting.
To use Sabbath mode, select "SAbbAtH" and press
Start. A ] will appear in the display and the clock will not
display.
Note that if you have a double wall oven, when you
place the control into Sabbath mode, both ovens are
now in Sabbath mode and available for cooking.
Once in Sabbath mode, at any time you can press Bake,
use the number pads to enter a temperature between
170F and 550F, and press Start. No sound will be given
when the keys are pressed. At a random time between
30 seconds and 1 minute, ][, will appear in the display
indicating the oven is running.
Note that both ovens of a double wall oven can be used
in Sabbath mode. Each oven can be programmed
to a different temperature and each oven must be
programmed separately.
If you need to adjust the temperature, press Bake, use
the number pads to enter a new temperature between
170F and 550F, and press Start.
To turn the oven off, press Cancel/Off at any time. The
oven will immediately turn off and ][ will change to ]
indicating that the oven has turned off.
Note that each oven of a double wall oven must be
turned off separately.
To exit Sabbath mode, make sure that the oven is
turned off. Press and hold the Bake and Broil pads for 3
seconds to enter special features then press Delay Time
until either "12 Shdn" or "no Shdn" is in the display and
press Start.
NOTE: If power outage occurs during Sabbath mode the
unit will remain in Sabbath mode but off when power is
restored.
If you wish to use the Cook Time feature to bake in the
oven and then have the oven automatically turn off, you
will need to press the Cook Time button, enter a cooking
time duration, and press Start. Then enter special
features to start Sabbath mode as detailed above.
49 80721
Page 9
Oven Racks
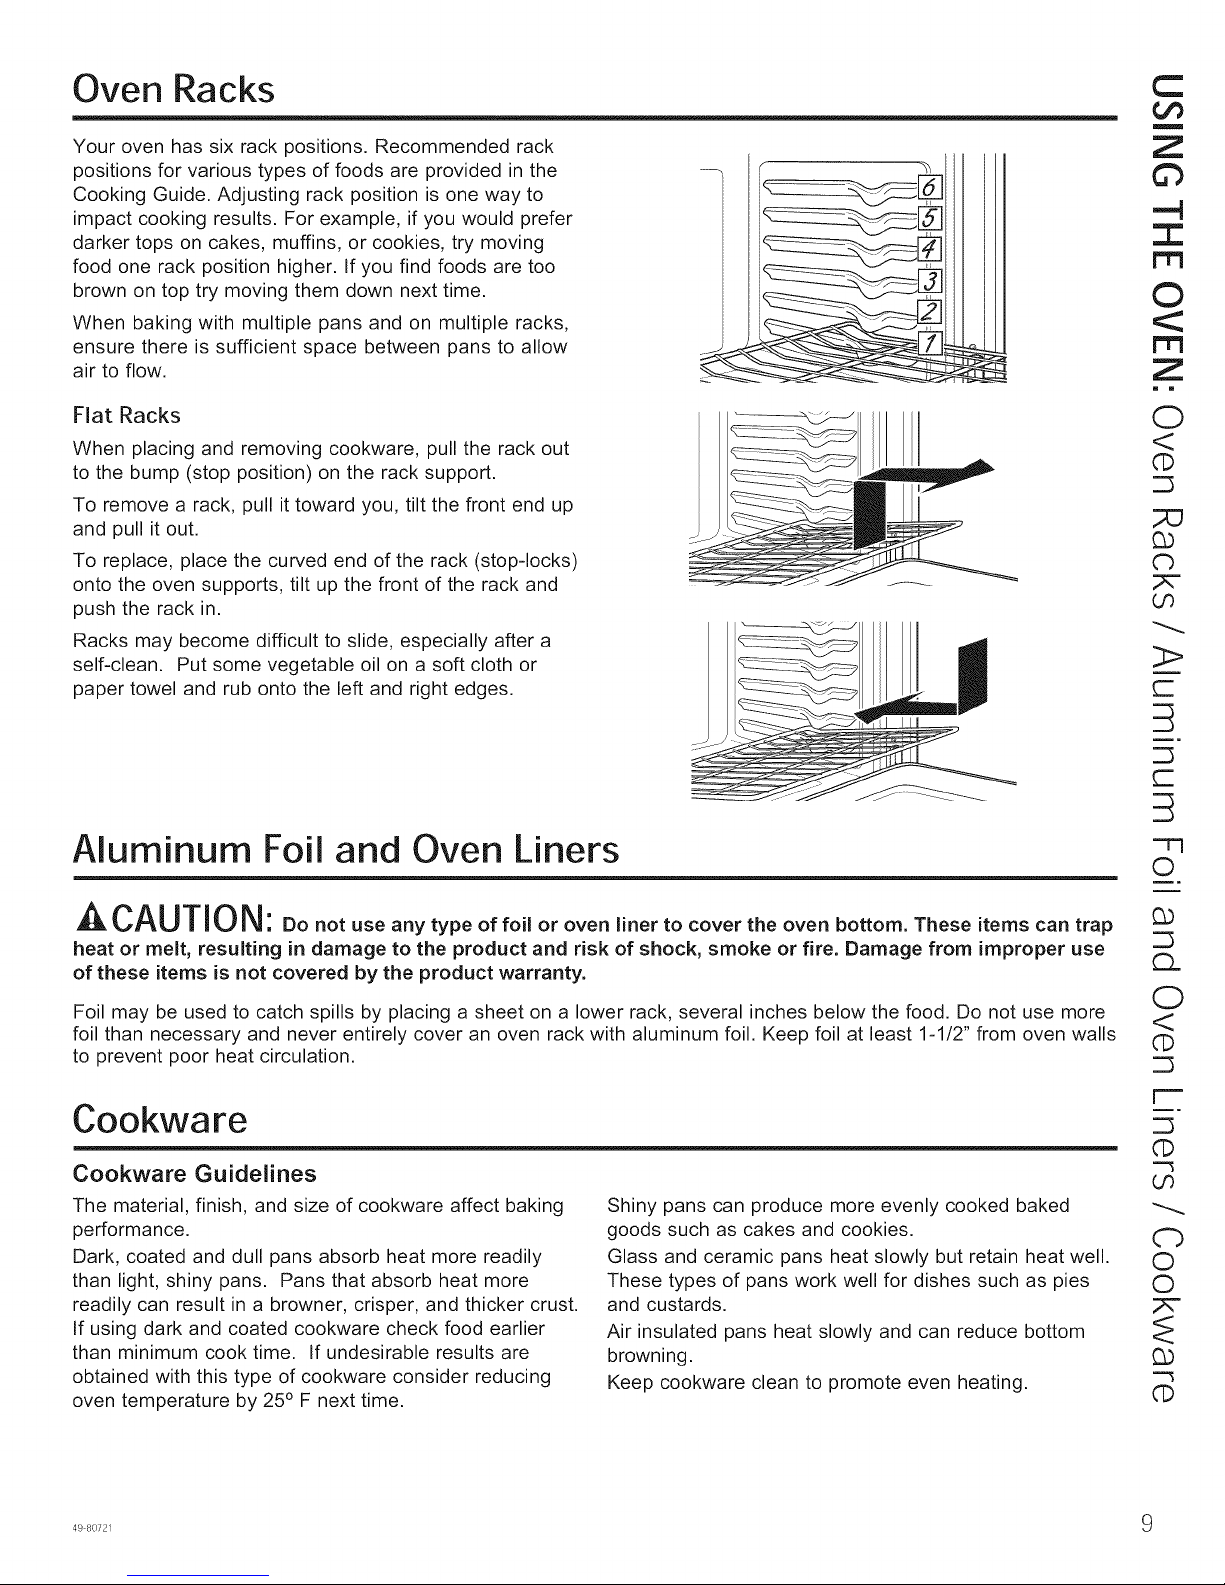
Your oven has six rack positions. Recommended rack
positions for various types of foods are provided in the
Cooking Guide. Adjusting rack position is one way to
impact cooking results. For example, if you would prefer
darker tops on cakes, muffins, or cookies, try moving
food one rack position higher. If you find foods are too
brown on top try moving them down next time.
When baking with multiple pans and on multiple racks,
ensure there is sufficient space between pans to allow
air to flow.
Fiat Racks
When placing and removing cookware, pull the rack out
to the bump (stop position) on the rack support.
To remove a rack, pull it toward you, tilt the front end up
and pull it out.
To replace, place the curved end of the rack (stop-locks)
onto the oven supports, tilt up the front of the rack and
push the rack in.
Racks may become difficult to slide, especially after a
self-clean. Put some vegetable oil on a soft cloth or
paper towel and rub onto the left and right edges.
C
t_o
m
Z
©
-4
I
1"I=i
O
r't3
Z
= m
O
<
('D
G3
Cb
O0
3>
c-
Aluminum Foil and Oven Liners
^,,-CAUTION: Donotuseanytypeoffoiloroven.nettocovertheovenbottomTheseitemscantrap
heat or melt, resulting in damage to the product and risk of shock, smoke or fire. Damage from improper use
of these items is not covered by the product warranty.
Foil may be used to catch spills by placing a sheet on a lower rack, several inches below the food. Do not use more
foil than necessary and never entirely cover an oven rack with aluminum foil. Keep foil at least 1-1/2" from oven walls
to prevent poor heat circulation.
Cookware
Cookware Guidelines
The material, finish, and size of cookware affect baking
performance.
Dark, coated and dull pans absorb heat more readily
than light, shiny pans. Pans that absorb heat more
readily can result in a browner, crisper, and thicker crust.
If using dark and coated cookware check food earlier
than minimum cook time. If undesirable results are
obtained with this type of cookware consider reducing
oven temperature by 25° F next time.
Shiny pans can produce more evenly cooked baked
goods such as cakes and cookies.
Glass and ceramic pans heat slowly but retain heat well.
These types of pans work well for dishes such as pies
and custards.
Air insulated pans heat slowly and can reduce bottom
browning.
Keep cookware clean to promote even heating.
c-
=71
O
CL
O
<
dE)
r--
©
O0
Cb
O
©
==3
dE)
49 80721 9
Page 10
'(3
Z
UO
Q
O
Cooking Modes
Your new oven has a variety of cooking modes to help you get the best results. These modes are described
below. Refer to the Cooking Guide section for recommendations for specific foods. Remember, your new oven
may perform differently than the oven it is replacing.
©
I
©
Z
m
c-
O
O
Bake
The bake mode is for baking and roasting. This mode
uses heat primarily from the lower element but also from
the upper element to cook food. When preparing baked
goods such as cakes, cookies, and pastries always
preheat the oven first. Follow recipe recommendations
for food placement. If no guidelines are provided center
food in the oven. To use this mode press the Bake pad,
enter a temperature, and then press Start.
Proof
Proof mode is designed for rising (fermenting and
proofing) bread doughs. Press the Proof pad and then
press Start. Cover dough well to prevent drying out.
Bread will rise more rapidly than at room temperature.
Note that for double wall ovens, proof can not be run
when running a clean mode in the lower oven.
Warm
Warm mode is designed to keep hot foods hot for up to
3 hours. To use this mode, press the Warm pad then
press Start. Cover foods that need to remain moist and
do not cover foods that should be crisp. Preheating is
not required. Do not use warm to heat cold food other
than crisping crackers, chips or dry cereal. It is also
recommended that food not be kept warm for more
than 2 hours.
Broiling Modes
Always broil with the door closed. The broil element in
this oven is very powerful. Monitor food closely while
broiling. Use caution when broiling on upper rack
positions as placing food closer to the broil element
increases smoking, spattering, and the possibility of
fats igniting. For best performance center food below
the broil heating element. Broiling on rack position 6
is not recommended.
Try broiling foods that you would normally grill. Adjust
rack positions to adjust the intensity of the heat to the
food. Place foods closer to the broil element when a
seared surface and rare interior is desired. Thicker
foods and foods that need to be cooked through should
be broiled on a rack position farther from the broiler or
by using Broil Lo.
Broil Hi
The Broil Hi mode uses intense heat from the upper
element to sear foods. Use Broil Hi for thinner cuts
of meat and/or foods you prefer less done on the
interior. To use this mode press the Broil pad once
and then press Start. It is not necessary to preheat
when using this mode,
Broil Lo
The Broil Lo mode uses less intense heat from the
upper element to cook food thoroughly while also
producing surface browning. Use Broil Lo for thicker
cuts of meat and/or foods that you would like cooked
all the way through. To use this mode press the Broil
pad twice and then press Start. It is not necessary to
preheat when using this mode.
q0 49 80721
Page 11

Cooking Guide
Baked Goods
Layer cake s, sheet cakes,
bundt cakes, muffins, quick
breads on a Single Rack
Layer cakes* on Multiple
Racks
Chiffon cakes (angel food)
Cookies, biscuits, scones
on a Single Rack
on Multiple Racks
Beef & Pork
Hamburgers
Steaks & Chops
Roasts
Poultry
Whole chicken
Bone-in chicken breasts,
legs, thighs
Boneless chicken breasts Broil Lo 1 (broil) or 3
Whole turkey Bake 1 or 2
Turkey Breast Bake 2 or 3
Fish Broil Lo 5 (1/2 thick or less)
Casseroles Bake 3
Frozen Convenience Foods
Pizza, french fries, tator tots,
chicken nuggets, appetizers
on a Single Rack
Pizza, french fries, tator tots,
chicken nuggets, appetizers
on Multiple Racks
Bake
Bake
Bake
Bake
Bake
Broil Hi
Broil Hi
Bake
Bake
Broil Hi
Broil Lo
Bake
Bake
Bake 3 Use shiny cookware.
Bake 2 and 4
2 and 4
1
3
2 and 4
2or3
2or3
1
4 (>1/2 inch)
Use shiny cookware.
Ensure adequate airflow
(see illustration below).
Use shiny cookware.
Use shiny cookware.
For foods like sugar cookies, switch food location
partially through cooking for more even cooking
results between racks. Ensure adequate airflow.
Use a broil pan; move food down for more
doneness/less searing. Watch food
closely when broiling. For best performance
center food below the broil heating element.
Use a broil pan; move food down for
more doneness/less searing. Watch food
closely when broiling. For best performance
center food below the broil heating element.
Leave uncovered, use a low sided pan such
as a broil pan. Preheating is not necessary.
Use a low sided pan such as a broil pan.
If breaded or coated in sauce avoid Broil
Hi modes. Broil skin side down first.
Watch food closely when broiling. For best
performance when broiling, center food below
the broil heating element.
Move food down for more doneness/less
searing and up for greater searing/browning
when broiling. For best performance when broil-
ing, center food below the broil heating element.
Use a low sided pan such as a broil pan.
Use a low sided pan such as a broil pan.
Watch food closely when broiling. For best
performance center food below the broil heating
element.
Use shiny cookware.
Switch food location partially through
cooking for more even cooking results.
C
m
Z
©
.-4
-!"
i'-rl
©
i'-rl
Z
m m
Cb
O
O
LQ
C)
C-
CZ
(13
*When baking four cake layers at a time, use racks 2
and 4. Place the pans as shown so that one pan is not
directly above another.
Cook food thoroughly to help protect against food
borne illness. Minimum safe food temperature
recommendations for food safety can be found at
www.lsltDoneYet.gov. Make sure to use a food
thermometer to take food temperatures.
%
[]
%
%
Page 12

©
Z
m
Z
<1:
I,.tJ
¢D
Z
Cleaning The Oven
Be sure electrical power is off and all surfaces are cool before cleaning any part of the oven.
Control Panel
It's a good idea to wipe the control panel after each use.
Clean with mild soap and water or vinegar and water,
rinse with clean water and polish dry with a soft cloth.
Oven Exterior
Do not use oven cleaners, abrasive cleansers, strong
liquid cleansers, steel wool, plastic scouring pads, or
cleaning powders on the interior or exterior of the oven.
Clean with a mild soap and water or vinegar and water
solution. Rinse with clean water and dry with a soft cloth.
When cleaning surfaces, make sure that they are at
room temperature and not in direct sunlight.
Stainless Steel Surfaces (on some models)
Do not use a steel wool pad; it will scratch the surface.
To clean the stainless steel surface, use warm sudsy
water or a stainless steel cleaner or polish. Always wipe
the surface in the direction of the grain. Follow the cleaner
instructions for cleaning the stainless steel surface.
Do not use abrasive cleansers, strong liquid cleansers,
plastic scouring pads or oven cleaners on the control
panel--they will damage the finish.
If stain on the door vent trim is persistent, use a mild
abrasive cleaner and a sponge-scrubber for best results.
Spillage of marinades, fruit juices, tomato sauces and
basting liquids containing acids may cause discoloration
and should be wiped up immediately. Let hot surfaces
cool, then clean and rinse.
To inquire about purchasing cleaning products including
stainless steel appliance cleaner or polish read the
Assistance and Accessories sections at the beginning of
this manual.
Oven Interior
The interior of your new oven can be cleaned manually
or by using the Steam Clean or Self Clean modes.
Spillage of marinades, fruit juices, tomato sauces and
basting liquids containing acids may cause discoloration
and should be wiped up immediately. Let hot surfaces
cool, then clean and rinse.
Manual Cleaning
Do not use oven cleaners, abrasive cleaners, strong
liquid cleansers, steel wool, scouring pads, or cleaning
powders on the interior of the oven. Clean with a mild
soap and water or vinegar and water solution. Rinse with
clean water and dry with a soft cloth. When cleaning
surfaces, make sure that they are at room temperature.
Steam Clean Mode
Steam clean is intended to clean small spills using water
and a lower cleaning temperature than Self-Clean.
To use the Steam Clean feature, wipe grease and soils
from the oven. Pour one cup of water into the bottom of
the oven. Close the door. Press the Clean pad twice
and then press Start. The oven door will lock. You can
not open the door during the 30 minute steam clean as
this will decrease the steam clean performance. At the
end of the steam clean cycle the door will unlock. Wipe
out any excess water and any remaining soil.
Self Clean Mode
Read Self-Cleaning Oven Safety Instructions at the
beginning of this manual before using Self Clean Mode.
Self clean uses very high temperatures to clean the oven
interior. The oven door will lock when using this feature.
Before operating the self-clean cycle, wipe up grease and
soils from the oven. Remove all items from the oven other
than enameled (dark color) racks. Shiny or silver racks
and any cookware or other items should all be removed
from the oven before initiating a self-clean cycle. Close
the door. Press the Clean pad once and a default self-
clean time is displayed. The clean time can be changed
to any time between 3:00 and 5:00 hours by using the
number pads to enter a different time and pressing Start.
For heavily soiled ovens, the maximum 5 hour clean time
is recommended. If you wish to use the default time, press
the Start pad immediately after pressing the Clean pad.
The oven will turn off automatically when the self-clean
cycle is complete. The door will stay locked until the oven
has cooled down. After the oven has cooled down wipe
any ash out of the oven.
IMPORTANT: The health of some birds is extremely
sensitive to the fumes given off during the self-cleaning
cycle of any range. Move birds to another well-
ventilated room.
Flat Racks
Flat racks can be left in the cavity during self-clean
(if enameled racks, not shiny) or can be washed with
warm, soapy water.
2 49 80721
Racks may be more difficult to slide, especially after
a self-clean. Put some vegetable oil on a soft cloth or
paper towel and rub onto the left and right edges.
Page 13

Maintenance
¢b
Oven Light Replacement (onsomemodels)
A WARNING power to the oven at the main fuse or circuit breaker panel. Failure to do so may result in
i } sHOcK OR BURN HAZARD: Bar°re replacing °van light bulb' disc°nnect the electrical
electric shock or burn.
iA CAUTION i URN HAZARD: The glass cover and bulb should be removed when cool. Touching hot
1. Disconnect power at the main fuse or circuit breaker
panel.
2. Remove oven racks.
3. Slide a flat blade screwdriver between the housing
and the glass light cover.
4. Support the glass light cover with two fingers to
prevent the cover from falling to the bottom of the
oven.
5. Gently twist the screwdriver blade to loosen the glass
light cover. Be careful not to chip the oven coating.
6. Remove the glass light cover.
Oven Light Bulb (onsome models)
NOTE: The glass cover should be removed only when
cold. Wearing latex gloves may offer a better grip.
Before replacing the bulb. disconnect electrical power to
the oven at the main fuse or circuit breaker panel. Let
the bulb cool completely before removing it. For your
safety do not touch a hot bulb with a damp cloth. If you
do the bulb may break.
To remove:
Turn the glass cover counterclockwise 1/4 turn until the
tabs of the glass cover clear the grooves of the socket.
Remove the bulb.
To replace:
Put in a new 40-watt appliance bulb. Place the tabs of
the glass cover into the grooves of the socket. Turn the
glass cover clockwise 1/4 turn.
NOTE:
glass with bare hands or a damp cloth can cause burns,
7. Remove the bulb by firmly grasping and sliding the
bulb straight out until the two prongs have cleared
the ceramic holder.
8. Do not touch the glass of the new replacement bulb
with your fingers. It will cause the bulb to fail when it
lights. Grasp the replacement bulb with a clean towel
or facial tissue with the prongs facing down. Align
the two prongs in the ceramic holder, pressing gently
until the bulb is securely in the ceramic socket.
9. Slide the protective lens into the holder and push
until the clips snap into the housing.
10. Reconnect power.
31_"
Max
length
I
I
i
, Bulb
i
Glasscover
Socket
I't3
Z
r_
Z
Z
©
[] A 40-watt appliance bulb is smaller than a standard
40-watt household bulb.
[] Reconnect electrical power to the oven once the new
bulb is installed.
[] For improved lighting inside the oven, clean the glass
cover frequently using a wet cloth. This should be
done when the oven is completely cool.
Page 14

©
Z
m
Z
I,L!
..,J
Z
Maintenance
Lift-Off Oven Door
The door is very heavy. Be careful when removing and lifting the door.
Do not lift the door by the handle.
To remove the door:
1. Fully open the door.
2. Pull the hinge locks down toward the door frame, to
the unlocked position. A tool, such as a small flat-
blade screwdriver, may be required.
3. Firmly grasp both sides of the door at the top.
4. Close door to the door removal position. The door
should be open approximately 3" with no obstruction
above the door.
.
Lift door up and out until both hinge arms are clear of
the slots.
To replace the door:
1. Firmly grasp both sides of the door at the top.
2. Starting on the left side, with the door at the same
angle as the removal position, seat the indentation of
the hinge arm into the bottom edge of the hinge slot.
The notch in the hinge arm must be fully seated into
the bottom of the slot. Repeat for right side.
3. Fully open the door. If the door will not fully open, the
indentation is not seated correctly in the bottom edge
of the slot.
4. Push the hinge locks up against the front frame of the
oven cavity, to the locked position.
5. Close the oven door.
Hinge lock
Pull hinge locks down to unlock
H:lge slot
Push hinge locks up to lock
Slot
C_
Remow?/ position
Hin(
edge of
4 49 80721
Page 15

Troubleshooting tips ... Before you call for service
==4
Save time and money! Review the charts on the following pages first and you may not need to call for service.
Possible Cause What To Do
My new oven doesn't
cook like my old one.
Is something wrong
with the temperature
settings?
Food does not bake
properly
Food does not broil Oven controls improperly set. Make sure you select the appropriate broil
properly mode.
Your new oven has a different cooking
system from your old oven and therefore
may cook differently than your old oven.
Oven controls improperly set.
Rack position is incorrect or rack is not
level.
Incorrect cookware or cookware of improper See the Cookware section.
size being used.
Oven temperature needs adjustment. See the Special Features section.
Ingredient substitution Substituting ingredients can change the
Improper rack position being used. See Cooking Guide for rack location
Food being cooked in a hot pan. Make sure cookware is cool.
Cookware not suited for broiling. Use a pan specifically designed for broiling.
Aluminum foil used on the broiling pan and If using aluminum foil conform to pan slits.
grid has not been fitted properly and
slit as recommended.
For the first few uses, follow your recipe
times and temperatures carefully. If you still
think your new oven is too hot or too cold,
you can adjust the temperature yourself to
meet your specific cooking preference.
See the Cooking Modes section.
See the Cooking Modes section and Cooking
Guide.
recipe outcome.
suggestions.
©
C
r""
m
-r"
©
©
==4
m
Z
©
==4
m
In some areas the power (voltage) may be Preheat the broil element for 10 minutes.
low.
Oven temperature too Oven temperature needs adjustment. See the Special Features section.
hot or too cold
Oven does not work or A fuse in your home may be blown or the Replace the fuse or reset the circuit breaker.
appears not to work circuit breaker tripped.
Oven controls improperly set. See the Using the Oven section.
Oven is in Sabbath Mode. Verify, that the oven is not in Sabbath Mode.
See the Special Features section.
"Crackling" or This is the sound of the metal heating This is normal.
"popping" sound and cooling during both the cooking and
cleaning functions.
Why is my range Your range has been designed to maintain This is normal.
making a "clicking" a tighter control over your oven's
noise when using my temperature. You may hear your oven's
oven? heating elements "click" on and off more
frequently than in older ovens to achieve
better results during baking, broiling, and
self=clean cycles.
Clock and timer do not A fuse in your home may be blown or the Replace the fuse or reset the circuit breaker.
work circuit breaker tripped.
Sometimes the Cookware or food in oven The cookware or food in the oven wilt cause
oven takes longer to the oven to take longer to preheat. Remove
preheat to the same items to reduce preheat time.
temperature Number of racks in oven Adding more racks to the oven will cause
the oven to take longer to preheat. Remove
some racks.
Page 16

tJ3
m
t.==
©
Z
m
t.==
©
©
I
¢/3
==J
©
t,,,'
t.==
Troubleshooting tips ... Before you call for service
oven,ghtdoesnot
work
oven will notself,
clean
Excessive smoking
during clean cycle
Excessivesmoking
during broiling
Oven door will not
open after a clean
cycle
oven n0t clean after
a clean cycle
"LOCK DOOR"
flashes in the
display
LOCKED light is on
when you want to
cook
"Fm and a number
or letter" flash in
the display
Display goes blank
Possible Cause
Light bulb is loose or defective.
Pad operating light is broken.
The temperature is too high to set a
self=clean operation.
Oven controls improperly set.
Excessive soil or grease..
Food too close to burner element.
Oven too hot.
Oven controls improperly set.
Oven was heavily soiled.
The self-clean cycle has been selected
but the door is not closed.
The oven door is locked because
the temperature inside the oven
has not dropped below the locking
temperature.
You have a function error code.
If the function code repeats.
A fuse in your home may be blown or the
circuit breaker tripped.
The clock is turned off.
What To Do
Tighten or replace bulb.
Call for service.
Allow the oven to cool and reset the controls.
See the Cleaning the Oven section.
Press the Cancel/Off pad. Open the windows to rid
the room of smoke. Wait until the LOCKED light goes
off. Wipe up the excess soil and reset the clean cycle.
Lower the rack position of the food.
Allow the oven to cool below locking temperature.
See the Cleaning the Oven section.
Clean up heavy spillovers before starting the clean
cycle. Heavily soiled ovens may need to self-clean
again or for a longer period of time.
Close the oven door.
Press the Cancel/Off pad. Allow the oven to cool.
Press the Cancel/Off pad. Allow the oven to cool for one
hour. Put the oven back into operation.
Disconnect all power to the oven for at least 30
seconds and then reconnect power. If the function
error code repeats, call for service.
Replace the fuse or reset the circuit breaker.
See the Special features section.
Oven is in Sabbath Mode.
Power outage,
clock flashes
"Burning" or "oily" This is normal in a new oven and will
odor emitting from disappear in time.
the vent
Strong odor An odor from the insulation around
Fan noise A cooling fan may automatically turn This is normal. The cooling fan wilt turn on to cool
My oven door glass
appears to be
"tinted" or have a
"rainbow" color, is
this defective?
]6 49 80721
Power outage or surge Reset the clock. If the oven was in use, you must
the inside of the oven is normal for the
first few times the oven is used.
on. internal parts. It may run for up to 1-1/2 hours after the
No. The inner oven glass is coated with
a heat barrier to reflect the heat back
into the oven to prevent heat loss and
keep the outer door cool while baking.
Verify that the oven is not in Sabbath Mode.
See the Special Features section.
reset it by pressing the Cancel/Off pad, setting the
clock and resetting any cooking function.
To speed the process, set a self-clean cycle for a
minimum of 3 hours. See the Cleaning the Oven
section. This is temporary.
This is temporary and wilt go away after several uses
or a self-clean cycle.
oven is turned off.
This is normal. Under certain light or angles, you may
see this tint or rainbow color.
Page 17

GEAppliances.com
0
0
0
0
t"
0
im
4,.a
LIJ
Informacion de Seguridad ...... 2
Garantia ........................... 4
Asistencia / Accesorios .......... 5
Uso del Homo
Controles del Horno .................. 6
Funciones Especiales ................. 8
Estantes del Homo ................... 9
Papel de Aluminio y Cobertores
del Homo .......................... 9
Utensilios ............................ 9
Modos de Coccion .................. 10
Guia de Coccion .................... 11
Cuidado y Limpieza
Panel de Control .................... 12
Exterior del Homo ................... 12
Superficies de Acero Inoxidable ...... 12
Interior del Homo ................... 12
Estantes Pianos ..................... 12
Mantenimiento ...................... 13
Consejos para la
SoluciOn de Problemas ......... 14
Homo de Pared Simple JK3000 de 27"
Homo de Pared Simple JT3000 de 30"
Homo de Pared Doble JK3500 de 27"
Homo de Pared Doble JT3500 de 30"
O
3::
Escriba los nomeros de modelo y
de serie aqui:
N° de Modelo
N° de Serie
Los podra encontrar en una
etiqueta en el borde lateral o en el
frente del homo (inferior) detras de
la puerta del homo,
Impreso en Estados Unidos
Impreso en
Papel Reciclado
49-80721 03-14 GE
Page 18

tm
INFORMACION IMPORTANTE DE SEGURIDAD
tm
m
LEA TODAS LAS INSTRUCCIONES ANTES DE USAR
= IAADVERTENClA]
ELI
O_ incendios, descargas electricas, lesiones graves o la muerte.
Z
,©
m
Lea todas las instrucciones antes de usar el product©. Si no se siguen estas instrucciones se podr_n producir
ADVERTENCiA DE LA PROPOSICiON 65 DEL ESTADO DE CALiFORNiA
La Ley sobre Agua Potable Inocua y Tratamiento de Residuos T6xicos de California (California Safe Drinking Water
and Toxic Enforcement Act) solicita al Gobernador de California que publique una lista de sustancias que el estado
reconoce que producen cancer, defectos de nacimiento u otros da_os reproductivos y solicita a los empresarios que
adviertan a sus clientes sobre la posible exposici6n a tales sustancias.
I ADVERTENCIA 1Este producto contiene uno o mas quimicos que el Estado de California entiende
que producen cancer, defectos en el nacimiento u otros da_os reproductivos.
©
Z
m
Los hornos con limpieza automatica pueden ocasionar exposiciones de bajo nivel a algunas de estas sustancias,
incluyendo mon6xido de carbono, durante el ciclo de limpieza. La exposici6n puede set minimizada si se ventila con
una ventana abierta o si se usa un ventilador o campana.
[ ADVERTENCIAI INSTRUCCIONESGENERALESDESEGURIDAD
-, Use este electrodom6stico s61o para su prop6sito
original, como se describe en el Manual del Propietario.
-, Solicite que un instalador calificado instale su
electrodomestico y que este adecuadamente conectado
a tierra, de acuerdo con las instrucciones de instalaci6n
provistas.
-, No intente reparar o reemplazar ninguna parte del
homo, a menos que se recomiende especificamente
en este manual. Cualquier otra reparaci6n debera ser
realizada por un tecnico calificado.
-, Antes de realizar cualquier servicio tecnico, desconecte
el suministro de corriente desde el panel de distribuci6n
del hogar, retirando el fusible o desconectando el
disyuntor.
,_ No deje a los ni_os solos - no se debera dejar a los
ni_os solos o fuera de su radio de atenci6n en el area
donde el electrodomestico se encuentre en uso. Nunca
se les debera permitir trepar, sentarse o pararse sobre
ninguna parte del electrodomestico.
,_ No toque el elemento calentador ni la superficie interior
-, No caliente envases de comida que no hayan sido
[] No use ningOn tipo de aluminio o cobertor para cubrir
• _PRECAUCION: Nocoloque articulosde
interes para los niSos sobre los gabinetes que estan
sobre un homo - si los niSos se trepan sobre el homo
para Ilegar a estos articulos podrian sufrir lesiones
graves.
,_ Use s61o mangos de ollas secas -los mangos hOmedos
sobre superficies calientes pueden producir quemaduras
debido al vapor. No deje que los mangos de las ollas
toquen los elementos que estan calientes. No use una
toalla u otra tela voluminosa para reemplazar el mango
de las cacerolas.
,_ Nunca use el electrodomestico para calentar o
calefaccionar la habitaci6n.
[] Evite las ralladuras o impactos sobre las puertas
[] Cocine carnes y carnes de ave en forma completa
del homo. Es posible que estas superficies esten
demasiado calientes como para quemar, aunque su
color sea oscuro. Durante y despues del uso, no toque
ni permita que telas u otros materiales inflamables
toquen cualquier area interior del homo; espere a que
haya pasado un tiempo suficiente para que se enfrien.
Otras superficies del electrodomestico se podran
calentar Io suficiente como para ocasionar lesiones. Las
superficies potencialmente calientes incluyen la abertura
de la ventilaci6n del horno, superficies cercanas a la
abertura y grietas alrededor de la puerta del homo.
abiertos. Se podria acumular presi6n y el envase podria
explotar, ocasionando una lesi6n.
el rondo del homo o cualquier parte del homo, excepto
como se describe en este manual. Los cobertores de
homo pueden atrapar el calor o derretirse, ocasionando
daSos sobre el producto y el riesgo de descargas, humo
o incendios.
de vidrio o los paneles de control. Hacer esto podra
producir la rotura de vidrios. No cocine un producto con
un vidrio roto. Es posible que se produzcan descargas,
incendios o cortes.
- la came por Io menos a una temperatura interna
de 1600 F y la came de ave pot Io menos a una
temperatura interna de 1800 F. Normalmente la cocci6n
a estas temperaturas es una protecci6n contra las
enfermedades transmitidas pot la comida.
GUARDEESTASINSTRUCCIONES
49 80721
Page 19

i'_, i MANTENGALOSMATERIALESINFLAMABLESALEJADOSDELACOCINA
ADVERTENCIA estooose cumple,sepodran sufrirlesionespersonalesgraveso incendios.
m
Z
'-'rl
©
[] No guarde ni use materiales inflamables en o cerca
de un horno, incluyendo papel, plastico, mangos de
ollas, trapos, cobertores de pared, cortinas, pahos y
gasolina u otros vapores y liquidos inflamables.
[] Nunca use prendas holgadas o que cuelguen
mientras usa el electrodom6stico. Estas prendas se
(^ADVERTENCIA iIENCASO DE INCENDIO,SIGALOS SIGUIENTESPASOS PARA
[]
No use agua sobre el fuego de la grasa. Nunca tome
una olla que se est6 incendiando.
[]
Si hay un incendio en el homo durante el horneado,
ahogue el fuego cerrando la puerta del homo y
apagando el mismo o usando un quimico seco
multiprop6sito o un extintor de incendio con espuma.
i,&ADVERTENCIAi
[] Mant6ngase alejado del horno al abrir la puerta del
mismo. El aire caliente o el vapor que sale puede
causar quemaduras en las manos, rostro y/u ojos.
[] Mantenga desobstruida la ventilaci6n del homo.
[] Mantenga el homo libre de acumulaci6n de grasa. La
grasa del homo se puede incendiar.
[] Coloque los estantes del homo en la ubicaci6n
deseada mientras 6ste se encuentra frio. Si es
necesario mover el estante mientras el homo esta
caliente, evite que el mango de la olla tenga contacto
con el elemento calentador en el homo.
[] AI usar las bolsas para cocinar o dorar en el homo,
siga las instrucciones del fabricante.
[] Es conveniente empujar hacia afuera los estantes
EVlTARLESIONESO LA PROPAGACION DEL FUEGO
INSTRUCCIONESDESEGURIDAD DEL HORNO
podran incendiar si entran en contacto con superficies
calientes, ocasionando quemaduras graves.
No permita que la grasa de la cocci6n u otros
materiales inflamables se acumulen en o cerca del
homo. La grasa que esta en o cerca del homo se
podra incendiar.
En caso de que haya fuego en el horno durante el ciclo
de limpieza autom&tica, apague el homo y espere a que
el fuego se extinga. No fuerce la puerta para abrirla.
La entrada de aire fresco sobre las temperaturas de la
limpieza autom_tica podr_ conducir a la producci6n de
llamas en el homo. Si no se siguen estas instrucciones,
se podr&n producir quemaduras graves.
estandares hasta el tope o empujar el estante
extensible hasta la posici6n completamente abierta
para levantar comidas pesadas. Esto tambi6n es una
precauci6n contra quemaduras pot tocar superficies
calientes de la puerta o las paredes del homo.
No deje productos tales como papel, utensilios de
cocina ni comida en el homo cuando 6ste no se
encuentre en uso. Los articulos guardados en el
homo se pueden incendiar.
Nunca coloque los utensilios de cocina, piedras para
pizza u horneado o cualquier otro tipo de aluminio o
cobertor en la base del horno. Estos items pueden
atrapar el calor o derretirse, ocasionando dahos sobre
el producto y el riesgo de descargas, humo o incendios.
Cb
m
©,
Z
m
i'm
©
C
m
iikADVERTENCIA iINSTRUCCIONES DE SEGURIDAD DEL HORNO CON LIMPIEZAAUTOMATICA
La funci6n de limpieza automatica usa el horno en temperaturas Io suficientemente altas como para consumir la
suciedad de comida que haya dentro del homo. Para un funcionamiento seguro, siga estas instrucciones.
[] No toque las superficies del horno durante el ciclo de
limpieza automatica. Mantenga a los nihos alejados
del homo durante la limpieza automatica. Si no
se siguen estas instrucciones, se podran producir
quemaduras.
[] Antes de usar el ciclo de limpieza automatica del
homo, retire los estantes de color gris brillante (en
algunos modelos), la sonda, cualquier papel de
aluminio, y cualquier bandeja para asar, rejilla, u otros
utensilios. S61o se pueden dejar dentro del homo los
estantes para homo cubiertos de porcelana.
[] Antes de utilizar el ciclo de limpieza automatica, limpie
la grasa y restos de comida que haya en el homo. Una
GUARDEESTASINSTRUCCIONES
49 80721 3
cantidad excesiva de grasa se puede incendiar, Io cual
puede producir dahos con humo en su hogar.
[] Si el modo de limpieza automatica funciona de
forma incorrecta, apague el homo y desconecte el
suministro de corriente. Solicite el servicio de un
t6cnico calificado.
[] No limpie la junta de la puerta. La junta de la puerta
es esencial para un buen sellado. Se debe tenet
cuidado de no frotar, dahar ni mover la junta.
[] No use limpiadores para homo. No se debera usar
limpiadores comerciales para homo ni revestimientos
de protecci6n para hornos de ningOn tipo en o
alrededor de cualquier parte del homo.
Page 20

p-
Z
tY
©
iGracias! ... por su compra de un electrodomestico de la Marca GE
Registre su I=lectrodomestico: iRegistre su electrodom6stico nuevo a trav6s de Internet, segQn su conveniencia!
www.geappliances.com/service_and_support/register/
Un registro puntuat de su producto permitir_ una mejor comunicaci6n y un servicio m_s puntual de acuerdo con los t6rminos de su
garantia, en caso de surgir la necesidad. Tambi6n puede enviar una carta en la tarjeta de inscripci6n pre-impresa que se incluye con
el material embalado.
Garantia de la Cocina Electrica de GE
GEAppliances.com
Todo el servicio de garantia es provisto por nuestros Centros de Servicio de Fabricaci6n, o un t6cnico autorizado de Servicio al
Ctiente (Customer Care®). Para programar una visita del servicio t6cnico a trav6s de Internet, visitenos en www.geapptiances.
com/service_and support/, o Ilame a1800.GE.CARES (800.432.2737). Cuando Ilame para solicitar el servicio, tenga los nQmeros
de serie y de modelo disponibles.
Para reatizar el servicio t6cnico de su electrodom6stico se podr_ requerir el uso de datos del puerto de abordaje para su
diagn6stico. Esto da al t6cnico del servicio de f_brica de GE la habilidad de diagnosticar de forma r_pida cualquier problema con
su electrodom6stico, y de ayudar a GE a mejorar sus productos al brindarle a GE la informaci6n sobre su electrodom_stico. Si no
desea que los datos de su electrodom_stico sean enviados a GE, solicitamos que le indique a su t_cnico no entregar los datos a
GE en el momento del servicio.
Durante el periodo de un ado desde la fecha original de compra. GE le brindar_ cuatquier parte de la cocina que fatle debido a
un defecto en los materiates o la fabricaci6n. Durante esta garantia limitada de un ado, GE tambi_n proveer_, sin costo, todo el
trabajo y el servicio en el hogar relacionado con el reemplazo de la parte que presente defectos.
Que no cubrira GE:
[] Viajes del t_cnico del servicio a su hogar para ense_arle
sobre c6mo usar el producto.
[] Instalaci6n, entrega o mantenimiento inadecuados.
[] Fatlas del producto en caso de abuso, mat uso, modificaci6n
o uso para prop6sitos diferentes at original o uso comerciat.
[] Reemplazo de fusibles de la casa o reinicio de disyuntores.
[] Da5os ocasionados sobre el producto por accidente,
3,4
0 0-
0 O)
_ 0
0
© 0
3_
_8
cro
n ,m
incendio, inundaciones o cat_strofes naturales.
EXCLUSION DE GARANTiAS IMPLiCITAS
Su Qnica y exclusiva attemativa es la reparaci6n del producto, como se indica en ta Garantia Limitada. Las garantias implicitas,
incluyendo garantias impticitas de comerciabilidad o conveniencia sobre un prop6sito particular, se limitan a un a_o o al periodo
m_s corto permitido por la tey.
Esta garantia se extiende al comprador original y a cuatquier due5o subsiguiente de productos comprados para uso hogarefio
dentro de EE.UU. Si el producto est_ en un _rea donde no se encuentra disponible un Proveedor Autorizado del Servicio T6cnico
de GE, usted ser_ responsable por el costo de un viaje o se podra requerir que traiga el producto a una ubicaci6n del Servicio
T_cnico de GE Autorizado para recibir el servicio. En Alaska, la garantia excluye el costo de envio o Ilamadas del servicio a su
hogar.
Algunos estados no permiten la exclusi6n o limitaci6n de da_os fortuitos o consecuentes. Esta garantia le da derechos legates
especificos y es posible que tenga otros derechos legates que varian entre un estado y otro. Para conocer curies son sus
derechos legates, consulte a la oficina de asuntos del consumidor local o estatal o al Fiscal de su estado.
Garante: General Electric Company. Louisville, KY 40225
[] Da_os incidentales o consecuentes causados por posibtes
defectos sobre este producto.
[] Da5o causado despu_s de la entrega.
[] Producto no accesibte para brindar el servicio requerido.
[] Solicite el servicio t_cnico para reparar o reemptazar las
I_mparas, excepto las I_mparas LED.
Garantias Extendidas: Adquiera una garantia extendida de GE y aprenda sobre descuentos especiates que est_n disponibtes
mientras su garantia aQn est_ vigente. La puede adquirir en cuatquier momento a trav6s de Internet en
o r_
www.geapptiances.com/service_and_support/shop-for-extended-service-plans.htm
o llamando a1800.626.2224 durante el horario comerciat habitual. Los Servicios para el Consumidor Hogarefio de GE aQn estar_n
atli cuando su garantia caduque.
49 80721
Page 21

Desea realizar una consulta o necesita ayuda con su electrodomestico?
iConsulte el Sitio Web de Electrodom6sticos de GE (www.geapplJances.comlservJceandsupportl) durante las 24 horas, cual-
quier dia del afr!! Para mayor conveniencia y un servicio mas r_pido, ahora puede descargar el Manual del Propietario, ordenar
piezas o inctuso programar el servicio t6cnico a trav6s de Internet.
Serviclo Programado: El servicio de reparaci6n de expertos de
GE est_ a s61o un paso de su puerta. Entre a Internet y programe
su servicio en www.geappliances.com/service and support/o
Ilame al 800.GE.CARES (800.432.2737) durante el horatio de
atenci6n comercial.
Piezas y AccesorJos: Aquellas personas calificadas para
realizar el servicio t6cnico sobre sus propios electrodom6sticos
podr_n soticitar el envio de piezas o accesorios directamente
a sus hogares (se aceptan tas tarjetas VISA; MasterCard y
Discover). Ordene a trav6s de Internet hoy, durante las 24
horas o en forma telef6nica al 800.626.2002 durante el horario
de atenci6n comerciat.
Las instrucciones que figuran en este manual cubren los
procedimientos que ser_n reatizados por cuatquier usuario.
Otros servicios t6cnicos generalmente deberian ser
derivados a personal catificado del servicio. Se deber_ tener
cuidado, ya que una reparaci6n indebida podr_ hacer que el
funcionamiento no sea seguro.
EstudJo de DJseffode la VJda Real: GE apoya el concept©
de Diseffo Universal en product©s, servicios y ambientes que
pueden ser usados pot personas de todas las edades, tamaffos
y capacidades. Reconocemos la necesidad de reatizar diseffos
para una amplia gama de habilidades e incapacidades fisicas y
mentates. Para m_s detalles sobre las apticaciones de Diseffo
Universal de GE, incluyendo ideas de diseffo de cocinas para
personas con incapacidades, visite nuestro sitio web hoy. Sobre
casos de incapacidad auditiva, comuniquese al 800.TDD.GEAC
(800.833.4322).
Contactenos: Si no se encuentra satisfecho con el servicio
que recibi6 de GE, comuniquese con nosotros a trav6s de
nuestro sitio web con todos los detaltes, incluyendo su nQmero
telef6nico, o escriba a:
General Manager, Customer Relations
GE Appliances, Appliance Park Louisville, KY 40225
Accesorios
m
-4
FT'I
Z
m
Cb
©
m
©
_Busca Algo Mas?
iGE ofrece una variedad de accesorios para mejorar sus experiencias de coccidn y mantenimiento!
Para reatizar una orden, visitenos a trav6s de Internet en:
www.GEApplianeeParts.eom (EE.UU.) o en www.GEApplianees.ea (Canada)
o flame at 800.626.2002 (EE.UU.) 800.661.1616 (Canada)
Estos y otros productos est_n disponibtes:
Accesorios
Otla para Asar Pequeffa (8 ¾ " x 1 ¼" x 13 ½ ")
Otla para Asar Grande* (12 ¾ " x 1 ¼" x 16 ½ ")
Otla para Asar Extra Grande* (17 ¾ " x 1 ¼" x 19 ½ ")
Piezas
Estantes del homo
Etementos del homo
L_mparas de luz
Sonda
Suministros de Limpieza
Limpiadores de Acero Inoxidabte CitriShine
Limpiador de Etectrodom6sticos de Acero Inoxidabte CeramaBryte
*La olla para asar grande no entra en cocinas de 20"/24".
**La olla XL no entra en hornos de pared de 24", empotrables de 27" o cocinas de 20"/24".
WB48X10055 (EE.UU.) 222D2097G001 (Canada)
WB48X10056 (EE.UU.) 222D2097G002 (Canada)
WB48X10057 (EE.UU.) No disponibte en Canad_
Los nOmeros de pieza varian segQn el model©
Los nOmeros de pieza varian segQn el model©
Los nQmeros de pieza varian segQn el model©
Los nQmeros de pieza varian segQn el model©
WX10X10007
PM10X311
Corn© Retirar la Pelicula Protectora de Envio y la Cinta
Con cuidado tome un extremo de la pelicuta protectora de envio
con los dedos y tentamente retire la misma de la superficie del
electrodom6stico.
No utilice ning0n product© filoso para retirar la pelicula. Retire toda
la pelicula antes de usar el electrodom6stico por primera vez.
Para asegurar que no haya daffos sobre el acabado del
49 80721 5
de Emba[aje
product©, la forma m_s segura de retirar el adhesivo de la cinta
de embalaje en electrodom6sticos nuevos es apticando un
detergente liquid© hogareffo para lavar ptatos. Aplique con una
tela suave y deje que se seque.
NOTA: Et adhesivo deber_ ser eliminado de todas las pares.
No se puede retirar si se hornea con 6ste dentro.
Page 22

O
c-"
O
"T-
m
d)
-C3
OO
(1)
O
4--J
O
LP
d
Z
tY
©
"l-
...J
LLJ
tm
©
oO
Homo de Pared Simple
_Bke_ c°°king t
_'--_rDoilJ-]
L_C_J _
E)
Bake (Hornear): Presione esta tecla para seleccionar
la funci6n para homear. Para mas informaci6n, consulte la
secci6n de Modos de Cocci6n.
2_
Broil (Asar): Presione esta tecla para seleccionar la funcidn
asar. Para mas informaci6n, consulte la secci6n de Modos de
Cocci6n.
3_
Proof (Leudar): Ayuda a elevar el pan con levadura. Para
mas informacidn, consulte la secci6n de Modos de Cocci6n.
4.
Warm (Calentar): Mantiene la comida caliente. Para mas
informaci6n, consulte la secci6n de Modos de Cocci6n.
5.
Clean (Limpieza): El horno cuenta con dos modos de
limpieza: Self Clean (Limpieza Automatica) y Steam Clean
(Limpieza con Vapor). Para acceder a informaci6n importante
sobre el uso de estos modos, consulte la secci6n de Limpieza
del Homo.
6_
Start (Iniciar): Se debera presionar para comenzar
cualquier funcidn de cocci6n, limpieza o por tiempo.
7.
Cancel/Off (Cancelar/Apagar): Cancelar TODAS las
operaciones del homo excepto el reloj y el temporizador.
8.
Cook Time (Tiempo de Cocci6n): Cuenta el tiempo
de cocci6n y apaga el homo cuando ei tiempo de cocci6n esta
completo. Presione la tecla Cook Time (Tiempo de Cocci6n),
use las teclas numericas para programar un tiempo de cocci6n
en horas y minutos, y luego presione Start (Iniciar).
.
Clock (Reloj): Configure la hora del reloj del homo: Presione
la tecla Set Clock (Configurar Reloj) y las teclas num6ricas
para programar el reloj. Presione Start (Iniciar) para guardar la
configuraci6n de la hora.
10.
Timer (Temporizador): Funciona como un temporizador
con cuenta regresiva: Presione la tecla Timer (Temporizador)
y las teclas num6ricas para programar el tiempo en horas y
minutos. Presione la tecla Start (Iniciar) El homo continuara
funcionando cuando la cuenta regresiva del temporizador se
haya completado. Para apagar el temporizador, presione la
tecla Timer (Temporizador).
_D Settings ?
[]
• Time
__Q
11.
Delay Time (Tiempo de Retraso): Genera un retraso
cuando el homo es encendido. Use esta tecia para configurar
el momento en que desea que el horno se inicie. Presione
la tecia Delay Time (Tiempo de Retraso) y use las tecias
num6ricas para programar ia hora del dia en que desea que
el homo se encienda y presione Start (Iniciar). Presione el
modo de cocci6n deseado y la temperatura y luego presione
Start (Iniciar). Si Io desea, tambi6n puede ser programado
un tiempo de cocci6n. Siga las instrucciones de Cook Time
(Tiempo de Cocci6n) para configurar esta funci6n. $61o se
puede usar con los modos Bake (Hornear) y Self-Clean (Auto
Limpieza).
NOTA: AI usar la funci6n de tiempo de retraso, las comidas
que se echan a perder r&pidamente, tales como leche,
huevos, pescado, relienos, ave y cerdo, no se deberan dejar
reposar por mas de 1 hora antes y despu6s de la cocci6n.
La temperatura ambiente estimuia el desarrollo de bacterias
nocivas. AsegQrese de que la luz del homo est6 apagada,
ya que el calor de la lampara acelerara el crecimiento de
bacterias nocivas.
Oven Light(s) (Luz(es) del Homo): Enciendeo apaga
la luz(es) del homo.
Lock Controls (Controles de BIoqueo): Bloquean
el control de modo que al presionar las teclas no se activen
los controles. Mantenga presionada la tecla Lock Controls
(Controles de Bloqueo) durante tres segundos para bloquear
o desbloquear el control. La funci6n Cancel/Off (Cancelad
Apagar) siempre esta activa, incluso cuando el control esta
bloqueado.
49 80721
Page 23

Horn© de Pared Doble
®
®
1. Upper Oven and Lower Oven (Homo Superior y Homo
Inferior): Designa qu6 homo operar_n los controles.
2. Bake (Hornear): Presione esta tecla para seleccionar la funci6n
para hornear. Para mas informaci6n, consulte la secci6n de
Modos de Cocci6n.
3,
Broil (Asar): Presione esta tecla para seleccionar la funci6n
asar. Para mas informaci6n, consulte la secci6n de Modos de
Cocci6n.
4,
Proof (Leudar): Ayuda a elevar el pan con levadura. Para mas
informaci6n, consulte la secci0n de Modos de Cocci6n. Se
debera observar que la funci6n para leudar no se podra activar
cuando se est6 usando un modo de limpieza en el horn© inferior.
5,
Warm (Calentar): Mantiene la comida caliente. Para mas
informaci6n, consulte la secci6n de Modos de Cocci0n.
6.
Clean (Limpieza): El horn© cuenta con dos modos de limpieza:
Self Clean (Limpieza Automatica) y Steam Clean (Limpieza con
Vapor). Para acceder a informaci6n importante sobre el us© de
estos modos, consulte la secci6n de Limpieza del Homo.
7. Start (Iniciar): Se deber_ presionar para comenzar cualquier
funci6n de cocci6n, limpieza o por tiempo.
8. Cancel/Off (Cancelar/Apagar): Cancelar TODAS las
operaciones del horn© except© el reloj y el temporizador.
9. Cook Time (Tiempo de Cocci6n}: Cuenta el tiempo de cocci6n
y apaga el horn© cuando el tiempo de cocci6n est_ completo.
Presione la tecla Cook Time (Tiempo de Cocci6n), use las
teclas num6ricas para programar un tiempo de cocci6n en horas
y minutos, y luego presione Start (Iniciar).
10. Clock (Reloj): Configure el tiempo del reloj del homo. Mantenga
presionadas las teclas 9 y 0 durante 3 segundos. Use las teclas
num6ricas para programar el reloj.. Presione Start (Iniciar) para
guardar la configuraci6n de la hora.
11. Timer (Temporizador): Funciona como un temporizador con
cuenta regresiva: Presione la tecla Timer (Temporizador)
y las teclas num6ricas para programar el tiempo en horas y
minutos. Presione la tecla Start (Iniciar) El homo continuar_
funcionando cuando la cuenta regresiva del temporizador se
haya completado. Para apagar el temporizador, presione la tecla
Timer (Temporizador).
12. Delay Time (Tiempo de Retraso): Genera un retraso cuando
el homo es encendido. Use esta tecla para configurar el
moment© en que desea que el homo se inicie. Presione la tecla
Delay Time (Tiempo de Retraso) y use las teclas num6ricas
para programar la hora del dia en que desea que el homo se
encienda y luego presione Start (Iniciar) Presione el modo
de cocci6n deseado y la temperatura y luego presione Start
(Iniciar). Si I© desea, tambi6n puede ser programado un tiempo
de cocci6n. Siga las instrucciones de Cook Time (Tiempo de
Cocci6n) para configurar esta funci6n. S61o se puede usar con
los modos Bake (Hornear) y Self-Clean (Auto Limpieza).
NOTA: AI usar la funci6n de tiempo de retraso, las comidas
que se echan a perder r_pidamente, tales como leche, huevos,
pescado, rellenos, ave y cerdo, no se deber_n dejar reposar por
mas de 1 hora antes y despu6s de la cocci6n. La temperatura
ambiente estimula el desarrollo de bacterias nocivas. AsegQrese
de que la luz del horn© est6 apagada, ya que el calor de la
I_mpara acelerar_ el crecimiento de bacterias nocivas.
13. Oven Light(s) (Luz(es) del Homo): Enciende o apaga la luz(es)
en ambos hornos. Se debe observar que las luces de ambos
hornos no se encender_n si la puerta es abierta mientras el otro
horn© se encuentra en el modo de limpieza.
14. Lock Controls (Controles de Bloqueo): Bloquean el control
de modo que al presionar las teclas no se activen los controles.
Mantenga presionada la tecla Lock Controls (Controles de
BIoqueo) durante tres segundos para bloquear o desbloquear el
control. La funci6n Cancel/Off (Cancelar/Apagar) siempre esta
activa, incluso cuando el control esta bloqueado.
C
t,/)
©
r'-
-t-
O
;X3
Z
©
m m
Cb
O
¢-'P
""3
O
dD
U3
CL
dP
-T-
O
""3
O
49 80721 7
Page 24

U0
Q
LP
d.)
CL
U0
Q
U0
Q
O
LJ
C
LJ_
d
Z
©
7"
...J
_.J
tm
©
Funciones especiales
Existen varias funciones especiales en su homo de pared. Para modificar las configuraciones de estas funciones especiales, mantenga
presionadas las teclas BAKE (Hornear) y BROIL (Asar) al mismo tiempo durante tres segundos. "SF" aparecera en la pantalla. Seleccione
la funcidn que desee modificar. Una vez realizado el cambio, presione la tecla START (Iniciar) para guardar dicho cambio y regrese a la
hora del dia.
Ajuste de la Temperatura del Homo
Esta funci6n permite que la temperatura de horneado del homo sea
ajustada hasta 35°F mas caliente o 35°F mas fria. Use esta funci6n
si piensa que la temperatura de su homo es demasiado caliente
o demasiado fria y desea modificarla. Pata los modelos con
homo doble, los hornos superior e inferior se ajustan de forma
separada.
Presione la tecla Bake (Hornear) para seleccionar el homo que
sera ajustado. Presione la tecla Bake (Horneat) nuevamente para
ingresar el modo de ajuste de temperatura. Se exhibira un nOmero
entre 35 y - 35. Use las teclas num6ricas para configurar el ajuste
de temperatura deseado y use la tecla Bake (Hornear) para realizar
cambios en forma descendente y ascendente.
Presione la tecla Start (Iniciar) para guardar el ajuste de
temperatura.
Sonido de Finalizacion del Temporizador
Se trata de un tono que indica la finalizaci6n de un temporizador. El
tono puede ser continuo (bEEP Cont) o un pitido repetido (bEEP).
Una configuraci6n continua seguira haciendo que un tono suene
hasta que un bot6n del control sea presionado. Presione la tecla
Broil (Asar) para visualizar la configuraci6n actual y luego modifique
la configuraci6n.
Seleccion de Temperatura Fahrenheit o Celsius
El control del homo esta configurado para su uso con temperaturas
Fahrenheit (F), pero Io puede modificar a temperaturas Celsius (C).
Presione Broil (Asar) y Cook Time (Tiempo de Cocci6n) al mismo
tiempo para visualizar la configuraci6n actual; presione nuevamente
para modificar la configuraci6n.
Pantalla del Reloj
Esta funci6n especifica c6mo la hora del dia sera exhibida o si no se
exhibira la hora del dia. Puede seleccionar el reloj con hora estandar
de 12 horas (12 H), la hora militar de 24 horas (24 H), o que no se
exhiba ningQn reloj (oFF) (Apagado). Presione ia tecla Clock (Relo])
para visualizar la configuraci6n actual, y vuelva a presionar la misma
para modificar la configuraci6n.
Volumen del Sonido
Esta funci6n permite que el volumen del tono del homo sea ajustado
entre alto (HI bEEP HI) (Pitido Alto), medio (Std bEEP Std) (Pitido
Estandar) y apagado (oFF bEEP oFF) (Pitido Apagado). Presione
la tecla Cook Time (Tiempo de Coccion) para visualizar al
configuraci6n actual o para modificar la configuraci6n. El control
hara que el tono del homo suene en el nuevo nivel de volumen cada
vez que el nivel de sonido sea modificado.
Apagado automatico de 12 horas y Modo Sabatico
Las opciones de esta funci6n son "12 SHdn" (Apagar Luego de 12
Horas), "no SHdn" (No Apagar) y "SAbbAtH" (Sabatico).
El apagado automatico de 12 horas apaga el homo luego de 12
horas de operaciones continuas.
El modo sabatico desactiva las luces del homo (la luz del homo no
se encendera cuando la puerta sea abierta), todos los sonidos (el
control no emitira un pitido cuando se presione un bot6n), los modos
de Asado, Calentar, Leudar, Tiempo de Cocci6n, Temporizador,
Reloj, y las funciones de Tiempo Retrasado. El modo sabatico s61o
puede ser usado con la funci6n Bake (Hornear). Esta funci6n se
activa conforme con los requisitos Sabaticos Judios de la Estrella K.
Mantenga presionadas las teclas Bake (Horneat) y Broil (Asat)
durante 3 segundos para ingresar al modo de funciones especiales.
Presione la tecla Delay Clock (Reloj Retrasado) para visualizar la
configuraci6n actual y luego para modificar la configuraci6n.
Para usar el modo Sabbath (Sabatico), seleccione "SAbbAtH"
(Sabatico) y presione Start (Iniciat). Aparecera una ] en la pantalla
y el reloj no sera exhibido. Observe que si cuenta con un homo
de pared doble, al colocar el control en el modo Sabatico, ambos
homos estan ahora en el modo sabatico y estan disponibles para la
coccidn.
Una vez en el modo Sabbath (Sabatico), en cualquier momento
puede presionar Bake (Hotneat); use las teclas num6ricas para
ingresar una temperatura entre 170°F y 550°F, y presione Start
(Iniciar). No se emitira ningQn sonido cuando las teclas sean
presionadas. En un momento al azar entre los 30 segundos y 1
minuto, ][, aparecera en la pantalla indicando que el homo esta en
funcionamiento.
Observe que ambos homos de un homo de pared doble pueden ser
usados en el modo sabatico. Cada homo puede ser programado en
una temperatura diferente y cada homo debe ser programado por
separado.
Si necesita ajustar la temperatura, presione Bake (Hotneat), use las
teclas num6ricas para ingresar una nueva temperatura entre 170° F
y 550° F, y presione Start (Iniciar).
Para apagar el homo, presione Cancel/Off (Cancelat/Apagat) en
cualquier momento. El homo se apagara inmediatamente y el
icono, ][ cambiara a ], indicando que el homo fue apagado.
Observe que cada homo de un homo de pared doble se debera
apagar por separado.
Para saiir del modo sab&tico, asegOrese de que el homo est6
apagado. Mantenga presionadas las teclas Bake (Hornear) y Broil
(Asar) durante 3 segundos para ingresar alas funciones especiales,
luego presione Delay Time (Tiempo Retrasado) hasta que "12
Shdn" (Apagar Luego de 12 Horas) o "no Shdn" (No Apagar)
aparezcan en la pantalla y presione Start (Iniciar).
NOTA: Si se produce un corte de corriente durante el modo
Sabatico, la unidad permanecera en el modo Sabatico pero apagada
cuando vuelva la corriente.
Si desea usar la funci6n Cook Time (Tiempo de Cocci6n) (siesta
disponible) para hornear en el homo y luego hacer que 6ste se
apague de forma autom&tica, debera presionar el bot6n Cook Time
(Tiempo de Cocci6n), ingresar una duraci6n del tiempo de cocci6n,
y presionar Start (lniciar). Luego ingrese alas funciones especiales
para iniciar el modo Sabbath (Sabatico), como se detalla mas arriba.
49 80721
Page 25

Estantes del Horno
Et homo cuenta con seis posiciones de estantes. En la Guia
de Cocci6n, se brindan recomendaciones de posiciones de
los estantes para diferentes tipos de comidas. Se ajusta
un estante en una direccidn para afectar los resultados de
coccidn. Por ejempto, si se prefieren pares superiores m_s
oscuras en tartas, panecillos o galtetas, pruebe moviendo
la comida a un estante que se encuentre una posicidn m_s
arriba. Si encuentra que las comidas est_n demasiado doradas
en la parte superior, pruebe moviendo las mismas m_s abajo
la prdxima vez.
AI homear con mQItiptes oltas y en mQltiptes estantes,
asegQrese de que haya suficiente espacio entre las ottas para
que fluya el aire.
C
Oo
©
I
©
po
Z
©
= =
m
o9
Flat Racks
At cotocar y retirar utensitios de cocina, empuje el estante
hacia afuera del tope (posici6n de detenci6n) sobre el soporte
del estante.
Para retirar el estante, empuje el mismo hacia usted,
incline el extremo frontal hacia arriba y empuje hacia
afuera.
Para hacer un reemplazo, coloque el extremo curvo del
estante (bloqueadores) en los soportes del homo, incline
hacia arriba el frente y empuje el estante hacia adentro.
Es posible que resulte dificil deslizar los estantes,
especialmente luego de la limpieza automatica. Coloque
aceite vegetal en una tela hL_meda o toalla de papel y
frote sobre los extremos izquierdo y derecho.
Papel de Aluminio y Cobertores del Horno
^_ PRE_._ .f_l f_RlILr_'_U_ | UI_I : No use ningun tipo de aluminio o oobertor de homo para oubrir el rondo del homo. Estos
items pueden atrapar el calor o derretirse, ocasionando dafios sobre el producto y el riesgo de descargas, humo o incen=
dios. Los da_os por uso inadecuado de estos items no estan cubiertos por la garantia del producto.
Se podr_ usar aluminio para evitar derrames, colocando una hoja sobre un estante inferior varias pulgadas debajo de la comida.
No use m_s aluminio que el necesario y nunca cubra totalmente el estante de un homo con papel de aluminio. Mantenga el
atuminio a pot Io menos 1 1/2" de las paredes del homo, para evitar una circulaci6n deficiente del cator.
Utensilios
Pautas de Uso de Utensilios
El material, el acabado y el tama_o de los utensilios afectan el
horneado.
Las ollas oscuras, revestidas y opacas absorben el calor mas
rapidamente que las ollas claras y brillantes. AI usar ollas que
absorben el calor mas rapidamente, las comidas podran resultar
mas doradas, crocantes y con una capa mas gruesa.
Si utiliza utensilios oscuros y revestidos, controle la comida antes
del tiempo minimo de cocci6n. Si se obtienen resultados no
deseados con este tipo de utensilios, considere la posibilidad de
reducir la temperatura del horno en 25 ° F la proxima vez.
49 80721
Las ollas brillantes pueden producir resultados de horneado mas
parejos en tortas y galletas.
Las ollas de vidrio y ceramica calientan con lentitud, pero retienen
bien el calor.
Estos tipos de ollas funcionan bien con platos tales como tartas y
postres con natilla.
Las ollas con aislante de aire calientan lentamente y pueden
producir fondos dorados.
Mantenga los utensilios limpios para una cocci6n mas pareja.
-O
9
(1:)
O9
£Z
(1:)
::E
O
O
(1:)
(1:)
:;>
r-
S
O
d'b
O
ET
(1:)
"-3
O
"-3
(1:)
O9
£Z
(1:)
::E
O
O
(1:)
O9
m:
O
O9
Page 26

c-
'O
C)
O
LD
Q
oO
O
O
Z
d
Z
r,/
©
--r.
....J
tm
©
oO
Modos de Coccion
Su nuevo homo posee una variedad de modos de cocci6n para que pu eda obtener los mejores resultados. Estos modos se describen a
continuaci6n. Para acceder a recomendaciones para comidas especificas, consulte la secci6n de la Guia de Cocci6n. Recuerde que es
posible que su nuevo homo funcione de manera diferente que aquel que esta reemplazando.
Hornear
El modo de horneado es utilizado para homear y dorar. Este
modo usa el calor principalmente desde el elemento inferior, pero
tambien desde el elemento superior para cocinar la comida. AI
preparar comidas homeadas tales como tartas, galletas y masas,
siempre precaliente el homo primero. Siga las recomendaciones
de la receta sobre la colocaci6n de la comida. Si no se brindan
pautas, centre la comida en el homo. Para usar este modo,
presione la tecla Bake (Hornear), ingrese una temperatura, y
luego presione Start (Iniciar).
Leudar
El modo Proof (Leudar) esta disefiado para elevar (fermentar y
leudar) masas de pan. Presione la tecla Proof (Leudar) y luego
presione Start (Iniciar). Cubra bien la masa para evitar que se
seque. El pan se elevara mas rapidamente que a temperatura
ambiente. Se debera observar que con los hornos de pared doble,
la funci6n para leudar no se podra activar cuando se est6 usando
un modo de limpieza en el homo inferior.
Calentar
El modo Warm (Calentar) esta disefiado para mantener comidas
calientes hasta durante 3 horas. Para usar este modo, presione la
tecla Warm (Caliente) y luego presione Start (Iniciar). Cubra las
comidas que necesitan mantener la humedad y no cubra aquellas
comidas que deberian quedar crocantes. No se requiere precalentar
las mismas. No use la funci6n Warm (Calentar) para calentar
comida fria, excepto galletas crujientes, papas fritas o cereales
secos. Tambien se recomienda que la comida no se mantenga
caliente por mas de dos horas.
Modo para Asar
Siempre ase con la puerta cerrada. El elemento para asar en
el homo es muy potente. Monitoree la comida de cerca al asar.
Tenga cuidado al asar en posiciones de estantes superiores,
ya que colocar la comida mas cerca del elemento para asar
incrementa el humo, salpicaduras y la posibilidad de que se
incendien las grasas. No se recomienda asar en el estante de la
posici6n 6.
Intente asar las comidas que normalmente haria a la parrilla.
Ajuste las posiciones de los estantes para ajustar la intensidad del
calor a la comida. Coloque las comidas mas cerca del elemento
para asar, cuando se desee una superficie mas cocinada y un
interior poco cocido. Las comidas mas gruesas y las comidas cuyo
interior debe ser cocinado deberian set asadas en un estante en
una posici6n alejada del usado para asar, o usando las funciones
Broil Lo (Asar Bajo).
Asar Alto
El modo Broil Hi (Asar Alto) usa calor intenso del elemento
superior para soasar las comidas. Use la funci6n Broil Hi (Asado
Alto) para cortes mas delgados de came y/o comidas que prefiera
que quedan menos cocinadas en su interior. Para usar este
modo, presione la tecla Broil (Asar) una vez en Traditional
(Tradicional) y luego presione Start (Iniciar). No es necesario
realizar el precalentamiento al usar este modo.
Asar Bajo
El modo Broil Lo (Asar Bajo) usa menos calor intenso del elemento
superior para cocinar la comida completamente mientras tambien
se realiza el dorado superficial. Use la funci6n Broil Lo (Asado Bajo)
para cortes de came mas gruesos y/o comidas que desee que
queden completamente cocinadas. Para usar este modo, presione
la tecla Broil (Asar) dos veces y luego presione Start (Iniciar). No
es necesario realizar el precalentamiento al usar este modo.
q0 49 80721
Page 27

Guia de Cocci6n
C
©
Productos Horneados
Tortas con capas, tortas rectan-
gulares, roscas, panecillos, pan
r&pido en un Solo Estante
Tortas con capas* en MQItiples
Estantes
Tortas de grasa (pastel de &nge])
Galletas, galletitas, bizcochitos en
un Solo Estante
Galletas, galletitas, bizcochitos en
MQItiples Estantes
Bife y Cerdo
Hamburguesas
Bifes y Chuletas
Dorados
Ave
Poll© entero
Pechugas, patas, muslos con
huesos
Pechugas de poll© deshuesadas 3
Pave entero Hornear 1 o 2
Pechuga de Pave Hornear 2 o 3
Pescado Asado Bajo 5 (mitad del grosor o men©s)
Cazuelas Hornear 3
Comidas Congeladas a Conveniencia
Hornear
Hornear
Hornear
Hornear
Hornear
AsarAIto
AsarAIto
Hornear 203
Hornear
Asar Alto
Asado Bajo
aornear
Asado Bajo
aornear
4 (>1/2 pulgada)
3
2y4
1
3
2y4
1,3y5
203
1
Use utensilios brillantes.
Asegurese de que haya un fiujo de aire adecuado
Con comidas tales como galletas con azucar, can]hie la uM
cacion de la comida parcialmente durante la coccion, a firs de
Iograr resultados de coccion m_ls pareios entre los estantes,
Use una olla para asa; precaliente 5 minutos si usara el
Modo para Asar por Convecci6n. Mueva la comida hacia
abajo para que quede mas preparada y menos soasada.
Preste atenci6n a la comida al asarla. Para un mejor
rendimiento, centre la comida debajo del element© que
Use una olla para asar; Mueva la comida hacia abajo
para que quede mas preparada y menos soasada. Preste
atenci6n a la comida al asarla. Para un mejor rendimiento,
centre la comida debajo del element© que emite calor
Deje sin cubrir, use una olla chata tal como una olla para
Use una olla chata tal como una olla para asar.
Si se empan6 o cubri6 con salsa, evite los modos Broil Hi
(Asar Alto). Ase del lad© de la piel hacia abajo primer©.
Preste atenci6n a la comida al asarla. Para un mejor
rendimiento, centre la comida debajo del element© que
Mueva la comida mas abajo para que quede mas
preparada y menos soasada y mas arriba para soasar/
dorar al asan Para un mejor rendimiento, centre la comida
debajo del element© que emite calor para asar.
Usa una olla chata tal como una olla para asar.
Use una olla chata tal como una olla para asar.
Precaliente 5 minutos al Asar por Convecci6n. Preste
atenci6n a la comida al asarla. Para un mejor rendimiento,
centre la comida debajo del element© que emite calor
(Vea la ilustraci6n).
Use utensilios brillantes.
Use utensilios brillantes.
emite calor para asaE
para asaE
asar. No se requiere precalentarla.
emite calor para asaE
para asaE
m
r"--
3:
©
Z
©
i m
Cb
c-
m_
CL
(13
Cb
O
Cb
(b
O,
Datitas de polio fritas, aperitivos en
Pizza, papas fritas, tator tots,
un Solo Estante
Pizza, papas fritas, tator tots.
patitas de polio fritas, aperitivos en
MQltiples Estantes
Hornear
Hornear
*At hornear cuatro tortas con capas a la vez, use los estantes
2 y 4. Cotoque las otlas como se muestra, de modo que no
quede una olla encima de la otra.
Cocine la comida comptetamente para evitar que se produzcan
enfermedades a partir de la comida. Puede encontrar
recomendaciones sobre temperatura minima para cocinar de
forma segura en www.lsltDoneYet.gov. Aseg_rese de usar
un term6metro de comidas para medir la temperatura de las
mismas.
2y4
Use utensilios brillantes.
Use utensilios brillantes.
Cambie la ubicaci6n de la comida parcialmente durante
la cocci6n, a fin de obtener resultados de cocci6n mas
parejos.
D
Page 28

r-
'O
(D
O
O
LD
(13
Z:D
oO
O
'o
O
Z
d
Z
r,/
©
--r.
,,,,J
tm
Limpieza del Horno
AsegQrese de que la corriente el6ctrica est6 apagada y que todas las superficies est6n frias antes de limpiar cualquier parte del homo.
Panel de Control
Una buena idea es limpiar el panel de control luego de cada
uso. Limpie con un jab6n suave y agua o vinagre y agua,
enjuague con agua limpia y pula en seco con una tela suave.
Exterior del Homo
No use limpiadores de homo, limpiadores abrasivos,
limpiadores liquidos fuertes, estropajos de acero, almohadillas
para fregar de pl_stico, ni polvos limpiadores en el interior
o el exterior del horno. Limpie el mismo con agua y jab6n o
una soluci6n de vinagre y agua. Enjuague con agua timpia y
seque con una tela seca. AI limpiar supeficies, asegQrese de
que est6n a temperatura ambiente y fuera del contacto con
Superficies de Acero Inoxidable (en algunos modelos)
No use virutas de acero; 6stas da_ar_n la superficie. Para
limpiar ta superficie de acero inoxidable, use agua tibia
con jab6n o un limpiador o pulidor para acero inoxidable.
Siempre limpie la superficie en la direccidn del veteado. Siga
las instrucciones del limpiador para limpiar la superficie de
No use limpiadores abrasivos, limpiadores tiquidos fuertes,
almohadiltas para fregar de pt_stico ni limpiadores de homo en
el panel de control; da_ar_n el acabado.
la tuz solar. Si tas manchas en el borde de la ventana de la
puerta son persistentes, use un limpiador abrasivo suave o
una esponja con estropajo para obtener un mejor resultado. Et
derrame de adobo, jugos de fruta, salsas de tomate y liquidos
para humedecer que contengan _cidos pueden ocasionar
descoloraci6n y se deber_n limpiar de inmediato. Deje que las
superficies catientes se enfrien, y luego limpie y enjuague.
acero inoxidabte. Para reatizar consultas sobre la adquisici6n
de productos, incluyendo limpiadores o pulidores para
electrodom6sticos de acero inoxidable, lea las secciones de
Asistencia y Accesorios, en el comienzo de este manual.
©
Interior del Homo
El interior de su nuevo horno puede ser limpiado de forma
manual o utilizando los modos Steam Clean (Limpieza con
Vapor) o Self Clean (Limpieza Autom_tica).
El derrame de adobo, jugos de fruta, satsas de tomate y
liquidos para humedecer que contengan _cidos pueden
ocasionar descoloraci6n y se deber_n limpiar de inmediato.
Espere a que las superficies catientes se enfrien, y luego
limpie y enjuague.
LimpJeza Manual
No use limpiadores de homo, limpiadores abrasivos,
limpiadores liquidos fuertes, estropajos de acero, atmohadiltas
para fregar, ni polvos limpiadores en el interior det horno.
Limpie el mismo con agua y jab6n o una soluci6n de vinagre
y agua. Enjuague con agua limpia y seque con una tela seca.
AI limpiar supeficies, asegOrese de que est6n a temperatura
ambiente y fuera del contacto con la luz solar.
Modo de Limpieza con Vapor
La limpieza con vapor est_ pensada para limpiar peque_os
derrames usando agua y a una temperatura de timpieza m_s
baja que la funci6n Self-Clean (Limpieza Autom_tica).
Para usar la funci6n Steam Clean (Limpieza con Vapor),
limpie las grasas y suciedades del horno. Vierta una taza de
agua en la parte inferior del horno. Cierre la puerta. Presione
la tecla Clean (Limpiar) dos veees y luego presione Start
(InJciar). La puerta del homo se trabar& No podr_ abrir la
puerta durante los 30 minutos de la limpieza con vapor, ya que
esto reducir_ su rendimiento. AI finatizar el ciclo de timpieza
al vapor, la puerta se destrabar& Limpie cualquier exceso de
agua y cuatquier suciedad que haya quedado.
Modo de LJmpJeza Autornatica
Lea tas Instrucciones de Seguridad del Homo con Limpieza
Autom_tica, en el comienzo de este manual antes de usar
el modo Self Clean (Limpieza Autom_tica). Este modo usa
temperaturas muy attas para limpiar el interior del horno.
Cuando use esta funcidn, la puerta del homo se trabar& Antes
de utilizar el ciclo de limpieza autom_tica, limpie la grasa
y restos de comida que haya en el horno. Retire todos los
articutos del homo, excepto los estantes esmattados (color
oscuro). Los estantes brittantes o de plata y cualquier utensilio
u otros articulos deberian ser retirados del homo antes de
iniciar un ciclo de limpieza autom_tica. Cierre la puerta.
Presione la tecla Clean (Limpiar) y se exhibir_ un tiempo de
limpieza autom_tica por omisi6n. El tiempo de limpieza puede
ser modificado en cuatquier momento entre las 3:00 y las 5:00
horas, usando las teclas num6ricas para ingresar un tiempo
diferente y presionando Start (Inieiar). Si desea usar el tiempo
por omisi6n, presione la tecla Start (Iniciar) inmediatamente
luego de presionar la tecta Clean (Limpiar) El homo se
apagar_ de forma autom_tica cuando el ciclo de timpieza
autom_tica sea comptetado. La puerta permanecer_ bloqueada
hasta que el homo se haya enfriado. Una vez que el horno se
haya enfriado, limpie cuatquier ceniza que haya quedado en el
horno.
IMPORTANTE: Las emanaciones producidas por el ciclo
de autolimpieza de cualquier homo afectan la salud de
algunas aves de manera notoria. Procure Ilevar sus aves
a otra habitaci6n bien ventilada.
Estantes Pianos
Los estantes pianos se podr_n dejar en ta cavidad durante ta
limpieza autom_tica (si se trata de estantes esmattados, no
britlantes) o se podr_n lavar con agua catiente y jab6n.
12
Es posibte que resulte m_s dificil deslizar los estantes,
especiatmente luego de la limpieza autom_tica. Cotoque
aceite vegetal en una tela hQmeda o toalla de papel y frote
sobre los extremos izquierdo y derecho.
49 80721
Page 29

Mantenimiento
Reemplazo de la Lampara del Homo
iA ADVERTENClAi PE"G"ooEOESCARGAOOOE"AOORAS:Antesreemp'azar'a' mpara'uz
IAJ--PRECAUCl0N1]RIESGO DE INCENDIO: La tapa de vidrio y la I_mpara de luz se deber_n retirar cuando
del homo, desconecte la conexi6n el6ctrica del homo del fusible principal o del panel del
disyuntor. Si esto no se cumple, se podr_ producir una descarga el6ctrica o un incendio.
est6n frias. Tocar el vidrio caliente sin protecci6n en las manos o con un trapo hOmedo
puede ocasionar quemaduras.
Cb
C
m
>
0
..<
rm
1. Desconecte la corriente desde el fusible principal o el panel
del disyuntor.
2. Retire los estantes del homo.
3. Deslice un destornitlador de punta ptana entre la caja y la
tapa de luz de vidrio.
4. Apoye la tapa de luz de vidrio con dos dedos para evitar
que se caiga al fondo del homo. Tenga cuidado de no
astillar la cubierta del horno.
5. De forma suave, gire la punta del destornillador para aflojar
la tapa de luz de vidrio.
6. Retire la tapa de luz de vidrio.
7. Retire la I_mpara sosteniendo firmemente y deslizando
la misma hacia afuera, hasta que las dos clavijas hayan
dejado el soporte de cer_mica.
Lampara de la Luz del Horno (en algunos modelos)
NOTA: La tapa de vidrio debera ser retirada s61o cuando
est6 fria. Si usa guantes de I_tex, tendra un mejor
agarre.
Antes de reemplazar la lampara, desconecte la conexi6n
el6ctrica del homo del fusible principal o del panel del
disyuntor. Deje que la lampara se enfrie completamente
antes de retirar la misma. Para su seguridad, no toque
una lampara caliente con una tela homed& Si Io hace, la
I_mpara se podra romper.
Para retirar:
D6 a la tapa de vidrio en contra de las agujas del reloj
un cuarto de giro hasta que las lengOetas de la tapa de
vidrio queden fuera de las ranuras de la ficha. Retire la
I_mpara.
Para reemplazar:
Coloque una lampara nueva de 40 watts para electrodo-
m6sticos. Coloque las leng(Jetas de la tapa de vidrio en
las ranuras de la ficha. D6 a la tapa de vidrio un cuarto
de giro en direcci6n de las agujas del reloj.
NOTA:
[] Las lamparas para electrodom6stico de 40 watts son
mas peque_as que las I_mparas hogare_as de 40
watts.
8. No toque el vidrio de la nueva I_mpara con los dedos. Esto
har_ que la l_mpara fatle al dar tuz. Tome la I_mpara de
reemptzado con una toatta limpia o un paduelo de papel
con las clavijas hacia abajo. Ati_e las dos clavijas en el
soporte de cer_mica, presionando suavemente hasta que la
I_mpara quede asegurada en la ficha de cer_mica.
9. Deslice las lentes protectoras del soporte y presione hasta
que las pinzas queden enganchadas en la caja.
10.Vuelva a conectar la corriente.
L_m
Ficha
3ara
maxima
de 3½"
Longitud_
I
I
I
i
Tapa de vidrio
N
>
[] Vuelva a conectar el horno una vez que la lampara nueva
est6 instalada.
[] Para una mejor iluminaci6n dentro del homo, limpie la
tapa del vidrio en forma frecuente utilizando una tela
homed& Esto se debera hacer cuando el homo est6
completamente frio.
49 80721
13
Page 30

<
N
LLJ
m
iVlantenimiento
Puerta del Homo Desmontable
m
>.
0
<
G5
La puerta es muy pesada. Tenga cuidado at retirar y levantar la puerta.
No levante la puerta usando la manija.
Para retirar la puerta:
1. Abra la puerta totalmente.
2. Empuje los bloqueos de la bisagra hacia abajo en
direcci6n a la estructura de la puerta, hasta la posici6n
desbloqueada. Es posibte que necesite una herramienta tat
como un destorniltador pequefio de punta ptana.
3. Firmemente tome ambos lados de la puerta por la parte
superior.
4. Cierre la puerta hasta la posici6n de retiro de la misma.
La puerta deberia ser abierta aproximadamente a 3", sin
obstrucci6n sobre la misma.
5. Levante la puerta hacia arriba y afuera, hasta que los
brazos de las bisagras queden fuera de las ranuras.
Para reemplazar la puerta:
1. Firmemente tome ambos lados de la puerta por la parte
superior.
2. Comenzando desde el lado izquierdo, con la puerta en el
mismo _ngulo de la posici6n de retiro, apoye ta hendidura
del brazo de la bisagra en el extremo inferior de la ranura
de la bisagra. La abertura en el brazo de la bisagra deber_
estar totatmente apoyada en la parte inferior de la ranura.
Repita el procedimiento del lado derecho.
3. Abra ta puerta totalmente. Si la puerta no se abre
totalmente, la hendidura no est_ correctamente apoyada en
el extremo inferior de la ranura.
4. Empuje los btoqueos de la bisagra contra la estructura
frontal de la cavidad del homo, hasta la posici6n de
btoqueo.
5. Cierre la puerta del homo.
Bloqueo de la bisagra
EmpL_je los bloqueos de la bisagra
hacia abajo para desbloquear
la bisagra ..,_ _ bloqueado
Bloqueo de
la bisagra
Ranura
C%
//\t
Extremo inferior de la ranura
Posicion de retiro
Empujeel
bloqueo de la
bisagra hacia
Brazo de la
bisagra
4 49 80721
Page 31

Consejos para la SoluciOn de Problemas... Antes de solicitar el servicio tecnico
iAhorre tiempo y diner©! Primer© revise los cuadros que aparecen en las siguientes paginas / es posible que no necesite
solicitar reparaciones,
Causa Posible
Mi homo nuevo no
cocina corn© el anterior.
LHay alg_n problema con
ias configuraciones de
temperatura?
La comida no se hornea
de forma apropiada
La comida no asa de
forma apropiada
La temperatura del horn© Consulte la secci6n Funciones Especiales.
es demasiado caliente o
demasiado fria
El homo no funciona o Es posible que un fusible de su hogar se haya Reemplace el fusible o reinicie el disyuntor.
parece no funcionar quemado o que el disyuntor se haya desconectado.
Sonido de "chisporroteo" teste es el sonido de metal calent&ndose o Esto es normal.
o "traqueo" enfri&ndose durante las funciones de cocci6n y
_Por qu_ la estufa hace
un sonido de "clic"
cuando us© el homo?
El reloj y el temporizador Es posible que un fusible de su hogar se haya Reemplace el fusible o reinicie el disyuntor.
no funcionan quemado o que el disyuntor se haya desconectado.
A veces el homo tarda Utensilio o comida en el homo El utensilio o la comida en el homo har_ que 6ste
m&s en precalentarse a la tarde mas en precalentarse. Retire estos articulos para
misma temperatura reducir el tiempo de precalentamiento.
49 80721
Su homo nuevo cuenta con un sistema de cocci6n
diferente con reiaci6n al anterior y, por 1otanto, es
posible que cocine de forma diferente.
Controles del homo configurados de forma
incorrecta.
La posici6n del estante es incorrecta o el estante
no est& nivelado.
Us© de una cacerola incorrecta o de una cacerola
de tamaho incorrect©.
La temperatura del homo debe ser ajustada.
Sustituci6n de ingredientes
Controles del homo configurados de forma
incorrecta.
Se us6 una posici6n incorrecta del estante.
Se cocin6 comida en una olla caliente.
Utensilio de cocina inadecuado para asar.
El papel de aluminio usado para la olla y la rejilla
para asar no se ajust6 ni cort6 de forma apropiada,
seg_n Io recomendado.
En algunas &reas, es posible que el nivel de
corriente (voltaje) sea bajo.
La temperatura del homo debe ser ajustada.
Controles del homo configurados de forma Consulte la secci6n Uso del Homo.
incorrecta.
El homo se encuentra en Sabbath Mode (Modo Verifique que el homo no est6 en Sabbath Mode
Sab&tico) (Modo Sab_tico). Consulte la secci6n Funciones
limpieza..
Su estufa fue disehada para mantener un control
m&s ajustado sobre la temperatura del horn©.
Es posible que escuche que los elementos de
calentamiento del homo hagan sonidos de "clic"
con mayor frecuencia que con hornos m&s
antiguos para lograr mejores resultados durante
los ciclos de horneado, asado, convecci6n y
limpieza autom&tica.
Cantidad de estantes en el homo Agregar mas estantes al homo har_ que 6ste tarde
Qu_ Hacer
En los pnmeros us©s, use los tiempos y temperaturas
de su receta con cuidado. Si aOn piensa que su homo
nuevo cocina con demasiado calor o demasiado frio,
podra ajustar el termostato usted mismo para aplicar
su preferencia de cocci6n especlfica. NOTA: Este
ajuste afecta las temperaturas de Bake (Hornear),
Convection Bake 1 Rack (Hornear per Convecci6n
en 1 Estante) y Convection Bake Multi (Hornear
por Convecci6n M_ltiple); no afectara las funciones
Convection Roast (Dorar por Convecci6n), Broil
(Asar), o Clean (Limpiar).
Consulte la secci6n Modos de Cocci6n.
SeConsulte la secci6n Modos de Cocci6n y la Guia
de Cocci6n.
Consulte la secci6n Utensilios.
Consulte la secci6n Funciones Especiales.
Sustituir ingredientes puede modificar el resultado de
la receta.
AsegOrese de seleccionar el modo correcto para
asar.
Para acceder a sugerencias de ubicaci6n de
estantes, consulte la Guia de Cocci6n.
AsegOrese de que el utensilio est6 frio
Use una olla especificamente diseSada para asar
Si usar_ papel de aluminio, deber_ usarse conforme
con las aberturas de la olla.
Precaliente el element© para asar durante 10
minutos.
Especiales.
Esto es normal.
mas en precalentarse. Retire algunos estantes.
15
©
Z
FT3
©
r-"
©
r-"
C
#b
n
©,
Z
l-m
©
r-"
Page 32

cO
<¢
Consejos para la SoluciOn de Problemas... Antes de solicitar el servicio tecnico
©
i,I
Z
,©
m
¢D
...J
©
cO
__J
cO
©
"h
cO
Z
©
¢D
Causa Posible
La luz del homo no
funciona
El rood© de limpieza
autom&tica del horn©
no funciona
E×ceso de hum©
durante un ciclo de
limpieza
Hum© e×cesivo al asar La comida est_l demasiado cerca del quemador.
La puerta del horn© El homo est_l demasiado caliente.
no se abrir_ luego de
un ciclo de limpieza
El homo no limpia Los controles del homo est&n configurados de Consulte la secci6n de Limpieza del Homo.
luego de un ciclo de forma incorrecta.
limpieza
"LOCK DOOR" El ciclo de limpieza autom&tica fue seleccionado Cierre la puerta del homo.
(Puerta Trabada) titila per© la puerta no est_ cerrada.
en la pantalla
La luz de LOCKED La puerta del homo est_ bloqueada debido a que Presione la tecla Cancel/Off (Cancelar/Apagar) Deje
(Bloqueado) est& la temperatura interior del homo no descendi6 por que el homo se enfrie.
encendida cuando debajo de la temperatura de bloqueo.
desea cocinar
"F - y un nQmero Tiene un c6digo de error de funci6n. Presione la tecla Cancel/Off (Cancelar/Apagar)
o letra" titila en la Permita que el homo se enfrie durante una hora. Vuelva
pantalla a poner el homo en funcionamiento.
La pantalla queda en Es posible que un fusible de su hogar se haya Reemplace el fusible o reinicie el disyuntor.
blanc© quemado o que el disyuntor se haya desconectado.
Corte de corriente, el Corte o exceso de corriente Reinicie el reloj. Si el horn© estuvo en us©, debera
reloj titila reiniciar el mismo presionando la tecla Cancel/Off
Olor a "quemado" Esto es normal en un homo nuevo y desaparecer& Para acelerar el proceso, configure un ciclo de limpieza
o "aceite" desde la con el tiempo, automatica por un minim© de 3 horas. Consulte la
ventilaci6n secci6n de Limpieza del Homo.
Olor fuerte Un olor en la aislaci6n alrededor del interior del Esto es temporado y desaparecer_ luego de vados usos
Ruido del ventilador Es posible que un ventilador de enfriamiento se Esto es normal. El ventilador de enfriamiento se
La l_mpara est& floja o presenta defectos.
La luz de funcionamiento del interruptor est& rota.
La temperatura del homo es demasiado caliente
corn© para configurar la limpieza autom&tica.
Los controles del homo est&n configurados de
forma incorrecta.
Suciedad o grasa excesiva.
El homo estaba demasiado sucio. Limpie derrames excesivos antes de iniciar el ciclo
Si el c6digo de funci6n se repite. Desconecte totalmente la corriente de la cocina durante
El reloj est& apagado. Consulte la secci6n Funciones Especiales.
El homo se encuentra en Sabbath Mode (Modo Verifique que el homo no este en Sabbath Mode (Modo
Sab_tico).. Sabatico). Consulte la secci6n Funciones Especiales.
homo es normal desde las primeras veces en que el o de un ciclo de limpieza automatica.
homo es usado.
Qu_ Hacer
Ajuste o reemplace la I_mpara.
Llame al servicio tecnico.
Espere a que el homo se enfrie y reinicie los controles.
Consulte la secci6n de Limpieza del Homo.
Presione la tecla Cancel/Off (Cancelar/Apagar) Abra
las ventanas para liberar el hum© en la habitaci6n.
Espere hasta que la luz de la funci6n LOCKED
(Bloqueado) desaparezca. Limpie el exceso de
suciedad y reinicie el ciclo de limpieza.
Baje la posici6n del estante con comida.
Espere a que el horn© se enfrie por debajo de la
temperatura de bloqueo.
de limpieza. Es posible que, en hornos con mucha
suciedad, sea necesario usar la limpieza automatica
nuevamente o usarla durante un period© de tiempo mas
prolongado.
Si el c6digo de error de funci6n se repite, Ilame alpor Io menos 30 minutos y vuelva a conectar la misma.
servicio tecnico.
(Cancelar/Apagar) configurando el reloj y reiniciando
cualquier funci6n de cocci6n.
active autom&ticamente, encendera para enfriar las partes internas. Es posible
La puerta de vidrio del No. El vidrio del homo intern© est& cubierto con una Esto es normal. Bajo ciertas luces y angulos, es posible
homo parece estar barrera de calor que refleja este Ultimo nuevamente que visualice esta tinta o arc©iris.
"teSida" o tener un hacia el homo, a fin de evitar la p_rdida de calor
color "arc©iris", LEs y de mantener fria la puerta externa mientras se
esto un defect©? hornea.
16 49 80721
que funcione hasta durante una hora y media, una vez
que el homo se haya apagado.
 Loading...