

Page 1
BE=WR~oR ANCE
fromyour
ICROWAVE
SAVE ENERGY
See energy saving tips on page 5.
SAVE THME AND MONEY
INSTRUCTIONS
~@+’ r?-
RANGE
FOR
FUTURE REFERENCE
49”43s
Page 2
It is our sincere hope that you enjoy everyfeature of your new range. It is designed to give you dependable cooking
results while conserving energy and saving you money.
In addition, extra savings are possible through wise use and care procedures. This booklet explains how you can
get the best use from your range by following tried and true cooking procedures outlined here. These recommended
procedures were developed using safe and energy conserving techniques.
if you have any questions about your new range, how to use any feature a different way, or special cooking techniques that are not answered in this booklet, please write or call the GEConsumer Coordinator near you whose job is
YOUand your family get the most out of your new range. The number IS available from your dealer! from the
to help
local GE Major Appliance Sales Office, or contact me directly. We would like to hear from you.
iMANAGEF1- COhHJhIIERS INSTYY’UTE
GENERAL ELECTRK$ CO?JPANY
APPLIANCE P~RK AF%2-235
LC)UISVILLE, KENTUCKY 40225
YourGeneralElectric rangehasanameplateon whichis stampedthe modelnumberandserialnumber.
To locate nameplate,open ovendoor and look at frame aboveovenopening.
Modeland serial numbersarealso on the PurchaseRecordCardwhich camewith your range.Before
sendingin this card, pleaserecordthe numbersin the space below,or get them from nameplatedescribedabove,and recordhere.
ModelNumber
Pleasereferenceboth these numbersin anyfuture correspondenceor product service calls concern-
ingyour range.
IMPORTANT!Beforeusing your newglass cooktop, see care and cleaning instructions,
page14.
I
Serial Number
L___Jll
When you get your new range...
I
—
Have it installed and properly grounded by a qualified installer.
Have the installer show you the location of the range circuit breaker or fuse, and
mark it for easy reference.
Don’t assume that you know how to operate all parts of the range. Some features
may work differently from those on your previous range.
Do take the time to read our suggestionsfor best use.
When usingyour range...
DO NOT TOUCH HEATING ELEMENTS OR INTERIOR SURFACE OF OVEN.
These surfaces may be hot enough to burn even though they are dark in color.
During and after use, do not touch, or let clothing or other flammable materials
contact any heating elements or interior area of oven until all of these areas
have had sufficient time to COOLOther potentially hot surfaces include the
cooktop and areas facing the cooktop, oven vent openings and surfaces near
the openings, crevices around the oven door and the edges of the doorwindo
Don’t leave children alone or unattended in the area where a range is hot or
in operation, They could be severely burned.
—.
Page 3
—.
Don’t allow anyone to climb, stand or hang on the door, drawer or top surface
of the range. They could damage the range and even tip it overcausing severe
personal injury.
CAUTION: IX) NOT STORE ITEMS OF INTEREST TO CHUXN?ENIN CABINETS
ABOVE A RANGE OR ON THE BACKSPLASH OF A RAIVGE-Cf-iiLDREN
CLNW3UW3ON THE RANGE TO REACH ITEMS COULD BE SERIOUSLY INJURED.
Wear proper apparel—loose fitting or hanging garments should never be worn
while using the appliance.
Never use your appliance for warming or heating the room.
Use I%3perPanSize—This appliance isequipped with one or more surface units
of different size. Select utensils having flat. bottoms large enough to cover the
surface unit heating area. The use of undersized utensils will exposea portion
of the heating area to direct contact and may resuit in ignition of clothing. Proper
relationship of utensil to heating area will also improve efficiency.
Never leave surface units unattended at high heat settings. Boi{over causes
smoking and greasy spillovers that may ignite.
W only dry pothohiers—
moist or damp potholderson hot surfacesmay result
in burns from steam. Do not jet potholders touch hot heating elements, Do not
use a towel or other bulky cloth.
Glazed cooking iutefmik—
only certain types of glass, glass/ceramic, ceramic,
earthenware, or other glazed utensils are suitable for range-top service without
breaking due to the sudden change in temperature.
To minimize burns, ignition of flammable materials, and spillage due to unintentional contact with the utensil, the handle of a utensil should be positioned
so that it is turned inward and does not extend over adjacent surface units.
When flaming foods under the hood, turn the fan off. The fan, if operating, may
spread the flame.
Stand away from range whm opening oven door to let hot air or steam escape
before removingor placing food inside.
Place oven racks in desired position while oven is cool. If racks must be handled when hot, do not let potholder contact hot heating element in oven.
Pulling out shelf all the way to the shelf stop is a convenience in lifting heavy
foods, It is also a precaution against burns from touching hot surfaces of the
door or oven wails.
Don’t hat unopened food containers in the oven. Pressurecould build up and
the container could burst, resulting in injury.
When using cooking or roasting bags in oven, follow manufacturer’s directions.
Don’t use aluminum foil anywhere in the ovenexcept as described in this booklet. Improper installation could result in a shock,
fire hazard, or damage to the
range.
Keep hood and grease filters clean according to
instructions to maintain good
venting and to avoid greasefires.
Do not store flammable materials in an oven or
near the cooktop.
(continuednext page)
Page 4
* DO NOT USE WATER ON GREASE FiRES, NEVER PICK UP A FLAM1N(3 PAN.
Smother flaming pan on surface area by covering pan completely with well fitting lid, cookiesheet or flat tray.
Flaming grease outside pan can be extinguished by taking soda or, if available,
a multi-purpose dry chemical or foam type extinguisher.
When cooking in the oven, flame can be smothered by completely closing door
and turning OVEN SET to OFF.
Alsoseefryingtips, surface unit pages.
MicrowaveOven...
Cooking utensils may become hot because of heat transferred from the heated
@
food. Pot holders may be needed to handle them.
Also, under some cooking operations the shelf can become too hot to touch.
THEREFORE, DURING AND AFTER COOKING, CAUTION SHOULD BE EXERCISED IN TOUCHING THE SHELF.
~ Remove wire twist-ties on paper and plastic bags before placing in microwave
oven. Twist-ties can cause heating of the bag under certain conditions, and
can cause fire.
GlassCeramicCookingSurface. . .
Do not cookon broken cooktop. If cooktop should break, cleaning solutions and
spilloversmay penetrate the broken cooktop and create a shock hazard. Contact
a qualified technician immediately.
Clean cookto~with caution. If a wet sponge or cloth is used to wipe spills on a
hot cooking area, be careful to avoid ste;m burn. Some cleansers can produce
noxiousfumes if applied to a hot surface.
Self-C14zdzgoven ...
~ Do
~ Do not use cleaners, No commercial oven cleaner or oven liner protective coat~ (lean only parts listed in this Use & Care booklet.
~ Before self-cleaning the oven, remove broiler pan and other utensils.
not clean door gasket. The door gasket is essential for a good seal. Care
should be taken not to rub, damage, or move the gasket.
ing of any kind should be used in or around any part of the oven.
If you needservice...
Read “Before YouCallfor ProductService”at rearof book.
Don’t attempt to repair or replace any part of your range unless it is specifically
recommended in the book. All other servicing should be referred to a qualified
technician.
Read the warranty on the warranty sheet* which accompanies your Use and
Care Book.
Disconnect range at range circuit breaker or main fuse before performing
service.
*if you did not receive the warranty sheet, drop a card to the Publications Distribution Section, General Electric Co., P.O.
111,NewConcord,Ohio 43762.
Box
Give them the complete model number of your range plus your name, address and zip code, and a warranty sheet will be
sent you.’
3
.-
Page 5

1. Cookingutensilsmaybecomehotbecause
ofheat transferredfromtheheatedfood.This
is especiallytrueif plasticwraphas been
coveringthetopandhandlesof theutensil.
Pot holdersmaybe neededto handlethe
utensil.
2. Sometimes,theovenshelfcanbecometoo
hot to touch.
Be carefultouchingtheshelf
duringandaftercooking.
3. Don’t heat unopenedfood containersin
theoven.
Pressurebuildingupcancausethe
containerto burst,resultingin injury.
4. ~Onr~
carbonatedones—
defrostfrozen iiquids—especially
in theoven.Evenif the
containeris opened,pressurecanbuildUP.
Thiscancaus~thecontainertoburst,resultingin injury.
5. ~on’t
overcookfood excessively.Food
driesout,andcanevenigniteinsomecases.
6. If
foodshouldeverignite:Keepthe oven
doorclosed.Turnoff thepowerimmediately:
tunrtimerto OFFordisconnectpowercord
orshutoffpowerat thefusecircuitbreaker
panel.
7.
Removethe temperaturesensorfrom the
ovenwhennot usingit to cookwith. If you
leavethesensorinsidetheovenwithoutinsertingitinfoodorliquid,andturnonmicrowaveenergyitcancreateelectricalarcingin
theoven,anddamageovenwalls.
8.
Removewiretwist-tiesonpaperandplas-
tic bagsbeforeplacingin oven.Twist-ties
sometimescausebagtoheat,andmaycause
fire.Foodsin paperor plasticbagsshould
onlybeheatedforshortperiodsoftime.
9.
Boilingeggs(in oroutof shell)is not rec-
ommended
formicrowavecooking.Pressure
canbuildupinsideegg.y?lkandmaycause
itto burst,resultingmmJury,
10.
Do not pop popcornin your microwave
unlessina specialmicrowavepopcorn
oven
accessoryor unlessyou use popcornin a
packagelabeledfor microwaveovens.Be-
causeof the heatgeneratedwithoutthese
precautions,thecontainercouldcatchfire.
IL Usemetal onlyas directedin cookbook.
stripsasusedonmeatroastsarehelp-
Metal
ful in cookingfood whenusedas directed.
Metaltraysmay be usedfor TV dinners.
However,whenusingmetalinthemicrowave
oven,
keepmetal at least l-inch awayfrom
sidesof microwaveoven.
12. Do not operatethe ovenwhile emptyto
avoiddamageto the ovenandthe dangerof
fire..Ifbyaccidenttheovenshouldrunempty
ammuteor two,noharmis done.However,
tryto avoidoperatingtheovenemptyatall
tih~;~=nitsavesenergyandprolongslifeof
.
13.
Foodswith unbrokenouter“skin”such
aspotatoes,hotdogsor sausages,tomatoes,
apples,chickenliversandothergiblets,and
eggs(seeabove)shouldbe piercedtoallow
steamto escapeduringcooking.
14.
*’Boilable”cookingpouchesandtightly
closedplasticbagsor plasticwraptightly
coveringcontainersshouldbeslit,prickedor
ventedas otherwisedirectedin Cookbook.
If theyarenot,plasticcouldburstduringor
immediatelyaftercookingresultingin injury.Also,plasticstoragecontainersshould
beatleastpartiallyuncoveredbecausethey
formsucha tightseal.
15.Do
newspaper.
16.
not useyourmicrowaveovento dry
If overheated,it can catchfire.
Plastic utensils—Plastic utensilsde-
signedformicrowavecookingareveryuseful,
butshouldbeusedcarefully.Evenmicrowave
plasticmaynotbeastolerantofovercooking
conditionsasareglassorceramicmaterials
andmaysoftenorcharif.subjectedto short
periodsofovercooking.Inlongerexposuresto
overcooking, thefoodandutensilscouldig-
Rnite.For t ese reasons:1) Use microwave
plasticsonly“andusethem”in strictcompliancewiththeutensilmanufacturer’srec-
ommendations.2) Do not subjectempty
utensilsto microwaving.3) Do not permit
childrentouseplasticutensilswithoutcompletesupervision.
1. Steamorvaporescapingfromaroundthe
door.
2. Light reflectingaround door or outer
case,
4
Page 6

%nergy&nservationTips
To Iw3umw WHENUJsmm ‘YCMm lwEww$bN%aE
A
1. Usecookingutensilsof mediumweightaluminum,withtight-fittingcoversandflatbottoms
which completelycover the heatedsunburstpatternedcookingarea.
2. Cook freshvegetableswithaminimumamount
of waterin a coveredpan.
3. “Keep an eye”
quicklyto cookingtemperaturesatHIGHheat.
When food reachescooking temperature,re:
duce heat immediatelyto lowest settingthat
will keep it cooking.
4. Useresidualheatwithsurfacecooking when-
ever possible,Forexample,whencookingeggs
in the shell bringwater to boi!, then turn to
OFFpositionto completethe cooking.
5. Alwaysturncookingareacontrol knobtoOFF
beforeremovingutensil.
6. ?Jsecorrectheatfor eachcooking task...high
heatsto startcooking,(if time,allows,do not
use HIGHheatto start) mediumhigh—quick
brownings,medium—slowfrying, low—finish 6. Useresidualheat
cooking most quantities, simmer-double
boilerheat,finishcooking,andspecialforsmall
quantities.
on foods when bringingthem
7. Whenboilingwaterfor teaor coffee,heatonly
theamountneeded.Itis not economicalto boil
a containerfull of water for only one or two
Cups.
El.
1. Preheatthe oven only when necessary.Most
foods will cook satisfactorily,withoutpreheating. If you find preheatingis necessary,keep
an eye on the indicatorlight,and put food in
the oven promptly after the light goes out.
2, Always turnoven OFF before removingfood.
3, During baking,avoid frequentdoor openings.
Keep door open as short a time as possible
whenit is opened.
4. For self-cleaningoven,be sureto wipeupex-
cessspillagebefore self-cleaningoperation.
5. Cook completeoven mealsinsteadof just one
food item.Potatoes,othervegetables,andsome
dessertswill cook togetherwith a main-dish
casserole,meatloaf, chickenor roast. Choose
foodsthatcook at thesame temperatureinap-
proximatelythe sametime.
finishcookingcasseroles,oven meals,
add rolls or precookeddessertsto warmoven,
usingresidualheattowarmthem.
in ovenwheneverpossibleto
etc.Also,
CXW1’?3MM
Self-cleaningovenshelpconserveenergysincetheirspecificallydesignedinsidationsystemmeansless electricity(thannonself-cleaningovens) is necessaryduringnormal
bakingandroasting.Infact,enoughenergyis savedthroughouta year’stimetopayfor
theaverageenergycostsusedinautomaticallyself-cleaningtheovenoverthesameperiod
oftime.
FACT:AGeneralElectricselfcleaning
electrically.Basedon nationalaverageelectricrateof 3.8? perKilowatthour ( 1977
forself cleancycleis abouti6@.
oven usesabout4,3KWHto automaticallyselfcleantheoven
DOEdata)cost
+
5
Page 7
.
u
It is essentialthatwe,themanufacturer,knowatall timesthelocationof themicrowaveoven
,,
youarenowusing.Weaskthatyou—
Checkwithyoursupplierto besurehehasregisteredyouasanownerof thisappliance.(He
shouldhavedoneso by sendingin thecardon theoutsideof thecartonwhenthisappliance
wasdeliveredor bymaintaining“hisownregistrationfile.)
It’youmove,pleaserenewyourregistrationby writingto theaddressbelow.
If you arenottheoriginalpurchaserof thisappliance,pleaseestablishthefactthatyouare
nowtheownerof thisapplianceby writingto—
GeneralElectricCompany
ProductServiceSection,RangeMarketingOperationAP 2-210
AppliancePark, Louisville,Kentucky40225
Pleasestate--MOIlELand SERIALNUMBERS.(ThesenumbersareIomtedby openingconven-
tionalovendoorand]ookingonframeaboveopening.) Spacesareprovidedon page1 foreach
customertorecordthemodelandserialnumberof bisor herownmicrowavecookingcenter,for
futurereference.
Thisappliancemustbe registered—pleasebe certainthat it is.
TttI
TO
130NO1’ATTEMPTcooperatethisovenwiththedooropensinceopen-dooroperation
~a
canresultinharmfulexposuretomicrowaveenergy.It isimportantnottodefeator
tamperwiththesafetyinterlocks.
~
DONOTPLACEanyobjectbetweentheovenfrontfaceandthedoororallowsoilor
9
cleanerresiduetoaccumulateonsealingsurfaces.
a. 00
a,
NOTOPERATEthe ovenif it is damaged.It is particularlyimportantthatthe
ovendoorcioseproperlyandthatthereisno damagetothe (1) Door (bent), (2)
hingesandlatches(brokenorloosened),(3) doorsealsandsealingsurfaces.
THE OVENSHOULDnotbe adjustedor repairedby anyoneexceptproperlyquali-
fiedservicepersonnel.
———. .................
6
Page 8
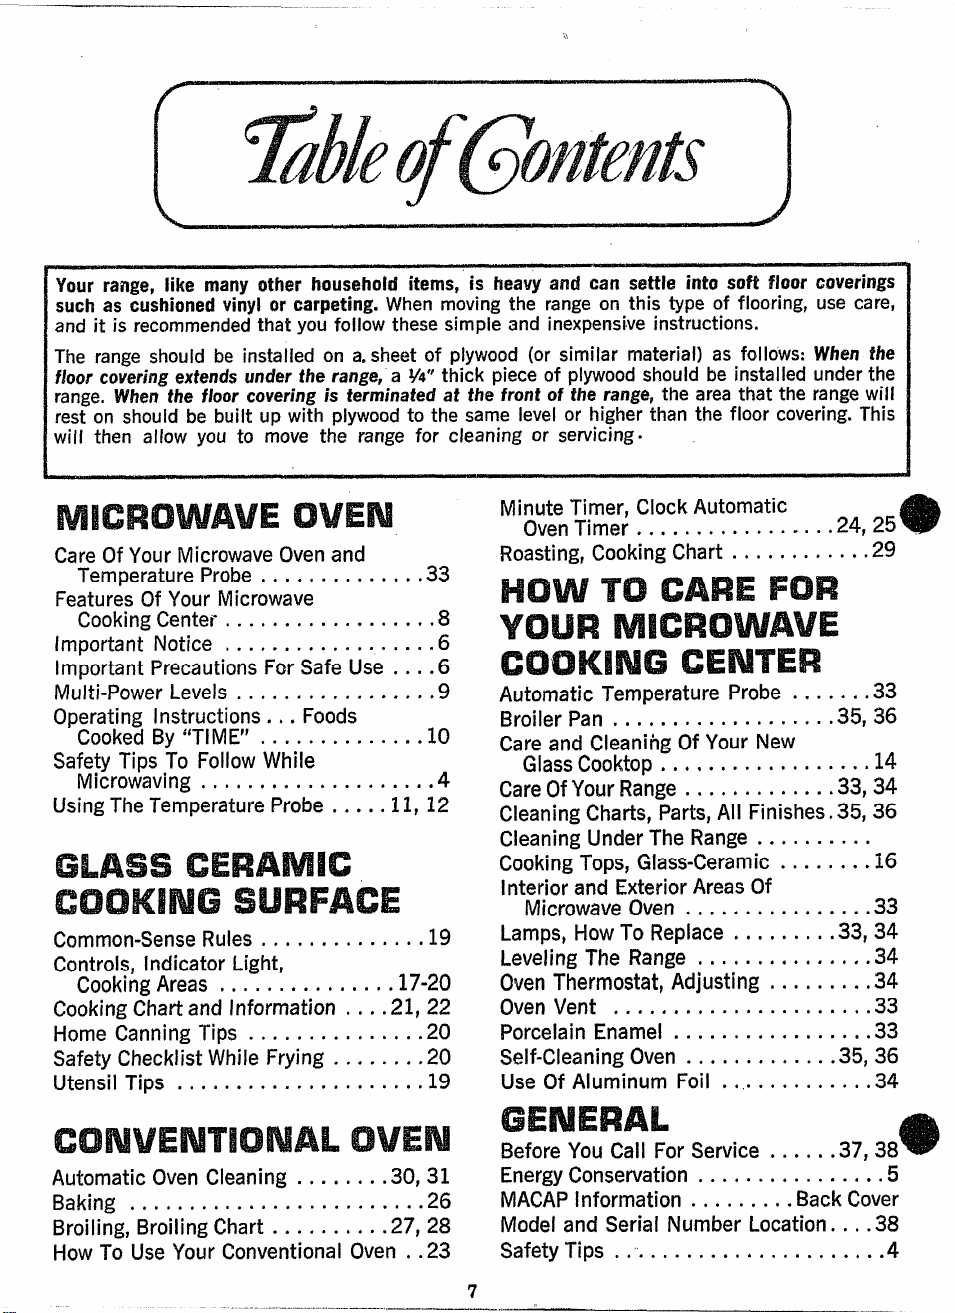
Yourrange,like manyother householditems,is heavyam! can settle into soft floorcoverings
suchas cushionedvinylor carpeting.Whenmoving the rangeon this type of flooring, use care,
and it is recommendedthat you follow these simple and inexpensiveinstructions.
The range should be installed on a.sheet of plywood (or similar material) as follows: Whenthe
floorcoveringextendsundertherange,a
range.When
rest on should be built up with plywoodto the same level or higher than the floor covering.This
will then allow you to move the range for cleaning or servicing
thefloorcoveringis terminatedat the frontof the range,the areathat the rangewill
V4° thick piece of plywoodshould be installed underthe
●
MinuteTimer, ClockAutomatic
OvenTimer . . . . . . . . . . . . . . . . .24, 25
CareOfYourMicrowave Oven and
Temperature Probe . . . . . . . .......33
Features Of
YourMicrowave
Roasting, CookingChart . . . . . .......29
CookingCentet . . . . . . . . . . ........8
Important Notice . . . . . . . . . . ........6
ImportantPrecautionsForSafe Use .. ..6
Multi-PowerLevels . . . . . . . . . ........9
Operating Instructions. . . Foods
CookedBy “TIME’J . . . . . . . .......10
SafetyTips To FollowWhile
Microwaving. . . . . . . . . . . . . . . . . . . .4
UsingTheTemperatureProbe.. ...11, 12
Automatic Temperature Probe .. .....33
Broiler Pan . ..................35, 36
Careand CleaningOf Your New
GlassCooktop. . . . . . . . . . . . . . . . .
● 14
CareOf‘four Range. ............33,34
CleaningCharts,Parts,All Finishes.35, 36
CleaningUnderThe Range. . . . . . . . . .
CookingTops,Glass-Ceramic. . . . . . .
●16
Interior and ExteriorAreasOf
Microwaveoven . . . . . . . . . .......33
Common-SenseRules . . . . . . . .......19
Controls,Indicator Light,
CookingAreas . . . . . . . . . . . ....17-20
CookingChartand Information .. ..21, 22
HomeCanningTips . . . . . . . . .......20
SafetyChecklistWhile Frying . .......20
Utensil Tips . . . . . . . . . . . . . . . . . . . . .19
Lamps,HowTo Replace . ........33, 34
LevelingThe Range . . . . . . . . .......34
OvenThermostat,Adjusting . . .......34
OvenVent . . . . . . . . . . . . . . . . . . . . ..33
PorcelainEnamel . . . . . . . . . . .......33
Self-CleaningOven . ............35,36
UseOf Aluminum Foil . . . . . . .......34
AutomaticOvenCleaning . .......30, 31
Baking ... , . . . . . . . . . . . . . . . . . . . . .26
Broiling, Broiling Chart . .........27, 28
HowTo UseYour ConventionalOven..23
...—...—..-——.....-————.—.
———.—-.— “
BeforeYou Call For Service . .....37,38
EnergyConservation. . . . . . . . ........5
MACAPInformation . . . . . . . . .BackCover
Modeland Serial Number Location. .. .38
SafetyTips . ... . . . . . . . . . . . . . . . . ...4
7
Page 9
.—
OF
1“
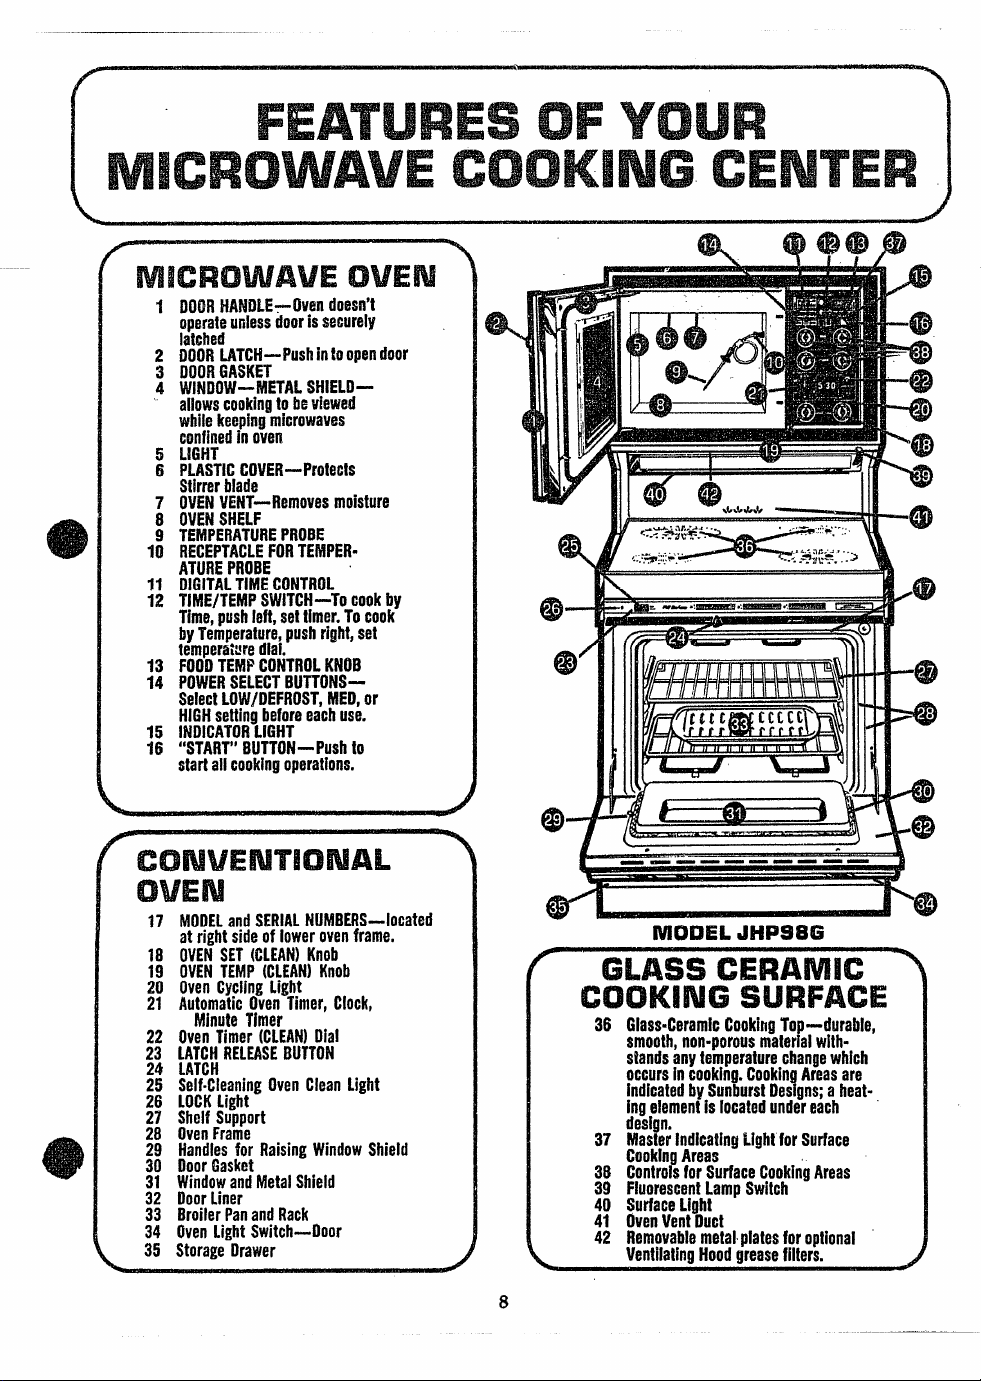
1DOORtfANi)f.E-OV@ndO$Sfi’t
operateunless
latched
DOORMTCH—PushinfOOPe~dOOr
2
3 DOOR6ASHET
4 WHIiDOW-iViETALWHElli—
allowscookingtobeviewed
whilekeepingmicrowaves
confinedinoven
5 i.iGHT
6 PLASTiGCOVEit-Protects
Stirrer
7 OVENVEf4T--Removesmoisture
8 OVEN$HELF
9 TEMPERATUREPROBE
10 RECEPTACLEFORTEhlPER”
ATU8EPROBE
11 DiGiTALTifflECONTROL
12 TiME/TEMPSWiTCH—Tocookhy
Time,pushieft,settimer.Tocook
byTemperature,pushright,set
temperaturediai.
13 FOOOTEMPCONTROLKNOB
14 POWERSELECTBUTTONS—
SeiecfLOWIDEFROST,MED,
HiGHsettingbeforeeachuse.
15 iNDiCATORLiGHT
16 “START’’BUTTiiN—pUShtO
startaiicookingoperations.
doorissecurely
hiade
or
CENTE
*
0
“al
:
=’4D
a
49
17 MODELandSERiALNUMBERS—iocated
atrightsideofiowerovenframe.
18 OVENSET(CLEAN)Knob
19 OVENTEMP(CLEAN) Knob
20 OvenCyclinglight
21 AutomaticOvenTimer,lliock,
MinuteT\mer
22 Oven Tim@r(CLEAN)Diai
$~ :~:#RElEASE8UTTON
25
Seff4XaaningOvenCfean light
26 IOCi( Light
27 SheffSupport
28 OvenFrame
29 Handfesfor RaisingWindowShieid
30 DoorGasket
31 Windowandh!etai$hieid
32 DoorLiner
33 BroiierPanandRack
34 OvenLightSwitch-Door
c?-’“ ~“-”’s—- ~-J
——-———---—
MO13ELJHPS8G
36 Gfess=CeramIcCookitifj’i’op-durabie,
smooth,non-porousmatwiaiwfthstandsanytemperaturechangewhich
occursincooking.CookinAreasare
ingeiementisfocatedundereach
design.
37
iWasterindicatingLiffhtforSurface
CookingAreas
38 ControlsforSurfaceCookingAreas
39 FiuorescentLampSwitch
40 SurfaceLight
41 OvenVentDuct
42 Removablemetalpiatesforoptionai
8
!indicatedbySunburstDesgns;aheat-
.
Page 10
.—
RllCROWAIJEOVEN
——— —
,,
r )
(.
t+IGH or WW On” (100%) FWver, @MW~~~5 Watis o@P~t (Z-W. Water ~ea~~fl~~e$~la
Boiling candy, puddings and sauces, cooking small to medium-sizevegetables,pastry
shells,chickenpieces,fish,hamburgers, bringingto boilsoups,stewsand simmered-type
meats.
Also, cookingbaked-type fruits such as apples, beverages,many moist cakes and bar
cookiessuch as brownies,appetizers and fast melting of butter.
MlED-Cookingcustard-type vegetable casseroles,whole head of cauliflower,omelets,
commerciallyfrozensouffles,somecookies,finishcookingfudge,bread puddingand other
dessert custards, drying homemade noodles and roasting some meats with automatic
temperature control, including “Carefree Roasting.”
M)W/13EFR0ST-Usefor most defrosting.Also dried beans and peas, pot roasting . . .
even poaching eggs. . . are possible at this setting. Shortbread and meringuecookies
are cookedwellat LOW.And softeningand meltingat this powerlevel, althoughlonger
than at higherpowerlevels,maybe preferred because the product ismoreevenlyheated.
9
.—
—.
—-—..——
—.—-—
—.
.—-
Page 11
,\
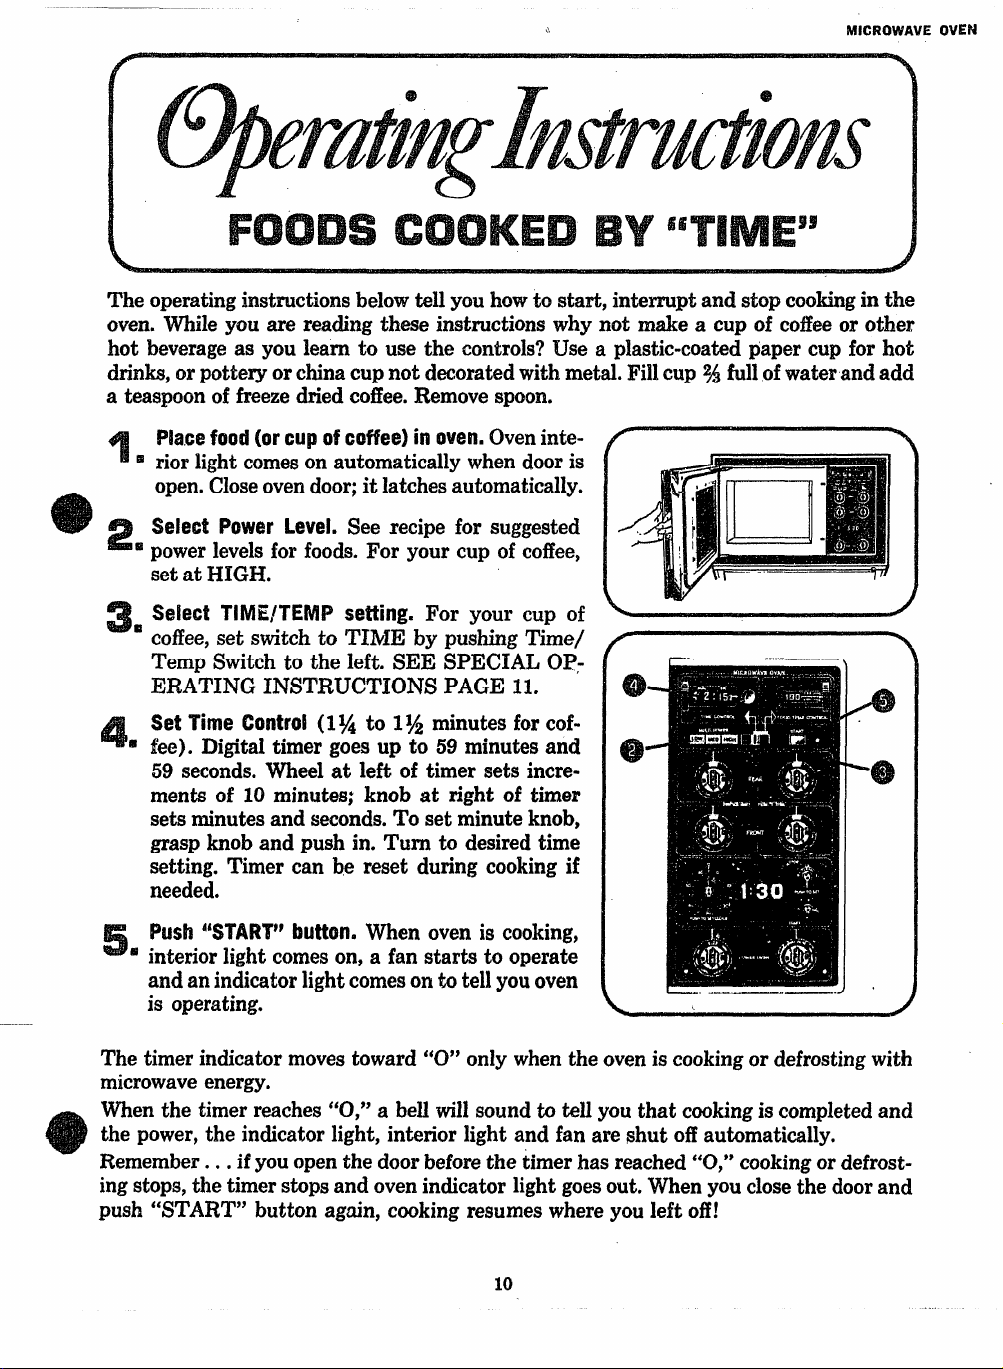
The o~eratin~instructionsbelowtell YOUhowto start, interrupt and stopcookingin the
oven.“mile ~ou are reading these i&tructions why not make a cup of coffeeor other
hot beverageas you learn to use the controls?Use a plastic-coatedpaper cup for hot
drinks,or pottery or chinacupnot decoratedwith metal.Fillcup ~ fullofwater and add
a teaspoonof’freezedried coffee.Removespoon.
MICROWAVE OVEN
Placefood (or cun of coffee] hi ovenmQvm inte-
rior light comeson automatically when dooris
open.Closeovendoor;it 1atchesautomatically.
Wed Power Level. See recipe for suggested
powerlevelsfor foods.For your cup of coffee,
set at HIGH.
Select TllVIE/TEMP setting. For your cup of
coffee,set switchto TIME
.
by pushing Time/
Te~p switch to the left. SEE SPECIAL OJ?,-
ERATING INSTRUCTIONS PAGE 11.
!$e~Time Control (l% to l% minutes for cof-
fee). DigitaItimer goesup to 59 minutes and
59 seconds.Wheel at left of timer sets increments of 10 minutes; knob at right of timer
sets minutesand seconds.To set minute knob,
grasp knob and push in. Turinto desired time
setting. Timer can be reset during cookingif
needed.
PM %TMV
interior light comeson, a fan starts to operate
and an indicatorlightcomeson to tellyouoven
is operating.
button. When oven is cooking,
r
L.. .——.—.
43
’49
J
The timer indicatormovestoward “O” only when the ovenis cookingor defrosting with
microwaveenergy.
When the timer reaches“O,” a bell willsound to tell youthat cookingiscompletedand
the power,the indicator light, interior light and fan are shut offautomatically.
Remember.. .
ingstops,the timer stopsand ovenindicator light goesout. Whenyou closethe doorand
push “START” button again, cookingresumes whereyou left off!
ifyouopenthe doorbeforethe timer has reached “O,”cookingor defrost-
10
Page 12
MICROWAVEOVEN
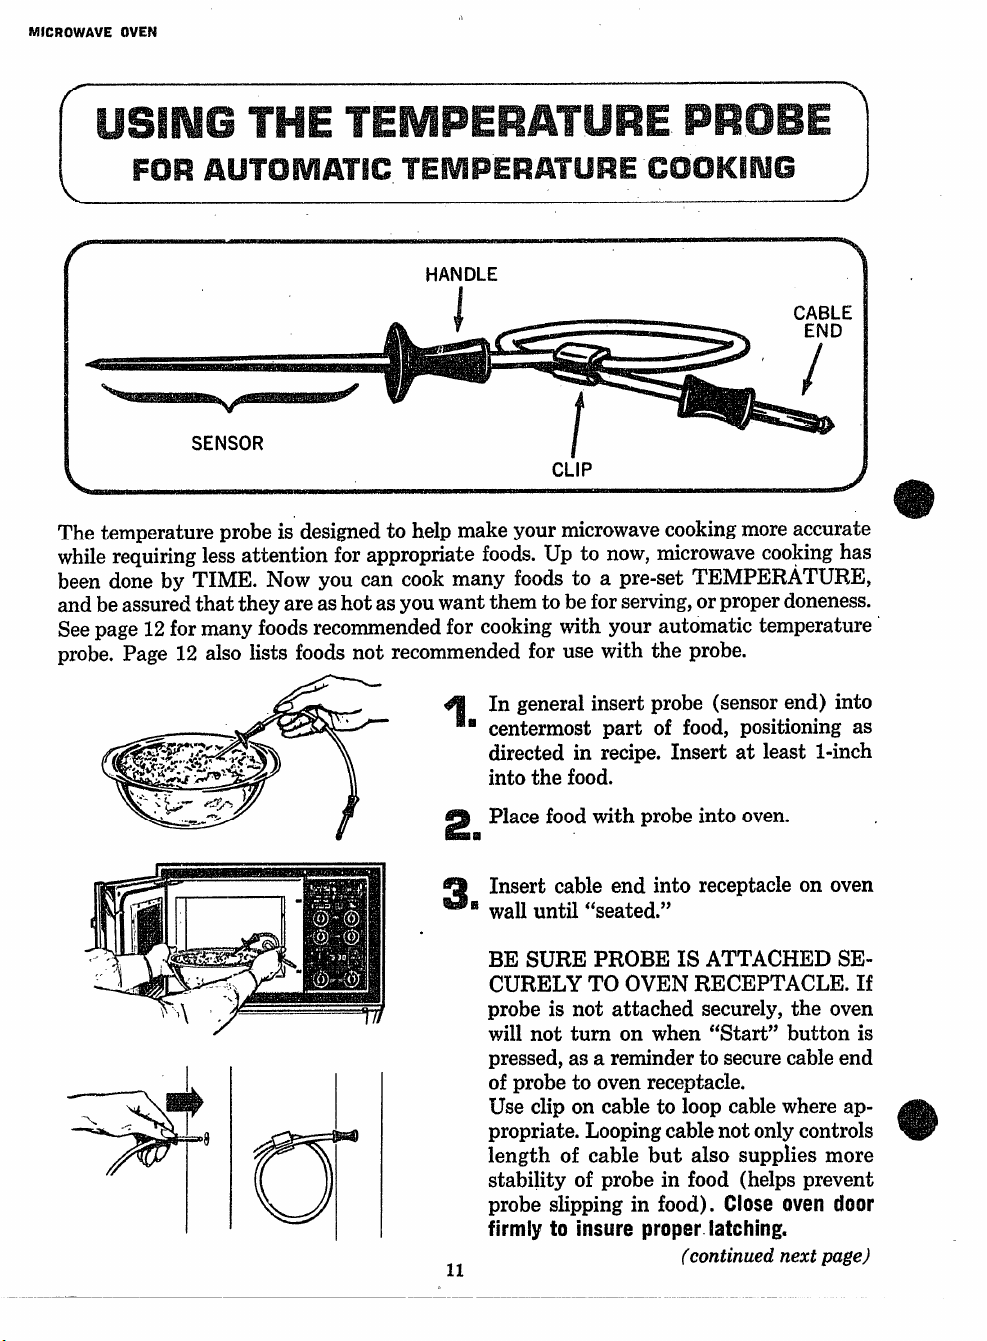
The temperatureprobeis designedto helpmakeyourmicrowavecookingmoreaccurate
whilerequiringlessattentionfor appropriatefoods.Up to now,microwavecookinghas
beendone by TIME. Now you can cook many foods to a pre-setTEMPER~TURE,
andbeassuredthattheyareashotasyouwantthemto beforserving,orproperdoneness.
Seepage12formanyfoods recommendedfor cookingwithyour automatictemperature
probe.Page 12 also listsfoods not recommendedfor usewith the probe.
,)
‘w~~
:’-:<.- +>
G9
.V
.
--9--
-/
,’.
o
In generalinsertprobe (sensorend) into
centermostpart of food, positioningas
directedin recipe. Insertat leastl-inch
intothe food.
Place foodwith probe into oven. .
Insert cable end into receptacle on oven
walluntil “seated.”
BE SURE PROBE IS ATTACHED SECURELY TO OVEN RECEPTACLE. If
probe is not attached securely, the oven
will not turn on when “Start” button is
pressed,as a reminderto securecableend
of probe to ovenreceptacle.
Use clip on cable to loop cablewhere ap-
propriate. Loopingcablenot onlycontrols
length of cable but also supplies more
stability of probe in food (helps prevent
probe slipping in food).
firmly to insure proper latching.
CIOSe oven door
(continuednextpage)
.——
——.-——-—.--..——....—......—..——.—.... —..—-—
Page 13

.
—.
MICROWAVE OVEN
—-—-----------
.
Set oven controls,followingrecipeinformation in special section.for Automatic
Temperature cooking, 1ocated in back
pages of Cook Book,w~ch accompanies
your
oven.
all
Set power level.
h.
Set THWE/TEIVIl?switchto TEW?
(~US~ SWitC~ toright)and did fh-
kki tet?lper+li’t?
followingrecipe
information. (NOTE: If the actual
temperature offoodin ovenishigher
than the temperature you dial the
ovenWWnotturn onwhen“ST~T”
button is pressed. Check temperature on dial to be sure it is set cor-
rectly. If not, reset. If so,then food
in oven has already reached or exceededdesiredfinishedtemperature
. . .no further heating needed!)
W:i:;h “START”butt”””reset Internal temperature is
—.
reached,interiorlightand fanshutQffand
the ovenautomaticallyturns off.Remove
cable end of probe from receptacle,then
remove food and temperature probe
together.
NOTE:
So that you can pkm an approximateservingtime, recipesfor usingtemperature
probe giveboth temperature to setand approximatecookingtime.Ifoven&rns off
unusually early, it may be that probe has slippedout of place in cooking.(This
can happen with any food thermometer.) When this happens, repositionthermometer and continue cooking.To determine actual cooking temperature of
food,turn TEMP control dialto lower temp setting until oven turns off.
,12
.—
Page 14

MICROWAVE OVEN
1.
Cmseroles-150°-WOointernaltemperaturegivesbestdonenesson rnixtureofprecooked
foodsheatedtogetherintoamaindish.Rawfoocissuchashamburgerorothermeat,vegetables
andsaucesstartingfrom“scratch”shouldbe precookedbeforecombiningtogetherintoa
casseroleheatedtoabovetemperature.Theadvantageof thetemperatureprobe:ittellsyou
whenwisseroleHatcorrecttemperatureforserving,withoutchecking,peekingorguessing.
2.
Reheatingleftoyers-thb typeof foodisexcellentto heatwith’lernperatureprobebecause
oftentheanmuntofleftoverfoodisnotknown,therefore,timetocookisonlyaguess.Cookingtoa presettemperature(usually140to 155°) eliminatestheguesswork
3.
PlatesofFood—ing~neral,placetemperatureprobeinlargestpieceoffood,thencoverplate
withwaxpaper(orhghtlywithplasticwrap).Apresettemperatureof150to160°givespipinghotfood.
Beveragesandsoups-use cliponcableofprobetohelpstabilizeprobeinliquids.A preset
4.
temperatureof 130°is“warmtodrink,”about170°is“steaminghot.”
Beef,lambandhamIoaves+besuretoplaceprobeashorizontallyaspossible,anduseclip
5.
to stabilizeprobem meatmudure.
Forbestresults,consultmeatloafrecipe?pagesinAutomaticTemperatureCookingSection
of cookbookandd? notex~ed totalweight.ofmeat.A goodruleofthumbtofollowinpreparingmeatloafm~xturesMto use1 cuphquid(milk,waterorjuicesuchastomato)to
I~zto~] poundsgroundm=to
6.
Roasts-carefreemicrowavemanyroasts.VeryspecificinstructionsareincludedinCookbook.
7.
Dips—hotdipsarea popularappetizer.Aninternaltemperatureof90-130°(dependingon
theingredients)isjustright toserveguests.
a
1.2.Stewing,simmeringandcandymaking-thistypeofcookinginvolvesbringingfoodtoaboil-
ingorsimmeringtemperatureandholdingit atthattemperaturefora longperiodof time.
WerecommendLOWPOWERandTIMEsettingson yourmicrowaveovenformoststewing.SeespecificrecipesuggestionspagesinspecialMEDIUMandLOWPOWERCOOKIJN~sectionof CookBookfor stewing.SeeCandychapterof MicrowaveOvenCookBook
forcandymaking.
Delicatebuttericings,icecream,frozenwhippedtipping,etc.-these Wftenrapidlyat W-
temperatures.Lowelstsettingontempel*atureproti is90°.
--
3..Manvfoodsin thefrozenstate-becausetenmeraturermobeshouldnotbeforcedintorockhard-foods,itcouldbreak.However,afterdefrosting,m~nyconveniencefoodsmaybeheated
withtheprobeto theprecisetemperatureforserving. -
4*
Individualfoodscookedinbatches-in cookingwithmicrowaveenergy,differencesfromone
food to another,
inthesamebatch.Avariationinsize
evenofthe *m@typeof foodcanresultin differentwookingtimesoffoods
(suchasincupcakes,sandwiches,etc.) ormoisturecontent(suchasinpotatoesandothervegetables)camcausevariationincookingspeed.Temperatureprobeinonefoodinabatchmightnotcorrectlyindicateinternaltemperatureofall
foodscookedtogether.
5.
Starchyvegetables-potatoeswhich cookto steamyhottemperaturestendto stickto tem-
peratureprobedueto starchynatureofinterior.(Cleanimmediatelywithsoapycloth,then
rub1ightlywithplasticscouringball,ifnecessary.)
&
Battersanddoughswhicharebaked.This type of foodshouldbe observedwhencook-
ingtobestjudgewhendone.Also, periodicturningof thedishisusuallyrequiredonthese
delicatefoodtypes.
13
Page 15

GLASSCOOKTOP
To maintainthe originalwhitecolor of your newglasscooktop,proper care andclean-
ingproceduresmustbe followedfromthetimetheunitis installed.
IT IS THE OWNER’S RESPONSiBILi’?’Y TO KEEP THE GLASS COOKTOP FREE FROM
I!IISCOLORAT!ON BY PROPER MAINTENANANCE IN ACCORDANCE WITH THESE INSTRUCTIONS, SINCE SOIL BUILD-UP IS THE ONLY CAUSE OF DISCOLORATION. THE
GENERAL ELECTRIC WARRANTY DOES NOT COVER IDISCOLORATION OF THE ICOOK-
TOP, OR SCRATCHING OR OTHER DAMAGE CAUSED BY IMPROPER CLEANERS.
Spatters and spillswhichare not cleanedproperlyfromunit can causea glassyfilmwhich
is yellowor brownish-greyin color.Heavybuild-upofthis filmcausesthe cooktopto appearto havechangedin colorevenwhenCOOL!f’his
beremoved.However,soilbuild-upcanbeavoidedentirelyif aprogramof careandclean-
ingis begunimmediatelyafterunitis installed.
build-upison the surfaceonlyandcan
1.
Before
using your glasstop unit for the first time, clean it thoroughly with Cleaner-
Conditioner (CatalogNo.WB64X5004).A sampleofthisproductispackedwithyour
newunit.
To use,applya smallamount( ~ teaspoonormoreasneeded)directlyto the center
of eachunit.Cleanwitha damppapertowel.Wipeoffwithanothercleandamppaper
towel,then wipe dry. Cleaner-Conditionerleavesa protectivecoatingof siliconeon
thesmoothsurfacewhichmakesspilloversand burnedon foodseasierto remove.
(#se Cleaner-Conditioner
Once or twice a week clean cookto~ with Delete@ cleanser,
2.
each day to remove all visible soil from glass cooktop.
a ~roductof DrackettCo,
(CatalogNo. WX1OX4). This specialpolishingcleanser-is~ormulatedfor cleaning
glasstop cookingappliancesand glass-ceramiccookware.
(CAUTIC)N:Unitshouldbe cooledto roomternperaturebeforeusingDeletecleanser,
Avoid spillingor applyingDelete cleanserto anyareaotherthanglasscookingsur=
face,) To use,applyDeletecleanserto damppapertowelandrubon stainuntilstain
is removed.
Iforextra-stubbornstains, apply a thick paste of Delete cleanser and water, cover
with wet paper towel, and allow to stand about 45 minutes. AFTER USING DELETE
CLEANSER, ALWAYS FOLLOW WITH CLEANER-CONi3iT10 NER, using directions in
Step 1.
14
Page 16

SURFACECOOKING
1$101’~:
If ~det~ cleanseris not available,alternative cleanersavailablefromother man-
ufacturers and sold under the followingtrademarks are: Bar Keepers Friend, Pan
Dandy, or Bon Ami. Bting soda may be used also. Plastic and nylon scouring balls
such as those sold~der the trademarks Dobie, Skruffy ~d TuffYmaYbe ~ed~ ,, ,.
r
DONOTUSEANYCLEANERS(’ITHERTHANTHOSELISTEDABOVE AND ON IPAGE14:
Metal scouringpads can mark and scratch surface;cleansingpowderscanscratch,chemical ovencleanerscancauseetching,other chemicalstainremovers(evenchlorinebleach)
can be harmful to cooktop. IXl I’UWMix ~~~S~~~~~ $H=~~~l~~PROlluCTS.Some
mixturesmay interact with objectionalor hazardqus results.
UUJ710N:If Cleaner-Conditionerisnot used regularlyor not at all and only othercleaning powdersare used overa period of time (about 6 months), the surface of the glasscerarnicwillbecomerough.Cleaningmaybecomeprogressivelymoredifficultand staining
may occur.
DO NOT COOK FOODS PACKAGED IN THilll ALUMINUM FOIL TRAYS OR FOODS
WRAPPED Ihi ALUMINUM FOIL ON GLASS COOKTOP. Commercialfoil containers,
such as for T.V. dinners,frozen preparedentrees,pot pies,popcorn,etc.,alsofoil
wrappingsfor foods suchas sandwiches,canmelton glasscooktopcausingpermanentdamage.
It istheowner’sresponsibilityto avoidthisoccurrence.Yourwarrantydoesnotcover
damageto thecooktopcausedby the useof aluminumfoil containersorwrappings
onthe cooktop.
1.
Beforeusingcooktop,makesurebottomof cookwareandcookingareaarecleanand
dry.
28
Selectheatsettingsandcookwarelargeenoughto accommodatefoodto avoidliquid
boiloversandspattering.
3.
Wipeupspillsandspatterswhe~cooktopis+coolenoughto handleandbeforespatters
burnonto surface.Besureto wipeareaadjacentto theunityou havebeenusing,in
casefood hasspatteredtheseareas,too. BE CAREFULTOAVOIDSTEAMBURNSON
HANDwhenwipingcooktop.
4.
Clean,damppaper towelsare recommendedfor wipingcooktop.Spongesand dish
clothsmayleaveafilmofsoil-ladendetergentwateron unitwhichcancausea brown
stainwhenunitis heated.(Cleaner-Conditionerwill removestain.)
!5.
Duringcooking,coverson panscollectcondensedsteam.If, whencoveris removed,
condensationdripsontocooktop,itcancausestainingdueto mineraldepositsinwater
or food whichis cooking.Try to formthe habitof lifting coversof cooking utensils
so that condensationdripsback into the utensilinsteadof onto cooktop.
6.
Avoidscratchingcooktopwithdiamondringorotherjewelry.
I
15
Page 17

SURFACECOCIKING
MITELotrangepart(s)COOIbeforecleaninginanlfally,itisretoinmendedWatrubberglovesbeworntoprotectthettands.
Brown streaks
and specks
Fine “brown
lines” (tiny
scratches or
abrasions which
have collected
soil).
Metal marking
[gra or black
xmar s)
Pittingor spalling
-iardwater spots
orbrawn
a gray
;tatn that does
lot seem to be
‘emcwecJusing
:learierWrditioner)
Cleaning with a sponge
or dishcloth that has
be~n used foq other
kitchen cleaning tasks
and may contain soilIaden detergent water.
Coarse particles (salt,
sand, sugar or grit)
caught between bottom
of cookware and cooktop
that are not,removed
before cooking.
Using incorrect cleaning
materials.
Sliding or scraping
metal utensils or oven
shetf racks across
cooktop.
BoHoverof sugar syrup
an d adherence of sugar
syrup to hot cooktop.
In cooking, condensation
often collects and dritx
when cover’sart? “
removed.
The mirrera!s found in
the water .5upplyand
in-foods may cause
mlrreral deposits to turn
a gray or brown color.
‘rhe layer is’so thin it
often seems to-be in or
under the c~cklng
surface and cannot
readily be felt.
Use Cleaner-Conditioner only
with clean, damp paper towel,
Normal daily use of CleanerConditioned.
In area where there is an
abundance of sand or dust,
be sure to wipe cooktop
before using.
IJse only cleaning materials
recommended in this manual.
4
,.
Do not slide racks or other “
sharp metal objects acro5-s
crmktop.
.-
Select correct heat setting and
large enough cookware to
eliminate boilovers and
spattering.
Watch sugar syrup carefully
to avoid boilover.
Daily use of L%2aner.
Conditioner app)ied with a
clean, damp paper towel will.
tokeep the @lass’.ceramic
help
surface free from hardvmtt?r
minera i deposits.
...
“- .
Use a tight application of CleanerCondkloner with clean, damp
paper towel.
Tiny scratches are not removable but
can be minimized by continual use of
Cleaner-Conditioner. Such scratches
do not affect cooking performance.
,
Appiy.dea&-Ccm~itiorrerwith $
ci;dap:eqt?qpaper towel;to cocded
While unit is still hot turn to OFF; wrap
several damp pa er towels around
spatula or panca e turner and use to
remove sugar syrup spill from hot
cooktop immediately.
CAUTION: Sugar syrup is very hot so
be careful not to burn yourself.
,
‘ , ‘ .-
... ‘
.
, , ,. .,
‘ ‘:, ‘.
, . - . , . J ., . .. . , ,. --
!
,. . .
.’,
!.
Scrape off remainder of burn with
urrl ISstl I warm-before coollng
“n’?’coed’fe ‘azor b’ade ‘h”e”
flown completely, Hold blade so edge
IScompletely flat on cooktop and
blade is at a
300 angle.
. . . . ----.
‘Mix a Wnkl;amount of Del& ‘
cleanser -wit~tap water to form a
thick, Wet’pwate.
.Aptii~ Wii$mixture ki stain”area.
s@it:45-rnimm5., ~
Let !!
Scfub:with cie@n,.damppaper.towei,
After s%iin“ikkrnoved:
Wipe UP rernainin~ ‘pastewith’damp
paper towel.
Apgdydab o#”fkmnser-Conditioner
and.polisfl with paper towel,
. .
,,
Page 18

SURFACECOOWNG
SPECIALNOTE:Withtheupperovenbeingoverthecookingsurface,youmayfindthatfoodsyouboilonthesurfaceunitsmaycause
watercondensationor waterdropletson theundersideof theupper
(microwave)oven.Thisisespecia~lytrueof foodsboiledwithwater
suchasvegetables,rice,noodles,etc.or foodsnaturallyhighinmoisture,suchassaucesor gravies.
, Steamcondensationwillnotdamageyourrange,butif youwishto
minimizethepossibilityof condensation:
L Coverpotsandpanswithlidswheneverpossiblewhenboiling
highmoisturefoodsonthesurfaceunit.
2. Selectafrontsurfaceunitforboilinganyfoods,whenpossible.
Yoursurfaceareasandcontrolsaredesignedto giveyouaninfinitechoiceof heatsettingsfor
cookingontopof therange.
Graspcontrol
knob
and
push in. . .
Controlknob must be pushed in to set only from OFF position. When control is in any position
other than OFF, it may be rotated without pushing in; when rotated to OFF, control knob pops
out.
Turn either
clockwise or
counterclockwise
to desired
heat setting..
AtHIGHpositionthereisaslightnichesocontrol“clicks”atthisposition;“click” onHIGH
marksthehighestsetting;thelowestsettingisbetweenthewordsLOWandC)I?F.In aquiet
kitchenyoumayhear-slight“popping”soundsduringcooking,indicatingheatsettkgsselected
arebeingmaintained.
Switchingheats to highersettingsalwaysshowa quickerchangethanswitchingto lower
settings.
Anindicatorlightglowsonthecontrolpanelwhenanysurfaceareacontrolknobisatanyposi-
tionotherthanC)FF.
Thecookingarea,underthesunburstpattern,turnsyellowasit heats.Whenthecontrolis ‘turnedto OFF,thecookingareacoolsandreturnsto theoriginalwhitecolor.The heatis
transferred
the bottom of the cooking utensil to the food.
from the heating element, through the flat surface of the cooking area, up through
Page 19

,)
SURFACECOOKING
See CookingChartforsuggestedsettings for specific foods.
1. Start with heatssuggestedon the CookingChart and switch heats
to lower settings, or in some cases to OFF} to complete cooking. The
glass-ceramic material retains heat which can be utilized to complete
cooking of some foods or for keeping some foods at serving temperature. Experience with your utensils, the foods in the amounts you
cook, the donenesses you prefer, etc. will indicate to you the best
heats foryour needs. See informationon utensil materials forhints on
your “pots and pans.”
2. Most foods cooked with liquid will come to boil and continue to
cook more efficientlywhen there is a cover on the utensil.
Some foods, cereals, pastas, seafood, some meats and poultry, etc.
foam and bubbleup in cooking. All liquids, regardlessof their nature,
expand when brought to boil. When boiling the foods that foam and
other foods, be
certainto usea utensillargeenoughto allowforex-
pansion.Withthefoodswhichfoam,addinga tablespoonof cooking
oilto thewaterbeforecookingwillhelppreventthefoamfromforming.Also,removingor tilting
foam-producingfoods.
Boilovers will create a ckanup job, so follow suggestions for best
settings, utensil sizes and other hints to keep cleaning to a minimum.
3. Switching heats to higher settings always shows a qtiicker change
than switching tolower settings.
the cover helps prevent a boilover of
I
,,
I
I
1. For crisp, well-browned exterior, cook food in utensil without a cover. See Cooking Chart
for suggested settings for best browning with a minimum of
spatteringandsmoking.Experi-
encewillindicatewhichsettingsarebestforthefood beingcookedin yourutensils.
2. For soft or lightly browned exterior, such as pancakes, french toast, etc., one heat setting to
heat utensil and cook food is sometimes adequate. For very soft foods, such as fried or scram-
bled eggs, frequently one setting can be used to heat and cook, Also, depending on the utensil
material and quantity of eggs, sometimes fried eggs can be cooked in a heated utensil with the
control at OI?F.
Heat utensilat HIGH long enoughto melt fat, thenreduce heat to MED HI for browning
meat. AcMliquid and reduce heat to LOW$cover utensil and cook until meat is tender.
For most thickened liquid mixtures, blend the thickening (flour, etc.) with cold liquid (ph.Is
salt, flavorings, etc.); cook, stirring constantly on MED or LOW heat. Pan gravies and white
sauces are often made by blending flour thoroughly with hot melted fat before adding liquid.
NOTE: AT HIGH and MED HI heat settings, never leave food unattended. Boilovers
cause smoking; grease spillovers may catch fire. Boil dry situations can causeutensil
damage or permanent damage to glass surface area. ~
18
Page 20

T)
SURFACECOOKING
~a Make sure bottom of utensil and cooking panel a~*ecleananddry. Industyorsandyareas,
wipe cooking panel and utensil before using to prevent scratching the glass ceramic finish.
~= Center utensil on a cooking area which most nearly matches bottom of utensil in size.
RI(3HT
Hot spo~swhich may cause scorching or
burning because they receive the most heat.
~, Utensilsshouldbe flaton bottomand shouldmatchsizeof cookingarea(largepanson
largeareas,smallpansonsmallareas).Utensilsshouldrestlevelonthecookingareawith
orwithoutfoodinthemorcoversonthem,andentirebottomof panshouldtouchheated
areaevenlytoeliminate“hotspots.”
& Usesmallcookingareasforsmallutensils,largecookingarea,sforlargetitensils.Theuseof
autensilsmallerthan thesizeofthecookingareawillexposeaportionofthqheatedareato
directcontactbytheuser.Thisconditioncouldresultin seriousburnsorclothingignition
accidents.
~, Useheatsettingsno higherthanMEDor followmanufacturer’sdirectionswhenusing
utensilsmadeof thefollowingmaterials:castiron,glassceramic(pyroceram),andstainlesssteel.Also,enamelwarewhichundercertainconditionscouldmeltandfuseto the
cookingpanelwhenhigherheatsareused.Manufacturersof glasscookingutensilsalso
recommendusingheatsno higherthanMED.
@ WhenhoLcookingareasglowyellow.Whenheat is turnedoff,theyellowdiminishesuntil
theglassiscool,Glasssurfacesstayhotfora longtime,Alsowhencookingtopisinuse,some
heat transfersto nearbyareasof the glass-ceramiccookingtop.BeCERTAINall areasof
the cookingtop are coolbeforetouchingthem with the hand, potholdersand cleaning
materials.
@ The cooking top can be used, when completely cool, asa work surface for some kitchen
tasks. The surface wil~ readily withstand normal use. Make certain bottoms of objects
placed on cooking top are smooth.
I 1
NEVER USE COOKING TOP AS A CUTTING BOARD.
I
19
Page 21

,)
SURFACECOOKING
Canning should be done on cooktop only.
OVEN,
In surface cooking of foods other than canning, the use of large-diameter utensils (extending
more than l-inch beyond edge of cooking area) is not recommended. However, when canning
with water-bath or pressure canners, large-diameter utensils may be used. This is because
boiling water temperatures (even under pressure) are not harmful to cooktop surfaces.
CM3!3E!%VE FcMAcmf#nm POINT’S Iw CANNING:
fi, Bring water to boil on ‘HIGHheat; then after boiling has begun, adjust heat to lowest set-
ting to maintain boil (saves energy and best uses cooking surface).
~. Be sure canner fits over center of cooking area. -
I
as XT IS MOST IMPORTANT WHEN CANNING ON THE GLASS-CERAMIC
COOKTOP THAT THE BOTTOM OF THE CANNER BE VERY FLAT. Canners
with flanged or rippled bottoms (often found in enamelware) are not recommended.
~~ For fastest heating of large water quantities, begin with hot tap water.
RIGHT
DO NOT CAN IN OVEN OR IN MICROWAVE
wFN31w3
~. When canning, use recipes from reputable sources. Reliable recipes are available from
the manufacturer of your canner; manufacturers of glass jars for canning, such as Ball
and Kerr; and, the United States Department of Agriculture Extension Service.
6. .Remember, in following the recipes, canning is a process that generates large amounts
of steam. Be careful while canning to prevent burns from steam or heat.
@ Use a minimum amount of fat for effective shallow or deep-fat frying. Filling the pan too
full of fat can cause spillovers when food is added.
x Keep an eye on foods which fry at high or medium heats,
@ lf a combination of oils or fats will be usedinfrying,stirtogetherbeforeheating,orasfats
meltslowly.Alwaysheatfatslowly,andwatchfatasitheats.
@ Usedeep
ing point).
FOOdSfor frying should be as dry as possible on exterior surfaces. Frost on frozen foods or
@
moisture on fresh foods can cause hot fat to bubble up and over sides of pan.
@ Keep range and ventilating hood free from grease accumulation.
fat thermometer whenever possible to prevent overheatingfat (beyondthesmok-
20
Page 22

SURFACECOOKING
Do not leave plastic items on cooking area.
@
DO not cook foods packagedin thinaluminumfoil traysor foodswrappedin alumi-
~
)
numfoilonglassceramic.
@ Whencookingisalmostcompleted,makeuse of theheatretainedin thecooking
completethe cooking. Turn the control knob to OFF and leave pan in place until cooking
area is cool and food is cooked. See Cooking Chartforspecific information.
area to
;..
b.. CEREAL
,.....,.,.-..,,,,..
@’In the
unlikely event tbt the g]aw-cerarnic co~king top breaks or cracks,
NOTUSEANYPARTOFIT.Callforproductservice,seepage38.
DO
NOTE: R is recommendedthatCleaner-Conditionerbeusedtinyour
newcookingtop initiallybefore it is usedfor cooking.See page14.
Cornmeal
Grits
Oatmeal
Rice,etc.
HI—Bring water to boil, Before
addingcereal,switch to
LOW,then stir in cereal.
Finish accordingto package
directions,
4
I
-1
1, Cerealsbubble and
expandwhen cooking.
Use large enough pan
to preuentboilover,
2. For steamed rice,cover
andcookabout 25 minutes.
—.
COFFEE ~,
EGGS
Cooked in shell
Fried
Poached
Scrambled
H1—Cover eggswith cool
water.Cover panand bring to
steaming polrrt.Switch to
MED.Hl—Melt butter.
Add eggs.Switch to
HI—Quickly bring water to
steamingpoint.Switch to
MED.Hi—To heatbutteruntil
lightgoldencolor.LeaveatMED
HI or switchto
(continued next page)
21
,-
OFF.Cook 3.4 min. for soft
eggs,about 15 min. for hard.
cooked,
OFF,Whenbottoms are just
set,turn eggs “over easy”
andcookother side.
OFF,Carefully addeggs. Cook
uncoveredabout 5 minutes for
medium doneness,
LOW,Add egg mixture,cook,
stirring to desireddoneness.
Removefrom heat,
Begintiming whenfirst
wispsof freesteam
come from cover.
Variations:After cooking
bacon,drain fat, switch
heatto OFF,Add eggs,Plus
1tablespoonwater for each
eg$ Coverpan and steam
until just cooked.
Eggsare easyto handle in
wide shallowskilletor pa
Removewith slotted SPO
or pancaketurnerto
drain.
Eggscontinueto set
slightlyafter removing
from heat.
Page 23

——
—
WaterCooked
Chicken,Corned
i
eef,Smoked
PorkShoulder,
Tongue,etc,)
MELTING -
ChocolateSquares,
Chocolate,
ButterscotchBits,
Butter etc.
PJWAKES
PASTA
Macaroni
Noodles
Spaghetti,etc.
PRESSURECOOK
SAUTE
Bre##~ghMeat
Sliced ~nions,
GreenPepper,
Mushrooms,etc.
WFXJE’VJLES
paredchicken pieces;Then”
coverskillet; and switchto ,
-, - ,
J41-Put iiicfk”ksingle i~yer ‘
in coldskillet. Whenjust ,
sizzling, switch to ,
HI —Cover meht with water;
coverkettle.When steaming
freely,switch to
LOW—Put in small saucepan
on small surfaceunit. Cover
for semi-sweetchocolateor
butterscotchpieces.
filEflHI—To heatskillet 8-10
minut~s.Grease lightly.
HI—To bring saltedwater to
boil in covered utensil.Add
pastaSIOWI soboiling doesn’t
HI—To bring to $ressure.
Whenfirst “jiggle” is heard,
switchto
MED—To melt fat.
ttl-ffleasure “withyour eye’)
about Y24t inch water into
pan, then add salt and prepared vegetable,Cover pan,
brln to boll,cook for % the
!
cookng’time, 5.15 mhr,
Switch to
HI—Measure %.% inch water
into pan,
block(s)of vegetables.Cover,
tosteamingpoint. -
bring
Sw~tchto
-. :.,
,.
{stop,Switc to
Addsaiiandfrozen
IMEDor MED.HI. Cook,ttirni6ti-
occasionallyto deslr$d :; : ~:
%doneness, ,,. ‘~
,,
LOW, so water boils slowly~’ :
Cookuntil fork tender. ~01. ,.
,, ., ,,
Allowabout 10-15min.to
melt through.Stir to smooth.
MED.LO—Cookpancakes” ~
1.2min. eachs!de,(Allow ..
slightly longer for thick .
batter.)
MED.Hl—Cookuncovereduntil
tender.
LOW. ttkgintiming fooda,s,’
soonas “jiggles’; begin ,
regularlyagain. .‘:
Add food, Cook to desired
doneness,
OFF to cook 10s15minutes,.
until just tender.
OFF.Time as directedon ‘”
package,
,.
, , ~, - J
. - ,-
,,
,.
. c.
,,
SURFACECOOKING
(contin.e~)
-Add $altor’~ther season. ‘
ings before,cookingif
meat’isuncur4d, r
Wheribubbles~nbatter rise
tosurface of pancakesturn
tosecondside. . --
1)Heat should behigh
enough so that waterstays
at rolling boil throughout
cooking.2) Use large
enoughpanto avoid
boilover.
ffCJT&*-me’pressute
cooker manufacturers
rna~,finda fewmoreor
lesssatisfactory.
Turn meat or stir
vegetables occasionally
to cookandbrown evenly. ~
,.
1)covered pan is best for
cookh’rgjif uncovered,
more water,M
needed;timing is longer.
2) Vegetablescookedjust
r-
to “crisptertder’$are
mostnutritious,
~hickcom~actblocksof
.,
stirringlmce during ctiok-
:ing for evervdoneness.
“7
.7.
..
‘-niw;tier;you I
.,
,,
22
Page 24

Your ovenis designed to give you top resultsin
baking, roasting, and broiling when used as
recommended.
mm TEMP iii
SETTUW FOR
Look at the controls.E3esure you understand
1.
how to set them properly.Read over the directions for the AutomaticOvenTimer so you understandits use with the controls. ‘
2. Checkoveninterior.Lookat the shelves.Take
a practice run at removingand replacingthem
properly,to givesure sturdysupport.
3, Read overinformationand tips that follow.
4. Keep this bookhandyso you can refer to it,
especially during the first weeks of getting acquaintedwith youroven.
The controlsfor the oven(s) are markedOVEN
SET and OVEN TEMP. OVEN SET has settings for BAKE, TIME BAKE, BROIL,
CLEAN, and OFF. When you turn the knob to
the desiredsetting, the properheating units are
thenactivatedfor that operation.
OVEN TEMP maintains the temperature you
set.from WARM (150°) to BROIL (550°) and
atCLEAN ($$0°). A light near this control
also
glows until oven reaches the selected temperature, then goes off and on with the oven unit(s)
duringcooking.PRE-HEATING the oven, even
to high temperaturesettings, is speedy—rarely
more than about 10 niinutes. Preheat the oven
only when necessary.Mostfoodswill cooksatis-
factorilywithoutpreheating.If you findpreheating is necessary, keep an eye on the indicator
light and put food in
light goes out.
the oven promptly after
COOKHW
For CLEAN, rotatethe knobto the right (clockwise) until the blue pointer is pointingup, toward the index marker. When this location is,
reached, the control should snap into fina
position.
h
mm mvlPA
Wr$’llw FORI
The shelve(s) are designed with stop-locks so
that when placed
(a) will stop before comingcompletelyfrom the
oven, (b) will not tiltwhen removing food nor
when placing food on them.
TO
REMOVE shelve(s) fromthe oven, when
cool,lift up
locks
along top of shelf supports.
TO
REPLACE shelve(s) in oven, insert shelf
with stop-locks resting on shelf supports. Push
shelf toward rear of oven: it will fall into place.
When shelf is in proper position,stop-lockson
shelf will run under shelf supportwhen shelf is
pulled forward.
correctly on the shelf supports,
retir of shelf, pull forward with stop-
IMPORTANT: The OVEN TEMP control has
a blue pointerthat is usedonlyfor CLEAN. For
normalcooking,line up the desiredtemperature
(marked
withthe indexmarkerlocatedimmediatelyabove
the control.
on the outer edge of the control knob)
. . ..
The light comes on automaticallywhen the door
is o~en-ed.Useswitchon windowdoor toturnlight
on and off when door is closed.
23
Page 25

MINUTE
TjlvlAEJR>
,,
CONVENTIONAL COOKING: TIMER
Ckmk and Minute Timfiw
DIGITAL CLOCK
TO SET THE CLOCK, pushinthe centir knob
of the Minute Timer and turn Knob in either
direction to set the Digital Clock numerals to
the correct time.
(After settingthe clock, let the knobout, and
turn the Minute Timer pointer to OFF.)
TIMER
TO SET THE MINUTE TIMER, turn the
center knob clockwise,withoutpushing in, until
pointer reachesnumber of minutesyou wish to
time (up to 60).
At the end of the set time a buzzer sounds to
tell you time is up. TO TURN OFF INJZZER
turn center Knob, without pushing in, until
pointer reachesOFF.
Automatic
OwenTimer
Theautomaticovencontrolsaredesignedfor
thehomemakerwhocan’tbetieddowntobeing
in thekitchenor athomeatspecifictimesto
turnanovenonoroff.Thesecontrolscanbe
presettostartandstopyourovenforyou.Or,
if you prefer to startthe food yourself,theywill
take over the job of turning the oven off.
24
Page 26

COtdVENTIONA1.COOKING: TIMER
To set the automutic oven timer, use the two
dials next to the clock, m~ked START and
STOP. Each dial is marked off in 15 minute
segmentsandnumberedby thehour. The pointers on thesedialscan be movedonly whenknob
is pushed in. (When the pointers are turned
you can hear a “ratchety” sound.) If pointer
can be turned it means knob has been pushed
in and pointer hasbeen set. To be certainknob
is in outposition,turn knobso pointer isat time
showing on the clock. Knob will pop out and
cannot then be turned. (Note: Before you set
thesedials,be sure thehandsof the rangeclock
show the correct time of day.)
A; TO SET THE AUTOMATIC OVEN
TIMER SO IT WILL SWITCH THE OVEN
HEAT ON AND OFF AUTOMATICALLY,
AT A LATER TIME THAN SHOWS ON
THE RANGE CLOCK, DC) AS FOLLOWS:
1. Set START time. Push in knob on START
dial and turnpointer to time you want oven to
turnon. The illustrationshowsSTART pointer
at 3:30.
2. Set STOP time.Push in knobon STOP dial
and turn pointer to time you want oven to turn
off. The illustration shows the STOP time at
6:00.
Automatic Timer works only if STOP time is
set for a later time than shows on range clock
and on START dial.
3, a. Turn OVEN SET* to TIME BAKE.
b.
TurnOVEN TEMP* to proper tempma-
ture for food to be cooked. Place food in oven,
close the door and automatically the oven will
be turned on
and ofi at the times you haveset.
i%TO SET THE OVEN TO START IMMEDIATELY A~D TO TURN OFF AUTOMATICALLY AT
only A2 and A3 above.
G When food is removedfrom oventurnOVEN
SET to OFF.
*OVEN
BAKE setting work differentlythanthey do at
BAKE setting.Do not be concerned if no light
appears. Carefully recheck the steps given
above. If all operations are done as explained,
oven will operate as it should.
INDICATORLIGHTS at TIME
A LATER TIME, follow
chokingFads
with ‘Y’U3m’”OwenTimer
Meats, fruits and vegetablesgenerallytake well
to automatic cooking. You can cook one food,
or severalfoods togetheras long asthey require
the same temperatureand time. However foods
of a highlyperishablenature,suchasmilk,eggs,
fish, stuffings,poultry, and pork, should not be
cooked automatically unless standing time in
the oven is not more than 2 hours before and
about 2 hours after cooking of these foods. In
all cases,no matter what the natureof the food,
unless cooking is to start immediately, foods
should be thoroughlychilled in the refrigerator
before placing in the oven.
LAMP Cwm HJRI=ACE
Surface lamp switchlocation is under right side
of control panel.3%mpmay
ing the lamp switch button.
ton depresseduntil light comes on.
be lightedby press-
Be suretoholdbut-
Page 27

CONVENTIONALOVEN
When cooking a food /or the first time in your new oven, use time
given on recipes as a guide. Oven thermostats, ouer a period of years,
may “drift” from the factory setting and differences in timing between
an old and a new ouen of 5 to 10 minutes are not unusual and you
may be inclined to think that the new oven is not performing correctly. However, your new ouen has been set correctly at the iactory
and is more apt to be accurate than the oven it replaced.
1. It is recommended that you operate the
range for a number of weeks to become familiar
with your new oven’s performance. However, if
you find that.your foods consistently brown too
little or too much, you may make a simple adjustment in the thermostat (OVEN TEMP)
knob. See section titled “Care of Your New
Oven.”
2. Use tested recipes from reliable sources.
Measure ingredients accurately and combine
carefully. Use correct size baking utensil.
3. Place shelf at position suggested on chart below. On models so equipped, letters are marked
on wall of large oven. On models where letters
are not marked on oven, lowest position corresponds to A in chart, B is next highest position,
etc.
4. Preheat the oven only when necessary. Most
foods will cook satisfactorily without preheating.
If you find preheating is necessary, keep an eye
BREADS,QUICK1
Biscuits
CoffeeCake
CornBread
Gingerbread
Plain Muffins
Popovers
Quick Loaf Bread
8,c
$, A
A, B
425-475
350-400
425-450
B
B
B’
B
350
400-425
375
350-375
10-20
20-30
25-40
30-45
20-30
45-60
45-60
on the indicator light and put food in the oven
promptly after light goes out.
5. To set oven: Close oven door. Turn OVEN
SET to BAKE and OVEN TEMP to temperature on recipe or on Baking Chart.
6. Place food in oven, being certain to leave
about l-inch of space between pans and walls
of oven for good circulation of heat. Close oven
door, During baking, avoid frequent door openings to prevent undesirable results. ~
7. Check foods for doneness at minimum time
on recipe, Cook longer if necessary. Remove
foods and switch off heat, When cooking food for
first time in this oven, use times on recipes as a
guide, Be certain foods are done before remov-
ing from oven, See Baking, Before You Call for
Product Service.
NOTE: Information about baking at high altitudes can usually be obtained at your state agricultural station.
COOKIES1
Brownies
Drop
Refrigerator
Rolledor Sliced
25-35
1O-2Q
6-12
7-12
CAKES1
(without shortening)
Angel Food
Sponge
Jelly Roll
r
* For best results, use shiny aluminum utensils, with dull finish on
with cloth and place in your well insulated oven to keep away from drafts. Yeast doughs raise best at 85
oven lamp should be off during rising. FRUIT CAKES: place large ones on
pan type on shelf in center of oven.
2 TO brown meringue only, use 400, 8-10 rein; to cook meringue through, use lower temperatures for times given.
NOTE: When two shelf positionSare listed, the first one gives well browned and cooked food. If-you desir
browning, use the second shelf position the next time you cook. Foods Ilsted with three sb
cessfully on any position listed, alone or in an oven meal.
A
Ill
A
B
325-375 30-55
325-350 45-60
375-400
10-15
MISCELLANEOUS
Apples,Baked
Custard,Cup
Potatoes,Baked
Puddings,Rice
and Custard
Scalloped Dishes
Souffles
bottom. To RAISE YEAST DOUGHS, I
lowershelf poshlon; place small or loaf
lelf posmom
26
30-60
30-60
60-90
60-90
30-60
30-75
C(
,0
re
Page 28

COI’WENTWNAL OVEN
Broilingis cookingfoods by intense radi-
antheatfromthe-upperunitin theoven.
Mostfishand tendercutsof meatcan be
broiled.Followthesestepsto keep spat-
teringand smokingto a minimum.
1. Ifmeathasfatorgristlenearedge,cut
verticalslashesthroughboth about 2-in.
apart.If desiredfatmaybe trimmed,1eavinga layerabout ~-in. thick.
2. Place meat on broiIerrack in broiler
pan whichcomeswithrange.Alwaysuse
rackso fat dripsinto broilerpan; otherwise juices may become hot enough to
catchfire.Aluminumfoilmay be usedto
line broilerpan and rack.But, be CERTAIN to cut openingsin foil, to correspend with rack so fat drips into pan
below.See note belowbefore marinating
and usingbarbecuesauce.
3. Letterson ovenwall,andchartbelow,
indicatewhereto positionshelf for best
browningwhilecookinginsideof food to
desireddoneness.Placing food closerto
. .
top of oven“increasessmoking, spattering,
exteriorbrownonmeat andthe possibility
of fatson foodscatchingfire.
4. LEAVE DOORAJAR about3 inches
—door stays open by itself, and keeps
heatingunit at propertemperaturefor
broiling.
5. SWITCH OVEN SET and OVEN
TEMP CONTROLS TO BROIL. Preheatingunit is not necessary.~~
6. Turn food only once duringcooking.
Timefoodsforfirstsideasonchart.Turn
food,thenusetimesgivenforsecondside
as a guideto preferreddoneness.(Where
two thicknessesand timesare given to-
gether,use firsttimesgivenfor thinnest
food.)
7. Turnovenoff,servefoodimmediately,
leavepanoutsideoventocoolduringmeal
for easiestcleaning.
Cookingtimesgivenareapproximateand
shouldbe usedonly asa guide;they are
basedonmeatatrefrigeratortemperature
when placedin oven.
H$lO~E If your range is being operated on low power (voltage), broiled foods may be
lighterbrownthan expected,eventhoughdirectionshavebeencarefullyfollowed.
Browningcan be improvedas follows:
1. Followdirections givenon this page for setting up the oven, preparing food,
setting controlsand leavingdoor ajar.
2. Preheat the broilunit f~r 10minuteswith foodand broilerpan outside the oven.
3. Place foodin oven,leavedoorajar and time first side offoodas directed.Turn
foodand time secondside,BUT forthe LONGESTtime givenonthe chart for
your particular food type, thickness,etc.
——
Page 29

CONVENTIONAL
....“
..--
—
———
—
———
——
-
=.:.=.
——————
_—-—”-——
- .
- .- ”- . . . . -= --. ..-”---
—— .————
” - . .> -- . . -%--------
.——
.m..m -
m..,q,.”~<=.- —
-—— -—=. ,.. -.—
.. — .-—
... .—-———- —------ -. .——— - - — --- — ——
—=. —-.— =.:.==-==-- ———
.r-7---------
-=--. .-=-. .—— -. . . . . . -. - ———-—— ------- -- -
———— .— - ----- . . .
—-- —— ----
-— ——— — ------------
——
I I I 1
Bacon
BeefSteaks*
Thin steaks, 1/2-3~ inch thick cook through very quickly. For. best outside browning, pan frying is
recommended.SeeSurface CookingChart. If oven broiling ISpreferred, use D shelf position. To
?42lb. about
8
I
thin slices
! II
achieve best browningon secondside, cookfirst side just to change meat color then turn and
cookto donenessprefe%ed.
1 in. thick
(1-1Y2Ibs.)
c
c
c
1?42in.thick
(2-2?/2Ibs.)
c
1-2slices, ?/2
about1 lb.
lY2.in
(1?/2Ibs.)
in.
4
I II
:::
8-10
1%
20-25
4-5
4-5
9-11
2(1 in,) “
about 10-12oz.
2 (1?/2
in.)
about1
lb.
D
4-7
8-10
4-6
?42
————.. .—
1. SeeUsing Your Oven for positioningshelves.
2. Seenoteon roastingchart abouttenderedbeef.
3. Brush eachsidewith fat, Broil skin side down first. Forall weightsof chicken,BROILWITHDOOR
CLOSED.For any weight over 2 Ibs., cook first side 5 minutes longerthan time given on chart.
4. Cut lobster lengthwise through hard backwith sharp knife—breakopenand brush with melted
oil or butter andagainafter half the cooking.
NOTE; Line broiler pan with aluminum foil when using pan for marinating, cooking with fruits,
cooking heavilycured meats,orfor bastingfoodduring cooking,Avoid spilling thesematerials
on oven liner or door. If spilled, wipe up immediately with a papertowel; whensurface is
cool,cleanandrinse.
..
28
Page 30

CONVENTIONAL OVEN
Roastingisovencookingof tendermeator poultry by ciry heat.Roasting temperaturesshould
be steady and low. (Low temperatures keep
spatteringand oven cleaning to a minimum.)
It is not necessaryto sear, cover, baste or add
water.
1. Checkweightof meat,and place,fat sideup,
on roastingrackina shallow pan. (Broiler pan
withrack is a goodpanfor this.)**
2. Place in ovenon shelf in A or B position.No
rmeheatirkis necessarv.
4. The chart below gives approximate time in
minutesper pound. These timesshould only be
usedas a guide. A meat thermometer,inserted
into the center of the thickestpart of the meat,
isthe only accuratetest for doneness.
.-
BEEF2
Standing Rib
Rare
Medium
Well Done
RolledRib
—.
...—.—
——————.————-.—=..- ..--”.-.—.....-..=.—....-,.
——
24-30 min. 18-22 min.
30.35 min. 22-26 min.
Add 5-10 min,/pound to times given for standing rib roasts,
35-45 min.
:.,.,,...-
3-5 Ibs. 6-8 lbs.1
5. Most meats continue to cook slightly while
standingafterbeingremovedfrom theoven.For
rareor mediuminternal doneness,if meat is to
stand
10-20 minuteswhile makinggravy or for
easier carving, you may wish to remove meat
from oven when internaltemperatureis 5-1OOF
below temperature suggested on chart. If no
‘standingisplanned,cookmeattosuggestedtem-
peratureon chart.
a. Frozen roastsof beef,pork, lamb,etc., can be
started without thawing,but allow 10-25minutes per pound additional time (10 min. per
pound for roastsunder5 pounds, more timefor
largerroasts).
b. Thaw most frozen poultry before roastingto
ensureeven doneness.Some commercial frozen
poultrycanbecookedsuccessfullywithoutthawing.Foilowdirectionsgivenon packer’s label.
—==—-=s ss--=sss.-.. se—
-—— .
28.33 min.
-~:-; -----
-—
.-.....l
130-140
150-160
170-185
PORK,fresh
Loin
Fresh Ham, Shoulder
——
POULTRY
Chicken
Reacty-to.Cook wt,
Turkey
Ready40.Cookwt.
3-5 Ibs.
35.40 min.
3-5 Ibs.
35.40 min.
Under 10 Ibs, 10-15 Ibs.
20.30 min.
20.25 min.
6-8 Ibs.
30-35 min.
30-40 min.
Over 5 Ibs,
30-35 min.
Over 15 Ibs,
15.20 min.
In Thigh
185-190
180-185
—-
170.175
185.190
Stu!ing
165
165
.
1 For roasts over 8 pounds, roast at 300 and’ reduce time, Figure the estimated time from the above chart, After V2
that time has passed, check meat thermometer for internal temperature at half-hour intervals.
2 Tendered beef, found in some markets, may require less cooking time than regular beef, When cooking tendered beef,
estimate cooking time using shortest time gwen in minutes/pound for desired doneness, Also this type of beef
is usually well.done at 170 internal tem~erature,
**NOTE: Line broiler pan with alumjnum‘foil when using pan for marinating, cooking with fruits, cooking heavily cured
meats, or for basting food during cooking. Avoid spilling these materials on oven liner or door, See cleaning note, on
charts, Care Section.
29
.—
Page 31

1
2
,,
TOI?REVENTSMOKING,
o
e
(a)‘Wipeq?
(lORenlove
front of book to
Clean spatters or spills on oven door outside gasket and area around oven
opening. See OVEN FRAME, DOOR LINER following ~ages. NEVER
USE C@4MERCIAL OVEN-CLEANER IN OR AROtiiD~13E SELFCLEANING OVEN,
excess grease or boikwers on oven bottom.
broiler pan, rack and other cooking utensils. See photo in
identify.
CONVENTIONAL OVEN
A
e
3
‘4!
e
5
o
On models so equipped, be sure rotisserie receptacle is closed.
Be sure oven Hightis o#’.
Raise the windowshield by lifting handles to fully raised position.
Shield must be up so door can be latched for ovento operate.
CLOSE OVEN DOOR. TURN
OVEN SET KNOB TO CLEAN.
TURN OVEN TEMP KNOB TO
THE RIGHT (CLOCKWISE)
PAST BROIL SETTING TO
CLEAN. THE POINTER ON
THE OVEN TEMI? CONTROL
SHOULD POINT UPWARD TOWARD THE INDEX MARKER.
(When this Iocation is reached the
control should snap into final
position. )
POINTER.=
OVENTEMPSET1’lNGFORCLEANCYCLE
/ l!!!XiiER
I
, 30
Page 32

——.
CONVENTIONAL OVEN
,1
BI
ii?
PUSH
e
LATCH TO
knob must be in OFFor CLEAN position before latch can he moved.)
ON YOUR AU~OMATIC OVEN TIMER:
e
CHECKSTART DIAL TO-BE CERTAINPOINTERIS AT THE SAME
TIME AS THE RANGE CXXXIK.IF NOT, TURN START ‘KNOBUNTIL IT
POPSOUTAND CANNOTBEIXJRNE12
SETTHEP61NTERAHEAD,OldTHEDIALMARKEDCLEAN,I@%AS
MANYHOURSAS NEEDEDTO CLEANTHE AMOUNTOF SOILIN
YOUROVEN.SUGGESTEDTIMESFORCLEANINGARE.
Self-Cleanoven alonea1Y2hoursformoderatesoil, 2 hoursormorefora more
heavilysoiledoven.
AND HOLD LATCH RELEASE BUTTON WHILE SLIDING
RIGHTUNTIL ITIS IN CLEANPOSITION.(OVEN SET
f??
c1
2
For exampieif-rangeclockreads7:00,set pointeron CLEAN dialat 8:30 for
a moderately
OVEN CLEANING LIGHT will glow when all steps have been set up
e
al
e
properly.
Whenthe LOCK LIGHT and fanfirst comeson,this indicatesthat the oven
is hot and the door will soon be LOCKED. The light will stay on during
cleaningtime and until ovenheat decreasesin temperature again.See more
information under When
HOT DURING SELF-CLEAN CYCLE. DO NOT TOUCH.
WHEN LOCKLIGHT1SOl?l?,PUSH ANDHOLD LATCHRELEASE
BUTTON WHILE SLIDING LATCH LEFT TO OPEN POSITION.
Now, open the oven door to see your sparkling oven! (Lqwer window
shield by pushing handles toward bottom of window. )
TURN OVEN SET KNOB TO OFI?, TURN OVEN TEMP KNOB TO
LEFT (COUNTER-CLOCKWISE) PAST BROIL.
See More Information On the Self-CleaningOwn, next page.
soiled oven:
Lock Light GZOWS.DOORAND WINDOW GET
31
Page 33

0
———.-——
C(INVENTIONAL QVEN
Hclwk
Your oven is cleanedby heat {at temperatures
aboveusualcookingheats) which causessoil to
disappear from the oven. A device in the oven
furtherconvertssoil into anessentiallyodorless
and colorless vapor. A slight odor may be detected, especiallyduringthe first few cleanings.
Before cleaning,
check the
OVEN FRAME AND DOOR LINIIR-Door
liner outside the woven gasket and the oven
frame,are sealedoff from theovenduringcleaning, therefore me not cleaned automatically.
However, during cleaning these areas heat
enoughto “bake on” soil present so it becomes
harderto clean.If theseareasare soiled, remove
before cleaningautomatically,using soap filled
steelwool pad, if necessary.Rinsethoroughlyto
removesoap before cleaning.DO NOT CLEAN
GASKET. See Care of Woven gasket below.
CARE OF WOVEN GASKET—On oven door,
see sketch, the woven fiber glass gasket is essential for good oven seal. CARE SHOULD
BE TAKEN NOT TO RUB, DAMAGE OR
MOVE THE GASKET. It is not necessaryto
use any cleaning materials on the gasket and
to do so might damageit.
NO COMMERCIALOVENCLEANEROROVENLINER PROTECTIVECOATINGOFANYKINDSHOULDBEUSEDIN ORAROUNDANY
PARTOFTHESELF-CLEANINGOVEN.ALSO DONOTUSEPIECESOF
FO\LTOCATCH SPILLOVERS OR TO DELAY CLEANING OF SELF.
CLEANING OVEN.
Additimal Parts 70 Be CIeartedl
SELF-CLEANING OVEN SHELVES—Place
shelvesin positionsA and C. Cleanonly shelves
from ovens specified here. The finish on other
non Self-Cleaningoven shelveswill deteriorate
if cleaned automatically. During cleaning
shelves may become iridescent, and may lose
someluster. (Ovenshelves discolor to deep gray
after many cleanings.)
NOTE: Ovenshelvesmay becomeso clean that
they will not slideeasilyon shelfsupportsafter
self-cleaning.To reduce this condition, dampen
fingertipswithsmallamountof cookingoil. Rub
lightly over right and left sides of shelves
(wheretheycontactshelfsupports). We a light
applicationof oil so it does-n’trundownand soil
oven walls.
If you prefer NOT to clean Self-Cleaningoven
shelvesautomatically,DO NOT use any abrasive materials for cleaning, such as scouring
powders, steel wool or other abrasivescouring
pads, etc.
Clw3nNMx?s
ASH—Some types of soil, even though they
disintegrate,till leave a deposit in the oven.
This appears as a light film or a darker, heavier ash, depending upon the amount of soil
which was in the oven. This ash can be removed with a wipe of a moist sponge or cloth.
IF PART OF A DARK DEPOSIT REMAINS
AFTER WIPING WITH A MOIST SPONGE,
CLEANING TIME WAS NOT LONG
ENOUGH. The deposit will be removed in
subsequentcleanings.
HAIR-LIKE LINES may be noticed on the
gray enameled surfaces of the Self-Cleaning
oven. This is a com~on condition, resulting
from heatingand cooling duringcleaning.These
lines do not affect oven performance.
WHEN LOCK LIGHT GLOWS-If
at high temperaturesjust before cleaning, the
Lock Light may glow when OVEN SET is
switched to CLEAN. The glow indicates that -
theovenmay be too hot for LATCH to bemoved
to CLEAN and the oven must be cooled first.
See precedingpages for informationon glowing
Lock Light during cleaning,
U? SMOKING OCCURS DURING CLEANING because of conditions mentioned in How
To Operate Self-CleaningOven, DO NOT TRY
TO FORCE DOOR OPEN but follow these
steps:
a, TURN OVEN SET TO OFF.
b. Open windows and door to rid the room of
smoke.
C. Allow ovento cool AT LEAST ONE HOUR
before opening the oven door.
d. Correct the condition which caused smok-
ing and start the Self-Cleaningoven operating
again.
HEATING AND COOLING metal during
cleaningorduring cookingresultin “crackling”
sounds which are considered normal,
YOU cook
Page 34

Proper care and c~eaningprocedures are essential for a long satisfactory life for your range.
Included in this section are directions and
CLEANING CHARTS for cl
the range.When cleaningrangemanually,wearing of rubber gloves is recommendedto protect
thehands.
Il%mdah fi!hamell Il%rkkh
The porcelain enamel finish is essentiallyglass
fused on steel at high temperature
caning all parts of
andisbreak-
ableifmisused.Thisfinishisacidresistant.How-
ever,cmyacidfoodsspilled(suchaslemonor
othercitrusfruitjuices,or mixturescontaining
tomatoor vinegar)shouldbe wipedup immediately.Seechartforcleaningsuggestions.
A.
walk,1%’MWand
IPbstlcCCWW’
Because there is little heat except in the food, or
sometimesin the utensils,spills and spattersare
easyto remove.Somespattercanberemovedwith
a paper towel, others may requirea damp cloth.
Remove greasyspatterswith a sudsy cloth, then
rinse, and dry.
oven walls.
attemptto removethe coveroverthe “stirrer”at
the top of the oven for cleaning. NEVER USE
A COMMERCIALOVEN CLEANERON ANY
PART 03? YOUR MICROWAVEOVEN.
SPECIAL NOTE WHEN USING BROWN ‘N SEAR
DISH WITH MICROWAVE OVEN:
SCORCHED-APPEARING STAINS ON THE SHELF
OF YOUR MICROWAVE OVEN,
grease baking onto shelf while preheating Brown
‘NSear Dish,maybe removedwith Delete@Cleanser, a product of Drackett Co, (Catalog No.
WX1OX4).(Note: Grease doesnot normally bake
onto oven interior in microwave operation, however, high heats generated on bottom of Brown ‘N
Sear Dish can cause baked-on condition on shelf
only, if grease is present.)
After using Delete Cleanser, rinse and dry thoroughly, followinginstructions on
Delete Cleanser on the painted surfaces of the
oven,such asthe walls. It will scratch the paint.
Delete Cleansermay be purchased from your local
GE dealer or from your GE Authorized Service
Center, checkthe *’yellowpages” for locationand
phone number.
Delete Cleanser may also be sold at local grocery
or hardware stores, or at housewares department
ofsomedepartment stores.
Donot use abrasive cleaners on
Under no circumstancesshould you
usually caused by
can. Do not use
E%Eh8m’-’wmkmk
Glass—wipe up spattersdaily, washwhensoiled
with a minimum of sudsy warm water. Rinse
thoroughly and dry.
Metal and Plastic Parts on Door—h assure a
tight seal around door, this area must
frequently with a damp cloth to removeall soil.
A buildup of soilcould resultinleakageofmicrow-
ave energy from
ABRASIVES, SUCH AS CLEANING POW-
DERS OR, STEEL AND PLASTIC PADS.
THEY WILL MAR THE SURFACE OF
THESE PARTS. ALSO, ALL CLEANING
MATERIALS USED ON THE DOOR PARTS
MUST BE THOROUGHLY RINSED OFF.
the oven.DO NOTUSE
be wiped
C:Automatic ~emperatwre
mom!
Probe is sturdy,but care should be takenin han-
dling. Do not twist or bend; avoid droppingtem-
peratureprobe.
Clean as soon after using as possible.To clean,
wipewith sudsy cloth, thenrublightlywithplas-
tic scouring ball if necessary.Rinse and dry. (Or
washin dishwasher.)
DO NOT USE TEMPERATURE PROBE IN
OVEN UNLESS IT IS INSERTED INTO
FOOD, AND TIME/TEMP SWITCH IS AT
TEMP.
then Vent IXmt
I
a%!..<. al;. :,= : . . . .
Theovenisventedthroughanopeninglocated
underthe centerof upperoven.Duringmost
operationsit is normalto observemoisture
and/or vaporsemittingfrom opening.Clean
this area frequently. NEVER COVEROR
BLOCKVENTOPENING.TODOSOPREVENTS THE OVEN VENT FROM
FUNCTION1NG PROPERLY DURING
COOKINGOR SELF-CLEANINGOPER-
ATIONS.
LAMP
CAUTION: BEFORE REPLACING ANY
LAMP. DISCONNECT ELECTRIC POWER
—... .—, —
TO RANGE AT THE MAIN FUSE OR CIRCUIT BREAKER PANEL. LET LAMP (OR
BULB) AND LAMP COVER COOL COMPLETELY.
83
I
.
Page 35

Fhmwment%$rfaux!Lamp
WHEN CHANGING A FLUORESCENT
LAMP, DO NOT TOUCH THE METAL AT
ENDS OF LAMP.
a. I?usl-!buttonseithersideof glasspanelcovering
lampand let swingdownfor accessto lamp.
b. Roll lamp, one quarter turn, remove.
c. Check type andwattageof Iamp; replacewith
same kind. Hold lamp near
prongsinto sockets.Gentlyrolllamp untilit stops.
d, Connect electric power to range: Start lamp;
see instructionson Surface Cooking pages.
0w43rI ~~~~ [!%lf=~ieaning 0M3n)
a
a.Removethethreeslottedscrewsin lam~cover:
see diagram. Remove cover; replace lamp with
40 watt appliance lamp.
b. Replace lamp cover with three screws.
C. Connect electric power to range.
0wf3rB ~arnp [#llkm38mwe Chmn]
Microwaveoven lamp should last almost as long
as the appliance lasts. To replace it requires a
Product Service call.
Lewelingthe Range
A levelingscrew is located at each corner of the
base of the range. By removing the bottom
drawer, you can level the range to an uneven
floor with the use of a nut driver.
llcljus%iri~ 0wf3m hmmstat
When cooking a food for the first time in your
new oven, use time given on recipe as a guide.
Oven thermostats,over a period of years, may
“drift” from the factory setting and differences
in timing between an old and a new oven of
10minutesare not unusuai. Your new oven has
beenset correctly at the factory and is more apt
to be accurate than the oven which it replaced.
However,if you find that your foods consistently
brown too little or too much, you may make a
simple adjustment in the thermostat (Oven
Temp) knob.
PULL KNOB OFF OF SHAFT, LOOK AT
BACK OF KNOB AND NOTE CURRENT
SETTING, BEFORE MAKING ANY AD-
USTMENT. To increase oven temperature,
djust toward RAISE; to decrease temperature
acljusttowardLOWER. Each notchchangesoven
temperature 10 degrees. Oven temperature can
be raised by 20degreesor loweredby 30 degrees.
See sketch below. To adjust, follow directions
under the sketch.
each end and insert
1
5 to
Y
MICROWAVE CCIOKINGCENTER: CARE AND CLEANING
1. Remove knob,and hold so pointer ISat top at,
knob.Usinga pot holderor similarmaterial,hold
“skirt” of knobfirmly in one hand. Grasphandle
of knob in other hand. Note position of pointer ..
andturn handle to move pointertoward Raise or
Lower. Pointer is designednot to move easily.If =
it is seated so it is difficult to move, pointermay
be loosened slightly. Insert a thin screwdriver,
knifeblade or similarinstrumentand lift up end
of pointer slightly.
2, After adjustmentis made,press pointer firmly
againstknob.Returnknobto range,matchingflat
area on knob and shaft, Recheck oven performance before makingan additionaladjustment.
use of Akmimm Foil
A. IN MICROWAVE OVEN, use metal only as
directed in the Cook Book. Metal strips as used
on meat roasts are helpful in cooking food when
usedas directed.Metal traysmaybe usedfor TV
dinners.However,whenusingmetalin themicrowaveoven, keep metal at least l-inch away from
side3of microwave oven.
B. DO NOT COOK FOODS PACKAGED IN
THIN ALUMINUM FOIL TRAYS OR FOODS
WRAPPED IN ALUMINUM FOIL ON GLASS
COOKTOP.
C. IN CONVENTIONAL OVEN, if desired,
broilerpan may belined withfoil andbroilerrack
may be covered with foil for broiling. ALWAYS
BE CERTAIN TO MOLD FOIL THOROUGHLY TO BROILER RACK AND SLIT
FOIL TO CONFORM WITH SLITS IN RACK.
Broiler rack is designedto minimizesmokingand
spattering, and to keep drippings cool during
broiling.Stopping fat andmeat juicesfrom draining to the broiler pan preventsrack from serving
itspurpose, and may let juices becomehotenough
to catch fire.
34 ‘
Page 36

F@pwTowelor
llr~ (XXII
%zq3,a@l/Vtl~er ,
. ..
,,-“,
,‘,
f-. “ “
..,.
.>.
, ,.
tii?doveri ‘
Optifxlal
Ventilating
I-hodMetal
GreaseFilter:,.
.-
SudsyCloth
Damp
DampCloth
Paper Towel
i-
.,
(Alsoseepg.331
Toassurea tight sealarounddoorthis areamust be
wipedfrequentlywith adampcloth toremoveall soil.
Abuild upofsoil couldresultin leakageofmicrowave
energy from the oven. DO NOT USEABRASIVES,
SUCH AS CLEANING POWDERSOR STEELAND
PLAST!CPADS.THEYWILL MARTHESURFACEOF
THESEPARTS.ALSO,ALL CLEANINGMATERIALS
USED ON THE DOOR PARTS MUST BE THOR-
OUGHLY RINSEDOFF.
DONOT USEABRASIVECLEANERS.DONOT USE
COMMERCIALOVENCLEANERS.Mostspatterswipe
cleaneasily with dampcloth.
Cleanwith damp cloth. DONOTTRYTO REMO
you will damageyour oven.
—
Page 37

NOTE:Id range part(s) cod hfofe cleaning manually.
#tis recommended that rubber gloves be worn to protect the hands.
.. . ..— —
___
Automatic
Temperature
Probe
Glass Cooktop
Shelves
(See SelfCleaning
Oven
directions.)
‘1,
“‘ BakeLh”m
,-
(Heating Wit
.,
---
. ..- ...... - .—... —
. -..-——-.—-..——-
-------..,., ==-.-=-.-.—--———-—-———.——
Sudsycloth
Plastic scouring
ball.
—
assoonafter usingaspossible.Toclean,wipe
Wash
with sudsycloththenrub lightlywith plasticscouring
ballifnecessary.Rinse&dry.(Orwashindishwasher.)
Seepage14for completedetails.
SoapandWater
For handcleaning, anyand all mentionedmaterials
can be used. Rinsethoroughly to removeall materials after cleaning.
.“ -
SM@atid”Watef
Soap-Filled ~
Scouring Pad
Pla;~~ Scouring
,.
“’(CXInot iet~~iied panand rfiikjzind ipiven h“cool.) , ‘ “ ‘
Drainfat, ciglpan ~n,d’’iacti~l,igtitlj.S~rinklecmde- ,
terg6r/t,
papertowelover.rack~letstatid’’a-fdwmin@@,Wash,’
scouringif ne$essary.Rin;e,-andc@. (O~.:wb~hi,n ~
d~~h~a~h’pr,) -, ~ , ‘ .. -.; ~~ “ ‘- ‘ ~ ‘,‘ ‘
Heating unitsi.,dohot require rn@tiualilia~ing: soil
burnsof-fwhenunit is hqateci.Thebaketinit IShingegi
so
of
YOU can lift it to;rdachoven.fIpot.. -’~ ~
———. ... ..-—..-- .. --—--
—————-... -.
——. ..—. .—. -
-—-.” - —
-. m.. . . . . . - -.. . - — -
,.
?-
“ - ‘. , : .. :
,.
fill ~pan,wjth warm water; .Sp~~adclcith or” ~
~.,
!..
,,
.,-
,.
, . .
.“
Soapand
*Spillage of marinades, fruit juices and bastin materials containin acids may cause discoloration, so should be wiped
up immediately with a paper towel. When sur ace is cool, clean an rinse.
Wlaier
F %
Page 38

———–--7.—–——
a. Check to be sure ‘1’IM13/TEMPSwitch is set at TEMP. If set at TIME, and Timer is at
“O,”no cookingtakes place. (If time remainson Timer,ovenwilloperateuntil time reaches
“Q,” then go off.)
b. When cookingwith TEMPERATURE PROBE, check to be sure cable end is securely
“seated” into ovenreceptacle. If it is not securely “seated:’ and oven is otherwiseset for
Temperature Probe Cooking,ovenwillnot start to tell you firm connectionhas not bee
made.
C.Whencookingwith TEMPERATURE PROBE, check to be sure temperature set on dial
ishigherthan actual temperature offoodin oven.If foodhas reached or exceededtemperature set on dial, oven willnot start to tell you set temperature has been reached.
*
IIFTHE W3WEFIWONI’T’COMEON
Checkto be certain the dooris securelyclosed,and the timer set. If a dish touchesthe door
when the door seemsclosed,it actually may not be firmlyclosed.Unlessthe dooris closed
to engagethe safety interlocks,the microwaveenergycannotcomeinto the oven.Checkto
be certain that TIME/TEMP switch is pushed all the way right or left. An “in-between”
setting should be avoided.
IF ENERGYGOESOFFBEH3RESETTIMEHAS ELAPSED
Check the house fuse protecting the range circuit. If fuse has not blown and power con-
tinues to gooff,this signalsa problem,so callserviceman.
LAMVIIP13LUWWC3t11’r
[IF
Changing Microwaveoven lamp requires a Product Servicecall. However,originallamp
is designedto last for about the life of range.
SomeTV and radio interference might be noticed whileoperating the microwaveoven.It
is similar to the interference caused by other small
mixers,etc. It doesnot indicate a problemwith youI
appli&es such as vacuum cleaners,
oven.
Page 39

!Rangje k Bu%
Trouble k with A Feature:
AUTOMATIC OVEN TIMERS. Check to be certain
step-by-step
Review pageson use of timer.
BAMfdG.Checkmaterialand sizeof bakingutensil; placement of shelf and food in oven. If the
oven was used for broiling,just before bakinga
food, turn the oven completely off and open the
door wide so it can cool (5 or 10minutes).Then
ven may be used for baking.
ROILING. Be sure OVEN TEMP is set at
BROIL., If there was excessive smoking and
spattering: Were shelf and broiler pan at posi-
tion suggested on broiling chart? If aluminum
foil was used on broil rack, was it handled ac-
cording to directions?
COOKTOP AREAS.
but the oven or surface areas do not heat, call
serviceman.
~elf=~leaning Owm
CAN’T LATCH DOOR. Check the step by step di-
rectionsfor latchingdoor: (a) Did you pushand
hold in latch release while moving latch? (b)
‘I’urn Oven Set knob to CLEAN. Glowing Lock
Light after knob is turned showsoven is too hot
from previous oven use and door won’t latch.
Open door wide so oven can cool, then latch
can be moved. (c) Be sure the door shield is in
up position and is firmly in place. (d) Oven Set
must be at CLEAN or OFF before latch can be
moved.
ODOR, SOUNDS. Check More lnfornzationon the
Self-Cleaning(hen, Care Section,
OVEN DOESN’T CLEAN,
be certain ALL operations were done correctly
for startingthe cleaningcycle. Cleanlightshould
come on.
Possible causes of the problem: (a) Failure to
set proper AutomaticTimer dial. The STOP dial
must be
on range clock. (b} The STOP dial was not ad-
anced for long enoughtime. (c)A thickpile of
pilloverwhencleanedleavesa heavy layer of ash
inspotswhichcould haveinsulatedthe area from
furtherheat.Seepage27concerningash. (d) Both
OVEN SET and OVEN TEMP must be at
CLEAN setting.
directions were followed correctly.
If lights on range are working
Check the directions to
set and advanced beyond the time noted
SMOKING. Cooking utensils and excessive
amounts of spillovers and liquid grease not
baked on were not removed before starting
SELF-CLEANING OVEN.
WhenYk$iyjegftheKikvlnf
If oven and surface unitsdo not heat,and lights
on the range are not working,check first to see
that the three-pronged plug connected on back
of rangeis fully inserted in wall receptacle.
Range House Fuse
The difficulty might also be in the main distri-
bution panel of’ your house by a blown oven
circuit fuse. a tritmed oven circuit breaker, the
main fuse, or the”main circuit breaker, depending upon the nature of the power supply. If a
circuit breaker is involved, reset it. If the control box employs fuses, the oven fuse (a cartridge-type) should be changed. BUT ONLY
BY SOMEONE FAMILIAR WITH ELECTRICAL CIRCUITS.
Apartment tenants and condominium owners
shouldrequesttheirbuildingmanagementto per-
form this check before calling for service.
If after replacing the oven circuit fuse or resetting the circuit breaker, the fuse blows or
circuit breaker trips open again, call your serviceman.
WHEN YOU CALL GENERAL ELECTRIC
FOR SERVICE help them give you prompt
service by:
1. Giving an accurate description of the trouble.
2. Giving the complete model number of your
oven. Below is an example of name plate. To
locate name plate open oven door and look on
frame aboveoven.Model and serial numbersare
also on the Purchase Record Card which came
with your oven. If desired, copy the numbers
from card &fore sendingit in.
f
@
*’%’MiERAL@ EucTF’ieN”*’@’M%
() “$:,:;”C6Y”,*CWY
Fcc WF8 JsmmqL
m
\
Mw mml w
Iawwv I Iallmv
WQammmIo
I
MousEl+lo
\
o
J
38
 Loading...