

Page 1
,
!,
.’
.
..
. . .
/
z
,,
,,
m
. .
r:-
.
.
Page 2
Read This Use and Care Book
Take the time to read this book and learn how to
enjoy your newCookingCenter.It contains detailed
operating instructions and recommended mainte-
nance,as well as handy tips to helpyou gain max-
imum benefits from your Cooking Center.Onceyou
have read the book, keepit handy to answer any
questions you may have.
if you haveany additional questions concerningthe
operation of your Cooking Center,write—including
your phonenumber–to:
IF YOURECEIVEDA DAMAGED
immediately contact the dealer (or builder) from
whom you purchased it. They have beeninformed
of the proper procedure to take care of such matters andcan handle it for you.
ConsumerAffairs
GeneralElectric
Appliance Park
Louisville, Kentucky 40225
COOKINGCENTER,
Record Model and Serial INwnbers
Your Rangehas a nameplate on which is stamped
the modelandserial numbers.Tolocate nameplate,
openoven door andlook at top of oven opening.
Modeland serial numbersarealso onthe Purchase
RecordCardwhich camewith your CookingCenter.
Recordthe numbers in the spaces
Please refer to both model and serial numbers in
any future corres ondence or product service calls
tconcerning your ooking Center.
ModelNumbw
!$erliilNumber
DatePurchased
KEEPPURCHASERECEIPTWITHTHISBOOKTO LISHTHEWARRANTYPERIOD.
below.
m
W%eti you get your new range.. i , .. ,- s ‘ .“. ~ ‘-
“..
o, Have it installed and properly grounde,d--byaqualified installer-”
e. Have the installer show you the location of the rangecircuit breakerorfuse, and
mark it for easyreference.
,’, ,
“).
,,
,.
~ Don’t assume that you-know howto..op6rateall partsof the range, Some:features
may work differently from those on your previousrange,
o Do take the time to read our suggestionsfor bestuse.
W~ew
using ymw ntrzge. ..
+ DO.NOT TOUCH HEATING ELEM-ENTS OR INTERIOR SURFACE OF OVEN.
These surfaces may be hot enough to burn even though they are dark in color.
During and after use, do not touch, or let clothing orother flammable materials
contact any heating e[ements or interior area ofoven until all of these are’ ‘-
have had sufficient time to COOLOther potentially hot surfaces include t
, .cooktop and areas facing the cooktop, oven vent openings and surfaces near
the openings, crevices arotind the oven d~orand the edges of the doorwindow.
Page 3
‘. Don’t “leavechildren alone or unattended in the area where a range is hot or
in operation. They could be severely burned.
Don’t allow anyoneto climb, stand or hang on the door, drawer or top surface
of the range. They could damage the rangeand even tip it overcausingsevere
personal injury.
CNJTKNW DO NOT STORE ITEMS OF HWYRESTTO CHILDREN IN CABINETS
/@(YVE A RANGE OR ON THE BACKSPLASH OF A RANGE-’CFHLDREN
CLIMBING ON THE RANGE TO REACH ITEMS COULD BE SERIOUSLY IN-
JURED.
Wear proper appmL-
loosefitting or hanging garments should never be worn
.
while using the appliance.
Never useyourappliance for warming or heating the room.
UseProperPanSize—T’his amliance isequirmedwith oneormore surfacpunits
of different size, Select utensils having flat bottoms large enough to coverthe
surface unit heating element. The useof undersized utensils will exposea portion of the heating element to direct contact and mayresult in ignition of cloth,ng. Properrelationship of utensil to burner will also improve efficiency.
* ‘Never leave surface units unattended at high heat se~tings.Boilover causes
smoking and greasyspilloversthat may ignite;
o
Use only dry pothoklers—
moist or damp potholderson hotsurfaces mayresult
in burnsfrom steam. Do not let potholderstouch hot heating elements. Do not
usea towel or other bulky cloth.
e
Glazed cooking utensils
—only certain types of glass, glass/ceramic, ceramic,
earthenware, or otherglazed utensils are suitable for range-top service without
breaking due tothe sudden change in temperature.
*
To minimize burns, ignition of flammable materials, and spillage due to unin-
tentional contact with the utensil, the handle of a utensil should be positioned
so that it is turned inward and does not extend overadjacent surface units.
e
Whenflaming foodsunderthe hood,turn the fan off. The fan, if operating, may
spreadthe flame.
a
Stand away from range when opening oven door to let hot air or steam escape
beforeremovingor placingfood inside.
6)
Place oven racks in desired position while oven is cool. If racks must be handled when hot, do not let potholder contact hot heating element in oven,
e
Pulling out shelf all the way to the shelf stop is a convenience in lifting heavy
foods. It is also a precaution against burns from touching hot surfaces of the
dooror ovenwalls.
e
Donft heat tmpemxf food containers in the oven. Pressure could build up and
the container could burst, resulting in injury,
When using cookingor roasting bags in oven, follow manufacturer% directions,
e sure reflector pans and vent ducts are unobstructed and in place. Their ab-
sence during cooking could damage components and wiring.
.
2
Page 4
.,
~ Don’t use aluminum foil to line reflector Pansor anywherein the OVeneXCePt
as described in-this“booklet.Improper installation could result in a shocl$ fire
hazard, ordarnagetoth,e range.
s
Keeph~od and’greasqfilters clean according to instructionsto maintain good
venting,and to avoidgreas6fires.
* Don? immerse or soakremiovai$esurface
* Do not store flammablk material~ in an oven or nearthe cooktop ~
~ DO NOT
Smother flaming pan on surface unit by covering pan completely with well fit-
~ ting lid, cookie sheet or flat tray.
Flaming greaseoutside pan can be extinguished bytaking sodaor, if available,
a multi-purpose dry chemical or foam type extinguisher.
When cookingin the oven,flame can be smothered bycompletely closingdoor
and turning OVEN SET to OFF.
Alsosee frying tips, surface unit pages.
tm wmm m :.GREASEF\RES. NEVER PICK UP A FI-AIVIM3 PAN.
wits,Don’tp@ them ina dishwasher.
.,
Self-Cleaning Oven...
~
Do not clean door gasket. The door gasket is essential for a good seal. Car
should be taken not to rub, darnage,or move the gasket.
* Do not use ovencleaners. No commercial ovencleaner oroven liner protective
coating of any kind should be used in oraround any partof the oven.
a Clean only parts listed in this Use & Care bookiet.
~ Before self-cleaning the oven, remove broiler pan and other utensils.
MicrowaveOven...
~
Cooking utensils may become hot becauseof heat transferred from the heated
food. Pot holders may be needed to handle them.
Also, under some cooking operations the shelf can become too hot to touch.
THEREFORE, DURING AND AFTER COOKING, CAUTION SHOULD BE EXERT
CISED IN TOUCHING THE SHELF.
~ Remove wire twist-ties on paper and plastic bags before placing in microwave
oven. Twist-ties can cause heating of the bag under certain conditions, and
can cause fire.
9
Wiumcmkingporkeither conventional or inthe microwave oven,follow our
directions exactly and always cook t e meatto at least 170°.This assures
{
that, intheremotepossibility that trichina maybe presentinthe meat,it will
bekilled and meatwill besafeto eat.
If you needservice...
~
Read “Before You Call for Product Service’;at rear of book.
~ Don;t attempt to repair or replace any partof yourrangeunlessit isspecifically
recommended in the book. AHother servicing should be referred to a qualifie
technician.
Q Disconnect range at range circuit breaker or ,mainfuse before performing any
service.
3
Page 5
~. k$temi!s may hat kmaww
ofheat transferred fromth? heated food. This
is especially trueifplastic wrap has been
covering the top and handles of the utensl
Pot. !nokiers may be needed to handle the
u@nsiL
:4. the Well SJW can iNxxmM3too
h& to touch. Be careful touching the shelf
during and after cooking.
,.,.
“ Don’t heat’ fowl Ccmtmltws h
the oven.
container to burst, resulting in inj~y.
-4.Khm’t defrost frozen liquids—especially
carbonated ones— in the oven, Even if the
container is opened, pressure can buiki up.
:3. Don’t overcook food excessh.m!y. Food
dries out, and can even ignite in some cases.
5, H f%odshould ever igrlife: Keep the Well
door c%HH.!. Turn W the power
turn timer to OFF’or disccmmxt power cord
or shut ofl power at the fuse circuit breaker
panel.
7. Remove the Wnperature sensor fmrn the
over! when not using it i%cook with. If you
leave the sensor inside the oven without inserting it in food or liquid, and turn on microwave energy it can create electrical arcing in
the oven, and damage oven walls.
S. Remove wire twist-ties on paper and, plas-
tic bags before p~,acing in oven, Twist-ties
.smrwtirnescause bag to heat, and may cause
fire. Foods in paper or plastic bags should
only be heated for short periods of time.
()- )z&J~~i~g~gg$(inoroutofshell]is~~~~~~”
fmfrmndedfor microwave cooking. IJressure
can build up inside egg yolk and may cause
it to burst, resulting in injury.
10. Do n~t pop in your
Wen
accessory or unless you use popcorn in a
package labeled.
cause of the heat generated without these
rxecauiions,
Pressure building up can cause the
is can caus; the cofitainer to burst, result-
in injury.
unless in a special microwave popcorn
for microwave ovens. Be-
the container could catch fire.
11.
L&2 If Y?eta!WNyas dii%wtw.!in
Metal strips as used on meat roasts are help-
M in cooking food v&en used as directed.
Metal trays may be used for TV dirmers.
However, when using metal in the microwave
oven, keep mt?tal at !WK5t1-inch away from
sides of oven.
12. ml not operate the Wferl whm.$ to
avoid $kmage to tm?oven and the danger of
fire). If by accident the oven should run empty
a minute or two, no harm is done. However,
try to avoid operating the oven empty at all
—it saves energy and prolongs life of
times
the oven.
13. Foods with outer “skin” such
as potatoes, hot dogs or sausages, tomatoes,
apples, chicken livers and other giblets, and
eggs (see above) should be pierced to allow
steam to escape during cooking.
I.A. “~oi!able”
closed plastic bags or plastic wrap tightly
covering containers should be slit, pricked or
vented as otherwise directed in Cookbook.
If they are not, plastic could burst during or
immediately after cooking resulting in injury. Also, plastic storage containers should
he at least partially uncovered becatise they
form such a tight seal.
15. Plastic Utensil$—??lastic utensils designed for microwave cooking am very useful,
but should be used carefully. Even microwave
plastic may not be as tolerant of overcooking
conditions as are glass or ceramic materials
and may soften or char if subjected to short
periods of overcooking. In longer exposures
to overcooking, the food and utensils may
even ignite, for these reasons: 1) Use microwave plastics only and use them in strict
compliance with the utensil manufacturer%
recommendations. 2) Do not subject empty
utensils to microwaving. 3) Do not permit
children to use plastic utensils without eomp!ete supervision.
16. .!30not use your micmmve oven to dry
newspaper. If overheated, it can catch fire.
cookingpm.mhes and tightly
1. steam or vapor escaping from around the
Cklol-.
2. Light reflecting around door
case.
4
or ollter
Page 6

~Your range, like many other household items, is heavyand can settle into soft fhmr coverings
such as
and
I
The range should be installed on a sheet of plywood (or similar material) as follows: When the
floor
rarge.
rest on should be built up with plywood to the same level or higher than the floor covering.
wi!I then
Rules To Follow In Using Your
Features Of Your
cushioned vinyl or carpeting. When moving the range on this type of flooring, use care,
it is recommended that you follow these simple and inexpensive instructions.
coveringextendsunder the range, a ?4” thick piece of plywood should be installed under the
When the floor covering is terminated at the frontof the range, the area that the range will
a Ilow you to move the range for cleaning or servicing.
Broiling, Broiling Chart . ..........23-24.
Roasting, Cooking Chart. . . . . . .......22
Microwave (hen . . . . . . . . . . . . . . . . 4
Automatic Oven Cleaning . . . . . ....25-27
Microwave
This
Cooking Cer]ter . . . . . . . . . . . . . . . . . 7
Important Notice . . . . . . . . . . ........5
Important Precautions
For Safe Use ...5
Multi-Power Levels . . . . . . . . . ........9
Operating Instructions. . .
Cooked By “TIME” . . . . . . . .......10
Foods
Using The Temperature Probe . ....11-12
Care Of
Cooking Heats-–How to Use . ......,14
Cooking Utensil Tips—Materials
Cooking Chart and Information .. ..15-16
Home Canning Tips . . . . . . . . .......17
Safety Checklist While Frying .. .....17
YourMicrowave Oven and
Temperature
and Sizes . . . . . . . . . ., . . . . . . . .. .15
Probe . . . . . . . .......28
Oven Vent, Duct . . . . . . . . . . . .......29
Porcelain Enamel . . . . . . . . . . .......28
Surface Units: Plug-in Feature,
Removable Chrome-Plated
Reflector Pan/Rings . . . . . . . ....28-29
Lamps, How To Replace . . . . . .......29
Broiler Pan, Use of Aluminum Foil .. ..30
Leveling The Range . . . . . . . . .......30
Oven Thermostat, Adjusting ... , .. ...30
Cleaning Charts, Parts, All
Finishes . . . . . . . . . . . . . . . ....31-32
Automatic Temperature Probe .. .....28
interior and Exterior Areas of
Microwave Oven . . . . . . . . . .......28
Safety Tips . . . . . . . . . . . . . ........1-3
Energy Conservation ... ... ... ... ... .$
Before You Call For Service . . ....33-34
Model and Serial Number Location .. .34
6
Page 7
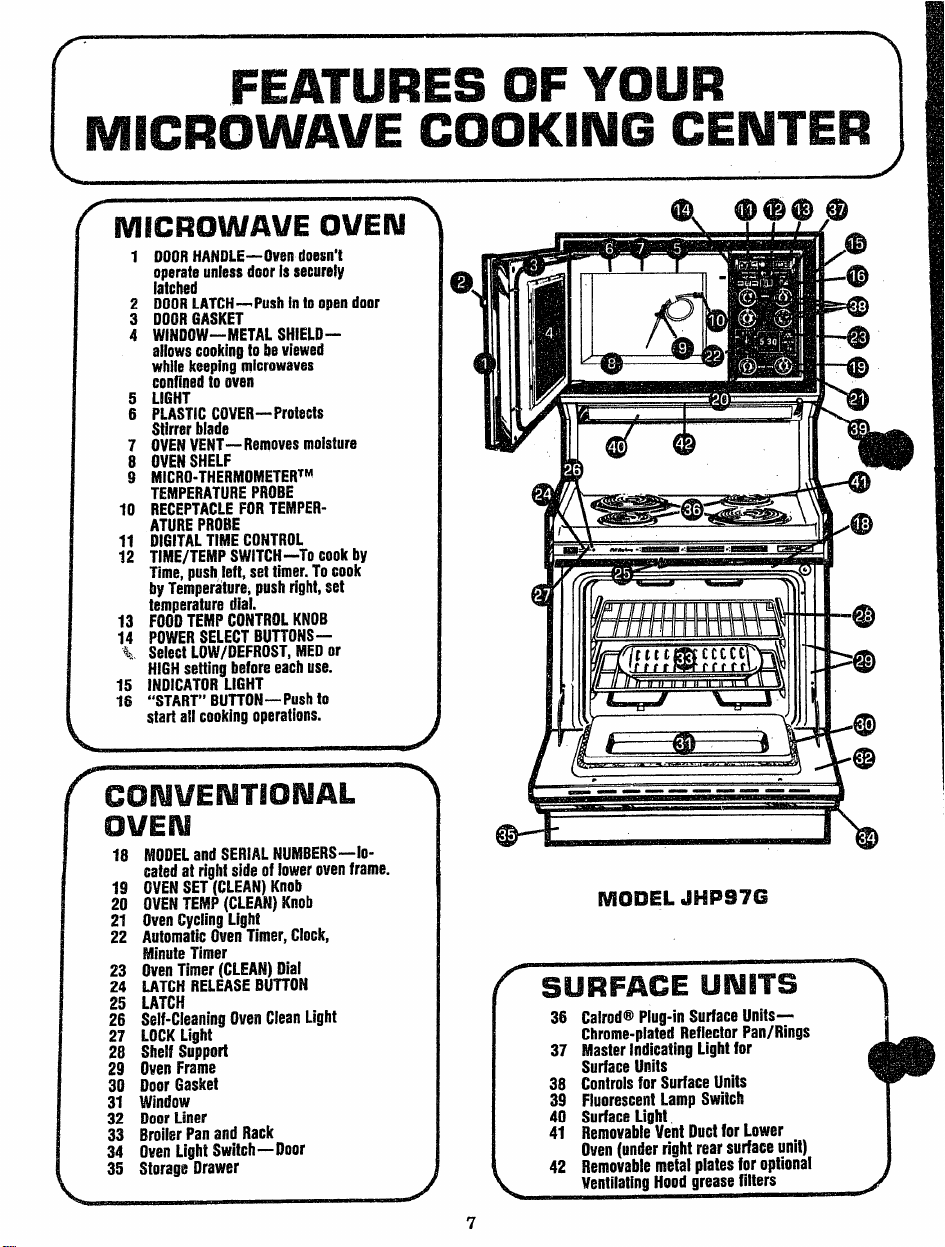
MICROWAVEOVEN
DOOR tiAt4DLE-Owtm dorm’!
opwate unlessdoorIssecurely
latched
DOOR t.ATCH-fWsh intoopen
DOOR GASKET
WINDOW—METAL SHIELD—
allowscookingtoheviewed
whilakeepingmicrowaves
confinedtooven
LtGHT
Pi.ASTiC COVER— Protects
Stirrerbiade
OVEN VENT— Removes moisture
OVEN SHELF
kliCRO-THERhlOMETEitTM
TEMPERATURE PROBE
RECEPTACLE FOR TEMPER-
ATUitE PR08E
DIGITAL TIME CONTROL
TihlE/TEMP SWiTCH-To cookby
Time,push left,set timer.To cook
@ Tempe~ture, push
temperaturedial.
FOOD TEMP CONTROL KNOB
POWER SELECT BUTTONS—
SelectLOW/tlEFROST, MEDor
HMH setting
lNDiCATOR LIGHT
“START”
BUTTON-PushtO
right,set
beforeeachuse.
startallcookingoperations.
door
.
—-—— ————— —
MODELandSEfliAL NUMBERS—io-
catedat rightsideoflowerovenframe.
OVEN SET (CLEAN) Knob
OVEN TEMP (CLEAN)
OvenCyclingLight
AutomaticOven Tiffler,Ctock,
MinuteTimer
OvenTimer [CLEAN) iilial
LATCH RELEASE IBUTTON
LATCH
Self-CieaningOven CieanLight
LOCK Light
Shelf Support
Oven Frame
Door Gasket
Window
Door Liner
ilroiierPanand Rack
Oven Light Switch—Door
Storagt?Drawer
Knob
e
Momm JHP97G
36 Calrod@Piug-inSurfaceUnits—
Chrome-platedReflectorPan/Rings
37 Master IndicatingLightfor
Surface Units
38 Controisfor SurfaceUnits
39 FluorescentLamp Switch
40 SurfaceLight.
41 RemovableVent Duct for Lower
Oven(under right rearsurfaceunit)
42 itemovahiemetalplatesfor optional
7
1
b
Page 8
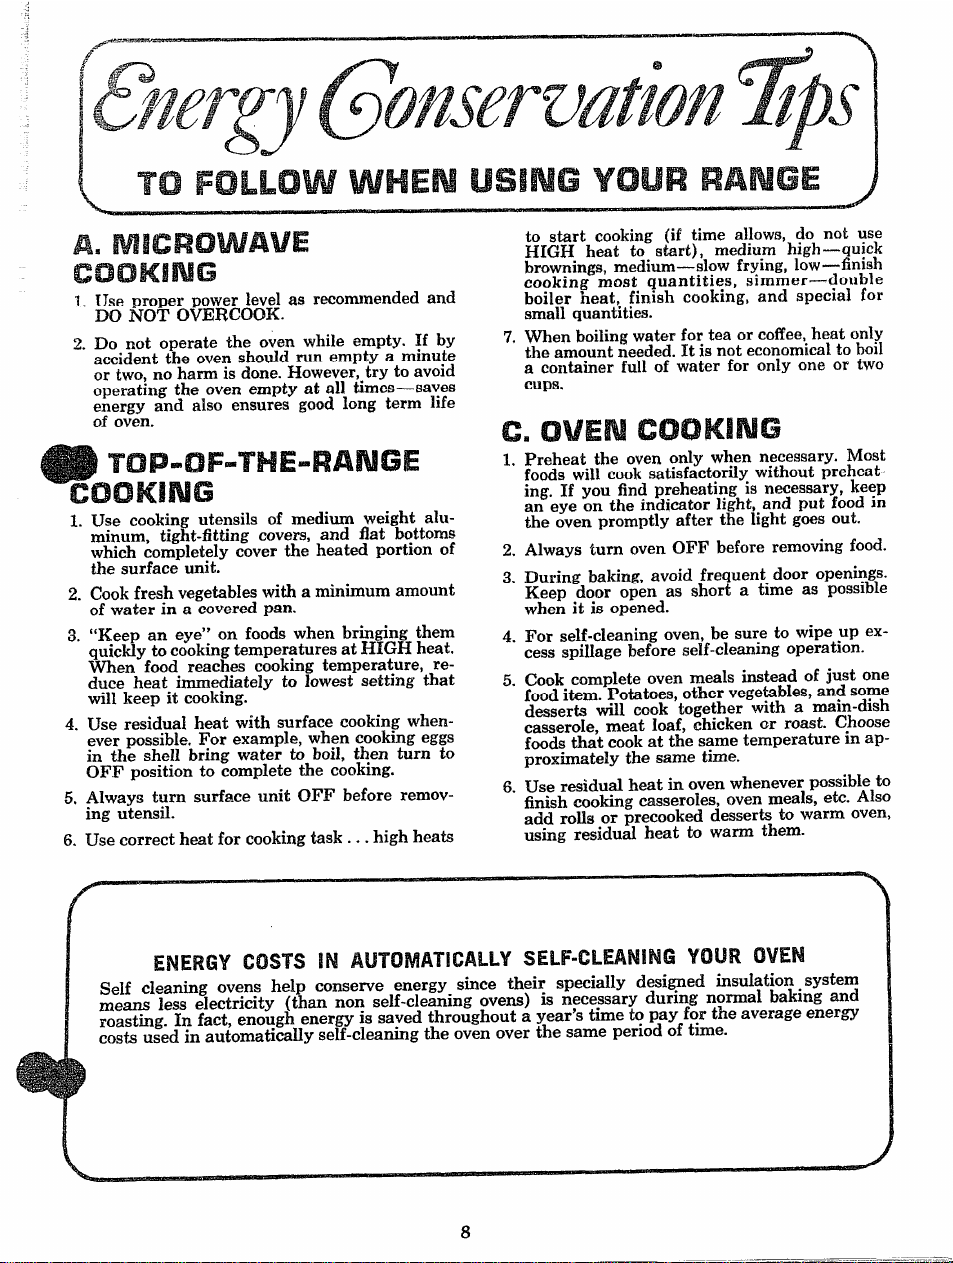
TO FOLLOWWHEN USBNGYOURRANGE
start cooking@Jime allows,do not use
to
‘l?rnrr L.. &J-,.
rucfn
brownings,medmm-slow frying,low
1. Use proper power level m recommendedand
DO NOT OVERCOOK. smallquantities.
Z. DO not operate the oven while empty. If by
accidentthe ovenshouldrun emptya minute
or two,no harmis done.However,try to avoid
operatingthe ovenempty at all times-saves
energy and also ensuresgood long term life
of oven.
L Use cooking utensils of mediumweight ahl-
minum, tight-fittingcovers, and flat bottoms
whichcompletelycover the heatedportion of
the surface unit.
2. Cook freshvegetableswitha minimumamount
of waterin a coveredpan.
3. “Keep an eye”
quicklytocooking temperaturesatHIGH heat.
When food reachescooking temperature,reduce heat immediatelyto lowestsetting that
on foods whenbringingthem
will keep it cooking.
4. Use residualheat with surfacecooking wheneverpossible.For example, whencookingeggs
in the shell bring water to boil, tl!en turn to
OF.Fposition to completethe cooking.
5, Always turn surface unit OFF before remov-
ing utensil.
6. Usecorrect heatfor cookingtask.. .highheats
finnlrinff mnat nl~nntities.simmer—double
LXIX-Ceat, fi~~~-b<ik~~g;’~ .
7, Whenboilingwaterfor teaor coffee,heat
theamountneeded.It isnot economicalto boil
a containerfull of waterfor only one or two
cups,
1. Preheatthe ovenonly when necessary.Most
foods will cook satisfactorilywithoutpreheating. If you findpreheatingis necessary,keep
an eye on the indicatorlight,and put food in
the oven promptly after the lightgoesout.
2. Always turn oven OFF before removingfood.
3. Duringbaking,avoid frequentdoor openings.
Keep door open as short a time as possible
whenit is opened.
4. For self-cleaningoven,be sure to wipe up excess spdlage before self-cleaningoperation.
5. Cookcompleteoven meals insteadof just one
food item.Potatoes,othervegetables,andsome
desserts will cook together with a main-dish
casseroIe,meat Ioaf, chickenor roast. Choose
food: thatcookat the sametemperatureinapproxunatelythe same time.
& Use residualheatin ovenwheneverpossibleto
finishcookingcasseroles,ovenmeals,etc.
add rolls or mecooked dessertsto warm oven,
usi~g residu~ heat to warmthem.
AIGUL w. UKIM WJ,
.-----
ti.~;,.-
11, GL4. LA*8, ...~.a
md special for
hicrh-nl, iolr
—iziih
only
Also
ENERGY msrs IN AUTOMATICALLYSELF-CLWNING?fOul’1OVEN
Self cleaning ovens help conserve energy since
rm+s less electricity (than non self-cleaningovens) is nece~saryduring normal bakingand
roasting.In fact, eno~gh energyISsa~edthroughouta year’s tune to pay f?r theaverageenergy
costs used in automatwallyself-cleamngthe oven over thesameperiod of tune.
)
their specially designed imndationsystem
8
Page 9
B
—.—.
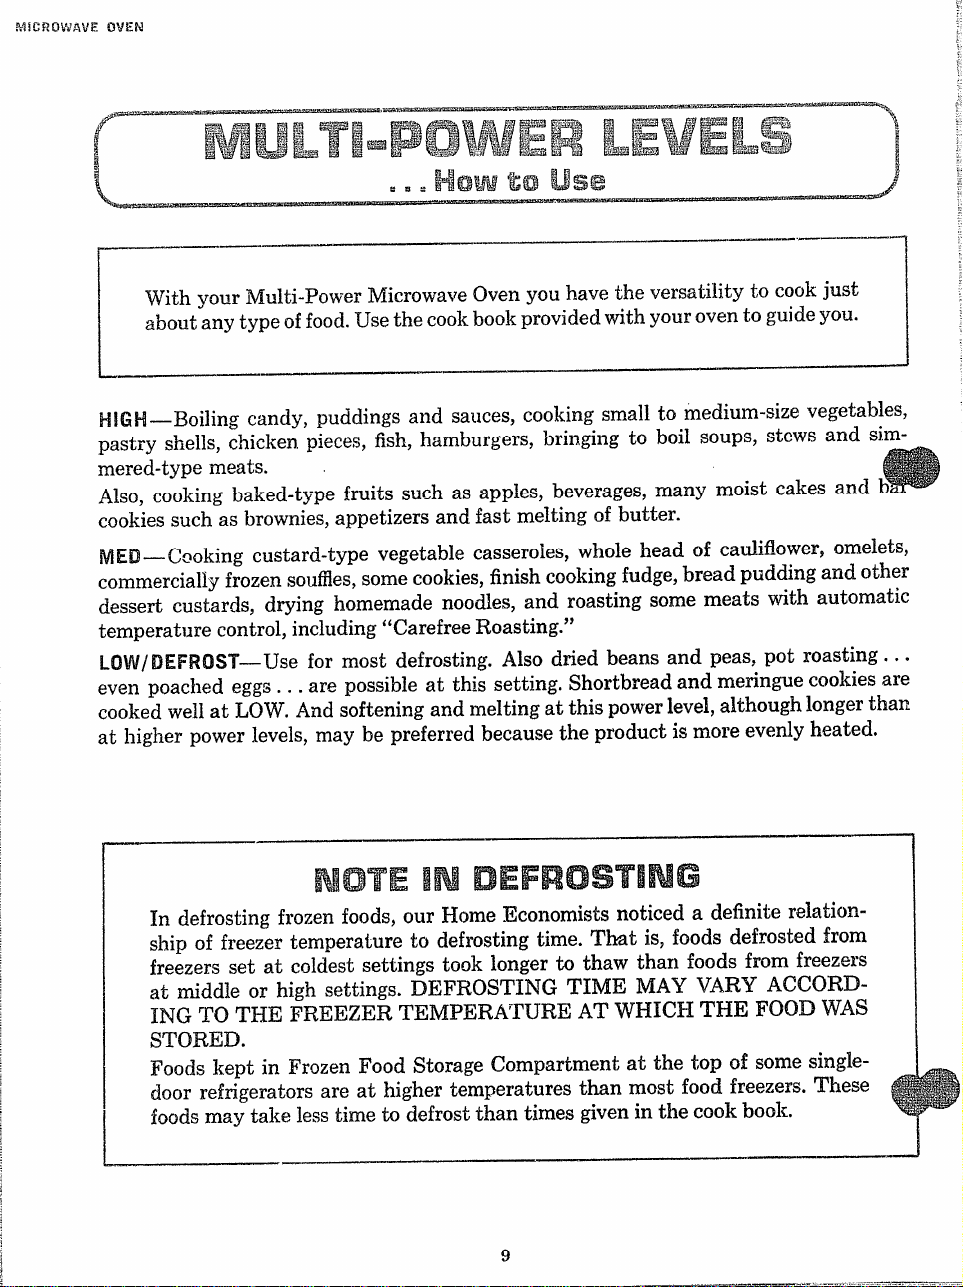
With your Multi-Power Microwave Oven you have the versatility to cook just
any type of food.Use the cookbook provided with your oven to guide you.
about
-..—
L
HICiH-Boiling candy, puddings and sauces, cooking srnaHto medium-size vegetable%
pastry shells, chicken pieces, fish, hamburgers,
rnered-type meats.
Also, cooking baked-type fruits such as apples, beverages, many moist cakes and b
cookies such as brownies, appetizers and fast melting of butter.
MH3—C90king custard-type vegetable casseroles, whole head of cauliflower, omelets,
commercial~~frozen soufiies,some cookies, finish cooking fudge, bread pudding and other
dessert custards, drying homemade noodles, and roasting some meats with automatic
temperature control, including “Carefree Roasting.”
!LOVV/DEFROSl’’-Usefor most defrosting. Also dried beans and peas, pot roasting . . .
even Doached ewzs. . .
.
cooked well at LOW. And softening and melting at this power level, although longer than
at
higher power levels, may be preferred because the product is more evenly heated.
.-
are Possible at this setting. Shortbread and meringue cookies are
bringing to boil soups, stews and si.m-
In defrosting frozen foods, our Home Economists noticed a definite relation-
ship of freezer temperature to defrosting time. ‘I’hat is, foods defrosted from
freezers set at coIdest settings took longer tn thaw than foods from freezers
at middle or high settings. DEFROSTING THvIE MAY VARY ACCO13DH?JGTO THE FREEZER TEMPERA’I’URE AT WHICH THE FOOD WAS
STORED.
Foods kept in Frozen Food Storage Compartment at the top of-some singledoor refrigerators are at higher temperatures than most food freezers. These
foods may take less time to defrost than times given in the cook book.
9
Page 10
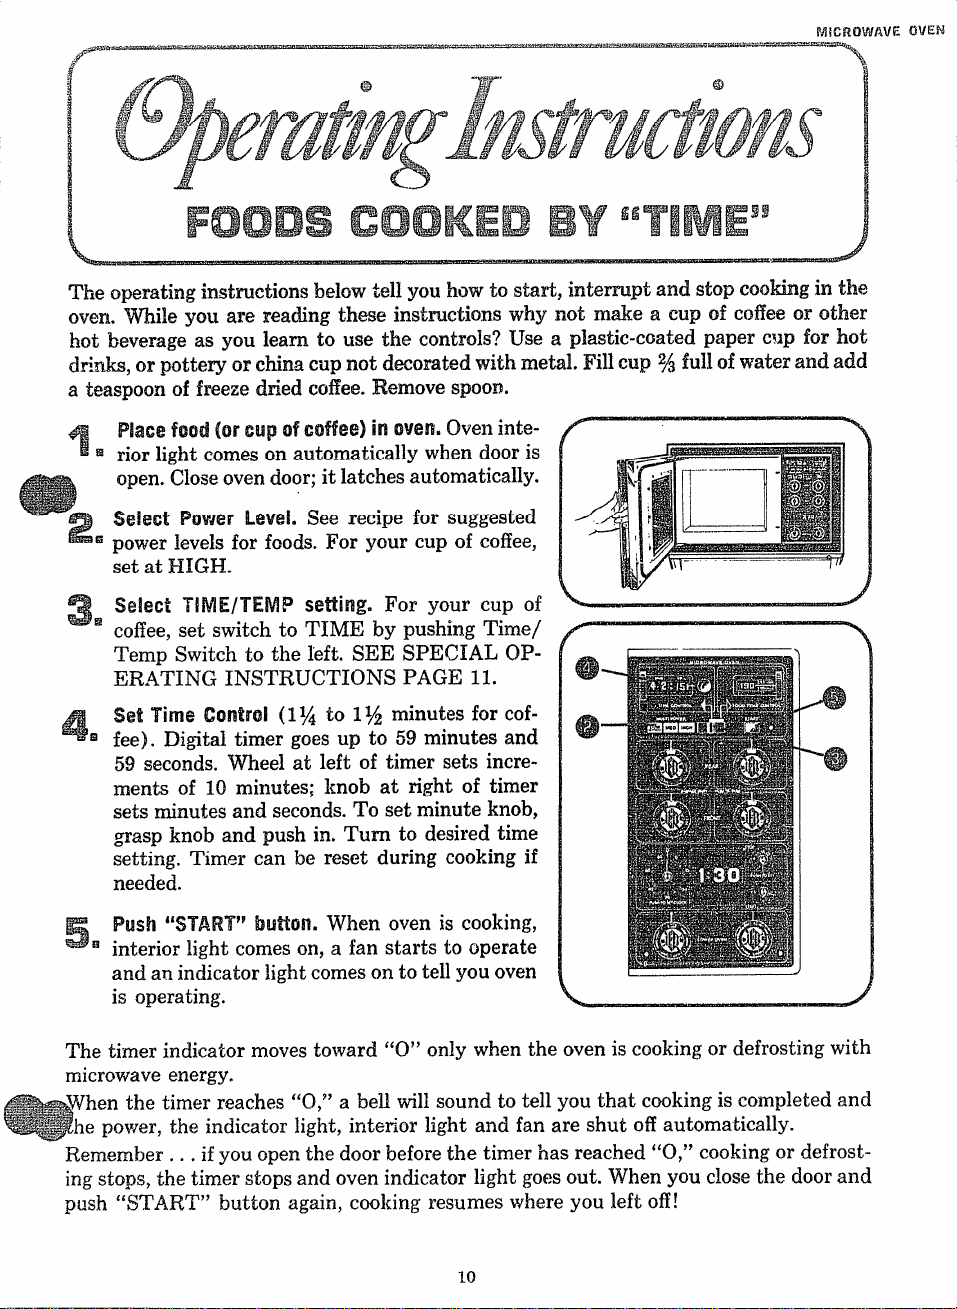
oven. ‘%%ilejou are reading these instructions why not make a cup of coffee or other
hot beverage as you learn. to use the controls? Use a plastic-coated paper cup for hot
drinks, or pottery or china cup not decorated with metal. Fill cup ~ fh.d]of water and add
a teasqmon of freeze fdtiecl tmflee. I%?rncm sPQOn.
Place (or cupofcoffee)inwm Oven i~te-
rior light comes on automatically when door is
open. Closeoven door; it latches automatically.
Sehwt !%)werUWei. See recipe for suggested
power levels for foods. For your cup of coffee,
set at HIGH.
Select TliVIE/lWViP
setting. For your cup of
coffee, set switch to TIME by pushing Time/
Ternp Switch to the left. SEE SPECIAL OPERATING INSTRUCTIONS PAGE 11.
@
A
%%Il?ne UmtrOl (l% to l% minutes for coffee). Digital timer goes up to 59 minutes and
59 seconds. wheel at left of timer sets increments of 10 minutes; knob at right of timer
sets minutes and seconds. To set minute knob,
gasp knob and pushin. Turn to desired time
setting. Timer can be reset during cooking if
needed.
I%@ ‘*START”buttwI. IVhen oven is cooking,
interior light
comes on, a fan starts to operate
and an indicator light comes cmto tell you oven
is operating.
timer indicator moves toward “O” only when the oven is cooking or defrosting with
microwave energy.
hen the timer reaches “0,” a bell will sound to tell you that cooking is completed and
e power, the indicator light, interior light and fan are shut off automatically.
—
Remember . . . if you open the door before the timer has reached “0,” cooking or defrost-
ing stops, the timer stops and oven indicator light goes out. When you close the door and
push “START” button again, cooking resumes where you left off!
10
Page 11
L
.—
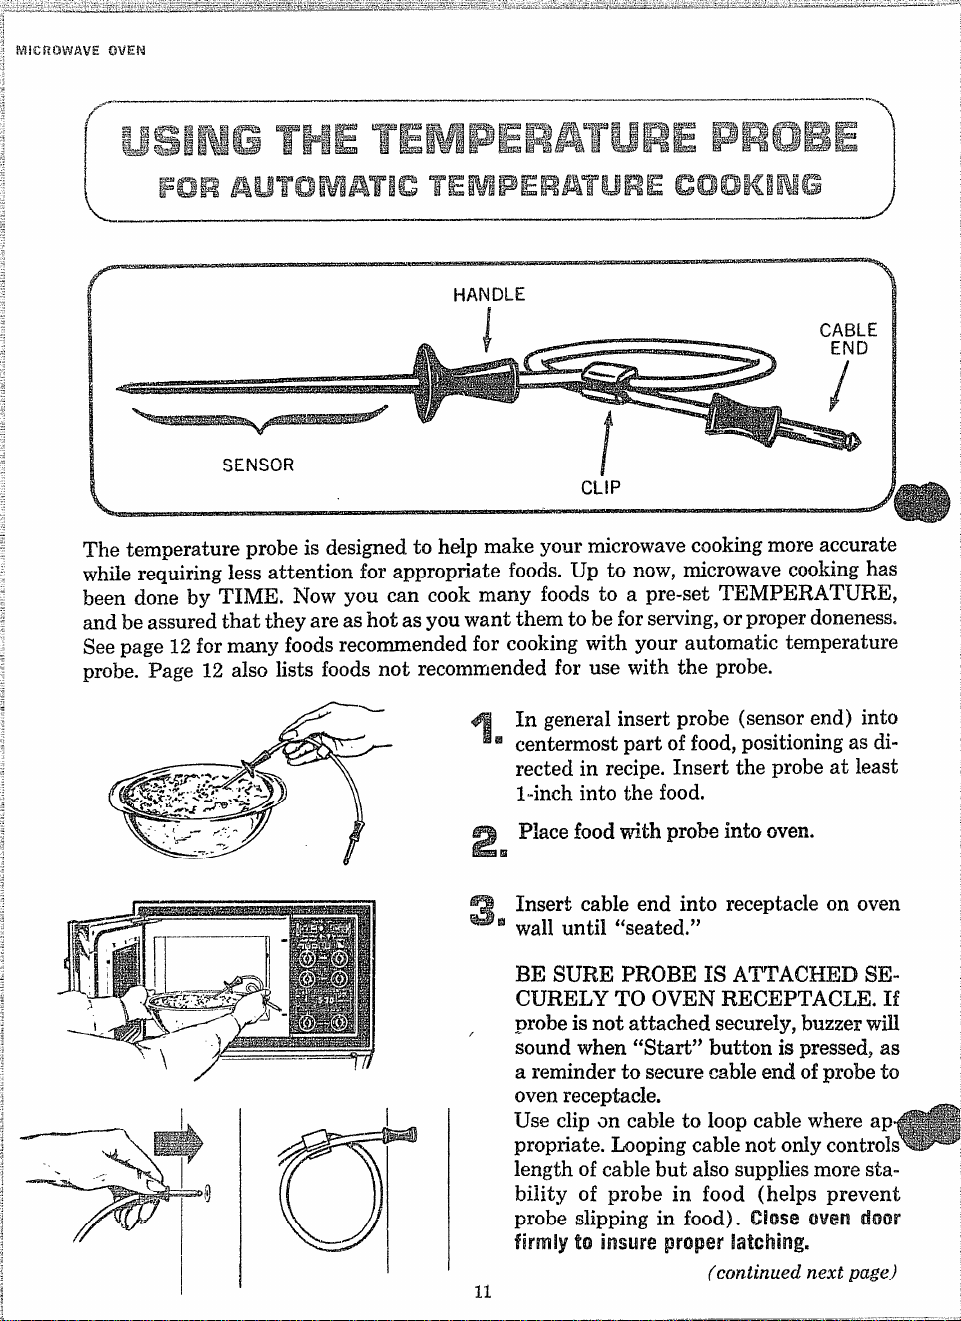
‘I’hetemperature probe is designed to help make your microwave cooking more accurate
while requiring le& attention for appropriate foods. Up to now$microwave cooking has
been done by TIME. Now you can cook many foods to a pre-set TEMPERATURE,
and be assured that they areas hot as you want them to be for serving, or proper doneness.
See page 12for many foods recommended for cooking with your automatic temperature
probe. Page 12 also lists foods not recommended for use with the probe.
—..—.
HANDLE
—.—.
A. SF.
-—~
5
E
A=---’
0
@
- In gerleral insert probe (sensor end) into
fi
s centermost part of food, positioning as di-
rected in recipe. Insert the probe at least
l-inch into the food.
Place food with probe into oven.
z
❑
Insert cable end into receptacle on oven
3
Nwall until “seated.”
BE
SulwPROBE1sATTACHEDsE-
CURELY TO OVEN RECEPTACLE. Ii!
probe is not attached securely, buzzer will
/
sound when C’Start”button is pressed, as
a reminder to secure die end of probe to
oven receptacle.
Use clip an cable to loop cable where ap
propriate. Looping cable not only controls
length of cable but also supplies more sta- ;-- =
bi~ity of probe in food (helps preve~~ ------- -
probe slipping in food), CI(XW OWWJdOOF
fin’nly to insure p$’qwr ilatdlingc
11
(continued next page) ,’ ““ “
Page 12

fvI!CRf3WAV~ OVEN
@y---
r-’--- .. —-
. —-.—.——. - \
Set oven controls, following recipe infor-
mation in special section for
f$utxnmatic
(hnperatwre cooking, located in back
pages d Cook Book, which accompanies
oven.
set power level.
Set TIME/TEMP switch to TEMI?
(~tidl SW~~Ch to right) ~~d dia! fi~-
ished following recipe
information. (NOT.H: If the actual
temperature offood in ovenis higher
than the temperature you dial, buzzer will sound when “START” button is pressed to tell you of this
condition. Check temperature on
dial to be sure it is set correctly. If
not, reset. If so, then food in oven
has already reached or exceeded desired finished temperature . . . no
further heating needed!)
Push “START” button.
When preset internal temperature is
reached, oven automatically turns off,and
a buzzer sounds to tell you food is done.
Open oven door to stop IWzzer. Remove
cable end of probe from receptacle, then
remove food. and temperature probe
together.
probe giveboth temperature to set and approximate cooking time. If buzzer sounds
unusutiy early, it may be that probe has slipped out of place in cooking. (This
can happen with any food thermometer). When this happens, reposition thermometer and continue cooking. TO determine actual cooking temperature of
food, turn TEMP control dial to lower temp setting until buzzer sounds.
m SETTING OVEN, MAKE SURE Is
...”:-.
cxmREcmY IWADE.
“WHEN BY Tma’i! , * ●
if by Xnhdake switch
:.
isset at TEMP, buzzeywill sprmd. Thiszwnimk you totiwiiih wmtrd h .
~~~~*
..
Page 13

!
. .
Casseroks—-150°-160” internal temperature gives best doneness on mixture of precooked
foods heated together into a main dish. Raw foodssuch as hamburger or other meat, vegetables
and sauces starting from “scratch” should be precooked before combining together in-to a
casserole heated to above temperature. The advantage C! the temperature probe: it MIs you
when casserole is at correct temperature for serving, without checking, peeking or guessing.
2,
Reheating leftovers
the amwmtofleftoverfoodis not known,therefore,time to cookis only a guess.Cook-
often
ing t. a ~rese~@TIpemture
3.
Plates of Food—in general, place temperature probe in largest piece of food, then cover piate
with wax paper (or lightly with plastic wrap ). A preset temperature of 150to 1606gives piping hot food.
4.
Beveragesand soups-use clip on cable of probeto help stabilizeprobe in liquids.A preset
temperature of
5.
Beef, l~b and hap loaves—be sure to place probe as horizontally as possible, and use clip
to stabdrze probe m meat mixture.
—this type of food is excellent to heat with temperature probe because
(usually 140 to 155° ) eliminates the guesswork.
180°is “warmto drink,” about 170° is “steaminghot.”
For bestresuRs,consultmeat loaf recipe?pages in AutomaticTemperature CookingSection
of cookbookand do not exceed.total we]ghtof meat. A goodrule ofthumb ti followin p
paring meat loaf mixtures is tQuse 1 cup liquid (milk, water or juice such as tomato)
1% tOt..aIpounds ground meat.
6.
Roasts-carefreemicrowavemany roasts. Veryspecificinstructionsare includedin Cookbook.
7=
Dips—hot dips are a popular appetizer. An internal temperature of 90-130° (depending on
the ingredients) is just right to serve guests.
1,
Stewing, simmering and candy making-this type of cooking involves bringing food to a boiling or simmering temperature and holding it at that temperature for a long period of time.
We recommend LOW POWER and TIME settings on your microwave oven for most stewing. See specific recipe suggestions pages in special MEDIUM and LOW l?OWEFt COOKING section of Cook Book for stewing. See Candy chapter of Microwave Oven Cook Book
for candy making.
2.
Delicate butter icings, ice cream, frozen whipped topping, etc.—these soften rapidly at warm
temperatures. Lowest setting on temperature probe is 90°.
3.
“Manyfoods in the frozen state-because temperature probe should not be forced into rockhard foods, it could break, However, after defrostin~, many convenience foods maybe heated
with the probe to the precise ternperatu.re for serving.
4.
Individual foods cooked.in batches-in cooking with microwave energy, differences from one
food to another, even of the same type of food tin result in different’ cooking times of foods
in the same batch. A variation in size (such as in cup cakes, sandwiches, etc. ) or moisture content (such as in potatoes and other vegetables) can cause variation in cooking speed. Temperature probe in one food in a batch might not correctly indicate internal temperature of all
foods cooked. together.
5.
Starchy vegetables—-
perature probe due to starchy nature of interior. (Clean immediately with soapy cloth,
rub ]ightly with plastic scouring ball, if necessary. )
6.
Batters and doughs which are baked. This type of food should be observed when cooking t. best judge when done.
delicate food types.
potatoes which cook to steamy hot temperatures tend to stick to te
JMSO, periodic turning of the dish is usually required on these
13
Page 14

Your surface units and controls m-edesigned to give you an infinite choice of heat settings for
cooking on top of the range. A diagram above each control knob shows the corresponding unit
which that knob controls.
.
w----
~
Control knob must be pushed into set only from OFF position. When control is in any position
other than OFF, it imay be rotated without pushing in; when rotated to OFF, control knob
pops out.
At HI position, there is a slight niche so control “clicks” into the ~ ~
highest setting; the lowest setting is between
and LOW. (See diagram). A slight turn of the control adjusts the heat
up or down, depending on your needs. in a quiet kitchen, you may hear
slight “popping
being maintained.
l-!!—
;~~~
&$~.-
pJqg~x—
~p:+
-2?~y-J@j_
1=.-.:2::-----,.-
.,.,,,.
‘~\:
1
“-’+;;,>’p$;~— Steam ~ice,Cel’eal;maintain serving temperature
7’So{llldsCluring cooking, irdiating heat
Quick startforcooking; bring water to boil.
Fast fry, pan broil; maintain fast boilon large amount of food.
%utk
and brown; rf~ainb.in sbw boil cm large amount of food.
COokafter starting at EU; cook with little water in covered pan.
OFF and WM or OFF
settings are
NOTE: 1. At “HI, MED HI never leave food unattended. B3ilovers cause smoking;
//
I
# %...
o
Of ~OSt foods.
Page 15

,.
.. .,: .-
#J%==
“’g$’;’”r————————
&.m—
-.-.>~.*..
,={-::L:%Y.,7
~=.
~,%.~
‘—.—
b...”.—
?,
~vd Ho-f’ L2i%$l $:’
#
~j~ell~~]~s]lo~~~& flat Ori b~~~~~~~~s!l~~~]~JTMtChSiZeOfSWfaUX-u.IIit(large pans on krge
units, small pans on small tits).
Aluminum uterwils of medium weight are reeormnended for surface cooking because they
heat evenly and quickly. Skillets do a good job of browning foods and.~xmcepans (with tight
fitting lids) are ideal for nutritious cooking with little water. Use regular, and non-stick type
finishes. Follow directions given in the Surface Cooking Chart on the following pages. Recommended akninum utensils were used in testing food for this chart.
Use heat setting no higher than medium or follow manufacturer’s directions when, using
utensils made of the following materials: cast iron, glass ceramic (pyroceram), and stainless
stxd. Also, some types of enamelware which under certain conditions could me].tand fuse to
surface unit when higher heats are used. Manufacturers of glass cooking utensils also recommend heats no higher than MED and using a wire grid Mw-een utensil and electric surface
unit. (Main grid when utensil is purchased, or at Housewares Section of most clepartme
stores.
LsMOST mmmTAN’T mm GOOD HEAT’CxH?mucmcmlTHAT urENsILs
IT
WITH YLAT 13CEPTOMSBE USED.
Special. cooking equipment without flat bottoms,
such as the oriental wok, am not recommended. Life of surface unit can be shortened and
range top can be damaged due to high temperatures
required in this type cooking.
-..-—..—.—....—....
Ccrnmeal
Grits
Oatmeal
Rice, etc.
rwT?x
EGGS
Cooked in shell
Fried “Sunny Side
up
Poached
Scrambled
HI— Bring water to boil. Before
adding cereal, switch to
HI —Cover eggs with cool
water. Ccwer pan and bring to
steaming point switch to
tIAED— Melt butter. Add eggs
and cover skillet; or do not
cover but baste with fat,
HI—Quickly bring water to
steaming point. Switch to
HI —To heat butter until light
golden color. Switch to
LOWor WM, then stir in
cereal. Finish according to
package directions.
LOW, tomaintain geutle but
steady perk
LOWor WM. Cook 3-4 min.
for soft eggs, about 15 min.
for hard-cooked.
Continue cooking until white
is “just set”, about 3.5
more minutes,
MED or LOW, Carefully add
eggs. Cooh uncovered about
5 minutes for medium
doneness.
fvlEDor LOW, Add egg mixture
cook stirring to @sired
doneness, f?emovsfrom heat,
1. Cereals bubble and
expand when cooking.
Use large enough pan
to prevent boilover.
2. For steamed rice, switch
to Wf?f;cover and cook
25 minutes.
PmelatO8-10minutes for
8 cups, less for fewer
N.!ps.
Begin timing when first
wisps of free steam
come from cover.
Variation: Start heating
fat at Hi; when melted,
switch to LOW, add eggs.
When bottoms are just set
turn eggs “over easy” to
cook other side.
Eggs are easy to handlu in
wide shallow skillet or pan,
Remove with slotted spoon
or pancake turner to 7’==+%7%
drain.
E~gscontinuetoset ~gf~~
slightly after removing
from heat,
5+,:%%7:-;
Page 16

MEL?!NG
Chocolate Squares,
Chocolate,
Butterscotch Bits,
Butter, etc.
WM—Put in small saucepan on
small surface unit, Cover for
semi-sweet chocolate or
butterscotch
pieces.
Allow about 10-15 min. to
melt through. Stir to smooth.
1.) If desired, melt butter,
unsweetened chocolate
squares about 5.10 rain. at
LOW, watching carefully.
2.) Long, slow melting of
chocoiate and trutter gives
best results.
mm
Macaroni
Noodles
Spaghetti, etc,
WWwfw cow
Green Pepper,
Mushrooms, etc.
MEW—-TOtwrtsMiiIX8.10
minutes, Grease lightly.
HI —To bring salted water to
boil in covered utensil, Add
pasta slowly so boiling doesn’t
stop. Switch to
.
i+!– To l.xin~ to pressure,
When first “jlggio” Ls heard,
swiich to
Wok fxmcakes
skie. (Al!ow .Nght!y longer
thickhatter,)
for
HI or MED lil-Cook uncovered until tender.
MEM HI or MED. Bf@n timing
frlmi as soon 3$ “jiggles”
begin regclariy again,
<
}{1--To melt fat, Switch to
MED, add food. Cook to
deswed doneness.
MED or LOW.to cook 10-30
minute%, untii just tender.
2-2min. finch
1.) Heat should be high
enough so that water stays
at roiiing boii throughout
cooking. 2,) Use large
enough pan to avoid
boilover.
1) Use NED iii for finishing
f’130dSWhich cookin $ilort
times [about 10 rnin, or
less). 2) Time carefttl!y to
avoid over-ccoking.
NOTE: !!lome pressure
cooker rrtamifat%rrers
recommend jlggllng of
control at rata r3f 2-2 m-’
min.
Two—3 jiggles is arr
approximate+ nbtnbar; you
may find a few mor% or
[0ss satisfactory.
Turn meat or stir
vegetables occaskmaiiy
to cook and brown evenly.
Page 17

*$=-aJyj.
~9 #
(%J?“k& (3,,$2
Carming should be Ck9rleCm range toponly. Do Nul” CAN IN OVEN OR IN
~;7~-pJo
In ~~r~ace cooking of foods other than canning, the use of ‘large diameter utensils (extending
more than l-inch beyond edge of cooking area) is not recommended. However, when canning
w;th wakw-bath or pressure canner, large-diameter utensils maybe used, This -istwcouse boiling
water temperatures (even under pressure) are not harmful to cooktop surfaces surrounding
iwlting unit.
fi~~$~~~R, ~~ ~~T USE LARGE ~~Al~E~ER ~A~~ERS OR ~~~3ER
~~~~ ~~~~$j~~f$ ~()~
syrup or sauce rnixtures-ancl ail types of frying—
boiling water. Such temperatures could eventually harm cooktop surfaces surrounding heating ~fits.
-r--l
ki-.-j?f~,jy’&’j,6) {7”/“’)’l$/.#
j“g?~,(j4rJ;&g’g
J3~~~~~T~ (_jR ~~~~~(’J ~~~~$ ~~~+~~ ~~~~~ w~~~~$ ~~s~
.--%l
~-.
-
,r?,.:’+,fl,:t fi, q,$yj j-”
@
(g:~$~’”g
~j)[j~
<’53
cook at temperatures much higher than
J
~J/%~~~ ~~~?/ii-
I!TiJ
1.
Bring water to boil on HIGH heat, then after boiling has begun, adjust heat to lowest set-
ting to maintain boil (saves energy and best uses surface unit}.
2. Be sure canner fits over
be centered on surface unit, use smaller diameter containers for good
3. Flat-bottomed canners give best canning results. Be sure bottom of canner is flat or
indentation fits snugly over surface unit. C2mners with flanged or rippled bottoms (often found
in enamelware) are not recommended.
center d surface unit. If your model range does not allow canner to
canning results.
slight
..*
P&
#$#&&”-
D
RiGHT”
4. When canning, use recipes from reputable sources. Reliable recipes are available from the
manufacturer of your canner, manufacturers of glass jars for
and, the United States Department of Agriculture Extension Service.
5. Remember, in following the recipes, canning is a process that generatxxi large arnolunts of
steam. Be careful while canning to prevent burns from steam or heat.
NOTE: .Ifyour range is being operated on low power (voltage), canning may ~~e ~onge~~ha~
expected, even though directions have been carefully followed. The process may be unproved
by: 1) Using a pressure canner, and 2) For faster heating of large water quantities, begin with
HOT tap water.
@ Use minimum amount of fat for effective shallow or deep-fat frying. Filling the pan
MI of fat can cause spillovers when food is added.
&’ Keep an eye on foods which fry at high or medium high heats.
WRONG
canning, such as Ball and Kerr;
-too
1’?
Page 18

.,=b-.f--=.,,--,,.-,-.- — -----”-===
.7
—
---=---.-_.,.... -.-. -.,.* .,-....
r=..... -m4.--.A---.r.--..-. =.-----~=-
- ,..~
CLEAN
.=’@&Dm..
.
-.,%
‘J<
TO SET THE CLOCK, push.inthe centei-knob
of the Minute Timer and turn Knob in either
direction to set the Digital ~lock numerals to
thecorrect time.
(After settingthe clock, let the knobout, and
turnthe Minute Timer pointerto OFF.)
center knob clockwise,withoutpushing in, until
]>oiriierreachesnumber of minutesYOUwish to
At the end of the set time a buzzer sounds to
tell YOMtime is up. TO TURN OFF EIUZZER
turn center Knob, without pushing in, until
pointer reachesOFF.
The automatic oven controls are designed for
the homemakerwho can’t be tied down to being
in the kitchen or at home at specific times to
turn an oven on or oR. These controls can be
preset to start and stop your oven for you. Or,
if you prefer to startthe food yourself, they will
take over the job of turning the oven off.
18
Page 19

?’0 SC>; the cu[oma!ic own timer, U.SCthe t,wc>
dials
12ext to the dock, marked START and
>’l’O1>. Each c%} is mwkecl off in 15 minuf,e
:egmenfs mcl
numberedby the hour.The pcinterson thesedialsran bemewedonly when knob
is pushed in. (When the pointers are turned
~-ouczanhear a “ratchety” So-und.)If pointer
can he turned it meansknob has been pushed
in and pointer has beenset. To be certainknob
is in out.position, turnknobso pointerisat time
showingon the clock. Knob will pop out and
cammt then be turned. (Note: Before you set
thesedials,be sure the handsof the rangeclock
showthecorrect,time of day.)
A. TO SET THE AUTO MA.z’lc OVEN
TIMER So IT WILL SWITCH THE OVEN
HEAT ON AND ON? AUTOMATICALLY,
AT A. LATER TIME THAN SHOWS OAT
TH13 RANGE CLOCK, DO AS FOLLOWS:
1. Set START time. Pushin knob on START
dial and turn pointer to time you wantoven to
turnon. The illustrationshowsSTART pointer
at 3:30.
2. Set STOP time.IJush
in knobon STOP dial
and turn pointer to time you want ovento turn
off. The illustration show’sthe STOP time at
6:00.
Automatic Timer works only if
set for a later time than shows on range clock
and on START dia;.
3. a. Turn OVEN SE’I”Fto TIME BAKE.
b. Turn OVEN TEMP* to proper temperature for food to be cooked. Place food in oven,
close the door and automaticallythe oven will
be turned on and ofl at the times you haveset.
STOP time is
C. When food isremovedfrom oventurnOVEN
SET to OFF.
*OVEN INDICATOR LIGHTS at ‘TIME
BAKE settingwork differentlythan they do at
BAKE setting.Do not be concerned if no light
appears. Carefully recheck the steps given
above. If all operationsare done as explained,
oven will operate asit should.
to automatic cooking. You can cook one food,
or severalfoods togetheras longas they require
the same temperatureand time.However foods
of a highlyperishablenature,suchasmilk,eggs,
fish,stufings, poultry, and pork, shouldnot be
cooked automatically unless standing time in
the oven is not more than 2 hours before and
about 2 hours after cooking of these foods. In
all cases,no matterwhatthe natureof the food,
unless cooking is to start immediately,foods
should be thoroughlychiiled in the refrigerator
before placing in the oven.
Surfacelampswitchlocationis underrightside
of control panel.Lamp may be lightedby pressingthelampswitchbutton.Be sureto hoM button depresseduntil light comes on.
Page 20

lbuz oven is designed to giveyou top zestdtsin
baking, roasting, and broiling when used as
recommended.
1. Look at the controls. Be sure you understand
how to set them properly. Read over the directions for the Automatic Oven Timer so you understandits use with the controls.
2. check oveninterior.Look at the shelves.Take
~?~~~$=;practice run at removingand replacing them
in
‘=~:oper~y, t. givesure sturdy support.
3. Read over informationand tips that follow.
4. Keep this book handy s-oyou can refer to it,
The controls for the oven(s) are marked OVEN
SET and OVEN ‘TEMP. IOVEN SET has settings for BAKE, TIME BAKE, BROIL,
~LEA15J,and OFF. When you turu the knob to
the desired setting,the proper heatingunits are
thenactivated for that operation.
9VEN TEMP rnai~tainsthe temperature you
set from
also at ~LEAN (880°). A light near this control
glows until oven reaches the selected tempera-
ture, then goes off and on with the oven unit(s)
during cooking. I?RE-HEATING the oven, even
to high temperaturesettings, is speedy—rarely
more than about 10 minutes. Preheat the oven
only when necessary. Most foods will cook satisfactorily withoutpreheating.If you find preheating is necessary, keep an eye on the indicator
light and put food in the oven promptly after
light goes out.
WARM (150°) to BROIL (550°) and
weeks of getting ac-
#
For ~IJZAN, rotatethe knobto theright (clock-
wise) until the blue pointer is pointing up, to-
ward the index marker. When this location is
reached, the cohtrol should snap into fina?.
position.
The shelve(s) are designed with stop-locks so
that when placed correctly on the shelf supports,
(a) will stop before coming completely from the
oven, (b) will not
when placing food on them.
TO REMOVE shelve(s) from the oven, when
cool, lift up rear of shelf, pull forwardwith stopIocksalong top of shelf supports.
TO REPLACE shelve(s) in oven, insert shelf
with stop-locks resting on shelf supports. Push
shelf toward rear of oven; it will fall into place.
When shelf is in proper position, stop-locks on
shelf wiHrun under shelf support when shelf is
pulled forward.
tiltwhen removingfood nor
norrnaicooking, line up the d&ired temperature
(marked m tl-w outer edge of the control knob)
withthe index marker locatecl immediatelyabove
The light comes on automaticallywhen the door
is opened.Use switchonwindowdoor to turnlight
on and off when door is closed.
20
Page 21

io be accurate thcmthe oven it repla;ecl. -
f. It is rewmmfded tlmt yr31.I operate the
range for a number of weeks to become farniIiar
w’iih
your new oven’s performance. However, if
you findthat your foodsconsistentlybrowntoo
Iittlc or too mu&, you may make a simple adjustment in the thermostat (OVEN T’13MJ?)
knob. See section titled “&me of Your New
O\”en.”
2. Use tested recipes from reliable sources.
h~easureingrec]ientsaccurately and combine
carefully.U-secorrect size bakingutensil.
3. Place shelfat positionsuggestedon chart below.Onmodelsso equipped,lettersare marked
on wall of large oven. On modelswhere letters
are not marked.on oven, lowest position corre-
sponds to A in chart,B is nexthighestposition,
etc.
~, Preheatthe oven
only whennecessary.Most
fowlswillcook satisfactorilywithout.preheating.
If you find preheatingis necessary,keep an eye
—=—.-,-----
3=-M- ...W ------~?a.he-xea,r=..
.?q*&.-*f.T
2!!J&2j$~;
,-...=-,-5-%...?
M<-,. (.E.——
..<-s-r...-*xi
.
+-. -,/-----
---- .
..-...—-.>--
;;.J.==-. .%. {l{l
—
Ir, ?.. ... m,...H#ekss
S+:.%%a@R%ea
*.AWL4%!EM%W
i,wm~-,
~wb%bmfaf
..-.
-.--...4
-—
BREADS,(3Uicl<’
Biscuits
Coffee Cake
Corn Bread
Gingerbread
Plain Muffins
Popovers
Quick Loaf Bread
~~~~~$, y~~$~r
2 IGaves
Fto~ls,o!ain
Rot is, sweet
CAKES’
(without shortening)
Angel Food
Sponge
Jelly Roll
~fi~gs~i
ErJr3dt Cakes
C5JDc2kes
Frti:t Cakes
~~y~~
L.ayfir, G3xolate
‘Loaf
1 For best results,
w!th cloth
oven lamp should be off during rlslntz. FRIJ IT CAKES: place pan type on shelf in center of OVWI.
2 To brown meringue cmlY, use 400, 8-10 min; to cook merinwJe through, use lower temperatures for times given.
N9TE: When two she!f positions are listed, the f~rst one gives well browned and cooked food. If YOU desire a different
t]ro;~ning, use the second shelf position the next time you cook. Foods listed with three shelf positions cook suc-
ccssf[illy cm
and Place i n your wel I insu iated oven to keep away from drafts. Yeast doughs ra is
any poSition Iisted, akme or in an oven meal.
i3, c
B, A
P., B
A, i3
A, R
3, Ii
A, B
A, B
El
!3
5?
425-475
350-400
B
425-450
B
!3
B
A
A
B
!3
350
400-425
375
350-375
375-425
375-425
350.375
325-375
325-350
375-400
325-350
350375
275-300
350-375
350+75
350
10-20
20-30
25-40
30-45
20-30
45-60
45-60
45-60
10-25
20-30
30.55
45-60
10-15
45-65
20-2!)
2-4 f’rrs.
20-35
25-30
40JG0
use shiny aluminum utensils, with dull finish on bottom, To RAISE YEAST DOUGHS
on tke indicatorlight and put food in the oven
promptly after light goes out.
5. ‘To set oven: ~lose oven door. Turn.OVEN
SET to RAKE and OV13N‘1’EMP to temperatureon recipe or on Bakingchart.
& Place food in oven, being certain to leave
about l-inch of space between pans and walls
of oven for good circulation of heat. close overi
door. During baking,avoid frequentdoor openingsto preventundesirableresults.
7. C!heckfcods for doneness at minimumtime
on recipe. ~ook longer if necessary. Remove
foods andswitchoff heat.When cookingfood for
first time in this oven, use timeson recipes as a
guide. Be certain foods are clonebefore removing from oven. See Bulzing,Before You Cullfor
Product Service.
NOTE: Information about bakingat high altitu.descanusuallybe obtainedat your stateagriculturalstation.
CQOKIES1
Brownies
Drop
Refrigerator
Rolled or Sliced
B, C 325-350
c, B
C, B 400-425
c, B
a
~tin-finish [anodized)
fozen pi-, in foii plai
El,A
At
350-400
375-400
400-425
A
325-350
B
400-425
!3
B
450
400-425
25-35
10-20
6-12
7-12
irmirrum
m
45-70
15-25
45-60
~~.35
40-60
MISCELLANEOUS
Apples, Baked
Custard, Cup
Potatoes, Baked
Puddings, Rice
and Custard
Scalloped Dishes
Souffles
large ones on lower sh@lf ~osition; ~lace small or loaf
A, B, C
A, B, C
A, B, C
350-400
300-350
B
325-400
B
B
325
325-375
300-350
se best at 85” to 110 ‘, so
30-60
30-60
60-90
60-90
30-60
30-75
—-6..—-
,, cover lightly
baking
or
“g$ifiim?i.
i ~@##i&&
.-.
21
Page 22

5. h40stmea k continue to cook slightly whilu
standingafterheingremovedfrom theoven.I;’Or
ram or IYJediurn internal doneness} if meat k t~?
stand 10-20
easier carving, you may wish to remove meat
from oven when internal temperature is 5-IO”F
below temperature suggested ml &arL If no
standing is planned, cook meat to suggested temperature orI chart.
a. Frozen roasts of beef, pork, lamb, etc., can be
started without thawing, but
tes per pound additioncd time (10 min. per
pound for roasts under 5 pounds, more time for
larger roasts).
b. Thaw most frozen poultry before roastingto
ensureeven doneness.Some commercial frozen
poultrycanbecookedsuccessfullywithoutthawing.Followdirectionsgivenon packer’slabel.
minutes while making gravy or for
allow 10-25minu-
,-
BEEF 2
Standing Rib
Rare
Medium
Well Done
Rolled Rib
M%IB
Leg
$ihx.rkkr
PORK,
fresn
Loin
Fresh Ham, Shoulder
PQRK,
cured
Ham, Precooked
!-fare, Cook bfMhw
EaiirJg
Shoulder, Picnic
Add 5-10 min./pound to times given for standing rib
~~r ~cne~ and ro}jed S~O~[der, a~~ ~~ rein,/ ~ound to ~im~s gilr’en,
3-5 lb% 6-8 Ibs.1
24-30 min. 18-22 min.
30-35 min. 22-26 min.
35-45 min. 28-33 min.
3-5 Ibs.
25-30
min.
3-5 Ibs.
35-40 min.
14-18 min. pm’ lb.
Under 10 i!+
.20-30 min. ‘
25-35 min.
25-WI min.
30-35 min.
30-40 min.
17-20
roasts.
6-8ibs.
6-8 lbS.
10-15 [bs.
min.
POULTRY
Chicken
Ready-to-Cook wt.
Turkey
Ready-to-Cook wt.
VEAL
2 Tendered beef, found In some markets, may req uirc less cooking time than regular beef. When cooking tendered beef,
estimate cook Irig time using shortest time given in rninutes/ pound for desired doneness. Also this type of beef
is ~usuaI Iy well-done at 170 interna I tern pera tu re.
**NOTE: Line broi Ier pan with a Iumi num foi I when u!;irr~ pan for marinating, cooking with fruits, Cookine heavi Iy cured
meats. or for bastt ng food c1url ng cook In E. AVOId SPIIIIng these materia Is on cve n IIne r or door, See clean in E note, n!?
charts, Care Sect Ion.
I
3-5 Ibs.
35-40 min.
Under 10 Ibs. 10-15 Ibs.
20-30 min. 20-25 min.
3-5 Ibs,
300 and’ rec~
thermometer
uce time, Fi
for internal
gure the estima
temperature at
Over 5 tbs.
30-35 min.
Over 15 Ibs.
15-20 min.
5.8 Ibs.
ted time from
half-hour inter
n Thigh
185-190
180-185
Page 23

i
Broiling iscooking foods by intense radi-
ant heat from the upper unit in the oven.
y,:f~~~fi~~~~~ tender cuts of ~=~ can be
13roik?d.Follow these steps to keep Spattering and smoking to a minimum.
1. If meat has fat or gristle near edge, cut
vertical slashes through both about
apart. If
ing a. layer about 1~-in. thick.
2. Place meat on broiler rack in broiler
pan which comes with range. Always use
rack so fat. drips into broiler pan; otherwise juic:es may become hot enough to
catch fire. Aluminum foil may be used to
line broilex%pan and rack. But, be CEI?TAIN to cut openings in foil, to correspond with rack so fat drips into pan
below. See note below before marinating
and using barbecue sauce.
3. Letters on oven wall, and chart below,
indicate where to position shelf for best
bwwning while cooking inside of food to
desirecl doneness. Placing food closer to
top of oven increases smoking, spattering,
desired fat may be trimmed, leav-
2-irI.
exterior brown on meat and the possibility
of fats on foods catching fire.
4.
LEAVE D(X)R .4JAR about 3 inches
—-door stays open by itself, and keeps
heating unit at proper temperature for
broiling.
SWITCH OVEN SET and OVE
5.
TERN? CONTROLS ‘TO BROIL. Pr
heating unit. is not neeessary.tt
6. Turn food only once during cooking.
Time foods for first side as on chart. Turn
food, then use times given for second side
as a guide to preferred doneness. (Where
two thicknesses and times are given _together, use first times given for thinnest
food.)
7. ‘I’urnoven off,serve food immediately,
leave pan
outs~de oven to cool during meal
for easiest, cleaning.
Cooking times given are approximate and
should be used only as a guide; they are
based on meat at refrigerator temperature
when placed in oven.
t?~!a~~: If your range is being operated on
lighter ~r~wn t,han expected, even though directions have been careful~y fo~iowed.
Browning can be improved as follows:
Follow directions given on this page for setting up the oven, preparing food,
setting controls and leaving door ajar.
Preheat the broil unit f~r IOminutes with food and broiler pan outside the oven.
~]ace food in
~Ven, leave door ajar and time first sicleof food as directed. Turn
low power (voltage), broiled foods may be
Page 24

1in. thick
(1-1?/2 tbs.)
1%2 in,thick
(2-2?/2tbs.)
X272 Ux3.r split
1 !b.fillets
1/4.1/2 in.
2 (68 WZ*
1-2 slices, ~2 in.
each]
about 1 lb.
IY2, in
(1Y2 Ibs.)
(Y2 ii.)
2
Z [1
in.)
about 1.%.
c
c
c
c
:
A
c
6-9
6-8
8-10
J&i
20-25
30-15
4-5
B
c
B
-c
B
4-5
9-11
4-6
12”14
cool,ckan and rinse.
2 (1 in.)
about
10-12 OZ.
2 (1V2 in.)
about 1lb.
1 lb.pkg.(10)
2-4 slices
1pkg.(2)
2—split
24
c
c
c
B
c
D
1)
4-7
8-1o
1$:4
1-2
%2
Page 25

while you are kwxmingq~~~~~~~~w~~~Y~~~’
Sdf-dt?mhg oven?weMxo$nmend2 hours for
h? moderatesoil condition, but h some cases
23longer dewing time, up to 3 hours may be
rwwewwy.in
order tojudge the degreeof soil,
SI”EP1:
Remove broiler pan, rack and other
from the oven. (Oven shelves may
oven.j
cookware
be left in
o
look.
at the oven floorand walls.Lightspatter
and thinner spillswould generally
cleaning.HeavygreasyWillsand ~Patter
hours
on the oven interior would need up to 3 hours.
Close oven door and make sure oven light (D)
is off.
need only 2
2:
Wipe up heavy soil on oven bottom.
\
\
\
——~.—
G. 0p6niHgS
D. Oven
Light
in Door
—_&—
smEP3!
Clean spatters or spiils on oven front frame
(A) and oven door outside gasket (B) with a
dampened cloth. Polish with a dry cloth, Do
not clean gasket (B), Do not allow water to
run down through openings in top of door (C).
~TeIer use a
around
commercial ~ven cleaner in and
self-cleaning oven.
1:
‘Mm OVEN SET and OVEN TEMP knobs
clockwise to CLEAN. Controls will snap into
final position when the CLEAN location is
reached.
Page 26

g’y~p ~:
W& and hold in LATCH
‘[ON -whilesliding LATCH HANDLE to the
righi until it is in CLEAT? position.
RELEASE 13LJT-
STEP 3:
Make sure both the range clock and the
START dial show the correct time of day.
Decide on cleaning hours necessary—two
hours for moderate soil or three hours for
hcav’ysoil.
Add these hours to present time of day, then
push in and turn STOP (CLEAN) dial
clockwise to desired tirnc. CLEAN 1NG
Light glows showing cleaning is starting.
in about 30 minutes the LOCKED Light
glows indicating oven is hot and door
cannot be opened. Oven door and window
get hot during self-cleaning. DO ‘NOT
T(3UCH.
STEP 1:
When LOCKED Light is off, push and hold in
LATCH RELEASE Button while sliding
LATCH HANDLE to the left until it is in
COOK position,
STEP 2:
Turn OVEN SET Knob to OFF
STEP ‘%
Turn OVEN TEMP Knob to WARM.
NOTE: If you wish to “start” and “stop”
cleaning at a later time than shown on clock,
push in and turn START dial to time you wish
to “start”, Add the hours needed for cleaning
to this “start” time, then push in and turn
STOP (CLEAN) dial to the desired time. Oven
will automatically turn on and off at the set
times,
26
Page 27

& After ha~ing just used the oven. the
i.OCK ED Light c;~me on and J could not
nlo~’ethe LATCH HANTD LE. Why?
~. LOCKED Light glowing indicates that
oven is hot. Open oven door to cool the
internal cavity. After a short period of time,
set up controls for cleaning again.
~. What should 1 do if excessive smoking
occurs during cleaning?
8. This is caused by excessive soil and you
should switch the OVEN SET Knob to OFF.
Open windows to rid room of smoke. AHOW
the oven to cool for at least one hour before
opening the door. Wipe up the excess soil and
reset the clean cycle.
Q, 1s the
cleaning normal’?
~. Yes. “Thisis the metal heating and cooling
during both the cooking and cleaning functions.
~. Whv won’t my oven clean immediately even
thougfi 1have set all the time and clean knobs
correct 1y’?
~. Check to be sure your START dial is set to
the same
“crackling”
timeas RANGE CLOCK. Alsocheck
sound 1 hear during
to be sure LATCH HANDLE is in CLEAhl
position.
@ 1fmy oven clock k not working can 1still
self-cleanmy oven?
fk No. ‘i’ourAutomatic Oven Timer uses the
range clock to help start and stop
cleaning cycle.
& Can 1 clean the Woven Gasket around the
oven door’?
&. No, this gasket is essential for a good oven
seal and care must be taken not to rub,
damage or move this gasket.
your self-
~, What causes the hair-like lines on the mMmeled surface of my oven?
& This is a normal condition resulting from
heating and cooling during cleaning. They do
not affect how your oven performs.
@ Should there bc any odor during the
cleaning’?
&. Yes, there may be a slight odor during the
first few cleanings. Failure to wipe out excessive soil might also cause
cleaning.
Q. My oven shelves have become gray after
several cleanings. 1sthis normal’?
~. Yes. After many cleanings, the shelves ma.
lose some luster and discolor to a deep gray
color.
Q. Can I use commercial oven cleaners on any
part of my self-cleaning oven’?
~. No cleaners or coatings should be used
around any part of this oven. if you do use
them and do not wipe the oven absolutely
clean, the residue can scar the oven surface
and damage metal parts the next time the oven
is automatically cleaned.
@ Why do 1 have ash left in my oven after
cleaning(?
~. Some types of soil will leave a deposit
which is ash. It can be removed with a damp
sponge or cloth.
f&My oven shelves do not slide easily. What is
the matter?
After many cleanings,,oven shelves may
A.
become so clean they do not slide easily. Ifyou
wish shelves to slide more easily, dampen fin-
gertips with a small amount of cooking oii and
rub lightly over sides of shelf where they con-
an odor when
tact shelfsupports.
2’7
Page 28

Proper care and cleaningprocedures are essentiaI for a long satisfactory life for your range.
Ir.eluded in this section are directions and
CLEANING CHARTS for cieaning aH parts of
the range.When cleaning rangemanually,wear-
ing Of rubber gloves is recommended to protect
thehands.
The porcelain enamel finish is essentially glass
fused on steel at high temperatureand is breakabIe if misused. This finish is acid resistant.
Howevel-,any acid foods spilled (such as lemon
or othercitrusfruit juices,or mixturescontaining
tomato or vinegar) should be wiped up immediately. See chart for cleanimzswnzestions.
As Fkmr’and
Plastic
Because there is little heat except in the food,
or sometimesin the utensils,spills and spatters
are easy to remove.Some
with a paper towel, others may require a damp
cloth. Remove greasyspatterswitha sudsycloth,
then rinse,and dry. Do
on oven walls.
attem~tto removethe cover over the “stirrer” at
the tdp of the oven for cleaning. NEVER USE
A COMMERCIAL OVEN CLEANER ON ANY
PART OF YOUR MICROWAVE OVEN.
SPECIALNOTEWHEN USINGFMOWFI‘NSEARDISHWITH
MICROWAVEOVEN:
SCORCHEII-APPEA131MS“(AIMSON THESHELFOF YOUR
MICMWAWE OVEN,
cower
spatter can be removed
Underno circumstancesshouldyou
not use abrasive cleaners
usually caused by grease baking
onto shelf whilepreheating Brown ‘N Scar Dish,
may be removed with 13ar Kccpcrs Friend@
Cleanser. (Note: Grease does not normally bake
onto oven interior in microwave opcmtion,
however, high heats gcncratcd on bottom of
Brown ‘N Scar Dish can cause baked-on
condition on shelf only, if grease is present.)
After using Bar Keepers Friend@Cleanser, rinse
arid dry thoroughly, following instructions on
can. Do not use Bar Keetxrs Friend@ Cleanser
with a. minimum of sudsy warm water. Rinse
thoroughlyand dry.
Metal and Plastic Parts on Door—to assure a
tight seal around door, this area must be wipec]
frequently with a damp cloth to removeaHsoil.
A buildup of soilcould result in leakageof microw-
ave energy from the oven. KX3 NOT USE
ABRASIVES, SUCH AS CLEANING POWDERS OR. STEEL AND PLASTIC PADS.
THEY WILL MAR THE SURFACE OF
THESE PARTS. ALSO, ALL CLEANING
MATERIALS USED ON THE DOOR PARTS
MUST BE THOROUGHLY RINSED OFF.
Probe is.sturdy, but care should be takenhan-
dling.IX5nottwistor bend;avoiddroppingtemp-
erature probe.
Cleanas soon after usingas possibie.TO clean,
wipe with sudsy cloth, then rub lightly with
plasticscouringballif necessary.Rinse and dry.
(Or washindishwasher.)
DO NOT USE ‘TEMPERATURE PROBE IN
OVEN UNLESS IT IS INSERTED INTO
FOOD, AND TIME/TEMP SWITCH 1S AT
TEMP.
Cleanarea under reflectorpansfrequently.Accu-
mulated soils, especially grease, may catch fire.
‘Po make your cleaning job easier, the surface
units on your range are Plug-h which can be
removed.
TO REMOVE PLUG-IN SURFACE UNIT:
a. Always be certain that the control for that
surface unit is at OFF positionand theunit coils
are ccIoibefore attemptingto removethe unit.
28
Page 29

pggCRgL*JAVE CD(IKING CENTER: CAREl AND CLEANING
b. Raise
tacle,aboutone inch above the pan/ring and pull
it away from the receptacle.
c. Carefully pull the unit terminalsthrough the
openingin thereflectorpan/ring.
move. the chrome-plated reflector pan/ring to
cleanundertheunit.
Nfll%: I%mgeswitn Plug-in surface units have
ctmme-piatedreflector panlrings.
DO NOT COVER W’ITH ALIJfvliNt,lFirliWIL Clean as
recommendedin (3eaning Chart.
Wipe around edges of the surface unit opening
in the cooktop, clean the bowl-shapedarea below
the unit and rinsewith damp cloth or sponge.
a. Place chrorne-p~ateclreflector pan/ring into
the unit recessin the cooktop so the unit recep-
taclecan beseenthroughopeningin reflectorpan.
b. Insert the terminalsof l?lug-In unit through
opening in chrome-plated pan/ring and into
receptacle.
c. Guide the surface unit into place so it fits
evenly.
the unikcoil, at point opposite recep-
After removing the P]ug.In surface unit, re-
in for
IX3 NOT immerse Plug-In surface units in
liquid of any kind. See the Cleaning Chart
for cleaningof surfaceunitcoils.If the spider
or medallionare cleaned,be certain to wipe
all cleaning materials thoroughly from the
unit coils before returning the unit to the
range.
DO NOT attemptto cleanPlug-In surface
units in an automatic dishwasher or selfcleaningoven.
DO NOT let the two electricalendsof the
Plug-h surface unit get damaged or bent.
The terminals are sturdy and will not be
damaged if handled with reasonable care.
The Plug-h unit terminals and receptacle
are designedto line up automatically when
plugged together.If the terminalsarc badly
bent and cannot be plugged into the receptacle, the unit should be taken to the GE
product servicecenter for replacement.
DO NOT attemptto clean,adjustor inany
way repairthe Plug-Inreceptacle.1fan abundance of liquid should accidentallyspill and
collectinsidethereceptacle,callfor service,
The Masteroven is ventedthrougha duct which
is locatedunderrightrear surfaceunit.Clean
duct frequently. (!70 remove, lift rear surface unit.,
remove reflector pan, and lift out duct. To repo-
placesolid part of duct over round opening
sition,
under -the cooMop. Then position hole in duct so
it sets directly under round opening in reflector
pan. Duct must be in correct position so moisture
and v~pcwsfrom oven can be vented during use.
N13V13RCOVER HOLE in oven vent duct with
aluminumfoil or any other material. To do so
preventstheovenventfrom functioningproperly
during cooking.
this
e
CAUTION: BEFORE REPLACING ANY
LAMP, DISCONNECT ELECTRIC
POWER TO RANGE AT THE MAINr
F[JSE OR CIRCUIT BREAKER PANEL.
LET LAMP (OR BULB) AND LAMP
ICOVERCOOL COMPLETELY.
WHEN CHANGING A FLUORESCENT
LAMP, DO NOT TOUCH THE METAL AT
ENDS OF LAMI?.
a. Push buttonseitherside of glasspanelcovering
lampand let swingdownfor accessto lamp.
b. Roll lamp,one quarterturn, remove.
C.Cheektype and wattageof lamp; replacewith
same kind. Hold lamp near each endand insert
prongsintosockets,Gentlyroll lampuntil it stops.
d. Connect electric power to range. Start lamp;
seeinstructionsonSurface Cookingpages.
Owen Lamp
a. Remove the threes!ottedscrewsin lamp cover;
see diagram. Remove cover; replace lamp with
40wattappliancelamp.
b. Replace lamp cover with three screws.
C.Connect electric powerto range.
I
Microwave oven lamp should last ahnostas long
as the appliance lasts. To replace
Product Service call.
it requires a
29
Page 30

if..$y$jefing‘th@
A leveling screw is located at each corner of the
base of the range. By
you can levelthe range to an unevenfloor with
theuseof a nut driver.
When cooking a food for the first time in your
new oven, use time g-ivenon recipe as a guidp
Oven thermostats,over a period of years, may
“drift” from the factory setting and differences
in timing between an old and a new oven of 5
to 10 minutes are not unusual.Your new oven
hasbeen set correctly at the factory and is more
apttdbeaccuratethantheovenwhichit replaced.
However,if you find that your foods consistently
brown too little or too much, you may make a
simple adjustment in the thermostat (Oven
‘1’emp)knob.
~LL KNOB OFF OF $HAFT. L~~K AT
CK OF KNOB AND NOTE CURRENT
TING, BEFORE MAKING ANY ADJUSTMENT. To increase oven temperature,
adjust toward I-Hor RAISE; to decrease tem-
perature adjust toward LO or LOWER. Each
notchchangesoventemperature10degrees.Oven
temperaturecan be raisedby 20degrees or lowered by 30 degrees.
See sketches below. One of the two type knobs
shown will be on your range. TO adjust, follow
directionsunder tie applicablesketch-.
removingthebottomdrawer,
Qfw$%-%
Lower. Pointer is designednot to move easily.If
it is seated so it is difficultt.omove,pointer may
be loosened slightly. Insert a thin ~crewdriver,
knife blade or similarinstrumentand lift up end
of pointer slightly.
2. After adjwtment ismade, press pointer firmly
againstknob.Return knobto range,matchingflat
area on knob and shaft. Recheck oven perfomnance before makingan additionaladjustment.
l&iI@ a~
IN MICROWAVE OVEN, use metal only as
A.
directed in the Cook Rook. Metal strips as used
on meat roastsare helpful in cooking food when
usedasdirected. Metal traysmay beusedfor TV
dinners.However,whenusingmetalin themicrowave oven, keep metal at least l-inch away from
sides of microwave ouen.
E%3ii
B. IN CONVENTIONAL OVEN, if desired,
broilerpanmay belinedwithfoil andbroilerrack
may be covered with foil for broiling.ALWAYS
BE CERTAIN TO MOLD FOIL THOROUGHLY TO BROILER RACK AND SLIT
FOIL TO C!ONI?ORMWITH SLITS IN RACK.
Broiler rackis designedto minimizesmokingand
spattering, and to keep drippings cool during
broiling.Stoppingfat and meatjuicesfrom draining to the broiler pan preventsrack from serving
itspurpose,andmay letjuices becomehot enough
to catch fire.
C. ON CHROME-PLATED REFLECTOR,
FAN/RINGS. Do not cover withaluminumfoil.
Cleanas recommendedin CleaningChart.
1. Remove knob,and hold so pointer is at top of
knob.Usinga pot holderor similarmaterial,hold
“skirt” of knob firmly in one hand. Cirasphandle
of knob in other hand. Note position of pointer
and turn handleto move pointertoward Raise or
D(I NOT placea sheetof ah.uninumfoil on
shelf of either conventional or microwave
oven. To do so may result in improperly
cooked foods, damageto oven finish,and in-
creaseinheaton outside surfacesof the range.
30
Page 31

} utomatic
Temperature Probe
~tK!S~ cloth.
F’l~>t~;scouring
Wash as soon after w.in~ as possible. To clean, wipe with sudsy cloth,
then rub !igh~lywith plastic scouring ball if necessary. Rinse and dry.
(Or wash !n dishwasher.)
Shelves
(see st?lf-
Cleaning oven
directions.)
Storage Drawer
Surface Unit CGi!s
Chrome-Plated
Refiector
Pan/ Rings
and Water
Soap
Co&~a;&~al Oven
Soap
and Water
Soapand Water
Stiff-Bristled Brush
Soap-Filled
Scouri!ug Pad
Remove oven ver!t duet found under rear surface unit(s].
soapy water,
tirmintheuse0$~/lMTlini,MTfoil.Cafe$ktim
For hand cleaning, any and all mentioned materials can be used. Rinse
thoroughly to remove all materials after cleaning.
NOTE: Some commercial oven cleaners cause darkening and discoloration. When using for first time, test cleaner on small part of shelf
and check for discoloration before completely cleaning.
Clean with clamp cloth. DO NOT TRY TO REMoVE, you will da
your oven.
For cleaning, removedrawer by pulling it all the way open, tilt up the
front and Ilft out. Wipe with damp cloth, or sponge and replace.
Never use harsh abrasives or scouring pads.
Spatters and spills burn away when coils are heated. At end of meal,
heat soiled W%ts‘at HIGH, \&t soil burn off “about a minute,” ~kvitch
units OFF. Avoid getting cleaning materials cm coils. Wipe off any
cleaning materials with damp paper ‘to’we[ before heating unit,
Let unit COOIcompletely before handiing.
Do not dean Plug in units in self-clean oven.
Clean as below or in dishwasher. DO NOT CLEAN IN SELF-!2LEAN
OVEN, they will discolor.
Wipe all rings after each cooking, so unnoticed spatter will not “burn
on” next time you cook. To remove “burned-on” s atters use any or
all cleaning materiais mentioned, Rub lightly wit scouring pad to
prevent scratching of surface. See picture on Surface Cooking pages
for sizes of pans to use to prevent permanent discoloration.
dry and repface. See ~ositioning directions, and, for caLr-
Wash \n hot
“1
&3ke ijnit
~ieating LJnitNear
i-[oorof Oven)
Pan
i3roiler
and Rack
;oap and Water
;oap-Filled
Scouring Pad
~lastic Scourine Pad
Heating l.lllJtsdo nOt
is heated, Ihe bake unit is hinged to you can lift it to reach oven floor.
not let soiled pan and rack stand in oven to cool.) Drain fat, cool
[Do
pan and rack slightly. Sprinkle on detergent, fill pan with warm water.
Spread cloth or paper towel over rack, let stand a few minutes. Wash,
;Courlng if necessary. RInse and dry. (or wash in dishwasher.)
r~q~ir~+n~~nual cleaning: sOiJ burns off ~~[:enunit
Page 32

C)u&t~dfFinish
Soap and Water
M&ai
Porcelain
Enamel
Mi;;:.m~ve Oven Door
Microwave Oven
Iiitericm
Optional Ventilating
Hood Metal Grease
Filters
Soapand Water
Paper Towel
Dry Cloth
Soap and Water
S@?Column
Sudsy Cloth
Damp
Damp Cloth
Paper Towel
Soap and Water
———
w
at Right
————
Acids— if range is hot use dry paper towel or cloth to wipe up right
away. When surface is CODI,wash and rinse. Other--such as fat smatterings, etc., wash with soap and water when cooled, rinse. Polish with
dry cloth.
Avoidcleaning powdersor harsh abrasives which may cause scratching
of surface. See note on porcelain enamel. Care
On !X3.F-CLEAB!!NGOVEN door, clean ONLYdoor liner outside the gas,,
ket. Do not rubar damage gasket. Avoidgetting ,41VYci%ming rnatermls
on gasket. @cor is removable, but removmg is
To
assure a tight seal around door this area must be wiped frequently
with a damp cloth to remove all soil.
in leakage of microwave energy from the oven. DO
SIVES, SUCH AS
THEY WILL MAR THE SURFACE (3F THESE PARTS. ALSCI, ALL CLEANING MATERIALS USED ON THE DOOR
RINSED OFF.
CLEANING POWDERS OR STEELAND PLASTIC PADS.
A build up of soil could result
PARTS MUST BE THOROUGHLY
Section.
i’!OtWCOiilnN?lK&?d.)
NOT USE AE3RA-
Page 33

(
i
[
1
~
~~-7hj/3fiE)k, ~leLftiqt1ufdbo6tf~
.
,
“%
1
Ii
I
.
IF,
TAKES 4NFTEER !4hfW
Check to be sure
“O,” no cooking takes place. (H time remains on Timer, oven will operate until time reaches
“0,” then gooff.)
!3F !s
~. Check to make sure TUi.4E/TEMP switch is correctly set. When cooking by TIME, i
mistake TIME/’I’EMP switch is set at TEMPj buzzer somids when “Start” buttol~.
pressed.
b. When cooking with TEMPERATURE PROBE, check
“seated” into oven.receptacle. If is is not securely “seated,” and oven is otherwise set for
Temperature Probe cooking, buzzer sounds to tell you firm connection has not been made.
C.When cooking with TEMPERATURE l?ROBE, check to be sure temperature set on dial
is higher than actual temperature of food in oven. H food has reached or exceeded temperat-
ure set on dial, buzzer sounds to tell you set temperature has been reached.
SFTHE GWU
Check to be certain the door is securely closed, and the timer set. 1fa dish touches the door
when the door seems closed, it actually may not be firmly closed. Unless the door is closed
to engage the safety interlocks, the microwave energy cannot come into the oven. Check to
be certain that TINIE/TEMP switch is pushed all the way right or left. An “in-between”
setting should be avoided.
TIME/TEMP Switch is set at TEMP. If set at TIMEj and Timer is at
to be sure cable end is securely
R!Q
J
1
SF GOES OFF SET Hills
Check the house fuse protecting the range circuit. If fuse has not blown and power continues to go off, this signals a problem, so call serviceman.
IF OUT
Changing Microwave oven lamp requires a Product Service call. However, original lamp
should last for about the life of range.
Page 34

is B&It
k A
AUTOMATIC OVEN TIMERS. Check to be certain
step-by-step directions were followed correctly.
Review pages on use of timer.
BAKING. Checkmaterialand size of bakingutensil: placementof shelf and food in oven. If the
oven was used for broiling,just before bakinga
food, turn the oven completely off and open the
wide so it can cool (5 or
may be used for baking.
011.iiNG.Be sure OVEN TEMl? is set at
BROIL. If there was excessive smoking and
spattering: Were shelf and broiler pan at position suggested on broiling chart? If aluminum
foil was used on broil rack, was it handled according to directions?
SUF?FACELJNII%.If lightson range are working
but the oven or surface units do not heat, call
serviceman.
Owen
CAN’TLATCHDOOR.
Check the step by step directions for latching door: (a) Did yell pUShand
}lo/t/in latch releasewhile moving latch? (b) ‘l”urn
O\”enSet knob to CLEAN. Glowing Lock Light
after knob is turned shows oven is too hot from
pretious oven use and door won’t latch. Open
door wide so o~fencan cool, then latch can be
mqled. (c) Oven Set must bcat CLEAN or OFF’
bciorc latch
ODOR SOUNDS.
Srl FCleunitlg(.hfen,Cure .S’ectio)l.
OVENOOfSN’TCLEAN.
can be moved.
Check More l~lfornw[iotl on I}w
Check the directions to bc
certain ALL operations were done correctly for
starting the cleaning cycle. Clcan 1ight should
corncon.
~~o>sib!ccauses Ofthe problem:(a)
proper Automatic l“irncr dial. ‘I”hc $-l”OP dial
mtiszbc set and advanced beyond the time noted
on riingc clock. (b) “1’hcS“10P dial was not
*‘incedfor long enough time. (c) A thick pile
illover when cle~inedleaves a heavy layer of
n spots w’hich couId havt insulated the arca
from further heat. Scc page 27 concerning ash.
(d) Both OVEN SE-l”and OVEN TEIMP must bc
AjNsctting.
i]i C“LE
10 minutes).Then
~;2ii!UlX tO SCt
SfM13KlNG. Cooking utensils and excessive
amounts of spillovers and liquid grease not
baked on were not removed before starting
SELF-CLEANING OVEN.
.
tht
If oven and surface unitsdo not heat, and lights
on the range are not working, check first to see
that the three-pronged plug connected on back
of rangeis fully inserted in wall receptacle.
.
F%mge Imse
The difficulty might also be in the main distribution panel of your house by a blown oven
circuit fuse, a tripped oven circuit breaker, the
main fuse, or the main circuit breaker,depending upon the nature of the power supply. If a
circuit breaker is involved, reset it. If the control box employs fuses, the oven fuse (a cartridge-type) should be changed. BUT ONLY
BY SOMEONE FAMILIAR WITH ELEC-
TRICAL CIRCUITS.
Apartment tenants
should requesttheirbuildingmanagementto perform thischeckbefore callingfor service.
If after replacingthe oven circuit
the circuit breaker, the fuse bl~wsor circuit breaker
trips openagain, call for scrvicc.
WHEN YOIJ CALL GENERAL ELECTRIC
FOR SERVICE help them give you prompt
service by:
1. Giving an accurate description of the trouble.
2. Giving the complete model number of your
oven. Below is an example of nmne plate. To
locate name plate open oven door and look on
frame above oven. Model and serial numbers are
also on the Purchase Record Card which came
with your oven.
from card before sending it in.
(~)
1O”’’’&~ERAL@ ELEC’t?iC’““ ~“]‘;;~~
0!, 3 W 1.3 !4; AC 0,11,
n U51
r
v
Wm, m
IVPE Ammwd
Fcc
?+0
—:::--=
I_
and condominium owners
fuse or resetting
If desired, copy the numbers
—..-—..———-—
1
—.-—
Page 35

Saveproof of ortginal purchase date such as your sales slip or cancelled check to estabiish warranty period.
——
—.———
FULLONE-YEAR
For one year from date of original
purchase, we will provide, free of
charge, parts and service labor in
your home to repairor replace
part
of the microwave Oven/range
any
that fails becauseof a manufacturing defect.
For the second through fifth year
from date of original purchase,
we will provide, free of charge, a
replacement
magnetron tube if the
magnetron tube fails because of a
manufacturing defect. Youpay for
the service trip to your home and
service labor charges.
!~ ~()~ ~Service trips to your home to
teach you how to usethe product.
Read your Use and Care material.
If you then haveany questions
about operating the product,
please contact your dealer or our
Consumer Affairs office at the
address below.
e Improper installation.
If you have an installation problem,
contact your dealer or installer.
Youare responsible for providing
adequate electrical, exhausting
Pagesfor
CUSTOMER CARE’ SERVICE
GENERAL
CUSTOMER CARE’ SERVICE.
e Replacement of house fuses
or resetting of circuit breakers.
e Failure of the product if it is
used for other than its intended
purpose or usedcommercially.
e Damage to product caused
by accident, fire, floods or acts
of God.
WARRANTORISNOT RESPON.
SIEILEFORCONSEQUENTIAL
DAMAGES,
GENERAL ELECTRIC
ELECTRIC-HOTPOINT :-.::=:::.
.———————.
and other connecting facilities.
or : ‘- ‘“- --
Some states do not allow the exclusion or limitation of incidental or consequential damages, so the above limitation
or exclusion may not apply to you. This warranty gives you specific legal rights, and you may also have other rights
which vary from state to state. To know what your legal rights are in your state, consult your local or state consumer
affairs office or your state’s Attorney General.
Warrantcx Gefleral Electric Company
Part h~O.862A725 1=%6
Pub.
t---
!tiO. 49-4541
+
6/87 ./
 Loading...