

Page 1
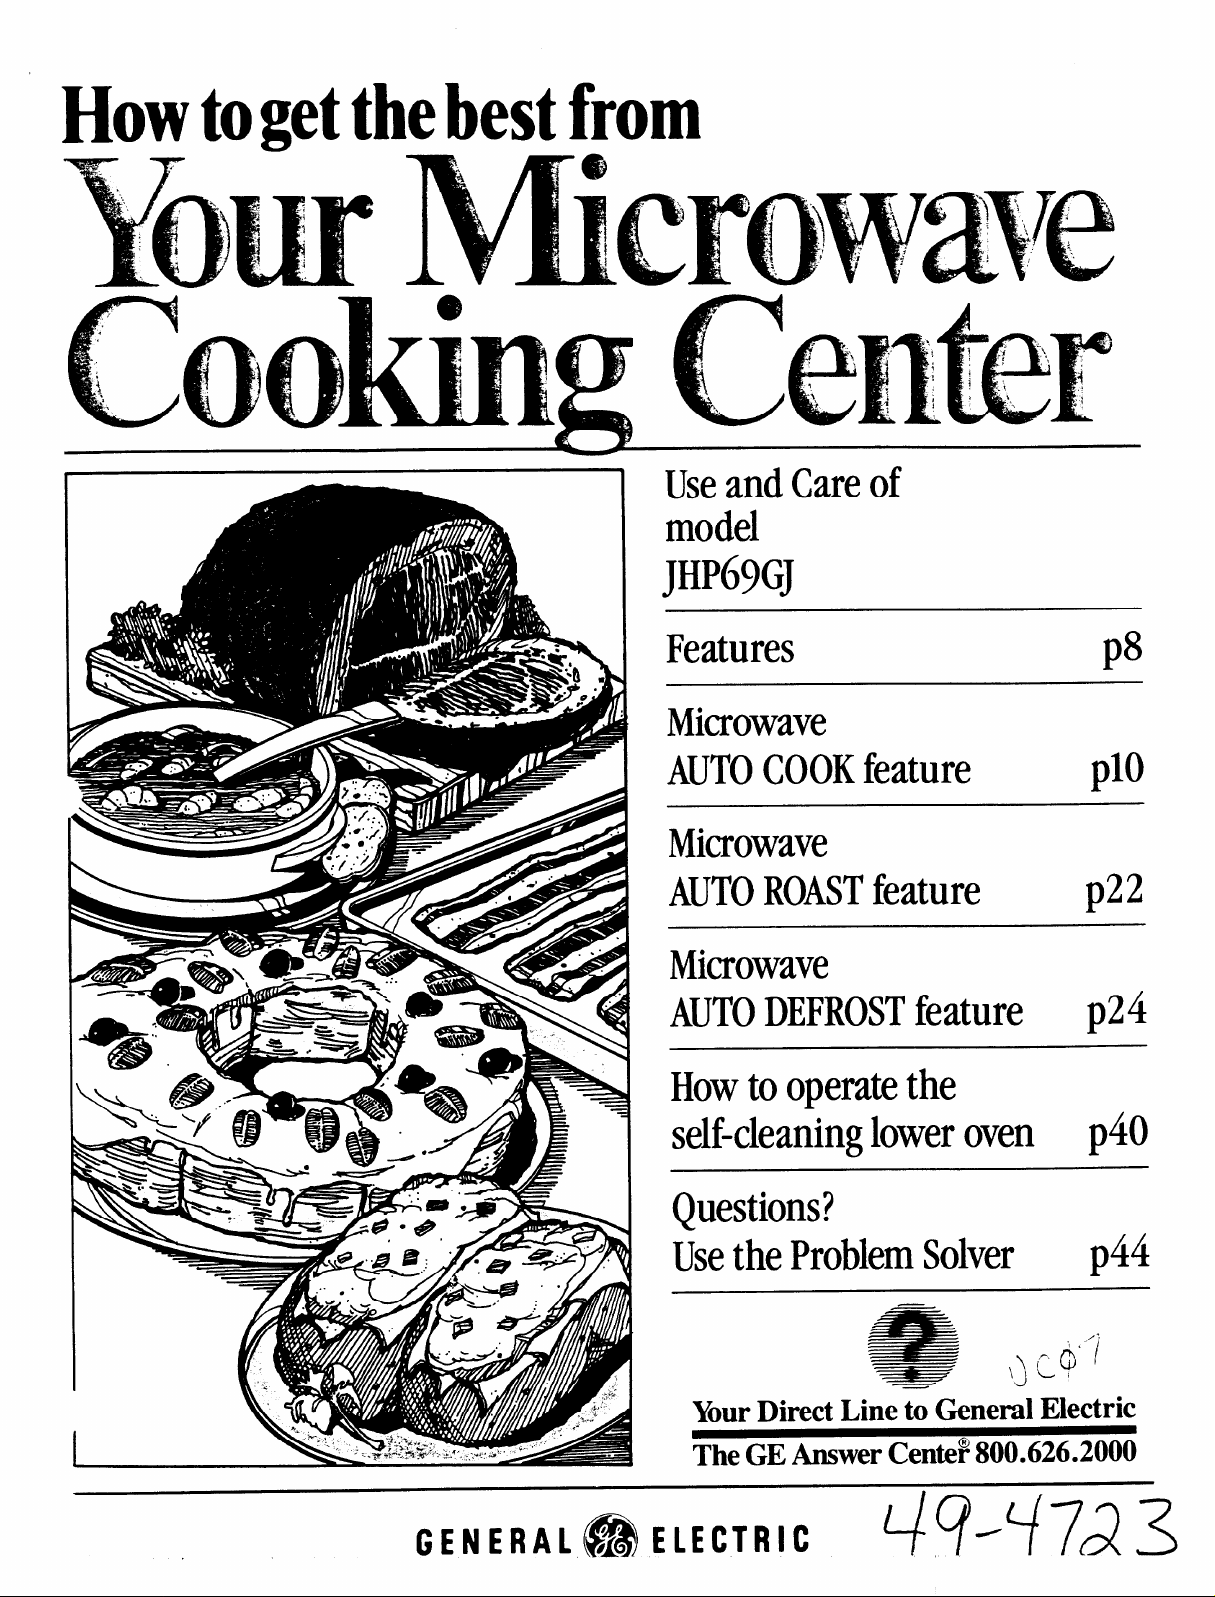
How
getthebestfrom
UseandCareof
model
Jm?69GJ
Features
Microwave
AUTOCOOKfeature
Microwave
AUTOROASTfeature
Microwave
AUTODEFROSTfeature
Howto operatethe
self-cleaningloweroven
Questions?
p8
plo
p22
p24
p40
Usethe ProblemSolver
Your Direct Line to General Electric
The GE Answer Cente~ 800.626.2000
GE NE RAl@EIECTRIC W-772 3
p44
Page 2
---
.—
,’& - “F;
.. --=.
m::::’:1: ‘
k-..
A
Microwaving Tips . . . . . . . . . . ...3
Safety Instructions . . . . . . . ...4-6
Features of Your
Cooking Center . . . . . . . . . ...8
TouchControlPanel . . . . . . . . ...9
AutomaticCooking . . . . . ...10-19
Automatic Cooking Guide . . ...20
Minute/Second Timer. . . . . . ...21
Automatic Roasting &
Guide . . . . . . . . . . . . . ...22.23
Automatic Simmer . . . . . . . . ...23
Automatic Defrosting. . . . . . ...24
Manual Defrosting . . . . . . . . ...25
Time Cook . . . . . . . . . . . . . . ...26
Temp Cook/Hold . . . . . . . . . ...27
Safety Instructions . . . . . . . ...4-6
Howto Use . . . . . . . . . . . . . ...28
Cooking Guide . . . . . . . . ...29.30
Home Canning Tips . . . . . . . ...47
Safety Instructions . . . . . . . ...4-6
Features . . . . . . . . . . . . . . . . . ...8
Oven Controls . . . . . . . . . . . . ...8
Oven Light . . . . . . . . . . . . . . ...31
Oven Shelves . . . . . . . . . . . . ...31
Minute Timer, Clock,
Automatic Oven Timer . . . ...31
Baking &Guide . . . . . . . ...32.33
Roasting & Guide. . . . . . ...34.35
Broiling&Guide . . . . . . ...36.37
Operating the
Self-Cleaning Oven. . . ...40.41
Before using your Cooking
Center, read this book
carefully.
It is intended to help you operate
and maintain your new Cooking
Center properly.
Keep it handy for answers to your
questions.
If you don’t understand something
or need more help, write (include
your phone number):
Consumer Affairs
General Electric Company
Appliance Park
Louisville, KY40225
Write down the model
and serial numbers.
You’ll find them on a label inside
the upper oven on the left side.
These numbers are also on the
Consumer Product Ownership
Registration Card that came with
your Cooking Center. Before
sending in this card, please write
these numbers here:
Model Number
Serial Number
Use these numbers in any
correspondence or service calls
concerning your Cooking Center.
The electric output of this
microwave oven is 625 watts.
Be sure your Cooking
Center is registered.
It is important that we, the
manufacturer, know the location of
your Cooking Center should a need
occur for adjustments.
Your supplier is responsible for
registering you as the owner.
Please check with your supplier to
be sure he has done so; also send in
your Consumer Product Ownership
Registration Card. If you move, or
if you are not the original purchaser
please write to us, stating model
and serial numbers. This appliance
must be registered. Please be certain
that it is.
Write to:
General Electric Company
Range Product Service
Appliance Park
Louisville, KY40225
If you received a damaged
Cooking Center ...
Immediately contact the dealer
(or builder) that sold you the
Cooking Center.
Save time and money.
Before you request service ...
check the Problem Solver on pages
44 and 45. It lists minor causes of
operating problems that you can
correct yourself.
Optional Accessory
available at extra cost from your
GE supplier.
JX79 Charcoal Filter Kit.
Add for non-vented installation.
Before Using Your
Cooking Center . . . . . . . . . ...2
Energy-Saving Tips . . . . . . . . ...7
Model & Serial Number
Location . . . . . . . . . . . . . ...2.8
Careand Cleaning . . . . . ...38-43
The Problem Solver . . . . ...44.45
Exhaust System . . . . . . . . . . ...46
If You Need Service . . . . . . . ...47
Warranty . . . . . . . . . .. Back Cover
All These Things Are Normal
● Steam or vapor escaping from
around the door.
● Light reflection around door or
outer case.
● Dimming oven light and change
in blower sound may occur while
operating at power levels other
than high.
with Your Microwave Oven:
● Dull thumping sound while
oven is operating.
● Some TV-Radio interference
might be noticed while using your
microwave oven. It’s similar to the
intetierence caused by other small
appliances and does not indicate a
problem with your oven.
Page 3
Am2mwavhlg Tips
PRECAUTIONS
● Make sure all cookware used in
your microwave oven is suitable for
microwaving. Most glass casseroles,
cooking dishes, measuring cups,
custard cups, pottery or china
dinnerware which does not have
metallic trim or glaze with a metallic
sheen can be used. Some cookware
is labeled “suitable for Microwaving?
If you are unsure, use this dish test:
Measure 1cup water in a glass cup.
Place in oven on or beside dish.
Microwave 1minute at HIGH. If
water becomes hot, dish is microwave
safe. If dish heats, it should not be
used for microwaving.
● Paper towels, wax paper, and
plastic wrap can be used to cover
dishes in order to retain moisture
and prevent spattering.
● Some microwaved foods require
stirring, rotating, or rearranging.
Check your Cookbook for specific
instructions.
● Steam builds up pressure in foods
which are tightly covered by a skin
or membrane. Pierce potatoes, egg
yolks and chicken livers to prevent
bursting.
when Poww is
Connected to
the Own
TO AVOID
POSSIBLE
EXPOSURE TO
EXCESSIVE
MICROWAVE
ENERGY
(a)Do Not Attempt to operate
this oven with the door open since
open door operation can result in
harmful exposure to microwave
energy. It is important not to
defat or tamper with the safety
interlocks.
b) DO Not Place any object
between the oven front face and
the door or allow soil or cleaner
residue to accumulate on sealing
surfaces.
(c) Do Not Operate the oven
if it is damaged. It is particularly
important that the oven door close
properly and that there is no
damage to the:
(1) door (bent)
(2) hinges and latches (broken or
loosened)
(3) door seals and sealing surfaces.
(d) The Oven Should Not be
adjusted or repaired by anyone
except properly qualified service
personnel.
The panel displays five 8’s and
18POWER on the upper portion
and all of the oven functions on the
lower portion. After 15seconds,
all lights disappear and “Reset”
appears in the upper portion. Touch
the CLEAR/OFF pad; the oven is
then ready for use and the clock
can be set.
If power is disrupted at any time,
the above sequence reoccurs and
you must reset the clock after
touching CLEAR/OFF.
3
Page 4
INIPORTAYT 5wmrY msT.xucTI’GPis
Read all instructions before using this appliance.
When using electrical appliances
basic safetyprecautions shouldbe
followed, includingthe following:
WARNING-To reduce the risk
ofburns, electric shock, fire,
injury to persons or exposureto
excessivemicrowaveenergy:
s Use this appliance only for its
intended use as described inthis
manual.
s Be sure your appliance is
properly installedand groundedby
aqualifiedtechnicianin accordance
with the providedInstallation
Instructions.
QThis appliance must be
connectedto a grounded, metallic,
permanent wiring system, or an
equipment grounding conductor
should be run withthe circuit
conductors and connectedto the
equipment grounding terminal or
lead on the appliance.
. Thisapplianceshouldbeserviced
onlybyqualifiedservicepersomel.
Contactnearest authorizedservice
facility forexamination, repair or
adjustment.
● Beforeperforming any service,
DISCONNECT’THE RANGE
POWERSUPPLYATTHE
HOUSEHOLD DISTRIBUTION
PANELBYREMOVINGTHE
FUSE OR SWITCHINGOFF
THE CIRCUIT BREAKER.
● Do not coveror block any
openingson the appliance.
s Do not use outdoors.
● Do not operate this appliance if
it isnot workingproperly, or if it
has beendamaged or dropped.
● As with any appliance, close
supervision is necessary when
used bychildren.
c Do not leave children alone—
childrenshouldnot be leftaloneor
unattendedin area whereappliance
is inuse. They should neverbe
allowedto sit or stand on anypart
ofthe appliance.
● Don’t allow anyone to climb,
stand or hang on the door,
drawer or range top. They could
damage the range and even tip
it over causing severe personal
injury.
● CAUTION: ITEMS OF
INTEREST TO CHILDREN
SHOULD NOT BE STORED
IN CABINETS ABOVE A
RANGE OR ON THE
BACKSPLASH OF A RANGE–
CHILDREN CLIMBING ON
THE RANGE TO REACH
ITEMS COULD BE SERIOUSLY
INJURED.
● Wear proper clothing. Loose
fittingor hanginggarments should
neverbe worn while usingthe
appliance. Flammable material
could be ignitedif brought in
contact with hotheating elements
and maycause severeburns.
Q
Use only dry potholders—
moist or damp potholders on hot
surfaces may result inbums from
steam. Do not let potholderstouch
hot heatingelements. Do not use
a towelor other bulky cloth.
● Never use your appliance for
warming or heating the room.
● Storage in or on appliance—
Flammable materials should not
be stored in an ovenor near
surfaceunits.
Q
Keep hood and grease filters
to maintain goodventing
clean
and to avoidgrease fires.
c Do not let cooking grease
or other flammable materials
accumulate in the range or
near it.
● Do not use water on grease
fires. Never pick up a flaming
pan. Smother flaming pan on
surface unit by covering pan
completely with well fitting lid,
cookie sheet or flat tray.
grease outside a pan can be put
out by covering with baking soda
or, if available, a multi-purpose
dry chemical or foam.
c Do not touch heating elements
or interior surface of oven. These
Flaming
surfaces maybe hot enoughto
burn eventhough they are dark in
color. During and after use, do
not touch, or let clothing or other
flammable materials contact
surfaceunits,areas nearbysurface
unitsor any interior area ofthe
oven; allow sufficient time for
cooling, first.
Potentially
hot surfaces include
the cooktopand areas facingthe
cooktop, oven vent openingand
surfaces near the openings, and
crevices around the ovendoor.
Remember: The inside surface
ofthe ovenmaybe hot when the
door is opened.
s
When cooking pork followour
directionsexactlyandalwayscook
the meat to at least 170”F.This
assures that, in the remote
possibility that trichina may be
presentinthe meat, it willbe killed
and meat willbe safe toeat.
Page 5
I
.
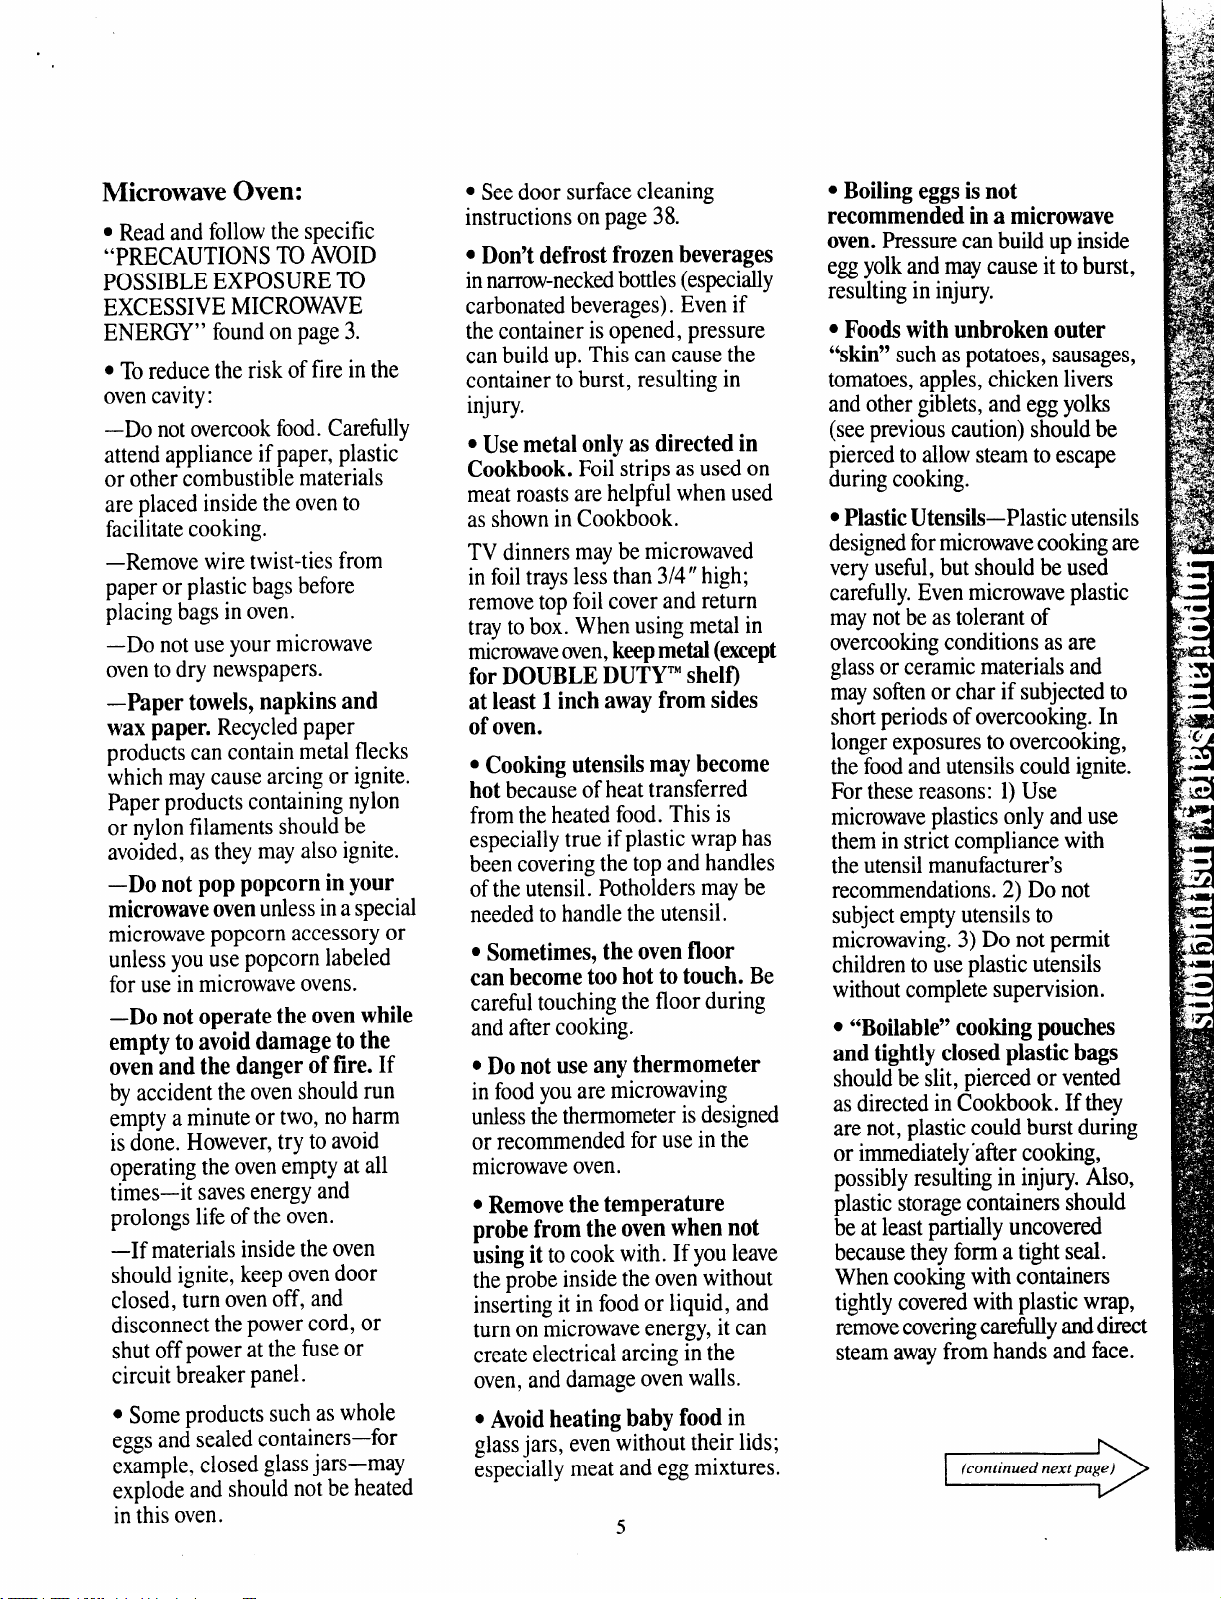
Microwave Oven:
● Read and followthe specific
“PRECAUTIONSTO AVOID
POSSIBLEEXPOSURETU
EXCESSIVEMICROWAVE
ENERGY” foundon page 3.
● Toreduce the risk of fire inthe
ovencavity:
–Do not overcookfood. Carefully
attend appliance ifpaper, plastic
or other combustible materials
are placed inside the ovento
facilitatecooking.
—Removewire twist-tiesfrom
paper or plastic bagsbefore
placing bagsin oven.
—Donotuse yourmicrowave
ovento dry newspapers.
–Paper towels, napkins and
wax paper.
products can contain metal flecks
which maycause arcing or ignite.
Paper products containingnylon
or nylon filamentsshouldbe
avoided,as theymay also ignite.
—Do not pop popcorn in your
microwave oven
microwavepopcorn accessory or
unless youuse popcorn labeled
for use in microwaveovens.
–Do not operate the oven while
empty to avoid damage to the
oven and the danger of fire.
by accident the ovenshould run
empty a minute or two, no harm
is done. However,try to avoid
operating the ovenempty at all
times—itsavesenergy and
prolongs lifeofthe oven.
—Ifmaterials insidethe oven
should ignite,keep ovendoor
closed, turn ovenoff, and
disconnect thepowercord, or
shut offpower atthe fuseor
circuit breaker panel.
● Some products such aswhole
eggsand sealed containers—for
example,closed glassjars—may
explode and should not be heated
in this oven.
Recycledpaper
unlessina special
If
c Seedoor surface cleaning
instructions onpage 38.
● Don’t defrost frozen beverages
innarrow-neckedbottles(especially
carbonatedbeverages). Even if
the container isopened, pressure
can build up. This can causethe
container to burst, resulting in
injury.
● Use metal only as directed in
Cookbook.
Foil strips as used on
meat roastsare helpfulwhen used
as shownin Cookbook.
TV dinnersmaybe microwaved
in foiltraysless than 3/4”high;
removetop foilcoverand return
trayto box.When using metal in
microwaveoven,
for DOUBLE DUTYTMshelf)
at least 1 inch away from sides
of oven.
● Cooking utensils may become
because of heat transferred
hot
keepmetal (except
fromthe heated food. This is
especiallytrue if plastic wrap has
been coveringthe topand handles
ofthe utensil. Potholdersmaybe
neededto handlethe utensil.
● Sometimes, the oven floor
can become too hot to touch.
Be
carefultouching the floor during
and aftercooking.
Q
Do not use any thermometer
in foodyouare microwaving
unlessthethermometerisdesigned
or recommendedfor use inthe
microwaveoven.
● Remove the temperature
probe from the oven when not
using it
to cook with. If youleave
the probe inside the oven without
inserting itin foodor liquid, and
turn on microwaveenergy, it can
create electrical arcing in the
oven, and damageovenwalls.
c
Avoid heating baby food in
glassjars, evenwithout their lids;
especially meat and eggmixtures.
5
● Boiling eggs is not
recommended in a microwave
Pressurecanbuild upinside
oven.
eggyolkand maycause it toburst,
resulting in injury.
c Foods with unbroken outer
“skin”
suchas potatoes,sausages,
tomatoes,apples,chicken livers
and other giblets,and eggyolks
(seepreviouscaution) shouldbe
piercedto allowsteam toescape
duringcooking.
● pl@ic utensils-plasticutensils
designedformicrowavecookingare
veryuseful, but should be used
carefhlly.Even microwave plastic
maynotbe astolerant of
overcookingconditionsas are
glassor ceramicmaterials and
maysoftenor char if subjectedto
short periods ofovercooking.In
longerexposuresto overcooking,
the foodand utensilscould ignite.
Forthese reasons: 1)Use
microwaveplasticsonly and use
them instrict compliancewith
the utensilmanufacturer’s
recommendations.2) Do not
subjectemptyutensils to
microwaving.3)Do not permit
childrento useplastic utensils
withoutcompletesupervision.
. “Boilable” cooking pouches
and tightly closed plastic bags
shouldbe slit, pierced or vented
as directed in Cookbook. If they
are not, plasticcould burst during
or immediately”aftercooking,
possiblyresultingin injury.Also,
plastic storagecontainers should
beat leastpartially uncovered
becausethey form a tight seal.
When cooking with containers
tightlycoveredwithplastic wrap,
removecoveringcarefullyanddirect
steamawayfrom hands and face.
Page 6
IIvD!?ORT~TT’SAFETY I!NJST’R..CTIGNS(continued)
● Use of the DOUBLE Dm
shelf accessory. (See
your
Cookbook for proper use.)
—Removethe shelf from oven
when notin use.
–Do not store or cook with shelf
on floor ofoven. Productdamage
may result.
–Use potholders when handling
the shelf and utensils. They may
be hot.
–Do not usemicrowavebrowning
dish on shelf. The shelfcould
overheat. Use ofshelf with
Automatic Cooking featureis
not recommended.
Self-Cleaning Lower Oven:
c
Stand away from the range
when opening oven door. The
hot air or steam which escapes
can cause burns to hands, face
and/or eyes.
● Don’t heat unopened food
containers in the oven. Pressure
could build up and the container
could burst, causing an injury.
● Keep ovenventducts
unobstructed.
● Keepovenfree fromgrease
buildup.
● Place ovenrack in desired
position while ovenis cool. If
racks mustbe handled when hot,
do not letpotholder contact
heating unitsin the oven.
● Pullingout shelftothe shelfstop
is a conveniencein liftingheavy
foods. It isalso aprecaution
against bums from touching hot
surfacesofthe dooror ovenwalls.
● When using cooking or
roasting bagsin oven,follow
the manufacturer’sdirections.
● Do not useyour oventodry
newspapers.If overheated,they
can catch fire.
● Do not clean door gasket. It is
essentialfix a goodseal. Becarefid
not torub, damage or moveit.
● Do not use oven cl~ne~. No
commercial ovencleaner or oven
linerprotectivecoatingofanykind
shouldbe used inor around any
part ofthe oven.
● Clean onlyparts listed in this
Use andCare Book.
● Before self-cleaning the oven,
removebroiler pan and other
utensils.
Surface Cooking Units:
● Use ~oWr Pan Size—This
appliance isequipped with one or
moresurfhceunitsofdifferentsize.
Selectutensilshavingflatbottoms
large enough tocoverthe surface
unit heatingelement. The use of
undersizedutensils willexpose a
portion ofthe heating element to
direct contactand mayresult in
ignitionofclothing. Proper
relationship of utensilto burner
will alsoimproveefficiency.
● Never leave surface units
unattended at high heat settings.
Boilovercausessmokingandgreasy
spilloversthat maycatch on fire.
● Be suredrip pans andventducts
are not coveredand are inplace.
Theirabsenceduringcookingcould
damagerange parts and wiring.
● Don’t use aluminum foil to line
drip pans
exceptas described in this book.
Misusecouldresultina shock, fire
hazard, or damageto the range.
● Only certain types of glass,
glasskxxamic,ceramic,earthenware
or other glazedcontainers are
suitablefor range-topservice;
others maybreak because ofthe
suddenchangein temperature.
(Seepage28 for suggestions.)
or anywherein theoven
● To minimize burns, ignition of
flammable materials and spillage,
the handleof a container should
be turnedtowardthe center ofthe
rangewithout extendingover
nearby surface units.
● Don’t immerse or soak
removable surface units. Don’t
put them in a dishwasher.
● Always turn surface unit to
OFF before removing utensil.
● Keep an eyeon foodsbeing
fried at HIGHor MEDIUM
HIGH heats.
● To avoid the possibility of a
burn or electric shock, always
be certain that the controls for
all surface units are at OFF
position and all coils are cool
before attempting to remove
the unit.
QWhen flaming f~ds under the
hood, turn the fan off. The fan, if
operating, may spread the flame.
● Foods for frying should be as
dry as possible.
Frost on frozen
foodsor moisture on fresh foods
can cause hotfat to bubble up and
oversidesofpan.
● Uselittletit for effectiveshallow
or deep-fatfrying. Filling the pan
too fullof fatcan cause spillovers
when foodis added.
● If acombination of oils or
fatswill be used in frying, stir
togetherbefore heating, or as
fatsmelt slowly.
● Always heat fat slowly, and
watchas it heats.
● Use deep fatthermometer
wheneverpossible to prevent
overheatingfatbeyondthe
smokingpoint.
SAW THESE
INSTRUCTIONS
6
Page 7
Your range, like many other
household items, is heavy and
can settle into soft floor coverings
such as cushioned vinyl or
carpeting. When moving the range
on this type of flooring, use care,
and it is recommended that these
simple and inexpensive instructions
be followed.
The range should be installed on
a sheet of plywood (or similar
material) as follows: When the
floor covering ends at the front of
the range, the area that the range
will rest on should be built up with
plywood to the same level or higher
than the floor covering. This will
then allow the range to be moved
for cleaning or servicing.
y
.-J. ‘ W.-- i.=
::
LuLL1.& k.
?4{
t<liy J,<i “ ~ ‘-, ‘-” ‘- ri=”.’_’
d-$ F-*.=)-(>
,.-
.Mlik
Leveling screws are located on
each corner of the base of the
range. By removing the bottom
drawer you can level the range to
an uneven floor with the use of a
nutdriver.
To remove drawer, pull drawer out
all the way, tilt up the front and
remove it. To replace, insert glides
at back of drawer beyond stop on
range glides. Lift drawer if necessary
to insert easily. Let front of drawer
down, then push into close.
● Use proper power level as
recommended and DO N~
OVERCOOK.
● Do not operate the oven while
empty. If by accident the oven
should run empty a minute or two,
no harm is done. However, try to
avoid operating the oven empty at
all times—saves energy and also
ensures good, long-term life of oven.
c Use cooking utensils of medium
weight aluminum, tight-fitting
covers, and flat bottoms which
completely cover the heated
portion of the surface unit.
● Cook fresh vegetables with a
minimum amount of water in a
covered pan.
. Watch foods when bringing them
quickly to cooking temperatures at
high heat. When food reaches
cooking temperature, reduce heat
immediately to lowest setting that
will keep it cooking.
● Use residual heat with surface
cooking whenever possible. For
example, when cooking eggs in the
shell, bring water to boil, then turn
to OFF position to complete the
cooking.
● Preheat the oven only when
necessary. Most foods will cook
satisfactorily without preheating.
If you find preheating is necessary,
keep an eye on the indicator light,
and put food in the oven promptly
after the light goes out.
● Always turn oven OFF before
removing food.
● During baking, avoid frequent
door openings. Keep door open as
short a time as possible when it is
opened.
● For self-cleaning oven, be sure
to wipe up excess spillage before
self-cleaning operation.
● Cook complete oven meals
instead of just one food item.
Potatoes, other vegetables, and
some desserts will cook together
with a main-dish casserole, meat
loaf, chicken or roast. Choose
foods that cook at the same
temperature in approximately
the same time.
● Use residual heat in oven
whenever possible to finish
cooking casseroles, oven meals,
etc. Also add rolls or precooked
desserts to warm oven, using
residual heat to warm them.
c Always turn surface unit OFF
before removing utensil.
● Use correct heat for cooking task...
high heats to start cooking (if time
allows, do not use high heat to start),
medium high—quick brownings,
medium—slow frying, low—finish
cooking most quantities, simmer—
double boiler heat, finish cooking,
and special for small quantities.
● When boiling water for tea or
coffee, heat only the amount
needed. It is not economical to
boil a container full of water for
only one or two cups.
7
Page 8
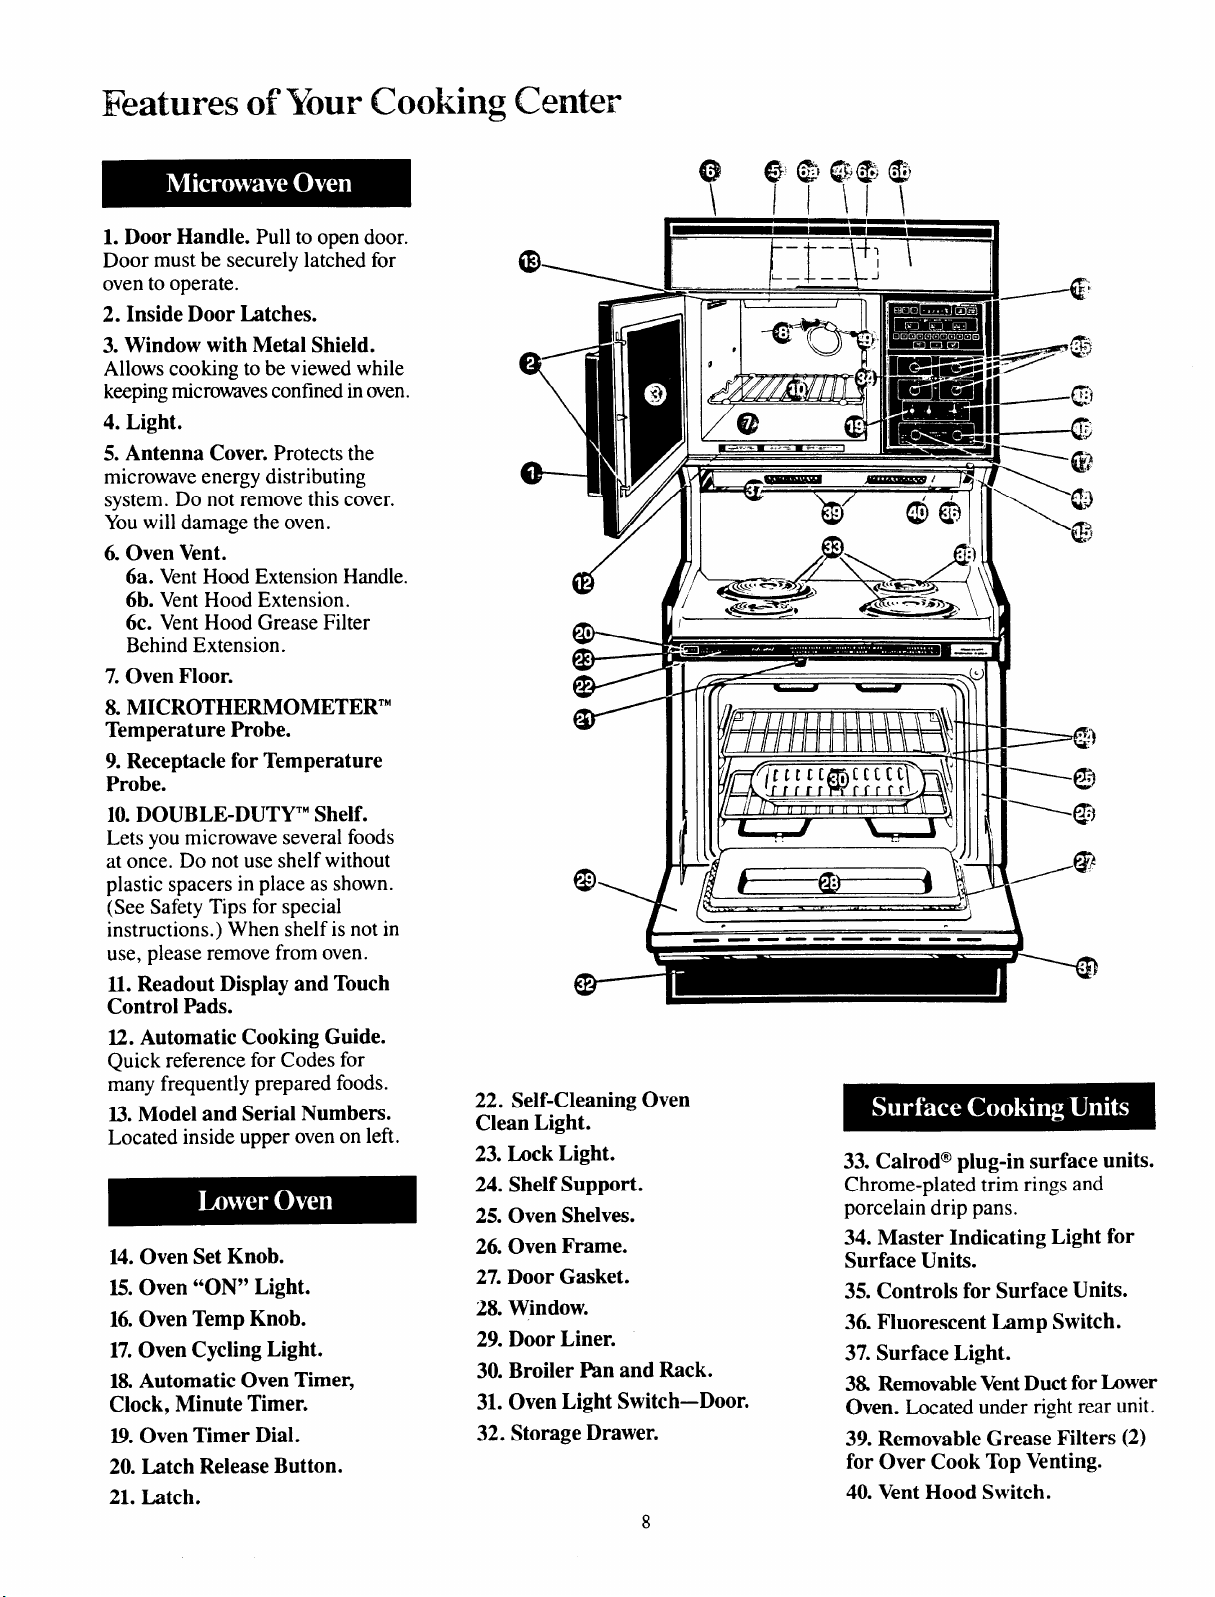
Features of’YourCooking Center
1. Door Handle. Pull to open door.
Door must be securely latched for
oven to operate.
2. Inside Door Latches.
3. Window with Metal Shield.
Allows cooking to be viewed while
keeping microwaves confined in oven.
4. Light.
5. Antenna Cover. Protects the
microwave energy distributing
system. Do not remove this cover.
You will damage the oven.
6. Oven Vent.
6a. Vent Hood Extension Handle.
6b. Vent Hood Extension.
6c. Vent Hood Grease Filter
Behind Extension.
7. Oven Floor.
8. MICROTHERMOMETERTM
Temperature Probe.
9. Receptacle for Temperature
Probe.
10. DOUBLE-DUTYTM Shelf.
Lets you microwave several foods
at once. Do not use shelf without
plastic spacers in place as shown.
(See Safety Tips for special
instructions. ) When shelf is not in
use, please remove from oven.
11. Readout Display and Touch
Control Pads.
12. Automatic Cooking Guide.
Quick reference for Codes for
many frequently prepared foods.
13. Model and Serial Numbers.
Located inside upper oven on lefi.
14. Oven Set Knob.
15. Oven “ON” Light.
16. Oven Temp Knob.
17. Oven Cycling Light.
18. Automatic Oven Timer,
Clock, Minute Timer.
19. Oven Timer Dial.
20. Latch Release Button.
21. Latch.
u
(I$
‘\
22. Self-Cleaning Oven
Clean Light.
23. Lock Light.
24. Shelf Support.
25. Oven Shelves.
26. Oven Frame.
27. Door Gasket.
28. Window.
29. Door Liner.
30. Broiler I% and Rack.
31. Oven Light Switch—Door.
32. Storage Drawer.
[L–L–_LJ
I
.
.
———— .——. .—
8
\
33. Calrod@ plug-in surface units.
Chrome-plated trim rings and
porcelain drip pans.
34. Master Indicating Light for
Surface Units.
35. Controls for Surface Units.
36. Fluorescent Lamp Switch.
37. Surface Light.
3& Removable Vent Duct for Lower
Oven. Located under right rear unit.
39. Removable Grease Filters (2)
for Over Cook Top Venting.
40. Vent Hood Switch.
Page 9
.-l
..
“)--
i::
3
I
‘4
t!!)
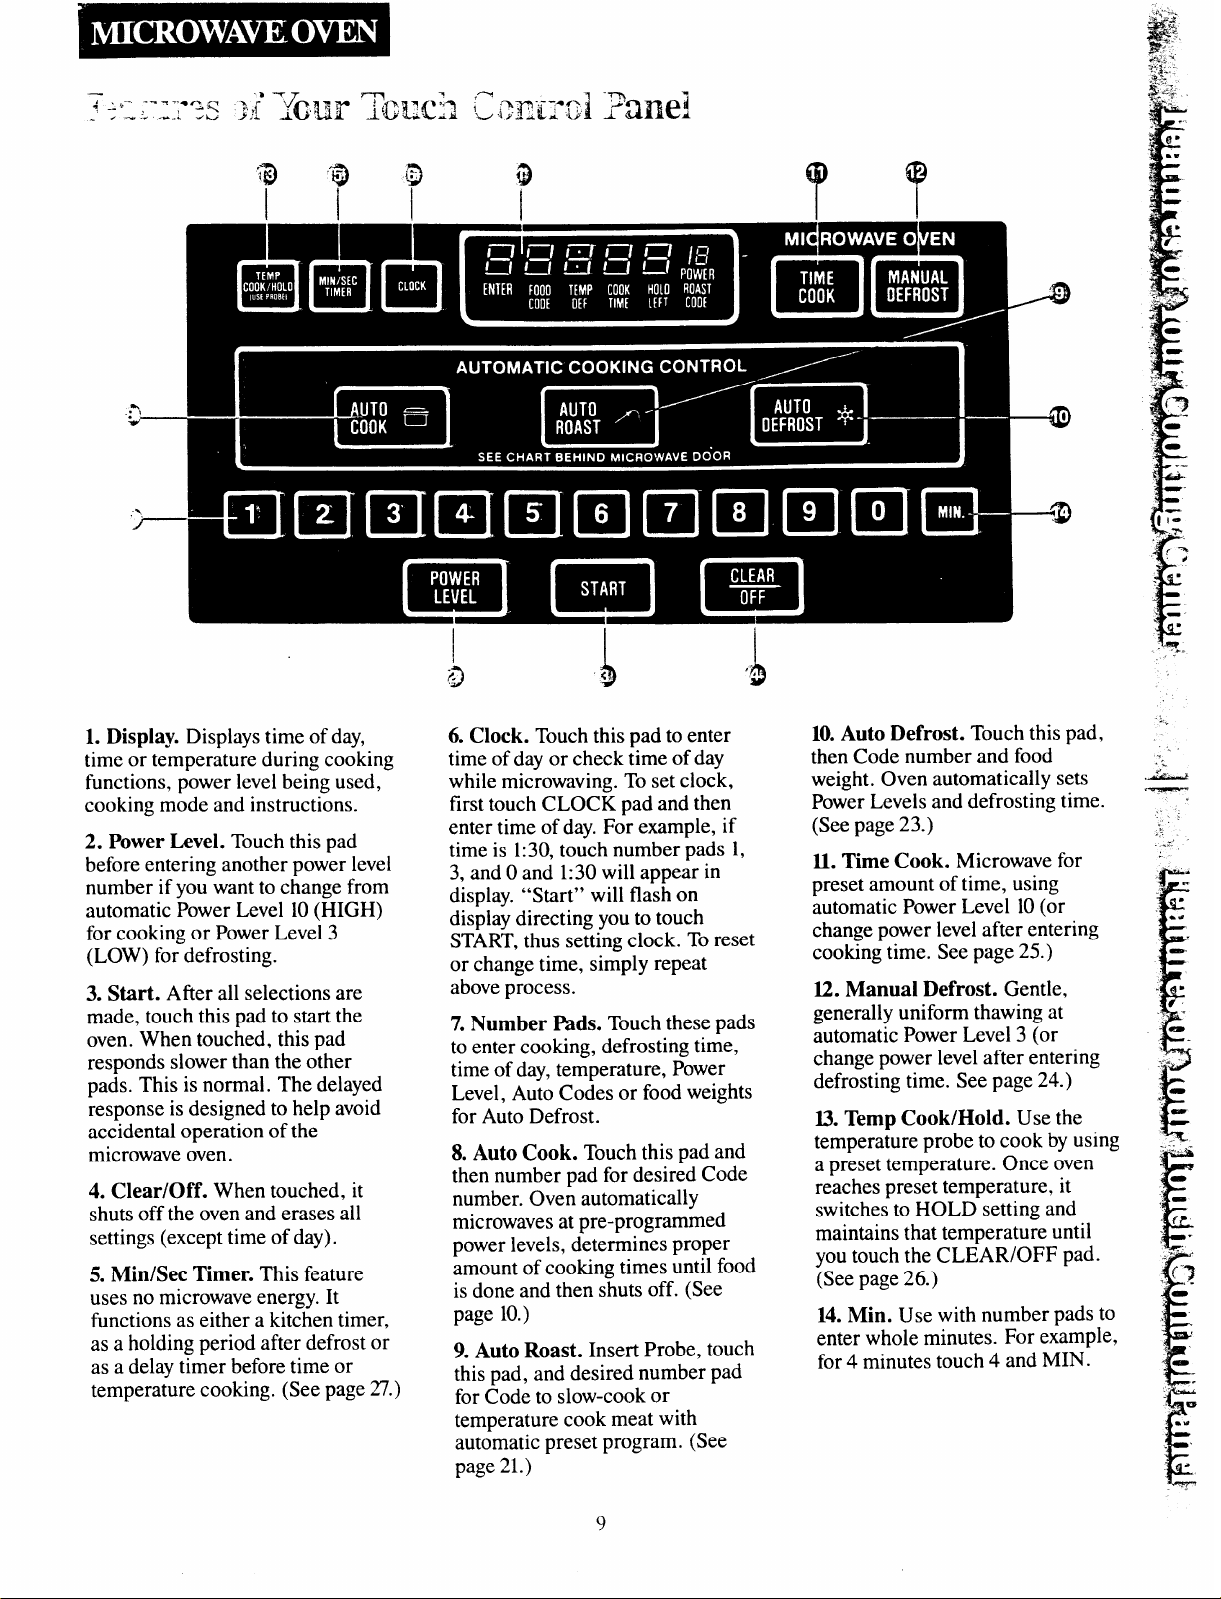
1. Display. Displays time of day,
time or temperature during cooking
functions, power level being used,
cooking mode and instructions.
2. Power Level. Touch this pad
before entering another power level
number if you want to change from
automatic Power Level 10 (HIGH)
for cooking or Power Level 3
(LOW) for defrosting.
3. Start. After all selections are
made, touch this pad to start the
oven. When touched, this pad
responds slower than the other
pads. This is normal. The delayed
response is designed to help avoid
accidental operation of the
microwave oven.
4. Clear/Off. When touched, it
shuts off the oven and erases all
settings (except time of day).
5. Min/Sec Timer. This feature
uses no microwave energy. It
functions as either a kitchen timer,
as a holding period after defrost or
as a delay timer before time or
temperature cooking. (See page 27.)
6. Clock. Touch this pad to enter
time of day or check time of day
while microwaving. To set clock,
first touch CLOCK pad and then
enter time of day. For example, if
time is 1:30, touch number pads 1,
3, and Oand 1:30 will appear in
display. “Start” will flash on
display directing you to touch
START, thus setting clock. To reset
or change time, simply repeat
above process.
7. Number I%ds. Touch these pads
to enter cooking, defrosting time,
time of day, temperature, Power
Level, Auto Codes or food weights
for Auto Defrost.
8. Auto Cook. Touch this pad and
then number pad for desired Code
number. Oven automatically
microwaves at pre-programmed
power levels, determines proper
amount of cooking times until food
is done and then shuts off. (See
page 10.)
9. Auto Roast. Insert Probe, touch
this pad, and desired number pad
for Code to slow-cook or
temperature cook meat with
automatic preset program. (See
page 21.)
10. Auto Defrost. Touch this pad,
then Code number and food
weight. Oven automatically sets
Power Levels and defrosting time.
(See page 23.)
11. Time Cook. Microwave for
preset amount of time, using
automatic Power Level 10 (or
change power level after entering
cooking time. See page 25.)
12. Manual Defrost. Gentle,
generally uniform thawing at
automatic Power Level 3 (or
change power level after entering
defrosting time. See page 24.)
13. Temp Cook/Hold. Use the
temperature probe to cook by using
a preset temperature. Once oven
reaches preset temperature, it
switches to HOLD setting and
maintains that temperature until
you touch the CLEAR/OFF pad.
(See page 26.)
14. Min. Use with number pads to
enter whole minutes. For example,
for 4 minutes touch 4 and MIN.
9
Page 10
Automatic Cooking
The AU’10 COOK pad maybe
used to eliminate your need to look
up cooking time in the Cookbook
or guessing how long to set cooking
time. By actually sensing the
steam and aroma which escape as
food microwaves, this feature
automatically adjusts the oven’s
cooking time to various types and
amounts of food.
After touching the AU10 COOK
pad, the desired Code number and
START, you will see the word “Auto”
on the display, which indicates that
the sensor has been activated to
sense steam and aroma from the
food. To prevent the escape of
steam and aroma from the oven, do
not open the door while the word
“Auto” is on the display. If door is
opened, “ERROR’ appears. Close
door and touch START immediately.
Setting 1,which is designed for easy
reheating of foods, automatically
turns the oven off as soon as the
sensor detects steam from the foods.
Other Auto Cook control settings,
which are for fresh or frozen foods,
need additional time after steam
and aroma have been sensed. For
these foods, the oven determines
the amount of additional time
needed, then automatically switches
the oven to Time Cook for the
necessary cooking time remaining.
Oven beeps when it switches to
Time Cook (“Auto” on display is
replaced by numbers, indicating
cooking time), and oven door can
be opened.
Be careful of steam when removing
tight covers. When you remove a
cover, direct the steam away from
your hands and face.
Be sure the outside of the cooking
container and inside of microwave
oven are dry.
A few foods need stirring or
rotating after partial cooking.
Check the “Automatic Cooking
Recipe Guide” section on page 13.
To keep the interior of the oven
clean, we suggest covering foods
that tend to spatter. This also helps
the food heat more evenly.
Note: Use of the DOUBLE DUTYW
Shelf with Automatic Cooking is
not recommended.
Nl&ICH THE AMOUNT OF FOOD ’10 THE SIZE OF THE CONTAINER. FILL CONTAINERS AT LEASI’ l/2 FULL.
BE SURE THE OUTSIDE OF THE COOKING CONTAINER AND INSIDE OF MICROWA~ OVEN ARE DRY.
Use microwave-safe casseroles or
bowls for entrees and vegetables.
Cover with lid to dish. Wax paper or
loose plastic wrap can also be used.
Do not use paper plates with
automatic cooking. Use microwavesafe plates or bowls for reheating.
Cover with plastic wrap or wax paper
and tuck edges under dish (you can
still use paper plates with regular
Time Cooking, Defrosting, etc.).
Use oblong or square containers
for chicken or corn on the cob.
Cover with wax paper or loose
plastic to prevent spattering.
Frozen Entrees in Paperboard
Tray: do not remove film over tray;
remove tray from box. Thick entrees
may need longer time. See guide on
page 20. Frozen Food in Metal
Tray: remove foil covering,
reinsert into box and close ends.
Follow control panel or Automatic
Cooking Guide settings for casseroles.
Cover casserole meat and vegetables
with sauce. Cool hot ingredients
or sauces. If hot, use Time Cook.
10
Page 11
%mqie oi’How io Use
.Automatic Cooking
mut ic
Prefere&e control
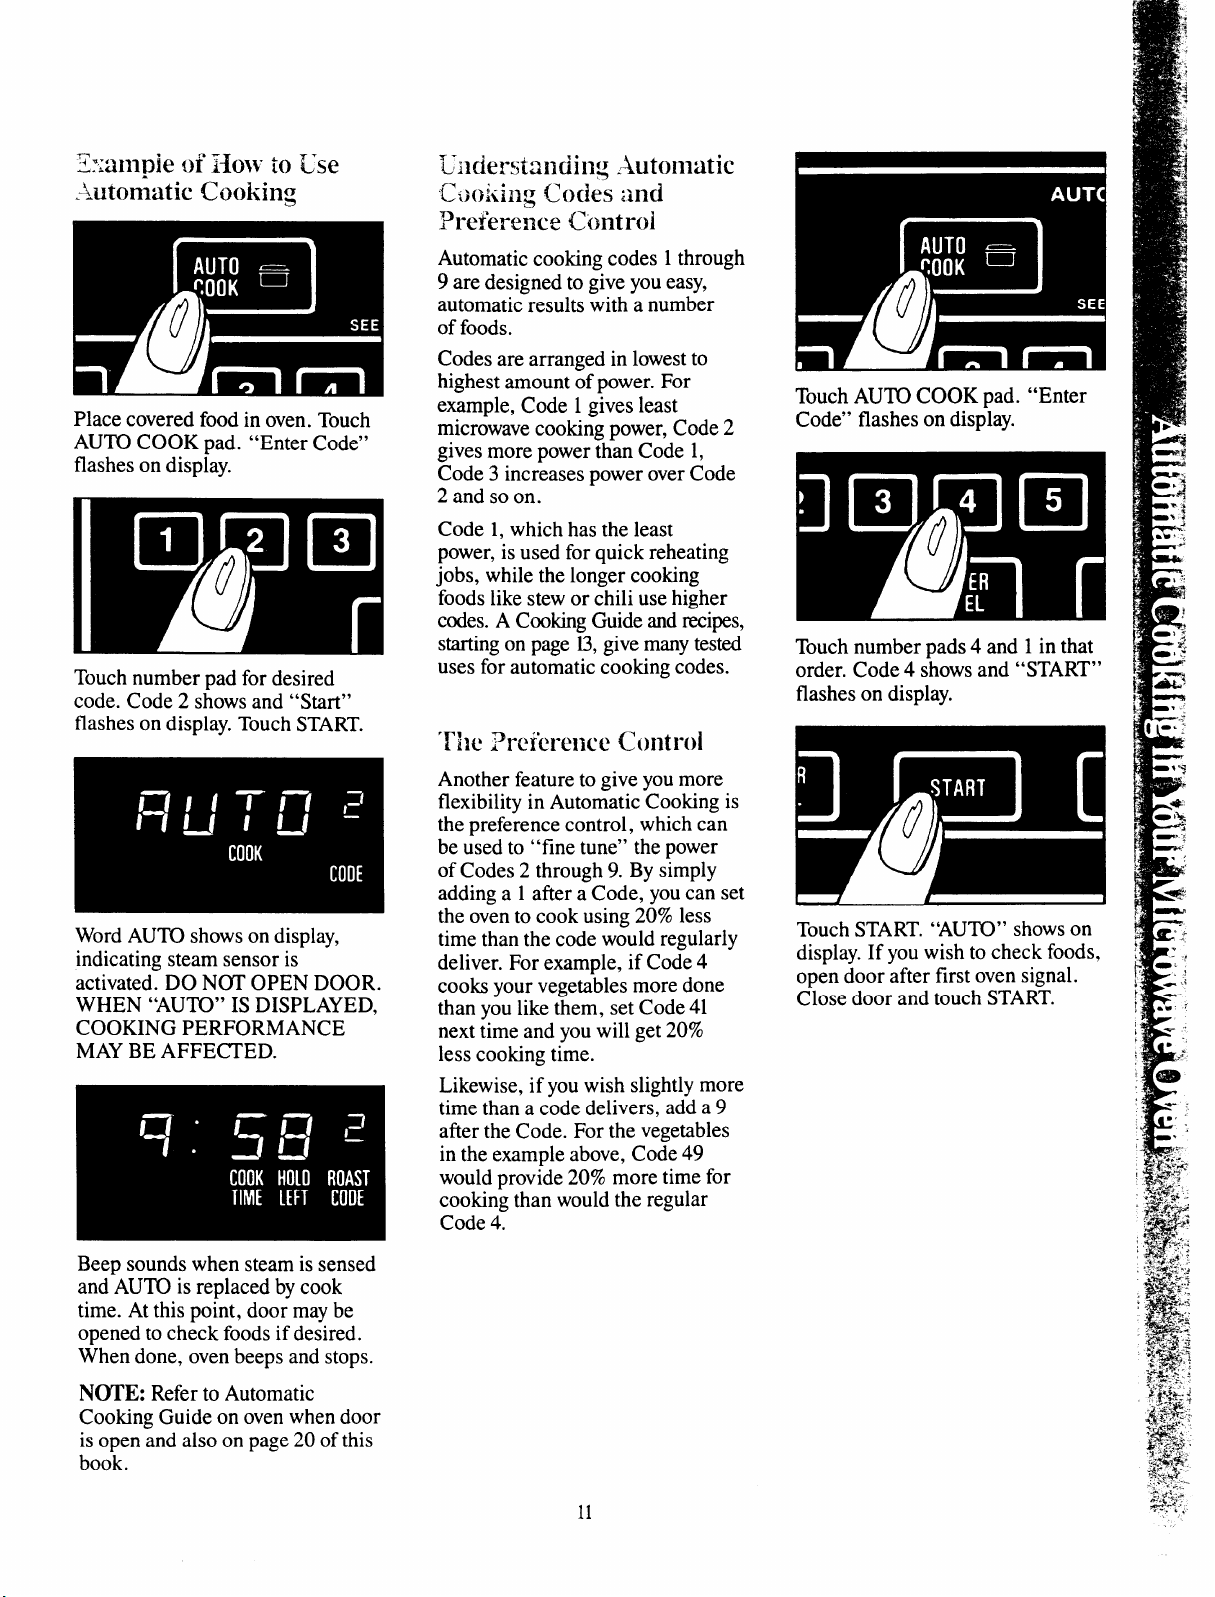
Place covered food in oven. Touch
AUTO COOK pad. “Enter Code”
flashes on display.
Touch number pad for desired
code. Code 2 shows and “Start”
flashes on display. Touch START.
Word AUTO shows on display,
indicating steam sensor is
activated. DO N~ OPEN DOOR.
WHEN “AUTO” IS DISPLAYED,
COOKING PERFORMANCE
MAY BE AFFE~ED.
Automatic cooking codes ~
9 are designed to give you
automatic results with a number
of foods.
Codes are arranged in lowest to
highest amount of power. For
example, Code 1 gives least
microwave cooking power, Code 2
gives more power than Code 1,
Code 3 increases power over Code
2 and so on.
Code 1, which has the least
power, is used for quick reheating
jobs, while the longer cooking
foods like stew or chili use higher
codes. A Cooking Guide and recipes,
starting on page 13,give many tested
uses for automatic cooking codes.
through
>asy,
“1’k i%xh-ence Control
Another feature to give you more
flexibility in Automatic Cooking is
the preference control, which can
be used to “fine tune” the power
of Codes 2 through 9. By simply
adding a 1 after a Code, you can set
the oven to cook using 20% less
time than the code would regularly
deliver. For example, if Code 4
cooks your vegetables more done
than you like them, set Code 41
next time and you will get 20%
less cooking time.
Likewise, if you wish slightly more
time than a code delivers, add a 9
after the Code. For the vegetables
in the example above, Code 49
would provide 20% more time for
cooking than would the regular
Code 4.
Touch START. “AUKI” shows on
display. If you wish to check foods,
open door after first oven signal.
Close door and touch START.
Beep sounds when steam is sensed
and-AU’TO is replaced by cook
time. At this point, door maybe
opened to check foods if desired.
When done, oven beeps and stops.
NOTE: Refer to Automatic
Cooking Guide on oven when door
is open and also on page 20 of this
book.
11
Page 12
A<mmticcooking Qtmtiol’ls ad A!A.mwm
Q. Why does my oven automatically
cut off after the Auto cycle when
using Auto Cook Control Code 1
when it does not for other settings?
A. When using Code 1, there is no
second phase of minutes counting
down. All the cooking is completed
in the first phase or Auto.
Q. If my food is not completely
cooked after using the suggested
Auto Cook Control Code, what
should I do?
A. Differences in recipes may
result in different cooking times.
Use Time Cook and Power Level 10
for a few minutes until completion
or re-cover and use Auto Cook
Code 1 if more time is needed.
Q. Do all fresh or frozen vegetables
require a standing period after
cooking with Auto Cook?
A. Most vegetables are cooked to
a crisp state during Auto Cook,
just as in regular microwaving.
Therefore, it is recommended that
you let the vegetables stand for up
to 5 minutes, depending on size and
density of pieces. This standing time
also enhances the overall flavor and
appearance of most vegetables.
Q. What if I don’t fully cover the
dish in Auto Cook?
A. While cooking without the
cover does not affect sensor
performance, we suggest covering
dishes that may spatter to keep the
oven clean. Covering also helps
foods heat evenly.
Q. Should I use Auto Cook to
cook pudding or sauces?
A. Most pudding and sauce recipes
require stirring many times during
cooking; therefore, Time Cook is
recommended since you should not
open the door during the Auto
phase of cooking without affecting
end cooking results.
Q. My scalloped potatoes were
not completely cooked when
I removed the dish after Auto
Cook. What is wrong?
A. If you prepared the sauce in the
oven prior to combining the sauce
with potatoes, there may have been
too much remaining moisture in the
oven. Make sure you dry the oven
completely before using Auto Cook,
since this function operates properly
by sensing steam and aroma in the
oven. Also, starting Auto Cook
with hot foods creates steam and
aroma in the oven too soon, and
decreases the first sensing cycle.
Q. Are there any other foods
which are best Time Cooked,
rather than Auto Cooked?
A. Bakery foods, candies, melted
chocolate, or foods when a dry or
crisp surface is desirable, are
cooked best by Time Cook.
Q. Do fresh or frozen vegetables
require water when using Auto
Cook?
A. Yes. Add water as recommended
on guide to the vegetables and cover
well for even, complete cooking.
Q. I tried to warm some chow
mein noodles using Auto Cook.
Why didn’t this work?
A. Food must have some moisture
in order to create steam which
helps the auto sensor function.
Extremely dry foods such as chow
mein noodles, potato chips and
other such foods do not have
enough moisture.
Q. Should I use Auto Cook when
I am cooking many foods in more
than one dish or casserole?
A. No, because of different food
densities, attention needed during
cooking, and food amounts, it is
best to use Time Cook when
cooking many foods.
Q. Do the shapes and sizes of
food make a difference when
using Auto Cook?
A. Yes, in some cases, larger
pieces will require additional Time
Cooking. Be sure to check sugested
arrangement of pieces in the dish,
since proper arrangement is often
a successful tip in regular
microwaving.
Q. Would my plastic containers
with very tight fitting lids be
appropriate for Automatic
Cooking?
A. No, most types of plastic
storage dishes, butter tubs, etc.,
with tight fitting lids, are not
recommended for microwaving.
Also, tight fitting plastic lids may
prevent adequate steam and aroma
from escaping, and food may not
cook properly during Automatic
Cooking.
12
Page 13
Automatic Cooking Control is a
fully automatic electronic control
system that lets your microwave
oven do the cooking for you. The
ouides and recipes in this section
a
are designed to help you make the
most of this feature.
Standard cooking techniques
require setting the oven for a
specified cooking time or a
selected finished temperature. And
that means looking up recipes in a
cookbook ...trying to convert old
recipes for microwave cooking .. .
or just resorting to guesswork.
This control method works on an
entirely different basis—with a
special electronic sensor that
detects steam and aromas from
cooking food. The oven “knows”
how the food is cooking, so it can
automatically set the correct
cooking time and maintain the
proper power level for different
types and amounts of food. And it’s
adjustable to suit your individual
taste.
Easy
m ~use
Simply touch two control pads—
AUKI COOK and the desired
Code number—and then START.
A guide on the oven control panel
gives a list of Codes for frequently
prepared foods. The display shows
AUTO until steam is sensed and
then signals, and displays time
counting down. During AUTO,
oven should not be opened, but
after oven signals, door may be
opened to check foods if desired.
Check the Automatic Cooking
Guide for suggestions.
Appropriate containers and
coverings help assure good cooking
results. Containers should match in
size to the size of the food being
cooked. Coverings such as w~x
paper, the lid that came with the
container, or microwave-safe
plastic domes are ideal. For
examples of containers and
coverings, see page 10and the
following recipes.
preference Cht rol
With Preference Control, you can
adjust the Automatic Cooking
Feature to your individual taste by
adding either “l” or “9” after
Code number. If after trying the
suggested Code, you would prefer
less cooking time, simply add the
number “l” after the Code and the
oven automatically lessens the
cooking time by 20%. If you wish
more cooking time, add “9” after
the Code to increase cooking time
by 20%.
Autonlatic lloasiing
Automatic Roasting uses the
temperature probe rather than the
electronic sensor to cook meats to
the desired degree of doneness.
The oven continually monitors the
food’s internal temperature. Unlike
ordinary Temperature Cooking, the
oven changes power levels two or
three times, depending on the degree
of doneness during cooking, to give
you the best results automatically.
After cooking, the oven switches
automatically to Hold for an hour.
Food stays warm without
overcooking.
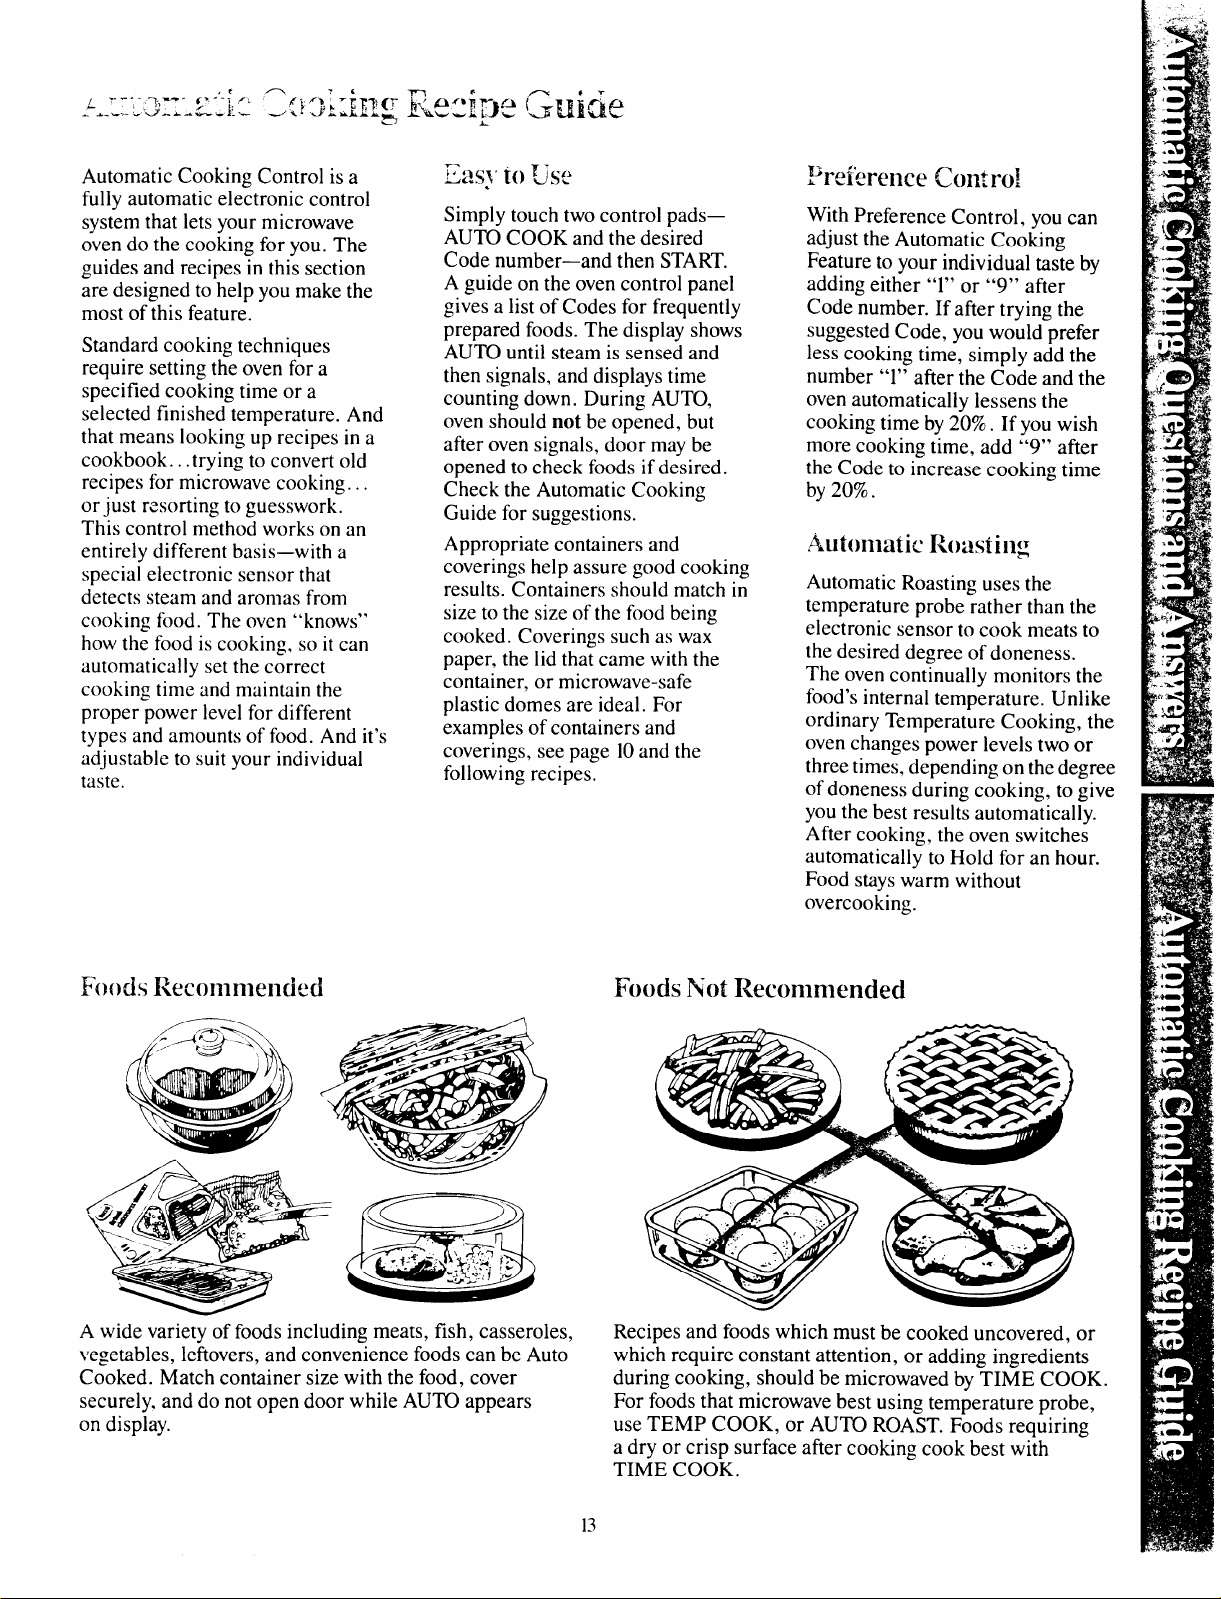
Foods Remi2mlenckd
A wide variety of foods including meats, fish, casseroles,
~ege~bles, lefiovers, and convenience foods can be Auto
Cooked. Match container size with the food, cover
securely. and do not open door while AUTO appears
on display.
Foods Not Recommended
Recipes and foods which must be cooked uncovered, or
which require constant attention, or adding ingredients
during cooking, should be microwaved by TIME COOK.
For foods that-microwave best using tem~erature probe,
use TEMP COOK, or AUTO ROAST. Fbods requiring
a dry or crisp surface after cooking cook best with
TIME COOK.
13
Page 14
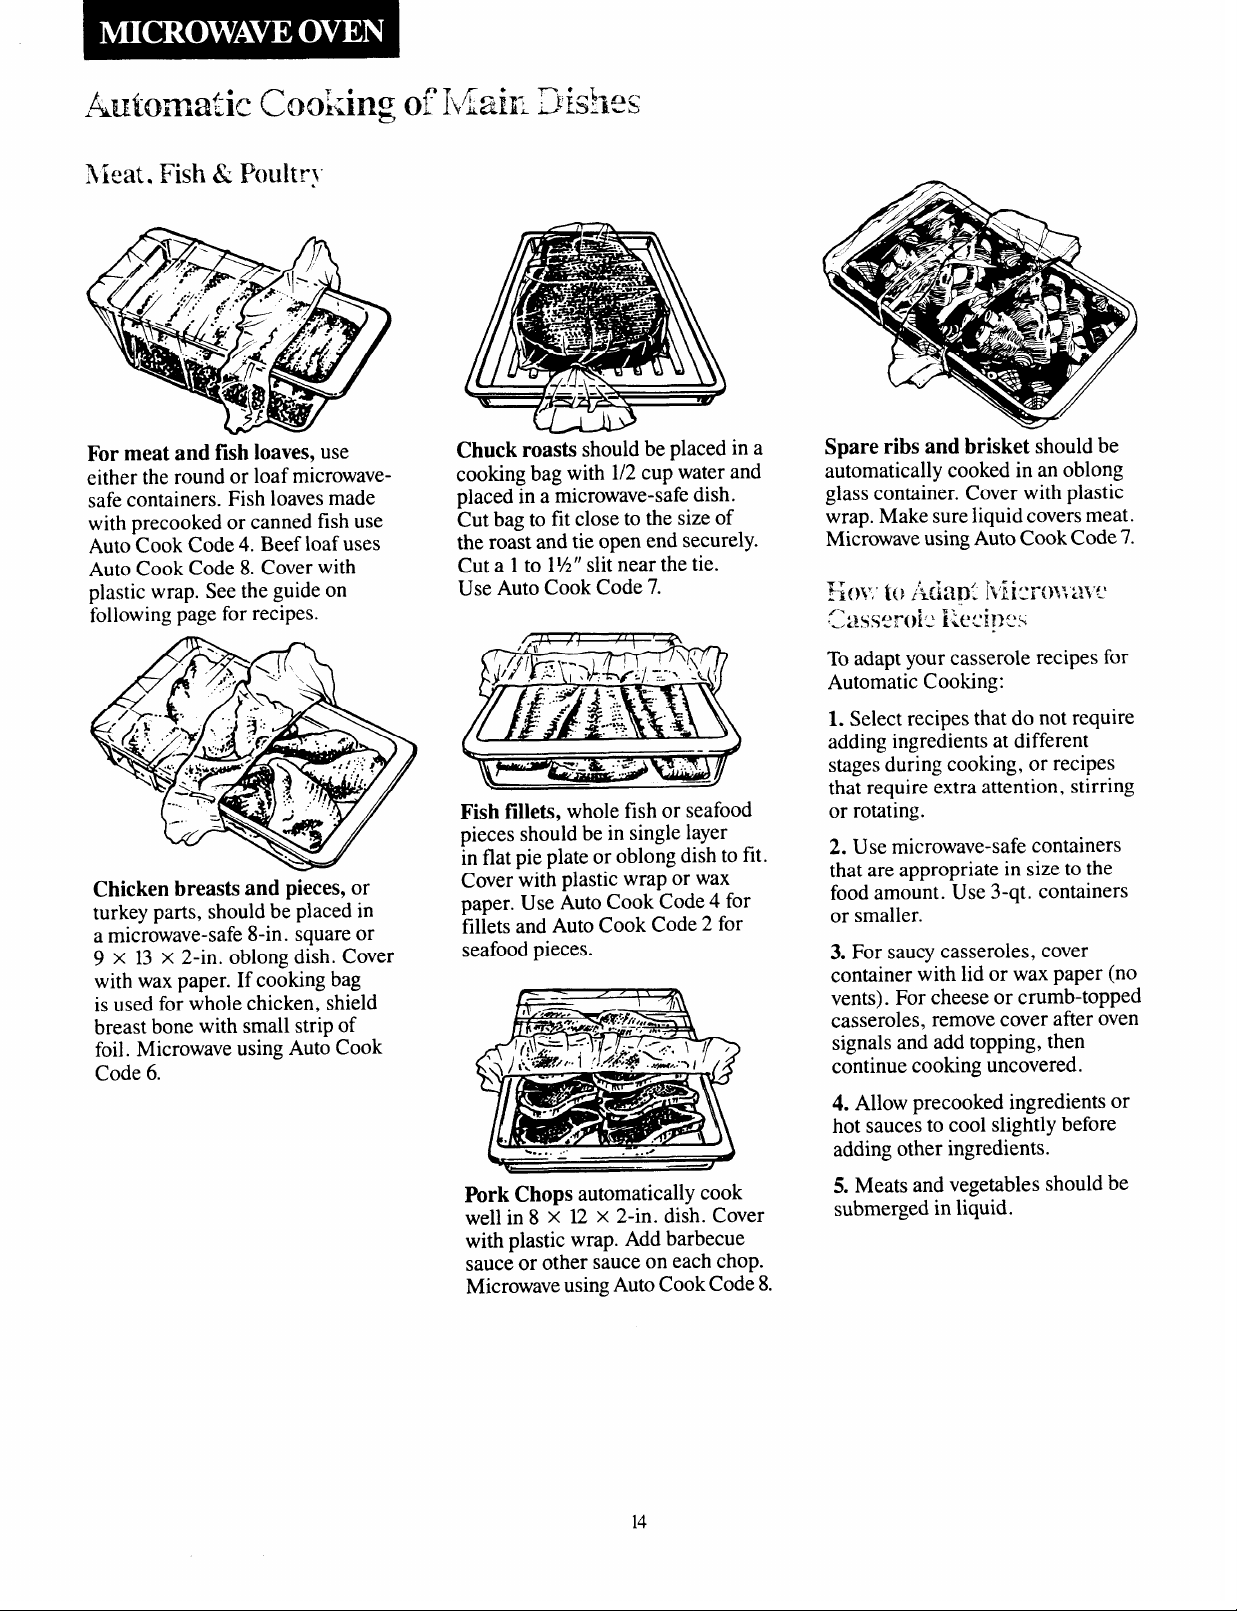
Automatic Cooking d’Iik.k Disks
Meat. Fish & huh-v
For meat and fish loaves, use
either the round or loaf microwave-
safe containers. Fish loaves made
with precooked or canned fish use
Auto Cook Code 4. Beef loaf uses
Auto Cook Code 8. Cover with
plastic wrap. See the guide on
following page for recipes.
Chicken breasts and pieces, or
turkey parts, should be placed in
a microwave-safe 8-in. square or
9 X 13 X 2-in. oblong dish. Cover
with wax paper. If cooking bag
is used for whole chicken, shield
breast bone with small strip of
foil. Microwave using Auto Cook
Code 6.
.
Chuck roasts should be placed in a
cooking bag with 1/2 cup water and
placed in a microwave-safe dish.
Cut bag to fit close to the size of
the roast and tie open end securely.
Cut a 1 to 1%” slit near the tie.
Use Auto Cook Code 7.
Fish fillets, whole fish or seafood
pieces should be in single layer
in flat pie plate or oblong dish to fit.
Cover with plastic wrap or wax
paper. Use Auto Cook Code 4 for
fillets and Auto Cook Code 2 for
seafood pieces.
Spare ribs and brisket should be
automatically cooked in an oblong
glass container. Cover with plastic
wrap. Make sure liquid covers meat.
Microwave using Auto Cook Code 7.
To adapt your casserole recipes for
Automatic Cooking:
1. Select recipes that do not require
adding ingredients at different
stages during cooking, or recipes
that require extra attention, stirring
or rotating.
2. Use microwave-safe containers
that are appropriate in size to the
food amount. Use 3-qt. containers
or smaller.
3. For saucy casseroles, cover
container with lid or wax paper (no
vents). For cheese or crumb-topped
casseroles, remove cover after oven
signals and add topping, then
continue cooking uncovered.
Pork Chops automatically cook
well in 8 x U x 2-in. dish. Cover
with plastic wrap. Add barbecue
sauce or other sauce on each chop.
Microwave using Auto Cook Code 8.
14
4. Allow precooked ingredients or
hot sauces to cool slightly before
adding other ingredients.
5. Meats and vegetables should be
submerged in liquid.
Page 15
Main Dish Recipes
Mexican Meatball
Casserole
Auto Cook Code 6
Approx. Cooking Time-17 min.
Makes 6 to 8 Servings
1 lb. ground chuck
1/2 cup dry bread crumbs
1/8 teaspoon pepper
1/2 teaspoon salt
1 teaspoon chili powder
3 tablespoons drymincedonions
1egg
3 tablespoons ketchup
1/2 cup instant rice
1 can (15%oz.) kidney beans,
undrained
1can (16oz.) tomatoes, chopped
and undrained
1 tablespoon chili powder
In large mixing bowl, place meat,
bread crumbs, pepper, salt, chili
powder, onion, egg and ketchup.
Mix well and form into 12 balls,
Arrange balls in a circle in 2-qt.
casserole. Set aside.
In small mixing bowl, place rice,
beans, tomatoes and chili powder.
Mix well and pour in center of
casserole and over meatballs.
Cover and microwave at Auto Cook
Code 6.
Chicken Teriyaki
Auto Cook Code 9
Approx. Cooking Time—32 min.
Makes 4 Servings
1/4 cup soy sauce
1/3 cup honey
1/3 cup orange juice
1 whole chicken (about 3 lbs.)
2 tablespoons cornstarch
1 tablespoon water
In small cooking bag, mix soy
sauce, honey and orange juice.
Add chicken to bag and tie with
plastic tie. Turn chicken on its side
in 12 X 8 X 2-in. dish. Marinate
1 hour on each side. Place bird
breast side up in dish. Slash bag
near closure. Microwave on Auto
Cook Code 9. When oven signals,
remove chicken and prepare Teriyaki
sauce. In l-pt. glass measuring cup,
stir together water and cornstarch.
Cut off one corner of cooking bag
with scissors and drain juices into
cup. Microwave at High (10)2
minutes. Remove chicken from bag
to serving platter. Pour sauce over
chicken just before serving.
Chicken and Rice
Auto Cook Code 9
Approx. Cooking Time—25 min.
Makes 6 Servings
1 can (10?4 oz.) condensed
cream of mushroom soup
1-1/4 cups milk (1 soup can full)
3/4 cup instant rice
1 can (4 oz.) mushrooms,
stems and pieces, drained
1 pkg. (1?4oz.) dry onion
soup mix
1 cutup chicken (about 3 lbs.)
In small mixing bowl, mix soup
and milk; reserve 1/2 cup of the
mixture. Blend remaining soup
mixture, rice, mushrooms and half
of the onion soup mix. Pour into a
12 x 8 x 2-in. glass dish.
Place chicken pieces on rice
mixture, arranging with meatiest
pieces to outside of dish. Pour
reserved soup mixture over chicken
and sprinkle with remaining soup
mix. Cover with wax paper and
tuck under dish. Microwave at
Auto Cook Code 9.
15
Page 16

Automatic Cooking of Vegetables
Fresh or Canned Vegetables
Whole or large halves of
vegetables such as cauliflower or
squash use Auto Cook Code 4. Use
round or square container close to
size of vegetable. Add 1/2 cup
water. Cover with lid or plastic
wrap.
Frozen Vegetables
Block or loose pieces of frozen
vegetables should be placed in
suitable size container (at least half
full) with lid or plastic wrap. Add 1
or 2 tablespoons water. Microwave
on Auto Cook Code 2. See Auto
Cook Guide for lima beans.
Pieces or slices of vegetables
require 1/4 to 1/2 cup of water. Use
appropriate size covered container.
Microwave on Auto Cook Code 4.
Dry root vegetables like carrots
may need to be stirred after oven
signals and time remaining appears
on display. Re-cover and touch
START to finish cooking.
Pouches of frozen vegetables
should be slit 1/2” in center before
placing directly on oven floor.
Microwave on Auto Cook Code 3.
Precooked/canned vegetables
should be placed in round
container similar in size to amount
being cooked (at least half full).
Microwave on Auto Cook Code 2.
Stir before serving.
16
Page 17

.siii-myV+ytabks
JJexican Zuecllini Lasagna
Green Rice
Auto Cook Code 4
Approx. Cooking Time—16 min.
Makes 4 Servings
1 tablespoon oil
1 tablespoon soft butter
3 medium onions, quartered
1 small green pepper,
cut in l/4-in. wide strips
2 cups thinly-sliced cabbage
2/3 cup carrots, sliced diagonally
1/4 cup (1 bunch) sliced green
onions
1 cup broccoli flowerets
1 cup cauliflower flowerets
2 stalks celery, sliced
diagonally
Toss vegetables with oil and butter
in 2-qt. microwave-safe casserole.
Cover. Microwave on Auto Cook
Code 4, stirring well when oven
signals and time remaining appears
on display. Serve immediately.
:Sun;me?”‘:;Lu-ien.}ie\Y’
Auto Cook Code 6
Approx. Cooking Time—51 min.
Makes 6 to 8 Servings
1 medium zucchini, cubed
2 large potatoes, peeled and
cubed
2 large carrots, coarsely grated
1 medium onion, cut in pieces
1/2 small head of cabbage, sliced
1 can (103Aoz.) cream of celery
soup
1 can (1OY4oz.) cream of
mushroom soup
1 block (8 oz.) pasteurized
processed cheese, cubed
2 cans (4 oz. each) mushroom
pieces
1 pound smoked sausage, sliced
in l-inch pieces
Auto Cook Code 6
Approx. Cooking Time—35 min.
Makes 8 to 10 Servings
1 large zucchini
1%pounds ground chuck
1/4cup green onions, thinly sliced
1can (15oz.) tomato puree
1can (4 oz.) green chilies,
drained and chopped
1/4teaspoon ground cumin
1 teaspoon Italian seasoning
(optional)
1can (6 oz.) ripe olives,
chopped and drained
12oz. Ricotta or cottage cheese
1/2cup grated Romano cheese
1egg
2 tablespoons flour
4 oz. Mozzarella cheese
1/4cup grated Romano cheese
1cup (8 oz.) sour cream
(optional)
Wash zucchini and cut into l/8-inch
lengthwise slices. In 12 X 8 X 2-in.
dish, place 1/2 of slices. In 2-qt.
casserole, place ground chuck,
onions, tomato puree, green chilies,
cumin, Italian seasoning and olives.
Set aside.
In small bowl, mix together
Ricotta, Romano cheese and egg.
Sprinkle flour on zucchini in dish,
layer half of Ricotta mixture, then
meat sauce and Mozzarella. Repeat,
sprinkle with Romano cheese.
Cover with plastic wrap, vent
corner, and microwave on Auto
Cook Code 6. Serve with sour
cream, if desired.
Auto Cook Code 6
Approx. Cooking Time—16 min.
Makes 4 to 6 Servings
1 pkg. (10 oz.) frozen
chopped spinach, thawed
and well drained
1% cups cooked rice
1/4 cup butter, melted
1/4 cup finely chopped onion
1 cup milk
1 egg, beaten
1/2 teaspoon salt
1 cup shredded cheddar
cheese
To cooked rice, add spinach,
butter, onion, milk, egg, salt and
cheese. Mix well. Cover and
microwave at Auto Cook Code 6.
Let stand 5 minutes, covered,
before serving.
(-kuntrv Style !kNowSquash
Auto Cook Code 6
Approx. Cooking Time—n min.
Makes 4 to 6 Servings
1 teaspoon salt
2 pounds yellow squash, cubed
1/4 cup yellow onion, chopped
1/4 cup butter, melted
1/4 teaspoon pepper
1/4 teaspoon basil
3 slices fresh bread, cubed
1/2 cup shredded cheddar cheese
8 strips crisply cooked,
In 2-qt. glass dish, mix together all
ingredients, using 1/2 of crumbled
bacon. Sprinkle top with remaining
bacon. C-over.
Cook Code 6.
. .
1 cup sour cream
crumbled bacon
Microwave on Auto
In a 4-qt. casserole dish, mix all
ingredients together until well
blended. Cover. Microwave on
Auto Cook Code 6.
17
Page 18

Fruits
Pineapple Casserole is a tangy
dessert or meat accompaniment. In
12 x 8 X2-in. dish, spread 2cans
(20 oz. ea.) drained pineapple
chunks, lcupsugarandl/2 cup
flour. Top with mixture of 2 cups
buttery-flavored cracker crumbs
and 1/2 cup melted butter. Cover
with wax paper and cook on Auto
Cook Code 5.
Desserts
& Breads
Caramel Biscuit Ring—Spread
1/4cup meltedbutterand 1/2cup
brown sugar in 8-in. round glass
dish. Sprinkle with cinnamon and
1/2 cup chopped nuts if desired.
Arrange 1can (10 oz.) refrigerated
biscuits around edges and place
drinking glass, open end up, in
center. Cover with plastic wrap.
Microwave on Auto Cook Code 3.
Invert onto serving plate, letting
dish stand over ring a few minutes
before removing.
Baked Apples automatic cook well
using Auto Cook Code 2. Match
number of apples to size of
microwave-safe covered container.
Use Auto Cook Code 2 for Baked
Pears also.
Nut Topped Cakes are easy to
cook automatically. Grease bottom
and sides of microwave-safe fluted
cake container and sprinkle bottom
evenly with 1/3 cup chopped nuts
or coconut. Carefully pour batter
from one box (2-layer size) cake
mix over nuts; cover with wax
paper. Microwave on Auto Cook
Code 91. When oven signals, rotate
dish 1/2 turn. Let stand 10 minutes
before inverting to cool.
Stewed Fruit and Fruit Compotes
should be stirred well before
microwaving, especially if sugar is
added. Cover, use Auto Cook Code
2 and stir once or twice after oven
signals and time appears on display.
Touch START and finish cooking.
Bacon and Cheese Topped
Cornbread—Distribute 1/2 cup
chopped,crisp fried bacon and
1tablespoon Parmesan cheese in
greased 8-in, round glass dish.
Over above ingredients, carefully
pour batter from 1 pkg. (8-1/2 oz. )
cornbread mix. Cover with wax
paper. Microwave on Auto Cook
Code 3. Let stand 5 to 10 minutes
before inverting.
18
Page 19

.-
1:.s;- ‘::;Gc;;iaL!? ‘::ui2
.
Auto Cook Code 91
Approx. Cooking llme-111 min.
Makes 1 (lO-in.) Tube Cake
1 pkg. (2-layer size) Devil’s
Food cake mix
3 eggs
1/2 cup cooking oil
1-1/3 cups water
1/4 cup finely chopped pecans
In large bowl, place cake mix,
eggs, oil and water. Blend on
medium speed of mixer, about 2
minutes, until smooth and creamy.
Lightly grease a 16-cup plastic
microwave fluted or straight-sided
ring mold. Sprinkle chopped nuts
evenly over bottom. Pour batter
over nuts.
Cover with wax paper tucked under
dish and microwave on Auto Cook
Code 91. Let stand in dish 5
minutes before turning out.
Auto Cook Code 3
Approx. Cooking Time-16 min.
Makes 6 to 8 Servings
1can (20-22 oz.) prepared
cherry pie filling
2 cups dry yellow or white
cake mix (1 pkg. [9 oz.] or
1/2 pkg. [17 oz.])
1/4 cup melted butter
1/2 cup coarsely chopped nuts
1 teaspoon ground cinnamon
In 8-in. square glass dish, spread
pie filling.
In small bowl, mix together cake
mix, butter, nuts, and cinnamon
until crumbly. Sprinkle evenly
over cherries or in three rows so
cherries are visible. Cover with
wax paper and tuck under dish.
Microwave on Auto Cook Code 3.
Pineappie Upside
Down Cake
Auto Cook Code 3
Approx. Cooking Time-10 min.
Makes 1 (8-in. round) Cake
1/4 cup butter
1/3 cup brown sugar (packed)
1can (8-1/4oz.) pineapple
slices
4 maraschino or candied
cherries, cut in half
3/4 cup all purpose flour
1/2 cup sugar
1-1/2 teaspoons baking powder
1/4 teaspoon salt
1/4 cup soft shortening
1 egg
1/3cup liquid from pineapple
3/4 teaspoon vanilla extract
In 8-in. round dish place butter.
Microwave at HIGH (10) 1 minute
until melted. Sprinkle sugar over
butter. Drain pineapple (save
liquid) on paper towels and arrange
in dish. Decorate with cherries.
Place a custard cup, open side up,
in center of dish.
In small mixer bowl, place flour,
sugar, baking powder, salt,
shortening, egg, liquid and vanilla.
Beat 3 minutes on lowest mixer
speed, scraping bowl constantly
first 1/2 minute. Carefully spread
batter over fruit in dish. Cover with
wax paper and tuck under dish.
Microwave on Auto Cook Code 3.
19
...
Page 20

Automatic Cooking Control Guide
Use of the DOUBLE DUTYTMshelf with Automatic Cooking is not
recommended.
● Do not open oven door during
Auto cycle. Door may be opened
afler oven beeps and the countdown
time is displayed.
● Match the amount of food
to the size of the container. Fill
containers at least 1/2 full.
● Add 1/4 to 1/2 cup water to fresh
vegetables. inside of oven are dry.
● Most foods should be covered
with lid to dish or wax paper to
prevent spattering to keep oven Code 1.
clean. Fish, seafood, spare ribs and
meatloaf should be covered tightly
to ensure even cooking.
Auto
Food
Canned Foods
Thin foods such as soup, broth, gravy
Thick foods such as canned ravioli, chunky
soups, beef stew, all canned vegetables
Leftovers
TV Dinners
(except for those with pasta)
Frozen Entrees 4
Such as lasagna, meat& potatces
TV Dhners
With pasta such as macaroni and cheese,
spaghetti. mexican dinners with burritos
or enchiladas
Casseroles
With precooked ingredients in white sauce 4
such as tuna noodle cawmle, turkey tetrazinni
All others with precooked ingredients
such as franks and beans, chow mein lid to dish.
With raw ingredients such as hamburger
patty stew. scalloped potatoes, seafood lid to dish.
casseroles
Chili
Meats and Seafood
Chicken pieces (up to 3 Ibs.) 6 12x 8 x 2-in. glass dish
Fish Fillets (1 lb.) 4
Meat loaf (1
Hamburger patties (4-5) 4
Sausage patties (1 lb.) 5 12x 8 x 2-in. glass dish
Pork chops (4-1” thick) 8 12x 8 x 2-in. glass dish
Spareribs (up to 3 Ibs.)
Swiss steak (1% Ibs.) 7
Chuck Roast (up to 5 lbs. )
Shrimp (up to I lb.) 2
Rice
Regular. raw, 1cup
Instant, 1 cup 2 2-qt. casserole with lid
Vegetables
Fresh such as carrots, artichokes, 4 2-qt. casserole with lid
cauliflower, broccoli. brussels sprouts (1 lb.)
Baking potatoes-2 to 4
Frozen block such as peas, green beans, 2
spinach, broccoli
Lima beans 3
Frozen pouch such as broccoli in cheese 3 Lay pouch on microwave-
sauce. corn, peas
Fruit
Baked apples—4 2 2-qt. casserole with lid
‘/2 lbs. ) 8
Cook Approximate
Code Container
1 Microwave-safe container 2-3 min.lcup Cover with lid to dish or wax paper.
matched to size of food.
2 Microwave-safe container 4 min./cup Cover with lid to dish or wax paper.
matched to size of food.
2 Microwave-safe container 4 min./cup Cover with lid to dish or wax paper.
matched to size of food.
4
Cook in container 8-10 min. If foil tray is no more than 3/4” deep, remove foil top,
(see comments). return to original box and reclose box. If tray is more
Cook in container 8-10 min.
(see comments).
3 Cook in container 8-10min.
(see comments).
2 to 3-qt. casscroie with
lid to dish.
5 2 to 3-qt. casserole with
6 2 to 3-qt. casserole with 16-24 min.
9 3-qt. casserole with lid
to dish
12x 8 x 2-in. glass dish
Glass Ioafdish
12 x 8 x 2-in. glass dish
7
13 x 9 x 2-in. glass dish
2-qt. casserole with lid
7
13 x 9 x 2-in. glass dish
I%-qt. glass dish with lid
6 2-qt. casserole with lid
6 None
1Yz-qt.casserole with lid
1‘/z-qt. casserole with lid
safe dish.
● Be sure outside of container and
● If food needs additional cooking,
return to oven and use Auto Cook
● Use meference control “l” or “9”
to adj{st cook times to suit your
indi~idual tastes.
13me
depending
on size
12-16min.
18-22 min.
~5_4(3mjn.
8-20 min. Cover with wax paper to prevent spatters.
6-9 min.
30-35 min.
7-9 min. Cover with wax paper.
7-9 min. Cover with wax paper.
11-17min.
1hr. 30 min. to Cover tightly with plastic wrap to cook evenly.
1hr. 45 min.
60-75 min.
65-90 min. Place in cooking bag with 1/2cup water. Slit bag 1!
4-6 min.
21-28 min.
5-8 min. Follow instructions on rice package.
10-15min.
8-16min.
depending on
number
8-10 min. Add 2 tablespoons water.
12-13min.
7-9 min. Make 1“ slit in pouch. Stir well before serving.
12-14min. Core apples and fill with butter and brown sugar.
Comments
than 1”thick, remove food and place in microwave-safe
dish and cover. If dinner is in paperboard container,
remove from box and cook in original container. If
dinner has cake or brownies, remove before cooking.
Cover with wax paper to prevent spatters.
Cover tightly with plastic wrap to cook evenly.
Baste with barbecue sauce. Cover with plastic wrap.
Cover tightly to ensure even cooking.
Follow instructions on rice package.
Add 1/4to 1/2cup water.
Pierce with fork and place on over floor.
Add 1/4 cup water.
20
Page 21

Eiim toUse the Minuteitkond Timer
The MIN/SEC TIMER has three
timing functions:
● It operates as a minute timer.
● It can be set to delay cooking.
● It can be used as a hold setting
after defrosting.
The MIN/SEC TIMER operates
without microwave energy.
~{~w’ to
Time a 3-? Jinute
Phone call
1. Touch MIN/SEC TIMER pad.
Display shows :0. “Enter Time”
flashes.
2. Touch number pads 3,0 and O
(for 3 minutes and no seconds).
Display shows 3:00 and “Hold~’
3. Touch START. Display shows
“Hold Time Left” and time
counting down.
4. When time is up, oven signals,
display flashes “End” and shows
time of day.
H(NYto Defrost, Hold
and Time Cook
Let’s say you want to defrost a
frozen casserole for 15minutes,
hold for 10 minutes and then Time
Cook for 25 minutes. Here’s how to
do it:
Step 1: Take casserole from freezer
and place in oven.
Step 2: Touch MANUAL DEFROST
pad.
Display shows “Enter Def Time:’
:0 and Power 3.
Step 3: Touch pads 1,5 and MIN
for 15minutes defrosting time.
“Def Tlme~’ 15:00 and Power 3
appear on display.
Step 4: Set hold time b) ~ouching
MIN/SEC TIMER pad. Display
shows “Enter Time” and :0.
Step 5: Touch 1,0 and MIN for
10minutes holding time. Display
shows 10:00 and “Hold~’
Step 6: Touch TIME COOK pad.
Display shows “Enter Cook Time;’
:0 and Power 10.
Step %Touch 2,5 and MIN for 25
minutes of cooking time. Display
shows “Cook Time;’ 25:00 and
Power 10.
Step 8: Touch START pad. Display
shows “Def Time Left ~’Power 3
and 15:00, counting down.
As each function is automatically
performed, display shows the
information you entered as you
set up the oven to defrost, hold
and cook.
QuestiOns and Answers
Q. What will happen if I
accidentally reverse my defrost,
hold and cook instructions?
A. The oven automatically
rearranges your program.
Defrosting always comes first,
then Hold, and then the cooking
function.
Q. Can I defrost and hold only?
A. Yes. Sometimes you may only
want to defrost a food, hold it, and
cook it later. All you need to do is
program in Defrost and amount of
time. Then program Hold and the
amount of time. Be sure to put the
thawed dish in the refrigerator
promptly.
NOTE: Let foods remain at room
temperature only as long as safe.
Times will vary.
Q. I programmed my oven for a
specific defrosting time but it
defrosted longer than necessary.
What happened?
A. When instructions conflict,
the oven carries out the last
instruction. You may have set the
oven to defrost for 4 minutes, hold
for 2 minutes, and then defrost for
6 minutes. In this case, the oven
would defrost for 6 minutes and
hold for 2 minutes and ignore your
first defrost instructions.
....
-
L-
21
Page 22

Automatic Roasting
See Auto Roast Guide.
Auto Roast uses the temperature
probe to cook to the desired
serving temperature. Unlike
Temp Cook/Hold, which uses a
single power level, Auto Roast is
designed to use up to 3 power
settings which automatically
switch during roasting, for even,
tender cooking results without
overcooking.
Handle
How to Prepare Roasts for
Auto
Roasting
Place tender beef roast on trivet in
microwave-safe dish. Insert probe
from the front horizontally into the
center meaty area, not touching
bone or fat. Cover with wax paper.
I
Sensor
Just as in conventional roasting,
only tender roasts should be Auto
Roasted until specified internal
temperatures are reached. Less
tender roasts should be microwaved
by time, according to the Cookbook
which comes with your oven.
Complete information on preparing
roasts for microwaving is in your
Cookbook.
Clip
Poultry, pork or ham roasts need no
trivet. Add 1/2 cup water to roast
dish and cover with plastic wrap.
(For cooking bag method, see
Cookbook.)-Insert probe into center
meaty area.
~
2. At 80”F., display switches to
show meat’s internal temperature.
3. Oven monitors internal
temperature, automatically
switching to lower power as meat’s
I ‘emperatu
prevent toughening or overcooking.
Place meat in oven with probe to
the right. Insert cable end of probe
firmly into receptacle on oven wall.
22
4. After temperature is reached, oven
switches to Hold for 1 hour, then
shuts off. Hold prevents overcooking
while keeping meat warm.
Page 23

.AmKmaticSimmer
(Auto Roast Code 6)
Food
Beef
Tender Roast
Rare
Medium
Well
Meatloaf
(loaf or round)
Pork
Loin Roast
Precooked Ham
Poultry
Whole Chicken (3 lbs.)
Whole Turkey (up
(Insert probe into meatiest area of inner
thigh from below
Turkey Breast
(Insert probe horizontally into
meatiest area. )
*Reconlnlended standing time before SCI_Vln&
QU’stions and Aiml”ws
to 12 lbs.)
and parallel to leg.)
Q. Why wasn’t my roast
fully cooked even though the
temperature on the display was
correct and Auto Roast was
completed?
A. The temperature probe must be
properly inserted when you Auto
Roast. Check your Cookbook to
see what you might have done
wrong.
Q. Do some types of trivets work
better than others?
A. Yes. Flat glass trivets generally
provide more browning to the
bottom of meats than plastic trivets.
Also, ceramic ridge-bottomed
roasting dishes usually work well.
Plastic trivets may require meat to
be turned over more often than
glass trivets do because the grid
design and legs let the bottom of
the meat stay cooler than glass
trivets do.
Code
‘2
3
4
4
4
1
5
5
4
Final
Temp
125°
140°
170°
170°
170°
115°
190°
190°
170°
Approx. Time
(Min. per lb.)
12-14
14-16
17-18
15-20
18-20
11-14
13-15
13-15
13-15
Q. When I’m cooking with Auto
Roast, why doesn’t my roast
continue to cook during the
holding time?
A. When your food reaches
finished temperature, the oven
automatically switches to a lower
power level. The even temperature
that’s maintained in the food during
this holding period keeps it warm
without overcooking.
Hold*
Minutes
5-1o
10-15
30
5-1o
20
5-10
20
20
20
Here’s how to Automatic Simmer
a few popular foods. See your
Cookbook for more cooking guides,
recipes and techniques.
Set
Auto Simmer like you do Auto
Roast except touch number
pad 6.
Display shows “Auto” until food is
80”F., then switches to show
temperature until fbod reaches 180”F.
Oven switches to Hold when food’s
internal temperature reaches 180”F.
and maintains that temperature
until food is done. If stirring is
recommended, you can reset the
oven by retouching START. Touch
CLEAR/OFF when cooking is
finished.
.J@On@ic
Simmer Guide
Approx.
Food Time/Hrs.
Beef
Pot Roast*
6-8
Stew 6-8
Chili 11-13
Chicken*
Stewing 11-12
Broiler/Fryer
4-6
Ham or Pork
Roast 4-6
soup
Stock/Vegetable 3-6
Split Pea 13-15
*For frozen, add 2 to 3 hours.
23
Page 24

Automatic Defrosting
Step 1: Place frozen food in a
microwave-safe dish, put it in the
oven and close the door. (Food
frozen in paper or plastic can be
defrosted in the package.)
Your microwave oven automatically
calculates defrosting time, changes
power levels during defrosting,
tells you when to turn your food,
and holds food for a short time
after defrosting time is up to
finish the thawing of the inside
of the food.
Here’s what you do:
Before YbuStart
to ‘AutoDefrost
First, check the Auto Defrost guide
below or the one at the bottom of
the oven when you open the door.
They show minimum and maximum
food weights for each code number.
Then, if your food’s weight is
stated in pounds and ounces, use
the guide below to convert ounces
to tenths (.1) of a pound.
~O1lvcrsiOzl {;uide
1to 2 ounces
3 ounces
4 to 5 ounces
6 to 7 ounces
8 ounces =
9 to 10ounces
11ounces
12to 13ounces =
14to 15ounces =
= .1 pound
= .2 pound
= .3 pound
= .4 pound
.5 pound
= .6 pound
= .7 pound
.8 pound
.9 pound
Step 2: Touch AUTO DEFROST
pad. “Enter Code” flashes on
display.
Step 3: Enter selected code from
guide. For example, ground beef
calls for Code 3.
Step 4: Enter weight. For example,
touch number pads 3 and Ofor
weight of 3 pounds, zero ounces.
Display shows 3.0, Code 3, and
“Start” flashes.
Note: If “ERROR’ appears after
you enter food weight, check the
Code Guide to make sure weight
corresponds to the code number
you entered.
Automatic Defrosting Guide
Recommended
Foods
Chicken Pieces
Fish
Ground Beef
Roasts, bone in
Roasts. boneless
Steaks ‘and Chops
“In Auto Defrost. it is necessary to let the meat stand during holding time to finish defrosting.
You may take the meat out of the oven at this time if you prefer.
Code
1
2 .5 to 3.9 pounds
3
4
5
6
Min.-Max.
Weight
.5 to 4.9 pounds
.5 to 5.9 pounds
3.0 to 5.9 pounds
3.0 to 5.9 pounds
.5 to 3.9 pounds
Hold
Tim@
—
5 seconds
5 seconds
5 seconds
20 minutes
20 seconds
5 seconds
Step 5: Touch START pad. Defrost
time begins counting down on display.
Step 6: When half the defrosting
time is up, the oven signals and
“TURN” flashes in the display. Open
the door and turn your food over.
Step %Close the door and touch
the START pad—defrosting will
not continue until you do. Display
shows remaining defrosting time
counting down.
Step 8: When defrosting time is up,
oven automatically switches to a
Hold period (5 seconds for Code 3).
“Hold” shows in display.
Step 9: When holding time is up,
the oven signals, “End”
and the oven turns off.
Q. I entered Auto Defrost Code 1,
then the number 4 for 4 pounds
of chicken. The display flashed
“Start” but when I touched the
START pad, “ERROR” flashed.
Why?
A. You must enter 4 (for pounds)
and O(for ounces). Touch CLEAR/
OFF and begin again. “ERROR’
will also flash if a wrong weight for
a particular code is entered.
flashes,
24
Page 25

The Manual Defrost setting is
designed for speedy thawing of
frozen food and is one of the
great advantages of a microwave
oven.
Use the Manual Defrost setting to
quickly thaw foods such as bread,
rolls, vegetables, fruits and
frozen dinners. The Auto Defrost
setting is preferred for meat and
poultry because the oven sets the
defrosting time and power levels
for you.
● Power Level 3 is automatically
set for defrosting, but you may
change this for more flexibility.
● See your Cookbook for defrosting
help.
To become better acquainted with
the defrost functions, defrost frozen
pork chops by following the steps
below.
Step 1: Place package of frozen
chops in the oven and close door.
Step2: TouchMANUAL DEFROST.
Display reads :0 and Power 3.
“Enter Def Time” flashes.
Step 4: Touch START. “Def Time
Left” shows and time counts down
on display. When cycle is completed,
“End” flashes, the oven signals
and automatically shuts off.
Step 5: Turn package over, close
door and repeat Steps 2,3 and 4.
Step 6: When oven signals, “End”
flashes and oven shuts off. Remove
package and separate chops to
finish defrosting.
Defrost ing
● Foods frozen in paper or plastic
Tips
can be defrosted in the package.
● For even defrosting, many foods
need to be broken up or separated
part of the way through the
defrosting time.
● Homemade dinners can be frozen
in shallow foil trays and heated for
later use. (Do not heat on DOUBLE
DUTYTMshelf.) Select foods which
microwave well.
● Pre-packaged frozen dinners can
be defrosted and microwave cooked.
● Check your Cookbook for other
defrosting tips.
Questions and Answers
Q. When I press START, I hear a
dull thumping noise. What is it?
A. This sound is normal. It is
letting you know the oven is using a
power level lower than HIGH.
Q. Can I defrost small items in a
hurry?
A. Yes, but they will need more
frequent attention than usual. Raise
the power level after entering the
time by touching POWER LEVEL
and 7 or 10. Power Level 7 cuts the
time about in half; Power Level 10
cuts the time to approximately onethird. During either, rotate or stir
food frequently.
Q. Can I open the door during
Defrost to check on the progress
of my food?
A. Yes.You may open the door at
any time during microwaving. To
resume defrosting, close the door
and press START.
Q. Why don’t the defrosting times
in the Cookbook seem right for
my food?
A. Cookbook times are averages.
Defrosting time can vary according
to the temperature in your freezer.
Set your oven for the time indicated
in your Cookbook. If your food is
still not completely thawed at the
end of that time, re-set your oven
and adjust the time accordingly.
Q. Can I select a power level
other than automatic Power
Level 3 for defrosting’?
A. Yes. Some smaller foods may
be defrosted quicker on higher
power levels but for even, carefree
defrosting, Power Level 3 is
suggested. Check the guide in the
Cookbook for specific times and
power levels.
Step 3: Touch number pad “8;’
then MIN Pad. “DefTimeJ’ 8:00
and Power 3 are displayed.
Q. When I’m entering minutes
with no seconds do I need to
touch “O” then “O”?
A. No. You touch the number
pad, then the MIN Pad, which
automatically enters “00~’
Page 26

Cooking h Time
w
The Time Cook feature allows
you to preset the cooking time.
The oven shuts off automatically.
Power Level 10 is automatically
set for time cooking, but you may
change this for more flexibility.
See your Cookbook.
To become better acquainted with
Time Cook function; make a cup of
coffee by following the steps be~ow.
Step 1:Fill a cup 2/3 full of water
and add 1 teaspoon of instant coffee
and stir to dis~olve. Use a cup that
has no metal decoration. Place cup
in oven and close door.
Step 3: Select your time. Touch 1,
2, and O for a minute and 20
seconds. “Cook Tlme~’ Power 10,
and 1:20 appear on the display. If
another power level is desired,
touch POWER LEVEL and the
number, although Power Level 10
(HIGH) is preferred for this cup
of coffee.
Step 4: Touch START. “Cook
Time Left;’ Power 10,and time
counting down show on display.
QUest:m :Illu J i.i;s-?’?e.rs
Q. I set my oven for the time
called for in the recipe but at the
end of the time allowed, my dish
wasn’tdone. What happened?
A. Since house powervaries due to
time or location, many Time Cook
recipes give you a time range to
prevent overcooking. Set the oven
for minimum time, test the food for
doneness, and cook your dish a
little longer, if necessary.
Q. I want to cook my dish on a
power level other than HIGH.
What do I need to do?
A. To change the power level,
touch the POWER LEVEL pad.
“Enter Power” flashes on the
display panel. Enter the desired
number.
Q. Can I interrupt my Time Cook
function to check the food?
A. Yes. To resume cooking, simply
close the door and touch START.
NOTE: Microwave power will not
come on until you are ready. You
must touch START for cooking
to begin.
Step 2: Touch TIME COOK. The
display shows :0 and Power 10.
“Enter Cook Time”’ flashes.
Step 5: When time is up, oven
sounds 3 times. Display flashes
“END:’ Oven, light, and fan shut off.
Q. 1 touched the number pads
and selected my power level.
When I touched START, however,
my oven didn’t come on. Why not?
A. The TIME COOK pad must be
touched before setting the number
pads or your oven will not begin
cooking.
Page 27

-2 -i
Formany foods, internal
temperature k the best test
of doneness.
Roasts or poultry are cooked to
your preferencewhen temperature
cooking.Heatingor reheatingfoods
accuratelyto aservingtemperature
you desire is simple and easy.
Temp Cook/Hold takes the
guesswork out of cooking because
the oven shuts off automatically
when the food is done and holds
that temperature until you touch
the CLEAR/OFF pad.
The temperature probe is a food
thermometer that gauges the
internal temperature of your food;
it must be
Cook/Hold or Auto Roast. Follow
the directions for use and insertion
on page 22.
Step 1: Insert temperature probe
as directed in Cookbook and attach
probe securely in oven wall. Close
door.
Step 2: Touch TEMP COOK/HOLD.
Display panel shows O, F, and
Power 10. “Enter Temp” flashes.
Step 3: Touch 1,3,0 for 130°F.
“Temp~’ 130F and Power 10show
on display.
used when using Temp
“Start” flashes.
step 4: Touch POWER LEVEL
pad. “Enter Power” flashes. Touch
5 for MEDIUM power. “Temp~’
130F and Power 5 show on display.
Step 5: Touch START. if internal
temperature of roast is less than
80°F., display will show “Cool~’
If temperature is 80°F. or above,
display shows temperature,
counting up.
When 130°F. is reached, oven will
sound and flash “Hold7 Oven will
then hold temperature.
Step 6: Touch CLEAR/OFF pad to
stop cycle.
Step %Remove probe and food
from oven.
Cooking Tips
● Use a lower power level setting;
it will heat evenly even though
requiring more time.
● Be sure frozen food has been
completely defrosted before
inserting probe. Probe may break
off if used in frozen foods.
● Always insert probe into the center
of meaty areas; take care not to
touch fat or bone.
● Insert probe as horizontally as
possible into foods as directed in
recipes. Make sure handle does not
touch food. Use clip to keep probe
in place while heating.
● Cover foods as directed in
Cookbook for moisture control
and quick heating.
Questions and Answers
Q. After I followed the steps
and touched START,“ERROR”
flashed in the display and a signal
sounded. What is wrong?
A. “ERROR’ flashes on display
if you set the temperature either
below 80°F. or greater than 199°F.
The oven tells you between the
flashings of “ERROR’ what the
incorrect entry was that you set.
Tore-enter, touch CLEAR/OFF
pad and begin steps again.
Q. Are there any foods I can’t
Temp Cook?
A. Yes.Delicate butter icings, ice
cream, frozen whipped toppings,
etc., soften rapidly at warm
temperatures. Batters and doughs
as well as frozen foods are also
difficult to cook precisely with the
probe. It is best to Time Cook
these foods.
Q. Why did “PROBE” flash
on the display after I touched
START?
A. “PROBE” will flash on the
display if you have not securely
seated the end of the probe into the
receptacle in the oven wall, or if
YOU touch TEMP COOK/HOLD
and have forgotten to use the probe.
Q. Can I leave my probe in the
oven if it’s not inserted in food?
A. No. If the probe is left inside
the oven, touching the oven wall,
and not inserted in food, you may
damage the oven.
Q. Can I Temp Cook different
portions of food at different
temperatures?
A. Yes.The temperature probe
gives you the freedom to cook
different portions of food at
different temperatures to suit
individual eating preferences.
Simply place the probe in the food
and change the temperature setting
as needed.
27
Page 28

surfacecooking
Surface Cooking with
Infinite Heat Controis
Your surface units and controls
are designed to give you an infinite
choice of heat settings for surface
unit cooking.
At both OFF and HIGH positions,
there is a slight niche so control
“clicks” at those
on HIGH marks the highest setting;
the lowest setting is between the
words LOW and OFF. In a quiet
kitchen, you may hear slight
“clicking” sounds during cooking,
indicating heat settings selected
are being maintained.
Switching heats to higher settings
always shows a quicker change than
switching to lower settings.
How to
Step 1: Grasp control knob and
push in.
Set the controls
positions;“click”
Control must be pushed in to set
only from OFF position. When
control is in any position other
than OFF, it maybe rotated
without pushing in.
Be sure you turn control to OFF
when you finish cooking. An
indicator light will glow when
ANY heaton anysurfaceunitis on.
~ooking @ide
for using Heats
HI
MED
HI
MED
Low
N~:
food unattended. Boilovers cause
smoking; greasy spillovers may catch
fire.
2. At WARM, LOW, melt chocolate,
butter on small unit.
Quick start for cooking; bring
water to boil.
Fast fry, pan broil; maintain
fast boil on large amount of
food.
Saute and brown; maintain
slow boil on large amount
of food.
Cook after starting at HIGH;
cook with little water in
covered pan.
Steam rice, cereal; maintain
serving temperature of most
foods.
1. At HIGH, MED HI, never leave
Questions & Answers
Q. May I can foods and preserves
on my surface units?
A. Yes, but only use utensils
designed for
the manufacturer’s instructions and
recipes for preserving foods. Be
sure canner is flat-bottomed and
fits over the center of your Calrod@
unit. Since canning generates large
amounts of steam, be careful to
avoid burns from steam or heat.
Canning should only be done on
surface units.
Q. Can I cover my drip pans with
foil?
A. No. Clean as recommended in
Cleaning Guide.
Q. Can I use special cooking
equipment, like an oriental wok,
on any surface units?
A. Utensils without flat surfaces
are not recommended. The life of
your surface unit can be shortened
and the range top can be damaged
from the high heat needed for this
type of cooking.
Q. Why am I not getting the heat
I need from my units even though
I have the knobs on the right
setting?
A. After turning surface unit off
and making sure it is cool, check to
make sure that your plug-in units
are securely fastened into the
surface connection.
canning purposes. Check
I
Step 2: Turneither clockwise or
counterclockwise to desired heat
setting.
A
28
Q. Why do my utensils tilt when I
place them on the surface unit?
A. Because the surface unit is
not flat. Make sure that the “feet”
on your Calrod@ units are sitting
tightly in the range top indentation
and the reflector ring is flat on the
range surface.
Q. Why is the porcelain finish on
my containers coming off?
A. If you set your Calrod@ unit
higher than required for the
container material, and leave it, the
finish may smoke, crack, pop, or
burn depending on the pot or pan.
Also, a too high heat for long
periods, and small amounts of dry
food, may damage the finish.
Page 29

,sE--f”acecooking-Guide
Cl]O1<\~are ~i~s
1. Use medium-or heavy-weight
cookware. Aluminum cookware
conducts heat faster than other
metals. Cast iron and coated cast
iron cookware is slow to absorb
heat, but generally cooks evenly at
LOW or MEDIUM settings. Steel
pans may cook unevenly if not
combined with other metals.
Food
Cereal
Cornmeal, grits,
oatmeal
Cocoa
coffee
Eggs
Cooked in shell
Fried sunny-side-up
Fried over easy
Poached
Scrambled or omelets
Fruits
Nleats, Poultry
Braised: Pot roasts of
beef, lamb or veal;
pork steaks and
chops
I?m-fried: Tender
chops; thin steaks up
to 3/4-inch: minute
steaks; hamburgers;
ti-itnks and sausage;
thm fish fillets
Cookware
Covered
Saucepan
Uncovered
Saucepan
Percolator
Covered
Saucepan
Covered
Skillet
Uncovered
Skillet
Covered
Skillet
Uncovered
Skillet
Covered
Saucepan
Covered
Skillet
Uncovered
Skillet
Use non-stick or coated metal fitting lids. Match the size of the
cookware. Flat ground Pyrocerarn@ saucepan to the size of the surface
saucepans or skillets coated on the unit. A pan that extends more than
bottom with aluminum generally an inch beyond the edge of the trim
cook evenly. Use glass saucepans
ring traps heat which causes
with heat-spreading trivets “crazing” (fine hairline cracks) on
available for that purpose. porcelain, and discoloration
2. To conserve the most cooking
energy, pans should be flat on the
ranging from blue to dark gray on
chrome trim rings.
bottom, have straight sides and tight
Directions and Setting
to Start Cooking
H1. In covered pan bring
water to boil before adding
cereal.
HI. Stir together water or
milk, cocoa ingredients.
Brin~ iust to a boil.
HI. At first perk, switch
heat to LOW.
HI. Cover eggs with cool
water. Cover pan, cook
until steaming.
MED HI. Melt butter, add
eggs and cover skillet.
HI. Melt butter.
HI. In covered pan bring
water to a boil.
HI. Heat butter until light
golden in color.
HI. In covered pan bring
fruit and water to boil.
HI. Melt fat, then add meat.
Switch to MED HI to
brown meat. Add water or
other liquid
HI. Preheat skillet, then
grease lightly.
Setting to Complete
Cooking
LOW or WM, then add cereal.
Finish timing according
to package directions.
MED, to cook 1 or 2 mmutes
to completely blend ingredients.
LOW to maintain gentle but
steady perk.
LOW. Cook only 3 to 4
minutes for soft cooked;
15minutes for hard cooked.
Continue cooking at MED HI
until whites are just set. about
3 to 5 more minutes.
LOW, then add eggs. When
bottoms of eggs have just set,
carefully turn over to cook
other side.
LOW. Carefully add eggs.
Cook uncovered about 5
minutes at MED HI.
MED. Add e= mixture.
Cook, stirring to desired
doneness.
LOW. Stir occasionally and
check for sticking.
LOW. Simmer until fork
tender.
MED HI or MED. Brown and
cook to desired doneness,
turning over as needed.
Comments
Cereals bubble and expand as
they cook: use large enough
saucepan to prevent boilover.
Milk boils over rapidly. Watch as
boiling point apprmches.
Percolate 8 m 10 minutes for
8 cups, ICSSfor fewer cups.
If you do not cover skillet, baste
eggs with ftit to cook tops evenly.
Remove cooked eggs with slotted
spoon or pancake turner.
Eggs continue to set slightly after
cooking. For omelet do not stir
last few minutes. When set. fold
in half.
Fresh fruit: Use 1/4 to 1/2 cup
water per pound of fruit.
Dried fruit: Use water as package
directs. Time depends on whether
fruit has been presoaked. If not,
allow more cooking time.
Meat can be seasoned and floured
before it is browned, if desired.
Liquid variations for flavor could
be winc. fruit or tomato juice or
meat broth.
Timing: Steaks 1 to 2-inches: 1 to
2 hours. Beef Stew: 2 to 3 hours.
Pot Roast: 2 % to 4 hours.
Pan frying is best for thin steaks
and chops. If rare is desired, preheat skillet before adding meat.
29
(continued Iwxt page)
Page 30

3. Frying. Do not overfill kettle with fat
that may spill over when adding food.
Frosty foods bubble vigorously. Watch
foods frying at HIGH temperatures,
and keep range and hood clean from
accumulated grease.
RIGHT
n
[c
OVER 1“
Food Container to Start Cooking Setting to Complete Cooking
Fried Chicken Covered
Skillet
Pan broiled bacon Uncovered
Sauteed: Less tender
thin steaks (chuck,
round, etc.); liver;
thick or whole fish
Simmered or stewed Covered HI. Cover meat with water LOW. Cook until fork tender.
meat; chicken; corned
beef; smoked pork;
stewing bcefi tongue; Large may be needed,
etc. Saucepan
Melting chocolate,
butter, Covered melt through. Stir to smooth. milk or water.
marshmallows
Pancakes or Skillet or MED HI. Heat skillet 8 to
French toast
Pasta
Noodles or spaghetti Covered
Pressure Cooking
Puddings, Sauces,
Candies, Frostings
Vegetables
Fresh
Frozen
Sauteed: Onions;
green peppers;
mushrooms; celery; etc.
Rice and Grits
Skillet
Covered
Skillet
Dutch Oven,
Kettle or
Small WM. AI1ow 10 to U minutes to When melting marshmallows, add
Saucepan.
Use small
surface unit.
Griddle 10 minutes. Grease lightly. time. llrn over pancakes when
Large kettle salted water to a boil, uncover
or Pot
Pressure
Cooker or heard.
Canner
Uncovered
Saucepan
Covered HI. Measure 1/2to l-in. water
Saucepan
Covered HI. Measure water and salt
Saucepan
Uncovered HI. In skillet, melt fat.
Skillet
Covered HI.
Saucepan
Directions and Setting
HI. Melt fat. Switch to MED LOW.Cover skillet
HI to brown chicken. tender.
HI. In cold skillet, arrange
bacon slices. Cook just
until starting to sizzle.
HI. Melt fat. Switch to MED
to brown slowly.
and cover pan or kettle.
Cook until steaming.
HI. Incoveredkettle, bring
and add pasta slowly so boiling
does not stop.
HI. Heat until first jiggle is
HI. Bring just to boil.
in saucepan. Add salt and
prepared vegetable. In covered
saucepan, bring to boil.
as above. Add frozen block
of vegetable. In covered
saucepan, bring to boil.
Bring saltedwater to a boil.
Uncover last few minutts.
MED HI. Cook, turning over as
needed.
LOW. Cover and cook until tender.
(Water should slowly boil.) For
very large amounts, medium heat
Cook 2 to 3 minutes per side. Thick batter takes slightly longer
MED HI. Cook uncovered
until tender. For large amounts, boilover. Pasta doubles in size
HI maybe needed to keep water
at rolling boil throughout entire
cooking time.
MED HI for foods cooking
10 minutes or less. MED for
foods over 10minutes.
LOW.Tofinish cooking.
MED. Cook l-lb. 10to 30
more minutes, depending on water and longer time.
tenderness of vegetable.
LOW. Cook according to Break up or stir as needed while
time on package. cooking,
MED. Add vegetable. Turn over or stir vegetable as
Cook until desired tenderness necessary for even browning.
is reached.
WM. Cover and cook Triple in volume after cooking.
according to time.
and cook until
Comments
For crisp dry chicken. cover only
after switching to LOW for 10
minutes. Uncover and cook, turning
occasionally-10 to 20 minutes.
A more attention-free method
is to start and cook at MED.
Meat may be breaded or marinated
in sauce before frying.
Add salt or other seasoning before
cooking if meat has not been
smoked or otherwise cured.
bubbles rise to surface.
Use large enough kettle to prevent
when cooked.
Cooker should jiggle 2 to 3 times
per minute.
Stir frequently to prevent
sticking.
Uncovered pan requires more
Time at WM. Rice: 1cup rice and
2 cups water-25 min. Grits: 1 cup
grits and 4 cups water—40 min.
30
Page 31

Your oven is designed to give
you the best results in baking,
broiling and roasting when used
as recommended. Before using
your oven, read the directions
for setting and using all of the
controls and timer.
Light comes on automatically
when door is opened. When door is
closed, you can use switch in upper
right corner of window door to turn
light on.
When the shelves are correctly
placed on shelf supports, they are
designed with stop-locks to prevent
them from coming out of the oven or
tilting when food is placed on them.
To remove, lift up rear of shelf and
pull forward with stop-locks along
top of shelf support.
To replace, insert shelf with stop-
locks resting on shelf supports and
push toward rearof oven until it
falls into correct position under
shelf supports.
Own (3)ntrok
The controls for the ovens are
marked OVEN SET and OVEN
TEMP. The OVEN SET control
has settings for BAKE, TIME
BAKE, BROIL, CLEAN (for
lower oven) and OFF. When you
turn the knob to the desired setting,
the proper heating units are then
activated for that operation.
The OVEN TEMP control maintains
the temperature you set, from
WARM (150”F.) to BROIL (550”F.)
and also at CLEAN (880”F. ) for
lower oven.
Oven Timer Controls are designed
to automatically start and stop
certain oven functions (TIME
BAKE or CLEAN). Dials are
timed by a special Clock with index
marks (denoting numerals) and
hands. (For location, see page 8.)
To set Clock, push in the center
knob of Minute Timer and turn the
Clock hands to correct time, then
let knob out.
To set Minute Timer, turn knob to
desired minutes. (Knob must be out
to set Minute Timer.) Minute Timer
will buzz when time has finished
and must be turned off manually.
Use the Microwave Oven Clock for
easy reference to time of day.
The oven has four shelf supports
marked A (bottom), B, C and D
(top). Shelf positions for cooking
food are suggested on Baking,
Roasting and Broiling pages.
31
Page 32

Biking
When cooking a food for the first
time in your new oven, use time
~iven on recipes as a guide. Oven
e
thermostats, over a period of years,
may “drill” from the factory setting
and differences in timing between
an old and a new oven of 5 to 10
minutes are not unusual and you
may be inclined to think that the new
oven is not performing correctly.
However, your new oven has been
set correctly at the factory and is
more apt to be accurate than the
oven it replaced.
How to Set Ybur Range
for Baking
Step 1: Place food in oven, being
certain to leave about 1 inch of
space between pans and walls of
oven for good circulation of heat.
Close oven door. During baking,
avoid frequent door openings to
prevent undesirable results.
~~
that you set. Examples of Immediate
Start (oven turns on now and you
set it to turn off automatically) or
Delay Start and Stop (setting the
oven to turn on automatically at a
later time and turn off at a preset
stop time) will be described.
NOTE: Before beginning make
sure the hands of the range clock
show the correct time of day.
Immediate Start is simply setting
oven to start baking now and turning
off at a later time automatically.
Remember, foods continue cooking
after controls are off.
Step 1:To set Stop Time, push in
knob on STOP dial and turn pointer
to time you want oven to turn off;
for example 6:00. The Start Dial
should be at the same position as
the time of day on clock.
Step 1:To set start time, push in knob
on START dial and turn pointer
to time you want oven to turn on,
for example 3:30.
Step 2: To set Stop Time, push in
knob on STOP dial and turn pointer
to time you want oven to turn off,
for example 6:00. This means your
recipe called for two and one-half
hours of baking time.
NOTE: Time on Stop Dial must be
laterthan time shown on range clock
and Start dial.
Step 2: Turn OVEN SET knob to
BAKE and OVEN TEMP knob to
temperature on recipe or in Baking
Guide.
Step 3: Check food for doneness
at minimum time on recipe. Cook
longer if necessary. Switch off heat
and remove foods.
How to Time Bake
Step 2: Turn OVEN SET knob to
TIME BAKE. Turn OVEN TEMP
knob to oven temperature, for
example 250”F.
to Set Delay Wart
HOMT
and Stop ‘
Delay Start and Stop is setting the
oven timer to turn the oven on and
off automatically at a later time
than the present time of day.
32
Step 3: Turn OVEN SET knob to
TIME BAKE. Turn OVEN TEMP
knob to 250”F. or recommended
temperature.
Place food in oven, close the door
and automatically the oven will be
turned on and off at the times you
have set. Turn OVEN SET to OFF
and remove food from oven.
OVEN INDICATOR LIGHT(s) at
TIME BAKE setting may work
differently than they do at BAKE
setting. Carefully recheck the steps
given above. If all operations are
done as explained, oven will
operate as it should.
Page 33

1. Aluminum pans conduct heat
2. Dark or non-shiny finishes,
quickly. For most conventional glass and Pyroceram@ utensils oflen
baking, light. shiny finishes generally absorb heat, which may result in
give best results. They prevent dry, crisp crusts. Reduce oven heat
overbrowning in the time it takes 25”F. if lighter crusts are desired.
for heat to cook the center areas. Preheat cast iron for baking some
Dull (satin-finish) bottom surfaces foods for rapid browning when
of pans are recommended for cake
pans and pie plates to be sure those
areas brown completely.
food is added.
3. Preheating the oven is not always
necessary, especially for foods
which cook longer than 30 to 40
minutes. For food with short
cooking times, preheating gives
best appearance and crispness.
4. Open the oven door to check
food as little as possible to prevent
uneven heating and to save energy.
Food Container Position Temperature Minutes Comments
Bread
Biscuits (Y~-in. thick) Shiny Cookie Sheet B, c
coffee cake Shiny Metal P~n with
Corn brcwl or muflins Cast 1ron or Glass
Glngcrbrewi Shiny Metal P~n with
Muffins Shiny Metal Muffin Pans A, B
Popovers Deep Glass or Cast Iron Cups
Quick loaf bread Metal or Glass Loaf Pans
Yimst brctid (2 loaves) Metal or Glass Loaf Pans
Plain rolls Shiny Oblong or Muffin Pans
Sweet rolls Shiny Oblong or Muffin Pans
Cakes
(wi(hout sh(wtcning)
Angel !(xx1
Jelly roll
Sponge
Cakes
Bunch cakes
Cupcakes Shiny Metal Muffin Pans
Fruit cakes
Layer Shiny Metal P~n with
Layer. chocolate
Loaf Metal or Glass Loaf Pans
Cookies
Brownies
Drop Cookie Sheet
Refrigerator
Rolled or sliced
Fruits,
Other Desserts
Baked apples Glass or Metal Pan
Custard
Puddings. Rice
and Custard
Pies
Frozen
Meringue
One crust Glass or Satin-finish Metal
Two crust
Pastry shell
hliscellaneous
Baked potatoes
Scalloped dishes
Souffles
satin-finish bottom
stitin-finish bottom
Aluminum Tube Pan
MctiIl Jelly Roll Pan
Mew] or Ceramic Pan
Metal or Ceramic Pan
Metal or Glass Loaf or
Tube Pan
satin-finish bottom
Shiny Metal
satin-finish bottom
Metal or Glass Pans
Cookie Sheet
Cookie Sheet
Glass Custard Cups or Casserole
(set in pan of hot water)
Glass Custard Cups or
Casserole
Foil Pan on Cookie Sheet
Spread to crust edges
Glass or Satin-finish Metal
Glass or Satin-finish Metal
Set on Oven Shelf
Glass or Metal Pan
Glass
Panwith
Shelf
B, A 350°-4000 20-30
B 400°-4500
B 350° 45-55
B 375° 45-60 mix, or b&e at 450”F. for 25 minutes,
B 350°-3750 45-60
A, B 375°-4250 45-60 Dark metal or glass give deepest
A, B 375°-4250 10-25 For thin rolls, Shelf B may be used.
B, A
A
B 375°-4000 10-15 L]nc pan with waxed paper.
A 325°-3500 45-60
A, B
B
A, B
B
B
B
B, C 325°-3500
B, C
B, C 400°-4250 6-12 25”F. to 50°F. for more browning.
B, C
A, B, C
B
B
A
B, A
A, B
B
B
A, B, C
A,B, C
B
Oven
400°-4750
400°-4250
350°-3750
325°-3750 30-55
325°-3500
350°-3750
275°-3000
350°-3750
350°-3750
350°
350°-4000
375°-4000 7-12
350°-4000
300°-3500
325° 50-90
400°-4250
325°-3500
400°-4250
400°-4250 40-60
450°
3~5°-4000
3~5°-~50
300°-3500
Time,
15-20 Canned, refrigerated biscuits take
ZO-40
20-30 Decrease about 5 minutes for muffin
~()-30
45-65
20-25 Paper liners produce more moist
2-4 hrs.
20-35
2 to 4 minutes less time.
Preheat cast iron pan for crisp crust.
then at 350°F. for 10to 15 mmutes.
browning.
For thin rolls. Shelf B maybe used.
Two-piece pan is convenient.
crusts.
Use 300°F. and Shelf B for small or
individual cakes.
25-30
40-60
25-35
10-20 Use Shelf C and increase temp.
30-60
30-60
45-70 Large pies use 400”F. and increase
15-25
45-60 Custard fillings require lower
12-15
60-90
30-60
30-75
Bar cookies from mix use same time.
Reduce temp. to 300”F. for large
custard. Cook bread or rice pudding
with custard base 80 to 90 minutes.
time.
To quickly brown meringue, use
400”F. for 8 to 10 minutes.
temperature, longer time.
Increase time for large amount
or size.
33
Page 34

Roasting
Roasting is cooking by dry heat.
Tender meat or poultry can be
roasted uncovered in your oven.
Roasting temperatures, which
should below and steady, keep
spattering to a minimum. When
roasting, it is not necessary to
sear, baste, cover or add water
to your meat.
Roasting is really a baking
procedure used for meats. Therefore,
oven controls are set to BAKE or
TIME BAKE. (You may hear a
slight clicking sound, indicating the
oven is working properly. ) Roasting
is easy; just follow these steps:
Step 1: Check weight of meat, and
place, fat side up, on roasting rack
in a shallow pan. (Broiler pan with
rack is agood pan for this. ) Line
broiler pm with aluminum foil when
using pan for marinating, cooking
with fruits, cooking heavily cured
meats, or for basting food during
cooking. Avoid spilling these
materials on oven liner or door.
Step 2: Place in oven on shelf in
10preheating is
Step 4: Most meats continue to
cook slightly while standing, afier
being removed from the oven. For
rare or medium internal doneness,
if meat is to stand 10to 20 minutes
while making gravy, or for easier
carving, you may wish to remove
meat from oven when internal
temperature is 5 to 10”F.below
temperature suggested in guide.
If no standing is planned, cook
meat to suggested temperature in
guide on opposite page.
NOTE: Youmaywish to use TIME
BAKE, as described on page 32, to
turn oven on and off automatically.
Remember that food will continue
to cook in the hot oven and therefore
should be removed when the desired
internal temperature has been
reached.
ForFrozen Roasts
● Frozen roasts of beef, pork,
lamb, etc., can be started without
thawing, but allow 10to 25 minutes
per pound additional time (10
minutes per pound for roasts under
5 pounds, more time for larger
roasts).
,~;~~sti~ns~116}.nswcrs
Q. Is it necessary to check for
doneness with a meat thermometer?
A. Checking the finished internal
temperature at the completion of
cooking time is recommended.
Temperatures are shown in Roasting
Guide on opposite page. For roasts
over 8 lbs., cooked at 300°F. with
reduced time, check with thermometer
at half-hour intervals after half the
time has passed.
Q. Why is my roast crumbling
when I try to carve it?
A. Roasts are easier to slice if
allowed to cool 10to 20 minutes
after removing from oven. Be sure
to cut across the grain of the meat.
Q. Do I need to preheat my
oven each time I cook a roast
or poultry?
A. It is rarely necessary to preheat
your oven, only for very small
roasts, which cook a short length
of time.
Q. When buying a roast, are
there any special tips that would
help me cook it more evenly?
A. Yes. Buy a roast as even in
thickness as possible, or buy rolled
roasts.
Q. Can I seal the sides of my foil
“tent” when roasting a turkey?
A. Sealing the foil will steam the
meat. Leaving it unsealed allows the
air to circulate and brown the meat.
Step 3: Turn OVEN SET to BAKE
and OVEN TEMP to 325”F. Small
poultry may be cooked at 375”F.
for best browning.
● Thaw most frozen poultry before
roasting to ensure even doneness.
Some commercial frozen poultry
can be cooked successfully without
thawing. Follow directions given
on packer’s label.
34
Page 35

1. Position oven shelf at B for 3. Remove fat and drippings as
small-size roasts (3 to 7 lbs.) and
at A for larger roasts.
2. Place meat fat-side up, or poultry
breast-side up, on broiler pan or
necessary. Baste as desired.
4. Standing time recommended for
roasts is 10to 20 minutes to allow roast
to firm up and make it easier to
other shallow pan with trivet. Do carve. Internal temperature will rise
not cover. Do not stuff poultry until
just before roasting. Use meat
probe for more accurate doneness.
Control signals when food has
about 5° to 10”F.; to compensate for
temperature rise, if desired, remove
roast from oven at 5° to 10”F.less
than temperature on guide.
reached set temperature. (Do not
place probe in stuffing.)
5. Frozen roasts can be
conventionally roasted by adding
10to 25 minutes per pound mor~
time than given in guide for
refrigerated roasts. (10 minutes
per pound for roasts under 5 pounds.)
Defrost poultry before roasting.
Oven
Type
Meat
Tender cuts: rib, high
rump or top mu nd*
Lamb Leg or bone-in shoulder*
Veal shoulder. leg or loin*
Pork Iom, rib or shoulder*
Ham. precooked
Ham. raw
*For boneless rolled ro~sts over 6-inches thick, add 5 to 10minutes per pound to times given above.
Poultry
Chicken or Duck
pieces
Chicken
Turkey
quality sirloin tip, 325°
Temperature
325°
325°
325°
325°
325°
i
325°
375°
325°
Doneness in Minutes per I%und Temperature ‘F
Rare:
Medium: 30-35 22-25
Well Done: 35-45
Rare:
Medium:
Well Done:
Well Done: 35-45 30-40
Well Done:
To Warm:
WellDone: 20-30
Well
Done: 35-40
Well Done:
Well Done: 20-25
Approximate Roasting Time, Internal
3 to 5-lbs.
24-30
21-25 20-23
25-30 24-28 150”-160°
30-35 28-33
35-45 30-40
10 minutes per pound
Under 10-lbs.
3 to 5-lbs.
35-40 185°-1900
10 to 15-lbs.
6 to 8-lbs.
18-22 130°-140°
28-33 170°-185°
150°-160°
130°-140°
170°-185°
170°-180°
170°-180°
(anyweight) 125°-1300
10to 15-lbs.
17-20 160°
Over 5-lbs.
30-35
Over 15-lbs. In thigh:
15-20
185°-190°
185°-1900
35
Page 36

Broiling
Broiling is cooking food by intense
radiant heat from the upper unit in
the oven. Most fish and tender cuts
of meat can be broiled. Follow
these steps to keep spattering and
smoking to a minimum.
Step 1:If meat has fat or gristle near
edge, cut vertical slashes through
both about 2“ apart. If desired, fat
may be trimmed, leaving layer
about 1/8” thick.
Step 2: Place meat on broiler rack
in broiler pan which comes with
range. Always use rack so fat drips
into broiler pan; otherwise juices
may become hot enough to catch fire.
Step 3: Positionshelfon recommended
shelf position as suggestedin Broiling
Guide on opposite page. Most
broiling is done on C position, but
if your range is connected to 208
volts, you may wish to usc higher
position.
II
II
Step 6: Turn food only once during
cooking. Time foods for first side
per Broiling Guide.
Turn food, then use times given for
second side as a guide to preferred
doneness. (Where two thicknesses
and times are given together, use
first times given for thinnest food.)
Step Z Turn OVEN SET knob
to OFF. Serve food immediately,
and leave pan outside oven to cool
during meal for easiest cleaning.
Use of’
I
Aluminum ~~oi[
Qwkiom 4!>i.IkTi’?’er:
Q. Why should I leave the door
closed when broiling chicken?
A. Chicken is the only food
recommended for closed-door
broiling. This is because chicken is
relatively thicker than other foods
you broil. Closed door holds more
heat in oven, so chicken maybe
broiled but well-done inside.
Q. When broiling, is it necessary
to always use a rack in the pan?
A. Yes. Using the rack suspends
the meat over the pan. As the meat
cooks, the juices fall into the pan,
thus keeping meat drier. Juices
are protected by the rack and stay
cooler, thus preventing excessive
spatter and smoking.
Q. Should I salt the meat before
broiling?
A. No. Salt draws out the juices
and allows them to evaporate.
Always salt after cooking. Turn
meat with tongs: piercing meat
with a fork also allows juices to
escape. When broiling poultry
or fish, brush each side often
with butter.
Stet) 4: Leave door ajar a few inches
(ex~ept when broiling chicken).
The door stays open by itself, yet
the proper temperature is maintained
in the oven.
Step 5: Turn both OVEN SET and
OVEN TEMP knobs to BROIL.
Preheating units is not necessary.
(See notes in Broiling Guide. )
1. If desired, broiler pan maybe
lined with foil and broiler rack may
be covered with foil for broiling.
ALWAYSBE CERTAIN TO MOLD
FOIL THOROUGHLY TO
BROILER RACK, AND SLIT
FOIL ~ CONFORM WITH
SLITS IN RACK. Broiler rack is
designed to minimize smoking and
spattering, and to keep drippings
cool during broiling. Stopping fat
and meat juices from draining to
the broiler pan prevents rack from
serving its purpose, and juices may
become hot enough to catch fire.
2. DO NOT place a sheet of
aluminum foil on shelf. Todo so
may result in improperly cooked
foods, damage to oven finish and
increase in heat on outside surfaces
of the oven.
Q. Why are my meats not turning
out as brown as they should?
A. In some areas, the power
(voltage) to the range maybe low.
In these cases, preheat the broil
unit for 10minutes before placing
broiler pan with food in oven.
Check to see if you are using the
recommended shelf position. Broil
for longest period of time indicated
in the Broiling Guide. Turn food
only once during broiling.
Q. Do I need to grease my broiler
racktopreventmeatfromsticking?
A. No. The broiler rack is designed
to reflect broiler heat, thus keeping
the surface cool enough to prevent
meat sticking to the surface. However,
spraying the broiler rack lightly with
a vegetable cooking spray before
cooking will make cleanup easier.
36
Page 37

~j “8”
““olklng To slash, cut crosswise through
1. Always use broiler panand rack
that comes with your oven. It is
designed to minimize smoking and
spattering by trapping juices in the
shielded lower part of the pan.
2. Oven door should be ajar for
most foods; there is a special
position on door which holds door
open correctly.
3. For steaks and chops, slash fat
evenly aroundoutside edges of meat.
outer fat surface just to the edge of
the meat. Use tongs to turn meat
over to prevent piercing meat and
losing juices.
4. If desired, marinate meats or
chicken before broiling. Or brush
with barbecue sauce last 5 to 10
minutes only.
5. When arranging food on pan,
do not let fatty edges hang over
sides, which could soil oven with
fat dripping.
6. Broiler doesnotneed tobe
preheated. However, for very thin
foods, or to increase browning,
preheat if desired.
7. Frozen Steaks can be
conventionally broiled by
positioning the oven shelf at next
lowest shelf position and increasing
cooking time given in this guide
1Y2times per side.
8. If your range is connected to
208 Volts, raresteaksmay be broiled
by preheating broil heater and
positioning the oven shelf one
position higher.
Food
Bacon %-lb. (about 8
Ground Beef l-lb. (4 patties)
Well Done YZto %-in. thick
Beef Steals
Rare l-inch thick
Medium (1 to l%-lbs. )
Well Done
Rare 1%-in. thick
Medium (2 to 2 %-lbs.)
WC]]Done
Chicken
Bakery Products
Bread (Toast) or
Toaster Pastries 1 pkg. (2)
English Muffins 2 (split)
Lobster Tails
(6 to 8-oz. each)
Fish l-lb. fillets % to
Ham Slices
(precooked)
Pork Chops
Well Done 2 (l-in. thick)
Lamb Chops
Medium
Well Done about 10 to
Medium
Well Done about 1 lb.
W’ieners and similar l-lb. pkg. (10)
precooked sausages,
bratwurst
Quantity andlor
Thickness
thin slices)
I whole
(~ to 2~-]bs.),
split lengthwise
~ to 4 slices
2-4 B
‘/z-in. thick Brush with lemon butter before and
1-in. thick B
2 (% inch)
about 1 lb.
2 (1inch)
12oz.
(lYz inch) c
2
Shelf
Position Time, Minutes Time, Minutes
c 3% 3 %
First Side
Second Side
c 7 4-5
c
c
c
7
9 9
13
7
13 rccomrncndcd.
c 10 7-8
c 15 14-16
c
A 35 10-15
c
c
c
c
B 13
c
c
B
c
25 20-25
1 Y2-2 ‘/2
3-4
13-16 Do not
5 5
8 8
10
8 4-7
turn over.
10
13
10 10
10
17
6
4-6
]~-14
1-~
Comments
Arrange m single layer.
Space evenly.
Up to 8 patties take about same time.
Steaks less than 1 inch cook through
befbre browmng. Pm frying is
Slash fat.
Reduce times about 5 to 10minutes per
side for cut-up chicken. Brush each side
with melted butter. Broil with skin
down first and broil with door closed.
Space evenly. Place English muffins
cut-side-up and brush with butter, if
desired.
Cut through back of shell. Spread
open. Brush with melted butter
before and after half time.
Handle and turn very carefully.
during cooking if desired. Preheat
broiler to increase browning.
Increase times 5 to 10minutes per side
for 1%-inch thick or home cured.
Slash fat.
Slash fat.
If desired, spl]t sausages in half
lengthwise into 5 to 6-inch pieces.
37
Page 38

Care and Ckming
Proper care and cleaning are
important so your Cooking
Center will give you efficient and
satisfactory service. Follow these
directions carefully in caring for
it to help assure safe and proper
maintenance.
BE SURE ELECTRIC POWER
IS OFF BEFORE CLEANING
ANY PMT OF YOUR
COOKING CENTER.
Control Panels
Don’t use sharp-edged utensils
around the control panels. They
might damage it.
Clean the
dampened cloth. DO NOI’ USE
cleaning sprays or large amounts
of soap and water. These can cause
problems with the control
mechanisms.
Temperature Probe
The probe is sturdy, but care
should be taken in handling it. Do
not twist it. Avoid dropping it.
Clean it as soon as possible after
use. Wipe it with a sudsy cloth, then
rub metal parts with a plastic
scouring pad if necessary. Rinse
and dry. DO NCYI’wash the probe
in an automatic dishwasher.
Aluminum Foilon Shelves—
why you shouldn’t use it
DO N~ place a sheet of aluminum
foil on any shelf in either your
microwave or conventional oven. If
YOUdo, your foods may not cook
properly. The oven finish may be
damaged. And there may bean
increase in heat on the outside
surfaces of the oven.
panels with a lightly
Oven Lamp
The oven lamp bulb is long-lasting.
Only a qualified service technician
should replace it.
DOUBLE DUTYTJi
Shelf Accessory
Your shelf accessory is designed
for use in a microwave oven only;
do not use in a conventional oven.
Do not use a browning dish with
the shelf. Arcing could occur.
Clean shelf with mild soap and
water or in the dishwasher. Do not
remove plastic spacers from the
shelf when cleaning. Do not clean
in self-cleaning oven.
.
Precautions for Use
of Metal
Use metal only as directed in the
Cookbook. Metal trays no more
than 3/4” deep may be used for TV
dinners, and the metal temperature
probe is designed for microwave
oven use. Always keep metal at least
one inch away from sides of oven.
Cleaning—Outside
Clean the outside of your
microwave oven with soap and
water, then rinse and dry. The outer
pane of the window is glass. Wipe
it clean with a damp towel. Chrome
is best wiped with a damp cloth and
then with a dry towel.
Cleaning—Inside
Keep it clean and sweet-smelling.
Openingtheovendoora fewminutes
aftercookinghelpsairouttheinside.
An occasional thorough wiping
with a solution of baking soda and
water keeps the interior fresh.
Spills and spatters are easy to
removefrom walls, floor and
antenna cover.That’sbecause
there’slittleheatexceptin the
food, orsometimesin the utensil.
Somespatterswipe up with a paper
towel, some may require a damp
cloth. Remove greasy spatters with
a sudsy cloth, then rinse and dry.
NEVER USE A COMMERCIAL
OVENCLEANERON ANY Pm
OF YOURMICROWA~ OVEN.
Wipe up spatters on the glass on
the inside of the door daily. Wash
glass, when it’s soiled, with a
minimum of sudsy, warm water.
Rinse thoroughly and dry.
Wipe metal and plastic parts on
the inside of the door frequently.
Use a damp cloth to remove all
soil. DO NOI’ USE ABRASIVES,
such as cleaning powders or steel
and plastic pads. They may mar
the surface.
Door Surface. When cleaning
surfacesof doorandoventhat
cometogetheron closing thedoor,
use onlymild, non-abrasivesoaps
ordetergentsappliedwith a sponge
orsoftcloth.
Do not remove the plastic
antenna cover at the top of the
oven (see page 8). You will damage
the oven if you do.
Using a Brown ‘N Sear Dish?
Use Bar Keepers Friend” Cleanser.
High heat generated on the bottom
of the Brown ‘N Sear Dish can
cause scorched appearing stains to
bake onto the oven floor if grease is
present. These may be removed
with Bar Keepers Friend” Cleanser
by SerVaasLaboratories, Inc.
After using this cleaner, rinse
and dry thoroughly, following
instructions on can. Do not use it
on the painted surfaces such as the
walls—it may scratch the paint.
Bar Keepers Friend@ Cleanser
is sold in many grocery, hardware
and department stores.
38
Page 39

Oven Thermostat
The temperature on your new oven
has been accurately set at the
factory. However, if your food
consistently browns too much or
too little, you may make a simple
adjustment behind your OVEN
TEMP knob. To readjust your
thermostat:
● Rotate OVEN TEMP knob to
CLEAN position and pull knob off
the shaft, revealing area behind
knob.
Oven is vented through a duct
located under the right rear Calrod@
unit. To clean duct, remove
Calrod” unit and drip pan/ring.
Lift out vent duct. In replacing,
make sure the duct opening is
under the opening in drip pan.
Correct positioning is important
to allow moisture and vapors to
be released from oven. Never
cover the hole.
Lamp Replacement
CAUTION:Before replacing
your ovenlamp bulb, disconnect
the electric powerfor your
Cooking Center at the main fuse
or circuit breaker panel. Be sure
to let the lamp cover and bulb cool
completely before removing or
replacing them.
To removedoor,open to BROIL
position, or whereyou feel hinge
catch slightly. Grasp
door at sides;
lift door up and away from hinges.
To replace, grasp door at sides.
Line up door with hinges and push
door firmly into place.
Otltltluc’d II(’XI p(w)
((
-
indented Are:
(Area seen through glass control
panel after knob is removed.)
c Insert the tip of a 3/16” standard
screwdriver into the indented area
directly under the notch and turn in
the desired direction. Be careful
not to scratch glass control panel.
● To increase oven temperature,
move dial one notch counterclockwise. To lower oven
temperature, move dial one notch
clockwise. (Each notch represents
approximately 15°F.)
● Return knob to the range by
matching the flat area of the knob
to the shaft.
● Recheck oven performance
before making an additional
adjustment.
\
To remove:
● Take out 3 slotted screws as
shown in lamp diagram.
. Detach lamp cover and remove
bulb.
Toreplace:
● Put in a new 40-watt appliance
bulb.
● Install lamp cover. Replace 3
screws and tighten them, making
sure cover fits flush with oven wall.
● Reconnect electric power to the
Cooking Center.
39
Page 40

Operating the Self-Cleaning Lower Oven
~~f’or~setting(hen
Controls, Check These
Things:
Step 1:
Remove broiler pan, broiler rack
and other cookware from the oven.
(Oven shelves may be left in oven.
Note: Shelves may become gray
after several cleanings. )
Step 2:
Wipe up heavy soil on oven
bottom.
Caution: Chrometrimrings
aroundthesurfaceunits should
neverbe cleanedin the selfcleaningoven. Neithershould
reflectorpansof foil or shiny
chrome.
Ilow’ to Set Oven
f’or cleaning
Step 1:
Turn OVEN SET and OVEN
TEMP knobs to CLEAN. Controls
will snapintofinalposition when
theCLEAN locationis reached.
Step 2:
Push and hold in LATCH
RELEASE BUTTON while
sliding LATCH HANDLE to the
right as far as it will go.
-.,---”
)
\
Step 3:
Set-the automatic oven timer:
!,
)
‘$
.;
4
c
c)
A. Oven Front Frame
B. Oven Door Gasket
C. Openings in Door
D. Oven Light
Step 3:
Clean spatters or spills on oven
front frame (A) and oven door
outside gasket (B) with a dampened
cloth. Polish with a dry cloth. Do
not clean gasket (B). Do not allow
water to run down through openings
in top of door (C). Never use a
commercial oven cleaner in or
around self-cleaning oven.
Step 4:
Close oven door and make sure
oven light (D) is off.
Step 5:
The porcelain-enameled drip pans
that came with your range can be
cleaned automatically in the selfcleaning oven. Wipe off boilovers
that are not stuck on before placing
two pans, upside down, on each
oven shelf.
QMake sure both the range clock
and the START dial show the correct
time of day. When the START knob
is pushed in and turned, it will “pop”
into place when the time shown on
the range clock is reached.
● Decide on cleaning hours
necessary.
Recommended Cleaning Time:
Moderate Soil—2 hours
(thin spills and light spatter)
Heavy Soil—3 hours
(heavy, greasy spills and spatter)
● Add these hours to present time
of day, then push in and turn STOP
dial clockwise to this desired stop
time. CLEANING light glows,
showing cleaning is starting.
The LOCKED light will glow,
indicating oven is hot and door
cannot be opened. Oven door and
window get hot during self-cleaning.
DO N~ TOUCH.
40
Page 41

After cleaning is complete, the
door will stay locked until the oven
cools and the LOCKED light goes
off. This takes about 30 minutes.
.-.
Step 1: “
When LOCKED light is off, push
and hold in LATCH RELEASE
BUTl_ON while sliding LATCH
HANDLE to the left as far as it
will go and open the door.
Step 2:
Turn OVEN SET knob to OFF.
Step 3:
Turn OVEN TEMP knob to WM.
NUIT3: If you wish to start and stop
cleaning at a later time than shown
on clock, push in and turn STAIW
dial to time you wish to start.
Add the hours needed for cleaning
to this “start” time, then push in
and turn STOP dial to this desired
stop time. Oven will automatically
turn on and off at the set times.
Q. Why won’t my oven clean
immediately even though I set
all the time and clean knobs
correctly?
A. Check to be sure your START
dial is set to the same time as the
range clock. Also check to be sure
LATCH HANDLE is moved to the
right.
Q. If my oven clock is not working,
can I still self-clean my oven?
A. No. Your Automatic Oven
Timer uses the range clock to help
start and stop your self-cleaning
cycle.
Q. Can I use commercial oven
cleaners on any part of my
self-cleaning oven?
A. No cleaners or coatings should
be used around any part of this
oven. If you do use them and do not
wipe the oven absolutely clean, the
residue can scar the oven surface
and damage metal parts the next
time the oven is automatically
cleaned.
Q. Can I clean the Woven Gasket
around the oven door?
A. No, this gasket is essential for
a good oven seal, and care must be
taken not to rub, damage or move
this gasket.
Q. After having just used the
oven, the LOCKED light came
on and I could not move the
LATCH HANDLE. Why?
A. After several continuous high-
temperature bakings or broilings,
the LOCKED light may come on.
The oven door can’t be latched for
self-cleaning while the LOCKED
light is on. If this happens, let the
oven cool until the LOCKED light
goes off. Then the oven door can
be latched for self-cleaning.
Q. What should I do if excessive
smoking occurs during cleaning?
A. This is caused by excessive soil,
and you should switch the OVEN
SET knob to OFF. Open windows
to rid room of smoke. Allow the
oven to cool for at least one hour
before opening the door. Wipe up
the excess soil and reset the clean
cycle.
Q. Is the “crackling” sound I
hear during cleaning normal?
A. Yes. This is the metal heating
and cooling during both the
cooking and cleaning functions.
Q. Should there be any odor
during the cleaning?
A. Yes, there maybe a slight odor
during the first few cleanings.
Failure to wipe out excessive soil
might also cause an odor when
cleaning.
Q. What causes the hair-like
lines on the enameled surface
of my oven?
A. This is a normal condition
resulting from heating and cooling
during cleaning. They do not affect
how your oven performs.
Q. Why do I have ash left in my
oven after cleaning?
A. Some types of soil will leave a
deposit which is ash. It can be
removed with a damp sponge or
cloth.
Q. My oven shelves do not slide
easily. What is the matter?
A. After many cleanings, oven
shelves may become so clean they
do not slide easily. If you wish
shelves to slide more easily,
dampen fingers with a small
amount of cooking oil and rub
lightly over sides of shelf where
they contact shelf supports.
Q. My oven shelves have become
gray after several cleanings. Is
this normal?
A. Yes. After many cleanings, the
shelves may lose some luster and
discolor to a deep gray color.
41
Page 42

Clean the area under the drip pans
often. Built-up soil, especially
grease, may catch fire. To make
cleaning easier, the plug-in surface
units are removable.
/“
Terminals
To remove:
. Be sure the control for the surface
unit is on OFF and the coils are cool
before removing the Calrod@ unit.
. Raise the unit coil opposite the
receptacle. Lift about one inch
above the trim ring and pull away
from the receptacle.
● After removing the plug-in
surface unit, remove the drip pan
and trim ring to clean under the unit.
To clean:
● Wipe around the edges of the
surface unit opening in the range
top. Clean the area below. Rinse
all washed areas with a damp cloth
or sponge.
To replace:
● Place drip pan in the surface unit
cavity found on top of the range.
Line up the drip pan so the unit
receptacle can be seen.
. Insert the terminals of the plug-in
unit through the opening in the drip
pan/ring and into the receptacle.
● Guide the surface unit into place
so it fits evenly and locks snugly
into the receptacle or trim ring.
Note: The drip pan must be under
thetrimring.
Do not attempt to clean, adjust,
or in any wayrepair the plug-in
receptacle. If liquid should spill
and collect inside the receptacle,
call for service.
42
Page 43

Ckxming Guide
NOTE: L@ range/oven parts cool before touching or handling.
?ART
3ake Unit and Broil
Jnit
MATERIALS TO USE
GENERAL DIRECTIONS
Do not clean the bake unit or broil unit. Any soil will burn off when the unit is
heated. NOTE: The bake unit is not hinged and cannot be lifted to clean the oven
floor. If spillover, residue or ash accumulates around the bake unit, gently wipe
around the unit with warm water.
Broiler Pan and Rack
● Soap and Water Drain fat, cool pan and rack slightly. (Do not let soiled pan and rack stand in oven to
● Soap-Filled Scouring Pad cool. ) Sprinkle on detergent. Fill pan with warm water and spread cloth or paper towel
● Plastic Scouring Pad over the rack. Let both stand for a few minutes. Wash; scour if necessary. Rinse and
dry. OFHON: The broiler pan and rack may also be cleaned in a dishwasher.
Control Knobs:
Range Top and Oven
Outside Glass Finish
● Mild Soap and Water Pull off knobs. Wash gently but do not soak. Dry and return controls to range,
making sure to match flat area on the knob and shaft.
. Soap and Water
Wash all glass with cloth dampened in soapy water. Rinse and polish with a dry
cloth. If knobs on the control panel are removed, do not allow water to run down
inside the surface of glass while cleaning.
Metal, including
Chrome Side Trims
● Soap and Water
Wash, rinse, and then polish with a dry cloth. DO N~ USE steel wool, abrasives,
ammonia, acids, or commercial oven cleaners which may damage the finish.
and Trim Strips
Porcelain Enamel
Surfdce*
● Pdpcr Towel
● Dry Cloth
● Soap and Water
Avoid cleaning powders or harsh abrasives which may scratch the enamel.
If acids should spill on the range while it is hot, use a dry paper towel or cloth to
wipe up right away. When the surface has cooled, wash and rinse.
For other spills, such as fat smatterings, etc., wash with soap and water when cooled
and then rinse. Polish with dry cloth.
[nside Oven Door*
● Soap and Water
On this oven, clean ONLY the door liner outside the gasket. The door is automatically
cleaned if the oven is in the self-cleaning cycle. If spillover or spattering should
occur in cooking function, wipe the door with soap and water. DO N~ rub or
damage gasket. Avoid getting soap and water on the gasket or in the rectangular
flanges on the door.
Oven Gasket*
Oven Liner*
● Soap and Water
Avoid getting ANY cleaning materials on the gasket.
Cool before cleaning. Frequent wiping with soap and water will prolong the time
between major cleanings. Be sure to rinse thoroughly. For very heavy soiling, use
your self-cleaning cycle often.
Shelves
(See Self-Cleaning
Oven Directions. )
Calrod” Surface
Unit Coils
● Soap and Water
Your shelves can be cleaned with the self-cleaning function in the oven. For heavy
soil, clean by hand, using any and al1mentioned materials. Rinse thorough] y to
remove all materials after cleaning.
Spatters and spills burn away when the coils are heated. At the end of a meal,
remove all utensils from the Cal rod@unit and heat the soiled units at HI. Let the
soil burn off about a minute and switch the units to OFF. Avoid getting cleaning
materials on the coils. Wipe off any cleaning materials with a damp paper towel
before heating the Calrod” unit.
DO NOT handle the unit before completely cooled.
DO N~ self-clean plug-in units.
DO N~ immerse plug-in units in any kind of liquid.
Chrome-Plated
Trim Rings
Porcelain Drip Pans
● Soap and Water
● Stiff-Bristled Brush
● Soap-Filled Scouring Pad
(Non-metallic)
. Soap and Water Cool pan slightly. Sprinkle on detergent and wash or scour pan with warm water. Rinse
. Soap-Filled Scouring Pad
● Plastic Scouring Pad
● Dishwasher
Clean as described below or in the dishwasher.
SELF-CLEANING FUNCTION. Rings will discolor.
Wipe all rings after each cooking so unnoticed spatter will not “burn on” next time
you cook. To remove
mentioned. Rub
and dry. In addition, pan may be cleaned in the dishwasher or in self-cleaning oven.
“burned-on” spatters, use any or all cleaning materials
lightly with scouring pad to prevent scratching of the surface.
*Spillage of marinades. fruit juices, and basting materials containing acids may cause discoloration.
\vith care being taken to not touch any hot portion of the oven. When the surface is cool, clean and rinse.
DO NOT CLEAN ON THE
Spillovers should be wiped up immediately,
43
Page 44

—.
———
——
z-=~-- (-@stiom?
—====—.5—
—— .—
e~n= use This Em3km sokY-
~
,.
PROBLEM
OVEN WILL NOT
WORK
OVEN LIGHT DOES
NOT’WORK
FOOD DOES N(YI’
BROIL PROPERLY
FOOD DOES N~
ROAST OR BAKE
PROPERLY
POSSIBLE CAUSE AND REMEDY
● Plug on range is not completely inserted into the outlet receptacle.
. The circuit breaker in your house has been tripped, or a fuse has been blown.
● Oven controls are not properly set.
● Door left in locked position after cleaning.
● Light bulb is loose.
● Bulb is defective. Replace.
. Switch which operates oven light is broken. Call for service.
● OVEN SET knob not set at BROIL.
c OVEN TEMP knob not set at BROIL.
● Door not left ajar as recommended.
● Improper shelf position is being used. Check Broiling Guide.
● Necessary preheating was not done.
● Food is being cooked on hot pan.
● Utensils are not suited for broiling.
● Aluminum foil used on the broil pan rack has not been fitted or slit properly.
● OVEN SET knob not set on BAKE.
● OVEN TEMP knob not set correctly.
● Shelf position is incorrect. Check Roasting or Baking Guides.
● Oven shelf is not level.
● Wrong cookware is being used. When roasting, pan is too small.
● A foil tent was not used when needed to slow down browning during roasting.
MOISTURE INSIDE
AND OUTSIDE OVEN
OVEN WILL NUI’
SELF-CLEAN
OVEN DOOR WON’T
LATCH
“PROBE’” APPEARS
ON READOUT
● Be sure oven vent duct is not covered with some material.
● Be sure oven vent duct is positioned properly.
. Automatic time dial/dials not set or not set properly. The STOP dial must be set and
advanced beyond the time noted on oven clock.
. The STOP dial was not advanced for long enough time.
. Both OVEN SET and OVEN TEMP knobs must be set at CLEAN setting.
● A thick pile of spillover when cleaned leaves a heavy layer of ash in spots which
could have insulated the area from further heat.
s Latch not moved to the right.
. Turn OVEN SET knob to CLEAN. Glowing LOCKED light after knob is turned
indicates oven is too hot from previous use and door won’t latch. To cool oven, open
door wide; then latch can be moved.
. OVEN SET knob must be at CLEAN or OFF before latch can be moved.
. Latch Release Button not pushed when moving latch.
● Probe has been forgotten or not seated properly in oven wall when using Auto Roast
or Temp Cook functions.
I
44
Page 45

PROBLEM
I
CALROD@ SURFACE
UNITS N~
FUNCI’IONING
PROPERLY
POSSIBLE CAUSE AND REMEDY
I
● Surface units are not plugged in solidly.
● Trim rings/drip pans are not set securely in the range top.
● Surface unit controls are not properly set.
PROBLEM
CONTROL PANEL
POSSIBLE CAUSE AND REMEDY
● Door not securely closed.
LIGHTED, YET OVEN . START must be touched after entering cooking selection.
WILL NOT START
● Another selection alread y entered for oven, and CLEAR/OFF not touched to cancel it.
● Make sure you have entered cooking time after touching TIME COOK.
● CLEAR/OFF was touched accidentally. Reset cooking program and touch START.
● Probe not inserted properly or not used during Auto Roast or Temp Cook.
● Make sure you have entered desired finished temperature after touching TEMP
COOK/HOLD.
● Make sure you entered a code number afier touching AUTO COOK, AUTO ROAST
or AUTO DEFROST.
“ERROR’ APPEARS
ON READOUT
● In Temp Cook, less than 80°F. or more than 199°F. has been entered.
● Door opened during Auto cycle of Auto Cook function. Close door, touch START.
. Weight is incorrect for Auto Defrost code on Guide. Oven must be reset.
FOODS ARE EITHER
OVERCOOKED OR
UNDERCOOKED
. Cooking times may vary because of starting food temperature, food density or
amount of food in oven. Touch TIME COOK and add cooking time for completion.
● Incorrect power level entered. Check Cookbook for recommended power level or
changing levels during cooking if necessary.
. Dish was not rotated, turned or stirred. Some dishes require specific instructions.
Check Cookbook or recipe for these instructions.
● Too many dishes in oven. Cooking time must be increased when cooking more than
one food item. Check Cookbook for recommendation on increasing time.
● Dish not completely covered as directed during Auto Cook.
. Previous microwaving lefi humidity or moisture in oven, thus lessening the cooking
time in Auto Cook ftmction.
. Certain vegetables need a standing time after using Auto Cook. Check Automatic
Cooking Guide.
● Oven door was opened during Auto cycle of Auto Cook function.
. Probe not inserted properly into meat or other food when using Temp Cook or Auto
Roast functions. See Cookbook or Auto Roast section of this book for instructions.
. Check Cookbook for food placement and use of Double DutyTMShelf.
All These Things Are Normal
with Your Microwave Oven:
● Steam or vapor escaping from
around the door.
● Light reflection around door or
● Dimming oven light and change in
blower sound may occur while operating
at Dower levels other than high.
QDull thumping sound while operating
at power levels other than high.
outer case.
If you need more help ...call, toll free:
The GE Answer Cente@
800.626.2000
consumer information service
● Some TV-Radio interference
might be noticed while using your
microwave oven. It’s similar to the
interference caused by other small
appliances and does not indicate a
problem with your oven.
45
Page 46

Exhaust !SWstern
w
This Cooking Center has a built-in
exhaust system equipped with
damper, a two-speed exhaust
blower and removable filters.
Exhaust openings are located over
cooking top and
The exhaust system functions only
when the blower is operating. The
switch for the exhaust system is
beneath the control panel. For high
speed, push switch once; for low
speed, push switch twice; and to
stop blower, push switch once
in sequence.
When blower is operating and hood
over oven is closed,
surface units only. When blower
operates with hood in open position,
it exhausts through openings over
surface units and over oven at the
same time.
THE EXHAUST SYSTEM
SHOULD BE OPERATED
WHENEVER ODORS, VAPORS
OR SMOKE ARE EXPECI’ED
TO BE THE RESULT OF A
COOKING OPERATION.
START FAN AT BEGINNING
OF COOKING.
inhood over oven.
it exhausts over
a
To open hood above the oven, lift
up handle at center of hood; to
close, push down on handle. Use
hood in its fully extended position
whenever vapor or smoke results
from cooking, such as when pan
broiling or frying on the surface
units. See information on use of
surface units.
Filters
Two filters are located over cooking
top and one behind hood extension.
Filters are removable for cleaning.
Filters become soiled over a period
of time. The efficiency of your
exhaust system depends on how
clean the filters are. Frequency of
cleaning, or replacing, depends on
the type of cooking you do, but
filters should be cleaned AT LEAST
ONCE A MONTH. Also, frequently
clean the grease-laden surfaces
adjacent to the filters.
To clean, agitate in hot detergent
solution. Light brushing may be
used to help remove imbedded soil
and dust. With careful use and
handling, filters will last for years.
However, if replacement becomes
necessary, obtain a filter from
your dealer.
Remove and Replace Filters
1. Cooking top:Place fingerin
recessatfrontedge of filter;push
filtertorearuntilfrontedge clears
theexhaustopening;lowerthe
frontandremove.Whenclean,
replace.Placeedgeof filteragainst
springatrearof exhaustopening.
Pushtorear,lift frontedge, andlet
springpushfilterforwardintoplace
underedge ofexhaustopening.
2. Hood:Extendhood as faras
possible, or removehoodextension
if desired;see illustrationbelow.
Place fingersoneach sideat
bottomof filter.Press filter to left
until it clears the holder on right
side, then remove. When clean,
replace. Push filter against clip at
left and press left until filter clears
holder at right side. Push filter
toward opening and release so it
slips behind holder.
Motor
The blower motor is permanently
lubricated; it does not need oiling.
To Remove and Replace Hood Extension
1. To remove, extendhood as far
as itwill open.
Withthumbscurvedaroundedge
of hood extension, hooka finger
betweenspringandbracketateach
side andpushtowardcenterofhood.
This moves pins out of holes in
bracket and hood extension can
be removed.
2. To ciean, wash with hot
detergent solution. Rinse and dry
with soft cloth.
3. Toreplace, fit bottomof halfcircleflanges intoside ofhood.
Secureone side ata time. Align
pinwithholes in bracketandhood
extension, thenpushpinthrough
holes. This secures hood extension
so it cannot be removed by mistake.
T=K’’/l=!’
46
HOOD EXTENSION
Page 47

Canning should be done on
cooktop only.
In surface cooking of foods other
than canning, the use of largediameter utensils (extending more
than l-inch beyond edge of trim ring)
is not recommended. However,
when canning with water-bath or
pressure canner, large-diameter
utensils may be used. This is
because boiling water temperatures
(even under pressure) are not
harmful to cooktop surfaces
surrounding heating unit.
HOWEVER, DO NOT USE
LARGE DIAMETER CANNERS
OR ~HER LARGE DIAMETER
UTENSILS FOR FRYING OR
BOILING FOODS OTHER
THAN WATER. Most syrup or
sauce mixtures—and all types of
frying-cook at temperatures much
higher than boiling water. Such
temperatures could eventually
harm cooktop surfaces surrounding
heating units.
observe lF01[0~~7illg~OiIlfS
i~l
Canniw
1. Bring water to boil on HIGH
heat, then after boiling has begun,
adjust heat to lowest setting to
maintain boil (saves energy and
best uses surface unit.)
2. Be sure canner fits over center
of surface unit. If your range does
not allow canner to be centered on
surface unit, use smaller-diameter
containers for good canning results.
3. Flat-bottomed canners give best
canning results. Be sure bottom of
canner is flat or slight indentation
fits snugly over surface unit.
Canners with flanged or rippled
bottoms (often found in enamelware)
are not recommended.
RIGHT
m
WRONG
4. When canning, use recipes from
reputable sources. Reliable recipes
are available from the manufacturer
of your canner; manufacturers of
glass jars for canning, such as Ball
and Kerr; and the United States
Department of Agriculture
Extension Service.
5. Remember, in following the
recipes, that canning is a process
that generates large amounts of
steam. Be careful while canning to
prevent burns from steam or heat.
NOTE: If your range is being
operated on low power (voltage),
canning may take longer than
expected, even though directions
have been carefully followed. The
process may be improved by:
(1) using a pressure canner, and
(2) for fastest heating of large
water quantities, begin with
HOT tap water.
lnibu Need service
To obtain service, see your warranty
on the back page of this book.
We’re proud of our service and
want you to be pleased. If for some
reason you are not happy with the
service you receive, here are three
steps to follow for firther help.
FIRST, contact the people who
serviced your appliance. Explain
why you are not pleased. In most
cases, this will solve the problem.
47
NEXT, if you are still not pleased,
write all the details-including
your phone number—to:
Manager, Consumer Relations
General Electric
Appliance Park
Louisville, Kentucky 40225
FINALLY, if your problem is still
not resolved, write:
Major Appliance
Consumer Action Panel
20 North Wacker Drive
Chicago, Illinois 60606
Page 48

Save proof of original purchase date such as your sales slip or cancelled check to establish warranty period.
VW-l&TIS C9VEFED
FULL ONE-YEAR WARRANTY
For one year from date of original
purchase, we will provide, free of
charge, parts and service labor
in your home to repair or replace
any part of the microwave
oven/range that fails because of a
manufacturing defect.
LIMITED ADDITIONAL
FOUR-YEAR WARRANTY
For the second through fifth year
from date of original purchase, we
will provide, free of charge, a
replacement magnetron tube if
the magnetron tube fails because
of a manufacturing defect. You pay
for the service trip to your home
and service labor charges.
This warranty is extended to
the original purchaser and any
succeeding owner for products
purchased for ordinary home use
in the 48 mainland states, Hawaii
and Washington, D.C. In Alaska the
warranty is the same except that it is
LIMITED because you must pay to
ship the product to the service shop
or for the service technician’s travel
costs to your home.
All warranty service will be provided
by our Factory Service Centers or
by our authorized Customer Care”
servicers during normal working
hours.
Look in the White or Yellow Pages
of your telephone directory for
GENERAL ELECTRIC COMPANY,
GENERAL ELECTRIC FACTORY
SERVICE, GENERAL ELECTRIC-
HOTPOINT FACTORY SERVICE or
GENERAL ELECTRIC CUSTOMER
CARE@ SERVICE.
‘1
,
I
I
I
I
,
I
. Replacement of house fuses or
teach you how to use the product.
Read your Use and Care material.
If you then have any questions
about operating the product,
please contact your dealer or our
Consumer Affairs office at the
address below, or call, toll free:
The GE Answer Center@
800.626.2000
consumer information service
resetting of circuit breakers.
. Failure of the product ,. .. ,“ ----
t if it ic Ilcfafi
for other than its intended purpose
or used commercially.
. Damage to product caused
by accident, fire, floods or acts
of God.
WARRANTOR IS NOT RESPONSIBLE
FOR CONSEQUENTIAL DAMAGES. !
— —
—
—
. Improper installation.
If you have an installation problem,
contact your dealer or installer.
You are responsible for providing
adequate electrical, exhausting
and other connecting facilities.
~
Some statesdo not allowthe exclusion or limitation of incidental or consequential damages, so the above limitation or exclusion
may not apply to you. This warranty gives you specific legal rights, and you may also have other rights which vary from state to state.
To know what your legal rights are in your
state, consult your local or state consumer affairs office or your state’s Attorney General.
Warrantor: General Electric Company
If further help is needed concerning this warranty, contact:
Manager—Consumer Affairs, Geneml Electric Company, Appliance Park, Louisville, KY 40225
P
II
II
● %
1
r,
!
,
,
Part No. 205C1O26P6O
Pub.
No.49-4723
2-86
GE NE RAL@EIECTRIC
JHP69GJ
 Loading...