

Page 1
Howtogetthebestfrom
Wcrowave
Centiie
Yow*
Cootig
.
-.—
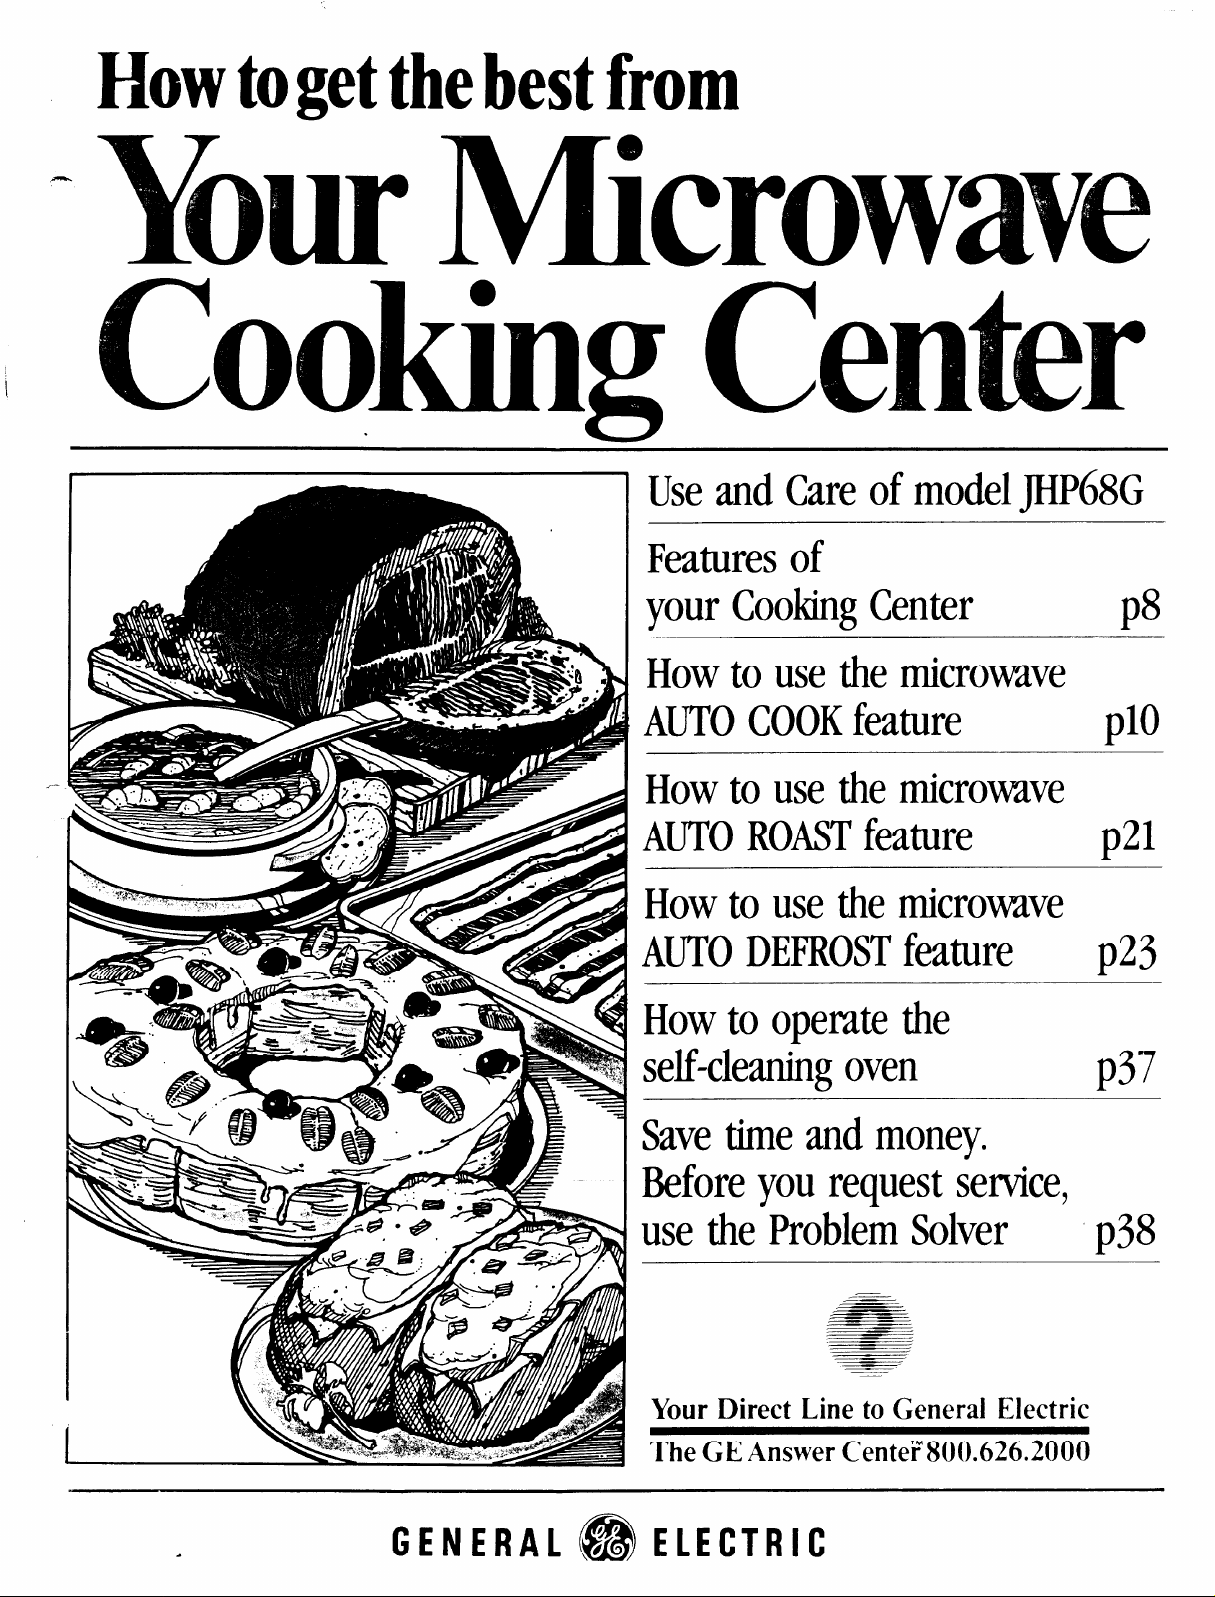
Useand Careof modelJHP68G
Featuresof
yourCookingCenter
Howto usethe microwave
AUTOCOOKfeature
Howto use the microwave
p8
plo
AUTOROASTfeature
Howto usethe microwave
AUTODEFROSTfeature
Howto opemtethe
self-cleaningoven
Savetimeandmoney.
Beforeyourequestservice,
usethe problemSolver
_——
—
Your Direct Line to General Electric
p21
p23
m
p37
p38
The GE Answer CenteF800.626.2000
. GENERAl@EIECTRIC
Page 2
Help Us
Help You. . .
Read this book carefully.
Itwill help you operate and main-
tain your new Cooking Center
properly.
Keep it handy for answers to your
questions.
If you don’t understand something
or need more help. . .
Call, toll free:
The GE Answer Center’”
800.626.2000
consumer information service
or write: (include your phone
number);
Consumer Affairs
General Electric Company
Appliance Park
Louisville, KY 40225
Write down the model and
serial numbers.
You’ll find them on a label inside the
upper oven on the left side.
These numbers are also on the
Consumer Product Ownership
Registration Card that came with
your Cooking Center. Before
sending in this card, please write
these numbers here:
Model No,
Serial No.
Use these numbers in any
correspondence or service calls
concerning your Cooking Center.
Be sure your oven is
registered.
It is important that we, the manufacturer, know the location of your
Cooking Center should a need
occur for adjustments.
Your supplier is responsible for
registering you as the owner.
Please check with your supplier to
be sure he has done so; also send
in your Consumer Product Owner-
ship Registration Card. If you move,
or if you are not the original purchaser please write to us, stating
model and serial numbers. This
appliance must be registered.
Please be certain that it is.
Write to:
General Electric Company
Range Product Service
Appliance Park
Louisville, KY 40225
If you received a damaged
oven. . .
immediately contact the dealer (or
builder) that sold you the Cooking
Center.
Save time and money.
Before you request service, check
the Problem Solver on page 38. It
lists minor causes of operating
problems that you can correct
yourself.
The electric output of this
microwave oven is 625 Watts.
I
PRECAUTIONS
TO AVOID
*
POSSIBLE
EXPOSURE TO
EXCESSIVE
MICROWAVE
ENERGY
(a) Do Not Attempt to operate this
oven with the door open since open
door operation can result in harmful
exposure to microwave energy. It is
important not to defeat or tamper
with the safety interlocks.
(b) Do Not Place any object between
the oven front face and the door or
allow soil or cleaner residue to
accumulate on sealing surfaces.
(c) Do Not Operate the oven if it is
damaged. It is particularly important
that the oven door close properly
and that there is no damage to the
(1) door (bent),
(2) hinges and latches (broken or
loosened)
(3) door seals and sealing surfaces.
(d) The Oven Should Not be
adjusted or repaired by anyone
except properly qualified service
personnel.
I
-.
t-.
Optional Accessories
Available at extra-cost from your GE supplier.
JV387 Vented Hood
Features 2-level venting that helps eliminate cooking vapors and odors.
JX79 Charcoal Filter Kit
Add for non-vented installation.
.
2
..-
Page 3
Contents
Microwave Oven
;*,Ylicrowaving Tips . . . . . . . . . . . . . . 3
‘4
Safety Instructions . . . . . . . . . ...4-7
Features of Your
Cooking Center . . . . . . . . . . . . . . 8
Touch Control Panel . . . . . . . . . . . 9
Automatic Cooking . . . . . . . . . . . . 10
Questions and Answers . . . . . . 12
Recipe Guide . . . . . . . . . . . . . . . 13
Main Dishes . . . . . . . . . . . . ..l4-l5
Vegetables . . . . . . . . . . . . . ..l6-l7
Fruits &Desserts . . . . . . . . ..l8-l9
Automatic Cooking Chart . . . . . . 20
Automatic Roasting &
Chart . . . . . . . . . . . . . . . . . . ..2l-22
Automatic Defrosting . . . . . . . . . . 23
Manual Defrosting . . . . . . . . . . . . 24
Time Cook . . . . . . . . . . . . . . . . . . .25
TempCook/Hold . . . . . . . . . . . . . 26
Minute/SecondTimer . . . . . . . . . 27
Surface Cooking
Safety Instructions . . . . . . . . . ...4-7
How to Use . . . . . . . . . . . . . . . . . . .28
Cooking Chart . . . . . . . . . . . ...29-30
-\
J
Conventional Oven
Safety Instructions . . . . . . . . . ...4-7
Features . . . . . . . . . . . . . . . . . . . ...8
Oven Controls . . . . . . . . . . . . . . . ..8
Oven Light . . . . . . . . . . . . . . . . . . .31
Oven Shelves . . . . . . . . . . . . . . . ..31
Minute Timer, Clock,
Automatic Oven Timer . . . . . . . 31
Baking . . . . . . . . . . . . . . . . . . . . . . .32
Baking Chart . . . . . . . . . . . . . . . ..33
Roasting . . . . . . . . . . . . . . . . . . . ..34
Broiling . . . . . . . . . . . . . . . . . . . . . .34
Roasting Chart . . . . . . . . . . . . . . . 35
Broiling Chart . . . . . . . . . . . . . . ..36
Care of Your Cooking Center
Self-Clean Operation . . . . . . . . . . 37
Care of Your
Cooking Center . . . . . . . . . . ...40
Lamp Replacement . . . . . . . . . . . . 40
Care of Surface Units . . . . . . . . . . 41
Oven Thermostat
Adjustment . . . . . . . . . . . . . . . . . 41
Oven Vent Duct . . . . . . . . . . . . . . . 41
Removable Oven Door . . . . . . . . . 42
Cleaning Chart (All Parts) . . . . . . 43
General
Before Using Your
Cooking Center . . . . . . . . . . . . . . 2
Energy Saving Tips . . . . . . . . . . . . . 7
Model &SerialNumber
Location . . . . . . . . . . . . . . . . . . . .8
The Problem Solver . . . . . . . . . . . 38
Consumer Services . . . . . . . . . . . . 47
Warranty . . . . . . . . . . . .. Back Cover
Microwaving Tips
● Make sure all utensils used in
your microwave oven are labeled
“suitablef ormicrowaving”. Check
yourCookbookfor specific test
todetermine”m icrowave-safe”
utensils.
● Paper towels, waxpaper, and
plasticwrapcan beused tocover
dishes inorder to retain moisture
and prevent spattering.
● Some microwaved foods require
stirring, rotating, or rearranging.
CheckyourCookbook forspecific
instructions.
● Some foods such as unshelled
eggsand hotdogs must be pierced
toailowsteamto escape during
cooking.
When Power is Connected
to the Oven
The panel displays five8’s and
18 POWER onthe upper portion
and alloftheoven functionsonthe
lower portion. After 15seconds, all
Iights disappear and “RESET”
appears in the upper portion. Touch
theCLEAR/OFF padand ovenis
ready for use and theclock can
be set.
If power is disrupted at anytime,
theabove sequence reoccurs, and
you must reset CLOCK after
touchingCLEAR/OFF.
Page 4
IMPORTANT SAFETY INSTRUCTIONS
Read all instructions before using this appliance.
When using electrical appliances
basic safety precautions should
be followed, including the
following:
WARNING—TO reduce the risk
of burns, electric shock, fire,
injury to persons or exposure to
excessive microwave energy:
● Use this appliance only for its
intended use as described in this
manual.
● Be sure your appliance is
properly installed and grounded
by a qualified technician in
accordance with the provided
installation instructions.
● This appliance must be con-
nected to a grounded, metallic,
permanent wiring system, or an
equipment grounding conductor
should be run with the circuit
conductors and connected to
the equipment grounding terminal or lead on the appliance.
● This appliance should be ser-
viced only by qualified service
personnel. Contact nearest
authorized service facility for
examination, repair or
adjustment.
● Before performing any
service, DISCONNECT THE
RANGE POWER SUPPLY AT
THE HOUSEHOLD DISTRIBUTION PANEL BY REMOVING
THE FUSE OR SWITCHING
OFF THE CIRCUIT BREAKER.
● Do not cover or block any
openings on the appliance.
● Do not use outdoors.
● Do not operate this appliance
if it is not working properly, or if
it has been damaged or dropped.
● As with any appliance, close
supervision is necessary when
used by children.
● Do not leave children alone—
children should not be left alone
or unattended in area where
appliance is in use. They should
never be allowed to sit or stand
on any part of the appliance.
● Don’t allow anyone to climb,
stand or hang on the door,
drawer or range top. They could
damage the range and even tip
it over causing severe personal
injury.
● CAUTION: DO NOT STORE
ITEMS OF INTEREST TO
CHILDREN IN CABINETS
ABOVE A RANGE OR ON THE
BACKSPLASH OF A RANGE—
CHILDREN CLIMBING ON THE
RANGE TO REACH ITEMS
COULD BE SERIOUSLY
INJURED.
● Wear proper clothing. Loose
fitting or hanging garments
should never be worn while
using the appliance. Flammable
material could be ignited if
brought in contact with hot heat-
ing elements and may cause
severe burns.
● Use only dry potholders—
moist or damp potholders on
hot surfaces may result in burns
from steam. Do not let potholders touch hot heating elements. Do not use a towel or
other bulky cloth.
● Never use your appliance for
warming or heating the room.
● Storage in or on Appliance—
Flammable materials should not
be stored in an oven or near surface units.
o Keep hood and grease filters
clean to maintain good venting
and to avoid grease fires.
● Do not let cooking grease or
other flammable materials accumulate in the range or near it.
● Do not use water on grease
fires. Never pick up a flaming
pan. Smother flaming pan on
surface unit by covering pan
completely with well fitting lid,
cookie sheet or flat tray. Flaming
grease outside a pan can be put
out by covering with baking
soda or, if available, a multipurpose dry chemical or foam.
o Do not touch heating elements or interior surface of
oven. These surfaces may be
hot enough to burn even though
they are dark in color. During
and after use, do not touch, or
let clothing or other flammable
materials contact surface units,
areas nearby surface units or
any interior area of the oven;
allow sufficient time for cooling,
first.
Potentially hot surfaces include
the cooktop and areas facing
the cooktop, oven vent opening
and surfaces near the openings,
and crevices around the oven
door.
Remembec The inside surface
of the oven may be hot when the
door is opened.
o When cooking pork follow
our directions exactly and
always cook the meat to at least
170°. This assures that, in the
remote possibility that trichina
may be present
in the meat, it
will be killed and meat will be
safe to eat.
6
@
4
Page 5
Microwave Oven:
● Read and follow the specific
“PRECAUTIONS TO AVOID
POSSIBLE EXPOSURE TO
e
EXCESSIVE MICROWAVE
ENERGY” found on page 2.
0 To reduce the risk of fire in
the oven cavity:
—Do not overcook food. Care-
fully attend appliance if paper,
plastic, or other combustible
materials are placed inside the
oven to facilitate cooking.
—Remove wire twist-ties from
paper or plastic bags before
placing bag in oven.
—Do not use your microwave
oven to dry newspapers.
—Paper towels and napkins,
wax paper. Recycled paper
products can contain metal
flecks which may cause arcing
or ignite. Paper products containing nylon or nylon filaments
should be avoided, as they may
also ignite.
—Do not pop popcorn in your
4
‘t: ,~inicrowave oven unless in a
T
special microwave popcorn
accessory or unless you use
popcorn labeled for use in
microwave ovens.
—Do not operate the oven while
empty to avoid damage to the
oven and the danger of fire. If by
accident the oven should run
empty a minute or two, no harm
is done. However, try to avoid
operating the oven empty at all
times—it saves energy and pro-
longs life of the oven.
—If materials inside the oven
should ignite, keep oven door
closed, turn oven off, and disconnect the power cord, or shut
off power at the fuse or circuit
breaker panel.
e Some products such as
whole eggs and sealed containers—for example, closed
glass jars—may explode and
hould not be heated in this
4:
w
oven.
e See door surface cleaning
instructions on page 40.
● Don’t defrost frozen bever-
ages in narrow necked bottles;
especially carbonated ones.
Even if the container is opened,
pressure can build up. This can
cause the container to burst,
resulting in injury.
. Use metal only as directed in
Cookbook. Metal strips as used
on meat, roasts are helpful when
used as shown in Cookbook.
TV dinners may be cooked in
metal trays but when using shelf
they must be replaced in their
box. However, when using metal
in microwave oven, keep metal
(except for DOUBLE DUTYTM
shelf) at least l-inch away from
sides of oven.
● Cooking utensils may
become hot because of heat
transferred from the heated
food. This is especially true if
plastic wrap has been covering
the top and handles of the
utensil. Potholders may be
needed to handle the utensil.
Sometimes, the oven floor
o
can become too hot to touch.
Be careful touching the floor
during and after cooking.
e Do not use any
thermometer
in food you are microwaving
unless that thermometer is
designed or recommended for
use in the microwave oven.
o Remove the temperature
probe from the oven when not
using it to cook with. If you leave
the probe inside the oven without
inserting it in food or liquid, and
turn on microwave energy, it can
create electrical arcing in the
oven, and damage oven walls.
● Boiling eggs (in and out of
shell) is not recommended for
microwave cooking. Pressure
can build up inside egg yolk and
may cause it to burst, resulting
in injury.
o Foods with unbroken outer
“skin” such as potatoes, hot
dogs or sausages, tomatoes,
apples, chicken livers and other
giblets, and eggs (see above)
should be pierced to allow
steam to escape during cooking.
5
● Avoid heating baby food in
glass jars, even without their
lids; especially meat and egg
mixtures.
● Plastic Utensils—Plastic
utensils designed for microwave
cooking are very useful, but
should be used carefully. Even
microwave plastic may not be as
tolerant of overcooking conditions as are glass or ceramic
materials and may soften or
char if subjected to short periods
of overcooking. In longer expo-
sures to overcooking, the food
and utensils could ignite. For
these reasons: 1) Use microwave plastics only “and use
them” in strict compliance with
the utensil manufacturer’s
recommendations. 2) Do not
subject empty utensils to microwaving. 3) Do not permit children
to use plastic utensils without
complete supervision.
● “Boilable” cooking pouches
and tightly closed plastic bags
should be slit, pierced or vented
as directed in Cookbook. If they
are not, plastic could burst during or immediately after cooking,
possibly resulting in injury. Also,
plastic storage containers should
be at least partially uncovered
because they form a tight seal.
When cooking with containers
tightly covered with plastic wrap,
remove covering carefully and
direct steam away from hands
and face.
. Use of the DOUBLE DUTY’M
shelf accessory. (See you r Cookbook for proper use.)
—Remove the shelf from oven .. .
when not in use.
—Do not store or cook
shelf on floor of oven. Product
damage may result.
with
—Use potholders when handling
the shelf and utensils. They may
be hot.
—Do not use microwave
browning dish on shelf. The
shelf could overheat. Use of
shelf with Automatic Cooking
feature is not recommended.
(Cc)nt/nued next page)
Page 6
IMPORTANT SAFETY INSTRUCTIONS
(continued)
Oven:
. Stand away from the range
when opening oven door. The
hot air or steam which escapes
can cause burns to hands, face
and/or eyes.
. Don’t heat unopened food
containers in the oven. Pressure
could build up and the container
could burst causing an injury.
. Keep oven vent ducts
unobstructed.
● Keep oven free from grease
build up.
. Place oven rack in desired
position while oven is cool. If
racks must be handled when
hot, do not let potholder contact
heating units in the oven.
● Pulling out shelf to the shelf
stop is a convenience in lifting
heavy foods. It is also a precau-
tion against burns from touching
hot surfaces of the door or oven
walls.
. When using cooking or roast-
ing bags in oven, follow the
manufacturer’s directions.
. Do not use your oven to dry
newspapers. If overheated, they
can catch fire.
Self-Cleaning Oven:
. Do not clean door gasket. ‘
The door gasket is essential for
a good seal. Care should be
taken not to rub, damage, or
move the gasket.
. Do not use oven cleaners.
No commercial oven cleaner or
oven liner protective coating of
any kind should be used in or
around any part of the oven.
. Clean only parts listed in this
Use and Care Book.
● Before self-cleaning the oven,
remove broiler pan and other
utensils.
Surface Cooking Units:
. Use Proper Pan Size—This
appliance is equipped with one
or more surface unit$ of different
size. Select utensils having flat
bottoms large enough to cover
the surface unit heating element.
The use of undersized utensils
will expose a portion of the
heating element to direct contact and may result in ignition of
clothing. Proper relationship of
utensil to burner will also
improve efficiency.
● Never leave surface units
unattended at high heat settings.
Boiiover causes smoking and
greasy spillovers that may catch
on fire.
. Be sure drip pans and vent
ducts are not covered and are in
place. Their absence during
cooking could damage range
parts and wiring.
● Don’t use aluminum foil to
line drip pans
the oven except as described in
this book. Misuse could result
in a shock, fire hazard, or
damage to the range.
● Only certain types of glass,
glass/ceramic, ceramic, earthenware, or other glazed containers
are suitable for range-top service; others may break because
of the sudden change in temperature (See Section on “Surface Cooking” for suggestions.)
● TO minimize burns, ignition of
flammable materials, and spillage; the handle of a container
should be positioned so that it is
turned toward the center of the
range without extending over
nearby surface units.
● Don’t immerse or soak
removable surface units. Don’t
put them in a dishwasher.
or anywhere in
. Always turn surface unit to
OFF before removing utensil.
. Keep an eye on foods being
fried at HIGH or MEDIUM HIGH
heats.
● To avoid the possibility of a
or electric shock, always
burn
be certain that the controls for
all surface units are at OFF position and all coils are cool before
attempting to remove the unit.
● When flaming foods under
the hood, turn the fan off. The
fan, if operating, may spread
the flame.
. Foods for frying should be as
dry as possible. Frost on frozen
foods or moisture on fresh foods
can cause hot fat to bubble up
and over sides of pan.
● Use little fat for effective
shallow or deep-fat frying. Fill-
ing the pan too full of fat can
cause spillovers when food is
added.
. If a combination of oils or
fats will be used in frying, stir
together before heating, or as
fats melt slowly.
● Always heat fat slowly, and
watch as it heats.
. Use deep fat thermometer
whenever possible to prevent
over-heating fat beyond the
smoking point.
SAVE THESE
INSTRUCTIONS
Page 7
Installing Your
Range
a
Your range, like many other household items, is heavy and can settle
into soft floor coverings such as
cushioned vinyl or carpeting. When
moving the range on this type of
flooring, use care, and it is recommended that these simple and
inexpensive instructions be
followed.
The range should be installed on a
sheet of plywood (or similar material) as follows: When the floor cov-
ering is terminated at the front of
the range, the area that the range
will rest on should be built up with
plywood to the same level or higher
than the floor covering. This will
then allow the range to be moved
for cleaning or servicing.
Leveling the
Range
Leveling screws are located on
each corner of the base of the
‘ range. By removing the bottom
c
drawer you can level the range to
an uneven floor with the use of a
nutdriver.
To remove drawer, pull drawer out
all the way, tilt up the front and remove it. To replace, insert glides at
back of drawer beyond stop on
range glides. Lift drawer if necessary to insert easily. Let front of
drawer down, then push in to close.
Energy Saving Tips
Microwave Cooking
● Use proper power level as
recommended and DO NOT
OVERCOOK.
● Do not operate the oven while
empty. If by accident the oven
should run empty a minute or two,
no harm is done. However, try to
avoid operating the oven empty at
all times—saves energy and also
ensures good long term life of oven.
Surface Cooking
o Use cooking utensils of medium
weight aluminum, tight-fitting
covers, and flat bottoms which
completely cover the heated portion
of the surface unit.
. Cook fresh vegetables with
a minimum amount of water in a
covered pan.
● Watch foods when bringing
them quickly to cooking temperatures at HIGH heat. When food
reaches cooking temperature,
reduce heat immediately to lowest
setting that will keep it cooking.
● Use residual heat with surface
cooking whenever possible. For
example, when cooking eggs in the
shell bring water to boil, then turn
to OFF position to complete the
cooking.
o Always turn surface unit OFF
before removing utensil.
. Use correct heat for cooking
task . . . high heats to start cooking
(if time allows, do not use HIGH
heat to start), medium high—quick
brownings, medium—slow frying,
low—finish cooking most quantities, simmer—double boiler heat,
finish cooking, and special for
small quantities.
e When boiling water for tea
or coffee, heat only the amount
needed. It is not economical to boil
a container full of water for only
one or two cups.
Conventional
Oven Cooking
● Preheat the oven only when
necessary. Most foods will cook
satisfactorily without preheating. If
you find preheating is necessary,
keep an eye on the indicator light,
and put food in the oven promptly
after the light goes out.
● Always turn oven OFF before
removing food.
● During baking, avoid frequent
door openings. Keep door open as
short a time as possible when it is
opened.
● For self-cleaning oven, be sure
to wipe up excess spillage before
self-cleaning operation.
● Cook complete oven meals
instead of just one food item.
Potatoes, other vegetables, and
some desserts will cook together
with a main-dish casserole, meat
loaf, chicken or roast. Choose
foods that cook at the same temperature in approximately the same
time.
● Use residual heat in oven when-
ever possible to finish cooking casseroles, oven meals, etc. Also add
rolls or precooked desserts to warm
oven, using residual heat to warm
them.
7
Page 8
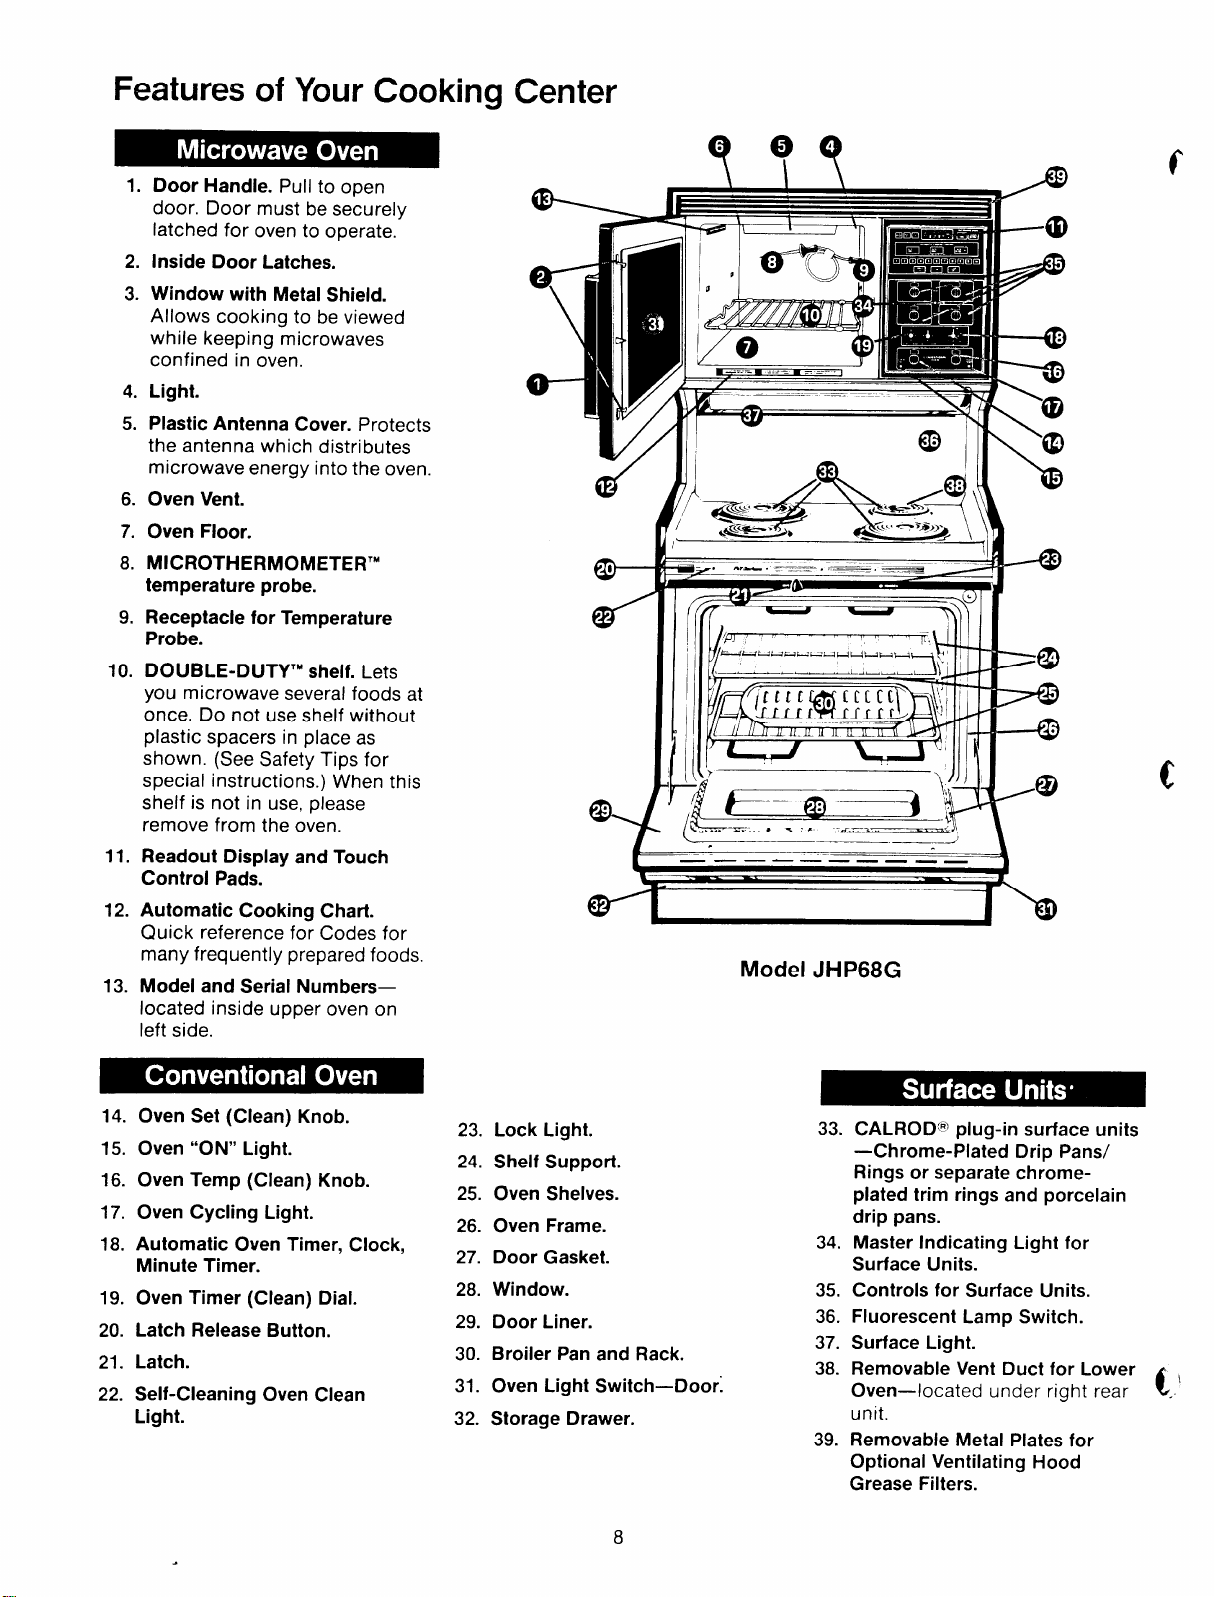
Features of Your Cooking Center
1.
Door Handle. Pull to open
door. Door must be securely
latched for oven to operate.
2.
Inside Door Latches.
Window with Metal Shield.
3.
Allows cooking to be viewed
while keeping microwaves
confined in oven.
4.
Light.
Plastic Antenna Cover. Protects
5.
the antenna which distributes
microwave energy into the oven.
6.
Oven Vent.
7.
Oven Floor.
8.
MICROTHERMOMETER’M
temperature probe.
9.
Receptacle for Temperature
Probe.
10.
DOUBLE-DUTY’M shelf. Lets
you microwave several foods at
once. Do not use shelf without
plastic spacers in place as
shown. (See Safety Tips for
special instructions. ) When this
shelf is not in use, please
I
remove from the oven.
11.
Readout Display and Touch
Control Pads.
12.
4utomatic Cooking Chart.
~uick reference for Codes for
many frequently prepared foods.
13. I
Model and Serial Numbers—
I
ocated inside upper oven on
I
eft side.
1. ,1111
r
lLIL. JIU JL 1.11
1
\,
..
——— ——. .
Model JHP68G
I
#==@
!
II HIM
Oven Set (Clean) Knob.
14.
Oven “ON” Light.
15.
Oven Temp (Clean) Knob.
16.
17.
Oven Cycling Light.
Automatic Oven Timer, Clock,
18.
Minute Timer.
19.
Oven Timer (Clean) Dial.
20.
Latch Release Button.
Latch.
21.
22.
Self-Cleaning Oven Clean
Light.
Lock Light.
23.
Shelf Support.
24.
25.
Oven Shelves.
Oven Frame.
26.
Door Gasket.
27.
Window.
28.
Door Liner.
29.
Broiler Pan and Rack.
30.
Oven Light Switch—Doo~
31.
32.
Storage Drawer.
33. CALROD@ plug-in surface units
—Chrome-Plated Drip Pans/
Rings or separate chromeplated trim rings and porcelain
drip pans.
34. Master Indicating Light for
Surface Units.
35. Controls for Surface Units.
36. Fluorescent Lamp Switch.
37. Surface Light.
38. Removable Vent Duct for Lower
Oven—located under right rear
\
t.
unit.
39. Removable Metal Plates for
Optional Ventilating Hood
Grease Filters.
8
Page 9
Features d Your Touch Control Panel
al
“q%
w
,.
@
@
I
o-
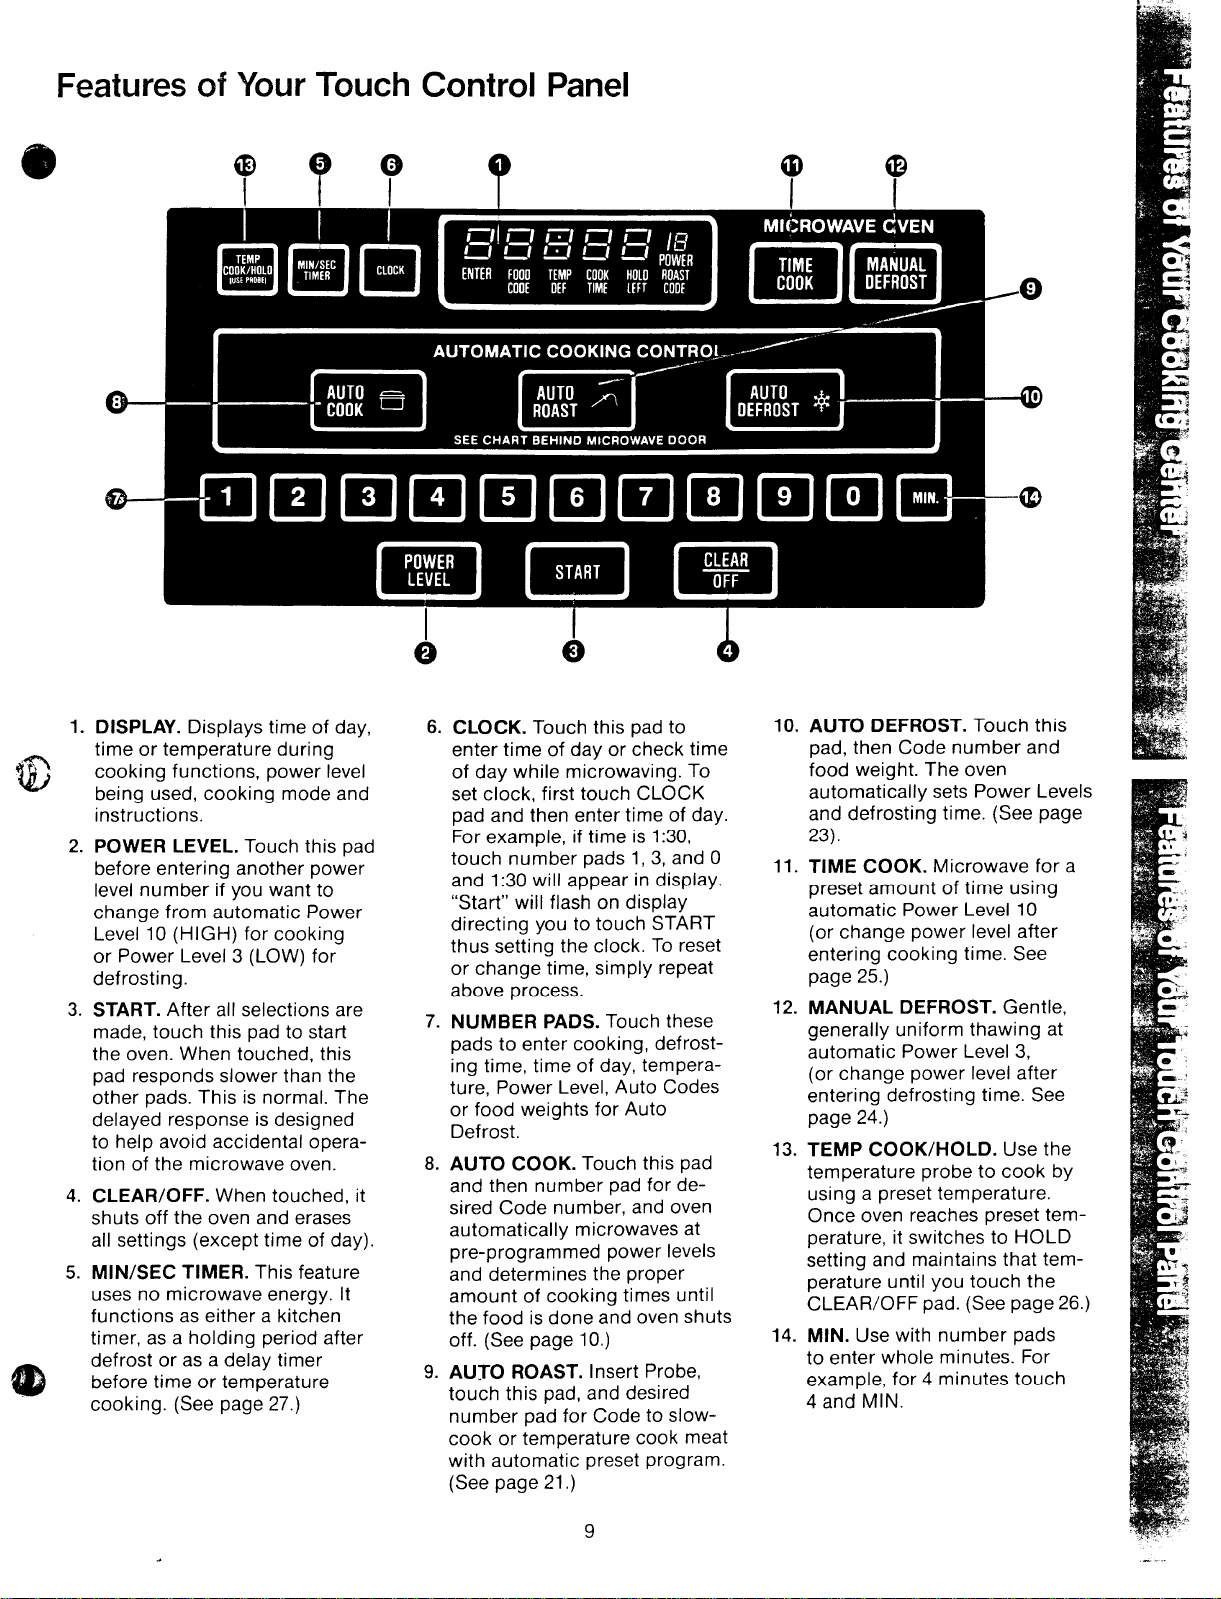
1.
DISPLAY. Displays time of day,
time or temperature during
cooking functions, power level
being used, cooking mode and
instructions.
2.
POWER LEVEL. Touch this pad
before entering another power
level number if you want to
change from automatic Power
Level 10 (HIGH) for cooking
or Power Level 3 (LOW) for
defrosting.
3.
START. After all selections are
made, touch this pad to start
the oven. When touched, this
pad responds slower than the
other pads. This is normal. The
delayed response is designed
to help avoid accidental operation of the microwave oven.
4.
CLEAR/OFF. When touched, it
shuts off the oven and erases
all settings (except time of day).
5.
MIN/SEC TIMER. This feature
uses no microwave energy. it
functions as either a kitchen
timer, as a holding period after
defrost or as a delay timer
before time or temperature
cooking. (See page 27. )
●
o
?
I ?
0
6.
CLOCK. Touch this pad to
enter time of day or check time
of day while microwaving. To
set clock, first touch CLOCK
pad and then enter time of day.
For example, if time is 1:30,
touch number pads 1, 3, and O
and 1:30 will appear in display.
“Start” will flash on display
directing you to touch START
thus setting the clock. To reset
or change time, simply repeat
above process.
7.
NUMBER PADS. Touch these
pads to enter cooking, defrosting time, time of day, temperature, Power Level, Auto Codes
or food weights for Auto
Defrost.
8.
AUTO COOK. Touch this pad
and then number pad for de-
sired Code number, and oven
automatically microwaves at
pre-programmed power levels
and determines the proper
amount of cooking times until
the food is done and oven shuts
off. (See page 10.)
9.
AUTO ROAST. Insert Probe,
touch this pad, and desired
number pad for Code to slowcook or temperature cook meat
with automatic preset program.
(See page 21.)
e o
@
I
A
10.
AUTO DEFROST. Touch this
pad, then Code number and
food weight. The oven
automatically sets Power Levels
and defrosting time. (See page
23).
11.
TIME COOK. Microwave for a
preset amount of time using
automatic Power Level 10
(or change power level after
entering cooking time. See
page 25.)
12.
MANUAL DEFROST. Gentle,
generally uniform thawing at
automatic Power Level 3,
(or change power level after
entering defrosting time. See
page 24.)
13.
TEMP COOK/HOLD. Use the
temperature probe to cook by
using a preset temperature.
Once oven reaches preset temperature, it switches to HOLD
setting and maintains that tem-
perature until you touch the
CLEAR/OFF pad. (See page 26.)
14.
MIN. Use with number pads
to enter whole minutes. For
example, for 4 minutes touch
4 and MIN.
@
I
.
.
0
o
4D
.’
(D
9
.
Page 10
Automatic Cooking in Your Microwave Oven
sense steam and aroma from the
food. To prevent the escape of
steam and aroma from the oven, do
not open the door while the word
AUTO is on the display. If door is
opened, ERROR appears. Close
door and touch START
immediately.
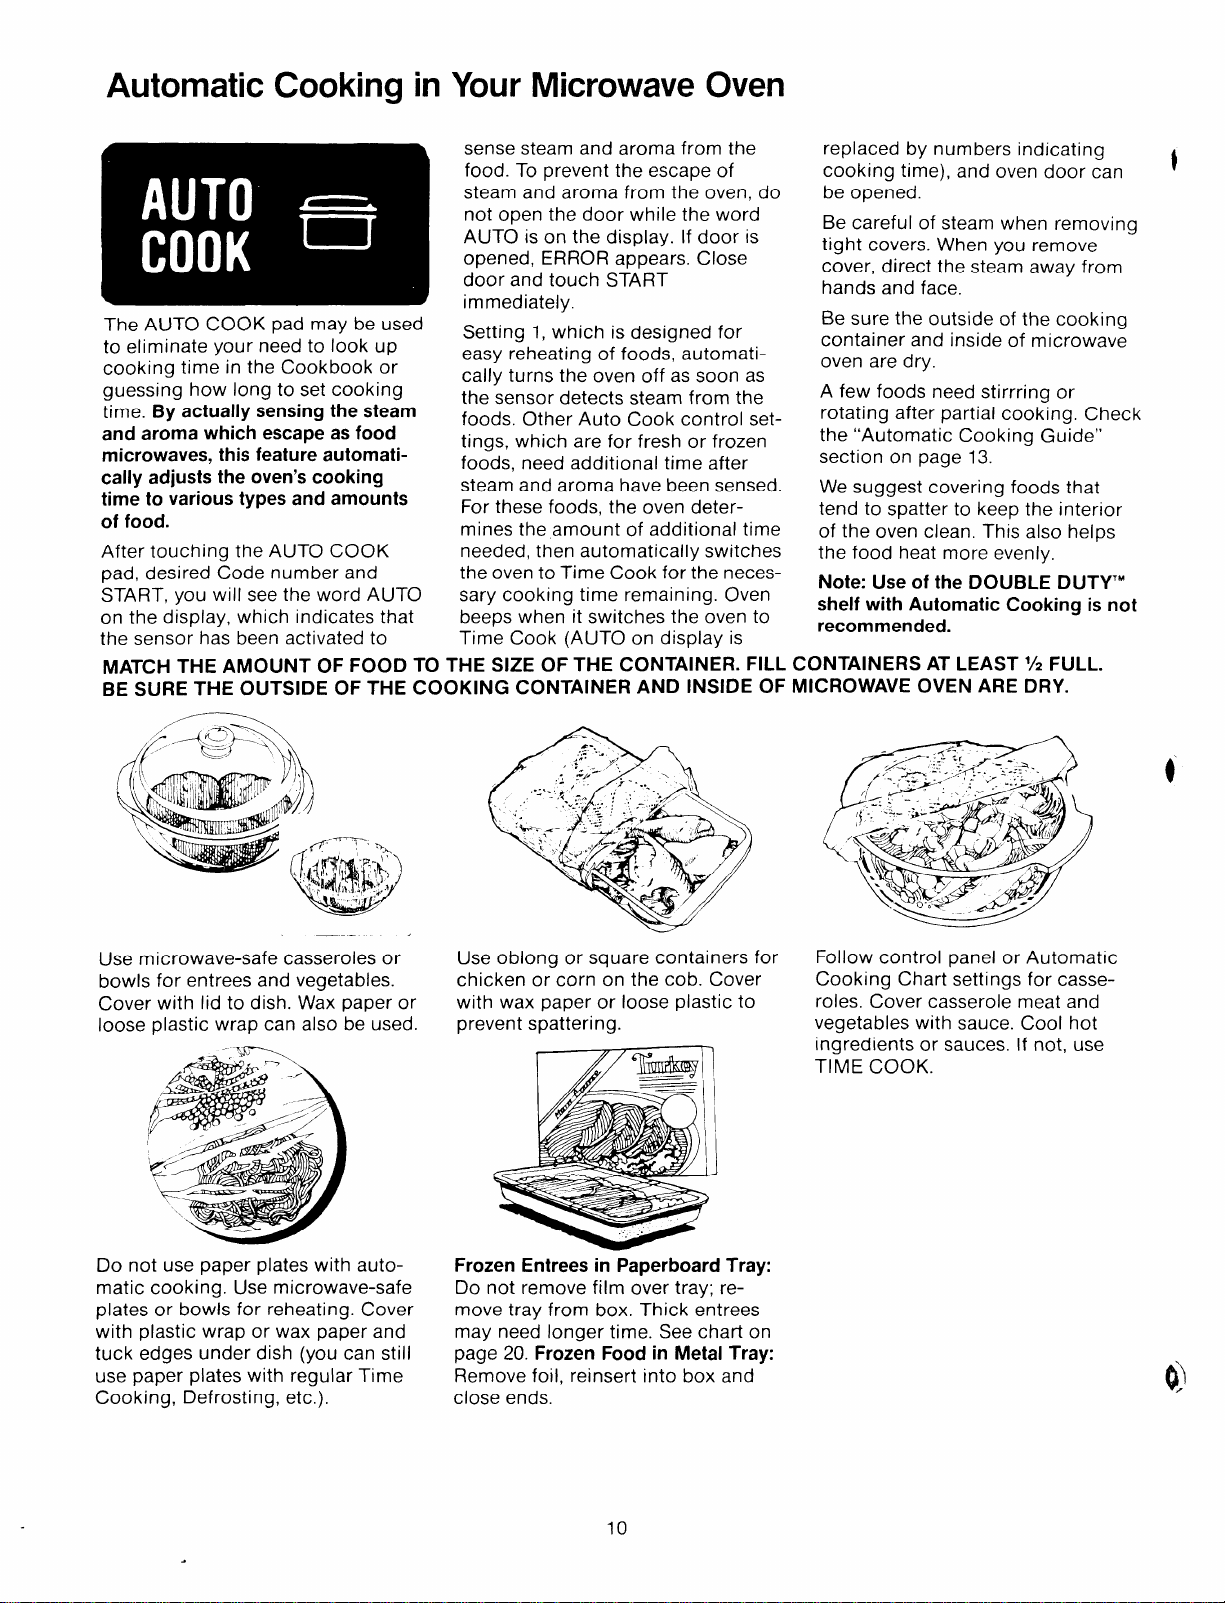
The AUTO COOK pad may be used
to eliminate your need to look up
cooking time in the Cookbook or
guessing how long to set cooking
time. By actually sensing the steam
and aroma which escape as food
microwaves, this feature automatically adjusts the oven’s cooking
time to various types and amounts
of food.
After touching the AUTO COOK
pad, desired Code number and
START, you will see the word AUTO
on the display, which indicates that
the sensor has been activated to
MATCH THE AMOUNT OF FOOD TO THE SIZE OF THE CONTAINER. FILL CONTAINERS AT LEAST
BE SURE THE OUTSIDE OF THE COOKING CONTAINER AND INSIDE OF MICROWAVE OVEN ARE DRY.
Setting 1, which is designed for
easy reheating of foods, automatically turns the oven off as soon as
the sensor detects steam from the
foods. Other Auto Cook control settings, which are for fresh or frozen
foods, need additional time after
steam and aroma have been sensed.
For these foods, the oven determines the amount of additional time
needed, then automatically switches
the oven to Time Cook for the necessary cooking time remaining. Oven
beeps when it switches the oven to
Time Cook (AUTO on display is
replaced by numbers indicating
cooking time), and oven door can
be opened.
Be careful of steam when removing
tight covers. When you remove
cover, direct the steam away from
hands and face.
Be sure the outside of the cooking
container and inside of microwave
oven are dry.
A few foods need stirrring or
rotating after partial cooking. Check
the “Automatic Cooking Guide”
section on page 13.
We suggest covering foods that
tend to spatter to keep the interior
of the oven clean. This also helps
the food heat more evenly.
Note: Use of the DOUBLE DUTYTM
shelf with Automatic Cooking is not
recommended.
1/2 FULL.
t
Use microwave-safe casseroles or
bowls for entrees and vegetables.
Cover with lid to dish. Wax paper or
loose plastic wrap can also be used.
Do not use paper plates witt
matic cooking. Use microwave-safe
plates or bowls for reheating. Cover
with plastic wrap or wax paper and
tuck edges under dish (you can still
use paper plates with regular Time
Cooking, Defrosting, etc.).
auto-
,
Use oblong or square containers ft
chicken or corn on the cob. Cover
with wax paper or loose plastic to
prevent spattering.
Frozen Entrees in Paperboard Tray:
Do not remove film over tray; remove tray from box. Thick entrees
may need longer time. See chart on
page 20. Frozen Food in Metal Tray:
Remove foil, reinsert into box and
close ends.
Follow control panel or Automatic
Cooking Chart settings for casseroles. Cover casserole meat and
vegetables with sauce. Cool hot
ingredients or sauces. If not, use
TIME COOK.
(j)
x
10
Page 11
Automatic Cooking (continued)
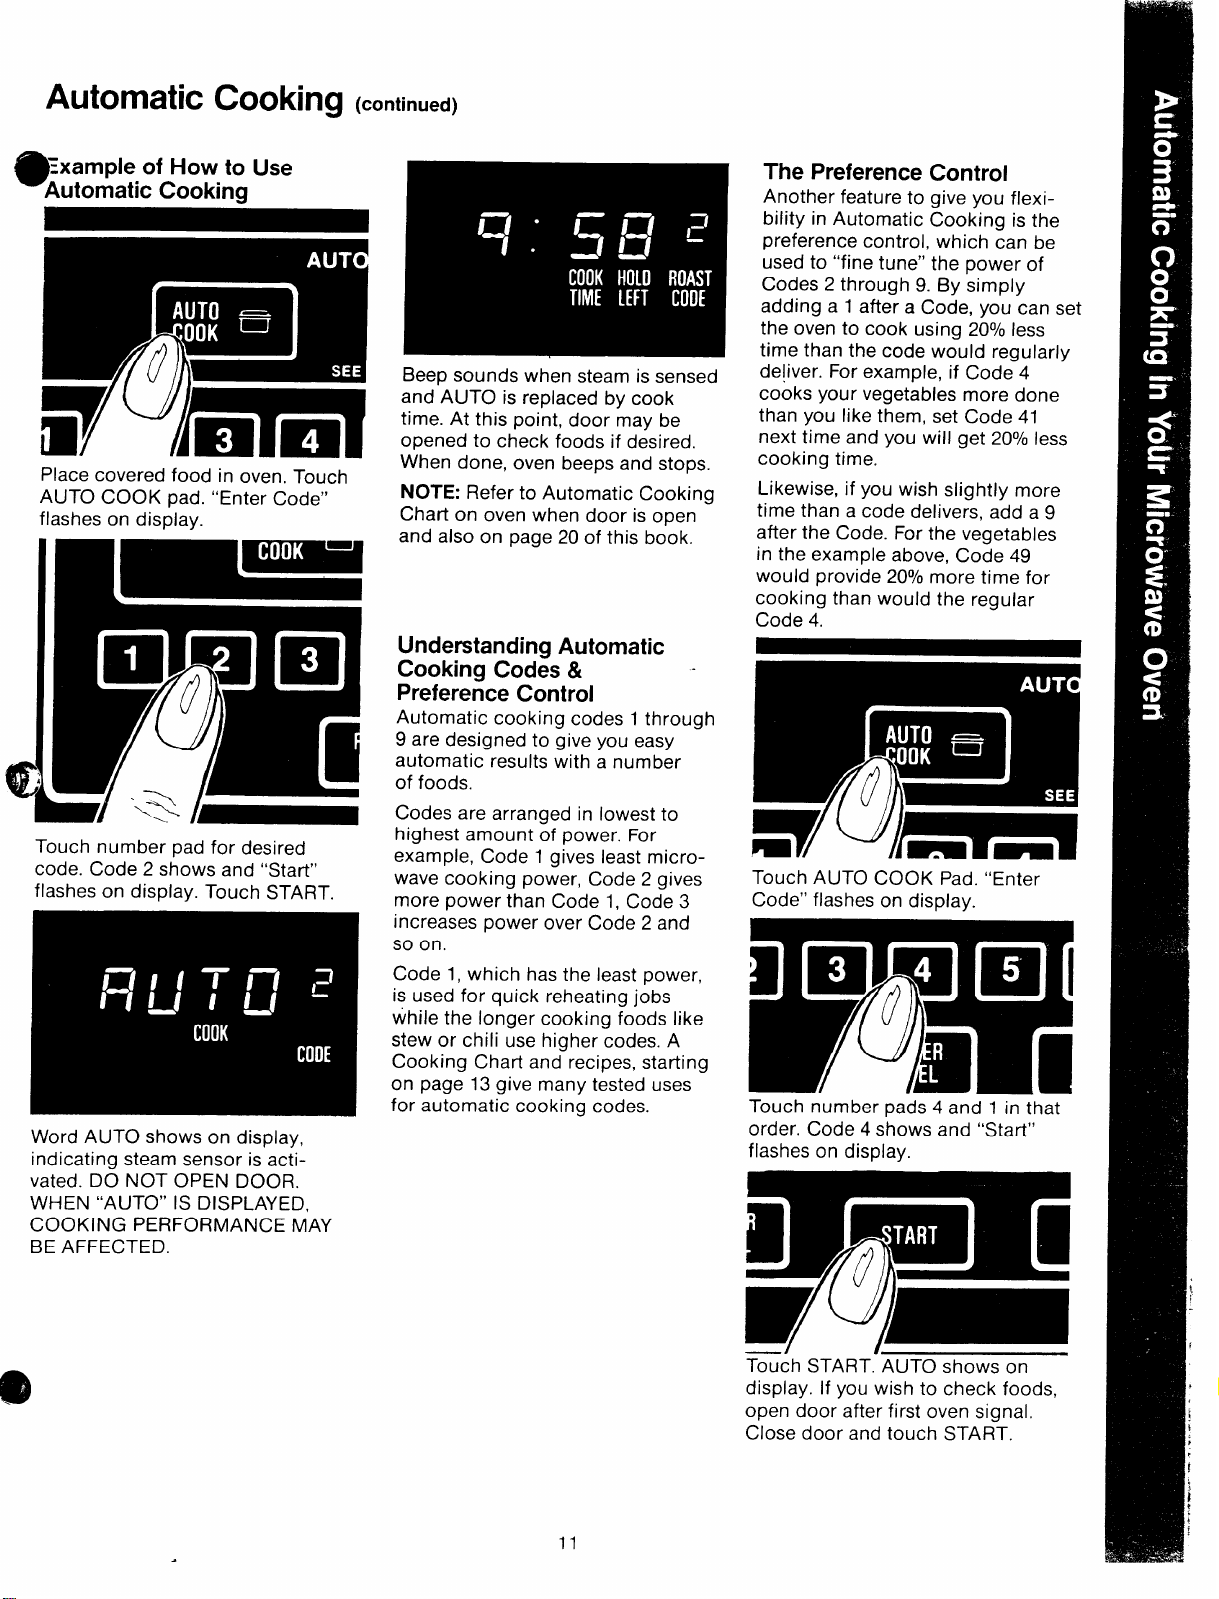
Example of How to Use
9
Automatic Cooking
Place covered food in oven. Touch
AUTO COOK pad. “Enter Code”
flashes on display.
Word AUTO shows on display,
indicating steam sensor is activated. DO NOT OPEN DOOR.
WHEN “AUTO” IS DISPLAYED,
COOKING PERFORMANCE MAY
BE AFFECTED.
Beep sounds when steam is sensed
and AUTO is replaced by cook
time. At this point, door may be
opened to check foods if desired.
When done, oven beeps and stops.
NOTE: Refer to Automatic Cooking
Chart on oven when door is open
and also on page 20 of this book.
Understanding Automatic
Cooking Codes &
Preference Control
Automatic cooking codes 1 through
9 are designed to give you easy
automatic results with a number
of foods.
Codes are arranged in lowest to
highest amount of power. For
example, Code 1 gives least microwave cooking power, Code 2 gives
more power than Code 1, Code 3
increases power over Code 2 and
so on.
Code 1, which has the least power,
is used for quick reheating jobs
while the longer cooking foods like
stew or chili use higher codes. A
Cooking Chart and recipes, starting
on page 13 give many tested uses
for automatic cooking codes.
The Preference Control
Another feature to give you flexi-
bility in Automatic Cooking is the
preference control, which can be
used to “fine tune” the power of
Codes 2 through 9. By simply
adding a 1 after a Code, you can set
the oven to cook using 20°/0 less
time than the code would regularly
deliver. For example, if Code 4
cooks your vegetables more done
than you like them, set Code 41
next time and you will get 20°/0 less
cooking time.
Likewise, if you wish slightly more
time than a code delivers, add a 9
after the Code. For the vegetables
in the example above, Code 49
would provide 20°/0 more time for
cooking than would the regular
Code 4.
Touch AUTO COOK Pad. “Enter
Code” flashes on display.
Touch number pads 4 and 1 in that
order. Code 4 shows and “Start”
flashes on display.
11
Tou~h START’AUTO shows on
display. If you wish to check foods,
open door after first oven signal.
Close door and touch START.
Page 12
Automatic Cooking Questions and Answers
Q. Why does my oven automatically
cut off after the
Auto Cook Control Code 1
using
when it does not for other settings?
A. When using Code 1, there is no
second phase of minutes counting
down. All the cooking is completed
in the first phase or AUTO.
Q. If the food is not completely
cooked after using the suggested
Code, what should I do?
A. Differences in recipes may result
in different cooking times. Use
Time Cook and Power Level 10 for
a few minutes until completion or
re-cover and use Auto Cook Code 1
if more time is needed.
Do all fresh or frozen vegetables
Q.
require a standing period after
cooking with Auto Cook?
A. Most vegetables are cooked to a
crisp state during Auto Cook, just
as in regular microwaving. Therefore, it is recommended that you let
the vegetables stand for up to 5
minutes depending on size and
density of pieces. This standing
time also enhances the overall
flavor and appearance of most
vegetables.
Q. What if I don’t cover the dish in
Auto Cook?
A. While cooking without the cover
does not affect sensor performance,
we suggest covering dishes that
may spatter to keep the oven clean.
Covering also helps foods heat
evenly.
AUTO cycle when
Q. Do the shapes and sizes of food
make a difference when using Auto
Cook?
A. Yes, in some cases, larger pieces
will require additional Time Cook-
ing. Be sure to check suggested
arrangement of pieces in the dish,
since proper arrangement is often
a successful tip in regular
microwaving.
Q. Should 1use Auto Cook to cook
pudding or sauces?
A. Most pudding and sauce recipes
require stirring many times during
cooking; therefore, Time Cook is
recommended since you should not
open the door during the AUTO
phase of cooking without affecting
end cooking results.
Q. My scalloped potatoes were not
completely cooked when I removed
the dish after Auto Cook. What is
wrong?
A. If you prepared the sauce in the
oven prior to combining the sauce
with potatoes, there may have been
too much remaining moisture in the
oven. Make sure you dry the oven
completely before using Auto Cook
since this function operates properly
by sensing steam and aroma in the
oven. Also starting Auto Cook with
hot foods creates steam and aroma
in the oven too soon, and decreases
the first sensing cycle.
Q. Are there any other foods which
are best Time Cooked, rather than
Auto Cooked?
A. Bakery foods, candies, melted
chocolate or foods when a dry or
crisp surface is desirable, are
cooked best by Time Cook.
Q. Do fresh or frozen vegetables
require water when using Auto
Cook?
A. Yes. Add water to the vegetables
as recommended on chart and cover
well for even, complete cooking.
Q. Would my plastic containers with
very tight fitting lids be appropriate
for Automatic Cooking?
A. No, most types of plastic storage
dishes, butter tubs, etc. with tight
fitting lids are not recommended for
microwaving. Also tight fitting lids
may prevent adequate steam and
aroma from escaping and food may
not cook properly during Automatic
Cooking.
Q. I tried to warm some chow mein
noodles using Auto Cook. Why
didn’t this work?
A. Food must have some moisture
in order to create steam which helps
the auto sensor function. Extremely
dry foods such as chow mein noodles, potato chips and other such
foods do not have enough moisture.
Q. Should I use Auto Cook when I
am cooking many foods in more
than one dish or casserole? -
A. No, because of different food
densities, attention needed during
cooking, and food amounts, it is
best to use Time Cook when
cooking many foods.
I
+
12
Page 13
Automatic Cocking Recipe Guide
‘4utomatic Cooking Control is a
m
ully automatic electronic control
system that lets your microwave
oven do the cooking for you. The
charts and recipes in this section
are designed to help you make the
most of this feature.
Standard cooking techniques
require setting the oven for a speci-
fied cooking time or a selected finished temperature. And that means
looking up recipes in a cookbook. . .
trying to convert old recipes for
microwave cooking. . .or just resorting to guesswork. This control
method works on an entirely different basis—with a special electronic sensor that detects steam
and aromas from cooking food. The
oven “knows” how the food is
cooking; so it can automatically set
the correct cooking time and maintain the proper power level for different types and amounts of food.
And it’s adjustable to suit your indi-
vidual taste.
Easy to Use
Simply touch two control pads—
AUTO COOK and the desired Code
number—and then START. A chart
on the oven control panel gives a
list of Codes for frequently prepared foods. The display shows
AUTO until steam is sensed and
then signals, and displays time
counting down. During AUTO, oven
should not be opened, but after
oven signals, door may be opened
to check foods if desired. Check the
Automatic Cooking Chart for
suggestions.
Appropriate containers and coverings help assure good cooking
results. Containers should match in
size to the size of the food being
cooked. Coverings such as wax
paper, the lid that came with the
container, or microwave-safe plastic
domes are ideal. For examples of
containers and coverings, see page
10 and the following recipes.
Preference Control
With Preference Control, you can
adjust the Automatic Cooking Feature to your individual taste by
adding either “l” or “9’ after Code
number. If after trying the suggested
Code, you would prefer less cooking
time, simply add the number “l”
after the Code and the oven automatically lessens the cooking time
by 20°/0. If you wish more cooking
time, add “9” after the Code to
increase cooking time by 20°/0.
Automatic Roasting
Automatic Roasting uses the tem-
perature probe rather than the electronic sensor to cook meats to the
desired degree of doneness. The
oven continually monitors the
food’s internal temperature. Unlike
ordinary Temperature Cooking, the
oven changes power levels two or
three times depending on the
degree of doneness during cooking
to give you the best results auto-
matically. After cooking the oven
switches automatically to Hold for
an hour. Food stays warm without
overcooking.
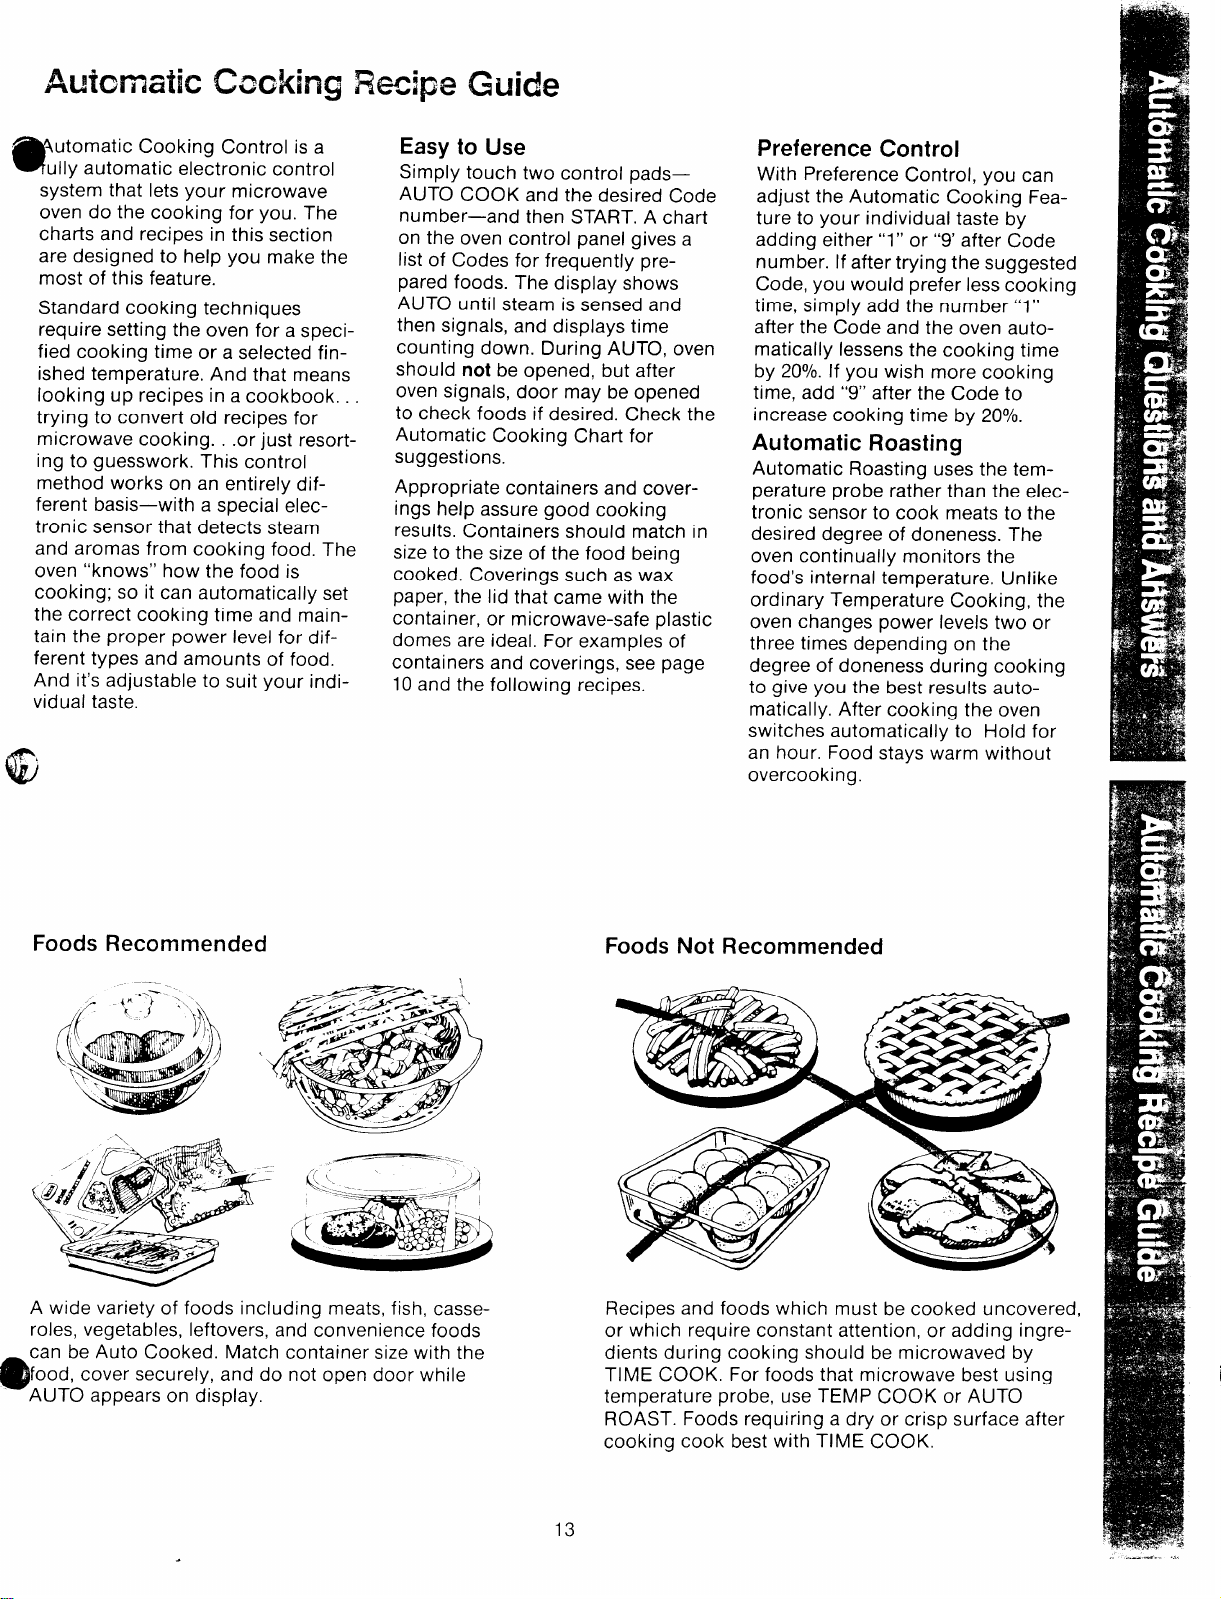
Foods Recommended
A wide variety of foods including meats, fish, casse-
roles, vegetables, leftovers, and convenience foods
can be Auto Cooked. Match container size with the
food, cover securely, and do not open door while
@
AUTO appears on display.
Foods Not Recommended
Recipes and foods which must be cooked uncovered,
or which require constant attention, or adding ingre-
dients during cooking should be microwaved by
TIME COOK. For foods that microwave best using
temperature probe, use TEMP COOK or AUTO
ROAST. Foods requiring a dry or crisp surface after
cooking cook best with TIME COOK.
13
Page 14

Automatic Cooking Main Dishes in Your Microwave Oven
Meat, Fish & Poultry
Spare ribs and brisket should be
automatically cooked in oblong
glass container. Cover with plastic
wrap. Make sure liquid covers meat.
Microwave using Auto Cook Code 7.
How to Adapt Microwave
Casserole Recipes
To adapt your casserole recipes for
Automatic Cooking.
1. Select recipes that do not require
adding ingredients at different
stages during cooking or recipes
that require extra attention, stirring
or rotating.
2. Use microwave-safe containers
that are appropriate in size to the
food amount. Use 3 qt. containers
or less.
3. For saucy casseroles, cover con-
tainer with lid or wax paper. (No
vents. ) For cheese or crumb-topped
casseroles, remove cover after oven
signals and add topping, then continue cooking uncovered.
4. Allow precooked ingredients or
hot sauces to cool slightly before
adding other ingredients
5. Meats and vegetables should be
submerged in liquid.
For meat and fish loaves use either
the round or loaf microwave-safe
containers. Fish loaves made with
precooked or canned fish use Auto
Cook Code 4. Beef loaf uses Auto
Cook Code 8. Cover with plastic
wrap. See the chart on following
page for recipes.
Chicken breasts and pieces, or
turkey parts should be placed in a
microwave-safe 8-in. square dish,
9 x 13 x 2-in. dish. Cover with wax
paper. If cooking bag is used for
whole chicken, shield breast bone
with small strip of foil. Microwave
using Auto Cook Code 4.
Chuck roasts should be placed in a
cooking bag with U cup water and
placed in microwave-safe dish. Cut
bag to fit close to the size of the
roast and tie open end securely.
Cut a l-l%” slit near the tie. Use
Auto Cook Code 7.
——_ —___
J
Fish fillets, whole fish or seafood
pieces should be in single layer in
flat pie plate or oblong dish to fit.
Cover with plastic wrap or wax
paper. Use Auto Cook Code 4 for
fillets and Auto Cook Code 2
for seafood pieces.
Pork chops automatically cook well
in 8 x 12 x 2-in. dish. Cover with
plastic wrap. Add barbeque sauce
or other sauce on each chop. Microwave using Auto Cook Code 8.
14
Page 15

Main Dish Recipes
Mexican Meatball Casserole
@
/
@
Cook Code 6
Auto
Approx. Cooking Time—17 min.
Makes 6 to 8 Sewings
1 lb. ground chuck
1/2 cup dry bread crumbs
1/8 teaspoon pepper
1/2 teaspoon salt
1 teaspoon chili powder
3 tablespoons dry minced onions
1 egg
3 tablespoons ketchup
1/2 cup instant rice
1 can (15% oz.) kidney beans
(undrained)
1 can (16 oz.) tomatoes, chopped
and undrained
1 tablespoon chili powder
1 teaspoon salt
In large mixing bowl, place meat,
bread crumbs, pepper, salt, chili
powder, onion, egg and ketchup.
Mix well and form into 12 balls.
Arrange balls in a circle in 2 qt.
casserole. Set aside.
In small mixing bowl place rice,
beans, tomatoes and chili powder.
. Mix well and pour in center of cas-
serole and over meatballs. Cover
and microwave at Auto Cook
Code 6.
Chicken Teriyaki
Auto Cook Code 9
Approx. Cooking Time—32 min.
Makes 4 Servings
1/4 cup soy sauce
1/3 cup honey
1/3 cup orange juice
1 whole chicken (about 3 Ibs.)
2 tablespoons cornstarch
1 tablespoon water
In small cooking bag, mix soy
sauce, honey and orange juice. Add
chicken to bag and tie with plastic
tie. Turn chicken on its side in
12 x 8 x 2-in. dish. Marinate 1 hour
on each side. Place bird breast side
up in dish. Slash bag near closure.
Microwave on Auto Cook Code 9.
When oven signals, remove chicken
and prepare Teriyaki sauce. In l-pt.
glass measuring cup stir together
water and cornstarch. Cut off one
corner of cooking bag with scissors
and drain juices into cup. Micro-
wave at High (10) 2 minutes. Re-
move chicken from bag to serving
platter. Pour sauce over chicken
just before serving.
Chicken and Rice
Auto Cook Code 9
Approx. Cooking Time—25 min.
Makes 6 Servings
1 can (10-1/2 oz.) condensed
cream of mushroom soup
1-1/4 cups milk (1 soup can full)
3/4 cup instant rice
1 can (4 oz.) mushrooms, stems
and pieces, drained
1 pkg. (1-1/2 oz.) dry onion
soup mix
1 cut up chicken (about 3 Ibs.)
In small mixing bowl mix soup and
milk; reserve 1/2 cup of the mixture.
Blend remaining soup mixture, rice,
mushrooms and half of the onion
soup mix. Pour into 12 x 8 x 2-in.
glass dish.
Place chicken pieces on rice mix-
ture, arranging with meatiest pieces
to outside of dish. Pour reserved
soup mixture over chicken and
sprinkle with remaining soup mix.
Cover with wax paper and tuck
under dish. Microwave at Auto
Cook Code 9.
Also try these recipes from the Microwave Guide and Cookbook
Recipe
Classlc Ham Loaf 96 8
Basic Meat Balls
Basic Meatloaf
Cheese Stuffed Meatloaf
Pork Chops Rosado
Sweet Tart Franks
Plaln Swiss Steak
Chow Meln
Chicken ‘n Dressing
Sweet ‘n Tangy Chicken
Crumb Coated Chicken
Spanish Style Chicken
Page No. Code Changes Adapting Recipe to Auto Cook
100 5
118 9
118
118
118
Auto Cook
74 6
75 8
75 8
99 8
63
81
2
7
9
4
9
None.
Omit turning dish.
None.
None.
Omit turning dish.
None.
None.
None.
None.
Cover with wax paper.
None.
Omit sherry In recipe.
15
.
Page 16

Automatic Cooking
Vegetables in Your Microwave Oven
Fresh or Canned Vegetables
Whole or large halves of vegetables
such as cauliflower or squash use
Auto Cook Code 4. Use round or
square container close to the size of
. ~getable. Add % cup water. Cover
with lid or plastic wrap.
,r_~..+’_r 7 . _ –“--- z -<
~.. . . -—~.—-—. – ,
r-
“’w’”
Block or loose pieces of frozen
vegetables should be placed in suit-
able size container (at least half full)
with lid or plastic wrap. Add 1 or 2
tablespoons water. Set Auto Cook
Code 2. See Auto Cook Chart for
lima beans.
Pieces or slices of vegetables
require ‘/4to ‘/2 cup of water. Use
appropriate size covered container.
Set Auto Cook Code 4. Dry root
vegetables like carrots may need to
be stirred after oven signals and
time remaining appears on display.
Re-cover and touch START to finish
cooking.
Frozen Vegetables
Pouches of frozen vegetables
should be slit 1/2” in center before
placing directly on oven floor. Set
Auto Cook Code 3.
Precooked/canned vegetables
should be placed in round container
similar in size to amount being
cooked (at least half full). Microwave on Auto Cook Code 2. Stir
before serving.
16
Page 17

Vegetable Recipes
Stir Fry Vegetables
@
Auto Cook Code 4
Approx. Cooking Time-16 min.
Makes 4 Servings
1 tablespoon oil
1 tablespoon soft butter
3 medium onions, quartered
1 small green pepper, cut in
l/4-in. wide strips
2 cups thinly-sliced cabbage
2/3 cup carrots, sliced diagonally
1/4 cup (1 bunch) sliced green
onions
1 cup broccoli flowerets
1 cup cauliflower flowerets
2 stalks celery, sliced diagonally
Toss vegetables with oil and butter
qt. microwave-safe casserole.
in 2
Cover. Microwave on Auto Cook
Code 4 stirring well when oven signals and time remaining appears on
display. Serve immediately.
Summer Garden Stew
Auto Cook Code 6
Approx. Cooking Time—51 min.
Makes 6 to 8 Servings
@
.
large zucchini, cubed
1
3
large potatoes, peeled and
cubed
4
large carrots, coarsely grated
1
medium onion, cut in pieces
1/2
small head of cabbage, sliced
1
can (103/4 oz.) cream of celery
soup
1
can (103/4) cream of mushroom
soup
1
block (8 oz.) pasteurized
processed cheese, cubed
2
cans (4 oz. each) mushroom
pieces
1
pound smoked sausage, sliced
in l-inch pieces
In a 4 qt. casserole dish, mix ail
ingredients together until well
blended. Cover. Microwave on
Auto Cook Code 6.
Mexican Zucchini Lasagna
Auto Cook Code 6
Approx. Cooking Time—35 min.
Makes 8 to 10 Servings
1 large zucchini
1-1/2 pounds ground chuck
1/4 cup green onions, thinly sliced
1 can (15 oz.) tomato puree
1 can (4 oz.) green chilies,
drained and chopped
1/4 teaspoon ground cumin
1 teaspoon Italian seasoning
(optional)
1 can (6 oz.) ripe olives,
chopped and drained
12 oz. Ricotta or cottage cheese
1/2 cup grated Romano cheese
1 egg
2 tablespoons flour
4 oz. Mozzarella cheese
1/4 cup grated Romano cheese
Green Rice
Auto Cook Code 6
Approx. Cooking Time—16 min.
Makes 4 to 6 Servings
1 pkg. (10 oz.) frozen chopped
spinach, thawed and well
drained
1-1/2 cups cooked rice
1 cup water
1/4 cup butter, melted
1/4 cup finely chopped onion
1 cup milk
1 egg, beaten
1/2 teaspoon salt
1 cup shredded cheddar cheese
To cooked rice, add spinach, butter,
onion, milk, egg, salt and cheese.
Mix well. Cover and microwave at
Auto Cook Code 6. Let stand 5
minutes covered before serving.
1 cup (8 oz.) sour cream
(optional)
Wash zucchini and cut into l/8-inch
lengthwise slices. In 12 x 8 x 2-in.
dish, place 1/2 of slices. In 2-qt.
casserole, place ground chuck,
onions, tomato puree, green chilies,
cumin, Italian seasoning, and olives.
Set aside.
In small bowl, mix together Ricotta,
Romano cheese, and egg.
Sprinkle flour on zucchini in dish,
layer half of Ricotta mixture, then
meat sauce and Mozzarella. Repeat,
sprinkle with Romano cheese. Cover
with plastic wrap, vent corner, and
microwave on Auto Cook Code 6.
Serve with sour cream, if desired.
Country Style Yellow Squash
Auto Cook Code 6
Approx. Cooking Time—11 min.
Makes 4 to 6 Servings
1 teaspoon salt
2 pounds yellow squash, cubed
1/4 cup yellow onion, chopped
1/4 cup butter, melted
1/4 teaspoon pepper
1/4 teaspoon basil
3 slices fresh bread, cubed
1/2 cup shredded cheddar cheese
1 cup sour cream
8 strips crisply cooked, crumbled
bacon
In 2 qt. glass dish, mix together all
ingredients, using 1/2 of crumbled
ba>on. Sprinkle top with remaining
bacon. Cover. Microwave on Auto
Cook Code 6.
Also try these recipes from the Microwave Guide and Cookbook
Auto Cook
Recipe
Eggplant Italiano
Corn pudding
Cabbage Rolls
Itallan Style
Stuffed Peppers
Page No.
181 5
180
76 6
25
Code Changes Adapting Recipe to Auto Cook
Omit cooking step prior to addklon of
Mozzarella cheese. Add Mozzarella and
microwave in one step.
3
4 None.
Omit cooking step prior to addition of
paprika. Add paprika and microwave in
one step.
Omit turning dish.
17
Page 18

Automatic Cooking Control Chart for Your IIVlicrowaveoven
Use of the DOUBLE DUTV” shelf with Automatic Cooking is not recommended.
—
● Do not open door during Auto
cycle. Door may be opened after
oven beeps and the countdown
time is displayed.
. Match the amount of food to the
size of the container. Fill containers
at least
‘/2 full.
. Add % to % cup water to fresh
vegetables.
. Most foods should be covered
with lid to dish or wax paper to prevent spattering to keep oven clean.
Fish. seafood, spare ribs, and meat-
loaf sould be covered tightly to
ensure even cooking.
. Be sure outside of container and
inside of oven are dry.
. If food needs additional cooking,
return to oven and use Auto Cook
Code 1.
. Use preference control “1” or “9”
to adjust cook times to suit your
individual tastes.
It
i
Food
Canned Foods
Thin foods such as soup, broth,
gravy
Thick foods such as canned rawoll,
chunky soups, beef stew, all canned
vegetables
Leftovers
TV Dinners
(except for those with pasta)
Frozen Entrees
Such as lasagna, meat & potatoes
TV Dinners
With pasta such as macaroni &
cheese, spaghetti, mexlcan dinners
with burrittos or enchiladas
Casseroles
With precooked ingredients In a
white sauce such as tuna noodle
casserole, turkey tetrazlnnl
All others with precooked ingredients such as franks and beans,
chow mein
With raw Ingredients such as hamburger patty stew, hamaghettl casserole, scalloped potatoes, seafood
casseroles
Chili
Meats and Seafood
Chicken pieces (up to 3 Ibs.)
Fish Fillets (1 lb.)
Meatloaf
Hamburger patties (4-5)
Sausage patties (1 lb. )
Pork chops (4-l” thick)
Spare ribs (up to 3 lb. )
SWISS steak (1% lb.)
Chuck roast (up to 5 Ibs.)
Shrimp (up to 1 lb.)
Rice
Regular, raw, 1 cup
Instant, 1 cup
Vegetables
Fresh such as carrots, artichokes,
cauliflower, broccoli, brussel sprouts
(1 lb.)
Baking potatoes—2-4
Frozen block such as peas, green
beans, spinach, broccoll.
Lima beans
Frozen pouch such as broccoll In
cheese sauce, corn, peas
Fruit
Baked apples—4
(1’/2lb.)
.
Ulto
:ook
Container
:ode
1
blicrowave-safe container
matched to size of food
2
2
2ook In container
4
[See comments)
4
3
2-3 qt. casserole with lid
4
to dish
5
6
3 qt. casserole with lid
9
to dish
12 x 8 x 2-in glass dish
4
4
glass loaf dish
8
12 x 8 x 2-in. glass dish
4
5
8
13 x 9 x 2-in. glass dish
7
2 qt. casserole with lid
7
13 x 9 x 2-in. glass dish
7
1% qt. glass dish with lid
2
2 qt. casserole w!th lid
6
2
2 qt. casserole with Ild
4
None
9
l% qt. casserole with lid
2
3
Lay pouch on microwave
3
safe dish.
2 qt. casserole with Ild
2
Approx.
Time
2-3 min./cup
,,
,!
,,
,,
4 min./cup
4 mln./cu~
8-10 min.
8-10 min.
depending
on size
8-10 min.
Comments
Cover with lid to dish or wax paper.
,,
If foil tray IS no more than 3/4”
top, return to orlglnai box and reclose box. If tray
IS more than 1” thick, remove food and place in
microwave safe dish and cover. If dinner IS in
paper board container, remove from box and
cook In orlglnal container If dinner has cake or
brownies, remove before cooking
deep, remove foil
—
12-16 mln
,,
18-22 mtn.
16-24 mln
25-40 min.
.—
,,
,,
,,
,,
8-20 min.
6-9 mln
30-35 mln
7-9 min.
7-9 min.
11-17 min
I hr. 30 min. tc
1 hr. 45 min.
60-75 min.
65-90 min.
4-6 min.
21-28 min.
5-8 min.
10-15 min.
8-16 min.
depending or
number
8-10 min.
12-13 mln
7-9 min.
12-14 m!n
20
Cover with wax paper to prevent spatters
Cover tightly with plastlc wrap to cook evenly
Cover with wax paper
Cover with wax paper
Baste with barbeque sauce Cover with
plastic wrap.
Cover tightly with plastic wrap to cook even;y
Place In cooking bag with ‘h cup water. Silt
bag 1”
Cover tightly to ensure even cooking.
Follow InstructIons on rice package
Add ‘h to % cup water
Pierce with fork and place on oven floor
Add 2 tablespoons water
Add
’14 cup water.
Make 1“ sld In pouch
Core apples and fill wkh butter and brown sugar
,,
,,
—.
Page 19

Automatic Roasting in Your
See Auto Roast Chart on page 22.
Microwave Oven
Auto Roast uses the temperature
probe to cook to the desired serving
temperature. Unlike Temp Cook/
Hold, which uses a single power
level, Auto Roast is designed to use
up to 3 power settings which auto-
matically switch during roasting, for
even and tender cooking results
without overcooking.
HAN[), t
~~
t N\OU
,1( I
Just as in conventional roasting,
only tender roasts should be Auto
Roasted until specified internal
temperatures are reached. Less
o
tender roasts should be microwaved
by time, according to the Cookbook
which comes with your oven. Complete information on preparing
roasts for microwaving is in your
Cookbook.
How to Prepare Roasts
for Auto Roasting
r
Place tender beef roasts on trivet in
microwave-safe dish. Insert probe
from the front horizontally into
center meaty area not touching
bone or fat. Cover with wax paper.
c,,,, ,
Poultry, pork or ham roasts need
no trivet. Add % cup water to roast
dish, cover with plastic wrap. (For
cooking bag method, see cookbook. ) Insert probe into center
meaty area.
l– 1-
How to Auto Roast
Beef to Medium
—
Step 1: Touch AUTO ROAST Pad.
Display flashes “Enter Code”.
Touch number pad 3. “START”
flashes. Touch START. Display
shows AUTO.
Step 2: At 80°, display switches to
show meat’s internal temperature.
Step 3: Oven monitors internal tem-
perature, automatically switching to
lower power as meat’s temperature
rises. This helps prevent toughening
or overcooking.
Place meat in oven with probe to
the right. Insert cable end of probe
firmly into receptacle on oven wall.
21
Step 4: Aft r emperature is
reache@c ~ to HOLD for 1 hr.,
{k
then shuts off. Hold prevents overcooking while keeping meat warm.
Page 20

Auto Roast Chart
Automatic Simmer
Final
Food
Beef
Tender Roast
Rare
Medium
Well
Meatloaf
(loaf or round)
Pork
Loin Roast
Precooked Ham
Poultry
Whole Chicken
(3 lb.)
Whole Turkey
(Up tO 12 Ibs.)
(Insert probe into meatiest area of inner thigh from below end and parallel to leg.)
Turkey Breast 170° 13-15
(Insert probe horizontally into meatiest ar~a.)
Code
2
3 140°
4
4 170° 15-20 5-1o
4
1
5
5
Temp (Min. per lb.)
125°
170°
170° 18-20
115° 11-14
190°
190°
Approx. Time
12-14
14-16
17-18 30
13-15 20
13-15
*Recommended standing time before serving.
Questions
Q. Why wasn’t my roast fully
cooked even though the temperature on the display was correct and
Auto Roast was completed.
A. The temperature probe must be
properly inserted when you Auto
Roast. Check your Cookbook to see
what you might have done wrong.
Q. Do some types of trivets work
better than others?
A. Yes. Flat glass trivets generally
and Answers
Q. When I’m cooking with Auto
Roast, why doesn’t my roast continue to cook during the holding
time?
A. When your food reaches finished
temperature, the oven automatically
switches to a lower power level. The
even temperature that’s maintained
in the food during this holding
period keeps it warm without
overcooking.
provide more browning to the
bottom of meats than plastic trivets.
Also, ceramic ridge-bottomed
roasting dishes usually work well.
Plastic trivets may require meat to
be turned over more often than
glass trivets do because the grid
design and legs let the bottom of
the meat stay cooler than glass
trivets do.
Hold*
Minutes
5-1o
10-15
20
5-1o
20
20
(Auto Roast Code 6)
Here’s how to Automatic Simmer a
few popular foods. See your Cook-
book for more cooking charts,
recipes and techniques.
Set Auto Simmer like you do Auto
Roast except touch number pad 6.
Display shows AUTO until food is
80°, then switches to show temperature until food reaches 180°.
Oven switches to HOLD when
food’s internal temperature reaches
180° and maintains that temperature
until food is done. If stirring is recommended, you can reset the oven by
retouching START. Touch CLEAR/
OFF when cooking is finished.
Automatic Simmer Chart
Approximate
Food
Beef
Pot Roast*
Stew
Chili
Chicken*
Stewing
Broiler/Fryer
Ham or Pork
Roast
soup
Stock/Vegetable
Spilt Pea
“For frozen, add 2 to 3 hours.
Time/Hrs.
6-8
6-8
11-13
11-12
4-6
4-6
3-6
13-15
22
Page 21

Automatic Defrosting in Your Microwave Oven
How to Auto Defrost
Step 1: Place frozen food in a
microwave-safe dish, put it in the
oven and close the door. (Food
frozen in paper or plastic can be
defrosted in the package.
Your microwave oven automatically
calculates defrosting time, changes
power levels during defrosting, tells
you when to turn your food, and
holds food for a short time after
defrosting time is up to finish the
thawing of the inside of the food.
Here’s what you do:
Before You Start
to Auto Defrost
First, check the Auto Defrost chart
below or the one at the bottom of
the oven when you open the door.
They show minimum and maximum
food weights for each code
number.
Then, if your food’s weight IS stated
in pounds and ounces, use the
chart below to convert ounces to
tenths (.1) of a pound.
Conversion Chart
1 to 2 ounces
3 ounces
4 to 5 ounces
6 to 7 ounces
8 ounces
9 to 10 ounces
11 ounces
12 to 13 ounces
14 to 15 ounces
= .1 pound
= .2 pounds
= .3 pounds
= .4 pounds
= .5 pounds
= .6 pounds
= .7 pounds
= .8 pounds
= .9 pounds
I‘ “’*W
t.
sot
F- m
Pn
Step 2: Touch AUTO DEFROST
pad. “Enter Code” flashes on
display.
Step 3: Enter selected code from
chart. For example, ground beef
calls for Code 3.
Step 4: Enter weight. For example,
touch number pads 3 and O for
weight of 3 pounds. Display shows
3.0, Code 3, and “Start” flashes.
Note: If ERROR appears after you
enter food weight, check the Code
Chart to make sure weight corre-
sponds to the code number you
entered.
Step 5: Touch START pad. Defrost
time begins counting down on
display.
Step 6: When half the defrosting
time is up, the oven signals and
“TURN” flashes in the display.
Open the door and turn your food
over.
Step 7: Close the door and touch
the START pad—defrosting will not
continue until you do. Display
shows remaining defrosting time
counting down.
Step 8: When defrosting time is
up, oven automatically switches
to a HOLD period (5 seconds for
Code 3). HOLD shows in display.
Automatic Defrosting Chart
Recommended
Foods Code
Chicken Pieces
Fish 2 .5 to 3.9 pounds 5 seconds
Ground Beef
Roasts, bone in
Roasts, boneless
Steaks and Chops
In Auto Defrost, It is necessary to let the meat stand during holding time to flmsh
defrosting. You may take the meat out of the oven at this time If you prefer
1
3
4 3.0 to 5.9 pounds
5 3.0 to 5.9 pounds
6
Min.-Max Hold
Weiqht Time*
.5 to 4.9 pounds 5 seconds
.5 to 5.9 pounds 5 seconds
20 minutes
20 minutes
.5 to 3.9 pounds 5 seconds
23
Step 9: When holding time is up,
the oven signals, “END” flashes,
and the oven turns off.
Q. I entered Auto Defrost Code 1,
then the number 4 for 4 pounds of
chicken. The display flashed START
but when I touched the START pad,
“ERROR” flashed. Why?
A. You must enter 4 (for pounds)
and O (for ounces). Touch CLEAR/
OFF and begin again. “ERROR”
also flash if a wrong weight for a
particular code is entered.
will
Page 22

Manual Defrm.,ing in Your Microwave Oven
The Defrost setting is designed for
even thawing necessary for large
amounts of food and is one of the
most important advantages of a
microwave oven.
● Power Level 3 is automatically set
for defrosting, but you may change
this for more flexibility.
● See your Cookbook for defrosting
help.
To become better acquainted with
the defrost functions, defrost frozen
pork chops by following the steps
below.
Step 1: Place package of frozen
chops in the oven and close door
Step 2: Touch MANUAL DEFROST.
Display reads :0 and Power 3.
“Enter Def Time” flashes.
Step 3: Touch number pad “8” then
MIN Pad. “Def Time”, 8:00 and
Power 3 are displayed.
Step 4: Touch START. “Def Time
Left” shows and time counts down
on display. When cycle is completed, “END” flashes, the oven signals and automatically shuts off.
Step 5: Turn package over, close
door and repeat Steps 2, 3 and 4.
Step 6: When oven signals, “END”
flashes and oven shuts off. Remove
package and separate chops to
finish defrosting.
Defrosting Tips
● Foods frozen in paper or plastic
can be defrosted in the package.
● For even defrosting, many foods
need to be broken up or separated
part of the way through the defrosting time.
● Homemade dinners can be frozen
in shallow foil trays and heated for
later use. (Do not heat on DOUBLE
DUTY’M shelf. ) Select foods which
microwave well.
. Pre-packaged frozen dinners can
be defrosted and microwave
cooked.
. Check your Cookbook for other
defrosting tips
Questions and Answers
~. When I press START, I hear ~
dull thumping noise. What is it?
A. This sound is normal. It is lettl~ g
you know the oven is using a Power
Level lower than HIGH.
Q. Can 1 Defrost small items in a
hurry?
A. Yes, but they will need more fre-
quent attention than usual. Raise
the Power Level after entering the
time by touching POWER LEVEL
and 7 or 10. Power Level 7 cuts the
time about in %; Power Level 10
cuts the time to approximately 1/3.
During either, rotate or stir food
frequently.
Q. Can I open the door during
DEFROST to check on the progress
of my food?
A. Yes. You may open the door at
any time during microwaving. To
resume defrosting, close the door
and press START.
Q. Why don’t the defrosting times
in the Cookbook seem right for
my food?
A. Cookbook times are average.
Defrosting time can vary according
to the temperature in your freezer.
Set your oven for the time indicated
in your Cookbook. If your food is
still not completely thawed at the
end of that time, re-set your oven
and adjust the time accordingly.
Q. Can I select a Power Level other
than automatic Power Level 3 for
defrosting. ?
A. Yes. Some smaller foods may be
defrosted quicker on higher Power
Levels but for even, carefree defrosting, Power Level 3 is suggested.
Check the chart in the Cookbook
for specific times and Power Levels.
Q. When I’m entering minutes with
no seconds do 1 need to touch “O”
then “O”?
A. No. You touch the number pad
then the MIN Pad which automatically enters two “00”.
24
Page 23

Cooking by Time in Your Microwave Oven
7 The Time Cook feature allows you
9
to preset the cooking time. The
oven shuts off automatically.
Power Level 10 is automatically set
for time cooking, but you may
change this for more flexibility.
See your Cookbook.
To become better acquainted with
Time Cook function, make a cup of
coffee by following these steps
below.
/’!!
I
—.,
I
r-
Step 1: Fill a cup 2/3 full of water
and add 1 teaspoon of freeze dried
coffee. Use a cup that has no metal
decoration. Place cup in oven and
close door.
Step 2: Touch TIME COOK. The
display shows :0 and Power 10.
“Enter Cook Time” flashes.
Step 3: Select your time. Touch 1, 2,
and O for a minute and 20 seconds.
“Cook Time”, Power 10, and 1:20
appear on the display. If another
Power Level is desired, touch
POWER LEVEL and the number
although Power Level 10 (HIGH)
is preferred for this cup of coffee.
Step 4: Touch START. “Cook Time
Left”, Power 10, and time counting
down show on display.
Step 5: When time is up, oven
sounds 3 times. Display flashes
“END”. Oven, light, and fan shut off
Questions and Answers
Q. I set my oven for the time called
for in the recipe but at the end of
the time allowed, my dish wasn’t
done. What happened?
A. Since house power varies due to
time or location, many Time Cook
recipes give you a time range to
prevent overcooking. Set the oven
for minimum time, test the food for
doneness, and cook your dish a
little longer, if necessary.
Q. 1want to cook my dish on a
Power Level other than HIGH, what
do 1 need to do?
A. To change the Power Level,
touch the POWER LEVEL pad.
“Enter Power” flashes on the display panel. Enter the desired
number.
Q. Can I interrupt my Time Cook
function to check the food?
A. Yes. To resume cooking, simply
close the door and touch START.
NOTE: Microwave power will not
come on until you are ready. You
must touch START for cooking to
begin.
Q. I touched the number pads and
selected my power level. When 1
touched START, however, my oven
didn’t come on. Why not?
A. The TIME COOK pad must be
touched before setting the number
pads or else your oven will not
begin cooking.
25
Page 24

~ooking by Temperature in Your Microwave
Oven
For many foods, internal tempera-
ture is the best test of doneness.
Roasts or poultry are cooked to
your preference when temperature
cooking. Heating or reheating foods
accurately to a serving temperature
you desire is simple and easy.
Temp Cook/Hold takes the guesswork out of cooking because the
oven shuts off automatically when
the food is done and holds that
temperature until you touch the
CLEAR/OFF pad.
The Temperature Probe
The temperature probe is a food
thermometer that gauges the
internal temperature of your food;
it must be used when using Temp
Cook/Hold or Auto Roast. Follow
the directions for use and insertion
on page 21.
How to Temp Cook
a Rolled Beef Rib Roast
to Medium
Step 1: Insert temperature probe as
directed in Cookbook and attach
probe securely in oven wall. Close
the door.
Step 2: Touch TEMP COOK/HOLD.
The display panel shows O, F, and
Power 10. “Enter Temp” flashes.
Step 3: Touch 1, 3, 0 for 130°.
“Temp”, 130 F and Power 10 show
on display. “START” flashes.
w/[ “A’~
Step 4: Touch POWER LEVEL pad.
“Enter Power” flashes. Touch 5 for
MEDIUM power. “Temp”, 130 F and
Power 5 shows on display.
Step 5: Touch START. If internal
temperature of the roast is less than
80°, display will show “COOL” or if
temperature is 80° or above, display
shows temperature counting up.
Step 6: When 130° is reached, the
oven will sound and flash “HOLD”.
The oven will then hold the temperature.
Step 7: Touch the CLEAR/OFF pad
to stop the cycle.
Step 8: Remove probe and food
from the oven.
Cooking Tips
● Use a lower power level setting;
it will heat evenly even though
requiring more time,
● Be sure frozen food has been
completely defrosted before inserting probe. Probe may break off if
used in frozen foods.
● Always insert probe into the
center of meaty areas; take care not
to touch the fat or the bone.
● Insert probe as horizontally as
possible into foods as directed in
the recipes. Make sure the handle
does not touch the food.
@Use the clip to keep the probe in
place while heating.
● Cover foods as directed in Cook-
book for moisture control and
quick, heating.
Questions and Answers
Q. After I followed the steps and
touched START, “ERROR’” flashed
in the display and a signal sounded.
What is wrong?
A. “ERROR” flashes on display if
you set the temperature either below
80° or greater than 199°. The oven
tells you between the flashing of
“ERROR” what the incorrect entry
was that you set. To re-enter, touch
CLEAR/OFF pad and begin steps
again.
Q. Are there any foods I can’t Temp
Cook?
A. Yes. Delicate butter icings, ice
cream, frozen whipped toppings,
etc., soften rapidly at warm temper-
atures. Batters and doughs as well
as frozen foods are also difficult to
cook precisely with the probe. It is
best to Time Cook these foods.
Q. Why did “PROBE”’ flash on the
display after I touched Start?
A. “PROBE” will flash on the display
if you have not securely seated the
end of the probe into the receptacle
in the oven wall or if you touch
TEMP COOK/HOLD and have forgotten to use the probe.
Q. Can I leave my probe in the oven
if it’s not inserted in the food?
A. No. If the probe is left inside the
oven, touching the oven wall, and
not inserted in food, you may
damage the oven.
Q. Can I Temp Cook different
portions of food at different
temperatures?
A. Yes. The temperature probe
gives you the freedom to cook different portions of food at different
temperatures to suit individual
eating styles. Simply place the
probe in the food and change the
temperature setting as needed.
26
Page 25

How to Use the Minute/SeCOncj Timer in Your Microwave Oven
- The MIN/SEC Timer, has three
o timing functions:
● It operates as a minute timer.
● It can be set to delay cooking.
● It can be used as a hold setting
after defrosting.
The MI N/SEC Timer operates
without microwave energy.
How to Time a 3-Minute
Phone Call
Touch MI N/SEC TIMER pad.
1.
Display shows :0. “Enter Time”
flashes.
2. Touch number pads 3, 0 and O
(for 3 minutes and no seconds).
Display shows 3:00 and HOLD.
3. Touch START. Display shows
Hold Time Left and time counting
down.
4. When time is up, oven signals,
display flashes “END” and shows
time of day.
How to Defrost, Hold and
Time Cook
Let’s say you want to defrost a
9
frozen casserole for 15 minutes,
hold for 10 minutes and then Time
Cook for 25 minutes. Here’s how
to do it:
Step 1: Take casserole from freezer
and place it in the oven.
Step 2: Touch MANUAL DEFROST
pad.
Display shows Enter Def Time, ;0,
and Power 3.
Step 3: Touch pads 1, 5 and MIN for
15 minutes defrosting time. Def
Time, 15:00, and Power 3 appear on
display.
Step 4: Set hold time by touching
MI N/SEC TIMER pad. Display
shows Enter Time and :0.
Step 5: Touch pads 1, 0, and MIN
for 10 minutes holding time. Display
shows 10:00 and HOLD.
1
~1 \ // i~
Step 6: Touch TIME COOK pad.
Display shows Enter Cook Time, :0,
and Power 10.
Step 7: Touch pads 2, 5, and MIN
for 25 minutes of cooking time.
Display shows Cook Time, 25:00,
and Power 10.
Step 8: Touch START pad. Display
shows Def Time Left, Power 3, and
15:00 counting down.
As each function is automatically
performed, display shows the
information you entered as you set
up the oven to defrost, hold and
cook.
Questions and Answers
Q. What will happen if I accidentally
reverse my defrost, hold and cook
instructions?
A. The oven automatically rear-
ranges your program. Defrosting
always comes first, then hold, and
then the cooking function.
Q. Can I defrost and hold only?
A. Yes. Sometimes you may only
want to defrost a food, hold it, and
cook it later. All you need to do is
program in Defrost and amount of
time. Then program Hold and the
amount of time. Be sure to put the
thawed dish in the refrigerator
promptly.
NOTE: Let foods remain at room
temperature only as long as safe.
Times will vary.
Q. I programmed my oven for a
specific defrosting time but it
defrosted longer than necessary.
What happened?
A. When instructions conflict, the
oven carries out the last instruction.
You may have set the oven to
defrost for 4 minutes, hold for
2 minutes, and then defrost for
6 minutes. In this case, the oven
would defrost for 6 minutes and
hold for 2 minutes and ignore your
first defrost instruction.
27
Page 26

Surface Cooking
Your range top is designed to give
you flexibility of boiling, steaming,
sauteing, browning, frying, canning,
or pressure cooking. It heats
through the metal coils of four
Calrod@ units thus giving the correct amount of energy for each
setting you choose.
How to Set Controls
You must push the knob in only
when it is set at OFF; this is to prevent you from turning the knob on
accidentally. When the knob is in
any other position, you can turn it
without pushing it in. You will feel
it pop out when you turn it to OFF.
The lowest setting is between OFF
and WARM. At the HI setting, you
will feel the knob lightly click into
place.
In a quiet kitchen, you may hear
slight “popping” sounds during
cooking, indicating heat settings
are being maintained.
I
Step 1: Push in control knob.
A
Step 2: Turn the knob in either
direction to the heat setting you
want.
SPECIAL NOTE: You may find
foods you boil on the surface units
causing condensation to gather
under the upper microwave oven.
This is especially true of foods
boiled with water or naturally high
in moisture.
Steam condensation will not harm
your range. However, you may min-
imize condensation by:
● Covering pots and pans with lids,
especially when cooking high mois-
ture foods on the range top.
. Select a surface unit at the front
of the range for boiling foods.
Cooking Tips
Keep range and ventilating hood
@
free from grease accumulation.
● When cooking is almost com-
pleted, use the retained heat to
finish cooking. Turn the knob to
OFF and leave the cooking utensil
in place. When surface unit has
cooled, remove the utensil and the
cooked food.
● To prevent certain foods from
foaming, add a tablespoon of
cooking oil to the water before
cooking.
● Never leave food unattended
when you are cooking at HI or
VIED HI settings. Boilovers cause
smoking and grease spillover may
catch fire.
● When canning foods, be sure to
check manufacturer’s instructions
and recipes. Be sure canner is flatbottomed and fits securely over
center of Calrod@ unit.
* Make sure Calrod@ plug-in unit is
securely plugged in and seated on
ring/pan properly for even heating
results.
Container Tips
● Pots and pans should be flat on
the bottom and match the size of
the surface units. Large containers
should be on large units and small
one on small units.
● It is important that pans fit the
units you are using. A pan that
extends more than one inch beyond
the edge of the trim ring may reach
temperatures that could eventually
harm cooktop surfaces around units.
● Center pots and pans on a sur-
face unit which closely matches the
bottom of the utensil in size.
● Containers of various materials
may require different heat settings
and/or cooking time. Check the
manufacturer’s instructions before
using.
● Special cooking equipment
without flat bottoms, such as the
oriental wok, are not recommended
and could shorten the life of the
surface unit and/or range top since
high heat temperatures are reqiired
in this type cooking.
Wrong
Concave Bottom Rounded Bottom
)
Wrong
L
Right
Right
\
-
NOT OVER 1
28
Page 27

Surface Cooking Chart
@Jtensil Tips
1. Use medium or heavy-weight cooking containers.
Aluminum containers conduct heat faster than other
metals. Cast iron and coated cast iron containers are
somewhat slower to absorb heat, but generally cook
evenly at LOW or MEDIUM settings. Steel pans may
cook unevenly if not combined with other metals.
‘Use non-stick coated or coated metal containers. Flat
ground pyroceram saucepans or skillets coated on
the bottom with aluminum generally cook evenly.
Glass saucepans should be used with the heatspreading trivets available for that purpose.
2. To conserve the most cooking energy, pans should
be flat on the bottom, have straight sides and tight fit-
ting lids. Match the size of the saucepan to the size of
the surface unit. A pan that extends more than one
inch beyond the edge of the trim ring traps heat
Food
Cereal
Cornmeal, grits,
oatmeal
Cocoa
Coffee
Eggs
Cooked In shell
Fried sunny -side-u~
Fried over easy
o
Poached
Scrambled or omele
Fruits
Meats, Poultry
Braised: Pot roasts c
beef, lamb or veal;
pork steaks and
chops
Pan-fried: Tender
chops; thin steaks u
to 3/4-in.; minute
steaks; hamburgers;
e
franks; and sausage
thin fish fillets
Container
Covered
Saucepan
Uncovered
Saucepan
Percolator
Covered
Saucepan
Covered
Skillet
Uncovered
Skillet
Covered
Skillet
Uncovered
Skillet
Covered
Saucepan
Covered
Skillet
Uncovered
Skillet
Directions and Setting
to Start Cooking
H1. In covered pan bring
water to boll before adding
cereal.
HI, Stir together water or
milk, cocoa Ingredients.
Bring just to a boil.
Hi. At first perk, switch
heat to LOW,
H1. Cover eggs with cool
water. Cover pan, cook
until steaming,
MED HI. Melt butter, add
eggs and cover skillet.
H1. Melt butter
H1. In covered pan bring
water to a boll.
HI, Heat butter until light
golden In color
HI. In covered pan bring
fruit and water to boll.
Ht. Melt fat then add meat.
Switch to MED HI to
brown meat. Add water or
other Ilquld.
H1. Preheat skillet, then
grease Ilghtly.
Setting to Complete
Cooking
LOW or WM, then add
cereal. Finish timing
according to package
directions.
MED, to cook 1 or 2 min.
to completely blend
ingredients,
LOW to maintain gentle
but steady perk.
LOW. Cook only 3 to 4
min. for soft cooked; 15
min. for hard cooked.
Continue cooking at MED
HI until whites are just set,
about 3to 5 min.
LOW, then add eggs.
When bottoms of eggs
have just set, carefully
turn over to cook other
side.
LOW. Carefully add eggs.
Cook uncovered about 5
mtn. at MED. Ht.
MED. Add egg mixture.
Cook, stirring to desired
doneness.
LOW. Stir occasionally
and check for stlcklng.
LOW. Simmer until fork
tender
VfED HI or MED. Brown
and cook to desired
doneness, turning over as
needed.
Comments
Cereals bubble and expand as
they cook; use large enough
saucepan to prevent boilover.
Milk bolls over rapidly Watch
as boiling point approaches.
Percolate 8 to 10 min. for 8
cups, less for fewer cups.
If you do not cover skillet,
baste eggs with fat to cook
tops evenly.
Remove cooked eggs w!th
slotted spoon or pancake
turner.
Eggs continue to set sllghtly
after cooking. For omelet do
not stir last few minutes, When
set fold in half,
Fresh fruit: Use % to % cup
water per pound of fruit.
Dried fruit: Use water as
package directs. Time
depends on whether fruit has
been presoaked. If not, allow
more cooking time.
Meat can be seasoned and
floured before it IS browned, If
desired.
Liquid variations for flavor
could be wine, fruit or tomato
juice or meat broth,
Timing: Steaks 1 to 2-in.: 1 to
2 hrs, Beef Stew: 2 to 3 hrs.
Pot roast: 2’/2 to 4 hrs.
Pan frying IS best for thin
steaks and chops. If rare IS
desired, preheat skillet before
adding meat
29
.
Page 28

Surface Cooking Chart (continued)
Utensil Tips (continued)
which causes “crazing” (fine hairline cracks) on the
porcelain and discoloration ranging from blue to dark
gray on the trim rings.
3. Frying. Do not overfill kettle with fat that may spill
over when adding food. Frosty foods bubble vigorously. Watch foods frying at HIGH temperatures and
keep range and hood clean from accumulated grease.
Food
Fried Chicken
Pan broiled bacon Uncovered
Sauteed: Less tender
th[n steaks (chuck,
round, etc.); liver;
thick or whole fish
Simmered or stewed
meat; chicken; corned
beef; smoked pork;
stewing beef; tongue;
etc.
Melting chocolate,
butter,
marshmallows
Pancakes or
French toast
Container
Covered
Skillet
Skillet
Covered
Skillet
Covered
Dutch Oven,
Kettle or
Large
Saucepan
Small
Covered
saucepan.
Use small
surface unit
Skillet or
Griddle
Pasta
Noodles or spaghetti
Pressure Cooking
Puddings, Sauces,
Candies, Frostings
Vegetables
Fresh
Frozen
Sauteed: Onions;
green peppers; mushrooms: celery; etc.
Rice and Grits
Covered
Large Kettle
or Pot
‘ressure
~ooker or
Oanner
Jncovered
Saucepan
:overed
Saucepan
Covered
Saucepan
Uncovered
Skillet
:overed
Saucepan
Directions and Setting
to Start Cooking
HI, Melt fat. Switch to MED
HI to brown chicken.
HI, In cold skillet arrange
bacon slices. Cook just
until starting to stzzle.
Ht. Melt fat, Swttch to MED
to brown slowly.
HI, Cover meat with water
and cover pan or kettle
Cook until steamtng.
WM. Allow 10 to 15 mln to
melt through. Stir to
smooth
MED HI. Heat skillet 8 to
10 mln, Grease lightly
H1. In covered kettle, bring
salted water to a boll,
uncover and add pasta
slowly so boiling does not
stop.
HI. Heat until first jiggle IS
heard.
H1. Bring just to boll
Ht. Measure %to l-in,
water In saucepan. Add
salt and prepared vege-
table. In covered saucepan
bring to boll.
Hi, Measure water and salt
as above. Add frozen block
of vegetable, In covered
saucepan bring to boll.
Hi. In skillet melt fat
H1. Bring salted water to a
boll,
WRONG
Setting to Complete
Cooking
LOW, Cover skillet and
cook until tender.
Uncover last few minutes
MED HI. Cook, turning
over as needed.
LOW. Cover and cook
unttl tender.
LOW. Cook until fork
tender. (Water should
boll slowly). For very large
loads medtum heat may
be needed.
Cook 2 to 3 mln per side,
MED HI, Cook uncovered
~ntll tender, For large
amounts HI may be
Ieeded to keep water at
“olllng boil throughout
?ntlre cooking time,
—
VfED HI for foods cooking
10 m[n, or less, MED for
oods over 10 min.
.OW. To finish cooking.
.
dED. Cook l-lb, 10 to 30
nore min., depend[ng on
~enderness of vegetable.
.OW. Cook according to
ime on package,
MED. Add vegetable
2ook unt]l desired tenderness IS reached.
NM. Cover and cook
]ccording to time.
I
Comments
For cris~
only afte
for 10 ml Jncover and cook
turning 0( ‘slonally 10 to 20
min.
A more attt. ‘ on ee method
is to start an.
Meat may be b 5 or marinated in sauce b~ frying.
Add salt or other sea>
before cooking If meat nas not
been smoked or otherwls
cured.
When melting marshmallows,
add milk or water.
Thick batter takes sllghtly
longer time Turn over pancakes when bubbles rise to
surface.
Use large enough kettle to
prevent bollover. Pasta doubles In .sIze when cooked.
Cooker should jiggle 2 to 3
times per minute.
Stir frequently to prevent
jtlcklng.
Jncovered pan requires more
Mater and longer time.
Break up or st!r as needed
while cooking. i
Turn over or stir vegetable as
necessary for even browning
Triples In volume after
>ooklng. Time at WM. Rice: 1
;UP rice and 2 cups water—25
nlns. Grits: 1 cup gr}ts and 4
;ups water—40 mln
y ch!cken, cover
,wltching to LOW
at MED.
‘]
~’
A,
I
~
I
I
I
.
~~i
30
Page 29

Using Your Conventional Oven
r--
Your oven is designed to give you
0
the best results in baking, broiling,
and roasting when used as recommended. Before using your oven,
read the directions for setting and
using all of the controls and timer.
Oven Light
Light comes on automatically when
door is opened or use switch in
upper right corner on window door
to turn it on when door is closed.
Oven Shelves
When the shelves are correctly
placed on shelf supports they are
designed with stop-locks to prevent
them from coming out of the oven
or tilting when food is placed on
them.
TO REMOVE, lift up rear of shelf
and pull forward with stop-locks
along top of shelf support.
TO REPLACE, insert shelf with
stop-locks resting on shelf supports
and push toward rear of oven until
it falls into correct position under
0
shelf supports.
Shelf Positions
The oven has four shelf supports
marked A (bottom), B, C and D
(top). Shelf positions for cooking
food are suggested on Baking,
Roasting and Broiling pages.
Automatic Oven Timer,
Minute Timer
Oven Timer Controls are designed
to automatically start and stop certain oven functions (TIME BAKE or
CLEAN). Dials are timed by a
special Clock with index marks
(denoting numerals) and hands.
(For location see page 8.)
TO SET CLOCK, push in the center
knob of Minute Timer and turn the
Clock hands to correct time, then
let knob out.
TO SET MINUTE TIMER, turn knob
to desired minutes. (Knob must be
out to set Minute Timer. ) Minute
Timer will buzz when time has finished and must be turned off
manually.
Use the Microwave Oven Clock for
easy reference to time of day.
31
.
Page 30

How to Bake and Time Bake in Your Conventional Oven
How to Set
Your Oven for Baking
See Baking Chart on page 33.
Step 1: Place shelf on embossed
shelf support “B” or as indicated on
Baking Chart, page 33.
8
Step 2: After making sure that the
oven door is closed, turn the OVEN
SET Knob to BAKE. Oven “On”
Light comes on and remains on as
long as OVEN SET Knob is on
BAKE.
Step 3: Turn OVEN TEMP Knob to
the temperature called for in recipe.
Oven Cycling Light comes on and
remains on until preset oven temperature is reached. It reappears
each time oven temperature drops
below preset temperature.
Step 4: YOU may set your Minute
Timer to the desired cooking time
as indicated in your recipe. If your
cooking time is longer than sixty
minutes, Minute Timer must be reset.
Most foods cook satisfactorily
without preheating. If preheating is
required, put your dish promptly in
the range after Oven Cycling Light
goes out.
Step 5: Place food inside the oven.
Make sure at least 1” of space is left
between the cooking container and
the oven wall or proper heat circulation. Close the oven door.
NOTE: Avoid opening your oven
door frequently. This could cause
undesirable results in your baking,
Only check foods at the minimum
time of the recipe. Then cook
longer if necessary.
Step 6: When the BAKE cycle is
complete, turn off heat. When
cooking food for the first time in
your oven, use the time on your
recipe as a guide. Be sure foods are
done before removing from oven.
How to Time Bake
Your Automatic Oven Timer controls
your Time Bake feature. When you
Time Bake, your range can be
preset to start and stop automati-
cally if you are not home.
Step 1: Be sure the range Clock
shows correct time of day since
Clock controls the Oven Timers.
Start dial pointer must indicate
same time of day as on Clock. If
you want the oven to turn on at a
later time, set that time by pushing
in knob on Start dial and turn
pointer to time that you want oven
to start. (There’s no need to set
Start dial when starting time is the
present time of day.)
Step 2: To determine Stop time, add
the food’s cooking time to time set
on Start dial. Push in knob on Stop
dial and turn pointer to time oven is
to turn off.
Step 3: Turn OVEN SET Knob to
TIME BAKE. Oven “On” Light
comes on immediately even if the
Start time is later,
Step 4: Turn OVEN TEMP Knob to
temperature setting. Oven Cycling
Light will come on even though
heat is not on in the oven if a later
start time is used. Your oven automatically turns on and off at the
times you set.
Step 5: Remove food and turn OVEN
SET Knob to OFF.
(
P
J
‘i
32
Page 31

Baking Chart
-.
1. Aluminum pans conduct heat quickly. For most conventional
,’
baking light shiny finishes generally give best results because they
*
prevent overbrownlng in the time It takes for heat to cook the
center areas. Dull (satin-finish) bottom surfaces of pans are
recommended for cake pans and pie plates to be sure those areas
brown completely.
2. Dark or non-shiny finishes, also glass and pyroceram, generally
absorb heat which may result in dry, crisp crusts. Reduce
oven heat 25° if lighter crusts are desired. Preheat cast iron for
baking some foods for rapid browning when food is added.
3. Preheating the oven is not always necessary, especially for
foods which cook longer than 30 or 40 minutes. For food with
short cooking times, preheating gives best appearance and
crispness.
4. open the oven door to check food as little as Dossible to mevent uneven heating and to save energy.
Food
Bread
Biscuits (’h-in. thick)
.
Coffee cake
Corn bread or muffins
Gingerbread
Muffins
Popovers
Quick Loaf Bread
Yeast bread (2 loaves)
Plain rolls
Sweet rolls
Cakes
(without shortening)
Angel food
Jelly roll
Sponqe
Cakes
3undt cakes
e
Cupcakes
Fruit cakes
Layer
Layer, Chocolate
Loaf
Cookies
Brownies
Drop
Refrigerator
Rolled or sliced
Fruits,
Other Desserts
Baked apples
Custard
Puddings, Rice and
Custard
Pies
Frozen
Meringue
‘ crust
Two crust
Pastry Shell
Miscellaneous
o
Baked potatoes
Scalloped dishes
Souffles
Container
Shiny Cookie Sheet
Shiny Metal Pan with
Satin-finish bottom
Cast Iron or Glass
Shiny Metal Pan with
Satin-finish bottom
Shiny Metal Muffin Pans
Deep Glass or Cast Iron Cups
Metal or Glass Loaf Pans
Metal or Glass Loaf Pans
Shiny Oblong or Muffin Pans
Shiny Oblong or Muffin Pans
Alum!num Tube Pan
Metal Jelly Roll Pan
Metal or Ceramic Pan
Metal or Ceramic Pan
Shiny Metal Muffin Pans
Metal or Glass Loaf or
Tube Pan
Shiny Metal Pan with
Satin-finish bottom
Shiny Metal Pan with
Satin-flnwh bottom
Metal or Glass Loaf Pans
Metal or Glass Pans
Cookie Sheet
Cookte Sheet
Dookle Sheet
Slass or Metal
Slass Custard Cups or
:asserole (set In pan of
lot water)
31ass Custard Cups or
2asserole
FOII Pan on Cookie Sheet
Spread to crust edges
Glass or Satin-flnlsh Metal
Glass or Satin-finish Metal
Glass or Sahn-finish Metal
Set on Oven $helf
Glass or Metal
Slass
Shelf
Position
c
B,
B, A
B
B
A, B
B
B“
A, B
A, B
B, A
A
B
A
A, B
B
A, B
B
B
B
B, C
B, C
B, C
B, C
A, B, C
B
B
A
B, A
A, B
B
B
A, B, C
A, B, C
B
Oven
Temp.
400°-475°
350°-400°
400°-450°
350°
400°-425°
375°
350”-375°
375°-425°
375°-425°
350°-375°
325°-375°
375°-400°
325°-350°
325°-350°
350°-375°
275°-300°
350°-375°
350°-375°
350°
325°-350°
350°-400°
400°-425°
375°-400°
350°-400°
300°-350°
325°
400°-425°
325°-350°
400°-425°
400°-425°
450°
325°-400°
325°-375°
300°-350°
Time,
Min.
15-20
20-30
20-40
45-55
20-30
45-60
45-60
45-60
10-25
20-30
30-55
10-15
45-60
45-65
20-25
2-4 hrs,
20-35
25-30
40-60
25-35
10-20
6-12
7-12
30-60
30-60
50-90
45-70
15-25
45-60
40-60
12-15
60-90
30-60
30-75
Comments
Canned refrigerated biscuits take
2-4 min. less time.
Preheat pan for crisp crust.
Decrease about 5 mtn. for muffin mix.
Or bake at 450° for 25 min., then at
350° for 10-15 min.
Dark metal or glass give deepest
browning.
For thin rolls, Shelf B may be used.
For thin rolls, Shelf B may be used.
Two piece pan is convenient
-Ine pan w!th waxed paper
‘aper liners produce more motst
:rusts,
Jse 300° and Shelf B for small or
ndlvldual cakes.
jar cookies from mlx use same time
Jse Shelf C and Increase temp 2510° for more browning
\educe temp to 300° for large cusard. Cook bread or rice pudding
ilth custard base 80 to 90 m!nutes
.arge pies use 400° and Increase
Ime.
‘o quickly brown meringue use
100° for 8-10 min.
;ustard fllllngs require lower temp ,
mger time
ncrease hme for large amount or
Ize.
33
Page 32

How to Set Your
Oven for Roasting
See Roasting Chart on page 35.
Step 1: Check the weight of the
meat and place, fat side up, on the
rack in the broiler pan that came
with your range. This helps the
meat to baste itself.
Step 2: Use shelf position “A” or
“B”; or the one indicated on Roasting Chart, page 35. Place Oven Shelf
on correct embossed shelf support.
For very tall roasts, remove second
oven shelf.
Step 3: Turn the OVEN TEMP Knob
to 325”. (The exception is small
poultry which is roasted at 3750.)
Step 4: Close the oven door and
turn the OVEN SET Knob to BAKE.
Oven “On” Light comes on and
stays on until OVEN SET Knob is
turned to OFF. Oven Cycling Light
comes on and remains on until
temperature is reached.
Step 5: Place your meat inside the
oven, making sure the pan is not
touching the oven walls or door.
Cooking Tips
c Be sure meat is cooked to your
satisfaction. Most meats continue to
cook slightly while standing after
being removed from the oven. This
should be taken into consideration
when determining your cooking
time.
● Always use a roasting pan that
fits the size of your meat. A roast
placed in a pan too small for its size
will drip over the edge.
● You may cook frozen meat roasts
without thawing. However, you
must allow more cooking time. For
large roasts, add 10-25 minutes per
pound. For roasts under 5 pounds,
add 10 minutes per pound.
● To slow down surface browning
on turkeys, you can use a foil “tent”.
The tent-shaped foil should be laid
loosely over the poultry so the heat
can circulate under the foil.
● Most frozen poultry should be
thawed before cooking to ensure it
is done evenly. Some, however, can
be cooked successfully without
thawing. Check the packer’s label
for specific directions.
How to Set Your
Step 2: Position oven shelf as indi-
cated on Broiling Chart, page 36.
Step 3: Turn the OVEN SET Knob
and OVEN TEMP Knob to BROIL.
Both Oven Indicator Lights cG::ie on.
Step 4: Leave oven door ajar
3 inches (except chicken, see
below). The door will stay open itself
yet the proper temperature will be
maintained in the oven. During
cooking, turn the food only once.
Step 5: Turn OVEN SET Knob to
OFF and serve food immediately.
Leave the pan outside the oven to
cool during the meal for easy
cleaning.
abOUt
Cooking Tips
/’f’
(
Step 6: Turn off the heat when the
roasting cycle is complete.
Oven for Broiling
See Broiling Chart on page 36.
Step 1: Place the meat on the
broiler rack in the broiler pan.
Always use the rack so fat drips
into the broiler pan.
34
● Foil may be used to line the
broiler pan and rack. However, be
sure to cut openings in the foil to
correspond with the slits in the
broiler rack so fat drips into the pan
below,
● For all weights of chicken, broil
with door closed.
● Placing food closer to the top of
the oven increases smoking, spattering, exterior browning on the
meat and the possibility of food fat
catching on fire. Always keep rack ~,
3-5 inches from the broiling unit. ‘ ‘
Page 33

Roasting Chart
1. Position oven shelf at B for small-size roasts (3 to 7 Ibs. ) and
o
at A for larger roasts.
2. Place meat fat side up or poultry breast-side up on brotler
pan or other shallow pan with trivet, Do not cover. Do not stuff
poultry until just before roasting. Use meat probe, for more
accurate doneness. Control signals when food has reached set
temperature. (Do not place probe in stuff ing. )
3. Remove fat and drippings as necessary. Baste as desired.
Oven
Type
Temp.
Doneness
Meat
Tender cuts: rib, h!gh quallty
sirloln tip, rump or top round”
Lamb Leg or bone-in shoulder’
Veal shoulder, leg or Ioln’
Pork Ioln, rlb or shoulder’
l-lam, pre-cooked
Ham. raw
“For boneless rolled roasts over 6-in th!ck, add 5 to 10 mln per lb. to times give
325°
325°
325°
325°
325°
325°
Rare:
Medium:
Well Done,
Rare:
Medium’
Well Done:
Well Done:
Well Done”
To Warm
Well Done,
Poultry
Chicken or Duck
9
Chicken pieces
Turkey
325°
375°
325°
Well Done. 35-40 30-35
Well Done 35-40
Well Done: 20-25 15-20
Standing time recommended for roasts is 10 to 20 min. to
4.
allow roast to f!rm up and make it easier to carve. It WIII rise
about 5° to 10° Internal temperature; to compensate for tem-
perature rise, if desired, remove roast from oven at 5° to 10°
less than temperature on chart.
5.
Frozen roasts can be conventionally roasted by adding 10
to 25 min. per pound more time than given in chart for refrigerated. (10 min. per lb. for roasts under 5-l bs. ) Defrost poultry
before roasting
Approximate Roasting Time,
in Minutes per Pound
Internal
Temp. 0F
3 to 5-lbs. 6 to 8-lbs.
24-30 18-22
30-35 22-25
35-45 28-33
21-25
25-30 24-28
30-35 28-33
35-45 30-40
35-45
10 reins. per lb. (any weight)
20-23
30-40
130°-140°
150°-160°
170°-1850
130°-140°
150°-1600
170°-185°
170°-1800
170°-1800
125°-1300
Under 10-lbs. 10 to 15-lbs.
20-30
~bove,
17-20
160°
3 to 5-lbs. Over 5 Ibs.
185°-1900
185°-1900
10 to 15-lbs. Over 15-lbs.
.n
thigh:
185°-1900
35
Page 34

Broiling Chart
1. Always use broiler pan and rack that comes with your oven,
It is designed to mlnlmize smoking and spattering by trapping
juices in the shielded lower part of the pan
2. Oven door should be ajar for most foods: there is a special
position on door which holds door open correctly.
3. For steaks and chops, slash fat evenly around outside edges
of meat. To slash, cut crosswise through outer fat surface just
to the edge of the meat. Use tongs to turn meat over to prevent
piercing meat and loosing Juices.
4. If des]red, martnate meats or chicken before broiling. Or,
brush with barbeque sauce last 5 to 10 minutes only
5. When arranging food on pan, do not let fatty edges hang
over sides, which could soil oven with fat drlpplng.
6. Broiler does not need to be preheated. However, for very
th!n foods or to Increase browning, preheat if desired.
7.
Frozen Steaks can be conventionally broiled by post-
tlonlng the oven shelf at next lowest shelf position and
increasing cooking time given In this chart
8. If your range IS connected to 208 Volts rare steaks may be
broiled by preheating the broil heater and positioning the oven
shelf one position higher,
Quantity
and/or
Food Comments
Ground Beef,
Well done
Thickness
%-lb. (about 8
thin slices)
l-lb. (4 patties)
% to 3/d-in. thick
Shelf
Position
c
c
First Side
Time, Min.
3%
7 4-5
Second Side
Time, Min.
3’/2
Arrange In single layer.Bacon
Space evenly.
Up to 8 patties take about same
time.
Beef Steaks
Rare
Medium
Well Done
Rare
Medium
Well Done
Chicken
1 inch thick
(1-1’/2 Ibs. )
1%-in. thick
(2-21/2 tbs. )
1 whole
(2 to 2%-lbs,),
split lengthwise
c
c
c
c
c
c
A
7
9
13
10
15
25
35
7
9
13
7-8
14-16
20-25
10-15
Steaks less than I-In, cook through
before browning. Pan frying is
recommended.
Slash fat.
Reduce times about 5-10 min per
side for cut-up chicken, Brush each
s!de with melted butter. Broil with
skin side down first and broil with
door closed
Bakery Products
Bread (Toast) or
Toaster Pastries
Engltsh Muffins
Lobster tails
8-oz. each)
(6 to
Fish
Ham slices
(precooked)
2-4 slices
1 pkg. (2)
2-spilt
2-4 B
l-lb. fillets ‘/, to
%-in thick
l-in thick
c
c
c
B
1‘/2-2
3-4
13-16 (Do not
5 5
8
‘/2
turn
over)
Space evenly. Place Engllsh muffins
cut-side-up and brush with butter, If
desired.
Cut through back of shell. Spread
open. Brush with melted butter
before and after half time,
Handle and turn very carefully
Brush wl!h lemon butter before and
during cooking If desired, Preheat
broiler to Increase browning
8 Increase times 5-10 min. per .sIde for
11/z-in. thick or home cured
Pork chops
Well Done
2 (’/2 inch)
2 (l-In. thick)
about 1 lb
c
B
10
13
10
13
Slash fat
Lamb chops
Medium
Well Done
Medium
Well Done
Wieners and slmllar
precooked sausages,
bratwurst
? (1 inch)
~bout 10-12
(11/2 Inch)
?
~bout 1 lb.
l-lb. pkg. (10)
c
OZ
c
c
B
c
8
10
10
17
6
4-7
10
4-6
12-14
1-2 f desired, split sausages In half
Slash fat
engthwlse into 5 to 6-in pieces
1’/2times per side
t
?
36
Page 35

How to Operate Your Self-Cleaning Oven
Recommended
o
Cleaning Time:
Moderate Soil (thin spills and light
spatter)—2 hours
Heavy Soil (heavy greasy spills
and spatter)—3 hours
Before Setting Oven Controls
Step 1: Remove all cookware and
food as well as heavy soil deposits
from the oven. Clean spatters or
spills around the oven door, rectangular flanges, and gasket. Then
close the door. (Oven shelves may
be left in oven. Note: Shelves may
become gray after several
clean ings. )
——..——————
How to Set Oven for Cleaning
Step 1: Turn OVEN SET Knob and
OVEN TEMP Knob clockwise to
CLEAN. The control will snap into
final position when the CLEAN posi-
tion is reached.
Step 2: Push and hold Latch
Release Button while sliding the
latch to CLEAN.
—[ u–+ \
‘y\*
Step 3: Set the Automatic
Oven Timer:
. Push in knob on Stop (Clean)
Dial and turn to the time you wish
oven to stop cleaning. Add the
number of hours needed for
cleaning to the present time of day.
. Cleaning Indicator Lights come
on when all steps are set properly,
. If you wish to clean at a later tirle
set Start Dial to that time.
NOTE: A slight odor may be
detected especially during the first
few cleanings. Do not be alarmed.
This is normal during the self-
cleaning cycle.
When cleaning temperature is
reached, Lock Light comes on and
door cannot be unlatched until
Lock Light goes off.
Step 4: When Lock Light goes off,
push and hold the Latch Release
Button while sliding Latch to OPEN.
–’i!!
Questions and Answers
Q. What should I do if excessive
smoking occurs during cleaning?
A. This is caused by excessive
grease and you should switch the
OVEN SET Knob to OFF. Open
windows and doors to rid room of
smoke. Allow the oven to cool for at
least one hour before opening the
door. Wipe up the excess grease
and reset the clean cycle.
Q. Why did the Lock Light come on
when I first set the oven for CLEAN?
A. Lock Light glowing indicates that
oven is too hot. Turn OVEN SET
Knob to OFF and open oven door
to cool the internal cavity. After a
short period of time, reset controls
for cleaning.
Q. My oven shelves have become
gray after several cleanings. Is this
normal?
A. Yes. After many cleanings, the
shelves may lose some luster and
discolor to a deep gray color.
Q. Why do I have ash left in my
oven after cleaning.
A. Some types of soil will leave a
deposit which is ash. It can be removed with a damp sponge or cloth.
Q. Why is there still some black soil
left after cleaning?
A. You did not time the oven to
clean long enough. This deposit will
be removed in later cleanings.
Q. If my oven clock is not working
can I still seif-clean my oven?
A. No. Your Automatic Oven Timer
uses the range clock to help start
and stop your self-cleaning cycle.
Step 5: Turn OVEN SET Knob to
OFF.
37
.
Page 36

The Problem Solver
To Save Time and Money—
before you request semice,
check the Problem Solver
Conventional Oven
PROBLEM
OVEN WILL NOT WORK
OVEN LIGHT
DOES NOT WORK
FOOD DOES NOT
BROIL PROPERLY
If you have a problem, it may be
minor. You may be able to correct
ityourself. Just use this Problem
POSSIBLE CAUSE AND REMEDY
Plug on range is not completely inserted in the outlet receptacle.
The circuit breaker in your house has been tripped, or a fuse has
been blown.
Oven controls are not properly set.
Door left in locked position after cleaning.
Light bulb is loose.
Bulb is defective. Replace.
Switch operating oven light is broken. Call for service.
OVEN SET Knob not set at BROIL.
OVEN TEMP Knob not set at BROIL.
Door not left ajar as recommended.
Improper shelf position is being used. Check Broiling Chart.
Necessary preheating was not done.
Food is being cooked on hot pan.
Utensils are not suited for broiling.
Aluminum foil used on the broil pan rack has not been fitted
properly and slit as recommended.
Solver to locate your problem and ,
then follow the suggested
recommendations.
1
i
FOOD DOES NOT ROAST OVEN SET Knob not set on BAKE.
OR BAKE PROPERLY
MOISTURE INSIDE AND
OUTSIDE YOUR OVEN
CALROD@ SURFACE UNITS
NOT FUNCTIONING
PROPERLY
OVEN WILL NOT
SELF-CLEAN
OVEN DOOR WON’T LATCH
OVEN TEMP Knob not set correctly.
Shelf position is incorrect. Check Roasting or Baking Charts.
Oven shelf is not level.
Wrong cookware is being used. When roasting, pan is too small.
A foil tent was not used when needed to slow down browning during
roasting.
Be sure oven vent duct is not covered with some material.
Be sure oven vent duct is positioned properly.
Surface units are not plugged in solidly.
Trim rings/drip pans are not set securely in the range top.
Surface unit contols are not properly set.
Automatic time dial/dials not set or not set properly. The STOP dial
must be set and advanced beyond the time noted on oven clock.
The STOP dial was not advanced for long enough.
Both OVEN SET and OVEN TEMP Knobs must be at CLEAN setting.
A thick pile of spillover when cleaned leaves a heavy layer of ash in
spots which could have insulated the area from further heat.
Latch not in “CLEAN” position.
Turn OVEN SET Knob to CLEAN. Glowing Locked Light after knob is
turned indicates oven is too hot from previous use and door won’t latch.
To cool oven, open door wide, then latch can be moved.
OVEN SET Knob must beat CLEAN or OFF before Latch can be moved.
Latch Release Button not pushed when moving Latch.
38
Page 37

Microwave Oven
PROBLEM
CONTROL PANEL LIGHTED,
YET OVEN WILL NOT START
“ERROR” APPEARS When using Temp Cook, a temperature less than 80° or more than 199°
ON READOUT
“PROBE” APPEARS
ON READOUT using Auto Roast or Temp Cook functions.
POSSIBLE CAUSE AND REMEDY
Door not securely closed.
START
Another selection entered already in oven and CLEAR/OFF not touched
to cancel it.
Make
CLEAR/OFF was touched accidentally. Reset cooking program and
touch START.
Temperature probe not inserted properly or not being used during Auto
Roast or Temp Cook.
Make sure you have entered desired finished temperature after touching
TEMP COOK/HOLD.
Make sure you entered a code number after touching AUTO COOK,
AUTO ROAST or AUTO DEFROST.
has been entered.
Door is opened during “AUTO” cycle of Auto Cook function. Close door
and touch START.
Weight is incorrect for Auto Defrost code on chart. It is necessary to
reset oven.
Probe has been forgotten or not seated properly in oven wall when
must be touched after entering cooking selection,
sure you have entered cooking time after touching TIME COOK.
FOODS ARE EITHER Over- cooking times may vary because of starting food temperature, food
COOKED OR UNDERCOOKED
All These Things Are Normal
on Your Microwave Oven:
. Steam or vapor escaping from
around the door.
. Light reflection around door or
outer case.
density or amount of foods in oven. Touch TIME COOK and additional
cooking time for completion.
Incorrect Power Level entered. Check Cookbook for recommended
Power Level or changing levels during cooking if necessary.
Dish was not rotated, turned or stirred. Some dishes require specific
instructions. Check Cookbook or recipe for these instructions.
Too many dishes in oven at same time. Cooking time must be increased
when cooking more than one food item. Check Cookbook for recommendation on increasing time.
Dish not completely covered as directed during Auto Cook.
Previous microwaving left humidity or moisture in oven, thus lessening
the cooking time in Auto Cook function.
Certain vegetables need a standing time after using Auto Cook. Check
Automatic Cooking Chart.
Oven door was opened during “AUTO” cycle of Auto Cook function.
Probe not inserted properly into meat or dish when using Temp Cook or
Auto Roast functions. Check Cookbook or Auto Roast section of this
book for specific instructions.
Check Cookbook for food placement and instructions when using
Double Duty’” Shelf.
.
Dimming oven light and change
in blower sound may occur while
operating at power levels other than
high.
. Dull thumping sound while opersting at power levels other than
high.
. Some TV-Radio interference
might be noticed while using your
microwave oven. It’s similar to the
interference caused by other small
appliances and does not indicate a
problem with your oven,
39
Page 38

Care and Cleaning of Your Cooking Center
Proper care and cleaning are important so your Cooking Center will
give you efficient and satisfactory
sewice. Follow these directions
carefully in caring for it to help
assure safe and proper
maintenance.
BE SURE ELCTRIC POWER IS
OFF BEFORE CLEANING ANY
PART OF YOUR COOKING
CENTER.
Control Panels
Don’t use sharp-edged utensils
around the control panels. They
might damage it.
Clean the panels with a lightly
dampened cloth. DO NOT USE
cleaning sprays or large amounts
of soap and water. These can
cause problems with the control
mechanisms.
TernDerature Probe
The ~robe is sturdy, but care
should be taken in-handling it. Do
not twist it. Avoid dropping it. Clean
it as soon as possible after use.
Wipe it with a sudsy cloth, then rub
metal parts with a plastic scouring
pad if necessary. Rinse and dry.
DO NOT wash the probe in an
automatic dishwasher.
Aluminum Foil on Shelves—
why you shouldn’t use it
DO NOT place a sheet of aluminum
foil on any shelf in either your microwave or conventional oven. If you
do, your foods may not cook properly. The oven finish may be damaged. And there may be an increase
in heat on the outside surfaces of
the oven.
Oven Lamp
The oven lamp bulb is long-lasting.
Only a qualified service technician
should replace it.
DOUBLE DUTYTM
Shelf Accessory
Your shelf accessory is designed
for use in a microwave oven only;
do not use in a conventional oven.
Do not use a browning dish with
the shelf. Arcing could occur.
Clean shelf with mild soap and
water or in the dishwasher. Do not
remove plastic spacers from the
shelf when cleaning. Do not clean
in self-cleaning oven.
Precautions for Use of Metal
Use metal only as directed in the
Cookbook. Metal trays no more
than 3/4” deep may be used for TV
dinners, and the metal temperature
probe is designed for microwave
oven use. Always keep metal at
least one inch away from sides
of oven.
Cleaning —Outside
Clean the outside of your microwave oven with soap ~nd water,
then rinse and dry. The outer pane
of the window is glass. Wipe it clean
with a damrI towel. Chrome is best
wiped with’s damp cloth and then
with a dry towel.
Cleaning—Inside
Keep it clean and sweet-smelling.
Opening the oven door a few min-
utes after cooking helps air out the
inside. An occasional thorough wip-
ing with a solution of baking soda
and water keeps the interior fresh.
Spills and spatters are easy to remove from wails, floor and antenna
cover. That’s because there’s little
heat except in the food, or sometimes in the utensil. Some spatters
wipe up with a paper towel, some
may require a damp cloth. Remove
greasy spatters with a sudsy cloth,
then rinse and dry.
NEVER USE A COMMERCIAL
OVEN CLEANER ON ANY PART ‘
OF YOUR MICROWAVE OVEN.
Wipe up spatters on the glass on
the inside of the door daily. Wash
glass, when it’s soiled, with a min-
imum of sudsy, warm water. Rinse
thoroughly and dry.
Wipe metal and plastic parts on the
inside of the door frequently. Use a
damp cloth to remove all soil. DO
NOT USE ABRASIVES, such as
cleaning powders or steel and
plastic pads. They may mar the
surface.
Door Surface. When cleaning sur-
faces of door and oven that come
together on closing the door, use
only mild, non-abrasive soaps or
detergents applied with a sponge
or soft cloth.
Do not remove the plastic antenna
cover at the top of the oven (see
page 8). You will damage the oven
if you do.
Using a Brown ‘N Sear Dish? Use
Bar Keepers Friend(a Cleanser.
High heat generated on the bottom
of the Brown ‘N Sear Dish can
cause scorched appearing stains to
bake onto the oven floor if grease IS
present. These may be removed
with Bar Keepers Friend{R) Cleanser
by SerVaas Laboratories, Inc.
After using this cleaner, rinse and
dry thoroughly, following instructions on can. Do not use it on the
painted surfaces such as the walls—
it may scratch the paint.
Bar Keepers Friend(’) Cleanser is
sold in many grocery, hardware and
department stores.
9
40
Page 39

Oven Thermostat
@
Indented Area
(Area seen through glass control
panel after knob is removed.)
The temperature on your new oven
has been accurately set at the factory. However, if your food consistently browns too much or too little,
you may make a simple adjustment
behind your OVEN TEMP Knob. To
readjust your thermostat:
. Rotate OVEN TEMP Knob to
CLEAN position and pull knob off
the shaft revealing area behind
. knob.
● Insert the tip of a 3/16” standard
i
Q
screwdriver, into the indented area
directly under the notch and turn in
the desired direction. Be careful not
to scratch glass control panel.
. To increase oven temperature
move dial one notch counterclock-
wise. To lower oven temperature,
move dial one notch clockwise.
(Each notch represents approximately 150. )
s Return knob to the range by
matching the flat area of the knob
to the shaft.
. Recheck oven performance
before making an additional
adjustment.
Lamp Replacement
CAUTION: Before replacing your
oven lamp bulb, disconnect the
electric power for your Cooking
Center at the main fuse or circuit
breaker panel. Be sure to let the
lamp cover and bulb cool completely before removing or
replacing them.
To remove:
c Take out 3 slotted screws as
shown in lamp diagram.
. Detach lamp cover and remove
bulb.
To replace:
● Put in a new 40-watt appliance
bulb.
● Install lamp cover. Replace 3
screws and tighten them, making
sure cover fits flush with oven wall,
● Reconnect electric power to the
Cooking Center.
Use of Aluminum Foil in
Broiling
If you wish, you may line the broiler
pan with aluminum foil and cover
the rack with it for broiling. ALWAYS
BE SURE TO MOLD THE FOIL
THOROUGHLY TO THE BROILER
RACK AND SLIT THE FOIL TO
CONFORM WITH SLITS IN THE
RACK. Stopping fat and meat juices
from draining into the broiler pan
prevents the rack from serving its
purpose and MAY LET JUICES
BECOME HOT ENOUGH TO
CATCH FIRE.
I
/
Oven Vent Duct
Oven is vented through a duct
located under the right rear Calrod@
unit. To clean duct: remove Calrod@
unit and drip pan/ring. Lift out vent
duct. In replacing, make sure the
duct opening is under the opening
.
in drip pan. Correct positioning is
‘important to allow moisture and
@
vapors to be released from oven.
Never cover the hole.
/cent/nued next page)
41
Page 40

Plug-In Surface Units
Clean the area under the drip pans
often. Built-up soil, especially
grease, may catch fire. To make
cleaning easier, the plug-in surface
units are removable.
I
SPIOER
MEDALLION
CHROME-PLATEO
ORIPPANRING
RECEPTACLE
TERMINALS
I
/“
To remove:
s Be sure the control for the sur-
face unit is on OFF and the coils
are cool before removing the
Calrod@ unit.
Q Raise the unit coil opposite the
receptacle. Lift about one inch
above the trim ring and pull away
from the receptacle.
● After removing the plug-in sur-
face unit, lift the drip pan/ring to
clean under the unit
To clean:
● Wipe around the edges of the
surface unit opening in the range
top. Clean the area below. Rinse all
washed areas with a damp cloth or
sponge.
To replace:
c Place drip pan/ring in the surface
unit cavity found on top of the
range. Line up the drip pan so the
unit receptacle can be seen.
● Insert the terminals of the plug-in
unit through the opening in the drip
pan/ring and into the receptacle.
● Guide the surface unit into place
so it fits evenly and locks snugly
into the receptacle or trim ring.
Note: If your range has separate
trim rings, the drip pan must be
under the trim ring.
Do not attempt to clean, adjust, or
in any way repair the plug-in receptacle. If liquid should spill and collect inside the receptacle, call for
service.
Removable Oven Door
\
r-\
TO REMOVE door, open to BROIL
position, or where you feel hinge
catch slightly. Grasp door at sides;
lift door up and away from hinges.
TO REPLACE, grasp door at sides.
Line up door with hinges and push
door firmly into place.
\
42
Page 41

Cleaning Chart
Note Let oven parts cool before cleaning manually.
@
PART
MATERIALS TO USE
GENERAL DIRECTIONS -
Do not clean the bake unit or broil unit. Any soil will burn off
when the unit is heated. NOTE: The bake unit is not hinged
Bake Unit and Broil Unit
and cannot be lifted to clean the oven floor. If spiliover,
residue, or ash accumulates around the bake unit, gently wipe
around the unit with warm water.
Drain fat, cool pan and rack slightly. (Do not let soiled pan and
Broiler Pan & Rack
● Soap and Water
● Soap-Filled
Scouring Pad
. Plastic Scouring Pad
rack stand in oven to cool). Sprinkle on detergent. Fill pan with
warm water and spread cloth or paper towel over the rack. Let
both stand for a few minutes. Wash; scour if necessary, Rinse
and dry. OPTION: The broiler pan and rack may also be
cleaned in a dishwasher.
Control Knobs:
Range Top and Oven
Mild Soap and Water
Pull off knobs. Wash gently but do not soak. Dry and return
controls to range making sure to match flat area on the knob
and shaft.
Wash all glass with cloth dampened in soapy water. Rinse and
Outside Glass Finish
Soap and Water
polish with a dry cloth. If knobs on the control panel are re-
moved, do not allow water to run down Inside the surface of
glass while cleaning.
Metal, including
Chrome Side Trims
and Trim Strips
Soap and Water
Wash, rinse, and then polish with a dry cloth. DO NOT USE
steel wool, abrasives, ammonia, acids, or commercial oven
cleaners which may damage the finish.
Avoid cleaning powders or harsh abrasives which may scratch
the enamel.
Porcelain Enamel
Surface*
. Paper
● Dry Cloth
. Soap and Water
Towel
If acids should sptll on the range while it is hot, use a dry
paper towel or cloth to wipe up right away. When the surface
has cooled, wash and rinse,
For other spills, such as fat smatterings, etc., wash with soap
and water when cooled and then rinse. Polish with a dry cloth.
On this oven, clean ONLY the door liner outside the gasket.
The door ISautomatically cleaned if the oven IS In the self-
Inside Oven Door*
Soap and Water
cleanlng cycle. If splllover or spattering should occur in
cooking function, wipe the door with soap and water. DO NOT
rub or damage gasket. Avoid getting soap and water on the
gasket or in the rectangular flanges on the door
Oven Gasket*
Avoid getting ANY cleanlng materials on the gasket,
Cool before cleanlng, Frequent wiping with soap and water
Oven Liner
Soap and Water
will prolong the time between major cleanings. Be sure to rinse
thoroughly. For heavy soiling, use yourself-cleaning cycle often.
Shelves
(See Self-Cleaning
Oven DirectIons)
Soap and Water
Your shelves can be cleaned with the self-cleaning function In
the oven. For heavy sotl, clean by hand
tioned materials. Rinse thoroughly to remove all materials after
cleanlng.
Spatters and spills burn away when the cotls are heated At the
end of a meal, remove allutensilsfrom the Calrod” unitand
heat the soiledunitsatH1.Letthe soilburn off about a minute
Calrod$ Surface Unit
Coils
and switch the units to OFF. Avoid getting cleanlng materials
on the COIIS. Wipe off any cleaning materials with a damp
paper towel before heating the Calrod” unit.
DO NOT handle the unit before completely cooled.
DO NOT self-clean plug-in units,
DO NOT immerse plug-in units In any kind of liquid.
Clean as described below or in the dishwasher. DO NOT
CLEAN ON THE SELF-CLEANING FUNCTION as pans and
rings will discolor.
vVipe all rings after each cooking so unnoticed spatter WIII not
‘burn on” next time you cook, To remove “burned-on” spatters
Jse any or all cleaning materials mentioned. Rub /ight/y with
Chrome-Plated Rings or
Chrome Trim Rings
and Pans
. Soap and Water
. Stiff-Bristled Brush
● Soap-Filled Scouring Pad
(Non Metalllc)
~courlng pad to prevent scratching of the surface,
Cool pan slightly. Sprinkle on detergent and wash or scour
pan with warm
water. Rinse and dry. In addition, pan may also
be cleaned in the dishwasher or in self -cleaning
Porcelain Drtp Pans
. Soap and Water
. Soap-Filled Scouring Pad
. Plastlc Scouring Pad
● Dishwasher
●S~lllaae of marinades, fruit iulces, and bastlna materials contalnlna actds mav cause discoloration. S~lllovers should be wiped
up Imfiedlately, with care being taken to not ;ouch any hot portlondof the ove’n. When the surface IScool,clean and rinse
using any and all men-
oven.
—-~..
m ‘.
\.,
?
“purchase ot new apphances, or have questions
. ..
.. ... fir--
,.
43
mformatlon service ISopen 24 hours a day,
 Loading...