

Page 1
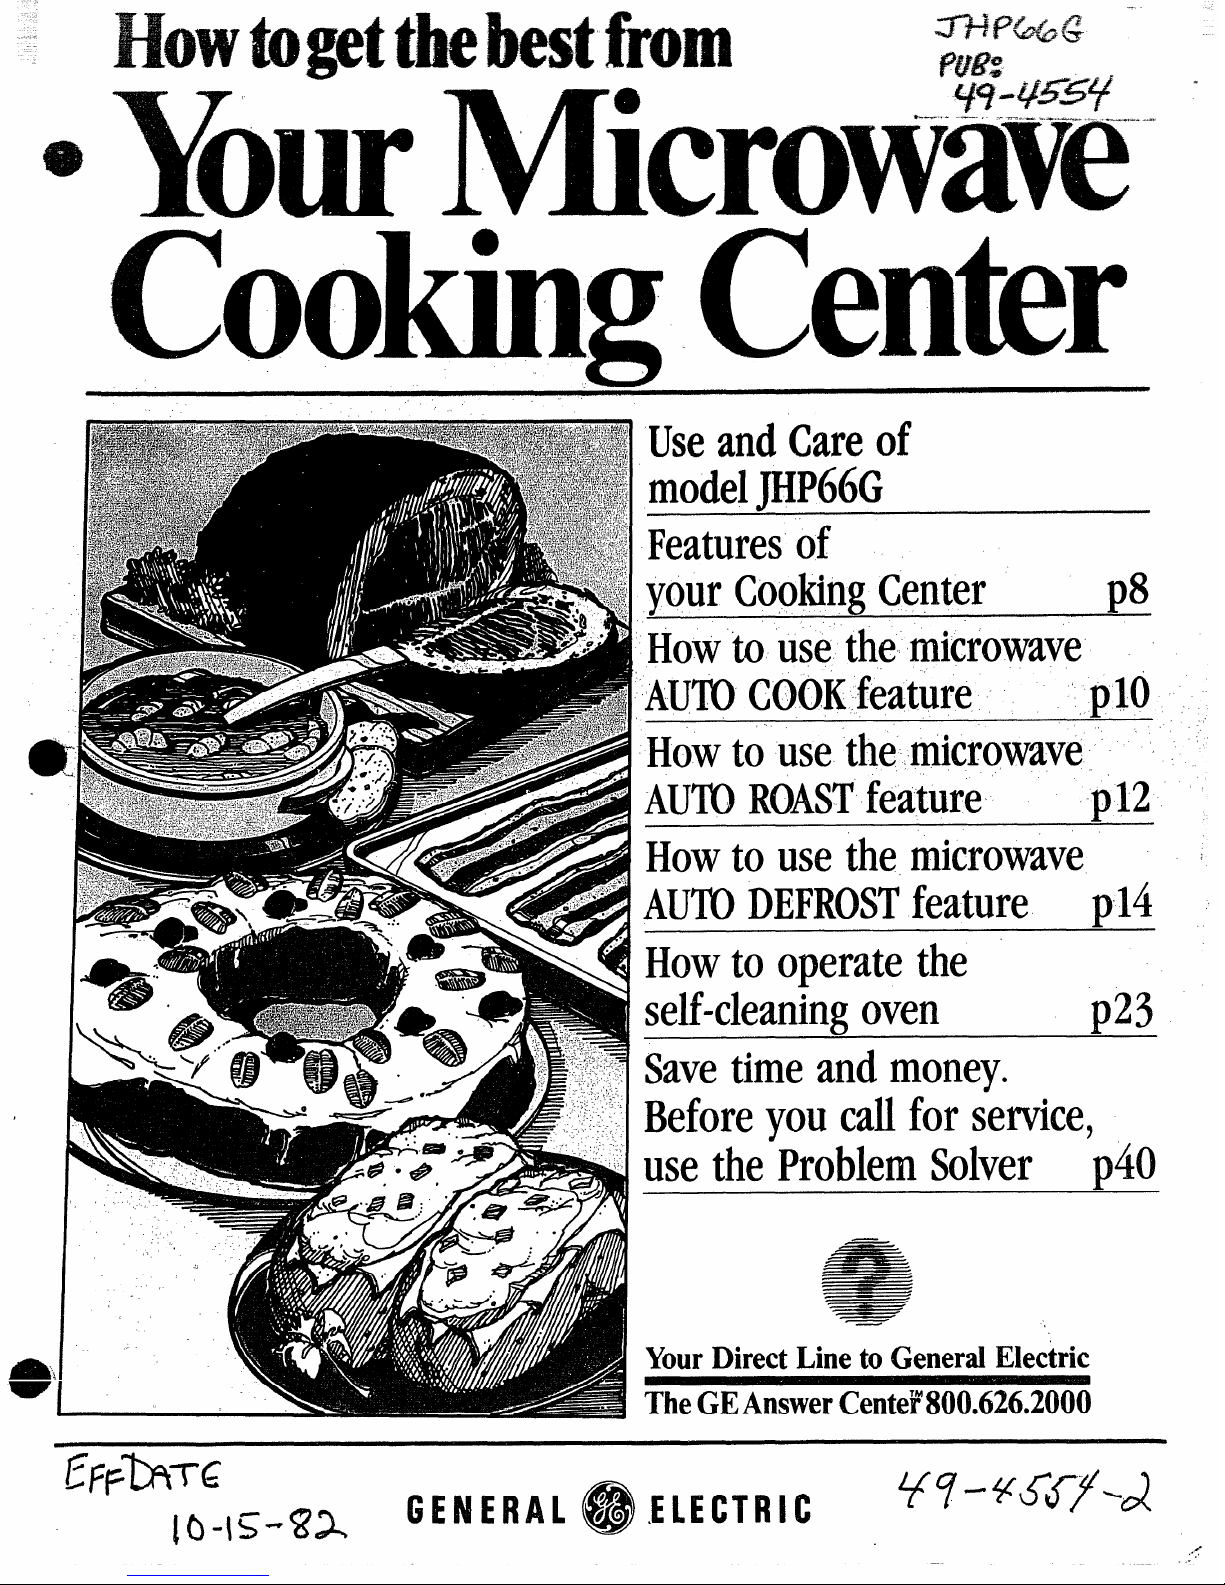
UseandCareof
a
.,
.
model
ED?66G
Featuresof
vourCookingCenter
HOWtousethemicrowave
AUIDCOOKfeature
plo
Howtousethemicrowave ~ ‘
AUTOROASTfeature -
p12
Howtousethe,microwave
AUTY)DEFROSTfeature
p14
Howtooperatethe
self-cleaningoven
p23
@qyyTG
GE NE RAL@EIECTRIC
[C)-m+!?a%
Savetimeandmoney.
Beforeyoucallforservice,
usetheProblemSolver
YourDirectLinetoGeneralElectric
TheGEAnswerCentef’800.626.2000
p40
47-’Y5J-’J--J
,,~”
. .-
Page 2
Read ‘l-his Book Carefully.
It is designed to help you operate
and maintain your new Cooking
Center properly.
Keep it handy for answers to your
questions.
If you don’t understand something
or need more help. . .
Call, toll free:
The GE Answer Center’M
800.626.2000
consumer information service
or ‘write: (include your phone
number);
Consumer Affairs
General Electric Company
Appliance Park
Louisville, KY 40225
wme Dcw$ilm?M(XH and
serial Numbers.
You’ll find them on a label inside
the upper oven on the left side.
These numbers are also on the
Consumer Product Ownership
Registration Card that came with
your Cooking Center. Before
sending in this card, please write
these numbers here:
Model No.
Serial No.
Use these numbers in any correspondence or service calls concerning your Cooking Center.
Be sure’ YWJb’ovenis
Registered.
It is important that we, the manufacturer, know the location of
your Cooking Center should a
need occur for adjustments.
Your supplier is responsible for
registering. you as the owner.
Please check with your supplier to
be sure he has done so; also send
in your Consumer Product
Ownership Registration Card. If
you move, or if you are not the
original purchaser please write to
us, stating model and serial numbers. This appliance must be registered. Please be certain that it is.
Write to:
General Electric Company
Range Product Service
Appliance Park
Louisville, KY 40225
Hyoureceivedadamaged
oven.m .
immediately contact the dealer (or
builder) that sold you the Cooking
Center.
Save ‘TWeand Money.. .
Before‘YcN4CM forService.
Check “The Problem Solver”
(page 40). It lists minor causes of
operating problems that you can
correct yourself.
It could save you an unnecessary
service call,
[a) Da Not Attempt to operate this
oven with the door open since open
door operation can result in harmful
exposure to microwave energy. It is
important not to defeat or tamper
with the safety interlocks.
(b)DONot Placeany object between
the oven front face and the door or
allow soil or cleaner residueto
accumulate on sealing surfaces.
(C]DONotOperatethe oven if it is
damaged. his particularly important
that the oven door close properly
and that there is no damage to the
(1) door (bent),
(2) hinges and latches (broken or
loosened)
(3) door seals and sealing sufiaces.
(d) TIIe
ChferiShouldnotbe
adjusted or repaired by anyone
except properly qualified service
personnel.
“Qpwma!Accessories
Available at extra-cost from your GE supplier.
JYW7 W5M%%5!HWX21
Features2-kwe\ venting that helps eliminate cooking vapors and odors.
Page 3
‘433a
e
Microwave oven
Safety instructions . . . ......... 5-7
Features of Your Oven . . . . . . . . .. 8
Touch Control Panel ....... . . ...9
Automatic Cooking .. .. ... 10,11
Automatic Roasting &
Charts ....... . ...... . . ...12. ~3
Automatic Defrost . . .......... . 14
Time Cook . ......... . ......... .16
Manual Defrost .. .. . . ......... ..l7
Temperature Cook . ........... .18
Hold/Timer . . . . . ..... . . .........19
SL!f’ba?mmking
Safety Instructions .. . . ........ 5-7
How to Use.... . ..... . . ........ .20
Cooking Chart .. ... . .......26. 27
Cclnveritional ch?rl
Safety instructions of. . . . ... . .. 5-7
Features . ...... . . . . . ........ . ....8
Oven Controls . . . .. ......... . ...8
Oven Light . . . . ..... . ......... ..2l
Oven Shelves ...... . . ....... . ..21
Minute Timer, Clock,
Automatic Oven Timer ... . ... 21
Baking . . ....... . . . ...... . . . ....2l
Broiling .... .. . . ..... . . . . . ......22
Roasting ........ . . ...... . . . . ...22
Baking Chart . . . . .... . . . . .......28
Broiling Chart . . ..... . . . . ...... .29
Roasting Chart . . . ....... . . .....30
Ci3red YourCooki17gCenter
Self-Clean Operation . .. . . . ....23
Oven Vent Duct . . . . ...... . . ....24
Care of Surface Units .... . . ....24
Lamp Replacement ... . . .......24
Oven -l_herrnostat
Adjustment ..... . ....... . . ...24
Care of Microwave Oven&
Temperature Probe ... . . .....24
Removable Oven Door .... . . ... 25
Cleaning Chart (All Parts) ... ...42
General
Before Using Your Range.... ... 2
Energy Saving Tips . . ....... . ...4
Model &.Serial Number
Location .... . . .... . . . . ..... . ..8
Automatic Cooking Recipe
Guide . . . . . ..... . .... . . . . .....3l
Meats ...... . . .... . . .....32.33
Vegetables ... . . .... . . ...34.35
Desserts .. . . . ... .. .....36.37
Automatic Cooking
Chart . .... . . . . . .... . ......38.39
The Problem Solver .. . . . .......40
Consumer Services . . . . . .......43
Warranty .... ...1..... !3ack Cover
@Ivlakesurea!l utensits used in
your microwave ovenarelabeled
“suitablef orrnicrowaving”. Check
your Cookbook forspecitictest
to determine ’’micrawaw?-safe”
utensils.
@Paper towe6s,waxpaper, and
plastic wrap can beu.sed tocover
dishes in order to retain moisture
and prevent spattering.
@Some microwaved foods
require stirring, rotating, or rearranging. Check your Cookbook
for specific instructions.
@Sornefoods such as unshelled
eggs and hotdogs rnustbe
pierced to allow steam to escape
during cooking.
when Power 1s
connected
tothe oven
The readout panel displays five
8’s and 18 PC)WEFion the upper
portion and all of the oven func-
tions on the lower portion. After
15seconds, all lights disappear
,and“RESET” flashes in the upper
portion. Touch the GLEAFVOFF
pad and oven is ready for use.
If power is disrupted at any time,
the above sequence reoccurs, and
you must reset CLOCK after
touching CLEAR/OFF.
Page 4
Ie
Vo,
no harm is done. However, try to
avoid operating the oven empty at
ail times—saves energy and aiso
ensures good long term iife of
oven.
surfacecooking
@ lJsecooking utensiis of
medium weight aiuminurn, tightfitting covers, and flat bottoms
which completely cover the
heated portion of the surface unit.
@ Cook fresh vegetables with
a minimum amount of water in a
covered pan.
e Watch foods when bringing
them quickly to cooking temperatures at HIGH heat. When food
reaches cooking temperature,
reduce heat immediately to lowest
s~tting that wiii keep it cooking.
@ Use residual heat with surface
cooking whenever possible. For
exampie, when cooking eggs in
the sheil bring water to boil, then
turn to OFF position to complete
the cooking.
@ Always turn surface unit OFF
before removing utensil.
@ Use correct heat for cooking
task. . . high heats to start cooking
(if time aiiows, do not use HIGH
heat to start), medium high—
quick brownings, medium—slow
frying, low
—finish cooking most
quantities, simmer—double boiler
heat, finish cooking, and special
for smaii quantities.
@ When boiling water for tea
or coffee, heat oniy the amount
needed. it is not economical to
boil a container fui! of water for
oniy one or two cups.
ovenGooliirl$j
e Preheat the oven only when
necessary. Most foods wiil cook
satisfactorily without preheating.
If you find preheating is necessary, keep an eye on the indicator
iight, and put food in the oven
promptly after the iight goes out.
@ Always turn oven OFF before
removing food.
@ During baking, avoid frequent
door openings. Keep door open
as short a time as possible when
it is opened.
e For seif-cieaning oven, be sure
to wipe up excess spillage before
seif-cleaning operation.
@ Cook complete oven meals
instead of just one food item.
Potatoes, other vegetables, and
some desserts will cook together
with a main-dish casseroie, meat
loaf, chicken or roast. Choose
foods that cook at the same tem-
perature in approximately the
same time.
@ Use residual heat in oven when-
ever possible to finish cooking
casseroles, oven meals, etc. Also
add rolls or precooked desserts to
warm oven, using residual heat
to warm them,
Page 5
h
..:-:
!Alhen
using electrical appliances
r.,-:.r-,.
:2,+.-7.
t=%
basic safety precautions
should
be followed, including the
following:
WARNING—TOreduce the risk
of burns, electric shock, fire,
injury to persons or exposure to
excessivemicrowave energy:
a Use this appliance o171yfor its
intended use as described in this
manual.
= Be sure your appliance is
properly installed and grounded
by a qualified technician in
accordance with the provided
installation instructions.
@ This appliance must be c@n-
nected to a grounded, metallic,
permanent wiring system, or an
equipment grounding conductor
shouid be run with the circuit
conductors and connected to
the equipment grounding terminai or iead on the appiiance.
_
@
Don’t attempt to repair or
w’
repiace
any part of your range
uniess it is specifically recommended in this book. Aii other
servicing shouid be referred to
a quaiified technician.
@ Before performing any
service, Disconnect THE
RANGE POWERSUPPLY AT
THE HOUSEHOLD DiSTRii3UTiON PANEL BY REMOViNG
THE FUSE OR SWITCi+iNG
OFFTHE CiRCUiT BREAi<ER.
a Do not cover or biock any
openings on the appiiance.
~ Do
not use outdoors.
n Do
not operate this appiiance
if it is not working properly, or if
it has been damaged or dropped.
>..—
s ASwith any appiiance, ciose
supervision is necessarywhen
used by chiidren.
a Da not h.%weCMdren akMw%——
chiidren shouid not be ieft aione
or unattended in areawhere
appiiance is in use.They shouid
never be aiiowed to sit or stand
on any part of the appiiance.
@ Don’t MOWanyone to climb,
stand or hang on the door,
dl%ww?ror range top. They (XX.dd
damage the range and even tip
it over causing severepersonal
injury.
@ CAUTION: Do NOT ST(IRE
ITEMS OF INTEREST To
CHILDREN IN CABINETS
ABOVE A RANGE OR ON THE
BACKSPLASH OF A RANGE—
CHILDREN CLIMBING ON THE
RANGE “1-oREACH ITEMS
COULD BE seriously
INJURED.
s wear proper clothing. Loose
fitting or hanging garments
shouid never be worn whiie
using the appiiance. Fiammabie
material could be ignited if
brought in contact with hot heat-
ing elements and may cause
severeburns.
@ Use only dry pothcMers-
moist or damp potholders on
hot surfaces may resuit in burns
from steam. Do not let pot-
holders touch hot heating eiements. Do not use a towei or
other bulky cloth.
@ Never use your appliance for
Warwningor heating the room.
@ storage in or (m Apphwm?--
Fiarnmab!e rnateriaisshouid not
be stored in an oven or near sur-
face units.
@ Keep hood and grease filters
clean to maintain good venting
and to avoid grease fires.
@ ‘Donot let cooking grease or
other flarfimabie materials MXX1lmulate in the range or near lit.
5
@ Elclno!.use wak?i-’cmgy’(i?ase
fires. Ntwer pick up a framing
pan. Smother
Warningpan cm
surface unit by fcowerhigpan
completely with well
fitting M,
CCmkie
sheet CM’flat fhy. Flaming
grease outside a pan can be put
‘out
by Cxweringwith baking
sda
‘w, if avam’ck, ‘aln’wM-
pturposedry C1’wm-ka!or fclams
@ Do
not touch I’m2athgek?-
ments or ihterior
surface d
oven. These surfaces may be
hot enough to burn even though
they are dark in coior. During
and after use,do not touch, or
let clothing or other fiammable
materiais contact surface units,
areas nearby surface units or
any interior area of the oven;
aiiow sufficient time for cooiing,
first.
Potentialityhot surfaces inciude
the cooktop and areas facing
the cooktop, oven vent opening
and surfaces near the openings,
and crevices around the oven
door.
Remember: The inside surface
of the oven may be hot when the
door is opened.
@ when cooking pork foiiow
our directions exactiy and
always cook the meat to at ieast
170°, This assures that, in the
remote possibility that trichina
may be present in the meat, it
wiil be kilied and meat wiii be
safeto eat.
(continiled lJext page)
Page 6
Q Read and follow the specific
‘;PRECAU-I”!ONSTO AVOID
POSSIBLE
EXPOSURE -m
i3(cEss!vE M!CF33VVAVE
ENERGY” found on page 2.
e To reduce the risk of fire in
the oven cavity:
—Do not overcook food. Careful!y attend appliance if paper,
plastic, or other combustible
materials are placed inside the
oven to facilitate cooking.
—Remove wire twist-ties from
paper or plastic bags before
placing bag in oven.
—Papertowels and napkins, wax
paper. Recycled paper products
can contain metal flecks which
may cause arcing or ignite.
Paper products containing nylon
or nylon filaments should be
avoided, as they also ignite.
—Do not useyour microwave
oven to dry newspapers.
—Do not pop popcorn in your
microwave oven unless in a
special microwave popcorn
accessory or unless you use
popcorn labeled
for use in
microwave ovens.
—Do nd operafe W3eoven
while
empty to avoid damage to the
cwenand the danger of We.
If by
accident the oven should run
empty a minute or two, no harm
is done. However,try to avoid
operating the oven empty at all
times—”[tsavesenergy and prolongs life of the oven.
—!f materials inside the oven
should ignite, keep oven door
closed, turn oven off, and disconnect the power cord, or shut
off power at the fuse or circuit
breaker panel.
s Some products such as
whole eggs and sealed containers—for example, closed
glassjars—may explode and
shouid not be heated in this
oven
,-
)
,.,~sedoor surface cleaning
p
instructions on page 24.
@ EkN’a’tdmtx3tWMxwtlibever”
ages in narrow necked botties;
especially carbonated ones.
Even if the coritainer is opened,
pressure can build up. This can
causethe container to burst,
resuiting in injury.
@ U&X?.metal only as directed in
Cookbook. Metal strips as used
on meat, roasts are helpful when
used as shown in Cookbook.
TV dinners may be cooked in
metal trays but when using shelf
they must be replaced in their
box. However, when using metal
in microwave oven, keep meia!
at least 1-inch away from sides
Ofoven.
e Caoking utensils may
become hot because of heat
transferred from the heated
food. This is especially true if
plastic wrap has been covering
the top and handles of the
utensil. Potholders may be
needed to handle the utensil.
@ Sometimes, the oven floor
can become too hot to touch.
Be careful touching the floor
during and after cooking.
@ Do not ‘useany thermometer
in food you are microwaving
unless that thermometer is
designed or recommended for
use in the microwave oven.
~ Remcwethe ‘temperature
probe from the oven when not
using it to cook with. If you leave
the probe inside the oven without
inserting it in food or liquid, and
turn on microwave energy, it can
create electrical arcing in the
oven, and damage oven walls.
e Boiling eggs (in and out of
shell) is not recommended for
microwave cooking. Pressure
can build up inside egg yolk and
may cause it to burst, resulting
in injury.
@ ~QQ& ~~f~ ~~~~Q~@~~~~e~
“skin” such as potatoes, hot
dogs or sausages,tomatoes,
apples, chicken livers and other
gibiek, at7deggs (see above)
should be pierced to allow
steam to escape during cooking.
6
o Avgjifj heating baby food in
glass jars, even without their
lids; especially meat arid egg
mixtures.
g~plastic Utensik5—P!astic
utensils designed for microwave
cooking are very useful, but
should be used carefully. Even
microwave plastic may not be as
tolerant of overcooking conditions as are glass or ceramic
materials and may soften or
char if subjected to short periods
of overcooking. In longer exposures to overcooking, the food
and utensils could ignite. For
these reasons: 1) Use microwave plastics only “and use
them” in strict compliance with
the utensil manufacturer’s
recommendations. 2) DOnot
subject empty utensils to microwaving. 3) Do not permit children
to use plastic utensils without
complete supervision.
e
“Boi!abh3’9cocking ptxdws
and tightly dosed plastic bags
should be slit, pierced or vented
as directed in Cookbook. If they
are not, plastic could burst dur-
ing or immediately after cooking,
possibly resulting in injury. Also,
plastic storage containers should
be at least partially uncovered
becausethey form a tight seal.
When cooking with containers
tightly covered with plastic wrap,
remove covering carefully and
direct steam away from hands
and face.
@ ?&M?of the DOUBLE IDUTYTM
shelf accessory. To position
shelf so that it is securely
“seated,” insert into the oven
cavity above shelf sup’ports and
completely to the back oven
wall. Drop into place so that the
recessedareas are over the shelf
supports. To remove shelf, lift
shelf above supports and then
pull forward and out. Do not
place food on shelf unless it is
securely “seated” on the
supports.
o When the shelf is nol in use,
remove from the oven<
~ Do not use a microwave
browning dish 017shelf,
Page 7

-------
$ *$”%>YW+.
Led- tl~%.3 g s,
:$ Stand away from the range
when Opening
Gwen Ckxx. TIM?
ho! air
CMsteam which escapes
can
Cause ibw’ns b ha-2ds9face
?wMwc$reyes.
~ ‘DcwI’theat unopened hod
Containers in the oven.
Preswre
Cxxddbuild up and the container
txlt.dd i!xws~C%3wmgan
hjw’y.
~
Keep oven vent ducts
i~nobst~ud~d.
~
Keep oven free from grease
build UP.
Q Place oven rack
in desired
position while oven is cool. if
racks must be handled when
hot, do not let potholder contact
heating units in the oven.
@
pu!iing out shelf to the shelf
stop
is a convenience in lifting
heavyfoods. His also a precau-
tion against burns from touching
hot surfaces of the door or oven
walls.
@ When
using cooking or roasting bags in oven, follow the
,rnanufacturer’sdirections.
@ Do not useyour oven to dry
newspapers. If overheated, they
can catch fire.
Seif””cleaning oven:
Q Do not clean door gasketr4
The door gasket is essential for
a good seal. Care should be
!aken not to rub, damage, or
movethe gasket.
Q Do not use oven c!eaners.
No commercial oven cleaner or
Oven[iner
protective coating Of
any
kind shouid be used in or
ar~~nd
any part of the oven.
~ Clean only parts listed in this
Useand (Me Book.
c~’E&&?’kll%?self-cleaning the Owen,
remove
broiler pan and other
utensils.
surfaceeGol’ciFlg‘mm%
Q Use il%cqxwPan Size—-This
appliance is equipped with one
or more surface units of different
size.Select utensils having flat
bottoms large enough to cover
the surface unit heating element.
The use of undersized utensils
will expose a portion of the
heating element to direct contact and may result in ignition of
clothing. Proper relationship of
utensil to burner will also
improve efficiency.
@ Never !leavesurface units
unattended at high heat settings.
Boilover causes smoking and
greasy spiliovers that may catch
on fire.
@
Be sure reflector pans and
vent ducts are not covered and
are in place. Their absence
during cooking could damage
range parts and wiring.
@ Don’t use aluminum foil to
line reflector pans or anywhere
in the oven except as described
in this book. Misuse could
result in a shock, fire hazard,
or damage to the range.
Q Only certain types of glass,
glass/ceramic, ceramic, earthenware, or other glazed containers
are suitable for range-top service; others may break because
of the sudden change in tem-
perature (See Section on “Surface Cooking” for suggestions.)
@ To minimize !burrnsJignition of
flammable materials, and spill-
age;the handle of a container
should be positioned so that it is
turned toward the center of the
range without exte17dingover
nearby surface units.
@ ~~~’~~~~~~$~~r ~~~k
removable surface units. Don’t
put them in a dishwasher.
~~ FmAlaysturnsurface unitm
‘OFF before removing !J&?nsiL
G ~ee~ an eye or] foods being
fried at HIGH or MEDIUM HIGH
heats.
@ -lb amid the possibility of a
burn or ‘ekx%’k shock, .dways
be ww-km’lthat the
Controls for
all surface units are at OFT fxx&W$nan’d al! coils
am coo! before
attempting b Hi?movethe Wm.
@ when flaming kxxk ‘under
the
hood, Wiwnw? fan Cm.“me
fan, if operating,
may spread
the Mm.
* FOOdSfor frying
dwdid b?24S
dry as possible. Frost on frozen
foods or moisture on fresh foods
can cause hot fat to bubble up
and over sides of pan.
@ Use little fat for effective
shallow or deep-fat frying. Fiil-
ing the pan too full of fat can
cause spillovers when food is
added.
@ if a combination of oils or
fats will be used in frying, stir
together before heating, or as
fats melt slowly.
@ Always heat fat slowly, and
watch as it heats.
@ Use deep fat thermometer
whenever possible to prevent
over-heating fat beyond the
smoking point.
SAVETHESE
INSTRUCTIONS
Page 8
-i.
2.
3.
4.
5.
&
7.
8.
$?.
10.
11.
12.
13.
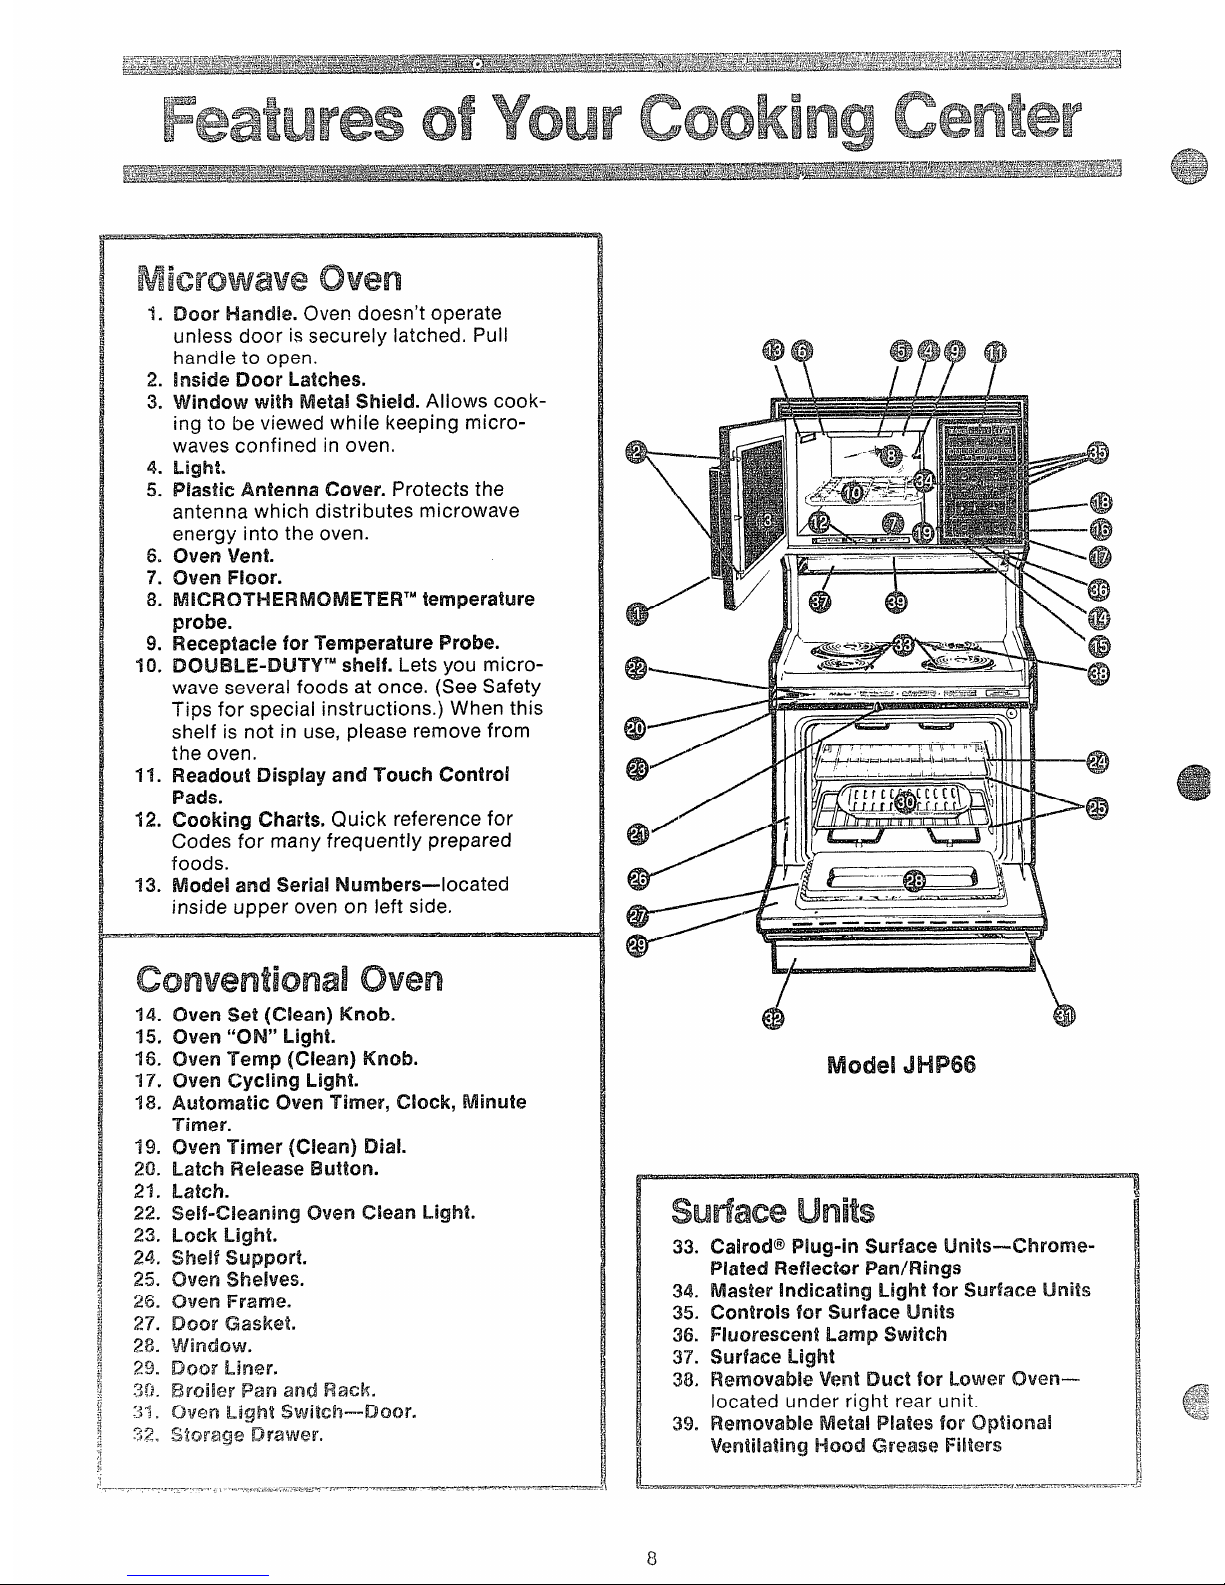
illoor I-land!e.Ovendoesn’t operate
unless door is securely latched. Pull
handle to open.
inside Door Latches.
window with Metal shield. Aliovvs cooking to be viewed while keeping microwaves confined in oven.
Lights
Plastic Antenna Cover. Protects the
antenna which distributes microwave
energy into the oven.
Oven Vent.
oven Floor.
M!CROTHERMOMETERTMtemperature
probe.
Receptacle for Temperature IPmbe.
DOUBLE-DUTYTMshelf. Lets you micro-
wave several foods at once. (See Safety
Tips for special instructions.) When this
shelf is not in use, please remove from
the oven.
Readout !Display and Touch Control
Pads.
Cooking Charts. Quick reference for
Codes for many frequently prepared
foods.
Model and Seria! Numbers—1ocated
insjde upper oven on left side.
Oven ‘9A (Clean) Knobm
oven “ON” Light.
Oven Temp (Clean) Knob.
‘chKwilcycling Light.
Automatic (hen Timer, Clock, Minute
-rimwr.
Oven Timer (Clean) Dial.
IL2M7Release Button.
II&itch.
Se!f-Cieaning Oven CXeanLight.
Lock Light.
shelf Support.
Oven Shelves.
Oven Frame.
Door Gasket.
zJy~~&-J~,
Door Liner.
Elroiler Pan and Rack.
oven Light swikW”-—Daor.
storage Drawer.
@@
@@@ @
/
ltll
III-NW
a)’’” _l?2!_=z3s@”-~P
P --”” ‘f
-----..
—...——————
0 .—
,
1
\-
@
i
r-AL
Mcde!i JHP66
33.
34.
35.
36.
W.
38.
39.
CahxW FWg-in Surface tUnits-CXworneIWted Rdeckw Pan/Flings
Master Indicating Light for Surface Units
Cx3ntrdsW Surkx+?uriit$
Huc?rew.w’ltLamp switch
Surface L@ht
~$n~~gffj~~fjI#@Jqt~~~~ f~~~-J&y@~fJ~~~—..—
located under right rear unit.
Rernovab!e M@taiPlates for optional
ventilating Htxwi G!%xw?Fib’s
8
Page 9
.. ..
.. .. ...
a.
Wi##
YourTouchContraolPanel
T
1.
2.
3.
4.
5.
&
7.
.
@
o
.
.
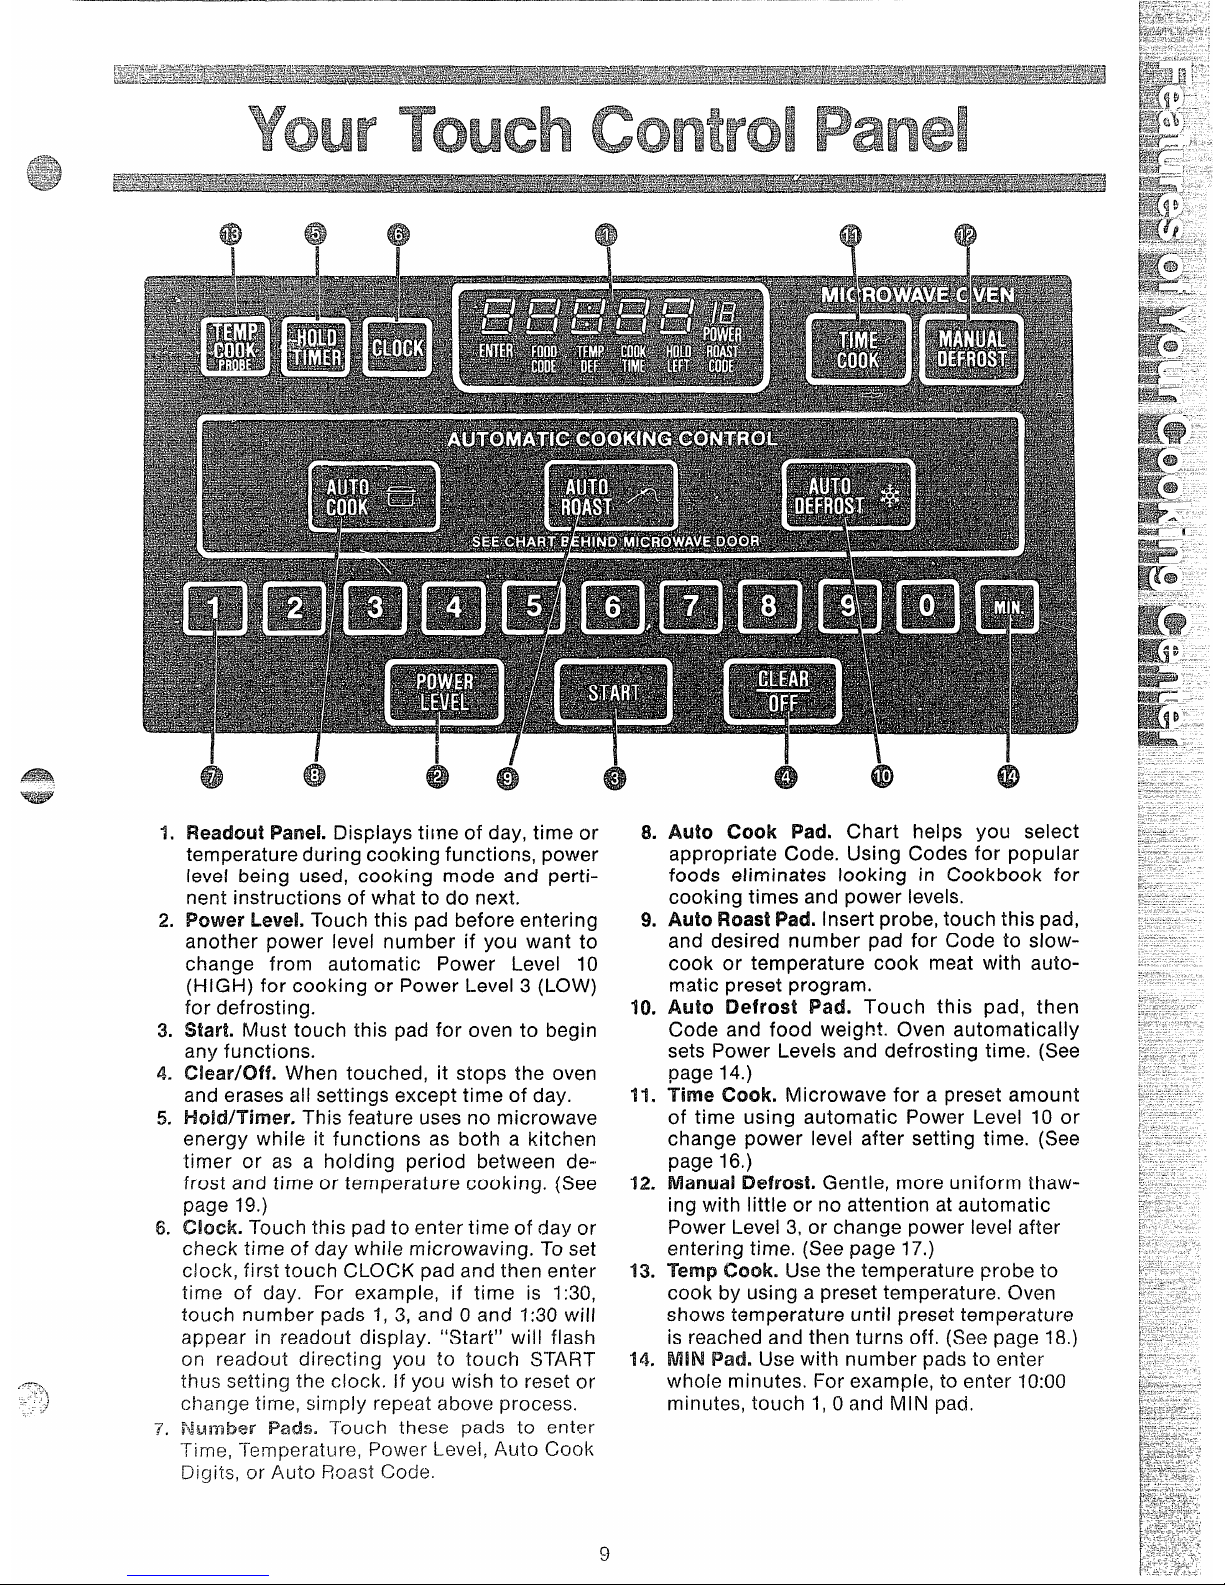
F#eadoutPanel. Displays ti[ne of day, time or
temperature during cooking functions, power
leve~ being used, cooking mode and pertinent instructions of what to do next.
Power LeveL Touch this pad before entering
another power level number if you want to
change from automatic Power Level 10
(HIGH) for cooking or Power Level 3 (LOW)
for defrosting.
Start. Must touch this pad for oven to begin
any functions.
Clear/Off. When touched, it stops the oven
and erases all settings except time of day.
HoWi%ner. This feature uses no microwave
energy while it functions as both a kitchen
timer or as a holding period between defrost and time or temperature cooking. (See
page 19.)
Clock. Touch this pad to enter time of day or
check time of day while microwaving. To set
clock, first touch CLOCK pad and then enter
time of day. For example, if time is 1:30,
touch number pads 1, 3, and Oand 1:30 will
appear in readout display. “Start” will flash
on readout directing you to touch START
thus setting the c{ock. If you wish to reset or
change time, simply repeat above process.
Nu-mher Pads. Touch these pads to enter
“T-“
i Ime,
Temperature, Power Level, Auto Cook
Digits, or Auto Roast Code.
n
@
8.
9.
10.
11.
12.
13.
14.
.
.
@
A
al
u
‘@
A
AWtQ Cook Pad. Chart helps you select
appropriate Code. Using Codes for popular
foods eliminates looking in Cookbook for
cooking times and power levels.
Auto RoastPad. Insert probe, touch this pad,
and desired number pad for Code to slowcook or temperature cook meat with automatic preset program.
Auto Defrost Pad. Touch this pad, then
Code and food weight. Oven automatically
sets Power Levels and defrosting time. (See
page 14.)
Time Cook. Microwave for a preset amount
of time using automatic Power Level 10 or
change power level after setting time. (See
page 16.)
Manual Defrost. Gentle, more uniform thaw-
ing with iittle or no attention at automatic
Power Level 3, or change power level after
entering time. (See page 17.)
Temp Cook. Use the temperature probe to
cook by using a preset temperature. Oven
shows temperature until preset temperature
is reached and then turns off. (See page 18,)
MINIPad, Use with number pads to enter
whole minutes. For example, to enter 10:00
minutes, touch 1,(1and MIN pad.
Page 10

The AutcYCook pad may be used to
frozen foods, need additional time after steam has
eliminate your need to look up cooking been sensed. For these foods, the oven determines
time in the Cookbook, or guessing the amount of additional time needed, then auto-
how 6ongto set cooking time. By actu-
matically switches the oven to Time Cook for the
al!y sensing the steam which escapes necessary cooking time remaining. Oven beeps
as food microwaves, this feature auto- when it switches to Time Cook (AUTO on readout is
matica!!y adjusts the oven’s cooking time to various replaced by numbers indicating cooking time), and
types and amounts of food.
oven door can be opened.
Because cooking containers must be covered, this
Be careful of steam when removing tight covers.
feature is best with foods which you wish to steam
When you remove cover, direct the steam away
or to retain mois~ure.
from hands and face.
After touching the Auto Cook pad, desired Code
Be sure the exterior of the cooking container and
number and Start, you will see the word AUTO on interior of microwave oven are dry.
the readout, which indicates that the sensor has
A few foods need stirring or rotating after partial
been activated to sense steam from the food. To
cooking. Check the “Automatic Cooking Guide”
prevent the escape of steam from the oven, do not
section on page 31.
open the door while the word AUTO is on the read-
A!Ways cower food containers using lids or plastic
out. If door is opened, ERROR appears. Close door
and touch START immediately.
wrap. Plastic wrap should be loose over food to
Setting 1, which is designed for easy reheating of
allow for expansion. Sea! by pressing p!astlc wrap
firmuy around edges. l%u’best results, never stretch
foods, automatically turns the oven off as soon as
plastic wrap tightiy over food, or use tight-sealing
the sensor detects steam from the foods. Other
plastic lids.
Auto Cook control settings, which are for fresh or
MATCH THE AMOUNT OF FOOD TO THE SIZE ‘OFTHE CONTAINER. FILL CONTAINERS AT IL!EAST
1/2 FULL.
BE SURE ‘THE EXTERIOR OF THE COOKING CONTAINER AND INTERIOR OF
MicRowAvEOVENAREDRY’.
ALWAYS COWERFOOD CONTAINERS FOR JAW%-(3COOK.
Use microwave-safe casseroles or
bowls for entrees and vegetables.
Cover with Iids that fit. Iflids are not
available, use plastic wrap. Plastic
wrap should be loose over food to
allowforexpansion. Seal by pressing
plastic wrap firmly around edges.
~.
\
I
I
I
1
I
i——_—
———.
DO
riotIJSe paper plates with auto-
matic cooking. Use microwave-safe
p!a!es or bawls for reheating. Cover
with p!astic wrap (you can still
:!s<,Ipaper plfites with regular Time
To9king, Defrosting, etc.).
Use oblong or square containers
for chicken or corn on the cob.
Plastic wrap covering should be
loose over food to allow for
expansion. Seal by pressing plastic
wrap firmly around edges.
1-
f%cmmEntrees inF%pertmardTray:
Do not remove film over tray; remove tray from box. Thick entrees
may need longer time. See chart
on page 38. ‘Frozen Food in Metal
Tray: Remove foil, reinsert into
box and close ends.
.
Slit plastic pouches %-inch as
Follow control panel or Automatic
shown above. For alternate pouch
Cooking Chart settings for casse-
method see page 34. roles. Cover casserole meat and
vegetables with sauce. Cool hoi
ingredients or sauces. If not, use
TIME COOK.
10
Page 11
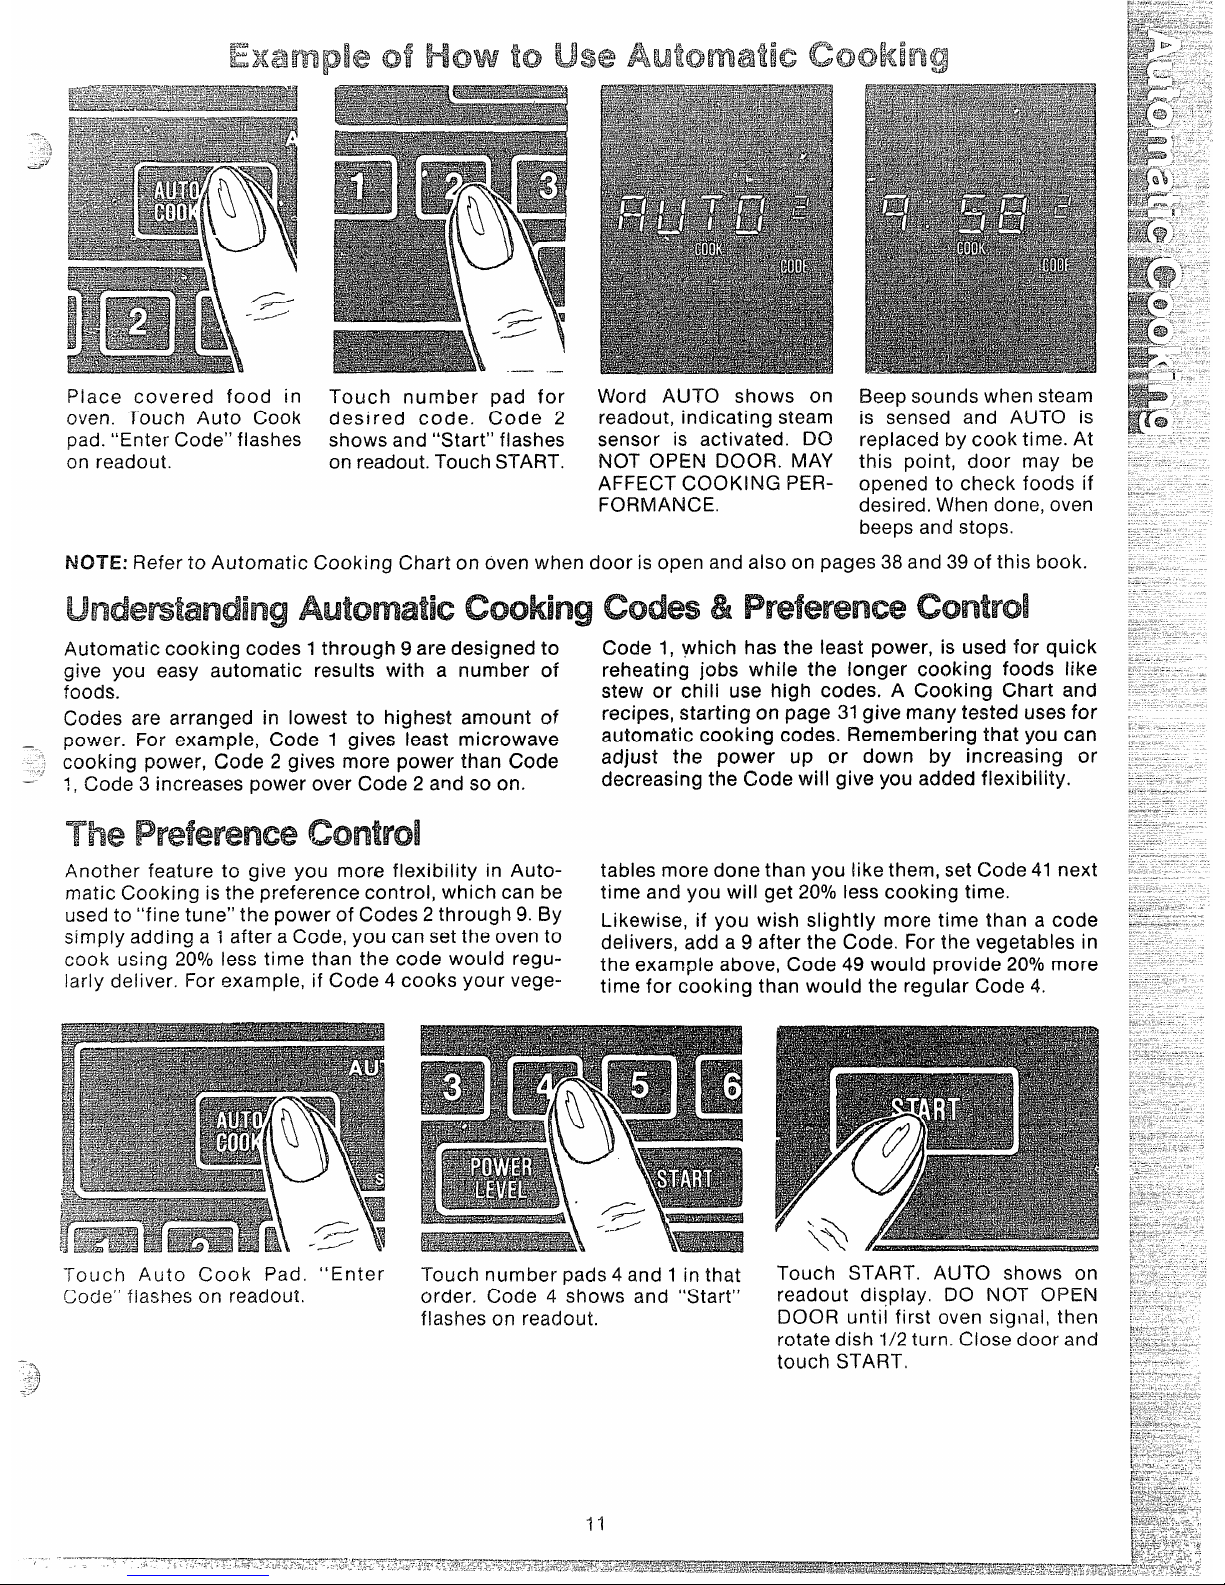
Place covered food in
oven. Touch Auto Cook
pad. “Enter Code” flashes
on readout.
-\’ \
—_
Touch number pad for
desired code. Code 2
shows and “Start” flashes
on readout. Touch START.
Word AUTO shows on
readout, indicating steam
sensor is activated. DO
NOT OPEN DOOR. MAY
AFFECT COOKING PEF4-
FORMANCE.
Beep sounds when steam
is sensed and AUTO is
replaced by cook time. At
this point, door may be
opened to check foods if
desired. When done, oven
beeps and stops.
NOTE: Refer to Automatic Cooking Chart on oven when door is open and also on pages 38 and 39 of this book.
Automatic cooking codes 1through 9 are designed to
Code 1, which has the least power, is used for quick
give you easy automatic results with a number of reheating jobs while the longer cooking foods like
foods.
stew or chili use high codes. A Cooking Chart and
Codes are arranged in lowest to highest amount of
recipes, starting on page 31give many tested uses for
power. For example, Code 1 gives least microwave
automatic cooking codes. Remembering that you can
cooking power, Code 2 gives more power than Code
adjust the power up or down by increasing or
?, Code 3 increases power over Code 2 and so on.
decreasing the Code will give you added flexibility.
ThePreferencecontrol
Another feature to give you more flexibility in Auto- tables more done than you like them, set Code 41 next
matic Cooking is the preference control, which can be
time and you will get 20°/0less cooking time.
used to “fine tune” the power of Codes 2 through 9. By
Likewise, if you wish slightly more time than a code
simply adding a 1 after a Code, you can set the oven to
delivers, add a 9 after the Code. For the vegetables in
cook using 20°/0less time than the code would regu-
the exam~le above, Code 49 would ~rovide 20°/0more
larly deliver. For example, if Code 4 cooks your vege-
time for cooking th’an would the regular Code 4.
TOUCh Auto Cook Pad. “Enter
CCIde”flashes on readout.
~\
- .----
.
+.
.-,,..
---
!-
Touch number pads 4and 1 in that
order. Code 4 shows and “Start”
flashes on readout.
11
rotate dish 1/2 turn. Close door and
touch START,
Page 12
AL!toimaticRoastir~g
,---
Auto Roast uses the temperature
Just as in conventional roasting, oniy ten_derroasts
probe to cook to the desired serving
should be Auto Roasted until specified internal tern-
temperature. Unlike Ternp Cook, which
peratures are reached. Less tender roasts should be
uses a single power level, Auto Roast
microwaved by time, according to the Cookbook
is designed to use up to 3 power set- which comes with your oven. Complete information
tings which automatically switch dur-
on preparing roasts for microwaving is in your
ing roasting, for even and tender cooking results
Cookbook.
without overcook irig.
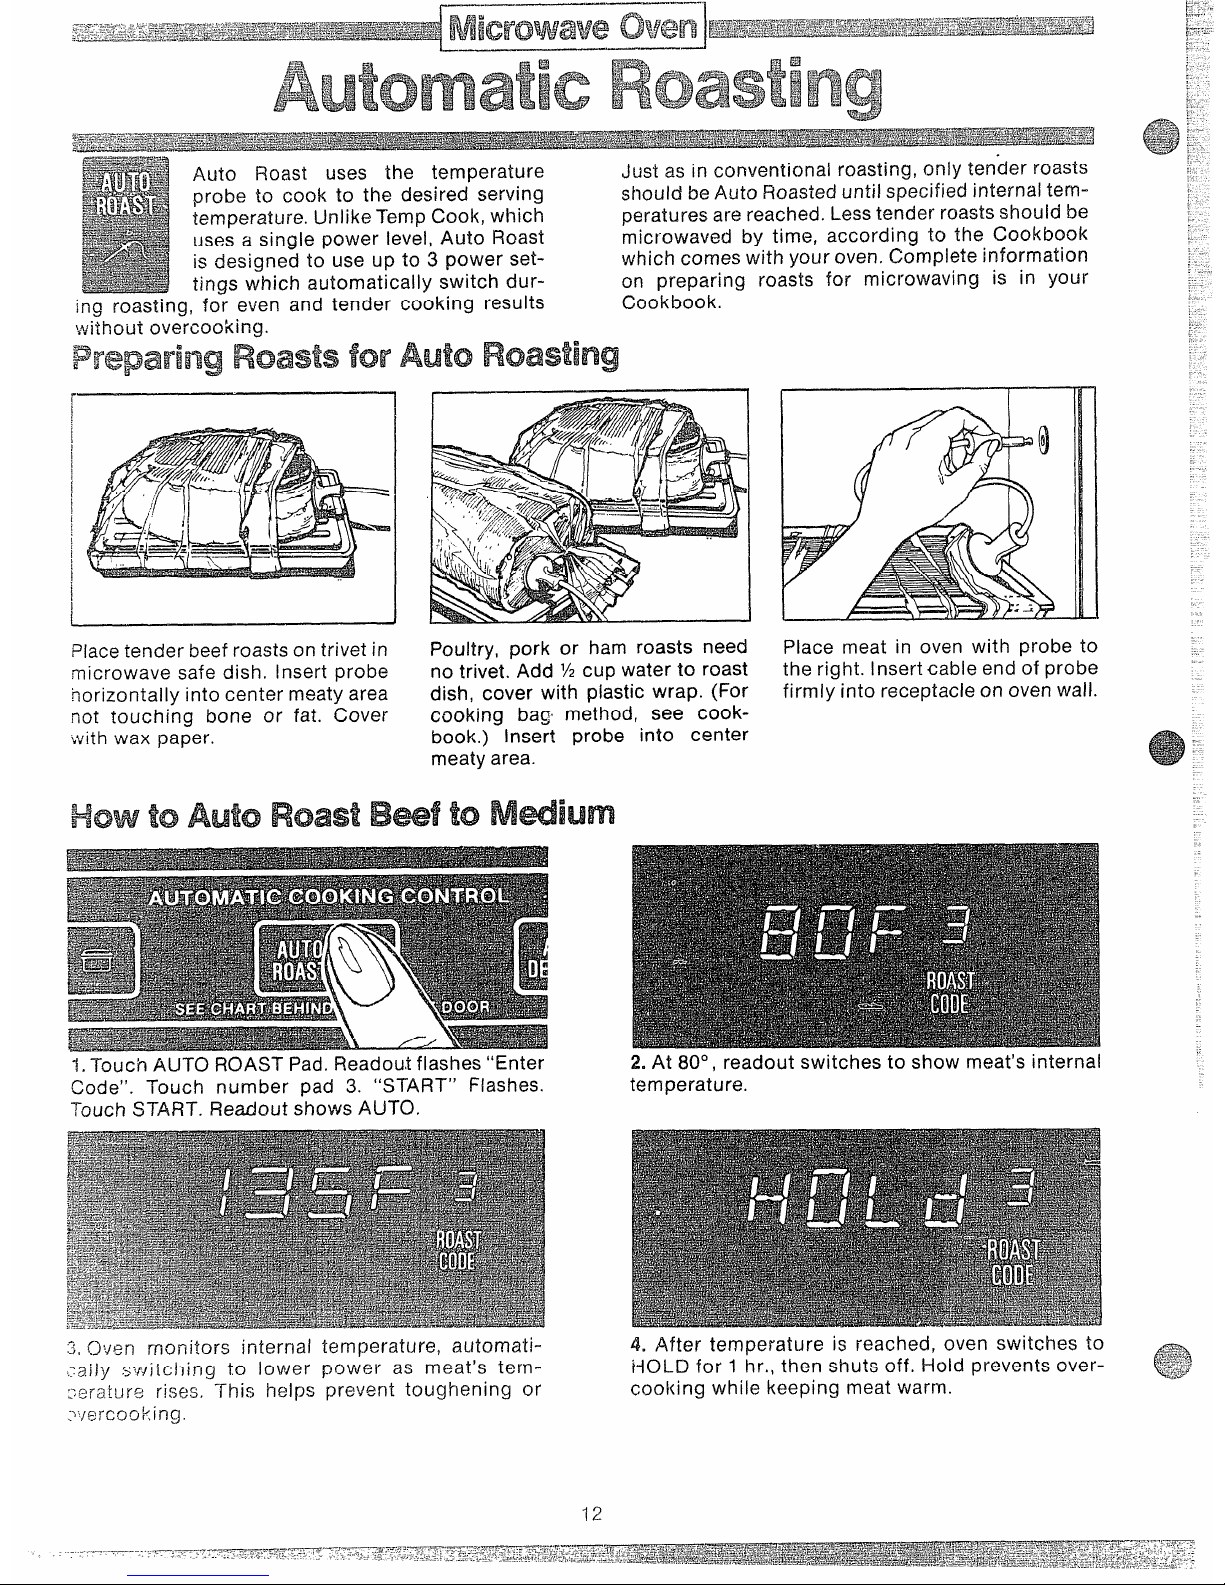
Preparing Roasts for Auto Roasting
i
Placetender beef roasts on trivet in
microwave safe dish. Insert probe
horizontally into center meaty area
not touching bone or fat. Cover
with wax paper.
Poultry, pork or ham roasts need
no trivet. Add M cup water to roast
dish, cover with plastic wrap. (For
cooking bag method, see cookbook.) Insert probe into center
meaty area.
HOWto Auto Roast Bef to Mdium
1.Touch AUTO ROAST Pad. Readout flashes “Enter
Code”. Touch number pad 3.
“START” Flashes.
Touch START. Readout shobvsAUTO.
Place meat in oven with probe to
the right. Insertable end of probe
firmly into receptacle on oven wall.
2. At 80°, readout switches to show meat’s internal
temperature.
3=Oven monitors internal temperature, automati.;al~y switching to lower power as meat’s tem;eraiure rises.
This helps prevent toughening or
:~~ercogking.
4. After temperature is reached, oven switches to
HOLD for 1 hr., then shuts off. Hold prevents over-
cooking while keeping meat warm.
Page 13
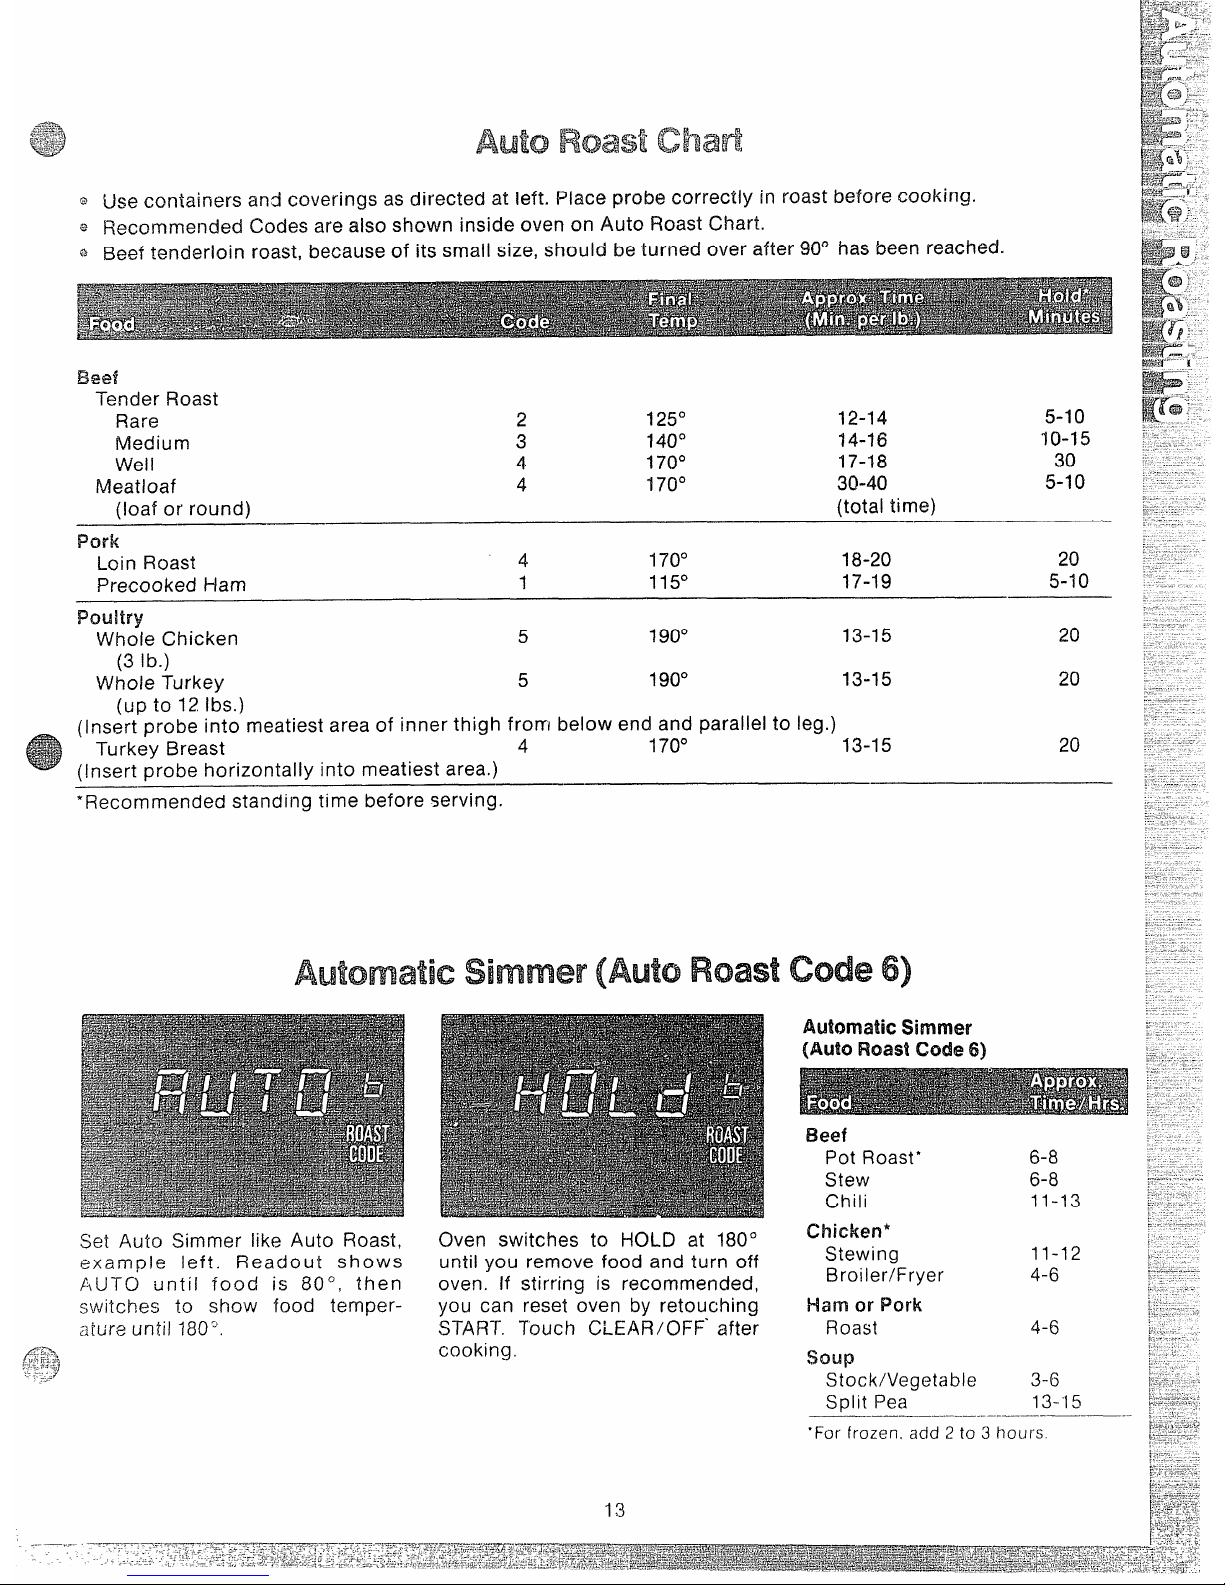
@Use containers and coverings as directed at left. Place probe correctly in roast before cooking.
~ Recommended Codes are also shown inside oven on Auto F?oastChart.
Q
Beef tenderloin roast, because of its small size, should be turned over after 90° has been reached.
BERN
Tender Roast
Rare
2
125°
12-14 5-1o
Medium
3
140°
14-16
10-15
VVelI 4 170° 17-18 30
Meatloaf
4
170°
30-40
5-10
(!oaf or round)
(total time)
Pork
Loin Roast 4
170°
18-20
20
Precooked Ham
1 115°
17-19
5-10
(
(
Poultry
Whole Chicken 5
190°
13-15
20
(3 lb.)
Whole Turkey
5
190°
13-15
20
(UPto 12 Ibs.)
nsert probe into meatiest area of inner thigh from below end and parallel to leg.)
Turkey Breast 4
170°
13-15
20
nsert probe horizontally into meatiest area.)
*Recommended standing time before serving.
AutomaticSimmer(AutoRoast
Set Auto Simmer like Auto Roast,
example left.
Readout shows
AUTO until food is 80°, then
switches to show food temperzitire until 180”.
Oven switches to HOLD at 180°
until you remove food and turn off
oven. If stirring is recommended,
you can reset oven by retouching
START. Touch CLEAR/C)FF’ after
cooking.
13
code6)
JM.4tornmcsimmer
(Auto Roast code 6)
Beef
Pot Roast’
6-8
Stew
6-8
Chili 11-13
chicken’
Stewing
11-12
Broiler/Fryer
4-6
!-lam or Pork
Roast
4-6
soup
Stock/Vegetable
3-6
–——-–– 13-“1~
Split Pea
.-
●For frozen, add 2 to 3 hOUrS.
Page 14

cl. Yihy does my oven automatically ‘cut cmaftertl-le
Au-l-cl cycle when I..Ang Auto cook crowd Cclde 1
$@”wnit Ckx2s
rwtforother settings?
A. When using Code 1, there is no second phase of
minutes counting clown. All the cooking is completed in the first phase or AUTO.
Q. H my food is
notcmrnpideiy cooked after using
the suggested Auto CMok Ccmtm! Code, wha!
Shwk! i do?
A. Thick starchy or dense foods may require some
additional time cooking. Use TIME COOK and
Power Level 10 for a few minutes until completion
or recover and use Auto Cook Code 1.
c?.Em all fresh 0? frmxmvegetables E’equkg al
standingperiod afier cooking withAUTO CXXM?
A. Most vegetables are cooked to a crisp state dur-
ing Auto Cook, just as in regular microwaving.
Therefore, it is recommended that you let the vegetables stand for up to 5 minutes depending on size
and density of pieces. This standing time also enhances the overall flavor and appearance of most
vegetables.
Q. what if i don’t fully cover the dish
inAuto
cook?
A. Oven senses steam too quickly which shortens
the cooking time thus leaving undercooked dish.
Recover tightly and reset Auto Cook.
IQ.Do the shapes and sizes of food make a difference when usin~ Auto Cook?
A. Yes, in some cases, larger pieces will require additional Time Cooking. Be sure to check suggested
arrangement of pieces in the dish, since proper arrangement is often a successful tip in regular microwaving.
c?.should I US? Auto cook b cook puumhJ or
%lwx?s?
A. Most pudding and sauce recipes require stirring
many times during cooking; therefore, Time Cook is
recommended since you should not open the door
during the AUTO phase of cooking without affecting end cooking results.
Q. R6y scalloped potatoes were
notmmpk?kdy
Cxmkwl when ! removed the dish
afterAuto cook.
What
isWrw’q?
A. If you prepared the sauce in the oven prior to
combining the sauce with potatoes, there may have
been too much remaining moisture in the oven.
Make sure you dry the oven completely before using Auto Cook since this function operates properly
by sensing steam in the oven. Also, starting Auto
Cook with hot foods creates steam in the oven too
SOOn,and decreases the
first sensing cycle.
(3. Do fn?s’-i of fi%mxmlvegetables !wquiw?
water
when L.m’RgAuto (kM3k’?
A. Yes. Add water as recommended on chart to the
vegetables and cover well for even, complete
cooking.
Q. would my’ plastic containers with very’ tight fi$”
ting lids be appropriate for Automatic Cooking?
A. No, most types of plastic storage dishes, butter
tubs, etc. with tight fitting lids are not recommended
for microwaving. Also tight fitting plastic lids may
prevent adequate steam from escaping and food
may not cook properly during Automatic Cooking.
Q. IItried to warm some chow meim noodles using
Auto cook. why didn’t this work?
A. Food must have some moisture in order to create
steam which helps the auto sensor function.
Extremely dry foods such as chow mein noodles,
potato chips and other such foods do not have
enough moisture.
Q. May 1use Auto Cook when ! am cocking many
foods in more than one dish or casserole?
)$. No, because of different food densities, attention
needed during cooking, and food amounts, it is best
to use TIME COOK when cooking many foods.
Q. Why was my roast not fu!ly cooked even though
$he #temperature on the readout was correct and
Auto Roast completed?
A. When cooking with Auto Roast, the temperature
probe must be inserted properly as fully described
in the Cookbook.
Q, Are there any particular trhfetsthat work better
than others?
A. Yes, flat glass trivets provide more browning to
the bottom of meats than plastic trivets. Also,
ceramic ridge-bottomed roasting dishes generally
work well. Plastic trivets may require meat to be
turned over more frequently because the grid
design and legs allow the bottom of the meat to stay
cooler as it cooks, than glass trivets do.
Q. When cooking by Auto Roast, why doesn’t the
roast continue cooking during the standing or
holding time?
A. The oven automatically reaches finished temperature and then decreases to a lower power Ieve!
to prevent overcooking. Thus an even temperature
is maintained.
Q. 1entered Auto Defrost Code 1, then the number
4 for 4 ibs. of chicken. ‘“U-wreadout flashed “Start”
but when I kM.NWd start “ERROR” flashed. why?
A. You must enter 4 and O denoting 4 Ibs. Touch
CLEAR/OFF and begin again. “ERROR” will also
flash if an improper weight for that particular code
has been entered.
15
Page 15

I ————-
The TIME COOK feature allows
you to preset the cooking time.
The oven shUts off automatically.
Power Level 10 is automatically set
for time cooking, but you may
change this for more flexibility.
See your Cookbook.
To become better acquainted with
TIME COOK function, make a cup
of coffee by following the steps
below.
~,p-
-1
.
Step f: Fill a cup 2/3 full of water
and add 1 teaspoon of freeze dried
coffee. Use a cup that has no metal
decoration. Place cup in oven and
close door.
Step 2: Touch TIME COOK. The
read-out panel shows :0 and
Power 10. “Enter Cook Time”
flashes.
Step 3: Select your time. Touch 1,
2, and Ofor a minute and 20 seconds. “Cook Time”, Power 10, and
1:20 appears on the display. If another Power Level is desired touch
Power Level and the number although Power Level 10 (HIGH) is
preferred for this cup of coffee.
Step 4: Touch START. “Cook Time
Left”, Power 10, and time counting
down shows on display.
Step 5: When time is up, oven
sounds. Display flashes “END”.
Oven, light, and fan shut off.
-
Q. [ set my oven for the time called
fcIr in the recipe but at the end of
the time allowed, my dish wasn’t
done. ‘What happened?
A. Since house power varies due
to time Or location, many Time
COOKrecipes give you a time range
to prevent overcooking. Set the
c)\J~r’)
for minimum time, test the
food for dcneness, and cook your
:!ish a,Ii\tle longer, if necessary.
Q. I want to cook my dish on a
Power Level other than HIGH, what
do I need to do?
A. To change the Power Level,
touch the Power Level pad. “Enter
Power” flashes on the display
panel. Enter the desired ilumber.
Q. Can I interrupt my Time Cook
function to check the food?
A. Yes. To resume cooking, simply
close the door and touch START.
NOTE: Microwave power will not
come on until you are ready, You
must touch START for cooking to
begin.
Q. I touched the number pads and
selected my power level. When i
touched START, however, my oven
didn’t come on. Why not?
A. The TIME COOK pad must be
touched before setting the number
pads or else your oven will not begin cooking.
Page 16

IIFkNJvtoDefrost
The Defrost setting is designed for
even thawing necessary for large
amounts of food and is one of the
most importarit advantages of a
microwave oven.
@ Power Level 3 is automatically
set for defrosting, but you may
change this for more flexibility.
e See your Cookbook for the
complete defrosting chart.
To become better acquainted with
your Defrost function, defrost frozen pork chops by following the
steps below.
Step 3: Touch number pad “8” then
MINI Pad.
“Def Time”, 8:00
and
Power 3 are displayed.
Step 4: Touch START “Def Time
Left” shows and time counts down
on display. When cycle is com-
pleted,
“END” flashes, the oven
signals and automatically shuts
off.
Step 1: P!ace package of frozen
chops in the oven and close door.
#&zA
*;
Step 2: Touch DEFROST. Display
reads :0 and Power 3. “Enter f3ef
Time” flashes.
Step 5: Turn package over, ciose
door and repeat Steps 2,3 and 4.
Step 6: When oven signals, “END”
flashes and oven shuts off. Re-
move package and separate chops
to finish defrosting,
@ Foods frozen in paper or piastic
can be defrosted in the package.
~ For even defrosting, many foods
need to be broken up or separated
part of the way through the
defrosting time.
#=-—--
/“
@ Homemade dinners can be frozen in shallow foil trays and heated
for later use. Select foods which
microwave well.
@ Pre-packaged frozen dinners
can be defrosted and microwave
cooked.
I
@ Check your Cookbook for other
defrosting tips.
Questions
antiAnswers
Cl.
‘When 1press START, I hear a
dLIlt thumping noise. What is it?
A. This sound is normal. It is letting
you know the oven is using a
Power Level lower than HIGH.
Q. Can ! Defrost small items in a
hurry?
A, Yes, ,but they will need more
frequent attention than usual. Raise
the Power Level after entering the
time by touching POWER 1.EVEL
-
...-.S....
.-..
and 7 or 10. Power LEwel7 cuts the
.... .-_;
time abuut in
3/2; Power Level 10
c(Its the time 10 approximately ‘~/s.
j’-.,
i.~~~jringeither, rotate or stir food
frwql,~cntiy,
Q. Can I open the door during DEFROST to check on the progress
of my food?
A. Yes. You may open the door at
any time during microwaving. To
resume defrosting, close the door
and press START.
Q. Why don’t the defrosting times
in the Cookbook seem tight for my
food?
A. Cookbook times are average.
Defrosting time can vary according
to the temperature in your freezer.
Set your oven
far the time indicated ir~your Cookbook. If your
food is still not completely thawed
at the end of that time, re-set your
oven agd adjust the time accordingly.
Q. Can I select a Power Level other
than automatic Power Level 3 for
defrosting?
A. Yes. Some smaller foods may be
defrosted quicker on higher Power
Levels but for even, carefree defrosting, Power Level 3 is suggested. Check the chart in the
Cookbook for specific times and
Power Levels,
Q. When I’m entering minutes with
no seconds do I need to touch “0”
then “O”?
A. No. Yowtouch the number pad
then the fvIIN Pad which automatically enters two “00”.
“17
Page 17

——...——
—--. .......
~=~~.-..-.
....=>-:-*--*.—----~~=,
”., ,.. .=+.,.s.
:
;.-7:..:. ,
“’:=’”~:~~’~~:%~?:~<~~y-=
~.-
,g;>gFJ:~2.53._2@L*%&.ak,&-*,z
-..-..--:-.-.-.:..-+i->>-.
:--L?c.~-L-—----
~:_:.:--~..: .T..q.. s==z..+l=..;~2&7
!-+=
Picrowawe
OVen~mW~W~~~=*~==
.Z-.Ys25z$?@2-$g$z=sms%E:?
.1. ..d.m.kaid+w+!l
———..
._.—
CookingbyTem~perature
Fo~
many foods, internal temperature is the best
test of doneness.
TheTemperatureProbe
i?cK3sts
or poultry are cooked to your preference
The temperature probe is a food thermometer that
when ternpexature cooking. Heating or reheating
gauges the internal temperature of your food; it
foods accurately to a serving temperature you
must be used when using TEMP COOK or AUTO
desire is simple and easy.
ROAST. Follow the directions for use and insertion
TEMP COOK takes the guesswork out of cooking
on page 12.
HANDLE
because the oven shuts off automatically when the
CABLE
food is done.
SENSOR
CLIP
HowtoTempCookaRolledRoasttoMedium
Step 1: insert temperature probe
as directed in Cookbook and attach probe securely in oven wall.
Close the door.
~~ep 2: Touch TEMP COOK. The
display panel shows F and Power
10. “Enter Temp” flashes.
te~ 3:-~ouch 1, 3, 0 for 130°.
“Te-mp”, 130 F and Power 10 show
on display.
Step 4: Touch POWER LEVEL pad.
“Enter Power” flashes. Touch 5 for
MEDIUM power. “Temp”, 130 F
and Power 5 shows on display.
Step 5: Touch START. If internal
temperature of the roast is less
than 80°,
display will show
IICOOL’” or if temperature is 80° or
above, display shows temperature
counting up.
Step 6: When 130° is reached, the
oven will sound and automatically
shut off. Remove probe and food
from the oven.
@ Use a lower power level setting;
it will heat more evenly even
though requiring more time.
@ Be sure frozen food has been
completely defrosted before insert-
ing probe. Probe may break off if
used in frozen foods.
@ Always insert probe into the
center of meaty areas; take care
not to touch the fat or the bone.
@ Insert probe as horizontally as
possible into foods as directed in
the recipes. Make sure the handle
does not touch the food.
@ Use the clip to keep the probe
in place whiie heating.
@ Cover foods as directed in
Cookbook for moisture control and
quick, even heating.
Questions
andAnswers
Q. After I followed the steps and
touched START, “ERROR” flashed
in the display and a signal
sounded. What iswrong?
“ERROR” flashes on display if
~;u set the temperature either beI~W800 or greater than 199”. The
ovQn tells you between the flash-
ing of
“ERROR” ‘what.
the in-
ccir-reelerjtry was that you set. To
re-~rltw,
touch CLEAR/OFF pad
and b<!~instepb again.
Q. Are there any foods I can’t
TEMP COOK?
A, Yes. Delicate butter icings, ice
cream, frozen whipped toppings,
e~c., soften rapidly at warm temperatures. Batters and doughs as
well as frozen foods are also difficult to cook precisely with the
probe. It is best to T~ME COOK
these foods.
Q. Why did “PROBE” flash on the
display after I touched Start?
A. “PROBE” will flash on the display if you have not securely
seated the end of the probe into
the receptacle in the oven wall or if
you touch TEMP COOK and have
forgotten to use the probe.
Q. Can I leave my probe in the
oven if it’s not inserted in the food?
A. No. If the probe is left inside the
oven, touching the oven wall, and
not inserted in food, y,oumay damage the oven.
Q. Can I TEMP COOK different
portions of food at different
temperatures?
A. Yes. The temperature probe
gives you the freedom to cook different portions of food at different
temperatures to suit individual eating styles. Simply place the probe
in the food and change the temperature setting as needed.
Page 18

HOLYtoUsetheHold/Timer
.
-=
r.
YOuf l-iOLDt TlMEt3, which OPGrates without microwave energy,
has three timing functions.
It operates as a Minute Timer, it
can be set to delay cooking or may
be used as a hold setting after de-
frosting. Hold/Timer can be set up
to 99 minutes.
Step t: Touch HOLD/TIMER pad.
The read-out panel shows :0. “Enter Time” flashes.
Step 2: Select the amount of time
you desire. Touch the appropriate
number pads. if, for example, you
are timing a three minute phone
call, touch 3, 0 and O.The readout
panel shows 3:00 and “HOLD”
appears on display.
Step 3: Touch START. The readout
display shows the time as it counts
down, and “Hold Time Left”.
Siep 4: When time is up, oven
sounds. The readout flashes “END”
and the timer turns off.
The HOLD/TIMER can also be
used to program “standing time”
between microwave cooking func~
tions. The time can range from o[’te
second to 99 minutes and 99 seconds. A HOLD, or “standing” time
may be found in some of your own
recipes or Cookbook.
To set the oven to delay cooking
up to 99 minutes follow Steps 1
and 2 to enter hold time, then set
time or temperature desired before
pressing START.When holdin’g be-
fore temperature cooking, be sure
probe is in food before pressing
START.
HowtoDefrost–.
Hold/Time—TimeCook
TOhelp you become acquainted with the HOLD/TIMER feature as used with Time Cook or Temp Cook follow
steps below to defrost a frozen casserole for 15 minutes, then hold 10 minutes and then cook 25 minutes. If using
Temp Cook after Hold/Timer, be sure to insert probe correctly as shown on page 12.
&ep 1: Remove casserole from the
freezer and place in oven. Touch
the DEFROST pad. The readout
panel shows “Enter Def Time”, :0,
and Power 3.
Step2: Touch 1,5, and MINIPad for
defrosting time. Def Time, 15:00,
and Power3 appear on the display
panel. (Defrosting is automatically
set on Power Level 3 but can be
changed by touching POWER
L.EVE!_ pad and the new Power
Level.)
Step 3: Set standing or hold time
by touching l-10LD/TIMER. “Enter
T!me” and :0 appear on display.
II
Step 4: Touch 1, 0, and MIN Pad to
hold for ten minutes, 10:00 and
“H-OLD” appear on the display.
Step 5: Touch th’e TIME COOK
pad. The display shows “Enter
Cook Time”, :0, and Power 10
(HIGH).
Step 6:Touch 2,5, and MIN Pad for
twenty-five minutes of cooking
time.
“Cook Time”, 25:00, and
Power 10 appear on the display
panel.
Step 7: Touch START. “Def Time
Left”, Power 3, and 15:00 counting
down show on display. As each
function is automatically performed oven display shows entered information.
Q. What will happen if ! accidenIaljy reverse the instructions?
A. If you accidentally reverse the
wquen~;e of programming instruc-
tions,
your oven automatically
rearranges your program. Defrosting always comes first, then hold,
and ~henthe cooking function.
Q. Can I Defrost-Hold only on my
oven?
A. Sometimes you may want to defrost a food, hold it, and refrigerate
it to be cooked later. All you need
to do is prog~am in Defrost and
amount of time. Then program
Hold and amount of time. Put your
thawed dish in the refrigerator and
cook later at a convenient time.
NOTE: Allow foods to remain at
Q. I programmed my oven f~r a
specific defrosting time but it defrosted longer than necessary,
What happened?
A. When instructions conflict, the
oven carries out the last instruction. You may have set the oven to
Defrost for 4 minutes, Hold/Time
for 2 minutes, and then Defrost for
6 minutes. In this case, the oven
would Defrost for 6 minutes and
.
room temperature only as long as
l-iolct/Time for 2 minutes.
safe. Times will vary.
.-._.$_L_r_=-.=. -
n?~v~~.--+%- ..,....>....,-_=L,.._-..-.
-.—-._—
J...... ,-.,m.
-T--..,-.>!.%-....+-4!.=-57.=47>-=
x,a-+-m....%-~~,. .
. .’ —. ...
.,e-i.r==.e--.Ti,-,,--,,W,.
.‘“-.L.
.....7:Fm2.>
19
Page 19

Flowtous e SurfaceUnits
4\
YcIurrange top is designed to give you the flexibility
&?#g~~>zj?,
-2
of boiling, steaming, sauteing, browning, frying,
&~<*>>>A1
canning, or pressure cooking. It heats through the
<-2
metal coils of four Calrodfz units thus giving the cor-
rect amount of energy for each setting you choose.
HCYvvtosetcontrols
You must push the knob in only
when it is set at OFF; this is to prevent you from turning the knob on
accidentally. When the knob is in
any other position, you can turn it
without pushing it in. You will feel it
pop out when you turn it to OFF.
Wep 1: Push in control knob.
SPECIAL NOTE: You may find
foods you boil on the surface units
causing condensation to gather
under the upper microwave oven.
This is especially true of foods
boiled with water or naturally high
in moisture.
Steam condensation will not harm
your range.
However, you may
minimize condensation by:
The lowest setting is between OFF
and WARM. At the HI setting, you
will feel the knob lightly click into
place.
In a quiet kitchen, you may hear
slight ““popping” sounds during
cooking, indicating heat settings
are being maintained.
Step 2: Turn the knob in either direction to the heat setting you
want.
@
Covering pots and pans with
lids, especially when cooking
high moisture foods on the
range top.
Selecting a surface unit at the
front of the range for boiling
foods.
@Pots and pans should be flat on
the bottom and match the size of
the surface units, Large containers
should be on large units and small
ones on small units.
@It is important that pans fit the
units you are using. A pan that
extends more than one inch beyond the edge of the trim ring may
reach temperatures that could
eventually harm cooktop surfaces
around units.
s Center pots and pans on a surface unit which closely matches
the bottom of the utensil in size.
@Containers of various materials
may require different heat settings
and/or cooking tilme. Check the
manufacturer’s instruction before
using.
@Special cooking equipment wiihout flat bottoms, such as the oriental wok, are not recommended and
could shorten the life of the surface unit and/or range top since
high heat temperatures are required in this type cooking.
M 4A-J@?
Concwe Bollom
Rmmded Bollom
F4ight
Wrong
1
Right
d
NOT OVLF? 1,
QKeep range and ventilating hood
fre~ from grease accumulation.
QWhen cooking is almost comoleted, LISethe retained heat to finish cooking. Turn the knob to (3FF
and !eave the cooking utensil in
Glace.
‘When surface unit has
LCOIed,
rgrrIovethe utensil and the
,:ooi<e(-jfg(j(j.
@To prevent certain foods from
foaming, add a tablespoon of
cooking oil to the water before
cooking.
@Never leave food unattended
when you are cooking at HI or
MED HI settings. Bclilovers cause
smoking a.nclgrease spillover may
catch fire.
20
@When canning foods, be sure to
check manufacturer’s instructions
and recipes. Be sure canner is flatbottomed and fits securely over
center of Calrod IIunit.
@Make sure Calrod’7 plug-in unit is
securely plugged in and seated on
ring/pan properly for even heating
results.
Page 20

Your oven is desigrwi to give you the best results in
baking, broiling, and roasting when used as recorn-
rnended. Before using your oven, look at the directions for setting and using all of the controls and
timer.
$zYw’enlLight
Light comes on automatically when door is opened
or use switch on window door to turn it on when
door is closed.
When the shelves are correctly placed on shelf sup-
ports they are designed with stop-locks to prevent
them from coming out of the oven or tilting when
food is placed on them. TO REMOVE, lift up rear of
shelf and pull forward with stop-locks along top of
shelf support. TO REPLACE, insert shelf with stop-
Iocks resting on shelf supports and push toward
rear of oven until it fails into correct position under
shelf support.
AutomaticOvenTimer,
MinuteTimer
Oven Timer Controls are designed to automatically
start and stop certain oven functions (TIME BAKE
or CLEAN). Dials are timed by a special Clock with
index marks (denoting numerals) and hands. (For
location see page 8.) TO SET THIS CLOCK, push in
the center knob of Minute Timer and turn the Clock
hands to correct time, then let knob out. TO SET
MINUTE TIMER, turn knob to desired minutes.
(Knob must be out to set Minute Timer.) Minute
Timer will buzz when time has finished and must be
turned off manually.
Use the Microwave Oven Clock for easy reference
to time of day.
—
HowtosetYourRange forBaking
—
(Aim see Baking (Mart, page 28.) -
-–
Step 1: Place shelf on embossed
shelf support “B” or as indicated
on Baking Chart, page 28.
—..
.-.
‘i
.-’.,
3
Step 2. After making sure that the
~ven door
isclosed, turn the oven
Set Knob to BAKE, Oven “On”
Light comes on and remains on as
long as
oven Se! Knob ison BAKE.
Step 3: Turn Oven Temp Knob to
the temperature called for in rec-
ipe. Oven Cycling Light comes on
and remains on until preset oven
temperature is reached. It reappears each time oven temperature
drops below preset temperature,
Most foods cook satisfactorily
without preheating. If preheating is
required, put your dish promptly in
the range after Oven Cycling Light
goes out.
Step 5: Place food inside the oven.
Make sure at least 1“ of space is
left between the cooking container
and the oven wall for pr~per heat
circulation. Close the oven door,
NOTE: Avoid opening your oven
door frequently. This could cause
undesirable results in your baking.
Only check foods at the minimum
time of the recipe. Then cook
longer if necessary.
Step 6: When the BAKE cycle is
complete, turn off heat. When
cooking food for the first time in
your oven, use the time on your rec-
ipe as a guide. Be sure foods are
done before removing from oven.
HKwwto$i%3tY’W.wk%mcy?
fmrTime Bake
Your Automatic Oven Timer controls your TIME BAKE feature,
When you TIME BAKE, your range
can be preset to start and stop
21
automatically ifyou are not home.
Step 1: Be sure the range Clock
shows correct time of day since
Clock controls the Oven Timers.
Start dial pointer must indicate
same time of day as on Clock. If.
you want the oven do turn on at a
later time, set that time by pushing
in knob on Start dial and turn
pointer to time that you want oven
to start. (There’s no need to set
Start dial when starting time is the
present time of day.)
Step 2: To determine Stop time,
add the food’s cooking time to
time set on Start dial, Push in knob
on Stop dial and turn pointer to
time oven is to turn off.
SWp3: Turn Oven Set Knob to TIME
BAKE. Oven “On” Light comes on
immediately even if the Start time is
later.
Step 4: Turn Oven Ternp Knob to
temperature setting. Oven Cycling
Light comes on even though heat
is not on in the oven if a later start
time is used. Your oven automatically turns on and off at the times
you set,
Step 5: Remove food and turn
Oven Set Knob to OFF.
Page 21

ways lj~e the rack so fat drips into
the broiler Dan.
Step 2: Position Oven Shelf as indicated on Broiling Chart, page 29.
Step 3: Turn the Oven Set Knob
and Oven Temp Knob to BROIL.
Both Oven Indicator Lid@ come on
Step 4: Leave oven door ajar
about 3 inches (except chicken,
see below). The door will stay open
itself yet the proper temperature
will be maintained in the oven. During cooking, turn the food only
once.
Step 5: Turn Oven Set Knob to
OFF and serve food immediately.
Leave the pan outside the oven to
cool during the meal for easy
cleaning.
@
64+
Foil may be used to line the
broiler ban and rack. However,
be sure to cut openings in the
foil to correspond with the slits
in the broiler rack so fat drips
into the pan below.
For all weights of chicken, broil
with door closed.
Placing food closer to the top
of the oven increases smoking,
spattering, exterior browning
on the meat and the possibility
of food fat catching on fire. Always keep rack 3-5 inches
from the broiling unit.
HowtoSet YourRange forRoasting
{!$!s0see Roasting Chart, page 30.)
Step 1: Check the weight of the
meat and place, fat side up, on the
rack in the broiler pan that came
with your range. This helps the
meatto baste itself.
Step 2: Use shelf
position “A” or
“’a”;
or the one indicated on
Roasting Chart, page 30. Place
oven Shelf cm correct embossed
shelf support. For very tall roasts,
remove second oven shelf.
Oven “On” Light comes on and
stays on until Oven Set Knob is
turned to OFF. Oven Cycling Light
comes on and remains on until
temperature is reached.
Step 5: Place your meat inside the
oven, making sure the pan is not
touching the oven walls or door.
10 325°. (The exception is small
c,oultry which is roasted at 375”. )
-:,==
, 4: Close the oven door and
-,>:-_7:.j
:I~rn the
Oven .Set Knob to BAKE.
22
Be sure meat is cooked to your
satisfaction. Most meats continue to cook slightly while
standing after being removed
from the oven. This should be
taken into consideration when
determining your cooking time.
Always use a roasting pan that
fits the size of your meat. A
roast placed in a pan too small
for its size will drip over the
edge.
You may cook frozen meat
roasts without thawing. However, you must allow more
cooking time. For large roasts,
add 10-25 minutes per pound.
For roasts under 5 pounds, add
10 minutes per pound.
To slow down surface browning
on turkeys, you can use a foil
“tent”.
The tent-shaped foil
should be laid loosely over the
poultry so the heat can circulate
under the foil.
Most frozen poultry should be
t~awed before cooking to ensure it is done evenly. Some,
however, can be cooked successfully without thawing.
Check the packer’s label for
specific directions.
Page 22

/f clone properly, it will take only a few moments to
While you are becoming acquainted witbytmr self-
start the self-cleaning cycle on your range. After set-
cleaning oven, we recommend 2 hours for the aver-
ting your range to self-clean, a high heat tempera-
age cleaning function, but in smw cases a hmgw
ture removes the soil in the oven cavity. Tile dirt will
cleaning time, up to 3 hours may be necessary. In
then disappear by turning into an ash waste or evap-
order to judge the degree of soil, look at the oven
orating into an odorless and colorless vapor. When
floor and walls. Light spatter and thinner spills
the cycle is complete, allow your range to cool.
would generally need only 2 hours cleaning. Heavy
greasy spills and spatter on the oven interior would
need up to 3 hours.
STEP f: $Wmmve al! ccmkware-
and food as well as heavy soil deposits from the oven. Clean spat-
ters or spills around the oven door,
rectangular flanges, and gasket.
Then close the door.
——--—.——-—,
~.
1
STEP 2:
-rumover-i set Knob
and Oven Temp Knob clockwise to
CLEAN. The control will snap into
final position when the CLEAN position is reached.
STEP’ 3: Push and hold C!ean
Button while sliding the Latch to
CLEAN.
~~~~ ~: Set The Automatic
Oven Timer:
pllsh in knob on Stop (Clean)
Dial and turn to the time you
wish oven to stop cleaning. Add
the number of hours needed for
cleaning to the present time of
day.
Cleaning Indicator Lights come
on when all steps are set
properly.
If you wish to clean at a later
time set Start Dial to that time.
NOTE: A slight odor may be detected especially during the first
few cleanings. Do not be alarmed.
This is normal during the seifcleanir]g cycle.
llihen cleaning temperature is
reached, Lock Light comes on ~nd
door tiarmot be unlatched until
Lock Light goes off.
STEP 5: When Lack Light goes
M, push and hold the Ciean Lock
Button while sliding Latch to
OPEN. Turn Oven Set Knob to
OFF.
1.
‘el
——
~jo iJ/~a~sh~uld I do if excessive
smoking occurs during cleaning?
A. This is caused by excessive
grease and you should switch the
‘Oven Set Knob to OFF. Open windows and doors to rid room of
Smoks.
g+JJ~wj{he oven fo rj~~l for
af least one hour before opening
?h~ dcIor. Wipe up {he excess
;;r~~~,~:and reset the clean cycie.
:>
—.—..:......,..-c-——~—,“.
-—----.=--7-- -...---—
Q. Why did the Lock Light come Q. Why do I have ash left in my
on when I first set the oven for
oven after cleaning?
CLEAN? A. Some types of soil will leave a
A. Lock Light glowing indicates
deposit which is ash. It can be rethat oven is too hot, Turn Oven Set moved with adampsponge or cloth.
Knob to OFF and open Oven Door
Q. Why is there still some black
to cool the internal cavity. After a
soil left after cleaning?
short period of time, reset controls
A. You did not time the oven to
for cleaning,
clean long enough. This deposit
Q. My oven shelves have become
will be removed in later cleanings,
gray after several cleanings. Is this
Q. If rny oven clock is not working
normal? can I still self-clean my oven?
A. Yes. After many cleanings, the
A. No. Your Automatic Oven Timer
shelves may lose some luster and
uses the range clock to help start
discolor to a deep gray color
and stop your self-cleaning cycle.
.‘.-’.-,--...,...--............
.--—.
..... -m
Page 23

i%qx?rcare and CkxwiirlgarehTlpw-
imt so ycw C2xMng Center will
giveyou efficientand satishdory
Servhx.FCNOVWMese CWAWBS
CxWduuyin $%3ringjfor it b help
Z3ssu?esafeand proper
maM3wwKx%
BESURE ELECT!%!(2POWERE3
OFF EEFCIRECLEANING ANY
PARTOF YCIGRt2Cx3KiNG
CENTER.
control Panels
Don’t use sharp-edged utensils
around the control panels.They
might damage it.
Clean the panels with a lightly
dampened cloth. DO NOT USE
cleaning sprays or large amounts
of soap and water. These can
cause problems with the control
mechanisms.
Temperature Probe
The probe is sturdy, but care
should be taken in handling it. Do
not twist it. Avoid dropping it, Clean
it as soon as possible after use.
Wipe it with a sudsy cloth, then rub
metal parts with a plastic scouring
pad if necessary. Rinseand dry.
(Or, wash the probe in an automatic
dishwasher.)
Aluminum Foil on she!ves—
Why you shouldn’t use it
DO NOT place a sheet of aluminum
foil on any shelf in either your microwaveor conventional oven. If you
do, your foods may not cook properly. The oven finish may be damaged. And there may be an increase
in heat on the outside surfaces of
the oven.
ovenLamp
The oven lamp bulb is long-lasting.
Only a qualified service technician
should replace it.
DOUBLE DuTYT”
shelf Accessory
Your sheif accessory isdesigned
for use [n a microwave oven only;
do not use in a conventional oven.
Do not use a browning dish with
the shelf.
Clean shelf with mild soap and
water or in the dishwasher.
PKXX3Ut!OnS for IJse Of ~etal
Use metal only as directed in the
Cookbook. Metal trays no more
than 3/4” deep may be usedfor TV
dinners, and the metal temperature
probe is designed for microwave
oven use.Always keepmetal at
least one inch awayfrom sides
of oven.
Cieaning—outside
Clean the outside of your micro-
waveoven with soap and water,
then rinse and dry. The outer pane
of the window is glass.Wipe it clean
with a damp towel, Chrome is best
wiped with a damp cloth and then
with a dry towel.
cleaning—inside
Keep it clean and sweet-smelling.
Opening the oven door a few minutes after cooking helps air out the
inside. An occasional thorough wiping with a solution of baking soda
and water keepsthe interior fresh.
Spills and spatters areeasyto remove from walks,floor and antenna
cover. That’s becausethere’s little
heat except in the food, or sometimes in the utensil. Some spatters
wipe up with a paper towel, some
may require a damp cloth. Remove
greasy spatterswith a sudsycloth,
then rinse and dry.
NEVERUSE A COMPAERCBAL
OVENCLEANER ‘oh!ANY iw4FH-
OF YOURMICROWAVEOVEN.
Wipe up spatters cmWeglass cm
the inside d the door daily. Wash
glass,when it’s soiled, with a minimum of sudsy, warm water. Rinse
thoroughly and dry.
Wipe metal and plastic parts on the
inside of the door frequently. Usea
damp cloth to remove all soil. DO
NOT USE ABRASIVES, such as
cleaning powders or steel and
plastic pads.They may mar the
surface.
Door Surface. When cleaning surfacesof door and oven that come
together on closing the door”,use
only mild, non-abrasive soaps or
detergents applied with a sponge
or soft cloth.
DO not remove the plastic antenna
cover at the top d the oven (see
page 8). You will damage the oven
if you do.
Using a Brown ‘N Sear Dish? !.@
Bar Keepers Friend@Cleanser.
High heat generated on the bottom
of the Brown ‘N Sear Dish can
causescorched appearing stains to
bakeonto the oven floor if grease is
present. These may be removed
with Bar Keepers Friend@Cleanser
by SerVaasLaboratories, Inc.
After using this cleaner, rinse and
dry thoroughly, following instructions on can. Do not use it on the
painted surfaces such asthe walls—
it may scratch the paint.
13arKeepers Friend@Cleanser is
sold in many grocery, hardware and
department stores.
Page 24

oven7wwm3s&4t
Indented Area
(Areaseen through glass control
pane! after knob is removed.)
The temperature on your new Oven
has been accurately set at tt7efactory. However, if your food consistently browns too much or too little,
you may make a simple adjustment
behind your Oven Temp Knob. To
readjust your thermostat:
~ Rotate OVEN TEMP Knob to
CLEAN position and pull knob off
the shaft revealing area behind
knob.
= Insert the tip of a 3/16” standard
screwdriver, into the indented area
directly under the notch and turn in
the desired direction. Be careful not
to scratch glass control panel.
~ To increase oven temperature
move dial one notch counter-
clockwise. To lower oven temperature, move dial one notch
clockwise. (Each notch represents
approximately 150.)
~ Return knob to the range by
matching the flat area of the knob
to the shaft.
@Recheck oven performance
before making an additional
adjustment.
~?@--$yfa~~ ~~~~
Oven is venled through a duct
located under the right rearCaIrod@
uriit. To clean duct: remove Calrod@
unit and reflector pan/ring. Lift out
vent duct. in replacing, make sure
the duct opening is under the
opening in reflector pan. Correct
positioning is important to allow
moisture and vapors to be released
/ron7 oven. Never cover the hole.
CAUT!O!4: Before replacing your
‘cwEmkm’lpbulb, disconnect the
ekxmk power h’ your Cooking
Center
atthemainfuseor chcuit
breaker panel. Be sureto let the
lamp cover and bulb cool completely before removing or
replacing them.
TOrft?rnow:
~ Take out 3 slotted screws as
shown in lamp diagram.
@Detach lamp cover and remove
bulb.
To replace:
@Put in a new 40-watt appliance
bulb.
@Install lamp cover. Replace3
screws and tighten them, making
sure cover fits flush with oven wall.
@Reconnect electric power to the
Cooking Center.
L&I?d Aluminum Foil h-n
Ehcm-lg
/1
If you wish, you may line the broiler
pan with alumir~umfoil and cover
the.rack with it for broiling. ALWAYS
BE SURE TO MOLD THE FOIL
THOROUGHLY TO THE BROILER
RACK AND SL[T THE FOIL TO
CONFORM WITH SLITS IN THE
RACK. Stopping fat and meat juices
from draining into the broiler pan
prevents the rack from serving its
purpose and MAY LET JUICES
BECOME HOT ENOUGH TO
CATCH FIRE.
25
p~~g.~n$Urfaae unit%
Clean the area under the reflector
pansoften. Built-up soil, especially
grease,may catch fire. To make
cleaning easier,the plug-in surface
units are removable.
To remove:
@Be sure the control for the sur-
face unit is on OFF and the coils
are cool before removing the
Calrod@unit.
@Raisethe unit coil opposite the
receptacle. Lift about one inch
abovethe trim ring and pull away
from the receptacle.
~ After removing the plug-in surface unit, lift the chrome-plated
reflector pan/ring to clean under
the unit.
To clean:
~ Wipe around the edges of the
surface unit opening in the range
top. Clean the area below. Rinseall
washed areaswith a damp cloth or
sponge.
To replace:
@Place reflector pan/ring in the
surface unit cavity found on top of
the range. Line up the reflector pan
so the unit receptacle can be seen.
@Insert the terminals of the plug-in
unit through the opening in the
reflector pan/ring and into the
receptacle.
@Guide the surface unit into place
so it fits evenly and locks snugly.
NOTE: Do not attempt to clean,
adjust, or in any way repair the
plug-in receptacle, If liquid should
spill and collect inside the recep-
tacle, call for service.
Removable ChK?nDcmr
TO REMOVE door, open to BROIL
position, or where you feel hinge
catch slightly. Grasp door at sides;
lift door up and away from hinges.
Page 25

1, Use medium or heavy-weight cooking coritairrers. .Alurninurn containers conduct heat faster
than other metals. Cast iron and coated cast iron
containers are somewhat slower to absorb heat, but
generaliy cocIk evenly at LOW or MEDIUM settings.
Steel pans may COOKunevenly if not combined with
other metals.
Usenon-stick coated or coated metal
containers. Flat ground pyroceram saucepans or
skillets coated on the bottom with aluminum generally cook evenly. Glass saucepans should be used
with the heat-spreading trivets available for that
purpose.
2. To conserve the most cooking energy, pans
shouid be ‘flat on the bottom, have straight sides
and tight fitting lids. Match the size of the saucepan
to the size of the surface unit. A pan that extends
~
!INrectiifotusand Setting
to
sfh3iR%txdsiflg!
-—
—.
settingtoG?mRgimm
fccmkhgi
CaMT41ments
—
C%mtairnlek’
C%remi
Cornmeal, grits,
oatmeal
LOWorW~,thenadd
cereal.Finishtiming
accordingtopackage
directions.
MED, to cook 1 or 2 min.
to completely blend
ingredients.
Cereals bubble and expand as
they cook; use large enough
saucepan to prevent boilover.
Covered
Saucepan
t+. In covered pan bring
water to boil before adding
cereal.
Milk boils over rapidly. Watch
as boiling point approaches.
Uncovered
Saucepan
HI. Stir together water or
milk, cocoa ingredients.
Bring just to a boil.
H1.At first perk, switch
heat to LOW.
Percolate 8 to 10 min. for 8
cups, less for fewer cups.
LOW to maintain gentle
but steady perk.
LOW. Cook only 3
to 4
min. for soft cooked; 15
min. for hard cooked.
Continue cooking at MED
HI until whites are just-set,
about 3 to 5 min.
LOW, then add eggs.
When bottoms of eggs
have just set, carefully
turn over to cook other
;ide.
.OW. Carefully add eggs.
:ook uncovered about 5
nin. at MED Hi.
vlEQ.Add egg mixture.
2ook, stirring to desired
~oneness.
.OW. Stir occasionally
~rrdcheck for sticking.
Percolator
Eggs
Cooked in shell
Covered
Saucepan
Covered
Skillet
Uncovered
Skillet
Covered
Skillet
Uncovered
Skillet
H1.Cover eggs with cool
wfiter. Cover pan, cook
until steaming.
MED H1. Melt butter, add
eggs and cover skillet.
If you do not cover skillet,
baste eggs with fat to cook
tops evenly.
Fried sunny-side-up
Fried over easy H1.Melt butter.
Remove cooked eggs with
slotted spoon or pancake
turner.
Eggs continue to set slightly
after cooking. For omelet do
not stir last few minutes.
‘When set fold in half.
HI, In covered pan bring
water to a boil.
Poached
Scrambled or omelets
HI, Heat butter until light
golden in color.
Fruits
Covered
Saucepan
H1.In covered pan bring
fruit and water to boif.
Fresh fruit: Use %to % cup
water per pound of fruit.
Dried fruit: Use water as
package directs. Time
depends on whether fruit has
been presoaked. If not, allow
more cooking time,
Meat can be seasoned and
floured before it is browned, if
desired.
Liquid variations for flavor
could be wine, fruit or tomato
juice or meat broth.
Timing: Steaks 1to 2-in.: 1 to
2 hrs, Beef Stew: 2 to 3 hrs.
Pot roast: 2Y2to 4 hrs.
Pan fryit}g IS best for thin
steaks and chops. If rare IS
desired, preheat skillet before
addlilgmeat,
i%msy F%mh-y
Braised Pot roasts of
ceef, lamb or veal,
pork steaks and
chops
Covered
Skillet
Uncoverf;d
Skillet
HI. Melt fat then add meat.
Switch to MED HI to
brown meat. Add water or
other Ilquld.
-OW.Simmeruntil fork
ender.
H6,Preheat skillet, then
grease Itghtly.
hlED HI or MED, Brown
znd cook to desired
~orlet7ess,turning over as
leeded,
Page 26

.—-..__..-— . ....—-.......—-—.. .-.
.....-—...-.. ..-...—-——--
WF2CIF+4G!
1
RIGHT
t-i NOT
OVER1“
than more one inch beyoncl the edge of the trim ring
traps heat which causes “crazing” (fine hairline
cracks) on the porcelain and discoloration ranging
from blue to dark gray of the trim rings.
3. Frying. Do not overfill kettle with fat that may
spi!l over when adding food. Frosty foods bubbie
vigorously, Watch foods frying at HIGH temperatures and keep range and hood clean from accurnu-
la.ted grease.
!mrectioms alruf Setting
to stlart coc$knngl
H1.Melt fat. Switch to MEC
HI to brown chicken.
comments
—.
For crisp dry chicken, cover
only after switching to LOW
for 10 min. Uncover and cook
turning occasionally 10 to 20
min.
A more attention-free method
is to start and cook at MED.
FCid
Fried Chicken
Sw91h!ainer
Covered
Skillet
Uncovered
Skillet
Covered
Skillet
Covered
Dutch Oven,
Kettle or
Large
Saucepan
Small
Covered
saucepan.
Use small
surface unit
LOW Cover skillet and
cook until tender.
Uncover last few minutes
H1.In cold skillet arrange
bacon slices. Cook just
until starting to sizzle.
H1.Melt fat. Switch to MED
to brown slowly.
i’d ED H1.Cook, turning
over as needed.
Pan broiled bacon
LOW. Cover and cook
until tender.
Meat may be breaded or marinated in sauce before frying.
Sauteed: Less tender
thin steaks (chuck,
round, etc.); liver;
thick or whole fish
Add salt or other seasoning
before cooking if meat has not
been smoked or otherwise
cured.
Simmered or stewed
meat; chicken; cornec
beef; smoked pork;
stewing beef; tongue;
etc.
R%?iting Chocokk?,
butter,
—
marshmallows
-.
-.
Hi. Cover meat with water
and cover pan or kettle.
Cook until steaming.
LOW. Cook until fork
tender. (Water should
slowly boil). For very large
loads medium heat may
be needed.
When melting marshmallows,
add milk or water.
WM. Allow 10 to 15 min. to
melt through. Stir to
wmooth.
—
Cook 2 to 3 min. per side.
Thick batter takes slightly
longer time. Turn over pancakes when bubbles rise to
surface.
IF%nlmi$te?sor
F$’’w$cta
toast
Skillet or
Griddle
ME.DH1.Heat skillet 8 to
10 min. Grease lightly.
%%3s+83
Noodles or spaghetti
Use large enough kettle to
prevent boilover. Pasta doubles In size when cooked.
Covered
Large Kettle
or Pot
——...
Pressure
Cooker or
Canner
Uncovered
Saucepan
Hi. In covered kettle, bring
salted water to a boil,
uncover and add pasta
slowly so boillng does not
stop.
MED H1.Cook uncovered
until tender. For large
amounts Hi may be
needed to keep water at
rolling boil throughout
entire cooking time.
—— ——
MED Hl for foods cooking
10 min. or less. MED for
foods over 10 min.
---.-—— ——-—
Hi. Heat until first jiggle IS
heard.
Cooker should jiggle 2 to 3
times per minute.
PB%E2?SLS?C??cooking
H1.Bring just to boil.
LOW. To flnisll cooking. Stir frequently to prevent
sticking.
—.—
——..
H1.Measure VZto l-in.
water In saucepan. Add
salt and prepared vege!able. In covered saucepan
bring to boll.
Ht. Measure water and salt
as above. Add frozen block
of vegetable. In covered
saucepan bring to boll.
HI, In skillet melt fat.
MED, Cook l-lb. 10 to 30
more mln,, depending on
tenderness of vegetable.
Uncovered pan requires more
water and longer time.
Covered
Saucepan
Covered
5alJcepan
Jncovered
sklllef
-.....—
:Ovelcd
:aucepan
Break up or stir as needed
while cooking.
Frozen
LOW. Cook according to
time on package.
MED. Add vegetable.
Cook untjl desired tenderness
IS reacl}ed.
-———-. -——.—...—.—---—.
l-urn over or stir vegetable as
necessary for even browning.
WM. Cover and cook
according to time
Triples ]n volume after
cooking Time at WM Rice 1
cup rice and 2 cups watef —25
reins Grfts. 1 CUPgrits and 4
cups watef —40 mill
—— ——.-. .—-———-
1-{1Bring salted w:]ter to a
boll
_—-__—
—
_——-.—-—-.. —-.
——-——.—
27
Page 27

%. Aluminum pans conduct heat quickly. For most conventional
oven heat 25° if lighter crusts are desired. Preheat cast iron for
baking light shiny finishes generally give best results because
baking some foods for rapid browning when food is added,
they prevent overbrowning in the time it takes for heat to cook
3. Preheating the oven is not always necessary, especially for
the center areas. Dull (satin-finish) bottom surfaces of pans are
foods which cook longer than 30 or 40 minutes. For food with
reconlmended for cake pans and pie plates to be sure those
short cooking times, preheating gives best appearance and
areas brown completely.
crispness.
~. Dark or nan-shiny finishes, aiso glass and pyroceram, gener-
4. Open the oven door to check food as little as possible to
ally absorb heat which may result in dry, crisp crusts. Reduce
prevent uneven heating and to save energy
——
mu’ntq
Mfin.
.—
15-20
20-30
20-40
45-55
20-30
45-60
45-60
45-60
10-25
20-30
—
fcxmrfwaimw
shelf
F%sitlkml
R,
c
B, A
B
B
A. B
B
B
A, B
A, B
B, A
%xmn
lkmgi.
._—
400°-4750
350°-400”
400°-4500
350°
400°-4250
37s0
350°-3750
375°-4250
375°-4250
350”-375°
i%md
C,kmmen%s
E3$’siz!d
BiscLllts (l/z-In.thick)
Canned refrigerated biscuits take
2-4 min. less tlrne.
Shiny Cookie Sheet
Shiny Metal Pan with
Satin-f~nlsh bottom
Cast Iron or Glass
Shiny Metal Pan with
Satin-finish bottom
Shiny Metal Muffin Pans
Deep Glass or Cast Iron Cup!
Metal or Glass Loaf Pans
Metal or Glass Loaf Pans
Shiny Oblong or Muffin Pans
Shiny Oblong or Muffin Pans
Aluminum Tube Pan
Metal Jelly Roll Pan
Metal or Ceramic Pan
Metal or Ceramic Pan
Shiny Metai Muffin Pans
Metal or Glass Loaf or
Tube Pan
Shiny Metal Pan with
Satin-finish bottom
Shiny Metal Panwith
Satin-ffnlsh bottom
Metal or Glass”Loaf Pans
Coffee cake
Preheat pan for crisp crust.
Corn bread or muffin
Gingerbread
Decrease about 5 min. for muffin
mix, Or bake at 450° for 25 min.,
then at 350° for 10-15 min.
Muff Ins
Popovers
Quick Loaf Bread
‘feast bread (2 loaves
Dark metal or glass give deepest
browning.
For thin rolls, Shelf B may be used.
For thin rolls, Shelf B may be used.
Plaln rolls
Sweet rolls
%%akes
(without shortening)
Angel food
Jelly roll
Sponge
A
B
A
325°-3750
375°-4000
325°-3500
325°-3500
350°-3750
275°-3000
350°-3750
350°-3750
350°
.
325” -350°
350”-400”
400°-4250
375°-4000
30-55
10-15
45-60
——
45-65
20-25
2-4hrs
20-35
25-30
40-60
,25-35
10-20
6-12
7-12
Two piece pan is convenient.
Line pan with waxed paper.
Cakes
Bunclt cakes
Cuocakes
A, B
B
A, B
B
B
B
Paper liners produce more moist
cr(Jsts.
Use 300° and Shelf B for small or
individual cakes.
Fruit cakes
Layer
Layer, Chocolate
Loaf
Bar cookies from mix use same
time. Use Shelf C and Increase
temp. 25-50° for more browning.
Metal or Glass Pans
Cookie Sheet
Cookie Sheet
Cookie Sheet
Glass or Metal
Glass Custard Cups or
Casserole (set In pan of
hot water)
Glass Custard Cups or
Casserole
B, C
B, C
B, C
B, C
F?efrlgerator
Ro!led or sliced
—.F#$?its$
CMhier E$e@&ei?ts
!3aked apples
Custard
A, B, C
B
B
A
B, A
A, [3
B
B
350°-4000
300”-350°
325”
——
400°-4250
325°-3500
4000-425(’
400” -425”
450(’
——----
325’’-400”
325’’-375”
300’1-350”
-—.————-—
30-60
30-60
50-90
45-70
15-25
45-60
40-60
12-15
Reduce temp. to 300° for large
custard. Cook bread or nce pudding
with custard base 80 to 90 minutes.
Puddings, Rtce and
Custard
——.
Large pies use 400° and Increase
time,
To quickly brown meringue use
400° for 8-10 mtn.
Custard fllllngs require lower ternp,,
longer time.
Fo[l Pan on Cookie Sheet
Spread to crust edges
Glass or Satin-flnlsh Metal
Glass or Satin-flnlsh Metal
Glass or Satin-flnlsh Metal
.———.—.——.—. .....—.
Set on Oven Shelf
Glass or Me:al
Glass
.—...———--———.——-——..———
Mer}rrglJe
A, B,
c
A,
El,c
B
——————
60-90
30-60
30..75
.——
Increase time for Iargc amount or
size
28
Page 28

BroilinqChart
~..
55.When arrar!glng food on pafi, do not let fatty edges hang over
sides, which could soi! oven with fat drlpplng.
& Elroller does not need to be preheated. However, forvery thin
foods or to increase browning, preheat if desired.
~. Frozen SWwakS can be conventionally broiled by positioning the oven shelf at next lowest shelf position and
increasing cooking time given In this chart 1%times per side.
6. If your range is connected to 208 Volts rare steaks may be
broiled by preheating the brol! heater and positioning the oven
shelf one position higher.
5. Always use broiler pan and rack that comes with your oven. It
IS designed to mlnlmlze smoking and spattering by trapping
juices In the shleldecf lower part of the pan.
2?.CJvendoor should be ajar for most foods; there t-sa special
position on door which holds door open correctly.
Q. For steaks and chops. slash fat evenly around outside edges
of meat. To slash, cut crosswise through outer fat surface just to
the edge of the meat, Use tongs to turn meat over to prevent
plerclng meat and loosing juices.
~. if desired, marinate meats or chicken before broiling. Or,
brush with barbecue sauce last 5 to 10 minutes only
Cw9ntifw
43rnd/aw
Ii’hicknesis
shdf
Position
FiiKst sidle
‘rime, Min.
Si?tmnd
side?
T’ime9 Min.
3
‘/2
Arrange in single layer.
%-lb. (about 8
thin slices
c
3%
Space evenly.
Up to 8 patties take about same
time.
Ground Beef,
Well done
l-lb. (4 patties)
1/2to 3/d-in.thick
c
7
4-5
-.
E3eef steaks
Rare
Medium
Well Done
Rare
—
Medium
Well Done
—
chicken
Steaks less than l-in. cook through
before browning. Panfrying is
recommended.
Slash fat.
1 inch thick
(1-1’hlbs.)
c
c
c
c
c
c
7
9
13
10
15
25
7
9
13
7-8
14-16
20-25
llh-in. thick
(2-2’/2tbs.)
Reduce times about 5-10 mln, per
side for cut-up chicken, Brush each
side with melted butter. Broil with
skin side down first and broil with
door closed.
? whole
(2 to 2’/rlbs.),
split lengthwise
A
35
10-15
Ekdkek-yProducts
Bread (Toast) or
Toaster Pastries
Engllsh Muffins
———.
Lobster tails
(6 to a-oz. each)
Space evenly. Place English muffins
cut-side-up and brush with butter, if
desired.
1‘/2-2
3-4
—. —
13-16
—
5
8
2-4 sl]ces
1 pkg. (2)
2-split
c
c
‘/2
—-—-———
(Do not
turn
over)
.—
Cut through back of shell. Spread
open. Brush with melted butter
before and after half time.
.—.—.
Handle and turn very carefully.
Brush with lemon butter before and
during cooking if desired. Preheat
broiler to increase browning.
2-4 El
l-lb, fillets %to
%-in, thick
c 5
Increase times 5-10 min. per side
for 1‘/z-in.thick or home cured.
I-In. thick B
—.—-
C
B
—.
c
c
c
D
~
_..
—
8
————.
Slash fat.
2 (% inch)
2 (1-~n thick)
about 1 lb.
10
13
10
13
Well Done
Slash fat.
2 (1 Inch)
abo~jt 10-1202
2 (llhlnch)
about 1 lb
I-It) pkg (10)
8
10
10
17
—-——..———.
6
4-7
10
4=6
12-14
_—_—__—
1-2
————.--.—-
—.
If desired, spilt sausages In half
lengthwise into 5 to 6-in pieces
— —--——..—— .——.—.—-—..
-. .-—-.
29
Page 29

i. Positiori oven shelf at B for small-size roasts (3 to 7 Ibs.) and
at A for larger roasis.
2. Place meat fat side up or poultry breast-side up on broiler
pan or other shallow pan with trivet. Do not cover. Do not stuff
poultry until just before roasting. Use meat probe,
for more
accurate doneness. Control signals when food has reached set
temperature. (Do not place probe in stuff ing.)
3. Remove fat and drippings as necessary. Baste as desired.
T-y$w
%leat
Tendercuts rib, high quahty
slrloln tip, rump or top round*
Lamb Leg or bone-in shoulder*
Veal shoulder, leg or Ioln*
Pork
1010.nb or shoulder*
Ham, pre-cooked
Ham. raw
‘For boneless rolled roasts over 6-11
POu!t?y
Chicken or Duck
Chicken pieces
Turkey
Ch4enl
-r$i?mp.
325°
325°
325C
325”
325”
325C
lick, add 510 10 I
325°
375°
325°
4. %N&wn$iimg4!4inrm recommended for roasts is 10 to 20 min. to
allow roast to firm up and make it easier to carve. \t will rise
about 5° to 10° internal temperature; to compensate for temperature rise, if desired, remove roast from oven at 5° to 10° less
than temperature on chart.
55.IFmxs%m@’cMM%fmcan be conventionally roasted by adding 10
to 25 min. per pound more time then given in chart for refrigerated. (10 min. per lb. for roasts under 5-lbs. ) Defrost poultry
before roasting.
Rare:
Medium
Well Done
Rare,
Medtum
Well Done.
Well Done
Well Done,
ToWarm:
Well Done.
per lb to [Imes gl
Well Done:
Well Done:
Well Done:
Approximate Roasting mm?,
in ?dirmtes per Pound
3 to 5=nbs.
6 to e“lbs.
24-30
18-22
30-35
22-25
35-45
28-33
21-25 20-23
25-30
24-28
30-35
28-33
35-45
30-40
35-45 30-40
10 mlns per lb (any weight)
under Io=tbs.
10to 45”U3S.
20-30
17-20
1above.
3 *O 5“ibs.
over ‘?i”ibs.
35-40
30-35
35-40
10 to 15-lb$. owe?’ f5”lbs.
20-25
15-20
$Fatemal!
Temp. “F
130”-140”
1500-160°
170”-185°
130”- 140[)
150J-160°
170°-185”
170°-1800
170°-180°
125°-1300
160’
185°:190°
185°-1900
In
thigh:
185°-190°
Page 30

AiJtomatIc Gooking Control is a fully automatic
electronic control system that lets your microwave
oven do the cooking for you. The charts and
recipes in this section are designed to help you
make the most of this truly new feature.
Standard cooking techniques require setting the
oven for a specified cooking time or a selected fin-
ished temperature.
And that means looking up
recipes in a cookbook. . trying to convert
old
recipes for microwave cooking. . .or just resorting
to guesswork. This control method works on an
entirely different basis
—with a special electronic
sensor that detects steam from cooking food. The
oven “knows” how the food is cooking; so it can
automatically set the correet cooking time and
maintain the proper power level for different types
and amounts of food. And it’s adjustable to suit
your individual taste.
Easy touse
Simply touch two control pads—AUTO COOK and
the desired Code number—and then START. A
chart on the oven control panel gives a complete
list of Codes for frequently prepared foods. The
readout display shows AUTO until steam is sensed
and then signals, and displays time counting down.
During AUTO, oven should not be opened, but after
oven signals, door may be opened to check foods if
desired. Check the Automatic Cooking Chart for
suggestions.
Appropriate containers and coverings help assure
good cooking results. Containers should match in
FcmdsRecommended
F+wide variety of foods including meats, fish, casseroles,
-—
...-
! ,+~ _--..=j: &&. J
F;,<+f.>d.s
p:zz-F*y,-._. -
size to tbe size of the food being cooked. Coverings
pg~<i’:
such as plastic wrap secured on all sidest the lid :;:..-. --that came with the container, or microwave-safe
~-~j~j~~3
plastic domes are ideal. For eXarnPks Qfcontainers ~~~~;--”
and coverings, see page 10and the following recipe @##j=<
section of this book.
&g@J;
-
----
,.:4-si,,-
=
With Preference Control, you can adjust the Automatic Cooking Feature to your individual ~asteby
adding either “l” or “9” after Code number. If after
trying the suggested Code, you would prefer less
cooking time, simply add the number “l” after the
Code and the oven automatically lessens the cooking time by 20°/0.If you wish more cooking time, add
“9” after the Code to increase cooking time by 20°/0.
Automatic Roasting uses the temperature probe :- .:
rather than the electronic sensor to cook meats +j_
evenly to the desired degree of doneness. The oven
-~=;-=--continually monitors the food’s internal tempera- <-=-~----,
ture. Unlike ordinary Temperature Cooking, the ~--.:-:.
. -..—
oven changes power levels two or three times ~i.-..l:
depending on the degree of doneness
durincj cook- ~“.{---
ing to give you the best results automatically. Meat ~~ ‘. ~
is cooked evenly, without toughening because lower ~=-.. ..
.-..-.
power levels are used as the meat temperature rises
~=.’~--+-
thus cooking meats evenly while retaining the nat-
r
ural juices. After cooking, the oven switches auto- ~
maticaily to Ho!d for an hour. Food stays warm ~
without overcooking.
1
~OQ~S ~Q~
Recommended I
—.
fieclpes and foods which must be cooked
uncovered, or which require constant attention, or adding ingredients during cooking
should be microwaved by TIME COOK. For
foods that microwave best using temperature
probe, use TEMP COOK or AUTO ROAST.
Foods requiring a dry or crisp surface after
cooking
COC)k best with TIME GOOK.
31
Page 31

For mtd and f!sh hxwes use either
Who$e chicken, chicken breasts
Chuck roasts should be placed in
the
round or loaf microwave-safe
containers.
Fish loaves made with
precooked or canned fish use Auto
Cook Code 4. Beef loaf uses Auto
cook Code 8. Cover with plastic
wrap. See the chart on following
page for recipes.
and pieces, or turkey parts should
be placed in a microwave-safe 8-in.
square dish, 8 x 12 x 2-in. dish or
3 qt. casserole. Cover securely with
plastic wrap or container lid. If
cooking bag is used for whole
chicken, shield breast bone with
small strip of foil.
a cooking bag with % cup water
and placed in microwave-safe dish.
Cut bag to fit close to the size of
the roast and tie open end securely.
Cut a 1-1%” slit near the tie. Use
Auto Cook Code 99 which is Code
9 with the added digit 9 giving the
Code 20°/0more time. (See page 31.)
——
+.= - —.
.— —.
FM fi~k?ts,whole fish or seafood
pieces should be in single layer in
flat pie p~ateor oblong dish to fit.
Cover with plastic wrap or container ~id. Use Auto Cook Code 2
for fillets and Auto Cook Code 1
for seafood pieces.
Pork chq3s automatically cook well
in 8 x 12 x 2-in. dish, covered with
plastic wrap. Add barbeque sauce
or other sauce on each chop. Microwave using Auto Cook Code 6.
Spare ribs and brisket should be
automatically cooked in round
glass container with lid or plastic
wrap. Make sure liquid covers
meat. Microwave using Auto Cook
Code 9.
seIe~t
recipes that do not require adding irlgre-
dients at different stages
during cooking or
recipes that require extra attenfion, stirring
g;
rotating.
4:
Use microwave-safe containers that are appro~~rl,gtf;
in size to the food amount. lJse 3 qt.,con-
5:
Ialners or less.
For sau~y casseroles, cover container with lid or
32
topped casseroles, remove cover after oven sig-
nals and add topping, then continue cooking
uncovered.
Allow precooked ingredients or hat sauces to
P
~
&&:--
cool slightly before adding other ingredients,
~
~%.=
.-<-:::1
.: ~-%-i
% >V
Meats and vegetables should be submerged in
liquid.
Page 32

Ado cook Cxxk?6 (Approx. cooking mm%-% min.)
1 b. ground cAN..Kk. . . . . . . . .. . . . In large mixing
?;2 cup dry bread Crumbs
powder, onion,
%/8teaspoon pepper
Arrange balls in
!/2 teaspoon salt
3 teaspoon chili powder
3 tablespoons dry m;nced onions
1 egg
3 tablespoofis ke?ehup
fl/2 cup reguizw rice . . . . . . . . . . .. . . .In small mixing
Makes 6 to 8 Servings
bowl, place meat, bread crumbs, pepper, salt, chi[i
egg and ketchup. Mix weli and form into 12 bails.
a circle in 2 qt. casserole. Set aside.
bowl place rice, beans, tomatoes and chili powder,
1 ICah {1S1/2 oz.) kidney beans Mix well and pour in center of casserole and over meatballs, Cover
{undrained)
and microwave at Auto Cook Code 64
1 can (16 oz.) tomatoes, chopped
and undrained
1 tablespoon chili powder
4 teaspoon salt
tQ~i~KERj TERIYAKI
.Auto Cook Code 4 (Approx. Cooking Time—29 min.)
Makes 4 Servings
f/4cupsoy sauce o.. . ’ .. . . . . .. .. . .
In 2-cup glass measure, place soy sauce, honey and sherry. Stir until
1/3 cup honey
blended. Add cornstarch; mix well. Microwave at HIGH (10) for 3 to
1/3 cup sherry 3-1/2 minutes, stirring every minute until thickened. Tie chicken legs
4 teaspoons cornstarch
and place in 12 X8 X 2-in. microwave-safe dish, breast side up. Brush
with half of sauce (reserve half for later use.) Microwave on Auto
il whole chicken (about 3 lb.)
Cook Code 4. When oven signals and time remaining appears on
readout, apply remaining sauce, recover and continue cooking.
‘if breast bone seems prominent, a 1“ strip of foil may be placed over bone to prevent splitting of wrap.
ALNOICOok Code 7’(Appiwt. G@sing Time—1 hr. 15 min.)
Makes 6 Servings
1 can (10-1/2 oz.) condensed . . .
In small mixing bowl mix soup and milk; reserve 1/2 cup of the
cream of mushroom soup
mixture, Blend remaining soup mixture, rice, mushrooms and half of
fi-1/4 cups milk (1 soup can full)
the onion soup mix. Pour into 12 X 8 x 2-in. glass dish.
3/4 cup regular rice, uncooked
1 can [4 Oz.) mushrooms, stems
and pieces, drained
t pkg. (1-1/2 oz.) dry onion soup mix
1 cut up chicken {about 3 lb.) . .
Place chicken pieces on rice mixture, arranging with meatiest pieces
to outside of dish. Pour reserved soup mixture over chicken and
sprinkle with remaining soup mix. Cover with plastic wrap, no vent.
Microwave at Auto Cook Code 7.
Recipe
1
Page MO.
CIassic Ham Loaf
96
Basic Meat Balls
74
Basic K/leat!c.mf
75
CrUrrtb Coated Chicken
“118
Pork chops Rosado
99
A
-.-..,,,,,,,
.,
..=.=.e.-m.
-1
—---..---.--:=.
‘Auto cook’
cex’k?
8
5
8
A
6
.-.
.-.-..
C)’-3
d ,J
Recipe
Chicken & Dressing
Sweet l-art Franks
Cheese Stuffed Meatloaf
Plain Swiss Steak
Chow i’vlein
Page No.
—.
na
63
75
81
100
‘Auto cook”
C2cde?
Page 33

MW=idem large RiWes d vegeU3Wessuch as cauliflower or squash
use Auto Cook Code 5. Use round
or square container close to the
size of vegetable. Add YZcup water.
Cover wi(h lid or plastic wrap.
Frozm Vqetabim
F%3tx?s
m’ slims d Vegjetabk?s
Precooked/canned vegetables
require 1/4to 7/2cup of waler. Use
appropriate size covered container.
Set Auto Cook Code 5. For broccoli
spears set Code 51. Dry root vegetables like carrots may need to be
stirred after oven signals and time
remaining appears on readout.
Recover and touch START to
finish cooking.
Pouches of frozen vegetables
shoIJM be slit ‘/2” in center before
placing directly on oven floor. Set
Auto Cook Code 4.
should be placed in round con-
tainer similar in size to amount
being cooked (at least half full).
Microwave on Auto Cook Code 1.
Stir before serving.
Alternately, frozen vegetables in
pouches can be slit with an “X”
shaped slit and placed in glass
container with “X” downward. After
cooking, pick up pouch and empty
food into dish through “X” opening.
For vegetable spears, remove to
dish after signal.
34
Page 34

-
-’
VEGETABLE LASAGNA
Auto CXK3kCmk-—i%%la 1 @ppmx. CxKdfing -mne’-t3 min.)
spinach II (App$’c)x.choking Time—+ min.)
Lasagna!2 [Appmx. Ccmking -rhne-25 min.)
Makes 6-8 Servings
6 lasagna noodles [1/3 pkg.) . . . . . .
.Place noodles, water and oil into a 13 X 9 X 2-in. dish. Cover with
4 cups water
plastic wrap. Microwave on Auto Cook Code 1. Allow to stand while
1 tablespoon Wegetab$eoil
preparing remaining ingredients.
1 pkg. (10 oz.] frozen chopped . . . . .Remove paper wrapping from box. Place unopened box into oven and
spinach microwave on Auto Cook Code 1. Drain well,
f can (8 oz.) tomato sauce. . . . . . . .
.In large bowl mix together tomato sauce, to’mato paste, mushrooms,
f can (6 oz.) tomato paste
onion, oregano, basil, salt and gariic powder.
1 jar (4.oz.) sliced mushrooms
(drained)
1/4 cup chopped onion
1 teaspoon leaf oregano
1 teaspoon basil
1 teaspoon salt
1/4 teaspoon gariic powder
2 cups (l-pt.) small curd cottage . . .In a 13 X 9 X 2-in. dish layer well drained lasagna noodles, 1 cup
cheese cottage cheese, 1/2 pkg. spinach and 1/2 of tomato sauce. Repeat.
8 oz. grated mozzarella cheese Sprinkle mozzarella cheese over top. Cover with plastic wrap. iVlicro-
wave on Auto Cook Code 2.
—.
-:,
___ ------- _____._..”_,—,..
,
.-
-’,-=—--——”7——
d
,. . .. . . . . . ...-.,—,—..,.., --—--,=—
?
—=— - ---- .—— . —s=-.,
:
~
ECJg,ulant italiano
L ‘ T
-181
5
i
;f-,
;
_,~j”~}
~lJ(jfj~~~~
180
4
..,———,.-. .—. -— ..=_= __ ....”. =_—m.. .,,.—m-—, ,
—.=.,..”..,.,-....-.+-=-=. ,,... . ___
——
Rmipe
. ..._=
Page No.
—.—.
Cabbage !3011s Italian Style
76 ‘-
Stuffed Peppers
25
. ..—
..
!3
....— .-——
1
Page 35

.
Pineapple C2merde is a tangy
Baked Apples automatic cook well stewed Fruit and Fruit Compoies
dessert or meat accompaniment.
in 12x8x2-in. dish spread 2 cans
(20 oz. ea.) drained pineapple
chunks, 1 cup sugar and ?4cup
flour, Cover and microwave on
Auto Cook Code 3. When oven
signals and time remaining appears
on readout, remove covering and
top with mixture of 2 cups butteryflavored cracker crumbs and ‘h
cup melted butter. Do not recover.
Touch “Start” and finish cooking.
using Auto Cook Code 2. Match
number of apples to size of microwave-safe covered container (see
page 190 in Microwave Guide and
Cookbook). Use Auto Cook Code
2 for Baked Pears and Applesauce
also.
/
--’.
should be stirred well before microwaving, especially if sugar isadded.
Cover; use Auto Cook Code 2 and
stir once or twice after oven sig-
nals and time appears on readout.
TouciI “Start” and finish cooking.
NWTopped Cakes are easyto cook
Caramel Biscuit fling: Spread U
automatically. Grease bottom and
sides of microwave-safe fiuted cake
container and sprinkle bottom even-
ly with ‘1/3 cup chopped nuts or
coconut. Carefuily pour batter from
one box (2-!ayer size) cake mix over
nuts, cover with piastic wrap. Microwave on Auto Cook Code 3, r~moving cover and rotating dish % turn
aftQr oven signals and remaining
timg appears on readout. Let stand
j Ornin[.,jtesbefore inverting to cool.
cup melted butter and %cup brown
sugar in 8-in. round giass dish,
Sprinkle with cinnamon and %cup
chopped nuts if desired. Arrange 1
can (10 OZ,) refrigerated biscuits
around edges and place drinking
giass, open end up, in center. Cover
with plastic wrap. Microwave on
Auto cook Code 39. Invert onto
serving plate, ietting dish stand
over ring a few minutes before
removing.
IBaxm and cheese T’c$ppt?dC(=?m”
bread: Distribute % cup chopped
crisp fried bacon and 1tablespoon
Parmesan cheese in greased 8-in.
round glass dish. Carefully pour
batter from 1 pkg. (8% oz.) cornbread mix or use batter from cornbread ring recipe on page 184 in
Cookbook, over above ingredients.
Cover with plastic wrap. lMicrowave on Auto Cook Code 3. Let
stand 5 to 10 minutes before
inverting.
Page 36

-,,4 :-> :. : ,:,-+ ;’ > f-w\ [/
,.-. - .+~.~+
;! -y
J , ~- $% ,.., *[,< p-
1----
..’-. 1,.7 2
: , L..,
!< ,,, ! E,- ,. :“ ,; -+, ; ,,.-> *2+1 & i+. ~:
Xuto Coi’ii fCt2cii 3 (Approx~&ooking
Titme-ltl min.)
Makes 1 (l O-in.) Tube Cake
lpkg. (2-!aye7size] . .. . . . . . .. . .
.In large bowl place cake mix, eggs, vanilla, oil and water. Blend on
fudge cake mix
medium speed of mixer, about 2 minutes, until srnoott] and creamy.
2 eggs
t teaspoon vanilla exfract
2/3 Cup Ccmkh-lgC?il
1-1/4 cups Waier
%/4cup finely chopped pecans. . . .
.Lightly grease a 16cup plastic microwave fluted orstraight-sided ring
mold. Sprinkle chopped nuts evenly over bottom. Pour batter over
nuts.
Cover with plastic wrap and microwave on Auto Cook Code 3. Rotate
dish 1/4 turn and remove wrap when oven signals and remaining time
appears on readout. Touch “Start” and continue cooking. Let stand in
dish 5 minutes before turninq out.
@
*-! IZ ?72?3W {~ ~ $2 ~ . ti=U‘i
&?k’1&t7ils HB ,
(y5L;l [-g)
a-l --
Auto Ccmk Cde 3 (Appmx. cooking Thm-—l6 min.)
Makes 6 to 8 Servings
1 can (20-22 oz.) prepared . . . . . .
.In 8-in. square g!ass dish, spread pie filling.
cherry pie tilling
2 cups dry yellow or white .. . . . .
.In small bowl, mix together cake mix, butter, nuts, and cinnamon until
cake mix {1 pkg. [9. 02.] or
crumbly. .Sprinkle evenly over cherries or, in three rows so cherries
1/2 pkg. [f17.oz.]]
are visible. Cover with plastic wrap.
1/4 cup melted butter
li2 cup coarsely chopped nuts
Microwave on Auto Cook Code 3.
t teaspotin ground dnnamon
w-”iE:Af~Pk.E
Llw%mE ili3wYRfk!CMJwEi’
iu.hCook Code 3 (Appmx. Cooking Time—lo min.)
Makes 1 (8-in. round) Cake
l/4cupbutter . . . . . .. o. . . . . . . . . . .
In 8-in. round dish place butter. Microwave at HIGH (10) for 1 minute
1/3 cup brown sugar (packed)
until melted. Sprinkle sugar over butter. Drain pineapple (save liquid)
1 can (8-1/4 oz.) pineapple slhws on paper towels and arrange in dish. Decorate with cherries. Place a
4 maraschino or candied
2“ diameter ~rinking glass (4” tall) open side up in center of dish. *
cherries, cut in half
3/4 cup d purpose fhdr . . . . . . . . . .
in small mixer bowl place flour, sugar, baking powder, salt, short-
1/2 cup sugar ening, egg, liquid and vanilla. Beat 3 minutes on lowest mixer speed,
1-1/2 teaspoons baking powder scraping bowl constantly first 1/2 minute. Carefully spread batter over
1/4 teaspoon salt fruit in dish. Cover with plastic wrap—no vent. Microwave on Auto
1/4 cup $Cm$d’’m-tenklg Cook Code 3.
1 egg
liquid hm pineapple (1/3 c.)
3/4 teaspoon vanilla extract
*Tip: Use a small
cheese spreads.
drinking glass like the type you buy containing
Cherry Caramel Ring
Pi!!sbury Fluted Tube Cake
Stewed Fruit
—.—z ,_.. - .=- ~.- .-. _. . . .. .
%cyNo.
“ALit(3cook”
186
200
190
Recipe
I
Page No.
Basic Bread Pudding
194
Streuseled Apples
192
Cornbread Ring
184
7
‘Auto cm-m”
Gfxie
3
2
3
1
1
!
-—-... ..... .5-----
. .
.._—
__. —,_r.=............,.,
. ...“. . . . . . . . ..-. -.—-.— ----- .—
.-. =..-
—.—.—-
Page 37

Be sure the exterior of the cooking container
and interior of microwave oven are dry.
St!r or rotate after beeping signalr
A few foods need stirring or rotating after partial
cooking. These foods are delicate cake batters,
fresh root vegetables
such as carrots, and
frozen blocks of vegetables.
Do not open microwave oven door during AI.JTO
a
cycle. Cooking performance may be affected.
Match the amount of the food to the size of the
@
container. Fill containers at least
1/2 full.
@
Add l’d-%cup water to fresh vegetables. Stir or
turn over vegetables and meats after first beeping
signal.
Use rnicrov~ave-safeplates or casseroles, except
DO NOT USE PAPER PLATES with Automatic
cooking.
C2wnm’mts
“Auto
cook”
code
Approx.
-mm?
2-3 min./cup
CW-Mner
Food
Rd&W!t3i$BfaSWdF%@J26#nFbzkk3:
Cover with plastic wrapor!idtc)dish.ia-ww7J R&is
Room Temp. or thin (small
amounts at refrig. temp. )
Refrig, temp. or thick (large
amounts at room temp.)
Deli Foods
1
2
Microwave-safe con-
tainer matched to size
of food.
,,
2 or more servings are considered large
amounts. Cover with plastic wrap or lid.
Cover with plastic wrap or lid to dish.
4 min./cup
Microwave-safe container matched to size
of food.
1
ErNree9
Frozen
Thin (under 1“)
Cook in own container, or for quicker cooking,
in glass container. NOTE: If entree is in alum-
inum pan, remove from box, remove lid and put
back in original closed box. If entree is in paperboard container, remove from box and micro-
wave with original plastic covering.
Use bowl with plastic wrap or cover plate with
microwave-safe plastic dome.
Cook in container.
(see comments)
12-14 min.
3
4
4
Cook in container.
(see comm,ents)
16-18 min.
25-35 min.
Thick (over l“) 10 oz.
21 OZ.
LWmfws
Serve or Reheat
Microwave-safe container !natched to size
of food.
2-3 min./cup
17-19 min.
Remove foil top and put back in box. If dinner has cake or brownies, remove before cooking.
TV Dinner (10-12 oz.)
45Cook in container.
[see comments)
6-8 min.
12 x 8 x 2-in, glass
dish lined with paper
towels. Cover with
plastic wrap.
Casseroles
Precooked ingredients
2 qt. casserole with lid
or cover with plastic
wrap.
,,
-———
35-45 min. Make sure liquid covers all ingredients.6
7
,1
45-55 min.
22-26 rein,
3aw meats & Poultry
:1’3idwn
3reasts (4)
No additional liquid needed, Note the preference control 1 is used with breasts to decrease
cooking time for best results,
41
7
4
4
99
..—
2
——-.-—
2
2
----- ...
12x 8 x 2-in. glass
dish. Cover with
plastic wrap.
NOTE: Make sure
meat doesn’t touch
Severing.
,,
;asserole
‘ieces
60-70 min.
2-4 min./piece No additional liquid needed.
,,
Tie legs together for most even shape.
~~hOte( 3 Ibs.)
12x 8 x 2-in. glass
dish or cooking bag.
Cover with 2 pieces of
Overlapping plastic
wrap.
30-35 min.
1 hr. 30 inin, -
1 hr. 40 rein,
Add %cup water.X-JuckFmM.
upto 5 lb. )
13x 9 x 2-in. glass
jish. Put in cooking
oag and secure with
:ie, Slit bag 1“ at top
near tie,
———.—.—. .
12x 8 x 2-in, ,~idss
jish, Cover with
O{asf.lcwrap.
..—. --—-—--.—-—.-....—.—
20 min. Baste with butter and lemon juice.
—.———-————-.—..-
—.—--..—-----
:::,:11
‘I;]!(:;CIt+~pks {4)
.-
-——
14-18 min.
14-18 min.
2qt. casserole with
id.
,,
Core apples. No water needed.
Core pears. fqo water needed.
Page 38

- —.——-—---—-—.-———.——
s..~.——
—..—
“AW3
axlk”
Ryx! ‘t%ciii? C23nwwer
—.s--
%kmhqw’
-i
Casserole 7 2 qt. glass dish wi!h Make sure liquid covers all ingredients.
lid.
f+deaf!oaf(1?+lb.) 8
Glass loaf dish, Cover
with piastlc wrap.
Patties {4-5)
~
8“ square dish. Cover
with plastic wrap.
—
Pc?r%
Sawsaae Patties
5 8“ glass square dish. 8 min.
(V,” th~ck–4)
Cover with plastic
wrap,
Chops
6
12 x 8 x 2-in. glass 33-38 min.
Baste with 1 tbsp. barbeque sauce per chop.
(%-l” thick)
dish. Cover with
plastic wrap.
NOTE: The Preference Control 9 is used for
chops to increase cooking time for better
results.
Spare Ribs
9 2 qt. glass dish, Cover 1 hr. 30 rnin.-
Meat must be covered with liquid. See page 32.
:U~ tO 3 lb.)
with lid or plastic
1 hr. 50 min.
wrap.
%Ice
nstant (Minute-n/2 cups) 2 2 qt. glass dish with 9 min. Follow instructions on package, Cover.
lid.
?aw (1
Cup)
6
r,
24 min.
Use 1cup rice and 2 cups water.
%?afood
‘ieces
1 lb. Shrimp or scallops)
1 1?4 qt. glass dish with
5-6 min.
lid.
;asserole
6 2 qt. casserole with lid 35-45 min.
Make sure liquid covers all ingredients,
or cover with plastic
wrap.
M9hwst43EJk
.—
1%lb. round steak)
8
3 qt. casserole with 55-60 min.
Cut into pieces. Make sure liquid covers all
lid.
meat,
~egefabies
—
‘resh
artichokes 2 2 qt. glass dish with 70-12 rein, Place artichokes in dish stem side down. Add
up to 4 med.)
lid.
1/4cup water.
hrrots (? lb. sliced)
5
,,
13 min.
‘Add %cup water.
cauliflower (1 med. head)
5
,,
15 min.
No water needed. Start cooking stem side
down.
mparagus (1 lb. cut spears)
5 12 x 8 x 2-in, glass
14 min.
Add ‘/4cup water.
dish. Cover with
plastic wrap.
,roccoli (1 lb. cut spears)
51
14 min.
II
IVZqt. glass dish with
\russe! Sprouts (1 lb.)
5 11 min.
to
lid.
otatoes’
5 1 qt. glass dish with 6-9 min.
Let stand 5 minutes after microwaving. NOTE:
lid.
Watch hot dish and steam!
5 2 qt. glass dish with 14-16 min.
,,
lid,
rclzeri EWXk(to oz.)
roc~olj
31 l% qt. glass dish with 18-20 min.
Add 2 tbsp. water. When oven signals, stir well.
lid,
NOTE: The Preference Control 1 is used for
broccoli to decrease cooking time for better
results.
rUSSSl Sprouts
3
II
16-18 min. Add 2 tbsp. water. When oven signals, stir well,
xzf .Spinach
3
,,
11-13 min.
1,
ixed Vegetables
3
,,
10-12 min.
II
?~z~~p$=J~~~
aby Lirnas 4 Lay pouch in 8-10 min.
Make a %“ slit in pouch, Stir well before
microwave-safe dish,
serving. NC)TE:Watch for hot steam.
No cover nwxfed.
O?n
4
II
8-10 min.
t,
:35
41
t!
8-10 min.
Make a Yaf’slit in pouch, Stir well before
II
serving, NOTE: Watch for hot steam, NOTE:
Preference Control 1 is used for peas to
~1
!
decrease cooking time for best results.
>j~,>~c,i-]
4
,,
‘10-12min.
Make a ‘/2”slit in pouch, Stir well before
serving, NOTE: Watch for hot steam,
...........“..-.—.z.“.-mrr-- ...-_.,....... ._—-e-.—J-e.. J- —.—.—-------........_-..--=-. ----
---
-.— ..-.—.-.—..
-.. --- ,...,,..T.-
Page 39

PROBLEM
IPOSSBBL.E CAUSE AND REMEDY
OVEN ‘WILL.
NOT WORK
PIIJgon range is not completely inserted in the outlet receptacle.
The circuit breaker in your house has been tripped, or a fuse has
been blown.
Oven controls are not properly set.
Door left in locked position after cleaning.
.—
OVEN LIGHT
Light bulb is loose.
DOES NOT WORK
Bulb is defective. Replace.
Switch operating oven light is broken. Gall for service.
FOOD DOES NOT
Oi&N THvIP Knob not set at BROIL.
BROIL PROPERLY
Door not left ajar as recommended.
Improper sheif position is being used. Check Broiling (Mart.
Necessary preheating was not done.
Food is being cooked on hot pan.
Utensils are not suited for broiling.
Aiuminum foil used on the broil pan rack has not been fitted properly
and slit as recommended.
FOOD DOES NOT ROAST
OVEN SET Knob not set on BAKE.
—
OR BAKE PROPERLY
OVEN TENIP Knob not set correctly.
Shelf position is incorrect. Check Roasting or Baking Charts.
Oven shelf is not level.
Wrong cookware is being used, When roasting, pan is too small.
A foil tent was not used when needed to slow down browning during
roasting.
MOISTURE INSIDE AND
Be sure oven vent du;t is not covered with some material.
OUTSIDE YOUR OVEN
Be sure oven vent duct is positioned properly.
_6ALROD@SURFACE UNITS
‘Surface units are not plugged in solidly,
NOT FUNCTIONING
Reflector rings/pans are not set securely in the range top.
PROPERLY
Surface unit controls are not properly set.
OVEN W!LL NOT –
——
Automatic time diai/diais not set or not set properly. The STOP dial
SELF-C~,EA~
must be set and advanced beyond the time noted on oven clock.
The STOP dial was not advanced for long enough.
Both OVEN SET and OVEN TEMP Knobs must be at CLEAN setting,
A thick pile of spillover when cleaned leaves a heavy layer of ash in
spots which could have insulated the area from further heat,
Latch not in “CLEAN” position.
——-—.
—..
—.— .
D!/Efq DOOR WON’T LATCH
Turn OVEN SET Knob to CLEAN. Glowing L~ked Light after knob
is turned indicates oven is too hot from previous use and door won’t
latch, To COOIov~n, open door wide, then latch can be moved,
OVEN SET KNOB must be at CLEAN or OFF before latch can be
moved,
Latch Heleaso Button not pushed when moving Latch,
. ..—...- ——.——. . ..—.———..——— -
—— —.———
——
40
Page 40

+
PRc)E3L.E@vl
I
R3ssif3LE! CXLJSE AND REMEDY
—— — —
—..—— .—.——
~Q~T’~fJ~ ~~~~~
L~~~~~_J,
Door not securely closed.
YET OVEN WILL NOT START
START must be touched after entering cooking selection.
Another selection entered aiready in oven and CH..EAFV(3FFnot
touched to cancel it.
Makesure you haveentered cooking time after touching TIME COOK.
CLEAR/OFF
was touched accidentally. Reset caoking program and
touch START.
Temperature probe not inserted properly or not being used during
Auto Roast or Temp Cook.
Make sure you have entered desired finished temperature after
touching TEMP COOK.
Make sure you entered a code number after touching AUTO (XX)K,
AUTO ROAST or AUTO DEFROST.
.
*’ERROR” APPEARS When using Temp Cook, a temperature iess than 80° or more than
ON READOUT
199° has been entered.
Door is opened during “AUTO” cycle of Auto Cook function. Close
door and touch START.
Weight is incorrect for Auto Defrost code on chart. It is necessary to
reset oven.
“PROBE” APPEARS Probe has been forgotten or not seated properly in oven wall when
ON READOUT using Auto Roast or Temp Cook functions.
FOODS ARE EITHER Over- cooking times may vary because of starting food temperature, food
COOKED OR UNDERCOOKED
density or amount of foods in oven. Touch TIME COOK and addi-
tional cooking time for completion.
Incorrect Power Level entered, Check Cookbook for recommended
Power Level or changing levels during cooking if necessary.
Dish was not rotated, turned or stirred. Some dishes require specific
instructions. Check Cookbook or recipe for these instructions.
Too many dishes in oven at same time. Cooking time must be
increased when cooking more than one food item. Check Cookbook
for recommendation on increasing time.
Dish not completely covered as directed during Auto Cook.
Previous microwaving left humidity or moisture in oven, thus les-
sening the cooking time in Auto Cook function.
Certain vegetables need a standing time after
using Auto Cook.
Check Automatic Cooking Chart.
Oven door was opened during “AUTO” cycle of Auto Cook function.
Probe not inserted properly into meat or dish when using Temp
Cook or Auto Roast functions, Check Cookbook or Auto-Roes: sQc-
tion of this book for specific instructions.
Check Cookbook for food placement and instructions when using
1
Double DutyyMShelf.
-—.—
—
——
>—.
‘!. Steam or vapor escaping from around the door.
4. DuII thumping sound while operating at power
2.
I-icJt_lt reflection around door or outer case,
levels other than high.
.2. ~lmmlng
oven Ilght and change In blower sound
5. Some TV-17adio interference might be noticed
VIz!y
occur while operating at power levels other
while
using your microwave oven. It’s similar to tt-)e
thar! hIqjh
interference caused by other small appliances and
does not Indicate a problem with your oven.
..-. -.-..——-?—-,.,..=.-..,,
Page 41

Do not clean the bake unit or broil unit, Any soil will burn off
when the unit is heated. NOTE: The bake unit is not hinged and
cannot be lifted to clean the oven floor. If spillover, residue, or
ash accumulates around the bake unit, gently wipe around the
unit with warm water.
Drain fat, cool pan and rack slightly. (Do not let soiled pan and
rack stand in oven to COOI),Sprinkle on detergent, Fill pan with
warm water and spread cloth or paper towel over the rack. Let
both stand for a few minutes. Wash; scour if necessary. Rinse
and dry. OPTION:The broiler pan and rack may also be cleaned
in a dishwasher.
Bake Unit and
Broil Unit
@ Soap and Water
@
Soap-Filled
ScouringPad
@ PlasticScouring
Pad
Broiler Pan & Rack
Pull off knobs. Wash gently but do not soak. Dry and return controls to range making sure to match flat area on the knob and
shaft.
Control Knobs: Range
Top and Oven
Mild Soap and
Water
Wash all glass with cloth dampened in soapy water, Rinse and
polish with a dry cloth. If knobs on the control panel are removed, do not allow water to run down inside the surface of
glass while cleaning.
OutsideGlassFinish
Soap and Water
Metal, including
Chrome Side Trims
and
Trim Strips
Wash, rinse, and then polish with a dry cloth. DO NOT USE steel
WOOI,abrasives, ammonia, acids, or commercial oven cleaners
which may damage the finish.
Soap and Water
Avoid cleaning powders or harsh abrasives which may scratch
the enamel.
If acids should spill on the range while it is hot, use a dry paper
towel or cloth to wipe up right away. When the surface has
cooled, wash and rinse.
For other spills, such as fat smatterings, etc., wash with soap
and water when cooled and then rinse. Polish with a dry cloth.
@ Paper Towel
@
Dry Cloth
@Soap and Water
Porcelain Enamel*
On this oven, clean ONLY the door liner outside the gasket. The
door is automatically cleaned if the oven is in the self-cleaning
cycle. If spillover or spattering should occur in cooking function, wipe the door with soap and water. DO NOT rub or damage gasket. Avoid getting soap and water on the gasket or in the
rectangular flanges on the door.
Jnside
oven Door:x
Soap and Water
Oven Gasket;’
Avoid getting ANY cleaning materials on the gasket.
——4smz
Soap and Water
Cool
before cleaning. Frequent wiping with mild soap and water
will prolong the time be?we.enmajor cleanings, Be sure to rinse
thoroughly. For heavy soiling, use your self-cleaning cycle often.
Oven Liner
Your shelves can be cleaned with the self-cleaning function in
the oven. For heavy soil, clean by hand using any and all mentioned materials. Rinse thoroughly to remove all materials after
cleaning.
Shelves
(See Self-Cleaning
Oven Directions)
Soap and Water
~spattersand spilJsburn away when the coils are heated. .&tthe
end of a meal, remove all utensils from the Calrod” unit and
heat the soiled units at H1.Let the soil burn off about a minute
and switch the units to OFF.Avoid getting cleaning materials on
the coils. Wipe off any cleaning materials with a damp paper
towel before heating the Calrod” unit.
DO NOT handle the unit before completely cooled.
DO NOT self-clean plug-in units.
DO NOT immerse plug-in units in any kind of liquid.
Calrod” Surface Unit
Coils
‘Spillage of marinades, fruit juices, and basting materials containing acids
maycause discoloration. Spillovers should
6%?%
be wi~ed up immediately, with care being taken to not touch any hot portion of the oven. When the surface is cool,
-1
f--
,J.,Y
K-*<q-
clean
a,ndrinse.
Page 42

—-.—
to build and we know that you want yotir appliances to give you many years of dependable
service.
Our Consumer Services are designed with your needs and wants in mind.
warrantyProtection
Yournew applianceis a welldesignedandengineered Seethe warrantyonthe backpageof this bookfor
product.Beforeit left the factory,it went through details.
H
..
*i-—
rigoroustests to detectmanufacturingdefects.And
youhave
a writtenwarrantyto protectyou.
Promptserviceatyourconvenience
Wheth& yourappliancei; in orout of warranty,
you’rejust a phonecall awayfrom our nationwide
networkof FactoryTrainedServiceprofessionals.
Simplycall ourGEserviceorganization.You’llfind
them in theWhite Pagesunder“GeneralElectric
Company”or “GeneralElectricFactoryService;’
and in the YellowPagesunder“GeneralElectric
CustomerCare@Service.”
Serviceis scheduledatyourconvenienceandthe
techniciandrivesa fully-stockedparts servicetruck
sothat, in mostcases,the repaircanbecompleted
inonevisit.
We$reproudof our serviceandwant youto be
pleased,but if for somereasonyouarenot happy
with the setviceyou receive,herearethreestepsto
follow for furtherhelp.
FIRST,contact the peoplewhoservicedyour
appliance.Explainwhyyouare not pleased.In most
cases,this will solvethe problem.
NEXT,if youarestill not pleasedwriteall the details
— includingyourphonenumberto:
Manager,ConsumerRelations
GeneraiElectricCompany
AppliancePark
Louisville,Kentucky40225
FINALLY,if yourproblemis still not resolved,write:
MajorApplianceConsumerAction Panel
20NorthWacker Drive
Chicago,Illinois 60606
servicecontracts
For troub!e~free service beyond
pyourapplianceingoodoperating
conditionduringthe contractperiodat
the writtenwvimmtyperiod.
noadditionalcharge.Servicecontracts
t you paytoday’spricesfor service
If youpreferto budgetyourrepair’expenditure
a month,a year,or severalyearsfrom
insteadof beingsurprisedbythem,GEoffer
now.And,you’ll receiveservicefrom
servicecontractsfor varyinglengthsof time
GEtrainedservicetechniciansusing
all GEmajorappliances.With a contract,we’ll
onlyGenuineGEparts.
IiiE!
..:
‘ -
.,
‘TM?Quick Fix@system
YCWcan save money and time
by doing lit yourself.
Fordo-it-yourselferswhowould
preferto fix GEmajorappliances
themselves,.,GEoffers anindustry
first, the Quick Fix@System.
A programfor do-it-yourselfappliancerepair,
the systemincludesstep-by-steprepair
manua/sfor refrigerators,most non-microwave
electricranges,dishwashers,andstandard
andlargecapacitywashersanddryers,plus
speciallypackagedreplacementpw!s: and
technicalhelpwith a tol/ free800number
.~&+@&:
HelpforYbuBy IPkme
I$3&&%d
TheGEAnswerCenterT~800.626.2000
...- 2..:-.+
,.,.-.......-+:.,
Shouldyou needhelp in the selectionand purchase
consumerinformationserviceis open24.hoursa
.–~-:.~~
,--.-,-=-;;;7j,y-~-—-
. ...-—7.
“-’:-QJ;$ f.,.7;
of newappliances,or havequestionsabout the
day,sevendaysa week.
_-...
>~j;~ @
oparationof the GEappliancesyou nowown-orhave
.
—,
$
anyotherquestionsaboutourconsumerproducts
C)urstaff of expertsstandsready to assist you
orservices, youarecmlya 7CU..-FREEtail away.
anytime.
Page 43

‘k$$$
save proof d original purchasedatesuchasyoursalesslip or cancelhxf check to establishwarrantyperiod.
“@j&
-.—.
1%>
-======
::%
FULLQNE~YmR WARRAMTY
For cm year fromdate cdoriginal
purchase,we will provide,free of
charge, parts and service labor in
your home to repair or replaceany
part of the microwave Owedramge
that fails because of a manufacturing defect.
For the second through fifth year
from date of original purchase,
we will provide, free of charge, a
replacement magnetron tube if the
magnetron tube fails becauseof a
manufacturing defect. Youpay for
the service trip to your home and
service labor charges.
~~~~ !~ ~~~ ~~~~~~~ @Service trips to your home to
teach you how to use the product.
Read your Use and Care material.
if you then haveany questions
about operating the product,
please contact your dealer or our
Consumer Affairs office at the
address below,or call, toll free:
The GEAnswer Center~
800.626.2000
consumer information service
~ Improper installation.
If you havean installation problem,
contact your dealer or installer.
Youare responsible for providing
adequate electrical, exhausting
and other connecting facilities.
This warranty is extended to the
original purchaserandany succeeding owner for products purchased
for ordinary home use in the 48
mainland states, Hawaii and
Washington, D.C.h Alaska the
warranty is the same except that it
is LIMITEDbecauseyou must pay
to ship the product to the service
shop or for the service technician’s
trawl costs to your home.
All warrantyservicewill be provided
by our Factory Service Centers or
by our authorized Customer Care@
servicers during normal working
hours.
Look in the White or Yellow Pages
of your telephone directory for
GENERALELECTRICCXXWVNY,
GENERALELECTRICFACTORY
SERVICE,GENERALELECTRK2I-K3TWMNTFACTORYSERVICEor
GENERALELECTRICCI.JSTOMH?
CAFE” SERVICE.
-—-—--= .:---.-A———..
.
Some states do not allow the exclusion or limitation of incidental or consequential damages, so the above limitation or exclusion
may not apply to you. This warranty gives you specific legal rights, and you may also have other rights which vary from state tc s%$e.
To know what your legal rights are in your state, consult your local or state consumer affairs office or your state’s Attorney General.
~arra~t~r: (%3rteF@
EE@ctricCompany
If h.lrfherhelp is needed concerningthiswarranty,Umntac%:
Manager—consumer Maim, ‘General!i%Wt$”kcompany,Appliance Park, Louisville, KY 40225
————.—-c..— .
 Loading...