

Page 1
Howtogetthebestfrom
..
Energy-savingtips
Surfacetooting
Ovencoo!dng
Howtouse the
self-cleaningloweroven
Questions?
UsetheProblemSolver
p5
p6
p7
p13
p24
p31
UseandCareof
model
JHP63v
YourDirectLinetoQneml Electric
TheGEhwer Centef$00.626.2000
Page 2
i;eklrelJsiRgYolirl?dng~,.,. .- ,~
;._.
safetyInstructions... . ... ..i3,4
F
~~~~ygy.~avingTips . . . . . . . . . “ .5
Feature’sofYoi3rRange . . . . . ...6
Surfdcecooking . .... ... ..+. .~
The3-in-Iunit...............$
HowtoGriddle..............~
HO~l~C~fl~i~~Ti~S . . . . . . ..$..9
SurfaceCookitigGuide. . ...10. 11
AutomaticTimeraridClock. . ..12
UsingYourOven. ...-.. ......13
BakiHg. . ........ .. .. ....i. l4
BakingGuide. .. .. .. ..+ .. ...~~
Roasting. .. .. .. . .. .. ....”...~~
MeatThermometer
RoastingGuide. ..~~ . . . . . . . ..~~
Broiling . . . . . . . . . . . . . . ..+ b.~9
Broilingwith
MeatThermometer . . . . . ...20
B~oilingGuide . . . . . . . . . . . . . ..2l
Rotisserie.. . . . . . . . . .-. . . ....22
RotisserieTimeand
TemperatureGuide. . . . . . ...23
OperatingtheSelf-Cleaning
LowerOven . . . . . . . . ...24.25
CareandCleaning . ..”l..,.26,-9
RemovableOvenDoor . . . . . ...27
CleaningGuide--. . .. .-. . ...28.29
If}fiu NeedService.“.. . . . . ...29
ExhaustSystem. . . . . . . . . . . ..~~
TheProblemSolver. . .. .. . ...31
W~arranty. . . . . . . . . .. BackCover
. . . . ...9..17
Itisintendedtohelpyouoperateand
maintainyournewrangeproperly.
Keepithandyforanswerstoyour
questions.
Ifyoudon’tunderstandsomething
orneedmorehelp,write(include
yourphonenumber):
ConsumerAffairs
GeneralElectricCompany
AppliancePark
Louisville,KY40225
writedownthemodeI
andserialnumbers.
You’llfindthemonalabellocated
onthefront oftherangebehindthe
ovendoor.
Thesenumbersarealsoonthe
ConsumerProductOwnership
RegistrationCardthatcamewith
yourrange.Beforesendinginthis
card,pleasewritethesenumbers
here:
Model Number
Serial Number
Usethesenumbersinany
correspondenceorservicecalls
concerningyourrange.
Immediately contactthedealer(or
builder)thatsoldyoutherange.
save time a~ld money.
Before
you request
service.e *
Checkthe ProblemSolveron
page31.Itlistsminorcausesof
operatingproblemsthatyoucan
correctyourself.
.—
..
-.
.-
.—
2
Page 3
b;lsic?ilfet}lprec:iutiollsshouldbe
;Qilt>iveti,i
niit]dillgthefollowing:
s t~scthisapplianceonlyforits
intendeduseasdescribedinthis
manual,
@Besureyourapplianceis
properlyinstalledandgrounded
byaqualifiedtechnicianin
accordancewiththeprovided
installationinstructions.
@Don’tattempttorepairor
replaceanypartofyourrange
unlessitisspecifically
recommendedinthisbook.All
otherservicingshouldbereferred
toaqualifiedtechnician.
QBeforeperforminganyservice,
DISCONNE~THERANGE
WERSUPPLYATTHE
USEHOLDDISTNBUTION
awearproperclothing.Loose
fittingorhanginggarmentsshould
neverbewornwhileusingthe
appliance,Flammablematerial
couldbeignitedifbroughtin
contactwithhotheatingelements
andmaycausesevereburns,
euse onlydry potholders—
Moistordamppotholdersonhot
surfacesmayresultinburnsfrom
steam.Donotletpotholderstouch
hotheatingelements.Donotuse
atowelorotherbulkycloth.
@Neveruseyourappliancefor
Warmingor heatingtheroom,
eStorigein or onappliaMce—
Flammablematerialsshouldnot
bestoredinanovenor near
surfaceunits.
eKeephoodandgreasefilten
cleantomaintaingoodventing
andtoavoidgreasefires.
@DonotletCookinggrease
or otherflammablematerials
accumulateinthe rangeor
near it.
@Donotusewaterongrease
fir~s.Neverpickup aframing
pan. smother flamingpauon
Rem@mber:
The insidesurface _- --:
oftheovenmaybehotwhenthe
-.
Page 4
surfaceCookixkgU12%S:
i
useProperPansize—”This
@
applianceisequippedwithoneor
moresurfaceunitsofdifferent
size.SeIectutensilshavingflat
bottomslargeenough.tocoverthe
surfaceunitheatingelement.The
useofundersizedutensilswill
exposeaportionoftheheating
elementtodirectcontactandmay
resultinignitionofclothing.
Properrelationshipofutensilto
burnerwillalsoimproveefficiency.
@Neverleavesurfaceud~
mattendedat tigh hat setiings,
Boilovercausessmokingand
greasyspilloversthatmaycatch
onfire.
~Besure
arenotcoveredandareinplace.
Theirabsenceduringcooking
coulddamagerangepartsand
wiring.
@~~~y~~~~~]~~~~~~f~~~~~
linedrippansoranywhereinthe
ovenexceptasdescribedinthis
book.Misusecouldresultina
shock,firehazard,ordamageto
therange.
@Onlycertaintypesofglass,
glass/cetic, cetic, -en-,
orotherglazedcontainersare
suitableforrange-topservice;
othersmaybreakbecauseofthe
suddenchangeintemperature.
(SeeSectionon“Surface
Cooking”forsuggestions.)
@Tonlinimizeburns, ignitionof
flammablematerials,and
spillage;thehandleofacontainer
shouldbepositionedsothatitis
turnedtowardthecenterofthe
rangewithoutextendingover
nearbysurfaceunits.
eDan9timlllerseorsoak
removablesurfaceunits.Don9t
putthemin a dislR$Yashere
drippansandventducts
@.Aiwaysturnsurfaceunitto
ofiFbefore
~Keepa~~eyeonfoodsbeing
friedatHIGHorMEDIU?ti
HIGHheats.
@Toavoidthepossibilityofa
bwn or elwtricshQck9alwaysbe
Cerhinthat thecoRtroIsforall
surfaceUtik areat Om psition
andallCoilsarecoolbefore
attenlptingtoremovetheunit.
@~hen flamingfoodsunder
thehood,twn thefan off.The
fan9ifoperating,mayspread
theflame.
@Foodsfor fryingShouldbe?dS
dryaspossible.Frostonfrozen
foodsormoistureonfreshfoods
cancausehotfattobubbleupand
oversidesofpan.
@Uselittlefatforeffective
shallowordeep-fatfrying.Filling
thepantoofi~ offit cancause
spilloverswhenfoodisadded.
e Ifacombinationofoi]sorfats
WMbeusedinfrying,stirtogether
beforeheating,orasfatsmelt
slowly.
@Alwaysheat fatslowly,and
watchasitheats.
*Usedeepfatthermometer
wheneverpossibletoprevent
overheatingfatbeyondthe
smokingpoint.
removingutensil,
—
SAVETHESE
msTRucTIoNs
:-..
—
..
Page 5
surfacecooking
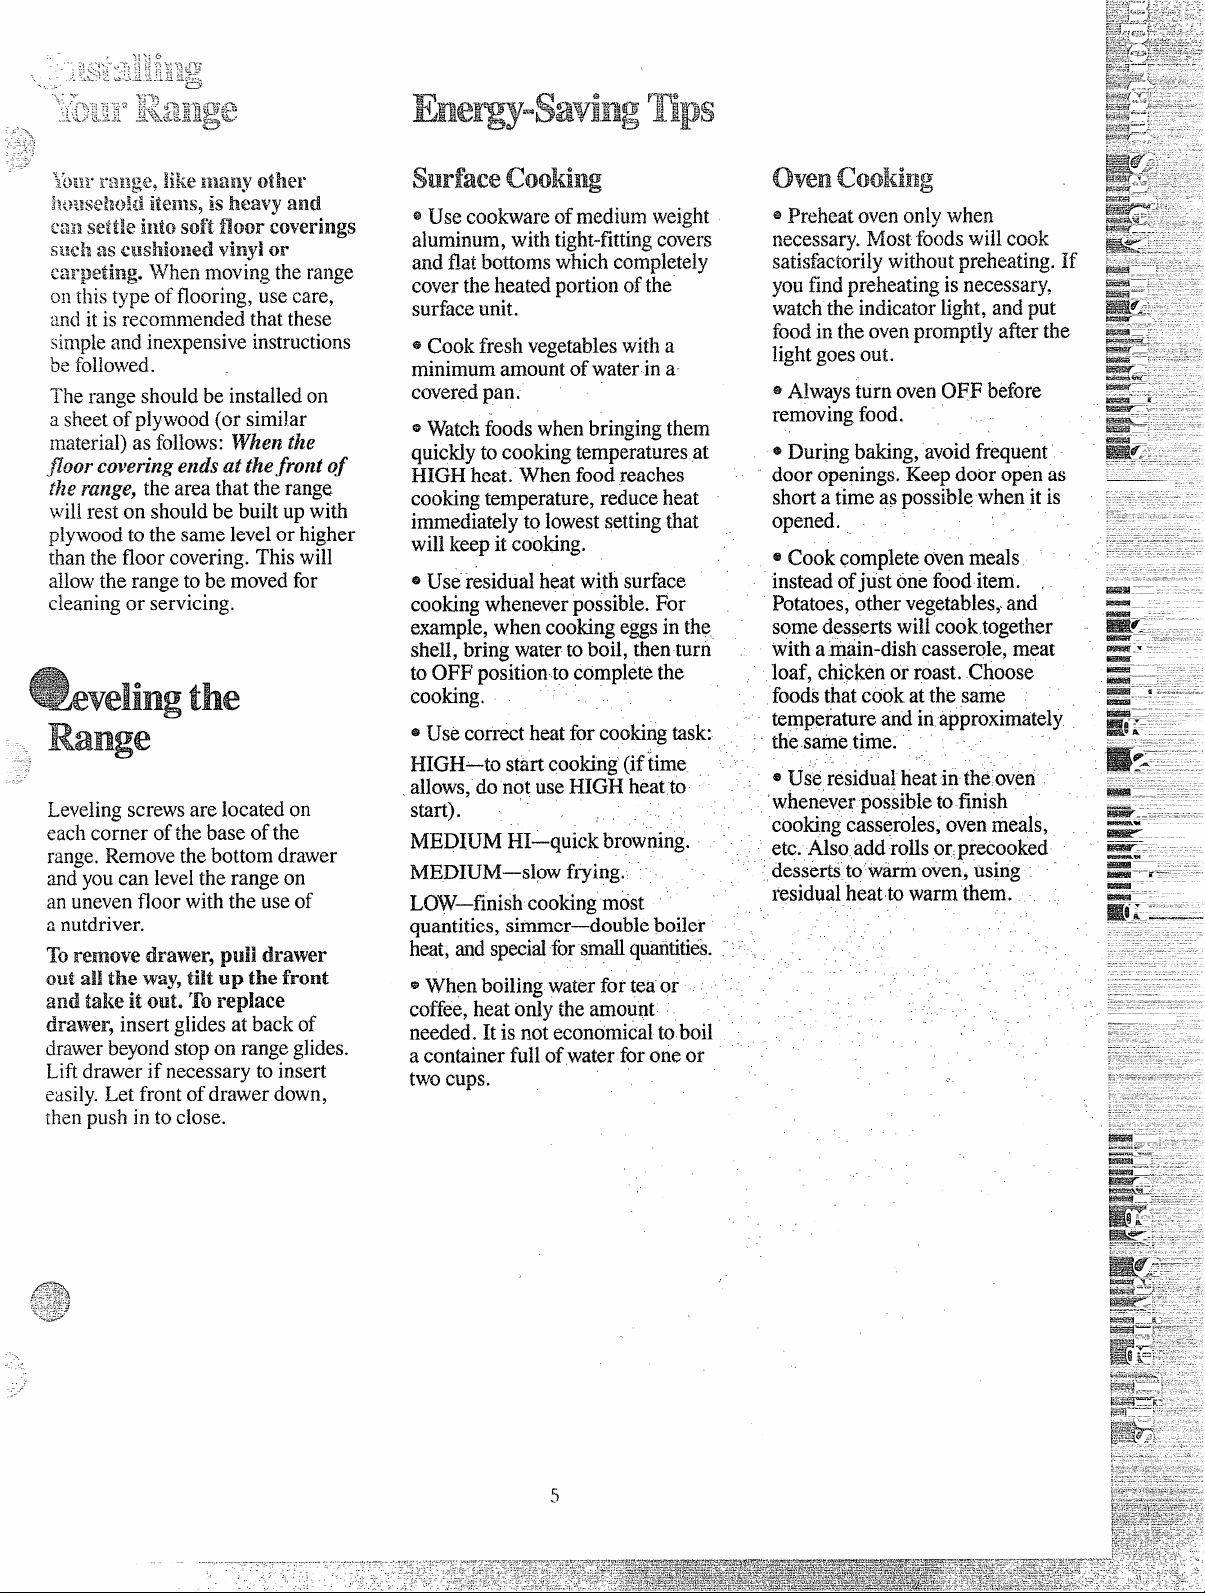
The range shouldbeinstalledon
asheetofplywood(orsimilar
material)asfollows:l~hen the
J~QoY’Co$’eringendsat the front of
flzera~~ge,theareathattherange
wilirestonshouldbebuiltupwith
plywoodtothesamelevelorhigher
tian thefloor covering.Thiswill
allowtherangetobe movedfor
cleaningor servicing.
Iing the
Range
Levelingscrewsarelocatedon
eachcornerofthebaseofthe
range.Removethebottomdrawer
andyoLlcan leveltherangeon
an unevenfloorwiththeuseof
2 nutdriver.
Toremove drawer, pulildrawer
outal! the wayy ti~t up the front
andtakeit
drawer,insertglidesatbackof
drawerbeyondstoponrangeglides.
Liftdrawerif necessarytoinsert
easily.Letfrontofdrawerdown,
~henpushintoclose.
out.‘roreplace
cookwareofmediumweight
@Use
aluminum,withtight-fittingcovers
andflat bottomswhichcompletely
coveytheheatedportionofthe
surfaceunit.
*Cookfreshvegetableswitha
minimumamountofwaterina
coveredpan.
~ Watchfoodswhenbringingthem
quicklytocookingtemperaturesat
HIGHheat.Whenfoodreaches
cookingtemperature,reduceheat
immediatelytolowestsettingthat
willkeepitcooking,
~Useresidualheatwithsurface
cookingwheneverpossible.For
example,whencookingeggsinthe
shell,bringwatertoboil,thenturn
toOFFposition-tocompletethe
cooking.
@Usecorrectheatforcookingtask:
HIGH—tos~rt coobg (iftirne
allows,donotuseHIGHheatto
st2rt).
MEDIUMHI—quickbrowning.
MEDIUM—slowfrying.
LOW—finishcookingmost
quantities,simmer—doubleboiler
hwt, andspecialforsm~ quantities.-
@Whenboilingwaterforteaor
coffee,heatody theamount
needed.It is not economicaltoboil acontainerfullofwaterforoneor
twocups.
!.
~Preheatovenon~ywhen
necessary.Mostfoodswilicook
satisfactorilywithoutpreheating.If
youfindpreheatingisnecessary,
watchtheindicatorlight,andput
foodintheovenpromptlyaftezthe
lightgoesout.
@AlwaysturnovenOFFbefore
removingfood.
@Duringbaking,avoidfrequent
dooropenings.Keepdooropen as
shorta timeaspossiblewhenitis
opened.
@Cookcompleteovenmeals
insteadofjust onefooditem. ,
Potatoes,othervegetables,.and
somedessertswillcooktogether
withamain-dishcasserole,meat
loaf,chickenor roast.Choose
foodsthatcookatthesame
temperatureandinapproximately
thesametime. ~
,.
~Useresidualheatintheoven
wheneverpossibletofinish
cookingcasseroles,ovenmeals,
etc.Alsoaddrollsor.precooked
dessertsto‘warmoven,using
residualheattowarmthem.
.-
..
.-
-.
5
.....
Page 6
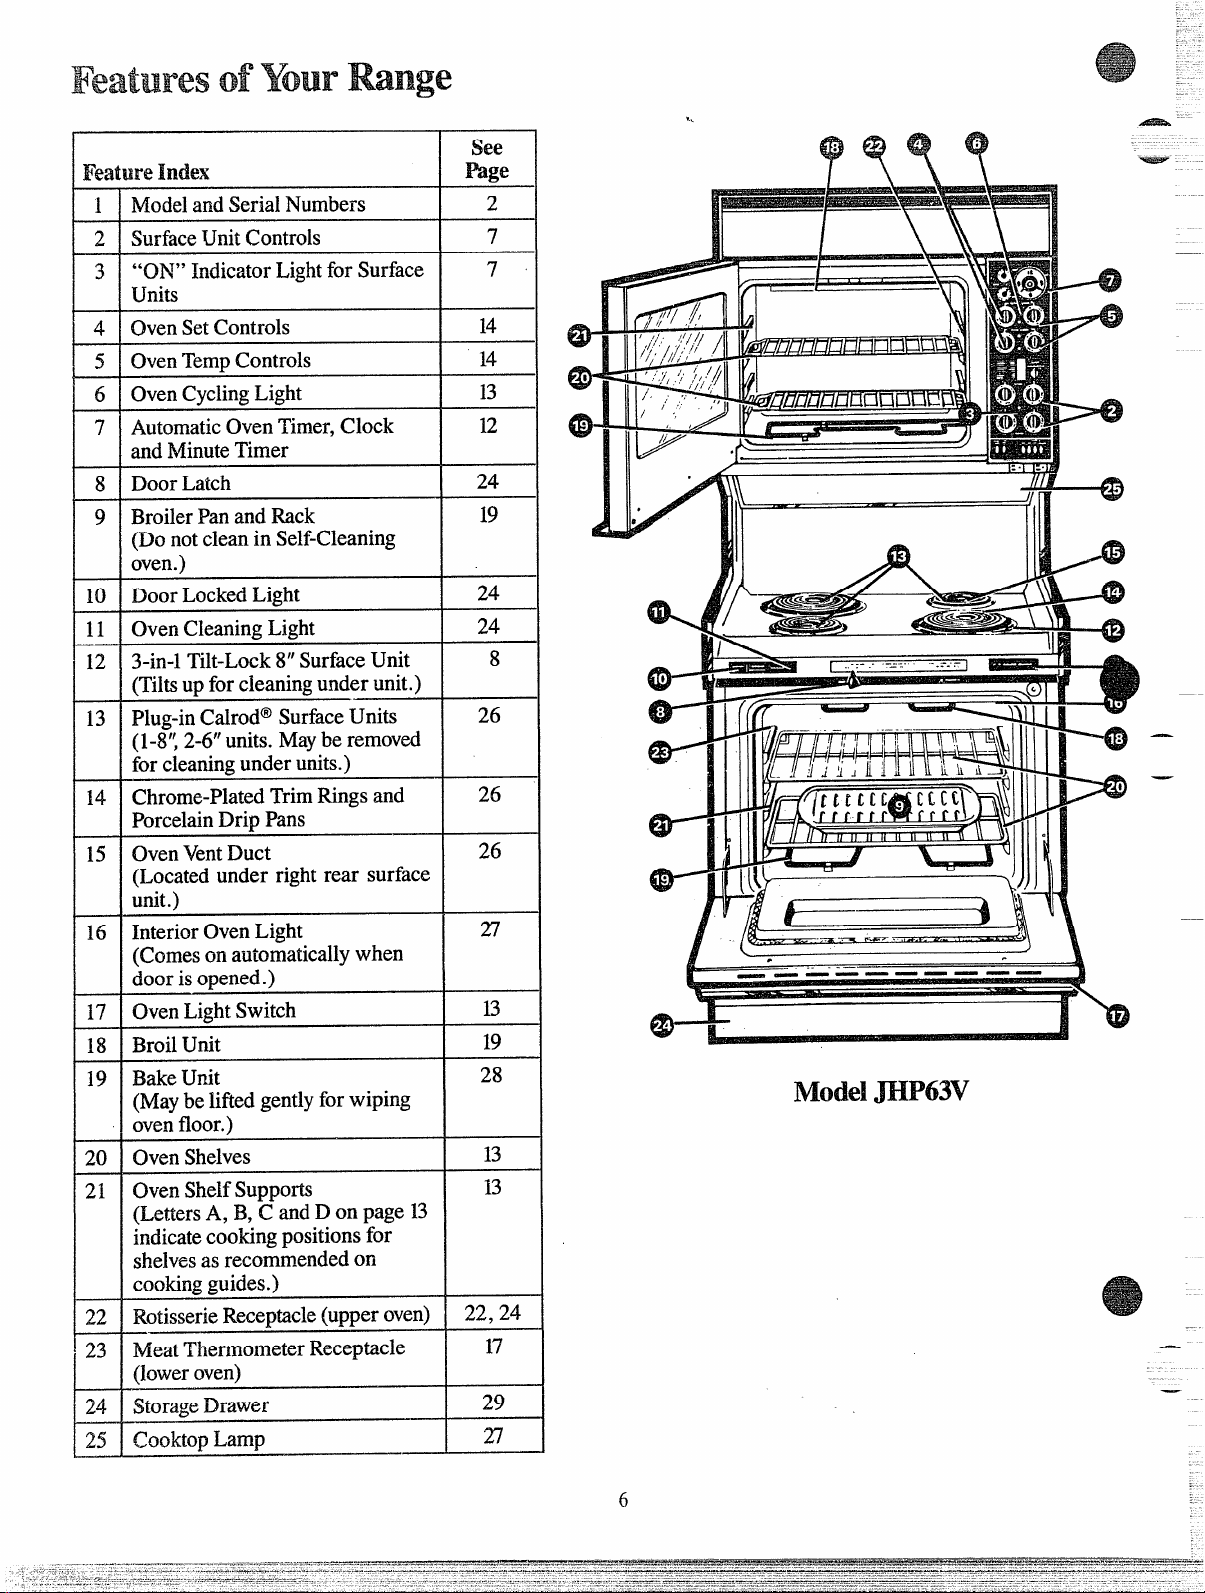
FeaturesoflburRange
-—
see
FeatureIndex
SurfaceUnitControls
“ON” IndicatorLightforSurface
Units
OvenSetControls
OvenTempControls
OvenCyclingLight
AutomaticOvenTimer,Clock
andMinuteTimer
DoorLatch
8
BroilerPanand~ck
9
(Donotcleanin Self-Cleaning
oven.)
DoorLockedLight
OvenCleaningLight
3-in-1Tilt-Lock8“SurfaceUnit
(Tiltsupforcleaningunderunit.)
Plug-inCalrod@SurfaceUnits
(1-8’;2-6”units.Mayberemoved
forcleaningunderunits.)
‘chrome-PlatedTrimRingsand
PorcelainDripPans
OvenVentDuct
(Locatedunder rightrear surface
unit.)
16
InteriorOvenLight
(Comesonautomaticallywhen
doorisopened.)
OvenLightSwitch
ii
BroilUnit
BakeUnit
(Maybeliftedgentlyforwiping
ovenfloor.)
OvenShelves
20
OvenShelfSupports
(LettersA,B,CandD onpage13
indicatecookingpositionsfor
shelvesasrecommendedon
cookingguides.)
RotisserieReceptacle(upperoven)
—
23
MeatThermometerReceptacle
(loweroven)
StorageDrawer
z
CooktopLamp
mge
14
14
13
12
24
19
24
24
26
26
26
27
28
22,24
2ModelandSerialNumbers
7
7
I
8
,_ ..- ———— ———
13
19
ModelmP63V
13
—
29
27
6
.
Page 7

Howtosetthecontrols
cookingGuide
Yoursurfaceunitsandcontrolsare
desigi]edtogiveyouaninfinite
choiceofheatsettingsforsurface
unitcooking.
AtbothOFFandHIGHpositions,
thereisaslightnichesocontrol
“clicks”at thosepositions;“click”
onHIGHmarksthehighestsetting;
thelowestsettingisbetweenthe
wordsLOWandOFF.Inaquiet
kitchenyoumayhearslight
“clicking”soundsduringcooking,
indicatingheatsettingsselected
arebeingmaintained.
Switchingheatstohighersettings
alwaysshowaquickerchangethan
switchingtolowersettings.
—
—.
step 1
Graspcontrolknobandpushin. . .
2
Step
Turneitherclockwiseorcounterclockwisetodesiredheatsetting.
Quickstartforcooking;
bringwatertoboil.
MED
HI
Fastfry,panbroil;maintain =
fastboilonlargeamountof ‘@food. -
MED
Sauteand brown;maintain
slowboilonlargeamount
offood.
CookafierstartingatHIGH;
cookwithlittlewaterin
coveredpan.
WM
Steamrice,cereal;maintain
servingtemperatureof most
foods.
N~E:
1. AtHIGH,MEDHI,neverleave
foodunattended.Boiloverscause
smoking;greasyspilloversmay
catchfire.
2. AtWARM,LOW,melt
chocolate,butteronsmallunit.
Controlmustbepushedintoset
onlyfromOFFposition.When
controiisinanypositionother
thanOFF,itmayberotated
withoutpushingin.
BesureyouturncontroltoOFF
whenyou finishcooking.An
indicatorlightwi~lglowwhenANY
heatonanysurfaceunitison.
—
.—
7
Page 8
3“in”lsurfaceunit
—
—..
.-
--
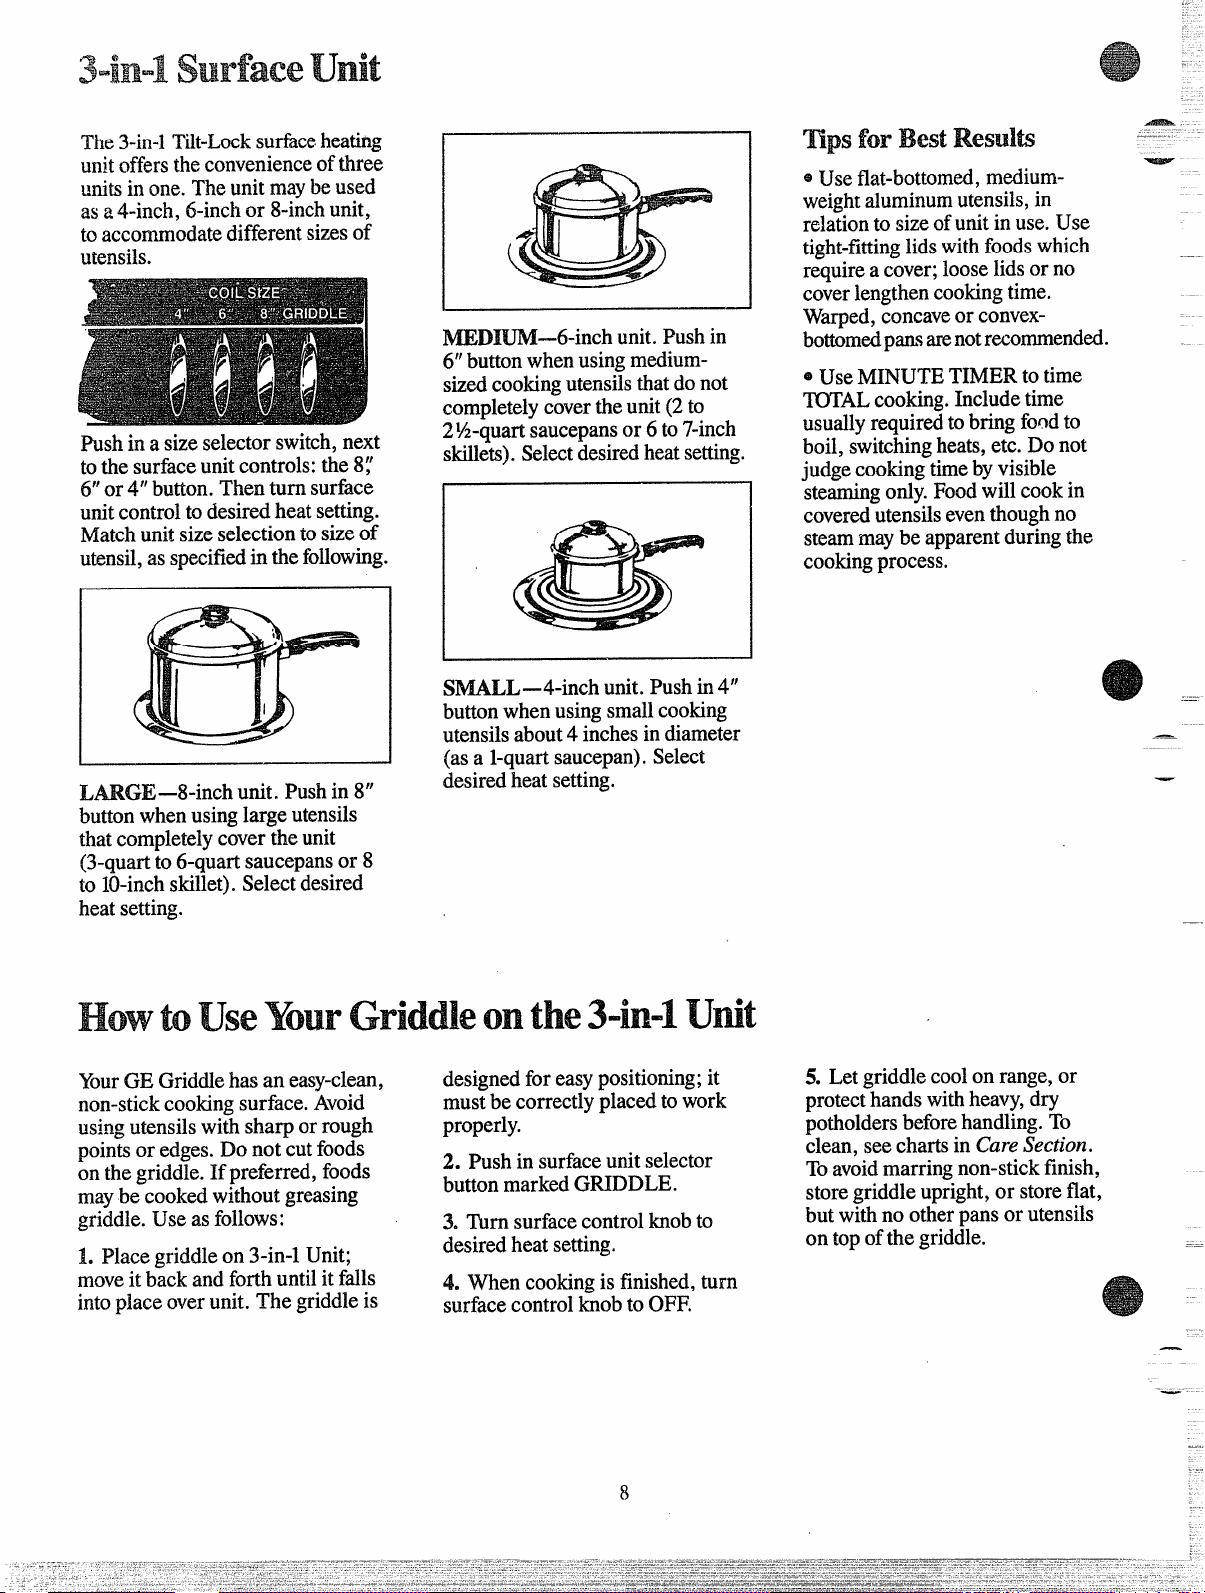
The 3-in-l Tfit-Locksufice heating
unitofferstheconvenienceofthree.
unitsinone.Theunitmaybeused
asa4-inch,6-inchor 8-inchunit,
toaccommodatedifferentsizesof
utensils.
Pushina sizeselectorswitch,next
tothesurfaceunit controls:the$:
6“or 4“button.Thenturnsurface
unitcontroltodesiredheatsetting.
Matchunitsizeselectiontosize of
utensil,asspecifiedinthefollowing.
L
L~GE–8-inch unit.Pushin8“
buttonwhenusinglargeutensils
that completelycovertheunit
(3-quartto6-quartsaucepansor 8
to 10-inchskillet).Selectdesired
heatsetting.
~Dm—6-inch unit.Pushin
6“ buttonwhenusingmediumsizedcookingutensilsthatdonot
completelycovertheunit(2to
2%-quartsaucepansor6 to7-inch
skillets).Selectdesiredheatsetting.
S~LL—4-inch unit.Pushin4“
buttonwhenusingsmallcooking
utensilsabout4inchesindiameter
(asa l-quartsaucepan).Select
desiredheatsetting.
mpsforBestResul@
~Useflat-bottomed,mediumweightaluminumutensils,in
relationto sizeofunitinuse.Use
tight-fittinglidswithfoodswhich
requireacover;looselidsorno
coverlengthencookingtime.
Warped,concaveor convexbottomedpmsarenotr~ommended.
~UseMINUTETIMERtotime
~AL cooking.Includetime
usuallyrequiredtobringfoodto
boil,switchingheats,etc.Donot
judgecookingtimebyvisible
steamingonly.Foodwillcookin
coveredutensilseventhoughno
steammaybeapparentduringthe
cookingprocess.
—_
—
HowtoUseYourGriddleonthe3-in-=1Utit
YourGEGriddlehasan easy-clean,
non-stickcookingsurface.Avoid
usingutensilswithsharp
pointsoredges.Do notcutfoods
onthegriddle.If preferred,foods
maybecookedwithoutgreasing
griddle.Useasfollows:
1. Placegriddleon3-in-1Unit;
moveitb~ckandforthuntilitfalls
intoplaceoverunit.Thegriddleis
orrough properly.
designedforeasypositioning;it
mustbecorrectlyplacedtowork
2. Pushinsurfaceunitselector
buttonmarkedGNDDLE.
3. Turnsurfacecontrolknobto
desiredheatsetting.
4. Whencookingisfinished,turn
surfacecontrolknobtoOFF.
8
5. Letgriddlecoolonrange,or
protec~handswithheavy,dry
potholdersbeforehandling.To
clean,seechartsin CareSection.
Toavoidmarringnon-stickfinish,
storegriddleupright,or storeflat,
butwithnootherpansor utensils
ontopofthegriddle.
—
.-
Page 9
A. Yes,but onlyuseutensils
-.
designedforcanningpurposes.Check
themanufacturer’sinstructionsand
recipesforpreservingfoods.Be
surecannerisflat-bottomedand
fitsoverthe centerofyourCalrod@
Llnit.Sincecanninggenerateslarge
amountsofsteam,becarefulto
al,oidburilsfrox~steamorheat.
Canningshou~donly be doneon
surfaceunits.
Q. Can1cover my drippanswith
foil?
A. No.Cleanasrecommendedin
CleaningGuide.
Q. CanI usespecialcooking
equipment,like anorientalwok,
onanysurfaceunits?
A. Utensilswithoutflatsurfaces
arenotrecommended.Thelifeof
yoursurfaceunitcanbe shortened
andthe rangetopcanbedamaged
fromthehighheat neededforthis
typeofcooking.
Q. WhyamI notgettingtheheat
I needfrommyunitseventhough
Ihavetheknobsontheright
setting?
A. Afierturningsurfaceunitoff
andmakingsureitiscool,checkto
makesurethatyourplug-inunits
aresecurelyfastenedintothe
surfaceconnection.
Q.WhydomyutensilstiltwhenI
piacethemonthesurfaceunit?
A. Becausethesurfaceunitis
notflat.Makesurethatthe“feet”
onyour Calrod”unitsaresitting
tightlyintherangetopindentation
andthereflectorringis flatonthe
rangesurface.
Q. Whyistheporcelainfinishon
mycontainerscomingoff?
A. If yousetyourCalrod@unit
higherthanrequiredforthe
containermaterial,andleaveit, the
finishmaysmoke,crack,pop, or
burndependingonthepotorpan.
Also,atoohigh heatforlong
periods,andsmallamountsofdry
food,maydamagethefinish.
-
-
-=
-
—
cantingTips
—
Canningshouldbedoneon
cooktop-on~y.
In surfacecookingoffoodsother
thancanning,theuseoflargediameterutensils(extendingmore
thanl-inchbeyondedgeoftrimring)
isnotrecommended.However,
whencanningwithwater-bathor
pressurecanner,large-diameter
utensilsmaybeused.Thisis
becauseboilingwatertemperatures
(evenunderpressure)arenot
harmfultocooktopsurfaces
surroundingheatingunit.
HOWEVER,DONOTUSE
LARGEDIAMETERCANNERS
OROTHERLARGEDIAMETER
UTENSILS FORFRYINGOR
BOILING FOODSOTHER
THANWATER.Mostsyrupor
saucemixtures—andalltypesof
ing—cookattemperaturesmuch
herthanboilingwater.Such
temperaturescouldeventually
harmcooktopsurfacessurrounding
Ileatingunits.
observe Followi~ Poin@
incanni~
1. BringwatertoboilonHIGH
heat,thenafterboilinghasbegun,
adjustheatto lowestsettingto
maintainboil(savesenergyand
best usessurfaceunit.)
2. Besurecannerfitsovercenter
ofsurfaceunit.If yourrangedoes
notallowcannertobecenteredon
surfaceunit,usesmaller-diameter
containersforgoodcanningresults.
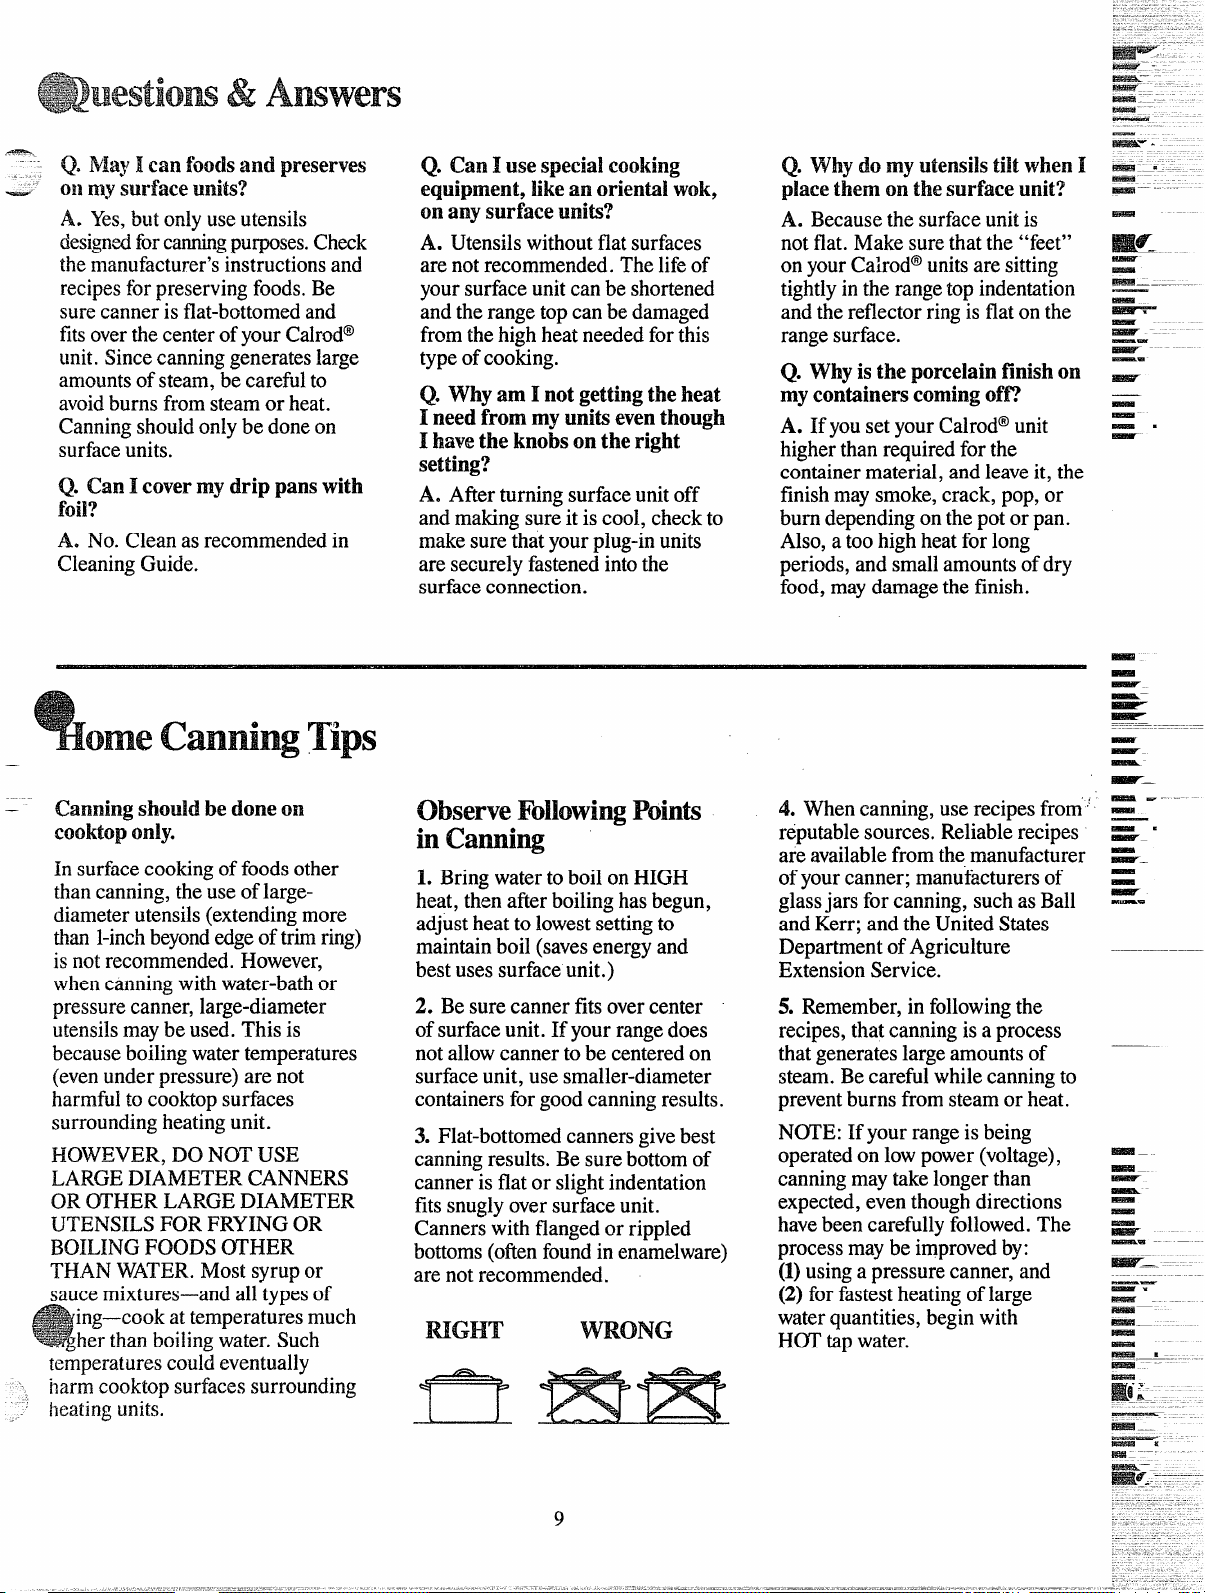
3. Flat-bottomedcannersgivebest
canningresults.Besurebottomof
canneris flator slightindentation
fitssnuglyoversurfaceunit.
Cannerswithflangedor rippled
bottoms(ofienfoundinenamelware)
arenotrecommended.
mGHT
WRONG
4. Whencanning,userecipesfrom:
reputablesources.Reliablerecipes
areavailablefromthemanufacturer
ofyourcanner;manufacturersof
glassjarsforcanning,suchasBall
andKerr;andtheUnitedStates
DepartmentofAgriculture
ExtensionService.
5. Remember,infollowingthe
recipes,that canningisa process
thatgenerateslarge amountsof
steam.Becarefulwhilecanningto
preventbumsfromsteamor heat.
N~E: If yourrangeisbeing
operatedonlow power(voltage),
canningmaytakelongerthan
expected,eventhoughdirections
havebeencarefullyfollowed.The
processmaybeimprovedby:
(1)usingapressurecanner,and
(2)forfastestheatingoflarge
waterquantities,beginwith
HOTtapwater.
=-. ---
=~...-
-–
9
Page 10
surfacecookingGuide
=
—
.
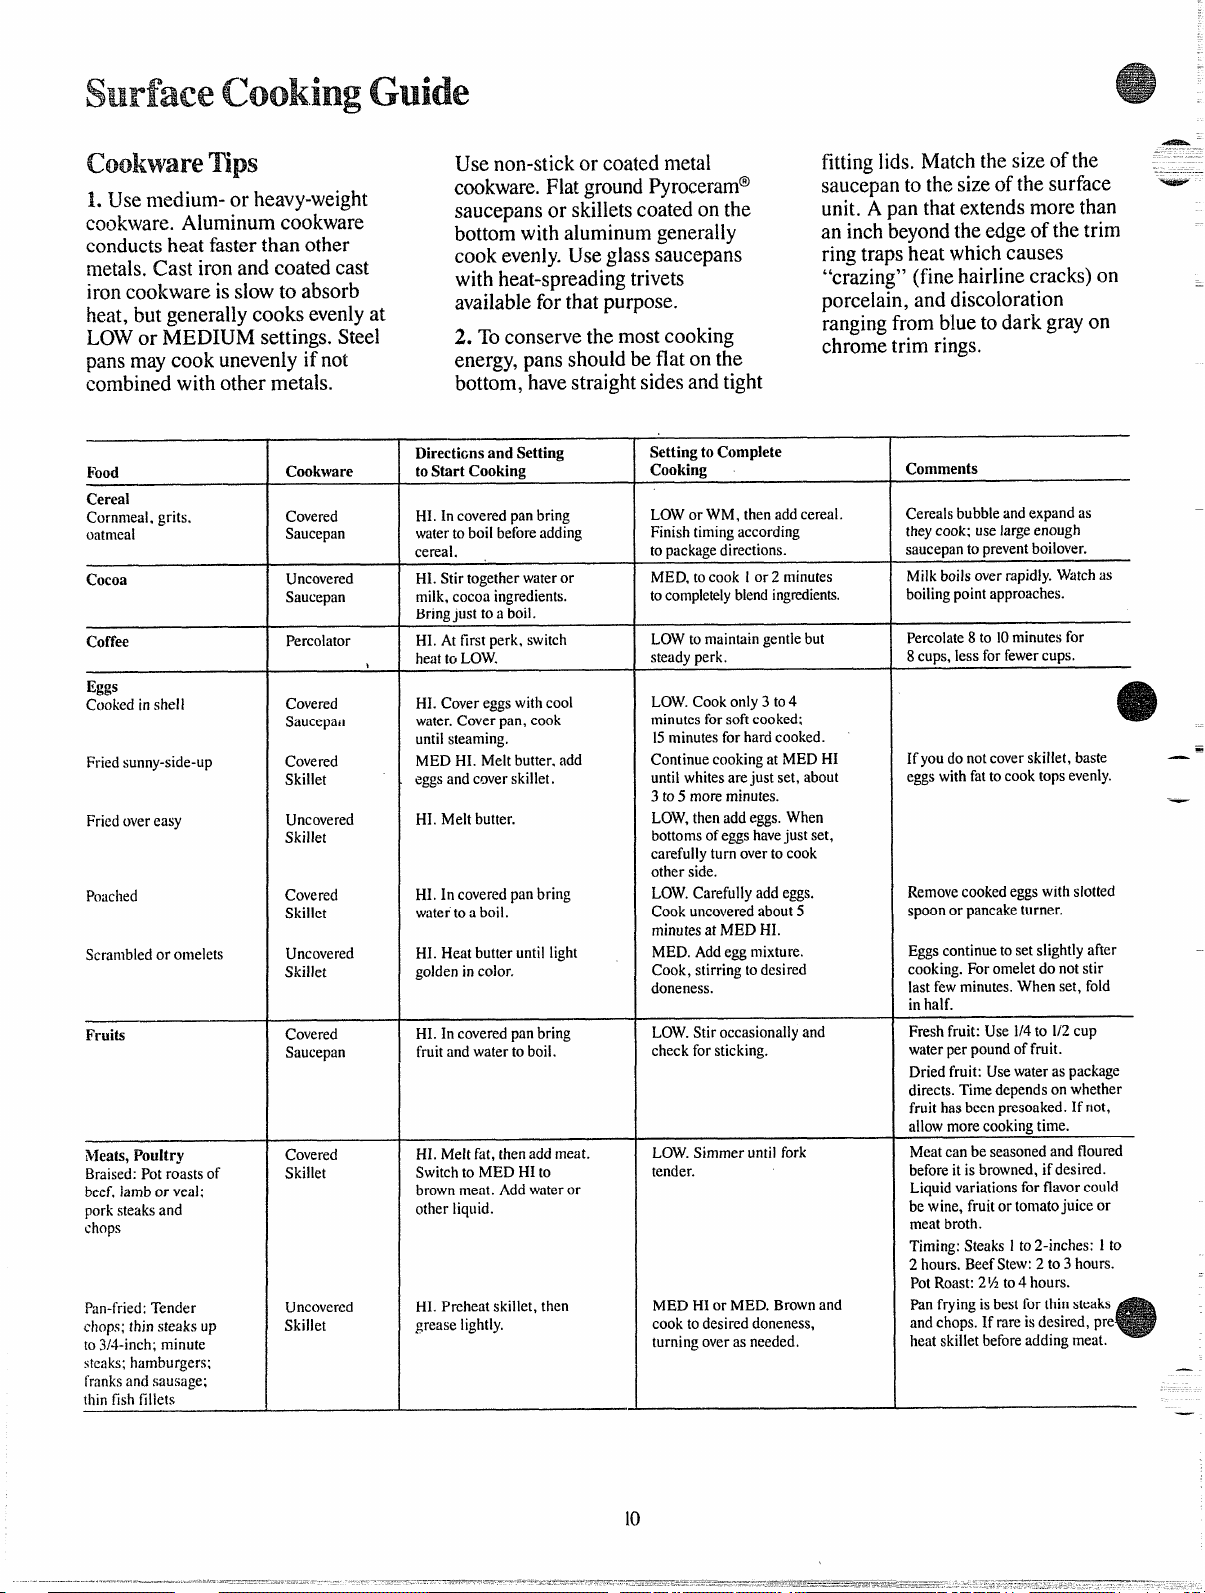
Cookw’aremps Usenon-stickorcoatedmetal
1.tJsemedium-orheavy-weight
cookware.Aluminumcookware
conductsheatfasterthanother
metals.Castironandcoatedcast
ironcookwareisslowtoabsorb
heat,butgenerallycooksevenlyat
LOW orMEDIUMsettings.Steel
pansmaycookunevenlyifnot
combinedwithothermetals.
Food Cook\vare
Cereal
Cornmeal,grits,
oatmeal
Cocoa
Coffee Percolator
Eggs
Cookedinshell Covered
Friedsunny-side-up
Friedovereasy
Poached
Scrambledor omelets Uncovered
Fruits
NIeats,Poultry
Braised:Potroastsof
beef,lamborveal;
porksteaksand
chops
Pan-fried:Tender
chops;thinsteaksup
to3/4-inch;minute
steaks;hamburgers;
franksandsausage;
thinfishfillets
Covered
Saucepan
Uncovered
Saucepan
Sallcepail
Covered
Skillet
Uncovered
Skillet
Covered
Skillet
Skillet
Covered
Saucepan
Covered
Skillet
Uncovered
Skillet
I
cookware.FlatgroundPyroceram@
saucepansorskilletscoatedonthe
bottomwithaluminumgenerally
cookevenly.Useglasssaucepans ringtrapsheatwhichcauses
withheat-spreadingtrivets
availableforthatpurpose. Porcelain,anddiscoloration
2. Toconservethemostcooking
energy,pansshouldbeflatonthe
bott~rn,-havestraightsidesandtight
Directionsand Setting
toStartCooking
HI.Incoveredpanbring
watertoboilbeforeadding
cereal.
HI.Stirtogetherwateror
milk,cocoaingredients.
Bringiusttoirboil.
HI.Atfirstperk,switch
heattoLOW.
HI.Covereggswithcool
water,Coverpan,cook
untilsteaming.
MEDHI.Meltbutter.add
eggs
andcoverskillet.
HI.Meltbutter.
HI.Incoveredpanbring
watertoa boil.
HI.Heatbutteruntillight
goldenincolor.
HI.Incoveredpanbring
fruitandwatertoboil.
HI.Meltfat,thenaddmeat.
SwitchtoMEDHIto
brownmeat.Addwateror
otherliquid.
HI.Preheatskillet,then
greaselightly.
Setting to Complete
Cooking
LOWorWM,thenaddcereal.
Finishtimingaccording
topackagedirections.
MED,tocook1or 2 minutes
tocompletelyblendingredients.
LOWto maintaingentlebut
steadyperk.
LOW.Cookonly3 to4
minutesforsoftcooked;
15minutesforhardcooked.
ContinuecookingatMEDHI
untilwhitesarejustset,about
3to 5 moreminutes.
LOW,thenaddeggs.When
bottomsofeggshavejust set,
carefullyturnovertocook
otherside.
LOW.Carefullyaddeggs.
Cookuncoveredabout5
minutesatMEDHI.
MED.Addeggmixture.
Cook,stirringtodesired
doneness.
LOW.Stiroccasionallyand
checkforsticking.
LOW.Simmeruntilfork
tender.
MEDHIorMED.Brownand
cooktodesireddoneness,
turningoverasneeded.
fittinglids.Matchthesizeofthe
saucepantothesizeofthesurface
unit.Apanthatextendsmorethan
aninchbeyondthe edgeofthetrim
“crazing”(finehairlinecracks)on
~angingfrombluetodarkgrayon
chrometrimrings.
Comments
Cereals bubbleandexpandas
theycook; uselargeenor.rgh
sauceDantor)reventboilover.
Milkboilsoverrapidly.Watchas
boilingpointapproaches.
Percolate8 to 10minutesfor
8
CUDS. lessforfewercuDs.
Ifyoudonotcoverskillet,baste —
eggswithfattocooktopsevenly.
Removecookedeggswithslotted
spoonor pancaketurner.
Eggscontinuetosetslightlyafter
cooking.Foromeletdonotstir
lastfewminutes.Whenset, fold
inhalf.
Freshfruit:Use 1/4to 1/2cup
waterperpoundoffruit.
Driedfruit:Usewateraspackage
directs.Timedependsonwhether
fruithasbeenpresoaked.Ifriot,
allowmorecookingtime.
Meatcanbeseasonedandfloured
beforeit isbrowned,ifdesired.
Liquidvariationsforflavorcould
bewine,fruitor tomatojuiceor
meatbroth.
Timing:Steaks1to 2-inches:1to
2hours.BeefStew:2to 3hours.
PotRoast:2%to4hours.
Panfryingisbestforthinsteaks
andchops.If rareisdesired,pre
heatskilletbeforeaddingmeat.
–—
—
—
10
Page 11

—
‘. 3. DeepFatFrying.Do notoverfill
—
kettlewithfatthatmayspillover
wilenaddingfood.Frostyfoods
bubblevigorously.Watchfoods
fryingatHIGHtemperaturesand
keeprangeandhood cleanfrom
accumulatedgrease.
OVER 1“
Food
FriedChicken
Panbroiledbacon Uncovered
Sauteed:Lesstender
thinsteaks(chuck,
round,etc.);liver;
thickorwholefish
Simmeredorstewed
meat;chicken;corned
becfismokedpork;
stewingbeefitongue;
b~~tter,marshmallows
Mncakes or
Frenchtoast
%Sta
Noodlesor spaghetti
PressureCooking
Puddings, Sauces,
Candies, Frostings
Vegeta9!es
Fresh
Frozen
Cookware
Covered
Skillet
Skillet
Covered
Skillet
Covered
DutchOven,
Kettleor
Large
Saucepan
Small
Covered
Saucepan.
Usesmall
surfaceunit
Skilletor
Griddle
Covered
Largekettle
orPot
Pressure
Cookeror
Canner
Uncovered
Saucepan
Covered
Saucepan
Covered
Saucepan
Uncovered
Skillet
Covered
Saucepan
Directionsand Setting
toStart Cookhlg
HI.Meltfat.SwitchtoMED
HIto brownchicken.
HI. Incoldskillet,arrange
baconslices.Cookjust
untilstartingtosizzle.
HI. Meltfat.SwitchtoMED
tobrownslowly.
HI.Covermeatwithwater
andcoverpanorkettle.
Cookuntilsteaming.
WM.Allow10to 15tinum to
meltthrough.Stirtosmooth.
MEDHI.Heatskillet8to
10minutes.Greaselightly.
HI.Incoveredkettle,bring
saltedwaterto a boil,uncover
andaddpastaslowlyso
boilingdoesnotstop.
HI.Heatuntilfirstjiggleis
heard.
HI. Bringjusttoboil.
H1.Measure1/2to 1 inch
waterinsaucepan.Add
saltandpreparedvegetable.
Incoveredsaucepanbring
toboil.
HI. Measure waterandsalt
asabove.Addfrozenblock
ofvegetable.Incovered
saucepanbringtoboil.
HI. Inskilletmeltfat.
HI. Bringsaltedwater toa
boil.
Setting to Complete
Cooking
LOW.Coverskilletand
cookuntiltender.
Uncoverlastfewminutes.
MEDHI.Cook,turning
overasneeded.
LOW.Coverandcook
untiltender.
LOW.Cookuntilfork
tender.(Watershould
slowlyboil).Forverylarge
loads,mediumheatmay
beneeded.
Cook
2 to3minutesperside.
MEDHI.Cookuncovered
untiltender.Forlarge
amounts,HImaybe
neededtokeepwaterat
rollingboil throughout
entirecookingtime.
MEDHIforfoodscooking
10minutesorless.MEDfor
foodsover10minutes.
LOW.Tofinishcooking.
MED.Cook1pound10
to30 or moreminutes,
dependingontenderness
ofvegetable.
LOW.Cookaccordingto
timeonpackage.
MED.Addvegetable.
Cookuntildesired
tendernessisreached.
WM.Coverandcook
accordingtotime,
Comments
Forcrispdrychicken,coveronly
afterswitchingtoLOWfor10
minutes.Uncoverandcook,turning
occasionally10to20minutes.
Amoreattention-freemethod
istostartandcookat MED.
Meatmaybebreadedor
marinatedinsaucebeforefrying,
Addsaltorotherseasoning
beforecookingifmeathasnot
beensmokedorotherwise
cured.
Whenmeltingmarshmallows,add
milkorwater.
Thickbattertakesslightlylonger
time.Turnoverpancakeswhen
bubblesriseto surface.
Uselargeenoughkettleto
preventboilover.Pastadoubles
insizewhencooked.
Cookershouldjiggle2to3times
perminute.
Stirfrequentlyto prevent
sticking.
Uncoveredpanrequiresmore
waterandlongertime.
Breakuporstiras neededwhile.
cooking.
Turnoverorstirvegetableas
necessary forevenbrowning.
Tripleinvolumeaftercooking.
TimeatWM.Rice:1cupriceand
2cupswater—25minutes.Grits:
1cupgritsand4 cupswater—
40minutes,
Page 12

TheAutomaticTimerandClockon
.-
yourrangearehelpfuldevicesthat
serveseveralpurposes.
Tosettheclock
fish thecenterknobinandturn
theClockhandstothecorrecttime.
(IftheAutomaticTimerpointer
shouldmovealso,letknobout,
turntheTimerpointertoOFF.)
settheMinutemmer
To
TheMinuteTimerhasbeen
combinedwiththeRangeClock.
Useittotimeallyourprecise
cookingoperations.You’llrecognize
theMinuteTimerasthepointer
whichisdifferentincolorand
shapethanthe Clockhands.
TOSETTHE MINUTETIMER,
turnthecenterknob,without
pushing in,untilpointerreaches
numberofminutesyouwishtotime.
(Minutesaremarked,upto60,in
thecenterringontheClock.)Atthe
endofthesettime,a buzzersounds
totellyoutimeisup.Turnknob,
withoutpushing in9untilpointer
reachesOFFandbuzzerstops.
mmeBakeuses
Automaticmmer
UsingtheAutomaticTimer,you
canTIMEBAKEwiththeoven
startingimmediatelyandturning
offattheStopTimesetoryoucan
setbothStartandStopdialsto
automaticallystartandstopoven
atalatertimeofday.Ittakesthe
worryoutofnot beinghometo
startorstoptheoven.
SettingthedialsforTIMEBAKE
isexplainedindetailonpage14.
Self-CleanUses
Automatic~mer
Theself-cleaningfunctiononyour
rangeusestheAutomaticTimerto
setthelengthof timeneededto
cleanwhetheryouwishtoclean
immediately,ordelaythecleaning.
BysettingtheStartand/or Stop
Dialsyoumaychoosetobegin
immediatelyor cleanatlowenergy
timesduringthenight.Full
explanationsofsettingStartand
StopDialsforself-cleaningare
describedonpages24and25.
QuestiomandAmwers ‘-
~
Q.Howcan1usemyMinute
Timertomakemysurface
cookingeasier?
A. YourMinuteTimerwillhelp
timetotalcookingwhichincludes
timetoboilfoodandchange
temperatures.Donotjudgecooking
timebyvisiblesteamonly.Food
willcookin coveredcontainers
eventhoughyoucan’tsee anysteam.
Q.MusttheClockbeseton
correcttimeofdaywhenIwish
tousetheAutomatic~mer
forbaking?
A. Yes,ifyouwishtosettheStart
or Stopdialstoturnon andoffat
settimesduringtimedfunctions.
Q.CanIusetheMinuteTimer
duringovencooking?
A. TheMinuteTimercanbeused
duringanycookingfunction.The
AutomaticTimers(StartandStop
dials)areusedwithTIMEBAKE —andSELF-CLEANfunctions.
Q.CanIchangetheClockwhile –
I’m~me Cookingintheoven?
A.No.The Clockcannotbechanged
duringanyprogramthat usesthe
oventimer.Youmusteitherstop
thoseprogramsorwaituntil they
arefinishedbeforechangingtime.
—
—
—
._
Page 13

eJsingYouroven
BeforeusingYouroven
1.Lookatthecontrols.Besure
youunderstandhowtosetthem
properly.Readoverthedirections
fortheAutomaticOvenTimerso
youunderstanditsusewiththe
controls.
2. Checktheoveninterior.Look
attheshelves.Takea practicerun
atremovingandreplacingthem
properly,togivesure,sturdy
support.
3.Readovertheinformationand
tipsthatfollow.
4. Keepthisbookhandysoyoucan
refertoit, especiallyduring the
firstweeksofgettingacquainted
withyourrange.
ovencontrols
PREHEATINGtheoven,evento
hightemperaturesettings,isspeedy–
rarelymorethanabout10minutes.
Preheattheovenofiywhennecessary.
Mostfoodswillcooksatisfactorily
withoutpreheating.If youfind
preheatingisnecessary,keepan
eyeontheindicatorlightandput
foodintheovenpromptlyafter
the lightgoesout.
oven shelves
Theshelvesaredesignedwithstoplocks,sowhenplacedcorrectlyon
theshelf supports,they(a)stop
beforecomingcompletelyoutof
theoven,and(b)donottiltwhen
removingor placingfoodonthem.
TOREMOVEashelffromthe
oven,liftuprear ofshelf,thenpull
itforwardwithstop-locks(curved
extensionsunder shel~ alongtop
ofshelf supports.Becertainthe
shelfiscoolbeforetouchingit.
OvenLight
Theinteriorovenlightcomes on
automaticallywhentheovendoor
isopened.
Usetheswitchonthefrontofthe
doortoturnthelightonandoff
whenthedoorisclosed.
LampOverSurfaceUnib
Thislampmaybelightedby
pressingthelampswitchbutton.
Besuretoholdthebuttoninuntil
thelightcomeson,
Thecontrolsfortheovenare
markedOVENSETandOVEN
TEMP.TheOVEN SETcontrolhas
settingsforBAKE,TIMEBAKE,
BROIL,CLEAN,andOFF.When
youturntheknobtothedesired
setting,theproperheatingunitsare
thenactivatedforthatoperation.
TheOVEN TEMPcontrolmaintains
thetemperatureyouset, from
‘WARM(150°F.)to BROIL(550°F.)
andalsoatCLEAN(880*F.).
ovencycling Light
TheOvenCyclingLightglows
1 theovenreachesyourselected
perature,thengoesoffandon
the ovenunit(s)duringtooting.
~ REPLACEa shelfintheoven,
insertshelfwithstop-locksresting
onshelfsupports.Pushshelftoward
rearofoven;itwillfallintoplace.
Whenshelfisin properposition,
stop-locksonshelfwillrununder
shelfsupportwhenshelfispulled
forward.
shelfPositions
II
Theovenhasfourshelfsupports—
A(bottom),B,C andD (top).
Shelfpositionsforcookingfood
aresuggestedonBaking,Roasting
andBroilin~~apes.
m—r.
w–.
—.
m– ->
— .—.-—_
—.— .
-
Page 14

Baking
—
---
—
——
}Vhencookingafoodforthefirst
timeinyournewoven, usetime
givenonrecipesasa guide. Oven
thermostats,overaperiodofyears,
may“drift” fromthefactorysetting
anddifferencesintimingbetween
anoldanda newovenof5 to 10
minutesarenotunusualandyou
maybeinclinedtothinkthatthenew
ovenisnotperformingcorrectly.
However,your newovenhasbeen
setcorrectlyatthefactoryandis
moreaptto beaccuratethanthe
ovenitreplaced.
HowtoBake
thatyouset.ExampiesofImmediate
Start(oventurnsonnowandyou
setittoturnoffautomatically)or
DelayStartandStop(settingthe
oventoturnonautomaticallyat a
latertimeandturnoffatapreset
stoptime)willbedescribed.
N~E: Beforebeginningmake
suretherangeclockshowsthe
correcttimeofday.
ImmediateStartis simplysetting
oventostartbakingnowandturning
offata latertimeautomatically.
Remember,foodscontinuecooking
afiercontrolsareoff.
DelayStartandStopissettingthe
oventimertoturntheovenonand
offautomaticallyata latertime
thanthepresenttimeofday.
Step1:Toset starttime,pushinknob
onSTARTdial andturnpointer
totimeyouwantoventoturnon,
forexample3:30.
Step1:Placefoodinoven,being
certaintoleaveabout1inchof
spacebetweenpansandwallsof
ovenforgoodcirculationofheat.
Closeovendoor.Duringbaking,
avoidfrequentdooropeningsto
preventundesirableresults.
Step2: firn OVENSETknobto
BAKEandOVENTEMPknobto
temperatureonrecipeoronBaking
Guide.
Step3: Checkfoodfordoneness
atminimumtimeonrecipe.Cook
longerifnecessary.Switchoffheat
andremovefoods.
HowtommeBake
Theautomaticoventimercontrols
aredesignedtoturntheovenonor
offal~tomaticallyat specifictimes
Step 1:TosetStopTime,pushin
knobon STOPdialandturnpointer
totimeyol.Iwantovento turnoffi
forexample6:00.TheStartDial
shouldbeatthesamepositionas
thetime ofdayonclock.
Step2: TurnOVENSETknobto
TIMEBAKE.TurnOVENTEMP
knobtooventemperature,for
example250”F.
—
Step 2: TosetStopTime,pushin
knobonSTOPdid andturnpointer ‘—
totimeyouwantoventoturnoff,
forexample6:00. Thismeansyour
recipecalledfortwoandone-half
hoursofbakingtime.
N~E: TimeonStopDial mustbe
laterthantimeshownonrangeclock
andStartdial.
Step3: TurnOVENSETknobto
TIMEBAKE.~rn OVENTEMP
knobto250”F.orrecommended
temperature.
Placefoodinoven,closethedoor
andautomaticallytheovenwillbe
turnedon andoffatthetimesyou -
haveset.TurnOVENSETto
andremovefoodfromoven.
OFF ---
..
14
Page 15

@aking Guide
———..—
.__A=
——
—-
~
~ 1.Aluminumpansconductheat
“-”
quickly.Formostconventional
baking,light,shinyfinishesgenerally
givebestresults.Theyprevent
overbrownirtginthetimeittakes
forheat to cookthecenterareas.
Dull(satin-finish)bottomsurfaces
ofpansarerecommendedforcake
pansandpieplatestobesurethose
areasbrowncompletely.
Food
Bread
Biscuits(%-in.thick) ShinyCookieSheet
Coffeecake
Cornbreadormuffins
Gingerbread
Muffins
Popovers
Quickloafbread MetalorGlassLoafPans
Yeastbread(2loaves)
lainrolls ShinyOblongor MuffinPans
F
Sweetrolls ShinyOblongor MuffinPans
Cakes
(withoutshortening)
Angelfood
Jellyroll
Sponge
Cakes
Bundtcakes MetalorCeramicPan A,B 325°-3500 45-65
Cupcakes ShinyMetalMuffinPans
Fruitcakes MetalorGlassLoafor A,B 275°-300” 2-4hrs.
Layer ShinyMetalPanwith
Layer,chocolate ShinyMetalPanwith
Loaf
Cookies
Brownies MetalorGlassPans B,C 325°-3500
Drop CookieSheet
Refrigerator CookieSheet B,C 400°-4250
Rolledorsliced CookieSheet B,C 375°-4000
Fruits,
Other Desserts
Bakedapples GlassorMetalPan A.B,C 350°-4000
Custard GlassCustardCupsor Casserole
Puddings,Rice GlassCustardCupsor
andCustard Casserole
Pies
Frozen FoilPanonCookieSheet
~Meringue Spreadtocrustedges B,A 325°-3500
Onecrust GlassorSatin-finishMetal
Twocrust GlassorSatin-finishMetal
Pastryshell GlassorSatin-finishMetal
Miscellaneous
Bakedpotatoes Seton OvenShelf
Scallopeddishes GlassorMetalPan A, B,C
Souffles Glass
Container Position
ShinyMetalPanwith
satin-finishbottom
CastIronorGlass
ShinyMetalPanwith
satin-finishbottom
ShinyMetalMuffinPans
DeepGlassorCastIronCups
MetalorGlassLoafPans
Aluminum~be Pan
‘Me~~IJellyRollPan
MetalorCeramicPan
TubePan
satin-finishbottom
satin-finishbottom
MetalorGlassLoafPans B
(setinpanofhotwater)
2. Darkornon-shinyfinishes,
glassandPyroceram@utensilsoften
absorbheat,whichmayresultin
dry,crispcrusts.Reduceovenheat
25°F.iflightercrustsaredesired.
Preheatcastironforbakingsome
foodsforrapidbrowningwhen
foodisadded.
3.Preheatingtheovenisnotalways
necessary,especiallyforfoods
Shelf Oven
B,C
B,A
B
B 350°
A,B
B 375° 45-60
B 350°-3750 45-60
A,B
A,B 375°-4250 10-25
B,A
A 325”-375°
B 375°-4000 10-15
A
B
B
B
B,C
B
B
A
A, B 400°-4250
B
B
A,B,C
B 300°-350”
Temperature
400°-4750 15-20 Canned,refrigeratedbiscuits take
350°-4000 20-30
400°-4500 2040 Preheatcastironpanforcrispcrust.
400°-4250 20-30 Decreaseabout5minutesformuffin
375°-4250 45-60 Darkmetalorglassgivedeepest
350°-3750 20-30 Forthinrolls,ShelfBmaybeused.
325°-3500 45-60
350°-375” 20-25 Paperlinersproducemoremoist
350°-3750
350°-3750 25-30
350° 40-60
350°-400”
300°-3500 30-60
325°
400°-4250
400°-4250
450°
325°-400”
325”-3’75°
whichcooklongerthan30to40 :----~
minutes.Forfoodwithshort
cookingtimes, preheatinggives
bestappearanceandcrispness. ‘.- :
4. Opentheovendoortocheck
food-aslittleaspossibletoprevent
unevenheatingandtosaveenergy.
Time,
Minutes Comments
2to4minuteslesstime.
45-55
mix,orbakeat450°F.for25minutes,
thenat350”F.for 10to 15minutes.
browning.
Forthinrolls,ShelfBmaybeused.
30-55 Two-piecepanisconvenient.
20-35
25-35 Barcookiesfrommixusesametime.
10-20
6-12
7-12
30-60
50-90 withcustardbase80to90minutes,
45-70
15-25
45-60
40-60
12-15
60-90
30-60
30-75
Linepanwithwaxedpaper.
crusts.
Use300”F.andShelfBforsmallor
individualcakes.
UseShelfCandincreasetemp.
25°F.to50°F.formorebrowning.
Reducetemp.to300”F.forlarge
custard.Cookbreadorricepudding
Largepiesuse400”F.andincrease
time.
Toquicklybrownmeringue,use
400”F.for8to 10minutes.
Custardfillingsrequirelower
temperature,longertime,
Increase timeforlargeamount
orsize.
___
15
Page 16

Roastingiscookingbydryheat.
.-
Tendermeatorpoultrycanbe
roasteduncoveredinyouroven.
Roastingtemperatures,which
shouldbelow andsteady,keep
spatteringtoaminimum.When
roasting,itisnotnecessaryto
sear,baste,coveroraddwater
toyourmeat.
Roastingisreallyabaking
procedureusedformeats.Therefore,
ovencontrolsaresettoBAKE.(You
mayhearaslightclickingnoiseto
indicatetheovenisworking
properly.)Roastingiseasy;just
followthesesteps:
Step1:Checkweightofmeat,and
place,fatsideup,onroastingrack
inashallowpan.(Broilerpan with
rackisagoodpanforthis.)Line
broilerpanwithaluminumfoilwhen
usingpanformarinating,cooking
withfruits,cookingheavilycured
meats,orforbastingfoodduring
cooking.Avoidspillingthese
materialsonovenlinerordoor.
Step2:Placeinovenonshelfin
“A’or “B” position.Nopreheating
isnecessary.
Step4:Mostmeatscontinueto
cookslightlywhilestandingafter
beingre~ovedfromtheoven.For
rareormediuminternaldoneness,
ifmeatistostand10to20minutes
whilemakinggravy,orforeasier
carving,youmay wishtoremove
meatfromovenwheninternal
temperatureis5to 10”F.below
temperaturesuggestedonguide.
Ifnostandingisplanned,cook
meattosuggestedtemperatureon
guideonpage18.
N~E: YoumaywishtouseTIME
BAKE,asdescribedonprecedingpage
toturnovenonandoffautomatically.
Also,ifyourovenisequippedwith
specialmeatthermometer,seepage17
forusage.
Por Rozen
Frozenroastsofbeef,pork,
@
lamb,etc.,canbestartedwithout
thawing,but allow10to25minutes
perpoundadditionaltime(10
minutesperpoundforroastsunder
5pounds,moretimeforlarger
roasts).
@Thawmostfrozenpoultrybefore
roastingtoensureevendoneness.
Somecommercialfrozenpoultry
canbe cookedsuccessfullywithout
thawing.Followdirectionsgiven
onpacker’slabel.
Roasts
QuestiomandAmwers ‘-+--
Q.k itnecessarytocheckfor
donenesswithameatthermometer?
A. Checkingthefinishedinternal
temperatureatthecompletionof
cookingtimeisrecommended.
TemperaturesareshowninRoasting
Guideonpage18.Forroastsover8
lbs., cookedat300”F.withreduced
time,checkwiththermometerat
half-hourintervalsafierhalfthe
timehas passed.
Q.Whyismyroastcrumbling
when1trytocarveit?
A. Roastsareeasierto sliceif ,
allowedtocool10to20minutes
afierremovingfromoven.Besure
tocutacrossthegrainofthemeat.
Q.DoI needtopreheatmyoven
eachtirrieIcookaromtorwtitrv?
A. Itisrarelynecessaryto~rehe”
your oven,onlyforverysmall
roasts,whichcookash-ortlength —
oftime.
Q.Whenbuyingaroast,are
thereanyspecialtipsthatwould
helpmecookitmoreevenly?
A. Yes.Buyaroastasevenin
thicknessaspossible,or buyrolled
roasts.
Q.CanIsealthesidesofrnyfoil
“tent”whenroastinga turkey?
A. Sealingthefoil willsteamthe
meat.Leavingitunsealedallowsthe
air to circulateandbrownthemeat.
e
—
Step3: TurnOVENSETtoBAKE
andOVEN T’E.MPto325”F.Small
poultrymaybecookedat375°F.
forbestbrowning.
16
---
--
Page 17

—
Formanyfoods,especially
roastsandpoultry,in!ernalfood
—
temperatureisthebest testfor
doneness.Themeatthermometer
takesthe guessworkoutofroasting
bycookingfoodstotheexact
donenessyouwant.Themeat
thermometerhasaskewer-like
probeatone endofthecableanda
two-prongedplugattheother.Use
handleofplugandprobe,rather
thancable,wheninsertingand
removingthese partsfrommeat
and/orovenwallreceptacle.Afier
preparingmeatandplacingin
roastingpanonrack,followthe
stepsbelowforproper useofmeat
thermometer.
i 1
Step3: Plugcableinto receptacle
onovenwall.Theprongsare
especiallydesignedtoonlyplugin
one way.Becertaintoinsertplug
intoreceptaclealltheway.Close
ovendoor.
.
Step6: Wheninternaltemperature
ofroast reachesnumberyouhave
set,a buzzersounds.Tostop
buzzer,turnpointertoSIGNAL
OFF.Internaltemperatureofmeat
canbedeterminedatanytime
duringcookingbyturningpointer
downuntilbuzzersounds.
‘1
I J
Step1:Togaugeplacementof
probe,layprobeonoutsideofmeat
alongto~or sideandmarkwith
fingerwhereedgeofmeatcomes
onprobe.Probe shouldbeplaced
sopointrestsincenterofthe
thickestpartofroast.
Step2: Insertprobeintomeatup
topointmarkedoffwithfingers.
intshouldnottouchbone,fator
stie.Notmorethan2” ofprobe,
notcountinghandle,shouldbeleft
exposedoutsideofmeat.
Step4: TurnOVENSETknobto
BAKEandOVENTEMPknobto
recommendedoventemperature,
forexample350°F.SeeRoasting
Guideonpage18foroven
temperature.
Step%Whenroastisdone,
usecarein removingplugfrom
receptacle.DONOTUSECABLE.
Removemeatfromoven.Sincemost
meatcontinuescooking,youmay
wishtoremove5° to 10°F.sooner.
Step5: Refertoguide nearMeat
ThermometerDialtodetermine
atwhatinternaltemperaturemeat
willbedone.Thenturnknobnext
todialtomovepointertocorrect
Step 8: Removeprobefrommeat,
usinghandleofprobenotcable.Most
number(internaltemperature) meatscarvemoreeasilyifletstand
ondial. 5 to 10minutes.Letthermometer
coolandcleanasdir~tedinCleaning
Guideonpage28.Do notleave
inoven.
SeeRoasting Guide on page I&
~.. .
—w
~--
-.
—_w
w–
—.
17
Page 18

RoastingGuide
1.PositionovenshelfatBfor
small-sizeroasts(3to 7 lbs.)and necessan. Basteasdesired.
.
atA forlarger roasts. “
2. Placemeatfat-sideup,orpoultry
breast-sideup,onbroilerpanor
othershallowpanwithtrivet.Do
notcover.Donotstuffpoultryuntil
justbeforeroasting.Usemeat
probeformoreaccuratedoneness.
Controlsignalswhenfoodhas
3.Removefatanddrippingsas
4. Stinding the recommendedfor
roastsis10to20minutesto~ow roast
tofirmupandmakeiteasierto
carve.Intirnaltemperaturewillrise
about5° to 10”F.;tocompensatefor
temperaturerise,ifdesired,remove
roastfromovenat5°to 10”F.less
thantemperatureonguide.
reachedsettemperature.(Donot
placeprobeinstuffing.)
Type Temperature
Met
Tendercuts;rib,highqualitysirlointip,
rumportop round*
Lambhg orbone-inshoulder*
Vealshoulder,legor loin*
Porkloin,ribor shoulder*
Ham,precooked
Ham,raw
*Forbonelessrolledroastsover6-inchesthick,add5to 10mimltesperpoundtotimesgivenabove.
Oven
325°
325° Rare:
325°
325°
325°
325°
Doneness
Rre:
Medium: 30-35
WellDone:
Medium: 25-30 24-28 150°-160°
WellDone:
WellDone: 35-45
WellDone: 35-45 30-40
ToWarm:
WellDone: 20-30 17-20
ApproximateRoastingTime,
in Minutes per Wund
3 to 5-lbs. 6 to $-lbs.
24-30 18-22
35-45 28-33 1700-185°
21-25
30-35 28-33
10minutesperpound(anyweight)
Under I&lbs.
5.Frown roasfi canbe
conventionallyroastedbyadding
10to
25 minutesperpound more
timethangiven inguidefor
refrigeratedroasts.(10minutes
perpoundforroastsunder5pounds.)
Defrostpoultrybeforeroasting.
Internal
Temperature‘F
130°-140°
22-25
20-23
30-40 170°-1800
tO 15-lbs.
10
150°-160°
130°-1400
170°-1850
170°-180°
125°-1300
160°
~
.
—
—
Poultry
Chickenor Duck
Chickenpieces
~rkey 325°
325°
375°.
3 to 5-ibs. Over 5-lbs.
WellDone: 35-40 30-35
WellDone: 35-40
10to E-lbs. Over 15-lbs. In thigh:
WellDone: 20-25 15-20
185°-1900
185°-1900
185°-1900
Page 19

.. ......................,-—.—...——.———.—..——————.———.
seeBroiling on page 21.
—_
Broilingiscookingfoodbyintense
radiantheatfromtheupper unitin
.
theoven.Most fishandtendercuts
ofm,eatcanbebroiled.Follow
thesestepstok~epspatteringand
smokingtoa minimum.
Step1:If meathasfatorgristlenear
edge,cutverticalslashesthrough
bothabout2“ apart.If desi~ed,fat
maybetrimmed,leavinglayer
about 1/8”thick.
Step2: Placemeatonbroilerrack
inbroiler panwhichcomeswith
range.Alwaysuseracksofatdrips
intobroilerpan;otherwisejuices
maybecomehotenoughtocatchfire.
S&p3:Wsitionshe~on~commended
shelfpositionassuggestedinBroiling
Guideonpage21.Most broilingis
doneon C position,butif your
rangeisconnectedto208volts,you
naywishto usehigher position:
Step6: firn foodonlyonce during
cooking.Time foodsforfirstside
perBroilingGuide.
~m food,thenusetimesgivenfor
secondsideas a guidetopreferred
doneness.(Wheretwothicknesses
andtimesaregiventogether,use
first.timesgivenforthinnestfood.)
Step%TurnOVENSETknob
toOFF.Servefoodimmediately,
andleavepanoutsideoventocool
duringmealforeasiestcleaning.
UseofAIuminumFoil
I
Questiom&Answers
Q. WhyshouldI leavethedoor
closedwhenbroilingchicken?
A. Chickenistheonlyfood
recommendedforclosed-door
broiling.Thisisbecausechickenis
relativelythickerthanotherfoods
youbroil.Closeddoor holdsmore
heat in oven,sochickenmaybe
broiledbutwell-doneinside.
Q.Whenbroiling,isit necessary
toalwaysusea rackinthepan?
A. Yes.Usingtheracksuspends
themeatoverthepan.Asthemeat
cooks,thejuicesfallintothepan,
thuskeepingmeatdrier.Juices
areprotectedbytherackandstay
cooler,thuspreventingexcessive
spatterandsmoking.
Q. Should1salt themeatbefore
broiling?
A. No.Saltdrawsoutthejuices
andallowsthemtoevapor~te.
Alwayssaltafiercooking.Turn
meatwithtongs;piercingmeat
withaforkalsoallowsjuicesto
escape.Whenbroilingpoultry
orfish,brusheachsideofien
withbutter.
-–.
-
Step4: Leavedoorajara fewinches
(exceptwhenbroilingchicken).
Thedoorstaysopenbyitself,yet
thepropertemperatureismaintained
intheoven.
Step5:
OVEN TEMPknobstOBROIL.
_.; Preheatingunitsisnotnecessary.
(SeenotesinBroilingGuide.)
TurnbothOVENSETand
1. Ifdesired,broilerpanmaybe
linedwithfoilandbroilerrackmay
becoveredwithfoilforbroiling.
ALWAYSBECERTAIN~ MOLD
FOILTHOROUGHLY~
BROILERRACK,ANDSLIT
FOIL~ CONFORMWITH
SLITSINRACK.Broilerrackis
designedtominimizesmokingand
spattering,andtokeepdrippings
coolduringbroiling.Stoppingfat
andmeatjuicesfromdrainingto
thebroilerpanpreventsrackfrom
servingitspurpose,andjuicesmay
becomehotenoughtocatchfire.
2. DONOTplaceasheetof
aluminumfoilonshelf.Todoso
mayresultinimproperlycooked
foods,damagetoovenfinishand
increaseinheatonoutsidesurfaces
oftheoven.
19
Q.Whyaremymeatsnotturning
outasbrownastheyshould?
AeIn someareas,thepower
(voltage)totherangemaybelow.
Inthesecases,preheatthe broil
unitfor 10minutesbeforeplacing
broilerpanwithfoodinoven.
Checktoseeifyou areusingthe
recommendedshelfposition.Broil
forlongestperiod oftimeindicated
intheBroilingGuide.Turnfood
onlyonceduringbroiling.
Q.DoI needtogreasemybroiler
racktopreventmmtfmmsticking?
A. No.Thebroiler rackisdesigned
to reflectbroilerheat,thuskeeping
thesurfacecoolenoughtoprevent
meatstickingtothesurface.However,
sprayingthebroilerracklightlywith
avegetablecookingspraybefore
cookingwillmakecleanupeasier.
(continttedne.rtpage)
1
b
Page 20

Youmayusethemeatthermometer
forbroiling,suchassteakorham
slices.Preparemeaton broilerrack
andpanas-explainedon page19,
“HOWto Broil:’Set bothOVEN
SETandOVEN TEMPknobsto
BROILandleavedoorajaras
recommended,afierplacingprobe
inmeatandovenasdirectedbelow.
Step1:Usesteakatleast 1to 1%
inchesthick.Layprobeontopof
steaktodeterminethe position
probeisto beinserted.Gauge
distancefromedgetocenterof
largestmuscle;markwiththu~nb
whereedgeofmeator fatmeets
probe.BecertainN~ MORE
THAN2inchesofprobe,not
countinghandle,isleftexposed
outsideofmeat.
Step3: Forraresteakscookfirst
sideto90onmeatthermometer
dial;formediumto 100;forwelldone110.SetMeatThermometer
Dialtopreferreddoneness.
Step4: Atsoundofbuzzer,turn
steak;checkprobeto becertainit
hasnotmovedoutofposition.
ResetpointeronMeatThermometer
andcook secondside.See guide on
ovennearMeatThermometerDial.
N~ES:
@If thereis aquestionabout
whetherprobehasmovedoutof
positionduring cooking,turnknob
sopointermovesdownondialuntil
buzzersounds.Noteindicated
temperatureandresetpointerto
SIGNALOFF.Pushprobefarther
downintoroast,about1inch,then
afierafewminutesredetermine
internaltemperatureasabove.If
newtemperatureislower,theprobe
wasprobablyoutofposition.Ifso,
allowmeattocooktoproper
internaltemperature.
QuestiomandAmwen
Q.Canthemeatthermometer
remainintheovenifit9snot
insertedinfood?
A. No.Removeprobefrom
receptaclewhennotinuse.You
couiddamagethe probebyleaving
itinduring cookingoperationsthat
donotrequiretheprobe.
Q.May1insertthemeat
thermometerintofrozenfoo~?
A. No.Foodsmustbecompletely
defrosted‘beforeinsertingprobe.
Q.ShouldIlinebroilerpanwith
aluminumfoil whenroasting?
A. Yes,whenusingpanfor
marinating,cookingwithfruitsor
heavilycuredmeats,orforbasting
duringcooking.Avoidspillingthese
materialsonovenlineror door.
Q.HowmayIbesurethatmy
roastwillcookthesameeachtke.
A. Whenusingthemeat
thermometerinroasting,theprobe -—-–
mustbeinsertedproperly.Check —
thepositionoftheprobe during
cooking.Sometimestheprobeslips
or istouchingbone,fator gristle.
Repositionprobecorrect!yandset
ovenagaintofinishroasting.
—
I
Step2: Lift probefrom meat
keepingthumbinplaceonprobe.
Insertprobeasnearas possibleto
centerofthicknessofsteak.Push
probeintosteaktowherethumb
meetsfator meat.
@Letmeatthawenoughtoallow
insertingprobe.Theprobeis
sturdybuttakecarenot to forceit
toohardintoroast.
@Do not disconnectprobeduring
cooking.Usehotpadswhen
removingprobe at endofcooking.
Donot usetongstopulloncable
sincetheymaydamageit.
—
-
20
Page 21

+-
1. Alwaysusebroiler panandrack
thatcomeswithyouroven.It is
designedto minimizesmokingand
spatteringbytrappingjuicesin the
shieldedlowerpartofthepan.
2. Ovendoorshouldbeajar for
mostfoods;thereisaspecial
positionondoorwhichholdsdoor
o~encorrectlv.
a
3. Forsteaks~ndchops,slashfat
evenlyaroundoutsideedgesofmeat.
Toslash,cutcrosswisethrough
outerfatsurfacejust totheedgeof
themeat.Usetongstoturnmeat
overtopreventpiercingmeatand
losingjuices.
4. Ifdesired,marinatemeatsor
chickenbeforebroiling.Orbrush
withbarbecuesaucelast5 to 10
minutesonly.
5. Whenarrangingfoodonpan,
donotletfatty;dges hangover
sides,whichcouldsoilovenwith
fatdripping.
...
6. Broilerdoesnotneed tobe
preheated.However,forverythin
foods,orto increasebrowning,
preheatifdesired.
7. Frozen $teaks canbe
conventionallybroiledby
positioningtheovenshelfatnext
lowestshelf positionandincreasing
cookingtimegiveninthisguide
1%timesperside.
8. If yourrangeisconnectedto =
208Volts,raresteaksmaybebroiled bypreheatingbroilheaterand
positioningtheovenshelfone
positionhigher.
—
-K
W---
.-
-
——
-
Food
Bacon
I
GroundBeef
WellDone
I
—
— Medium
Medium
WellDone
Wre
WellDone
Chicken
BakeryProducts
Bread(Toast)or
ToasterPastries
EnglishMuffins
r
LobsterTails
to8-02.each)
(6
I
fish
I
Ham Slices
(precooked)
PorkChops
Well Done
F
Quantityandlor
I
I Thickness
k-lb. (about8
thinslices)
l-lb.(4patties)
1
to %-in.thick
1/2
~-inchthick
(1to 1%-lbs.)
Shelf
I
~ Position I Time, Minutes
c
I
c 7
I
I
l~li
llA-in.thick
(2to2%-lbs.)
1:1:
1whole A
(2to2%-lbs.),
splitlengthwise
2 to4slices
1 pkg.(2)
2(split)
2-4 B
l-lb.fillets%to c 5
lA-in.thick
l-in.thick
2(% inch)
2(l-in.thick)
about1lb.
1:134
I
B
I
c
B
First Side
3%
35
1%-2
13-16
8
10
13
SecondSide
Time, Minutes
3%
4-5
7
9
13
7-8
14-16
20-25
10-15
‘/2
Donot
turnover.
5
8 Increasetimes5to 10minutesperside
10
13
Comments
I
Arrangeinsinglelayer.
I
Spaceevenly.
Upto 8pattiestakeaboutsametime.
Steakslessthan1inchcookthrough
beforebrowning.Panfryingis
recommended.
Slashfat.
Reducetimesabout5to 10minutesper
sideforcut-upchicken.Brusheachside
withmeltedbutter.Broilwithskin “
downfirstandbroilwithdoorclosed.
1
Spaceevenly.PlaceEnglishmuffins
cut-side-upandbrushwithbutter,if
desired.
Cutthroughbackofshell.Spread
open.Brushwithmeltedbutter
beforeandafterhalftime.
Handleandturnverycarefully.
Brushwithlemonbutterbeforeand
duringcookingif desired.Preheat
broilertoincreasebrowning.
for1%-inchthickorhomecured.
Slashfat.
‘.,L
Wienersandsimilar
precc>okedsausages,
bratwurst
inch)
2(!
about10to 12oz.
2(1%inch)
about1lb.
l-lb. pkg.(10)
c
c 10
c
B 17
IC16
21
10
8
4-7
10
4-6
12-14
1-2
Slashfat.
Ifdesired,splitsausagesinhalf
lengthwiseinto5 to6-inchpieces.
Page 22

Rotkserie(upper oven)
—
.——
Foodiscookedbyrevolvingon
a spitunder the(upper)broilunit.
Asfoodturns,itbastesitselfto
producea succulentbrownand
tenderroast.Meattenderenough
forroastingmaybe rotissed.
1. Assemblerotisserie.Insert
curvedendsofframeinto large
holesofbroilerpanhandles.Lock
frameinplacebyfittingstraight
endsofSUpportintoholesincenter
handles.
2. Securefoodon spit.When
securedcorrectly,foodwillbe
locatedin centerareaofspit
leaving4 inchesfreeat thepointed
end(thispartgoesintomotor).
3. Tosecurefoodonspit:Push
2-prongedforkontospit
handleend. Tightenwithscrew.
Pushspit throughfood(tiefood
securelymd compactly),distributing
weightevenlyoneachsideofspit.
Tocheckweightdistributionon
spit,holdspit(andfood)between
hands,palmsup;spitshouldroll
smoothlyfrompalmstofingertips
whenpalmsaretippedforward.
near
Finishsecuringfoodonspitby
glidingsecond2-prongedforkonto
spitwitiprongstowardfti. Tighten
screwstoa flatsurfaceonspit.
4. Placespitonframesohandleend
isinnarrowsupport,andpointed
endisinwide U-shapedsupport.
Rotissiq theFood
1. Putovenshelfinlowestposition
inoven.Withfoodon spit,place
spit onovenshelf.
2. SetOVENTEMPknobas
suggestedon RotisserieTimeand
TemperatureGuideatright.Settings
are300-400”F.togetfoodsjuicy
anddonewithoutoverbrowning.
3. SwitchOVENSETknobto
ROTISSEWE.Thisstartsbroilunit
androtisseriemotoroperating.Spit
canbeinsertedandremovedmore
easilywhenmotorisoperating.
N~E: Makecertainwhentouching
spitthatnopartofbodyorpot
holdertouchescoilsofbroilunit.
4. Insertspitintomotor:Grasp
handleonspit.Usingpointofspit,
movetoonesidethecoverover
motoroutletin rearofoven;push
spit firmlyintomotoroutletasfar
asitwillgo.Removehandle.
5. Checkrotationoffood.Tighten
or adjustforksifnecessary.During
cooking,forksmayneedtightening
duetonormalmeatshrinkage.
6. As foodcooks,leavedoorajarin
“Broil”position;doorstaysopen
byitself.
7. Bastefoodifdesired.Bastewith
long-handledbrushasfoodrevolves.
RotisserieNo&s
oA regular,non-electricmeat
thermometermaybeusedwhile
rotissingprovidingitdoesn’ttouch
theoven,frameorpanwhilemeat
revolves.(Or,ifdesired, cookto
estimateddonenessthenpull
meatfromoventoinsertmeat
thermometer.Waitabout2 minutes –..
fortemperaturetoregister.If meat —
isnotdone,removethermometer
andcontinuecookingif necessary.)
~If rotissingturkey,let standin
warmoven10to20minutesafier
cookingto assurejuicymeatand
completedoneness.
~Atendofcookingpulloutpan
andshelftogether,usingpot
holders.TurnOVENSETtoOFF.
Removefoodfromspit.Coolpan
outsideoven;soakforksandscrews
foreasiestcleanup.
e
—
22
Page 23

.—
-.
@otkserie mmeandTempemtureGuide
——
Food
Beef
RolledRib
Rare 325 22-29
Medium
WellDone
-b
bonedand rolled
Leg,
Pork, fresh
Loin
Spareribs(barbecued)
Spareribs(plain) 400
Pork, cured
Ham
Cook-Before-Eating
bonein 325 17-20
FullyCooked 325
Poultry
Capon*(6-8lbs.)
k
hicken*(2-3Ibs.) 400
Chicken7(1%-2Ibs.)
(
(
CornishHen*(1\b.) 400
Duckling*(4-5lbs.)
1
.
~rkey* (8-12Ibs.)
J
Veal
s
Shoulder,bonedandrolled 350
E
Bologna
?anadianBacon
(
.uncheon Meat
;
can)
12-oz.
I
v
Wieners,large 350
Oven~mp.
Setting Nlinutes Per Lb. Temperatures
325 27-31 150-160 checkat 1/2hourintervalswithmeat
325
350
350
350
375
400
350
350 17-27
350
350
350
1%-1%hrs.(totaltime)
About1 hr.(totaltime)
23-32
23-32
Approfiate
RotissingTime Thermometer
32-42
24-27 175-185 175formedium.
25-34 170-195
%-1hr.
14-18
26-30
33-42
48-62
31-35 185-190
30-33
23-25
23-27
(totaltime)
(totaltime)
Meat
130-140
170-185
160
130
185-190
t
T
-t
180-185
180
180
160
GeneralDirWtiom
NOTE:1.Forroas~$OVER10pounds,
cookabout1/2estimatedtime,then
thermometerforinternaldoneness.
2. Thinroasts,3to4 pounds,mayrequire
slightlylongertimesperpoundthan
thosegivenon guide.
185forwelldone.
Buyribssplitdowncenter.Threadon
spit.Tobarbecue,brushwithsauce
every15minutes.
Brushwithmeltedbutterormargarine,
bastingorbarbecuesauceseveraltimes
duringcooking.
Sameasabove.
Ifdesired,&d 4 to5ofthisSk chicken
crosswiseonspit.Letrevolvetowithin
1/2hourofdonenesstime,thenbrush
every10minuteswithbarbecuesauce.
Brushwithbutter,or butterandlemon
juicemixed.Threadhensonspiteither
lengthwiseorcrosswise.
Donotbrushwithfat.
Cookwithoutbrushingwithfat,orbrush
withbutterormargarineasdesired.When
cooked,switchOVENSETtoOFF,cIose
door,letturkeystand10to20minutesIN
OVEN.Removefromovenandcarve.
Brushwithsauceifdesired.
Brushwithsauceifdesired.
Brushwithsauceifdesired.
=#_ “
mf—.
-
Ion smallpoultry,testdonenessbymovingleggentlybackandforth,andpresslegmuscletobecertainitis soft.
*Ready-to-cookweight.IMPORTANTTielegsandwingscloseto bodytomakedonenessofbirdasuniformaspossible.Alltimesgivenareforunstuffedbirds.
.
NOTE:Spillageofmarinades,fruitjuicesandbastingmaterialscontainingacidsmaycausediscolorationonovenlinerordoorso shouldbewipedupimmediately
withapapertowel.Whensurfaceiscool,cleanandrinse.
—
—
23
Page 24

Opel”atingthe
self-cleaning bwer oven
—.
Befowsettingoven
Controls,chickThese
Things:
step1:
Removebroilerpan,broilerrack
andother cookwarefromtheoven.
(Ovenshelvesmaybeleftinoven.
Note:Shelvesmaybecomegray
afterseveralcleanings.)
step 2:
Wipeupheavysoilon oven
bottom.
-y
A. OvenFrontFrame
B. OvenDoorGasket
C. OpeningsinDoor
DeOvenLight
Step3:
Cleanspattersor spillsonoven
frontframe(A)andovendoor
outsidegasket(B)witha dampened
cloth.Polishwithadry cloth.Do
notcleangasket(B).Do not allow
watertorundownthroughopenings
intopofdoor(C). Neverusea
commercialovencleanerinor
aroundself-cleaningoven.
———— .
.—— - —
Caution:Chrometrimrings
aroundthesurfaceunitsshould
neverbe cleanedintheselfcleaningoven.Neithershould
reflectorpans offoilor shiny
chrome.
HowtoSet Oven
forCBeating
Step1:
~rn OVEN SETandOVEN
TEW knobstoCLEAN.Controls
willsnapintofinalpositionwhen
theCLEANlocationis reached.
2:
Step
Slide
theLATCHHANDLEtothe
rightasfaras itwillgo.
step3:
Settheautomaticoventimer:
@Makesureboththerangeclock
andtheSTARTdialshowthe
correcttimeofday.Whenthe
STARTknob ispushedinand
turned,it will“pop”intoplace
whenthetimeshownontherange
clockisreached.
eDecideoncleaninghoursnecessary.
RecommendedCleaningTime:
ModerateSoil—2hours
(thinspillsandlightspatter)
HeavySoii—3hours
(heav~,greasyspillsandspatter)
e Addthesehourstopresenttime
ofday,thenpushinandturnS~P
dial clockwisetothisdesiredstop
time.CLEANINGlightglows,
showingcleaningisstarting.
TheLOCKEDlightwillglow,
indicatingovenishotanddoor
cannotbeopened.Ovendoorand
windowget hotduringself-cleaning.
DON(YI’~?JCH.
@
—
—-
—
——
step4:
Closeovendoorandmakesure
ovenlight(D)is off.
step5:
Theporcelain-enameleddrippans
thatcame withyourrangecanbe
cleanedautomaticallyintheselfcleaningoven,Wipeoffboilovers
thatarenotstuckon beforeplacing
twopans,upsidedown,oneach
ovenshelf.
—
—.
24
Page 25

-- FoilolvThesestepsafter
— self-cleaning
After cleaningiscomplete,the
ovendoorwillstaylockeduntilthe
ovencools aridtheLOCKEDlight
goesoff.Thistakesabout30
minutes.
1:
Step
WhenLOCKEDlight is off,slide
the LATCHHANDLEtotheleftas
Step2:
TurnOVENSETknobto OFF.
Step3:
TurnOVENTEMPknobtoWW.
NOTE:Tostartandstopcleaning
atalatertimethanshownonclock,
pushinandturnSTARTdialtotime
youwishto start.Addthehours
neededforcleaningto this“start”
time,thenpushinandturnS~P
dial to thisdesired“stop”time.
Ovenwillautomaticallyturnon
andoffatthe settimes.
QuestiowandAmwers
Q.Whywon’tmyovenclean
immediatelyeventhoughI set
allthetimeandcleanknobs
correctiy?
A. Checkto besureyourSTART
dialissetto thesametimeasthe
rangeclock.Alsochecktobe
sureLATCHHANDLEismoved
totheright.
Q.It’myoven clockisnot
working,can I stillself-clean
myoven?
A. No.YourAutomaticOven
Timerusestherangeclocktohelp
startandstopyourself-cleaning
cycle.
Q. Can 1usecommercialoven
cleanerson any part of’my
self-cleaningoven?
A. Nocleanersorcoatingsshould
beusedaroundany partofthis
oven.Ifyoudousethemanddonot
wipetheovenabsolutelyclean,the
residuecanscartheovensurface
anddamagemetalpartsthenext
timetheovenisautomatically
cleaned.
Q. CanIclean theWovenGasket
aroundtheovendoor?
A. No,thisgasketisessentialfor
agoodovensealandcaremustbe
takennot to rub,damageormove
thisgasket.
Q.After havingjust usedthe
oven,theLOC=D lightcame
onand 1couldnot movethe
LATCHHANDLE.Why?
A. Afierseveralcontinuoushigh-
temperaturebakingsor broilings,
theLOCKEDlightmaycomeon.
Theovendoorcan’tbe latchedfor
self-cleaningwhiletheLOCKED
lightison. Ifthishappens,letthe
ovencooluntil theLOCKEDlight
goesoff. Thentheovendoorcan
belatchedforself-cleaning.
IQ.What shouldI doif excessive
smokingoccurs during cleaning?
A. Thisiscausedbyexcessivesoil,
andyou should switchtheOVEN
SETknobtoOFF.Openwindows
torid roomofsmoke.Allowthe
oventocoolforat leastonehour
beforeopeningthedoor.Wipeup
theexcesssoilandresettheclean
cycle.
Q.Is the “crackling”sound I
hear during cleaningnormal?
A. Yes.Thisisthemetalheating
andcoolingduringboththe
cookingandcleaningfunctions.
Q.Shouldthere be any odor
during the cleaning?
A. Yes,theremaybea slightodor
duringthefirstfewcleanings.
Failuretowipeoutexcessivesoil
mightalsocauseanodorwhen
cleaning.
Q.What causesthe hair-like
lines on the enameledsurfaceof
myoven?
A. Thisisa normalcondition,
resultingfromheatingandcooling
duringcleaning.Theydonotaffect
howyourovenperforms.
Q.Whydo 1haveash leftin my
ovenafter cleaning?
A. Sometypesofsoilwillleave
adepositwhichisash. It canbe
removedwithadampspongeor
cloth.
Q.Myovenshelvesdo not s~ide
easily.What isthematter?
A. Aftermanycleanings,oven
shelvesmaybecomesoclean they
donot slideeasily.If youwish
shelvestoslidemoreeasily,
dampenfingerswitha small
amountofcookingoilandrub
lightlyoversidesofshelfwhere
theycontactshelfsupports.
Q.Myovenshelveshavebecome
grayafter severalcleanings.1s
thisnormal?
A. Yes.Aftermanycleanings,the
shelvesmaylosesomelusterand
discolortoadeepgraycolor.
Q. Can 1cookfoodon the cooktop
whiletheovenisself-cleaning?
A. Yes.Whiletheovenisselfcleaning,youcanusethecooktop
justasyounormallydo.
,1,
25
Page 26

careandcleating
Propercareandcleaningare
importantsoyourRangewillgive
youe~lcientandsatisfactoryservice.
Followthesedirectionscarefillyin
cuing foryourrangetoassuresafe
andpropermaintenance.
grease,maycatchfire. Tomake
cleaningeasier,theplug-insurface
unitsareremovable.
R
~Donotimmerseplug-insurface ‘
unitsinliquidsofanykind.
@Do notbendtheplug-insurface
unitplugterminals.
@Donotattempttoclean,adjust
or in anywayrepairtheplug~in
receptacle.
—
~
Theporcelainenamelfinishis
sturdybutbreakableifmisused.
Thisfinishisacidresistant.
However,anyacidfoods spilled
(suchasfruitjuices,tomato,or
vinegar)shouldnotbe permitted
toremainonthefinish.
ovenventDud
YourRangeisventedthrougha
ductlocatedundertherightrear
Calrod@unit.Cleantheductoften.
Toremove:
~ Makesureunitiscool.
~ Liftuprightrear surfaceunit.
@Removetrimringanddrippan.
~ Liftoutovenventduct.
Toreplace:
@Placethepartovertheovenvent
locatedbelowthe cooktopwiththe
openingoftheductundertheround
openinginthedrippan. Itis
importantthattheductisinthe
correctpositionsomoistureand
vaporsfromtheovencanbe
releasedduringovenuse. NOTE:
Nevercoverthe holein theoven
ventductwithaluminumfoil or
anyothermaterial.Thisprevents
theovenvent fromworking
properlyduringanycookingcycle.
Cleantheareaunderthedrippans
often.Built-upsoil,especially
R
ToCaean:
@Wipearoundtheedgesofthe
surfaceunitopeningintherange
top.Clean theareabelowtheunit.
Rinseallwashedareaswitha damp
clothorsponge.
Caution:Besureallcontrolsare
turnedOFFbeforeattemptingto
cleanunderthecooktopor
removingthe Calrod”units.
ToremOve:
@Raisetheunit coiloppositethe
receptacle.Liftaboutoneinch
abovethetrimringandpullaway
fromthereceptacle.Caution:Be
surethecoilsarecoolbefore
removingaCalrod@unit.
@Afier removingtheplug-in
surfaceunit,liftthetrimringand
drippantoclean undertheunit.
Toreplace:
@Placethedrippaninthesurface
unitopeningin therangetop.Line
upthedrippansotheunitreceptacle
canbeseen.Putthetrim ringin
place overthedrippan.
@Inserttheterminalsoftheplug-in
unit throughtheopeninginthepan
andintothereceptacle.
~Guidethesurfaceunitintoplace
soit fitsevenlyandfitssnuglyinto
thetrimring.
N~E: Thedrippanmust be
underthetrimring.
CAUTION
@Donotattempttocleanplug-in
surfaceunits in anautomatic
dishwasher.
mlt-bek 3-h-l
surfaceHeatingUtit
TheTilt-Lock3-in-1surfaceunitis
stationaryandcannotberemoved.
Itcanbelifiedupwardandlocked
inthatpositionforcleaningunder
theunit.Becertain the unit is
coolbefore liftingthe CON.
Afierliftingcoilunit,removetrim
ringanddrippantocleanunder
unit.Cleanpanandtrimringas
recommendedonCleaningGuide
onpage28.
ToCleanUpperOven
hwer Oven
Placeshelffromupper ovenona
shelfoftheself-cleanoven.(The
shelfmayhavetobeshiftedslightly
soshelfstopsdonotinterferewith
placementofpanels.)
Slideoutovenbottom;liftingbake -unitslightlymakesthiseasiertodo.
Lifibackpanelandremove.Place
bottomandbackpanelsback-tobacksosoiledsidesface outward.
It is importantthatpanelslayflat
onshelf.
Liftsidepanelsupandoutofoven.
Placeback-to-backon remaining
self-cleanshelf.
ToReplaceWneIs
Inupperoven
Replacepanels in anyorder
desired.Becertainovenbottom
isreplacedsonotchis at right,
and“feet” onbake unitrestin
depressionsinpanel.Replace
broilerreflectorso “openside”
istowardbottomofoven.
-—
..—.
26
Page 27

ToREMOVEdoor,opentoBROIL
_—
position,or whereyou feelhinge
catcf~slightly.Graspdooratsides;
liftdoorupandawayfromhinges.
ToREPLACE,graspdoor atsides,
lineupdoorwithhingesandpush
doorfirmlyinto place.
L-p Replacement
CAUTION:Beforereplacing
you ovenlampbulb?discomect
theelectricWwerforyour
CootingCenteratthemak fuse
or circuitbreakerpanel.Besure
toletthelampcoverandbulbcool
completelybeforeremovingor
replacingthem.
—
Coowp surfaceLmp
WHENCHANGINGCOOK~P
LAMP,DON~ ~UCH METAL
ENDOFLAMP.
~Holdglasspanelassemblyand
removethe3 screwsfromthemetal
framethatholdstopofassembly
inplace.
@Holdassemblyinbothhandsand
lowerituntil it isremoved.
~Whencompletelycool,remove
lampandreplacewithbulb ofthe
samewattage.Liftglasspanel
assemblyintoplace andreplace
screwsintopofassemblytohold
itinplace.
@Reconnectelectricpowertothe
range.
OV~~ ~a~~ ~pper Oven)
Adjmtingoven
Thermostat
Ifyoufindthatyourfoods
consistentlybrowntoolittleor
toomuch, youmaymakeasimple
adjustmentin thethermostat
(OvenTemp)knob.
PULLKNOBOFFSHAFT,
LOOKATBACKOFKNOBAND
N~E CURRENTSETTING,
BEFOREMAKINGANY
ADJUSTMENT.
Toincreasetemperature,turn
towardHIor RAISE;todecrease,
turntowardLOorLOWER.Each
notchchangestemperature10
degrees.
f~
*Z
~
+
——
-.
—
- –%–.–––
-
Theovenlamp(bulb)iscovered
witha glassremovablecoverwhich
isheld~nplacewithabail-shaped \
wire.Removeovendoor,ifdesired,
toreachcovereasily.
T’remove:
@Holdhand undercoversoit
doesn’tfallwhenreleased.With
fingersofsamehand,firmlypush
backwirebailuntilit clearscover.
Lifioffcover.DONOTREMOVE
ANYSCREWS~ REMOVE
COVER.
@Replacebulbwith40-watthome
appliancebulb.
replacecover:
laceitintogrooveoflamD
receptacle.Pufiwirebailfo~ward
i~>centerofcoveruntil it snapsinto
~~lace.Wheninplace,wireholds
;overfi~mly.Bece@inwirebailis
indepressionincenterofcover.
@Connectelectricpowertooven.
Toremove:Disconnectelectric
powertotherangeatthemainfise
or circuitbreakerpanel.When
completelycool,hold glasscover
andremovescrew.Pullglasscover
forward,thendown,andremove.
Screwinnew40-wattappliancebulb.
Toreplace:~ck extensionon
glasscoverintobackoflamp
opening.Fitcoveroveropening
andreplacewasherandscrew.
(Whenremovingandreplacing
cover,ifthermostattube shouldbe
moved,outofplace,besureitis
returnedtoitsproperhorizontal
positionabout1/2’;fromcover.)
Thenreconnectelectricpower
torange.
Upper Oven
LowerOven
1.PulloffOvenTempknob for
ovenneedingadjustment.Loosen
bothscrewsonbackofknob.
2. Movepointerone notchin
desireddirection.Tightenscrews.
3.Returnknobtorange,matching
flatareaofknobto shaft.Recheck
ovenperformancebeforemaking
anadditionaladjustment.
—.
-.
-
27
Page 28

Guide
Noie: Let range/ovenparts cool beforetouchingor handling.
—.
PART
Unit
Bake
andBroil Unit
Broiler%n andRack
ControlKnobs:
MnEe
Topand Oven
Outside Glass Wnish
PorcelainEnamel
Surface*
Inside Oven Door*
OvenGasket*
OvenLiner
OvenVentDuct
Chrome-Plated
TrimRings
Porcelain
Drip Pans
Meat Thermometer
Shelves
(SeeSelf-Cleaning
Oven Directions)
MATERIALS~ USE
SoapandWater
*
* Soap-Filled ScouringPad
e Plastic Scouring Pad
~ Mild Soap and Water
e
SoapandWater
o Paper Towel
e Dry C1oth
o Soapand Water
o
Soapand Water
o
Soapand Water
~
Soapand Water
e
Soapand Water
e Stiff-Bristled Brush
e Soap-Fiiied ScouringPad
(Non-Metaiiic)
~
SoapandWater
e Soap-Fiiied Scouring Pad
e Piastic Scouring Pad
*Dishwasher
~
Soapand Water
e Soap-Fiiied Scouring Pad
@
SoapandWater
GENERALDIRE~IONS
Donotcieanthebakeunitor broiiunit.Anysoilwiliburnoffwhentheunitis
heated.NOTE:Thebakeunitishingedandcanbeiiftedgentiytocieantheoven
floor.Ifspiiiover,residueor ashaccumulatesaroundthebakeunit,gentiywipe
aroundtheunitwithwarmwater.
Drainfat,cooipanand racksiightly,(Donotletsoiiedpanandrackstandin
oventocooi.)Sprirddeondetergent.Filipanwithwarmwaterandspreadcioth
orpapertoweioverrack.Letpanandrackstandfora fewminutes.Wash;scour
ifnecessary.Rinseanddry.OPTION:The broiierpan andrackmayaisobe
cieanedina dishwasher.
Puiioff knobs.Washgentiybutdonotsoak.Dryandreturncontroistorange,
makingsuretomatchflatareaonknobandshafi.
Washaiigiasswithclothdampenedinsoapywater.Rinseandpoiishwithadry
cioth.Ifknobsareremoved,donotailowwatertorundowninsidesurfaceof
~iasswhiiecleaning.
Avoidcieaningpowdersorharshabrasiveswhichmayscratchtheenamel.
Ifacidsshouldspiiiontherangewhiieitis hot,useadrypapertoweior cioth
towipethemup rightaway.Whenthesurfacehascooied,washandrinse,
Forotherspiils,suchasfatsmatterings,etc., washwithsoapandwaterwhen
cooledandthenrinse.Poiishwithadrycloth.
Onseif-cleaningoven,cieanONLYthedooriineroutsidethegasket.Thedoor
isautomaticallycieanediftheovenisintheseif-cleaningcycle.Ifspiiioveror
spatteringshouidoccurincookingfunction,wipethedoorwithsoapandwater.
DON~ rubordamagegasket.Avoidgettingsoapandwateron thegasketori
thesiotson thedoor.
AvoidgettingANYcleaningmateriaisonthegasket.
Cooibeforecleaning.Frequentwipingwitilmiidsoapandwaterwiiiprolong
thetimebetweenmajorcieanings.Besuretorinsethoroughly.
RemovetheOvenVentDuctfoundundertherightrearsurfaceunit.Washin
hot,soapywater,dryandreplace.
Cieanasdescribedbeiowor indishwasher.
CLEANINGOVEN.
Ringswilidiscolor.Wipeaii ringsafiereachcookingso
DO NOTCLEANIN SELF-
unnoticedspatterwiiinot“burnon”nexttimeyoucook.Toremove“burned-
on”spatters,useanyoralicieaningmateriaismentioned.Rublightly with
scouringpad to preventscratchingofthesurface.
Cooipansiightiy.Sprinkleondetergentandwashorscourpanwithwarmwater.
Rinseanddry.Inaddition,thepansmayaisobe cieanedinthedishwasheror in
theSeif-Cleaningoven.
Cooibeforecieaning.DON~ IMMERSEINWATER.Scourstubbornspots
withsoapyscouringpad,rinseanddry.DONOTS~RE IN OVEN.
SheivescanbecieanedinSeif-C1eaningovenordishwasher,or byhand,using
soapandwater.Rinsethoroughlytoremovesoapaftercieaning.
—
—
*Spiiiageof marinades, fruit juices, andbasting materiais containingacids maycause discoloration. Spiiloversshouid be wiped up immediately,with
carebeingtakentonottouchanyhotportionoftheoven.Whenthesurfaceiscooi,cieanand rinse.
28
.
Page 29

PART
.—–-..–.––.-
—
Unit Coils
Nietai,
includingChrome
SideTrims
andTrimStrips
Griddle
Rotisserie
Spit,Forks
Screws,Frame
StorageDrawer ~SoapandWater Forcleaning,removedrawerbypullingitallthewayopen,tiltingup thefront
BroilReflector
]
N~ATERIALS~USE
SoapandWater
~
*
SoapandWater Letgriddlecool.Pouroffgrease.Washinsudsywater.Soaka fewminutesif
~SoapandWater
OCommercialOvenCleaner
I
GENERALDIREHIONS
Spattersandspillsburnawaywhencoilsareheated.Aftermeal,removeall
cookwarefromsurfaceunitsandheatsoiledunitsatHI. Letsoilburnoffabouta
minuteandswitchunitstoOFF.Trynottogetcleaningmaterialsoncoils.Ifyou
do,wipeoffwithdamppapertowelbeforeheatingsurfaceunit.
DONOThandletheunitbeforecompletelycooled.
DON~ self-cleanplug-inunits.
DON~ immerseplug-inunitsin anykindof liquid.
DONCYI’washindishwasher.
Wash,rinseandthenpolishwithadry cloth.DON~ USEsteelwool,
abrasives,ammonia,acidorcommercialovencleanerswhichmaydamage
thefinish.
necessarytoremovefoodstuckonsurface.
Soakinhot,sudsywater;scourtoremovecooked-onfoodorsauces;wash.
andthenliftingthedrawerout.Wipewithadampclothorspongeandreplace
thedrawer.Neveruseharshabrasivesor scouringpads.
Takeremovableitemsfromupperoven.PlacethemintheSelf-Cleaninglower
oveninthismanner:
1. CompanionOvenShelves—invertandplaceon eachoftheSelf-Cleaning
ovenshelveswiththeirstopsfacingforward.
2. BroilReflector-placesoiledsidedownonlowershelf.
3.Bottomovenpanelandbackpanels:placeback-to-backwithsoiledside
facingout onSelf-Cleaningshelf.Laythesepanelsflatovercompanionshelves
thatwereplacedinSelf-Cleaningoven.
4. Sidepanel—layback-to-backon remainingSelf-Cleanpanel.
a
-.
--- ___
~
IfYouNeedservice
Toobtainservice,seeyour
warrantyon.thebackofthisbook.
We’reproudofour serviceand
wantyoutobepleased.Ifforsome
reasonyouare nothappywiththe
serviceyoureceive,herearethree
stepstofollowforfurtherhelp.
FIRST,contactthepeoplewho
servicedyourappliance.Explain
whyyouarenotpleased.Inmost
cases,thiswillsolvetheproblem.
NEXT,if youarestillnotpleased,
writeallthedetails-including
yourphonenumber—to:
FINALLY,if yourproblemisstill
notresolved,write:
MajorAppliance
ConsumerActionPanel
20NorthWackerDrive
Chicago,Illinois60606
Manager,ConsumerRelations
GeneralElectricCompany
AppliancePark
Louisville,Kentuc@40225
—–
~-
—
-
mfl—.
-–=. — ~.
-
-
~——-
29
Page 30

............
.—
_—
Rhamt System
ThisCookingCenterhasabuilt-in
exhaustsystemequippedwitha
damper,atwo-speedexhaust
blowerandremovablefilters.
Exhaustopeningsare locatedover
cooktngtopandinhoodoveroven.
Theexhaustsystemfunctionsonly
whentheblowerisoperating.The
switchfortheexhaustsystemis
beneaththecontrolpanel.Forhigh
speed,pushswitchonce;forlow
speed,pushswitchtwice;andto
stopblower,pushswitchonce
insequence.
Whenblowerisopezatingandhood
overovenisclosed,itexhaustsover
surfaceunitsonly.Whenblower
operateswithhoodin openposition,
itexhauststhroughopeningsover
surfaceunitsandoverovenatthe
sametime.
THEEXHAUSTSYSTEM
SHOULDBEOPERATED
WHENEVERODORS,VAPORS
ORSMOKEAREEXPE~ED
TOBETHERESULTOFA
COO~G OPERATION.
STARTFANATBEGINNING
OFCOOKING.
s
Toopenhoodabovetheoven,lift
uphandleatcenterofhood;to
close,pushdownonhandle.Use
hoodin itsfullyextendd position
whenevervaporor smokeresults
fromcooking,s~~chaswhenpan
broilingor fryingonthesurface
units.Seeinformationonuseof
surfaceunits.
Hlters
Twofaltersarelocatedovercooking
topandonebehindhoodextension.
Filtersareremovableforcleaning.
Filtersbecomesoiledovera period
oftime.Theefficiencyofyour
exhaustsystemdependsonhow
cleanthefiltersare.Frequencyof
cleaning,or replacing,dependson
thetype ofcookingyoudo,but
faltersshouldbecleanedATLEAST
ONCEAMONTH.Also,frquently
cleanthegrease-ladensurfaces
adjacenttothefilters.
Toclean, agitateinhotdetergent
solution.Lightbrushingmaybe
usedtohelpremoveimbeddedsoil
anddust.Withcarefuluse and
handling,filterswilllastforyears.
However,ifreplacementbecomes
necessary,obtainafilterfrom
yourdealer.
Removeand ReplaceFilters --
1. Cookingtop:Placefingerin
recessatfrontedgeoffilter;push
filtertorear untilfrontedgeclears
theexhaustopening;lowerthe
frontandremove.Whenclean,
replace.Placeedgeoffilteragainst
springatrear ofexhaustopening.
Pushtorear,liftfrontedge,andlet
springpushfilterforwardintoplace
underedgeofexhaustopening.
2. Hood:Extendhoodasfaras
possible,or removehoodextension
ifdesired;seeillustrationbelow.
Placefingersoneachside at
bottomoffilter.Pressfiltertolefi
untilitclearstheholderonright
side,thenremove.Whenclean,
replace.Pushfilteragainstclipat
lefiandpressleft untilfilterclears
holderatrightside. Pushfilter
towardopeningandreleasesoit
sli~sbehindholder.
x
—–
Motor
Theblowermotorispe~manently
lubricated;itdoesnotneedoiling. ----
ToRemoveandReplaceHoodEtiemion
1. T’ remove,extendhoodasfar
asitwillopen.
Withthumbscurvedaroundedge Secureonesideatatime.Align
ofhoodextension,hooka finger
betweenspringandbracketateach
sideandpushtowardcenterofhood.
ThismovesDinsoutofholesin
bracketandkoodextensioncan
beremoved.
2. Toelean9 washwithhot
detergentsolution.Rinseand dry
withSOftcloth.
3. Toreplace, fitbottomofhalfcircleflangesintosideofhood.
pinwithholesinbracketandhood
extension,thenpushpinthrough
holes.Thissecureshoodextension
soitcannotberemovedbymistake.
30
HOOD EXTENSION .
IIF
OVEN
DOOR
Page 31

...—..
....—-—.
————
Qklestions?
.---————
-—4
. . —.
UseThisProblemSolver
PROBLEM
OVEN WILLNOTWORK
OVENLIGHT
DOESN~ WORK
FOODDOESNm
BROILPROPERLY
OODDOESN~ ROAST
ORBAKEPROPERLY
POSSIBLECAUSEANDRE~DY
Plugon rangeisnotcompletelyinsertedin theelectricaloutlet.
Thecircuitbreakerin yourhousehasbeentripped,or a fusehasbeenblown.
Ovencontrolsnotproperlyset.
Doorleftinlockedpositionaftercleaning.
CALROD@SU~ACE UNITS
NOTFUN~IONING
PROPERLY
OVENWILLN~
SELF-CLEAN
OVENDOOR
WON’TLATCH
—
TlieGEAnswer cenier@
, 800=626.2000
-----
“- c4>nsuEmerinformation service
TurnOVENSETknob to CLEAN.‘Glowi~g,Lock+dLight’afterknobisturned
indicatesovenistoohotfromprevioususe anddoorwon’tlatch.Tocool oven,
opendoorwide;thenLatch canbe moved. ‘
OVENSETknobmust beat CLEANor OFF beforeLatchcapbemoved.
Page 32

YOURGENERALELEmR1cRANGE
WARRANTY
Saveproof of original purchase date such asyour sales slip or cancelled check to establish warranty period.
WHAT!s COVERED
WHATIs Nm COVERED
FULLONEWEARWARRANTY
Forone yearfrom date of original
purchase,we will provide,free of
charge, parts and service labor
inyour home to repair or replace
any pafi of therange that fails
becauseof a manufacturing defect.
~ Service trips toyour home to
teach you howto usethe product.
Readyour Useand Cam material.
If you then haveany questions
about operating the product,
please contact your dealer or our
Consumer Affairs office at the
address below,or call, toll free:
The GE Answer Cente@
800.626.2000
consumer information service
~ Improper installation.
This warranty isextended to
the original purchaser and any
succeeding ownerfor products
purchased for ordinary home use
in the 48mainland states, Hawaii
andWashington, D.C.InAlaskathe
warranty isthe same exceptthat it is
LIMITED because you must payto
ship the product to the service shop
or for the service technician’s travel
coststo your home.
All warranty service will be provided
byour Factory Service Centersor
our authorized Customer Care”
by
servicers during normal working
hours.
Look in the White orYellowPages
of your telephone directory for
GENERAL ELE~RIC COMPANY,
GENERAL ELECTRICFACTORY
SERVICE, GENERAL ELECTRICHOTPOINT FACTORYSERVICEor
GENERAL ELECTRICCUSTOMER
CARE@SERVICE.
~ ReD1acementof housefuses or
rese~tingof circuit breakers.
e Failure of the product if it is used
for other than its intended purpose
or used commercially.
~ Damage to product caused
by accident, fire,floods or acts
of God.
WARRAN~R IS NOTRESPONSIBLE
FORCONSEQUENTIAL DAMAGES.
Some states do not allow the exclusion or limitation of incidental or consequential damages, sothe above limitation or exclusion
may not apply to you. This warranty gives you specific legal rights, and you may also have other rights which vary from stateto state.
Toknowwhat your legal rights are in your state, consult your local or state consumer affairs office or your state’sAttorney General.
Manager—Consumer Atiaim, General Electric Company,Appliance Park, Louisville, KY 40225
_Part ~0. 164D1352 P024 ]
[
Pub. No. 49-4818
Ifyou have an installation problem,
contact your dealer or installer.
Youare responsible for providing
adequateelectrical, gas,exhausting
and other connecting facilities.
Warrantor:General E!fectricCompany
If futiher help is needed concerning this warranty, write:
—
JHP63V:“
J
 Loading...