

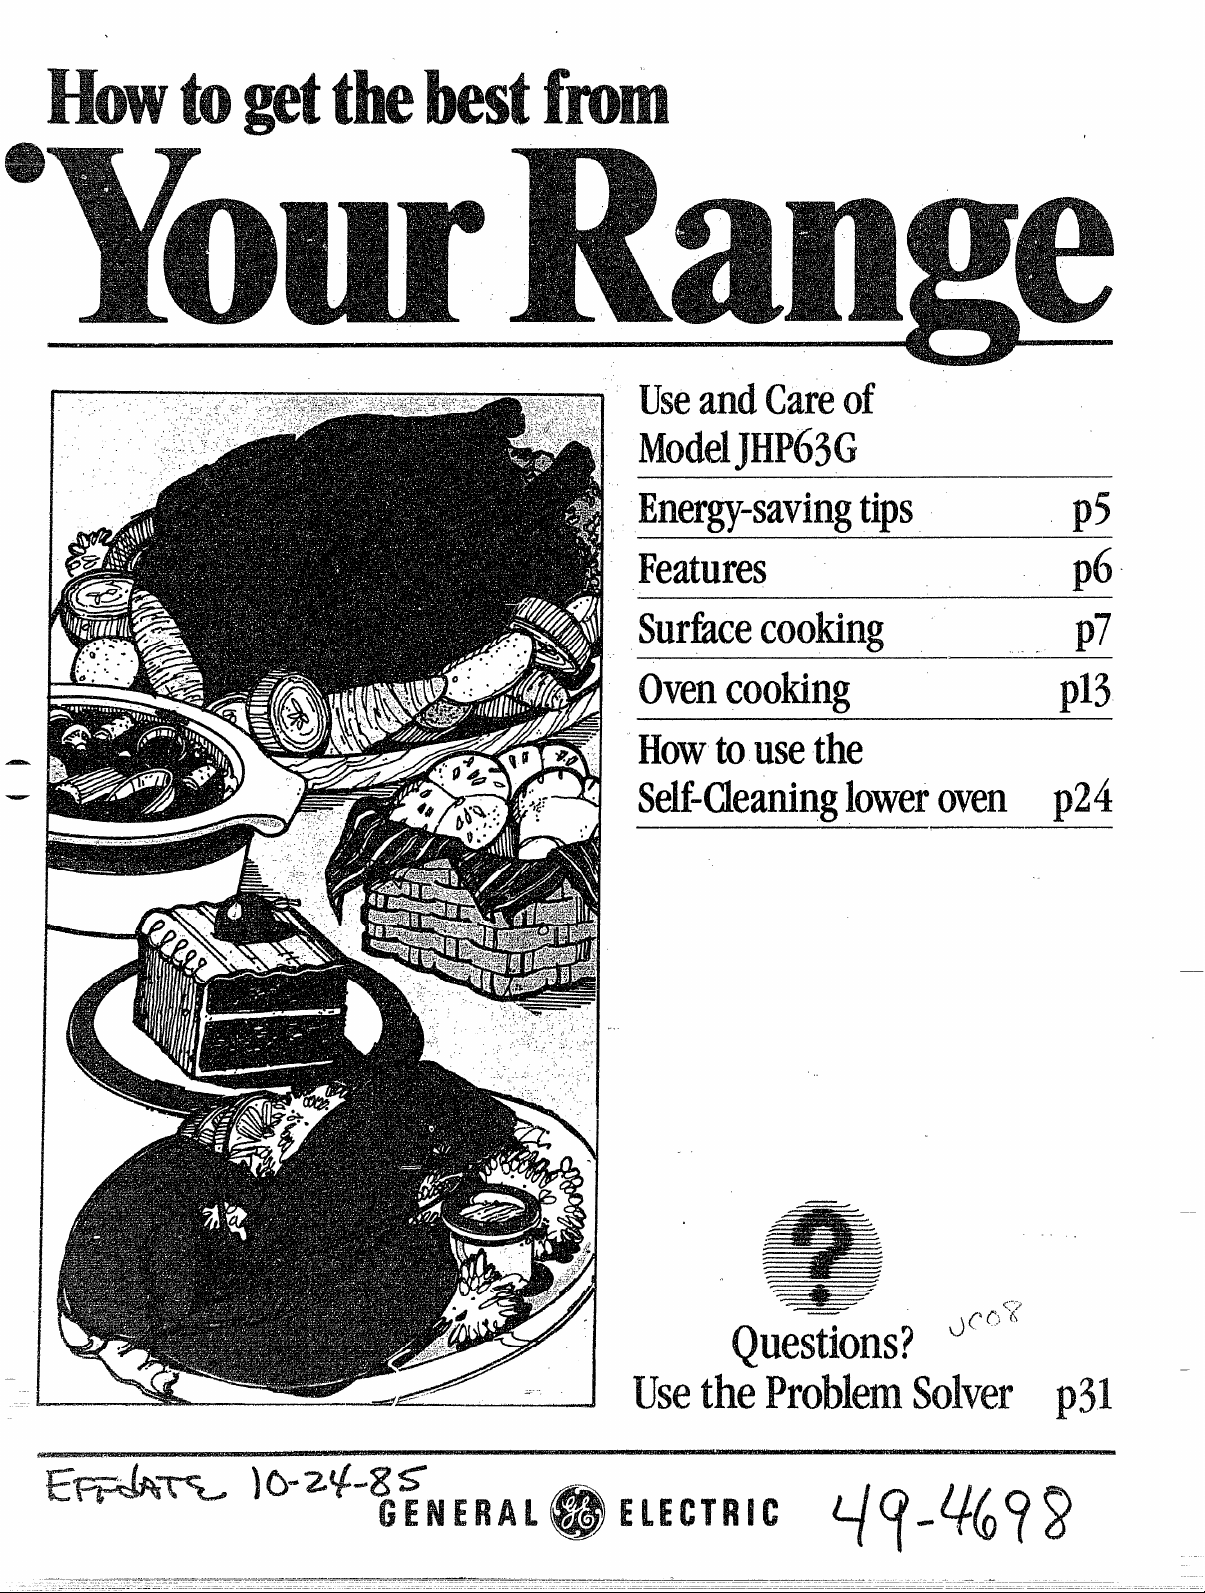
Page 1
.
UseandCareof
I
tips
I
—
—
Features p
%diicecooking
ovencooking
Howtousethe
Self-~eaningloweroven p
,.
p
p7
‘pIs
U
“ ‘
Page 2

.
...
Autom
Remov
Exha
Th
Ke
ques
yo
num
Gen
ov
yo
conc
co
BefUsYoRan. ..
SafInstruc. .....‘
-EnergyTi. . . . . . . . . .. .
~eatLo YoRar”, .-...
SurfCoo. . . . . ....
~Ot ~se3-iUn...$
Hot Gfi. . . . . . $
HoCanTi. ....
SurfCooCh.
UsiYoOv. . . . . ....
Hot Baa TiBa. .
HowtoRoast . . . . . . ... . . . . . . .U
BakCh. ........
Tia Clo. .
,
1 ‘
.
~o+ .....
~owto~i-oil.............. L..1$,~
BroiCh. .. . . . ....
Howto Use -
YoRo~is. ......
HowU
YoMeTherm. ..
Hot Brwi
YoMeTherm. .
Hot Opet
Self-COv. ....
Hot Caf
YourRange . . . . . . . . . . b.26,n
C-leaYoRa. ....
I Y NeServ. . . . ..
ProSol. . . ....
Warr. . . . . . . . . . .BCo
OvDo. ....
Sys. . . . . . ....
BeforeIBsingyourra
readthisbookUMwmye
I i intt h y opa
maiy n rapr
i haf ant y
I y doundso
o n m hewr(i
ph
ConAf
AppP
LouiKY
EleCo
w down themodel
andserialnumbers.
Yof t o alalo
o t fro t rabet
do
Thnua a o t
ConPrOwn
RegiC t c w
raBesei t
caplwrthnu
he
MoNu
SeNu
U thnui a
correo sec
y ra
Ifym.1Mxx!ived
a damaged.range.o s
Imc t d (
but s y t r
s t andmoney.
Beforeyourequest
service..
C t P S o
p 3 I l m c o
opp t y c
yo
..
2
Page 3
~ SmETY Instructions
Readah!instructionbeforeusingthisappliance.
— Whenusingelectricalappliances,
basicsafetyprecautionsshouldbe
followed,includingthefollowing:
@Usethisapplianceonlyforits
intendeduseasdescribedinthis
manual.
*Besureyourapplianceis
properlyinstalledandgrounded
byaqualifiedtechnicianin
accordancewiththeprovided
installationinstructions.
~Don’tattempttorepairor
replaceanypartofyourrange
unlessitisspecifically
recommendedinthisbook.All
otherservicingshouldbereferred
toaqualifiedtechnician.
@Beforeperforminganyservice,
DISCONNECTTHERANGE
POWERSUPPLYATTHE
HOUSEHOLDDISTRIBUTION
PANELBYREMOVINGTHE
FUSEORSWITCHINGOFF
a
THECIRCUIT13REAK3R.
@Donot leavechildrenalone—
Childrenshouldnotbeleftalone
orunattendedinareawhere
applianceisinuse.Theyshould
neverbeallowedtositorstandon
anypartoftheappliance.
@DorilaUowanyonetoclimb,
standorhangonthedoor,
drawerorrangetop.They
could!damagetherangeand
eventipitover,causingsevere
personalinjury.
eCAUI’’ION:Do Nm STORE
H’EMSOFDJ’17ERESTTO
CHILDREN’UNCABINETS
ABOVEA RANGEORON
THEBACKSPLASHOFA
RANGE–CHILDREN
CLIMB~G ON
THERANGE
TOREACHKlMW3COULD
* Wearproperclothing.Loose
fittingorhanginggarmentsshould
neverbewornwhileusingthe
appliance.Flammablematerial
couldbeignitedifbroughtin
contactwithhotheatingelements
andmaycausesevereburns.
@Useonlydrypothohks-
Moistordamppotholdersonhot
surfacesmayresultinburnsfrom
steam.Donotletpotholderstouch
hotheatingelements.Donotuse
atowelor otherbulkycloth.
@Neveruseyourappliancefor
warmingorheatingtheroom.
~Storageinoronappliance—
I?lammablematerialsshouldnot
bestoredinanovenornear
surfaceunits.
*Keephoodandgreasefilters
cleantomaintaingoodventing
andtoavoidgreasefires.
@Donotletcookinggrease
orotherflammbk materials
accumulateintherangeor
nearit.
@Donotusewaterongrease
fires.Neverpickupaflaming
pan.Smotherflamingpanon
surfaceunitbycoveringpan
completelywithwellfittinglid,
cookiesheetorflattray.Fkuning
greaseoutsideapan.canbeput
outbycoveringwithbaking
sodaor,ifavailable?anmMpurposedrychemicalorfoam.
‘@Donottouchheatingek!ments
orinteriorsurfacesofoven.
Thesesurfacesmaybehot
enoughtoburn,eventhoughthey
aredarkincolor.Duringandafter
use,donottouch,orletclothing
orotherflammablematerials
contactsurfaceunits,areas
nearbysurfaceunitsorany
interiorareaoftheoven;allow
sufficienttimeforcooling,first.
Potentiallyhotsurfacesinclude
thecooktopandareasfacingthe
cooktop,ovenventopeningand
surfacesneartheopenings,and
crevicesaroundtheovendoor.
Remember:Theinsidesurface
oftheovenmaybehotwhenthe
doorisopened.
@Whencookingpork9follow
ourdirectionsexactlyandalways
cookthemeattoatleast170”l?.
Thisassuresthat,intheremote
possibilitythattrichinamaybe
presentinthemeat,itwillbe
killedandmeatwillbesafetoeat.
-
BE?F
-w
FaYd
!?i&?r-
-
(cmltilttidnkw pqc)
r
—------k’
3
Page 4
— ——... -. ———-——.. —————..—.- —- - ——— —- ——— .-. - - .-
* ~f~~~
whopovdo‘TIM
hot
awf thera
a o stwhesc
c cabut hafa
aney
~~ohelmofo
conti t ovPre
cobuu a t con
eoburcaua inj
~u hof Si
appi eqw o o
m suu o di
siSeuthaf
bok ent c t
suu heelT
u o undutw
exapoo t he
elt dicoa m
rei igo cl
@Keovvedu
unobst
~
Keovfrfrgr
bui
*Plovshei des
posiwhovi coI
shemub hanwh
hod n l pothcon
heauni t ov
~Pulo sht t sh
sti aconvei lif
hefooRi alaprec
agabufktouh
surfo t doo ovwa
~Wh
uscooo roa
bai t ovfot
manufadire
~D n u yoovt d
newspI overth
c cafi
Prrelo utt
buw a imeff
a ~e~es~~
unaa h h se
130casma
grspit m c
o fi
@B s d p a v d
a n coa a i
pl
Thabduco
codar p a
wi
@Dou alf t
l d p o ani t
o exa dei t
boMic rei a
shf hao dat
t ra
~O cet o gl
glasceear
o otglcona
self-ov
suif
ranse
otm brbeo t
*D n cldogasT
dogasi essef a
go
seCashob tan t
rudamo mot gas
~D n u ovcle
No
commovcleo ov
liprotcoao a
kishob usi o ar
a pao t ov
*Clonpalii th
U a CaBo
s BefSelf=t ov
rembrop a ot
suchi tem
( Seo “S
Coof sug
@T mib igo
flamata
spillage; the hao aco
shb poss t i i
tutot ceo t
rawiexo
nesuun
@Doimo s
remsuunD
p t i adis
~ ~ turns u t
O b r u
~K a e o f b
f a H o M
H h
*T a t p o a
b o e s a b
c t t c f a
s u a a O p
a 2 c a c b
att r t u
~~~en bning f under
t h t thefanoff.The
f i opm s
t f
~F f f s b w
d a p F o f
f o m o f f
c c h f t b u a
o s o p
eU l f f e
s o d f F
t p t f o f c c
spw f i a
~I acoo o o f
w b u i i s t
b h o a f m
s
eA h f s a
w a i h
e U d f t
whp t p
ovf b t
s p
~~~~
Page 5
will- range, me many other
fl
temp
ke
pr
—.——..-
8EEM?.
items, is heavy a
cansettle into soft m ‘cO
sudi as cushioned.vinylor
carpeWhen movingthe ra
c thtyo floou ca
and it is recommended that these
simpleand inexpensiveinstructions
be followed,
The range shouk.ibe installedon
a sheet of plywood (or similar
material) as follows:When lhe
jkw
coveendtfro
thran
will rest on shouldbe built
plywoodtothesame levelor higher
than the floor covering. This wiH
allowtherangeto be movedfor
cleaning or servicing.
the area that the range
U wi
* Use cooo mewe
aluw tigh‘c
‘a
bowhcom
cot hepoof1
surun
neM . w c
,
satw
y f pri n
w t inl a p
‘f i o p a t =
@Cookfrve@w a
light goeso@: . ‘-’‘ ‘ , =-
minqrnbwai a
coveredpan. ,
,
@Wafow brt
quit cti
a
HIhel$f re4
cootempreh
immet Ioset
wi
i co,
@A t o C =
fen.i~vi~gfOOd. .,
,.,
‘ s D b a f
d opK a o a =
,
s a t a poi i =
obenecl.’ ~ ~”
@U resheasu
coowheti6F
~xaw coe i t
shbrwat bot t
t O post con~
t
cooking. ~~•~~• ,’
~U coh f co&
-
,
EWHstco(i
alld n u H he~
Levelingscrewsare located on
each corner ofthe base of the
range. Removethe bottom drawer
and you can levelthe range on
an uneven floor with the use of
a nutdriver.
TOremove drawer, pull drawer
outd! the wayqtilt up the front
antait out. TOreplace
drawer,insert glides at back.of
drawerbeyondstopon rangeglides.
Lift drawer if necessary to insert
easily.Let front of drawer down,
then push in to close.
s~a’fi)- “ ‘ ,“
MEHIbro
,
,
~EDI1ry~:
Low—@&m “ ~
quansimmbo
hea specsmqua
,, .
@Whbowaf te
.. ‘
,
coffee,heatonlytheamt)u~t~~‘ ,’ “,~ ~ . ~
needed.It isnot econqm!caltdboili L.~ ~‘ ~- .‘ ‘.”, ~
~ con~inerfill ofwatdrforoneor .. ., . .- :<,.’ -‘ ;“ ; ‘,
twocups. . ,
‘
.
.
......
~k..
....
. -..
,
,
? -,
,
w
=
I ‘
&
~
&
=
m
H
U
-
*
-
,
,
E
— — -
-
-—
...-
..--.,
.-..
,
I
Page 6
see
Recep
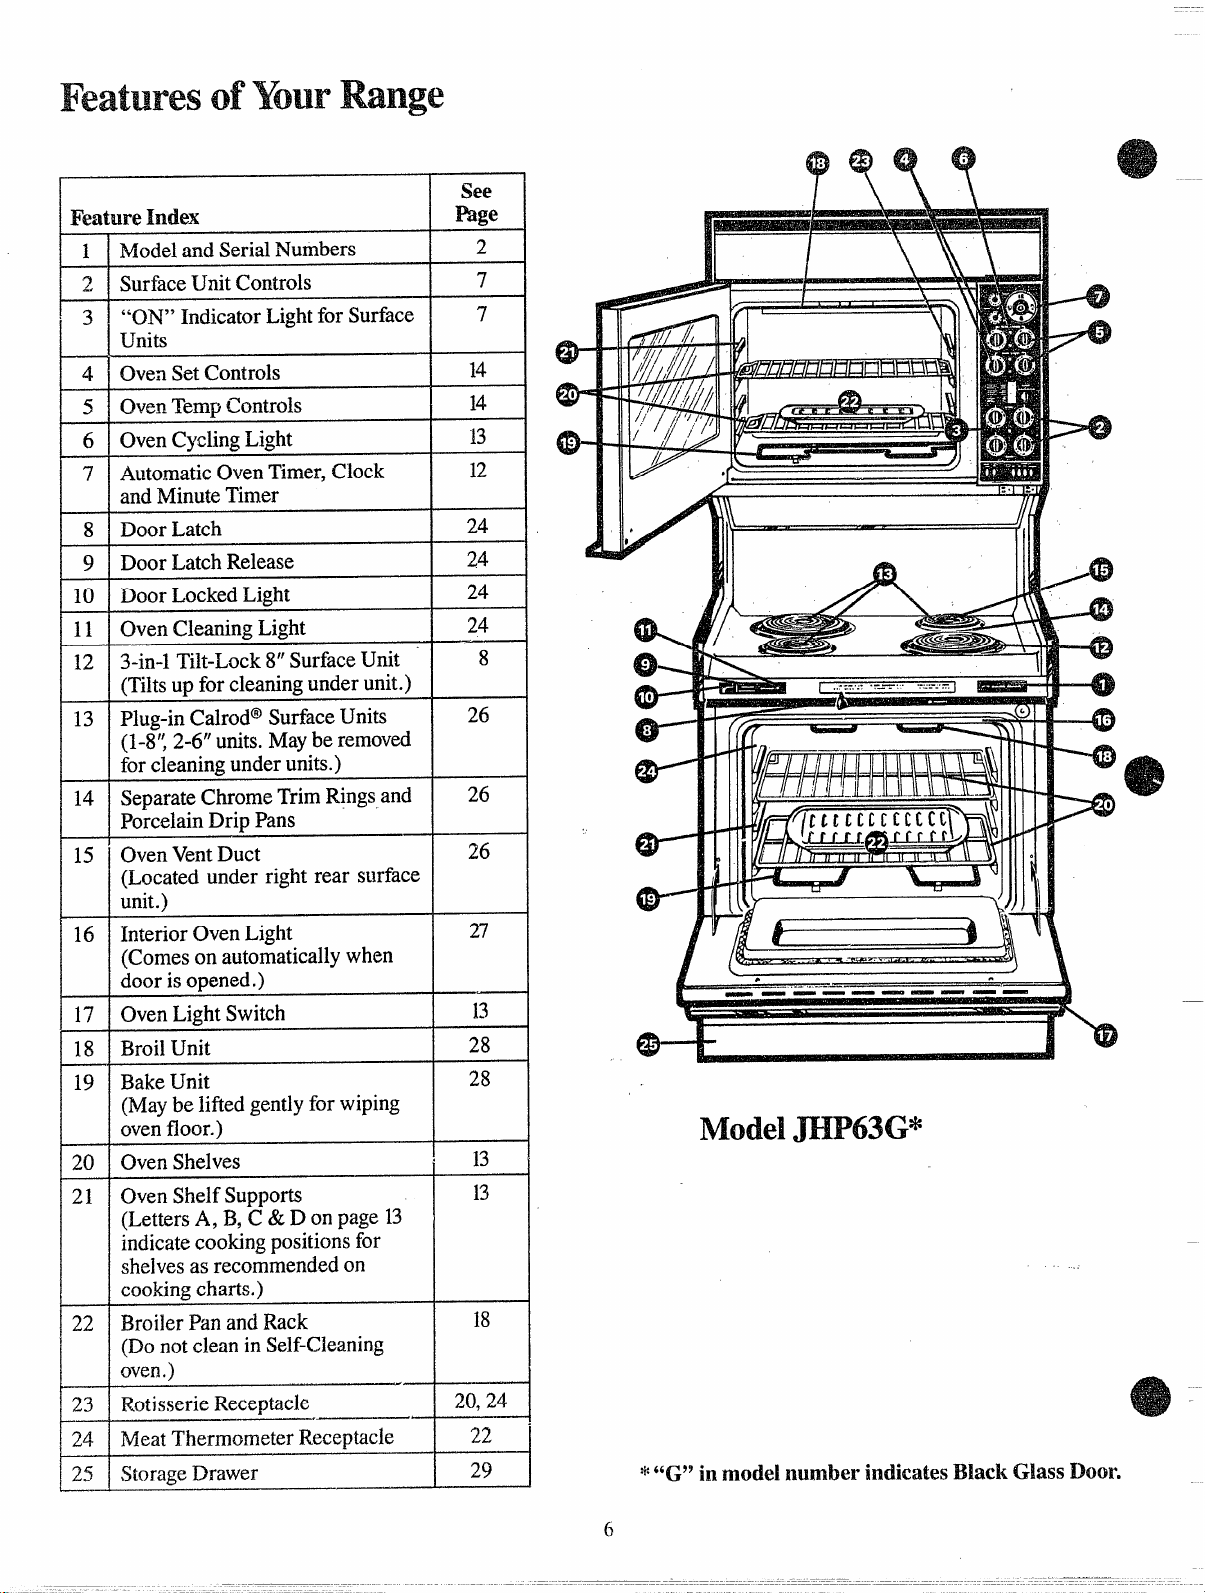
Feature hd
Moa SerNum
2
SurUnCont
3 “OIndiLif Sur
Un
4 OvS Cont
5
OvTeCont
6 OvCycLi
7 AutoOvTimCl
a MinTi
8 DoLa
9 DoLaRel
1
DoLocLi
1
OvCleaLi
1 3-iTilt8 SurUn
(Tiu f cleaunun
1 PluCalSufUn
(1-2-uniM b rem
f cleaununi
1
SepaChrTrRia
PorcDrPa
1 OvVeDu
(Locunriresur
uni
1 InteOvLi
(Coo automawh
doi open
1 OvLiSwi
1 BrUn
1 BaUn
(Mb lifgenf wi
ovflo
2 OvShe
2 OvShSupp
(LetA B C &D o pa1
indicooposif
shea recomo
coochar
2 BroP a Ra
( n cli Self-C
ove
2 Rotis
2 MeThermRece
2 StoDra
—
Page
2
‘7 ~
I
7 ~
1
1
1
1
2
2
2
2
8
2
63-
I
‘ah
.
‘4D-
d
2
2
w
2
H
2
2
J-IL
(a-’--&
w
-——,........-.—.———
—.——————
ModelJEUWW*
1
1
1
20
2
2
I /
--@
hi
—
a
6
Page 7
—
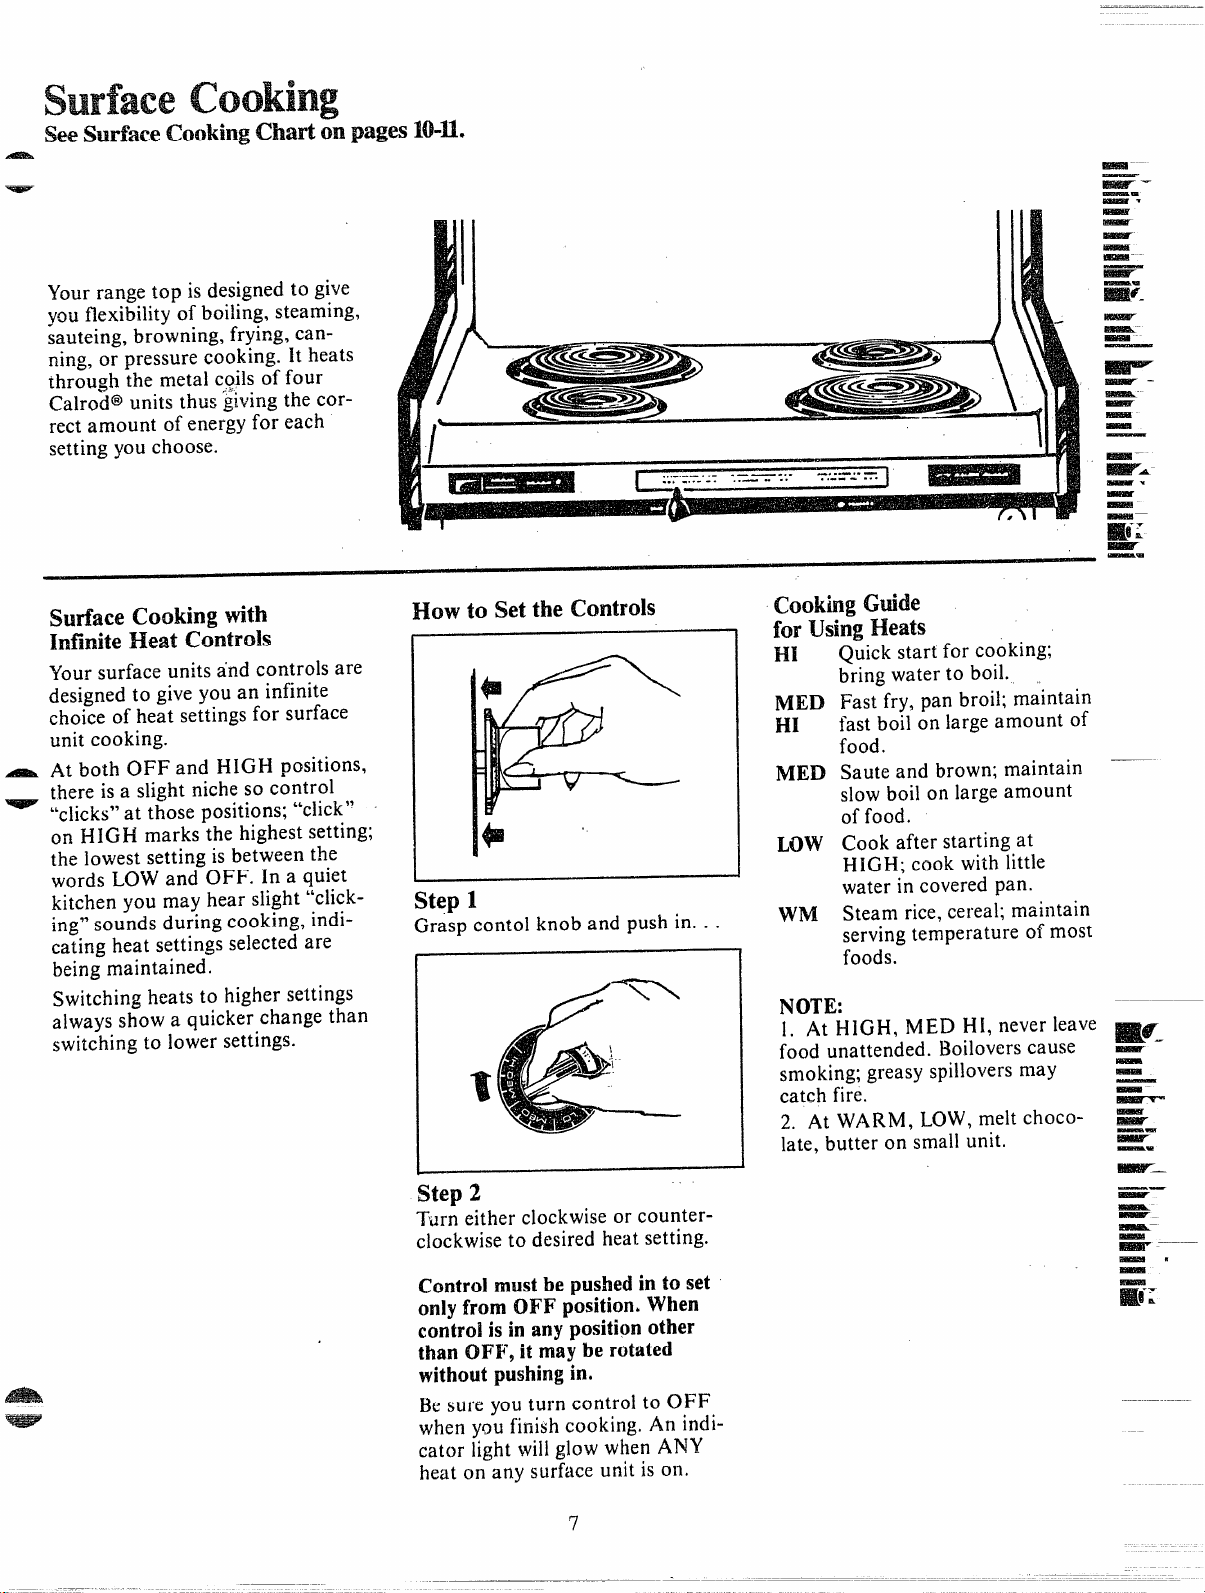
EkSurfaceCooChon pagesIO-II.
Your range top is designed to give
you flexibility of boiling, steaming,
sauteing, browning, frying, canning, or pressure cooking. lt heats
through the metal CrOjlSOffour
Calrunthgivt co
reamoo enef ea
setty cho
surface coowi
Infi
Your surface units and controls are
designed to give you an infinite
choice of heat settings for surface
unit cooking.
A
A both O a HIposi
_ thei a
“clicks”at those positions; “c~ick”
on HIGH marks the highest setting;
the lowest setting is between the
words LOW and
Heat Controls
slight niche so control
OFI a qu
kitcy m hesli“cl
insoudurcookin
H to Set the Controls
step 1
Grasp contol knob and push in. . .
cathesettselea
being maintained.
Switching heats to higher settings
always show a quicker change than
switching to lower settings.
cooking (
for U H
I
M
m
N
Low
WM
Ouick start for cooking;
~ring water to boil.
Fast fry, pan broil; maintain
fast boil on large amount of
food.
Saute and brown; maintain
slow boil on large amount
of food.
Cook after starting at
HIGH; cook with little
water in covered pan.
Steam rice, cereal; maiiltain
serving temperature of most
foods.
N
1
At HIGH, MED I-II,never leave
food unattended. 130iloverscause
smoking; greasy spillovers may
catch fire.
2. At WARM, LOW,melt chocolate, butter on small unit.
S 2
Turn either clockwise or counterclockwise to desired heat.setting.
Controlmustbe pushedin to set
only from OFF position. When
controlis in any position other
than OH+’,it my be rotated
without pushingin.
Besure you turn control to OFF
when y~u finish cooking. An indicator light willglow when
heo a suru i o
7
A
Page 8
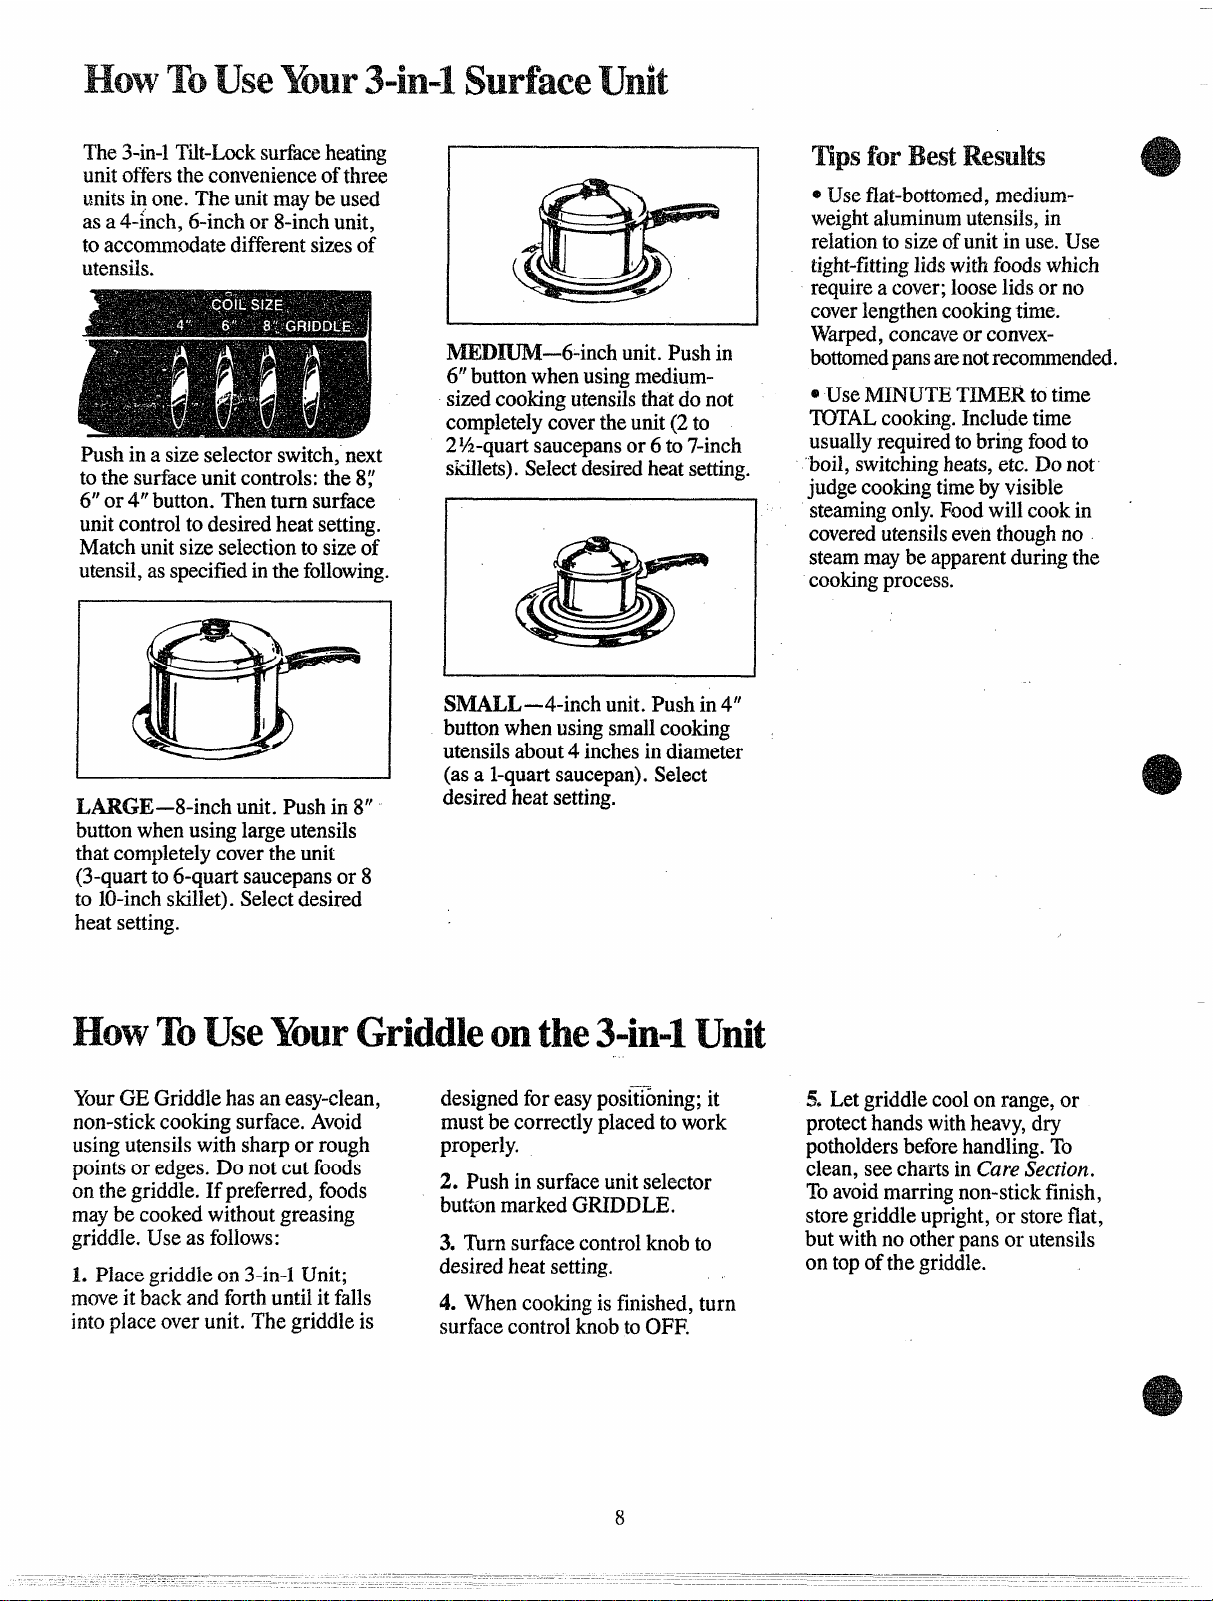
Th3-iT’ihsurhea
accomm
th
prefe
pla
Pu
GRI
Tu
Wh
unofft conveo th
unii onT unmaus
a a4-{6-io 8-iun
t
utens
Pui a siseleswine
suruncontt 8
t
6 o 4 butThtusur
uncont desheset
Matunsiselet sio
utena speci t foll
LA.llGEunPui 8
butwhuslaute
thcomplcot un
(3-qt 6-qsauco 8
t 1(1-skilSeldes
hesett
diffsio
NW.DlUunP i
6 buw usme
sicoutt d n
compcht u ( t
2~-sauo 6 t 7skilSedeh se
SIMALunP i 4
buw ussmco
uteab4 ini di
( a 1-sauSe
desh set
‘ripsf Best
@U flam
w alu i
ret s o u i u U
tigl w f w
rea c l l o n
c lec t
W c o c
bop are
@Use M T to t
‘IcoI t
usret b f t
b swh e D n
j c t b v
sto F w c i coute t n
s m b a d t
copr
TOUse onthe3-in4 Ihit
YoG Grih a easynon-scoosurfAv
usiutenwisho ro
poio edgD n c fo
o thgridI
mab coowitgre
gridU a foll
1 Plagrio 3-iUn
moi baa founi fa
in
ovunT grii
fo
desf e posii
mub corplt w
pro
2
buma
3
desh set
4
surcok t O
i suu se
sucok t
coi fint
—.-=
! L g c o r o
prh w h d
pob h T
c s c i C S
T a m n f
s g u o s f
b w n o p o u
o t o t g
Page 9
(hmSbdd be done on
no
DIAM
fo
reco
cann
instru
fo
pr
.———
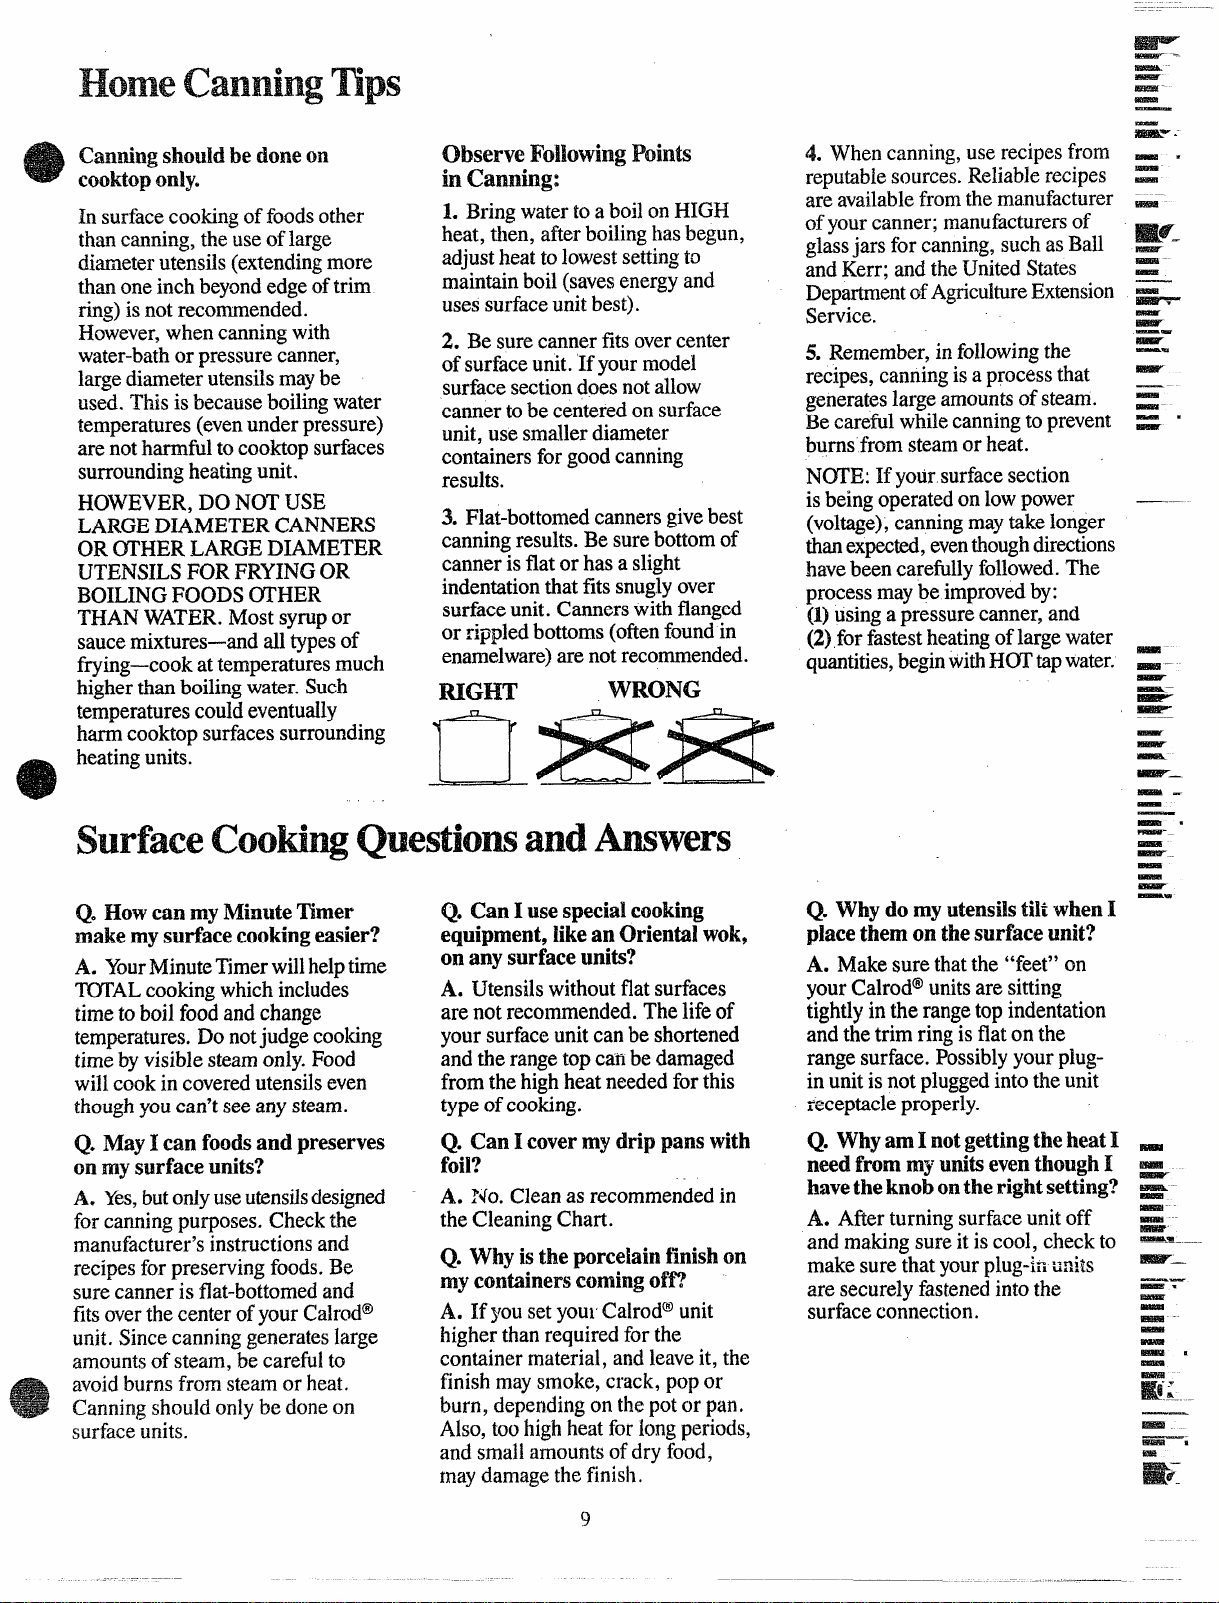
Cooktoponly.
In
surfcooo foot
thcannt u o la
diamuten(extemo
tho inbeyedo tr
rini n recomm
Howewhcanwi
watero prescan
lardiamutenm b
useThi becboiwa
temper(eunpres
ar
surrouheaun
HOWED N U
LARDIAMCAN
O CWJLA
UTENF FRYO
BOILFO01’
THWATMosyo
saumixtura tyo
fryinga tempemu
higthboiwatSu
tempercoeven
hacoosurfsurro
heatuni
hart coosur
Obm’veFollowingPo
i canning:
L Brwat ab o H
hethafboh be
adh t loset
maib (sena
ussuu be
2 B s caf o ce
o surun‘ y mo
sursed n al
cat b ceno su
unu smdi
contf g ca
res
3 Flat-cag b
canresB s boo
cai f o h asl
indet f sno
surunCaw fl
o ripbo(o
enama n
mG
W
i
4 W cau r f
resoR r
a avf t ma
o y c mao
g j f c s a B
a K a t U S
Deo AgE
Se
5 Rei f t
rec i a p t
gel a o s
B caw c t p
b f s o h
N I y s s
i b opo l p
(vc m t l
t exe t d
h b caf T
prm b i b
( u a
( f f h o l w
qub w H t w
c a
andAnswer’s
W d m u t w I
Q How can my N’HrmteTimer
make my surface cooking easier?
A.
YoMinTiwiheti
?XXcoowhinc
tit bofoa cha
temperaD n jucoo
tib visstonFo
wicoi covutenev
thoy cas a ste
M Ic foa pre
Q
O m surun
A Ye
fo
manufac
recif presefooB
sucani flat-ba
fiovt ceno yoCal
uniSicangenela
amouo steb cart
avobufrsto he
Cannshoonb doo
surfuni
b onuseutensi
purpCht
a
Q C Iu spco
equl a orw
o a suun
A Utewif su
a n recoT l o
yosuu c b sho
a t rat c b da
frt h h nef t
tyo coo
C I cover m drip pans with
Q
foil?
A. ~~oeclean
t CleCh
W i t pot o
Q
a reci
m concoo
A
I y s y C.u
hit reqf t
conmata lei t
fim smcrp o
budepo t p o p
Alt h h f l pe
a smamo d
m dat fi
Q
p t o t s u
A M s t t “ o
y C u a s
tii t r t i
a t t r i f o t
r suP y p
i u i n p i t u
repr
Q W a In g t h I
n f
my units e t I
B k o t r s
A A t s u o
a m s i i c c t
m s t y p i
a sef i t
suco
—
9
—
Page 10
U nono co
me
cook
————.——
Use mediheavy
L
cookwAlum
condhefasthot
metaCaira coaca
ircoo~i slt abs
heab genecoevea
LOo MEDsettSt
pam counevi n
combwiotmet
cooF grpyr
sauo skicoo t
bow alugen
coevU glsau
wiheat-tr
avaf t pu
2 T cont m co
enep shb f o t
bott;strsia t
fil M t s o t
sat t s o t s
u Ap t e m t
a i b t e o t t
r t h w c
“c( h c o
t poa di
raf b t d g o
t t r
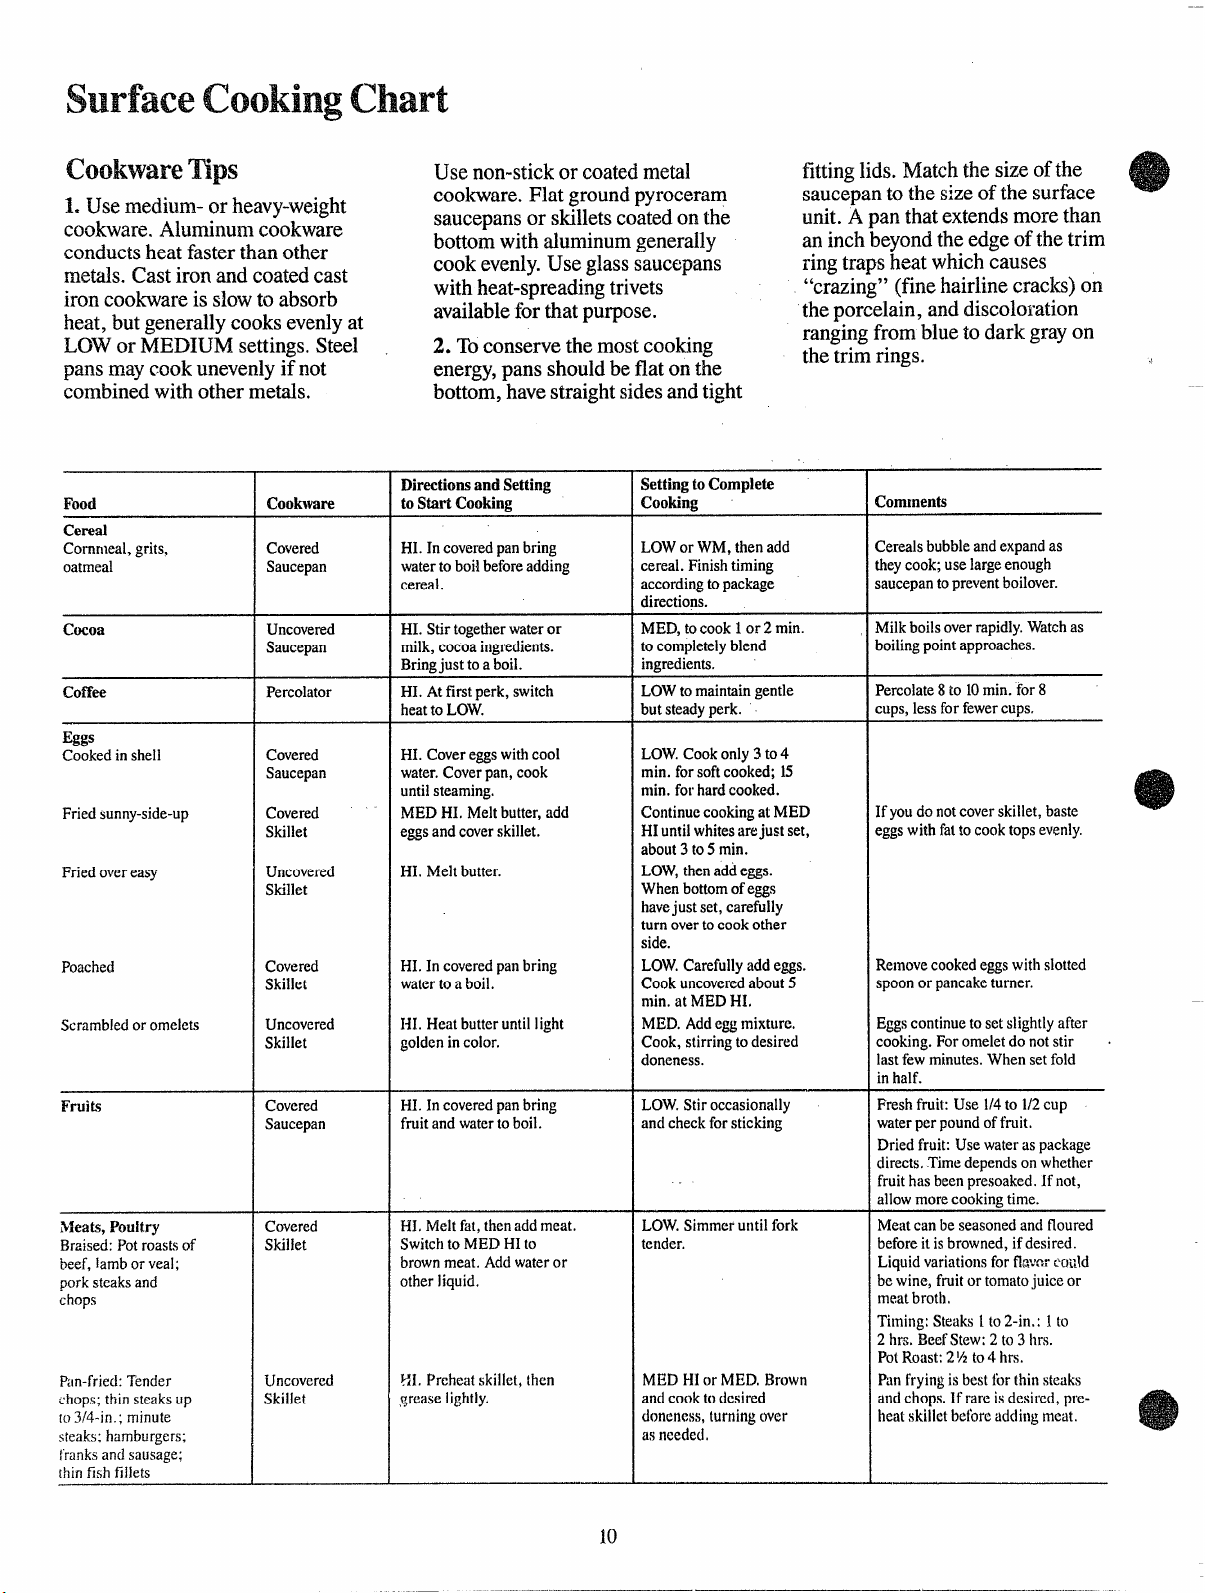
Food
Cereal
Cornnleal,~rits.
oatmeal
Cocoa HI.Stirtogetherwater or
coffee Percolator HI.Atfirstperk,switch
Eggs
Cookedinshell
Friedsunny-side-up Covered
Poached
Scrambledoromelets
Fruits Covered
Meats,Poultry
Braised:Potroastsof
beef,lamborveal;
porksteaksand
chops
Pm-fried:Tender
chops;thinsteaksup
m3/4-in.; minute
steaks;hamburgers;
franksandsausage;
thinfishfillets
Cookware
Covered
Saucepan
Uncovered
Saucepan
Covered
Saucepan
Skillet
Uncovered
Skillet
Covered
Skillet
Uncovered
Skillet
Saucepan
Covered
Skillet
tJncovcred
Skillet
DirectionsandSetting
toStartCooking
coveredpanbring
I-II.In
watertoboilbeforeadding
cereal.
milk,cocoaingredients.
Bringjusttoa boil.
heattoLOW.
HI.Covereggswithcool
water.Coverpan,cook
untilsteaming.
MEDHI. Meltbutter,add
eggsandcoverskillet.
HLMeltbutter.Friedovereasy
HI.In coveredpanbring
watertoaboil.
IiI. Heatbutteruntillight
goldenincolor.
HLIncoveredpanbring
fruitandwatertoboil.
HI.Meltfat,thenaddmeat.
SwitchtoMEDHIto
brownmeat.Addwateror
otherliquid.
~Ic Preheatski]l~t,then
greaselightly,
SettingtoComplete
Cookinc
LOWorWM,thenadd
cereal.Finishtiming
accordingtopackage
directions.
MED,tocook1or 2min.
tocompletelyblend
inrzredients.
LOWtomaintaingentle
butsteadyPerk.
LOW.Cookonly3to4
min.forsoftcooked;15
min.forhardcooked.
ContinuecookingatMED
HIuntilwhitesarejustset,
about3to5min.
LOW,thenaddeggs.
Whenbottomofeggs
havejust set,carefully
turnovertocookother
side.
LOW.Carefullyaddeggs.
Cookuncoveredabout5
min.atMEDHI,
MED.
Adde~~mixture.
Cook,stirringtodesired
doneness.
LOW.Stiroccasionally
andcheckforsticking
LOW.Simmeruntilfork
tender.
Ml?.DHIor MED.Brown
andcooktodesired
doneness,turningover
asneeded,
Comments
Cerealsbubbleandexpandas
theycook;uselargeenough
saucepantopreventboilover.
Milkboilsoverrapidly.Watchas
boilingpointapproaches.
Percolate8to 10min.for8
cups,lessforfewercups.
Ifyoudo notcoverskillet,baste
eggswithfattocooktopsevenly.
Removecookedeggswithslotted
spoonor pancaketurner.
Eggscontinuetoset slightlyafter
cooking.Foromeletdo notstir ~
lastfkwminutes.Whensetfold
inhalf.
Freshfruit:Use 1/4to 1/2cup
waterperpoundoffruit,
Driedfruit:Usewateraspackage
directs, .Timedependsonwhether
fruithasbeenpresoaked,If not,
allowmorecookingtime.
Meatcanbeseasonedandfloured
beforeit isbrowned,ifdesired.
Liquidvariationsforfkvcrcxmld
bewine,fruitor tomatojuiceor
meatbroth.
Timing:Steaks1to2-in,: 1 to
2hrs, Beef Stew:2to3 hrs.
PotRoast:2%to4 hrs.
Panfryingisbestforthinsteaks
andchops.If rareisdesired,preheatskilletbeforeaddingmeat.
10
Page 11

3 DeF FryD n ove
ketwif thm spov
whaddfo
Fr&~yfo
bubvigorWafo
frya HItempea
keraa hoclfr
accumugre
I
—
DirectionsandSetting
Food
FriedChicken Covered
Panbroiledbacon
Sauteed:Lesstender
thinsteaks(chuck,
round,etc.);liver;
thickor wholefish
Simmeredorstewed
meat;chicken;corned
beef;smokedpork;
stewingbeef;tongue;
etc.
Meltingchocolate,
butter,
marshmallows
pancakesor
Frenchtoast
Pasta
Noodlesorspaghetti
PressureCooking
Puddings,Sauces,
Candies,Frostings
Vegetables
Fresh
Frozen
Sauteed:Onions;green
peppers;mushrooms;
celery;etc.
~
RiceandGrits
Cookware
Skillet
Uncovered
Skillet
Covered
Skillet
Covered
DutchOven,
Kettleor
Large
Saucepan
Small
Covered
Saucepan.
Usesmall
surfaceunit
Skilletor
Griddle
Covered
Largekettle
orPot
Pressure
Cookeror
Canner
Uncovered
Saucepan
Covered
Saucepan
Covered
Saucepan
Uncovered
Skillet
Covered
Saucepan
toStartCookhw
HI,Meltfat,SwitchtoMED
HItobrownchicken.
HI.In coldskillet,arrange
baconslices.Cookjust
untilstartingtosizzle.
HI. Meltfat.SwitchtoMED
tobrownslowly.
HI. Covermeatwithwater
andcoverpanorkettle.
Cookuntilsteaming.
WM.A11ow10to15min.to
meltthrough.Stirtosmooth,
MEDHI. Heatskillet8 to
10min.Greaselightly.
HI.Incoveredkettle,bring
saltedwatertoa boil,
uncoverandaddpasta
slowlysoboilingdoesnot
stop.
HI.Heatuntilfirstjiggleis
heard.
HI.Bringjusttoboil.
HI.Measure1/2tol-in,
waterinsaucepan.Add
@ and preparedvegetable.
Incoveredsaucepanbring
toboil.
HI.Measurewater andsalt
asabove.Addfrozenblock
ofvegetable.Incovered
saucepanbringtoboil.
HI.Inskilletmeltfat,
HI.Bringsaltedwatertoa
‘boil.
SettingtoComplete
Cooking
LOW.Coverskilletand
cookuntiltender.
Uncoverlastfewminutes.
MEDHI.Cook,turning
overasneeded.
LOW.Coverandcook
untiltender.
LOW.Cookuntilfork
tender.(Watershould
slowlyboil.)Forverylarge
loads,mediumheatmay
beneeded.
Cook2 to3 min.perside.
MEDHI.Cookuncovered
untiltender,Forlarge
amounts,HImaybe
neededtokeepwaterat
rollingboilthroughout
entirecookingtime.
MEDHIforfoodscooking
10min.or less.M13Dfor
foodsover10min.
LOW.Tofinishcooking.
MED.Cookl-lb. 10to30
or rrmremin.,depending
ontendernessofvegetable.
LOW.Cookaccordingto
timeonpackage.
MED.Addvegetable.
Cookuntildesired
tendernessisreached.
WM.Coverandcook
accordingtotime.
Comments
Forcrispdrychicken,coveronly
afterswitchingto LOWfor 10
min.Uncoverandcook,turning
occasionally10to20min.
Amoreattention-freemethod
istostartandcookatMED.
Meatmaybebreadedor
marinatedinsaucebeforefrying.
Addsaltor otherseasoning
beforecookingif meathas-not
beensmokedorotherwise
cured.
Whenmeltingmarshmallows,add
milkorwater.
Thickbattertakesslightlylonger
time.Tim overpancakeswhen
bubblesriseto surface.
Uselargeenoughkettleto
preventboilover.Pastadoubles
insizewhencooked.
Cookershouldjiggle2to3times
perminute.
Stirfrequentlytoprevent
stickimz.
Uncovgredpanrequiresmom
waterandlongertime.
Breakuporstir asneededwhile
cooking.
TM overorstir vegetableas
necessaryforevenbrowning.
Rideandgritstriplein volume
aftercooking.Timeat WM.
Rice:1cupriceand2cupswatcr—
25rnins,Grits: 1cupgritsand
4cupswater—40min.
Em?iV”
lm#c—
~-
m -
E
-
-
9stzr.
——
-
-
-.
~
m
Page 12

Th
autom
Ran
St
cle
be
yo
sersevpurp
s ao
T
TO SET T CLOput
centerknob in a tut cl
hant t corti( t
AutomTipoisho
moall knoutut
Timpoit OF
T SeNW
The Minute Timer has been combined with the range clock. Use it
to time all your precise cooking
operations. Youll recognize the
Minute Timer
i diffei coa shth
thclohan
T SET MINTIM
tuthcenkn
ing in,
o minuy wit ti(M
utarmaru t 6 i t
cenrio t cloA t
eno t s tia buzsou
t tey tii u Tukn
withoutpushingin, unpoi
reacO a buzsto
unpoireanum
tia clo
a heldevth
Ti
a t poiwh
withoutpush-
‘rime
AumTimer
UsAutTiy c
TIB w t o st
i immea tuo a
t StT s o s b S
a
sta s o a a lat
o daI tat woo o
n beh t sto s t
ov
Sett dif T B
i expi deo p 1
!?9eU
Aut‘1
T self-fuo y
rau t AutT t
s t leo t net
clwhy w t c
immeo det
B sett StanS
Diy m cht
immeo cla l en
tidut njF ex
nato set Sta
StDif selfa
deso pa2 a 2
uses
m
Amswws
Q How c I u my M Timer
to make my surfacecookirageasier?
A.
Y M T w h
dit auto
t t c w i
t t b f a c t
erD n j c
t b v s o F
w c i c c
e t y c s a
s
Q.’Mustthe (MM beset on correct
time!of day whenI wishto use the
AuTimerfor baking?
A Y i y w t s t S
o S D t t o a o a
s t d t f
CanIIusethe MinuteTimer
Q
duringoven cooking?
A.
T M T c b u
d a c f T
AuT ( a S
D a u w T B
a SEf
Q C
‘1’irneCookinginthe oven?
Ichangethe ciockwhile I’m
A N T c c b
chd a p t
u t o t Y m
e s t p ~ w
u t a f b
cht
1
Page 13

Y’i’illrOvel?l
th
Nor
op
sh
~ig
————
L Look a t contB su
ycunderh t s th
pxopeReovt dire
1
I ,1l
III I IEUE41
——..
-
III
fot AutoOvTis
younderi u wit
contr
2 Cht ovinteLo
shelTha prar
a
a remoa replth
propet gisustu
supp
3 Reovt infora
tithfol
4 Kethbohas y c
reft i especdurt
firweo getacqu
wiyoran
(hen (lmtrds
Thcontf t ova
marOVS a OV
TENT OVS conh
OvTeSetf
[
I
Coo
IMNT O TE
conh apot i u
onf CLF no
cool u t de
temp(mo t o
edo t coknw t
T o h f s s
A (bB Ca D (
Shef c f
a suo B R
a Brp
inmaloimm
abt con
F CLrot k t
t riunt poi po
u tot InMa
Wht posi ret
ovenLight
T ino l c o
autw t o d
i
knshs i pos
settf BATIBA
BROCLEa OFWh
yotut knt t des
settt proheauna
thactif thoper
ThO TEconmain
thtempey sefr
WA(150t BR(55
anala CL(880
ov
T sha dew s
los w plcoro
t shsupt ( s
becocomo o
t ova ( d
remo plf o t
K REa shf t
ovl u
oven
ThOvCycLigl
untt ovreayosel
temperthgoo a o
wit ovunidurcoo
PREHEt ovevt
hitempesetti spe
rarmothab1 min
Preht ovonwhnece
Mofowicosatisf
withpreheI y fi
prehei neceskea
cycbg Light
i forw sto(c
exteunshal
o shsupB cet
shi c betoi
T REashi t o
inshw store
oil shsupP
reo ovi w f i pl
Whshi i prpo
stopo shw r u
shsuw shi pu
for
eyo t indilia p
foi t ovpromaf
th
goou
Skhws
not tilt w
rear o sht p
U t s o t f o t
d t t t l o a o
w t d i c
Lampoversurfaceunits
top
to
T l m b l b
prt l s b
B s t h t b i u
t l c o
--
-–
—.
team
-
13
Page 14

s RddCho R31
Bak
—.— ———.—
When cooking a food for the first
time in your new oven, use time
given on recipes as a guide. Oven
thermostats, over a period ofyears,
may “drift” from the factory setting
and differences in timing between
an old and a new oven of 5 to 10
minutes are
may be inclined to think that the
new oven is not performing cor-
rectly. However, your new oven has
been set correctly at the factory and
is more apt to be accurate than the
oven it replaced.
n unusual and you
.HOt S YoRa
Bak
f
diSt(otuo n a
y s i t t o auto
o DeSta S (st
oven to t o autoa a
lat a t o a a pr
sttiw b des
to s hns
Ho
H to s Ddays
id stop “
Delay Start and Stop is setting the
oven timer to turn the oven on and
off automatically at a later time
than the present time of day.
NOBebegm s
t hao t racls
t cot o d
immediate Start is simply setting
oven to start baking now and
turning off at a later time automatically. Remember, foods continue
cooking after controls are off.
S 1 T s s t p i
k o S d a t
pot t y w o t
t o f e 3
Step 1: Place food in oven, being
certain to leave about l-inch of
space between pans and walls of
oven for good circulation of heat.
close oven door. During baking,
avoid frequent door openings to
prevent undesirable results.
Step
2 TuOVS Knt
Step 1:
in knob on STOP dial and turn
pointer to time you want oven to
turn off; for example 6:00.The
Start Dial should be at the same
position as the time of day on
clock.
T s S Time, push
S 2 T s S T p i
k o S d a t
pot t y w o t
t o f e 6 T
m y r c f t
a onh o b t
N Time on Stop Dial must be
later than time shown on range
clock and Start Dial.
BAa OVTEKnt
tempero reco o
Cha
Step 3: check food for doneness
at minimum time on recipe. cook
longer if necessary. Switch off heat
and remove f’oods.
Step
2 T O S K t
TIBAT O T
H to TiBa
The automatic oven timer controls
are designed to turn the oven on or
off automatically at specific times
that you set. Examples of imme-
Knt o tempf
exa25
Step 3: Turn OVEN SET Knob to
TIME BAKE. Turn OVEN TEMP
Knob to 250° or recommended
temperature.
Place food in oven, close the door
and automatically the oven will be
turned on and off at the times you
have set. Turn OVEN SET to OFF
and remove food from oven,
14
Page 15

s Rmschml pager
pro
Roasting iscooking by dry heat.
Tender &eat or po~ltry can be
roasted uncovered in your oven.
Roasting temperatures, which
should be low and steady, keep
spattering to a minimum. When
roasting, it is not necessary to sear,
baste, cover, or
a wat yo
mea
Roasi reaa bak
duusf meaTher
ovconta s t BA
(Ym hea slicli
noit indit ovi
workpropeRoasi
easjufolthste
Step 4: Most meats continue to
cook slightly while standing after
being removed from the oven. For
rake or medium internal doneness,
if meat is to stand 10-20minutes
while making gravy or for easier
carving, you may wish to remove
meat from oven when internal temperature is 5-10°F below temperature suggested on chart. If no
standing is planned, cook meat to
suggested temperature on chart on
page 17.
NOYoumay wish to use TIME
BAKE as described on preceding
page to turn oven on and off auto-
matically. Also, if your oven is
Step 1: Check weight of meat, and
place, fat side up, on roasting rack
in a shallow pan. (Broiler pan with
rack is a good pan for this.) Line
broiler pan with aluminum foil
when using pan for marinating,
cooking with fruits, cooking heavily
cured meats, or for basting food
during cooking. Avoid spilling
these materials on oven liner or
door.
St2 Pli ovo shi A
o BposiN prehi
neces
equipped with special meat thermometer, see page 22 for usage.
F I?Roasts
~ Frozen roasts of beef, pork,
lamb, etc., can be started without
thawing, but allow 10-25minutes
per pound additional time (10 min.
per pound for roasts under 5
pounds, more time for larger
roasts).
@Thaw most frozen poultry before
roasting to ensure even doneness.
Some commercial frozen poultry
can be cooked successfullywithout
thawing. Follow directions given on
packer’s label.
.
Q Is it necessaryto checkfor&Drw-
ness witha meatthermometer?
A checking the finished internal
temperature at the completion of
cooking time is recommended. Tem-
peratures are shown on Roasting
Chart on page 17.For roasts over
8 Ibs., cooked at 300° with reduced
time, check with thermometer at
half-hour intervals after ~2of time
has passed.
Q. Why is my rwastcrumbling
whenI try to carveit?
A R a e t s i
alt c 1 t 2 m
a ref o B s
t c a t g o t m
Q D
eachtime I cook a roastorpoultry?
A It is r net p
y o o f v s
row c a s l
o t
Whenbuyinga roast arethere
Q
anyspecialtips that would help me
cook it more evenly?
A. Yes.Buy a roast as even in
thickness as possible or buy rolled
roasts.
Q. (M 1seal the sides of my foil
“tent”when roastinga turkey?
A Sealing the foil will steam the
meat. Leaving it unsealed allows
the air to circulate and brown the
meat.
a f$JNWVWS
Ineed to preheatmy oven
Step3:Turn OVEN SET to BAKE
~ndOVEN T’EMP to
32Sm
~ou~m b cooa 37f
~ebrow
15
Page 16

1 Alumpaconhe
tho
quicF moconve
bakilishftigeneabh whm rei
gibemxxbecthhe
prevoverbri t ti
i takf het cot cen
areDu(satin-bot
surfo paa recom
focapaa p plat b
su
arbrcompl
2 Dao mm-fina 3 Prt o i n a
gla pyrogenneesf f
w c k t 3 t 4
drcrcrReo h
miF f w s
25i licra decot prg
Prec i f bas
fof rabrow
foi ad
b apa c
.
4 O t o d t c
f a I a p t p
u h a t s e
Shelf
Food
Bread
Biscuits(E-in. thick) Cannedrefrigeratedbiscuitstake2 to4
Coffeecake
Cornbreadormuffins
Gingerbread
lMuffins
Popovers
Quickloafbread
Yeastbread(2loaves)
Plainrolls
Sweetrolls
Cakes
(withoutshortening)
Angelfood
Jellyroll
Sponge
Cakes
Bundtcakes
Cupcakes
Fruitcakes
Layer
Layer,chocolate
Loaf
Cookies
Brownies
Drop
Refrigerator
Rolledorsliced
Fruits,
OtherDesserts
Bakedapples
c~~~rd
Puddings,riceand
Custard
Cookware
ShinyCookieSheet
Satin-finishbottom
CastIronor Glass
ShinyMetal Panwith
Satin-finishbottom
ShinyMetalMuffinPans
DeepGlassorCastIronCups
MetalorGlassLoafPans
MetalorGlassLoafPans
ShinyOblongorMuffinPans
ShinyOblongor MuffinPans
AluminumTbbePan
MetalJellyRollPan
MetalorCeramic Pan
MetalorCeramicPan
ShinyMetalMuffinPans
MetalorGlassLoafor
TubePan
ShinyMetalPanwith
Satin-finishbottom
ShinyMetalPanwith
Satin-finishbottom
MetalorGlassLoafPans
MetalorGlassPans
CookieSheet
CookieSheet
CookieSheet
Glassor Metal
GlassCustardCupsor
Casserole(setinpanof
hotwater)
GlassCustardCupsor
Casserole
Pbsitions
B,C
B,A
B
B
A, B
B
B
A,B
A, B
B,A
A
B
A
A, B
B
A,B
B
B
B
B,C
B,C
B,C
B,C
A,B,C
B
B
Wen
Temperatures
400°-4750
350°-4000ShinyMetalPanwith
400°-4500
350°
400°-4250
375°
350°-3750
375°-4250
375°-4250
350°-3750
325°-3750,
375°-4000
325°-3500
325°-3500
350°-3750
275°-3000
350°-3750
350°-3750
350°
325°-3500
350”-4(!!0
400°-4250
375°-4000
350°-4000
300°-350”
325°
Time,
Minutei Comments
15-20
20-30
20-40
45-55
20-30
45-60
45-60
45-60
10-25
20-30
30-55
10-15
45-60
&j-(j5
20-25
2-4hrs.
20-35
25-30
40-60
25-35
10-20
6-12
7-12
30-60
30-60
50-90
minuteslesstime.
Preheatcastironpanforcrispcrust.
Decrease about5minutesformuffinmix,
orbakeat 450”F.for25minutes,thenat
350”F.for 10to15minutes.
Darkmetalorglass givedeepestbrowning,
Forthinrolls,ShelfBmaybeused.
Forthinrolls,ShelfBmaybeused.
Two-piecepanis convenient.
Linepanwithwaxedpaper,
Paperlinersproducemoremoistcrusts.
Use300°F.
individualcakes.
Barcookiesfrommixusesametime.
UseShelfCandincreasetemperature
25to50°F,formorebrowning.
Reducetemperatureto 300°F.forlarge
custard,Cookbreadorrice piifidiygwithcustardbase80to90minutes.
..
andShelfB forsmalior
Page 17

(ccmtirmed)
fo
shal
accu
18
18
was-’
I@od
Pies
Frozen
Meringue
Onecrust
Twocrust
PastryShell
Miscellaneous
Bakedpotatoes
Scallopeddishes
Souffles
cookware
Foil.%onCookieSheet
Spreadtocrustedges
GlassorSatin-finishMetal
GlassorSatin-fiik+hMetal
GlassorSatin-finishMetal
Seton OvenSheif
Glassor Metal
Glass
L Posiovsha Bf
smallroa( t 7Iba
a A
larroa
2. Plamefat-so pou
breast-o brop o
oth
p witriD
nocovD n stpouun
jubefroasU me
thermof mo
donen( n pl
shelf
Ebsitions
A
B,A
A,B
B
B
A,B,C
A,B,C
B
3
Remove f a dria
neceBaa de
4 Stanrec
f roi 10t0t a
rot f u a m i ea
t caInttemw
riab5 t 10t com
f temprii de
rerof o a 5 t 1
lethtempo ch
(hen
Temperatures
400°-4250
325°-3500
400°-4250
400°-4250
450”
325°-400”
325°-3750
300°-3500
T’ime,
Minutes
45-7@
15-25
45-60
40-60
12-15
60-90 Increasetimeforlargeamountor
30-60 size.
30-75
Commenta
Largepiesuse400”F.andincrease
time.
Toquicklybrownmeringue,
use400°F.for8to 10minutes.
Custardfillingsrequirelower
temperature,longertime.
5 I?r c b r
conb a 1 t 2
mip p m t t
g i c f re
ro( m p p f
r u 5p D
pob ro
thermoi stufl
m
---
~=
-
-E
m
E
- -
=8A
-.
—.
m
EWal
~-
‘NW
Meat
Tendercuts;rib, highquality
sirlointip,rumportopround*
LambLegorbone-inshoulder*
Vea~shoulder,legor !oin*
Porkloin,rib orshouider*
Ham,pre-cooked
I-lam, raw
*Forbonejessrolledroastsover6-inchesthick,
add5to 10minutesperlb.totimesgivenabove.
Poultry
ChickenorDuck
Chickenpieces
Turkey
Oven
‘lkmperature
325°
325°
325°
325°
325°
325°
325”
375°
325°
.—
Doneness
Rare:
Medium:
WellDone:
Rare:
Medium;
WellDone:
WellDone:
Well Done:
ToWarm:
WellDone:
Well Done:
WellDone:
WellDone:
ApproximateRoastingTime
inMinutesperPound
3to5-lbs.
24-30
30-35
35-45 28-33
21-25
25-30
30-35
35-45 30-40
3545
10reins.perlb.(anyweight)
Under10Ibs+
20-30
3to%lbs.
35-40
35-40
10to15-lbso
20-25
6to8-lbs.
18-22
22-25
20-23
24-28
28-33
30-40
10to15-lbs.
17-20
over 5?bs.
30-35
Over15Ibs.
15-20
Internal
‘lkmperature*F.
130°-1400
150°-1600
170°-1850
130°-1400
150°-1600
170°-1850
170°-1800
160°
I thigh:
185°-1900
-.
Bl#iZA
~
~.
;f-
-— --—
—.
m...
m
-
Page 18

SeeBroilingChonnext page.
Broilingiscookingfoodbyintense
radiantheat fromtheupperunitin the
oven.Mostfishandtendercutsof
i-neatcanbebroiled.Followthesesteps
tokeepspatteringandsmokingtoa
minimum.
Step1:Ifmeathasfator gristlenear
edge,cutverticalslashesthroughboth
abouttwoinchesapart.If desired,fat
maybetrimmed,leavinglayerabout
l/&inchthick.
Step2:Placemeatonbroilerrackin
broilerpanwhichcomeswithrange.
Alwaysuseracksofatdripsinto
broilerpan; otherwisejuicesmay
becomehot enoughtocatchfire.
Aluminumfoilmaybeusedtoline
broiler
paandrack. ButbeCERTAIN
tocutopeninginfoil to correspond
withslotsintherack,sofatdripsinto
panbelow.
Step3:Positionshelfon
recommendedshelfpositionas
suggestedinBroilingChart. Most
broilingis doneonC position,butif
yourrangeisconnectedto208volts,
ym.imaywishtousehigherposition.
SteD5:‘IbrnOVENSETknoband
OVEN TEMP
kIt BROIL.
Preheatingunitsisnotnecessary.(See
notesinBroilingChart.)
Step6:Turnfoodonlyonceduring
cooking.Timefoodsforfirstsideas
inBroilingChart.‘Ibrnfood,thenuse
timesgivenforsecondsideasaguide
topreferreddoneness.(Wheretwo
thicknessesandtimesaregiven
together,usefirsttimesgivenfor
thinnestfood.)
QW2sthm
a Answers
Q. Shoukil lezwethedoorajarwhen
broilingchicken?
A N Thedoor shouldbeclosed
whencookingchicken,andshelf
position“A”isrecommended.
Q. MayI me aluminumfoiltoIine
thebroilerpanandrack?
A. Yes,ifyoumoidfoilthoroughlyto
broilerrack,slittingittoconformto
slitsinrack.Slitspermitproper
drainageofmeatjuicesintobroiler
pan,minimizingsmokingand
spattering,andpreventingpossibility
offirefromoverheateddrippings.Do
notplacesheetoffoilon ovenshelf.To
doso”mayresultinimproperlycooked
foodandpossibledamagetoovenfinish.
Q. Should1
saltthemeatbefore
broiling?
A N Saltdrawsout thejuicesand
allowsthemtoevaporate.Alwayssalt
aftercooking.Turnmeatwithtongs;
piercingmeatwithaforkalsoallows
juicestoescape.Whenbroiling
poultryorfish,brusheachsideofien
withbutter.
Q.
W broiling,isitnecessaryto
alwaysusea rackinthepan?
A. Yes.Usingtheracksuspendsthe
meatoverthepan.Asthemeatcooks,
thejuicesfhllintothepan,thus
keepingmeatdryer.Juicesare
protectedbytherackandstaycooler,
thuspreventingexcessivespatterand
smoking.
Step4: Leavedoorajara fewinches.
Thedoorstaysopenbyitself,yetthe
propertemperatureismaintainedin
Fileoven .
Step7:TurnOVEN SETknobtoOFFI.
Servefoodimmediately,andleavepan
outsideoventocoolduringmealfor
easiestcleaning. I
Q. DoIneedtogreasemybroiler
racktopreventmeatfromsticking?
A. No.Thebroilerrackisdesignedto
reflectbroiler heat,thuskeepingthe
surfacecool enoughtopreventmeat
fromstickingtothesurface.
Q.
W aremymeatsnotturning
outasbrownas theyshoukl?
A. In someareas,thepower(voltage)
totherangemaybelow.Inthesecases,
preheatthebroilunitfor 10minutes
beforeplacingb~40ilerpanwithfoodin
oven.Checktoseeif youare usingthe
recommendedshelf~osition,Broilfor
thelongestperiodo~timeindicatedin
theBroilingChart,llwn foodonly
onceduringbroiling.
Page 19

L Alwuselwoa ra
po
I?orsteaks
thcawiyoovI i
desit minismoa
spattb trapjuii t
shielopao t pa
2 Ovendooeaj
mofoothi aspe
posio dowhho
doopcorre
3
slf 5 W arrf o p
T slc croth
ouf suj t t e o
t meU tot t m
ovt prpim a
loju
4 I desmarn
chibebroO b
wibarsal 5t 1
minon
evearooutedo med n l faedha
siwhcos o w
drif
Quantity
andlor
Food
Bacon
Groundbeef
WellDone
Beefsteaks
Rare
lMedium
WellDone c
Rare I%-in.thick c
Medium
WellDone c
Chicken
Bakeryproducts
Bread(Toast)or
ToasterPastries 1pkg.(2)
EnglishMuffjns
Lobstertails
(6to8-02.each) turn
Hsh
Hams?ices
(Precooked) for1%inchthickorhomecured,
Porkchops
Weli Done 2(l-in.thick)
Lamb
ChOpS
Medium
WellDone about10-12
Medium
WeilDone about1lb.
Wienersandsimilar
precookedsausages,
bratwurst
Thickness
%-lb.(about8 c
thinslices)
l-lb.(4patties)
1/to %-in.thick c 7 4-5
l-in.thick c 7 7 Steakslessthanl-in.cookthroughbefore
(1to1%-ibs.) c
(2to2~-]bsc)
1whole
(2to2W-lbs.),
splitlengthwise
2-4slices
2–split
2-4 B
l-lb.fillets%to
%-in.thick
l-in,thick B 8 8
2(%-in.)
aboutl-lb.
2(1-in.)
OZ. c
2(1%-in.)
l-lb. pkg.(10)
Shelf
Position
c
A 35 10-15 Reducetimesabout5to10minutesperside
c
c 3-4 desired.
c 5
-,.
c 10 10 Slash fat.
B 13 13
c 8 4-’7 Slashfat.
c
B 17 12-14
c
FirstSide SecondSide
Time,Minutes
3%
9 9 browning.Panfryingisrecommended.
13 13
10 7-8 Siashfat.
15 14-16
25 20-25
1%-2
13(Donot Cutthroughbackofshell.Spread
10
10
6
Time,Minutes Comments
31/!!
1/+
over)
5
8
4-6
1-2
6 B d no
prH f v t
f o t i b
pri d
‘ F fib
coyb
o
s a n l s p
a inc t g
i t c 1 t p s
8 I y r i co
v r s m b b b
prb h a m
o s o p h
Arrangeinsinglelayer.
Spaceevenly.
Upto8pattiestakeaboutsametime.
forcut-upchicken.Brusheachsidewith
meltedbutter.Broilwithskinsidedown
firstandbroilwithdoorclosed.
Spaceevenly.PlaceEnglishmuffins
cut-side-upandbrushwithbutter,if
open.Brushwithmeltedbutter
beforeandafterhalftime.
Handleandturnverycarefully.
Brushwithlemonbutterbeforeand
duringcookingif’desired.Preheat
broilertoincreasebrowning.
Increasetimes5 to10minutesperside
Ifdesired,splitsausagesinhalf
lengthwiseinto5 to6-inchpieces.
19
Page 20

Food is cooked by revolving on a
hand
2-pro
spi
roti
th
desBa
spit under the (upper) broil unit. AS
food turns, it bastes itself to produce a succulent brown and tender
roast. Meat tender enough for
roasting may be rotissed.
4 Place s o frs ha
e i i nasua
poie i i w Usup
Rott l?
1 AsserotisIns
cureno frinla
holo brop
Lo
frai plb fitstr
eno supinhoi ce
hand
2. Secure food on spit. When
secured correctly, food will be
located in center area of spit
leaving4 inches free at the pointed
end (this part goes into motor).
3 T secfoo spPu
o
foonspne
hanenTigwiscr
Puspthrfo(tfo
secua compadis
butweieveo easi
o
To check weight distribution on
spit, hold spit (and food) between
hands, palms up; spit should roll
smoothly from palms to fingertips
when palms are tipped forward.
L P o shi lopo
i ovW f c spp
spo o sh
2 S O T k a sugo RotT a
TempCho n p
Seta 3 t 40t g
fojua d wi
overb
3 SwO S k t
IWHST stb u
a
moopeS
c b insa rem
eaw moi ope
NOM cew to
sp
n p o b o po
toucoo brun
4 Ins i moRe
hanh brp w
potha p s fi
inmooua f a i w g
5 Chroto foTi
o adfoi necDu
@D not use e m t
mometer, on models so equipped,
while operating the rotisserie. A
regular, non-electric meat thermometer may be used while
rotissing providing it doesn’t touch
the oven, frame or pan while meat
revolves. (Or, if desired, cook to
estimated doneness then pull meat
from oven to insert meat thermometer. Wait about 2 minutes for
temperature to register. If meat is
not done, remove thermometer and
continue cooking if necessary.)
@I rot l s i
w o 1 t 2 m a
cot a j m a
codo
@At end of cooking pull out pan
and shelf together, using potholders.
Turn OVEN SET to OFF. Remove
food from spit. COOIpan outside
oven; soak forks and screws for
easiest clean up.
NU3tes
coofom n tig
==
d t nom shr
6 A F COLE
DOA I “B
POSd sto
/
.--
/’-’
b its
7 Baf i
w
lohabra f re
Finish securing food on spit by
gliding second 2-pronged fork onto
spit with prongs toward food.
Tighten screws to a flat surface
on spit.
20
Page 21

Food
Beef’
Rolledrib
Rare
Medium 325°
Welldone
Lamb
Leg,bonedandrol!ed 350” 24-27 175°-185”
I%)rk,fresh
Loin 350°
Spareribs(barbecued) 350°
Spareribs(plain)
i%rk,cured
Ham
Cook-Before-Eating
bone-in
FullyCooked 325° 14-18 ,
ovenlkmR R@ssingThe Thermometer
Setting
325° 22-29
325° 32-42
400°
325°
Approximate
MinutesRx Lb. Temperatures
27-31
25-34
1%-1%hrs.(totaltime)
?4-1 hr.
17-20 160°
Meat
GeneralDirection
130°-1400
150°-1600 hourintervalswithmeatthermometerfor
170°-1850
170°-1950 .?3uyribssplitdowncenter,
130°
NOTE:1.Forroastsover10pounds,cook
about1/2estimatedtime,thencheckat 1/2 ‘
internaldoneness.2. Thinroasts,3to4 pounds,
mayrequireslightlylongertimesperpound
thanthosegivenonchart.
175”F.formedium.
185°F.forwelldone.
Threadonspit.
Tobarbecue,brushwithsauceevery
15minutes.
e’mlitry
Capon*(6-8]bs.)
Chicken*(2-3lbs.) 400° 33-42
Chickenf(11A-2Ibs.)
~ornishHen*(1lb.)
Xckling*(4-5lbs.)
l%rkey*(8-12lbs.) 350°
lea]
;houlder,boned&rolled 350°
ioiogna
;anadianBacon
c
xneheonMeat
L
12-ourIcecan)
(1
Weners,large
$Onsmallpoultry,testdonenessbymovingleggentlybackandforth,andpresslegmuscletobecertainit issoft.
*Ready-to-cookwei@t.IMPORTANT:tie
NOTE:Spillageof marinades,fruitjuicesandbastinginaterialscontainingacidsmaycause discolorationonovenlineror door,sotheyshouldbewipedup
immediatelywithapapertowel.Whensurface iscool,cleanandrinse,
. . .. . -- -- . . . .
...
1
375° 26-30 185°-1900
400°
400” About1 hr. (totaltime)
350°
350° 23-25
350°
350°
33
I
48-62
31-35 185°-1900
17-27
30-33
23-27
23-32(total time) ‘
z+~z[totaltime)
I
?
-t
?
180°-1850
180°
180°
160°‘
Brushwithmelted butterormargarine,basting
orbarbecuesauceseveral timesduring
cooking.
Sameasabove,
Ifdesired,thread4to5chickensofthissize
crosswiseon spit, Letrevolvetowithin112
hourofdonenesstime,thenbrushevery10
minuteswithbarbecuesauce.
Brushwithbutter,orbutterandlemonjuice
mixed.Threadhensonspiteitherlengthwise
orcrosswise.
Donotbrushwithfht.
Cookwithoutbrushingwithfat, orbrushwith
butteror margarineas desired.Whencooked,
switchOVENSETtoOFF,closedoor,let
turkeystand10to20minutes
fromovenandcarve.
Brush
withsauceifdesired.
Brushwithsauceif desired.
—
Brushwithsauceifdesired.
I
.-.
i o Remove
]eanwinclosetobodytomakedonenessofbirdas uniformas possible,Alltimesgivenareforunstuffedbirds.
.—
—
—
-
=ff-”
H
—
-
-
~
—
Page 22

to
For many foods, especiallyroasts
and poultry, internal food tempera-
ture is the best test for doneness.
The meat thermometer takes the
guesswork out of roasting by
cooking foods to the exact done-
nessyou want. The meat ther-
mometer has a skewer-like probe at
one end of the cable and a twopronged plug at the other. Use
handle of plug and probe, rather
than cable, when inserting and
removing these parts from meat
and/or oven wall receptacle. After
preparing meat and placing in
roasting pan on rack, follow the
steps below for proper use of meat
thermometer.
@
St3 P cai rec
o ovwaT pra s
cidest o p i o
waB cet inp i
recea t w Clo
do
Step6:When internal temperature
of roast reaches number you have
set,
a buzzer sounds. To stop buzzer
turn pointer to SIGNA-LOFF.
Internal temperature of meat can
be determined at any time during
cooking by turning pointer down
until buzzer sounds.
Step 4 T O S K t
BAa O T K
Step 1: To gauge placement of
probe, lay probe on outside of meat
along top or side and mark with
finger where edge of meat comes on
probe. Probe should be placed so
point rests in center of the thickest
part of roast.
St2 Insprinmeu t
for example 350°. See Roasting
Chart on page 17for oven
temperature.
Step 5: Refer to chart near Meat
Thermometer Dial to determine at
what internal temperature
bedone. Then turn knob next to dial
to move pointer to correct number
(internal temperature) on dial.
m will
poimaro wifinPo
shon tobof c gri
Not more than 2“ of probe, n;t
counting handle should be left
exposed outside of meat,
t recoo tem
Step
7 W r i d u
care in removing plug from receptacle. DO NOT USE CABLE. Remove meat from oven. Since most
meat continues cooking, you may
wish to remove 5°-100 sooner.
Step
8 R p f m
u h o p
Most meats carve easier if let stand
5 to 10minutes. Let therrmmeter
cool and clean as directed in Cleaning Chart on page 28. Do not leave
in oven.
notcable.
22
Page 23

Youmay use the meat thermometer
for broiling, such as steak or ham
slices.Prepare meat on broiler rack
and pan as explained on page 18,
“How to Broil”. Set both OVEN
SET and OVEN TEMP Knobs to
BROIL and leave door ajar as
recommended, after placing probe
in meat and oven as directed below:
Step 1: Use steak at least l-l%
inches thick. Lay probe on top of
steak to determine the position
probe is to be inserted. Gauge distance from edge to center of largest
muscle; mark with thumb where
edge of meat or fat meets probe.
Becertain NOT MORE THAN
2 inches of probe, not counting.
handle, is left exposed outside of
meat.
!?@ 2: Lift probe from meat
keeping thumb in place on probe.
Insert probe as near as possible to
center of thickness of steak. Push
probe into steak to where thumb
meetsfat or meat.
NOTE: DO NOT USE MEAT
THERMOMETER WITH
ROTISSERIE.
Qw?stions
Q. Canthe meatthermometer
remainin the oven if it’snot
Step 3: For rare steaks cook first
side to 90 on meat thermometer
dial; for medium to 100;for welldone 110.Set Meat Thermometer
Dial to preferred doneness.
Step 4: At sound of buzzer, turn
steak; check probe to be certain it
has not mov~d out of position.
Reset pointer on Meat Thermom-
eter and cook second side. See
chart on range near Meat Thermometer Dial.
NO
If there is a question about
@
whether probe has moved out of
position during cooking, turn knob
so pointer moves down on dial
until buzzer sounds, Note indicated
temperature and reset pointer to
SIGNAL OFF. Push probe farther
down into roast, about 1 inch, then
after a few minutes redetermine
internal temperature as above. If
new temperature is lower, the probe
was probabiy out of position. If so,
allow meat to cook to proper
internal temperature.
@Let meat thaw enough to allow
inserting probe. The probe is sturdy
but take care not to force it too
hard into roast.
@Do not disconnect probe during
cooking. Use hotpads when re-
moving probe at end of cooking.
Do not use tongs to pull on cable
since they may damage it.
insertedin food?
A. No. Remove probe from recep-
tacle when not in use. You could
damage the probe by leaving it in
during cooking operations that do
not require the probe.
Q. May 1insertthe meat ther-
mometerinto frozenfoods?
A. No. Foods must be completely
defrosted before inserting probe.
Q. ShouldI linebroilerpan with
aluminumfoil whenroasting?
A. Yes,when using pan for mari-
nating, cooking with fruits or
heavilycured meats, or for basting
during cooking. Avoid spilling
these materials on oven liner or
door.
Q. FIow may I be surethatmy
roastwillcook the same eachtime?
A.
W u t m t
moi rot p
m b inp C
t poo t p d
coSot p s
o i tob f o g
Rep c a s
o a t f r
a Answers
———
23
Page 24

t
CL
ch?m
Mo&E (tspills andlightsp@h
HeSo
(heavy greasyspillsand spatter)-3 hours
BefSetting
ovcont
CheThThi
ST1
Remove broiler pan, rack and other
cookware from the oven. (Oven
shelves may be left in oven. Note:
Shelves may become gray after several cleanings.)
STEP
Wipe up heavy soil on oven
bottom.
A
B
c
D
ST3
Clean spatters or spills on oven
front frame (A) and oven door outside gasket (B) with a dampened
cloth. Polish with a dry cloth. Do
not c~eangasket (B). Do not a)low
water to run down through openings in top of door (C). Never use
a commercial oven cleaner in and
around self-cleaning oven.
2
c
c
OvenFrontFrame
OvenDoor Gasket
Openingsin Door
(km Light
H to S O
f Ck?
ST1
TurnOVEN SET and OVEN
TEMF knobs clockwiseto
CLEAN.
fiposw t
loci rea
Conw s i
STEP 2:
l?ushandhid in
REB w s
L H t t r
u i i C p
S -
Settheautomaticoventimer:
@
M s botht r c a
t S d s t c t
o d W t S k i
p i a t i w “
i p w t t s o t
r c i r
@D o c h
nech f m
s o t h f h s
e A t h t p t o
d t p i a t S
(Cd clt t
det C L
g s c i s
~T L L w g
int o i h a t
d c b o T o
d a w g h d s
clD N 7
L
STEP 4:
Closeovendoorandmake sure
ovenlight (E) isoff.
24
Page 25

FdTkStAf
su
ov
us
Ga
Th
After cleaningiscomplete,the oven
door willstay lockeduntilthe oven
coolsandtheLOCKEDlightgoes
off. Thistakesabout30 minutes.
A.—.. t
Quea An
Q W wuiftm o d
immee thI s
the time and clean knobs
M
correctly?
A.
Cht b s y S
dii s t t s t a
RACLA c t
b
t CLpos
Q
LAHAi i
M o cln
woc Is sel
m ov
A N
Tiu t raclt h
sta s y self
cy
Q C I u
STk
WhLOClii ofpu
anhoi LAREL
ButwhsliLA
HANt t leuni i i
COposi
cleaners on any part of
self
A N cleo cosh
b
ovI y d u t a d n
wit o absclt
resc s t o su
a damepat n
tit o i auto
cle
Q
Y AutO
commercial oven
m
ara p o t
C Iclt W
art o d
A N
a goo s a c m b
STE
TuOVS Knt OF
ST
3
“fOVTEMPWA
IWYI y wit “sta
“stcleaa aiatith
shoo clopui a tu
STAdit tiy wit
“staA t honeef
cleat th“sttith
pui a tuS’(CL
dit thdestiOvwi
automattuo a o a t
setim
tan t r dao m
thisgasket. “
Q
ovt LOL c
o a IC n m t
LAHAW
A
tempbao bro
t LOlim c o
T o d cab laf
self-wht LO
lii o I t hal t
ovc unt LOl
goo T t o d c
b latf self
t gai essf
Afhaj u t
Afseconh
S K t O O w
t r r o s A o
t c f
opd W u e s
a r c c
Q 1
at least an hour b
the “cs I
h d c n
A Y
a c d b t
coa c f
Q S
T i t m h
t b a o
d t c
A Y
d t f f c
Failureto wipeout e s
m a c a o w
cl
Q
t m a s o
What causes t h
l o t e s o
m o
T i a n c
A
ref h a c
d clT d n a
h y o p
W d Khaveash left in my
Q
ovenafter cleaning?
A S t o s w l
adew i a I c b
rew ad s o
c
Q M o
s h b
g a s c ‘
t n
A Y
shm l s l a
dit ad g c
Q M o s
e
A A m clo
shm b s c t
d n s e I y w
sht s m e
d f w a s
a o c o a r
lio s o s w
t c s s
A m c t
d n s
W is the matter’?
Q. W’IMshId if excessive
smoking occurs during cleaning?
A
i cab excs
a y shswt O
2
Page 26

t
porce
misu
ra
Ran
loca
ope
th
Procaa cleaa
impors yoRawigi
yoefilca satisfser
grem cafiT m
cleeat plsu
una rem
Folthdireccarei
carf yorat asssa
anpromainte
RE
@D n i p s
u i l o a k
* DO not &xxl the p surface
p terminals.
unit
~D n a t c a
o i a w r t p
re
Ehishes
Th
stub breai
enafini
Thfini acresis
Howea acfospi
(sua frjuitomo
vineshon b perm
t remo t fin
Oven VentDuct
Yo
du
CalrunClt duoft
remove:
T
@
Masuuni co
@Liu riresurun
~Remtrria drpa
@Lio ovvedu
Toreplace:
* Place the part overthe ovenvent
locabet coowit
openo t duunt ro
openi t drpaI i
importht dui i t
corrposis moisa
vapfrt ovc b
reledurovusN(Y
Nevcot hoi t ov
veduwialumfoo
anothmateThpre
thovvefrwor
propdura coocyc
Clean
oftBuilsoespe
i venthra
unt rire
arunt drpa
CHRO
TRIM
RING
TM4mck3“in-1
surfaceIk!athg unit
T Ti3 s u i
‘ de
~Wiart edo t
suru opi t
toClt a bet u
Ria waarw a d
clo sp
Caution: B s a coa
tuO beattt
clunt coo
remt Caun
T re
@Rat u c opt
receL abo i
abt t r a p a
frt receCaB
sut coa c be
rema Caun
~ Afremt pl
surunl t t r a
drp t clunt u
T rep
@Plt d p i t su
un
u t d p s t u rec
c b seP t t r i
plo t d p
@Int tero t pl
i t rat L
sta c b r
I c b l u a l
i t pof c u
t u B c t u i
c b l t
c
A l c u r t
r a d p t c u
u C p a t r a
reo C C
o p 2
ToCka.nupperovenMeki
h SeM-Ckiining (Mm
P s f u o o a
s o t seo (
s m h t b s s
s s s d n i w
plo p
S o b l b –
u slm t e t d
L b p a r P
b a b p b
b s s s f o
I i imt p l f
o s
L s p u a o o o
P bao r
ses
unthrt opi t p
a int rece
e Gut suu i p
s i fieva f sni
t trri
N~T d p
m b
unt t ri
ToReplacePanels
In Upper(Men
Rep i a o
deB c o b
i res n i a r
a “ o b u r i
dei p R
brres “ s
i t b o o
@D n att clpl
surtmi a aut
dish
26
Page 27

Lower
sid
Remo
ti
unu
be
ov
dec
ad
ovenDoor
T REMdoopt BR
posito why fehi
catsligGrdoa
Iidou a awfrhin
T REPLgrdoa si
liu dowihina pu
dofirinpla
oven Lampand
surface Limp
CAUTBefrepl
yoovbuo surla
discot electpo
foyoraa t mafuo
circbrepao pupl
B sut l t lacoa
bucocomplbef
remoo replth
oven Lamp
T
*Discoelecpot t
rana t mafuo cir
breapan
@Remt 3 sloscr
i thlacoa shi t
diag
@Dett lacoa
remt bu
T Repl
@Pui a n 40-appl
bul
@InstlacovRep3
scra tighmaksu
covfiflwiovwa
Reconnect electpot
@
thran
CO($ktopsurfaceLamp
WHCHALAD
N TOT MEA
ENO LA
a Discelepot t
raa t m f o ci
brepa
b Pusho sio g
coAlglt swd
c Pltho bon
eae o laPra r
boo l getof
o rauni stRe
d Cht a wao l
repw s kiH l
nee e a inpri
socGer boo l
tor o rauni st
e Snt glcoi pl
f Recelepot
t ra
AdjustingOven
Thermoht
U
gio re
whcofitiO
theri tim “d
frt fasea
diffi tibea
o a a o o 5t 1
mina n
h
a i m a t b act
t
i y f t y fo
consbrt lio
t muy m m asi
adjui t the
(OTekn
PUK O SH
LOA B O K A
N(CUSE
BEMAA
AIXU
T inctempt
toH o RAt
tutoL o LOE
nochtem1
degTempc b ra
b 2 deo lob 3
deg
whi repHo
s cora t fa
Y o
[ R k a h s
]oi a t o k U a
poo s m -
“so k f i o h
G h o k i t o
h N p o p a
t h t m p t
R o L P i d
n t m e I i i s s
i i dit m p m
b loslI a t
scrk b o s
ina l u o
posl
2 A adi m p
mof a t k
R k t r m
f a o t k a s
Reo peb
m a ad
L P o k a l b
s o b o k
2 L p a m o n
i dediT s
3 R k t r m
f a o k t s R
o peb m
a adad
27
Page 28

YoRai clet wacleB s t fot
Pap
Soap-F
Soap-F
Plas
Soap-F
ra
wa
sc
th
unnospa
sh
manua b wit auto
self-cfuncThch
descrpao yoran
direcart as
maxu o y ra
NCL rapac be
cleamatet u c eacleman
parargendirecf
#—
PA
Wit
Ba
andI&d unit
MAT‘ U
GENERAL~ll
l n clt b u o b u A s w b o w t u i
heN T b u i hia c b l g t c t o
—
flI spireo a acca t b u g w
art u w w wa
Broiler F’arnandRack
* Soapand Water
e Soap-Filled Scouring Pad
e Plastic Scouring Pad
Drf c p a r sl( n l s p a r s i
o t coSpo detF p w w w a s c
o patoo
L p a r s f af m w s
i necRia d C)T brp a r m a b
cli adis
Control Knobs:
RangeTopand Oven
Outside Glass Finish
PorceiainEnamel
Surface*
o Mild Soap
ISSoand Water
o
eDryCloth
oSoapandWater
Inside C)venDoor*
(lven Gasket*
Oven Liner
Oven VentDuct
~hrm
TrRin
Porcelain
Drip l%ns
,MeatThermometer
kwlv
(See Se\f-Cleaning
()\,en ~irecti~ns)
*Soa Wa
e Soa Wa
● Soa Wa
@Soa Wa
e Stiff-BBr
●
(Ncm-Me
e Soa Wa
e
e
e Dishw
*Soa Wa
~
* Soa Wa
a Water
Towel
ScouP
ScouP
ScouP
ScouP
P o knW geb d n s D a r c t r
mas t maf a o k a s
Waa glw cldai s
clI kna remd n a w t r d i s o
glwhcle
Avclepoo haabw m
I acshspo t raw i i h u ad p t o c
t withu riawW t suh cow a r
F otspis a f smae w w s a w w
coa
& self-ovclO t d l out g T d
i automcli t o i i t selc I s o
spatshoci cofuw t d w s a w
D N(r ordgaA ges a w o t g o i
t slo t do
AvgetA clemato t ga
CobecleFrewiw m s a w w p
t tibetmacleB s t r th
Ret O V D fou t r r s u W i
hosowad a re
Cla desbeo i dis
CLO
o spau a o a clmameR l w
scop t prscro t su
Cop sliSpro deta w o s p w w w
Ria drI addp m a b cli t dio c
i Self-ov
CobecleD N IMI W S s s
wisoscop ria d D N S I O
Shec b cli Selfo o dio b h u
soa waRithot res a cl
riPow ad cl
a t w diW a r a e c s
w n “bo n t y c T r “
R a p w ad
t e
D N C I S
+pillo marinafrujuica basmatecontacm cadiscSpi
c&e b~irtgtaken to not touch any hotportion o t ovWht suri cocla ri
b w u imw
Page 29

CidrSO
imm
wa
nece
pro
yo
ov
unitcm
Meta
incluChr
SiTri
anTrStr
Griddle o Soa Wa
Rotisserie
SpiFor
ScreFra
—
StorageDrawer
—
Upper Wen
RemovOv
PaneShelv
BroRefle
Surface
Spaa spb a w c m heA m r a
coofrsuuna h sou a H L s b o a a
mia swunt O T n t g clmao c I y
d wio w d patobehesuu
D IWhat u becomco
D N0selfplun
D N
D NO
e Soa Wa
*Soa Wa
@CommeOvCle
s Soa Wa
Waria t pow ad clD N U s w
abraamma o como clw m d
t fin
L gricoP o grW i s w S af m i
Soi hosuwasct recof o s w
F cleredrb pui a t w o t u t f
a thlift dro W w a d c o s a r
t draNeu haabro scp
T remitf upo P t i t Sel
ovi thma
L ComO Shela p o e o t Se
ovshew thstfafo
2 BrReflesos d o l s
3 Bo
fao o SelfshL t paf o cos
thwepli Selfo
4 Sipanbacko reSep
t ref sto su
pluni a k o li
i dish
paandpap bacw s s
E
~ --
—
-
-
Toobtservs yo
warro t bao thbo
We’
wa
o o sera
t b pleaI f so
reay a n hawit
servy recehea th
stet folf furhe
FIRcont peow
servyoappliExp
whyoa n pleaI mo
casthwisot pro
NEi y a stn pl
wra t detai
yophnum
ManConRel
GenEle
-
AppP
LouiKen40
FINi y pri s
-,
m
—
s
—
n reswr
MaApp
ConAcPa
2 NoWaDr
ChiIll60
2
“
Page 30

Yorawii builexh
butt
blo
de
hoo
re
sysi equiwiadam
atwo-sexhbloa
removfiltExhope
arlocovcoot a i
hoovov
Thexhsysfuncon
wht bloi oper
Loct butf exhsy
a thboto t vertcon
panF hisppui t
o
boto buta t st
f l sppui
puceno but
Whbloi opera ho
ovovi cloi exhov
surfunonWhblo
operwihoi opposi
i exhathropenov
surfuna ovov
simultan
THEXHSYS
SHOB OPER
WHENODOVAP
Too h abt o l
u haa rio hot c
pud o haU h i
i fuextpowh
vao smref co
sua w p bro d
f fro t suunS
infoo u
ofsuun
L C t P f i
r a f e o f p
f t r u f e c
t e o l t
f a r W c
reP e o f a
s a r o e o
P t r l f e a l
Fib.%
T fia loo co
t a o beh ext
Fila remf cl
Filbesoo a
peo tiT effo
yoexsydeo
hoclt fili Fr
o cleo repde
o t t o coy d B
fiishb clA
LEO A MOA
clfret gre
s p f f i
p u e o o
2 H E h a f a
poo r h e
i
( ilP
fio e s a b o
fiP f t l u i
c t h o r s
reW c r P
f a c a l a p
l u f c h a r
s P f t o
a r s i s b h
suradjt t fil
O SMA EXP
T B T RESO A
COOKOPERAST
FAA T BEGIO
COOK
ToRemoveand RepkiceHood Extension
~+.
R!rnove
m
Exthoa f a i wi
1
ope
2 Withucuraro
edo hoextenhoa
finbetspra bra
a easia putowce
o
holi braa hoexte
cab remo
Thmopio o
H
T Re
L F boofhafl
ins o ho
2 Seo s a a tiA
p w hoi bra h
extet p p th
hoT seh ex
s i cab reb mi
T C
L Fia i h d
soL b m b
u t h r i s
a d W c u a
hat f w l f
y Hoi
beneo a f
f y - E d
f y s r m
2 H exr a
w w h d s
R a d w s c
E
I
M
T b m i p
lus i d n n o
30
Page 31

—
UALR
H3L
pro
le
us
do
en
ov
-—-:----
————--
:--=~,
—-:————
...——
——c*—-——
———-———
.-——-
‘
-ss---
-—--
—.———
CAUSEAND
rai n comini t elo
OVENIVILL NOT WORK
POSSIBLE
Plug on
T cirbri y hoh b tro a f h b b
Ovcona n
s
Dolei loposafcl
OVMm-n’
DOESNor V{(IRK
Libui lo
Bui defeRep
Swwhopeo lii brC f se
FOOD DOES NOI’
BROIL
PRO
OVS o O T k n s a B
Don
Impshposbe
Necprew n
a a reco
C BrC
Foi becoo h p
Utea n suf bro
Aluf u o t brp r h n b f p o s a
recom
FODON ROA
O BAPROP
OVS k n s o BA
OVTEk n s cor
Shposi incChRoo B C
Ovshi n le
Wrcooi beusW rop i t s
A fotew n u w net s d brd r
SUR
WWN
fiUN~
. --. . .
YKUJ?EKLX
3VWIN
CL
Suruna n pli so
Trria d p a n s sei t r t
Suruncona n prs ... . . .... ......
Auttidin s o n s prT S d m b s a
advbet t noo o cl
T S’d w n adf a l
t
BoOVS a O T k m b s a C s
Athpio spiw cllea h l o a i s
whcoh inst a f fuh
Lan i CLpos
IVDO
?JO
LA~H
TaOVS k t CLGlL L a k i t
ind
i t h f pru a d w l T c o
opdowit lac b mo
OVS k m b CLo O b L c b m - LaRelBun puw moL
Page 32

porcancelledchecktoestablishwarrantyperiod.
I
FULL ONE-YEAR VVAFIRANTY
Foroneyearfrom dateoforiginal
purchase,wewill provide,freeof
charge,partsandservicelaborin
yourhometo repairorreplaceany
partofthe rangethatfailsbecause
ofa manufacturingdefect.
Thiswarrantyisextendedto the
originalpurchaserandanysucceedingownerfor productspurchased
forordinaryhomeuseinthe48
mainlandstates,Hawaiiand
Washington,DC, InAlaskathe
warrantyisthesameexceptthat it
is LIMITEDbecauseyoumustpay
to shiptheproductto the service
shopor for the servicetechnician’s
travelcoststoyour home.
Allwarrantyservicewill be~rovided
byour FactoryServiceCentersor
byourauthorizedCustomerCare”
servicersduringnormalworking
hours.
LookintheWhiteorYellowPages
of yourtelephonedirectoryfor
GENERALELECTRICCOMPANY,
GENERALELECTRICFACTORY
SERVICE,GENERALELECTRIC-
HOTPOINTFACTORYSERVICEor
GENERALELECTRICCUSTOMER
CARE@SERVICE.
~~~~ ~~ ~()~ ~()~~~~~ e Servicetrips to your hometo
R yourUse andCarematerial.
Ifyouthen haveanyquestions
aboutoperatingthe product, purposeor usedcommercially.
pleasecontactyourdealeror our
ConsumerAffairsoffice atthe
addressbelowor call,toll-free:
TheGEAnswerCenter@
800.626.2000
consumerinformationservice
e improper installation.
Ifyouhaveaninstallationproblem,
contactyourdealeror installer.
Youareresponsiblefor providing
adequateelectrical,gas,exhaustingandotherconnectingfacilities.
Sostad noallt exclo limio incio consdas t a lio e
manoappt YOThwarrgiY speleriga Y m a h o riw v f s t s
T knwhyolegriga i yostaconyoloo stconafofo y stA $
Warrantor:(kmerd, ElectricCompany
If furtherhelpisneededconcerningthiswarranty,contact:
Manager–-(hrwmw Affairs,(Mmera!ElectricCompany,AppliancePark,Louisville,
@Replacementof housefuses
@Failureof the productif it is
usedforotherthanitsintended
o Damage to productcaused
byaccident,fire, floodsoracts
of God.
WARRANTORISNOTRESPON-
SIBLEFORCONSEQUENTIAL
DAMAGES.
K 40225
(
—
I
*
 Loading...