

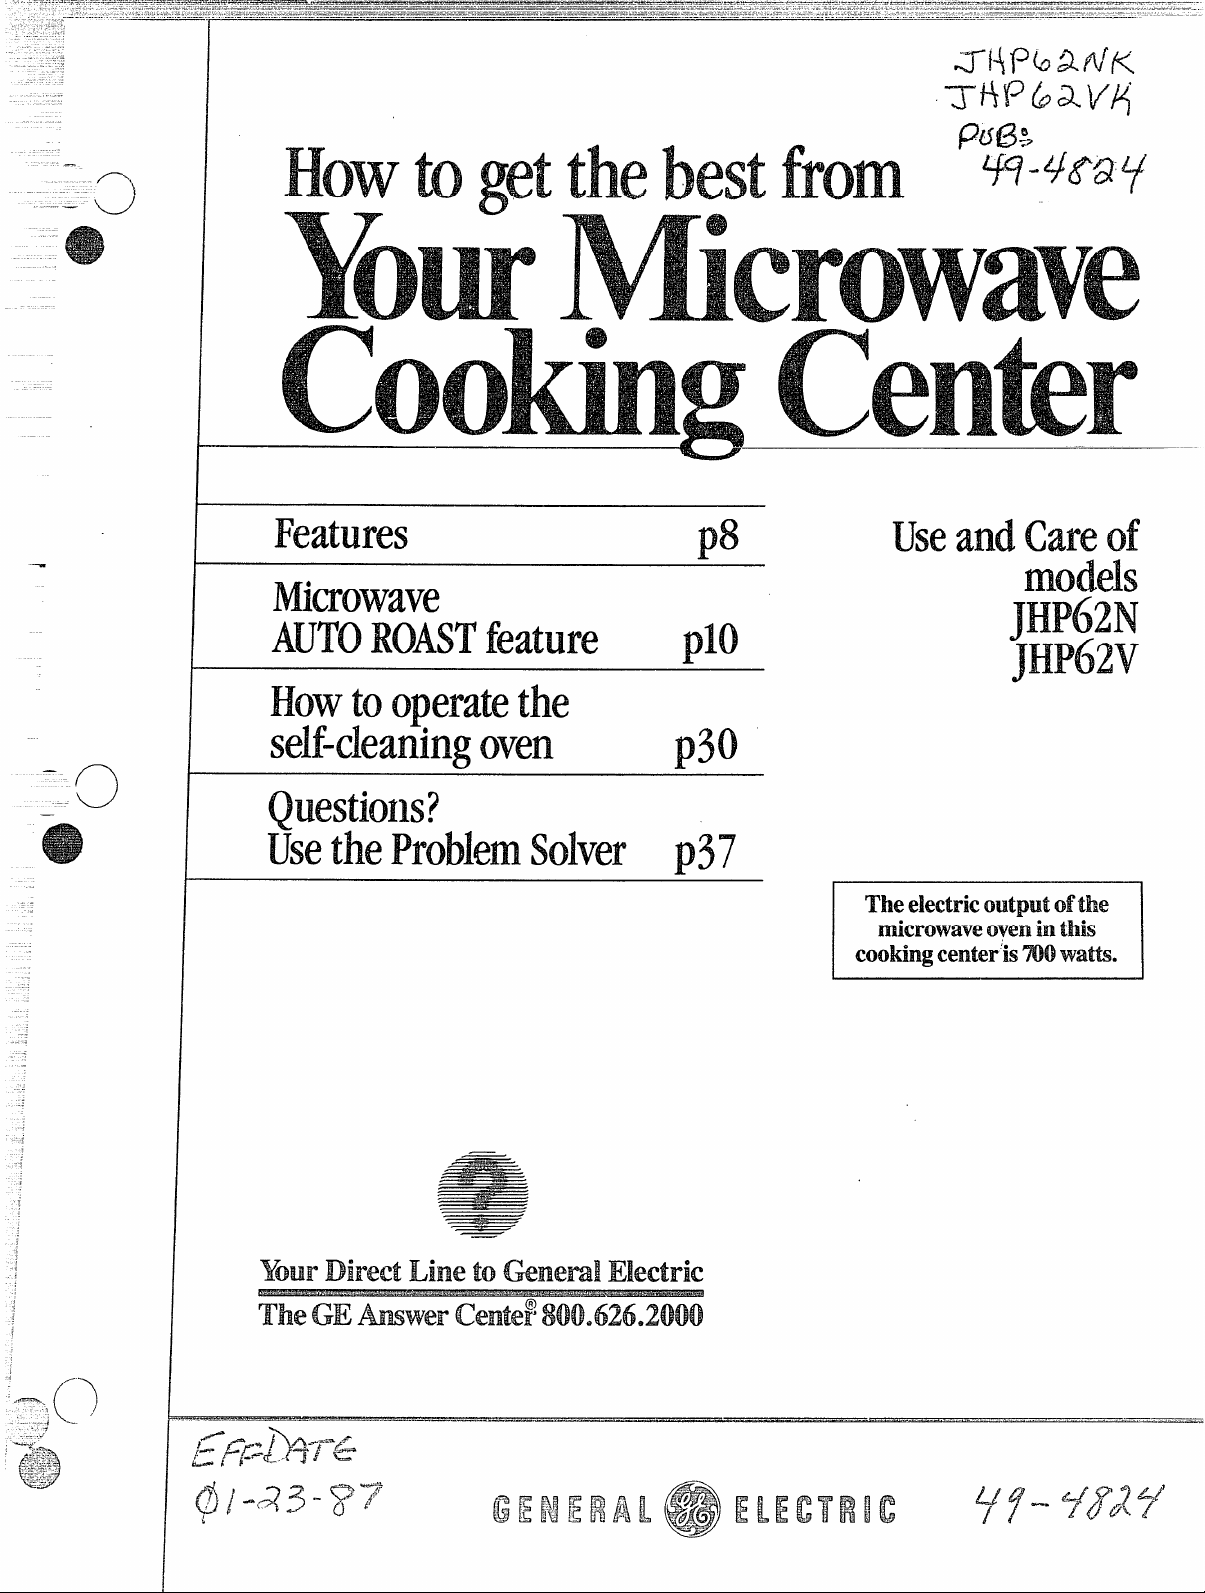
Page 1
—
--
Feature
AWN
-@o
Use of
I
p3
pl
othe
well
Center’is
Y D L toG E
A C
.. —.—.—
.——.—
E E c
.“------
Page 2
-.
Safetyinstructions . .........3-6
MicrowavingTips.. . . . . .. .....7
FeaturesofYour
CookingC~nter . . . . ........8
TouchControlPanel. . .........9
AutomaticRoasting&
Guide. . . . . . . .. . ... .. :.10,11
AutomaticSimmer. . . . .......11
Defrosting. . . .. . ... ... ... .<.12
CookingbyTime. . . . . .......13
CookingbyTemperature... ....14
Minute/SecondTimer.. .......15
DoubleDuty~’Shelf. ......16,17
SafetyInstructions. .........3-6
Howtouse . . . . . . . . . . .......18
HomeCanningTips. . . .......19
CookingGuide.. .
SafetyInstructions. .........3-6
Features. . . . . . . . . . . . ........8
OvenControls
OvenShelves. . . . . .......22,32
OvenLight.. . . . . , .......22,34
Baking,BakingGuide . ....23-25
Roasting,RoastingGuide.. .26,27
Broiling,.BroilingGuide.. .28,29
Operatingthe
Self-CleaningOven. .....30,31
“CleaningGuide. . . . . . .......35
.
.
‘your
center,
Itisintendedtohelpyouoperate.
andmaintainyournewCooking
Centerproperly.
Keepithandyforanswerstoyour
questions.
Ifyoudon’tunderstandsomething
or needmorehelp,write(include
yourphonenumber):
ConsumerAffairs
GeneralElectricCompany
AppliancePark
Louisville,KY40225
‘Write
and serial
You’llfindthemona labelonthe
frontofthelowerovenbehindthe
door.
Thesenumbersarealsoonthe
ConsumerProductOwnership
RegistrationCardthatcamewith
yourCookingCenter.Before
sendinginthiscard,pleasewrite
thesenumbershere:
ModelNumber
Serial Number
Usethesenumbersinany
correspondenceorservicecalls
concerningyourCookingCenter.
ym.m
centeris
Itisimportantthatwe,the
manufacturer,knowthelocationof
yourCookingCentershoulda need
occurforadjustments.
Yoursupplierisresponsiblefor
registeringyouastheowner.
Pleasecheckwithyoursupplierto
besurehe hasdoneso;alsosendin
yourConsumerProductOwnership
RegistrationCard.If youmove,or
ifyouarenottheoriginalpurchaser
pleasewritetous,statingmodel
andserialnumbers.T?&appliance
mustbe registered.Pleasebecertain
that itis.
Writeto:
GeneralElectricCompany
RangeProductService
AppliancePark
Louisville,KY40225
you a
center*•a
Immediatelycontactthedealer
(orbuilder)that soldyouthe ‘–CookingCenter.
.
.—
savetimemoney.
Beforeyourequestservice...
checktheProblemSolveronpages
37through39.It listscausesof
minoroperatingproblemsthatyou
cancorrectyourself.
BeforeUsingYour
CookingCenter . . . . ........2
Modei&Scriai Number
Location. . . . . .
Energy-SavingTips. . . ........6
InsuilingtheCookingCenter ...7
LcveJingthcCootingCen[er ....7
CaremndCleaning . . . . ....32-35
~xil~k~st~ysfern . . . . . . . . . . . , .~~ \
‘1’hePd31mnSolver ...
,
,.. .Eack. .EackCowx
.
. . .
@Steamorvaporescapingfrom
aroundthe door.
@Lightreflectionarounddooror
outercase.
@Dimmingovenlightandchange
inMowersoundmayoccurwhile
operatingatpowerieveisother
thanhigh.
*Dullthumpingsoundwhile
ovenisoperating.
@$oimeT’V-Radiointerference
mightbenoticedwhileusingyour
microwaveoven.It’ssimilar
interferencecausedbyothersmall
appliancesanddoes notindicatea.
probkxnwithyouroven.
t t
Page 3
‘-
-------
-~:
--= TO
Attempt,tooperate
thisovenwiththedooropensince
opendoor operationcanresultin
harmfulexposuretomicrowave
energy.It is importantnot to
defeatortamperwiththesafety
interlocks.
(b)DoNotPlaceanyobject
betweentheovenfrontfaceand
thedoor or allowsoilorcleaner
residuetoaccumulateonsealing
surfaces.
(c)DoNot Operatetheoven
ifitisdamaged.Itisparticularly
importantthatthe ovendoorclose
—
properlyandthatthereis no
‘-- damagetothe:
—
(1)door(bent)
(2)hingesandlatches(brokenor
loosened)
(3)doorsealsandsealingsurfaces.
precautionsshcwltlbe
@
@
a
@
a
on
~ serviced
only
e Donotkm dm-M?——
@
hangonthed$mj
drawerorrangetop.Theycould
damagetherangeandfmmtip
itovercausingsfm%wpersmld
hlju’y.
@CAUTION:
~ O
TO
SHOULDNOTBE
INCABDJETSABOVEA
RANGEOR ONT’HE
m
%
Loose
.
IMEwnY.
-—..
—
——
—
—
—
—
—.
—-
—
—
(d)TheOvenShould
Not be
adjustedor repairedbyanyoneexcept
properlyqualifiedservicepersonnel.
~
@Do
@
@
~
@
mly dry
a
@~~~~~useyour for
m’ thelro’om,
~
=
venting
@DonotM grease
\
Page 4
‘@- m grtwe
---
;
Up a
pan.
sw’f’we
fkmingpm m
by
M,
sheetor
w Fkming
grease apancanbeput
outby Withbddrlgsoda
oq almdti?pqlose
drychemicalorfoamtypek
* n ekxnents
m
surface ofovene These
–PlqNx’towels, and
microwaveovenunless
not(wwcookpotatoes.
@
~sfjmetal!dy w? in
3/4”high;
remove
metal
for DUTYTM
shelf)atleast1inchawayfrmn
sidesofoven.
* lnten!msmay
M
@~~~gj~~~~s,~~~~~en
canbecometoohottotouch.Be
careful
.
–
~
@
notoperatetheovenwhile
emptyto avoiddamageto the
ovenandthe dangeroffire.If
a
@
~
@ Cm’)ked liquids(such
fOOdSc~ntig
@DonotUsea in
@Remove
probefkm’nthe
KYwxRwhen
usingit
t
eA-oid ‘babyfowl.in
s
CWt3”COOk
or(Nl?el” materkds
e IDmgt frozen
oI’M%—
@~(J*“
ina Qwen. Pressure
. . .
@
eggsk
f.Ji.q..
-
Page 5
s ~’~~~with dNdWM3outer
@~~e~f’~~~~(j~~~~ ~~~~T~
Shehwxmy.
e jf’’)(’j~Qt ~~~ oyr~~c~~~~fb~. pbkj
@
@ Cookingpouches
tightlyckkd plasticbags
S
@
whenopemingovendoor.The
hotair orsteamwhichescapes
cancause$mmstohands,face
andor eyes.
~~on>theatunopenedfood
containersin theoven.Pressure
couldbuildupandthecontainer
couldburst,causinganinjury.
@
@
@
awayfromtherange
@
t 0
surface
o
a
@
unattendedathighheatsettings.
~
a
e
during or
shortlyafterremovalfrom the
splashingliquid,stir the
1@uidbrMy beforeremovingthe
txm~ainerfromthemicrowaveoven.
~
a
a
@
@
@ H
a
6$Don>t~~e f~i~to1i~~@
a
~
~To
bum+ ignitionof
a
(continuednextpage)
Page 6
removablesurfaceunits.Don’t
adishwasher.
@ W!II unitto
(MTbeforeremovingkmsil.
KeepMI eye
e
a possibilityof a
e TO
burnorelectricshock,always
becertainthatthecontrolsfor
d! surfaceunitsareatOFF
positionandallcoilsarecool
before to remove
theunit.
e foodsunderthe
hood,turnthefanoff.Thefh, if
mayspreadtheflame.
@~Qf)& Eyingshouklbem
dryaspossible.
s
@ a
~ Useproperpowerlevelas
recommendedandDON(YI’
OVERCOOK.
eDonotoperatetheovenwhile
empty.If byaccidenttheoven
shouldrunemptyaminuteor two,
noharmisdone.However,tryto
avoidoperatingtheovenemptyat
alltimes—savesenergyandalso
ensuresgood,long-termlifeofoven.
e Usecookwareofmediumweight
aluminum,tight-fittingcovers,and
flatbottomswhichcompletely
covertheheatedportionofthe
surfaceunit.
~ Cookfreshvegetableswitha
mininmmamountofwaterin a
coveredpan.
@Watchfoodswhenbringingthem
quicklytocookingtemperaturesat
highheat.Whenfoodreaches
cookingtemperature,reduceheat
immediatelytolowestsettingthat
willkeepitcooking.
~Useresidualheat withsurface
cookingwheneverpossible.For
example,whencookingeggsinthe
shell,bringwatertoboil,thenturn
toOFFpositiontocompletethe
cooking.
~preheattheovenonlywhen
necessary.Most foodswillcook
satisfactorilywithoutpreheating.
Ifyoufindpreheatingisnecessary,
keepaneyeonthe indicatorlight,
andputfoodintheovenpromptly
afterthe lightgoesout.
@AlwaysturnovenOFFbefore
removingfood.
eDuringbaking,avoidfrequent
door openings.Keepdooropenas
shortatimeaspossiblewhenitis
opened.
~Forself-cleaningoven,besure
towipeupexcessspillagebefore
self-cleaningoperation.
~Cookcompleteovenmeals
insteadofjustonefooditem.
Potatoes,othervegetables,and
somedessertswillcooktogether
withamain-dishcasserole,meat
loaf,chickenor roast.Choose
foodsthatcookatthesame
temperatureinapproximately
thesametime.
@Useresidualheatinoven
wheneverpossibleto finish
cookingcasseroles,ovenmeals,
etc.Alsoaddrollsorprecooked
dessertstowarmoven,using
residualheatto warmthem.
@
~AlwaysturnsurfaceunitOFF
beforeremovingutensil.
@Usecorrectheatforcookingtask...
highheatsto startcooking(iftime
allows,donotusehighheattostart),
mediumhigh—quickbrownings,
medium—slowfrying,low—finish
cookingmostquantities,simmer—
doubleboiler heat, finishcooking,
andspecialforsmallquantities.
~Whenboilingwatei-forteaor
coffee,heat onlytheamount
needed.It is noteconomicalto
boilacontainerfi.dlof waterfor
onlyoneor twocups.
6
Page 7
Yourrange,likemanyother
.—.——
householditems,isheavyand
cansettleintosoftfloorcoverings
suchascushionedvinylor
carpeting.Whenmovingtherange
onthist]~peofflooring,tisecare,anditisrecommend~thatthese
simpleandinexpensiveinstructions
be followed.
Therangeshouldbeinstalledon
asheetofpIywood(orsimilar
material)as follows:Whenthe
jloorcoveringends atthefrontof
themnge,
the areathattherange
willrestonshouldbebuiltupwith
plywoodtothesamelevelorhigher
thanthefloorcovering.Thiswill
thenallowtherangetobe moved
forcleaningor servicing.
Levelingscrewsarelocatedon
eachcornerofthebaseofthe
range.Byremovingthebottom
draweryoucanlevelthe rangeto
anunevenfloorwiththeuseofa
nutdriver.
Toremovedrawer,pulldrawerout
aIItheway,tiltupthefrontand
removeit. Toreplace,insertglides
atbackofdrawerbeyondstopon
rangcgiides+Liftdrawerifnecessary
toinserteasily.Letfrontofdrawer
down,thenpushinto close.
@Makesureall cookwareusedin
yourmicrowaveovenis suitablefor
microwaving.Mostglasscasseroles,
cookingdishes,measuringcups,
custardcups,potteryor china
dinnerwarewhichdoesnothave
metallictrimorglazewithametallic
sheencanbeused.Somecookware
islabeled“suitableforMicrowaving:’
Ifyouareunsure,usethisdishtest:
Measure1cupwaterinaglasscup.
Placeinovenonorbesidedish.
Micmve 1-1%minutesatHIGH.If
waterbecomeshot,dishismicrowave
safe.If dishheats,it shouldnotbe
usedformicrowaving.
@Papertowels,waxpaper,and
plasticwrapcanbeusedtocover
dishesinordertoretainmoisture
andpreventspattering.
~Somemicrowavedfoodsrequire
stirring,rotating,orrearranging.
CheckyourCookbookforspecific
instructions.
@Steambuildsuppressureinfoods
whicharetightlycoveredbyaskin
ormembrane.Piercepotatoes,e=
yolksandchickenliverstoprevent
bursting.
its
to
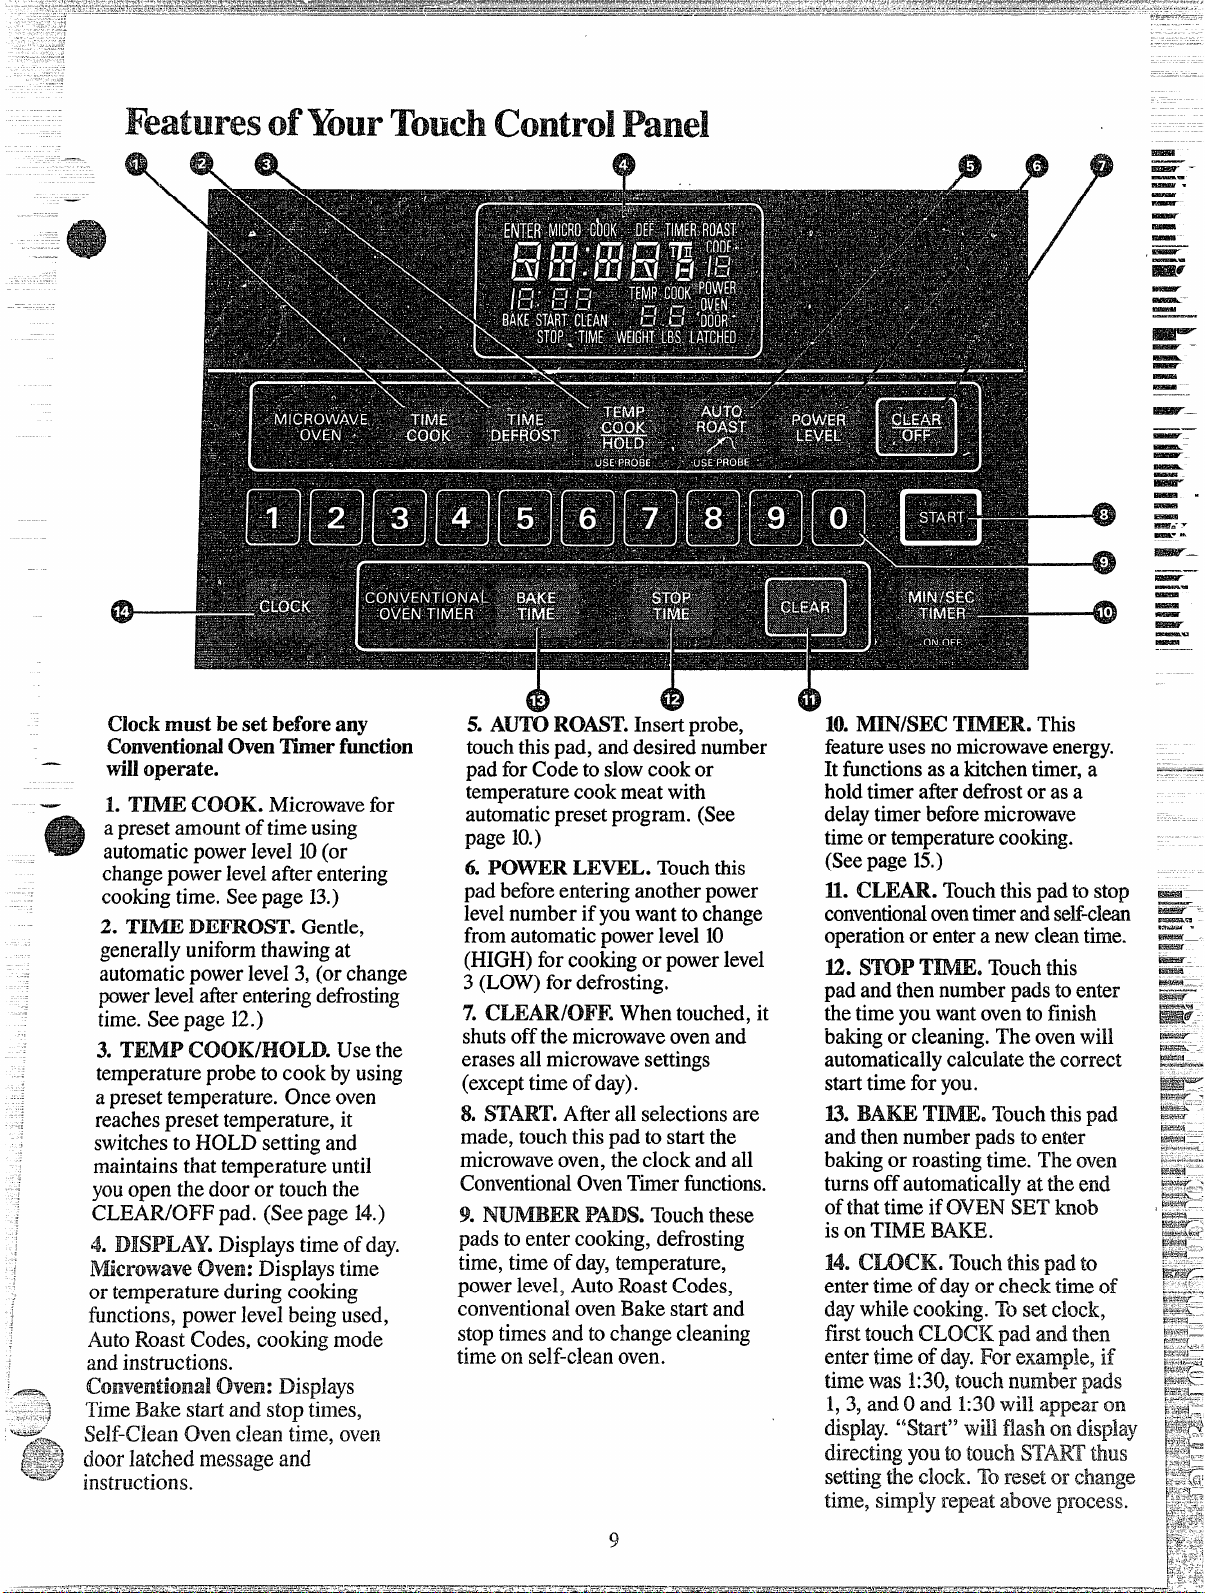
Thepaneldisplaysalloftheoven
functions.AfterE seconds,all
lightsdisappearand“Reset”appears
inthedisplay.TouchCLOCKpad
andsettheclockandthentouch
STARTpad.
Ifpowerisdisruptedatanytime,
theabovesequencereoccursand
youmustresettheclockafter
touchingCLEAR/OFF.
—
—.
-
—-
-
—
~
—.
—
—.—.
---
~un
Lra&?-
—-
—
—.
-
mu..=
Emm
—
—
—.
—
-
-.
E#mJH
=.-..
eaa..=
.—
@-
.-.-.—
7
Page 8
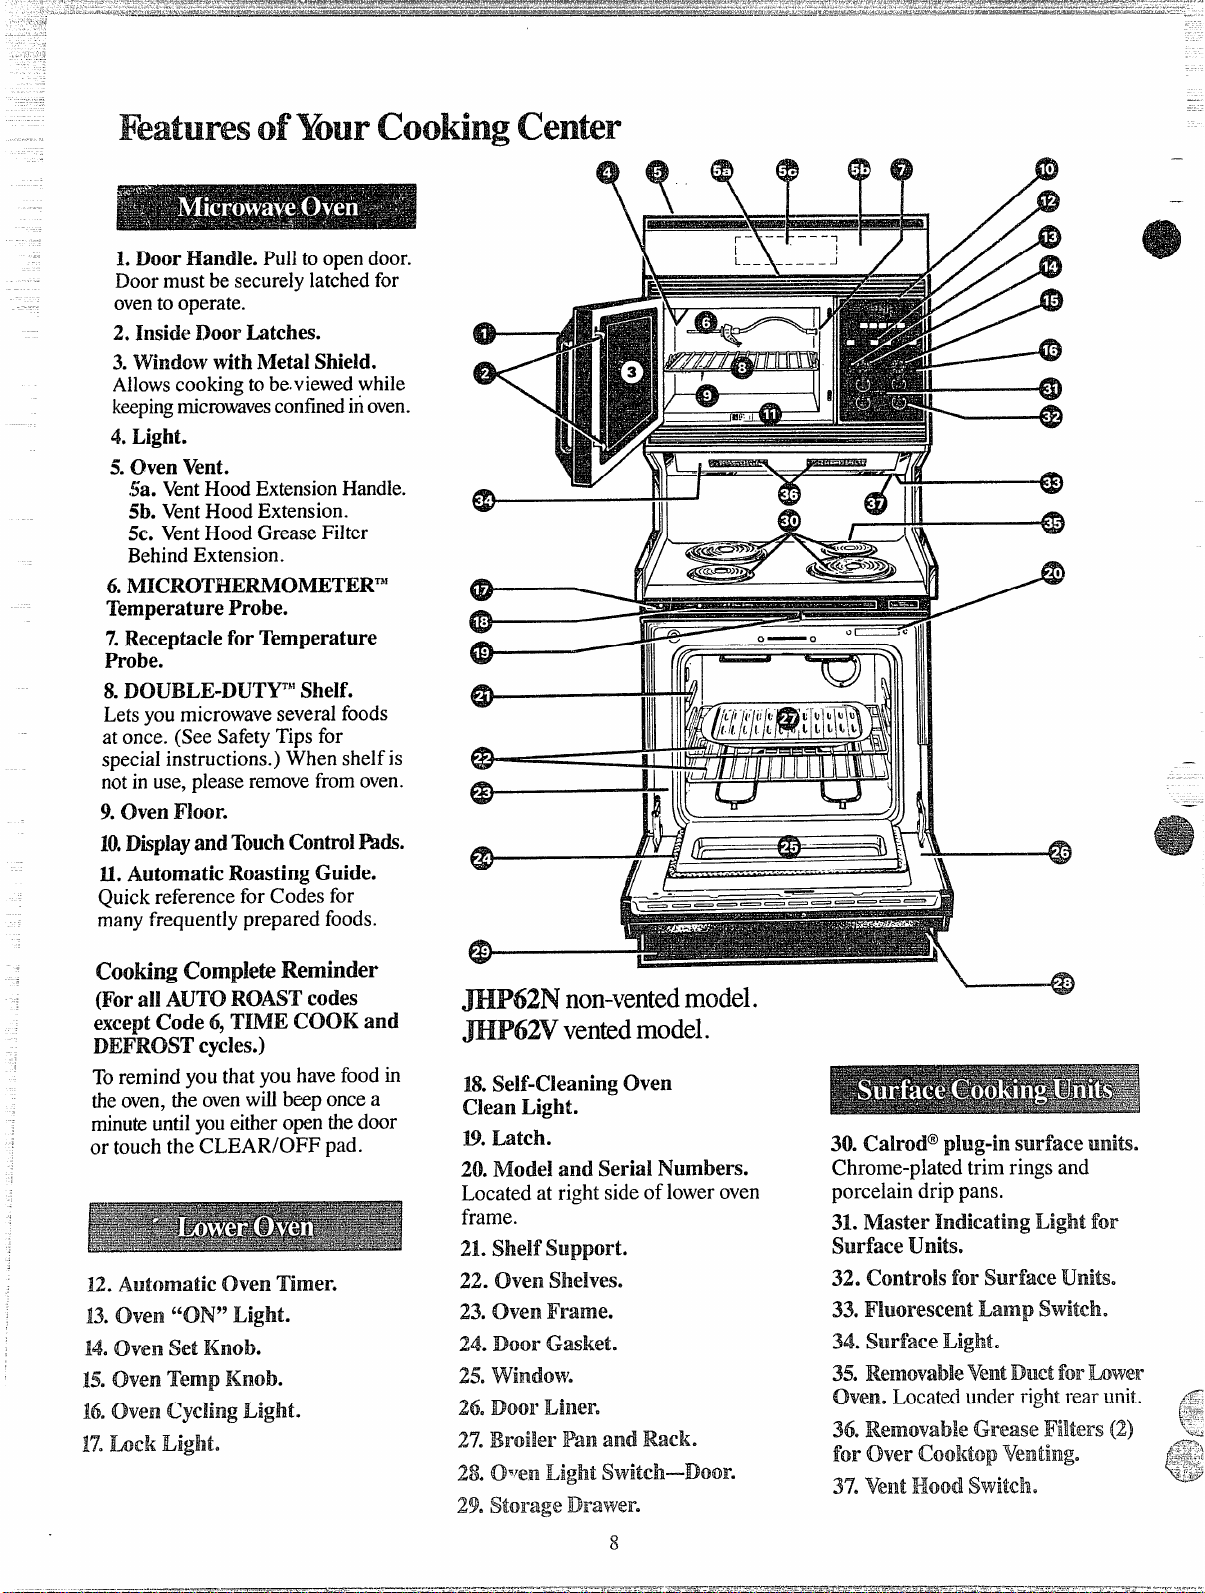
— -- .- —..
L DoorkUandIe.Pulltoopendoor.
Doormustbesecurelylatchedfor
oventooperate.
2. InsideDoorLatches.
3.WindowwithMetalShiekL
Allowscookingtobe.viewedwhile
keepingmicrowavesconfinedinoven.
4.Light.
5.C?venVent.
%. VentHoodExtensionHandle.
5b.VentHoodExtension.
5c. VentHoodGreaseFilter
BehindExtension.
6.MICROTHEl?lMOMETER”’
TemperatureProbe.
7.ReceptacleforTemperature
Probe.
8.DOtJBLE-DIJTYTh’Shelf.
Letsyoumicrowaveseveralfoods
atonce.(SeeSafetyTipsfor
specialinstructions.) Whenshelfis
notinuse,pleaseremovefromoven.
9.OvenMoor.
10.DisplayandTouchControlR&.
IL AutomaticRoastingGuide.
QuickreferenceforCodesfor
manyfrequentlypreparedfoods.
—
—
—
—
w
Cooking (lm@3te
Reminder
(Forall AUTOROASTcodes
exceptCode6, TIME COOKand
DEFROSTcycles.)
Toremindyouthatyouhavefoodin
theoven,theovenwillbeeponcea
minuteuntilyoueitheropenthedoor
ortouchtheCLEAR/OFFpad.
12. (Mm Timer.
U Oven “ON” Light.
M.oven set Knob.
150 ‘Imp Knob.
16.chumcycling Light.
17.Lock light.
J
18.Self-CleaningOven
CleanLight.
l.%Latch.
~~o~odei and serial ~~mberso
Locatedatrightsideof loweroven
frame.
21.shelf support.
22. Oven Shelvese
23.Oven Frame.
24.Door Gasket.
30.Cah-od@plug-insurfaceunits.
Chrome-platedtrimringsand
porcelaindrippans.
M. Master Lightfor
SurfaceUnitse
32. controls for SUl”faceunits.
33 IWoreseent Lamp S%dtch.
34.Surface Lighte
Page 9
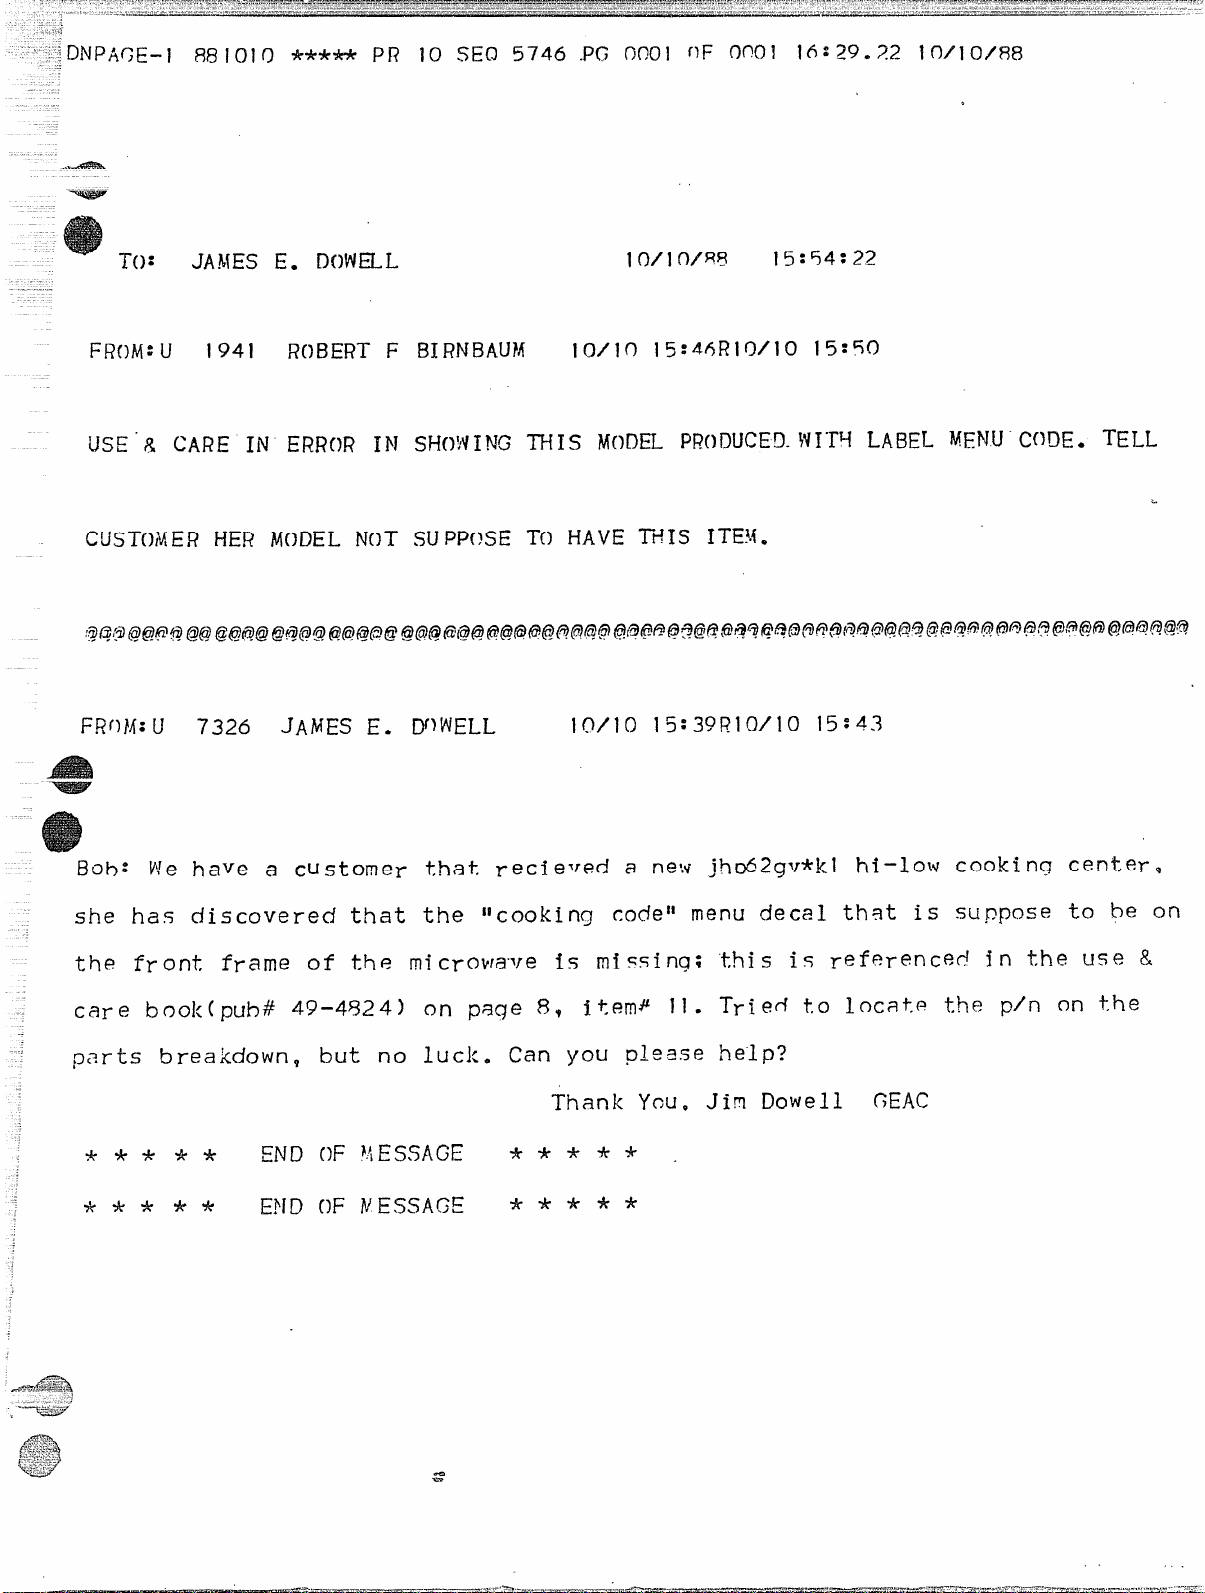
-i-():
JAMES E. 130WELL
10/ 1n/’w?
I5 :54:22
F~OI/f:u
Bob:
7326 JAMES E. IYWELL
y!e have a CUStom er ~~a ~ r ecf everi a new jho62gv*k 1 hi -1 OWc~~ki n~ cent e~ Q
she has d is cove red that the 1:cook i ng code’i menu de ca 1 that is suppose to be on
the fy ont frame of the microwa”ve is mi ss i nq:
car e book ( puh~ 49-4824 ) o n paq e 89 i t W# 1I .
par ts b re a Mown ~ but no I
uCk. Can YOU .p~ease ~elP?
“t.his is ye feren ced i n ~!ne USe &
Tri ed to 1ocaf, ~ the p/n on the
Thank Ycu. J in Dowe11 GEAC
*****
*****
END OF ?~~ESSAGE
E!/D OF YESSAGE
***** .
*****
Page 10
—
.
0---
Clockmustbeset befol”eany
ConventionalOvenTimerfunction
wiUoperate.
1. TIIMIECOOK. Microwavefor
apresetamountoftimeusing
automaticpowerIevel10(or
changepowerlevelafterentering
cookingtime.Seepage13.)
2. TIM13DEHROST.Gentle,
generallyuniform
level3,(orchange
powerlevel&r enteringdefrosting
time.Seepage12.)
3. TEIVW Usethe
temperatureprobeto cookbyusing
apresettemperature.Owe oven
reachespresettemperature,it
switchesto HOLDsettingand
maintainsthattemneratu;euntil
open
CLEAR/OFJ?pad. (SeepageM.)
4. DISPLAY.Displaystimeofday.
JNIiemwvveOven: Displaystime
ortemperatureduringcooking
functions,powerlevelbeingused,
AutoRoastCodes,cookingmode
andinstructions.
T’imeBakestartandstoptimes,
Self-C1eanOvencleantime, oven
doorlatchedmessageand
instructions.
&
Ovem:Displays
(
5. AUTOMhM$I’.Insertprobe,
touchthispad,anddesirednumber
padforCodeto slowcookor
temperaturecookmeatwith
automaticpresetprogram.(See
page10.)
6. IWNVERLEVEL. Touchthis
padbeforeenteringanotherpower
levelnumberifyouwanttochange
fromautomaticpowerlevel10
(HIGH)forcookingor powerlevel
3 (LOW)fordefrosting.
7. CLEAJMMUZWhentouched,it
shutsoffthemicrowaveovenand
erasesallmicrowavesettings
(excepttimeofday).
START’.Afterallselectionsare
made,touchthispadtostartthe
microwaveoven,theclockandall
ConventionalOvenTimerfictions.
9. PADS.Touchthese
padstoentercooking,defrosting
time,timeofday,temperature,
powerlevel,AutoRoastCodes,
conventionalovenBakestartand
stoptimesandtochangecleaning
timeon self-cleanoven.
(
10. This
featureusesnomicrowaveenergy.
Itfunctionsasakitchentimer,a
holdtimerafterdefrostorasa
delaytimerbeforemicrowave
timeor temperaturecooking.
(Seepage 15.)
Il. CLEAR.Touchthispadtostop
conventionaloventimerandself-clean
operationor entera newcleantime.
EL STCWTINIE.Touchthis
padandthennumberpadstoenter
thetimeyouwantoventofinish
bakingor cleaning.Theovenwill
automaticallycalculatethecorrect
starttimeforyou.
B. BAKETD!wIE.Touchthis pad
andthennumberpadstoenter
bakingorroastingtime.Theoven
turnsoffautomaticallyattheend
ofthattimeifOVENSETknob
isonTIMEBAKE.
14.CLOCK. Touchthispadto
entertimeofdayor checktimeof
daywhilecooking.Tosetclock,
firsttouchCMXK padandthen
entertimeof day.Forexample,if
timewas1:30,touchnumberpads
1,3,and10and 1:30will appearon
display.‘T&W”willflashondisplay
directingyoutotouchSTAR”thus
time,simplyrepeataboveprocess.
9
Page 11
—
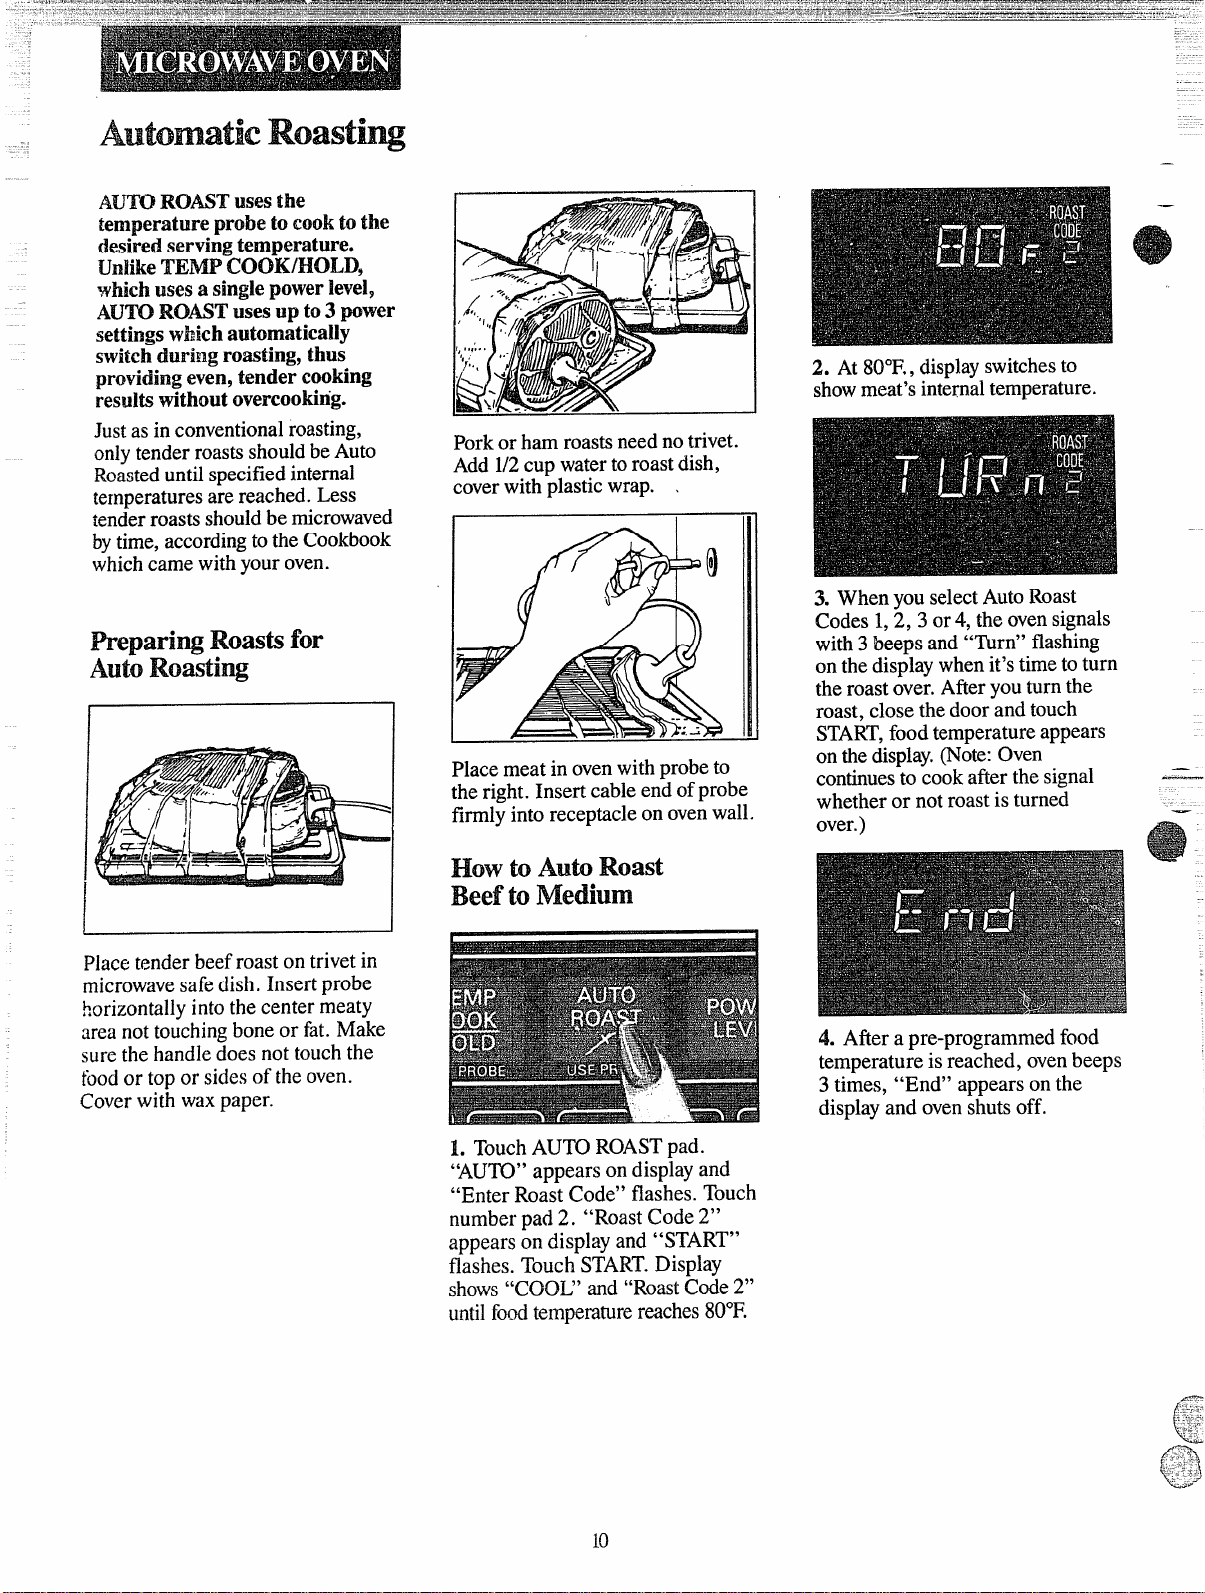
AUTO~Ck$STIMX?Sthe
temperature probe to cook to the
desired!servingtemperature.
UnlikeTEMPCOOIWHOLD,
whichusesa singlepowerleve19
AUTOROAST~ses-upto3 power
settingswhichautomiitkaHy
switchduring roasting,thus
providingeven,tender cooking
resultswithoutovercooking.
lustasinconventionalroasting,
onlytenderroastsshouldbeAuto
Roasteduntilspecifiedinternal
temperaturesarereached.Less
tenderroastsshouldbemicrowaved
bytime,accordingtotheCookbook
whichcamewithyouroven.
P
Porkorhamroastsneednotrivet.
Add1/2cupwatertoroastdish,
coverwithplasticwrap. .
Placemeatinovenwithprobeto
theright.Insertcableendofprobe
firmlyintoreceptacleonovenwall.
2. At80”F.,displayswitchesto
showmeat’sinternaltemperature.
3. WhenyouselectAutoRoast
Codes1,2, 3 or4, theovensignals
with3beepsand“Tbrn”flashing
onthedisplaywhenit’stimetoturn
theroastover.Afteryouturnthe
roast,closethe doorandtouch
START,foodtemperatureappears
onthedisplay.(Note:Oven
continuesto cookafterthesignal
whetheror not roastisturned
over.)
.
.—
—
—
Placetenderbeefroastontrivetin
microwavesafedish.Insertprobe
horizontallyintothecentermeaty
areanottouchingboneor fat.Make
surethehandledoesnottouchthe
foodortoporsidesoftheoven.
Coverwithwaxpaper.
L TouchAUTOROASTpad.
“AUTO”appearsondisplayand
“EnterRoastCode”flashes.Touch
numberpad
“RoastCode2“
appearsondisplayand“START”
flashes.TouchSTART.Display
shows“COOL”and“RoastCode2“
untilfd ternpemturereaches80”F.
4. Afiera pre-programmedfood
temperatureisreached,ovenbeeps
3times,“End” appearsonthe
displayandovenshutsoff.
Page 12
—
— .—.—
—
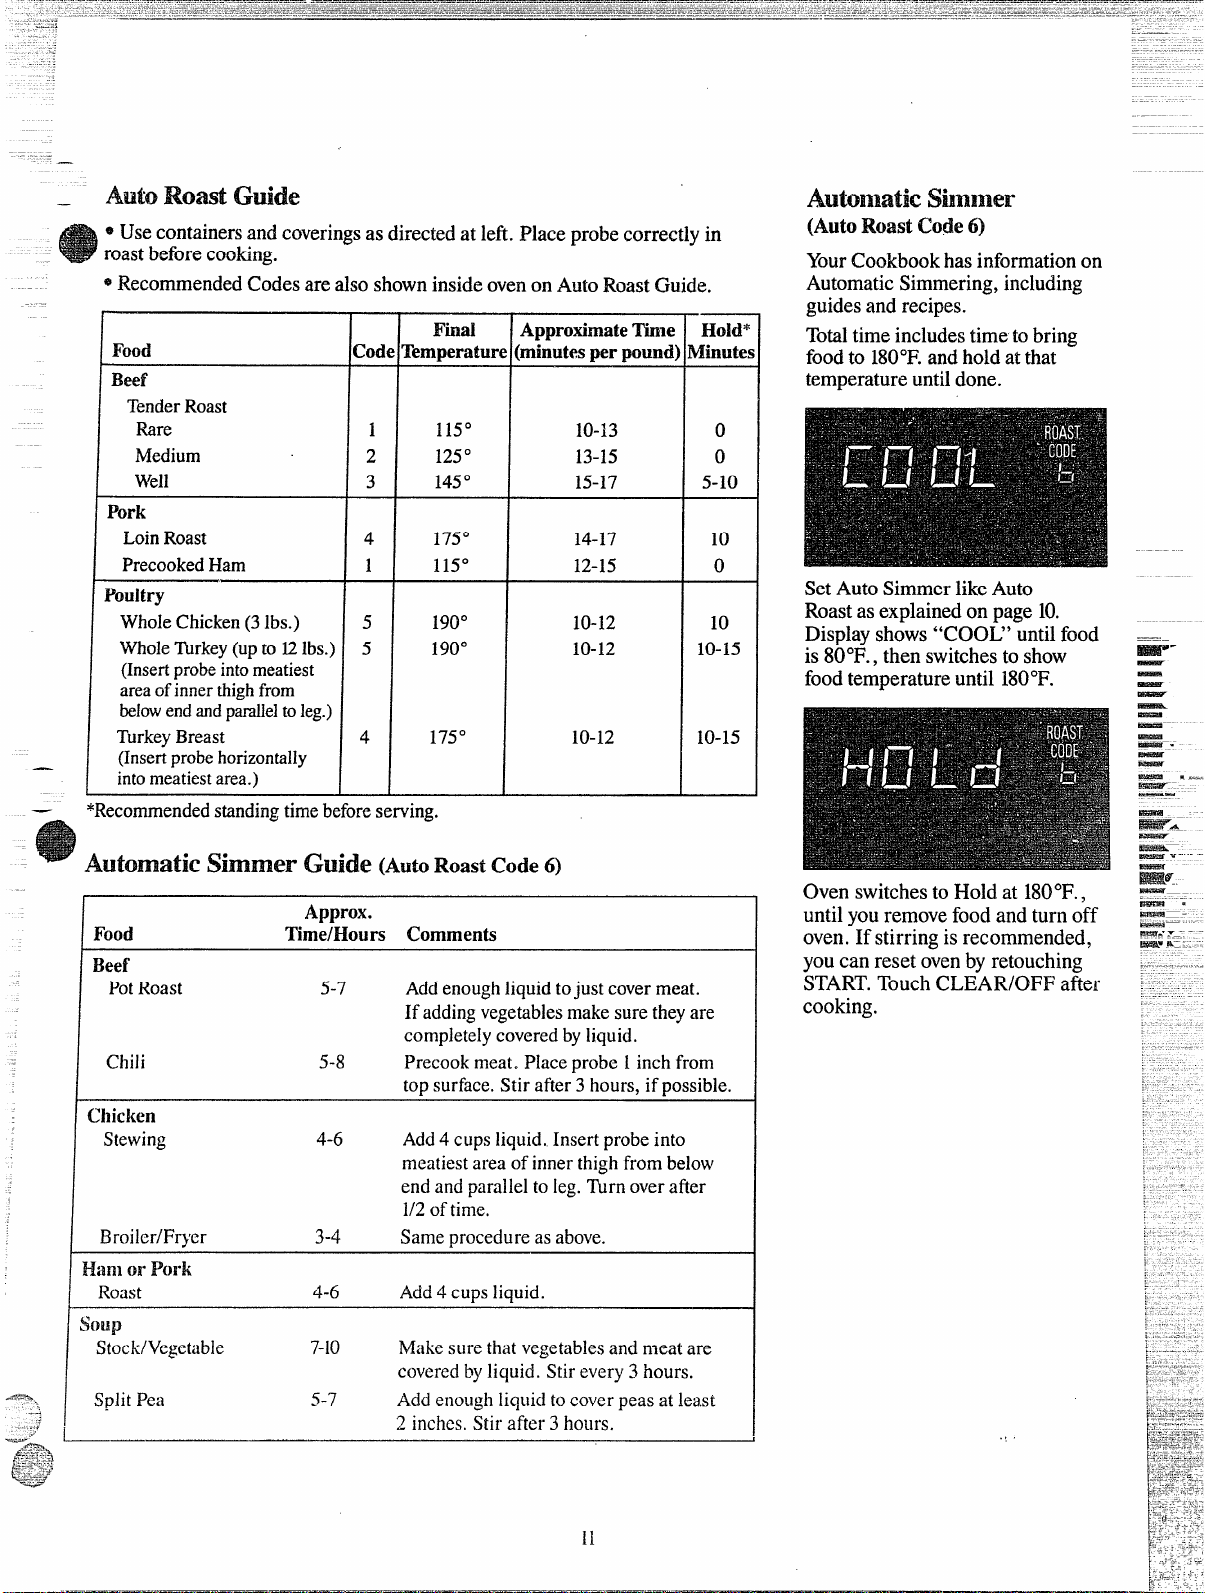
~ Usecontainersandcoveringsasdirectedatleft.Placeprobecorrectlyin
roastbeforecooking.
@RecommendedCodesarealsoshowninsideovenonAutoRoastGuide.
Food
Beef
TenderRoast
Rare
Medium
Well
Pork
LoinRoast
PrecookedHam
Poultry
WholeChicken(3lbs.)
Whole‘Ikkey(upto12lbs.)
(Insertprobeintomeatiest
areaofinnerthighfrom
endandparalleltoleg.)
below
TurkeyBreast
(Insertprobehorizontally
intomeatiestarea.)
I
——
*Recommendedstandingtimebeforeserving.
:(A
1
2
3
4
1
5
5
4
Final
Femperatur
115°
125°
145°
175°
115°
190°
190°
175°
ApproximateTime
:minutesperpound:
1O-I.3
13-15
15-17
14-17
12-15
10-12
10-12
10-12
.—
Hold”
Winutes
0
0
5-10
10
0
10
10-15
10-15
simmer
(AutoRoastCode6)
YourCookbookhasinformationon
AutomaticSimmering,including
guidesandrecipes.
Totaltimeincludestimetobring
foodto180”F.andholdatthat
temperatureuntildone.
SetAutoSimmerlikeAuto
Roastasexplainedonpage 10.
Displayshows“COOL”untilfood
is80°F.,thenswitchesto show
foodtemperatureuntil180”F.
~~lll~fi!~ &~&?
Approx.
(AutoRoastCode6)
Food Time/Hours Comments
Beef
PotRoast 5-7 Addenoughliquidtojustcovermeat.
Ifaddingvegetablesmakesuretheyare
completelycoveredbyliquid.
Chili
Chicken
Stewing
Broiler/Fr}rer
5-8 Precookmeat.Placeprobe1inchfrom
topsurface,Stirafter3hours,ifpossible.
4-6 Add4cupsliquid,Insertprobeinto
meatiestareaofinnerthighfrombelow
endandparalleltoleg.‘Mn overafter
1/2oftime.
3-4
Sameprocedureasabove.
orPork
Roast
;Oup
Stock/Vegetable
SplitPea
4-6 Add4 cupsliquid.
7-1o Makesurethatvegetablesandmeatare
coveredbyliquid.Stirevery3hours.
5-7
Addenoughliquidtocoverpeasat least
~ in~hcs.Stil.after3 holll.s.
Ovenswitchesto Holdat 180°F.,
untilyouremovefoodandturnoff
oven.Ifstirringisrecommended,
youcanresetovenbyretouching
START.TouchCLEAR/OFFafter
cooking.
11
Page 13
—
TheT@xDefrostsettingis
designedfor speedythawingof
frozenfoodandisoneofthe
greatadvantagesofa microwave
oven.
~PowerLevel3 isaut~maticaliy
setfordefrosting,butyoumay
changethis formoreflexibility.
@SeeyourCookbookfor
defrostinghelp.
Tobecomebetteracquaintedwith
thedefrostfunction,defrostfrozen
porkchopsbyfollowingthesteps
below.
Stepk Placepackageoffrozen
chopsintheovenandclosedoor.
Step2: TouchTIMEDEFROST.
Displayshows: Oand“POWER3:’
“ENTERMICRODEFTIME”
flashes.
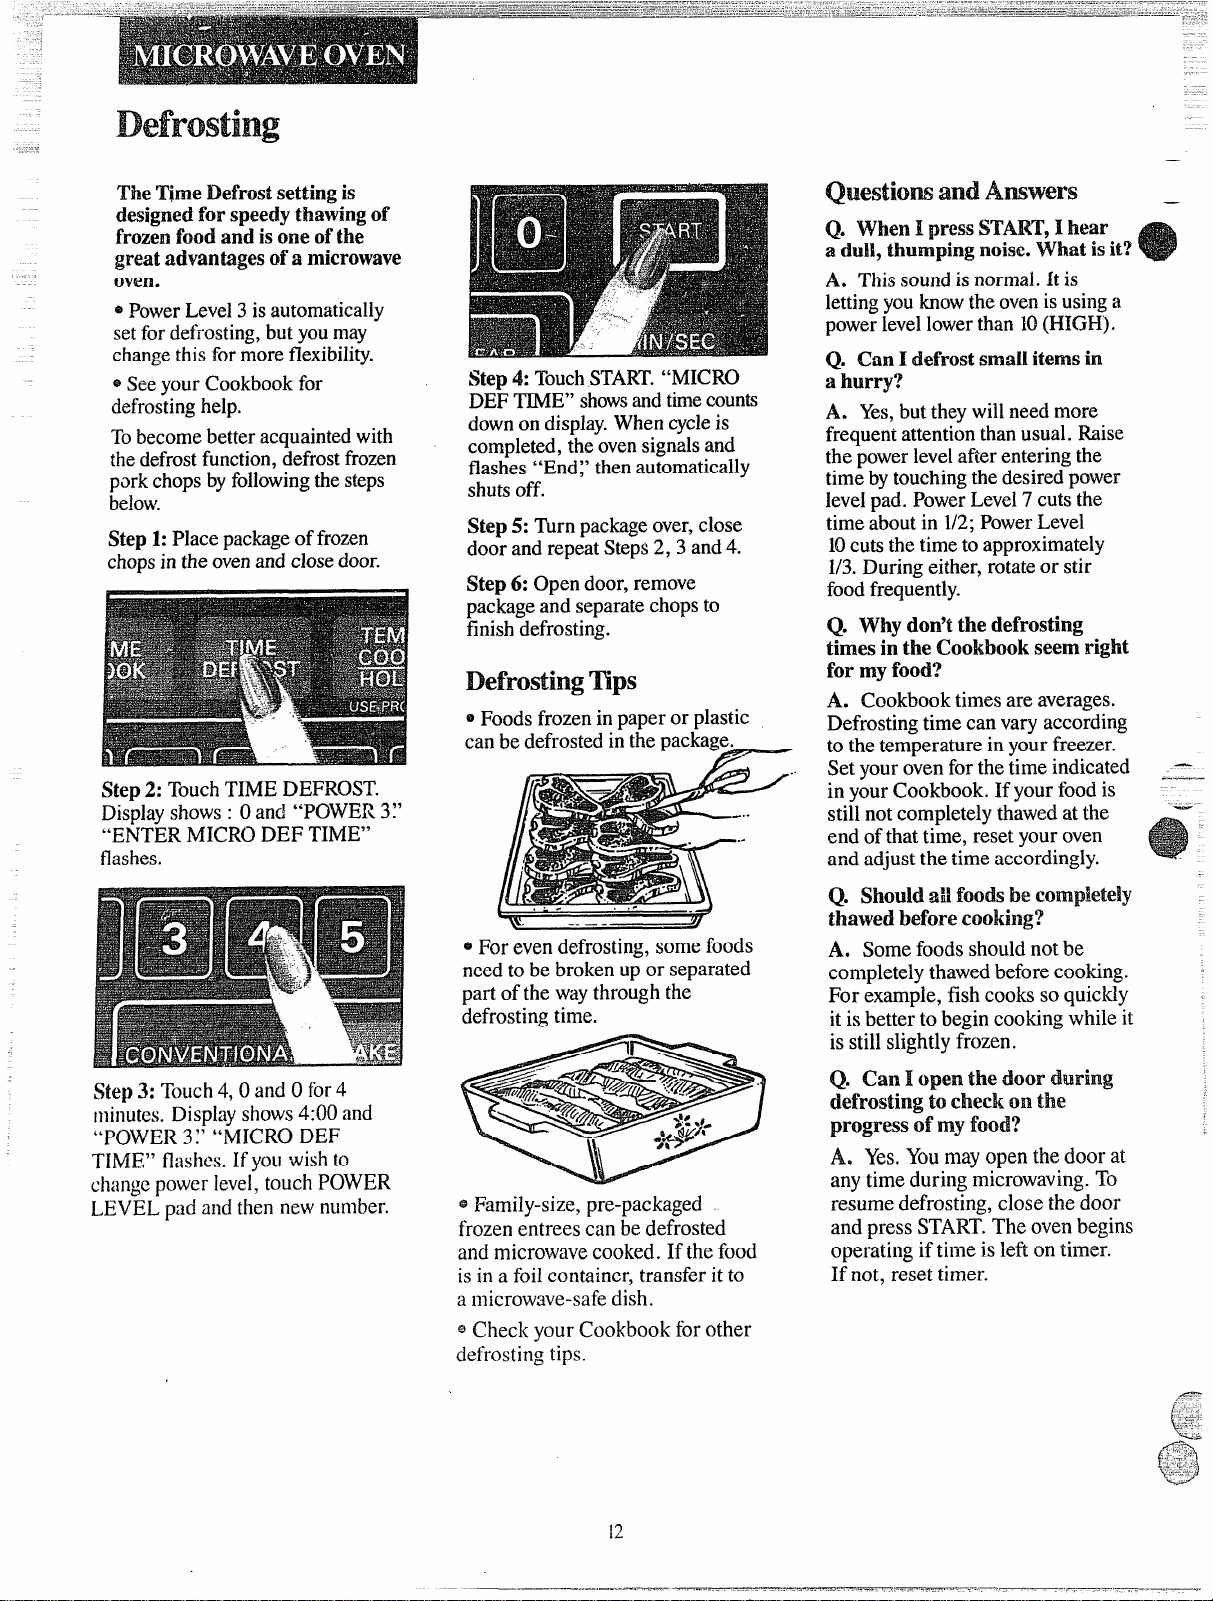
Step4:TouchS’~AIW.“MICRO
DEFTIME”showsandtie counts
downondisplay.Whencycleis
completed,the ovensignalsand
flashes“End~’thenautomatically
shutsoff.
Step5: Turnpackageover,close
doorandrepeatSteps2,3 and4.
Step6: Opendoor,remove
packageandseparatechopsto
finishdefrosting.
~ Foodsfrozeninpaperorplastic
canbedefrostedihthepackage.
~
Q. WhenIprmSTART, I hear
a dull,thumpingnoise.What isit’?
A. Thissoundisnormal.Itis
lettingyouknowtheovenisusinga
powerlevellowerthan10(HIGH).
Q. Canl defrostsmaiiitemsin
a hurry’?
A. Yes,buttheywillneedmore
frequeniattentionthanusual.Raise
thepowerlevelafterenteringthe
timebytouchingthedesiredpower
levelpad.PowerLevel7 cutsthe
timeaboutin 1/2;PowerLevel
10cutsthetimetoapproximately
1/3.Duringeither,rotateorstir
foodfrequently.
Q. Whydon’tthe defrosting
timesin the Cookbookseemright
for myfood?
A. Cookbooktimesareaverages.
Defrostingtimecanvaryaccording
tothetemperatureinyourfreezer.
Setyourovenforthetimeindicated
inyourCookbook.If yourfoodis
still notcompletelythawedatthe
endofthat time,resetyouroven
andadjustthe timeaccordingly.
—
——
—.
—
Step3:Touch4,0 andOfor4
minutes.Displayshows4:00and
“POWER3:’ “MICROIIEF
TIME”flashes.Ifyouwishto
changepowerlevel,touchPOWER
LEVELpadandthennewnumber.
@Forevendefrosting,somefoods
needtobebrokenupor separated
partofthewaythroughthe
defrostingtime.
~Family-size,pre-packaged
frozenentreescanbedefrosted
andmicrowavecooked.If thefood
isin a foilcontainer,transferitto
amicrowave-safedish.
@Checkyour Cookbookforother
defrostingtips.
Q. Shouldaiifoo& becomplete!y
thawedbeforecooking?
Somefoodsshouldnotbe
completelythawedbeforecooking.
Forexample,fishcookssoquickly
itisbettertobegincookingwhileit
isstillslightlyfrozen.
Q. CanIopen the door duwing
defrostingto cheekonthe
progressof myfood?
A. Yes.Youmayopenthedoorat
anytimeduringmicrowaving.To
resumedefrosting,closethedoor
andpressSTART.Theovenbegins
operatingiftimeisleftontimer.
Ifnot,resettimer.
Page 14

by
—
The cooking feature allows
———
you to preset the cooking
Theo~~enshutsoffautomatically,
PowerLevel10(HIGH) is
recommendedformos~cooking,
butyoumaychangethisformore
.
—
—
flexibility.SeeyourCookbook.
Tobecomebetteracquaintedwith
timecooking,makeacupofcofike
byfollowingthestepsbelow.
Step 1:Filla cup2/3fullof
waterandadd 1teaspoonofinstant
coffeeandstir todissolve.Usea
cupthathasnometaldecoration
andismicrowavesafe.Placecup
inovenandclosedoor.
Step2:TouchTIMECOOKpad,
Displayshows: Oand “POWER
[O:’“ENTERMICROCOOK
TIME”flashes.
Step3: Selectyourtime.Touch
~,~a*~ ()foraminuteand’20
seconds,“MICROCOOKTIME”
flashesand “POWER10”and [:20
appearon display.
time.
Ifanotherpowerlevelisdesired,
touchPOWERLEVELpadand
desirednumber,althoughPower
Level10(HIGH) ispreferredfor
thiscupofcoffee.
Step4: TouchSTART.“MICRO
COOK TIME;’“POWER10~’and
timecountingdownshowondisplay.
Step5:Whentimeisup,theoven
signalsandflashes“EndYOven
shutsoff.
Step6: Openthedoor.
n
WiththeTimeCookUfeature,you
cansettwotimecookingfunctions
withinoneprogram.Thiswould
beidealifyoudesiredtochange
powerlevelsduringyourcooking
operations.
Thefollowingisan exampleof
tochangepowerlevelsusingTi:
CookII.
Step 1:RepeatSteps1,2 and3.
Step2: TouchTIMECOOKpad
again.“POWER10~’: OandII
appearondisplayand“ENTER
MICROCOOKTIME”flashes.
Step3:Setyourtime.
Step4:Tochangethepowerlevel,
touchPOWERLEVELpadand
desirednumberfornewpowerlevel.
Step5:TouchSTART,
Step 6: “POWER10”and
“MICROCOOKTIME1“are
displayedandTimeCookI is
showncountingdown.
low
ne
Step7:Atthe endof“MICRO
COOKTIMEI“ thenextselected
powerlevelisdisplayedand
“MICROCOOKTIMEH“is
showncountingdown.
Step8:Whentimeisup,the oven
signalsandflashes“End?The
ovenshutsoff.
Step9:Openthedoor.
~llWl%%S
Q. 1setmyovenforthetime
calledforintherecipe,butatthe
endofthetimeallowed,mydish
wasn’tdone.Whathappened?
A. Sincehousepowervariesdue
totimeor locationmanyTime
Cookrecipesgiveyoua timerange
topreventovercooking.Setthe
ovenforminimumtime,testthe
foodfordoneness,andcookyour
disha littlelonger,ifnecessary.
Q. 1touchedthe number pads
andselectedmypowerlevel.When
1touchedSTART,however,my
ovendidn’tcomeoneWhynot?
A. TheTIMECOOKpadmustbe
touchedbeforesettingthenumber
padsorelseyourovenwillnot
begincooking.
Q. 1wantto cookon a power
levelother than HIGH. What do
1needto do?
A. Tochangethe powerlevel,
touchthePOWERLEVELpad
afterenteringcooktime. “ENTER
POWER”flashesonthedisplay
panel.Enternewnumber.
Q. Can 1interrupt myTime
Cookfunctiontocheckthe food?
A. Yes.Toresumecooking,
simplyclosethedoorandpiess
theSTARTpad. Thetimermustbe
resetforcookingtoresumeunless
timeisremainingontimer.
13
Page 15

—
Internal temperature ist best
testof’donenessformanytbods.
“TEMPCOOK/HOLD”takesthe
guessworkoutofcookingbecause
theovenautomaticallyswitches
to “Hold”settingafterreaching
thepresetfoodtemperatureand
maintainsthattemperatureuntil
youopenthedooror touchthe
Step1:Inserttemperatureprobe
andattachprobesecurelyinoven
wall.Closethedoor.
Step2:TouchTEMPCOOK/
HOLD.“ENTERMICROTEMP”
flashes.
CLEAR/OFFpad. .
Step3:Touch1,2,5 for 125”F.
Tempe
SENSOR
HANDLE
“MICROTEMPCOOK;’125F
andPOWER10showondisplay.
Step4: TouchPOWERLEVEL
pad. “ENTERPOWER”flashes.
Touch5 formediumpower.
“MICROTEMPCOOK;’125F
TWOPOSITION
CLIP
CABLE
END
The temperatureprobe isafood
thermometerthat gaugesthe
internaltemperatureofyourfood;
itmustbeusedwhenusing“TEMP
COOWHOLIY’or “AUIXIROAST;’
Atwo-positionclipattachesto
thesideofadishto helpkeepthe
probeinpositionwhentemperature
cookingfoodssuchaschilior soup.
andPOWER5 showondisplay.
Step5: TouchSTART.Ifinternal
temperatureofthe roastislessthan
80”F.,displaywillshow“COOL”
oriftemperatureis 80”F.or above,
displayshowstemperature
countingup.
Step6:When125”F.isreached,
theovenwillsoundanddisplay
“HOLD:’Theovenwillthenhold
thetemperature.
Q. Are theremy foods I can’t
Temp Cook?
A. Yes.Delicatebuttericings,ice
cream,frozenwhippedtoppings,
etc.softenrapidlyatwarm
temperatures.Batters,doughsand
frozenfoodsarealsodifficultto
cookpreciselywiththeprobe.It’s
besttoTimeCookthesefoods.
Q. Whydid“PROBE”flash
after 1touchedthe STARTpad?
A. “PROBE”willflashifyou
don’tseatthe cableendoftheprobe
securelyintothereceptacleinthe
ovenwallorifyoutouchthe TEMP
COOWHOLDpadandforgettouse
theprobe.
Q.CanIleavemyprobeinthe
ovenit?it9snotinsertedinfood?
A. No,ifittouchestheovenwall,
youmaydamagetheoven.
Touseyourprobeproperlyina
roast,followdirectionsonpage10.
Step7:TouchtheCLEAR/OFF
padtostopthecycle.
—
—
-—.
—
Step8:Removeprobeandfood
fromtheoven.
Cooting mps
@Usea lowerpowerlevel;itwill
heat moreevenlyeventhough
requiringmoretime.
~ Besurefrozenfoodhasbeen
completelydefrostedbeforeinserting
probe.Probemaybreakoffifused
infrozenfoods.
@Coverfoodslooselyformoisture
controlandquick,evenheating.
Page 16

t u IUN3
—
l’heMDJ/SECTIMERhasthree
timingfunctions:
* It operatesasa minutetimer.
* It can besettodelaycooking.
@It can
beusedasaholdsetting
afterdefrosting.
TheMIN/SEC TIMER operates
withoutmicrowaveenergy.
HOW~0l!i~~ ~
LTouchMIN/SECTIMERpad.
Thedisplayshows: 0 and“ENTER
T’IME”flashes.
,
J. Touchnumberpads 3,OandO
(for3minutes andno seconds).
Display
shows3:00and“TIMER:’
3. TouchSTART.Displayshows
timecountingdown.
4. Whentimeisup,ovensignals,
flashes“TIMERj’anddisplays: O.
—
5. TouchMIN/SECTIMERpadto
displayto clock or microwave
reset
cookordefrostprograms.
mm
The Minute/SecondTimercanalso
beusedtoprogram“holdtime”
betweenmicrowavecooking
functions.Thetimecanrangefrom
one secondto99minutesand99
scccmds.AHOLD,or “standing”
timemaybefoundin someofyour
ownrecipesor Cookbook.
mm
Let’ssayyouwanttodefrostati-ozen
casserolefor 15minutes,holdfor
10minutesandthenTimeCookfor
25minutes.Here’showtodoit:
Step1:Takecasserolefromfreezer
andplaceinoven.
!!%ep2: TouchTIMEDEFROST.
The displayshows:Oand
“POWER3V“ENTERMICRO
DEFTIME” flashes.
3: Touchpads1,5,0 andOfor
Step
15minutesdefrostingtime.15:00
appearsondisplay.(Defrostingis
automaticallysetonpowerlevel3
butcanbechangedbytouchingthe
POWERLEVELpadandthe
desiredpowerlevel.)
Step6:TouchTIMECOOKpad.
Thedisplayshows:Oand
“POWER10:’“ENTERMICRO
COOKTIME”flashes.
Step7: Touch2,5,0 andOfor
twenty-fiveminutesofcookingtime.
“MICROCOOK TIME”flashes
and25:00and“POWER10”appear
ondisplay.
Step8: TouchSTART.“MICRO
DEFTIME”and 15:00counting
downshowondisplay.Aseach
functionis automatically
performed,theovendisplayshows
instructionsenteredandthe
fimction.
Mep 9: Whentimeisup,the oven
signals,flashes“End”andshutsoff.
Q. What willhappen ifli
accidentallyreversemydefrost,
ho!dand cookinstructions?
The ovenwill automatically
rearrangeyourprogram.Defrosting
willalwayscomefirst,thenhold,
andthenthecookingfunction.
FxmA%n—
—.
—
—
—
—–
-
uirxsF-
-–
-
~—.-.
-—
——
Ra.e-
F#mwl
@#skF–
—.
-
-
62U
~—
—.
—.
-
—
-
-
E3Far
—.
delaycookingupto99minutesand
~~seconds,touchTiNIE
COOWHOLDorAUTO
ROASTandentercooktime,temp.
oiacode.TbuchMIN/SECTIMER
ai~denternumberofminutesto
ddaycooking.TouchSTART.Timer
willcountdowntozeroandcooking
willbegin.Whendelayingtemp.
cookorautoroast,besureprobe
isinfoodbeforepressing
START.
Step 4: Setstandingorholdtime
bytouchingMIN/SECTIMER.
Thedisplayshows: Oand
“ENTERTIME” flashes.
Step5: Touch1,0,0 andOtohold
fortenminutes.10:00appearson
displayand“TIME” flashes.
Q. Can I defrost and hold only?
Yes.Sometimesyoumayonly
wanttodefrostafood,holdit, and
cookitlater.Allyouneedtodois
programinDefrostandamountof
time.ThenprogramHoldandthe
amountoftime.Besuretoputthe
thaweddishin therefrigerator
promptly.
NOTE:Let foodsremainatroom
temperatureonlyaslongassafe.
Timeswillvary.
Page 17

U D Duty’”~
—
e ~ ~o~s~~~or COO~
shelfonfloorofoven.Product
dmnagemayresuk
*use ~thokiers when
metalshelfandcontainers.
Theymy behot.
oDonotstoremjcrowave
browningdishonmetalshelf.
handing
Thewireshelfisspecifically
designedforaddedcapacityheating
andreheatinginyourmicrowave
oven.Nowm-ore-thanonefoodmay
beheatedorreheatedandreadyto
serveatthe sametime.
Whenmicrowavingwiththeoven
shelf,sometechniqueswilldiffer
fromtheCookbookwhichcame
withyouroven.Itisimportantto
arrangefoodsproperly,andthisis
shownonthenextpage.Container
sizeisimportant;selectfrom
amongthesuggestionsbelow.Also,
foodsizeshouldbeconsidered;
foodsover4incheshigh, or3%
poundsarenotrecommendedfor
shelfcooking.
Battersanddoughfoodsandalso
uncookedfoodswhichneedtobe
preparedfromscratchshouldbe
cookedwithoutthe ovenshelf,
followingCookbookdirections.
fixshelf
Beforeplacingfoodinthedishes
youpkmtouseforshelfmicrowaving,
checktoseethattheywillfittogether
onorunderthe shelf.Also,be sure
containersaremicrowavesafe.
I
Containersforheatingorreheating
include1cupmeasuringcup,
9x5x3-inchloafdishesor9-inchpie
plates.
Leftoversmaybeplacedinsmall
individualceramicorplasticbowls
ordividedplates.
Tot)ositiontheDOUBLEDUTY””
sh~lf,tipthebackslightlyandfitthe
shelfsupportguidesontothe
supportguideslocatedoneachside
oftheovenintherear.
!
Next,lowerthefrontuntiltheshelf
supportguidesfit
ontothesupport
guideslocatedateachsideofthe
oveninthefront.
Whenproperlypositioned,theshelf
shouldfitsnuglyinplace.
Ifarcingoccurswhenusingthe
shelftocookmorethanonefoodat
the sametime,turntheovenoff.
Makesuretheshelfispositioned
right-side-uponallfourshelf
supportsandnottouchingoven
walls.
—
—
Usepotholderswhenhandling
foodsheatedtogetherwithyour
ovenshelf,especiallywhenheating
largeramountsoffood.Extrasteam
generatedfrommultiplefood
cookingmaymakecontainershotter
thanwithregularmicrowaving.
Usewaxpaperorplasticwrap
insteadoflidsoncasseroles.Lids
mayaddtoomuchheighttodish.
16
Page 18

—
—
ttmeat s
f I
I
I
I’woplatesof leftoversmaybe
reheatedtogether.Arrangethick
ordensefoodstooutsideedgesof
plateandcoverwithplasticwrap.
MicrowaveatHIGH(10)for3
minutes.Reversepositionofplates
(toptobottom)androtate1/2turn.
ContinuemicrowavingatHIGH
(10)for2 to3minutes.Continue
heating,ifnecessary,untilhot.
—
—
t
Whenheatingseveraldifferent
typesoffoodtogether,foodswhich
shouldbeservedhotmustbeplaced
ontheovenfloor,whilefoodswhich
areonlywarmedshouldbeplaced
ontheshelf.Thisisbecause
microwaveenergyenterstheoven
fromthebottomonly.Also,itis
importanttorememberthatfoods
absorbmicrowaveenergyat
differentrates.Ratescanbeaffected
bythesizeofthefood,andits
startingtemperature.
Becauseofthevaryingrates,you
mayneedtostartreheatinga large
ordensefoodafewminutesahead
oftime,thenaddothersmalleror
lessdensefoods.Alternately,if
-..
oneofthefoodsyouareheating
seemsundercookedbuttheothers
=A ~ll.e~ea~edSatisfidctori]y,letthe
==~: underheatedfood continuecooking.
Reheating two casseroles (height
shouldbe lessthan4 inches)isnow
possible.Coverwithplasticwrap.
Usestaggeredarrangementsof
food,placingfoodonrightsideof
shelfandleftsideoffloor.Referto
HeatingorReheatingGuidein
cookbookforsuggestedmicrowave
timepercasseroleandaddthetimes
together.MicrowaveatHIGH(10)
reversingpositionoffoods(topto
bottom)afterhalfoftime.Also,
heatseveralsmallbowlsofleftovers
thisway,stirringandreversing
positionsafterhalfoftime.
Heatorreheatdifferenttypesof
foodatHIGH(10).Todetermine
heatingtimes,addtimesforall
foodstogether.(Seeheatingguide
incookbook.)Afterhalfoftime,
stirorrearrangefoods(donot
reversepositions).Checkfoods
(floorespecially)after3/4oftotal
timeandremoveanywhichare
done.Continuecookingothers.
Twofrozenindividualentrees
(5to7oz. each)ortwo TVdinners
(Mlto12Qz.each)
serveat thesametime.Removebatter
foods;cooktheseconventionally.
Removefoilcoversandreturnfoil
trayscontainingfoodtoboxesin
whichtheywerepurchased.Place
inovenwithoneTVdinneronright
shelfandtheseconddinneronlefl.
floor.MicrowaveatHIGH(10)for6
minutes.Reversepositions(topto
bottom)androtatefoods1/2turn.
ContinuemicrowavingatHIGH
(10)for6minutes.Checkdinners
forheating.If onedinnerseemsless
donethandesired,returnittothe
boxandcontinueheatingonfloor
1to2moreminutes.
I%3ceonfloorkwgem-dense
whichneedthemostheating,such
asleftoverfriedchicken,casseroles
ofcannedorleftovervegetables,
riceorpasta.Placeonshelfthose
foodswhichneedonlybewarmed,
suchasbakerypies,rolls,muffins
orbreads.
arebothreadyto
I I
17
Page 19

.... ... .. . . ............
--
—
—-
..
--
.—
SeeSurfaceCookingGuideonpages20and21.
..
-.
. .......... .....
“
.-
-.-.-.
.. ....——........ ... .
.-
——
..
—.
— -.
—
SUrfi3cecaking
C
Yoursurfaceunitsandcontrols
aredesignedtogiveyouaninfinite
choiceofheatsettingsforsurface
unitcooking.
AtbothOFFandHIpositions,there
isaslightnichesocontrol“clicks”
at thosepositions;“click”onHI
marksthehighestsetting;thelowest
settingisbetweenWMandOFF.In
aquietkitchen,youmayhearslight
“clicking”soundsduringcooking,
indicatingheatsettingsselectedare
beingmaintained.
Switchingheatstohighersettings
alwaysshowsaquickerchangethan
switchingtolowersettings.
Stepk Grasp controlknoband
pushin.
Step2: Turneitherclockwiseor
counterclockwisetodesiredheat
setting.
f
H&Quickstartforcooking; bring ‘watertoboil.
IWEDHI(7)-Fastfry,panbroil;
maintainfistboilonlargeamount
offd.
NIED(4)—Sauteandbrown;
maintainslowboilonlargeamount
offood.
LOW(3)–-CookafterstartingatHI;
cookwithlittlewaterincoveredpan.
WNI-Steamrice,cereal;maintain
servingtemperatureofmostfoods.
NOTE
1.AtHI,MEDHI(7),neverleave
fd unattended.130iloverscause
smoking;greasyspilloversmay
catchfwe.
2. AtWM,LOW(3),melt
chocolate,butteronsmallunit.
—
.-
-—
Controlmustbepushedinto set
onlyfrom OFF position.When
control isin anypositionother
OFF,it maybe rotated
than
withoutpushingin.
BesureyouturncontroltoOFF
whenyoufinishcooking.An
indicatorlightwillglowwhen
ANYheatonanysurfaceunitison.
Page 20

&
.—.— .——.
—
Q. May 1canfoodsandpreserves
—
mlInvsurfaceunits?
“
A. Yes,butonlyusecookware
designedformnningpurposes.Check
the&anufacturer’s-inst&ctionsand
recipesforpreservingfoods.13e
surecannerisflat-bottomedand
fitsoverthecenterofyourCalrod@
unit.Sincecanninggenerateslarge
amountsofsteam,becarefulto
avoidburnsfromsteamorheat.
Canningshouldonlybedoneon
surfaceunits.
Q. Can I covermydrip panswith
foil?
A. No.Cleanasrecommendedin
CleaningGuide.
Q. Cm Iumespecidl cooking
eq@nmmt9likeanoriental-wok,
onanysurfaceunits?
A.
Cookwarewithoutflatsurfaces
isnotrecommended.Thelifeof
yoursurfaceunitcanbeshortened
andtherangetopcanbedamaged
fromthehighheatneededforthis
typeofcooking.
Q. Whyam1notgettingthe heat
I needfrommyunitseventhough
1havethe knobsontheright
setting?
A. Afterturningsurfaceunitoff
andmakingsureitiscool,checkto
makesurethat yourplug-inunits
aresecurelyfastenedintothe
surfaceconnection.
Q. Whydoesmycookwaretilt
whenI placeitonthesurfaceunit?
A.
Becausethe surfaceunitis
notflat,Makesurethatthe“feet”
onyourCalrod@unitsaresitting
tightlyintherangetopindentation
andthe reflectorringisflatonthe
rangesurface.
Q. Whyisthe porcelainfinishon
mycookwarecomingoff?
A. IfyousetyourCalrod”unit
higherthanrequiredforthe
cookwarematerial,andleaveit, the
finishmaysmoke,crack,pop,or
burndependingonthepotorpan.
Also,atoohighheatforlong
periods,andsmallamountsofdry
food,maydamagethefinish.
—
—
—
———
—.
—
WRmr
—.
—
—.
~—
———
—
Canningshoukl be done on
cooktoponly.
Insurfacecookingof foodsother
thancanning,theuseoflargediameterpots(extendingmorethan
l-inchbeyondedgeoftrimring).is
not recommended.However,when
canningwithwater-bathor
pressurecanner,large-diameter
potsmaybeused.Thisis because
boilingwatertemperatures(even
underpressure)are notharmfulto
cooktopsurfacessurrounding
heatingunit.
HOWEVER, DONOTUSE
LARGEDIAMETERCANNERS
OROH-HZRLARGEDIAMETER
POTSFOR FRYINGOR
BOILINGFOODSOTHER
THANWATER.Mostsyrupor
saucemixtures—andalltypesof
frying—cookattemperaturesmuch
higherthanboilingwater.Such
temperaturescouldeventually
harmcooktopsurfacessurrounding
heatingunits.
o
incanning
L BringwatertoboilonHIGH
heat,thenafterboilinghasbegun,
adjustheatto lowestsettingto
maintainboil(savesenergyand
bestusessurfaceunit.)
2. Besurecannerfitsovercenter
surface unit.Ifyourrangedoes
of
notallowcannertobe centeredon
surfaceunit,usesmaller-diameter
pots forgoodcanningresults.
3. Flat-bottomedcannersgivebest
canningresults.Besurebottomof
cannerisflator slightindentation
fitssnuglyoversurfaceunit.
Cannerswithflangedorrippled
bottoms(oflenfoundinenamelware)
arenotrecommended.
4. Whencanning,userecipesfrom
reputablesources.Reliablerecipes
areavailablefromthemanufacturer
ofyourcanner;manufacturersof
glassjars forcanning,suchasBall
andKerr;andtheUnitedStates
DepartmentofAgriculture
ExtensionService.
5. Remember,infollowingthe
recipes,thatcanningis aprocess
thatgenerateslargeamountsof
steam.Becarefulwhilecanningto
preventburnsfromsteamorheat.
N(YI’E:If yourrangeisbeing
operatedon lowpower(vokage),
canningmaytakelongerthan
expected,eventhoughdirections
havebeencarefullyfollowed.The
processmaybeimprovedby:
(1)usingapressurecanner,and
(2)forfastestheatingoflarge
waterquantities,beginwith
HOTtapwater.
19
Page 21

G
—
1.Usemedium-orheavy-weight
cookware.Aluminumcookware
conductsheat fasterthanother
metals.Castironandcoatedcast
ironcookwareisslo~wtoabsorb
heat,butgenerallycooksevenlyat
LOWor MEDIUMsettings.Steel
partsmaycookunevenlyifnot
combinedwithothermetals.
Food
Cereal
Cornmeal,grits,
oatmeal
Cocoa
Coffee
Eggs
Cookedinshell
Friedsunny-side-up Covered
Friedovereasy
Poached
Scrambledoromelets Uncovered
Fruits
Meats,P@try
Braised:Potroastsof
beef,lamborveal;
porksteaksand
chops
Pan-fried:Tender
chops;thinsteaksup
m3/4-inch;minute
steaks;hamburgers;
ti-anksandsausuge;
thinfishfillets
coved
Saucepan
Uncovered
Saucepan
Percolator
Covered
Saucepan
Skillet
Uncovered
Skillet
Covered
Skillet
$killet
:overed
;aucepan
;overcd
killet
ncovcred
tilfet
FlatgroundPyrocerarn@saucepans
orskilletscoatedonthebottom
withaluminumgenerallycook
evenly.Useglasssaucepanswith
heat-spreadingtrivetsavailable
forthatpurpose.
2. Toconservethe mostcooking
energy,pansshouldbefiatonthe
bott&&,havestraightsidesandtightfittinglids.Matchthesizeofthe
Directionsand Setting
toStartCooking
HI.Incoveredpanbring
watertoboilbeforeadding
cereal.
HI.Stirtogetherwateror
milk,cocoaingredients.
Brimziusttoa boil.
HI.Atfirstperk,switch
heattoLOW(3).
HI.Covereggswithcool
water.Coverpan,cook
untilsteaming.
MEDHI(7).Meltbutter,add
eggsandcoverskillet.
J
HI.Meltbutter.
HI.Incoveredpanbring
watertoa boil.
W.Heatbutteruntillight
~oldenincolor.
-II.Incoveredpanbring
‘ruitandwatertoboil.
iI, Meltfat,theriaddmeat.
;witchtoMEDHI (7)to
lrownmeat.Addwateror
Itherliquid.
[1.Preheatskillet,then
reaselightly.
StU.ICCPii~t thesizeofthesurface
unit.Apanthatextendsmore
thananinchbeyondtheedgeofthe
trimringtrapsheatwhichcauses
“crazing”(finehairlinecracks)on
porcelain,anddiscolorationranging
frombluetodarkgrayonchrome
trimrings.
SettingtoComplete
Cooking
LOW(3)orWM,thenaddcereai.
Finishtimingaccording
topackagedirections.
MED(4),tocook1or 2minutes
tocompletelyblendingtedkmts.
LOW(3)tomaintaingentlebut
steadyperk.
LOW(3).Cookonly3to4
minutesforsoftcooked;
15minutesforhardcooked. ,
ContinuecookingatMEDHI(7)
untilwhitesarejust set,about
3to5moreminutes.
LOW(3),thenaddeggs.When
bottomsofeggshavejust set,
carefullyturnovertocookother
side.
LOW(3),Carefullyaddeggs.
Cookuncoveredabout5
minutesatMEDHI(7).
MED(4).Addeggmixture.
Cook,stirringtodesired
doneness.
LOW(3).Stiroccasionallyand
checkforsticking.
LOW(3).Simmeruntilfork
tender.
MEDHI(7)orMED(4).Brown
andcooktodesireddoneness,
turningoverasneeded.
Comments
Cerealsbubbleandexpandas
theycook;uselargeenough
saucepantoprevent130ilover.
Milkboilsoverrapidly.Watchas
boilingpointapproaches.
Percolate8to 10minutesfor
8cups,lessforfewercups.
*
Ifyoudonotcoverskillet,baste
eggswithfattocooktopsevenly.
Removecookedeggswithslotted
spoonorpancaketurner.
Eggscontinuetosetslightlyafter
cooking.Foromeletdonot stir
lastfewminutes.Whenset, fold
inhalf.
Freshfruit:Use1/4to 1/2cup
waterperpoundoffruit.
Driedfruit:Usewateraspackage
directs.Timedependsonwhether
fruithasbeenpresoaked.If not,
allowmorecookingtime.
Meatcanbeseasonedandfloured
beforeitis browned,ifdesired.
Liquidvariationsforflavorcould
bewine,fruitortomatojuiceor
meatbroth.
Timing:Steaks1to2-inches:1to
2hours.BeefStew:2to3 hours.
PotRoast:21Ato4 hours.
Panfryingisbestforthinsteaks
andchops.Ifrareis desired,preheatskilletbeforeaddingmeat.
—
—
—
——.
—
Page 22

.-—.
Fai?z#
—
RIGHT
3.DeepFatFrying.Donot overfill
kettlewithfatthatmayspillover
whenaddingfood.Fr&&foods
bubblevigorously.Watchfoods
f~ing atHIGH temperaturesand
keeprangeandhoodcleanfrom
accumulatedgrease.
Directionsand Setting
Cookware
FriedChicken
Panbroiledbacon Uncovered
Sauteed:Lesstender
thinsteaks(chuck,
round,etc.);liver;
thickor wholefish
Simmeredorstewed
meat;chicken;corned
beef;smokedpork;
stewingbeef;tongue;
etc.
Meltingchocolate,
butter,marshmallows
Pancakesor
Frenchtoast
Pasta
Noodlesorspaghetti
PressureCooking 11,Heatuntilfirstjiggleis
Puddings, Sauces,
(lmdies, Frostings
Vegetables
Fresh
Frozen
Sau[ml:Onions:
greenpcppms:
Skillet
Skillet
Covered
Skillet
Covered
DutchOven,
Kettleor
Large
!laucepan
Small
?overed
;aucepan.
Jsesmall
;urfzceunit
;killetor
lriddle
;overed
.argekettle
IrPot
ressure
~ookeror
‘anner
lncovcred
aucepan
ovcrcd
auccpan
?overed
$aucepan
Uncovered
Skillet
toStartCookingFood
HLMeltfat,SwitchtoMED(4)
tbrownchicken,
HI
HI.Incoldskillet,arrange
baconslices.Cookjust ,.
untilstartingtosizzle.
HI.Meltfat.SwitchtoMED(4)
tobrownslowly.
HI,Covermeatwithwater
andcoverpanor kettle.
Cookuntiisteaming.
WM.Allow10to Isminutesto
meltthrough.Stirtosmooth.
MEDHI(7). Heatskillet8to
10minutes.Greaselightly.
HI.Incoveredkettle,bring
;altedwater toa boil,uncover
mdaddpastaslowlyso
]oilingdoesnot stop.
)eard.
31.Bringjust toboil.
11.Measure1/2to1 inch
vaterinsaucepan.Add
altandpreparedvegetable.
ncoveredsaucepanbring
)boil.
II.Measurewaterandsalt
sabove.Addfrozenblock
ofvegetable,Incovered
saucepanbringtoboil.
HI, Inskilletmeltfat.
-H.Bringsaltedwatertoa
roil.
--L
Settingto Complete
Cookimiz
LOW(3).Coverskillet and
cookuntiltender.
Uncoverlastfewminutes,
MEDHI(7).Cook,turning
overasneeded.
LOW(3).Coverandcook
untiltender.
LOW(3).Cookuntilfork
tender.(Watershould
slowlyboil).Forverylarge
loads,mediumheatmay
beneeded.
MEDHI(7).Cookuncovered
untiltender.Forlarge
amounts,HImaybe
neededtokeepwater at
rollingboilthroughout
entirecookingtime.
MEDHI(7)forfoodscooking
10minutesor less.MED(4)for
foodsover10minutes.
LOW(3).Tofinishcooking.
MED (4). Cook1pound10
to30 or moreminutes,
dependingontenderness
ofvegetable.
LOW(3).Cookaccordingto
timeonpackage.
MED (4), Addvegetable.
Cookuntildesired
tendernessisreached.
WM. Coverandcook
accordingtotime.
Comments
Forcrispdrychicken,coveronly
afterswitchingto
minutes,Uncoverandcook,taming
occasionally10to20minutes.
A moreattention-freemethod
istostartandcookat MED(4).
Meatmaybebreadedor
marinatedinsaucebeforefrying.
Addsaltor otherseasoning
beforecookingifmeathasnot
beensmokedorotherwise
cured.
Whenmeltingmarshmallows,add
milkorwater.
!}
Thickbattertakesslightlylonger
time.Tim overpancakeswhen
bubblesriseto surface.
Uselargeenoughkettleto
preventboilover.Pastadoubles
insizewhencooked.
Cookershouldjiggle2to3times
perminute.
Stirfrequentlytoprevent
sticking.
Uncoveredpanrequiresmore
waterandlongertime.
Breakupor stirasneededwhile
cooking.
Tbmoveror stirvegetableas
necessary forevenbrowning.
Tripleinvolumeaftercooking.
TimeatWM.Rice: 1cuprice and
2cupswater–25 minutes.Grits: 1
cupgritsand4 cupswater—
40minutes.
LOW(3)for 10
!i
-
~
—
K4%iI$”
—.
EEmar
—.
——.
Page 23

oven
—
Mm’Oven designed giv$
you bat resdts baking,
androastingwhenused
asrecommended.Beforeusing
youroven,readthe directions
forsettingandusingalloftlm
controlsand timer.
o
Lightcomesonautomatically
whendoorisopened.Useswitchin
upperrightcornerofwindowdoor
toturnlightonwhendoorisclosed.
o Shdves
Whentheshelvesarecorrectly
placedonshelfsupports,theyare
designedwithstop-lockstoprevent
themfromcomingoutoftheovenor
tiltingwhenfoodisplacedonthem.
Toremove,liftuprearofshelfand
pullforwardwithstop-locksalong
topofshelfsupport.
To replace, insertshelfwithstop-
locksrestingonshelfsupportsand
pus~towardrearofovenuntilit
fallsintocorrectpositionunder
shelfsupports. -
—
The ConventionalChumTimeris
designedtoautomaticallystartand
stopcertainovenfunctions(TIME
BAKEor CLEAN).Clockmustbe
setbeforeConventionalOvenTimer
willoperate.
TosetClock,firsttouchCLOCK
padandthennumberpadstoenter
timeofday.Forexample,iftimeis
1:30,touchnumberpads1,3andO
and1:30willappearindisplay.
TouchSTARTandclockwillbeset.
—
—
The ovenhasfour shelfsupports
r-narkedA (bottom),B,C andD
(top).Shelfpositionsforcooking
foodaresuggestedon Baking,
Roastingand Broilingpages.
Thecontrolsfortheovenare
markedOVEN SETandOVEN
TEMP.TheOVENSETcontrol
hassettingsforBAKE,TIME
BAKE,BROIL,CLEAN(for
loweroven)andOFF.Whenyou
turntheknobtothedesiredsetting,
theproperheatingunitsarethen
activatedforthatoperation.
The OVENTEMPcontrolmaintains
thetemperatureyouset, from
WARM(150”F.)to BROIL(550°F.)
andalsoat CLEAN(880°F.)for
loweroven.
Page 24

— page
—
—
—
Whencookingafoodforthefirst
timeinyournewoven,usetime
givenonrecipesasaguide.Oven
thermostats,iweraperiodofyears,
may“drift”fromthefactorysetting
anddifferencesintimingbetween
anoldanda newovenof5 to 10
minutesarenot unusualandyou
maybe inclinedtothinkthatthenew
ovenisnotperformingcorrectly.
,EIowever,yournewovenhasbeen
setcorrectlyatthefactoryandis
moreapttobeaccuratethanthe
ovenitreplaced.
RPlacefoodin oven,being
certaintoleaveabout1inchof
spacebetweenpansandwallsof
ovenforgoodcirculationofheat.
Closeovendoor.Duringbaking,
avoidfrequentdooropeningsto
preventundesirableresults.
thatyouset.IkarnplesofImmediate
Start(oventurnsonnowandyou
setittoturnoffautomatically)or
DelayStartandStop(settingthe
oventoturnonautomaticallyata
latertimeandturnoffata preset
stoptime)willbedescribed.
NOTE:Beforebeginningmake
suretheovenclockshowsthe
correcttimeofday.
ImmediateStartissimplysetting
oventostartbakingnowandturning
offatalatertimeautomatically.
Remember,foodscontinuecooking
aftercontrolsareoff.
-–
Step3:Touchnumberpadstoenter
desiredbakingtime.Forexample,
touch3,0 andO for3hoursbaking
time.“BakeTime”and3:00are
displayed.
Step4: TouchSTART.“BakeTime”
isdisplayedandbakingtimecounts
down:
Step2: TurnOVENSETknobto
BAKEandOVEN TEMPknobto
temperatureonrecipeoronBaking
Guide.
Step3: Checkfoodfordoneness
atminimumtimeon recipe.Cook
longerifnecessary.Switchoffheat
andremovefoods.
HOWto mme Bake
TheConventionaloventimercontrol
allowsyouto turntheovenonor
offautomaticallyatspecifictimes
Step 1:TurnOVENS13T’)knobto
TIMEBAKE.TurnOVENTEMP
knobtooventemperature,for
example250°F.
Step TouchBAKETIMEpad.
Timeofdayremainsondisplayand
“EnterBakeTime”and: Oappear.
Step 5:When,bakingiscompleted,
ovensignals;
“End”and “Bake”
aredisplayedandovenshutsoff.
Step 6: TouchCLEARpad, open
doorandremovefood.
(continuednextpage)
\
23
Page 25

(continued)
~fi~~
.~$%
q%@
DelayStartandStopissettingthe
oventimertoturntheovenonand
offautomaticallyata latertime
thanthepresenttimeofday.
Forexample:Let’ssayit’s2:00and
dinnertimeisshortlyafter7:00.
The recipesuggests3hoursbaking
timeat250”F.Here’show:
—
—
—
“BakeTime”and“3:00”are
displayed.
Step6:TouchSTARTpad. The
ovenautomaticallyfiguresthestart
timesoovenwillturnoffwhenyou
wantbakingtobecompleted.
1:TurnOVENSETknobto
Step
TIMEBAKE.TurnOVENTEMP
knobto250°F.or recommended
temperature.
Step2: TouchBAKETIMEpad.
Timeofdayremainson displayand
“EnterBakeTime”and : Oappears.
Step4:TouchSTOPTIMEpad. ‘
“EnterBakeStopTime”and: 0
appearsondisplay.
Step 5: Touchnumberpads7,0
andOtoenter forthetimeyou
wanttheoventoturnoff.
“4:00”and“BakeStartTime”are
displayed.Inthisexample,baking
willbeginat4:00andovenwill
turnoffat7:00,
Whenbakingtimeiscompleted,oven
signals,“EndBake”appearsand
,, ovenshutkoff.
r,i
.
-.
—
Step3: Touchnumberpads3,0
and0 for 3 hoursbakingtime.
“7:00”and“BakeStopTime”are
displayed.
24
Step 7:TouchCLEARpad, open
doorandremovefoodfromoven.
Remember,foodwillcontinueto
cookina hotovenevenafteritis . .
turnedoff.
Note:“E IXi”willappearon
‘ disdav whdnvoutouchstartifyou
ha;e sit a sto~timethat is less~han
thetimeofdayplusthebaketime. ‘:
TouchCLEARandbeginagain.
..fl?
---,,
3
Page 26

—
—
—
—
L Aluminumpansconductheat
quickly.Forniostconventional
baking,light,shinyfinishesgenerally
givebestresults.Theyprevent .
overbrowninginthetimeittakes
forheattocookthecenterareas.
Dull(satin-finish)bottomsurfaces
ofpansarerecommendedforcake
pansandpieplatestobesurethose
areasbrowncompletely.
Bread
Biscuits(%-in.thick)
Coffeecake
Cornbreador muffins
Gingerbread
Muffins
Popovers
Quickloafbread
Yeastbread(2loaves)
Plainrolls
$weetrolls
Kakes
‘withoutshortening)
4ngelfood
ellyroll
;pon~e
Zakes
lundtcakes
hpcakes
‘i-uitcakes
Layer
I
I Layer,chocolate
Cookies
B~ownies
Drop
Refrigerator
Rolledorsliced “’
Fruits,
Other Desserts
Bakedapples
I
Istard
ddings,Rice
~Custard
!s
)zen
ringue
>crust
)crust
tryshell
IKx?hteolls
edpotatoes .
‘Iooeddishes
I Souffks
ShinyCookieSheet
ShinyMetal Panwith
satin-finishbottom
CastIronorGlass
ShinyMetal Panwith
satin-finishbottom
ShinyMetalMuffinFans
DeepGlass orCastIronCups
MetalorGlassLoafPans
MetalorGlass Loaf~ns
ShinyOblongor Muf~nPans
ShirwOblongor MuffinPans
Aluminumllbe Pan
MetalJellyRollFan
VletalorCeramicPan
MetalorCeramicPan
lhiny‘MetalMuffinPans
vletalo}Glass Loafor
kbe Pan
ihinyMetalPanwith
atin-finishbottom
lhinyMetalPanwith
atin-finishbottom
fletalor GlassLoafPans
4etalorGlassPans
~ookieSheet
‘ookieSheet
‘ookieSheet
lassor MetalPan
lassCustardCupsor Casserole
etin panofhot water)
lassCustardCupsor
asserole
)ilPanonCookieSheet
~readtocrustedges
assor Satin-finishMetal
ass orSatin-finishMetal
assor Satin-finishMetal
ton OvenShelf
assor MetalPan
1
i Glass
I
2. Daikornon-shinyfinishes,
glassandPyroceran@cookware,
generallyabsorbheat,whichmay
resultindry,crispcrusts,Reduce
ovenheat 2“5°F,iflightercrustsare
desired.Preheatcastironfor
bakingsomefoodsforrapid
browningwhenfoodisadded,
3.Preheatingthe ovenisnotalways
necessary,e~peciallyforfoods -
oven
‘IWperature
400°-4750
350°”4000
400°-4500
350°
400°-425”
375°
350”-375d
375°-4250
375°-4250
350°-3750
325°-3750
375°-4000
325°-3500
325°-3500
350°-3750
275°-3000
350°-3750
350°-3750
350° “
325°-3500
‘ 350°-4(100
400°-4250
375°-4000
350°-4000
300°-3500
325° ,
...
400°-4250
325°-3500
400°-4250
400°-4250
450°
325°-4000
325°-3750
300°-3500
$?
Shelf
Pbsition
B,C
B,A
B
B
A, B
B
B
A,B
A, B
B,A
A
B
A
!,
A, B
B
A, B
B
B
[)
B
B,C
B,C
B,C
B,C
A, B,C
B
B “
A
B,A
A, B
B
B
A, B,C
A, B,C
B
——.
MinutesFood Container
,.
,. 15-25<.
) 40-60
‘ 30-60
whichcookkmgerthan30to40
minutes.Forfo6dwithshort
cookingtimes,preheatinggives
bestappearanceandcrispness.
4.open theovendoorto-check
foodaslittleMpossibletoprevent
unevenheatingandtosaveenergy.
Time,
15-20
20-30
20-40
45-55
20-30
45-60
45-60
45-60
10-25
20-30
30-55
10-15
45-60
45-65
20-25
2-4$hrs.
20-35 a
25~30
40-60
25-35
10-20f
6-12
7-12
30-60
30-60
50-90
45-70
40-60
12-15‘
60-90
30-75
Comments
Canned,refrigeratedbiscuitstnkc
2to4minuteslesstime,
Preheatcastironpanfor
Decreaseabout5 minutesformuffin
mix,orbakeat450°F.for25minutes,
thenat350”F.for10to 15minutes.
Darkmetalorglassgivedeepest
Iyowning.
Forthinrolls,ShelfBmaybeused.
Forthinrolls,ShelfBmaybeused.
Two-piecepanisconvenient.
Linepanwithwaxedpaper.
Paperliners producemoremoist
crusts.
Use300°F.andShelfBforsmallor
.,
individualcakes.
i)
,Barcookiesfrommixusesametime.
UseShelfCandincreasetemp.
25°Fito50”F.formorebrowning.
Reducetemp.to300”F.forlarge
custard.Cookbreadorricepudding
withcustardbase80to90tqjnutes.
Largepiesuse400”F.andincrease
time.
Toquicklybrownmeringue,use,
400°F.for8to 10minutes.
Custardfillingsrequirelower
temperature,longertime.
Increasetimeforiargeamount
or size.
crispcrust,
25
Page 27

,
—
Roastingiscookingbydryheat.
Tendermeatorpoukrycanbe
roasteduncoveredinyouroven.
Roastingtemperatures,which
shouldbelowandsteady,keep
spatteringtoa minimum.When
roasting,itisnotnecessaryto
sear,baste,coveroraddwater
toyourmeat.
Roastingisreallyabaking
procedureusedformeats.Therefore,
ovencontrolsaresettoBAKEor
TIMEBAKE.(Youmayheara
slightclickingsound,indicatingthe
ovenisworkingproperly.)Roasting
iseasy;just followthesesteps:
Step1:Checkweightofmeat,and
place,fatsideup,onroastingrack
inashallowpan.(Broilerpanwith
rackisagoodpanforthis.)Line
broilerpanwithaluminumfoilwhen
usingpanformarinating,cooking
withfruits,cookingheavilycured
meats,or forbastingfoodduring
cooking.Avoidspillingthese
materialsonovenlinerordoor.
Step2:Placeinovenonshelfin
AorBposition.Nopreheatingis
necessary.
Step4:Mostmeatscontinueto
cookslightlywhilestanding,after
beingremovedfromtheoven.For
rareormediuminternaldoneness,
ifmeatistostand10to20minutes
whilemakinggravy,orforeasier
carving,youmaywishtoremove
meatfrQmovenwheninternal
temperatureis5;OIO”F.below
temperaturesuggestedinguide.
Ifnostandingis.plan.~ed,cook
meatto-suggestedtemperaturein “
g+deo-ode page.
N6’I’E:YOUmaywishtouseTIME
BAKE,asdescribedonpages23
and24,toturnovenonandoff
automatically.
Rememberthatfoodwillcontinue ~
tocookinthehotovenandtherefore
shouldberemovedwhenthe desired
internaltemperaturehasbeen
reached.
~Frozenroastsofbeef,pork,
lamb,etc.,canbestartedwithout
thawing,butallow.10to25minutes ‘
perpoundadditionaltime(10
minutesperpoundforroastsunder
5pounds,moretimeforlarger
roasts).
QwstionsandAmwem –
Q.k itnecessaryto checkfor
donenesswithanwatthermometer?
A.
Checkingthefinishedinternal
temperatureatthecompletionof
cookingtimeis recommended.
TemperaturesareshowninRoasting
Guideonoppositepage.Forroasts
over8lbs., cookedat300”F.with
reducedtime,checkwiththermometer
athalf-hourintervalsafterhalfthe
titie haspassed.
Q.Whyismyroastcrumbling
when I try to carveit?
A.
Roastsareeasierto sliceif
allowedtocool 10to20minutes
afterremovingfromoven.Besure
tocutacrossthegrainofthemeat.
Q.DoI need topreheatmy
oveneachtime I cook a roast .”
or poultry?.
A=It israrelynecessarytopreheat
“Youroven,onlyforverysmall
~oasts,which~ookash-ortlength —
oftime. .
Q. When buying aroast, are —
there any special tips that would
. .
helprnecookitmo;e evenly?
A. -Yes.
.
thicknessas possible,orbuyrolled
Buya roastas evenin
ro-asts. - ~-
Q. Can ~ seal the sides of my foil
:“tent”
when,roasting a turkey?
Sealingthefoilwillsteamthe
meat.Leavingitunsealedallowsthe
airtocirculateandbrownthemeat.
~-
?$jep3: Turn OVENSETtoBAKE
:mdOVENTEMPto325”F.Snmll
~li)u]tryImy becooked at375”F.
~i}rbestbrowning.
*
@Thawmostfrozenpoultrybefore
roastingtoensureevendoneness.
Somecommercialfrozerip6ultry.
canbecookedsuccessfullywithout
thawing.Followdirectionsgiven
on packer’slabel. ..
26
, ,. .. .
,-
‘,
,,
Page 28

——
“
—
—
—
Roasting
1.PositionovenshelfatBfor
small-sizeroasts(3to7lbs.)and
atAforlargerroasts.
2. Placemeatfat-sideup,orpoultry
breast-sideup,onbroilerpanor
othershal!owpanwithtrivet.Do
notcover.Donotstuffpoultryuntil
3.Removefatanddrippingsas 5.Frozen
necessary.Basteasdesired. conventionallyroastedbyadding
4.Standingtimerecommendedfor
roastsisIOto20minutestoallowroast
tofirmupandmakeiteasierto
carve.Internaltemperaturewillrise
about5°to 10”F.;tocompensatefor
justbeforeroasting.U;emeat temperaturerise,ifdesired,remove
thermometerformoreacctirate roastfromovenat5°to 10”F.less
doneness.(Donotplace
thantemperatureonguide.
thermometerinstuffing,)
Oven ApproximateRoastingTime, Internal
VW
Meat
Tendercuts;rib,highqualitysirlointip, 325°
rumportopround*
LambLegorbone-inshoulder*
Vealshoulder,legorloin*
Porkloin,ribor shoulder*
Ham,precooked 325° ToWarm: 10minutesperpound(anyweight) 125°-1300
-iam,raw 325°
‘Forbonelessrolledroastsover6-inchesthick,add5to 10minutesperpoundtotimes givenabove.
‘oultI”y
;hickenor Duck 325°
;hickenpieces
urkey
Temperature Doneness in Minutesper Pound Temperature‘F
Rare:
Medium:
WellDone: 35-45 28-33 170°-1850
325° Rare: 21-25 20-23 130°-1400
325°
325°
I
375° WellDone: 35-40 185°-1900
325°
Medium: 25-30 24-28 150°-1600
WellDone: 30-35 28-33 170°-1850
WellDone:
WellDone:
WellDone: 20-30 17-20
WellDone: 35-40 30-35 185°-1900
Well Done:
roastscanbe
10to25minutesperpoundmore
timethangiveninguidefor
refrigeratedroasts.(10minutes
perpoundforroastsunder5pounds.)
Defrostpoultrybeforeroasting.
3 to 5-lbs.
24-30 18-22
30-35 22-25
35-45
35-45
Under NMbs. 10to 15-lbs.
3 to5-lbs. Over5-lbs.
10 to 15-lbs. Over15-lbs. In thigh:
zO-25
6to 8-lbs.
130°-1400
150°-1600
30-40
30-40 1’70°-1800
15-20
170°-1800
160°
!85°-1900
.
,,.
,.
-L.;.
, :.
Page 29

.-
--
—
—-
“w
-.
.-
—
-.
—--- --—-—
.
—
Broiliqgiscookingfoodbyintense
radiantheatfromtheupperunitin
theoven.Mostfishandtendercuts
ofmeatcanbebroiled.FO11OW
thesestepstokeepspatteringand
smokingtoa minimum.
Step1:Ifmeathasfatorgristlenear
edge,cutverticalslashesthrough
bothabout2“ apart.Ifdesired,fat
maybetrimmed,leavinglayer
about1/8”thick.
Step2:Placemeatonbroilerrack
inbroilerpanwhichcomeswith
range.Alwaysuseracksofatdrips
intobroilerpan;otherwisejuices
maybecomehotenoughtocatchfire.
!%ep3:Fbsitionshelfonrecommended
shelfpositionassuggestedinBroiling
Guideonoppositepage.Most
broilingisdoneonCposition,but
ifyourrangeisconnectedto208
volts,youmaywishtousehigher
position.
Step6:
Turnfoodonlyonceduring
cooking.Timefoodsforfirstside
perBroilingGuide.
Turnfood,thenusetimesgivenfor
secondsideasaguidetopreferred
doneness.(Wheretwothicknesses
andtimesaregiventogether,use
firsttimesgivenforthinnestfood.)
Step7:TurnOVENSETknob
toOFF.Servefoodimmediately,
andleavepanoutsideoventocool
duringmealforeasiestcleaning.
&
—
Q. why $hdd ~k!W$2the dOOl?
closedwhen broilingchicken?
Chickenistheonlyfood
recommendedforclosed-door
broiling.Thisisbecausechickenis
relativelythickerthanotherfoods
youbroil.Closingthe doorholds
moreheatintheovenwhichallows
chickento cookevenlythroughout.
Q.Whenbroiling,is it necessary
to alwaysusea rackin the pan?
A. Yes.Usingtheracksuspends
themeatoverthe pan.Asthemeat
cooks,thejuicesfti intothepan,
thus keepingmeatdrier. Juices
areprotectedbythe rackandstay
cooler,thus preventingexcessive
spatterandsmoking.
Q. ShouldIsaitthe meat before
broiling?
Saltdrawsoutthejuices
andallowsthemtoevaporate.
Alwayssaltaftercooking.‘lhrn —
meatwithtongs;piercingmeat
withaforkalsoallowsjuicesto
—
escape.Whenbroilingpoultry
or fish,brusheachsideoften
withbutter.
Step4: Leavedoorajarafewinches
(exceptwhenbroilingchicken).
Thedoorstaysopenbyitself,yet
thepropertemperatureismaintained
intheoven.
Step5: TurnbothOVENSETand
OVEN TENIPknobstoBROIL.
Preheatingunitsis not
in Broiling Guide.)
notes
1. Ifdesired,broilerpanmaybe
linedwithfoilandbroilerrackmay
be coveredwithfoilforbroiling.
ALWAYSBECERTAINTOMOLD
FOILTHOROUGHLYTO
BROILERRACK,ANDSLIT
FOILTOCONFORMWITH
SLITSINRACK.Broilerrackis
designedtominimizesmokingand
spattering,andtokeepdrippings
coolduringbroiling.Stoppingfat
andmeatjuicesfromdrainingto
thebroilerpanpreventsrackfrom
servingitspurpose,andjuicesmay
becomehotenoughtocatchfire.
2. DONOTplaceasheetof
aluminumfoilonshelf.TOdoso
mayresultinimproperlycooked
foods,damagetoovenfinishand
increaseinheatonoutsidesurfaces
ofthe oven.
Why are my meats not turning
Q.
out asbrownasthey should’?
Insomeareas,thepower
(voltage)totherangemaybelow.
Inthesecases,preheatthebroil
unitfor10minutesbeforeplacing
broilerpanwithfoodin oven.
Checktoseeifyouareusingthe
recommendedshelfposition.Broil
forlongestperiodoftimeindicated
inthe BroilingGuide.Turnfood
onlyonceduringbroiling.
Do I need to greasemy broiler
racktopreventmeatfromsticking?
A.No.
Thebroilerrackisdesigned
toreflectbroilerheat,thuskeeping
thesurfacecool enoughtoprevent
meatstickingtothesurface.However,
sprayingthebroilerracklightlywith
avegetablecookingspraybefore ~
cookingwillmakecleanupeasier. ;l
28-
Page 30

.—----
.——
—
—
—
L Alwaysusebroilerpanandrack
thatcomeswithyouroven.Itis
designedtominimizesmokingand
spatteringbytrappingjuicesinthe
shieldedlowerpartofthepan.
2. Ovendoorshouldbeajarforall
foodsexceptchicken;thereisa
specialpositionondoorwhich
holdsdooropencorrectly.
3. Forsteaksandchops,slashfat
evenlyaroundoutsideedgesofmeat.
Food Thickness
Bacon
Ground
Beef l-lb.(4 patties)
WellDone
BeefSteaks
Rare l-inchthick
Medium (1to1%-lbs.)
WellDone
Rare I%-in.thick
Medium (2to2%-lbs,)
WellDone
Chicken
BakeryProducts
Bread(Toast)or
ToasterPastries 1 pkg.(2)
EnglishMuffins
LobsterTiiils 2-4
(6to8-(M.
17jfjh
Ham Slices
(prccookcd)
PorkChops
WellDone
CiiCh)
Quantityandlor
%-lb.(about8
thinslices)
‘%to%-in.thick
whole
1
to2%-lbs.),
(2
splitlengthwise
1 # I
2 to4slices
2(split)
i-lb,filletsXto
%-in.thick
l-in.thick
inch)
2(%
2(l-in.thick)
about1lb.
Toslash,cut crosswisethrough
outerfatsurfacejusttotheedgeof
the meat.Usetongstoturnmeat
overtopreventpiercingmeatand
losingjuices.
4. If desired,marinatemeatsor
chickenbeforebroiling.Orbrush
withbarbecuesaucelast5to10
minutesonly.
5. Whenarrangingfoodonpan,
donot letfattyedgeshangover
sides,whichcouldsoilovenwith
6. Il!lroilerdoesnotneedtobe
preheated.However,forverythin
foods,ortoincreasebrowning,
preheatifdesired.
7.FrozenSteakscanbe
conventionallybroiledby
positioningtheovenshelfatnext
lowestshelfpositionandincreasing
cookingtimegiveninthisguide
l%t~es perside.
$. Ifyourovenisconnectedto
208volts,raresteabmaybebroiled
fatdripping. bypreheatingbroilheaterand
positioningtheovenshelfone
positionhigher.
Sheif FirstSide
Position
c
‘rime,Minutes
3~
SecondSide
Time,Minutes
31/j
Comments
I
Arrangeinsinglelayer.
I
c
c 7
c 9
c 13
c
7
10
c 15
c 25
A
35
c 1%-2
4-5
7
9
13
7-8
14-16
20-25
10-15
‘/2
c 3-4
B 13-16 Donot
B
8
c 10
B
13
turnover.
5c 5
8
10
13
Spaceevenly.
to8pattiestakeaboutsametime.
UP
Steakslessthan1inchcookthrough
beforebrowning.Panfryingis
recommended.
Slashfat.
Reducetimesabout5to 10minutesper
sideforcut-upchicken.Brusheachside
withmeltedbutter.Broilwithskin
downfirstandbroilwithdoorclosed.
Spaceevenly.PlaceEnglishmuffins
cut-side-upandbrushwithbutter,if
desired.
Cutthroughbackofshell.Spread
open,Brushwithmeltedbutter
beforeandafterhalftime.
Handleandturnverycarefully.
Brushwithlemonbutterbeforeand
duringcookingifdesired.Preheat
broilertoincreasebrowning.
Increasetimes 5to 10minutesperside
for1%-inchthickorhomecured.
Slashfat.
I
I
I
Lamb chops
Medium
wellDone‘ about1~to 12
Medium
We]]Done about1lb.
Wienersandsimilar l-lb. pkg.(10)
precookedsi~us~ges,
bratwurst
2 (1inch)
2 (1%inch)
OZ.
c
-i-J--L
L-
8 4-7
10
4-6
12-14
1-2
29
Slashfat.
Ifdesired,splitsausagesinhalf
lengthwiseinto5 to6-inchpieces.
Page 31

s o
controls, These
Step1:
Removebroilerpan,broilerrack
andothercookwarefromtheoven.
(Ovenshelvesmaybeleftinoven.
Note:Shelvesmaybecomegray
afterseveralcleanings.)
Step2:
Wipeupheavysoilonovenbottom.
c
c1
A. OvenFrontFrame
B. OvenDoor Gasket
C.OpeningsinDoor
D. Oven Light
Step
Cleanspattersorspillsonoven
frontframe(A)andovendoor
outsidegasket(B)witha dampened
cloth.Polishwithadrycloth.Do
notcleangasket(B).Donotallow
watertorundownthroughopenings
intopofdoor (C). Neverusea
commercialovencleanerinor
aroundself-cleaningoven.
Step4:
Close
ovendoorandmakesure
ovenlight(D) isoff.
t set o
f
Step 1:
TurnOVENSETandOVEN
TEMPknobstoCLEAN.
willsnapintofinalpositionwhen
theCLEANlocationisreached.
Step2:
SlideLA~H HANDLE tothe
rightasfarasitwillgo.
3:00,CLEANTIMEandOVEN
DOORLATCHEDappearon
display.
Theovenisprogrammedtoclean
for3 hoursbutyoumaychange
cleantimebytouchingCLEAR
padandnumberpadstoentera
differentcleantimefrom1%to
4%hours.
Controls
\
Step3:
Tobegincleaningimmediately,
touchSTART.Displayshowsstop
time—inthisexample3hoursfrom
the timecleaningoperationstarts.
You’llknowcleaninghasstarted
whenthe Cleaninglightglows.
Nootherfunctionofthe
ConventionalOvencanbeused
untiltheself-cleaningcycleisover
andtheovendoorisunlatched.You
mayusetheMicrowaveOvenduring
cleaningtime.
Todelaystart ofcleaning:
Step1:
Repeatsteps1and2.
step 2:
TouchSTOPTIMEpadandnumber
pads forthetimeofdayyou want
cleaningtobefinished.
—
—–
“E EE” appearson displayif you
enteracleantimelessthan
morethan4%hours.If this
happens,touchCLEARpadand
beginagain.
30
1Y2or
Displayshowsthetimeyou
programmedoventostopcleaning,
STOPCLEANTIME andOVEN
DOORLATCHED.
Page 32

Step3:
“,
\—
.-==
TouchSTART,Displayshows
thetime ofdayovenwillbegin
cleaning,STARTCLEAN TIME,
OVENDOOR LA~HED andthe
timeofday.
N~E: Oven’automaticallyfigures
thestartingtimeso cleaningwill
endwhenyou wantit to.
Follow ‘l%ese ~te~s
S
.
Aftercleaningis complete, the
o~~endoor will staylockeduntilthe
ovencools and the LOCKED light
goesoff. This takesabout
minutes.
—
—
1:
Step
WhenLOCKED lightisoff, slide
LATCHHANDLEtotheleftasfar
asit willgoandopenthedoor.
30
Q.If my ovenclockis notworking,
canIstill self-cleanmyoven?
A. No.YourAutomaticOven
Timerusestheovenclocktohelp
startandstopyourself-cleaning
cycle.
Q.CanI use commercialoven
cleanerson anypart of my
self-cleaningoven?
cleanersorcoatingsshould
beusedaroundanypartofthis
oven.Ifyoudousethemanddonot
wipetheovenabsolutelyclean,the
residuecanscartheovensurface
anddamagemetalpartsthenext
timethe ovenisautomatically
cleaned.
Q.CanI clean the WovenGasket
aroundthe ovendoor?
A. No,
this gasketisessentialfor
agoodovensealandcaremustbe
takennot to rub,damageormove
thisgasket.
Q.Afterhavingjust usedthe
oven, the LOCKEDlightcame
on and I could not movethe
LATCHHANDLE. Why?
A.
Afterseveralcontinuoushightemperaturebakingsorbroilings,
theLOCKEDlightmaycomeon.
The ovendoorcan’tbelatchedfor
self-cleaningwhiletheLOCKED
lightison. If thishappens,let the
ovencool untiltheLOCKEDlight
goesoff.Thentheovendoorcan
belatchedforself-cleaning.
Q. What should I do if excessive
smoking occurs during cleaning?
A.
Thisiscausedbyexcessivesoil,
andyoushouldswitchtheOVEN
SETknobto OFF.Openwindows
torid roomofsmoke.Allowthe
oventocoolfor
at least one hour
beforeopeningthedoor.Wipeup
theexcesssoilandresettheclean
cycle.
Q.1sthe “crackling”soundI
hearduringcleaningnormai?
Thisisthemetalheating
andcoolingduringboththe
cookingandcleaningfunctions.
Q.Shouldtherebeanyodor
duringthe cleaning?
Yes,theremaybea slightodor
duringthefirstfewcleanings.
Failuretowipeoutexcessivesoil
mightalsocauseanodorwhen ,.
cleaning.
Q.Whatcausesthe hair-like
lineson the enameledsurfaceof
my oven?
Thisisa normalcondition
resultingfromheatingandcooling
duringcleaning.Theselinesdonot
affecthowyourovenperforms.
Q.Whydo I haveash left in my
ovenafter cleaning?
Sometypesofsoilwillleave
adepositwhichisash. Itcanbe
removedwithadampspongeor
cloth.
Q.Myoven shelvesdo notslide
easily.What is the matter?
Aftermanycleanings,oven
shelvesmaybecomesocleanthey
donotslideeasily.If youwish
shelvesto slidemoreeasily,
dampenfingerswitha small
amountofcookingoil andrub
lightlyoversidesofshelfwhere
theycontactshelfsupports.
Q.Myoven
grayafter severalcleanings. Is
this normal?
she!veshavebecmne --
Emw.
F&E&-.
—.
-.
-
step 2:
‘-. ‘I’m (WHY
-, Nt?p.3:
~~~~%’urnOVEN TEMPknobtoWm.
-==.J-
G
Step4:
SETknobtoOFF.
Page 33

andCkining Center
Propercareandcleaning ‘
areimportantsoyourCooking
CenterVVMgiveyoueffkient and
satisfactoryservice.Followthese
directionscarefullyin caringfor
. ittohelpassuresafe andproper
maintenance.
BESUREELECTRICPOWER
ISOFFBEFORECLEANING
ANYP“ OFYOUR
COOKINGCENTER.
Toreplacemicrowaveovenlamp,
fidisconnectpowerat main
fuseorcircuitbreakerpanel.
RemovetheHoodExtensionand
HoodFilterfollowinginstructions
onpage36.
.
Yourshelfaccessoryisdesigned
foruseina microwaveovenonly;
donot useina conventionaloven.
Donotuseabrowningdishwith
the shelf.Arcingcouldoccur.
Cleanshelfwithmildsoapand
wateror inthedishwashe~.Donot
cleaninself-cleaningoven.
l
Don’tusesharp-edgedutensils
aroundthecontrolpanel.They
mightdamageit.
Cleanthe panelswitha lightly
dampenedcloth.DONOTUSE
cleaningspraysorlargeamountsof
soapandwater.Thesecancause
problemswiththecontrol
mechanisms.
T
Theprobeissturdy,butcare
shouldbe takeninhandlingit. Do
nottwistit. Avoiddroppingit.
Cleanassoonaspossibleafteruse.
Wipeitwithasudsycloth,thenrub
metalpartswitha plasticscouring
padifnecessary.Rinseanddry.
(Or,washtheprobein anautomatic
dishwasher.)
s
whyyou useit
DONUl_’placeasheetofaluminum
foi~onanyshelfineitheryour
microwaveorconventionaloven.If
youdo,your foodsmaynot cook
properly.Theovenfinishmaybe
damaged,andtheremaybean
increasein heatonthe outside
surfacesoftheoven.
1
L
Thelampcoverislocatedonthe
lowerleftsidebehindthehoodfilter.
Usea shortblade-typescrewdriver
andremovethescrewinthe front
ofthelampcover.
Liftthelampcoverandgentlytwist
thebulbtobreakthewhitesilicone
adhesiveattachedtothe bulband
sockettopreventdamageduring
shipping.Unscrewthebulband
replacewithabulbof sametype
andwattageavailablefromyour
GeneralElectricsupplier.
Screwreplacementbulbinto
socket,replacescrewinlampcover
andre-installHoodFilterand
HoodExtension.Re-connect
powertoCookingCenter.
Usemetalonlyasdirectedinthe
Cookbook.Metaltraysnornorei
than3/4”deepmay beusedforTV
dinners,andthe metaltemperature
probeisdesignedformicrowave
ovenuse.Alwayskeepmetalat
leastoneinchawayfromsides
ofoven.
C
Ckmntheoutsideofyourmicrowave —
ovenwithsoapanddampcloth,
thenrinsewithdampclothanddry. —
Wipethewindowcleanwitha
dampcloth.Chromeisbestwiped
with-adampclothandthenwitha
drytowel.
C
Keepyourmicrowaveovenclean
and sweet-smelling.
ovendoor a fewminutesafter
cookinghelpsairouttheinterior.
Anoccasionalthoroughwiping
withasolutionofbakingsodaand
waterkeepsthe interiorfresh.
Spills and spattersare easy to
removefrom wallsand floor.
That’sbecausethere’slittleheat
exceptinthefood,or sometimesin
theutensil.Somespatterswipeup
withapapertowel,somemay
requirea dampcloth.Remove
greasyspatterswithasudsycloth,
thenrinseand
Openingthe
32
Page 34

––-—
ksfaY&_
OVENCLEANERONANYPART
OFYOURMICROWAVEOVEN.
Wipeup spatterson thewindow
Ontheinsideof thedoordaily.
Washwindow,whenit’ssoiled,
withadampcloth.Rinse,thoroughly
anddry.
Wipemetal andplasticpartson
theinsideof thedoorfrequently.
Useadampclothtoremoveall “
soil.DO-NOT’USEABRAS~ES,
suchascleaningpowdersorsteel
andplasticpads.Theymaymarthe
sutiace.
DoorSurface. Whencleaning
surfacesofdoorandoventhat
cometogetheronclosingthedoor,
useonly-mild,nonabrasivesoaps
ordetergentsappliedwithasponge
orsoftcloth.
Wing a Brown ‘NSear Dish?
UseBon Arni@brandcleanser.
Highheatgeneratedonthebottom
—
oftheBrown‘NSearDishcan
—
causescorchedappearingstains
tobakeontothefloorifgreaseis
present.Thesemayberemoved
withBonAmi@brandcleanser.
Afterusingthiscleaner,rinseand
drythoroughly,followinginstructions
oncan.Donotuseiton thepainted
surfacessuchasthewalls—itmay
scratchthepaint.
—.—
P
Cleantheaieaunderthedrippans
ofien.Built-upsoil,especially
grease,maycatchfire.Tomake
cleaningeasier,theplug-insurface
unitsareremovable.
.
I / f I
Toremove:
~Be sure the control forthesurface
unitisonOFFandthecoilsarecool
beforeremovingtheCalrod@unit.
oRaisetheunitcoiloppositethe
receptacle.Liftaboutoneinch
abovethetrimringandpull away
fromthereceptacle.
@Aflerremovingtheplug-in
surfaceunit,removethedrippan
andtrimringtocleanundertheunit.
.
Toclean:
eWipearoundtheedgesofthe
surfaceunitopeningintherange
top.Cleantheareabelow.Rinse
all washedareaswithadampcloth
orsponge.
TOreplace:
(
ePlacedrippaninthesurfaceunit
cavityfoundontopofthe range.
Lineupthedrippansotheunit
receptaclecanbeseen.
oInserttheterminalsofthe plug-in
unitthroughtheopeninginthedrip
pan/ringandintothereceptacle.
oGuidethe surfaceunitintoplace
soitfitsevenlyandlockssnugly
intothe receptacleor trimring.
Note:Thedrippan
must beunder
thetrimring.
Do not attempttociean, adjust,
or in anywayrepairthe plug-in
receptacle.If liquidshouldspill
and collectinsidethe receptacle,
cail forservice.
(continuednextpage)
RE3iEr.
——
—.
-
-—
mEmlT
—.
—“
-
-
~.
-
—.—
-
kzEa?#—.
-.
-
-
-
Ess&-.=
--
33
Page 35

T
——-—-... -=
Usetimegiven on recipe when
cooking for first time.
thermostatsmay“drift”fromthe
factorysettingoverthe years,and5
to 10-minutedifferencesintiming
betweenanoldandanewovenare
notunusual.Yourovenhasbeenset
correctlyatthefactoryandismore
apttobeaccuratethanthe oven
whichitreplaced.However,ifyou
findthatyourfoodsconsistently
browntoolittleortoomuch,you
maymakeasimpleadjustmentin
theOVEN TEMPthermostatknob.
PULLKNOBOFFSHAFT.
LOOKATBACKOFKNOBAND
NOTECURRENTSETTING
BEFOREMAKINGANY
ADJUSTMENT.
L Pu1loffknob,
2. Movepointeronenotchin
desireddirection.RAISEto
increase,LOWERtodecrease.
Eachnotchchangestemperature10
degrees.
3.Returnknobtooven,matching
flatareaof knobto shaft.
NOTE: Becertainknobsare
returnedto shaftsfromwhichthey
wereremoved.
Recheckovenperformancebefore
makingan additionaladjustment.
Oven
Theovenisveniedthroughaduct
locatedundertherightrearCalrod”
unit.Tocleanduct:removeCalrod@
unit‘anddrippan/ring.Liftout vent
duct.In replacing,makesurethe
ductopeningisundertheopening
indrippan.Correctpositioningis
importanttoallowmoistureand
vaporstobereleasedfromoven.
Nevercoverthehole.
Beforereplacing
yourovenlamp bulb, disconnect
the electric powerfor your
CookingCenterat the mainfuse
or circuitbreakerpanel.
Besure
toletthelampcoverandbulbcool
completelybeforeremovingor
replacingthem.
Theovenlamp(bulb)iscovered
withaglassremovablecoverwhich
isheldinplacewitha bail-shaped
wire.Removeovendoor,if
desired,toreachcovereasily.
Toremove:
~Holdhandundercoverso it
doesn’tfdl whenreleased.With
fingersofsamehand,firmlypush
backwirebailuntilitclearscover.
Liftoffcover.DONOTREMOVE
ANYSCREWS10 REMOVE
COVER.
@Replacebulbwith40-watthome
appliancebulb.
Toreplacecover:
@Placeitintogrooveoflamp
receptacle.Pullwirebailforward
tocenterofcoveruntilitsnapsinto
place.Wheninplace,wireholds
coverfirmly.Becertainwirebailis
indepressionincenterofcover.
~Connectelectricpowertooven.
Use
i
Ifyouwish,youmaylinethe
broilerpanwithaluminumfoiland
covertherackwithitforbroiling.
ALWAYSBESURETOMOLD
THEFOILTHOROUGHLYTO
THEBROILERRACKANDSLIT
THEFOILTOCONFORMWITH
SLITSIN THERACK.Stopping
fatandmeatjuicesfromdraining
intothebroilerpanpreventsthe
rackfromservingitspurposeand
MAYLETJUICESBECOME
HOI’ ENOUGHTOCA~H FIRE.
TOIremovedoor,open.to BROIL
position,or whereyoufeelhinge
catchslightly.Graspdooratsides;
liftdoorupandawayfromhinges.
—
—
—
E%?&
—
34
To replace; graspdooratsides.
Lineupdoorwithhingesandpush
doorfirmlyintoplace.
Page 36

(lklicrowavcovencleaninginstructionson pages32and33@)
NOTE:Let range/oven
partscool beforetouchingorhandiing.
PART
BakeUnit andBroil
Unit
BroilerPan andRack
ControlKnobs:
RangeTopand Oven
OutsideGlass Finish
Metal, including
ChromeSide Trims
andTrimStrips
PorcelainEnamel
Surface*
nsideOven Door*
~vcnGasket*
OvenLiner* ~ SoapandWater
m
Calrod@)Surface
UnitCoils
Chronle-Plated
Trim Rings
}+~l.ccll~irlDrip
——
~Si]ilk~gcofmarinade.s, fruit juiccs, and basting materials containing acids may cause discoloration. Spillovers should be wiped upimmediately,
\\;ithc;u-cbeing taken to not-touch anyhot poiion of the oven. When the surface is cool, clean and rinse.
&~f.=&
~.>-
Pans
I MA1’ERIALS111USE GENERALDIIlllCT1OIQS
notclean thebakeunit or broilunit, Anysoil wi~lburn offwhenthe unitis
llo
heated. NCYTE:Thebake unitis nothingedand cannotbe lifted toclean theoven
floor.If spillover,residueor ash accumulatesaround thebake unit,gently wipe
aroundtheunit withwarmwater.
*Soapand Water
o sOap-Fil]edScouringPad
@Plastic ScouringPad
@MildSoap andWater Pulloff knobs.Washgentlybut donot soak. Dry and returncontrols torange,
I
o Soapand Water
e SoapandWater
oPaper Towel
c Dry Cloth
@Soapand Water
+JSoap andWater
~Soapand Water
e Soap andWater
~Stiff-Bristled Brush
@Soap-Filled Scouring Pad
(Non-metallic)
~Soap and Water
@Soap-Filled Scouring Pad
@Plastic Scouring Pad
@Dishwasher
Drain fat, coolpanandrack slightly.(Do notlet soiledpan and rackstand inovento
cool.)Sprinkleondetergent.Fillpanwith warmwaterand spreadclothor papertowel
overthe rack. Letboth standfor a fewminutes. Wash;scour if necessary.Rinseand
dry. OITHON:The broilerpan andrack mayalso be cleanedin adishwasher,
makingsure tomatchflat area on theknoband shaft
Washall glass withcloth dampenedin soapywater, Rinse.andpolish witha dry
cloth. If knobsonthe controlpanel are removed,do notallowwater to rundown
insidethe surface ofglass whilecleaning.
Wash,rinse, andthen polishwitha dry cloth. DO NCYI’USEsteel wool,abrasives,
ammonia, acids, or commercialovencleaners which maydamagethe finish.
Avoidcleaningpowdersor harsh abrasives whichmayscratch the enamel.
If acids shouldspillon the rangewhile it is hot, use adry paper towelor cloth to
wipeup right away.Whenthe surfacehas cooled, washand rinse.
For otherspills, suchas fat smatterings,etc., washwith soapand waterwhen cooled
andthen rinse. Polishwith dry cloth.
Onthis oven,cleanONLYthedoor liner outsidethe gasket.The dooris automatically
cleaned if the ovenis in theself-cleaning cycle.If spillover or spatteringshould
occur in cooking function, wipethe door with soapand water. DOFNX rub or
damagegasket, Avoidgetting soap andwater onthe gasket or in the rectangular
flangeson the door.
AvoidgettingANY cleaning materials onthe gasket.
Cool beforecleaning. Frequent wipingwith soap andwater will prolongthe time
betweenmajor cleanings. Be sure to rinse thoroughly.For veryheavy soiling,use
yourself-cleaning cycleoften.
Yourshelves canbe cleaned with the self-cleaning fi.mctionin the oven. Forheavy
soil, clean byhand, using anyand all mentioned materials. Rinse thoroughlyto
removeall materials after cleaning.
Spattersand spills burn awaywhen the coils are heated. Atthe end of a meal,
removeall utensils from the Calrod@unit and heat the soiled units at HI. Let the
;oil burnoff about a minuteand switch the unitsto OFF. Avoidgetting cleaning
naterials on the coils. Wipe offany cleaning materials with a damppaper towel
!x#&eheatingthe Calrod” unit.
DO NOThandle the unitbefore completely cooled.
DO NOTself-clean plug-in units,
DO N(YTimmerse plug-in units inany kind ofliquid.
Clean as described below or in the dishwasher. DO NOT
CLEANON T.13E
SELIWLEAI?lNGmCTION. Ringswilldiscolor.
all rings after each cooking so unnoticed spatter will not “burn on” next time
Wipe
youcook. Toremove “burned-on” spatters, use anyor all cleaning materials
mentioned. Rub Iighflywith scouring pad to prevent scratching of the surface.
Coolpan slightly.Sy-inkleon detergentand washor scour pan withwarm water.Rinse
and dry. IrJaddition, pan maybe cleaned in the dishwasher or in self-cleaning oven.
.
. .
35
Page 37

ThisCookingCenterhasabuilt-in
exhaustsystemequippedwitha
damper,a two-speedexhaust
blowerandremovablefilters.
Exhaustopeningsarelocatedover
cookingtopandinhoodoveroven.
Theexhaustsystemfunctionsonly
whentheblowerisoperating.The
switchfortheexhaustsystemis
beneaththecontrolpanel.Forhigh
speed,pushswitchonce;forlow
speed,pushswitchtwice;andto
stopblower,pushswitchonce
insequence.
Whenblowerisoperatingandhood
overupperovenisclosed,it
exhaustsoversurfaceunitsonly.
Whenbloweroperateswithhoodin
openposition~texhauststhrough
openingsoversurfaceunitsand
overovenatthe sametime.
THEEXHAUSTSYSTEM
SHOULDBEOPERATED
WHENEVERODORS, VAPORS
ORSMOKEAREEXPECTED
TOBETHERESULTOFA
COOKINGOPERATION.
STARTFANATBEGINNING
OFCOOKING.
openhood abovethe oven,lift
To
uphandleatcenter
ofhood;to
close,pushdownonhandle.Use
hoodinitsfullyextendedposition
whenevervapororsmokeresults
fromcooking,suchaswhenpan
broilingorfryingonthesurface
units.Seeinformationonuseof
surfaceunits.
‘IWOfiltersarelocatedovercooking
topandonebehindhoodextension.
Filtersareremovableforcleaning.
Filtersbecomesoiledoveraperiod
oftime.Theefficiencyofyour
exhaustsystemdependsonhow
cleanthefiltersare.Frequencyof
cleaning,or replacing,dependson
thetypeofcookingyoudo,but
filtersshouldbecleanedATLEAST
ONCEAMONTH.Also,frequently
cleanthe grease-ladensurfaces
adjacenttothefilters.
Toclean,agitateinhotdetergent
solution.Lightbrushingmaybe
usedtohelpremoveimbeddedsoil
anddust.Withcarefuluseand
handling,filterswilllastforyears.
However,if replacementbecomes
necessary,obtaina filterfrom
yourdealer.
—
Removeand ReplaceFilters
—
L Cookingtop: Placefingerin
recessatfrontedgeoffilter;push
filtertorearuntilfrontedgeciears
the exhaustopening;lowe;the
frontandremove.Whenclean,
replace.Placeedgeoffilteragainst
springatrearofexhaustopening.
Pushtorear,liilfrontedge,andlet
springpushfilterforwardintoplace
underedgeofexhaustopening.
2. Hood:Extendhoodas faras
possible,or removehoodextension
ifdesired;seeillustrationbelow.
Placefingersoneachsideat
bottomoffilter.Pressfiltertoleft
untilitclearstheholderonright
side,thenremove.Whencle[n,
replace.Pushfilteragainstclipat
leftandpressleftuntilfilterclears
holderatrightside,Pushfilter
towardopeningandreleasesoit
slipsbehindholder.
Non-ventedmodelsalsohavea
replaceableCharcoalFilterlocated
behindHoodFilter.Replaceas —
neededwithPartNo. WB2X’XN2
—
availablefromyourGeneral
Electricsupplier.
Theblowermotorispermanently
lubricated;itdoesnotneedoiling.
To and
1. T’oremove, extendhoodasfar
asitwillopen.
With thumbscurved around edge
of hood extension, hook a finger
between spring and bracket at each
sideand push towardcenterofhood.
This movespins out of holes in
bracket and hood ex[ensioncan
bc rcmoved.
2. ‘III
dean, wash with hot
detergent solution. Rinse and dry
with soft cloth.
3. TOreplace, f bottomofhalf-
circleflangesintosideofhood.
Secureonesideatatime. Align
pinwithholesinbracketandhood
extension,thenpushpinthrough
holes.Thissecureshoodextension
so it cannot be removed by mistake.
~
HOOD EXTENSION .
I Iv
k BRACKET
,
UPPER
OVEN
DOOR
Page 38

I
CONTR&?ANE~
ON,YETOVENWILL
NOTOPERATE
POSSIBLECAUSEAND REMEDY
~
STARTpadnottouched.
~ Doornotsecurelyclosed.
@Anotherfunctionwas~ouched,TouchC.LEAR/OFFtocancel.
~ NumbersnotenteredaftertouchingTimeCook.
@Finished notenteredaftertotichingTempCook
~CLEAR/OFFpadtouchedaccidentally.
eNQcodenumberenteredaftertouchingAutoROa@.
,!
!,
..
,.
,:
, ‘.
,,
,,’
,’.
. ~’
O
OR UNDERCOOKED
1.,
“PROBE” APPEAR$
ON
DISPLAY
●’ERROR”APPEARS
ONDISPLAY
@Steamor vaporescapingfroin
aroundthedoor.
*Light reflectionaround
outercase.
~
offoodsvariedwidely.
@Varyingdensityandamountoffoodswillsometimesrequiremorecookingtime..
*Probenotinsertedproperlyintomeatordish.CheckCookbookorAutoRoas~ -
sectionofthisbook.
@Incorrectpowerlevelentered.
*Dishnot rotated,turnedorstirredascalledforinrecipe. -
@Toomanydishesinovenatsametime.
@Foodnotthoroughlydefrosted.
@Improperuse ofcoverings.CheckCookbookand thisb60k forinstructions.
@Probenotinsertedproperlyintoovenreceptacleorfood.
@Probenotused,althoughAutoRoastorTempCookpadshavebeentouchgd.
I e whenuSing the TenlpCook function, youhaveenteredatemperatureofkksthan
i
80°F.or morethan 199”E
Ail Tkw. ThingsAre on Your oven:
door or
Not enoughtimesetwhenusingTimeCookfunctionbecausestartiugtelnperatures .
.,
@Dull,thumpingsoundwhile
ovenisoperating.
~
Dimmingovenlightandchange
inblowersoundmayoccurwhile
operatingatpowerlevelsother
thanhigh.
~SomeTV-Radiointerference
mightbenoticedwhileusingyour
microwaveoven.It’ssimilartothe
interferencecausedbyothersmall
appliancesanddoes notindicatea
problemwithyouroven.
??7
(continuednextpqge)
I
Page 39

”-.—----
-~,.. _--_--,*
-.” ..-. , -.-.-..,.
.—— . . . . . . . . . . . --.. .-—---
-..-=
<-.-:..-=.;,.
,,-
-.
—“’:
..- .
. ... . .... . .
i
.... .. . .. ...
. ....
..... . .......
.. .... .................
--Ta.-a..&%=.,.. -.:-&-. -&..:-:. -&-.2 --,,7p.-:::,;::$-&.:.::+.-
...,,..<......-....=.
,””. ... .,..,.. -...
-7<.==-... %...—,.=l-
T~~ (continued)
POSSIBLECAUSEANDREMEDY
~ Difficultymaybeinthemaindistributkmpanelofyourhousebyablownoven
circuitfuse,a trippedovencircuitbreaker,themainfhseor themaincircuitbreake~,
dependingonnatureofthepowersqqdy.Ifa circuitbreakerisinvolved,resetit, Ifthe
controlboxusesfuses,theowmfuse(acartridge-type)shouldbechanged.BUTONLY
BYSOMEONEFAMILIARWITHELECTRICALCHWXJITS.If afterdoingoneof
theseprocedures,thefuseblowscmcircuitbreakertripsagain,callforservice,
NOTE:Apartmentternantsorcondominiumownersshouldrequesttheirbuilding
managementtoperformthischeckbeforecallingforservice.
@Ovencontrolsnotproperlyset.
@Doorleftinlockedpositionaftercleaning.
OVEN LIGHT
DOESNOT
ELECTRONIC
@Lightbulbislooseorbulbisburnedout.
@Buttonoperatingovenlightisdefective.
~ Clocknotset.TouchCLOCKpadandentertime.
mucH PADS’
WILLNOTWORK
ELECTRONIC
DEWLAYPANEL
GOESBLANK
@If itcannotberesetbytouchingpads,electricalservicetoyourresidencehascaused
interferencesignalsonthemainpowerline.DisconnectyourcooI@gcenteratthe
mainfuseorcircuitbreakerpanel.Waitonerqinuteandreconnectpower.Resetclock.
ORBLINKS
—
—
~e’
FOODDOESNOT
BROILPROPERLY
FOODDOESNOT
ROASTORBAKE
PROPERLY
@OVENSET’knob notsetatBROIL.
@OVENTEMPknobnotsetcorrectly. ,
@Doornotleftajarasrecommended.
@Impropershelfpositionis beingused.CheckBroilingGuide.
~ Necessarypreheatingwasnotdone.
@Foodisbeingcookedona hotpm.
@Utensilsare notsuitedforbroiling.
~Aluminumfoilusedonthebroilrackhasnotbeenfittedproperlyandslit.
P OVENSETknobnotsetonBAKE.
~OVENTEMPknobnotsetcorrectly.
~Shelfpositionisincorrect.CheckRoastingor BakingGuide.
~Ovenshelfisnot level.
~Roastingpanis toosmall.
~Impropercookwareisbeingused.
~A foil tentwasnotusedwhenneededtoslowdownbrowning.
38
Page 40

CAUSE AND Rmmmi’
@Oventoohot toacceptcleaninginstruction,
@Latchisnotmovedallthewaytothe right,
@Excessivespills,spatters,andsoildepositsarenotbeingcleaneduppriorto
self-cleaning.
@STARTpadnottouched.
OVENDOOR
IVON’TLATCH
‘~TurnOVENSETknobtoCLEAN.GlowingLockedLightafterknobisturned
indicatesovenistoohotfromprevioususeanddoorwon’tlatch.Tocooloven,open
door wide,then Latchcanbemoved.
~ OVENSETknobmustbeatCLEANor OFFbeforeLatchcanbemoved.
@Latchnotmovedallthewaytotheright.
DO(IR
w~~’~ u~~ocK
IROBLEM POSSIBLE CAUSEAND REMEDY
CALROD@SURFACE’
~fJI’pJ pJ(-jT
—–
-1
PROPERLY
~ Ovenhasn’tcooledtoasafetemperature.
~Surfaceunitsarenotpluggedin solidly.
~ ‘I’rimrings/drippansare notsetsecurelyin therangetop.
~Surfaceunitcontrolsarenotproperlyset.
f need more .cW, free:
GEAnswer Center”
The
consumer informationservice
~—. --
ii%x%?=-
———
EzmEK
-–w—–
—.
lwfN
?b obtainservice, seeyour warranty
OHthe back pageofthis book.
We’reproud of our service and
w:~ntyou to be pleased. If for some
rc:~sonyou are nothappy with the
service you rcccive, here are three
stc~s to followfor further help.
FIRST,contact the people who
scrviccd your app~iance. Exp]ain
WTI1)’you arc notpleased. In most
CWWS.this will solve the problem.
NEXT,ifyouarestill notpleased,
writeallthedetails—including
your phone number—to:
Manager, Consumer Relations
General Electric
Appliance Park
Louisville, Kentucky 40225
FINALLY, if your problem is still
not resolved, write:
Major Appliance
Coilsumer Actioi~Panel
20 ~o~-t~lWacker ~1-ive
e~licago.Illinois
60606
Page 41

Y i“
T
Saw?proofoforiginal purchase datesuchasyoursalesslip orcancehxi checktoestablishwarrantyperiod.
FW..L
Foroneyearfromdateoforiginal
purchase,wewill provide,freeof
charge,partsand serviceiabor
inyourhometo repairor replace
anypartof the
fxxM2g center thfails because
of a manufacturing defect.
HXUR-YEAR
Forthe secondthrough fifth year
from date of original
will provide,
replacementmagnetron tube if
the magnetrontubefails because
of a manufacturing defect. Youpay
for the servicetrip to your home
and service labor charges.
ill
freeofcharge,a
~urchase, we
Thiswarrantyisextendedto
the original purchaserand any
succeedingownerfor products
purchasedfor ordinaryhomeuse
inthe
48mainlandstates,Hawaii
andWashington,DC. [nAlaskathe
warrantyisthe sameexceptthat it is
LHvIIT$33becauseyoumust payto
shipthe producttothe serviceshop
or forthe servicetechnician’stravel
coststo your home.
Ail warrantyservicewill be provided
byourFactoryServiceCentersor
byour authorized CustomerCare”
servicersduring normalworking
hours.
LookintheWhiteorYellowPages
of yourtelephonedirectoryfor
GENERAL ELECTRICCOMPANY,
GENERAL ELECTRICFACTORY
SERVKX, GENERAL ELECTRIC-
HOTPOINTFACTORYSERVICEor
GENERAL ELECTRICCUSTOMER
CARE@SERV!CE.
.....
,—
~ Service trips to your hometo
teach you howto usethe product.
your Use and Care material.
Read
Hyouthen haveany questions
about operating the product,
please contact yourdealer or our
Consumer Affairs office atthe
address below,or call, toll free:
The GE Answer Cente@
800.626.2000
consumer information service
@Improper installation.
If you havean installation problem,
contact your dealer or installer.
Youareresponsible for providing
adequateelectrical, gas,exhausting
and other connecting facilities.
Some statesdo notallowthe exclusionor limitationofincidentalorconsequentialdamages,sothe abovelimitationor exclusion
may not apply to you.
Toknowwhat your legal rights are in your state,consult your local or stateconsumer affairs office or your state’sAttorney General.
Thiswarranty givesyou specific legal rights, and you may also have other rights which vary from statetostate,
Electric
~ Replacement of house fuses or
resetting of circuit breakers.
@Failureofthe product if it is used
for other than its intended purpose
or used commercially.
~ Damage to productcaused
byaccident, fire, floods or acts
of God.
WARRANTORISNOTRESPONSIBLE
FORCONSEQUENTIAL DAMAGES,
;?ar”t No. IEZID1352 P029–]
:PuhNo.49-4824
I
 Loading...