

Page 1
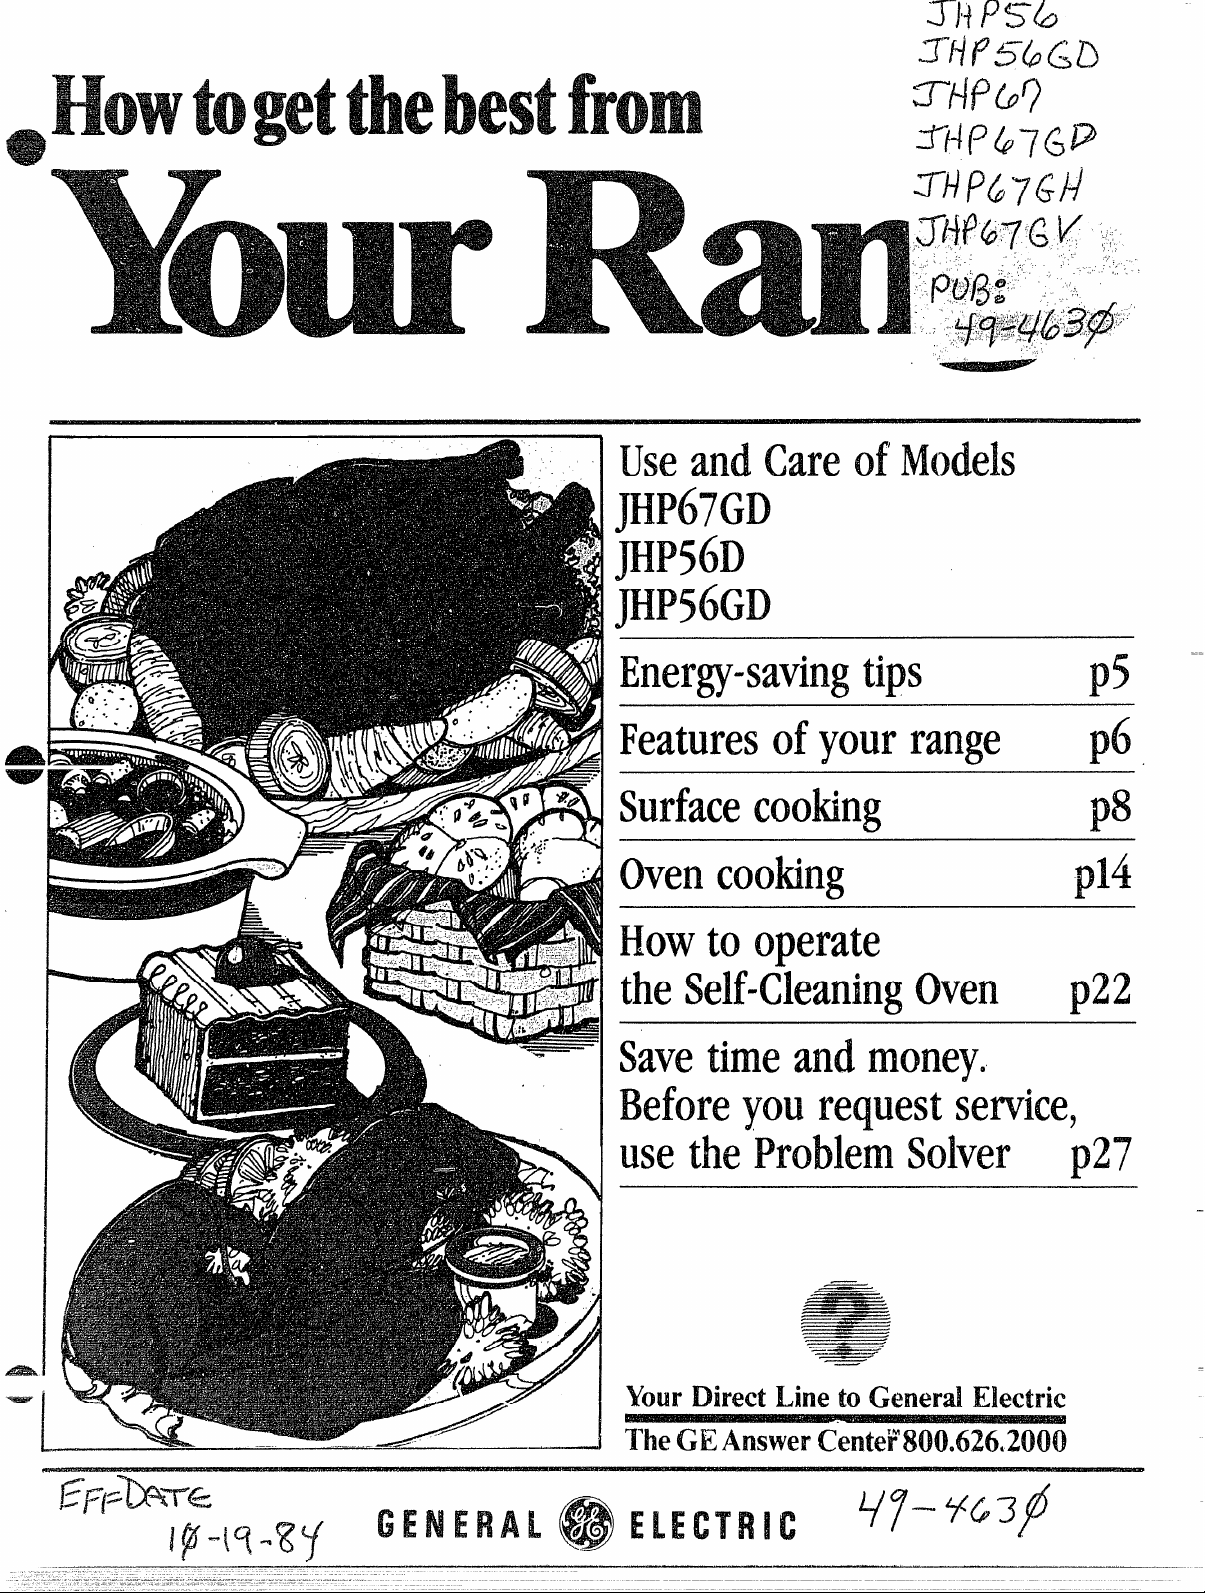
UseandCareof
.-
—
tips
Featuresofyourrange
Surfacecooking
Ovencooking
p5
p6
p$
.
pMi
Howtooperate
theSelf-CleaningOven
p22
Savetimeandmoney
Beforeyourequestservice,
usetheProblemSolver
p2’7
w
Mm Direct Line toGeneral Electric
The ~ihhmwm
Page 2
Before Using Your Range. ... , ...2
Safety instructions ...........3-4
Energy Saving Tips. . . . ... ......5
Feati.wesofYour Range .......6-~
Sudace~ooking .. .. ..*. ... ~..*8-
Ho~7ToLJseYour~utomatic Surface<
Unit & Cooking ~hart .. ...9-10
~owTo Griddle . ... . . . .......11 “:
Automatic.Tirner and Cl~cks .. .13
Using Your Ov&no.,.. . . . .......14
~owTo~ak~anclThngBake .. .15 ,
HOW-TORoast. ~. .: . . ....:.... 16
HoWTo Broil:: ... .. . . .. ......17 , .
How To Use. ““
Your Rotisserie ... ... ... .l8-l9
How To Use ~ð‘ - ‘
Your Meat Ther~ometer ; .20-21 ~
EIowto~elf-.Clean - . s
Your Range ::i.:.. .”.:.22223r3r-
How To C&e fior :
YourRange . .i. . . . . . . . ~.24-25 .“
-Removable”&en Door -..-.*....24
ExhaustSystem.. . . i.. . .... . . .26
Problem Solver . . . .; . ~,.. . . . . . . ~~:
Cleaning Y:ur Ra~ge, . . . ....28-29
Surface Cooking Chart .. ...30-31
Baking Char~ ...:. . . . . . . . . . . . .32
Roasting Chart . . . .. . . . . . . . . t
Broiling Chart . ...............34,
Home Canning Tips . . ... ......35
Consumer Services . . . . . .......39
Warranty . . . . . . . . . . . Back Cover
. .
,.
●33.
Read ThisBook Ctwefuiiy
It will help you operate and-maintain your new Range properly.
Keep it handy for answers to your
questions.
If you don’t understand something
or-need more help. . .
Call, toll free:
T1-IeGE Answer Center’M
800.626.2000
consumer information service
or write: (include your phone
number);
Consumer Affairs
General Electric Company
Appliance Park
Louisville, KY 40225
WriteDowrIthe Model and
SerialNumbers
You’llfind them on a label on the
front of the Range behind the oven
door.
These numbers are also on the
Consumer Product Ownership Registration Card that came with your
Range. Before sending in this card,
please write these numbers hel”e:
ModelNO.
Serial No.
Use these numbers in any correspondence or servicecalls concerning your Range.
MYouReceived
a DamagedRange?
immediately contact the dealer (or
builder) that sold you the Range.
Save Timeand Money . . .
BeforeYouRequestService
Check the Problem Solver (page
27). It lists minor causes of operating problems that you can correct
yourself.
Page 3
, Read an before using this
When using electrical appliances
basic safety precautions should be
followed, including the following:
@ Use this appliance only for its
intended use as described in this
mailual.
* Be sure your appliance is properly installed and grounded by a
qualified technician in accordance
with the provided installation
instructions.
* Don’t attempt to repair or
replace any part of your range
unless it is specifically recommended in this book. All other
servicing should be referred to
a qualified technician.
@ Before performing any service,
DISCONNECT THE RANGE
POWER SUPPLY AT “rHE
HOUSEHOLD DISTRIBUTION
PANEL BY REMOVING THE
FUSE OR SWITCHING OFF
THE CIRCUIT BREAKER.
@ Do
children should not be left alone
or unattended in area where
appliance is in use. They should
never be allowed to sit or stand
on any part of the appliance.
@ Don’t
not leavechikirenahme-
allowanyoneto climb,
standorhangon thedoor,drawer
orrangetop. Theycoulddamage
therangeandeventipit over
causingseverepersonalinjury.
* CALJ’HON:DO NOTSTORE
@ Wearproperclothing.Loose
fitting or hanging garments should
never be worn while using the
appliance. Flammable material
could be ignited if brought in contact with hot heating elements and
may cause severe burns.
@ Use only
moist or damp potholders on hot
surfaces may result in burns from
steam. Do not let potholders
touch hot heating elements. Do
not use a towel or other bulky
cloth.
@
Neveruseyourappliancefor
warmingorheatingtheroom.
@ Storagein oron Appliance—
Flammable materials should not
be stored in an oven or near sur-
face units.
@
Keephoodandgreasefilters
to maintain good venting
clean
and to avoid grease fires.
@ Do
not letcookinggreaseor
otherflammablematerialsaccumulateintherangeornearit.
@ Do not usewateron grease
fires.Neverpickupa flamingpan.
Smotherflamingpanon surface
unitby coveringpancompletely
withwellfittinglid,cookiesheet
orflattray.Flaminggreaseoutsidea pancanbeput outby
coveringwithbakingsodaor,if
available,a multi-purposedry
chemicalorfoam.
ITEMSOF’INTERESTTO
CHILDRENIN CABINETS
ABOVEA RANGE ORON THE
BACKSPLASHOF ARANGE–
CHILDREN CM’WMNGON
THERANGE TOREACH
ITEMSCOULDBESERIOUSLY
INJURED.
drypothokiers—
@ Do not touchheatingelements
orinteriorsurfaceof oven.
surfaces may be hot enough to
burn even though they are dark in
color. During and after use, do
not touch, or let clothing or other
flammabIe materials contact surface units, areas nearby surface
units or any interior area of the
oven; allow sufficient time for
cooling, first.
Potentially hot surfaces include
the cooktop and areas facing the
cooktop, oven vent opening and
surfaces near the openings, and
crevices around the oven door.
These
Remember:The inside surface of
the oven may be hot when the
door is opened.
@ When
directions exactly and always cook
the meat to at least 170°. This
assures that, in the remote possibility that trichina may be present
in the meat, it will be killed and
meat will be safe to eat.
cookingporkfollow our
(Ccmtinuednext p~gc?) - ~
Page 4
‘owl-x
@ Standawayfromthe range
whenopeningovendoor.Thehot
airorsteamwhichescapescan
causebur=nsto hands,face2md/
oreyes.
* Don’theatunopenedfoodcontainersinthe oven.Pressurecould
Mid up andthe containercould
burstcausinganinjury.
Keep oven vent ducts
@
unobstructed.
@ Keep oven free from grease
build up.
@ Place oven rack in desired posi-
tion while oven is cool. If racks
must be handled when hot, do not
let potholder contact heating units
in the oven.
@ Pulling out shelf to the shelf
stop is a convenience in lifting
heavy foods. It is also a precaution against burns from touching
hot surfaces of the door or oven
walls.
* When using cooking or
roasting bags in oven, follow the
manufacturer’s directions.
@ Do not use your oven to dry
newspapers. If overheated, they
can catch fire.
Self-Cleaning Oven:
@ Do not
door gasket is essential for a good
seal. Care should be taken not to
rub, darnage, or move the gasket.
@ Do
commercial oven cleaner or
No
oven liner protective coating of
any kind should be used in or
around any part of the oven.
@ (lean only parts listed in this
Use arid Care Book.
@
Beforeself-cleaningthe oven,
remove broiler pan and other
utensils.
cleandoorgasket.The
not useovencleaners.
!!hw’fhcecooking units:
@ lhe
appliance is equipped with one or
more surface units of different
size. Select utensils having flat
bottoms large enough to cover the
surface unit heating element. The
use of undersized utensils will
expose a portion of the heating
element to direct contact and may
result in ignition of clothing.
Proper relationship of utensil
to burner will also improve
efficiency.
@ Never Ieave
unattendedat highheatsettings.
Boilover causes smoking and
greasy spillovers that may catch
on fire.
@ Be sure
ducts are not covered and are in
place. Their absence during cooking could damage range parts and
wiring.
@ Don’t
drippans
except as described in this book.
Misuse could result in a shock,
fire hazard, or damage to the
range.
@ Only certain types of glass,
glass/ceramic, ceramic, earthenware, or other glazed containers
are suitable for range-top service;
others may break. because of the
sudden change in temperature
(See Section cm“Surface Cooking”
for suggestions.)
@ To minimize
flammable materials, and spillage;
the handle of a container should
be positioned so that it is turned
toward the center
without
surface units.
@ Don’t immerse or soak removable surface units. Donl put them
in a dishwasher.
P’roperPan Size—This
surfaceunits
drippans and vent
useahrmimrrnfoilto line
or anywhere in the oven
burns,ignition of
of& range
extendingovernearby
@ Ahvaysturnsurfaceunitto
OFF beforeremovingutensil.
* Keep an eye cmfoods being
fried at HIGH or MEDIUM
HIGH heats.
@ Toavoid the possibilityof a
burnor electricshock,alwaysbe
certainthatthe controlsforail
surfaceunitsareat OFF position
andallcoilsarecoo]before
attemptingto removethe unit.
@ Whenflamingfoodsunderthe
hood, turnthefan off.Thefan,if
operating,mayspreadtheflame.
@ Foods forfryingshouldbe as
dryas possible.
foods or moisture on fresh foods
can cause hot fat to bubble up
and over sides of pan.
@
[Jselittle fat for effective
shallow or deep-fat frying. Filling
the pan too full of fat can cause
spillovers when food is added.
@ If a combination of oils or fats
will be used in frying, stir together
before heating, or as fats melt
slowly.
@
Alwaysheatfatsiowly9and
watch as it heats.
@ Use deep fat thermometer
whenever possible to prevent overheating fat beyond the smoking
point.
Frost on frozen
Page 5
}“ouI-ranqe, like many other house-
hold items, isheavy and can settle
into soft floor coverings such as
cushioned vinylor carpeting. When
moving the range or-ithis type of
ilooring. use care, and it is recommended that these simple and inexpensiveinstructions be followed.
The range should be instaHedon a
sheet of plywood (or similar material) as follows: When
covering is terminated at thejront
of the range,
the area that the range
ihejloor
\\’illrest on should be built up with
plywood to the same level or higher
than the floor covering. This will
then allow the range to be moved
for cleaning or servicing.
-the
Levelingscrewsare located on each
corner of the base of the range. By
removing the bottom drawer you
can level the range to an uneven
j?oorwith the use of a nutdriver.
To remove drawer, pull drawer out
all the way, tilt up the front and
remove it. To replace, insert glides
at back of drawer beyond stop on
range glides. Lift drawer if necessary to insert easily. Let front of
d~.a~verdown, then push
in to close.
surfacecooking
Use cooking utensilsof medium
weight aluminum, tight-fitting
covers, and -iIatbottoms which
completely cover the heated portion of the surface unit.
Cook fresh vegetableswith a
minimum amount of water in
a covered pan.
Watch foods when bringing them
quickly to cooking temperatures
at HIGH heat. When food
reaches cooking temperature,
reduce heat immediately to
lowest setting that willkeep it
cooking.
Use residual heat with surface
cooking whenever possible.For
example, when cooking eggsin
the shell, bring water to boil,
then turn to OFF position to
complete the cooking.
Use correct heat for cooking
task. .
(if time allows, do not use HIGH
heat to start), MEDIUM HI—
quick brownings, MEDIUM—
slowfrying, LOW—finishcooking
most quantities, simmer—doUble
special for small quantities.
coffee, heat only the amount
.HIGH—to start cooking
boiler heat, finish cookifig,and
When boiling water for tea or
needed. It is not economical to
boil a container full of water for
only one or two cups.
oven$mMRg
Preheat the oven only when
necessary. Most foods will cook
satisfactorily without preheating.
If ~~oufind preheating is neces-
sary, watch the indicator light,
and put food in the oven
promptly after the light goes out.
Always turn oven OFF before
removing food.
During baking, avoid frequent
door openings. Keep door open
as short a time as possible when
it i’sopened. ,
Cook complete oven meals
instead of just one food item.
Potatoes, other vegetables, and
some desserts willcook together
with a main-dish casserole, meat
loaf, chicken or roast. Choose
foods that cook at the same temperature and in approximately
the same time.
Use residual heat in oven whenever possibleto finish cooking
casseroles, oven meals, etc. Also
add rolls or precooked desserts
to warm oven, using residual
heat to warm them.
———
ImsYm
,—.
——-——
J——
-.—--—
——n
—
!ai#w4
,—--—
W=& —.
=~.
5
Page 6
@—
al’
— —.———————
4
IVMds JEIP56D,JHP%GD*
?9
.
1
Ill
\ \ I
6?
.
0
●
..
“1/L’””w
L\+ .Zii!i-6
6
a)
@
.
(D
&El
6
/&
f!?
Page 7
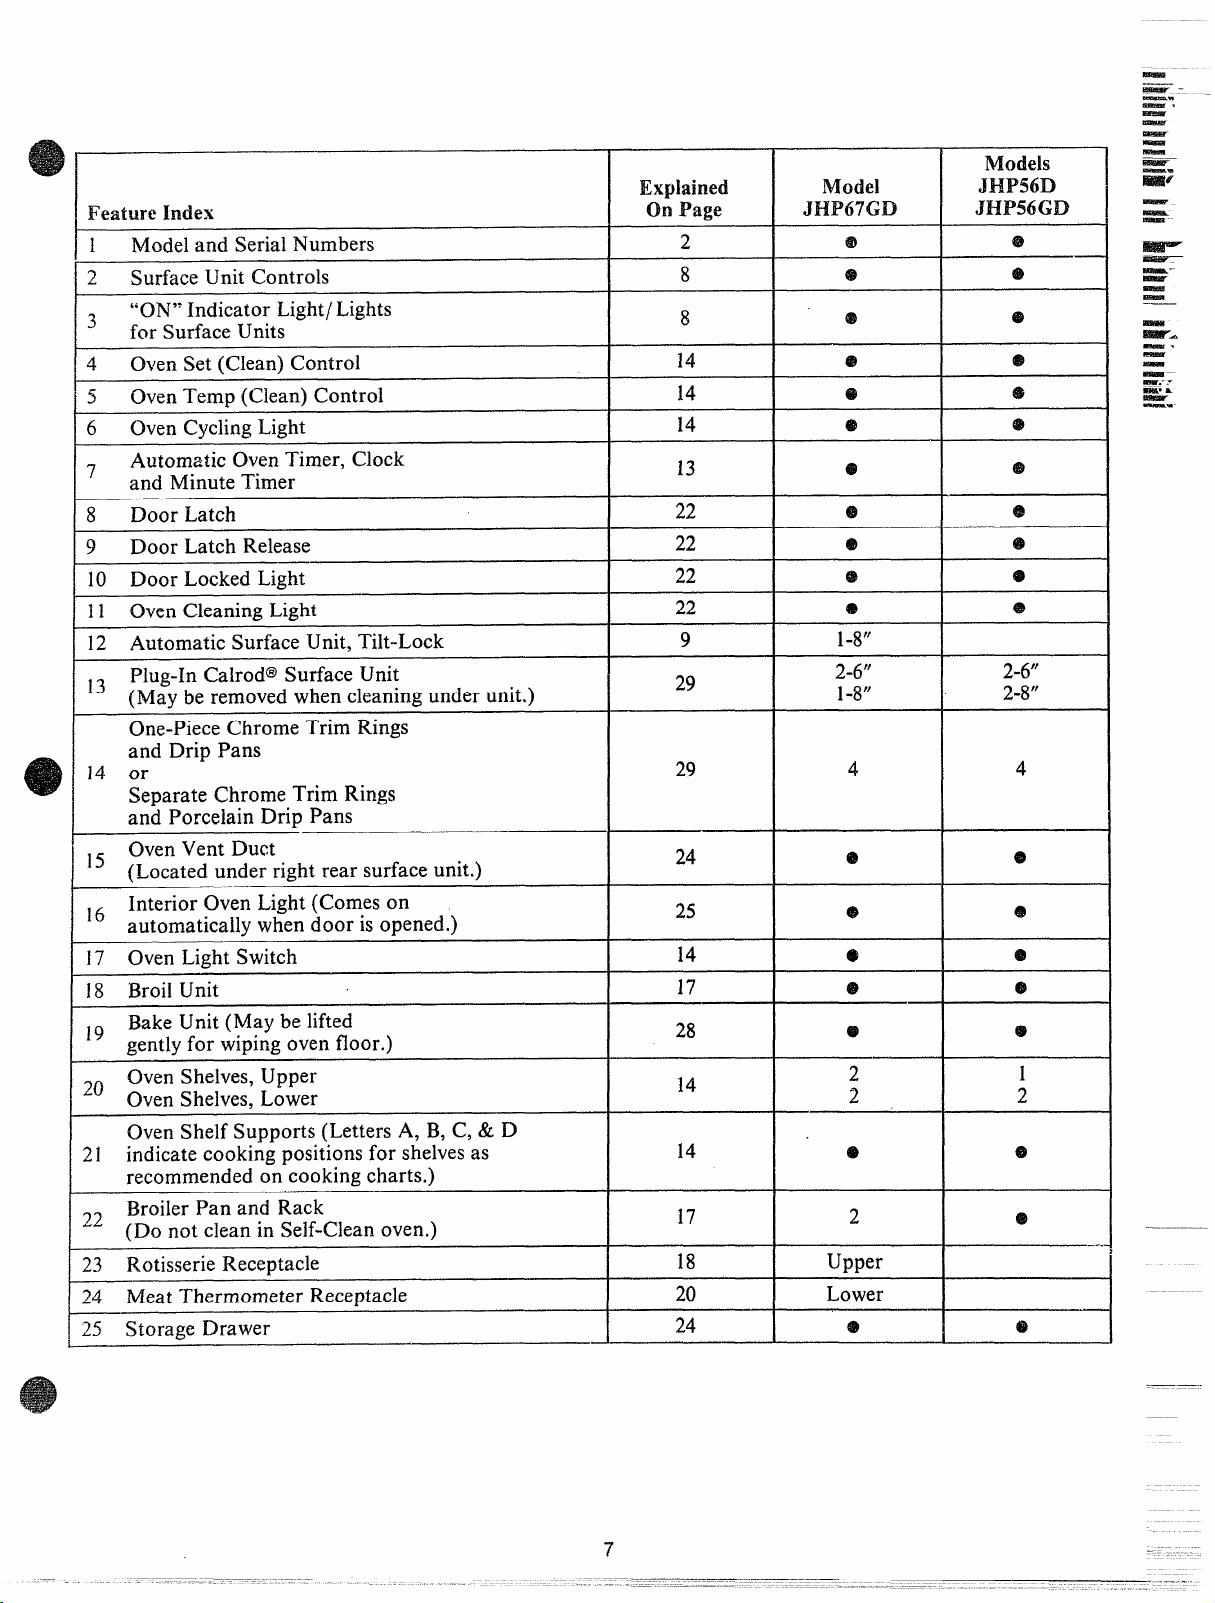
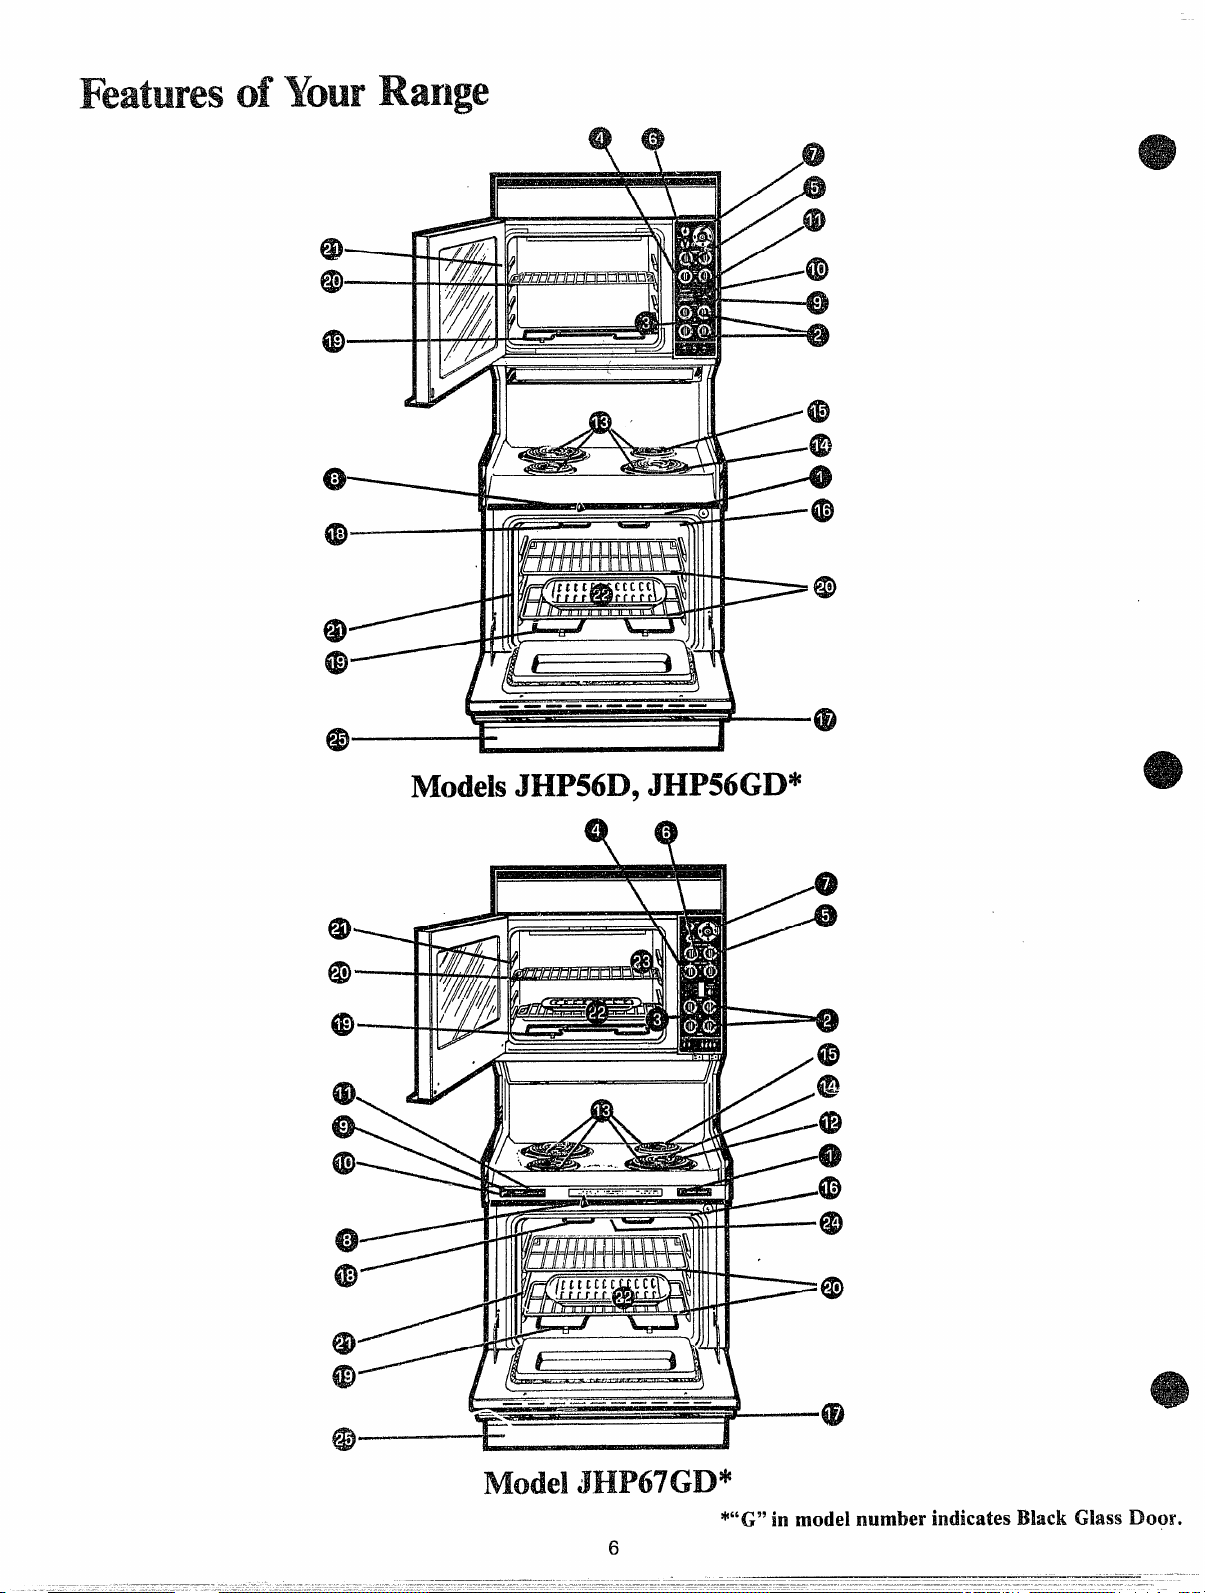
E’eatureIndex
I
Mode] and Serial Numbers
2
Surface Unit Controls
“ON” indicator Light/ Lights
3
for Surface Units
@en set (Clean) control
4
5
Oven Temp (Clean) Control
6 Oven Cycling Light
Automatic Oven Timer, Clock
7
and Minute Timer
8 Door Latch
9
Door Latch Release
10 Door Locked Light
11 Oven Cleaning Light
12 Automatic Surface Unit, Tilt-Lock
13 Plug-h Calrod@Surface Unit
(N4avbe removed when cleaning under unit.)
One-Piece Chrome Trim Rings
and Drip Pans
14 or
Separate Chrome Trim Rings
and Porcelain Drip Pans
I
)
15 Oven Vent Duct
(Located under right rear surface unit.)
I
lb Interior Oven Light (Comes on
automatically when door is opened.)
17 Oven Light Switch
I
I 18 Broil Unit
19 Bake Unit (Maybe lifted
gently for wiping oven floor.)
~. Oven Shelves, Upper
Oven Shelves, Lower
I
Oven Shelf Supports (Letters A, B, C, & D
21 indicate cooking positions for shelves as
recommended on cooking charts.)
22 Broiler Pan and Rack
(Do not clean in Self-Clean oven.)
! 23 Rotisserie Receptacle
t 24 Meat Thermometer Receptacle
I 25 Storage Drawer
Explained
on Page
2
8
8
14
14
14
22
22
22
9
29
24
25
14
17
28
14
17
18
20
24 –
Mock]
lJHP67GD
@
@
@
143”
2+”
143”
2
2
2
Upper
Lower
@
—
Models
Jm%m
JHP56GD
e22
@
2-6”
2-8”
429 4
1
2
kzilE4r:
—.
-.
-
-
-
-
—
--
-
-
.—
Page 8
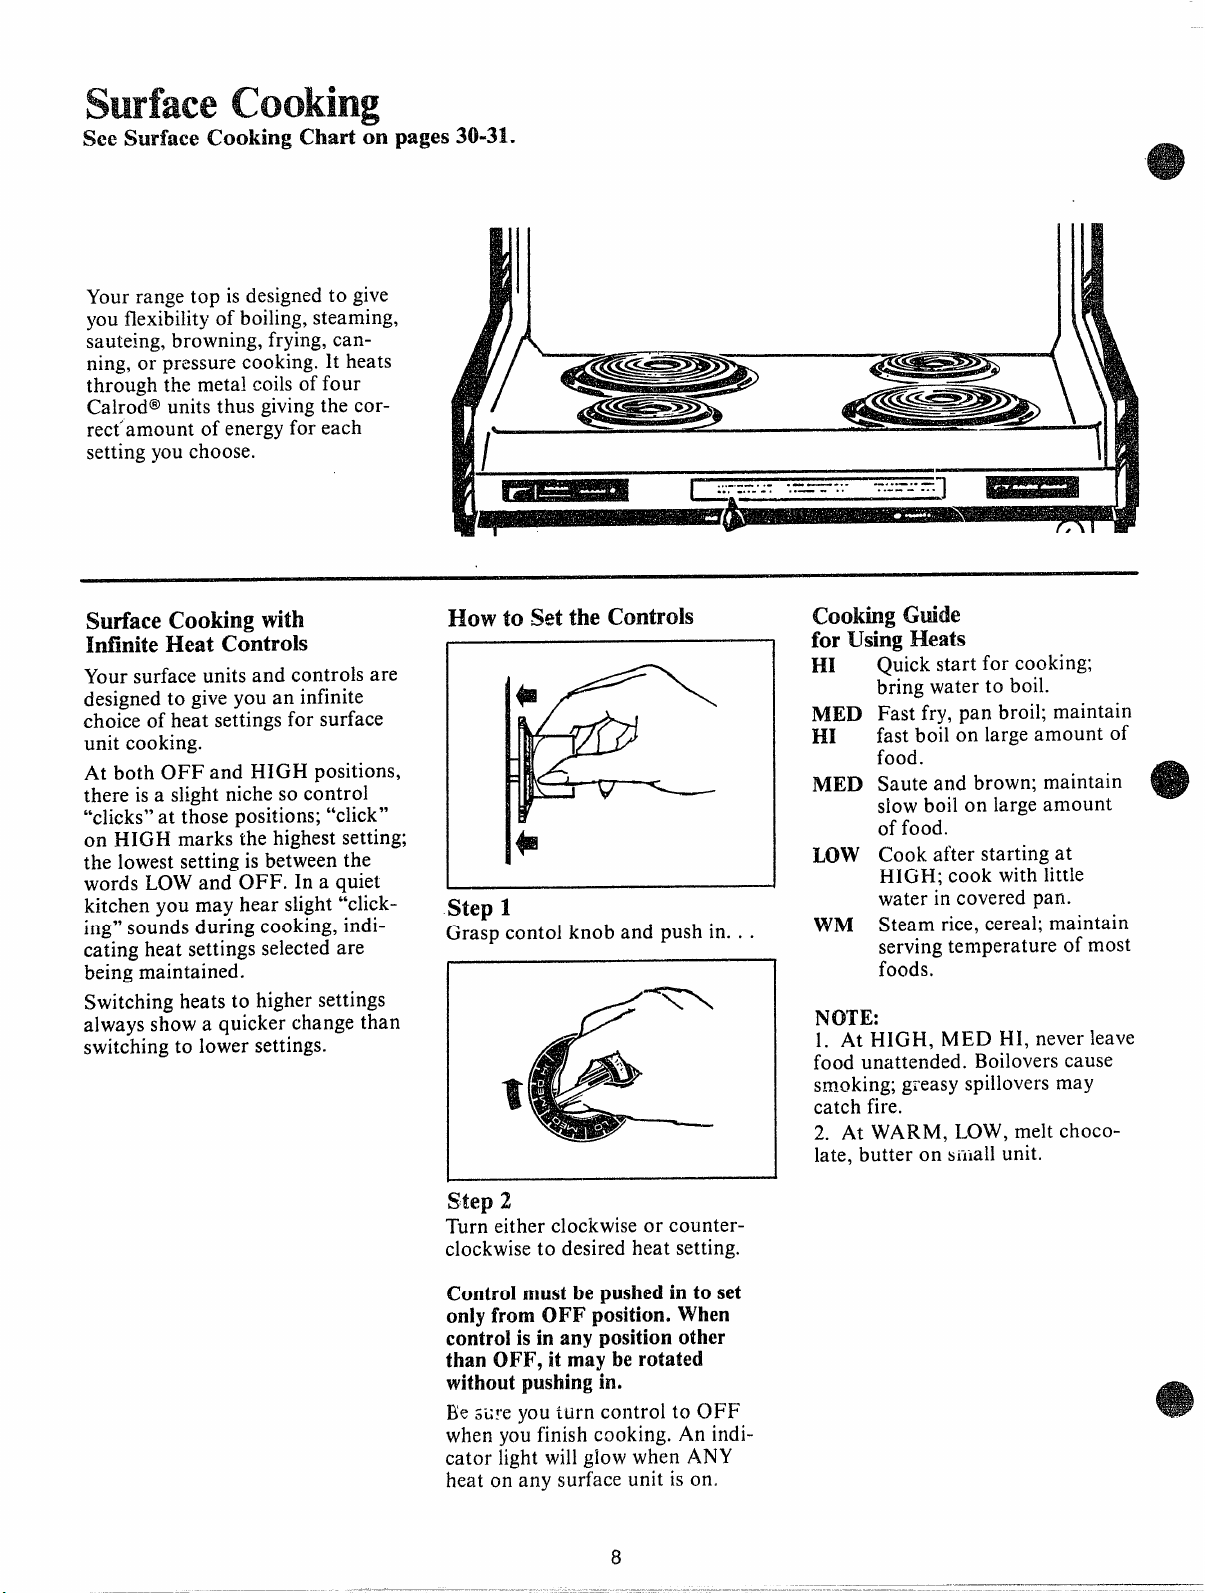
%xSurface Cooking Charton pages 30-31.
Your range top is designedto give
you flexibility of boiling, steaming,
sauteing, browning, frying, canning, or pressure cooking. lt heats
through the metal coils of four
Calrod@units thus givingthe correct’amount of energy for each
setting you choose.
Surface Cooking with
Infinite Heat Controls
Your surface units and controls are
designed to giveyou an infinite
choice of heat settings for surface
unit cooking.
At both OFF and HIGH positions,
there is a slight niche so control
“clicks” at those positions; “click”
on HIGH marks the highest setting;
the lowest setting is between the
words LOW and OFF. In a quiet
kitchen you may hear slight “clicking” sounds during cooking, indicating heat settings selected are
being maintained.
Switching heats to higher settings
always show a quicker change than
switching to lower settings.
I
.,
.-.”- . .-
. . . ---- - . ..— - . .
I
How to Setthe Controls
Step 1
Grasp contol knob and push in. . .
.- —...
Cooking (hide
-.. —.. —
. ---- - . . .
for Using Heats
I-H
MED
HI
MED
Low
WM
NCYI’E:
1. At HIGH, MED HI, never leave
food unattended. Boilovers cause
smoking; greasy spillovers may
catch fire.
2. At WARM, LOW, melt choco-
late, butter on siiiall unit.
Quick start for cooking;
bring water to boil.
Fast fry, pan broil; maintain
fast boil on large amount of
food.
Saute and brown; maintain
S1OWboil on large amount
of food.
Cook after starting at
HIGH; cook with little
water in covered pan.
Steam rice, cereal; maintain
serving temperature of most
foods.
“
Mep 2
Turn either clockwise or counterclockwise to desired heat setting.
Controlmust be pushedin to set
only from OFF
controlis in any position other
than OFF, it may berotated
without pushing in.
Be stimyou ttirn control to OFF
when you finish cooking. An indicator light will giow when ANY
heat on any surface unit is on,
position.When
Page 9
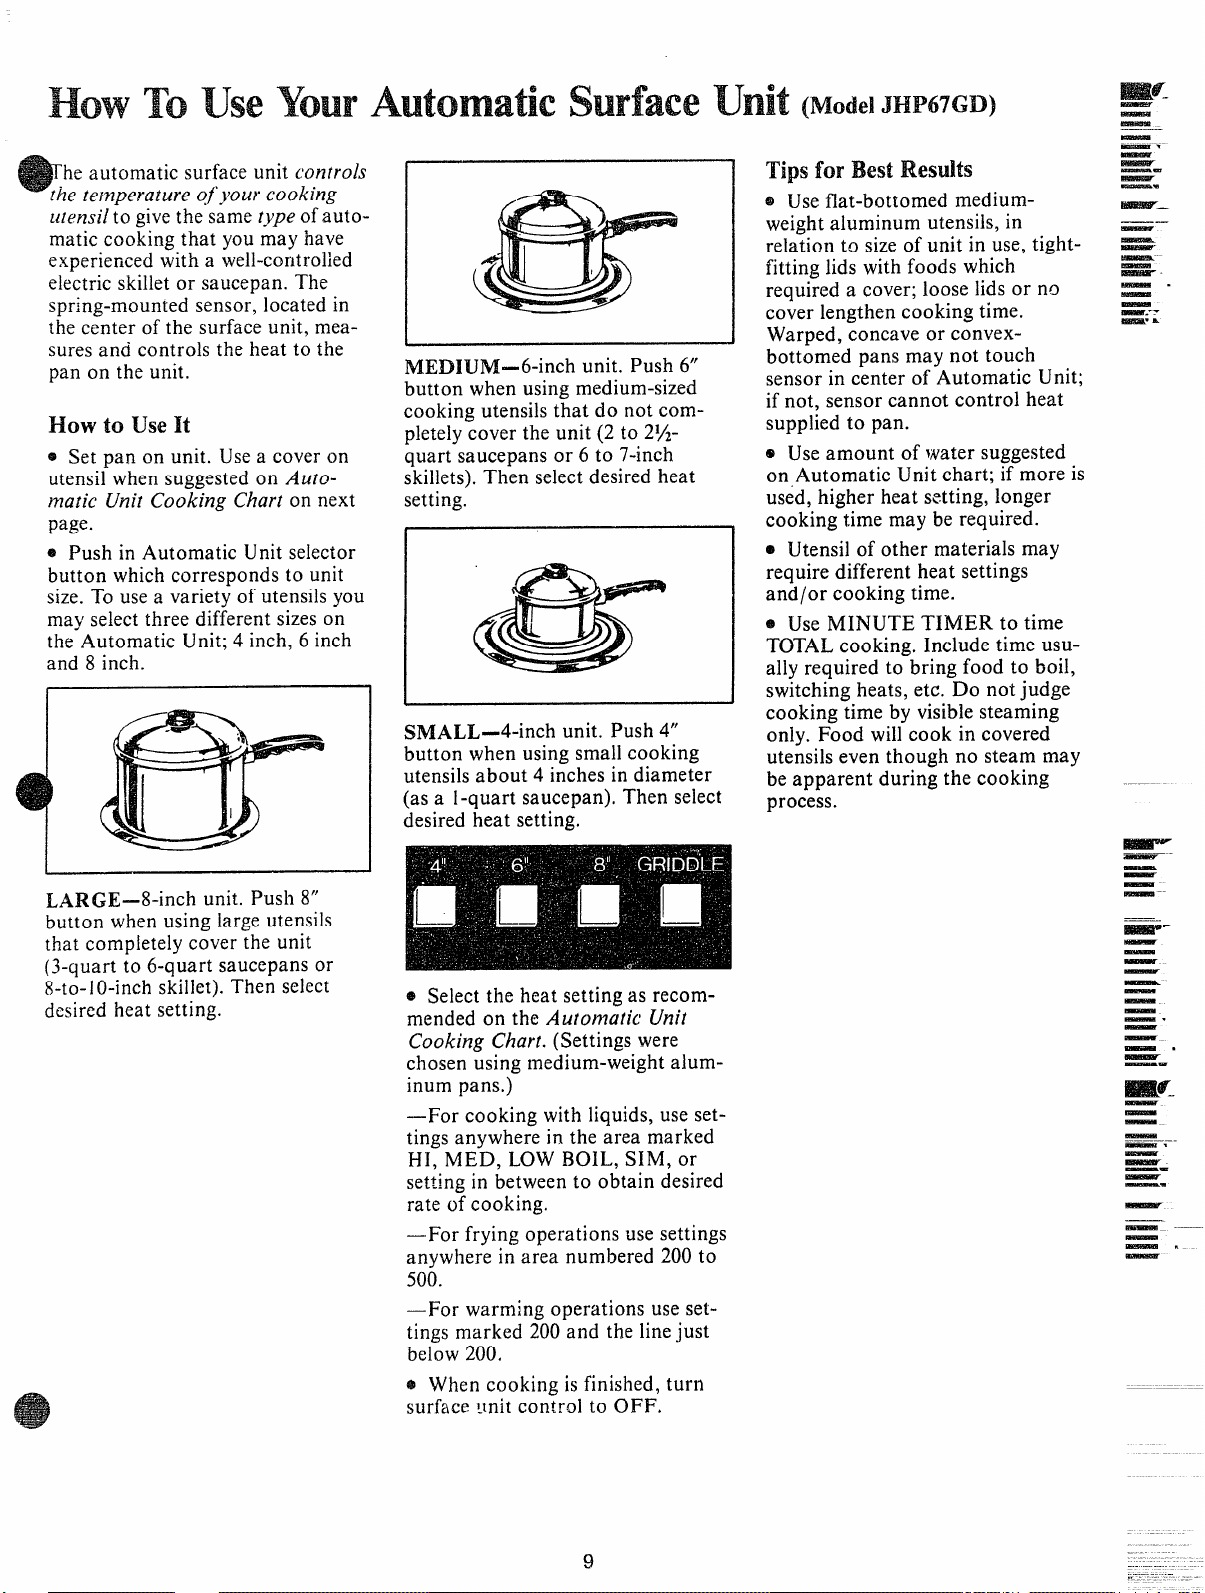
he automatic surface unit controls
——
~hetemperature of’j’ow.
cooking
ulensiltogive the same type ofautomatic cooking that you m-ayhave
experienced with a well-controlled
electric skilletor saucepan. The
spring-mounted sensor, located in
the center of the surface unit, measures and controls the heat to the
pan on the unit.
How touseIt
@Set pan on unit. Usea cover on
utensil when suggested on
Auto-
matic (.ki~ Cooking Chart on next
page.
~ Push in Automatic Unit selector
button which corresponds to unit
size.To use a variety of utensilsyou
may select three different sizes on
the Automatic Unit; 4 inch, 6 inch
and 8 inch.
LARGE—8-inch unit. Push 8“
button when using large utensils
that completely cover the unit
(3-quart to 6-quart saucepans or
8-to-10-inch skillet).Then select
desired heat setting.
I$lEDIUiM-6-inch unit. Push 6“
button when using medium-sized
cooking utensils that do not completelycover the unit (2 to 2~zquart saucepans or 6 to 7-inch
skillets).Then select desired heat
setting.
I
SMALL-4-inch unit. Push 4“
button when using small cooking
utensils about 4 inches in diameter
(as a l-quart saucepan). Then select
desired heat setting.
@Select the heat setting as recom-
mended on the Automu[ic Unit
Cooking Chart. (Settings were
chosen using medium-weight aluminum pans,)
—For cooking with liquids, use settings anywhere in the area marked
HI, MED, LOW BOIL, SIM, or
setting in between to obtain desired
rate of cooking.
—For frying operations use settings
anywhere in area numbered 200 to
500.
—For warming operations use set-
tings marked 200 and the linejust
below 200.
* When cooking is finished, turn
surface Ilnit control to OFF.
TipsforBest Rf?si.dts
* Use flat-bottomed mediumweight aluminum utensils, in
relation to sizeof unit in use, tightfitting lids with foods which
required a cover; loose lids or no
cover lengthen cooking time.
Warped, concave or convexbottomed pans may not touch
sensor in center of Automatic Unit;
if not, sensor cannot control heat
supplied to pan.
@Use amount of water suggested
on Automatic Unit chart; if more is
used, higher heat setting, longer
cooking time may be required.
@Utensil of other materials may
require different heat settings
and/or cooking time.
~ Use MINUTE TIMER to time
TOTALcooking. Include time usually required to bring food to boil,
switching heats, etc. Do not judge
cooking time by visiblesteaming
only. Food will cook in covered
utensils even though no steam may
be apparent during the cooking
process.
—
—.
—.
—
~ -.
—
~
—.
—
—.
mmw7—L—
——
—
—
——
ia!a!w-
—“
—
—
---
MmA_K
—
—
—
—
—–
.——.
f#smz--
—
—
—
—
—
—
—
—.
—
—–
—.
~
—.
—
—
—
-.
—
~
—.
—
—.
~
—.
—
— ---
—
9
Page 10
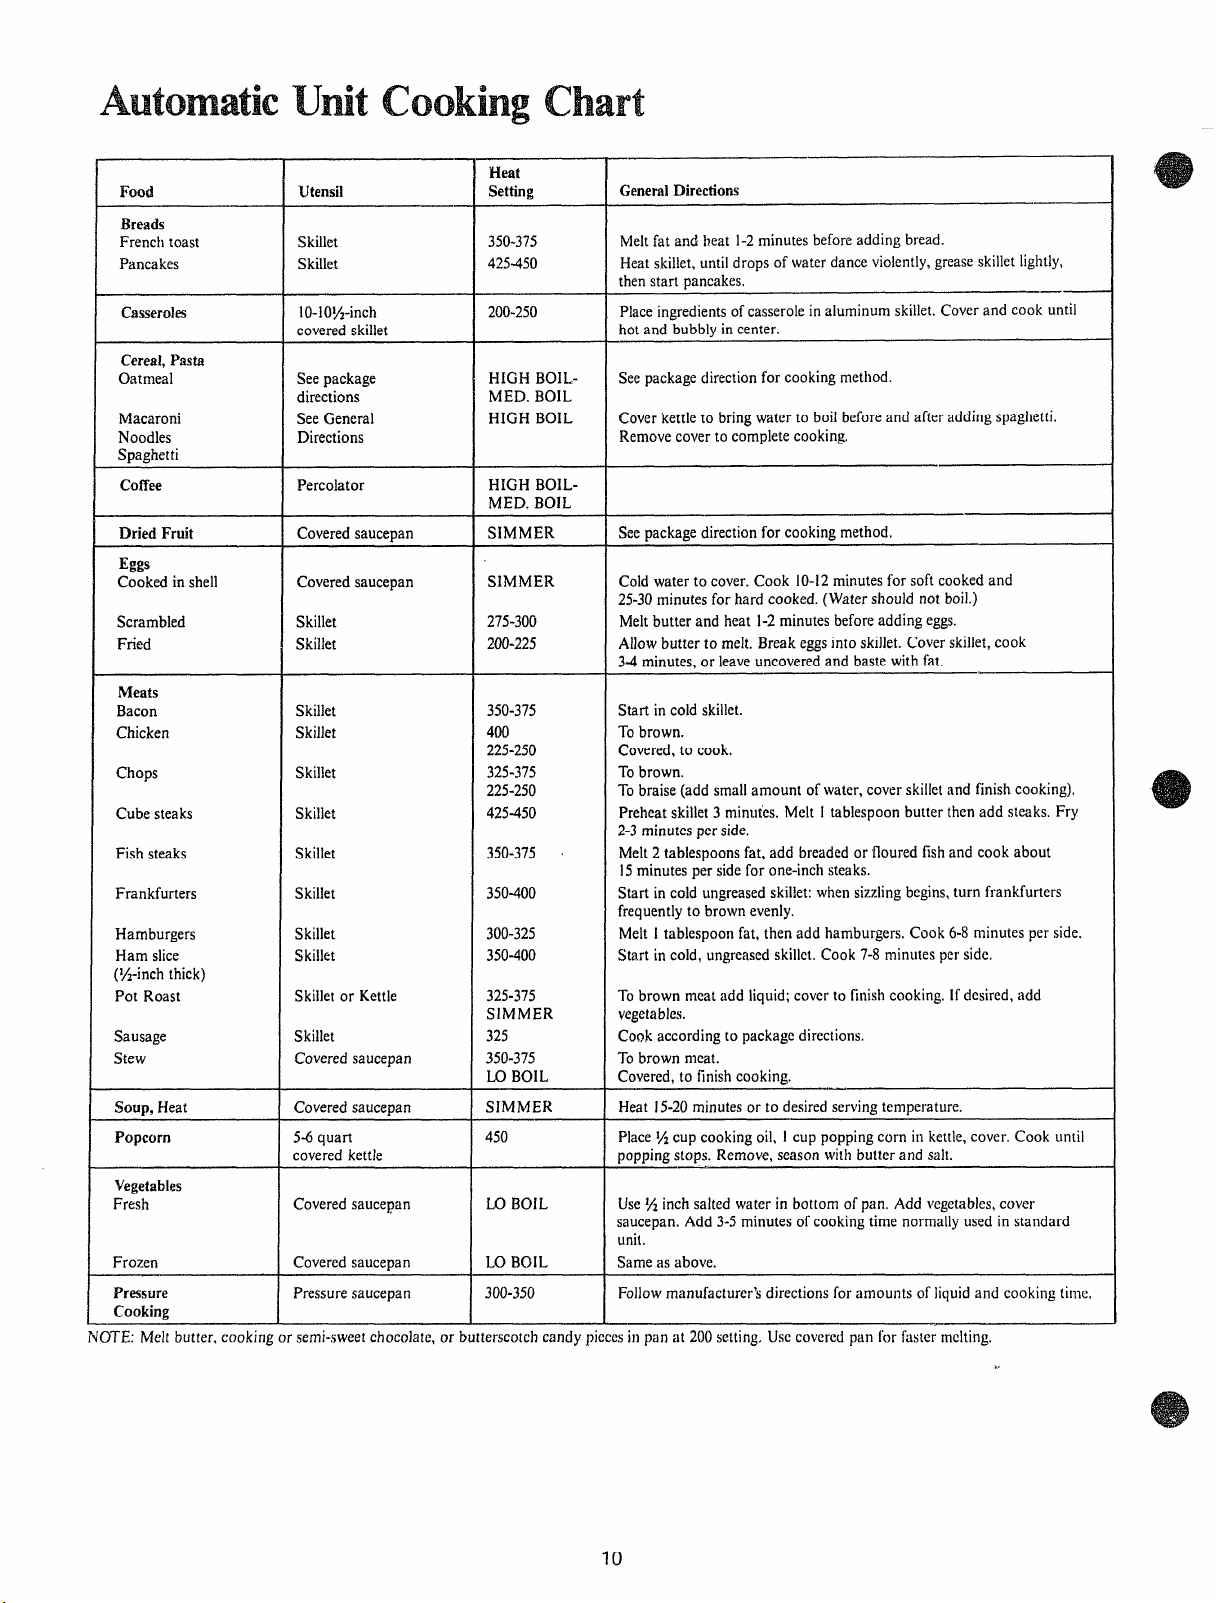
Utensil
Breads
Frenchtoast
Pancakes
Casseroles
Cereal,Pasta
Oatmeal
Macaroni
Noodles
Spaghetti
Coffee Percolator
Skillet
Skillet
10-10~2-inch
coveredskillet
Seepackage
directions
SeeGeneral
Directions
Herd
SettingFood
—
350-375
4~5450
200-250
HIGHBOILMED.BOIL
HIGHBOIL
HIGHBOILMED.BOIL
IXedFruit Coveredsaucepan SIMMER
Eggs
Cookedinshell Coldwaterto cover.Cook10-12minutesforsoftcookedand
Scrambled
Fried
Meats
Bacon
Chicken
Chops
Cubesteaks
Fishsteaks
Frankfurters
Hamburgers
Hamslice
(%-inchthick)
Pot Roast Tobrown meatadd liquid;coverto finishcooking,If desired,add
Sausage
Stew Tobrownmeat.
Coveredsaucepan
Skillet
Skillet
Skillet
Skillet
Skillet
Skillet
Skillet
Skillet
Skillet
Skillet
Skilletor Kettle
Skillet
Coveredsaucepan
soup,Heat Coveredsaucepan
Popcorn 450
Vegetables
Fresh
Frozen
Pressure
Cooking
NOTE:Meltbutter,cookingorsemi-sweetchocolate, or butterscotchcandypicccsinpan at 200setting,Usccoveredpanforfastermelting,
5-6quart
coveredkettle
Coveredsaucepan
Coveredsaucepan
Pressure saucepan
SIMMER
275-300
200-225
350-375
400
225-250
325-375
225-250
425-450
350-375
350400
300-325
350-400
325-375
SIMMER
325
350-375
LOBOIL
SIMMER
LO BOIL
LO BOIL
300-350
(hem] Directions
Meltfatandheat 1-2minutesbeforeaddingbread.
Heatskillet,untildropsof waterdanceviolently,greaseskilletlightly,
thenstart pancakes,
Placeingredientsofcasserole inaluminumskillet.Coverand cookuntil
hotand bubblyincenter.
Seepackagedirectionforcookingmethod.
Coverkettleto bringwaterto boilbeforeandafteraddingspaghetti.
Removecoverto completecooking.
Seepackagedirectionfor cookingmethod.
25-30minutesforhardcooked.(Watershouldnotboil.)
Meltbutterandheat 1-2minutesbeforeaddingeggs.
Allowbutterto melt,Breakeggsintoskillet.Coverskillet,cook
34 minutes,or leaveuncoveredandbastewithfat.
Startincoldskillet.
Tobrown.
Covered,to cook,
Tobrown.
Tobraise(addsmallamountofwater,coverskilletandfinishcooking),
Preheatskillet 3mirmies.Melt1 tablespoonbutterthen add steaks.Fry
2-3minutesperside.
Melt2tablespoonsfat,add breadedor flouredfishandcookabout
15minutespersidefor one-inchsteaks.
Startincoldungreasedskillet:whensizzlingbegins,turnfrankfurters
frequentlyto brownevenly.
Melt1tablespoonfat,thenaddhamburgers,Cook6-8minutesperside.
Startincold,ungreasedskillet.Cook7-8minutesperside.
vegetables.
cook accordingtopackagedirections.
Covered,to finishcooking
Heat15-20minutesorto desiredservingtemperature.
PlaceY2cupcookingoil, 1cuppoppingcorn inkettle,cover.Cookuntil
poppingstops.Remove,seasonwithbutterandsalt.
Use%inchsaltedwaterin bottomofpan,Addvegetables,cover
saucepan.Add3-5minutesofcookingtimenormallyusedin standard
unit.
Sameas above.
Followmanufacturer’sdirectionsforamountsof liquidand cookingtime,
.
—
——
,,
10
Page 11

ToLTse
Model JHP67GD)
YourGE Griddle has an easy-clean,
non-stick cooking surface. Avoid
usingutensils with sharp or rough
points or edges. Do not cut foods
on the griddle. See chart for
cooking directions. If preferred,
foods may be cooked without
greasing griddle.
1. Place griddle on Automatic
Unit; move it back and forth until
it falls into place over unit. The
griddle is designed for easy posi-
tioning; it must be correctly placed
to work properly.
2. Push in Automatic Unit selector
button marked GRIDDLE.
3. Select heat on surface unit control knob. Use settingslisted on
griddle or on chart. For griddle
cooking, use heats between 200-
500.Other markings are for boiling
operations and should not be used
with GRIDDLE settings.
4. When cooking isfinished turn
surface control k-nobto OFF.
5. Let griddlecool on range, or protect hands with heavy, dry potholders before handling. To clean,
seecharts, CareSeclion. To avoid
marring non-stick finish, store
griddle upright, or store flat but no
other pans or utensils on top.
-.—.
—.
—
—
—
—
—.
—
—
—=
—.
—
—.
—
——.
—
—
—“
—
—
-.-T
-,
EmMr.
—
—.
—
—
—
a
Food
~~*Bacon
~~*~Chops
**Cubed Steaks
**~Eggs,Fried
**Fish Steaks, ]”
~~‘~Franks
**-French Toast
r
**Hamburgers,
‘~T*Ham
**
t
**Rolls, Sandwiches
slice, ~“
Pancakes
1/2”
~~*Sausage
*Cold Griddle
TGrease lightly, if desired
**Preheat 10minutes
~~preheat, if desired
setting
375-425
350-400
425-500
275
375-425
400-450
350-375
300-350
375-425
425-450
375-425
350-400
First
Side
Minutes
2-3
2-3
15
5-6
6-8
7-8
lx
Brown each side
Brown each side
Turn, brown evenly
Brown each side
Turn, brown evenly
Second
Side
Minutes
2-3
2-3
15
5-6
6-8
7-8
lx
~–
~-
—
—
———
—
——
—x
—
—
—
—
—
—
—.
11
Page 12
Q. How can my Minute ‘f’hner
make my surface cooking
Your Minute Timer will help.
A.
time TOTALcooking which
includestime to boil food and
change temperatures. Do not judge
cooking time by visiblesteam only.
Food willcook in covered utensils
even though you can’t seeany
steam.
Q. May I can foods and
onmy
A. Yes,but only use utensils de-
signed for canning purposes. Check
the manufacturer’s instructions and
recipesfor preserving foods. Be
sure canner is flat-bottomed and
fits over the center of your Calrod@
unit. Since canning generates large
amounts of steam, be careful to
avoid burns from steam or heat.
Canning should only be done on
surface units.
Q. Can 1use specialcooking equip-
mentlike an orientalwok, on any
surfaceunits?
A. Utensils without flat surfaces am
not recommended. The life of your
surface unit can be shortened and
the range top can be damaged from
the high heat needed for this type
of cookifig.
surface units?
easier?
preserves
Q. CanI covermy drippans with
foil?
A. No. Clean as recommended in
the Cleaning Chart.
Q. Why is the porcelain finish on
my containerscoming off?
A. If you set your Calrod@ unit
higher than required for the container material, and leave it, the
finish may smoke, crack, pop, or
burn depending on the pot or pan.
Also, a too high heat for long
periods, and small amounts of dry
food, may damage the finish.
Q. Whydo my utensils tilt when I
placethemon the surfaceunit?
A. Make sure that the “feet” on
your Calrod@units are sitting
tightly in the range top indentation
and the trim ring is flat on the
range surface. Possibly your plug-in
unit is not plugged into unit
properly.
Q. Why amI not gettingthe heat I
need from my unitseventhough I
havethe knob on the rightsetting.
A. After turning surface unit off
and making sure it is cool, check to
make sure that your plug-in units
are securely fastened into the surface connection.
12
Page 13

The automatic timer and clock on
~rourRange are helpful devicesthat
serve several purposes.
To setclock
TO SET THE CLOCK, push the
centerknob in and turn the clock
hands to the correct time. (If the
Automatic Timer pointer should
move also, let knob out, turn the
Timer pointer to OFF.)
~o SW
Minute Timer
The Minute Timer has been combined with the range clock. Use it
to time all your precise cooking
operations. You’llrecognize the
Minute Timer as the pointer which
isdifferent in color and shape than
he clock hands.
TO SET THE MINUTE TIMER,
turn the center knob, without push-
ing in, until pointer reaches number
of minutes you wish to time. (Min-
utes are marked, up to 60, in the
center ring on the clock.) At the
end of the set time, a buzzer sounds
to tell you time is up. Turn knob, ’
withoutpushingin, until pointer
reaches OFF and buzzer stops.
ml-wBake uses
Ammmtic ‘rimer
UsingAutomatic Timer, you can
I“IME BAKE with the oven starting immediately and turning off at
the Stop Time set or set both Start
and Stop dials to automatically
start and stop oven at a later time
of day. It takes the worry out of
not being home to start or stop the
oven.
Setting the dials for TIME BAKE
is explained in detail on page 15.
~el.f-~lean IJses
Automatic Timer
The self-cleaningfunction on your
range uses the Automatic Timer to
set the length of time needed to
clean whether you wish to clean
immediately or delay the cleaning.
B3Tsetting the Start and/or Stop
Dials you may choose to begin
immediately or clean at low energy
timesduring the night. Full explanations of setting the Start and
Stop Dials for self-cleaningare
described on pages 22 and 23.
Questions
and Answers
Q. How canI usemy MinuteTimer
to make my surfacecooking easier?
A. Your Minute I“imerwillhelp
time total cooking which includes
time to boil food and change temperatures. Do not judge cooking
time by visiblesteam only. Food
willcook in covered containers
even though you can’t seeany
steam.
Q. Mustthe Clockbe set on correct
time of day when 1wishto use the
AutomaticTimerfor baking?
A. Yes,if you wishto set the Start
or Stop Dials to turn on and off at
set times during timed functions.
Q. Can I use the
MinuteTimer
duringovencooking?
A. The Minute Timer can be used
during any cooking function. The
Automatic Timers (Start and Stop
Dials) are used with TIME BAKE
and SELF-CLEAN functions.
Q. Can I changethe clock while I’m
Time Cooking inthe oven?
A. No. The clock cannot be
changed during any program that
uses the oven timer. You must
either stop those programs or wait
until they are finished before
changing time.
Em#s—.
ii%%ik–
—
—
—
—
-– .
——
—
—.
—
—
—
—
——
——
—
IBkar”
——
——
—-
—
—
—
—.
—
—
—~
—.
—.
—
—
~
—.
—
—.
—
-
-
~.
——
-
—
—
msir.
—.
-~-–
13
Page 14

Before -using Youroven
1. Look at the controls. Be sure you
understand how to set them prop-
erly. Read over the directions for
the Automatic Oven Timer so you
understand its use with the
controls.
2. Check oven interior. Look at the
shelves. Take a practice run at re-
moving and replacing them prop-
erly, to givesure sturdy support.
3. Read over information and tips
that follow.
4. Keep this book handy so you can
refer to it, especially during the first
weeks of getting acquainted with
your oven.
oven controls
The controls for the oven(s)are
marked OVEN SET and OVEN
TEMP. OVEN SET has settings for
BAKE, TIME BAKE, BROIL,
CLEAN (and on ovens so
equipped, ROTISSERIE), and
OFF. When you turn the knob to
the desired setting, the proper
heating units are then activated for
that operation.
OVEN TEMP maintains the temperature you set from WARM
(150°) to BROIL (550°) and also at
CLEAN (8800).The Oven Cycling
Light glows until oven reaches the
selected temperature, then goes off
and on with the oven unit(s) during
cooking. PREHEATING the oven,
even to high temperature settings, is
speedy—rarely more than about 10
minutes. Preheat the oven only
when necessary. Most foods will
cook satisfactorily without preheating. If you find preheating is necessary, keep an eye on the indicator
light and put food in the oven
promptly after light goes out.
Poin!er
OvenTempSettingfor NormalCooking
I
HVIPOR’FAN’I’:The OVEN TEMP
control has a blue pointer that is
used only for CLEAN. For normal
cooking, line up the desired tem-
peratures (marked on the outer
edge of the control knob) with the
index marker located immediately
above the control.
For CLEAN, rotate the knob to the
right until blue pointer is pointing
up, toward Index Marker. When
position is reached, knob should
snap into position.
(lven
InteriorShelves
The shelve(s)are designed with
stop-locks so that when placed cor-
rectlyon the shelf supports, (a) will
stop-before coming completely from
the oven, (b) will not tilt when
removing food nor when placing
food on them.
TO REMOVE shelve(s)from the
oven, lift up
rearof shelf, pull for-
ward with stop-locks (curved exten-
sion under shelf)along top of shelf
supports. Becertain that shelf is
cool before touching.
TO REPLACE shelve(s)in oven,
insert shelf with stop-locks resting
on shelf supports. Push shelf
toward rear of oven; it willfall into
place. When shelf is in proper posi-
tion, stop-locks on shelf willrun
under shelf support when shelf is
pulled forward.
oven light
The light comes on automatically
when the door is opened. Use
switch to turn light on and off
when door is closed. Switch is on
front of door.
Lamp IOVerSurface Unit
Lamp may be lighted by pressing
the lamp switch button. Be sure to
hold button depressed until light
comes on.
Page 15

see Baking chart on Page 32.
————————
--
—
When cooking a food for the first
time iri ~ow new Ove~, use time
@ven on recipes as ~ guide. Oven
~~ermostats, over a period of years,
may “drift” from the factory setting
and clifferences in timing between
an old and a ntixv oven of
5 to 10
minutes are not unusual and you
may be inclined to think that the
new oven isnot performing correctly. However, your new oven has
been set correctly at the factory and
is more apt to be accurate than the
oven it replaced.
HOWtO set
YourRange
for Baking
Step 1: Place food in oven, being
certain to leave about l-inch of
space between pans and walls of
oven for good circulation of heat.
Close oven door. During baking,
avoid frequent door openings to
prevent undesirable results.
Step 2: Turn OVEN SET Knob to
BAKE and OVEN TEMP Knob to
temperature on recipe or on Baking
Chart.
Step 3: Check food for doneness
at minimum time on recipe. Cook
longer if necessary. Switch off heat
and remove foods.
l+OWtO
‘f-heautomatic oven timer controls
are designed to turn the oven on or
off automatically at specific times
that you set. Examples of Jmme-
Time Bake
diate Start (oven turns on now and
you set it to turn off automatically)
or Delay Start and Stop (setting the
oven to turn on automatically at a
later time and turn off at a preset
stop time) will be described.
How toSet hmmdiate Start
NOTE:Before beginning make sure
the hands of the range clock show
the correct time of day.
Immediate Start is simplysetting
oven to start baking now and
turning off at a later time automatically. Remember, foods continue
cooking after controls are off.
Step 1:To set Stop Time, push
in knob on STOP dial and turn
pointer to time you want oven to
turn off; for example 6:00.The
Start Dial should be at the same
position as the time of day on
clock.
Step
2:Turn OVEN SET Knob to
TIME BAKE. Turn OVEN TEMP
Kfiob to oven temperature, for
example 250°.
How to$%4Dekty Start
and Stop
Delay Start and Stop is setting the
oven timer to turn the oven on and
off automatically at a later time
than the present time of day.
Step 1: To set start time, push in
knob on START dial and turn
pointer to time you want oven to
turn on, for example 3:30.
Step2: To setStop Time, push in
knob on STOP dial and turn
pointer to time you want oven to
turn off, for example 6:00.This
means your recipecalled for two
and one-half hours of baking time.
NOTE:Time on Stop Dial must be
later than time shown on range
clock and Start Dial.
Step 3:Turn OVEN SET Knob to
TIME BAKE. Turn OVEN TEMP
Knob to 250° or recommended
temperature.
Place food in oven, close the door
and automatically the oven will be
turned on and off’at the times you
have set. Turn OVEN SET to OFF
and remove food from oven.
15
Page 16

to
seeRoasting chart or?) Page 33.
Roasting is cooking by dry heat.
Tender meat or poultry can be
roasted uncovered in your oven.
Roasting temperatures, which
should be low and steady, keep
spattering to a minimum. When
roasting, it is not necessary to sear,
baste, cover, or add water to your
meat.
Roasting is really a baking procedure used for meats. Therefore,
oven controls are set to BAKE.
(You may hear a slight clicking
noise to indicate the oven is
working properly.) Roasting is
easy,just follow these steps:
Step 1:Check weight of meat, and
pla~e,fat side up, on roasting rack
in a shallow pan. (Broiler pan with
rack is a good pan for this.) Line
broiler pan with aluminum foil
when using Pan for marinating,
cooking w~thfruits, cooking h~avily
cured meats, or for basting food
during cooking. Avoid spilling
these materials on oven liner or
door.
Step 2:Place in oven on shelf in A
or B position. No preheating is
necessary.
Step 4:Most meats continue to
cook slightlywhile standing after
being removed from the oven. For
rare or medium internal doneness,
if meat is to stand 10-20minutes
whilemaking gravy or for easier
carving, you may wish to remove
meat from oven when internal temperature is 5-10”F below temperature suggested on chart. lf no
standing is planned, cook meat to
suggested temperature on chart on
page 33.
NOT’E:You may wish to use TIME
BAKE as described on preceding
page to turn oven on and off automatically. Also, if your oven is
equipped with special meat ther-
mometer, see page 20for usage.
For Frozen Roasts
Frozen roasts of beef, pork,
~
lamb, etc., can be started without
thawing, but allow 10-25minutes
per pound additional time (10 min.
per pound for roasts under 5
pounds, more time for larger
roasts).
UIThaw most frozen poultry before
roasting to ensure even doneness.
Some commercial frozen poultry
can be cooked successfullywithout
thawing. Follow directions given on
packer’slabel.
Questionsand Answers
Q.1s it necessarytocheckfordone-
newwitha meatthermometer?
A. Checking the finished internal
temperature at the completion of
cooking time isrecommended. Temperatures are shown on Roasting
Chart on page 33. For roasts over
8 lbs., cooked at 300° with reduced
time, check with thermometer at
half-hour intervals after % of time
has passed.
Q. Why is my roastcrumbling
whenI tryto carve it?
A. Roasts are easier to slice if
allowed to cool 10to 20 minutes
after removing from oven. Be sure
to cut across the grain of the meat.
Q. Do 1need to preheatmy oven
eachtime I cook a roastor poultry?
A.
Itis rarely necessary to preheat
your oven, only for very small
roasts, which cook a short length
of time.
Q. Whenbuyinga roast arethere
any specialtipsthat would helpme
cook it moreevenly?
A. Yes.Buy a roast as even in
thickness as possible or buy rolled
roasts.
Q. Can I seal the sides of my foil
“tent” when roasting a turkey?
A, Sealing the foil willsteam the
meat. L,eavingit unsealed allows
the air to circulate and brown the
meat.
Step 3:Turn OVEN SET to BAKE
arid OVEN TEM P to 325°. Small
poultry may be cooked at 375° for
best browning.
Page 17

See Broiling Charton Page 34.
- -—
EE3sisl
—
Broiling is cooking food by intense
radiant heat from the upper unit in
the oven. Most fish and tender cuts
of meat can be broiled, Follow
these steps to keep spattering and
smoking to a minimum.
Step 1: If’meat has fat or gristle
near edge, cut vertical slashes
through both about 2-in. apart. If
desired fat may be trimmed, leaving
layer about %-in. thick.
Step 2: Place meat on broiler rack
in broiler pan which comes with
range. Always use rack so fat drips
into broiler pan; otherwise juices
may become hot enough to catch
fire. Aluminum foil may be used to
line broiler pan and rack. But, be
CERTAIN to cut opening in foil, to
correspond with slots in ~herack so
fat drips into pan below.
Step3: Position shelf on recomme~ded shelf position as suggested
on Broiling Chart on page 34. Most
broiling is done on C position, but
if your range is connected to 208
\olts, you may wish to use higher
position.
,
Step 4: Leave door ajar about 3
inches. The door stays open by
i{self,yet the proper temperature
ismaintained in the oven.
Step 5: Turn OVEN SET Knob and
OVEN TEMP Knob to BROIL. Preheating units is not necessary.(See
notes on Broiling Chart page 34.)
Step 6: Turn food only once during
cooking. Time foods for first side
as on Broiling Chart page 34, Turn
food, then use times given for sec-
ond side as a guide to preferred
doneness. (Where two thicknesses
and times are given together, use
first times given for thinnest food.)
Step 7:Turn OVEN SET Knob to
OFF. Serve food immediately,
leave pan outside oven to cool
during meal for easiest cleaning.
Questions and Answers
Q. Should I leave the door ajar
when broiling chicken?
A. No, The door should be closed
when cooking chicken and shelf
position “A” is recommended.
Q.
May I use aluminumfoil to line
the broiler pan and rack?
A. Yes,if youmold foil thoroughly
to broiler rack, slittingit to con-
form to slits in rack. Slits permit
proper drainage of meatjuices into
broiler pan, minimizingsmoking
and spattering and preventing possibility of fire from overheated
drippings. Do not place sheet of
foil on oven shelf. To do so may
result in improperly cooked food
and possible damage to oven finish.
Q. Should Isalt the meat before
broiling?
A. No. Salt draws out the juices
and allows them to evaporate,
Always salt after cooking. Turn
meat with tongs; piercing meat with
a fork also allowsjuices to escape.
When broiling poultry or fish,
brush each side often with butter.
Q. Whenbroiling,isit necmsaryto
alwaysusea rackin
A. Yes.Using the rack suspends the
meat over the pan. As the meat
cooks, thejuices fall into the pan
thus keeping meat dryer. Juices are
protected by the rack and stay
cooler, thus preventing excessive
spatter and smoking.
Q. Do 1 need to greasemy broiler
rackto preventmeatfrom sticking?
A. No, The broiler rack is designed
to reflect broiler heat thus keeping
the surface cool enough to prevent
meat sticking to the surface,
Q.
Why are my meatsnot turzd~g
out as brown as theyshould? A. In some areas, the power (volt-
age) to the range may be low. In
these cases, preheat the broil unit
for 10 minutes before placing
broiler pan with food in oven,
Check to see ifyou are using the
recommended shelfposition, Broil
for the longest period of time indicated in the Broil Chart in this
book, Turn food only once during
broiling,
the pan?
—
—
—.
—
-
Em&u-. —
—
—
—-
—
17
Page 18

to
Mode] JHI%’7GD
Food is cooked by revolving on a
spit under the (upper) broil unit. As
food turns, it bastes itselfto pro-
duce a succulent brown and tender
roast. Meat tender enough for
roasting may be rotissed.
1. Assemble rotisserie. Insert
curved ends of frame into large
holes of broiler pan handles. Lock
frame in place by fitting straight
ends of support into holes in center
handles.
2. Secure food on spit. When
secured correctly, food will be
located in center area of spit
leaving 4 inches free at the pointed
end (this part goes into motor).
3. To secure food on spit: Push
on 2-pronged fork onto spit near
handle end. Tighten with screw.
Push spit through food (tie food
securely and compactly), distributing weight evenly on each side ~
of spit.
To check weight distribution on
spit, hold spit (and food) between
hands, palms up; spit should roll
smoothly from palms to fingertips
when palms are tipped forward.
Finish securing food on spit by
gliding second 2-pronged fork onto
spit with prongs toward food.
Tighten screws to a flat surface
on spit,
4. Place spit on frame so handle
end is in narrow support, and
pointed end is in wide U-shaped
support.
Rotissing the Food:
Put oven shelf in lowest position
1.
in oven. With food on spit, place
spit on oven shelf.
2. Set OVEN TEMP Knob as suggested on Rotisserie Time and
Temperature Chart on next page.
Settings are 300-400to get foods
juicy and done without
overbrowning.
3. Switch OVEN SET Knob to
ROTISSERIE. This starts broil
unit and rotisserie motor operating.
Spit can be inserted and removed
easier when motor is operating.
NOTE: Make certain when touching spit that no part of body or
potholder touches coils of broil
unit.
4. Insert spit into motor: Remove
handle, hold broiler pan with
potholders and push to the right,
pushing spit firmly into motor
outlet as far as it willgo.
5. Check rotation of food. Tighten
or adjust forks if necessary. During
cooking, forks may need tightening
due to normal meat shrinkage.
6. AS FOOD COOKS LEAVE
DOOR AJAR IN “BROIL” POSI-
TION; door stays open by itself.
7. Baste food
long handled
revolves.
if desired. Baste
brush as food
with
Rotisserie Notes
@Do not use electric meat thermometer, on models so equipped,
while operating the rotisserie. A
regular, non-electric meat thermometer may be used while
rotissing providing it doesn’t touch
the oven, frame or pan while meat
revolves, (Or, if desired, cook to
estimated doneness then pull meat
from oven to insert meat ther-
mometer. Wait about 2 minutes for
temperature to register. If meat is
not done, remove thermometer and
continue cooking if necessary.)
@If rotissing turkey, let stand in
warm oven 10to 20 minutes after
cooking to assurejuicy meat and
complete doneness.
e At end of cooking pull out pan
and shelf together, using potholders.
Turn OVEN SET to OFF. Remove
food from spit. Cool pan outside
oven; soak forks and screws for
easiest clean up.
Page 19

Meat
Ther~o~eter
~einpemtures
I300-140°
150°-1600
170°-1850
—
175°-1850
GeneralDirections
~OTE:1.ForroastsCWER10pounds
cookabout 1,4estimated time,thencheckat
yzhourinteWa]swithmeatthermometerfor
internaldoneness.2. Thinroasts,3-4
pounds,mayrequireslightlylongertimes
perpoundthanthosegivenonchart.
175°formedium.
185°forwelldone,
—
Food
Beef
Rolledrib
Rare
Medium =
Welldone
Lamb
bonedandrolled
L.cg,
Approximate
oven Temp.
Setting
325°
325°
325°
350° 24-27
RotissingTime
MinutesPer Lb.
22-29
27-31
32-42
Por~,fresh
Loin
Spareribs(barbecued)
Spareribs(Plain)
Pork,cured
Ham
Cook-Before-Eating
bone-in
FullyCooked
Poultry
Capon*(6-8lbs.)
Chicken*(2-3Ibs.)
:hicken~(1%-2lbs.]
CornishHen*(1lb.)
Duckling*{4-5Ibs.)
Turkey*(8-12lbs.)
350°
350”
400”
325°
325°
375”
400°
400”
400”
350°
350”
25-34
]~-] ~ hrs.(totaltime)
3A-f hr.
17-20
14-18
26-30
3342
48-62
About I hr. (totaltime)
31-35
17-27
170”-195°
160”
130”
185°-1900
t
“t
185°-1900
I
180°-1850
Buyribssplitdowncenter.
Threadon spit.
To barbeque,brus!lwithsauceevery
15minutes,
Brushwithmeltedbutteror margarine,
bastingor barbecuesauceseveraltimes
duringcooking.
Sameas above.
Ifdesired,thread4-5ofthissizechicken
crosswiseon spit,LetrevolvetowithinM
hour of donenesstime,then brushevery10
minuteswithbarbequesauce.
Brushwithbutter,or butterand lemonjuice
mixed.Threadhensonspiteitherlength-
wiseorcrosswise.
Do notbrushwithfat.
Cook withoutbrushingwithfat, or brush
withbutteror margarineasdesired.When
cooked,switchOVENSET to OFF,close
door,let turkeystancl10-20minutesIN
OVEN.Removefromovenandcarve,
Veal
Shoulder,boned& rolled
Bologna
Canadian Bacon
LuncheonMeat
350°
350”
—
350”
350”
Wieners,large 350”
+on sma]]poultrytestdonenessbymovingleggentlybackand forth,and presslcgmuscleto becertainit issoft.
*Retidy-to&jk weight.1MPORI=ANT:ti~le&-and‘wingscloseto bodyto-make~onencssof birdas uniformas possible,Alltimesgivenareforunstuffed
birds.
NOTE:Spillageofmarinades,fruitjuicesand bastingmaterials containingacidsmaycausediscolorationonovenlineror doorsoshouldbewipedup
imediately witha papertowel.Whensurfaceiscool,cleanand rinse.
30-33
23-25
180°
Brushwithsauceifdesired.
23-27
(totaltime)(12-ouncecan)
23-32
23-32(total time) Brushwithsauceifdesired.
Brushwithsauceifdesired.
-–.
Fsma
—
--
-
B?s$z-
—.—..
-
-
—
.—
-
-
..——
-.
—.
-
—
19
.———
Page 20

(Model Wn%’Km)
For many foods, especiallyroasts
and poultry, internal food temperature is the best test for doneness.
The meal thermometer takes the
guesswork out of roasting by
cooking foods to the exact donenessyou want. The meat thermometer has a skewer-like probe at
one end of the cable and a twopronged plug at the other, Use
handle of plug and probe, rather
than cable, when inserting and
removing these parts from meat
and/or oven wall receptacle. After
preparing meat and placing in
roasting pan on rack, follow the
steps belowfor proper use of meat
thermometer.
Step3: plug cableinto receptacle
on oven wall. The prongs are speciallydesigned to only plug in one
way. Be certain to insert plug into
receptacle all the way. Close oven
door.
@
Step 6: Wheninternaltemperature
of roast reaches number you have
set, a buzzer sounds. To stop buzzer
turn pointer to SIGNAL OFF.
Internal temperature of meat can
be determined at any time during
cooking by turning pointer down
until buzzer sounds.
!?@ 1:To gauge placement of
probe, lay probe on outside of meat
along top or side and mark with
finger where edge of meat comes on
probe. Probe siould be placed so
point rests in center of the thickest
part of roast.
/
%P z: ~nser~ probe into meat UP tO
~~int marked off with fingers. Point
~houldnot touch bone, fat or gristle.
Not more than 2“ of probe, not
counting handle should be left
exposed outside of meat. NOTE:
To obtain best results with poultry,
place point of probe in center of
stuffing; see Roasting Chart for
doneness temperature of stuffing.
Step 4:TurnOVENSET Knobto
BAKE and OVEN TEMP Knob
to recommended oven temperature,
for example 350°. See Roasting
Chart on-page 33 for oven temperature.
Step 5: Refer to chart near Meat
Thermometer Dial to determine at
what internal temperature meat will
be done. Then turn knob next to dial
to move pointer to correct number
(internal temperature) cmdial.
Ste~ 7: When roast is done, use
car; in removing plug from receptacle. DO NOT USE CABLE. Remove meat from oven. Since most
meat continues cooking, you may
wish to remove 5°-100 sooner.
Step 8: Remove probe from meat,
using handle of probe
notcable.
Most meats carve easier if let stand
5 to 10minutes. Let thermometer
cool and clean as directed in Cleaning Chart on page 29, Do not leave
in oven.
20
Page 21

to
(Model M-H-W(ID)
Youmay use the meat thermometer
for broiling, such as steak or ham
slices.Prepare meat on broiler rack
and pan as explained on page 17,
“How to Broil”. Set both OVEN
SET and OVEN TEMP Knobs to
BROIL and leave door ajar as
recommended, after placing probe
in meat and oven as directed below:
Step 1: Use steak at least l-l~z
inches thick. Lay probe on top of
steak to determine the position
probe is to be inserted. Gauge distance from edge to center of largest
muscle;mark with thumb where
edge of meat or fat meets probe.
Becertain NOT MORE THAN
2 inches of probe, not counting
handle, is leftexposed outside of
meat.
Step2:
keeping thumb in place on probe.
Insert probe as near as possible to
center of thickness of steak. Push
probe into steak to where thumb
meets fat or meat.
Lift probe from meat
Step 3: For rare steaks cook first
side to 90 on meat thermometer
dial; for medium to 100; for welldone 110.Set Meat Thermometer
Dial to preferred doneness.
Step 4:At sound of buzzer, turn
steak; check probe to be certain it
has not moved out of position.
Reset pointer on Meat Thermometer and cook second side. See
chart on range near Meat Ther-
mometer Dial,
NOTES:
e If there is a question about
whether probe has moved out of
position during cooking, turn knob
so pointer moves down on dial
until buzzer sounds. Note indicated
temperature and reset pointer to
SIGNAL OFF. Push probe farther
down into roast, about 1inch, then
after a few minutes redetermine
internal temperature as above. If
new temperature is lower, the probe
was probably out of position. lf so,
allow meat to cook to proper
internal temperature.
e Let meat thaw enough to allow
inserting probe. The probe is sturdy
but take care not to force it too
hard into roast.
~ Do not disconnect probe during
cooking. ‘Usehotpads when removing probe at end of cooking,
Do not use tongs to pull on cable
since they may damage it,
NOTE: DO NOT USE MEAT
THERMOMETER WITH
ROTISSERIE.
Questhmsand Answers
Q. Cm themeatthermometer
remainin the ovenif it’snot
insertedin food?
A. No. Remove probe from recep-
tacle when no%in use. Youcould
damage the probe by leaving it in
during cooking operations that do
not require the probe.
Q. May I insertthe meat ther-
mometer into frozen foods?
A. No. Foods must be completely
defrosted before inserting probe.
Q. Should Iline broilerpan with
aluminumfoil whenroasting?
A. Yes,when using pan for mari-
nating, cooking with fruits or
heavilycured meats, or for basting
during cooking, Avoid spilling
these materials on oven liner or
door.
Q. How may1be surethat my
roastwillcook thesame each time?
A. When using the meat ther-
mometer in roasting, the probe
must be inserted properly. Check
the position of the probe during
cooking, Sometimes the probe slips
or is touching bone, fat or gristle.
Reposition probe correctly and set
oven again to finish roasting.
~-–
IasmE-”
—
—
—
———..
E4&Y.
—“
—
—.
—.
—
—
——.
16msi–
—.
—
——.
—
—
—
—
—
—
—
—.
—
—.
-
21
Page 22

Recommended Cleaning Time:
ModerateSoil (thinspillsand lightspatter)—2hours
Heavy Soil(heavygreasy spillsand spatter)-3 hours
Before Setting
Oven COntrok+
Cheek These Things:
STEP 1:
Remove broiler pan, rack and other
cookware from the oven. (Oven
shelves may be left in oven. Note:
Shelves may become gray after sev-
eral cleanings.)
STEP 2:
Wipe up heavy soil on oven
bottom.
w
A.
(hwn Front Frame
B.
OvenDoor Gasket
c.
(lpenings in Door
D.
RotisserieReceptacle
FA*
Oven Light
S’lm?3:
Clean spatters or spills on oven
front frame (A) and oven door outside gasket (B) with a dampened
cloth. Polish with a dry cloth. Do
not clean gasket (B), Do not allow
water to run down through openings in top of door (C). Never use
a commercial oven cleaner in and
around self-cleaning oven.
How toSet (hen
forCleaning
STEP 1:
Turn0VEP4SET and OVEN
‘E’EMPknobs clockwiseto
CLEAN. Controls willsnap into
final position when the CLEAN
location is reached.
STEP 2:
Push
and holdin LATCH
RELEASE BUTTON while sliding
LATCH HANDLE to the right
until it is in CLEAN position.
STEP 3:
Set theautomaticoventimer:
(Refer to examples of different
Timers on next page.)
~ Make sure boththe range clock
and the START dial show the cor-
rect time of day.
@Decide on cleaning hours
necessary—two hours for moderate
soil or three hours for heavy soil.
@Add these hours to present time
of day, then push in and turn STOP
(CLEAN) dial clockwiseto desired
time. CLEANING Light glows
showing cleaning is starting.
In about 30 minutes the LOCKED
Light glows indicating oven is hot
and door cannot be opened. Oven
door and window get hot during
self-cleaning. DO NOT TOUCH.
STEP 4:
rotisserie receptacle (D) on
Close
models so equipped.
S’I’El?5:
Close oven door and make sure
oven light (E) is off,
22
Page 23

FM(IW These stepsAfter sewm?aning
Questions and Answers
Q.f4fterhaving
the IXICKEDLightcameon and I
COUkiKIOtmOVethe LA~~k~
HANDLE, Why?
A. LOCKED Light glowing indi-
cates that oven is hot. Open oven
door to cool the internal cavity.
After a short period of time, set up
controls for cleaning again.
Q. Whatshould Ido if excessive
smoking occursduringcleaning?
A. This is caused by excessivesoil
and you should switch the OVEN
SET Knob to OFF. Open windows
STEP 1:
When LOCKED light is off, push
and hold in LATCH RELEASE
Button while sliding LATCH
HANDLE to the left until it is in
COOK position.
STEP 2:
Turn OVEN SET Knob to OFF.
STm? 3:
Turn OVEN TEMP Knob to
WARM.
INOTE:If you wish to “start” and
“stop” cleaning at a later time than
shown on clock, push in and turn
START dial to time you wish to
“start”. Add the hours needed for
cleaning to this “start” time, then
push in and turn STOP (CLEAN)
dial to desired time. Oven willautomatically turn on and off at the set
tirrxs.
to rid room of smoke. Allow the
oven to cool for at leastone
before,opening the door. Wipe up
the excess soiland reset the clean
cycle.
Q. Is the “crackling” sound I hear
during cleaning normal?
A. Yes.This is the metal heating
and cooling during both the
cooking and cleaning functions.
Q. Why won’tmy oven clean
immediatelyeven thoughI set all
the time andcieanknobs correctly?
A. Check to be sure your START
dial is set to the same time as
RANGE CLOCK. Also check to be
sure LATCH HANDLE is in the
CLEAN position.
Q. H my oven clockis not working
can 1still self-cleanmy oven?
A. No. Your Automatic Oven
Timer uses the range clock to help
start and stop your self-cleaning
cycle.
Q. Can I cleanthe WovenGasket
around the oven door?
A. No, this gasket is essential for a
good oven seal and care must be
taken not to rub, damage or move
this gasket.
Q. What causes the hair-likelines
on the enameledsurfaceof my
oven?
A. This is a normal condition
resulting from heating and cooling
during cleaning. They do not affect
how your oven performs.
just usedthe oven,
hour
Q. Shou]cltherebe any odor during
the cleaning?
A. Yes,there may be a slight odor
during the first few cleanings.
Failureto wipe out excessivesoil
might also cause an odor when
cleaning?
Q. My oven shelveshave become
grayafterseveral cleanings.Is this
normal?
A. Yes. After many cleanings, the
shelvesmay lose some luster and
discolor to a deep gray color.
Q. CanI use commercialoven
cleanerson any partof my selfcleaningoven’?
A. No cleaners or coatings should
be used around any part of this
oven. If you do use them and do
not wipe the oven absolutely clean,
the residue can scar the oven surface and damage metal parts the
next time the oven is automatically
cleaned.
Q. Whydo I haveash left in my
oven aftercleaning?
A. Some types of soil willleave a
deposit which is ash. It can be removed with a damp sponge or
cloth.
Q. My oven shelvesdo not slide
easily. What is the matter?
A. After many cleanings, oven
shelvesmay become so clean they
do not slide easily. If you wish
shelves to slide more easily,
dampen fingers with a small
amount of cooking oil and rub
lightly over sides of shelf where
they contact shelf supports.
Hiawc—
?sm#&—
w
—–
—.
-
.—
--:
-—
--
-.
-
m.-~
m. &-
—
-
-
—.
—.
-—
-
imzr.
.——
—.
—.
-
-
-
-– .
-
-
muJ----
w~=
-—
B%@&&—
~
—.
-
-
23
Page 24

to
Proper care and cleaning are
important so your Range willgive
you efficientand satisfactory
service. Followthese directions
carefully in caring for your range
to assure safe and proper
maintenance.
Ftishes
The porcelain enamel finish is
sturdy but breakable if misused.
This finish isacid resistant. However. any acid foods spilled (such
as fruit juices, tomato, or vinegar)
should not be permitted to remain
on the finish.
(km VentDud
Your Range isvented through a
duct located under the right rear
Calrod@unit. Clean the duct often.
?’0remove:
e Make sure unit is cool.
s Lift up right rear surface unit.
e Remove drip pan and ring.
@Lift out oven vent duct.
To replace:
@Place the part over the oven vent
located below the cooktop with
opening of the duct under the
round opening in the drip pan. It is
important that the duct is in the
correct position so moisture and
vapors from the oven can be
released during oven use. NOTE:
Nevercover the hole in the oven
vent duct with aluminum foil or
any other material. This prevents
the oven vent from working prop-
erly during any cooking cycle.
Pipg”In surface units
Clean the area under the drip pans
often. Built-up soil, especially
grease, may catch fire. To make
cleaning easier, the plug-in surface
units are removable.
I
SPIDER
MEDALLION
CHROME-PLATED
DRIP PANIRING
RECEPTACLE
TERMINALS
R
To clean:
~ Wipe around the edges of the
surface unit opening in the range
to-p.Clean the area below the unit.
Rinse all washed areas with a damp
cloth or sponge.
Caution:Be sure all controls are
turned OFF before attempting to
clean under the cooktop or removing the Calrod@units.
To remove:
@Raise the unit coil opposite the
receptacle. Lift about one inch
above the trim ring and pull away
from the receptacle. Caution: Be
sure the coils are cool before removing a Calrod@unit.
* After removing the plug-in surface unit, lift the drip pan/ ring to
clean under the unit.
To replace:
@Place the drip pan/ring in the
surface unit cavity found on top of
the range. Line up the drip pan so
the unit receptacle can be seen.
@Insert the terminals of the plug-
in unit through the opening in the
pan/ring and into the receptacle.
e Guide the surface unit into place
so it fits evenly and fits snugly into
drip pan or trim ring.
Note: If your range has separate
trim rings, the drip pan must be
under the trim ring.
CAIJTION’
@Do not attempt to clean plug-in
surface units in an automatic
dishwasher,
@Do not immerse plug-in surface
units in liquids of any kind.
* Do not bend the plug-in surface
unit plug terminals.
@Do not attempt to clean, adjust
or in any way repair the plug-in
receptacle.
Tilt”Lock
Automatic Surface Unit
(on Model
The automatic surface unit is stationary and cannot be removed. It
can be lifted upward and locked in
that position for cleaning under
unit. Be certainunitis cool before
liftingcoil up.
After lifting coil unit, remove trim
ring and drip pan to clean under
unit. Clean pan and trim ring as
recommended on Cleaning Chart
on pages 28 and 29.
l’o Clean ~~~er Oven l%mels 1mI
$lel~-~leaning Ove~
Place shelf from upper oven on
either shelf of self-clean oven.
(Shelf may have to be shifted
slightly so shelf stops do not interfere with placement of panels.)
Slide out oven bottom; lifting bake
unit slightly makes this easier to do.
Lift back panel and remove. Place
bottom and back panels back-toback so soiled sides face outward.
Place these panels over shelf on
STRAIGHT shelf. It is important
that panels lay flat on shelf.
Lift side panels up and out of oven.
Place back-to-back on remaining
self-clean shelf.
To Replace Panels In
upper oven
Replace panels in any order
desired. Becertain oven bottom is
replaced so notch is at right, and
“feet” on bake unit rest in depres-
sions in panel. Replace broiler
reflector so “open side” is tuward
bottom of oven.
<H4P67GD)
Removabie (hen Door
To REMoVE door, open to BROIL
position, or where you feel hinge
catch slightly. Grasp door at sides;
lift door up and away from hinges.
To REPLACE, grasp door at sides.
Line up door with hinges and push
door firmly into place.
24
Page 25

‘lb Repositkm surfaceWit:
* Replace drip pan into recess in
cooktop.
* Put trim ring in place over drip
pan.
@Guide the surface unit into place
so it fits evenly into trim ring. Pan
must beunder trim ring.
(hum Lampand SurfaceLamp
CAUTION: Before replacing your
oven bulb, disconnect-the electrical
power for your range at the main
fuse or circuit breaker panel or pull
plug. Besure to let the lamp cover
and bulb cool completely before
removing or replacing.
To Remove:
@Remove the 3 slotted screws in
the lamp cover as shown in
diagram.
* Detach lamp cover and remove
bulb.
To Replace:
e Put in a new 40-watt appliance
bulb.
* Install lamp cover. Replace 3
screws and tighten, making sure
cover fits flush with oven wall.
@Reconnect electrical power to
the range.
(hoktop SurfaceI.-Amp
(OnModelsJHP56D, JHP56GD)
WHEN CHANGING LAMP, DO
NO”rTOUCH THE METAL END
OF THE LAMP.
a. Disconnect electricpower to
range at main fuse or circuit
breaker panel.
b, Hold glass panel assemblyand
remove the three screwsfrom the
metal frame that holds top of
assembly in place.
c. Hold assembly in both hands
and lower it until it is removed.
d. Remove lamp and replace with
bulb of the same wattage. Lift glass
panel assembly into place and
replace screwsin top of assembly to
hold it in place.
e. Re-connect electricpower to
range.
Cooktop SurfaceLamp
Model UH%7GD)
(On
WHEN CHANGING LAMP, DO
NOT TOUCH THE METAL AT
ENDS OF LAMP.
a, Disconnect electric power to
range at main fuse or circuit
breaker panel.
b. Push buttons an sides of glass
cover. Allow glassto swing down.
c. Place thumbs on bottom near
each end of lamp. Press and roll
bottom of lamp gently toward front
of range until it stops. Remove.
d. Check type and wattage of
lamp; replace with same kind. Hold
lamp near each end and insert
prongs into socket. Gently roll bottom of lamp toward rear of range
until it stops.
e. Snap glass cover in place.
f. Re-connect electric power to
range.
AdjustingWm ‘Hwrnmstat
Use time given on recipe when
cooking first time. Oven thermostats, in time, may “drift” from the
factory setting and differences in
timing between an old and a new
oven of 5 to 10 minutes are not
unusua~.Your oven,has been set
correctly at the factory and is more
apt to be accurate than the oven
which it replaced, However, if you
find that your foods consistently
brown too little or too much, you
may make a simple adjustment in
the thermostat (Oven Iemp) knob,
25
PULL KNOB OFF OF SHAFT,
LOOK AT BACK OF KNOB AND
NOTE CURRENT SETTING,
BEFORE MAKING ANY
ADJUSTMENT,
To increase temperature, turn
toward HI or RAISE; to decrease
turn toward LO or LOWER. Each
notch changes temperature 10degrees. Temperature can be raised by
20 degreesor lowered by 30
degrees.
1. Remove knob, and hold so
pointer is at top of knob. Using a
potholder or similar material, hold
“skirt” of knob firmly in one hand.
Grasp handle of knob in other
hand. Note position of pointer and
turn handle to move pointer toward
Raise or Lower. Pointer is designed
not to move easily. If it is seated so
it is difficult to move, pointer may
be loosened slightly. Insert a thin
screwdriver, knife blade or similar
instrument and lift up end of
pointer slightly.
2. After adjustment is made, press
monitor firmly against knob,
Return knob to range, matching
flat area on knob and shaft.
Recheck oven performance before
making an additional adjustment.
1, Pull off knob, loosen both
screws on back of knob. 2. Lift
pointer and move one notch in
desired direction. Tighten screws.
3. Return knob to range, matching
flat area of knob to shaft, Recheck
oven performance before making
an additional adjustment,
mmw–.–
——
—.
—
—
—
—.
—
—
——..
—
—
—
mrmm
EEi?#’z
—.
—
—
-----
-“A
—.
--
Page 26

The Americana model with a builtin exhaust system isequipped with
a damper, a two-speed exhaust
blower, and removable filters.
Exhaust openings are located over
cooking top and in hood over oven.
The exhaust systemfunctions only
when the blower is operating.
Locate the button for exhaust
system at the bottom of the vertical
control panel. For high speed push
in top of button; for low speed
push in bottom of button and to
stop blower push center of button.
When blower is operating and hood
over oven is closed, it exhausts over
surface units only. When blower
operates with hood in open position, it exhausts through openings
over surface units and over oven
simultaneously.
THE EXHAUST SYSTEM
SHOULD BE OPERATED
WHENEVER ODORS, VAPORS,
OR SMOKE ARE EXPECTED
TO BE THE RESULT OF A
COOKING OPERATION. START
FAN AT THE BEGINNING OF
COOKING.
To open hood above the oven, lift
up handle at right of hood; to close
push down on handle. Use hood in
its fullyextended position whenever
vapor or smoke results from
cooking, such as when pan broiling
or deep-fat frying an the surface
units. See information on use of
surface units.
Two filters are located over cooking
top and one behind hood extension. Filters are removable for
cleaning.
Filter(s) becomes soiled over a
period of time. The efficiencyof
your exhaust systemdepends on
how clean ih~ filter(s) is. Frequency
of cleaning, or replacing, depends
on the type of cooking you do, but
filters should be cleaned AT
LEAST ONCE A MONTH.
clean frequently the grease-laden
surfaces adjacent to the filter(s).
Ako,
Remove and Replace Filters
Cooking top: Place finger in
1.
recessat front edge of filter, push
filter to rear until front edge clears
the exhaust opening, lower the
front and remove. When clean,
replace. Place edge of filter against
spring at rear of exhaust opening.
Push to rear, lift front edge, and let
spring push filter forward into
place under edge of exhaust
opening.
2. Hood: Extend hood as far as
possible, or remove hood extension
if desired, see illustration. Place
fingers on each side at bottom of
filter. Press filter to left until it
clears the holder on right side,
remove. When clean, replace. Push
filter against clip at left and press
left until filter clears holder at right
side. Push filter toward opening
and release so it slips behind
holder.
‘b
‘I’o remove,
as it willopen.
With thumbs curved around
edge of hood extension, hook
a finger between spring and
bracket at each sideand push
toward center of hood. This
moves pins out of holes in
bracket and hood extension can
be removed.
extend hood as far
HOOD EXTENSION .
2.
(a)
Toreplace,fit bottom of halfcircleflanges into side of hood.
Secure one side at a time. Align
(b)
pin with holes in bracket and
hood extension, then push pin
through holes. This secures
hood extei~sionso it cannot be
removed by mistake.
// A’
3’0Clean
1. Filters, agitate in hot detergent
solution. Light brushing may be
used to help remove imbedded soil
and dust. With careful use and
handling the filter will last for
years. However, if replacement
becomes necessary, obtain a filter
from your General Electric dealer
for your specificrange model.
2. Hood extension, remove and
wash with hot detergent solution.
Rinse and dry with soft cloth
Motor
The blower motor is permanently
lubricated so does not need oiling.
26
Page 27

To Save Time and Money—
before ym request service,
check
the Problem Solver
If you have a problem, it may be
minor. You may be able to correct
ityourself. Just use this I%oblem
Solver to locate your problem and
then follow the suggested
recommendations.
PROBLIH%l
OVEN WILL NOT WORK
POSSIBLE CAUSE AND REMEDY
Plug on range is not completely inserted in the,outle~,recepta’cle.
The circuit breaker in your house has been tripped,,or a fise has be~n”
blown. ,7
Oven contr~]s are not properly set. “; 7, ,, ~“’”,,; ‘“ ~: .
Door left in locked position ”aftercleaning. ‘ . ‘ ,’ -
OVEN LIGHT
DOES NOT WORK
FOOD DOES NOT
BROIL PROPERLY
Light bulb is loose.
Bulb is defective. Replace.
Switch operating oven
light is broken. ~all for Servic~, ~~•~~‘ ~ ‘
OVEN SET Knob not set at BROIL. ~ “ ““‘:”; ~, ~.’‘ ,’
OVEN TEMP,Knob not set at BROIL. .‘
Door not left
~mproper
ajar as recommended,, ~,. ‘“ : ‘~( ~. :::,”,-, -~:,,’.-:,~,.
she]fposition is being used. check Broilin~L’Chart~:;.’.1..-~:~,
Necessary preheating was not done: ‘‘ - “, : . “ “~“‘“-’-’‘--”,, ~
Food is
being cooked on hot pan. ~ ‘ ~ͯ•Pǯ•““-“. ‘“’“ ‘.
Utensils are not suited for broiling. . - ~.. ,“, “”: ,.”’, ~
Aluminum foil used on the broil pan rack ~as not been fitted’.’poperlyl~.~
and slit as recommended.
FOOD DOES NOT ROAST OVEN SET Knob not set on BAKE.
OR BAKE PROPERLY
OVEN TEMP Knob not set correctly. ~ ~~ “ ~‘ ~ ‘ “~
Shelf position is incorrect.
CheckRoastingOrBakingChartS. ~ ‘
Oven shelf is not level.
Wrong cookware is being used. When roasting, pan istoo small. ‘t’
A foil tent was not used when needed to slow down, browning during
roasting.
,,
.-.
,,
.//-
;/ , ..
,. ‘,
..
,>
. ‘,
,,
,!
. ..
‘,,
.“.
,. ,“-
,. , , .
,,
., ,~’.
:.i
. .
\.,
..
,,
,.
,,
,,
.>
,,., ,
,,
,. - ,
,,
.’
,.
/,
,.
OALROD@SURFACE UNITS
xOT FUNCTIONING
3ROPERLY
3VEN WILL NOT
Surface units are not plugged in solidly.
Trim rings/drip pans are not set securely in the range top.
Surface unit controls are not properly set.
Automatic timer dial/dials not set or set properly.The STOP dial - -
;ELF-CLEAN must be set and advanced beyond the time ‘notedon oven clock. ‘
The STOP dial was not advanced for long enough.
Both OVEN SET and OVEN TEMP Knobs must be se-iat CLEAN
setting.
A thick pile of spilloverwhen cleaned l~avesa heavy layer of ash in
]VEN DOOR
WON’T LATCH
spots which could have insulated the area from further heat.
Latch not in “CLEAN” position.
Turn OVEN SET Knob to CLEAN. Glowing Locked Light after kno~
is turned indicates oven is too hot from previous use-and door won’t
.- . ....-!
latch. To cool oven, open door wide, then latch can be-moved.
OVEN SET Knob must be at CLEAN or OFF before Latch can be
moved.
Latch Relca~e Button not pushed when moving Latch+
27
Page 28

Your Range is cleaned two ways; manually and by
cleaning. Be sure to follow these directions carefully
usingthe automatic self-cleaningfunction. This to assure maximum use of your range. NOTE: Let
chart describes parts of your range, cleaning mate-
range parts cool before cleaning manually.
rials to use on each part, and general directions for
PART
Bake LTnitand
IJnit
Broil
Broiler Pan and Rack
Control Knobs:
Range Top and Oven
Outside Glass Finish
including
Metal,
Brushed(%rorne
andCooktoo
Porcelain Enamel
Surface*
MATERIALS TO
e SOap and Water
~ Soap-Filled
Scouring Pad
e P]astic Scouring Pad
@Mild Soap and Water
e Soap and Water
e
Soap and Water
e Paper Towel
@Dry Cloth
@Soap and Water
U!3E
GEi’4ERAI../DIRECTIONS
Do not clean the bake unit or broil unit. Any soil will burn off when the
unit is heated. NOTE: The bake unit is hinged and can be lifted gently to
clean the oven floor. If spillover, residue, or ash accumulates around the
bake unit, gently wipe around the unit with warm water.
Drain fat, COOIpan and rack slightly. (Do not Iet soiled pan and rack
stand in oven to cool). Sprinkle on detergent. Fill the pan with warm
water and spread cloth or paper towel over the rack. Let pan and rack
stand for a few minutes. Wash; scour if necessary. Rinse and dry.
OPTION: The broiler pan and rack may aIso be cleaned in a dishwasher.
Pull off knobs. Wash gently but do not soak. Dry and return controls to
range making sure to match flat area on the knob and shaft.
Wash all glass with cloth dampened in soapy water. Rinse and polish
with a dry cloth. If knobs are removed, do not allow water to run down
inside the surface of glass while cleaning.
Wash,rinse, and then polish with a dry cloth. DO NOT USE steel wool,
abrasives, ammonia, acids, or commercial oven cleaners which may
damage the finish.
Avoid cleaning powders or harsh abrasives which may scratch the enamel.
If acids should spill on the range while it is hot, use a dry paper towel or
cloth to wipe up right away. When the surface has cooled, wash and rinse.
For other spills, such as fat smatterings, etc., wash with soap and water
when cooled and then rinse. Polish with a dry cloth.
On self-cleaning
oven,cleanONLY the door liner outside the gasket. The
door isautomatically cleaned if the ovenis in the self-cleaningcycle.If
e
Inside Oven Door*
Oven Gasket*
Oven Liner
Oven Vent Duct
*spil]age of mal.inades,fruit
immediately, with care being taken to not touch any hot portion of the oven. When the surface is cool, clean and rinse.
Soapand Water
spilloveror spatteringshould occur in cooking function, wipe the door
with soap and water. DO
soa~ and water on the ~asket or in
NOT rub or damage gasket. Avoid getting
the slots on the door.
Avoidgetting ANYcleaningmaterials on the gasket.
@
Soap and Water
~ Soap and Water
juices, and basting materials containing acids may cause discoloration. spill~vers should be wiPe~ LIP
Cool beforecleaning.Frequent wipingwith mildsoapand water will
prolongthe time betweenmajor cleanings.Besureto rinsethoroughly.
Removethe OvenVentDuct found underthe right rear
surfaceunit, Washin hot, soapywaterand dry and replace.
———
28
-.——
.
.———.
Page 29

——.——
Chrome-Plated Rings
or ChromeTrim
Rings andPans
Porcelain Drip Pans
Meat Thermometer
Shelves
(See
Self-Cleaning
OvenDirections)
Calrod@Surface
Unit Coils
Metal,
includingChrome
SideTrims
and Trim Strips
Griddle
Rotisserie
spit, Forks
Screws,~rame
Storage Drawers
{Hi/Low Mode]
Upper Oven
RemovableOven
PanelsjShelves,
BroilReflector
MATERIALS TO USEPART
@Soapand Water
~ Stiff-BristledBrush
@Soap-FilledScouringPad
(Non Metallic)
@Soapand Water
~ Soap-FilledScouringPad
Plastic ScouringPad
e
e Dishwasher
e Soap and Water
@Soap-FilledScouringPad
e
Soap and Water
@Soapand Water
@Soapand Water
o Soap and Water
@CommercialOven
Cleaner
Soap and Water
~
GENERAL DIRECTIONS
Gleanas describedbelowor in thedishwasher.DO NOTCLEAN ON
THE SELF-CLEANING FUNCTION
as pansand ringswilldiscolor.
Wipeall ringsafter eachcookingso unnoticedspatter willnot “burn on”
next time you cook. Toremove
“burned-on”spatters useany or all
cleaningmaterials mentioned. Rublightlywith scouringpad to prevent
scratchingof the surface.
Cool pan slightly.Sprinkleon detergentand washor scour panwith
warm water, Rinseand dry. in addition, pan may also be cleaned in the
dishwasheror cleanedin self-cleaningoven.
Cool beforecleaning.DONOTIMMERSE IN WATER..Scour stubborn spotswithsoapyscouringpad, rinseand dry. DONOTSTORE IN
OVEN.
Yourshelvescan be cleanedwith the self-cleaningfunctionin the oven.
For heavysoil, clean by hand usingany and all mentionedmaterials.
Rinse thoroughlyto removeall materialsafter cleaning.
Spatters and spillsburn awaywhenthe coils are heated. At theend of a
meal, removeall utensilsfrom the Calrod@unit and heat the soiledunits
at H]. Let the soilburn offabout a minuteand switchthe units to OFF.
Avoid getting cleaningmaterialson the coils. Wipeoffany cleaning
materials witha damp paper towelbefore heating the Calrod@unit. ‘~
DO NOT handlethe unit beforecompletelycooled.
DO NOT self-cleanplug-inunits.
DO NOT immerseplug-inunits in any kind of liquid.
DO NOT washin dishwasher.
Wash,rinse,and then polishwith a dry cloth. DONOTUSE steelwool,
abrasives,ammonia, acid,or commercialovencleanerswhich may
damage the finish.
Let griddle cool. Pour offgrease. Washin sudsywater. Soak a fewmin-
utes if necessaryto removefood stuckon surf’ace.
Soak in hot sudsy water; scour to removecooked-on food or sauces;
wash,
For cleaning,removedrawer by pullingit all the wayopen, tilt up the
front and liftout. Wipewithdamp cloth or spongeand replace.Never
use
harsh abrasivesor scouringpads.
Removefrom nonself-cleaningcompanion oven.Place in self-cleaning
ovenin this manner.
1. Companion OvenShelves-
invertand place on each of the self-clean
ovenshelveswith their stops facing forward.
2. Broil Reflector—placesoiledsidedownon lowershelf.
3. Bottom ovenpanel and back panels:place back-to-backwithsoiled
sidefacingout onself-cleanshelf, Lay thesepanelsflat overcompanion
ovenshelvesthat were placed in self-cleanoven.
4. Side Panel–1ay back-to-backon remainingself-cleanpanel,
—–-
~
—61
—.
—
—.
—.——
—
—.
—-
Page 30

tJtensii Tips
1. Use medium or heavy-weight cooking containers.
Aluminum containers generally conduct heat faster
than other metals. Cast iron and coated cast iron
containers are slow to absorb heat, but generally
cook evenlyat LOW or MEDIUM settings. Steel
pans may cook unevenly ifnot combined with other
metals. Use non-stick coated or coated metal con-
tainers. Flat ground pyroceram saucepans or skillets
coated on the bottom with aluminum generally cook
evenly. Glasssaucepans should be used with the
heat-spreading trivets available for that purpose.
2. To conservethe most cooking energy, pans should –
be flat on the bottom, have straight sides and tight
fitting lids. Match the size of the saucepan to the size
of the surface unit. A pan that extends more than
one inch beyond the edge of the trim i.ing traps heat
which causes“crazing” (fine hairline cracks) on the
porcelain and discoloration ranging from blue to
dark gray on the trim rings.
Food
Cereal
Cornmeal,grits,
oatmeal
Cocoa
Coffee
Eggs
Cooked in shell
Fried sunny-side-up
Fried overeasy
Poached
Scrarnblcdor omelets
Fruits
Meats, Poultry
Braised:Pot roasts
beef. lamb or veal;
pork steaks and
chops
Pan-fried:Tender
chops: thin steaks up
to ~A-in,;minute
steaks: hamburgers;
franks; and sausage:
thin fish fillets
Container
Covered
Saucepan
Directions and Setting
to Start Cooking
HI. Incoveredpan bring
to boilbeforeadding
water
cereal.
Setting to Complete
Cooking
LOWor WM.then add
cereal. Finishtiming
accordingto package
Comments
Cerealsbubk)leand expandas
theycook: use
large enough
saucepanto preventboilover.
directions.
Uncovered
Saucepan
Percolator
Covered
Saucepan
Covered
Skillet
HI. Stir togetherwater or
milk,cocoa ingredients.
Bringjust to a boil.
H]. At first perk,switch
heat to LOW.
H]. Covereggswithcool
water. Coverpan.cook
untilsteaming.
MED l-l]. Meltbutter,add
eggsand coverskillet.
MED. to cook 1or 2 min.
to completelyblend
imzredients.
LOW
to maintaingentle
but steadv ~erk,
LOW.Cookonly3to 4
min. for softcooked; 15
min. for hard cooked.
Continuecookingat
MED
HI untilwhitesare just set,
Milkboilsover rapidly. Watchas
boilingpointapproaches.
——
Percolate8 to 10 rein, for 8
cups,lessfor fewercups.
If you do notcoverskillet,baste
eggswithfat to cook tops evenly.
about 3to5 min.
Uncovered
SkiIlet
HI. Meltbutter.
LOW,thenadd eggs.
Whenbottoms ofeggs
havejust set. carefully
turn overto cookother
side.
Covered
Skillet
Uncovered
Skillet
HI, Incovcrcdpan bring
water to a boil.
H], Heat butter untillight
goldenin color.
LOW.Carefullyadd eggs,
Cook uncovcrcdabout 5
min.
iit MED. HI.
MED. Addcggrnixturc,
Cook, stirringto dcsirwl
dorwncss.
Removecookedeggswith slotted
spoonor pancaketurner,
Eggscontinueto setsligh[lyafter
cooking.For omeletdo not stir
last fewminutes.Whenset fold in
half.
Covered
Saucepan
1+1.In coveredpan bring
fruit and waterto boil,
LOW.Stir occasionally
and checkfor sticking.
Freshfruit: Use% to Y2cup water
pcr poundoffruit.
Driedfruit: Usewater as package
directs,Timedepends on whether
fruit hasbeen presoaked.If not,
allowmorecookimztime.
Covered
of
Skillet
HI. Meltfat thenadd meat.
Switchto MED HI to
LOW.Simmeruntil fork
tender.
brownmeat. Addwater or
other liquid.
Meatcan beseasonedand floured
beforeit isbrowned,if desired.
Liquidvariations for flavor cotrid
bewine,fruit or tomato juice or
meat broth.
Timing:Steaks 1to 2-in.: i to
2 hrs, BeefSlew:2to 3hrs.
‘Jncovcrcd
Skillet
l-l],Preheat skillet, then
greaselightly.
MEf) 141
and cook to desired
doneness, turning over as
nccdcd,
or MED, ~1’(lWll
Pot roast:2Mto
I)iinfryingis best for thin steaks
Hndchops,Ifrare is desired, pre-
heat skilletbcforxadding meat.
4 111”s,
Page 31

utensil Tips (continued)
3. Deep Fat Frying. Do not overfill kettle with fat
that may spill over when adding food, Frosty foods
bubble vigorously. Watch foods frying at HIGH
temperatures and keep range and hood clean from
accumulated grease.
Container
Fried Chicken
Covered
Skillet
Pan broiledbacon Uncovered
Skillet
Sauteed:Lesstender
thin steaks (chuck,
Covered
Skillet
round,etc.); liver;
thick or wholefish
Simmeredor stewed
meat;chicken;corned
beef:smokedpork;
stewingbeef;tongue;
etc.
Melting chocolate,
butter,
marshmallows
Covered
Dutch Oven,
Kettleor
Large
Saucepan
Small
Covered
saucepan.
Usesmall
surfaceunit
Pancakes or
French toast
Pasta
Noodlesor spaghetti
Skilletor
Griddle
Covered
Large Kettle
or Pot
Pressure Cooking
Pressure
Cookeror
Canner
Puddings, Sauces,
Candies, Frostings
Vegetables
Fresh
Uncovered
Saucepan
Covered
Saucepan
Frozen Covered
Saucepan
Sauteed:Onions;
green peppers;mush-
Uncovered
Skillet
rooms;celery;etc.
Rice and Grits
Covered
Saucepan
Directions and Setting
to Start Cooking
HI. Meltfat. Switchto h4ED
H] to brownchicken.
HI. In coldskilletarrange
baconslices.Cookjust
untilstarting to sizzle.
H], Meltfat. Switchto MED
to brownslowly.
H]. Cover meat withwater
and cover pan or kettle.
Cook until steaming.
WM. Allow10to 15min. to
melt through.Stir to
smooth.
MED H], Heat skillet8to
IOmin.Greaselightly,
HI. Incovered kettle,bring
salted water to a boil,
uncoverand add pasta
slowlyso boiiingdoesnot
stop.
HI, Heat until firstjiggle is
heard.
HI. Bringjust to boil,
HI. Measure%to l-in.
water in saucepan. Add
salt and prepared vegetable. Incoveredsaucepan
bringto boil.
HI. Measurewater and salt
as above, Add frozen block
of vegetable.In covered
saucepan bringtc boil,
HI. Inskillet melt fat.
l-l]. Bringsalted water tc}a
boil,
wFm
RIGHT
mJ===-
Setting to Complete
CookingFood
LOW.Coverskilletand
cook until tender.
Uncoverlast fewminutes.
‘P4 NOT OVER 1“
Comments
Forcrispdry chicken,cover only
after switchingto LOWfor 10
min. Uncoverandcookturning
occasionally10to 20 min.
MED HI. Cook, turning
overas needed.
LOW,Coverand cook
untiltender.
LOW.Cookuntil fork
tender.(Water should
slowlyboil). Forverylarge
loads mediumheat may
A moreattention-freemethod
isto start and cookat MED.
Meat maybebreaded or mari-
nated in saucebeforefrying.
Addsalt or other seasoning
beforecookingif meat hasnot
beensmokedor otherwise
cured.
beneeded,
Whenmeltingmarshmallows,add
milkor water.
Cook2 to 3 min. per side.
Thick batter takes slightlylonger
time.Turn overpancakeswhen
bubblesriseto surface.
MED HI. Cook uncovered
untiltender, Forlarge
amounts HI maybe
Uselargeenoughkettle to preventboilover.Pa$tadoublesin
sizewhencooked.
nccdcdto keepwater at
rollingboilthroughout
entirecookingtime,
N4ED H1for foodscooking
10min. or less. MED for
Cookershouldjiggle2to 3 times
per minute.
foodsover 10min.
LOW,To finishcooking. Stir frequentlyto prevent
sticking.
MED. Cook l-lb. 10to 30
more min.,dcpenciingon
Uncoveredpan requiresmore
waterand longertime.
tendernessof vegetable.
LOW.Cookaccordingto
time on package,
MED. Addvegetable.
Cookuntil desiredten-
Breakup or stiras neededwhile
cooking.
Turnover or stir vegetableas
ncccssaryfor evenbrowning.
dernessis reached,
W M, Cover and cook
accordingto time,
Triplesin volumeaf’tcrcooking.
Timeat WM. Rice: 1 cup riceand
2cupswater-25 reins. Grits: I
cupgritsand 4cupswater-40
min.
—
--
———
-
—.
—
~
—.
—
—.
lmE#K—
——
—
—
—
--
-.
—
—
-.-T
m~~
sw%w2—
———
-
-—.
—
—
—
37
Page 32

1. Aluminumpans conduct heat quickly.For mostconventional
baking light shiny finishes generally give best results because they
help prevent overbrowning in the time it takes for heat to cook the
center areas. Dull(satin-finish)bottom surfacesof pansare recoinmendedfor cake pans and pieplalesto be surethoseareas brown
completely.
2. Dark or non-shinyfinishes.also glassand pyroceram,generally
absorb heat whichma}’result in
dry, crisp crusts. Reduce oven heat
if lighter crusts are desired. Preheat cast iron for baking some
25°
foods for rapid browning when food is added.
3. Preheating the oven is not always necessary, especially for
foods
whichcook longerthan 30or 40 minutes. For foodwithshort
cookingtimes,preheatinggivesbestappearanceand crispness.
4. Openthe oven door to checkfoodas little as possibleto prevent
unevenheatingand to saveenergy.
Food
Bread
Container
Biscuits(%-in.thick) Shiny Cookie Sheet
Coffeecake Shiny Metal Pan with
Satin-finish bottom
Corn bread or muffins
Gingerbread
Muffins
Popovers
Quick Loaf Bread
Yeastbread (2loaves)
Plain rolls
Sweet rolls
Cakes
(without shortening)
Angelfood
Jelly rolj
Sponge
Cakes
Bundt cakes
Cupcakes
Fruit cakes
Layer
Layer, Chocolate
Loaf
Cookies
Brownies
Drop
Refrigerator
Relied or sliced
Fruits,
Other Desserts
Bakedapples
Custard
Puddings. Riceand
Custard
Pies
Frozen
.Meringue Spread to crust edges
One crust
Twocrust
Pastry Shell
%liscelianeorls
Hzkcd potatoes
Scalloped dishes
solJffle5
Cast Iron or Glass
Shiny Metal Pan with
Satin-finish bottom
Shiny Metal Muffin Pans
Deep Glass or Cast Iron Cups
Metal or Glass Loaf Pans
Metal or Glass Loaf Pans
Shiny Oblong or Muffin Pans
Shiny Oblong or Muffin Pans
Aluminum Tube Pan
Metal Jelly Roll Pan
Metal or Ceramic Pan
Metal or Ceramic Pan
Shiny Metal MuffinPans
Metal or Glass Loafor
Tube Pan
Shiny Metal Pan with
Satin-finish bottom
Shiny Metal Pan with
Satin-finish bottom
Metal or Glass I.oaf Pans
Metal or Glass Pans
Cookie Sheet
Cookie Sheet
Cookie Sheet
Glass or Metal
Glass Custard Cups or
Casscroic (set in pan of
hot waler)
Glass Custard Cups or
Casserole
Foil Pan on Cookie Sheet 400°-4250
Glassor Satin-finishMetal
Glassor Satin-finishMetal
Glassor Satin-finishMetal
Set on C)vcnShelf’
Glms or McMl
Glass
Shelf
Position
B,C
B, A
B
B
A, B
B
B
A, B
A, B
B, A
A
B
A
A, B
B
A, .R
B
B
B
n,c
B, C’
c
13,
B, C
A, B, C
B
B
A
B, A
A, B
B
11
A. B, C
A, B, C
B
Oven
N?tnp.
400°4750
350°-4000
400”-450°
350”
4000-4250
375”
350°-3750
375°-4250
375°-4250
350°-375”
325°-3750
375”-400”
325°-3500
325°-3500
350”-375”
275°-3000
350”-375”
350”-375”
350”
325°-3500
350”-400”
400°-4250
375”-400”
350”-400”
3000-3500
325”
325°-3500
4000-4250”
40f)0-4250
450°
325°-400°
.325”-375°
3oo’J-350~”
Time,
IVlin.
15-20
Comments
Cannedrefrigeratedbiscuitstake
2-4 min. less time.
20-30
20-40
45-55
20-30
45-60
Preheat cast iron pan for crisp crust.
Decreaseabout 5 min. for muffin mix,
Or bake at 450° for 25 min., then at
350°for 10-15min.
45-60
45-60
Dark metalor glassgivedeepest
browning.
IO-25
20-30
30-55
10-15
45-60
For thin rolls, Shelf B may be used.
For thin rolls, Shelf B may be used.
Two piecepan isconvenient.
Linepan with waxedpaper.
45-65
20-25
Pstpcrliners produce more moist
crusts,
2-4 hrs.
Use300°and ShelfBfor small or indi-
vidualcakes.
20-35
25-30
40-60
25-35
10-20
Bar cookiesfrom mix usc same time.
UscShelf C ami increase temp. 25-50°
for more browning.
6-12
7-12
30-60
30-60
Reducetemp. to 30utifor large custard, Cook breador rice pudding
with custard btise80 1090 minutes.
50-90
45-70
Large piesusc400°and incrcasc
time.
15-25
To quickly brown meringue use400°
for 8-10rein,
45-60
40-60
12-15
—
W90
30-60
30-75
Custard fillingsrequire lower temp.,
Iongcr time,
—
Incrcaw time for Itirgcamount or
size,
32
Page 33

1. Position oven shelf at B for small-size roasts (3 to 7 lbs.) and at
—.—.—
33
A for larger roasts.
2. Place meat fat side up or poultry breast-side up on broiler pan
or other shallow pan with trivet. Do not cover. Do not stuff
poultry until just before roasting. Use meat thermometer, for
more accurate doneness. (Do not place thermometer in stuffing.)
3. Remove fat and drippings as necessary. Baste as desired.
Standingtime recommended f’orroasts is 10to 20 min. to
4.
“allowroast to firm up and make it easier to carve. It will rise
about 5° to 10° internal temperature; to compensate for temperature rise, if desired, remove roast from ovenat 5° to 10°lessthan
temperature on chart,
5. Frozenroasts
can be conventionally roasted byadding 10to 25
min. per pound more time than given in chart for refrigerated.
(10 min. per lb. for roasts under5-lbs.) Defrost poultry before
roasting.
?a?Am!–
—.
—
—
—.
—
———
—-
—.
—
—
—
Type
INleat
Tender cuts: rib. highquality
sirloin tip. rump or top round*
Lamb Leg or bone-inshoulder*
Vealshoulder, leg or loin*
Pork loin, rib orshoulder*
Ham, pre-cooked
Ham. raw
*For bonelessrolled roasts over6-in. thick, add 5 to 10min.
Poultry
Chicken or Duck
Chicken pieces
Turkey
Oven
Temp.
325°
325”
325°
325°
325”
325°
325°
375”
325°
Doneness
Rare:
Medium:
Well Done:
Rare:
Medium:
WellDone:
WellDone:
WellDone:
To Warm:
Well Done:
per lb. to timesgivenabove.
Well Done:
Well Done:
Done:
Well
I
ApproximateRoastingTime,
in MinutesperPound
to 5-lbs.
3
24~30
30-35
35-45
21-25
25-30
30-35
35-45
35-45
10reins. per lb. (any weight)
Under10-lbs.
20-30
3
to 5-lbs. Over 5lbs.
35-40
35-40
to t5-lbs. Over 15-lbs.
10
20-25
I
I
I
I
6
to 8-!ZM.
18-22
22-25
28-33
20-23
24-28
28-33
30-40
30-40
10to 15-lbs.
17-20
30-35
15-20
Interna!
Temp.0F
130”-!40°
150°-1600
170°-1850
130’3-1400
150°-1600
170°-1850
170°-1800
170°-1800
125°-1300
160°
185°-1900
185°-1900
In thigh:
185°-1900
—
—.
—
—
Page 34

1. Alwaysusebroiler pan and rackthat comeswith youroven. It is
designedto minimizesmokingand spatteringby trappingjuices in the
shieldedloi~’erpart ofthepan.
2. Ovendoor should beajar for mostfoods;there is a specialposition
ondoor whichholdsdoor open correctly.
3, Forsteaksand chops,slash fat evenlyaround outsideedgesof
meat.To slash,cut crosswisethroughouterfat surfacejust to the
edgeof the meat.
meat and loosingiuices.
4. If desired,ma~~natemeats or chickenbeforebroiling.Or, brush po.s_itionhigher.
withbarbequesaucelast 5to 10minutesonly.
Use tongs to turn meat overto preventpiercing
5. Whenarrangingfoodon pan,do not let fatty edgeshangover
sides,whichcould soil ovenwithdripping fat.
6. Broilerdoes not need to bc preheated. However,for verythin
foodsor to increasebrowning, preheat ifdesired.
7,
Frozen Steaks can be conventionallybroiledbypositioningthe
ovenshelfat nextlowestshelfpositionand increasingcookingtime
givenin this chart 1%times per side.
8. Ifyour rangeisconnectedto 208Voltsrare steaks may be broiled
bypreheatingthe broilheater and positioningthe ovenshelfone
——
Quantity
Food
Bacon
GroundBeef,
Welldone
Beef Steaks
Rare
Medium
WellDone
Rare
Medium
WellDone
Chicken A
BakeryProducts
Bread(Toast)or
ToasterPastries
EnglishMuffins
Lobstertails
to 8-oz.each)
(6
Fish
Ham slices
(precooked)
Pork chops
Well Done
Lamb chops
Medium
WellDone
Medivm
WellDone
Wienersand similar
precookedsausages,
bratwurst
and/or
Thickness
1&lb.(about 8
thin slices)
l-lb. (4 patties)
%to %-in.thick
1 inch thick
(1-l% lbs.)
I?/z-in.thick
(2-2ti lbs.)
1 whole
(2to 2%lbs.),
split lengthwise
2-4slices
I pkg. (2)
2-split
2-4
l-lb. fillets %to
I/z-in.thick
l-in. thick
2(% inch)
2(l-in. thick)
about 1lb.
2(1 inch)
about 10-12oz.
2(1%inch)
about 1lb.
l-lb. pkg. (10)
Shelf
Position
First Side
Time, Min.
c
c
c
c
c
c
c
c
c
c
13 13-16
c
B 8 8
c
B
c
c
c
B
c
7
7
9
13
10
15
25
35
I%-2
3-4
5
10
13
8
10
10
17
6
SecondSide
Time, Min.
4-5
7
9
13
7-8
14-16
20-25
10-15
‘/2
(Do not
turn
over)
5
10
13
4-7
10
4-6
12-14
1-2
—
Comments
Arrangein singll?layer.
Spaceevenly.
Upto 8 patties take about same
time.
Steaks lessthan 1-in.cookthrough
beforebrowning.Pan fryingis
recommended,
Slashfat,
Reducetimes about 5-!0 min.per side
for cut-up chicken.Brusheach side with
meltedbutter. Broilwith skinsidedown
first and broilwithdoor closed.
Spaceevenly.PlaceEnglishmuffins
cut-side-upand brushwithbutter, if
desired,
Cut through back of shell, Spread open.
Brushwith meitedbutter beforeand
after halftime.
Handleand turn verycarefully. Brush
with lemonbutter beforeand during
cookingif desired. Preheat broiler to
increasebrowning,
Increasetimes5-10 min. pcr side for
1~-in. thickor homecured.
Slash fat.
Slash fat.
If desired,split sausagesin half lengthwiseinto 5to 6-in.pieces.
—
34
Page 35

bming shouldbe doneOnCOOktOp
only.
in surface cookingoffoods other
than canning,the useof largediameterutensils(extendingmore
thaii l-inch beyondedgeof trimring)
isnot recommended.However,when
canningwithwater-bathor pressure
canner, largediameter utensilsmay
be used.Thisis becauseboilingwater
temperatures(evenunderpressure)
are not harmful to cooktop surfaces
surroundingheatingunit.
HOWEVER, DO NOT USE
LARGE DIAMETER CANNERS
OR OTHER LARGE DIAMETER
UTENSILS FOR FRYING OR
BOILING FOODS OTHER THAN
WATER.Most syrupor sauce
mixtures—andall typesoffrying—
cook at temperaturesmuch higher
than boilingwater. Suchtemperatures could eventuallyharm cooktop
surfacessurroundingheatingunits.
Observe Following Points
in Canning:
Bring water to boil on HIGH
1.
heat, then after boiling has begun,
adjust heat to lowest setting to
maintain boil (savesenergy and
best usessurface unit.)
2. Be sure canner fits over center of
surface unit. If your model surface
section does not allow canner to be
centered on surface unit, use
smaller-diameter containers for
good canning results.
3. Flat-bottomed canners give best
canning results. Besure bottom of
canner is flat or slight indentation
fits snuglyover surface unit. Canners with flanged or rippled bottoms (often found in enamel-ware)
are not recommended.
RIGHT
WRONG
4. When canning, use recipesfrom
reputable sources. Reliable recipes
are available from the manufacturer of your canner; manufacturers
of glass jars for canning; such as
Balland Kerr; and, the United
States Department of Agriculture
Extension Service.
5. Remember, in following the
recipes, canning is a process that
generates large amounts of steam.
Becareful while canning to prevent
burns from steam or heat.
NOTE: If your surface section is
being operated on low power (volt-
age), canning may take longer than
expected, even though directions
have been carefully followed. The
process may be improved by: (1)
using a pressure canner, and (2) for
fastest heating of large water quantities, begin with HOT tap water.
m-
iBfa”-
--
—.—
—
—–
Ei@iWM.
Em!&Y—
- ‘-
—=
—
-
WE=’
—
—
—
—
—
mmlar..
——
—.
—
—
—
..——
i-
35
—-
Page 36

4
ix #%4
At GeneralElectric we’recommittedto providingyou with the bestappliancesweknowhowto buildand weknow
that you wantyour app~iancesto giveyou manyyearsof dependableservice.
Our ConsumerServicesare designedwith your needsand wantsin mind.
fw
e
Wm%ultyProtection
Beforeyournewapplianceleft the factory,it went
throughrigoroustests to detectmanufacturingdefects.
Gmwmient Service
Whetheryour applianceis in or out of warranty,you’re
just a phone callawayfrom our nationwidenetworkof
FactoryTrainedServiceprofessionals.
Simplycallour GE serviceorganization. Look in the
Whiteor YellowPagesof yourtelephonedirectoryfor
GENER.4LELECTRIC COMPANY,GENERAL
ELECTRIC FACTORYSERVICE,’GENERAL
ELECTRIC-HOTPOINTFACTORYSERVICEor
GENERALELECTRIC CUSTOMERCARE”
SERVICE.
Servicecannormallybe scheduledat your convenience
and thetechniciandrivesa fully-stockedparts service
truck so that, in mostcases, the repaircan be completed
in one visit.
We’reproud of ourserviceand want you to bepleased,
but if forsomereasonyouare not happy with the service
youreceive,hereare three steps to follow for furtherhelp.
Andyouhavea writtenwarrantyto protectyou. Seethe
warrantyon the back pageof this book for details.
FIRST,contact thepeoplewhoservicedyourappliance.
Explainwhyyouare not pleased.Mmostcases,this will
solvethe problem.
NEXT,if youarestillnot pleasedwriteall the
details—includingyour phonenumberto:
Manager,ConsumerRelations
GeneralElectric
AppliancePark
Louisville,Kentucky40225
FINALLY,if yourproblemisstillnotresolved,write:
Major ApplianceConsumerActionPanel
20 North WackerDrive
Chicago,Illinois60606
servicecontracts
Fortrouble-freeservicebeyond
thewrittenwarrantyperiod.
If youpreferto budget your repair expenditures \ ---,-,--~====~
insteadofbeingsurprisedbythem, GEoffers
servicecontracts forvaryinglengthsof time on \
all GE major appliances.With a contract, we’ll
keepyourappliancein good operatingcondition
duringthe contract period at no additional
charge.
m
~.-._._..4--
/’ ;
;%:;+:;;-.’,.:$?
l.__J
*
The Quick Fix”System
cansavemoneyandtime
You
doingityourself.
by
For do-it-yourselferswhowouldprefer to fix . .
GE maior
an ind&try_fi_rst,theQuickFix@System.
appliancesthermelves...GEoffers
1!
#
\
Help For l(ou By Phone
Shouldyou needhelpinthe selectionand
purchaseof newappliances, or havequestions
about the operation ofthe GE appliancesyou
nowown—orhave any other questionsabout
GE consumerproducts or services,youare
onlya TOLL.FREEcall
away.
Servicecontracts letyou paytoday’spricesfor
servicea month, a year,or severalyears from
now. And, you’llreceiveservicefromGE
trainedservicetechniciansusingonlygenuine
GEparts. If you haveany questionsabout
ServiceContracts, call TOLL-HU7@
800.626.2224.(In Kentucky,call800.292.2057.)
A programfor do-it-yourselfappliancerepair,
thesystemincludesstep-by-steprepairmanuals
for refrigerators,most non-microwaveelectric
ranges,dishwashers,and standard and large
capacitywashersand dryers, plusspecialiy
packagedreplacementparts, and technicalhelp
‘witha-tolifree800number.
F
TheGE Answer Center”r~~consumer
informationserviceisopen24hoursa day,
sevendaysa week.
Our staff ofexpertsstands readyto assistyou
anytime.
=---
-—.+:
e
-—L
‘~ “1’heGEAnswerCente~800.626.2000
—-=
.
YourDirectLine$0GeneralEketric
Page 37

,,
—.——————.
d
El
Save proof of original purchase date such as your sales slip or cancelled check to establish warranty period.
-——
—-—=————.. .——. —.————
1s
..... .-—_.—
——. ,- ——.—-—.——-—.
..—————
FULL(INE-WEAF?WARRANTY This warranty is extended to the
Forone year from date of original
~urchase, wewill provide, freeof
charge, parts and
service labor in
your home to repair or replaceany
part cd the rangethat fails because
of a manufacturing defect.
original purchaser and any succeed-
ing owner for products-purchased
for ordinary home use in the
mainland states, Hawaii and
Washington, D,C.In Alaska the
warranty is the same except that it
is LIMITEDbecauseyou must pay
to ship the product to the service
shop or for the service technician’s
travel costs to your home.
All warrantyservice wiil be provided
by our Factory Service Centers or
by our authorized Customer Care@
servicers during normal working
hours.
Look in the White or Yellow Pages
of your telephone directory for
GENERALELECTRICCOMPANY,
GENERALELECTRICFACTORY
SERVICE,GENERALELECTRICHOTPOINTFACTORYSERVICEor
GENERALELECTRICCUSTOMER
CARE” SERVICE.
——
48
*V2
,—
%
‘r?%!
$
&
*-w%-.
3-2=.\
al
>r~
V&
~~~~ ~~ ~()~ ()()~~~~~ ~Service trips to your home to
teach you how to use the product.
Read your Useand Carematerial.
If you then haveany questions
about operating the product,
please contact your dealer or our
Consumer Affairs office at the
address below,or call, toll free:
The GE Answer CenterTM
800.626.2000
consumer information service
e Improper installation.
If you havean installation problem,
contact your dealer or installer.
Youare responsible for providing
adequate electrical, gas, exhausting and other connecting facilities.
7—
Somestates do not aHowtheexclusion or limitation of incidental or consequential damages, so the above limitation orexclus!an
maynot apply to you.
knowwhat yourlegal rightsarein yourstate,consultyourlocalorstateconsumeraffairs office or yourstate’s AttorneyGeneral,
To
———.
This warrantygives youspecific legal rights, and you may also haveother rights which vary from state to state,
Warrantor:General Electric Company
I
further help is neededconcerningthis warranty,contact:
H
Manager–-Consumer Affairs, General Electric Company,Appliance Park, Louisville, KY 40225
——.
. Replacement of house fuses
or resetting of circuit breakers.
@Failure of the product if it is
used for other than its intended
purpose or used commercially.
. Damage to product caused
by accident, fire, floods or acts
of God.
WARRANTORISIV(2TRESPONSIBLE FORCONSEQUENTIAL
DAMAGES.
—
.-. -YN-ws-k,
Part No, 862A725 P738 1
Pub. No. 49-4630
9/84
 Loading...