

Page 1
Wide
Gas
. . . . . . . . . . . . . . . . . .
Anti-Tip Device . . . . . . . . . . . . . . . . . . . . . . . . . . . . . . . . . . . 2,3,35
Operating
Aluminum Foil. . . . . . . . . . . . . . . . . . . 5, 19, 22–24, 26
Features . . . . . . . . . . . . . . . . . . . . . . . . . . . . . . . . . . . . . . . . . . . . . . . . . . . . . .
Oven . . . . . . . . . . . . . . . . . . . . . . . . . . . . . . . . . . . . . . . . . . . . . . . . . . . . . .
Baking . . . . . . . . . . . . . . . . . . . . . . . . . . . . . . . . . . . . . . . . . . . . . . . .
Broiling, Broiling Guide . . . . . . . . . . . . . . . . . . . 24,25
Control, Clock and Timer . . . . . . . . . . . . . . . . 13, 14
Fan..... 6,15,17, 19,20,22,24,27,28,38
Light; Bulb Replacement . . . . . . . . . . . . . . . . 16,34
Oven Vent. . . . . . . . . . . . . . . . . . . . . . . . . . . . . . . . . . . . . . 4, 16,33
Preheating . . . . . . . . . . . . . . . . . . . . . . . . . . . . . . . . . . 17,23,25
Roasting, Roasting Guide . . . . . . . . . . . . . . . 22,23
Self< leaning Instructions . . . . . . . . . . . . . 26–29
Shelves . . . . . . . . . . . . .
Timed Baking . . . . . . . . . . . . . . . . . . . . . . . . . . . . . . . . . . . . 19,20
Using Your Oven . . . . . . . . . . . . . . . . . . . . . . . . . . . . . . 15, 16
Surface Cooking . . . . . . . . . . . . . . . . . . . . . . . . . . . . . . . . . . 11, 12
Control Settings . . . . . . . . . . . . . . . . . . . . . . . . . . . . . . . . 11, 12
Comparison . . . . . . . . . . . . . . . . . . . . . . . . . . . . . 10
Cookware Tips . . . . . . . . . . . . . . . . . . . . . . . . . . . . . . . . . . . . . . . . . 12
5, 16-19,22,24-27,29
2-6
8,9
15-29
17–20
Problem solver . . . . . . . . . . . . . . . . . . . . . .
Thermostat Adjustment
Do It
More questions
and cleaning . . . . . . . . . . . . . . . . . . .
Burner
Door
Glass
Removable Oven Bottom . . . . . . . . . . . . . . . . . . . . . . . . . . 34
Self<leaning Instructions ..................26-29
Shelves . . . . . . . . . . . . . . . . . . . . . . . . . . . . . . . . . . . . . . . . . . . . . . . . . . . . . . . . .
Preparation . . . . . . . . . . . . . . . . . . . . . . . . . . . . . . . . . . .
Anti-Tip Device . . . . . . . . . . . . . . . . . . . . . . . . . . . . . . . . . . . . . . . . . . . . 35
Flooring Under the Range . . . . . . . . . . . . . . . . . . . . . . . . . . . 7
Leveling . . . . . . . . . . . . . . . . . . . . . . . . . . . . . . . . . . . . . . . . . . . . . . . . . . . . . . . . . . .
Removal of Packaging Tape . . . . . . . . . . . . . . . . . . . . . . . 7
Range
. . . . . . . . . . . . . . . . . . . . . . . . . . . . . . . . . . .
. . . . . . . . . . . . . . . . . . . . . . . . . . . . . . . . . . . . .
. . . . . . . . . . . . . . . . . . . . . . . . . . . . . . . . . . . . . . . . . . . . . . 32
. . . . . . . . . . . . . . . . . . . . . . . . . . . . . . . . . . . . .
Consumer Services . . . . . . . . . . . . . . . . . .
Appliance Registration . . . . . . . . . . . . . . . . . . . . . . . . . . . . . . . . . 2
Phone Numbers . . . . . . . . . . . . . . . . . . . . . . . 39
Model and Serial Number Location ..........2
. . . . . . . . . . . . . . . . . . . . . . . . . . . . . . . . . . . . . . . Back Cover
36,37
21
80~62&2000
26-34
30
31
33
7
39
Models:
Page 2
US
Before
read
is
new range properly.
Keep it handy for answers
If you don’t understand
Write
These numbers
Ownership Registration Card that
numbers here:
Model Number
using your range,
guide
intended
GE
24 hours a day, 7 days a week
these numbers in
concerning your
to help you operate
Answer Center
model and
the
sending in this
behind the
your questions.
m
numbers on
the Consumer
please write
Serial Number
maintain your
help,
numbers.
drawer.
with your “
service
If you received a damaged range...
Immediately
the
the
(or builder)
on
WARNING: If the
guide is not followed exactly, a fire or
information in
this
explosion may result causing property
damage, personal injury or death.
— Do not store or use gasoline or other
flammable vapors and liquids in the
vicinity of this or any other appliance.
— WHAT TO DO IF YOU
●
Do not try to light any appliance.
GAS
Do not touch any electrical switch; do
not use any phone in your building.
●
Immediately call your gas supplier from
a neighbor’s phone. Follow the gas
supplier’s instructions.
If you cannot reach your gas
call the fire department.
— Installation and service must be
performed by a qualified installer, service
agency or the gas supplier.
Save time and money. Before you
request service...
Check the
it lists
correct
in the back
problems
this
A WARNING
●
ALL
RANGES
CAN TIP
INJURY TO PERSONS
COULD RESULT
INSTALL ANTI-TIP
DEVICES PACKED
WITH RANGE
SEE
YOU
service.
in the
We’re
pleased. If
the service
further help.
FIRST,
appliance. Explain why you are not pleased.
In
NEXT, if you
details—including your
Manager, Consumer
GE Appliances
Appliance
Louisville, KY 40225
FINALLY, if your problem is still
20 North
Chicago, IL 60606
of this guide.
cases, this will solve the problem.
Appliance Consumer Action Panel
the
service
receive. here
the people who serviced your
still not pleased. write
Drive
SERVICE
se~i~es
to be
with
th~e
the
resolved. write:
2
Page 3
SAFETY NOTICE
The California Safe Drinking Water and Toxic
Enforcement Act
California to publish a list of substances known to
the state
cause cancer, birth
reproductive
customers
●
appliances can cause minor exposure to
four
ptential exposure
these substances,
formaldehyde and
requires
Governor of
or other
businesses to warn
such substances.
namely benzene, carbon
caused
primarily by the incomplete combustion of natural
fuels. Properly adjusted burners,
indicated by
bluish
than a yellow
minimize incomplete combustion, Exposure to
these substances
an open window
be minimized by venting with
using a ventilation fan or hood.
When You Get Your
Have the installer show you the location of the
range gas cut-off valve and how to shut it off
your range installed and properly
grounded by a
with the Installation Instructions. Any adjustment
service should be performed only by qualified
range installers or service technicians.
●
not
attempt to repair or replace any
part of your range unless it is specifically
recommended in this guide. All other service
should be referred to a qualified technician.
your range into a 120-volt grounded
outlet only.
from
personal responsibility
Do not
the round grounding
plug. If in doubt about the
the home electrical system, it is your
obligation to
ungrounded outlet replaced with a properly
three-prong outlet in accordance with
the National Electrical Code. Do not use an
extension cord with this appliance.
in accordance
an
●
Be sure your range is
by a
qualified service technician or installer for the
type of gas (natural or
that is to be used.
Your range can be converted for use with either
type of gas. Seethe Installation Instructions.
adjustments must be made
by a qualified service technician in accordance
with the manufacturer’s instructions and all codes
and requirements of the authority having
jurisdiction. Failure to follow these instructions
could result in serious injury or property damage.
The qualified agency performing this work
assumes responsibility for
conversion.
After prolonged use of a range, high floor
coverings
Never
install the range over vinyl tile or linoleum
not
kind of use.
that cannot withstand such type of use. Never
install it directly over interior kitchen carpeting.
Using Your
ranges
tip and
To prevent
the range,
attach it to the wall or
floor by installing the Anti-Tip
device-supplied. Make sure the chain
fits securely into the bracket.
If you pull the range out from the
wall for any reason, make sure the
Anti-Tip device is engaged before you push
the
back against
is a possible risk of the range tipping over and
causing injury if you or a
on an open door.
Please refer to the Anti-Tip device information in
this guide. Failure to take this precaution could
result in tipping of the range and injury.
Do not allow the chain or bracket to damage the
gas plumbing in any way.
codd
tipping of
wall. If it is not, there
stand, sit or lean
Be sure all packaging materials
from the range
fire or smoke damage
before operating it to prevent
the packaging
removed
material ignite.
the range out of kitchen
out of drafty locations to prevent
outage and poor air circulation.
path
●
Let the burner gram and other
cool
before touching them or leaving them where
children can reach
3
Page 4
(continued)
●
Do not leave
where a range is hot or in operation. They
be seriously burnd.
.
not allow anyone
on the oven door,
They
could damage the range and even tip it over,
causing severe personal injury.
CAU~ON:
CHILDREN SHOULD NOT BE STORED IN
CABINETS ABOVE A RANGE OR ON THE
BACKSPLASH OF A RANGMHILDREN
CLIMBING ON THE RANGE TO REACH
ITEMS COULD BE SERIOUSLY
Never wear loose fitting or hanging garments
while using
reaching for items stored in cabinets over the
range. Flammable material could be ignited
brought in contact with flame or hot oven surfaces
and may cause severe bums.
●
Teach children not to
or any other part of the range.
alone or unattended
climb, stand or hang
drawer or
OF
appliance.
Be careful when
with the controls
could
TO
~STRUCmONS
● Do not use water on grease
Never pick up a
Turn the controls off. Smother a
flaming pan on a surface burner by
covering the pan completely with
lid, cookie sheet or
Use
dry chemical or foam-type fire extinguisher.
Flaming grease outside a pan can be put out by
covering it with baking soda or, if available, by
using a multi-purpose dry chemical or foam-type
fire extinguisher.
in the oven can be smothered
by closing the oven door and turning the oven
off or
using a multi-purpose dry chemical or
foam-type fire extinguisher.
●
When cooking pork,
exactly
cook the
temperature of at
the directions
This assures
in the remote possibility that trichina may be
present in the meat, it will be killed and the meat
will be safe to eat.
pan.
well-fitting
multi-purpose
to
internal
●
Never leave
oven door open
when you are
not watching the range.
keep combustible
coverings,
curtains or drapes a safe distance from
your range.
●
For your safety, never use your appliance
for warming or heating the room.
Always keep dish towels, dishcloths, pot
holders and other
a safe distance
from your range.
●
Always keep wooden and plastic utensils
and canned food a safe distance away from
your range.
Do not leave paper produti, cooking utensils
or food in the oven when not in use.
●
Do not
in an oven,
a range storage drawer or near a
Do not store or use combustible materials,
or other flammable vapors and liquids
in the vicinity of this or any other
●
Do
not
cooking grease or other flammable
accumulate in or near the range.
igniting the top burners and make sure the
burners have ignited.
●
Never
high flame settings.
greasy
Adjust the top burner flame size so it does not
extend beyond the edge of the cookware.
Excessive flame is hazardous.
Do not
when lifting cookware. Do not use a towel
or other bulky cloth in place of a pot holder.
Such cloths can catch fire on
When using
is designed for top-of-range cooking.
To minimize the possibility of
ignition of flammable materials and
spillage, turn cookware handles toward the
side or back of the range without extending
over adjacent burners.
use
position when
the surface burners unattended
smoking
that may catch on fire.
. Use only dry pot
or damp pot holders on hot surfaces
may result in burns from steam.
pot holders come near open flames
hot burner.
cookware, make sure it
4
Page 5
ways turn the surface burner controls off
before removing cookware.
Do not leave plastic items on the
they may melt if
too close to the vent.
Carefully watch foods being fried at a high
flame setting.
Never block the
range.
They provide the air inlet and outlet that
(air openings) of the
are necessary for the range to operate properly
with correct combustion. Air openings are located
at the rear of
at the top of the oven
and under the storage drawer.
Do not use a wok on the cooking surface if the
wok has a round metal ring that is placed over
the burner grate to support the wok.
This ring
as a heat trap, which may damage the burner
grate and burner head. Also, it may cause the
burner to work improperly. This may cause a
monoxide
current standards, resulting in
above that allowed by
health hazard.
Foods for frying should be as dry as possible.
Frost on frozen foods or moisture on fresh foods
can cause hot fat to bubble up and over the sides
the pan.
the least possible amount of fat for effective
shallow or deep-fat frying.
full of fat can cause
●
If a combination of
in frying,
stir together before heating or as fats
Filling the pan too
when food is added.
or fats will be used
melt slowly.
Always heat fat slowly,
Use a deep fat thermometer whenever
.
possible
to prevent overheating fat beyond
and watch as it heats.
the smoking point.
Keep
Do not leave any items on
away
the surface burners.
The hot
air from the vent may ignite flammable items and
increase pressure in closed containers, which
may cause them to burst.
●
smell gas,
turn off the gas to the range and
call a qualified service technician. Never use an
open flame to locate a leak,
●
To avoid the possibility of a bum, always be
certain that the controls for
the off position and
grates are
burners are at
before
attempting to remove them.
●
Never clean the
surface when it is hot.
Some cleaners produce noxious fumes and
wet cloths could cause steam bums if used on
a hot surface.
●
Never leave
or cans of fat drippings
on or near your range.
Oven
Do
not use the oven for a storage area. Items
stored in the oven can ignite.
●
Stand away from the range when opening the
door of a hot oven.
escape
●
Keep the oven free from grease buildup,
cause burns to hands, face and eyes.
the oven
while the oven is cool.
The hot air and steam that
in the desired position
Never try to move a pan of hot fat, especially
a deep fat fryer.
Use proper pan
Wait until the fat is
pans that are
unstable or easily tipped. Select cookware having
bottoms large enough to cover burner grates.
make sure cookware is large
enough to contain the food properly. This will both
cleaning time
prevent hazardous
accumulations of food, since heavy spattering or
left on range can ignite. Use pans with
handles that can be
grasped and remain cool.
flaming foods are under the hood, turn
fan off. The fan, if operating, may spread
the flames.
. Pulling out the shelf
convenience in
the shelf-stop is a
heavy foods. It is dso
a precaution against bums from touching hot
surfaces of the door or oven
●
Do
not heat
containers.
Pressure could build up and the container could
burst, causing
Do not use aluminum
except as
in a
hazard or damage to the range.
in this guide.
anywhere in the oven
Misuse could
When using cooking or roasting bags in the
oven,
follow the package directions.
Page 6
~STRUCTIONS
(continued)
Do not use your oven
dry newspapers.
If overheated, they can catch
Use
for
●
When broiling, if meat is too
the fat may
use in ovens.
that is recommended
the flame, .
Trim excess fat to prevent
excessive flare-ups.
After broting, always take the broiler pan out of
the range and clean it. Leftover
in the broiler
pan can catch fire next time you use the pan.
●
If you should have a grease
in
broiler
pan, turn the oven off and keep the oven door
closed to contain
●
Keep the range
of grease or
until it bums out.
and free of
which may ignite.
Self-Cleaning Oven
●
Be sure to wipe up excess spillage before
self-cleaning operation.
Clean
Care Guide.
parts
in the Use and
Your range is shipped from the factory set to
operate only with Natural Gas. If you wish to use
your range with Liquefied Petroleum Gas, have the
installer check the Installation Instructions that
came with your range.
adjustments must be made by a
qualified service technician in accordance with the
manufacturer’s instructions and all codes and
requirements of the authority having jurisdiction.
Failure to follow these instructions could result in
serious injury or property damage. The qualified
agency performing this work assumes responsibility
for the conversion.
SAVE
Before self-cleaning the oven, remove the
broiler pan, rack and other cookware.
Do not clean the door gasket. The
door gasket
is essential for a good seal. Be careful not to rub,
damage or move it.
●
the
mode malfunctions,
turn
the oven off and disconnect the power supply.
Have it serviced by a qualified
●
Do
not use oven cleaners. No
commercial oven
cleaner or oven liner of any kind should be used
in or around any part of the oven. Residue from
oven cleaners will damage the inside of the oven
when the self-clean cycle is
●
Listen for a
fan noise should be heard
sometime during the cleaning cycle. If not,
for service before self-cleaning again.
6
Page 7
Under the Range
Your range, like so many other household items,
is heavy
such as cushioned vinyl or
the range
installed l/4-inch-thick sheet of plywood (or
similar material)
ends at the front of the range,
will rest
level
the
settle into
this type
should be built up with plywood
higher
to be moved
the
floor coverings
When moving
it should
cleaning or servicing.
the
This will
the
Leveling the Range
1
open-end
the four
sides
installation
measuring cup partially
spirit level,
the
oven shelves to check for levelness. If using
just the four legs
The
Carefully slide the
Then
first in
side to side. The
must not hang
adjustable wrench to equally
must be
Observe
a spirit level or
two readings. with the level
(rims)
top of
into its
it is clearing the
with water on one of
and then the other.
the range
legs must rest
the countertop.
the
to
the
How
to Remove Packaging Tape
the
packaging
household liquid
thoroughly clean
the chrome trim on
if it is
oil. Apply with
Wipe
The plastic tape must be
is done to the finish of the
remove adhesive left
on
appliances is
then
detergent. mineral
soft cloth and
appliance polish to
the surface.
It
application of
Removing Packing Materials
Check
covering
under burner
removed
end
insure
packaging
such
etc.
the
using.
from
removed
protective
trim,
7
Page 8
.
Q
I
8
Page 9
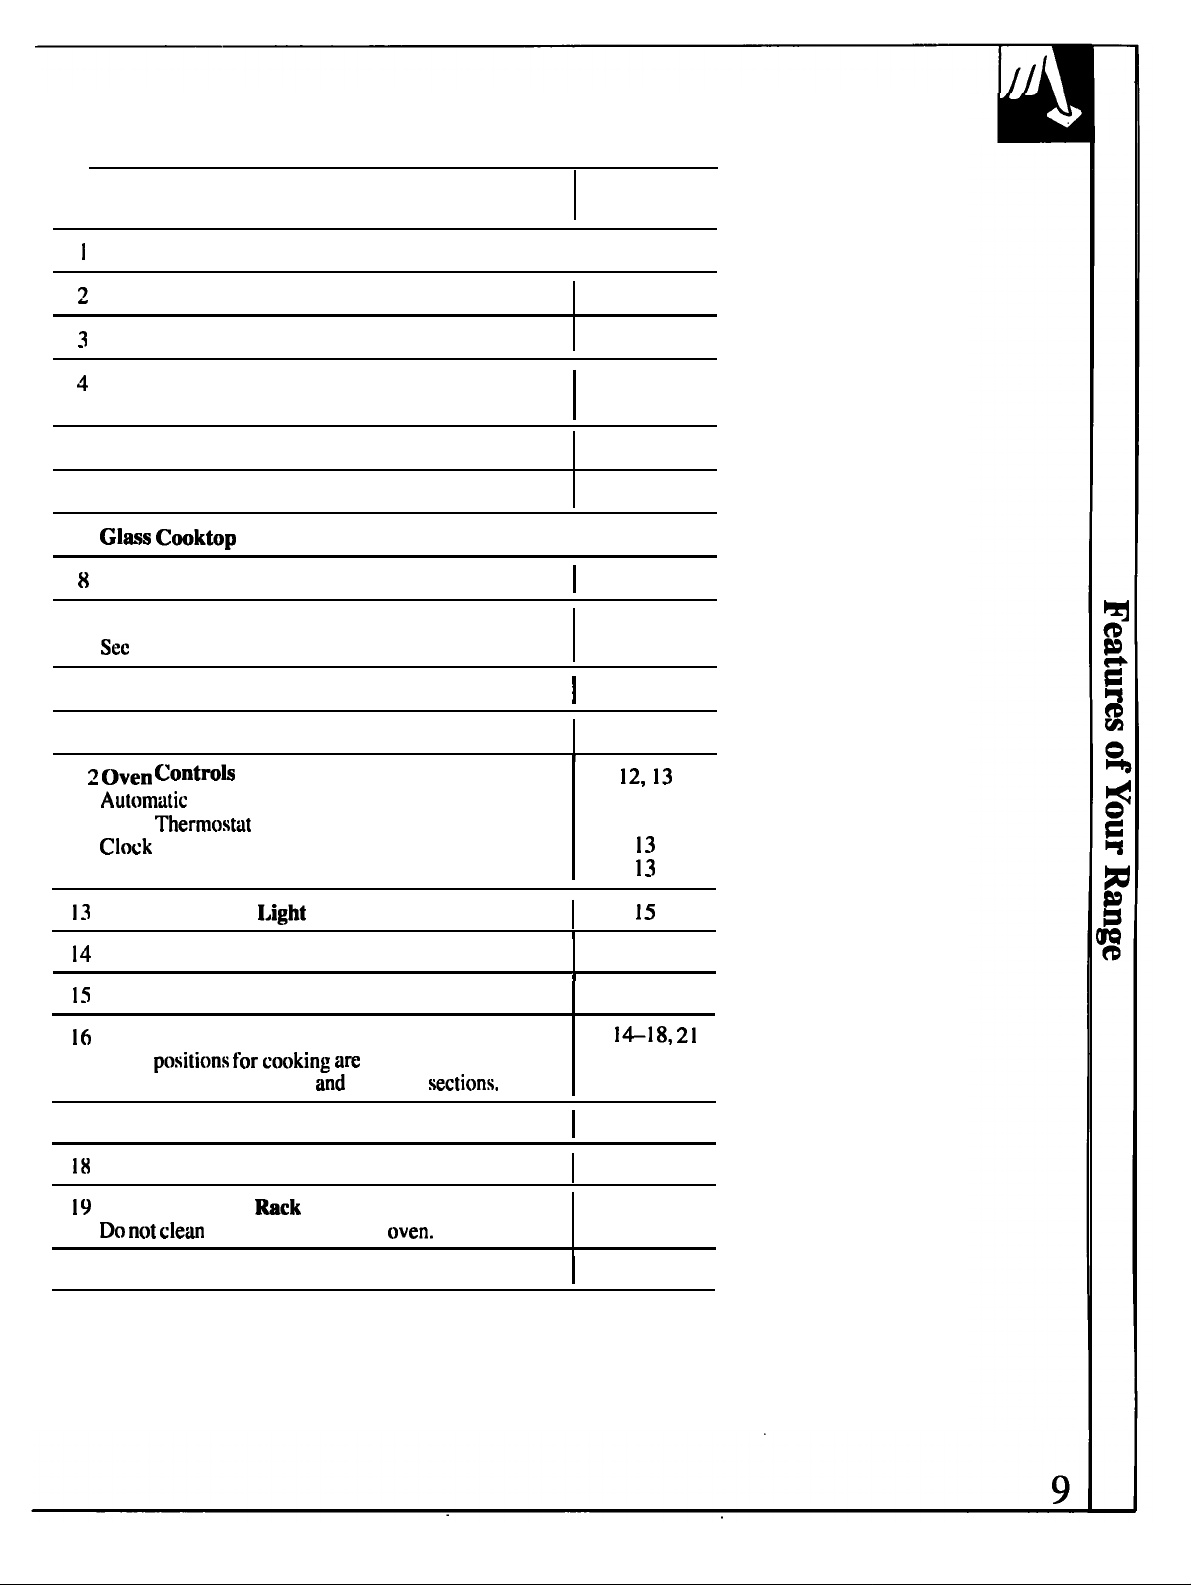
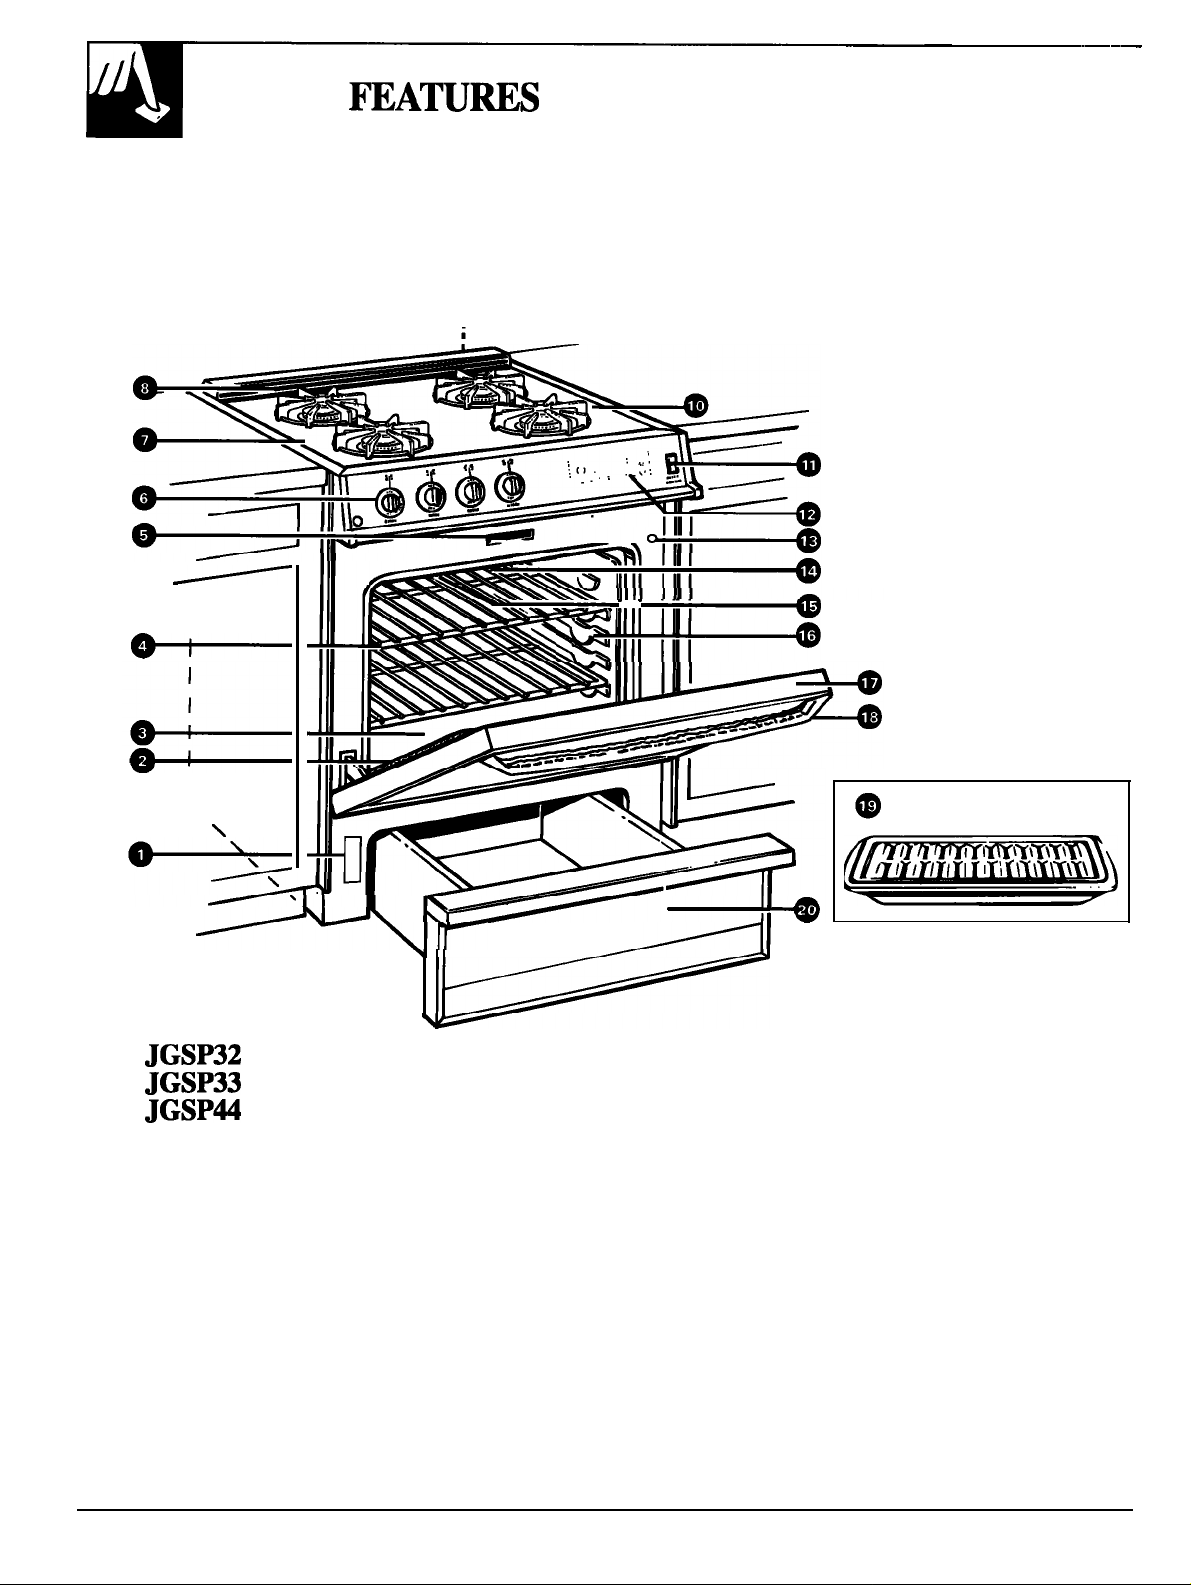
Feature Index
Explained
on page
Model and Serial Numbers
Oven
Removable Oven Bottom
Oven Shelves with Stop-Locks
5 Automatic Oven Door Latch
6 Surface Burner Controls
7
9 Anti-Tip Device
10 Surface Burners and Grates
I I oven Light Switch
“ ~
Door Gasket
oven Vent
the Installation Instructions.
Oven Timer
Oven
I
2
6,25,31
33
5, 1418,21
23-26,28
25-28
10,30
I
30
4,15,32
2,3,34
29,30
15
13
20
Timer
Automatic Oven
Oven Interior Light
Broil Burner
oven Shelf Supports
Shelf
in the Baking, Roasting
17 Lift-Off Oven Door
Sure Grip Handle
Broiler Pan and
20 Storage Drawer
in the self-cleaning
Switch
suggested
Broiling
15.33
23
5, 1~18,
23-26,28
3,4,6,25,31
32
,
5,6,21,24
3,4,31
Page 10
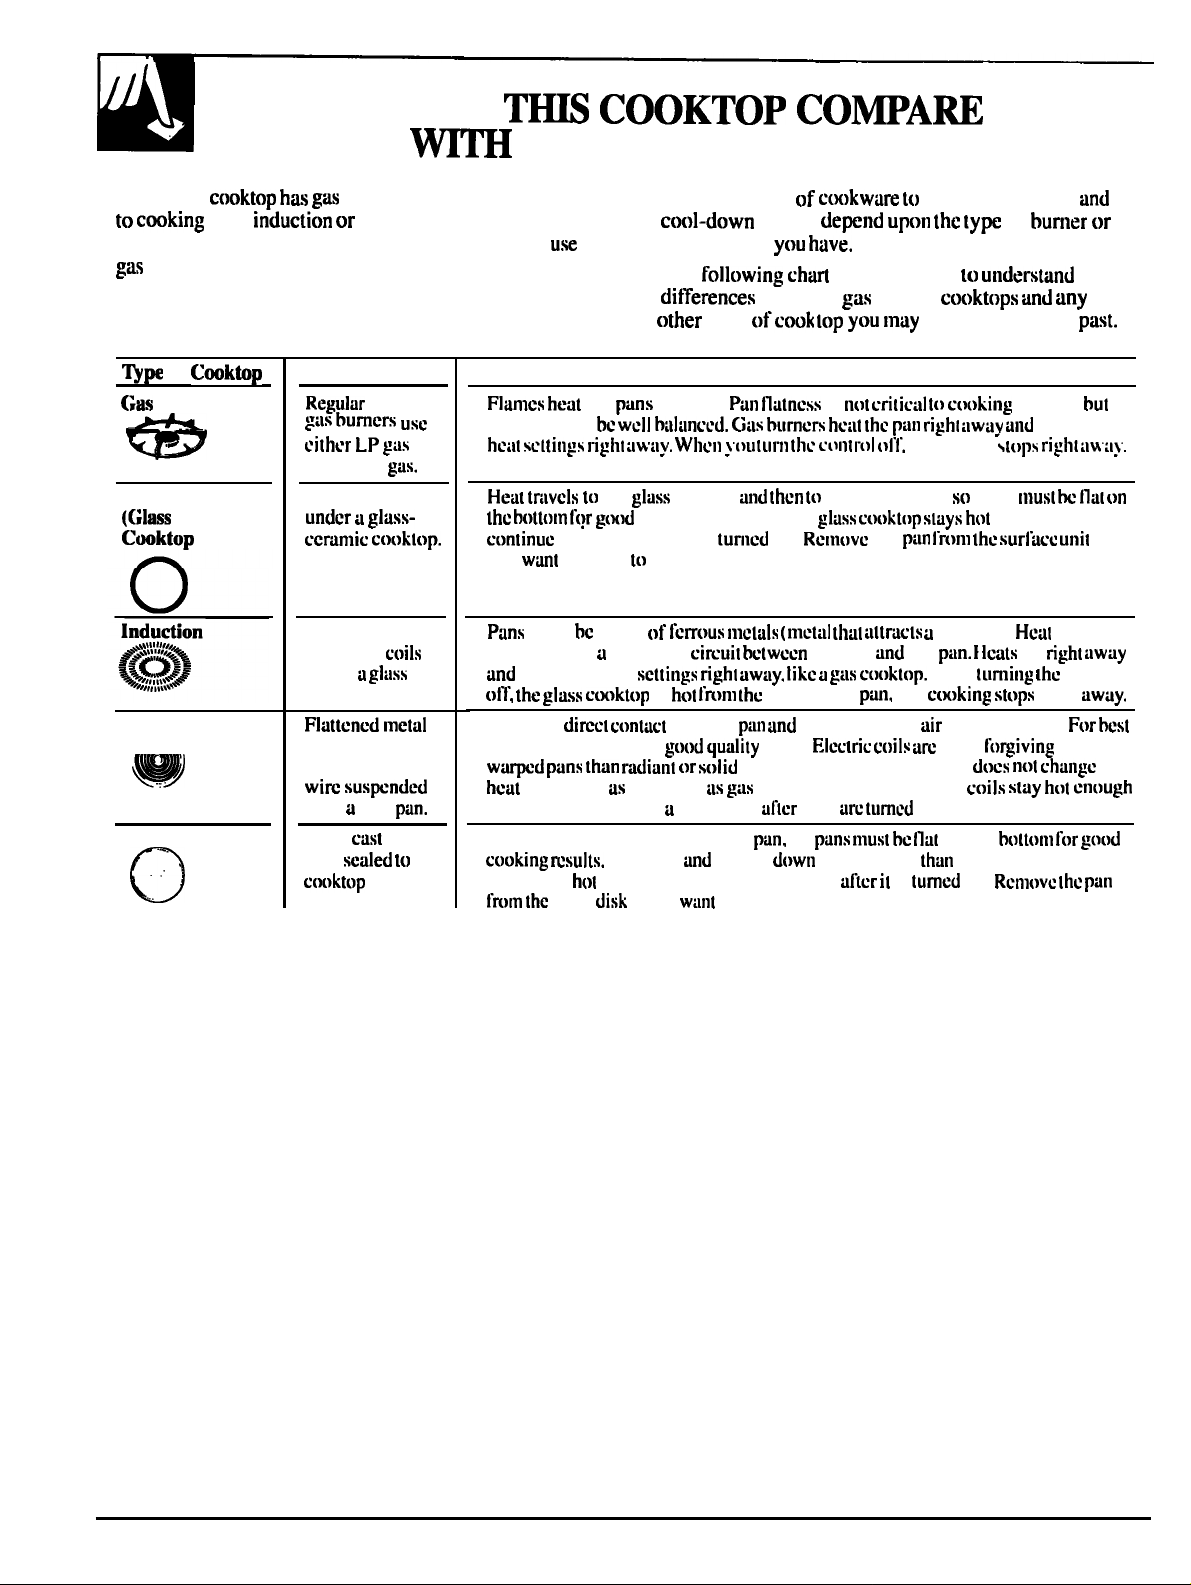
HOW DOES
YOUR OLD ONE?
Your new
cmking with
burners. If you are used
other electric surface
units, you will notice some differences when you
burners.
of
Burners
Radiant
Ceramic)
Electric Coil
r\
Solid
Disk
Description
or scaled
or natural
Electric coils
High frequency
induction
under
surface.
tubing containing
electric resistance
over
Solid
disk
drip
surface.
~iis
iron
the
How It Works
pans should
cooking” after it is
you
produced by
Heats by
cooking” results. usc
continue cooking” for
Heats by direct contact with the
disk stays
cooking
must
changes heat
settings
solid
The best types
times,
surface unit
The
will help you
between
.
type
the
made
directly.
the
magnetic
Heats up
enough to continue cooking” is
surface
cooking” results. The
stop.
is
with the
quickly
short time
if you
off.
(tll~[ill
heat of the
pans.
disks. Heats up quickly hut
~ils or induction. Electric
cools”
the cooking” I() stop.
is
IhC
the cookware.”
illtr~~ls
the coil
Iikc
by heating the
they
so
more slowly
USC
. plus heat-up
burner
have used in the
to
cooking”
the
fn)tn
magnet).
the
After
hut
under the pan.
more fo~iving of
off.
on the
electric coils. The
off.
of
results.
pans
enough to
up
the
change
il~il}.
is
ilw~y
control
right
I\)r
if
-
to “
10
Page 11
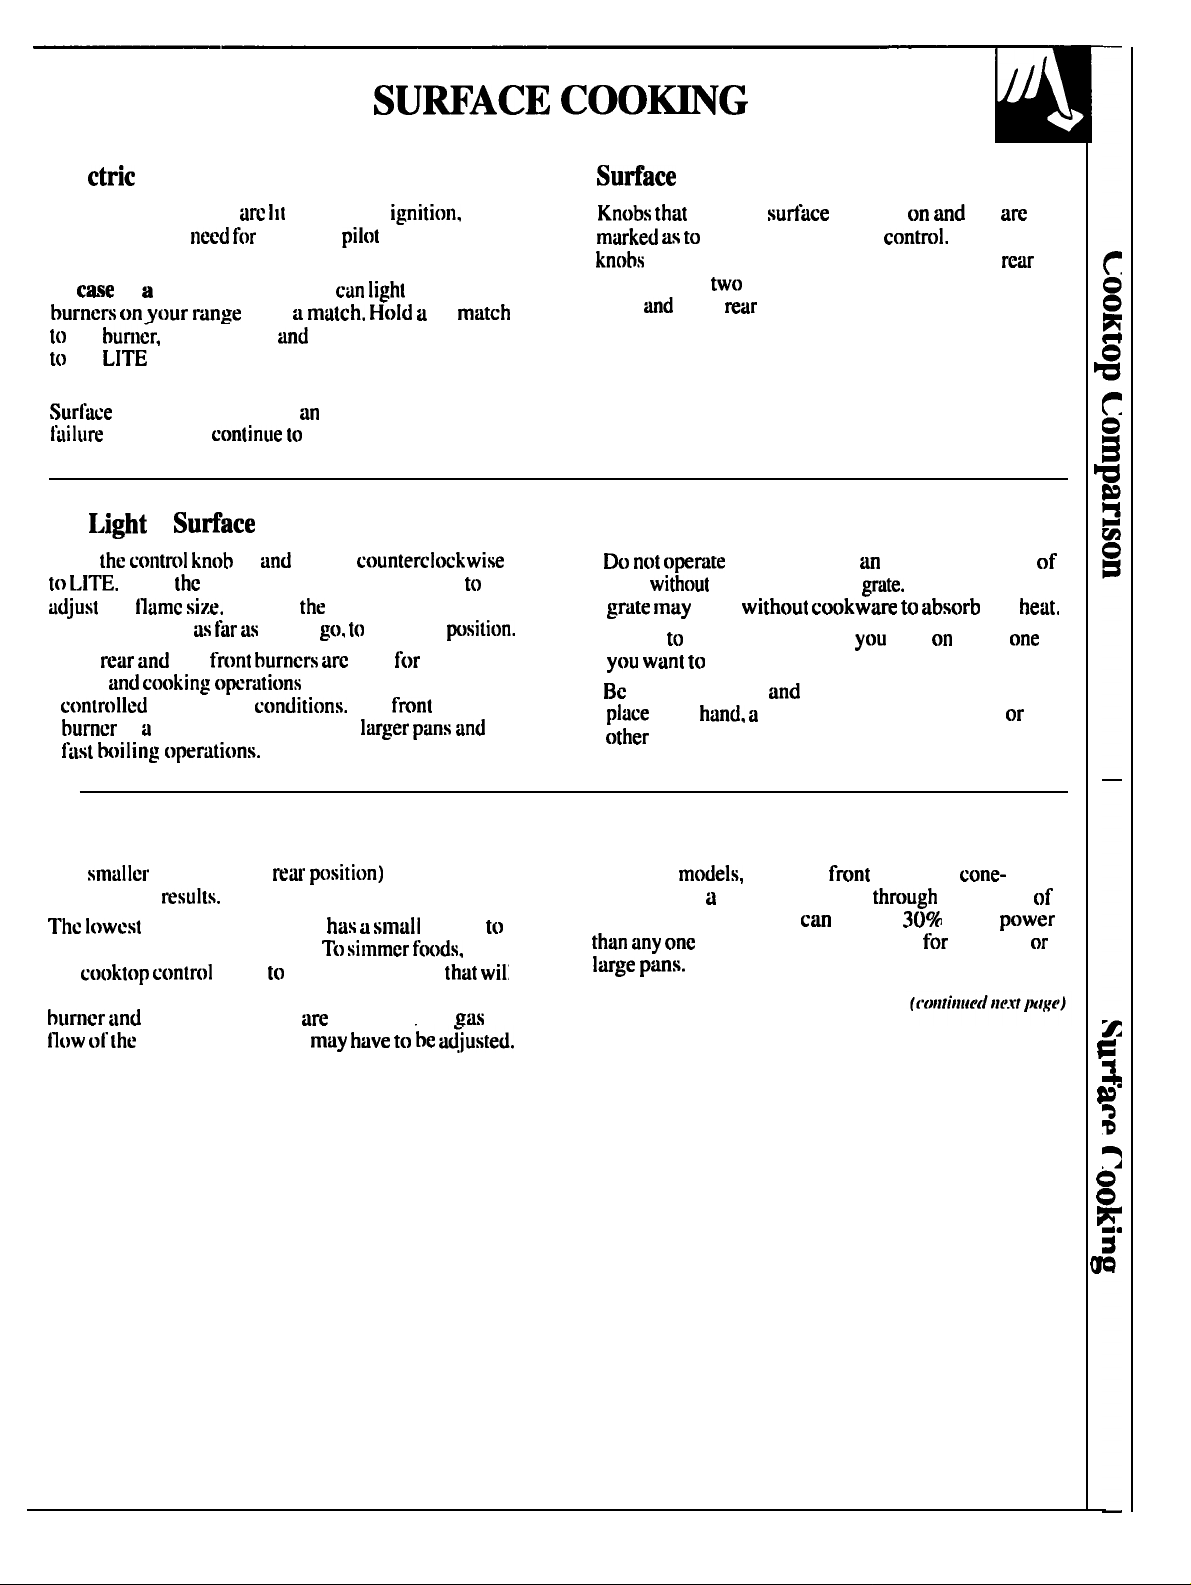
Ignition
Your
surface burners by electric
eliminating the
constantly burning
In
the
the
of
power failure, you
then push in
position.
lighting burners this way.
burners in use when
occurs will
To
Push
a
After
the
knob clockwise
●
The
pans
simmering
is
high power burner for
standing
names.
with
Use
extreme caution when
operate normally.
Burner
in
turn it
burner ignites. turn the knob
To turn
it will the OFF
left
requiring carefully
lights with
the surface
lit
turn the control knob
electrical power
burner off. turn the
best
The
smaller
right
Burner Controls
turn the
which burners they
on the left control the left front and left
burners. The
front
●
right
time
●
Check
●
sure the burners
your
knobs on the right control the right
burners.
the burner for
cookware on the
chip
be sure the burner
use.
pot holder, cleaning cloths
materials on them.
burners
extended period
The finish on the
turn
grates are cool before you
The two
is the
off
the
Simmer Burner
The
best simmer
provide simmering capability.
the
maintain the desired simmer. If simmering on one
burner (right
setting of the burner
the other burners
simmering burner
knob
will give the
flame
the lower setting
turned on. the
set
Super Burner
On some
shaped with
the burner.
the right
circular opening
This burner
of the other three. Use it
burner is
provide
the center
more
conning
11
Page 12
(continued)
How to
Watch the flame, not the knob, as you
gas burner should
FOR SAFE HANDLING OF COOKWARE,
NEVER LET THE FLAME EXTEND UP THE
SIDES OF THE COOKWARE. Any
than the
serves
heat the handle.
the cookware is wasted
Size
the cookware you
heat.
using.
larger
only
Cookware
Aluminum:
Most
Use saucepans with tight-fitting lids when
with minimum amounts
Cast Iron:
Enamelware:
some
Glass: There are two types of glass
very slowly.
Medium-weight cookware is
because it
brown evenly in
If
results.
use
coffee and
Under some conditions. the
may melt.
those
quickly
aluminum skillet. .
most skillets will give
top-of-range cooking
Glass
evenly.
size on
surface
COOIS
Stainless Steel:
aluminum
satisfactorily
manufacturer
Ceramic:
very
be sure it
This Inctal
is usually
other metals
they
be used for either
It
be used on
used with medium the
heat very
manufacturer’s
heat
usually
heating
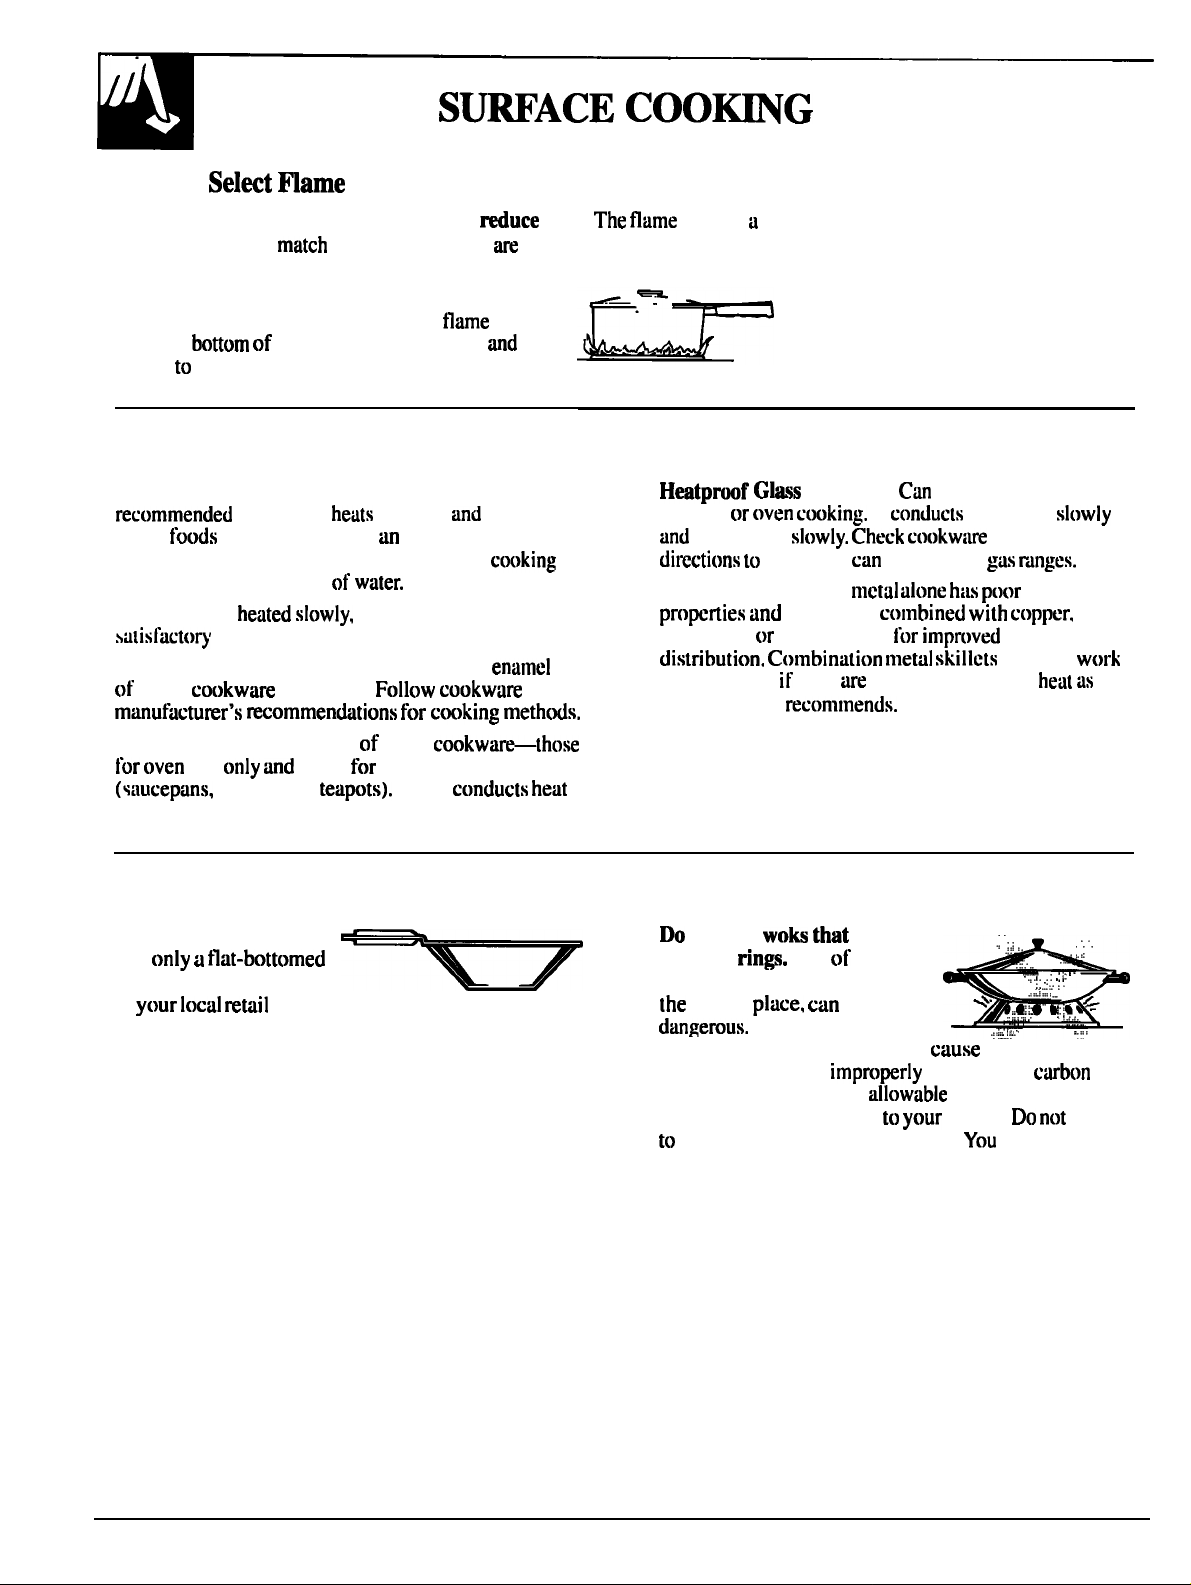
Wok Cooking
We recommend that you
use
wok. They are available
at
store.
not use
support
types of woks, with or
ring in
eve; the burner grate may
the burner to work
monoxide levels above
This could be dangerous
use such woks without the ring.
seriously burned if the wok tipped over.
have
Use of these
without
be
Placing the ring
,:
“”
resulting in
current standards.
health.
could be
. .
.
.
try
12
Page 13

FEATURES OF YOUR
CONTROL
1.
2.
DISPLAY.
selected, the time
status.
temperature by
the
amounts.
DECREASE. Short this
4.
the time
temperature by larger
5.
BAKE.
BROIL. Press this select the broil function.
7.
AUTO
self-cleaning function. See
Cleaning Oven section.
8. COOK
STOP TIME.
TIME or
automatically time you select.
AUTO SELF CLEAN pad to stop
Press this
except
Shows
taps
increase the time or temperature by
temperature by small amounts. Press
to decrease the time
Press this select the bake function.
CLEAN.
Press this
Use
this
timer.
the cooking
this
Press this
Operating the Self-
you have
increase the
Press
decrease
to select the
Timed
with the COOK
Baking
10. CLOCK.
Then press
To set clock, first press the CLOCK
the INCREASE or DECREASE
the time
day. Press the clock
to
to
11. TIMER ON/OFF. Press this pad to select the
timer function.
To set the timer, first press the TIMER
pad. Then press the INCREASE or
to change the time.
To cancel the timer, press
ON/OFF pad until the word “TIMER” disappears
the display.
If “F-and a
and the oven control
function error code.
Allow the oven to cool for
into operation. If the function error code
repeats, disconnect the power to the range and call
service.
flash in the
Press the
hold the TIMER
this indicates
hour. Put the oven
ON/OFF
DECREASE
pad.
13
Page 14

CONTROL, CLOCK
Clock
The clock must
functions to
during a Timed Baking or Self-Cleaning cycle.
set
work properly. The time of
Timer
The timer is
not
The maximum setting
hours
is
minute timer: it
55 minutes.
the automatic oven timing
be
To Set
the timer
A
❑
2. Press
To Set
CLOCK
A
Timer
Press
ON/OFF
or DECREASE
to set
time
TIMER
INCREASE
amount
the [imcr.
Clink
1.
Press the CLOCK
2. Press the INCREASE
set the time of
within
INCREASE or DECREASE pad. The
timer,
seconds until
Then it will display minutes
seconds until
minutes until the maximum time
minutes
minutes, it will display
now
appears
hours
55 minutes is reached.
DECREASE
automatically
releasing
it, will display
minute is
reached.
in display)
To Reset
If
DECREASE
If “TIMER” is not displayed,
ON/OFF
set the timer.
Timer
is displayed,
until desired time is reached.
first, then
press the
press the TIMER
the instructions
INCREASE
End of Cycle Tone
end
cycle tone is a series of three beeps
followed by one beep every six
like to
press and hold the
To return the
press
the
hold the
that beeps every six seconds,
seconds. If
beeps every six seconds,
pad for 10
for 10 seconds.
Power Outage
After a power outage, when power is restored, the
display will flash and time shown
correct-for example, after a 5-minute power
interruption the
will be 5 minutes
no
be
To Cancel
Press
word ‘.TIMER”’ disappears from the display.
Timer
the
TIMER
ON/OFF
until
Display Messages
●
If “clean”
the oven control
cycle
If
is in the locked position. BAKE, BROIL
TIME cannot be set if the door is in the locked
The display flashes until the clock is reset.
functions that were in operation when the
out will have to be programmed again.
did
ody
in the display,
signals,
shut the door.
in
DOOR
set the self-clean
the
oven door
COOK
other
went
14
Page 15

Using Your Oven
YOUR
1.
2.
3.
4.
set
properly.
Check the oven
practice run
Take
sure, sturdy support.
Keep this guide
especially during
sure you understand
the shelves.
replacing them
tips
you can refer
of using your
Electric Ignition
The oven burner and broil burner are lit by
electric ignition.
light
either burner. touch
function
pad until
press
burner should
After the
burner
keep
INCREASE or DECREASE
tcmpcratum is displayed. The
reaches the selected temperature, the
oven temperature
then
the
with a
NOTE:
●
notice a “burning” or “oily” smell the
first few times you turn
in a
oven and will disappear in a short time.
To speed the process, set a self-clean cycle
minimum
your oven on. This is normal
a
See the Operating the Self-
Cleaning Oven section.
●
A
fan may automatically turn
and off to cool
internal parts. This is normal and the fan may
run even after the oven is turned off.
Power
CAUTION: DO NOT MAKE ANY
OPERATE THE ELECTRIC IGNITION OVEN
DURING AN ELECTRICAL
OUTAGE.
Neither the oven nor the broiler can be lit during an
electrical
outage. Gas will not flow unless the
bar is hot.
oven is in use when
If
the oven burner shuts
power
and cannot be
is restored.
TO
occurs,
until
Oven Shelves
The shelves are designed with stop-locks so
when placed correctly on the shelf supports, they
will stop before coming out completely from the
oven, and will not tilt when removing food from or
placing food on them.
When placing
bump on the shelf
to
on the shelf. then slide the shelf back
This will eliminate reaching into the
To remove the shelves
tilt
To replace,
place the shelf on the shelf support with
stop-locks (curved extension
toward the rear of the oven. Tilt up the front and push
the shelf toward the back of the oven
the bump
the shelf support. Then lower the
the shelf and push it all the way back.
a shelf, pull the shelf out
Place the
the oven.
oven.
the oven, pull them
end upward and pull them out.
the
facing up
it goes past
of
15
Page 16

YOUR OVEN
The oven has four shelf supports, identified in this
A
illustration as
Shelf positions for cooking are suggested in the
Baking, Roasting and Broiling sections.
Oven Light
(bottom), B, C and D (top).
The light
the switch on the control
automatically when the oven
turn the light
and off when the
is closed.
Oven Vent
oven is vented through ducts
the
block these ducts when cooking
in the oven—it is important
the oven
fresh the oven burner be
uninterrupted. Avoid
surfaces during oven or broiler
they may become hot.
●
Vent openings and nearby surfaces may become
hot. Do not touch them.
Handles of pots and pans on the
become hot if left too close to the vent.
● Do not leave plastic
items on the
they may melt if
too close to the vent.
the rear
the
the vent
,
of
may
air
●
Do not leave any items on the
the vent may ignite flammable items
increase pressure in closed
burst.
●
Metal items will become very hot if they are
on the
and could cause burns.
The
which
will
Oven Moisture
As your oven
cause water droplets to form
and will
up, the temperature change
the oven continues to heat up.
16
the air in the oven may
the door glass. These droplets
Page 17

.
using
you
time given
with
new oven’s performance.
is
the
system. It is recommended
a number of weeks using the
recipes guide
very accurately
familiar
you think an adjustment is necessary, see the Adjust
the Oven Thermostat section. It lists
NOTE:
When the oven gets hot, the top
surfaces of the
on
to adjust the thermostat.
get hot too.
outside
How to Set Your
To
position before
1.
possible burns,
turn the oven on.
Press the BAKE pad.
for Baking
place shelves in the correct
2. Press the INCREASE or DECREASE pad until the
desired temperature is displayed.
The oven will start
will he displayed. As the
the display will
When
will sound.
the changing temperature.
the temperature
The word
heats up,
set,
Oven Shelves
Arrange the oven
-
shelves in
desired
is
The correct
shelf
depends
of
As
middle of
C.
the kind
the
desired.
general rule.
most foods
in
oven.
chart for suggested shelf
either
B
3.
Press the
when baking is finished
then remove the food from the oven.
NOTE: A
automatically turn on and off to
internal parts. This is normal, and the fan may
to run after the oven is turned off.
To
the oven
during BAKE
press the BAKE pad and then the INCREASE
or DECREASE
of Food
Angel
cake
to get the new temperature.
Shelf Position
A
Biscuits or muffins B or C
cupcakes
B or C
Brownies B or C
Layer
pound
B or C
A or B
Pies or pie shells B or C
Preheating is necessary
pastry and breads.
good results when baking
most casseroles
and masts, preheating is not necessary. For ovens
without a preheat indicator light or tone, preheat
minutes. After the
in the oven as quickly as
is preheated, place the selecting a higher temperature does
to prevent
from escaping.
Frozen pies A (on cookie sheet)
Casseroles
Roasting A
Preheat the
if the recipe calls for it. Preheat
B or C
B
means bringing the oven up to the specified
temperature before putting the food in the oven.
To preheat, set the
at the correct
shorten
preheat time.
]xi~~~)
17
Page 18

(continued)
Baking Pans
Use the proper baking pan. The type of finish
determines the amount of browning that will occur.
rough or dull
browner, crisper crust. Use this type for pies.
●
Shiny, bright
in a lighter, more delicate browning.
require this type of pan.
●
reduced by
●
If
using
prevent
smooth pans reflect heat, resulting
dishes
dishes. the temperature
to reduce the oven temperature
absorb
non-stick pans, you may find
resulting in a
When
the
and
in
need to be
Baking Guides
When using prepared
for the best baking results.
mixes, follow
recipe or
Pan Placement
even
results
much
or to the back
Pans should not touch
If you need to use
possible
Allow 1-
from the
is
directly
proper browning. there must
for
be better if
the oven.
I
of
shelves, stagger the
in the
than being
or the walls of the
between
the
the
centered
the front
well
the sides.
Cookies
When
sides)
in
jelly
edges
not use
shelf with
For best results, use only one cookie sheet in the oven
time.
better-looking cookies. Cookies
pan (short sides all around) may
cookie sheet
the door
cookie sheets
or light browning
the oven. Never entirely cover
cookie sheet.
it
occur.
the
Pies
For best results,
produce
pans should be placed on an aluminum cookie sheet
for
from the pie crust; the cookie sheet helps
browner, crisper crust. Frozen pies in
since the shiny foil pan reflects heat
pies in
rough or dull
it.
Cakes
When
uneven
A cake
recommends will usually be crisper, thinner
than it should be. If baked in
recommended, it may be undercooked
used is the one recommended.
cakes,
results
in
Check the recipe to
or bent
larger
the recipe
smaller than
sure the
will
drier
may
size
18
Page 19

Foil
Don’t Peek
Never
shelf with aluminum
This will disturb the heat
sheet of
placing it
shelf
the
result in
A smaller
inches
be used
by
How to Time Bake
The
of
turn
to turn the oven on or
specific times that
turns
the oven to turn on automatically
preset Stop Time) will be described.
Delay
now
Examples the
you set it
time
Set the timer
open the door
provide minimum and maximum
as
DO NOT open the door
time. Opening the oven door frequently during
times longer. Your
NOTE:
To set the clock, first press the
the INCREASE or DECREASE
time
30-~ minutes.’.
Before beginning
the estimated cooking time
check until the minimum
heat to
time
is displayed.
results
CLOCK
Most recipes
times such
the
be
Press
until the correct
to Set Immediate
To avoid possible burns, place the shelves in the
correct
The oven will turn
of time. At the
the oven will turn off
1.
Press the COOK TIME
A
the
2. Press the INCREASE
time
Press the BAKE
4. Press the INCREASE
displayed. An attention tone will
if step
The words ● ’TIME
The oven will
” 100”’’” will be displayed. The
display will
the
will
reaches the temperature you set,
The
you turn the
immediately
automatically.
If
your recipe requires preheating.
need
of the
until the desired
in
until
temperature
Time
desired temperature is
is
will be displayed
automatically. The
As the
the changing temperature. When
will continue
then shut
and Automatic Stop
on.
of Cook Time.
Time.
display.
you set and the
entered.
time
DECREASE
with the
Time will
up. the
tone
the
the end
The end
5. Press the
if necessary. Remove the food from the oven.
Remember, even though the oven shuts
controls
NOTE:
●
Foods
sit
more
temperature promotes the growth of
the bulb will
●
A
internal
Timed
COOK TIME”’
cycle tone will sound.
off.
spoil easily, such
Be sure
pork, should
before or
the oven light is off because
automatically turn
This is normal, and the
run
the oven is turned
the display will show
the oven will turn off.
the display
cooking
milk, eggs,
be
the
cool
IIr.rt
19
Page 20

How to Set
Quick Reminder:
1. Press
2. Press the
3. Press
4. Press the
5. P~ss the BAKE pad.
6. Press the
To avoid possible burns,
correct position
You
A
❑
2. Press the INCREASE
A
❑
The control automatically sets the Stop Time by
example,
Time-is
4.
INCREASE pad until the desired Stop Time
appears in the display. The words “DELAY TIMED
BAKE”
the COOK TIME pad.
the length of baking time.
the STOP TIME
the desired Stop Time appears in the display.
select
specific length of time
set the
1. Press the COOK TIME pad.
NOTE: If your recipe requires
preheating,
additional time to the Cook Time.
time appears in the display.
3. Press the
TIME” and the earliest
can set
the
the time of day is
hours. Adding
the
“STOP TIME”
and Automatic Stop
pad
pad until
temperature.
the shelves in the
you turn the
Time to the time
Time by pressing the
delay-start the oven,
then turn off
you may need
until the desired length
STOP
TIME
in the display.
hours to the time
“STOP
and the Cook
in the display.
set
Time
day
5.
Press the BAKE
BAKE
A
6. Press the INCREASE
DECREASE
temperature is displayed.
The oven will turn on
“ON”
The
As the
the changing temperature. The
continue to
time
At
will
the oven will turn
tone will sound.
7. Press the
CLEAR
OFF
●
The
foods
●
stuffings.
sit
bacteria. Be sure the oven light is
the bulb will speed harmful bacteria
●
A
internal parts. This is normal,
continue
the display
food from the oven. Remember,
temperature zone
these
easily, such
temperature
automatically turn
run
Time will
shut
●
the
is available
kept in the
temperatures
hour
the oven is turned
until
“l(M)”” will be displayed.
up,
the
automatically.
Timed
’OHR:(M) COOK
The
necessary.
shuts
this
keep
milk,
the
the desired
count
display will
the display
cycle
to
the
the
(between
cooked
longer
be allowed
after
nf harmful
because heat
the
The
will
20
Page 21

DO
You may find that your new oven cooks differently
than the one it replaced.
use your new oven for
with it, following
guide.
If you think your new oven is too hot or too cold,
you can adjust the thermostat
hot,
think it is
it hotter.
We
not recommend the use of inexpensive
thermometers,
check
These thermometers
such
temperature setting
We recommend
few weeks to become more
times given in your
thermostat to make
the thermostat to
those
in grocery
degrees.
cooler.
new
YOURSELF!
you
think
To Adjust the Thermostat:
1. Press
BAKE
n
2. Select an oven temperature between
3. Immediately, before the BAKE indicator stops
flashing, press
4
adjustment display.
CLEAR
OFF
NOTE:
the self-cleaning temperatures. It
when power is removed.
The display will change to the oven
4. The oven temperature
5. After you have made the adjustment,
This adjustment will not affect the broiling or
the BAKE pad.
the BAKE pad for
be adjusted
up to
Use the INCREASE
to select the desired change in
the display.
press the
to the time of
you would normally.
hotter
(–)
DECREASE
pad to go
display. Use your
be remembered
cooler.
21
Page 22

is cooking
be
Roasting temperatures, which should be low
steady, keep spattering minimum.
Roasting is really
Therefore. the oven controls
Baking.
indicating the oven is working properly.) Timed
will turn the oven on
Tender meat or
uncovered in your
baking pr(xedure used for
set
slight clicking sound,
off automatically.
Most
being removed
less
Remember
oven
desired internal temperature
continue
roasts
The internal temperature will rise
to compensate
the
the temperature in
firm up
from the oven sooner
food will continue to
oven. The
is 10 minutes. This
temperature rise. if desired.
be removed when
been
easier to
5“
Guide).
in the
time
5“ to
1.
2. Check the weight
❑
the shelf in A
it
up (or for
side up)
in
The melting
baste the
the
(The broiler
BAKE
A
to the size
3. Press the BAKE
4. Press the INCREASE
displayed.
is necessary.
side
wilt
with
B
the
is
the desired
this.)
DECREASE
is
The
the
When the
tone wilt sound.
CLEAR
continue
To change the oven temperature during the
roasting cycle,
the INCREASE or DECREASE
will
will show the changing temperature.
5. Press the CLEAR/OFF
roasting is Iinishcd
OFF
internal
temperature.
the food from the oven.
A
run
be displayed. As the oven heats up,
the temperature
automatically turn on
This is
the
press the BAKE
The
when
rcmove
the
is turned off.
to get the
off to
Use of Aluminum Foil
You
This
cured meats
the
use aluminum tine the broiler
clean-up
cooking with fruits,
basting
tightly
when using the
during
the inside of the
22
for
Press
Page 23

and Answers
Is
it necessary to check for doneness with a
meat thermometer?
A. Checking the finished internal temperature
completion of
Temperatures
section.
thermometer
the cooking time
time is recommended.
shown in the Roasting Guide
over 8
check with
half-hour intervals after
passed.
Why is my roast crumbling when I try to
carve it?
A.
20 minutes
Be sure to
if
them
the
the
the
Frozen
beef,
without thawing, but allow
time (10 minutes per pound for
5 pounds,
etc.,
be started
to 25 minutes per
time for larger roasts).
I()
the
Q. Do I need to preheat my oven each time
I cook a roast or
A.
It is not necessary to preheat your oven.
Q.
When buying a roast, are there any special tips
that would help me cook it more
A. Yes.
Buy a roast as even in thickness as possible,
buy rolled roasts.
Q.
Can I seal the sides of my foil
when
roasting a turkey?
A.
Sealing the
unsealed
will steam the meat.
the
to circulate
brown
the
sure poultry is thawed before roasting.
poultry often does not cook evenly.
Some commercial frozen poultry
successfully without thawing. Follow the directions
given
the package
be cooked
Oven
Tender
sirloin tip. rump
Veal
Pork
Poultry
Chicken
Chicken pieces
Turkey
*For boneless rolled
U. S. Department
food poisoning organisms may survive.”
high quality
round*
rib
Duck
or Ioin*
shoulder*
325”
3s0”
over
Agriculture
thick,
“Rare beef is popular, but you should know that
Approximate Roasting Time
Doneness in Minutes per Pound
3
5
Medium:
Well Done:
Rare:
Medium:
Well Done:
Well
Well Done:
To
Well
Done:
3s-39
21-2s
2S-30
3
5
10 to 15
Well Done:
S minutes per pound to times given
Food Book. Your Kitchen
USDA Rev. June 198S.)
Temperature
6 to 8
22-29
1s0°–160”
170°–18s0
1S0°–1600
28-33
1700–180”
170°-1800
weight)
Over
5
Over 15
15-20
it to only I@°F. means some
1
In
soot
Page 24

Broiling is
broiled. Follow these directions to keep spattering
The oven door should be closed during broiling.
cooking
Most fish
minimum. given
by direct
tender cuts of
from
be
the
Turn
Time the
Guide. Turn the
the
using
the
side
(rely
side according
then use
the preferred
1. If the
vertical slashes through
desired, the
2.
which comes with the range.
so the fat drips into the broiler
juices may become hot enough
3.
position
4. Clwe
❑
or gristle around the edge, cut
be trimmed. leaving layer
thick.
the meat on the broiler rack
the
the oven
5.
on the recommended shelf
suggested in the Broiling Guide.
Press the BROIL pad. Preheating the
burner is not necessary. (See the
Comments column in the Broiling Guide.)
Use of Aluminum Foil
usc aluminum foil
However,
tightly
juices
could become hot
not
the
the slits, the foil
the slits, you are frying. not broiling.
and
draining into the broiler
line your broiler
must mold the foil
in it just like the rack.
prevent fat
to
2“
the
use the rack
otherwise the
catch on
meat
The juices
fire. If
If
pan
6. Press the INCREASE
press the INCREASE
To change from HI Broil to 1.0 Broil, press the
DECREASE
To change back to HI Broil,
once.
.
7. When broiling is
Serve the food immediately,
easiest cleaning.
NOTE: A
internal
to run
the
once.
This is
the oven is
to
LO Broil
twice
press the CLEAR/OFF
HI Broil.
press the INCREASE
leave the
turn
the
the
off
Questions and Answers
O. When
rack in the
A. Yes.
Q.
A.
Using the
As the
thus keeping
rack
spatter
Should I salt the meat before broiling?
Turn the meat with tongs instead
stay cwler, thus preventing excessive
draws out the juices and
with a fork
is it
smoking.
Always
suspends the
the juices
drier. Juices
allows the juices
protected by the
Piercing the
a fork.
24
a
the
the
them
escape.
Q. Do I need to grease my broiler rack to prevent
the meat from sticking?
A.
No.
The
thus keeping the surface
prevent the
vegetable
clean-up easier.
from sticking
spraying
spray before cooking will make
is designed to
the surface.
broiler
lightly with
Page 25

use the broiler pan
rack that comes with
your oven. It is designed to minimize smoking and
spattering by trapping the juices in the shielded
lower part
.
Broiling should always be done with the oven
the pan.
door closed.
●
For
piercing the
●
If
desired, marinate
brush with
and chops,
edges of the meat.
the outer
surface just to the edge of the
Use tongs to turn the
and losing the juices.
chicken before
barbecue sauce
evenly around the
cut crosswise
over to prevent
5
10 minutes
●
When
food on the pan, do not let fatty
edges hang over the sides because dripping fat could
soil the oven.
●
The broiler does not need to be preheated.
for very thin
foods, or to increase browning, preheat
However,
if desired.
●
Use LO Broil to cook foods such as poultry or thick
pork chops thoroughly without over-browning them.
●
Frozen steaks
be broiled by positioning the oven
shelf at next lowest shelf position and increasing
time
in this guide 1
times per side.
Bacon
I
Ground Beef
Done
Beef Steaks
Rare
Medium
Well Done
Rare
Dune
Chicken
Bakery
Bread
(Toast)
Pastries
Muffins
Tails
Fish
Ham Slices I
Pork
Done
Lamb
Medium
Welt Done
Medium
Well
Done
bratwurst
2 (In
2(1 inch thick),
about t
2(1 inch thick),
about 10 to
2 (I
Quantity andor
Thickness
l/~
slices)
I
lb.
(4
1/2
inch-thick C
inch
( 1 to I
split lengthwise
1 pkg. (2)
l-lb.
l-lb. pkg. (10) c
inch thick
to 2X
4
(split)
inch
inch thick
inch thick)
inch thick),
1 lb.
each)
oz.
Shelf
Position Time, Minutes
I
I
II
I
C
C
I
First Side
Second Side
Time.
c
5
I
I
I
B
B
B 10
2-13
8-20
I
D
D
t
I
B
c
B
B 12–1
B
B 10 10
B
B
5
8 8
10
6
I
over.
5
1-2
Comments
Arrange in single
Up patties take about
7
2
less than 1 inch thick cook
through before browning. Pan frying
is recommended.
Reduce time
per side for cut-up chicken. Brush
side with melted butter. Broil
down
evenly. Place English
cut-side-up
if desired.
Cut through
Brush with melted butter
half
with lemon butter
cooking if desired. Preheat broiler to
increase browning.
brush with butter.
broiling time.
turn very carefully. Brush
5 to
Increase time 5 minutes
for 1
inch thick
fat.
desired, split sausages in half
lengthwise; cut into 5-to 6-inch pieces.
home cured ham.
time.
minutes
Spread
and during
per side
Page 26

Before a Clean Cycle
Cleaning Time:
OVEN
We recommend venting with
using
ventilation
open window
during the first
self-clean
1.
the broiler
aluminum foil from the oven—they
rack,
cookware
withstand the high cleaning temperatures.
NOTE: The oven shelves may be cleaned in
the self-cleaning oven.
lose their luster
However, they will darken.
to slide. Wipe the
shelf supports with cooking oil after self-cleaning
make shelves
2. Wipe up
rinse thoroughly before
more easily.
on the oven
you
self-cleaning .
to prevent shining.
frame
.
outside
gasket
Area
inside
gasket
in door
Oven door
gasket
3.
the
spatters
tile oven
cloth. The oven front
the
clean cycle.
or
soap-filled steel
with
vinegar
prevent
brown residue from forming when
these
water
oven is heated. Buff these
the gasket.
the
with
sides
and
outside front
Do not use abrasives
frame
dampened
the oven
use detergent
This will help
with
the oven
well
oven cleaners.
sure the
light bulb cover is
Do not rub or clean the door gasket—the
fiberglass
resistance
oven door
oven
notice the
in
the
the gasket
An
well-fitting
is essential for energy-efficient
results. If
becoming worn. frayed
or if it
become displaced
it replaced.
Do not let water run down through openin~ in
the top of the door. To help prevent
getting in
it will
4. Close the oven door
light is off.
the life
burn
immediately. The
automatically
slots when cleaning.
sure the
the oven light is
turned
the
the bulb will be shortened or it
latches
the
cycle is set.
not use commercial oven cleaners or oven
protectors in or near the self-cleaning oven.
A
high clean-cycle temperature
porcelain
of
of the
these
plus the
–
26
Page 27

to Set Oven for Cleaning
Quick Reminder:
1. Press the AUTO SELF
2. Press the INCREASE or DECREASE
until the desired
. .
the oven is
cycle, the
set the cycle.
1.
AUTO SELF
CLEAN
section.
A
and
●
’OFF* will
time for cooling before you try to
2. After
SELF CLEAN
3.
Press
displayed.
Clean
2
in
INCREASE
until the desired
is
the
4
CLEAN
Time appears.
start
in the
the
to
depending
set a
in the display.
press the AUTO
DECREASE
Time is
time between
the
You
The self-clean
“CLEAN” is displayed
cycle is set. The words “ON” and “LOCK” will
appear in the display when the door automatically
locks. It will not be possible to open the oven door
until the temperature drops below the lock
temperature
4. When the LOCK light is off, open the door.
NOTE:
●
You can
will be finished by pressing the STOP
A
n
●
The
“DOOR”’ will
set the
●
A
internal
continue
TIME pad.
“clean” will be displayed, the word
cycle and forget to close the oven
automatically turn on
run
will automatically begin
the time for the
the LOCK light goes off.
out when the
oven control will
This is
the oven is turned off.
and the
cycle
may
if you
Stop a Clean Cycle
1.
Press the
CLEAR
After Self-Cleaning
notice some white ash in the oven. Just wipe
it up with a damp cloth
If white spots remain, remove them with
steel
vinegar
usually
clean cycle.
pad. Be sure
mixture. These deposits are
residue
the oven cools.
rinse thoroughly with
cannot be removed by the
soap-filled
2. When the LOCK light gws
oven
open the door.
If the oven is not clean after one
repeat the cycle.
the shelves become hard to slide, wipe the shelf
supports with cooking oil.
NOTE: No functions
door automatically unlocks.
below the
be
indicating
cycle,
before the
the
tlext
Page 28

How to Set Delay Start of Cleaning
Quick Reminder:
Press the AUTO SELF CLEAN
1.
2. Press the INCREASE or D=
until the desired
3. Press the STOP TIME
4. Press the INCREASE or DECREASE
the desired Stop Time
is setting the oven timer to
automatically at a
time of day.
NOTE:
shows the correct time of day.
1.
❑
Before beginning, make sure the oven
the directions in the Before a Clean
Cycle section.
2. After closing the door, press the AUTO
CLEAN
A
SELF CLEAN pad.
Time appears.
time
pad.
until
in the display.
the
the present
5.
Press the INCREASE change the
Stop Time to a
desired. For example: If
Time at 11
cycle at
latches automatically.
When the time of
time, CLEAN, ON and LOCK appear in the display.
6. When the LOCK light is
NOTE:
●
AUTO SELF
CLEAN
A
❑
●
A
internal parts. This is
continue
During a delayed self-clean
you can find
turn
AUTO SELF CLEAN
may automatically turn
run
time of
oven will start clean
end at 11
reaches the
open the
when the oven is set
by pressing and holding the
the
the
is turned
set Stop
The
for
may
if
3. Press the INCREASE
pad to enter Clean Time.
4. Press the STOP TIME pad. “STOP
TIME” and the earliest Stop Time
A
❑
The earliest Stop Time will be the Clean Time
selected plus the time of day.
Clean Time is three hours and the time of day is
the Stop Time that appears in the display will be
can set will appear in the display.
For example:
DECREASE
the
28
Page 29

and
Q. If my oven clock is not set to the correct time of
day, can I
the
will not be able
time.
Can I use commercial oven cleaners on any part
Q.
of my self-cleaning oven?
A.
cleaners
this oven. If you do use them not
the oven surface
time the
What should I do if excessive smoking occurs
Q.
during cleaning?
A.
This is
Open
until the oven has
in the
the
Q. 1s
the “crackling” or “popping” sound I hear
during cleaning normal?
Yes.
This is
self-clean my oven?
is
set to the correct time of day
set
delay clean to end at
coatings should be used
rinse the oven with water, wiping it
afterwards, the residue
is
by excessive
windows
cycle.
rid the
Wipe up the
of the
the cooking
cleaned.
Turn the oven
of
the
heating
cleaning
the next
“LOCK”’ is
soil
reset
Q. What causes the hair-like lines on the enameled
surface of my oven?
A.
This is a normal condition, resulting
cooling during cleaning. These lines do
how your oven performs.
Q. Why do I have ash left in my oven after
cleaning?
A.
Some types
It
be
Q. My oven shelves do not slide easily.
is the matter?
A.
After many cleanings, the oven shelves will lose
their luster
shelves slide
with
Q.
My
oven shelves have become gray after the
self-clean cycle. Is this normal?
A. Yes. After
lose
Q. Can
A. Yes.
cook food on the
is self-cleaning?
While the oven is self-cleaning, you can use
the
soil will
with a
become hard
easily, wipe the shelf
self-clean cycle, the shelves will
and discolor
just as you normally do.
a deposit which is
sponge or cloth.
slide. To make the
a deep
while the oven
heating
Q.
Should there be any odor during the cleaning?
A.
Yes,
there will bean
cleanings. Failure
cause
during the first
wipe
excessive
when cleaning.
might
Page 30

will give
cleaning
satisfactory
these directions carefully in caring
assure
proper maintenance.
service.
range
BE SURE ELECTRICAL
ANY PARI’ OF
THE
Burner Assembly
IS
Mixing Tube
Grate
The burner assemblies
and,
Turn
course,
controls
The electrode of
be washed regularly
igniter is exposed
beyond the surface of the burner bowl. When
cleaning the burner bowl, be careful not to snag
the electrode of the spark igniter with your
cleaning cloth.
Be
occur.
careful not
controls while cleaning the burner
to the igniter could
push in any
A
electrical shock might result which could cause
you to knock over hot cookware.
The burner grates.
be
I
/Spark Igniter
parts with an all-purpose non-abrasive cleaner
easy cleaning.
the burner
the spark igniter. leave the burner
when cleaning the burner
water.
reassemble while
gets dirty
sewing needle
reassemble,
Burner Wwl
burner
heads
the
the burner head
burner grate.
burner
snagging
burner
them with a
If
igniter
small
then the
gives
in
CAUTION:
NOT OPERATE THE BURNER
WITHOUT ALL BURNER PARTS IN PLACE.
30
Page 31

Porcelain enamel
burner grates should
be washed regularly
and, of course, after
them
in hot,
rinse with
grates. Dry the grates with
sure
use
the range
positioned”
steel
When
securely
the grates.
the burners.
burner
put
Control Panel and Knobs
It’s a
use.
water. rinse with
cloth.
not use abrasive cleansers, strong liquid
the control panel–they will
50/50”
The control knobs may be removed for easier
cleaning.
the
right side
replacing the
idea to wipe the control panel after each
Clean with
plastic scouring pads or oven cleaners
removing the knobs for cleaning,
in the
placement.
vinegar
the left side
OFF
the OFF position
water
the
or vinegar
dry with
the
on the
When
A
insure
To get rid of burned-on food,
covered container
ammonia
let them
plastic bag. Add 1/4
for
the grates
minutes.
Wash,
rinse well, and dry.
prevent rusting,
to the grates.
Although they’re durable, the grates will gradually
lose their shine,
give them. This is due
temperatures.
not operate a burner for an extended period
of time without cookware on the grate.
the grate
the heat.
--
--- -
.
To remove a knob,
is
the knob
Wash the knobs and water but
Avoid getting water into the knob stem holes.
chip without cookware to
--
to
or
piece of string under
a light coating
the best
their continual exposure
—
pull it straight
pull up.
The
the stem. If
thin cloth (like
around
not
Glass
To keep the
spills
burning on and becoming more
As soon as the
surface with a cloth moistened with warm, soapy
water; rinse with clean water, and dry with a soft cloth.
You can use any liquid household detergent.
Do not use abrasive materials such
such as bleach or chemical oven cleaners.
they occur. This will keep them from
tilled pads—they may scratch the surface. Do not use harsh chemicals
streaks or spotting, you may find it helpful to rinse glass with white
or a fifty percent white vinegar/water solution.
looking iti
is cool,
wipe up any
remove.
wash the glass
metal pads,
powder and
31
Page 32

Lift-Off Oven Door
The oven door is removable, but it is
heavy. You
replacing the door. Do not lift the
by the handle.
the door.
To remove the door, open it a few
inches
the special stop ~sition
will hold the door open.
side and lift the door straight
up
the hinges.
NOTE:
.
careful
the
door frame
pinch
●
While working in the oven
with
pinched
on the
To replace the door,
special stop position. Position the slots in the
the door squarely
slowly
time. If hinges
them back out.
TO CLEAN THE DOOR:
Inside of the door:
●
Because the
the self
hand. Any soap left
when the oven is heated.
●
The area outside the
scouring
need help removing
or
This
cause the
damage to
firmly
not to
place hands between the hinge
the hinge
cover the hinges
or empty
rolls
and chipping the porcelain
make sure the hinges
the hinges. Then lower the
evenly over both hinges at the
against the oven
inside the
is cleaned during
cycle, you do not need to
the liner causes additional
be cleaned with a
in the
this by
(continued)
[
I
.
pull
●
not rub
material
resistance to abrasion. An
oven door
oven
notice the gasket becoming
in
you
NOTE:
The
Outside of the door:
●
Use
sides and front
run
Rinse
the glass on the
●
Spillage
basting materials
When surface is
●
Do “not use oven cleaners, cleansing powders or
harsh abrasives on the outside of the door.
clean the door
the
gasket-the
extremely
is essential
energy-efficient
results. If
if it
become displaced on the
have it replaced.
is designed with
proper
to
the
circulation.
Inside Gasket
Gasket
Outside Gasket
door. DO NOT let
through openings in the
You
use a
the door.
marinades, fruit juices,
should be wiped up immediately.
rinse.
well-titting
or
the top,
cleaner
may cause
the
of the
Removable Storage Drawer
The storage drawer is
and
Do not store plastics
material in the drawer.
Do not overload the storage drawer. If the drawer is
heavy, it
slip off the track when opened. To
open the drawer, grasp the center of the handle
The storage
under the
good
to store
flammable
may be removed for cleaning
32
To
remove:
Pull the
straight
and lift over the
guide
To replace:
Lift
“‘
i
.
over the guide stops
and slide the drawer
into
To clean both the inside and the
Wipe with
cleansing powders or
and water. Rinse well. Do not use -
abrasives which may
scratch the surface.
-.
>.
Page 33

Shelves
the shelves with a mild
steel wool.
water
self-cleaning
slide
After cleaning. rinse the shelves with
oven shelves
with
with
become
the shelves will darken,
oil
Broiler Pan and Rack
broiling,
the
overt.
the grease
with it
If food
while
rinse
burned on,
cover with wet
the
will
the hroilcr
the
broiler
plastic scouring
the
sprinkle the rick with detergent
burned-on
cleanser
be cleaned
slide. Wipe the
the shelves
the
in
the
the broiler pan
commercial
the
from
the
the dishwasher.
Do
not clean the broiler pan or rack in the
cleaning oven.
cleaner.
rack
be cleaned with
rack anywhere in
be cleaned in
Oven Vent
is vented through
the
Never
material. This would prevent the
vent
properly.
discolor during self-cleaning.
the
or
oven vent
vent
Sure Grip
The soft door handle is
water
cleaners
might
a non-abrasive cleaner. Avoid using heavy-duty
detergents,
the sure grip handle.
the
with
to keep clean. Soil will easily wash
the rear
with aluminum
they
contain
Painted
The
with
Do not use commercial oven cleaners, cleansing
powders, steel wool or harsh abrasives on any
painted surface.
which
with
front is
water vinegar
painted surface.
it
water solution.
33
Page 34

Oven Light Bulb
bulb is located
replacing the bulb, disconnect the electric
to
unplug the range
Let the bulb cool completely before
touch bulb with
will
TO REMOVE:
●
Remove the
●
the
screws in
cover
TO REPLACE:
Put in
new 40-watt appliance
NOTE: A 40-watt appliance bulb is smaller .
standard 40-watt
●
Install the light
tighten,
sure the cover fits flush with the
wall.
●
the electric power to the
the back
the main fuse
the electric outlet.
damp
light cover.
remove the bulb.
Replace the
wall.
circuit breaker
it.
If
bulb.
screws
Removable Oven Bottom
oven
spills, and
The oven bottom must be replaced before using
the self-clean cycle.
To remove:
1. Slide the the center front
to the left.
2.
Lift the
To replace:
1.
Slip the oven bottom into the oven
the
oven
2.
the front
slide the front
bottom into
be removed
Unlink
of the oven
the oven bottom into
to the right to
up
the oven burner.
the oven
fit
the
the
in the
the oven
in
The oven bottom has a porcelain enamel finish.
excessive
high
cleaning easier, protect the
This is particularly
when
content.
(such
with
milk,
the porcelain enamel surface.
or
fruit
sauerkraut.
juice)
or other
with
pitting
To protect the oven bottom surface,
aluminum
dish to
in the
slightly
sheet
the
Aluminum
the
shelf
It
dish
under
not
this would cause uneven
on the oven
If a
the oven to
with soap
tilled abrasive
does occur on the oven bottom,
first.
the
mild abrasive cleanser
Rinse
before self-cleaning.
Page 35

location
attached to the
should work
be more convenient to hook the stability
the unit when the stability bracket is
attached
the
intended for use with
backsplash is
structural
will interfere with the stability bracket when
in the upper set of
Bracket
Optional
Location
Bracket
2.
Fasten
the stability
the
the
washer-supplied.
B.
screw is going
the
of
the wall or
is in
plumbing in the
which will allow the
bracket side to
attached
securely fastened by tugging on the chain.
in the counter, notice the
the stability bracket which is already
the range. This location
for most installations.
the upper set
See Fig. A. The upper level set of holes
being used,
?!
; I
,
,
,:
I::
i
i‘
i \
I
I
I
Chain
screw
certain
the wall
the unit. Test to see if the chain is
,
of
to
with
Fig. C. Whether
inch thickness of
there
the stability
holes in the back of
backsplash kit. If
for the countertop which
1’
‘
and
one of the
be certain
which the screw
be in line with the
much
However, it
sure
,.
\
Chain
in the
the
that
the screw
other
electrical wires or
in
location
possible when
Chain
Long Screw
3. Temporarily
I
the rear
the packaging. See Fig. D.
4.
5. Hook the loose end of the
6. Slide the range
NOTE:
●
●
the
by slipping the nearest the
in the bracket. See Fig. A
is pulled
is
excess
attached to
CAUTION: Excessive slack in the chain
A
could
Once the range is pushed back in place, there will
small amount of slack in the chain. This
be
is
If attaching to masonry, you
and anchors at hardware stores. Use
to drill the required
If range is removed for cleaning or any other reason,
make sure chain is reattached.
attach the loose end of the
the countertop with the
in
between the
the stability bracket.
tight as possible and
in the
bracket.
the range to tip over.
the way back into the counter.
cutout leaving just
of the range
after the
buy suitable screws
Wall Plate
onto the
into the
sure the
from
the
there
drill
35
Page 36

●
QUESTIONS?
USE
PROBLEM
“F-
AND A NUMBER”
FLASH
IN THE DISPLAY
BURNERS HAVE YELLOW OR
YELLOW-TIPPED FLAMES
SURFACE BURNER KNOBS
WILL NOT TURN
SURFACE BURNERS
DO NOT LIGHT
TICKING SOUND
OF SPARK IGNITER
PERSISTS
BURNER LIGHTS
TICKING SOUND
PERSISTS
BURNER 1S
TURNED OFF
BURNER FLAMES VERY
LARGE OR YELLOW
FOOD DOES NOT
BROIL PROPERLY
POSSIBLE
This is
Call
●
If burner
With
●
●
Gas supply not connected turned
●
Check
●
●
Igniter
●
Burner
●
Hole in burner top behind igniter
●
Turn knob out of the
●
●
Be sure knob is in the OFF position. Remove knob by pulling it straight off
●
If
. The oven controls
●
The
●
Improper shelf position is being used. See the Broiling section.
●
Food is being cooked on
●
Cookware is not suited for broiling.
Oven bottom not securely seated in position.
Aluminum foil used on the broiler rack has not been
as
PROBLEM
a function error code. Press the
hour.
Put the
disconnect all power to the range.
Yellow
for service
flames look like (A),
look like (B) or (C), depending on the type of
gas, some yellow
turn
from OFF
sure electrical plug is plugged live, properly
for power outage.
sitting on burner
for combustion. Remove pan and try again.
in burner
Cleaning section. Remove the obstruction.
replaced correctly. See the
needle to unplug.
burner off and relight.
the stem
check
is connected
is not closed.
If the failure
for
tip on
for
service.
gas
you use.
tipping on outer cones
push the knob in
be partially blocking the free
be
be clogged. small sewing
ticking
still present, call for service.
of knob for
check
steps in the
properly set. See the Broiling
hot
then turn.
See the
build-up of
Allow
(C)
Normal
burner
normal.
Cleaning
properly and slit,
oven to
repeats,
blue
for natural
should
outlet.
needed
36
Page 37

FOOD DOES NOT ROAST
OR BAKE PROPERLY
OVEN TEMPERATURE
TOO HOT OR TOO COLD
OVEN CONTROL SIGNAL!
ENTERING COOK
TIME OR STOP TIME
STRONGODOR
SELF-CLEAN
FANNOISE
●
The oven controls are
not properly
set. See the Baking or Roasting section.
. Shelf position is incorrect.
●
●
Oven thermostat
●
Clock not set correctly.
●
Aluminum foil used improperly in the oven.
Oven bottom not securely
●
Oven thermostat needs adjustment. See the Adjust the Oven
. This is reminding enter
Oven shut off
cookware is being used.
adjustment.
is in closed position. Locate oven shut on pressure
the Adjust the Oven
in position.
bake
regulator of self-cleaning oven. Move shut off lever to open position.
●
Oven
●
Heavily soiled ovens require 4-hour clean time.
●
Heavy
●
An odor from the insulation around the inside of the oven is normal for the
●
Improper air/gas ratio in oven. Call for service.
●
Bulb
●
Electrical plug must
●
Switch operating oven light is broken. Call
●
Stop time must be
●
Oven temperature is
●
This is
set
self-clean cycle for
set properly.
should be cleaned up before starting clean
times the oven is used. This is temporary.
be
or burned
plugged into a
outlet.
service.
high
temperature
in
new oven
3 hours
set self-clean operation.
reset controls.
than stirt time.
disappear in time. To
minimum hours. See the Operating the Self-
the range
the
Cleaning Oven section.
●
A fan may
turn on and off to cool internal
This is
and the fan may continue to run after the oven is turned
●
Make sure the electrical plug is
into
live, properly grounded
power outlet.
●
Check for power outage.
●
See the Oven Control, Clock and Timer section.
If you need more help... call, toll free:
Answer
consumer information service
37
Page 38

NOTES
Page 39

With
purchase
formation”
Be
assistance
GE,
the
be there. All you have
ifyou ever need
do is call–toll-free!
proinptly
is
is
(;k:(.ollslllllct.setvi(.c
ahout
24
(.ollk’cllictlt
ofli’1.
For
rc’quest,
in
(;E
applian{.c,
to help.
And
day, 7
will providccxpcrl rcp;lirsclvit.e,
visit.
week.
your
1011101
inside
will provide
illld ii
111.
pers(ms with Iimitcd
ohlilill
01.(;11
Answer
he
time’.
01-
OUt-S() most
Answer
to
or
{id] 80(h’I.lll)<;FA(: (~()()~:~f~~~~)
he:lring or
have
in
47,()()()
thc
fkcling
service ill
(;E
(;E
discount. With
prices.
Selvice will still be there
while
is still
contr:lcl,
to
system
(;E
sent directly
access
Renewal
and
river
cards
User main
personnel.
improper
instictiona
intended to be performed by any=.
be referred to
mwt be
in
operation.
guide
Page 40

YOUR GE GAS RANGE
WARRANTY
Staple
sales slip
check
here. Proof of original purchase date
is needed to obtain
under warranty.
WHAT IS COVERED
WHAT IS NOT COVERED
FULL ONE-YEAR WARRANTY
For one year from date of original
purchase, we will provide, free of
charge, parts and
your home to repair or replace
pati
because of. a manufacturing defect.
●
Service trips to your home to
teach you how to use the product.
Read
you
please contact your dealer or our
Consumer Affairs office at the
address below, or call,
GE Answer CenteF
800.626.2000
consumer information service
. Improper instantiation.
If you have an installation problem,
contact your
You are responsible for providing
adequate electrical, gas, exhausting
and other connecting facilities as
range
that fails
Use and Care material.
have any questions
operating the product,
free:
or installer.
*************** ********
This warranty is extended to
original purchaser and any
succeeding owner for products
purchased for
the 48 mainland states, Hawaii
Washington,
warranty is the same except that it is
ship the product to the service shop
or for the service technician’s
costs to your home.
All warranty
by our Factory Service Centers or by
our authorized Customer
servicers during
Should your appliance need service,
during the warranty period or beyond,
call 800-GE-CARES (800-432-2737).
described in the
instructions provided with the product.
. Replacement
resetting
●
Failure of
other than its intended purpose or
used commercially.
●
Damage to product caused by
accident, fire, floods or
WARRANTOR IS NOT RESPONSIBLE
FOR CONSEQUENTIAL DAMAGES.
of house fuses or
circuit breakers.
product if it is used for
home use in
In Alaska the
working hours.
of
Recycled Paper
No. 164
2
may
To know
49.8599
do
apply to you.
your
I
exclusion or
warranty
in
your state, consult
If further help
you specific legal rights, and you may also have
Warrantor:
of incidental or
your local or
Electric Company
consumer
above limitation or exclusion
rights which vary from
office or your state’s Allorney General.
needed concerning this warranty, write:
GE Appliance,
KY 40225
Printed in LaFayetle, GA
 Loading...