

Page 1
Range
Contents
Anti:lip Bracket 3, 5 Sheh'es 9, 19
Appliance Registration 2 Thermostat Adjustment 25
Care and Cleaning 16-23 Vent Duct i0
Clock IO Problem Solver 26
Eiectr<mic (:<m trois i0 Repair Service 27
Features 6, 7 Safety Instructions 2-5
Flooring Under Range 5 Surface Cooking 8, 9
loeveling 5 Burners !7
l,ift-Up Cooktop 17 Burner Grates 16
Minute Timer 10 Control Settings 8
Model and Serial Numbers 2 Cookware Tips 9
()yen 9 Drip Pans 17
Air Adjustment 24 Flame Size 8
Baking, Baking Guide 12, 13 Lighting Instructions 8
Broiler Pan and Rack 15, 19 Warranty Back Cover
Broiling, Broiling Guide 15
(:ontrol Settings 10, 11
Door Removal 18
l+ight; Bulb Replacement 10, 19
Oven Bottom Removal 18
Oven Timer I0, 11
l'reneaung IO
Roasting, Roasting Guide 14 GEAnswer CoMe# )
_.Jpera[lon_elr-t,leanlng
-."o-_ _ #UII.tl,_O._UUU
Model JGSPIOGEK(
Page 2
1MP@ ANT
Read this book cm-efuiiy.
It is intended to help you operate and
maintain your new range properly.
Keep it handy for answers to your
questions.
If you don't understand something
or need more help, write (include
your phone number):
Consumer Affairs
GE Appliances
t-xl_p._al_ rat r_
! nnlrvilio KY4OW25
Write down the model
and serial numbers.
You'll find them on a label located
on the front frame behind the
storage drawer front. See pages 6
and 7.
These numbers are also on the
Consumer Product Ownership
Rezistration tara mat came wlm
yUUl l_kil_ll_, DII_IUI_ _-_lgsllll,.llll_ 111 L,IIIO
r_rA nl_a_ write thege nnmbers
here:
Serial Number
Use these numbers in any
corresponaence or sel-vlce Calls
ff_Olkll
FOR YOUR SAFETY
I
I
If you __rnelloas:
I
I, up_H w.iuow_.
I
2. Don'ttouch
i
_.l__ntricaiswitches?
!
^ :-73.-_:.TL/.L_;-......
_, _xungumn uny
I
openflame.
I
d imm#_di_t__iv call
II illUlili_l_lll_ imP--
I
I
*Don't turn electric switches
I
on or_Offbecause sparks may
Ignlle zne gas.
i
I
€:t'_ Vt'_i i_ _Ai=i:::TV
| W_I i U VVl I _nl h I I
i
I
Do not store oruse
gasoiine-oroiher
!
i li:ll i I! i i_UI_ vicapu| o o! _t,di
I
liquidsinthe vicinity
I
ofthisoranyother
_nnlianee.
I
...... _ ;_
Read all instructions
before using th_s
appliance.
JLl.Vmm V/_&_tZ"l_t _ J_
k._P_L]L_J_Il J..L_N_JLJL'_.J_
The California Safe Drinking
Water and ToxicEnforcement
• . . ^ f
Ac!._qu!res Uae _overnor o
t=amorma to putmsn a nst ol
substances known to the state
nf nnte.ntlal exnosure to _uch
substances.
1
Gas appliances can cause
I
minor exposure to t[lJ-_e u_ tunic
!
formaldehyde and soot, caused
I
• nrlm_rl]v hv th_ in,-nrnnlete
y= =---_--j _j ....... .,.r=.. r ....
I
e.omhustion of natural gas or LP
I
fuels. Properly aditisted ranzes,
indicateAby a'blu_'shrather t'han
a yellow flame, will minimize
I
incomplete combustion. Exposure
to these substances can be
minimized further by venting
with an open window or using
a Velltlla[lOl! LUll UI- IIUUU.
Jtll _Ugll IL g;;gcg;:li y_LJl.
Immediately contact the dealer (or
builder) that sold you the range.
_ave rune ano money.
Before you request
serlrlce...
Check the Problem Solver on
page 26. It lists causes of minor
operating problems that you can
correct yourself.
* Havetheinstaller show you
the location of the range gas
cut-offvalve.andhowtoshut
it off if necessary.
oHave your range installed
and properly grounded by a
qualified installer, in accordance
with the installation instructions.
_.._:-.,oAnyadjustment and service should
' - -P! *=_i :1_ It_ ..... t.'J_- - J
.... oe penormea omy oy qummea
gUS I_lllgl_ lilStilIl¢l_i UI ;_131VICe
Page 3
Do _ot remove the round
grounding prong from the plug. if
in _ou_ t about the _rounding of
o Be sure yov_rrange b _._t_y
adjusted by a qualified service
teehNdan or installer for the
type of gas (Natural or LP) on
which it is to he used. Your
Never use your appha_ce for
warming or heating the r_m.
Pro!onged use of the range
without adequate ventilation can
be hazardous.
your personal responsibility and
n_|_(r_tlon to hw_',a an nn_rcmnd_d
outlet replaced with a properly-
grounded three-prong outlet in
accordance with the National
Electrical Code. Do not use an
extension cord with this appliance.
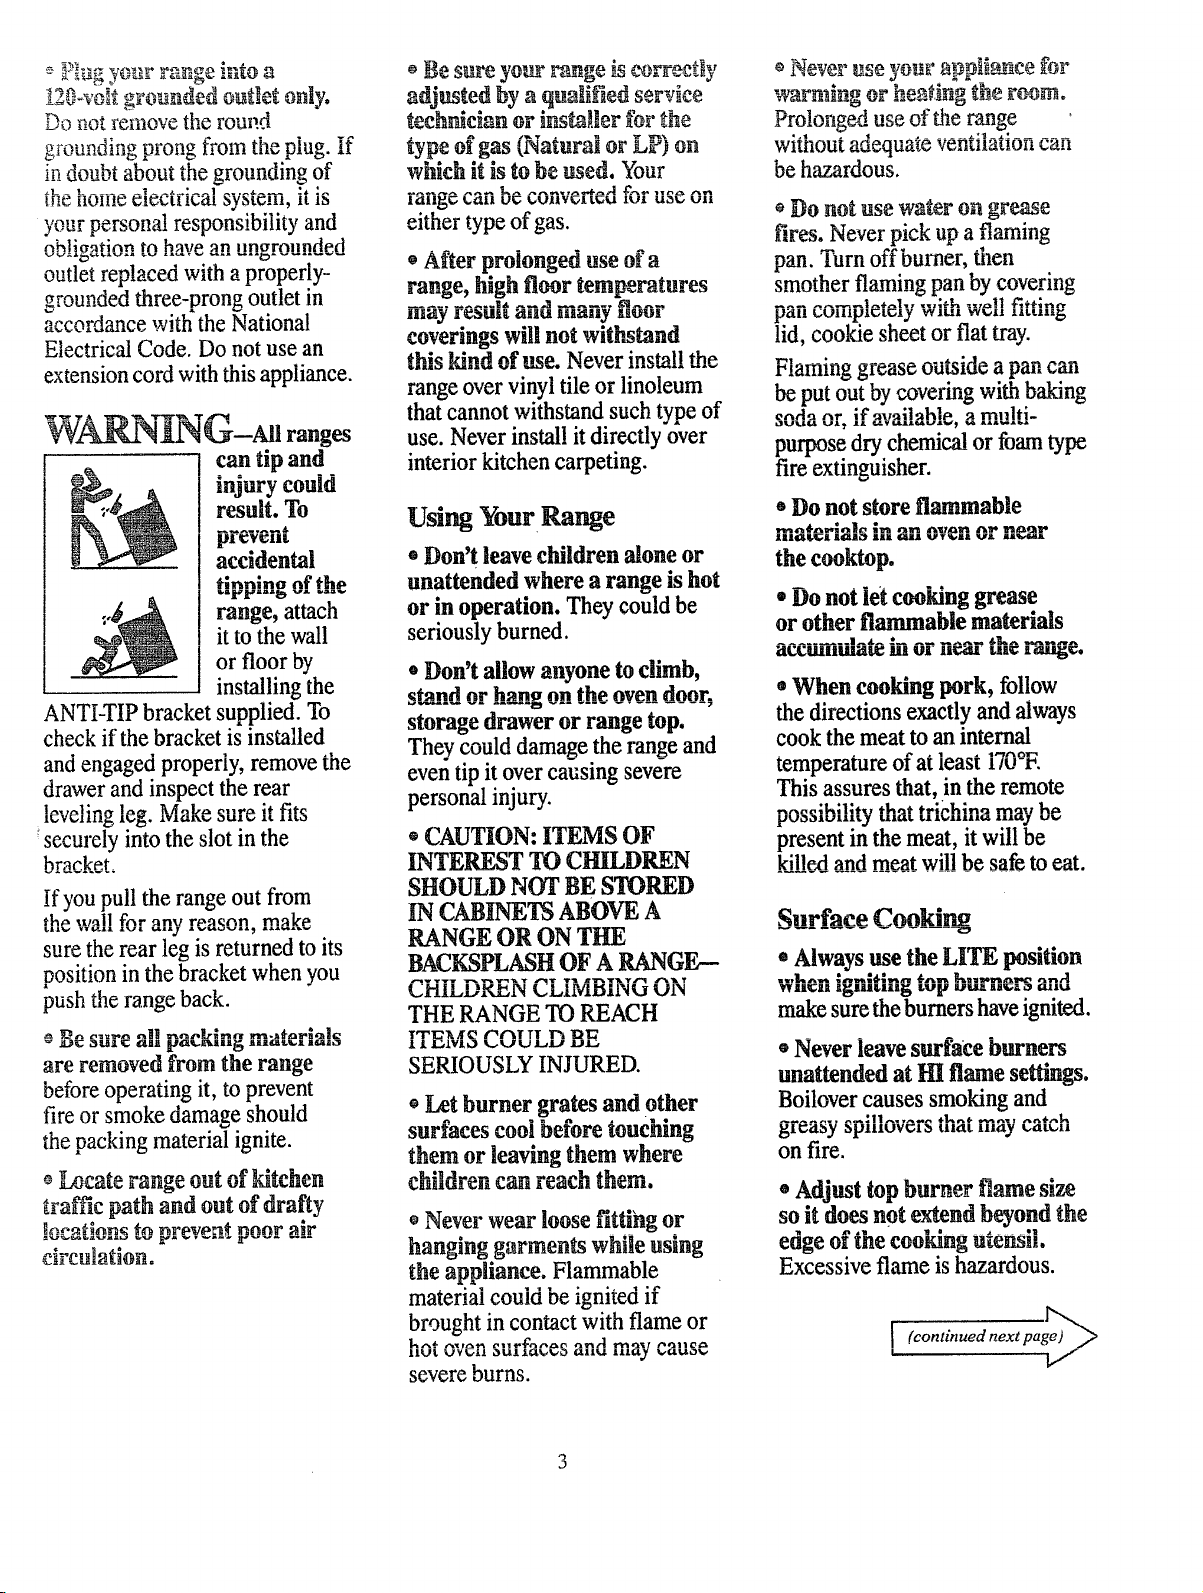
W_'N LrN _'--All ranges
__ I can tip and
rys#}J-7°
accidental
_nn_no of tho
_ range, attach
ANTI-TIP bracket supplied. To
check if the bracket is installed
and engaged properly, remove the
drawer and inspect the rear
IgVK;.].].II_ IK;,_. 1¥10,1X._.., OUl_,,, It ltlto
;securely into the slot in the
bracket,
If you pull the range out from
tho utMl fnr nnv rr, a_nn ma[-o
sure the rear leg is returned to its
position in the bracket when you
push the range back.
are removed from the range
before operating it, to prevent
fire or smoke damage should
the packing material ignite.
traffic path and out of drafty
c_rcu!ation.
it to the wall
I orfloorby
installing the
either type of gas.
* After prolonged use of a
range, high floor temperatures
coverings will not withstand
this kind of me. Never inv,!! the
range over vinyl tile or linoleum
that cannot withstand such ty_ of
use. Never install it directly over
interior kitchen carpeting.
Using Your Range
oDon't leave children alone or
unattended where a range is hot
or in operation. They could be
seriously burned.
* Don't allow anyone to climb,
_t_nd or h_no on the oven daar.
storage drawer or range top.
They could damage the range and
even tip it over causing severe
personal injury.
CAUTION: ITEMS OF
INTEREST TO CHILDREN
SHOULD NOT BE STORED
IN CABINETS ABOVE A
RANGE OR ON THE
BACKSPLASH OF A RANGE--
(_HILDNEiN _LIMBIN_J UIN
THE RANGE TO REACH
Tqe"_U'I_AF_ /'_/"_TTT l'_ 'D]l.l.l.l.l.l.l.l.__
1 It rdv_O k.,kJt3LaL,_ UI.:,
SERIOUSLY INJURED.
* Let burner grates and other
surfaces cool before touching
them or leaving them where
• Never wear loose fittfng or
hanging garments while using
the appliance. Flammable
material could be ignited if
brought in contact with flame or
severe burns.
* Do not use water on grease
fires. Never pick up a flaming
pan. Turn offburner, then
smother flaming pan by covering
p_ll UUIIIIJIK;t_Iy WliJl v'k'_l[l l,u.tlutl_
lid, cookie sheet or flat tray.
flaming grease uu_uc a pro]. _m_
be put out by covering with baking
enda ar if.vMl_hla nmnlti-
purpose dry chemical or foam type
fire extinguisher.
* Do not store flammable
the cooktop.
• Do not let cooking grease
or other flammable materials
_d[.l_Ullll[ll_[_f Ill qJl" nN lkllllg Ii_U,_.
• When cooking pork, follow
the directions exactly and always
cook the meat to an internal
temperature east t tu-r.
of at i .....
This assures that, in the remote
.... ;l.d.lh-_, th,_* ¢t.;t,h_no rna, t_ 1"_
l.JIIJr,_._lL/llllL_ tlll_lg I_11_11111(,,1. lll¢_.J Ida,
present in the meat, it will be
killed and meat wil! be safe to eat.
,%,trace Cooking
* Always use the LITE position
WiltOn _;tHuin_ t_ u,pua aa_a_ a_u
make sure the burners have ignited.
• Never leave surface burners
unattended at HI flame settings.
Boilover causes smoking and
gleasy ISI3111UVK;15 Ul0.t lllily UtltK,ll
onfire.
oAdjust top burner flame size
so it does not extend beyond the
edge of the cooking utem_i.
Excessive flame ishazardous.
(continued next paie) _
,
Page 4
Use only dry pot holders--
i_llOl_[ O! _,.lgJ.llp _UI. IIUlU_Ib Ull IIUL
_L£1 lta_,_t_ llltO.y I,K,_UI, L 111 L}LIL 1113 IlUIII
cto_m 15f_ not lot ruat hnld_r,c onmP
near open flames when lifting
utensils. Do not use a towel or other
bu!kTclothinplace of a pot holder.
of burns, ignition of flammable
m_t_rlnl_ and _nillao_ tnrn the
cookware handles toward the side
or back of the range without
extending over adjacent burners.
* Carefully watch foods being
fried at HI flame setting.
* Never block the vents (air
o__nings) of the range. They
provide the air inlet and outlet
which is necessary for the range
to operate properly with correct
combustion.
• Do not use a wok on the
cooking surface if the wok has a
round metal ring which is
placed over the burner grate to
support the wok. This ring acts
as a heat trap which may damage
the .... '-
burner grate ano ourner neau.
A 1-- -'_ .......... _-k ^ k ..... a-_
WU_I_ lltS_.,zay, x _tto zttaav _auo_
a carbon monoxide level above
thnt allnwed hv cnrrent gtandards.
resa!tingin ahealth hazard.
* Foods for flying should be as
dry as p_ssible. Frost on frozen
li./LIU} O/t IlIUI_LUI_, UII ll_ll IUUUO
,',on f.m,eo hf_* fat t_ knhhlo un and
nwr _iri_g nf nnn
* Use least possible amount of
fat for effective shallow or deep-
]_a{ _°ylng. U!lllllg tll_ [,)i_ll LUO lull
Ol l@!l. Uiall bdldbli5 D_IIIUVK,15 WUtK,II
food is added.
o If a combination of oils or
_'n._|'hor hofnr_ hv_.qtlna z'_r ,lq
fal_:melt qlnwIv
Always heat fat slowly, and
watchas it..........Flt_ats.
®Use deep fat thermometer
whenever possible to prevent
overheating fat beyond the
smoking point.
o Use proper pan size--Avoid
pans that are unstable or easily
tipped. Select utensils having fiat
bottoms large enough to properly
contain food avoiding boiiovers
and spiiiovers, and large enough
to cover burner grate. This will
I. __! ....... I----: .... A ....... *
DO[H 5_iV_ I.Jll_i:llllllg i:lllU _)l_V_llt
IIi:IL41LILIUI.I_. O[t.,k, UIIIHI_,IILIUII_ IJI lU_JlOt_
cin,'_ h_rtt cn_tt_rincr fw enill_v_r_
leftonrangecan ignite.Usepans
withhandlesthatcan beeasily
graspedandremaincool.
is recommended for use on gas
IJ lair 111_*¢1 d *
* Keep all plastics away from
top burners.
* To avoid the _ssibility of a
burn, always be certain that the
controls for all burners are at
OFF position and all grates are
cool before attempting to
remove a grate.
* When flaming foods under
the hood, turn the fan off. The
fan, if operating, may spread
the flame.
f_
window, do not use long curtains
which could b!ow over the top
burners and create afire hazard.
v ._.l yOU _l!ll_J[l_ _t_, LUIII UII LIIC
gas to the range and call a qualified
c_ra_if.a to ohn_,_ian Uoxt_r rico an
0_£ Y 1 _,..'_,_ I._,/%_,1111,1,%,'11._11 • x a _ v l_..& €0_,,_ ,,,,_11
nn_n llama tn lneate a leak
Bakip_g, Broiiing and
o Do nol use oven for a storage_
area.
o Sland away from the range
when opening tt_e door of a hot
oven. The hot air or steam
which escapes can cause burns
to hands, face and/or eyes.
• Place oven shelves in desired
position while oven iscool.
* Pulling out shelf to the shelf
51Lq3[L! 13 a [_@IIV_KIIlK2II_ _11 iP, glLlltl_._
nraea.tinn noaingt |turns from
touching hot surfaces of the
door or oven walls.
w LIUii t lll_idll ililtl[,R_ill_tll lgOtll
could build up and the container
emdd hn_t caurinp an inlnrv.
................. tD ...... d_--- .r -
* Don't use aluminum foil
I • _ zll ........ aL __
in
me oven excep_ asanywnere
described in this book. Misuset_
rta_x_aao t_ tho r.ano_
* Use only glass cookware that is
recommended for use in gas
ovens.
• Whenusingcookingor
roasting bagsinoven, follow
the manufacturer'sdirection.
o AIw_v_ ramavo hrailor nan
from the oven as soon as you
finish broiling.Greaseleft inthe
pan cancatch fireifovenisused
without removingthe greasefrom
the broilerpan.
* When broiling, if meat is too
elo_ ta the fl_me, the f_t m_v
.................. _ ........... d
ignite. Trim excess fat to prevent
excessiveflare-ups.
#
4
Page 5

_ ¢_a_¢correcdv to reduce the
e_ossibility,_ "'_'_"
. {,,g_c,_s_=fires.
F oorfingunder the
Range
]f you should have a grease
fire in _he bl-oiier pan, turnoff
oven, and keep oven door closed
to contain fire until it burns out.
Self-Cleaning Oven
o Do not clean the door gasket
before reading special cleaning
instructions on page 20. The
door gasket is essential for a good
seat, Be careful not to rub, damage
or move it.
* Do not use oven cleaners. No
commercial oven cleaner or oven
liner protective coating of any
kind should be used in or around
any part of the oven.
o Remove the broiler pan and
other cookware before self-
_!eanin_ the oven.
: ¢.W
_ibur range, like so many other
household items, is heavy and can
_ettle into soft floor coverings
such as cushioned vinyl or
carpeting. When moving the range
on this type of flooring, use care.
Do not install the range over
kitchen carpeting unless you
place an insulating pad or sheet of
1/4-inch-thick plywood between
the range and carpeting.
When the floor covering ends at the
front of the range, the area that the
range will rest on should be built up
with plywood or similar material to
the same level or higher than the
floor covering. This will allow the
range to be moved for cleaning or
servicing.
Leveling the Range
leaning Your Range
lean only parts listed in this
Use and Care Book.
* Keep range clean and free
of accumulations of grease or
spitiovers which may ignRe.
ill You Need Service
o Read "The Problem Solver"
on page 26 of this book.
o Don't attempt to repair
or replace any part of your
range unless it is specifically
recommended Jn iris book, All
other servicing should be referred
to a qualified technician.
TH. E
g_
J
Leveling legs are located on each
corner of the base of the range.
Remove the bottom drawer and you
can level the range on an uneven floor.
To remove drawer, pull drawer
out all the way, tilt up the front
and take it out. To replace drawer,
insert glides at back of drawer
beyond stop on range glides.
Lift drawer if necessary to insert
easily. Let front of drawer down,
then push in to close.
One of the rear leveling legs
will engage theANTI-TIP bracket
(allow for some side to side
adjustment). Allow a minimum
clearance of 1/8"between the range
and the leveling leg that is to be
installed into the ANTI-TIP bracket.
5
Page 6
O O
_ 1 II
!
i
J
/
/
J
' \- I III!
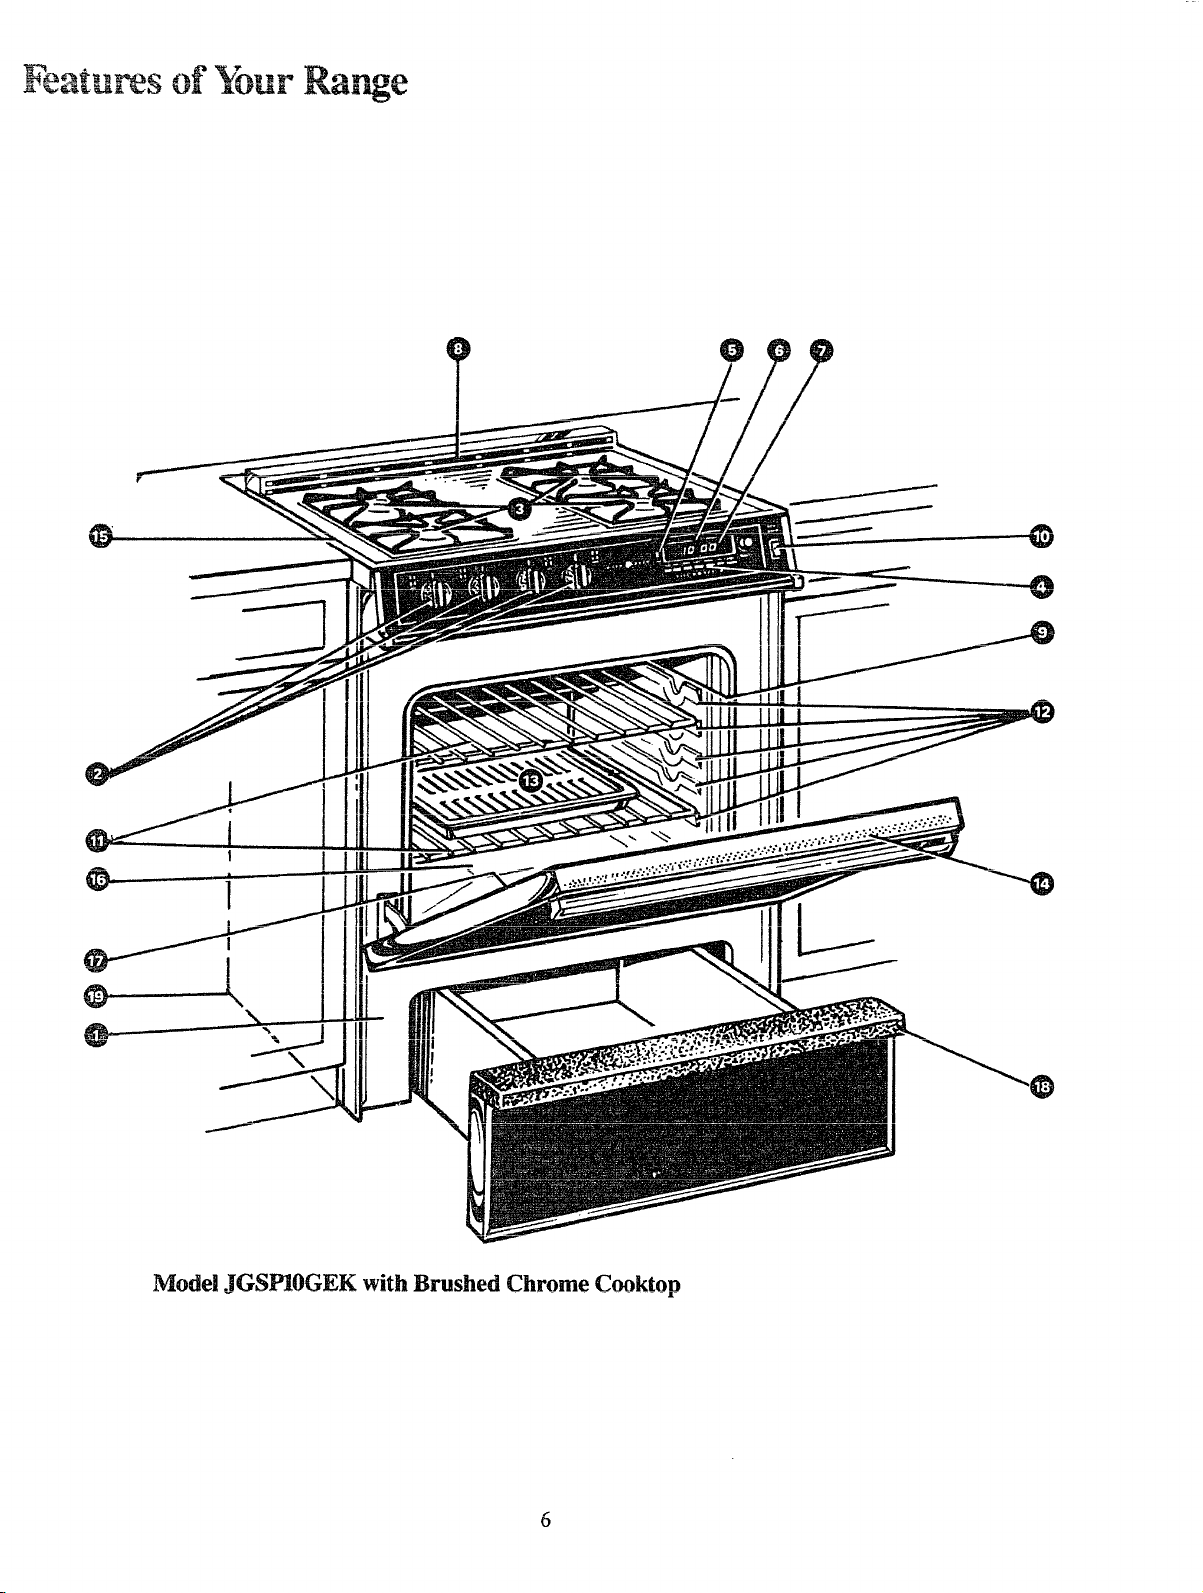
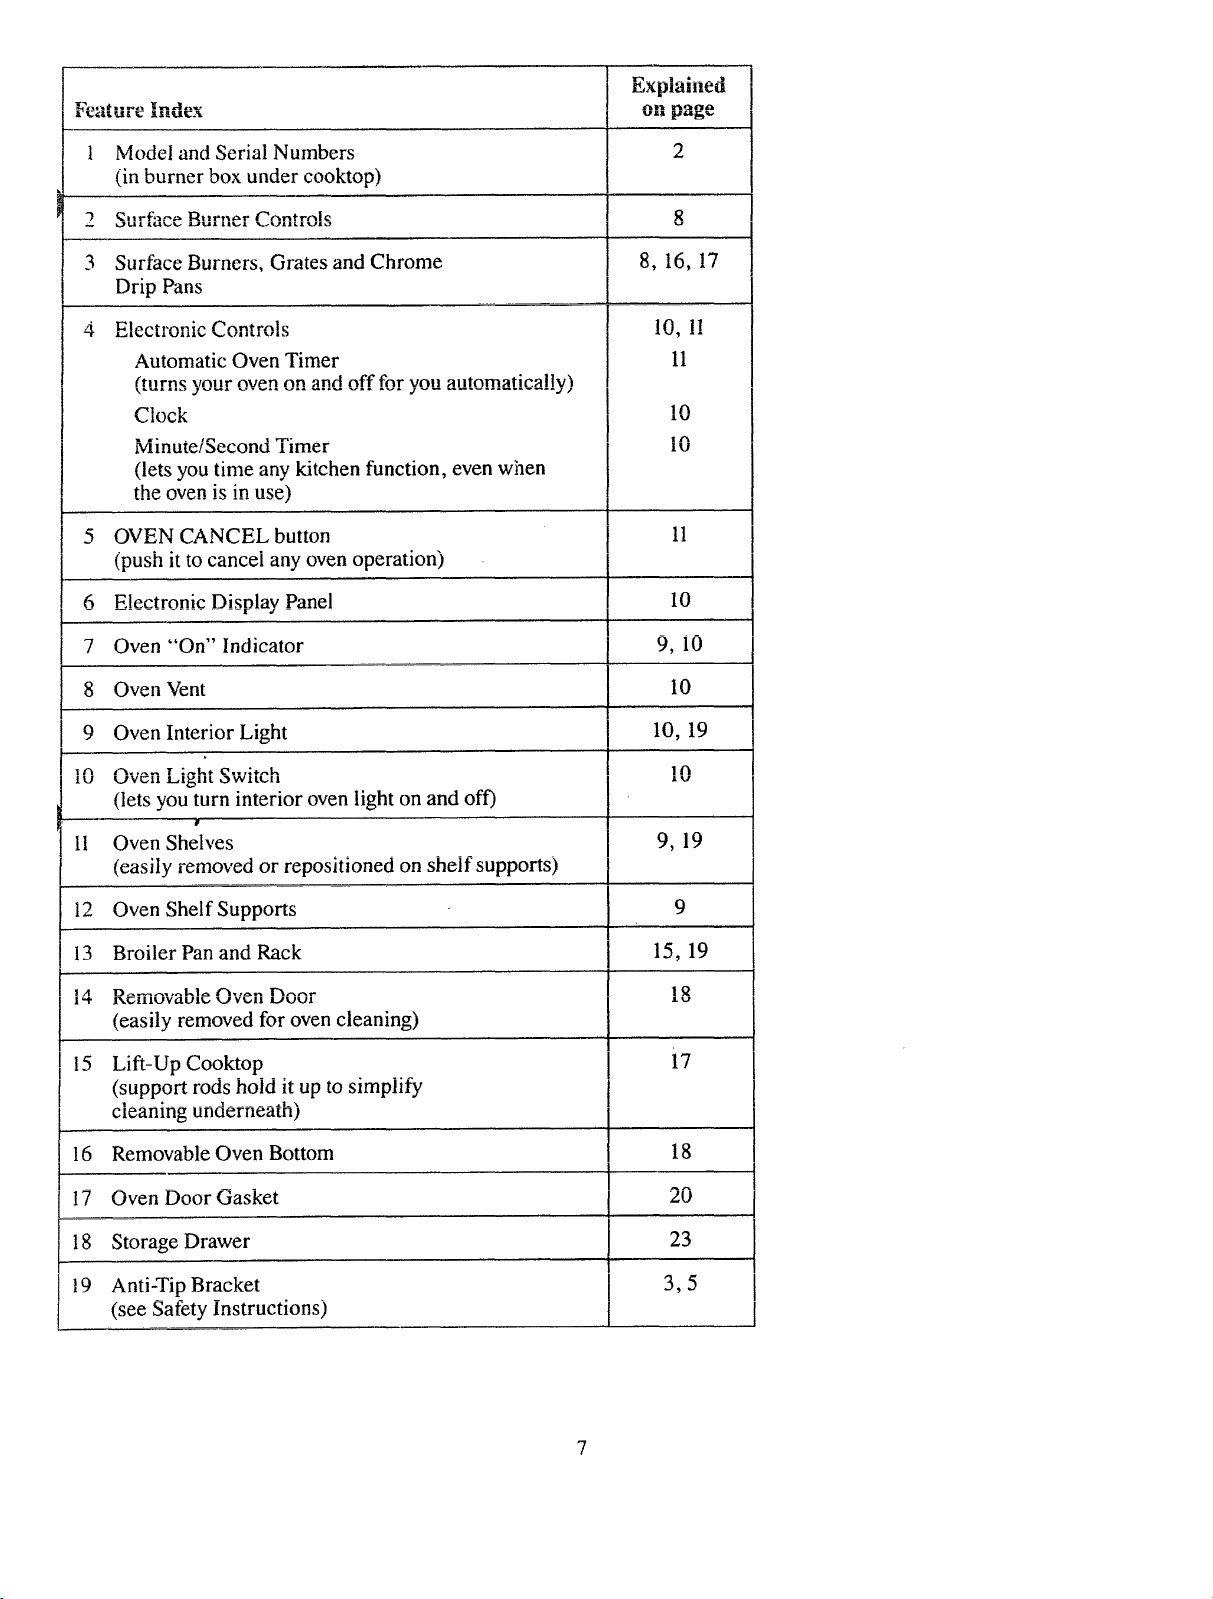
Model JGSPIOGEK with Brushed Chrome Cooktop
6
Page 7
I
I _ ..... a.. _._ _ _11
I l_xplallleQ
lt'l£_.gKllL K7 I|IKItK_2CL
1 Model and Serial Numbers
J (in burner box under cooktop)
3 Surface Burners, Grates and Chrome
I Drip Pans
l_l_ot t,nn _n (_r_nt rn| e
j-
t
I
I
t
1 5
16
I
1 7
18
19
rt 11
f
Automatic Oven Timer
(tllrn_ xrnltrnvon nn nngl nff fnr vnn nntnrnntie_llv]
Pl ,._1.
Minute/Second Timer
(lets you time any kitchen function, even when
the oven is in use)
OVEN CANCEL button
(push it to cancel any oven operation)
Electronic Display Panel
Oven "On" Indicator
Oven Vent
Oven Interior Light
UVUII hi,ilL OWIL_II
(lets you turn interior oven light on and off)
Oven Shelves
(easily removed or repositioned on shelf supports)
2
I
I 8, 16, !7
!
I !O, !!
I 11
I
I 11
I 9, i0
I 10, 19
I ,n
Jt_
I
I 9,19
I
Oven Shelf Supports
Broiler Pan and Rack
113
1F']...... I..1_ .'"_,,_ T"_
Jt_ClIII.JV_LUIF,-, K.J V_II LJUUI
(easily removed for oven cleaning)
Lif_-Up Cooktop
I15
(support rods hold it up to simplify
cleaning unoerneam)
t16
Removable Oven Bottom
I
Oven Door Gasket
117
Storage Drawer
Anti-Tip Bracket
119
(see Safety instructions)
I 15, 19
_tu
I
I
I 23
I 3,5
I
Page 8
Surface Cooking
Automatic Ignition
Your surthce burners are lighted
by electric ignition, eliminating the
need for standing pilot lights with
constantly burning flames.
In case of a power outage, you can
light the surface burners on your
range with a match. Hold a lighted
match to the burner, then turn the
"knob to the LITE position. Use
extreme caution when lighting
burners this way.
Surface burners in use when an
electrical power failure occurs will
continue to operate normally.
Surface Burner Controls
Knobs that turn the surface burners
on and off are marked as to which
burners they control.
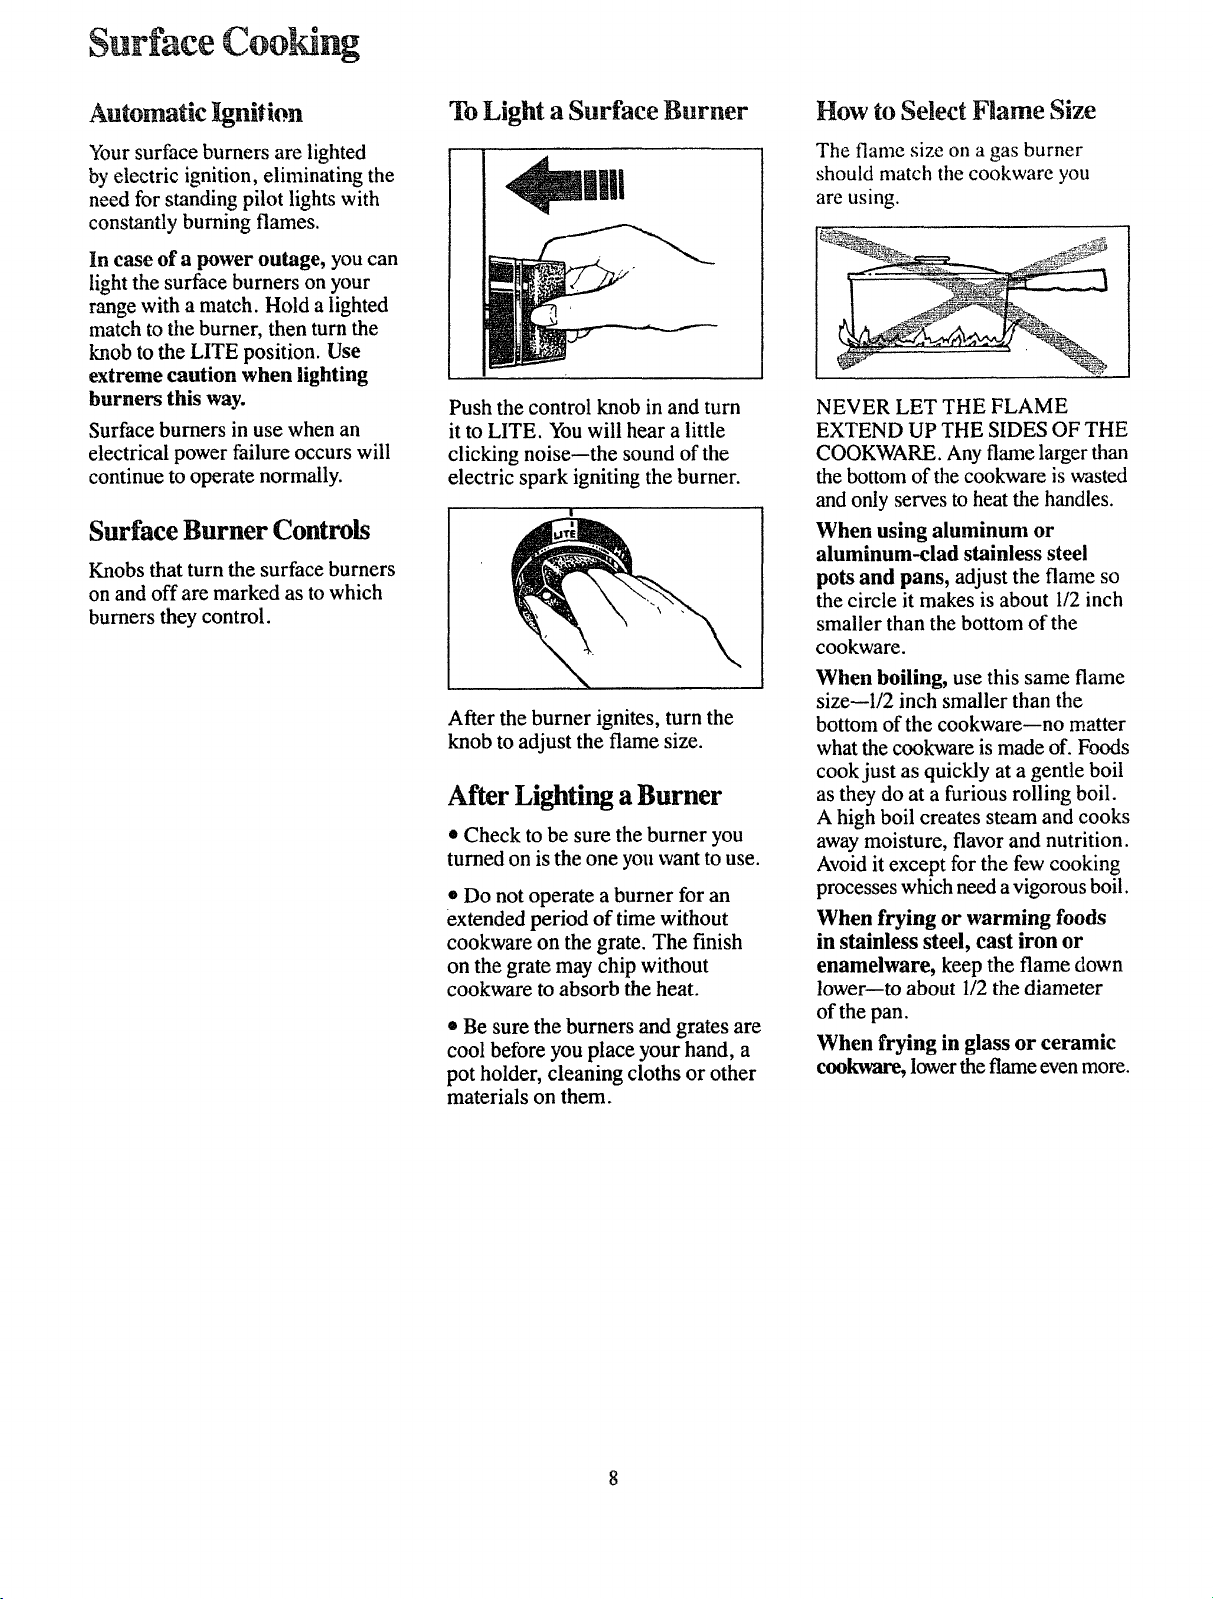
To Light a Surface Burner
4 11||il
Push the control knob in and turn
it to LITE. You will hear a little
clicking noise--the sound of the
electric spark igniting the burner.
After the burner ignites, turn the
knob to adjust the flame size.
After Lighting a Burner
, Check to be sure the burner you
turned on is the one you want to use.
e Do not operate a burner for an
extended period of time without
cookware on the grate. The finish
on the grate may chip without
cookware to absorb the heat.
. Be sure the burners and grates are
cool before you place your hand, a
pot holder, cleaning cloths or other
materials on them.
How to Select Flame Size
The flame size on a gas burner
should match the cookware you
are using.
NEVER LET THE FLAME
EXTEND UP THE SIDES OF THE
COOKWARE. Any flame larger than
the bottom of the cookware is wasted
and only serves to heat the handles.
When using aluminum or
aluminum-clad stainless steel
pots and pans, adjust the flame so
the circle it makes is about 1/2 inch
smaller than the bottom of the
cookware.
When boiling, use this same flame
sizewl/2 inch smaller than the
bottom of the cookware--no matter
what the cookware is made of. Foods
cook just as quickly at a gentle boil
as they do at a furious rolling boil.
A high boil creates steam and cooks
away moisture, flavor and nutrition.
Avoid it except for the few cooking
processes which need a vigorous boil.
When frying or warming foods
in stainless steel, cast iron or
enamelware, keep the flame down
lower--to about 1/2 the diameter
of the pan.
When frying in glass or ceramic
cookware, lower the flame even more.
Page 9
Using Your Oven
"lbp-of-Range Cookware
Aluminunl: lVledium-weight
c_kv, arc is recommended because it
theatsquickly and evenly,.Most fc×xts
brown evenly in an aluminum skillet.
Minerals in food and water will stain
but will not harm aluminum. A
quick scour with a soap-filled wool
pad after each use keeps aluminum
cookware looking shiny new. Use
saucepans with tight-fitting lids for
cooking with •minimum anaounts
of water.
Cast Iron: If heated slowly, most
skillets wil! give satisfactory results.
Enamelware: Under some
conditions, the enamel of some
cookware may melt. Follow cookware
manufacturer's recommendations
for cooking methods.
Glass: There are two types of glass
cookware--those lor oven use only
and those tbr top-of-range cooking
(saucepans, coffee and teapots).
Glass conducts heat very slowly.
Heatproof Glass Ceramic: Can
be used for either surface or oven
ooking. It conducts heat very
lowly and cools very slowly.
Check cookware manufacturer's
directions to be sure it c_a be used
on gas ranges.
Stainless Steel: This metal alone
has poor heating properties, and is
usually combined with copper,
aluminum or other metals for
improved heat distribution.
Combination metal skillets usually
work satisfactorily if they are
used with medium heat as the
manufacturer recommends.
Automatic Ignition
The oven burner and broil
burner on your range are lighted
by electric ignition.
To light either burner, push the
button for the desired function and
turn the SET knob until the desired
temperature is displayed. The
burner should ignite within 60
seconds.
Power outage?
The oven and broiler burners on
this range will not light in the event
of an electrical power outage. Do
not attempt to light them
manually with a match.
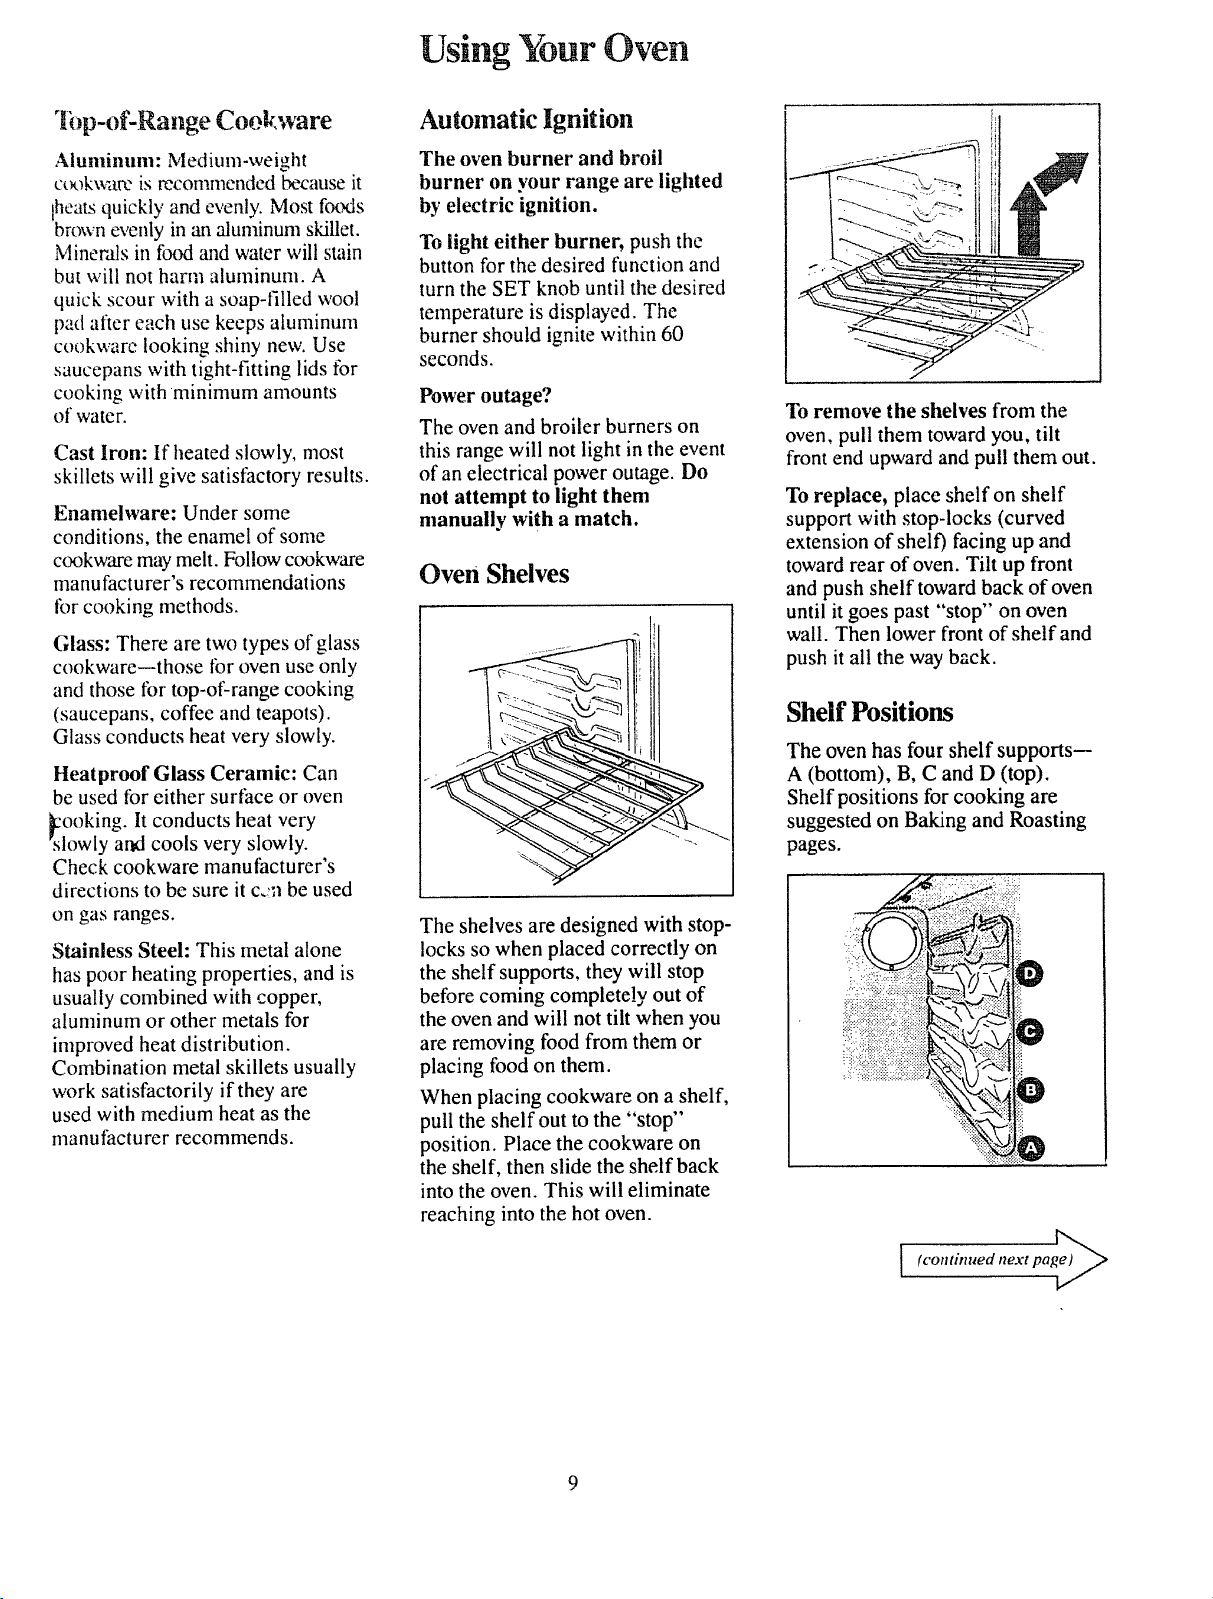
Oven Shelves
The shelves are designed with stop-
locks so when placed correctly on
the shelf supports, they will stop
before coming completely out of
the oven and will not tilt when you
are removing food from them or
placing food on them.
When placing cookware on a shelf,
pull the shelf out to the "stop"
position. Place the cookware on
the shelf, then slide the shelf back
into the oven. This will eliminate
reaching into the hot oven.
To remove the shelves from the
oven, pull them toward you, tilt
front end upward and pull them out.
To replace, place shelf on shelf
support with stop-locks (curved
extension of shelf) facing up and
toward rear of oven. Tilt up front
and push shelf toward back of oven
until it goes past "stop" on oven
wall. Then lower front of shelf and
push it all the way back.
Shelf Positions
The oven has four shelf supports--
A (bottom), B, C and D (top).
Shelf positions for cooking are
suggested on Baking and Roasting
pages.
(continued next pag>
Page 10

Using Your Oven
tcontmued)
Oven Light
t _...L ..... ._, -I .... ,t ..... *--_| .... l
L,c.NC 11!¢_ SV¢ILL.'I1 O11 [llt2 IdUlltli)l [}dllL':l
to turn the light on and off.
Oven Vent
_rbur oven is vented through ducts
at the rear of"the range (see page 6).
l'_n nnt hl,aeL- th_cc_ thtet¢ _xJh_n
cooking in the oven--it is important
that the flow of hot air from the oven
and fresh air to the oven burner be
uninterrupted. Avoid touching the
Velll o[,J_lllll,l_b Ul llCdl uy _Ul llak,cz_
during oven or broiler operation--
they may become hoL
• Vent openings and nearby
_ur_e_r_ rn_v hoenm_, hnL I'ln nn!
touch them.
" IlidlllUit;_ U! IJUI_ itlllU IJPlli_ Uii LIII;
cooktop may become hot if left
too close to the vent.
I
• Do not leave plastic items on
the cooktop--they may melt if
|elr[ too close to me VelllLo
Oven Moisture
As your oven heats up, the
temperature change of the air
in the oven may cause water
droplets to form on the door
glass. To prevent this, open the
oven door for the first minute
of oven heat-up to let the moist
air out.
Electronic Controls
Oven "On" Indicator
Word "ON" is displayed when
BAKE or BROIL button is energized,
goes out when CANCEL button is
pushed or when oven burner shuts
L"!" ....... -" __11-.
oH automaucany.
The oven operation is controlled
{.7,1_t, JLIUIilL.;iallV. I IIC IUllUWIIII _
instructions tell you how to operate
the electronic controls.
To Set the Clock
1. Push CLOCK button.
2. Turn SET knob to correct time
of day. Clock is now set. The clock
m,,ot ka _at In tho _nrr_t t_m_ nf"
_lU_[ UI_ _(b I.U I.l|rrt,_ _UI IbKIL [llll,r_s Ult
day for accurate automatic oven
timing operations.
To Set the
Minute/Second Timer
,1_1 D,,ol_ rl"T'_..4"r._D K, ttt,'_n
1[ u_ll JLLtVlA..aI_. UUltLUII.
2. Turn SET knob to desired
amount of time (up to 9 hours and
59 minutes). The Minute/Second
Timer will immediately begin to
1
count down.
3. When time is up, the End-of-Cycle
I
Tnn_ (q Ion_ hae.n,q_ will sound and
the display will again show the time
I
of day.
Note: The Minute/Second Timer is
a reminder only and will not operate
the oven.
b
You can use the ...............IVImute/_econo
1
Timer whether or not the oven is
he.ino u._e,d The Minute/Second
Timer does not interfere with oven
operations.
To Cancel the Timer
Push and hold TIMER button for
three seconds. This will clear the
Minute/Second Timer function.
To Bake
1. Push BAKE button.
2. Turn SET knob until desired
tc_mnerntHr_ i_ di_nlaved.
A one-second beep will sound
when the oven has preheated to and
stabilized at selected temperature.
"4 MU'h_,n GrGchoAh,._klno ntt_:h
CANCEL button.
Nnto. Tn roe.all wh-_t temn_ratttre
you have selected while the rising
temperature is being shown, push
and hold the BAKE button. The
selected temperature will be shown
...kll ...... k_lA #1_ DA I/'l_ I-.,,##n_
WIIII_ yuu IIUIU tllr_ Dt'_IX.L_ UULLUII.
The actual oven temperature will
be shown after a few seconds.
You can push the CLOCK button to
display time of day without
cancelling the oven operation.
You can change the selected [
pushing the BAKE button and
temperature at any time by
_U| lJlll _ tJl_,,,_ K.,1]L-_ • ItXII_.'U. J
To Broi!
!. Push BROIL button.
2. Turn SET knob until your
1 ." _£TTT hrll_Tl _-- I _ lnJD_IT
is visible in the display.
"tl/k___ g':__;..k--_l k_._:l: ....... k #k_
VY I1_11 lllllSllt_U 131UIIIIi_:_ pLl311 LIIU
CANCEL button.
1
10
Page 11

Automatic Oven Timer
The oven timer will automatically
start and stop your oven cooking or
_elf-cleaning operation for you.
p-
For automatic oven cooking:
At, D,,oh €'_i-_/'_V "lPI/k,'ll7 h,,e÷_n
,L 1,,,1_)|| V_,_'e*.,.*_'r*_.FA_k. • JLIYJLJL._ UUIL.Lm,,,,IA|.
2. Turn SET knob to set length of
baking time.
3. Push BAKE button.
4. Turn SET knob to set desired
temperature.
When cook time is reached, the
End-of-Cycle Tone will sound and
the oven will turn off.
During automatic cooking:
. You can pUsh the STOP TiME
button to find out when the End-of:
Cycle Tone will sound and the oven
will turn off.
6 You can pushthe CLOCK button
to display time of day without
cancelling the oven operation.
ToDelay Starting an
_kutomatic Oven Operation
Caution: Never let food sit in the
oven for more than 4 hours before
[UUI_III_ _llla_l l[_* J[%.UUIII I,V_llllJK_'itfi!.Ul_,
is ideal tbr the growth of harmful
bacteria. Be sure oven light is off
because heat from the bulb will
speed bacteria growth.
Note: You can push the STOP
TIME button to find out when the
oven will turn off. Push and hold
the COOK TIME button to find out
¥_IIK,_II lll_ U¥_,,,,'II Yl¢III Lldllll UII.
If a delayed self-cleaning oven
operduon is ueslreu, see page zt.
How toChange
a Program
When a function has been
entered, you can recall what has
I.,........ om_A K,,..._,,oh;,-,,,,
u_.,+_ ptu_Ja-uAJ_,u uy21-,uot_u_E,
the corresponding function -
button. The messages inthe
display show you which function
is currently beingdisplaye d. .., ,,_ _
wnn e me mncuon !S olspmyeo, I
you can change jt with :the SET
knob. You can chan_e any
programmed function atany time.
• ; 57 _=_..- ,a . • I
Function Error Tone (series of
very rapid beeps, 1/8-second on,
Ii_"Sg_.UIIU. UI2}, Ul,._l./lo. _ frill OltuY_' 1._
failure code. Cancel Function Error
Tone by pushing the CANCEL
button. If the Function Error Tone
starts again (after about 15
• x Is ..... -"__
seconos), Call for serv|ce.
Disconnect the range electrical
sunnlv to stop the tone.
- --17£" -J
If the function error occurred
while you were programming the
Electronic Control, push the
CANCEL buttonand try again.
To Cancel the Tone... If you don't
want an audible tone when you
push a button, you can eliminate
the Key Tone. by pushing and
IIUIUIII_ tlll_ _,.,;d'Ikl'_lK._lt_'l-.' UULIAJII UIItll
you hear ashort beep (in
approximately, two seconds). To
activate the tone again, push and
hold the CANCEL button once
more until you hear a Short beep.
Cancelling or activating the tone
_honld 0nlv h_ donewhP.n there is
no oven operation
I
Pushing the CANCEL button will
clear all functions except the Clock
I
and Minute/Second Timer.
programmed
If a delayed cooking operation
is desired, t .....
1. Push COOK TIME button.
2. Set length of baking time with
SET knob.
3. Push STOP TIME button.
4. Turn SET knob to time of day
when baking should be completed.
Stop time must be equal to Or
greater than the cook time plus the
current time of day.
5. Push BAKE button.
6. Turn SET knob to desired
112.11lpE:l i:l.t U 1_.
When stop time is reached, the
l(7--A --€ ,¢"I.,_1,-_ "IF'...... ;ii ..... d _.d
JK_IIU-UI-_._y_,I_ IUII_ %-'/111 _UUIAU allU
the oven will turn off.
Tones: ' • ':_
End-of-Cycle Tone (3 long beeps--:
one second on, one second off):
shows that a timed oven operation
has reached STOP TIME or that
the Minute!Second Timer has .
counted down. - .
Attention Tone (series of short
heP.n_ lla-_eeond on, l/4-._eennd "
off, until proper response is •given):
will sound if oven has onlybeen _
partially programmed.-For example,,
if you have selected a cook time but
IIU tl_lll[)_lat_lC, .yUtl Wlll'll_,.._dl IJIK;
Attention Tone until you select a
temperature or push CANCEL.
Notification Tone (single, one-
_ac'nnd hao.n_l • indleat_ clvan ha_
stabilized at selected temperature.
r_cy _tuHct_mgJC, uxu-bct;uuu
beep): sounds when any button is
pushed,
ii
Page 12

How to Set Your Range
forBaking
1. Position the shelf or shelves in
the oven. If cooking on two shelves
at the same time, place shelves
about 4 inches apart and stagger
food on mem.
"_ Close oven door.
3. Push the BAKE button and
turn the SET knob until desired
temperature is displayed. If
preheating is desired, do not put
IOOU in UIe UVI_ll HIILII d Olll_-_l_t_%.YllU
beep sounds to tell you the oven has
stabilized at the selected baking
temperature.
At C_rtan da_r _nd n|ar_ fOOd in
oven on center of shelf. Allow at
least 2 inches between edge of
bakeware and oven wall or adjacent
cookware.
5. Close oven door.
minimum time on recipe. Cook
longer if necessary. Push CANCEL
button and remove food.
Shdf Positions
Most baking is done on the second
shelf position (B) from the bottom.
When baking three or four items,
use two shelves positioned on the
second and fourth sets of supports
tt_ & t J) from bottom oven.
Bake angel food cakes on first shelf
position (A) from bottom of oven.
Baki Tips
+ Follow a tested recipe and
measure the ingredients carefully.
T _ .... I ..... I if
lI you are using a pacicagc lillY,.,
follow label directions.
d ....
t_h_t,F fntwl fnr ttnnt_n_ itt
Ol
o If moisture is noticeable on the
front of the oven or on the glass door
WIICll 111 _t till Illll_ IJil gll_ VV+ll, l_llv+
the oven door ajar for a few minutes
or until the oven is warm.
• Do not open the oven door during
a baking operation--heat will be lost
and the baking time might need to
be extended. This could cause poor
OaKlIlg lr_Ult_. U ytJtI iliu_t opl;;ll Ull+_
door, open it partially--only 3 or 4
inches--and close it as quickly as
possible.
• Do not disturb the heat circulation
in the oven with the use of aluminum
foil. If foil is used, place a small
sheet of it, about iu..............ay _z inches at
the most, on a lower shelf several
inches below the food. Do not place
foil on the oven bottom.
Common Baking Problems
and Possible Solutions
PIES
Rurninp around edges
_"()ven-t_-fuiii- avoidovercrowding.
• Edges of crust too thin.
e Incorrect baking temperature.
Bottom crust soggy and unbaked
• Allow crust and/or filling to cool
sufficiently before filling pie shell.
Fllllll_ lllia,_ IJl tU',,.t LIIlll _1 _[I.tl+J.
• Filling allowed to stand in pie shell
before baking. (Fill pie shells and
bake immediately.)
• Ingredients and proper measuring
affect the quality of the crust. Use a
tested recipe and good technique.
Make sure there are no tiny holes or
tears in a bottom crust. "Patching"
a pie crust could cause soaking.
Ple tililn# rnn_ over
+ Top and bottom crust not well
sealed together.
+ Edges of pie crust not built up
high enough.
II+JtJ illL_tbll lllllll_,
+ Check size of pie plate.
Pastry is ..... '- .......... __l...
* Too much handling.
"Fat too soft or cut in too fine.
Roll dough lightly and handle as
little as possible.
[OUgll I IDl-U_t IIUL llill<_y
CAKF_
Cake rises higher on one side
e R_tt_r _nr_ad unevenly in pan.
Oven shelves not level.
o Using warped pans.
e Incorrect pan size.
Cakes cracking on top
• Oven temperature too high.
• Batter too thick, follow recipe
or exact pat;lcalgc till Ck,tlOHa.
o Check for proper shelf position.
• Check pan size called for in recipe.
Improper mixing of cake.
Cake falls
o Too much shortening, sugar or
liquid.
+ Check leavening agent, baking
powder or baking soda to assure
6"._hnc,_ K/Iolt_ _ h_hit tc_ nntt_
expiration dates of packaged
ingredients.
• Cake not baked long enough or at
incorrect temperature.
1I aoolng Oll tO ii t;tthC 1111._, lllahK,
certain the oil is the type and
amount specified.
Crust is hard
• C"h_k t_.mneramre.
........... r ........
e Check shelf position.
Pob_ hoe _a.ov lavor ar _fr_ak_ at
bottom
• Undermixing ingredients.
• Shortening too soft for proper
creaming.
,, 1oo mucn llqUlU.
COOKIES & BISCUITS
Doughy center; heavy crust on
surface
• Check temperature.
Check shelf position.
• Follow baking instructions
carefully as given in reliable recipe
or on convenience food package.
Flat cookie sheets will give more
,_xz,_n h_Flno rOelll/q r')cin_t nver_row(
foods on a baking sheet.
• Convenience foods used beyond
their expiration date.
Browning more noticeable on
one side
Oven door not closed properly,
check gasket seal.
Check shelf position.
i2
Page 13

Baking Guide
I. Preheating is very iniportant
when using temperatures below
225T. and when 'baking foods such as
_A_enlt_ r_nklo_ eako_ and nfher
Sastries. After pushing the BAKE
button and turning the SET knob to
the desired temperature, be sure to
wait for the one-second beep before
I)ulllll_ IUU_I Iill, U tll_ %lVr_ll.
FtMnt
Bread
Biscuits ( ½-in. thick)
Coflk:c cakc
Corn bread or muffins
Ginge rhread
Muffins
Popovers
Quick loaf bread
x! .... L ..... l t'-. t..........
T_IS[ [lftdilO I_ Hli-IVK£hl
Plain rolls
€_ ....... i ...I l,,
Cakes
(without shortening)
Angel food
Jelly roll
Sponge
litCakes
Bundt cakes
Cupcakes
Fru iicakes
Layer
Layer, chtmolate
Loaf
Cookies
Brownies
Drop
Refrigerator
Rolled or sliced
1_FUIL_,
Other Desserts
Baked apples
,r_...... J
L {lStUl u
Puddings. rice
Pies
Frozen
Meringue
One crust
Pastry shell
I wo crust
Miscellaneous
_ Baked potatoes
_ Scalloped dishes
Souffles
C{mkware
Shiny Cookie Sheet
Shiny Metal Pan with
satin-finish bottom
Cast Iron or Glass Pan
Shiny Metal Pan with
satin-finish bottom
Shiny Metal Muffin Pans
ucep tJlaNS Or LUNI
Mctal orGlass Loaf Pans
Shiny Obhmg or Muffin Pans
_hinw _hlt_n_• t_r _itft_n P'_n_
Aluminum Tube Pan
Metal Jelly Roll Pan
Metal orCeramic Pan
Metal orCeramic Pan
Shiny Metal Muffin Pans
Metal or (_ilass Loaf or
Tube Pan
Shiny Metal Pan with
satin-lmisn nottom
Shiny Metal Pan with
satin-finish bottom
,.. t _t , .....
Metal or kJlaSS Loa! rails
Metal or Glass Pans
Cookie Sheet
Cookie Sheet
Cookie Sheet
Glass or Metal Pans
Uld3_ _u,_tOl u _._up,_ x)l
Casserole (set in pan of hot water)
Glass Custard Cups or
Foil Pan on Cookie Sheet
Spread to crust edges
Glass or Satin-finish Metal Pan
Glass or Satin-finish Metal Fan
Glass or Satin-finish Metal Pan
Set on Oven Shelf
Glass or Metal Pan
Glass Pan
Preheating is not necessary when
roasting or for long-time cooking of
whole meals.
. • t __: ............... A.._, t ..... .
mumlnunl pa,s co,uuct .eat
quickly. For most conventional
baking, light, shiny finishes give best
results because they help prevent
overbrowning. For best browning
results, we recommend duii bottom
surfaces for cake pans and pie plates.
Shelf
Positions
B,C
B,A
B
B
A,B
IlltHI
B
B
A,B
A,B
B,A
A
B
A
A,B
B
A,B
B
B
B
B,C
B,C
B,C
B,C
A,B,C
I:1
A
D, L,
A,B
B
B
A,B,C
A,B,C
B
Oven
Temperatures
4000.475 °
330 --,_uu -
4000-450 °
400°-425 _
350°-375 °
_5°.425 °
375°.425 °
350°-375 °
_J -JtJ
375°-400 °
3250-350 °
3250-350 °
350*-375 °
Z/D -- 3Lt_-
3500-375 °
350°-375 °
325°-350 °
3500-400 °
400°-425 o
375°.400 °
3500-4000
3Cu3°-350°
4000-425°
D_J -3JU
400°-425 °
3250-400 °
325°-375 °
300°-350 °
.lOt)
"L¢'/€ o
Jtd
_€_o
325 °
450 °
Time,
Minutes
15-20
ZU-3U
20-40
_J-.L)
20-30
A _ _ €,O
45-60
45-(4J
10-25
20-_0
_u-J_
10-15
45-60
45-65
20-25
2-4 hi's.
20-35
25-30
_v-vv
25-35
10-20
6-12
7-12
30-60
30-60
50-90
45-70
l= ,.l_
IJ -Z,J
45-60
_u-uu
12-16
60-90
30-60
30-75
3. Dark or non-shiny finishes, also
glass anta l_'yFocc:.ralll v COOKWdlU,
generally absorb heat which may
result in dry, crisp crusts. Reduce
oven heat 25°F. if lighter crusts are
desired. Rapid browning of some
foods can be achieved by preheating
cast iron cookware.
Comments
Canned. refrigerated biscuits take 2 to 4
minutes less time.
Preheat cast iron pan for crisp crust.
Decrease about 5 minutes for muffin mix.
Or bake at 450°E for 25 minutes, then at
3500E for I0 to 15minutes.
Dark metal or glass gives deepest
hrnwnincs
For thin mils, Shelf B may be used,
For thin rolls, Shelf Bmay be used.
Line pan with waxed paper.
Paper liners produce more moist crusts.
U_U DUU g. itU[l _IIUII D IUI 3111illl or
individual cakes.
If baking four layers use
Bar cookies from mix use same time.
Use Shelf C and increase temperature
25 to 50°E for more browning.
Rpl{liPP toror_rallirP tel _li_/l_ [7 lefW lar_P
custard.
Cook bread or rice pudding with custard
ha_e RO to QO minutes.
Large pies use 40001:. and increase time.
,'1",.... 2_1.1.. k ......... : ......... #li'3Z_o_ _.
IU qLllt£hly UIUWI| llllffllll_Ut; LI_C *'¢UU F. IUI
9 to 11minutes.
Custard fillings require lower temperature,
1..... ,1_^
IU,II_ I ill l l_;.
increase time for large amount or size.
o
13
Page 14

Roasting
Roasting is cooking by dry heat.
Tender meat or poultry can be
roasted uncovered in your oven.
Roasting temperatures, which
should _ !ow and steady, keep
spattering to a minimuna. When
roasting, it is not necessary to sear,
baste, cover, or add water to your
meat. Roasting is easy, just follow
91"s.'__ c-t _,tattr *
Step 1. Position oven shelf at
seconu igOill ool.tOlll publtlUll _D}
for small size roast (3 to 5 ibs.) and
at bottom position (A) for larger
roasts.
Step 2: Check weight of roast.
Place meat fat-side-up or poultry
oreas[-SlOC-up ou [oa_tmg _a_h mv.
shallow pan. The melting fat will
baste the meat. Select a pan as
close to the size of rneat as possible.
(Broiler pan with rack is a good
pan for this.)
Step 3: Push BAKE button and
turn SET knob until desired
temperature is displayed. Check the
approximate cooking times.
Step 4: Most meats continue to
cook slightly while standing after
Urt._lll_._ II_[I[_,,IVbLI [l_Jlil l, llb _.JYbll. I _1
rare or medium internal doncness,
you may wish to remove meat from
the oven just before it is done if it is
to stand 10to 20 minutes while you
make gravy or attcnu to
........ J .- --.L--- t*.__..J..
IOULI,h.UtllL_I
If no standing is planned, cook
meat to suggested temperature.
Frozen Roasts
Frozen roasts of beef, pork,
Inmh i=.1,," t-nn ho _:tartocl wlthoHt
thawing, but allow 15 to 25 minutes
per pound additional time (15
minutes per pound tbr roasts under
5 pounds, more time for larger
l uia_t_).
Thaw most frozen poultry before
Some commercial frozen poultry
can be cooked successfully without
thawing. Follow directions given
on packer's label.
Roasting Guide
Type
Meat
TondPr c.llfg- rih hi_,h oualitv
.......... • ---, ---o oo 1 ......w
sirloin tip, rump or top round*
Veal ............. ' ....... '-:-*
snouloer, leg or IUIII'
Pork loin, rib or shoulder*
Ham, pre-cooked
Ham, raw
*Forboneless rolledroastsover6-inches
thick, add 5 to 10minutes per lb.to times
givenabove.
Poultry
Chicken or Duck
Chicken pieces
Turkey
Oven
i_lUpl_l J:ltu |
325 °
325 °
_qqo
325 °
325 °
325 _
325°
375°
325 °
Approximate Roasting Time
3 to 5-1bs. 6 to 8-1bs.
Rare: 24-33 18-22
Medium: 35-39 22-29
Welt Done: 40-45 30-35
._re: 21-25 20-23
Medium: 25-30 24-28
Well Done: 30-35 28-33
Well Done: 3545 30-40
To Warm: 1%20 minutes per lb. (any weight)
Under 10Ibs. 10 to I5-1bs.
Well Done: 2. I-b3 Z_-Z I
3 to 5-1bs. Over 5 Ibs.
Well Done: 35-40 30-35
Well Done: 30-35
10 to 15-1bs. Over 15 ibs.
Well Done: 18-25 15-20
Internal
Tom n.o _]lt i i ro o'_
130°-140 °
150°-160 °
170°-185 °
130°-140 °
150°-160 °
170°-185 °
!70o-!80°
170°-180 °
115"-125 °
1700
I
185°-190 °
185°-190 °
In thigh:
I 185°"1900
14
Page 15

Broiling is cooking food by direct
!'.--':;atfrom above the food. Your
t-,_n,_. ;e A_.e;_*noA fc_r upMct-h;oh
broiling. A specially designed
broiler pan and rack allows
_lripping fat to drain away from the
foods and be kept away from the
tHL_!I ll_J.t UL tilt;:: _ilb lli:l[lllK:.
Th_oven door should be closed
during broiling.
TW A _ _ _ el
_OW [0 _rOli
1. If meat has fat or gristle near the
edge, cut vertical slashes through it
about 2 inches apart, but don't cut
IlILU I[I_€,.IL. ¥¥Ka I_I._UIIIIiI_.,IIWOK tli_L ff_/U
trim fat to prevent excessive
smoking, leaving a layer about
t/8-inch thick.
2_ Arrzn_e food on rack and
position the broiler pan on the
appropriate shelf in the oven.
Placing food closer to flame
increases exterior browning of
t_,_r_,_l la=lt ,_lcr_ inor_acoc cn_tto.rtncr
and the possibility of fats and meat
juices igniting.
_3..Close the oven door.
"4. Press the BROIL button and turn
the SET lmob until your choice
,',,f T-ITRDI_TT nr I O RI_(")T[ i_
displayed. Note: Chicken and ham
are broiled at LO BROIL in order
to cook food through without
over-browning it.
5. Turn most foods once during
cooking (the exception is thin fillets
of fish; oil one side, place that side
[JOVdII UII UIUIItSI li:lLilk igdlU t,..U¢OI%VVlUlUUtt
turning until done). Time foods for
about one-half the total cooking
time, turn food, then continue to
cook to preferred doneness.
6. Push CANCEL button.
Remove broiler pan from oven and
serve food immediately. Leave pan
outside the oven to cool.
TIE_ _ _ei____ __ r'll__
_romng _ps
,, Use tongs to turn meat over--
pierced meat loses juices.
Broiling Guide
Food
Bacon
Ground Beef
Well Done
Beef Steaks
Rare
Medium
Well Done
_lre
Medium
Well Done
Chicken (450")
Bakery Products
Bread (Toast) or
Toaster Pastries
English Muffins
6 to 8-oz. each)
Fish
Ham Sliees (450 °)
Precooked
Pork Chops
Lamb Chops
Medium
Well Done
Medium
Well Done
Wieners,
similar precooked
sausages,
bratwurst
Quantity
and/or
Thickness
V2-1b.(about 8
l-lb. (4 patties)
V,,to ¾-in. thick
i-in. thick
(1 to 1V:-Ibs.)
U&-in. thick
(2 to 2 V:-Ibs.)
1 whole
(2 to 2 %-lbs.),
split lengthwise
2-4 slices
1pkg. (2)
2-spilt
2-4
I-lb. fillets tAto
%-in. thick
l-in. thick
2 (V_ in,)
Z. _1"111, I,Illt,,*h]t
about ! lb.
2 (1 in.) D
about 10to 12-oz. D
2 (1V_in.), D
about 1 lb. C
I-lb. pkg. (10) HI D
HI or
Broil Position
LO Shelf
HI D
HI
D
HI I D
D
D
D
D
D
LO B
HI D
H! C
HI D
LO C
HI
* Steaks and chops should be at
least i inch thick for best broiling
results. Pan broil thinner ones.
1st Side 2od Side
Time, _Time,
Minutes Minutes
12-13 6-7
28-30 18-20
D
5 2'h
8-9 6-7
9 7
13 8-9
10 6-7
15 9-12
d.,.3 IU-IO
2-3 V2-1
3-4
3-!6 13nnnt
5 5
8 8
10-12 4-5
!2-13 8-9
Comments
Arrange in single layer.
Space evenly. Up to 9
)attics take about same
time.
cook through before
browning. Pan frying is
recommended.
Slash Pat.
ieduce times about 5 to 10
minutes per side for
cut-up chicken. Brush
each side with melted
butter. Broil with skin side
down first and broil with
door closed.
Space evenly. Place
English muffins cut-side-up
desired.
t_nt through back of shell.
turn
spread open. Brush with
imelted butter before and
over.
iafter half time.
Handle and turn very
carefully. Brush with
lemon butter before and
during cooking if desired.
Preheat broiler to increase
browning.
minutes per side for
I Increase times 5-10
PA-inch thick or home
Slash fat.
i cured.
I
8 4-7
10 10
10 4-6
6 1-2
I Slash fat.
!f desi..red,split sausages
5 to 6-inch pieces.
in halt lengthwise; cut into
!5
Page 16

Propercareandcleaningare
importantsoyourrangewillgive
youefficientandsatisfactory
service.Followthesedirections
ballDILllly 111 _,,a1111_ IOl At LU i11_1_,1
assure safe and proper maintenance.
_l-:S €'sT,rl-alr:_ "ll':sT lr_l"_ra, nlr_T,€'_ w,If'_,llr_
DJ_, _)UJ_.J_ J_Jl_Jl2,qL.l IT,JL. I"U_JI2,K
IS OFF BEFORE CLEANING
ANY PART OF THE RANGE,
Control Panel
It's a good idea to wipe the control
n_n,M r,l,a_n c,.€-t_r ,_r,h ,,e_ _¢th,a
_p/g.,ILlillb,,el %,_1%.t1,_11 g.l_llg_l _.,*(,,g%,¢ll l,d[_.l_.,_ Ik]l I*ll_
oven. For a more thorough cleaning,
the knobs can be removed by pulling
them off the knob stems. If knobs
are removed, do not allow water to
un uuwn the msJue surmce o_ me
glass while cleaning. Clean with
mild soap and water, rinse with
clean water and polish dry with
a soft cloth.
Do not use abrasive cleansers,
strong liquid cleaners or oven
cleaners on the control panel--
they will damage the finish.
Brushed Chrome Finish
L, ll_rlll I.IIG Ol tlbllCl.l t.lllOlll(_ {Up
with warm, soapy water or an all-
purpose household cleaner and
immediately dry it with a clean,
soft cloth. Take care to dry the
surface following the "grain." To
help prevent finger marks after
eleanin¢,_ gnrend a thin film cff Baby
......... 0 _ _r ...................... J
oil on the surface. Wipe away
excess oil with a clean, soft cloth.
A good appliance wax will help
protect this finish.
Burner Grates
I"OIC_IUIII _IILIIIICI_LI UUl III_I _ILItL_,h
should be washed regularly and, of
course, after spillovers. Washthem
in hot, soapy water and rinse with
clean water. Dry the grates with a
cloth--don't put them back on the
range wet. When replacing the
orntP_ he qllrP they're _Pntect
/19..... s .......... d ........
properly over the burners.
To get rid of burned-on fo(_, soak
the grates in a slightly diluted liquid
cleanser or use a plastic or nylon
scouring pad.
Although they're durable, the
grates will gradually lose their
shine, regardless of the best care
vn. c,nn oi_o thPm Thi_: i_: rt.P t,_
their continual exposure to high
temperatures.
Do not operate a burner for an
extended period of time without
cookware on the grate. The finish
on the grate may chip without
16
Page 17

I,_na_ Tnn Ralsonor_z
The holes in the burners must be
_,cpt clean tit umc,-, F_upc_
_1.11 lrOl
ignition and an even, unhampered
flame,
Clean the burners routinely and
especially after bad spillovers
which could clog these holes.
Burners lilt out for cleaning.
Note: A screw holds each of tile
burners in place to keep them from
wobbling around during shipment.
Remove and discard the shipping
Gas Valve I
Support /
I
..... iBurner
It/
T:°/
A!r .._t'_
bnutter '_ ]
}To removd burners:
I _7_ jBumer
Lighter _ Ports
Port _'_"-_
! ._//_, % Burner Supp°rt
I Shutter
To replace burners:
1 qlin th_ air qhntter nv_r tho ¢_n_
valve orifice.
I ...... ML,._ 1L............ 1.,,.I..
"_, IaUW_:! LIIU UUIII_;I ia_,b;:;lllUiy
and hook the tabs in the slots in the
burner support.
3. Be sure both tabs are in their
slots, that the burner sits level and
straight, and that the flash tube
forms a straight line from the
igniter to the burner.
_rin P,_n_
Remove the grates and lift out the
b|llUlllr_7. €_11 l|J [,./O.lta. ¥_'€,_*,_11 LL|_.,III 111
hot, soapy water. Rinse them with
clean, hot water and polish them
dry with a cloth. Never use
abrasive cleaner or steel wool--
scratcn surmcc.
mey 11 the lllStt_atl,
soak the drip pans for about 20
minutes in slightly diluted liquid
cleanser or mild solution of
ammonia and water (1/2 cup of
ammonia to one gallon of water).
After soaking, wash them in hot,
cn_n_ w_t_r Rin_, with ale.an water
and polish with a clean, soft cloth.
Do not actemnt tn clean the drin
pans in the self-cleaning oven.
When replacing drip pans, the
notch on the rear pan and the notch
on the front pan should meet in the
middle.
Lift-Up Cooktop
Clean the area under the cooktop
often" Built-up soil, especially
grease, may catch fire.
// i1 117 ]
1. Grasp burner head and tilt it
tc_tho riaht tn rolonqo the twn tah_
from slots in the burner support.
.,_. lall[ tilE; _llU UI LIIE; UUlIIE;I
assembly, then pull away from the
front of the range to free the air
shutter from the gas valve orifice.
To remove burned-on food, soak
the burner in a solution of a product
used for cleaning the inside of coffee
makers. Soak the burner for 20 to
JU IIIIJIUL£_b. JJ Lliqu,_ IUUU UUI_t_II I,
rinse off completely, scrub it with
soap and water or a mild abrasive
cleanser and a damp cloth.
Do not attempt to clean burners in
an automatic dishwasher. Loosened
food soil can clog burner holes,
and the caustic .........
action Ol me
dishwasher detergent can damage
the burner heads.
Betbre putting the burner back, dry
it thoroughly by setting it in a warm
oven for 30 minutes.
17
To make cleaning easier, the entire
cooktop may be lifted up and
supported in the up position.
Be sure all burners are turned off
hatgAv, a _._i_Ino _ho r._f_n Thon
remove the grates and drip pans,
grasp the two front burner wells
and lift up. Dual support rods will
hold the cooktop up while you
1 .... 1 ........ _1.
clean unaerneam it.
After cleaning under the cooktop
Wltll IIUL, IIIIIU bU_tl3y Wi:!.t_:l i:lllU a
clean cloth, lower tbe cooktop. Be
careful not to pinch your fingers,
I ................... r-t,_..-
Page 18

Removable Oven Bottom
The oven bottom can be removed
to make cleaning easier after heavy
spillovers and to enable you to reach
.L ....... L ......
tIl_ I..)V_II UUI I11_1.
un,ock k ,oc,
To remove:
1, Slide the tab at the center front
of the oven bottom to the left,
2. Lift the oven bottom up and out.
JU ll[:piilLl:: ,,
1. Slip the oven bottom into the
oven so the tabs in the rear of the
oven bottom fit into the slots in the
oven back.
2. Lower the front of the oven
bottom into place and slide the
front tab to the right to lock the
oven bottom into place.
The oven bottom has a porcelain
enamel finish. To make cleaning
_a_;_r nrntPPt thP Avon lanttnm
from excessive spillovers. This is
particularly important when baking
a fruit pie or other foods with high
acid content. Hot fruit fillings or
IUUU_ Llldt _.11C ,:IK_IU lit k.UIItf..tlt _Ut..It
as milk, tomato or sauerkraut, and
sauces with vinegar or lemon juice,
may cause pitting and damage to
the porcelain enamel surface.
To protect the oven bottom surface,
place a piece of aluminum foil
l.ll_l.ll til_ I,.)_I.KIII_Largersngnuy
Ul_i.I 1
or a small cookie sheet on a lower •
shelf or. under the baking dish ,to
catch any boilovers. It should, not
completely cover the shelf as this
would cause uneven heatin the
oven. Alumintim foil Should n0tbe
nl_PPd an th_ avon halation1
If a spillover does occur on the
oven bottom a!!owthe Oven to cool
first. You can clean the bottom with
soap and water, amild abrasive
cleanser, soap-filled abrasivepads
or use the self-clean cycle.
T -*_ ,€"_,.1["_ _ .... lr',z,_
Lll[IL-Llqll _JVldlll lffUtll
The oven door is removable to
make the interior more accessible
during replacement of the lamp bulb.
To remove the door, open it a few
inches to the special stop position
.I . .lii _lJ _1__ J ....... _ .....
[nat WIll nolo [nt: [lOOt Opeli. Ultt_p
firmly on each side and lift the door
straight up and off the hinges.
Note: :Be careful not to place hands
between the spring hinge and the
ovendo0r frame as the hinge could
snap back and pinch fingers.
To replace the door, make sure the
hinges are in the _'out!' position.
Position the slots in the bottom of
the door squarely over the hinges.
I lll_;ll IUWK:;I LillE; UUUI +31U'i'YIff {lilU
evenly +over both hinges at the same
time. If hinges snap back against
the oven frame, pull them back out.
lO
1o
Page 19

Oven Shelves
_v_n ! ,iohf Ruih
Oven shelves may be cleaned with
..... :1._ ..k ..... _ ..... 1 ........... l-'_ ! I .... ,i ....
d III[|U iI[_[iI,NIVU _,.l_2.dl]_[_7-1 l[lllU"_lll_-_
mnuthcturer's directions. After
leaning, rinse the shelves with
clean water and dry with a clean
cloth.
To remove heavy, burned-on soil,
soapy metal pads may be used
ibiiowing ...............
manumcturer s mrecuons.
After scrubbing, wash with soapy'
water, rinse and dry.
Broiler Pan & Rack
After broiling, remove the broiler
,-_:-t, ,an,'! ¢,,arof.,lh, n_ur _ff tho
grease. Wash and rinse the pan and
rack in hot, soapy water.
If food has burned on, sprinkle
the rack while hot with detergent
and cover with wet paper towels or
a dish cloth. That way, burned-on
•%....1 ..... ;11 .... I. I--_,._ ..,h;l_ 4-ho
ILli,3U3 Will _k)dl_ It)k,/,,_l.., _llllrl. - ill%.,
meal is being served.
1_,'_ n,xt ct_ro _ c_i|orl brat|or n_n
and rackintheoven.Do notclean
in self-cleaning oven.
The light bulb is located in the
U[3t../K.I ll_llt _.dlll_at Ut tll_ Uv_,.ll,
Before replacing the bulb,
disconnect electric power to the
range at the main fuse or circuit
breaker panel or unplug the range
from the .................
electric OUtlet. Let tile
bulb cool completely before
removing it. Do not touch a hot
bulb with a damp cloth. If you
do, the bulb will break.
l
To remove:
• Remove the 3 screws in the lamp
cover.
• Detach lamp cover and remove
bulb.
To replace:
- Put in a new 40-watt appliance
bulb. (Note: A 40-watt appliance
bulb is smaller than a standard
40-watt household bulb.)
• Install lamp cover. Replace 3
screws and tighten, making sure
...... _ig i'l..--l'r. "'':ik ....... ,_11
¢_OVtTI !It8 [iUSII WII.II UVI_il Wflll.
* Reconnect electrical power to
tile 1_ll I+_1_.
19
Page 20

Care and Cleaning (continued)
Oneratin the Self-Cleanin Oven
Programmed Cleaning Time:
3% hours
Prepare the Oven Before
The range must be completely cool
in order to set the self-clean cycle.
Step 1:
Remove the broiler pan, broiler
rack, all cookware and any
_IUIIIIIIUIli £',,Jz,t ll_Jlli till,., _JY_.,ll.
(Oven shelves may be !eft in oven.
Note: Shelves will discolor after
the self-clean cycle.)
Step 2"
Remove the oven bottom panel (see
page 18) if it is excessively soiled.
Clean it and put it back in the oven.
Too much soil on oven bottom may
r,m_e_ cm_l_ncr thor;nor th_ ol_nlno
cycle. The bottom must be in place
during the self-clean cycle.
Step 3:
Clean spatters or soil on the oven
front frame (A), under the front
edge of the cooktop, the door liner
outside the door gasket and the
front edge of the oven cavity (about
! " intn tho nvon_ l I_ d_t_ro_nt
and hot water with a soap-filled
steel wool pad, then rinse well with
a vinegar and water mixture. This
will help prevent a brown residue
IIUIII IOlllllllg WIIK;II 1,1112; OVt_ll lb
heated. Buff these areas with a
dry cloth.
Do not !et water run down through
openings in the top of the door (B).
Clean the door gasket (C) using a
clean sponge to soak the soiled area
with hwtro_en neroxide.. Repeated
soaking may be needed depending
on the amount of soil. Frequent
cleaning will prevent excessive soil
build up. Do not rub the door
,-,,_,bat___tl_o Gl-_rrrl,_ct- ,','_t,ar';_l ..'-,f
the gasket has an extremely low
resistance to abrasion. An intact
and well-fitting oven door gasket is
essential for energy-efficient oven
goou oaKmgoperation anu
[t:2-,"iU 1tb.
If you notice the gasket becoming
worn, frayed or damaged in any
way or if it has become displaced
on the door, you should replace it.
Make sure the oven light bulb cover
(D) is in place.
Ill li
/__ .'72L_..,_:_;7:7"7 L7.2_ 7 ..-=
A. Oven Front Frame
R (")in_nlno_ _n rlnnr
C. Oven Door Gasket
D. Oven Light Bulb Cover
Step 4:
Close the oven door and make
sure the oven light is off.
Chrome drip pans from the top
of )'our range should never be
cleaned in the se!f-c!eaning oven.
Oven shelves may be cleaned in the
sell-cleaning oven. However, they
will darken, lose their luster and
become hard to slide. Wipe the
shelf supports with cooking oil
after self-cleaning to make shelves
Do not use commercial oven
IL.i_illl_l 3 LII Ikl¥1_ll _1 tlll,_tk;ILttl_l _ I!!
or near the self-cleaning oven.
A combination of any of these
products plus the high clean-cycle
temperature may damage the
porcelain tlnlSrl ot tile oven.
Important
The oven door must be c!oscd
and all controls must be set
correctly for the clean cycle to
work properly. To help you
understand how the clean cycle
ttrnvU,.- tla,-_ ct.ano.t.o.f th_ ,-ttt-lr,
are noted below.
!. Yo,- set the ,controls,.
2. The words "CLEAN TIME"
ar_ diqnlnuod Tnrn ._F.T knob
until 3:30 appears. The oven
begins to heat, the door locks
automatically and the word
"LOCK" is displayed.
If the oven door is not closed,
the word "DOOR" is displayed
and the oven beeps continuously.
_lose the. door, touch CAN_F,I
and begin again.
3. When the 3% hour clean
cycle is over, the word
"CLEAN" goes out and the
oven begins to cool.
4. When the oven temperature
has fallen below the locking
temperature (about 20-30
mlnmafoc ,._i_tortho _._rcl
"CLEAN" goes out at the end
of the clean cycle), the word
"LOCK" goes out and the
door can be opened.
2O
Page 21

Set the Oven for Cleaning
The range must be completely cool
in order to set the self-clean cycle.
1. Push the CLEAN button.
d.,. 11dl II O112, I IklIUU 111 Lli_ _lUIdl_Wl_i!;_
direction about 1/2 turn. The display
will show "3:30?
The words "CLEAN TIME" will
be displayed on the left. Within 20
seconds, the words "CLEAN
LOCK" will be displayed on the
right.
Note: You can find out when the
_1 ....... I .... .'11 L-- £"I__.'_L_J L..
_ISI_II _yU.l_ Will ID_ lllll_iIllZ.Cd Dy
,-:_ _.hi_]gthe STOP TIME button.
'T'I--,_ ..... A 'q'_{-%/'_D" ;_ A;_I .... A
.t ll_.. WUlU UUUIX. 1_ ul_playcu
hen you try to set a clean cycle
ith the door open or when the
o_en temperature is too high,
To Set a Delayed Start
1. Push STOP TIME button.
T_rn qlTT lrnnt_ tn t;rn_ nf rt_
when you wish cleaning to be
completed (must be more than
3_ hours later than current time
of day):
3. Push the CLEAN button.
4. Turn SET kmobin the clockwise
direction about 1/2 turn.
The words "DEI .AY CT.EAN" wi!!
be on in the display until the clean
cycle starts. After the clean cycle
starts, the word "CLEAN" will be
on in the display.
Note: During a delayed self-clean
operation you can find out when
thP nv_n t_lrn_ nn hv nn_hlno and
holding the CLEAN button.
To Stop a Clean Cycle
1. Press the CANCEL button.
"_ 'iM,_;t .nt;I th,a nw.'-n hoe ,'.nnl_,.A
_ ¥¥1rJl.ll, ULI_II I_1_ V¢%.ll ilcJt,_ _UVlbU
below locking temperature (about
20-30 minutes) and the word
"LOCK" is off in the display.
You will not be able to open the
door right away unless the oven
temperature is at a safe level. If
._U I1 ballllUL UF_II U, IG UV¢_II LIUUI
immediately after the word
"LOCK" goes off, wait one
minute and try again.
After Self-Cleaning
!, When a clean _cle is finished,
the word "CLEAN" will be off in
the display.
2. Wait until the oven has cooled
below locking temperature (about
20-30 minutes) and the word
"LOCK" is off in the display.
You will not be able to open the
door unless the oven temperature
Ib _It i:1 blnl_g; Ig;Vg;;l. II _/UU IGglIIIIUL Ul3t;;ll
the oven door immediately after the
word "LOCK" goes off, wait about
one minute and try again.
You may notice some white ash
in the oven. Just wipe it up with
a damp cloth.
If white spots remain, remove them
with a soap-filled steel wool pad.
Be sure to rinse thoroughly with a
21
deposits are usually a salt residue
that can not be removed by the
clean cycle.
If the oven is not clean after one
clean cycle, repeat the cycle.
I (continued nextpage)_
tf
Page 22

Care and Cleaning
Operating the Self-Cleaning Oven tco.ti.uea)
Questions and Answers
Q. If my oven clock is not
working, can I still self-clean
my oven?
A. No. Your Automatic Oven
Timer uses the range clock to help
start and stop your self-cleaning
Q. Can i use commercial oven
Ik_l_l:llll_l 3 US1 gllll]l' _tSglll t ILPlL lll_
self-cleaning oven?
be used around any part of this
oven. If you do use them and do not
wipe the oven absolutely clean, the
residue can scar the oven surface
and damage metal parts the next
1.11111_; LIIG 1_35G|| l*.._ 61.11[_.tlllfl_.l_,4Kll|Jq
cleaned.
Q. Can I clean the Woven Gasket
_llUUIIIU I.iI_K; VT_il U_JIL .
t %r l-.._ .... C..il .... .4 ^--I..
,q_. IeS_ Ill.l[ tdal_ll.illy_ i:[llLi Oilly
_11ith a r_lr, an ¢nnno_ to tt3_k tho
soiled area with hydrogen peroxide.
See page 20.
t-_ lYdhot ch_itl I d_ if_voocci_o
smoking occurs during cleaning?
A. This is caused by excessive soil.
Press the CANCEL button. Open
windows to rid room of smoke.
Wait until the oven has cooled
(about 20-30 minutes) and the word
"LOCK" is off in the display. Wipe
_,n th_ ,_vr,occ ccGl n_:rl r_t th_
clean cycle.
t,_. 1_ I[[lld --t,_Vdt_Kllilg _UUI|U I
hear during cleaning normal?
_-_k. ][_. J. [Li_ 1_ LII_ _OUlIU UI I.IIK: IIIgUOLI
hoatinr_ an_l onnllno rh_rlno hnth tho
cooking and cleaning functions.
Q. Should there be any odor
UUIII[IIIIg IllU ILf.llC_llillig i
A. Yes, there may be a slight odor
Failnr_ tn win_ nnt _xee.ggiva _oil
might also cause a strong odor
when cleaning.
Wh,.ae e_a._o_ tho hair-liko
lines on the enameled surface'of
my oven?
A. This is a normal condition,
resulting from heating and cooling
during cleaning. These lines do not
affect how your oven performs.
Q. Why do I have ash left in my
oven after cleaning?
A. Some types of soil will leave
a deposit which is ash. It can be
removed with a damp sponge or
cloth.
Q. My oven shelves do not slide
easily. What is the matter?
A. After many cleanings, oven
shelves may become so clean they
UU llOl. _llLlg_ U;_lbll_, ILl yuut Wlbll
_holv_ tn _lid_ more _a_ilv
OIAVA vv_ _v o_x_v lily ....... J_
dampen fingers with a small
amount of cooking oil and rub
lightly over sides of shelf where
they contact shelf supports.
Q. My oven shelves have become
gray after the self-clean cycle. Is
this normal?
A. Yes. After the self-clean cycle,
the shelves may lose some luster
a I__ I ...... _1 .......... I__
ana cuscolol- [o a ueep gray t:ii_u_.
22
Page 23

"_ • •
_..- !_ltEi JR_ _3r UJU_
I':_,K 1
__:-_c_"Pan and Rack
8_
Uontrol Knobs o Mild Soap and Water FUll_" OII°"r'Knoos.'..........wash'........gcnuy' out'..... uo"" not soa_. t)ry anu lctut, s.u.u u_a tut _.t_c.
Outside Glass Finish • Soap alld Water
Metal, including
Side Trims,
Trim Strips and
Brushed Chrnme
Conktop
Porcelain Enamel
Surfa,ce *
including
Oven Frame,
inside Oven Dour
and Renmvable
Oven Bottom
* Soap and Water
. Soap-Filled Scouring Pad
e Plastic Scouring Pad
,' Soap and Water
• Paper Towel
,, Soap and Water
IJr.al'N IP.,IrttlL, l/l!_,/tbk.. ! lk/i'_lO
Drain lht. cool pan and rack slightly. (Do not let soiled pan and rack stand in
oven to cool.) Sprinkle detergent on rack and pan. Fill pan with warm water and
spread cloth or paper towel over rack. Let pan and rack stand for a few minutes.
Wash; scour if necessary. Rinse and dry. OPTION: Clean pan and rack in
dishwasher. DO NOT CLEAN IN SELF-CLEANING OVEN.
Wash all glass with cloth dampened in soapy water. Rinse and polish with a dry
cloth. If knobs are removed, do not allow water to run down inside surface of
glass wmle meaning.
Wash, rinse, and then polish with a dry cloth. DO NOT USE steel wool,
abrasives, ammonia, acids, or commercial oven cleaners which may damage
the finish.
Avoid cleaning powders or harsh abrasives which may scratch the enamel.
If acids should spill on the range while it is hot, use a dry paper towel or cloth
to wipe tip right away. When the surface has cooled, wash and rinse.
For other spills, such as fat spatterings, etc., wash with soap and water when
cooled and then rinse. Polish with a dry cloth.
Oven Gasket
_Oven Liner
Sheh, es
Chrome-Plated
Drip Pans
Burner Grates
Aluminum
Surface Burners
" Hydrogen PeroXide
- Soap and Water
I
I
* Soap and Water
•Soan and Water
,, Stifi'-Bristled Brush
o Soap-Filled Scouring Pad
(Non-metallic)
1
• Soap and Water
" O_[_-FiH_U _tSOUJ IH_ l-iau
(Non-metallic)
J
_ So]ut!onfor Clean, ing
IFlSltle oi k.oiIee lVlaKers
'* Soap and Water
, Mild Abrasive Cleanser
J
o Damp Cloth
Soak with hydrogen peroxide. Frequent soaking helps prevent soil build-up.
Do not rnh See _elf-clean _ection for more information.
Cool before cleaning. Frequent wiping with mild soap and water will prolong
the time between major cieanings. Be sure to rinse thoroughly.
I
Shelves can be soaked in dishwasher or cleaned by hand. using soap and water.
Rinse thoroughly to remove any soap after cleaning. Shelves may also be
cleaned in self-cleaning oven, but will lose some luster and discolor.
Clean as described below or in dishwasher. DO NOT CLEAN IN SELF-
CLEANING OVEN as they will discolor. Wipe all chrome drip pans after each
cooking so unnoticed spatter will not burn on next time you cook. To remove
burned-on spatters, use any or all cleaning materials mentioned. Rub lightly
with scouring pad to prevent scratching of the surface.
Lift out when cool. Soak 5-10 minutes if desired in warm solution of dishwasher
particles. DO NOT CLEAN IN SELF-CLEANING OVEN.
Wipe off burner heads. If heavy spillover occurs, remove burners from range
....... v-Ix r:_l ..... t .... -' ........... -'.L ................ I-- t L---A
Boil burner head down in a solution of hot water and product for cleaning inside
of coffee makers, such as Dip-It brand. Remove burner and rinse. Wipe away
any remaining soil with a cloth or soft brush. Drain out water and dry burners in
IN SELF-CLEANING OVEN OR IN DISHWASHER. Do not use all-
purpose cleaners, ammonia, powder cleansers or oven cleaners--they can
scratch or discolor aluminum.
t _). a non-alummum pan With water to cover ule ourne_ neau.tsee page rnl
1191
*Spi::.ge of marinades, frnit itliee_ and hartin_ materinlg enntainino aeid_ may eauge direnlnmtion Rnillover_ rhnuld ha wined un immediately with
care being taken to not touch any hot portion of the oven. When the surface is cool, clean and rinse.
..... .J ..... _ ........... t_ ....................... :m ......... d ..................... v .................... l- -- -1- .............. d • ......
/O
Page 24

Minor Adjustments You Can Make
Surface Burner
Air Adjustment Shutters
An air adjustment shutter for each
surface burner regulates the flow of
air to the flame.
When the right amount of air
flows into the burner, the flame
will be steady, relatively quiet and
have approximately 3/4" sharp blue
cones. This is usually the case with
factory preset shutter settings.
With too much air, the flame will
be unsteady, possibly won't burn all
the way around, and will be noisy,
sounding like a blowtorch.
With not enough air, you won't see
any sharp blue cones in the flame,
you may see yellow tips, and soot
may accumulate on pots and pans.
Broil and Oven Burner
Air Adjustment Shutters
Air adjustment shutters lbr the
broil and oven burners regulate the
flow of air to the flame.
Loosen
Air
adjustment
shutter
The air adjustment shutter for the
top (broil) burner is in the center of
the rear wall of the oven.
Loo.,
To adjust tile flow of air to either
burner, loosen the Phillips head
screw and rotate the shutter to
allow more or less air into the
burner tube as needed.
The flame for the top (broil)
burner should be steady with
approximately l-inch bluc concs
and should not extend out over thc
baffle edges.
The air adjustment shutters set on
the hood of the valves and are
positioned on the burner tubes by
friction fit.
To adjust the flow of air to the
burners, apply a blade-type
screwdriver against the friction-fit
shutters and push to rotate the
shutters, allowing more or less air
into the burner tubes as needed.
Air adjustment
shutter
The shutter for the bottom (oven)
burner is near the back wall behind
the storage drawer.
To determine if the bottom (oven)
burner flame is proper, rcmovc
the oven bottonl (see page 18) and
the burner baffle. The flanlc shoukt
have 1/2" to 3/4" bluc concs with no
yellow tipping. Whcn the baffle is
back in place, the tlamc will resettle.
24
Page 25

Oven Thermostat
Adju tnlent
temperatureinyourno.v,/range
qm,, ht.e.n_:olc_rrt.,.'IIv :H It',."I_wh'wv
............. . .......... , ............... j
he sure to tbllow the recipe
nperaturcs and timex the first Ibw
_mes you bake in your new oven.
Ifv_m think the oven should be
houcr or cooler, you can ad.ius! it
yourself, qb decide how much to
temperature 25°F. higher or lower
than the temperature in your recipe,
then bake. The results of this lest
should give you an idea of how
....... k JL _ • ........... • ....... L .... l .I L_..
IIIUL;ll [IIC I._ll I]IISI LItUI _ hlIUUIU [JU
changed.
"lb adjust temperature:
!. Push the BAKE button,
2. Select a temperature hetwecn
500°F. and 550°F. with the SET
knob.
3. Quickly (within two seconds,
bclbre the BAKE function energizes)
push and hold the BAKE button for
about 5 seconds.
The display will show number
of degrees diflizrcnce between the
_rloln;;I f".;ot¢_r_J tomnor:_Itlro _zottino
"" '_b "''_'' '_'_'"" g ..... I................ ,b
and the current temperature setting.
If the oven temperature has never
been adjusted, the display will
read 00.
4. Turn the SET knob to adjust the
temperature in 5°E steps. You can
raise it 35°F. or lower it 35°E A
minus sign (-) betbre the number
means that the oven wi!! be cooler
by the displayed amount of degrees.
If the control beeps and flashes, push
the CANCEL button and start over.
5. When you have made the desired
adjustment, push the CLOCK
button to go back to the time of day
display or to use your oven as you
would normally.
l_Otle; .1 llk_ 0A,.Ij Ubtlll_llt _IC_GI IUCU
above will not change the self-clean
temperature.
25
Page 26

_i ¸
POSS!BLE CAUSE ANDtOR WHAT TO DO
_OP BU RNERS
DO NOT LIGHT
SURFACE BURNER
KNOBS WILL NOT
TURN
COOK PROPERLY
,_Make sure the electrical plug is plumed into a live, properly grounded power outieL
Gas supply not connec,'ed or not turned on.
Check for power outage.
!
Fdn s!|[lng oil ourner grate llltiy De pat tl_ny uiot;Kmg tire ti_c atn I tow tmt;ucu _ut
combustion. Remove pan and try again.
* Burner holes on side of burner may be clogged. Remove and clean them.
o Burners not seated properly on burner supports. Reinstall them--see page 17.
To turn from OFF position, push the knob in and then turn.
I
t
I
I
tMumlnHm iOll oelng llSe(l improperly in oven.
I
, Oven vent blocked on top of range.
Incorrect cookware being used. Check each cooking section for cookware tips.
!
N_r_n hnttnm nnt _rnr_h_, _nt_rl in nnc:itlnn
* Electronic Controls set incorrectly. Review pages 10and 11.
l
®Check common baking, roasting and broiling problems on pages 12-15.
PI 1"11"_tt" A MPI
MINUTE/SECOND
TIMER DO NOT WORK
OVEN LIGHT DOES
NOT COME ON
OVEN WILL NOT
SELF-CLEAN
l
!
STRONG ODOR
GE Answer Center*
consumer information service
l
e Mn[-_ _:uro th_ PIPetrleni nh_e i_ nhtoood intn z lira nrono.r!v oronndex! nnwer Ollt|et.
®Check for power outage.
Bulb may be loose or burned out.
o Electrical plug must be plugged into a live power outlet.
STOP TIME must be more than 3 V2hours later than START TIME.
Oven temperature is too high to set self-clean operation, Allow the range to cool to
mnm tO.I'T!l"lO.lr'_l[I1tO.
®Improper air/gas ratio in oven. Adjust oven burner air shutters--see page 24.
26
Page 27

Need > erv ce
"I]_obtain service, see your warranty
on file back page of this book,
We're proud of our service and
want you to be pleased. If lbr some
reason you are not happy with tile
service you receive, here are three
steps to t,,,u .... ' for fu,'ih_'r help.
FIRST. contact the people who
set-,iced .v"u"-.........,appliance. Exphtin
why you are not pleased. In most
cases, this will solve the problem.
NEXT, if you are still not pleased,
write all the details--including
your phone number--to:
Manager, Consumer Relations
GE Appliances
Appliance Park
.... ;,:,,;11o Kc'nlnoky 40225
FINALLY. if your problem is still
not resolved, write:
Major Appliance
Consumer Action Panel
20 North Wacker Drive
Chicago, lllinois 60606
27
Page 28

YOUR GENERAL ELECTR!C RANGE
WARRANTY
Savep+vofoforiginalpurchase datesuch asyoursales slip orcancelledchecktoestablishwarrantyperiod.
J
J
J
WHAT iS COVERED
i
f
i
!
!
I
!
I
WHAT IS NOT COVERED
!
FULL ONE-YEAR WARRANTY
For one year from date of original
purchase, we will provide, free of
charge, parts and service labor
in your home to repair or replace
any part of the range that fails
because of a manufacturing defect.
• Service trips to your home to
teach you how to use the product.
Read your Use and Care material.
If you then have any questions
about operating the product,
please contact your dealer or our
Consumer Affairs office at the
dUUIl_,t_ U_IUW_ UI _;CIII, LUll II!_:_.
GE Answer Center ®
800.626.2000
consumer information service
° ImnrnnAr in_tnllntinn
This warranty is extended to
the original purchaser and any
_1 IrP_,=3t'4infl n_^tnmt fnr nr_t'_l it',l'q
purchased for ordinary home use
in the 48 mainland states, Hawaii
..., . • . _ , A+ + .,
and wasnmgton, u.v. in _lasKa tne
warranty is the same except that it is
LIMITED because you must pay to
ship the product to the service shop
or for the service technician's travel
All warranty service will be provided
by our Factory Service Centers or
by our authorized Customer Care®
servicers during normal working
I IUUI _.
Look in the White or Yellow Pages
of your telephone directorv for
GENERAL ELECTRIC C(3MPANY,
GENERAL ELECTRIC FACTORY
OIL'L'-D\II. "_1"- {___I_Ir--DAI r"l I"/'_TDIP
_._r-nvl%JF v _._r-I_lr_ 1-11"%1.. t-I-I..+_' I Ill'-J"
HOTPOINT FACTORY SERVICE or
GENERAL ELECTRIC CUSTOMER
CARE ® SERVICE.
• Replacement of house fuses or
resetting of circuit breakers.
° Failure of the product if it is used
for other than its intended purpose
...... J ........ .=--II..
ur usreuCU[TIfTIfdIUI_Ily,
° Damage to product caused
by accident, fire, floods or acts
of God.
WARRAN_R ISNOT RESPONSIBLE
FOR CONSEQUENTIAL DAMAGES.
Some states do not allow the exclusion or limitation of incidental or consequential damages, so the above limitation or exclusion
To know what your legal rights are in your state, consult your local or state consumer affairs office or your state's Attorney General.
Dwo.No. 164D1352P224
Pub.No. 49-4992
MNL107(343301)
3;_.9
If you have an installation problem,
contact your dealer or installer.
You are responsible for providing
adequate electrical, gas, exhausting
and other connecting facilities.
Warrantor: General Electric Company
If further help is needed concerning this warranty, write:
Manager--Consumer Affairs, GE Appliances, Louisville, KY 40225
JGSP10GEK
 Loading...