

Page 1
con
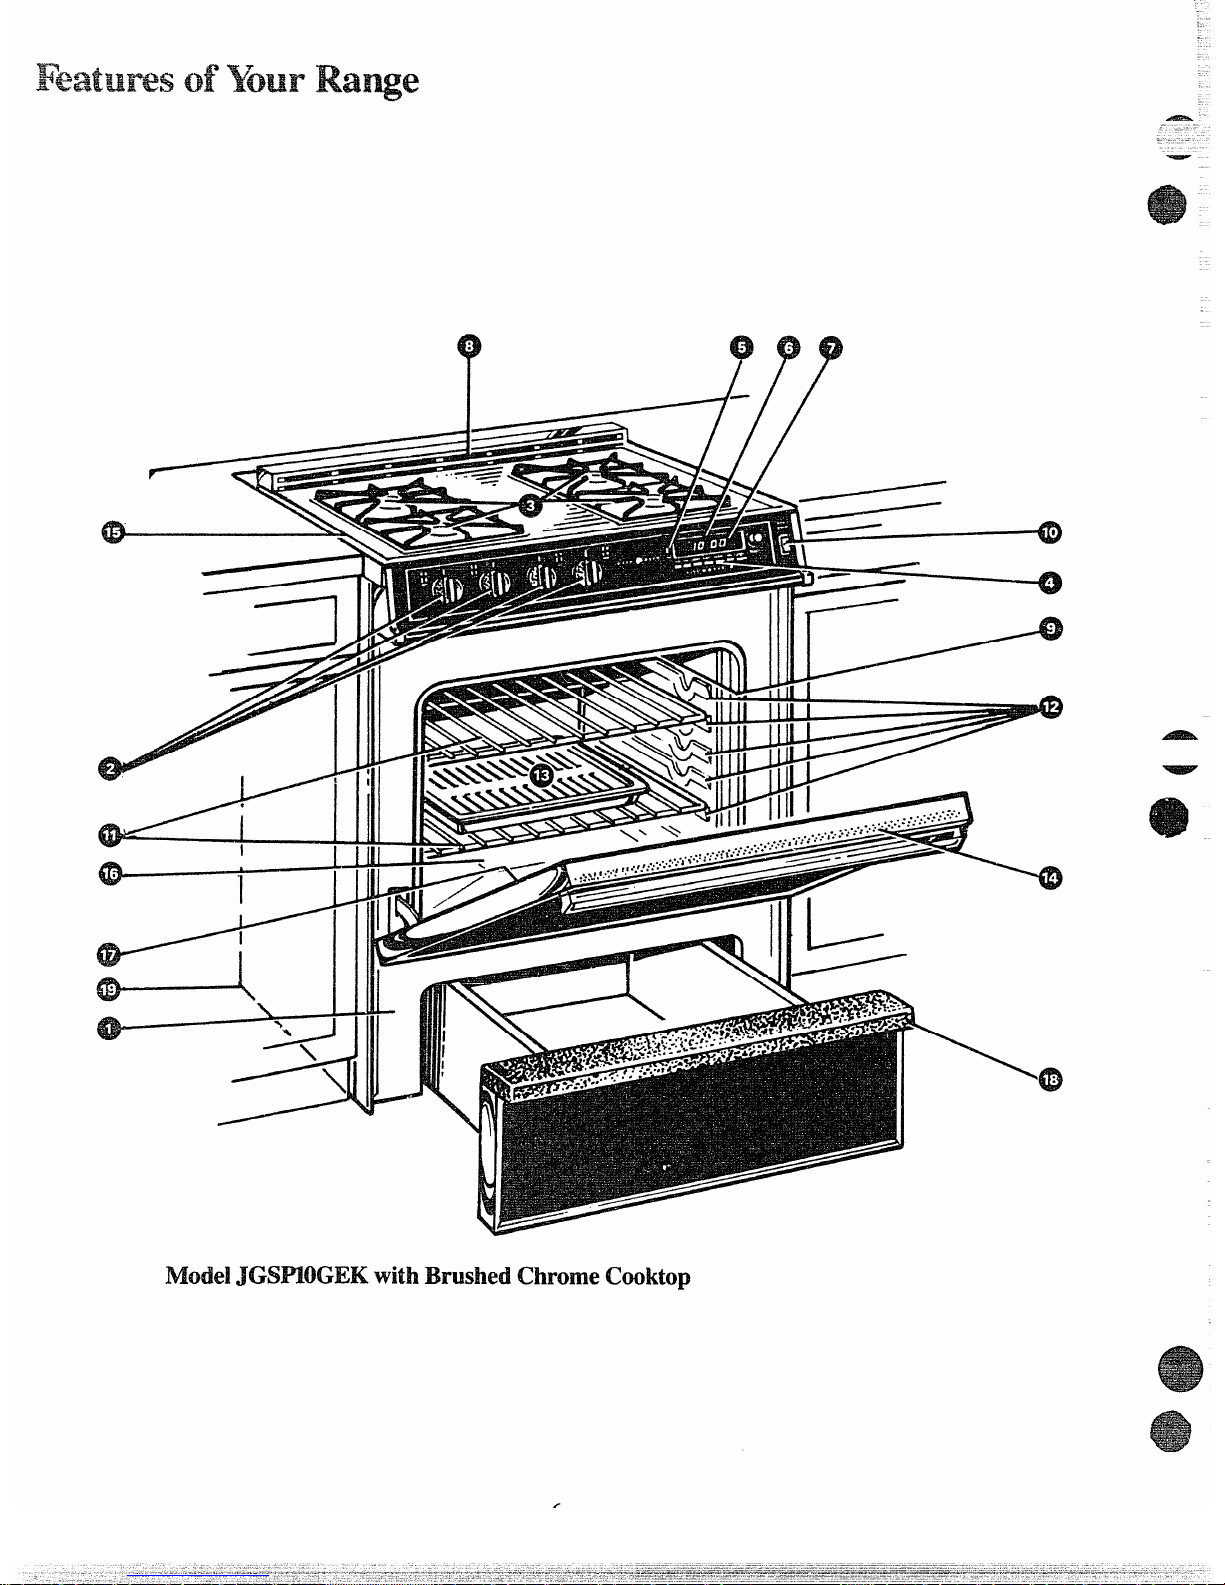
Anti-Tip Bracket
3,.5 Shelves 9, 19
Appliance Registratitm
2 Thermostat Adjustment 25
(:arc and {:lcaning
16-23
Vent Duct
1()
(:lock 10 26
Problem Solver
Electronic (:ontrols
1() Repair Service
27
I+Aturcs
6, 7
Safety instructions 2-5
Flooring”Under Range
~
. Surface Cooking 8,9
I.cveling
.5
Burners 17
1.ift-Up {:(mktop
17
Burner Grates 16
Minute “rimer 10
{:ontrol Settings 8
Model anti Serial Numbers 2 Cookware Tips 9
own
9
Drip Pans 17
Air Adjustment 24 Flame Size 8
Baking, Baking (;uide
12, 13
Lighting instructions
8
llroilcr Pan and Rack 15, 19 Warranty
Back Cover
Broiling, Broiling Guide 15
(:ontrol Settings
10, 11
Door Removal 18
I.ight; Bulb Replacement 10, 19
oven Bottom Removal
18
own Timer 10, 11
Preheating 13
Roasting, Roasting Guide 14
GEAnswerCentt#
Self-{ lleaning operation 20-22
80L?82M?O!0
ModeIJGsPloGEK
Page 2
R isintendedtohelpyouoperateand
maintainyour newrangeproperly.
Keepithandyforanswerstoyour
questions.
Myoudon’tunderstandsomething
orneedmorehe~p,write(incIude
yourphonenumber):
ConsumerAffiiirs
GEAppliances
AppliancePark
Louisville,KY40225
writedown themodel
ad serialm.dm’s.
You’llfindthemona labellocated
onthefrontframebehindthe
storagedrawerfront.Seepages6
and7.
Thesenumbersarealsoonthe
ConsumerProductOwnership
RegistrationCardthatcamewith
yourrange.Beforesendinginthis
card,pleasewritethesenumbers
here:
ModelNumber
serialNumber
?Jsethesenumbersinany
correspondenceor servicecalls
concerningyourrange.
If youreceived
43tiaged range.*•
Immediatelycontactthedealer(or
builder)thatsoldyou therange.
sawthe andmoney.
Beforeyou requmt
service.
● .
ChecktheProblemSolveron
page
26.Itlistscausesofmirxx
operatingproblemsthatyoucan
correctyourself.
FORYOURSAETY
Ifyousmellgas:
1“openwindows.
2.Don’ttouch
electricalswitches!
3.Efiinguishany
openflame.
4.Immediatelycall
yourgassupplier.
*D@tturn
electrlcswitches
onoroffbecause sparksmay
ignitethegas.
FOR YOUR SAFETY
IDo
not storeoruse
gasolineorother
flammablevaporsand
liquidsinthevicinity
ofthisoranyother
appliance.
TheCaliforniaSafeDrinking
WaterandToxicEnforcement
ActrequirestheGovernorof
Californiatopublishalistof
substancesknowntothestate
tocausecancerandrequires
businessestowarncustomers
ofpotentialexposuretosuch
substances.
Gasappliancescancause
minorexposuretothreeofthese
substances,namelybenzene,
forinaldehydeandsoot,caused
primarilybytheincomplete
combustionofnaturalgasorLP _-
fuels.Properlyadjustedranges,
indicated-byabluishratherthan ~
ayellowflame,willminimize
incompletecombustion.Exposure
tothesesubstancescanbe
minimizedfirtherbyventing
withanopenwindoworusing
aventilationfanorhood.
whenYimGetYourWin&
@Havetheinstallershowyou
thelocationofthe
rangegas
cut-offvalveandhowtoshut
it
offifnecessary.
e
~~veyour range h.st.dkd
and
properlygroundedbya
qualifiedinst4er, inaccordance
withtheInstallationInstructions.
;: Anyadjustmentand-serviceshould
beperfikm$donlybyqualified
gasrangeinstaUersorservice
technicians.
Page 3
=I%gywir Img’e w?R
KRl+’dtgmmdd Wtkt 4M@?*
E3QEot rfjmwethe.Kw?d.
! minding pm-g fmrnmlphlg.If
L doubtaboutthegroundingof
-a.
thehomeelectricalsystem,itis
Yourpersonalresponsibilityand
_.*.-.
~b~ig~ti~ntohavean
ungrounded
outletreplacedwith a properly-
gmundedthree-prongoutletin
accordancewiththeNational
ElectricalCode.Donotusean
extensioncordwiththisappliance.
Wm
NG–M1ranges
Wmtip and-
iqumycould
result.lb
prevent
mmkmtd
tippingd the
range9attach
ittothewall
orfloorby
installingthe
UQTI-TIPbracketsumdie~To
checkifthebracketi;~nstalled
-----and engagedproperly,removethe
=
drawerandinspecttherear
a.
levelingkg. Makesureitfits
~ securelyintotheslotinthe
bracket.
Ifyoupulltherangeoutfrom
thewallforanyreason,make
suretherearlegisreturnedtoits
positioninthebracketwhenyou
pushtherangeback.
~fJ~~~rea]]packingmaterials
m’%removedfromtherange
beforeoperatingit,toprevent
fireorsmokedamageshouM
thepackingmaterialignite.
QLocaterangeoutofMtchen
trafficpathand‘outof’drafty
!Geationstopreventpoorair
circulation.
—
-..:
-:;1
./---->.
..
~.=,
..
..
;
-_mJ’
_,--
* Beiwwe yew mge ismm2&ly
adjwtd by
a qualified%i%%ke
tihdcian
m’insallerforme
type d gas INatwr%lCwlx?)Wil
whichitistobeused.Your
rangecanbeconvertedforuseon
eithertypeofgas.
@Afterprolongeduseofa
!r$ange~highfloorkm~mtwres
mayresultandmanyfloor
CoveringswillnotWithbnd
thisMndofuse.Neverinstallthe
rangeovervinyltileorlino~eurm
thatcannotwithstandsuchtypeof’
use.Neverinstallitdirectlyover
interiorkitchencarpeting.
UsiBlgYOwRaue
@~~~9~~e~~e~~~&e~~~~e~~
unattendedwherearangeis hot
orh operation.They
couldbe
seriouslyburned.
@Don9t
allowanyonetodid,
standorhangontheovendoor,
storagedrawerorrangetop.
Theycoulddarnagetherangeand
eventipitovercausingsevere
personalinjury.
eCAUTION:ITEMS(M’
INTEmsT m cmLDmN
SHOULDN(YI’BEsmmD
INcABlmm ABOVEA
MNGE ORONTm
BACWPLMHOFAIMJ?WX&
CHDJXENC.LIMBBWON
THERANGEIX)REACH
ITEMSCOULDBE
SERIOUSLYN?UR13D.
@Letburnergratesandother
surfacescoolbeforetouching
themor
leavingthan where
childrencanreachtherm
@Neverwearloosefitttngor
hanginggarmen%whileusing
theappliance,
Flammable
materialcouldbeignitedif
broughtincontactwithflameor
hotovensurfacesandmaycause
severeburns.
3
@~y~~g~
&~~ y~ugap~ii$mceftm
warRIingw= heatiag4Wm43m=
Rolongd IJSe
ofthe range ~
withoutadequateventilationcan
behazardous.
@Donot%M’x!watermlgrease
fires.Neverpickupaflming
pan.Turnoffburner,then
smotherflamingpanbycovering
pancompletelywithwellfitting
lid,cookiesheetorflattray.
Flaminggreaseoutsideapancan
beputoutbycoveringwithbaking
sodaor,ifavailable,amultipurposedrychemicalorfoamtype
fireextinguisher.
~Do~@s~o~eflam~~b~e
ma@tialsinanovenornear
the
COOktO~e
e Do
notletcookinggrea$e
orotherfl-able makdals
accumulateh ormartherange.
@Whenc~ting pork9
follow
thedirectionsexactlyandalways
cookthemeattoaninternal
temperatureofatleast170”F.
Thisassuresthat,intheremote
possibilitythattrichinamaybe
presentinthemeat,itwillbe
killedandmeatwillbesafetoeat.
surfaceCootiw
@
Always use the LH’E psition
when igtitingtopbwnem and
makesuretheburnershaveignited.
63~eve~~~ve~~f~~e~~~e~
una~nded
atHI flme seti~so
Boilovercausessmokingand
greasyspilloversthatmaycatch
onfire.
@Adjust
topbuamer flme size
soit doesnotextendbqond the
edgeoftheCmtingUtemile
Excessivefkame
ishazardous.
e
Page 4

@useCmJydrypt hd?krs—
IT&X
or (kUq?pothOkk13 on hot
dices mayresult in burns from
steam.Do notletpot130kkmcome
nearopen flameswhen lifting
Wends. Do notusea towelor other
bulky clothinplaceofa potholder.
@Tomitimize the possibility
of bums9 ignitionof flammable
materials, and spillage,turn the
cookwarehandlestowardtheside
or back of therange without
extendingoveradjacentburners.
@Alwaysturn surface burner to
OiFFbefore removing utemsil.
* carefully Watchfoods being
fried WHI
!fimesetting.
epaJ~g7&~~~~ ~~~~~~~(~~r
optings) oftherange.They
providetheairinletandoutlet
whichisnecessaryfortherange
tooperateproperlywithcorrect
combustion.
sDonotll!sealwokonthe
Cwtingsurface”ifthewokhasa
roundmetalringwhichis
placedovertheiXmnergrate
to
SUppti thewok.
Thisringacts
asaheattrapwhichmaydamage
theburnergrateandburnerhead.
Also,itmaycausetheburnerto
workimproper&.Thismaycause
acarbonmonoxidelevelabove
thatallowedbycurrentstandards,
resultinginahealthhazard.
@Fmldsforfryingshouldbeas
@as possible.Mostonfrozen
foodsormoistureonfreshfoods
cancausehotfattobubbleupand
oversidesofpan.
=usek%$tNssibleamountof
fatforefiwtiveshallow0!4’deep”
fatfrying.Fillingthepantoofull
offatcancuusespilloverswhen
foodisadded.
= If a Conlbinationd’oilsor
fatswillbeusedinfrying, s~ir
toge[herbeforeheating.or as
fatsmelt slowly.
~
!dtW’j% !kX3t fd Shdy, arid
watchas it heats.
~use deep fat thermometer
whenever pssible to prevent
overheatingfatbeyondthe
smokingpoint.
@Use proper pan size-Avoid
pansthat are unstableor easily
tipped. Selectutensilshavingflat
bottomslargeenoughto properly
containfoodavoidingboilovers
and spillovers,and largeenough
tocoverburner grate. This will
both savecleaningand prevent
hazardousaccumulationsoffood,
since heavyspatteringor spillovers
lefton rangecan ignite.Use pans
with handlesthatcan beeasily
graspedandremaincool.
@Useonlyglass
cookwarethat
isrecommended
foruseongas
burners.
~Keep all plastics
awayfrom
topburners.
~Toavoid
the ~ssibility Ofa
!im’n,alwaysbecertainthatthe
cofitroisforal!burnersareat
OFFpositionand241gratesare
cod beforeattemptingto
remve agrate.
~when flamingfWls under
thehood,turnthefanoff.‘I’he
fan,ifoperating,mayspread
theflame.
s If
~ange islocatedneara
window9 donotuselongcurtains
whichcouldblowoverthetop
burnersandcreateafirehazard.
@Ifyousmell
gas9turnoffthe
gastotherangeandcallaqualified
servicetechnician.Neverusean
openflametolocatealeak.
4
@Ike oven shelvesindesk-d
psition while
own iscd.
@hlling outshelf’totheshelf
stopisaconvenienceinlifting
heavyfood%Misalsoa
precautionagainstburnsfrom
touchinghotsurfacesofthe
doororovenwake
~ Don’theatunopenedfood
containersintheoven.Pressure
couldbuildupandthecontainer
coukiburstcausinganinjury.
.A@%
*
Don’tuseahiminm foil
anywhereintheovenexceptas -.
describedin
thisbook. Misus
could result in a fire hazard or
damageto the range.
@Useonlygiasscookwarethatis
recommended
for use ingas
ovens.
@Whenusingcooking or
roastingbagsinoven?follow
themanufacturer’sdirection.
@Alwaysremovebroilerpan
fromtheovenassoonasyou
finishbroiling.
Greaseleftinthe
pan can catch fire ifovenis used
withoutremovingthe grease from
the broiler pan.
@Whenbroiling9ifmeatistoo
closetothefhne9 thefatmay
ignite.
Trim excessfatto prevent
excessiveflare-ups.
Page 5
@DonotmeovenA%mer$.No
cxmmmidovencleaneroroven
Iincrpmteciivecoatingofany
kindshouldbeusedinoranx.md
anypartoftheoven.
Ieaniap‘MOWRange
ckm mypartslistedinthis
the andcareBook.
IfYouNeedservice
~ ReadWneRoblemsdvtw
m! page26ofthisbook.
Flooriwunderthe
Range
MM’range, M&2somaE2yf.l~hr
i3Gllseh@id
item,isheavyand win
!Mik!MO
softmmCWel-irlgs
suchas cushionedvinyl
m“
carpeting. Whenmovingtherange
on(histypeofflooring,usecm.
Do
notinstall the range over
kitchencarpetingunlessyou
placeaninsulatingpador sheetof
l/4-inch-thickplywoodbetween
the rangeandcarpeting.
Whentlzefloorcoveri’ngends atthe
front ofthe range,
theareathatthe
rangewillrestonshouidbebuiltup
withplywoodor similarmaterialto
thesamelevelorhigherthanthe
floorcovering.‘I’hiswillallowthe
rangetobemovedforcleaningor
servicing.
Levelinglegsarelocatedoneach
cornerofthebaseoftherange.
Removethebottomdrawerandyou
canleveltherangeonanunevenfloor.
Toremovedrawer,puildrawer
outalltheway,tiltup the front
andtakeitout.Toreplacedrawer,
insertglidesatbackofdrawer
beyondstoponrangeglides.
Liftdrawerifnecessarytoinsert
easily.Letfrontofdrawerdown,
thenpushintoclose.
Oneoftherear levelinglegs
willengagetheANTI-TIPbracket
(allowforsomesidetoside
adjustment).Allowaminimum
clearanceof 1/8”betweenthe range
andthelevelinglegthatistobe
installedintotheANTI-TIPbracket.
Page 6
Page 7
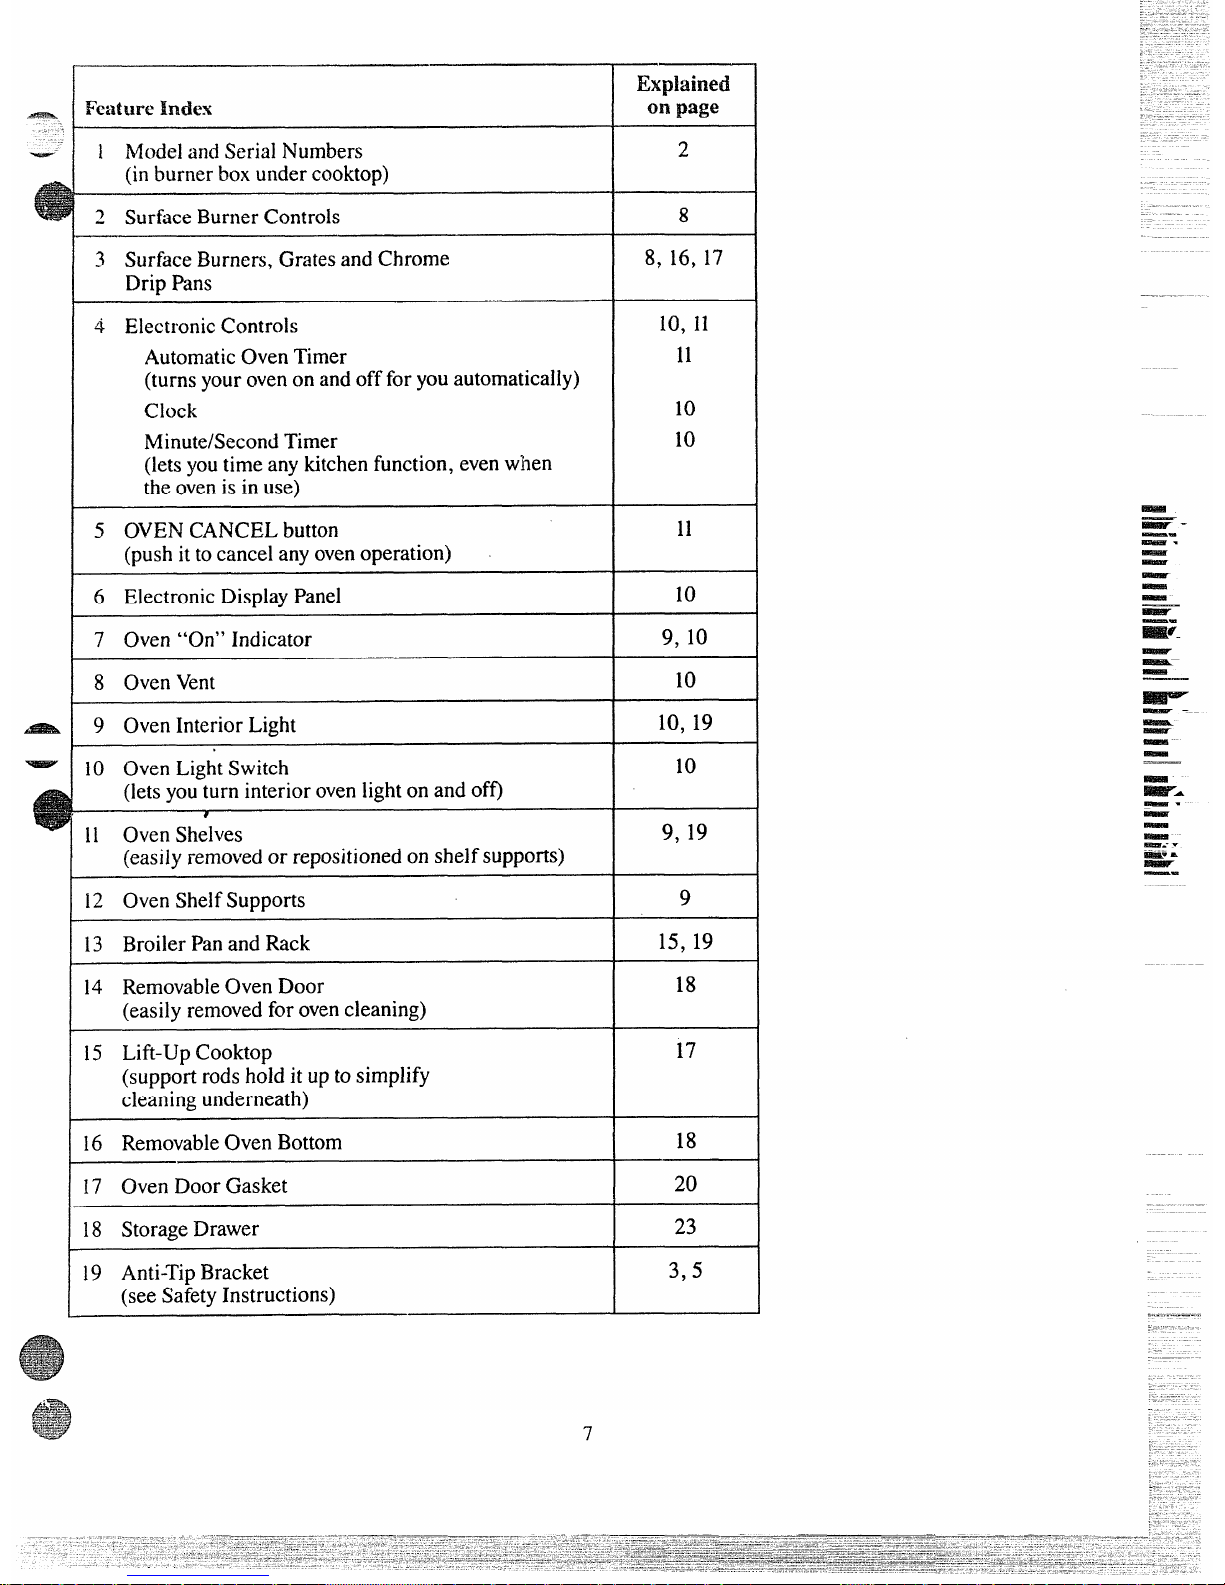
Explained
onpage
Feature Index
} Modeland SerialNumbers
(inburnerboxundercooktop)
2 SurfaceBurnerControls
3 SurfaceBurners,GratesandChrome
Drip Pans
..—.-—
.-
—-
2
8
8, 16, 17
4 ElectronicControls
10,11
11
AutomaticOvenTimer
(turnsyourovenon andofffor youautomatically)
10
10
clock
Minute/SecondTimer
(letsyoutimeanykitchenfunction,evenwhen
theovenis inuse)
E#a
iiEiF-
=“.
~
-
5 OVENCANCELbutton
(pushittocancelanyovenoperation)
11
6 ElectronicDisplayPanel
10
7 Oven “On” Indicator
9, 10
10
8 OvenVent
9 OvenInteriorLight
10, 19
10 OvenLightSwitch
(letsyouturn interiorovenlight on andoff)
10
9, 19
11 OvenShelves
(easilyremovedor repositionedon shelfsupports)
—.
9
I
12 OvenShelfSupports
13 BroilerPanand Rack
15, 19
14 RemovableOvenDoor
(easilyremovedforovencleaning)
18
15 Lift-UpCooktop
(supportrodshold it upto simplify
cleaningunderneath)
18
I
16 RemovableOvenBottom
20
I 17 OvenDoorGasket
23
I
18 StorageDrawer
19 Anti-TipBracket
(seeSafetyInstructions)
3,5
7
Page 8
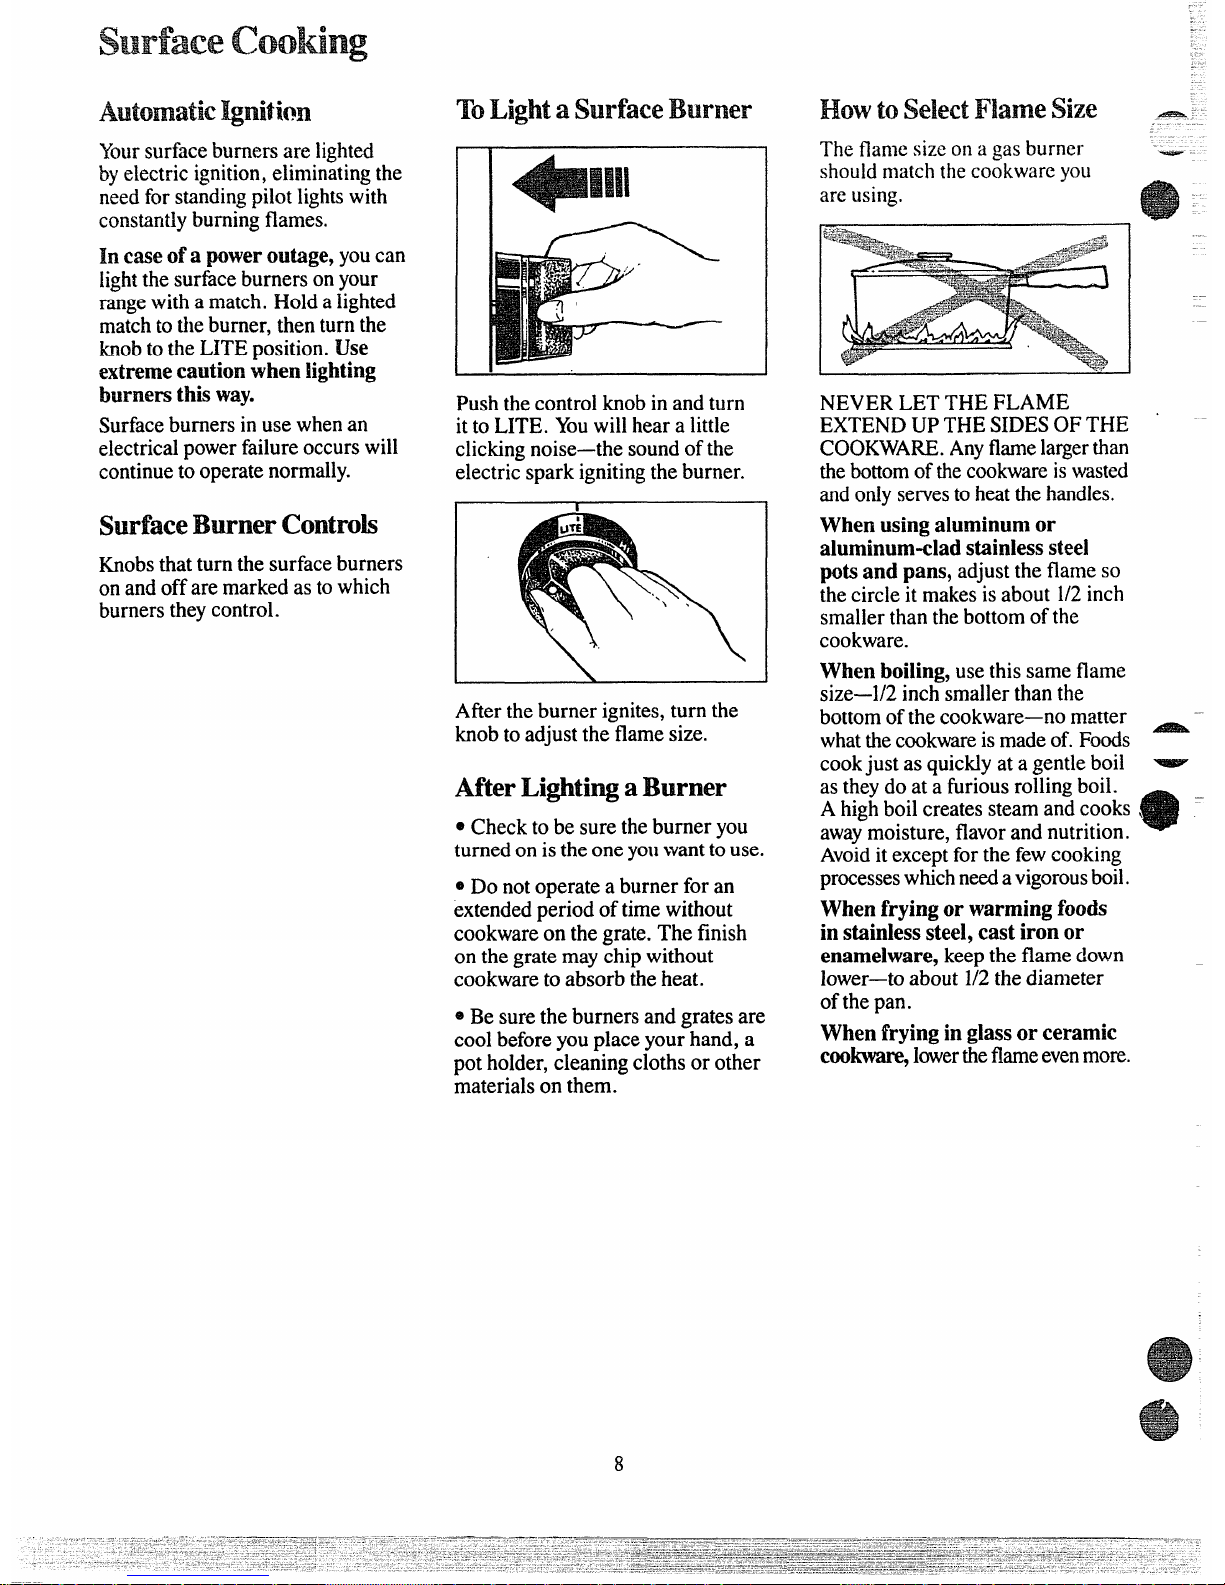
Automatic~nition
Xmrsurfaceburnersare lighted
byelectricignition,eliminatingthe
needfor standingpilotlightswith
constantlyburningflames.
In caseofa poweroutage,youcan
lightthesurfaceburners onyour
rangewitha match.Holda Iighted
matchtotheburner,thenturnthe
knobtotheLITEposition.Use
extremecautionwhenlighting
burnersthisway.
Surfaceburnersinusewhenan
electricalpowerfailureoccurswill
continuetooperatenormally.
TOLightasurfaceBurner
Pushthecontrolknobinandturn
ittoLITE. Youwillheara little
clickingnoise—thesoundofthe
electricsparkignitingtheburner.
surfaceBurnerContrd$
Knobsthatturnthesurfaceburners
onandoffare markedasto which
burnerstheycontrol.
Aftertheburnerignites,turnthe
knob to adjusttheflamesize.
~~~~
Lightinga Burner
o
Checktobe suretheburneryou
turnedon istheoneyouwanttouse.
@Do notoperatea burnerfor an
extendedperiodoftimewithout
cookwareon thegrate.Thefinish
onthegratemaychipwithout
cookwaretoabsorbtheheat.
~Besuretheburnersandgratesare
cool beforeyouplaceyourhand,a
potholder,cleaningclothsor other
materialsonthem.
HowtoSekt Fiamesize
Theflamesizeona gasburner
shouldmaichthecookwareyou
areusing,
NEVERLETTHE FLAME
EXTEND UPTHESIDESOFTHE
COOKWARE.Anyflamelargerthan
the bottomofthecookwareiswasted
andonlyservesto heatthehandles.
Whenusingaluminumor
aluminum-cladstainlesssteel
potsandpans,adjusttheflameso
thecircleit makesisabout1/2inch
smallerthanthebottomofthe
cookware.
Whenboiling,usethissameflame
size—1/2inchsmallerthanthe
bottomofthecookware—nomatter
whatthecookwareismadeof.Foods
cookjust as quicklyat agentleboil
astheydo at a furiousrollingboil.
Ahighboilcreatessteamandcooks
awaymoisture,flavorandnutrition.
Avoidit exceptforthefewcooking
processeswhichneedavigorousboil.
Whenfryingor warmingfoods
instainlesssteel,castironor
enamelware,keeptheflamedown
lower—toabout1/2thediameter
ofthepan.
Whenfryinginglassorceramic
cookware,lowertheflameevenmore.
—
.~
—
e-
—
8
Page 9
usingYouroven
!
.~ “r{lp-of-Rallgecock.~vare
—
Aiimlinuin:Meciium-weight
ciwkwwcisrecommendedbecauseit
heatsquicklyandrowdy.Mostfm~s
biotvnevenlyinanaluminumskillet.
Ivlineraisinfd andwaterwil1 stain
but willnotharmaluminum.A
quickscourwitha soap-tilledwool
p:xiaftereachusekeepsaluminum
cookwarelookingshinynew.Use
stiucepanswithtight-fittinglidsfor
cookingwithminimumamounts
ofwater.
Casth-on:If heatedslowly,most
skilletswillgivesatisfactoryresults.
Enamelware:Undersome
conditions,theenamelof some
cookwaremaymelt.Followcookware
manufacturer’srecommendations
fbrcookingmethods.
Glass:Therearetwotypesofglass
cookware-those forovenusconly
andthosefortop-of-rangecooking
(saucepans,coffeeandteapots).
Glassconductsheatveryslowly.
HeatproofGlassCeramic:Can
beusedforeithersurfaceor oven
ooking.Itconductsheatvery
slowlyandcoolsveryslowly.
Checkcookwaremanufacturer’s
directionsto besureitc.;) beused
ongasranges.
Stainless!Meel:Thismetalalone
haspoorheatingproperties,andis
usuallycombinedwithcopper,
aluminumor othermetalsfor
improvedheatdistribution.
Combinationmetalskilletsusually
worksatisfactorilyiftheyare
usedwithmediumheatas the
manufacturerrecommends.
A3%14Bk
e“
AutomaticIgnition
‘I’heovenburnerandbroil
burneronyourrangearelighted
byelectricignition.
lb lighteitherburner,pushthe
buttonforthedesiredfunctionand
turntheSETknobuntilthedesired
temperatureisdisplayed.Tim
burnershouldignitewithin60
seconds.
Poweroutage?
Theovenandbroilerburners on
thisrangewillnotlightintheevent
ofanelectricalpoweroutage.Do
notattempttolightthem
manuallywitha match.
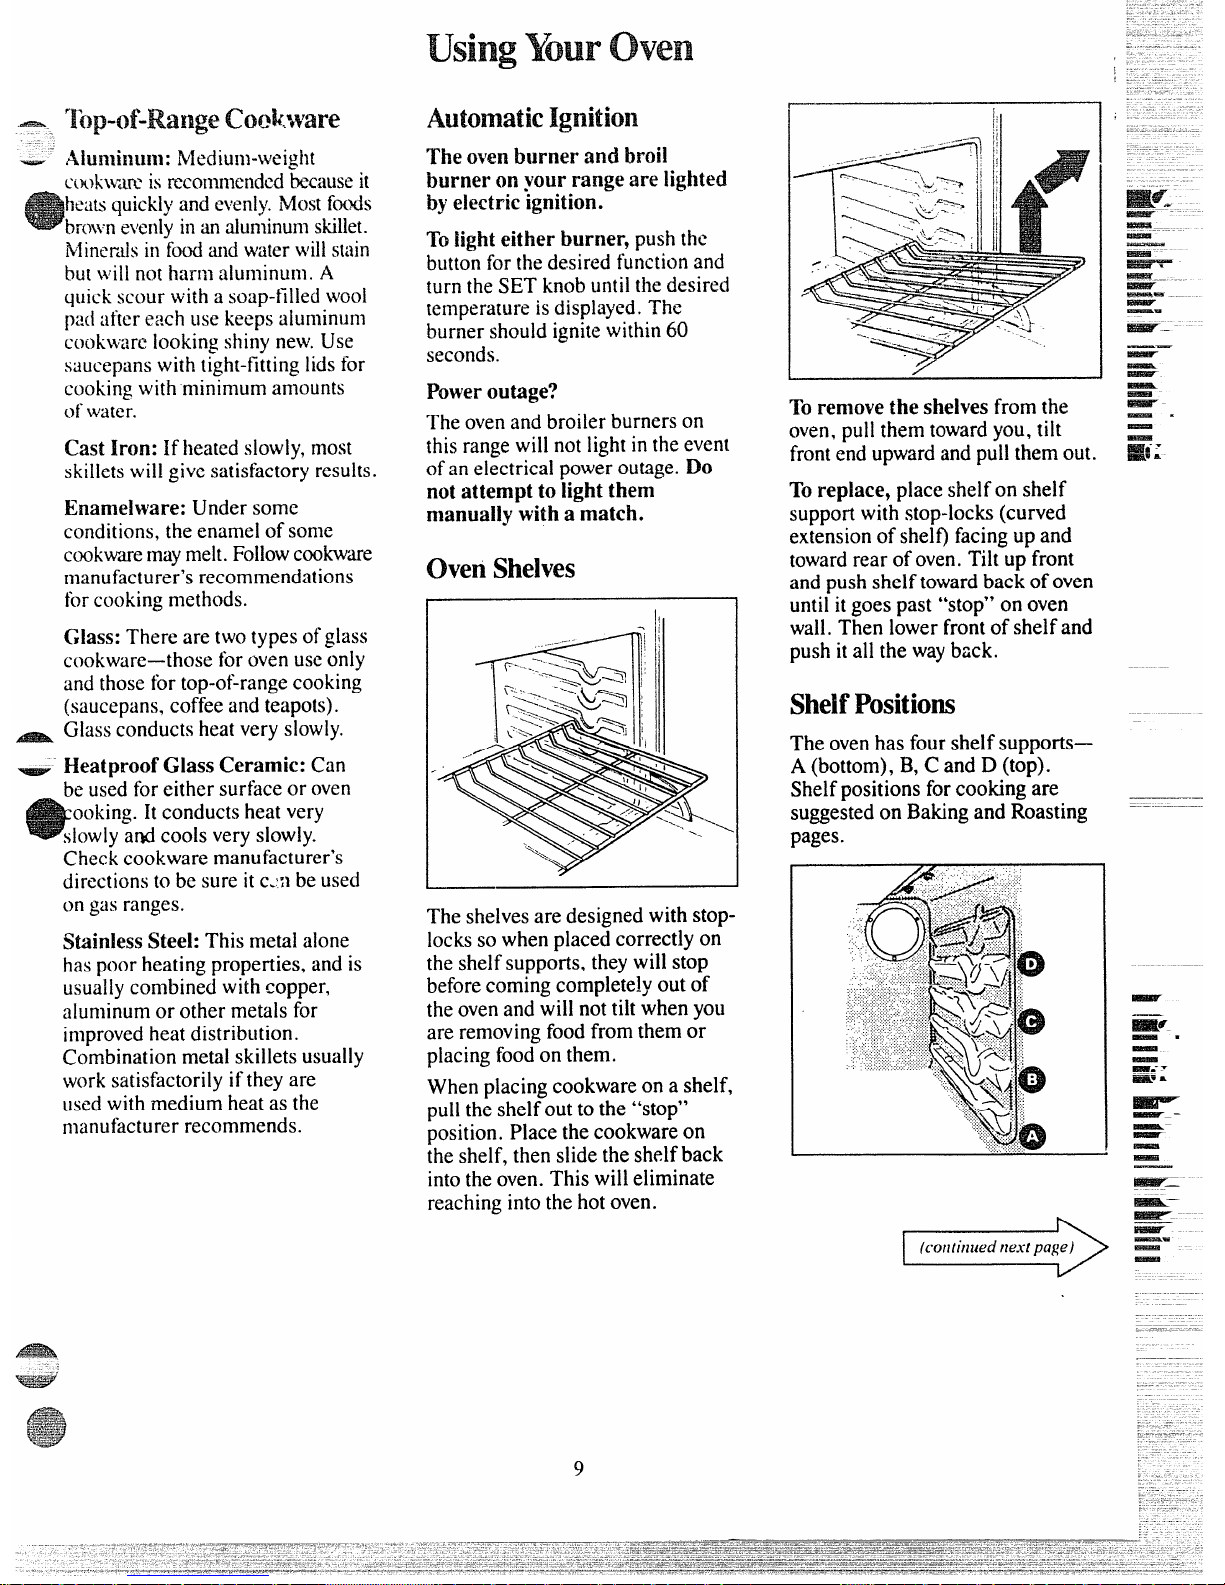
OvenShelves
-I
BEBE?..
~
—.
..——— ——.
K!#a##—.
I%z?aErl
~
Toremovethe shelvesfromthe ‘-
—*
oven,pullthemtowardyou,tilt
frontendupwardandpullthemout.
Toreplace,placeshelfon shelf
supportwithstop-locks(curved
extensionof shelf)facingupand
towardrearofoven.Tiltup front
andpushshelftowardbackofoven
until itgoespast “stop”on oven
wall.Thenlowerfrontof shelfand
pushitallthewayback.
ShelfPositions
Theovenhas fourshelfsupports—
A(bottom),B, C andD (top).
Shelfpositionsforcooking are
suggestedon BakingandRoasting
pages.
Theshelvesaredesignedwithstoplockssowhenplacedcorrectlyon
theshelfsupports,theywillstop
beforecomingcompletelyoutof
theovenandwillnottiltwhenyou
areremovingfoodfromthemor
placingfoodonthem.
Whenplacingcookwareon a shelf,
pull theshelfoutto the “stop”
Position.Placethecookwareon
~heshelf,thenslidetheshelfback
intotheoven.Thiswilleliminate
reachingintothehotoven.
I
(continuednextpage)
I
—-
.
-
Page 10

O\’Light
Usc theswitchon the control panel
to turn the light on and off.
ovenvent
Yt)urovenisventedthroughducts
a[therear ofthe range(seepage6).
Donotblocktheseductswhen
cookingintheoven—itis important
thattheflow
of hotair fromtie oven
andfreshair totheovenburnerbe
uninterrupted.Avoidtouchingthe
ventopeningsornearbysurF~ces
duringovenor broileroperation—
theymaybecomehot.
@Ventopnings andnearby
surfacesmaybecomehot. Donot
touchthem.
~Handlesof pts and panson the
cooktopmaybecomehotif left
tw closetothevent.
~Do notleaveplasticitems on
thecooktop—theymaymeltif
iefttooclosetothevent.
ovenMoMure
Asyourovenheatsup, the
temperaturechangeoftheair
intheovenmaycausewater
dropletsto formonthe dooF
glass.Topreventthis,openthe
ovendoor for the firstminute
ofovenheat-upto letthemoist
airout.
Electroniccontrols
Oven“On” Indicator
Word“ON” isdisplayedwhen
BAKEor BROILbuttonisenergized,
goesoutwhenCANCELbuttonis
pushedor whenovenburnershuts
offautomatically.
Theovenoperationiscontrolled
electronically.Thefollowing
instructionstellyouhowtooperate
theelectroniccontrols.
TO
SettheClock
1.
PushCLOCKbutton.
2. TurnSETknobtocorrecttime
ofday.Clockisnowset. Theclock
mustbesettothecorrecttimeof
dayforaccurateautomaticoven
timingoperations.
ToSetthe
Minute/Second~mer
1.
PushTIMERbutton.
2. TurnSETknobtodesired
amountoftime(upto9 hoursand
59minutes).The Minute/Second
Timerwillimmediatelybeginto
countdown.
3. Whentimeisup,theEnd-of-Cycle
Tone(3longbeeps)willsoundand
thedisplaywillagainshowthetime
ofday.
Note:TheMinute/SecondTimeris
a reminderonly andwillnotoperate
theoven.
Youcan usethe Minute/Second
Timerwhether or nottheovenis
beingused.TheMinute/Second
Timerdoesnot interferewithoven
operations.
ToCancelthe~mer
PushandholdTIMERbuttonfor
threeseconds.Thiswillclearthe
Minute/SecondTimerfuncti(~n.
ToBake
1. PushBAKEbutton.
2. TurnSETknobuntildesired
temperatureisdisplayed.
Aone-secondbeepwillsound
whentheovenhaspreheatedtoand
stabilizedatselectedtemperature.
3. Whenfinishedbaking,push . _
CANCELbutton.
Note:Torecallwhat tempcrdture ~
youhaveselectedwhiletherising
temperatureisbeingshown,push
andholdthe BAKEbutton.The
selectedtemperaturewillbeshown
whileyouholdtheBAKEbutton.
Theactualoventemperaturewill
beshownaftera fewseconds.
Youcan pushtheCL9CK buttonto
displaytimeofdaywithout
canceling theovenopertition.
Youcan changetheselected
temperatureat anytimeby
pushingtheBAKEbuttonand
turningtheSETknob.
ToBroil
1. Push BROILbutton.
2. TurnSET knobuntilyour
choiceofHI BROILor LOBROIL
isvisibleinthedisplay.
Whenfinishedbroiling,pushthe
CANCELbutton.
Page 11

*. AutonlatieovenTher
_‘ Theoventimerwillautomatically
startandstopyourovencookingor
‘elf-cleaningoperation foryou.
Forautomaticovencooking:
1. PushCOOKTIME button.
2. TurnSETknobtoset lengthof
bakingtime.
3. PushBAKEbutton.
4. TurnSETknobto setdesired
temperature.
Whencooktimeisreached,the
End-of-CycleTonewillsoundand
theovenwillturnoff.
Duringautomaticcooking:
@YoucanpushtheSTOPTIME
buttonto findoutwhentheEnd-of=
CycleTonewillsoundandtheoven
willturnoff.
e YoucanpushtheCLOCKbutton
todisplaytimeofdaywithout
cancelingtheovenoperation.
‘lbMay Startingan
utomaticOvenOperation
Ifa delayedcookingoperation’
isdesired! -
L PushCOOKTIMEbutton.
2. Setlengthofbakingtimewith
SETknob.
3. PushSTOPTIMEbuttcm. ,
4. TurnSET knobtotimeofday
whenbakingshouldbecofipleted.
Stoptimemustbeequaltobr
greaterthanthecooktimeplusthe
currenttimeofday.
5. PushBAKEbutton.
6. TurnSET knobto desired
temperature. ,
Whenstoptimeis reached,the
End-of-CycleTonewillsoundand
theovenwillturnoff.
~
‘-’
Caution:Neverletfood sit inthe
ovenformorethan4 hoursbefore
cookingstarts,Roomtemperature
isidealforthegrowthofharmful
bacteria.Besureovenlightisoff
becauseheat fromthebulbwill
speedbacteriagrowth.
Note:YoucanpushtheSTOP
TIMEbuttonto findoutwhenthe
ovenwillturnoff. Pushandhold
theCOOKTIMEbut!onto findout
whentheovenwillturn on.
Ifa delayedself-cleaningoven
operationisdesired,seepage21.
I
.,
,,
HowtoChange ~
apqy’ati- . ..
Whenafunctionhasbeen
entered,youcanrecallwhathas
beenprogrammedby.pushing
thecorrespondingfunction
button.’Themessagesin the
displayshowyouwhichfimction
iscurrentlybeiggdisplayed., ~..
Whilethefunctionisdisplay~,
youcanchange,it,withthe SET
bob. YoucanchangeNY ,
programmedfimctionatanytime.
!,
End-of-CycleTone(3long~eeps—
onesecondon, onesecondoff): !
showsthat a timedovenoperation ~
hasreachedSTOPTU’vlEor that ~
theMinute/SecondTimerhas ..
counteddown.
Attention”Tone(seriesofshort
beeps, l/4-secondon, l/4-second
off,-untilproperresponseis‘given):
willsoundif ovenhasonlybeen ‘
partiallyprogrammed.For.example,,
ifyouhaveselectedacooktimebut
notemperature,youwillhear the
AttentionToneuntil youselecta
temperatureor pushCANCEL. ~
NotificationTone(single,one-
secondbeep):indicatesovenhas
stabilizedat selectedtemperature.
KeyToni (single,l/10-second
beep):sounds‘whenanybuttonis
FunctionErrorTone(seriesof
veryrapidbeeps, 1/8-secondon,
l/4-secondoff):displaywillshowa
failurecode.CancelFunctionError
TonebypushingtheCANCEL
button.If the FunctionError Tone
startsagain(afterabout15
seconds),callforservice.
Disconnecttherangeelectrical
supplytostopthetone.
Ifthefunctionerroroccurred
whileyouwereprogrammingthe
ElectronicControl,pushthe
CANCELbuttonandtryagain.
ToCanceltheTone...If youdon’t
wantanaudibletonewhenyou
pushabutton, youcaneliminate
theKeyTone.bypushingand
holdingtheCANCELbuttonuntil
youheara.shortbeep(in
approximatelytwoseconds).To
activatethetoneagain,pushand
holdtheCANCELbuttononce
moreuntilyouheara shortbeep.
Canceling,oractivatingthetone
shouldonlybedone‘whenthereis
noovenoperationprogrammed.
Pushingthe”CANCELbuttonwill
clearallfunctionsexceptthe Clock
andMinute/Second
~lmer.
,,
,,
,,.
.,. .
,.
~–
——
——
—
~
—.
Imwr
—.
—
—
—
—
—
--
~
—-
EliElsr-
- ——
—
~–
~_
-–
-—
.—
—-
—. –.
Rg:
pushed.
11
Page 12

B*W
*
HowtoSetYiiNRrKange
forB-
1. Positiontheshelfor shelvesin
theoven.If cookingon twoshelves
atthesametime,placeshelves
about4 inches apartand stagger
foodonthem.
2. Closeovendoor.
3. PushtheBAKEbuttonand
mm the SET knobuntildesired
temperatureisdisplayed.If
preheatingisdesired,donotput
foodin the ovenuntila one-second
beepsoundsto tellyoutheovenhas
stabilizedatthe selectedbaking
temperature.
4. Opendoor andplacefoodin
ovenoncenterofshelf. Allowat
least2 inchesbetweenedge of
bakewareandovenwallor adjacent
cookware.
5. Closeovendoor.
& Checkfoodfordoneness at
minimumtimeon recipe.Cook
longerif necessary.PushCANCEL
buttonandremovefood.
shelf
Positiom
Mostbakingis doneonthesecond
shelfposition(B)fromthebottom.
Whenbakingthreeor fouritems,
usetwoshelvespositionedonthe
secondand fourthsetsof supports
(B42D)frombottomof oven.
Bakeangel foodcakesonfirst shelf
position(A) frombottom ofoven.
~Followatestedrecipeand
measuretheingredientscarefilly.
Ifyouareusingapackagemix,
followlabel directions.
~If moistureisnoticeableonthe
frontoftheovenorontheglassdoor
whenfirstturningontheoven,leave
the ovendoorajarforafewminutes
oruntiltheoveniswarm.
~ Donot opentheovendoorduring
abakingoperation—heatwillbelost
andthebakingtimemightneedto
beextended.Thiscouldcausepoor
bakingresults.Ifyoumustopenthe
door,openitpartially-only 3or4
inches—andcloseitasquicklyas
possible.
@
Do notdisturbtheheatcirculation
intheovenwiththe useofaluminum
foil.Iffoilisused,placeasmall
sheetofit, about10by12inchesat
themost,onalowershelfseveral
inchesbelowthefood.Donotplace
foilontheovenbottom.
commonBakingProbhmls
andPossibIeSolutions
PIES
Burningaroundedges .
eOventoofill; avoid
overcrowding.
e
Edgesofcrusttoothin.
oIncorrect
baking temperature.
Bottomcrustsoggyandunbaked
oAllowcrustand/or
fillingto COO1
sufficientlybeforefillingpieshell.
~
Filling maybe too thinorjuicy.
@Fillingallowedtostandinpieshell
beforebaking.(Fillpieshellsand
bakeimmediately.)
~
Ingredients and proper measuring
affectthe qualityofthecrust. Usea
testedrecipeandgoodtechnique.
Makesuretherearenotinyholesor
tearsinabottomcrust. “Patching”
apiecrustcould causesoaking.
Piefillingrunsover
~
Topand bottom crust notwell
sealedtogether.
@
Edges ofpie crustnotbuiltup
highenough.
eToomuch
filling.
@
Checksizeofpieplate.
Pastryistough;crustnotflaky
~
TOOmuch handling.
~ Fattoo
SOftor cut intoofine.
Rolldoughlightlyandhandleas
littleaspossible.
-—
CAKES
~
Cakeriseshigherononeside
-.
s ~at~erspread
u~evcnly inpan.
—
e ovend-wivesnotlevel.
~
Usingwarpedpans.
@Incorrectpansize.
Cakescrackingontop
eOventenlperaturetoohigh.
eBattertoothick,followrecipe
orexactpackagedirections.
~ Checkfor
proper shelfposition.
eCheck
pan size called forinrecipe.
~Impropermixingofcake.
Cakefalls
eToomuchshortening,sugaror
liquid.
eCheck
leavening agent, baking
powderorbakingsodatoassure
freshness.Makeahabittonote
expirationdatesofpackaged
ingredients.
oCakenotbaked
long enoughorat
incorrecttemperature.
eIf
addingoiltoa cake mix, make
certaintheoilisthetype and
amountspecified.
Crustishard
@Checktemperature.
~Checkshelfposition.
Cakehassoggylayerorstreaksat
bottom
oUnderminingingredients.
e
Shorteningtoo SOftforproper
creaming.
e
TOOmuchliquid.
COOKIES&BISCUHS
Doughycenter;heavycruston
surface
oChecktemperature.
o check shelfposition.
.
FOl~OWbaking instructions
carefullyasgiveninreliablerecipe
oronconveniencefoodpackage.
eFlatcookiesheetswillgivemore
evenbakingresults.Don’tovercrowd
foodsonabakingsheet.
eConveniencefoodsusedbeyond
theirexpirationdate.
Browningmorenoticeableon
oneside
~Ovendoornotclosedproperly,
checkgasketseal. .
eCheckshelfposition.
Page 13

.
..—.—
--...—..,————a::——-..—-.
.T —.—
--
-.
-.
.—
.—
.-
.—
—
BakingGuide
—
~, 1. Preheatingisveryimportant
Preheatingisnotnecessarywhen
3. Darkor non-shinyfinishes,
ah ::
‘when
usingtemperaturesMow
roastingor forlong-timecookingof
glassandPyrocerml@cookware, -’---
~ Z&E andwhenbakhwfoodssuchas
wholemeals. wmerallyabsorbheatwhichmay
iscuits,cookies,cal& andother
2. Aluminumpansconductheat
;&.dt in-dry,crispcrusts.Rcdu;e
astries.AfterpushingtheBAKE
quickly.Formostconventional
ovenheat25*F.if lightercrustsare
buttonandturningtheSET knobto
baking,light, shinyfinishesgivebest
desired.Rapidbrowningofsome
thedesiredternpemture,besureto
resultsbecausetheyhelpprevent
foodscanbe achievedbypreheating ~–=.-
wuitfortheone-secondbeepbefore
overbrowning.Forbestbrowning
castironcookware.
puttingfoodintothem-w-t.
results,we recommenddullbottom
surfidces forcakepansandpieplates.
Oven
Temperatures
400°-4750
350°-400”
400”-450°
350°
400°-4250
375°
350°-3750
375°-4250
375°-4250
350°-3750
325°-375”
375°-4000
325°-3500
Shelf
Positions
B,
c
B,A
B
B
A, B
B
B
A, B
A, B
B,A
A
B
A
A, B
B
A, B
B
B
B
Time,
Minutes Comments
hod
Bread
Biscui[s(Win. thick)
Coftiicl,uke
Cornhrcudor muf}ins
GingcrbrcwJ
Mullins
Pop(wcrs
Quickloafbrcud
Yeastbread(2hxwcs)
Plainroils
SWWrolls
Cakw
(withou[shortening)
Cookware
Canned,refrigeratedbiscuitstake2to4
minuteslesstime.
15-20
20-30
20-40
45-55
20-30
45-60
45-60
45-60
10-25
20-30
ShinyCookieSheet
ShinyMctidPmwith
satin-linishbo[mm
CasIIronor GlassPin
ShinyMetalPmwith
satin-finishbottom
ShinyMetalMuffinI%ns
DeepGlassorCustIronCups
MetalorGlassLoafI%ns
M&IlorGlassLoafPans
ShinyOhlongor MuffinPdns
ShinyOblonxor MuffinP~ns
Preheatcastironpanforcrispcrust.
Decreaseabout5minutesformuffinmix.
Orbakeat450”F.for25minutes,thenat
350”F.for 10to 15minutes.
Darkmetalor glassgivesdeepest
browning.
Forthinrolls,ShelfB maybeused.
Forthinrolls,ShelfBmaybeused.
U!smu
_.A-
—.
-
-
Ktrm-
-=
-
30-55
10-15
45-60
Twopiecepanisconvenient.
Linepanwithwaxedpaper.
AluminumTubePin
MetalJcliyRollPm
MetalorCeramicPdn
MetalorCeramicPdn
ShinyMet:ilMuffinPdns
MetalorGlassLoafor
TubePdn
ShinyMetalPdnwith
satin-finishbottom
ShinyMetalPdnwith
satin-finishbottom
MetalorGlassLoafPans
Angellood
Jellyroll
Srwwc
Cakes
Bumltcakes
Cupcakes
Fruit~iikes
Layer
Layer,chocoltite
Loaf
Cookies
Brownies
Drop
Refrigerator
Rolledor sliced
Fruits,
OtherDesserts
Bakedapples
Custard
Puddings,rice
andcustard
325°-3500
350°-3750
275°-300”
350°-3750
350°-3750
350°
325°-3500
350°-4000
400°-4250
375°-4000
45-65
20-25
2-4hrs.
20-35
25-30
40-60
Paperlinersproducemoremoistcrusts.
Usc300”F.and ShelfBforsmallor
individualcakes.
Ifbakingfourlayersuse
shelvesBandD.
Barcookiesfrommixusesametime.
UseShelfCandincreasetemperature
25to50”F,formorebrowning.
B,C
B,C
B,C
B,C
A, B,C
B
B
25-35
10-20
6-12
7-12
MetalorGlassP~ns
CookieSheet
CookieSheet
CookieSheet
350°-4000
300°-3500
325°
30-60
30-60
50-90
Glassor MetalPans
GlassCustardCupsor
Casserole(setinpanof hotwater)
GlassCustardCupsor
Casserole
FoilPanonCookieSheet
Spreadtocrustedges
GlassorSatin-finishMetalI%
GlassorSatin-finishMetalPan
GlassorSatin-finishMetalPan
Reducetemperatureto 300”F.forlarge
custard,
Cookbreadorrice puddingwithcustard
base80to90 minutes.
Pies
Frozen
Meringue
Onecrust
Twocrust
45-70
15-25
45-60
40-60
12-16
Largepiesuse400”F.andincreasetime.
Toquicklybrownmeringueuse400°F.for
9to 11minutes.
Custardfillingsrequirelowertemperature,
longertime.
A
B,C
A, B
B
B
400°-4250
325”-350°
400°-4250
400°-4250
450°
F%stryshell
Miscellaneous
Bakedpotatoes
Scallopeddishes
souffles
325°-4000
325°-3750
300°-3500
60-90
30-60
30-75
Increasetimeforlargeamountorsize.Seton OvenShelf
GlassorMetalPan
GlassPan
A, B,C
A, B,C
B
13
Page 14

Roasting
Misting iscookingbydry heat.
Tendermeator poultrycunbe
roasteduncoveredinyouroven.
Roastingtemperatures,which
shouldbeIowandsteady,keep
spa~tcringto a minimum. When
roasting,itis notnecessarytosear.
bas{c.cover,or addwatertoyour
meat.Roastingis easy.justfollow
thesesteps:
Step L Positionovenshelfat
secondfrombottmn position(B)
forsmallsizeroast(3to5 lbs.)and
atbottomposition(A)for larger
roasts.
RoastingGuide
Step2: Checkweigh{ofroast.
Placemeatfiat-side-upor poultry
breast-side-upon roastingriickina
shallowpan. Themeltingfatwill
* bastethemeat.Selecta panas
closeto thesizeofmeataspossible.
(Broilerpanwithrackisagood
panforthis.)
Step3:PushBAKEbuttonand
turnSETknobuntildesired
temperatureisdisplayed.Checkthe
RoastingGuidefortemperaturesand
approximatecookingtimes.
Step4: Most
nlCtNs continueto
cookslightlywhiIest:mdingafter
~.. .
beingrcmow.ifromtheoven.For -Q-
rtircor mediuminternaldoneness,
youmaywishtoremovemeatfrom
theovenjust beforeit isdoneifit is
to
Stiil}d 10WI20minuteswhileyou
makegravyorattendtootherfbods.
If nostandingisplanned,cook
meattosuggestedtemperature.
FrozenRoasts
Frozenroastsofbeef,pork,
lamb,etc.,can bestartedwithout
thawing,butallow15to25minutes
perpoundadditionaltime(15
minutesperpoundforroasts under
5 pounds,moretimeforlarger
roasts).
Thawmostfrozenpoultrybefore
roastingtoensureevendoneness.
Somecommercialfrozenpoultry
canbecookedsuccessfullywithout
thawing.Followdirectionsgiven
onpacker’slabel.
Oven
ApproximateRoastingTime Internal
TYW
Temperature
Doneness inMinutesperPound
.
Temperature‘F
Meat
3to5-lbs. 6to8-lbs.
Tendercuts;rib, highquality
325°
Rare: 24-33 i8-22 130°-1400
sirlointip,rumpor topround*
Medium: 35-39 22-29 150°-160°
WellDone: 40-45 30-35
170°-185°
Lamblegorbone-inshoulder*
325°
Rare: 21-25 20-23
130°-140°
Medium: 25-30 24-28 150”-160°
WellDone:
30-35
28-33 170°-185°
Vealshoulder,legor loin* 325°
WellDone: 35-45 30-40
170°-180°
F%rkloin,ribor shoulder*
325° Well Done: 35-45 30-40
170°-i80°
Ham,pre-cooked
325°
ToWarm: 17-20minutesperlb.(anyweight) 115°-1250
Under10Ibs. 10to15-lbs.
Ham,raw
325°
WellDone:
27-35
24-27
170°
*Forbonelessrolledroastsover6-inches
thick,add5to 10minutesperlb.totimes
givenabove.
l%ultry
3to5-lbs.
Over5lbs.
Chickenor Duck
325°
WellDone:
35-40 30-35 185°-190°
Chickenpieces
375°
WellDone:
30-35
185°-190°
10to15-lbs. Over15ibs. Inthigh:
Turkey
325°
WellDone: 18-25
15-20 185°-190°
14
Page 15

BroilingT@
@Usetongstoturnmeatover—
Broiling is cooking foocibydirect
-- h:~’]tfrom
a~ovc thefbod.Your
...___.
—====range
is designedforwaist-high
~I!Meaksandchopsshouldbeat
least1 inchthickforbestbroiling
results.Panbroilthinnerones.
piercedmeatlosesjuices,
BroilingGuide
broiling.Aspeciallydesigned
roilerpanand
~dc~ allows
dripping fattodrainawayfromthe
foodsandbe keptawayfromthe
highheat of thegasflame.
l’%~ovendoorshouldbeclosed
duringbroiling.
HowtoBroil
L
Ifmeathasfator gristlenearthe
edge,cutverticalslashesthroughit
about2inchesapart, butdon’tcut
intomeat.Werecommendthatyou
trimfatto preventexcessive
smoking,leavinga layerabout
l/8-inchthick.
2. Arrangefoodonrackand
positionthebroilerpanon the
appropriateshelfintheoven.
Placingfoodclosertoflame
increasesexteriorbrowningof
food,butalso increasesspattering
andthepossibilityof fatsandmeat
juices igniting.
M or
LO
3roii
MSide
llrne,
\linutes
Quantity
andlor
Thickness
%-lb.(about8
thinslices)
Shelf
Fosition
Comments
Food
Bacon
5
8-9
Arrangeinsinglelayer.
HI D
spaceevenly.Upto9
pattiestakeaboutsame
lime.
GroundBeef
WellDone
l-lb.(4patties)
%to %-in.thick
HI
6-7D
BeefSteaks
Rare
Medium
Well Done
HI
Steakslessthanl-inch
cookthroughbefore
browning.Panfryingis
recommended.
SlashFit.
l-in.thick
(1to 1%-lbs.)
lYz-in.thick
(2to2fi-lbs.)
D
D
D
D
D
D
9
12-13
13
10
15
25
7
6-7
8-9
6-7
9-12
16-18
18-20
Rare
Medium
WellDone
Reducetimesabout5to 10
minutespersidefor
cut-upchicken.Brush
eachsidewithmelted
butter.Broilwithskinside
downfirstandbroilwith
doorclosed.
28-30
Chicken(450°)
1whole
(2to2k-lbs.),
splitlengthwise
2-4slices
1pkg.(2)
2-split
LO
HI
HI
B
BakeryProducts
Bread(Toast)or
ToasterPastries
EnglishMuffins
Spaceevenly.Place
Englishmuffmscut-side-up
andbrushwithbutterif
desired.
D
D
2-3
3-4
3-16
‘/2-1
3. Closeth~ovendoor.
4. PresstheBROILbuttonandturn
theSETknobuntil yourchoice
ofI-HBROILor LOBROILis
displayed.Note:Chickenandham
arebroiledatLOBROILinorder
tocookfoodthroughwithout
over-browningit.
5. Turnmostfoodsonceduring
cooking(theexceptionis thinfillets
offish;oiloneside,placethatside
downonbroilerrackandcookwithout
turninguntil done).Timefoodsfor
aboutone-halfthetotalcooking
time,turnfood,thencontinueto
cookto preferreddoneness.
6. PushCANCELbutton. ,
Removebroilerpanfromovenand
servefoodimmediately.Leavepan
outsidetheovento cool.
Cutthroughbackofshell.
spreadopen.Brushwith
meltedbutterbeforeand
afterhalftime.
Handleandturnvery
carefully.Brushwith
lemonbutterbeforeand
duringcookingifdesired.
Preheatbroilertoincrease
brownin~.
c
Do not
turn
over.
LobsterTails
(6to8-02.each)
2-4
l-lb.filletsMto
IA-in.thick
Fish
HI
LO
HI
HI
D 5
8
5
l-in.thick
c
8 Increasetimes5-10
minutesper sidefor
1%-inchthickorhome
cured.
Ekrnslices(4507
Precooked
Slashfat.
PorkChops
Well Done
2 (Yzin.)
2 (1-in,thick),
about! lb.
D
c
10-12
12-13
4-5
8-9
LambChops
Medium
Well Done
8
10
10
17
4-7
10
4-6
12-14
Slashfat.
2(1in.)
about10to12-02
D
D
D
c
F
2(1Y2 in.),
about1lb.
l-lb. pkg.(10)
Medium
Well Done
Wieners,
similarpreeooked
sausages,
bratwurst
Ifdesired,splitsausages
inhalflengthwise;cut into
5to6-inchpieces.
1-2HI D 6
15
Page 16

careandcleaning
Propercare andcleaningare
importantso your rangewillgive
youefficientandsatisfactory
service.Followthesedirections
carefullyincaringfor ittohelp
assuresafeandpropermaintenance.
BESUREELECTRICPOWER
1SOFFBEFORECLEANING
ANYPARTOFTHERANGE.
It’sagoodideato wipethecontrol
panelcleanaftereachuseofthe
oven.Foramorethoroughcleaning,
theknobscanberemovedbypulling
themofftheknobstems.Ifknobs
areremoved,donotallowwaterto
rundowntheinsidesurfaceofthe
glasswhilecleaning.Cleanwith
mildsoapand water,rinsewith
cleanwaterandpolishdry with
a softcloth.
Donotuseabrasivecleansers,
strongliquidcleanersor oven
cleanersonthecontrolpanel—
theywilldamage the finish.
BrushedChmm Finish
Cleanthe brushedchrometop
withwarm,soapywateror anallpurposehouseholdcleanerand
immediatelydry itwitha clean,
softcloth.Takecaretodrythe
surfacefollowingthe
●’grain.”To
helppreventfingermarksafter
cleaning,spreadathinfilmofbaby
oilonthesurface.Wipeaway
excessoilwitha clean,softcloth.
Agoodappliancewaxwillhelp
protectthisfinish.
Bwner GE%3tes
Porcelainenameledburnergrates ~
shouldbewashedregularlyand,of
course,afterspiliovers.Wash them
inhot, soapywaterandrinsewith
cleanwater.Dry thegrateswitha
cloth—don’tputthembackon the
rimgewet.Whenreplacingthe
grates,besurethey’reseated
properlyovertheburners.
Togetrid of burned-onfood,soak
thegratesina slightlydilutedliquid
cleanseror usea plasticor nylon
scouringpad.
Althoughthey’redurable,the
grateswillgraduallylosetheir
shine,regardlessofthebestcare
youcan givethem.Thisisdueto
theircontinualexposuretohigh
temperatures.
Donotopemtea burnerforan
extendedperiodoftimewithout
cookwareon thegrate.Thefinish
onthegratemaychipwithout
cookwareto absorbtheheat.
16
Page 17

-- Theholesin the burners must be
~ keptclean al
alltimesfor proper
ignitionand an even, unhampered
flame.
Cleanthe burners routinely and
especially after bad spillovers
which could clog these holes.
Burners lift out for cleaning.
Note:Ascrewholdseachofthe
burnersinplaceto keepthemfrom
wobblingaroundduringshipment.
Removeanddiscardthe shipping
screw.
Burner
Gas Valve
Orifice
Support
Tab
Air
Shutter
\\
i-
Toremovalburners:
1. Graspburnerheadandtiltit
totherightto releasethetwotabs
fromslotsin theburner support.
2. Lifttheendofthe burner
assembly,thenpullawayfromthe
frontoftherangeto freetheair
shutterfromthegasvalveorifice.
Toremoveburned-onfood,soak
/# ~< BurnerSupport
Toreplaceburners:
1. Sliptheair shutteroverthegas
valveorifice.
2. Lowertheburnerassembly
andhookthetabsin theslotsinthe
burnersupport.
3. Besurebothtabsare intheir
slots,thatthe burnersitsleveland
straight,ancIthattheflashtube
formsastraightlinefromthe
ignitertotheburner.
DripPans
Removethegratesandliftoutthe
chromedrippans.Washthemin
hot,soapywater.Rinsethemwith
clean,hotwaterandpolishthem
dry withacloth. Neveruse
abrasivecleaneror steelwool—
they’llscratchthesurface.Instead,
soakthedrip pansforabout20
minutesinslightlydilutedliquid
cleanseror mildsolutionof
ammoniaandwater(1/2cupof
ammoniato onegallonofwater).
Aftersoaking,washthemin hot,
soapywater.Rinsewithcleanwater
andpolishwitha clean,softcloth.
Donotattempttocleanthedrip
pansintheself-cleaningoven.
Whenreplacingdrip pans,the
notchontherearpanandthenotch
onthefrontpanshouldmeetin the
middle.
.
Lift-UpCooktop
Cleantheareaunderthecooktop
often’.Built-upsoil, especially
grease,maycatchfire.
theburnerin a solutionof ~product
usedforcleaningtheinsideofcoffee
makers.Soaktheburnerfor20 to
30minutes.If thefooddoesn’t
rinseoffcompletely,scrub itwith
soapandwateror a mildabrasive
cleanserand a dampcloth.
Donotattempttocleanburnersin
anautomaticdishwasher.Loosened
foodsoilcan clogburner holes,
andthecausticactionofthe
dishwasherdetergentcandamage
theburnerheads.
Beforeputtingtheburnerback,dry
itthoroughlybysettingit ina warm
ovenfor 30 minutes.
17
Tomakecleaningeasier,theentire
cooktopmaybeliftedup and
supportedintheup position.
Besureallburnersareturnedoff
beforeraisingthecooktop.Then
removethegratesanddrippans,
graspthetwofrontburnerwells
andliftup. Dualsupportrodswill
holdthecooktopupwhileyou
cleanunderneathit.
Aftercleaningunderthecooktop
withhot, mildsoapywateranda
cleancloth,lowerthecooktop.Be
carefulnottopinchyourfingers.
——
-
-
——
—.
—..
–
-
-
-
--
-
-
w=- .
Ei#&.=
—.
Page 18

Theoven bottomcanbe removed
tomakecleaningeasierafterheavy
spilloversandto enableyoutoreach
theovenburner.
—..———-----———-----------
‘h remove:
L Slidethetabat thecenter front
oftheovenbottomtotheleft,
2. Lifttheovenbottomup andout.
Toreplace:
1. Sliptheovenbottomintothe
ovensothetabsin therearofthe
ovenbottomfitintotheslotsinthe
ovenback.
2. Lowerthe frontoftheoven
bottomintoplaceandslide the
fronttabtotherightto lock the
ovenbottomintoplace.
The ovenbottomhasa porcelain
enamelfinish.Tomakecleaning
easier,protecttheovenbottom
fromexcessivespillovers.Thisis
particularlyimportantwhenbaking
a fruitpieor otherfoodswithhigh
acidcontent.Hotfruitfillingsor
foodsthatareacidincontentsuch
asmilk,tomatoor sauerkraut,and
sauceswithvinegaror lemonjuice,
maycausepittinganddamageto
theporcelainenamelsurface.
Toprotecttheovenbottomsurface,
placea pieceofaluminumfoil
slightlylargerthanthebakingdish
or a smallcookiesheetona lower‘
shelfor,underthebakingdishto
catchanyboilovers.It should,not
completelycovertheshelfasthis
wouldcauseunevenheat‘inthe
oven-.Aluminumfoilshouldnotbe’
placedon theovenbottom. ‘
If a spilloverdoesoccuronthe .
ovenbottomallowtheoven tocool
first. Youcan cleanthebottomwith
soapandwater,a-mildabrasive
cleanser,soap-filledabrasive’pads
or usethe self-cleancycle.
—
.—
Lift”off ovenDoor
-ara&-
Theovendoor isremovableto
-w-
maketheinteriormoreaccessible
duringreplacementofthelampbulb.
—
Toremovethedobr,openita few
inchestothespecialstopposition
thatwillholdthedooropen. Grasp
firmlyoneachsideand liftthedoor
straightupandoffthehinges.
Note:Becarefulnottoplacehands
between.thespringhingeandthe
ovendoorframeasthehinge could
snapbackandpinchfingers.
Toreplacethedoor,makesurethe
hinges
are in the “out” pc)sitkm.
Position the slots in the bottom of
the door squarely over”thehinges.
Then lower the door slowly and
evenly’over both hinges at the same
time.
If hingessnapback,against
theovenframe,,pullthembackout.
..
—
---
Page 19

-~ owl shelves
=-~~vcn shelvesmaybe cleanedwith
a mild abr:~sivccleanser following
xmufwturer’s directions. After
leaning.rinsetheshelveswith
cleanwater
and dry with a clean
cloth.
T(Iwmoveheavy.burned-on soil.
soapymetai pads maybe
used
tibllowingmanufacturer’sdirections.
Afterscrubbing,washwithsoapy
wa[cr,rinseanddry.
Broiler Pan & E&k
Afterbroiling,removethebroiler
rackandcarefullypouroffthe
grease.Washandrinsethepanand
rackinhot, soapywater.
If foodhasburnedon, sprinkle
therackwhilehotwithdetergent
andcoverwithwetpapertowelsor
adishcloth.Thatway,burned-on
foodswillsoakloosewhile the
mealisbeingserved.
Donotstorea soiledbroilerpan
andrackin the
oven. Do not clean
inself-cleaningoven.
ovenLightBulb
Thelightbulbis locatedinthe
upper rightcorneroftheoven.
Beforereplacingthebulb,
disconnectelectricpowertothe
rangeatthemainfuseorcircuit
breakerpanelor unplugtherange
fromtheelectricoutlet.Letthe
bulbcoolcompletelybefore
removingit. Do nottoucha hot
bulbwitha dampcloth.If you
do.thebulbwillbreak.
Toremove:
~Removethe3 screwsinthelamp
cover.
@Detachlampcoverandremove
bulb.
Toreplace:
oPut ina new40-wattappliance
bulb.(Note:A40-wattappliance
bulbis smallerthana standard
40-watthouseholdbulb.)
~Installlampcover.Replace3
screwsandtighten,makingsure
coverfitsflushwithovenwall.
~Reconnectelectricalpowerto
therange.
——
—.
-
-
——
-
~-.-—.
—.
—.
-
-
-
---
.——
-—
Page 20

OpemtingtheSelf-CleaningOven
ProgrammedCIeaning‘l%m2:
3%hmu’-s
hpare the oven Before
setting the Controk
Therangemustbe completelycool
inorderto settheself-cleancycle.
step 1:
Removethebroilerpan, broiler
rack,allcookwareandany
aluminumfoilfromtheoven.
(Ovenshelvesmaybeleftinoven.
Note:Shelveswilldiscolorafier
theself-cleancycle.)
step 2:
Removetheovenbottompanel(see
page18)ifitis excessivelysoiled.
Cleanitandputitbackin theoven.
Toomuchsoilon ovenbottommay
causesmokingduringthecleaning
cycle.Thebottommustbeinplace
duringtheself-cleancycle.
Step3:
Cleanspattersor soilon theoven
frontframe(A), underthefront
edgeofthecooktop,thedoorliner
outsidethe door gasketandthe
frontedgeoftheovencavity(about
1“intotheoven).Usedetergent
andhotwaterwitha soap-filled
steelwoolpad, thenrinse wellwith
avinegarand watermixture.This
willhelppreventa brownresidue
fromformingwhentheovenis
heated.Bufftheseareas witha
dry cloth.
Do notletwaterrun down through
openingsin thetopofthe door(B).
Cleanthedoorgasket(C)usinga
cleansponge[osoakthesoiled area
withhydrogenperoxicic.Repeated
soakingmaybeneededdepending
ontheamountofsoil.Frequent
cleaningwillpreventexcessivesoil
buildup.Do notrubthedoor
gasket–the fiberglassmaterialof
thegaskethasanextremelylow
resistanceto abrasion.An intact
andwell-fittingovendoorgasketis
essentialforenergy-efficientoven
operationandgoodbakingresults.
Ifyounoticethegasketbecoming
worn,frayedordamagedinany
wayor if it hasbecomedisplaced
onthedoor,youshouldreplaceit.
Makesuretheovenlightbulbcover
(D)isinplace.
m
cP-
A’
/ =
,
1.
p“
1$
. ——
—
II
‘-- A
IF-
C
w--”----”~”
—-——.-.......——--..—
A. OvenFrontFrame
B. OpeningsinDoor
C OvenDoorGasket
D. OvenLightBulbCover
Step4:
Closetheovendoorandmake
suretheovenlightisoff.
20
~
CM-mmdrippansfromthetop
d’yourrangeshouldmwr be
cleanedintheself-cleaningoven.
Ovenshelvesmaybecleanedinthe
self-cleaning oven. However, they
will darken, lose their luster and
becoinc hard to slide. Wipethe
shelf supports withcooking oil
after self-cleaning to make shelves
slide more easily.
Donotusecommercialoven
cleanersorovenprotectorsin
orneartheself-cleaningoven.
Acombinationofanyof these
productsplusthehighclean-cycle
temperaturemaydamagethe
porcelainfinishoftheoven.
Important
Theovendoormustbeclosed
andall controlsmustbeset
correctlyforthecleancycleto
workproperly.Tohelpyou
understandhowthecleancycle
works,the stagesofthecycle
are notedbelow.
1.
You setthecontrols.
2. Thewords“CLEANTIME”
aredisplayed.TurnSETknob
until 3:30 appears.Theoven
beginsto heat,thedoor locks
automaticallyandthe word
“LOCK” isdisplayed.
If theovendoorisnotclosed,
theword“DOOR”isdisplayed
andtheovenbeepscontinuously.
Closethedoor,touchCANCEL
andbeginagain.
3. Whenthe3
Y2 hourclean
cycleisover,theword
“CLEAN” goesoutand the
ovenbeginstocool.
4. Whentheoventemperature
hasfallenbelowthelocking
temperature(about20-30
minutesaftertheword
“CLEAN” goesoutat theend
ofthecleancycle),theword
“LOCK” goesoutandthe
doorcan beopened.
—
Wsi=’ ....
—
Page 21

settheovenforcleaning
Therangemustbecompletelycool
inorderto settheself-cleancycle.
L PushtheCLEANbutton.
2. TurnSETknobintheclockwise
directionabout1/2turn. Thedisplay
willshow“3:30~’
Thewords“CLEANTIME” will
bedisplayedon theleft. Within20
seconds,thewords“CLEAN
LOCK”willbedisplayedonthe
right.
Note:Youcanfindoutwhenthe
-clean cyclewillbe finishedby
1‘:.-”:theSTOPTIMEbutton.
---.,.,,.-
——.....
‘Qasw-
Theword“DOOR” isdisplayed
henyoutry to seta cleancycle
iththe door open or when the
oventemperature is too high.
To SetaDelayedStart
1.
PushS’IOPTIME button.
2. TurnSETknobtotimeofday
whenyouwishcleaningtobe
completed(mustbe morethan
3%hourslaterthancurrenttime
ofday).
3. PushtheCLEANbutton.
4. TurnSETknobintheclockwise
directionabout1/2turn.
Thewords“DELAYCLEAN”will
beon inthedisplayuntiltheclean
cyclestarts.Afterthecleancycle
starts,theword“CLEAN”willbe
oninthedisplay.
Note:Duringadelayedself-clean
operationyoucanfindoutwhen
theoventurnson bypushingand
hoMing~heCLEANbutton.
lb stopaclean Cyck
1. PresstheCANCELbutton.
2. Waituntiltheovenhascooled
belowlockingtemperature(about
20-30minutes)andtheword
“LOCK”isoff inthe display.
Youwillnotbeabletoopenthe
doorrightawayunlesstheoven
temperatureisat a safelevel.If
youcannotopentheovendoor
immediatelyaftertheword
“LOCK”goesoff, waitone
minuteandtry again.
~~te~
SeIf-Cleaning
1. Whena cleancycleisfinished,
theword“CLEAN” willbeoffin
thedisplay.
2. Wait untilthe ovenhas cooled
belowlockingtemperature(about
20-30minutes)andtheword
“LOCK” is offinthedisplay.
Youwillnotbe ableto openthe
doorunlessthe oven.temperature
isat a safelevel.Ifyoucannot open
theovendoorimmediatelyafterthe
word“LOCK” goesoff, waitabout
oneminuteand tryagain.
Youmaynoticesomewhiteash
intheoven.Just wipeitup with
adampcloth.
If whitespotsremain,removethem
witha soap-filledsteelwool pad.
Besureto rinse thoroughlywitha
vinegarandwatermixture.These
depositsareusuallya saltresidue
thatcannotbe removedbythe
cleancycle.
If the ovenis notcleanafterone
cleancycle,repeatthe cycle.
w..
——
——
~
—.
—.
-
-
-
~
~—
——
~––----.—.
—. ——
—.
—
-
-
-.
-
-
&E.- Y
-- =
21
Page 22

QuestiQENandAmwem
Q.If myovenclockis not
Wdiingy an I stillself-clean
myoven?
A.No. YourAutomaticOven
Timerusestherangeclockto help
stm-tandstopyourself-cleaning
cycle.
Q. Can 1use commercialoven
cleanersonanypartof my
self-cleaningoven?
.4. Nocleanemor coatingsshould
beusedaroundanypartofthis
oven.If youdo usethemanddo not
wipethe ovenabsolutelyclean, the
residuecan scar theovensurface
anddamagemetalpartsthenext
timetheovenis automatically
cleaned.
Q. CanI cleantheWovenGasket
aroundtheovendoor?
A. Yes,butcarefully,andonly
withaclean spongeto soakthe
soiledarea withhydrogenperoxide.
Seepage20.
Q.WhatshouldIdo if excessive
smokingoccursduringcleaning?
A. This is causedbyexcessivesoil.
PresstheCANCELbutton.Open
windowsto rid roomof smoke.
Waituntilthe ovenhas cooled
[about20-30minutes)andthe word
“LOCK”is offinthe dispiay.Wipe
upthe excesssoilaridresetthe
cleancycle.
Q. Is the “crackling”soundI
hearduringcleaningnormal?
A. Yes.~s isthesoundofthemetal
heatingandcoolingduringboththe
cookingandcleaningfhnctions.
Q.Shouldtherebeanyodor
duringthecleaning?
A.Yes,theremaybe a slightodor
duringthefirst fewcleanings.
Failuretowipeoutexcessivesoil
mightalsocausea strongodor
whencleaning.
Q. Whatcausesthehair-like
linesontheenameledsurface’of
myoven?
A.Thisis a normalcondition,
resultingfromheatingandcooling
duringcleaning.Theselinesdo not
affecthowyourovenperforms.
Q. WhydoI haveashleftinmy
ovenaftercleaning?
A. Sometypesof soilwillleave
a depositwhichisash. It can be
removedwithadampspongeor
cloth.
Q. Myovenshelvesdo notslide
easily.Whatisthematter?
A. Aftermanycleanings,oven
shelvesmaybecomeso cleanthey
do notslideeasily.If youwish
shelvestoslidemoreeasily,
dampenfingerswitha small
amountofcookingoiland rub
lightlyoversidesof shelfwhere
theycontactshelfsupports.
Q. Myovenshelveshavebecome
grayafterthe self-cleancycle.Is
thisnormal?
A.Yes.Afterthe self-cleancycle,
theshelvesmaylosesomeluster
anddiscolorto a deepgraycolor.
22
‘+=aw-
Page 23

I
L’ontrolKnobs
OutsideGlassFinish
Jletai, including
SideTrims,
TrimStrips and
BrushedChrome
Cooktop
PorcdainEnamel
Surface*
including
OvenFrame,
InsideOven Door
andRemovable
OvenBottom
‘ (Men Gasket
r
Shelves
Chron~e-P1ated
DripPans
BurnerGrates
Aluminum
Surface Burners
?tlA’I’ERIALS TOUSE
* SoapandWdr
@Soap-FilledScouringPJd
~ PlasticScouringF%d
oi%fildSoapandWakr
e SoapandWater
e SoupandWater
* P~pcrTowel
~DryCloth
~SoapandWmr
eSoapandWdtcr
@Soapand Wdtcr
@Soapand Water
9 Stiff-BristledBrush
~ Soap-FiIledScouringPad
(Noiv-rnctallic)
~SoapandWater
@Soap-FilledScouringPad
(Non-metallic)
~SolutionforCleaning
InsideofCoffeeMakers
*SoapandWater
@MildAbrasiveCleanser
0DampCloth
GENERALDIRECTIONS
Drainfat.coolpanandrick slightly.(Donotletsoiledpan andriickstandin
oventocool.)Sprinkledetergentonrackandpan. Fillpanwithwarmwaterand
spreadclothor papertoweloverreck.Letpanandrackstandfora fewminutes.
Wwih;scourif necessary.Rinseanddry.OPTION:Cleanpanandrackin
dishwasher.DONOTCLEANINSELF-CLEANINGOVEN.
Pulloffknobs.Wwhgentlybut do notsoak.Dry andreturncontrolstorange.
S%shall glasswithclothdampenedin soapywater.Rinseandpolishwithadry
cloth.Ifknobsare removed.do notallowwaterto rundowninsidesurfaceof
glasswhilecleaning.
Wash.rinse.andthenpolishwitha drycloth.DONOTUSEsteelwool,
abrmives.ammonia.acids.or commercialovencleanerswhichmaydamage
thefinish.
Avoidcleaningpowdersor harshabrasiveswhichmayscratchtheenamel.
Ifacidsshouldspillon therangewhileit ishot,useadrypapertowelorcloth
towipeuprightaway.Whenthe surfacehascooled.washandrinse.
Forotherspills.suchas fatsmatterings.etc., wmhwithsoapandwaterwhen
cooledandthenrinse.Polishwithadry cloth.
Soakwithhydrogenperoxide.Frequentsoakinghelpspreventsoilbuild-up.
Donotrub.Seeself-cleansectionformoreinformation.
Coolbeforecleaning.Frequentwipingwithmildsoapandwaterwillprolong
thetimebetweenmajorcleanings.Besureto rinsethoroughly.
Shelvescanbesoakedindishwasheror cleanedbyhand,usingsoapandwater.
Rinsethoroughlyto removeanysoapaftercleaning.Shelvesmayalsobe
cleaneciinself-cleaningoven,butwilllosesomelusteranddiscolor.
Cleanasdescribedbeloworindishwasher,DO NOI’ CLEANINSELF-
CLEANINGOVENastheywilldiscolor.Wipeallchromedrippansaftereach
cookingsounnoticedspatterwilinotburnonnexttimeyoucook.Toremove
burned-onspatters,useanyorallcleaningmaterialsmentioned.Rublightly
withscouringpadtopreventscratchingofthe surface.
Liftoutwhencool.Soak5-10minutesifdesiredin warmsolutionofdishwasher
detergent.Scourwithmaterialsmentionedheretoremoveburned-onfood
particles.DO N6YI’CLEANIN SELF-CLEANINGOVEN.
Wipeoff burnerheads.Ifheavyspilloveroccurs,removeburnersfromrange
(seepage17).Fillanon-aluminumpanwithwatertocovertheburnerhead.
Boilburnerheaddownina solutionofhotwaterandproductforcleaninginside
of coffeemakers,suchasDip-Itbrand.Removeburnerand rinse.Wipeaway
any remainingsoilwitha clothor softbrush.Drainoutwateranddryburnersin
awarmovenfor30minutesbeforereturningthemtotherange.DONCYI’CLEAN
INSELF-CLEANINGOVENOR IN DISHWASHER.Donot useall-
purposecleaners,ammonia,powdercleansersor ovencleaners-they can
scratchordiscoloraluminum.
-Spillageofmarinades,fruitjuices,andbastingmaterialscontainingacidsmaycausediscoloration.Spilloversshouldbewipedupimmediately,with
--’ ~’&eb;ingtakentonottout-hanyhotportionoftheoven.Whenthesurfaceiscool, cleanandrinse;
23
Page 24

MinorAdjwtmenkYoucanMake
Stn-fwx?Bmmer
Air
Adjwtment Shutters
Anair adjustmentshutterforeach
surfaceburnerregulatestheflowof
airtothetlame.
Whentherightamountofair
flowsintotheburner,theflame
willbesteady,relativelyquietand
haveapproximately3/4”sharpblue
cones.This isusuallythecasewith
factorypresetshuttersettings.
Withtoomuchair,the flamewill
beunsteady,possiblywon’tburnall
thewayaround,andwillbe noisy,
soundinglikeablowtorch.
Withnotenoughair,youwon’tsee
anysharpblueconesin theflame,
youmay see yellow tips, andsoot
mayaccumulateon potsandpans.
Theair adjustmentshuttersseton
thehoodofthevalvesandare
positionedontheburner tubesby
frictionfit.
Toadjusttheflowof airtothe
burners,applyablade-type
screwdriveragainstthefriction-fit
shuttersandpushto rotatethe
shutters,allowingmoreor lessair
intotheburnertubesas needed.
BroilandovenBurner
AirAdjustmentShutters
Airadjustmentshuttersforthe
broilandovenburnersregulatethe
flowofair to theflame.
Theair adjustmentshutterforthe
top(broil)burneris inthecenterof
therearwalloftheoven.
shutter
II I
Theshutterforthebottom(oven)
burneris nearthebackwallbehind
thestoragedrawer.
~> ~
-WA%= ‘-
Toadjusttheflowof airto either
burner,loosenthePhillipshead
screwandrotatetheshutterto
allowmoreor less
air into the
burner tube as needed.
1
I_-_:-.,--- --- --:-.--—------,,
Theflameforthetop(broil)
burnershouldbcstcwiywith
approximately1-inchblue cones
andshouldnotextendoutoverthe
bafficedges.
Todetermineifthebottom(mm)
burnerflameisproper, remove
theovenbottom(SCCptigc18)and
theburnerbaffle.The flwncshouk!
have1/2”to 3/4”blueconeswith no
yellow tipping. Whenthebaftlcis
backinplace,thetlamcwillrcscttlc.
—
Page 25

‘1’0ad,justtcmper:lturw
2. Selectiitcmfwraturcbc(wccn
5(N°F.and5500F.with[hcSIN
knob.
3. Quickly (within twoseconds.
bcfixc(k
BAKEfunctioncncrgizcsj
pushandholdthe BAKEbutton
for
about5 seconds.
The displtiywillshownumber
ofdcgrecs difference bc{wccnthe
original fktory temperature setting
and
thecurrent temperature setting.
Ifthe oventemper-aturchasnever
beenadjusted, the display will
read00.
Zws!m. -—
-
4. Turn theSET knobtoadjust the
tcrnpcraturcin5“F.steps. Youcan
raise it35”F.or lowerit35”F.A
minussign (–) beforethe number
meansthat the ovenwill be cooler
bythedisplayedamountofdegrees.
Ifthe control beepsand flashes,push
theCANCEL buttonand startover.
-
5. When youhavemade thedesired
adjustment, push theCLOCK
buttonto go back tothe time ofday
displayor to useyourovenas you
wouldnormally.
--—
-.—
——
—.
Note:The adjustment described
abovewill notchange the self-clean
temperature.
5
—.
—.
25
Page 26

SURFACEBURNER
KNOBS WILL NOT
~fJ~~
OVEN DOES ?wr
COOKPROPERLY
CX.iXX AND
MINuTE/sEcoND
TIMERDo Nm
WORK
OVEN LIGHT’DOES
NOTCOME ON
OVEN‘vimL NOT
SELF-CLEAN
STRONGODOR
aGasSqq’iy
rm$CormwxedW’i-m.wiled cm.
@Ekmm mt seatedproperlyon bwmx Wpports. ReirMaHthem—seepage17.
=T“turnfrom(XT position,pushtheknobinaridthenturn.
*Makesute thermostatcapillw)ybulbs(locatedinupper portionofov~~J are ~~e~~ely
~~lcl
bythemountingclips,arenottouchingovensides,andarenotcoatedwithanything.
@Aluminumfoilbeingusedimproperlyinoven.
*Ovenventblockedontopofrange.
~ ~ncorrecteaokwarebeingused,Checkeach
cookingsectionforcookwaretips.
@Ovenbottomnotsecurelyseatedinposition.
@ElectronicControlssetincorrectly.Reviewpages10and 11.
@Check commonbaking,roastingandbroilingproblemsonpages12-15.
a Make sure theelectrical ph.qgis plugged intoalive,properiygroundedpoweroutlet.
@Checkforpoweroutage.
@Bulbmaybelooseorburnedout.
@Electricalplugmustbepluggedintoa livepoweroutlet.
~ S’IOPTIME
must lx morethan3%hourslaterthanSTARTTIME.
*Oventemperatureistoohightosetself-cleanoperation.Allowtherangetocoolto
roomtemperature.
*Improperair/gasratioinoven.Adjus{ovenburnerair shutters—seepage24.
Ifymi!need
more help.. .6MI, W free:
service
26
Page 27

—
.. ....—..—
.-,.
e_—.- . .. ,-.
.—.
If YOUJ!$kediservice“.-
NEXT, if you are still not pleased,
write all {hedetails-incluciing
your phone nunlbcr-t~~:
Manager.
Consunler Relations
GE Appliances
Appliance Park
Louisville. Kentucky
40225
FINALLY.if
your problenl is still
not resolved, write:
Major
Appliance
Consumer Action Panel
~o NC~rth~t~cker Drive
Chicago, Illinois
60606
.-....-.
27
Page 28

_————
—
YOURGE~ER~L ELE~~Rl~ R~~GE
WARRANTY
~
J;
Savepiuof of original purchase date such asyour sales slip or cancelled check toestablish warranty period.
WHATs COVERED
FULL ONE-YEARWARRANTY
Forone year from date of original
purchase, we will provide, free of
charge, parts and service labor
in your home to repair or replace
any
part of therange that fails
because of a manufacturing defect.
.
This warranty is extended to
the original purchaser and any
succeeding owner for products
purchased for ordinary home use
in the 48 mainland states, Hawaii
and Washington, D.C.In Alaska the
warranty is the same except that it is
LIMITED because you must payto
ship the product to the service shop
or for the service technician’s travel
costs to your home.
All warranty service will be provided
b,your Factory Service Centers or
by our authorized Customer Care@
servicers during normal working
hours.
Look in the White or YellowPages
of your,telephone directory for
GENERAL ELECTRIC COMPANY,
GENERAL ELECTRIC FACTORY
SERVICE, GENERAL ELECTRICHOTPOINT FACTORYSERVICE or
GENERAL ELECTRIC CUSTOMER
CARE@SERVICE. ~
WHATENOTCowwm “ --vicetrips‘0yourhome‘0
teach you how to usethe product.
Readyour Use and Care material.
Ifyou then haveany questions
about operating the product,
please contact your dealer or our
Consumer Affairs office at the
address below,or call, toll free:
GE Answer Center”
800.626.2000
consumer information service
@Improper installation.
If you have an installation problem,
contact your dealer or installer.
Youare responsible for providing
adequate electrical, gas,exhausting
and other connecting facilities.
o Replacement of house fuses or
resetting of circuit breakers.
@Failure of the product if it i’sused
for other than its intended purpose
or used commercially.
o Damage to product caused
by accident, fire, floods or acts
of God.
WARRANTORISNOTRESPONSIBLE
FOR CONSEQUENTIAL DAMAGES.
Some states do not allow the exclusion or limitation of incidental or consequential damages, so the above limitation or exclusion
may not apply to you. This warranty gives you specific legal rights, and you may also have other rights which vary from stateto state.
Toknow what your legal rights are in your state, consult your local or state consumer affairs office or your state’s Attorney General.
Warrantor: General Electric Company
If further he!p is needed concerning this warranty, write:
Manager—Consumer Affairs, GE Appliances, Louisville, KY 40225
1
~Wg. NO.1(34CH352P224
I
i Pub. NO.49-4992
I IVINLI
07(343301)
2:~.9
JGSFWGEK
 Loading...