

Page 1
—
contents
AluminumFoil
9
Preheating
10
ApplianceRegistration 2
ProblemSolver
18
Baking,BakingGuide
9,10
RepairService
19
Broiling,BroilingGuide 12,13
Roasting,RoastingGuide
11
Careand Cleaning
14-17 SafetyInstructions
2-4
Clock
7 Shelves
6,15
ContinuousCleaningCare 14~
ThermostatAdjustment
16
DoorRemoval
15 Warranty
BackCover
ElectronicControls
7,8
Energy-SavingTips
4
Features 5
light; BulbReplacement
6,15
MinorAdjustmentsYouCanMake16
GEAmwer Centerm
Modeland SerialNumbers 2“
$fl~62E2000
Page 2
Itisintendedtohelpyouoperateand
maintainyour new ovenproperly.
Keepithandyforanswerstoyour
questions.
Ifyoudon’tunderstandsomething
orneedmorehelp,write(include
yourphonenumber):
ConsumerAffairs
GEAppliances
AppliancePark
Louisville.KY40225
writedownthemodel
and serialnumbers.
You’llfindthemona labelonthe
frontframebehindthebroilerdoor.
Seepage5.
Thesenumbersarealsoonthe
ConsumerProductOwnership
RegistrationCardthatcamewith
youroven.Beforesendinginthis
card,pleasewritethesenumbers
here:
Model Number
Serial Number
lJsethesenumbersinany
correspondenceorservicecalls
concerningyouroven.
If you received
a damagedoven.● o
Immediatelycontactthe dealer(or
builder)thatsoldyoutheoven.
savetimeandmoney.
Beforeyou request
service.*e
ChecktheProblemSolveron
page18.Itlistscausesofminor
operaiingproblemsthatyoucan
correctyourself.
FORYOUR SAFETY
Isopenwindows.
2. Don’ttouch
electricalswitches:
4.Immediately call
yourgassupplier=
:Don’t~urnele~tricswitches
onor offpecause sparksmay
ignitethegas. “
IMPORTANT
SAFETY
INSTRUCTIONS
Readal!imtructiom
beforeusingthis
appliance.
SAFETYNmIcE
The”CaliforniaSafeDrinking
WaterandToxicEnforcement
ActrequirestheGovernorof
Californiatopublishalistof
substancesknowntothestate
tocausecancerandrequires
~usinessestowarncustomers
ofpoieniialexposuretosuch
substances.~ .
. .
Gas‘aDDliancescancause
mitio;;xposuretothreeofthese
‘.s,~bstatices,namelybenzene,
‘fotnialdehvdeandsoot,caused
n~cessary.@~~~e
jouroveninstalled
and
properlygroundedbya
qualifiedinstaiier9inaccordance
withtheInstallationInstructions.
Anyadjustmentandserviceshould
beperformedonlybyqualified
gas rangeinstallersOrservice
!
2
Page 3
—
—
e
—
-
—@
oplugyouroveninto
a
U&voltgroundedoutletonly.
Donotremovetheround
groundingprongfrom the plug. If
indoubtaboutthegroundingof
thehomeelectricalsystem,it is
yourpersonalresponsibilityand
obligationtohaveanungrounded
outletreplacedwitha properlygroundedthree-prongoutletin
accordancewiththeNational
ElectricalCode.Donotusean
extensioncordwiththisappliance.
@Besureallpackingmaterials
areremovedfromtheoven
beforeoperatingit,topreventfire
orsmokedamageshouldthe”
packingmaterialignite.
eBesureyouroveniscorrectly
adjustedbyaqualifiedservice
technicianorinstallerforthe
typeofgas(NaturalorLP)on
whichitistobeused.Youroven
canbeconvertedfor useoneither
typeofgas.SeeInstallation
Instructions.
Using
Your Oven
oDon’tleave
childrenaloneor
unattendedwhereanovenis
hotorinoperation.Theycould
beseriouslyburned.
oDon’tallowanyonetoclimb,
standorhangonthedooror
broilercompartment.They
coulddamagetheoven.
e ~~uT’~~: ITEMS OF
INTEREST~ CHILDREN
SHOULDN~ BESTORED
INCABINETSABOVE
ANOVEN–CHILDREN
CLIMBINGONTHEOVEN
TOREACHITEMSCOULD
BESERIOUSLYINJURED.
eNeverwearloosefittingor
hanginggarmentswhileusing
theappliance.Flammable
materialcouldbeignitedif
broughtincontactwithflameor
hotovensurfacesandmaycause
severeburns.
oNeveruseyourappliancefor
warmingorheatingtheroom.
Prolongeduseoftheovenwithout
adequateventilationcanbe
hazardous.
oDonotusewaterongrease
fires.Neverpickupaflaming
pan.Turnoffburner,then
smotherflamingpanbycovering
pancompletelywithwellfitting
lid,cookiesheetorflattray.
Flaminggreaseoutsideapancan
beputoutbycoveringwith
bakingsoda,or ifavailable,a
multi-purposedrychemicalor
foamtypefireextinguisher.
oDonot storefla~mab~e
materialsinanoven.
eDonotletcookinggrease
orotherflammablematerials
accumulateinorneartheoven.
eDonotuseovenforastorage
area.
eWhencookingpork,
follow
thedirectionsexactlyandalways
cookthemeattoaninternal
temperatureofatleast170”F.This
assuresthat,intheremote
possibilitythattrichinamaybe
presentinthemeat,itwillbe
killedandmeatwillbesafetoeat.
eStandawayfromovenwhen
openingovendoor.Thehotair
orsteamwhichescapescan
burnhands,faceand/oreyes.
eDon’theatunopenedfood
containemintheoven.fiessure
couldbuildupandthecontainer
couldburst,causinganinjury.
● Keepovenventducts
unobstructed.
● Keepovenfreefromgrease
buildup.
ePlaceovenshelfindesired
positionwhileoveniscool.
Ifshelvesmustbehandledwhen
hot,donotletpotholdercontact
heatingunitsintheoven.
oPullingoutshelftoshelfstop
isaconvenienceinliftingheavy
foods.Itisalsoaprecaution
againstburnsfromtouching
hotsurfacesofdoororoven
walls.
eWhenusingcookingor
roastingbagsinoven9followthe
manufacturer’sdirections.
eDonotuseyouroventodry
newspapers.Ifoverheated,they
cancatchfire.
-
-
—-
-–
~–
—
—
—
—-
-
—
—
—
—
—-
——
——
—
—
me
—=
v
—
—
Page 4
I
IWIPORTANTSAFETYINSTRUCTIONSI
Emewy-Saviwll
(continued)
@Don9tusealuminumfoil
anyw’hereintheovenexceptas
describedinthisbook.Misuse
couldresultinafirehazardor
damagetotheoven.
~~~e~~]yg]a~~
cookwarethatis
recommendedforuseingas
ovens.
o
Alwaysremovebroilerpan
fromthebroilercompartment
assoonasyoufinishbroiling.
Greaseleftinthepancancatch
fireifovenisusedwithout
removingthegreasefromthe
broilerpan.
@Whenbroiling,ifmeatistoo
closetotheflame9thefatmay
ignite~Trimexcessfattoprevent
excessiveflare-ups.
~Makes~~ebroiler
panis in
place
correctlytoreducethe
possibilityofgreasefires.
@If youshould!
haveagrease
fireinthebroilerpan,turnoff
oven,andkeepbroilerdoorclosed
tocontainfireuntilitburrisout.
Cleanonlyparklistedinthis
UseandCareBook.
IfYouNeedservice
@Read66TheProblemSolver’9
on page18of thisbook.
~Don9tattemptto irepair
orreplace
anypartof your
rangeunless it isspecifically
recommendedinthis book.
All
otherservicingshouldbereferred
toaqualifiedtechnician.
SAW THDE
INSTRUCTIONS
1’
1
?~=w., . ..- ------
nd:ii~~prbxifiatel~
Page 5
-
=–
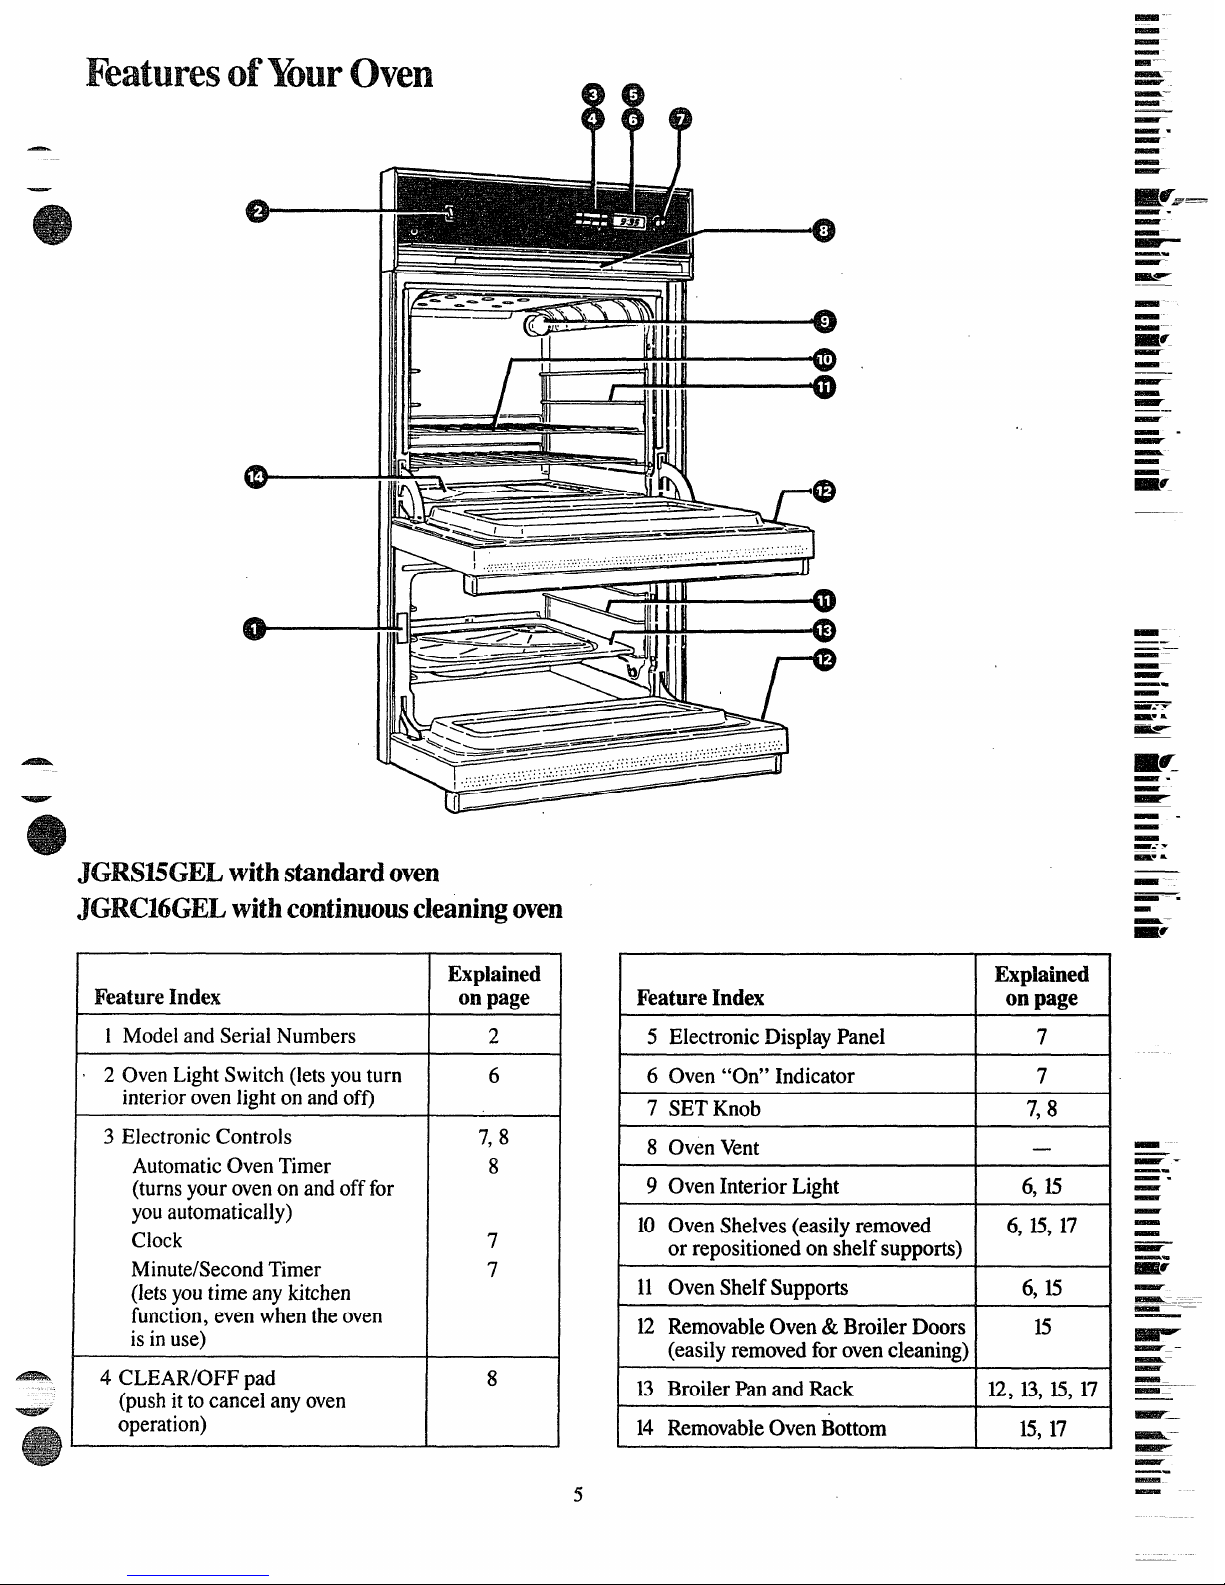
FeaturesofYouroven
——
—=
-
-
—
-
—
—.
—
_.
—.
IIn
Ilu
—.
-
--
JGRS15GELwithstindardoven
JGRC16GELwithContinuowcleaningoven
_-
-.
M
Explained
FeatureIndex
onpage
1 ModelandSerialNumbers
2
‘ 2 OvenLightSwitch(letsyouturn
6
interiorovenlightonandof~
3 ElectronicControls
7,8
AutomaticOvenTimer
8
(turnsyourovenonandofffor
youautomatically)
Clock
,
Minute/SecondTimer
,
(letsyoutimeanykitchen
function,evenwhentheoven
isinuse)
4 CLEAR/OFFpad
8
(pushitto cancelanyoven
operation)
Explained
on
page
FeatureIndex
5 ElectronicDisplayPanel
7
6 Oven“On”Indicator
7
7 SETKnob
7,8
8 OvenVent
~-
—.
—.
—
—
—
—
-
-
—
9 OvenInteriorLight
6, 15
10 OvenShelves(easilyremoved
or repositionedonshelfsupports)
6, 15,17
7
7
11 OvenShelfSupports
6, 15
12 RemovableOven& BroilerDoors
(easilyremovedforovencleaning)
15
13 BroilerPanandRack
12,13,15, 17
14 RemovableOven~ottom
15,17
Page 6
usingYouroven
AutomaticIgnition
shelfPositions
Theovenburnerandbroilburner
Theovenhasfourshelfsupports—
arelightedbyelectricignition.
A (bottom),B,CandD(top).Shelf
Tolighteitherburner,pushthe
positionsforcookingaresuggested
onBakingandRoastingpages.
Dadforthedesiredfunctionand
turntheSETknob untilthedesired
temperatureisdisplayed.The
burnershouldignitewithin60
seconds.
Poweroutage?
Theovenandbroilerburnerswill
notlightintheeventofanelectrical
poweroutage.Donotattemptto
lightthemmanuallywitha match.
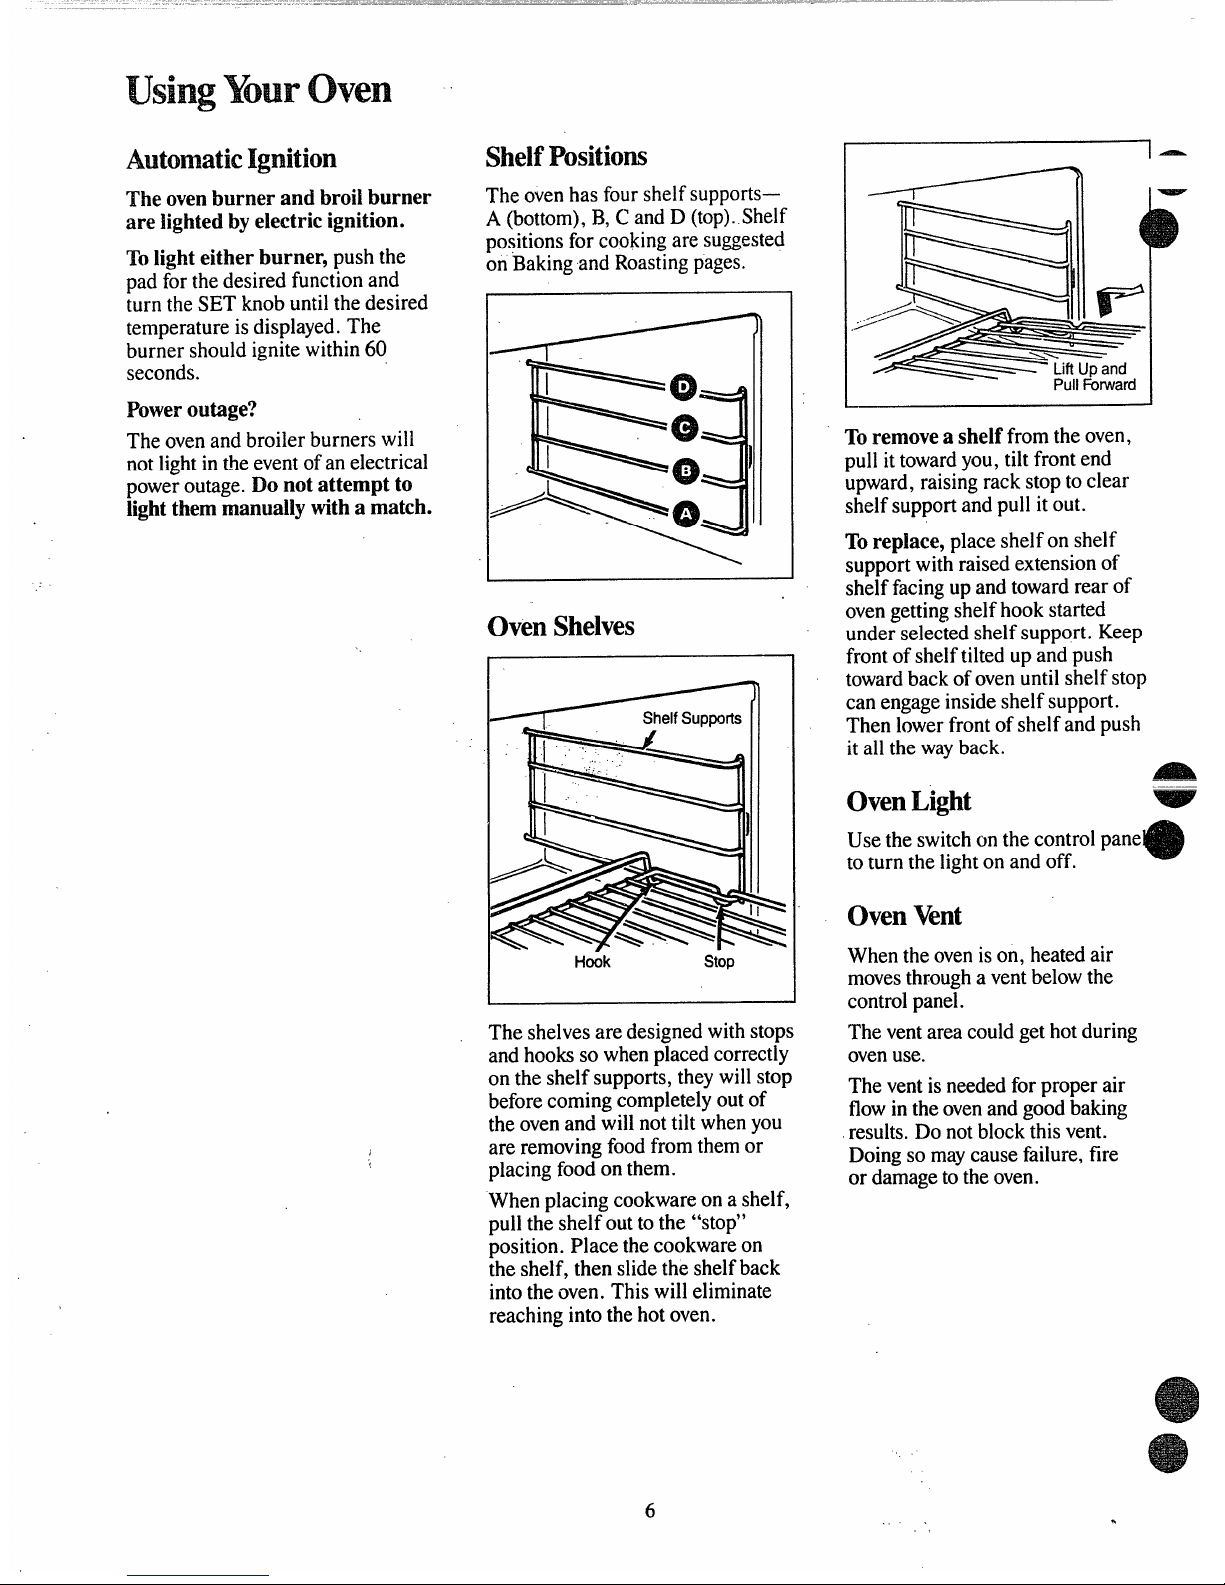
OvenShelves
1
Hook
stop
Theshelvesaredesignedwithstops
andhookssowhenplacedcorrectly
ontheshelfsupports,theywillstop
beforecomingcompletelyout of
theovenandwillnottiltwhenyou
areremovingfoodfromthemor
placingfoodonthem.
Whenplacingcookwareona shelf,
pull theshelfouttothe “stop”
position.Placethecookwareon
theshelf,thenslidetheshelfback
intotheoven.This willeliminate
reachingintothehotoven.
l—
Toremovea shelffromtheoven,
pullittowardyou,tiltfront end
upward,raisingrackstoptoclear
shelfsupportandpullitout.
Toreplace,placeshelfon shelf
supportwithraisedextensionof
shelffacingupandtowardrearof
ovengettingshelfhookstarted
underselectedshelfsupport.Keep
frontofshelftiltedup andpush
towardbackofovenuntil shelfstop
canengageinsideshelfsupport.
Thenlowerfrontofshelfandpush
itallthewayback.
m
Oven~ig~t
Usetheswitchonthecontrolpane
toturnthelightonandoff.
*
OvenVent
Whentheovenison, heatedair
movesthrougha ventbelowthe
controlpanel.
Theventareacouldgethotduring
ovenuse.
Theventisneededforproperair
flowintheovenandgoodbaking
results.Donotblockthisvent.
Doingsomaycausefailure,fire
ordamagetotheoven.
6
,,
Page 7

ElectronicControk
Oven“On”Indicator
Theword“ON” isdisplayedwhen
theBAKEor BROILpadispushed,
andgoesout whentheCLEAR/OFF
padispushedor whentheoven
burnershutsoffautomatically.
Theovenoperationiscontrolled
electronically.Thefollowing
instructionstellyouhowtooperate
theelectroniccontrols.
To set the clock
1. PushCLOCKpad.
2. TurnSETknobto correcttime
ofday.Clockisnowset. Theclock
mustbesettothecorrecttime of
dayforaccurateautomaticoven
a~rni.~ operations.
.
ToSet the
Mnuk/Second~mer
1. PushTIMERpad.
2. TurnSETknob to desired.
amountoftime(upto9 hoursand
59minutes).TheMinute/Second
Timerwillbegintocountdown
withina fewseconds.
3. Whentimeisup,the End-of-Cycle
Tone(3longbeeps)willsoundand
thedisplaywillagainshowthetime
ofday.
Note:TheMinute/SecondTimeris
a reminderonlyandwillnotoperate
theoven.
YoucanusetheMinute/Second
Timerwhetheror nottheovenis
beingused.TheMinute/Second
Timerdoes notinterferewithoven
operations.
TO
Cancelthe~mer
PushandholdTIMERpadfor
threeseconds.Thiswillclearthe
Minute/SecondTimerfunction.
To Bake
1. PushBAKEpad.
2. Wm SETknobuntildesired
temperatureisdisplayed.
A one-secondbeepwillsound
whentheovenhaspreheatedtoand
stabilizedat selectedtemperature.
3. Whenfinishedbaking,push
CLEAR/OFFpad.
Note:Torecallwhattemperature
youhaveselectedwhiletherising
temperatureisbeingshown,push
andholdtheBAKEpad.The
selectedtemperaturewillbeshown
whileyouholdtheBAKEpad.The
actualoventemperaturewillbe
shownaftera fewseconds.
YoucanpushtheCLOCKpad
todisplaytimeofdaywithout
cancelingtheovenoperation.
—–
—
—
-
-
~
—.
-
_—
Youcanchangetheselected
temperatureatanytimeby
pushingtheBAKEpadand
turningtheSETknob.
To Broil
1. PushBROILpad.
2. ~m SETknobuntilyour
choiceofHI BROILor LOBROIL
isvisibleinthedisplay.
Whenfinishedbroiling,pushthe ~
CLEAR/OFFpad.
—.
——
-
~
—.
~
———
——
—
——
-
-
—
--
~———z-y.
,,
7
Page 8

Automaticovenmmer
Theoventimerwillautomatically
startandstopyourovencookingor
self-cleaningoperationforyou.
Forautomaticovencooking:
1. PushBAKETIMEpad.
2. TurnSETknobto setlengthof
bakingtime.
3. PushBAKEpad.
4. TurnSETknobto setdesired
temperature.
Whencooktimeisreached,the
End-of-CycleTonewillsoundand
theovenwillturn off.
Duringautomaticcooking:
~YoucanpushtheSTOPTIME
padtofindoutwhentheEnd-ofCycleTonewillsoundandtheoven
willturnoff.
~YoucanpushtheCLOCKpadto
displaytimeofdaywithout
cancelingtheovenoperation.
ToDelayStirtingan
AutomaticOvenOpemtion
If adelayedcookingoperation
isdesired:
1. PushS~P TIMEpad.
2. TurnSETknobtotimeofday
whenbakingshouldbecompleted.
Stoptimemustbeequal to or
greaterthanthecooktimeplus the
currenttimeofday.
3. PushBAKETIMEpad.
4. Setlengthofbakingtimewith
SETknob.
5. PushBAKEpad.
6. TurnSETknobtodesired
temperature.
Whenstoptimeisreached,the
End-of-CycleTonewillsoundand
theovenwillturnoff.
Caution:Neverletfoodsitinthe
ovenformorethan4 hoursbefore
cookingstarts.Roomtemperature
isidealforthegrowthofharmful
bacteria.Besureovenlightis off
becauseheat fromthebulbwill
speedbacteriagrowth.
Note:YoucanpushtheS~P
TIMEPadtofindoutwhenthe
ovenwillturnoff. Pushandhold
theBAKETIMEpadto findout
whentheovenwillturnon.
Howtochange
aRogram
Whena functionhasbeen
entered,youcanrecallwhathas
beenprogrammedbypushingthe
correspondingfunctionpad.
Themessagesinthedisplayshow
youwhichfunctioniscurrently
beingdisplayed.Whilethe
functionisdisplayed,youcan
changeitwiththeSETknob.
Youcanchangeanyprog~ed
functionatanytime.
Tones
~
End-of-CycleTone(3longbeeps– ~
onesecondon, onesecondof~:
showsthatatimedovenoperation
hasreachedS~P TIMEor that
e
theMinute/SecondTimerhas
counteddown.
AttentionTone(seriesofshort
beeps,l/4-secondon, l/4-second
off, untilproperresponseisgiven):
willsoundif ovenhasonlybeen.
partiallyprogrammed.Forexample,
ifyouhaveselecteda cooktimebut
notemperature,youwillhearthe
AttentionToneuntilyouselecta
temperatureor pushthe
CLEAR/OFFpad.
NotificationTone(single,one-
secondbeep):indicatesovenhas
stabilizedat selectedtemperature.
KeyTone(single,l/10-second
beep): soundswhenanypadis
pushed.
FunctionErrorTone(seriesof
veryrapidbeeps, l/8-secondon,
m
l/4-secondoff):displaywillshowa--failurecode.CancelFunctionError =
TonebypushingtheCLEAR/OFF
pad.If theFunctionErrorTone
e
startsagain(afierabout15
seconds),callforservice.
Disconnecttheovenelectrical
supplytostopthetone.
If thefunctionerroroccurred
whileyouwereprogrammingthe
ElectronicControl,pushthe
CLEAR/OFFpadandtry again.
ToCanceltheTone...If youdon’t
wantanaudibletonewhenyoupush
apad, youcaneliminatetheKey
Tonebypushingandholdingthe
CLEAR/OFFpaduntilyouheara
shortbeep(inapproximatelytwo
seconds).Toactivatethetoneagain,
pushandholdtheCLEAR/OFFpad
once moreuntilyouheara short
beep.Canceling oractivatingthe
toneshouldonlybedonewhenthere
isnoovenoperationprogrammed.
Pushingthe CLEAR/OFFpadwill
clearall functionsexcepttheClock
andMinute/SecondTimer.
a
Page 9

Baking
- How tosetYouroven
:::
Baking
Positiontheshelfor shelvesin
Ieoven.If cookingontwoshelves
atthesametime,place shelves
about4 inchesapartandstagger
foodonthem.
2. Closeovendoor.
3. PushtheBAKEpadandturnthe
SETknob untildesiredtemperature
isdisplayed.Ifpreheatingisdesired,
donotputfoodin theovenuntila
one-secondbeepsoundstotellyou
theovenhasstabilizedat the
selectedbakingtemperature.
4. Opendoorandplace foodin
ovenoncenterofshelf.Allowat
least2 inchesbetweenedgeof
bakewareandovenwallor adjacent
cookware.
5. Closeovendoor.
- 6. Checkfoodfordonenessat
minimumtimeon recipe.Cook
longerif necessary.Push
LEAR/OFFpadandremove
helfPositiom
Most baking isdoneonthe second
shelfposition(B)fromthebottom.
Whenbakingthreeor fouritems,
usetwoshelvespositionedonthe
secondandfourthsetsofsupports
(B& D) frombottomofoven.
Bakeangelfoodcakeson firstshelf
position-(A)frombottomofoven.
ovenMokture
Asyourovenheatsup,the
temperaturechangeoftheair
intheovenmaycausewater
dropletsto formon thedoor
glass.Topreventthis,openthe
ovendoorforthefirstminute
ofovenheat-upto letthemoist
air out.
/
/
BaM~ mps
~
FO11OWatestedrecipeand
measuretheingredientscarefully.
Ifyouareusingapackagemix,
followlabeldirections.
~Donot
opentheovendoorduring
abaking
operation—heatwillbelost
andthebakingtimemightneedto
beextended.Thiscouldcausepoor
bakingresults.Ifyoumustopenthe
door,openitpartially-only
3or4
inches—andcloseitasquickly
as
possible.
. Donot disturbtheheatcirculation
intheovenwiththeuseofaluminum
foil.Iffoilisused,placeasmall
sheetofit, about10by12inchesat
the most,onalowershelfseveral
inchesbelowthefetid~Donotplace
fd~ontkeoven
bottom.
..
.
,.
Com’rnOfiB~titigRoblem
andPossibleSolutiom
Pms
Burningaroundedges
eOventoofull; avoidovercrowding.
o Edgesofcrusttoothin.
@Incorrectbakingtemperature.
Bottomcrustsoggyandunbaked
oAllowcrustand/orfillingtocool
sufficientlybeforefillingpieshell.
e
Fillingmaybetoothinorjuicy.
e
Fillingallowedtostandinpieshell
beforebaking.(Fillpieshellsand
bakeimmediately.)
. Ingredientsandpropermeasuring
/
affectthe ualityofthecrust.Usea
testedr ipeandgoodtechnique.
Make uretherearenotinyholesor
tear nabottomcrust. “Patching”
ap“ecrustcouldcausesoaking.“
He fillingrunsover
@
Topandbottomcrustnotwell
sealedtogether.
~Edgesofpiecrustnotbuiltup
highenough.
@Toomuchfilling.
@Checksize ofpieplate.
Wstryistough;crustnotflaky
~
TOOmuchhandling.
eFattoosoftorcutintoofine.
Rolldoughlightlyandhandleas
littleaspossible.
CAW
Cakeriseshigherononeside
~Batter
spreadunevenlyinpan.
*Ovenshelvesnotlevel.
~Usingwarpedpans.
@Incorrectpansize.
Cakescrackingontop
~Oven
temperaturetoohigh.
~Battertoothick,followrecipe
orexactpackagedirections.
s Checkfor
propershelfposition.
oCheck
pansizecalledforinrecipe.
o Impropermixingofcake.
Cakefalls
e
TOOmuchshortening,sugaror
liquid.
. Checkleaveningagent,baking
powderorbakingsodatoassure
freshness.Makeahabittonote
expirationdatesofpackaged
ingredients.
eCakenot baked
longenoughorat
incorrecttemperature.
~Ifaddingoiltoacakemix,make
certaintheoilisthetypeand
amountspecified.
Crustishard
eChecktemperature.
eCheckshelfposition.
Cakehassoggy
layerorstreaksat
bottom
~
Underminingingredients.
*Shorteningtoosoftforproper
creaming.
e
TOOmuchliquid.
Coowm &Blscm
Doughycenter;heavycruston
surface
ocheck
temperature.
eCheckshelfposition.
e
FO11OWbakinginstructions
carefullyasgiveninreliablerecipe
oronconveniencefoodpackage.
eFlatcookiesheetswillgivemore
evenbakingresults.Don’tovercrowd
foodsonabakingsheet.
eConveniencefoodsused
beyond
theirexpirationdate.
Browningmorenoticeableon
oneside
e
Ovendoornot closedproperly,
checkgasketseal.
eCheckshelfposition.
9
Page 10

BakingGuide
1. Reheatingisveryimportant Preheatingis not necessarywhen
3. Darkor non-shinyfinishes,also
whenusingtemperatures below roastingor forlong-timecookingof
glassandPyroceram@cookware,
225*Eandwhenb- foodssuchas wholemeals.
generallyabsorbheatwhichmay
biscuits,cookies, ca~esand other
2. Aluminumpansconductheat
resultin dry,crispcrusts.Retiuce
pastries. AfterpushingtheBAKE
ovenheat25°F,iflightercrustsare
padandturningtheSETknobtothe
quickly.Formostconventional
desired.Rapidbrowningofsome
desiredtemperature,besureto wait
baking,light,shinyfinishesgivebest
foodscanbeachievedbypreheating
forthe one-secondbeepbefore
resultsbecausetheyhelpprevent
castironcookware.
puttingfoodintotheoven.
overbrowning.Werecommenddull
bottomsurfacesforcakepansand
pieplates.
Shelf Oven
Time,
Food Cookware
Positions Temperatures Minutes Comments
Bread
Biscuits(Yz-in.thick) ShinyCookie Sheet
B,C
400°-4750 15-20 Canned, refrigeratedbiscuitstake2 tf>4
minutes less time.
Coffeecake
Shiny Mek! Pan with B. A
350°-4000
~()-3(3
satin-finishbottom
Corn bread or muffins
Cast Iron or Glass Pan
B
400°-4500 20-40 Preheat cast iron pan forcrisp crust.
Gingerbread
ShinyMetal Panwith
B 350°
45-55
satin-finishbottom
Muffins ShinyMetal Muffin Pans A. B
400°-4250 20-30 Decrease about 5 minutes formuffin mix.
Popovers
DeepGlass or Cast Iron Cups
B 375° 45-60 Or bake at 450°F. for 25 minutes.then at
350°F. for 10to 15minutes.
Quick loafbread Metal or Glass Loaf Pans
B
350°-3750
45-60 Dark metal or glass givesdeepest
Yeastbread (2 loaves) Metal or Glass Loaf Pans
A. B
375°-4250 45-60 browning.
Plain rolls ShinyOblongor Muffin Pans
A. B
375°-4250
IO-25
For thin rolls, Shelf B maybe used. ”
Sweet roils
ShinyOblong or Muffin Pans
B. A
350°-3750 20-30 For thin rolls, Shelf B maybe used.
Cakes
(withoutshortening)
Angelfood AluminumTube Pan
A
325°-3750 30-55 Twopiece panis convenient.
Jelly roll MetalJelly RollPan
B
375°-4000
1o-15 Line pan with waxed paper.
Sponge
Metal or Ceramic Pan
A
325°-3500 45-60
Cakes
Bundt cakes Metal or Ceramic Pan A. B
3~50-35fj0
45-65
Cupcakes
ShinyMetal Muffin Pans B
350°-3750
~0-25
Paper liners produce more moist crusts.
Fruitcakes Metal or GlassLoaf or A, B
2750-3000
Z-4hrs.
Use 300°F. and Shelf B forsmall or
TubePan
individual cakes.
Layer
ShinyMetal Panwith
B 350°-3750 20-35 If baking fourlayersuse
satin-finishbottom
shelves B and D.
Layer.chocolate
ShinyMetal Panwith B
350°-3750 25-30
satin-finishbottom
Loaf Metalor Glass Loaf Pans B
350° 40-60
Cookies
Brownies Metal or Glass Pans B, C
325°-3500 25-35 Bar cookies from mix usesame time.
Drop Cookie Sheet
B.C
350°-4000 10-20 Use Shelf C andincrease temperature
25 to 50”F.for more browning.
Refrigerator Cookie Sheet B. C
400°-4250
6-12
Rolledor sliced
Cookie Sheet B.C
375°-4000
7-12
Fruits.
OtherDesserts
Bakedapples
Glass or Metal Pans A, B,C
350°-4000
30-60
Custard
Glass Custard Cups or B
300°-3500 30-60
Reduce temperature to 300°F,for large
Casserole (setin pan of hotwater)
custard.
Puddkgs. rice
Glass Custard Cupsor B
325° 50-90
Cook bread or rice pudding with custard
and custard
Casserole base 80 to 90minutes.
Pies
Frozen Foil Panon Cookie Sheet
A
400°-4250
45-70 Large piesuse 400”F. and increasetime.
Meringue
Spreadto crust edges B, C
325°-3500 15-25 Toquickly brown meringue use400°F. for
9 to 11minutes.
One crust
Glass or Satin-finish Metal Pan A, B
400°-4250 45-60 Custard fillingsrequire lower temperature,
l-wocrust Glass or Satin-finish Metal Pan
B
400°-4250 40-60 longer time.
F’ast~shell Glass or Satin-finish Metal Pan
B
450°
1~-16
Miscellaneous
Bakedpotatoes
Set on Oven Shelf
A, B, C
325°-4000
60-90 Increase time for large amountor size.
Scallopeddishes
Glass or Metal Pan A,B, C
325°-3750 30-60
Souffles
Glass Pan
B
300°-3500 30-75
10
Page 11

—
—
Roasting
Roastingiscookingbydry heat.
Tendermeatorpoultrycanbe
roasteduncoveredinyouroven.
Roastingtemperatures,which
shouldbelowandsteady,keep
spatteringto aminimum.When
roasting,it isnotnecessarytosear,
baste,cover,oraddwatertoyour
meat.Roastingiseasy,justfollow
these steps:
Step1.Positionovenshelfat
secondfrombottomPosition(B)
Step2:Checkweightofroast.
Placemeatfat-side-upor poultry
breast-side-uponroastingrackina
shallowpan.Themeltingfatwill
bastethemeat.Selectapanas
closetothesizeofmeataspossible.
(Broilerpanwithrackisagood
panforthis.)
Step3:PushBAKEpadandturnSET
knob until desired temperature
isdisplayed,ChecktheRoasting
Guidefortemperaturesand
Step4: Mostmeatscontinueto
cookslightlywhilestandingafter
beingremovedfromtheoven.For
rareor mediuminternaldoneness,
YOUmay wishtoremovemeatfrom
the ovenjust beforeitis doneif itis
tostand10to20 minuteswhileyou
makegravyorattendtootherfoods.
Ifnostandingisplanned,cook
meattosuggestedtemperature.
_–
-—.
-.
frozen Roasts
forsmallsizeroast(3to5 lbs.)and
.
approximatecookingtimes.
-=
Frozenroastsofbeef,
pork,
~
atbottomposition(A)forlarger
lamb,etc.,can bestartedwithout ~~
roasts.
I
—
@
RoastingGuide
thawing,butallow15to25 minutes
per poundadditionaltime(15
minutesper poundforroastsunder
5pounds,moretimeforlarger
roasts).
Thawmostfrozenpoultrybefore
roastingto ensureevendoneness.
Somecommercialfrozenpoultry
canbecookedsuccessfullywithout
I
thawing.Followdirectionsgiven
onpacker’slabel.
Oven
ApproximateRoastingTime Internal
‘Iype
Temperature Doneness
inMinutesper Pound
Temperature“F
Meat
3to5-lbs. 6to 8-lbs.
Tendercuts; rib, highquality
325° Rare:
24-33
18-22
130°-140°
sirloin tip, rump or top round*
Medium:
35-39 22-29
150°-1600
WellDone:
40-45
30-35
170°-1850
Lamb legor bone-in shoulder* 325°
Rare:
21-25
20-23
130°-140°
4.
Medium:
25-30 24-28 150°-1600
WellDone: 30-35 28-33
170°-1850
Vealshoulder, legor loin*
325° WellDone: 35-45 30-40
170°-180°
Pork loin, rib or shoulder* 325°
WellDone:
35-45 30-40 1700-180°
Ham, pre-cooked
325° ToWarm: 17-20minutesper lb. (anyweight)
115°-1250
Under 10Ibs. 10to15-lbs.
Ham, raw
325°
WellDone:
27-35
24-27
170°
*For boneless rolled roasts over6-inches
thick, add 5 to 10minutesper lb. totimes
given above.
Poultry
3toS-lbs.
Over5Ibs.
Chicken or Duck
325°
WellDone:
35-40
30-35
185°-1900
Chicken pieces
375°
WellDone: 30-35
185°-190°
10
to 15-lbs.
Over 15lbs. In thigh:
Turkey 325°
Well Done:
18-25
15-20
185°-190°
Page 12

Broiling
Broilingiscookingfoodbydirect
heatfromabovethefood.Your
ovenhasa convenientcompartment
belowthe ovenforbroiling.A
speciallydesignedbroilerpanand
rackallowsdrippingfattodrain
awayfromthe foodsandbe kept
awayfromthehighheatofthe
gasflame.
Distancefromtheheatsourcemay
bechangedbypositioningthe broiler
panandrackononeofthreeshelf
positionsinthebroilercompartment—
A (bottomofbroilercompartment),
B(middle)andC (top).
How
to Broil
1. If meathasfator gristlenearthe
edge,cutverticalslashesthroughit
about2 inchesapart,but don’tcut
intomeat.Wer~cornmendthat
trimfattopreventexcessive
smoking,leavingalayerabout
l/8-inchthick.
2. Arrangefoodonrackand
positionthebroilerpaninthe
you
compartment.Placingfoodcloser
toflameincreasesexteriorbrowning
offd, butalsoincreasesspattering
andthepossibilityoffatsandmeat
juicesigniting.
3. Closethebroilerdoor.
4. PresstheBROILpadandturn
theSETknobuntilyourchoice
ofHIBROILor LOBROILis
displayed.Note:Chickenandham
arebroiledatLOBROILinorder
tocookfoodthroughwithout
overbrowningit.
5. Turnmostfoodsonceduring
cooking(theexceptionisthinfillets
offish;oiloneside,placethatside
downonbroilermckandcookwithout
turninguntil done).~lmefoodsfor
aboutone-halfthetotalcooking
time,turn food;thencontinueto
cookto preferreddoneness.
6. PushCLEAR/OFFpad.Remove
broflerpanfrombroilercompartment
andservefoodimmediately.Leave
panoutsidethecompartmenttocool.
Questiom&Amwers ~
Q.Whenbroiling,isitnecessary to alwaysusea rackinthepan?
A. Yes.Usingtheracksuspends
themeatoverthepan. Asthemeat
cooks,thejuicesfallintothepan,
thuskeepingmeatdrier.Juices
areprotectedbytherackandstay
cooler,thus preventingexcessive
spatterandsmoking.
Q.ShouldIsaltthemeatbefore
broiling?
A. No.Saltdrawsout thejuices
andallowsthemtoevaporate.
Alwayssaltaftercooking.Turn
meatwithtongs;piercingmeat
witha forkalsoallowsjuicesto
escape.Whenbroilingpoultry
or fish,brusheachsideoften
withbutter.
Q.Whyaremymeatsnotturning
outasbrownastheyshould?
A. Checkto seeif youareusingthe
recommendedshelfposition.Broil
forlongestperiodoftimeindicated
intheBroilingGuide.Turnfood
onlyonceduringbroiling.
Q. Do1needtogreasemybroiler e
racktopreventmeatfromsticking?
A. No.Thebroilerrackisdesigned
to reflectbroilerheat,thuskeeping
thesurfacecoolenoughtoprevent
meatstickingtothesurface.However,
sprayingthebroilerracklightlywith
a vegetablecookingspraybefore
cookingwillmakecleanupeasier.
12
Page 13

BroilingGuide
*Whenarrangingfoodonpan,
donotletfattyedgeshangover
sides,whichcouldsoilbroiler
compartmentwithfatdripping.
e Afterplacing
foodon the
broiler pan, put the pan in the
broiler compartment inthe proper
position. The recommended shelf
position and cooking timecan be
found in the guide below.
The closer the food isto the broil
clement the fiasterthe meat browns
on the outside, yet staysred to pink
inthe center. Movingthe meat
~drtherawdyfrom the flame lets the
meat cook to the center while
—
~ Broiling isalwaysdone with oven
i~ndbroiler doors closed.
~
Usctongs toturn meatovcr-
picrccd mci.ttloses juices.
~Broiler does notneed to be
preheated. However,for very thin
foods,or to increasebrowning,
preheat if desired.
~Steaks and chops should be al
Ic:istI inch thick forbest broiling
results. P~nbroil thinner ones.
@FrozenSteakscan be
conventionallybroiledby positioning
the broiler pan and rack at next
~Alwaysusc broiler pan and rack
thtit comes with vour oven. It is
lowestposition andincreasing
cookingtime given inthis guide
1%times per side.
~csigncd to min;nlizcsmoking and
browning outside.
~If desired, marinate meatsor
chicken before broiling. Or brush
with barbecue sauce last 5to 10
minutes only.
spat;cring by trappingjuices in the
shielded lower part of the pan.
SecondSide
Time,Minutes
3%
Shelf
Position
c
Qu:lntityand/or
Food
‘1’hickncss
1+1or 1.0
llr{)il
HI
VirstSide
‘lime,Minutes
Comments
Arrange in singlelayer.
3‘/’2
llilColl
‘/2-lb.(ilhoUl8
[binslices)
Spaceevenly.Up to 8 patties take
about same time.
7-8
1
HI
9-10
c
Steaks lessthan l-inchcookthrough
beforebrowning.Pan frying is
recommended.
Slash fat.
g
12
13
Io
15
25
7
5-6
8-9
6-7
]2-14
16-18
—–
-“
-
--
-
RiirC
Mcdiutl]
l-in. thick
(1 10 lY2-lhs.)
A
A
A
A
A
A
Reduce times about 5 to 10minutes
per side for cut-upchicken. Brush
each side with meltedbutter. Broil
with skin sidedownfirst andbroil
with door closed.
25-30
(’hicken(450@)
I
Whole
I
LO
(2[()2Y~-lh\.),
A
c
c
30-35
split Icngthwist
!I:lker}Products
f3r~ildi-fi)ilst)or
Ti)iis[~rPiistrics
English Muffins
Ix)hsterI’ails
(6[()8-OZ.
C:lch)
HI
Spaceevenly.Place English muffins
cut-side-upand brush with butter if
desired.
l/2-]
Z-3
3-4
13-16
2-spli(
I
Do not turn over.
Cut through backof shell, spread
open. Brushwith melted butter before
and after half[ime.
BHI
5
Handle and turn verycarefully.Brush
with lemon butterbeforeand during
cooking ifdesired. Preheat broiler to
increase browning.
l-lb. I“illcts
1Ato
I/z-in.[hick
HI
c 5
1
Increase times 5-10minutesper side
for 1l/~-inchthickor homecured.
8 8
Ham
Slices(4500)
l-in. [hick
Prccookcd”
LO
B
A
A
B
B
B
B
10
13
4-5
10-12
Slash fat.
I]t)rkChops 2 (’/2in.)
WCllDone
2 (l-in. thick),
ahout 1lb.
HI
HI
Lambchops
Medium 2( I in.)
WellDt)nc
about
10(012-(YZ.
Medium ‘
2(IYz
in.),
Well Done
about 1 lb.
*-
*Wieners,
l-lb. pkg. (lo)
sin]itiirprccookcd”
stiuiagcs,
br~ltwursl
8
10
10
17
6
4-7
10
4-6
12-14
1-~
Slash fat.
If desired, split sausagesin half
lengthwise:cut into5 to 6-inch pieces.
HI c
13
Page 14

CaremdCleati~
spidcamof
oven
hkrior
ModelJGRC16GEL
TheContinuous-Cleaningoven
cluns itse!fwtilecooking.The
insideoftheoven—top,sidesand
back—isfinishedwitha
special
coatingwhichcannotbecleaned
intheusualmannerwithsoap,
detergents,steelwoolpads,
commercialovencleaners,coarse
abrasivepadsor coarsebrushes.
Useofsuchcleanersand/ortheuse
ofovensprayswillcausepermanent
damage.
The
specialcoatingisa porous
ceramicmaterialwhichis darkin
colorand feelsslightlyroughtothe
touch.If magnified,thesurface
wouldappearaspeaks,valleys,and
sub-surface“tunnels:’Thisrough
finishtendstopreventgrease
spattersfromforminglittlebeads
or dropletswhichrundown the
sidewallsofa hard-surfaceoven
linerleavingunsightlystreaksthat
requirehandcleaning.Instead,
whenspatterhitstheporousfinish
itis dispersedandispartially
absorbed.Thisspreadingaction
increasestheexposureofoven
soilto heatedair,andmakesit
somewhatlessnoticeable.
%U
maynotdisap~r completely
andat sometime afterextended
usage,stainsmayappearwhich
cannotberemoved.
Thespecialcoatingworkbeston
smallamounb ofspatter.It does
notworkwellwithlargerspills,
especiallysugars,eggor dairy
mixtures.
Thespecialcoatingisnotused
onovensheBves.Shelvesshouldbe
cleanedoutsidetheoventoavoid
damagetothe specialcoating
insidethe oven.
Tocleanthecontinuom-
cleani~ oven:
1.
Letovenpartscoolbefore
handling.Werecommendrubber
glovesbewornwhencleaning.
2. Removeshelvesandcookware.
3. Soil visibilitymaybereducedby
operatingtheovenat4W”F.Close
the doorandpushtheBAKEpad.
ThenturntheSETknobuntil4(X)°F.
isdisplayed.Timeforatleast4
hours.Repeatedcyclesmaybe
necessarybeforeimprovementin
appearanceis apparent.
mMEmER: DURINGTHE
OPERATIONOFTHEOVEN,THE
DOOR,WINDOWAND(YI’HEROVEN
SURFACESWILLGETHCYI’ENOUGH
~ CAUSEBURNS.DON~
~UCH.
LETTHEOVENCOOLBEFORE
REPLACINGOVENSHELVES.
4. Ifa spilloveror heavysoiling
occursontheporoussurface,as
soonastheovenhascooled,
removeasmuchofthesoil as
possibleusingasmallamountof
wateranda stiffbristlenylon
brush. Usewatersparinglyand
changeitfrequently,keepingit as
cleanaspossible,andbesureto
blotit upwithpapertowels,cloths,
or sponges.Donotruborscrub
withpapertowels,clothsor
sponges,sincetheywillleave
unsightlylintontheovenfinish.If
waterleavesawhiteringonthe
finishasit dries,applywateragain
andblotitwithacleansponge,
startingattheedgeoftheringand
workingtowardthecenter.
I
Donotusesoap,detergent,
steelWOOIpads,commercial
ovenc~eaner,siliconeoven
sprays,coarsepadsorcoarse
brushesontheporoussurface.
Theseproductswillspot,clog,
andmartheporoussurfaceand
reduceitsabilityto work.
Do
notscrapetheporous
stiace withaMe orspatda—
theycouldpermanentlydarnageit.
PomelainOvenInkrior ~
ModelJGRSBGEL
Withpropercare,theporcelain
enamelfinishontheinsideofthe
oven—top,bottom,sides,backand
insideofthedoor—willstaynewlookingforyears.
Letovencoolbeforecleaning.We
recommendthatyouwearrubber
gloveswhencleaningtheoven.
Soapandwaterwillnormally
dothejob. Heavyspatteringor
spilloversmayrequirecleaning
witha mildabrasivecleanser.
Soapy,wetmetalpadsmayalsobe
used.Do notallowfoodspillswith
a highsugaror acidcontent(such
asmilk,tomatoes,sauerkraut,fruit
juicesor piefilling)to remainon
thesurface.Theymaycausea dull
spotevenaftercleaning.
Householdammoniamaymakethe
cleaningjobeasier.Place1/2.cupin
a shallowglassorpotterycontainer
ina coldovenovernight.The
ammoniatimes willhelploosen
theburned-ongreaseandfood.
a
If necessary,youmayusea caustic
cleaner.Followpackagedirections.
14
Page 15

—_
—
oven shelves
RemovableOvenand
Broiler
Doon .
Ovenshelvesmaybecleanedwith
amildabrasivecleanserfollowing
manufacturer’sdirections.After
cleaning,rinsethe shelveswith
cleanwateranddrywithaclean
cloth.
Toremoveheavy,burned-onsoil,
soapymetalpadsmaybe used
followingmanufacturer’sdirections.
Afterscrubbing,washwithsoapy
water,rinseanddry.
Theovenandbroilerdoorsare
removabletomakeovenandbroiler
compartmentmoreaccessible.
Toopeneitherdoor, opendoor
fullyandraisethereleasetabon
eachdoorhinge. ,
I
Front Frame
—
Toreplace,slidetheovenbottom
sothat thebackedgeoftheoven
bottomrestsontheridgein the
backovenwall.Thenlowerthe
frontoftheovenbottomintoplace
behindtheovenfrontframe.
closed
open
OvenShelfSupporb
BroilerWn& Rack
Toremoveshelfsupports,lifithe
frontofthesupporttounhookit
fromtheovenwall.Thenpullthe
supportpegsoutoftheholesin
thebackwallofthe oven.-
Afterbroiling,removethebroiler
rackandcarefullypouroffthe
grease.Washandrinsethepan
andrackinhot, soapywater.
Rele;se Tab
——
—-
-
=
If foodhasburnedon, sprinkle
therackwhilehotwithdetergent
andcoverwithwetpapertowelsor
a dishcloth.Thatway,burned-on
foodswillsoakloosewhilethe
mealisbeingserved.
Slotfor
FrontHook
\
Rotatethe releasetabstowardthe
ovenasfar astheywillgo,then ‘closethedooruntilyoureachthe =
specialstoppositionwhichholds
thedooropenafewinches.
,,
Do not storea soiledbroiler
panandrackinthebroiler
compartmentor intheoven.
OvenLi@tBulb
Replacement
Toreplaceshelfsupports,insert
thepegs on theendoftheshelf
Beforereplacinganylightbulb,
disconnectelectricpowertothe
rangeatthemainfuseorcircuit
breakerpanel.Letthebulbcool
completelybeforeremovingit. Do
nottouchahotbulbwith.a damp
cloth—thebulbwillbreak.
suDDortintotheholes in theoven
ba;k. Thenlockthe fronthookin
theslotintheovenside.
Ovenshelfsupportscanbecleaned
thesame
way oven shelvesare
cleaned.
Removableoven Bottom
Theovenbottomcanberemoved
foreasiercleaning.
Graspthedoorfirmlyat thesides
and,~otatetheloweredge ofthe
doorawayfromtheovenandliftit
offthehinge arms.
Toreplace,slipthehingearmsinto
the upperendoftheslotsinthedoor.
Toremove,takeouttheoven
shelvesandshelfsupports(see
above).Liftthefrontoftheoven
bottomenoughtoclearthefront
frame,thenpullout.
LowerthedoortotheMy open
positionandrotatethe~leasetabsto .-=..=
theoriginalposition.
Thelightbulbin yourovenis
locatedintheupperrightcorner.
Reachinandunscrewit after
takingprecautionsmentioned
above.Replaceitwitha hightemperatureappliancebulbof
thesamewattage.
—
. ... ......
15
.,, , ..
..
..-..
Page 16

MinorAdjwtmen6YoucanMake
ovenThermostat
Adjmtment
The temperature inyournewoven
hasbeensetcorrectlyatthefactory,
sobesuretofollowtherecipe
temperaturesandtimesthe firstfew
timesyoubakeinyournewoven.
Ifyouthinktheovenshouldbe
hotterorcooler,youcanadjustit
yourself.Todecidehowmuchto
changethetemperature,settheoven
temperature25”F.higherorlower
thanthe temperatureinyourrecipe,
thenbake.Theresultsofthistest
shouldgiveyouanideaofhow
muchthetemperatureshouldbe
changed.
Toadjusttemperature:
1. Pushthe BAKEpad.
2. Selectatemperaturebetween
500”F.and550”F.withtheSET
knob.
3. Quickly(withintwoseconds,
beforetheBAKEfinctionenergizes)
pushandholdtheBAKEpadfor
about5seconds.
The displaywill shownumber
ofdegreesdifferencebetweenthe
originalfactorytemperaturesetting
andthecurrenttemperaturesetting.
Ifthe oventemperaturehasnever
beenadjusted,thedisplaywill
read00.
4. TurntheSETknobtoadjustthe
temperaturein5“F.steps.Youcan
raiseit25”F.or lowerit25”F.A
minussign(–) beforethenumber
meansthattheovenwillbecooler
bythedisplayedamountofdegrees.
Ifthecontrolbeepsandflashes,push
the CLEAR/OFFpadandstartover.
5. Whenyouhavemadethe desired
adjustment,pushthe CLOCKpad
togobacktothetimeofdaydisplay
ortouseyourovenasyouwould
normally.
BroilandOvenBurner
AirAdjwtmentShutters
Air adjustment shuttersfor the
broil and ovenburners regulatethe
flowof air to the flame.
Toadjusttheair shutters,remove
theovenbottom(seepage15).Turn
burnerfullon andchecktheflames.
Burnerflamesshouldnotflutteror
blowawayfromtheburner.They
shouldbeblueincolorwithno
traceofyellow.Foreignparticlesin
thegaslinemaycausean orange
flameatfirst, but thiswillsoon
disappear.Iftheflamesareyellow
or flutter,opentheair shutter
more.If theyblowawayfromthe
burner,closetheair shuttermore.
If necessary,usea screwdriverto
loosenthe air shutterscrew.Then
adjusttheair shutterand, whenthe
flamesareright,retightentheair
shutterscrew.
8
~ Air ShutterScrew
~
Toadjusttheorificehoods,check
theinnerconeofthe flame.
WARNING:Ifyouattemptto
measuretheinnerconeofthe
flame,pleaseusecaution.Burns
couldresult.
InnerCone of Flame
Theinnercone ofthe flameshould
beabout 1/2”long.If theflameis
notright,usea 1/2”openend
wrenchor adjustablejointpliersto
adjusttheorificehood.
.
r
NAT
Toshortenthecones,tightenthe
orificehoodbyturninginthe LP
direction.Tolengthenthecones,
loosentheorificehoodbyturning
intheNATdirection.
Note:Theadjustmentdescribed
abovewillnotchangetheself-clean
temperature.
16
Page 17

cleaningGuide
Note:Letovenpartscoolbeforecleaning.
—
—
—
PA~
MATERIALS~ USE
GENERALDWIONS
BroilerPanandRack
oSoapandWater
Drainfat,coolpanandrackslightly.(Donotletsoiledpanandrackstandinbroiler
e Soap-FilledScouringPad
compartmenttocool.)Sprinkleon detergent.Fillthepanwithwarmwaterandspread
o CommercialOvenCleaner
clothorpapertowelovertherack.Letpanandrackstandfora fewminutes.Wash;scour
ifnecessary.Rinseanddry.OFf’ION:Thebroilerpanandrackmayalsobecleanedina
dishwasher.
ControlPanel
o MildSoapandWater
Washcontrolpanelwithsoapandwater,usingasoftcloth.Donotuseabrasivecleaners.
Rinseanddry witha softcloth.
OutsideGlassFinish
o SoapandWater
Cleanoutsideofcooledblackglassdoorwithaglasscleanerthatdoesnotcontain
ammonia.Washotherglassw’ithclothdampenedinsoapywater.Rinseandpolishwitha
drycloth.If knobsareremoved,donotallowwatertorun downinsidethe sutiaceofglass
whilecleaning.
Metai,inciuding
~SoapandWater
Wash,rinse,andthenpolishwithadrycioth.DO N~ USEsteeiwooi,abrasives,
SideTrimsand
ammonia,acids,orcommercialovencleanerswhichmaydamagethefinish.
fiim Strips
PbrceiainEnamei ePapr Towel
Avoidcleaningpowdersorharshabrasiveswhichmayscratchtheenamei.Ifacidsshouid
Finish
● DryCloth
spiliontheovenwhileitishot,useadrypapertowelorciothtowipeuprightaway.When
● SoapandWater
thesurfacehascooied,washandrinse.Forotherspiiis,suchas fatsmatterings,etc.,wash
withsoapandwaterwhencooledandthenrinse.Polishwithdrycioth.
mintedSurfaces
*SoapandWater Usea mildsolutionofsoapandwater.Donotuseanyharshabrasivesor cleaningpowders
whichmayscratchormarsurface.
InsideOvenDoofi
o SoapandWater Tocleanovendoor;removeitfoliowinginstructionson pageiS.Ciean”withanyandaii
~Soap-FilledScouringPad mentionedmaterials.
~CommercialOvenCleaner
OvenInteriofi—
o StiffBristleNyionBrush Coolbeforecleaning.
Top,SidesandBack
modei JGRC16GEL)
Ifheavysoiiinghasoccurredontheporohs
su”~ace,removeasmuchofthesoiias possibie
(CAUTION:Whenirh
usinga smallamountofwateranda stiffbristienyionbrush.Usewatersparingiyand
use,lightbulbscan
changeitfrequently,keepingitascieanaspossibie,andbe suretobiotitup withpaper
becomewarmenoughto
towels,cloths,orsponges.Do notMbor scmbwithpapertowels,ciothsorsponges,since
breakif touchedwith
theywiilleaveunsightlylintoiltheovenfinish.If waterieavesawhiteringonthefinishas
moistclothortowel.
‘
itdries,applywater againand
blotitwitha cleansponge,startingattheedgeofthering
Whencleaning,avoid
andworkingtowatithecenter.
touchingwarmlamps
Forspeciaicieaninginstructions,seepage14.
withcleaningcloths.)
OvenLined
oSoapandWater
Coolbeforecleaning.
(ModeiJGRS15GEL) eSoap-FilledScouringPad
(CAUTION:Whenin
e CommercialOvenCleaner
FORLIGHTSOIL:Frequentwipingwithmiidsoapandwater(especiaiiyaftercooking
use,iightbulbscan
meat)wiliprolongthetimebetweenmajorcleaning.Rinsethoroughly.N~E: Soapieft
becomewarmenoughto
on linercausesadditionalstainswhenovenisreheated.
breakif touchedwith ~
FORHEAVYSOIL:Chooseanonabrasivecieanerandfoliowiabeiinstmctions,using
moistclothortowel.
thinlayerofcieaner.Useofrubberglovesis recommended.Wipeorrubiightiyon
Whencleaning,avoid
stubbornspots.Rinseweli.Wipeoffanyovencieanerthatgetsonthe~ostat buib.When
touchingwarmlamps
rinsingovenaftercieaningaisowipethermostatbuib.
withcleaningclothsif
lampcoverisremoved.
RemovabieOven
● SoapandWater
Theovenbottompanelcanberemovedforeasycleaning(seepagei5).Usethesame
Bottom eSoap-FilledScouringPad
directionsforcleaningasexplainedaboveforPorceiainEnameiFinish.
(Non-metallic)
Sheivesand e SoapandWater
Removeshelvesandshelfsupportsandcleanthemoutsideoftheoventoavoiddamaging
SheifSupprE
eSoap-FilledScouringPad
thespeciallycoatedoventop,sidesandback.Useanyandailmentionedmaterials.Rinse
OCommercialOvenCleaner
thoroughlytoremovealimaterialsaftercleaning.NCYfE:Somecommercialovencieaners
causedarkeninganddiscoloration.Whenusingforfirsttime,testcieaneronsmaiipartof
sheifandcheckfordiscolorationbeforecompletelycleaning.
. .
. .
—...
. . . . . . .
.. . ...
—
—
--
—
—
—
—-
—
—
——----
—
—
—.
—–
—
—
z
——
—
—
—
—-
—
—
—
———
—-
—
—
*sPi]iageofmarinades,fmitjuices, and basting materials Conumlngacidsmaycausediscoloration.SpilloversshouldM blottedUp lmme(lla~ly,WIUl Cam
beingtakennottotouchanyhotportionoftheoven,Whenthesurfaceiscool,cleanandrinse.
17
Page 18

Questiom?
useThkRoblemsolver
PROBLEM
OVEN DOES~~
COOKPROPERLY~
.
,.
CLOCKA~D , >’I
MINUTE(SECO~D<-:
TIMERw ~~WO~:
OVEN LIGHTDOES’‘::
~~ C~M~ ON ‘ : ~ .
>,,
..
OVE~~S”BEEPIN-Gr,, -
.“
,,.
s~ktiN”qODOR<.“‘2‘;
,-
POSSIBLECAU~EA~D/ORWHATTODO
I
Ifyouneedmorehelp..call, tollfree:
GEhswer Center”
8W.6242M
consumerinformationservice
18
Page 19

IfYouNeedservice
Toobtainservice,seeyourwarranty
onthebackpageofthisbook.
We’reproudofour serviceand
wantyoutobe pleased.If forsome
reasonyouarenothappywiththe
serviceyoureceive,herearethree
stepstofollowforfurtherhelp.
FIRST,contactthepeoplewho
servicedyourappliance.Explain
whyyouare notpleased.In most
cases,thiswillsolvetheproblem.
NEXT,if youarestillnotpleased,
writeallthedetails-including
yourphone number—to:
ConsumerAffairs
GEAppliances
AppliancePark
Louisville,Kentucky40225
FINALLY,if yourproblemisstill
notresolved,write:
MajorAppliance
ConsumerActionPanel
20NorthWackerDrive
Chicago,Illinois60606
19
Page 20

YOURGENERALELEmRICRANGE
WARRANTY
Saveproof of original purchase datesuch as your sales slip or cancelled check to establish warranty period.
WHATISCOVERED
FULL ONE-YEARWARRANTY
Forone year from date of original
purchase, we will provide, free of
charge, parts and service labor
in your home to repair or replace
anypaff of the range that f~iis
because of a manufacturing defect.
This warranty is extended to
the original purchaser and any
succeeding owner for products
purchased for ordinary home use
in the 48 mainland states, Hawaii
and Washington, D.C.In Alaska the
warranty is the same except that it is
LIMITED because you must payto
ship the product to the service shop
or for the service technician’s travel
coststo your home.
All warranty service will be provided
byour Factory Service Centers or
byour authorized Customer Care”
servicers during normal working
hours.
Look in the White or Yellow Pages
of your telephone directory for
GENERAL ELECTRIC COMPANY,
GENERAL ELECTRIC FACTORY
SERVICE, GENERAL ELECTRIC-
HOTPOINT FACTORYSERVICE or
GENERAL ELECTRICCUSTOMER
CARE@SERVICE.
WHATISNm COVERED
o Service trips to your home to
teach you how to use the product.
Readyour Useand Care
material.
If youthen haveany questions
about operating the product,
please contact your dealer or our
Consumer Affairs office at the
address below,or call, toll free:
GE Answer Center@
800.626.2000
consumer information service
@Improper installation.
If you havean installation problem,
contact your dealer or installer.
Youare responsible for providing
adequateelectrical, gas,exhausting
and other connecting facilities.
. Replacement of house fuses or
resetting of circuit breakers.
~ Failure of the product if it is used
for other than its intended purpose
or used commercially.
● Damage to product caused
by accident, fire, floods or acts
of God.
WARRAN~R ISNOTRESPONSIBLE
FOR CONSEQUENTIAL DAMAGES.
Some states do not allow the exclusion or limitation of incidental or consequential damages, so the above limitation orexclusion
may not apply to you. This warranty gives you specific legal rights, and you may also have other rights which vary from state to state.
Toknow what your legal rights are in your state, consult your local or state consumer affairs office or your state’sAttorney General.
Warrantor: General Electric Company
if further help is needed concerning this warranty, write:
Manager—Consumer Affairs, GE Appliances, Louisville, KY 40225
1
MNL134(343523)
..
.———
D
I
JGRS15G
JGRC16GEL
 Loading...