

Page 1
Howíoget ii;^-
the best fromJLvI UI
BuíMn Oven
Use and Care of
gas models
JGKS15GEH
JGKC15GEH
JGKC16GEH
Features p4
Using the oven
Special care of
continuous-cleaning oven pll
Questions?
Use the Problem Solver
p6
pl5
-^-7;í777
\bur Direct Line to G<.7S At lu^srij
The GE Answer Cente;;/^ i<'X' / ■
GENERAL ELECTRIC
TGKCi^Qf.:fj
-"A
f'ütí.
‘4^1 - V 7
Page 2

tents
Saiety Instructions
Features of Your Oven
/-\UlUU4as.iU V/Vi^il JLliiiWi,
.....................
..................
2-3
4
Clock and Minute Timer ,... ,5
Using Tour Oven 6
Baking ...........................................
T2oI»-SS
i-T«SVA45^ V .V./
Roasting, Chari
Broiling, Chart
Special Care of
.................................
.....................
7
9
10
r^r^ntimìnnc-.r^li»iminia Ovi^n 11
Care and Cleaning ......... 11-13
Cleaning Chart
Problem Solver
rr^'\r.
___
c*.,™.;...« 1C
il lUU i'iCCU esci V11.C
Warraniy
....................
.............................
................
...................
15
..............................
....
Back Cover
14
.
FOR YOUR SAFETY
Turn OFF all range
controls
if you smell gas:
1. Open windows
2. Don’t touch electrical
switches*
3. Extinguish any open
flame
4. immediately call your
gas supplier
^[?on’t turn electric switches
on or off because sparks may
ignite the gas.
FOR YOUR SAFETY
Keep the appliance
area clear and free from
combustible materials,
gasoline and other
fiamiTiable vapors and
liquids.
Read this book carefully.
It is intended to help you operate
UliVi lll«4Ht4Aiii v/vwii
properly.
Keep it handy for answers to your
questions.
If you don’t understand something
or need more help, write (include
your phone number):
Consumer Affairs
General Electric Company
Appliance Park
Louisville, KY 40225
and serial numbers.
You’ll find them on a label located
inside the oven on the left side. See
page 4.
These numbers are also on the
Consumer Product Ownership
Registration Card that came with
your oven.
"Piics#! €»11 iisiricjr tfiie isnrillsìTif
the installer show you the
location of the oven gas cut-off
valve and how to shut it off if
necessary.
pro^rly grounded by a qualified
insteller, in accordance with the
Installation Instructions. Any
adjustment and service should be
performed only by qualified gas
technicians.
Help us
help you
Before sending in this card,
please write these numbers here:
'a 1 to 1«
Model Number
Serial Number
Use these numbers in any
correspondence or service
calls concerning your oven.
if you received
a damaged oven...
Immediately contact the dealer (or
builder) that sold you the oven.
Write down the model
Save time and money.
Before you request
service...
Check the Problem Solver on
page 15. It lists minor causes of I
operating problems that you can
correct yourself.
IMPOKTANT SAFETY INSTRUCTIONS
MJLA A.filJBUJKa'JL
® When you get your oven have
® Have your oven installed and
range installers or service
® Plug your oven into a 120-voIt
grounded outlet only. Do not
remove the round grounding prong
from the plug. If in doubt about the
grounding of the home electrical
system, it is your personal
responsibility and obligation to
have an ungrounded oudet replaced
with a properly-grounded threeprong outlet in accordance with
the National Electrical Code. Do
not use an extension cord with
this appliance.
® Be sure all packing materials
are removed from the oven before
operating it, to prevent fire or
smoke damage should the packing
material ignite.
® Be sure your oven is correctly
adjusted by a qualified service
technician or Installer for the
______
i* J —
iy|jse ui gias ui j un/ j
which it is to be used. Gas can
be converted from one type to the
other. See Installation Instructions.
rr:T-'V
ii
II
Page 3

iPORTANT SAFETY INSTRUCTIONS (continued)
^Using ibiir Oven
® Don^i leave children alone or
unattended where an oven is
hot or in operation. They could
be seriously burned.
® Don’t allow’ anyone to climb,
stand or hang on the door or
broiler compartment. They
could damage the oven and even
tip it over causing severe personal
injury.
® CAUTION: DO NOT STORE
ITEMS OF INTEREST TO
CHILDREN IN CABINETS
ABOVE AN OVEN-CHILDREN
CLIMBING ON THE OVEN TO
REACH ITEMS COULD BE
SERIOUSLY INJURED.
® Never wear loose fitting or
hanging garments while using
the appliance. Flammable
material could be ignited if
)rought in contact with flame or
Tiot oven surfaces and may cause
severe burns.
® Never use your appliance for
warming or heating the room.
Prolonged use of the oven without
adequate ventilation can be
hazardous.
® Do not use water on grease
fires. Never pick up a flaming
pan. Turn off burner, then smother
flaming pan by covering pan
completely with well fitting lid,
cookie sheet or flat tray. Flaming
grease outside a pan can be put
out by covering with baking soda
or, if available, a multi-purpose
dry chemical or foam.
® Do not store йшшГшЫе materials
in an oven.
® Do not lei cooking grease or
other flammable materials
accumulate in or near the oven.
® Do not use oven for a storage
area.
® Stand away from the oven
when opening oven door. The
hot air or steam which escapes
can cause burns to hands, face
and/or eyes.
® Keep oven free from grease
buildup.
* Place oven shelves in desired
position while oven is cool.
® Pulling out shelf to the shelf
stop is a convenience in lifting
heavy foods. It is also a precaution
against burns from touching
hot surfaces of the door or oven
walls.
® Don’t use aluminum foil
anywhere in the oven except as
described in this book. Misuse
could result in a fire hazard or
damage to the range.
® Don’t heat unopened food
containers in the oven. Pressure
could build up and the container
could burst causing an injury.
® Use only glass cookware that
is recommended for use in gas
oven.
®When using cooking or
roasting bags in oven, follow
the manufacturer’s directions.
® When cooking pork, follow
our directions exactly and always
cook the meat to at least 170°F.
This assures that, in the remote
possibility that trichina may be
present in the meat, it will be
killed and meat will be safe to eat.
® Always remove broiler pan
from broiler compartment as
soon as you finish broiling.
Grease left in the pan can catch
fire if oven is used without
removing the grease from the
broiler pan.
® When broiling, if meat is too
close to the flame, the fat may
ignite. Trim excess fat to prevent
excessive flare-ups.
® Make sure broiler pan is in
place correctly to reduce the
possibility of grease fires.
® If you should have a grease
fire in the broiler pan, turn off
oven, and keep drawer closed to
contain fire until it burns out.
® Clean only parts listed in this
Use and Care Book.
® Keep oven clean and free of
accumulations of grease or
spillovers which may ignite.
If You Need Service
® Read ’’The Problem Solver”
on page 15 of this book.
® Don’t attempt to repair or
replace any part of your oven
unless it is specifically
recommended in this book. All
other servicing should be referred
to a qualified technician.
SAVE THESE
INSTRUCTIONS
Page 4
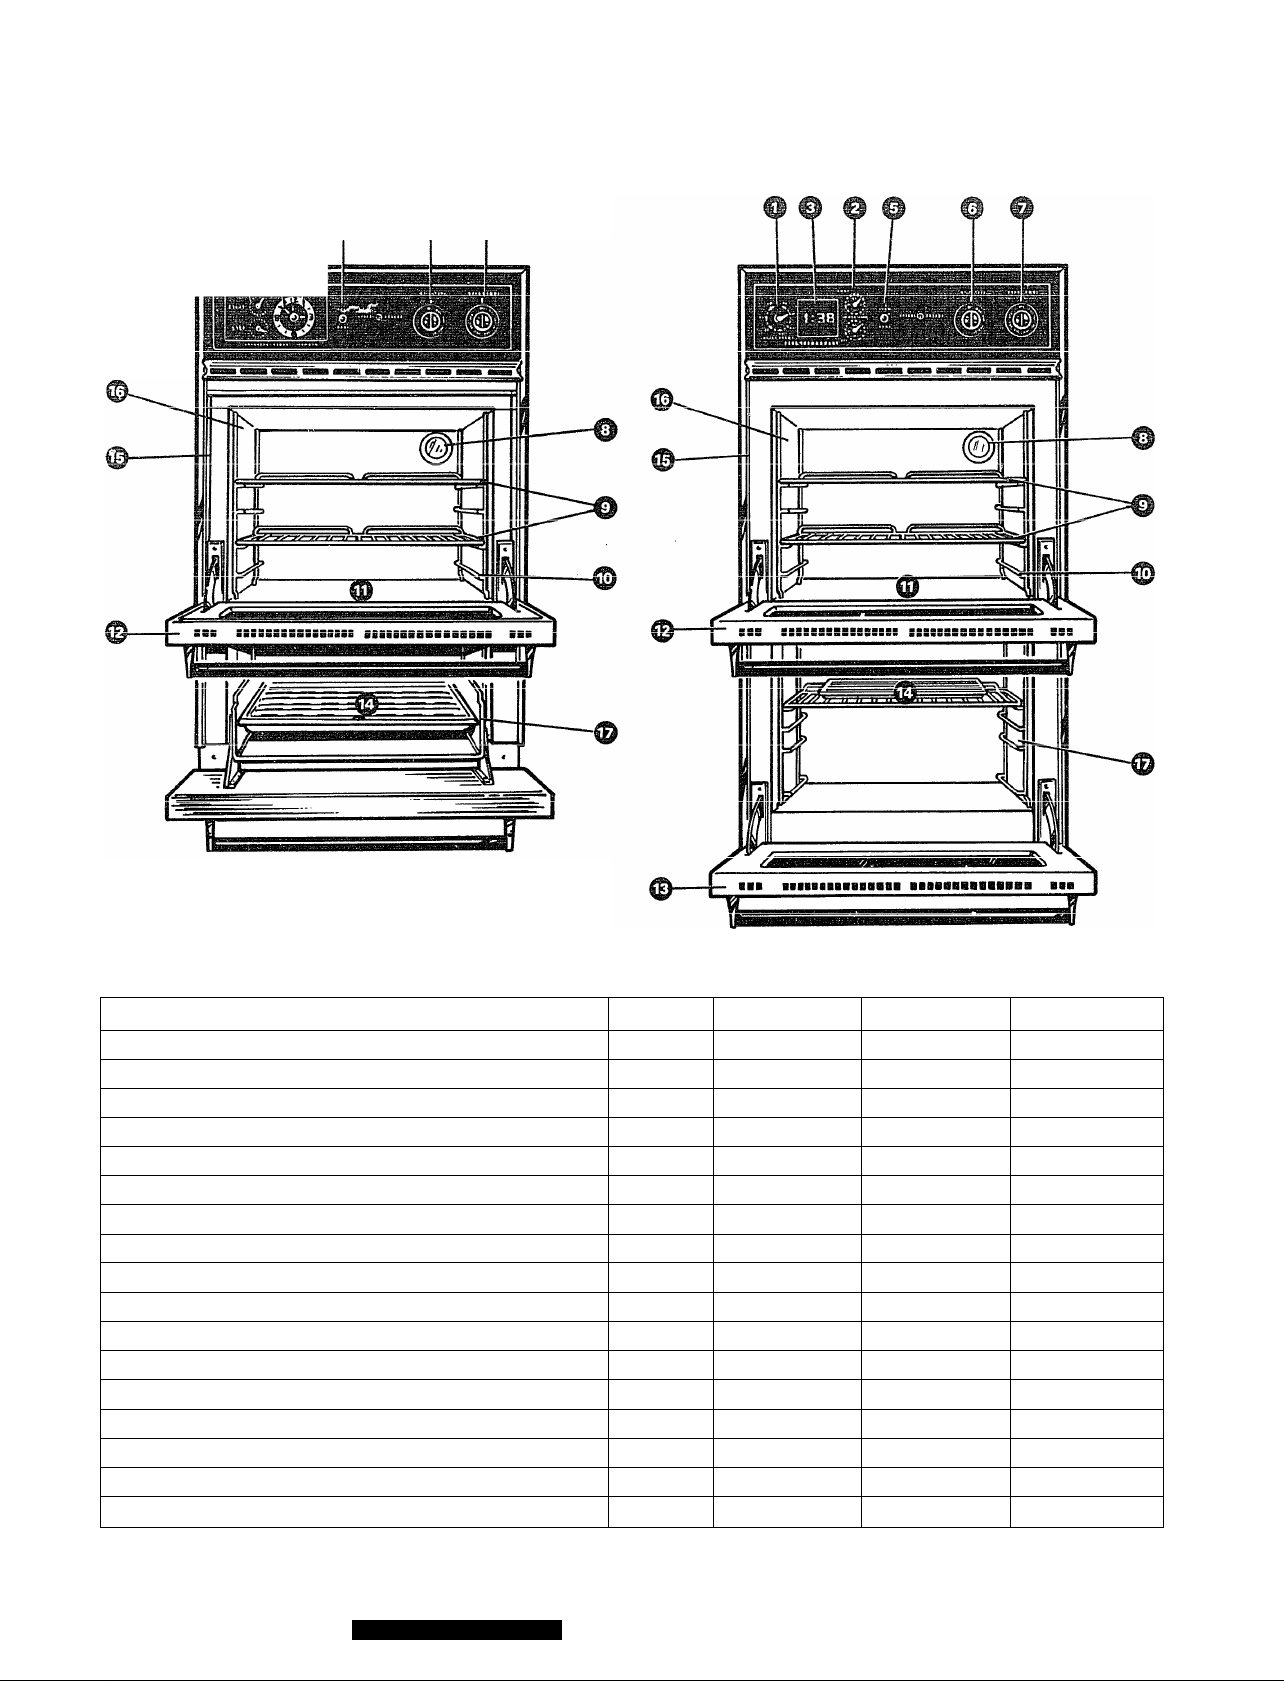
Features of Your Oven
'???? 9 0
Models JGKS15GEH (Standard Oven)
JGKC15GEH (Conilnnous=C!eaning Oven)
Feature Index
1 Minute Timer
2 Automatic Oven Timer
3 Digital Electric Clock
4 Radial Electric Clock
S Ovf^n T iaht Slwitrh
6 Oven Set Knob
^
nRamr^ n/^V\
/
VWll X'VllV/L/
8 Oven Interior Light 6
y V^VC^ll
10 Oven Shelf Supports
11 Removable Oven Bottom
12 Removable Oven Door
13 Removable Broiler Compartment Door
14 Broiler Pan and Rack
15 Model and Serial Numbers
16 Continuous-Cleaning Oven Interior 11
17 Broiler Compartment
Model JGKC16GEH (Continuous-Cleaning Oven)
See page
5
5
5
5
6
5
vr
<
KJ
6
1
^
IL
12 ,
12
10, 13
2
10, 13
JGKS15GEH JGKC15GEH
9
9
9
9 9 9
9
9
9 9 9
9 9
9 9 9
w
9 9 9
9
9
9 9
•
•
•
9
0
0 0
9 9
9 9
9 9
JGKC16GEH
9
9
9
9
9
A
9
9
Page 5
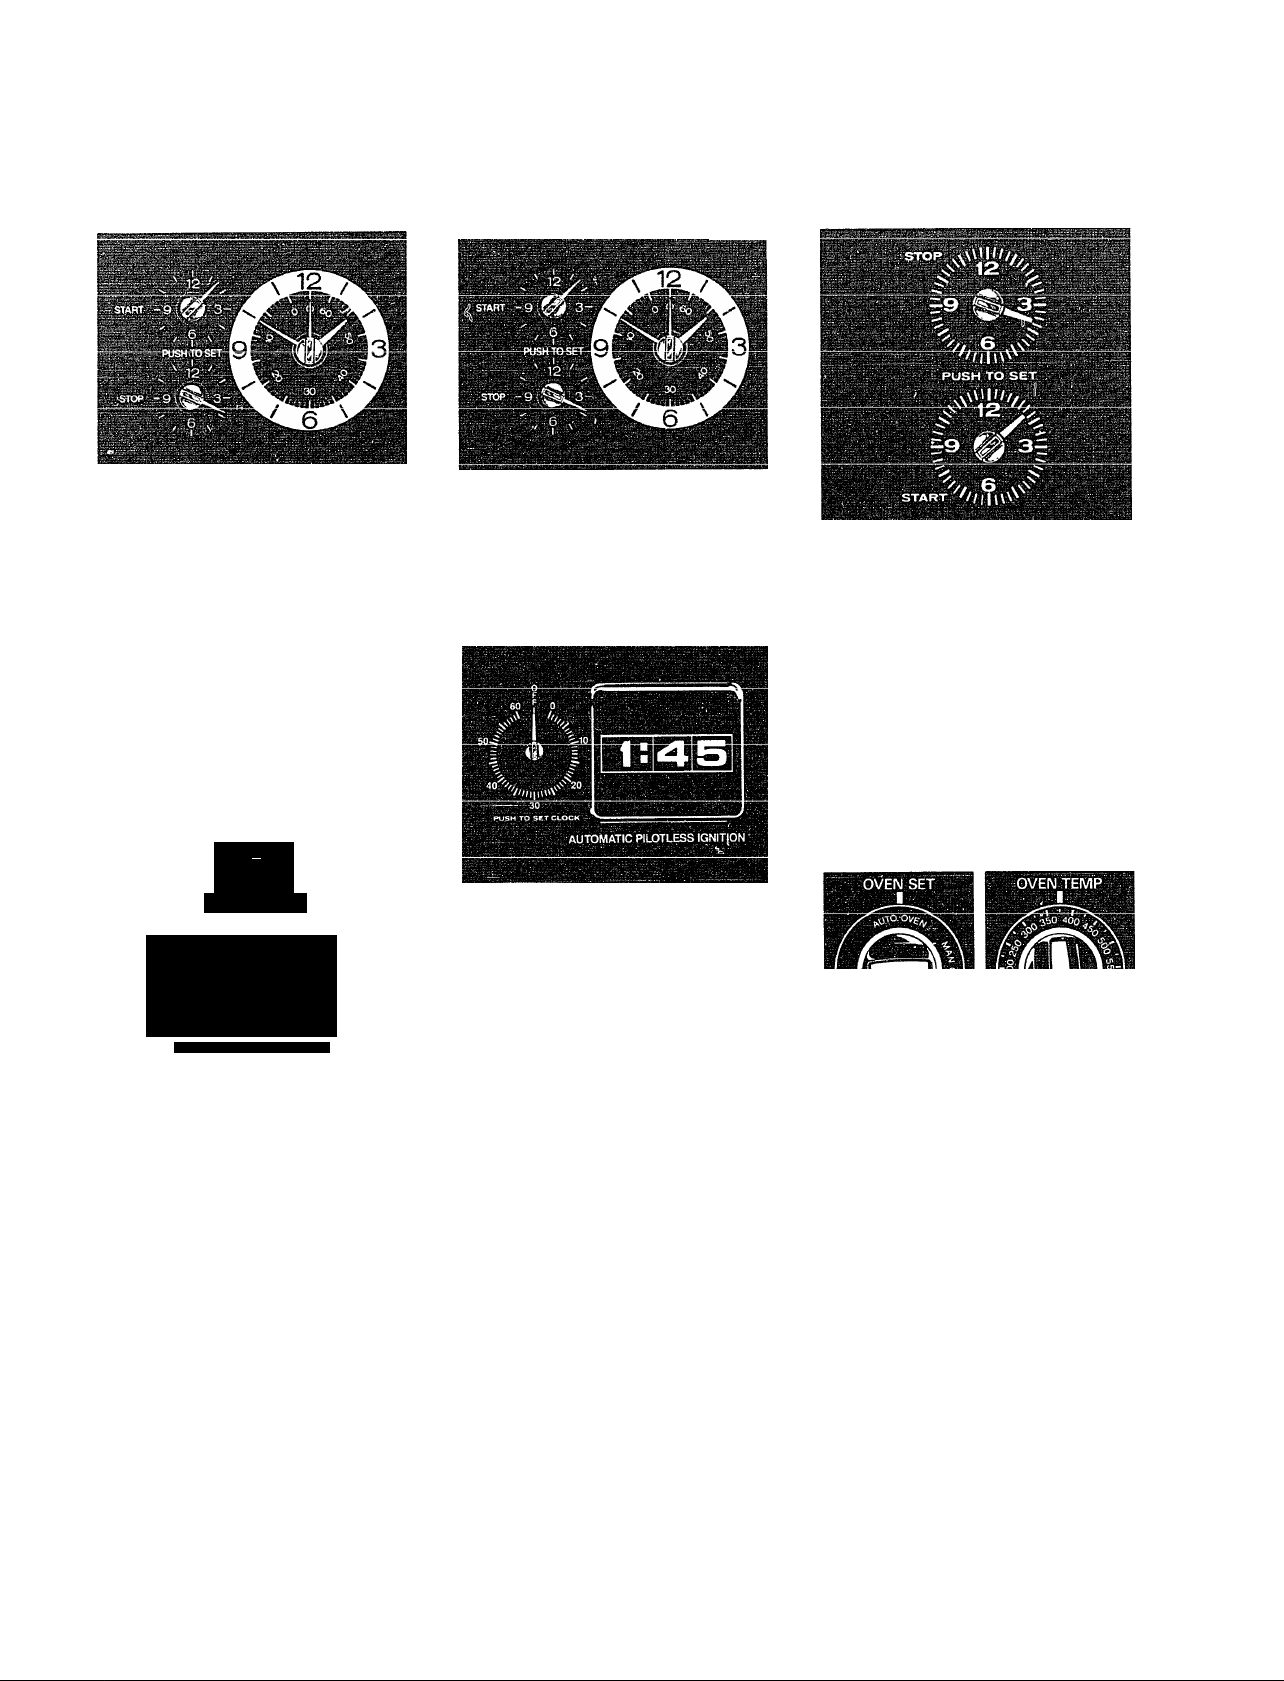
Minute Umei^ Automatic Oven Timer and Clock
'Miiiiìte Timer
JGKS15GEH & JGKC15GEH
The Minute Timer has been
combined with the oven clock. Use
it to time all your precise cooking
operations. You’ll recognize it as
the pointer which is different in
color than the clock hands.
Minutes are marked up to 60 on the
center ring of the clock.
To set the Minute Timer, turn the
knob to the left, without pushing in,
iuntil the pointer reaches the number
T 1170nt fri timA
i W«11C WJ
o
F
60 0
aA I h/
'
...
I PUSH TO SET CLOCK
Model JGKC16GEH
The Minute Timer is the large dial
to the left of the digital clock. Use
it to time all your precise cooking
operations. This dial also changes
the diiJital clock.
To set the Minute Timer, turn
if/il- VnrvK r>1r»r'V'\X/icf‘ \Alithnilt
pushing in, until the pointer reaches
the number of minutes you want to
time (up to 60).
.4t the end of the time set on
either Minute Minder, a buzzer
founds to tell you time is up. Turn
the Icnob, without pushing in, until
the pointer reaches OFF and the
buzzer stops.
The Clock
i ■’I
JGKS15GEH & JGKC15GEH
To set the Clock, push the knob m
and turn the clock hands to the
right to the correct time. Then let
the knob out and continue turning
to OFF.
Model JGKC16GEH
To set the Clock, push in the center
knob of the Minute Timer and turn
the knob in either direction to set
the digital clock numerals to the
correct time. (After setting the
clock, let the knob out and turn the
Minute Timer nointer to OFF)
Automatic Oven Timer
ims timer win automatically start
and stop your oven for you. Here’s
what vou do:
1. Make sure both your oven clock
1/4 tV«i> CTA PT /4iii1 clin«/ tliA r>nrri»r't
time of day. When the START knob
is pushed in and turned, it will “pop”
into place when the time shown on
the oven clock is reached.
kJL VfrXMJL kJAXV/*
2. Set the START control. Push in
and turn the START knob to the
time you want the oven to turn itself
on. (If you want it to start cooking
immediately, do not set the Start
time.)
3. Set the STOP control. Push in
and turn the STOP knob to the time
\//-iii «rant tVw=> nv#»n tn turn itcplf nfr
JVJKA
.........
....................... ■■ .............................— -
rMXXV VAt
Note: There must be at least a half
hour difference between the START
and STOP dials for the automatic
control to work.
4. Set the OVEN SET knob to
AUTO OVEN.
5. Set the OVEN TEMP knob to
the desired cooking temperature.
Now the oven will turn itself on
immediately or at a later Start time
that you set, cuuk at the temperauire
----------
you selected and turn itself off at
the StOD time vou selected.
After taking food out of the oven,
be sure to turn the OVEN TEMP
control to off and the OVEN SET
knob to the MAN. OVEN setting
where it should be kept for normal
oven use.
Page 6

Using ììmr Oven
Aiitoiiiaiic Ignition
The oven and broiler burners on
your oven are lighted by electric
ignition eiiniinatin® the need for
standing pilot lights with constantly
burning flame.
CAUTION: DO NOT MAKE ANY
ATTEMPT TO OPERATE THE
ELECTRIC IGNITION OVEN
DURING AN ELECTRICAL
iTKJyy XVCiiUlUpUUU
of electrical power when OVEN
TEMP control is in any position
other than OFF will result in
automatic ignition of the oven
burner and could cause severe
burns if, at the time, you were
attem,pting to light the burner with
a match.
To Light the Oven Burner
Turn the OVEN TEMP knob to the
desired temperature. The burner
should ignite within 60 seconds.
Air Adjustment
An air adjustment shutter for the
oven burner regulates the flow of air
to the flame.
Remove the broiler pan and rack,
pull the broiler compartment drawer
out to the “stop” position or remove
LllC UlUllCl V^Ullipai OllV^lX
you’ll find the shutter against the
back wall of the compartment.
T7A TT TTrir? T» ^ ^^ .
screw and rotate the shutter to allow
more or less air into the burner tube
as needed.
When the right amount of air
flows into the burner, the flame
should be steady, with approximately
1-inch blue cones and should not
extend out over the baffle edges.
Before Using Your Oven
1. Look at the control. Be sure you
understand how to set it properly.
2. Check the inside of the oven.
Look at the shelves. Practice
removing and replacing them
while the oven is cool.
3. Read the information and tips
on the following pages.
4. Keep this book handy where you
can refer to it—especially during
thp. first few weeks of eettinn
acquainted with your oven.
---
^-^
Oven Temperature Control
T'Vwi rW/TnM T'r?X/fP or*nf-rr»l ic
± IIV T JL^i. ^ A J^JLTAX V/A
located on the upper oven control
panel.
OVEN TEMP
Oven Shelves
The shelves are designed with
stop-locks so when placed correctly
on the shelf supports, they will stop
before coming completely out of
luc uvcii aiiu will iiwt tilt wiiwii jt^t*
are removing food or placing food
on them.
When placing cookware on a shelf,
pull the shelf out to the “stop”
position. Place the cookware on
the shelf, then slide the shelf back
nPl^ic \i;i 11 ¿3klimir%ati3k
llltu til& v^vt/ii* A mo will wiiiiiiiicitw
reaching into the hot oven. ^
TV» r/>mra/f» tViA ciif»lvp« fmm thp nvp.rrl
for cleaning, pull out to stop
position, lift up on front and pull
them out.
Shelf Positions
The oven has four shelf supports—
A (bottom), B, C and D (top). Shelf
positions for cooking are suggested
On Baking and Roasting pages.
Oven Light
filf
To adjust the flow of air to the
burner, loosen the Phillips head
Use switch on control panel to turn
light on and off.
Simply turn tne khod to ine aesireu
cooking temperatures, which are
marked in 25 °F, increments on the
dial. It will normally take 30 to 60
seconds before the flame comes on.
After the oven reaches the selected
temperature, the oven burner cycles
off completely, then on with a full
flame to keep the oven temperature
rnntrnllp.d
Page 7

Baking
How to Set Your Range
for Baking
L Position the shelf or shelves in
the oven.
TEMP knob to desired temperature
and preheat oven for about 10
minutes if preheating is necessary.
3. Place food in oven on center of
shelf. Allow at least an inch between
edge of bakeware and oven wall or
adjacent utensils.
If cooking on two shelves at the
same time, place shelves about 4
inches apart and stagger food on
them.
4. Check food for doneness at
minimum tim.e on recipe. Cook
longer if necessary. Switch off
heat and remove food.
JVeheating
’reheating is important when using
temperatures below 225°F. and
when baking foods such as biscuits,
cookies, cakes and other pastries.
Preheating is not necessary when
roasting or for long-time cooking
mACilc
Shelf Positions
Most baking is done on the second
1-»
.-N 1 y-V
MICU pUisUlUll llUlll lilC^ UULlUlll.
When baking three or four items,
use two shelves positioned on the
second and fourth sets of supports
(B & D) from bottom of oven.
Bake angel food cakes on first shelf
position (A) from bottom of oven.
Baking Tips
® Follow a tested recipe and
measure the ingredients carefully.
If you are using a package mix,
follow label directions.
® If moisture is noticeable on the
front of the oven or on the oven
window when first turning on the
r\^.ran tViA rw;An Hnnr iiinr fnr it
few minutes or until the oven is
warm.
® Do not open the oven door during
a baking operation—heat will be
lost and the baking time might need
to be extended. This could cause
poor baking results.
® Do not disturb the heat circulation
in the oven with the use of aluminum
foil. If foil is used, place a small
chp>pt r»f it nhmit in hv 17 inrhf».«; at
...............
'j
..............
the most, on a lower shelf several
inches below the food. Do not
place foil on the oven bottom.
Common Baking Problems
and Possible Solutions
PIES
Burning around edges
® Oven too full; avoid overcrowding.
® Edges of crust too thin.
® Incorrect baking tem.perature.
Bottom crust soggy and unbaked
A All t 1 Til 11 r\r»
/AiAUW iiiiiug
sufficiently before filling pie shell.
® Filling may be too thin or juicy.
® Filling allowed to stand in pie
shell before baking. (Fill pie shells
and bake immediately.)
® Ingredients and proper measuring
affect the quality of the crust. Use a
/-> « -P**^«-**-» ♦■l*»
tested recipe and good technique.
Make sure there are no tiny holes
or tears in a bottom crust. “Patching”
a \Ji^ v^uuiu owaiviiig.
Pie nUing runs over
® Top and bottom crust not well
sealed together.
® Edges of nie crust not built un
--------o
------
----
~ I
------
----------------
high enough.
® Too much filling.
® Check size of pie plate.
Pastry is tough; crust not flaky
® Too much handling.
® Fat too soft or cut in too fine.
T^_11 J
_______
lYUii auugil li^nuy culu imiiuic ¿ts
U
little as possible.
" A
_____
3 U
___
CAKES ^ ^
Cake rises higher on one side
® Batter spread unevenly in pan.
® Oven shelves not level.
® Using warped pans.
® Incorrect pan size.
Cakes cracking on top
® Check oven temperature.
® Batter too thick, follow recipe
or exact package directions.
^ /11
___
1. r
• v.^necK lur piupci SUCH pcsiuuu.
___________
® Check pan size called for in recipe.
• Improper mixing of cake.
Cake falls
® Too much shortening; sugar or
liquid.
® Check leavening agent, baking
powder or baking soda to assure
freshness. Make a habit to note
Avniratinn nf niif'li'aapd
WyV^JUL V4VAV/AA Vi
ingredients.
® Cake not baked long enough or at
correct temperature.
• If adding oil to a cake mix, make
to •I'Ka or»H
tllt^ lO UIV/
amount specified.
<urusi is nara
® Check temperature.
® Check shelf position.
Cake has soggy layer or streaks
f»t hnttQm
• Undermixing ingredients.
® Shortening too soft for proper
creaming. '
® Too much liquid.
COOKIES & BISCUITS
Doughy center; heavy crust on
surface
a i~'V\t3.nXr ti»mnArQtnrp>
' V^'AIWWAV AV/AAA^WXU.i.UlL Wa
® Check shelf position.
® Follow baking instructions
carefully as given in reliable recipe
or on convenience food package.
® Flat cookie sheets will give more
even baking results. Don’t overcrowd
foods on a baking sheet.
® Convenience foods used beyond
their expiration date.
Browning more noticeable on
one side
® Oven door not closed properly,
check gasket seal.
A oViOkl-f
Page 8

Baking Chart
1. Aluminum pans conduct heat quickly. For most
conventional baking, light, shiny finishes give best results
because they help prevent over-browning in the time it
takes for heat to cook the center areas. We recommend
dull (satin-finish) bottom surfaces of pans for cake pans
and pie plates to be sure those areas brown completely.
Food
Bread
Biscuits ('/^-in. thick)
Coffee cake
Com bread or muffins
Gingerbread
Cookware
Shiny Cookie Sheet
Shiny Metal Pan with
satin-finish bottom
Cast Iron or Glass Pan
Shiny Metal Pan with
Positions
SQtin-iiniSii uGttGui
Muffins
Popovers
Quick loaf bread
Yeast bread (2 loaves)
Plwin rolls
Sweet rolls
Cakes
^WIUIUL
Angel food
Jelly roll
Cakes
Bundt cakes
Cupcakes
Fruit cakes
Layer, chocolate
Loaf
Cookies
BrOwîîicS
Drop
Rolled or sliced
Fruits,
Other Desserts
Baked apples
Custard
Puddings, rice
and custard
Pies
Frozen
Meringue
One crust
Two crust
Pastry shell
Miscellaneous
Baked potatoes
Scalloped dishes
Souffles
Shiny Metal Muffin Pans
Deep Glass or Cast Iron Cups
Metal or Glass Loaf Pans
Metal or Glass Loaf Pans
Shiny Oblong or Muffin Ptns
Shiny Oblong or Muffin Pans
Aluminum Thbe Pan
Metal Jelly Roll Pan
nr r'iariimir' Pan
Metal or Ceramic Pan
oiiiiiy mcuu muiuii rall^
Metal or Glass Loaf or
Tübe Pan
X/Tatol Dnr. ..Mtt,
iTjiwiAi J. ail wivii
satin-finish bottom
Shiny Metal Pan with
satin-finish bottom
Metal or Glass Loaf Pans
iVACuli vjiadd A ana
riloon D„..o
Cookie Sheet
^Qnjrig Sheet
Cookie Sheet
Glass or Metal Pans
Glass Custard Cups or
Casserole (set in pan of hot water)
Glass Custard Cups or
Casserole
Foil Pan on Cookie Sheet
Spread to crust edges
Glass or Satin-finish Metal
Glass or Satin-finish Metal
Glass or Satin-finish Metal
Set on Oven Shelf
Glass or Metal
Glass
A, B,C
A, B, C
A, B,C
B, c
B, A
B
B
A, B
B
B
A, B
h; B
B, A
A, B
B
A, B
R
B
B
E C
bÍc
E, C
b[c
B
A
B, A
A,B
B
B
B
2. Dark or non-shiny finishes, also glass and pyroceram,
ge lerally absorb heat which may result in dry, crisp
ViUOld. XX^iaUW liWClL X . Ai. AA^ll'^.'W'A V^A VAOI.O «.* w
l-iciot if lirrHtiAr r*riictc
desired. Preheat cast iron for baking some foods for rapid
browning when food is added.
Temperatures
4UU“-4/0”
350°-400°
400°-450“
350°
400°-425°
375°
350°-375°
375°-425°
375°-425°
350°-375°
325°-375°
375°-400°
37S°-350°
325°-350°
TCrVO
275°-300°
35Q°-375°
350°-375°
350°
325°=350°
350°-400°
400°-425°
375°-400°
350°-400°
300°-350°
325°
400°-425°
325°-350°
400°-425°
400°-425°
450°
325°-400°
325°-375°
300°-350°
jniliC)
Minutes
o-zu
20-30
20-40
45-55
20-30
45-60
45-60
45-60
10-25
20-30
30-55
10-15
45-60
45-65
20=25
2-4 hrs.
20-35
25-30
40-60
25-35
10-20
6-12
7-12
30-60
30-60
50-90
45-70
15-25
45-60
40-60
12-15
60-90
30-60
30-75
Comments
cannea, reingeraiea oiscUUS laKe lo h
minutes less time.
Preheat cast iron pan for crisp crust.
Decrease about 5 minutes for muffin mix.
Or bake at 450°F. for 25 minutes, then at
350°E for 10 to 15 minutes.
Dark metal or glass gives deepest
browning.
For thin rolls, Shelf B may be used.
For thin rolls, Shelf B may be used.
____
Two piece pan is convenient.
Line pan with waxed paper.
Paper liners produce more moist crusts
Use 300°F. and Shelf B for small or
individual cakes.
Bur cookies from mix use ssme time.
Use Shelf C and increase temperature
25 to 50°F. for more browning.
Reduce temperature to 300°F. for large
custard.
Cook bread or rice pudding with custard
base 80 to 90 minutes.
Large pies use 400°F. and increase time.
To quickly brown meringue use 400°F. for
8 to 10 minutes.
Custard fillings require lower temperature,
longer time.
Increase time for large amount or size.
Page 9

Roasting
basting is cooking by dry heat.
Tender meat or poultry can be
roasted uncovered in your oven.
Roasting temperatures, which
should be low and steady, keep
spattering to a minimum. When
roasting, it is not necessary to sear,
baste, cover, or add water to your
meat. Roasting is easy, just follow
thpcf* «tpn«'
Step 1. Position oven shelf at
f'**1/-i + ZTD’\
C>tCUllU liuin UULIUUI pusiliuil \UJ lUl
small size roast (3 to 5 lbs.) and at
bottom position (A) for larger
roasts.
Step 2: Check weight of roast.
Place meat fat-side-up or poultry
breast-side-up on roasting rack in a
shallow pan. The melting fat will
baste the meat. Select a pan as
close to the size of meat as possible.
(Broiler pan with rack is a good
pan for this.)
Step 3: Turn OVEN TEMP control
to desired temperature. Check the
Roasting Chart for temperatures
aiiu appiv/Aiiiiatw tiiiivo.
1 fv*»rif/a
Lr
1 nrr ♦■tTV»<ac'
Step 4: Most meats continue to
cook slightly while standing after
being removed from the oven. For
rare or medium internal doneness,
if meat is to stand 10 to 20 minutes
while making gravy or for easier
carving, you may wish to remove
meat from oven just before it is
done. If no standing is planned,
rnnk mp.at tn snapp.stp.d
temperature.
Frozen Roasts
Frozen roasts of beef, pork,
lamb, etc., can be started without
thawing, but allow 10 to 25 minutes
per pound additional time (10
minutes per pound for roasts under
^ iT^/4c r-ryr\r*£^ fimii F/^T" lor»r»iaT-
U IWl Aai^Wi
roasts).
Thaw most frozen poultry before
roasting to ensure even doneness.
Some commercial frozen poultry
can be cooked successfully without
thawing. Follow directions given
r\rt 1oV\o1
Roasting Chart
Type
Meat
Tender cut.s; rib, high quality
Lamb leg or bone-in shoulder*
Veal shoulder, leg or loin*
R'lK loin, rib or shoulder*
, , 11
«am, pre-cooKea
Ham, raw
*For boneless rolled roasts over 6-inches
thick, add 5 to 10 minutes per lb. to times
given above.
Poultry
Chicken or Duck
Chicken pieces
Turkey
Oven
Temperature
325°
325°
325°
325°
325°
325° Well Done:
375°
325°
Doneness
Rare;
Well Done:
Rare: 21-25
ivicuiUiii'
Well Done:
Well Done:
Well Done:
Well Done: 20-30
Well Done: 35-40
Well Done: 20-25
111 yyi •
lU Wcuill.
Approximate Roasting Time
in Minutes per Pound
3 to 5-lbs.
24-30
35-45
30-35 28-33
35-45 30-40
35-45
* • It / »1
lu iiiuiuics ^ci lu. (any vvcigni)
Under 10 lbs.
3 to 5-lbs.
35-40
10 to 15-lbs.
6 to 8-lbs.
18-22 130°-140°
28-33
20-23 130°-140°
30-40 170°-180°
10 to 15-lbs.
17-20
Over 5 lbs.
30-35 185°-190°
Over 15 lbs. In thigh:
15-20 185°-190°
Internal
Temperature °F
____
i<;n°-1tsn°
17t.°-185°
i,jv.; -luu
170°-185°
170°-180°
I'iCO 1-ino
160°
185°-190°
__
Page 10

Broiling
Broiling is cooking food by direct
heat from above the food. Your
range has a convenient compartment
below the oven for broiling. It also
has a specially dS; dgned broiler pan
and rack that allow dripping fat to
drain away from the foods and be
kept away from the high heat of
the gas flame.
Distance from the heat source may
be changed by positioning the broiler
[juii ¿uiu laciv uu uiit; oiiv^ii
positions in the broiler compartment-
A (bottom of broiler compartment),
B (middle) and C (top).
How to Broil
1. If meat has fat or gristle near the
edge, cut vertical slashes through it
about 2 inches apart, but don’t cut
into meat. We recommend that you
trim fet to prevent excessive smoking,
leaving a laver about 1/8-inch thick.
2. Remove broiler pan and rack
frr»m hrr»ilpr mmniirtmpnt and
place food on rack.
run UUL UlUllCl Uiawt'l U1
shelf and position broiler pan in
compartment. Placing food closer to
flame increases exterior browning of
food, but also increases spattering
and the possibility of fats and meat
juices igniting.
4. Close broiler door and, for most
foods, turn OVEN TEMP knob to
BROIL. Exceptions are chicken
and ham which are broiled at a
lower setting in order to cook food
through before overbrowning it.
5. Turn most foods once during
cooking; (the exception is thin fillets
of fish; oil one side, place that side
down on broiler rack and cook without
turning until done). Time foods for
about one-half the total cooking
time, turn food, then continue to
cook to preferred doneness.
6. Turn OVEN TEMP knob to
OFF. Remove broiler pan from
compartment and serve food
immediately. Leave pan outside
compartment to cool.
-
-----------
Broiling Tips
® Broiling is usually done with oven
and broiler doors closed. However,
if you like your steaks very rare
inside and charred on the outside,
leave the oven door slightly ajar.
Food
Bacon
Ground Beef
Well Done
Beef Steaks
Rare
Medium
Well Done
Rare
Medium
Well Done
Chicken (450°)
Bakery Products
Bread (Toast) or
•TV.X
lUilMCl rdMl iCd
English Muffins
Lobster tails
(6 to 8-oz. each)
Fish
Ham slices (450°)
Precooked
Pork chops
Well Done
Lamb chops
Medium
Well Done
Medium
Well Done
Wieners,
sausages,
bratwurst
Quantity
and/or
Thickness
1 / 11-
V2-1U. VULHIUI O
___
thin slices)
1-lb. (4 patties)
'h to %-in. thick
1-in. thick
(1-1'/: lbs.)
i‘/:-in. thick
(2-2'/2 lbs.)
1 whole
(2 to 2'/2-lbs.),
split lengthwise
2-4 slices
1 «Irr.
1 prv^.
2-split
2-4
1-ib. fillets *4 to
'/2-in. thick
1-in. thick
2 C/2in.)
2 (1-in. thick),
about I lb.
2 (1 inch)
about 10-12 oz.
2 (l'/2 inch),
about 1 lb.
1-lb. pkg. (10)
Broil
Po.sition
* O
C
A
A
A
A
A
A
A
C
C
B
C
B 8
A
A
B
B
B
B
1st Side
Minutes
c
® Use tongs to turn meat over—
piercing meat loses juices.
® Steaks and chops should be at
least 1 inch thick for best broiling
results. Pan broil thinner ones.
2nd Side
Time,
1 \L
^ '/i
9-10
30-35
13-16 Do not
Time,
Minutes
9
12
13
10
12-14
15
16-18
25
25-30
2- 3
3- 4
'/2-1
5
10
13
8
10
10
17
6
Comments
3IA
10-12
12-14
Arrange in single layer.
Space evenly. Up to 8 patties
take about same time. —
7-8
n
/
through before browning.
5- 6
8-9
6- 7
turn
over.
Pan frying is recommended.
Slash fat.
Reduce times about 5 to 10
minutes per side for cut-up
chicken. Brush each side with
melted butter. Broil with skin
side down first and broil with
door closed.
Space evenly. Place English
muffins cut-.side-ur> and brush
with butter if desired.
Cut through back of shell, spread
open. Brush with melted butter
before and after half time.
Handle and turn very carefully.
5
Brush with lemon butter before
and during cooking if desired.
Preheat broiler to increase
browning.
Increase times 5 to 10 minutes
8
per side for I'/2-in. thick or
home cured.
4-5
4-7
10
4-6
1-2
iwaa man 1 mvn
Slash fat.
Slash fat.
If desired, split sausages in half
lengthwise into 5 to 6“inch pieces.
Page 11

Care and Cleaning
Proper Ciire uiiu cleaning sre
important so your oven will give
you efficient and satisfactory
service. Follow these directions
carefully in caring for it to help
assure safe and proper rnainienanee.
BE SURE ELECTRIC POWER
IS OFF BEFORE CLEANING
ANY PART OF YOUR OVEN.
Special Care of
Coiitinuoiis-Cleaning
Oven Interior
Models JGKC15, JGKC16
Your oven has a Continuous-
Cleaning oven that cleans itself
while cooking. The inside of the
oven—top, sides, and back—is
finished with a special coating
which cannot be cleaned in the
usual manner with soap, detergents,
commercial oven cleaners, coarse
•aKraciT/i:» r\r r*r\nra=^ KriicVi<ac
CAL/i. ClOl V w V/JL V'WUXOW' i./A V&Ol IWO •
leir use and/or the use of oven
fprays will cause permanent
damage.
The special coating is a porous
ceramic materia! which is dark in
color and feels slightly rough to the
touch. If magnified, the surface
would appear as peaks, valleys, and
sub-surface “tunnels” This rough
finish tends to prevent grease
spatters from forming little beads
or droplets which run down the
side walls of a hard-surface oven
liner leaving unsightly streaks that
require hand cleaning. Instead,
v/hen spatter hits the porous finish
it is dispersed and is partially
absorbed. This spreading action
increases the exposure of oven
soil to heated air, and makes it
somewhat less noticeable.
Soil may not disappear completely
and at some time after extended
usage, stains may appear which
cannot be removed.
special coating works best on
^Ball amounts of spatter. It does
not work well with larger spills,
especially sugars, egg or dairy
mixtures.
The special coating IS not used
on oven shelves. Shelves should be
cleaned outside the oven, to avoid
damage to the special coating.
lU Cleaii the
Continuous-Cleaning Oven:
1. Let oven parts cool before
handling. It is recommended that
nihhpr alnvp*: he^ u/nrn whf^n
---------- -TV.,*-. w..
cleaning oven parts manually.
3. Soil visibility may be reduced by
operating the oven at 450'F. Close
the door and turn OVEN TEMP
knob to 450°E Time for at least 4
hours. Repeated cycles may be
necessary before improvement in
appearance is apparent.
REMEMBER: DURING THE
OPERATION OF THE OVEN, THE
DOOR, WINDOW AND OTHER
CTTDITAr’CC \X7TT T riC'T UrVTn
ayy \jjc. 1 nv-/i
TO CAUSE BURNS. DO NOT TOUCH.
Let THE oven cool before
REPLACING shelves.
4. If a spillover or heavy soiling
occurs on the porous surface, as
soon as practical after the oven has
cooled, remove as much of the soil
as possible using a small amount of
water and a stiff bristle nylon
brush. When using water, use it
sparingly and change it frequently,
keeping it as clean as possible, and
be sure to blot it up with paper
towels, cloths, or sponges. Do not
rub or scrub with oaoer towels.
- - ^ - - - - -----------------------------------------------------------------------------------,
cloths or sponges, since they will
leave unsightly lint on the oven
finish. If water leaves a white ring
on the finish as it dries, apply water
nonin imH hint it with n ennnap«
....V. .... « .........
Starting at the edge of the ring and
working toward the center.
Do not use soap, detergent,
commercial oven cleaner, silicone
oven sprays, coarse steel pads or
coarse brushes on the porous
surface. Th
clog, and mar the porous surface
and reduce its ability to work.
___
1O 11
ÜX/OV WllX
Do not scrape the porous surface
with a knife or spatula—they could
permanently damage the finish.
Porcelain Oven Interior
With proper care, the porcelain
enamel walls will retain their good
looking finish for many years.
Soap and water will normally
do the job. Heavy spattering or
spillovere may require cleaning
with a mild abrasive cleanser. Soapy,
wet pads may also be used. Do not
allow food spills with a high sugar or
acid content (such as milk, tomatoes,
sauerkraut, fruit juices or pie filling)
to remain on the surface. Tney may
cause a dull spot even after cleaning.
Household ammonia may make the
cleaning job easier. Place 1/2 cup in a
shallow glass or pottery container in
a cold oven overnight. The ammonia
fumes will help loosen the bumed-on
grease and food.
If necessary, you may use a caustic
cleaner. Follow the package
directions.
Cautions about using
spray-on oven cleaners:
Be careful where the oven cleaner
is sprayed.
® Do not spray on the electrical
controls and switches (on models so
short circuit and result in sparking
or fire.
A TIrt olIrMi; o -filtYi ftr^m
~ AAVl» CUAV/TT CA XAAIAA AX V7X11 tliw
cleaner to build up on the temperature
sensing bulb—it could cause the
oven to heat improperly. (The bulb
is located at the top of the oven.)
v.aiciuiiy wipe uic uuiu eicmi ctuci
...:
_____
*1... u,,ii
each oven cleaning, being careful
not to move the bulb as a change in
its position could affect how the
oven bakes.
® Do not spray any oven cleaner
on the oven door, handles or any
exterior surface of the oven, wood
or painted surfaces. The cleaner can
dalliagC these SUrfaCCS*
1^
It wv7tiAti vaudw a
_______1________£.____
^0110^0
№
11
Page 12

Care and Cleaning (continued)
Removable Oven Door
The oven door is removable to
make cleaning the oven easier.
To remove the door, open it a few
inches to the special stop position
that will hold the door open. Grasp
1.11 KJii wawii attu iitv viiw viv/v/a
straight up and off the hinges. (Due
to the large amount of insulation
and the construction of the door, it
is heavy.)
Note: Be careful not to place hands
between the spring hinge and the
UVC^ll LlVlV/l llO-lllV. XilW lllll^W VV/UAU
snap back and pinch fingers.
Wijch %1/ith hr»t cnanv wiitpr Pnr
TTC&OIA TT*W** »»V*W*.* * V*
stubborn spots, use a solution of
ammonia and water. Do not
immerse the door in water.
To replace the door, position slots
in bottom of door over the hinges
that are in the “out” position. Then
lower the door slowly and evenly
over both hinges at the same time.
If hinges snap back against the oven
frame, pull them back out.
Model JGKC16GEH also has a
removable broiler compartment
door which may be removed for
cleaning.
Oirla Itft t’VlA
T^l-1^ Vl t nr»0 />/^11 \A
Removable Oven Bottom
The raised section of tne oven
bottom is removable for cleaning.
Take it out of the oven and you can
apply effective cleaners to clean
Up cXCCSSiVc spillovers GT rCIilOVS
baked-on soil—cleaners that should
never be used near the special
porous ceramic oven interior.
To remove the oven bottom:
1. Remove the oven shelves.
2. Lift upward on shelf supports.
Swing bottom of supports toward
center of oven and remove.
down screws at each front corner.
If screws are too tight to remove by
hand, use a screwdriver.
5. Pull the bottom forward and out
of the oven, keeping the rear of the
oven bottom gliding on the bottom
of the lowest shelf glide= This keeps
it from catching on the burner ignitor
shield. To replace the bottom, just
reverse this procedure, making sure
the two tabs on the rear of the oven
l./V/VAV./iiA X»n.vy I.XXW dXWO «.*•. AWVAA.
cm intr» clrttc i»t thp rP»iir
The oven bottom has a porcelain
enamel finish. To make cleaning
easier, protect the oven bottom
from excessive spillovers. This is
particularly important when baking
a fruit pie or other foods with high
aW'lVA VVyilLWIAI.* AXV/K. XXVXXV XXXXXXA^tJ V/X
fruit fillinoc nr
foods that are acid in content such
as milk, tomato or sauerkraut, and
sauces with vinegar or lemon
juice, may cause pitting and damage
lu UlC |.;uiV./C^iaiu ouijiawu.
To protect the oven bottom surface,
nlono o r»i<ar»A nf Qliiminiim fnil
C4 V/X UXUXXXXXXVAXAX XK.'XX
slightly larger than the baking dish
or small cookie sheet on a lower ^
rack or under the baking dish to ^
catch any boilovers. It should not
C'Uvci iii^ lawivao mio
would cause uneven heat in the
oven. Aluminum foil should not
be placed on the oven bottom.
If a spillover does occur on the
oven bottom, allow the oven to cool
first. You can clean the bottom with
uiiu wuici, a iiuiu auiaoivc^
cleanser, soap-filled abrasive pads,
or caustic oven cleaner following
manufacturer’s directions.
When applying oven cleaner,
be carefiil not to get it on the
countertop, floor, continuouscleaning oven parts or any other
Clirfijr“#»
7CXX XVXWV'*
Note: Porcelain oven door liner and
oven bottom may be cleaned with a
commercial oven cleaner. They
must be removed and cleaned away
from the oven to prevent damage to
the continuous-cleaning oven liner.
4. Place your fingers in the slots in
the bottom and lift up the front
edge of the oven bottom until it is
clear of the oven front frame.
12
Page 13

K'eii Shelves
Oven shelves may be cleaned with
a mild abrasive cleanser following
manufacturer’s directions. After
cleaning, rinse the shelves with clean
water and dry with a dry cloth. To
remove heavy, bumed-on soil, soapy
metal pads may be used following
manufacturer’s directions. After
scrubbing, wash with soapy water,
rinse and dry.
Broiler Pan & Rack
After broiling, remove the broiler
rack and carefully pour off the
grease. Wash and rinse the pan
and rack in hot, soapy water.
If food has burned on, sprinkle
the broiler rack while hot with
detergent and cover with wet paper
towels or a dish cloth. That way,
burned-on foods will soak loose
while the meal is being served.
not store a soiled broiler pan
’ rack in the oven or broiler
compartment.
Oven Light Bulb
Replacement
Before replacing any light bulb,
disconneci eieciric power to the
range at the main fuse or circuit
breaker panel. Let the bulb cool
completely before removing it. Do
not touch a hot bulb with a damp
cloth—the bulb will break.
The light bulb in your oven is
located in the upper right corner
Reach in and unscrew it aft
precautions mentioned above.
Replace it with a high-temperature
appliance bulb of the same wattage.
_
Lwi laivliig
Adjusting the
Oven Therniostai
The temperature control in your
new oven has been carefully adjusted
to provide accurate temperatures.
How'ever, if this oven has replaced
one you have used for several years,
you may notice a difference in the
degree of browning or the length
of time required when using your
favorite recipes. Oven temperature
controls have a tendency to “drift”
over a period of years and since
luid uiiiL giauuai, u uui
readily noticed. Therefore, you
may have become accustomed to
your previous oven which may
have provided a higher or lower
temperaiure than you selected.
Before attempting to have the
i£rnp6raiUr6 of your Ìi6w 0V6ÌÌ
changed, be sure you have followed
the baking time and temperature of
the recipe carefully. Then, after
you have used the oven a few times
and you feel the oven is too hot
or too cool, there is a simple
adjustment vou can make vourself
on the OVEN TEMP knob.
Pull the knob off the control shaft
and look at the back side. There is
a disc in the center of the knob skirt
with a series of notches on the inner
edge next to the knob shaft. One of
these notches is positioned over a
pointer on the side of the knob shaft.
Note position of
pointer to notches
before adjustment
Note which notch the pointer is
located in. To make an adjustment,
carefully loosen (approximately
one turn), but do not completely
remove the two screws that hold the
skirt to the knob. Hold the knob in
one hand and with the other hand
carefully tilt the skirt until the notch
in the disc clears the pointer on the
knob shaft. .
To raise the oven temperature, turn
UiC UlUl 111 LUC UllCCUUU KJl UiC
arrow for “Raise.” To lower the
temperature, turn the dial in the
direction of arrow for “Lower!’
Each notch will change the oven
temperature approximately 25'F.
We suggest that you make the
adjustment one notch from the
original setting and check oven
performance before making any
additional adjustments.
After the adjustment is made, make
sure the pointer on the knob shaft
is aligned with the notch in the disc.
Press skirt and knob together and
retighten screws so they are snug,
but be careful not to overtighten.
Re-install knob on range and
check performance. Note: After
an adjustment has been made the
“Off” and “Broil” positions will
not line up with the indicator mark
on the control panel as they
previously did. This condition
is normal and will not create
a problem.
i:
>i\ Loosen oniy the
locking screws
n
(continued next page)
Page 14

Cleaning Guide
Note: Let range parts cool before cleaning.
F.\R1
Broiler Pun and Rack
Control Knobs • Mild Soap and Water Pull off knobs. Wash gently but do not soiik. Dry and return controls to range making sure
Outside Glas.s Finish • Soap and Water Clean outside of cooled black glass door with a glass cleaner that does not contain
Metal, inciudlng
Side iVims and
Trim Strips
Fbrcclain Enamel
Finish
Painted Surfaces
Inside Oven Door* • Soap and Water
Oven Interior*—
Tod. Sides and Back
(Models JGKC15 and
JGKC16)
(CAUTION: When in
use, light bulbs can
become warm enough to
break if touched with
moist cloth or towel.
When cleaning, avoid
warm lamps with cleaning
cloths.)
Oven Liner*
(Model JGKS15)
(CAUTION: When in
use, light bulbs can
become warm enough to
break if touched with
iTiGiSi CiOtu or iOwci.
When cleaning, avoid
warm lamps with cleaning
cloths ,'f lamp cover is
removed.
Removable Oven
Bottom
Shelves
=^SpilIage of marinades, fruit juices, and basting materials containing acids may cause discoloration. Spillovers should be blotted up immediately, with care
being taken not to touch any hot portion of the oven. When the surface is cool, clean and rinse.
MATERIALS TO USE
• Soap and Water
® Soap-Filled Scouring Pad
• Coni.T.ercial Oven Cleaner
• Soap and Water Wash, rinse, and then polish with a dry cloth. DO NOT USE steel wool, abrasives,
• Paper Towel
• Dry Cloth .
• Soap and Water
• Soap and W'atcr Use a mild solution of soap and water. Do not use any harsh abrasives or cleaning powders
• Soap-Filled Scouring Pad
» Commercial Oven Cleaner
• Stiff Bristle Nylon Brush Cool before cleaning.
• Soap and Water
• Soap-Filled Scouring Pad
• Commercial Oven Cleaner
• Soap and Water
• Soap-Filled Scouring Pad
(Non-metallic)
* Soap and Water
* Soap-Filled Scouring Pad
* Commercial Oven Cleaner
Drain fat, cool pan and rack slighlly. (Do not let soiled pan and rack stand in broiler
compartment to cool.) Sprinkle on detergent. Fill the pan with warm water and spread
cloth or paper towel over the rack. Let pan and rack stand for a few minutes. W^iish; scour
if ,.r,H an, noTinx!- krniirtr ..r.a «„H, ■.ic„ k.. in
.. .n-w,-....«. .......JV, V..^. • ..V- u.... u.-.v. ...V, ... ..
dishw'ashcr.
to match flat area on the knob and shaft.
srnmQnio.. olhcr^ltiss with cloth durnpened in soupy wutcr. Rinse und polish with u
dr>' cloth. If knobs are removed, do not allow water to run down inside the surface of glass
while cleaning.
ammonia, acids, or commercial oven cleaners which may damage the finish.
Avoid cleaning powders or harsh abrasives which may scratch the enamel. If acids should
spill on the range while it is hot, use a dry paper towel or cloth to wipe up right away.
When the surface has cooled, wash and rinse. For other spills, such as fat spattcrings. etc.,
wash with soap and water when cooled and then rinse. Polish with dry cloth.
which may scratch or mar surface,
To clean oven door; remove by opening a few inches and grasping door at sides. Lift door
up and away from hinges. Clean with any and all mentioned materials. Replace by
grasping door at sides and lining up door with hinges. Push door firmly into place.
If heavy soiling has occurred on the porous surface, remove as much of the soil as possible j
using a small amount of water and a stiff bristle nylon brush. Use water sparingly and 1
change it frequently, keeping it as clean as possible, and be sure to blot it up with paper
towels, cloths, or sponges. Do not rub or scrub with paper towels, cloths or sponges, since
they will leave unsightly lint on the oven Finish. If water leaves a white ring on the finish as
it dries, apply water again and blot it with a clean sponge, starting at the edge of the ring
and working toward the center.
For special cleaning instructions, see page 11.
Cool before cleaning.
FOR LIGHT SOIL: Frequent wiping with mild soap and water (especially after cooking
meat) will prolong the time between major cleaning. Rinse thoroughly. NOTE: Soap left
on liner causes additional stains when oven is reheated.
FOR HEAVY SOIL: Choose a nonabrasive cleaner and follow label instructions, using
thin layer of cleaner. Use of rubber gloves is recommended. Wipe or rub lightly on
stubborn spots. Rinse well. Wipe off any oven cleaner that gets on thermostat bulb. When
rinsing oven after cleaning also wipe thermostat bulb.
The oven bottom panel can be removed for easy cleaning (see page 12). Use the same
directions for cleaning as explained above for Porcelain Enamel Finish.
Remove shelves and clean them outside of the oven to avoid damaging the specially coated
oven top, sides and back. Use any and all mentioned materials. Rinse thoroughly to
remove si! msterisls sfter clesning. NOTEi Seme ccmmercis! oveii clcsriers CuUsc
darkening and discoloration. When using for first time, test cleaner on small part of
shelf and check for discoloration before completely cleaning.
GENERAL DIRECTIONS
14
Page 15

estions
Use Tills Problem Solver
PROBLEM
OVEN WILL NOT W ORK
OVEN LIGHT DOES
NOT WORK
FOOD DOES NOT
BROIL PROPERLY
FOOD DOES NOT ROAST
OR BAKE PROPERLY
f MOISTURE INSIDE AND
OUTSIDE OVEN
POSSIBLE CAUSE AND REMEDY
® Plug on range is not completely inserted into the outlet receptacle.
® Circuit breaker in house has been tripped, or fuse has been blown.
® Oven controls are not properly set.
® Light bulb is loose.
® Bulb is defective. Replace.
® Switch which operates oven light is broken. Call for service.
® OVEN TEMP knob not set at BROIL. Broiler will not operate if OVEN
TEMP knob is turned past BROIL.
® FnnH ic hpina rrinlr#>H nn hnt nan
® Utensils are not suited for broiling.
® OVEN SET knob not set on AUTO. OVEN when using Automatic Oven
Timer.
® OVEN TEMP knob not set correctly.
® Shelf position is incorrect. Check Roasting and Baking pages.
® Oven shelf is not level.
® Wrong cookware is being used. When roasting, pan is too small.
® Foil tent not used when needed to slow down browning during roasting.
® Be sure oven vent duct is not blocked or covered.
»
_
K-i _
r.,-^3
l^J¿ -
pl® Al-f-:
iSCtii
r*^-t"
If you need more help... call, toil free:
The GE Answer Center®
800.626.2000
consumer Information service
If ¥oii Need Service
To obtain service, see your warranty
on the back page of this book.
WeTe proud of our service and
want you to be pleased. If for some
reason you are not happy with the
service you receive, here are three
C'tAr\C -fXr CnffVlOf i-IOilt-V
FIRST, contact the people who
Qr^rvirpH vrmr annliimpp Pvnliiin
IWllV^VV XKJl ¿ClICIlWl
why you are not pleased. In most
cases, this will solve the problem.
NEXT, if you are still not pleased,
write all the details—including
your phone number—to:
Manager, Consumer Relations
General Electric
Appliance Park
FINALLY, if your problem is still
not resolved, write:
Major Appliance
Consumer Action Panel
20 North Wacker Drive
Chicago, Illinois 60606
spa:”
-4_.
•''-'-'“Zl
r - --r
r -T._
iSM-.—E
tí-
fi
15
Page 16

vni IP Pi pf'Tpm OÄMnp
WARRANTY
Save proof of original purchase date such as your sales slip or cancelled check to establish warranty period.
WHAT IS COVERED
FULL ONE-YEAR WARRANTY
For one year from date of original
purchase, we will provide, free of
charge, parts and service labor in
your home to repair or replace any
part of the range that fails because
of a manufacturing defect.
This warranty is extended to the
unymai purunaber anu any buoceea-
ing owner for products purchased
for ordinary home use in the 48
mainland states. Hawaii and
Washington. D.C. In Alaska the
.................................... »4*
vvai I ai iiy lo ii ic? oaiiic; ii lai ii
is LIMITED because you must pay
to ship the product to the service
shop or for the service technician’s
travel costs to your home.
Ail warranty service will be provided
by our Factory Service Centers or
by our authorized Customer Care®
servicers during normal working
hours.
Look in the White or Yellow Pages
of your telephone directory for
GENERAL ELECTRIC COMPANY.
GENEFIÄL eEeCTRi’c FACTORY ’
SERVICE,_GENERAL ELECTRIC-
HOTPuiN I i-AC I uhY SbHVioE or
GENERAL ELECTRIC CUSTOMER
CARE® SERVICE.
t'
I
■<r-
i'lFrrt
o
>C-
V.:
K'
£1---
«r
e.--
C"-
C.“
II
¡¡K‘
li>cs
II x=*
!!i®“
II r s
IIV-.
WHAT IS NOT COVERED
fi .Qor\/ir*0 +rir\o \/r\i ir hr\mci fr\
^ wv-ri V \.i cw jrv/i^l I iWi I
teach you how to use the product.
Read your Use and Care material.
If you then have any questions
about operating the product,
please contact your dealer or our
Consumer Affairs office at the
address below or call, toll-free:
The GE Answer Center®
800.626.2000
consumer information service
I I ic?i II Lji I luuoc;
or resetting of circuit breakers.
® Failure of the product if it is
used for other than its intended
purpose or used commercially.
® Damage to product caused
by accident, fire, floods or acts
of CioH
WARRANTOR IS A/OT RESPON
SIBLE FOR CONSEQUENTIAL
DAMAGES.
® Improper installation.
If you have an installation problem,
contact your dealer or installer.
You are responsible for providing
adequate electrical, gas, exhaust
ing and other connecting facilities.
Some states do not allow the exclusion or limitation of incidental or consequential damages, so the above limitation or exclusion
may not apply to you. This warranty gives you specific legal rights, and you may also have other rights which vary from state to state.
To know what your legal rights are in your state, consult your local or state consumer affairs office or vour state's Attornev General.
Warrantor: General Electric Company
If further help is needed concerning this warranty, contact:
Manager-
■Consumer Affairs, General Electric Company, Appliance Park, Louisville, KY 40225
i|W
I tJci
i!^
I!?i^
¡1^
!i(=
liice
IS-.
!!?=-■
II
li>ta
III..'
life’.
!!Gr“
ii^s
K--
ti^
!1^:
IIZZ
II >«s
IK
Part No. 205C1026 P105
Di.h Mr. /iQ_/17RO
P/N 560T691 P355
G/fi6
GENERÄL
ELECThIC
JCKS15GE!JGKC15GE1
JGKC16QE!
 Loading...