

Page 1
I
“.-
. .
.
. .
;
UseandCareof
gasmodels
Features p4
Usingtheoven p6
Specialcareof
continuous-cleaningoven pll
Questions?
UsetheProblemSolver
YourDirect LimetoG(7< ($+’C:~ &~L’
p15
. .
‘--,,“
TheGEAmwverG-W-I-77 L/’T : L-2-,,2--/’
Page 2

&@
=&*.
-9
S+dy Insmlctims . .........2-3
Featuresof!bur CNen . ........4
AutomaticC&en-mm,
C2Gckml. MinuteT’hm2r.. ...5
using Jbw chum , . . . ., ... , ..,6
Baking . . . . . “. . . . . . . ........7
Baking‘chart . .
R(mthlg, c%art. . . . . . ........9
Eln-ding,CYM3rt. . . . . . . . . . . . =. m
special Gu%d
Cmthmws-(%aring Oven. . .H
~M=emdcleaning , , . . . . . . . II-13
Cleaning
ProblemSolver.. .. . . . . .... ..15
Chart . . . . . . . . . . .. ..14
● . . +. . ........8
Iflbu NeedService. . . .......15
“V&irrmty.. .. ... .. . .13ackCover
TiiJmOF%all range
CCmtr’ck
Nycm
smellgas:
1.open
2. touch+dectrical
switches’
3. anyopen
fhm?
4.
gas
*non$tWmelectricswitches
onorCM
ignite the gas.
because sparks may
call your
FOR
Keep the
area dew’ and freemm-%1
and (mK?r
and
It isintendedtohelpyouoperate
andmaintainyournewoven
properly.
Keepithandyforanswerstoyour
questions.
Ifyoudon’tunderstandsomething
or needmorehelp.write(include
yourphonenumber):
ConsumerAffairs
GeneralElectricCompany
AppliancePark
Louisville,KY40225
downthe modd
andserialnumbers.
You’llfindthemona labellocated
insidetheovenontheleftside.See
page4.
Thesenumbersarealsoonthe
ConsumerProductOwnership
RegistrationCardthatcamewith
youroven.
all this
e pit getyourmm have
the showyouthe
ofthe ovengascut-off
valveandhowtoshutit offif
necessary.
~Haveyourwen
bya
installer,inaccordancewiththe
InstallationInstructions.Any
adjustmentandserviceshouldbe
performedonlybyqualifiedgas
rangeinstallersorservice
technicians.
~Plugyourovenintoa 120-vW
wtkt only.Donot
removetheroundgroundingprong
fromthepkg.Ifi aoubtaboutthe
groundingofthehomeelectrical
system,itisyourpersonal
and
13cfbresendinginthiscard.
pleasewritethesenumbershere:
Model Number
Serial Number
Usethesenumbersinany
correspondenceorservice
callsconcerningyouroven.
youreceived
H
damagedCW2n...
a
Immediatelycontactthedealer(or
builder)thatsoldyoutheoven.
Sawtime
Beforeyourequest
service;..
ChecktheProblemSolveron
page15.Itlistsminorcausesof
operatingproblemsthatyou can
correctyourself.
responsibilityandobligationto
haveanungroundedoutletreplaced
withaproperly-groundedthreeprongoutletinaccordancewith
theNationalElectricalCode.Do
notuseanextensioncordwith
thisappliance.
@Besureallpacking
areremovedhm theovenbefore
operatingit, topreventfireor
smokedamageshouldthepacking
materialignite.
@~~~~~~
adjustedby a service
typeofgas or ill) on .%+
~hid it k to be
beconvertedfromonetypetothe
other.SeekstdlationInstructions.
your own iscorrectly
or forthe
~$d. &is (%n “-
=—w=
@
2
Page 3
(continued)
!s!%--
i%sa%c:.
~DWt leavechiklrenaloneor
unattendedwherean ovenis
hotor inoperation.Theycould
beseriouslyburned.
~Donftallo~t’anyonetoclimb,
standor hangonthedooror
broihwcompartment.They
coulddamagetheovenandeven
[ipitovercausing severepersonal
injury.
CAUTION: DO NOT STORE
Q
ITEMSOF INTERESTTO
CHILDRENINCABINETS
ABOVEANOVEN-CHILDREN
CLIMBINGONTHEOVENTO
REACHITEMSCOULDBE
SERIOUSLYINJURED.
~Neverwearloosefittingor
hanginggarmentswhileusing
theappliance.Flammable
materialcouldbeimitedif
u
roughtincontactwithflameor
hotovensurfacesandmaycause
severeburns.
~Neveruseyourappliancefor
warmingor heatingthe room.
Prolongeduseoftheovenwithout
adequateventilationcanbe
hazardous.
~Donotusewateron grease
fires.Neverpickupaflaming
pan.Turnoffburner,thensmother
flamingpanbycoveringpan
completelywithwellfittinglid,
cookiesheetorflattray.Flaming
greaseoutsideapancanbeput
outbycoveringwithbakingsoda
or,ifavailable,amulti-pu~ose
drychemicalorfoam.
e ~ nots~o~fl~~na~~e matefi~
inanoven.
~Donotletcookinggreaseor
otherflammablematerials
accumulateinor neartheoven.
@Donotuseovenfora storage
area.
@Standawayfromthe oven
whenopeningovendoor.The
hotair or steamwhichescapes
cancauseburnstohands,face
and/oreyes.
@Keepovenfreefromgrease
buildup.
@Placeovenshelvesin desired
positionwhileoveniscool.
~Pullingoutshelftothe shelf
stopisa convenienceinlifting
heavyfinds.Itisalsoaprecaution
againstburns fromtouching
hotsurfacesofthedooror oven
walls.
@Don’tusealuminumfoil
anywherein the ovenexceptas
describedinthisbook.Misuse
couldresultina firehazardor
damagetotherange.
~Don’theat unopenedfood
containersinthe oven.Pressure
couldbuildupand thecontainer
couldburst causingan injury.
@Useonlyglasscookwarethat
isrecommendedforuseingas
oven.
~When
using cookingor
roastingbagsinoven,follow
themanufacturer’sdirections.
~Whencookingpork?follow
ourdirectionsexactlyandalways
cookthemeattoatleast170°F,-
Thisassuresthat,intheremote
possibilitythattrichinamaybe
presentinthemeat,itwillbe
killedandmeatwillbesafetoeat.
@Ahvaysremovebroiler pan
frombroilercompartmentas
soonasyoufinishbroiling.
Greaseleftinthepancancatch
fireifovenisusedwithout
removingthegreasefromthe
broilerpan.
~Whenbroiling9ifmeatistoo
ciosetothe flame,thefat may
ignite.Trimexcessfattoprevent
excessiveflare-ups.
@Makesurebroilerpan isin
placecorrectlytoreducethe ‘.--possibilityofgreasefires.
—
@If youshouldfiavea grease
fireinthe broilerpan, turnoff
oven,andkeepdrawerclosedto
containfireuntilitburnsout.
@Cleanonlyparts listedinthis
UseandCare Book.
@Keepovencleanandfreeof
accumulationsofgreaseor
spilloverswhichmayignite.
If YouNeedService
eReacl
onpage15ofthisbook.
@Don’tattempttorepair or
replaceanypart ofyouroven
unlessitisspecifically
recommendedinthis book.All
otherservicingshouldbereferred
toaqualifiedtechnician.
66TheProblemSolver>5
SAVE
3
Page 4
.
@
I
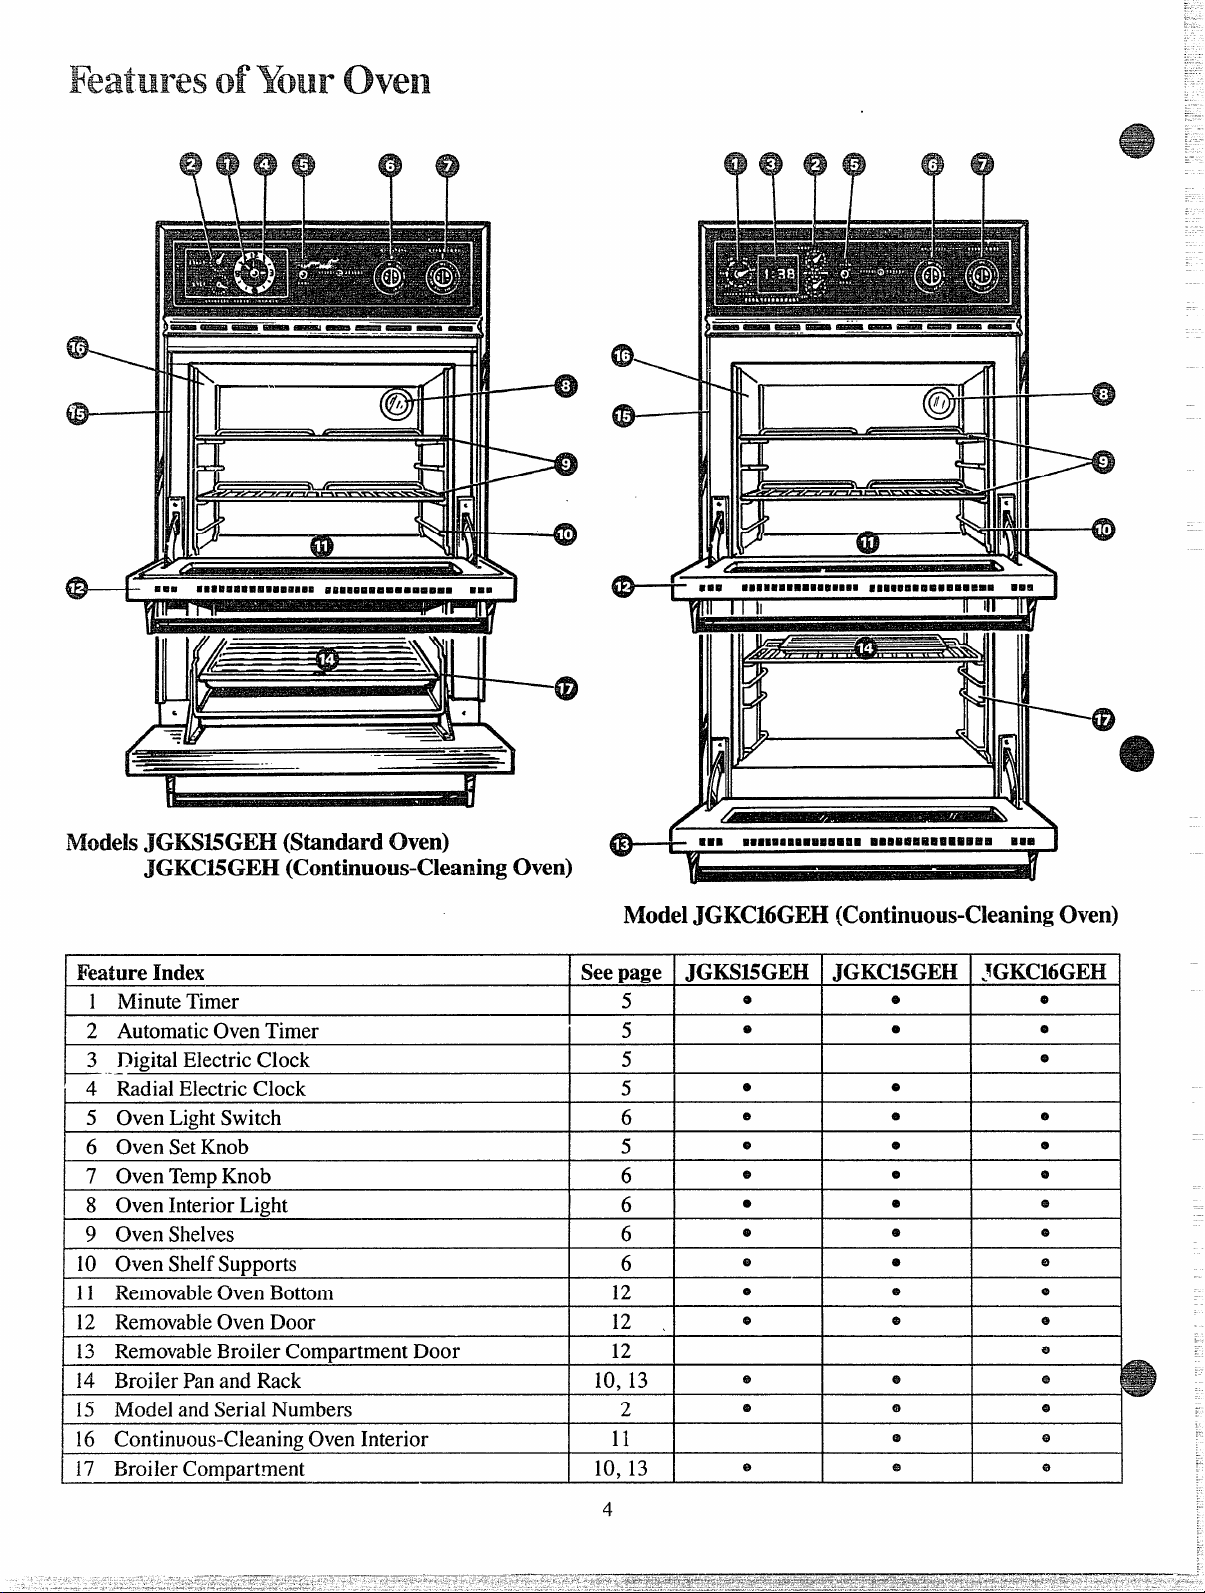
Models JGKM5GEH (Standard Oven)
—
JGKC15GEH(Continuous-CleaningOven)
See
page JGKS15GEH
1
MinuteTimer
2 AutomaticOvenTimer
3 DigitalElectricClock
~ 4 RadialElectricClock 5
I 5 ovenblhts~itch
6 OvenSetKnob
I
7 OvenTemPKnob
I
1 8 OvenInteriorLight I
9 OvenShelves
10 OvenShelfSupports 6
I
I
12
12
10,13
11
10.13
11 RemovableOvenBottom
12 RemovableOvenDoor 12 ,
13 RemovableBroilerCompartmentDoor
I
I 14 BroilerPanandRack
15 ModelandSerialNumbers 2
16 Continuous-CleaningOvenInterior
117 BroilerCom~artrnent
-\
ModelJGKC16GEH(Continuom+CleaningOven)
JGKC15GEH
5
5
I
5
I
I
6
I
5
I
6
I
6
I
6
——
e
e e
e e
e
e
e
e
e
e
@
o
e e
IJGKC16GEHIFeatureIndex
I I
I I
I I
1
I
I I
I I
e
I
I
e
e
I
4
Page 5
7%6
clock
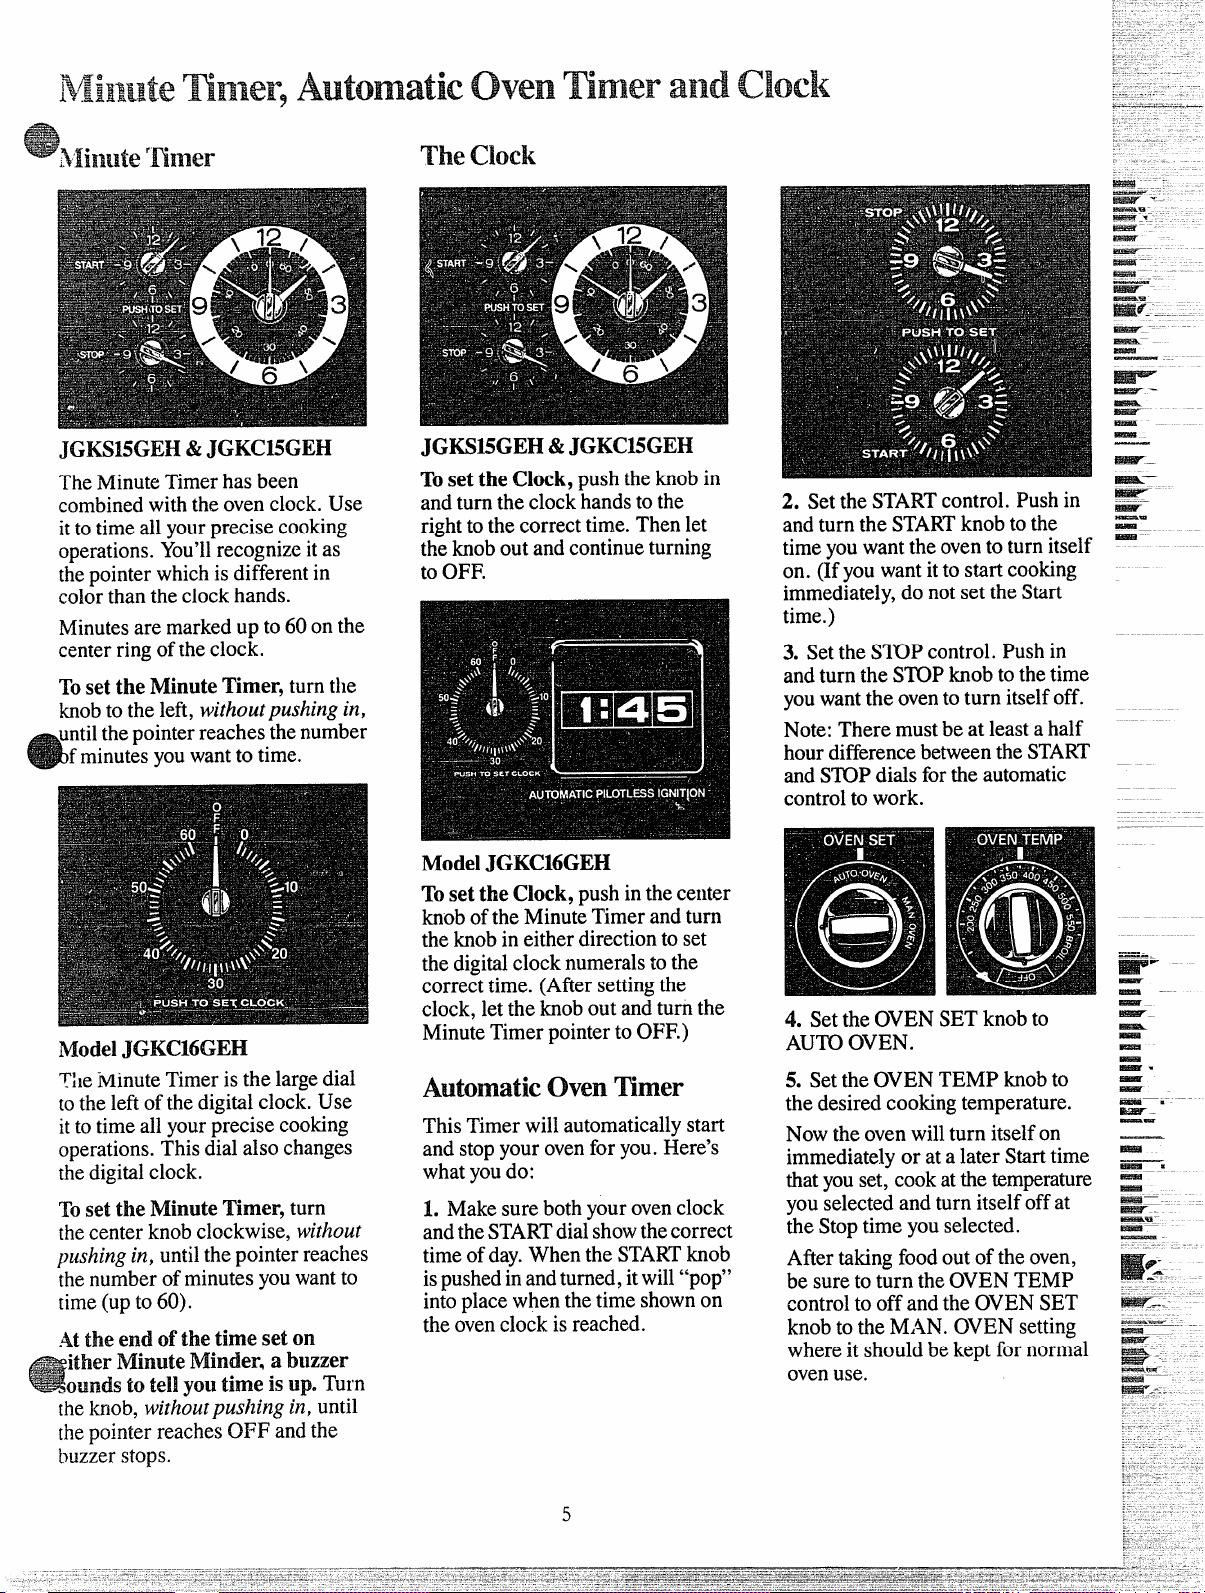
JGK!315GEH&JGKC15GEH
The MinuteTimerhasbeen
combinedwiththeovenclock.Use
ittotimeallyourprecisecooking
operations.You’llrecognizeitas
the pointerwhichisdifferentin
colorthantheclock hands.
Minutesaremarkedupto60onthe
centerringoftheclock.
set the Minute Timer, turnthe
To
knobtotheleft,withoutpushingin,
untilthepointerreachesthenumber
fminutesyouwantto time.
ModelJGKC16GEH
~lleMinute
totheleftofthedigitalclock.Use
ittotimeallyourprecisecooking
operations.Thisdialalsochanges
the digitalclock.
set the Minute Timer, turn
To
thecenterknobclockwise,without
pushingin, untilthepointerreaches
the numberofminutesyouwantto
time(upto60).
Atthe end of the
, ither Minute Minder. a buzzer
unds to tell
the kmob,withoutpushingin,until
thepointerreachesOFFandthe
buzzerstops.
Timeristhelargedial
time set on
youtime is up. Turn
JGKS15GEH&JGKC15GEH
TosettheClock,
andturntheclockhandstothe
righttothecorrecttime.Thenlet
theknoboutandcontinueturning
toOFF.
Model JGKC16GEH
Toset the CIock,
knoboftheMinuteTimerandturn
theknobin eitherdirectiontoset
thedigitalclocknumeralstothe
correcttime.(Aftersettingthe
clock,lettheknoboutandturnthe
MinuteTimerpointertoOFF.)
pushthe knobin
pushinthecenter
AutomaticOwenTimer
ThisTimerwillautomaticallystart
andstopyourovenforyou.Here’s
whatyoudo:
L Makesurebothyourovenclock
andtheSTARTdialshowthecorrect
timeofday.WhentheSTARTknob
ispushedinandturned,itwill“pop”
intoplacewhenthetimeshownon
theovenclockisreached.
2. SettheSTARTcontrol.Pushin
andturntheSTARTknobtothe
timeyouwanttheoventoturnitself
on. (Ifyouwantitto startcooking
immediately,donotsettheStart
time.)
3. SettheSl_OPcontrol.Pushin
andturntheSTOPknobtothetime
youwanttheoventoturnitselfoff.
Note:Theremustbeat leastahalf
hour differencebetweentheSTART
andSTOPdialsfortheautomatic
controltowork.
4. SettheOVENSETknobto
AUTOOVEN.
5. SettheOVENTEMPknobto
thedesiredcookingtemperature.
Nowtheovenwill turn itselfon
immediatelyorata laterStarttime
thatyouset,cookatthetemperature
youselectedandturnitselfoffat
theStoptimeyouselected.
Aftertakingfoodout of theoven,
be suretoturn theOVENTEMP
controltooffandtheOVENSET
knobtotheMAN.OVENsetting
whereitshouldbekeptfornormal
ovenuse.
5
Page 6

TheOWII and broilerburners on
)“ourovenare lightedby electric
ignition eliminating the need for
scmdingpilotlightswithconwmtly
burningflame.
C,4LJTION:DON~ MAKEANY
ATTEMPT’TOOPERATETHE
ELECTRICIGNITIONOVEN
DURINGANELECTRICAL
POWERFAILURE.Resumption
ofelectricalpowerwhenOVEN
TEMPcontrolisinanyposition
otherthanOFFwiHresultin
automaticignitionoftheoven
burnerandcouldcause severe
burnsif, atthetime,youwere
attemptingtolighttheburnerwith
amatch.
lb LighttheOvenBurner
TurntheOVENTEMPknobtothe
desiredtemperature.Theburner
shouldignitewithin60seconds.
M Adjustment
Anairadjustmentshutterforthe
ovenburner regulatestheflowofair
totheflame.
Removethebroilerpanandrack,
pullthebroilercompartmentdrawer
outtothe “stop”positionorremove
thebroilercompartmentshelfand
you’llfindtheshutteragainstthe
backwallofthecompartment.
screwandrotatethe shut~ertoallow
moreor lessair intotheburnertube
asneeded.
Whenthe right
flowsintotheburner,
shouldbesteady,withapproximately
l-inchblue conesandshouldnot
extendoutoverthebaffleedges.
&%O~~
1. Lookatthecontrol.Besureyou
understandhowtosetitproperly.
2. Checktheinsideoftheoven.
Lookattheshelves.Practice
removingandreplacingthem
whiletheoveniscool.
3. Readtheinformationandtips
onthefollowingpages.
4. Keepthisbookhandywhereyou
canrefertoit—especiallyduring
thefirstfewweeksofgetting
acquaintedwithyour oven.
UsingYourOwn
amountofair
theflame
(hen ‘lkmperatureControl
TheOVENTEMPc&trol is
locatedontheupper ovencontrol
panel.
oval shelves
Theshelvesaredesignedwith
stop-lockssowhenplacedcorrectly
on_theshelfsupports,theywillst~p
beforecomingcompletelyoutof
theovenandwillnottiltwhenyou
areremovingfoodor placingfood
onthem.
Whenplacingcookwareona shelf,
pull theshelfouttothe “stop”
position.Placethecookwareon
theshelf,thenslidetheshelfback
intotheoven.Thiswilleliminate
reachingintothehotoven.
Toremovetheshelvesfromtheove
forcleaning,pullouttostop
position,liftupon frontandpull
themout.
ShelfPositions
Theovenhasfourshelfsupports—
A (bottom),B,CandD (top).Shelf
positionsforcookingaresuggested
onBakingandRoastingpages.
Ove~
Light
adjust the f’low.ofair to the
‘h
burner,loosenthePhillipshead
Useswitchoncontrolpaneltoturn
lightonandoff.
Simplyturntheknob to thedesired
cookingtemperatures,whichare
markedin25°F.incrementsonthe
dial.It willnormallytake30to 60
secondsbeforetheflamecomes on.
Aftertheovenreachestheselected
temperature,theovenburnercycles
offcompletely,thenon witha full
flametokeeptheoventemperature
controlled.
6
Page 7

Eikm’tosetMm”Range
h“
1. Positiontheshelforshelvesin
theoven.
Close oven door,turnOVEN
2.
I“EMPknobtodesiredtemperature
andpreheatovenforabout10
minutesifpreheatingis necessary.
Place foodinovenon centerof
3.
shelf.Allowatleastaninchbetween
edgeofbakewareandovenwallor
adjacentutensils.
If cooking on two shelvesatthe
sametime,placeshelvesabout4
inchesapartandstaggerfoodon
them.
4.Checkfoodfordonenessat
minimumtimeonrecipe.Cook
longerifnecessary.Switchoff
heatandremovefood.
reheating is important when using
temperaturesbelow225”F.and
whenbakingfoodssuchasbiscuits,
cookies,cakesandotherpastries.
Preheatingisnotnecessarywhen
roastingor forlong-timecooking
ofwholemeals.
Mostbakingisdoneon the second
shelfposition(B)fromthebottom.
Whenbakingthreeor fouritems,
,l~c~Wushelvespositionedonthe
secondandfourthsetsofsupports
(B& D)frombottomofoven.
Bakeangelfoodcakesonfirstshelf
position(A) frombottomofoven.
BakingTips
@Followatestedrecipeand
measuretheingredientscarefully.
Ifyouare usingapackagemix,
followlabeldirections.
~ If moistureisnoticeableonthe
frontoftheovenorontheoven
windowwhenfirstturningonthe
oven,leavetheovendoorajarfora
fewminutesor untiltheovenis
warm.
e Do notopentheovendoorduring
abakingoperation—heatwill
be
lost andthebakingtimemightneed
tobeextended.Thiscouldcause
poorbakingresults.
~Donotdisturbtheheatcirculation
intheovenwiththeuseofaluminum
foil.If foilisused,placea small
sheetofit, about10by 12inchesat
themost,ona lowershelfseveral
inchesbelowthefood. Do not
place foilontheovenbottom.
CommonBaking Problems
andPossibleSolutions
Pm
Burning around edges
~
Oventoofill; avoidovercrowding.
@Edgesofcrusttoothin.
@Incorrectbakingtemperature.
Bottom crust soggy and unbaked
@
Allowcrustand/orfillingtocool
sufficientlybeforefillingpieshell.
~Fillingmaybetoothinorjuicy.
~Fillingallowedtostandinpie
shellbeforebaking.(Fillpieshells
andbakeimmediately.)
~ Ingredientsandpropermeasuring
affectthequalityofthe crust. Usea
testedrecipeandgoodtechnique.
Makesuretherearenotinyholes
ortearsinabottomcrust.“Patching”
apiecrustcouldcausesoaking.
Pie filling runs over
~
Topandbottomcrustnotwell
sealedtogether.
@Edgesofpiecrustnot builtup
highenough.
@Toomuchfilling.
~Checksizeofpieplate.
Pastry is tough; crust not flaky
@TOO
muchhandling.
@Fattoosoftor cutintoofine.
Rolldoughlightlyandhandleas
littleaspossible.”
CAKES
Cakerises higher on one side
@
Batterspreadunevenlyinpan.
@Ovenshelvesnotlevel.
@Usingwarpedpans.
@Incorrectpansize.
Cakescracking on top
~
Checkoventemperature.
~Battertoothick,followrecipe
orexactpackagedirections.
~Checkforpropershelf position.
~Checkpansizecalledforinwipe.
~ Impropermixingofcake.
Cakefalls
~
Toomuchshortening,sugaror
liquid.
e Checkleaveningagent,baking
powderorbakingsodato assure
freshness.Makeahabitto note
expirationdatesofpackaged
ingredients.
e Cakenotbakedlongenoughorat
correcttemperature.
~Ifaddingoilto acakemix,make
certaintheoilisthetypeand
amountspecified.
Crustis hard
e
Checktemperature.
gCheckshelf position.
Cake has soggy layeror streaks
at bottom
UI
Underminingingredients.
gShorteningtoosoftfor proper
creaming.
gToomuchliquid.
Cooms &
Doughy center; heavycrust on
surface
~
Checktemperature.
Imxmm
@Checkshelfposition.
eFollowbakinginstructions
carefi.dlyas giveninreliablerecipe
or onconveniencefoodpackage.
~Flatcookiesheetswillgivemore
evenbakingresults.Don’tovercrowd
foodsona bakingsheet.
8Conveniencefoodsusedbeyond
theirexpirationdate.
Browning more noticeable on
one side
~
Ovendoornot closedproperly,
checkgasketsea!.
gCheckshelf position.
7
Page 8

L Aluminumpansconductheatquickly.Formost
2. D.trkor non-shinyfinishes,alsoglassandpyroceram,
conventionalbaking,light,shinyfinishesgivebestresults gc wrallyabsorbheatwhichmayresultindry,crisp
becausetheyhelppreventover-browninginthetimeit
takesforheattocookthecenterareas.Werecommend
dull (satin-finish)bottomsurfacesofpansforcakepans
- and pie plates tobesurethoseareasbrowncompletely.
crusts.Reduceovenheat25°F.if lightercrustsare
desired.Preheatcastironforbakingsomefoodsforrapid
browningwhenfoodisadded.
Shelf
Food Cookware
Positions Temperatures
Bread
Biscuits(Win. thick) Shiny Cookie Sheet
Coffeecake Shiny MetalPan with
Corn breador muffins Cast Iron or Glass Pan
Gingerbread Shiny Metal Pan with
Muffins Shiny Metal Muffin Pans
Popovers Deep Glass or Cast Iron Cups
Quick loaf bread Metal or Glass Loaf Pans
Yeastbread (2loaves) Metal or Glass Loaf Pans
Plain rolls Shiny Oblongor Muffin Pans
Sweet rolls Shiny Oblongor Muffin Pans B, A 350°-3750
Cakes
(withoutshortening)
Angelfood
Jelly roll MetalJelly Roll Pan
Sponge
satin-finish bottom
satin-finish bottom
Aluminum“llbe Pan A 325°-3750 30-55
Metal or Ceramic Pan
B, C
B, A 350°-4000 20-30
B 400°-4500
B 350° 45-55
A, B 400°-4250
B 375° 45-60
B 350°-3750 45-60
A, B
A, B
B
A 325°-3500 45-60
Oven Time,
Minutes
400°-4750
375°-4250 45-60 browning.
375°-4250 10-25
375°-4000
15.20
20-40 Preheatcast iron pan for crisp crust.
~()-3(3
20-30
10-15
Comments
Canned, refrigeratedbiscuitstake 2 to4
minuteslesstime.
Decreaseabout 5 minutes for muffin mix.
Or bake at 450”F.for25 minutes, then at
350”F.for 10to 15minutes.
Dark metal or glass givesdeepest
For thin rolls, ShelfB maybe used.
For thin rolls, ShelfB maybe used.
Twopiecepan is convenient.
Line pan with waxedpaper.
Cakes
Bundtcakes Metal or Ceramic Pan A, B 325°-3500
Cupcakes
Fruit cakes Metal or Glass Loaf or
Layer
Layer,chocolate ShinyMetal Pan with
Loaf
Shiny Metal Muffin Pans
Tube Pan
Shiny Metal Panwith
satin-finish bottom
satin-finish bottom
Metal or Glass Loaf Pans B 350° 40-60
B 350°-3750
A, B 275°-3000 2-4 hrs. Use 300”F.and Shelf B for small or
B 350°-3750 20-35
B
350°-3750
45-65
20-25 Paperliners producemore moist crusts.
individualcakes.
25-30
cookies
%ownies Metal or Glass Pans
3rop Cookie Sheet
refrigerator
lolled or sliced Cookie Sheet B, C 375°-4000 7-12
Cookie Sheet
B,C 325°-3500 25-35
B,C 350°-4000 10-20 UseShelf C and increase temperature
B, C 400”-425° 6-12
Bar cookies from mix use sametime.
25 to 50”F.for more browning.
Fruits,
OtherDesserts
3akedapples Glass or Metal Pans A, B, C 350°-4000 30-60
hstard
Puddings, rice
andcustard Casserole
Pies
Frozen Foil Pan on Cookie Sheet A 400°-4250 45-70 Large piesuse 400”F.and increase time.
Meringue
One crust Glass or Satin-finishMetal
Twocrust Glass or Satin-finish Metal
Pastry shell Glass or Satin-finish Metal
Glass Custard Cups or
Casserole (set in pan of hot water)
Glass Custard Cups or
Spread to crust edges
B
B 325°
B, A
A, B 400°-4250 45-60 Custard fillings require lowertemperature,
B
B 450° 12-15
300°-3500 30-60
50-90
325°-3500 15-25
400°-4250 40-60
Reducetemperatureto 300”F.for large
custard.
Cook bread or rice pudding with custard
base 80 to 90 minutes.
Toquicklybrownmeringue use 400°F. for
8to 10minutes.
longer time.
Miscellaneous
Baked potatoes Set on OvenShelf
Scallopeddishes Glass or Metal
Souffles
Glass
A, B, C 325°-4000 60-90 Increase time for large amount or size.
A, B, C 325°-3750 30-60
B 300°-3500
30-75
8
Page 9

oastins is ~~~~in~ by dry heat.
~endmmeat or poultry can be
roasteduncoveredin your oven.
Roastingtemperatures, which
shouldbe lowand steady, keep
spatteringto a minimum. When
roasting,it is not necessary to sear,
baste,cover,or add water to your
meat. Roastingis easy,just f~llow -
thesesteps:
Step2:Checkweightofroast.
Placemeat fat-side-uporpoultry
breast-side-uponroastingrackina
shallowpan.Themeltingfatwill
bastethemeat.Selectapanas
closetothesizeofmeataspossible.
(Broilerpanwithrackis agood
panforthis.)
Step3:TurnOVENTEMPcontrol
todesiredtemperature.Checkthe
StepL Positionovenshelfat RoastingChafifortemperatures
secondfrombottomposition(B)for andapproximatecookingtimes.
smallsizeroast (3to-5lbs.)andat
bottomposition(A)forlarger
roasts.
Step ~: Most meats continue to
cook slightlywhile standing after
being removed from the oven. For
rare or medium internal doneness,
if meat is to stand 10to 20 minutes
while making gravy or for easier
carving, you maywish to remove
meat from ovenjust before it is
done. If nostandingisplanned,
cookmeatto suggested
temperature.
FrozenRoasts
Frozenroastsofbeef,pork,
lamb,etc., canbestartedwithout
thawing,butallow10to25minutes
perpoundadditionaltime(10
minutesperpound forroastsunder
5pounds,more timeforlarger
roasts).
Thawmostfrozenpoultrybefore
roastingtoensureevendoneness.
Somecommercialfrozenpoultry
canbecookedsuccessfullywithout
thawing.Followdirectionsgiven
onpacker’slabel.
Roastingchart
Type
hfeat
Tendercuts; rib, highquality
sirlointip, rump or topround*
Lamblegor bone-in shoulder*
\’ealshnulcler,legor loin* 325°
PctK1oin,rib or shoulder*
Ham, pre-cooked
Ham, raw
*Forbonelessrolled roasts over 6-inches
thick, add5 to 10minutes per lb. to times
gi~en above.
Poultry
Chicken or Duck
Chicken pieces
Turkey
—
Temperature
Oven
325° Rare: 24-30
325°
325°
325°
325°
325°
375”
325° WellDone:
Doneness
Medium: 30-35
WellDone: 35-45
Rare:
Medium: 25-30
WellDone: 30-35
WellDone: 35-45
WellDone:
ToWarm: 10minutesper lb. (any weight)
Well Done: 20-30
WellDone:
Well Done: 35-40
ApproximateRoastingTime
inMinutesperPound
3to5-lbs.
21-25 20-23 130°-1400
35-45
Under10lbs.
3to5-lbs. Over5Ibs.
35-40
10to15-lbs. Over15lbs. Inthigh:
20-25 15-20 185°-1900
Internal
Temperature‘F
6to8-lbs.
18-22
22-25 150°-1600
28-33 17~0-1850
24-28
28-33 170°-1850
30-40
30-40 170°-180”
10to15-lbs.
17-20
30-35 185°-1900
130°-1400
150°-1600
170°-1800
125°-1300
160°
185°-1900
——-.
9
Page 10

Elroilingiscookingibodbydirect
h~:~tf~~i~~ ab~v~the f~(>d.Your
rangehasa convenientcompartment
belowthe ovenforbroiling.
Italso
hasa speciallydesigned broiler pan
and rack that allowdripping fat to
drain awayfrom the foods and be
keptawayfrom the high heat of
thegas tlame.
Distancefrom the heat source may
bechanged by positioningthebroiler
pan and rack on one of three shelf
positionsin thebroiler compartment—
.4 (bottomof broiler compartment),
B(middle)and C (top).
HowtoBroil
L Ifmeat has fator gristle near the
edge, cut vertical slashes through it
about
2 inchesapart,butdon’tcut
intomeat.Werecommendthatyou
trimM topreventexcessivesmoking,
leavinga layeraboutl/8-inchthick.
2. Removebroilerpanandrack
frombroilercompartmentand
placefoodonrack.
3. Pulloutbroilerdrawerorbroiler
shelfandpositionbroilerpanin
compartment.Placingfoodcloserto
flameincreasesexteriorbrowningof
food,butalsoincreasesspattering
andthe possibilityoffatsandmeat
juicesigniting.
4. Closebroilerdoorand,formost
foods,turnOVENTEMPknobto
BROIL.Exceptionsarechicken
andham whicharebroiledata
settingin order to cook food
~ol.vel”
throughbeforeoverbrowningit.
5. Turn most foodsonce during
cooking;(theexception is thin fillets
of fish; oil one side, place that side
downonbroilerrackandcookwithout
turning until done). Time foodsfor
aboutone-half thetotal cooking
time, turn food, then continue to
cookto preferred doneness.
6. TurnOVENTEMPknobto
OFF.Removebroiler panfrom
compartmentandservefood
immediately.Leavepanoutside
compartmenttocool.
Tips
~Broilingisusuallydone withoven
andbroilerdoorsclosed. I-lowcvm.
ifyoulike your steaksvery rare
insideand charred on the outside,
leavethe oven door slightly ajar.
Quantity
imdlor
Food
Bacon
GroundBeef
WellDorm
BeefSteaks
Rare
Medium
WellDone
Rare
Medium
WellDone
Chicken(450°) 1 whole
BakeryProducts
Bread(Toast)or
Toasterpastries
English Muffins
Lobstertails
(6
to 8-oz. each)
Fish
Hamslices(450°
Precooked
Porkchops
WellDone
Lambchops
Medium
WellDone
Medium
WellDone
Wieners,
similar precooked
sausages,
bratwurst
Thickness
%-lb. (about S
thin slices)
l-lb. (4patties)
!4to %-in.~hick
l-in, thick
(1-1VZIbs.)
]~z-in.thick
(2-Zi/jIbso)
(2 [()2\fi-lbs.),
split lengthwise
2-4 slices
1 pkg. (2)
2-split
2-4
l-lb. fillets %to
1~-in.thick
l-in. thick
2 (%in.)
2 (1-in,thick),
about 1lb.
about 10-12oz.
2 (1%inch),
about 1 lb.
Broil
Position
c
c
A
A
A
A
A
A
A
c
c
B Do not
c
A
A
B
B
B
B
c
@Usetongs to turn meat over-
piercing n~eatlosesjuices.
~
Steaksand chops shouldbeat
least 1inch thick-forbest broiling
results. Pan broilthinner ones.
IstSide
Time,
Uinutes
!ndSide
Time,
Uinutes
31/2
9-1o
9
12
13
10
12-14
15
25
16-18
30-35
2-3
13-16
p5-30
3-4
5 Handle and turn very carefully.
8
10
13
8
10
10
17
6
Comments
Arrange in single layer.
Space evenly.Up to 8 patties
7-8
take about same time.
SteaksIcssthan 1inchcook
7
5-6
throughbeforebrowning.
Pan frying is rccommcndcd.
8-9
6-7
slush fat.
Reducetimes about5 to 10
minutesper side for cut-up
chicken. Brush each side with
meltedbutter. Broil with skin
sidedown first and broil with
door closed.
Space evenly.Place English
‘/2-1
muffins cut-side-upand brush
with butter if desired.
Cut throughbackof shell,spread
turn
over.
10-12
12-14
open. Brush with melted butter
beforeandafter half time.
5
Brush with lemon butter before
andduring cooking if desired.
Preheat broiler to increase
browning.
8B
Incteasetimes5 to 10minutes
per sidefor Ifi-in. thick or
homecured.
4-5
Slash fat.
4-7
4-6
Slash fat.2(1 inch)
10
If desired, split sausages in half
1-2l-lb. pkg. (10)
lengthwiseinto5to 6-inchpieces.
10
Page 11

e
-–A-
Proper cm and cleaning are
imp-ortantso your oven ~%’illgive
}Youefficientand satisfactory
service. Followthese directions
carefully in caring for itto help
assuresafeand proper maintenance.
BE SURE ELECTRIC POWER
IS OFF BEFORE CLEANING
ANY PARTOF WI-R OVEN.
SpecialCareof
cwlthNmus-ckmling
(hen Interior
ModelsJGKCk5,JGKC16
Ymr oven has a Continuous-
Cleaning oven that cleans itself
while cooking.
oven—top,sides,andback—is
finishedwithaspecialcoating
which cannot be cleaned in the
usualmanner withsoap, detergents,
commercial ovencleaners, coarse
abrasivepads or coarse brushes.
eir use and/or the use of oven
prayswill cause permanent
damage.
The special coating is a porous
ceramic material whichis darkin
colorandfeelsslightlyroughtothe
touch.
Ifmagnified,thesurface
wouldappear aspeaks,valleys,and
sub-surface“tunnels:’This rough
finishtendstopreventgrease
spattersfromforminglittlebeads
ordropletswhichrundownthe
sidewallsofa hard-surfaceoven
linerleavingunsightlystreaksthat
requirehandcleaning.Instead,
whenspatterhitstheporoustinish
itisdispersedandispartially
absorbed.Thisspreadingaction
increasestheexposureofoven
soiltoheatedair,andmakesit
somewhatlessnoticeable.
Soilmay not disappearcompletely
andatsome time afterextended
usage,stains may appearwhich
cannotberemoved.
%:es ecia coatingworksbeston
@p i
%+mallamountsofspatter.
notwork well with larger spills,
especially sugars, egg or dairy
mixtures.
Theinsideofthe
Itdoes
Thespecialcoatingisnotused
onovenshelves.
cleanedoufsidefhe oven,toavoid
damagetothespecialcoating.
Shelvesshouldbe
mclew] the
Continuous-CleaningOven:
1. Letovenpartscoolbefore
handling. It is recommended that
rubber glovesbe worn when
cleaningovenparts manually.
2. Removeshelvesandcookware.
3. Soil visibilitymaybe reducedby
operatingtheoven at450”F.Close
thedoorandturnOVEN
knobto450°F.Timeforatleast4
hours.Repeatedcyclesmaybe
necessarybeforeimprovementin
appearanceisapparent.
REMEMBER:DURINGTHE
OPERATIONOFTHEOVEN,THE
DOOR,WINDOWANDOTHER
SURFACESWILLGETHOTENOUGH
‘IOCAUSEBURNS.DONCYI’
LETTHEOVENCOOLBEFORE
REPLACINGSHELVES.
4. If a spilloverorheavysoiling
occursontheporoussurface,as
soonaspracticalaftertheovenhas
cooled,removeasmuchofthesoil
aspossibleusingasmallamountof
wateranda stiffbristlenylon
brush.Whenusingwater,useit
sparinglyandchangeitfrequently,
keepingitas cleanaspossible,and
besuretoblotit upwithpaper
towels,cloths,orsponges.Donot
ruborscrubwithpapertowels,
clothsorsponges,sincetheywill
leaveunsightlylintontheoven
finish.If waterleavesawhitering
onthefinishasitdries,applywater
againandblot itwithacleansponge,
startingattheedgeoftheringand
workingtowardthecenter,
Donot use soap, detergent,
commercialovencleaner,silicone
ovensprays7coarsesteelpadsor
coarsebrushesontheporous
surface.
clog,andmartheporoussurface
andreduceitsabilitytowork.
Theseproductswillspot,
TEMP
TOUCH.
Do not scrape the poroussurface
withaknifeorspatula—theycould
permanentlydamagethefinish,
PorcelainOvenInterior
Withpropercare,theporcelain
enamelwallswillretaintheirgood-
-lookingfinishformanyyears.
Soapandwaterwillnormally
dothejob.Heavyspatteringor
spilloversmayrequirecleaning
withamildabrasivecleanser.Soapy,
wetpadsmayalsobeused.Donot
allowfd spillswithahighsugaror
acidcontent(suchasmilk,tomatoes,
sauerkraut,ffuitjuicesorpiefilling’)
toremainonthesurface.Theymay
causeadullspotevenaftercleaning.
Householdammoniamaymakethe
cleaningjobeasier.Place1/2cupina
shallowglassorpotterycontainerin
acoldovenovernight.Theammonia
timeswillhelploosentheburned-on
greaseandfood.
Ifnecessary,youmayuseacaustic
cleaner.Followthepackage
directions.
Cautionsabout using
spray-onovencleaners:
Becarefilwheretheovencleaner
issprayed.
eD. notsprayontheelectrical
controlsandswitches(onmodelsso
equipped)becauseitcouldcausea
shortcircuitandresultinsparking
orfire.
~Donot~lowafilmfromthe
cleanertobuilduponthetemperature
sensingbulb—itcouldcausethe
oventoheatimproperly.(Thebulb
islocatedatthetopoftheoven.)
Carefullywipethebulbcleanafter
eachovencleaning,beingcareful
nottomovethebulbasachangein
itspositioncouldaffecthowthe
ovenbakes.
DO not sprayanyovencleaner
~
ontheovendoor,handlesor
exteriorsurfaceoftheoven,wood
orpaintedsurfaces.The cleanercan
damagethesesurfaces.
(contittuedne.vtpage)
any
Fi3sz ”–
S#mi&
-=
___
~11
-
—
11
Page 12

Door
.
The ovendoorisremovableto
makecleaningtheoveneasier.
Toremovethedoor,openita few
inchesto thespecialstopposition
thatwillholdthedooropen.Grasp
firmlyoneachsideandliftthedoor
straightupandoffthehinges.(Due
tothelargeamountof insulation
andtheconstructionof thedoor, it
isheavy.)
Note:Becarefulnot to placehands
betweenthespringhingeandthe
ovendoorframe.Thehingecould
snapbackandpinchfingers.
Washwithhot, soapywater.For
stubbornspots,usea solutionof
ammoniaandwater.Do not
immersethedoorinwater.
replace the door, positionslots
lb
inbottomofdooroverthehinges
thatare in the “out”position.Then
lowerthedoorslowlyandevenly
overbothhingesatthesametime.
Ifhingessnap backagainsttheoven
frame,pullthembackout.
ModelJGKC16GEHalsohasa
removablebroilercompartment
door whichmayberemovedfor
cleaning.
0“431
Theraisedsectionoftneoven
bottomisremovableforcleaning.
Takeit outoftheovenandyoucar
ap@~ effectivecleanerstoclean
upexcessivespilloversorremove
baked-onsoil—cleanersthatshou
neverbeusednearthespecial
porousceramicoveninterior.
removethe ovenbottom:
To
L
Removethe ovenshelves.
2. Liftupwardonshelfsupports.
Swingbottomofsupportstoward
centerofovenand remove.
3. Removethetwoknurledholddownscrewsateachfrontcorner.
If screwsaretootightto removeby
hand,useascrewdriver.
5. Pullthebottomforwardandout
oftheoven,keepingtherearofthe
ovenbottomglidingonthebottom
ofthelowestshelfglide.Thiskeeps
it fromcatchingontheburnerigniter
shield.Toreplacethebottom,just
d
reversethis procedure,makingsure
the IWOtabsontherearoftheoven
bottomgointo theslotsattherear.
The ovenbottomhasa porcelain
enamelfinish.Tomakecleaning
easier,protecttheovenbottom
fromexcessivespillovers.Thisis
particularlyimportantwhenbaking
afruitpieor otherfoodswithhigh
acidcontent.Hotfruitfillingsor
foodsthatareacid incontentsuch
asmilk,tomatoor sauerkraut,and
sauceswithvinegaror lemon
juice,maycausepittinganddamage
totheporcelainenamelsurface.
Toprotectthe ovenbottomsurface,
placeapiece ofaluminumfoil
slightlylargerthanthebakingdish
or smallcookiesheetona lower
rackorunderthebakingdishto
catchanyboilovers.Itshouldnot
completelycovertherackasthis
wouldcause unevenheatinthe
oven.Aluminumfoilshouldnot
beplacedontheovenbottom.
If a spilloverdoes occuronthe
ovenbottom,allowtheoventocool
first.Youcancleanthebottomwith
soapandwater,a mildabrasive
cleanser,soap-filledabrasivepads,
orcausticovencleanerfollowing
manufacturer’sdirections.
Whenapplyingovencleaner,
becarefulnottogetit onthe
countertop,floor,continuouscleaningovenpartsor anyother
surface.
Note:Porcelainovendoor linerand
ovenbottommaybecleanedwitha
commercialovencleaner.They
mustberemovedandcleanedaway
fromtheoventopreventdamageto
thecontinuous-cleaningovenliner.
4. Placeyour fingersintheslotsin
thebottomandli~tupthefront
edgeofthe
ov~i~ bottomuntilitis
clearoftheovenfrontframe.
12
@
.-
.
Page 13

O\Tenshelvesmaybecleanedwith
iimildabrasive cleanser following
manufacturer’sdirections. After
cleaning.rinsethesheiveswithclean
waterand dry with a dry cloth.
removeheavy,burned-onsoil, soapy
metalpads
maybeusedfollowing
To
manufacturer’sdirections.After
scrubbing,washwithsoapywater,
rinseanddry.
Bmik Pall 6%Rack
Afterbroiling,removethe broiler
rackandcarefullypouroffthe
grease.Wash andrinsethepan
andrackin hot,soapywater.
Iffoodhasburnedon, sprinkle
thebroilerrackwhile hotwith
detergentandcoverwithwetpaper
towelsor a dishcloth.Thatway,
burned-onfoodswillsoakloose
whilethe mealisbeingserved.
notstorea soiledbroilerpan
rackintheovenorbroiler
compartment.
Beforereplacing any light bulb,
disconnectelectric power to the
rangeat the main fuse or circuit
breakerpaneL
completelybeforeremovingit.
nottoucha hot bulb with a damp
cloth—thebulb will break.
Thelightbulbinyourmm is
locatedinthe upperrightcorner.
Reachinandunscrewit aftertaking
precautionsmentionedabove.
Replaceitwitha high-temperature
appliancebulbofthesamewattage.
Letthebulbcool
Do
the
oven
Thetemperaturecontrol inyour
newovenhasbeencarefullyadjusted
toprovideaccuratetemperatures.
However,ifthisovenhasreplaced
oneyouhaveusedforseveralyears,
youmaynoticeadifferenceinthe
degreeofbrowningorthelength
oftimerequiredwhenusingyour
favoriterecipes.Oventemperature
controlshavea tendencyto“drift”
overaperiodofyearsandsince
this driftis verygradual,itisnot
readilynoticed.Therefore,you
mayhavebecomeaccustomedto
yourpreviousovenwhichmay
haveprovidedahigheror lower
temperaturethanyouselected.
Beforeattemptingtohavethe
temperatureofyournew oven
changed,be sureyouhavefollowed
thebakingtimeandtemperatureof
therecipecarefully.Then,after
youhaveusedtheovenafewtimes
andyou feeltheovenis toohot
or toocool,thereisa simple
adjustmentyoucanmakeyourself
ontheOVENTEMPknob.
Pull the knob offthe control shaft
and look at the back side. There is
a disc in the center of the knob skirt
witha seriesof notcheson the inner
edgenext to the knob shafi. One of
these notches ispositioned over a
pointeron the sideofthe knob shall.
Note position of
pointer to notches
before adjustment
, #@-~ ~
(
, 4$0h
‘\,
‘~R?&
\. -.
@
w!
a
,’
Loosen onlv the
.
locking scr~ws
Notewhichno[chthepointeris
locatedin. Tomakeanadjustment,
carefullyloosen(approximately
one turn),butdonot completely
removethetwoscrewsthatholdthe
skirttotheknob.Holdtheknobin
onehandandwiththeotherhand
carefullytiltthe skirtuntilthenotch
inthedisc clearsthepointeronthe
knobshaft. .
Toraisetheoventemperature,turn
dial in thedirectionofthe
the
arrowfor
temperature,turnthe
“Raise~’Tolowerthe
dial inthe
directionofarrowfor“Lower~’
Eachnotchwillchangetheoven
temperatureapproximately25”F.
Wesuggestthat youmakethe
adjustmentonenotchfromthe
originalsettingandcheckoven
performancebeforemakingany
additionaladjustments.
Aftertheadjustmentismade,make
surethe pointerontheknobshaft
isalignedwiththenotchinthedisc.
Pressskirtand knobtogetherand
retightenscrewssotheyaresnug,
but becarefulnottoovertighten.
Re-installknobonrangeand
checkperformance.Note:After
anadjustmenthasbeenmadethe
“Off” and“Broil”positionswill
notlineup withtheindicatormark
onthecontrolpanelasthey
previouslydid.Thiscondition
isnormalandwillnotcreate
aproblem.
13
(continuednetipage)
Page 14

.—.——-...
..
PART
outsideGlassFinish
I&let@,including
SideTrimsand
TrimStrips
porcelainEnamel
Finish
I%intedSurfaces
InsideOvenDoor*
OvenInterioF–
Top,SidesandBack
(ModelsJGKC15and
JGKC16)
(CAUTION: When in
USC,lightbulbs can
becomewarm enoughto
break if touched with
moistcloth or towel.
Whencleaning, avoid
warmlamps with cleaning
cloths.)
OvenLiner*
OlodelJGKS15)
(CAUTION: When in
use, light bulbs can
becomewarm enoughto
break if touched with
moistcloth or towel.
Whencleaning, avoid
warmlamps with cleaning
c!othsif lamp cover
removed.
RemovableOven
Bottom
k
Shelves
*spillage of marinades, fmit juices, and basting materials containing acids may causediscoloration. Spilloversshould be blotted up immediately, with care
beingtaken not to touch any hot portion of the oven, When the surface is cool, clean and rinse.
ifiATERL$L!!TOUSE
eSoap and W’atcr
o Paper Towel
@DryCicth
*Soap and Water
*Soapand Water
@Soap and Water
oSoap-Filled Scouring
~
Commercial Oven Cleane
*Stiff Bristle Nylon Brush
~Soapand Water
● Soap-Filled Scouring Pad
~Commercial Oven Cleane
e Soapand Water
a Soap-Filled Scouring Pad
(Non-metallic)
● Soap and Water
0Soap-Filled Scouring Pad
@Commercial Oven Cleane
Pdd
Dmin fat, cool pan irndrick sligh[ly.(Do not let soiled
compartment to cool.) Sprinldc on dcwrgent. Fill [hcpxnwith warm wmcrand
cloth or paper toweloverthe reck. Let pan and rackstand ft>ra fewminutes. Wash;scour
if necessary.Rinse and dry. OPTION: The broiler pun and rack mayalso be ciwtncdina
dishwasher.
Pull off knobs. Washgently butdo not soak. Dry and return controls m rangemakingsure
to match flat w-caonthe knoband shaft.
Clean outside of cooicd black$Iassdoor with
ammonia. Washother glass with cloth dampened in soapywater, Rinse and polish with a
dry cloth. If knobswe rcrnoved,do not allow Wa[ertorun down insidethe surfaceof gloss
whilc c!eaning.
Wmh, rinse, andthen polish with a dry cloth. DO NCY’fUSE steel wool, abrasives,
ammonia, acids, or commercial ovencleaners which may damage the finish.
Avoidcleaningpowdersor harsh abrasives which mayscratchthe enamel. If acids should
spill on the rangewhile it is hot, usca dry paper towelor cloth to wiw up right away.
When the surface has cooled, washand rinse. fir other spills, suchas fatsmatterings.etc.,
washwith soap and water when cooled and then rinse. Polish with dry cloth.
Usc a mild solutionof soap andwater. Do not usc any harsh abrasivesor cleaning powders
which mayscratchor mar surface,
Toclean ovcrrdoor; removebyopeninga few inchesand grasping door at sides. Lift door
upand awayfromhinges. Clean with any and all mentioned materials. Replaceby
gmsping door at sides and lining updoor with hinges. Push door firmly into place.
Cool beforecleaning.
If heavysoiling hasoccurred on theporous
usinga small amount of water and a stiff bristle nylonbrush. Use water sparingly and
changeit frequently,keeping it as c!ean as possible, and be sure to blot it up with paper
towels,cloths, or sponges.Do
they will leaveunsightly lint on the oven finish. If waterleavesa white ring on the finish as
itdries, apply water again and
and working towardthe center.
Forspeeialcleaninginstructions,seepageU.
Cool beforecleaning.
FOR LIGHT SOIL: Frequent wiping with mild soap and water (especially after cooking
meat) will prolong the time between major cleaning. Rinse thoroughly. NOI’E: Soapleft
on liner causes additional stains when ovenis reheated.
FOR HEAVYSOIL: Choose a nonabrasive cleaner and followlabel instructions, using
thin layerof cleaner. Use of rubber glovesis recommended. Wipe or rub lightly on
stubborn spots. Rinse well. Wipe off anyovencleaner that gets on thermostat bulb. When
rinsing oven after cleaning also wipe thermostat bulb.
The ovenbottom panel can be removed for easy cleaning (see page 12).Use the same
directions for cleaning as explainedabovefor Porcelain Enamel Finish,
Remove shelves and clean them outside of the ovento avoiddamagingthe specially coated
oven top, sides andback. Use anyandall mentioned materials. Rinsethoroughly to
remove all materials after cleaning. N~E: Some commercial ovencleaners cause
darkening and discoloration, When using for first time, test cleaner on small part of
shelf and check for discoloration before completely cleaning.
GENERAL DNUX.T1ONS
pm iid rack sIandinhroik?r
Sprtid
ii glass cleaner thatdoes not contain
suryuce,removeas much ofthe soil as possible
notruborscrubwith paper towels, cloths or sponges, since
blotitwith a clean sponge, starling at the edge of the ring
(
14
Page 15

~f’~~ LIGHT’ EM--JES
NO-rWORK
CAUSE
@Plugonrangek not completelyinsertedintotheoutletreceptacle.
@
Circuitbreakerinhousehasbeen~ripped~or fusehasbeimbkwvn,
=oven controlsarenotproperlyset.
AND
@Bulbisdefective.Replace.
@Switchwhichoperatesovenlightisbroken.Cal!forservice.
F(3OD
BROIL PI?C)I?ERLY
DOESNOT
@OVENTEMPknobnotsetatBROIL.Broilerwillnot operateifCWEN
TEMPknobisturnedpastBROIL.
*Foodisbeingcookedonhotpan.
~Utensilsarenotsuitedforbroiling.
FOODDOESNOTROAST
ORBAKEPROPERLY
~OVENSETknobnotsetonMJ7X).(MM whenusingAutomaticOven
Timer.
~OW3NTEMPknobnotsetcorrectly.
@Shelfpositionis incorrect.CheckRoastingandBakingpages.
~Ovenshelf is notlevel.
@Wrongcookwareisbeingused.Whenroasting,panistoosmall.
@Foiltentnotusedwhenneededtoslowdownbrowningduringroasting.
IMoEmJRE H“JSIDEAND
= Besureovenventductis notblockedorcovered.
OUTSIDEOVEN
HJ“(IU‘needmore help.. .Cw, toll free:
The GE AnswerCenter”
consumer service
To ob[ainservice,seeyourwarranty
onthebackpageofthisbook.
1~~-re proudofour service and
wiint you to
reasonyou are nothappy with the
service you receive, here are three
stepsto followfor further help.
FIRST’,contactthe people who
servicedyour appliance. Explain
bepleased, If for some
whyyouarenotpleased. In most
cases,thiswillsolvetheproblem.
NEXT,ifyouarestillnotpleased,
writeall the details—including
yourphonenumber—to:
Manager,ConsumerRelations
GeneralElectric
AppliancePark
Louisville,Kentucky40225
15
FIIVALLY, if
yourproblemis still
notresolved,write:
MajorAppliance
ConsumerActionPanel
20NorthWackerDrive
Chicago,Illinois 60606
Page 16

-%8AI+ g---- ~-”
>L—
,,~<.
t - .’ , ,“
~-~::-
.“
b.==
I&
Save proof of original purchase date such as your sales slip or cancelied check to establish warranty period. 4~~l~.-..-
—.
-==$?Ji!:-
—
1s
=
FULL ONE-YEAR WARRANTY
For one year from date of original
purchase, we will provide, free of
charge, parts andservice labor in
your home to repair or replace any
part ofthe range that fails because
of a manufacturing defect.
This warranty is extended to the
original purchaser and anysucceed-
ing owner for products purchased
for ordinary home use in the 48
mainland states, Hawaii and
Washington, D.C.In Alaska the
warranty is the same except that it
is LIMITED because you must pay
to ship the product to the service
shop or for the service technician’s
travel costs to your home.
All warranty.service will be provided
by our Factory Service Centers or
by our authorized Customer Care~
servicers during normal working
hours.
Look in the White or Yellow Pages
of your telephone directory for
GENERAL ELECTRICCOMPANY,
GENERAL ELECTRIC FACTORY
SERVICE, GENERAL ELECTRIC-
HOTPOINT FACTORYSERVICE or
GENERAL ELECTRIC CUSTOMER
CARE@SERVICE,
Is N(YTCOVEFED
Some states do not allow the exclusion or limitation of incidental or consequential damages, so the above limitation or exclusion
may not apply to you. This warranty gives you specific legal rights, and you may also have other rights which vary from state to state.
To know what your legal rights are in your state, consult your local or state consumer affairs office or your state’s Attorney General.
H further help is needed C0nc3ernirq t~is warranty,contact:
Manager-Consumer Affairs, General Electric Company, Appliance Park, Louisville, W 40225
@Service trips to your home to
teach you how to use the product.
ReadyourUse andCarematerial.
If you then have any questions
about operating the product,
please contact your dealer or our
Consumer Affairs office at the
address below or call, toll-free:
The GE Answer Center@
800.626.2000
consumer information service
~ Improper installation.
If you have an installation problem,
contact your dealer or installer.
Youare responsible for providing
adequate electrical, gas,exhausting and other connecting facilities.
V#arrantOr: (N3neral El~ctric Company
~ Replacement of house fuses
or resetting of circuit breakers.
@Failure of the product if it is
used for other than its intended
purpose or used commercially,
@Damageto product caused
by accident, fire, floods or acts
of God.
WARRANTOR IS NOT RESPON-
SIBLE FOR CONSEQUENTIAL
DAMAGES.
a;;~-<
ilk
IIx-s
II~=
~~@
ll&:-
,,’=——
1,,=
Ilxs=
~;
~;---
1!:=
~!~-:
IIG—.
 Loading...