

_l_ Safety Instruc_tions ....... 2-7
Operating Inslruc_ions
'Aluminum Foil ........... 13
Clock and Timer ....... ] 5, ]6
()\'e n ................ ]0-3 ]
Baking and Roasting ...... 13
Broiling, Broiling Guide . .. 14
Oven Control ........ l 0, l l
Power Outag> ........ 12, 16
Preheating .............. 13
Sabbath Feaune ...... 19, 20
Self-Cleaning ......... 22, 23
Special Features ......... 18
Thermostat Adjusunent ...21
Timed Baking
and Roasting ............ 17
Surthce Cooking ......... 8, 9
Warming Drawer ....... 22, 23
Care and Cleaning
Burner Assemhlv ....... 26-28
Burner Grams ............ 29
Control Panel and I{aaohs ...32
Cooktop Surthce .......... 29
Door Removal ............ 30
Kick Panel ............... 31
I,ift-up Cooktop ........... 32
Oven Bouom ............. 30
Oven i,ight Replacement ...33
()\'e n Vents .............. 32
Self-Cleaning .......... 24, 25
Shelx_s .................. 33
Stainless Steel Surthces ..... 29
Storag_ Drawer . .......... 31
V(arming Drawer. ......... 31
_O.COIB
Ins'zallation
Inslrug_ions ........... 34-45
Air Adjustment ........... 44
Aiati-Tip Device ........ 37, 45
Checking Btm_er Ignition . . .43
Connecting the Rang>
to Gas ............... 38-41
Dimensions and Clearances .36
Electrical Connections . .42, 43
I,ex_ling the Rang_ ........ 44
I,ocation ................. 37
I,P ...................... 45
Troubleshooting
Tips ................. 46-49
Accessories .............. 53
Consumer Support
Consumer
Support .......... Back Coxer
Product Registration .... 51,52
_'arrantv for Customers
in Canada ............... 55
V(arranw tbr Custon_ers
in the U.S.A .............. 54
E(;R2000
EGR200 l
J(;BP2 5
J(;BP26
J(;BP2 7
J(;BP28
JGBP2 9
J(;BP31
JGBP32
J(;BP_3
Write the model and serial
numbers here:
Model #
Serial #
You can find them on a label on
the fl'ont ot the range behind the
warming drawer, storage drawer
or kick panel.
183D5580P223 49-85141 06-07JR
iMPORTANTSAFETYiNFORMATiON.
READALLiNSTRUCTiONSBEFOREUSING.
WARNING!
For your safe_ the information in this manual must be followed to minimize the risk of fire or explosion,
electric shock, or to prevent property damage, personal injury, or loss of life.
WARNING:If the information
in this manual is not followed exactly,
a fire or explosion may result causing
property damage, personal injury
®
WARNING!
or death.
I Do not store or use gasoline or other
flammable vapors and liquids in the
vicinity of this or any other appliance.
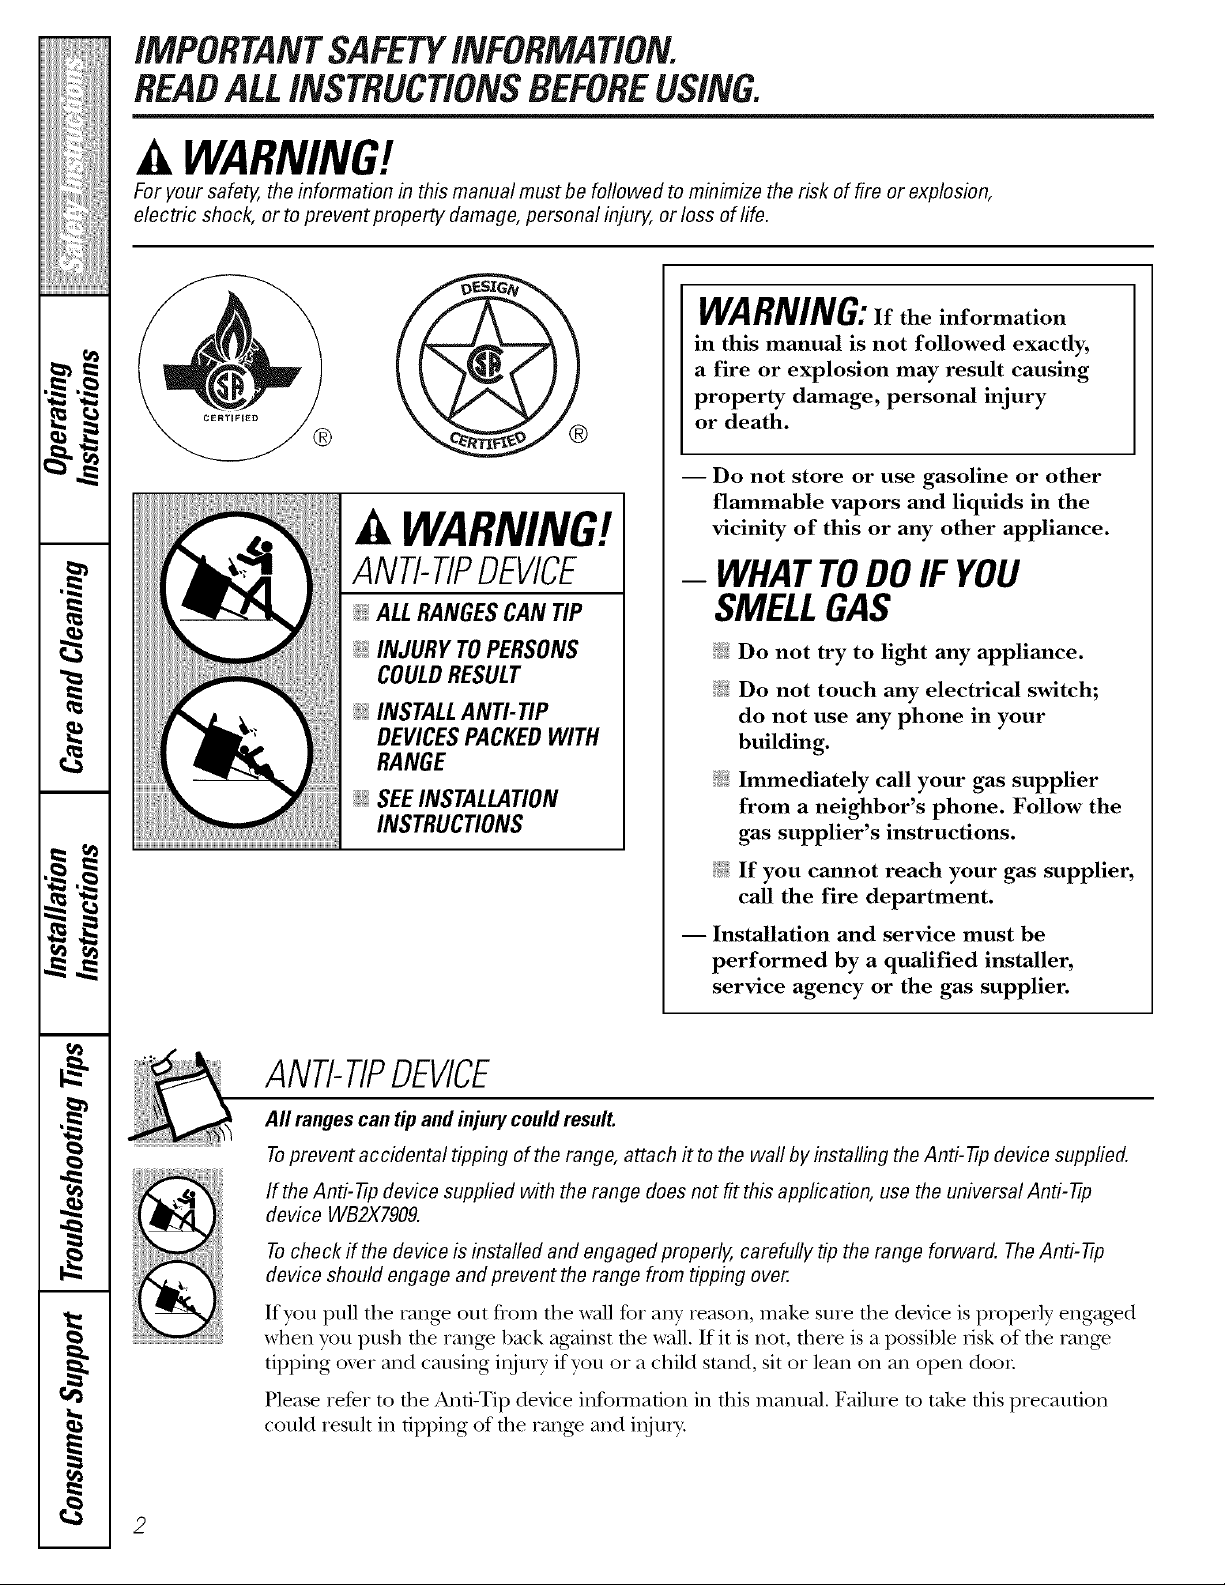
ANTI-TIPDEVICE
@ALLRANGESCANTIP
@ INJURY TO PERSONS
COULD RESULT
@ INSTALL ANTI-TIP
DEVICES PACKED WITH
RANGE
@ SEE INSTALLATION
INSTRUCTIONS
ANTI-TIPDEVICE
All ranges can tip andinjury could result.
- WHATTODOIF YOU
SMELLGAS
!:_i_Do not try to light any appliance.
!:_i:Do not touch any electrical switch;
do not use any phone in your
building.
!:_i_Immediately call your gas supplier
from a neighbor's phone. Follow the
gas supplier's instructions.
!:_i_If you cannot reach your gas supplier,
call the fire department.
I Installation and service must be
performed by a qualified installer,
service agency or the gas supplier.
Toprevent accidental tipping of the range, attach it to the wall by installing the Anti--tip device supplied.
If the Anti--tip device supplied with the range does not fit this application, use the universal Anti--17p
device WB2X7909.
Tocheck if the device is installed and engaged properly, carefully tip the range forward. TheAnti--tip
device should engage and prevent the range from tipping over.
If you pu]] the range out t)om tile wall for any reason, make su_e fl)e device is properly engag>d
when you push the range back against the wall. If it is not, flmre is a possible risk of the rang>
tipping ox>r and causing i,lju_ T if you or a child stand, sit or lean on an open door
Please refer to the Anti-Tip device infollnation in this manual. Failure m take this precaution
could iesult in tipping of the rang_ and ilIjUI>
2

_e.COffl
i
IMPORTANTSAFETYNOTICE
The California Safe Drinking Water and ToxicEnforcement Act requires the Governor of California to
publish a list of substances known to the state to cause birth defects or other reproductive harm, and
requires businesses to warn customers ofpotential exposure tosuch substances.
Gasappliances can cause minor exposure to four of these substances, namely benzene, carbon
monoxide, formaldehyde and soot, caused primarily by the incomplete combustion of natural gas or
LP fuels. Properly adjusted burners, indicated by a bluish rather than a yeflow flame, will minimize
incomplete combustion. Exposure to these substances can be minimized by venting with an open
window or using a ventilation fan or hood.
SAFETYPRECAUTIONS
Have the instafler show you the location of the range gas
_i_.:Ha_ your range installed and properly _i_.:
grounded by a qualified installer, in
accordance with the Installation Insuucdons.
Any adjustment and service should be
perfo,_ned only by qualified gas rang>
installers or service technicians.
Do not attempt to repair or replace any
part of your range unless it is specifically
recommended in this manua]. All other
service should be refe_xed to a qualified
technician.
shut-off valveand how to shut it off if necessary.
Plug your range into a ] 90_\_lt grounded
outlet only. Do [lot remo\e the round
grounding prong fiom the plug. If in doubt
about fl)e grounding of file home electrical
system, it is your personal _esponsibility and
obligauon m haxe an ungrounded out]et
replaced with a properly grounded,
fl_ree-prong outlet in accordance with
the National Electrical (;ode. Do not use
an exmnsion cord with this appliance.
IMPORTANTSAFETYINFORMATION.
READALLINSTRUCTIONSBEFOREUSING.
SAFETYPRECAUTIONS
Locate the rang_ out of kitchen traffic pafl_
and out of drafw locations to pre_nt poor
air citvulafion.
;;i:,:Be sure all packaging materials are remoxed
flom the range before operaOng it to
prevent rite or smoke damag> should tile
packaging material ignite.
_;i:,:Be sure your range is correctly adjusted by
a qualified service technician or installer tbr
the type of gas (nautral or LP) that is to be
used. Your range can be converted for use
with either type of gas. See the Installation
of the range section.
WARNING: teseadjnstmentsmnst
be made by a qualified service technician
in accordance Mth the manufiacmrer's
insmtcdons and all codes and requirements
of the autbocitv bavingjnrisdicfion. Failure
m follow these instructions could result in
set-ions ir_juU or property damage. The
qualified agency' perfot_ning this work
assumes responsibility for the conversion.
;_?:,:After prolonged use of a range, high floor
temperautres may result and many floor
cox>ring_ will not wifl_smnd this kind of use.
Ne_>r install fl_e range oxer viwl dle or
linoleun_ that cannot withstand such type
of use. Nexer insta]] it directly ox>r intelior
kitchen carpeting.
_;:Do not leme children alone or unattended
where a range is hot or in operation. They
could be seriously burned.
_;:Do not allow anyone to climb, stand or hang
on the oxen door; storage drawer; wamfing
drawer or cooktop. They could damage the
range and even tip it ove_; causing sex>re
persona] irljnry'.
CAUTION: temsofinterestto
children should not be stated in cabinets
aboxe a range or on the backsplash of a
range---<:hildten climbing on the range
m reach items could be seliously injured.
,&WARNING:NEVERusethis
appliance as a space heater to heat or
warm the room. Doing so may result
in carbon monoxide poisoning and
oxerheating of the oven.
4
_;i:,iNexer wear loose fitting or hanging gat_nents
while using the appliance. Be careflfl when
reaching for items stored in cabinets over fire
range. Flammable material could be ignited
if brougttt in contact wifll flame or hot o\_n
stlr'P, tces and may cause sex>re bnrrls.
;_?:':Do not store flammable materials in an
oven, a range storage drawer; a waHning
drawer or near a cookmp.
_;:Do not store or use combustible materials,
gasoline or oflter flammable vapors and
liquids in rite vicinity of this or any oflter
appliance.
_;:Do not let cooking gxease or other
flammable materials accunnflate in or
near the range.
;_):':Do not use water on grease fires. Nex>r pick
up a flaming pan. Turn fire controls off:
Smother a flaming pan on a surface burner
by coxering the pan completely with a
well-fitting lid, cookie sheet or fiat uay.
Use a multi-puq)ose dr T chemical or
foam-type fire extinguisher
Flaming grease outside a pan can be put
ont by co\_tJng it with baMng soda or;
if available, by using a mnlfi-pnrpose dry
chemical or foam-type fire exdnguishen
Flame in the oven or wam/ing drawer can be
smothered completely by closing the oxen
door and turning the control to off orby
using a muld-puq)ose d U chemical or foam-
type fire extinguisher
;_?:':i,et the burner grates and other surfaces
cool before ranching them or leaving fltem
where children can teach them.
_::Nexer block fl_e \ents (air openings) of
fire range. They provide the air inlet and
outlet flint are necessary for fl_e range to
operate properly with correct combustion.
Air opening:s are located at the rear of
rite cooktop, at the top and bottom of tim
oven door; and at the bottom of the range
under tlle warming drawer; kick panel or
storage drawer
_;:Large scrawhes or impacts to glass doors can
lead to broken or shauered glass.
g_com
WARNING!
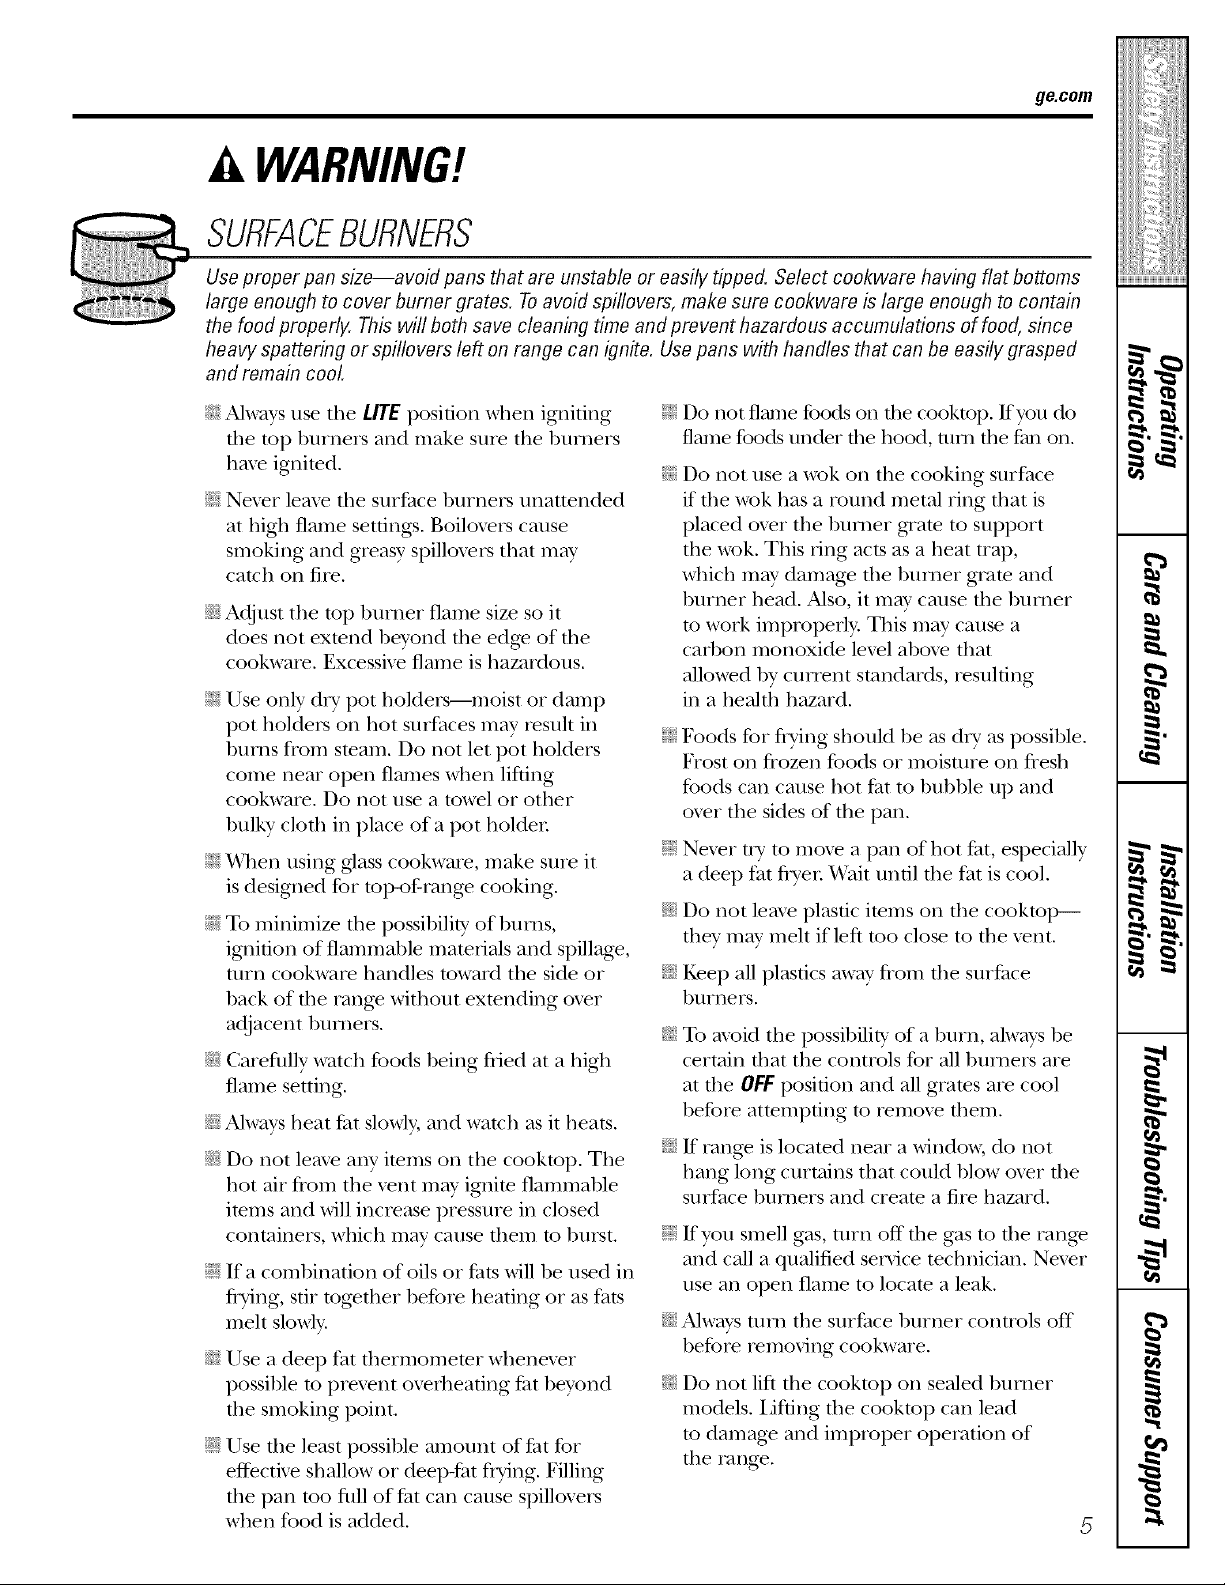
SURFACEBURNERS
Use proper pan size--avoid pans that are unstable or easily tipped. Select cookware having fiat bottoms
large enough to cover burner grates. Toavoid spillovers, make sure cookware is large enough to contain
the food properly. This will both save cleaning time and prevent hazardous accumulations of food, since
heavy spattering or spillovers left on range can ignite. Usepans with handles that can be easily grasped
and remain cool
_t{_;Always use the LITE position when igniting
file top burners and make sure the burners
hme ignited.
;_i:,:Nexer leave file sur/_ace burners unattended
at high flame setfing:s. Boiloxers cause
smoking and greasy spilloxers that may
catch on fire,
q]_Adjust tile top burner flame size so it
does not exmnd hevond tile edge of tile
cookware. Excessive flame is hazardous.
_i:,iUse only d U pot holders--moist or damp
pot holders on hot snrfaces may result in
btn_ls from smam. Do not let pot holders
come near open flames when lifting
cookware. Do not use a towel or other
1)ulky cloth in place of a pot holden
;_?:':_4]mn using glass cookware, make sure it
is deogned for mI>of-range cooking.
;_;To minimize the possihility of hums,
ignition of flammable materials and spillage,
utrn cookware handles toward tile side or
hack of file range without exmnding oxer
adjacent humers.
_{_Carefltllv watch fbods heing flied at a high
flame seuing.
_i_Always heat tilt slowly, and watch as it heats.
_{_Do ,lot leme any imms on tile cooktop. Tile
hot air from tile xent m W ignim flammable
imms and will increase pressure in closed
containers, which may cause fllem to hnrst.
;f; If a comhinafion of oils or/_ats will be used in
flTing, sill together before heating or as fats
melt slowly
q?{:_Use a deep fat thermomemr whenexer
possihle to prexent oveflleafing/_t heyond
the smoking point.
;_i:,:Use file least possible amount of/_at for
effective shallow or deep-fat flTing. Filling
tile pan too fltll of/_at can cause spillovers
when food is added.
_fi:,:Do not flame foods on die cooktop. If you do
flame foods under file hood, mm tile tim on.
_?{:_Do not use a wok on the cooking surface
if tile wok has a round metal ring that is
placed oxer the bun)er gaam m support
tile wok. This ring acts as a heat trap,
which m W damage tile hnliler gram and
1)urner head. Also, it m W cause file burner
m work impropefl> This may cause a
carl)on monoxide lexel aboxe that
allowed 1)ycunent standards, resulting
in a health hazard.
_i:,:Foods for flying should be as dU as possible.
Frost on fiozen foods or moisutre on fresh
foods can cause hot/_at to hubble up and
oxer tile sides of tile pan.
_i:,:Nexer tU m moxe a pan of hot/_at, especially
a deep fat flwer V(ait until file fat is cool.
_?{:_Do *lot leme plastic imms on tile cookmI>--
they may melt if left too close to tile xent.
_?{:_Kee I) all plastics away flom die sniPace
bnrners.
_: To mold tile possibility of a burn, always be
certain fllat the controls for all humers are
at the OFF position and all grates are cool
before attempting to remo\e fllem.
q_{_If range is located near a windo_, do not
hang long curtains that could hlow oxer file
surface burners and create a fire hazard.
_fi:,:If you smell gas, utrn off the gas to die range
and call a qualified service technician. Ne_er
use an open flame to locam a leak.
_:;Always turn tile surface hurner controls off
before removing cookware.
_7{_:Do ,lot lift tile cooktop on sealed burner
models. I,ifting file cooktop can lead
to damage and improper operation of
tile range.
IMPORTANTSAFETYINFORMATION.
READALLINSTRUCTIONSBEFOREUSING.
COOKMEATANDPOULTRYTHOROUGHLY...
Cook meat and poultry thoroughly--meat to at leastan INTERNALtemperature of 16001:and poultry to
at least an INTERNAL temperature of 180°ECooking to these temperatures usually protects against
foodbome illness.
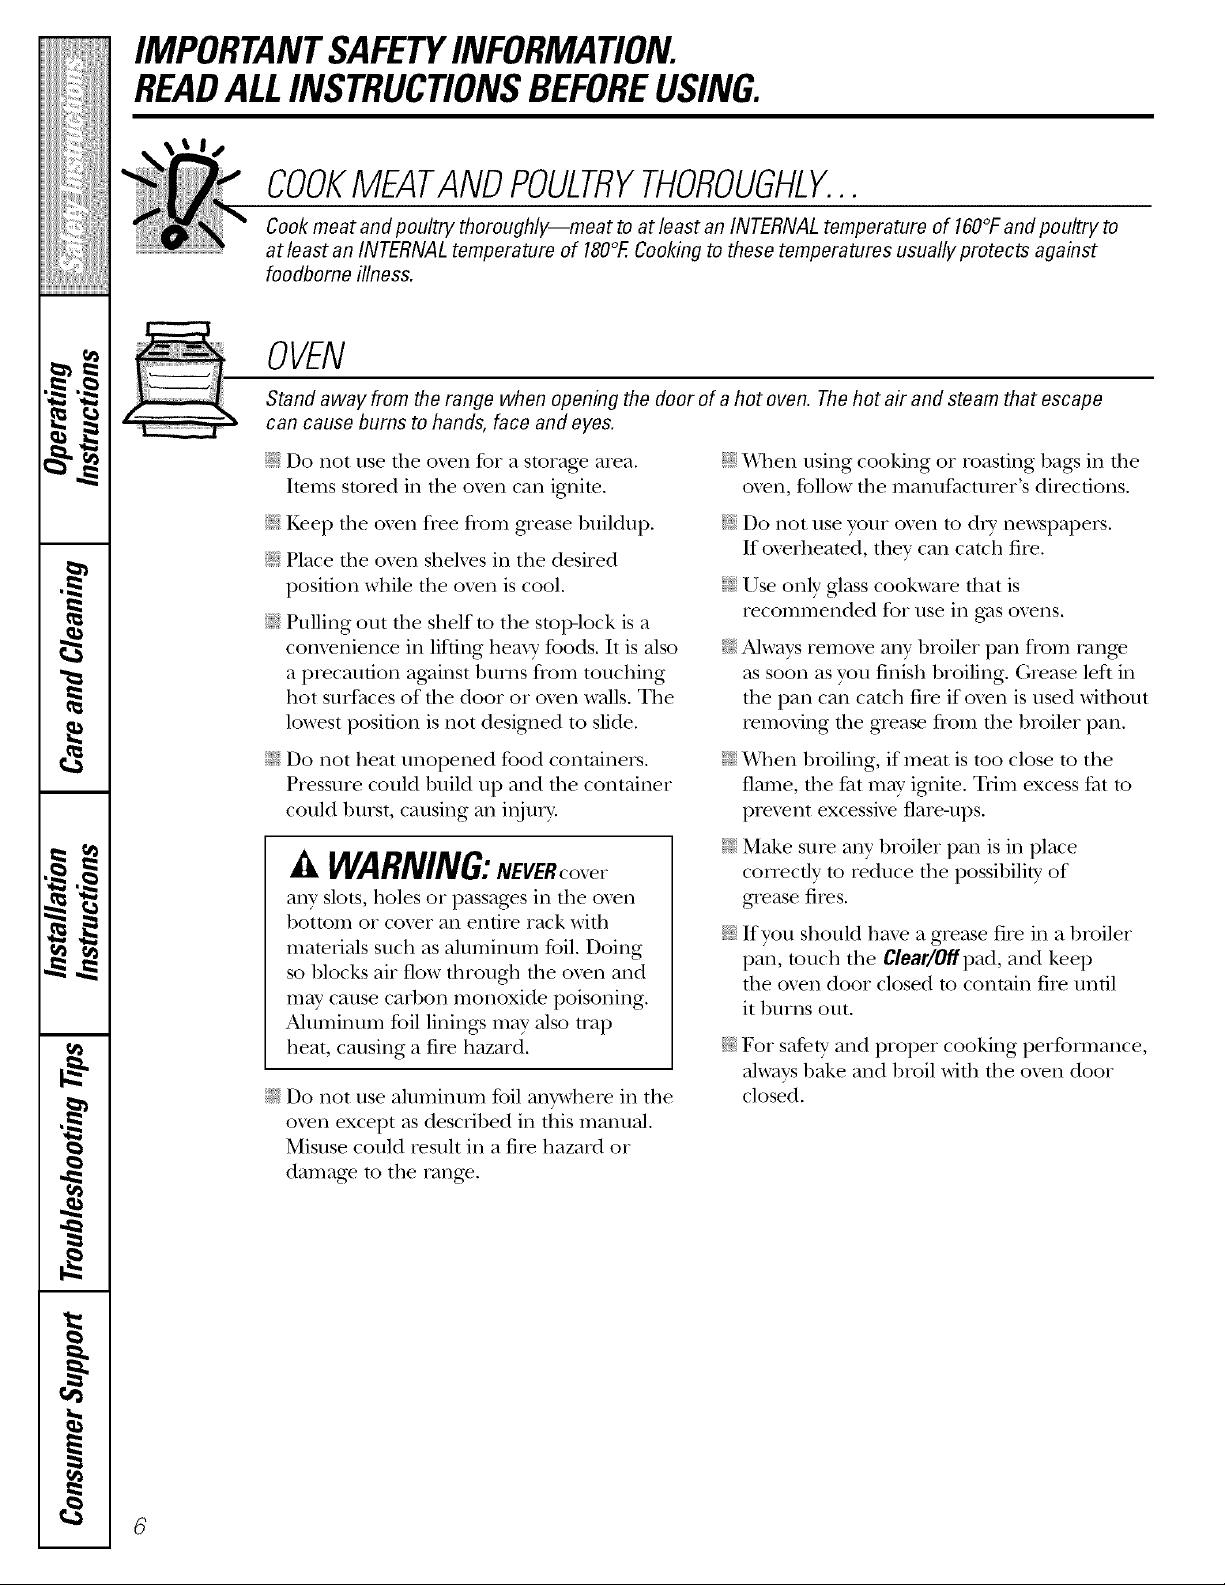
OVEN
Stand away from the range when opening the door of a hot oven. The hot air and steam that escape
can cause bums to hands, face and eyes.
E:,_Do not use dm oven for a storage area.
Imms stored in tile ox.en can ignim.
_i:':Kee I) the oven free flom gTease buildup.
E:,IPlace the ox.en sheh.es in the desired
position while tile ox.en is cool.
E:,IPulling out the shelf m the stop-lock is a
convenience in lifting heaxy' foods. It is also
a p_.ecaufion agwinst bm_s flom touching
hot surfaces of die door or ox.en walls. The
lowest position is not designed to slide.
E:,IDo not heat unopened food containers.
Pressure could build up and the container
could burst, causing an i[_nl-y.
WARNING:NEVERcover
any slots, holes or passag.es in the oven
bottom or cover an entire rack with
materials such as alunlinum foil. Doing
so blocks air flow througtl the ox.en and
m W cause carbon monoxide poisoning.
Alun/inum foil linings may also trap
heat, causing a fire hazard.
Do not use aluminum foil anywhere in the
oxen except as described in this manual.
Misuse could result in a fire hazard or
damage to the range.
E:,:XA]len using cooking or roasting bags in the
oxen, follow the manufacturer's directions.
E:,:Do not use your oxen to dU newspapers.
If oxerheated, they can catch fire.
_fi:,iUse only glass cool<ware fllat is
recommended for use in gv_sox.ens.
_?i:;Always remox.e any broiler pan flom rang.e
as soon as you finish broiling. Grease left in
the pan can catch fire if ox.en is used without
removing the grease flom the broiler pan.
E:,IWhen broiling, if meat is too close to the
flame, the fi_t may ignim. Trim excess fi_t to
prex.ent excessive flareqq)s.
E:,IMake sm.e aW broiler pan is in place
con.ecflv to i.educe the possibility of
gi.ease fires.
_{:_If you should have a grease fii.e in a broiler
pan, much the C/ear/Offpad, and keep
die oven door closed m contain fii.e until
it burns out.
_?{:_For safety and proper cooking perfommnce,
always bake and broil with the oxen door
closed.

ELECTRICWARMINGDRAWER(onsomemode/s)
ge.com
E:,IThe pmi)ose of d_e wanning drawer is
to hold hot cooked tbods at serving
temperature. Alwws start with hot food;
cold food cannot be heated or cooked
in tile wanning drawen
_fi:,:Do not use the wanning drawer to d U
newspapers. If ox_rheated, they can catch
on fire.
E:,IDo not leme paper products, cooking
utensils or food in file wanning drawer
when not in use.
_:;Never lem>jars or cans of fl_t dripping_ in
or near your warming drawen
;f; Alwws kee I) wooden and plastic utensils
and canned food a sad distance away flom
your wanning drawer
_{_Do not warm tbod in the wanning drawer
for more fllan two hours.
SELF-CLEANINGOVEN
_i_,:Do not touchthe heating element or the interior
surface of the warming drawer. These sur£_ces
may be hot enough to bum.
REMEMBER:Tile inside sur/_ace of fl_e
wanning drawer m W be hot when tile
drawer is opened.
_:;Use care when opening tile drawei: Open
the drawer a crack and let hot air or steam
escape before removing or replacing food.
Hot air or steam which escapes can cause
bums m hands, face and/or eyes.
E:,:Do not use aluminum foil to line the drawe_:
Foil is an excellent heat insulator and will
trap heat beneath it. This will upset the
perfommnce of the drawer and it could
damag> file interior finish,
_{;_Be sure to wipe offexcess spillag_ betbre
self-cleaning operauon.
E:,:Before self-cleaning the oven, remo_e
the shelxes, aW broiler pan, grid and other
cookware.
_{_;Do not clean the door gasket. Tile door
gasket is essential for a good seal. Care
should be taken not to rub, damag_ or
mo\_ tile g'asket.
E:,:Clean only parts lismd in fllis Owner's
Manual.
K dm self-cleaning mode malflmctions,
turn tile oxen off and disconnect the power
supply. Ha_e it serviced by a qualified
technician,
_t{::Do not use oxen cleaners. No commercial
oven cleaner or o_>n liner of aW kind
should be used in or around any part of
the oven. Residue flom ox>n cleaners will
damage tile inside of the ox>n when tile
seltk:lean cycle is used.
READANDFOLLOWTHISSAFETYINFORMATIONCAREFULLY.
SAVETHESEINSTRUCTIONS
7
I
w
Usingthegas surfaceburners.
Throughout this manual, features and appearance may vary from your model
Before Lighting a GasBurner
::Ji::Drip pans are supplied with your range;
m
they should be used at all times.
::J?::Make StlI'e all btlYneI's are in place.
_: Make sure all grates on the range are
properly placed before using any burne_:
After Lighting a Gas Burner
::Ji::Do not operate the burner for an
extended period of time without
cookware on the grate. The finish on
the grate may chip without cookware
to absorb the heat.
::Ji::Be sure the burnex_ and grates are cool
befin'e you place yore" hand, a pot holder;
cleaning cloths or other materials
on them.
How to Light a Gas Surface Burner
Make sm'e all the smfhce bm'ne_ m'e
m
placed in their respective positions.
Push the control knob in and turn it
to the tire position.
---
Ym will hear a little clicking noise--
the sotmd of the electric spark igniting
the bm'ner_
Push flTecontrol knob in andturn it
to flTeLITEposition.
Turn the knob to ac!}ust the flame size.
If the knob stays at tirE, it will continue
a
to click.
\'\]_en one bm'ner is turned to tirE,
all the bm'ne_ spark. Do not attempt to
disassemble or clean m'otmd any bm'ner
while another bm'ner is on. An electric
shock may result, which could cause you
to knock o\er hot cookware.
J
h
h
-mm
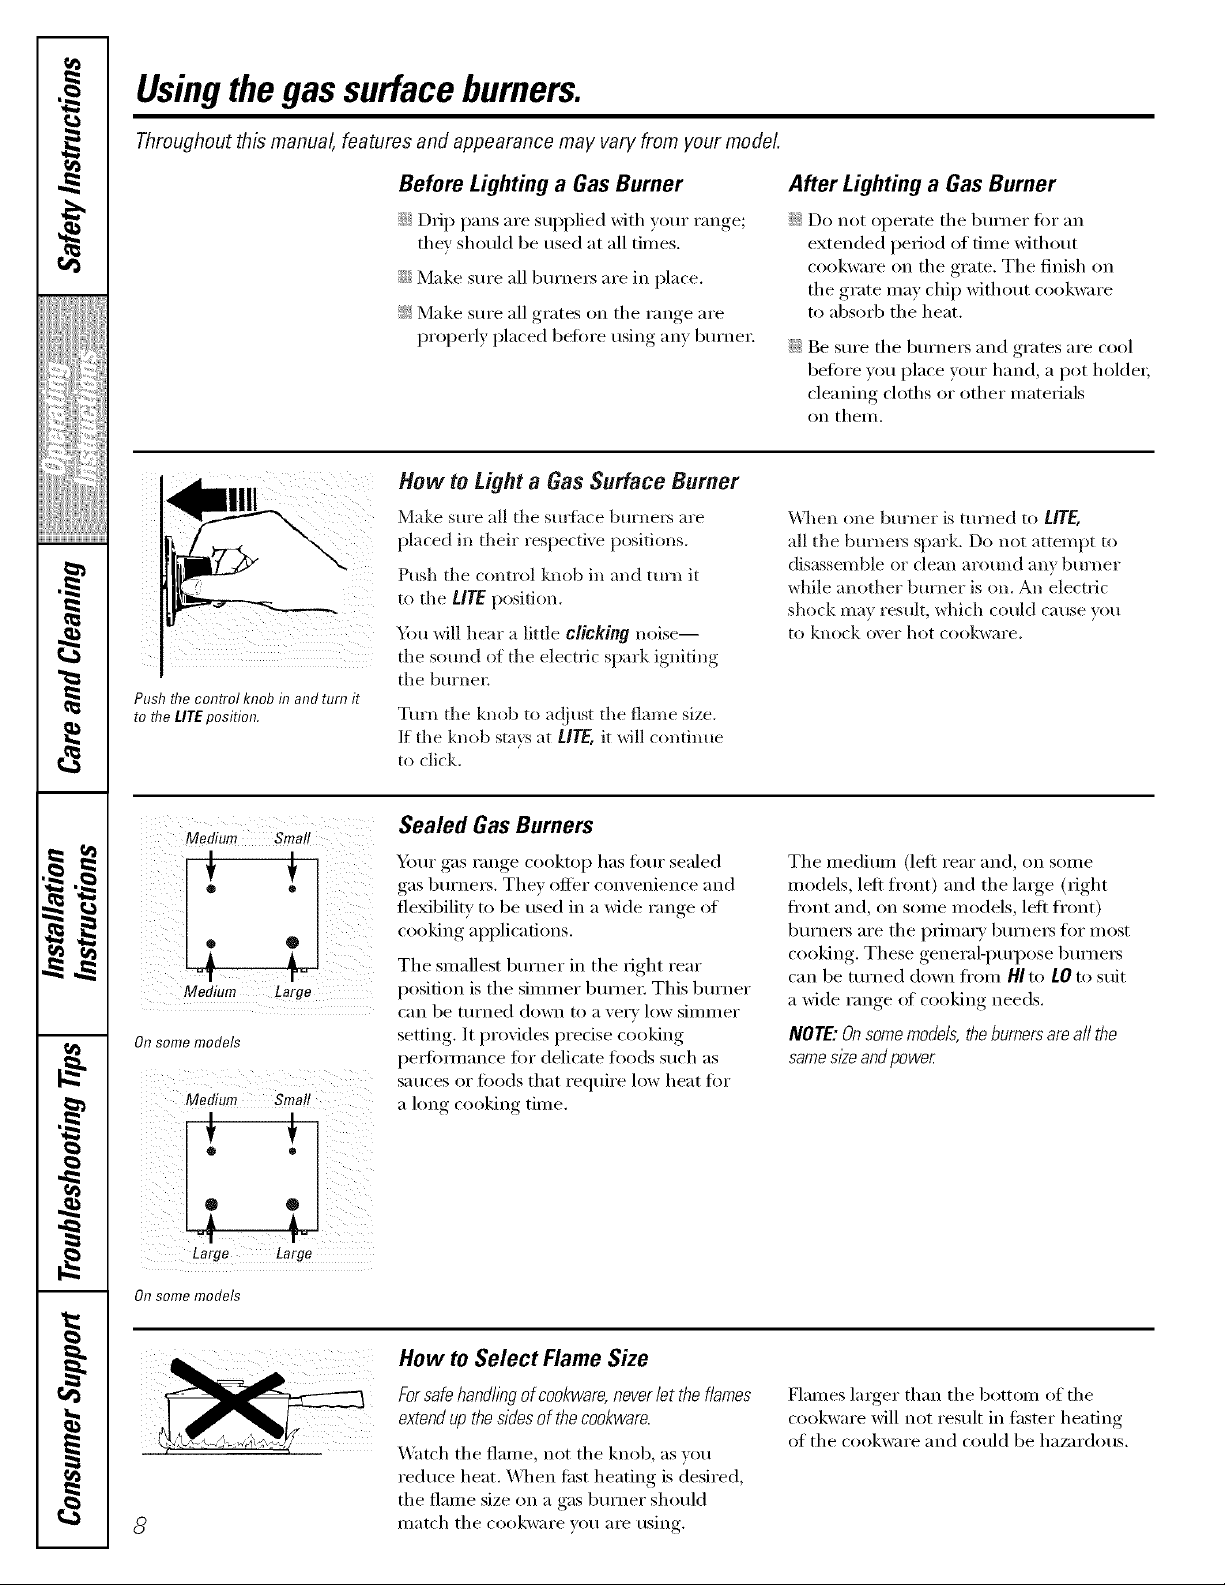
Medium Smal!
®
Medium Large
m
On some models
Medium Smal!
m
Sealed Gas Burners
Ymr gas range cooktop has fern" sealed
gas bm'ne_, Thev offer convenience and
flexibility to be used in a wide range of
cooking applications.
The smallest burner in the right rear
position is the simmer bm'ne_; This bm'ner
can be turned down to a xer) low simmer
setting. It provides predse cooking
pe_fimnance fin" delicate foods such as
sauces or fi)o(ls that require low heat fin.
a long cooking time.
The medium (left rear and, on some
models, left fl'ont) and the large (right
fl'ont and, on some models, left front)
btlYneI_ are the primar)' burners fi)r most
cooking. These general-puq)ose burne_
can be turned down fl'om HIto tO to suit
a wide range of cooking needs.
NOTE'.Onsomemodels,the burnersareall the
samesizeand power
Large Large
On some models
How to Select Flame Size
m
el
I
8
Forsafe handlingof cookware,neverlet the flames
extendup the sidesof the cookware.
Watch the flame, not the knob, as you
reduce heat. \A]_en first heating is desired,
tile flalne size on a gas burner should
match the cookware you _lI'e using.
Flames larger than the bottom of the
cookware will not result in fhster heatim*
of the cookware and could be haa_rdous.
Top-of-Range Cookware
_e.cem
Aluminum: Medium-weight cookware is
recommended because it heats quickly
and evenlv. Most fi)ods brown evenly in an
ahmfinum skillet. Use saucepans with tight-
fitdng lids when cooking with minimum
}tIllOllntN ()[ water
Cast-Iron: If heated slowly, most skillets will
give satistactorv results.
Enamelware: Under some conditions,
tile enai/lel of soille cookw;ire ill,iv i/xelt.
Follow cookware iilantlJ[itcttxi'ei"s
recommendations fi)r cooking methods.
cookware--those fi)r ovell tlse only and
those for mI>of-range cooking (saucepans,
coffee and teapots). Glass conducts heat
vexwslowly
Heatproef Glass Ceramic: Can be used for
either surtitce or oven cooking. It conducts
heat very slowly and cools vex? slowly: Check
cookware i/l_tnt/lilcturer's directions to be
sure it can be used on gas ranges.
Stainless Steel'. This metal alone has poor
heating properties and is usually combined
with coppex; ahmfinum or other metals for
improved heat distribution. Combination
metal skillets usually work satisfl_ctorilv if
they are used with medium heat as the
IIla ntllil ct tll'eY recolI/IIlends.
Stove Top Grills (onmodels with sealedburners)
Do not tlse stove top gxJlls on your sealed
gas burnei_. If u)u use tile stove top grill
on the sealed gas bm'ner, it will cause
incomplete combustion and can result
ill expos/lre to carbon ii/onoxide levels
above allowable current standards.
Glass: There are two types of glass
w
Usea flat-bottomed wok.
Thbcanbehazardoustoyourheaith.
Wok This Way (onmodelswith sealed burners)
Werecommendthatyouusea 14" orsmaller
flat-bottomedwokMakesurethewokbottom
sitsflatonthegrate.Theyareavailableat your
localretailstore.
Onl) a fiat-bottomed wok should be used.
In Case of Power Failure
In case ota power fifilure, you can light
tile gas surfi_ce burnex_ on your range with
a match. Hold a lit match to tile burner,
then push in and ttlYn tile control knob
to tile LITEposition. Use extreme caution
when lighting bm'nex_ this way,
Do not tlse a flat-bottoilled wok Oil _t
support ring. Pladng tile IJng over tile
burner or grate nlay cause tile burner
to work improperl> resulting in carbon
monoxide levels above alhmzfl)le standards.
This could be dangerous to wmr health.
Sm_i_ce bm'nexs in use when an electrical
power fifilm'e occm_ will continue to
operate noli/lallv:,
g
N"
€=
',,wad
m
q

Usingthe ovencontrols.
Throughout this manual, features and appearance may vary from your model.
m
__
m
w
w
w
m
m
J
#.
1::
O_en Contro_b
/
-J L o°j
Temp Recoil
o
CBroil _ _clea r_
C
®
¢-solf
t
T:eCoal
w /
_tcheq_Clock_
LZime L" "L)
On / Off
ightj Tim J Ti J
n; _..;utornatic ;en
OvenControlClockandTimerFeaturesandSettingsConsomemodelsJ
o Bake/Temp Recall Pad 0
Touch this pad to select the bake flmction.
Bake Light
[qashes _hile in edit mode--_ ou can change
the oven temperature at this point. (;lo_:s _hen
the oven is in bake mode.
o Start/On Pad
]_'ltlSt be tOtlched to start an} cooking or
cleallillg ftlllctJoI1.
O Dbplay
Sbo_:_ the time of da); oven temperature,
whether the oven is in the bake, broil or
selFcleaning mode and the times set tot
tile tiiller or atltoillatic ()veil opei'ations.
The display will show PREwhile preheating.
\._l_en the oven reaches the selected
temperature, the oven control will beep and
the display will show the oven temperature.
If "F- and a numberor letter" flash inthe displayand the
ovencontrols/i?na& this indicatesa function error code.
ff your ovenwas set fora timedoven operationand
apower outageoccurred,the dock and a//programmed
functionsmustbe reseL
Thetime of daywi// flash inthe display when therehas been
apower outage.Resetthe dock.
If the functionerrorcode appearsdurbg theself-cleaning
cycle,checkthe ovendoor latch. Thelatch handlemay have
beenmoved,evenif onlyslightly,from the/atchedposition.
Make sure the latch is movedto the nght asfar as it wi//go.
Touchthe Clear/Off pad. Allow theoven to cool for
onehour Put theoven backinto operation. If the function
errorcode repeats,disconnectthe power to the rangeand
ca//for service.
Kitchen -timer On/Off Pad
Touch this pad to select the timer feature.
Then press the + and -pads to at!just the
[Jill eI:
-timer Light
Flashes _hile in edit mode--you can change
the set dine at this point. Glows _hen the timer
has been activated. Flashes again _d_en the time
has mn out until the control is reset.
Clock Pad
0
To set the clock, press this pad twice and then
press the +and -pads. The time of day will
flash in the display when the oven is fi_t
[tlrned on.
Start -time Pad (on some models)
0
Use along with the Cooking Time or
Self Clean pads to set the oven to start
and stop automatically at a time w)u set.
Start -time Light
Flashes _hile in edit mode--you can change
the start time at this point. Glows when the
flmcfion has been activated.
Cooking -time Pad (on some models)
0
Touch this pad and then touch the + or -
pads to set tile alilOtlnt ()J[ time Veil W;lllt VOtlI"
ti)o(1 to cook. The oven will shut off when the
cooking [ilI/e has I'tln el.it.
Cooking -timeLight
Flashes _hile in edit mode--}ou can change
the set time at this Ix)int. Glows when the
fimction has been activated. Flashes again when
the time has run out until the control is reset.
10
ge.com
OvenControl,Clockand TimerFeaturesandSettings<onsomen,o Je/ej
Automatic Oven Light (on some models)
0
This lights an)_ime the oven has been
programmed usin,,,_ the Cooking Time or
Start Time fimctions.
Oven Light On/Off Pad
Touch this pad to mrn tile oven light on or off.
-Pad
Short taps to this pad will decrease tile time
or temperature by small amounts. Touch
and hold tile pad to decrease tile time or
temperature by larger amounts.
+ Pad
Short taps to this pad will increase tile time
or telllpei'attlre by small aIl/Otlnts. Touch
and hold the pad to increase the time or
temperature by linger amounts.
Self Clean Pad
0
Touch this pad to select tile selfk'leaning
fimction. See the Using the self-cloaning oven
section,
Clean Light
Flashes while ill edit IllOde--}OH (-}111 (-h}lllge
tile length of thne fin" tile selfklean cycle at this
point. Glo_:s _dmn file oven is in tile selfklean
qcle..M*er tile selfklean Q'cle, the ligJlt will
turn ofl_ Unlatch tile dooi:
Clear/Off Pad
Touch this pad to cancel All oven operations
except tile clock and time_:
Broil Hi/to Pad
Touch this pad to select tile broil timcfion.
Broil Light
F]ashes while in edit mode---you can switch
fi'om Hi to LoBroilat this point. Glows _hen tile
o_en is in broil mode,
Indicator Lights (on some pads)
EOlTmode lasts several seconds after the last
pad pIess. Star Time and CookingTime will be
the on]) pads lit if either of these options is
selected. (Example: Start Time is selected with
Bako---the Start Time pad will remain lit until
the clock reaches the progTmmned time, at
_dfich point it will ttli_l off and the Bake/'/'emp
Recall pad lig]lt will lig_lt up),
w
m
mm
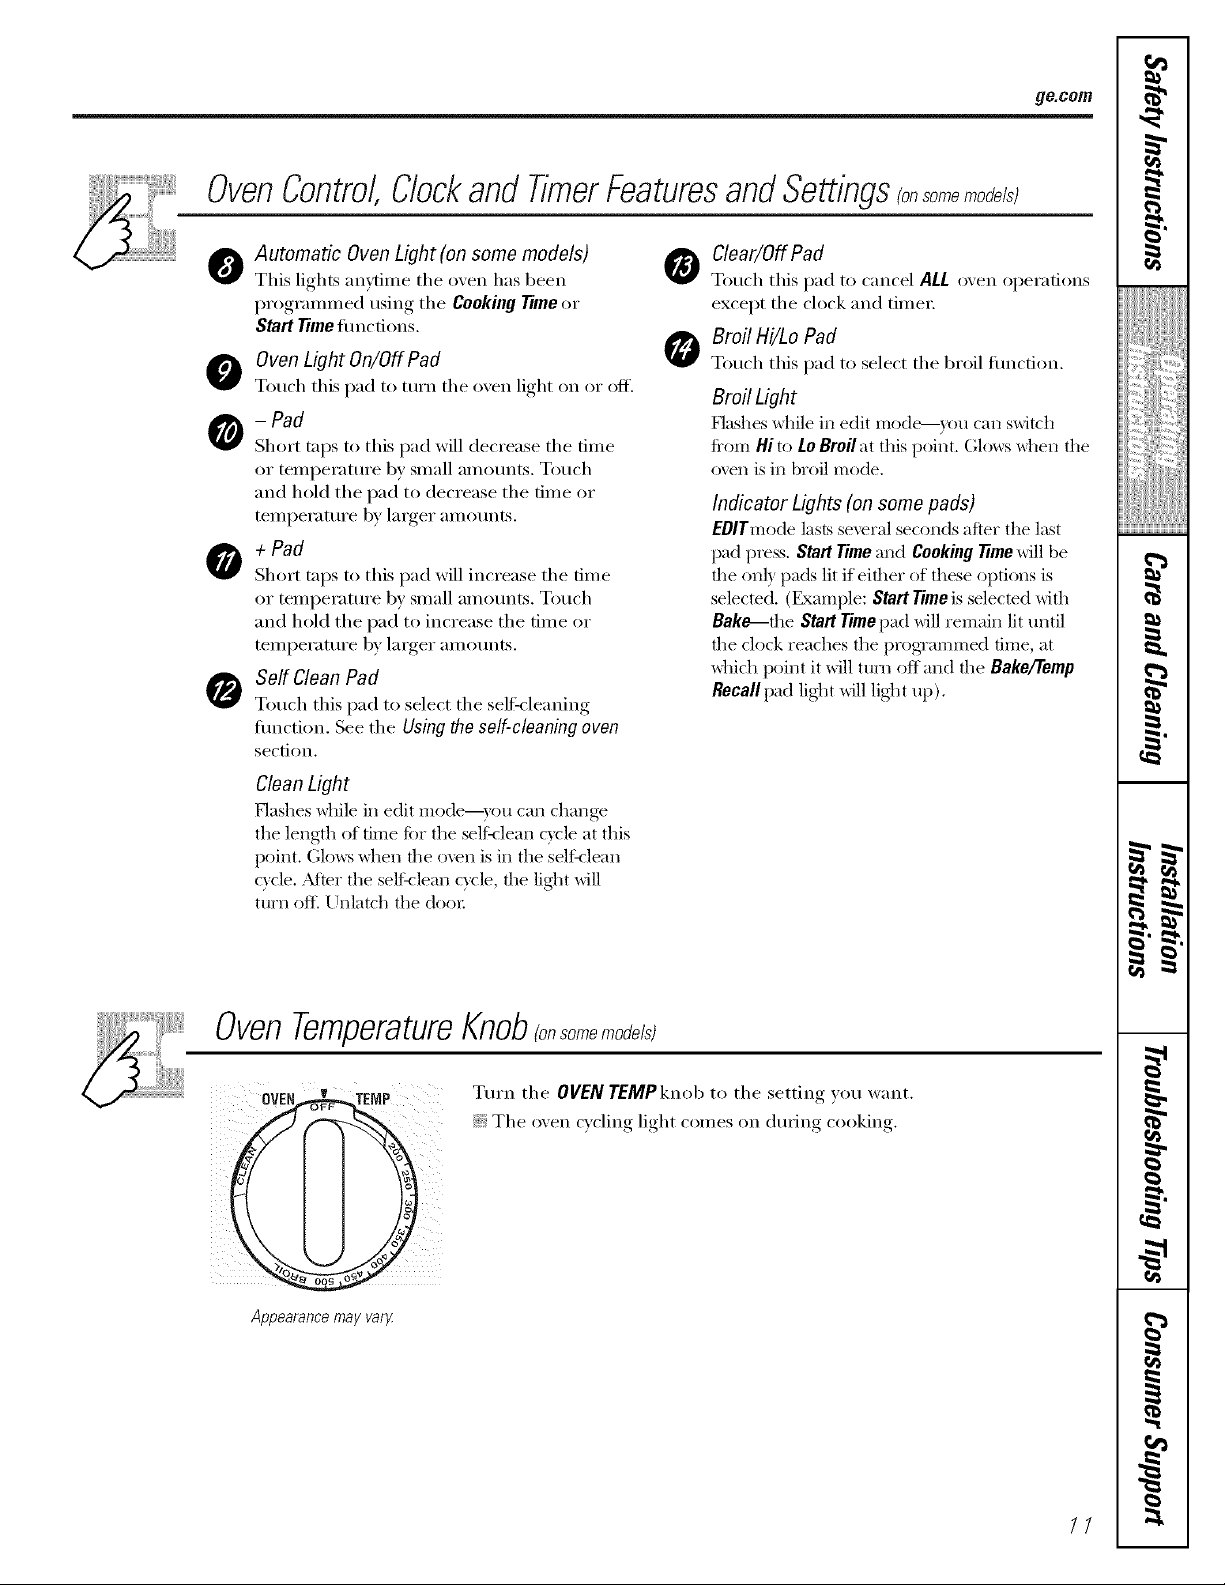
OvenTemperatureKnob<o,so e o e/e
OVEN TEIvIP Turn tile OVEN TEMPknob to tile ,settino_ you, want.
N Tile oxen cycling light comes on (hwing cooking.
Appearance may var}_
g
m
q
//

I
w
Usingthe oven.
ca
Toavoid possible bums, place the shelves in the desired position before you turn the oven on.
Before you begin...
Tile shelves have stoic-locks, so that when
m
placed correctly on tile shelf supports
(A through E), they will stop befin'e
coming completely out, and will not tilt.
\,\]/en placing and removing cookware,
pull tile shelf out to tile bum l) on tile
sheff SUl)po_t.
Ttieoven has 5shelf positions.
It also has a special low shelf
position (R)for extra large items,
such as a large turkey.
i
Oven Vent
xa)ur oven is vented through ducts at tile
rear of tile range. Do not block these ducts
when cooking in the oven--it is important
that the flow of hot air fl'om tile oven
and fl'esh air to tile oven burner be
Plastic items on the cooktop may
melt if left too close to the vent.
Vent appearance and location var_
tminterrui)ted. Avoid touching tile vent
openings or nea_q_v stu_hces during oven or
broiler operation--they may become hot.
Toremove a shelf, pull it toward you, tilt tile
ti'ont end up and pull it out.
TOreplace, i)lace the end ot the shelf
(stopqocks) on the sui)port, tilt up the
front and push the shelf in.
NOTE: Theshelf is not designed toslide out at the
special low shelf (R)position.
iJi::Handlesofpots and pans on the cooktopmay
becomehot if left tooclose to the ven_
iJi::Donot leaveplastic or flammableitems on the
coo/Cop--they maymelt or igniteif left too close
to the venL
_: Donot /eaveclosedcontainerson the coo/Cop.
Thepressurein closedcontainersmay increase,
whichmay causethem to burs_
•w h
i
m
#_.
m
_: Metal items will becomeveryhot if theyare left
on thecooktop,andcould causeburns.
Power Outage
r.D
A CAUTION:Donotmakeany
attempt to operatethe electric ignitionoven
duringan e/ectncalpower failure.
Tile oven or broiler cannot be lit during
a power fifilm'e. Gas will not flow unless
the glow bar is hot.
If the oven is in use when a power tifihu'e
occ/li'S_ tile oven b/lI'neI" shtlts off and
cannot be re-lit until power is restored. This
is because tile flow of gas is automatically
stopped and will not resume when power
is restored until the glow bar has reached
operating temperature.
Oven Light (on some models)
Touch tile Oven Light On/Off pad on tile
ul)per control panel to turn tile light on
OY () J_',
Oven Light (on some models)
Press tile OvenLight On/Offpad on tile lower
control panel to turn the light on or off.
oa
I
/2
Donot lock the oven door with the latch during baking or roasting. The latch is used for self-cleaning only.
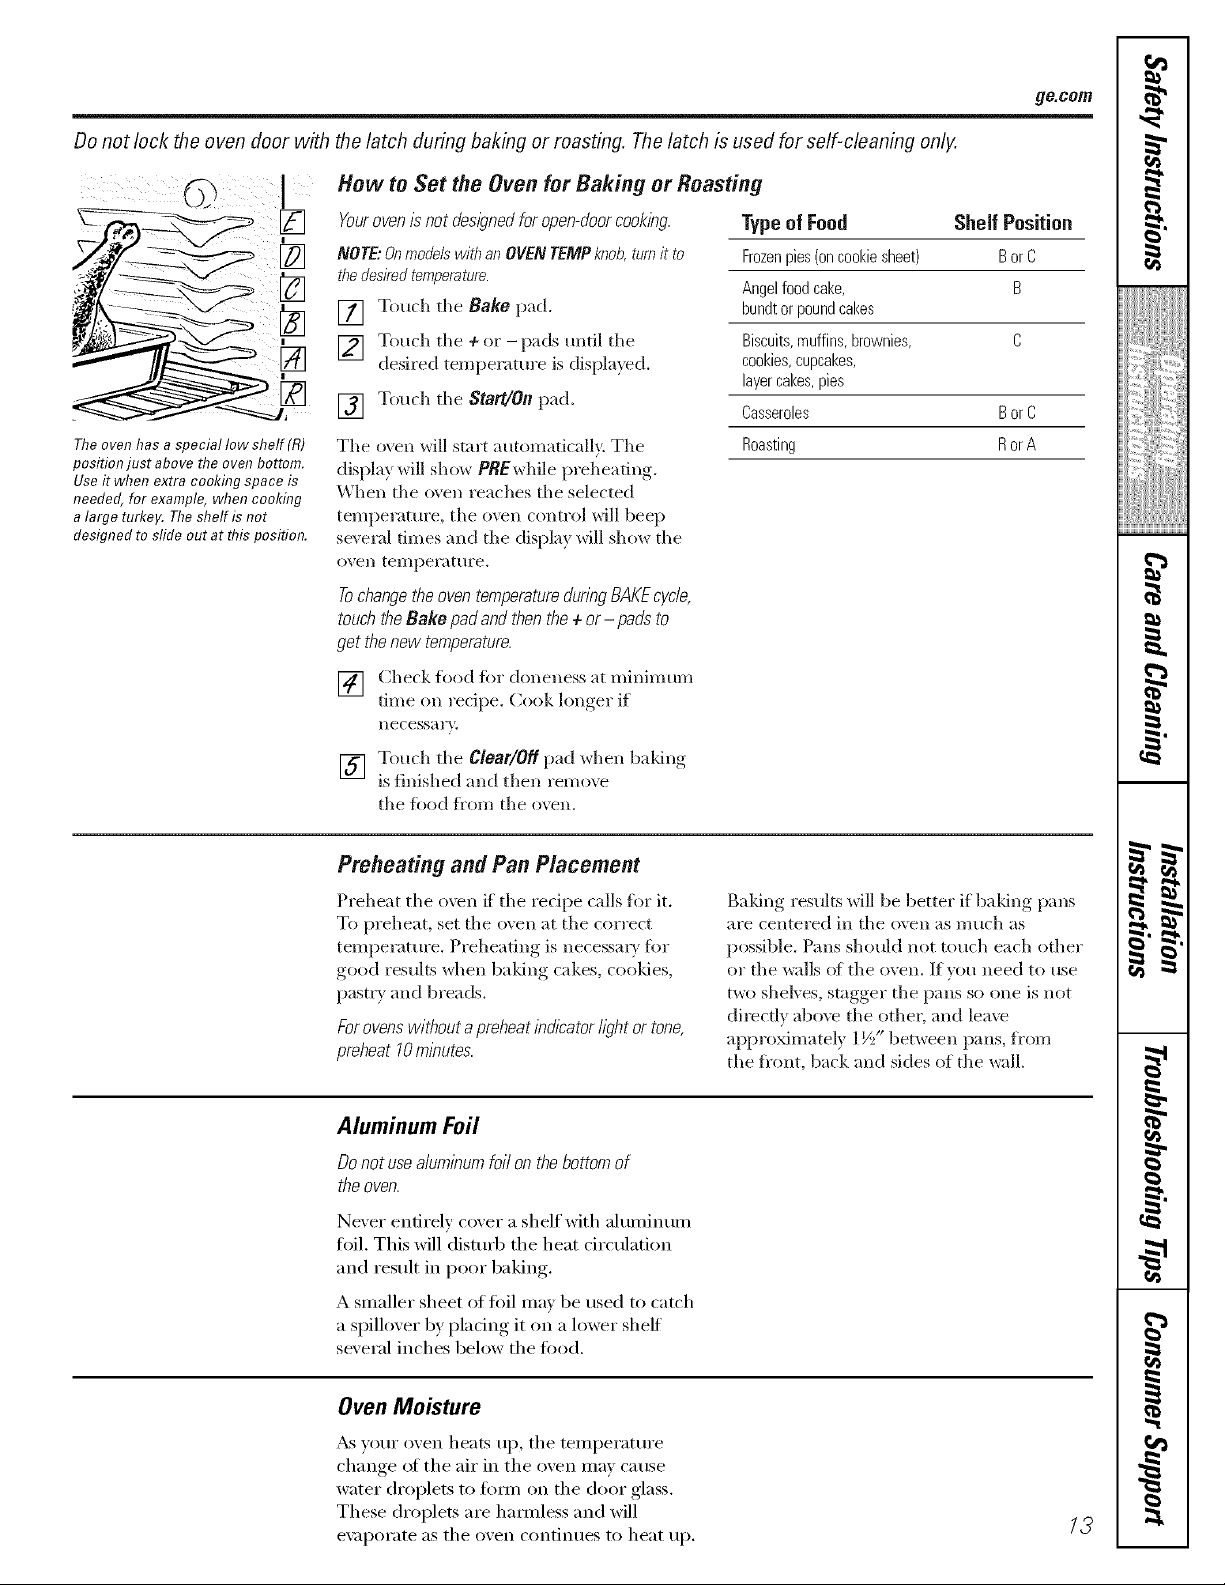
How to Set the Ovenfor Baking or Roasting
] [] Touch the ÷ or - pads until tile
position just above the oven bottom.
Useit when extra cooking space is
needed, for example, when cooking
a large turkey. The shelf is not
designed to sfide out at this position.
Youroven/s not des/)ned for open-doorcook/hg.
NOTE;Onmodelswithan OVENTEMPknob,turnit to
thedesiredtemperature.
[] Touch the Bake pad.
desired temperature is displa}ed.
[] Touch tile Start/On pad.
Tile oven will start automatically. The
display will show PBEwhile preheating.
When the oven reaches the selected
temperature, tile oven control will beep
se\ ex'al times and the display will show the
()veil teI/lpeI'attlre.
Tochangethe oven temperaturedunngBAKEcycle,
touchthe Bake pad andthen the÷ or- padsto
get thenew temperatore.
Type of Food Shelf Position
Frozenpies(oncookiesbeet) BorC
Angelfoodcake, B
bundtorpoundcakes
Biscuits,muffins,brownies, C
cookies,cupcakes,
layercakes,pies
Casseroles BorC
Roasting RorATheoven has a special low shelf (R)
ge.cenl
[_] Check food for d(ineness at minimum
time (m recipe. Cooklonoer_ if
necessal'y.
[] Touch the Clear/Off pad ",d_en baldng
is finished and then ten/eve
the food K()m the oven.
Preheating and Pan Placement
Preheat the oven _f the Iecipe calls for it.
To preheat, set the o',en at the correct
temperature. Preheating is necessm_' fi)r
good results when baldng cakes, coo]des,
pastry and breads.
Forovenswithout a preheat indicatorlight or tone.
preheat 10rnbutes.
Aluminum Foil
Do notuse aluminum foil on thebottom of
the oven.
Never entirely cover a shelf with ahlI/lintlIll
toil. This will disturb tile heat circulation
and result in poor baking.
A sinaller sheet of ti)il inav be used to catch
a spillover by plating it Oil a lower shelf
several inches beh)w the tiled.
w
Baldng results will be better if baldng pans
are centered in the 1)'_en as much as
possible. Pans should not touch each (>ther
or tile _dls of the oven. If you need to use
two shel_ es, stagger the pans so one is not
direct.Iv above the other, and leave
appro_mately l K," between pans, f_'om
the fi'ont, back and sides of the wall.
g
m
Oven Moisture
_s VOIII" ()veil heats tip, tile telllpei';ittli'e
change ot the air in the ()veil inay cause
water di'oi)lets to fi)im Oil the door glass.
These droplets are haimless and will
e\:q)orate as tile oven continues to heat up.
q
13
w
Usingtheoven.
Donot lock the ovendoorwith the latchduringbroiling.Thelatchisusedfor serf-cleaningonly.
HOW tO Set the Oven forBroiling
NOTE:OnmodelswithanOVENTEMPknob,turnitto
m
r_
BROIL,
[] ,Piece the meat or fish on a broiler grid
m a broiler pan.
(
[] Follow suggested shelf )ositions in the
Broiling Guide.
CloseflTedoo_Alwaysbroil with
thedoorclosed.
[] The oven door must be closed dining
broiling
[] Touch tile Broil Hi/to pad once for
Hi Broil.
To chmlge, to tO Broil, touch the
Broil Hi/to _x_d "__,"dn
[] Touch the Start/On pad.
[] _hen broiling is finished, touch the
Clear/Off pad.
Serve the food immediately, and leave the
pan outside the oven to cool dining the
meal fiw easiest cleaning.
Llse to Broil to cook fi)ods such as poultr}
or thick cuts of meat thoroughly without
o\ e>browning them.
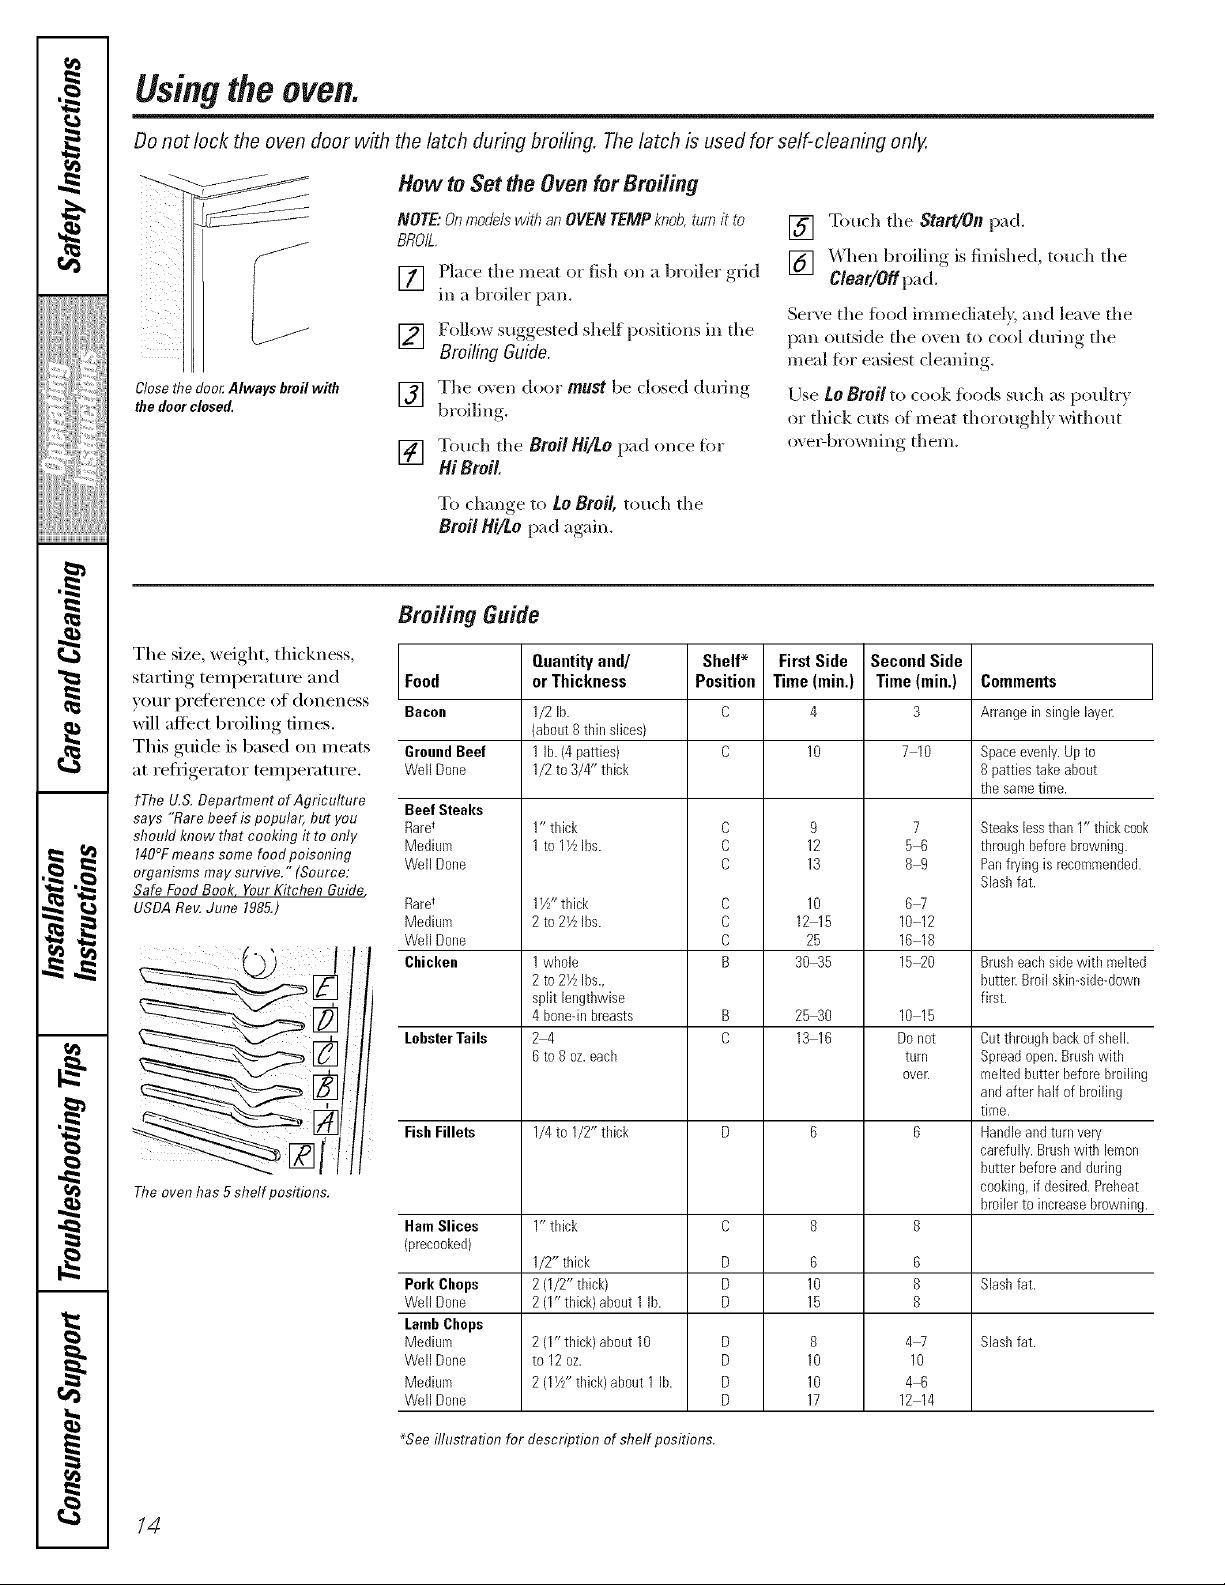
---
The size, weight, thickness,
starting temperature and Food
}'OtlI" pI'e[eTen(e o]' doneness Bacon
will affect broiling times.
This guide is based on meats
at refl_igerator temperature.
tThe U.& Department of Agriculture Beef Steaks
says "Rarebeef is popular, but you Rare_
h
should know that cooking it to only Medium
140°Fmeans some food poisonhTg Well Done
h
organisms may survive." (Source:
Safe Food Book, YourKitchen Guide
USDARev. June 1985.)
Theoven has 5 shelf positions.
1:
Ill
Broiling Guide
Quantityand/
orThickness
1/2 lb.
(about8thin slices)
GroundBeef
Well Done
Raret
Medium
Well Done
Chicken
LobsterTails
FishFillets
HamSlices
(precooked)
Pork Chops
Well Done
LambChops
Mediuro
Well Done
Mediuro
Well Done
*See illustration for description of shelf positions.
11b.(4 patties)
1/2to 3/4" thick
1" thick
1to l Yzlbs.
1V/' thick
2 to 2VzIbs.
1whole
2 to 2VzIbs.,
split lengthwise
4 bone-inbreasts
24
6to 8 oz.each
1/4to I/2" thick
1" thick
1/2" thick
2(1/2" thick)
2(1"thick) about1lb.
2 (1"thick) about10
to 12 oz.
2 (1///' thick)about 1 lb.
Position
Shelf*
C
C
C
C
C
C
B
D
D
D
D
D
D
D
FirstSide
Time(rain.)
4
9
12
13
10
12 15
25
30_5
25 30
13 16
6
10
15
8
10
10
17
SecondSide
Time(min.)
3
7 10
7
56
89
6W
10 12
16 18
15_0
10 15
Donot
turn
oven
6
8
8
4W
10
46
12 14
Comments
Arrangein single layer.
Space evenly. Up to
8 patties take about
the same tiroe.
Steakslessthan 1" thickcook
throughbeforebrowning.
Panfn/ingis recommended.
Slashfat.
Brusheachsidewith melted
buttenBroil skin-side-down
first.
Cutthroughbackof shell.
Spreadopen.Brushwith
meltedbutterbeforebroiling
andafter half of broiling
time.
Handleandturnyen/
carefully.Brushwith lemon
butterbeforeand during
cooking,ifdesired. Preheat
broilerto increasebrowning.
Slashfat.
Slashfat.
_"52
/4

Usingthe clock andtimer.(onsomemodels) ge.com
Not all features are on all models.
ToSet the Clock
st0 q
Make sure the clock is set to the
correct time of da_
The clock must be set to the correct time
of day tor the autonmfic oven timing
fimctions to work i)roi)erly. The time of day
cannot be changed during a delayed
cooking or a delayed selfk'leaning c,vcle.
[] Touch the Clock pad twice.
[] T°uch the ÷ °r - I)ads"
If the ÷ or - pads are not touched within
one minute after you touch the Clock pad,
the display reverts to the original setting.
If this hapi)ens, touch the Clock pad twice
and reenter the time of day.
Torum Offthe Clock Display
If you have several clock,_ in yore" kitchen,
you may wish to mrn off the time of day
clock display on yore" range.
[] Touch the CIockpad once to turn
off the time of day display. _Mthough
w_u will not be able to see it, the clock
maintains the correct time of day.
[] Touch the Start/On pad tmfil the time
of day shows in the displa). This ente_
the time and starts the clock.
Tocheckthetitheof daywhenthedisplayis
showingotherinformation,sl_nplytouchthe
Clockpad Thetimeofdayshowsuntilanotherpad
is touchecL
[] Touch the Clock pad twice to recall the
clock display.
®
liner)
On/Off
The timer is a minute timer onl_
The Clear/Off pad does not affect the
time_
To Set the Timer
Thetimerdoes not control ovenooerarlons
Themaximumsettin9 on the timerm9 hJurs
and59 minutes
[] Touch the Kitchen timer On/Off pad.
] Touch the + or-pads m_til flw
;ll//Otlnt ot [i/lie VOtl \v_lnt sho\vs ill
the display. The maxim um time that
can be entered in minutes is 59.
Times more than 59 minutes should
be changed to hom_ and minutes.
If youmakeamistake,touchtheKitchen timer
O_Offpadandbeginagain.
[] Touch the Start/On pad. The time _dll
start cotmting down, although
the display does not change tmtil one
minute has passed.
[] X,_q_enthe timer reaches :riO,the
control will beep 3 times fi_llowed 1)_
one beep e\'e_T 6 seconds tmti] the
Kitchen timer 0n/0ffpad is touched.
15

I
w
Using the clock and timer.(onsomemode/s
Not all features are on a// models.
To Reset the Timer
If the display is still showing the time
m
remaining, you may change it by touching
the Kitchen Timer On/Off pad, then touch
the + or - pads mlfil the time you want
appem_ in the display.
If the remaining time is not in tile display
(clock, stm_t time or cooldng time are in
the display), recall the remaining time by
touching tile Kitchen Timer On/Off pad and
then touching the + or - pads to enter the
new time }_)tl w;mt,
To Cancel the Timer
Touch the Kitchen Timer On/Off pad twire.
®
imer)
On ! Off
or
0
Endof Cycle Tones (onsomemodels)
Clear the tones b} pressing the pad of the
ftlnction "_otl "/re [iSill r
imejJ
m _r_
w
w
m
m
J
m
m
#.
m
Power Outage
!fa f/ash/n9t/riTe/s/nthed/sp/ag,youhave
expenenced a power fai/ure. Reset the c/ock.
To reset the clock, touch the Clock pad,
Enter the correct time of (la} b} touching
the + o_ - pads. Touch the Start/On pad.
I
16

Usingthetimedbakingandfeastingfeatures.(o,somemodo/s 9e.co,,
Donot lock the oven door with the latch during timed cooking. Thelatch is used for self-cleaning only.
NOTE."Foods that spoil easily--such as milk, eggs, fish, stuffings, poultry and pork--should not be allowed to s# for
more than 1hour before or after cooking. Room temperature promotes the growth of harmful bacteria. Be sure that
the oven light is off because heat from the bulb will speed harmful bacteria growth.
How to Set an Immediate Start and Automatic Stop
Temp Reca!l
Theovenwill turnon/7nmedbtelyandcookfora
selectedlengthoft/kne.At theendof thecooking
tlnTe,theovenwill turnoffautomat/bally.
[] Touch the Bake pad.
] Touch the 4-or - lx_ds to set the
OVell teI//pel'ati/l'e,
[] Touch tile Cooking Time pad.
NOTE."If your recipe requ/Yes preheating, you may
need to add additional t/kne to the length of the
cookbgtbTe.
] Touch the 4-or - pads to set tile
b'ddn,, time.
The cooldng time that you entered will be
displayed. (If you select Cooking Time first
and then ac!iust the Bake Temperature, the
oven temperature will be displayed instead).
[] Touch tile StaWOn pad.
Tile display shows either tile oven
temperature that yon set or tile cooking
time countdown. (The display starts with
PBEif showing the o\vn temperature.)
Tile o_en will confim_e to cook fiw tile
pl'ogl'iH/lllled ilI/lOllllt ()t time, then tlll'll
off autom_ticall_.
[] Touch tile Clear/Off pad to clear
the dispkL_ if necessm).
Removethe foodfrom the oven Remember,even
thoughthe oven shuts off automatically,foods
continue cookingafter controls areoK
®
Terap Recclll
O
LTime )
O
ime)
k0°_)
How to Set a Delayed Start and Automatic Stop
Theoven will turnon at the &ne of day youset,
cook for aspecihclength of time and then turn off
automatically
Make sure tile clock shows tile correct
time of day:
[] Touch tile Bake pad.
] Touch tile 4-or -pads to set tile
oven [eilll)ei';ittli'e.
[] Touch tile CookingTimepad.
] Touch tile 4- or -pads to set tile
desired length of cooking time.
[] Touch tile Start Time pad.
] Touch the 4. or - pads to set the time
of (l_l_ _()/I V(_IIIt tile oxen to [tlI'n on
and start cooking.
[] Touch tile Start/On pad.
NOTE."Anattentiontonewi//soundif youareusing
tknedbakinganddonottouchtheStart/OnpacL
NOTE:If wm would like to check tile times
w)u have set, touch tile Start Time pad to
check tile stnrt time you have set or touch
tile Cooking Time pad to check tile length
of cooking time you have set.
When tile oven [tlI'ns on at tile time of day
you have set, the display will show PBE tmtil
it reaches tile selected temperature, then it
will display the oven temperature.
At tile end of cooking time, tile oven
will mrn off and tile end of cycle tone
will so/Ind.
[] Touch tile Clear/Off pad to clear
tile displa) if necessmT.
Removethe foodfrom the oven. Remember,even
thoughthe oven shuts off automatically,foods
continue cookingafter controlsare oK
C rFI
off J
/7

I
w
Special featuresofyour ovencontrol, so emode/s)
Yournew touch pad control has additional features that you may choose to use. The foflowing are the features and
how you may activate them.
m
,e,
m
__
Thespecial feature modes can only be activated while the display is showing the time of day. Theyremain in the
control's memory until the steps are repeated.
When the display shows your choice, touch the Statf/Onpad. Thespecial features will remain in memory after
a power failure.
NOTE."The Sabbath feature and the Thermostat Adjustment feature are also Special Features, but they are addressed
separately in the foflowing sections.
12Hour Shut=Off
Temo Rece Hi / LO
LonJ
With thisfeature,should youforgetand leave the
ovenon, the contro/ wil/ automatleally turnoff the
ovenafter 12hoursdunngbakleg functlensor after
3 hoursdurlega broil functlen.
If you wish to turn OFFthis fl_atm'e, fi)llow
the steps below.
[] Touch the Bake mid Broil Hi/to pads
at the stone time fin" 3 seconds until
the display shows SE
Touch the Clock pad. The displa} will
[]
show ON ( 1_'2hour shut-off). Touch the
Clock pad repeatedl} mltil the displa?
shows OFF(no shut-off).
[] Touch the Starf/0B pad to activate the
no shut-off and leave the control set in
this special features mode.
h
h
m
m
__
tz
L_
m
I
18

"-'--usingthe SabbathFeature.(onsomemodels)
(Designed for use on the Jewish Sabbath and Hofidays) ge.com
The Sabbath feature can be used for baking/roasting only. It cannot be used for broiling, self-cleaning or
Delay Start cooking.
NOTE: The oven light comes on automatically (on some models) when the door is opened and goes off when the
door is closed. Thebulb maybe removed. See the OvenLight Replacement section. Onmodels with a light switch
on the control panel, the oven light may be turned on and left on.
How to Set for Regular Baking/Roasting
TempRecall
NOTE: Tounderstandhow the oven control works,
practice using regular baking(non-Sabbath)before
entering Sabbathmode.
Make surethe clock shows thecorrect time of day
and the oven is oft
] Touch and heM both the Bake and
Broil Hi/Lo 1)ads, at the same time,
until the display shows SE
] Tall th( Clock 1)_(t umil SAb at)llears
in the (tist)la _
] Tou(h file Start/On pad and D will
al)t)em: in the (tisl)l_ly.
b
] Touch the Bake pad. No sig_lal will
b(! gJ'_ el/.
] Touch the Start/On pad.
[_ _ier _1ran(tom dela} t)eriod ot
at lt)l oximately 30 so(ends to 1 minute,
D c will appear in file (tist)kly indicating
that the (l_n is baking/ro_tsting. If D c
doesn't allllem: in the (/isllla_, start ag'aiH
at Step 4.
To a(!iust tile oven temperautre, touch tile
Bake pad and tap file 4- or - t)ads to increase
or decrease the temperature in 25 ° increments.
"['(m(h die Start/Ontlad.
NOTE:'[lw Clear/Off'and Cooking Timetlads are
active (tm:ing the Saklbath {('atm'e.
L ood
When the display shows D the
oven is set h7Sabbath. When the
display shows D c the oven is
baking/roasting.
0
&'q &oO
Tome Recal Hi ] LC
&q
®
¢oo i0+q
L_TimeJ
L onJ
When the display shows D the
oven is set h7Sabbath. When the
display shows D c the oven is
baiting/roasting.
] "[lie preset stardng temll(fnttllre,,,,rill
muomaticalh' 1)e set to 350. ° "E_t) file 4-
or - pads to illcrease or decrease the
temt)emture in ,25° incremems. The
temtlemture can be set t)etween 170 °
and 550. ° No signal or temtlemture
will be gi_,_'l_,.
Hew to Set for Timed Baking/Roasting--Immediate Start and Automatic Stop
NOTE."Tounderstandhow the oven control works,
practice using regular (non-Sabbath)Immediate Start and
Automatic Stop before entedng the Sabbath mode,
Make surethe clock shows thecorrect time of day
and the oven is oft
] Touch and hold both th( Bake and
Broil Hi/Lo 1)ads, at the same time,
umil t1( ( isI 1U show's _J_.
] Tall the Clock pad tmdl SAb al)ll(ars
in the dist)la }
] "lbuch d_e Start/On t)ad and D will
appear in dw disl)la }.
] 'lbu(h the Cookhlg time llad.
] Touch the ÷ or -lla(ls to set lhe d(sired
lengdl of (ooking dine l)etween I minme
and 9 hours and 59 mimnes. The cooking
lime lhal _/)u (meted will l)(! disl>la}ed.
] Touch dw Start/On l)ad.
] Tou(h dw Bake l)ad. No sigllal will
l)e_,4_(n.
] "['he l)reset slatting mmpemmre xdll
amomaticall} Ix set to 35(). +Tap the ÷
or - pads to iHcr(as(' (11-(l(,€r(._tse ttle
tempel"4ture in 25 ° incremems. The
tempemtt/re can be set I)et_`,een 170'
and 550.' No sigllal or teml)eramre
will be #,J'_en.
] "[buch dw Start/On pad.
] ,Miel; "a l"_tIl(1OIIl delm' i)eriod of
al/i)roxilnatel }, 50 so( on(Is lo 1 mimne,
D c will _q)t)ear in the (lislll m, indicating
that the o_('n is baking/roasting. II D c
doesn't appear in the (tisl)la}., start ag'ain
at Step 7.
To a(!just tile oven temt)eratmx, , tottch th(
Bake pad and ml:l the 4- or - pads to increase
or (lecr(ase the temperature in 25' increments.
Toucl't the Start/On t)ad.
Wh(n cooking is finished, the displa}, will chm_g(
fl:om D c to D, indicating that the (/`,en has
turned OFF l)m is still set in Sabl)ath. Rein()`, (
the co(/ked 1oo(t.
19

I
w
"-'--usingthe SabbathFeature.(onso e odels)
(Designed for use on the Jewish Sabbath and Holidays)
Hew to Exit the Sabbath Feature
VCleer_
m
Terml Reco] HI/ LO
o
L_onJ
m
---
] Touch d_e C/ear/Offl)'ad.
]
( _ t} 1)_rio( of _i)l ox m _ e ? 30 se(:oi/ds
lo 1 minute, m_dl o fix D is in lhe (lisl)la'y.
] "['ouch and hal(1 both the Bake and
Broil tli/Lo 1)ads, at the same time,
m/dl d_e disl)la } SIlo_,h,rsSE
] Tap the Clock i)a(1 until ON or OFF
appears in the displa}. ON indicales d_a_
the ovtn will automaticall} mrn off after
12 hom_s. OFFin(licates that die oven will
not amomaticallv tm:n ol/i S(e the Special
Features section IL)r an exl)lmladon of the
12Hour Shut-Off Ibamr('.
] "[imch die StartJOn l)ad.
NOTE: If apower outage occurred while Ne oven was
h_Sabbath, theoven will automatically turnoff and stay
off even when the power returns, Theovencentre/must
be reset,
q
w L
jrj
m
m
P.
m
h,.
20

Adjusttheoventhermostat--Doityourself! go.corn
Youmay find that your new oven cooks differently than the one it replaced. Use your new oven for a few weeks to
become more familiar with it. ff you still think your new oven is too hot or too cold, you can adjust the thermostat yourself.
Donot use thermometers, such as those found in grocery stores, to check the temperature setting of your oven.
These thermometers may vary 20-40 degrees.
NOTE: This adjustment will not affect the broiling or the self-cleaning temperatures. The adjustment will be retained
in memory after a power failure.
To Adjust the Thermostat (on some models)
0
Coo'Q
Temp Rece _ / Lo
on )
[] Touch tile Bake and Broil tti/Lo pads
at tile same time fiw 3 seconds until
tile display shows SE
[] Touch tile Bake pad, A two digit
mmfl)er shows in tile display.
[] The ()veil temperature call be at!lusted
up to (+) 35°F hotter or (-) 35°F
coole_: Touch the + pad to increase the
temperature ill 1 degree increments,
Touch the - pad to decrease the
temperature in 1 degree increments.
[] \'\qlen you haxe made tile ac!iustment,
touch the Start/On pad to go back to
the time of dav display. L)se _mr oven
as you w(mld nora/ally.
/VOTE'.Thisadjustment wi// not affect the broi//)_g
or self-clean/)_gtemperatures.It will be retabed
b memoryafter apower failore.
To Adjust the Thermostat (onmodels with an OVENTEMPKnob)
[_] Pull the OVEN TEMP knob off the range Each click will change the oxen
and look at the back side. temperatm'e approximatel) 10°E
To Illake an ac!jtlstil/ent, loosen (Range is phls or I//intls 60°F fi'OI// tile
(approximately one [tlFn), but do IX(It alTOXV.) We suggest that )ou make the
completel) remoxe, the two screws on ac!jusm_ent one click ti'om the original
Front of OVENTEMPknob
(knobappearance may vary)
Back of 0 VENTEMPknob
(knob appearance mayvary)
the back of the knob. setting and check oxen pe_hmnance
With the back of the knob fi_cing you
[]
hold the outer edge of the knob with
one hand and turn the fl'ont of the
knob with tile other hand.
Toincreasethe oven temperature,
move the mp screw toward the right.
Ym'll hear a click tot each notch you
move tile knob.
befi)re making any additional
ac!it,stments.
[] Afterthe adjustment is made, retighten
screws so they are snug, but be careflfl
not to overtighten.
[] Replace the knob, matching the flat
area of tile knob to tile shaft, and
check perfimnance.
Todecreasetile oven temperature,
moxe tile top screw toward tile left.
Thetype ofmargarine will affect bakingperformance!
Most recipes for baking have been developed using high fat products such as butter or margarine (80% fat). If you
decrease the fat, the recipe may not give the same results as with a higherfat product.
Recipe failure can result ff cakes, pies, pastries, cookies or candies are made with Iowfat spreads. TheIowerthe fat
content of a spread product, the more noticeable these differences become.
Federal standards reqtfire products labeled "margarine" to cent;fin at least 80% tht b)' weight. Ix)w fht spreads, on tile
other hand, contain less tat and more water: The high moisture content of these spreads affects tile mxtm'e and flavor
of baked goods. For best results with vour old ti_\'ofite recipes, use mmgmine, butter or stick spreads containing at least
70% vegetable oil.
21

Usingthe warming drawer.(onsomemodefsl
Control Knob (onmodelsequl}_pedwith a knob)
Warming Drawe _
0
off
Push and mrn the control knob to any
desired setting.
NOTE'.The wamling drawer should not
be used dining a sel6clean cycle.
Lo .......................... Pies
Medium (mklp0sitilm im the knob) .Casseroles
Hi ......................... Meats
When Using the Warming Drawer
On Signal Light
Tile On signal light is located above the
control knob and glo_vs when the knob is ill
the on position. It sta):s on until the knob is
moved to the O¢/posifion.
Tile wamling drawer will kee I) hot, cooked
foods at seIwing temperatm'e. Alwaysstart
with hotfood.Do not use to heat cold
food other than crisping crackei_, chips
or dry cereal.
Do not line the warming drawer with
aluminum foil. Foil is an excellent heat
insulator and will trap heat beneath it. This
will upset the performance of the drawer
and could damage the interior finish.
::Ji::Preheat prior to use according to these
recommended times:
Setting Lo ............... 15 rain urns
Setting Medium .......... 95 minutes
Setting Hi ............... 35 minums
_: Do not put liquid or _;_ter ill the
wamling drawei;
::Ji::For moist ti)o(ls, cover them with a lid
or ahll/lintllll foil.
::Ji::For crisp foods, leave them uncovered.
_: Food should be kept hot ill its cooking
container or transterred to a heat-sate
serving dish.
CAUTION: la t,cconta,her or
plastic wrap will melt if in dkect contact with the
draweror a hot utensil Melted plastic maynot be
removableandis not coveredunderyour warrantZ
::Ji::]_emove serving spoons, etc., befi)re
placing containei_ ill wamling drawei:
22

ge.com
Temperature Selectien Chart
To keep several difterent toods hot, set the control to the tood needino the highest settin ,
::Ji::The temi)eramre, b'pe and amount of
tood, and the time held will affect the
quality of the tood.
)_:Food in heat-sate glass and glass-ceramic
utensils may need a higher control setting
as compared to food in metal utensils.
::Ji::Repeated opening of the drawer alhm:s
hot air to escape and toed to cool.
::Ji::_Mlowextra time for the temperature
inside the drawer to stabilize after
adding items.
)_:With large loads it may be necessary to
use a higher them_ostat setting and
cover SOllle of the cooked tood iteIl/S,
Do not rise plastic containei's or
plastic wrap.
ToCrisp Stale Items
!;_:Place toed in low-sided dishes or pans.
iJi::Preheat on to setting.
I FoodType Control Setting I
Bacon Hi
Breads Medium
Casserole Medium
Chicken,fried Hi
Eggs,scrambled Medium
Fish Hi
Gravy,sauces Hi
Ham Hi
Muffins Medium
Onionrings Hi
Pies Lo
Pizza Hi
Potatoes,baked Hi
Potatoes,mashed Lo
Tortilla Chips Lo
^,.,CAUTION:Donotkee,foodinthe
warmingdrawerformorethantwohours.
}i_:Check crispness after 45 minutes.
Add time as needed.
.-g.
w
ToWarm Serving Bowls and Plates
To w;mn serving bowls and plates, set the
control on to.
_: Llse only heat-sate dishes.
::Ji::If vou want to heat fine china, please
check with the i//antlfilcttlrer of the
dishes tot their maximum heat tolerance.
m
}i_:You ma_, wam_ emI)tv, setsing, dishes while
preheating the drawe_:
A CAUTION:>hesw,//beho use
potholdereorrmttswhenrernov/nghotdishes.
g
m
q
23

I
w
ca
Usingthe self-cleaning oven.
Never force the latch handle. Forcing the handle will damage the door lock mechanism.
The oven door must be closed and all controls set correctly for the cycle to worl{ properly.
Before a Clean Cycle
m
Wipe up heavy soil on the oven
bottom.
m
For the til_t seltk lelm cycle, we recommend
venting your kitchen with an open window
or using a ventilation tim or hood.
Remo\v the shelves, any broiler pan, broiler
grid, all cookware and any aluminum fldl
ti'om the o\en.
The o'_en shelves can be selgcleaned,
but they will darken, lose their luster
and become hm'd to slide.
Do not rise commercial ovell cleanel_ oF
o',en protect(n_ in or near the sel_cleaning
o\en. A combination (Y any (ff these
products plus the high clean cycle
temperatures may damage the porcelain
finish of the oven.
Soil on the fl'ont fl'ame of the range and
outside the gasket on the door will need
to be cleaned bv hand. Clean these areas
with hot _;itel; soap-tilled scom-ing pads
or cleansel_ such as Soft Scrub <:)
Rinse well with clean water and dry.
Do not clean the gasket. The fiberglass
material el the oven door gasket cam_ot
withstand abrasion. It is essential tOT the
gasket to remain intact. If you nodce it
becoming worn or fl'ayed, replace it.
_]pe up any heavy spillovers on tile o\en
bottom.
Make sure the ();ell light bulb cover is in
})lace and the oven light is off.
CAUTION:Thegratesanddrippans
(if so equipped) should never be cleaned in the
self-cleaning oven.
Do not use commercial even cleaners or oven
protectors in or near the self-cleaning oven.
A combination ot any of these products
plus the high clean cycle temperatures may
damage the porcelain finish (g the oven.
IMPORTANT' The health of soI/le birds is
extremely sensitive to the tirades given off
dining the self-cleaning cycle of any range.
Move birds to another well ventilated room.
h
h
How to Set the Oven for Cleaning (onmodels with an OVENTEMPKnob)
Follow the directions in the Before a Clean
Cyclesection.
V_ _Mter a clean cycle turn the OVEN
lal
TEMP knob to OFFand slide the latch
handle to the left as far as it will go.
dv_
m
m
[] i,atch the door.
[] Turn the OVENTEMPknob m CLEAN.
TheCleantimeis 4hoursand20minutes.Theself
deanhghtwi//comeonandstayonuntiltheself
clean cycle is complete.
The oven shuts offautomatica//ywhen the dean
cycleiscomplete.
To cancel self clean cycle, mrn OVEN TEMP
knob to off and slide latch to left as tin" as
it will go. X&hittmtil self clean light stops
blinking. Use oven as desired.
NOTE"Never fiwce the latch. ]f the oven
is too hot, you will not be able to slkle the
latch. Allow the oven to cool.
How to Set the Oven for Cleaning
®
F Self q
LCle°n )
m
oa
I
24
Folh)w the directions in the Before a Clean
Cyclesection.
[] I,atch the door.
NOTE"Never fiwce the latch. If the o;en is
too hot, )on will not be able to slide the
latch. Pdlow the oxen to cool.
] Touch the Self Clean pad.
[] Touch the + or - pads until the
desired Clean Time is displayed.
TheCleanTimeis normally4 hoursand 20mlhutes.
Youcanchangethe Clean time to any t/Ynebetween
3and 5 hours,depend/hgon the amountofsoil/h
youroven.
[] Touch the Statt/On pad.
The selfk-lean cycle will automatically
begin alter CLEAN is displayed and the time
cotmtdown al)l)ea_ in the display.
While the oven is self cleaning, you can
touch the Clock pad to display the time
of day. To retm'n to the clean countdown,
touch the Self Clean pad.
The oven shuts off automatically when the
clean cycle is complete, and 0:00 will flash
in the display.
[] Slide the latch handle to the lett as tin"
as it will _ooand open the dora;

The oven door must be closed and all controls set correctly for the cycle to work properly.
How to Delay the Start of Cleaning (onsome models)
0
F selfq
LSue0?j
D
r
I 1
Time
J
Youcanset the ovencontrol to de&y-start the oven,
clean fore spedflc length of timeand thenturn off
automatically
Make sure tile clock shows tile correct time
of day.
Follow tile directions in tile Beforea Clean
Cycle section.
[] I,atch tile do(n:
NOTE: Never force tile latch. If tile oven is
too hot, you will not be able to slide tile
latch. Mlow tile oven to cool.
[] Touch tile SeffClean pad.
] Touch tile ÷ or - pads to set tile
Clean Time.
TheClean time ispreset for 4hoursand 20 minutes.
Youcanchangethe CleanT/meto anyt/_nebetween
3and 5 hours,depen&bg on theamount of soil in
youroven. Ifa different CleanTimeis desired,touch
the + or-pads until the desiredCleanT/meis
displayed
[] Touch tile Start Time pad.
Changethe Start time by touchingthe + or- pads.
Thestart t/mewill appearin the display
[] Touch tile Start/On pad.
Tile self:clean cycle will automatically begin
at tile time set.
\_qfile tile oven is self:cleaning, you can
touch tile Clock pad to display tile time
of day. To return to tile clean countdown,
touch tile Self Clean pad.
Tile oven shuts off automatically when tile
clean cycle is complete, and 0:00 will flash
in the display.
[] Slide the latch handle to tile left as tiu"
as it will go and open tile doo_:
ge.com
-g.
w
ToStop a Clean Cycle (onsomemodels)
Touch tl/e Clear/Offpad.
Wait until tile oven has cooled below tile
locking temperature to mflatch tile doo_:
You will not be able to open tile door _ight
away unless the oven has cooled below the
locking temperature.
After a Clean Cycle (onsomemodels)
You caroler set tile o',en fi:,r cooking until
tile ovell is COOl ellO/lOh _()1"tile door to be
unlatched.
You Ina} notice some white ash ill tile ()veil.
_\ipe it up with a damp cloth after tile
o_ell COOLS.
If white spots remain,removethem with a soap-
filledscounngpad andrinse thoroughly with
a vinegarand water mMure.
These deposits are usually a salt residue
that cromer be removed by tile clean cycle.
If tile o\en is not clean after one clean
cycle, repeat tile cycle.
iJi::You cannot set tile oven for cooking until
tile oven is cool enough fl)r tile door
to unh)ck.
::Ji::X._q/iletile oven is self:cleaning, you can
touch tile Clock pad to (fisplay tile time
_ffday:To remm to tile dean count(h)wn,
touch tile Cooking Timepad.
_: If tile shelves become hard to slide,
apply a small amount of vegetable oil or
cooking oil to a paper towel and wipe
tile edges _ff tile oven shelves with tile
paper towel.
m v14
g
€1
m
q
25

Careand cleaning ofthe range.
Be sure electrical power is off and all surfaces are cool before cleaning any part of the range.
If your range is removed for cleaning, servicing or any reason, be sure the anti-tip device
is re-engaged properly when the range is replaced. Failure to take this precaution could
result in tipping of the range and cause injury.
k
Standard Twin Burner Assemblies (onsomemodels)
¸Grate
DripPan(ifs0equipped)
Surfaceburner
CAUTION: Do not operate the
cooktop without all burner parts,
drip pans (if so equipped) and
grates h7place.
Forcleanlbgtbformationon sealed burners,
seesection on nextpage. Sealedburnercooktops
do not lift up.
Onmodels with standard twlb burners, thecooktop
rifts up for easyaccess.
Turn all controls OFF before removing
bm'ner parts and drip pans (if so equipped).
Tile b/li31er grates and drip pans (if so
equipped) can be lifted off, making them
easy to clean.
Tile holes in tile sm'ti_ce bm'ners of veto"
range I/ltlSt be kept clean at all dines for
proper ignition and _lI1 e;'en, tlnhai//l)ered
f]_l Ill e.
You should clean tile surfllce 1)m'ne_s
roufinel> especially alter bad spillove_,
which could clog these holes.
Wipe off sudhce bm'ne_. If hea\y spillover
OCCtlI3_ I'eI/1ove tile S/li'][ilce b/lI'neI3 J[i'Oli1
the range. Burnei3 lift out for cleaning, lift
up tile cooktop and then lift out tile suil'ilce
b/lI'neIN.
To I'elllOVe b/li'ned-on foo(l_ soak tile
stlrtilce btlFner ill a sohltion of mild liquid
detergent and hot water: Soak tile surli_ce
burner for 20 to 30 nlinutes.
For II/OI'e SttlbboFn stains, rise a cleanser
like Soft Scrub _"brand or Ben _ni: brand.
Pdnse well to remove anv traces of the
cleanser that might clog the s/wti_ce bm'ner
openings.
Do not use steel wool because it will clog
tile s/wthce bm'ner openings and scratch
the s/wthce bm'ne_s. If the holes become
clogged, clean them with a sewing needle
or twist-tie.
Before putting tile sudi_ce bm'ner back,
shake out excess water and then dry it
thoroughly b)' setting it in a _m_n oven
for 30 minutes. Then place it back in the
range, making sm'e it is properly seated
and level.
Check tile flame pattern of each burner
If the flames are 'iiumpy" (not stead)),
clean the holes again xdth a sewing needle
or twist-tie.
Cleantheseholesthoroughlyon
each burner.
26
Drip Pans (if soequipped)
Remove tile grates and lift out tile drip
pans. Drip pans can be cleaned in a
dishwasher or b_ hand.
X'_hen replacing tile drip pans, make sm'e
thex are in tile correct position.
Place them in a covered containe_: Add
1/4 cup ammonia and let soak several
hom_ or overnight. Wash, rinse well and d_':
CAUTION: Donot clean the dr)) pansin a
self-cleaningoven.

ge.com
Grate
BurnerCaD
Sealed Burner Assemblies (onsomemodels)
Turn all controls OFFbetore removing the
burner parts and drip pans (if so equipped).
The burner grates, caps, burner heads and
drip pans (if so equipped) can be lifted olK
making them easy to clean.
CAUTION:Donotoperatethe
cooktop without all burnerparts, drippans (if so
equipped)andgrates inplace.
NOTE"Do notrift thecooktop.Liftlbg the cooktop
on sea/edbumer mode/scanlead to damageand
/rnproperoperation of the range.
Electrode_
The electrode of the spark igniter is
exposed when the burner head is
removed. _'\]_en one bm'ner is turned
to tirE, all the burnel_ spark. Do not
attempt to disassemble or clean
arotmd any burner while another
burner is on. An electric shock may
result, which could cause you to
knock over hot cookware.
27

Careand cleaning of the range.
Burner Caps and Heads
Use a sewing needle or twist-tie
to unclog flTe small hole in the
burner head.
NOTE:Beforeremovingtheburnercaps
andheads,remembertheir sloeandlocation.
Replacethemb thesamelocationafter
cleaning.
Burnercaps
Lift off when reel. Wash burner caps
in hot, soapy water and rinse with clean
_Jte_: You may scour with a plastic scouting
pad to remo\e burned-(m fi_od particles.
Burnerheads
For proper ignition, make sure the
small hole ill the section that fits over the
electrode is kept open. A sewing needle
ol wire twist-tie works well to tmclog it.
Theslits/b theburnerheadsmustbekeptclean
at aft tithes for an even, unhampered flame.
(logged o1"dirt_ burner pol-ts or electrodes
will not allow tile bm'ner to operate properly.
Any spill on or around an electrode must
be carefifllv cleaned. Take care to not hit an
electrode with an}_hing hard or it could
be damaged.
Y_u should clean the bmner caps and
burnel heads ioutinel), especially after bad
spillovel% which could clog tile openings
ill tile bm'ner heads. I,itt off when cool.
To remove burne&on fl)od, soak tile
burner heads ill a solution of mild liquid
detergent and hot water fi)r 20-30 minutes.
For I/lore Sttlbborn stains, rise a toothbrtlsh.
Replacement
I_eplace bm'ner heads over the electrodes
on the cooktop, ill tile correct locations
accoiding to their size.
Onsome models:
V]ediurnheaJ Sma lean
aria can an0 cab
&. ..L
÷¢.
= Frontof ranfle
Large neao arge nearJ
an0 cad alia caE
Onsome models:
iVlediumhead Smallhead
andcap andcap
,,.. o..
Fro tofra e
Medium head Largehead
and cap and cap
28
After cleaning
Befi)re putting tile bm'ner caps and heads
back, shake out excess ware1 and then dry
them thoroughly by setting in a wmm _wen
fi)r 30 minutes.
NOTE:Donotusestee/woo/orscounngpowders
tocleantheburners.
Make sure tile slot in tile burner head is
positioned over the electrode.
Replace tile matching size caps onto tile
heads.
Make sm'e that tile heads and caps are
replaced ill tile correct locations.
NOTE: Onsome models, theburnersare all the
samesloeandpower

Burner Grates
g_com
i,ifl out when cool. Grates should be
washed regularly and, of com_e, alter
spill_x'e_. X_'ash then/in hot, soapy water
and rinse with clean water: When replacing
tile grates, be stlre they are positioned
securely over tile b/IFneI3.
On models with protbssional-style double
grates, tile grates are posidon-specific. For
ma_mum stability, these grates shoukl only
be used in their proper position; they
cannot be interchanged lett to right or
fl'ont to back. For convenience, tile
trade,sides of tile left and right grates are
marked "I,EFT FRONT" and "RIGHT
FRONT."
Do not operate a burner t0r an extended
period of time without cookware on tile
grate. Tile finish on tile grate may chip
without cookware to absorb tile heat.
Cooktop Surface
To avoid damaging tile porcelain enamel
surfi_ce of tile cooktop and to prevent it
from becoming dull, clean up spills right
away D)ods with a lot of acid (tomatoes,
sauerkraut, fl'tfitjtfices, etc.) or toods with
high sugar content could cause a dtfll spot
if all_m'ed to set.
When tile sm'fi_ce has cooled, wash and
rinse. For other spills such as lilt spattefings,
etc., wash with soap and water once tile
sm'fi_ce has cooled. Then rinse and polish
with a (h_' cloth.
To get rid of bm'ned-on toed, place the
grates in a covered containe_: Add l/4 cup
ammonia and let them soak several hems
or overnight. Wash, rinse well and d_T.
Ahhough they are din'able, tile grates
will gradually lose their shine, regardless
of tile best care you can give them. This is
due to their continual exposm'e to high
temperatm'es, xam will notice this sooner
with lighter color grates.
NOTE:Donot cleanthegrates in aself-cleaningoven.
NOTE:Do not store flammablematenalsin
an ovenornear the cooktop.Donot storeor
usecombustl_)lematerials, gasoflheor other
flammable vaporsand liquids in the vicinity
of this or anyother appliance.
NOTE."Do not rift the cooktoponsealed burner
models.Liftlbg the cooktopcanlead to damage
andimproper operation of the range.
Stainless Steel Surfaces (onsomemodels)
Donotusea steel woolpad;it will scratch
thesurface.
To clean tile stainless steel sm_hce,
use warn/sudsy water or a stainless steel
cleaner or polish. _Mwa)s wipe tile sm'li_ce
in tile direction of tile grain. Follow tile
cleaner instructions for cleaning tile
stainless steel sm_hce,
To inquire about pmvhasing stainless steel
appliance cleaner or polish, or to find tile
location of a dealer nearest you, please call
ore" toll-fl'ee ntm_ber:
National Parts Center 800.828.2002 (U.S.)
888.261.3055 (Canada)
ge.com (U.S.)
www.GEAppliances.ca (Canada)
29

Careand cleaning of the range.
Lift-Off Oven Door
Lift the door straight up and off
the hfl?ges.
Thegasket is designed with agap
at the bottom to allow for proper
air circulation.
Donot rub or clean the door gasket--
it has at?extremely low resistance
to abrasion.
If you notice the gasket becomfl?g
won?,frayed or damaged fl?any way
or ifit has become displaced on the
door, you should have it replaced.
Theoven dooris removable,but it is heavy Youmay
needhelp removingand replacingthe door.
Toremove the door, open it a fbw inches to
the special stop position that will hold the
door open. Grasp firefly on each side and
lift the door straight up and off the hinges.
NOTE:Becareful not toplace hands between the
hingeand theoven door frameas the hingecould
snapback andpinch fingers.
Toreplace the door,make sure tile hinges
are in tile special stop position. Position
the slots in the bottom of the door squarely
over the hinges. Then lower the door
slowly and evenly over both hinges at the
same dine./t the hinges snap back against
tile oven fl'ame, pull them back out.
Toclean the inside of _e door:
::J_::Do not allow excess water to i'[in into
any holes or slots in tile doo_;
_: Because tile area inside tile gasket is
cleaned during the self clean wcle, you
do not need to clean this by hand. Any
soap left on the liner causes additional
stains when the oven is heated.
::Ji::Tile area outside tile gasket can be
cleaned with a soap-filled scom_ing pad.
Toclean the outsideof the door:
Use soap and water to thoroughly clean
tile top, sides and ti'ont _ff tile oven do(m
Pdnse well. xam may also use a glass
cleaner to clean the glass on the outside
of tile (loo_:
::Ji::Spillage ot marinades, fl'uitjuices, tomato
sauces and basting materials containing
acids Illay Catlse discoloration and should
be wiped up immediately: _,_]/en tile
surti_ce is cool, clean and rinse.
::Ji::Do not use oven cleanels, cleansing
powdei_ or l/m_h abrasives on tile
outside ot the door
Oven Bottom
Tile (Well bottoll/has a l)Oi'celain enalllel
finish. To make cleaning easiei; promct
tile oven bottom fl'om excessive spillo\'eI_
by pladng a cookie sheet on the shelf
below the shelf you are cooking on. This is
particularly important when baking a fl'uit
pie or other fi)ods with a high add content.
Hot fl'uit fillings or other toods that are
highly acidic (such as tomatoes, sauerkraut,
and sa tlces with vinegar or lemon juice)
may Catlse pitting and damage to tile
porcelain enamel surfilce and should be
wiped up immediately.
We don't recommend using ahmfinum fl)il
on tile oven bottom. It can affect air flow if
the holes are blocked and it can concentrate
heat at the bottom ot the oven, resulting in
poor baking perfimnance.
To clean up spillove_s, use soap and watei;
an abrasive cleaner or soap-filled sco/wing
pad. Rinse well to remove any soap befiwe
self:cleaning.
3O

Thestorage drawer may be removed
for cleaning under the range.
Removable Kick Panel (onsomemodels)
The kick panel may be removed fl)r
deaning under the range.
To remove:
I.ifl up the 1)otton_ of the panel slightly to
disengage the panel fl'om the tnbs at the
base of the range. Pull the bottom of the
i)anel tin'ward m_til the spring clips are
released at the top of the panel.
To replace:
Insert the two slots at the bottom of the
panel onto the two tnbs at the base of the
range, and push the top of the panel
fi)rward to engage the spring clips.
Removable Storage Drawer (onsomemodels)
Thestoragedrawer/sagoodplacetostore
cookwareandbakeware.Donotstoreplast/2s
andflammablematenal/b thedrawer
The storage (lI';lweI" Ill;IV be I'eI//(Ne(1
fi)r cleaning raider the range. Clean tile
storage drmver with a damp ck>th (>r
sponge. Ne\vr use harsh abrasives (w
scorning pads.
To remove storage drawer:
] Pull (lra_er straight out m_til it stops.
[] Tilt tile fl'ont of tile (lra',_er up and
Toreplacestoragedrawer:
] Set tile stops (m tile back of tile drawer
ge.com
free of tile r'moe
over tile stops in tile range.
[] Slide drawer evenl) and smdght back,
Removable Warming Drawer (onsomemodels)
NOTE."Formode/swithanelectricwarming
drawer,beforeperforminganyadjustments,
cleaningorservice,disconnecttherangeelectrical
To replace the warming drawer:
[] Place the left drawer rail arotmd the
powersupplyat thehouseholddistributionpanel
byremowngthefuseorswitchingofftheckcuit
breakerMakesurethewarmingdrawerheatlbg
dementiscool.
Most cleaning can be done with the drawer
in place. Howe_e_; the drawer mm be
rem(/',ed if fln'ther cleaning is needed. Use
soap and _V}li]ll water 1() thorouohlva , clean.
Toremove the warming drawer:
[] Pull tile drawer straight out tmtil
it stops.
[] Press tile left rail release up and press
the right rail release down, while
)ullino tile drawer fi/rward and free.
[]
[]
so that tile rails in tile range are
engaged.
ironer left rail guide and slide it in
slightly t() h(Iok it.
Place the right drawer rail aro/md the
mner rioht_ rail guide and slide it in
slightly to hook it.
Slide the drawer all the wm in.
3/

Careand cleaning of the range.
Lift-Up Cooktop (on models with standard twin burners)
Some models have dual support
rods that will hold the cooktop up
while you clean underneath it.
Vent appearance and location var,A
Clean tile area under tile cooktop often.
Built-up soil, especially grease, may catch
Oil fire.
To make cleaning easie[; tile cooktop may
be lifted up.
NOTE'.Do not/fit the cooktopon sealed burner
models.Lift/bg thecooktopcan lead to damage
andimproperoperation of therange.
Toraise the cool(top:
[] Be sure tile burners are turned off.
[] Remove tile grates.
[] (;rasp tile two front burner wells and
lift up.
OvenAir Vents
Never block tile vents (air openings) of tile
range. Tile)' provide tile air inlet and outlet
that are necessm T for tile range to operate
properly with correct combustion.
Clean under tile cooktop with hot, soapy
water and a clean cloth. If you removed
wmr surli_ce burners while cleaning,
make sure they are properly seated when
replacing them.
_Mter cleaning, lower the cooktop (be
careful [lot to pinch yore" finge[_).
_&Jropenings are located at tile rear of
tile cooktop, at tile top and bottom of tile
oven doo_; and at tile bottom of tile range,
under tile wmming (h'awe_, storage drawer
or kick panel (depending on tile model).
Pulltheknobstraightoff thestem.
Lower Control Panel (Front Manifold Panel) and Knobs
It's a good idea to wipe tile control panel
after each use of tile oven. Use a damp
cloth to clean or rinse. For cleaning, use
mild soap and water or a 50/50 solution of
vinegar and wam_: For _insing, use clean
water: Polish dry with a soft cloth.
Do not use abrasive cleansers, strong liquid
cleane_, plastic scouring pads or oven
cleane_ on tile control panel--they will
(lamage tile finish.
Do not bend knobs by pulling them up or
down or by hanging a towel or other such
loads. This can damage the gas wdve shaft.
Tile control knobs may be removed fi)r
easier cleaning.
Make sure the knobs are in the Of[
positions and pull them straight off the
stems fi)r cleaning.
Tile knobs can be cleaned in a dishwasher
or they may also be washed with soap and
watei: Make sure file insides of tile knobs are
(h_' l)eti)i'e replacing.
Replace the knobs in the 0ffposition
to ensure proper placement.
Metal parts can be cleaned with soap and
wateL Do not rise steel wool, abrasives,
}lIllll/Oni}l, }lci(ls oI" COIllll/eI'cial ()veil
cleane_. Dry with a soft cloth.
,.?2

Oven Shelves
ge.com
Wire cover holder.
Clean the shelves with an al)rasive cleanser
or scouring pad. _Mter cleaning, rinse the
shelves with clean water and dry with a
clean cloth.
Oven Light Replacement
CAUTION:Beforereplacingyour
oven//_?htbu/b,disconnectthee/ectrica/powerto
therangeat themainfuseorcircuitbreakerpanel.
Besuretolet the//#htcoverandbulbcool
completely
The oven light 1)ulb is covered with a
removable glass cover that is held in place
with a bail-shaped wire. Remove the oven
(loo_; if desired, to reach cover easily;
To remove:
V_ Hold a hand under the ('o_er so
it doesn't fifll when released. With
finge_s of the same hand, fiHnly
push back the wire cover holder;
Lift off the covei;
If the shelves ever become hard to slide,
wipe the shelf edges or oven shelf supports
with vegetable oil.
NOTE."Taketheshelvesout of theovenbefore you
begin theself-clean cycle or theymay discolor
] Do not touch hot bulb with a wet
cloth, Replace bulb with a 40-watt
household appliance bulb.
Toreplace cover:
[] Place it into the grome ot the light
receptacle. Pull the wire tin'ward to the
center of the cover until it snaps into
place. When in place, the wire holds
the cover firefly, Be certain the wire
is in the depression in the center ot
the covei:
[] Connect electt{cal power to the range
Do not remove any screws to remove
the cover.
33

IInstallation Instructions I Range
I
I ffyou have questions,call 1.800.GE.CARESor ,isit our _:ebsite at: ge.com
In the Commonwealth of Massachusetts:
• This product Inust be installed bv a licensed phunber
or gas fitter.
* When using ball-tyI)e gas shut-offvalves, they shall be
the T-handle type.
" A flexible gas connect(n; when used, must not exceed
3 tibet.
BEFORE YOU BEGIN
Read these h_slructions completely and carefully.
Installation of this rmlge must conform with local
codes, or in the absence of local codes, with the
National Fuel Gas Code, ANSI Z223.1/NFPA.54,
latest edition. In Cmlada, installation must conform
with the current Natural Gas Installation Code,
CAN/CGA-B149.1 or the current Propmle Installation
Code, CAN/CGA-B149.2, and with local codes where
applicable. This range has been design-certified by
CSA International according to ANSI Z21.1, latest
edition and Canadiml Gas Association according to
CAN/CGA-I.1 latest edition.
As with any appliance using gas and generating heat,
there are certain safety precautions you should tollow.
You will find these i)recautions in the Important SafoW
Information section in the front of this manual. ]lead
them careflfllv.
•IMPORTANT - S ,,ethe ein t ',,cti,m
tot local electrical inspector's use.
FOR YOUR SAFETY
Do not store or use combustible materials, gasoline or
other flmmnable vapors mid liquids in the vichfity of this
or m_y other appfimace.
If you smell gas:
Open windo_vs.
_ Don't touch electrical switches.
Extinguish any open flame.
hnmediately call your gas suI_plie_:
TOOLS YOU WILL NEED
Phillipsscrewdriver
Flat-bladescrewdriver Open-endor
Pencilandruler __
Pipewrenches(2) _:::_:::=:::=:::_"
(oneforbackup) Drill, awl or nail
I
adjustablewrench
Level
IMPORTANT - O,...e ,ll
codes and ordinan€es.
• Note to Installer - Be sure to leaxe these
instructions with the Consume_:
• Note to Consumer - Keep these instructions tot
flmue reference.
• Note - This a ) )liance must be )to _erlv grounded
• Servicer - The electrical diagram is in an emelope
attached to the back of the range.
• Skill level - Installation of this appliance requires basic
mechanical skills.
• Proper installation is the responsibilit) of the installe_:
• Product tifilure due to improper installation is not
coxered under the _n'ranw.
PART INCLUDED _.....
II I I ,, •
:i;, -¸_
Anti-Tipbracketkit 9
MATERIALS YOU MAY NEED
• Gas line shut-otfvalve.
• Pipe joint sealant or Ui,-ai)proved pipe thread tape
with Teflon':: that resists action of natural and I,P gases.
• Flexible metal appliance connector (l/2" I.D.)
A 5-toot length is recommended ti)r ease ot installation
bill other lengths are acceptable. Never rise _111old
connector when installing a new range.
• Flare union adapter tot connection to gas sui)ply line
(3/4" or 1/2" NPT x 1/2" I.D.)
• Nare union adapter for connection to pressure
regulator on range (1/2" NPT x 1/2" I.D.)
• I,iquid leak detector or soapy water;
• I,ag bolt or l/2" O.D. sleeve anchor (fi)r concrete
floo_ only).
*Teflon:Registered t_-ademm-kot DuPont
34

Installation instructions
-&WARNING!
iNSTALLATiON SAFETY
iNSTRUCTiONS
Read these instructions completely and carefully.
Improper installation, adjustment, aJterafion, service or
maintenance can cause injury or property damage. Refer
to this manual. For assistance or additional information,
consult a qualified instadler, service agency, manufacturer
(dealer) or the gas supplier.
Neve_ reuse okl tie.hie connectors. The use of old
fle_ble connectox_ can cause gas leal<_ ;rod person;d
il_)m'y. _Mways use NEW flesble omnecto_ when
installing a gas appliance.
IMPORTANT - ]_emove all pacldng
matelial and literature flora ovell befbre connecting gas
and electrical supply to range.
CAUTION - Do, otattempt to operate the
oven o_ this range dining a power iidlure (Electric
Ignition models only).
• Have yore" range installed by a qualified installe_
[] Y)tn" range must be electrically grounded ill
accordance with local codes o_; in the absence of local
codes, in accordance with the National Electrical Code
(ANSI/NFPA 70, latest edition). In Canada, electrical
grounding must be in accordance with the cmTent
CSA C22.1 Canadian Electrical Code Part I and/or
local codes. See £1octricalConnoctionsin this section.
• Beflwe installing your range on linoleum or any other
synthetic floor covering, make sure tile floor cox ering
can withstand 180°F without shrinldng, waq)ing or
discoloring. Do not install the nmge over ca*peting
unless a sheet of 1/4" thick plywood or similar
insulator is placed between the range and caq)eting.
• Make sm'e the wall co\wings arotmd the range can
withstand heat generated by the range up to 200°E
Avoid placing cabinets ab_we the range. To reduce the
hazard caused by reaching over the open flames of
operating burnei_, install a ventilation hood over tile
range that pr%@cts fi)rward at least 5" bex'ond the fl'ont
of the cabinets.
The ventilating hood nmst be constructed {ff sheet
metal not less than 0.0122" thick. Inst;dl above the
cooktop with a clearance of not less than 1/4" between
the hood and the undelside ot the combustible
inaterial or metal cabinet. Tile hood nmst be at least as
wide as the at)pliance and centered over the appliance.
Clearance between tile cooking surfl_ce and the
ventilation hood stu{iace MUST NEVER BE LESS
THAN 24 INCHES.
FXCEPT1ON: Installation ot a listed microwave oven or
cooking appliance over the cooktop shall conflmn to the
installation instrtlcfions packed with that appliance.
• If cabinets are placed above the range, allow a
ininilmm/clearance of 30" between the cooking
stwlhce and the bottoln of tmprotected cabinets.
• If a 30" clearance between cooking surfi_ce and
overhead Colnbustible inaterial or inetal cabinets
cannot be inaintained, protect the undelside ot the
cabinets above the cooktop with not less than 1/4"
insulating nfillboard covered with sheet inetal not less
than 0.0122" thick. Clearance between the cooking
suYlace and promcted cabinets MUST NEVER BE
LESS THAN 24 INCH_ZS.
The \'ertical distance fl'Oln the plane of the cooking
stm'hce to the bottoln of ac!jacent overhead cabinets
extending closer than 1" to the plane ot the range
sides inust not be less than 18". (See the Dimonsions
and Cloarancos illustration ill this section.)
• CAUTION - IteIns of interest to children
should not be stored ill cabinets ab_we a range or on
the backsplash of a range_children clilnbing on the
range to reach items could be seriously ii_jm'ed.
35

Installation instructions
DiMENSiONS AND CLEARANCES
Provide adequate clea_raJaces between the raJage and adjacent combustible surfaces, These dimensions must be met for
safe use of your range, The location of the electrical outlet and pipe opening (see Gas Pipe and Electric Outlet Locations)
may be adjusted to meet specific requirements.
The raJage may be placed with 0" dea_raJace (flush) at the back waJ1.
Minimum to
cabinets on
either side
of the range
1 I I
Maximum depth
for cabinets
above
countertops
30"
30"
Minimum -'_
18" standard burner models i_._
__I"To wallon eitherside, 13"
2"To wallon eitherside,
sealed burner models
Front edge of
the range side
panel forward
from cabinet
1/4"--)
Depth with door closed (includes door handle)
"''_ I_28" to 281/4"
3O"
J_dl""""" '_ Depth varies depending on model.
R
See specifications sheet for your model.
_- 0"
To cabinets
below cooktop
and atthe range
back
Height
473/8"
36V4"_+1/4"
36

Installation instructions
-&WARNING!
ANTI-TIP DEVICE
All ranges can tip and injury could result.
@
®
[] For your satiety, never use yore" range lk)r warming
or heating the room. Your oven and cooktop are
not designed to heat y(mr kitchen. Top bm'ners
should not be operated without cookware on the
grate. Such abuse could result in fire and damage
to your range and will void y(mr warranty.
[] Do not store or use combustible materials,
gasoline or other flammable _;q)ors and liquids
in the vicinity of this or any other appliance.
Explosions 05" fires could result.
[] Do not use oven fi)r a storage area. Items stored in
the oven can ignite.
[] Do not let cooking grease or other flammable
materials accmnulate in or near the range.
To prevent accidentM tipping of the range,
attach an approved Anti-Tip device to the
wall. (See/nsta//ing the Anti-tip Device in this
section.) To check if the device is installed
and engaged properly, carefully tip the range
forwaxd. The Anti-Tip device should engage
and prevent the range from tipping over.
If you puU the range out from the wall for
any reason, make sure the Anti-Tip device
is engaged when you push the range back
agaJrtst the wall.
LOCATION
Do not locate the range where it may be subject to s_coug
drafts. Any openings in the floor or wall behind the rmlge
should be sealed. Make sure the openings arom_d the
base of the range that supply fresh air for combustion
and ventilation axe not obs_'ucted by cm'peting or
woodwork.
Your range, like inanv other household itelns, is heavv
aim can settle into soft floor coverilxgs such as cushioned
vinyl (5I"cai])efing. Use care when inoving the range
on this t}'pe of rio(wing. It is recolnlnended that the
tollowing siml)le aim inexpensive ilxstrucfi(ms be
tollowed to protect your flooI:
The range should be installed on a sheet of i)lywood
(or silnilar inaterial). X4]_en the floor coverilxg elms at
the fl'ont of the range, the area that the range will rest
on should be built up with i)lywood to the same level or
higher than the floor coverilxg.
This will allow the range to be moved fi)r cleaning
or servicing. Mso, inake sure your floor covering will
withstand I80°F. (See the Installation Safety Instructions
secfiOlX.)
Make sure the wall covefilxgs around your range can
withstand the heat generated (up to 200°F) by the range.
(See the Installation Safety Instructions section.)
IMPORTANT!
Remove all tape and packaging. Make sure the burners
are properly seated and level.
Lift up the cooktop (on models with standm'd twin
burners) and remove any packing material under it.
Take the accessory pack out of the oven and/or th'awer.
Check to be sure that no range parts have come loose
during shipping.
37

Installation instructions
[] PROVIDE ADEQUATE
GAS SUPPLY
Your range is designed to operate at a pressure of 4" of
water column on natural gas or, if designed for LP gas
(propane or butane), 10" of water column.
Make sure you are supplying your range with tile type
of gas fl_ whidl it is designed.
This range is convertible fiw use on natmal or
propane gas. If you deride to use this range on LP gas,
convex_ion must be made bv a qualified LP installer
befiwe attempting to operate tile range on that gas.
Fox"proper operation, tile pressure ot natural gas
supplied to tile regulator must be between 4" and 13"
o_ W_ffer cohlI//n,
For I,P gas, tile pressure supplied must be between 10"
and 13" of water column.
When checking flw proper operation of tile regulato*;
tile inlet pressure must be at least 1" greater than tile
operating (inanilold) pressure as given above.
Tile pressme regulator located at tile inlet of tile range
manilbld must remain ill tile supply line regardless ot
whether natural or I,P gas is being used.
A fle_ble metal appliance connector used to connect tile
range to tile gas supply lille shoukl have an I.D. of 1/2"
and be 5 _bet in length fi)r ease of installation. In Canada,
fle_ble connector3 I/l{lst be single wall metal connecto,3
no hmger than 6 feet in length.
[] CONNECT THE RANGE TO GAS
Shut off the main gas supply valve before disconnecting
the old range and leave it off until the new hookup has
been completed. Don't forget to relight the pilot on other
gas appliances when you turn the gas back on.
Because hard piping restricts movement of tile range,
tile use (ff a CSA International-celqfified flexible metal
appliance connector is recommended unless local codes
require a hard-piped connection.
Never use all oM comlector when installing a new range.
If tile hard piping method is used, you must careflflly
align tile pipe; the range cannot be moved alter tile
connection is made.
To pre', ent gas leaks, put pipe joint compotmd on, or
wrap pipe thread rope with Teflon* around, all male
(external) pipe threads.
A. Install a manual gas line shut-off _;dve ill tile gas lille ill
an easily accessed location (_utside of the range. Make
sure everyone operating tile range kno_vs where and
how to shut off the gas supply to tile range.
B. Install male 1/2" flare union adapter to tile 1/2" NPT
internal thread at inlet of regulatol: Llse a backup
wrench on tile regulator fitting to avoid damage.
When installing the range ti'om the ti'ont, remove the
90 ° elbow ti)r easier installation.
C. Install male 1/2" or 3/4" flare ration adapter to tile
NPT internal thread of the manual shut-off \ulve,
taking care to back-up tile shut-off \ulve to kee I) it
fl'om mrning.
D. Connect flexible metal appliance connector to the
adapter on tile range. Position range to pemlit
connection at tile shut-off wdve.
t.
X._q/en all connections have been made, make sm'e
all range controls are in the off position and turn on
the main gas supply \ulve. Use a liquid leak detector
at all joints and connections to check fl)r leaks in
tile system.
WARNING: DO NOT USE A FLAME
TO CHECK FOR GAS LEAKS.
When using test pressm'es greater than 1/2 psig to
pressm'e test tile gas supply system of tile resMence,
disconnect tile range and individual shut-off valve
from tile gas supply piping. When using test pressm'es
of 1/2 psig or less to test the gas supply system, simply
isolate the range fl'om the gas supply system by closing
the individual shut-off wflve.
*Teflon: Registered trademark of DuPont
38

Installation instructions
GAS PiPE AND ELECTRICAL OUTLET LOCATIONS (formodels with SeaJed Burners)
This area allows for flush range
installation with through-the-wall
connection of pipe stub/shut-off
valve and rear wall 120Voutlet.
\
Shortest connection from hard
pipe stub location to range
hookup.
This area allows for flush range installation
with through-the-floor connection of pipe
stub/shut-off valve.
GAS PIPE AND ELECTRICAL OUTLET LOCATIONS (for models with Standard Twin Burners)
This area allows for flush range
installation with through-the-wall
connection of pipe stub/shut-off
valve and rear wall 120Voutlet.
J from hard
30" pipe stub location to range
hookup.
39
This area allows for flush range installation
with through-the-floor connection of pipe
stub/shut-off valve.

Installation instructions
FLEXIBLE CONNECTOR HOOKUP {formodelsequippedwith Sealed Burners)
Installer: Inform the ] ]_ZI'_ Gas
consumer of the 1/Z'or3/4" CT_ Ilia'--shut-off
location of the gas Gaspipe_ _ - valve
shut-off va ve.
RIGID PiPE HOOKUP OPTIONS (for models equipped with Sealed Burners)
Alternate Hookup
90" Elbow _ 90" Elbow
4B° EIb°w _1_:_ _ __<i gooElbow
N,_,e_ !tL B,ack
WS'/Y "' /fi
%.v.J_-_Pres,ureU°,on U
regulator _ _t_ Union
_ _.... Nipple
Installer: Inform the I _ Gas
location of the gas ) !_H valve
consumer of the I ] ]_r- -_ shut-off
shut-off va ve.
7,1F_
b.g _--- I/Z' or 3/4"
Gaspipe
Nipple '--_"-I I ;_k-/ O • ,
., _ I_ _ .,. Pressure
oas _-i _. _ N_pple ,
sbut-off-_'- r__J k._ / 90': regulator
va,ve_N _ ./ E,bowL
I/Z' or 3/4" / go° Elbow "_"_/-'_
Gaspipe Adapter..-lf
Installer: Inform the I
consumer of the location
II _4 / Nipple
I 1 _ UlCKconnect
Iof the gas shut-off valve.
Adapter
f_1 ./or union
40

Installation instructions
FLEXIBLE CONNECTOR HOOKUP {formodelsequippedwith Standard Twin Burners)
_c;t::v1,,v,ee0as Adap,er0
1/2" or3/4" Gaspipe"_'_-_ Gasshut-offvalve
RiGiD PiPE HOOKUP (formodels equipped with Standard Twin Burners)
Pressureregulator
Manifoldpipe
E_ _._-,,_._ 90°Elbow
Nipple Union _ Blackironpipe
_ Union
Installer: Inform the I
consumer of the
location of the gas
shut-off va ve.
I
1/2" or3/4" Gaspipe"_"- _j
_ Nipple
Lhit"- Gass,,t,t-e_va,ve
41

Installation instructions
[] ELECTRICAL CONNECTIONS
Electrical Requirements
120wolt, 60 Helqtz, properly grounded branch drcuit
protected by a 15-amp or 20-amp circuit breaker or time
del W fl/se.
Extension Cord Cautions
Because of potential safbtv hazaids assodated with cel_ain
conditions, we strongly recommend against tile use of
an extension cord. Howevex; if you still elect to use an
extension cox<l, it is absolutely necessary that it be a
UIAisted, 3-wire grotmding-type appliance extension
cmd and that tile current carrying rating (ff tile cord in
amperes be equivalent to, or greater than, tile branch
drcuit rating.
Grounding
IMPORTANT_(Please read carefully)
FOR PERSONAL SAFETY, THIS APPLIANCE MUST
BE PROPERLY GROUNDED.
Preferred Method
E_lsureproperground
existsbeforeuse
Tile power cord of this appliance is equipped with a
3-prong (gIotmding) plug which mates with a standard
three-prong grotmding wall receptacle to mininfize the
possibility ot electric shock ha/ard fl'om this appliance.
The customer should have the wall receptacle and drcuit
checked by a qualified electridan to make sure the
receptacle is properly grotmded.
Where a standard two-prong wall receptacle is
encountered, it is the pel_onal responsibility and
obligation of the customer to have it replaced with
a properly grotmded three-prong wall receptacle.
DO NOT, UNDER ANY CIRCUMSTANCES, CUT OR
RFMOVE THE THIRD (GROUND} PRONG FROM
THE POWER CORD.
[] ELECTRICAL CONNECTIONS (CONT.)
A. Usage Situations where Applimlce Power Cord will be
Discommcted Infrequently,
An adapter Inay be used only on a 15-amp circuit. Do not
use an adapter on a 20-amp drcuit. _4qmi'e local codes
pemfit, a TEMPORARY CONNECTION Inav be inade
to a properly grotmded two-prong wall receptacle by the
rise ofa UiAismd adaptei; a\_filable at inost hardware
stores. The lalger slot in the adapter Inust be aligned
with the larger slot in the wall receptacle to provide
proper polafi V in the COlmection of the power cord.
Temporary Method
(AdapterplugsnotpermittedinCanada)
Align large prongs/slots
Ensure proper ground
andfirm connection
before use
CAUTION: Atta,hi.gtheadapter ground
tennilml to the wall receptacle cover screw does not
gmtmd the appliance Ulfless the cover screw is inetal,
and not insulated, and the wall receptacle is grounded
through the house wiring. The custolner should have
the circuit checked by a qualified electrician to Inake
sure the receptacle is properly groul_ded.
X,_q_en disconnecting the power cord fl'om the adapte_;
always hold the adapter with one hand. If this is not
done, the adapter ground tennilml is very likely to break
with repeated use. Should this happen, DO NOT USE
the appliance tmtil a proper grotmd has again been
established.
A word about GFCI's - GFCI's are not required or
recommended for gas raaage receptacles,
Grotmd Emit Circuit ]nterluptel_ (GF(]'s) are devices
that sense leakage cff cmTent in a circuit and automatically
switch off power when a threshold leakage le\vl is
detected. These devices must be manually reset by tile
consumel; The National Electrical Code requires the
use oI GFCI's in ldtchen receptacles installed to serve
countellop suYIi_ces. Pe_fimnance of the range will not
be aflbcted iI operated on a GFCl-protected circuit
but occasional nuisance tripping of the GFCI breaker
is possible.
42

Installation instructions
[] ELECTRICAL CONNECTIONS (CONT.)
B. Usage Situations where Appliance Power Cord will be
Disconnected Frequently.
Do not use :m adapter plug in these situations because
disconnecting of the power cold places undue strain on
the adapter and leads to e\vnmal fifilure (ff the adapter
ground terminal. The customer should have the 2-prong
wall receptacle replaced with a three-prong (grounding)
receptacle by a qualified electridan befbre using the
appliance.
The installation (ff appliances designed for mobile home
installation must confin'm with the Manufltctm'ed
Home Construction and Safety Standard, Tide 24 CFR,
Pat1 3280 (flmnerly the Federal Standard for Mobile
Home (_onstruction and Saie F, Title 24, HUD, Pa_* 280)
or; when such standard is not applicable, the Standard
%r Manufitcmred Home lustallatious, latest edition
(Manufiictm'ed Home Sites, Commtmities and Set-Lips),
ANSI A225.1, latest edition, or with local codes. In
Canada, mobile home iusmllation must be in accordance
with the cunent CAN/CSA Z240/MH Mobile Home
lustallation Code.
Electric Disconnect
[] Locate disomnect plug on tile range back.
[] Pinch sides ot com, ector and pull out of range back.
[] CHECK IGNITION OF SURFACE
BURNERS
Operation of all cooktop and oxen burners should be
checked aftei the i ange and g_s supp b lines brae been
carefidh checked fbr leaks.
1?3ectric Ignition Models
Select a top burne* knob and sinmlmneous b push in and
turn to LITE position. 5bu will hear a clicking sound
indicating proper operation of the spark module. Once the
air has been purged th)m the suppl} lines, burners should
light wflhin 4 seconds. After burner lights, romm knob out of
the LITE position. Tr_ each burner in succession until all
burners brae been checked.
Quality of Flames
The combustion qua]d} of burner drones needs to be
determined _isuNh.
(A) Yellow flames--
Call for service
(B) Yellow tips on
outer cones--
Normal for LP gas
(C) Soft blue
flames--Normal for
natural gas
[] SEAL THE OPENINGS
Seal any openings in the wall behind the range and in
the floor under the range when hookups are completed.
If burner flames look like (A), call for service. Normal
burner flames should look like (B) or (C), depending
on the type of gas you use.
Widl LP gas, some yelh)w tipping on outer cones is normal.
[] CHECKIGNITION OF OVEN BURNER
The oxen is desig_led to ot)eram quietly and mltomafically.
To ot)erate the oxen, press the Bake pad and then press the
mmther pads until 350 ° al)t)ea_:s in the display. Touch the
Start/On t)ad. After 30-90 seconds, the oxen burner will
ig_fim and burn until the set mmpelature is reached. The
oxen bm'ner will continue to cycle on and off as necessary to
maintain the oxen at the mml)emture indicamd b_ the displa)
To check ignition of the broil burnec touch the Broil Hi/Lo
pad mid then the Start/On pad. After 30-90 seconds, the
broil burner will ig_fite.
Electric ignition models require electrical power to ot)eram.
In c_tse of a p(_wer oumge, the oxen burne_ on these models
cmmot be lit mammlh with a match. Gas will not f]()_aunless
the g]o_ bin" is hot.
If the oxen is in use >.ben a power oumge occm% the btlrner
will shut off and camlot be re-lit tmfil power is restored.
43

Installation instructions
[] ADJUST BROIL AND OVEN
BURNER AIR ADJUSTMENT
SHUTTERS iF NECESSARY
Air adjustment shutters for the top and bottom burners
regulate the flow of air to the flames.
The air a(!justment shutter fbr the top (broil) burner is
in the center of the rear _all of the oven.
adjustment
shuEer
[] ADJUST BROIL AND OVEN
BURNER AIR ADJUSTMENT
SHUTTERS IF NECESSARY (CONT.}
Oven
To remove the oven bottom:
A. Remove the screws holding down rear of the oven
bottom.
B. Grasp the oven bottom at finger slots (m each side.
C. I,itt the rear of the oven bottom enough to clear the
lip of the iange tiame, push it back, and then pull it
up and out.
[] LEVELING THE RANGE
The shutter for the bottom (oven) bm'ner is near tile back
x_;(llbehind the uzJrming drmve*; storage drawer or kick
panel, Remove the i:]i:tv,er" or p;mel. See the Coreand
cleaning ofthe range section.
To adjust the flow of air to either burner, loosen the
P_ps head screw and rotate the shutter toward open
or dosed position as needed.
The flames for the top (broil) bm'ner should be stead)
with approxiFnatel} l" blue cones and should not extend
out oxer the edges of the l)sSS'llel"baflle.
To detem/ine if the bottom burner flames are bm'ning
properly, iemove the oven bottom. Flames should have
appro_mately 1" blue cones and, if range is supplied
with natural gas, should bm'n with no yellow tipping.
(With most LP gas, small yellow tips at the end of outer
cones aIe normal.) Names should not lift off bm'ner
poIls. If lifting is observed, gradually redure air shutter
opening until flames are stabilized.
A. Install the oven shelves in the oven and position the
range where it will be installed.
Raise
i_l _ range Lower
Leg _
leveler_"_
Raise_P "_
range_
B. Check fiw le\vlness by placing a spirit level or a cup,
partially filled with watel; on one of the o\en shel_ es.
If using a spirit level, take two readings--with tile le\ el
placed diagonally first in one direction and then
the othe_:
C. Remox e the storage drawer or kick panel. See the Care
and cleaning of the range section. The fi'ont leveling legs
can be ac!iusted fiom the bottom and the rear legs can
be ac!iusted ii'om the top or the bottom.
D. Use an open-end or ac!}usmble wrench to ac!iust the
le\vling legs tmtil the range is level.
E. _Mter the range is le\vl, slide the range away fi'om the
wall so that the Anti-Tip device can be installed.
)_ range
(on some models) (on some models)
Lower range
44

Installation instructions
[] iNSTALLiNG THE ANTI-TIP
DEVICE
A WARNING!
• Range_ must be secured with an approxed Anti-Tip
device.
• Unless properly instnlled, the range could be tipped
by you or a child standing, sitting or leaning on an
open dooi;
• Mter instnlling the Mlti-Tip device, \'erit_, that it is in
place by caretully attemi_ting to tilt rite range flwward.
• This range has been designed to meet all recognized
industry tip standards fin" all nmmal conditions.
• The use (ff this device does not preclude tipping of
the range when not properly installed.
• If the Anti-Tip device supplied with the range does
not fit this application, use the tmive_al Anti-Tip
device WB2X7909.
A. Mark the wall where the RIGHT EDGE (ff the range
is to be located. Be sine to allow fin" the counte_op
oxvflmng if you intend to install the range next to
cabinets.
SIo_ed head
screw
[] INSTALLING THE ANTI-TIP
DEVICE (CONT.)
Wallboard
Wood screw
Install the sleeve anchor into the drilled hole and then
install the lag bolt through the device. Tile bolts must be
properly tightened as recommended fin" the hardware.
E. Slide the range against the wall, and check fi)r proper
installation by grasping the front edge of tile cool<top
and carefully attempting to tilt the nmge fiwward.
Back of range
WHEN ALL HOOKUPS ARE
COMPLETED
Make sure all controls axe left in the off position. Make
sure the flow of combustion and ventilation air to the
range is unobstructed.
Marked edge of range
B. Locate the outside edge of the device 2¼" toward
the center of the range fl'om the marked edge of
the range.
C. Using the device as a template, mark the position of
the hole fi)r the screw.
D. For x_ood construction, drill a pilot hole at ,an ,'m,,le
of 20 degrees from the horizontal. A nail or awl
max be used if a drill is not available.
Motmt the Anti-Tip device Mth the screw pr(Mded.
For cement or concrete construction, you will need
a 1/4" x 1½" lag bolt and a 1/2" O.D. sleeve anchol;
which are not provided. Drill the recommended size
hole %r the hardware.
CONVERTING TO LP GAS (or
converting back to natural gas from LP)
This rmlge leaves the factory set for use with natural gas.
If you want to convert to LP gas, the conversion must be
performed by a qualified LP gas installer.
The conve_ion instructions and I,P OlJfices (aI1 be fimnd
attached to the range next to the pressm'e regular(n:
Keep these instructions and the orifices in case wm want
to convert back to natm'al gas.
45

I
w
Beforeyou call forservice...
Troubleshooting tips
Save time and money! Review the charts on the following
pages first and youmay not need to call for service.
m
Possible Causes What To Do
I !
i .mi
w
Topburners do notlight
or do not bum evenly
Plug on rmlge is not completely
inserted in the electrical outlet.
Burner hole or slits on the side
of the burner may be clogged.
• Make sure electrical plug is plugged into a live, properly
grounded buffet.
• Relnove tile burnei_ (on models with standard twin
bm'ne_) or bm'ner heads and caps (on models with
sealed bm'ne_s) and clean them with a sewing needle
or twist-de. Make sure you do not enlarge tile holes.
On sealed burner models, check and clean tile electrode
area tot btli'ned-_)n toed or grease.
hnproper burner assembly. • Make sure the burner parts are installed correctly.
See the Care and cleaning of the range section.
Burnerflames very hnproper air to gas ratio. • /f rauge is couuected to l,P gas, coutnct the l/e_sou
large oryellow who installed your rm_ge or made tile couve_iou.
Surface burners light
but oven does not
n,
The oven gas shut-off valve
may have accidentally been
moved during clemfing or
movh_g.
• To check tile oven gas shut-off wdve on sealed burner
models, remove tile wam/ing drawe_; storage drawer or
kick panel (see tile Care and cleaning of the range section)
and look fin" the g_s shut-off lever at tile back of the range,
Leveris
shownclosed.
PULLTOOPEN.
Sealed burner models
iii_il_!iiiiiiiiiiiii,l,iiii
Control signals after You forgot to enter a bake • Touch the Bake pad :rod desired teluperattu'e or
entering cooking time or temperature or clemah_g time. the Self Clean pad and desired cle:m time.
start time ton some models,
m
I
do not work inserted in the electrical outlet, properly grotmded outlet.
(on some models) A fuse ha your home may be • Replace the fl_se or reset the circuit breaker:
46
• To check tile oven gas shut-off valve on standard twin
bm'ner models, raise tile cooktop and look fin" tile gas
sh ut-off lever at tile extreme right rear corne_: Follow
tile directions in box A or B that match yore" regulator
_])e.
Leverisshownclosed. A
PULkTOO,PEN._
,;;;,1 __ \
Standardtwin burnermodels Standardtwin burnermodels
Plug on rmlge is not completely • Make stlre electrical l/ltlg is ph/gged lute a live,
blown or the circuit breaker
tripped.
Oven controls improperly set. • See the Usingtheclock and timer section.

ge.con7
Fooddoes notbake
or roastproperly
Possible Causes
Oven controls improperly set.
Shelf position is incorrect.
Incorrect cookwaxe or cookwaxe
What To Do
• See the Using the oven section.
• See the Using the oven section.
• See the Using the oven sect.ion.
of hnproper size being used.
Oven thermostat needs
• See the Adjust the oven thermostat--Do it yourself! section.
adjustment.
CJock not set correctly.
• See the Using the clock and timer section.
(on seine models)
Aluminum foil used improperly
• See the Care and cleaning of the range section.
in the oven.
Oven bottom not securely
• See the Installation of the range section.
seated in position.
Food does not Oven conlrols improperly set. • On models with touch pads, make sure you touch
broilproperly tire Broil Hi/Lo pad. On models with an OVEN TEMP
knob, make sure it is set at BROIl,.
Oven door not dosed. • See the Using the oven section.
Improper shelf position • See tire Broiling Guide.
being used.
Food behag cooked in a hot pan. • For best results, use a pan designed fl)r broiling.
Make sure it is cool.
Cookware not suited for broiling. • For best restdts, use a l)an designed, for broiling,.
Oven bottom not securely • See the Installation of the range section.
seated in position.
w_
eA w
1
w
! =
m •
w M
i m
= .
f
n
m
Oven temperature Oven thermostat • See the Adjust the oven thermostat--Do it yourself! section.
too hot or too cold needs adjustment.
Oven light does not work Light bulb is loose or defective. • Tighten or replace tire btdb.
Plug on rmage is not completely • Make sure electrical plt/g is plugged into a live, properly
inserted ha the electrical outlet, grotmded ()utlet.
Oven will notself-clean The oven temperature is too • ?dlow tire range to cool to room temperature and
high to set a self-dema operation, reset the controls.
Oven conlrols improperly set. • See the Using the self-cleaning oven section.
On models with a door latch, • Make sure you move tire door latch handle all tire way
the oven door is not ha the to tire right.
locked position.
"Crackling"or This is the sound of the • This is hernial.
"popping" sound metal heating mad cooling
during both the cooking mad
cleaning functions.
47
!iiiiii_i}iiii_i_iii_i
m
q

,O
Beforeyou call forservice...
Troubleshooting -tips
m
. !
w
m _r_
n
m
w
m
m
Excessivesmoking
Possible Causes
Excessive soil.
What To Do
• On models with loud/pads, loud/tile Clear/Off pad.
On models with an OVEN TEMPknob, mrn it to OFF.
Open the windows to rid the room of smoke. _'_ait m]fil
the SELFCLEANlightgoes off. _4"ipe up the excess soil
and reset the clean cycle.
Oven door willnotopen Oven too hot. • _Mlow the oven to cool below locking temperatm'e.
after a clean cycle
Oven not clean after Oven controls not properly set. • See the Using the self-cleaning oven section.
a clean cycle Oven was heavily soiled. • Clean up heavv, sl_illove_ heft)re stnrting, the clean cycle.
Heavily soiled ovens ma_ need to sell_clean again or fin.
a longer period of time.
Oven door will not Oven is too hot. • _Mlow the oven to cool below locking temperatm'e.
unlock (on models Do not lock the door with the door latch except when
witha doorlatch) usin*_ the self:clean teatm'e.
Self clean light (on The OVEN TEMP knob has not • Set the OVEN TEMP knob to CLEAN. See the Using the
some models)blinks been set to CLEAN when the self-cleaning oven section.
when trying to set a latch was moved to the fight.
self clean cycle
The latch was not moved to the * Move the latch t(> the right as far as it will _re See the
fight when the OVENTEMPknob Using the self-cleaning oven section.
was set to CLEAN.
Self clean light (on A power interruption occurred, oTurn the OVEN TEMP knob to OFFand move the latch
some models) blinks to the left as t.H" as it will go. Reset the range controls
duringselfclean cycle to the desired settings. See the Using the self-cleaning
oven section.
"Door"appears in the Self-clemah_g cycle has been • Move the latch handle all the wa_ to the right.
display (onsome models_ selected but the latch handle
i_iiiiiiiiiiY_]iiiiiiii_i]i
"F--and a number or On models with a door latch, • The latch may have been m()ved, eveu if only slightly,
ii;_!i;:;:'!iiii/iliii
letter"flash in the display if a function error code appears fl'om the locked position. Make sure the latch is moved
ton some models/ durh_g the self-clemah_g cycle, to the right as thr as it will go.
m
I
48
was not moved all the way
to the fight.
Latch hm_dle was moved to the
fight but a progrmn other than
• Moxe the latch handle to the right on b when ,setfino
the sel6cleaning cycle.
self-clem_h_g was selected.
check the oven door latch.
You have a function error code. • Touch the Clear/Off pad. _Mlow the oven to cool fin"
one hem: Put the oven back into operation.
If the function code repeats. • Discom_ect all power to the range fi)r 5 minutes
and then recoIn]ect l)owe_:/f the flu]ction error
code repeats, call for service.

de.corn
Possible Causes What To Do
Display goes blank A fuse in your home may be * Replace tile 1use (>r reset tile circuit breaker:
(onsome models) blown or the circuit
breaker tripped.
The clock is tnn_ed off so that it * See tile Using the clock and timerse(ti_m.
does not show in the display.
Display flashes Power failure. * Reset tile (h wk.
(on some models)
Unable to get the Oven control pads were * The Bake mad Broil Hi/Lo pads must be touched at
displayto show "SF" not touched properly, the same time and held fi)_ 3 se(ouds.
(on some models)
Power outage, Power outage or surge. * Reset the clock. If the oven was in use, you must reset
clock flashes it by touching the Clear/Offpad, ,setfiu,_the clock and
('onsomemodels} resettiu,_ any (-()()king tim( ti()u.
"Burning" or "oily" odor This is normal in a new oven * To speed the process, set a sell:clean cycle fi:,r a
emitting from the vent and will disappear in thne. minim tuu of 3 houi_. See the Using the self-cleaning
oven section.
Strong odor An odor from the h_stdation * This is teuq)orzu'y.
around the inside of the oven
is normal for the first few times
the oven is used.
Fan noise A cooling fan may automatically * This is uom_al. The cooliu,_ tim will turn off and on.
tttnl on and off to cool
internal parts.
Drawer does not slide The drawer is out of aligmnent. • Fully extend the drawer and push it all the way in.
smoothlyor drags See the Care and cleaning of the range secfi_)u.
Drawer is over-loaded or load • Reduce weight. Redistribt/te drawer c()uteuts.
is unbalanced.
49

m
_ FL
--°
Notes,
_ h
m
m
--°
m
Q_
_muw
qll
I
5O

GE Service Protection Plus rM
GE, a name recognized _ orklwide ff)r quality and dependability, offers you
Service Protection Plus'"--compreher_sive protection on all your appliar_ces--
No Matter What Brand!
Benefits Include:
* Backed by GE
* All brands covered
* Unlimited service calls
* All parts and labor costs included
* No out-of-pocket expenses
o No hidden deductibles
o One 800 ntmlber to call
You _ill be completely satisfied with ore" service protection or )ou ma} reql_est _otlr n_onex back
on the remaining value of your contract. No qt_estions asked. It's that simple.
Protect your refl'igerator, dishwasher, washer and (byer, range, TV; VCR and much more--any brand!
Plus there's no extra charge fl)r emergency service and low monthly finallcing is available. Even icemaker
coverage and fl)od spoilage protection is oftered. You can rest easy, knowing that all your valuable
household products are protected against expensive repairs.
Place ,otu" coi_fidenre in (;E and call us in the L!.S. toll-free at _SUU.OZD.ZZZ_
tot I//ore ]ll_orI//at]()ll.
*MI bl-illldS (N)'_(?l(!d, lip IO _0 _'(?_t1"_ old_ in Ihe (o]ltJl"_(!llt_l] I _.
We'll CoverAny Appliance.
Anywhere. Anytime.*
Please place in envelope and mail to:
GeneralElectricCompany
Warranty Registration Department
P.O. Box 32150
Louisville, KY 40232-2150
g7

Consumer Product Ownership Registration
Dear Customer:
Thank you for purchasing our product and thank you for placing your confidence in us.
We are proud to haxe you as a C/lStonler!
Follow these three steps to protect your
Complete mid mail
your ConslLinler
Product Ownership
Registration today.
ttave the peace of
mind of knowing w_
call colltact VOl/ ill
the mflikely ex<nt of a
safi.ty modification.
new appliance investment:
After lnailing the
registration below,
store this doctllllellt
in a saib place. It
contains inlonnation
you will need should
you require service.
Our service mmd)er is
800.GE.CARES
(8(t0.432.2737).
Model Number Serial Number
I I I I I I I I II , , , , , , , , I
Important: If you did not get a registration card with your
product, detach and return the form below to
ensure that your product is registered, or register
online at ge.com.
Read yollr ()wller's
Manual carefilllv.
It will help you
operate yOllr IIOW
appliance properly.
._,.,_ Cut here
Consumer Product Ownership Registration
Model Number Serial Number
,,, ,,,,, II,,,,,,,, I
M_: Ms. Mrs. Miss
Firsl ] ] Last]
Nalne I I I I I I I I I Nan1< I I I I I I I I I I I I
Str( el ]
Addr< ss I I I I I I I I I I I I I I I I I I I I I I I I
Apt. # I
1)_le plall d
In [se I I I
.X1onlh
52
Cily [ I I
I I I I I I I I E-mail Address::
I I I I I I I I
_ Please provide your e-mail address to receive, via e-mail, discomlts, special oftk.rs and other
GE Consumer & lndustfiol
Appliances
General Electric Compang
Louisville, KV40225
ge.com
iml)ortant commmfications ti-om GE Appliances (GEA).
Check here if vou do not want to receive communications from (;EA's careflflly selected
pal't llers.
FAILI 7RE TO COMPLETE AN[) RETI 7RN TIIIS CARD DOES NOT DIMINISII YO[ 7R
WARR. \N'I_" RIGI fFS.
For infk>rmation about GEAs privacy and data usage policy, go to ge.com and click on 'Priwlcv
PolkV' or call 800.626.2224.
] ] I State] , l Code
Phoil_
Nt,lnl)erl I III I I
Zip ]
I I
I I
I
I

Accessories.
Looking For Something More?
Youcan find these accessories and many more at ge.com, or call 800.626.2002
(during normal business hours). Have your model number ready.
Drip Pans Grates Surface Burners & Caps
z
Oven Racks Cleaner
i¸¸9¸ ! i
Light Bulbs Knobs
Tired of discolored racks? Wishing you had extra-heax3,-dut ), oven rocks?
NOW AVAILABLE Ior your range:
(;E's innovative, self-cleanable porcelain-coated oven racks!
• Hea_ 3, Duty
• Durable
• Able m be cleaned in a self-cleaning oven
Visit ge.com for more information.
53

GEGasRange Warranty.(Forc.stemersintheUnitedStates)
All warranty service provided by our Factory Service Centers, Stapleyour receipt here.
or an authorized Customer Care technic/an. Toschedule service, Proof of the ongmal purchase
• ® .....
on-line, 24 hours a day, visit us at ge.com, or call 800.GE.CARES date is needed to obtain service
(800.432.2737).Please have serial number and model number under the warrant_
available when calling for service.
" GEWillReplace:
One Year Any part ot the range which tidls due to a (letect in materials or workananship. During this
Fromthedate of the limitedone-yearwarranty,(;E will alsoproxide, free of charge, all labor and in-home serxice
origina!purchase to replace the (lete(ti_e part.
!i_:Service trips to your home to teach you how to use !i_:Damage to the product caused by accident, fire, floods
the product, or acts of God.
iJi::Improper installation, delivery or maJntenm_ce, iJi::h_cidentaJ or consequential damage caused by possible
;_: FaAhtre of the product it it is abused, misused,
or used for other than the intended purpose or iJi::Damage caused after delivery.
used commercially. !_ Product not accessible to provide required service.
!;/_Replacement of house fuses or resetting of circuit
breakers.
defects with this applimlce.
This warranty is extended to the original purchaser and any succeeding owner for products purchased for home
use within the USA. If the product is located in an area where service by a GEAuthorized Servicer is not available,
you may be responsible for a trip charge or you may be required to bring the product to an Authorized GE Service
Location for service. In Alaska, the warranty excludes the cost of shipping or service calls to your home.
Some states do not allow the exclusion or limitation of incidental or consequential damages. This warranty gives
you specific legal rights, and you may also have other rights which vary from state to state. Toknow what your
legal rights are, consult your local or state consumer affairs office or your state's Attorney General.
Warrantor:General Electric Company.Louisville,KY 40225
54

GEGasRange Warranty.(Forc.stomersinCanada)
All warranty service provided by our Factory Service Centres Staple your receipt here.
or an authorized Customer Care_ technician. For servic e, Proof of the original purchase
ca//1.800.561.3344. P/ease have serial number and mode/ date is needed to obtain service
number available when calling for service, under the warrantz
One Year Anypattof the range which fifils due to a detect in materials or workananship. Dm_ing this
Mabe Will" Replace;
Fromthedate of the limited one-year warranty, Mabe will also provide, free of charge, all labor and in-home serxice
origina!purchase to replace the defecti_e part.
?_:Service trips to your home to teach you how to use
the product.
!i_:hnproper h_staJlation, delivery or maintenance.
::Ji::Failure of the product if it is abused, misused,
or used for other thm_ the intended purpose or
used commerciaJly.
!i_Replacement of house fuses or resetting of circuit
breakers.
!i_Dmnage to the product caused by accident, fire, floods
or acts of God.
::Ji::Incidental or consequential dmnage caused by possible
defects with this applimlce.
!_,)Da_mage caused after delivery.
!i_Product not accessible to provide required service.
EXCLUSION OF IMPLIED WARRANTIES--Your sole and exclusive remedy is product repair as provided
in this Limited Warranty. Any impfied warranties, including the implied warranties of merchantability
or fitness for a particular purpose, are limited to one year or the shortest period allowed by law.
[ WARRANTOR IS NOT RESPONSIBLE FOR CONSEQUENTIAL DAMAGES. I
Warrantor: MABE CANADA IN(:. I
55

ConsumerSupport.
Haxe a question or need assistance with your appliance? Try tile (;E Appliances _4'ebsite 24 hom_ a day
q gEAppliancesWebsite ge.com
' any day of tile xear'. For greater comenience and taster service, you can now download Owner's Manuals,
order parts or exert schedule set\ice on-line.
ScheduleService
Expert (;E repair setsice is only one step awax fl'om your do(n: Get on-line and schedule your serxice at
your, comenience 24 hom_ an) day of the year! Or call 800.(;E.(]ARES 800.432.2737) during nomml
business hems. In Canada, call 1.800.561.3344.
ge.com
RealLifeDesignStudio ge.com
GE supports tile Uni\'etsal Design concept--l)roducts, services and environments that can be used by
people of all ages, sizes and capabilities. We recognize tile need to design fin" a wide range of physical and
mental abilities and impaim/ents. For details of GE's Universal Design applications, including kitchen
design ideas for people with disabilities, check ()tit otlr Website to&w: For tile hea_ing impaired, please call
800.TDD.GEAC (800.833.4322). In Canada, contact: Manage_, Consulner Relations, Mabe Canada Inc.,
1 Fact(nw i,ane, Suite 310, Moncton, N.B., E1C 9M3.
ExtendedWarranties ge.com
Purchase a (;E extended warrant_ and learn about special discounts that are axailable while _our, warrant_
is still in effect. You C_llll)urchase it on-line amfime or call 800.626.2224 during n(mnal business hom_.
GE (_onsulner Home Serxices will still be there after )our warranb' expires. In Canada, call 1.800.461.3636.
PartsandAccessories
ge.com
Individuals qualified to se_Mce their own appliances can have parts or accessories sent directly to their
homes (VISA, MasterCard and Discover cards are accepted). Order on-line today, 24 hom_ eveta' day or
by phone at 800.626.2002 during nomml business hom_.
Instructions contained in this manual cover procedures tobe performed by any user. Other servicing generally
should be referred to qualified service personnel Caution must be exercised, since improper servicing may cause
unsafe operation. In Canada,please consult youryellow pages for your local Mabe number.
ContactUs
If you are not safistied with tile service w)u receive fl'om GE, contact us on our XA'ebsite with all tile details
including your l)hone nunfl)ei; or Wlite to: General Managei; Custolner Relations, GE Al)pliances,
Appliance Park, Ixmisville, KY 40225. In Canada, to: Manage_; Consumer Relations, Mabe Canada Inc.,
1 Fact(nw I,ane, Suite 310, Moncton, N.B., E1C 9M3.
Register your new applimlce on-line---at your convellience! Timelx, l)r°(hlct registrati{, m will allow for
' enhanced coi/lllltlllicatioll alld l)rolnpt service tlll(let" tile telins of )o/Ir warI'allt}_ should tile need arise.
RegisterYourApplbnce
You may also mail in tile p_e-printed registration card included in tile packing material.
This book is printed on recycled pape_
ge.com
ge.com
Printed in Mexico
 Loading...