

Page 1
Self-Cleaning Gas Range
instructions ....................2-5
Anti-Tip Device ............................2, 3,33,41
Problem
More questions
GE Answer
Operating Instructions, Tips
Aluminum Foil ...................................5, 15, 18
Features . . . . . . . . . . . . . . . . . . . . . . . . . . . . . . . . . . ......................6, 7
Oven . . . . . . . . . . . . . . . . . . . . . . . . . . . . . . . . . . . . . . . . . . . . . . . . . . . .
Baking . . . . . . . . . . . . . . . . . . . . . . . . . . . . . . . . . . . . . . . . . . . . . . . . .
Broiling, Broiling Guide ....................18, 19
Clock and Timer . . . . . . . . . . . . . . . . . . . . . . . . . . . . . . . . . . . . . . . . 13
Control
Door Latch ..............14, 16, 18,20,21,48
Light; Bulb Replacement . . . . . . . . . . . . . . . . . 10,28
Preheating . . . . . . . . . . . . . . . . . . . . . . . . . . . . . . . . . . . . . . . . . .
Roasting, Roasting Guide ................l6, 17
Self-Cleaning Instructions ..............20-22
Shelves ..................................1 1, 14-16,27
Surface Cooking .........................................8, 9
Control Settings ..........................................8
Electric Ignition ............................................8
10-22
14, 15
14, 16, 18
14, 17
Preparation .................................31-46
Flame Size ..................................9, 39,46,47
Flooring Under the Range .........................34
Installation Instructions ......................32 -46
Leveling
Minor
Thermostat Adjustment . . . . . . . . . . . . . . . . . . . . . . . . . . . . . 12
Consumer Services
Appliance Registration ..................................2
Important Phone Numbers ........................5 1
Model and Serial Number Location ...........2
Warranty ........................................Back Cover
48
800.626.2000
1
Care and Cleaning
Broiler Pan and
Burner Assembly ........................................2 3-25
Door Removal
Lift-up
Oven Bottom . . . . . . . . . . . . . . . . . . . . . . . . . . . . . . . . . . . . . . . . . . . . . . . .
Oven Vents ....................................4, 5, 11,30
Storage Drawer
GE Appliances
18, 19,27
30
.............................................30
27
Models:
Page 2
HELP US HELP YOU...
Read this book carefully.
It is intended to help you operate and maintain your
new range properly.
Keep it handy for answers to your questions.
If you don’t understand something or need more help,
write (include your phone number):
Consumer Affairs
GE Appliances
Appliance Park
Louisville, KY 40225
Write down the model and serial numbers.
Depending on your range, you’ll find the model and
serial numbers on a label on the front of the range,
behind the kick panel, storage drawer or broiler drawer.
These numbers are also on the Consumer Product
Ownership Registration Card that came with your
range. Before sending in this card, please write these
numbers here:
Model Number
Use these numbers in any correspondence or service
calls concerning your range.
Serial Number
If you received a damaged range...
Immediately contact the dealer (or builder) that sold
you the range.
Save time and money. Before you
request service...
Check the Problem Solver in the
back of this book. It lists causes of
minor operating problems that you . f
can correct yourself.
.
\’
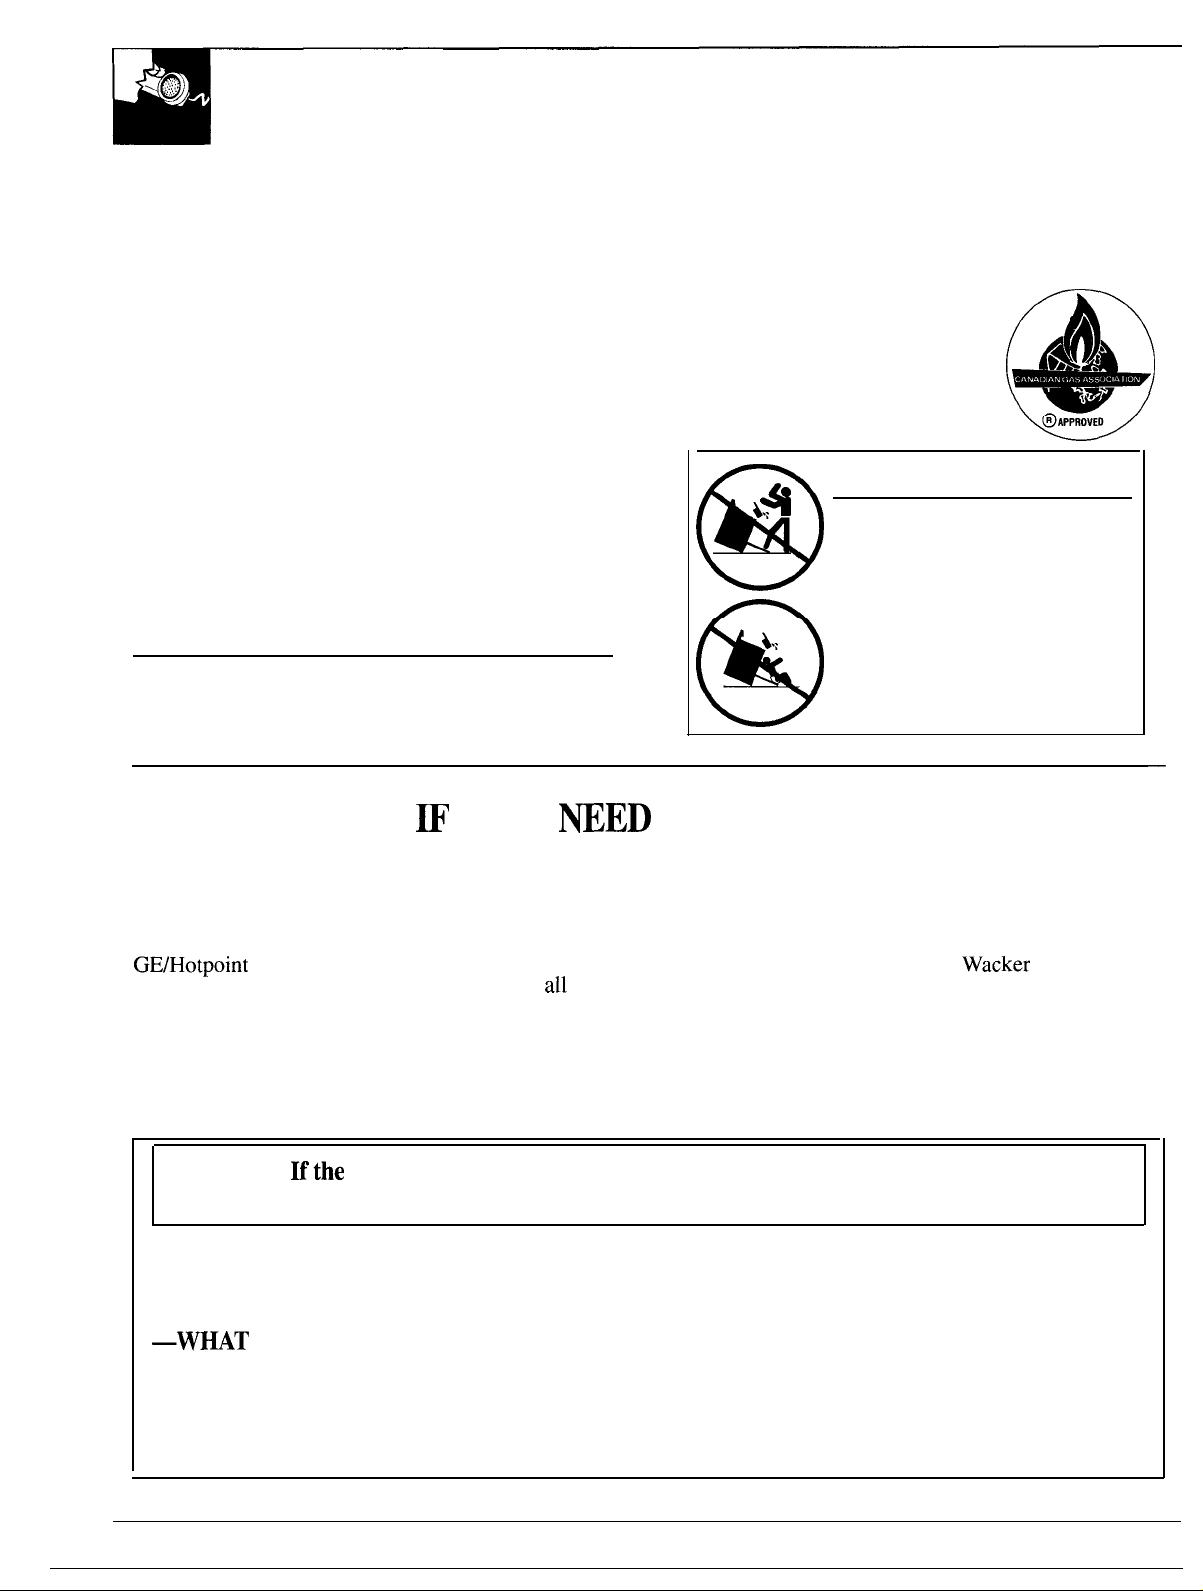
A WARNING
● ALL RANGES CAN TIP.
● INJURY TO PERSONS
COULD RESULT.
● INSTALL THE ANTI-TIP
DEVICE PACKED WITH
THE RANGE.
● SEE THE INSTALLATION
INSTRUCTIONS.
YOU
To obtain service, see the
Consumer Services page in the serviced your appliance. Explain
back of this book.
To obtain replacement parts, contact
We’re proud of our service and
want you to be pleased. If for some
reason you are not happy with the
service you receive, here are three
steps to follow for further help.
WARNING:
information in this manual is not followed exactly, a fire or explosion may result
FIRST, contact the people who
why you are not pleased. In most
cases, this will solve the problem.
NEXT, if you are still not pleased,
write
your phone number—to:
the details—including
Manager, Consumer Relations
GE Appliances
Appliance Park
Louisville, KY 40225
SERVICE...
causing property damage, personal injury or death.
—Do not store or use gasoline or other
flammable vapors and liquids in the vicinity
of this or any other appliance.
TO DO IF YOU SMELL GAS
● Do not try to light any appliance.
● Do not touch any electrical switch; do not
use any phone in your building.
● Immediately call your gas supplier from a
neighbor’s phone. Follow the gas supplier’s
instructions.
● If you cannot reach your gas supplier, call
the fire department.
—Installation and service must be performed
by a qualified installer, service agency or the
gas supplier.
FINALLY, if your problem is still
not resolved, write:
Major Appliance Consumer
Action Panel
20 North
Chicago, IL 60606
Drive
2
Page 3
NOTICE
state to
reproductive harm, wd requires businesses to warn
customers of
Gas
of these
monoxide, formaldehyde and
primarily by the incomplete combustion of natural
gas or
indicated by a bluish rather than a yellow flame,
will minimize incomplete combustion, Exposure to
substances can be minimized by venting with
open
●
has these features, they must be
according to local, state and federal codes.
Safe Drinking Water
requires
publish a of substances
cancer, birth
Toxic
of
or other
exposure to such substances.
can cause minor exposure to
namely
caused
Properly adjusted burners,
or using a ventilation fan or hood.
light bulbs and safety valves on
pilot ranges contain mercury. If your
carbon
to
Locate range out of kitchen traffic path
and out of drafty locations to prevent poor
air circulation.
● Be sure your range is correctly adjusted by a
qualified service technician or installer for the
type of gas (natural or
Your range can be converted
that is to
be used.
use with either
type of gas. See the Installation Instructions.
WARNING:
by a
with the manufacturer’s instructions and
These adjustments must be made
service technician in accordance
codes
and requirements of the authority having
jurisdiction. Failure to follow these instructions
could result in serious injury or property
The qualified agency performing this work
assumes responsibility for the conversion.
● After prolonged use of a range, high floor
temperatures may result and many floor
coverings will not withstand this kind of use.
Never install the range over vinyl tile or linoleum
that cannot withstand such type of use. Never
install it directly over interior kitchen carpeting.
You
Have the
if
* Have your range
Your
show you the location of the
and properly
in accordance
with the Installation Instructions. Any adjustment
and service should be performed only by qualified
gas range installers
●
Do
attempt
of
range unless it is
recommended in this guide.
be referred to
●
your range into a 120-volt grounded
only.
not
from the plug.
service technicians.
repair or replace any
All other servicing
qualified technician.
the round grounding
doubt about
grounding
of the home electrical system, it is your personal
responsibility and
with a properly grounded,
to have an
prong outlet in accordance with the National
Electrical Code.
Canada, the appliance must be
electrically grounded in accordance with the
Canadian Electrical
not use an
extension cord with this appliance.
sure @packing
before operating it
damage
the packing material ignite,
are removed from
prevent fire or
Using Your Range
● Do not leave chtidren
a range is hot or in operation. They
seriously burned.
●
Do not allow anyone to climb, stand or
the door, storage or brofier drawer
models) or range top. They
and even tip it over, causing severe personal injury.
● CAUTION: ITEMS OF INTEREST TO
CHILDREN SHOULD
CABINETS ABOVE A RANGE OR ON THE
OF A
CLIMBING
ITEMS COULD BE SERIOUSLY INJURED.
THE RANGE TO
could
Anti-Tip device to the wall.
Installation Instructions.) To check if the
device is installed and engaged properly,
carefully tip the range forward. The
Anti-Tip device should engage and
prevent the range from tipping over.
pull the range out from the wall for any
reason, make sure the Anti-Tip device is engaged
when you push the range back against the wall.
or unattended where
on
some
could damage the range
can
tip
To prevent
and injury
-
Page 4
SAFETY
(continued)
● Let the burner grates and other surfaces cool
before touching them or leaving them where
children can reach them.
. Never wear loose ~tting or hanging
garments while using the appliance.
&
Be careful when reaching for items
stored in cabinets over the
Flammable material could be ignited if brought
in contact with flame or hot oven surfaces and
may cause severe burns,
● For your safety, never use your appliance for
warming or heating the room.
● Do not use water on grease fires. Never pick up
a flaming pan. Turn off burner, then smother
flaming pan by covering pan completely with
well-fitting lid, cookie sheet or flat tray. Flaming
grease outside a pan can be put out by covering
with baking soda or, if available, a multi-purpose
dry chemical or foam-type fire extinguisher.
● Do not store flammable materials in an oven,
a range storage drawer or near a
● Do not store or use combustible materials,
gasoline or other flammable vapors and liquids
in the vicinity of this or any other appliance.
● Do not let cooking grease or other flammable
materials accumulate in or near the range.
●
When cooking pork,
and always cook the meat to
of at least
follow the directions exactly
internal temperature
This assures that, in the remote
possibility that trichina may be present in the meat,
it will be killed and the meat will be safe to eat.
● Always use the LITE position when igniting top
burners and
● Never leave surface burners unattended at
high flame settings.
greasy spillovers that
● Adjust top burner flame size so it does not
make sure the burners have ignited.
causes smoking
may catch on fire.
extend beyond the edge of the cookware.
Excessive flame is hazardous.
● Use only dry pot holders—moist
or damp
pot holders on hot surfaces
may result in burns from steam. Do
not let pot holders come near open flames when
lifting cookware. Do not use a towel or other
bulky cloth in place of a pot holder.
4
● To minimize the possibility of burns, ignition
of flammable materials, and spillage, turn
cookware handles toward the side or back of the
range without extending over adjacent burners.
● Always turn surface burner to OFF before
removing cookware.
● Carefully watch foods being fried at a high
flame setting.
● Never block the vents (air openings) of the
range. They provide the air inlet and outlet that
are necessary for the range to operate properly
with correct combustion. Air openings
at the rear of the
at the top and bottom of
located
the oven door, and at the bottom of the range,
under the kick panel, storage drawer or broiler
drawer (depending on the model).
●
Do not use a wok on models with sealed burners
if the wok has a round metal ring that is placed
over the burner grate to support the wok. This
acts as a heat trap, which may damage the
burner grate and burner head. Also, it may cause
the burner to work improperly. This may cause a
carbon monoxide level above that allowed by
current standards, resulting in a health hazard.
●
Foods for frying should
be as dry as possible.
Frost on frozen foods or moisture on fresh foods
can cause hot fat to bubble up and over sides
of pan.
● Use least possible amount of fat for effective
shallow or deep-fat frying. Filling the pan too
full of fat can cause spillovers when food is added.
● If a combination of oils or fats will be used
in frying, stir together before heating or as fats
melt slowly.
● Always heat fat slowly, and watch as it heats.
● Use a deep fat thermometer whenever possible
to prevent overheating fat beyond the smoking
point.
● Use proper pan
unstable or easily tipped. Select cookware having
flat bottoms large enough to properly contain food
and avoid
and spillovers and large
enough to cover burner grate. This will both save
cleaning time
prevent hazardous accumulations
of food, since heavy spattering or spillovers left
on range can ignite. Use pans with handles that
can be easily grasped and remain cool.
. When using glass cookware, make sure it is
designed for top-of-range cooking.
pans that are
Page 5
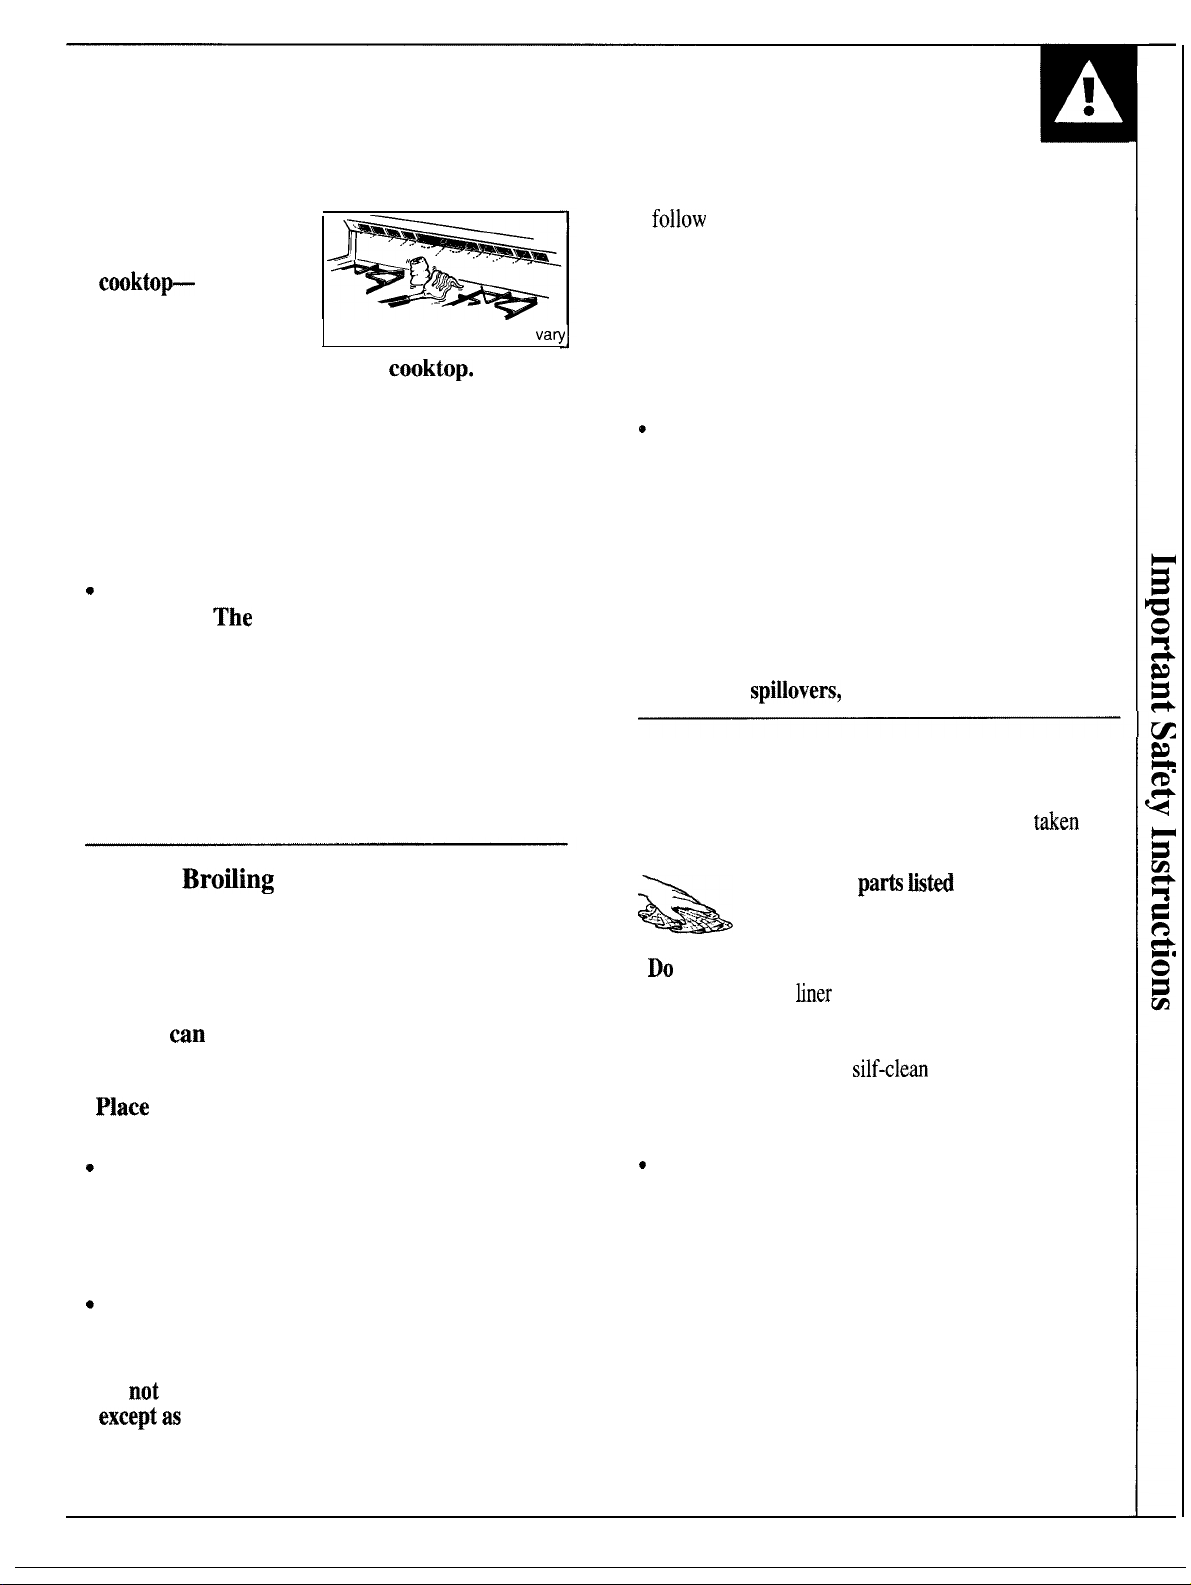
● Keep all plastics away from top burners.
●
Do not leave plastic
items on the
they may
melt if left too close to
the vent.
● Do not leave any items on the cooktop. The hot
air from the vent may ignite flammable items and
will increase pressure in closed containers, which
may cause them to burst.
●
To avoid the possibility of a burn, always be
Vent appearance and location
certain that the controls for all burners are at
the OFF position and all grates are cool before
attempting to remove them.
When flaming foods are under the hood, turn
the fan off.
the flames.
● If the range is located near a window, do not
hang long curtains that could blow over the top
burners and create afire hazard.
●
If you smell gas, turn off the gas to the range and
call a qualified service technician. Never use an
open flame to locate a leak.
Baking,
●
Do not use oven
stored in the oven can ignite.
● Stand away from the range when opening the
door of a hot oven. The hot air and steam that
escape
● Keep the oven free from grease buildup.
cause burns to hands, face and eyes.
and Roasting
for a storage area. Items
●
When using cooking or roasting bags in oven,
the manufacturer’s directions.
●
Use
only glass cookware that is recommended
for use in gas ovens,
●
Always remove broiler pan from oven as soon
as you finish broiling.
Grease left in the pan can
catch fire if oven is used without removing the
grease from the broiler pan.
When broiling, if the meat is too close to the
flame, the fat may ignite.
Trim excess fat to
prevent excessive flare-ups.
●
Make sure the broiler pan is in place correctly
to reduce the possibility of grease fires.
●
If you should have a grease fire in the broiler
pan,
turn off oven, and keep the oven door closed
to contain fire until it burns out.
●
Keep range clean and free of accumulations of
grease or
which may ignite.
Self-Cleaning Oven
●
Do not clean door gasket. The
essential for a good seal. Care should be
to rub, damage or move the gasket.
●
Clean only
Care Guide.
●
not use oven cleaners. No
cleaner or oven
protective coating of any kind
should be used in or around any part of the oven.
Residue from oven cleaners will damage the inside
of the oven when the
door gasket is
in this Use and
commercial oven
cycle is used.
not
● Place the oven shelves in the desired position
while the oven is cool.
Pulling out the shelf to the shelf-stop is a
convenience in lifting heavy foods. It is also
a precaution against burns from touching the
hot surfaces of the door or oven walls, The
lowest position “R” is not designed to slide.
Do not heat unopened food containers.
Pressure could build
up and the container
could burst, causing an injury.
●
Do
use aluminum foil anywhere in the oven
described in this book.
Misuse could
result in a fire hazard or damage to the range.
●
Before self-cleaning the oven, remove broiler
pan and other cookware.
Be sure to wipe up excess spillage
before starting
the self-cleaning operation.
●
If the self-cleaning mode malfunctions,
turn off
and disconnect the power supply. Have serviced
by a qualified technician.
SAVE THESE
INSTRUCTIONS
5
Page 6
OF
RANGE
6
‘\
,
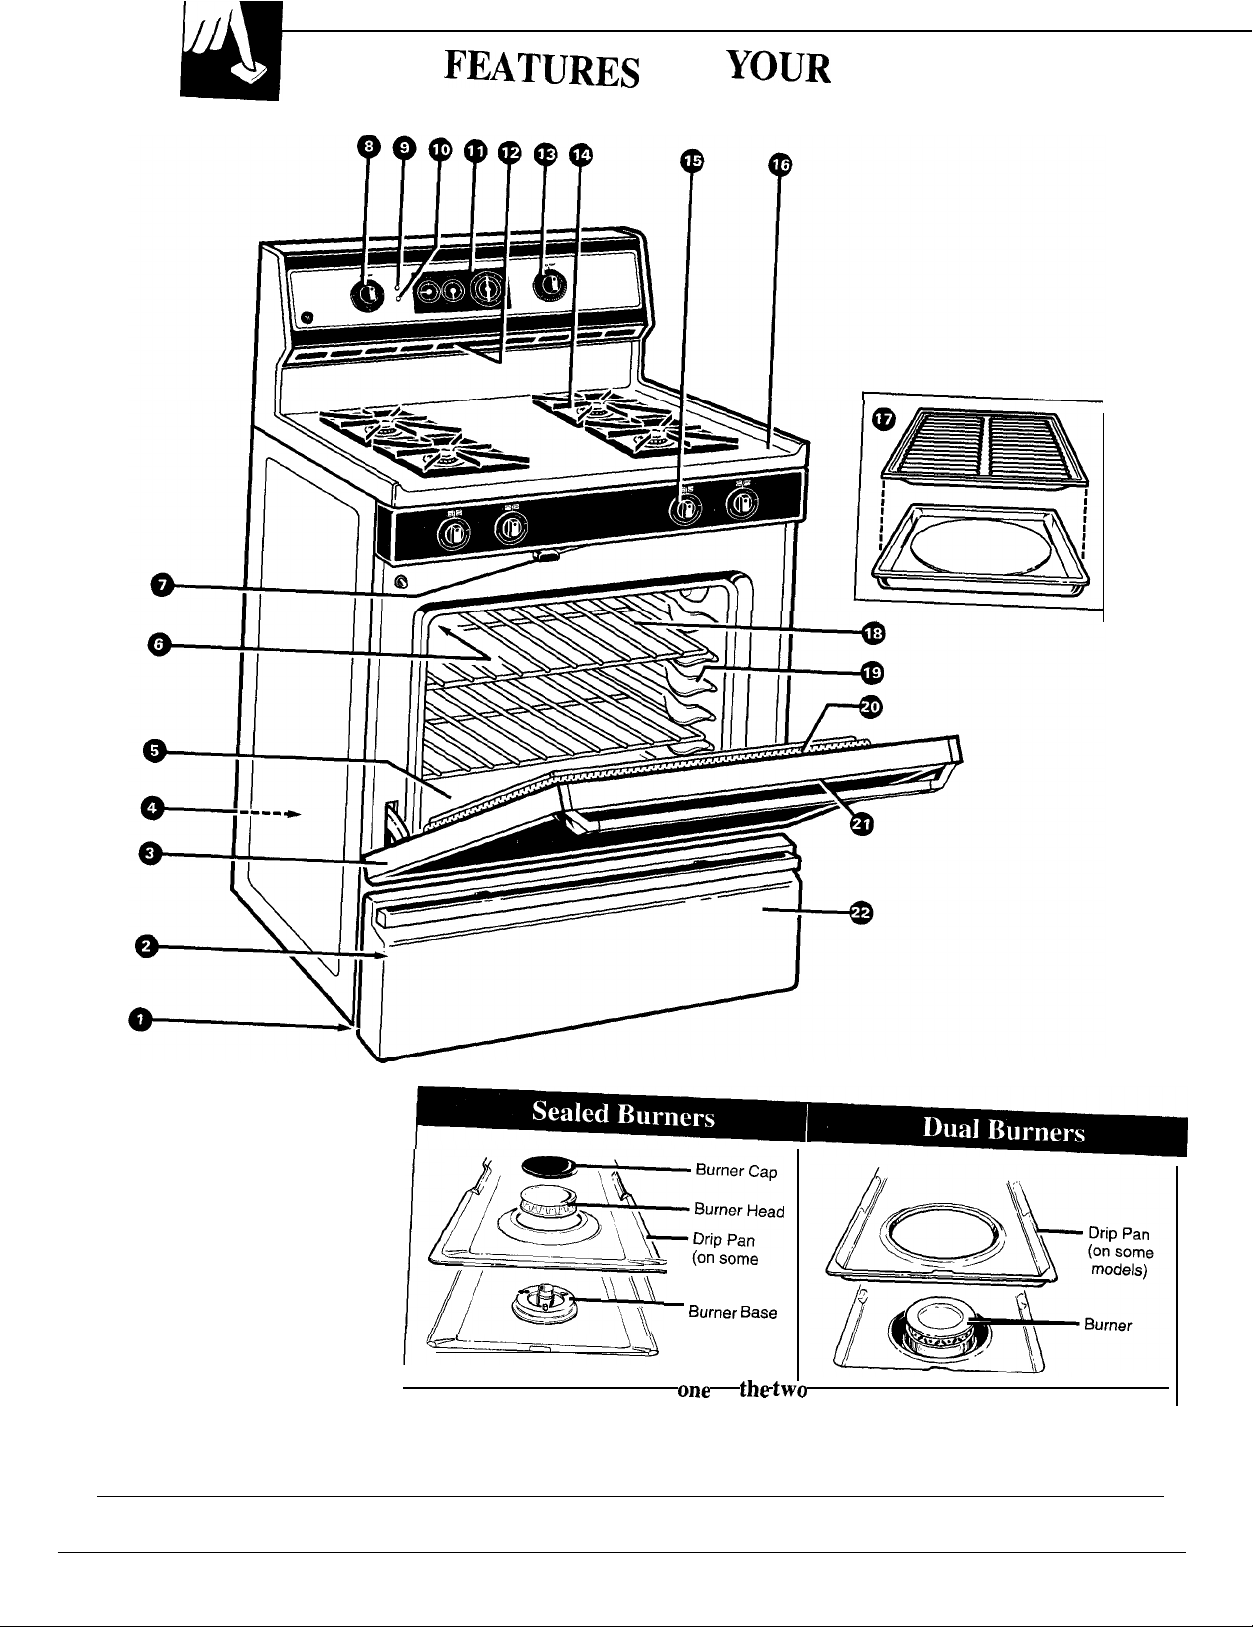
Your range is equipped with
‘
ode’s)
of
types of surface burners shown above.
Page 7
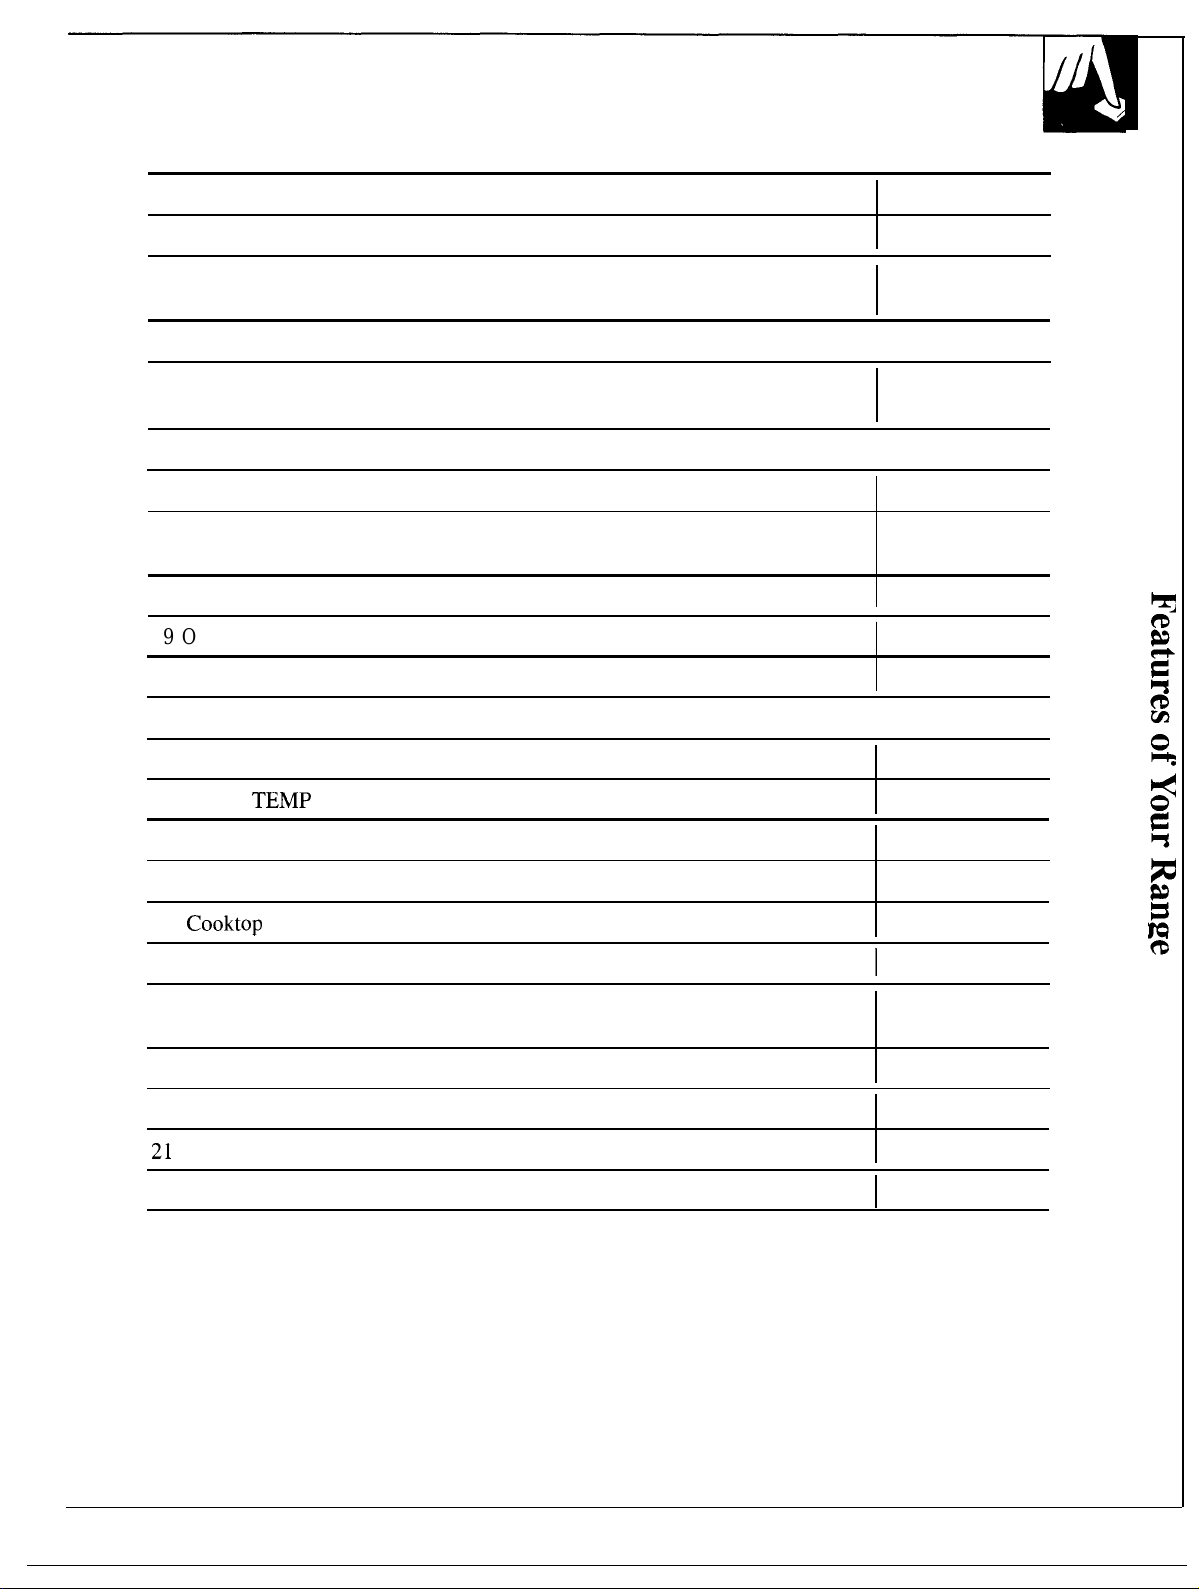
Feature Index (Not all models have all features. Appearance of features varies.)
See
page
1 Air Intake (under storage drawer)
2 Model and Serial Numbers
(on front frame of range, behind storage drawer or kick panel)
3 Removable Oven Door
4 Anti-Tip Device
(Lower right rear corner on range back. See Installation Instructions.)
5 Oven Bottom
6 Oven Interior Light 10,28
7 Oven Door Latch
(use for Self-Cleaning cycle only)
8 OVEN SET Knob
9 Oven “On” Indicator Light
10 Oven Cleaning Indicator Light
11 Automatic Oven Timer, Clock and Minute Timer
12 Oven Vent
13 OVEN
I
I
I
4,30
3,33,41
14, 16, 18,
20,21,48
4,5, 11,30
2
26
27
10
10
21
13
10
14 Grates, Drip Pans (on some models) and Surface Burners
15 Surface Burner Controls
16
17 Broiler Pan and Rack
18 Oven Shelves
(easily removed or repositioned on shelf supports)
19 Oven Shelf Supports
20 Oven Door Gasket
Air Vent in Oven Door (top of oven door)
22 Storage Drawer or Kick Panel (depending on model)
20, 23–25
8,28
25,30
5,18,19,27
11, 14-16,27
11
5,20,22,26
4,30
29
7
Page 8
Electric Ignition
Your surface burners are lighted by electric ignition,
eliminating the need for standing pilot lights with
constantly burning flames.
In case of a power failure, you can light the surface
burners on your range with
match to the burner, then turn the knob to the LITE
position.
this way.
Surface burners in use when an electrical power
failure occurs will continue to operate normally.
Use extreme caution when lighting burners
a match. Hold a lighted
Surface Burner Controls
Knobs that turn the surface burners on and off are
marked as to which burners they control. The two
knobs on the left control the left front and left rear
burners. The two knobs on the right control the right
front and right rear burners.
On ranges with sealed burners:
●
The smaller burner (right rear
the best simmer results.
● The right front burner is higher powered than the
others and will bring liquids to a boil quicker
(natural gas installations only).
will give
The electrode of the spark igniter is exposed.
When one burner is turned to LITE,
spark. Do not attempt to disassemble or clean
around any burner while another burner is on.
An electric shock may result, which could cause
you to knock over hot cookware.
the burners
Before Lighting a Burner
● If drip pans are supplied with your range, they
should be used at all times.
● Make sure all grates on the range are in place before
using any burner.
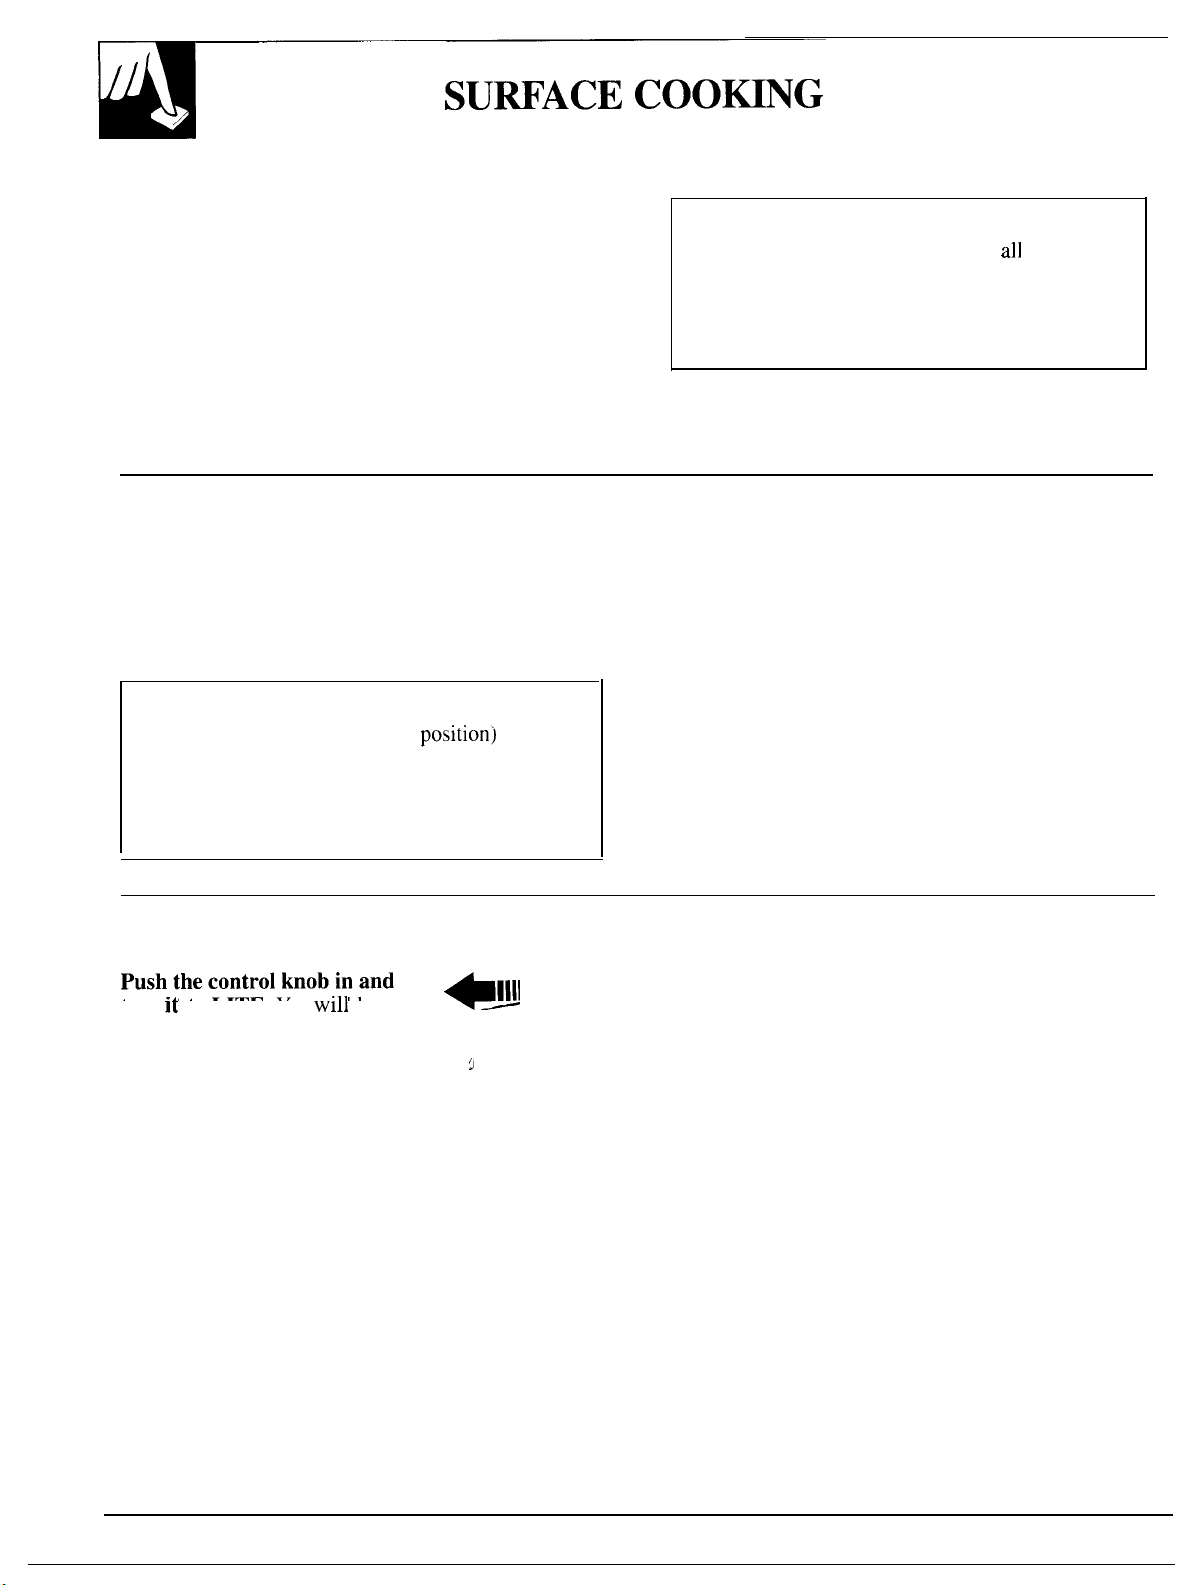
To Light a Surface Burner
turn
to LITE. You
a little “clicking” noise—the
sound of the electric spark
igniting the burner.
After the burner ignites, turn the
knob to adjust the flame size.
+1111
hear
8
P
After Lighting a Burner
● Check to be sure the burner you turned on is the one
you want to use.
● Do not operate a burner for an extended period
of time without cookware on the grate. The finish
on the grate may chip without cookware to absorb
the heat.
● Be sure the burners and grates are cool before you
place your hand, a pot holder, cleaning cloths or
other materials on them.
Page 9
How to Select Flame Size
Watch the flame, not the knob, as you reduce heat.
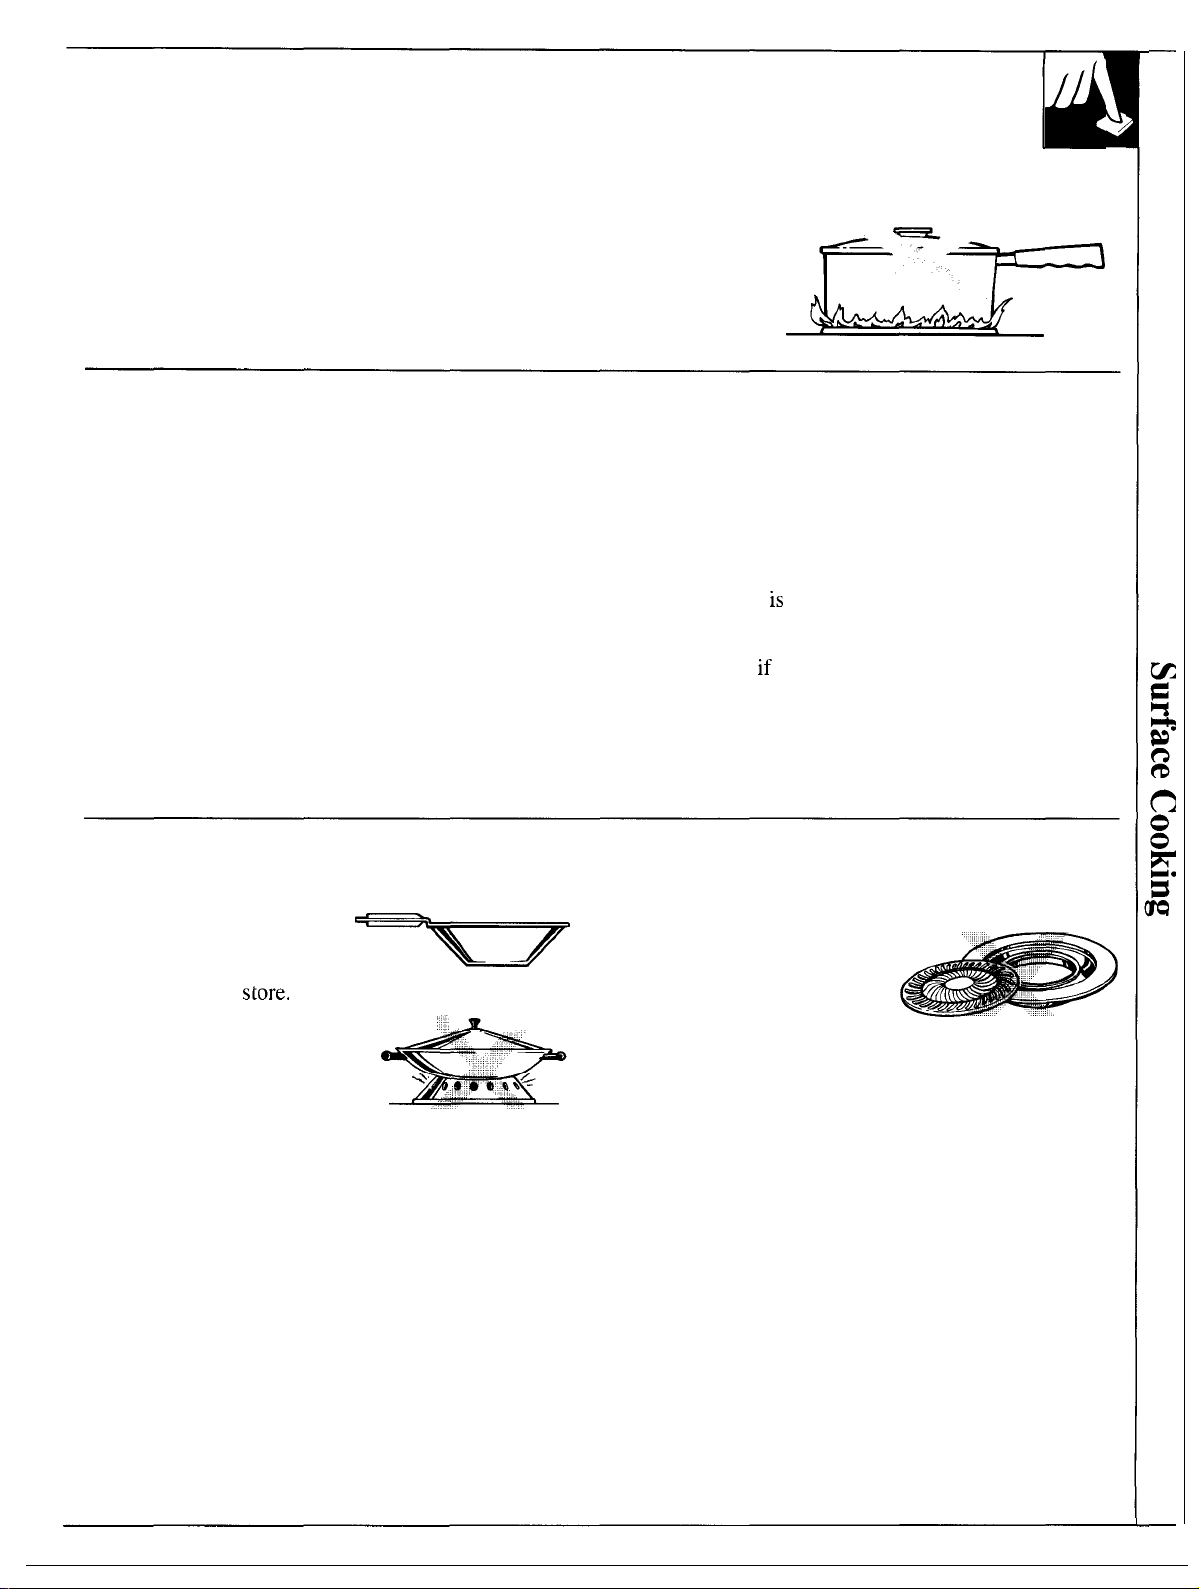
The flame size on a gas burner should match the cookware you are using.
FOR SAFE HANDLING OF COOKWARE NEVER LET THE FLAME
EXTEND UP THE SIDES OF THE COOKWARE. Any flame larger than
the bottom of the cookware is wasted and only serves to heat the handle.
Top-of-Range Cookware
Aluminum: Medium-weight cookware is
recommended because
Most foods brown evenly in an aluminum skillet. Use
saucepans with tight-fitting lids when cooking with
minimum amounts of water.
it heats quickly and evenly.
Cast-Iron: If heated slowly, most skillets will give
satisfactory results.
Enamelware: Under some conditions, the enamel of
some cookware may melt. Follow cookware
manufacturer’s recommendations for cooking methods.
Glass: There are two types of glass cookware—those
for oven use only and those for top-of-range cooking
(saucepans, coffee and teapots). Glass conducts heat
very slowly.
Wok Cooking
(on models with sealed burners)
● We recommend that you
use only a flat-bottomed
wok. They are available at
your local retail
● Do not use woks that have
support rings. Use of these
types of woks, with or
without the ring in place,
can be dangerous. Placing the
ring over the burner grate may
cause the burner to work improperly resulting in
carbon monoxide levels above allowable current
standards. This could be dangerous to your health,
Do not try to use such woks without the ring. You
could be seriously burned if the wok tipped over.
..’
Heatproof Glass Ceramic: Can be used for either
surface or oven cooking. It conducts heat very
slowly and cools very slowly. Check cookware
manufacturer’s directions to be sure it can be used
on gas ranges.
Stainless Steel: This metal alone has poor heating
properties and
usually combined with copper,
aluminum or other metals for improved heat
distribution. Combination metal skillets usually work
satisfactorily
they are used with medium heat as the
manufacturer recommends.
Use of Stove Top Grills
(on models with sealed burners)
Do not use stove top grills
on your sealed gas burners.
If you use the stove top
grill on the sealed gas
burner it will cause
incomplete combustion
and can result in exposure
to carbon monoxide levels
above allowable current standards.
This can be hazardous to your health.
9
Page 10
YOUR
Before Using Your Oven
Be sure you understand how to set the controls properly, Practice removing
and replacing the shelves while the oven is cool. Read the information and
tips on the following pages. Keep this book handy where you can refer to it,
especially during the first weeks of using your new range.
Electric Ignition
The oven burner and broil burner are lighted by
electric ignition.
To light either burner, turn the OVEN
the desired oven operation and the OVEN TEMP
knob to the desired temperature. The burner should
ignite within 30-90 seconds.
After the oven reaches the selected temperature, the
oven burner cycles—off completely, then on with a
full flame-to keep the oven temperature controlled.
OVEN SET
Control
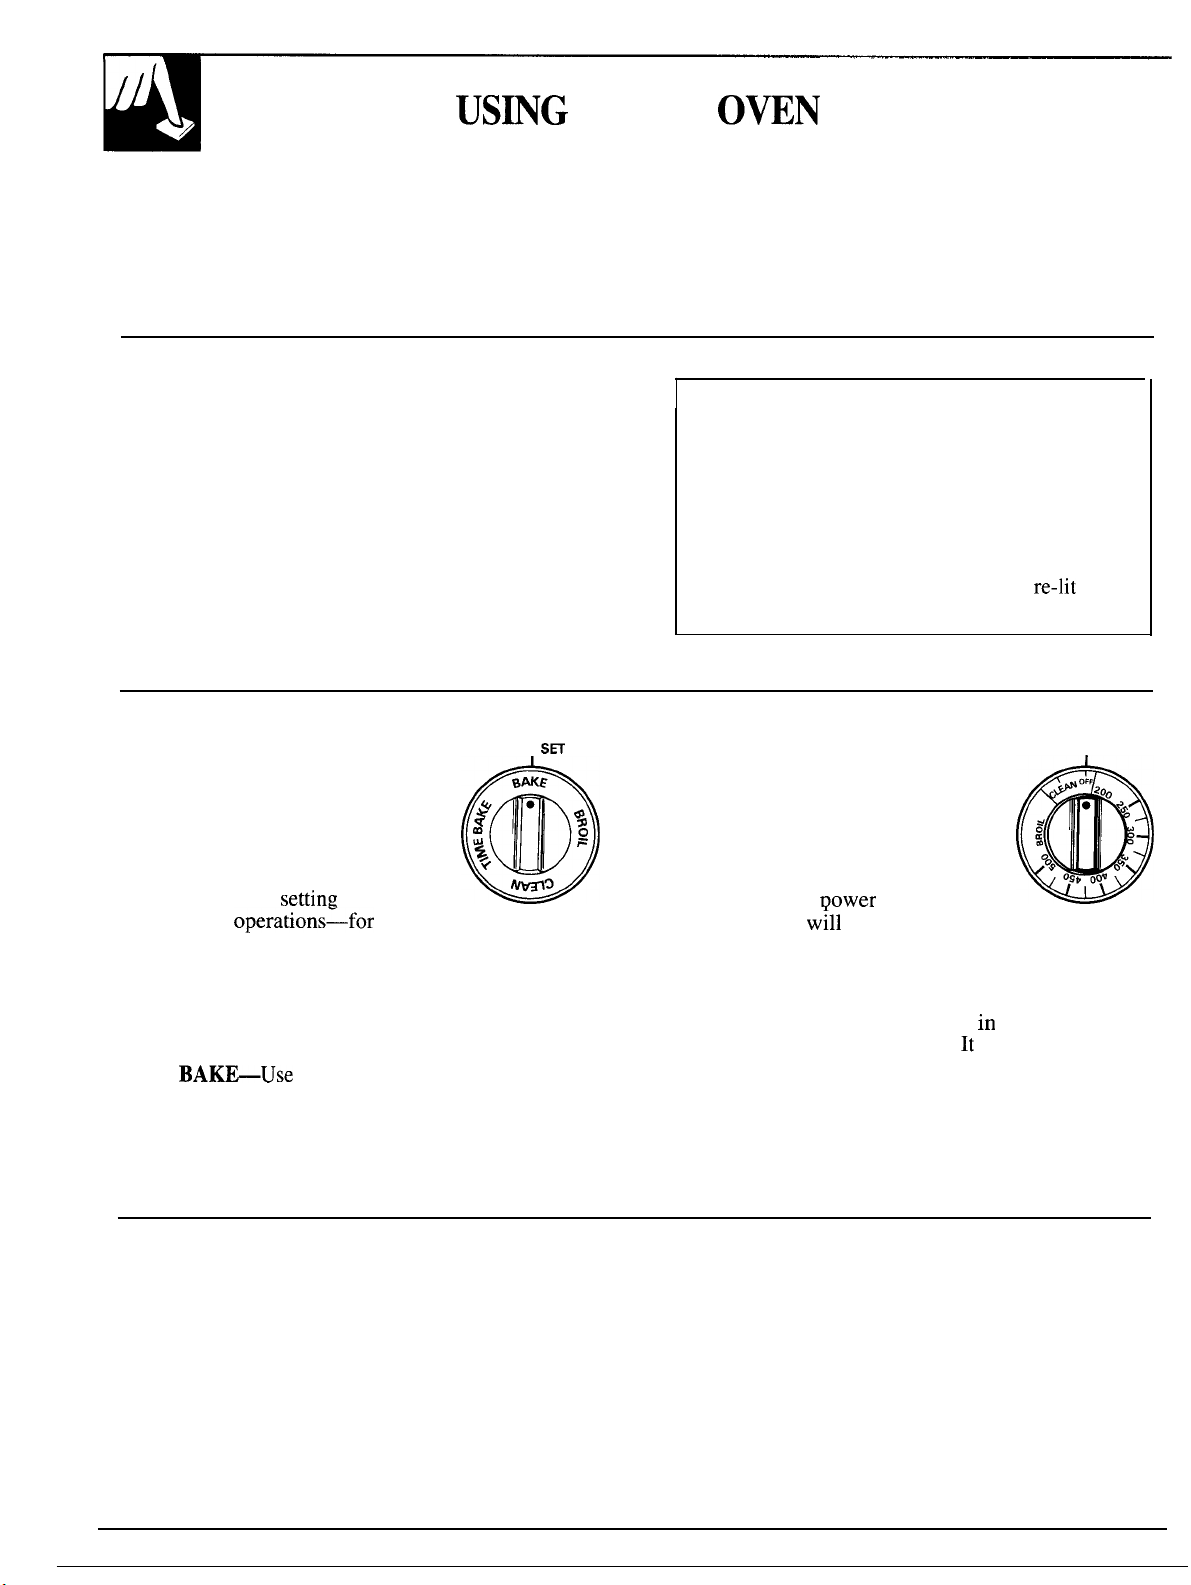
The OVEN SET control has
settings for BAKE, BROIL, TIME
BAKE and CLEAN. When you
turn the knob to the desired setting,
the proper burner is activated for
that operation.
BAKE—Use this
normal oven operations~for
example, for cooking roasts or
casseroles. Only the bottom oven
burner operates during baking.
for all
BROIL—Use this setting for broiling. Only the top
(broil) burner will operate.
TIME
this setting to turn the oven
on and off at specified times when you want cooking
to start and stop. See Automatic Oven Timer section.
CLEAN—Use this setting for the self-cleaning
function only.
SET knob to
OVEN
Power Outage
CAUTION: DO NOT MAKE ANY ATTEMPT TO
OPERATE THE ELECTRIC IGNITION OVEN
DURING AN ELECTRICAL POWER FAILURE.
The oven or broiler cannot be lit during a power
failure. Gas will not flow unless the glow bar is hot.
If the oven is in use when a power failure occurs,
the oven burner shuts off and cannot be
power is restored.
OVEN
TEMP Control
The OVEN TEMP control
maintains the temperature you set
for normal oven operation as well as
for broiling. Push in and turn to set
temperatures or to set into CLEAN
position.
OFF—Shuts off
controls. Oven
OVEN TEMP knob should be
turned to OFF whenever the oven is
not in use.
For normal oven operation, push
knob to the desired temperature.
to the oven
not operate. The
and turn the
will normally take
30-90 seconds before the flame comes on.
After the oven reaches the selected temperature, the
oven burner cycles—off completely, then on with a
full flame-to keep the oven temperature controlled.
until
OVEN TEMP
Oven Indicator Light
The oven indicator light glows until the oven reaches
your selected temperature, then goes off and on with
the oven burner(s) during cooking.
10
Oven Light
The oven light comes on automatically when the door
is opened. Some models have a switch on the lower
control panel that allows you to turn the light on or off
when the door is closed.
Page 11

Oven Moisture
As your oven heats up, the temperature change of the air in the oven may
cause water droplets to form on the door glass. These droplets are harmless
and will evaporate as the oven continues to heat up.
Oven
The oven is vented through duct openings at the rear
of the cooktop. See Features section. Do not block
these openings when cooking in the oven—it is
important that the flow of hot air from the oven and
fresh air to the oven burners be uninterrupted.
●
The vent openings and
nearby surfaces may
- . . . .
. .
,
become hot. Do not
touch them.
● Do not leave
items on the
Vent appearance and location
they may melt if left too
close to the vent.
● Handles of pots and pans on the cooktop may
become hot if left too close to the vent.
● Metal items will become very hot if they are left
on the cooktop and could cause burns.
● Do not leave any items on the cooktop. The hot air
from the vent may ignite flammable items and will
increase pressure in closed containers, which may
cause them to burst.
Oven Shelves
The shelves are
designed with stoplocks so when placed
correctly on the shelf
supports, they will stop
before coming
completely out of the
oven and will not tilt
when you are removing
food from them or
placing food on them.
When placing cookware on a shelf, pull the shelf out
to the “stop” position. Place the cookware on the
shelf, then slide the shelf back into the oven. This will
eliminate reaching into
the hot oven.
To remove a shelf from
the oven, pull it toward
you, tilt the front end
upward and pull the
shelf out.
To replace,
place the
shelf on the shelf
support with the stop-locks (curved extension of
facing up and toward the rear of the oven. Tilt up the
front and push the shelf toward the back of the oven
until it goes past
“stop” on the oven wall. Then lower
the front of the shelf and push it all the way back.
—
The oven has five shelf
supports for normal
baking and roasting
identified in this
illustration as A
(bottom), B, C, D and
E (top). It also has a
special low shelf
position (R) for roasting
-
extra large items, such
as a large turkey—the
shelf is-not designed to slide out at this position.
Shelf positions for cooking are suggested on the
Baking and Roasting pages.
(continued next page)
I
11
Page 12
Adjusting the Oven Thermos~t
YOUR
(continued)
When cooking food for the first time in your new oven,
use the time given on recipes as a guide. Oven
thermostats, over a period of years, may “drift” from
the factory setting and the differences in timing between
an old and a new oven of 5 to 10 minutes are not
unusual. Your oven has been set correctly at the factory
and is more likely to be accurate than the oven which
it replaced.
We do not recommend the use of
inexpensive thermometers, such as
those found in the grocery store, to
check the temperature setting of your
new oven. These thermometers can
vary by
the oven should be hotter or cooler,
you can adjust it yourself. To decide
how much to change the temperature,
set the oven temperature
or lower than the temperature in your
recipe, then bake. The results of this “test” should
give you an idea of how much the temperature
should be changed.
degrees. If you think
higher
Front of OVEN
TEMP knob.
Back of OVEN TEMP knob,
(appearance
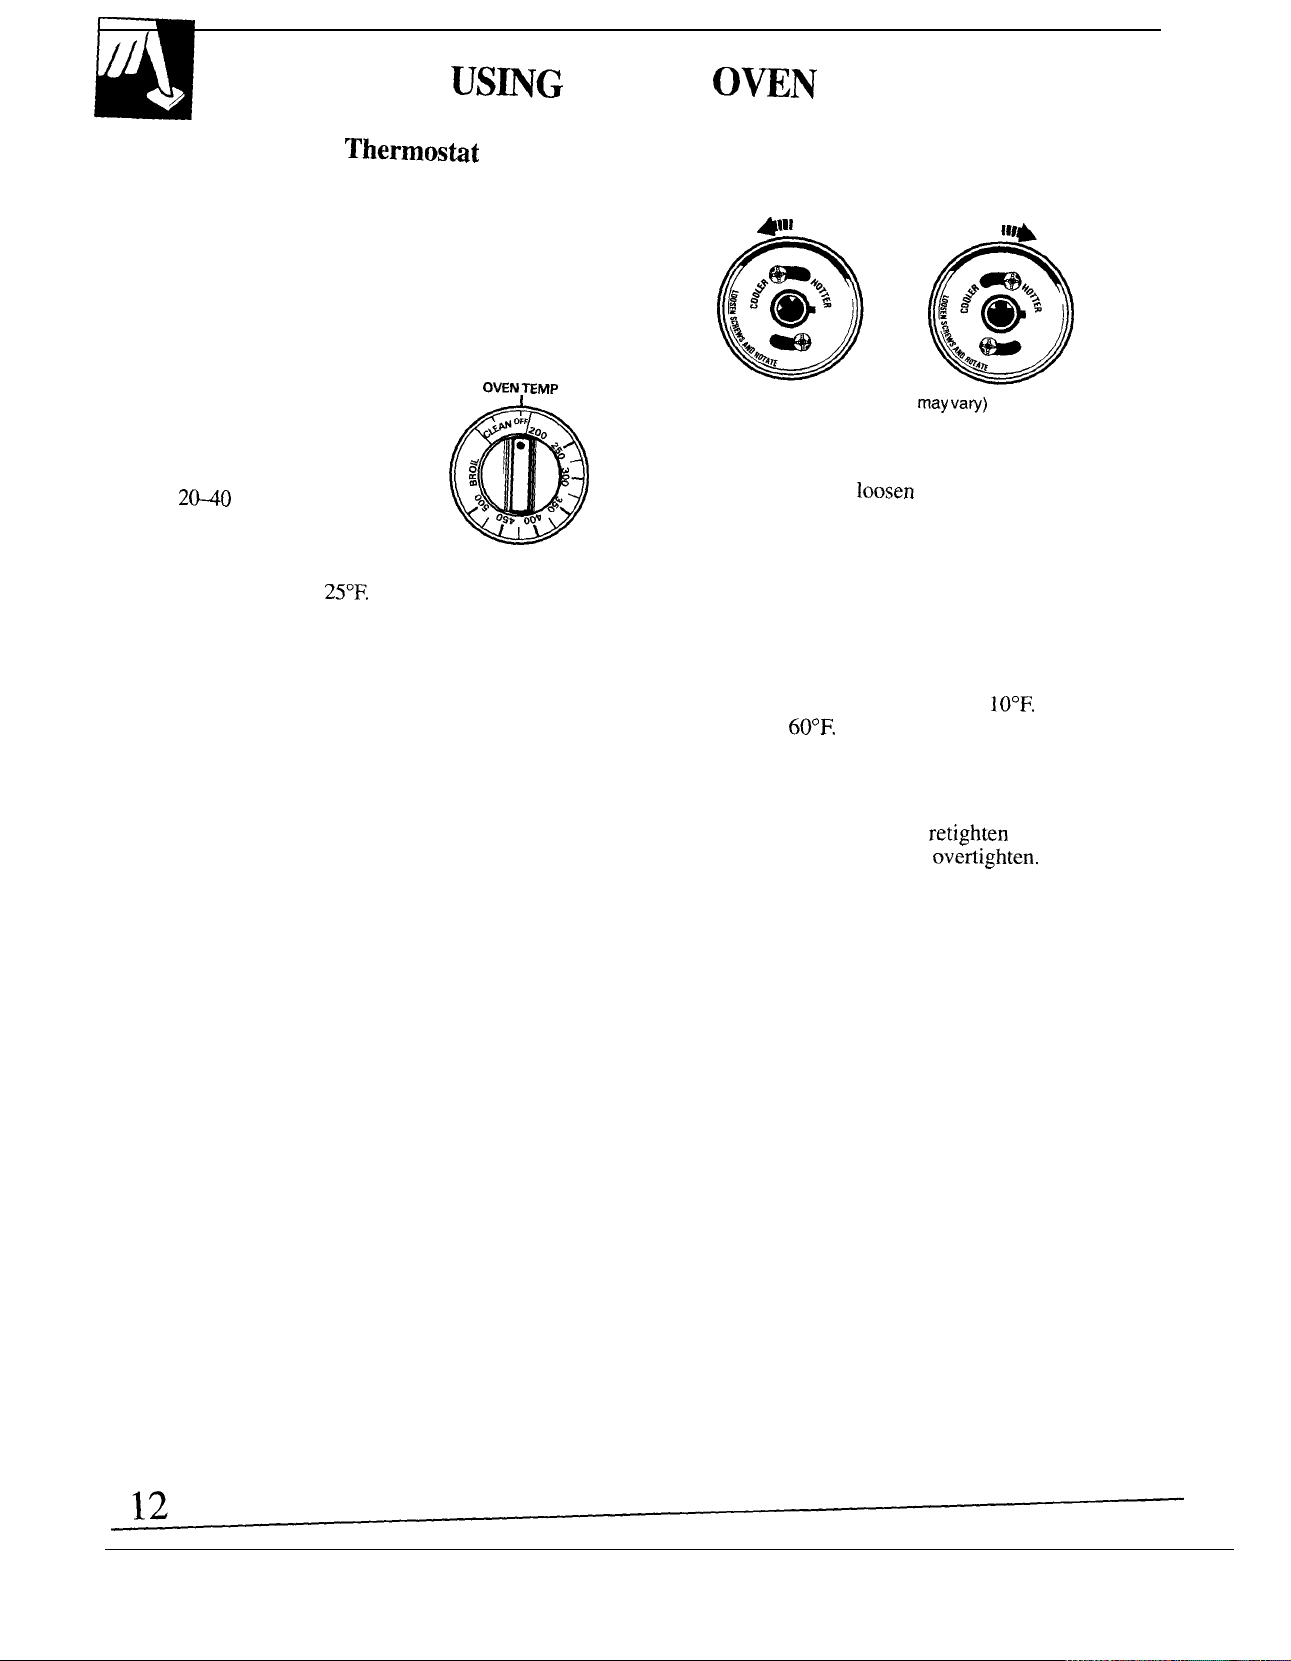
Pull the OVEN TEMP knob off the range and look
at the back side.
To make adjustment,
but do not completely remove, the two screws on the
back of the knob. With the back of the knob facing
you, hold the outer edge of the knob with one hand
and turn the the front of the knob with the other hand.
To raise the oven temperature, move the top screw
toward the right. You’ll hear a click for each notch
you move the knob. To lower the temperature, move
the top screw toward the left. Each click will change
the oven temperature approximately
plus or minus
We suggest that you make the adjustment one click
from the original setting and check oven performance
before making any additional adjustments.
After the adjustment is made,
are snug, but be careful not to
knob on range and check performance.
from the arrow.)
va~)
(approximately one turn),
(Range is
screws so they
Reinstall
Page 13
Clock and Minute Timer
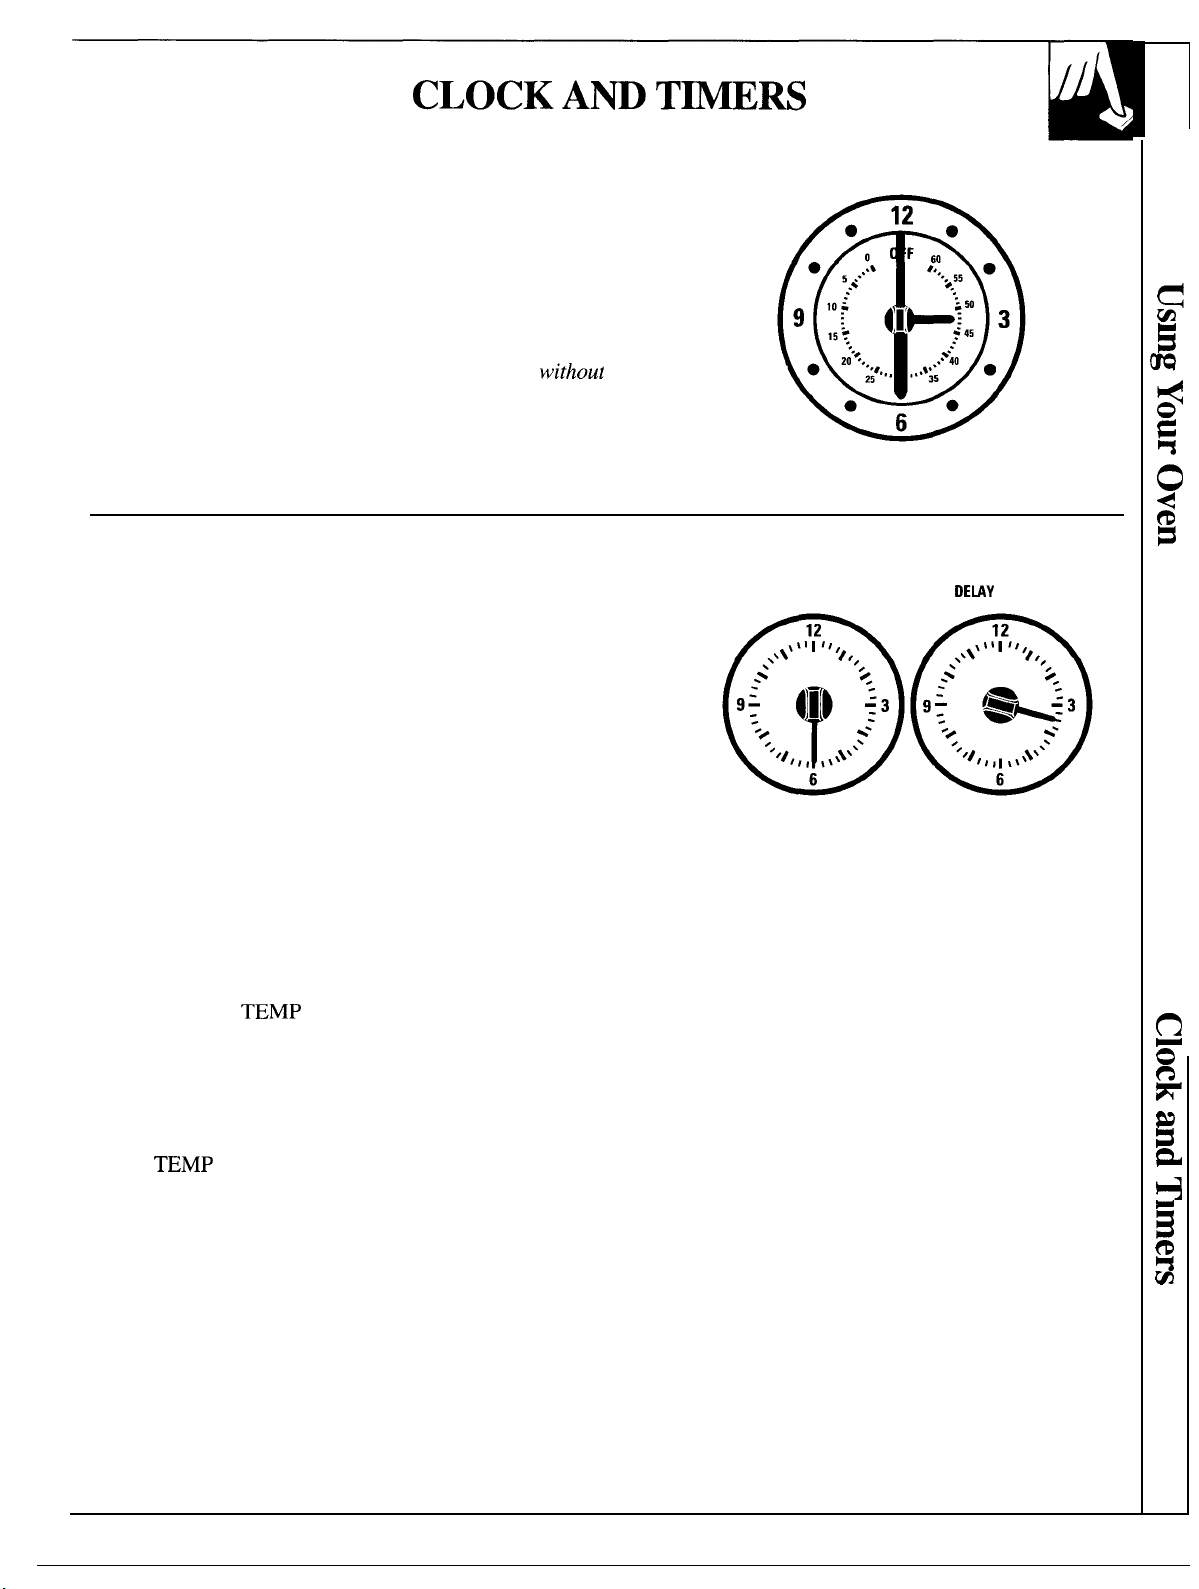
To set the clock, push the knob in and turn the clock hands to the
correct time. Then let the knob out and continue turning to OFF.
The Minute Timer has been combined with the range clock. Use
it to time cooking operations. You’ll recognize it as the pointer that
is different in color from the clock hands.
Minutes are marked up to 60 on the center ring of the clock.
To set the Minute Timer,
until the pointer reaches the number of minutes you want to time.
in,
turn the knob to the left,
pushing
At the end of the set time, a buzzer sounds to tell you time is
up. Turn the knob,
OFF and the buzzer stops.
without pushing in, until the pointer reaches
Automatic Oven Timer
This Timer will automatically start and stop your oven for you.
Here’s what you do:
1. Make sure both your range clock and the DELAY START dial
show the correct time of day. When either the DELAY START dial
or STOP TIME dial is pushed in and turned, it will “pop” into
place when the time shown on the range clock is reached.
2. Set the DELAY START control. Push in and turn the DELAY
START dial to the time you want the oven to turn itself on.
(If you want it to start cooking immediately, do not set DELAY
START time.)
3. Set the STOP TIME control. Push in and turn the STOP TIME
knob to the time you want the oven to turn itself off.
NOTE: There must beat least a half-hour difference between the
DELAY START and STOP TIME dials, and times can be set only
up to 11 hours and 45 minutes in advance.
4. Set the OVEN SET knob to TIME BAKE.
5. Set the OVEN
The oven will turn itself on immediately unless you have set the
DELAY START control for a later starting time. It will operate
at the temperature you selected and turn itself off at the Stop Time
you selected.
After you take your food out of the oven, be sure to turn the
OVEN
STOP TIME
START
PUSH TO TURN
13
Page 14
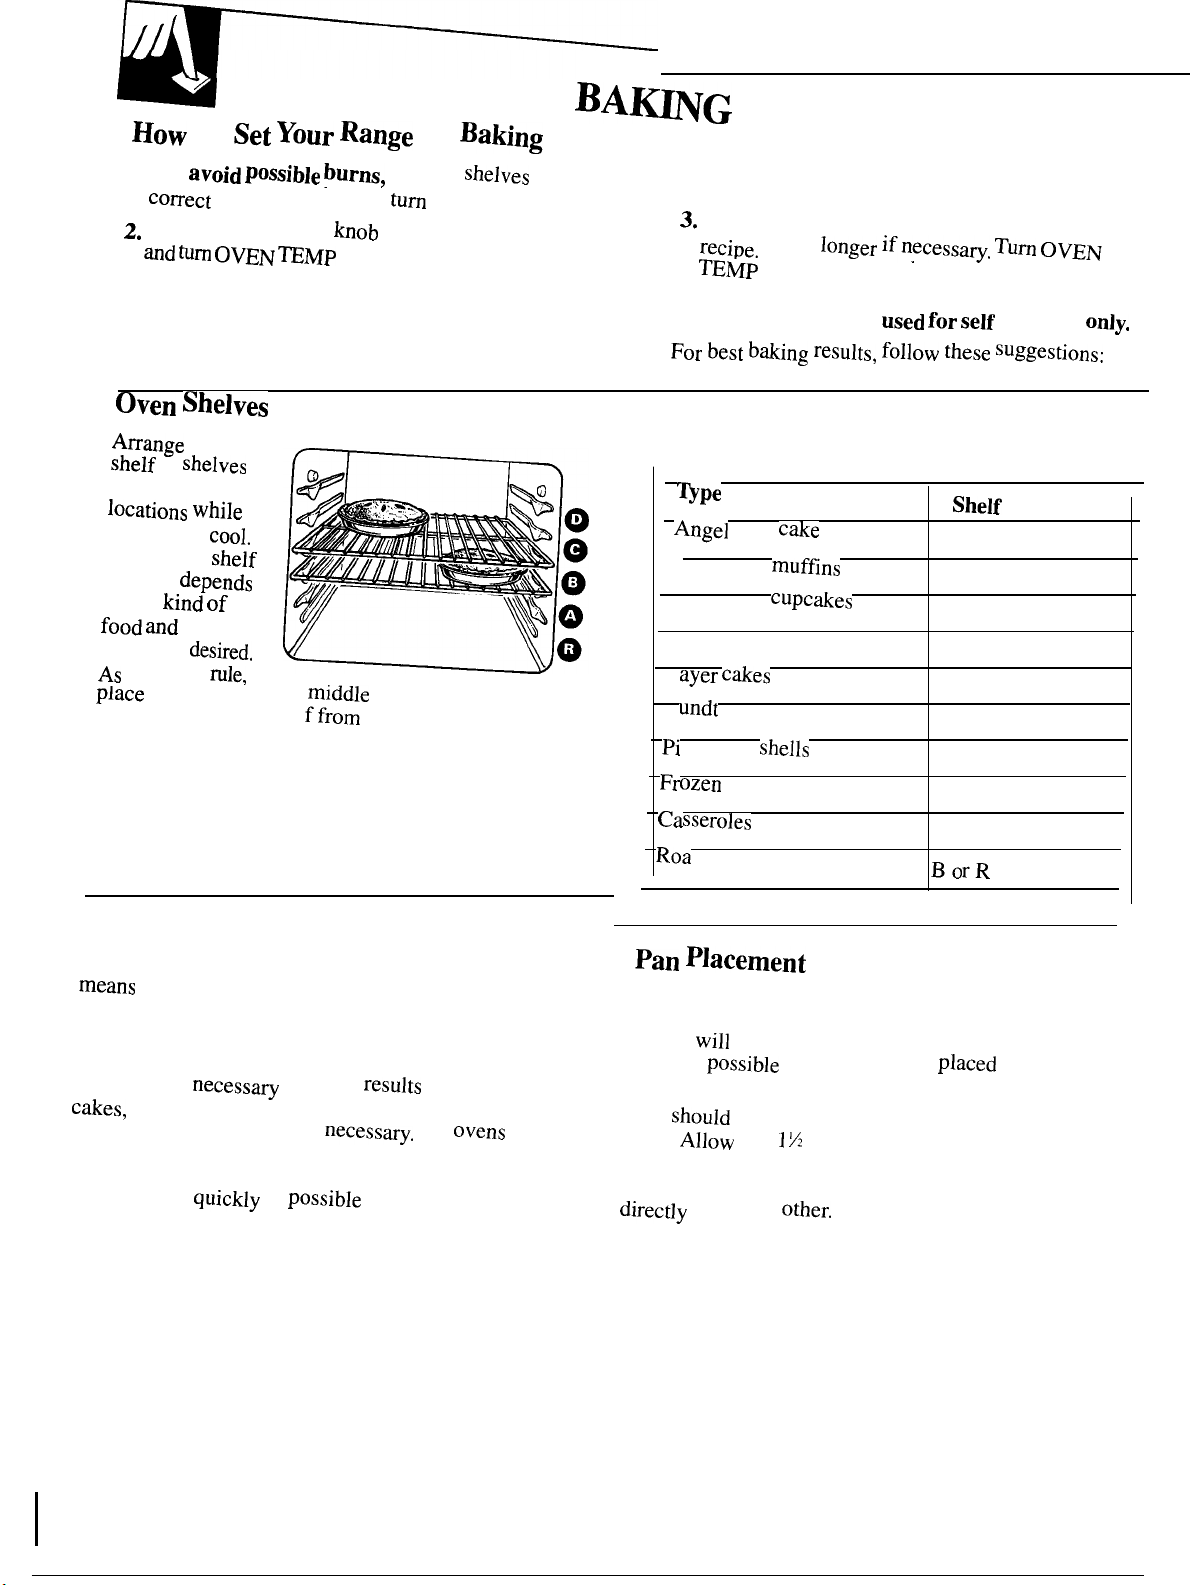
TO
1. To
position before you
Turn OVEN SET
OVEN
possible
place the
to BAKE or TIME BAKE
knob to desired temperature.
the oven
or shelves
in the desired
the
oven
is
The correct she]f
position
on the
brownin
a
the second or third she]
chart for suggested shelf positions.
of
the
g
general
of the oven, on eithe
the bottom. See the
Fo
r
the oven on.
in the
r
Check food for doneness at minimum time o
Cook
Do not lock the oven door with the door latch
during baking. This
b~ing
Of Food
food
Biscuits or
Cookies or
Brownies
L
B
or pound cakes
es or pie
pies
sting
ifneces5aw.
is
B or C
B or C
B or C
B or C
A or B
B
A
B
OVEN
cleaning
Position
A
or C
(on cookie sheet)
or C
n
Preheatin
Preheat the oven if the recipe calls for it. Preheat
bringing the oven up to the specified
temperature befor
the oven at the correct temperature—selecting a
higher temperature does not shorten preheat time.
Preheating is
cookies, pastry and breads. For most casseroles
and roasts, preheating is not
without a preheat indicator light or tone, preheat 10
minutes. After the oven is preheated place the food
in the oven as
from escaping.
g
putting in the food. To preheat, set
e
when baking
as
to prevent heat
14
For even cooking and proper browning, there must be
enough roo
results
much as
or to the back of the oven.
Pans
oven.
as from the back of the oven, the door and the sides.
If you use two shelves, stagge
for air circulation in the oven. Baking
m
be better if baking pans are centered as
rather than being placed to the front
not touch each other or the wails of the
1 to inch space between pans as well
the pans so one is not
r
above the
Page 15
Baking Guides
When using prepared baking mixes, follow package recipe or instructions
for best baking results.
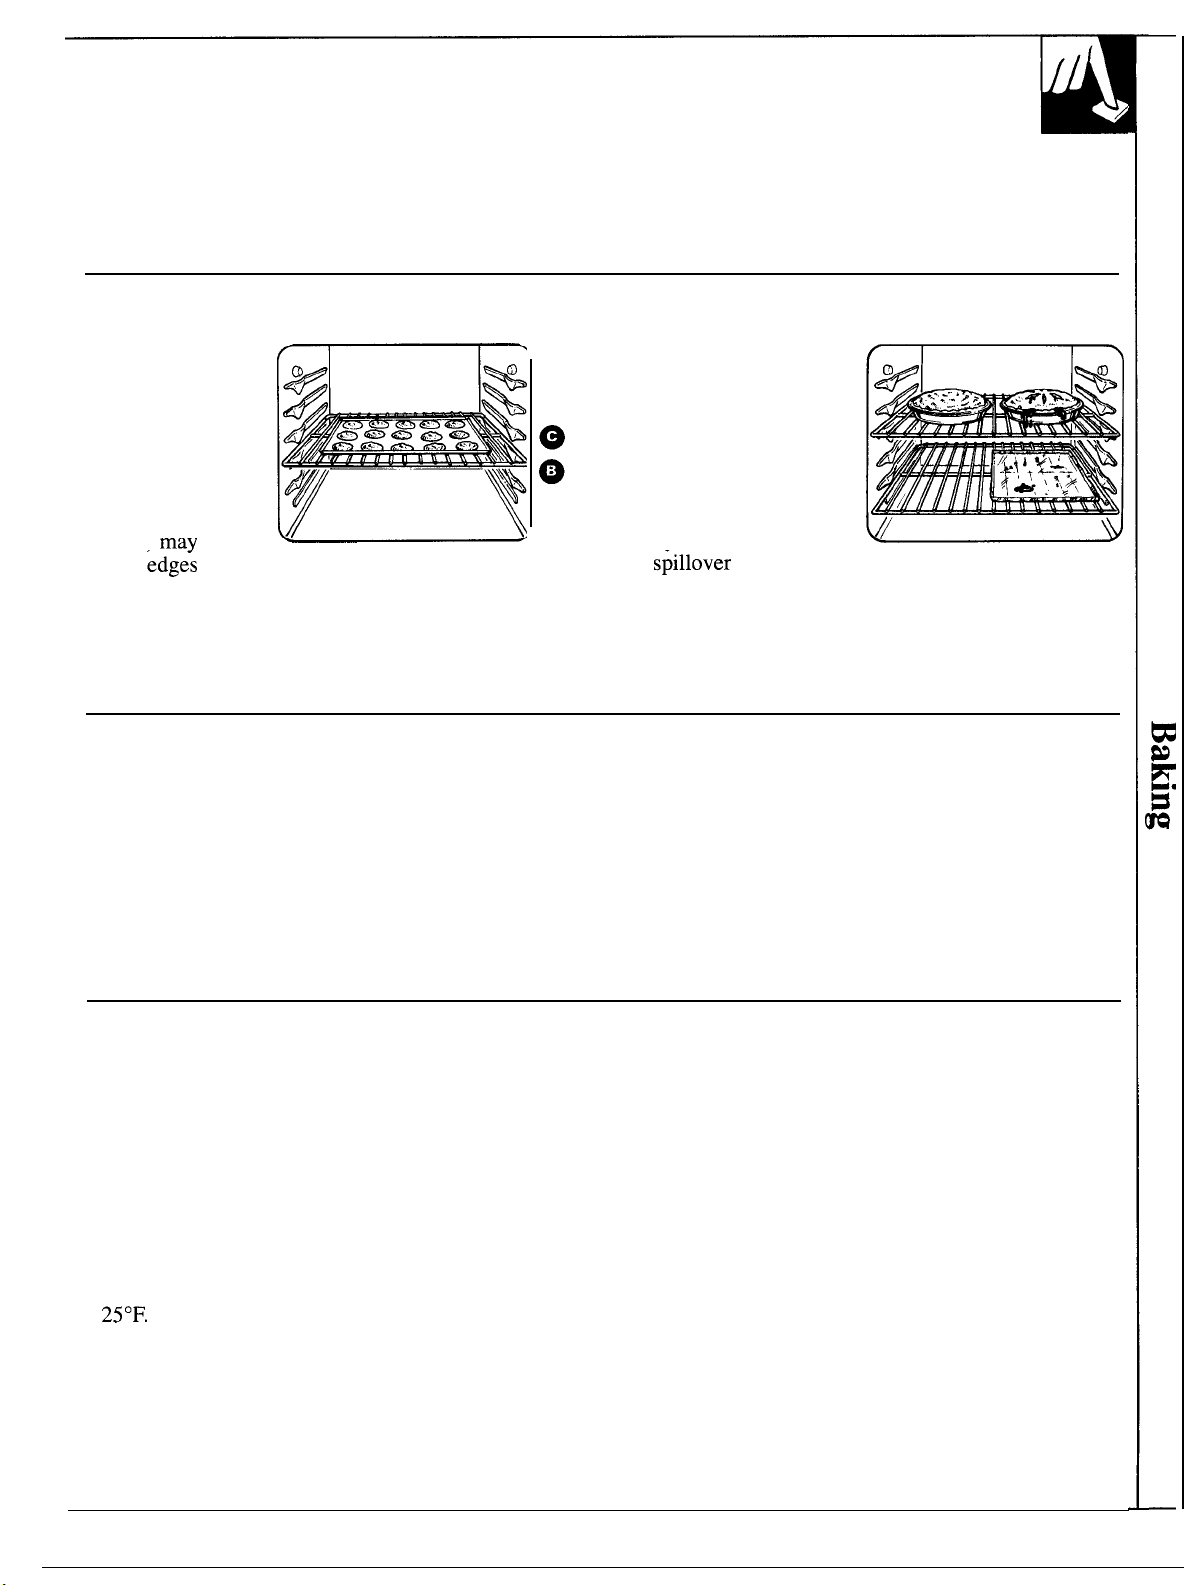
Cookies
When baking
cookies, flat cookie
sheets (without
sides) produce
better-looking
cookies. Cookies
baked in a jelly roll
pan (short sides all
around)
darker
Do not use a cookie sheet so large that it touches the
walls or the door of the oven.
For best results, use only one cookie sheet in the
oven at a time.
have
Pies
For best results, bake pies in dark, rough or dull
pans to produce a browner, crisper crust. Frozen
pies in foil pans should be placed on an aluminum
cookie sheet for baking since the shiny foil pan reflects
heat away from the pie crust; the cookie sheet helps
retain it.
Aluminum Foil
Never entirely cover
a shelf with a large
cookie sheet or
aluminum foil. This
will disturb the heat
circulation and results
in poor baking. A
smaller sheet of foil
may be used to catch
a
on a lower shelf several inches below the food.
by placing it
Cakes
When baking cakes, warped or bent pans will cause
uneven baking results and poorly shaped products.
A cake baked in a pan larger than the recipe
recommends will usually be crisper, thinner and drier
than it should be. If baked in a pan smaller than
recommended, it may be undercooked and batter may
overflow. Check the recipe to make sure the pan size
used is the one recommended.
Baking Pans
Use the proper baking pan. The type of finish on the
pan determines the amount of browning that will occur.
● Dark, rough or dull pans absorb heat resulting in a
browner, crisper crust. Use this type for pies.
● Shiny, bright and smooth pans reflect heat, resulting
in a lighter, more delicate browning. Cakes and
cookies require this type of pan.
● Glass baking dishes also absorb heat. When baking
in glass baking dishes, lower the temperature by
and use the recommended cooking time in
the recipe. This is not necessary when baking pies
or casseroles.
Don’t Peek
Set the timer for the estimated cooking time and do
not open the door to look at your food. Most recipes
provide minimum and maximum baking times such
as “bake 30-40 minutes.”
DO NOT open the door to check until the minimum
time. Opening the oven door frequently during
cooking allows heat to escape and makes baking
times longer. Your baking results may also be
affected.
15
Page 16
Do not lock the oven door with the door latch
during roasting. This is used for self-cleaning only.
Roasting is cooking by dry heat. Tender meat or
poultry can be roasted uncovered in your oven.
Roasting temperatures, which should be low and
steady, keep spattering to a minimum.
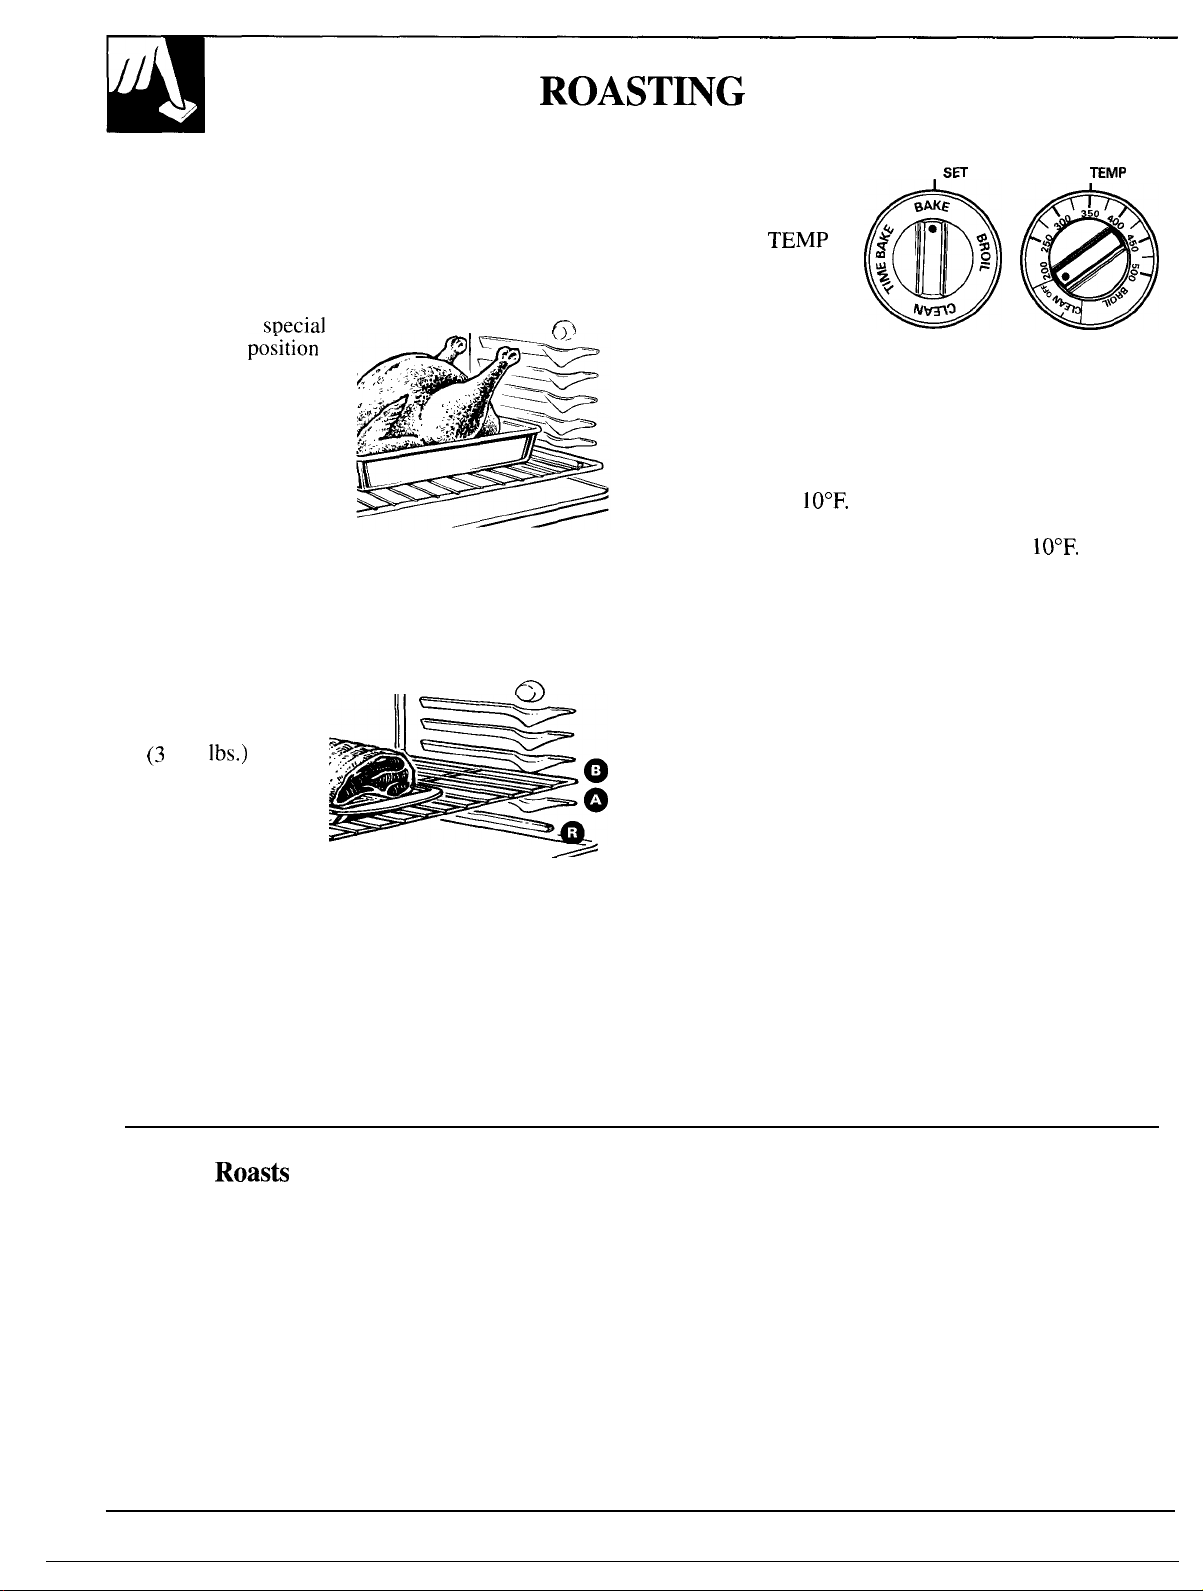
The oven has a
I
low shelf (R)
just above the oven
bottom. Use it when
extra cooking space is
needed, for example,
when roasting a large
turkey. The shelf is not
designed to slide out at
this position.
Roasting is really a baking procedure used for meats.
Therefore, oven controls are set for BAKE or TIME
BAKE (you may hear a slight clicking sound, indicating
the oven is working properly). Roasting is easy; just
follow these steps:
1. Position oven shelf
Ill
at (B) position for
small size roast
to 5
and at
(R) position for
larger roasts.
2. Check the weight of
the roast. Place the
meat fat-side-up or the poultry breast-side-up
on the roasting rack in a shallow pan. The melting
fat will baste the meat. Select a pan as close to
the size of meat as possible. (Broiler pan with
rack is a good pan for this.) Line the broiler pan
with aluminum foil when using pan for marinating,
cooking with fruits, cooking heavily cured meats,
or basting food during cooking. Avoid spilling
these materials inside the oven or inside the
oven door.
3.
Turn OVEN SET
OVEN
OVEN
knob to BAKE or
TIME BAKE and
OVEN
knob to desired
temperature.
Check the
Roasting Guide
for temperatures and approximate cooking times.
4. Most meats continue to cook slightly
while standing after being removed from the oven.
Recommended standing time for roasts is 10 to 20
minutes. This allows roasts to firm up and makes
them easier to carve. Internal temperature will rise
about 5° to
If you wish to compensate for
temperature rise, remove the roast from the oven
when its internal temperature is 5° to
less
than temperature shown in the Roasting Guide.
NOTE:
● You may wish to Time Bake (See Using Your
Oven section of this book) to turn oven on and
off automatically.
● Remember that food will continue to cook in the
hot oven and therefore should be removed when
the desired internal temperature has been reached.
Frozen
● Frozen roasts of beef, pork, lamb, etc., can be started
without thawing, but allow
15
to 25 minutes per
pound additional time (15 minutes per pound for
roasts under 5 pounds, more time for larger roasts).
● Thaw most frozen poultry before roasting to ensure
even doneness. Some commercial frozen poultry can
be cooked successfully without thawing. FO11
OW
directions given on package label.
16
Dual Shelf Cooking
This allows more than one food to be cooked at the
same time. For example: While roasting a 20-lb.
turkey on shelf position R, a second shelf (if so
equipped) may be added on position D so that
scalloped potatoes can be cooked at the same time.
Calculate the total cooking time to enable both dishes
to complete cooking at the same time. Allow 15-20
minutes of additional cooking time for the potatoes.
Page 17

Questions and Answers
Q. Is it necessary to check for doneness with a
meat thermometer?
A. Checking the finished internal temperature at the
completion of cooking time is recommended.
Temperatures are shown in Roasting Guide. For
roasts over
check with thermometer at
hour intervals after half the time has passed.
Q. Why is my roast crumbling when I try to
carve it?
A. Roasts are easier to slice if allowed to cool 10 to
20 minutes after removing from oven. Be sure to
cut across the grain of the meat.
Oven
temperature
Meat
Tender cuts; rib, high quality sirloin
325°
tip, rump or top round*
Lamb leg or bone-in shoulder*
Veal shoulder, leg or loin*
Pork loin, rib or shoulder*
Ham, precooked
Poultry
Chicken or Duck
Chicken pieces
Turkey
325°
325°
325°
325°
325°
350°
325°
Doneness
Rare:
Medium:
Well Done:
Rare:
Medium:
Well
Done:
Well Done:
Well Done:
To Warm:
Well Done:
Well Done:
Well Done:
Q. Do I need to preheat my oven each time I cook
a roast or poultry?
A. It is unnecessary to preheat your oven.
Q. When buying a roast, are there any special tips
that would help me cook it more
evenly?
A. Yes. Buy a roast as even in thickness as possible,
or buy rolled roasts.
Q. Can I seal the sides of my foil “tent” when
roasting a turkey?
A. Sealing the foil will steam the meat. Leaving
it unsealed allows the air to circulate and brown
the meat.
Approximate Roasting Time
in Minutes per Pound
3 to 5 lbs. 6 to 8
24-35
35-39
39-45 31-33
21-25
25-30
30-35
35-45
35-45
18-25
25-31
20-23
24-28
28-33
30-40
30-40
18-23 minutes per pound (any weight)
3
to 5 lbs.
35-40
35-40
10 to 15 lbs.
16-22 12-19
Over 5 lbs.
30-35
Over 15
Internal
Temperature
150°-1600
170°-1850
140°-15007
150°-1600
170°-1850
170°-1800
170°-1800
115°-1250
185°-1900
185°-1900
In thigh:
185°-1900
*For boneless rolled roasts over 6 inches thick, add 5 to 10 minutes per pound to times given above.
some food poisoning
may survive.” (Source:’S;fe Food Book. Your Kitchen Guide.
it to
means
1985.)
Page 18
Do not lock the oven door
the door latch during roasting.
This is used for self-cleaning only.
How to Broil
Broiling is cooking food by direct
heat from above the food. Most
fish and tender cuts of meat can
be broiled. Follow these steps to
keep spattering and smoking to
a minimum.
The oven door must be closed
during broiling.
1. Oven does not need to be preheated for broiling.
2. If meat has fat or gristle near the edge, cut vertical
slashes through it about 2 inches apart, but don’t
cut into meat. We recommend that you trim fat to
prevent excessive smoking, leaving a layer about
1/8 inch thick.
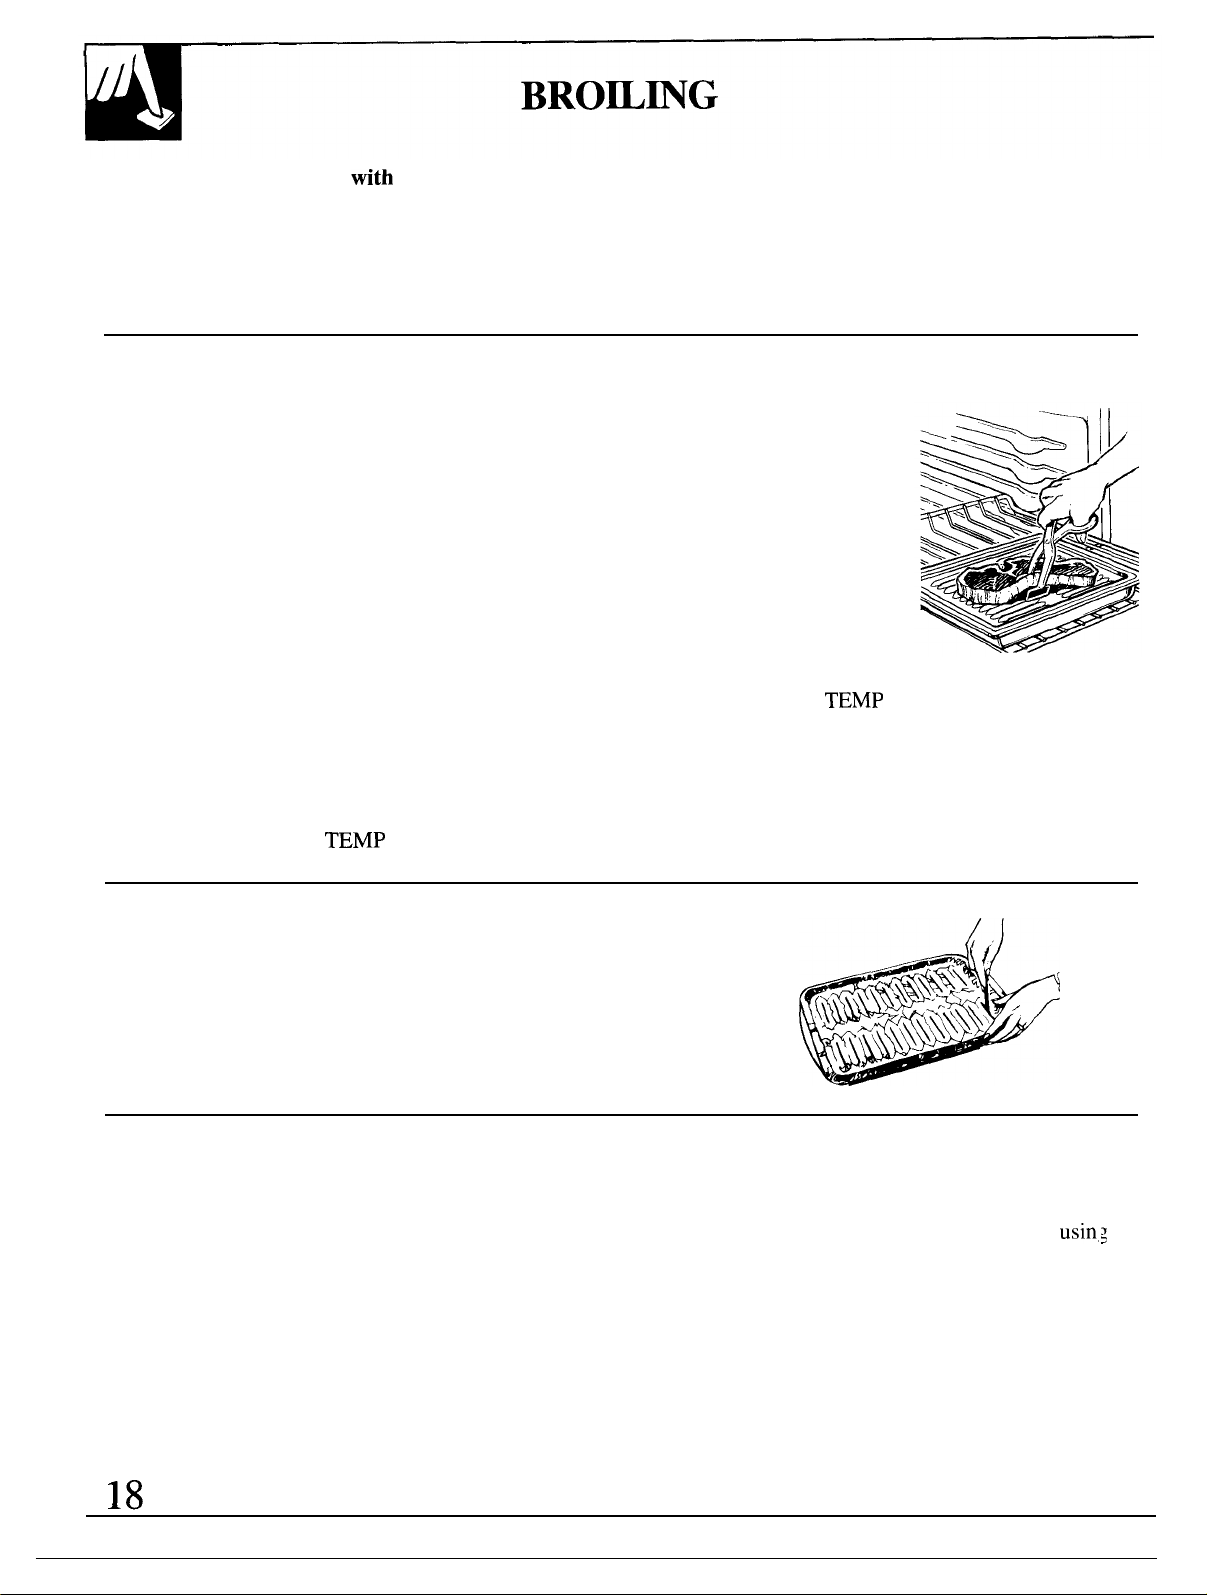
3.
Arrange
pan on the appropriate shelf in the oven. Placing
food closer to flame sears the exterior and
increases surface browning of food, but also
increases spattering and the possibility of fats
and meat juices igniting.
4. Close the oven door but do not latch it. If the
door latch is moved to the right during a broil
operation, the door may lock and you may not
be able to open it until the oven cools.
5. Turn the OVEN SET knob to BROIL. For most
foods, turn the OVEN
food on rack and position the broiler
6. Turn most foods once
during cooking (the
exception is thin fillets
of fish; oil one side,
place that side down on
broiler rack and cook
without turning until
done). Time food for
about one-half the total
cooking time, turn food,
then continue to cook to
preferred doneness.
7. Turn the OVEN TEMP knob to OFF. Remove
broiler pan from oven and serve food immediately.
Leave pan outside the oven to cool.
Use of Aluminum Foil
You can use aluminum foil to line your broiler pan and broiler rack. However,
you must mold the foil tightly to the rack and cut slits in it just like the rack.
Without the slits, the foil will prevent fat and meat juices from draining to
the broiler pan. The juices could become hot enough to catch on fire. If you
do not cut the slits, you are frying, not broiling.
Questions & Answers
Q. When broiling, is it necessary
to always use a rack in
the pan?
A. Yes. Using the rack suspends
the meat over the pan. As the
meat cooks, the juices fall into
the pan, thus keeping meat
drier. Juices are protected by
the rack and stay cooler, thus
preventing excessive spatter
and smoking.
Q. Should I salt the meat before
broiling?
A. No. Salt draws out the juices
and allows them to evaporate.
Always salt after cooking. Turn
meat with tongs; piercing meat
with a fork also allows juices to
escape. When broiling poultry
or fish, brush each side often
with butter.
Q. Why are my meats not
turning out as brown as
they should?
A. Check to see if you are
the recommended shelf
position. Broil for longest
period of time indicated in the
Broiling Guide. Turn food only
once during broiling.
Page 19
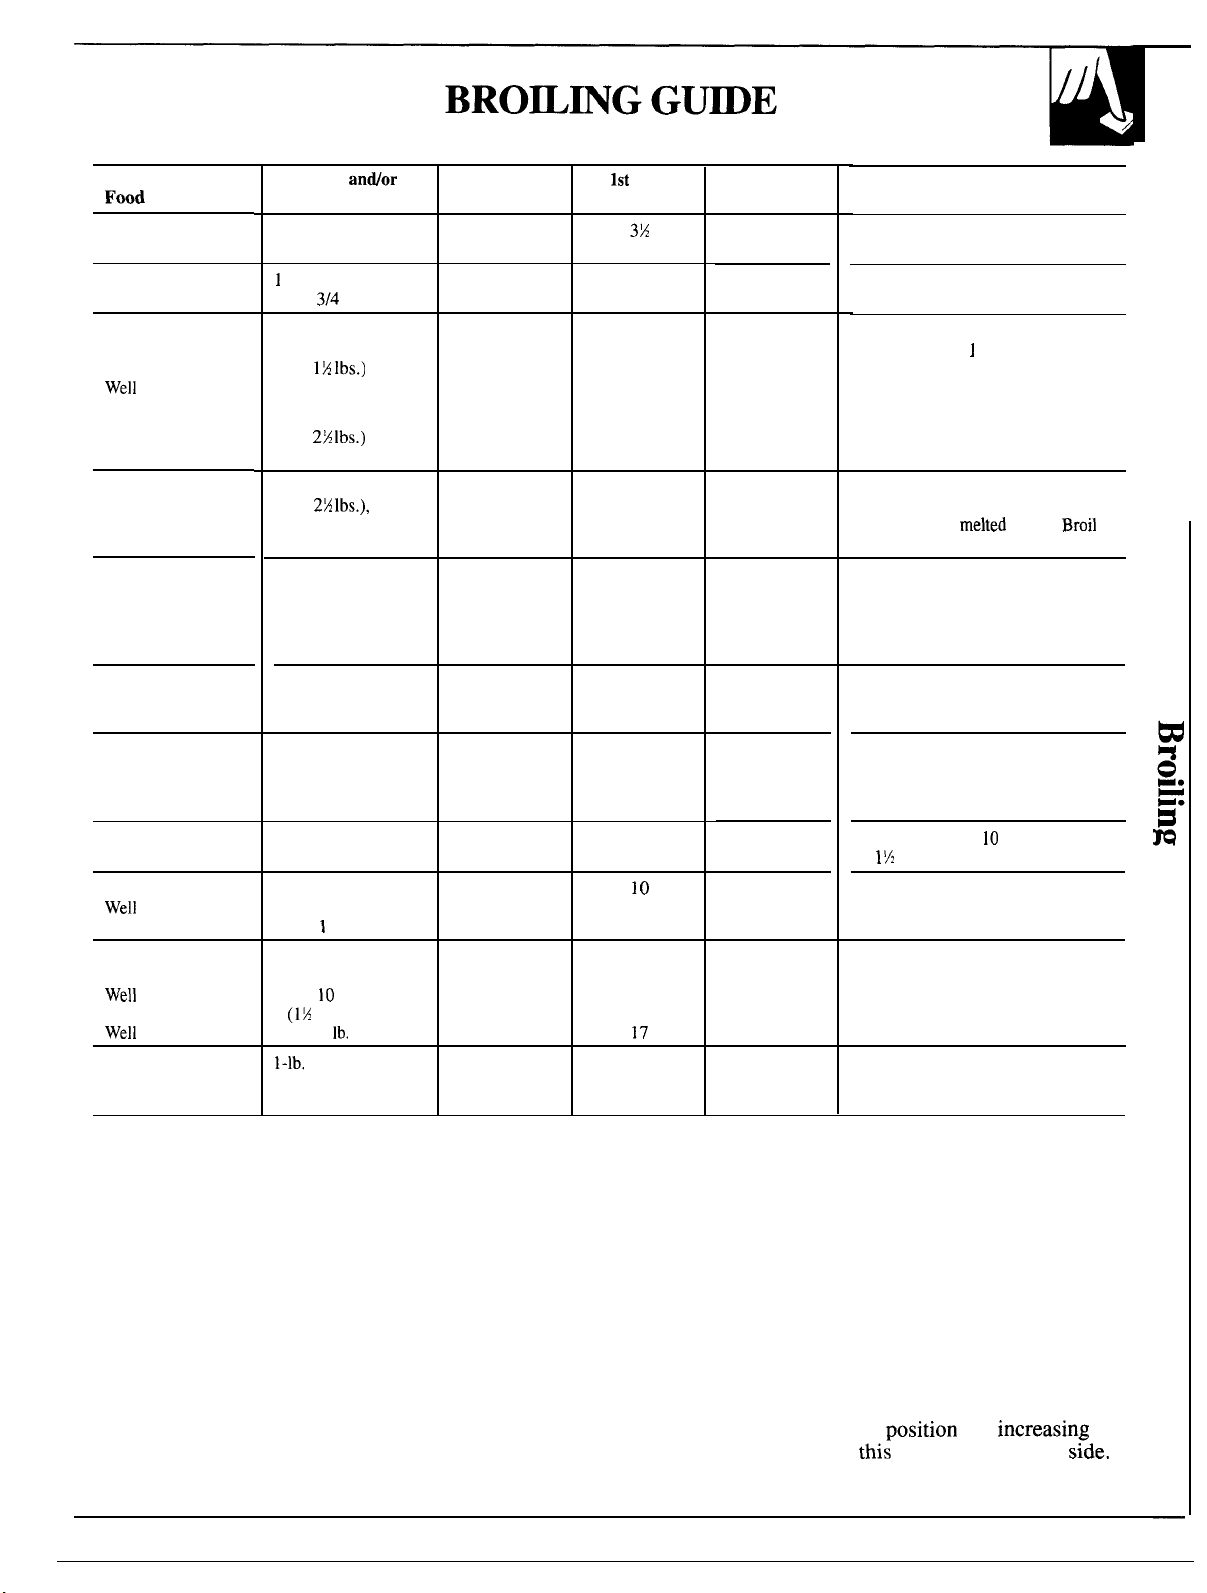
Bacon
Ground Beef
Beef Steaks
Rare
Medium
Done
Rare
Medium
Well Done
Chicken
Bakery Products
Bread (Toast) or
Toaster Pastries
English Muffins
Lobster Tails
Fish
Ham Slices
Precooked
Pork Chops
Done
Lamb Chops
Medium
Done
Medium
Done
Wieners
similar precooked
sausages, bratwurst
Quantity
Thickness
1/2 lb. (about 8
thin slices)
lb. (4 patties)
1/2 to 3/4
1 inch thick
(1 to
1 inch thick
(2 to
1 whole
(2 to
split lengthwise
2
1 pkg. (2)
2, split
2 to 4
(6 to 8 oz. each)
1-lb. fillets
1/4 to 1/2 inch thick
1 inch thick
2 (1/2 inch thick)
2 (1 inch thick),
about
2 (1 inch thick),
about
2
about 1
inch thick
to
4 slices
lb.
to 12 oz.
inch thick),
pkg. (10)
Shelf
Position
c
c
B
B
B
B
B
B
B
c
c
c
B
c
B
B
B
B
B
B
c
Side
Minutes
10-11
9
12
13
10
12-15
25
30-35
2-3
3-5
13-16
5
8
13
8
10
10
6
2nd Side
Minutes
3
4-5
7
5-6
8-9
6-7
10-12
16-18
25-30
1/2-1
Do not
turn over.
5
8
4-5
9-12
4-7
10
4-6
12-14
1-2
Comments
Arrange in single layer.
Space evenly. Up to 8 patties take
about same time.
Steaks less than
through before browning. Pan frying
is recommended.
Slash fat.
Reduce times about 5 to 10 minutes
per side for cut-up chicken. Brush
each side with
skin-side-down first.
Space evenly. Place English muffins
cut-side-up and brush with butter
if desired.
Cut through back of shell and spread
open. Brush with melted butter
before broiling and after half of time.
Handle and turn very carefully. Brush
with lemon butter before broiling and
during broiling if desired. Preheat
broiler to increase browning.
Increase time 5 to
inch thick or home cured.
for
Slash fat.
Slash fat.
[f desired, split sausages in half
lengthwise; cut into 5-to 6-inch
pieces.
inch thick cook
butter.
minutes per side
Broiling Tips
The oven door must be closed during broiling.
1. Always use broiler pan and rack that comes with
your oven. It is designed to minimize smoking and
spattering by trapping juices in the shielded lower
part of the pan.
2. For steaks and chops, slash fat evenly around
outside edges of meat. To slash, cut crosswise
through outer fat surface just to the edge of the
meat. Use tongs to turn meat over to prevent
piercing meat and losing juices.
3. If desired. marinate meats or chicken before
broiling. Or brush with barbecue sauce last 5 to 10
minutes only.
4. When arranging food on pan, do not let fatty edges
hang over sides, which could soil oven with fat dripping.
5. Oven does not need to be preheated. However, for
very thin foods, or to increase browning, preheat
if desired.
6. Frozen steaks can be broiled by positioning the oven
shelf at next lowest shelf
cooking time given in
guide 1 ‘/2 times per
and
19
Page 20

SELF-CLEANING
Before a Clean Cycle
Step 1:
cookware and any aluminum foil from the oven—they
cannot withstand the high cleaning temperatures.
(Oven shelves may be left in oven. NOTE: Shelves
will discolor after the self-clean cycle.)
Step
If you use soap, rinse thoroughly before self-cleaning
to prevent staining.
Step 3:
(A) and only that area on the oven door that is outside
the gasket (B). Do not clean the gasket. Use detergent
and hot water with a soap-filled steel wool pad, then
rinse well with a vinegar and water mixture. This will
help prevent a brown residue from forming when the
oven is heated. Buff these areas with a dry cloth. Never
use a commercial oven cleaner in or around the
cleaning oven.
Remove the broiler pan, broiler rack, all
2:
Wipe up heavy soil on the oven bottom.
A.
B.
c.
Clean spatters or spills on the oven front frame
Oven
Oven
Oven
Front Frame
Door Gasket
Light
● Clean top, sides and outside front of oven door with
soap and water. Do not use abrasives or oven cleaners.
● Do not rub or clean the door gasket
fiberglass material of the gasket has an extremely
low resistance to abrasion. An intact and well-fitting
oven door gasket is essential for energy-efficient
oven operation and good baking results. If you
notice the gasket becoming worn, frayed or damaged
in any way or if it has become displaced on the door,
you should have it replaced.
Step 4: Close and latch the door. Make sure the oven
light (C) is off.
Oven shelves may be cleaned in the self-cleaning
oven. However, they will darken, lose their luster and
become hard to slide. Wipe the shelf supports with
cooking oil after self-cleaning to make shelves slide
more easily.
Caution: Drip pans (on some models), and
burner grates, should never be cleaned in the
self-cleaning oven.
Do not use commercial oven cleaners or oven
protectors in or near the self-cleaning oven. A
combination of any of these products plus the high
clean cycle temperatures may damage the porcelain
finish of the oven.
Important
The oven door must be closed and latched and all
controls must be set correctly for the clean cycle to
work properly.
20
Page 21
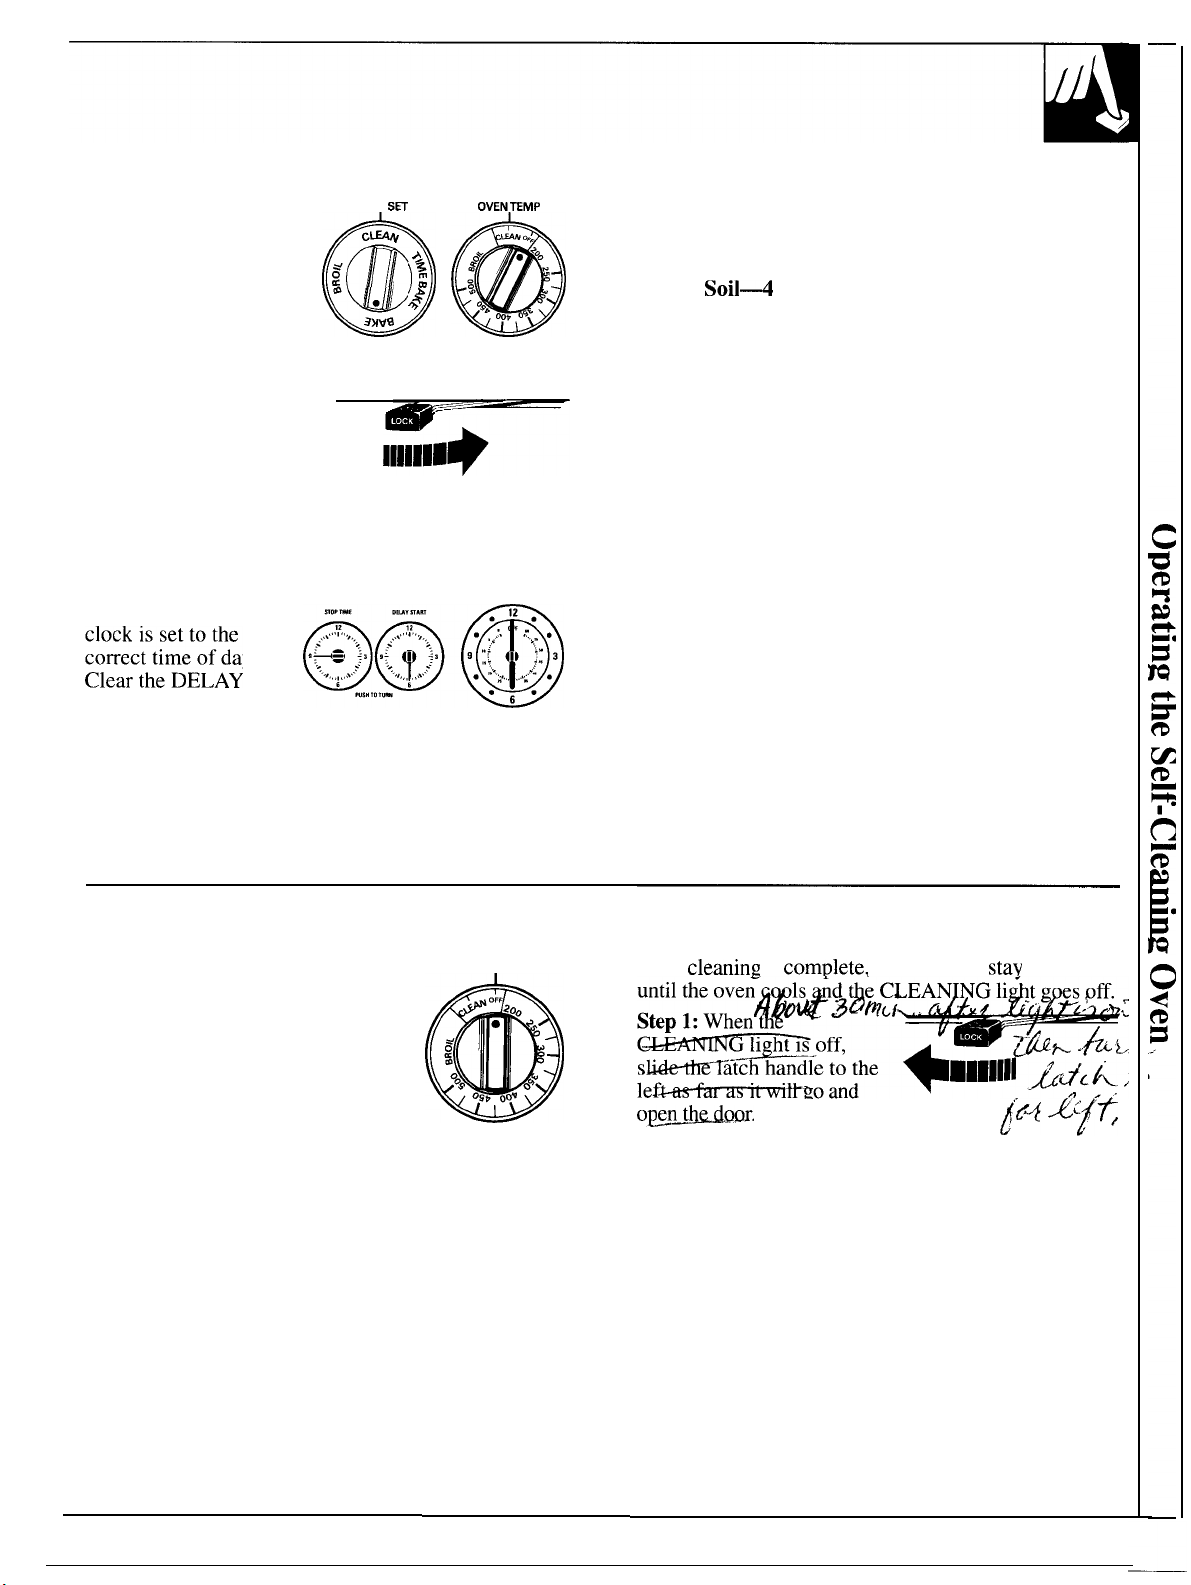
How to Set Oven for Cleaning
Step 1: Turn the OVEN
SET knob to CLEAN.
Push in and turn the
OVEN TEMP knob to
CLEAN. Controls will
snap into final position
when the CLEAN
location is reached.
Step 2: Slide the latch —
handle to the right as far
as it will go.
Never force the door
latch handle. Forcing
the handle may damage
the door lock mechanism.
Step
3:
Set the automatic oven timer.
Make sure the range
OVEN
● Decide on cleaning hours necessary.
Recommended Cleaning Time:
Light to Moderate Soil—2-3 hours (thin spills and
light spatters)
Heavy
hours (heavy, greasy spills and
spatters)
● Add these hours to present time of day, then push in
and turn the STOP TIME dial clockwise to this later
stop time.
Oven door gets hot during self-cleaning. DO NOT
TOUCH.
The CLEANING light will glow, indicating the
controls have been set correctly and the clean cycle
has begun. If a delayed start has been selected, the
CLEANING light will not glow until the start time
has been reached and the clean cycle begins. The door
will lock approximately 20 minutes after the clean
cycle has begun.
correct time of day.
START and STOP
6’
TIME dials of any
previous timed cooking or cleaning function by: one
at a time, push the DELAY START and STOP TIME
knobs in and turn the knob. Using a light touch,
continue turning the knob until it “pops” out. Both
knobs should now be in the out position.
How to Set a Delayed-Start Cleaning
If you wish to start and stop
cleaning at a later time than shown
on the clock, push in and turn the
DELAY START dial to time you
wish to start. Add the hours needed
for cleaning to this “start” time, then
push in and turn the STOP TIME
dial to this later stop time. The oven
will automatically turn on and off at
the set times.
OVEN TEMP
After a Clean Cycle
After
Never force the latch handle. The latch slides
easily. Forcing the latch handle may damage
the door lock.
Step 2: Turn the OVEN TEMP knob to OFF.
After a clean cycle, you may notice some white ash in
the oven. Just wipe it up with a damp cloth.
If white spots remain, remove them with a soap-filled
steel wool pad. Be sure to rinse thoroughly with a
vinegar and water mixture. These deposits are usually
a salt residue that can not be removed by the clean
cycle. If the oven is not clean after one cycle, the
cycle may be repeated.
is comulete, the door will
locked
(continued next page)
21
Page 22

Questions and Answers
Q.
Why won’t my oven clean immediately
even though I set
knobs correctly?
A. Check to be sure your DELAY START dial is set
to the same time as the range clock. Also check to
be sure latch handle is moved to the right.
Q. If my oven clock is not set to the correct time of
day, can I still self-clean my oven?
A. No. Your Automatic Oven Timer uses the range
clock to help start and stop your self-cleaning
cycle.
Q. Can I use commercial oven cleaners on any part
of my self-cleaning oven?
A. No cleaners or coatings should be used around
any part of this oven. If you do use them and do
not thoroughly rinse the oven with water, wiping it
absolutely clean afterward, the residue can scar the
oven surface and damage metal parts the next time
the oven is automatically cleaned.
Q. Can I clean the woven gasket around the oven
door?
A. No, this gasket is essential for a good oven seal,
and care must be taken not to rub, damage or move
this gasket.
Q. What should I do if excessive smoking occurs
during cleaning?
A. This is caused by excessive soil, and you should
switch the OVEN
windows to rid room of smoke.
Allow the oven to cool for at least one hour before
opening the door. Wipe up the excess soil and reset
the clean cycle.
Q. Is the “crackling” sound I hear during
cleaning normal?
A. Yes. This is the metal heating and cooling during
both the cooking and cleaning functions.
the time and clean
(continued)
Q. Should there be any odor during the cleaning?
A. Yes, there maybe a slight odor during the first few
Q. What causes the hair-like lines on the enamel
A. This is a normal condition resulting from heating
Q.
A. Some types of soil will leave a deposit, which is
Q. My oven shelves do not slide easily. What is
A. After many cleanings, oven shelves may become
Q. My oven shelves have become gray after the
A. Yes. After the self-cleaning cycle, the shelves may
Q. Can
A. Yes. While the oven is self-cleaning, you can use
cleanings. Failure to wipe out excessive soil might
also cause an odor when cleaning.
surface of my oven?
and cooling during cleaning, They do not affect
how your oven performs.
Why do I have ash left in my oven after cleaning?
ash. It can be removed with a damp sponge or
cloth.
the matter?
so clean they do not slide easily. To make shelves
slide more easily, after each self-cleaning cycle
dampen fingers with a small amount of cooking
oil and rub lightly over sides of shelf where they
contact shelf supports.
self-cleaning cycle. Is this normal?
have lost some luster and discolored to a deep
gray.
cook food on the cooktop while the oven
is self-cleaning?
the
careful when standing in front of the range-oven
becomes very hot while self-cleaning.
just as you normally do. However, be
22
Page 23

Proper care and cleaning are important so your range will give you efficient
and satisfactory service. Follow these directions carefully in caring for it to
help assure safe and proper maintenance.
BE SURE ELECTRICAL POWER IS DISCONNECTED BEFORE
CLEANING ANY PART OF YOUR RANGE.
CAUTION: DO NOT OPERATE THE BURNER WITHOUT ALL BURNER PARTS AND DRIP PANS
(IF SO EQUIPPED) IN PLACE.
Sealed Burner Assemblies
Turn all controls OFF before removing burner
parts and drip pans (if so equipped).
The burner grates, caps, burner heads and drip
pans (if so equipped) can be lifted off, making them
easy to clean.
The electrode of the
spark igniter is
exposed. When
one burner is turned
to
spark. Do not attempt to
disassemble or clean around any burner while
another burner is on. An electric shock may result,
which could cause you to knock over hot cookware.
all the burn
(on some models)
Burner Cap
Electrode
The holes in the surface burners of your range must
be kept clean at all times for proper ignition and an
even, unhampered flame.
You should clean the surface burners routinely,
especially after bad
these holes. Wipe off surface burners. If heavy
occurs, remove the surface burners from
range. Burners lift out for cleaning. Lift up the
and then lift out the surface burners.
To remove burned-on food, soak the surface burner
in a solution of mild liquid detergent and hot water.
Soak the surface burner for 20 to 30 minutes. For
more stubborn stains, use a cleanser like Soft
brand or Bon
traces of the cleanser that might clog the surface
burner openings. Do not use steel wool because it will
clog the surface burner openings and scratch the
surface burners. If the holes become clogged, clean
them with a toothpick.
Before putting the surface burner back, shake out
excess water and then dry it thoroughly by setting it in
a warm oven for 30 minutes. Then place it back in the
range, making sure it is properly seated and level.
brand. Rinse well to remove any
which could clog
Burner
Lift off when cool. Wash burner caps in The burner base (the part of the burner
hot, soapy water and rinse with clean
water. If desired, soak up to 30 minutes cleaned with a soft brush and a mild
and scour with a plastic scouring pad to remove
burned-on food particles. Dry them in a warm oven or
with a cloth—don’t reassemble them wet.
(on sealed burners only)
Burner Base
fastened to the
cleanser. Clean all food residues from
around spark electrode. Do not use steel wool;
small bits of steel wool will short out the electrode.
Rinse well.
(on sealed burners only)
may be
(continued next page)
23
Page 24
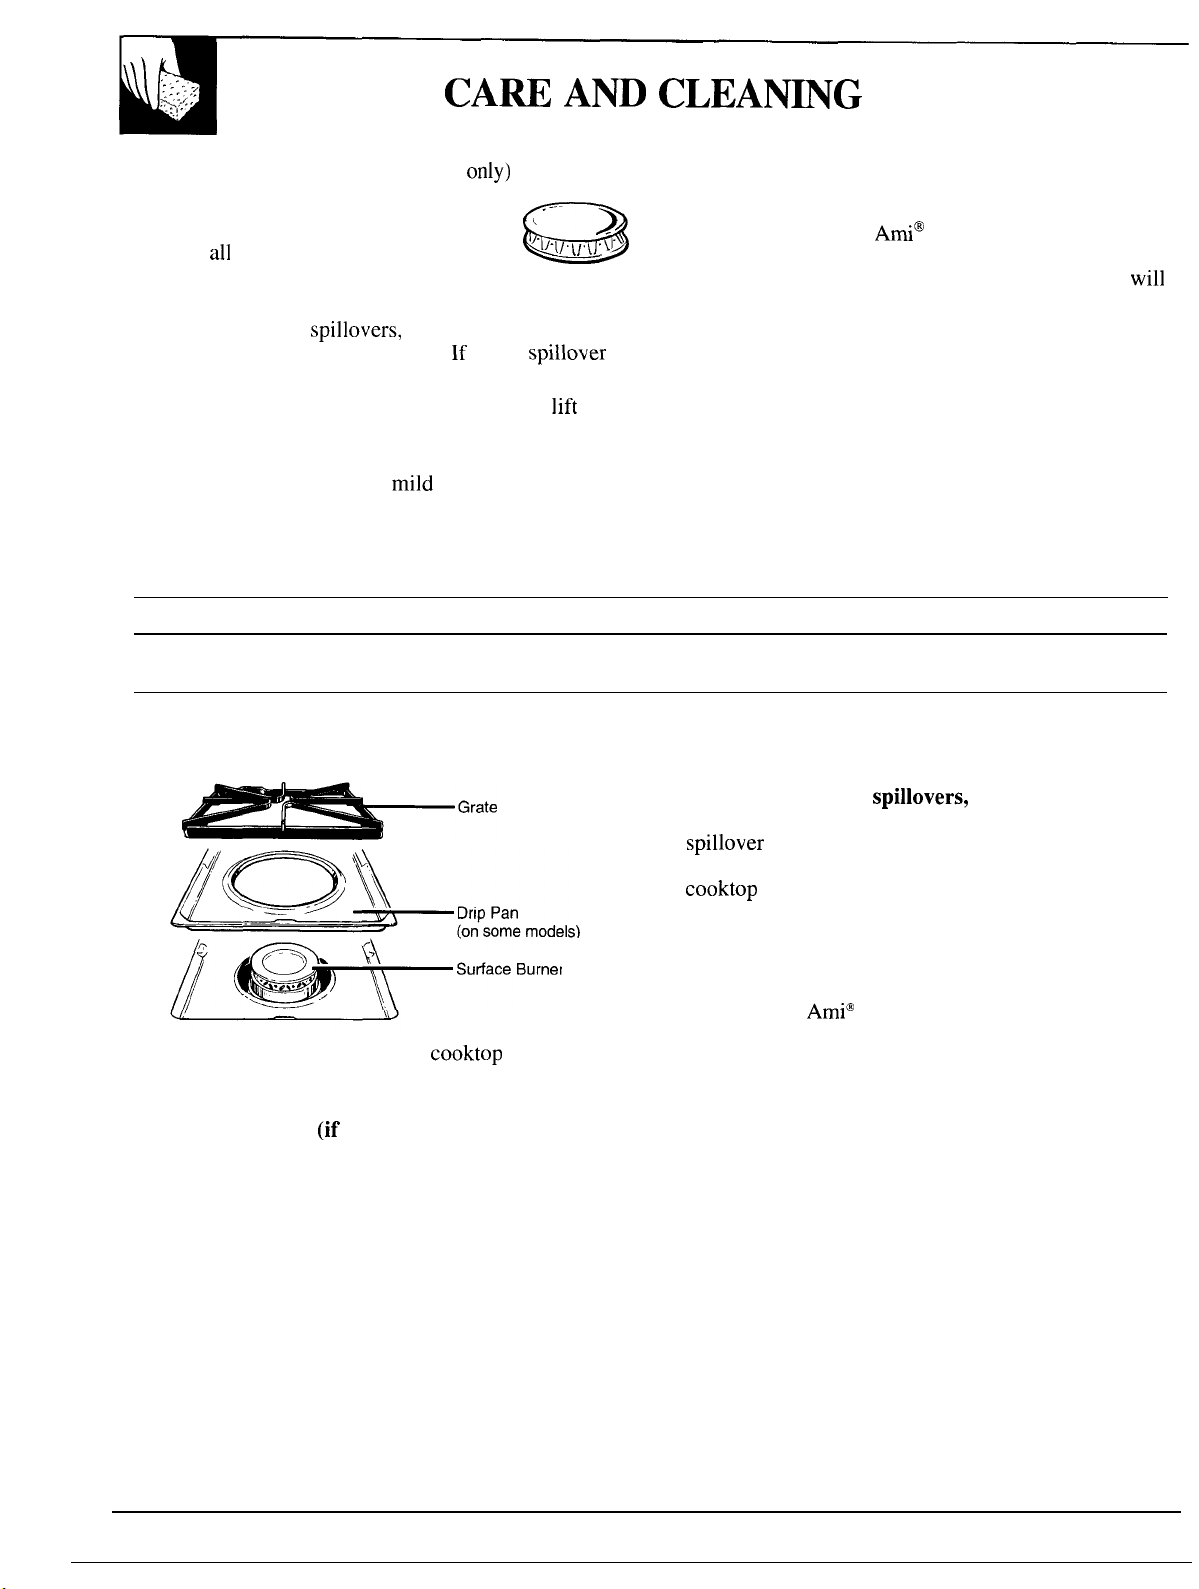
(continued)
Burner Heads
The holes in the burners of your range, ,---and the spark electrodes, must be kept
clean at
an even, unhampered flame.
You should clean the burner heads routinely,
especially after bad
these holes. Wipe off burner heads.
occurs, remove burner heads from range.
Remove the burner grate and burner cap. Then
burner head straight up.
To get rid of burned-on food, soak the burner head
upside-down in a solution of
hot water. Soak the burner head for 20 to 30 minutes.
If the food doesn’t rinse off completely, scrub it with
soap and water and a soft brush or plastic scouring pad.
CAUTION: DO NOT OPERATE THE BURNER WITHOUT ALL BURNER PARTS AND DRIP PANS
(IF SO EQUIPPED) IN PLACE.
times for proper ignition and
(on sealed burners
which could clog
liquid detergent and
heavy
,
the
For more stubborn stains, use a cleanser like Soft
G
Scrub
brand or Bon
remove any traces of the cleanser that might clog the
burner openings. Do not use steel wool because it
clog the burner openings and scratch the burners. If
the holes become clogged, clean them with a toothpick.
Before putting the burner head back, shake out
excess water and dry it thoroughly by setting it in a
warm oven for 30 minutes. Then place it back in the
range, making sure the pin in the burner base goes in
the hole in the burner head, and that the burner heads
are properly seated and level.
brand. Rinse well to
Dual Burners (on some models)
I
On models with dual burners, the
easy access.
lifts up for
Turn all controls OFF before removing burner
parts and drip pans
The burner grates and drip pans (if so equipped)
can be lifted off, making them easy to clean.
The holes in the surface burners of your range must
be kept clean at all times for proper ignition and an
even, unhampered flame.
so equipped).
You should clean the surface burners routinely,
especially after bad
these holes. Wipe off surface burners. If heavy
occurs, remove the surface burners from
range. Burners lift out for cleaning. Lift up the
and then lift out the surface burners.
To remove burned-on food, soak the surface burner
in a solution of mild liquid detergent and hot water.
Soak the surface burner for 20 to 30 minutes. For
more stubborn stains, use a cleanser like Soft Scrub”
brand or Bon
traces of the cleanser that might clog the surface
burner openings. Do not use steel wool because it will
clog the surface burner openings and scratch the
surface burners. If the holes become clogged, clean
them with a toothpick.
Before putting the surface burner back, shake out
excess water and then dry it thoroughly by setting it in
a warm oven for 30 minutes. Then place it back in the
range, making sure it is properly seated and level.
brand. Rinse well to remove any
which could clog
24
Page 25
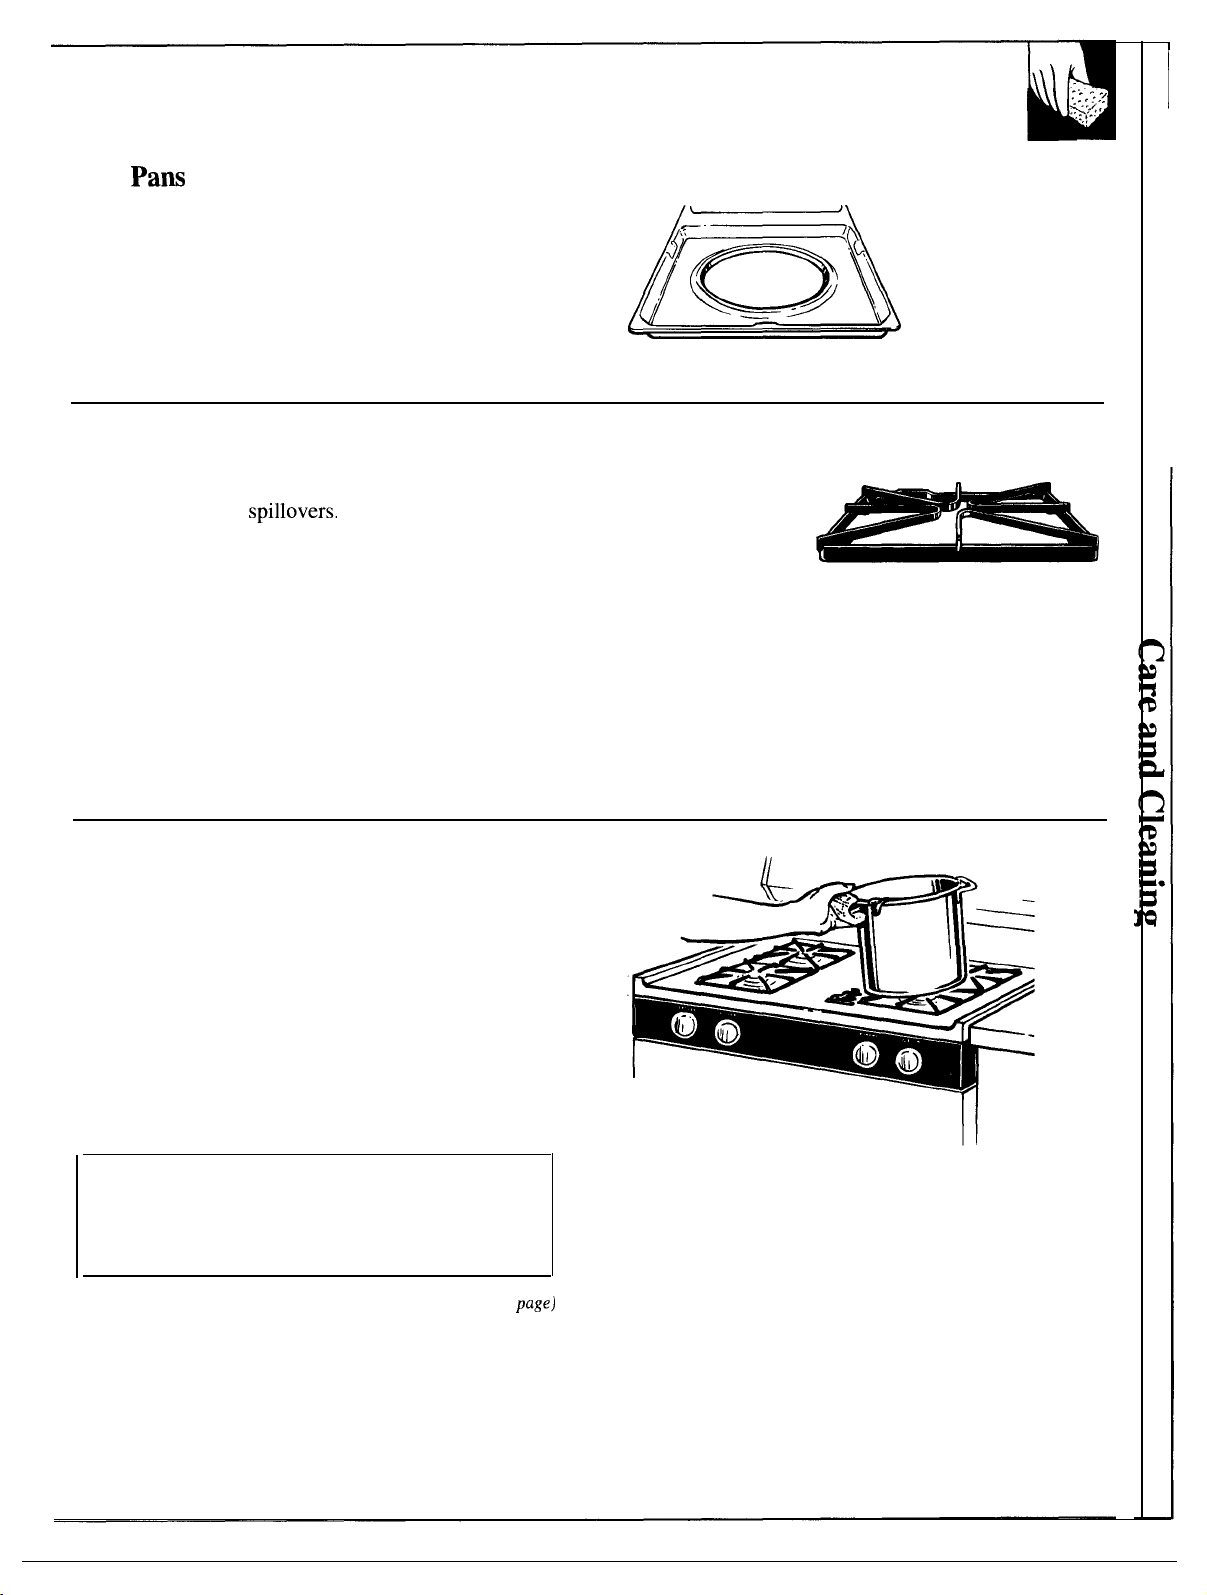
Drip
Remove the grates and lift out the drip pans.
Drip pans can be cleaned in dishwasher or by hand.
To get rid of burned-on food, place the drip pans
in a covered container (or plastic bag) with 1/4 cup
ammonia to loosen the soil. Then scrub with a
soap-filled scouring pad if necessary.
CAUTION: Drip pans cannot be self-cleaned.
(on some models)
Burner Grates
Lift out when cool. Grates should be washed regularly
and, of course, after spillovers. Wash them in hot,
soapy water and rinse with clean water. After cleaning,
dry them thoroughly by putting them in a warm oven
for a few minutes. Don’t put the grates back on the
range while they are wet. When replacing the grates,
be sure they’re positioned securely over the burners.
To prevent rusting on cast iron grates, apply a light
coating of cooking oil on the bottom of the grates.
To get rid of burned-on food, place the grates in
a covered container (or plastic bag) with 1/4 cup
ammonia to loosen the soil. Then scrub with a
soap-filled scouring pad if necessary.
Cooktop Surface
To avoid damaging the porcelain enamel surface of
the cooktop and to prevent it from becoming dull,
clean up spills right away. Foods with a lot of acid
(tomatoes, sauerkraut, fruit juices, etc.) or foods with
high sugar content could cause a dull spot if allowed
to set.
When the surface has cooled, wash and rinse. For
other spills such as fat smatterings, etc., wash with
soap and water once the surface has cooled. Then
rinse and polish with a dry cloth.
Although they’re
durable, the grates
will gradually lose
their shine,
regardless of the
best care you can give them. This is due to their
continual exposure to high temperatures.
Do not operate a burner for an extended period of
time without cookware on the grate. The finish on
the grate may chip without cookware to absorb the heat.
Do not store flammable materials in an oven or
near the cooktop.
materials, gasoline or other flammable vapors and
liquids in the vicinity of this or any other appliance.
Do not store or use combustible
(continued next
25
Page 26
(continued)
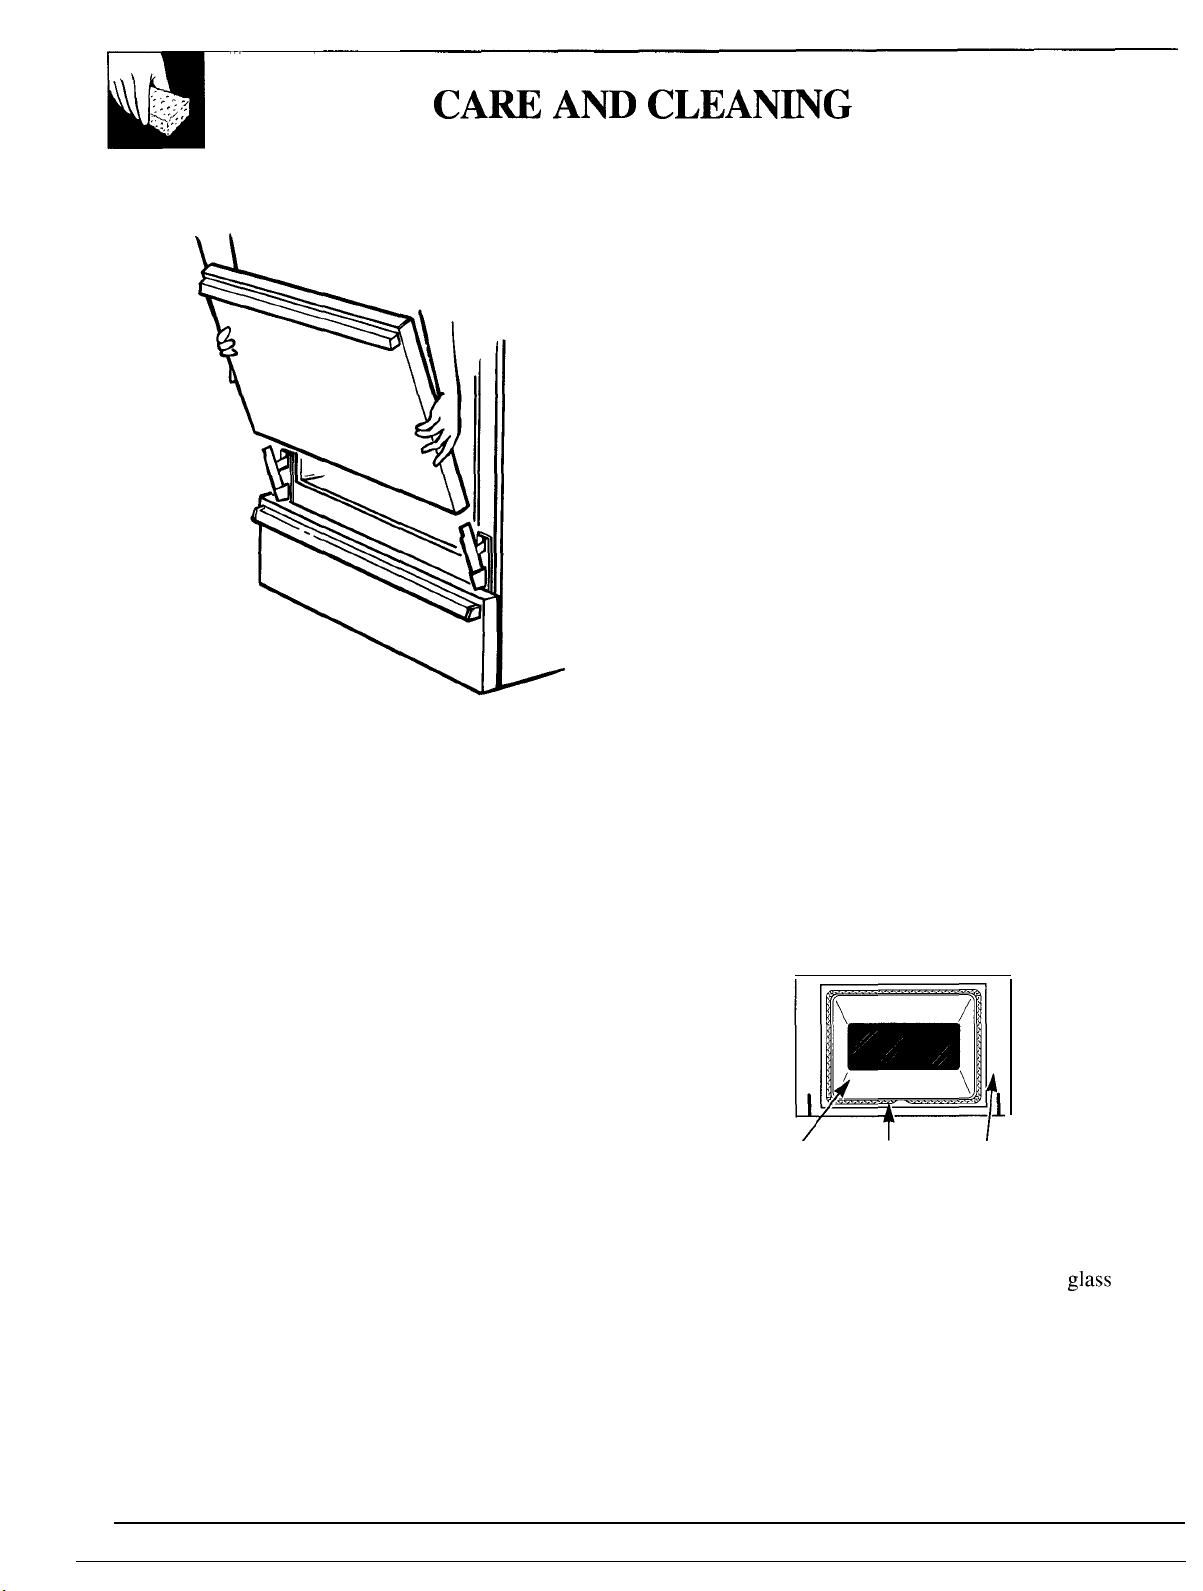
Lift-Off Oven Door
The oven door is removable but it is heavy. You may
need help removing and replacing the door.
To remove the door, open it a few inches to the
special “stop” position that will hold the door open.
Grasp firmly on each side and lift the door straight up
and off the hinges.
NOTE: Be careful not to place hands between the
spring hinge and the oven frame as the spring hinge
could snap back and pinch your fingers.
To replace the door, make sure the hinges are in the
“out” position. Position the slots in the bottom of the
door squarely over the hinges. Then lower the door
slowly and evenly over both hinges at the same time.
TO CLEAN THE DOOR:
(Do not immerse door in water.)
Inside of door:
● Because the area inside the gasket is cleaned during
the self clean cycle, you do not need to clean this by
hand. Any soap left on the liner causes additional
stains when the oven is heated.
● The area outside the gasket can be cleaned with a
scouring pad.
● Do not rub or clean the door gasket–the fiberglass
material of the gasket has an extremely low
resistance to abrasion. An intact and well-fitting
oven door gasket is essential for energy-efficient
oven operation and good baking results. If you
notice the gasket becoming worn, frayed or damaged
in any way or if it has become displaced on the door,
you should have it replaced.
26
inside
Gasket Gasket
Gasket
Outside
Outside of door:
● Use soap and water to thoroughly clean the top,
sides and front of the oven door. Rinse well. You
may also use a glass cleaner to clean the
on
the outside of the door.
● Spillage of marinades, fruit juices, tomato sauces
and basting materials containing acids may cause
discoloration and should be wiped up immediately.
When surface is cool, clean and rinse.
● Do not use oven cleaners, cleansing powders or
harsh abrasives on the outside of the door.
Page 27
Oven Shelves
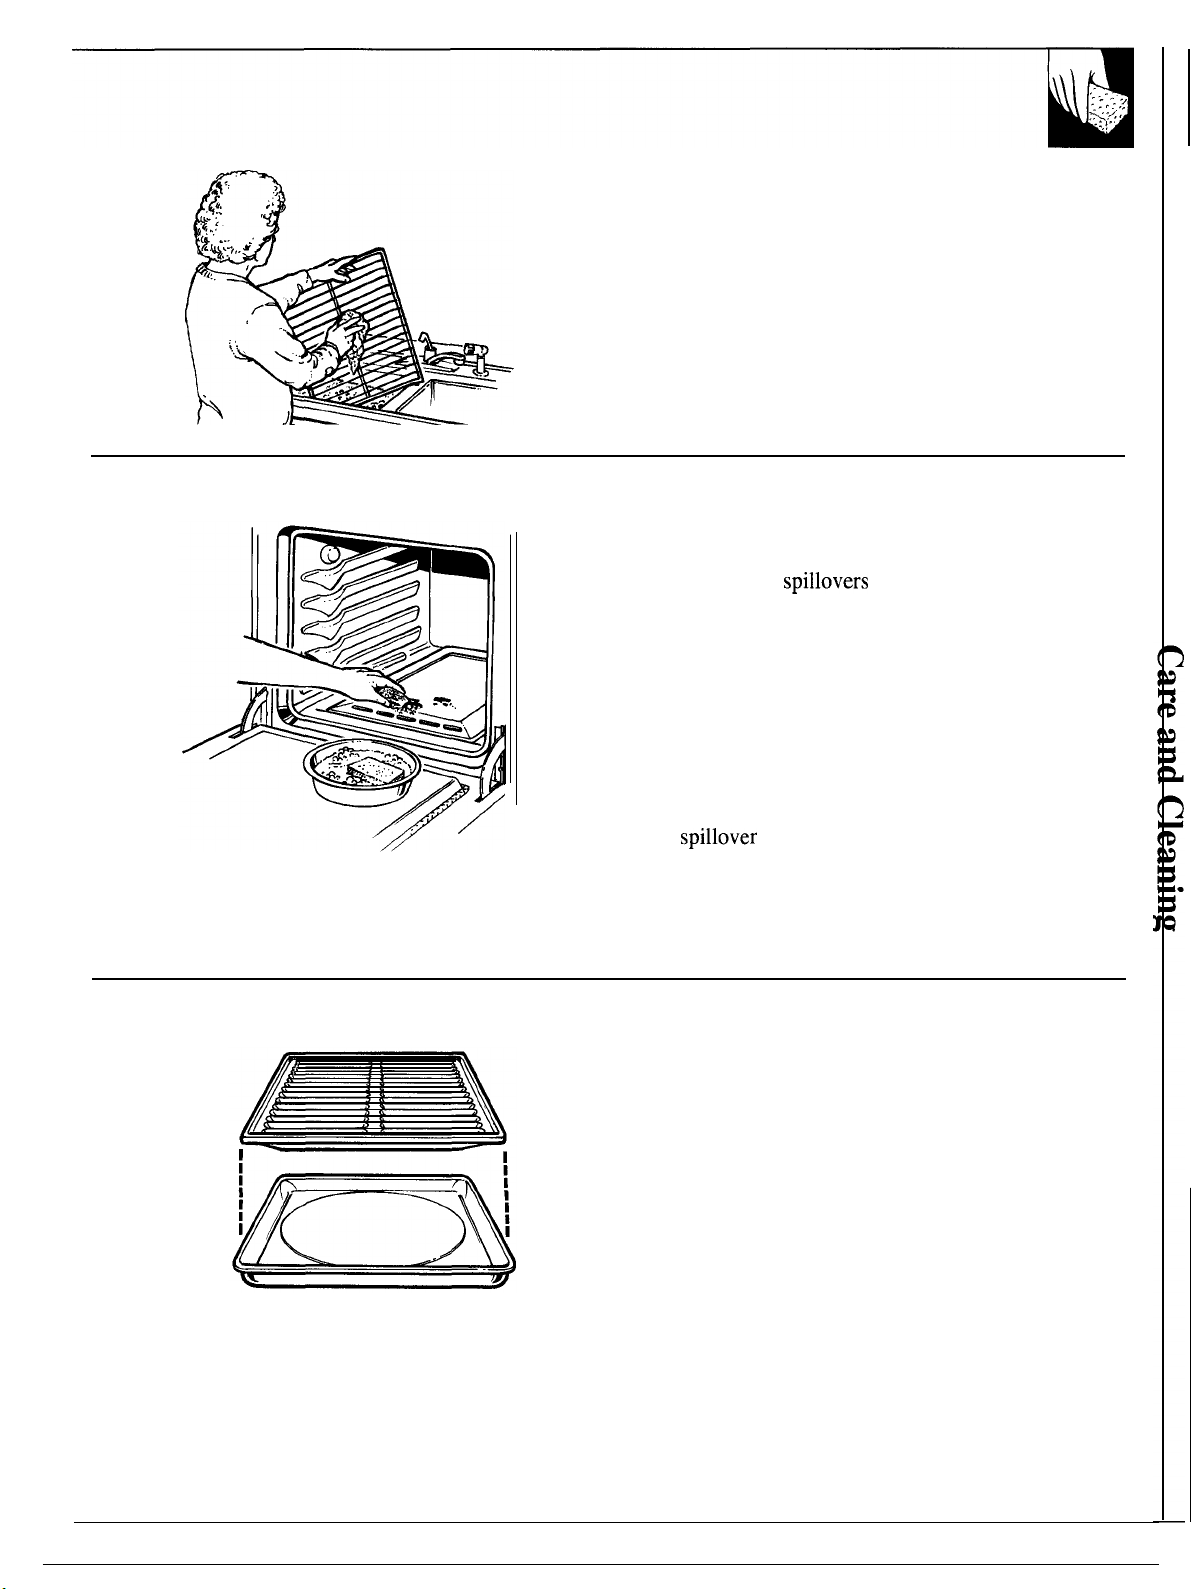
Shelves can be cleaned by hand using soap and water or
with an abrasive cleanser. After cleaning, rinse the
shelves with clean water and dry. To remove heavy,
burned-on soil, you may use scouring pads. After
scrubbing, wash with soapy water, rinse and dry.
Shelves may also be cleaned in self-cleaning oven,
but will discolor and lose some luster. See the SelfCleaning section.
Oven
The oven bottom has a porcelain enamel finish.
To make cleaning easier, protect the oven bottom
from excessive
the shelf below the shelf you are cooking on. You can
use aluminum foil if you do not cover the whole shelf.
This is particularly important when baking a fruit pie
or other foods with a high acid content. Hot fruit
fillings or other foods that are highly acidic (such as
milk, tomatoes or sauerkraut, and sauces with vinegar
or lemon juice) may cause pitting and damage to the
porcelain enamel surface and should be wiped up
immediately. Take care not to touch hot portion of
oven.
If a
the oven to cool first. You can then clean the oven
bottom with soap and water, an abrasive cleanser or
scouring pads.
●
Bottom
by placing a cookie sheet on
does occur on the oven bottom, allow
Rinse well to remove any soap before self-cleaning.
Broiler Pan and Rack
After broiling, remove the broiler pan and rack
from the oven. Remove the rack from the pan.
Carefully pour out the grease in the pan into a
proper container.
If food has burned on, sprinkle the rack with detergent
while hot and cover with wet paper towels or a
dishcloth. That way, burned-on foods will soak loose
while the meal is being served.
Wash; scour if necessary. Rinse and dry. The broiler
pan and rack may also be cleaned in a dishwasher.
Do not store a soiled broiler pan and rack anywhere
in the range. Do not clean in self-cleaning oven.
(continued next page)
27
Page 28
(continued)
Lamp Replacement
CAUTION: Before replacing your oven bulb,
disconnect electrical power to the range at the
main fuse or circuit breaker panel. Be sure to let
the lamp cover and bulb cool completely.
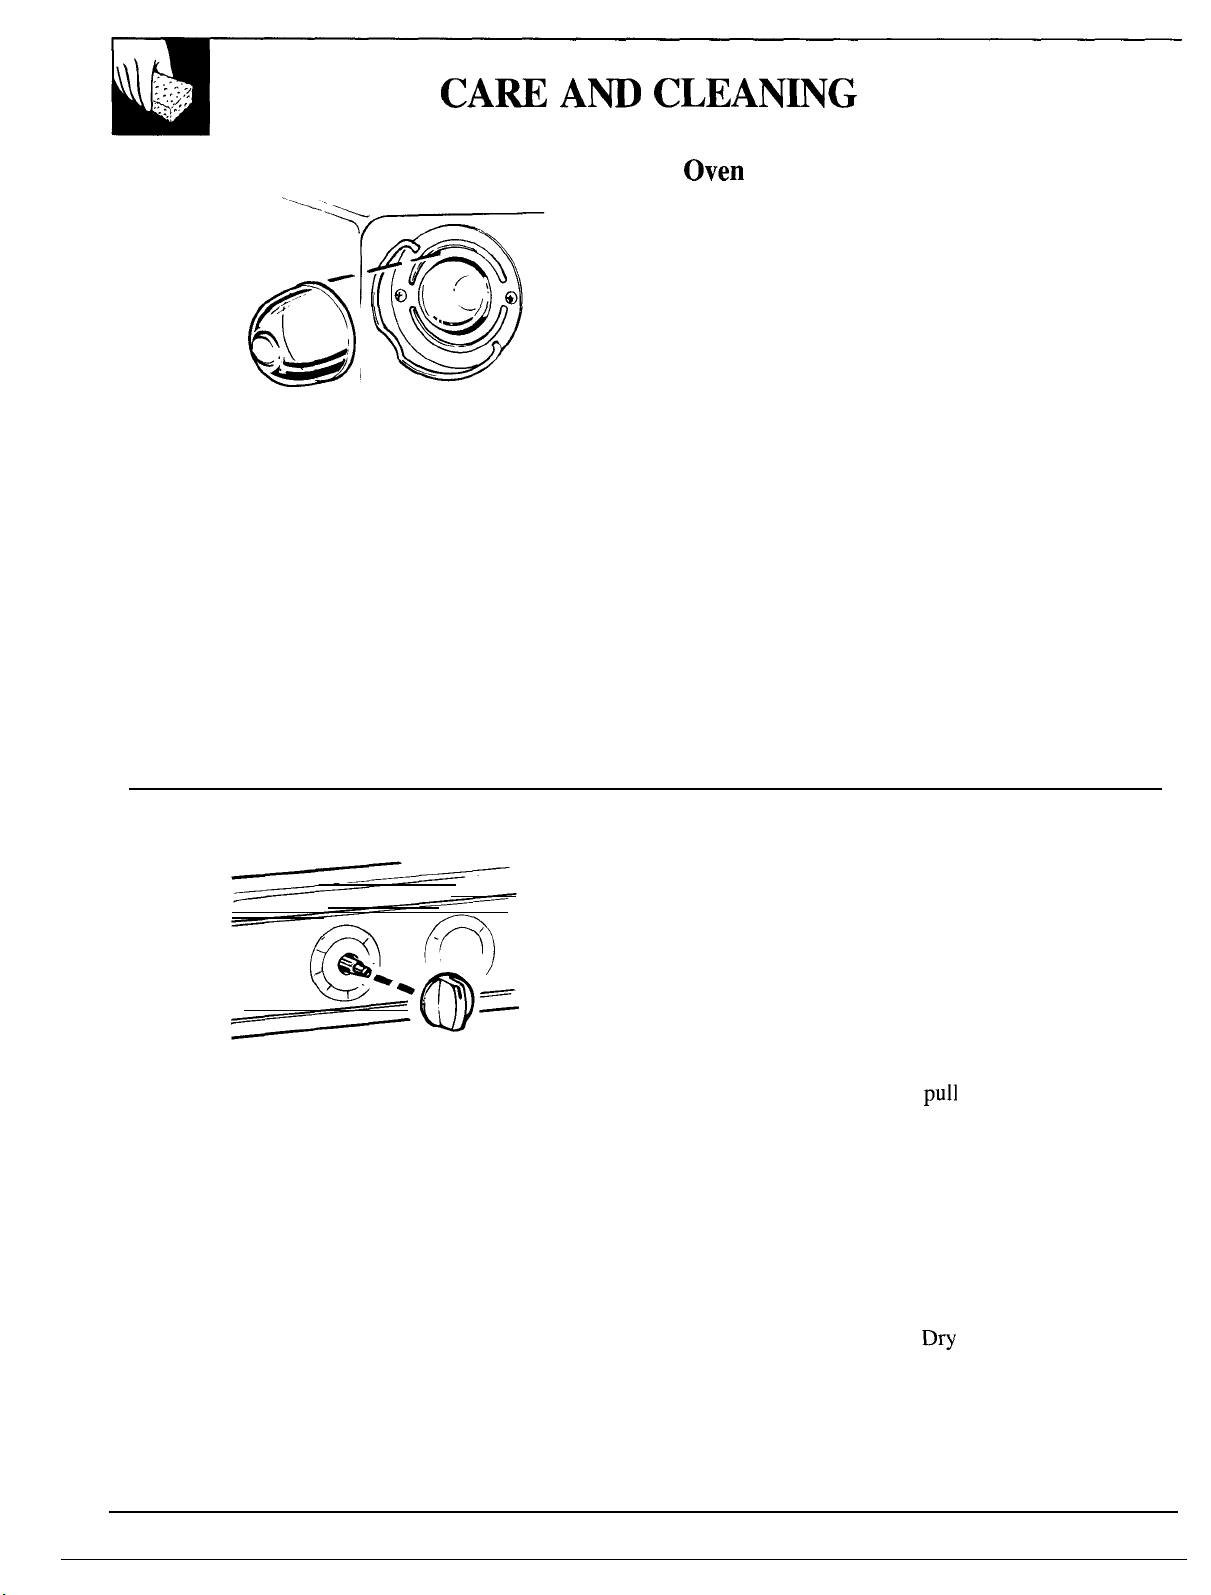
The oven lamp (bulb) is covered with a removable
glass cover that is held in place with a bail-shaped
wire. Remove oven door, if desired, to reach cover
easily.
To
remove:
1. Hold hand under cover so it doesn’t fall when
released. With fingers of same hand, firmly push
back wire bail until it clears cover. Lift off cover.
DO NOT REMOVE ANY SCREWS TO
REMOVE COVER.
2. Do not touch hot bulb with a wet cloth. Replace
bulb with a 40-watt household appliance bulb.
To replace cover:
1. Place it into groove of lamp receptacle. Pull wire
bail forward to center of cover until it snaps into
place. When in place, wire holds cover firmly. Be
certain wire bail is in depression in center of cover.
2. Connect electrical power to the range.
(on some models )
Control Panel and Knobs
It’s a good idea to wipe the control panel after each
use of the oven. Clean with mild soap and water or
vinegar and water, rinse with clean water and polish
dry with a soft cloth.
Do not use abrasive cleansers, strong liquid cleaners,
plastic scouring pads or oven cleaners on the control
panel—they will damage the finish. A 50/50 solution
of vinegar and hot water works well.
The control knobs may be removed for easier
cleaning. To remove knob,
stem. If knob is difficult to remove, place a towel
or dishcloth between the knob and control panel
and pull gently. Wash the knobs in soap and water
or a vinegar and hot water solution but do not soak.
To clean outside glass finish, use a glass cleaner. Do
not allow the water or cleaner to run down inside
openings in the glass while cleaning.
Metal parts can be cleaned with soap and water. Do
not use steel wool, abrasives, ammonia, acids or
commercial oven cleaners.
it straight off the
with a soft cloth.
28
Page 29
Removable Storage Drawer
The storage drawer is a good place to store cookware
and
material in the drawer.
Do not overload the storage drawer. If the drawer is
too heavy, it may slip off the track when opened.
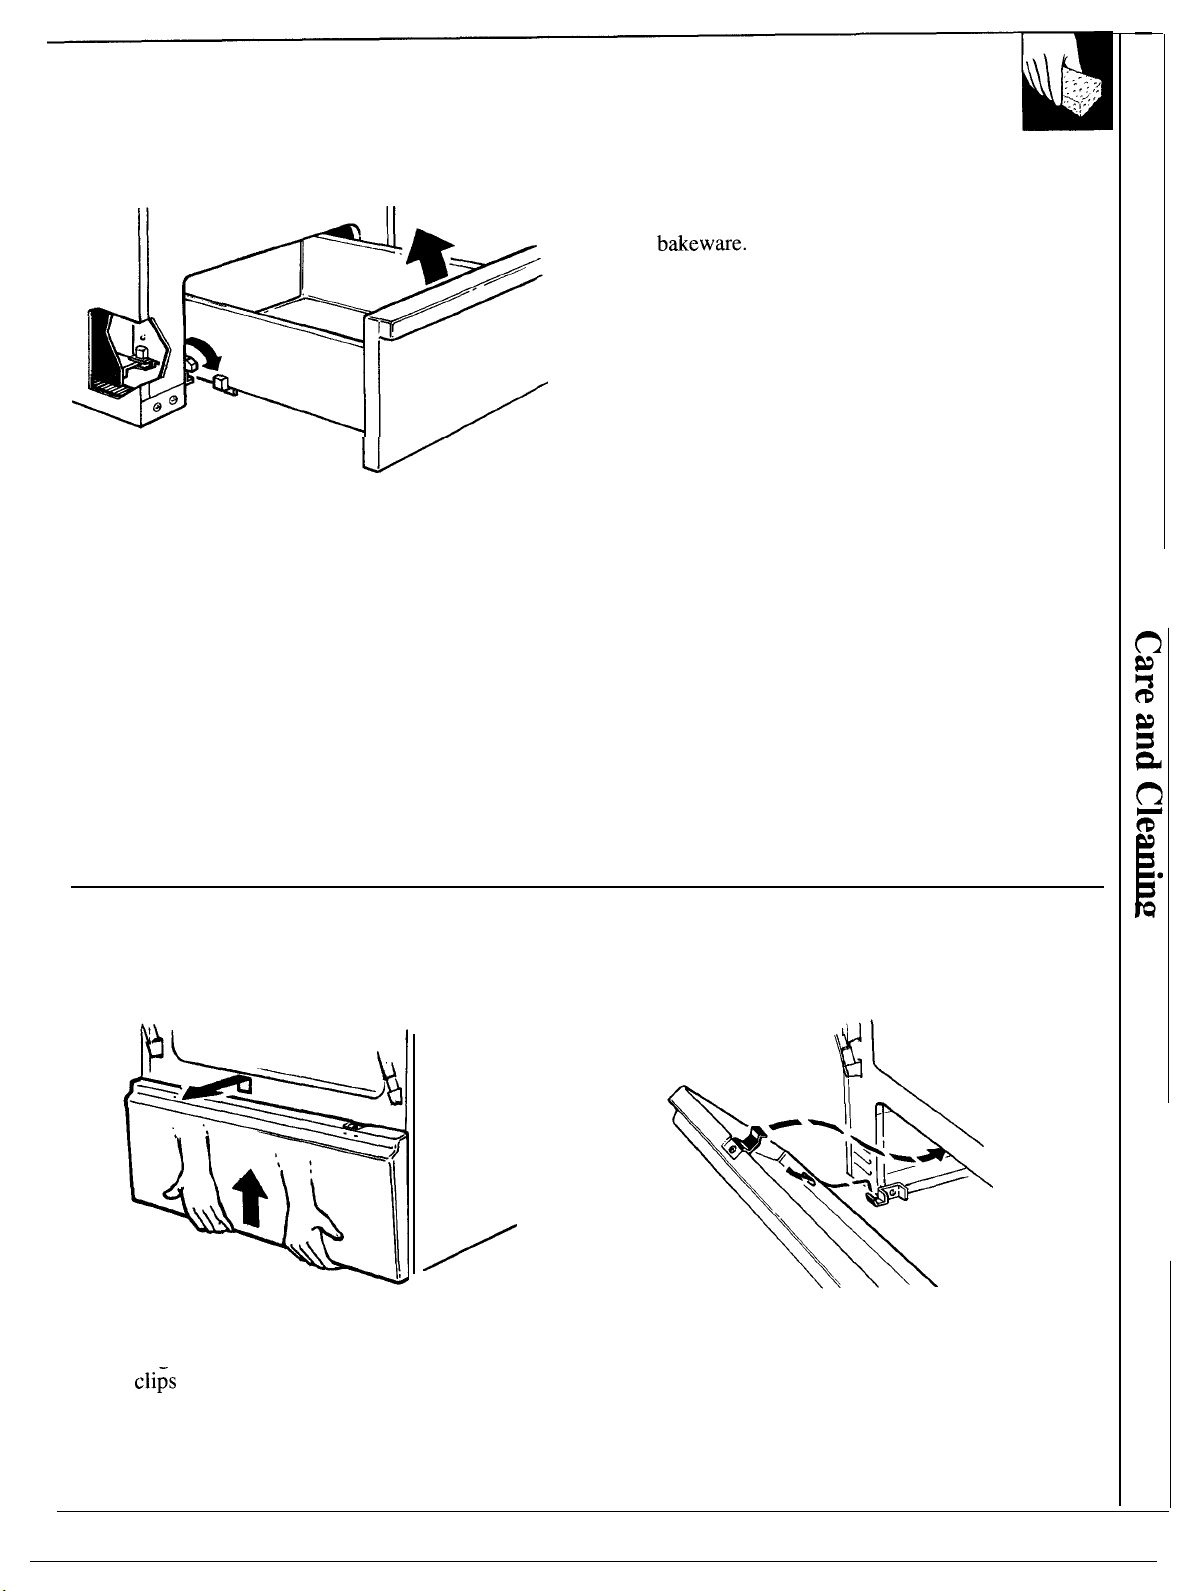
The storage drawer may be removed for cleaning
under the range. Clean the storage drawer with a
damp cloth or sponge. Never use harsh abrasives or
scouring pads
To remove storage drawer:
1.
Pull drawer straight out until it stops.
2. Lift drawer until stops on drawer clear stops on
range.
3. Again pull drawer out until it hits second set of
stops.
4. Tilt front of drawer up and free of range.
To replace storage drawer:
1. Set the stops on the back of the drawer over the
stops in the range.
2. Slide drawer evenly and straight back, so that the
rails in the range are engaged.
3. Push drawer back until second stops on drawer hit
stops in the range. Tilt drawer up and over these.
4. Slide drawer the rest of the way in.
(on some models)
Removable Kick Panel
The kick panel may be removed for cleaning under
the range.
To remove,
disengage the panel from the tabs at the base
of the range. Pull bottom of panel forward until
spring
lift up bottom of panel slightly to
are released at top of panel.
(on some models)
To replace,
onto the two tabs at base of range and push top of
panel forward to engage spring clips.
insert the two slots at bottom of panel
(continued next page)
29
Page 30
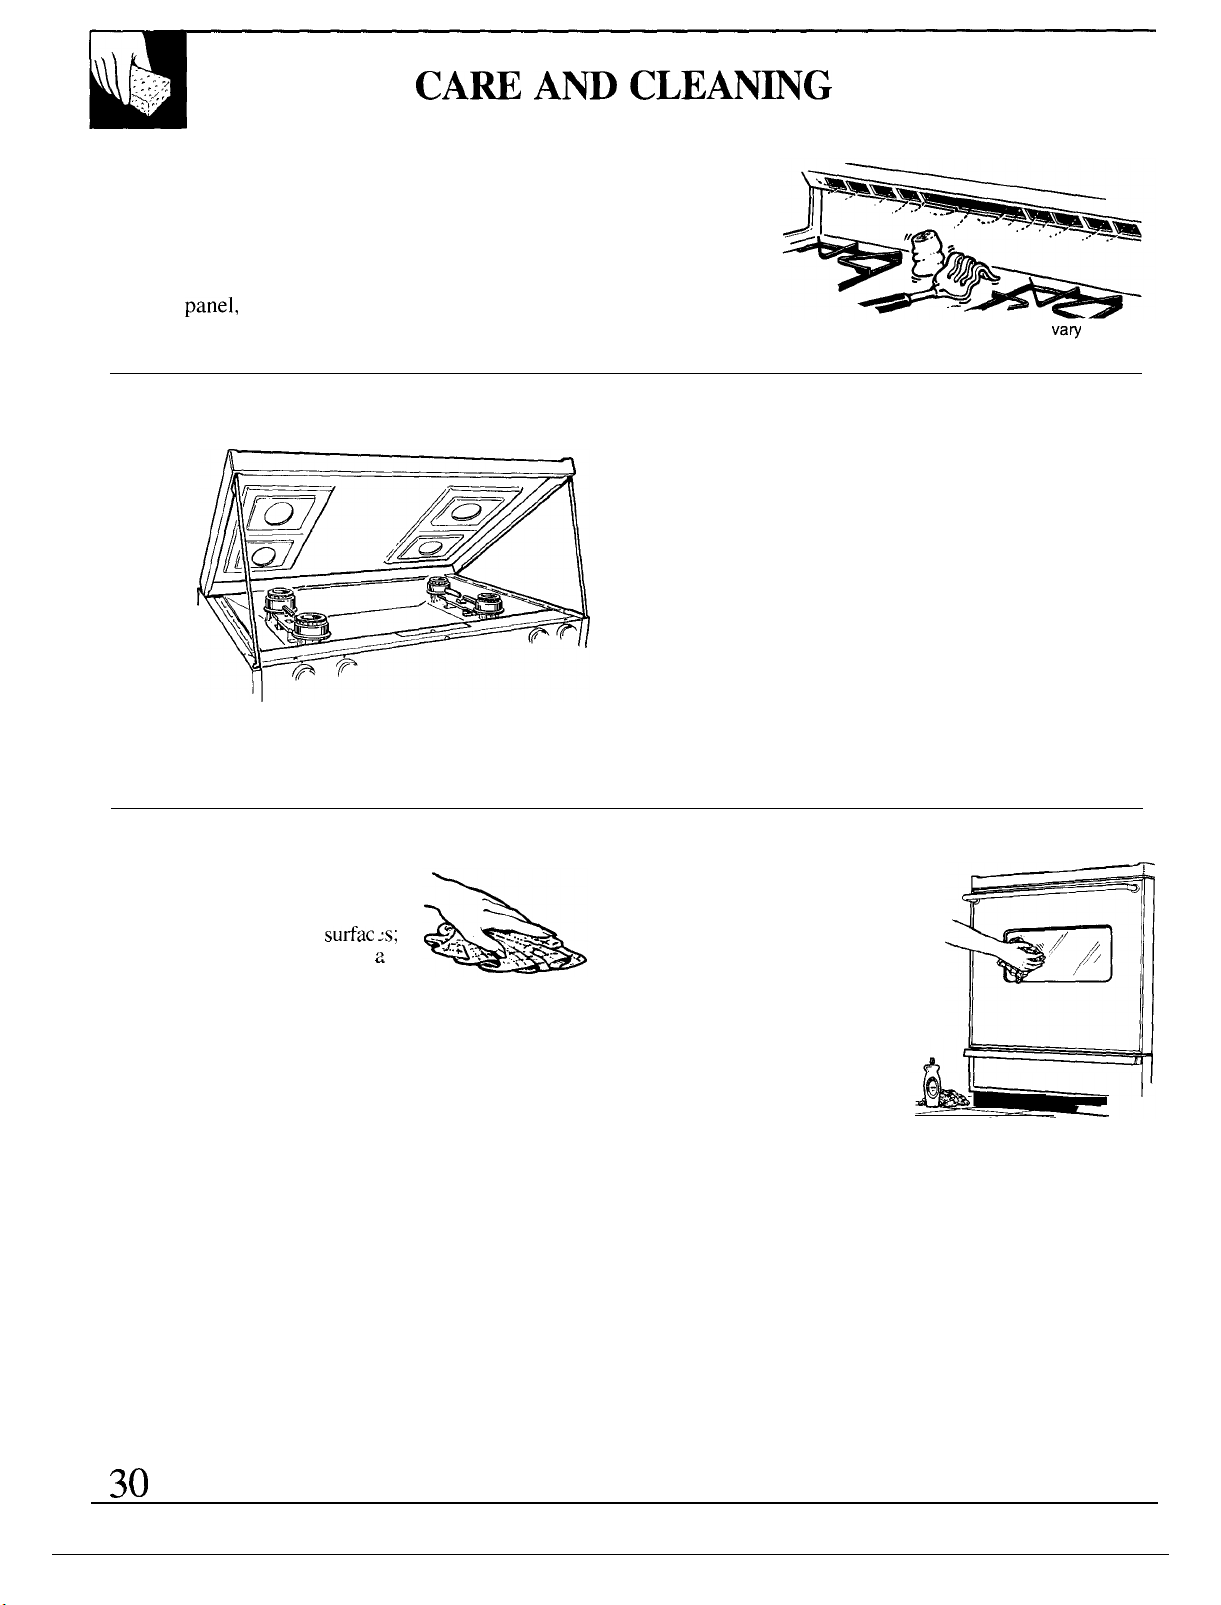
(continued)
Oven Air Vents
Never block the vents (air openings) of the range. They provide the air
inlet and outlet that are necessary for the range to operate properly with
correct combustion. Air openings are located at the rear of the cooktop, at
the top and bottom of the oven door, and at the bottom of the range, under
the kick
storage drawer or broiler drawer (depending on the model).
Vent appearance and location
Metal Parts
Do not use steel wool, abrasives,
ammonia or commercial oven
cleaners. To safely clean
wash, rinse and then dry with
soft cloth.
Lift-up Cooktop
Clean the area under the cooktop often. Built-up soil,
especially grease, may catch on fire.
To make cleaning easier, the cooktop may be lifted up.
To raise the cooktop:
1. Be sure burners are turned off.
2. Remove the grates.
3. Grasp the two front burner wells and lift up.
Some models have dual support rods that will hold the
cooktop up while you clean underneath it.
(on models with dual burners)
After cleaning under the cooktop with hot, soapy
water and a clean cloth, lower the cooktop. Be careful
not to pinch your fingers.
Glass Surfaces
To clean the outside glass
finish, use a glass cleaner.
Rinse and polish with a dry
cloth. Do not allow the
water or cleaner to run
down inside openings in
the glass while cleaning.
Page 31
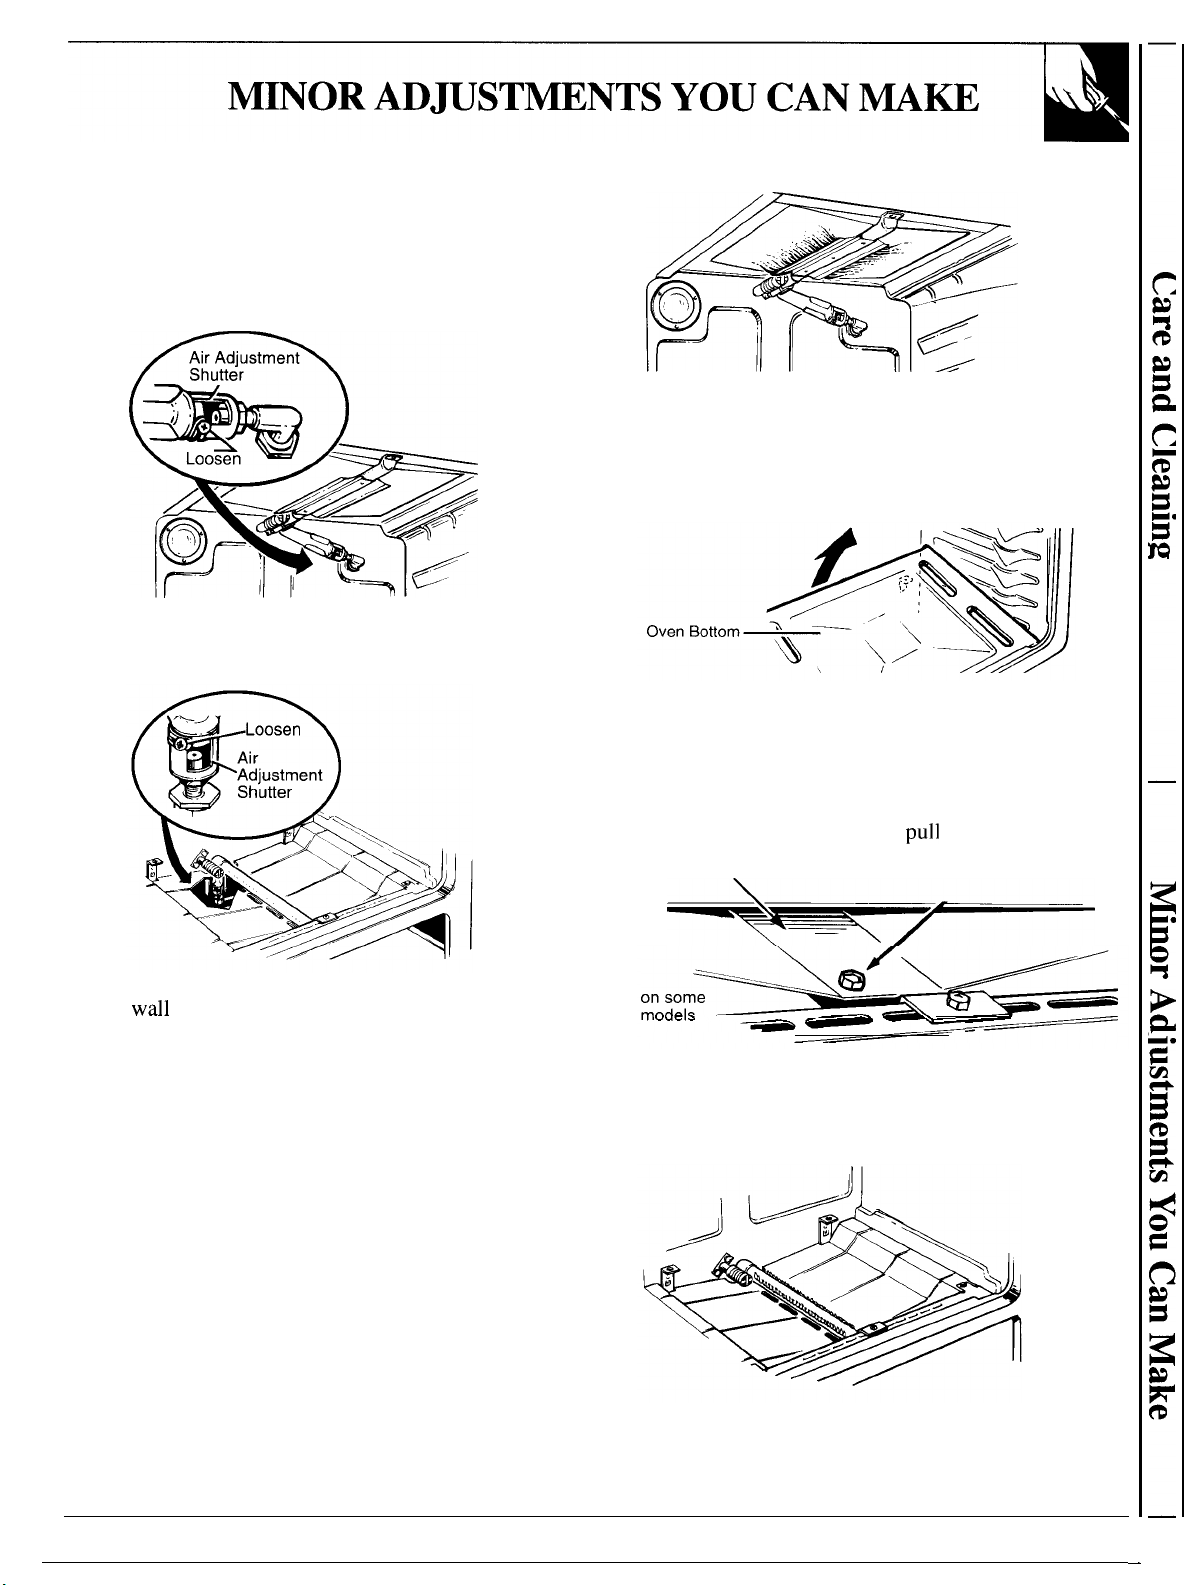
Broil and Bottom Burner Air Adjustment Shutters
The combustion quality of burner flames needs to be
determined visually. See the Installation Instructions
and the Problem Solver sections in this book. Air
adjustment shutters for the top (broil) and bottom
burners regulate the flow of air to the flames.
The flames for the top (broil) burner should burn
steady with approximately 1“ blue cones and should
not extend out over the edges of the burner baffle.
To determine if the bottom burner flames are
proper, remove the oven bottom and the burner
baffle.
The air adjustment shutter for the top (broil) burner
is in the center of the rear wall of the oven.
(See Installation Instructions in this book.)
To remove the oven bottom:
1. Remove the knurled screws holding down rear of
oven bottom.
2. Grasp the oven bottom at finger slots on each side.
3. Lift the rear of the oven bottom enough to clear the
lip of the range frame, then
out.
The shutter for the bottom (oven) burner is near the
back
To adjust the flow of air to either burner, loosen the
Phillips head screw and rotate the shutter to allow
more or less air into the burner tube as needed.
behind the storage drawer, or kick panel.
Burner Baffle
To remove the burner baffle
a nut driver to remove the 1/4” hex head screw shown
in the illustration above. Do not remove any other
screws. Pull baffle straight out until it is free from the
slot that holds it at rear of oven.
The flames should have 1/2” to 3/4” blue cone with no
yellow tipping. When the baffle is back in place, the
flames will resettle.
Remove Screw
(on some models), use
31
Page 32
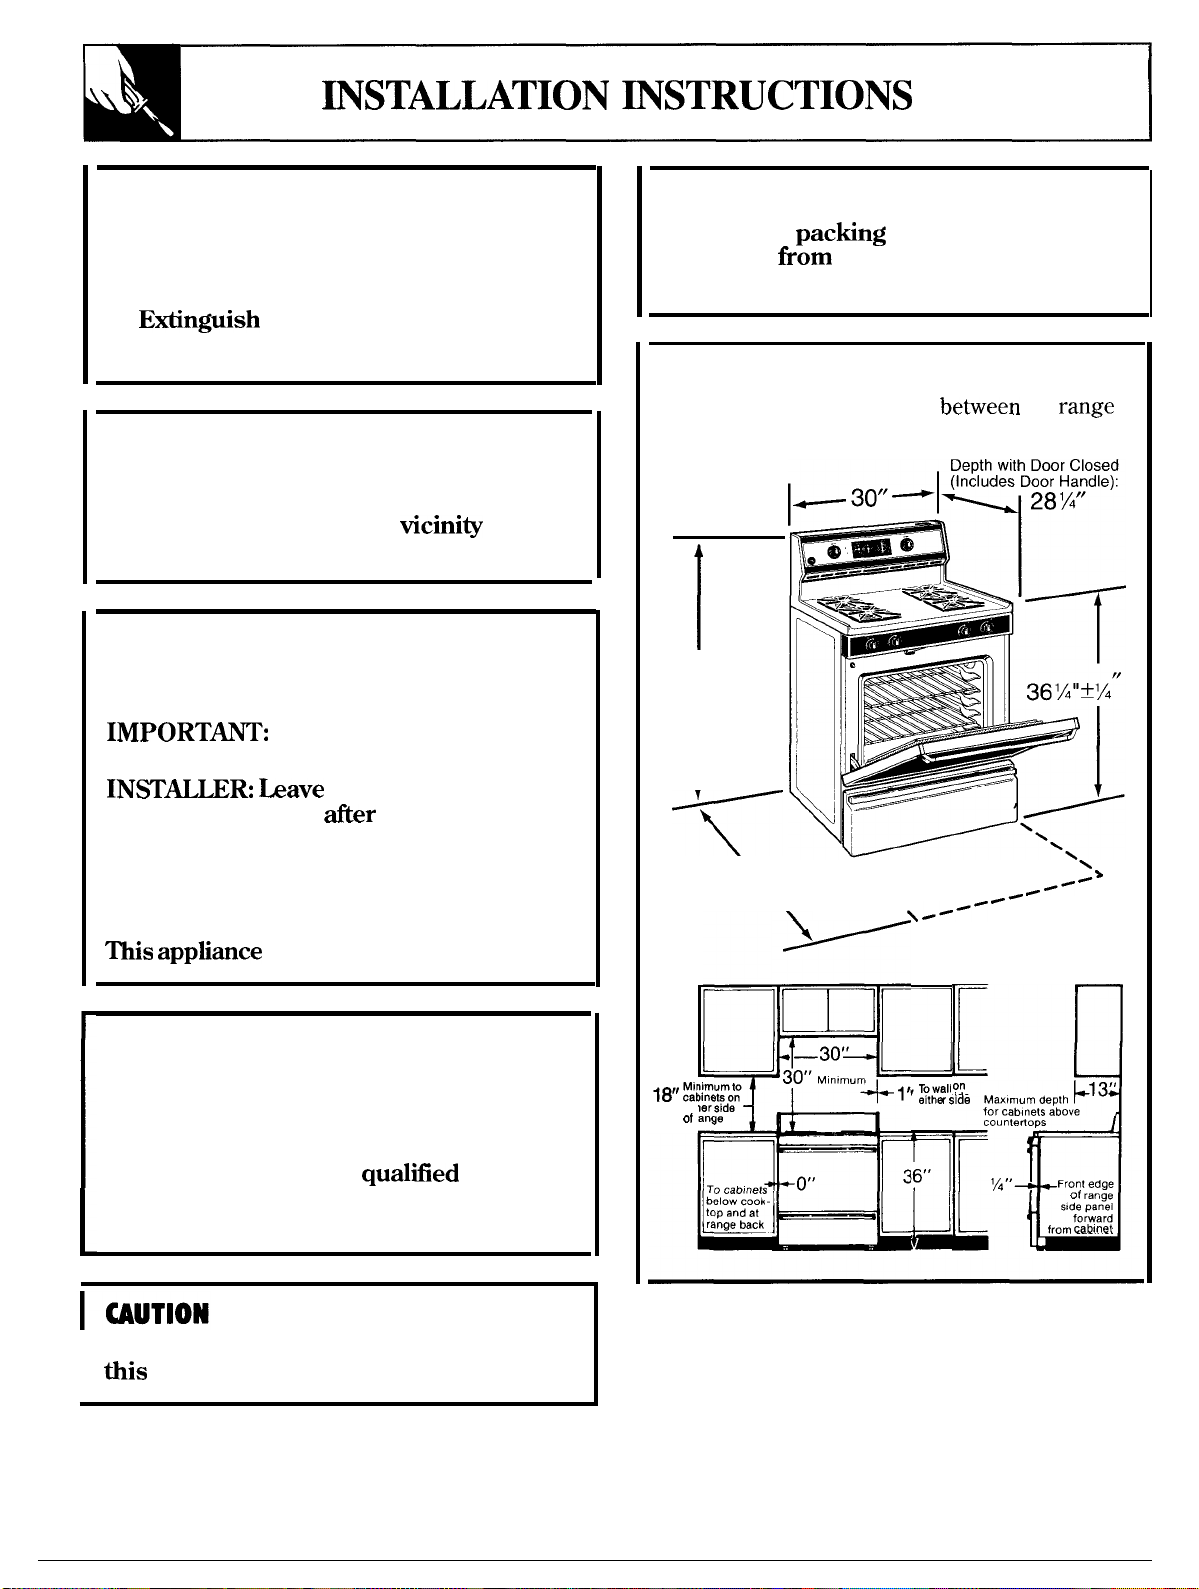
FOR YOUR SAFETY
If you smell gas:
1. Open windows.
2. Don’t touch electrical stitches.
3.
4. Immediately call your gas supplier.
any open flame.
FOR YOUR SAFETY
Do not store or use combustible
materials, gasoline or other flammable
vapors and liquids in the
or any other appliance.
of this
BEFORE YOU BEGIN
Read these instructions completely and
carefully.
Save these instructions
for the local electrical inspector’s use.
with the appliance
completed.
CONSUMER: Keep this Use and Care
Guide and the Instigation Instructions
for future use.
must be properly grounded.
these instructions
installation is
IMPORTANT
Remove all
literature
gas and electrical supply to range.
material and
DIMENSIONS AND CLEARANCES
Provide adequate clearances
and adjacent combustible surfaces.
Height:
461A”
the
I
Depth with Door Open: \,
46%”
\
\
.
WARNING
Improper installation, adjustment,
alteration, service or maintenance can
cause injury or property damage. Refer to
this manual. For assistance or additional
information, consult a
service agency, manufacturer (dealer) or
the gas supplier.
Do not attempt to operate the oven of
I
range during a power failure.
32
either side
range back
—30”
Minimum
o“
36”
‘/4”
Front edge
stale panel
forward
from
Page 33
SAFETY INSTRUCTIONS
Instigation of this range must conform
local codes, or in the absence of
the National Fuel Gas Code, ANSI
2223.1,
must conform
edition. In Canada, initiation
current Natural Gas
Instigation Code,
current Propane Initiation Code,
and
codes
This range has been design-certtiled by the
American Gas Association according to ANSI 221.1,
latest edition and Canadian Gas Association
according to
latest edition. As with
any appliance using gas and generating heat,
there are certain safety precautions you should
follow. You will find these precautions in the
Important Safety Instructions in the front of this
book. Read them carefully.
● Have your range installed by a qualtiled
installer or service technician.
. Your range must be electrically grounded in
accordance with local codes or, in the absence of
local codes, in accordance with the National
Electrical Code
In Canada, electrical grounding must be in
accordance with the current
Electrical Code Part 1 and/or local codes. See
Electrical Connections in this section.
. Before installing your range on linoleum or
any other synthetic floor covering, make sure
the floor covering can withstand
shrinking, warping or discoloring. Do not install
the range over carpeting unless a sheet of 1/4”
thick plywood or similar insulator is placed
between the range and carpeting.
● Make sure the wall coverings around the
range can withstand heat generated by the
range up to
● Avoid placing cabinets above the range. To
reduce the hazard caused by reaching over the
open flames of operating burners, install a
ventilation hood over the range that projects
forward at least 5“ beyond the front of the cabinets.
● The ventilating hood must be constructed of
sheet metal not less than 0.0122” thick. Install
above the
than 1/4” between the hood and the underside
of the combustible material or metal cabinet. The
hood must beat least as wide as the
centered over the appliance. Clearance between
the cooking surface
MUST
● If cabinets are placed above the range, allow a
the ventilation hood surface(,
BE
24 INCHES. ,..
minimum clearance of 30” between the cooking
surface and the bottom of unprotected cabinets.
codes,
or the
Canadian
●
a
30”
clearance
overhead combustible material or
between cooking surface
cabinets
cannot be maintained, protect the underside of
the cabinets above the
than 1/4” insulating
with not less
covered with
sheet metal not less than 0.0122” thick.
●
Clearance between the cooking surface and
protected cabinets
BE
THAN 24 INCHES. The vertical distance from
the plane of the cooking surface to the bottom
of adjacent overhead cabinets extending closer
than 1“ to the plane of the range sides must not
be less than 18”. (See Dimensions and
Clearances illustration in this section.)
● Caution: Items of interest to children should
not be stored in cabinets above a range or on the
backsplash of a
climbing on the
range to reach items could be seriously injured.
WARNING
ranges can tip and injury
could result. To prevent
accidental tipping of the range,
attach an approved Anti-Tip
device to the wall. (See
Installing the Anti-Tip Device
in this section.) To check if
the device is installed and
engaged properly, carefully
tip the range forward. The
Anti-Tip device should engage
and prevent the range from
tipping over.
If you pull the range out from the wall for any
reason, make sure the Anti-Tip device is engaged
when you push the range back against the wall.
● For your safety, never use your range for warming
or heating the room. Your oven and range top are
not designed to heat your kitchen. Top burners
should not be operated without cookware on the
grate. Such abuse could result in fire and damage
to your range and will void your warranty.
. Do not store or use combustible materials,
gasoline or other flammable vapors and liquids
in the vicinity of this or any other appliance.
Explosions or fires could result.
● Do not use oven for a storage area. Items
stored in the oven can ignite.
● Do not let cooking grease or other flammable
materials accumulate in or near the range.
(continued next page)
33
Page 34
GENERAL
● See Dimensions and Clearances in this section
for all rough-in and spacing dimensions. These
dimensions must be met for safe use of your
range. The location of the electrical outlet and
pipe opening (see Gas Pipe and Electric Outlet
Locations) may be adjusted to meet specific
requirements.
● The range may be placed with O“ clearance
(flush) at the back wall and side walls of
the range.
Do not locate the range where it may be subject
to strong drafts. Any openings in the floor or wall
behind the range should be sealed. Make sure
the openings around the base of the range that
supply fresh air for combustion and ventilation
are not obstructed by carpeting or woodwork.
PROTECT YOUR FLOOR
Your range, like many other household items,
is heavy and can settle into soft floor coverings
such as cushioned vinyl or carpeting. Use care
when moving the range on this type of flooring.
It is recommended that the following simple and
inexpensive instructions be followed to protect
your floor.
The range should be installed on a sheet of
plywood (or similar material).
covering
ends at
front of
that the range will rest on should be built up with
plywood to the same level or higher than the
floor covering. This will allow the range to be
moved for cleaning or servicing.
the floor
the area
TOOLS YOU WILL NEED
● Phillips and flat-blade screwdrivers
● Pencil and ruler
● Two pipe wrenches (one for backup)
●
open-end or adjustable wrench
● Nut drivers or wrenches: 3/16” and 1/4”
ADDITIONAL MATERIALS YOU MAY NEED
●
Gas line shut-off valve
● Pipe joint sealant or
tape with Teflon* that resists action of natural
I
and
●
A 5-foot length is recommended for ease of
installation but other lengths are acceptable.
Never use an old connector when installing a
new range.
● Flare union adapter for connection to gas
supply line (3/4” or 1/2”
● Flare union adapter for connection to pressure
gases
metal appliance connector
regulator on range (1/2”
*Teflon: Registered trademark of DuPont
●
Remove all tape and packaging. Lift up the
(on models with dual burners) and
remove any packing material under it. Make sure
the dual burners are properly seated and level.
● Remove plastic film that covers some chrome
parts (around oven door, side trim).
● Take the accessory pack out of the oven.
● Check to be sure that no range parts have
come loose during shipping.
pipe thread
(1/2”
1/2” I. D.)
1/2” I. D.)
I. D.)
MODEL AND SERIAL NUMBER
Depending on your range, you’ll find the model
and serial numbers on a label on the front frame
of the range, behind the storage drawer, kick
panel or broiler drawer.
34
Page 35
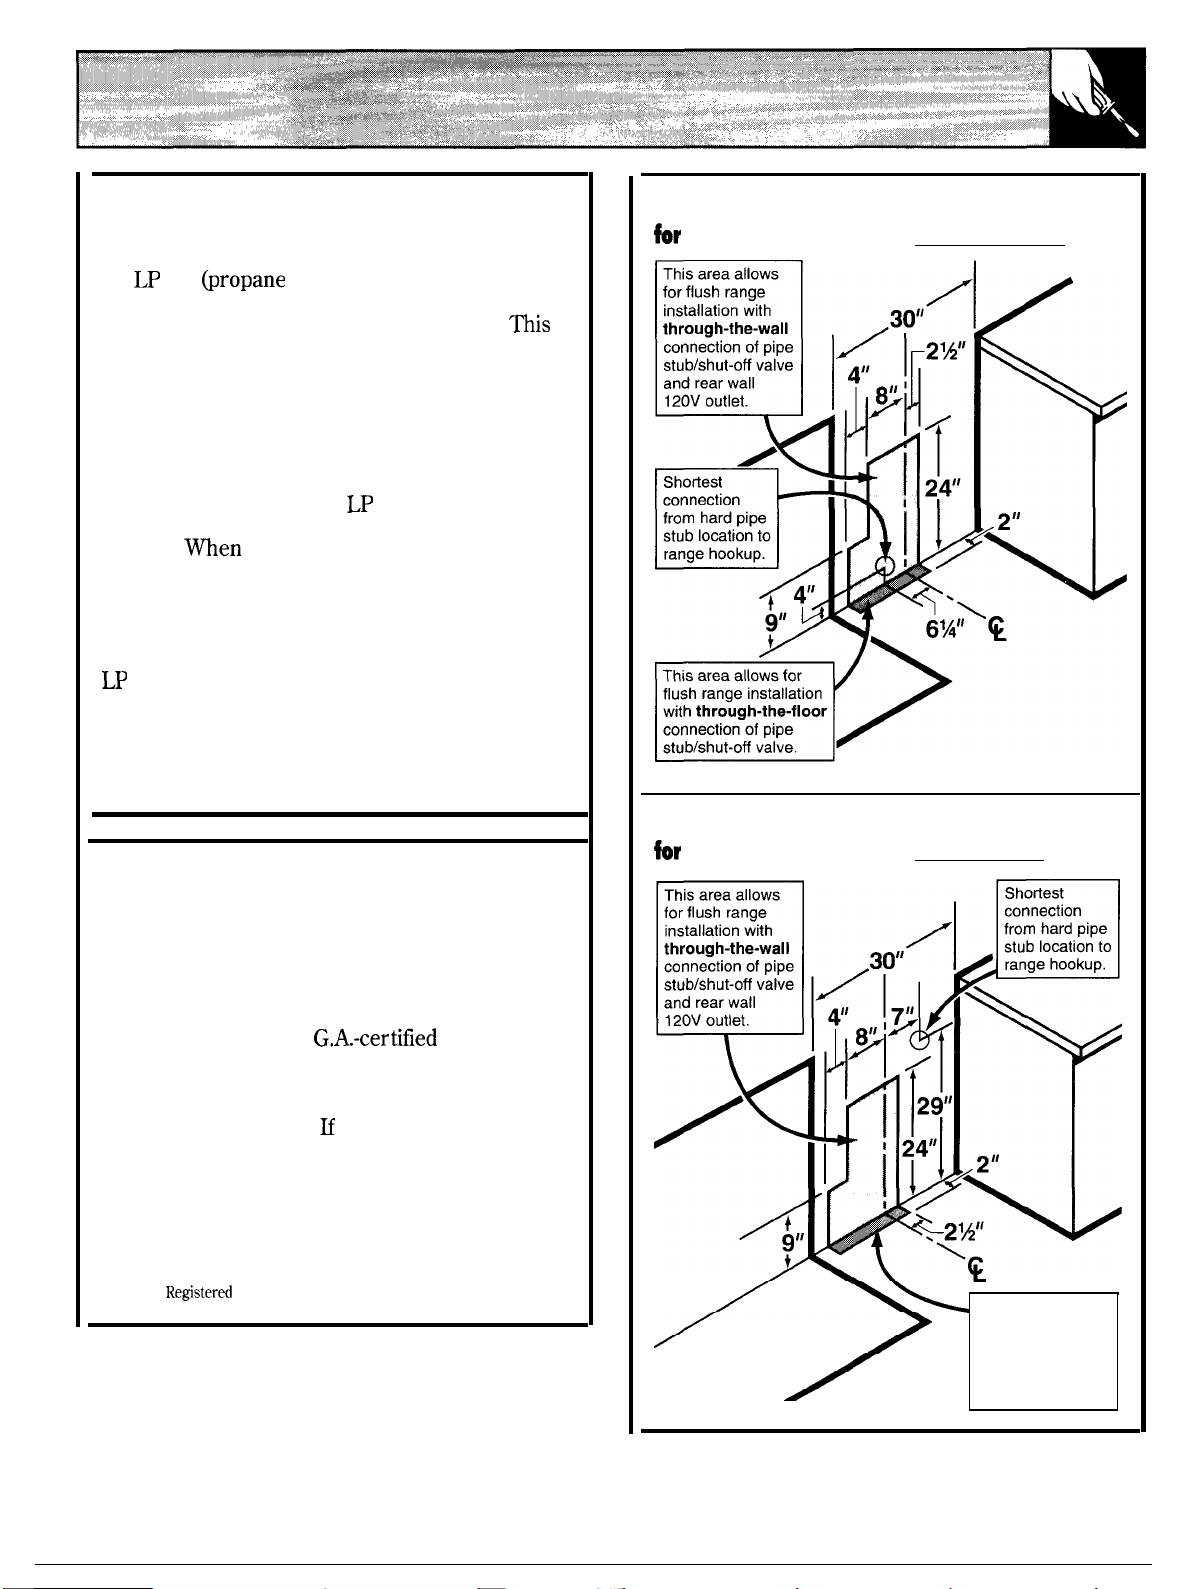
❑ pROVIDE ADEQuATE GAS SUPPLY
Your range is designed to operate at a pressure
of 4“ of water column on natural gas or, if designed
for
gas
column. Make sure you are supplying your range
with the type of gas for which it is designed.
range is convertible for use on natural or propane
gas, if you decide to use this range on a different
type of gas, conversion adjustments must be made
by a service technician or other qualified person
before attempting to operate the range on that gas.
For proper operation, the pressure of natural gas
supplied to the regulator must be between 4“ and
13” of water column. For
supplied must be between 10” and 13” of water
column.
the regulator, the inlet pressure must beat least
1“ greater than the operating (manifold) pressure
as given above. The pressure regulator located
at the inlet of the range manifold must remain in
the supply line regardless of whether natural or
gas is being used. A flexible metal appliance
connector used to connect the range to the gas
supply line should have an I.D. of 1/2” and be
5 feet in length for ease of installation. In Canada,
flexible connectors must be single wall metal
connectors no longer than 6 feet in length.
❑
CONNECT
Shut off the main gas supply valve before
disconnecting the old range and leave it off until
new hook-up has been completed. Don’t forget
to relight the pilot on other gas appliances when
you turn the gas back on.
Because hard piping restricts movement of the
range, the use of an A.
metal appliance connector is recommended
unless local codes require a hard-piped
connection. Never use an old connector when
installing a new range.
is used, you must carefully align the pipe; the
range cannot be moved after the connection
is made.
To prevent gas leaks, put pipe joint compound
on, or wrap pipe thread tape with Teflon*
around, all male (external) pipe threads.
*Teflon:
or butane), 10” of water
gas, the pressure
checking for proper operation of
THE RANGE TO GAS
flexible
the hard piping method
trademark of DuPont
Gas Pipe and Electric Outlet Locations
Models Equipped with Sealed Burners
Gas Pipe and Electric Outlet Locations
Models Equipped with Dual Burners
This area allows
for flush range
installation with
through-the-floor
connection of pipe
stub/shut-off valve.
(continued next page)
35
Page 36
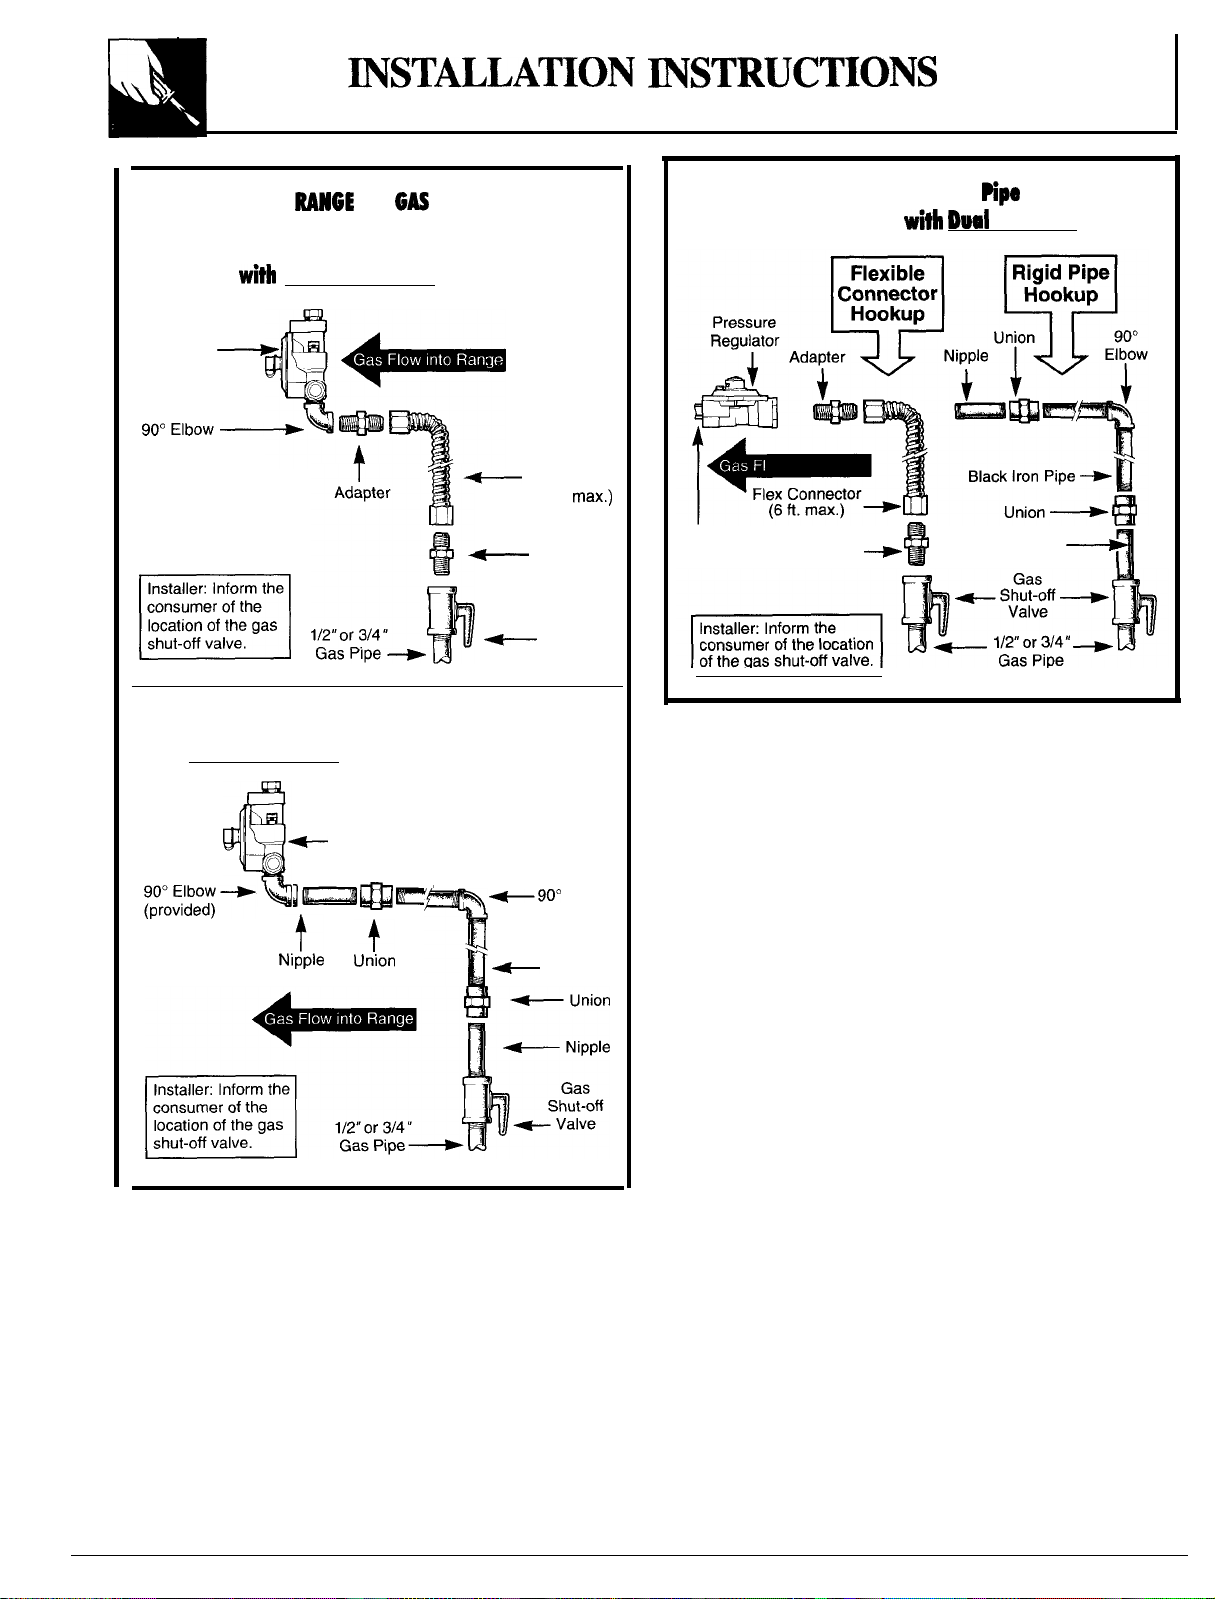
(continued)
CONNECT THE
TO
(continued)
Flexible Connector Hookup for Models
Equipped
Pressure
Regulator
(provided)
Sealed Burners
●
0- e-
Adapter
Flex
Connector
(6 ft.
Adapter
Gas
Shut-off
Valve
Rigid Pipe Hookup for Models Equipped
with Sealed Burners
Flexible Connector and Rigid
for Models Equipped
Manifold Pipe
Adapter
Hookups
Burners
Nipple
Pressure
Regulator
●
.
Elbow
Black
Iron Pipe
36
Page 37
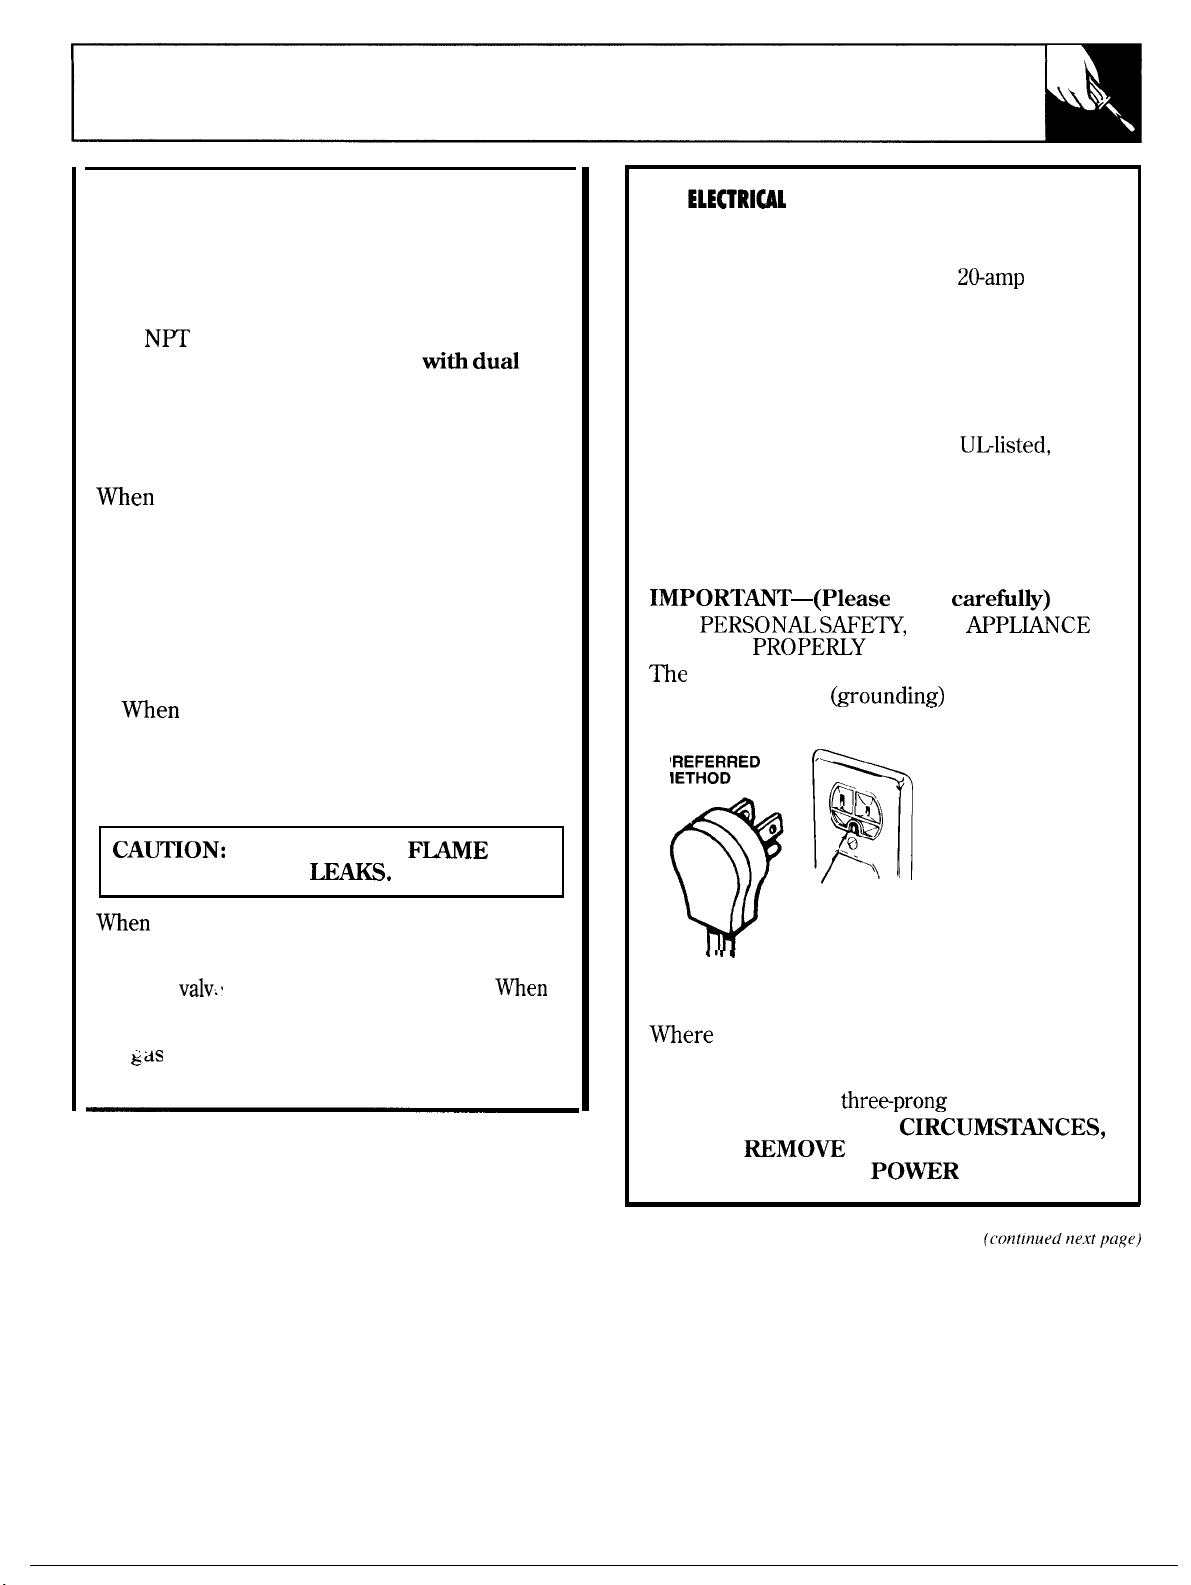
1.
Install a manual gas line shut-off valve in the
gas line in an easily accessed location outside of
the range. Make sure everyone operating the
range knows where and how to shut off the gas
supply to the range.
2. Install male 1/2” flare union adapter to the
1/2”
regulator. On models equipped
burners,
the 1/2” flare union adapter to the
internal thread elbow at inlet of
install the male pipe thread end of
1/2” NPT
internal thread at inlet of pressure regulator.
Use a backup wrench on the regulator
to avoid damage.
installing the range from the front,
remove
the 90° elbow for easier installation.
3. Install male 1/2” or 3/4” flare union adapter
to the NPT internal thread of the manual shutoff valve, taking care to back-up the shut-off
valve to keep it from turning.
4. Connect flexible metal appliance connector
to the adapter on the range. Position range
to permit connection at the shut-off valve.
5.
all connections have been made, make
sure all range controls are in the off position and
turn on the main gas supply valve. Use a liquid
leak detector at all joints and connections to
check for leaks in the system.
DO NOT USE A
CHECK FOR GAS
fitting
TO
using test pressures greater than 1/2 psig
to pressure test the gas supply system of the
residence, disconnect the range and individual
shut-off
using test pressures of
gas supply system, simply isolate the range from
the
shut-off valve.
from the gas supply piping.
1/2
psig or less to test the
❑
Electrical Requirements
CONNECTIONS
120-volt, 60 Hertz, properly grounded branch
circuit protected by a 15-amp or
circuit
breaker or time delay fuse.
Extension Cord Cautions
Because of potential safety hazards associated
with certain conditions, we strongly recommend
against the use of an extension cord. However,
if you still elect to use an extension cord, it is
absolutely necessary that it be a
3-wire grounding-type appliance extension cord
and that the current carrying rating of the cord
in amperes be equivalent to, or greater than,
the branch circuit rating.
Grounding
read
FOR
MUST BE
GROUNDED.
THIS
power cord of this appliance is equipped
with a three-prong
plug which
mates with a standard three-prong grounding
wall receptacle
PREFERRED ‘
METHOD
.\
to minimize the
possibility of
electric shock
o
hazard from
this appliance.
The customer
ENSURE PROPER
GROUND EXISTS
BEFORE USE
should have the
wall receptacle
and circuit
checked by a
qualified electrician to make sure the receptacle
is properly grounded.
a standard two-prong wall receptacle is
encountered, it is the personal responsibility and
obligation of the customer to have it replaced with
a properly grounded
wall receptacle.
DO NOT, UNDER ANY
CUT OR
PRONG FROM THE
THE THIRD (GROUND)
CORD.
37
Page 38
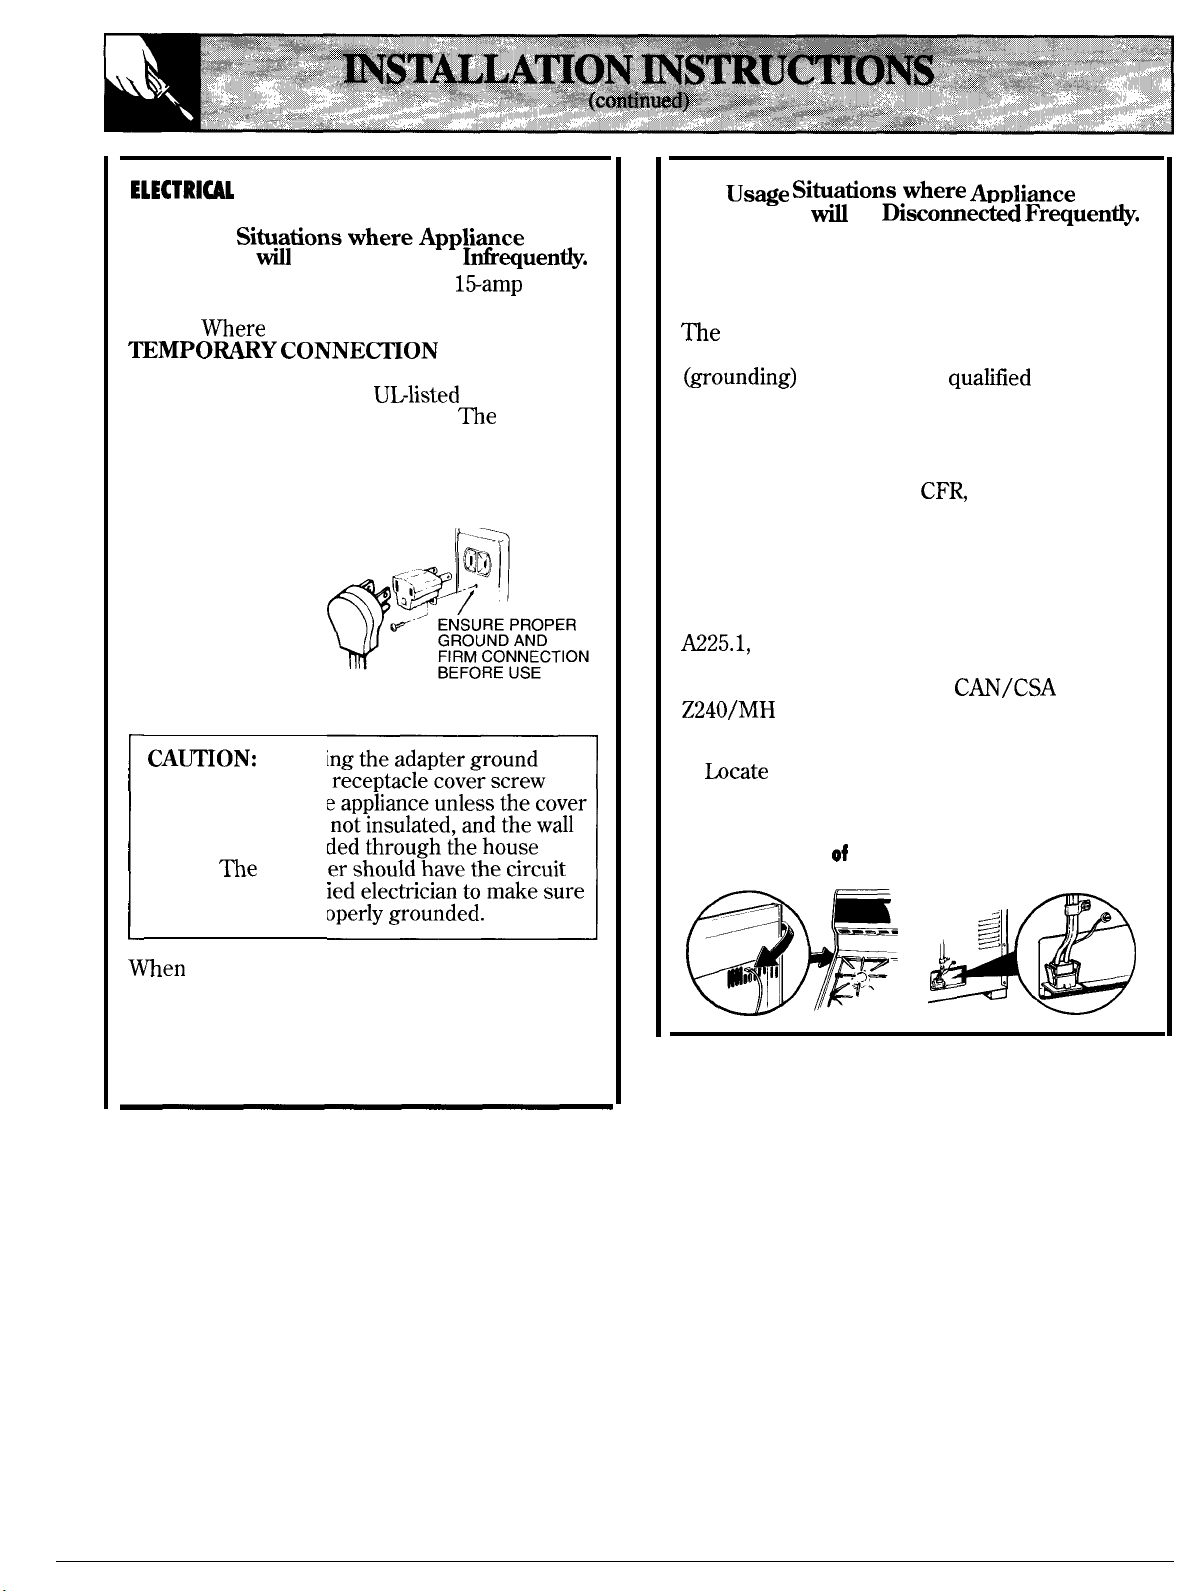
CONNECTIONS
(continued)
❑ USage
Power Cord
An adapter maybe used only on a l~amp
circuit. Do not use an adapter on a 20-amp
circuit.
made to a properly grounded two-prong wall
receptacle by the use of a
available at most hardware stores. The larger
slot in the adapter must be aligned with the
larger slot in the wall receptacle to provide
proper polarity in the connection of the
power cord.
TEMPORARY METHOD
(ADAPTER PLUGS NOT ,..,.
PERMITTED IN CANADA)
ALIGN LARGE
PRONGS/SLOTS
be Disconnected
local codes permit, a
may be
. >
“’ ENSURE PROPER
GROUND AND
FIRM CONNECTION
BEFORE USE
adapter,
---- ,
❑
Power Cord
be
Do not use an adapter plug in these situations
because disconnecting of the power cord
places undue strain on the adapter and leads to
eventual failure of the adapter ground terminal.
wall receptacle replaced with a three-prong
receptacle by a qualtied electrician
before using the appliance.
The installation of appliances designed for
mobile home installation must conform with
the Manufactured Home Construction and
Safety Standard, Title 24
Part 3280
(formerly the Federal Standard for Mobile
Home Construction and Safety, Title 24, HUD,
Part 280) or, when such standard is not
applicable, the Standard for Manufactured
Home Installations, latest edition (Manufactured
Home Sites, Communities and Set-Ups), ANSI
latest edition, or with local codes. In
Canada, mobile home installation must be in
accordance with the current
Attaching the adapter ground
terminal to the wall receptacle cover screw
does not ground the appliance unless the cover
screw is metal, and not insulated, and the wall
receptacle is grounded through the house
wiring.
checked by a qualified electrician to make sure
the receptacle is properly grounded.
disconnecting the power cord from the
adapter, always hold the adapter with one hand.
If this is not done, the adapter ground terminal
is very likely to break with repeated use. Should
this happen, DO NOT USE the appliance until a
proper ground has again been established.
Electric Disconnect
1.
disconnect plug on the range back.
2. Pinch sides of connector and pull out of
range back.
You will have one
these disconnect plugs:
38
Page 39

❑
SEAL
Seal any openings in the wall behind the range
and in the floor under the range when hookups
are completed.
❑
CHECK SURFACE BURNER IGNITION
Operation of all cooktop and oven burners
should be checked after range and gas supply
lines have been carefully checked for leaks.
Push in one of the surface burner controls and
turn it to the
snapping sound indicating proper operation of
the spark module. Once the air has been purged
from the supply lines, burner should light within
4 seconds. After burner lights, rotate knob out of
the
until all burners have been checked.
OPENINGS
❑
CHECK IGNITION OF OVEN BURNER
The oven is designed to operate quietly and
automatically. To operate the oven, turn the
knob to
knob to 300°
burner will ignite and burn until the set temperature
is reached. The oven burner will continue to
cycle on and off as necessary to
at the temperature indicated by the display.
To check ignition of the broil burner, turn both
the
After 30-90 seconds, the broil burner will ignite.
The oven requires electrical power to operate. In
the case of a power outage, the oven burners on
these models cannot be lit manually with a match.
Gas will not flow unless the glow bar is hot.
If the oven is in use when a power outage occurs,
the oven burner shuts off and cannot be
until power is restored.
After 30-90 seconds, the oven
SET and
and the
TEMP
knobs to BROIL.
The combustion quality of burner flames needs
to be determined visually.
If burner flames look like (A), call for service.
Normal burner flames should look like (B) or
(C), depending on the type of gas you use.
With
cones is normal.
(B) Yellow tips on
outer
Normal for LP gas
(C)
Normal for natural gas
(continued next page)
39
Page 40
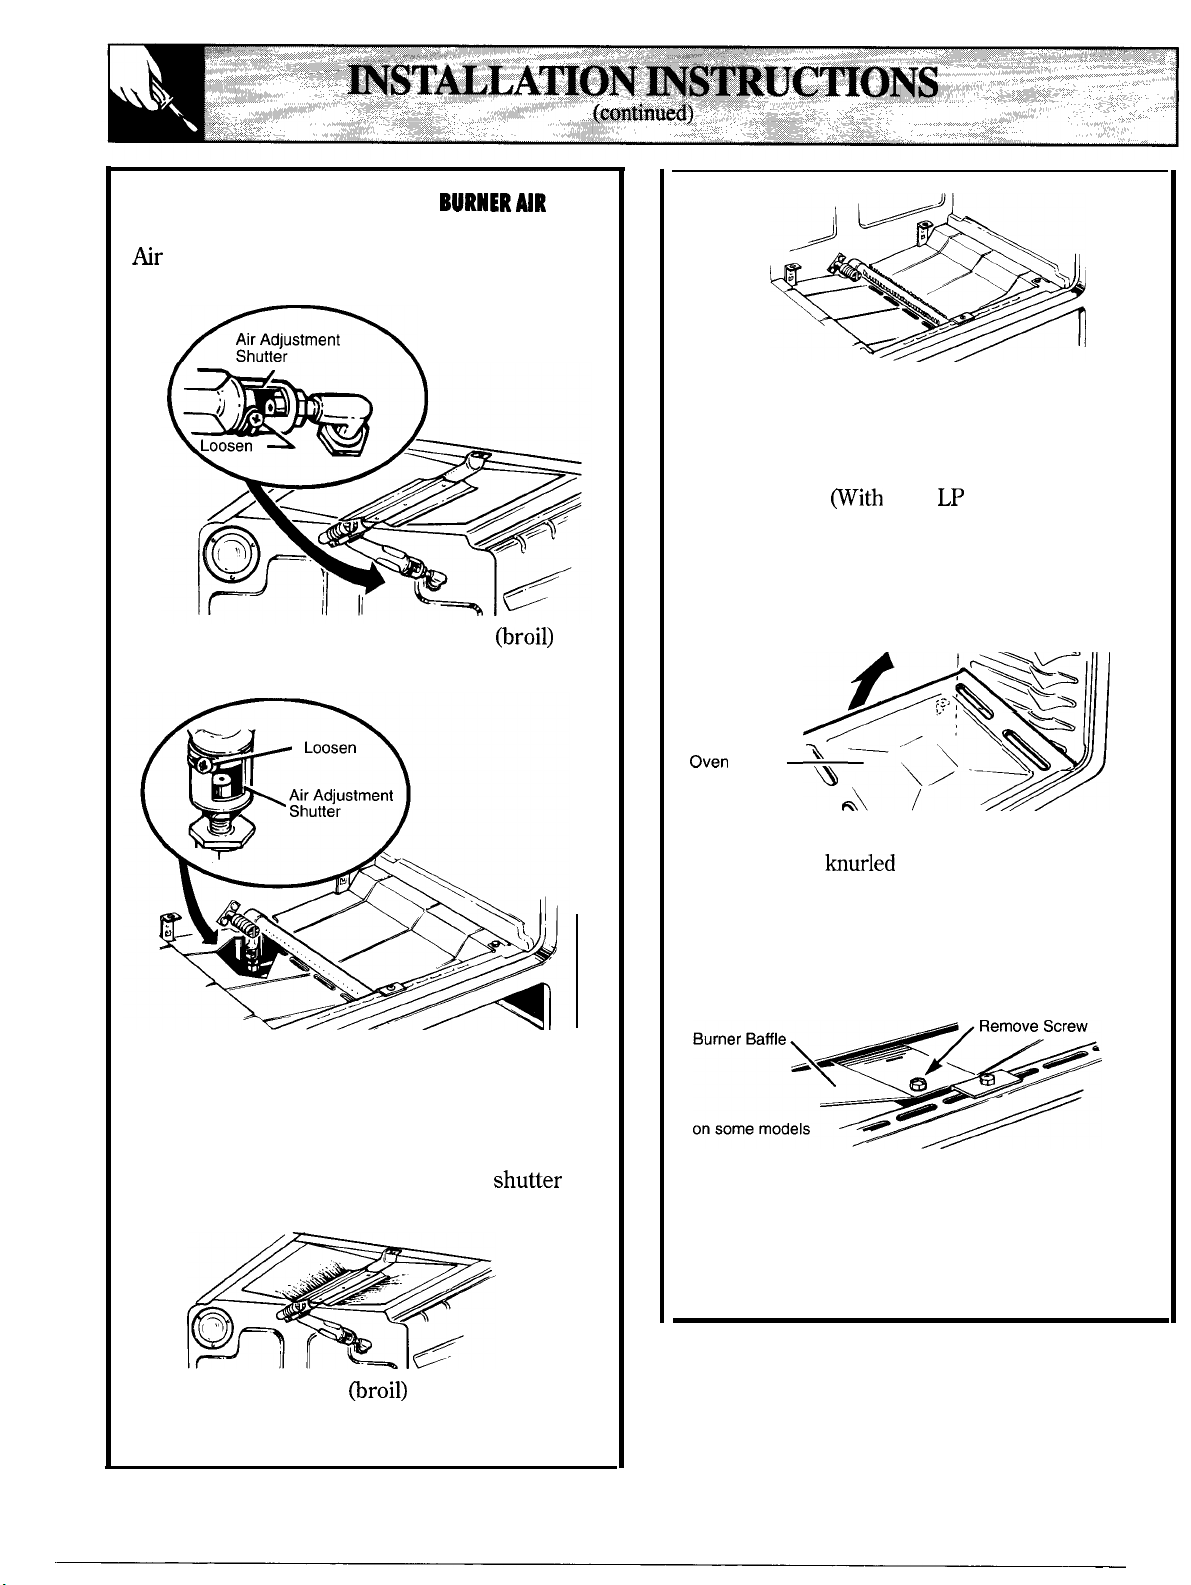
❑
ADJUST BROIL AND OVEN
ADJUSTMENT SHUTTERS IF NECESSARY
adjustment shutters for the top and bottom
burners regulate the flow of air to the flames.
The air adjustment shutter for the top
burner is in the center of the rear wall of the
oven.
To determine if the bottom burner flames are
burning properly, remove the oven bottom and
the burner baffle (see below). Flames should
have approximately 1“ blue cones and, if range
is supplied with natural gas, should burn with no
yellow tipping.
tips at the end of outer cones are normal.)
Flames should not lift off burner ports. If lifting
is observed, gradually reduce air shutter opening
until flames are stabilized. With the baffle in
place, the flames should burn steady and should
not extend past the edges of the burner baffle.
most LP gas, small yellow
,
The shutter for the bottom (oven) burner is near
the back wall behind the storage drawer or the
kick panel (depending on the model). Remove
the drawer or panel. (See Care and Cleaning
section in this book.)
To adjust the flow of air to either burner, loosen
the Phillips head screw and rotate the shutier
toward open or closed position as needed.
The flames for the top
steady with approximately 1“ blue cones and should
not extend out over the edges of the burner baffle.
burner should be
To remove the oven bottom:
1.
Remove the
screws holding down rear
of the oven bottom.
2. Grasp the oven bottom at finger slots on
each side.
3. Lift the rear of the oven bottom enough to
clear the lip of the range frame, then pull out.
To remove the burner baffle (on some models):
1. Use a nut driver to remove the 1/4” hex-head
screw shown in the illustration above. Do not
remove any other screws.
2. Pull baffle straight out until it is free from the
slot that holds it at rear of oven.
40
Page 41
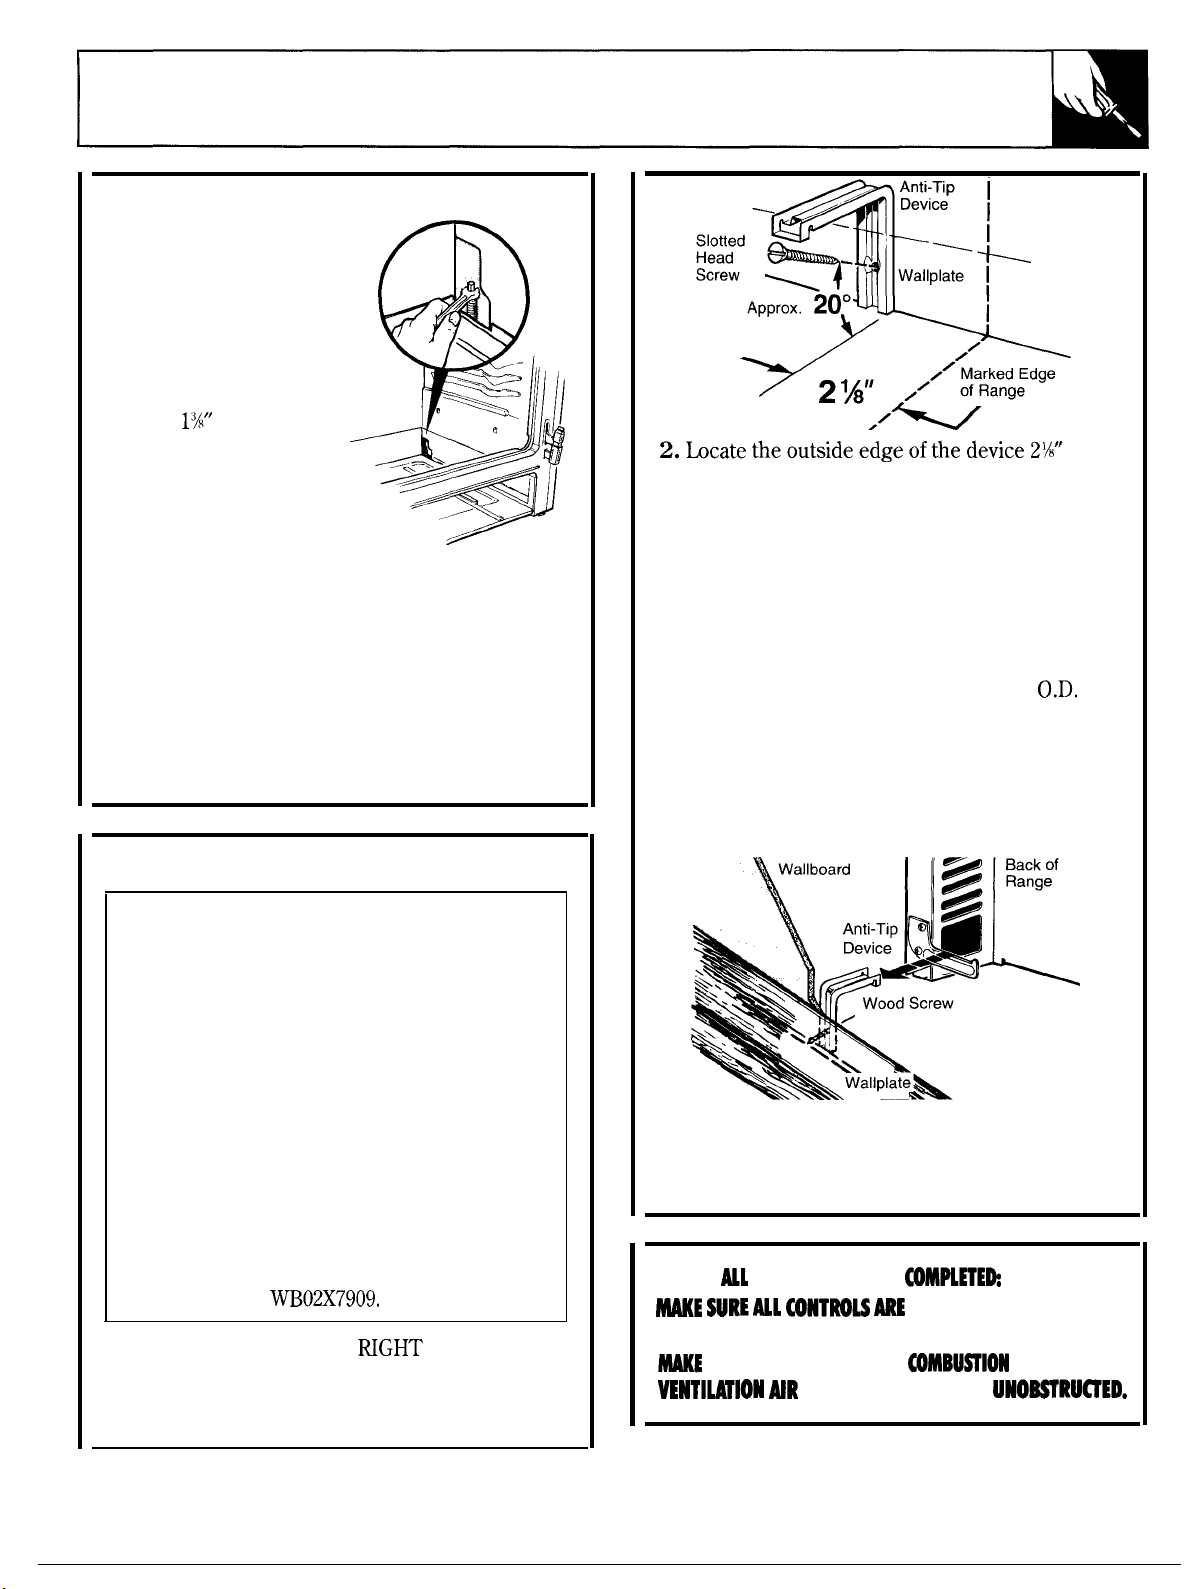
❑
LEVELING THE RANGE
1.
Remove the storage
drawer, broiler drawer
or kick panel.
2. Use a 3/16” open-end
or socket wrench to back
out both rear leveling
legs approximately two
turns.
3. Use a
open-end
or adjustable wrench to
back out the front
leveling legs two turns.
4. Install the oven
shelves in the oven and
position the range
where it will be installed.
5. Check for levelness by placing a spirit level or a
cup, partially filled with water, on one of the oven
racks. If using a spirit level, take two readings—with
the level placed diagonally first in one direction and
then the other.
6. Adjust the leveling legs until the range is level.
7. After the range is level, slide the range away from
the wall so that the Anti-Tip device can be installed.
toward the center of the range from the marked
edge of the range.
3. Using the device as a template, mark the
position of the hole for the screw.
4. For wood construction, drill a pilot hole at an
angle of 20 degrees from the horizontal. A nail or
awl may be used if a drill is not available.
Mount the Anti-Tip device with the screw provided.
For cement or concrete construction, you
will need a 1/4” x 1%” lag bolt and a 1/2”
sleeve anchor, which are not provided. Drill
the recommended size hole for the hardware.
Install the sleeve anchor into the drilled hole and
then install the lag bolt through the device. The
bolts must be properly tightened as recommended
for the hardware.
❑
INSTALLING THE ANTI-TIP DEVICE
WARNING:
●
Range must be secured with an approved
Anti-Tip device.
●
Unless properly installed, the range could be
tipped by you or a child standing, sitting or
leaning on an open door.
●
After installing the Anti-Tip device, verify that
it is in place by carefully attempting to tilt the
range forward.
●
This range has been designed to meet all
recognized industry tip standards for all normal
conditions.
●
The
use of this device does not preclude
tipping of the range when not properly installed.
●
If the Anti-Tip device supplied with the range
does not fit this application, use the universal
Anti-Tip device
1.
Mark the wall where the NGHT EDGE of the
range is to be located. Be sure to allow for the
countertop overhang if you intend to install the
range next to cabinets.
5. Slide the range against the wall, and check for
proper installation by grasping the front edges of
the rear surface unit openings and carefully
attempting to tilt the range forward.
WHEN
HOOKUPS ARE
LEFT IN THE OFF
POSITION.
SURE THE FLOW OF
TO THE RANGE IS
AND
(continued next page)
41
Page 42
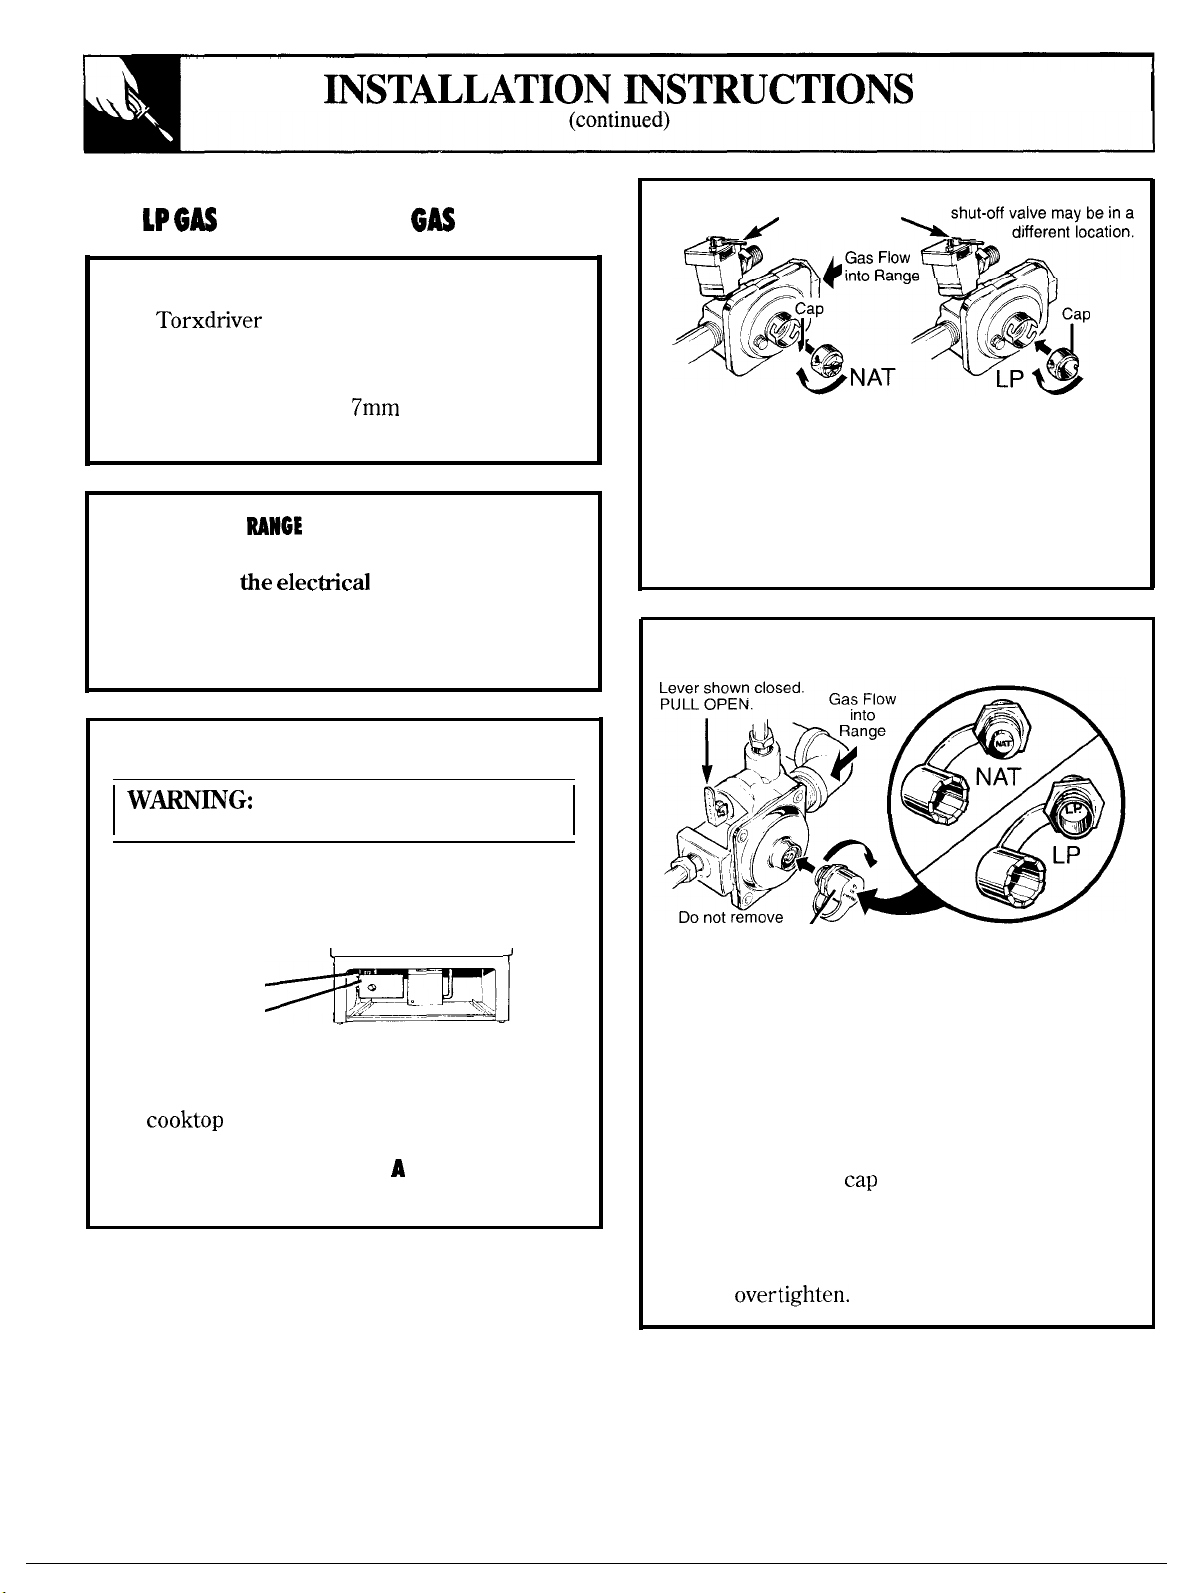
HOW TO CONVERT THE RANGE FOR USE
WITH
OR
TOOLS REQUIRED:
T-10 Torxdriver (for sealed burners)
1/2” and 3/4” open-end wrench
Flat blade screwdriver (small)
Nut drivers or wrenches:
(depending on the size of the spuds)
❑
PREPARE
(1) Turn off gas supply at the wall.
(2) Turn off
If range has not yet been connected to gas supply,
or if flexible connection was made, range maybe
pulled out from the wall to make conversion easier.
❑
CONVERT THE PRESSURE REGULATOR
NATURAL
or 5/16”
FOR CONVERSION
power to the range.
❑
If it is this regulator:
1.
Use a coin to remove the cap from the
pressure regulator.
2. Turn the cap over and hook it into the slots.
The type of gas to be used should now be visible
on the top of the cap.
❑
Lever shown closed.
ROTATE OPEN.
Note: On some models the shut-off valve
may be in a different location.
Note: On some models the
Do not remove the pressure
regulator from the range.
1. For models equipped with sealed burners,
remove the storage drawer, broiler drawer or
kick panel and locate the pressure regulator at
rear of the range.
Remove Screws
Access Cover
On some models, you may have to remove an
access cover also.
For models equipped with dual burners, remove
the
right rear of range.
2. Follow the directions in
your regulator type.
and locate the pressure regulator at
or B that match
❑ 0
this protective cap ‘
except for conversion
If it is this regulator:
1. Unscrew the plastic-protected hex-nut cap
from the regulator.
2. Carefully pry the protective plastic cap off
the threaded metal cap. Gently pull the plastic
washer off the threads on the other side of the
metal cap.
3. Push the plastic
cap displaying the type of gas you are converting
to. Press the attached plastic washer onto the
threads on the other side of the metal cap.
4. Screw the hex-nut cap back into the regulator.
Do not overtighten.
onto the end of the metal
Cap Assembly
42
Page 43

❑
CONVERTING SURFACE BURNERS ON
MODELS EQUIPPED WITH SEALED BURNERS (See
Step 4 if range is equipped with dual burners.)
1. Remove grates, burner caps and burner heads.
2. Remove burner bases by unscrewing the 3
small screws in each base.
straight out.
DO NOT
bases unless the
3. Remove the brass orifice spud under each
burner base by unscrewing spud from fitting with
your spuds).
on the gas inlet tube as a back-up when
removing spud to prevent
tube
4.
Install orifice spuds
following diagrams (see ❑ or
gas or natural gas, depending on which you are
converting to.
disconnect the wires from the burner
or 5/16” wrench (depending on the size of
Apply a 3/4” wrench to
twisting.
burner
needs to be raised.
aluminum
to one of the
B ),
for
hex
❑
with this Use and Care book.
have a 2-digit number and the Letter “L” on
one side. Each orifice spud will also have 1 or 2
grooves on one side, denoting the location on
the range where it is to be installed.
❑
Natural gas orifice spuds have a 3-digit number
on one side. Each
or 3 grooves on one side, denoting the location
on the range where it is to be installed.
Orifice Spuds for Converting to LPGas:
orifice spuds are in a small plastic bag packed
Orifice Spuds for
spud will also have 1, 2
spuds
Natural Gas:
next page)
43
Page 44
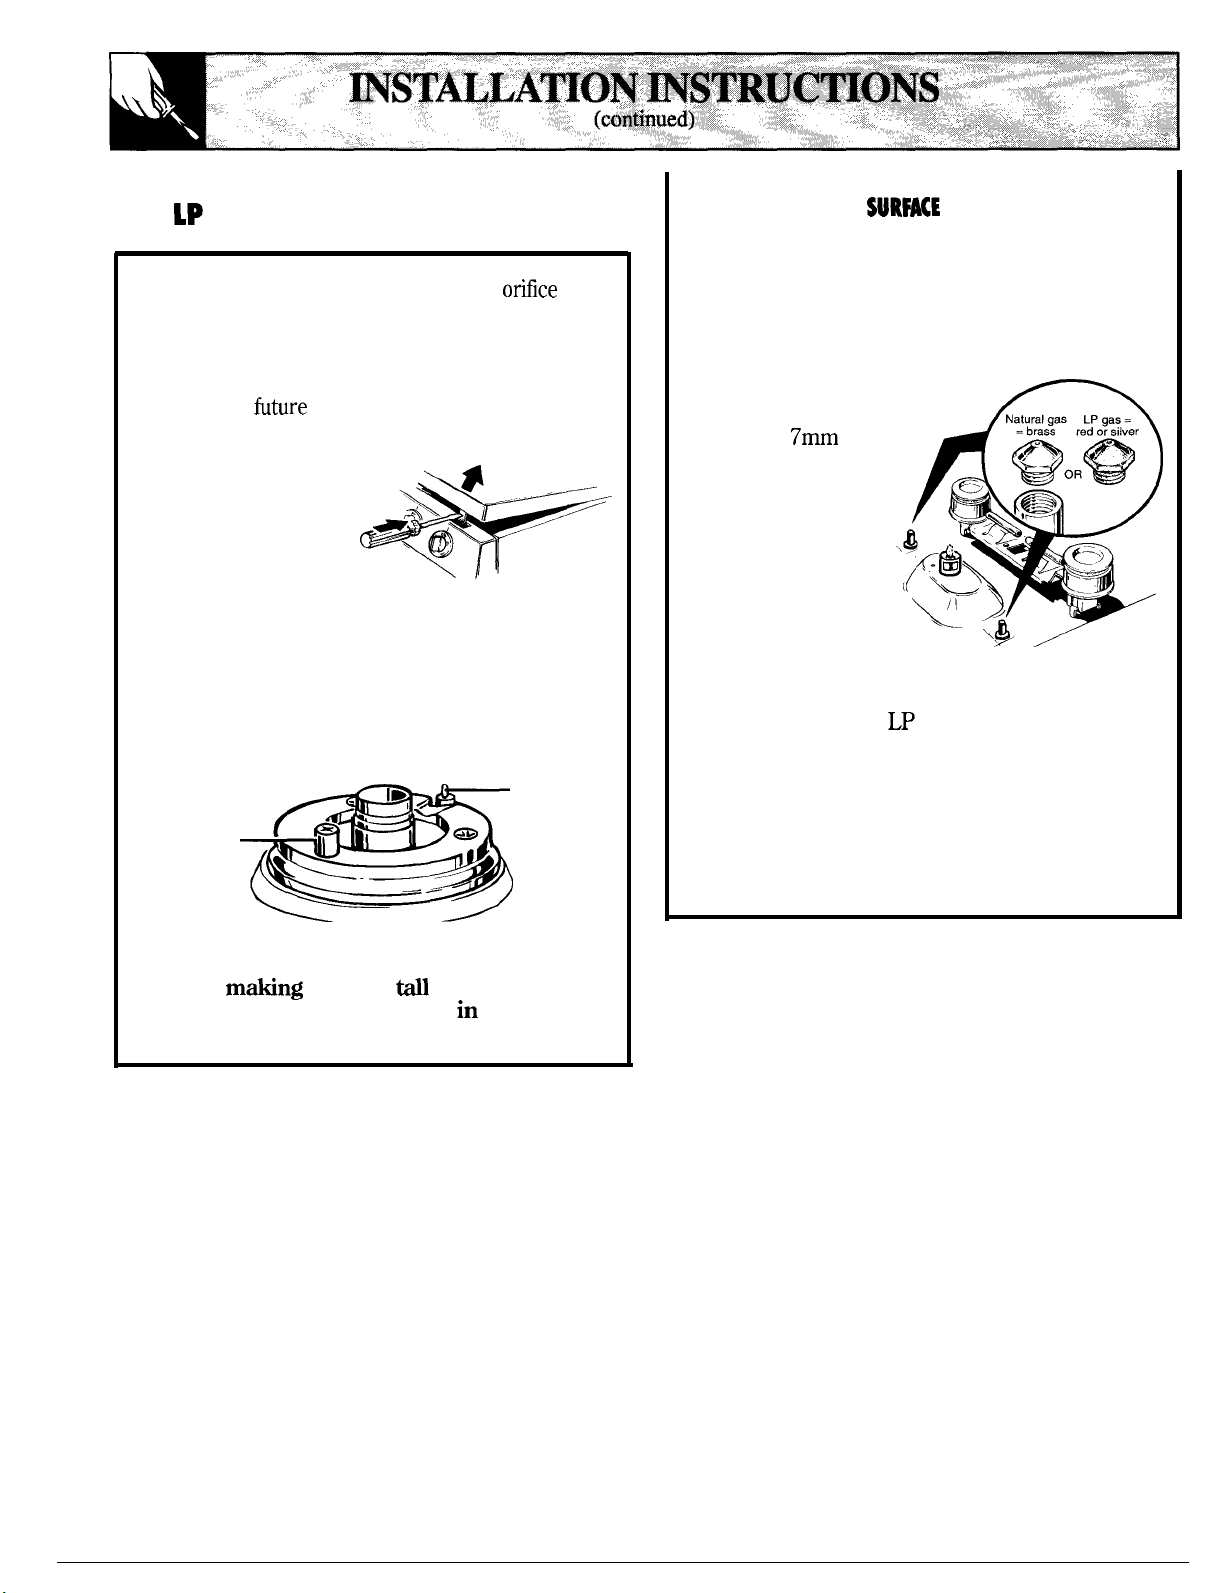
HOW TO CONVERT THE RANGE FOR USE
WITH 1P GAS OR HATURAL GAS (continued)
5. To prevent leakage, make sure the
spuds are securely screwed into the gas inlet
tubes. Use a small wrench to hold the inlet tube
hex to prevent it from twisting.
6. Put old orifice spuds back in the bag to save
for possible
Note: If an orifice spud is accidentally
dropped, the cooktop
can be raised by
the 2 front clips
with a large flat
blade screwdriver.
“engaging
DO NOT attempt to raise the cooktop without
removing all 4 burner bases.
If wires were disconnected to remove the
cooktop, feed wires through the burner holes in
the cooktop. Attach to each burner electrode
terminal carefully, making sure not to bend the
terminal. Then lower cooktop until it snaps
over the clips.
Electrode
Tall Screw
❑
CONVERTING
MODELS EQUIPPED WITH DUAL BURNERS
(See Step 3 if range is equipped with sealed
burners.)
1.
Lift cooktop.
2. Lift burner assemblies straight up and set
aside to gain
access to surface
burner spuds.
3. With a
or 5/16” wrench
(depending on
the size of your
spuds), remove
each of the four
spuds on the
surface burner
gas inlet tubes
and replace them
with the correct
gas spuds mounted in a holder at the right rear
of the range, above the regulator. Natural gas
spuds are brass and
silver. (Mount the spuds that you removed from
the inlet tubes back in the holder.) To prevent
leakage, make sure spuds are securely screwed
into gas inlet tubes.
4. Replace the burner assemblies.
5. Keep all spuds with your range so you have
them if you move or get a different gas hook-up.
BURNERSON
gas spuds are red or
I
7. Carefully insert burner bases straight down
with the tube over the orifice spud. Replace the
screws,
opposite the burner electrode
burner base.
sure the
screw is
44
Page 45
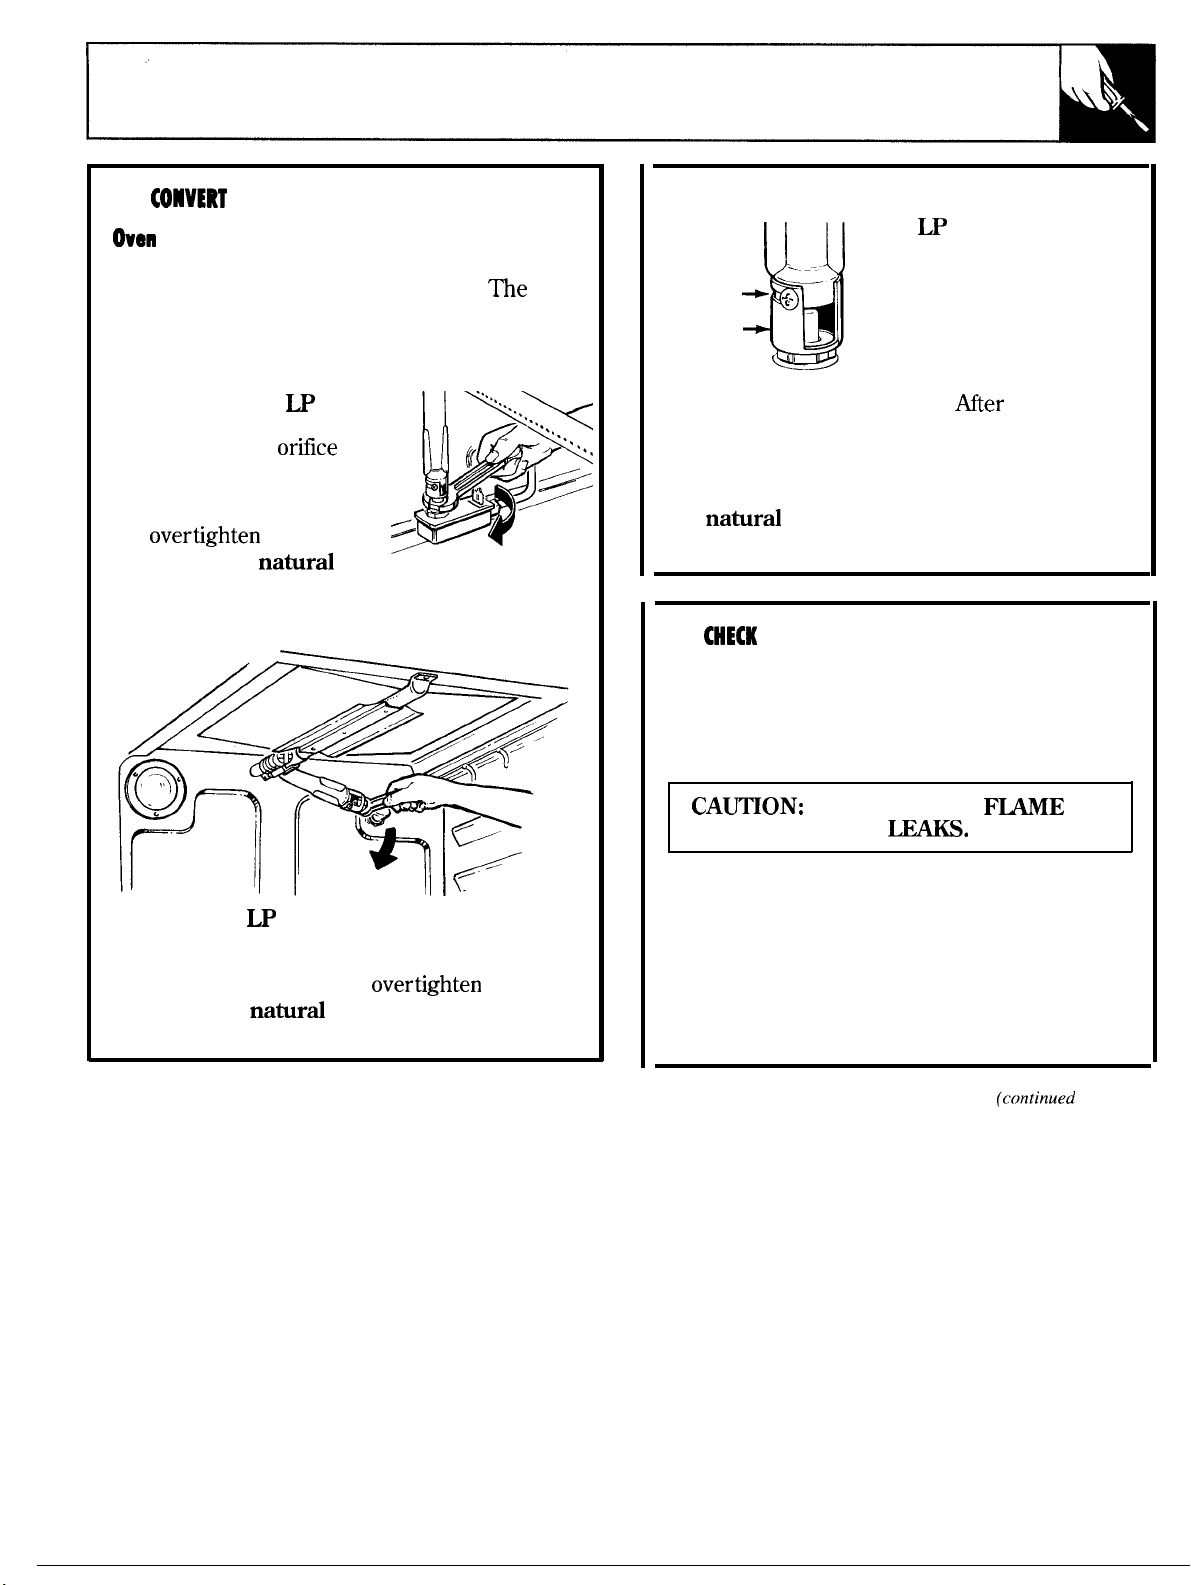
❑
Burner
1. Remove oven door, storage drawer or broiler
drawer, oven bottom and burner baffle.
lower burner orifice spud is located behind the
storage drawer, broiler drawer or kick panel. (On
some models, a metal shield must be removed to
access the orifice.)
2. To convert to
use a 1/2” wrench to turn
the lower burner
spud clockwise. Tighten the
spud only until it is snug.
To prevent damage, do
not overtighten the spud.
To convert to
loosen the spud about 2 turns.
THE OVEN BURNER ORIFICES
gas,
gas,
❑
CONVERT AIR ADJUSTMENT SHUTTER(S)
For
Phillips head screw and
rotate the shutter to the
Screw
Air Shutter
the edges of the burner baffle.
of burner operation, check for flames lifting off
burner ports. If lifting is observed, gradually
reduce air shutter opening until flames are
stabilized.
For
1/2” or about 3/4 of the way open.
gas, the shutter should be open
full open position. With
baffle in place, flames
should have approximately
l-inch blue cones and
should not extend beyond
gas,
loosen the
30 seconds
Broil Burner
To convert to
turn the upper burner orifice spud clockwise.
Tighten spud only until it is snug with the base.
To prevent damage, do not
To convert to
about 2 turns.
(on
some models)
gas, use a 1/2” wrench to
gas, loosen the spud
❑
When all connections have been made, make sure
all range controls are in the off position and turn
on the main gas supply valve. Use a liquid leak
detector at all joints and connections to check for
leaks in the system.
CHECK FOR GAS
When using test pressures greater than 1/2 psig
to pressure test the gas supply system of the
residence, disconnect the range and individual
shut-off valve from the gas supply piping. When
using test pressures of 1/2 psig or less to test the
gas supply system, simply isolate the range from
the gas supply system by closing the individual
shut-off valve.
FOR LEAKS
DO NOT USE A
TO
45
Page 46
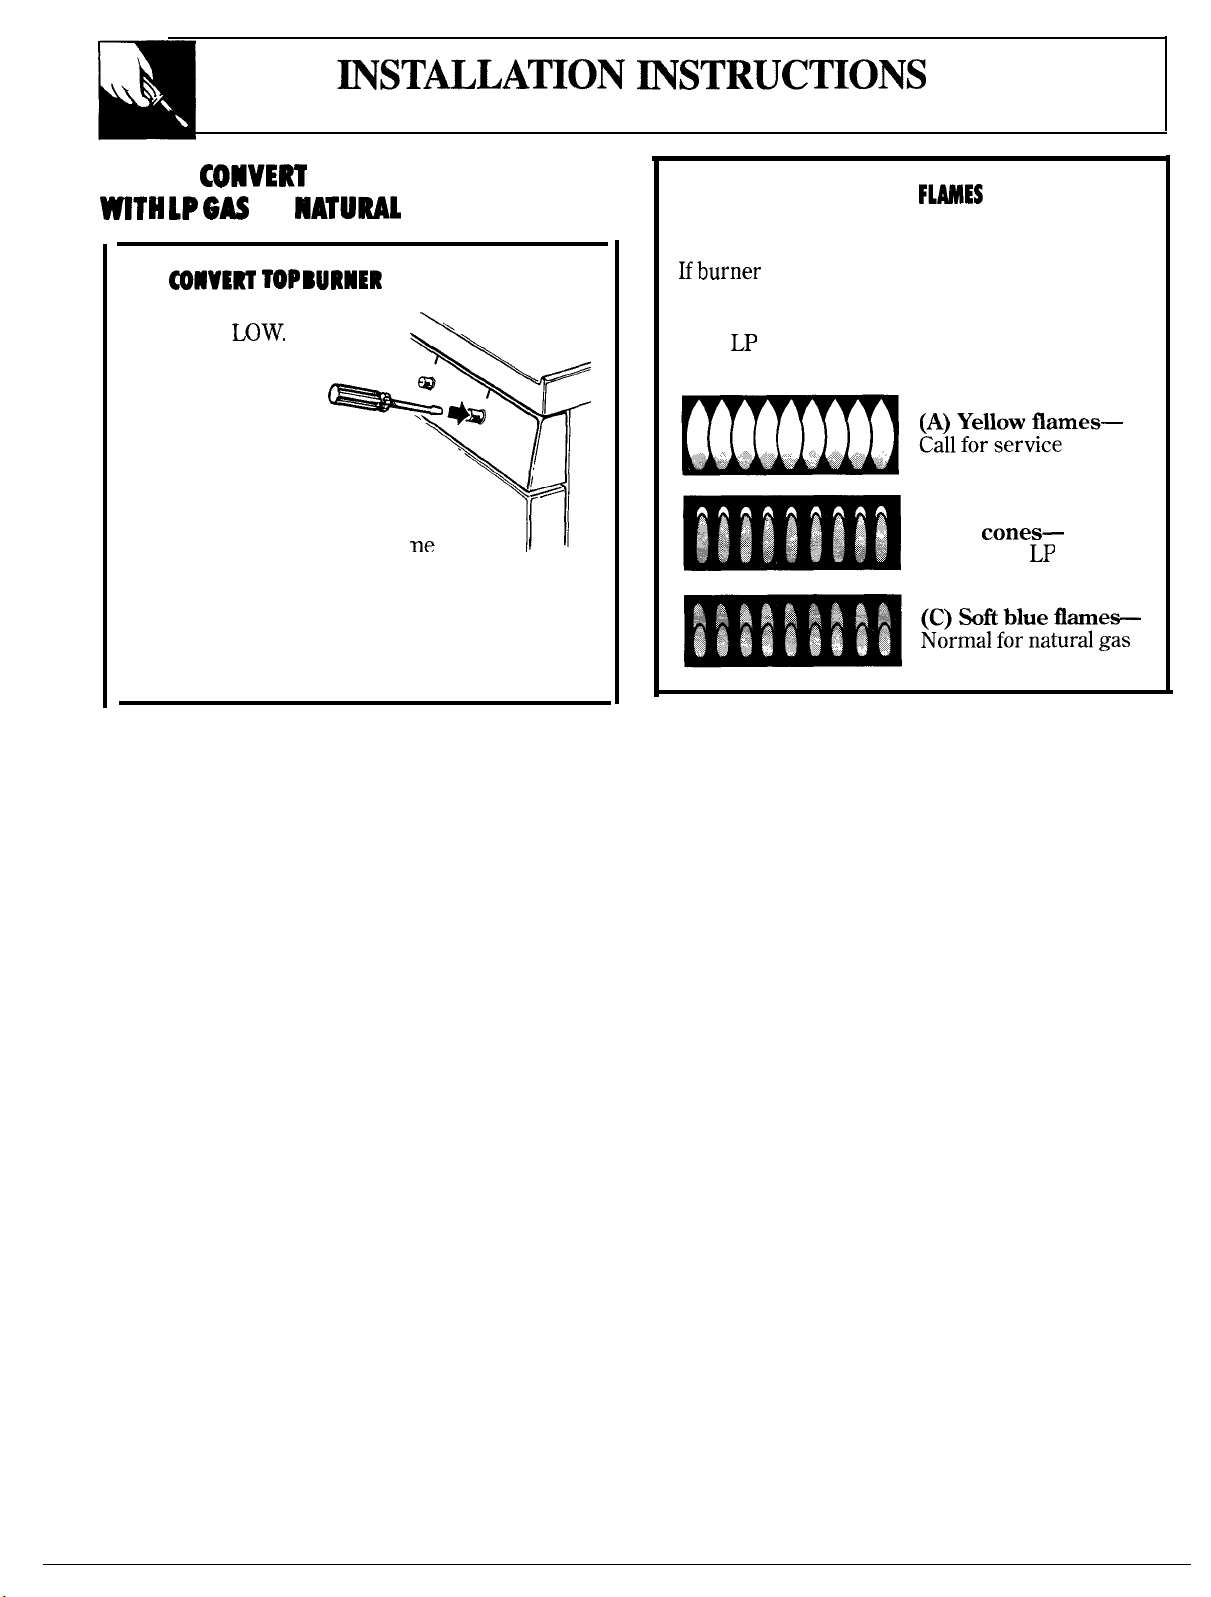
(continued)
HOW TO
1P 6AS OR
❑
1. Turn all top
burners to
2. Remove all
four knobs.
3. With a small flat
blade screwdriver, turn
the valve set screws
clockwise to decrease
flame size, counterclockwise
to
increase flame size. Adjust
until the flame is about the same
height as the top of the burner.
4. Replace knobs.
5. Check for flame outage by opening and
closing the oven door several times. If the flame
goes out, increase the flame size.
THE RANGE FOR USE
GAS (continued)
VALVES
\
i
❑
CHECK QUALITY OF
The
combustion quality of burner flames needs
to be determined visually.
flames look like
Normal burner flames should look like
(C),
depending on the type of gas you use.
With
is normal.
gas, some yellow tipping on outer cones
(A),
call for service.
(B) Yellow tips on
outer
Normal for
(B) or
gas
46
Page 47
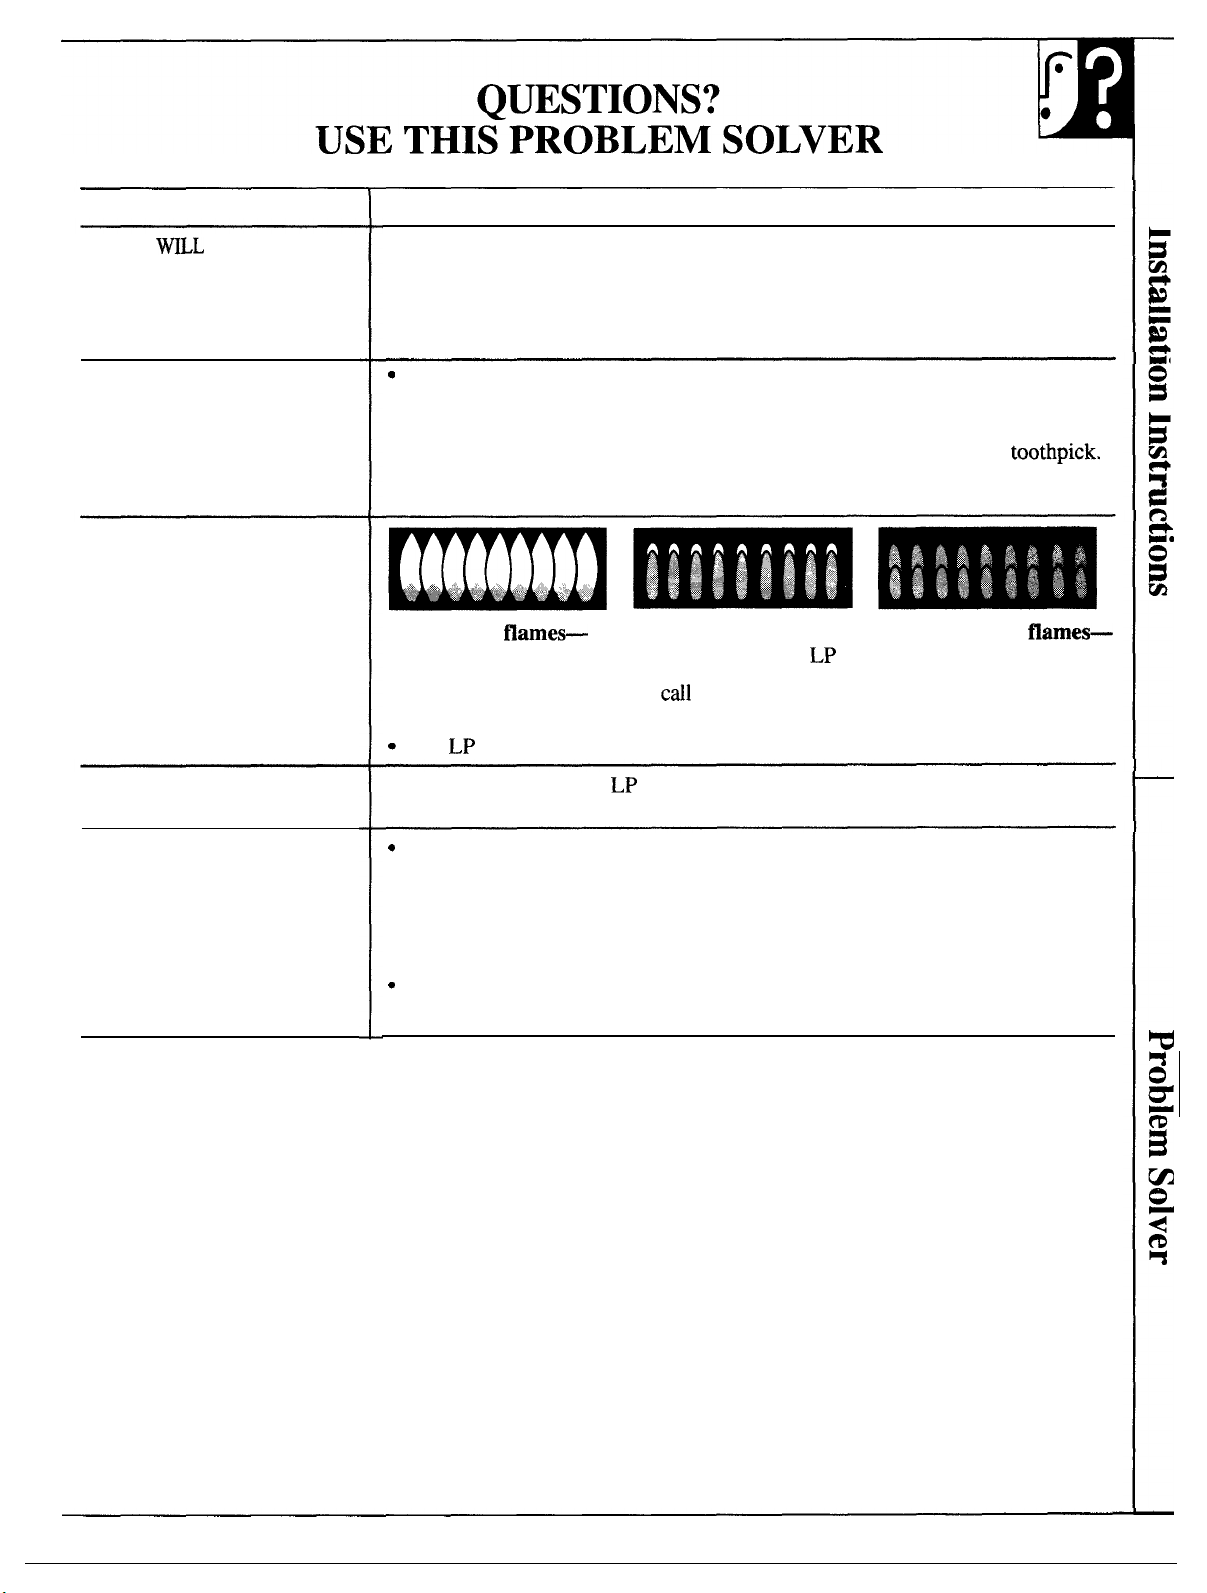
PROBLEM
POSSIBLE CAUSE
OVEN
NOT WORK
TOP BURNERS DO NOT
LIGHT OR DO NOT
BURN EVENLY
BURNERS HAVE YELLOW
OR YELLOW-TIPPED
FLAMES
BURNER FLAMES VERY
LARGE OR YELLOW
● Plug on range is not completely inserted in the electrical outlet.
●
The circuit breaker in your house has been tripped, or a fuse has been blown,
●
Oven controls not properly set.
●
Door left in locked position after cleaning.
Make
sure electrical plug is plugged into a live power outlet.
●
Burner holes on the side or around the top of burner may
be clogged. Remove
burners (on models with dual burners) or burner heads (on models with sealed
burners) or burner caps on spill-proof models, and clean them with a
Make sure you do not enlarge the holes. On spill-proof models, check electrode
area for burned-on food or grease.
(A) Yellow
Call for service
●
If burner flames look like (A),
cones—Normal for
for service. Normal burner flames should look
Normal for natural gas
like (B) or (C), depending on the type of gas you use.
With LP gas, some yellow tipping on outer cones is normal.
● If range is connected to LP gas, check all steps in the Installation Instructions.
OVEN DOES NOT
COOK PROPERLY
Make sure thermostat capillary bulb (located in upper portion of oven) is in
correct position, not touching oven sides and not coated with anything.
● Aluminum foil being used improperly in oven.
● Incorrect cookware being used. Check each cooking section for cookware tips
or recommendations.
Check common problems listed in Baking, Roasting and Broiling sections.
● Oven bottom not securely seated in position.
(continued next page)
47
Page 48
PROBLEM
(continued)
PROBLEM
CLOCK DOES NOT WORK
POSSIBLECAUSE
●
blown fuse or tripped circuit breaker.
OVEN LIGHT DOES NOT
COME ON
STRONG ODOR
OVEN WILL NOT
SELF CLEAN
OVEN DOOR WILL
NOT UNLOCK
CLEANCYCLE
If you need more
●
Bulb may be loose or burned out.
Improper
● An odor from the insulation around the oven liner is normal for the
times oven is used. This is temporary.
● Oven temperature is too high to set self-clean operation. Allow the range to cool
to room temperature and reset the controls.
● Door latch handle not moved all the way to the right.
● Oven must cool below locking temperature (approximately 30 minutes after the
clean cycle is complete). Do
using
●
Oven controls not set properly. Review Operating the Self-Cleaning Oven section.
● Heavily soiled oven requires
●
toll free:
GE Answer Center”
800.626.2000
consumer information service
Range electical plug must be securely seated inalive power outlet. Check for
plug must be plugged into a live power outlet.
ratio
feature or the oven may lock.
should be cleaned up before starting clean
oven.
not
oven burner
lock the
to 4 hour clean time.
door with
shutter.
few
door latch except when
Page 49
Page 50

NOTES
50
Page 51
—
Be There
With
information or assistance from GE,
In-Home Repair Service
AGE consumer service professional will provide expert repair service, scheduled at a time that’s convenient for you. Many GE Consumer Service
operated locations offer you service today or tomorrow, or at your convenience
trained technicians know your appliance inside and out—so most repairs can be
handled in just one visit.
purchase
a.m. to
p.m. weekdays,
new GE appliance, receive the assurance that ifyou ever need
a.m. to
be
p.m. Saturdays).
All you have to do is call—toll-free!
Center
a
Whatever your question about any GE major appliance, GE Answer Center@
information service is available to help. Your call—and your question—will be
answered promptly and courteously. And
With Special Needs...
8006262000
Upon request, GE
Braille controls for
appliances, and a brochure to
assist in planning a barrier-free
kitchen for persons with limited
mobility. To obtain these items,
free of charge, call 800.626.2000.
Service Contracts
provide
variety of GE
Consumers with impaired hearing or speech who have
access to a
or service.
80&626-2224
or a conventional teletypewriter may
(800-833-4322) to request informa-
You can have the secure feeling that GE Consumer Service will still be there
after your warranty expires. Purchase a GE contract while your warranty is still
in effect and you’ll receive a substantial discount. With a multiple-year contract,
you’re assured of future service at today’s prices.
80&626-2002
qualified to service
can have needed parts or accessories sent directly to
their home. The GE parts system provides access to over
47,000
fully warranted. VISA, MasterCard and Discover cards
are accepted.
parts
. . and all GE Genuine Renewal Parts are
appliances
User maintenance instructions contained in
cover procedures intended to be performed by any user.
Other servicing
service
improper servicing may cause unsafe operation.
personnel. Caution
shotid be referred to
be exercised, since
Page 52

Save proof of original purchase date such as your sales slip or
check to establish warranty period.
WHAT IS COVERED
WHAT IS NOT COVERED
FULL ONE-YEAR WARRANTY
For one year from date of original
purchase, we will provide, free of
charge, parts and service labor in
your
home to repair or replace
any part of the range that fails
because of a manufacturing defect.
● Service trips to your home to
teach you how to use the product.
Read your Use and Care material.
If you then have any questions
about operating the product,
please contact your dealer or our
Consumer Affairs office at the
address below, or call, toll free:
GE Answer
800.626.2000
consumer information service
. Improper installation.
If you have an installation problem,
contact your dealer or installer.
You are responsible for providing
adequate electrical, gas, exhausting
and other connecting facilities
This warranty is extended to
the original purchaser and any
succeeding owner
for products
purchased for ordinary home use
in the 48 mainland states, Hawaii
and Washington,
In Alaska the
warranty is the same except that it
is LIMITED because you must pay
to ship the product to the service
shop or for the service technician’s
travel costs to your home.
All warranty service will be
provided by our Factory Service
Centers or by our authorized
Customer
normal working hours.
Should your appliance need
service, during the warranty period
or beyond, call 800-GE-CARES
(800-432-2737).
In Canada, consult your telephone
directory for the Cameo Service
Center.
as described in the Installation
Instructions provided with the
product.
● Replacement of house fuses or
resetting of circuit breakers.
● Failure of the product if it is used
for other than its intended purpose
or used commercially.
● Damage to product caused
by accident, fire, floods or acts
of God.
WARRANTOR IS NOT RESPONSIBLE
FOR CONSEQUENTIAL DAMAGES.
Some states do not allow the exclusion or limitation of incidental or consequential damages, so the above limitation or exclusion
may not apply to you. This warranty gives you specific legal rights, and you may also have other rights which vary from state to state.
To know what your legal rights are in your state, consult your local or state consumer affairs office or your state’s Attorney General.
book
Part No. 164 D2764P020
Pub
12-92
prjnted on recycled
49-8402
Warrantor: General Electric Company
If further help is needed concerning this warranty, write:
Manager—Consumer Affairs, GE Appliances, Louisville, KY 40225
Printed in Louisville,
 Loading...