

Page 1
.
—
contents
Anti-TipBracket 3,5 Shelves
.ApplianceRegistration
CareandCleaning 17-23 ProblemSolver 26
Clock
ControlPanel
Features 6,7
FlooringUnderRange 5 Burners
Leveling
Lift-UpCooktop
MinuteTimer
ModelandSerialNumbers
Oven 9 FlameSize 8
AirAdjustment
Baking,BakingGuide 13,14
BroilerPanand Rack 18,23
Broiling,BroilingGuide 16
ControlSettings 9
DoorRemoval 19
Light;BulbReplacement 10,19
OvenBottomRemoval 19
OvenTimer 10-12
Preheating 13,14
2
10-12 RepairService 27
17
5
18
10-12
2 DripPans
24
VentDuct
SafetyInstructions
SurfaceCooking
Burner Grates
ControlSettings
CookwareTips
LightingInstructions 8
Warranty
10,19
10
2-5
49
18,23
17,23
l%23
BackCover
8
9
Roasting,RoastingGuide 15
Self-CleaningOperation 20-22
MOCMSJGBI?24GEJ‘JCW?27GEJ
JGBP26GEJ JGBP28GEJ
.
6E4NwW
8H.8262H0
CimteP
3
2’/--”
Page 2
Itisintendedtohelpyouoperateand
maintainyournew
rangeproperly.
Keepithandy
foranswerstoyour
questions.
don’tunderstandsomething
Nyou
orneedmorehelp,write(include
yourphonenumber):
ConsumerAffairs
GEAppliances
AppliancePark
Louisville,KY
40225
writedown themodel
andserial!nmbers.
You’llfindthemonalabellocatedin
theburnerboxunderthecooktop.
Seepages6and7.
Thesenumbersarealsoonthe
ConsumerProductOwnership
RegistrationCardthatcamewith
yourrange.Beforesendinginthis
card,pleasewritethesenumbers
here:
Model Number
Serial Number
Usethesenumbersinany
correspondenceorservicecalls
concerningyourrange.
FORYOURSAFEW
Do
not storeoruse
gasolineOrother
flammablevapomand
liquidsinthevicioity
ofthisoranyother
appliance.
woRTmT
smTY Nma
T’heCaliforniaSafeEMinking
Waterand ‘lloxicEnforcement
ActrequirestheGovernorof
Californiatopttblisha list of’
substancesknownto the state
tocausecancer and requires
businessestowarncustomers
ofpotentialexposure@such
substances.
Oasappliancescan cause
minorexposureto three of these
substances,namelybenzene,
formaldehydeandsoot, caused
primarilybytheincomplete
combustionof naturalgas or IX
fuels. l?roperlyadjustedranges,
indicatedby a bluishrather than
ayellowflame, willminimize
incompletecombustion.Exposure
to thesesubstancescan be
minimizedfurthe~by venting
with an open windowor using
a ventilationfimor hood.
Ifyou Zwxivd.
a damagedrange. o a
Immediatelycontactthedealer(or
builder)that soldyoutherange.
sawtimeandmoney.
Bfmr’eyou request
service.e e
ChecktheProblemSolveron
26.Itlistscausesofminor
page
opemtingproblemsthatyoucan
correctyourself.
men%!i9tllGetYourMnge
eHavethe imhiler showyou
thelwationoftherangegas
cut-offvalveandhowtoshut
itoffifIMx?ssaryo
@~~~gj
and
qu~lifie~iMtiller9 in accordance
with theInstallationinstructions.
Anyadjustmentandserviceshwldi
be performed onlybyqualified
gasrangeinstallersor service
technicians.
yo~r rangeimall~d
properlygroMndedbya
Page 3
indoubiaboutthegroundingof
thehomeelectricalsystem,it is
yotixpersonalresponsibilityand
obligationtohavean tmgrounded
outietreplacedwith a properly-
groundedthree-prongoutletin
accordancewith the National
ElectricalCode. Do not usean
extensioncordwiththisap@iance.
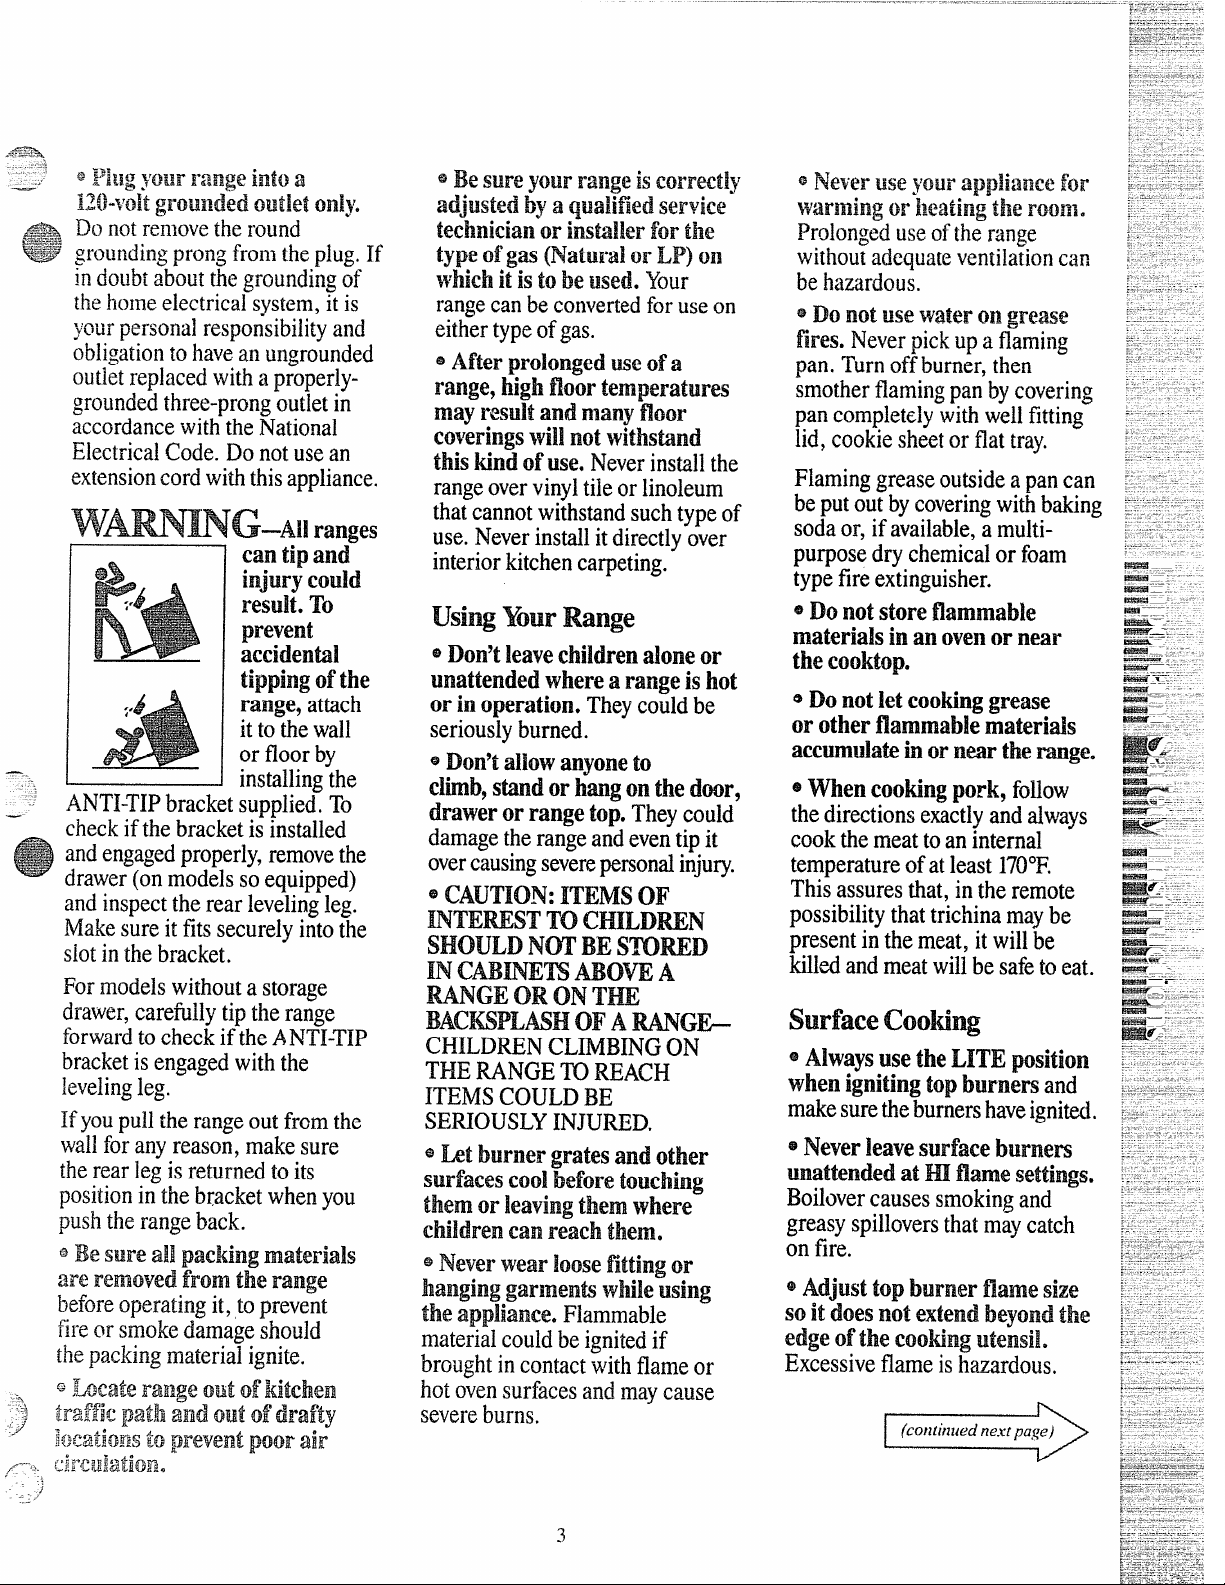
w
~G–AIl ranges
cantipand
injurycould
red. m)
prevent
accidental
tippingd’the
range,
ittothewaH
orfloorby
installingthe
UWI-TIPbracketsup~lied;To
checkifthebracketi; ~nstalled
andengagedproperly,removethe
drawer(on modelsso equipped)
andinspecttherearlev;lii~leg.
Makesureitfitssecurelyintothe
siotinthebracket.
Formodelswithouta storage
drawer,carefi.dlytiptherange
forwardtocheckiftheANTI-TIP
bracketisengagedwiththe
levelingleg.
Ifyoupulltherangeoutfromthe
wallforanyreason,makesure
therearlegisreturnedtoits
positioninthebracketwhenyou
-pushtherangeback.
QBesureallpackingmateria~s
areremovedfromtherange
beforeoperatingit,,toprevent
fireorsmokedamageshould
thepackingmaterialignite.
QIQMmterangeoutofkitchen
:3
-.,>
-3
trafficpath and out‘ofdrafty
:./
Matimls to $MWentpoorah?
.
,,,.,$+
,ti:k~~jj~f~~~o
/- ~-
.1
J
attach
type(@gas(NatwralorLP)013
;%’hiehit is@beWsed.Your
rangecanbeconvertedforuseon
eithertypeofgas.
@Afterproion~edWX?d’a
range,high
may resultand manyf’kw
COverirlgswill!
moortemperature
notWithstind
thiskindofuse.Neverinstallthe
rangeovervinyltileorlinoleum
thatcannotwithstandsuchtypeof
use.Neverinstallitdirectlyover
interiorkitchencarpeting.
usingYourRange
~ Don’tMow anyoneto
climb,standorhangonthedoor,
drawerorrangetop.Theycould
damagetherangeandeventipit
overcausingseverepersonalinjury.
eCiw.mri: mms OF
mTEmsT ‘m CHILDWN
SHOULDNom’BE
Cmmm ABOVEA
m
RANGEOR ONTHE
BACWPLMH OFARANGE
CHILDRENCLIMBINGON
THERANGEK) REACH
ITEMSCOULDIX
SERIOUSLYINJURED.
@Letburnergratesandother
surfacescod beforetouching
themm leavingthan where
childrencanreachthem
= Neverwearhose fittingor
hanginggarlnenk whilewing
theappliance.Flammable
materialcouldbeignitedif
broughtincontactwithflameor
hotovensurfacesandmaycause
severeburns.
smmD
s NW3°
Jvarlningw ileaiing the
l.we ywr appliailce!&N
rmIn*
Prolongeduseoftherange
withoutadequateventilationcan
behazardous.
eDonotusewatermlgrease
fires.Neverpickupaflaming
pan.Turnoffburner,then
smotherflamingpanbycovering
pancompletdywithwellfitting
lid,cookiesheetorflattray.
Flaminggreaseoutsideapancan
beputoutbycoveringwithbaking
sodaor,ifavailable,amulti-
purposedry chemical or foam
typefireextinguisher.
@~~ ~()~~~o~~fl~~~~~~~
materialsinanovenormar
the Cooktop.
e Do not M cookinggrease
orotherflammablematfxids
accumulateinorneartherange.
e Whencookingpork,
thedirectionsexactlyandalways
cookthemeattoaninternal
temperatureofatleast170°F.
Thisassuresthat,intheremote
possibilitythattrichinamaybe
presentin the meat, it willbe
killedandmeatwillbe safeto eat.
surface Cooting
~AIwaysusetheLITEposition
whenignitingtopburners
makesuretheburnershaveignited.
~Never
mattended atHIfkme settings.
leave surfaceburners
I’3oilovercausessmokingand
greasyspilloversthatmaycatch
on fire.
@~djust top burner flame size
so it does not extend beyo~d the
M&eof the tooting utensil.
Excessiveflame is hazardous.
follow
and
3
Page 4
={.2%2WA’iky patMdm-
11-lCAor
Swhxs my result
SWml. DOnotk%potI“lokkrscorm
mm open fkimeswhen M@
UkmikiDonotUSCa WV’elor CX’her
buk.ycM.hinpkiceofa pothokier.
s m minilniEethe possibility
d’ bur~lsyignition of fkinmxibk
fhmppothokitmcmho{
inbum from
materials,andspillage,turnthe
cookwarehandlestowardtheside
orbackoftherangewhhout
extendingoveradjacentburners.
aMwaysturn!surfacebMrner‘to
OFFbeforeremovingutensil.
@Cwefdly watchfoodsbeing
friedat HI flamesetting.
@p$~~~J’~]()~~~~~~~~~(~~~
o~nings) ofthe range.They
providetheairinletandoutlet
whichisnecessaryfortherange
tooperateproperlywithcorrect
combustion.
@Doriotw%?s wokonthe
Cootingsurfaceifthewokhasa
roundmetalringwhichis
placedoverthe Iblwner
suppor$ the w&.. This ring acts
grate to
asaheattrapwhichmaydamage
theburnergrateandburnerhead.
Also,itmaycausetheburnerto
workimproperly.Thismaycause
a carbonmonoxidelevelabove
thataHowedbycurrentstandards,
resultingina healthhazard.
@Foodsfor fryingshouldibeas
dryas possible. Frostonfrozen
foodsormoistureonfreshfoods
cancausehotfattobubbleupand
oversidesofpan.
@use !k%stpossibleamountof
fatforeffeeti%%shallowOrdeep”
M frying,Fillingthepantoofull
d’fatcancausespilloverswhen
g
modisMk.kXi.
eAlways heatfatdilwkyy and
watchas itheats.
@Usedeepfiatthermometer
whenever~ssible toprevent
overheatingfatbeyondthe
smokingpoint.
* Useproprpansize-.~void
thatare unstableor easily
pans
tipped. Select utensilshavingflat
bottomslargeenoughto properly
containfoodavoidingboilovers
and spillovers,and largeenough
to coverburner grate. Thiswill
both savecleaningandprevent
hazardousaccumulationsof food,
sinceheavyspatteringorspillovers
lefton rangecan ignite. Use pans
with handlesthat can beeasily
graspedand remain cool.
~seonlygkwiiscookwarethat
e
is recommended
foruseongas
burners.
@Keepallplasticsawayfrom
topbmmm.
~ TOavoidthe possibilityofa
burn, alwaysbe certainthat the
controlsforallburnemareat
OFFpositionandall
cd beforeattemptingto
removea grate.
* When flamingfoodsunder
the hood, turn thefanoff. The
fan, if operating,mayspread
the flame.
=If rangeishated neara
window9
donotuselongcurtains
gratesare
whichcouldblowoverthetop
burnersandcreateafirehazard.
@Ifyousmellgw+turnoffthe
gastotherangeandcallaqualified
servicetechnician.Neverusean
openflametolocatealeak.
BakiQg,BroiliIlgaE2d
Ro%tiag
*
Dom we w’tm fora$mmige
iww%.
SmndafvayfronltheE’arlgy
*
whenopeningthe door d’ahot
well. mehotah’m“ Stean}
whichescapes(%Nnmuse burns
to hands, face amlkweyes.
@Placemm shelvesindesired
positioIlwhileoveniscd.
@PullingoutSIMM’to theshelf
stopisa conveniencein lifting
heavyfoods. It is also a
precautionagainstbums from
toucting hot !nwfkes ofthe
doororovenwalk
~Don9theatmoped food
Comimrs intheoven.Pressure
couldbuildupandthecontiiner
couldburstcausing
*Don’tusealuminumfoil
anywherein theovenexceptas
describedin thisbook.
couldresultinafirehazardor
damagetotherange.
~seody glasscookwarethatis
~
recommendedfor
ovens.
Whenusingcookingor
@
roastingbagsin oven~
themanufacturer’sdirection.
Alwaysremovebroilerpan
IS
fromtheovenassoonasyou
finishbroiling.
pancancatchfireifovenisuseci
withoutremovingthegreasefrom
thebroilerpan.
9when broiling9if
dose tothe fkme9 the fat may
ignite.
excessiveflare-ups.
Trimexcessfattoprevent
‘
an injury.
Misuse
useingas
follow
Greaseleftinthe
meatistoo
4
Page 5
—.
* m notdeanthedwxgidw!t.
‘N-Edoorgasketisessentialfora
goodseal.Becwefulnottorub,
damageormoveit.
* Do notU&x!ovendt%m?meN()
commercialovenckxmeroroven
linerprotectivecoatingofany
kindshouldbeusedinor around
anypal-toftheWen.
e RemovethebroiierpmJland
othercookwarebeforeselfcleaningtheoven.
Flooringunder‘the
Range
!iburrange, likesomanyother
householditems,isheavyand can
settleintosortfloorCoverings
suchascushionedvinylOF
carpeting.WhenmovingIhemnge
onthistypeof
Donotinstalltherangeover
kitchencarpeting
placean
~/4-inch-thick
the rangeandcarpeting.
Whenthejkw
Jrontof therange,theareathat the
rangewillrestonshouldbebuiltup
withplywoodorsimilarmateiialto
the samelevelorhigherthanthe
floorcovering.Thiswillallowthe
rangetobemovedforcleaningor
servicing.
flooring.usecare.
unlessyou
insulatingpadorsheetof
plywcxxl between
coveringendsd the
—
cleaning Your Range
e ckm only partslistedinthis
Us%?aidcm?Bd’1.
e Keeprangedean and free
d’accuInMlationsof’greaseor
spiIIQvemWtiehmayignite.
sRead663%43moblemsober”
onpage26of’thisbook..
=$~~n>tattempt‘torepair
orrephce any pm& your
rangeWMH’?9it
isspecifically
recommendedinthis hk AH
otherservicingshmddbereferred
toaqualifkdtechnician.
hvelingtheRange
Levelinglegsarelocatedoneach
cornerofthe baseoftherange.
Removethe bottomdrawer(on
modelssoequipped)andyoucan
levelthe rangeonanunevenfloor.
Toremovedrawer,pulldrawer
outalltheway9tiltupthefront
andtakeitout.Toreplacedrawer,
insertglidesatbackofdrawer
beyondstoponrangeglides.Lift
drawerifnecessarytoinserteasily.
Letfrontofdrawer
intoclose.
Oneoftherearlevelinglegswill
engagethe
ANTI-TIPbracket(allow
forsomesidetosideadjustment).
Allowaminimumclearanceof1/$”
betweentherangeandtheleveling
legthatistobeinstalledintothe
ANTI-TIPbracket.
down,thenpush
Page 6
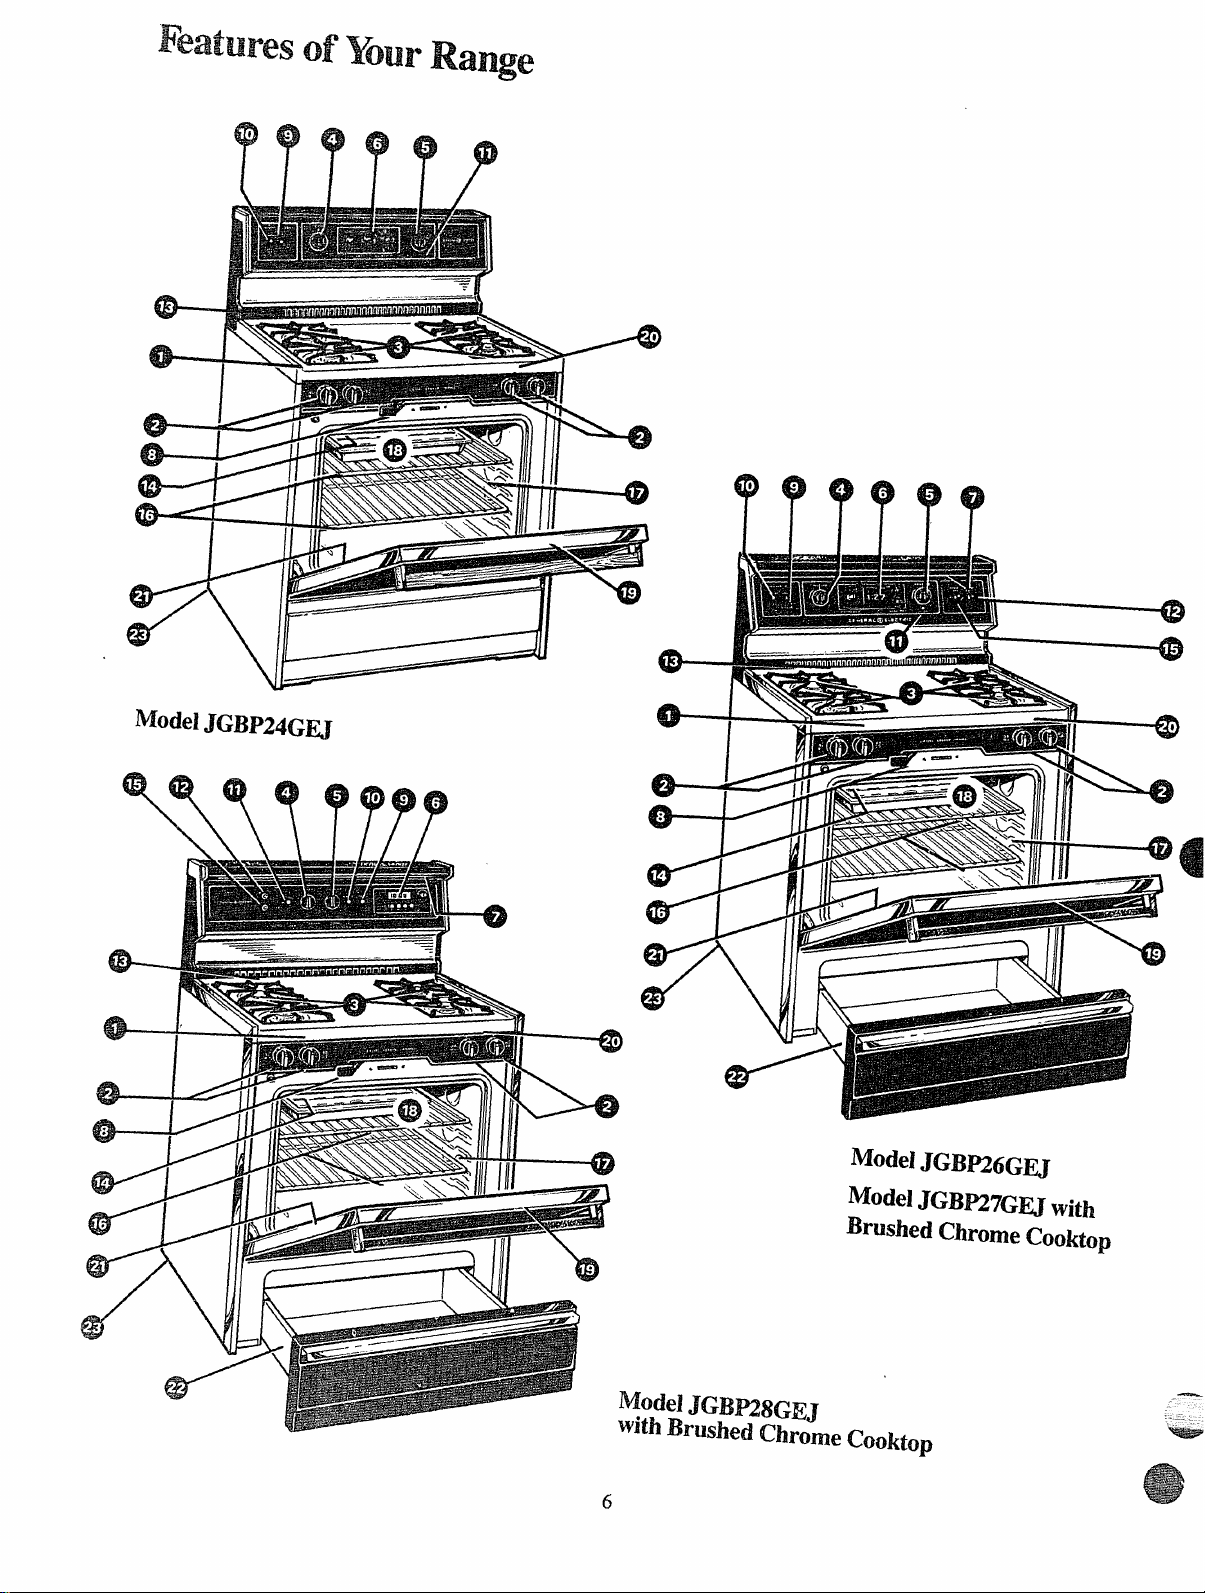
FeaturesofYourRange
-G-
69”
#ssa
l+-
1A
(B-J
fwsz2!!
1
-*
.9
MOM JGBP26G~
Model JGBW7G~ with
Brushed c~romp rfifiLhr-
‘---- UUWALW
P
ws=————
Model JGBM8GE.1
...—
Wth Ih.l$hed Chro-me Cooktop
6
Page 7
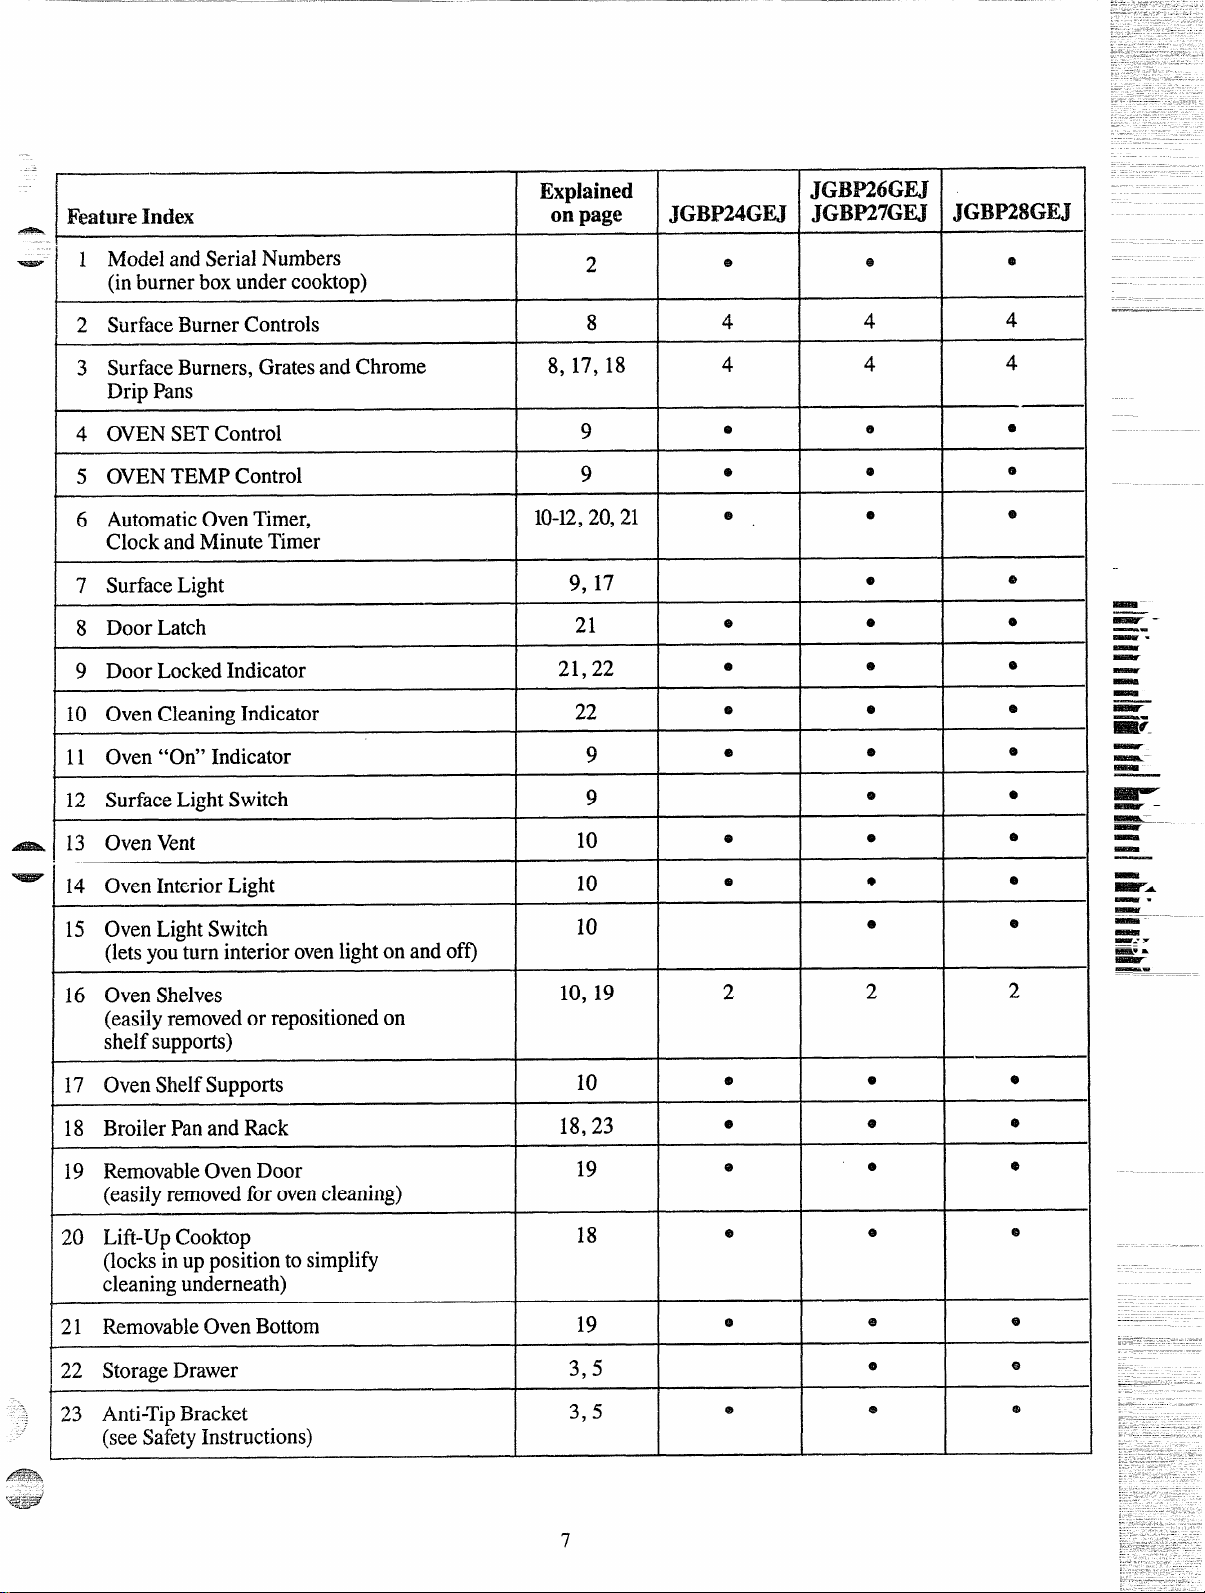
Explained
FeatureIndex
ModelandSerialNumbers
1
onpage JGBP24GEJ
(inburnerboxundercooktop)
2 SurfaceBurnerControls 8
JG~n6GEJ
JGBP27GEJ
2
e
e
4 4
JGBm$Gu
e
4
—.—..—
3 SurfaceBurners,GratesandChrome 8,17,18 4 4
DripPans
4 OVENSETControl
5 OVENTEMPControl
AutomaticOvenTimer,
6
ClockandMinuteTimer
7 SurfaceLight
8 DoorLatch
9 DoorLockedIndicator
10 OvenCleaningIndicator 22
11 Oven“On”Indicator
12 SurfaceLightSwitch
13 OvenVent 10
14 OvenInteriorLight
15 OvenLightSwitch
(letsyouturninteriorovenlightonandoff)
9
9
1(H2,
9, 17
21
21,22
10
10
20,21
9
9
@
e @
e @
e @
e
@
e
e e e
e * e
e
e
@
o
e
e *
e e
4
e
e
@
e
o
e
e
a
16 OvenShelves 10, 19
(easilyremovedor repositionedon
shelfsupports)
17 OvenShelfSupports
18 BroilerPanandRack
19 RemovableOvenDoor
(easilyremovedforovencleaning)
10 Lift-UpCooktop
(locksinuppositiontosimplify
cleaningunderneath)
~1 RemovableOvenBottom
12 StorageDrawer
~S Anti-TipBracket
(seeSafetyInstructions)
10
18,23
19
18
19
3,5
3,5
7
2 2 2
e e
6
e e
@ e
0 e
@
e e
@
@ @
e
e
e
@
e
Page 8

surfaceCootiw
.ss=$
.
AutomaticIgnition
Yoursurfaceburnersarelighted
byelectricignition,eliminatingthe
needforstandingpilot lightswith
constantlyburningflames.
In caseof a poweroutage,youcan
lightthesurfaceburneisonyour
rangewithamatch.Holda lighted
matchtotheburner,thenturnthe
knobtotheLITEposition.Use
extremecautionwhenlighting
.burnersthisway.
Surfaceburnersinusewhenan
electricalpowerfailureoccurswill
continuetooperatenormally.
surface Burner Contmk
Knobsthatturnthesurfaceburners
onandoffarelocatedonthelower
controlpanelandaremarkedasto
whichburnerstheycontrol.
ToLightaSurfaceBurner
Pushthecontrolknobinandturn
itto LITE. Youwillhearalittle
c~ickingnoise—thesoundofthe
electricsparkignitingthe burner.
Normalburneroperation:
Whena burnerisfirstturnedon,
youmayhearablowingorhissing
soundfor30to45secondsor until
the burnerheatsup.Thisnormal
soundisduetoimprovedinjection
ofgasandair intothe burner.Puta
panontheburnerbeforelightingit,
or adjusttheflametomatchpan
sizeas soonasitlights,andthe
blowingor hissingsoundwillbe
muchlessnoticeable.
Lifting
Flamewillbealmosthorizontal
andwillliftslightlyawayfromthe
burnerwhen~he burnerisfirst
turnedon. A blowingorhissing
soundmaybeheard.
Flamewillstabilizeandcurve
upwardsafteraburnerheatsupor
30to45secondsafteritisturned
on.Theblowingorhissingsound
willstop.
Afterlightingaburner: ~
~Checktobe suretheburneryou
turnedonistheoneyouwanttouse.
How
toSAMFlameSize
Theflamesizeonagasburner
shouldmatchthe cookwareyou
areusing.
NEVERLETTHEFLAME
EXTENDUPTHESIDESOFTHE
COOKWARE.Anyflamelargerthan
thebottomofthe cookwareiswasted
andonlyservestoheatthe handles.
Whenusingaluminumor
aluminum-cladstainlesssteel
potsandpans,adjusttheflameso
thecircleitmakesisabout1/2inch
smallerthanthebottomofthe
cookware..
Whenboiling,usethissameflame
size—1/2inchsmallerthanthe
bottomofthecookware—nomatter
whatthe cookwareismadeof.Foods
cookjust asquicklyata gentleboil
astheydoatafuriousrollingboil.
Ahighboilcreatessteamandcooks
awaymoisture,flavorandnutrition.
Avoiditexceptforthefewcooking
processeswhichneedavigorousboil.
Whenfryingorwarmingfoods
instainlesssteel,castironor
enamelware,keeptheflamedown
lower—toabout1/2thediameter
ofthepan.
Whenfryinginglassorceramic
cookware,lowertheIlarneevenmore.
—
~..
Afiertheburnerignites,turnthe
knobto adjusttheflamesize.
~Donotoperateaburnerforan
extendedperiodoftimewithout
cookwareon thegrate.Thefinish
onthegratemaychipwithout
cookwareto absorbthe heat.
~Besuretheburnersandgratesare
coolbeforeyouplaceyourhand,a
potholder,cleaningclothsor other
materialsonthem.
Page 9

LlsingYouroven
JGBZ?H3)
A full-widthfluorescentlightover
theuppercontrolpanelilluminates
thecooktop.Pressandmomentarily
hoidtheSURFACELIGHTswitch
ontheuppercontrolpaneltoturn
thelightonandoff.
Top-Qf-Ra~e Cookware
Aluminum:Medium-weight
cookwareisrecommendedbecauseit
heatsquicklyandevenly.Mostfds
brownevenlyinanaluminumskillet.
Mineralsinf~ andwaterwillstain
butwillnotharmaluminum.A
quickscourwitha soap-filledwool
padaftereachusekeepsaluminum
cookwarelookingshinynew.Use
saucepanswithtight-fittinglidsfor
cookingwithminimumamounts
ofwater.
Cast Iron: If heatedslowly,most
—
skilletswillgive satisfactoryresults.
~ Enamelware:Undersome
conditions,theenamelof some
cookwaremaymelt.Followcookware
manufacturer’srecommendations
forcookingmethods.
Glass:Therearetwotypesofglass
cookware—thoseforovenuseonly
andthose fortop-of-rangecooking
(saucepans,coffeeandteapots).
Glassconductsheatveryslowly.
HeatproofGlassCeramic:Can
beusedfor eithersurfaceoroven
cooking.It conductsheatvery
slowlyandcoolsveryslowly.
Checkcookwaremanufacturer’s
directionstobesureitcanbeused
ongasranges.
AutonlaticIgnition
Theovenibkwmwandbroil
burneronyourrangearelighted
byekctrk ignition.Theovenand
broikrcannotbeoperatedinthe
eventofa powerfailure.
Tolighttheburners,turnthe
OVENSETandOVENTEMP
knobstothedesiredfunctionand
temperature.Theburnershould
ignitewithin60 seconds.
CAUTION:DON(YI’MAKEANY
ATTEMPTlX3OPERATETHE
ELECTRICIGNITIONOVEN
DURINGANELKIXICAL
POWERFAILURE. Resumption
ofelectricalpowerwhenOVEN
TEMPandOVENSETcontrols
arein anypositionotherthanOFF
willresultinautomaticignitionof
theovenor broilerburnerand
couldcausesevereburnsif, atthe
time,youwereattemptingtolight
theburnerwithamatch.
ll~~Ore
Besureyouunderstandhowtoset
thecontrolsproperly.Practice
removingandreplacingtheshelves
whiIetheoveniscool.Readthe
informationonthefollowingpages,
andkeepthis bookhandy.
OveB ~o~~~ok
Thecontrolsforyouroven
aremarkedOVENSETandOVEN
TEMP.
UsingYourOven
TheOVENSETcontrolhassettings
forBAKE>BROIL,TIMEDBAKE,
CLEANandOFF.Whenyouturn
theknobtothedesiredsetting,the
properburnerisactivatedforthat
operation.
BAKE—Usethissettingforall
normalovenoperations—for
example,forcookingroastsor
casseroles.Onlythebottomoven
burneroperatesduringbaking.
BROIL-Use this settingfor
broiling.Onlythe top(broil)
burnerwilloperate.
TIMEDBAKE-Use thissetting
toturntheovenonandoffat
specifiedtimeswhenyouwant
cookingtostartandstop.See
AutomaticOvenTimeron next
page.
CLEAN-Use thissettingforthe
self-cleaningfunctiononly.
OFF-Shuts offpowertotheoven
controls.Ovenwillnotoperate.
TheOVENSETandOVENTEMP
controlsshouldbeturnedtoOFF
whenevertheovenisnotinuse.
TheOVENTEMPcontrol
maintainsthetemperatureyouset
fornormalovenoperationas well
asforbroiling.
Fornormalovenoperation,turn
theknobtothedesiredtemperature
whichis markedin25°increments.
Itwillnormallytake30to60
secondsbeforetheflamecomeson.
Aftertheovenreachestheselected
temperature,theovenburnercycles
—offcompletely,thenonwitha
fi.dlflame-to keeptheoven
temperaturecontrolled.
StainlessSteel:Thismetalalone
haspoorheatingproperties,andis
usuallycombinedwithcopper,
aluminumorothermetalsfor
improvedheatdistribution.
Combinationmetalskilletsusually
worksatisfactorilyif theyare
usedwithmediumheatasthe
manufacturerrecommends.
Ove~ “0~9’
Lightonuppercontrolpanelglows
whenovenis in operation;itgoes
outwhentheOVENSETknobis
turnedto OFF.
9
Indicator
Page 10

LTsingYouroven
Ass?&.
Oven Shelves
Theshelvesaredesignedwith
stop-iockssowhenplacedcorrectly
ontheshelfsupports,theywillstop
beforecomingcompletelyoutof
the ovenandwillnottiltwhenyou
areremovingfoodfromthemor
placingfoodonthem.
Whenplacingcookwareona shelf,
pulltheshelfouttothe “stop”
position.Placethecookwareon
theshelf,thenslide the shelfback
intotheoven.Thiswilleliminate
reachingintothehot oven.
Toremoveashelffromtheoven,
pullitouttothestopposition,lift
upon frontandpull out.
ova-l!vent
Yourovenisventedthroughducts
attherearoftherange(seepage6).
Donot blocktheseductswhen
cookinginthe oven—itisimportant
thattheflowofhot air fromthe
ovenandfreshairtotheoven
burnersbeuninterrupted.
~Ventopeningsandnearby
surfacesmaybecomehot.Donot
touchthem.
oEhmUesofpotsandpansonthe
cooktopmaybecomehotifleft
tooclose to thevent.
*Donotleaveplasticitemson
thecooktop-they maymeltif
lefttooclosetothevent.
Automatic~mersand(lock
—— -
.
—
SheIfPositions
The oven hasfourshelfsupports——
A(bottom),B,C andD (top).Shelf
positionsforcookingaresuggested
onBakingandRoastingpages.
oven Li@t
The lightcomesonautomatically
whentheovendooris opened. For
modelsJGBP26,JGBP27and
JGBP28,usetheswitchonthe
uppercontrolpaneltoturnthelight
cmandoffwhenthedoorisclosed.
OvenMokture
Asyourovenheatsup,the
temperaturechangeoftheair
intheovenmaycausewater
dropletstoformonthedoor
glass.Topreventthis,openthe
ovendoorforthefirstminute
ofovenheat-uptolet themoist
airout.
Ekdronk Digitalclock
Whenpowerisfirstconnected
totherangeoraflerapoweroutage,
thedisplaywillflashshowing
figure8’salternatingwithtwo
flashingindicatorsdirectlyabove
buttons(A)and(B).
‘I’osetthetimeofday,push
andholdbuttons(A)and(B)
whilerotatingknob(D)until the
correcttimeofdayappearsinthe
displaywindow.Releasebuttons
(A)and (B).
Mintlt!e/&xondsW
Tosettheminute/secondtimer,
pushtheNIIN/SECTIMERbutton
(A)androtatetheknob(D)
clockwiseto thedesiredtime(up
to 99minutes).Anindicatorwill
appeardirectlyabovebutton(A),
showingthatthetimeris in use,
andtimewillstartcountingdown
in seconds.
Tostoptheaudiblesignal,push
button(A).
Thetimeremainingcanbe
changedwhilethetimerisinuse,
Simplyrotateknob(D)clockwise
toincreaseor counterclockwise
todecrease.
m.mer
—
Page 11

‘lbcheckthetimeofdayduring
aminute/secmMitimeroperation,
pushbuttons(A)and(B)
simultaneously,thenreleasethem
andthedisplaywillshowthetime
of’day.Theindicatordirectlyabove
button(A)willnowflashto remind
youthat thetimerisbeingused.
Toagaindisplaythetime
remainingontheininute/second
timer,pushbutton(A).Whenthe
timehaselapsed,an intermittent
signalwillsounduntilbutton(A)
hasbeenpushed.
Theminutelseccmdtimercan
beusedduringanautomatic
cookingorself-cleaningoven
operation.Justpushbutton(A)in
androtateknob(D)clockwiseto
the desiredtime.
Automatic oven mmer
The oventimerwill automatically.
startandstopyourovencookingor
self-cleaningoperationforyou.
Forautomaticovencooking,
here’swhatyoudo.
1. Makesurethe clockshowsthe
correcttimeofday.
2. TurntheOvenSetknobto
TIMEDBAKE.
3. Turnthe OvenTempknobto
thedesiredtemperature.
4. Enterthedesiredamountof
cooktimebypushingCOOK TIME
button(B)androtatingknob(D)to
the desiredlengthofcookingtime
(hoursand/orminutes).
Whenacooktimehasbeenset:
~Acooking
indicatorthatlooks
likeasteamingpot
willappearinthe
upperlefthand
cornerofthe
displaywindow.Thisindicatesthat
theautomaticoventimerhasbegun
itscountdown.
~Anindicatorwillappearabove
button(B).
~Aflashingindicatorwillappear
abovebutton(C), indicatingthat
thestoptimehasautomatically
beensettostopthecooking
operationafterthecooktimehas
elapsed.
Forautomaticovencleaning,see
OperatingtheSelf-CleaningOven
onpages20-22.
11~
DelayStartingan
Automatic(hen operation
Ifa delayedcookingoperation
isdesired:
L TurntheOvenSetknobto
TIMEI)BAKE.
2. ThrntheOvenTempknobtothe
desiredtemperature.
3. Entertheamountoftimeyou
wanttocookbypushingCOOK
TIMEbutton(B)androtatingknob
(D)tothedesiredlengthofcooking
time(hoursand/orminutes).
4. Enterthetimeofdayyouwant
theoventostopcookingbypushing
STOP TIMEbutton(C)androtating
knob(D)tothedesiredstoptime.
If a delayedself-cleaning
ovenoperationisdesired9see
OperatingtheSelf-CleaningOven
onpages20-22.
Tocheck‘mnes
Tocheckthetimesetforany
operation,proceedasfollows:
@Timeofday
Pushbuttons(A)and(B)
simultaneously.
@Minute/secondtimer
Pushbutton(A).
@Cooktime
Pushbutton(B).
~ Stoptime
Pushbutton(C).
@Cleantime
Pushbutton(E).
Todisplaytimeofdayafterany
oftheabovechecks,pushbuttons
(A)and(B)simultaneously.
Whenperforminganyof these
checks:
@An indicatorwillappearabove
thebuttonpushed,indicatingwhat
isappearinginthe displaywindow.
@Flashingindicatorswillappear
abovetheotherbuttons,indicating
that timeshavebeenset.
@Thetimesetforanyoperation
canbechangedduringanyofthe
checkslistedabove—excepttime
ofday.Simplyrotateknob(D)
clockwisetoincreaseor
counterclockwisetodecrease.
~Tochangetimeofday,hold
buttons(A)and(B)whilerotating
knob(D).
~TocancelCookTimeorStop
Timebeforetheautomatic
operationiscompleted,pushthe
COOKTIMEbutton(B)and rotate
knob(D)to 0:00.
UITostoptheaudiblesignall
foranyoperation,simplypush
button(A).
11
Page 12

Oven~mer andClock
M(NMJGBP24GEJ
kdia~ CIwk
Tosettheclock,pushtheknobin
andturntheclockhands tothe
righttothecorrecttime.Thenlet
theknoboutandcontinueturning
toOFF.
ModelsJGBP26GEJand
JGBP27GEJ
DigitalClock
Pushinthecenterknobofthe
MinuteTimerandturntheknob
ineitherdirectiontosetthedigital
clocknumeralstothecorrecttime.
(TheMinuteTimeristhelargedial
totheleftofthe digitalclock.)After
settingtheclock,letthe knobout
andturntheMinuteTimerpointer
toOFF.
AutonlatieovenTimer
ThisTimerwillautomaticallystart
andstopyour oven foryou.Here’s
whatyoudo:
L Makesurebothyourrangeclock
andthe STARTdialshowthecorrect
timeofday.
2. SettheSTARTcontrol. Pushin
andturntheSTARTknobtothetime
youwanttheoventoturnon. (If
youwantittostartoperating
immediately,donotsettheSTART
time.)
3. SettheS’10Pcontrol.Pushin
andturntheSTOPknobto thetime
youwanttheoventoturnitselfoff.
MnuteTamer
TheMinuteTimerhasbeen
combinedwiththerangeclock.
Useittotimeallyourprecise
cookingoperations.You’ll
recognizeitasthepointerwhichis
differentin colorfromtheclock
hands.
TosettheMinuteTimer,turnthe
knobtotheleft,withoutpushingin,
untilthepointerreachesthe
numberofminutesyouwantto
time(upto60).
Attheendofthesettime,abuzzer
soundstotellyoutimeisup.Turn
theknob,withoutpushingin,until
thepointerreachesOFFandthe
buzzerstops.
Minute‘I’i.nwr
TosettheMinuteTimer,turnthe
centerknobclockwise,without
pushingin,untilthe pointerreaches
thenumberofminutesyouwantto
time(upto 60).
Attheendofthesettime,a buzzer
soundstotellyoutimeisup.Tbrn
theknob,withoutpushingin, until
thepointerreachesOFFandthe
buzzerstops.
—
Note:Theremustbeat leasta
half-hourdifferencebetweenthe
STARTandSlOP dialsforthe
automaticcontroltowork.
4. SettheOVENSETknobto
TIMEBAKEandtheOVENTEMP
knobtothedesiredoventemperature.
Theovenwillturnitselfon
immediately,or ata laterSTART
timethatyousetifyouhavesetthe
STARTcontrol.Itwilloperateat
thetemperatureyouselected,andit
willturnitselfoffattheSTOPtime
youhaveset.
Afterovenoperationiscompleted,
besuretoturntheOVENTEMP
andOVENSETknobstoOFF.
12
Page 13

HowtosetM.)urRange
fixBaking
L Positiontheshelfor shelvesin
Iheoven.
2. Closeovendoor.TurnOVEN
SETknobtoBAKEorTIMEBAKE
andOVENTEMFknobtodesired
ternpemture.Preheatovenforat
least15minutesifpreheatingis
necessary.
3. Placefoodinovenoncenter
ofshelf.Allowatleast2 inches
betweenedgeofbakewareandoven
walloradjacentcookware.
Ifcookingontwoshelvesatthe
sametime,placeshelvesabout4
inchesapartandstaggerfoodon
them.
4. Checkfoodfordonenessat
minimumtimeon recipe.Cook
longerifnecessary.Switchoff
heat andremovefood.
Preheating
Preheatingisveryimportantwhen
usingtemperaturesbelow225°F.
andwhenbakingfoodssuchas
biscuits,cookies,cakesandother
pastries.
Preheatingisnotnecessarywhen
roastingorforlong-timecookingof
wholemeals.
shelfPositiom
Mostbakingisdoneonthesecond
shelfposition(B)fromthebottom.
Whenbakingthreeor fouritems,
usetwoshelvespositionedonthe
secondandfourthsetsofsupports
(B&D)frombottomofoven.
Bakeangelfoodcakesonfirstshelf
position(A)frombottomofoven.
Batiw ‘13ps
~Followatestedrecipeand
measuretheingredientscarefully.
Ifyouareusingapackagemix,
followlabeldirections.
~Ifmoistureisnoticeableonthe
frontoftheovenorontheblackglass
doorwhenfirstturningontheoven,
leavetheovendoorajarforafew
minutesoruntiltheoveniswarm.
@Donotopentheovendoorduring
abakingoperation-h~dtwillbelost
andthebakingtimemightneedto
be extended.Thiscouldcausepoor
bakingresults.Ifyoumustopenthe
door,openitpartially-only3or4
inches—andcloseitasquicklyas
possible.
~DOnotdisturbtheheatcirculation
intheovenwiththeuseofaluminum
foil.Iffoilisused,placeasmall
sheetofit, about10by12inchesat
themost,onalowershelfseveral
inchesbelowthefood.Donotplace
foilontheovenbottom.
Comon BakingProbkxns
andPossibleSolutions
Pm
Burningaroundedges
~oventoofill; avoidovercrowding.
@Edgesofcrusttoothin.
oIncorrectbakingtemperature.
Bottomcrustsoggyandunbaked
@A11owcrustand/orfillingtocool
sufficientlybeforefillingpie shell.
@Fillingmaybetoothinorjuicy.
~Fillingallowedtostandinpieshell
beforebaking.(Fillpie shellsand
bakeimmediately.)
~Ingredientsandpropermeasuring
affectthe qualityofthecrust.Usea
testedrecipeandgoodtechnique.
Makesuretherearenotinyholesor
tearsinabottomcrust. “Patching”
apiecrustcouldcausesoaking.
Piefillingrunsover
~Topandbottomcrustnotwell
sealedtogether.
~Edgesofpiecrustnotbuilt up
highenough.
@Toomuchfilling.
@Checksizeofpieplate.
Pastryistough;crustnot.flaky
@Toomuchhandling.
aFattoosoftorcutintoofine.
Rolldoughlightlyandhandleas
littleaspossible.
CAKES
Cakeris~shighercmmmside
*Batters~readuneverdy
~Ovenshe]vesnot]eve~.
*Usingwarpedpans.
*Incorrectpansize.
Cakescrackingontop
@Oventemperaturetoohigh.
~ Battertoothick,followrecipe
orexactpackagedirections.
*check for
pro~r shelfposition.
echeck pansizecalledforinrecipe.
@Impropermixingofcake.
CakefaHs
TOO muchshortening,sugaror
@
liquid.
eCheckleaveningagent,baking
powderorbakingsodatoassure
freshness.Makeahabittonote
expirationdatesofpackaged
ingredients.
~Cakenotbakedlongenoughor
atincorrecttemperature.
s Ifaddingoilto
acakemix,make
certainthe oilisthetypeand
amountspecified.
Crustishard
~Checktemperature.
oCheckshelfposition.
Cakehassoggylayerorstreaks
atbottom
● Underminingingredients.
eShorteningtoosoftforproper
creaming.
eToomuchliquid.
COOKI13!!3& BIscmm
Doughycenter;heavycruston
surface
@Checktemperature.
oCheckshelfposition.
e FOl~OW bakinginstructions
carefullyasgiveninreliablerecipe
oronconveniencefoodpackage.
*Flatcookiesheetswillgivemore
evenbakingresults.Don’tovercrowd
foodsonabakingsheet.
oConveniencefoodsusedbeyond
theirexpirationdate.
Browningmorenoticeableon
oneside
@Ovendoornotclosedproperiy,
checkgasketseal.
~Checkshelfposition.
inpan.
Esi?l#
_-_A-
-.
-
-._–
-.
-
=a==—
=.- ..
~s*
13
Page 14

BakingGuide
1. Preileatingiswry iifnporoimt
whmlusingtemperaturesbelow
225W.and whenbakingfoods
suchas biscuits.CooklesTcakes
and otherpastries.Preheatthe
overtforatIeas[15minutes.
Preheatingis notnecessarywhen
roastingor forlong-timecooking
2. Aluminumpans conductheat
quickly.For mostconventional
3. Darkor non-shinyfinishes,also
glassandPyroceram@cuokware,
baking,light,shinyfinishesgive generallyabsorbheat whichmay
bestresultsbecausetheyhelp
preventoverbrowning.Forbest
resultindry,crispcrusts.Reduce
ovenheat25°F.iflightercrustsare
browningresults,werecommend desired.Rapidbrowningofsome
dullbottomsurfacesforcakepans fxxiscan& achievedb; preheating
andpieplates.
castironcookware.
ofwhalemeals.
Food
Bread
Bkcuits ( %-in.thick) shinyCookieSheet B,~ 400°-4750
Coffeecake Shiny,Metall% with B,A
Cornbreadormuffins CastIronorGlassPan B 400°-450” 20-40 Preheatcastironpanforcrispcrust.
Gingcrbmad
h4uffins
Popovers DeepGlassorCastIronCups
Quickloafbread MetalorGlassLoafPans B
Yeastbread(2loaves) MetalorGlassLoafPans
Plainrolls ShinyOblongorMuffinPans
$weetrolls ShinyOblongor MuffinPans B,A
Cakes
:withoutshortening)
4ngelfood
k!lyroll
$xmge Metalor CeramicPan
~akes
hmdtcakes
lqnkes ShinyMetalMuffinPans B
%uitcakcs MetalorGlassLoafor A, B
=yer ShinyMetalPanwith B
.ayer,chocolate ShinyMetalPanwith B
oaf
~ook~are Positions Temperatures
satin-finishbottom
ShinyMetalP’anwith B
satin-finishbottom
ShinyMetalMuffinPans
A. B 400°-425” 20-30 Decreaseabout5minutesformuffinmix.
B 375° 45-60 C)rbakeat450% for25minutes,thenat
A, B 375°-4250 45-60 browning.
A,B
AluminumTubeI% A 325°-3750 30-55 Twopiecepanisconvenient.
MetalJellyRollPan
MetalorCeramicPan A, B
‘AIbePan
satin-finishbottom
satin-finishbottom
MetalorGlassLoafPans B
B
A 325°-3500
shelf
Oven Time,
Minutes
15-20
Commen?s
Canned,refrigeratedbiscuitstake2to4
minuteslesstime.
350”-400” 20-30
350” 45-55
350°-3750 45-60 Darkmetalorglassgivesdeepest
375°-4250
350°-3750 20-30
375°-4000
325°-3500
350°-3750 20-25
275°-3000 2-4hrs. Use300”F.andShelfB forsmallor
350°-375” 20-35
350°-3750 25-30
350” 40-60
10-25
10-15
45-60
45-65
350”F.for10to 15minutes.
Forthinrolls,ShelfBmaybeused.
i% thinrolls,ShelfBmaybeused.
Linepanwithwaxedpaper.
Paperlinersproducemoremoistcrusts.
individualcakes.
Ifbakingfourlayersuse
shelvesB andD.
;ookies
lrownies
)rop
~efrigerator
[oiledorsliced
hits,
Desserts
)ther
Iakedapples GlassorMetalPans A, B,C 350°-4000
:ustard
uddings,rice GlassCustardCupsor B 325°
ndcustard
‘ies
rozen
Ieringue
mecrust Glassor Stitin-finishMetal A, B
Wocrust
~stryshell
ffiscellaneous
:akedpotatoes
callopeddishes
ouffles Glass
MetalorGlassPans B,C
CookieSheet B,C
CookieSheet B,C
CookieSheet
GlassCustardCupsor
Casserole (setinpanofhotwater)
Casserole
FoilPanon CookieSheet A 400°-4250
Spreadtocrustedges
Glassor Satin-finishMetal B 400°-4250
Glassor S:itin-finishMetalPan
seton OvenShelf
GlassorMetal
B,C
B
B,C 325°-3500
B
A, B,C
A, B,C
B
325°-3500 25-35 Barcookiesfrommixusesametime.
350°-4000
@O0.4~50
375°-4000 7-12
300°-3500 30-60
400°-4250 45-60
450° 13-16
325°-4000 60-90
325°-3750
300°-3500 30-75
10-20
6-12
30-60
50-90
45-70
15-25 Toquicklybrownmeringueuse400°F.for
40-60
UseShelfCandincrease temperature
25to50”F.formorebrowning.
Reducetemperatureto300”F.forlarge
custard.
Cookbreador ricepuddingwithcustard
base80to90minutes.
Largepiesuse400”F.andincreasetime,
8to 10minutes.
Custardfillingsrequirelowertemperature,
longertime.
Increasetimeforlargeamountor size.
30-60
14
Page 15

roasted ~nc~ver& in y~~r oven.
~~~stin~ temper~tur~s, which
should be low and steady, ~eep
spatteringtoarni~imurn. When
rO~stin~, it is not necessary to sear,
baste, ~~vcr, or add water
meat.Roastingiseasy,just follow
thesesteps:
Step 1.Positionovenshelfat
secondfrombottomposition(B)
forsmallsizeroast[3to5 lbs.)and
atbottomposition(A) forlarger
roasts.
toyour
Step2:Checkweightofroast.
Placemeatfat-side-uporpoultry
breast-side-uponroastingrackina
shallowpan. Themeltingfatwill
bastethemeal.Selectapanas
closetothesizeofmeataspossible.
(Broilerpanwithrackisagood
panforthis.)
Step3: ‘IbrnOVENSETtoBAKE
andOVENTEMPtodesired
temperature.ChecktheRoasting
Guidefortemperaturesand
approximatecookingtimes.
Stepd:Most meatscontinueto
cookslightlywhilestandingafter
beingremovedfromtheoven.For
rareor mediuminternaldoneness,
youmaywishtoremovemeatfrom
the ovenjustbeforeitisdoneifitis
tostand10
to 20minuteswhileyou
makegravyor attendtootherfoods.
Ifnostandingisplanned,cook
meatto suggestedtemperature.
I!hMenRoa$ts
Frozenroastsofbeef,pork,
lamb,etc., canbestartedwithout
thawing,but allow15to25minutes
perpoundadditionaltime(15
minutesperpoundforroastsunder
5pounds,moretimeforlarger
roasts).
Thawmostfrozenpoultrybefore
roastingtoensureevendoneness.
Somecommercialfrozenpoultry
canbecookedsuccessfullywithout
thawing.Followdirectionsgiven
onpacker’slabel.
~ RoastingGuide
Meat
Tendercuts;rib,highquality
sirlointip,rumpor topround*
Lamblegorbone-inshoulder*
Vealshoulder,legor loin*
Porkloin,ribor shoulder*
Ham,pre-cooked
Ham,raw
*Forbonelessrolledroastsover6-inches
thick,add5to 10minutesperlb.totimes
givenabove.
Poultry
Chickenor Duck
Chickenpieces
Turkey
Oven
Temperature
325°
325°
325°
325°
325°
325°
325°
375°
325°
Doneness
Rare:
Medium:
WellDone:
Rare:
Medium:
Well Done:
WellDone:
WellDone:
ToWarm:
Well Done:
WellDone:
Well
Done:
WellDone:
ApproximateRoasting‘llme
inMinutesperI%und
3to5-ibs. 6to8-ibs.
24-30 18-22
30-35 22-25
35-45 28-33
21-25
25-30 24-28
30-35 28-33
35-45
35-45 30-40
17-20minutesper lb,(anyweight)
Under10lbs.
27-35 24-27
3to5-]bs. Over5lbs.
35-40 30-35
30-35
10to15-lbs.
18-23
20-23
30-40
10to15-lbs.
Over15lbs.
15-20
Interrml
Temperature‘F
130°-1400
150°-1600
1700-185°
130°-1400
150°-1600
170°-1850
170°-180°
170°-180°
115°-1250
170°
185°-1!300
185°-1900
Inthigh:
185°-190°
15
Page 16

Broiling
13rdingiscookingfoodbydirect
heatfromabovethefood.Your
rangeisdesignedforwaist-high
broiling.Aspeciallydesigned
broilerpanandrackallows
drippingfattodrainawayfromthe
foodsandbekeptawayfromthe
highheatofthegasflame.
Theovendoorshouldbeclosed
duringbroiling.
How’toBroil
L If meathasfator gristlenearthe
edge,cutverticalslashesthroughit
about2inchesapart,butdon’tcut
intomeat.Werecommendthatyou
trimfatto preventexcessive
smoking,leavingalayerabout
U8-inchthick.
2. Arrangefoodonrackand
positionthebroilerpan onthe
appropriateshelfintheoven.
Placingfoodclosertoflame
increasesexteriorbrowningof
food,butalsoincreasesspattering
andthe possibilityoffatsandmeat
juicesigniting.
3. Close theovendoorbutdo
notlatchit. If thedoorlatchis
movedtotherightduringa broil
operation,thedoormaylockand
youmaynotbeableto openituntil
theovencools.
4. TbrnOVENSETknobtoBROIL.
Formostfoods,turnOVENTEMP
knobtoBROIL.Note:Chicken
andhamarebroiledatalower
settingin orderto cookfood
throughwithoutover-browningit.
5. ‘Ihrnmostfoodsonceduring
cooking(theexceptionis thinfillets
offish;oil oneside,placethatside
downonbroilerrackandcookwithout
turninguntildone).Timefoodsfor
aboutone-halfthetotalcooking
time,turn food,thencontinueto
cooktopreferreddoneness.
~Usetongstoturnmeatover— ~Steaksandchopsshouldheat
piercedmeatlosesjuices. least 1inchthick forbestbroiling
resuits.ParIbroilthinnerones.
Broilingchide
Quantity
Food
Bacon
GroundBeef
WellDone
BeefSteaks
Rare
Medium
Done
Well
Rare
Medium
WellDone
Chicken(450°) 1whole
BakeryProducts
Bread(Toast)or
ToasterPastries
EnglishMuffins
LobsterTails
(6to8-02.each)
HamSlices(450°)
Precooked
Pork Chops
WellDone
LambChops
Medium
WellDone
Medium
WellDone
Wieners,
similarprecooked
sausages,
bratwurst
Thickness
%-lb.(about8
thinslices)
i-lb.(4 patties)
%to3A-in.thick
I
l-in.thick
(1to 1%lbs.)
I%-in.thick
(2to2%-lbs.)
(2to2 %-lbs.),
splitlengthwise
2-4 slices
1pkg.(2)
2-split
2-4
l-lb.fillets%to
Yz-in.thick
l-in.thick
2(Viin.)
2(l-in.thick),
about1lb.
2(1in.)
about10to12-02
2(lYzin,),
aboutI lb.
l-lb. pkg.(10)
andfor
Position Comments
C,D 6
1stSide 2ndSide
Shelf
Time, Time,
Minutes Minutes
D
II
c
9-1o 7-8 takeaboutsametime.
c
c
c
B,C
B,C
B
B
25-30 25-30
D
2-3
D
c 14-17
c 5
B,C
c
c
B
B
B
B
21/+
5
9
12
13
10
15
25
3-6
8 8 Increasetimes5-10minutesper
10
13
8
10
10
17
5-6
6-7
9-12
16-18
l/&2
Donot Cutthroughbackofshell,spnxid
turn open.Brushwithmeltedbutter
over. beforeandafterhalftime.
4-5
11-13
4-7
4-6
12-14
Arrangeinsinglelayer.
Spaceevenly.Upto9patties
7
Steakslessthanl-inchcook
throughbeforebrowning.
8-9
Panfryingisrecommended.
Slashfat.
Reducetimesabout5to 10
minutespersideforcut-up
chicken.Brusheachsidewith
meltedbutter.Broilwithskin
sidedownfirst.
Spaceevenly.PlaceEnglish
muffinscut-side-upandbrush
withbutterifdesired.
5
Handleandturnverycarefully.
Brushwithlemonbutterbefore
andduringcookingifdesired.
Preheatbroilertoincrease
browning.
sideforI%-inchthickorhome
cured.
Slashfat.
Slashfat.
10
1-2 Ifdesired,splitsausagesin
lengthwise;cutinto5to6-i
pieces.
half
nch
~
6. TurnOVENSETand OVEN
TEMPknobstoOFF.Remove
broilerpanfromovenand serve
foodimmediately.Leavepan
outsidetheoventocool.
16
Page 17

careandcleating
–——–
Propercareandcleaningare
importantsoyourrdngewillgive
youefficientandsatisfactory
service.Followthesedirections
carefullyincaringforittohelp
assuresafeandpropermaintenance.
Beforecleaninganypartofyour
range(exceptforoperatingtheselfcleaningcycle),DE!XXW4NECT
ELECTRICPOWERm THE
RANGEatthefise boxor circuit
breakerpanel,or pulltherange
powercordplugfromtheelectric
outlet.
outerEnamelFinish
Whentherangeiscool,washthe
enamelfinishwithmildsoapand
wateroramildabrasivecleanser
appliedwithadampcloth.Rinse
thesurfacewithcleanwaterand
drywitha softcloth.If youwish,
occasionallyapplya thincoatof
mildcleaningwaxto helpprotect
thefinish.
Therearea numberofprecautions
youcantaketo avoidmarringthe
surfaceoftherangeandtoprevent
itfrombecomingdull. Don’tslide
heavypansacrossit. If youspill
foodswithalot ofacid(tomatoes,
sauerkraut,fruitjuices,etc.)or
foodswithhighsugarcontent,
cleanthemupas soonaspossible.
If allowedtoremain,thesefoods
couldcauseadullspot.,Also,no
matterhowstubbornthefoodstain,
neveruseharshabrasivecleansers.
Theycouldpermanentlydamage
theenamelsurface.
Brushed
(M~del~JGB~7 andJGBJ?28)
Cleanthebrushedchrometop
withwarm,soapywateror anallpurposehouseholdcleanerand
immediatelydry itwitha clean,
softcloth.T&ecaretodrythe
surfacefollowingthe “grain.”To
helppreventfingermarksafter
cleaning,spreadathinfilmofbaby
oilonthesurface.Wipeaway
excessoilwithaclean,softcloth.
Agoodappliancewaxwillhelp
protectthisfinish.
chromeFinish
controlR3nds
It’sagoodideatowipethecontrol
panelscleanafiereachuseofthe
oven.Foramorethoroughcleaning,
thecontrolknobscanbepulledoff
the knobstemsandtheglassupper
controlpanelcanbe cleanedonboth
sides.
TOremovetheglasspanel:
L Disconnectpowertotherange.
2. Removethescrewoneachendof
thebacksplash.
3. Removethe blackmetalstripson
eachendthatholdthe glassinplace.
4. Removethe controlknobs,clock
knobsandscrewssecuringthelight
switches.
5. Carefullyremovetheglassand
placeitona smooth,flatsufice.
Cleanitwithmildsoapandwater,
rinsewithcleanwateranddrywith
a softcloth.
Caution:Donotuseabrasive
cleansers,strongliquidcleanersor
ovencleanersonglassorenamel
controlpanelsurfiices-theywill
damagethefinish.
solace L@’lt
(ModelsJGB~ JGBP27
andJGBP28)
WHENCHANGINGASURFACE
LAMP,DONOTTOUCHTHE
METALATENDSOFLAMP
Yoursurfacelampiseasilyreplaced
\vithafluorescenttubeofthe same
wattage.Makesurepowertothe
rangeisdisconnectedat themainfuse
orcircuitbreakerpanelorpullthe
powercordplugfromtheelectric
outlet.
17
Toremove,liftthelampcover.Place
fingersontopneareachendofthe
lighttube.Pressdownandrollthe
topofthetubegentlytowardthefront
oftherangeuntilitstops.Remove
thetubegentlyfiorntheunit,making
sureitdoesn’thitthelampcover.
Toreplace,placefingersontop
neareachendofthelighttube.
Pressthe bulbgentlyintotheslots
androllthetopoftubegentlytoward
the backoftherangeuntilitstops.
Thenmovethelampcoverdown.
BurnerGates
Gratesshouldbewashedregularly
and,ofcourse,afterspillovers.
Washtheminhot,soapywaterand
rinsewithcleanwater.Drythe
grateswitha cloth-don’t putthem
backontherangewet.
Togetrid ofburned-onfood,soak
thegratesin a slightlydiluted
liquidcleanser.
Althoughthey’redurable,the
grateswillgraduallylosetheir
shine,regardlessofthebestcare
youcangivethem.Thisis dueto
theircontinualexposuretohigh
temperatures.
Do notoperateaburnerforan
extendedperiodoftimewithout
cookwareon thegrate.Thefinish
onthegratemaychipwithout
cookwareto absorbtheheat.
Whenreplacinga
pairofgrates,
theirregular
sidesshould
interlockin
themiddleas
shownatright. +-
m
M
_
EsEtK”&
—–
—
—-
-—
—-
_—
m=- 7
m- =
Page 18

DripPans
Theholesin theburnersmustbe
keptcleanatalltimesforproper
ignitionandaneven, unhampered
flame.
Cleantheburnersroutinelyand
especiallyafterbadspilkwers
whichcouldclogtheseholes.
Burnersliftoutforcleaning.
Note:Twoscrewsholdeachburner
pairinplacetokeepthemfrom
wobblingaroundduringshipment.
Removeanddiscardtheshipping
screwsandliftthe burnersupand
out.Thisdisengagesthemfromthe
mountingbracketundereach
burnerpair.
Toremoveburned-onfood,soak
theburnerinasolutionofaproduct
usedforcleaningtheinsideofcoffee
makers.Soakthe burnerfor20to
30minutes.If thefooddoesn’t
rinseoffcompletely,scrubitwith
soapandwateror amildabrasive
cleanserandadampcloth.
Donotattempttocleanburnersin
anautomaticdishwasher.Loosened
foodsoil can clogburnerholes,
andthe causticactionofthe
dishwasherdetergentcandamage
theburnerheads.
Beforeputtingtheburnerback,dry
itthoroughlybysettingitin awarm
ovenfor30minutes.Thenplaceit
backintherange,makingsureitis
properlyseatedonthemounting
bracketandislevel.
Removethegratesandlifioutthe
chromedrippans.Washthemin
hot,soapywater.Rinsethemwith
clean,hot waterandpolishthem
drywitha cloth.Neveruse
abrasivecleaneror steelwool—
they’llscratchthesurface.Instead,
soakthedrippansforabout20
minutesinslightlydilutedliquid
cleanseror mildsolutionof
ammoniaandwater(1/2cupof
ammoniatoone gallonofwater).
Afiersoaking,washtheminhot,
soapywater.Rinsewithcleanwater
andpolishwithaclean,softcloth.
Donotattempttocleanthedrip
pansin theself-cleaningoven.
Whenreplacing
drippans,the
notchontherear
panandthenotch
onthefrontpan
shouldmeetin
the middle.
Cleantheareaunderthecooktop
often.Built-upsoil,especially
grease,maycatchfire.
Tomakecleaningeasier,theentire
cooktopmaybefifiedupand
supportedbylockingarmsthat
catchandholdthe topwhenit’sall
thewayup.
Besureallburnemareturnedoff
beforeraisingthecooktop.Then
removethegratesanddrippans,
graspthefrontsidesofthecooktop
andlift.
Aftercleaningunderthecook-top
withhot,mildsoapywateranda
cleancloth,putthecooktopbackin
place.Liftupaiittletoreleasethe
lockingarmsandpushthemin
whileguidingthetopbackdown.
Be carefulnottopinchyourfingers.
BroilerPan&Rack
Afterbroiling,removethebroiler
rackandcarefullypouroffthe
grease.Washandrinsethepan
andrackinhot, soapywater.
If foodhasburnedon, sprinklethe
broilerrackwhilehotwithdetergent
andcoverwithwetpapertowelsor
adishcloth. Burned-onfoodswill
thensoakloosewhilethemealis
beingserved.
Donotstorea soiledbroilerpan
andrackin theoven.Neverattempt
tocleanthemintheovenduringthe
self-cleaningcycle.
18
Page 19

Oven Shelves
Oven shelves may be cleaned with a
mild abrasive cleanser following
manufacturer’s directions. After
cleaning, rinse the shelves with
clean water and dry with a clean
cloth. To remove heavy, burned-on
soil, soapy metal pads may be used
●
following manufacturer’s directions.
After scfibbing, wash with soapy
water, rinse and dry.
Removable Oven Bottom
You can remove the oven bottom
to clean any excessive spillovers
before starting the self-cleaning
cycle.
To remove the oven bottom:
1. Remove the oven shelves.
Removable Oven Door
The oven door is removable to
make the interior more accessible
during replacement of the lamp
bulb.
Remove
.-
Oven Light Bulb
The light bulb is located in the
upper left corner of the oven.
Before replacing the bulb,
disconnect electric power to the
range at the main fuse or circuit
breaker panel or unplug the range
from the electric outlet. Let the
bulb cool completely before
removing it. Do not touch a hot
bulb with a damp cloth as the bulb
will break.
To remove: Hold hand under
lamp bulb cover so it doesn’t fall
when released. With fingers of
same hand, firmly push down wire
bail until it clears cover. Lift off
cover. DO NOI’ REMOVE ANY
SCREWS TO REMOVE THIS
COVER. Replace bulb with a
40-watt home appliance bulb.
To replace cover: Place cover into
groove of lamp receptacle. Lift
wire bail up to center of cover until
it snaps into place. When in place,
wire holds cover firmly. Be certain
wire bail is not below depression
in center of cover,
2. Remove the two knurled holddown screws at the rear of the oven.
If they are too tight to remove by
hand, use a coin or screwdriver.
3. To lift out the oven bottom,
place your fingers in the slots in the
bottom and lift the rear of the oven
bottom up and back until the oven
bottom is clear of the lip at the front.
4. Then lift the bottom up and out.
To replace the bottom, place it in
the oven with the back raised about
6 to 8 inches or until you can insert
the front of the oven bottom under
the hold-down lip at the front.
Then push the back of the oven
bottom down fully into place on the
metal flanges and insert the holddown screws.
Open the oven door fully and
remove the two Phillips screws that
hold the door to the hinges. Then
close the door to the automatic stop
position (at about 3 inches open),
and lift the door straight up and off
the hinges. (Due to the large amount
of insulation and the construction
of the door, it is heavy. )
Note: Care should be taken not to
place hands between the spring
hinge and the oven door frame as
the hinge could snap back and
pinch fingers.
To replace the door, make sure the
hinges are in the “out” position.
Position the slots in the bottom of
the door squarely over the hinges.
Then lower the door slowly and
evenly over both hinges at the same
time. If hinges snap back against
the oven frame, pull them back out.
When the door is in position, open
it fully and insert the two Phillips
screws.
19
Page 20

Agi?&&-
‘_
SettheovenfixCleati% ::--
ModelsJGBP2MMU,JGBW4GEI —‘_
Rwommendedckming mm:
ModemteSOW-2 hours
(thinspillsandlightspatter)
HeavySOik+ hours
ExcessivelyHeavysoil—4hours
(heavygreasespillsandspatter)
hpm the oven Mom
setting the COntrok
Step1:
Removethebroilerpan,broiler
rackandothercookwarefromthe
oven.(Ovenshelvesmaybeleftin
oven.Note:Shelveswilldiscolor
aftertheself-cleancycle.)
Step2:
Removethe ovenbottompanel (see
page19)ifitisexcessivelysoiled.
Cleanit andputitbackinthe oven.
Step3:
Cleanspattersor soilonthe oven
frontframe(A), theovendoor
outsidethegasket(B)andthesmall
areaatthefrontcenteroftheoven
bottom.Bufftheseareaswitha dry
cloth.Donotcleanthegasket(B).
Donot letwaterrundownthrough
openinginthetopofthedoor(C).
Makesuretheovenlightbulb
cover(D)is in place.Neveruse
acommercialovencleanerinor
aroundtheself-cleaningoven.
k----” ““”‘ lil
T&the OvenSetknobto
CLEAN.
Step2:
Settheautomaticoventimer:
a
A. OvenFrontFrame
B.OvenDoorGasket
C.OpeningsinDoor
D.OvenLightBulbCover
Step4:
Closetheovendoorandmakesure
theovenlightisoff.
Caution:Chromedrippansfrom
thetopofyour range should
neverbecleanedintheself-
cleaningoven.
a
*Makesureboththerangeclock
andtheSTAKI’dialshowthecorrect
timeofday.
@Decideoncleaninghours
necessary-two hoursformoderate
soil,threehoursforheavysoil,
fourhoursforexcessivelyheavysoil.
~Addthesehoursto presenttime
ofday,thenpushinandturnSTOP
dialclockwisetodesiredstoptime.
Note:TheSlOP dialmustbeset
andadvancedatleasthalfanhour
beyondthetimenotedonthe
STARTdial.
20
Page 21

~
SettheOvenforCleaning
—
NkdelJGIW28GEJ
-.
@PushtheCLEANTIMEbutton
(E).The clockhasbeenpreprogrammedtocleanforthree
hours,sothistimewillappearin
thedisplaywindow.
—
TosetaDekwedstart
— ModelsJGlW24&J,JGBP26GEJ
dJGBP27GEJ
Tostartandstopcleaningatalater
timethanshownonclock,pushin
andturn STARTdialtotimeyou
wishtostart. Addthehoursneeded
forcleaningtothis“start”time,
thenpushin andturnSTOPdialto
thisdesiredtime.Ovenwill
automaticallyturnon andoff
atthesettimes.
~Turnknob(D)toincreaseor
decease cleantime(3hoursand
59minutesisthemaximumyou
canset).
ModelJGBP28GEJ
AfterpushingtiheCLEANTIME
button(E)and,ifdesired,changing
thepre-prograrnmedcleantime,
simplypushtheS’IO?TIME
button(C)androtateknob(D)to
thedesiredstoptime.Thedelayed
startingtimewillbecomputedand
programmedautomatically.
LatchtheOvenDoor
theSelf-CleanLatchLever
Pwh
totherightasfarasitwillgoto
locktheovendoor.
A shorttimelater,theLOCKED
lightcomeson andthedoorlocks.
TheglowingLOCKEDlight
indicatesthattheovenis hotand
thedoorcannotbeopened.The
ovendoorgetshotduringselfcleaning.DONOI’‘IOUCH.
AfterSeIf-Cleaning
~—
——
—.
-
-
iiiEEF—.
—.
—
-
—
—
~_.- –
——
~
—.
—.
—
-
-
-.
-
-
T
~.-
-! =
21
Sometimeaftercleaningis
completed,whentheovenhas
cooledandthedoorcanbeunlocked,
theLOCKEDlight goesout.
Stepk
lulovethelatchlevertothelefias
farasitwillgotounlockthedoor.
2:
Step
TurntheOVENSETknobtoOFF.
Page 22

camandcleating
Opemtingtheself-cleatingoven(Umtkmed)
If YouHavetoInterruptthe
CIea*g Cycle
step1:
ModelsM3W24GEJ,JGBm6GEJ
andJGIW27GEJ
TurntheSTOPdialuntil the
pointerisatthecorrecttimeofday.
ModelJGIW28GEJ
PushtheSlOP TIMEbutton(C)
androtateknob(D)untilthe
correcttimeofdayappearsin
thedisplaywindow.
step 2:
(Allmodels)
Slidethe doorlatchlevertotheleft
asfar asitwillgo.If theLOCKED
lightison,youmustwaituntilthe
lightgoesoffbeforemovingthe
latchlever.Thiswillunlockthe
ovendoorsoitcanbe opened.
Step3:
TurntheOVENSETknobfrom
CLEANto OFF.
Important: Anyattemptto
unlockthedoorbyforcewhile
theCLEANINGIightisoncan
resultindamagetothedoor
lockingmechanism.
Que*iomandlh’Rm’vem
Q.Whywon’tmyovenclean
immediatelyeventhoughIset
thestarttimecorrectly?
A. ChecktobesuretheSTART
timeisthesameasthe timeonthe
rangeclock.Alsochecktobesure
latchleverismovedtotherightas
farasit willgoandtheOVENSET
knobisturnedtoTIMEBAKEor
CLEAN.
Q.Ifmyovenclockisnot
working,canI stillseif-clean
myoven?
A. No. YourAutomaticOven
Timerusestherangeclocktohelp
startandstopyourself-cleaning
cycle.
Q.CanIusecommercialoven
cleanersonanypartofmy
self-cleaningoven?
A. Nocleanersorcoatingsshould
beusedaroundanypartofthis
oven.Ifyoudousethemanddonot
wipetheovenabsolutelyclean,the
residuecanscartheovensurface
anddamagemetalpartsthenext
timetheovenisautomatically
cleaned.
Q.Can1c~eantheWovenGasket
aroundtheovendoor?
A. No,thisgasketisessentialfor
agoodovensealandcaremustbe
takennottorub,damageor move
this gasket.
Q.WhatshouldI doif excessive
smokingoccursduringckxming?
A. Thisiscausedbyexcessivesoil,
andyoushouldswitchtheOVEN
SETknobtoBAKEORBROIL.
Openwindowstorid roomof
smoke.Allowtheoventocool for
atleastonehourbeforeopening
thedoor.Wipeuptheexcesssoil
andresetthecleancycle.
Q.Isthe“crackling”soundI
hearduringcleaningnormal?
A. Yes.Thisisthesoundofthemetal
heatingandcoolingduringboththe
cookingandcleaningfunctions.
Q. $hodd therebeanyodor
duringthecleaning?
A. Yes,theremaybeaslightodor
duringthefirstfewcleanings.
Failuretowipeoutexcessivesoil
mightalsocauseastrongodor
whencleaning.
Q.Whatcausesthehair-like
Sinesontheenameledsurfaceof
myoven?
A. Thisisanormalcondition,
resultingfromheatingandcooling
duringcleaning.Theselinesdonot
affecthowyourovenperforms.
Q.Whydo1haveashleftinmy
ovenaftercleaning?
A. Sometypesofsoilwillleave
adepositwhichisash.Itcanbe
removedwithadampspongeor
cloth.
Q.Myovenshelvesdo notslide
easil~.Whatisthematter?
A. Aftermanycleanings,oven
shelvesmaybecomesocleanthey
donotslideeasily.Ifyouwish
shelvestoslidemoreeasily,
dampenfingerswitha small
amountofcookingoilandrub
lightlyoversidesofshelfwhere
theycontactshelfsupports.
Q.Myovenshelveshavebecome
grayaftertheseif-cleancycle.Is
thisnormal?
A. Yes.Aftertheself-cleancycle,
theshelvesmaydiscolorandlose
someoftheiroriginalluster.
—
22
Page 23

cleaningGuide
—
--
—
PART
hIfATEllIALSTOUSE
GENERALIXRINX1ONS
Ilroiler
4
ControlKnobs
OutsideGlassFinish
lMetal,including
SideTrims,
‘lYimStripsand
BrushedChrome
Cooktop(onmodels
soequipped)
Outer Porcelain
EnamelSurfac@
PaintedSurfaces
PanandRack ~ Soapand Water
o Soap-Filled Scouring Pad
o Plastic Scouring Pad spread cloth or paper towel
~ MildSoapandWater
*SoapandWater
e SoapandWater Wash,rinseandthenpolishwithadrycloth.DONCfI’USEsteelwool,
~ PaperTowel
oDryCloth
e SoapandWater
~ SoapandWater Usea mildsolutionofsoapand water.Donotuseanyharshabrasivesor
Drain fat, cool panand rack slightly. (Do not let soiled pan and rack stand in
ovento cool.) Sprinkle detergent on rack and pan. Fill pan with warm water and
Wash; scour if necessary. Rinse and dry. OFTION: Clean pan and rack in
dishwasher.
DO N(YI’CLEANlNSELF-CLEANINGOVEN.
over rack. Let pan and rack stand fora few minu~es.
Pulloffknobs.Washgentlybutdonotsoak.Dryandreturncontrolstorange.
Washallglasswithclothdampenedinsoapywater.Rinseandpolishwhhadry
cloth.lfknobsareremoved,donotallow
glasswhilecleaning.
abrasives,ammonia,acids,orcommercialovencleanerswhichmaydamage
thefinish.
Avoidcleaningpowdersorharshabrasiveswhichmayscratchtheenamel.
Ifacidsshouldspillon the rangewhileit ishot,usea drypapertowelor cloth
towipeuprightaway.Whenthesurfacehascooled,washandrinse.
Forotherspills,suchasfatsmatterings,etc.,washwithsoapandwaterwhen
cooledand thenrinse.Polishwithadrycloth.
cleaningpowderswhichmayscratchormarsurface.
watertorundowninsidesur!hceof
-
E4fstr.
InsideOven Doo@
OvenGasket
OvenLiner
Shelves
Chrome-Plated
DripPans
Burner Grates
SurfaceBurners
—
*Spillageof marinades,fruitjuices,andbastingmaterialscontainingacidsmaycausediscoloration.Spilloversshouldbewipedupimmediately,with
care being taken to not touch any hot portion of oven. When the surface is cool, clean and rinse.
.
*SoapandWater Removeovendoor(seepage 19).Cleanwithsoap andwaterandreplace.
e None AvoidgettingANYcleaningmaterialsonthegasket.
@SoapandWater
e SoapandWater
~Soapand Water
e Stiff-BristledBrush
e Soap-FilledScouringPad cookingso unnoticedspatterwillnotbumonnexttimeyoucook.Toremove
(non-Metallic) burned-onspatters,useanyor allcleaningmaterialsmentioned.Rub
~SoapandWater
e Soap-FilledScouringPad
(Non-metallic)
*SolutionforCleaning
InsideofCoffeeMakers
~SoapandWater productforcleaninginsideof coffeemakers,suchas Dip-Itbrand.Ifsoildoes
e MildAbrasiveCleanser
~DampCloth cleanseranda dampcloth.Dryburnersina warmovenfor30 minutesbefore
Coolbeforcleaning.Frequentwipingwithmildsoapandwaterwillprolongthe
timebetweenmajorcleanings.Besuretorinsethoroughly.
Shelvescanbewashedindishwasherorcleanedbyhandusingsoapandwater.
Rinsethoroughlytoremoveanysoapaftercleaning.Shelvesmayalsobecleaned
inself-cleaningoven,butmaylosesomelusteranddiscolor.
Cleanasdescribedbelowor indishwasher.
CLEANINGOVENastheywilldiscolor.Wipeallchromedrippansaftereach
DONCYI’CLEANINSELF-
lightlywith
scouringpadtopreventscratchingofthesurface.
Liftoutwhencool.Soak5to 10minutesifdesiredinwarmsolutionof
dishwasherdetergent.Scourwithmaterialsmentionedheretoremoveburned-on
foodparticles.DONOI’CLEANINSELF-CLEANINGOVEN.
Wipeoffburnerheads.Ifheavyspilloveroccurs,removeburnersfromrange
(seepage18)andsoakthemfor20to30minutesinsolutionofhotwaterand
notrinseoff completely,scrubburnerswithsoapand wateror amildabrasive
returningthemtotherange.DON(YI’CLEANIN SELF-CLE~NG OVEN.
——
-
FEssF-
—.
—.
-
-
-
--
= ~-----
-—-
Ersx- =
E==s—
Es?isss=-
23
Page 24

h4inorAdjwtmen@YouCanMake
ovenDoorHeight
Adjmtment
Repeatedopeningsandclosings
cancausetheovendoortowork
itselfoutofadjustment.Oneside
mayclosehigherthantheother,
andthedoormaynotsealproperly.
T’ adjusttheheightofthedoor:
L Removethedoor(seepage19).
2. Withathin-bladedscrewdriver,
turnthescrewintheopeningat
thetopofeachdoorhinge.Turn
clockwisetolower,counterclockwise
toraiseeachside ofthedoor.
BroilandovenBtwner
AirAdjwtmentShutters
Airadjustmentshuttersforthe
broilandovenburnersregulatethe
flowofair totheflame.
Theairadjustmentshutterforthe
top(broil;burnerisintheupper
right-handcomerneartherearwall
of_theoven.
TOadjusttheflowofairtoeither
burner,kmsenthePhillips
screwandrotatethe shutter to
allowmoreor lessair intothe
burnertubeasneeded.
Theflameforthetop(broil)
burnershouldbesteadywith
approximatelyl-inchbluecones
andshouldnotextendoutoverthe
baffleedges.
head
3. Replacethe door,closeit, and
checkalignmentanddoorseal.
Theshutterforthebottom(oven)
burnerisnearthebackwallofthe
ovenbehindthestoragedraweror
panelundertheoven,
Todetermineifthebottom(oven)
burnerflameisproper,remove
theovenbottom(seepage19)and
theburnerbaffle.Theflameshould
have1/2”to3/4”blueconeswithno
yellowtipping.Whenthebaffleis
backinplace,theflamewill resettle.
24
Page 25

----Oven ‘thermostat
‘- Adjmtlnent
hetemperatureccmtroiin your
NWovenhasbeencarefullyadjusted
toprovideaccuratetemperatures.
However,ifthis ovenhasreplaced
oneyouhaveusedforseveralyems,
YOUmaynoticeadifferenceinthe
degreeofbrowningorthelengthof
timerequiredwhenusingyour
favoriterecipes.Oventemperature
controlshavea tendencyto “drift”
overaperiodofyearsandsince
thisdriftisverygradual,it isnot
readilynoticed.Therefore,you
mayhavebecomeaccustomedto
yourpreviousovenwhichmay
haveprovideda higheror lower
temperaturethanyouselected.
Beforeattemptingtohavethe
temperatureofyournewoven
changed,besureyouhavefollowed
the bakingtimeandtemperatureof
therecipecarefully.Then,after
youhaveusedtheovena fewtimes
—
andyoufeeltheovenistoohot
ortoocool,thereisasimple
– adjustmentyoucanmake-yourself
n-the OVE-NTEMPknob.
uI1theknob offthecontrolshall
andlookat thebackside.Thereis
adisc in thecenteroftheknobskirt
with a series ofmarks opposite a
pointer.
Loosen onlythe
locking screws
Notetowhichmarkthepointeris
pointing.Tomakeanadjustment,
carefullyloosen(approximately
one turn), butdonotcompletely
removethetwoscrewsthatholdthe
sldrttotheknob.Holdtheknob
bladeinonehandandtheouter
skirtintheotherhand.
Toraisetheoventemperature,
movethepointerinthedirectionof
thearrowforRAISE.Tolowerthe
temperature,movethepointerin
thedirectionofarrowforLOWER.
Eachmarkwillchangetheoven
temperatureapproximately20”F.
Wesuggestthat youmakethe
adjustmentone markfromthe
originalsettingandcheckoven
performancebeforemakingany
additionaladjustments.
Afiertheadjustmentismade,
pressskirtandknobtogetherand
retightenscrewssotheyaresnug,
but be carefulnotto overtighten.
Re-installknobonrangeand
checkperformance.
Note:Afteran adjustmenthas
beenmade,theOFF andBROIL
positionswillnotlineupwith
theindicatormarkonthe control
panelastheypreviouslydid.This
conditionis normalandwillnot
createa problem.
~
-.
-
_—
~—
-
lis$FJ-—
—
--
—
=6
—
-
-
-
~
—.
-
_—
—mr
k–
—.—
~— ‘– ‘—
mm?r.
——
— . . .
-
-
*
R3faa
—.
-
~.–-
—.
L Note position of
pointer to marks
before adjustment
25
Page 26

P.ROBLEM
mPBuRNERs
Do NOTLIGHT
POSSIBLE(MLJSEAND/oR WHAT
mDO
OWH’4DOES NOT
C(X)KPROPERLY
DOOR
IXUUNG
WON’TOPEN
BROILING
ORBAKING
CLOCKDOES
Nm WORK
OVENI.JGHTDOES
NoT‘COMEON
OVENWILLNOT
SELF-CLEAN
*Makesurethermostatcapillarybuibs(locatedinupperportionofoven)aresecurely
heldbythe mountingclips,arenottouchingovensides,andarenotcoatedwithanyihing.
@Aluminumfoilbeingusedimproperlyinoven.
@Ovenventblockedontopofrange.
eIncorrect~oo~are
beingused. check eachCootingsectionforcookwaretips.
*Ovenbottomnot securelyseatedinposition.
*OVENTEMPknobsetincorrectlyornotturnedon.
~Checkcommon
baking,roasting andlxoiling probiemsonpages13-16.
@Doorlatchmovedtotherightduringbroilingorbakingcancausedoortolockwhen
ovenishot. Thn ovenoffandletitcoolbeforeattemptingtoopendoor.
@Rangeelectricalplugmustbesecurelyseatedinalivepoweroutlet.Checkforblown
fbseortrippedcircuitbreaker.
@Bulbmaybe loose orburnedout.
@Electricalplugmustbepluggedintoalivepoweroutlet.
~AutomaticTimernot setornotsetproperly.FormodelsJG131?24G13.J,JGBP26GEJand
K%W27GEJtheSTW dialmustbesetandadvancedatleasthalfanhourbeyondthetime
notedontheSTARTdial.
~ OVENSETknobmustbesetatCLEANsetting.
*Ovendoorlatchnot movedtotherightasfarasitwillgo.
H’RONGODOR
e Improperair/gasratioin oven. Adjust oven burner airshutters—seepage24.
Ifyoulneedmare help.. ●m, Ml free:
‘GEAnswerCkmttw
800.626.2080
4xMNYwmerinformationservice
Page 27

—
If YouNeedservice
Toobtainservice,seeyourwarranty
onthebackpageofthis b(’’~k.
We’reproudofourserviceand
wantyoutobepleased.Ifforsome
reasonyouarenothappywiththe
serviceyoureceive,herearethree
stepstofollowforfurtherhelp.
FIRST,contactthepeoplewho
servicedyourappliance.Explain
whyyouarenotpleased.Inmost
cases,thiswillsolvetheproblem.
NEXT,ifyouarestillnotpleased,
writeall thedetails-including
yourphonenumber—to:
Manager,ConsumerRelations
GEAppliances
AppliancePark
Louisville,Kentucky40225
FINALLY,ifyourproblemisstill
notresolved,write:
MajorAppliance
ConsumerActionPanel
20NorthWackerDrive
Chicago,Illinois60606
——
--—.
——
~
—u
-
—
27
Page 28

—
YOURGENERALELECTRICRANGE
L’
II
Saveprcmfoforiginalpurchasedatesuchas your salessliporcancelledchecktoestablishwarrantyperiod.
WHATIs COVERED
WARRANTY
HA?aONE-YEARWARRANTY
Foroneyearfromdateoforiginal
purchase,wewillprovide,freeof
charge,partsandservicelabor
inyourhometorepairorreplace
anypartof therangethatfails
becauseofamanufacturingdefect.
This warranty isextendedto
theoriginalpurchaserandany
succeedingownerforproducts
purchasedforordinaryhomeuse
inthe
48mainlandstates,Hawaii
andWashington,D.C.InAlaskathe
warrantyisthesameexceptthatitis
LIMITEDbecauseyoumustpayto
shiptheproducttotheserviceshop
orfortheservicetechnician’stravel
coststoyourhome.
Allwarrantyservicewillbeprovided
byourFactoryServiceCentersor
byourauthorizedCustomerCare”
servicersduringnormalworking
●hours.
LookintheWhiteorYellowPages
ofyourtelephonedirectoryfor
GENERALELECTRICCOMPANY,
GENERALELE~RIC FACTORY
SERVICE,GENERALELE~RICH(XPOINTFACTORYSERVICEor
GENERALELECTRICCUSTOMER
CARE@SERVICE.
.
WHATIISNOTCOVERED
~Servicetripstoyourhometo
teachyouhowtousetheproduct.
ReadyourUseandCarematerial.
Ifyouthenhaveanyquestions
aboutoperatingtheproduct,
pleasecontactyourdealerorour
ConsumerAffairsofficeatthe
addressbelow,orcall,tollfree:
GEAnswerCenter”
800.626.2000
consumerinformationservice
@Improperinstallation.
Ifyouhaveaninstallationproblem,
contactyourdealerorinstaller.
Youareresponsibleforproviding
adequateelectrical,gas,exhausting
andotherconnectingfacilities.
Somestatesdonotallowtheexclusionorlimitationofincidentalorconsequentialdamages,sotheabovelimitationorexclusion
maynotapplytoyou.Thiswarrantygivesycuspecificlegalrights,andyoumayalsohaveotherrightswhichvaryfromstatetostate.
Toknowwhatyourlegalrightsareinyourstate,consultyourlocalorstateconsumeraffairsofficeoryourstate’sAttorneyGeneral.
Warrantor:GeneralElectricCompany
Hfurtherheipisneededconcerningthiswarranty,write:
Manager—ConsumerAffairs,GEAppliances,Louisville, KY40225
~Replacementofhousefusesor
resettingofcircuitbreakers.
. Failureoftheproductifit is used
forotherthan itsintendedpurpose
orusedcommercially.
o Damagetoproductcaused
byaccident,fire,floodsoracts
ofGod.
WARRANIC)RISIVOTRESPONSIBLE
FORCONSEQUENTIALDAMAGES.
JG13FWGEvJJGBP26G
JGEIP27GEJJGEWW3
 Loading...