

Page 1
‘ -
GasRang@
contents
Anti-Tip Device 3,5
Appliance Registration
Care and Cleaning
Clock
Consumer Services
Control Panel
Features
Flooring Under Range
Leveling
Lift-Up Cooktop
Minute Timer
Model and Serial Numbers
Oven
Air Adjustment
Baking, Baking Guide
Broiler Pan and fick
Broiling, Broiling Guide
control Settings
Door Removal
Light; Bulb Replacement 10, 18
Oven Bottom Removal 18
Oven Timer 11
16-22
12, 13
17,22
Self-Cleaning Operation 19-21
2
11 Problem Solver
27
16
6,7 Burners
5 Burner Grates 16,22
5
17 Cookware Tips 9
11 Drip Pans
2
Shelves
Vent Duct
Safety Instructions
Surface Cooking 8,9
Control Settings 8
Flame Size
Lighting Instructions
10,18
2-5
17,22
17,22
2: Warranty Back Cover
15
9
18
;:
8
8
Preheating
Roasting, Roasting Guide 14
GEAppiaBc@s
12, 13
GEAnsweRCenfera
8oa62&zooo
----
,-
>-.
Page 2

If yol~needservice.● e
Itisintendedtohelpyouoperateand
maintainyournewrangeproperly.
Keepithandyforanswerstoyour
questions.
Ifyoudon’tunderstand something
orneedmorehelp,write(include
your phonenumber):
ConsumerAffairs
GEAppliances
AppliancePark
Louisville,KY40225
writedownthemodel
serial numbers.
and
You’llfindthem on a labellocatedin
theburnerbox underthe cooktop.
Seepages6and 7.
Thesenumbersare alsoonthe
ConsumerProduct Ownership
RegistrationCardthat camewith
yourrange.Beforesendinginthis
card, pleasewritethesenumbers
here:
ModelNumber
Toobtainservice, seethe
ConsumerServicespage in the
backofthisbook.
We’reproud of our serviceand
wantyouto be pleased. If for some
reasonyouare nothappy withthe
serviceyoureceive,here are three
stepsto followfor further help.
FIRST,contactthe peoplewho
servicedyourappliance.Explain
whyyouare notpleased. In most
cases,this willsolve the problem.
NEXT, if you are stillnotpleased,
writeall the details-including
yourphonenumber-–to:
Manager, Consumer Relations
GE Appliances
AppliancePark
Louisville,Kentucky40225
FINALLY,if yourproblem isstill
not resolved, write:
Major Appliance
Consumer ActionPanel
20 North WackerDrive
Chicago,Illinois60606
Serial Number
Usethesenumbersin any
correspondenceor servicecalls
concerningyourrange.
If youreceived
a damagedrange.. e
Immediately contactthe dealer (or
builder)that soldyouthe range.
savetimeandmoney.
Beforeyou request
service.
Check theProblem Solveron
page25.It listscauses ofminor
operatingproblems that youcan
correct yourself.
e e
t
Page 3
woRTmT
SAFETY
TheCaliforniaSafeDrinking
WaterandToxicEnforcement
ActrequirestheGovernorof’
Californiatopublishalistof
substancesknowntothestate
tocausecancer,birthdefectsor
otherreproductiveharm,and
requiresbusinessestowarn
customersofpotentialexposure
tosuchsubstances.
Gasappliancescancause
minorexposuretofourofthese
substances,namelybenzene,
carbonmonoxide,formaldehyde
andsoot,causedprimarilybythe
incompletecombustionofnatural
gasorLPfuels.Properlyadjusted
burners,indicatedbya bluish
ratherthanayellowflame,will
minimizeincompletecombustion.
Exposuretothesesubstancescan
beminimizedfurtherbyventing
withanopenwindoworusinga
ventilationfanorhood.
NOTICE
when You&t YourRange
~Have the instiller showyou
thelocationoftherangegas
cut-offvalveandhowtoshut
it
offifnecessary.
@Haveyourrange instilled
a~~dproperlygroundedby
qllalifiedinStilIer9inaccordance
withtheInstallationInstructions,
Anyadjustmentandserviceshould
beperformedonlybyqualified
gasrangeinstallersor service
Technicians.
~plugyour rangeintoa
Uo=voltgroundedoutletonly.
Donotremovetheround
groundingprongfromthe
kin
doubtaboutthegroundingof
ihehomeelectricalsystem,itIS
a
p~L~g.
outletreplacedwithaproperly-
groundedthree-prongoutletin
accordancewiththeNational
ElectricalCode.
DOnot use an
extensioncordwiththisappliance.
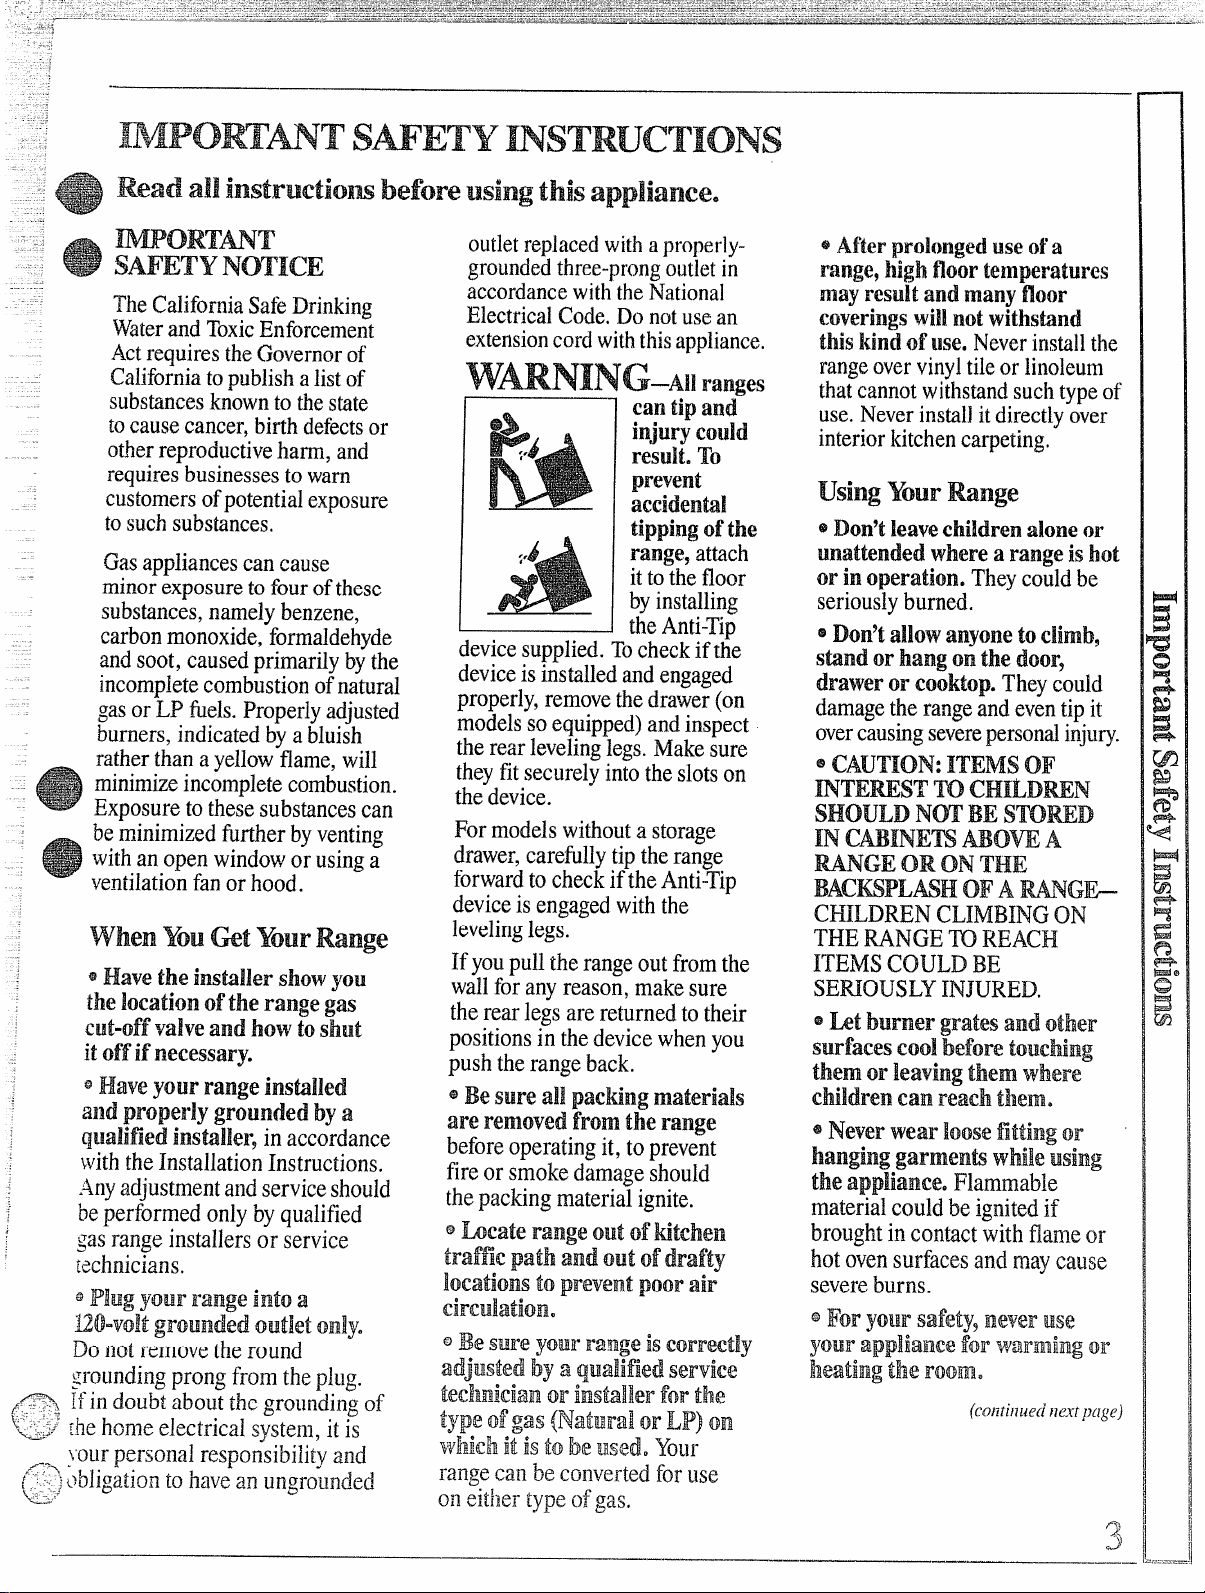
cantipand
injurycould
result.To
prevent
accidental
tippingOfthe
range9attich
ittothefloor
byinstalling
theAnti-TiD
devicesupplied.Tocheckiftfie
deviceisinstalledandengaged
properly,removethedrawer(on
modelssoequipped)andinspect
therearlevelinglegs.Makesure
theyfitsecurelyintotheslotson
thedevice.
Formodelswithoutastorage
drawer,carefillytiptherange
forwardtocheckiftheAnti-Tip
deviceisengagedwiththe “
levelinglegs.
Ifyoupulltherangeoutfromthe
wallforanyreason,makesure
therearlegsarereturnedtotheir
positionsinthedevicewhenyou
pushtherangeback.
@Besureall patting materiaIs
are renioved
fromthe range
beforeoperatingit,toprevent
fireorsmokedamageshould
thepackingmaterialignite.
@Afterprolt)i]geduseofa
range,nighfloortemperatures
mayresultandmanyfloor
coveris~gswillnotwithsbnd
thiskindof~Bse.Neverinstallthe
rangeovervinyltileorlinoleum
thatcannotwithstandsuchtypeof
use.Neverinstallitdirectlyover
interiorkitchencarpeting,
usingYourRange
Don’tleavechildrenaloneor
@
unattendedwherearangeishot
orinoperation.Theycouldbe
seriouslyburned.
@D0n2tallowanyonetoClimb$
shndorhangonthedoor?
drawerorcooktop.Theycould
damagetherangeandeventipit
overcausingseverepersonalinjury.
eCAUTION:ITEMSOF
INTEMST m CHILDWN
SHOULDNm BESTOWD
INcABINEm ABOW A
MNGE ORONTHE
BAcmPLMH ORAmG&
CHILDRENCLIMBINGON
THEMNGE ~ REACH
ITEMSCOULDBE
SENOUSLYINJURED.
@ht burnergratesandother
surfacesCoolbeforetouching
themorleavingthemwhere
childrencanreachthem.
@Neverwearloosefittingor
hanginggarmenbwhileusing
theappliance.Flammable
materialcouldbeignitedif
broughtincontactwithflameor
hotovensurfacesandmaycause
severeburns.
oForyour safety9neveruse
yourapplianceforWarnlimgor
heatingthe roome
——
——-
Page 4
...
.-
.—
—
~-
~:--
~>
~
....
—
EmommT SAFETY INSTRUCTIONS(continued)
. .
9 Donotusewaterongrease
fires.Neverpickupaflaming
pan.Turnoff’burner,then
smotherflamingpanbycovering
pancompletelywithawell-fitting
lid,cookiesheetoraflattray.
Flaminggreaseoutsideapancan
beputoutbycoveringwithbaking
sodaor,ifavailable,amultipurposedrychemicalorfoam-type
fireextinguisher.
eDQ~~~~~~~~fla~~~~~~
materialsinanOvenornear
theCooktop,Donotstoreoruse
gasolineor otherflammable
Vapn Wdliqti& h thetictity
ofthisor allyotherappliance.
@DonotletcooMnggrease
orotherflammablematerials
accwdak inornearthermge.
@wheneootingperkyfollow
thedirectionsexactlyandalways
cookthemeattoaninternal
temperatureofatleast170”F.
Thisassuresthat,intheremote
possibilitythattrichinamaybe
presentinthemeat,itwillbe
killedandmeatwillbesafetoeat.
surfacecQoH~
9 AlwaysusetheLITEposition
whenignitingtopburnersand
makesuretheburnershaveignited.
@~~~~~~~~~~s~~f~~~~~~~~~s
unattendedat highflame
settings.Boilovercauses
smokingandgreasyspillovers
thatmaycatchonfire.
QAd*justtop burner name size
soit doesnot extendbeyondthe
edgeofthecookware,Excessive
flameishazardous.
* Tominimizethepossibility
ofburns,ignitionofflammable
materials,andspillage,turnthe
cookwarehandlestowardtheside
orbackoftherangewithout
extendingoveradjacentburners,
@Alwaysturn surfaceburner
ContmktoOBTbeforeremoving
cookware.
@carefullywatchfoombeing
friedat HIflamesetting.
@~~~~~~]~~~~~~~~~~f~~~
openings)oftherange.They
providetheairinletandoutlet
whichisnecessaryfortherange
tooperateproperlywithcorrect
combustion,
&~~ ~Qg~~~~~~~~~~~~
coo~ngsMrfaceifthe wokhas
a roundmem~ringwhichis
p~aeedovertheburner grateto
supportthewok,Thisringacts
asaheattrapwhichmaydamage
theburnergrateandburnerhead.
Also,itmaycausetheburnerto
workimproperly.Thismaycause
acarbonmonoxidelevelabove
thatallowedbycurrentstandards,
resultinginahealthhazard.
@floodsforfryingShouldbe8s
dry aspossible.Frostonfrozen
foodsormoistureonfreshfoods
cancausehotfattobubbleupand
oversidesofpan.
@Useleastpossibleamountof
fatfor effectiveshallowor deep”
fatfrying.FiUingthepantootill
offatcancausespilloverswhen
foodisadded.
@Ifa combinationofoilsor
fafi willbe usedinfrying9stir
togetherbeforeheating,oras
fatsmeltslowly.
GAIwaysbeat fatslowly9and
watchasitheats.
oUSedeepfatthermometer
wllemeverpossibletoprevent
overl~eatingfatbeyondthe
smokingpoint.
*Useproperpansi~e—Avoid
pansthatareunstableoreasily
~ipped.Selectcookwarehavi~g
flatbottomslargeenoughto
properlycontainfoodavoiding
--
boiloversandspillovers,andlarge $
enoughtocoverburnergrate.
Thiswillbothsavecleaningand
preventhazardousaccumulations
Gffood,sinceheavyspatteringor
spilloversleftonrangecanignite.
Usepanswithhandlesthatcanbe
easilygraspeda~]dremaincool,
ewhenusinggiasscookware,
makesureitisdesignedfortopof-rangecooking.
,. ..:. I
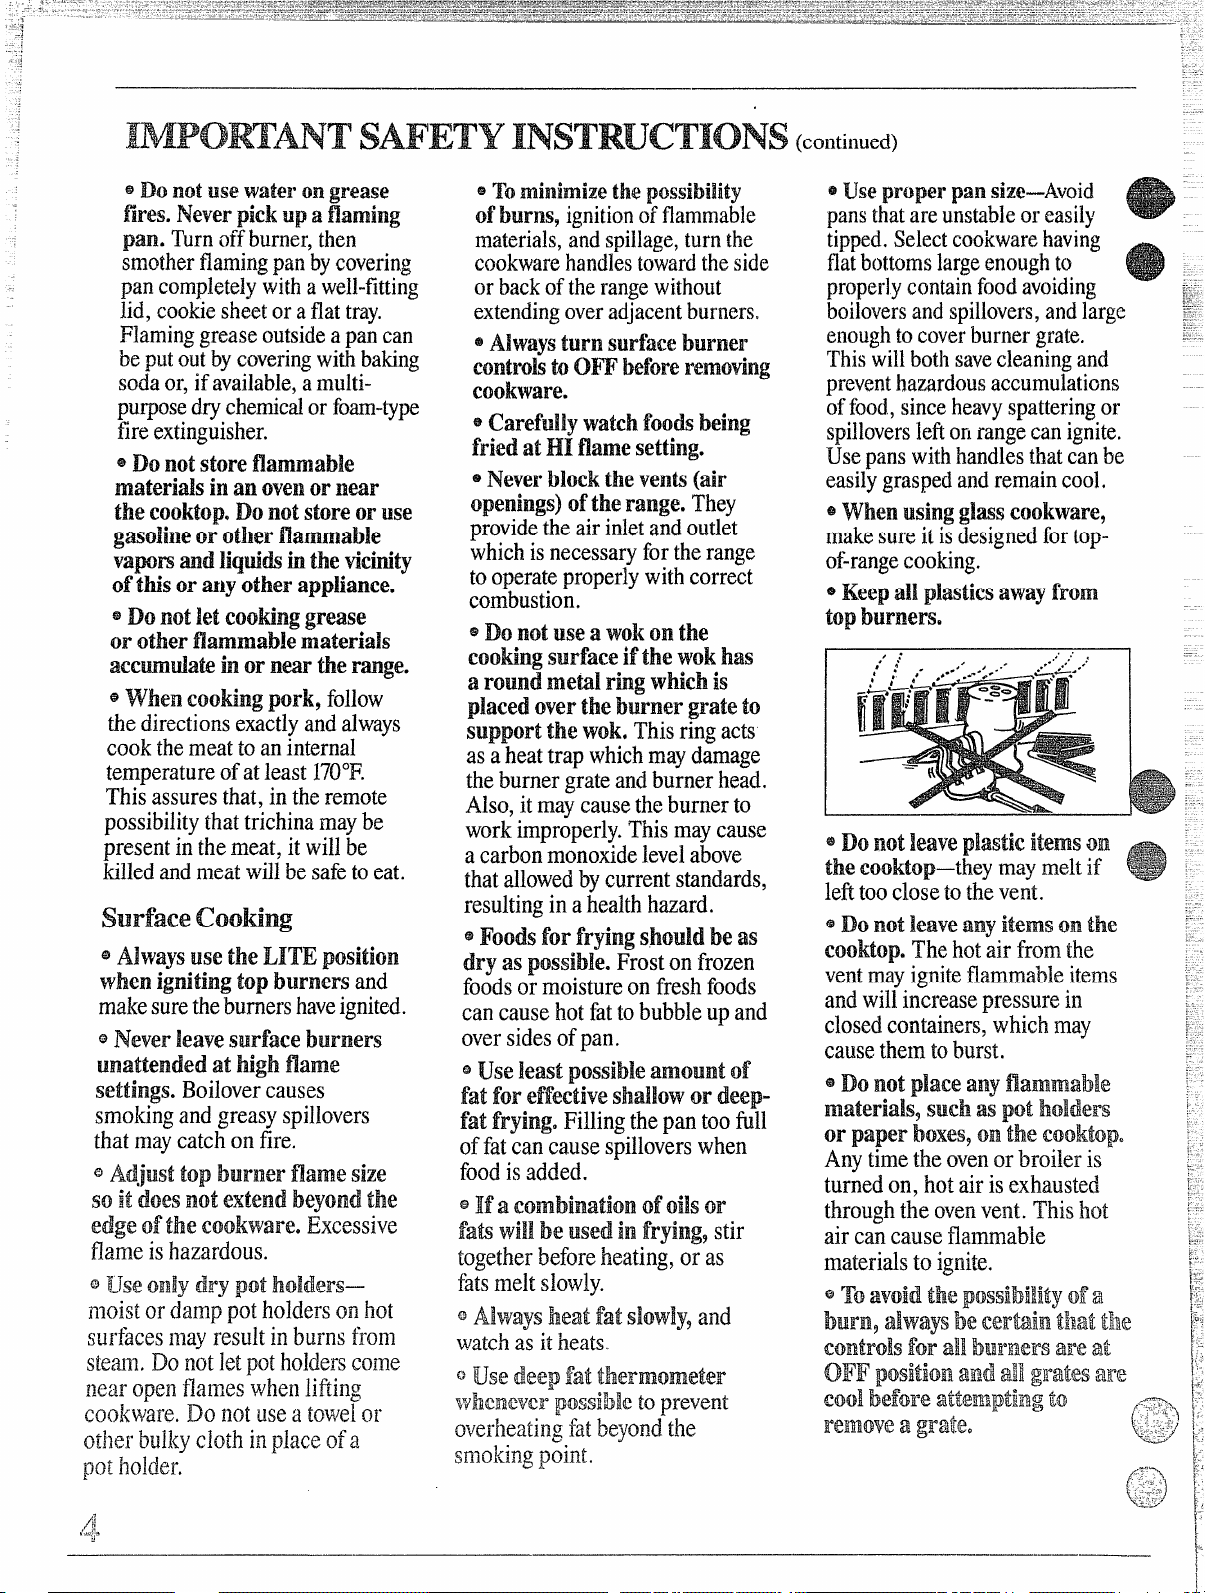
@Donot!eaveplasticitemson
thecooktop–theymaymeltif
lefttooclosetothevent. - .
@Donotleaveanyitemsonthe
cooktop.Thehotairfromthe
ventmayigniteflammableitems
andwillincreasepressurein
closedcontainers,whichmay
causethemtoburst.
e Donotplaceanyflammable :
materials9suchaspotholders
or paper hoxes~ontheCooktop. :
Anytimetheovenorbroileris
turnedon,hotairisexhausted }
throughtheovenvent.Thishot
aircancauseflammable
materialstoignite.
~..
;
—
Page 5

FlooringUnder
the Range
burnersandcreateafirehaz~rd.
@Ifyousmellgas,turnoffthe
SUPPIYto the rangeandcalla
gas
qualifiedservicetechnician.Never
useanopenffametoIocatealeak.
Bating, Brofli~ and
Rowbg
~Donotuseovenforastorage
mea.
@S~nd awayfromtherange
whenopeningthedoorofahot
oven.Thehotairorstem
whichescapescancauseburns
tohan&9faceand/oreyes.
@p~~~~~~~~~~~~~~s~~~~s~~~~
positionwhileoveniscool.
@filling outshelftothe
shelfstopisaeonveIIiencein
liftingheavyfoods.Itisalsoa
precautionagainstburnsfrom
touchinghotsurfacesofthe
~Don9theat unopenedfood
Containers intheoven. Pressure
couldbuildup andtheContiiner
Couid
burst Causing an injllrya
pancancatchfireifovenisused
withoutremovingthegreasefrom
thebroilerpan.
@Whenbroiling$ifn]eatistoo
closetotheflame,thefatmay
ignite.Trimexcessfattoprevent
excessiveflare-ups,
@Makesure broilerpanisin
placecorrectly
toreducethe
possibilityofgreasefires.
~Ifyoushouldhaveagrease
fireinthebroilerpan,turnoff
oven,andkeepovendoorclosed
tocontainfireuntilitburnsout.
@Donotcleanthedoorgasket.
Thedoorgasketisessentialfora
goodseal.Becarefulnottorub,
damageormoveit.
@Donotuse oveneieanem.No
commercialovencleaneroroven
linerprotectivecoatingofany
kindshouldbeusedinor around
anypartoftheoven.
a R~move thebroiIerpan and
othercookwarebeforeself-
cleaningtheoven.
CieaningYourRa~e
Cleanonly partslistedinthis
@
andCareBook.
Use
@Keeprangecleanandfree
ofaccumulationsofgreaseor
spilloverswhichmayigdte.
Yourrange, likeso many other
llousellold items, is heavy and
ea~~settle into soft floor coveri~lgs
such as cushioned vinylor
carpeting. ~Nhenmovingthe range
on thistype offlooring,use care,
Do not
kitclleilcarpeting unlessyou
placean insulatingpad or sheetof
l/4-inch-thickplywoodbetween
the rangeand carpeting,
ins~ll the range over
menthefloor covering endsat
the~ront o~the range, the area that
the range will reston shouldbe
builtup with plywoodor similar
materialto the samelevelor higher
than the floor covering.This will
allowthe rangeto be movedfor
cleaningor servicing.
bvelingtheRange
Levelinglegs are located on each
corner ofthe base of the range.
Removethe bottomdrawer (on
modelsso equipped)and youcan
levelthe range on an uneven floor
To remove drawer, pull drawer
out all the way9tilt up the front
and hke it Olat.Toreplace wwer~
insert glides atback of drawer
beyondstop on range glides. Lift
drawer if necessary to insert easily.
Let front of drawerdown, then
push into close.
Both of the rear levelinglegswill
engagethe Anti-Tipdevice (allow
for some side to side adjustment).
Allow a minimum clearance of 1/8”
between the rangeand the leveling
legstopermit installation into the
Anti-Tipdevice.
5
Page 6
Page 7
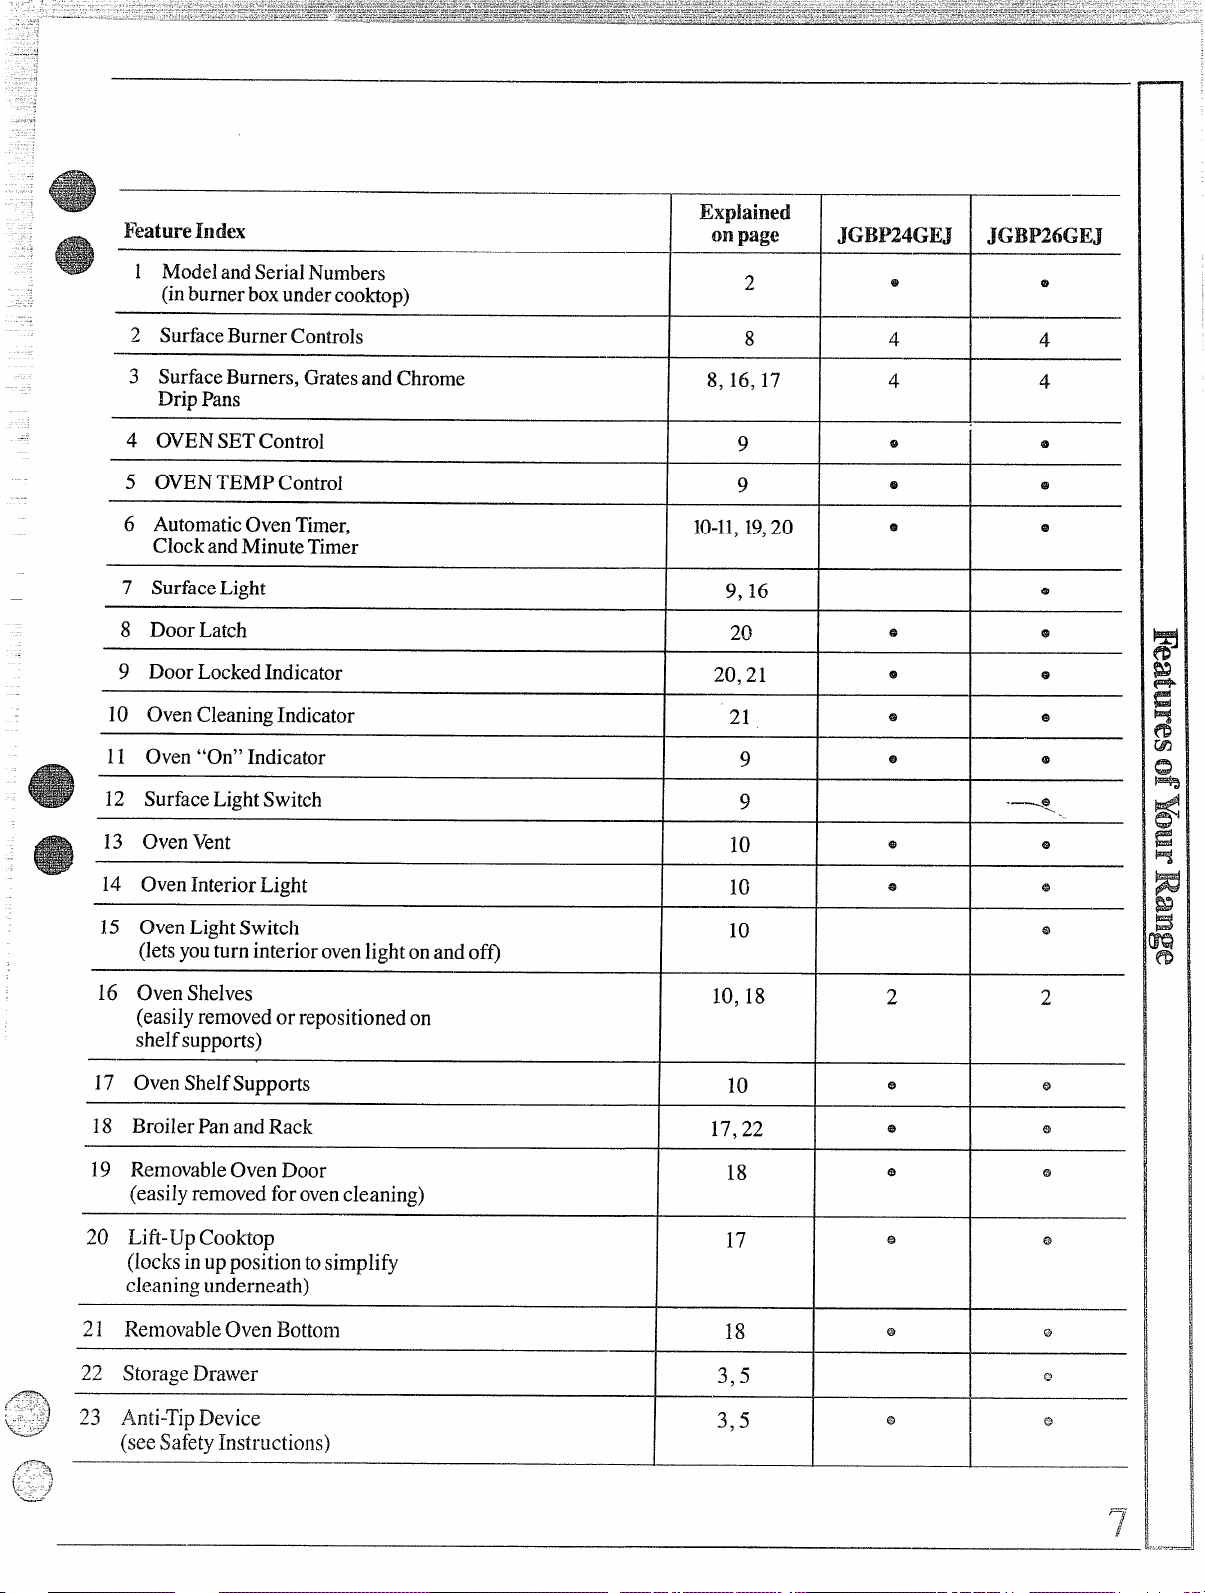
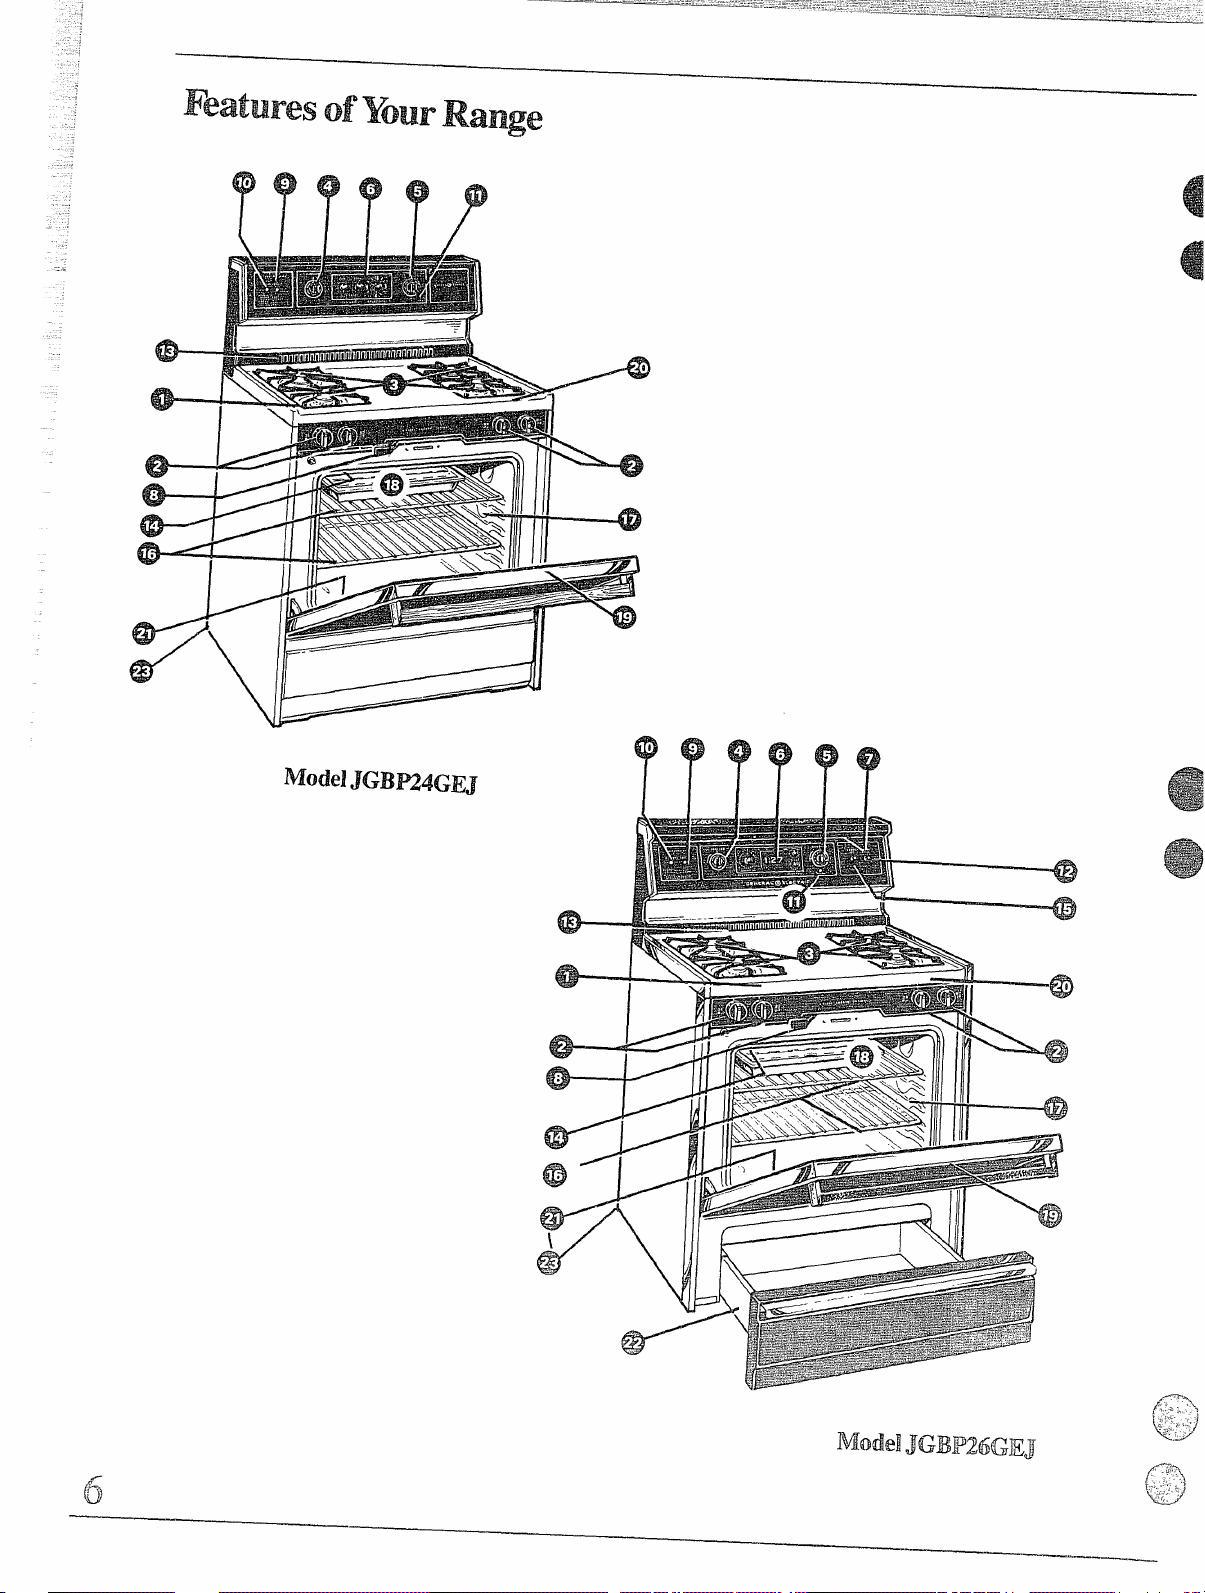
1 ModelandSerialNumbers
(inburnerboxundercooktop)
Explained
on page
JGBP24GEJ JGBP26GEJ
2 Surface BurnerControls
3 SurfaceBurners, Gratesand Chrome
Drip Pans
4 OVENSET Control
5 OVENTEMP Control
6 AutomaticOvenTimer,
ClockandMinuteTimer
7 SurfaceLight
8 DoorLatch
9 Door LockedIndicator
10 OvenCleaningIndicator
11 Oven “On” Indicator
12 SurfaceLightSwitch
13 Oven Vent
14 OvenInterior Light
8 4 4
8, 16,17
9
9
10-11,19,20
9,16
20
20,21
21
9
9
10
I
I
4
4
-~j
%..27
15 OvenLightSwitch
(letsyouturn interior ovenlightonand of~
16 Oven Shelves
(easilyremovedor repositionedon
shelfsupports)
17 OvenShelfSupports
18 BroilerPanand Rack
19 RemovableOven Door
(easilyremovedforovencleaning)
20 Lifi-Up CooMop
(locksin upposition tosimplify
cleaningunderneath)
22 StorageDrawer
23 Anti-TipDevice
(seeSafetyInstructions)
I
Page 8
AutomaticIgnition
Yoursurfaceburners are lighted
byelectric ignition,eliminatingthe
need for standingpilotlightswith
constantlyburningflames.
In case ofa power outage, youcan
lightthe surfaceburners on your
rangewith a match. Hold a lighted
matchtothe burner, then tur~ the
knobto the LITE position. CJse
extreme caution when lighting
burnem this way.
Surfaceburners in use when an
electricalpower failure occurs wi.
continueto operate normally.
surface Burner Controk
Knobsthatturn the surfaceburners
on and off are located on thelower
controlpanei and are marked as to
which burners theycontrol.
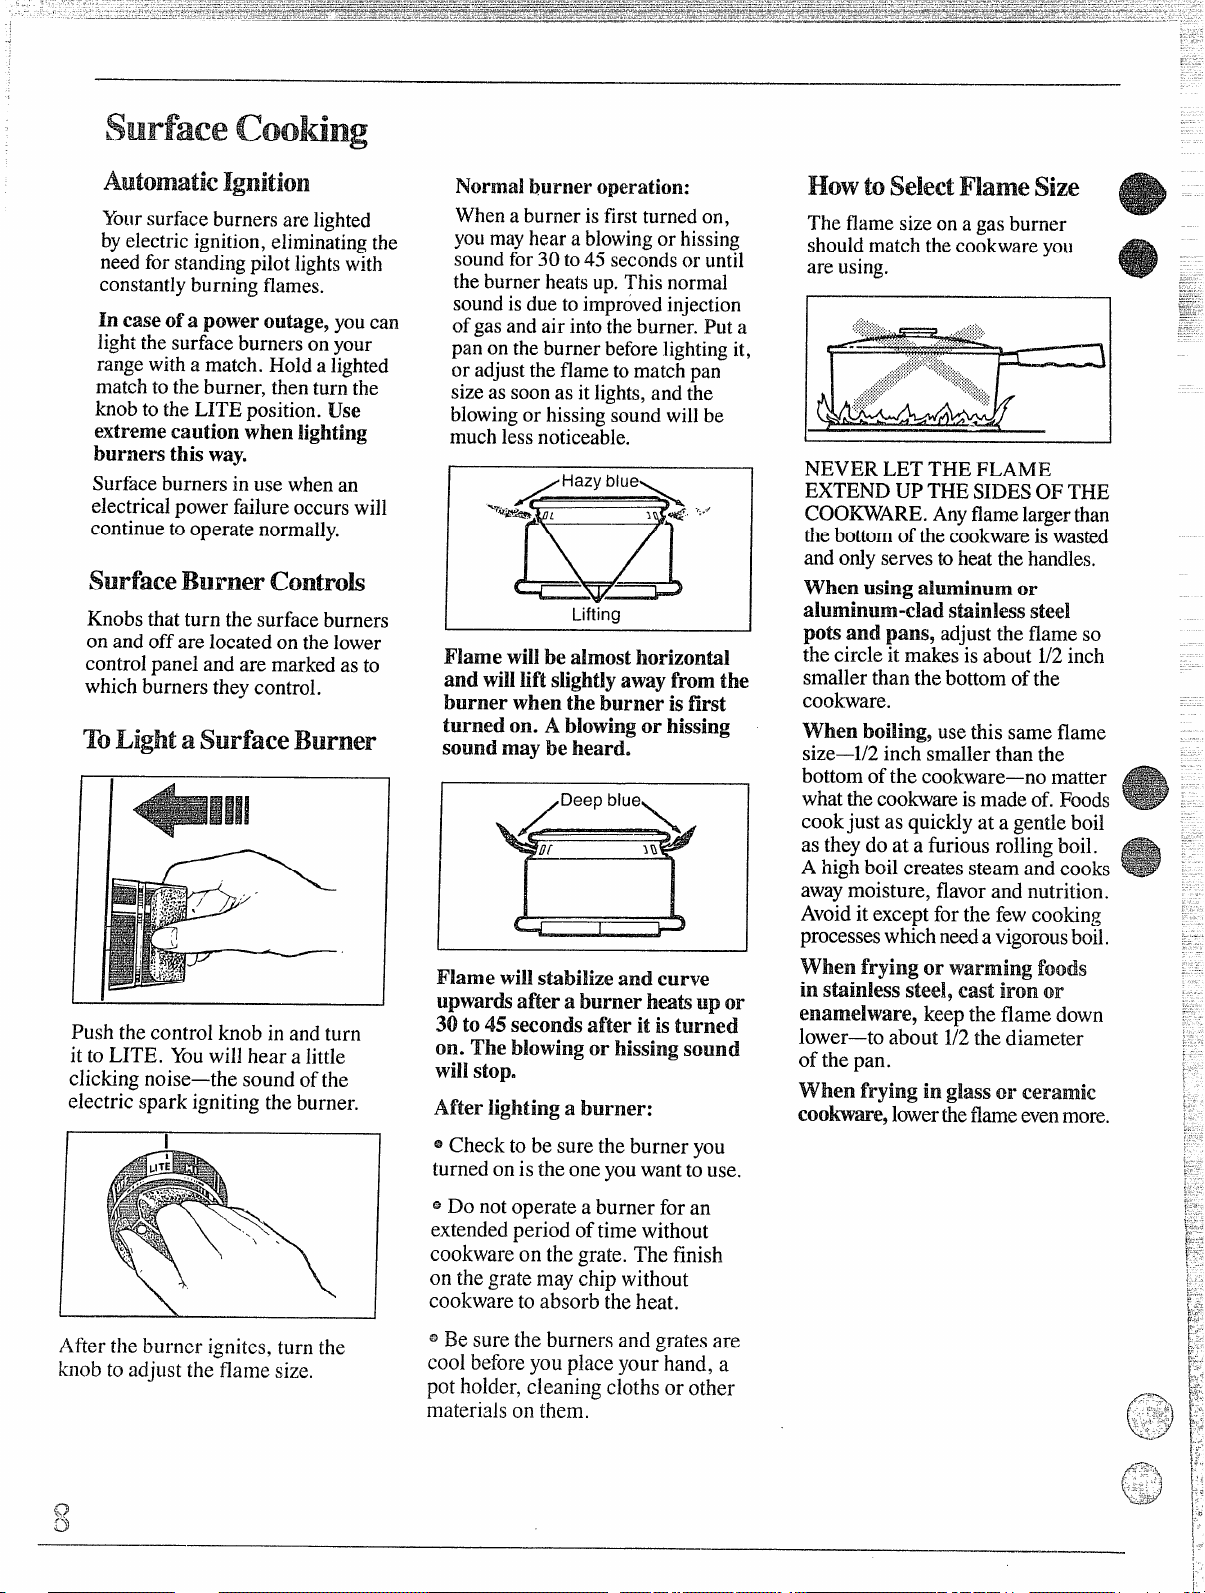
To Light a surface Burner
Push the control knob in and turn
it to LITE. Youwill hear a little
clicking noise—thesound ofthe
electric spark igniting the burner.
I
NorRnalb~~rneroperation:
Whena burneris first turned on,
youmayhear a blowingor hissing
soundfor 30 to45 secondsor until
theburner heatsup. This normal
soundis due to improved injection
ofgasandair intotheburner. Put a
Panon theburner beforelightingit,
.
or adjusttheflame to match pansizeas soonas it lights,and the
blowingor hissingsound will be
muchlessnoticeable.
1
I
and willtift slightlyaway from the
burner when the burner is first
turned on. A blowing or hissing
sound may be heard.
Flame willstabilize and curve
upwar~ after a burner heatsup or
30 to 45 seconds after it is turned
on. The biowing or hissing sound
will stop.
After lighting a burner:
@Check to be sure the burner you
turned on is the one youwantto use.
Lifting
The flame sizeon a gas burner
shouldmatch thecookwareyou
are using.
NEVER LET THE FLAME
EXTEND UP THE SIDESOF THE
COONARE. Anyflamelargerthan
thebottom of the cookwareis wasted
andordyservesto heatthehandles.
When using aluminum or
aluminum-clad stiinless steel
poti and pans, adjust the flame so
the circle it makes is about 1/2inch
smallerthan the bottomofthe
cookware.
Whenboiling9usethis same flame
size—1/2inch smaller than the
bottomofthe coolcware—nomatter
whatthecookwareis made of. Foods
cookjust as quickly at a gentle boil
as theydo at a furious rollingboil.
A high boil creates steam and cooks
awaymoisture, flavorand nutrition.
Avoiditexcept for the few cooking
processeswhichned a vigorousboil.
When frying or warming foods
in sminless stee19cast iron or
ename~ware, keep the flame down
lower—toabout 1/2the diameter
of the pan.
When frying in gIass or ceramic
eoohme, lowerthe flameevenmore.
After theburner ignites, turn the
knob to adjust the flame size.
~Do notoperate a burner for an
extendedperiod of time without
cookware on the grate. The finish
on the grate may chip without
cookware to absorb the heat.
~Be sure the burners and grates are
cool beforeyou place your hand, a
pot holder, cleaning cloths or other
materials on them.
Page 9
usingYouroven
surfaceLight
(on modelsoequipped)
A full-widthfluorescentlightover
theupper controlpanel illuminates
the cooktop.Pressnd momentarily
holdthe SURFACELIGHT switch
onthe upper controlpanelto turn
thelighton and off.
Top”of”Rangecookware
Aluminum:Mediurn-wei~ht
COO* isrecommendedbecauseit
heatsquic~y and evenly.Mostfoods
brownevedy in an ahIminurnstiet.
Mineds in foodand waterwillstain
butwillnotharm aluminum.
quickscour with a soap-filledsteel
woolpad afier each use keeps
aluminumcookwarelookingshiny
and new.Use saucepans with tight-
fittinglids forcooking with
minimumamountsof water.
Cast Iron: If heated slowly,most
skilletswill give satisfactoryresults.
Enamelware: Under some
conditions,the enamel ofsome
cookwaremaymelt.Followcookware
manufacturer’srecommendations
for cooking methods.
Glass: There are two typesofglass
cookware—thosefor ovenuse only
and those for top-of-rangecooking
(saucepans, coffeepotsand
teapots). Glass conducts heat very
slowly.
Heatproof Glass Ceramic: Can
be used for either surface or oven
cooking. It conducts heat very
slowly and cools very slowly.
Check cookware manufacturer’s
directionstobe sure it can be used
on gas ranges,
Stiinless Steel: This metal alone
haspoor heatingproperties, and is
usually combined with copper,
aluminum or other metals for
improvedheat distribution.
Combination metal ski~letsusually
work satisfactorily if they are
used with medium heat as the
man~~facturerrecommends.
u
A
AutomaticIgnition
TbIlight the burners, turnthe
OVENSET knobto thedesired
finction. Push in and turn the
OVENTEMP knobto thedesired
temperature. The burner should
ignitewithin 60 seconds.
CAUTION:DO NOTMAKE ANY
ATTEMPT~ OPERATE THE
ELE~MC IGNITION OVEN
DURING AN ELECTRICAL
POWERFAILURE. Resumption
ofelectricalpowerwhenthe OVEN
TEMP and OVEN SET controls
are in anyposition other than OFF
willresult in automaticignitionof
the ovenor broiler burner and
couldcause severeburns if, at the
time,you were attemptingto light
the burner with a match.
Beforeusi~Youroven
Besure you understandhowto set
the controls properly. Practice
removingand replacing the shelves
while the ovenis cool. Readthe
information on the followingpages,
and keep this book handy.
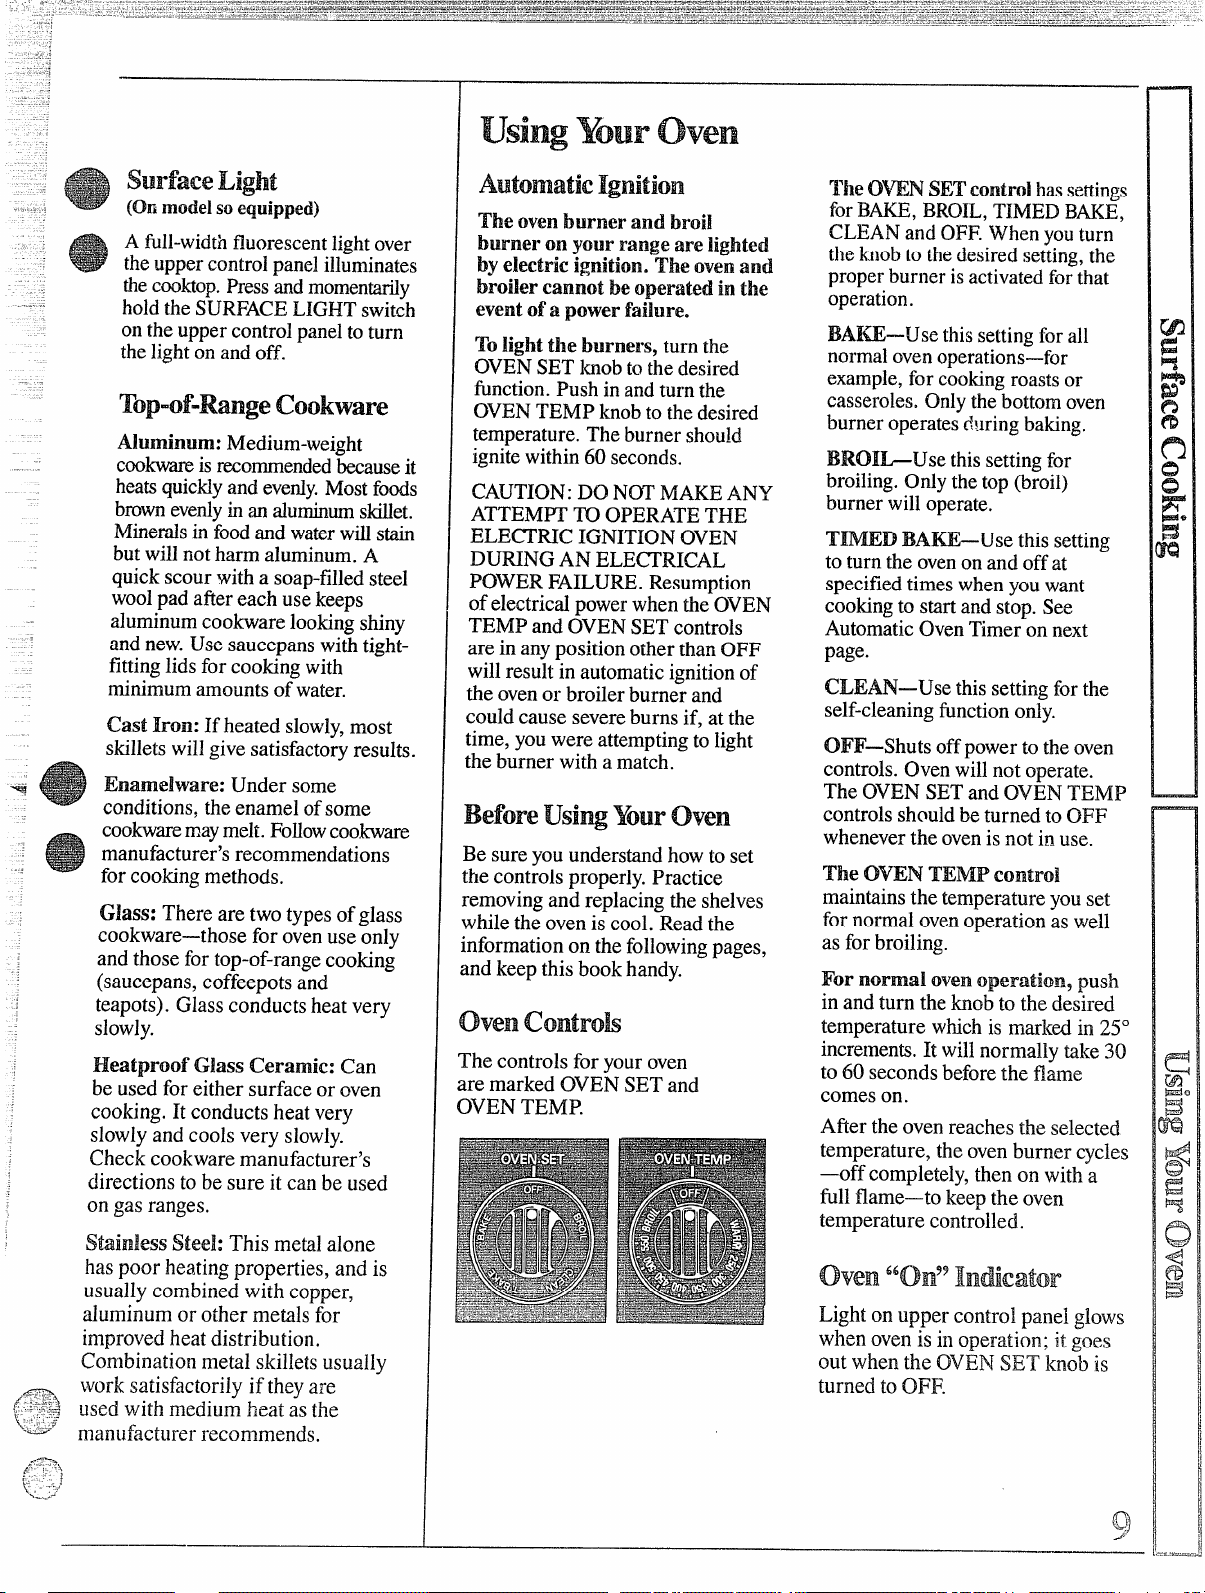
The controls for your oven
are marked OVEN SET and
OVEN TEMP.
Tl~eOWN SETcontrolhassettings
forBAKE,BROIL,TIMED BAKE,
CLEAN and OFF.When youturn
the knobto thedesired setting,the
properburner isactivatedfor that
operation.
BA~–Use thissettingfor all
normalovenoperations—for
example,for cookingroastsor
casseroles.Onlythe bottomoven
burner operatesduringbaking.
BROI&Use thissettingfor
broiling.Only thetop (broil)
burner will operate.
TmED BA-Use thissetting
to turnthe ovenon and off at
specifiedtimes when youwant
cookingto startand stop. See
AutomaticOvenT~meron next
page.
CLEAN—Use thissettingfor the
self-cleaningfinction only.
OFF—Shutsoffpower to the oven
controls. Oven willnot operate.
The OVEN SET and OVEN TEMP
controlsshouldbe turned to OFF
wheneverthe ovenis not in use.
The OVENTEMP controi
maintainsthe temperature you set
for normal ovenoperation as well
as forbroiling.
Yornormal ovenoperation, push
in and turn the knob to the desired
temperature whichis marked in 25°
increments.It willnormally take 30
to 60 secondsbeforethe flame
comes on.
After the oven reaches the selected
temperature, the ovenburner cycles
—offcompletely,then on with a
full flame-to keep the oven
temperature controlled.
~~~~ “~n” Indicator
Light on upper control panel glows
when oven is in operation; it goes
out when the OVEN SET knob is
turned to OFF.
—
Page 10

usingYotlroven
ovenshelves
The shelves are designedwith
stop-locksso whenplaced correctly
onthe shelfsupports,theywill stop
beforecomingcompletelyout of
the ovenandwill nottilt when you
are removingfoodfrom them or
placingfoodon them.
When placing cookware on a shelf,
pull the shelf out to the “stop”
position. Place the cookware on
the shelf, then slidethe shelfback
intothe oven.This will eliminate
reaching into thehot oven.
Toremovea shelf from the oven,
pull it out to the stopposition, lift
up on front andpull out.
ovenLi@t
Thelightcomeson automatically
whentheovendooris opened. For
a modelwith theovenlightswitch
on the u~~ercontrol~anel, turn the
lighton~nd off whe~the door is
closed.
Asyour ovenheats up, the
temperaturechangeofthe air
inthe ovenmaycause water
dropletsto formon the door
glass.These dropletsare
harmlessand willevaporateas
the ovencontinuesto heat up.
ovenvent
Yourovenisventedthroughducts
atthe rear oftherange (seer~age6).
Do notblocktheseductswhen
cookingin the oven—itis important
thatthe flowof hot air from the
ovenand fresh air to the oven
burnersbeuninterrupted.
@Handes ofpok andpansonthe
Cooktop
too closeto the vent,
@Do not leave plasticitemson
the
left
may become hot if left
Cooktop—theymay melt if
toocloseto the Vente
SheIfPositiom
The ovenhas four shelf supports—
A (bottom), B, C and D (top). Shelf
positionsfor cooking are suggested
on Baking and Roastingpages.
Donotleaveany itemson the
@
cooktop. The hot air from the vent
mayigniteflammableitems and
willincrease pressure in closed
containers, which may cause them
to burst.
Page 11

.
Autimaticovenmmer
ThisTimer=willautomatically start
and stopyourove~~for you. Iqere’s
whatyoudo:
1. Makes~:rebothyour rangeclock
andtheSTARTdialshowthe~orrect
timeof day.
Toset theclock, push theknob in
and turn the clock handsto the
rightto
theknob out and continueturning
toOFF.
thecorrect time. Then let
Digitil clock
Push inthe centerknobofthe
MinuteTimer and turn theknob
in either directionto set the digital
clock numerals to the correct time.
(The Minute Timer is the largedial
to the lefiofthedigitalclock.) After
settingthe clock, let the knob out
and turnthe MinuteTimer pointer
to OFF.
2. Setthe
andturnthe Y.ARTknobtothe time
youwantthe ovento turl~on. (If
youwantit to startoperating
immediately,donotset the START
time.)
3. Setthe STOPcontrol. Push in
and turn the S~P knob to thetime
youwantthe ovento turn itselfoff.
START control. Push in
Minutemmer
The Minute Timer has been
combined with the range clock.
Use it to time all your precise
cooking operations. You’ll
recognize it as the pointer which is
different in color from the clock
hands.
Toset the Minute Timer, turn the
knob to the left,
until thepointer reaches the
in,
number ofminutes you want to
time (up to 60).
At the end of the set time, a buzzer
sounds to tell you time is up. ~rn
the knob,
thepointer reaches OFF and the
buzzer stops.
withoutpushingin, until
withoutpushing
mnutemer
Tosetthe Minute Timer, turn the
center knob clockwise,
pushingin,
the number of minutesyou want to
time (upto 60).
At the end ofthe settime, a buzzer
soundsto tell you time is up. Turn
the knob,
the pointer reaches OFF and the
buzzer stops.
untilthe pointer reaches
withoutpushingin, until
without
Note: There mustbeat least a
half-hourdifference between the
STARTand S~P dials for the
automatic control to work.
4. Setthe OVEN SET knob to
TIME B- andthe OVEN TE’P
knobtothedesiredoventemperature.
The ovenwill turn itself on
immediately, or at a later START
time that you set if you haveset the
STARTcontrol. It will operate at
the temperature you selected, and it
will turn itself off at the S~P time
youhave set.
After oven operation is completed,
be sure to turn the OVEN TEMP
aridOVEN SET ho~s to OFF.
—
Page 12

1. Position the shelfor shelvesin
theoven.
2.
Close ovendoor.TurnOVENSET
knob to BAKE or TIME BAKE.
Push in andturn OVENTEMP
knobto desiredtemperature.
Preheatovenfor at least 15minutes
ifpreheatingisnecessary.
3. Place foodin ovenon center
ofshelf. Allowat least2 inches
betweenedge of bakewareand oven
wallor adjacent cookware.
If cookingontwo shelvesatthe
same time, staggerthecookware
for best heat circulation.
4.Check food for donenessat
minimumtime on recipe. Cook
longerif necessary. Switchoff
heat and removefood.
Preheatingisvery importantwhen
usingtemperaturesbelow225°F.
andwhenbakingfoodssuchas
biscuits,cookies, cakesandother
pastries.
Preheatingisnotnecessary when
roastingor for long-timecookingof
wholemeals.
she]fPositiom
Most baking is done on the second
shelf position (B) from the bottom.
When baking three or four items,
use two shelvespositioned on the
second and fourth sets of supports
(B& D) from bottom of oven.
Bake angel food cakes on ~lrstshelf
position (A) from bottom of oven.
~FO11OWa tested recipe and
measure the ingredients carefully.
Ifyou are using a packagemix,
followlabel directions.
@~fmoistureisnoticeableon the
frontoftheovenorontheblackglass
doorwhenfirstturningontheoven,
leavetheovendoorajar fora few
minutesor untiltheoveniswarm,
~Do notopen theovendoor during
abakingoperation—heatwillbe lost
andthebakingtimemightneed to
beextended.Thiscould causepoor
bakingresults.If youmustopen the
door,openit partially–only 3or 4
inches—-andcloseitas quicklyas
possible.
@Donotdisturb theheatcirculation
intheovenwiththeuseofaluminum
foil.Iffoilis used, place asmall
sheetofit, about 10by 12inchesat
themost, on a lowershelfseveral
inchesbelowthe food. Do notplace
foilonthe ovenbottom.
common Bating
and Possible Solutiom
Woblems
pm
Burning around edges
~Edgesofcrust toothin.
@Incorrectbakingtemperature.
Bottom crust soggy
@
Allowcrust and/or fillingto cool
sufficientlybefore fillingpie shell.
@Fillingmaybe toothin orjuicy.
~~il]ingallowedto standinpie shell
beforebaking. (Fillpie shells and
bakeimmediately.)
@Ingredientsandproper measuring
affectthequality ofthecrust. Use a
testedrecipe and goodtechnique.
Make sure there are no tinyholesor
tearsina bottom crust. “Patching”
apiecrust could causesoaking.
Pie filling Funs over
@Topand bottom crust notwell
sealed together.
@Edgesofpie crust not built up
high enough.
QToomuch filling.
Q Check size ofpieplate.
%stry is tough; crust not
oToo much handling.
QFattoo softor cut in too fine.
Rolldough lightlyand handle as
littleaspossible.
andunbaked
flaky
CAKW
Cake riseshigher on one side
~Batterspreadunevenlyinpan.
@Ovenshelvesnotlevel.
@Usingwarpedpans.
cakes cracking
Oventemperaturetoohigh.
@
On @p
~Battertoothick, followrecipe
orexactpackagedirections.
@Checkforproper shelfposition.
oCheckpan sizecalledforinrecipe.
@Impropermixingofcake.
Cake falls
@Toomuchshortening,sugar or
liquid.
@Checkleaveningagent,baking
powderor bakingsodatoassure
freshness.Makeahabittonote
expirationdatesofpackaged
ingredients.
@Cakenotbakedlong enoughor
bakedatincorrecttemperature.
@Ifaddingoil toacakemix, make
certainthe oilisthe typeand
amountspecified.
Crust is hard
@check temperature.
*Check shelfposition.
Cake
has soggy layer or streak
at bottom
s Undermining ingredients.
@Shortening too softforproper
creaming.
e Toomuch liquid.
cooms &~~scmm
Doughy center; heavy crust on
surface
o check
@Check shelf position.
o
carefullyas givenin reliable recipe
or on conveniencefoodpackage.
~Flat cookie sheetswill givemore
evenbakingresults.Don’tovercrowd
foodson a bating sheet.
@Conveniencefoodsused beyond
their expiration date.
Browning more noticeable on
one side
0Ovendoor notclosed properly,
check gasket seal,
QCheck shelf position.
temperature.
~OllOW bakinginstructions
.->
--\.--
(
~:;
Page 13

BakingGuide
1. Preheatingisvery imprmnt
when using temperatures below
225”F.and when baking foods
such as biscuifi, cookiesqcakes
and other pastries. Preheatthe
ovenforat least 15minutes.
Preheatingis notnecessarywhen
roastingor forlong-time cooking
ofwholemeals.
Food
Bread
Biscuits(M-in. thick)
Coffeecake ShinyMetal Panwith
Corn bread or muffins
Gingerbread
Muffins
Popovers
Quickloafbread
Yeastbread(2loaves)
Plain rolls
Sweet rolls
Cakes
(without shortening)
Angelfood
Jelly roll
Sponge
Cakes
Bundtcakes
Cupcakes
Fruitcakes
Layer
Layer,chocolate
Loaf
Cookies
Brownies
Drop
Refrigerator
Rolledor sliced
Fruits,
Other Desserts
Baked apples
Custard
Puddings, rice
and custard
Pies
Frozen
Meringue
Onc crust
Twocrust
Pastrv sflell
Cookware
ShinyCookieSheet
satin-finishbottom
CastIronor Glass Pan
ShinyMetal Panwith
satin-finishbottom
ShinyMetalMuffinPans
DeepGlassor Cast-IronCups
Metalor Glass Loaf Pans
Metalor Glass Loaf Pans
ShinyOblongor MuffinPans
ShinyOblong or Muffin Pans
AluminumTubePan
MetalJelly Roll Pan
Metalor Ceramic Pan
Metalor Ceramic Pan
shinyMetal Muffin Pans
MetalorGlass Loafor
rube Pan
lhinyMetal Pan with
atin-finishbottom
ihinyMetal Panwith
atin-finishbottom
fletalor Glass Loaf Pans
fletalor Glass Pans
:ookieSheet
ookieSheet
ookie Sheet
lassor Metal Pans
lassCustard Cups or
asserole(set in pan of hot water)
Glass Custard Cupsor
Casserole
FoilPanon Cookie Sheet
Spreadtocrust edges
Glass or Satin-finish Metal
Glassor Satin-finish Metal
Glassor Satin-finish Metal Pan
I
2. Aluminumpansconduct heat
3, Dark or non-shinyfinishesand
quickly,For mostconventional glasscookwaregenerallyabsorb
baking,light, shinyfinishesgive
heatwhich mayresult in dry, crisp
bestresults becausethey help crusts. Reduceovenheat25”F.if
preventoverbrowning,
browningresults, werecommend
dullbott~msurfacesfor cake pans
andpieplates.
shelf
Positions
B,C
B,A
B
B
A,B
B
B
A, B
A, B
B, A
A
B
A
A, B
B
A,B
B
B
B
B, C
B, C
B, C
B, C
A, B, C
B
B
A
B, C
A, B
B
B
For best lighter crusts arc desired. Mpid
browningofsome foodscan be
achieved-bypreheatingcast-iron
cookware.
Oven
Temperatures
400°-4750
350°-4000
400°-4500
350°
400°-4250
375°
350°-3750
375°-4250
375°-4250
350°-3750
325°-3750
375°-4000
325°-3500
325°-3500
350°-3750
275°-3000
350°-3750
350°-3750
350°
325°-35G0
350°-4000
400°-4250
375°-4000
350°-4000
300°-3500
325°
400°-4250
325°-3500
400°-4250
400°-4250
450°
Time,
Minutes
15-20
20-30
20-40
45-55
20-30
45-60
45-60
45-60
10-25
20-30
30-55
10-15
45-60
45-65
20-25
2-4 hrs.
20-35
25-30
40-60
25-35
10-20
6-12
7-12
30-60
30-60
50-90
45-70
15-25
45-60
40-60
13-16
Comments
Canned, refrigeratedbiscuitstfike2to 4
minuteslesstime.
Preheat cast-ironpan forcrisp crust.
Decreaseabout5 minutesfor muffinmix
or bakeat 450”F. for 25 minutes,then at
350”F.for 10to 15minutes.
Dark metalor glass gives deepest
browning.
For thin rolls, Shelf B maybe used,
For thin rolls, Shelf B maybe used.
Two-piecepan is convenient.
Line panwith waxpaper.
Paper liners producemoister crusts.
Use 300”F.and Shelf B for small or
individualcakes.
Ifbaking four layers,use
ShelvesB and D.
Bar cookies from mix use same time.
Use Shelf C and increase temperature
25° to 50°F.for more browning.
Reducetemperature to 300”F.for large
custard.
Cook bread or rice pudding with custard
base 80 to 90 minutes.
Large pies use 400”F,and increased time.
Toquickly brown meringue. use 400”F. for
8to 10 minutes.
Custard fillings require lower temperature,
longer time.
A, B, C
A, B, C
B
325°-4000
325°-3750
300°-3500
60-90
30-60
30-75
Increase time for large amount or size.
Page 14

Roasting
..—
——
?
Roastingis cookingbydry heat.
Tendermeator poultry can be
roasteduncoveredinyour oven.
Roastingtemperatures,which
shouldbelowand steady,keep
spatteringto a minimum. When
roasting,it is notnecessaryto sear,
baste,coveror add waterto your
meat. Roastingis easy,just follow
thesesteps:
Step 1:Position oven shelfat
secondfrombottomposition(B)
forsmallroasts(3 to 5 pounds)and
at (A)positionforlarger roasts.
Step 2: Checkweightofroast.
Placemeat fat-side-upcr poultry
breast-side-upon roastingrack in
a shallowpan. The meltingfatwill
bastethe meat. ~e~ecta
panasclose
tothe sizeofthe meatas possible.
(Broilerpan withrackisa good
pan for this,)
Step 3: TurnOVENSET knobto
BAKEor TIME BAKEand OVEN
TEMP knobto desiredtemperature.
Checkthe RoastingGuide~or
temperaturesand approximate
cookingtimes.
Step 4: Most meatscontinueto
cookslightly whilestandingafter
beingremovedfromthe oven.
Stindingtime recommendedfor
roastsis 10to20 minutes.“I’his
allowsroaststo firm up and makes
themeasierto carve. Internal
temperaturewillrise about5° to
10”P.;tocompensatefortemperature
increase,if desired, removeroast
fromovenwhen itsinternal
temperatureis 5°to 10°F.lessthan
tem~eratureshownin the Roasting
Guide.
mozenRoasts
Frozenroastsofbeef, pork,
lamb,etc., can be roastedwithout
thawing,but allow 15to25 minutes
additional time uer Dound(allow 15
minutesadditio~al~imepe~pound
for roastsunder 5 pounds, more
timeper pound forlarger roasts).
Thawmost frozen poultry before
roastingto ensure even doneness.
Somecommercial frozen poultry
can be cooked successfullywithout
thawing.Followdirections given
on packer’slabel.
—-
.-
.
-.
—-...
-—
—
--
Roasting Guide
Type
Meat
Tendercuts; rib, highquality
sirloin tip, rump or top round*
Lamb legor bone-in shoulder*
Vca!shoulder, lcg or loin*
Pork loin, rib or shoulder*
Ham, precooked
Ham, raw
*Forboneless rolled roasts over 6 inches thick.
add 5 to 10minutes per lb. to times givenabove.
Po[iltry
Chicken or Duck
Chicken pieces
Turkey
Oven
Temperature
325°
325°
325°
325°
325°
325°
325°
350°
325°
Doneness
Rare:
Medium:
WellDone:
Rare:
Medium:
WellDone:
WellDone:
WellDone:
ToWarm:
Welldone:
Well Done:
Well Done:
Well Done:
ApproximateRoastingTime
in Minutes per PoIInd
3 to 5 Ibs.
24-35
35-39
39-45
21-25
25-30
30-35
35-45
35-45
18-23minutesper pound (any weight)
Under 10lbs. 10to Mlbs.
27-35 24-27
t.O5 ibs.
3
35-40
35-40
tO ~~ lbs.
~~
16-22
6to 8lbs.
18-25
25-31
31-33
20-23
24-28
28-33
30-40
30-40
over 5lbs.
30-35
Over15lbs.
12-19
Infernai
-.
Temperature‘F.
130°-140°
150°-160°
170°-1850
130°-140°
150°-160°
170°-1850
170°-1800
170°-180°
115°-1250
185°-1900
185°-190”
In thigh:
185°-1900
Page 15

—
Broilingiscooking foodbydirect
heatfromabovethefood.Your
rangeisdesignedforwaist-high
br~iling.A speeiailydesigned
broiler pan andrack allowsdripping
fattodrainawayfromthefoodsand
bekeptawayfromthehighheatof
thegasflame.
The ovendoor should be Ciosed
during broiiing.
How to Broil
1.
Ifr-neathasfatorgristlenear the
edge,cutverticalslashes throughit
about 2 inchesapart, butdon’tcut
intomeat. Werecommendthatyou
trimfattopreventexcessive
smoking, leavingalayerabout
l/8-inchthick.
2. Arrangefoodonrack and
position the broiler pan onthe
appropriateshelfintheoven.
Placingfoodcloserto flame
increasesexteriorbrowningoffood,
butalsoincreasesspatteringandthe
possibility of fatsand meatjuices
igniting,
3. Closetheovendoor butdo
notlatchit. If the door latch is
moved to the right during a broil
operation, the door may Iock and
youmaynot be able to openituntil
theovencools.
4. TurnOVENSET knob toBROIL.
Formost foods, turn OVEN TEMP
knobto BROIL. Note: Chicken and
hamare broiled ata lowersettingin
order tocook foodthrough without
over-browningit.
5. Turn mostfoodsonce during
cooking(theexception
is thinfillets
offish; oilone side, place that side
downonbroiler rackand cookwithout
turninguntil done). Time foodsfor
about one-half the total cooking
:ime,turn food,then continue[o
;ooktopreferred doneness.
Broiling mps
@usetongstoturnmeatover—
piercedmeat]osesjuices.
Broiling Guuide
Quantity
andlor
Thickness
Bacon
GroundBeef
WellDone
BeefSteaks
Rare
Medium
WellDone
Rare
Medium
WellDone
Chicken(450°)
BakeryProducti
Bread (Toast) or
ToasterPastries
EnglishMuffins
hbster Taiis
(6to8-02.each)
Rsh
HamSlices (450°,
Precooked
PorkChops
WellDone
hmb Chops
Medium
WellDone
Medium
WellDone
Wieners,
similarprecooked
sausages,
bratwurst
‘i~-lb.(about8
thinslices)
l-lb.(4 patties)
‘Ato%-in.thick
l-in. thick
(1 to I %-lbs.)
(2 to2 %-lbs.)
1whole
(2to2%-lbs.),
splitlengthwise
Z-4slices
1pkg. (2)
2-split
T
2-4 c
l-lb. fillets %to
Yz-in.thick
l-in. thick B,C
2( ’Ain.) c 10 4-5 Slash fat.
2(l-in. thick),
about 1lb.
2(lin.)
about 10to 12-02.
2(1fi in.),
ibout 1 lb.
l-lb. pkg. (10) C,D 6 1-2 If desired, splitsausagesinhalf
a ~~~~h and chopsshould beat
least 1inch thick forbestbroiling
results.Panbroilthinnerones.
2ndSide
1stSide
shelf
Position
Time,
Minutes Minutes Comments
D
c
c
c
c
B,C
B,C
B
25-30
B
D
D
I I
c 5 5 Handleandturn verycarefully.
c 13
B
B
B
B
2-3
3-6
I 14-17 I Donot I Cutthroughbackofshell, spread
I
Time,
2%
5
9
12
13
10
15
25
10 10
10
17
9-12
16-18
25-30
turnIopen. B~sh with meltedb-utter
over. beforebroiiin~and afterhalftime.
I
8 8 Increasetimes5-10minutesper
11-13
8 I 4-7 ~ Slash fat.
4-6
12-14
Arrangeinsinglelayer.
Spaceevenly.Up to 9 patties
takeabout shinetime.
I
7
Steakslessthanl-inchcook
5-6
throughbeforebrowning,
8-9
Panfrying isrecommended.
6-7
Slashfat.1%-in.thick
Reducetimesabout5 to 10
minutespersideforcut-up
chicken.Brush eachside with
meltedbutter.Broilskin-sidedown first.
‘/2-2 Spaceevenly.PlaceEnglish
muffinscut-side-upand brush
withbutterifdesired.
Brushwithlemonbutter before
andduring cooking if desired.
Preheatbroilerto increase
browning.
sidefor 1IA-inchthick or home
cured.
lengthwise;cutinto5 to6-inch
pieces.
;. Turn OVEN SET and OVEN
~EMP knobs to OFF. Remove
]roiler pan from ovenand serve
bod immediately,Leavepan
)utsidethe ovento cooi.
Page 16

CareandCleaning
Proper care and cleaningare
importantsoyourrangewil~give
youefficientand satisfactory
service. Followthesedirections
carefilly in caring for ittohelp
assuresafe and propermaintenance.
Beforecleaningany part of your
range (exceptfor operatingthe selfcleaningcycle), DISCOmCT
ELECTNC POWER To THE
RANGE at the fuse box or circuit
breaker panel, or pull therange
powercord plug f~omtheele~tric
outlet.
When the range is cool, wash the
enamel finish with mild soap and
water or amild abrasive cleanser
appliedwith a damp cloth. Rinse
the surface with clean waterand
dry with a softcloth. If you wish,
occasionallyapply a thin coat of
mild cleaning waxto help protect
the finish.
There are a number ofprecautions
youcan taketo avoidmarring the
surface ofthe range and to prevent
it from becoming dull. Don’tslide
heavypans across it. If you spill
foodswith a lot of acid (tomatoes,
sauerkraut, fruitjuices, etc.) or
foodswith high sugar content,
clean them up as soon as possible.
If allowed to remain, these foods
could cause a dull spot. Also, no
matter how stubborn the food stain,
never use harsh abrasive cleansers.
They could permanently damage
the enamel surface.
It’sa goodideatowipethe control
panelsclean aftereach use ofthe
oven.Fora morethoroughcleaning,
thecontrolknobscanbepulledoff
theknobstemsandti]eglassupper
controlpanelcanhe cleanedonboth
sides.
Toremovethe glws
1. Disconnectpowerto the range.
2. Removethescrewoneachend of
thebacksplash.
3. Removetheblackmeti stripson
eachendthatholdtheglassinplace.
4. Removethecontrol knobs,clock
knobsand screwssecuringtie light
switches.
5. Carefi~y removetheglassmd
placeit on a smooth,flatsutiace.
Cleanit with mildsoap and water,
rinsewithcleanwateranddry with
a soficloth.
panel:
Caution:Do notuseabrasive
cleansers,strongliquidcleanersor
ovencleanerson glassor enamel
controlpanel surfaces-they WM
damagethe fiish.
SwfaeeL@t
(onmodels so ‘eqtippd)
WHEN C~NGNG ASURFACE
LAMP,DO N~ ~UCH THE
METALATENDS OF LWP.
Yoursutiace lamp is easilyrep~ac-ed
witi a fluorescenttube of the same
wattage.Make surepowertothe
rangeisdisconnectedat the main
fuseor circuitbreakerpanelor pull
thepowercord plughorn the
electricoutlet.
Toremove, liftthe lamp cover.
Placefingerson topnear each end
ofthelighttube. Pressdownand
rollthetopofthe tubegentlytoward
thefront of the rangeuntil it stops.
Removethetubegentlyfromthe
unit,makingsureit doesn’thit the
lamp cover.
Toreplace, placefingerson top
near each end of the lighttube.
Press thebulb gentlyinto the slots
androllthetopoftubegenflytoward
the back ofthe rangeuntilit stops.
Then movethe lamp coverdown.
BurnerGrates
Gratesshouldbe washed regularly
and, ofcourse, after spillovers.
Washthem in hot, soapywater and
rinse with clean water. Dry the
grateswith a clot~—don’tput them
back on the rangewet.
Toget rid of burned-on food, soak
the gratesin a slightlydiluted
liquid cleanser.
Althoughthey’redurable, tl~e
grates will gradually lose their
shine, regardless of the best care
youcan give them. This isdue to
their continual exposure to high
temperatures,
Do notoperate a burner for an
extendedperiod of time without
cookware-onthe grate. The fi~~ish
on the grate may chip without
cookware to absorb the heat.
When replacing a
pair of grates,
the irregular
sides should
interlock in
the middle as
shown at right. +
m n“
Page 17

careandcleaning(continued)
“-”o
Do not attempt to clean burners in
an automatic dishwasher. Loosened
food soil can clog burner holes,
and the caustic action ofthe
dishwasher detergent can damage
the burner heads.
Beforeputting the burner back, dry
itthoroughly by setting itin a warm
ovenfor 30 minutes. Then place it
back in the range, making sure it is
properly seated on the mounting
~racketand is level.
Rawe TopBurners
Theholes in the burnersmust be
keptclean at all timesforproper
ignition and an even, unhampered
flame.
Cleanthe burners routinelyand
especiallyafier bad spillovers
whichcould clog these holes.
Burnersliftout for cleaning.
I
Note: Twoscrewsholdeach burner
pair in place to keep themfrom
wobblingaround during shipment.
Removeand discard the shipping
screwsand lift the burners up and
out. This disengagesthem from the
mountingbracket under each
burner pair.
Toremoveburned-on food, soak
the burner in a solution ofa product
used for cleaning the insideof
coffeemakers, Soak the burner for
20 to 30 minutes. If the food doesn’t
rinse off completely, scrub it with
soap and water or a mild abrasive
cleanser and a damp cloth.
w
Removethe gratesand lift out the
chrome drip pans. Washthem in
hot, soapywater. Rinsethem with
clean, hot water andpolish them
dry with a cloth. Neveruse abrasive
cleaner or steelwool—they’ll
scratch the surface. Instead, soak
the drip pans for about20 minutes
in slightlydilutedliquid cleanser or
mild solutionofammoniaand water
(1/2cupof ammonia to one gallon
ofwater). After soaking,wash them
in hot, soapy water. Rinse with
clean waterand polish with a clean,
SOficloth.
Do not attempt to clean the drip
pans in the self-cleaningoven.
When replacing
drip pans, the
notch on the rear
pan and the notch
on the front pan
should meet in
the middle.
Lift-up Cooktop
Cleanthe area under thecooktop
ofien.Built-upsoil, especially
~rease,may catchfire.
Tomakecleaningeasier, the entire
cooktopmaybe liftedup and
supportedby lockingarms that
catchand hold thetop when it’sall
thewayup.
Be
stlre all burners are turned off
before raising the cooktop. Then
removethe gratesand drip pans,
grasp the front sidesofthe cooktop
and lift.
After cleaningunder the cooktop
withhot, mild soapywater anda
clean cloth, put the cooktop back in
place. Lift up a little to release the
lockingarms and push them in
while guiding the topback down.
Becareful not to pinch your
fingers.
Broilermm& Rack
Afierbroiling, removethebroiler
rack andcarefullypour off the
grease. Washandrinse thepanand
rack in hot, soapywater.
If foodhasburned on, sprin~e the
broi~errack whilehotwith
detergentand coverwith wetpaper
towelsora dishcloth. Burned-on
foodswillthen soakloose while the
mealisbeing served.
Do notstore a soiledbroiler pan and
rack inthe oven.Never attemptto
cleanthem intheovenduring the
self-cleaningcycle.
P.
17
[,
Page 18

ovenshelves
Ovenshelvesmaybecleaned with
a mild abrasivecleanser following
manufacturer’sdirections.After
cleaning,rinse the shelves with
cleanwateranddry witha clean
cloth. Toremoveheavy,burned-on
soil, soapymetalpads may be used
followingmanufacturer’sdirections.
Afier scrubbing,washwith soapy
water,rinse and dry,
Youcanremovethe ovenbottomto
clean
anyexcessivespilloversbefore
startingihe self-clea;ingcycle.
Toremove the oven bottom:
1. Removetheoven shelves.
/
RenlovabieovenDoor
The ovendooris removabletomake
the interior moreaccessibleduring
the replacementofthe lampbulb,
.—
‘7
oven Light Bulb
Thelightbulbis located in the
upperleftcorner oftheoven.Before
replacingthe bulb,disconnect
electricpowerto the rangeat the
main fuse or circuit breaker panel
orunplug the rangefromthe electric
outlet. Let the bulb coolcompletely
beforeremovingit. Do nottouch a
hotbulb with a damp clothas the
bulb willbreak.
Toremove: Hold hand under lamp
bulb cover so itdoesn’tfall when
released. With fingersof same
hand, firmly push down wire bail
until it clears cover. Lift off cover.
DONOTREMOVEANY SC~WS
~ REMOVE THIS COVER.
Replace bulb with a 40-watthome
appliance bulb.
Toreplace cover: Place cover into
grooveof lamp receptacle. Lifi wire
bail up to center of cover until it
snaps intoplace. When in place,
wire holds cover firmly. Be certain
wire bail is not below depression in
center ofcover.
2. Removethe two knurled holddown screws at the rear of the oven.
If theyare too tight to removeby
hand, use a coin or a screwdriver.
3. To lift out the ovenbottom,
placeyourfingersin the slotsin the
bottom and lifi the rear of the oven
bottom up and back until the oven
bottomis clear ofthe lip at the front.
4. Then lift the bottom up and out.
Toreplace the bottom, place it in
the ovenwith the back raised about
6 to 8 inches or untilyou can insert
the front of the oven bottom under
the hold-down lip at the front. Then
push the back of the oven bottom
down fully into place on the metal
flanges and insert the hold-down
screws.
Open theovendoor fullyand
removethe twoPhilipsscrewsthat
holdthedoor tothe hinges.Then
closethedoor to the automaticstop
position(at about3 inches open),
and liftthe doorstraightup and off
thehinges.(Duetothe largeamount
of insulationandthe construction
ofthe door, it isheavy.)
Note: Care shouldbe taken not to
place hands between the spring
hingeand the ovendoor frame as
the hingecould snap back and
pinch fingers.
To replace the door, make sure the
hinges are in the “out” position.
Positionthe slotsin the bottom of
the door squarely over the hinges.
Then lower the door slowly and
evenly overboth hingesat the same
time. If hinges snap back against
the ovenframe, pull them back out.
‘Whenthe door is in position, open
it fully and.insert the two Philips
screws.
Page 19

Opemting theself-c~eaningoven
ReeolnmendedCIeaning~~me:
Moderate
(thin spi~lsand light spatter)
Heavy soil—3 houm
ExcessivelyHeavy soil—4hours
(heavy grease spills and
Soil--2houm
spatter)
Repare the ovenBefore
settingtheControk
step1:
Removethe broiler pan, broiler
rack and other cookwarefrom the
oven. (Ovenshelvesmaybe leftin
oven.Note: Shelveswilldiscolor
afier the self-cleancycle.)
Step 2:
Removethe ovenbottompanel (see
page 18)ifit is excessivelysoiled.
Clean it and put it back in the oven.
Step3:
Cleanspattersor soilon the oven
frontframe
outsidethe gasket(B)and the small
area at the front centerofthe oven
bottom.Bufftheseareas witha dry
cloth. Do notcleanthe gasket(B).
Do notlet waterrun down through
openinginthe topofthe door (C).
Makesurethe ovenlight bulb
cover(D) is inplace. Neveruse
a commercial ovencleaner in or
aroundthe self-cleaningoven.
Ill----- --
(A), theovendoor
—----liI
settheovenforcleani~
step1:
‘Wrn theOven Setknob to
CLEAN.
step2:
set the aM@tomaticOvcrltimer:
A. OveMIFront Frame
B. oven Door Gasket
c.openings ill Door
D.
ovenLightBulb cover
step4:
Close the oven door and.make sure
the ovenlight is off.
Caution:Chromedrippansfrom
the top of your range should
neverbe cleaned in the selfcieaning oven.
@Makesure both therangeclock
andtheST.T did showthecorrect
timeofday.
~Decide on cleaninghours
necessary—twohoursfor moderate
soil, three hoursforheavysoil, four
hours forexcessivelyheavysod.
@Addthese hoursto present time of
day,thenpush in and tur~ S~P dia~
clockwiseto desired stoptime.
Note: The S~P dialmust be set
and advanced atIeasthalfan hour
beyondthe timenoted.onthe
STARTdial.
Page 20

Ti startand stopcleaningat a later
timethan shownon clock, push in
andturn STARTdialtotimeyou
wishto start. Addthehoursfieeded
forcleaningto this “start” time,
thenpush in and turn S~P dialto
thisdesired time. Ovenwill
automaticallyturn on and off
atthe settimes.
msh the self-clean btch hver
to the right as far as it willgoto
lock the oven door.
A short time later, the LOCKED
lightcomes on andthe door locks.
The glowingLOCKED light
indicatesthat theovenis hot and
the door cannot be opened. The
ovendoor getshot during selfcleaning.DO N~ ~UCH.
Afkr self-c!ea~ling
Sometimeaftercleaningis
completed,whenthe ovenhas
cooledandthedoorcanbe unlocked,
theLOCKEI~lightgoesout,
step1:
Movethe latchleverto the left as
far as itwill gotounlockthedoor,
Step 2:
firn the OVENSET knobto OFF.
Page 21

careandcleaning
Opemting theSelf=CIeaningOven(cofiti~u~d)
If YouHavetoInterrupt the
cleating cycle
step1:
Turnthe STOPdial untilthe
pointeris at the correcttime of day.
step 2:
(Allmodels)
Slidethe door latch leverto the left
asfar as it will go. If the LOCKED
light is on, youmust waituntilthe
lightgoesoff beforemovingthe
latchlever. This will unlock the
ovendoor so it can be opened.
step3:
Turn the OVEN SET knob from
CLEAN to OFF.
Importint: Any attempt to
Uniockthe door by force while
the CLEA~NG light ison can
result in damage to the door
lockingmechanism.
1
Questiom andAwwers
Q.YVhywon’tmyoveB3clean
immediate~yeventhoughI set
the starttime correctly?
A. Check to be surethe START
time is the sameas the time on the
rangeclock. Also check to be sure
latchleveris movedtothe right as
far as it will go andthe IOVENSET
knobis turned to TIME BAKEor
CLEAN.
Q. If my oven clock is not
working, can I still self-clean
my oven?
A. No. YourAutomaticOven
Timeruses the rangeclock tohelp
start and stop your self-cleaning
cycle.
Q. Can I use commercial oven
cleaners on any part ofmy
self-cleaning oven?
A. No cleaners or coatingsshould
be usedaround anypart of this
oven.If you do usethem and do not
wipe theoven absolutelyclean, the
residue can scar the ovensurface
and damage metalparts the next
time the oven is automatically
cleaned.
Q. Can 1clean the Woven Gasket
around the oven door?
A. No, this gasketisessential for
a good oven seal and care must be
taken not to rub, damage or move
this gasket.
Q. What should I do if excessive
smoking occurs during cleaning?
A. This is caused byexcessivesoil,
and you should switch the OVEN
SET knob~E
Open windows to rid room of “
smoke. Allow the ovento cool for
at
least one hour before opening
the door. Wipe up the excess soil
and reset the clean cycle.
Q. Isthe “crackling”soundI
hearduringcleaningnormal?
A. Yes.Thisisthesouridofthemetal
heatingand coolingduringboththe
cookingandcleaningfunctions,
Q. Should there be
duringthe cleaning?
A, Yes,theremaybe a slight.odor
duringthe firstfewcleanings.
Failureto wipeout excessivesoil
mightalso causea strongodor
when cleaning.
Q. What causesthe hair-like
lineson the enameledsurface of
my oven?
A. This isa normal condition,
resultingfrom heating and cooling
duringcleaning.These lines do not
affecthowyour ovenperforms.
Q. Why do 1have ash left in my
ovenafter cleaning?
A. Some types of’soilwill leave
a depositwhich is ash. It can be
removedwith a damp spongeor
cloth.
Q. My oven shelves do not slide
easily.What is the matter?
A, After many cleanings,oven
shelvesmay become so clean they
do not slideeasily.If you wish
shelvesto slidemore easily,
dampen fingerswith a small
amountof cookingoil and rub
lightlyover sidesof shelf where
they contact shelf supports.
Q. My oven shelves have become
gray after the self-clean cycle. Is
this normal?
A. Yes.After the self-clean cycle,
the shelvesmay discolor and lose
some oftheir original luster.
any odor
Page 22

careand cleaning
operatingtheself-cleani~lgoven(Contintned)
If YouHa%’eto lnterrlRptthe
cleaningcycle
step1:
Turnthe STOPdial untilthe
pointerisat the correcttime of day.
step 2:
(AllmOd~]S)
Slidethedoor latchleverto the left
as far as itwillgo. If the LOCKED
light
is on, you must wait until the
light goes off beforemovingthe
latchlever.This wil~unlockthe
ovendoorso it can be opened.
Step 3:
Turnthe OVEN SET knob from
CLEAN to OFF,
Importint: Any attempt to
unlock the door by force while
the CLEANING light is on can
result in damage to the door
locking mechanism.
GE U/C, pub 49-8163, JGBlJ24GL?J/26GEJ,pg 21, lnicldl~ coluln[l, last quest iorl,
Questions and AIMwers
Q. why WO13’tIlly ovenC]eaBI
i.mmediate$yevenfhougl]I set
thestartti~~lecorrectly?
A. Check to be surethe
time is the sameas the time on the
clock. Also checkto be sure
range
latchlever is movedto the rightas
faras it willgo and the OVENSET
knobis turned to TIME BAKEor
CLEAN.
Q. If my
working,call I stillself-clean
myoven?
A. No. YourAutomaticOven
Timer usesthe rangeclock to help
startand stopyourself-cleaning
cycle.
OV~~ C~OCk ilSnOt
Q.CanI use commercialoven
cleaners on any part of nly
self-cleaning oven?
A. No cleaners or coatingsshould
be used around anypart ~f this
oven. If you do usethem and do not
wipe the ovenabsolutelyclean, the
residuecan scar the ovensurface
and damage metalparts the next
time the ovenis automatically
cleaned.
Q. Can I clean the WovenGasket
around the ovendoor?
A. No, this gasket isessential for
a good oven seal and care must be
taken not to rub, damage or move
thisgasket.
IQ. Whats~louldI (10ifexcessive
smoking occurs during cleaning?
A. This iscaused byexcessivesoil,
and you should switch the OVEN
SET knob
Open windowsto rid room of
smoke, Allow the oven to cool for
at least one hour before opening
the door. Wipe up the excess soil
and reset the clean cycle.
s}l~uld read:
s~f~ikc]l OVEN SET knob to ()~~.
START
/
?
3,-j~;.--
x::
Q.Is tl~e“cracklii~g”solIn[iI
du~+i~~gcleaning norn~al?
i~ear
A, Yes.Thisisthesoundofthemetal
heatingandcoolingduringboth LIIC
cookingandcleaningfunctions,
Q. ShotIld there be a~~yodor
duringthe cleaning?
A. Yes,theremaybe a slightodor
duringthefirst fewcleanings.
Failureto wipe outexcessivesoil
mightalsocausea strongodor
whencleaning.
Q. Whatca~nsesthe hair-like
lineson the enameledsurface of
Rmyoven?
A. This isa normal condition,
resultingfrom heatingand cooling
duringcleaning.These linesdo not
affecthowyour ovenperforms.
Q. Why do I haveash left in my
ovenafter cleaning?
A. Some types ofsoilwill leave
a depositwhich is ash. It can be
removedwith a damp spongeor
cloth.
Q. My oven shelves do not slide
easily.What is the matter?
A. After many cleanings, oven
shelvesmay become so clean they
do not slide easily.If you wish
shelvesto slide more easily,
dampen fingerswith a small
amountof cookingoil and rub
lightlyover sidesof shelf where
theycontact shelf supports.
Q. My oven shelves have become
gray after the self-clean cycle. Is
this normal?
A. Yes.After the self-clean cycle,
the shelvesmay discolor and lose
some of their original luster.
Page 23

PART
Broiler~n and
Wck
ControlKnobs
Outside GlassFinish
Metal,including
SideTrims,
TrimStripsand
BrushedChrome
Cooktop (on models
so equipped)
OuterPorcelain
EnamelSurface and
PaintedSurfaces*
Inside Oven Door*
MATERIALSTOUSE
@Soapand Water
@Soap-FilledScouringpa{
~ Plastic ScouringPad
@Dishwasher
@Mild Soap and Water
o Soapand Water
~ Soapand Water
~Paper Towel
~Dry Cloth
e Soapand Water
~Soapand Water
..—
GENERALDIIRECFIONS
DO N~ cleaniBIseif- Drain fat, cool pan and rack slightly. (Do not let soild
cleaning oven.
L
Pull off knobs. Washgently butdo not soak. Dry and return controls to range, making
sure to match flat area on the knoband shaft,
Washall glass with cloth dampenedin soapy water. Rinse and polish with a dry cloth. If
knobsare removed,do not allowwaterto rundowninside surfaceof glass while
cleaning,
DO Nm
abrasives,ammonia,acids
orcommercialoven
cleaners.
DO N~ USE ove~~
cleaners, cleansing
powdersorharsh
abrasives. These might
scratch the surface.
DO N~ USE oven
cIeaners9cleansingpowders
orharshabrasives.
USE steel wool,
pan and rackstand in oven to cool. ) Sprinkle detergt>nt
on mck and pan, Fill pan with warm water and spread
cloth or paper towel over rack.
fora fewminutes.Wash;scour if necessary. Rinse and
dry.O~lON: Clean pan and rack indishwasher,
Wash,rinse and then polish with a dry cloth,
If acids should spill on the range while it is hot, use a dry
paper towelor cloth to wipe up right away.When the
surface has cooled, washand rinse.
For other spills, such as fat smatterings,etc., wash with
soapand water whencooled andthen rinse. Polish with a
dry cloth.
Removeovendoor (see page 18),Clean with soap and
water and replace.
Letpan and rack stand
—._
OvenGasket ~None
OvenLiner
She~ves Soapand Water
Chrome-Plated
Drip Rns
StBrface BllrneB
)Soapand Water
1Soap-FilledScouringPad
Soap-FilledScouringPad
@Soap and Water
~Stiff-Bristled Brush
9 Soap-FilledScouringPad
‘Non-Metallic)
~Soapand Water
)Soap-Filled Scouring Pad
Non-metallic)
QSolution for Cleaning
Inside of Coffee Makers
@Soapand Water
~Mild Abrasive Cleanser
e Damp Cloth
I
‘}’Spillageofmarinades. fruitjuices, tomato sauces and basting materials containing acids maycause discoloration. Spillovers should be wiped up ‘:’:; -~
immediately. with care being taken to not touch any
Avoidgetting ANY cleaning materials on the gasket.
Coolbefore cleaning. Frequent wipingwith mild soap and water will prolong the time
betweenmajor cleanings. Rinse thoroughly.N~E: Soap left on liner causes additional
$tainswhen-ovenis reheated.
Shelvescan be washedin dishwasheror cleaned byhand usingsoap and water. Rinse
horoughly to removeany soap after cleaning. Shelves may also be cleaned in self-
;Ieaningoven, butmay lose some luster and discolor.
00 NW clean in self:Ieaningoven. Do not use
;teelwool, abrasives,
)mmonia,acids or
:ommercialoven cleaners.
DONW clean inself-
cleaningoven.
DON~ clean inself-
:Ieaningoven.
hoi portion of oven. When the surface is cool, clean and rinse.
Clean as described belowor in dishwasher. Wipe all
chrome drip pans after each cooking so unnoticed
spatter will not burn on next time youcook. To remove
burned-on spatters, use any or all cleaning materials
mentioned. Rub
scratching ofthe surface.
Lift out when cool. Soak 5 to 10minutes if desired in
warm solution of dishwasher detergent. Scour with
materials mentioned here to remove burned-on food
particles.
Wipe off burner heads. If heavyspilloveroccurs, remove
burners from range (see page 17)and soak them for 20
to 30 minutes in solution of hot water and product for
cleaning inside of coffee makers, such as Dip-It brand.
If soil does not rinse off completely, scrub burners with
soap and water or a mild abrasive cleanser and a damp
cloth. Dry burners in a warm ovenfor 30 minutes before
returning them to the range.
lig}ztly with scouring pad to prevent
—
,/.:.
,.-,>,
L .V
Page 24

MinorAdjwtmentiYouCanMake
BroiEandovenBurBler
Adjwtment -
Air Adjustment shutters
—
Repeatedopeningsand closings
-.
can cause the ovendoorto work
itselfout ofadjustment, One side
mayclosehigherthanthe other,
andthe door maynot sealproperly.
Toadjust
the heightofthe door:
Air adjustment shuttersfor the
broiland ovenburners regulatethe
flowofair to the flame.
Toadjustthe flowof air to either
burner,loosenthe Phillipshead
screwand rotatethe shutterto
allowmore or lessair intothe
burnertubeas needed.
1. Removethe door (see page 18).
,
The air adjustmentshutterfor the
top broil) burner is in theupper
righ~-handcorner near the rear wall
ofthe oven.
The flame for the top @roil)
burner should be steadywith
approximatelyl-inch blue cones
and shouldnotextendout overthe
baffleedges.
... . .
I
.-
2. With a thin-bladed screwdriver,
turn the screw in the openingat
thetop ofeach door hinge. Turn
—
clockwisetolower,counterclockwise
to raise each side ofthe door.
3. Replace the door, close it, and
check alignmentand door seal.
The shutterfor the bottom(oven)
burner is near the back wallof the
ovenbehind the storagedrawer or
panelunder the oven.
To determine ;f the bottom (oven)
burner flame is proper, remove
the ovenbottom (see page 18)and
the burner baffle. The flame should
have 1/2”to 3/4”blue cones with no
yellowtipping. When the baffle is
back in place, theflamewill resettle.
Visuallycheck the color ofthe
flamesevery six months. If they
look likeillustration (A) on page
25, call for service.
Page 25

OvenThermosbt
Adjmtment
Thetemperaturecontrolinyour
newovenhasbeen carefi~y adjusted
toprovideaccurate temperatures.
However,if thisovenhasreplaced
oneyouhaveused for severalyears,
youmay noticea differencein the
degreeofbrowningor the length of
timerequiredwhen usingyour
favoriterecipes. Oventemperature
controlshavea tendencyto “drift”
overa period ofyears and since
thisdrift is very gradual, it is not
readilynoticed. Therefore, you
mayhavebecome accustomedto
yourpreviousoven which may
haveprovideda higher or lower
temperaturethan you selected.
Beforeattemptingto havethe
temperatureofyournew oven
changed,be sure youhavefollowed
the bakingtime and temperature of
the recipe carefuliy.Then, afier
youhaveused the ovena fewtimes
and youfeel the ovenis too hot
or toocool, there is a simple
adjustmentyou can make yourself
on the OVEN TEMP knob.
Pull the knob off the control shafi
and look at the back side. There is
a disc in thecenter of the knob skirt
with a series of marks opposite a
pointer.
Notetowhich mark the pointeris
pointing.Tomakean adjustment,
carefullyloosen (approximately
oneturn), but do notcompletely
removethe twoscrewsthatholdthe
skirttothe knob. Holdthe knob
bladein one hand andthe outer
skirtin the otherhand.
Toraise the oventemperature,
movethepointer in the directionof
thearrow for RAISE. Tolowerthe
temperature, movethepointerin
thedirection of arrow forLOWER.
Each mark will changetheoven
temperatureapproximately20°F.
Wesuggest that you make the
adjustmentone mark fromthe
originalsettingand check oven
performancebeforemakingany
additionaladjustments.
After the adjustmentis made,
press skirt and knobtogetherand
retightenscrewssothey are snug,
but be carefil notto overtighten.
Re-installknob on range and
check performance.
Note: After an adjustmenthas
been made, the OFF and BROIL
positionswill notline up with
the indicator mark on the control
panel as they previouslydid. This
conditionis normal and will not
create a problem.
a
Loosen only the
locking screws
Page 26

-====_-
—.
—-.—
~*-.
~.
---- UseThk
——
~~
Questions?
POSSIBLE CAUSEAND/ORWAT TODO
—=
RobIemSolver
mP BURNERS
Do Nm LIGHT
BURNERSHAVE
YELLOWOR
YELLOW-TIPPED
FLAMES
OVENDOES N~
COOK PROPERLY
@Makesuretheelectricalplugispluggedintoa~ive,properlygroundd poweroutlet,
@BurnerholesorIsideofburnermaybeclogged,Removeandcleanthem.
@Burnersnotfittedcorrectlyontomountingbrackets.Removeandrei]~stall
burnersnro~erly.
(A)YeHownames–
Callfor service
~Ifburner flameslookUke(A), call for service. Normal burner flamesshouldlooklike
(B)or(C), depending
LP %as,someyellowtippingon innerconesisnormal.
@With
@Makesurethermostatcaptilarybulbs(locatedinupperportion ofoven)aresecurely
heldbythemountingclips, are nottouchingovensides,andarenotcoatedwithanything.
onthetypeofgasyouuse,
m)Yellowtipsonimer
cones—Normal for LP gas Normal fornaturalgas
(c)softbluenames––
~Aluminumfoilbeingusedimproperlyinoven.
@Ovenventblockedontop ofrange.
=Incorrect cookwarebeingused. Checkeach cookingsectionforcookwaretips.
DOOR WON’TOPEN
DUWNG BROILING
ORBA~NG
CLOCK DOES
Nm WORK
OVENLIGHTDOES
Nm
COMEON
OVENWILLN~
SELF-CLEAN
STRONGODOR
@
Ovenbottomnotsecurely seatedinposition.
~OVENTEMP knob setincorrectly or not turned on.
@Checkcommon baking,roastingand brotiingproblems on pages 12-15.
~
Doorlatchmovedtothe rightduringbroiling or bakingcan causedoor to lock when
ovenishot. Wrn ovenoff and letitcool beforeattemptingto open door.
~Rangeelectricalplugmustbesecurelyseatedinalivepoweroutlet.Checkforblown
fiseortrippedcircuitbreaker.
I
I
‘Bu~bmaybelooseorburnedout.
@Electrical plug must bepluggedinto alive poweroutlet.
I
@AutomaticTimernotsetornotsetproperly.TheS~P dialmustbesetandadvancedat
leasthalfanhourbeyondthetimenotedontheSTARTdial.
I
I @OVENSETknobmustbe setatCLEANsetiing.
~Oven door latch notmovedtotheright as far as it willgo.
I
QImproperair/gasratioinoven.Adjustovenburnerairshutters—-seepage23.
I
—
-.
Page 27

We’llBeThere
-—.-.————..-
IVitll tiepurchase OfyOur new GE a~~limce, receive the
ssurance hat if yOu ever need in~OmatiOn Or assistance
OmGE, we’llbe here. Ml you have to dO is call—toll-free!
GE ConsumerServiceprofessional
provideexpertrepair service,
scheduledat a time that’sconvenient
oryou.ManyGEConsumer Service
rnpany-operatedlocationsofferyou
servicetodayor tomorrow,or at your
convenience
weekda~
days).Our factory-trainedtechnicians
knowyourapplianceinsideand out—
somostrepairs can be handled injust
one visit.
(ZOOa.m.to 700 p.m.
9:00 am. to 2:00 p.m. Satur-
You can havethe secure feeling that
GE Consumer Service willstillbe
there afteryour warrantyexpires.Purchase a GE contract whileyour warranty is stillin effect and you’~ receive
a substantialdiscount.With a muhipleyear contract, you’re assuredof fiwre
service at today’sprices.
Whateveryour
major appliance, GEAnswerCente@
information serviceisavailableto
help. Your cdl—and your question—
willbe answeredpromptly and
courteously.And you can call any
time. GE Answer CenteP service is
open 24 hours a day 7 daysa week.
~lecommunication Device for the Deti
questionaboutanyGE
Upon request,GEwillprovideBraille
controlsfor a varietyofGEappliances,
and a brochure to assistin planing
barrier-freekitchen for personswith
limited
freeof charge,~all800,626.2000,
or speechwho haveaccessto a TDD )
or a conventionaltele~pewriter may
call800-TDD-GWC(800-833-4322) ~
to request information or sePJice.
mobility.
Consllmerswithimpaired hearing
a
!
1
i
Page 28

YOURGEGASRANGE
WARRANTY
Save
proofoforiginal purchasedatesuch as your salesslip or caricelled checkto establishwarrantyperiod.
(
WHAT1sCOVERED
WHAT!s NOTCOVERED
FULL ONE-YEARWARRANTY
Foroneyear from dateof original
purchase,we will provide,free of
charge,parts and servicelabor
in your hometo repairor replace
anypart of the range that fails
becauseof a manufacturing defect.
@Service trips to your home to
teach you howto usethe product.
yourUse andCammaterial.
Read
If you then have anyquestions
about operating the product,
please contact your dealer or our
Consumer Affairs office at the
address below,or tail, toil free:
GE Answer Center”
800.626.2000
consumer information service
@Improper installation.
This warranty is extendedto
the original purchaserand any
succeedingownerfor products
purchasedfor ordinary homeuse
inthe 48 mainland states,
andWashington,D.C,InAlaskathe.
warrantyisthe sameexceptthat it is
LIMITEDbecauseyoumust Davto
shipthe product to-theservi~e ~hop
or for the servicetechnician’stravnl
coststo your home.
All warrantyservicewill be provided
byour FactoryServiceCentersor
byour authorized CustomerCare@
servicersduring normalworking
hours.
Lookinthe White or YellowPages
of yourtelephone directoryfor
GENERAL ELECTRICCOMPANY,
GENERAL ELECTRICFACTORY
SERVICE,GENERAL ELECTRiCHOTPOINTFACTORYSERVICEor
GENERAL ELECTRICCUSTOMER
CARE@SERVICE.
~ Replacement of housefuses or
resetting of circuit breakers.
~ Failureof the product if it is used
for other than its intended purpose
or used commercially.
~ Damage to product caused
byaccident, fire, floods or acts
of God.
WARRANTORISNOTRESPONSIBLE
FORCONSEQUENTIAL DAMAGES.
Hawaii
1
Some states do not allow the exclusion or limitation of incidental or consequential damages, so the above limitation or exclusion
may not apply to you. This warranty gives you specific legal rights, and you may also have other rights which vary from stateto state.
Toknowwhat your Iegai rights are in your state, consult your local or state consumer affairs office or your state’sAttorney General.
P/N56(?01180090
L —— .—
9-90 CG
If you have an installation problem,
contact your dealer or installer.
Youare responsible for providing
adequate electrical, gas,exhausting
and other connecting facilities.
warrantor: General Electric company
if furif?er help is needed concerning this warranty, write:
Manager—consumer Affairs, GE Appliances, Louisville, KY 4Q2~5
I
 Loading...