

Page 1
co
Anti-TipBracket
ApplianceRegistration
Careand Cleaning 15-19 VentDuct 10
ControlPanel 17 ProblemSolver
Features 6,7 RepairService
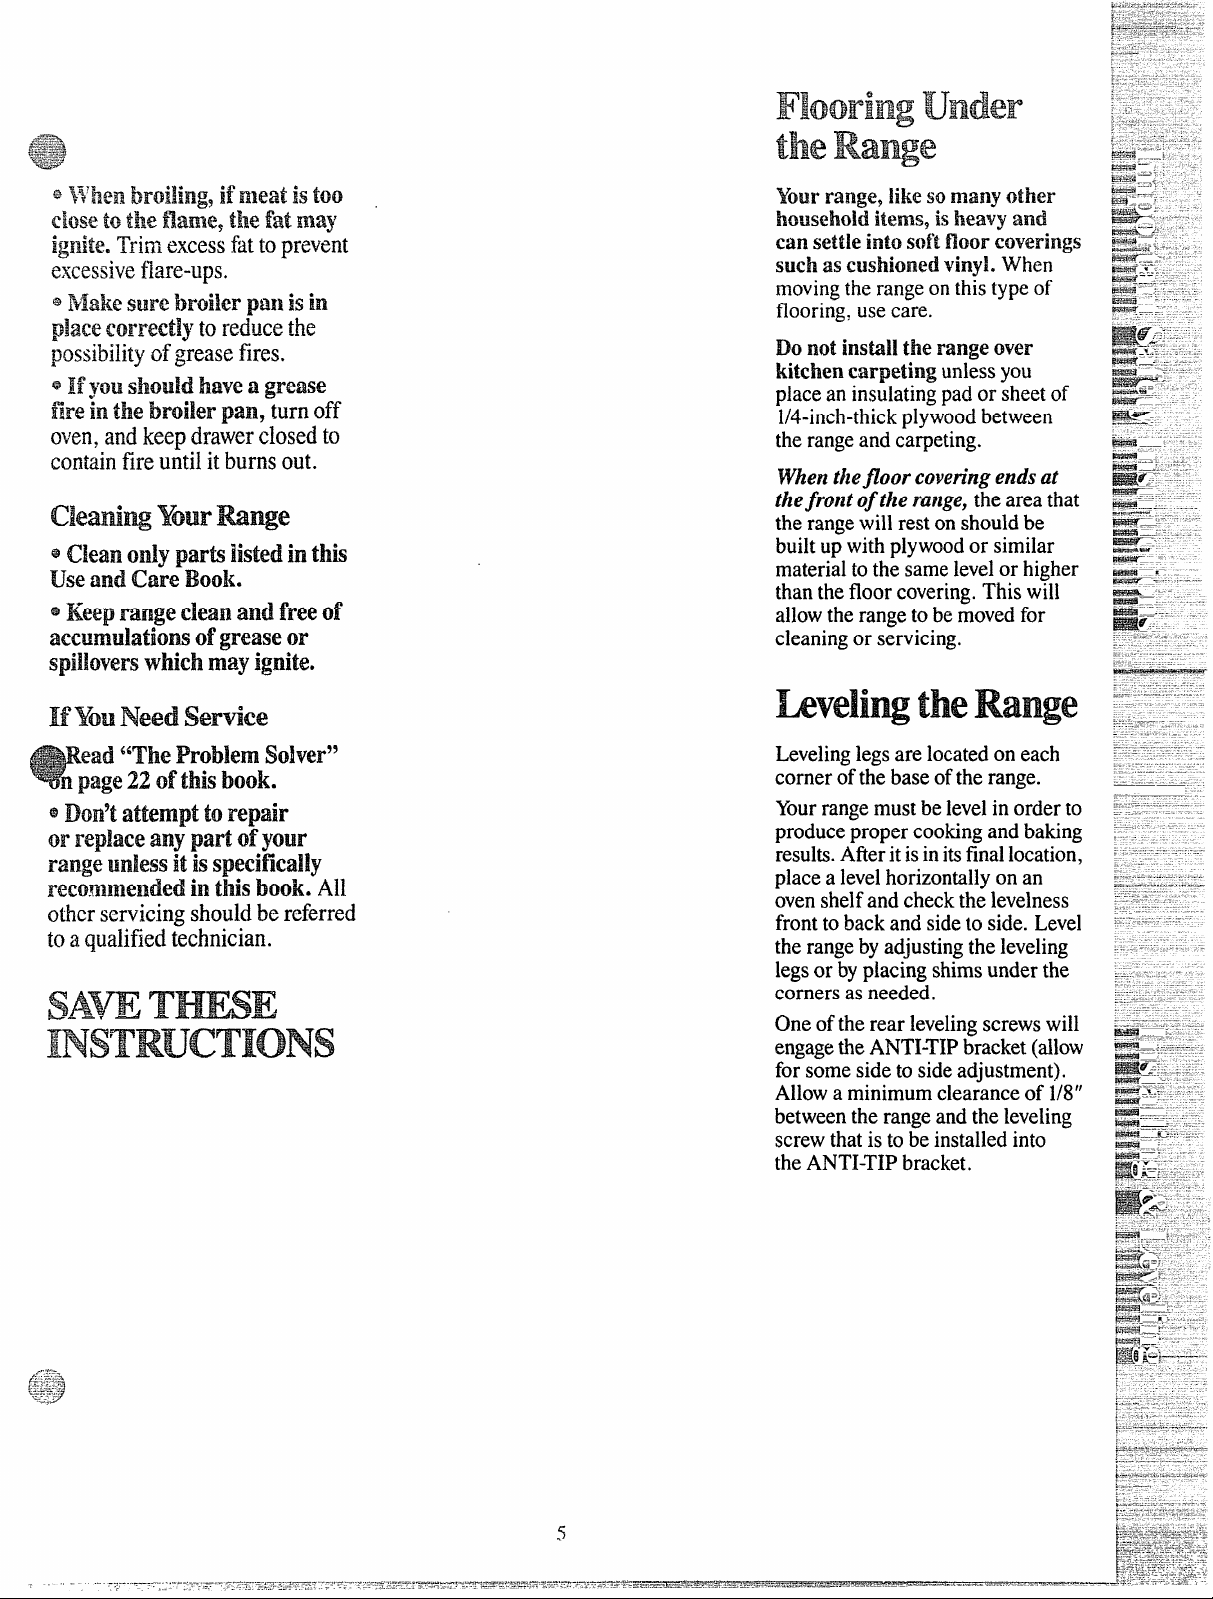
FlooringUnderRange
Leveling
Lift-UpCooktop 16 BurnerGrates 16
Modeland SerialNumbers
Oven 9,10 Clockand Timer 9
AirAdjustment
Baking,BakingGuide
BroilerPanand Rack 19 DripPans ‘
Broiling,BroilingGuide 14 FlameSize
ContinuousCleaningCare 15 LightingInstructions
ControlSettings
DoorRemoval 18
Light;BulbReplacement 10,18
LightingInstructions
OvenBottomRemoval 19
Preheating 11,12
Roasting,RoastingGuide 13
3,5 Shelves
2
5
5 SurfaceCooking 8,9
2
20
11,12 CookwareTips .9
10
9,10
ThermostatAdjustment 20
SafetyInstructions
Burners 17
ControlSettings
Warranty “
GEAmwtwCmtw@
&wa&?2&2#w
10,19
22
23
2-5
16
BackCover
8
8
8
,)
[Lr
;“.~.
Page 2
Ifyoudon’tunderstandsomething
or needmorehelp,write(include
yourphonenumber):
ConsumerAffairs
GEAppliances
AppliancePark
Louisville.KY40225
writedownthemodel
andserialInl.n-nbers.
You’llfindthemon a labellocated
inthe-burnerboxunderthe
cookmp.
Seepage6.
Thesenumbersarealsoonthe
ConsumerProductOwnership
RegistrationCardthatcamewith
yourrange.Beforesendinginthis
card,please writethesenumbers
here:
ModelNumber
Serial Number
Usethesenumbersin any
correspondenceor servicecaHs
concerningyourrange.
FOR YOUR sAFE”rY
If yousmellgas:
openwindows.
la
2sDon’t touch
electrical switches:
3. Extinguish any
open flame.
4.Immediatelycall
your gassupplier,
*Ck3n’~iwn
Cm43PCM’betxw$eSparksmay
ignite theC&m,
FOR YOUR SAETY
Do not store or use
gasoline or’ other
ehxtrksNRches
flammablevapomand
liquidsinthevicinity
ofthisor anyother
appliance,
TheCaliforniaSafe1.3rinking
WaterandToxicErtforcemeni
ActrequirestheGovernorof
(1.diforniatopublisha listof
substancesknowntothestate
tocausecancerand
businessesto warncustomers
OfpOtentialexpOsurctosuch
substances.
Gasappliancescan cause
minorexposuretOthreeofthese
substances,namelybenzene,
formaldehydeandsoot,caused
primarilybytheincomplete
combustionofnaturalgasorU
fuels.Properlyadjustedranges,
indicatedbyaMuishratherthan
ayellowflame,willminimize
incompletecombustion.Exposure
tothesesubstancescanbe
minimizedMther byventing
withanopenwindowor using
aventilationfanorhood.
i-equires
Hyollreceived
a damagedIrm-Rge. , ●
hnmediatelycontactthedealer(or
builder)thatsoldyoutherange.
savetimeandmoney.
Beforeym.1request
servicee . e
~~eck the problem ~o]veron
page22. Rlistscausesofminor
operatingproblemsthatyoucan
correctyourself.
~ Havetheinstallershowyou
theh!atim d’therangegas
clm=off
vim%?andimwtoshut
itoffif’m!cessary.
~Have yourrangeinstilled
andproperlygroundedbya
quaiifiedinsbller,inaccordance
withtheInstallationInstructions.
Anyadjustmentandserviceshould
beperformedonlybyqualified
gas rangeinstallersor service
technicians.
2
F#J&
-==
Page 3
~Besure4 packingmaterials
...
..
areremwxifmmtherange
beforeoperatingit,topreventfire
orsmokedamageshoddthe
packingmaterialignite.
@Locaterangeoutofkitchen
traffkpathandoutofdrafty
i!omfionstopreventpilotoutage
(mmodelssoequipped)and
or
aircireulahfi~
Besureyourrangeiscorrectly
adjustedbya qualifiedservice-
Which or ihstdk’ forthe
q-p d
gas(Naturalor u?) on
whichit isto beused.Your
rangecanbeconvertedforuse
cmeithertypeofgas.See
kMallationInstructions.
~AfterprolongedUSCd’ a
ralqy+ highfloortemperatures
mayresultandmanyfloor
W’eringsVW
notWitbwnd
thiskindofuse.Neverinstallthe
nmgeovervinyltileorlinoleum
thatcannotwithstandsuchtypeof
use.Neverinstallitdirectlyover
interiorkitchencarpeting.
-wn.g-YimrRange
eDm9tkm! childrenakmeor
unattended
orh?.G~2Fation.‘h3y Cdd be
seriouslyburned.
wherea range isM
@~~~~~~~: ~~~~f~ <}~
INTEWT To CRILDMN
SHOULDNOTBE
CABIWB ABOW i-$RANGE
‘m IONTHEBACKSPLASH
OFA MNGGCHILDREN
CLHVH3HNG
ONTHERANGE
mm~mT
TOREACHITHvISCOULDBE
SERKKJSLYINJURED.
w
~G–All ranges
cantipandinjurycould
resukTo
prevent
wxkkmd
tippingofthe
range,attach
ittothewall
orfloorby
installingthe
ANTI-TIPbracketsupplie{(on
modelssoequipped).Tocheckif
thebracketisinstalledandengaged
properly,carefullytiptherange
forwardtocheckiftheANTI-TIP
bracketisengagedwiththe
levelingleg.
Ifyoupulltherangeoutfrom
thewallforanyreason,make
suretherearlegisreturnedtoits
positioninthebracketwhenyou
pushtherangeback.
63~t lNUTMTgratuand other
surfacescoolbeforetouching
themm leavingthemwhere
Chihk!ncanreach‘them.
@Neverwearloosefittingor
hanginggarmen@whileusing
theappliance.Flammable
materialcouldbeignitedif
broughtincontactwithflame
orhotovensurfacesandmay
causesevereburns.
* Neverwe yourappliancefor
warmingorheatingthemm.
Prolongeduseoftherange
withoutadequateventilation
canbehazardous.
@h notuse waterongrease
fires.Neverpickupaflaming
pan.‘I’urnoffburner,then
smotherflamingpanbyccwcring
pancompletelywithwellfitting
lid,cookiesheetorflattray.
Naminggreaseoutsideapan
canbeputoutbycoveringwiih
bakingsodaor,ifavailable,a
multi-purposedrychemical
orfoamfire~xtinguisher.
@Donotstoreflammable
materialsinanmm ornear
thecooktop.
eDonot.M cookinggrease
orotherflammablematerials
accmmdateinorneartherange.
@Whencookingpork9follow
thedirectionsexactlyandalways
cookthemeattoaninternal
temperatureofatleast170”E
Thisassuresthat,intheremote
possibilitythattrichinamaybe
presentinthemeat,itwillbe
killedandmeatwillbesafetoeat.
SW4i!MX3Cooting
~MwaysusetheMIX position
whenignitingtopburnersand
makesuretheburnershaveignited.
@Neverleavesurfaceburners
unattendedatHIGHflame
settings.Boilovercauses
smokingandgreasyspillovers
thatmaycatchonfire.
*Adjusttopburnerflamesize
soitdoesnotextendbeyondthe
edgeofthecookingUBtensiL
Excessiveflameishazardous.
~lhe onlydry pothMers-
moistordamppotholdersonhot
surfacesmayresukinburnsfrom
steam.Donotletpotholders
comenearopenflameswhen
liftingutensils.Donotuseatowel
orotherbulkyclothinplaceofa
potholder.
3
Page 4
@~Q]~~nimizethe possibilityd’
hums, ignitionofflammable
materials,andspillage,turn
cookwarehand~estowardtheside
orbackoftherang-ewithout
extendingoveradjacentburners.
~Aiw’aysturn surface!burner to
OI?Fbeforeremovingutensil.
acarefully watchfoodsbeing
friedat HI flmllesetting.
ely~~~~~]~~~~~~~~~~(~~~
opetings)ofthe range.They
providetheairinletandoutlet
whichisnecessaryfortherange
tooperateproperlywithcorrect
combustion.
e~~ n~~~~ea w& ~~~~e
cookingsurfaceif the wokhas24
roundmetal!ringwhichispkmed
overtheburner grate tosupport
thewok.Thisringactsasaheat
tmpwhichmaydamagetheburner
grateandburnerhead.Also,it
maycausetheburnertowork
improperly.Thismaycausea
carbonmonoxidelevelabovethat
allowedbycurrentstandards,
resultinginaheakhhazard.
aFoodsforfryingshouldbeas
dryas possible.Frostonfrozen
foodsormoistureonfreshfoods
cancausehotfattobubbleupand
oversidesofpan.
~l.heleastpossib~eamountof
fatfor effectiveshaibv or deepfatfrying.Fillingthepantoofill
offatcancausespilloverswhen
foodisadded.
eH’acombinationofoilsor
fatswillbeusedin frying9stir
togetherbeforeheating,orasfats
meltslowly.
@Alwaysheatfat s10wly9and
watchasitheats.
@Usedeepfat thermometer
V4”heMNUWpossibletoprevent
overheatingfatbeyondthe
smokingpoint.
~Use~~operpansize—Avoid
pansthatareunstableoreasily
tipped.Selectutensilshavingilat
bottomslargeenoughtoproperly
containfoodavoidingboilovers
andspillovers,butlargeenough
tocoverburnergrate.ThisWN
bothsavecleaningandprevent
hazardousaccumulationsoffood,
sinceheavyspatteringorspillovers
leftonrangecanignite.Usepans
withhandlesthatcanbeeasily
graspedandremaincool.
~Useonlygbss cookwarethat
isrecommendedforuseongas
burners.
~Keep811plasticsawayfrom
topburners.
@Toavoidthepossibilityofa
burn,ahvaysbecertainthatthe
controlsforallburnersareat
OFFpositionandallgratesare
coolbeforeattemptingtoremove
thegrate.
aWhenflamingfoodsunder
thehood,turn thefanoff.The
fan,ifoperating,mayspread
theflame.
@Mrangeis10cMAIneara
window,donotuselongcurtains
whichcouldblowoverthetop
burnersandcreateafirehazard.
@Whena pilotgoesout9(on
modelssoequipped),youwill
detecta faintodorofgasasyour
signaltorelightpilot.When
relightingpilot,makesureburner
controlsareinOFFpositionand
followinstructionsdescribedon
followingpagestorelight.
~If yousmellgas9andyouhave
alreadymadesurepilotsarelit,
turnoffthegastotherangeand
callaqualifiedservicetechnician.
Neveruseanopenflametolocate
aleak.
&*$
BaKI~,
Broilingand
w
Roastifig
Donotuse oven forastorage
=
area.
@Stand
whenopeningthedoorofahot
oven.Thehotairorsteamlv}tich
escapescancauseburnsto
hands,facean4Yoreyes.
~Keepovenfreefromgrease
buildup.
@Placeovenshelvesindesired
positionwhileoveniscool.
@Pullingoutshelftotheshelf
stopisaconvenienceinlifting
heavyfoods.Misalsoa
precautionagainstburnsfrom
touchinghotsurfacesofthe
doororovenwalls.
~Don’theatunopenedfood
containersintheoven.Pressure
couklbuildupandthecontai
420uMburstcausinganinjury.
e~on9tusea~uminumfoil
anywhereintheovenexceptas
describedinthisbook.Misuse
couldresultinafirehazardor
damagetotherange.
*Whenusingcookingor
roastingbagsinoven9followthe
manufacturer’sdirection.
@Useonlyglasscookware
thatisrecommendedforuse
ingasovens.
@Alwaysremovebroi!erpan
frombroilercompartmentas
soonasyoufinishbroiling.
Greaseleftinthepancancatch
fireifovenisused.without
removingthegreasefromthe
broilerpan.
awtiyfromtherange
4
Page 5
Flooringunder
theRawe
* when!k2FoiIingyif’meatisWI
dose
tothe fkme~thefatmay
ignite.Trimexcessfattoprevent
excessiveflare-ups.
eRfskeSMlrebroilerplanisin
placecorrectlytoreducethe
possibilityofgreasefires.
@Hyous~louidhavea grease
fireinthe broilerpanyturnoff
oven,andkeepdrawerclosedto
con[ainfireuntilitburnsout.
cled~ Your m~e
@clean
useandCii’emodi.
e
Keeprange dean -andfrw
accumulationsof gm!aseor
Spillovers
IfYouNeed
~ Dm9tattempttorepair
m’H@Nemy jptu-td’your
rangelmkss it isspecifically
recommendedinthisbook.All
otherservicingshouldbereferred
toaqualifiedtechnician.
dy partslistedinthis
whichmay ignite.
service
WidVrheProbEem
page22 Of ’thisbook.
d
So$w%’”
!4.’burrange, likeso manyother
householditems,isheavyand
can settleintoSof’tfloor em’%?r’ings
suchas cushioned vinyl.When
movingtherangeonthis typeof
flooring,usecare.
notinstallthe range over
Do
kitchen
placeaninsulatingpador sheetof
l/4-inch-thickplywoodbetween
therangeandcarpeting.
W72eFIthej?oorcoveringendsd
thejront ofthe range, theareathat
therangewillrestonshouldbe
builtupwithplywoodor similar
materialtothesamelevelorhigher
thanthefloorcovering.Thiswill
allowtherangetobemovedfor
cleaningor servicing.
carpetingunlessyou
Wveliw theRange
Levelinglegsarelocatedoneach
cornerofthebaseoftherange.
Yourrangemustbelevelinorderto
producepropercookingandbaking
results.Afteritisinitsfinallocation,
placea levelhorizontallyonan
ovenshelfandcheckthelevelness
fronttobackandsidetoside.Level
therangebyadjustingtheleveling
legsor byplacingshimsunderthe
cornersasneeded.
Oneoftherear levelingscrewswill
engagetheANTI-TIPbracket(allow
forsomesideto sideadjustment).
Allowa minimumclearanceof 1/8”
betweentherangeandtheleveling
screwthatisto beinstalledinto
theANTI-TIP bracket.
5
Page 6
-
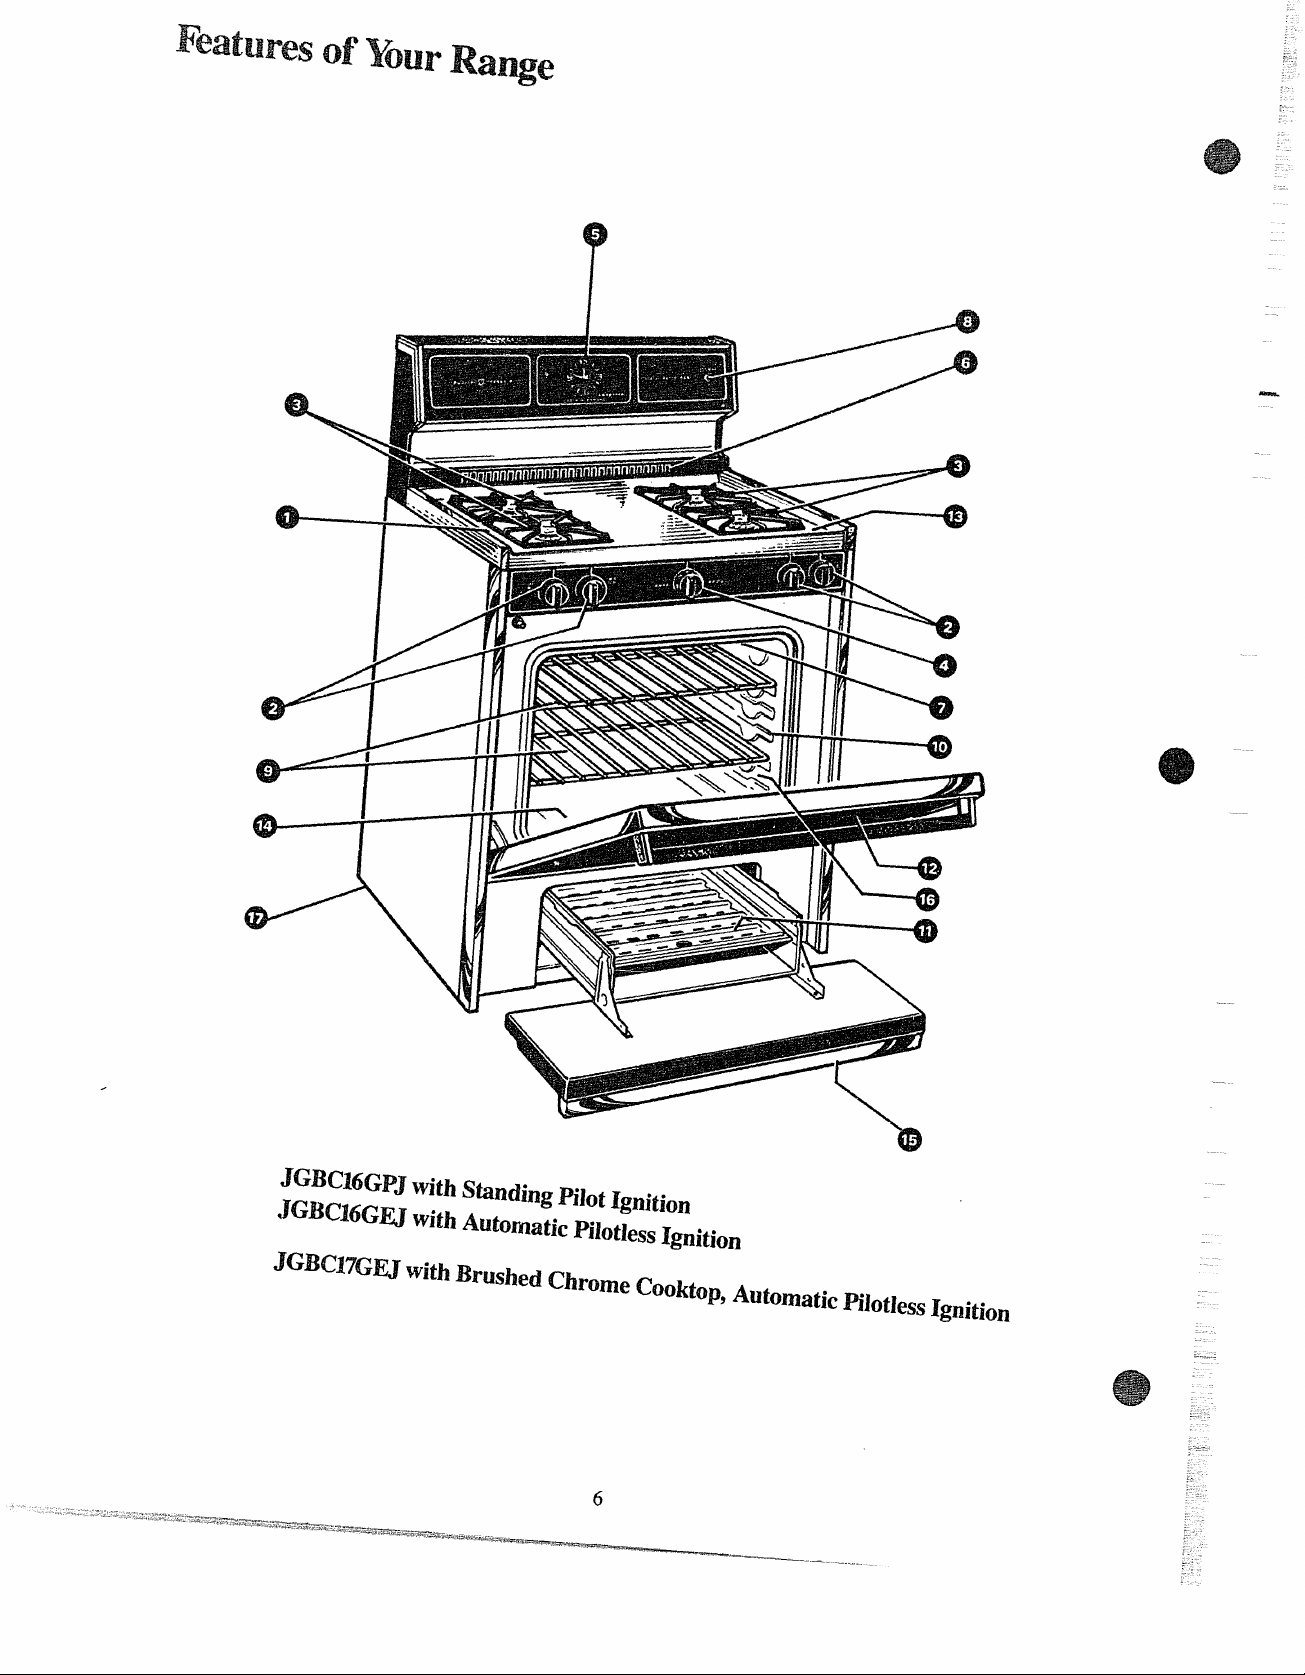
JGEKx6GPJwith StandingPiJotIgnition
XX!3C16GMwithAutomaticPilotlessIgnition
K%C17GNwithBrushedChromeCooktop,Automatic
Pilotless Ignition
Page 7
Explained
FeatureIndex on page
JGJ3CMGPJ
JGBC~~GW
JG~Cl~GEJ
ModelandSerialNumbers
1
2
(inburnerboxundercooktop)
2 SurfaceBurnerControls
8
3 SurfaceBurners,GratesandDripPans 8, 16,17
4 OvenTemperatureControl
5 ClockandTimer
6 OvenVent
10
9
10
7 OvenInteriorLight 10,18
8 OvenLightSwitch
10
(letsyouturninteriorovenlightonandoff)
9 OvenShelves
10,19
(easilyremovedorrepositionedonshelfsupports)
10 OvenShelfSupports
H BroilerPanandRack
10
19
@ @
4 4
4
e
4
e
* e
* e
* e
e e
2 2
e
e
e
e
-
i6iEF--
—.
—.
—
—
-
-
_-
~
12 RemovableOvenDoor
(easilyremovedforovencleaning)
13 Lift-UpCooktop
(locksinuppositiontosimplifycleaningunderneath)
14 RemovableOvenBottom
15 BroilerDrawer
16 Continuous-CleaningOvenInterior
[7 Anti-TipBracket
(seeInstallationInstructions)
)
18
16
19
19
15
3,5
e
@ e
e
e e
e e
e e
e
e
—.—
7
Page 8
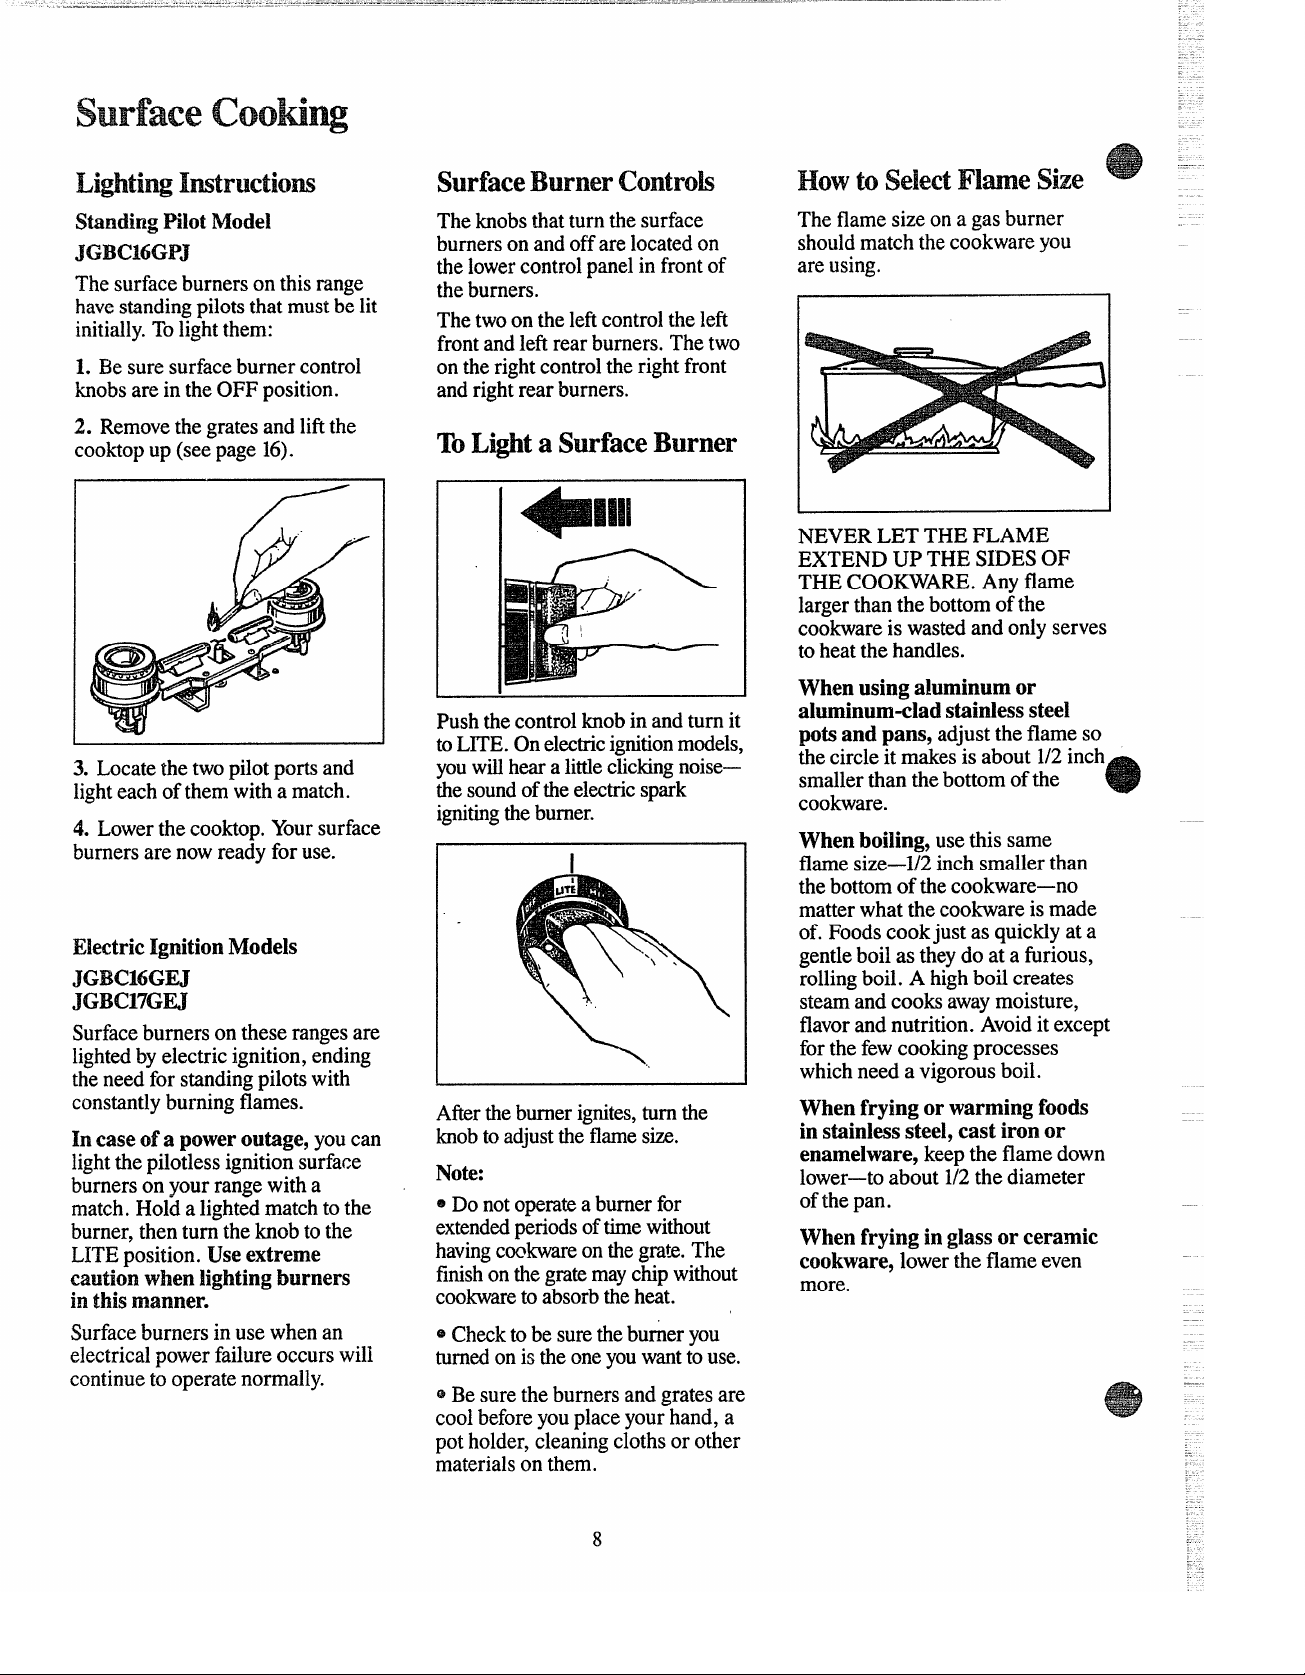
Lighti~Itiructiom
Wading PilotModel
JGK16GR?
Thesurfaceburnersonthisrange
havestandingpilotsthatmustbelit
initially.Tolightthem:
L Besuresurfaceburnercontrol
knobsareintheOFFposition.
surfaceBurnerControk
Theknobsthatturnthesurface
burnersonandoffarelocatedon
thelowercontrolpanelinfrontof
theburners.
Thetwoontheleftcontrolthe left
frontandleflrearburners.Thetwo
ontheright controltherightfront
andrightrear burners.
HowtoSelectFlme Size
Theflamesizeona gasburner
shouldmatchthecookwareyou
areusing.
2. Removethegratesandliflthe
cooktopup (seepage
3. Locatethetwopilotportsand
lighteachofthemwitha match.
4. Lowerthecooktop.Yoursurface
burnersarenowreadyforuse.
ElectricIgnitionModels
JG~C~6GEJ
JGK17GEI
Surfaceburnerson theserangesare
lightedbyelectricignition,ending
theneedforstandingpilotswith
constantlyburningflames.
In caseof a poweroutage,youcan
lightthepilotlessignitionsurface
burnersonyourrangewitha
match.Holdalightedmatchtothe
burner,thenturntheknob to the
LITEposition.Useextreme
eautiomwhen lightingburners
in thismanner.
Surfaceburnersinusewhenan
electricalpowerfailureoccurswill
continuetooperatenormally.
16).
Lighta$urfmeBurner
’10
Pushthecontrolknobinandturnit
toLITE.Onelectricignitionmodels,
youwillheara littleclickingnoise—
the soundoftheelectricspark
ignitingthe burner.
I
Aftertheburnerignites,turnthe
knobtoadjusttheflamesize.
Note:
@Donotoperateaburnerfor
extendedperiodsoftimewithout
havingcookwareonthegrate.The
finishonthegratemaychipwithout
cookwaretoabsorbtheheat.
~Checktobesurethebufier you
turnedonistheoneyouwanttouse.
@Besuretheburnersandgratesare
coolbeforeyouplaceyourhand,a
potholder,cleaningclothsor other
materialsonthem.
NEVERLET THEFLAME
EXTENDUPTHE SIDESOF
THECOOKM?ARE.Anyflame
largerthanthebottomofthe
cookwareis wastedandonlyserves
toheat thehandles.
When using a!uminumor
aluminum-cladstainlesssteel
potsand pans, adjust theflameso
thecircleit makesisabout1/2inch
smallerthanthebottomofthe
cookware.
When boiling,usethissame
flamesize—1/2inchsmallerthan
thebottomofthecookware—no
matterwhatthecookwareismade
of. Foodscookjustas quicklyata
gentleboilas theydo at a furious,
rollingboil.A highboilcreates
steamandcooksawaymoisture,
flavorandnutrition.Avoiditexcept
forthefewcookingprocesses
whichneeda vigorousboil.
When frying or warming foods
in stainlesssteel, cast iron or
enamelware, keepthe flamedown
lower—toabout 1/2thediameter
ofthepan.
When frying in glassor ceramic
cookware,lowerthe flameeven
more.
*
8
Page 9

usingYouroven
op-of-Rangecookware
Alurnirmm:Medium-weight
cookwareisrecommendedbecause
itheatsquicklyandevenly.Most
foodsbrownevenlyinanaluminum
skillet.Mineralsinfoodandwater
willstainbutwillnotharm
aluminum.Aquickscourwitha
soap-filledsteelwoolpadafter
eachusekeepsaluminumcookware
lookingshinynew.Usesaucepans
withtight-fittinglidsforcooking
withminimumamountsofwater.
Castkm: If heatedslowly,most
skilletswillgivesatisfactoryresults.
Enamelware:Undersome
conditions,theenamelofsome
cookwaremaymelt.Followcookwm
manufacturer’srecommendations
forcookingmethods.
Glass:Thereare twotypesofglass
cookware—thoseforovenuseonly
andthose fortop-of-rangecooking
saucepans,coffeeandteapots).
lassconductsheatveryslowly.
Heatproof Glass Ceramic:Can
beusedforeithersurfaceoroven
cooking.It conductsheatvery
slowlyandcoolsveryslowly.Check
cookwaremanufacturer’sdirections
tobesureitcanbeusedongasranges.
StainlessMeekThismetalalonehas
poorheatingproperties,andisusually
combinedwithcopper,aluminum
or other metalsforimprovedlieat
distribution.Combinationmetal
skilletsgenerallyworksatisfactorily
ifusedatmediumheatasthe
manufacturerrecommends.
TheClockandTimerarehelpful
devicesthatserveseveralpurposes.
The clock
TOsetthe C?ock,pushin the knob
andturntheclockhandstothe
righttothecorrecttime.Thenlet
theknoboutandcontinueturning
toOFF.
Timer
TheTimerhasbeencombinedwith
therangeclock. Useittotimeall
yourprecisecookingoperations.
You’llrecognizethe Timerasthe
pointerwhichisdifferentincolor
thantheclockhands.
Ontheinner graduateddial,
minutesaremarkedupto 30.
Hoursaremarkedupto4.
Toset the Timer,turntheknob to
theleft,withoutpushingin, until
thepointerreachesthe numberof
minutesyouwanttotime.
Atthe end ofthe settime, a
buzzersoundsto tellyoutimeis
up. Turntheknob,withoutpushing
in, untilthepointerreachesOFF
andthebuz;er stops.
LightingMtruetiom
StandingPilotModel
JGBCMGPJ
Thisrangehasa standingoven
pilotportthatmustbelitinitially.
Tolightit:
L BesureOVENTEMPknobisin
the OFFposition.
2. Removetheovenbottom(see
page 19)andtheovenbaffle.
3. Locatethepilotport ontheside
oftheburneratthebackofthe
broilercompartment.Usingalong
matchormatchholder,reachin
andlighttheovenpilot.
Note:Theovenmustbeat room
temperaturebeforeyoucanlight
theovenpilot.
4. Replacetheburnerbaffleand
ovenbottomandclosethe door.
Yourovenandbroilerarenow
readyforuse.
Poweroutage?
Anelectricalpowerfailurewillnot
affectalightedstandingovenpilot.
———
—
=-
Eaa&a”–
EaFg&.
~=
-
-
----EREw=
-.
-
-
-
~—
-
-
-=
-
_—
-
~
—.
-
9
Page 10

LightingImtruetioBE
ElectricIgnitionModels
K=$aazl
JGBC17GEJ
Theovenburner and broil
burner ontheserangesare lighted
byelectric ignition,‘I’heovenand
broiler cannot be operated in the
eventof a powerfailure.
ovenlkxnperattwecontrol
TheOVENTEMPcontrolis
locatedatthecenterofthecontrol
panelonthefrontoftherange.
Simplyturntheknobtothedesired
cookingtemperatures,whichare
markedin25°F.incrementsonthe
dial.It willnormallytake60
secondsbeforetheflamecomescm.
Aftertheovenreachestheselected
temperature,theovenburnercycles—
offcompletely,thenonwitha full
flame-to keepthe oventemperature
controlled.
CAUTION:DO NOTMAKEANY
ATTEMPTTOOPERATETHE
EIJXI’RIC IGNITIONOVEN
DURINGANELECTRICAL
POWERFAILURE.Resumption
ofelectricalpowerwhenOVEN
TEMPcontrolis inanyposition
otherthanOFF willresultin
automaticignitionoftheovenor
broilerburnerandcouldcause
severeburnsif, atthetime,you
wereattemptingtolighttheburner
witha match.
oven Light
Usetheswitchonthecontrolpanel
toturnthelight onandoff.
oven vent
Yourovenisventedthroughducts
attherearoftherange(seepage6).
Donotblocktheseductswhen
cookingintheoven—itisimportant
thattheflowofhotairfromthe oven
andfreshairtotheovenburnerbe
uninterrupted.Avoidtouchingthe
ventopeningsor nearbysurfaces
duringovenorbroileroperation—
theymaybecomehot.
~ Ventopeningsand nearby
surfaces maybecomehot. Donot
touch them.
@Handlesof potsand pans on the
cooktopmay becomehot ifleft
toocloseto the vent.
*Donot leaveplasticitemson
the cooktop—theymaymelt if
lefttoo close to the vent.
oven Moisture
Asyour ovenheatsup,the
temperaturechangeoftheair
intheovenmaycausewater
dropletstoformonthedoor
glass.Topreventthis,openthe
ovendoorforthe firstminute
ofovenheat-uptoletthemoist
air out.
oval
Theshelvesaredesignedwithstoplockssowhenplacedcorrectlyon
theshelfsupports,theywillstop
beforecomingcompletelyoutof
theovenandwill nottiltwhenyou
areremovingfoodfromthem or
placingfoodonthem.
Whenplacingcookwareona shelf,
pull theshelfouttothe “stop”
position.Placethecookwareon
theshelf,thenslidetheshelfback
intotheoven.Thiswilleliminate
reachingintothehotoven.
Toremovetheshelvesfromthe
oven,pullthemtowardyou,tilt
frontendupwardandpullthem out.
Toreplace,placeshelfonshelf
supportwithstop-locks(curved
extensionundershelf)facingup
andtowardrearofoven. Tdtup
frontandpushshelftowardbackof
ovenuntilitgoespast “stop”on
ovenwall.Thenlowerfrontofshelf
andpushit allthewayback.
shelves
SMfPositions
Theovenhasfiveshelfsupports—
A (bottom),B,C, D andE (top).
Shelfpositionsforcookingare
suggestedon BakingandRoasting
pages.
@
Page 11

Baking
OWtoSetYourRange
forBaking
1. I%sitiontheshelfor shelvesin
{heoven.
~. Close ovendoor. TurnOVEN
TEMPknobtodesiredtemperature.
Preheatovenforatleast 15minutes
ifprehe:itingisnecessary.
3. Placef(mdinovenoncenter
ofshelf.Allowatleast2 inches
betweenedgeofbakewareandoven
wailoradjacentcookware.
Ifcookingontwoshelvesatthe
sametime,place shelvesabout4
inchesapartandstaggerfoodon
them.
4. Checkfoodfordonenessat
minimumtimeonrecipe.Cook
longerifnecessary.Switchoff
heatandremovefood.
Preheating
reheatingisveryimportantwhen
usingtemperaturesbelow225°F.
andwhenbakingfoodssuchas
biscuits,cookies,cakesandother
pastries.
Preheatingisnotnecessarywhen
roastingorforlong-timecookingGf
wholemeals.
?!hMTtKitions
Mostbakingisdoneon thesecond
shelfposition(B)fromthebottom.
Whenbakingthreeor fouritems,
usetwoshelvespositionedonthe
secondandfourthsetsofsupports
(B& D)frombottomofoven.
Bakeangelfoodcakesonfirstshelf
position(A)frombottomofoven.
BaMngTips
~ Followatestedrecipeand
measuretheingredientscarefully.
Ifyouareusingapackagemix,
howlabeldi~ections.-
s If~lloistureisn[]tiecab~eon~he
f’ron!oftheovenorontheblackglass
doorwhenfirstturningontheoven,
leavetheovendoorajarforafew
minutesoruntiitheoveniswarm.
~Donotopentheovendoorduring
abakingoperation—heatwillbelost
andthebakingtimemightneedto
be extended.Thiscouldcausepoor
bakingresuks.Ifyoumustopenthe
door,openitpartially-only3or4
inches—andclose itasquicklyas
possible.
~Donotdisturbthe heatcirculation
intheovenwiththe useofaluminum
foil.Iffoilisused, placeasmall
sheetofit,about10by12inchesat
themost,onalowershelfseveral
inchesbelowthefood.Donot place
foilontheovenbottom.
CommonBakingProblems
andI?ossibkSolutions
Pm
Burningaround edges
@Oventoofill; avoidovercrowding.
@Edgesofcrusttoothin.
@Incorrectbakingtemperature.
Bottomcrust soggyandunbaked
. A11owcrustand/orfillingtocool
sufficientlybeforefillingpieshell.
oFillingmaybetoothinorjuicy.
~ Fillingallowedtostandinpieshell
beforebaking.(Fillpieshellsand
bakeimmediately.)
~Ingredientsandpropermeasuring
affectthequalityofthecrust.Usea
testedrecipeandgoodtechnique.
Makesuretherearenotinyholesor
tearsinabottomcrust.“Patching”
apiecrustcouldcausesoaking.
l% fillingruns over
Top andbottomcrustnotwell
@
sealedtogether.
~Edgesofpie crustnotbuiltup
highenough,
~Toomuchfilling.
@Checksizeofpieplate.
Pastry istough;crust notflaky
TOO muchhandling.
~
~Fattoosoftorcutintoo fine.
Rolldoughlightlyandhandleas
littleaspossible.
CAKES
CakerkesM@er
@Batterspreaduncverdyinpan.
~ ~veI~~h~~v~snot]e~el.
~Usingwarpedpans.
~Incorrectpansize.
Cakescrackingontop
@Oventemperaturetoohigh.
~Battertoothick,followrecipe
orexactpackagedirections.
@CheckforpropersheIfposition.
@Checkpansizecalledforinrecipe.
*Impropermixingofcake.
ononeside
Cakefalls
*
Toomuchshortening,sugaror
liquid.
~ Checkleaveningagent,baking
powderorbakingsodatoassure
freshness.Makeahabittonote
expirationdatesofpackaged
ingredients.
eCakenotbakedlongenoughor
atincorrecttemperature.
oIfaddingoiltoacakemix,make
certaintheoilisthetypeand
amountspecified.
Crust ishard
oChecktemperature.
oCheckshelfposition.
Cakehassoggylayerorstreaks
at bottom
@Underminingingredients.
eShorteningtoosoftforproper
creaming.
TOO muchliquid.
~
Coowm & Blscmm
Doughycenter;heavycrust on
surface
~ Checktemperature.
~Checkshelfposition.
*Followbakinginstructions
carefullyasgiveninreliablerecipe
oronconveniencefoodpackage.
~Flatcookiesheetswillgivemore
evenbakingresults.Don’tovercrowd
foodsonabakingsheet.
oConveniencefoodsusedbeyond
theirexpirationdate.
Browningmore noticeableon
oneside
@Ovendoornotclosedproperly,
checkgasketseal.
~ Checkshelfposition.
E3Ef!sr-.
=..
-
m
-–.
-.
---
11
Page 12

BakilBgGuide
1. Preheating is veryhnportant 2. Aluminumpansconduc[hcat 3. Darkornon-sllinyfi~~ishes,t~lso
whenusingtemperaturesbelow quickly.Formostconventionalbaking,
225”F.and
biscuits, cookies, cakes and becausetheyhelppreventover-
as
other
atleast 15
Preheatingis notnecessarywhen
roastingorforlong-timecookingof
wholemeaLs.
when baking foods such
light,shinyfinishesgivebestresults
pastries. Reheattheovenfor browninginthetimeittakesforheatto
minutes. cookthecenterareas.Werecommend
dull(satin-finish)bottomsurfacesof
pansforcakepansandpieplatestobe added.
surethoseareasbrowncompletely.
glassandPyrocmam@cookware.
gencwillyabsorbheatwhichmayresult
indry,crispcrusts.Rcduccovenheat
25*F.iflightercrustsaredesired.
Preheatcastironforbakingsome
foodsforrapidbrowningwhenfoodis
Food cookware Positions Temperatures Minutes Comments
Bread
Biscuits(Yz-imthick)
Coffeecake ShinyMetalI% with
Cornbreador muffins CastIronor GlassF% B 400°-4500 20-40 Preheatcastironpanforcrispcrust.
Gingerbread ShinyMetalPanwith
Muffins
Popovers DeepGlassorCastIronCups
Quickloafbread MetalorGlassLoafPans B 350°-375” 45-60 Darkmetalorglassgivesdeepest
Yeastbread(2loaves) Metalor GlassLoafPans A, B 375°-4250 45-60 browning,
Plainrolls ShinyOblongorMuffinPans
Sweetrolls ShinyOblongorMuffinPans B,A 350°-3750 20-30 Forthinrolls,ShelfB maybeused.
Cakes
[withoutshortening)
Angelfd
\ellyroll MetalJellyRollPan
SponSe MetalorCeramicPan
Cakes
Bundtcakes
:upeakcs
Fniitcakes MetalorGlassLoafor
-ayer ShinyMetalPanwith
.ayer,chocolate ShinyMetalPanwith
oaf
hokies
3rownies MetalorGlassPans
lrop
refrigerator
lolledorsliced
~ruits,
)therDesserts
lakedapples
hstard
‘uddings,rice
ndcustard
%
‘rozen
leringue Spreadtocrustedges
)necrust
‘Wocrust
astryshell Glassor Satin-finishMetalPan
fisce!laneous
akedpotatoes
callopeddishes
ouffles
6.
ShinyCookieSheet B.C
satin-finishbottom
satin-finishbottom
ShinyMetal MuffinPans A, B 400°-4250
AluminumTubePan
MetalorCeramicPan A, B 325°-3500 45-65
ShinyMetalMuffinPiins B 350°-3750
TubePan
satin-finishbottom
satin-finishbottom
MetalorGlassLoafPans
CookieSheet B,C
CookieSheet B,C
CookieSheet
Glassor MetalPans
GlassCustardCupsor
Casserole (setinpanof hotwater)
GlassCustardCupsor B
Casserole
FoilPanonCookieSheet
GlassorSatin-finishMstalPan
GlassorSatin-finishMetalPan B
SetonOvenShelf
GlassorMetalPan A, B,C
GlassPan
Shelf Oven
400°-4750 15-20
B,A
B
B
A, B 375°-4250
A 325°-3750 30-55 Twopiecepanisconvenient.
B 375°-4000 10-15 Linepanwithwaxedpaper.
A 325°-3500 45-60
A. B
B 350°-375”
B
B
B,C
B,C
A,B,C
B
A 400°-4250
B
A, B 400°-4250
B
A,B,C
B
350°-4000
350°
375”
275°-3000 2-4hrs.
350°-3750 25-30
350° 40-60
3~5”-350°
350°-4000 10-20
400°-4250
375°-4000 7-12
350°-4000 30-60
300°-3500
325°
325°-3500
400°-4250
450°
325°-4000
325°-3750
300°-3500
Ilme,
Canned,refrigeratedbiscuitstake2 to4
~o.3(-)
45-55
20-30
45-60
10-25 Forthinrolls,ShelfBmaybeused.
20-25 Paperlinersproducemoremoistcrusts.
20-35 Ifbakingfourlayersusc
25-35 Barcookiesfrommixuscsametime.
6-12
30-60 Reducetemperatureto300°Eforlarge
50-90
45-70
15-25 Toquicklybrownmeringueuse400”F.for
45-60 Custardfillingsrequirelowertemperature,
40-60
13-16
60-90
30-60
30-75
minuteslesstime.
Decrease about5 minutesformuffinmix.
Orbakeat450”F.for25 minutes,thenat
350”F.for 10to 15minutes.
Use300”F.andShelfBforsmallor
individualcakes.
shelvesBandD.
UseShelfCandincreasetemperature
25to50”F.formorebrowning.
custard.
Cookbreadorricepuddingwithcustard
base80 to90minutes.
Largepiesuse400”F.andincreasetime.
9to 11minutes.
longertime.
Increasetimeforlargeamountor size.
12
Page 13

Roasting
oastingiscookingbydry heat. Step2: Checkweightofroast.
Tendermeator poultrycanbe
roasteduncoveredinyour oven.
Placemeatfat-side-upor poultry cookslightlywhilestandingafter
breast-side-uponroastingrackina
Roastingtemperatures,which shallowpan.Themeltingfatwill
shouldbelowandsteady,keep
spatteringtoaminimum.When
bastethemeat.Selectapanas roastsis 10to20minutesto allow
closetothesize ofmeataspossible. roastto firmupandmakeiteasier
roasting,-itisnotnecessarytosear, (Broilerpanwithrackisagood
baste,cover,oraddwatertoyour panforthis.)
meat.Roastingiseasy,just follow
thesesteps:
Step L Positionovenshelfat
secondfrombottomposition(B)
Step3:l!hmOVENTEMPto
desiredtemperature.Checkthe
RoastingGuidefortemperatures
andapproximatecookingtimes.
forsmallsizeroast(3to5 Ibs.)and
atbottomposition
(A) forlarger
roasts.
/. .
Step4: Most meatscontinueto
beingremovedfromtheoven.
Standingtimerecommendedfor
tocarve.Internaltemperaturewill
riseabout5°to 10*F.;tocompensate
fortemperaturerise,ifdesired,
removeroastfromovenat5°to 10*F.
lessthantemperatureon guide.
IhozenRoasts
Frozenroastsofbeef,pork,
lamb,etc., canbe startedwithout
thawing,butallow15to25minutes
perpoundadditionaltime(15
minutesper poundforroastsunder
5 pounds,moretimeforlarger
roasts).
Thawmostfrozenpoultrybefore
roastingtoensureevendoneness.
Somecommercialfrozenpoultry
canbecookedsuccessfi.dlywithout
thawing.FO11OWdirectionsgiven
onpacker’slabel.
RoastingGlide
Oven ApproximateRoastingTime Internal
Type
Meat 3to5-lbs. 6to8-lbs.
Tendercuts;rib,highquality 325° Rare: 24-30 18-22
sirlointip,rumportopround* Medium: 29-33
Lamblegorbone-inshoulder* 325° Rare: 21-25
Vealshoulder,legor loin*
Porkloin,riborshoulder* 325°
Ham,pre-cooked 325° ToWarm:
Ham,raw
*Forbonelessrolledroastsover6-inches
thick,add5to 10minutesperlb.totimes
givenabove.
Poultry
Chickenor Duck 325° WellDone:
Chickenpieces 375° WellDone: 30-35
Turkey 325°
Temperature Doneness inMinutesperPbund
Well Done:
Medium: 25-30
Well Done:
325° WellDone: 35-45
WellDone:
325°
WellDone: 27-35
WellDone:
35-45
30-35
35-45
18-23minutesper lb.(anyweight)
Under10lbs.
3to’5-lbs.
35-40
10tolS-lbs.
16-22
22-25 150°-1600
28-33 170°-1850
20-23 130°-1400
24-28
28-33 170°-1850
30-40
30-40
10to15-lbs.
24-27
Over5 Ibs.
30-35 185°-1900
OverKIbs.
13-19
Temperature‘F
130°-1400
150°-160°
170°-180°
170°-180°
115°-1250
170°
185°-1900
Inthigh:
185°-1900
13
Page 14

Broiling
Broilingiscookingfoodbydirect
heatfromabovethefood.Your
mngehasa convenientcompartment
belowtheovenforbroiling.Italso
hasa speciallydesignedbroilerpan
andrackthatallowdrippingfatto
drainawayfromthefoodsandbe
keptawayfromthehighheatof
thegasflame.
Distancefromtheheatsourcemay
be changedbypositioningthebroiler
panandrackononeofthreeshelf
positionsinthebroilercompartment—
A @ottomofbroilercompartment),
B(middle)andC(top).
theovenandbroiler
Both
eornpartrnentdoorsshouldbe
closedduringbroiiing.
How to Broil
L
Ifmeathasfator gristlenearthe
edge,cutverticalslashesthrough
bothabout 2 inchesapart,butdon’t
cutintomeat.Werecommendthat
youtrimfatto preventexcessive
smoting,leavinga layerabout
V8-inchthick.
2. Removebroilerpanandrack
frombroilercompartmentand
placefoodonrack.
3. Pull outdrawerandposition
broilerpanincompartment.Placing
f~ closertoflameincreasesexterior
browningoffood, butalsoincreases
spatteringandthepossibilityoffats
andmeatjuicesigniting.
4. Closebroilerdoorand, formost
foods,turnOVENTEMPknobto
BROIL.Note:Chickenandham
arebroiledata lowersettingin
ordertocookfoodthroughwithout
over-browningit.
5. Turnmostfoodsonceduring
cooking;(theexceptionisthinfillets
offish;oiloneside,placethatside
downonbroilerrackandcookwithout
turninguntildone).Timefoodsfor
aboutone-halfthetotalcooking
time,turn food,thencontinueto
cooktopreferreddoneness.
BroilingTips
e use tongsto tmw meat oVer-
piercedmaatlosesjuices.
Broiling Guide
Quantity
Food Thickness
BeefSteaks
Rare
Medium
WellDone
Rare
Medium
WellDone
Chicken(450°)
BakeryProducts
Bread(Toast)or
ToasterPastries
EnglishMuffins 2-split
Lobstertails
(6to8-oz.each)
Fish
Hamslices(4509
Precooked
Porkchops
WellDone
Lambchops
Medium
WellDone
Medium
WellDone
Wieners, i l-lb. pkg.(10)
similarprecooked
sausages,
bratwurst
andlor
I
l-in.~hick
(1-l%lbs.)
1%-in.thick
(2-2%Ibs.)
1whole
(2t02%4bs.),
splitlengthwise
2-4slices
1pkg.(2)
2-4
l-lb.fillets%to
%-in.thick
l-in.thick
2(%in.)
2(l-in.thick),
about1lb.
2(1inch)
about10-12oz.
2(1%inch),
about1lb.
M Sid
Broil
l%sitionMimtt
T
+
‘llnm,
B
c 9-1o
A
A
A
A 10
A 15
A 25
A 30-35
c 2-3
c 3-4
B 13-16
c 5
3)4
9
~
13
I
I I
B
A 10
A 13
B
B
B
B
c
8
8
10
10
17
6
*Steaksand chonsshould bea?
least 1inchthick-forbestbroiling
results.l%wlbroilthinnerones.
3
Arrangeinsinglelayer.
I
!$paccevenly.Up[o8patlics
takeaboutsame time.7-8
7
S[eaksless thanl-in.cook
5-6
throughbeforebrowning.
Piinfryingisrecommended.
8-9
6-7
12-14
16-18
25-30 Reducetimesabout5to10min.
Donot
turn
ever.
4-5
10-12
4-7
4-6
12-14
1-2 Ifdesired,splitsausagesinhalf
Slashfat.
persideforcut-upchicken.
Brusheachsidewithmelted
butter.Broilwithskinsidedown
first andbroilwithdoorclosed.
1/+.1
Spaceevenly.PlaceEnglish
muffinscut~side-upan~brush –
withbutterifdesired.
Cutthroughbackofshell,spread
open.Brushwithmeltedbutter
beforeandafterhalftime.
Handleandturnverycarefully.
5
Brushwithlemonbutterbefore
andduringcookingifdesired.
Preheatbroilertoincrease
I
/ browninz
8 Increasetimes5-10min.perside
forll&in.thickorhomecured.
Slashfat,
I
Slashfat,
10
lengthwise;cutinto5to6-in.
pieces.
e
6. TbrnOVENTEMPknobto
OFE Removebroilerpanfrom
compartmentandservefood
immediately.Leavepanoutside
compartmenttocool.
14
Page 15

Careand Cleaning
kqxr care:mdcleaningare
iin@wtantsoyourrarygc-wi11give
~OLiefficientandsatisfactory
service.Followthesedircc{ions
carefullyincaringforittohelp
assuresafeandpropermaintenance.
BE SUREELECTRICPOWER
ISOFFBEFORECLEANING
ANYPARTOF YOURRANGE.
‘MeContinuot.is-CIeaningoven
cleansitselfwhilecooking.The
insideoftheoven—top,sides,back
andinsideofthedoor—isfinished
witha specialcoatingwhichcannot
becleanedin theusual manner
withsoap,detergents,steelwool
pads,commercialovencleaners,
coarseabrasivepadsor coarse
brushes.Useofsuchcleaners
and/oruseofovensprayswill
usepermanentdamage.
Thespecialcoatingisaporous
ceramicmaterial
colorandfeelsslightlyroughtothe
touch.If magnified,thesurface
wouldappearaspeaks,vallcys,and
sub-surface“tunnekl’Thisrough
finishtendstopreventgrease
spattersfromforminglittlebeads
or dropletswhichrundownthe
side wallsofahard-suri%ceoven
linerleavingunsightlystreaksthat
requirehandcleaning.Instead,
whenspatterhitstheporousfinish,
itisdispersedandispartially
absorbed.Thisspreadingaction
increasestheexposureofoven
soil to heatedair,andmakesit
somewhatlessnoticeable.
whichisdark in
Soilmaynotdisappearcompletely
andat sometimeafterextended
usage,stainsmayappearwhich
cannotberemoved.
Thespecialcoatingworksbeston
smallamountsofspatter.
notworkweliwithlargerspills,
especiallysugars,eggordairy
mixtures.
Itdoes
Thespecia~coatingisnotused
onovenshelves.
cleanedoutsidethe
damagetothespecialcoating
insidethe oven.
Shelvesshouldbe
oventoavoid
lb fckmtheContinuom”
ckmirg
L Letrangepartscoo]before
handling.Werecommendrubber
glovesbewornwhencleaning.
2. Removeshelvesandcookware.
3. Soilvisibilitymaybereducedby
operatingtheovenat400°F.Close
the doorandturnOVENTEMP
knobto400°F.Timeforatleast4
hours.Repeatedcyclesmaybe
necessarybeforeimprovementin
appearanceisapparent.
REMEMBER:DWNG THE
OPERATIONOFTHEOVEN,THE
DOOR,WINDOWAND(YI’HER
RANGESURFACESWILLGETHOT
ENOUGH‘IQCAUSEBURNS.~0 N(YI’
TQUCH.LETTHERANGECOOL
BEFOREREPLACINGOVENSHELVES.
4. If a spilloverorheavysoiling
occursontheporoussurfhce,as
soonastheovenhascooled,remove
asmuchofthesoil aspossibleusing
asmallamountofwateranda stiff
bristlenylonbrush.Usewater
sparinglyandchangeitfrequently,
keepingitascleanaspossible,and
besuretoblotit upwithpaper
towels,cloths,or sponges.Donot
ruborscrubwithpapertowels,
clothsor sponges,-sincetheywill
leaveunsightlylintontheoven
finish.If waterleavesawhitering
ontheftish as itdries, applywater
againandblotit witha clean
sponge,startingatthe edgeofthe
ringandworkingtowardthe center.
Donotusesoap,detergent,steel
woolpads,commercialovencleaner,
siliconeovensprays,coarsepads
orcoarsebrushesontheporous
surface.
clog,andmar theporoussurface
andreduceitsabilitytowork.
notscrapetheporoussurface
Do
withaknifeorspatula—they
couldpermanently
Theovenbottomhasaporcelain
enamelfinish.
forcleaningawayfromthe
continuous-cleaningoven.
oven:
Theseproductswillspot,
damageit.
It canberemoved
Page 16

Lift-upCmktop
BurnerGrates
Drip Pam
Cleantheareaunderthecooktop
often.Built-upsoil,especially
~rease,maycatchfire.
*
Tomakecleaningeasier,theentire
cooktopmaybelifteduparid
supportedbylockingarmsthat
catchandholdthetopwhenit’sall
the wayup.
Besure W burnersareturnedoff
beforeraisingthecooktop.Then
removethegratesanddrip pans,
graspthefrontsidesofthecooktop
andlift.
Aftercleaningunderthecooktop
withhot, mildsoapywateranda
cleancloth,putthecooktopbackin
place.Liftup alittle to releasethe
lockingarmsandpushthemin
whileguidingthetopbackdown.
Becarefidnot topinchyourfingers.
Gratesshouldbew~shedregularly
and,ofcourse, afterspillovcrs.
Washtheminhot, soapywaterand
rinsewithcleanwater.Drythe
grateswitha cloth—don’tputthem
backontherangewet.
Togetridofburned-onfood,soak
thegratesina slightlydiluted
liquidcleanser.
Althoughthey’redurable,the
grateswillgraduallylosetheir
shine,regardlessofthebestcare
youcangive them.Thisis dueto
theircontinualexposureto high
temperatures.
Donotoperatea burnerforan
extendedperiodoftime without
cookwareonthegrate.Thefinish
cmthegratemaychipwithout
cookwaretoabsorbtheheat.
Whenreplacing
pairofgrates,
theirregular
sidesshould
interlockin
themiddleas
shownatright.
12fsJ
Removethegratesandliftoutthe
chromedrippans.Washthemin
hot,soapywater.Rinsethemwith
clean,hotwaterandpolishthem
dry withacloth.Neveruse
abrasivecleaneror steelwool—
they’llscratchthesurface.Instead,
soakthedrippansforabout20
minutesin slightlydilutedliquid
cleanseror mildsolutionof
ammoniaandwater(1/2cupof
ammoniatoonegallonofwater).
Afiersoaking,washtheminhot,
soapywater.Rinsewithcleanwater
andpolishwithaclean,softcloth.
Whenreplacing
drippans,the
notchontherear
panandthenotch
onthefront pan
shouldmeetin
themiddle. +
Page 17

q tingeTopBurners
Theholes in the burners must be
kept
cleanat alltimesforproper
ignitionandaneven,unhampered
flame.
Cleanthe burnersroutinelyand
especiallyafterbadspillovers
whichcouldclogtheseholes.
Burnersliftoutforcleaning.
Note:No screwsholdeachburner
pairinplacetokeepthemfrom
wobblingaroundduringshipment.
moveanddiscardtheshipping
rewsandlifttheburnersupand
out.Thisdisengagesthemfromthe
mountingbracketundereach
burnerpair.
Toremoveburned-onfood,soak
theburnerina solutionofa product
usedforcleaningtheinsideofcoffi
makers.Soaktheburnerfor20to
30minutes.Ifthefooddoesn’t
rinseoffcompletely,scrubit with
soapandwateror amildabrasive
cleanseranda dampcloth.
Doriotattempttocleanburnersin
anautomaticdishwasher.Loosened
foodsoiIcanclogburnerholes,
andthecausticactionofthe
dishwasherdetergentcandamage
the burnerheads.
Beforeputtingthe burnerback,dry
itthoroughlybysettingit ina warm
ovenfor30minutes.Thenplace it
backintherange, makingsureitis
properlyseatedonthemounting
bracketandis level.
CkmtrdI+md$
It’sagood ideatowipethecontrol
panelscleanaftereachuseofthe
oven.Fora morethoroughcleaning,
thecontrolknobscanbepulledofftheknobstemsand,onmodelsso
equipped,the glassuppercontrol
panelcanbecleanedonbothsides.
Toremovetheglasspanel:
1. Removethescrewoneachendof
thebacksplash.
2. Removethemetalstripsoneach
endthatholdthe glassinplace.
3. Removethe clockknobandnut
securingthelightswitch.
4. Carefidlyremovetheglassand
placeitona smooth,flatsur%ce.
Cleanitwithmildsoapandwater,
rinsewithcleanwateranddrywith
asoftcloth.Caution:Donot use
abrasivecleansem,strongIiquid
cleanersorovencleanemonglassor
enamelcontrolpanelsurfaces-they
willdamagethefinish.
Oukrbel mh
Whentherangeiscool,washthe
enamelfinishwithmildsoapand
waterora mildabrmivecleanser
appliedwithadampcloth.Rinse
withcleanwateranddry witha soft
cloth.Ifyouwish,occasionally
applya thincoatofmildcleaning
waxtohelpprotectthefinish.
Toavoidmarringthesurfhceof
the rangeandtopreventitIlom
becomingdull,don’tslideheavy
pansacrossit.If youspillfds with
alotofacidorhighsugarcontent,
cleanthemupassoonaspossible.If
allowedtoremain,thesefti could
causeadullspot.Also,neveruse
harshabrasivecleansers.Theycould
permanentlydamagethe enamel
surface.
~—
—.
—.
—
~
—.
—.
—
-
-
—–
~.—
Page 18

BrushedChmneFinish
—
ModelJGB3CXKHLJ
Cleanthebrushedchrometop
withwarm,soapywateroranallpurposehouseholdcleanerand
immediatelydry itwithaclean,soil
cloth.Takecaretodry thesurface
followingthe “grain.”Tohelp
preventfingermarksaftercleaning,
spreada thinfilmofbabyoilonthe
surface.Wipeawayexcessoilwitha
clean,soilcloth.A goodappliance
waxwillhelpprotectthisfinish.
oven Light Bulb
Replacement
The light bulb is located in the
upper left corner of the oven.
Beforereplacing the bulb,
disconnect electric power tothe
rangeat the main fuse or circuit
breaker panel or pull the range
powercord plug from the electrical
outlet. I&t the bulb cool completely
beforeremoving it. Do not touch a
hotbulb with a damp cloth as the
bulb wiUbreak.
Replace with a high temperature
appliance bulb
ofthesamewattage.
RemovableOwn Door
The ovendoorisremovableto
maketheinteriormoreaccessible.
Opentheovendoorfullyand
removethetwoPhillipsscrewsthat
hokithedoorto thehinges.Then
closethedoortotheautomaticstop
position(atabout3inchesopen),
andliftthedoorstraightupandoff
thehinges.(Duetothelargeamount
ofinsulationandthe construction
ofthedoor,itisheavy.)
‘h replacethe o~endoor, make
surethehingesareinthe “out”
position.Positiontheslotsinthe
bottomof thedoorsquarely
ovc~
thehinges.Thenlowerthedoor
slowlyandevenlyoverbothhinges
atthesametime.Ifhingessnap
backagainstthe oven frame,pull
thembackout. Whenthedooris
inposition,openit fullyandinsert
thetwoPhil!ipsscrews.
Note:Careshouldbetakennotto
placehandsbetweenthespring
hingeandtheovendoorframeas
the hingecouldsnapbackand
pinchfingers.
18
Page 19

q
emokableovenBottwn
ovenshdves
Mu can i-cmovetheporcelain
enamel ovenbottom for cleaning
outsidethe cwen.
To
remove the oven Mtorn:
Removetheovenshelves.
1,
Removethe two knurled hold-
2.
downscrewsattherearoftheoven.
Iftheyare tootight to removeby
hand,usea coinorscrewdriver.
I
—
—
//11
3. Tolift out theovenbottom,
placeyourfingersintheslots inthe
bottomand lifttherearoftheoven
bottomupandbackuntil theoven
bottomisclearofthelipatthefront.
Thenliftthebottomupandou~.
Ovenshelvesmaybe cleaned with
a mild abrasive cleanser following
manufacturer’sdirections. After
cleaning, rinse the shelveswith
clean water and dry with a clean
cloth. To removeheavy,burned-on
soil, soapy metal pads maybe
used
followingmanufacturer’sdirections.
Afterscrubbing,washwithsoapy
water,rinseanddry.
BroilerI%& Rack
Afterbroiling,removethebroiler
rackandcarefullypouroffthe
grease.Washandrinsethepan
andrackinhot, soapywater.
Iffoodhasburnedon,sprinklethe
broilerrackwhilehotwithdetergent
andcoverwithwetpapertowelsor
adishcloth.Burned-onfoodswill
thensoakloose whilethemealis
beingserved.
Thebroilerpanandrackare
designedtoallowdrippingfatto
drainandbekeptawayfromthe
highheatof thebroiler.Do not
covertherackwithaluminumfoil
or usethepanwithoutthe rack
becausethe exposedfat may
catchfire.
Donotstore a soiledbroilerpan
andrackin thebroilercompartment
or oven.
E3m%K.
——
-.–
—
=
—.
—.
-
-
~
~—
——
~
—.
—.
-
-
-
-.
-
_–
lb replace the ovenbottom,place
itintheovenwiththebackraised
about6to 8 inchesor untilyoucan
insertthefrontoftheovenbottom
underthehold-downlipat the front.
Thenpushthe backoftheoven
bottomdownfilly intoplace onthe
metalflangesandinserttheholddownscrews.
DO NOT placea sheetofaluminum
foil
onthebottom of the oven. If
youdo,yourfoodsmaynotcook
perly.Theovenfinishmaybe
aged.Andtheremaybean
increaseh heatontheoutside
wrfacesoftheoven.
Page 20

ovenThernlosbt
Adjwtment
The temperature control inyour
newovenhas beencarefullyadjusted
to provideaccurate temperatures.
However,if this oven has replaced
oneyou
youmay
degree of browningor the length of
time required when usingyour
favoriterecipes. Oven temperature
controls havea tendency to “drifi”
overa period of years and since
thisdrift is very gradual, it is not
readily noticed. Therefore, you
may havebecome accustomed to
yourprevious oven which may
haveprovideda higher or lower
temperature than you selected.
Beforeattemptingto havethe
temperature of your new oven
changed, be sure you havefollowed
the baking time and temperature of
the recipe carefully.Then, after
youhave
andyoufeeltheovenistoohot
ortoocool,thereisa simple
adjustmentyoucanmakeyourself
ontheOVENTEMPknob.
Pulltheknobofftheshaftandlook
at the backside. Thereisa discin
thecenteroftheknobskirtwitha
seriesof marksoppositeapointer.
haveusedforseveralyears,
noticea difference in the
usedtheovena fewtimes
thedirectionofarrowforLOWER.
Eachmarkwillchangetheoven
temperatureapproximately20°E
Wesuggestthatyoumakethe
adjustmentonemarkfromthe
originalsettingandcheckoven
performancebeforemakingany
additionaladjustments.
Aftertheadjustmentismade,
pressskirtandknobtogetherand
retightenscrewssotheyaresnug,
butbecarefulnottoovertighten.
Re-installknob onrangeand
checkperformance.
Note:Afteranadjustmenthas
beenmadetotheOVENTEMP
knob,OFFandBROILwillnot
line up withtheindicatormarkon
thecontrolpanelastheypreviously
did.Thisconditionisnormaland
willnotcreatea problem.
OV~~
DoorIHeight
Adjustment
Repeatedopeningsandclosings
cancausetheovendoortowork
itselfoutofadjustment.Oneside
mayclosehigherthantheother,
andthedoor maynotsealproperly.
Toadjusttheheightofthedoor:
1. Removethedoor(seepage18).
OvenBurner
The air adjustmentshutter for the
ovenburner regulatesthe flow of
air to the flame.
Theshutterfortheovenburneris
nearthebackwalloftheoven
behindthebroilerdrawer.
Toreachtheshutter,remove
theovenbottom(page19)andthe
burnerbaffle.
Toadjusttheflowofairtothe
burner,loosenthePhillipshead
screwandrotatetheshut~erto
allowmoreor lessair intothe
burnertubeasneeded.
Loosenonlythe
lockingscrews
~Notepositionof
pointertomarks
beforeadjustment
Noteto which mark the pointer is
pointing. Tomake an adjustment,
carefully loosen (approximately
one turn), but do not completely
removethetwoscrewsthat holdthe
skirtto theknob.Holdtheknob
bladein onehandandtheouter
skirtin theotherhand.
Toraisetheoventemperature,
movethepointerinthedirectionof
thearrowforRAISE.Tolowerthe
temperature,movethepoiuterin
2. Withathin-bladedscrewdriver,
turnthescrewintheopeningat
thetopofeachdoorhinge.Turn
clockwisetolower,counterclockwise
toraiseeachside ofthedoor.
3. Replacethedoor,closeit, and
checkalignmentanddoorseal.
20
Todetermineiftheburnerflame
isproper,lighttheburner.The
flameshouldhave1/2”to 3/4”blue
coneswithnoyellowtipping.When
thebaffleis backinplace,the
flamewillresettle.
m
Page 21

i~>te:Letrange/ovenpartscm! beforetouchingorhandling.
Wi#v
—
PART
NfKI’ERIAW3TO USE
GENERALIMRECTIONS
Broilerl%mandRack QSoapandWater
~ Soap-FilledScouringPad
o plasticScouring~dd
ControlKnobs e MildSoapand lk%ter
OutsideGlass Finish
Metal$including
SideTrims, Trim
Stripsand Brushed
ChromeCooktop
OuterEnamel
Finish*
@Soapand Water
e SoapandWater
e I%perTowel
* DryCloth
~SoapandWater
intedSurfaces
Shelves
~ SoapandWater
* SoapandWater
@Soap-FilledScouringPad
o PlasticScouringPad
Drain fat,coolpanand rackslightly,(Donot let soiled pan and rack stand in
broiler compartment
tocool.)Sprinkledetergentonrackandpan.Fillpan with
warmwaterandspreadclothorpapertoweloverrack.Letpanandrackstand
for a fewminutes.Wash;scourifnecessary.Rinseanddry.OKNON:Chxmpan
and rackindishwasher.
Pulloffknobs.Washgentlybutdonotsoak.Dry andreturncontrolstorange.
Cleanoutsideofcooledblackglassdoorwitha glasscleanerthatdoesnot
containammonia.Washotherglasswithclothdampenedinsoapywater.Rinse
and polishwithadrycloth.Ifknobsareremoved,donotallowwatertorun
downinsidesurfaceofglasswhilecleaning.
Wash,rinseandthenpolishwithadrycloth.DO NOTUSEsteelwool,
abrasives,ammonia,acids,orcommercialovencleanerswhichmaydamage
thefinish.
Avoidcleaningpowdersorharshabrasiveswhichmayscratchtheenamel.
Ifacidsshouldspillontherangewhileitishot,usea drypapertowelorcloth
towipeuprightaway.Whenthesurfacehascooled,washandrinse.
Forotherspills,suchas fatsmatterings,etc.,washwithsoapandwaterwhen
cooledandthenrinse.Polishwithadrycloth.
Useamildsolutionofsoapandwater.Donotuseanyharshabrasivesor
cleaningpowderswhichmayscratchor marsurface.
Shelvescanbesoakedindishwasherorcleanedbyhandusingsoapandwater.
Rinsethoroughlytoremoveanysoapaftercleaning.
SurfaceBurner
Grates
Chrome-Plated
DripPans
SurfaceBurners
e SoapandWater
e Soap-FilledScouringPad
(Non-metallic)
e SoapandWater
~ Stiff-BristledBrush
e Soap-FilledScouringPad
(Non-metallic)
~SolutionforCleaning
InsideofCoffeeMakers
e SoapandWater
e MildAbrasiveCleanser
oDampCloth
Liftoutwhencool.Soak5to 10minutesifdesiredinwarmsolutionof
dishwasherdetergent.Scourwithmaterialsmentionedheretoremoveburnedonfoodparticles.
Cleanat sinkor indishwasher.Wipedrippansaflereachcookingsounnoticed
spatterwillnot“bumon”nexttimeyoucook.Toremove“burned-on”spatters,
useanyorallcleaningmaterialsmentioned.Rublightlywithscouringpadto
preventscratchingofthesurface.
Wipeoffburnerheads.Ifheavyspilloveroccurs,removeburnersfromrange
(seepage17)andsoak themfor 20to30minutesinsolutionofhotwaterand
productforcleaninginsideof coffeemakers,suchas Dip-Itbrand.Ifsoildoes
notrinseoffcompletely,scrubburnerswithsoapandwateroramildabrasive
cleanseranda dampcloth.Dryburnersina warmovenfor30 minutesbefore
returningthemtothe range.
RemovablePorcelain
EnamelOven Bottom*
e SoapandWater
o CommercialOvenCleaner
e Soap-FilledScouringPad
~ PlasticScouringPad
*Spillageof marinades, fruit juices,andbastingmaterialscontainingacidsmaycausediscoloration,soshouldbeblottedupimmediately.Take
Removeovenbottompanelfromovenbeforecleaning.Whencool,wipewith
mildsoapandwater,especiallyaflercookingmeat.For heavysoil,usenonabrasivecleanerandfollowlabelinstructions,usingthinlayerofcleaner.Wipe
orrublightlyonstubbornspots.Useofrubberglovesis recommended.
c~ren~ttotouchhotportio~ofoven.Whens~rfaceiscool,cleanandrinse.CAUTION:Lightbulbscangetwarmenoughtobreakiftouched
‘i[hmoist cloth. When cleaning, avoidwarm lamp.
21
Page 22

PROBLEM
POSSIBLECAUSENVD/ORWHAT’‘N) DO
TOPBURNERS
DONOTLIGHT betweenfrontandrearburners.Onmodelswithelectricignition,makesureekxtrical
OVENDOESN(YI’
COOKPROPERLY position,nottouc~g oven-sidesandnotcoatedwithanything.
CLOCKDOES
Nm WORK fuseortrippedcircuitbreaker..
OVENLIGHTDOES
N~ COMEON
@Pilotsarenotlit. Removeor liftcooktopandholdli@tedmatchnexttopilotopening
plugispluggedintoa livepoweroutlet.
@Burnerholes‘cmsideofburner ~maybeclogged.Removeandcleanthem.
@1%.wne~Maynotbefittedcorrectlyontothemountingbrackets.Removeandreinstall
themproperly.
~ Makes~e the~osat &@lary bulb(locatedinupperportionofoven)isincorrect
QAluminumfoil&ing usedimpro~erlyin”oven.
Q Qvenvent’blockedontopofrahge.
e Incomct ~o~~~
reco&nendations.
*Ovenbottomnotsecurelyseati inposition.
*OVENTEMP
o
Checkcotion baking,roas&g andbiding problemsonpages11-14.
R~ge elwtric~plugmustbe‘Se~”~relySeatedinalivePosver outlet. Checkforblown
e
@Bulb maybelooseorburnedout.
- Electricalplugmustbepluggediito alive ‘poweroutlet.-
,.
beingused,ch~~ eachcookingsectionforcookwaretipsor
,)
,>
knob sit in&rrectly or notturned’on.
,, !.
STRONGODOR @Improperair/gasratioinoven.Adjustovenburnerair shutter.
you need more help..call, toUfree:
If
GEAnswerCenter@
800.626.2000
eons~merinformationservice
22
e
Page 23

If YouNeedservice
Toobtainservice,seeyourwarranty
onthebackpageofthis book.
We’reproudofourserviceand
wantyoutobepleased.If forsome
reasonyouarenothappywiththe
serviceyoureceive,herearethree
stepstofollowforfurther help.
FIRST,contactthepeoplewho
servicedyourappliance.Explain
whyyouarenotpleased.In most
cases,thiswillsolvetheproblem.
NEXT,ifyouarestillnot pleased,
writeallthedetails-including
yourphonenumber—to:
Manager, Consumer Relations
GE Appliances
AppliancePark
Louisville,Kentucky40225
FINALLY,ifyour problemisstill
not resolved,write:
MajorAppliance
ConsumerActionPanel
20NorthWackerDrive ~
Chicago,Illinois60606
—.
Imi=
=“
—v.
Irsffg-= __
!i3=si
Page 24

YOURGENERALELEmRlc RANGE
WARRANTY
Saveproof of original purchase date such as your sales slip or cancelled check to establish warranty period.
WHAT1sCOVERED
WHAT
IsNOTCOVERED “Servicetrips‘0your‘ome‘0
FULL (XW-YEN? WARRANTY
Forone yearfrom date of original
purchase,we will provide,free of
charge, parts and service labor
in your home to repairor replace
anypart of the rangethat fails
becauseof a manufacturing defect.
teach you howto usethe product.
ReadyourUseand Carematerial.
If youthen haveany questions
about operating the product,
please contact your dealer or our
Consumer Affairs office atthe
address below,or call, toll free:
GE Answer CenteF
800.626.2000
consumer information service
e Improper installation.
This warranty is extendedto
the original purchaser and any
succeeding owner for products
purchasedfor ordinary home use
in the 48 mainland states, Hawaii
and Washington, D.C.h Alaskathe
warranty is the same exceptthat it is
LIMITED because you must pay to
ship the product to the service shop
or for the service technician’s travel
coststo your home.
All warranty service will be provided
byour FactoryService Centersor
byour authorized CustomerCare”
servicersduring normal working
hours.
Look in the White or YellowPages
of your telephone directoryfor
GENERAL ELECTRICCOMPANY,
GENERAL ELECTRICFACTORY
SERVICE, GENERAL ELECTRIC-
HOTPOINTFACTORYSERVICEor
GENERAL ELECTRICCUSTOMER
CARE@SERVICE.
o
Replacement of housefuses or
resetting of circuit breakers.
~ Failure of the product if it is used
for other than its intended purpose
or used commercially.
~ Damage to product caused
byaccident, fire, floods or acts
of God.
WARRANTORISNOTRESPONSIBLE
FORCONSEQUENTIAL DAMAGES.
Ifyou havean installation problem,
contact your dealer or installer.
Youare responsible for providing
adequateelectrical, gas,exhausting
and other connecting facilities.
Some statesdo not allow the exclusion or limitation of incidental or consequential damages, so the above limitation or exclusion
may not apply to you. This warranty gives you specific legal rights, and you may also have other rights which vary from state to state.
Toknow what your legal rights are in your state, consult your local or state consumer affairs office or your state’sAttorney General.
Warrantor:General Electric Company
If further help is needed concerning this warmty, write:
Manager—Consumer Affairs, GE Appliances, Louisville, KY 40225
 Loading...