

Page 1

Contents
Gmtliwge
Appliance Registration
Care and Cleaning 15-19 Vent Duct
Control Panel
Features
Flooring Under Range 5 Safety Instructions 3-5
Leveling
Lift-Up Cooktop
Model and Serial Numbers
- Oven
Air Adjustment
Baking, Baking Guide 11, 12 Cookware Tips
Broiler Pan and Rack 19
Broiling, Broiling Guide 14 Flame Size
Continuous Cleaning Care 15 Lighting Instructions
Control Settings 10
Door Removal 18
Light; Bulb Replacement 10, 18
Lighting Instructions 9, 10
Oven Bottom Removal 19
Preheating 12
Roasting, Roasting Guide 13
Shelves 10, 19
2
17 Problem Solver
6,7
5 Surface Cooking
16
2
9, 10
20
Thermostat Adjustment 20
Repair Service 23
Burner Grates
Burners 17
Clock and Timer
Control Settings
Drip Pans
Warranty
Back Cover
GEAnswer Cknt#
8W.&2E2UW
10
22
8,9
16
9
8
9
16
8
8
c’
Standing Pilot
Electric Ignition
Model Modeis
JGJ3C16GPJ JGBC16GEJ
JGBC17GEJ
GEA/@kiwces
Page 2
Help us
help
YOU. . .
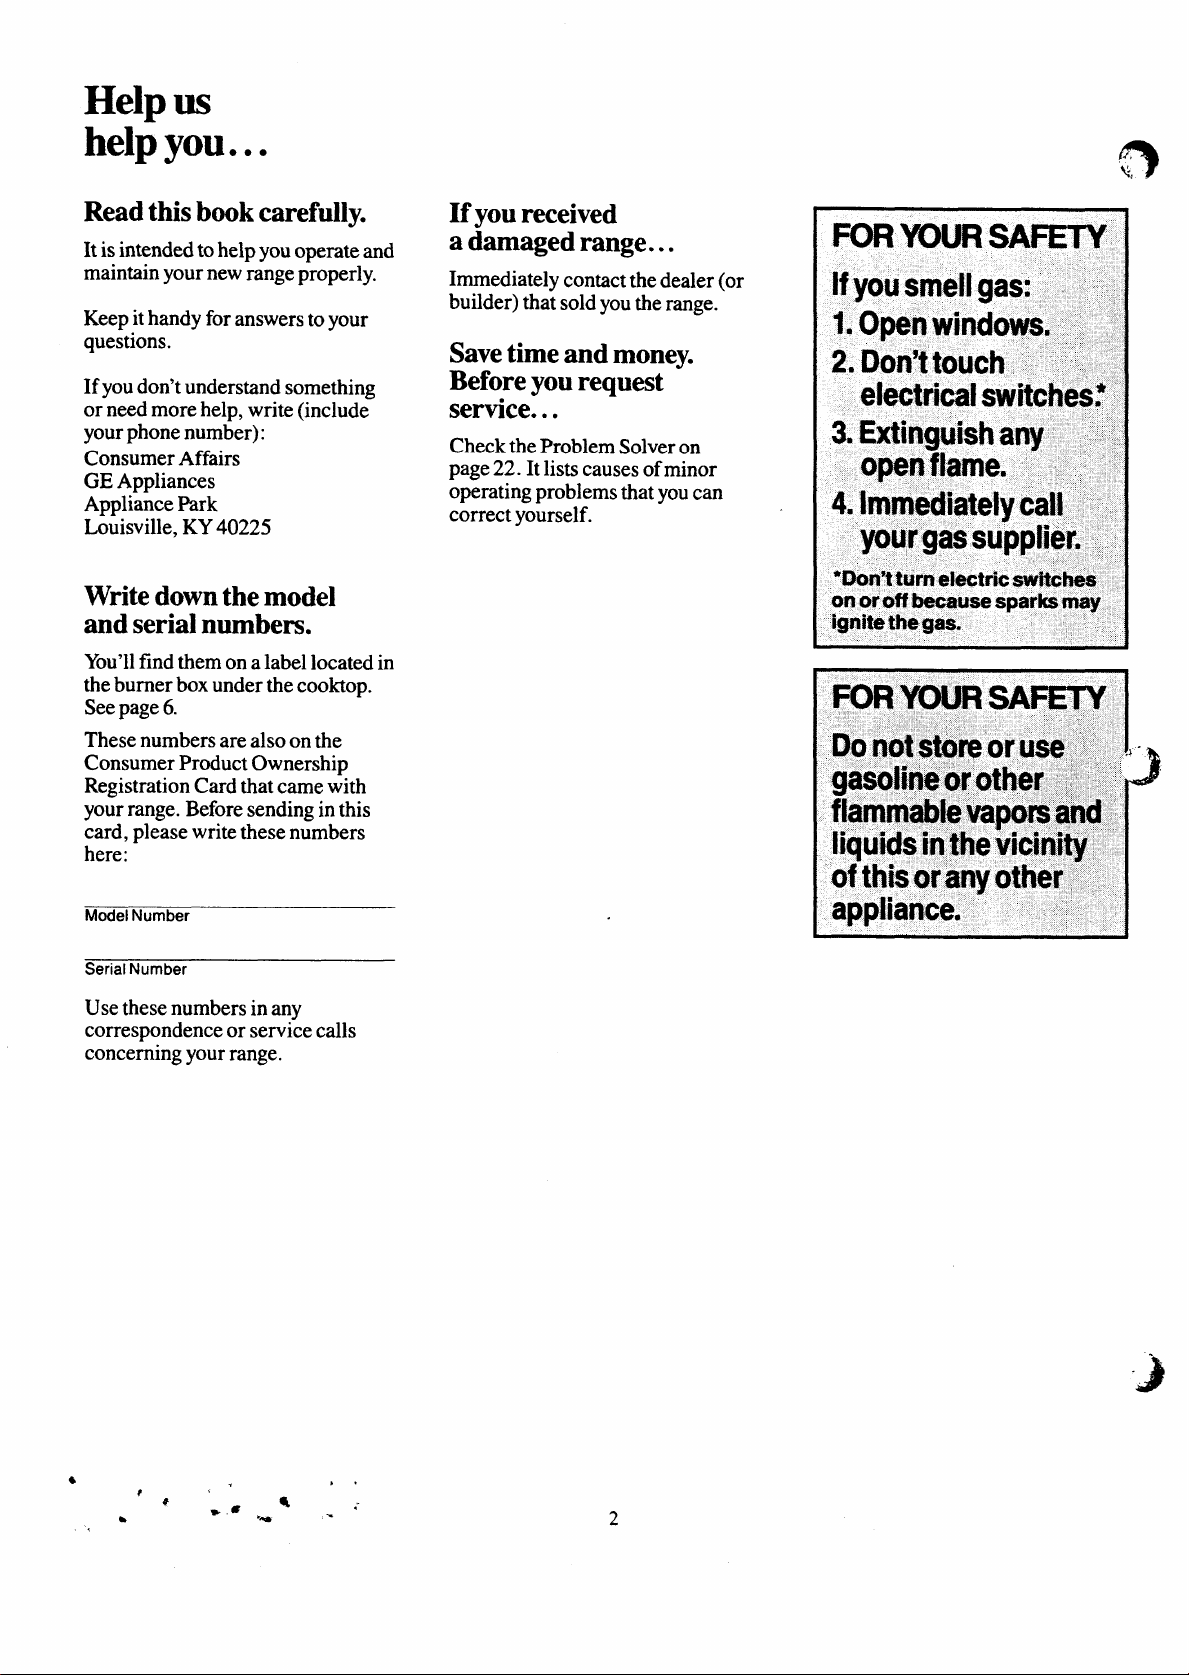
Read this book carefully.
It is intended to help you operate and
maintain your new range properly.
Keep it handy for answers to your
questions.
If you don’t understand something
or need more help, write (include
your phone number):
Consumer Affairs
GE Appliances
Appliance Park
Louisville, KY 40225
Write down the model
and serial numbers.
You’ll find them on a label located in
the burner box under the cooktop.
See page 6.
These numbers are also on the
Consumer Product Ownership
Registration Card that came with
your range. Before sending in this
card, please write these numbers
here:
If you received
a damaged range ...
Immediately contact the dealer (or
builder) that sold you the range.
Save time and money.
Before you request
service...
Check the Problem Solver on
page 22. It lists causes of minor
operating problems that you can
correct yourself.
Model Number
Serial Number
Use these numbers in any
correspondence or service calls
concerning your range.
.
-J
Page 3

IMPORTANT SAFETY INSTRUCTIONS
Read ail instructions before
When YouGet YourRange
● Havethe installer show you
the location of tlw range gas
cut-off valve and how to shut
it off if necessary.
● Have your range installed
and properly grounded by a
qualified installer, in
with the Installation instructions.
Any adjustment and service should
be perform only by qualified
gas range installers or Serviee
technicians.
● Plug your range into a 120-volt
grounded outlet only. Do not
remove the round grounding prong
from the plug.
If in doubt about
thegroundingofthehomeelectrical
system, it is yourpersonal
responsibility and obligationto
haveanungroundedoutletreplaced
with aproperly-grounded three-
prong outlet in accordance with
the National Electrical code. I)o
not use
this appliance.
● Be sure all packing materials
an extension cord with
are removed from the range
beforeoperating it, to preventfire
or smoke damage shouldthe
packing material ignite.
● Locate range out of kitchen
traffk path and out of drafty
locations to prevent pilot outage
(on models so equipped} and
poor air circulation.
● Be sure your range iscorrectly
adjusted by a qualified service
technician or installer for the
type ofgas (Natural or LP)on
which it is to be used. Your
range can be convertedforuse
on either type of gas. See
Installation Instructions.
accordance
using this appliance.
● After prolonged use of a
range, high floor temperatures
may result and many floor
coverings will not withstand
this kind of use. Never installthe
range over vinyltile or linoleum
that cannot withstand such type of
use. Never install it directly over
interior kitchen carpeting.
W@
● Don’tleave children alone or
unattended where a range ishot
or in operation. They could be
serious]y burned.
● Don’taliow anyone to climb,
stand or hang onthe door,
broiler compartment or range
top. Theycould damagethe range
and eventip itovercausing severe
personal injury.
*~A_(JT~~N:~TE~S QF
IhTTERESTTll CHILDREN
SHOULDNOTBE WIRED IN
CABINETS ABOVEA RANGE
OR ONTHE BACKSPLASH
OF ARANGE–CHILDREN
CLIMBING ON THE RANGE
T() REACHITEMS COULD BE
SERIOUSLYINHJRED.
* Let burner grates and other
surfaces cod before touching
them or leaving them where
children can reach them.
● Never wear loose fitting or
hanging garments while using
the appliance. Flammable
material couldbe ignited if
brought in contact with flame
or hot oven surfacesand may
cause severeburns.
● Never use your appliance for
warming or heating the room.
Prolonged use ofthe range
without adequateventilation
can be hazardous.
Your Range
o Do not use water on grease
fires. Never pick up a flaming i
pan. Turn off burner, then
smother flaming pan bycovering
pan completely with well fitting
lid, cookie sheet or flat tray.
Flaming grease outside a pan
can be put out by coveringwith
baking soda or, if available,a
multqmrpose dry chemical
or foam fire extinguisher.
* Do not store flammable
materials in an oven or near
the cooktop.
● Do not let cooking grease
or other flammable materials
accumulate in or near the range.
e When cooking pork, follow
the directions exactlyand always
cook the meat to an internal
temperature ofat least 170”F.
This assures that, in the remote
possibility that trichina maybe
present in the meat, it will be
killed and meat will be safeto eat.
Surface Cooking
● AJM~~jTSuse the IJTE position
when igniting top burners and
makesurethe burners haveignited.
e Never leave surface burners
unattended at HIGH flame
settings. Boilover causes
smoking and greasy spikwers
that maycatch on fire.
* Adjust top burner flame size
so it does not extend beyond the
edge of the cooking utensil.
Excessive flame is hazardous.
* Use only dry pot hoklers—
moist or damp pot holders on hot
surfaces mayresult in burns from steam. Do not let potholders
come near open flames when
lifting utensils. Do not use a towel
or other bulky cloth inplace of a “”
pot holder.
Page 4
.
JMPORT~T SAFETY INSTRUCTIONS (continued)
● Tominimize the possibility of
burns, ignition offlammable
materials, and spillage, turn
cookwarehandles towardthe side
or back ofthe range without
extendingoveradjacent burners.
● Alwaysturn surface burner to
OFF before removing utensil.
● Carefuliy watch foods being
fried at HI flame setting.
● Never block the vents (air
openings) of the range. They
provide the air inlet and outlet
which is necessary forthe range
to operateproperly w~ithcorrect
combustion.
. Do not we a wok on the
cooking surface if the wok has a
round metal ring which isplaced
over the burner grate to support
the wok. This ring acts as aheat
trap whichmaydamagethe burner
grate andburner head. Also, it
maycause the burner to work
improperly. This maycause a
carbon monoxide level abovethat
allowedbycurrent standards,
resulting in ahealth hazard.
● Foods for frying shouki be as
dry as possible. Frost on frozen
foodsor moisture on fresh foods
can causehot fat tobubb~eup and
oversides ofpan.
*Use least possible amount of
fat for effective shallow or deepfat frying. Filling the pan too full
offat cm cause spilloverswhen
foodis added.
oIf a combination of’oils or
fats willbe used in frying, stir
~ogetherbefore heating, or as fats
melt slowly.
● Alwaysheat fat slowly, and
watchas it heats.
*Use deep fat thermometer
whenever possible to prevent
overheatingfa[beyondthe
smokingpoint.
● Use proper pan size-Avoid
pans that are unstable or easily
tipped. Select utensils having flat
bottoms large enough toproperly
contain food avoidingboilovers
and spillovers, but large enough
to coverburner grate. This wfll
both savecleaning andprevent
hazardous accumulations of food,
sinceheavyspatteringor spillovers
left on range can ignite. Usepans
with handles that canbe easily
grasped and remain cool.
● Use only glass cookware that
is recommended for use ongas
burners.
● Keep all plastics awayfrom
top burners.
● Toavoid the possibility ofa
burn, always be certain that the
controls for all burners are at
OFF position and all grates are
coolbefore attempting toremove
the grate.
● When flaming foods under
the hood, turn the fan off. The
fan, if operating, may spread
the flame.
● If range is ~ocatednear a
window, do not uselong curtains
which could blowover the top
burners and create afire hazard.
● When a pilot goes out, (on
models so equipped), you will
detect a faint odor of gas as your
signal to relight pilot. When
relighting pilot, make
s~ie burner
controls are in OFF position and
followinstructions described on
followingpagesto relight.
● If you smell gas, and you have
already made surepilo[s are lit,
turn offthe gas to the range and
call aqualified servicetechnician.
Never use an open flame to locate
a leak.
Baking, Broiling and ‘....
9
Wasting
● Do not use oven for a storage
area.
* Stand away from the range
when opening the door of a hot
oven. The hot air or steam which
escapes can cause bums to
hands, face andlor eyes.
● Keep oven free from grease
buildup.
s Place oven shelves in desired
position while oven is COOL
● Pulling out shelf to the shelf
stop is a convenience in lifting
heavy foods. It is also a
precaution against burns from
touching hot surfaces of the
door or oven walls.
● Don’t heat unopened food
containers in the oven. Pressure
could build up and the container,<.
could burst causing an injury. ‘~
● Don’t use aluminum foil
anywhere in the oven except as
described in this book. Misuse
could result in a fire hazard or
damage tothe range.
@When using cooking or
roasting bags in oven, followthe
manufacturer’s direction.
* Use only glass cookware
that is re&mmended for use
in gas ovens.
* Aiv7aysremove broiler pan
from broiler compartment as
soon as you finish broiling.
Grease left inthe pan can catch
fire if ovenis used without
removing the grease from the
broiler pan.
. .
‘#J
.;-
‘
Page 5
.-
Flooring Under
-y
-c Whenbroiling, if meat is too
close tothe flame, the fat may
ignite. Trim excessfat to prevent
I
excessiveflare-ups.
*Make sure broilerpan is in
placecorrectly @reduce the
possibility of grease fires.
● Myou should have a grease
fwe in the broiler pan, turnoff
oven, andkeep drawerclosed to
contain fire until it burns out.
Cleaning YourRange
● Cleanonly pm-tslistedin this
Use and Care Book.
* Keep range ciean and free of
accumulations of grease or
spiliovers which mayignite.
the Range
Yourrange, like so many other
household items, is heavy and
can settle into soft floor coverings
such as cushioned vinyl. When
movingthe rangeonthistypeof
flooring,usecare.
Do not install the range over
kitchen carpeting unless you
place an insulating pad or sheet of
l/4-inch-thick plywood between
the range and carpeting.
When the floor cowing ends&
the front of the range, the
the range will rest on should be
built up with plywood or similar
material to the same level or higher
than the floor covering. This will
allow the range to be moved for
cleaning or servicing.
areathat
If YouNeed Service
~.%
● R-d “The fiob~em ~lver~~
}on page 22of this book.
● Don$t attempttorepair
or replaceany partof your
rangeunless itis specifidly
recommended inthis book. All
other servicing should be referred
to a qualified technician.
SAW THESE
INSTRUCTIONS
Leveling the Range
Your range must be level in order to
produce proper cooking and baking
results. After it is in its final location,
place a level horizontally on an
oven shelf and check the levelness
front to back and side to side. Level
the range by adjusting the leveling
legs or by placing shims under the
comers as needed.
,.
..
.3
Page 6
Features of YourRange
. .
---
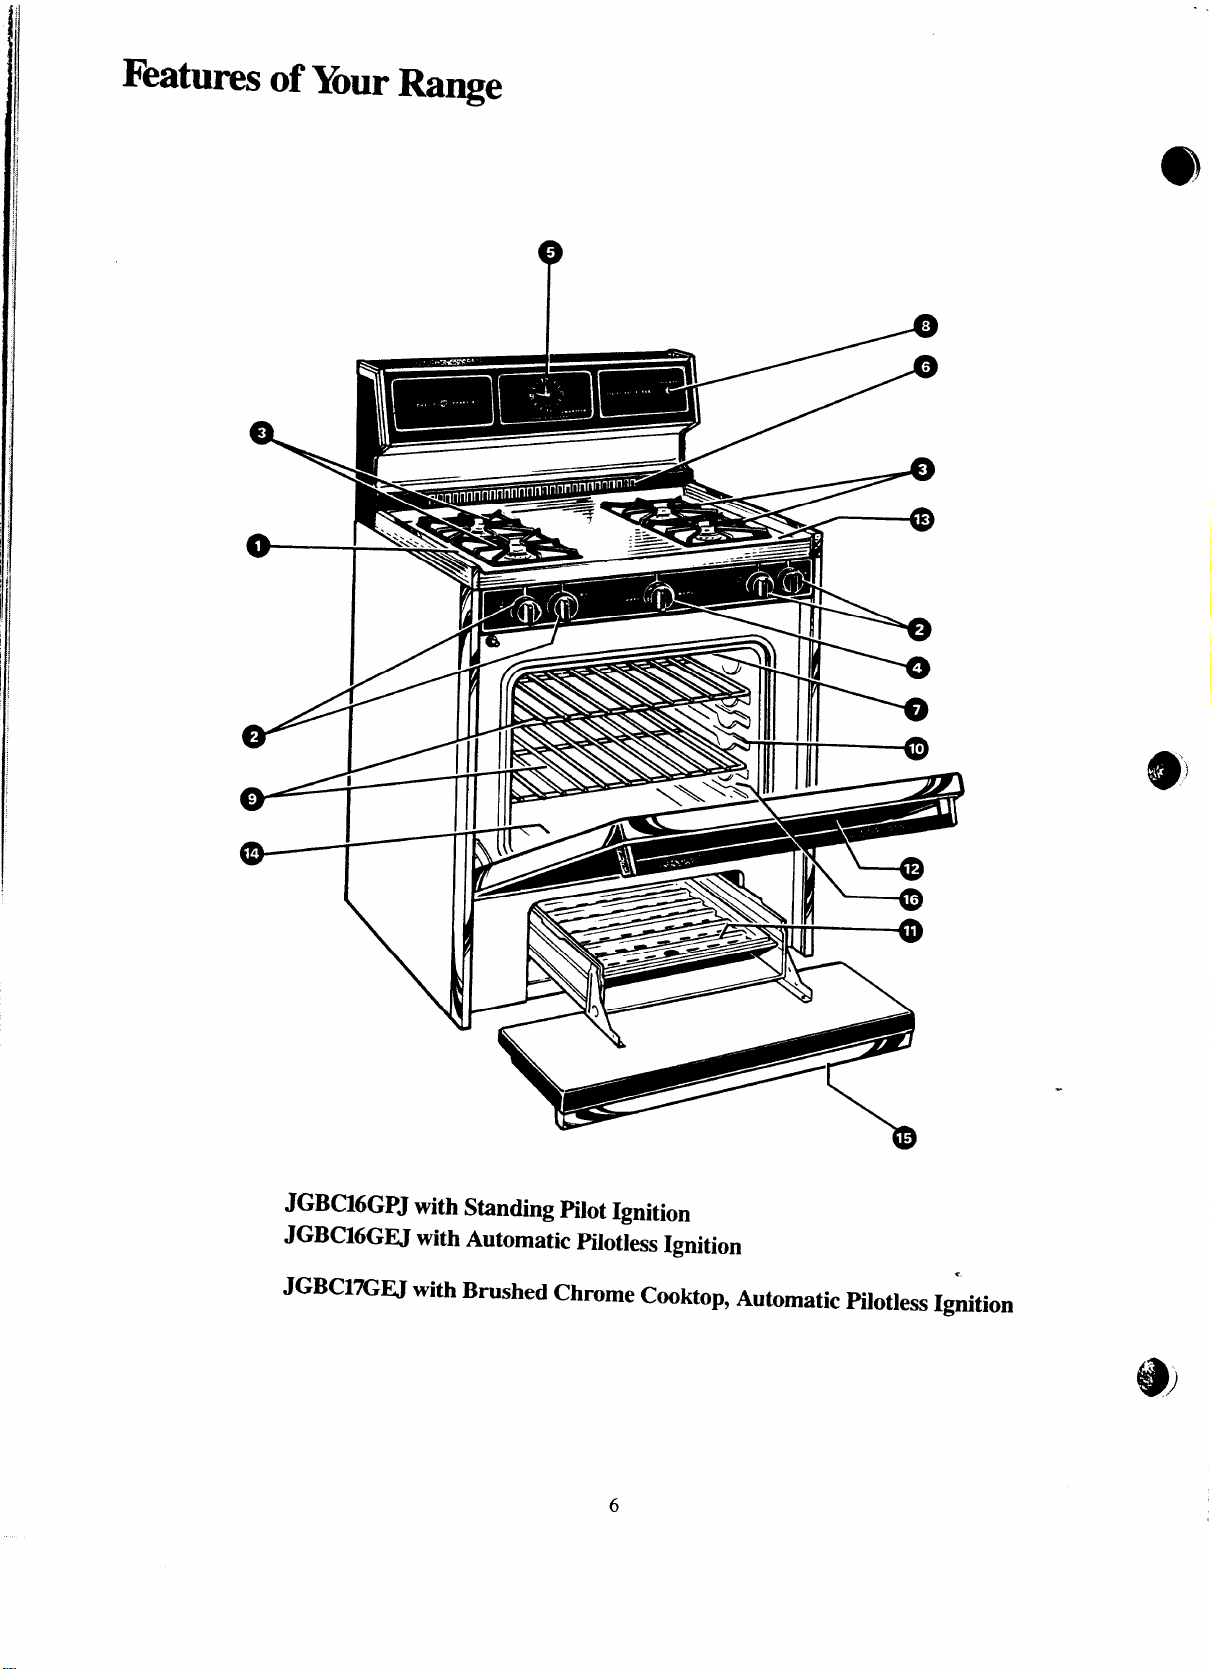
JGBC16GPJwith Standing Pilot Ignition
JGBC16GU with Automatic pilotless Ignition
JGBC17GU with Brushed Chrome Cooktop,
6
Automatic pi]otless Ige&ion
Page 7
——.. - --—
I
\
I
,
I
!
I
i
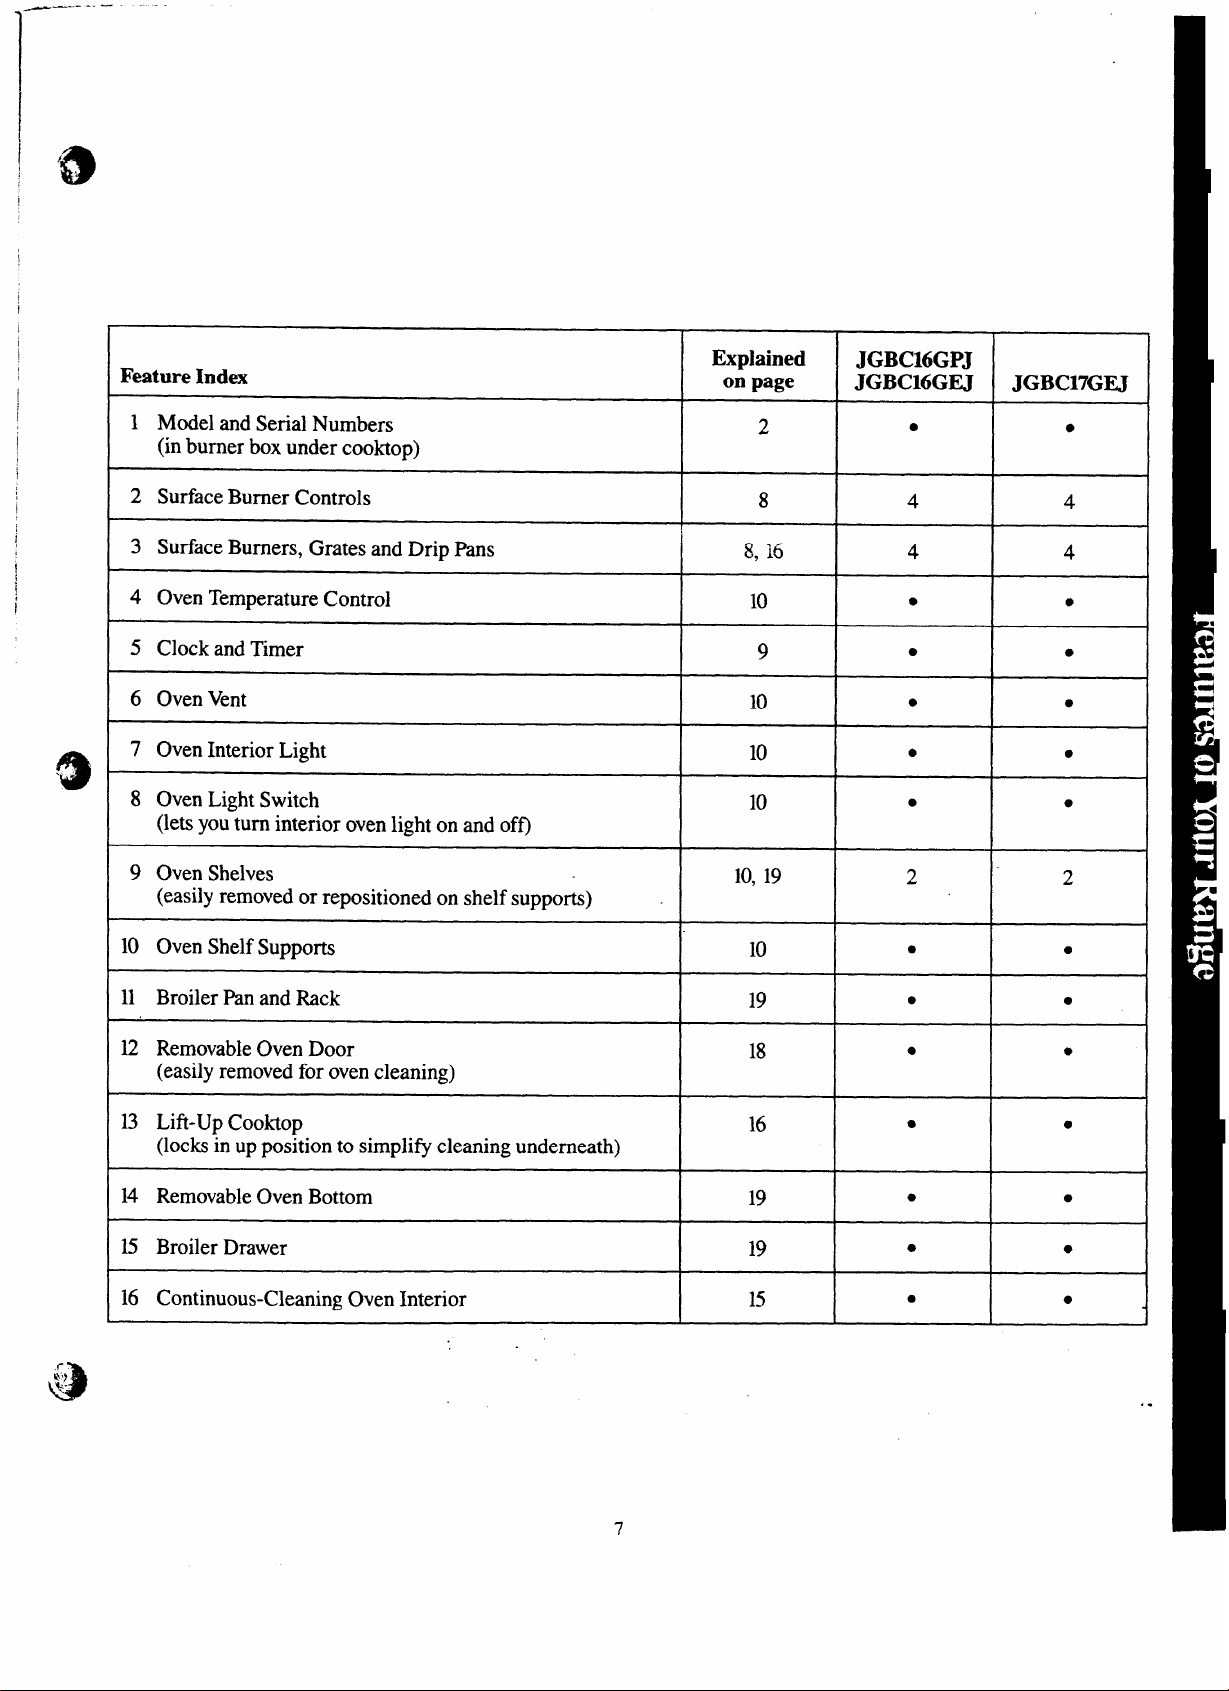
Feature Index
1 Model and Serial Numbers
(in burner box under cooktop)
2 Surface Burner Controls
Explained
on page
2
8
JGWMGPJ
JGBC16GEJ
●
4
JG13c17GEJ
●
4
.,
9
3 Surface Burners, Grates and Drip Pans
8, M 4 4
4 Oven Temperature Control
5 Clock and Timer
6 Oven Vent
7 Oven Interior Light
8 Oven Light Switch
(lets you turn interior oven light on and off)
9 Oven Shelves
10, 19
(easily removed or repositioned on shelf supports)
10 Oven Shelf Supports
11 Broiler Pan and Rack
12 Removable Oven Door
(easily removed for oven cleaning)
13 Lift-Up Cooktop 16
(locks in up position to simplify cleaning underneath)
10
10
10
10
10
19
18
● ●
9
● ●
● ●
● ●
● ●
2 2
● c
● ●
● ●
● ●
14 Removable Oven Bottom 19
15 Broiler Drawer
16 Continuous-Cleaning Oven Interior
19
15
7
● ●
●
●
s
●
..
Page 8
Surface Cooking
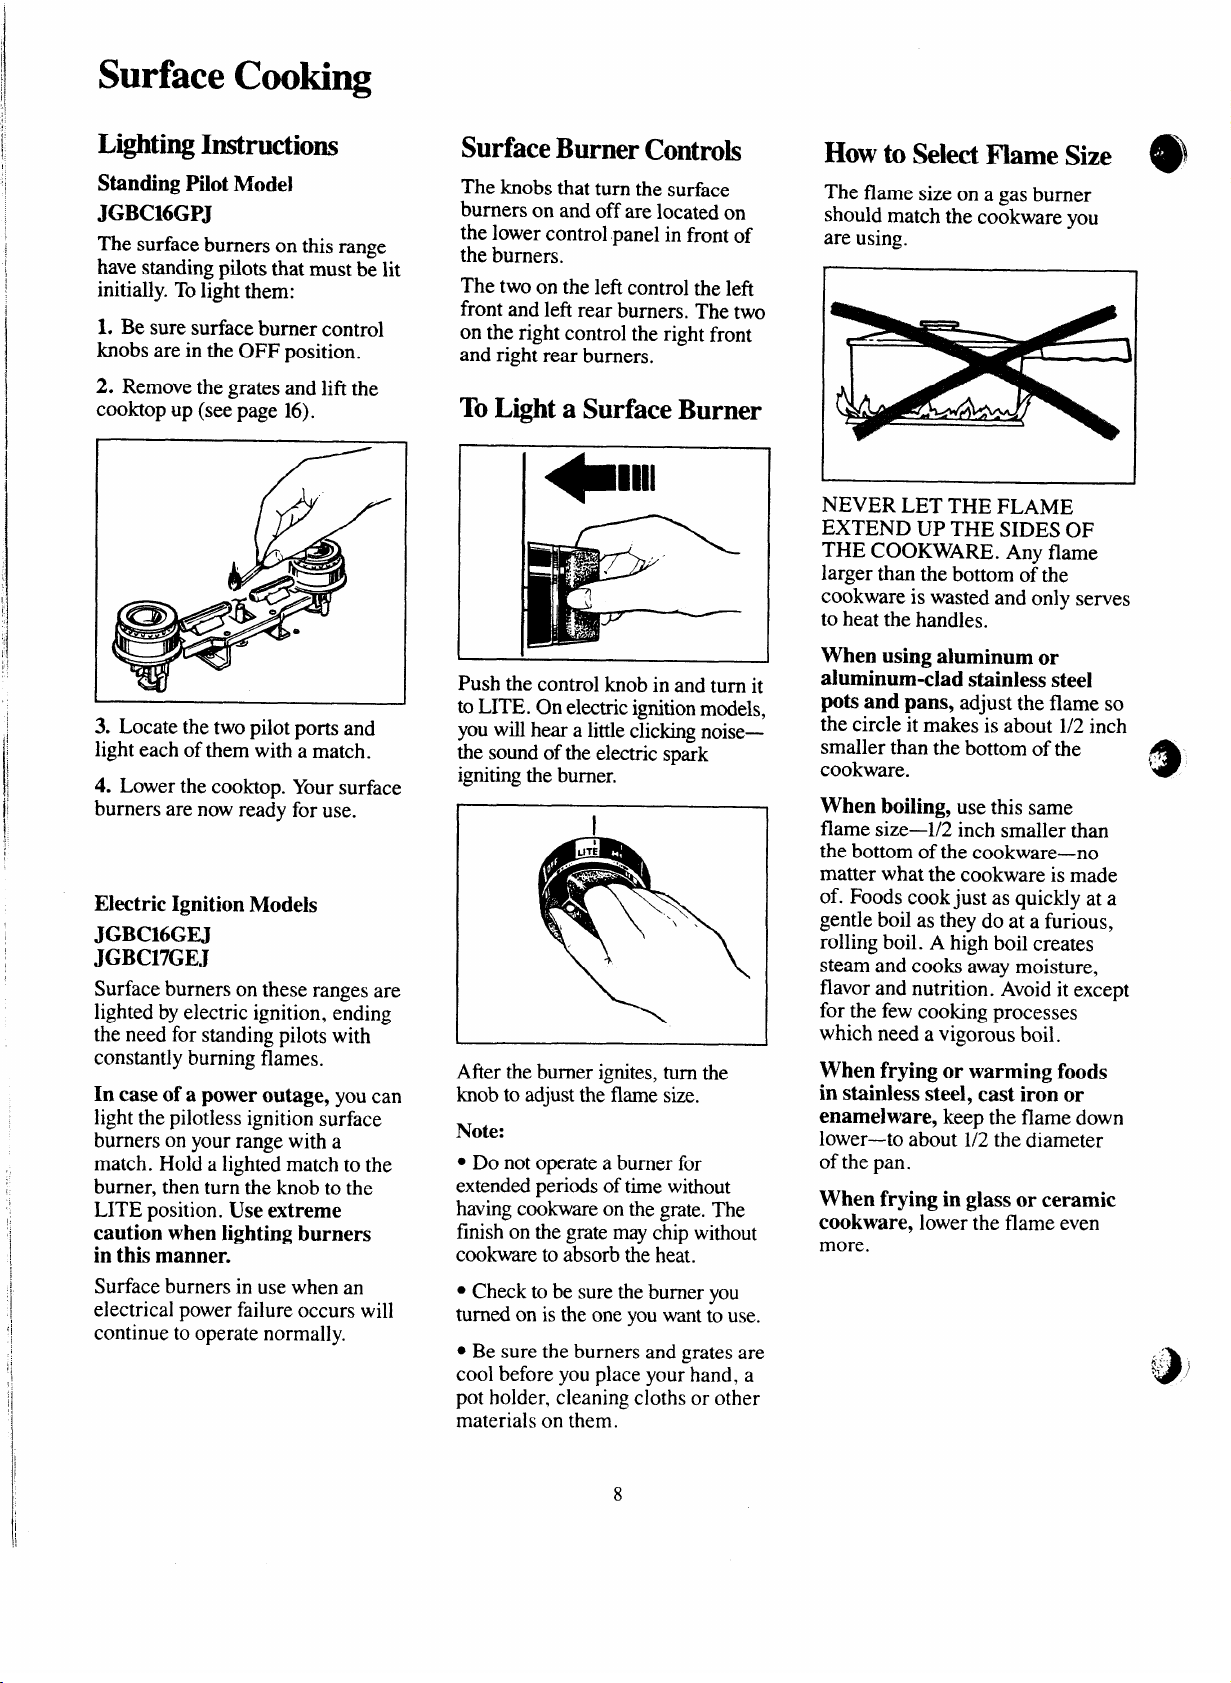
Lighting Instructions
Standing Pilot Model
JGBC16GPJ
The surface burners on this range
have standing pilots that must be lit
initially. To light them:
L Be sure surface burner control
knobs are in the OFF position.
2. Remove the grates and lift the
cooktop up (see page 16).
I
3. Locate the two pilot ports and
light each of them with a match.
4. Lower the cooktop. Your surface
burners are now ready for use.
Electric Ignition
JGBC16GEJ
JGBC17GEJ
Surfaceburnersontheserangesare
lightedbyelectricignition,ending
theneedforstandingpilotswith
constantlyburningflames.
In case of a power outage, youcan
lightthepilotlessignitionsurface
burners
match. Hold a lighted match to the
burner, then turn the knob to the
LITE position. Use extreme
caution when lighting burners
in this manner.
Surface burners in use when an
electrical power failure occurs will
continue to operate normally.
on your range with a
Models
Surface Burner Controls
The knobs that turn the surface
burners on and off are located on
the lower control panel in front of
the burners.
The two on the left control the left
front and left rear burners. The two
on the right control the right front
and right rear burners.
To Light a Surface Burner
Push the control knob in and turn it
to LITE. On electric ignition models,
you will hear a little clicking noise—
the sound of the electric spark
igniting the burner.
1
\
After the burner ignites, turn the
knob to adjust the-flame size.
Note:
● Do not operate a burner for
extended periods of time without
having cookware on the grate. The
finish on the grate may chip without
cookware to absorb the heat.
● Check to be sure the burner you
turned on is the one you want to use.
● Be sure the burners and grates are
cool before you place your hand, a
pot holder, cleaning cloths or other
materials on them.
How to Select Flame Size
The flame size on a gas burner
should match the cookware you
are using.
NEVER LET THE FLAME
EXTEND UP THE SIDES OF
THE COOKWARE. Any flame
larger than the bottom of the
cookware is wasted and only serves
to heat the handles.
When using aluminum or
aluminum-clad stainless steel
pOtSand pans, adjust the flame so
the circle it makes is about 1/2 inch
smaller than the bottom of the
cookware.
When boiling, use this same
flame size—1/2 inch smaller than
the bottom of the cookware—no
matter what the cookware is made
of. Foods cook just as quickly at a
gentle boil as they do at a furious,
rolling boil. A high boil creates
steam and cooks away moisture,
flavor and nutrition. Avoid it except
for the few cooking processes
which need a vigorous boil.
When frying or warming foods
in stainless steel, cast iron or
enamelware, keep the flame down
lower—to about 1/2 the diameter
of the pan.
When frying in glass or ceramic
cookware, lower the flame even
more.
8
Page 9

.
f!)
‘ Topof-Range Cookware
Aluminum: Medium-weight
cookware is recommended because
it heats quickly and evenly. Most
foods brown evenly in an aluminum
skillet. Minerals in food and water
will stain but will not harm
aluminum. A quick scour with a
soap-filled steel wool pad afier
each use keeps aluminum cookware
looking shiny new. Use saucepans
with tight-fitting lids for cooking
with minimum amounts of water.
Cast Iron: If heated slowly, most
skillets will give satisfactory results.
Enamelware: Under some
conditions, the enamel of some
cookware may melt. Follow cookware
manufacturer’s recommendations
for cooking methods.
Clock and Timer
The Clock a~d Timer are helpful
devices that serve several purposes.
The Clock
To set the Clock, push in the knob
and turn the clock hands to the
right to the correct time. Then let
the knob out and continue turning
4
to OFF.
Using YourOven
Lighting Instructions
Standing Pilot Model
JGBC145GPJ
This range has a standing oven
pilot port that must be lit initially.
To light it:
1. Be sure OVEN TEMP knob is in
the OFF position.
2. Remove the oven bottom (see
page 19) and the oven baffle.
Glass:There are two types of glass
cookware—those for oven use only
and those for top-of-range cooking
(saucepans, coffee and teapots).
Glass conducts heat very slowly.
Heatproof Glass Ceramic: Can
be used for either surface or oven
cooking. It conducts heat very
slowly and cools very slowly. Check
cookware manufacturer’s directions
to be sure it can be used on gas ranges.
StainlessSteel: This metal alone has
poor heating properties, and is usually
combined with copper, aluminum
or other metals for improved heat
distribution. Combination metal
skillets generally work satisfactorily
if used at medium heat as the
manufacturer recommends.
Timer
The Timer has been combined with
the range clock. Use it to time all
your precise cooking operations.
You’ll recognize the Timer as the
pointer which is different in color
than the clock hands.
Minutes are marked up to 60 on the
center ring of the clock.
To set the Timer, turn the knob to
the left, without pushing in, until
the pointer reaches the number of
minutes you want to time.
At the end of the set time, a
buzzer sounds to tell you time is
up. Turn the knob, without pushing
in, until the pointer reaches OFF
and the buzzer stops.
3. Locate the pilot port on the side
of the burner at the back of the
broiler compartment. Using a long
match or match holder, reach in
and light the oven pilot.
Note: The oven must beat room
temperature before you can light
the oven pilot.
4. Replace the burner baffle and
oven bottom and close the door.
Your oven and broiler are now
ready for use.
Power outage?
An electrical power failure will not
affect a lighted standing oven pilot.
..
9
Page 10

Using YourOven (continued)
—-. .
Lighting Instructions
Electric Ignition Models
JGBCMGEJ
JGBCIXW
The oven burner and broil
burner on these ranges are lighted
by electric ignition. The oven and
broiler cannot be operated in the
event of a power failure.
To light the burners, turn the
OVEN SET and OVEN TEMP
knobs to the desired function and
temperature. The burner should
ignite within 60 seconds.
CAUTION: DO N(YI’MAKE ANY
ATTEMPT TO OPERATE THE
ELECT’RIC IGNITION OVEN
DURING AN ELE(T.RICAL
POWER FAILURE. Resumption
of electrical power when OVEN
TEMP and OVEN SET controls
are in any position other than OFF
will result in automatic ignition of
the oven or broiler burner and
could cause severe bums if, at the
time, you were attempting to light
the burner with a match.
Oven Temperature Control
The OVEN TEMP control is
located at the center of the control
panel on the front of the range.
Simply turn the knob to the desired
cooking temperatures, which are
marked in 25 “F. increments on the
dial. It will normally take 60
seconds before the flame comes on.
Afier the oven reaches the selected
temperature, the oven burner cycles—
off completely, then on with a fuIl
flame-to keep the oven temperature
controlled.
Oven Light
Use the switch on the control panel
to turn the light on and off.
Oven Vent
Your oven is vented through ducts
at the rear of the range (see page 6).
Do not block these ducts when
cooking in the oven—it is important
that the flow of hot air horn the oven
and fresh air to the oven burner be
uninterrupted. Avoid touching the
vent openings or nearby surfaces
during oven or broiler operation—
they may become hot.
● Vent openings and nearby
surfaces may become hot. Do not
touch them.
● Handles of pots and pans on the
cooktop may become hot if left
too close to the vent.
● Do not leave plastic items on”
the cooktop—they may me)t if
left too close to the vent.
oven Shelves
I IIi
The shelves are designed with stopIocks so when placed correctly on
the shelf supports, they wiIl stop
before coming completely out of
the oven and will not tilt when you
are removing food from them or
placing food.on them.
When placing cookware on a shelf,
pull the shelf out to the “stop”
position. Place the cookware on
the shelf, then slide the shelf back
into the oven. This will eliminate
reaching into the hot oven.
To remove the shelves from the
oven, pull them toward you, tilt
front end upward and pull them out. “
To replace, place shelf on shelf
support with stop-locks (curved
extension under shel~ facing up
and toward rear of oven. Tilt up
front and push shelf toward back of
oven until it goes past “stop” on
oven wall. Then lower front of shelf
and push it all the way back.
Shelf Positions
The oven has five shelf supports—
A (bottom), B, C, D and E (top).
Shelf positions for cooking are
suggested on Baking and Roasting
pages.
@
10
h“;..
9
Page 11

—.. -
Baking
How to Set YourRange
for Baking
1. Position the shelf or shelves in
the oven.
2. Close oven door. Turn OVEN
SET knob to BAKE or TIME
BAKE and OVEN TEMP knob to
desired temperature. Preheat oven
for at least 15 minutes if preheating
is necessary.
3. Place food in oven on center
of shelf. Allow at least 2 inches
between edge of bakeware and oven
wall or adjacent cookware.
If cooking on two shelves at the
same time, place shelves about 4
inches apart and stagger food on
them.
4. Check food for doneness at
minimum time on recipe. Cook
longer if necessary. Switch off
heat and remove food.
Preheating
Preheating is very important when
using temperatures below 225”F.
and when baking foods such as
biscuits, cookies, cakes and other
pastries.
Preheating is not necessary when
roasting or for long-time cooking of
whole meals.
Shelf Positions
Most baking is done on the second
shelf position (B) from the bottom.
When baking three or four items,
use two shelves positioned on the
second and fourth sets of supports
(B& D) from bottom of oven.
Bake angel food cakes on first shelf
position (A) from bottom of oven.
Baking Tips
● Follow a tested recipe and
measure the ingredients carefully,
If you are using apackage mix,
follow label directions.
● If moisture is noticeable on the
front of the ovenor on the black glass
door when first turning on the oven,
leave the oven door ajar for a few
minutes or until the oven is warm.
● Do not open the oven door during
a baking operation—heat will be lost
and the baking time might need to
be extended. This could cause poor
baking results. If you must open the
door, open it partially-only 3 or 4
inches-and close it as quickly as
possible.
● Do not disturb the heat circulation
in the oven with the use of aluminum
foil. If foil is used, place a small
sheet of it, about 10by 12inches at
the most, on a lower shelf several
inches below the food. Do not place
foil on the oven bottom.
Common Baking Problems
and Possible Solutions
PIES
Burning around edges
● Oven too full; avoid overcrowding.
c Edges of crust too thin.
● Incorrect baking temperature.
Bottom crust soggy and unbaked
● Allow crust and/or filling to cool
sufficiently before filling pie shell.
● Filling maybe too thin or juicy.
● Filling allowed to stand in pie shell
before baking. (Fill pie shells and
bake immediately.)
● Ingredients and proper measuring
affect the quality of the crust. Use a
tested recipe and good technique.
Make sure there are no tiny holes or
tears in a bottom crust. “Patching”
a piecrust could cause soaking.
Pie filling runs over
● Top and bottom crust not well
sealed together.
● Edges of pie crust not built up
high enough.
● Too much filling.
● Check size of pie plate.
R&y is tough; crust not flaky
● Too much handling.
● Fat too soft or cut in too fine.
Roll dough lightly and handle as
little as possible.
CAKES
Cake rises higher on one side
● Batter spread unevenly in pan.
QOven shelves not level.
● Using warped pans.
● Incorrect pan size.
Cakes cracking on top
● Oven temperature too high.
● Batter too thick, follow recipe
orexact package directions.
● Check for proper shelf position.
● Check pan size called for in recipe.
● Improper mixing of cake.
Cake falls
● Too much shortening, sugar or
liquid.
● Check leavening agent, baking
powder or baking soda to assure
freshness. Make a habit to note
expiration dates of packaged
ingredients.
● Cake not baked long enough or
at incorrect temperature.
● If adding oil to a cake mix, make
certain the oil is the type and
amount specified.
Crust is hard
● Check temperature.
● Check shelf position.
Cake has soggy layer or streaks
at bottom
● Undermining ingredients.
● Shortening too soft for proper
creaming.
● Too much liquid.
COOKIES & BISCUITS
Doughy center; heavy crust on
surface
● Check temperature.
● check shelf position.
FOI1OW baking instructions
.
carefully as given in reliable recipe
or on convenience food package.
. Flat cookie sheets will give more
even baking results. Don’t overcrowd
foods on a baking sheet.
● Convenience foods used beyond
their expiration date.
Browning more noticeable on
one side
● Oven door not closed properly,
check gasket seal.
● Check shelf position.
.-
Page 12

Baking Guide
1. Preheating isvery important
when using temperatures below
and when baking foods such light, shiny finishes give best results
225”I?
biscuits, cookies, cakes and
as
other pastries. Preheat the ovenfor
at least 15minutes.
Preheating is not necessary when
roasting or for long-time cooking of
whole meals.
Food Cookware Positions
Bread
Biscuits (%-in. thick)
Coffee cake Shiny Metal Pan with
Corn bread or muffins
Gingerbread Shiny Metal Pan with B 350° 45-55
Muffins
Popovers
Quick loaf bread Metal or Glass Loaf Pans B 350°-3750
Yeast bread (2 loaves) Metal or Glass Loaf Pans A, B 375°-4250 45-60
Plain rolls
Sweet rolls Shiny Oblong or Muffin Ruts B, A 350°-3750
Cakes
(without shortening)
Angel food Aluminum Tube Pan A 325°-3750 30-55 Two piece pan is convenient.
Jelly rolI Metal Jelly Roll Pan
Sponge Metal or Ceramic Pan
Cakes
Bundt cakes Metal or Ceramic Pan A,B 325°-3500
Cupcakes Shiny Metal Muffin Pans
Fruitcakes
Layer Shiny Metal Pan with
Layer, chocolate Shiny Metal Pan with
Loaf Metal or Glass Loaf Pans
cookies
Brownies
Drop Cookie Sheet
Refrigerator Cookie Sheet
RoHed or sliced Cookie Sheet
Fruits,
Other Desserts
Baked apples Glass or Metal Pans
Custard
Puddings, rice
and custard Casserole
Pies
Frozen
Meringue Spread to crust edges
One crust Glass or Satin-finish Metal f%
Two crust Glass or Satin-finish Metal Pan
Pastry shell Glass or Satin-finish Metal Pdn
Miscellaneous
Baked potatoes Set on Oven Shelf A, B, C
Scalloped dishes
Souffles
Shiny Cookie Sheet
satin-finish bottom
Cast Iron or Glass Pan
satin-finish bottom
Shiny Metal Muffin Pans A, B 400°-4250 20-30 Decrease about 5 minutes for muffin mix.
Deep Glass or Cast Iron Cups
Shiny Oblong or Muffin Pans A,B 375°-4250 10-25 For thin rolls, Shelf B maybe used.
Metal or Glass Loaf or
Tube Pan
satin-finish bottom shelves B and D.
satin-finish bottom
Metal or Glass Pans
Glass Custard Cups or
Casserole (set in pan of hot water)
Glass Custard Cups or
Foil Pan on CooK\e Sheet
Glass or Metal Pan
Glass Pan
2. Aluminum pans conduct heat
quickly. For most conventional baking,
because they help prevent overbrowning in the time it takes for heatto
cook the center areas. We recommend
dull (satin-finish) bottom surfaces of
pans for cake pans and pie plates to be
sure those areas brown completely.
Shelf Oven
B, C 400°-4750
B, A
B 400°-4500
B
B 3750-4000 10-15
A 325°-3500
B
A, B 275°-3000 2-4 hrs.
B
B
B
B, C 325°-350”
B, C
B, C
B, C 375°-4000 7-12
A, B, C
B 300°-3500 30-60 Reduce temperature to 300”F. for large
B
A 400°-4250 45-70 Large pies use 400°F. and increase time.
B 325°-3500
A, B
B
B
A,B, C
B
Temperatures Minutes
350°-4000
375°
350°-3750 20-25
350°-3750 20-35 If baking four layers use
350°-3750 25-30
350°
350°-4000 10-20
400°-4250 6-12
350”-400° 30-60
325°
400°-4250
400°-4250 40-60 longer time.
450°
325°-400”
3~5°-3750
300°-3500
3. Dark or non-shiny finishes, also
glass and Pyroceram@cookware,
generally absorb heat which may result
in dry, crisp crusts. Reduce oven heat
25°F. if lighter crusts are desired+
Preheat cast iron for baking some
foods for rapid browning ~hen food is
added.
Time,
15-20
20-30
20-40 Preheat cast iron pan for crisp crust.
45-60
45-60
20-30 For thin rolls, Shelf B maybe used.
45-60
45-65
40-60
25-35
50-90
15-25
45-60
13-16
60-90 Increase time for large amount or size.
30-60
30-75
Comments
Canned, refrigerated biscuits take 2 to 4
minutes less time.
Or bake at 450”F. for 25 minutes, then at
350”F. for 10to 15minutes.
Dark metal or glass gives deepest
browning.
Line pan with waxed paper.
Paper liners produce more moist crusts.
Use 300°F. and Shelf B for small or
individual cakes.
Bar cookies from mix use same time.
Use Shelf C and increase temperature
25 to 50”F. for more browning,
custard.
Cook bread or rice pudding with custard
base 80 to 90 minutes.
To quick)y brown meringue use 400”F. for
9 to 11 minutes.
Custard fillings require lower temperature,
e
J
i:
i?
Page 13

Roasting
Roasting is cooking by dry heat.
(9
Tender meat or poultry can be
roasted uncovered in your oven.
Roasting temperatures, which
should be low and steady, keep
spattering to a minimum. When
roasting, it is not necessary to sear,
I
I
I
baste, cover, or add water to your
meat. Roasting is easy, just f~llow “
these steps:
Step1. Position oven shelf at
second from bottom position (B)
for small size roast (3 to 5 lbs.) and
at bottom position (A) for larger
roasts.
Step2: Check weight of roast.
Step 4: Most meats continue to
Place meat fat-side-up or poultry cook slightly while standing after
breast-side-up on roasting rack in a
shallow pan. The melting fat will
baste the meat. Select a pan as
close to the size of meat as possible.
(Broiler pan with rack is a good
Pan for this. )
Step 3: Turn OVEN TEMP to
desired temperature. Check the
Roasting G~ide for temperatures
being removed from the oven.
Standing time recommended for
roasts is 10to 20 minutes to allow
roast to firm up and make it easier
to carve. Internal temperature will
rise about 5° to 10”F.;to compensate
for temperature rise, if desired,
remove roast horn oven at 5° to 10”F.
less than temperature on guide.
and app~oximate cooking times.
Frozen Roasts
Frozen roasts of beef, pork,
lamb, etc., can be started without
thawing, but allow 15to 25 minutes
per pound additional time (15
minutes per pound for roasts under
5 pounds, more time for larger
roasts).
Thaw most frozen poultry before
roasting to ensure even doneness.
Some commercial frozen poultry
can be cooked successful] y without
thawing. Follow directions given
on packer’s label.
Roasting Guide
Oven
VP
Meat 3 to 54bs. 6 to 8-lbs.
Tender cuts; rib, high quality
sirloin tip, rump or top round* Medium:
Lamb leg or bone-in shoulder* 325°
Veal shoulder, leg or loin* 325°
Pork loin, rib or shoulder* 325°
Ham, pre-cooked 325°
Ham, raw
*For boneless rolled roasts over 6-inches
thick, add 5 to 10minutes per lb. to times
given above.
I%ultry
Chicken or Duck
Chicken pieces
Turkey
Temperature Doneness
325°
325°
325°
375°
325°
Rare:
Well Done: 35-45 28-33
Rare:
Medium:
Well Done: 30-35 28-33
Well Done: 35-45 30-40
Well Done: 35-45 30-40
To Warm:
Well Done:
Well Done:
Well Done:
Well Done:
Approximate Roasting llme
in Minutes per Pbund Temperature W
24-30
29-33
21-25
25-30
18-23 minutes per lb. (any weight) 115°-1250
Under 10 lbs. 10 to 15-lbs.
27-35 24-27
3 to 5-lbs. Over 5 lbs.
35-40 30-35
30-35
10 to 15-lbs. Over 15 Ibs.
16-22
18-22
22-25
20-23
24-28
13-19
Internal
130°-1400
150’-160”
170°-1850
130°-1400
150°-1600
170°-1850
170°-180°
170°-180°
170°
185°-1900
185°-190°
In thigh:
185°-1900
..
Page 14

Broiling
..
Broiling is cooking food by direct
heat from above the food. Your
range has a convenient compartment
below the oven for broiling. It also
has a specially designed broiler pan
and rack that al]cwt i ~:pping fat to
drain away from the foods and be
kept away from the high heat of
the gas flame.
Distance from the heat source may
be changed by positioning the broiler
pan and rack on one of three shelf
positions in the broiler compafiment—
A (bottom of broiler compartment),
B (middle) and C (top).
How to Broil
1. If meat has fat or gristle near the
edge, cut vertical slashes through
both about 2 inches apart, but don’t
cut into meat. We recommend that
you trim fat to prevent excessive
smoking, leaving a layer about
l/8-inch thick.
2. Remove broiler pan and rack
from broiler compartment and
place food on rack.
3. Pull out drawer and position
broiler pan in compartment. Placing
food closer toflame increases exterior
browning of food, but also increases
spattering and the possibility of fats
and meat juices igniting.
4. Close broiler door and, for most
foods, turn OVEN TEMP knob to
BROIL. Note: Chicken and ham
are broiled at a lower setting in
order to cook food through without
over-browning it.
5. Turn most foods once during
cooking; (the exception is thin fillets
of fish; oil one side, place that side
down on broiler rack and cook without
turning until done). Time foods for
about one-half the total cooking
time, turn food, then continue to
cook to preferred doneness.
6. Turn OVEN TEMP knob to
OFF. Remove broiler pan from
compartm c:,: tind
immediately. Leave pan outside
com~artment to cool
1
~cr~.t food
---,
Broiling Tips
. Broiling is
and broiler doors closed. However,
if you like your steaks very rare
inside and charred on the outside,
leave the oven door slightly ajar.
usually done with oven
Broiling Guide
Quantity
Food
Bacon
Ground Beef
Well Done
Beef Steaks
Rare
Medium
Well Done
Rare
Medium
Well Done
Chicken (450°)
Bakery Products
Bread (Toast) or
Toaster Pastries
English Muffins
Lobster tails
(6to 8-02. each)
Fish
Ham siices (4500)
Precooked
pork chops
Well Done
Lamb chops
Medium
Well Done
Medium
Well Done
Wieners,
similar precooked
sausages,
brat wurst
d
andlor
Thickness
%-lb. (about 8
thin slices)
l-lb. (4 patties)
% to %-in. thick
l-in. thick
(1-l% lbs.)
1%-in. thick
(2-2 % Ibs.)
1 whole
(2t02&]b~.),
split lengthwise
2-4 slices
1pkg. (2)
2-split
‘2-4
l-lb. fi]]et~ 1Ato
~z-jn thjck
l-in. thick
2(%in. )
2(l-in. thick),
about 1lb.
2(1 inch)
~bout 10-12
?(1Y2
d-)out 1 lb.
T
l-lb.pkg.(10)
OZ.
inch),
l%sition Minuf
+
Broil
B
c
A
A
A
A
A
A
A
c
c
B
c
B
A
A
B
B
B
B
c
● Use tongs to turn meat over—
pierced meat loses juices.
● Steaks and chops should be at
least 1 inch thick for best broiling
results. Pan broil thinner ones.
1stSit
Timt
30-35
13-16
3%
9-1o
13
10
15
25
2-3
3-4
5
8
10
13
8
10
10
17
6
2nd Sid(
Time,
Minute~
7-8
9
12
5-6
8-9
6-7
12-14
16-18
25-30
‘/2-1
Do not
turn
over.
8
4-5
10-12
4-7
10
4-6
12-14
1-2
Comments
3
Arrange in single layer.
Space evenly. Up to 8 patties
take about same time.
7
Steaks less than l-in. cook
through before browning.
Pan frying is recommended.
Slash fat.
Reduce times about 5 to 10min.
per side for cut-up chicken.
Brush each side with melted
butter. Broil with skin side down
first and broil with door closed.
Space evenly. Place English
muffins cut-side-up and brush
with butter if desired.
Cut through back ofshell, spread
open. Brush with melted butter
before and after half time.
5
Handle and turn very carefully.
Brush with lemon butter before
md during cooking if desired.
Preheat broiler to increase
wowning.
!ncrease times 5-10min. per side
‘or 1%-in. thick or home cured.
IIash fat.
;Iash fat.
f desired, split sausages m half
engthwise; cut into 5 to 6-in.
lieces.
c-
,.
,,.’
9’
‘))
14
Page 15

-..
Care and Cleaning
*
Proper care and cleaning are
important so your range will give
you efficient and satisfactory
service. Follow these directions
carefully in caring for it to help
●
assure safe and proper maintenance.
BE SURE ELECTRIC POWER
IS OFF BEFORE CLEANING
✎
ANY PART OF YOUR RANGE.
Special Care of
Continuous-Cleaning
Oven Interior
The Continuous-Cleaning oven
cleans itself while cooking. The
inside of the oven—top, sides, back
and inside of the door—is finished
with a special coating which cannot
be cleaned in the usual manner
with soap, detergents, steel wool
pads, commercial oven cleaners,
coarse abrasive pads or coarse
brushes. Use of such cleaners
and/or use of oven sprays will
cause permanent damage.
✠
The special coating is a porous
ceramic material which is dark in
color and feels slightly rough to the
touch. If magnified, the surface
would appear as peaks, valleys, and
sub-surface “tunnels? This rough
finish tends to prevent grease
spatters from forming little beads
or droplets which run down the
side walls of a hard-surface oven
liner leaving unsightly streaks that
require hand cleaning. Instead,
when spatter hits the porous finish,
it is dispersed and is partially
absorbed. This spreading action
increases the exposure of oven
soil to heated air, and makes it
somewhat less noticeable.
Soil may not disappear completely
and at some time after extended
usage, stains may appear which
cannot be removed.
The special coating works best on
small amounts of spatter. It does
not work well with larger spills,
especially sugars, egg or dairy
mixtures.
The special coating is not used
on oven shelves. Shelves should be
cleaned outside the oven to avoid
damage to the special coating
inside the oven.
ToClean the ContinuousCleaning Oven:
1. Let range parts cool before
handling. We recommend rubber
gloves be worn when cleaning.
2. Remove shelves and cookware.
3. Soil visibility maybe reduced by
operating the oven at 400*F. Close
the door and turn OVEN TEMP
knob to 400”F. Time for at least 4
hours. Repeated cycles may be
necessary before improvement in
appearance is apparent.
REMEMBER: DURING THE
OPERATIONOFTHE OVEN,THE
DOOR,WINDOWAND~HER
RANGESURFACESW1~LGET H(YT
ENOUGH‘IQCAUSEBURNS.DO NOT
~UCH. LET THERANGECOOL
BEFOREREPLAclNGOVENSHELVES,
4. If a spillover or heavy soiling
occurs on the porQ~s surface, as
soon as the oven has cooled, remove
as much of the soil as possible using
a small amount of water and a stiff
bristle nylon brush. Use water
sparingly and change it frequently,
keeping it as clean as possible, and
be sure to blot it up with paper
towels, cloths, or sponges.
rub or scrub with paper towels,
cloths or sponges, since they will
leave unsightly lint on the oven
finish. If water leaves a white ring
on the finish as it dries, apply water
again and blot
itwith a clean
sponge, starting at the edge of the
ring and working toward the center.
Do not use soap, detergent, steel
wool pads, commercial oven cleaner,
silicone oven sprays, coarse pads
or coarse brushes on the porous
surface. These products will spot,
clog, and mar the porous surface
and reduce its ability to work.
Do not scrape the porous surface
with a knife or spatuia—they could permanently damage it.
The oven bottom has a porcelain
enamel finish.
Itcan be removed
for cleaning away from the .0
continuous-cleaning oven.
Do not
1s
Page 16

Care and C1eafing (continued)
.-.
—. .
—~ .-
Lift-Up Cooktop
Clean the area under the cooktop
often. Built-up soil, especially
grease, may catch fire.
To make cleaning easier, the entire
cooktop maybe liiled up and
supported by locking arms that
catch and hold the top when it’s all
the way up.
Be sure all burners are turned off
before raising the cooktop. Then
remove the grates and drip pans,
grasp the front sides of the cooktop
and lift.
After cleaning under the cooktop
with hot, miId soapy water and a
clean cloth, put the cooktop back in
place. Lifl up a little to release the
locking arms and push them in
while guiding the top back down.
Be careful not to pinch your fingers.
Burner Gates
Grates should be washed regularly
and, of course, after spillovers.
Wash them in hot, soapy water and
rinse with clean water. Dry the
grates with a cloth—don’t put them
back on the range wet.
To get rid of burned-on food, soak
the grates in a slightly diluted
liquid cleanser.
Although they’re durable, the
grates will gradually lose their
shine, regardless of the best care
you can give them. This is due to
their continual exposure to high
temperatures.
Do not operate a burner for an
extended period of time without
cookware on the grate. The finish
on the grate may chip without
cookware to absorb the heat.
When replacing a
pair of grates,
the irregular
sides should
interlock in
the middle as
shown at right.
Drip Fans
Remove the grates and lift out the
chrome drip pans. Wash them in
hot, soapy water. Rinse them with
clean, hot water and polish them
dry with a cloth. Never use
abrasive cleaner or steel wooJ—
they’ll scratch the surface. Instead,
soak the drip pans for about 20
minutes in slightly diluted liquid
cleanser or mild solution of
ammonia and water (1/2 cup of
ammonia to one gallon of water).
Aller soaking, wash them in hot,
soapy water. Rinse with clean water
and polish with a clean, soft cloth.
When replacing
drip pans, the
notch on the rear
pan and the notch
on the front pan
should meet in
the middle.
16
Page 17

._+4.--” - .- - -
Range TopBurners
0
The holes in the burners must be
kept clean at all times for proper
ignition and an even, unhampered
flame,
Clean the burners routinely and
especially after bad spillovers
which could clog these holes.
Burners lift out for cleaning.
Note: Two screws hold each burner
pair in place to keep them from
wobbling around during shipment.
~ Remove and discard the shipping
crews and lift the burners up and
@
out. This disengages them from the
mounting bracket under each
burner pair.
To remove burned-on food, soak
the burner in a solution of a product
used for cleaning the inside of coffee
makers. Soak the burner for 20 to
30 minutes. If the food doesn’t
rinse off completely, scrub it with
soap and water or a mild abrasive
cleanser and a damp cloth.
Do not attempt to clean burners in
an automatic dishwasher. Loosened
food soil can clog burner holes,
and the caustic action of the
dishwasher detergent can damage
the burner heads.
Before putting the burner back, dry
it thoroughly by setting it in a warm
oven for 30 minutes. Then place it
back in the range, making sure it is
properly seated on the mounting
bracket and is level.
Control F%mels
It’s a good idea to wipe the control
panels clean after each use of the
oven, For a more thorough cleaning,
the control knobs can be pui.led offthe knob stems and, on models so
equipp@ tie glass upper control
panel can be cleaned on both sides.
B=-
To remove the glass panel:
1. Remove the screw on each end of
the backsplash.
2. Remove the metal strips on each
end that hold the glass in place.
3. Remove the clock knob and nut
securing the light switch.
4. Carefidly remove the glass and
place it on a smooth, flat surface.
Clean it with miid soap and water,
rinse with clean water and dry with
a soft cloth. Caution: Do not use
abrasive cleansers, strong liquid
cleaners or oven cleaners. on glass or
enamel control panel surfaces—they
will darnage the finish.
Outer Enamel Finish
When the range is cool, wash the
enarnel finish with mild soap and
water or a mild abrasive cleanser
applied with a damp cloth. Rinse
with clean water and dry with a soft
cloth. If you wish, occasionally
apply a thin coat of mild cleaning
wax to help protect the finish.
To avoid marring the surface of
the range and to prevent it from
becoming dull, don’t slide heavy
pans across it. If you spill fds with
a lot of acid or high sugar content,
clean them up as soon as possible. If
allowed to remain, these fds could
cause a dull spot. Also, never use
harsh abrasive cleansers. They could
permanently damage the enamel
surface.
-’
Page 18

care and cleaning (continued)
. .
Brushed Chrome Finish
Model JGBC17GEJ
Clean the brushed chrome top
with warm, soapy water or an allpurpose household cleaner and
immediately dry it with a clean, soft
cloth. Take-care to dry the surface
following the “grain.” To help
prevent finger marks after cleaning,
spread a thin film of baby oil on the
surface. W@e away excess oil with a
clean, soft cloth. A good appliance
wax will help protect this finish.
Oven Light Bulb
Replacement
The light bulb is located in the
upper left corner of the oven.
Before replacing the bulb,
disconnect electric power to the
range at the main fuse or circuit
breaker panel or pull the range
power cord plug from the electrical
outlet. Let the bulb cool completely
before removing it. Do not touch a
hot bulb with a damp cloth as the
bulb will break.
Replace with a high temperature
appliance bulb of the same wattage.
Removable oven Door
The oven door is removable to
make the interior more accessible. :
Open the oven door fully and
remove the two Phillips screws that
hold the door to the hinges. Then
close the door to the automatic stop
position (at about 3 inches open),
and lift the door straight up and off
the hinges. (Due to th~ large amount
of induration and the construction
of the door, it is heavy. )
To replace the oven door, make ‘!
sure the hinges are in the “out”
position. Position the slots in the
bottom of the door squarely over
the hinges. Then lower the door
slowly and evenly over both hinges
at the same time. If hinges snap
back against the oven frame, pull
them back out. When the door is
in position, open it fully and insert
the two Phillips screws.
@
y
Note: Care should be taken not to
place hands between the spring
hinge and the oven door frame as
the hinge could snap back and
pinch fingers.
18
.-
-,.-..——
Page 19

knovable ovenBottom
Oven Shelves
YOU Can remove the porcelain
enamel oven bottom for cleaning
outside the oven.
To remove the ov”n bottom:
1. Remove the oven shelves.
2. Remove the two knurled hold-
down screws at the rear of the oven.
If they are too tight to remove by
hand, use a coin or screwdriver.
3. To lift out the oven bottom,
place your fingers in the slots in the
bottom and Iifi the rear of the oven
bottom up and back until the oven
bottom is clear of the lip at the front.
Then lifi the bottom up and out.
Ovenshelves may be cleaned with
a mild abrasive cleanser following
manufacturer’s directions. After
cleaning, rinse the shelves with
clean water and dry with a clean
cloth. To remove heavy, burned-on
soil, soapy metal pads may be used
following manufacturer’s directions.
After scrubbing, wash with soapy
water, rinse and dry.
Broiler Pan & Rack
After broiling, remove the broiler
rack and carefully pour off the
grease. Wash and rinse the pan
and rack in hot, soapy water.
If food has burned on, sprinkle the
broiler rack while hot with detergent
and cover with wet paper towels or
a dish cloth. Burned-on foods will
then soak loose while the meal is
being served.
The broiler pan and rack are
designed to allow dripping fat to
drain and be kept away from the
high heat of the broiler. Do not
cover the rack with aluminum foil
or use the pan without the rack
because the exposed fat may
catch fire.
Do not store a soiled broiler pan
and rack in the broiler compartment
or oven.
To replace the oven bottom, place
it in the oven with the back raised
about 6 to 8 inches or until you can
insert the front of the oven bottom
under the hold-down lip atthe front.
Then push the back of the oven
bottom down filly into place on the
metal flanges and insert the holddown screws.
DO N~ place a sheet of aluminum
foil on the bottom of the oven. If
you do, your f~ds may not cook
properly. The oven finish may be
damaged. And there may bean
increase in heat on the outside
surfaces of the oven.
--—_
19
Page 20

Minor Adjustments YouCan Make
-“OvenThermostat
Adjustment
The temperature control in your
- new oven has been carefully adjusted
to provide accurate temperatures.
However, if this oven has replaced
one you have used for several years,
you may notice a difference in the
degree of browning or the length of
time required when using your
favorite recipes. Oven temperature
controls have a tendency t~ “drift”
over a period of years and since
this drift is very gradual, it is not
readily noticed. Therefore, you
may have become accustomed to
your previous oven which may
have provided a higher or lower
temperature than you selected.
Before attempting to have the
temperature of your new oven
changed, be sure you have followed
the baking time and temperature of
the recipe carefully. Then, after
..
you have used the oven a few times
and you feel the oven is too hot
or too cool, there is a simple
adjustment you can make yourself
on the OVEN TEMP knob.
Pull the knob off the shaft and look
at the back side. There is a disc in
the center of the knob skirt with a
series of marks opposite a pointer.
the direction of arrow for LOWER.
Each mark will change the oven
temperature approximately 2C)°F.
We suggest that’you make the
adjustment one mark from the
original setting and check oven
performance before making any
additional adjustments.
After the adjustment is made,
press skirt and knob together and
retighten screws so they are snug,
but be careful not to overtighten.
Re-install knob on range and
check performance.
Note: After an adjustment has
been made to the OVEN TEMP
knob, OFF and BROIL will not
line up with the indicator mark on
the control panel as they previously
did. This condition is normal and
will not create a problem.
Oven Door Height
Adjustment
Repeated openings and closings
can cause the oven door to work
itself out of adjustment. One side
may close higher than the other,
and the door may not seal properly.
To adjust the height of the door:
1. Remove the door (see page 18).
oven Burner
Air Adjustment Shutter
The air adjustment shutter for the
oven burner regulates the flow of
air to the ~lame.
The shutter for the oven burner is
near the back wall of the oven
behind the broiler drawer.
1
I
To reach the shutter, remove
the oven bottom (page 19) and the
burner baffle.
To adjust the flow of air to the
burner, loosen the Phillips head
screw and rotate the shutter to
allow more or less air into the
burner tube as needed.
J
f!?
,SE-KW64
‘.ERN@
\
Loosen only the
locking screws
To determine if the burner flame
is proper, light the burner. The
flame should have 1/2”to 3/4” blue
cones with no yellow tipping. When
the baffle is back in place, the
flame will resettle.
2. With a thin-bladed screwdriver,
turn the screw in the opening at
the top of each door hinge. Turn
cloctiise to lower, counterclockwise
to raise each side of the door.
3. Replace the door, close it, and
check alignment and door seal.
20
..----
/
@
~+
L
Note position of
pointer to marks
before adjustment
Note to which mark the pointer is
pointing. To make an adjustment,
carefully loosen (approximately
one turn), but do not completely
remove the two screws that hold the
skirt to the knob. Hold the knob
blade in one hand and the outer
skirt in the other hand.
To raise the oven temperature,
move the pointer in the direction of
the arrow for RAISE. To lower the
temperature, move the pointer in
...
Page 21

cleaning Guide
Note: Let ~an~e/oven pafis cool before touching or handling.
45’1
%
PART
MATERIALS TO USE
GENERALDIRECTIONS
Broiler fin and Rack
Control
Outside Glass Finish
IMetal, including
Side
Trims, Trim
Strips and Brushed
Chrome Cooktop
Outer Enamel
Finish*
Painted Surfaces
.
..>,
.,.
J
c
Shelves
Knobs
● Soapand Water
● Soap-Filled Scouring Pad
. Plastic Scouring Pad
● Mild Soap and Water
● Soap and Water
● Soap and Water
● Paper Towel
● Dry Cloth
● Soap and Water
● Soap and Water
● Soapand Water
● Soap-Filled Scouring Pad
● Plastic Scouring Pad
Drain fat, cool pan and rack slightly. (Do not let soded pan and rack stand in
compartment to COOI.)Sprinkle detergent on rack and pan. Fill pan with
broiler
warm water and spread cloth or paper towel over rack. Let pan and rack stand
a few minutes. Wash; scour if necessary. Rinse and dry. OPTION: Clean pan
for
and rack in dishwasher.
Pull off knobs. Wash gently but do not soak. Dry and return controis to range.
Clean outside of cooled black glass door with a glass cleaner that does not
contain ammonia.
Wash other glass with cloth dampened in soapy water. Rinse
and polish with a dry cloth. If knobs are removed, do not allow water to run
down inside surface of glass while cleaning.
Wash, rinse and then polish with a dry cloth. DO N~ USE steel wool,
abrasives, ammonia, acids, or commercial oven cleaners which may damage
the finish.
Avoid cleaning powders or harsh abrasives which may scratch the enamel.
If acids should spill on the range while it is hot, use a dry paper towel or cloth
to wipe up right away. When the surface has cooled, wash and rinse.
For other spills, such as fat smatterings, etc., wash with soap and water when
cooled and then rinse. Polish with a dry cloth.
Use a mild solution of soap and water. Do not use any harsh abrasives or
cleaning powders which may scratch or mar surface.
Shelves can be soaked in dishwasher or cleaned by hand using soap and water.
Rinse thoroughly to remove any soap after cleaning.
Surface Burner
Grates
Chrome-Plated
Drip Pans
Surface Burners
● Soap and Water
● Soap-Filled Scouring Pad
(Non-metallic)
● Soap and Water
s Stiff-Bristled Brush
● Soap-Filled Scouring Pad
(Non-metallic)
..
● Solution for Cleaning
Inside of Coffee Makers
c Soap and Water
● Mild Abrasive Cleanser
● Damp Cloth
Lift out when cool. Soak 5 to 10minutes if desired in warm solution of
dishwasher detergent. Scour with materials mentioned here to remove burnedon food particles.
Clean at sink or in dishwasher. Wipe drip pans after each cooking so unnoticed
spatter will not “burn on” next time you cook. To remove “burned-on” spatters,
use any or all cleaning materials mentioned. Rub
lighdy with scouring pad to
prevent scratching of the surface.
Wipe off burner heads. If heavy spillover occurs, remove burners from range
(see page 17)and soak them for 20 to 30 minutes in solution of hot water and
product for cleaning inside of coffee makers. such as Dip-It brand. If soil does
not rinse off completely. scrub burners with soap and water or a mild abrasive
cleanser and a damp cloth. Dry burners in a warm oven for 30 minutes before
returning them to the range.
Removabie Porcelain
Enamel Oven Bottom*
● Soap and Water
● Commercial Oven Cleaner
. Soap-Filled Scouring Pad
. Plastic Scouring Pad
Remove oven bottom panei from oven before cleaning. When cool, wipe with
mild soap and water, especially after cooking meat. For heavy soil, use nonabrasive cleaner and follow label instructions, using thin layer of cleaner. Wipe
or rub lightly on stubborn spots. Use of rubber gloves is recommended.
*Spillage of marinades, fruit juices, and basting materials containing acids may cause discoloration, so should be blotted up immediately. Take
care not to touch hot poflion of oven. When s&face is cool, clean {nd rinse. CAUTION: Light bulbs can get warm enough to break if touched
with moist cloth. When cleaning, avoid warm lamp.
,
,Y
c
21
Page 22

.. ,~: Questions?
~ Use This Problem Solver
PROBLEM
TOPBURNERS
DO N(YI’LIGHT’
OVEN DOES N(YI’
COOK PROPERLY
CLOCK DOES
NOI! WORK
POSSIBLE CAUSE AND/OR WHAT TO DO
● Pilots are not lit. Remove or Iiil cooktop and hold lighted match next to pilot opening
between front and rear burners. On modeis with electric ignition, make sure electrical
plug is plugged into a live power outlet.
● Burner holes on side of burner may be clogged. Remove and clean them.
● Burners may not be fitted correctly onto the mounting brackets. Remove and reinstall
them properIy.
● Make sure thermostat capillary bulb (Iocated in upper portion of oven) is in correct
position, not touching oven sides and not coated with anything.
● Aluminum foil being used improperly in oven.
c Oven vent blocked on top of range.
o ~ncomect coo~a~e
beingused. Check each cooking section for cookware tips or
recommendations.
● Oven bottom not securely seated in position.
● OVEN TEMP knob set incorrectly or not turned on.
. Check common baking, roasting and broiling problems on pages 11-14.
*Range electrical plugmustbe securelyseatedin a livepoweroutlet. Check for blown
fise ortrippedcircuitbreaker.
OVENLIGHTDOES
NCXI’COMEON
STROhJG OIX)R
● B@ may be loose or burned out.
● Electrical plug mustbe plugged into alive power outlet.
● Improper air/gas ratio in oven. Adjust oven burner air shutter.
If you need more help.. call, toll free:
GE Answer Cente#
800.6242000
consumer information service
Page 23

If YouNeed Service
To obtain service, see your warranty
on the back page of this book.
We’re proud of our service and
want you to be pleased. If for some
reason you are not happy with the
service you receive, here are three
steps to follow for further help.
FIRST, contact the people who
serviced your appliance. Explain
why you are not pleased. In most
cases, this will solve the problem.
NEXT, if you are still not pleased,
write all the details-including
your phone number—to:
Manager, Consumer Relations
GE Appliances
Appliance Park
Louisville, Kentucky 40225
FINALLY, if your problem is still
not resolved, write:
Major Appliance
Consumer Action Panel
20 North Wacker Drive
Chicago, Illinois 60606
i
I
[
I
23
Page 24

YOUR GENERAL ELECTRIC RANGE
..
Save proof of original purchase date such as your sales slip or Cancelled check to establish warranty period.
.WHAT IS COVERED
WARRANTY
FULL ONE-YEAR WARRANTY “
For one year from date of original
purchase, we will provide, free of
charge, parts and service labor
in your home to repair or replace
any part of the range that fails
because of a manufacturing defect.
This warranty is extended to
the original purchaser and
succeeding owner for products
purchased for ordinary home use
in the 48 mainland states, Hawaii
and Washington, D.C. In Alaska the
warranty is the same except that it is
LIMITED because you must pay to
ship the product to the service shop
or for the service technician’s travel
costs to your home.
All warranty service will be provided
by our Factory Service Centers or
by our authorized Customer Care@
servicers during normal working
hours.
Look in the White or Yellow Pages
of your telephone directory for
GENERAL ELECTRIC COMPANY,
GENERAL ELECTRIC FACTORY
SERVICE, GENERAL ELECTRIC-
HOTPOINT FACTORY SERVICE or
GENERAL ELECTRIC CUSTOMER
CARE” SERVICE.
any
,
WHAT IS 1$1~COVERED “sewjcet@stOyourhometO
teach you how to use the product.
Read your Use and Care material.
If you then have any questions
about operating the product,
please contact your dealer or our
Consumer Affairs office at the
address below, or call, toll free:
GE,Answer Cente@ “
800.626.2000
consumer. information service
s Improper installation.
If you have an installation problem,
contact your dealer or installer.
You are responsible for providing
adequate electrical, gas, exhausting
and other connecting facilities.
Some statesdo not allow the exclusion or limitation of incidental or consequential damages, so the above limitation or exclusion
may not apply to you. This warranty gives you specific
Toknow what your legal rights are in your state, consult your local or state consumer affairs office or your state’s Attorney General.
Warrantor: General Electric Company
If further help is needed concerning this warranty, write:
Manager—Consumer Affairs, GE Appliances, Louisville, KY 40225
legal rights, and you may also have other rights which vary from state to state.
● Replacement of house fuses or
resetting of circuit breakers.
● Failure of the product if it is used
for other than its intended purpose
or used commercially.
● Damage to product caused
by accident. 5:% floods cr acts
of God.
WARRANlOR IS NOT RESPONSIBLE
FOR CONSEQUENTIAL DAMAGES.
I
4
E2?a
8-88
JGBC16GPJ
JGBC16GEJ
JGBC17GEJ
 Loading...