

Page 1

Anti-TipBracket
—
ApplianceRegistration
CareandCleaning
3,5 Preheating
2 Roasting,RoastingGuide 14
16-20
Shelves
ControlPanel 16 ThermostatAdjustment
13
11,19
21
Features
FlooringUnderRange
Leveling
Lift-UpCooktop
ModelandSerialNumbers
Oven
-
.AirAdjustment 21
Baking,BakingGuide
BroilerPanand Rack
6,7 VentDuct
5 ProblemSolver
5
16
2
RepairService 23
SafetyInstructions
SurfaceCooking
10,11 BurnerGrates
Burners
12,13
ClockandTimer
19,20” ControlSettings
Broiling,BroilingGuide 15 CookwareTips
ContinuousCleaningCare 17
ControlSettings
DoorRemoval
Light
LightingInstructions
OvenBottomRemoval
11 FlameSize
19
11 Warranty
10
18
Drip Pans 16,20
LightingInstructions
BackCover
GEAnswefCenterm
8oa62&2flQo
11
22
2-5
8,9
16,20
19,20
9
8
9
8
8
Page 2

i%eadthis boolicarefkBlly.
--—
1$isintendedtohelpyouoperate
andmaintainyournewrange
properly.
Keepithandyforanswerstoyour
questions.
Ifyoudon’tunderstandsomething
or needmorehelp,write(include
yourphonenumber):
ConsumerAffairs
GEAppliances
AppliancePark
Louisville,KY40225
write down the model
and serial numbers.
You’llfindthemon a labellocated
intheburnerboxunderthe
cooktop.Seepage6.
Thesenumbersarealsoontile
ConsumerProductOwnership
RegistrationCardthatcamewith
yourrange.Beforesendinginthis
card, pleasewritethesenumbers
here:
klodelNumber
SerialNumber
Usethesenumbersinany
correspondenceor servicecalls
concerningyourrange.
mPoRTMT
,sMTY ~mc~
The ~alifornia SafeDrinking
~ater and ToxicEnforcement
~Actre~uifesthe Governorof
~alifo;nia fopublish a iistof
,+ub$taficesbown tb the state
to caysec~ricerand re~uires
businessestowarricustomers ~
ofpot~ntialexposuretOsuch
~,substances.
Gas appliancescan cause
~mipbr
~subimncei,namely,benzene,
‘.fo~rnald~hydeand~oot,caused
primarily“bytheincomplete
.cdmtiustitin’ofnaturalgasorLP
kels: Properlyadjustedranges,
~~in~ieatedbyabluishratherthan
.;a yelltiwflatie,willminimize
in~omplete”.tiornbustion.ExposuIe
toth+p stibstancescanbe ,
:miti~mi<~~~furtherbyventing
:,’wi~hanopenwindowortising.”
avenii~tition’fan”.drhood.
,.
e~posuretothreeofthese
,*.
.-——
‘-;
If you received
a am~ed mngee o e
Immediatelycontactthe dealer(or
builder)thatsoldyoutherange.
save time and money.
Before yol~request
~~~~~~~** ~
ChecktileProblemSolveron
page 22. It listscausesofminor
operatingproblemsthatyoucan
COrreCfyourself.
2
Page 3
theg~oun~in~Ofthehomeelectrical
s~;stem,it is
~;sponsibilityandobligationto
haveanungroundedoutletreplaced
witha
yourpersona]
proper]y-groundedthree-
p~ong~utletinaccordancewith
theNationalElectricalCode.Do
notuseanextensioncordwith
thisappliafice.
‘Be sureallpackingmaterials
areremovedfromtherange
beforeoperatingit, topreventfire
orsmokedamageshouldthe
packingmaterialignite.
a~~~~~~~~g~~~~of~~~~~~~
trafficpath and outofdrafty
locationstopreventpilotoutage
(onmodelssoequipped)and
poorair circulation.
@B8sureyourrangeiscorrectly
adjustedbya qualifledservice
technicianor installerforthe
@CAUTION:ITEMSor
INTEmsT To CHILDMN
sHomD Nm BEsmMD
cABINEmABOWARANGE
ORONTm
OFARANGE–CHILDREN
CLIMBINGONTHERANGE
~ REACHITEMSCOULDBE
SENOUSLYINJURED.
Wm
BACKSPLASH
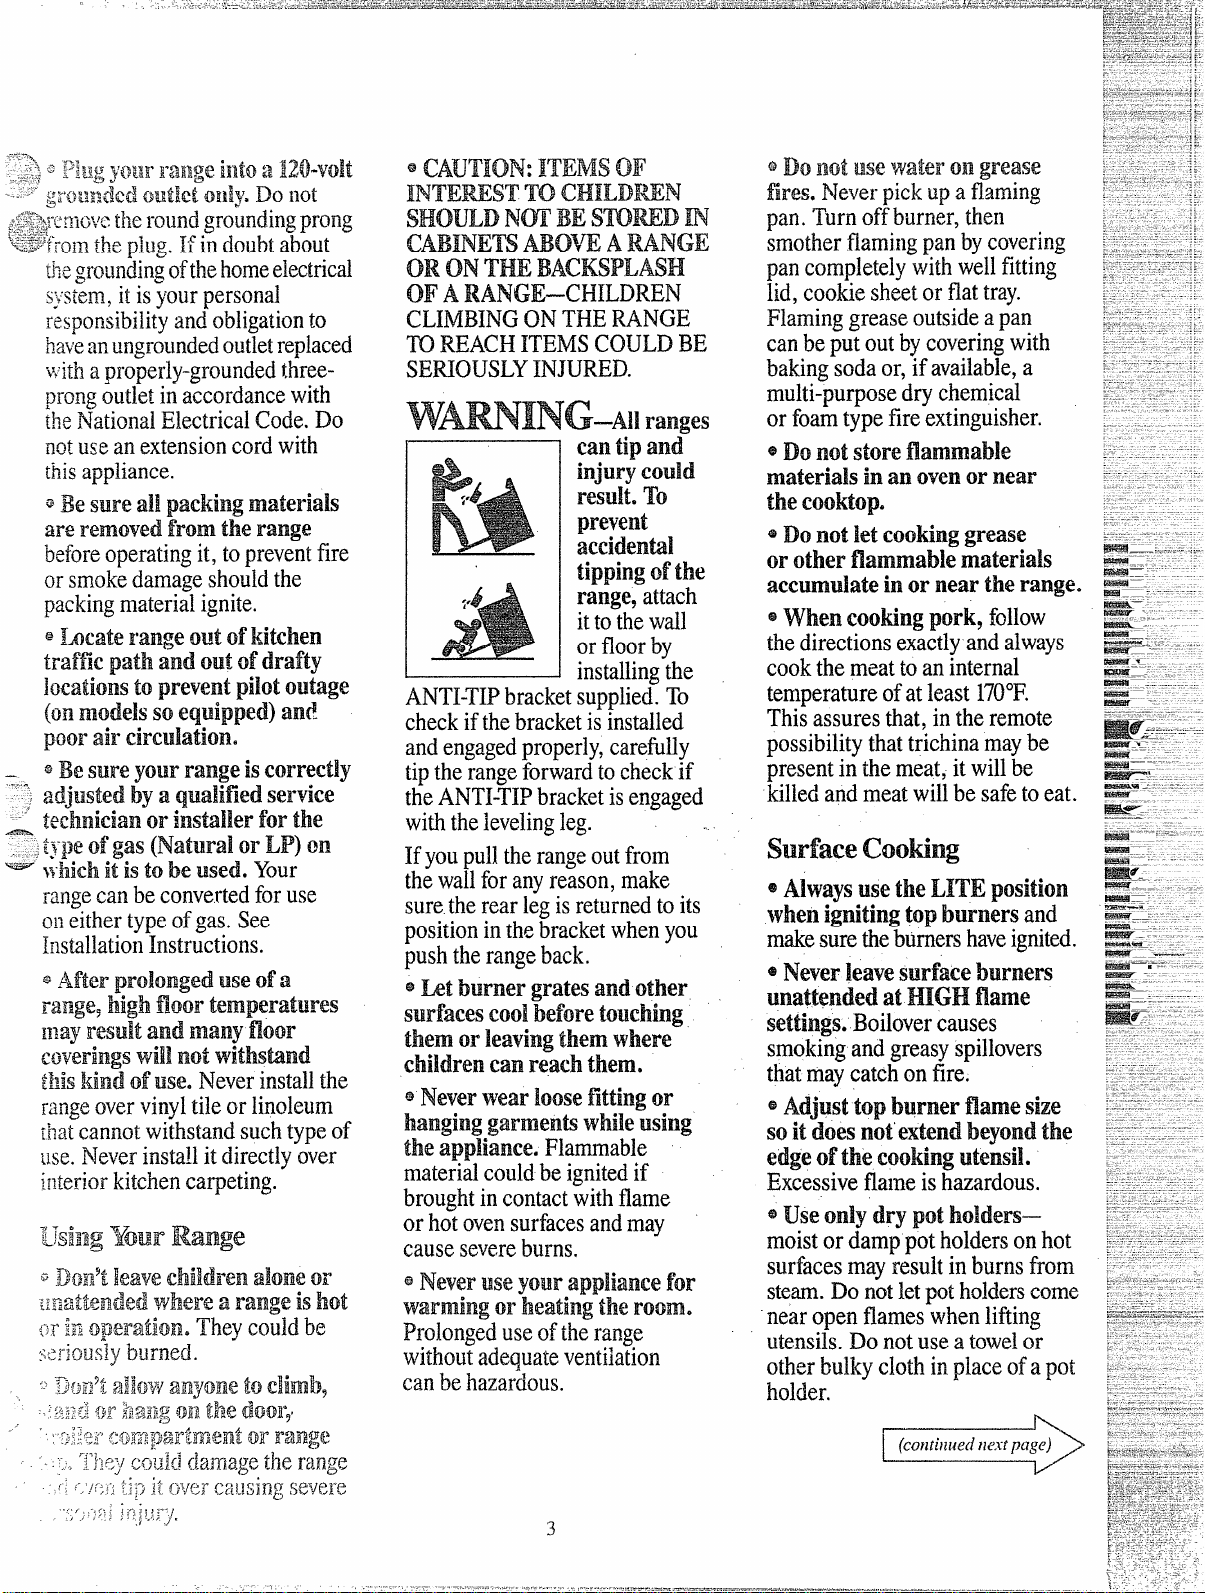
NG–A1l
cantip
injurycould
result.To
m~
ranges
and
prevent
accidenhl
tippingofthe
range,attach
ittothewdl
orfloorby
installingthe
ANTI-TIPbracketsupplied.To
checkifthebracketisinstalled
andengagedproperly,carefully
tiptherangeforwardtocheckif
theANTI-TIPbracketisengaged
withthelevelingleg.
Ifyoupulltherangeoutfrom
thewallforanyreason,make
suretherearlegisreturnedtoits
positioninthebracketwhenyou
pushtherangeback.
~ht burner gratesandother
surfacescoolbeforetouching
themor leavingthemwhere
childrencanreachthem.
eNeverwearloosefittingor
hanginggarmenk whileusing
theappliance.Flammable
materialcouldbeignitedif
broughtincontactwithflame
orhotovensurfacesandmay
causesevereburns.
QNeveruseyourappliancefor
warmingorheatingtheroom,
Prolongeduseoftherange
withoutadequateventilation
canbehazardous.
@~~ ~~~usewafer 011grease
fires.Neverpickupa flaming
pan.Turnoffburner,then
smotherflamingpanbycovering
pancompletelywithwellfittirig
lid,cookiesheetorflattray.
Flaminggreaseoutsideapan
canbeputoutbycoveringwith
bakingsodaor,ifavailable,a
multi-purposedrychemical
orfoamtypefireextinguisher.
@Donotletcookinggrease
orother
accumulateinorneartherange.
e when Cooungpork,follow
thedirectionsexactlyandalways
cookthemeattoaninternal
temperatureofatleast170°F.
Thisassuresthat,intheremote
possibilitythattrichinamaybe
presentinthemeat,itwillbe
killedandmeatwillbesafetoeat.
@AlwaysusetheLITEposition
whenig~itingtopburnersand
makesuretheburnershaveignited.
* ~ev~~~e~~e~~~f~~e~~~~~~
unattended at~GH flame
settings.Boilovercauses
smokingandgreasyspillovers
thatmaycatchonfire.
@Adjusttopburner flame size
so itdoesnotextend beyond the
edge
Excessiveflameishazardous.
e use o~ly drypotholders—
moistordamppotholdersonhot
surfacesmayresultinburnsfrom
steam.Donotletpotholderscome
nearopenflameswhenIiRing
utensils.Donotuseatoweior
otherbulkyclothinplaceofapot
holder.
flammablematerials
ofthecookingutensil.
..3
Page 4
—
e ToWlillilllizethepossibilityof
b~:r~~s,ignitionofflammable
materials,andspillage,turn
cookwarehandlestowardtheside
orbackoftherangewithout
extendingoveradjacentburners.
~Ai”way$turn surface!burner $0
OFFbeforeremovingIltensii.
ecarefullyWatchfoodsbeing
friedat HI flamesetting.
@NeverblocktheVens(air
openings)oftherange.They
providetheairinletandoutlet
whichisnecessaryfortherange
tooperateproperlywithcorrect
combustion.
@Donot usea wokonthe
cookingsurfaceifthewokhasa
rouIIdmehlringwhichis
overtheburner
gratetosupport
placed
thewok.Thisringactsasaheat
trapwhichmaydamagetheburner
grateand.burnerhead.Also,it
maycausetheburnertowork
improperly.Thismaycausea
carbonmonoxidelevelabovethat
allowedbycurrentstandards,
resultinginahealthhazard.
@Foodsforfryingshouldbeas
dryaspossibIe.Frostonfrozen
foodsormoistureonfreshfoods
cancausehotfattobubbleupand
oversidesofpan.
@Useleastpossibleamountof
fatforeffectiveshallowordeepfatfrying.
Fillingthe pantoofull
offatcancausespilloverswhen
foodisadded.
@If ~~~~~~~~~~~~~of~~~$~~
fa~ willbeusedin frying,stir
togetherbeforeheating,orasfats
meltslo~wly.
@Alwaysi~catfat slowly,and
watch
asitheats.
ouse deepfn$fhermom.eter
:zthe31e~Je~possibletoprevent
ov8Yt152tiIlgfatbeyondthe
!;rilc~kingpoint.
@USe properpansixe—~void
pansthatareunstableoreasily
tipped.Selectutensilshavingflat
bottomslargeenoughtoproperly
containfoodavoidingboiiovers
andspillovers,butlargeenough
tocoverburnergrate.Thiswill
bothsavecleaningandprevent
hazardousaccumulationsoffood,
sinceheavyspatteringorspillovers
lefionrangecanignite.Usepans
withhandlesthatcanbeeasily
graspedandremaincool..
@Useonlyglasscookwarethat
isrecommendedforuseongas
burners.
@Keepallplasticsawayfrom
topburners.
@Toavoidthepossibilityofa
burn,alwaysbecertainthatthe
controlsforal~burnersareat
OFFpositiona~dallgratesare
coolbeforeattemptingtoremove
thegrate.
@Whenflamingfoodsunder
thehood,turnthefanoff.The
fan,ifoperating,mayspread
theflame.
@Ifrangeislocatedneara
window9donotuselongcurtains
whichcouldblowoverthetop
burnersandcreatea firehazard.
@Whenapilotgoesout9(on
modelssoequipped),youwill
detecta faintodorofgasasyour
signaltorelightpilot.When ‘
relightingpilot,makesureburner
controlsareinOFFpositionand
followinstructionsdescribedon
followingpagestorelight.
~Ifyousmellgas5andyouhave
alreadymadesurepilotsarelit,
turnoffthegastotherangeand
callaqualifiedservicetechnician.
Neveruseanopenflametolocate
aleak.
@Keepovenfreefromgrease
buildupe
@PIaceovenshelvesindesired
position while oven
@Pullingoutshelftotheshelf
isCOOI.
stopisaconvenienceinlifting
heavyfoods.Itisalsoa
precautionagainstburrofrom
touchinghotsurfacesofthe
doororovenwalls.
@Don9theatunopenedfood
containersintheoven.Pressure
couldbuiidupandthecontainer
couldburstcausinganinjury.-.:
@~o~9~ use a~~~i~~~f~~~ ‘-
anywhereinthe oven except a
describedinthisbook.Misus
couldresultinafirehazardor
darnagetotherange.
@Whenusingcoo~ngor
roastingbagsinoven9followthe
manufacturer’sdirection.
@Useotiyglasscookware
thatisrecommendedforuse
ingasovens.
@Alwaysre~novebroilerpan
broilercompartmentas
from
asyoufinishbroiling.
soon
Greaseleftinthepancancatch
fireifovenisusedwithout
removingthegreasefromthe
broilerpan.
Page 5
Flooringunder
theRange
Yourrange, likeso manyother
householditems,
can settle
suchas cushionedvinyl.When
movingtherangeonthistypeof
flooring,usecare.
Donot insta~lthe rangeover
kitchen
placeaninsulatingpador sheetof
l/4-inch-thickplywoodbetween
therangeandcarpeting.
intosoftfloorCoverings
carpetingunlessyou
isheavy and
SAVETmE
~NSTRUCr~IONS
Men thefloor covetingends
thefront oftherange,theareathat
therangewillrestonshouldbe
builtupwithplywoodor similar
materialtothesamelevelor higher
thanthefloorcovering.Thiswill
allowthe rangetobemovedfor
cleaningorservicing.
at
bvelkg theRange
Levelinglegsare locatedoneach
cornerofthebaseoftherange.
Yourrangemustbelevelinorderto
producepropercookingandbaking
results.Afteritisinits find location,
placea levelhorizontallyonan
ovenshelfandcheckthelevelness
fronttobackandsidetoside.Level
therangebyadjustingtheleveling
legsor byplacingshimsunderthe
cornersas needed.
OneoftherearlevelingIegswill
engagetheANTI-TIPbracket(allow
forsomesidetosideadjustment).
Allowaminimumclearanceof 1/8”
betweentherangeandtheleveling
legthatistobeinstalledinto
theANTI-TIP bracket.
I
/
Page 6
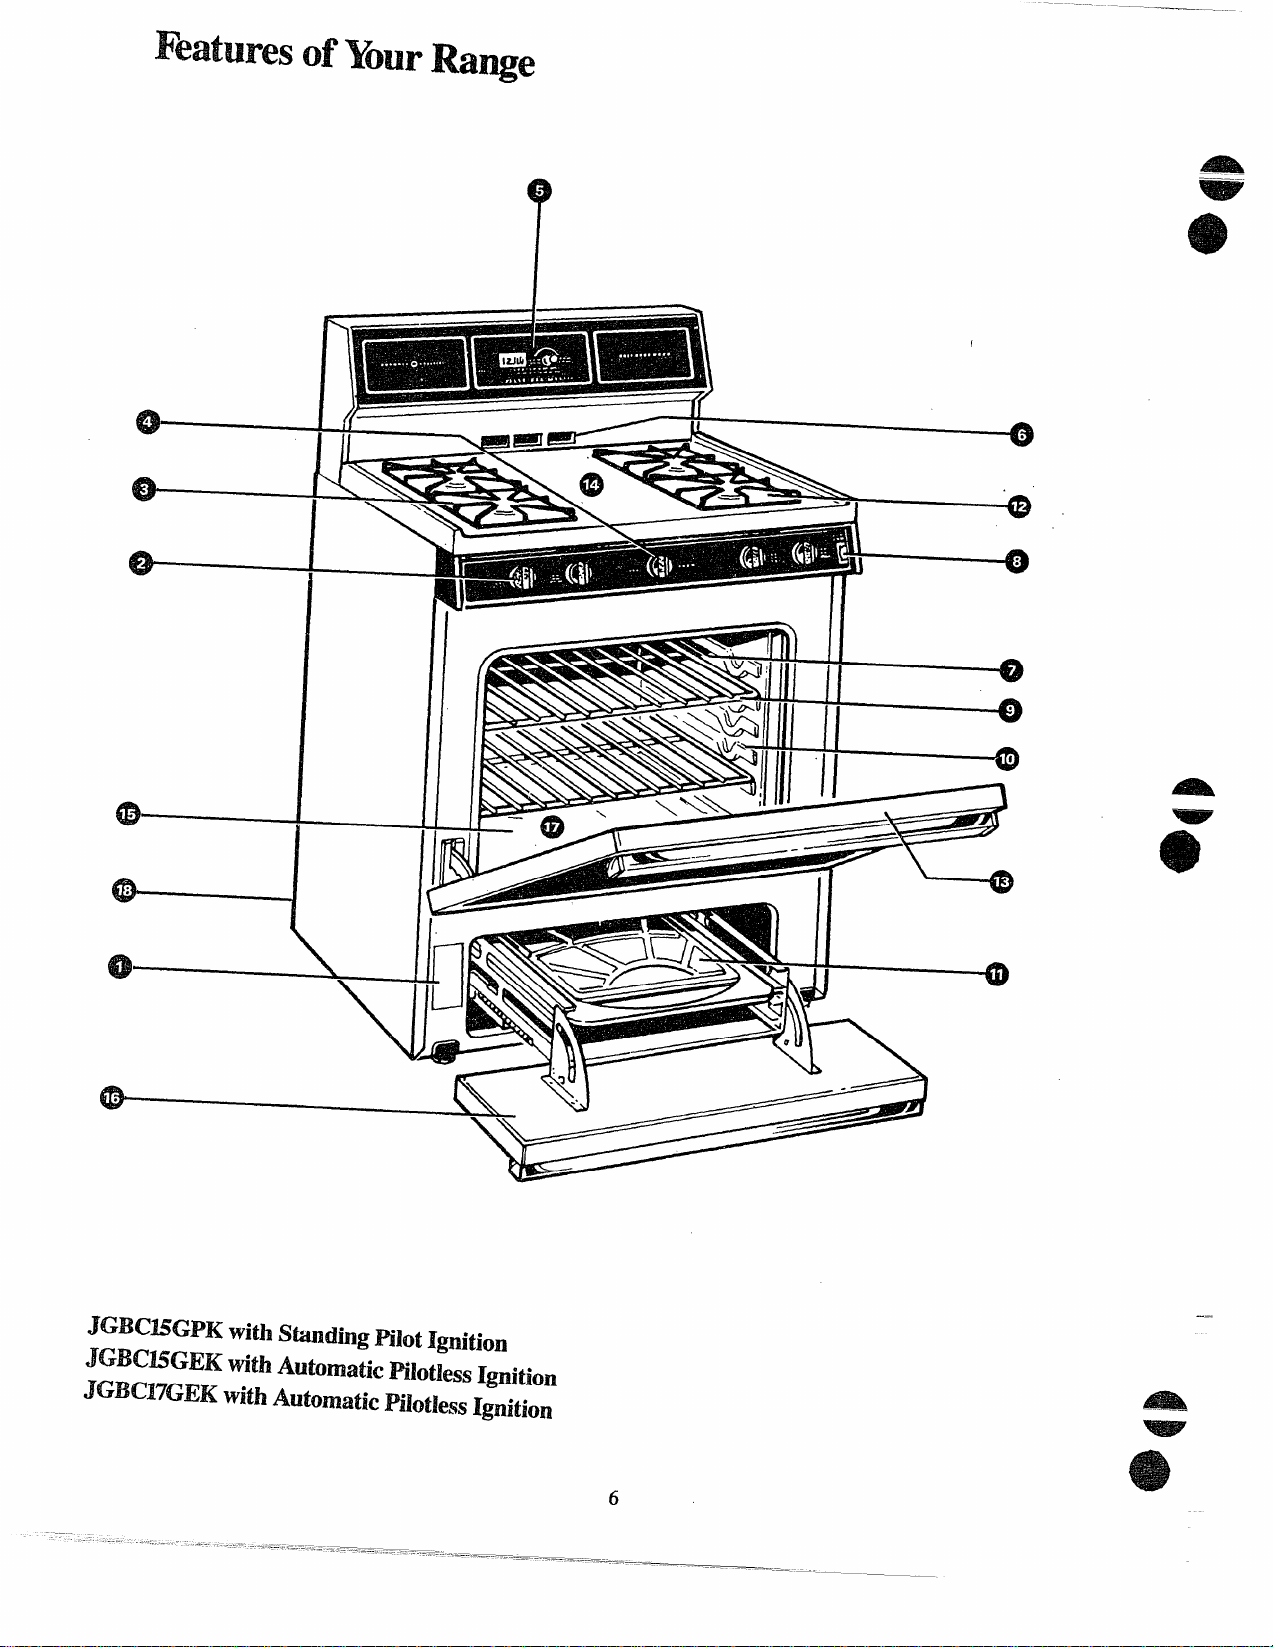
Featuresof YourRa~e
e
JGBCBGPK withStindingHlotIgnition
JGBCKGEKWthAutomaticHlotlessIgnition
JGBC17GEKwithAutomaticRlotlessIgnition
.
6
Page 7
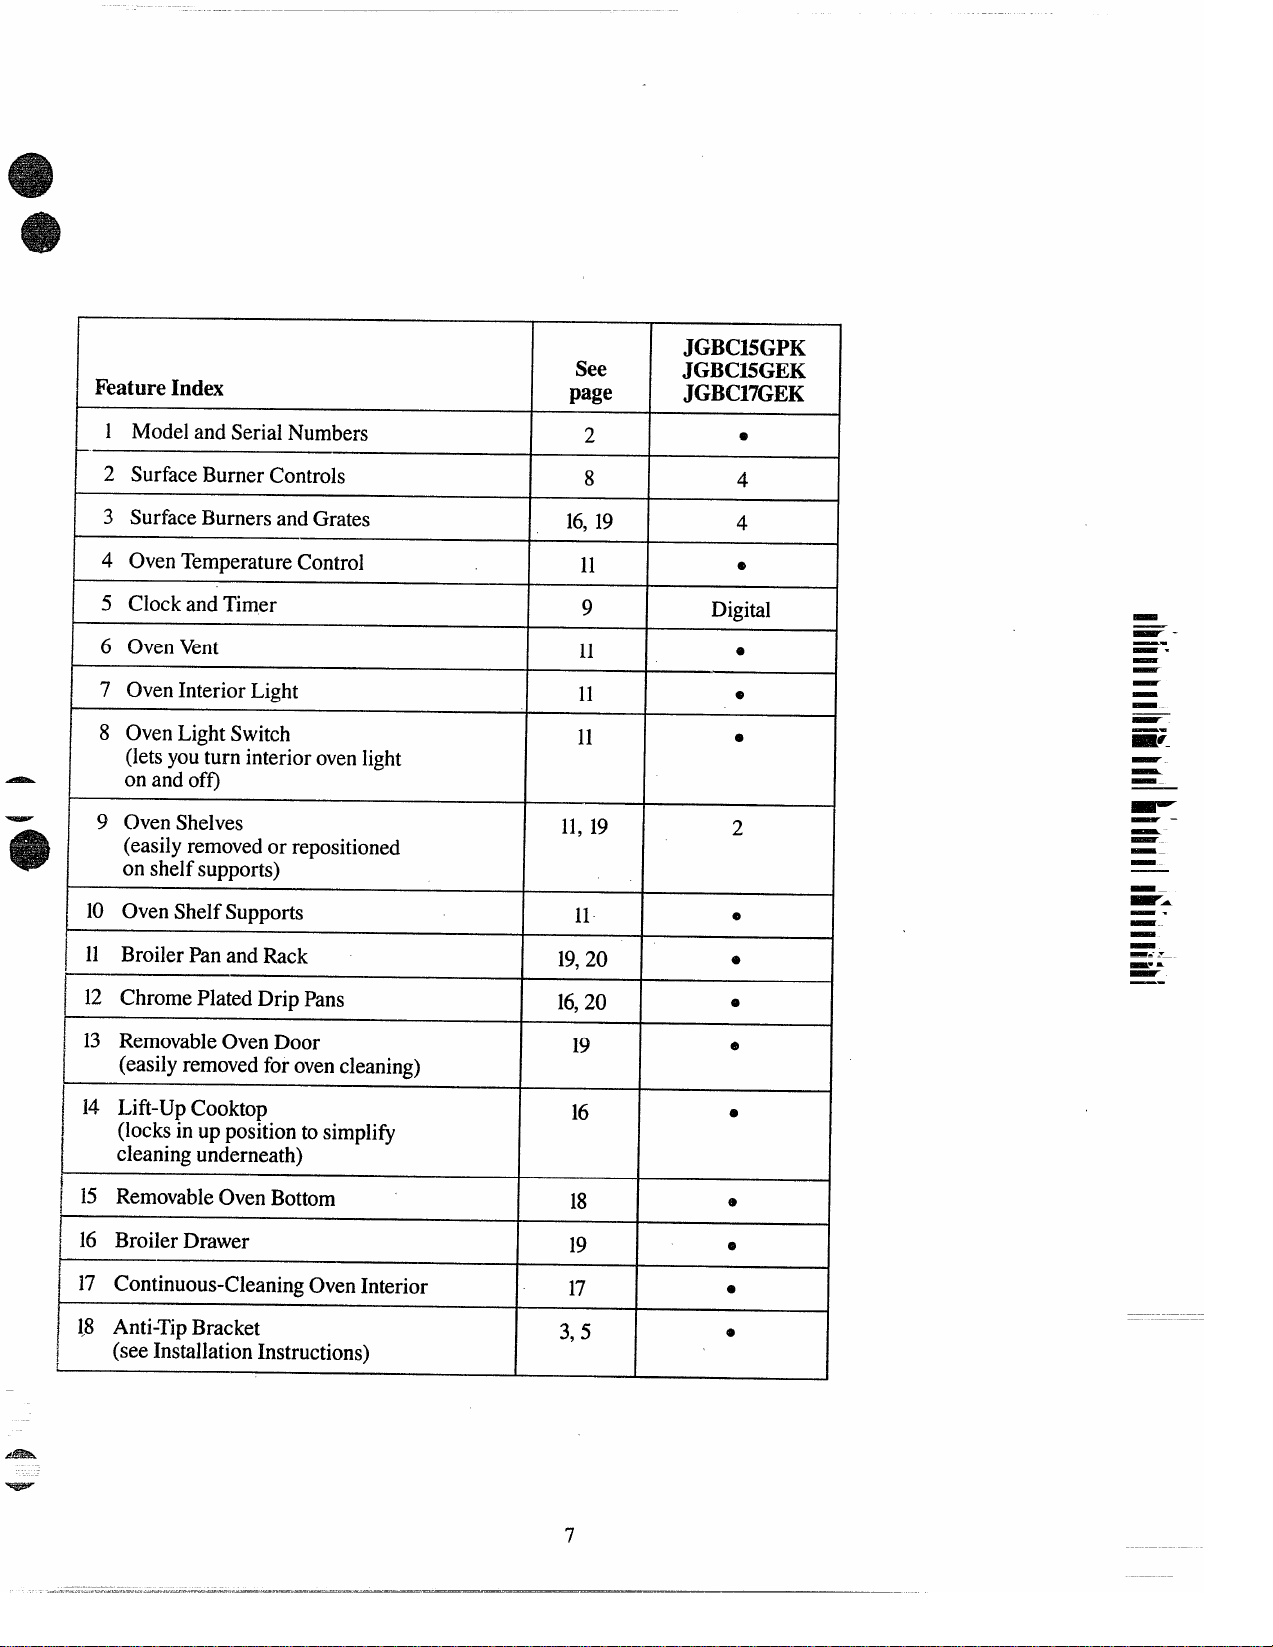
FeatureIndex
See
page
JGBC15GPK
JGBC15GEK
JGBC17GEK
1 ModelandSerialNumbers
2 SurfaceBurnerControls
3 SurfaceBurnersandGrates
4 OvenTemperatureControl
5 ClockandTimer
6 OvenVent
7 OvenInteriorLight
8 OvenLightSwitch
(letsyouturninteriorovenlight
onandoff)
9 OvenShelves
(easilyremovedor repositioned
on shelfsupports)
10 OvenShelfSupports
11 BroilerPanandRack
12 ChromePlatedDripPans
2
8
16,19
I
11
9 Digital
11
11
11
11,19
11
I 19,20
16,20
I
9
4
4
~-
—.
-.
—
e
e
2
e
—
-–
——
-
-
E.- .
m! =
—.
.
13 RemovableOvenDoor
(easilyremovedforovencleaning)
14 LiR-UpCooktop
(locksinuppositiontosimplify
cleaningunderneath)
15 RemovableOvenBottom
(
16 BroilerDrawer
~
17 Continuous-CleaningOvenInterior
1,8 Anti-TipBracket
(seeInstallationInstructions)
j
19
16
18
19
17
3,5
7
e
e
e
e
e
Page 8
Howb Seld Me Sh
,
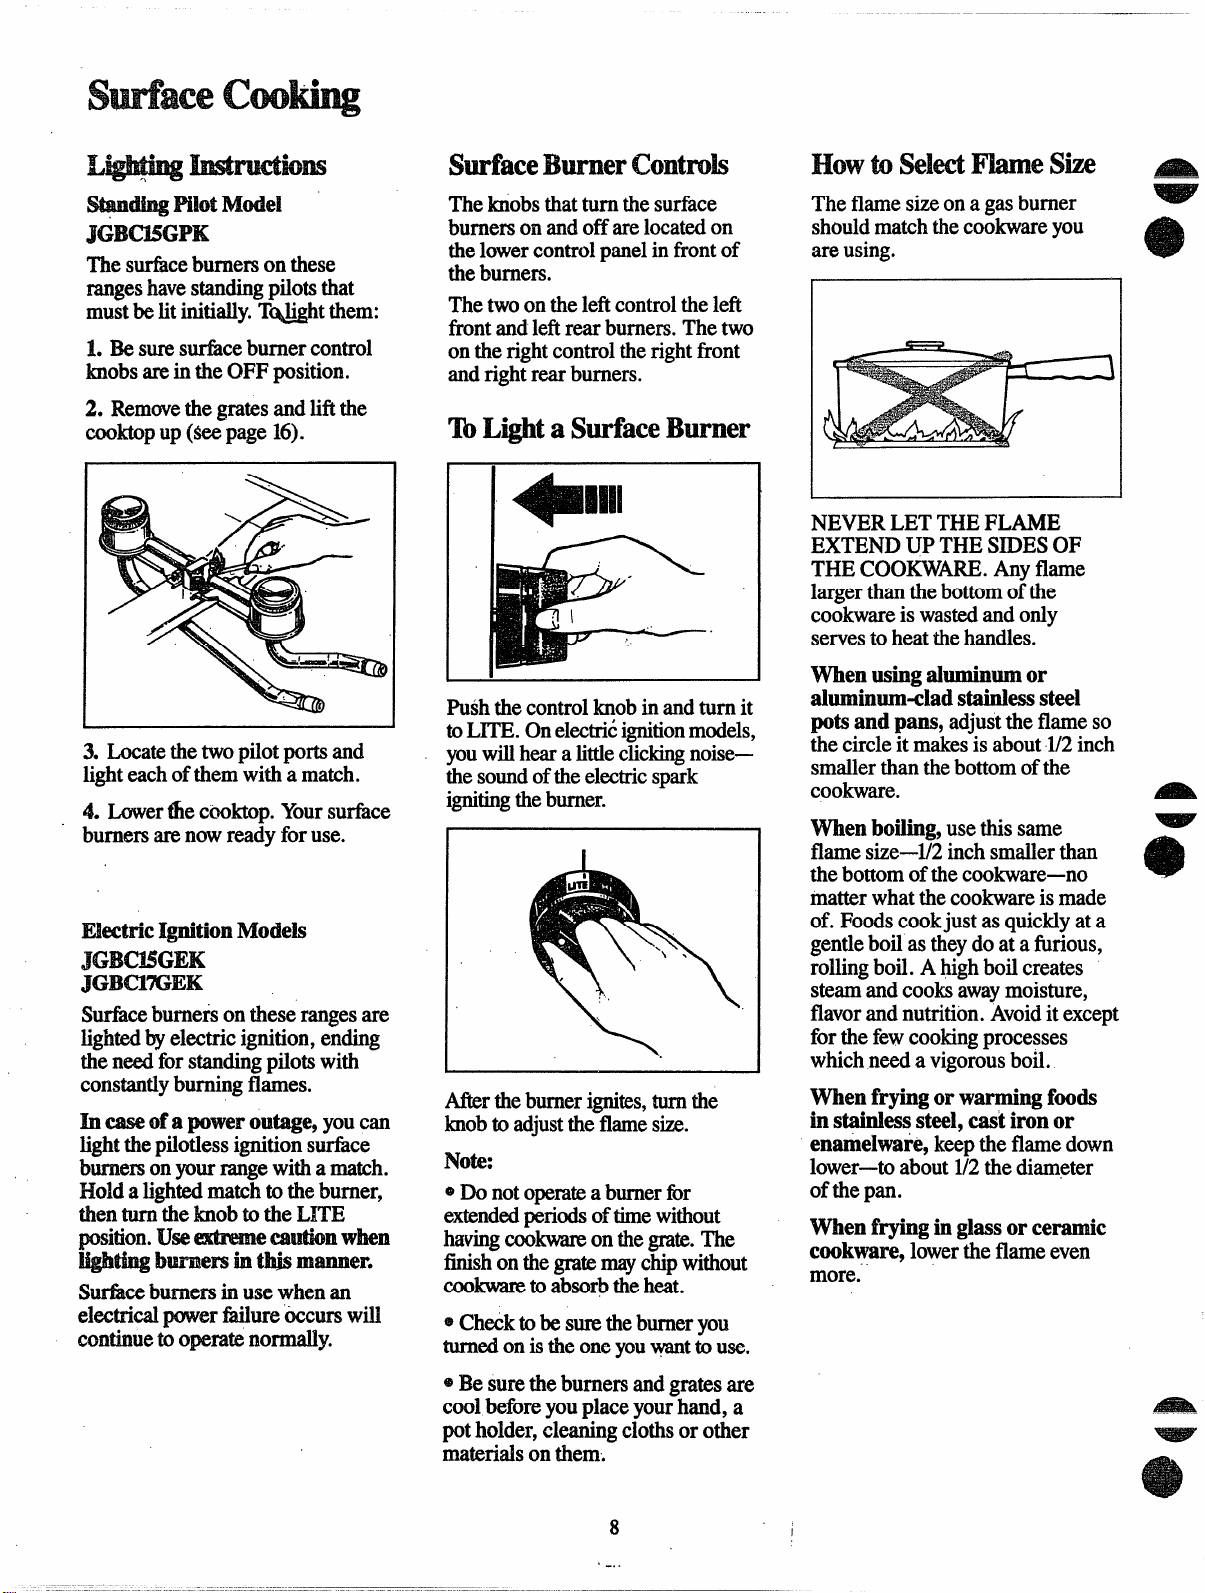
-* MBotMdel
JGBmGPK
Theshce burnemonthese
rangeshavestandingpilotshat
mustbelitiniti~y. T~ht them:
1. W surestice burnercontrol
bobs areintheOFFposition.
2. Removethegratesandlifithe
cuoktopup ($eepage16).
3. Locatethe twopilotportsand
lighteachofthemwithamatch.
4. Wer *e cooktop.Yoursufice
burnersarenowreadyforuse.
Stice burne~sontheserangesare
lightedbyelectricignition,ending
theneedforstandingpilotswith
constantlyburningflames.
h-of apwer ou~e, youcan
lightthepflotlessignitionsufice
burnerson~ur rangewithamatch.
Holdalightedmatchto theburner,
hen turntheknobtotheL~E
pition. U* ~ a*n wkn
W* ~-em b tm mmer.
S@ce burnersin u= whenan
electrid powerMure tiurs w~
continuetooperaknotiy.
Theknobsthatturnthesufice
burnersonandoffarelocatedon
thelowercontrolpanelinfrontof
theburners.
Thetwoontheleftcontrolthe left
frontandleftrear burners.Thetwo
ontie right controltherightfront
andrightrearburners.
Pushthecontrolknobinandturnit
toLITE.Onelectri~ignitionmodels,
youwillhearalitie clickingnoise—
thesoundofthe electricspark
ignitingtheburner.
Wr the burnerignites,turnthe
knobtoadjusttheflamesize.
Note:
~Donot operatea burnerfbr
extendedperiodsoftimewithout
havingcoo- onthegrate.The
fish onthegratemaychipwithout
mkware toabsorbthe heat.
~Checktobesm theburneryou
turnedonistheoneyouwanttouse.
Theflamesizeonagasburner
shouldmatchthe cookwareyou
areusing.
?
I
NEVERLET THEFLAME
EXTENDUPTHE SIDESOF
THECOO~ARE. Anyflame
largerthanthebottomofthe
cookwareis wastedandonly
servestoheatthehandles.
men usingaluminm or
alurninm-cladstainlesssteel
pfi andpans,adjusttheflameso
thecircleitmakesisabout1/2inch
smallerthanthe bottomofthe
cookware.
men boiling,usethissame
flamesize-1/2 inchsmallerthan
thebottomofthecookware-no
matterwhatthecookwareismade
of. Foodscookjustasquicklyata
gentleboil as theydo at a firious,
rohg boil.A highboil creates
steamandcooksawaymoisture,
flavorandnutrition.‘Avoiditexcept
forthefewcookingprocesses
whichneeda vigorousboil.
menfryingorwarmingfinds
instaidess steel,castironor
enamelwa~e,keeptheflamedown
lower—toabout1/2thediameter
ofthepan.
men fryinginglassorceramic
cookware,lowertheflameeven
more.
*
@Besuretheburnersandgratesare
cool beforeyouplaceyourhand, a
potholder,cleaningclothsor otier
materialsonthem.
8
-.
Page 9

Clwkandher
- mpof-wqeCookwre
Aluminu: Medium-weight
cookwareis recommendedbecause
itheatsquicklyandevenly.Most
foodsbrownevedy in an aluminum
skillet.Mineralsinfoodandwater
willstainbut willnotharm
aluminum.Aquickscourwitha
soap-filledsteelwoolpadafter
eachusekeepsaluminumcookware
lookingshinynew.Usesaucepans
withtight-fittinglidsforcooking
withminimumamountsofwater.
Castfion: If heatedslowly,most
skilletswillgivesatisfactoryresults.
Enamelware:Undersome
conditions,theenamelofsome
cookwaremaymelt.Followcookware
manufacturer’srecommendations
forcookingmethods.
Glass:Therearetwotypesofglass
cookware—thoseforovenuseonly
andthosefortop-of-rangecooking
(saucepans,coffeeandteapots).
—
Glassconductsheatvery slowly.
A HeatproofGlassCeramic:Can
beusedforeithersurfaceor oven
-- ”’-”
cooking.Itconductsheatvery
slowlyandcoolsveryslowly.Check
cookwaremanufacturer’sdirections
tobe sureitcanbeusedongasranges.
TosettheC1oek,turntheknobto
the leftuntilthewordsSETTIME
appearinthedisplay.Thenturnthe
knobineitherdirectionuntilthe
correcttimeisdisplayed.Aftera
slightpause,timeisset.
Wer
TosettheTimer,turntheknobto
therightuntiltheweds SETTIMER
appearinthedisplay.Thenturnthe
knobineitherdirectionuntilthe
desiredtime(minutesandseconds)
isdisplayed.Thetimerwillstart
countingdown.
Tocancelthetimer,turntheknob
ineitherdirectionuntil0:00 appears
inthedisplay.
Attheendofthetimeroperation,
Wr the3 &ps, thedisplayreturns
totimeofdayautomatically.During
thetimerfunction,thedisplay
flashesbacktothe timeofday
every10seconds.
-
—.
.——
—
——
—
—
-
~
--
-
_—
w.- .
m- =
Smess $t~l: Thismetalalonehas
poorheatingproperties,andisusually
combinedwithcopper,aluminum
orothermetalsfor improvedheat
distribution.Combinationmetal
skilletsgenerallyworksatisfactorily
ifusedatmediumheatasthe
manufacturerrecommends.
——
I
~—
——
-
—
—
—-
-
~
l—.
—
-
-
, ——
-—
~
.-.
-
-
,=
—.
-_ ———.—
Page 10

—
usingYouroven
LightingItiructiom
StandingPilotModel
JGBC15GPK
Theserangeshaveastandingoven
pilotportthatmustbelitinitially.
Tolighttheovenpilotport:
1. BesureOVENTEMPknobisin
theOFF position.
2. Openthebroilerdrawerandpull
the drawerdownflat.Putthebroiler
paninthelowestpositionandslide
thedrawerbackintotherange.This
willmakeit easierforyoutoreach
insidethebroilercompartment.
LightingImtructiom
ElectricIgnitionModeIs
JGBCMGEK
JGSC17GEK
Theovenpiloton theserangesis
lightedbyelectricignition. 2. Openboththeovenandbroiler
Tolighttheburner,turnthe
OVENTEMPknobtothedesired
temperature.Theburnershould 3. Unplugtherangefromthewall
lightwithin60 seconds.Youwill outlet,turnoffthecircuitbreaker,
heara littleclickingnoise—the
soundoftheelectricsparkigniting
theburner.
Poweroutage?
Althoughtheoven/broilerburner
ontheserangeswillnotself-light
intheeventofanelectricalpower
outage,aburnir Inusewhenan
electricalpowerfailureoccurswill
.
continuetooperatenormally.
—
C- 5’LocatetheovenPilotassemblY \
..
lighttheovenpilotduringan
To
electricalpoweroutage,carefully -
followthestepsbelow.
1. BesureOVENTEMPknobis
intheOFF position.
doorsandwait5 minutestoallow
anypilotgastodissipate.
orremovethefusetoavoidaccidental
ignitionoftheovenifelectricpower
isrestoredwhileyouarelighting
thepilot.
4. Putthebroilerpaninthelowest
position.
bylookng intothebroileropening.
Thepilotisatthebackofthebroiler
compartment,ontheleftsideof
theburner.
Note:The ovenmust beat room
temperaturebeforeyoushould
attempttolighttheovenpilot
manually.
—.
e
..
3. Findtheovenpilotportatthe
backofthebroilercompartment.
Thelongtube,runningfromfront
toback,istheovenburner.The
pilot portisattheback,aboutone
inchbelowthe burner.
4. Usinga longmatchor match
holder,reachinandlighttheoven
pilot.
Iighttheovenburner:
To
TurntheOVENTEMPknobtothe
desiredtemperature.
Wweroutage?Anelectricalpower
failurewillnotaffectalighted
standingovenpilot.
6. TurntheOVEN TEMPknobto
thedesiredtemperaturesetting.
7. Lightthe pilotwitha matchand
withdrawyourarm immediately
becausetheovenburnermaylight
inaslittle as20seconds.
8. Closetheovenandbroilerdoors.
Note:Itisnecessarytolightthe
pilotmanuallyeachtimetheoven
isusedduringapoweroutage.
@
10
I
Page 11

~ OvenTempemtureControl
oven Venk
TheOVENTEMPcontrolis
ocatedonthecontrolpanelonthe
@
frontof therange(seepage6).
Simplyturnthe knobtothedesired
cookingtemperatures,whichare
markedin25°F.incrementsonthe
dial.Itwillnormallytake60
secondsbeforetheflamecomeson.
After[heovenreachesthese]ected
temperature,theovenburnercycles—
offcompletely,thenonwitha full
flame-to keepthe oventemperature
controlled. -
ovenLight
(onmodelssoequipped)
Usetheswitchonthecontrolpanel
toturnthelighton andoff.
ovenshelves
w
Theovenisventedthroughduct
openingsat thecenterrearofthe
range,(seepage6), Do notblock
theseopeningswhencookinginthe
oven—itisimportantthattheflowof
hotairfromthe ovenandfreshairto
theovenburnersbeuninterrupted.
~ Ventopeningsandnearby
surfacesmaybecomehot.Donot
Toremovetheshe!vesfromthe
touchthem.
oven,pull themtowardyou,tilt
.
frontendupwardandpullthemout.
TorepIace,placeshelfonshelf
oHandlesofpotsandpanson the
cooktopmaybecomehotif left
tooclosetothevent.
supportwithstop-locks(curved
extensionundershelf)facingup
andtowardrearofoven.Tiltup
frontandpushshelftowardbackof
ovenuntilitgoespast“stop”on
ovenwall.Thenlowerfrontofshelf
andpushitallthewayback.
ShelfPositiom
Theovenhasfourshelfsupports—
A (bottom),B,C andD(top).
Shelfpositionsforcookingare
suggestedon BakingandRoasting
pages.
@Donotleaveplasticitemson
thecooktop—theymaymeltif
lefttooclosetothevent.
~
m~-
-.
-
-
-----
-! =
—.—=...—_–
—
——
-
-
.
Theshelvesaredesignedwithstoplocksso whenplacedcorrectlyon
theshelfsupports,theywillstop
beforecomingcompletelyoutof
theovenandwillnottiltwhenyou
areremovingfoodfromthemor
placingfoodonthem.
Whenplacingcookwareona shelf,
pullthe shelfouttothe“stop”
position.Placethecookwareon
theshelf, thenslide theshelfback
intothe oven.Thiswilleliminate
reachingintothehotoven.
—
:.:,:.:.:.
.............. . ..,:,:,:,:
I
OvenMoisture
Asyour ovenheatsup,the
temperaturechangeoftheair
intheovenmaycausewater
dropletstoformonthedoor
glass.Topreventthis,openthe
ovendoorforthefirstminute
ofovenheat-uptoletthemoist
airout.
Page 12

Baking
——
HOTVtoSet YourRange
forBaking
Positionthe shelfor shelvesin
1.
theoven,
2. Closeovendoor.TurnOVEN
TEMPknobtodesiredtemperature.
Preheatovenforatleast15minutes
ifpreheatingisnecessary.
3. Placefoodinovenoncenter
ofshelf.Allowatleast2 inches
betweenedgeofbakewareandoven
wallor adjacentcookware.
Ifcookingontwoshelvesatthe
sametime,placeshelvesabout4
inchesapartandstaggerfoodon
them.
4. Checkfoodfordonenessat
minimumtimeonrecipe.Cook... ,,
longerifnecessary.TurnOVEN
TEMPknobtoOFF andremove,
food. ~
..
Preheating
Preheatingisveryimportantwhen
usingtemperaturesbelow225”F.
andwhenbakingfoodssuchas,
biscuits,cookies,cakesandother
pastries.
Preheatingisnotnecessarywhen
roastingorforlong-timecookingof
wholemeals.
ShelfPositions
Mostbakingisdone on thesecond
shelfposition(B)fromthebottom.
Whenbakingthreeor fouritems,
usetwoshelvespositionedon.the
secondandfourthsetsofsupports
(B& D)frombottomofoven.
Bakeangelfoodcakesonfirstshelf
position(A)frombottomofoven.
Batingmps
,//”’
@Followatested,,~~~peand
measuretheingredientscarefully.
Ifyouareusingapackagemix,
followlabeldirections.
~If moistureisnotnoticeableonthe
frontoftheovendoorwhenfirst
turningontheoven,leavethedoor
ajarfora fewminutesoruntilthe
oveniswarm.
eDonotopentheovendoorduring
abakingoperation—heatwillbelost
andthebakingtimemightneedto
beextended.Thiscouldcausepoor
bakingresults.Ifyoumustopenthe
door,openitpartially-only 3or4
inches—andcloseit asquicklyas
possible.
@Donotdisturbtheheatcirculation
intheovenwiththeuseofaluminum
foil.Iffoilisused,placeasmall
sheetofit,about10by12inchesat
the most,onalowershelfseveral
inchesbelowthe”food.Donotplace
foilontheovenbottom. ,
CAKES
Cakeriseshigherononeside
oBatterspreadunevenlyinpan.
e oven shelvesnotlevel,
eUsingwarpedpans.
oIncorrectpansize.
Cakescrackingontop
oOventemperaturetoohigh.
eBattertoothick,followrecipe
orexactpackagedirections.
eCheckforpropershelfposition.
● Checkpansizecalledforinrecipe.
eImpropermixingofcake.
Cakefalls
oToomuchshortening,sugaror
liquid.
eCheckleaveningagent,baking
powderorbakingsodatoassure
freshness.Makeahabittonote
expirationdatesofpackaged
ingredients.
CommonBakingProblems
andPossibleSolutions
Pms
Burningaroundedges
@Oven~oo’full;avoidovercrowding.
o Ed~es ofcrusttoothin. ‘ -
eInc%rrectbakingtemperature.
Bottomcrustsoggyandunbaked
oA11owcrust and/orfillingtocool
<
.,
sufficientlybeforefillingpieshell.
Filling maybe too”thinorjuicy.
e
Filling allowedtostandinpieshell
e
beforebaking.(Fillpieshellsand
bakeimmediately.)
eIngredientsandpropermeasuring
affectthequalityof.thecrust.Usea
testedrecipeandgoodtechnique.
Makesuretherearenotinyholesor
tearsinabottomcrust.“Patching”
apiecrustcouldcausesoaking.
Piefillingrunsover
Top andbottomcrustnotwell
@
sealedtogether.
~ Edgesofpiecrustnotbuiltup
highenough.
eToomuchfilling.
@Checksizeofpie plate.
Wstryistough;crustnotflaky
@Toomuchhandling.
eFattoosoftorcutintoofine.
Rolldoughlightlyandhandleas
eCakenotbakedlongenoughorat
incorrecttemperature.
● Ifaddingoiltoacakemix,make
certainthe oilisthetypeand”
amountspecified.
Crustishard
● Checktemperature.
e check shelfposition.
Cakehassoggylayerorstreaksat
bottom ~
,.
0Underminingingredients.
eShorteningtoosoftforproper ~
creaming. ‘.
e TOO muchliquid.
COOKIES&BISCUITS
Doughycenter;heavycruston
surface. ~
0Checktemperature.
oCheckshelfposition.
e FO11OW bakinginstructions
carefu~y-asgiveninreliablerecipe
oronconveniencefoodpackage,
eFlatcookiesheetsw1llgivemore
evenbakingresulk.Don’tovercrowd,
foodsonabakingsheet.
0Conveniencefoodsusedbeyond
theirexpirationdate. .
Browningmorenoticeableon
oneside
~Ovendoor not closedproperly,
checkgasketseal.
oCheckshelfposition.
..
;,
-
e
W
littleaspossible.
12
Page 13

BakingGuide
1.Preheatingisveryimportant
when usingtemperaturesbelow
S
225°F.
and when baking foods
such as biscuits,cookies, cakes
andotherpastries.Preheatthe
ovenforatleast15minutes.
Preheatingisnotnecessarywhen
roastingor forlong-timecooking
2. Aluminumpansconductheat
quickly.Formostconventional glassandPyroceram”cookware,
baking,light,shinyfinishesgive
bestresultsbecausetheyhelp
preventoverbrowning.Forbest
browningresults,werecommend
dullbottomsurfacesforcakepans
andpie plates.
ofwholemeals.
Food Cookware Positions
=read
Biscuits(M-in.thick)
Coffeecake ShinyMetalPanwith B, 350°-4000 20-30
Cornbreadormuffins CastIronorGlassPan B 400°-4500 20-40 Preheatcastironpan forcrispcrust.
Gingerbread
Muffins ShinyMetalMuffinPans B“
Popovers
Quickloafbread Metal orGlassLoafPans B
Yeastbread(2loaves) MetalorGlassLoafPans
Plainrolls ShinyOblongor MuffinPans
Sweetrolls ShinyOblongor MuffinPans B 350°-3750 20-30
.
—
Cakes
(withoutshortening)
Angelfood AluminumTubePan
Jellyroll Metal JellyRollPan
Sponge
?akes
Bundtcakes
Cupcakes
Fruitcakes MetalorGlassLoafor
Layer ShinyMetalPanwith
Layer,chocolate ShinyMetalPanwith ‘B
Loaf MetalorGlassLoafPans
Cookies
Brownies
Drop CookieSheet B,C
Refrigerator CookieSheet
Rolledor sliced CookieSheet B,C 375°-4000 7-12
Fruits,
OtherDesserts
Bakedapples
:ustard
~uddings,rice
]ndcustard Casserole
3ies
‘rozen F
dcringuc
)necrust GlassorSatin-finishMetal A, B 400°-4250 45-60
‘WOcrust
‘astryshelI
miscellaneous
lakedpotatoes
~cailopeddishes
!Oufflcs
ShinyCookieSheet B,C
satin-finishbottom
ShinyMetalPanwith B
satin-finishbottom
DeepGlassorCastIronCups
Metal orCeramicPan
Metal orCeramicPan
ShinyMetalMuffinPans ,
TubePan
satin-finishbottom
satin-finishbottom
MetalorGlassPans B,C
GlassorMetalPans
GlassCustardCupsor
Casserole[setinpanofhotwater) custard.
GlassCustardCupsor
oilPanonCookieSheet
preadtocrustedges B
s
lassorSatin-finishMetal B
G
lassor Satin-finishMetalPan B 450° 13-16
G
eton OvenShelf A,B,C
s
lassor Metal A, B,C 325°-3750 30-60
G
lassPan B
G
Shelf Oven
. .
B “375° 45-60
A, B 375°-4250 45-60
B 375°-4250 10-25
A
B
A
A.,B
B
A, B
B
B 350° 40-60
B,C
A,B,C
B
B
.,
A 400°-4250 45-70
Temperatures
400°-4750
350° 45-55
400”-425°
350°-3750
325”-375° 30-55
375°-4000
325°-3500 45-60
325”-350°. ~~45:65
350°-3750
275°-3000
350°-3750
350°-3750 25-30
325°-3500 25-35 Barcookiesfrommixusesametime.
350°-4000 10-20
400°-4250
350°-4000 30-60
300”-350° 30-60
325° 50-90
325°-3500 15-25 Toquicklybrownmeringueuse400”F.for
400°-4250 40-60
325°-4000 60-90 Increase timeforlargeamountorsize.
300°-3500 30-75
3. Darkor non-shinyfinishes,also
generallyabsorbheatwhichmay
resultindry,crispcrusts.Reduce
ovenheat25”F.iflightercrustsare
desired.Rapidbrowningofsome
foodscanbeachievedbypreheating
castironcookware.
Time,
Minutes Comments
15-20
20-30
45-60 Darkmetalorglassgivesddepest
10-15
20-25
2-4hrs. Use300”F.andShelfB forsmallor
20-35
6-12 ‘
Canned,refrigeratedbiscui~”take2to4
minuteslesstime.
{“
Decrease about5minutesformuffinmix.
Orbakeat450”F.for25 minutes,thenat
350”F.for.10to 15minutes.
browning.
TWOpiecepanisconvenient., ,
Linepanwithwaxedpaper.
Paperlinersproducemoremoistcrusts.
individualcakes.
Ifbakingfourlayersuse
‘ shelvesBandD.
UseShelfC andincreasetemperature
25 to50°F.formorebrowning.
.
Reducetemperatureto300”F.for large
Cookbreadorricepuddingwithcustard :
base80to90minutes.
~ Largepiesuse400°F.andincreasetime.
9to 11minutes,
Custardfillingsrequirelowertemperature,
longertime.
-“A
-.
-
-
u.- ..
---
13
Page 14

Roasting
Roastingiscookingbydryheat.
Tendermeator poultrycanbe
roasteduncoveredinyouroven.
Roastingtemperatures,which
Step2:Checkweightofroast.
Placemeatfat-side-upor poultry
breast-side-upon roastingrackin a
shallowpan. Themeltingfatwill
shouldbelowandsteady,keep bastethemeat.Selectapanas
spatteringtoa minimum.When
roasting,itis notnecessarytosear,
baste,cover,or addwatertoyour
meat.Roastingiseasy,justfollow
thesesteps:
Step1.Positionovenshelfat
secondfrombottomposition(B)
closetothesizeofmeat;Spossible.
(Broilerpanwithrackis a good
panforthis.)
Step3:TurnOVENTEMPto
desiredtemperature.Checkthe
RoastingGuidefortemperatures
andapproximatecookingtimes.
forsmallsizeroast(3to5 lbs.)and
atbottomposition(A)forlarger
roasts.
Step4: Mostmeatscontinueto
cookslightlywhilestandingafter
beingremovedfromtheoven.For
rareor mediuminternaldoneness,
Youmaywishto removemeatfrom
~heove~iustbeforeitisdoneifitis
stand~0to20minuteswhileyou
to
makegravyorattendtootherfoods.
If nostandingisplanned,cook
meatto suggestedtemperature.
frozenRoask
Frozenroastsofbeef,pork,
lamb,etc., canbestartedwithout
thawing,but allow15to25minutes
perpound additionaltime(15
minutesperpoundforroastsunder
5 pounds,moretimeforlarger
roasts).
Thawmostfrozenpoultrybefore
roastingtoensureevendoneness.
Somecommercialfrozenpoultry
canbecookedsuccessfullywithout
thawing.Followdirection~given
onpacker’slabel.
e
RoastingGuide
Type
Meat
Tendercuts;rib,highquality
sirlointip,rumportopround*
Lamblegorbone-inshoulder*
Vealshoulder,legor loin*
Porkloin,riborshoulder*
Ham,pre-cooked
Ham,raw
*Forbonelessrolledroastsover6-inches
thick,add5to 10minutesper!b.totimes
givenabove,
%ultry
Chickenor Duck
Chickenpieces
Turkey
Oven
Temperature
325°
325°
325°
325°
325°
325°
325° WellDone:
375° WellDone:
325° WeltDone:
Doneness inMinutesperPound
Rare:
Medium:
Well Done:
Rare:
Medium:
WellDone:
WellDone:
Well Done:
ToWarm:
WellDone:
ApproximateRoastingTime
I
3to5-lbs. 6to8-lbs.
24-35
35-39
39-45
21-25
25-30
30-35
35-45
35-45
18-23minutesper lb.(anyweight)
Under10lbs. 10to15-lbs.
27-35
3to5-lbs.
35-40
30-35
10to15-lbs.
16-22
18-25
25-31
31-33
20-23
24-28
28-33
30-40
30-40
24-27
Over5lbs.
30-35 185°-1900
Over15lbs. Inthigh:
13-19
Internal
Temperature“F
I
130°-140°
150°-160°
1700-185°
130°-140°
150°-160°
170°-185°
170°-180°
170°-180°
115°-1250
170°
185°-1’900
185°-1900
14
Page 15

Broiling
Broilingiscookingfoodbydirect
heatfromabovethe food.Your
—
rangehasa convenientcompartment
belowtheovenforbroiling.Italso
– hasa speciallydesignedbroilerpan
andrackthat allowdrippingfatto
drainawayfromthefoodsandbe
keptawayfromthe highheatof
the gasflame.
Distancefromtheheatsourcemay
be changedbypositioningdiebroiler
panandrackononeofthreeshelf
positionsinthebroilercompartment—
A(bottomofbroilercompartment),
B(middle)andC (top).
Boththeovenandbroiler
compartmentdoorsshouldbe
closedduringbroiling.
HowtoBroil
1. If meat hasfatorgristlenearthe
edge,cutverticalslashesthrough
bothabout2 inchesapart,butdon’t
cutintomeat.Werecommendthat
youtrimfattopreventexcessive
smoking,leavinga layerabout
l/8-inchthick.
2. Removebroilerpanandrack
frombroilercompartmentand
placefoodonrack.
3. Pulloutdrawerandposition
broilerpanincompartment.Placing
fd closertoflameincreasesexterior
browningoffood,butalsoincreases
spatteringandthepossibilityoffats
andmeatjuicesigniting.
4. Closebroilerdoorand, formost
foods,turnOVENTEMPknobto
BROIL.Note:Chickenandhamare
broiledat 450°inordertocookfood
throughwithoutover-browningit.
5. Turnmostfoodsonceduring
cooking;(theexceptionisthinfillets
offish;oiloneside,placethatside
downonbmflerrackandcookwitiout
turninguntildone).Timefoodsfor
aboutone-halfthetotalcooking
time,turnfood,thencontinueto
cookto preferreddoneness.
Broiling~ps
Usetongstoturnmeatover—
~
piercedm~atlosesjuices.
BroilingGuide
Quantity
Food
Bacon
GroundBeef
WellDone
BeefSteaks
Rare
Medium
WellDone
Rare
Medium
WellDone
Chicken(450°)
BakeryProducts
Bread(Toast)or
ToasterPastries
EnglishMuffins
bbster tails
(6to8-02.each)
Rsh
Hamslices(450°)
Precooked
~rk chops
WellDone
Lambchops
Medium
WellDone
Medium
WellDone
Wieners,
similarprecooked
sausages,
bratwurst
andlor
Thickness
‘A-1b.(about8
thinslices)
1-lb.(4patties)
‘hto%-in.thick
l-in.thick
(1-l%lbs.)
1%-in.thick
(2-2%Ibs.)
1whole
(2to2%-lbs.),
splitlengthwise
2-4slices
1pkg.(2)
2-split
2-4
l-lb.fillets%to
‘A-in.thick
l-in.thick
2(%in.)
2(l-in.thick),
about1lb.
2(1inch)
~bout10-12
2(1‘Ainch),
ibout1lb.
l-lb.pkg.(10)
OZ.
~Steaksandchopsshouldbeat
least1inchthickforbest broiling
results.Panbroilthinnerones.
1stSide
Broil
~sitior
B,C
Time,
Minute!
B
B
B
B
B
B
B
A
30-35 25-30 Reducetimesabout5to10min.
c
c
B 13-16 Donot
B,C
B
B
B
B
B
B
B
B,C
2ndSide
Minutes
3%
8-9
9
12
13
10
15
25
2-3
3-5
5 5 Handleandturnverycarefully.
8
10
13
8
10
10
17
12-14
6 1-2 Ifdesired,splitsausagesinhalf
Time,
12-14
16-18
‘h-1
turn
over.
4-5
9-12
4-7
10
4-6
Comments
Arrangeinsinglelayer.
3
Spaceevenly.Upto8patties
takeaboutsametime.
6-7
7
Steakslessthanl-in.cook
5-6
throughbeforebrowning.
8-9
Panfryingisrecommended.
6-7
Slashfat.
persideforcut-upchicken.
Brusheachsidewithmelted
butter.Broilwithskinsidedown
firstandbroilwithdoorclosed.
Spaceevenly.PlaceEnglish
muffinscut-side-upandbrush
withbutterifdesired.
Cutthroughbackofshell,sp~d
open.Brushwithmeltedbutter
beforeandafierhalftime.
Brushwithlemonbutterbefore
andduringcookingifdesired.
Preheatbroilertoincrease
browning.
Increasetimes5-10min.perside
8
forllA-in.thickorhomecured.
Slashfat.
Slashfat.
lengthwise;cutinto5to6-in.
pieces.
-----
-=
—
—
-– -
-– -
——
—
-----
---
6. TurnOVENTEMPknobto
OFF.Removebroilerpanfrom
compartmentandservefood
immediately.Leavepanoutside
compartmenttocool.
15
Page 16

——-
CareandCleaniw
Propercareandcleaningare
importantso yourrangewillgive
youefficientandsatisfactory
service.Followthesedirections
carefullyincaringforittohelp
assuresafeandpropermaintenance.
IFYOURRANGEHAS
ELECTRICIGNITION, BE
SUREELECTRICPOWERIS
OVFBEFORECLEANING
ANYPARTOFIT.
OutermintedFinish
Whentherangeiscool,washthe
top,frontand,ifexposed,thesides
withmildsoapandwater.Neveruse
anyharshabrasivesor cleaning
powdersthatmayscratchormarthe
paintedsurface.Rinsethesurface
withcleanwateranddrywitha soft
cloth.If youwish,occasionally
applya thincoatofmildcleaning
waxtohelpprotectthefinish.
PorcelainCooktop
Therearea numberofprecautions
youcantaketoavoidmarringthe
porcelainenameledsurfaceofthe
cooktopandpreventitfrom
becomingdull.Don’tslideheavy
pans acrossit. Ifyouspillfoods
withalotofacid(tomatoes,
sauerkraut,fruitjuices,etc.)or
foodswithhighsugarcontent,
cleanthemup as soonaspossible.
If allowedtoset,thesefoodscould
causea dullspot.Also,nomatter
howstubbornthe foodstain,never
useharshabrasivecleansers.They
couldpermanentlydamagethe
enamelsurface.Werecommenda
cleansersuchas “SofiScrub”
brand.
controlRnel
It’sa goodidea to wipethecontrol
panelcleanaftereachuseofthe
oven.Foramorethoroughcleaning,
theknobscanberemovedby
pullingthem offtheknobstems.
Cleanwithmildsoapandwater,
rinsewithcleanwaterandpolish
drywitha soficloth.
Donotuseabrasivecleansers,
strongliquidcleanersoroven
cleanersonthecontrolpanel—
theywilldamagethefinish.
BrushedChromeFitish
(onmodelssoequipped)
Cleanthebrushedchrometop
withwarm,soapywateror anallpurposehouseholdcleanerand
immediatelydry itwithaclean,
soficloth. Takecaretodry the
surfacefollowingthe “grain.”To
helppreventfingermarksafter
cleaning,spreadathinfilmofbaby
oilonthesurface.Wipeaway ~
excessoilwithaclean,soficloth.
Agoodappliancewaxwillhelp
protectthisfinish.
Lift-UpCooktop
Cleantheareaunderthecooktop
often.Built-upsoil,especially
grease,maycatchfire.
Tomakecleaningeasier,the
cooktopmaybe liftedup.
Toraisethecooktop:
1. Besureburnersareturnedoff.
2. Removethegratesand, on
modelssoequipped,thedrippans.
3. Graspthetwofrontburnerwells
andlifiup.
Dualsupportrodson somemodels
willholdthecooktopupwhileyou
cleanunderneathit. Othermodels
havea singlesupportrod.
BurnerGmtes
Gratesshouldbewashedregularly
and,ofcourse,afterspillovers.
Washtheminhot,soapywaterand
rinsewithcleanwater.Drythe
grateswithacloth—don’tputthem
backontherangewet.When
replacingthegrates,besurethey’re
lockedintopositionovertheburners.
Togetrid ofburned-onfood,soak
thegratesin aslightlydiluted
liquidcleaner.
Althoughthey’redurable,the
grateswillgraduallylosetheir
shine,regardlessofthebestcare
youcangivethem.Thisisdue to
theircontinualexposuretohigh
temperatures.
Donotoperateaburnerforan
extendedperiodoftimewithout
cookwareonthegrate.Thefinish
onthegratemaychipwithout
cookwaretoabsorbtheheat.
DripRns
(onmodelssoequipped)
Removethegratesandliftoutthe
chromedrippans.Washthemin
hot,soapywater.Rinsethemwith
clean,hotwaterandpolishthem
drywitha cloth. Never use
abrasivecleaneror steel wool—
they’llscratchthesurface.Instead,
so~kthedrippansforabout20
minutesinslightlydilutedliquid
cleanserormildsolutionof
ammoniaandwater(1/2cupof
ammoniato onegallonofwater).
Aftersoaking,washtheminhot
soapywater.Rinsewithcleanwater
andpolishwitha clean,soficloth.
m
Aftercleaningunderthecooktop
withhot, soapywaterandaclean
cloth,lowerthecooktop.Be
carefulnotto pinchyourfingers.
16
Page 17

specia~careof
Continuow-Cleaning
Oven
TheContinuous-Cleaningoven
cleans itself
insideoftheoven—top,sidesand
back—isfinishedwithaspecial
coafi}?gwhichcannotbecleaned
intheusualmannerwithsoap,
detergents,steelwoolpads,
commercialovencleaners,coarse
abrasivepadsor coarsebrushes.
Useofsuchcleanersand/orthe use
ofovensprayswill causepermanent
damage.
Thespecialcoatingisa porous
ceramicmaterialwhichisdarkin
colorandfeelsslightlyroughtothe
touch.If magnified,thesurface
wouldappearaspeaks,valleys,and
sub-surface“tunnels~’Thisrough
finishtendstopreventgrease
spattersfromforminglittlebeads
ordropletswhichrundownthe
sidewallsofa hard-surfaceoven
linerleavingunsightlystreaksthat
requirehandcleaning.Instead,
whenspatterhitstheporousfinish
itisdispersedandispartially
absorbed.Thisspreadingaction
increasestheexposureofoven
soil toheatedair,andmakesit
somewhatlessnoticeable.
Soilmaynotdisappearcompletely
andatsometimeafierextended
usage,stainsmayappearwhich
cannotberemoved.
Thespecialcoatingworksbeston
smallamountsofspatter.
notworkwellwithlargerspills,
especiallysugars,eggor dairy
mixtures.
Thespecialcoatingisnotused
onovenshelves.Shelvesshouldbe
cleanedoutsidetheoventoavoid
damagetothespecialcoating
insidetheoven.
Interior
whilecooking.The
Itdoes
ToCleantheContinuom-
CleaningOven:
Letrangepartscoolbefore
1.
handling.Werecommendrubber
glovesbewornwhencleaning.
2. Removeshelvesandcookware.
3. Soilvisibilitymaybereducedby
operdtingtheovenat400”F.Close
thedoorandturn OVEN TEMP
knobto400”F.Timeforatleast4
hours.Repeatedcyclesmaybe
necessarybeforeimprovementin
appearanceisapparent.
REMEMBER: DURINGTHE
OPERATIONOFTHEOVEN,THE
DOOR,WINDOWANDOTHER
RANGESURFACESWILLGETH~
ENOUGH~ CAUSEBURNS.DONOT
T’O?JCH.LETTHERANGECOOL
BEFOREREPLACINGOVENSHELVES.
4. Ifa spilloveror heavysoiling
occursontheporoussurface,as
soonastheovenhascooled,remove
asmuchofthesoilaspossibleusing
a smallamountofwaterandastiff
bristlenylonbrush.Usewater
sparinglyandchangeitfrequently,
keepingitascleanaspossible,and
besuretoblot it upwithpaper
towels,cloths,orsponges.Donot
ruborscrubwithpapertowels,
clothsorsponges,sincetheywill
leaveunsightlylintontheoven
finish.If waterleavesa whitering
onthefinishasitdries,applywater
againandblot itwithaclean
sponge,startingattheedgeofthe
ringandworkingtowardthecenter.
Donotusesoap,detergent,
steelwoolpads,commercial
ovencleaner,siliconeoven
sprays,coarsepadsorcoarse
brushesontheporoussurface.
Theseproductswillspot,clog,
andmarthe poroussurfaceand
reduceitsabilitytowork.
Donotscrapethe~rous
surfacewithaknifeorspatula—
theycouldpermanentlydamageit.
Theovenbottomandtheinside
oftheovendoorhaveaporcelain
enamelfinish.Thedoorliftsoff
andthe bottomcomesoutfor
cleaningawayfromthecontinuouscleaningoven.
——
—.
—.
-
-
-.
-
-
-----
—
—
17
Page 18

RemovableOvenBottom
Theovenbottomcanberemovedto
makecleaningeasier.
Finger
slot II,
Toremove:
1.
Graspovenbottomatfinger
slotsoneachside.
2. Lififrontedgeofovenbottom
enoughtoraisetabsfromslotsin
frontframe.
3. Pushovenbottombackabout
1/4”toreleaseflangefromfront
frame,thenpullout.
Toreplacetheovenbottom:
1. Slideovenbottomintoovenso
reartabsfit intoslotsinrearwallof
oven.
2. Graspovenbottomatfinger
slotsandpushitbackandthen
downtohooktheflangeunderthe
frontframe.
3. Fitfronttabsintoslotsinfront
frame.
Theovenbottomhasa porcelain
enamelfinish.Tomakecleaning
easier,protecttheovenbottom
fromexcessivespillovers.Thisis
particularlyimportantwhenbaking
a fruitpieor otherfoodswithhigh
acidcontent.Hotfruitfillingsor ‘
foodsthatare acidincontentsuch
asmilk,tomatoor sauerkraut,and
sauceswithvinegaror lemonjuice,
maycausepittinganddamageto
theporcelainenamelsurface.
Toprotecttheovenbottomsurface,
placeapieceofaluminumfoil
slightlylargerthanthe bakingdish
or a smallcookiesheetonalower
shelforunderthebakingdishto
catchanyboilovers.It shouldnot
completelycovertheshelfasthis
wouldcauseunevenheatinthe
oven.Aluminumfoilshouldnot be
placedontheovenbottom.
If a spilloverdoesoccuronthe
ovenbottomallowtheoventocool
first.Youcancleanthebottomwith
soapandwater,amildabrasive
cleanser,soap-filledabrasivepads
or causticovencleanerfollowing
manufacturer’sdirections.
18
Page 19

Lift-offOven Door
Theovendoorisremovabletomake
theinteriormoreaccessible.
BroilerDmwer
Toremove:
1. Whenbroileriscool,remove
rackandpan.
2. Pullthebroilerdraweroutuntil
itstops,thenpushitbackinabout
one inch.
k~e TopBurners
Theholes in theburnersofyour
rangemustbe keptcleanatall
timesforproperignitionandan
even,unhamperedflame.
Youshouldcleantheburners
routinelyandespeciallyafterbad
spilloverswhichcouldclogthese
holes.Burnerslifirightoutfor
cleaning” ~
—
Toremovethe door,openitafew
inchestothespecialstopposition
thatwillholdthe dooropen.Grasp
firmlyoneachsideandliftthedoor
straightupandoffthehinges.
Note:Becarefulnottoplacehands
betweenthespringhingeandthe
ovendoorframeasthehingecould
snapbackandpinchfingers.
Washwithhot,soapywater.For
stubbornspots,useasolutionof
vinegarandwater.Donotimmerse
thedoor inwater.
replacethe door,makesurethe
To
hingesareinthe“out”position.
Positiontheslotsinthe bottomof
thedoorsquarelyoverthehinges.
Thenlowerthedoor slowlyand
evenlyoverbothhingesatthesame
time.Ifhingessnapbackagainstthe
ovenframe,pullthembackout.
oven
Ovenshelvesmaybecleanedwith
amildabrasivecleanserfollowing
manufacturer’sdirections.Afier
cleaning,rinsetheshelveswithclean
wateranddrywitha dry cloth. To
removeheavy,burned-onsoil,soapy
metalpadsmaybeusedfollowing
manufacturer’sdirections.After
scrubbing,washwithsoapywater,
rinseanddry.
shelves
3. Grasphandle,lifiandpull
broilerdrawerout(lifttherollers
locatedunderthedraweroverthe
rollerguidestopsintherange).
Toreplace:
1. Puttherollersunderthebroiler
drawerbehindtherollerguide
stopsintherange.
2. Holdthebroilerdrawerinthe
raisedpositionasyouslideit
partwayintotherange.Thenlower
thedrawerandpushitcompletely
closed.
BroilerWn&Rack
Afierbroiling,removethe broiler
rackandcarefullypouroffthe
grease.Washandrinsetherack
inhot,soapywater.
Iffoodhasburnedon, sprinkle
therackwhilehotwithdetergent
andcoverwithwetpapertowelsor
adishcloth.Thatway,burned-on
foodswillsoakloose whilethe
mealisbeingserved.
Donotstoreasoiledbroilerpan
andrackintheovenorbroiler
compartment.
w.
Note:A screwholdseachof
theburnersinplacetokeepthem
fromwobblingaroundduring
shipment.Removeanddiscardthe
shippingscrew.Tilttheburnerto
theright to releaseitstwotabsfrom
slotsintheburnersupportand
movetheburnertowardthebackof
therange.Thisdisengagesitfrom
thegasvalveatthe frontofthe
range,anditlifisouteasily.
Toremoveburned-onfood,soak
theburnerin a solutionofaproduct
usedforcleaningtheinsideofcoffee
makers.Soaktheburnerfor20to
30minutes.If thefooddoesn’t
rinseoffcompletely,scrubitwith
soapandwateror a mildabrasive
cleanseranda dampcloth.
Beforeputtingthe burnerback,dry
itthoroughlybysettingitinawarm
ovenfor30 minutes.Thenplaceit
backinthe range,makingsureit is
properlyseatedandlevel.
—
19
Page 20

cleaningGuide
Note:Letrange/ovenpartscoolbeforetouchingor handling.
PART
Broiler Panand Rack
MATERIALSTOUSE
● SoapandWater
o Soap-Filled Scouring Pad
e Plastic Scouring Pad
GENERALDIRECTIONS
Drainfat,coolpanandrackslightly.(Donotletsoiledpanandrackstandin
broilercompartmenttocool.)Sprinkledetergenton rackandpan.Fillpanwith
warmwaterandspreadclothorpdpertoweloverrack.Letpanandrackstand
fora fewminutes.Wash;scourifnecessary.Rinseanddry.O~ION: Cleanpan
andrackindishwasher.
ControlKnobs
Outside Giass Finish
● Mild Soap and Water
@
Soapand Water
Pulloffknobs.Washgentlybutdonotsoak.Dryandreturncontrolstorange.
Cleanoutsideof cooledblackglassdoorwi,tha glasscleanerthatdoesnot
*
containammonia.Washglasscontrolpanelwithclothdampenedinsoapywater.
Rinseandpolishwithadry cloth.Ifknobsareremoved,donotallowwaterto
run downinsidesurfaceofglasswhilecleaning.
Metal, including
Side Trims, Trim
Strips andBrushed
● Soapand Water
Wash,rinseand thenpolishwithadrycloth.DON~ USE steelwool,
abrasives,ammonia,acids,orcommercialovencleanerswhichmaydamage
thefinish.
ChromeCooktop
PorcelainCooktop*
● Paper Towel
s Dry Cloth
● Soapand Water
Avoidcleaningpowdersorharshabrasiveswhichmayscratchtheenamel.
Werecommend“SoftScrub”brandcleanser.
Ifacidsshouldspillon the rangewhileitis hot,useadrypapertowelorcloth
towipeuprightaway.Whenthesurfacehascooled,washandrinse,
Forotherspills,suchasfatsmatterings,etc.,washwithsoapandwaterwhen
cooledandthenrinse.Polishwithadry cloth.
WintedSurfaces
(doorfront,broiler
Soapand Water
Usea mildsolutionofsoapandwateranda soficloth.Donotuseanyharsh
abrasivesorcleaningpowderswhichmayscratchormarsurface.
o
drawerfront,
sidepanels)
Shelves
SurfaceBurner
Grates
Chrome-Plated
DripPans
SurfaceBurners
o SoapandWater
~ Soap-FilledScouringPad
● PlasticScouringPad
● SoapandWater
@Soap-FilledScouringPad
(Non-metallic)
@SoapandWater
e Stiff-BristledBrush
~ Soap-FilledScouringPad
(Non-metallic)
eSolutionforCleaning
InsideofCoffeeMakers
eSoapandWater
~MildAbrasiveCleanser
~DampCloth
Shelvescanbecleanedbyhandusingsoapandwater.Rinsethoroughlyto
removeanysoapaftercleaning.
Liftoutwhencool.Soak5 to 10minutesifdesiredinwarmsolutionof
dishwasherdetergent.Scourwithmaterialsmentionedhereto removeburnedonfoodparticles.
Cleanasdescribedbelowor indishwasher.Wipedrippansaftereachcooking
sounnoticedspatterwillnot“burn on” nexttimeyoucook.Toremove“burnedon”spatters,useanyorallcleaningmaterials mentioned.Rub
lightlywith
scouringpadtopreventscratchingofthe surface.
Wipeoffburnerheads.Ifheavyspilloveroccurs,removeburnersfromrange
(seepage19)andsoakthemfor 20to 30minutesinsolutionofhotwaterand
productforcleaninginsideofcoffeemakers,suchasDip-Itbrand.Ifsoildoes
notrinseoff completely,scrubburnerswithsoapandwaterora mildabrasive
cleanseranda dampcloth.Dryburnersina warmovenfor30 minutesbefore
returningthemtotherange.
*Spillageofmarinades,fruitjuices,andbastingmaterialscontainingacidsmaycausediscoloration,soshouldbewipedupimmediately(blottedup
ifinContinuous-Cleaningoven).Takecarenottotouchhotportion-ofoven.Whensurfaceiscool,cleanandrinse.CAUTION:Lightbulbscanget
warmenoughtobreakiftouchedwithmoistcloth.Whencleaning,avoidwarmlamp.
-.
-
—
e
e
20
Page 21

MinorAdjwtmenkYouCanMake
OvenThermostat
Adjustment
Thetemperaturecontrolinyour
newovenhasbeencarefullyadjusted
{oprovideaccuratetemperatures.
However,ifthisovenhasreplaced
one youhaveusedforseveralyears,
youmaynoticeadifferenceinthe
degreeofbrowningor the lengthof
timerequiredwhenusingyour
favoriterecipesbecauseoven
temperaturecontrolshaveatendency
to “drift” overa periodofyears.
Beforeattemptingtohavethe
temperatureofyournewoven
changed,besureyouhavefollowed
thebakingtimeandtemperatureof
therecipecarefully.Then,after
youhaveusedtheovena fewtimes
andyoufeelthe ovenistoohot
ortoocool,thereisa simple
adjustmentyoucanmakeyourself
ontheOVENTEMPknob.
Pulltheknob offtheshaftandlook
atthebackside.Thereisadisc in
thecenteroftheknobskirtwitha
seriesofmarksoppositeapointer.
originalsettingandcheckoven
performancebeforemakingany
additionaladjustments.
Afiertheadjustmentismade,
pressskirtandknobtogetherand
retightenscrewssotheyaresnug,
butbecarefulnottoovertighten.
Re-installknobonrangeand
checkperformance.
Note:Afteranadjustmenthas
beenmadetotheOVENTEMP
knob,OFF andBROILwillnot
lineupwiththeindicatormarkon
thecontrolpanelas theypreviously
did. Thisconditionisnormaland
willnotcreatea problem.
SurfaceBurner
AirAdjustmentShutters
Anairadjustmentshutterforeach
surfaceburnerregulatestheflowof
airtotheflame.
Whentherightamountofair
flowsintotheburner,theflame
willbesteady,relativelyquietand
haveapproximately3/4”sharpblue
cones.Thisisusuallythe casewith
factorypresetshuttersettings.
Withtoomuchair,theflamewill
beunsteady,possiblywon’tburnall
thewayaround,andwillbe noisy,
soundinglikea blowtorch.
OvenBurner
AirAdjustmentShutter
Theairadjustmentshutterforthe
ovenburnerregulatestheflowof ~–
airtotheflame.
Theshutterfortheovenburneris ‘“
nearthebackwalloftheoven
behindthe broilerdrawer.
r
\
(
v
K h
Toreachtheshutter,remove
thebroilerdrawer(page19).
Toadjusttheflowof airto the
burner,loosenthePhillipshead
screwandrotatetheshutterto
allowmoreorlessairintothe
burnertube as needed.
Air adjustment ,
..- .-
Loosen-
shutter
--
-
1
——
-
w
—.
L Notepositionof
pointertomarks
beforeadjustment
Noteto whichmarkthepointeris
pointing.Tomakeanad~ustment,
carefullyloosen(approximately
oneturn), but do notcompletely
re~.ovethe twoscrewsthatholdthe
skirtto theknob.Holdtheknob
bladein onehandandtheouter
skirtintheotherhand.
Toraisetheoventemperature,
movethepointer inthedirectionof
thearrowforRAISE.Tolowerthe
temperature,movethe pointerin
_ thedirectionofarrowfor LOWER.
Eachmarkwillchangetheoven
—
temperatureapproximately20”F.
Wesuggestthatyoumakethe
adjustmentonemarkfromthe
Withnotenoughair,youwon’tsee
anysharpblueconesin theflame,
youmayseeyellowtips,andsoot
mayaccumulateonpotsandpans.
I
Theairadjustmentshuttersseton
thehoodofthevalves,andare ‘
positionedon theburnertubesby
frictionfit.
Toadjusttheflowof irtothe
bur~ers,applya bladetype
screwdriveragainstthefriction-fit
shuttersandpushtoadjustthe
shutters,allowingmoreorlessair
intotheburnertubesasneeded.
Airadjustmentshutter
\
21
I
Todetermineiftheburnerflame
isproper,lighttheburner.The
flameshouldhave1/2”to 3/4”blue
coneswithno yellowtipping,and
shouldnot extendoutoverthe
baffleedges.
~
-.
-
-
—
—
-
-
—
-.
—
=r.
-–
-
-
-
~
—.
-
-
-
Page 22

Questiom?
.—.
UseThisProblem
PROBLEM
TOPBURNERS
DONOTLIGHT
OVENDOESNOT
COOKPROPERLY
Solver
-POSS~LE CAtiSEAND/ORWHAT~ DO ‘ ‘ ‘
.CLOCKDOES
NOTWORK
OVENLIGHTDOES ~
NOTCOMEON ‘
(onmodelssoequipped)
Ifyouneedmorehelp..call, tollfree:
GEAnswerCenter”
800.626.2000
consumerinformationservice
22
Page 23

IfYouNeedservice
—
—
Toobtainservice,seeyourwarranty
onthebackpageofthisbook.
We’reproudofour serviceand
wantyoutobepleased.Ifforsome
reasonyouare nothappywiththe
serviceyoureceive,herearethree
stepstofollowforfurtherhelp.
FIRST,contactthepeoplewho
servicedyourappliance.Explain
whyyouarenotpleased.Inmost
cases,thiswillsolvethe problem.
NEXT,if youarestill notpleased,
writeallthedetails-including
yourphonenumber—to:
Manager,ConsumerRelations
GEAppliances
AppliancePark
Louisville,Kentucky40225
FINALLY,ifyourproblemisstill
notresolved,write:
MajorAppliance
ConsumerActionPanel
20NorthWackerDrive
Chicago,Illinois60606
—
-
—.
-
—
—
Page 24

,.
m
———
I
YOURGENERALELEmR1cRANGE
WARRANTY
Saveproof of original purchasedatesuchasyoursalessliporcancelledchecktoestablishwarrantyperiod.
,.
J
WHATIs COVERED
FULL ONEWEARWARRANTY
Foroneyearfromdateoforiginal
purchase,wewill provide,freeof
charge,partsandservicelabor
. .
:-
,’.
inyourhometo repairor replace
anypafi ofthe range thatfails
becauseofamanufacturingdefect.
Thiswarrantyisextendedto
theoriginalpurchaserandany
succeedingownerforproducts
purchasedforordinaryhomeuse
inthe48mainlandstates,Hawaii
andWashington,D.C.InAlaskathe
warrantyisthesameexceptthatitis
.LIMITEDbecauseyoumustpayto
shiptheproductto~heserviceshop
orfortheservicetechnician’stravel
:
coststoyourhome.
Allwarrantyservicewillbeprovided
.,
byourFactoryServiceCentersor
byourauthorizedCustomerCare”
servicersduringnormalworking
hours.
LookintheWhiteorYellowPages
ofyourtelephonedirectoryfor
GENERALELECTRICCOMPANY,
GENERAL ELECTRICFACTORY
SERVICE,GENERALELECTRIC-
HOTPOINTFACTORYSERVICEor
GENERALELECTRICCUSTOMER
CARE@SERVICE.
W~~~ IS ~0~ co~~~~~ ~Servicetripstoyourhometo
teachyouhowtousetheproduct.
ReadyourUseand Carematerial.
Ifyouthenhaveanyquestions
aboutoperatingtheproduct,
pIeasecontactyourdealerorour
ConsumerAffairsofficeatthe
addressbelow,orcall,tollfree:
GEAnswerCenter”
800.626.2000
consumerinformationservice
● Replacementofhousefusesor
resettingofcircuitbreakers.
@Failureoftheproductifitisused
forotherthanitsintendedpurpose
orusedcommercially.
e Damagetoproductcaused
byaccident,fire,floodsoracts
ofGod.
WARRANTORISNOTRESPONSIBLE
FORCONSEQUENTIALDAMAGES.
(
)
e Improperinstallation.
Somestatesdonotallowthe exclusionor limitationofincidentalorconsequentialdamages,sotheabovelimitationorexclusion
maynotapplytoyou.Thiswarrantygivesyouspecificlegalrights,andyoumayalsohaveotherrightswhichvaryfromstatetostate,
Toknowwhatyourlegalrightsareinyourstate,consultyourlocalorstateconsumeraffairsofficeoryourstate’sAttorneyGeneral.
PartNo.MNL106
[
3-89
Ifyouhaveaninstallationproblem,
contactyourdealeror installer.
Youareresponsibleforproviding
adequateelectrical,gas,exhausting
andotherconnectingfacilities.
Warrantor:General Electric Company
If further help is needed concerning this warranty, write:
Manager—Consumer Affairs, GE Appliances, Louisville, KY 40225
.. ..
1
JGBC15G
JGBC17GEK
 Loading...