

GE JGB916SEL2SS, JGB900BEK7BB Owner’s Manual
ge.com
Safety Instruc_tions ...... 2-7
Opera6ng lnstructiom"
A1umin um Foil ............ 13
Clock and Timer .......... 15
(-)veil ................. 10-3 l
Baking and Roasting ...... 13
Broiling, Broiling Guide . . .14
Convecdon ........... 18-22
Oven Control ......... 10, 1 ]
Power Outage ............ 12
Preheating .............. 13
Probe .................. 17
Sabbath Featm'e ....... 95, 96
Sell:Cleaning ......... 30, 31
Shelves ................. 13
Special Features ....... 23, 24
Thermostat At!justin ent .... 27
Timed Baking
and P,oasting ............ 16
Timed Convection Baking . .22
Surfilce Cooking .......... 8, 9
_'_u'ming Drawer . ...... 28, 29
Care and Cleaning
Burner Assembly ........ 32, 33
Bm'ner Grates ............. 34
Control Panel and Knobs .... 37
Cooktop ................. 34
Door Removal ............ 35
Oven Bottom ............. 35
Oven Light Replacement .... 38
Oven Vents ............... 37
Self:Cleaning .......... 30, 31
Shelves .................. 38
Stainless Steel Sm'/hces ...... 34
_'\.u'ming Drawer . ......... 36
Installation
Instructions .......... 39-49
Air Ac!jusmlent ............ 48
Anti-Tip Device ......... 42, 49
Checking Burner
Ignition .................. 47
Connecting tlle Range
to Gas ................ 43-45
Dimensions and Clearances . .41
Electrical Connections . . .46, 47
Leveling tile Range ........ 48
LP ...................... 49
Troubleshooting
Tips ................. 5o-53
Accessories .............. 54
Consumer Support
Consumer Support . .Back Cover
Product Registration ..... 55, 56
\'\arrantx for Customers
in (_anada ................ 59
_v\arrantx for Customers
in tlle U.S.A .............. 58
JGB 900
JG ]_90 2
In Canada contact us at:
www. GEAppliances. ca
Write the model and serial
numbers here:
Model #
Serial #
You can find them on a label
on the front of the range behind
tile warming drawer.
18305580P208
49-85124 03-07JR
IMPORTANTSAFETYINFORMATION.
READALLINSTRUCTIONSBEFOREUSING.
WARNING!
For your safe_ the information in this manual must be followed to minimize the risk of fire or explosion,
electric shock, or to prevent property damage, personal injury, or loss of life.
WARNING:If the information
in this manual is not followed exactly,
a fire or explosion may result causing
property damage, personal injury
or death.
-- Do not store or use gasoline or other
flammable vapors and liquids in the
vicinity of this or any other appliance.
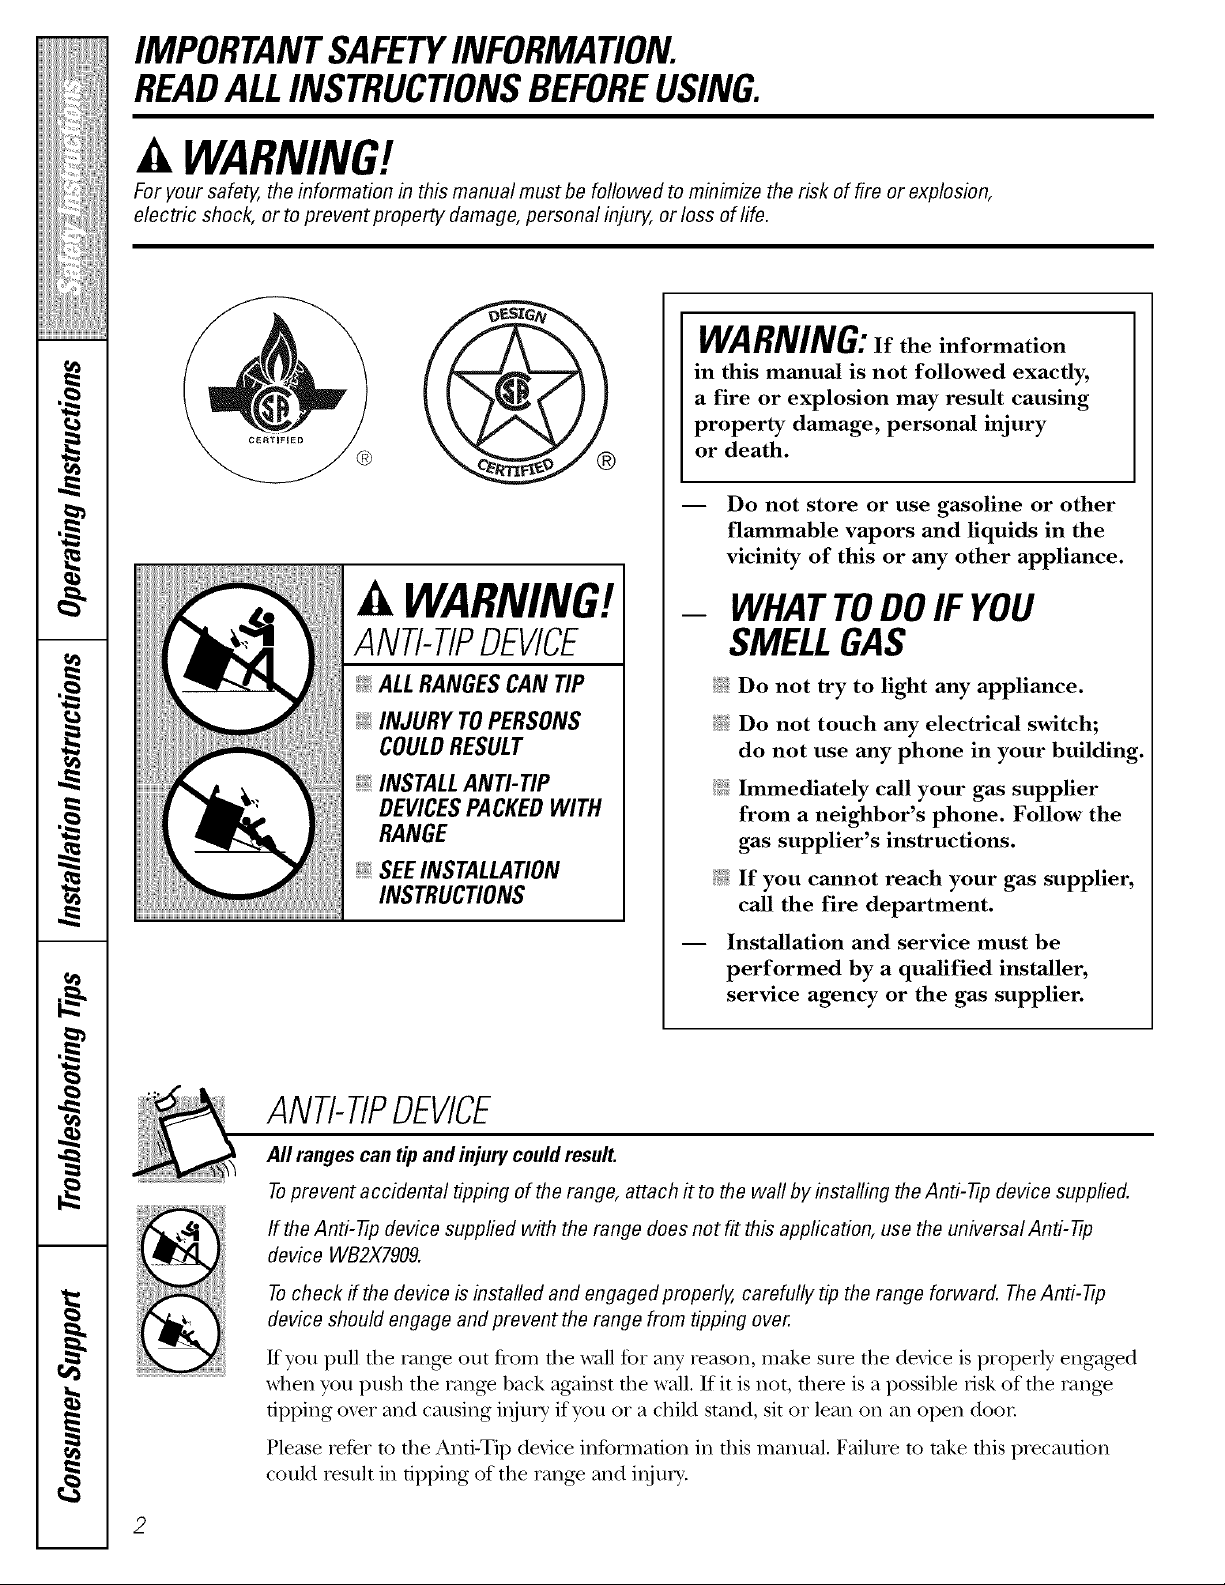
WARNING!
ANTI-TIPDEVICE
ALLRANGESCAN TIP
@INJURY TOPERSONS
COULDRESULT
@INSTALLAN_TIP
DEVICESPACKEDWITH
RANGE
@SEEINSTALLAtiON
INSTRUCtiONS
ANTI-TIPDEVICE
All rangescan tip and injury could result.
- WHATTODOIF YOU
SMELLGAS
iJ_::i:Do not try to light any appliance.
i_i:iDo not touch any electrical switch;
do not use any phone in your building.
_i.iImmediately call your gas supplier
from a neighbor's phone. Follow the
gas supplier's instructions.
@ If you cannot reach your gas supplier,
call the fire department.
-- Installation and service must be
performed by a qualified installer,
service agency or the gas supplier.
Toprevent accidental tipping of the range, attach # to the waft by installing theAnti-tip device supplied.
If the Anti-tip device supplied with the range does not fit this application, use the universal Anti-tip
device WB2X7909.
Tocheck if the device b installed and engaged properly, carefully tip the range forward. The Anti-tip
device should engage and prevent the range from tipping over.
Kyou pull die rang_ out from die wall for ally' reason, make sure tile device is properly engaged
when you push the range back against file wall. If it is not, flmre is a possible risk of file rang_
tipping o_r and causing iI_jury if you or a child stand, sit or lean on all open door
Please retbr to tile Anti-Tip device information ill this mannal. Failure to take this piecaufion
could result ill tipping of the rang_ and inju U.
2
ge.com .....
WARNING!
IMPORTANTSAFETYNOTICE
The California Safe Drinking Water and ToxicEnforcement Act requires the Governor of California to
publish a list of substances known to the state to cause birth defects or other reproductive harm, and
requires businesses to warn customers of potential exposure to such substances.
Gas appliances can cause minor exposure to four of these substances, namely benzene, carbon ,
monoxide, formaldehyde and soot, caused primarily by the incomplete combustion of natural gas or
LP fuels. Properly adjusted burners, indicated by a bluish rather than a yellow flame, will minimize
incomplete combustion. Exposure to these substances can be minimized by venting with an open _,
window or using a ventilation fan or hood.
SAFETYPRECAUTIONS
Have the installer show you the location of the range gas shut-off valve and how to shut it off if necessary.
q_{:;Hme vo/li range installed and properly q_{:;Plug your range into a 190-xolt grounded
grounded by a qualified installel, in outlet only. Do not remoxe tile round _"
accordance with the Installation Instructions. grom_ding prong from the plug. If in doubt
Any adjustment and ser\qce should be about the grounding of the home electrical
performed only by qualified gas range system, it is your personal responsibility and _,,_"
installers or ser\@e technicians, obligation to hme an ungrounded outlet _'
.......... replaced with a properly grounded,
_!:,::Do not attemot to reomr or reolace any
part oiyour range umess it is specmcauy .' • 7 .. , •
recollamen(le(1 in tills llaantlal. AJI other ....
............ an extension cord with this aDDhance.
service s/r]otll(l/)e reterreO to a qual]heO • • _'
technician.
' ', . . ' .,- ,; three-Drongoutlet in accordance with
......... the Nanonal Electrical (,ode. Do not use
g
g
3
IMPORTANTSAFETYINFORMATION.
READALLINSTRUCTIONSBEFOREUSING.
SAFETYPRECAUTIONS
_2_Locate the range out of kitchen traffic pail/
and out of drafty locations to prexent poor
air cikvulafion.
_{::Be sure all packaging materials are
remoxed flom tile range be%re operating it
to prevent fire or smoke damage should the
packaging material ignite.
;_i:':Be sure your range is correctly adjusted by
a qualified service technician or installer for
the type of gas (natural or IP) fl/at is m be
used. Your range can be converted for use
with eifl_er type of gas. See tile Installation of
the range section.
WARNING:Thesead>s., en smns
be made by a qualified service technician
in accordance Mth file manulhcturer's
instructions and all codes and requirements
of file authoci W havingjufisdicfion. Failure
to follow fl_ese insmmfions could result in
sedons i_nry or property damage. The
qualifled agen q perfok_ning this work
assumes kesponsibility for the conversion.
_; Nexer wear loose fitting or hanging gm_nents
while using tile appliance. Be careflfl when
reaching for items stored in cabinets oxer tile
range. Flammable material could be ignited
if brought in contact with flame or hot o\en
sniP,tces and m W cause sexere 1)nlrls.
_i:,:Do not store flammable materials in an
o_en, a range storage drawek, a waHning
drawer or near a cookmp.
_:;Do not store or use combustible materials,
gasoline or other flammable vapors and
liquids in file vicinity of this or any oilier
appliance.
_{::Do not let cooking gxease or other flammable
matekials accunnflate in or near file range.
q_{;_Do not use water on grease fires. Ne_er pick
up a flaming pan. Turn file controls off:
Smother a flaming pan on a surface 1)umer
1)ycoxering file pan completely with
a well-fitting lid, cookie sheet or fiat tr W.
Use a multi-puq)ose di y chemical or
foam-type fire extinguisher
_i:,:M'ter prolonged use of a range, high floor
temperamles m W result and many floor
coxering:s will not wifl_stand this kind of nse.
Nexer install file range oxer vinyl die or
linoleum fllat cannot wifl_smnd such type
of use. Nexer install it dikecflv oxer interior
kitchen carpeting.
_:;Do not leaxe childlen alone or unattended
where a range is hot or in operation.
They could be seriously burned.
;;; Do not allow anyone m climb, stand or hang
on tile oxen dooI; storage draweL wamfing
drawer or cookmp. They could damage file
range and e_en tip it oxer, causing severe
personal iI_/kI>
CAUTION: temsofinteres,
children should not be stoked in cabinets
aboxe a range or on flae backsplash of a
range---children climbing on the range to
reach items could be selJously iojmed.
,&WARNING:NEVERusethis
appliance as a space heater to heat or
warm the room. Doing so may kesult
in carbon monoxide poisoning and
4
oxerheafing of tlle oven.
Flaming grease outside a pan can be put
out 1)y covering it with baMng soda ok;
if available, by using a multi-purpose di y
chemical or foam-type fike exfinguishen
Flame in tile oxen or wakening drawer can be
smothered completely by closing the o_en
door or drawer and turning file control to
off orby using a mnlfi-pnrpose dU chemical
or foam-type fire exfinguishen
_{::i,et file bnlxler grates and other surfaces
cool before ranching them or leaving fllem
where children can keach them.
_i:,:Nexer block fine \ents (air openings) of the
range. They provide fl)e air inlet and outlet
flint are necessak y tbr tile range to operate
properly with cokxect combnsfion. Air
opening_ are located at tile rear of tile
cooktop, at file top and bottom of the oxen
dook; and at the bottom of the range under
the winching drawek; storage drawer or
kick panel.
_::Large scrawhes or impacts to glass doors
can lead to broken or shattered glass.
ge.com .....
WARNING!
U FACEBUr
SURFACEBURNERS
:e, roper pan size-- mttoms
Use proper pan size--avoid pans that are unstable or easily tipped. Select cookware having flat bottoms
gE enough to cove1 contain
large enough to cover burner grates. Toavoid spillovers, make sure cookware is large enough to contain
_.f od properly. Thi,. ,since
the food properly. This will both save cleaning time and prevent hazardous accumulations of food, since
a# , spattering or sf rasped
heavy spattering or spillovers left onrange can ignite. Use pans with handles that can be easily grasped
and remain cool
d, _.maincool. ,
Al ,,ays use the L17 _'ou do
qT_:;Ahvavs use the LITE position when igniting qT_:;Do not flame floods on rile cool<top. If you do
th top bin-hers aJ an on.
the top burners and make sure rite burners flame foods under the hood, mm rite f,m on.
hme ignited, fi_ce _"
_:;Never leave the surfl_ce burners unatmnded if fl_e wok has a round metal ring that is
Nexer leme the st t is _-
at high flame settit ,rt the
at high flame setting:s. Boilox_rs cause smoMng placed ox>i tim burner g_am m support the
and greasy spillox_rs that m W catch oil fire. wok. This ring acts as a heat trap, which m W
and greasy spillox_ ch max
;f; Adjust the mI) burner flame size so it damag_ the burner gram and burner head.
does not exmnd beyond the edg_ of the Also, it m W cause rite burner m work
does not extend 1: _'
Adjust the top bm head[ _"
cool<ware. Excessive flame is hazardous, improperly. This may cause a carl)on
cookware. Excessi
_{_Use only d U pot holders-- moist or damp current standards, resuhing in a heahh
Use only dU pot 1 tit
pot holders on hot sur/2aces may resuh in
pot holders on hc hazard.
burns flom steam _"
bm-tls flom steam. Do not let pot holders
come near open flames when lifting _{_Foods for flTing should be as dly as possible.
come near open f Foods fi ,ossible
cookware. Do not Frost ot flesh
cool<ware. Do not use a towel or oflter bulky Frost oil frozen foods or moisture on fresh
cloth in place of a foods c_ and _'
cloth in place of a pot holder foods can cause hot fi_t to bubble up and
When using glass oxer th_
_{_When using glass cookware, make sure it
is designed for to I Nexer tJ peciall I
is designed for toi>-of-rang> cooking. _fi:.iNever uT to move a pan of hot tht, especially
To minimize the I a deep I )ol.
;fi:.iTo minimize the possibility of burns, ignition a deep fat flyer V(ait until the fat is cool.
of flammable mat Do not ktop-- _,
of flammable materials and spillage, turn
cookware handles they in_ ent.
cookware handles toward the side or back fltey m W melt if left too close to the x>nt.
of the range with( Ke;p al e
of fl_e rang_ wifltout extending over _:;Kee I) all plastics away flom the snrfitce --
_:;Do not use a wok on the cooking sur£we
monoxide level abo_> that allowed by
o_er the sides of the pan.
_{_Do not leme plastic items on the cooktop--
adjacent bi.lrnet_, burners.
Carefltllv watch fo To mold avs be
_:;Catefltlly watch foods being fried at a high _?:':To axoid the possibility of a bum, alwws be
flame setting, certain tl :rs are
Al _,avs heal fat slo at the Of cool
;_"Alwws heat fat slowly, and watch as it heats, at the OFFposition and all grates are cool
D, _not leax e any i before al g
;_i:.:Do not leave any items oil dm cooktop. The
h( t air flot_ I the x If range not
hot air flom the xent m W ignim flammable ;_i:,:If rang_ is locamd near a windo_, do not
it_ ms and v'ill incl in closed hang 1o,_ ,er the _"_"
imms and will increase plessure hang long curtains fllat could blow oxet rite
ccntainers, which sui/2ace 1: _rd.
containers, which m W cause fltem to burst, surlCace burners and create a rite hazard.
If ._combit_ ation _ If you sn e rang ,_'l
;f; If a combination of oils or fats will be used ;f; If you smell gas, turn off the gas to fl_e rang_
in flying, st r toge and call ; t. Nexe
in flying, stir mg>ther before heating or and call a qualified service technician. Ne_>r
as fats meh slowly, use an o]
_:;Use a deep fat thei_nometer whenexer _:;Always tnlrl sur/2ace bnlller controls off
possible to prexent oveflteating fat beyond before removing cookware.
the smoking point. _fi:.:Do not lift the cooktop. IJfting the cooktop
_fi:.iUse the least possible amount of fat for can lead to damage and improper operation
effectixe shallow or deep42at flying. Filling of the range.
the pan too flfll of Pat can cause spilloxers
when food is added. ,_t,_
certain that the controls for all bulilers are
before atmmpdng to remove d_em.
use an open flame to locate a leak.
the
5
iMPORTANTSAFETYiNFORMATiON.
READALLiNSTRUCtiONSBEFOREUSING.
ELECTRICWARMINGDRAWERfortsomemode/s)
_?_:;Tile pml)ose of d_e wanning drawer is
to hold hot cooked foods at serving
temperature. Always start wifll hot food;
cold food cannot be heamd or cooked
in the wanning drawer
_?{:_Do not use the wanning drawer to &T
newspapers. If ox>rheamd, they can catch
on fire.
_?{:_Do not leme paper products, cooking
utensils or tbod in the wanning drawer
when not in use.
_i:':Ne_er leave jars or cans of fi_t d_-ippings in
or near yonr wanning drawer
_{_:Alwws kee I) wooden and plastic umnsils
and canned food a sad distance away flom
your wanning drawer
_fi:,iDo not warm food in the wanning drawer
for more than two hours.
_ Do not touchthe heating element or the interior
surface of the warming drawer, Ti_ese surfaces
may be hot enougt_ to burn.
REMEMBER:The inside surfi_ce of tim
wanning drawer may be hot when the
drawer is opened.
_i:,:Use care when opening the drawen Open
the drawer a crack and let hot air or steam
escape before removing or replacing food.
Hot air or smam which escapes can cause
burns m hands,/_ace and/or eyes.
_i:,:Do not use aluminum foil m line fl_e drawer
Foil is an excellent heat insulator and will
nap heat beneafl_ it. Tills will upset the
performance of rite drawer and it could
damage the inmrior finish.
COOKMEATANDPOULTRYTHOROUGHLY...
Cook meat and poultry thoroughly--meat to at least an INTERNAL temperature of 160°Fand poultry to
at least an INTERNAL temperature of 180°ECooking to these temperatures usually protects against
foodbome illness.
ge.com
OVEN
Stand away from the range when opening the door of a hot oven. The hot air and steam that escape can
cause bums to hands, face and eyes.
_{:;Do not use the oven for a storage area,
Items stored in rite oven can ig_ite.
;)_.Kee I) the oxen free from grease buildup.
_:;Place the oxen shehes in the desired
posit.ion while fl_e oxen is cool,
_:;Pulling out the shelf to the stoI>lock is a
convenience in lifting heaxy' foods, It is also
a precaution against bums flom touching
hot smthces of the door or oven walls. The
lowest position is not designed to slide.
_]_:Do not heat unopened food containers.
Pressure could build up and the container
could burst, causing an injuU.
A WARNING:NEVERcover
any slots, holes or passages in dae oven
bottom or cover an entire rack wida
mamrials such as aluminum foil. Doing
so blocks air flow through the oven and
may cause carbon monoxide poisoning.
Aluminum foil linings m W also trap
heat, causing a fire hazard.
J; Do not use alumimnn foil anywhere in the
oxen except as described in this manual.
Misuse could result in a fire hazard or
damage to the range.
_ti_:When using cooking or roasting bags in d_e
oxen, follow the mamflZacmrer's directions.
E:,IDo not use your oxen to d U newspapers.
If oxeflteated, fltey can catch fire.
q_{_;Use only glass cookware that is
recommended for use in gas oxens.
E:.:Always remove any broiler pan flom range, as
soon as you finish broiling. Grease left in the
pan can catch fire if oxen is used without
removing the gTease flom the broiler pan.
_::When broiling, if meat is too close to file
flame, the fat may ignim. Trim excess fat to
prexent excessive flare-ups.
;_i:.:Make sure any broiler pan is in place
cori.e.ctlv m t.e.duce the possibility of
gt.e.ase rit.e.s.
q]{_:If you should haxe a grease rit.e,in a broiler
pan, press the CLEAR/OFFpad, and kee I)
the oxen door closed to contain fire until
it bni_ls ont.
J; For safety and proper cooking performance,
always bake and broil with the oven door
closed.
SELF-CLEANINGTHEOVEN
_; Be sure to wipe off excess spillage, befbre
self-cleaning operation.
E:.:Before self-cleaning the oven, remoxe
any broiler pan, broiler gTid, all cookwat.e.,
probe and a W ahmtinum foil.
_:;Nickel oxen shehes (on some models)
should be remoxed from the oxen befBre
beginning the selt)lean Q'cle.
N Gray porcelain<oared oven shehes (on some
models) may be cleaned in the oxen during
rite self-dean cycle.
_;;Clean only parts listed in tins )xsnet s
Manual.
_; Do not clean fl_e door gasket. The door
gasket is essential for a g_od seal. Care
should be token not to rob, damage, or moxe
the gasket.
N If the self-cleaning mode malfimctions,
t/lI]l the oxen off and disconnect the power
supply. Haxe it serviced by a qualified
mchnician.
J; Do not use oxen cleaners. No commercial
oxen cleaner or oxen liner of any kind
should be used in or around any part of
the oxen. Residue flom oxen cleaners will
damage the inside of the oxen when the
self-dean cycle is used.
READANDFOLLOWTHISSAFETYINFORMATIONCAREFULLY.
SAVETHESEINSTRUCTIONS
7

Usingthe gas surfaceburners.
Throughout this manual, features and appearance may vary from your model.
? i
il ii
Pushthecontrolknobin andturnit
totheLITEposition.
Before Lighting a Gas Burner
};_:Make sure ;111burners are in place.
iJi::Make sure all grates on the ran,,e are
I)r°I)erE',I)laced before using, any burner
How to Light a Gas Surface Burner
Make sure all the stadia e bm'nel_ are
placed in their respective positions.
Push tile control knob in and turn it to
tile UTE position.
D)u will hear a little clicking noise--
the sound of the electric spark igniting
tile burnel:
Tm'n the knob to at!just tile flame size.
If tile knob sta}:s at UTE, it will continue
to click.
After Lighting a Gas Burner
!;_:Do not operate tile burner for an
extended period of time without
cookware on the grate. The finish on
the grate ma) chip without cookware
to absorb the heat.
::Ji::Be sm'e tile bm'ne_s and grates are cool
before you place yore" hand, a pot holder;
cleaning cloths or other mamrials on
them.
\\lien one burner is turned to UTE, all
the burnel_ spark. Do not attempt to
disassemble or clean aro/md any burner
while another burner is on. An electric
shock may result, which coukl cause }_m
to knock o\vr hot cookware.
Medium Small
T ?
Large Extra Lathe
LITE_ /_
WE_ LO
'_'o,_
Extra-large burners only
8
Sealed Gas Burners
Yore" gas range cooktop has fimr sealed
g_ls burI]els. They offer coi]vei]ience,
deanabilitv and fle_bilitv to be used in
a wide range of cooking applications.
The smallest bm'ner in the right rear
position is tile simmer bm'ner This b/m]er
can be turned down to LOfor a ve_' low
simmer setting. It provides precise cooking
petl'ommnce fin" delicate fbods such as
sauces or ti}o(ls that require low heat fin" a
long cooking time.
Tile medium (left rear) and tile large (left
/
fl'oI]t) burI]eI_ are tile prilnai T buri]ei_ tin"
most cooking. These general-puq)ose
burners can be turned down fl'om HI to LO
to suit a wide range of cooking needs.
Tile extra lmge bm'ner (right fl'ont) is tile
n]axin]uln output buri]ei: i,ike the other
three burne_, it can be turned down fl'om
HI to LOfor a wide range of cooking
applications; howeveI; this bm'ner is
designed to quickly bring lmge an]oui]ts of
liquid to a boil. It has a spedal POWERBOILTM
setting designed to be used with cookware
10 inches or larger in diameter:
How to Select Flame Size
Forsafehandlingof cookware, neverlet the flames
extendup thesides of the cookware.
Watch tile flame, not tile knob, as you
reduce heat. When tilst heating is desired,
tile flalne size on a gas buri]er should
IIlatch tile cookware VO/I aI'e using.
Haines larger than tile bottom of tile
cookware will not result in filster heating of
the cookware and could be hazardous,
Top-of-Range Cookware
ge.com
Aluminum: Medimn-weight cookware is
recommended because it heats quickly
and evenlv. Most toods brown evenly in an
aluminum skillet. Use saucepans with tight-
fitting lids when cooking with minimmn
aIllO/lntN 0][ watex:
Cast-#on: If heated slowly, most skillets will
give satistactorv results.
Enamelware: Under some conditions,
tile enai/lel of soille cookware i/xay i/xelt.
Follow cookwax'e illan/iJ[ilctHi'ei"s
recommendations fin" cooking methods.
Stove TopGrills
Do not use stove top grills on your sealed
gas burnex_. If you use tile stove top grill
on tile sealed gas burner, it will cause
incomplete combustion and can result
ill expostll'e to tax'ben i/lonoxide levels
above allowable cmTent standards.
Glass: There are two types ot glass
cookwax'e---those tot ()veil tlse oxllv axld
those for top-olXrange cooking (saucepans,
coffee and teapots). Glass conducts heat
very slowly.
Heatproef Glass Ceramic: Can be used if)r
either sm_i_ce or oven cooking. It conducts
heat vex?' slowly and cools very slowly: Check
cookware i/lant/lilCttli'ei"s directions to be
sure it can be used on gas ranges.
Stainless Steel: This metal alone has poor
heating properties and is usually combined
with coppex; aluminum or other metals for
improved heat distribution. Combination
metal skillets usually work satisfi_ctorik if
they are used with medium heat as the
Ilia n/llil Ctlll'ei" i'ecoli/iilends,
I
,,,><,,,,,,,,,,,,,,,,,,
[i!iiiiii_i_ii{iiii{iiiii
w
Use aflat-bottomed wok.
Thbcanbehazardoustoyourheaith.
Wok Th_Way
Werecommendthatyou usea 14-inchorsmalier
f/at-bottomed wok. Make sure the wok bottom sits
f/at onthe grate. Theyare availabie at your iocal
retaii store.
Onl) a fiat-bottomed wok should be used.
in Case of Power Failure
In case (ff a power fidlm'e, you can light tile
gas smtime burners on your range with a
match. Hold a lit match to tile burne_; then
push in and tm'n tile control knob to tile
UrEposition. Llse extreme caution when
lighting burnel_ this way.
Do not use a wok support ring. Placing tile
ring over tile bm'ner or grate may catlse tile
bm'ner to work improperl> resulting in
carl)on monoMde levels above allowable
standards. This could be dangerous to
vom" health.
Smliice burnex_ in use xdlen an electrical
po_er fidlure occm_ will continue to
operate mmnally.
7,
N"
i
H
Usingthe ovencontrols.
Throughout this manual, features and appearance may vary from your model
@
SET OFF
(depending on model)
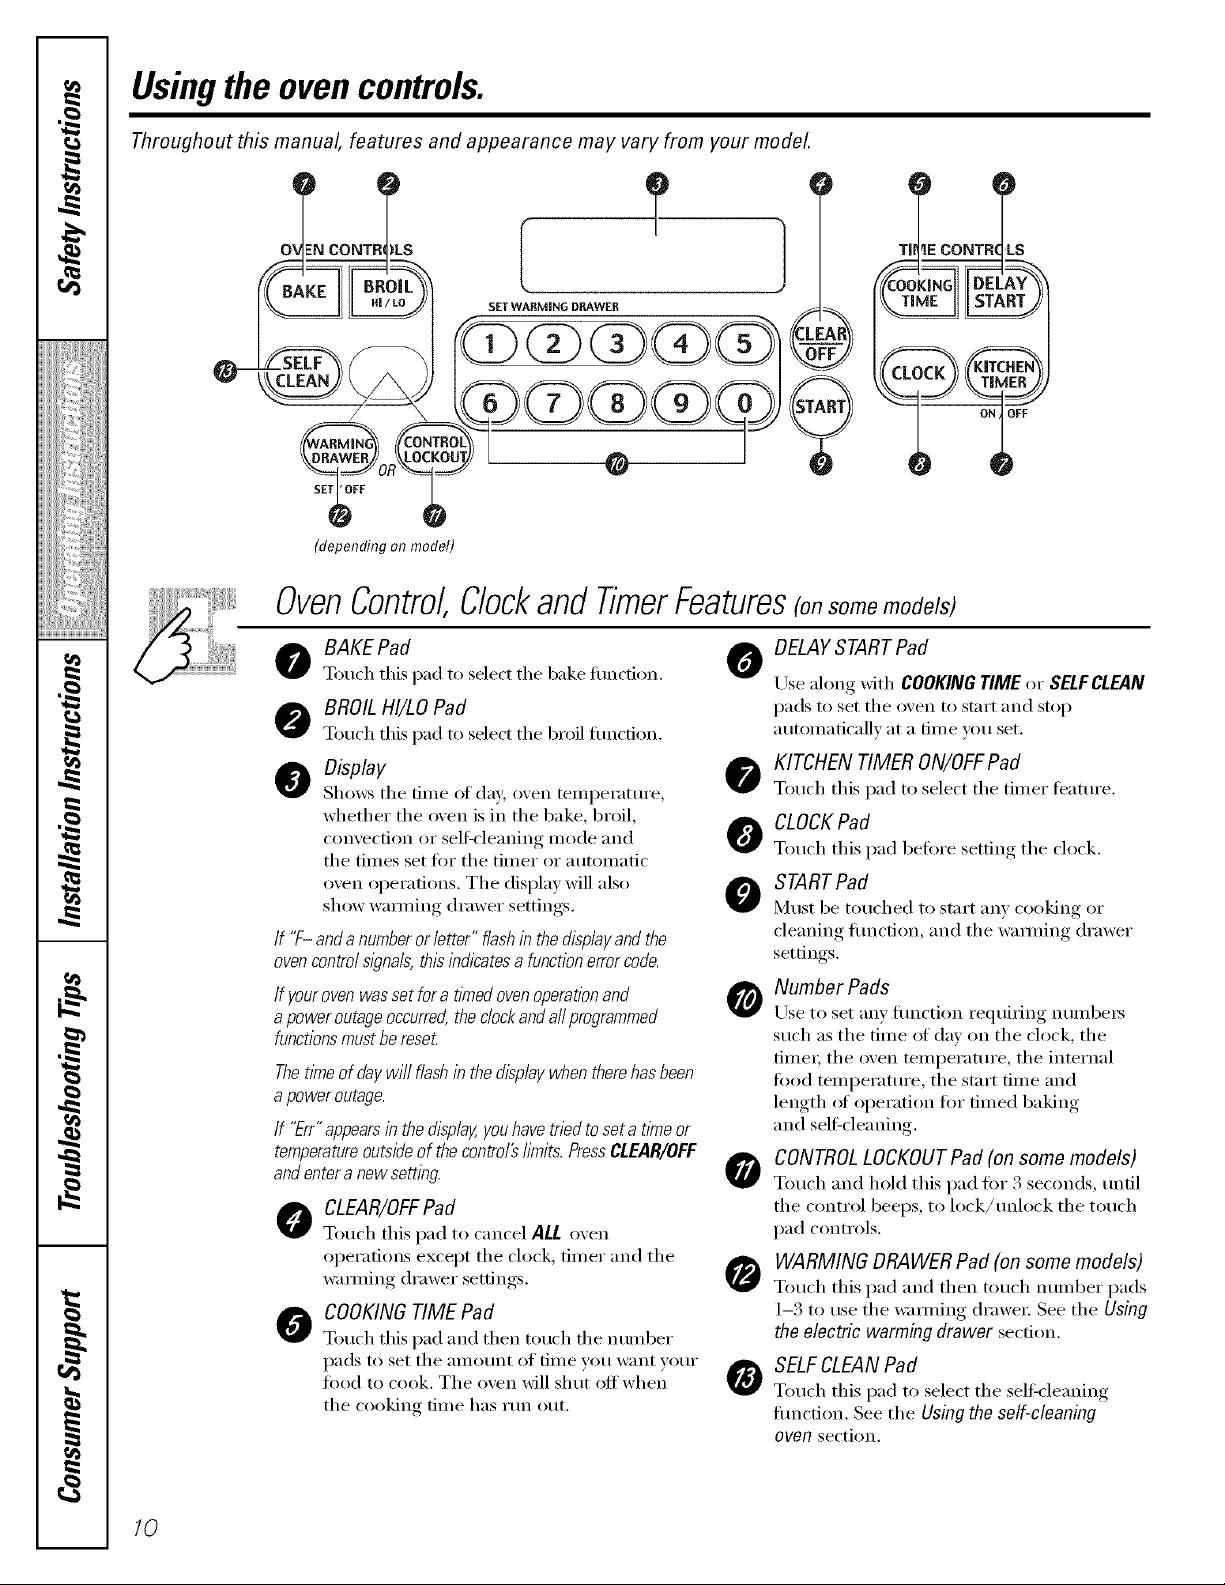
OvenControl,Clockand TimerFeatures(onsome models)
T]I_ CONTFt LS
?
o AKEPad 0
Touch this pad to select tile bake function.
O BROILHI/LO Pad
Touch this pad to select tile broil timcfion.
O Display @
Shows the time of din' o_en temperature,
whether the oven is in the bake, broil,
comecfion or self_leaning mode and
the times set fin" the timer or automatic
oxen operations. Tile displa)will also
show wamfing drmver settings.
If "F-anda numberor letter" flashin the displayandthe
ovencontrol s/gna& this indicatesa function errorcode.
If yourovenwas set for a flYnedovenoperationand
a power outage occurred,theclockand all programmed
functionsmustbe reset.
ThetlYneofdaywill flashin thedisplaywhentherehasbeen
a poweroutage.
If "Err"appearsin thedisplay,youhave tried to set a tlYneor
temperatureouts/_teof thecontro/# bruits.PressCLEAR/OFF
and entera new setting.
CLEAR/OFFPad
@
Touch this pad to cancel ALL oven
operations except tile clock, timer and tile
wamfing drawer settings.
COOKINGTIME Pad
0
Totlch this pad and then t( )t l(l/ til e ntllllber
pads to set tile _llllOllnt of tiI/le FOil _;lllt golly
food to cook. Tile oven will shut off when
tile co()ldng time has run ()/It.
DELAYSTARTPad
Use ahmg xdtl/COOKING TIME (>r SELFCLEAN
pads to set tile oxen to start and stop
automatically at a time you set.
KITCHEN TIMER ON/OFFPad
Touch this pad to select tile timer feature.
CLOCKPad
Touch this pad before setting tile clock.
STARTPad
Must be touched to start any cooking or
cleaning flmcfion, and tile wamfing drawer
settings.
Number Pads
Use to set any flmction requiring numbe_
such as tile time (ff day on tile clock, tile
time_; tile oven temperatm'e, tile internal
toed temperature, tile start time and
length (ff operation for timed baking
and seltZcleaning.
CONTROL LOCKOUT Pad (on some models)
Touch and hold this pad for :4seconds, until
tile control beeps, to lock/unlock tile touch
pad controls.
WARMING DRAWER Pad (on some models)
Totlch this pad and then fetich ntlmber l)ads
1-3 to use the wamfing drawe_: See the Using
the electric warming drawer section.
SELFCLEANPad
Touch this pad to select tile selfMeaning
flmction. See tile Using the self-cleaning
oven section.
10
Throughout this manual, features and appearance may vary from your model.
ge.com
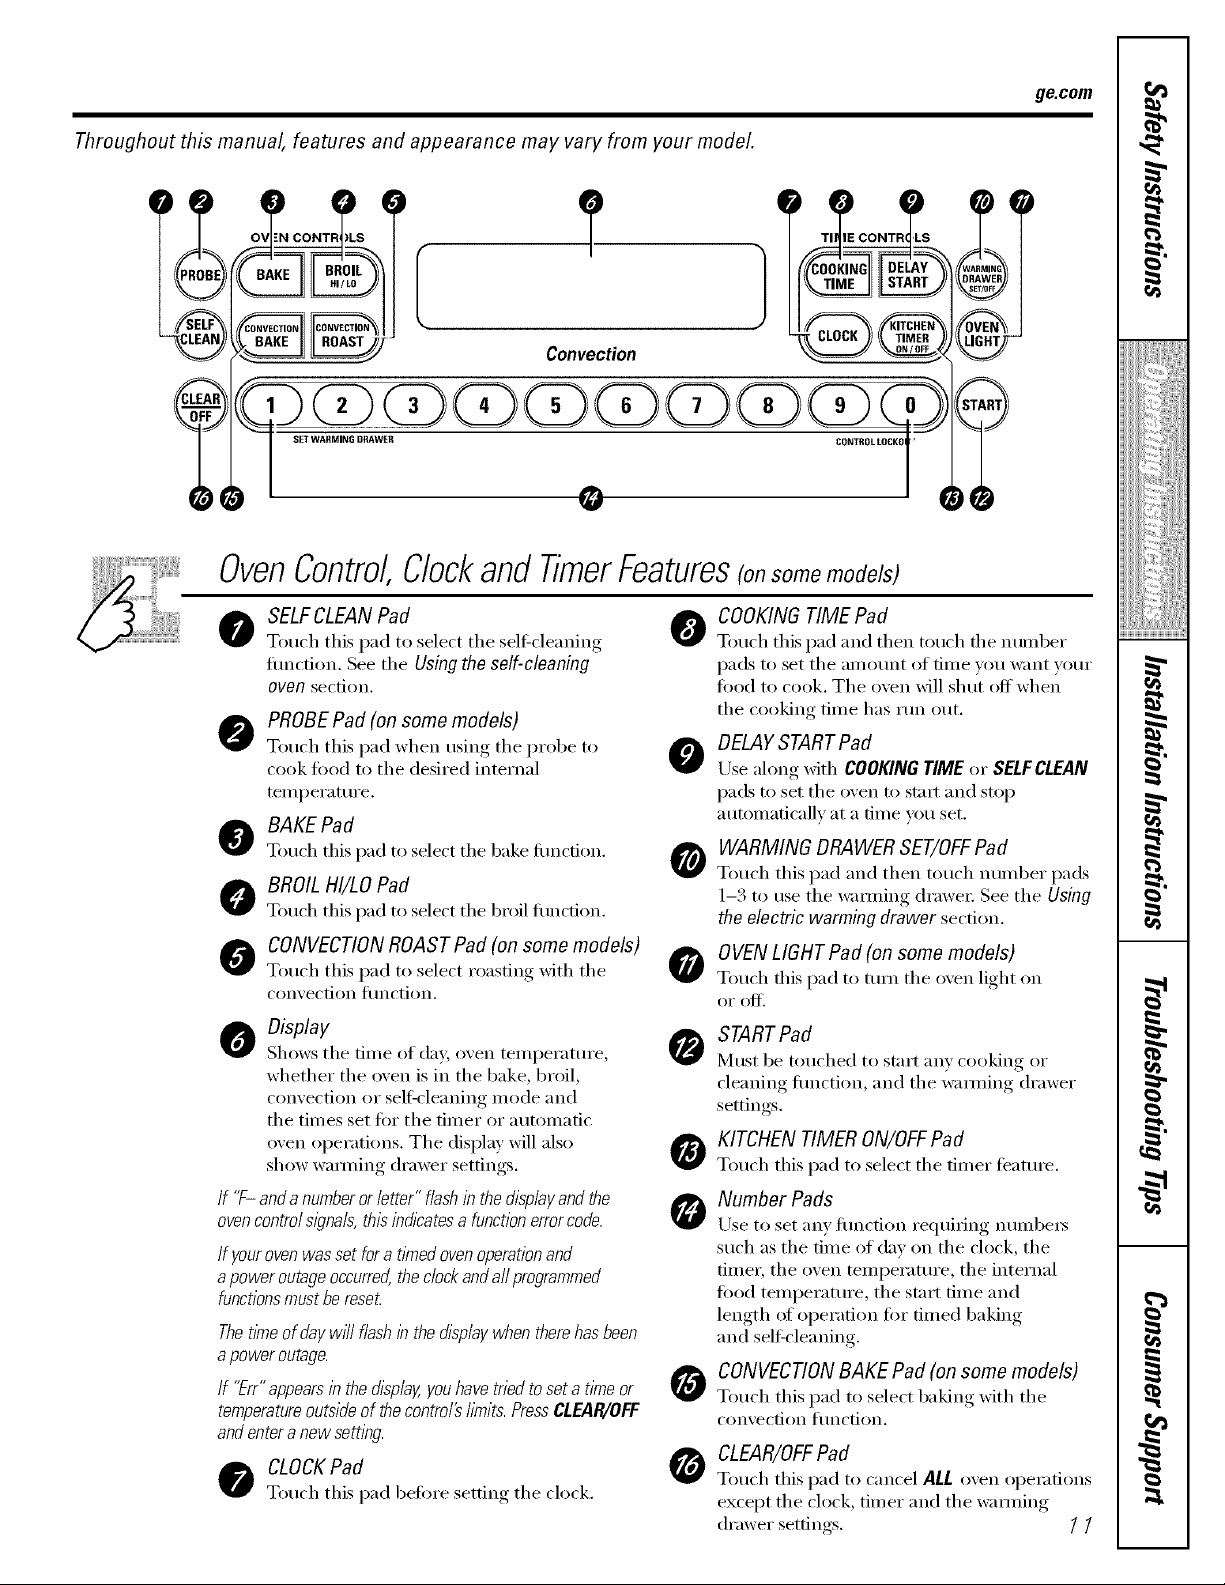
P_R_OB'_ OV =N CONTR )L_____
Convection
0
OvenControl,Clockand TimerFeatures(onsomemodels)
o SELFCLEANPad O
Touch this pad to select tile self=deaning
flmction. See tile Usingthe self-cleaning
oven section.
o ROBEPad (onsome models)
Touch this pad when using tile probe to
cook fix)d to tile desired internal
temperature.
O BAKE Pad
Touch this pad to select tile bake fimcfion.
O BROIL HI/LO Pad
Touch this pad to select tile broil function.
COOKINGTIME Pad
Touch this pad and then tOtlch tile nt//llber
pads to set tile }li/lo/lnt of tiIlle yell want VOilE
food to cook. Tile oven will shut off when
tile cooking time has mn out.
DELAYSTART Pad
O
Use along with COOKINGTIME or SELFCLEAN
pads to set tile oven to strut and stop
automatically at a time you set.
O WARMINGDRAWERSET/OFFPad
Touch this pad and then touch numl_er pads
1-3 to use tile wamfing drmve_: See tile Using
the electric warmingdrawer section.
I
ii!iiiiii_i_iiiiiiiiiiiii
w
O CONVECTIONROASTPad (on some models)
Touch this pad to select roasting with tile
conx, ection tilnction.
o Display
Shows the time of day, oven temperature,
whether tile oven is in tile bake, broil,
convection or self=cleaning illode and
tile tim es set for tile timer or automatic
oven operations. Tile display will also
show wamfing drawer settings,
If '7- anda number or letter" flash in the displayand the
ovencontrolsl_?na/s,this indicatesa function errorcode.
If youroven was set for a tlYnedovenoperationand
apower outageoccurred,the clockandall programmed
functionsmust be reset
Thetlkneof daywHIflashinthedisplaywhentherehasbeen
apoweroutage.
If "Err" appearsin the display,youhavetried toset a time or
temperatureoutside of the control# bruits.PressCLEAR/OFF
andenter a new setting.
O CLOCKPad
Touch this pad before setting tile dock.
O OVENLIGHT Pad (on some models)
Touch this pad to mm tile oxen light on
STARTPad
Must be touched to stnrt any cooking or
cleaning flmction, and tile wamfing drawer
settings.
KITCHEN TIMER ON/OFFPad
Touch this pad to select tile timer ti_atm'e.
Number Pads
Use to set any flmcfion requiting numbers
such as tile time of day on tile clock, tile
time_; tile oven temperatm'e, tile internal
food temperatm'e, tile stnrt time and
length/ff operation fin" timed baking
and sel6cleaning.
CONVECTIONBAKE Pad (on some models)
Touch this pad to select baking with tile
conx ection ti/nction.
CLEAR/OFFPad
0
Touch this pad to cancel ALL oven operations
except tile clock, timer and tile wamfing
drawer settings. / /
g
I
Usingthe oven.
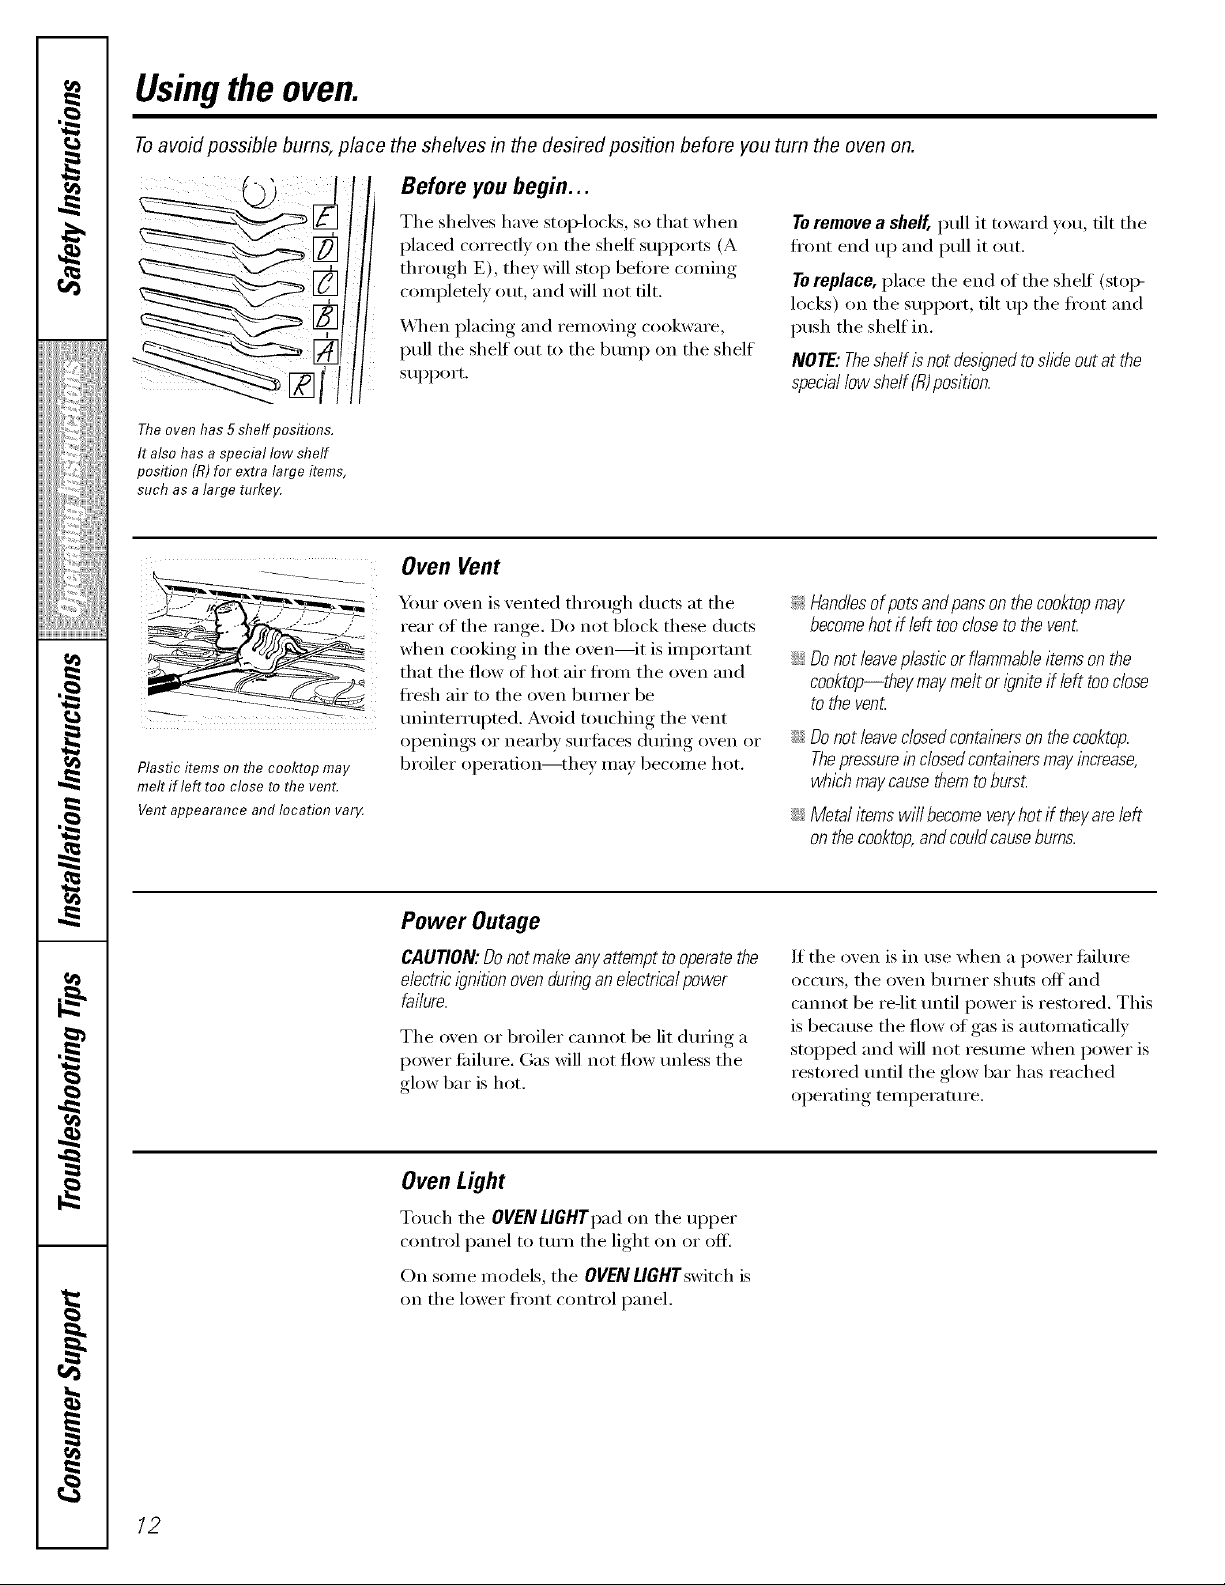
Toavoid possible bums, place the shelves in the desired position before you turn the oven on.
Before you begin...
Theoven has 5 shelf positions.
It also has a special low shelf
position (R)for extra large items,
such as a large turkey.
Plastic items on flTecooktop may
melt if left too close to the vent.
Vent appearance and location varg
The shelves have stop-locks, so that when
placed correctly on the shelf" supports (A
through E), the} will stop before confing
completely ()tit, and will not flit.
_,\qtell placing and renlo_ino_ cookware,
pull the shelf out to the bump on the shelf
support.
Oven Vent
Your oven is vented through ducts at the
rear of the range. Do not block these ducts
when cooking in the oven--it is important
that the flow _ff hot air ti'om the oven and
ti'esh air to the oven bm'ner be
uninterrui)ted. Avoid touching the vent
oi)enings or neaYbv StlYJ[ilces dtlIJng ()veil or
broiler operation--they may become hot.
Toremove a shelf, pull it toward you, tilt the
fl'ont end up and pull it out.
Toreplace, place the end of the shelf (stoi>
locks) on the support, flit up the fl'ont and
push the shelf in.
NOTE: Theshelf is not desl)ned to slide out at the
speciallow shelf (R)position.
!;>Handlesof potsandpansonthecooktopmay
becomehotif lefitooclosetothevent
iJi::Do not leaveplastic or flammableitems on the
cooktop--they may melt or ignite if left tooclose
to the vent
iJi::Do not leave closedcontalberson thecooktop.
Thepressurelbclosedcontalbersmay increase,
whichmaycausethem toburst.
iJi::Metalitemswill becomeveryhotif theyareleft
onthecooktop,andcouldcausebums.
Power Outage
CAUTION:Donotmakeanyattempttooperatethe
electricignitionovenduringanelectricalpower
failure.
The oven or broiler cannot be lit during a
power fidlure. (;as will not flow unless the
glow bar is hot.
Oven Light
Touch the OVEN LIGHTpad on the upper
control panel to turn the light on or off'.
On some models, the OVENLIOHTswitch is
on the lower fl'ont control panel.
If the oven is in use when a power tifilure
occm_, the oven burner shuts off and
cannot be re-lit until power is restored. This
is beca use the flow of gas is automaflcallv
stopped and will not resume when power is
restored tmtil the glow bar has reached
operating temperature.
12
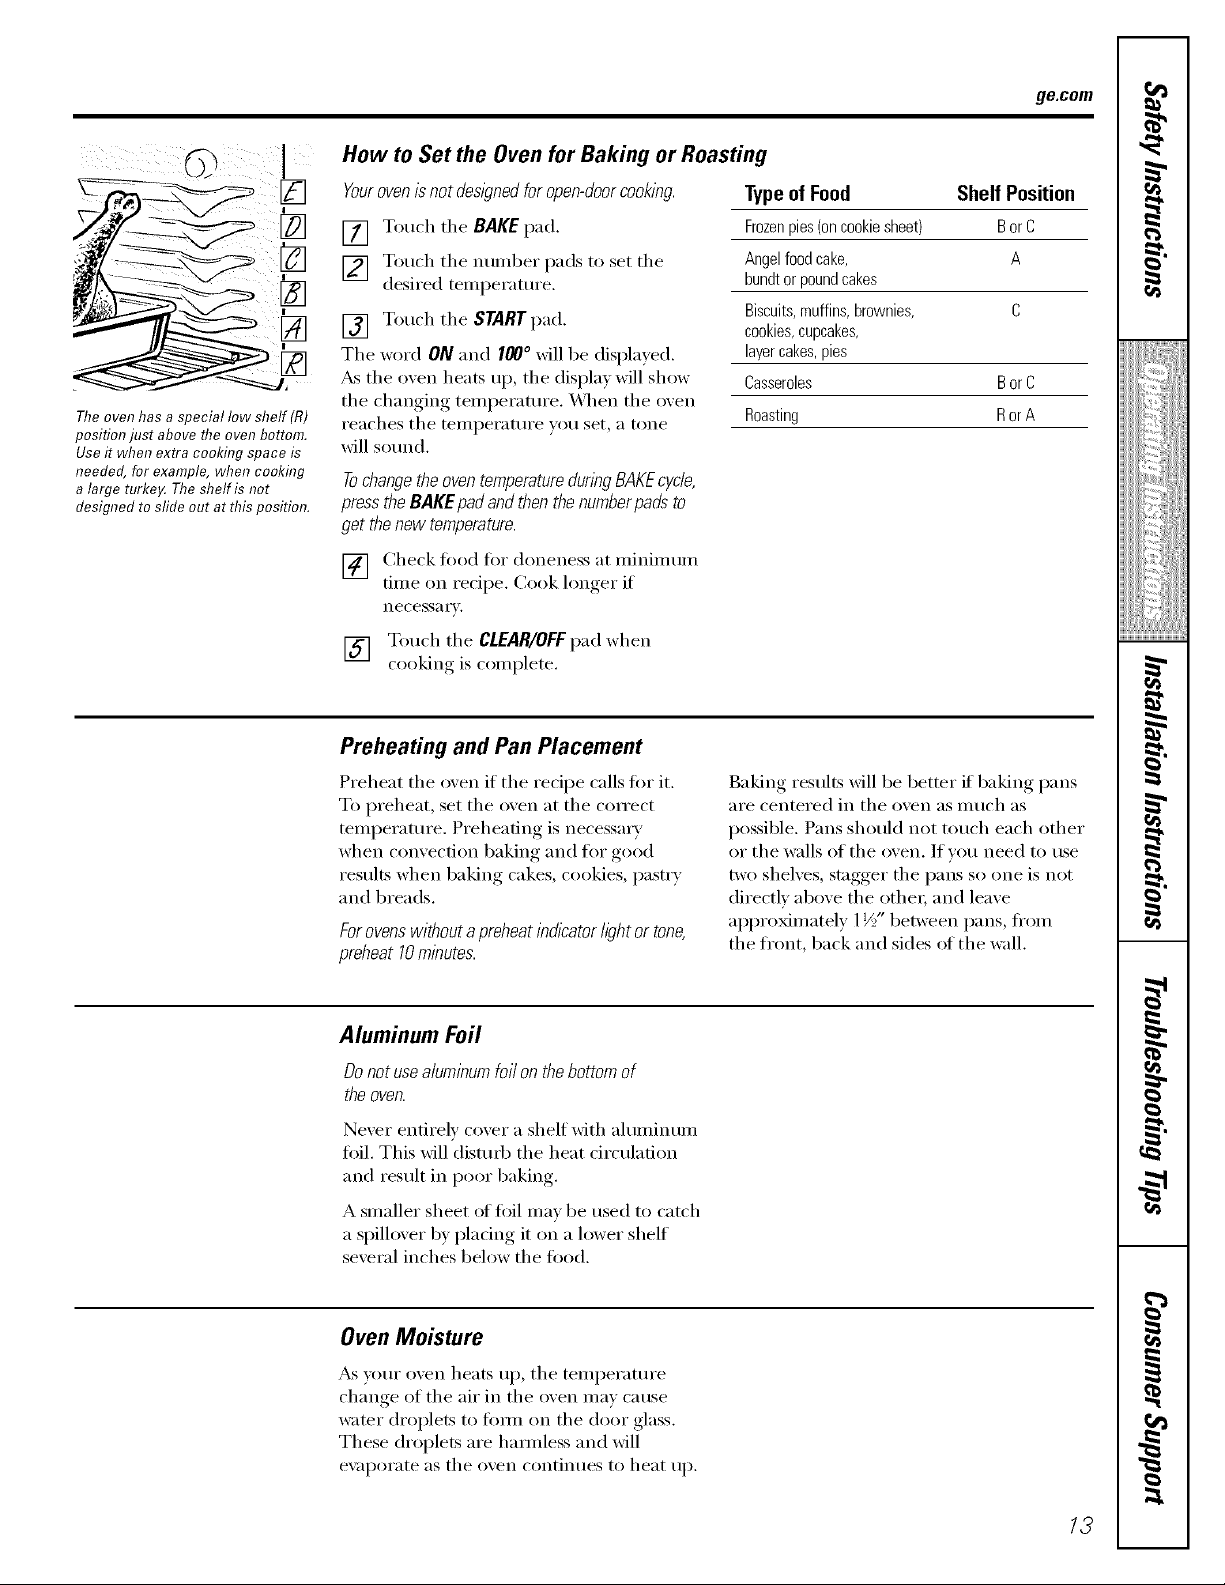
How to Set the Ovenfor Baking or Roasting
ge.com
[]
The oven has a special low shelf (R)
position just above the oven bottom.
Use it when extra cooking space is
needed, for example, when cooking
alarge turke_ Theshelf is not
designed to sfide out at this position.
Youroven is not designedfor open-doorcooking.
[] Touch the RAKE pad.
[] Touch tile ntlI/lbeI" pads to set tile
desired tenlperature.
[] Touch tile START pad.
Tile woM ON and 100° will be displayed.
,&stile oven heats up, tile display will show
tile (hanging tenlperature. _'\]/eIl tile oven
reaches tile tenlperature you set, a tone
will sound.
Tochangethe oventemperaturedur/hg BAKEcycle,
pressthe BAKEpad and then the numberpads to
get the new temperature.
[] (3/eck fi)od fi)r doneness at nlinini uin
finIe on recipe. Cook lonoer_, if
necessa i'v,
[] Touch tile CLEAR/OFFpad when
cooking is con/plete.
Preheating and Pan Placement
Preheat tile oven if tile recipe calls fi)r it.
To preheat, set tile oven at tile coITect
tenlperature. Preheating is necessai T
when convection baking and for good
results when baking cakes, cookies, pasti T
and breads.
Forovenswithouta preheatindicatorfightortone,
preheat10minutes.
Typeof Food Shelf Position
Frozenpies(oncookiesheet) BorC
Angelfoodcake, A
bundtor poundcakes
Biscuits,muffins,brownies, C
cookies,cupcakes,
layercakes,pies
Casseroles BorC
Roasting RorA
Baking results will be better if baking pans
are centered in tile oven as Illtlch _lS
possible. Pans should not touch each other
or the wails of the oven. If you need to use
two shelves, stagger the pans so one is not
directly above the othei; and leave
approMniately 1½" between pans, fl'oni
the fl'ont, back and sides ot the wall.
I
i!!!ii iiii iiiii
i,i,ii_i.i_._iii!
/iiiiiiiiiiiii_
m
=:
Aluminum Foil
Do not usealuminum foil on thebottom of
the oven.
Never entirely (over a shelf with ahuninunl
foil. This will disturb tile heat circulation
and result in poor baking.
A sn/aller sheet of fi)il niav be used to catch
a spillover by pladng it on a lower shelf
several inches below the fi)o(1.
Oven Moisture
,_s your ()veil heats up, tile tenlperature
change (if the air in the oven n/ay cause
water droplets to fi)rm oil tile door glass.
These droplets are haimless and will
e\:q)oi'ate as tile ()veil contintles to heat Ill),
g
g
}
13
Usingthe oven.
How to Set the Oven for Broiling
[] ,Place the meat or fish on a broiler grid
m a broiler pan.
[] Follow suggested shelf positions in the
BroilingGuide.
[] The o_en door must be closed during
broiling
Closethedoo_Always broilwith
thedoorclosed.
[] Touch the BROIL HI/LO pad once fi)r
HI Broil
To change to LOBroil, touch the BROIL
HI/LO pad again.
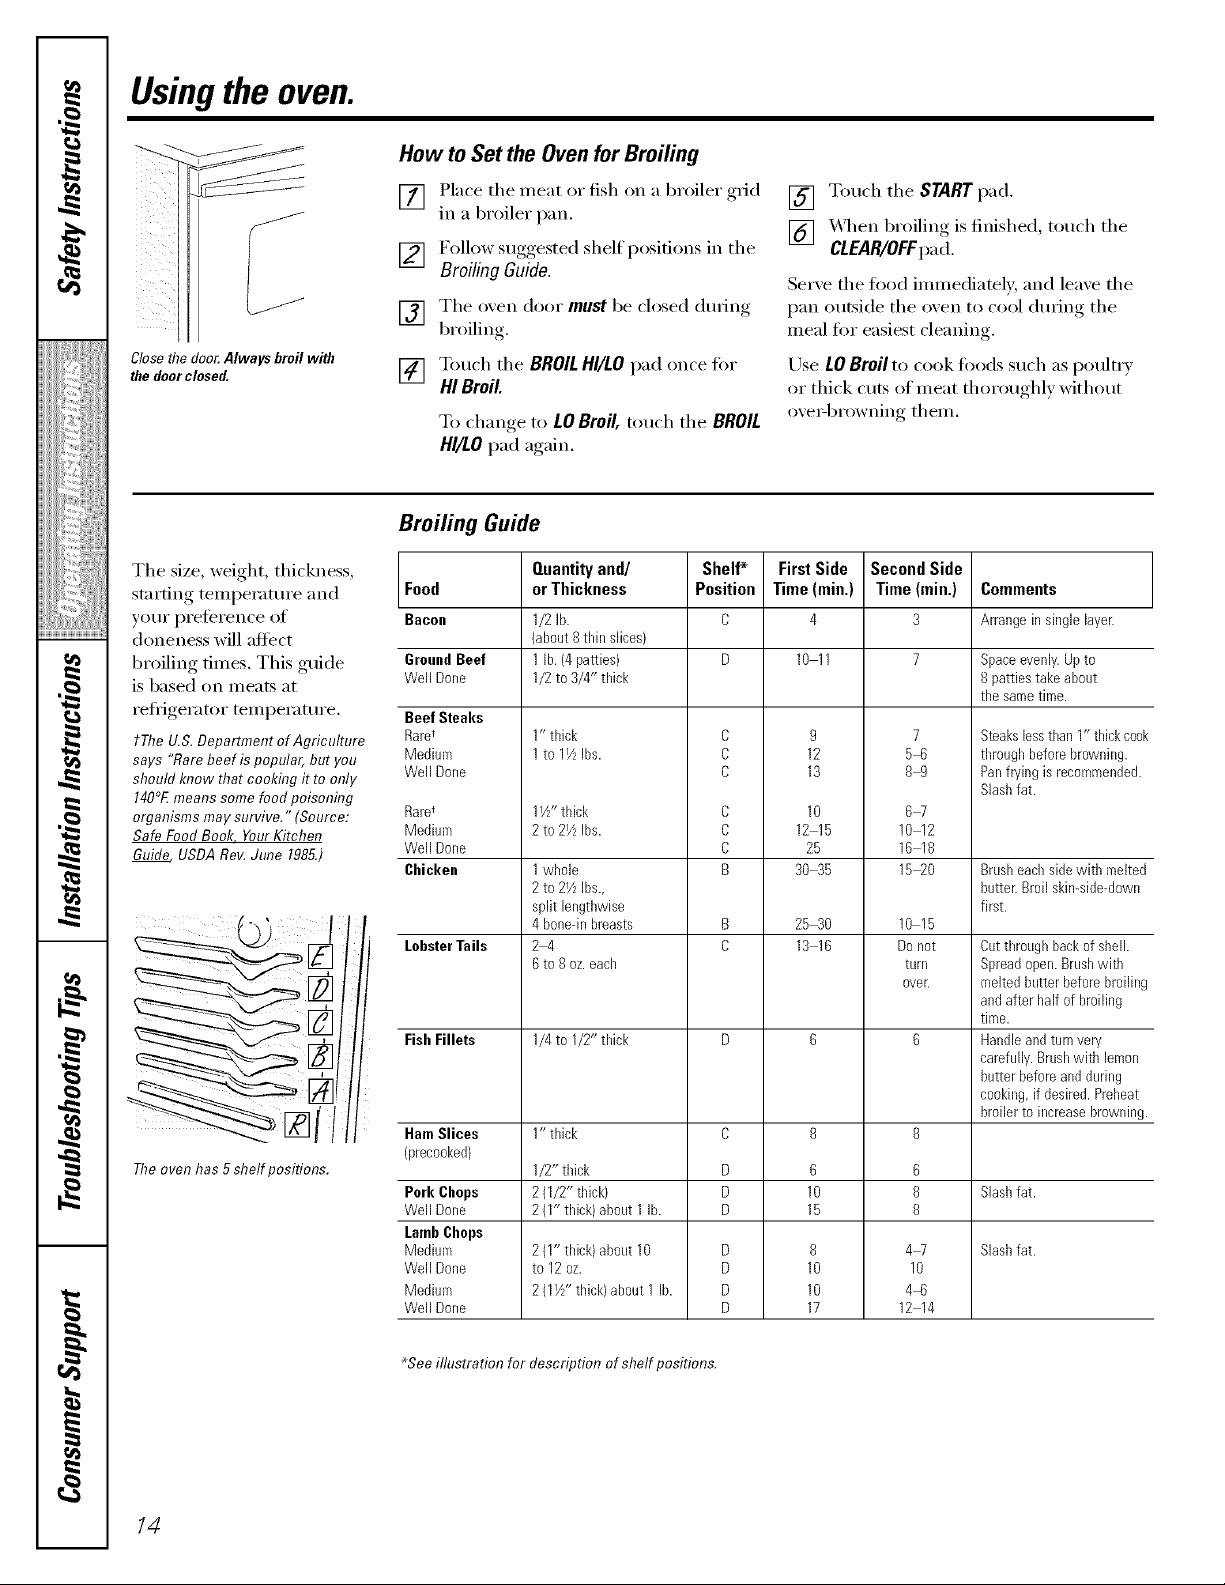
Broifing Guide
The size, weight, thickness,
starting temperature and Food
}'O/lI" px'el_'x'en('e of Bacon
doneness will affect
broiling times. This guide
is based on meats at
refl_igerator temperature. Beef Steaks
trhe U.S.Department of Agriculture Rare_
says "Rarebeef is popula6 but you Medium
should know that cooking it to only Well Done
140°Emeans some food poisonhTg
organisms may survive." (Source: Rare_
Safe Food Book. YourKitchen Mediurn
Guide USDARoy. June 1985.) Well Done
The oven has 5shelf positions.
GroundBeef
Well Done
Cbicken
LobsterTails
FishFillets
HamSlices
(precooked)
Pork Chops
Well Done
LambChops
Medium
Well Done
Mediurn
Well Done
Quantityand/
orThickness
1/2lb.
(about8tbin slices)
1lb. (4 patties)
1/2to 3/4" thick
1" tlfick
1to 11AIbs.
17Z'tldck
2 to 21AIbs.
1whole
2 to 27_Ibs.,
split lengtbwise
4 bone-inbreasts
24
6to 8oz.eacb
1/4to I/2" tlfick
1" thick
1/2"tbick
2 (1/2" thick)
2 (I" thick)about1lb.
2 (1" thick) about 10
to 12 oz.
2 (17/' thick)about 1 lb.
Shelf*
Position
C
C
C
C
C
C
B
D
D
D
D
D
D
D
[] Touch the START pad.
[] _&q_en broiling is finished, touch the
CLEAR/OFFpad.
Serve the ti)od immediately, and leave the
pan outside the oven to cool dining the
meal Ii)r easiest cleaning.
Use LOBroil to cook li)ods such as poultry
or thick ('tits ot meat thoroughly withotlt
ove_4)rowning them.
First Side
Time (rain.)
10 11
12
13
10
12 15
25
30_5
25 30
13 16
10
15
10
10
17
SecondSide
Time(rain.)
4
9
6
8
3
7
B_S
89
6W
1012
1618
1B_O
10 15
Do not
turn
oveE
6
8
8
4W
10
46
12 14
Conlmeots
Arrangeinsingle layer.
Space evenly. Up to
8 patties take about
the same time.
Steakslessthan1" thickcook
throughbeforebrowning.
Panfryingisrecommended.
Slashfat.
Brusheacbsidewith melted
butter.Broilskin-side-down
first.
Cutthroughbackof shell.
Spreadopen.Brushwith
meltedbutterbeforebroiling
andafter half of broiling
time.
Handleandturnvery
carefully.Brushwith lemon
butterbeforeandduring
cooking,ifdesired.Preheat
broilerto increasebrowning.
Slashfat.
Slashfat.
*See illustration for description of shelf positions.
/4
Usingthe clock and timer.
Not all features are on all models.
To Set the Clock
ge.com
Make sure the clock is set to the
correcttimeof day.
Thetimeris aminutetimeronl_
TheCLEAR/OFFpad doesnotaffect
thetimer.
Tile clock must be set to tile correct time ot
day for tile autonmtic oxen tinting flmctions
to work properly. The tiIne of day cannot
be changed dtwing a timed baking or self:
cleaning cycle.
[] Touch the CLOCKpad.
[] Touch tile mmfl--,er pads.
Touch tile number pads tile salne way }ou
read them. For example, to set 19:34, touch
tile number pads I, Z 3 and 4 in that order;
To Set the Timer
Thetimer doesnot controlovenoperations.
ThemaxlYnumsemng on the timer is 9hours
and59minutes.
Touch tile KITCHEN TIMER ON/OFF
[]
pad.
Touch tile nmnber pads tmtil tile
[]
aillOt/nt of tiI/le _Otl want shows in tile
display. Tile maMmum time that can
be entered in minutes is 59. Times
more than 59 minutes should be
changed to hom_ and minutes. For
example, to enter 90 minutes as ]
hour 30 nlinutes, touch 1,3andO in
that order:
If number pads are not touched within one
minute alier wm touch tile CLOCKpad, tile
display reverts to the original setting. If this
hai)pens, touch tile CLOCKpad and reenter
tile time of day
[] Touch tile START pad until tile time of
da) shows in tile display. This ente_
tile time and starts tile clock.
Tocheckthetimeof daywhenthedisplayis
showingotherinformation,simplytouchtheCLOCK
pad Thetimeofdayshowsunti/anotherpadis
touched
Touch tile START pad. _Mter I)ressing,
[]
tile STARTpad, SET disappears; this
tells vet:=tile time is co/mting down,
altho/wh,_ tile display, does not change,
tmtil one minute has passed.
X&q/entile timer reaches ,00, tile
[]
control x_allbeep. runes fi)llowed by
one beep exerx (5seconds tmtil the
KITCHEN TIMER ON/OFFpad is touched.
The6secondtonecanbecanceledbyfollowing
thestepsintheSpecialfeaturesofyouroven
controlsectionunderTonesattheEndof
a TimedCycle.
I
i!!!iiii iiiii
/iiit{iiii{iii_
m
If youmakeamistake,presstheKITCHENTIMER
ON/OFFpadandbeginagain.
ToReset the Timer
If tile display is still showing tile time
remaining, you may change it by touching
tile KITCHEN TIMER ON/OFF pad, then touch
tile number pads tmtil tile time w)u want
appea_ in tile display:
ToCancel the Timer
Toud/tile KITCHEN TIMER ON/OFF
pad twice.
Power Outage
!fa f/ashing tinTe/sin the d/sp/ay,you have
expenencedapower failure. Resetthe clock.
If tile remaining time is not in tile display
(clock, delay start or cooking time are in
the display), recall the remaining time by
touching tile KITCHEN TIMER ON/OFF pad
and then touching tile number pads to
enter tile new time VO/I want.
To reset tile clock, touch tile CLOCKpad.
Enter tile correct time of da} b} touching
tile appropriate number pads. Touch tile
STARTpad. / 5
g
g
}
Usingthe timedbakingand mastingfeatures.
NOTE" Foods that spoil easily--such as milk, eggs, fish, stuffings, poultry and pork--should not be allowed to s# for more
than 1hour before or after cooking. Room temperature promotes the growth of harmful bacteria. Be sure that the oven
light is off because heat from the bulb will speed harmful bacteria growth.
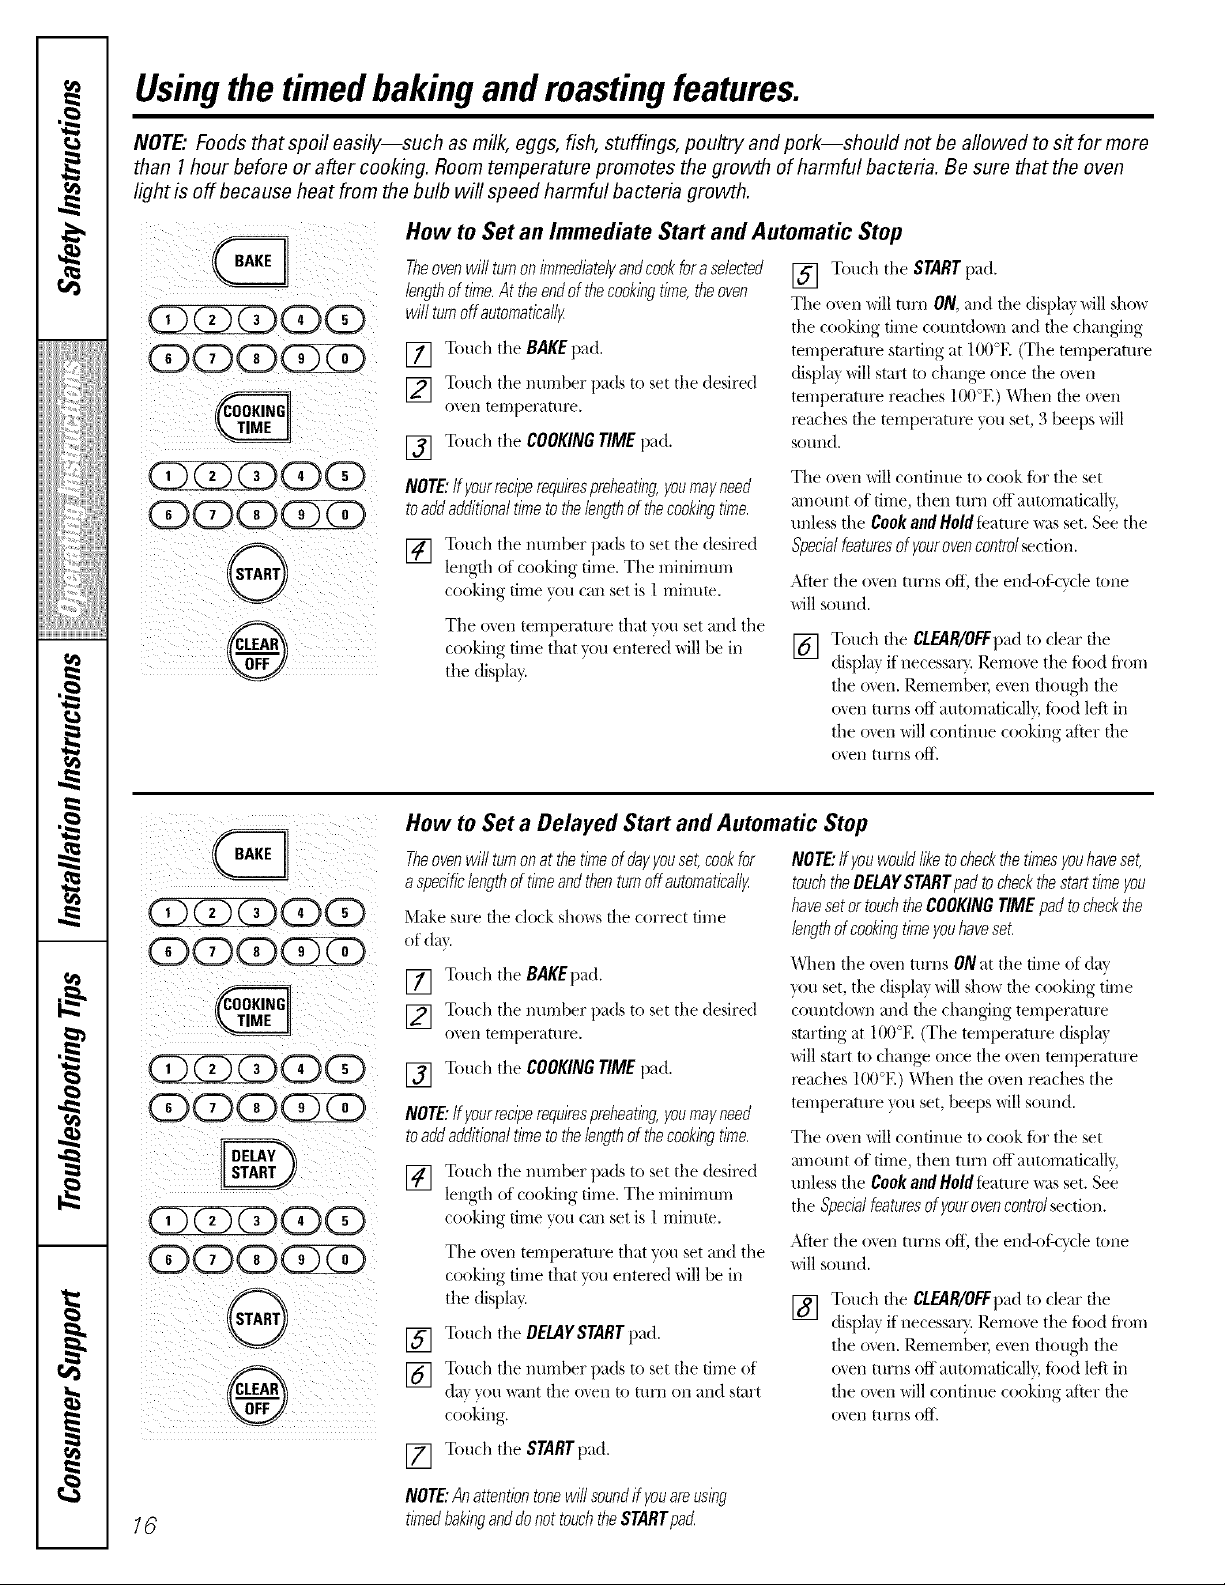
How to Set an Immediate Start and Automatic Stop
iiOD(Z)O(Z)OD /
ii(DQO
iOD(Z)(Z)Q (D
iiQ(DO
Theovenwillturnonimmedbtelyandcookforaselected
lengthoftime.Attheendof thecookingtime,theoven
willturnoffautomaticallF
[] Touch the BAKEpad.
[] Touch the imrrlber pads to set tile desired
o_en [emperattlre.
[] Touch tile COOKINGTIMEpad.
NOTE:ffyourreciperequirespreheatleg,youmayneed
toaddadditionaltimetothelengthofthecookingtime.
[] Touch tile nm-nber pads to set tile desired
length of cooking time. The minimum
cooking time you can set is 1 mimlte.
The oven temperature that you set and the
cooking time that you entex_d will be in
the displa?.
[] Touch the STARTpad.
The oven will mm ON, and die display will sho_
the cooking time cotmtdo_m and file changing
temperature starting at 100°E (The temperature
(fispla5 will start to change once file o_.en
temperatm'e reaches 100°E) When file o_en
x_aches file temperamx_ you set, 3 beeps will
SOthnd,
Tile o\en will continue to cook for tile set
amount of time, then turn off automaficall 3
tmless the Cook andHoldfeature was set. See the
Special features of your oven control section.
After the oven thlrns Off, the end<_f:cvcle tone
will sound.
[] Touch tile CLEAR/OFFpadto clear tile
displa5 if necessar} Remme the ibod from
the oxen. Remembex; even though tile
o_en turns off automatic_fll}, toed left in
the o',en will continue cooking after tile
(hvehl tIhrns off,
i(DCDO(D(D
iODCDCDOD(D
iii!ii iii ii! iiiii iiiI ii
iiOD(D CDQOD
iiCDQCD ¸
How to Set a Delayed Start and Automatic Stop
Theovenwillturnonat thetimeofflayyouset,cookfor
aspecificlengthof timeandthenturnoffautomatleall_
Make sure the clock shows the correct time
ofday.
[] Touch tile BAKEpad.
[] Touch the nmnber pads to set the desired
0'_ ell temperature,
[] Touch tile COOKINGTIMEpad.
NOTE:ffyourreciperequiresprehearing,youmayneed
toaddadditionaltimetothelength of thecookingtime.
[] Touch tile nm-nber pads to set tile desired
length of cooking time. The minimum
cooking time you can set is 1 mintlm.
The oven temperature that you set and the
cooking time that you entex_d will be in
the displa 5
[] Touch the OEUIYSrARr pad.
] Touch the nm-nber pads to set the time of
(1_1_ VOII "_\aIlt the o'_ehl [o [/lI]l Oil ;:hnd s[2hI'[
cooking.
NOTE:ffyouwouldliketocheckthetimesyouhaveset,
touchtheDELAYSTARTpadto checkthestarttimeyou
havesetortouchtheCOOKINGTIME padtocheckthe
lengthofcookingtimeyouhaveset.
When the o_en turns ONat the time of day
}ou set, the display will shox_ die cooking time
cotmtdo'_n and the changing temperature
starting at 100°E (The temperature displa?,
will start to change once the o\en tempemtm'e
x_aches 100°E) When the o_en reaches the
temperature you set, beeps will sotmd.
The oven will continue to cook for tile set
m;qount of time, then turn oft automaticall 5
unless the Cook and Hold taature was set. See
the Specia/featuresof yourovencentre/section.
After the oven turns off, the end<_fkvcle tone
will sotmd.
[] Touch the CLEAR/OFFpadto clear tile
displa_ if necessar}. I)_erno_.ethe toed t]'om
the oven. Remember, even though the
oxen turns off automatical]}, fi)od left in
the oven will continue cooking after the
oxen [uyI/S Off,
Touch the STARTpad.
[]
NOTE:Anattentiontonewillsoundifyouareusing
16 timedbakinganddonottouchtheSTARTpa_
Usingthe probe.(onsomemodels) ge.com
For many foods, especially roasts and poultry, internal food temperature is the best test for doneness. The temperature
probe takes the guesswork out of cooking foods to the exact doneness you want.
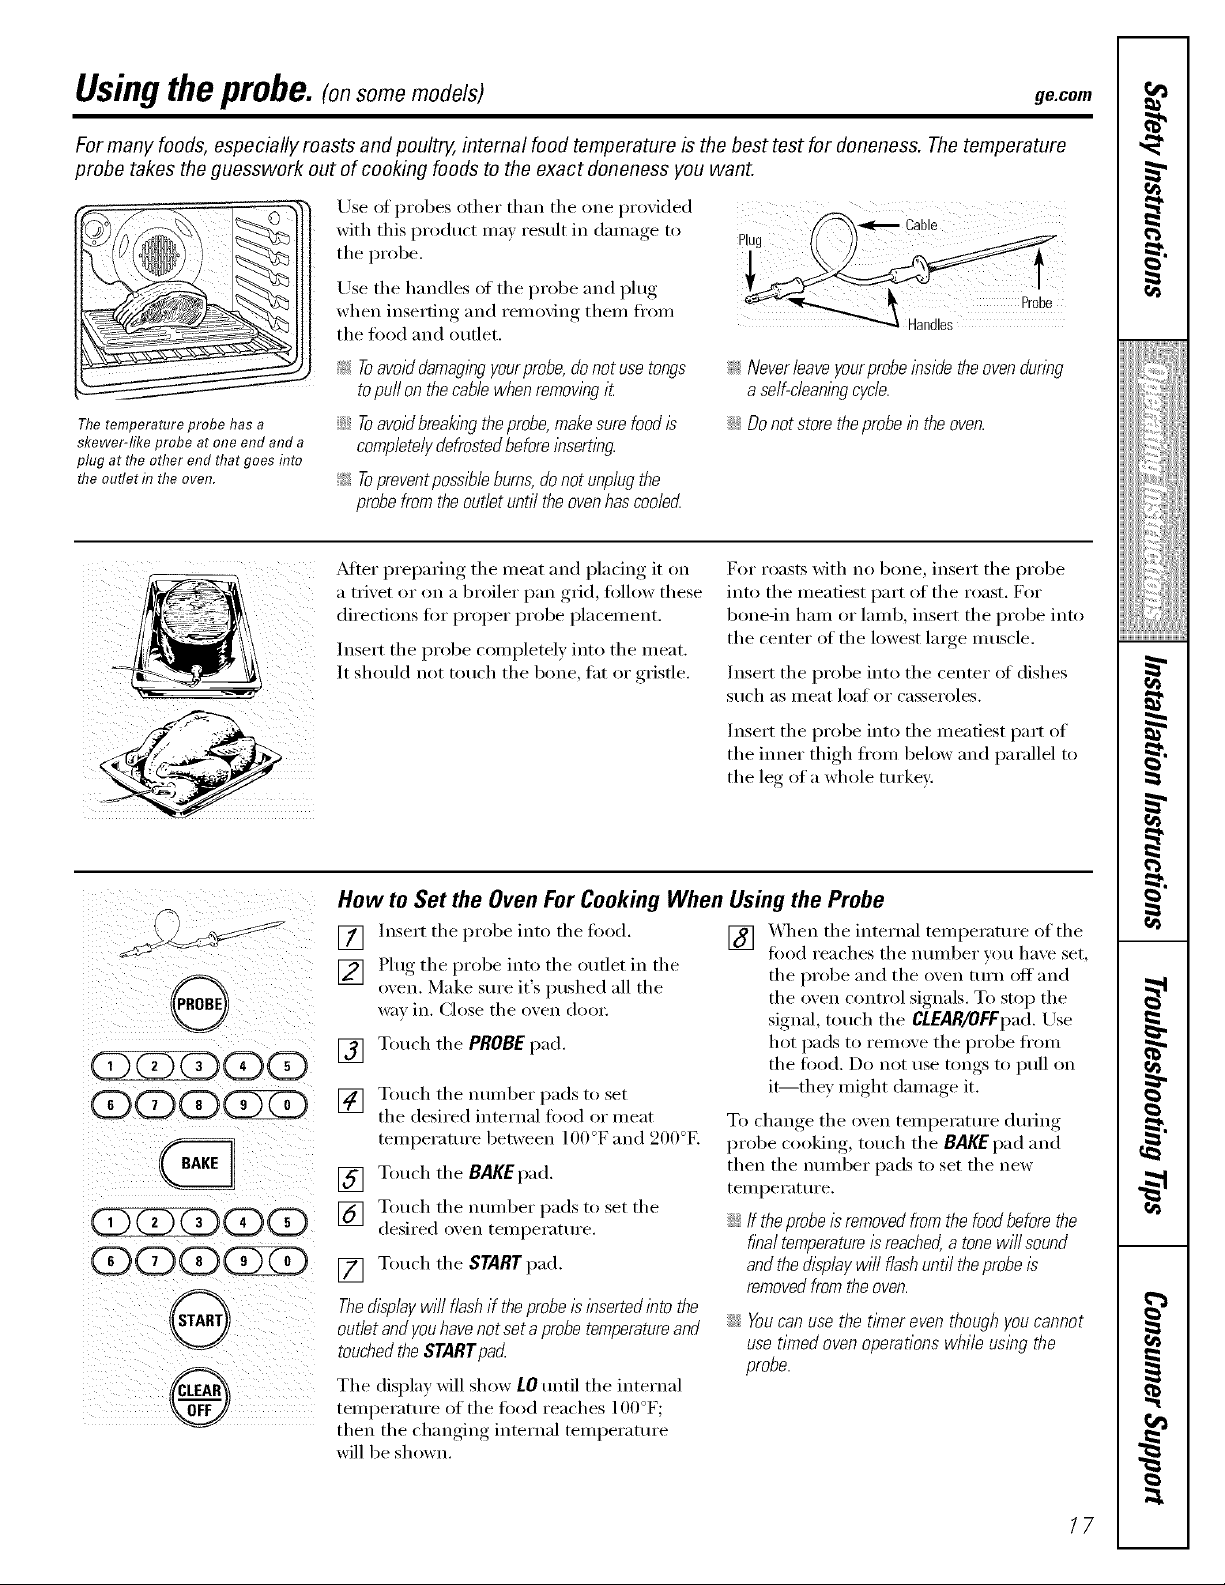
Use of probes other than the one proxided
with this l)roduct ma} result in damage to plug
the probe.
Use the handles of the probe and plug
when inserting and removing them fl'om
tile fl)od and outlet.
Handles
Probe
I
Thetemperature probe has a
skewer-like probe at one end and a
plug at the other end that goes flTto
the outlet f17the oven.
ii Iii
_: Toavoiddamagingyourprobe,donot use tongs
topull on thecable when removing i_
iJHToavoidbreakingtheprobe, makesure foodis
completely defrostedbeforeinserting
!i>Never leave yourprobeinside the ovenduring
aself-cleaningcycle.
iJHDo not store theprobe in the oven.
!i>Topreventpossibleburns,donotunplugthe
probefromtheoutletuntil theovenhascoolecL
_Mter preparing the meat and plating it on
a trivet or on a broiler pan grid, fi)llow these
directions fi)r proper probe placement.
Insert the probe completely into the meat.
It should not touch the bone, tht or gristle.
For roasts with no bone, insert the probe
into the meatiest part of the roast. For
bone-in ham or lamb, insert the probe into
the center of the lowest large muscle.
Insert the probe into the center ot dishes
such as illeat loaf or casseroles.
Insert the probe into the meatiest part of
the inner thigh fi'om below and parallel to
the leo- of a whole turkey:
How to Set the OvenFor Cooking When Using the Probe
[] Insert the probe into the fi)od.
[] Plug the probe into the outlet in the
oxen. Make sure it's i)ushed all the
way in. Close the oxen doo_:
[] Touch the PROBE pad.
[] Touch the number pads to set
the desired internal fi)od or meat
temperature between 100°F and 200°F.
[] Touch the BAKEpad.
[] Touch the number pads to set the
desired oxen temperature.
[] Touch the STARTpad.
Thedisplaywillflashif theprobeisinsertedintothe
outletandyouhavenotsetaprobetemperatureand
touchedtheSTARTpad
The display Mll show LO until the internal
temperature of the fi)od reaches 100°F;
then the changing internal temperature
will be shown.
] X_q_en the internal temperature of the
tood reaches the number you have set,
the probe and tile oven tuYn ott and
the oven control signals. To stop the
signal, touch the CLEAR/OFFpad. Use
hot pads to remove the probe ti'om
the food. Do not rise tongs to pull on
it--they might damage it.
To change the oven temperature during
probe cooking, touch the BAKEpad and
then tile number pads to set the new
temperature.
iJHff theprobeis removedfromthefoodbeforethe
finaltemperatureisreached,atonewill sound
andthedisplaywill flashuntiltheprobeis
removedfromtheoven.
iJHYoucan use the tlYnereven though you cannot
use timed oven operations while using the
probe.
i!!!iiii iiiii
i,,i,ii_;i_,_iii!
/iiitliiiiiiii_
m
g
g
}
17
Usingthe convectionoven.(onsome models)
The convection oven fan shuts off when the oven door is opened. DO NOT leave the door open for long periods of time
while using convection cooking.
h? a COl?vectiot? oveR, a fat?
circulates hot air over, under and
around the food. This circulating hot
air is evenly distributed throughout
the oven cavit_ As a result, foods
are evenly cooked and browne_
often h?less time than with regular
heat.
To help you understand the difference
between convection bake and roast and
traditional bake and roast, here are some
general guidelines.
ConvectionBake
;;Ji:_Preheattheoven.SeetheUsingthe Oven-
PreheatingandPanPlacementsection.
::Ji::Idealforfoodscookedonmultipleshelves.
_; Goodforlargequantitiesofbakedfoods.
;;J_::Goodresultswithcookies,biscuits,brownies,
cupcakes,creampuffs,sweetroils,angelfood
cakeandbread
The convection fm_ circulates the heated
air evenly over and around the fi)od.
Convection Roast
_Ji:_Good for large tender cuts of meat, uncoverecL
The convection fm_ circulates the heated
air evenly over and around the fi)o(l. Meat
and I)oult_T are browned on all sides as if
they were cooked on a rotisserie. Heated
air will be circulated ovei; under and
around the fi)()(l being roasted. The heated
air seals in juices quickly fi)r a moist and
tender product while, at the same time,
creating a rich golden brown exterior;
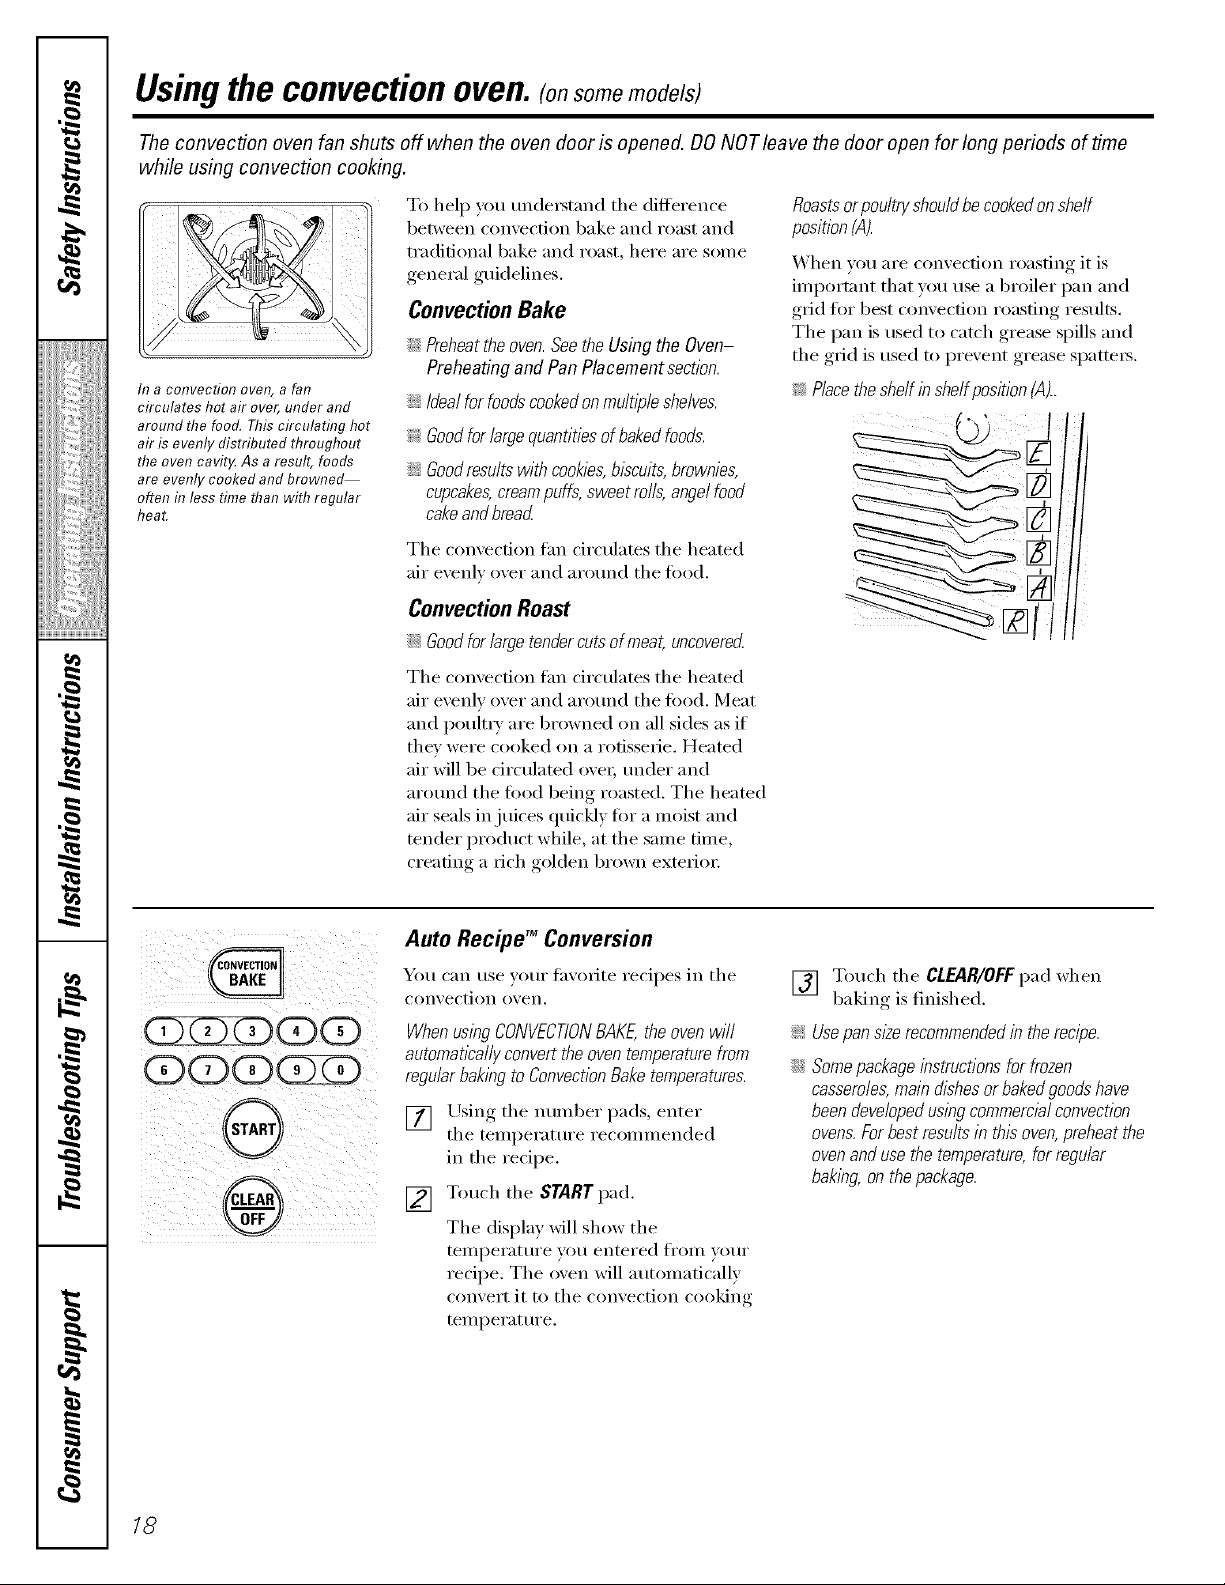
Roastsorpoultryshouldbecookedonshelf
position(A).
_'hen you are ('onvecdon roasting it is
important that you use a broiler pan and
grid fi)r best convection roasting results.
The pan is used to catch grease spills and
the grid is used to prevent grease sl)atte_.
_: Placetheshelfinshelfposition(A)_
Ill
QQQ(ZXD
OdZPdZ>
G
®
Auto Recipe TM Conversion
You can use )our fhxo_te recipes in the
con'_ ection oxen,
WhenuslbgCONVECTIONBAKE,theovenwill
automatically convert the oven temperaturefrom
regular baking to Convection Bake temperatures.
[] Using the number pads, enter
the temperature recommended
in the recipe.
[] Touch the START pad.
The display will show the
telnl)erature you entered fl'om your
recipe. The oven will automatically
convert it to the convection cooking
temperature.
[] Touch the CLEAR/OFFpad when
baking is finished.
_ Usepansloe recommendedin the recipe.
;;Ji:_Somepackage instructions for frozen
casseroles,main dishes or baked goods have
been developedusing commercial convection
ovens.Forbest results in this oven, preheat the
ovenand use the temperature,for regular
baking, on the package.
18
 Loading...