

GE JGB900SEP2SS, JGB900SEP1SS, JGB820SEP2SS, JGB820SEP1SS, JGB810SEP2SS Owner’s Manual
...
GEAppliances.com
- ----_are_yInstructions .... 2-7
Installation
Instructions ........... 4o-s1
Operating Instructions
Aluminum Foil ................. 14
Clock and Timer ............... 16
Lower Oven Drawer ........... 30
Oven ...................... 11-32
Baking and Roasting ......... 14
Broiling, Broiling Guide ....... 15
Om
Control Lockout .............. 25
Convection .............. 19-23
Gas/Control Lockout ......... 25
Oven Control ............. 11, 12
Power Outage ............ 13, 16
Preheating .................. 14
Probe ........................ 18
Racks ....................... 14
Sabbath Feature ............. 26
Self-Cleaning ............. 31, 32
Special Features ......... 24, 25
Thermostat Adjustment ...... 27
Timed Baking
and Roasting ................ 17
Timed Convection Baking .... 23
Surface Cooking ............ 8-10
Griddle ...................... 10
Warming Drawer .......... 28, 29
Air Adjustment ................ 50
Anti-Tip Device ............ 43, 51
Assemble Surface Burners ..... 48
Checking Burner
Ignition ....................... 49
Connecting the Range
to Gas .................... 44-46
Dimensions and Clearances ...42
Electrical Connections ..... 47, 48
Leveling the Range ............ 50
LP ............................ 51
Troubleshooting
Tips ...................... 52-55
Accessories ............... 57
Consumer Support
Consumer Support ...Back Cover
Warrantg for Customers
in Canada ..................... 59
Warrantg for Customers
in the U.S.A................... 58
JGB800
JGB805
JGB810
JGB820
JGB900
In Canada contact us at:
www.G EAppliances.ca
Care and Cleaning
Burner Assemblg .......... 33, 34
Burner Grates ................. 35
Control Panel and Knobs ...... 36
Cooktop ...................... 35
Door Removal ................. 37
Drawer .................... 38, 39
Griddle ........................ 35
Oven Bottom .................. 36
Oven Light Replacement ...... 38
Oven Vents ................... 36
Racks ......................... 38
Self-Cleaning .............. 31, 32
Stainless Steel Surfaces ....... 37
Write the model and serial
numbers here:
Model #
Serial #
You can find them on a label
on the front of the range behind the
warming drawer or lower
oven drawer.
183D5580P25249-85170 05-09JR

IMPORTANTSAFETYINFORMATION.
READALL INSTRUCTIONSBEFOREUSING.
WARNING!
For gour safety, the information in this manual must be followed to minimize the risk of fire or
explosion, electric shock, or to prevent property damage, personal injury, or loss of life.
WARNING: iftheinformation
in this manual is not followed exactlg,
a fire or explosion mag result, causing
®
propertg damage, personal injurg
or death.
- Do not store or use gasoline or other
flammable vapors and liquids in the
vicinitg of this or ang other appliance.
- WHAT TO DO IF YOU
SMELL GAS
....Do not trg to light ang appliance.
.... Do not touch ang electrical switch;
do not use ang phone in gour building.
Immediatelg call gour gas supplier
from a neighbor's phone. Follow the
gas supplier's instructions.
.... If gou cannot reach gour gas supplier,
call the fire department.
- Installation and service must be
performed bg a qualified installer,
service agencg or the gas supplier.
ANTI-TIP DEVICE
To reduce the risk of tipping the range, the range
must be secured by a properly installed anti-tip bracket.
See installation instructions shipped with the bracket for
complete details before attempting to install.
To check if the bracket is installed and engaged properly,
• All ranges can tip.
• BURNSor other SERIOUS
INJURIEScan result.
• INSTALLand CHECKthe
ANTI-TIP bracket following
the instructions supplied
with the bracket.
2
carefully tip the range forward. The bracket should stop
the range within 4 inches. If it does not, the bracket must be
reinstalled. If the range is pulled from the wall for any reason,
always repeat this procedure to verify the range is properly
secured by the anti-tip bracket.
For free-standing or slide-in ranges, never completely remove
the leveling legs or the range will not be secured to the anti-tip
device properly.
If you did not receive an anti-tip bracket with your purchase,
cull 1.800.626.8774 to receive one at no cost (in C(_nc_da,cull
1.800.561.3344). For installation instructions of the bracket,
visit GEAppliances.com (in C(_nc_da,GEAppliances.ca).
GEAppliances.com
WARNING!
IMPORTANT SAFETY NOTICE
TheCalifornia Safe Drinking Water and Toxic Enforcement Act requires the Governor of California to
publish a list of substances known to the state to cause birth defects or other reproductive harm, and
requires businesses to warn customers of potential exposure to such substances.
Gas appliances can cause minor exposure to four of these substances, namely benzene, carbon
monoxide, formaldehyde and soot, caused primarily by the incomplete combustion of natural gas or
LPfuels. Properly adjusted burners, indicated by a bluish rather than a yellow flame, will minimize
incomplete combustion. Exposure to these substances can be minimized by venting with an open
window or using a ventilation fan or hood.
SAFETY PRECAUTIONS
Have the installer show you the location of the range gas shut-off valve and how to shut it off if necessary.
Haveyour range installedand properly
grounded by a qualified installer,in
accordance with the Installation Instructions.
Any adjustment and serviceshould be
performed only by qualified gas range
installersor servicetechnicians.
Do notattemptto repairorreplaceany
partofyourrangeunlessitisspecifically
recommended inthismanual.Allotherservice
shouldbe referredtoa qualifiedtechnician.
Plug your range into a 120-volt grounded
outlet only. Do not remove the round
grounding prong from the plug. If in doubt
about the grounding of the home electrical
system, it is your personal responsibility and
obligation to have an ungrounded outlet
replaced with a properly grounded,
three-prong outlet in accordance with
the National Electrical Code. Do not use
an extension cord with this appliance.
IMPORTANTSAFETYINFORMATION.
READALL INSTRUCTIONSBEFOREUSING.
SAFETYPRECAUTIONS
Locate the range out of kitchen traffic path
and out of drafty locations to prevent poor
air circulation.
Be sure all packaging materials are removed
from the range before operating it to prevent
fire or smoke damage should the packaging
material ignite.
Be sure your range is correctly adjusted by
a qualified service technician or installer for
the type of gas (natural or LP)that is to be
used. Your range can be converted for use
with either type of gas. See the Installation
of the range section.
WARNING:Theseadjustments
must be made by a qualified service
technician in accordance with the
manufacturer's instructions and all codes
and requirements of the authority having
jurisdiction. Failure to follow these instructions
could result in serious injury or property
damage. The qualified agency performing
this work assumes responsibility for the
conversion.
After prolonged use of a range, high floor
temperatures may result and many floor
coverings will not withstand this kind of use.
Never install the range over vinyl tile or
linoleum that cannot withstand such type
of use. Never install it directly over interior
kitchen carpeting.
Do not leave children alone or unattended
where a range is hot or in operation.
They could be seriously burned.
Do not allow anyone to climb, stand or hang
on the oven door, lower oven drawer, warming
drawer or cooktop. They could damage the
range and even tip it over, causing severe
personal injury.
CAUTION:Items of interest to
children should not be stored in cabinets
above a range or on the backsplash of a
rangeichildren climbing on the range to
reach items could be seriously injured.
Never wear loose-fitting or hanging garments
while using the appliance. Be careful when
reaching for items stored in cabinets over the
range. Flammable material could be ignited
if brought in contact with flame or hot oven
surfaces and may cause severe burns.
Do not store flammable materials in an oven,
a range drawer or near a cooktop.
Do not store or use combustible materials,
gasoline or other flammable vapors and
liquids in the vicinity of this or any other
appliance.
Do not let cooking grease or other flammable
materials accumulate in or near the range.
Do not use water on grease fires. Never pick
up a flaming pan. Turn the controls off.
Smother a flaming pan on a surface burner
by covering the pan completely with
a well-fitting lid, cookie sheet or flat tray.
Use a multi-purpose dry chemical or
foam-type fire extinguisher.
Flaming grease outside a pan can be put
out by covering it with baking soda or,
if available, by using a multi-purpose dry
chemical or foam-type fire extinguisher.
Flame in the upper oven or lower oven drawer
can be smothered completely by closing the
oven door or drawer and turning the control
to off or by using a multi-purpose dry
chemical or foam-type fire extinguisher.
Let the burner grates and other surfaces cool
before touching them or leaving them where
children can reach them.
Never block the vents (air openings) of the
range. They provide the air inlet and outlet
that are necessary for the range to operate
properly with correct combustion. Air openings
are located at the rear of the cooktop, at the
top and bottom of the oven door, and at the
bottom of the range under the warming
drawer, lower oven drawer or kick panel.
Large scratches or impacts to glass doors
can lead to broken or shattered glass.
WARNING: NEVERusethis
appliance as a space heater to heat or
warm the room. Doing so may result
in carbon monoxide poisoning and
/4
overheating of the oven.
GEAppliances.com
WARNING!
SURFACEBURNERS
Use proper pan s/zelavoid pans that are unstable or easily tipped. Select cookware having flat
bottoms large enough to cover burner grates. Toavoid spillovers, make sure cookware is large enough
to contain the food properly. This will both save cleaning time and prevent hazardous accumulations
of food, since heavy spattering or spillovers left on range can ignite. Use pans with handles that can
be easily grasped and remain cool.
Always use the L/TE position when igniting
the top burners and make sure the burners
have ignited.
Never leave the surface burners unattended
at high flame settings. Boilovers cause smoking
and greasg spillovers that may catch on fire.
Adjust the top burner flame size so it does
not extend begond the edge of the cookware.
Excessive flame is hazardous.
Use onlg drg pot holders- moist or damp pot
holders on hot surfaces mag result in burns
from steam. Do not let pot holders come near
open flames when lifting cookware. Do not use
a towel or other bulks cloth in place of a pot
holder.
When using glass cookware, make sure it
isdesigned for top-of-range cooking.
To minimize the possibilitg of burns, ignition
of flammable materials and spillage, turn
cookware handles toward the side or back
of the range without extending over adjacent
burners.
Carefullg watch foods being fried at a high
flame setting.
Alwags heat fat slowlg, and watch as it heats.
Do not leave ang items on the cooktop. The
hot air from the vent mag ignite flammable
items and will increase pressure in closed
containers, which mag cause them to burst.
If a combination of oils or fats will be used
in frging, stir together before heating or
as fats melt slowlg.
Use a deep fat thermometer whenever
possible to prevent overheating fat begond
the smoking point.
Use the least possible amount of fat for
effective shallow or deep-fat frging. Filling the
pan too full of fat can cause spillovers when
food is added.
Do not flame foods on the cooktop. If you
do flame foods under the hood, turn the
fan on.
Do not use a wok on the cooking surface
if the wok has a round metal ring that is
placed over the burner grate to support the
wok. This ring acts as a heat trap, which mag
damage the burner grate and burner head.
Also, it mag cause the burner to work
improperlg. This mag cause a carbon
monoxide level above that allowed bg current
standards, resulting in a health hazard.
Foods for frging should be as drg as possible.
Frost on frozen foods or moisture on fresh
foods can cause hot fat to bubble up and
over the sides of the pan.
Never trg to move a pan of hot fat, especiallg
a deep fat frger. Wait until the fat is cool.
Do not leave plastic items on the cooktop-
theg mag melt if left too close to the vent.
Keep all plastics awag from the surface
burners.
To avoid the possibilitg of a burn, alwags be
certain that the controls for all burners are
at the OFF position and all grates are cool
before attempting to remove them.
If range is located near a window, do not hang
long curtains that could blow over the surface
burners and create a fire hazard.
If SOUsmell gas, turn off the gas to the range
and call a qualified service technician. Never
use an open flame to locate a leak.
Alwags turn the surface burner controls off
before removing cookware.
Do not lift the cooktop. Lifting the cooktop can
lead to damage and improper operation of the
range.
When disabling Gas/Control Lockout, make
sure the surface controls are set to the OFF
position. This will preclude gas flow when
the range isturned on.
IMPORTANTSAFETYINFORMATION.
READALL INSTRUCTIONSBEFOREUSING.
ELECTRICWARMINGDRAWER
AND LOWEROVENDRAWERConsome models)
The purpose of the worming drower ond the
WARM ZONE setting of the lower oven drower
isto hold hot cooked foods ot serving
temperoture. Alwoys stort with hot food;
cold food connot be heoted or cooked in the
worming drower or the WARM ZONE setting
of the lower oven drower.
Do not use the drower to dry newspopers.
If overheoted, they con cotch on fire.
Do not leove poper products, plostics, conned
food, or combustible moteriols in the drower.
Never leove jors or cons of lot drippings
in or neor your drower.
Do not worm food in the drower for more
thon two hours.
Never ploce, use or self-cleon the lower oven
drower pon in the upper oven.
Do not touch the heoting element
or the interior surface of the drawer.
These surfaces moll be hot enough to burn.
REMEMBER:The inside surface of the drower
moll be hot when the drower is opened.
Use core when opening the drower. Open
the drower o crock ond let hot oir or steom
escope before removing or replocing food.
Hot oir or steom which escopes con couse
burns to honda face ond/or eyes.
Do not use oluminum foil to line the lower
oven drower. Foil is on excellent heot insulotor
ond will trop heot beneoth it. This will upset
the performonce of the drower ond it could
domoge the interior finish.
COOK MEATAND POULTRY THOROUGHLY...
Cook meot ond poultry thoroughly-meot to ot leost on INTERNALtemperoture of160°F ond poultry
to ot leost on INTERNALtemperoture of l 80°E Cooking to these temperotures usuolly protects ogoinst
foodbome illness.
SELF-CLEANING THE UPPEROVEN
Be sure to wipe off excess spilloge before
self-cleoning operotion.
Before self-cleoning the oven, remove ony
broiler pon, broiler grid, oil cookwore, probe
ond ony oluminum foil.
Never ploce, use or self-cleon the lower oven
drower pon in the upper oven.
Nickel oven rocks (on some models) should
be removed from the oven before beginning
the self-cleon cycle.
Grog porceloin-cooted oven rocks (on some
models) moll be cleoned in the oven during
the self-cleon cycle.
Cleon only ports listed in this Owner's Manual.
6
Do not cleon the door gosket. The door gosket
isessentiol for o good seol. Core should be
token not to rub, domoge or move the gosket.
If the self-cleoning mode molfunctions,
turn the oven off ond disconnect the power
supply. Hove it serviced by o quolified
technicion.
Do not use oven cleoners. No commerciol
oven cleoner or oven liner of ony kind should
be used in or oround ong port of the oven.
Residue from oven cleoners will domoge
the inside of the oven when the self-cleon
cycle is used.
GEAppliances.com
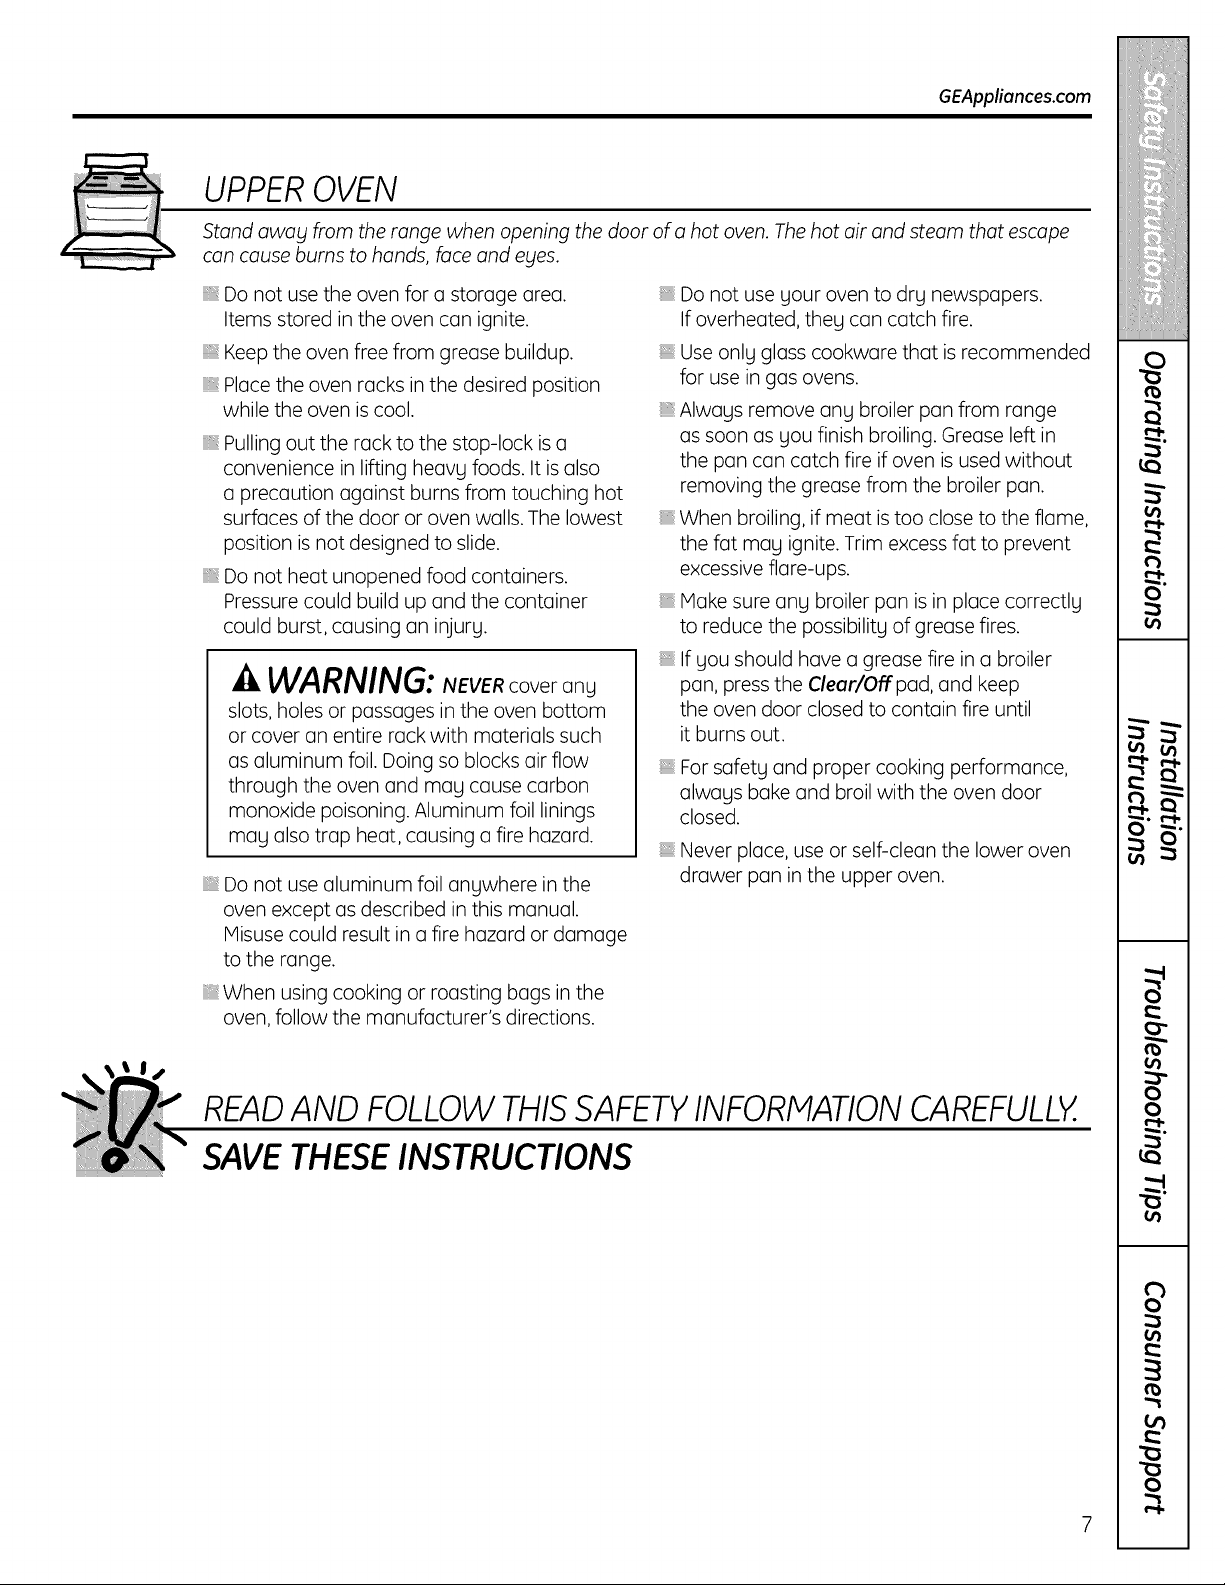
UPPEROVEN
Stand away from the range when opening the door of a hot oven. The hot air and steam that escape
can cause burns to hands, face and eyes.
Do not usetheoven fora storagearea.
Itemsstoredintheoven can ignite.
Keep theovenfreefromgreasebuildup.
Placetheoven racksinthedesiredposition
whiletheoven iscool.
Pulling out the rack to the stop-lock is a
convenience in lifting heavy foods. It is also
a precaution against burns from touching hot
surfaces of the door or oven walls. The lowest
position isnot designed to slide.
Do not heat unopened food containers.
Pressure could build up and the container
could burst, causing an injury.
WARNING: NEVERcoverany
slots, holes or passages in the oven bottom
or cover an entire rack with materials such
as aluminum foil. Doing so blocks air flow
through the oven and may cause carbon
monoxide poisoning. Aluminum foil linings
may also trap heat, causing a fire hazard.
Do not use aluminum foil anywhere in the
oven except as described in this manual.
Misuse could result in a fire hazard or damage
to the range.
When using cooking or roasting bags in the
oven, follow the manufacturer's directions.
Do not use your oven to dry newspapers.
If overheated, they can catch fire.
Use only glass cookware that is recommended
for use in gas ovens.
Always remove any broiler pan from range
as soon as you finish broiling. Grease left in
the pan can catch fire if oven is used without
removing the grease from the broiler pan.
When broiling, if meat istoo close to the flame,
the fat may ignite. Trim excess fat to prevent
excessive flare-ups.
Make sure any broiler pan is in place correctly
to reduce the possibility of grease fires.
If you should have a grease fire in a broiler
pan, press the Clear/Off pad, and keep
the oven door closed to contain fire until
it burns out.
For safety and proper cooking performance,
always bake and broil with the oven door
closed.
Never place, use or self-clean the lower oven
drawer pan in the upper oven.
READAND FOLLOW THISSAFETYINFORMATIONCAREFULLY.
SAVE THESE INSTRUCTIONS
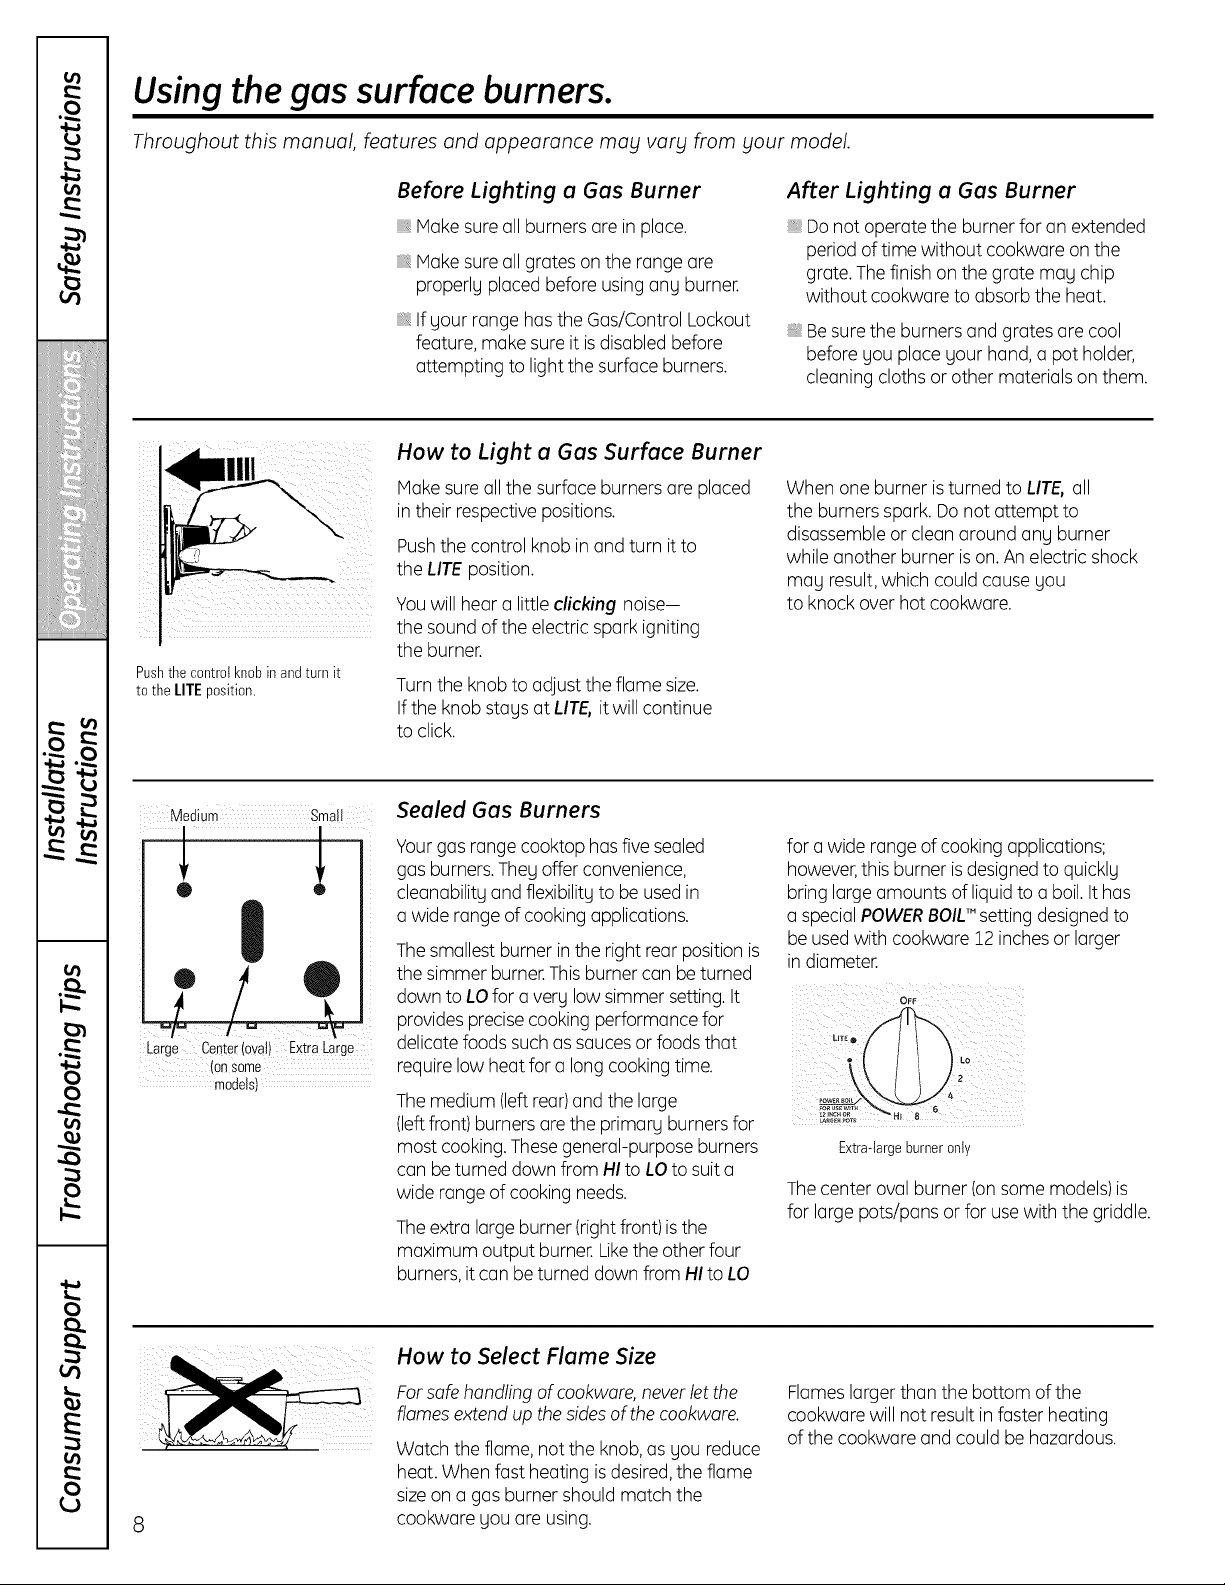
Using the gas surface burners.
Throughout this manual, features and appearance may vary from your model.
Pushthecontrolknobin andturn it
tothe lIT[ position.
Before Lighting u Gus Burner
Make sureallburnersoreinplace.
Make sureallgratesontherangeore
properlyplacedbeforeusingany burner,
IfyourrangehastheGas/ControlLockout
feature, make sureit isdisabledbefore
attempting to light the surface burners.
How to Light u Gus Surfuce Burner
lake sure all the surface burners are placed
in their respective positions.
Push the control knob in and turn it to
the LITE position.
Youwillhear a little clicking noise-
the sound of the electric spark igniting
the burner.
Turnthe knobto adjust the flame size.
If the knobstays at LITE,it will continue
to click.
After Lighting a Gas Burner
Donot operate the burner for on extended
period of time without cookwore on the
grote. Thefinish on the grote may chip
without cookwore to absorbthe heat.
Besurethe burners and grates ore cool
before you place your hand, o pot holder,
cleaning cloths or other materials on them.
When one burner isturned to LIT& oil
the burners spark. Donot attempt to
disassembleor cleon around any burner
while another burner is on.An electric shock
may result,which could cause you
to knock over hot cookwore.
Medium Small
W
Large Center(oval) ExtraLarge
(onSome
models)
Seuled Gus Burners
Yourgas range cooktop hasfive sealed
gas burners.They offer convenience,
cleonobilitg and flexibility to be usedin
o wide rangeof cooking applications.
Thesmallest burner in the right rear positionis
the simmer burner.Thisburner con beturned
down to LOfor o very low simmer setting. It
provides precisecookingperformance for
delicate foods such as saucesor foods that
require low heat for o long cooking time.
Themedium (leftrear)and the large
(leftfront)burners orethe primary burners for
most cooking. Thesegeneral-purposeburners
con be turned down from HI to LOto suit o
wide range of cooking needs.
Theextra large burner (rightfront)is the
maximum output burner. Likethe other four
burners, itcon be turned down from HI to LO
How to Select Flume Size
for o wide range of cooking applications;
however,this burner isdesignedto quickly
bring large amounts of liquid to o boil.It has
o special POWERBOIL'"setting designedto
be usedwith cookwore 12 inchesor larger
in diameter.
OFF
LO
Extra-largeburneronly
Thecenter oval burner (on some models)is
for largepots/pans orfor usewith the griddle.
Forsafe handling of cookware, never let the
flames extend up the sides of the cookwore.
Watch the flame, not the knob,as you reduce
Flameslarger than the bottom of the
cookwore will not result in foster heating
of the cookwore and could behazardous.
heat. When fast heating isdesired,the flame
sizeon o gas burner should match the
8
cookwore you ore using.

Top-of-Range Cookware
GEAppliances.com
Aluminum: Medium-weight cookware is
recommended becauseit heats quickly
and evenly.Host foods brown evenly in an
aluminum skillet. Usesaucepanswith tight-
fitting lidswhen cookingwith minimum
amounts of water.
Cast-Iron: If heated slowly,most skillets
will give satisfactory results.
Enamelware: Undersome conditions,
the enamel of some cookware may melt.
Follow cookware manufacturer's
recommendations for cooking methods.
Stove Top Grills
Donot usestovetop grillson your sealed
gas burners. If you usethe stovetop grill on
the sealed gas burner, itwill cause incomplete
combustion and can result in exposureto
carbon monoxide levelsabove allowable
current standards.
This can be hazardous to your health,
Glass: There are two types of glass
cookware-those for oven use only and
those for top-of-range cooking (saucepans,
coffeeand teapots).Glassconducts heat
very slowly.
HeatproofGlass-Ceramic: Canbe used for
either surface or oven cooking. It conducts
heat very slowly and cools very slowly.Check
cookware manufacturer's directions to be
sureit can be usedon gasranges.
Stainless Steel: Thismetal alone has poor
heating properties and isusually combined
with copper,aluminum or other metals for
improved heat distribution. Combination
metal skilletsusually work satisfactorily if
they are usedwith medium heat asthe
manufacturer recommends.
t_
O"
o_
iii!i!!!iii_iiiiiiill
!i_i_iiiiiiiiiiiiiiii
,,iiiii_bl
i!5"i!i!iii!
• IP
Usea flat-bottomed wok.
Wok This Way
We recommend that you use o 14-inch or
smaller riot-bottomed wok. Make sure the wok
bottom sits flat on the grote. They ore
availableat your local retailstore.
Only a flat-bottomed wok should be used.
In Case of Power Failure
In caseof a power failure,you can light the
gas surface burners on your range with a
match. Hold a lit match to the burner,then
push in and turn the control knob to the LITE
position. Useextreme caution when lighting
burners this way.
Donot use a wok support ring. Placingthe
ring overthe burner or grate may cause the
burner to work improperly, resulting in carbon
monoxide levelsabove allowable standards.
Thiscould be dangerous to your health.
Surface burners in use when an electrical
power failure occurs will continue to operate
normally.
NOTE:IfGas/Control Lockout is in use at the
time of o power failure, the surface burners
cannot be lit.
o_
0
0
r,,l-
o_
on
R
0
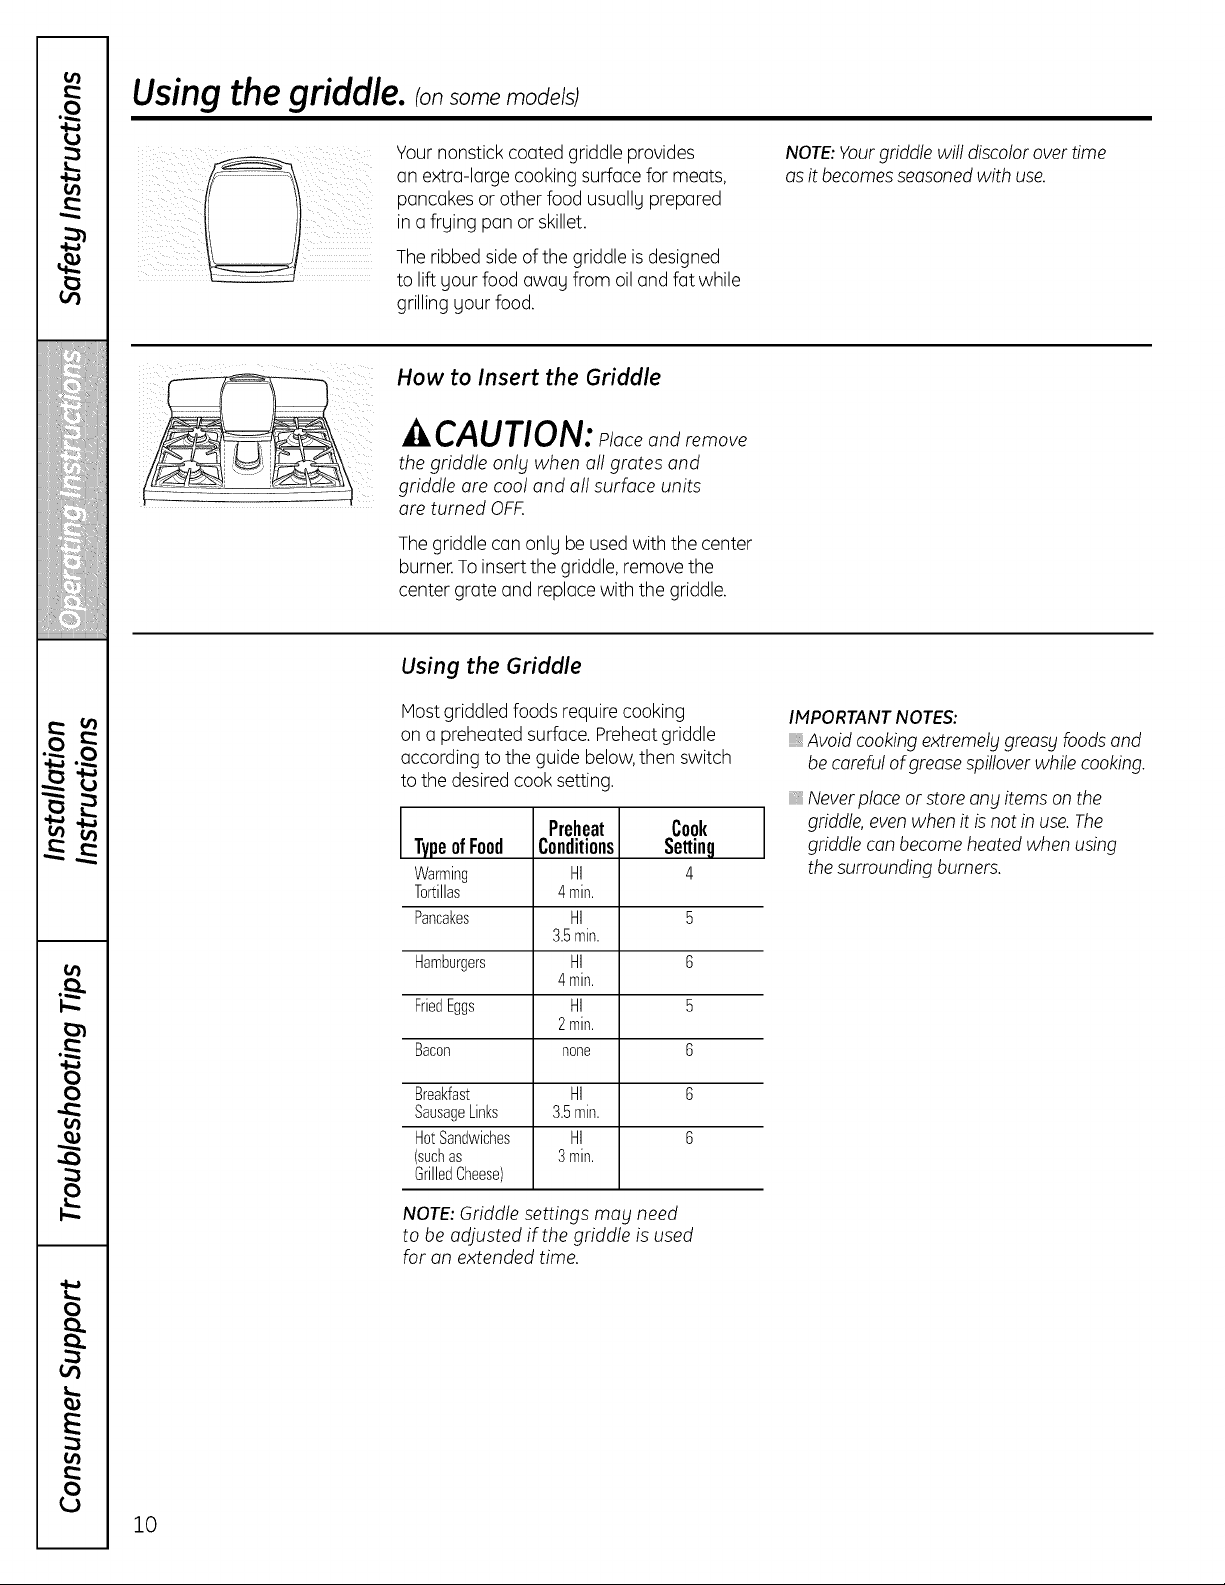
Usingthe griddle, ionsomemode/sj
Yournonstick coated griddle provides
on extra-large cooking surface for meats,
pancakes or other food usually prepared
in a frying pan or skillet.
Theribbed side ofthe griddle is designed
to liftyour food away from oil and fat while
grilling your food.
How to Insert the Griddle
CAUTION: placeandremove
the griddle only when oil grates and
griddle ore cool and oil surface units
ore turned OFF.
The griddle can only be used with the center
burner.To insert the griddle,remove the
center grate and replace with the griddle.
Using the Griddle
Host griddledfoods requirecooking
on a preheated surface. Preheatgriddle
according to the guide below,then switch
to the desired cook setting.
Preheat Cook
TypeofFood Conditions Settinq
Warming HI 4
Tortillas 4min.
Pancakes HI 5
Hamburgers HI 6
FriedEggs HI 5
Bacon none 6
3.5min.
4min.
2min.
NOTE:Yourgriddle will discolor overtime
asit becomesseasonedwith use.
IMPORTANTNOTES:
Avoid cooking extremely greasy foods and
be careful of grease spillover while cooking.
Never place or store any items on the
griddle, even when it is not in use. The
griddle can become heated when using
the surrounding burners.
10
Breakfast HI 6
SausageLinks 3.5min.
HotSandwiches HI 6
(suchas 3min.
GrilledCheese)
NOTE:Griddle settings may need
to be adjusted if the griddle isused
for on extended time.
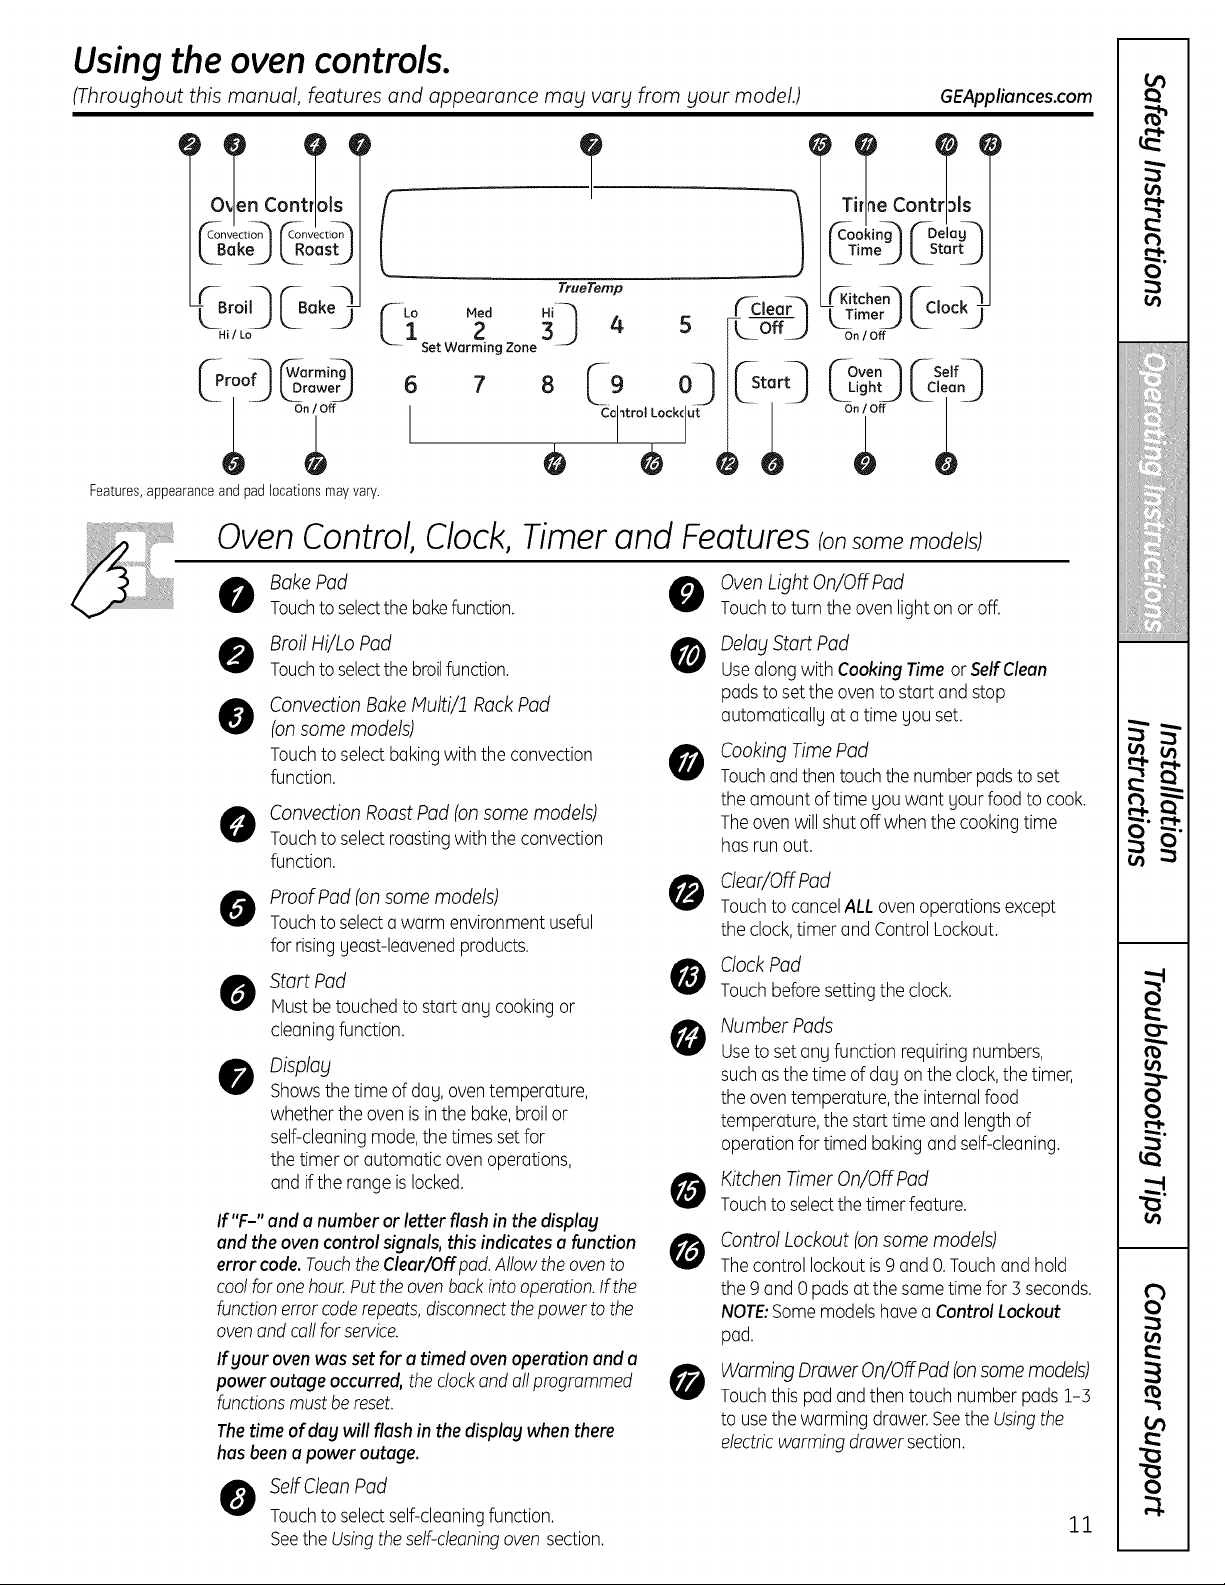
Using the ovencontrols.
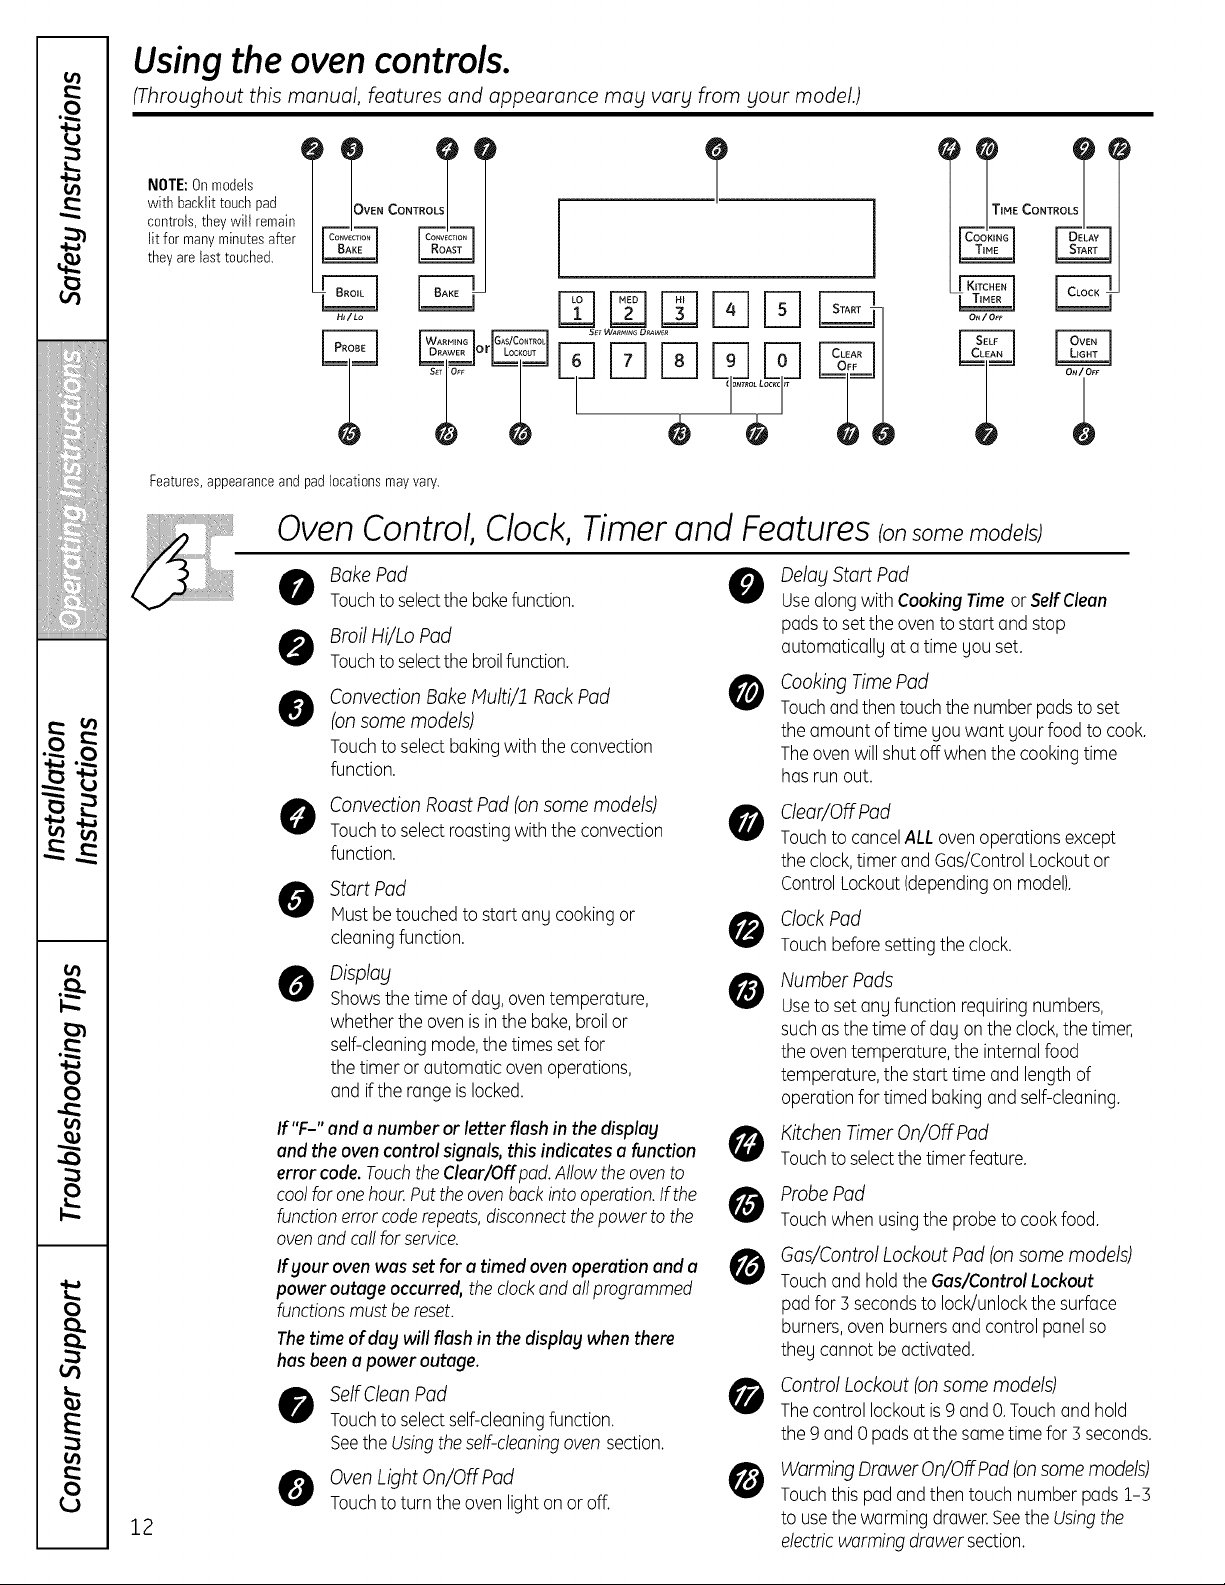
(Throughout this manual, features and appearance may vary from your model.) GEAppliances.com
,1 q
&o,,]GQ
Hi/Lo
roo, ,oOo:U
Features, appearance and pad locations may vary.
Oven Control, Clock, Timer and Features ionsomemode sJ
BakePad 0
Touchtoselectthe bakefunction.
0 Broil Hi/Lo Pod 0
Touchtoselectthe broilfunction.
Convection BakeMulti/1 Rock Pad
@
(on some models)
Touchto selectbakingwith the convection
function.
O ConvectionRoast Pad (onsome models)
Touchto selectroastingwiththe convection
function.
2 3_ 4 5 oolo.
Set Warming Zone
6 7
I
TrueTemp
8C9 o]
Co ltrol Lock(ut
e o
0
T e Con Is
('-C-ookJng_ f--Deioy_'_
LTimoJLsto,U
LoffJ
_-Stert]
OvenLight On/Off Pad
Touchto turn theoven lighton or off.
Delay Start Pad
Use along with Cooking Time or Self Cleon
pads to set the oven to start and stop
automatically at a time you set.
Cooking TimePad
Touchandthentouchthenumberpadstoset
theamount of time you want yourfoodto cook.
Theovenwill shutoff when the cookingtime
hasrun out.
O roofPad (on some models)
Touchtoselectawarm environmentuseful
for risingyeast-leavenedproducts.
Start Pod
Mustbetouched tostart ang cookingor
cleaningfunction.
Display
Showsthetime of day, oventemperature,
whetherthe ovenis inthe bake,broilor
self-cleaningmode,the timessetfor
thetimer or automatic ovenoperations,
and ifthe range islocked.
If "F-" and a number or letterflash in the display
and theovencontrolsignals,thisindicatesa function
errorcode. Touchthe Clear/Off pod. Allow the oven to
cool for one hour. Putthe oven back into operation. Ifthe
function error code repeats, disconnect the power to the
oven end coil forservice.
Ifgour oven was set for a timed oven operation end u
power outage
functions must be reset.
The time of dug will flash in the displag when there
has been a power outage.
occurred, the clock and oilprogrammed _[_
Clear/Off Pad
Touchto cancelALLovenoperationsexcept
theclock,timer and ControlLockout.
O CIockPod
Touchbeforesettingthe clock.
Number Pods
@
Useto set any function requiringnumbers,
suchasthetime of day on the clock,thetimer,
theoventemperature,the internalfood
temperature,the start time and lengthof
operationfor timed bakingand self-cleaning.
Kitchen Timer On/Off Pad
Touchtoselectthetimerfeature.
Control Lockout (on some models)
Thecontrol lockoutis9 and O.Touchandhold
the9 and 0 padsatthe sametimefor 5 seconds.
NOTE:Somemodelshavea ControlLockout
pad.
Worming Drawer On/OffPad (onsomemodels)
Touchthis pad andthen touch numberpads 1-5
to usethe warming drawer.Seethe Usingthe
electricwormingdrawersection.
O elf Clean Pad
Touchto selectself-cleaningfunction.
Seethe Usingtheself-cleaningoven section.
11
Using the ovencontrols.
(Throughout this manual, features and appearance may vary from your model.)
NOTE:Onmodels
with backlittouchpad
controls,they will remain
lit for manyminutesafter
they arelast touched.
Features, appearance and pad locations may vary.
Oven Control, Clock, Timer and Features Ionsomen,ode sJ
CONTRO
BakePad @
Touchtoselectthe bakefunction.
Broil Hi/Lo Pod
Touchtoselectthe broilfunction.
Convection BakeMulti/ff Rock Pad
@
(on some models)
Touchto selectbakingwith the convection
function.
Convection Roast Pad (onsome models)
Touchto selectroastingwiththe convection
function.
Start Pad
Mustbetouched tostart anUcookingor
cleaningfunction.
Display
Showsthetime of daU,oventemperature,
whetherthe ovenis inthe bake,broilor
self-cleaningmode,the timessetfor
thetimer or automatic ovenoperations,
and ifthe range islocked.
If"F-" and onumber or letterflash in the display
and theovencontrolsignals,thisindicates o function
errorcode.TouchtheCleor/Offpad.Allowtheovento
coolforonehour.Puttheovenbackintooperation.Ifthe
functionerror coderepeats,disconnectthepower to the
ovenand call forservice.
Ifyour ovenwas set for otimed ovenoperationand o
power outageoccurred,theclockandallprogrammed
functionsmustbereset.
The time of day willflash in the display when there
has been a power outage.
Delay Start Pad
Use along with Cooking Time or Self Clean
pads to set the oven to start and stop
automaticallg at a time gou set.
Cooking TimePad
@
Touchandthentouchthenumberpadstoset
theamount of time Uouwant uourfoodto cook.
Theovenwill shutoff when the cookingtime
hasrun out.
Clear/Off Pad
0
Touchto cancelALLovenoperationsexcept
theclock,timer and Gas/ControlLockoutor
ControlLockout(dependingon model).
ClockPad
Touchbeforesettingthe clock.
Number Pads
Useto set anUfunction requiringnumbers,
suchasthetime of daUon the clock,thetimer,
theoventemperature,the internalfood
temperature,the start time and lengthof
operationfor timed bakingand self-cleaning.
Kitchen Timer On/OFFPad
Touchtoselectthetimerfeature.
Probe Pad
_rJ
Touchwhen usingthe probeto cookfood.
Gas/Control Lockout Pad (on some models)
@
Touchand holdthe Gas/Control Lockout
pad for 5secondsto lock/unlockthe surface
burners,ovenburnersandcontrol panelso
theUcannot be activated.
12
SelfClean Pad
Touchto selectself-cleaningfunction.
Seethe Usingtheself-cleaningoven section.
OvenLight On/OffPad
Touchto turn the oven lighton or off.
Control Lockout (on some models)
Thecontrol lockoutis9 and O.Touchandhold
the9 and 0 padsatthe sametimefor 5 seconds.
Warming Drawer On/OffPad (onsomemodels)
@
Touchthis pad andthen touch numberpads 1-5
to usethe warming drawer.Seethe Usingthe
electricwarmingdrawersection.
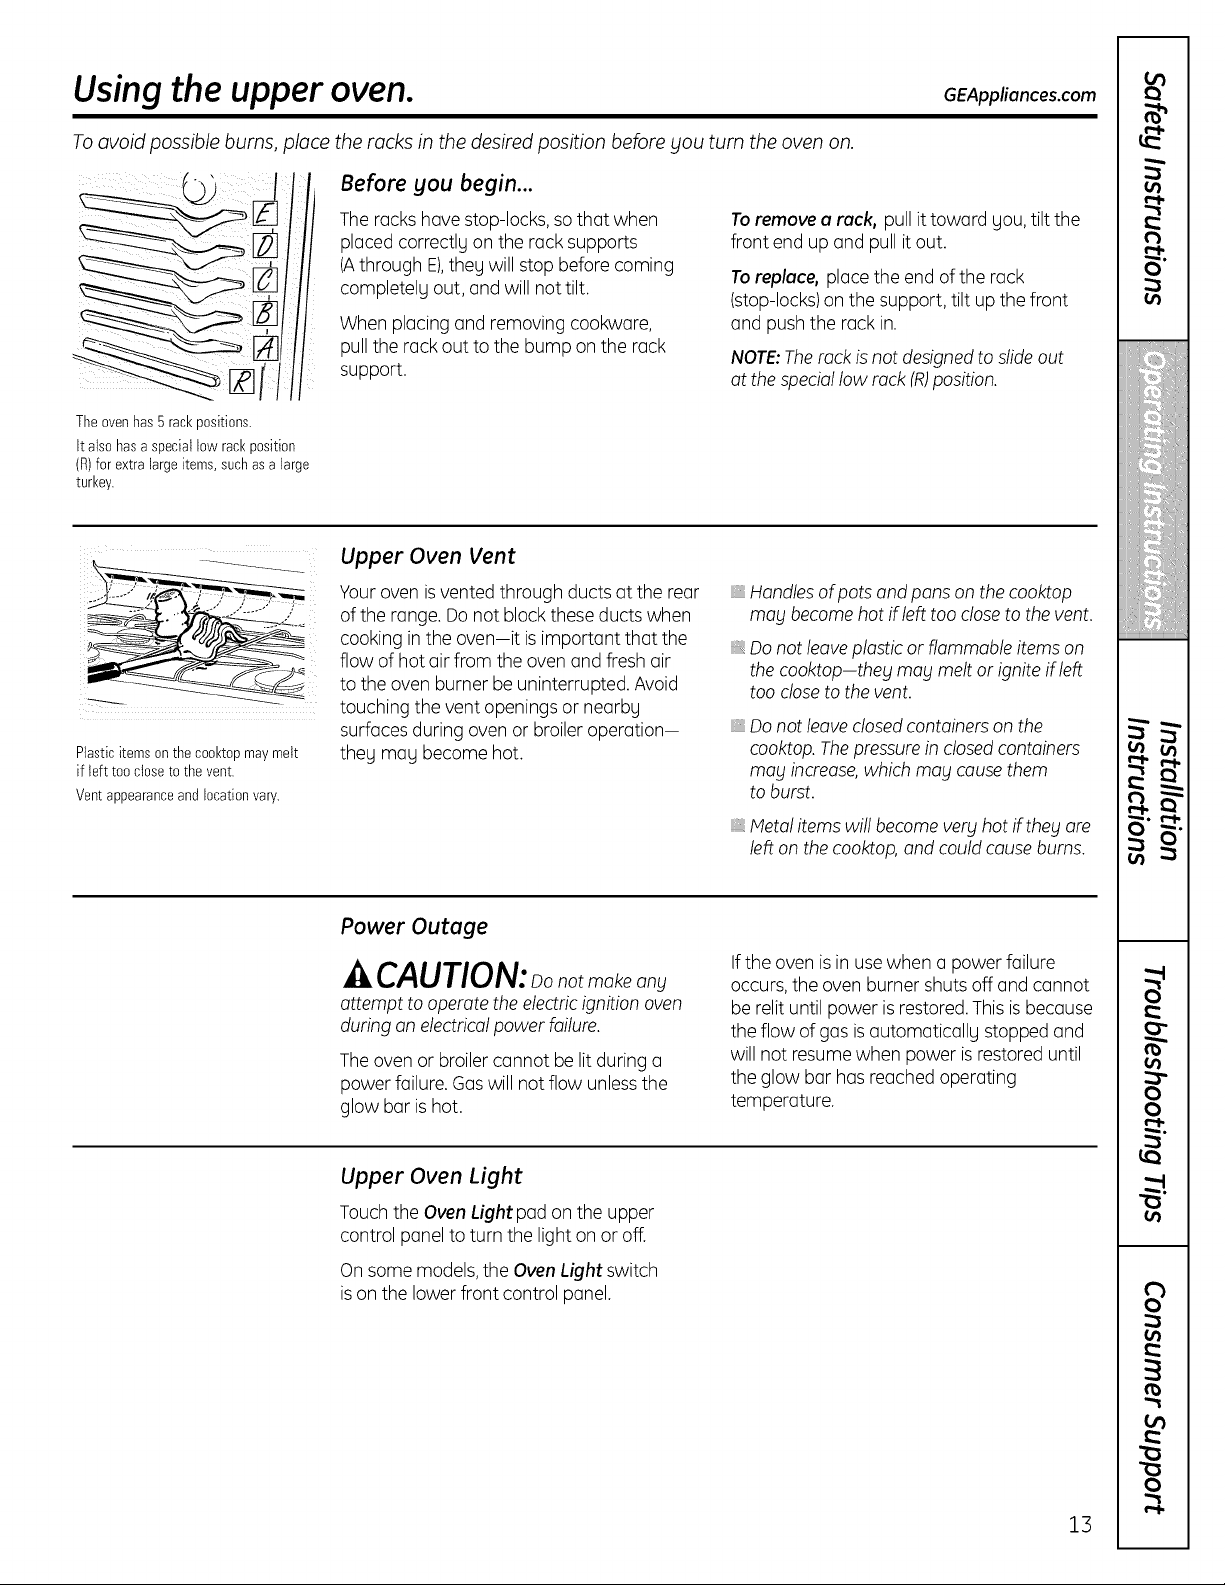
Using the upper oven. GEAppliances.com
To avoid possible bums place the racks in the desired position before you turn the oven on.
Before you begin...
//j
The oven has 5 rack positions.
It also has a special low rack posltlon
(R)for extra large items, such as a large
turkey.
!i i(
Plasticitems on the cooktopmaymelt
if left too closetothe vent.
Ventappearanceand locationvary.
The racks have stop-locks,so that when
placed correctlg on the rack supports
(Athrough E),theg will stop before coming
completelg out, and will not tilt.
When placing and removing cookware,
pull the rack out to the bump on the rack
support.
Upper Oven Vent
Your oven is vented through ducts at the rear
of the range. Donot block these ducts when
cooking in the oven-it isimportant that the
flow of hot air from the oven and fresh air
to the oven burner be uninterrupted. Avoid
touching the vent openings or nearbg
surfaces during oven or broiler operation-
theg mag become hot.
Toremove a rack, pull ittoward gou,tilt the
front end up and pullit out.
Toreplace, place the end of the rack
(stop-locks)on the support, tilt up the front
and pushthe rack in.
NOTE:The rack is not designed to slide out
at the special low rack (R)position.
Handles of pots and pans on the cooktop
may become hot ifleft too close to the vent.
Do not leaveplastic or flammable itemson
the cooktop-they mag melt or ignite if left
too closeto thevent.
Do not leave closed containers on the
cooktop. The pressure in closed containers
mag increase, which mag cause them
to burst.
Metal items willbecome verg hot if theg are
left on the cooktop, and could cause bums.
Power Outage
CAUTlON: notmakeany
attempt to operate the electric ignition oven
during an electrical power failure.
Theoven or broiler cannot be lit during a
power failure. Gaswill not flow unlessthe
glow baris hot.
Upper Oven Light
Touch the Oven Light pad on the upper
control panel to turn the light on or off.
On some models,the Oven Light switch
ison the lower front control panel.
If the oven isin usewhen apower failure
occurs,the oven burner shutsoff and cannot
be relit until power isrestored.Thisisbecause
the flow of gas isautomaticallg stopped and
will not resumewhen power is restored until
the glow bar has reached operating
temperature.
1B
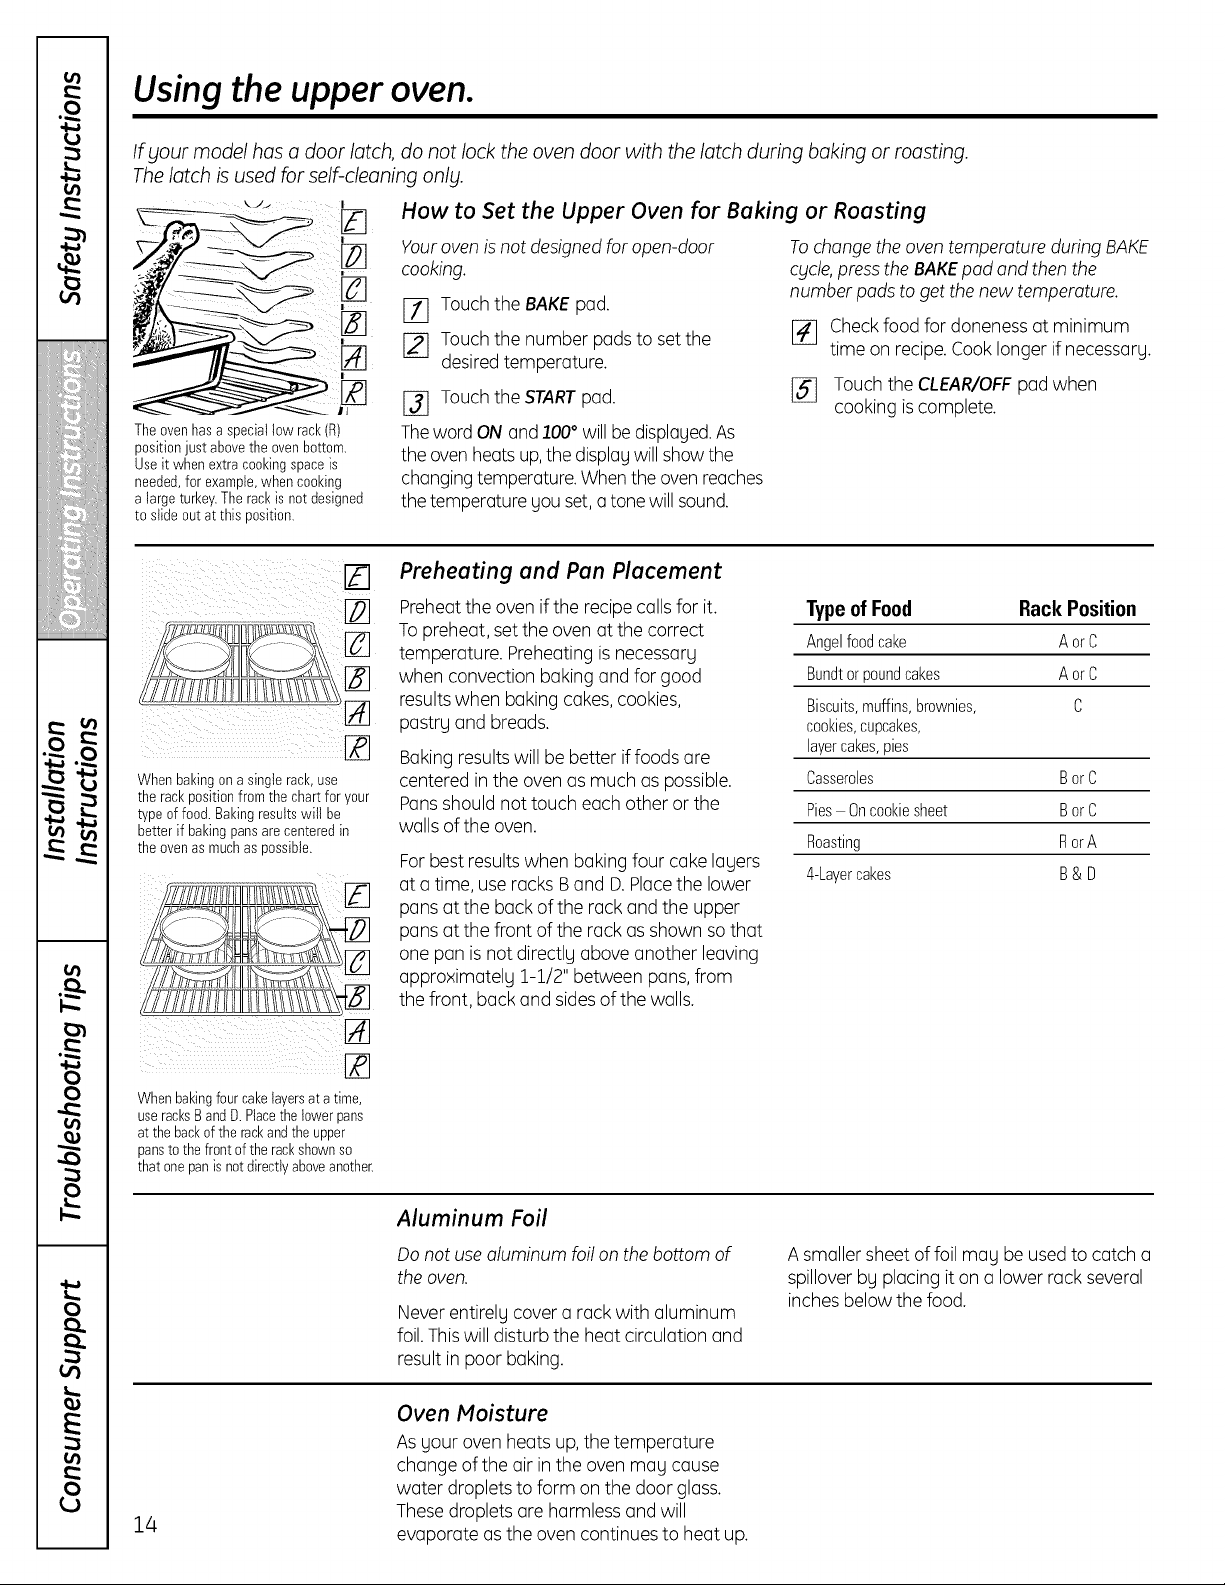
Using the upper oven.
If your model has a door latch, do not lock the oven door with the latch during baking or roasting.
The latch is used for self-cleaning only.
How to Set the Upper Oven for Baking or Roasting
|
Theovenhasaspeciallowrack(R)
positionjust abovethe ovenbottom.
Useit when extra cookingspaceis
needed,for example,whencooking
a largeturkey.The rackis not designed
to slide out at this position.
When bakingonasinglerack,use
the rackpositionfromthe chart for your
type of food. Bakingresultswill be
betterif bakingpansare centeredin
the ovenas muchas possible.
Yourovenis not designedfor open-door
cooking.
[_] Touchthe BAKE pad.
[_ Touchthe number pads to set the
desiredtemperature.
[_ Touchthe STARTpad.
Theword ON and100° will bedisplayed.As
the oven heatsup,the displaywill show the
changingtemperature.Whenthe ovenreaches
the temperature you set, a tonewill sound.
Preheating and Pan Placement
Preheatthe oven ifthe recipecallsfor it.
Topreheat, set the oven at the correct
temperature. Preheatingis necessary
when convection baking and for good
resultswhen baking cakes,cookies,
pastryand breads,
Bakingresultswill be better if foods are
centered in the oven as much as possible.
Pansshould not touch each other or the
walls of the oven.
Forbest resultswhen bakingfour cake layers
at atime, useracks Band D.Placethe lower
pans atthe back of the rack and the upper
pans at the front of the rack asshown sothat
one pan is not directly above another leaving
approximately 1-1/2" between pans,from
the front, back and sides of the walls.
Tochange the oven temperature during BAKE
cgcle,pressthe BAKEpad and then the
number pads to get the new temperature.
[_ Checkfood for doneness at minimum
time on recipe.Cook longer if necessarg.
[_] Touch the CLEAR/OFFpad when
cooking iscomplete.
Type ofFood Rack Position
Angelfood_'ake AorC
Bundtorpoundcakes AorC
Biscuits,muffins,brownies, C
cookies,cupcakes,
layercakes,pies
Casseroles BorC
Pies Oncookiesheet BorC
Roasting RorA
4-Layercakes B& U
Whenbakingfourcakelayersat atime,
useracksBand D.Placethelowerpans
at thebackofthe rackandtheupper
pansto the frontoftherackshownso
that onepanis notdirectlyaboveanother.
14
Aluminum Foil
Do not usealuminum foil on the bottom o1:
the oven.
Neverentirely cover a rack with aluminum
foil.Thiswill disturb the heat circulation and
result in poor baking.
Oven Moisture
Asyour oven heats up, the temperature
change of the air inthe oven may cause
water droplets to form on the door glass.
Thesedropletsare harmlessand will
evaporate asthe oven continuesto heat up.
A smaller sheet of foil may be usedto catch a
spillover by placing it on a lower rack several
inchesbelow the food.
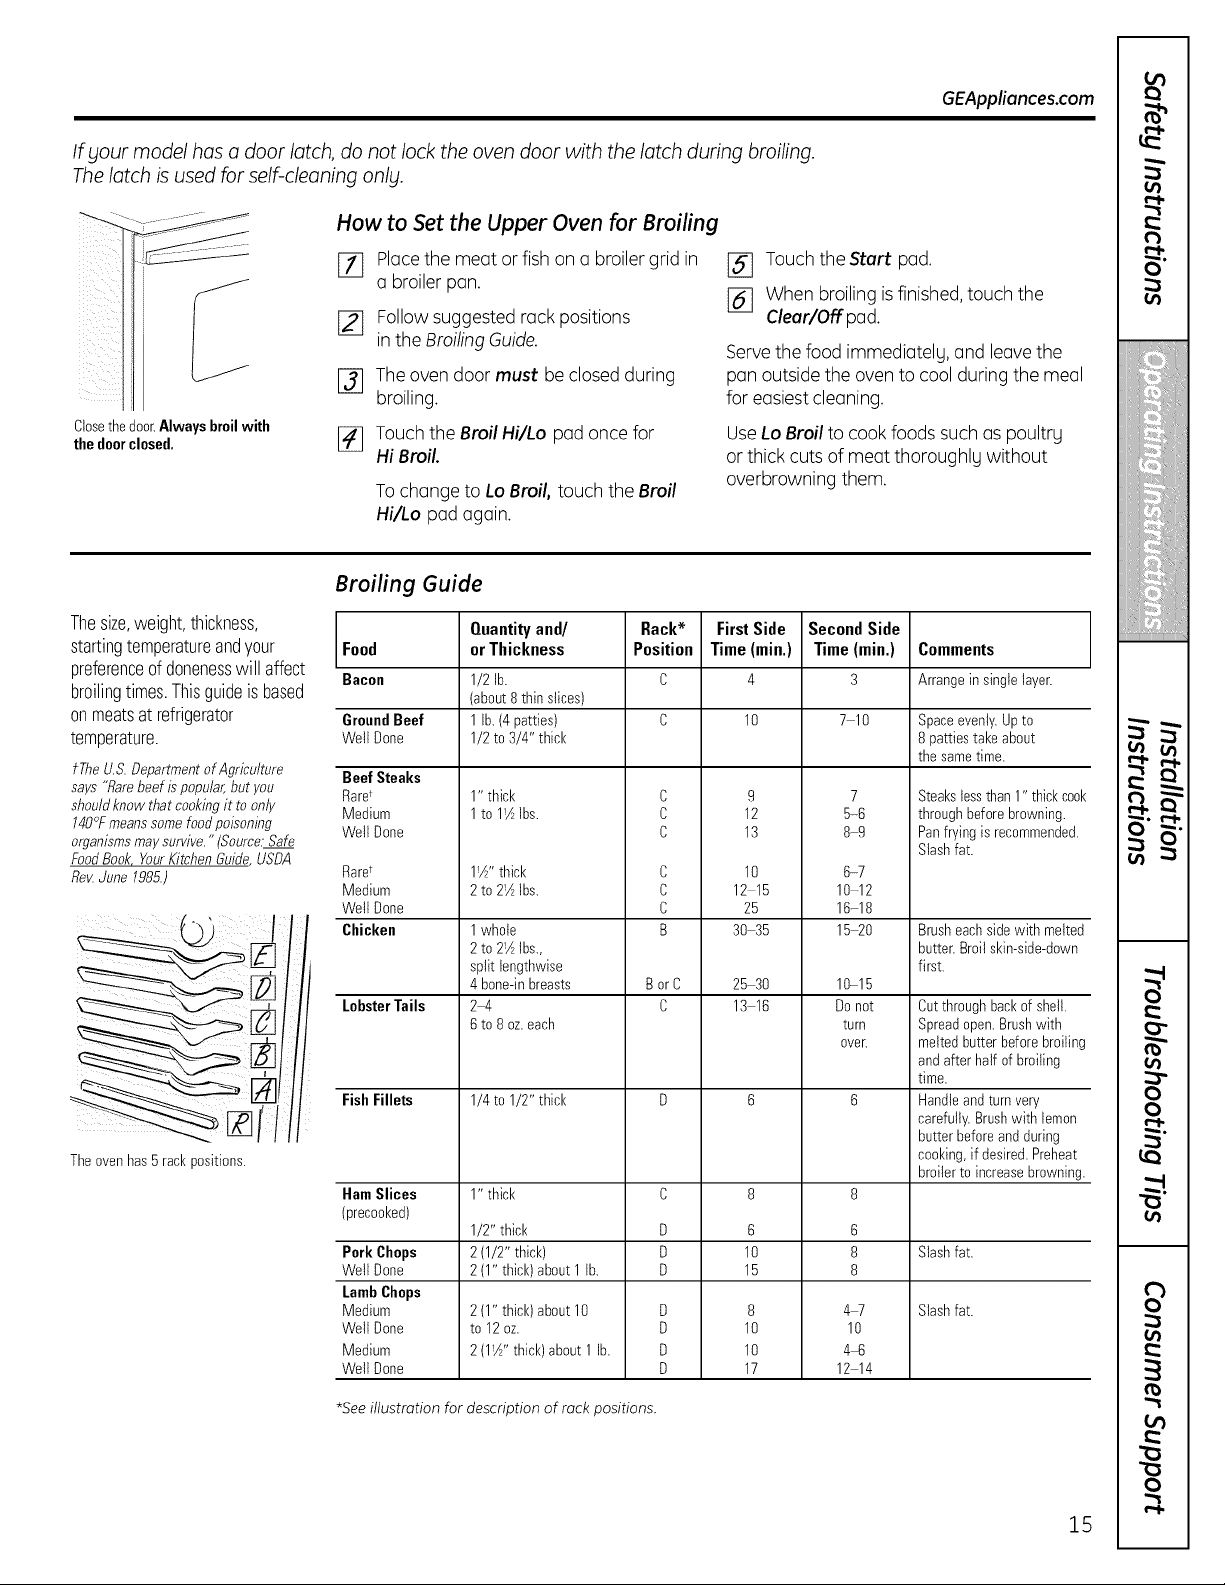
If your model has a door latch, do not lock the oven door with the latch during broiling.
The latch is used for self-cleaning only.
How to Set the Upper Oven for Broiling
GEAppliances.com
J
a broiler pan.
[_ Follow suggested rack positions
[] Placethe meat orfish ona broilergrid in
i_il £
in the Broiling Guide.
I-_ Theoven door must be closed during
broiling.
Closethedoor.Always broilwith
the doorclosed.
I_ Touch the Broil Hi/Lo pad once for
Hi Broil.
To change to Lo Broil, touch the Broil
Hi/Lo pad again.
Broiling Guide
Thesize,weight,thickness,
startingtemperatureandyour Food
preferenceof donenesswill affect Bacon
broilingtimes.Thisguideisbased
onmeatsat refrigerator
temperature.
fTheU.S.Departmentof Agriculture BeefSteaks
says "Rarebeefis popular,but you RaW
shouldknow thatcookingit toonly Medium
140°Fmeanssomefoodpoisoning WeltDone
organismsmaysurvive."(Source:Safe
FoodBook YourKitchenGuide_,USDA
fle_ June 1985.)
Theovenhas5 rankpositions.
GroundBeef
WeltDone
Raret
Medium
WeltDone
Chicken
Lobster Tails
FishFillets
HamSlices
(precooked)
Pork Chops
WeltDone
LambChops
Medium
WetlDone
Medium
WeltDone
Quantityand/
or Thickness
1/2 lb.
(about8thin slices)
1lb.(4 patties)
1/2to 3/4" thick
1" thick
1to 1_AIbs.
1!A'' thick
2 to 2!AIbs.
1whole
2 to 21AIbs.,
split lengthwise
4 bone-inbreasts
2_4
6 to 8oz.each
1/4to 1/2" thick
1" thick
1/2" thick
2 (1/2" thick)
2 (1" thick)about1lb.
2 (1" thick)about10
to 12 oz.
2 (1W' thick)about 1lb.
Rack*
Position
C
C
C
C
C
C
B
BorC
C
D
D
D
D
D
D
D
[_ Touch the Start pad.
[_ When broiling isfinished, touch the
Clear/Off pad.
Servethe food immediatelg, and leavethe
pan outside the oven to cool during the meal
for easiestcleaning.
UseLoBroil to cook foods such as poultrg
or thick cuts of meat thoroughlg without
overbrowning them.
FirstSide
Time(min.)
10
9
12
13
10
12 15
25
30 35
25 30
13 16
6
10
15
8
10
10
17
SecondSide
Time(min.)
7 10
7
5-6
8-9
6-7
10-12
16-18
1520
10-15
Donot
turn
over.
6
8
8
4W
10
4q_
12 14
Comments
Arrangeinsinglelayer.
Spaceevenly.Upto
8 patties takeabout
the sametime.
Steakstessthan1" thickcoo_
throughbeforebrowning.
Panfryingis recommended.
Slashfat.
Brusheachsidewith melted
butter.Broilskin-side-down
first.
Cutthroughbackof shell.
Spreadopen.Brushwith
meltedbutterbeforebroilinc
andafter half of broiling
time.
Handleandturn very
carefully.Brushwith lemon
butterbeforeandduring
cooking,ifdesired.Preheat
broilerto increasebrowning
Slashfat.
Slashfat.
*See illustration for description of rack positions.
15
Using the clockand timer.
Not all features are on all models.
ToSet the Clock
Theclock must be set to the correct time of
day for the automatic oven timing functions
Make sure the clock is set to the correct
time of day.
to work properly. Thetime of day cannot be
changed during atimed baking or self-
cleaning cycle.
If number padsare not touched within one
minute after you touch the Clock pad,the
display reverts to the original setting. If this
happens,touch the Clock pad and reenter
the time of day.
I KITCHEN
W T,MER]
ON/OFF
E]mS S !N
Thetimer isa minutetimeronly.
TheClear/Off pad doesnotaffect
thetimer.
[_ Touch the Clock pad.
[_ Touch the number pads.
Touch the number pads the same way you
read them. Forexample, to set 12:54,touch
the number pads 1,2,3 and 4in that order.
To Set the Timer
Thetimer doesnot control oven operations.
Themaximum setting on the timer is9 hours
and 59 minutes.
Touch the KitchenTimer On/Off pad.
[]
Touch the number pads untilthe
[]
amount of time you want shows in the
display.Themaximum time that can be
entered in minutes is59.Times more
than 59 minutes should be changed to
hours and minutes.For example,to
enter 90 minutes as 1 hour 30 minutes,
touch 1,3and 0 inthat order.
Ifgou make a mistake,pressthe Kitchen
Timer On/Off pod and begin again.
I_ Touch the Start pad until the time of
day shows in the display.Thisenters
the time and starts the clock.
Tocheck thetime of dog when thedisplag
isshowing other information, simplg touch
the Clock pod. The time of dog shows until
another pod istouched.
Touch the Startpad. After pressingthe
%
Startpad,Setdisappears;this tells you
the time iscounting down, although the
display does not change until one
minute has passed.
When the timer reaches :00othe control
will beep 3 times followed by one beep
every 6 seconds until the Kitchen Timer
On/Off pad istouched.
The6-secondtone can be canceledbg
following the stepsin the Spedalfeatures
of gout ovencontrol section under Tones
at the Endof o TimedCgcle.
16
To Reset the Timer
If the display isstill showing the time
remaining, you may change it by touching
the Kitchen Timer On/OFFpadand then
touching the number pads untilthe time
you want appears inthe display.
To Cancel the Timer
Touchthe Kitchen Timer On/Off pad twice.
Power Outage
If o flashing time isin the displog,gou have
experiencedo power failure.Resettheclock.
Ifthe remaining time is not in the display
(clock,@lay start or cooking time are in
the display), recallthe remaining time by
touching the Kitchen Timer On/OFFpad
and then touching the number pads
to enter the new time you want.
Touch the Clock pad once to reset.
Enterthe correct time of day by touching
the appropriate number pads.Touch
the Startpad.

Usingthetimedbakingandroastingfeatures.IupperovenonU;OEAppliances.com
r-I-
If gour model has a door latch, do not lock the oven door with the latch during timed cooking. The latch is used for
self-cleaning only.
NOTE: Foods that spoil easily-such as milk, eggs, fish, stuffings, poultry and pork-should not be allowed to sit for
more than J hour before or after cooking. Room temperature promotes the growth of harmful bacteria. Be sure that
the oven light is off because heat from the bulb will speed harmful bacteria growth.
How to Set an Immediate Start and Automatic Stop
t_
O"
Fqrqrq
i _ iii ii i
i i i iiii i_ i i
N U :N
i iiiii iiiii )i
E]F-IFqF1l-q
rqFq
EBmFq
DDDUo
Theupperovenwillturnonimmediatelgandcook
foraselectedlengthoftime.Attheendof the
cookingtime,theovenwillturnoff outomoticollg.
_] TouchtheBakepad.
[_] Touchthenumberpadsto setthedesired
oventemperature.
[_ TouchtheCookingTimepad.
NOTE:Ifyourreciperequirespreheating,youmay
needto oddadditionaltimetothelengthofthe
cookingtime.
[] Touch the number padsto set the desired
length of cooking time. Theminimum
cooking time you can set is 1minute.
Theoven temperature that you set and the
cooking time that you entered will be in the
display.
J_ TouchtheStart pad.
Theovenwillturn ON,andthedisplaywill show
thecookingtimecountdownandthechanging
temperaturestartingat IO0°F.(Thetemperature
displaywillstartto changeoncethe oven
temperaturereachesIO0°F.)Whentheoven
reachesthetemperatureyouset,3beepswill
sound.
Theovenwill continue to cookfor the set amount
of time, then turn off automatically.
After the oven turns off,the end-of-cycle tone will
sound.
[] TouchtheClear/Offpadtoclearthe display
if necessary.Removethefoodfromthe
oven.Remember,eventhoughthe oven
turnsoffautomatically,food leftintheoven
willcontinuecookingafterthe oventurnsoff.
How to Set a Delaged Start and Automatic Stop
Theupperovenwillturnonatthetimeofdog_lOU
set,cookforaspecificlengthof timeandthenturn
offautomaticallg.
Hakesuretheclockshowsthecorrecttimeofday.
_] TouchtheBakepad.
[_ Touchthenumberpadstosetthedesired
oventemperature.
[_ TouchtheCookingTimepad.
NOTE:Ifgoutreciperequirespreheating,goumag
needto oddadditionaltimetothelengthofthe
cookingtime.
[_ Touchthenumberpadstosetthedesired
lengthofcookingtime.Theminimum
cookingtime youcansetis1minute.
Theoventemperaturethatyousetandthe
cookingtimethat youenteredwillbeinthe
display.
[_ TouchtheDelagStart pad.
[_ Touchthenumberpadstosetthetime of
day youwanttheoventoturn onandstart
cooking.
NOTE:Anattentiontonewill soundif_louareusing
timedbakinganddonottouchtheStartpad.
NOTE:If_louwouldliketocheckthetimes_lou
hoveset,touchtheDelagStartpadto checkthe
starttime_louhovesetortouchtheCookingTime
padtocheckthelengthofcookingtimeyouhove
set.
WhentheoventurnsONatthetimeofday
youset,thedisplaywillshowthecookingtime
countdownandthechangingtemperature
startingat 100°t:.(Thetemperaturedisplay
willstartto changeoncetheoventemperature
reachesIO0°F.)Whentheovenreachesthe
temperatureyouset,beepswillsound.
Theovenwill continue to cookfor the set amount
of time, then turn off automatically.
Aftertheoventurnsoff,theend-of-cycletone
willsound.
TouchtheClear/Offpadtoclearthedisplay
%
if necessary.Removethefoodfromthe
oven.Remember,eventhoughthe oven
turnsoffautomatically,food leftintheoven
willcontinuecookingafterthe oventurnsoff.
illiiiii'_'iiiiiiiiiiiiii
¢t
¢
v
O
O
r",l-
r_
0
[Z] Touchthe Start pad. 17
Using the probe, ionsomemode sJ
If your model has a door latch, do not lock the oven door with the latch while cooking with the probe. The latch is used
for self-cleaning only.
For many foods, especially roasts and poultry, internal food temperature is the best test for doneness. The temperature
probe takes the guesswork out of cooking foods to the exact doneness you want.
The temperature probe has
askewer-likeprobeat oneend
anda plugat theother endthat
goesintotheoutlet in the oven.
Useof probes other than the one provided
with this product mag result in damage to
the probe.
Usethe handles of the probe and plug when
inserting and removing them from the food
and outlet.
_,Toavoid damaging your probe,do not use
tongs to pull onthe cablewhen removing it.
_,Toavoid breakingthe probe,make sure food
iscompletely defrostedbeforeinserting.
Toprevent possible bums, do not unplug the
probe from the outlet untilthe oven has cooled.
After preparing the meat and placing it on
a trivet oron abroiler pangrid, follow these
directions for proper probe placement.
Insertthe probe completelg into the meat.
It should not touch the bone,fat or gristle.
/_--_ _'_ Cable
Never leave your probe inside the oven
during a self-cleaning cycle.
Donotstore the probe inthe oven.
Forroasts with no bone,insert the probe into
the meatiest part of the roast. For bone-in
ham or lamb, insert the probe into the center
of the lowest large muscle.
Insertthe probe into the center of dishessuch
asmeat loaf or casseroles.
Insertthe probe into the meatiest part of the
inner thigh from below and parallelto the leg
of a whole turkeg.
rqp]rq
E]D rq
I CLEA.I
18
How to Set the Upper Oven For Cooking When Using the Probe
[] Insertthe probe intothe food. r_]
[_ Plugthe probe intothe outlet in the
oven. Make sureit's pushed all the
wag in.Closethe ovendoor.
Touch the Probe pad.
%
Touch the number pads to set
the desired internal food or meat
temperature between 100°Fand 200°F.
Touch the Bakepad.
%
Touch the number pods to set the
%
desiredoven temperature.
Touch the Start pad.
[]
The display will flash if the probe is inserted
into the outlet and you have not set a probe
temperature and touched the Start pad.
Thedisplagwill show LO until the internal
temperature of the food reaches 100°F;then
the changing internal temperature will be
shown.
When the internaltemperature of the
food reachesthe number gou have set,
the probe andthe oventurn off and the
oven control signals.Tostop the signal,
touch the Cleur/Offpad. Use hot pads to
remove the probefrom the food. Do not
usetongs to pull on it-theg might
damage it.
Tochange the oven temperature during
probe cooking,touch the Bakepad and then
the number pads to set the new temperature.
Ifthe probe is removed from the food before
the final temperature is reached, a tone will
sound and the display willflash until the
probe is removed from the oven.
You can use the timer even though you
cannot use timed oven operations while
using the probe.
 Loading...