

Page 1
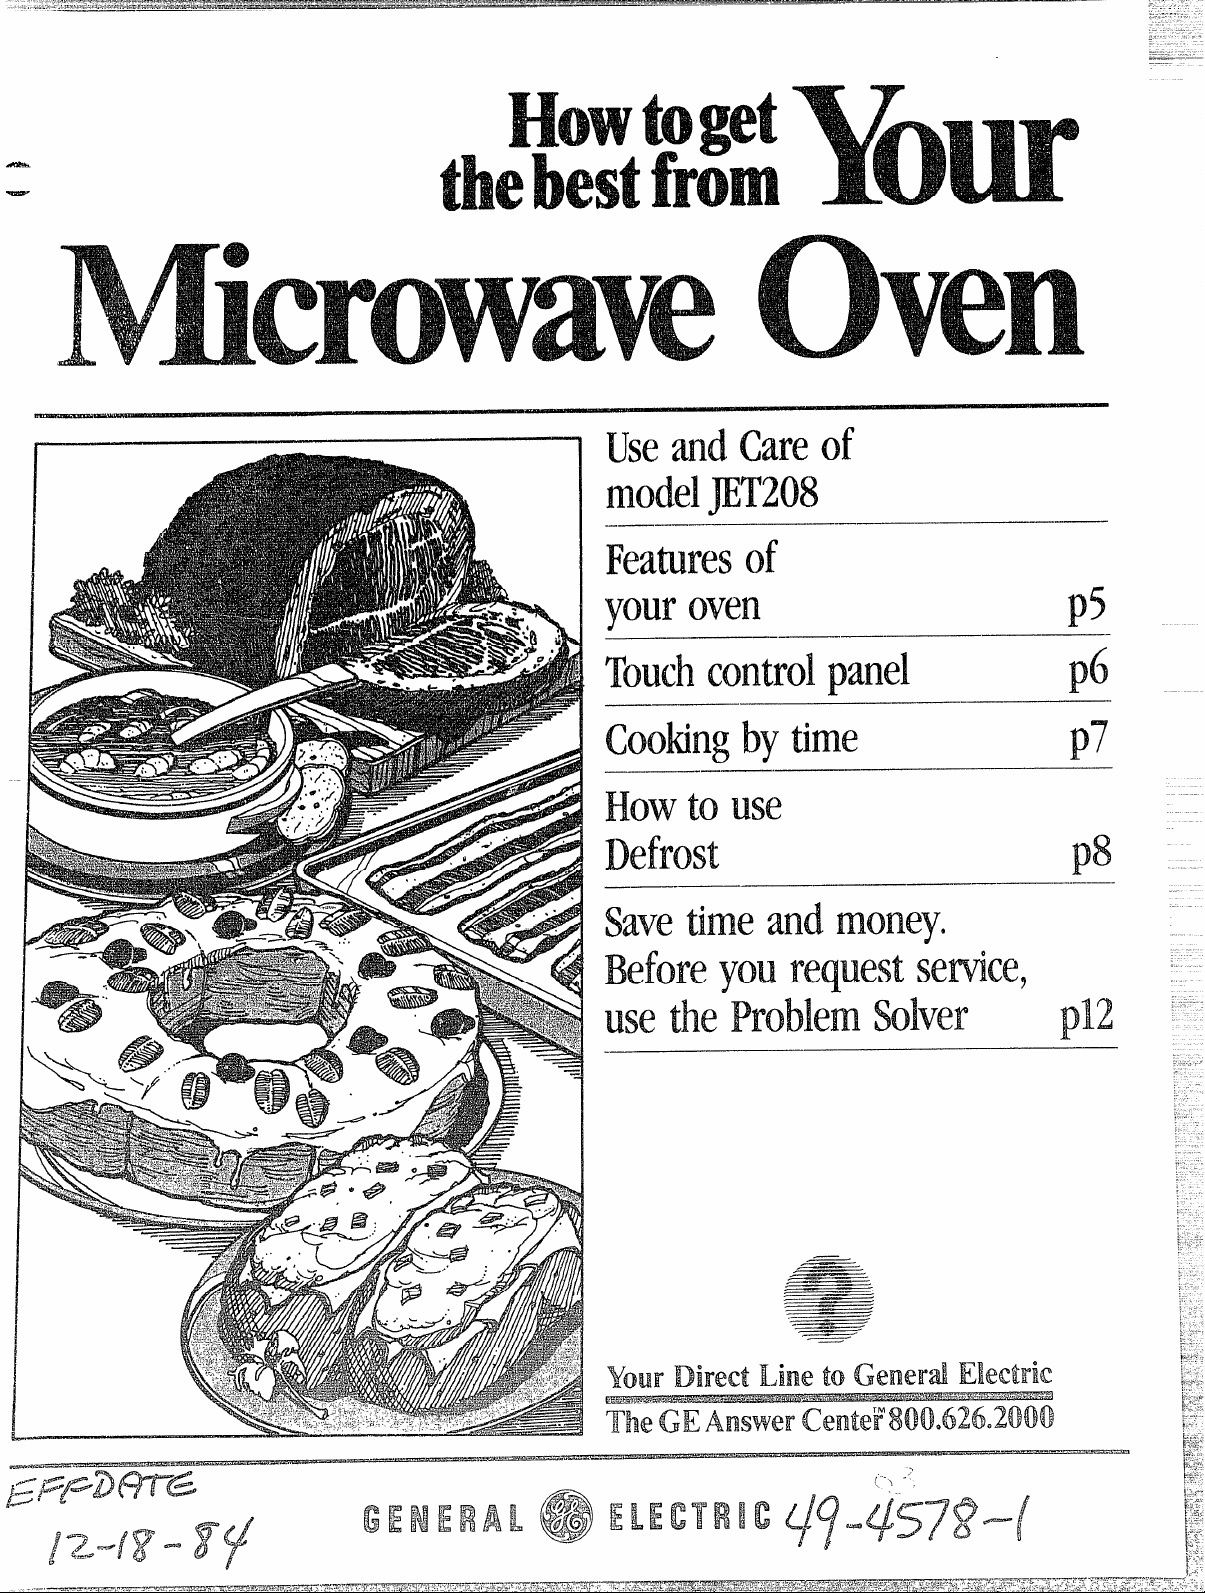
COokhg”bytime - p’7
and
B
Y&n’Dinxt line toGenedi Ehxtrk
TheGE
AEWVWO
Page 2

.
-:%..—
‘
Fled thisbookWm?ful!y”
It will help you operateand maintain your new MicrowaveOven
properly.
Keepit handyfor answersto your
questions.
If you don’t understand something
or needmore help. . .
Call, toll free:
The GEAnswerCenterT”
800.626.2000
consunler information
or write: (include your phone
number);
Consumer Affairs
General Electric Company
Appliance Park
Louisville, KY 40225
service
Wwm? the model and
serial
You’llfind them on a label inside
the oven on the upper left side.
These numbers arealso on the
Consumer Product Ownership
Registration Card that came with
your Microwave Oven. Before
sending in this card, pleasewrite
these numbers here:
Model No.
mmbel’sm
BesureyourMicrowave
Ovenisregistered.
It is important that we,the manufacturer, know the locationof your
MicrowaveOvenshould a need
occur for adjustments,
Your supplier is responsiblefor
registeringyou asthe owner,
Pleasecheckwith your supplier to
besure he hasdone so; also send
in your Consumer Product Ownership Registration Card, If you move,
or if you are not the original purchaserpleasewrite to us, stating
model and serial numbers.This
appiiancemustberegistered.
Pleasebecertainthatit is.
Write to:
General Electric Company
RangeProduct Service
Appliance Park
Louisville, KY 40225
H ~OU
receiveda damaged
oven.. “
immediately contact the dealer (or
builder) that sold you the Micro-
waveOven.
save timeand rmm?y.
Beforeyourequestserwice,check
theProblemSolveron page12. It
lists minor causes of operating
problems that you can correct
yourself.
(a) !DQNot Attempt to operatethis
ovenwith the door open since open
door operation can result in harmful
exposureto microwaveenergy. It is
important not to defeat or tamper
with the safety Interlocks,
(b)Do NMMaceany object
betweenthe oven front face and the
door or allow soil or cleaner residue
to accumulate on sealing surfaces,
(c) Do ‘Notoperatethe ovenif it is
damaged. it is particularly important
that the oven door close properly
and that there is no damage to the:
(1) door (bent)
(2) hinges and latches (broken or
loosened)
(3) door sealsand sealing surfaces.
(d)TheChfemShouldnot be
adjusted or repaired by anyone
except properly qualified service
personnel.
Serial No.
Usethese numbers in any
correspondence or servicecalls
concerning your Microwave Oven.
Available at extra-cost from your GE supplier.
3411 Kit
Converts your countertop ovento a built-in wall oven.This microwave
oven is L!L listed for installation over GE wall ovens with black glass
doors.
Page 3
BeforeMicrowaving . . . . . . . . . . . . z
SafetyInstructions . . . . . . . . . .
Featuresof YourOven . . . . . . . . . . 5
Control Panel
Howto Setthe Clock. . . . . . .. . . . 6
Time Cook . . .. . . . . . . . . . . . . . . .. 7’
Defrost . . . . . . . .. . . .. . . . . .. . . . . 8
l-lold/Timer, . . . . . . . . . . . . . . . . . . 10
Careof YcmrOven ... ... .....O II
The Probiem Solver . . . . . . . . . . . 12
Grounding Instructions . . . . .. . . 13
Useof Extension Cords. . . . . . . . 13
ConsumerServices. . . . . . . . . . . . 15
Warranty .. . . . . . . . . . . . BackCover
@Makesure all utensils usedin
your microwaveoven are labeled
“suitable for microwaving”. Check
your Cookbook for specific test
to determine “microwave-safe”
utensils.
@Papertowels, wax paper, and
plastic wrap can be used to cover
dishesin order to retain moisture
and prevent spattering.
@Some microwaved foods require
stirring, rotating, or rearranging.
Check your Cookbook for specific
instructions.
@Some foods such as unshelled
eggs and hot dogs must be pierced
to allow steam to escape during
cooking.
...,.,. ..,.,.,0 . . .
● ,3-4
Read auinstructions beforeLMm’lgthis appm’=.
When using electrical appliances
basic safety precautions should
6
be followed, including the
following:
WARNING—TO reduce the risk
of burns,
electric shock,fire,
injury to personsor exposureto
excessivemicrowaveenergy:
e Usethis applianceonly for its
intended useasdescribed in this
manual.
@ Read and follow the specific
“PRECAU7”10NS TO
POSSIBLEEXPOSURETO
EXCESSIVEMICROWAVE
ENERGY”found on page2.
Q This appliance must be
grounded. Connect only to
properly grounded outlet. See
‘GROUNDING INSTRUCTIONS”
found on page 13.
@ For best operation, plug this
appliance into its own electrical
outlet, to preventflickering of
lights, blowing of fuse or tripping of circuit breaker.
e Install or locate this appliance
only in accordance with the provided installation instructions.
@ EN?tx?rtaintopkl%xm?front
surfaceofthe door three inches
or more
topedge toavoid acckientdtlp-
phg ofilheappliance inntxmd
usage.
e Do not cover or block any
openings on the appliance.
e Do not use outdoors.
@ Do not immerse power cord
or plug in water.
@ Keep power cord away from
heated surfaces.
@ Do not let power cord hang
over edge of table or counter.
@ Do not operate this appliance
if it has a damaged power cord
or plug, if it is not working proper!y, w if it has been damaged
or dropped.
@ Seedoor surface cleaning
instructions on page 11.
backfromthe counter-
AVOID
0 This applianceshould beservicedonly by qualified service
personnel.Contact nearest
authorizedservicefacility for
examination,repair or
adjustment.
@ As with any appliance,close
supervision is necessa~ when
usedby children.
e To reducethe risk of fire in
the ovencavity:
—Do not overcook food. Care-fully attend appliance if paper,
plastic,or other combustible
materialsare placedinside the
oven to facilitate cooking.
—Removewire twist-ties from
paper or plastic bags before
placing bag in oven.
—Do not use your microwave
ovento dry newspapers.
—Papertowels and
waxpaper.
Recycled paper
products can contain metal
flecks which may causearcing
or ignite, Paper products containing nylon or nylon filaments
should be avoided, as they may
also ignite.
—Do not pop popcorn in your
rnkrcnvaveovenunless in a spe-
cial microwave popcorn acces-
sory or unless you use popcorn
labeled for use in microwave
ovens.
—Do not operate the ‘mK%llwhile
empty to avoid damage to the
oven and the danger of fire. If by
accident the oven should run
empty a minute or two, no harm
is done. However, try to avoid
operating the oven empty at all
times—it savesenergy and pro-
longs life of the oven.
—If materials inside the oven
should ignite, keep oven door
closed, turn oven off, and dis-
connect the power cord, or shut
off power at the fuse or circuit
breaker panel.
K
B
napkins,
(continued next page)
3
Page 4
e Some products suchas
whole eggsand sealedcontainers—for example,closed
glassjars—may explode and
should not be heated in this
oven!
e Avoid !iwMWng
baby food in
glassjam, evenwithout their
lids; e:jpecially meatand egg
mixtures.
~ Don’t defrost
in narrow necked bottles;
ages
frozen bever-
especially carbonated ones.
Evenif the container is opened,
pressurecan build up. This can
causethe container to burst,
resulting in injury.
e Use metal only as
QxWmSk.
Metal strips asused
directed in
cmmeat roastsare helpful when
usedas shown in Cookbook.
TV dinners may be cooked in
metal trays. However,when
using metal in microwave oven,
keep metal at least
from sides cdoven.
63 Cooking utensils may
become hot
becauseof heat
l-inch away
transferred from the heated
food. This is especially true if
plastic wrap has been covering
the top and handles of the
utensil. Potholders may be
needed to handle the utensil.
@ Scwm?times, the oven floor
can become too hot to touch.
Be careful touching
the floor
during and after cooking.
@ DOnot use any
in food you are microwaving
unless that thermometer is
designed or recommended for
use in the microwave oven.
!%stic LJtensils-Plastic
e
utensilsdesignedfor microwave
cooking arevery useful,but
should be usedcarefully. Even
microwaveplastic maynot be as
tolerant of overcooking conditions asare glassor ceramic
materialsand maysoften or
char if subjectedto shortperiods
of overcooking. In longer exposuresto overcooking,the food
and utensilscould ignite. For
these reasons:1) Use microwaveplastics only “and use
them” in strict compliance with
the utensil manufacturer’s
recommendations, 2) Do not
subject empty utensilsto microwaving.3) Donot permitchildren
to useplastic utensils without
complete supervision.
e When
cooking pork follow
our directions exactly and
always cook the meatto at least
170°.This assuresthat, in the
remote possibility that trichina
may be present in the meat,it
will be killed and meatwill be
safeto eat.
49
Boiling eggs (in and out cd
shell)
is not recommended for
microwave cooking. Pressure
can build up inside egg yolk and
may cause it to burst, resulting
in injury.
69Foods with
“skin”
such as potatoes, hot
unbroken outer
dogs or sausages,tomatoes,
apples, chicken livers and other
giblets, and eggs (seeabove)
should be pierced to allow
steam to escape during cooking.
e “Boilable”cooking pouches
and tightly closed plastic bags
should beslit, piercedor vented
asdirected in Cookbook. If they
are not, plastic could burstdur-
ing or immediately aftercooking,
possibly resulting in injury. Also,
plastic storagecontainersshould
be at leastpartially uncovered
becausethey form atight seal.
When cooking with containers
tightly covered with plastic wrap,
removecovering carefully and
direct steamaway from hands
and face,
4
Page 5
.. .. ... .
—
—
. .. ...
..
. ..
—
....
—
—-—
E
~–
—
.-
‘“
—--------=----
——.--—-——,————————
-—.
—.— .
1~ .—..
IBl7
:
43
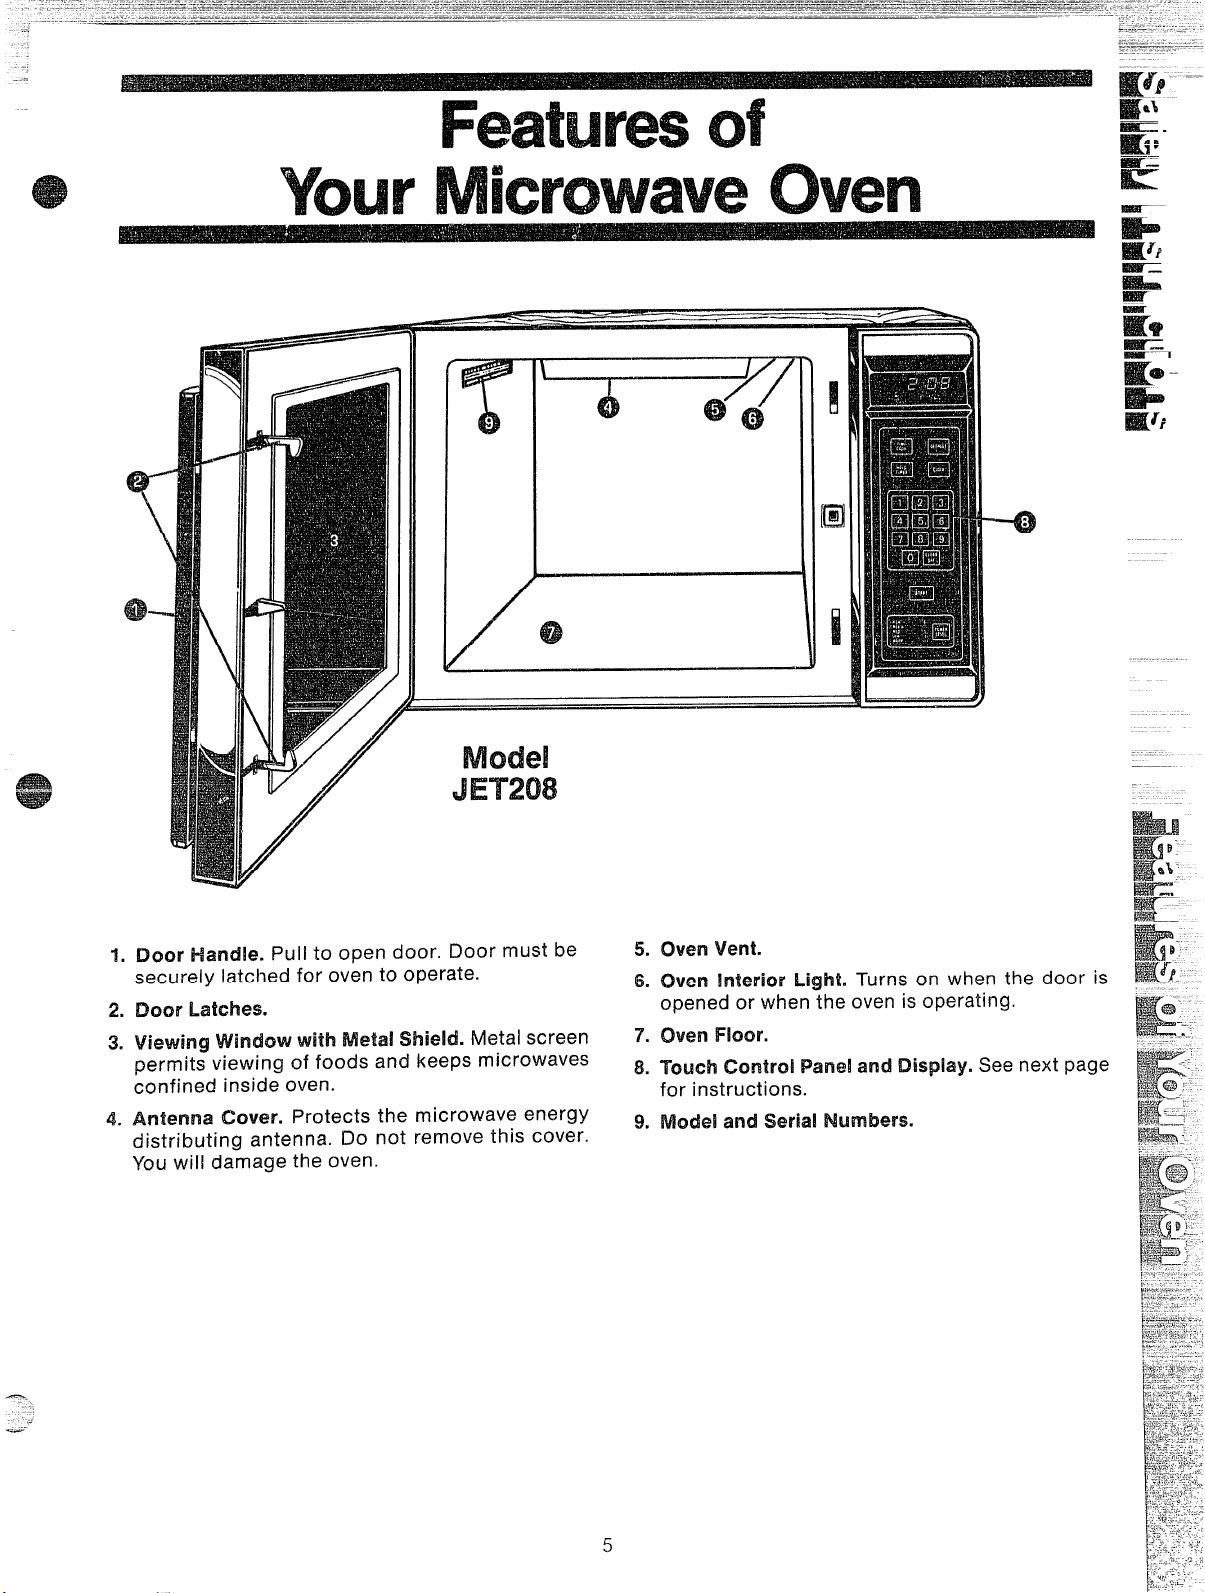
1.
Door Handle. Pull to open door. Door must be
securely latched for oven to operate.
!DOorLatches.
2.
Viewing Window with Shield. Metal screen
3
permits viewing of foods and keeps microwaves
confined inside oven.
Antenna Cover. Protects the microwave energy
4.
distributing antenna. Do not remove this cover.
YOUwill damage the oven.
5.
Oven Vent
6.
Oven Interior Light. Turns on when the door is K!!
opened or when ~he oven is operating.
oven Floor.
7.
8.
9.
—.
‘ “@-
K
e-:
—
Page 6

.... ...<..
.
D!SPLAY. Displays time of day,
cooking/defrosting time (or power
level when Power Level Pad is
touched).
TIME COOK. Microwave for a
preset amount of time using automatic Power Level 10 (or change
power level after entering cooking
time. See page 7.)
HO1..D/TlMER.This feature uses
no microwave energy while it functions as both a kitchen timer or as
a holding period between defrost
and time cooking. (See page 10.)
NUMBER PADS. Touch these pads
to enter cooking/defrosting time,
time of day and Power Level.
.,...:,
=-..=.———..,.~>~J-~.~———=:_ ... __.. ..=:- &—.—.-=--
__. -----::-:
s-.---G.-::-. -----= -==------== ==== -=-`=--=---'-----= ----- =-=-----=-----.--=-=.-.==-=--~=~ .
-:.-.—c--..====”=====.— -------- -——--—————- —
L-——.————---.—--—— --till.=_-;- _——-.&.-G-
—-.——
—
.— —— ... -———--—-
Model:JE!T’208
CIEFROST.Gentle, generally uni-
form thawing at automatic Power
~ Level 3 (or change power level
after entering defrosting time. See
page 8.)
CLOCK. Touch this pad to enter
time of day or check time of day
while microwaving. To set clock,
first touch CLOCK pad and then
enter time of day. For example, if
\
time is 1:30, touch number pads 1,
3, and O and 1:30 will appear in
display. Re-touch CLOCK pad. To
reset or change time, simply repeat
above process.
------ — ———
-—.—-... _.-=.,+=-— .- R—. -.——. —- . . . .
—.
-.
START. After all selections are
made, touch this pad to start oven.
CLEAFVOFF. When touched, it
= shuts off the oven and erases all
settings (except time of day).
POWER LEVEL. Touch this pad
before entering another power
— level number if you want to change
from automatic Power Level 10
(HIGH) for cooking or Power Level
3 (LOW) for defrosting.
<
6
Page 7

- — --—-
The TIME COOK feature allows
you to preset the cooking time.
The oven shuts off automatically,
PCWWML.wel 10 is automatically set
for time cooking, but you may
change this for more flexibility. See
your Cookbook.
To become better acquainted with
the TIME COOK function, make a
cup of coffee by following the steps
below.
----- .-~-----------------=---------=---=---=------------- ——---—--——--——————-—_—=—————
...
——.-.~—-—===!=!~ m%~m%------- --..-*- :--.= ~s=—--——-~s=—=, =.-... —- -— . .
—.
. . .
. .
-.. .
--. -... -—
.—
Step 1: Fill a cup 2/3 full of water
and add 1teaspoon of freeze dried
coffee. Usea cup that has no metal
= decoration. Place cup in oven and
close door.
v
Step 2: Touch TIME COOK. The
display shows :0.Signal light above
TIME COOK flashes.
10
is automatically set.
and
Q.1
set my oven for the time called
for in the recipe but at the end of
the time allowed, my dish wasn’t
done. What happened?
A. Since house power varies due
to time or location, many Time
Cook recipes give you a time range
.; to
prevent overcooking. Set the
Power Level
mm for minimum time, test the
food for doneness, and cook your
disha little longer, ifnecessary.
——...—-—
Step 3: Select your time, Touch
1, 2 and Ofor a minute and 20 seconds. 1:20 and signal light above
TIME COOK appear on display. If
another Power Level is desired
touch POWER LEVEL and the
number, although Power Level 10
(HIGH) is preferred for this cup of
coffee.
Q. I want to cook my recipe on a
Power Level other than HIGH, what
do I need to do?
A. To change the Power Level,
touch the POWER LEVEL pad after
entering desired cooking time.
Enter the desired number and then
touch START.
Q. Can 1interrupt my Time Cook
function to check the food?
A. Yes. To resume cooking, simply
close the door and touch START.
INOTE: Microwave pgwer will not
come on until you are ready. You
must touch START for cooking to
begin.
7
—-.m-
—-.y%.,.,.,-
-Am%. -.=.1,..z%-.w,:,:
Step 4: Touch START. Time
counting down shows on display.
Step 5: When time is up, oven
sounds and oven, light, and fan
shut off.
Q. Itouched the number pads and
selected my power level. When I
touched START, however, my oven
didn’t come on. Why not?
A. The TIME COOK pad must be
touched before setting the number
pads or else your oven will not begin cooking.
.. . .T~d~
F----..,z,,a..t-....f...=-.,
~t.:>~.-wz~~.~m~-?~~~z:; ::,:.,::,,~.’–—‘-‘
iEi=@
~r-
e ---
R
=. :
E%&i:-[.-
.—a-------..
“.—..—
-.... .......
. -.
.
:,
6.’..-.....<-.,!.-
.;.S.,.WA
,.=,....—,
:--.-:.7---.
..
:..... - ..—
..... .....
gy-+s-e-,-”-
>-..,,y..:...--—
tsL, .?-.. ..
~-..cd,z
..L..V,.
~.-l-=.%,:,.:,L
~.;”.;*::.i?;:$.i.,iL.
~>+=.+.JL.=.-~
P>.--.--J-:.,,,!
!.L.,....\., -:
I*!...&,.,-%..
t+......+,-..
~::<<~::-
,.-..;
p-+i.$::.
Fv-...g{,....
!3:5==’
[.+:,,:+’.
,.7..,.+---“.:_..L.:
, l--
~. -
.-
. -—
,. —
.—
.....
..
.
.
......
,-—..
..
....7”,,,
“i:
:-.-..>’.
-.*.,-+...
~:t.
,,.,,,.~-
~.z!: ,..
km-?-..,’
~:
.-.~,.’-;:---
,,=%.:-..!=
.,
:,....,
.,,
.-:-~,;,--
,.->-
.>-- ,
-0
:..>:
-,:,
-~..
Page 8

H
l-I-w Defrost setting is designed for
even thawing necessary for large
amounts of food and is one of the
most important advantages of a
microwave oven,
@ Power Level 3 is automatically
set for defrosting, but you may
change this for more flexibility,
@ See your Cookbook for the
complete defrosting chart.
To become better acquainted with
your Defrost function, defrost frozen pork chops by following the
steps below,
1: Place package of frozen chops
in the oven and close door,
‘2:Touch DEFROST. Display reads
:0. Power Level 3 is automatically
set in oven but does not appear on
readout. Signal Light above DEF.
flashes.
e Foods frozen in paper or plastic
can be defrosted in the package.
@ Forevendefrosting, many foods
need to be broken up or separated
part of the way through the defrosting time.
><-.
@ Homemade dinners can be fro-
zen in shallow foil trays and heated
for later use. Select foods which
microwave well.
@ We-packaged frozen dinners
can be defrosted and microwave
cooked.
3: Touch 8, 0, and Ofor 8 minutes.
8:00 and signal light above DEF.
are displayed. If you wish to
change Power Level,touch POWER
LEVEL pad and then new number.
4: Touch START. Time counts down
on display. When cycle is completed, the oven signals and automatically shuts off.
5: Turn package over, close door
and repeat Steps 2, 3 and 4.
6: When oven signais and shuts
off, remove package and separate
chops to finish defrosting.
@ Check your Cookbook for other
defrosting tips.
Page 9

Q. Can I open the door during
DEFROST to check on the pro-
gress of my food?
A. ‘r’es.You may
any
time during microwaving. TO
resume defrosting, close the door
and press START.
0. Why don’t the defrosting times
in the Cookbook seem right for my
food?
A. Cookbook times are average.
Defrosting time can vary according
to the temperature in your freezer.
Setyour oven for the time indicated
in your Cookbook. if your food is
still not completely thawed at the
end of that time, re-set your oven
=A and adjust the time accordingly.
~
open the door at
Q. When I press START, I hear a
dull thumping noise. What is it?
A.
Thissoundisnormal.Itisletting
you know the oven is
Power Level lower than HIGH.
Q. Can I Defrost smail items in a
hurry?
A. Yes, but they will need more fre-
quent attention than usual. Raise
PowerLevel after entering the
the
time by touching POWER LEVEL
and 7or 10. Power Level 7cuts the
time in %: Power Level 10 cuts the
time to 1/s.During either, rotate or
stir food frequently.
using a
(3, Can Iselect aPower
than automatic Power
defrosting?
A. Yes.Some smaller foods maybe
defrosted quicker on higher Power
Levelsbut generally for even,carefree defrosting, Power Level 3 is
suggested. Check the chart in the
Cookbook for specific times and
Power Levels.
Levelother
Level 3 fOr
. ..
Page 10

Your t+C)LD/TIMER operates without microwave energy and has
three timing functions.
f. It operates asa Minute
2. it
can be set to delaycooking.
3. R may be used as a hold setting after defrosting. Holcf/Timer
can be set up to 99 minutes and
~~seconds,
Step 1: Touch t-10LD/TIMER pad.
The display shows :0. Signal light
above HC?LD/TllvlERflashes.
Timer.
Step 2: Select the desired time.
Touch the appropriate number
pads. If for example, you aretiming
athree minute phone call, touch 3,
0, and O.The display shows 3:00,
Step 3: Touch START. The display
shows the time as it counts down.
Step 4: When time is up, a signal
sounds and the timer turns off.
The HOLD/TIMER can also be
used to program “standing time”
between microwave cooking functions. The time can rangefrom one
second to 99 minutes and 99 seconds. A HOLD, or “standing” time
may befound in some of your own
recipes or Cookbook.
To set the oven to delay cooking
up to 99 minutes follow Steps 1
and 2 to enter hold time, then set
Time Cook and time, before press-
ing START.
Defros?–Ho!d/Time-Time
To help you become acquainted with the HOL13/TIMER feature as Usedwith Time Cook follow Steps below to
defrost a frozen casserole for 15 minutes, then hold 10 minutes and then cook 25 minutes.
Step 1: Remove casserole from the
freezer and place in oven. Touch
the DEFROST pad. The display
shows :0 and signal light above
DEF. flashes.
Step 2: Touch 1, 5, 0 and O for
defrosting time 15:00 appears on
display. (Defrosting is automatically set on Power Level 3 but can
be changed by touching POWER
LEVEL pad and the new Power
Level.)
Q. What will happen if I acciden-
~ally reverse the instructions?
A. If you accidentally reverse the
sequence of programming instructions, your oven automatically
rearranges your program. Defrosting always comes first, then hold
and then the cooking function.
%?p 3: Set standing or hold time
by touching HOLD/TIMER. :0 appears on display. Signal light above
l-10LD/Tltvl ER flashes.
St&p 4: Touch 1, 0, 0 and Oto hold
for ten minutes. 10:00 appears on
display.
Q. I programmed my oven for a
specific defrosting time but it defrosted longer than necessary.
What happened?
A. When instructions conflict, the
oven carries out the last instruction. You may have set the oven to
Defrost for 4 minutes, Hold/Time
for 2 minutes, and then Defrost for
6 minutes.
would Defrost for 6 minutes and
Hold /Time for 2 minutes.
in this case, the oven
pad. This display shows :0 and
signal light above TIME COOK
flashes.
Step 6: Touch 2, 5, 0 and O for
twenty-five minutes of cooking
time. 25:00 appears on display.
.Step7’:Touch START. 15:00count-
ing down shows on display. As
each function is automatically performed oven display shows entered
information and light above that
function comes on. While cooking,
you may touch appropriate pad to
recall times you set.
Q. Can ! only Defrost-Hold on my
oven?
A. Yes, for foods you don’t want
to cook, like frozen fruit, frozen
whipped topping,
Cookbook.
NOTE: Allow foods to remain at
room temperature only as long as
safe. Times will vary.
etc.—refer to
Page 11

for Oven
YourNewMicrowave(hen isa
WiiuableAppliance,Protect H From
MisuseByFollowingTheseRules:
e Keepyourovencleanand
sweet-smelllng.Opening the oven
dcmra few minutesafter cooking
helps“air-out” the interior, An
occasionalthorough wiping with a
sol:Mcmof bakingsoda and water
keepsthe interior fresh.
@ Don’tusesharp-edgedMerisil$
withyow oven.The interior and ex-
terior ovenwalls can bescratched,
Thecontrol panel can bedamaged.
@I remove?heantennacover
atthe top of the oven (microwave
feature4 on page5), Youmay
damagethe oven.
B
l-tow to clean the Imkk
Walk,floorandplasticcover.13e-
cause there is little heatexcept in
the food, or sometimesm the utensils,spilis and spattersareeasyto
remove.Somespatterscan be removedwith apapertowel, others
may require a damp cloth. Remove
greasyspatterswith asudsy cloth,
then rinseand dry. Do not use
abrasivecleanerson oven walls.
NEVERUSEA COMMERCIAL
OVEN CLEANERON ANY PART
OF YOURMICROWAVEOVEN.
Door-inside.Glass:Wipe upspatters
daily, wash when soiled, with a minimum of sudsy warm water,Rinse
thoroughly and dry.
Metal and plastic parts on door:
Wipe frequently with a damp cloth
to removeall soil. DO NOT USE
ABRASIVES,SUCH AS CLEANING
POWDERSOR STEEL AND PLASTIC PADS,THEY MAY MAR THE
SURFACE.
SpecialnotewhenusingBrown‘N
SearDish:High heat generated on
bottom of Brown ‘N Sear Dish can
causescorched appearing stains to
bake onto the oven floor if greaseis
present. These may be removed
with Bar KeepersFriend@Cleanser
by SerVaasLaboratories, Inc.
After using Bar Keepers Friend@
Cleanser, rinse and dry thoroughly,
following instructions on can. Do
not use Bar Keepers Friend@
Cleanser on the painted surfaces
such asthe walls. It may scratch the
paint.
Bar Keepers Friend@Cleanser is
sold in many grocery, hardware,
and department stores.
)-kNwto (Hem theOutside
Case.Cleanthe outside of your
ovenwith soapanddamp cloth,
then rinseand dry. The outer pane
of the window is glass.Just wipe
clean with adamp cloth. Chrome
trim is bestwiped with adamp cloth
and then with a dry towel.
ControlPanel.Wipe with adamp
cloth. Drythoroughly. Do not use
abrasivesor sharp objectson the
panel.They can damageit.
DoorSurface.Whencleaning surfacesof door and oventhat come
together on closing the door, use
only mild, non-abrasivesoapsor
detergentsapplied with asponge
or soft cloth,
PowerCord, If the cord becomes
soiled, unplug andwashwith damp
cloth, Forstubborn spots,sudsy
water may be used,but becertain
to rinseand dry thoroughly before
plugging cord into outlet.
OvenLamp‘Replacement.First
unplug the oven.Then remove lamp
compartment cover by removing
screw which holds coverin place.
Cover is located at the rear
of outer case.
Replacewith 40 watt appliance
bulb, (It is available in drug and
hardwarestores.) Replacecom-
partment cover, Plug in the oven.
Page 12

lb Save Time and Money——
beforeyourequestservice,
checkthe ProblemSolver
If you havea problem, it may be
minor, Youmay be ableto correct
it yourself. Just usethis Problem
Solverto locate your problem and
then follow the suggested
recommendations.
Al?These Things Are Normal
onYourMkrowaveChfenE
Steamorvaporescapingfrom
@
around the door.
~ Light reflection around door or
outer case.
@Dimming ovenlight andchange in
blowersoundmayoccurwhile
ating atpower levelsotherthan high,
oper-
QSound of rotating antennamaybe
heardforafewsecondsafterthe
ovenis turned off,
@<Dull thumping sound while oper-
ating at power levelsother than high,
ISSomeTV-Radio interference
might be noticed while
microwaveoven. It’s similar to the
usingyour
interferencecausedby othersmall
appliancesanddoesnotindicatea
p’rbblemwith
your oven.
F$ROBLEM
OVEN WILL NOT COME ON
CONTROL PANEL LIGHTED,
YET OVEN WILL NOT START
—.
‘OODS ARE EITHER OVER-
BOOKEDORUNDERCOOKED
—-
POSSIBLE CAUSE AND REMEDY
A fuse in your home
Replacefuseor resetcircuit breaker.
may be blown or the circuit breakertripped,
‘ Y
Makesure3-prongplugonovenisfully insertedintowall receptacle.
Door not securely closed.
START must be touched after entering cooking selection.
Another selection entered already in oven and CLEAR/OFF not
touched to cancel it.
Makesure you haveentered cooking time after touching
CLEAR/OFF was touched accidentally. Reset cooking program and
touch START,
Cooking times may vary because of starting
food temperature,food
TIMECOOK.
density or amount of foods in oven.Touch TIME COOK and addi-
tional cooking
Incorrect Power Level entered. Check Cookbook for recommended
Power Level or changing levels during cooking if necessary.
Dish was not rotated, turned or stirred. Some dishes require specific
instructions. Check Cookbook or recipe for these instructions.
Too many dishes in oven at same time. Cooking time must be
increased when cooking more than one food item, Check Cookbook
for recommendation on increasing time.
time for completion.
PF” APPEARS ON DISPLAY
L
Appears when oven is first plugged in. This is norrrmlti
Appears when power to oven has been interrupted, and then
resumed. Touch CLEAR/OFF to erase “PF”. Clock must be re-set.
12
Page 13

Thisappliance must be grounded.
.—
Inthe eventof an electrical short
circuit, grounding reducesthe risk
of electric shock by providing an
escapewire for the electric current,
Thisappliance is equipped with a
powercord havinga grounding
wirewith a grounding plug. The
plug must be plugged into an outlet
that is properly installedand
grounded. (Fig. 1)
WARNING—improperuseof the
grounding plug can result in a risk
of electric shock,
PllE
MET
Fig.
Consult a qualified electrician or
servicemanif the grounding instructions are not completely understood, or if doubt exists as to
whether the appliance is properly
grounded.
Wherea standard two-prong wall
receptacle is encountered, it isyour
personal responsibility and obligation to haveit replaced with a properly grounded three-prong wall
receptacle.
Do Not under Any circum-
stances cut or Remove the
‘l-bird From
The Power cord.
C)UND
Use ofAdapterPlugs
IUsageSituationsWhere
Applkmcx$sPowerCord!
WillBe Disconnected
IMeqwmt!y.
Becauseof potential safety hazards
under certain conditions, we
stronglyrecommendagaindthe
useofan adapterplug.However,
if you still electto usean adapter,
m
● .>-’
TEfvF
/
where local codes permit, a
PORARYCONNECTION maybe
madeto a properly grounded twoprong wall receptacleby the useof
a UL listed adapter (Fig, 2) which is
availableat most local hardware
tores.
WllHIRflR~METt100
(ADAPTERPLUGS
PERMITTEDIN CANADA)
ALIGN LARGE
PRONGSISLOTS - ‘-./~-
Fig.2
Ie larger slot in the adapter must
NOT
IQ,}:.. -
a
Q?ij$#;k;RJ:;#;:;o
BEFORE WE
UsageSituationsWhere
Appliance’sPowerCord
Will Be Disconnected
IFreqw’ltly.
notusean adapterplugin these
DO
situationsbecausedisconnectingof
thepowercordplacesunduestrain
ontheadapterandleadsto eventualfailureof theadapterground
terminal,Youshouldhavethetwo-
prongwallreceptaclereplacedwith
athree-prong(grounding)receptaclebyaqualifiedelectrician
before
Lkw d ExtensionCords
Becauseof potential safetyhazards
under certain conditions westrongly
recommend against the use of an
extension cord. However,if it is
necessary to use an extension cord,
useonly a3-wire extension cord
that has a 3-blade grounding plug,
and a 3-slot receptaclethat will
accept the plug on the appliance.
The marked rating of the extension
cord shall be equal to or greater
than the electrical rating of the
appliance (15amperes,)
Such extension cords areobtainable
through General Electric service. H
you do usean extension cord with
your microwaveoven,the interior
usingthe appliance.
light may flicker and the blower
sound mayvarywhen ovenis in use.
.
Page 14

At General Electric we’re committed to providing you with the best appliances we know how
y,-
--?
to build and we know that you want your appliances to give you manyyears of dependable
service,
(3urConsumer Services are designed with your needs and wants in mind.
Warranty Protection
Yournewapplianceis a welldesignedandengineered Seethewarrantyonthebackpagecdthisbookfor
product.Beforeit left the factory,it wentthrough details.
rigorousteststo detectmanufacturingdefects,And
youhavea writtenwarrantyto protectyou,
Prompt Service a! your CXmverkmm
Whetheryourapplianceis in orout of warranty,
you’rejust a phonecall awayfromournationwide
networkof FactoryTrainedServiceprofessionals.
Simplycall ourGEserviceorganization.You’llfind
them in theWhitePagesunder“GeneralElectric
Company”or“GeneralElectricFactoryService;’
andintheYellowPagesunder“GeneralElectric
CustomerCare”Service!’
Serviceisscheduledatvourconvenienceandthe
techniciandrivesa fully~stockedpartsservicetruck
so that, in most cases,the repaircan becompleted
inonevisit.
We’reproudof ourserviceandwantyouto be
Dieased,but if for somereasonyouarenot happy
with the’servicevoureceive,heiearethreestepsto
follow for furthe~help. ‘
FIRST,contactthe peoplewhoservicedyour
appliance.Explainwhyyouarenotpleased.Inmost
cases,thiswill solvetheproblem.
NEXT,if youarestill not pleasedwriteall thedetails
—
includingyourphonenumberto:
Manager,ConsumerRelations
GeneralElectricCompany
AppliancePark
Louisville,Kentucky40225
FINALLY,if your problemisstill not resolved,write:
fvlaiorAmiiance (hXHJmerActionPanel
20~orth ‘WackerDrive
Chicago,Illinois60606
service
For Wcmb!e=frcmserwice beyond
the written warranty period.
If you preferto budgetyourrepairexpenditure
insteadof beingsurprisedbythem,GEoffer
servicecontractsfor varyinglengthsof timeon
all GEmajorappliances.With a contract,we’ll
L
,+
i-,
...$+, .
.r
The
You can savemoney andtime .
by’doingityourself.
Fordo-it-yourselferswho would
preferto fix GEmajorappliances
themselves...GEoffers an industry .,O
first, theQuick Fix@System.
1
farYiwi?By
Shouldyou needhelp in the selectionand purchase
.
-A.
~....
-*-:*=
~==;r
H
of newappliances,or havequestionsabout the
operationof the GEappliancesyou now own-or have
anyother questionsabout ourconsumerproducts Ourstaff of expertsstandsreadyto assist you
or services, youareonly a TOLL-FREEcall away.
keepyourapplianceingoodoperating
conditionduringthe contractperiodat
noadditionalcharge.Servicecontracts
letyoupaytoday’spricesfor service
a month,ayear,orseveralyearsfrom
now.And,you’ll receiveservicefrom
GEtrainedservicetechniciansusing
onlyGenuineGEparts.
A programfor do-it-yourselfappliancerepair,
the systemincludesstep-by-steprepair
rnanua/sfor refrigerators,mostnon-microwave
electric ranges,dishwashers,andstandard
andlargecapacitywashersanddryers,plus
speciallypackagedreplacementparts,and
technical helpwith a toll free800numbefl
TheGEAnswerCenterTM800.626.2000
consumerinformationserviceis open24hoursa
day,sevendaysa week.
anytime.
Page 15

—-
Saveproofoforiginalpurchasedatesuchasyoursales
——..— .-..—.— —... ...—.—.-—————--.-—---
—_-_l----.. .=.—.——---------------------
slip or cancelled checktoestablishwarrantyperiod.
...= . .. . ..—-- ----..-——.-——.——.——.
--
Wl”m’rIs CXNERED
1SNOT oImproper imtdlahn.
LIMITED FWE=YEARWARRANTY
For five yearsfrom date of original
purchase,we will provide,free of
charge,parts and service laborto
repairor replaceanypartof the
micmvvaveoven that fails because
of a manufacturing defect, To
avoid any charges,you must take
the microwaveovento a General
Electric FactoryServiceCenteror
a GeneralElectric Customer Care”
Servicerand pick it up following
service.In-homeserviceis also
available, but you must payfor the
servicetechnician’s travelcosts to
your home.
if you havean installation problem,
contact your dealeror installer.
Youare responsible for providing
adequate electrical, exhausting
and other connecting facilities.
~ Replacement of house fuses
or resetting of circuit breakers.
This warranty is extendedto the
original purchaserandanysucceed-
ing ownerfor productspurchased
for ordinary home use in the 48
mainland states, Alaska,Hawaii
andWashington, D.C,
All warrantyservicewill be provided
byour FactoryServiceCentersor
by our authorizedCustomerCare”
servicersduring ncrmalworking
hours.
Look in the White orYellowPages
of yourtelephone directory for
GENERALELECTRICCOMPANY,
GENERALELECTRICFACTORY
SERVICE,GENERALELECTRIC-
HOTPOINTFACTORYSERVICEor
GENERALELECTRICCUSTOMER
CARE@SERVICE.
* Failure of the product if it is
used for other than its intended
purposeor usedcommercially.
@Damage to product caused
by accident, fire, floods or acts
of God.
WARRANTORISNOT RESPONSIBLE FORCONSEQUENTIAL
DAMAGES.
\
.“ .—
-.-—
Somestatesdo not allow the exclusion or limitation of incidental or consequential darnages, so the above limitation or exclusion
Thiswarrantygivesyouspecificlegalrights,andyoumayalsohaveotherrightswhichvaryfromstatetostate.
your Ioca! or state consumer affairs office or your state’s Attorney General.
k ‘.
.“
may not apply to you.
Toknowwhatyou?’legalrightsareinyourstate,consult
Warrantor: Genera! Electric Company
,--?
,,
Manager–Consumer Affairs, Genera! Electric Company, Appliance Park, Louisville, ‘KY40225
If further help is needed concerning this warranty, contact:
,“
&,, .. , ~~• ,$ ~ . . . .- , -, , . ‘ . ;- , ~ - .:
F%.rtNo. 862A725 P% Rev. 1
NO. 49-4578-1
Pub.
3/84
GEN EBAL @ c
—
‘-
!7
%
~
e
—
@
‘M
8
@
E
$
$
~
~
,4
k
 Loading...