

Page 1
—
———
Eiii ‘—-—”----—-————-—–– --———-”--
——.—...-
Page 2

-.. .
(
..
—
.-
.-
--
Oven
--a%==m
-----
—
.-
-.
.-
.
Y
-i-his and
-—
‘rakethe time to readthisbook and learn how to enjoy
your new MicrowaveOven, It contains detailed operating instructionsand recommendedmaintenance,as
well ashandytips to helpyou gain maximum benefits
from your MicrowaveOven, Once you haveread the
book, keepit handyto answer any questions you may
have,
If you hf~v~any additional questions concerning the
operalicn of your Microwave Oven, write—including
your phone number—to:
ConsumerAffairs
GeneralElectric Company
Appliance Park
Louisville,Kentucky 40225
IFYOU RECEIVEDA DAMAGEDOVEN, immediately
contact the dealer (or builder) from whom you purchased it. They have been informed of the proper
procedure to take care of such matters and can
handle it for you,
Yt’wr
It is ir~~’ortan”~that we, the manufactut’,!:, know the
locatiorl of your MicrowaveOven should a need occur
for adjustments.
Please check with your supplier to be sure he has
registered you as the owner; also send in your Purchase Record Card. if you move,or if you are not the
original purchaser please write to us, stating model
and serial nurnhers, This appliance must be regis-
tered. Pleasebe certainthat it is.
Wr;teto:
General Electric Company
RangeProduct Service
,4P2-210
Appliance Park
Louisville, Kentucky 40225
A mwwqiate on which isstamped the model and serial
nurntmr islocated either inside oven at top left side,or
0!7 M%31’outside Of case.
Model and serial numbers are also on the Purchase
Record Card which came with your Microwave Oven
Record the numbers in the spaces below.
please refer t. both model and serial numbers in anY
future correspondence or product service calls concerning your Microwave Oven.
Made! !Nwmbc?BO
se?’ialNumber
Date !?%’chased——–
~~~~~$WJ~cHAsE RECEIPT WITH THIS ~~~~ ~Ql
THE PERICID.
——.-
..————
Check “The Problem Solver”. (Seepage 18,) It lists
many minor causes of operating problems that you
can correct yourself and may saveyou an unneces-
sary service call.
If You
In many cities, there’s a General Electric Factory
Service Center. Call, and a radio-dispatched truck
will come to your home by appointment—morning
or afternoon, Charge the work, if you like. All the
centers accept both Master Card and Visa cards,
(See Inside Back Cover,)
Or look for General Electric franchised Customer
Care@~servicers. You’ll find them in the Yellow
Pages under “GENERAI.. ELECTRIC CUSTOMER
CARE@ SERVICE” or “GENERAL
HOTPC)INTCUSTOMER CARE@SERVICE”,
tlf you need service literature, parts lists, parts or
accessories, contact one of the Factory Service
Centers, a franchised Customer Carei’ Servicer or
your General Electric dealer,
Extended!$wwkeContracts:The terms of your war-
ranty provide free service covering failures due to
manufacturing defects for a definite period of time,
After this warranty expires you may purchase an (
Extended Service Contract which will enable you to
budget your service needs. This coverage beyond
warranty ISavailablefrom our FactoryServiceCenters
and from many franchised Customer Care@servicers,
It isa good ideato apply for this coverage before your
warranty expires.
to for Help
First, contact the people who serviced your microwave oven. Explain why you are dissatisfied, in most
cases,this will solve the problem.
Next, if you are still dissatisfied, write all the details—
including vour phone number—to:
Managerj Consumer Relations
General Electric Company
WCE-312
Appliance Park
Louisville, Kentucky 40225
Finally, if your problem is still not resolved,write:
Major Appliance ConsLimerAction Panel
20 North VVackerDrive
Chicago, Illinois 60606
This panel, known as MACAP, is a group of inde-
pendent consumer experts under the sponsorship of
several industry associations. Its purpose is to study
practices and advise the industry of ways to improve
customer service. Because MACAP is free of industry
control and influence, it is able to make impartial
recommendations, considering each case individually.
for
ELECTRI CJ.——.—
@I982 General Electric Co., IJ.S.A, All rights reserved.
Page 3
–3
---a
“ma
--
--
1
13efore Microwaving . . . . . . . . ... , ... , , , , . z
~rol~nding instructions & ~recautlons, ., 3
s~f~~yTip~ . . . . . . . . . . . . . . . . . . . . . . . . . . . . 4
!r~lroductiorl tO Oven ,,, , .,, . ., ..,,..... 5
T~uch Control Panel . . . . . . . . . . . . . . . . . ,, 6
Setthe (lock . . . . . . . . . . . . . . . . . . . . . . . . . .
~utomatic Cookiflg ,,, ..,,,..,,,,.,.. 8,9
/lu~ornatic f30asting &Chart .. ..,,,, 10, 11
Defrc@~.. . . . . . . . . . . . . . . . . . . . . . . . . . . . . 13
030k C0cleW~ontrol ,,, , .,,,,,,,,,,,, . 13
TLmeCook . ...............,.,,.,.,,,, 14
Temp~ook
***.***
● ****,*, ● .*.,**, ● ,,*
Holcl/~imer . . . . . . . . . . . . . . . . . . . . . . . . . . . 16
Care Of Your Oven , .....,,,,,.,.,,., . . 17
Problem Solver ,,, ....,,,,...,.,,,.,,, 18
~utomatic Cooking 13ecipe Guide,., . . . 19
6
Meats
******* *******. ****.*** ****
Vegetables, ..,, ,.,,.....,,,.,,..,22,23
~esserts,. ,.,., . .................24,25
Automatic Co~king Chart
● ******* ● *
Factory Service ~enters.lnside~ack cover
warranty ,., .,, ,,, ,., ... ... .,,l3ack cover
15
20,21
26,27
TEMPORARYMETHOD
(ADAPTIRPIo(XNOI
FYRMlllfl)iNcANAoAl r’-%
ANOflRhiCONNICllON
—,..
—..-”.! 1
ll[totwust
For Persma\Satet~, ?’hk Appliance Mg,jstBe Prop.
erly Groufic!ad. The power cord of this app~anceis
equipped with a three-prong (grounding) plug
which mdtes with a standard three-prong (grounding) wall receptacle (Fig. 1) to minimize the
Possi-
bility of electric shock hazard from this appliance.
The customer sitlould have the wall receptacle and
circuit ch~c!w:d by a qualified electrician to make
sure the receptacle is properly grounded,
Where a standarc~two-prong wall receptacle is en-
countered, It is the)personal responsibility and obligation of the customer to have it replaced with a
properly grouqded three-prong wall receptacle.
Do Not Under Any Circumstances Cut or Remove
The Third {Ground) Prong From The PowerCord.
A. Usage Situations Where Appliance’s Power
Cord Will EleDisconnected infrequently.
Because d potential safety hazards under certain
condifjcl!]s, we strongly recommend against the use
of an adapter plug. However, if you still elect to use
an adapter, where local codes permit, a TEMPO-
RARY CONNECTION may be made to a properly
groundml two-prong wall receptacle by the useof a
UL listed adapter which is available at most local
hardware stores (Fig, 2). The larger slot in the
adapter must be aligned with the larger slot in the
wall receptacle to provide proper polarity in the
connection of the power cord,
.-
Caution: Attaching the adapter ground terminal to
the wall receptacle cover screw does not ground
the appliance unless the cover screw is metal, and
not insulated, and the wall receptacle is grounded
through the house wiring. The customer should
have the circuit checked by a qualified electrician to
make sure the receptacle is properly grounded.
When disconnecting the power cord from the
adapter, always hold the adapter with one hand. If
this is not done, the adapter ground terminal is very
likely to breai< with repeated use. Should this happen, DO NOT USE the appliance until a proper
ground has again been established,
B. !Jsage Situations Where Appliance’s Power
Cord Will Be Disconnected Frequently.
Do not use an adapter plug in these situations because disconnecting of the power cord places undue strain on the adapter and leads to eventual fail-
ure of the adapter ground terminal. The customer
should have the two-prong wall receptacle replaced
with a three-prong (grounding) receptacle by a
qualified electrician before using the appliance.
3
Page 4
SafetyTipsto Follow
1. For personalsafetythe oven must be properly
grounded.See groundinginstructionson page3 of
this book.
into itsownelectricaloutlet,to preventflickeringof
lights,blowingoffuseortrippingofcircuitbreaker.
2. Use of extension cords. Because of potential
safetyhazardsundercertainconditionswe strongly
recommendagainstthe use of an extensioncord.
However,if you stillelect to usean extensioncord,
itisabsolutelynecessarythatit be a ULlisted3-wire
groundingtype appliance extensioncord and that
the current carrying rating of the cord in amperes
be 15amperesorgreater.Such extensioncordsare
obtainablethrough General Electric service. if you
do use an extension cord with your microwave
oven, the interior light may flicker and the blower
soundmayvarywhenoven isinuse.
3. Be certain to piace the frontsurface of the door
three inches or more back from the countertop
edge to avoid accidental tipping of the appiiance in
normalusage.
4. Use metai only as directed in cookbook. Metal
stripsas used on meatroastsare helpfulin cooking
food when used as directed. Metal trays may be
used for TV dinners. However,when usingmetal in
the microwave oven, keep metai at ieast l-inch
awayfrom sidesof microwaveoven.
5. Do not operate the oven while empty to avoid
damage to the oven and the dangerof fire. If byac-
cident the oven should run emptya minute or two,
no harm is done. However, try to avoid operating
the oven empty at all times–it saves energy and
prolongslifeof the oven.
6. Cooking utensiis may become hot because of
heattransferred from the heated food. This is especiallytrue if plasticwrap has been coveringthe top
and handles of the utensil. Pot holders may be
needed to handlethe utensil.
7. Sometimes, the oven sheif can become too hot
to touch. Be careful touching the shelf during and
after cooking.
8. Do not use any thermometer in food you are
microwaving unless that thermometer is designed
or recommended for use in the microwaveoven.
9. Remove the temperature probe from the oven
when not using it to cook with. If you leave the
probe insidethe oven without insertingit infood or
liquid, and turn on microwaveenergy, it can create
electrical arcing in the oven, and damage oven
walls.
10. Remove wire twist-ties on paper and plastic
bags before placing in oven. Twist-ties sometimes
cause bag to heat, and may cause fire.
\ 1.Don’t defrost frozenbeverages in narrow necked
bottles especially carbonated ones. Even if the container is opened, pressure can build up. This can
cause the container to burst, resulting in injury.
i2. Don’t overcook. Excessive overcooking dehy-
drates potatoes, and may cause them to ca!ch fire
causing damage.
For best operation, plug this appliance
13. [f food shouid ever ignite: Keepthe ovendoor ~
ciosed. Turn off the power immediately: Touch
CLEAR/OFF or disconnectpowercord or shut off
poweratthefusecircuitbreakerpanel.
14. i30iiingeggs (in and out of sheil) is not recornmenctedfor microwavecooking.Pressurecan build
up insideeggyolkand maycauseit to burst,resultingin injury.
15. Foodswith unbrokenouter “skin” such as potatoes, hot dogs or sausages, tomatoes, apples,
chicken livers and other giblets, and eggs (see
above)should be piercedto allow steamto escape
duringcooking.
16,’’Boiiabie” cooking pouchesand tightiy ciosed
piastic bagsshould bq slit,prickedor ventedas directed in Cookbook. If they are not, plastic could
burstduring or immediatelyafter cooking, possibly
resultingin injury. Also, plastic storage containers
shouldbe at least partiallyuncoveredbecausethey
form a tight seal. When cooking with containers
tightly covered with plasticwrap, remove covering
carefully and direct steam away from hands and
face.
17. Do not pop popcorn in your microwave oven
unless in a special microwavepopcorn accessory
or unlessyou use popcorn labeledfor use in micro-
wave ovens.Becauseof the heatgenerated without
theseprecautions,the containercould catch fire.
18. Piastic Utensiis–Plastic utensils designed for
microwave cooking are very useful, but should be
used carefully. Even microwaveplastic may not be
as tolerant of overcooking conditions as are glass
or ceramic materialsand may softenor char if subjected to shortperiodsof overcooking.In longer exposures to overcooking, the food and utensils
could ignite. For these reasons:1) Use microwave
plastics only “and use them” in strict compliance
with the utensil manufacturer’s recommendations.
2) Do notsubject empty utensilsto microwaving. 3)
Do not permit children to use plastic utensils withoutcomplete supervision.
19. Do not use your microwave oven to dry news-=
papers. If overheated, they can catch fire.
20. Use of Sheif Accessory. To position shelf so
that itissecurely “seated,” insertinto the oven cavityabove shelf supports and completelyto the back
oven wall. Drop into place so that the recessed
areas are over the shelf supports. To remove shelf,
lift shelf above supports and then pull forward and
out, Do not place food on shelfunless it is securely
“seated” on the supports.
21. When cooking pork either conventionally or in
the microwave oven, follow our directions exactly
and always cook the meat to at least 170°. This
assures that, in the remote possibility that trichina
may be present in the meat, it will be killed and
meat will be safe to eat.
22. Avo~dheating baby food in glass jars especially
meat and egg mixtures.
o
Page 5
li%EiEa
—-.
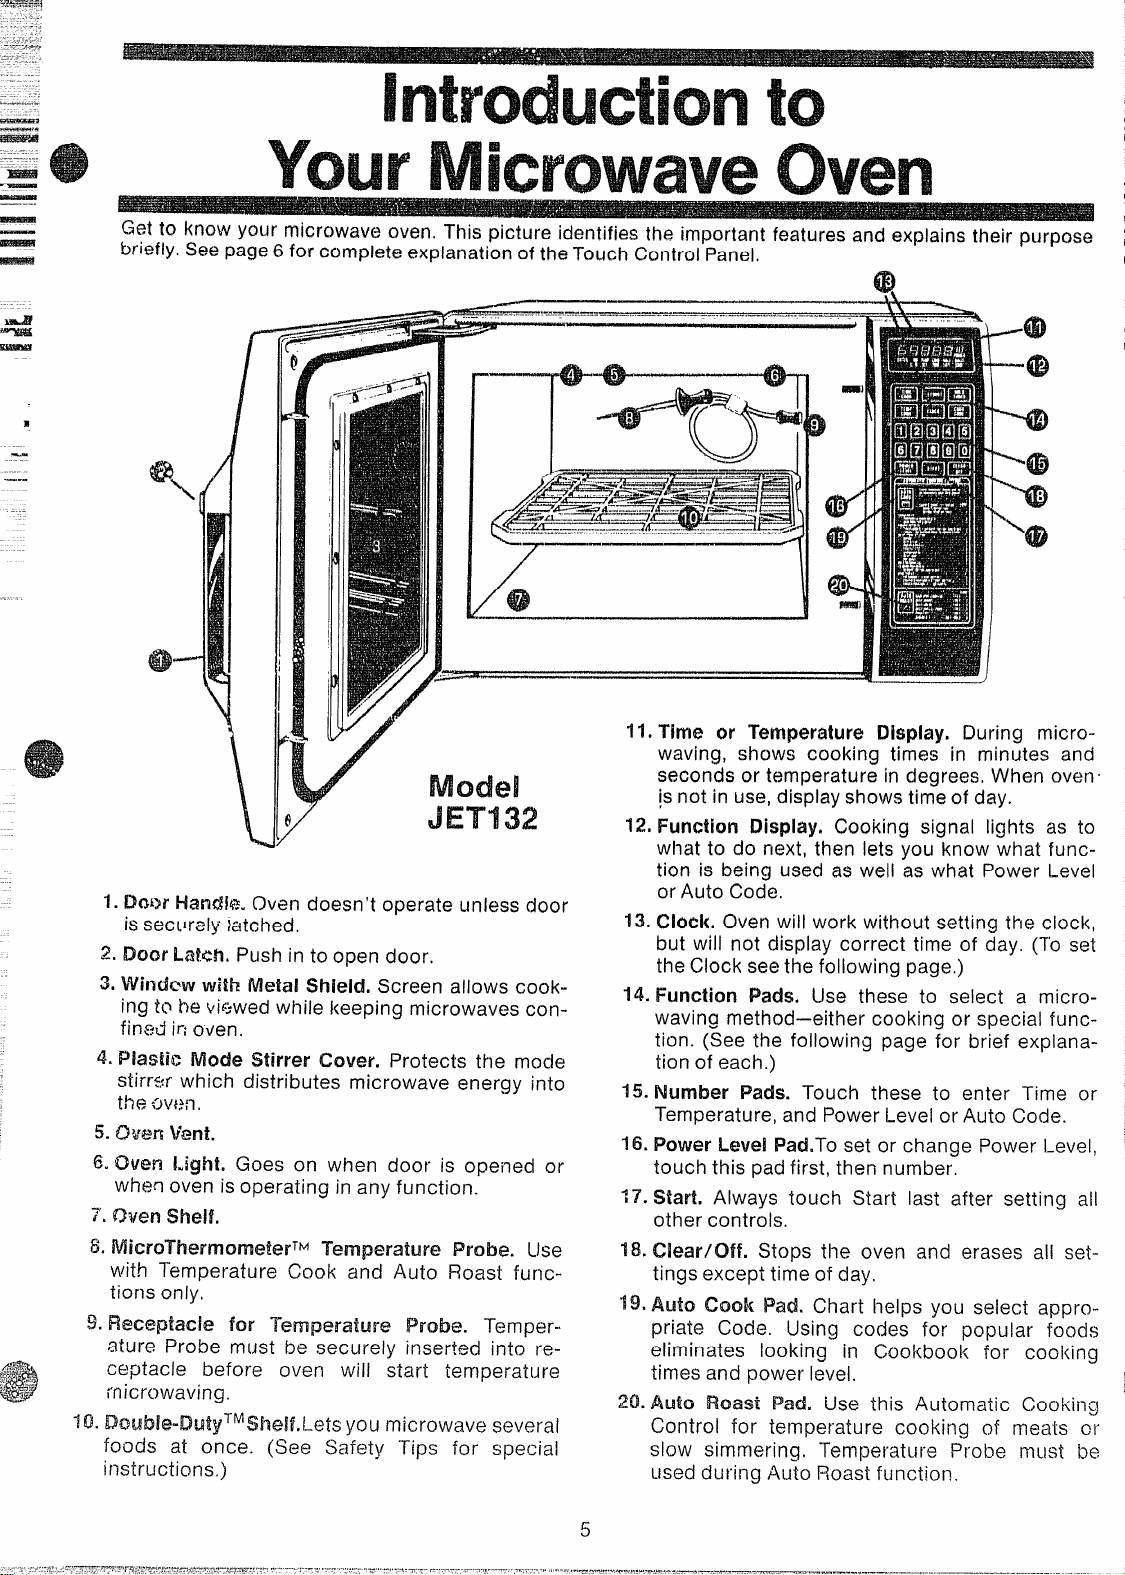
Get toknow your microwave oven, This picture identifies the important features and explains their purpose
Mefly. See page 6 for complete explanation of the Touch Control Panel,
m
.-
—.
1. Door Hand%?.Oven doesn’t operate unless door
is secllrely iatched,
2. Door Lat.eh.Push in to open door.
3. Windew with Metal Shield. Screen allows cook.
ing to he vi~~wedw}7ilekeeping microwaves confined jr: oven,
4. Plastic Mode Stirrer Cover. Protects the mocie
stirr+r which distributes microwave energy into
the ovt?n,
5. aw?n vent.
6. Oven Light. Goes on when door is opei7ed or
whm oven is operating in any function.
7’.oven shelf,
8. MicroThermOn@erTM Temperature Probe. Use
r~mp~t”ature~~ok and Auto Roastfurlc.
with
tions only,
9. Receptacle for Temperature F%obe. Temperature Probe must be securely inserted into receptacle before oven will start temperatut-e
microwaving.
10. DOUble-DUtyTMSh~If.LetS you microwave several
foods at once. (See Safety Tips for special
instructions.)
.-——-..—
........—.----—
.-v—-—q.q. . . ... ...,,..— -----
11,Time or Temperature Display, During micro-
12. Function !JXsplay, Cooking signal lights as to
73. Clock. (lmn will work without setting the clock,
14. Function Pads. Use these to select a micro-
15. Number Pads. Touch these to enter Time or
f 6. Power Level Pad.To set or change Power Level,
IT. Start. Always touch Start last after setting all
18. Clear/Off. Stops the oven and erases all set-
’19.Auto Cook Pad. Chart 17elpsyou select appro-
20. Auto Roast Pad. Use this Automatic Cookii~g
waving, shows cooking times in minutes and
seconds or temperature in degrees, When oven.
~snot in use, display shows time of day.
what to do next, then lets you ‘know what function is being used as well as what Power Level
or Auto Code,
but will not display correct time of day. (To set
the Clock seethe following page.)
waving method—either cooking or special function. (See the following page for brief explanation of each.)
Temperature, and Power Level or Auto Code.
touch this pad first, then number.
other controls,
tings except time of day.
priate Code, Using codes for popu!ar foods
eliminates looking in Cookbook for cooking
times and power level.
Control for temperature cooking of meats cr
slow simmering, Temperature Probe must be
used during Auto Roast function.
Page 6
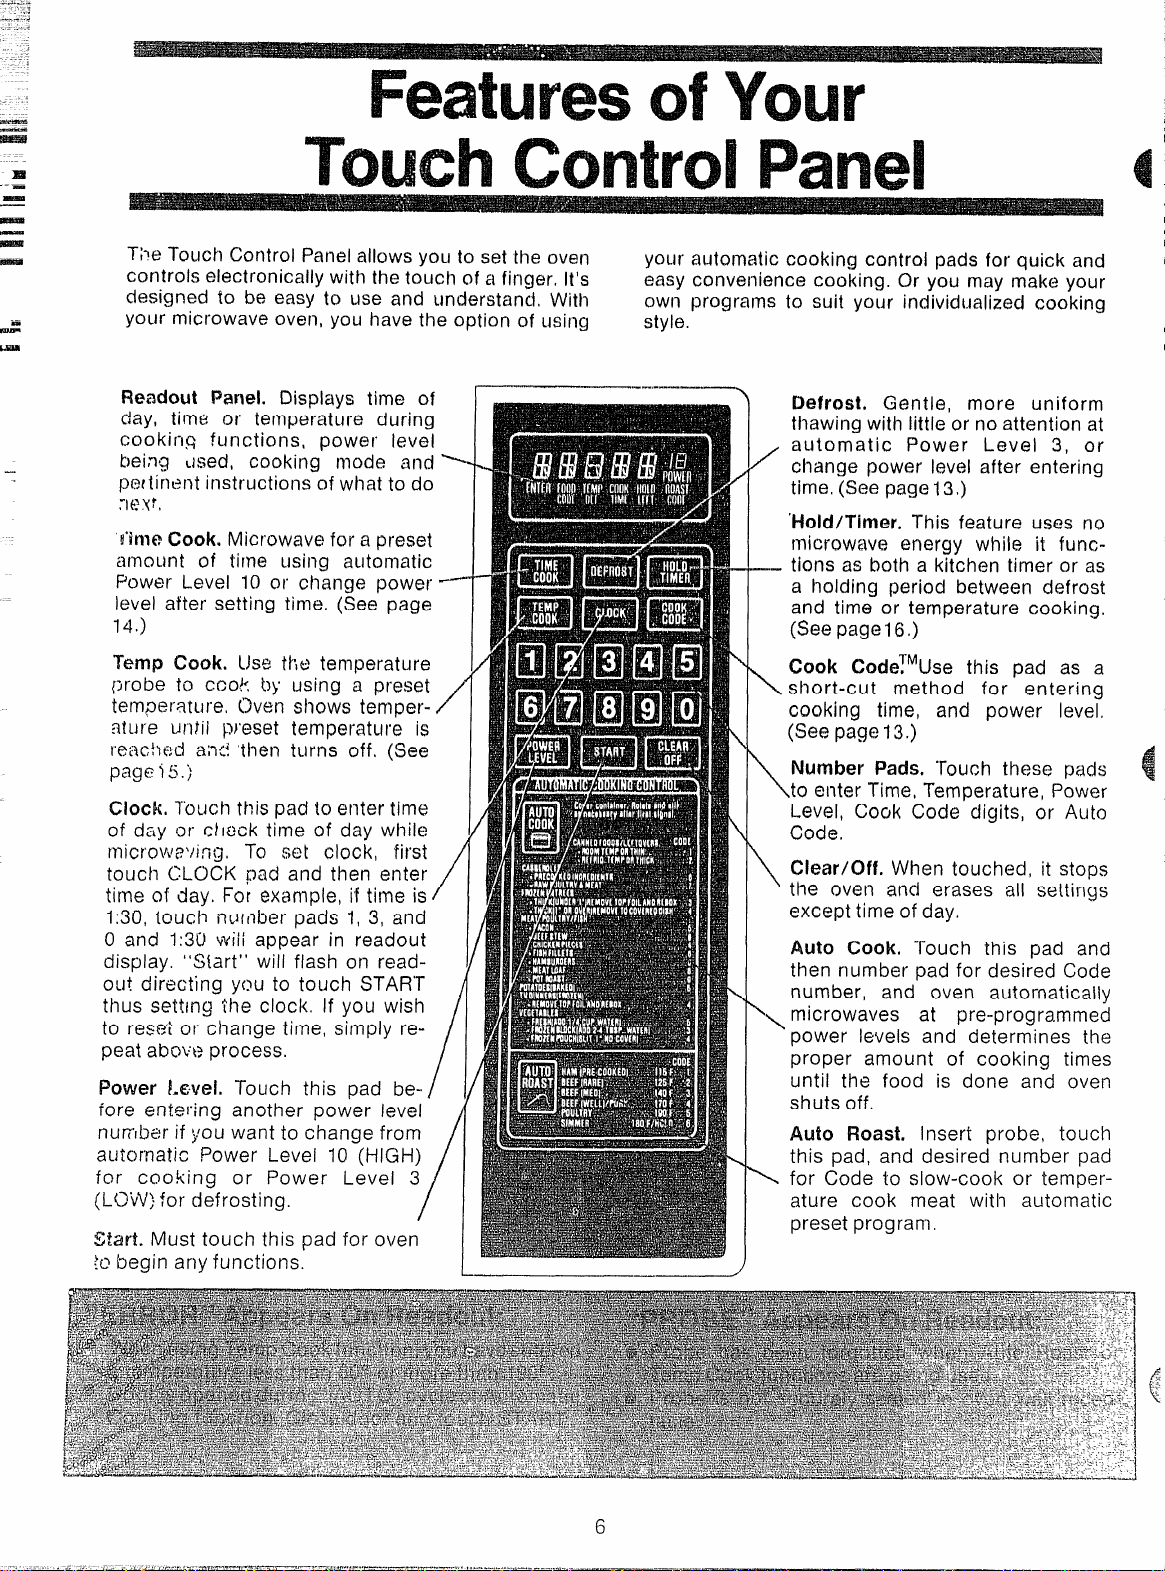
T;-wTouch Control Panelallows you to set the ov@n
controls electronically with the touch of a finger, It’s
designed to be easy to use and understanii, With
--
your microwave oven, you have the option of using
your automatic cooking control pads for quick and
easv convenience cooking. Or you may make your
owt{ nrograms
to suit your individualized cooking
style.’
Readout Panel. Displays time of
day, tirnti or temperature during
cookin~ functions, power level
—
being dsed,
pmtinent instructions of what to do
cooking mode and .
:1(?Vt,
ti’itneCook. Microwave for a preset
amount of time using automatic
Power Level 10 or change power level after setting time, (See page
14$)
Temp Cook. Use t};e temperature
probe to cook by using a preset
temperature Oven shows temper-
/
ature unlii p~teset temperature is
Defrost. Gentle, more uniform
thawing with little or no attention at
automatic Power Level 3, or
change power level after entering
time, (See page 13,)
‘Hold/Timer. This feature uses no
microwave energy while it functions as both a kitchen timer or as
a holding period between defrost
and tifme or temperature cooking,
(See pagel 6.)
Cook Code!”Use this pad as a
short-cut method for entering
cooking time, and power level,
(see page 13.)
t-eaci~wi and ‘then turns off, (See
page i 5.)
Number Pads, “rouch these pac~s
{
\to enter Time, Temperature, Power
Clock. I“’ouchthis pad to enter time
of day or chock time of day while
microwe\/i ng,
To set clock, first
touch CLC)CKpad and then enter
time of day. For example, if time is
1:30, touch nu{nber pads 1, 3, and
O and 1:30 wili appear in readout
display. “S{art”
OLIi directing you to touch START
will flash on read-
thus settfng the clock. If you wish
to reset
or change time, simply re-
peat abmw process,
Power Level. Touch this pad be-
fore errt~l”ing another power level
number if you want to change from
automatic Power Level 10 (HIGH)
for cooking or Power Level 3
(LOW) for defrosting.
/
/’
/
Level, Cook Code digits, or Auto
Code,
Clear/Off. When touched, it stops
\
the oven and erases all settings
except time of day.
Auto Cook, Touch this pad and
then number pad for desired Code
number, and oven automatically
\ microwaves at pre-programmed
‘ power levels and determines the
proper amount of cooking times
until the food is done and oven
shuts off.
Auto Roast. Insert probe, touch
this pad, and desired number pad
\
for Code to slow-cook or temperature cook meat with automatic
preset program,
Start. Must touch this pad for oven
{0 begin any functions.
6
Page 7
-.
z
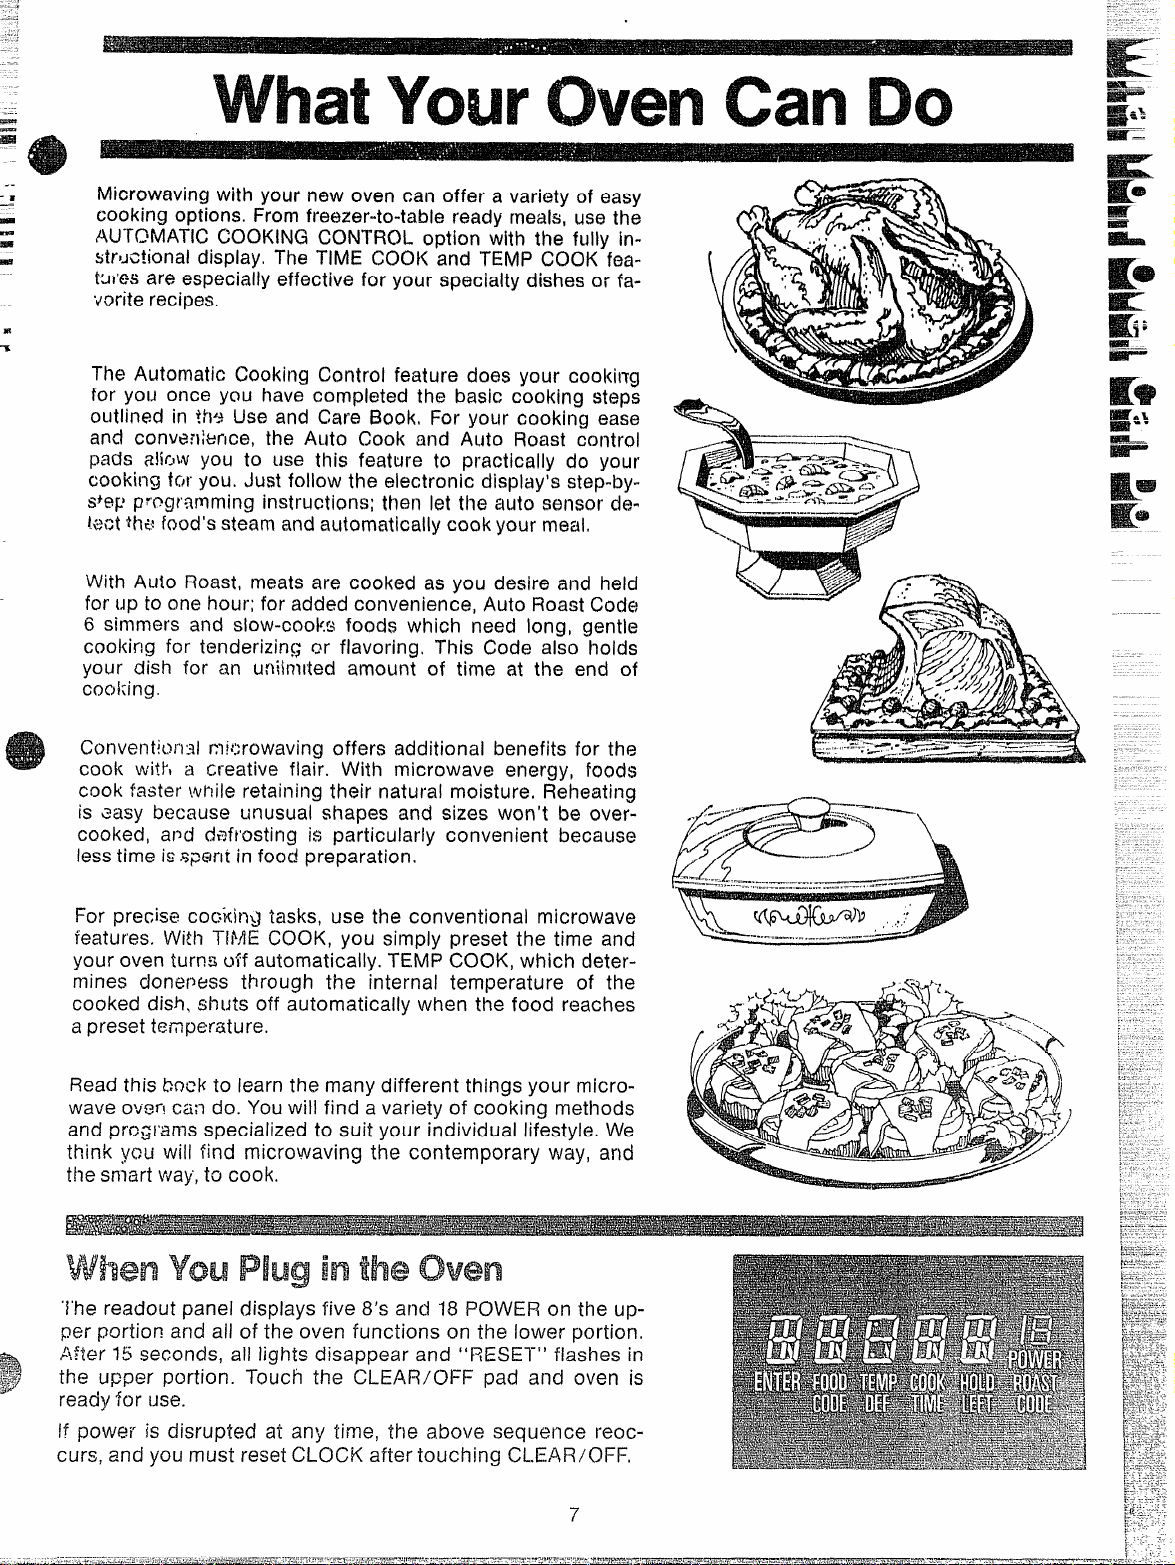
Microwaving with your rmw oven can offer a variety of easy
cooking options. From freezer-to-table ready meals, use the
AUTOMATIC COOKING CONTROL option with the fully inS~OJChI’Iddisplay, The TIME COOK and TEMP COOK featut’es are especially effective for your specialty dishes or fa-
vorite recipes.
Ia
The Automatic Cooking Control feature does your cooking
for you once you have completed the basic cooking steps
outlined in th~sUse and Care Book, For your cooking ease
and convenkmce, the Auto Cook and AlltO Roast control
pads RM.ILVyou to use this feature to practically do your
cooking tm-you. Just follow the electronic display’s step-by-
~JQp~~~oglamming instructions; then Id the auto twmwr dekmt.fk food’s steam and automatically cook your meal.
With Auto Roast, meats are cooked as you desire and held
for up to one hour; for added convenience, Auto Roast Code
6 simmers and slow-cooi<s foods which need long, gentle
cookirrg for tenderizirt~ or flavoring. This Code also hoids
your dish for an unihnrted amount of time at the end of
cooking.
Cww?ntkwi~i microwaving offers additional benefits for the
cook wit~l a creative flair. With microwave energy, foods
cook faster wt?iieretaining their natural moisture, R;heating
is easy because unusual shapes and sizes won’t be overcooked, af~d defrosting is particularly convenient because
lesstime isspent in fooci preparation.
For precisa cooking tasks, use the conventional microwave
features, With TiME COOK, you simpiy preset the time and
your oven turns uff automatically. TEMP COOK, which determines done~ess through the internal temperature of the
cooked dish, shuts off automatically when the food reaches
a preset temperature.
Read this kmckto iearn the many different things your microwave ov~rl can do. You will find a variety of cooking methods
and pro~rwns specialized to suit your individual lifestyle. We
think yc?tiwili find microwaving the contemporary way, and
tile snlart way.,ta cook.
“l’he readout panei displays five 8’s and 18 POWER on the up-
per portion and all of the oven functions on the iower portion.
After’ 15 seconds, alt lights disappear and ‘‘RESET’ fiashes in
the upper portion. Touch the CLEAR/OFF pad and oven is
ready for use.
If pOWW7k disrupted at any time, the above sequence reoc-
curs, and you musl reset CLOCK after touching CLE,41?/OFF,
7
Page 8
The Auto Cook pad may be used to eliminate your
need to look up cooking time in the Cookbook, or
guessing how long to set cooking time, By actually
sensing the steam which escapes as food microwaves, this feature automatically adjusts the oven’s
cooking time to various types and amounts of food.
Because cookiog containers must bo covered, this
feature is best with foods which you wish to steam
or to retain moisture. Foods which are best n?icrowaved uncovered or only lightly covered shouid be
cooked using time or temperature settings, or Cook
code’” co~:troi,
After touc!~ing the Auto Cook pad, and pressing
Start, ynu will see the word AUTO on the readout,
w!l~cfl iilc]icates that the sensor has been activated
to sense steam from the food, To prevent the escape of steam from the oven, do no~open the door
while the word AUTO is on the readout, If door is
the sensor detects steam from the foods. Other
Auto Cook control settings, which are for fresh or
frozen foods, need additional time after steam has
been sensed, For these foods, the oven determines
the amount of additional “time needed, then auto-
matically switches the oven to Time Cook for the
necessary cooking time remaining, Oven beeps
when it switches to Time Cook (AUTO on readout is
repiaced by numbers indicating cooking time), and
oven door can be opened for stirring or rotating
food.
i% careful of steam when removing tight covers,
When you remove cover, direct the steam away
from hands and face.
Be sure the exterior of the cooking container and
interior of microwave oven are dry,
Aiways cover food cont~iners using lids or plastic
wrap, Plastic wrap should be loose over food to
opened, ERROR appears, Ciose door and touch allow for expansion, Seal by pressing piastic wrap
START immediately.
Setting 1, which is designed for easy reheating of
foods, automatically turns the. oven off as soon as
firmiy around edges, For best results, never stretch
plastic wrap tightly over food, or use tight-seaiing
pia$tic lids,
Always stir or rotate after beeping signal.
MATCH THEAMOUNT OFFOOD K) THE SIZEOFTHE CONTAINER. FILL CONTAINERS AT LEAST
112FULL.
HESIJRET!-%KX’I’ERIOROF THE COOKING CONTAINER AND INTERIOR OF MICROWAVE OVEN ARE DRY,
ALWAYSCOVER FOOD(X?NTAIBJERSFor? AUTO CCKM AND STIR OR ROTATEAFTER ~EEPING $l~~A~.
.—, ,,
—.r-.—
, ..., ------%-
1
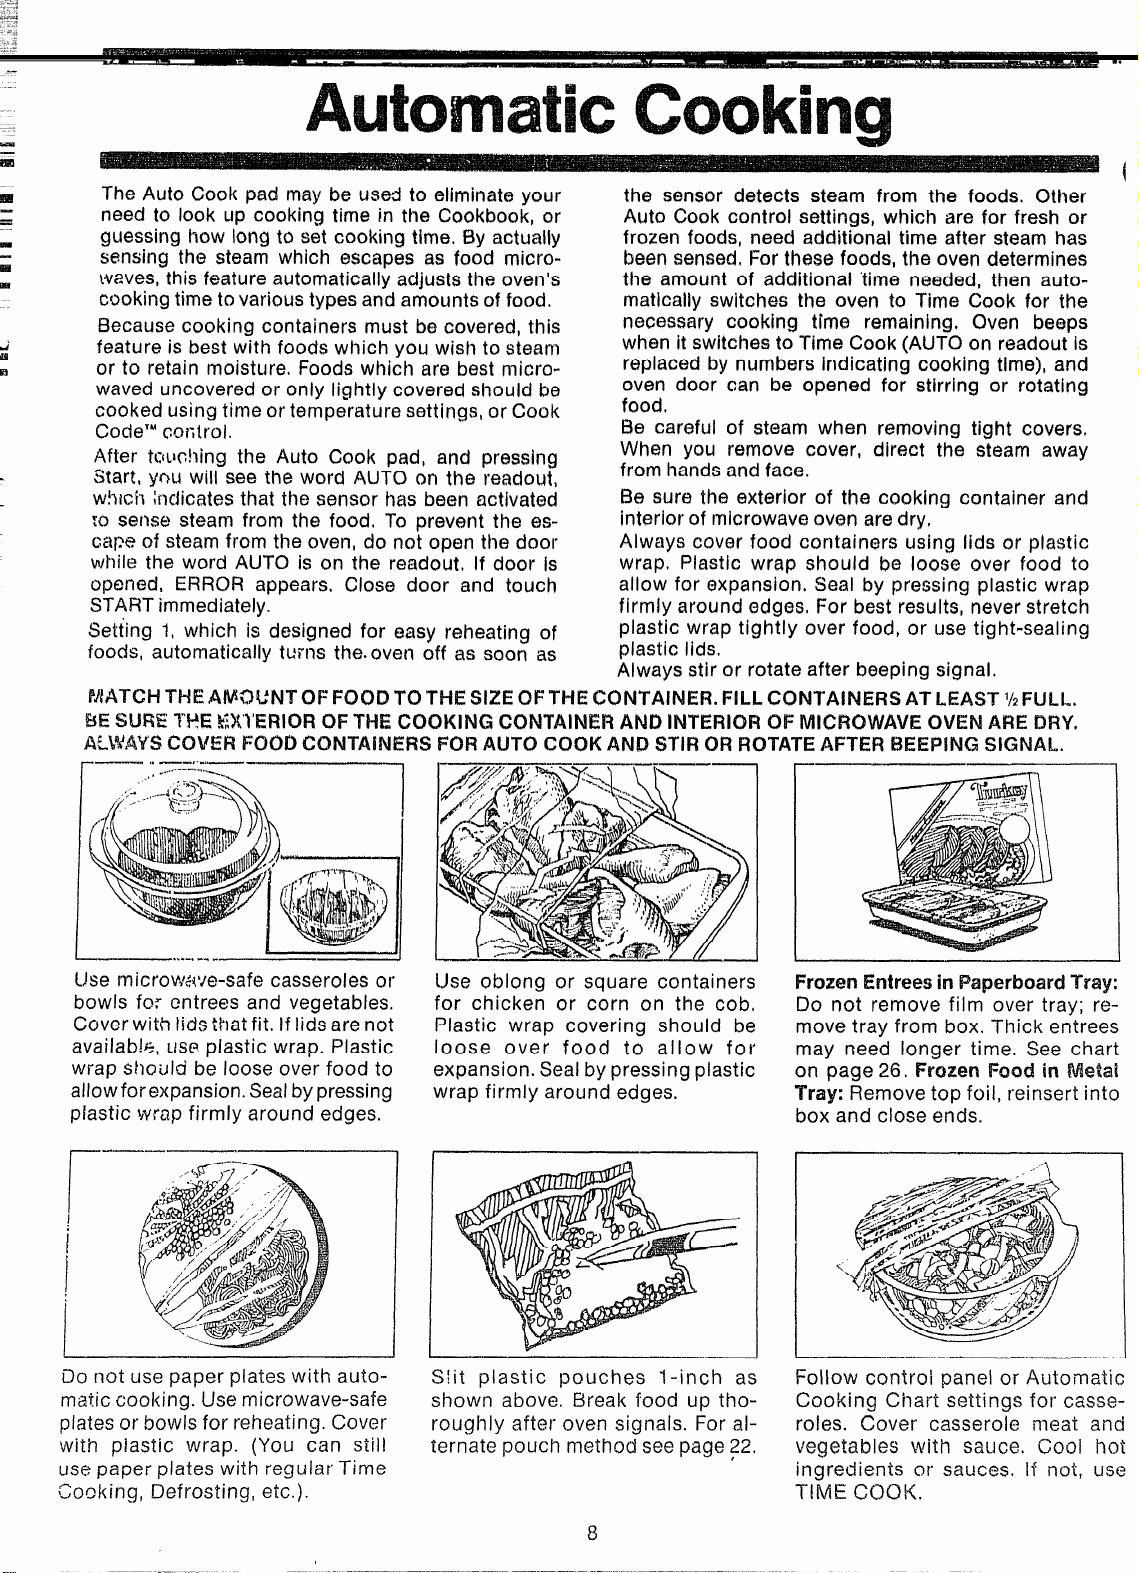
Use rnicrow+{’~e-safecasseroles or
bowls for entrees and vegetables.
Cover with lids that fit. If lids are not
avaiiab!%, LISPplastic wrap. plastic
wrap sho~Jldbe loose over food to
allow for expansion.Sealbypressing
plastic wrap firmly around edges.
——
Do not use paper piates with automatic cooi<ing. Use microwave-safe
plates or bowls for reheating. Cover
with piastic wrap. (You can stiii
use paper piates with reguiar Time
IOooking, Defrosting, etc.).
Use obiong or square containers
for chicken or corn on the cob,
Plastic wrap covering should be
loose over food to allow for
expansion. Seal by pressing plastic
wrap firmly around edges,
S!it piastic pouches 1-inch as
shown above. Break food up thoroughly after oven signais. For alternate pouch method see page 22.
8
FrozenEntreesin PaperboardTray:
Do not remove fiim over tray; re-
move tray from box. Thick entrees
may need longer time. See chart
on page 26. Frozen Food in fv%eta!
Tray: Remove top foii, reinsert into
box and close ends.
“1
.
Foiiow controi panel or Automatic
Cooking Cilart settings for casseroles. Cover casseroie meat and
vegetables with sauce. Cooi hot
ingredients or sauces. If not, use
TIME COOK.
Page 9
—
I--&!
...
....
—.
—
Em
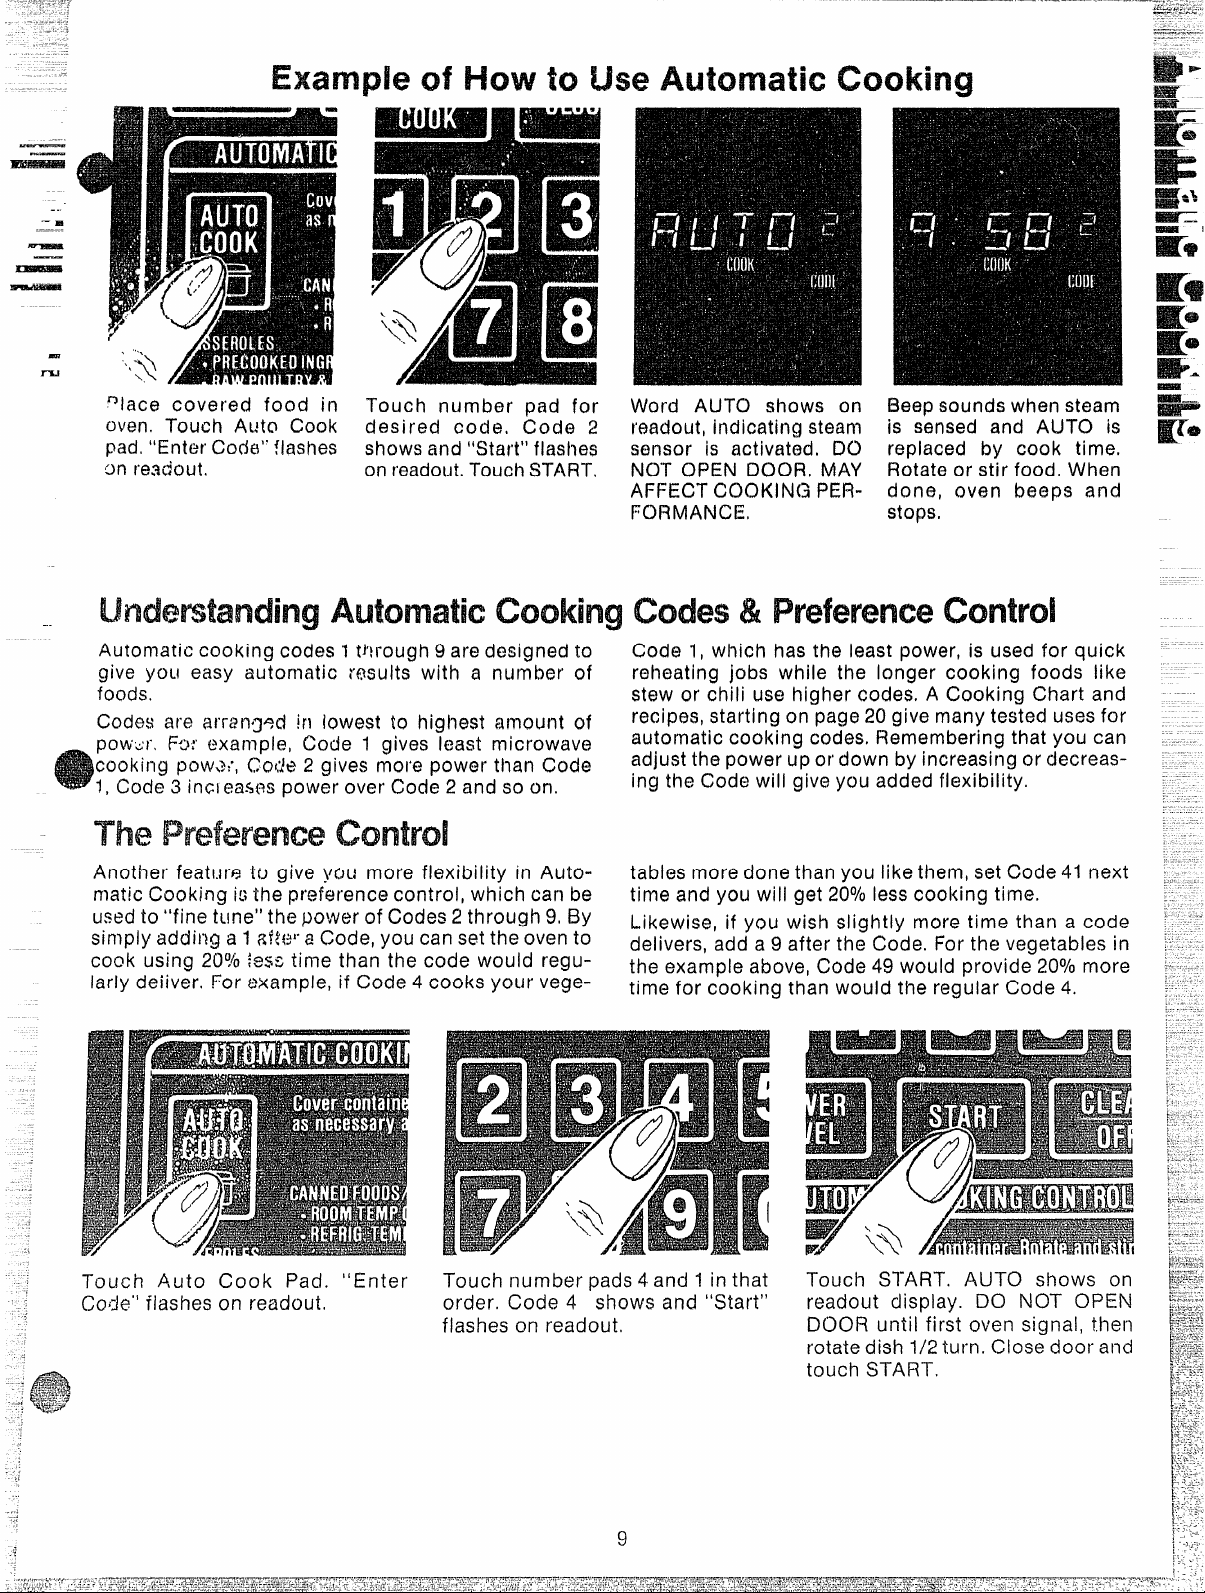
~lace Covered food iII
oven. Touch Al~t~ cook
pad, “Enter Cod6° flashes
on readout.
of tol!Jse
Touch number pad for
desired code, Cod Q 2
shows and “Start” flashes
on readout. Touch START,
Word AUTO shows on
remhut, indicating steam
sensor is activated, D()
NOT OPEN DOOR, MAY
AFFECT COOKING PE17-
FC)RMANCE.
. ....
Beep sounds when steam
is sensed and ALJTO is
replaced by ccmk time,
Rotate or stir food. When
done, oven beeps and
StQ~S,
..
Automatic cooking codes 1through 9 are designed to
give you easy au~ornatic rosult~ with a number of
foods.
Codes are arranged !N lowest to highest amount of
pomurt Fo:$example, Code 1 gives le~st microwave
cooking pow.%’,
1, Code 3 inc~eastw power over Code 2 and so on,
Another featur~ tu give you more flexibility in Automatic Cooking it; the preference control, which can be
used to “fine t~~ne”the power of codes 2 through 9, By
simply adding a 1~Rw”a Code, you can set the oven to
cook using 20% tess time than the code would r“eguIarly deiiver. For example, if Code 4 cooks your vege-
Code 2 gives more power than Code
&
Cod@1, which has the least power, is used for
reheating jobs while the longer cooking foods like
stew Qrchili use higher codes, A Cooking Chart and
recipes, starting on page 20 give many tested uses for
automatic cQoking codes. Remembering that you can
adjust the power up or down by increasing or decreasing the Code will give you added flexibility.
tables more done than you like them, set Code 41 next
time and you will get 20°/0less cooking time.
Likewise, if you wish slightly more time than a code
delivers, add a 9 after the Code. For the vegetables in
the example above, CQde49 wQuld provide 20°/0more
time for cooking than would the regular Code 4.
quick
.:
-<
..
Touch Auto Cook Pad. “Enter
Code”’ fiashes on readout,
,,
order. Code 4 shows and “Start”
flashes on readout.
9
Touch START. AUTO shows on
readout display. DO NOT OPEN
DOOR until first oven signal, then
rotate dish 1/2 turn. Close door and
touch START.
Page 10

—
.$:3
-,-;
-..+
—
-
KIr#a
Auto Roast uses the temperature probe to cook to
the desired serving temperature, Unlike Temp Cook,
nl-
.
w~ich uses a single pow~r level, Auto Roast uses
up to 3 power settings which automatically $witch
$urir,~ !oasting, thus providing even tender cooking
r+;sukswithout overcooking.
Just as in conventional roasting, only tender roasts
should be Auto Roasted until specified internal temperatures are reached, Less tender roasts should
be microwaved by time, according to the Cookbook
which comes with your oven. Complete information
on preparing roasts for microwaving is in your
Cookbook,
for
~--- .—..————.—...—..—..-—.—
,-...
—--- . . ,... .... .. ..,,..&”..,.——
~.–-..--.
I
.——
___- —.--.—-.—.
Place tender beef roasts 0/? trivet
in microwave safe dish, Insert
probe from front horixontalty into
centm’ meaty arw noi touching
b: :io or f:~t,Cover wdthWaXpaper,
J.--. -- _-., ...._., I
Poultry, pork or ham roasts need
no trivet, Add Y?cup water to roast
dish, cover with plastic wrap, (For
cooking bag method, see cookbook.) Insert probe into center
Place meat with probe in oven. In
sert cable end of probe firmly into
receptacle on oven wall,
. ... .
?. Touch AUl”O F?OASTPad, Readout flashes “Enter 2. At 80°, readout switches to show meat’s internal
Code”. Touch number pad 2. “START” Flashes. temperature. Turn roast over and restart oven by
Touch START. Readout shows AUTO. touching START.
3. Oven monitors internal temperature, automati~ti~~,{sv+~tching to lower Power as meat’s tem.~era-
4. After temperature is reached, oven switches to
HOLD for 1 hr., then shuts off. Hold prevents over-
ttire’ rises. This prevents toughening or overcooking. cooking while keeping meat warm.
:7
----
L
-
Page 11

@ Usecontainers and coverings asdirected at left. Place probe correctly in roast before cooking.
e Turnover when 80” (except pork) hasbeen reached,
ml
%hM
Tender Roast
.
Rare 2 80°
Medium
3
80°
well 4 80°
Meatloaf 4 No Turn
(lOafOrround) over
.. - . . -.-.—--- —--------.---—.-—..-—.-—-..-..-—----. ,“...... . ... . ......- .. ....... ..............-.,.-.-.—.--.————-——
125”
140° 14-16 10”15
170°
170°
Pork
1.uin Hoas! 4
?I’ecooked Han-1
..- ... . .. . ...—.
PoLII:ry’
Vlihn~9C17i~ken
(:llb,)
W’t-loleTurkey
120”
1
.-.
5
5
80° 115°
~(yl
800
170°
.... ..-.....
190”
190”
___
(Ll\2to 12 Ibs,)
(Insert probe into meatiest arm of inner thigh from below end and parallel to leg,)
Turkey Breast
(Insert DYOtX?horizontally
. ... .-,,...,,--.-,. -,.-........ . .. . -. .. . . . .- ,..-.. ..............—-.-—.———......-—.-_—..—-—-..._———--—————
4
iilto meatiest area,)
‘“~~c~~lnl~;lde~-standjlqg time before
S~l’Vif’lfJ,
80° 170°
12-’14 5-10
17-18 30
30-40
5-1o
———.——.——.-
18“”20 20
-...-.—.-.-—.........—-—.-. —----—...--..-.-—r.r..——..-—-—-—.——..
17“19 5“10
13-1!5 20
13-15 20
13-15 20
-—.-—
Your Cookbook Ims a chapter on Automatic Simmering, including charts and recipes, Refer to this
chapter for adc!it’icmaltwhniques and cooking time.
AUtO simmer like Auto Roast,
SEX
example left. Readout shows
AUTC) ~:ntii food is 800, then
switches to show food temper-
ature Unti! 180°.
Oven switches to HOLD at 180°
until you remove food and turn off
oven. If stirring is recommended,
you can reset over? by retouching
START, Touch CLEAR/OFF after
cooking.
Total time includes time to bring food to 180° and
hold at that temperature until done.
AutomaticSimmer
(Auto Roast Code 6)
Beef
Pot Roast’
Stew
Chili
6-8
6-8
11-13
Chicken*
Stewing
Broiler/Fryer
or Pot%
Ham
Roast
11-12
4-6
4-6
soup
Stock/\/egetable
Split Pea
3-6
13-15
Page 12

(2.Whydoes myovenautomaticallycut Qf#af!erthe
a
....
-.-
ALfTOcyclewhen usingAutoCook ControlCode 1
q
.
when it do~snotforothersettings?
A. }Vhen using Code 1, there is no second phase of
l?l!pllt(?scounting doWll, All the cooking is Oclm”
,)!vied in the first phase@rAUT~”
Q. If my food is not completely cooked after (Iairq
the suggwted Auto Cook Control Code, what
shouid1
A.
additional time cooking. Use TIME COOK ~nd
Power Leval !0 for a few minutes u17tllcompletion
or recover and use Auto Cook Code 1,
C?.DC alf fresh w hxmm vqj~tiddmi require a
~tand!ngjperiod aftercooking with ALJTOCXN3K?
A. fvlcs: wgetables are cooked to a crisp stat~ dur-
ing Auto Cook, just as In regul~lr mlcrowavlng,
T“i>t?rek)!oe,it Is racomrnendecl that you let the veg~.
tables stand far up to 5 minutes depending on tiize
and density of pieces, This standing time also enhances tt7e cwerail fiavor and appearwnc~ of most
vegetables,
0. ‘What it I don’t fu;Iy cmmr the disiI in Auto
Cuok?
A, O~Jiwlsense$ steam too quickiy which shortens
tile cook!r?~ tifn~~thus ietiving ur@@rccmkecidish,
Recover t;ght]y and reset Auto Cook,
Cl. Do the shapes and sizesof food make a difter-
erlcewhen using Autocook’?
A. Yes,in somi3Gases,kwger pieces wiii require ad-
ditional Tirr;e Cooking, Be sure to check suggested
arrangemefit of pie~%sin the disi~, since proper ar-
rangernerlt is oftw a successful tip in reguiar microwaving
Q. ~~~~~~ ~ ~~~ AutQ cook to cook PlJ~d~~9 ‘r
sauces?
A. Most pudding and sauce recipes require stirring
many times ct~iringcooking; therefore, Time Cook is
recommended since you shouid not open the door
during the AUTO phase of cooi(ing without affect-
ing end cao~ing resuits.
Q. h!y sr:ai$OPed PQtatOes
cooked
What ia wrong?
A. if ynu prepared the sauce in the oven prior to
(:~)inl)in~ng the sauce with potatoes, there may hav~
baw
Make sure you dry the oven cornpieteiy before us-
i!~cjAuto Cook since this function operates properiy
by sensing steam in the oven. Also, starting Auto
COok with hot foods creates steam in the oven too
soon, and decreases the first sensing cycie.
~, ~;~ ~~~ereany ~t~er ?aads which afe kXX5tTime
Cookec!, rather than Auto Cooked?
A. Bakery foods, candies, melted chocoiate or
foods wilen a dry or cr!sp surface is de.sirabie, are
cooked best by Time Cook,
CfO?
Thick starchy or dense foods may require some
W6?~~,rtd KXN31f)ktdy
when / removed the dish after Auto Cook.
too much remaining moisture in the oven.
0. Do fresh or frozen vegetables require water -
whenusingAutoCook?
A. Yes.Add water as rwxmmendu.t cmchart to the
v~g~tabia~ aIId cover weiI for even, ~omplete
cooking,
Q. Would my piastic containers with very tight fit-
ting lidsbe qpproprifitefor Automatic Coakln@
A, No, most typm of plastic stor~ge dishm, butter
tubs, etc. with tight fitting lids are not recommended
for microwaving, Also tight fitting plastic lids
prevent adequat~ steam from escaping and food
may not cook properiy during Automatic (%oking,
Q. i tried to warm some Gi143wmein nofxtiesusing
Auto Cook, Whydidn’t this wink?
A. Foodmusthavosome moisture in order to create
st~nm which hoi ps the auto sensor function,
Extr@moiydry fooc.i~such as chow moin nocdle~,
potato chip~ ~r~d oth~r such foods do not have
orrough moisture,
Cl. May I use Auto Cook when I am cooking many
foods in more than one dish or casserole?
A, No, becaus~ of different food d~nsities, attention
ntw?dedduring cooking, and food amounts, it is best
to USQTiME COOK when cooking many foods.
~, WhyVVtiSnly I’eastnot flli~y cooked eVQllthough
the temperature cm the readaut WGScorrect and
Auto Roastcompleted?
A, When cxmking with Auto Roast, the temperature
probe must be inserted properiy as fuily describQd
iri the CXxMbooi<,After turning meat over or t’otating, the probe shouid be checked to make wre it
ham’t siipped or changed position,
(2. Last time i used Auto Roast i removed the roast
from the oven toturn Hover, When I replaced roast
in oven and reconnected the meat probe, AUTO
reappeared, Why?
A, The oven and roast may have cooled to below
80”, or prob~ may have been repositioned, Continue roasting and numbers wiil soon reappear.
(2. Are there any particular
than others?
A. Yes, fiat giass trivets such as iids or dish covers
give more even cooking resuits than plastic trivets.
Aiso, ceramic ridge-bottomed roasting dishes work
weii. Pias’tic trivets require meat to be turned over
more frequently because the grid design and iegs
aliow the bottom of the meat to stay cooier as it
cooks, than glass trivets do.
Cl. Why dOeSn’tthe roast continue cooking duri:3g
the standing or hoiding time?
A. The oven automatically reaches finished temper-
ature and then decreases to a iower power ievei to
prevent overcooking. Thus an even t~rnperature is -,
maintained.
12
trivets that work better
my
.?
T2
\=
Page 13

.=A
.
-.—
&
il’-hwto
Cook ~cde?~~is a short-cut control for entering time
and We Power Level on your microwave oven. Be Step 1: Touch CCN3K(XX3E. “Enter Cook Code”
%re to check your Cookbook for specific codes for flashes on readout.
specific recipes.
To vr!derstand the Cook Code control, it Is impor-
tant to know what the numbers mean and what the
sequence is, The first and second numbers, if settirlg a 3 digit Cook Code, hldicate the amount of
time you desire; Ttw last contfaolentry number is always ih~ Power Level, For example, 125 means 12
minutes at F%-mw!.evel 5, NOTE: Your oven can
OIII~be ~ragrwnmeci to 99 Iminuteswhen using the caunting down and Power 10” show on display,
-—~w*—
to
The Defrost setting is designed for
even thawing necessary for kwge
amounts of food and is ona of the
most important advante~~s of a
mlcrow~~e oven. rnakin~ defrost-
ing ~,uicksnd easy with little attention, PowzwLevfxl3 is automatically
set for defrost jfig, but you may
change this for more flexibility, See
your Cookbook for the complete
defrosting chart,
To become better wquaintad with
your’ Defrost function, defrast frozen pork chops by following the
steps below.
Step t: Place package of frozen
chops in the oven and close door.
Step 2: Touch DEFROST, Display
reads :0 and Poww 3. “Ent@r 12ef
Time” flashes,
Step 3: Touch 8, 0, and 0 for 8 minutes, “Def Time”, !3:00 and Power
3 are displayed,
Step4: Touch START, “13@fTime
Left” shows and tim~ counts down
cm display, When cyc+le is com-
pleted,
signals and automatically shuts
off!
Step 5: Turn package over, close
door and repeat Steps 2,3 and 4.
Step 6: When oven signals, “END”
flashes and oven shuts off. l%move package and separate cholw
to finish defrosting.
“END” flashes, the oven
Cook Code control and the highest Power Level is
10which is represented by “0”. When setting a 2
digit Cook Code control entry, the first is time, the
second is power Iovol,
!3tep2: Enter the proper code into Cook Code control, Far example, a recipe calling for 12 minutes
cooking time at Power Level 10would be 120.Code
nw’nber appe~rs and “START” flashes immediately
after entering a 3-digit code, but when a 2-digit
code is used, there is a delay before “START”
flashes,
Step 3: TOL]~h START. “Cook Time Mft, time
-
@Foods frozen in paper or plastic
can be defrosted in the package.
@For even defrosting, many foods
need to be turned over, rotated, or
broken up part of the way through
the defrosting time,
@Homemade dinners can be frozen In shallow foil trays and heated
for later use, Select foods which
microwave well,
@Pre-packaged frozen dinners
can be defrosted and microwave
cooked,
@Check your Cookbook for other
defrosting tips.
w
O, when I prC+SSSTART, I hear a
duil thumpi:x; noise. What is it?
A. This s~~~ndis ilo~mal. It is letting
you know the oven is using a
Power Lt>vellower than HIGH.
Q. C~l”i I Defrost small items in a
hufry?
A. Yes, but they will need more fre-
q~jei~~attention than usual, Raise
ths P~j~~~rLevel after entering the
time by touching POWER LEVEL
ti[id 7 or 10. power Level 7 cuts the
/llmein k; Power Level 10 cuts the
time to !4. During either, rotate or
stir {ood frequently.
Cl.Can I open the door during DEFROST to check on the progress
of myfood?
A. Yes. You may open the door at
any time during microwaving. To
resume defrosting, close the door
and press START.
Cl.Why don’t the defrosting times
in the Cookbook seem right for my
food?
A. Cookbook times are average.
Defrosting time can vary according
to the temperature in your freezer.
Set your oven for the time indicated in your Cookbook. If your
food is still not completely thawed
at the end of that time, re-set your
oven and adjust the time according y.
13
Q. When I enter the fourth digit using Cook Cocie control, nothing
happens. What went wrong?
A. The oven will take only 2 or 3
numbers. If more are pressed,
oven does not respond. Touch
Clear/Off and begin again.
Q. Can I select a Power Level other
than automatic Power Level 3 for
defrosting?
A. Yes. Some smaller foods may be
defrosted quicker on higher Power
Levels but for even, carefree defrosting, Power Level 3 is suggested. Check the chart in the
Cookbook for specific times aild
Power Levels.
Page 14

Time Cooking, or cooking your food according to a pre-
~
determined amount of time, is probably familiar to you from
Conventional cooking, With your microwave oven, howaver,
you prcxmtthe time and the oven turns off automatically.
Follow the cooking steps below to
help you learn to Time Cook
properly.
Step & “fbUL’!l 77ME COOK, The
read-out panel shows :0 and
Power ‘IO. “Enter Cook Time”
flashes.
step a: Select your time, Tou~h 1~
2, and Ofor a minute and 20 sec-
onds, “Cook Time”, Power 10,and
1:20 appear on the display. If another Power Level is desired touch
POWERLEVEL and the number al”
thoug!l Pow@t’LQvel 10 (HIGH)
preferred for this cup of coffee,
Step 4: Touch START. “Cook Time
Left”, Power 10, and time counting
down show on display,
Step 5: Wh@n time is up, oven
SC)LlndS, Display f!ashes “END”,
Oven, light, and fan shut off,
‘Tips
@ Make sure all utensils used in
your microwave oven are labeled
“suitable for microwaving”. Check
your Cookbook for specific test to
determine “microwave-safe” uten-
sils,
IS
@ Paper towels, wax paper, and
plastic wrap can be used to cover
dishes in order to retain moisture
and prevent spattering,
o Most microwaved foods require
stirring, rotating, or rearranging,
Check your Cookbook for specific
instructions for the food you are
microwaving.
* Some foods such as unshelled
eggs and hot dogs must be
pricked to allow steam to escape
during cooking,
(2. 1set my oven for the time called
f{)r in the recipe but at the end of
ttie [ime ailowed, /my dish wasn’t
cicIle, What happened?
A. Since house power varies due
to time or location, many Time
Cook recipes give you a time range
to prevent overcooking, Set the
overt for minimum time, test the
food for doneness, and cook your
dish a little longer, if necessary,
IQ. I want to cook my dish on a
Power Level other than HIGH, what
do I need to do?
A. To change the Power Level,
touch the POWER LEVEL pad.
“Enter Power” flashes on the display panel. Enter the desired
number.
Cl. Can I interrupt my Time Cook
tulle’tion to check the food?
A. Yes. To resume cooking, simply
close the door and touch START.
NO’’T”E:Microwave power will not
come on until you are ready. You
must touch START for cooking to
begin.
‘14
Q. I touched the number pads and
selected my power level. When 1
touched START, however, my oven
didn’t come on. Why not?
A, The TIME COOK pad must be
touched before setting the number
pads or else your oven will not be-
gin cooking.
Page 15

..
..
-.
-.
.-
For many foods, internal temperature is the bt?st gauges the internal temperature of your food; it
B
.
r.
test of doneness,
Roasts or poultry are cmokod to perfection when—
temperature cooking. Heating or reheating foods
LWGUrately to a sewing temperature you desire is
Amp;a and easy.
EMP COOK takes the guesswork out of cooking
because the oven shuts off automatically when the
food is done,
-1-he
The temperature probe is a food ttwwmometer that
10.“Erlter’ “i’c{lnp”flasiles,
Step 3: Touch 1, 3, 0 for 130”.
“Temp” ,
on display.
’130F and Power 10 show
must he used when using TEfvtPCOOK or AUTO
ROAST,To utilize your temperature probe properly,
follow the directions far use and insertion in this
book in the section emtitled“HOWto Auto Roast”,
N(IOH
!,[
Step 4: rouch POWER LEVEL pad,
“Enter Poww4°flashes, Touch 5 for
MEDIUM pow~r, “Temp”, 130 F
iwxl Power 5 shows on display,
Step 5: Touch START, If internal
ternpw+ature of the roast is 163ss
than 80,
“CXX3L” or if temperature is 80” or
above, display shows temperature
counting up.
Step 6: When 130’) is reached, the
oven will sound and automatically
shut off. Remove probe and food
from the oven.
displtiy wi II show
I{ANDII
(:1’11’
-rips
@Where you havo a choice of
P0W61’143VelS,us@a lower setting;
it will heat more evenly ev~n
though requiring more time.
a Be sure frozen food has been
completely d~frosted before inserting probe. Probe may break off
if used infrozen foods.
s Always insert probe into the
center of meaty areas; take care
not to touch the fat or the bone.
* Ifwmrt probe as horizontally as
possible into foods as directed in
tho rcwipes. Make sure the hancjie
does not touch the food, The probe
is easiest to use when insei’ted
from the front,
s Usethe clip to keep the probe in
place while heating.
@ Cover foods as directed in
Cookbook for moisture control and
quick, even heating.
(2. After I followed the steps and
tollched ~TAf?T,
in t he d is p Iay and a signaI
sC>Ur\f:~ed.What is wrong?
1-1.
“ERROR” f!ashes on display if
you set the temperature either beIo’w80’~ or greater than 199C).The
tnven telis you between the flash-
‘‘ERROR” what the ii7~o’rrecf entry was that you set. TO
re-enter, touch GLEAR/OFF pad
anc1begin steps again.
“ERROR” flashed
(2. Are there any foods I can’t
TEMP COOK?
A. Yes, Deiicate butter icings, ice
cream, frozen whipped toppings,
etc., soften rapidly at warm temperatures. Batters and doughs as
weli as frozen foods are also difficuit to cook precisely with the
probe. [t is best to TIME COOK
these foods,
Cl. Why clici “PROBE” flash on the
display after i touched Start?
A. “PROBE” wiil flash on the dis-
play if you have not securely
seated the end of the probe into
the receptacle in the oven wall or if
you touci? TEMP COOI< and have
forgotten to use the probe.
15
Cl. Can I leave my probe in the
oven if it’s not inserted in the food?
A. No. If the probe is left inside the
oven, touching the oven wall, and
not inserted in food, you may damage the oven.
Cl. Can I TEMP COOK different
portions of food at different
temperatures?
A. Yes, The temperature probe
gives you the freedom to cook different portions of food at different
temperatures to suit individual eat-
ing styles. Simply place the probe
in the food and change the ter-r-rperature setting as needed.
Page 16

Your t-iC)LD/TIMER, which operates without microwave energy,
hasthree timing functions,
It operates as a Minute Timer, it
car, be set to delay cooking or may
ba used as a hold settingafter de-
frosting. Hold/”rimer can be set up
to 99 minutes,
Step 1: Touch HOLD/TIMEP pad,
The read-out panel shows :0. “Enter Time” flashes,
Step 2: Se16ctthe amount of time
ycu desire, “iouch the appropriate
numbm pads. If, for example, you
are timing a three minute phone
call, touch 3, 0 and 0. The readout
panel shows 3:00 and “HOLD”
appears on display,
Step 3: Touch START.The rmadout
display shows the time as it counts
down, and “Hold “rime L@ft”,
Step 4: When time is up, oven
sounds, The readout flashes “END”
and Ihe timer turns off,
The l-10LD/TIMER can also be
umcl to program “standing time”
between microwave cooking func-
tions. The time can rangefromone
second to 99 minutes and 99 seconds. A HOLD, ar “standing” time
may be found in some of your own
recipt!mor Cookkxx%,
To set the oven to delay cooking
up to 99 minutes follow Steps 1
and 2 to enter hold time, then set
time or temperature desired before
prmm[ng START,When holding before temperature cooking, be sure
probe is in food before pressing
START.
toDefrost–Hold/Time–Time
TO
fielp y~~ubecOmea~qu~inted with the ~C)LD/TIMER fe~ltureas used with Time Cook or Temp Cook follow Steps
below to defrost a frozen casserole for 15minutes, then hold 10 minutes and th~n cook 25minutes, If using Temp
Cook after H’old/Timer, bo sure to insert prob~ corre~tly as shown in Automatic Roasting section of this book,
Step 1: Remove casserole from the
freezer and piace in cwn, Touch
the DEFRCX3Tpad, Tlw readout
nanal shows
and FWver3.
Step 2: “rouch 1, 5, 0 and O for
defrosting time. 13efTime, 15:00,
and Power 3 appear on the display
panel, (Defrosting is automatically
set on Powsr Level 3 but can be
changed by touching POWER
LEVEL pad and the new Power
Level.)
“Ente: l%f Time”, :0,
Step 3: Set standing or hold time
by touching llOLD/TIMER. “Enter
Time” and :0appear cmdisplay,
Step 4: Touch 1,0, 0, and Oto hold
for ten minutes. 10:00and “HOLD”
appear on the display,
Step 5: Touch the TIME CCX)K
pad, The display shows “Enter
Cook Time”, :0, and Power 10
(HIGH),
Step 6: Touch 2, 5, 0, and O for
twenty-five minutes of cooking
time,
Power 10 appear on the display panel,
Step 7’: Touch START, “13ef Time
Left”, Power 3, and 15:00 counting
down show on display. As each
function is automatically performed oven display shows entered information.
“Cook Time”, 25:00, and
(J. ‘A/i;~t will happen if I accicJentaI!y reverse the instru etions?
yOLI accidentally reverse the
A. If
s~;quence of programming instruc-
tions, your oven automatically
rearranges your program. Defrosting always comes first, then hold,
and then Ihe cooking function,
Cl. CaIl I Defrost-Hold only on my
oven?
A. Sometimes you may want to defrcst a food, hold it, and refrigerate
it to be cooked later. All you need
to do is program in Defrost and
amount of time. Then program
Hold and amount of time. Put your
thawed dish in the refrigerator and
cook !ater at a convenient time,
NOTE: Allow foods to remain at
room temperature only as long as
safe, Times will vary,
C?.I programmed my oven for a
specific defrosting time but it ciefrosted longer than necessary.
What happened?
A. When instructions conflict, the
oven carries out the last instruc-
tion,
YOU may have set the oven to
Defrost for 4 minutes, Hold/T’ime
for 2 minutes, and then Defrost for
6 minutes. In this case, the oven
would Defrost for 6 minutes and
Hold /Time for 2 minutes.
Page 17

1
YourNewIbNcrowawOven19a VAM1631QApplhmx,
FhxMctIt From MISWW3$y IWlowlng Them RWN3:
* K*w youroven dean tindleweet-amellhg. Open-
in~ the oven door a few minutes after cooking helps
“air-out” the interior, An ocmwional thorough
wiping with a solution of baiting soda and water
keeps the interior fresh,
* Don’t use Aairp+dged utensils with your oven.
The interior and exterior oven walls can be
scratched, The control panel can be damaged,
@Don’t iwmovethe cover over the %tirrfw” at the
top of tb~ oven (microwave feature 4 on page 5,)
You may damage the oven,
BE
POWERIs OFT CLEANING ANY PART (IF’ -l-His C)VEN.
floor and plastic tmver,Because there is little
heat except in the food, or sometimes in the utensils, spills and spqt~ersare easy to remove, Some
spatters ar~ easy to remove. Some spatters can be
removed witil a p$per towel, others may require a
damp cloth> Remove greasy spatters with 8 sudsy
cloth, Mm rinse and dry, Do not use abrasive
cleaners on oven wails. NEVER USE A COMiVIERCIAL OVEN CLEANER ON ANY PART OF YC)UR
MICROWAVE C?VEN.
Door-inside. Glass: Wipe up spatters daiiy, wash
when soi!ed, with a minimum of sucisy warm water.
Rinse thoroughly and dry.
Metal and plastic parts on door: Wipe frequently
with a damp c;t:th to remove all soil. DO NOT USE
ABRASiVES, SUCH-IAS CLEANi NG POWDERS OR
STEEL AND PLASTIC PADS. THEY WiLL MAR THE
SURFACE.
Special note when using Brown ‘N Sear IINsh: High
heat generated on bottom of Brown ‘N Sear Dish
can cause scorched appearing stains to bake onto
the oven $helf if grease is present. These may be
rernowxi with Bar Keepers Friend@ Cleanser by
SerVa:+sLaboratories, inc.
After using Bar Keepers Friend@ Cleanser, rinse
and dry Lboroughiy, following instructions on can.
Do not use Bar Keepers Friend@ Cleanser on the
painted surfaces such as the walls, it wiil scratch
the paint.
Bar Keepers Friend@ Cleanser can be purchased
from your deaier or Service Center. Bar Keepers
Frierld@ Cleanser is also sold in many grocery,
hardware, and department stores.
AcxxxwmryShelf. Your sheif accessory is made of
pcdysulfone, one of the strongest microwave ovenproof piastics, [t is designed for use in a microwave
oven only; do not use it in a conventional cnwm.Do
Not operate your microwave oven with the shelf in
place unless you also have food in the oven.
Never use a microwave browning dish with the
shelf. Heat from browning dish can damage the
shelf. The easy to clean shelf is dishwasher safe, or
may be washed in hat water with a mild detergent.
Do not use abrasive cleansers or scouring pads,
AWmwMc Temperature Probe. Probe is sturdy, but
care should be taken in handling, Do not twist or
bend; avoid dropping temperature probe.
Clean as soon after using as possible, To ciean,
wipe with sudsy cloth, then rub lightly with plastic
scouring ball if necessary. Rinse and dry. (Or wash
in dishwasher. )
Ca$e. Ciean the outside of your oven with soap and
damp cloth, then rinse and dry, The outer pane of
the window is glass. Just wipe clean with a damp
cloth. Chrome trim is best wiped with a damp cloth
and then with a dry towel.
Control Pane!. Wipe with a damp cioth, Dry thoroughly. Do not use abrasives or sharp objects on
the panel. They can damage it.
Cord. If the cord becomes soiled, unplug and wash
with damp cioth. For stubborn spots, sudsy water
may be used, but be certain to rinse and dry thoroughly before plugging cord into outiet.
Oven lamp First, unplug the oven.
Then remove lamp compartment cover by removing
screw which holds cover in place. Cover is located
at the rear of outer case.
To remove bulb, push it inward gently and turn it to
the left or counter clockwise; then pull outward out
of the socket. Replace with 25 watt appliance bulb.
(It is available in drug and hardware stores.) Replace
compartment covert Piug in the oven.
17
;.,
),
Page 18

The
‘saw’mm?and money. m
.bfmm? you call forSW’vkx?,d’leek the femnfving:
OWN-I Not Cbm? on: ,
8 lbl~irtcircuit breaker is tripped.
a One of house fuses hasblown.
a 3-prong plug isn’t fully inserted into wall recep-
tficle.
PatTell Lk$mm, MN
oven will
Not start:
Make sure YO:Jtouched STARTbutton.
@J
Docr is not securely closed.
You have already entered another program and
not touched CLEAR/OFF to cancel it.
Telnperature Probe not inserted properly or not
being used during Auto Roast or TempCook.
Yo~ have not entered numbers after Time Cook.
You have not entered desired finished temperature after TempCook.
CLEAR/OFF was touched accidentally.
After touching Cook Code:”Auto Cook, or Auto
Roast pads, no code number was entered.
Appears onFkdcmt:
@ When using Temp Cook function, you haveentered
a temperature less than 80° or more than 199°.
@ Door isopened during “AUTO” cycle of Automatic
Cooking function. Close door and touch START.
FcmdsAre Either ChKmxmked UN
@
Not enough time set when using Time Cook func-
tion because of variance of starting food temper-
atures.
e
The density and amount of foods will vary and
thus may need more time for completion,
Dish not completely covered as directed for Auto
@
Cook.
69
Previous microwaving left humidity or moisture in
oven thus lessening the cooking time in Auto
Cook function.
@
Certain vegetables that are cooked using Auto
Cook need a standing period after cooking. Check
Automatic Cooking Chart.
e
Probe not inserted properly into meat or dish.
Check Cookbook and Auto Roast section in this
book for specific probe placement.
63
Incorrect Cook Code numbers entered.
Incorrect Power Level entered.
Dish was not rotated, turned or stirred if these instructions were given in recipe.
Oven was opened during “AUTO” cycle of Auto
Cook function.
Too many dishes in oven at sametime.
Check Cookbook for food placement when using
Double-DutyTMshelf.
Appears onReadout:
Probe has been forgotten when Auto Roast or
Temp Cook functions are being used.
Probe is not securely seated in oven wall recep-
tacle.
Page 19

.-
~utb~atic Cooking Con’~rol is-a fully ~utomatic
,~lectronic control system that lets your microwave ‘
o@rI do the cooking fix you, The charts and
retiipe~
ma~et)~emost of this truly new feature, ‘ ‘
‘ Stamfiard cooking techniques require setting the
over,“for aspecified cooking time or a selected fin- ~
is~ed temperature. And that means looking up
rixipes in a cookbook, . ,trying to convert old
recipes for microwave cooking. ,,or just resorting
i to .gues~work.. This control method work’s on. an
#ntircly. difffwe{fit basis—with a special electronic
sefisor th~t detects steam from cooking food. The
oven “k;lows’” how the food is c’ooking; so it can
autorbaticaliy, s6t the correct cooking time and,
mainlafti the proper power level for different types
and ar’!lountsl of food. And it’s adjustable to-suit
your individual taste.
in this sdction are designed to help yo,u
,,
to
Simply touch two control p,ads-AU.TO COOK and
the desi:ed Code number—and then START, A
chart on the oven control “panei gives a compiete
iist ~f Cedes for frequently prepared foods. The
readout dispiay sho.wcAUTO untii steam is sensed
and then sigr’~als,atld dispiays time counting down.
During AUTO,
when oven signais, most foods shouid be turned,
stirred, or rotated. check the Automatic Cooking
Chart for suggestions.
Appropriate containers and coverings heip assure
good cooking resuits. Containers shouid match in
CJVE?H shouid not be opened, but
sizeto the size of the food being cooked, Coverings
such as piastic wrap secured on aii sides, the iid
that came with the container, or microwave-safe
piastic domes are ideai. Forexampies of containers
and coverings, see page 8 and the foiiow\ng recipe
section of this book.
With ~reference Con’troi, you can adjust the Automatic Cooking Feature to your individual taste by
adding either “1” or “9” after Code number, if after
trying the suggested Code, you wouid prefer iess
cooking time, simply add the number “1” after the
Code and the oven automatically iessens the caoking time by 20°/0,if you wish more cooking time, add
“9” after the Code to increase cooking time by
Automatic Roasting uses the, temperature probe
rather than the electronic sensor to cook meats
eveniy to the desired degree of doneness. The oven
continually monitors the food’s internai temperature. Uniike ordinary Temperature Cooking, the
oven changes power ieveis two or three times
depending on the degree of doneness during cooking to give you the best resuits automatically. Meat
iscooked eveniy, without toughening because lower
power ieveis are used asthe meat temperature rises
thus cooking meats eveniy whiie retaining the naturai juices. After cooking, the oven switches automatically to Hoid for an hour, Food stays warm
without overcooking.
20°/0,
A wide variety of foods inciuding meats, fish, casseroles,
vegetables, ieftovers, and convenience foods can be Auto
—
—“
Gooked. Match container size with the food, cover
,<
..
sec.ureiy, and do not open door during AUTO cycie,
When cwen signais, turn, rotate or stir as recommended in
Cookbook or chart on pages 26 and 27.
19
Recipes and foods which must be cooked
uncovered, or which require constant attention, or adding ingredients during cooking
shouid be microwaved by TiMiE CC)OK. For
foods that microwave best using temperature
probe, use TEiMP COOK or AUTO ROA~T.
Foods requiring a dry or crisp surface after
cooking cook best with TIME COOK,
. .
Page 20

The benefit is automatic setting and control of cooking, but just like conventional microwaving you must
check the food after the AUTO cycle (oven beeps and cook time begins to count down on display) andturn,
rotate or stir as recommended.
TO
\
(
$h%xookedor canned fish useAuto
Cook Code 4. Beef’loaf uses Auto
Cook Code 8. Cover with plastic
wrap and rotate M turn after oven
signals. See the chart cti following
page for recipes,
——
Fish whole fish or seafood
pieces should be in single layer in
fiat pie plate or oblong dish to fit.
Cover with plastic wrap or container lid, Us@Auto Cook Code 6
for fill~ts and Auto Cook Code 1
for seafood pieces.
Whoie chicken, chicken breasts
and pieces, or turkey parts should
be placed in a microwave-safe 8-in,
square dish, 8 x 12 x 2-in. dish or
3qt. casserole, Cover securely with
plastic wrap or container lid. If
cooking bag is used for whole
chicken, shield breast bone with
small strip of foil. Rotate dish
1Aturn when oven signals. Use
Auto Cook Code 4.
Chuck or rump roasts should be
placed in a cooking bag with %
cup water or marinade (see rnarinacle recipes on page 100 in
Cookbook) and placed in a microwave-safe dish. Cut bag to fit close
to the size of the roast and tie open
end securely. Cut a 1-1%“ slit near
the tie, Use Auto Cook Code 9 for
cooking.
I
Pork chops automatically cook well
in 8 x 12 x 2-in, dish, covered with
plastic wrap. Add barbeque sauce
or other sauce on each chop.
Microwave using Auto Cook Code
49 which is Code 4 with the added
digit 9 giving the Code 20°/0more
time. (See page 19.)
Spare ribs and brisket should be
automatically cooked in round
glass container with lid or plastic
wrap. Makesure iiquid covers meat.
After oven signals, turn over or
rearrange meats often.
I
Use the following step-by-step instructions and tips when adapting your casserole recipes for Automatic
Cooking.
Select recipes that do not require adding ingre-
dients at different stages during cooking or
recipes that require extra attefltion, stirring
ar rotating.
Use microwave-safe containers that are appro-
2:
priate in size to the food amount. Use 3 qt. con-
ta~rlef$ or less!
For saucy casseroles, cover container with lid or 6:
3:
plastic w~ap. (No vents.) For cheese or crumb-
20
topped casseroles, remove cover after oven signals and add topping, then continue cooking
uncovered.
4:
Allow precooked ingredients or hot sauces to
cool slightly before adding other ingredients.
Meats and vegetables should be submerged in
5:
[iquid.
After oven signals, rotate c!ish % turn and stir
covering ail ingredients with liquid.
f
i
Page 21

or
..
.
.
Auto Cook Code 6 (Apprax, CmMdngThne—35min.)
1 lb. groundchuck
~{~ cup dry breadcrumbs
,‘ ‘1#8 teaspoonpqpper
1/2 teaspoonwait
1>
1 teaspoonchili powder
\
2 MMqm2n$ dry minced onions
1 egg
112cup regularrice
1 can (f~~!goz.) kidneybeans
(W’?t%aind) and microwave at Auto Cook Code 6, Rotate 1/2 turn when oven
,’ 1 ~a~I~16oz.) $cmatoes, chopped signals and time,remaining appears on readout,
,+%mdundrahwt
~‘!‘i;ffabhmpocmchill powder
~,,
1
Auto C%’okCode 4 (Approx. Cooking Time–-29 min.)
3/3 cup sherry
“If breasi bofle seems prominent, a 1”
;,
(’
1/4 cup soy sauce., “, *. . . .. . . . .
-!/3 cup honey
4 W3spons WWM&N’ch
1 whole chk,!lW1/(@XNlt3 lb.)
,1,
,,
,,
.. . . . . . .... . . . {n large mixing bowl, place meat, bread crumbs, pepper, salt, chili
powder, onion and egg. Mix well and form into 12balls. Arrange balls
in a~ircle in 2 qt. casserole, Set aside,
,.. . . . . . . . . . . . .{n small mixing bowl placm rice, beans, tomatoes and chili powder.
Mix well and pour in center of casserole and over meatballs. Cover
● . .
In 2-CUPgiass measure, place soy sauce, honey and sherry, Stir until
blended, Add cornstarch; mix well, Microwave-at HIGH (~0) for 3 to
3-1/2 minutes, stirring every minute untii thickened, Tie chicken legs
and place in 12X 8 X 2-in, microwave-safe dish, breast side up. Brush
with half of sauce (reserve haif for later use.) Microwave on Auto
Cook Code 4, When oven signals and time remaining appears on
readout, apply remaining sauce, recover and continue cooking.
strip of foii may be placed over bone to prevent splitting of wrap,
Makes6 to 8 Servings
Makes 4 Servings
Auto Cook ,$3fx@7’@q49prox.G3fMdngTime—f M, ?!5mhk) Makes 6 Servings
1 Can (10”412Oz.)condensed
wetm ofmwhrcmrmsoup
1-4/4 Cup? tif!k {1 soup Canfw$$)
3/4 cup irqj,uiarrice, uncooked
1 can (4 oz.) stem$
and pieces
f pkg. (lf=~/2oz.} dry onion soup mix
t Gutup chicken (about 3 lb.)
Recipe
Classic Ham Loaf
Elasic lvle~t Balls
Sauerbraten Beef Ring
E3aS~CIVleatloaf
CrlJmb chated Chicken
Perk Chops Rosado
Cassercde of Beans tk
Sausage
,.
,!———
..-
Page NO.
. . .In small mixing bowl mix soup and milk; reserve 1/2 cup of the
mixture. Blend remaining soup mixture, rice, mushrooms and half of
the onion soup mix, Pour into 12 X 8 x 2-in, glass dish,
. . .Place chicken pieces on rice mixture, arranging with meatiest pieces
to outside of dish. Pour reserved soup mixture over chicken and
sprinkle with remaining soup mix. Cover with plastic wrap, no vent.
Microwave at Auto Cook Code 7, rotate 1/2 turn when oven signals
and time remaining appears on readout,
Recipe
111
86
94
93
138
117
129
—-
5
2
8
4
6
5
ti--
Sweet & Sour Ham 124
Chicken & Dressing
Round Salmon Loaf
Beef Burger Stroganoff
B13QFranks
Cheese Stuffed lvleatioaf 93
Polynesian Swiss Steak
Chow Mein 118
.5
138
162
84
129
99
Page 22

—.
.-
Fresh43?’
I-
-i’,
k-w
Whole or iarge halves of vegeta-
bles such as &auliflower or squash
use Auto Cook Code 5. Use round
or square container. ~;lbse to the
size of vege~a~~~:,fW~ cuP water”
Cover wit}<l,I(da~plastic wrap. Turn
~ag~ifl~wer
!!
OVer after oven signals.
Far other ve@~abies, rotate Mturn
!.
,.
,’
Pieces or slices of vegetab~e~
require M to
1/2 cup of watfx. Use
appropriate sizecovered container.
Stir or rotate after oven signals.
Use Auto Cook Code 5.
,,
lPr6ct30ke.d/canned wegetabk$
should be placed in round corltainer similar in siz~ to amount
being cooked (at least half f.u,il).
Cover and ,stir well after AUTO
cycle. Use Auto Cook Code 1. ‘
,.
::
,’
i%kxk or Ikmw2 pkmes of frozen
vegetables should be placed in suitabla size container (at least half full)
with lid or plastic wrap. Add 1 or 2
tablespoo~s water. Stir after oven
signals. Use Auto Cook Code 3.
Pouches of frozen vegetab!e~
should be slit 1“ in center before
placing directly on oven floor. Use
Auto Cook Code 4. After oven signals, rearrange vegetable and rotate
DOUCh ‘/2 turn.
1
I
frozen vegetables in
Douches can be slit with an “X”
shaped slit and placed in glass
container with “X” downward. After
cooking, pick up poLIch and empty
food into dish through “X” opening.
22
Page 23

—
.-
R
AutoCook
1 tabk?spoo~ OH
fi tablespoonsoft butter
3 mediumonions,quartered
1small green pepper,cut in
2 cupsthinly-slicedcabbage
2/3 cup carrot%sliceddiagonally
1/4 cup (f bunch) slicedgreen onions
1 cup brocco!iflowerek
1 cup cauliflower f!owwerets
2 sla?kacelery, sliceddiagonally
—.—
AU!OCook Code—Pasta1 IApprox. ChokingTirne-f~ min.}
1,
6 lasagna noodles(1/3 pkg.) . . . . . . .
4 cups water
1 tabkspoo~vegetable oil
pkg. (fiO02.) Mxzen chopped . .. . .
can (8 oz.) tomafo sauce
can {8 oz.) tomatopaste
pw{4 oz.) sliced mushrooms
cup chopped onion
kwspmn hmforegano
W3spoon basil
R@s1300n$mit
Was+cmingarlic pmder
CUPS(f-pt.]wnai! curd cottage . . .
8 oz. grated mmzardla cheese
Code 5(Approx. Cooking Thm-16 min.)
l/4-in. wide strips
spinach
{drained)
$NWN?SQ
.. . . . .. . . . . . . . . . . . .Toss vegetables with oil and butter in 2 qt. microwave-safe casserole”
Cover.Microwave cmAutomatic Cook Code 5stirring well when oven
signals and time remaining appears on readout. Serve immediately.
Spinach 1 (Approx. Cooking Time--s min.)
Lasagna2 IApprox. Cooking Time—2~ min.)
Place noodles, water and oil into a 13 X 9 X 2-in. dish. COver wi:h
Piastic
preparing remaining ingredients.
Remove paper wrapping from box. Place unopened box into oven and
microwave on Auto Cook Code 1. Drain well.
. . . . . . . . .In
onion, oregano, basil, salt and garlic powder.
In a 13 X 9 X 2-in. dish layer well drained lasagna noodles, 1 CUP
cottage cheese, 1/2 pkg. spinach and 1/2 of tomato sauce. Repeat.
Sprinkle mozzarella cheese over top. Cover with plastic wrap. Mi~rowave on Auto Cook Code 2. Rotating and removing wrap when oven
signals and remaining time appears on readout.
wrap.Microwave on Auto Cook Code 1. Ailow to stand while
largebowl mix together tomato sauce, tomato paste, mushrooms)
FRY’
Makes 4 Servings
Makes 6-8 Servings
AUtOCod Chxb—See Recipe (ApproxmCooking+‘l’ime-z~ to 25 min.)
q pkg. (10 oz.) frozen . . . . . . . . . *. . . .
Ghopped spinach
I/2 cup rice
I Imp water
f/4 cup butter, melted
“!/4 cup finely chopped onion
1 cup milk
Place box of spinach in microwave oven and partiaiiy cook on Auto
cook Code 1. Remove from box and drain well. Set aside. in
2 qt. casserole place rice and water. COVer”~icrowave at ‘Uto Cook
Code &
Mix well. Cover and microwave at Auto Cook Code 2. Rotate 1/4 turn
when oven signals and time remaining appears on readout. Let stand
5 minutes covered before serving.
TO cooked rice, add butter, onion, ml~k,egg, salt and cheese”
Makes 4-6 Servings
Page 24

..’
,.’
,.
{
Baked App~esautomatic cook well
using A~to Cook Code 2, Match
number of apples to size of microwave-safe covered container (see
page 240 in Microwave Guide and
Cookbook), Use Auto Cook Code
2 for Baked Pears and Applesauce
~tf3Wed
~BWitand Fruit COm~Ote$
.
should bestirred well before microwaving, especially if sugar is added.
Cover; use Auto Cook Code 2 and
stir once or twice after oven sig-
nals and time appears on readout.
Touch “Start” and finish cooking.
also.
After preparirrg @ ingredients for the individual recipe as shown below the picture, follow these steps
for cooking,;;” ‘
Wep 1: GcNGr’with, plastic wrap and use Auto Cook Step 3: When cooking is finished, turn out (upside
Code 3. ‘ ‘(
Step 2: When,;@ven signals and time remaining
appears cm{i@@@M,remove covering and rotate dish
1Xturn.
.t.,:
, <,
,!
‘,
/---+.
down) the Nut Cake and Cornbread. Invert Caramel
Biscuit Ring and let dish stand over ring a few
minutes before serving.
[,
——
aubrntrticd!y. Cimise bottom and
sid9SOfmicrowave-Safe fiuted cake
cxm%irmrand sprirrk!e bottom evenly vv~th 1/3
CUf3 chopped r?~k or
caconut. Carefully pour batter from
one box (2-layer size) cake mix over’
nuts, cover with plastic wrap. See
Steps above for Automatic Cooking.
Cook Code 3. Spread ~ cup melted
butter and M cup brown sugar in
tl-in. round glass dish. sprinkle
with cinnamon and 1Acup chopped
nuts if desired. Arrange 1 can
(10oz.) refrigerated biscuits around
edges and place drinking giass,
open end up, in center, &3e steps
above for Autornati~ Cooking.
24
bread: Distribute
1/2 cuj chopped
crisp fried bacon and 1 tablespoon
Parmesan cheese in greased 8-in.
round glass dish. Carefully pour
batter from 1 pkg. (81AOL) corn- L
bread mix or use batter from corn- ‘Q&Y
a.:..
:.jjyj+;::
n
bread ring page 226, over above ,
ingredients. See Steps above for
Automatic Cooking.
Page 25

N
Auto Cook Code 3 @pprox. CookingTMw?--18min~)
1 pkg. (2-iay@rsize) . . . . .. . . . . . . ~
Wdge cakemix
3;Ni/~@.4~Swabr
,
I(4 cup finely chopped peean$,. .,.
, , $;
(’ nuts
{‘,
{n large b~wi place cake mix, eggs, vaniilal ?i~and wat~r” Pi@?don
mediumspeedof mixer,about2 rninute$, Uf)tllSmooth and :feal~y~ ~
Lightly grease a 16cup plastic microwave fluted or straight~~ided ring ~
mold, Sprinkle chopped nuts evenly over bottom, POWb?tter.ov~r
Cover with plastic wrap and microwave cmAuto Cook C%db3.Fh+NNe’
dish 1/4 turn and remove wrap when
appearson~eadc)ut,
(
A(W$QCook CW#e3 (Approx. Cooking llme—f~ min~]
~’~an(~&22 OZ.]prepared,. . . g
(
‘ Wmwwypie filling
,’
,1
dish 5 minutes before turning out+
In B-in. square glass dish, spread pie filling.
● ●
Nlalw?s1 (lQ-in.) Tube Cake”
oven SignalSandremainingtirn~
Touch “start” and continue cooking? Let stand In
,’
Makes Qto,? Servings
Ask.
2 cups dry ye!lowor white . . . . . . .
cake mix (f pkg.[9. w?!.]or
l/~ pkg. ~17.OZ.])
1/4 cup nmdted butter ~
1/2 cup coarsdy chq@dd nuts
1 ‘&wpoan gqw!m.$1ahwlamo~
mm Cmk Ckds aI@pp6’cDLCooking Time-~~ min~)
cup butter
, . . . . , . . *. .
● ,.● . ● ● Q. ●
In small bowl, mix together cak~ mix, butter, nuts, and cinnamon until
crumbly, sprinkle evenly over cherries or, in three r~w~ so ~herr@s
are visible. Cover with plastic wrap.
Microwave on Auto Cook Code 3 rotating dish 1/2 turn andremoving
plastic wrap when oven signais and remaining time appears on
readout. Touch “Start” and continue cooking.
In 8 in. round dish place butter. lvlicrOwave at HIGH (10) for 3/4 to 1
minute until meltedt Sprinkle sugar over butter. Drain pineapple (save
liquid)on paper towels and arrange in dish. Decorate wi~h cherries”
Place a 2“ diameter drinking glass (4” tall) open side up in center of
dish.*
In small mixer bowl place fiour, sugar,
ening, egg, iiquid and vanilia. Beat 3 minutes on iowest mixer sPe@dt
scraping bmvi constantly first 1/2.minute. CarefuiiY spread batter over
fruit in dish. cover with piastic
Cook Code 3
and time remaining appears on readout. TOuch “S~art” and continue
cooking.
I
W!Y3P-no vent. ~i~rowave on, ‘Uto
Rotate 1/4 turn and remove wrap when oven signals
Makes 1 (f+in. round) Cake
baking powder, sait, short-
E31.Jrldt
Applesauce
Stewed Dried Fruit
II
240
241
Recipe
Basic Bread Pudding
Steamed Pudding
Streuseied Appies
Cornbread Ring
9
2
Steamed Brown Bread
Page!NO.
246
265
240
226
226
r
4
2
3
7
Page 26

e
Do not open oven door during AUTO cycle. May
effect cooking performance. After first beeping
signal (time appearson readout for codes except
Code 1), stir or rotate food.
Match the amount of the food to the size of the
C{lnt,ainer. Fill containers at least Mfull,
Add %-%cup water to fresh vegetables. Stir or
turn over vegetables and meatsafter first beeping
signal.
—.
@ Use microwave-safe plates or casseroles,except
IX) NOT USE PAPER PLATES with Automatic
Cooking.
@ Be sure the exterior of the cooking container
and interior of microwave oven aredry.
@ Stir or rotate after ovensignals andtime appears
on readout.
I
lames
Frozeri
Thin (under 1“)
‘Thick (over l“) 10 oz. Cook in container,
21 oz.
Mkn%?l’s
—..—.
TV it)inner(10-12m,) Cook in containor. -
cooking:
!Macotl
:4 slims)
Xfxwok
~?ecookedingrmiienk
..—.,..—
——
! 4200
!
Cc9nta!nw
Microwave-safecontainermatchadtosize
of food.
I
Microwave-safe container matched to size
~ of food.
3
Cook in container.
(see comments)
4
(see comm~nts}
4
1 Microwave-safe
container matched to
size of food.
4
(see comments) _
.——
5
12 x 8 x 2-in. glass
dish lined with paper
towels. Cover wit17
plastic wrap,
2 qt. casserole with lid
6
or cover with plastic
wrap.
7
II
——
##
Approx.
Time
,
2-3
4 rnin,/cup
12-14 min.
16-18 min.
25-35 min.
2-3 min./cup
17-19 min.
6-8 min.
35-45 min
45-55 min.
min./cup
G3mmmt8
Govwwithplastic
2 or moreswvingsweconsideredlarg@
amounts.Coverwithplasticwrap
~over with plastic wrap or lid to
Cook in own container, or for quicker cooking,
in glass container. NOTE: If entree is in aluminum pan, remove from box, remove lid and put
back in originai closed box. If entree is in paperboard container, remove from box and microwave with original plastic covering.
Use bowl with plastic wrap or cover plate with
microwave-safe plastic dome.
Remove foil top and put back in box, If dinner
has cake
When oven signals, rotate %turn.
Make sure iiquid covers all ingredients, When
oven signals, stir well.
orbrownies, remove before cooking.
wrap or lid to dish,
or lid.
dish.
,,
:asserole
ieces
rwit
aked Apples (4)
aked Pears (4)
12x 8 x 2-in. glass
41
dish. Cover with
plastic wrap.
NOTE: [Makesure
meat doesn’t touch
covering.
7
4
4
12 x 8 x 2-in. glass
dish or cooking bag.
Cover with 2 pieces of
overlapping plastic
wrap.
13 x 9 x 2-in. glass
9
dish. Put in cooking
bag and secure with
tie, Slit bag 1“ at top
near tie.
12x 8 x 2-in. glass
6
~ish. Cover with
]Iastic wrapt
?qt. casserole with
2
id.
2
—
,,
It
!!
22-26 min.
60-70 min.
2-4 min.~piece
42-44 min.
1 hr. 30 min.1 hr. 40 min.
20 min.
14-18 min.
14-18 min.
No additional liquid needed. When oven signals, rotate M turn. Note the preference control
1 is used with breasts to decrease cooking Iim(
for best results.
When oven signals, stir well and rotate %turn.
No additional liquid needed. When oven
signals, rotate Mturn.
Put on trivet and sit as straight as possib!e.
Rotate Mturn when oven signals.
Add Mcup water. When oven signals, rotate
1/2 turn.
Baste with butter and lemon juice. When oven
signals, rotate
1/2 turn.
—
Core apples. No water needed. When oven
signals, rotate M turn.
Core pears. No water needed. When oven
signals, rotate Mturn.
Page 27

B~
l~q
.%
.%.
Save proof of original purchase date
WHAT’ISCx3vwu!m
.——..
.—-—.....
(includesmicrowavecooking centers and ovens)
such as your sales sliporcancelledcheckto establish warranty period.
—
FLJLLONE-YEAR WARRANTY
For one yearfrom date of original
purchase,we will provide,freeof
charge,parts and servicelabor in
your hometo repairor replaceany
part of the microwaveovenlrange
that fails becauseof a manufac-
turing defect.
LIMITEDA!IDITK3NAL
FCN.JR-YEARWARRANTY
Forthe secondthrough fifth year
from date of original purchase,
we will provide,freeof charge,a
replacementmagnetron tube if the
magnetron tube fails becauseof a
manufacturing defect. Youpay for
the servicetrip to yourhome and
service labor charges.
This warranty is extendedto the
original purchaserand
ing
ownerfor productspurchased
for ordinary homeuse in the 48
mainland states, Hawaii and
Washington, D.C.In Alaskathe
warrantyis the sameexceptthat it
is LIMITEDbecauseyou must pay
to ship the productto the service
shopor for the servicetechnician’s
travelcosts to your home.
All warrantyservicewill be provided
by our Factory ServiceCentersor
by our franchised CustomerCare”
servicersduring normalworking
hours,Check the White Pagesfor
GENERALELECTRICCOMPANY
or GENERALELECTRICFACTORY
SERVICE.Look in the Yellow
Pagesfor GENERALELECTRIC
CUSTOMERCAR12SERVICEor
GENERALELECTRIC-HOTPOINT
CUSTOMERCARE@SERVICE,
any succeed-
;[/=
IIe–
ii:=
1! ?=
J_.?-
—.
—.
Il&
11-x
1sNf3T
Some states do not allow the exclusion or limitation of incidental or consequential damages, so the above limitation or exclusion
may no! apply to you.This warranty givesyou specific legal rights, and you may also have other rights which vary from state to state.
To know what your legal rights are in your state, consult your local or state consumer affairs office or your state’s Attorney General.
!f further help .isneeded concerning this warranty,contact:
Affairs, General EIectric Company,Appliance Park, Louisville, KY 40225
@Service trips to your home to
teach you how to usethe product.
Readyour Useand Care material.
If you then haveany questions
about operating the product,
please contact your dealer or our
Consumer Affairs office at the
address below.
~ Improper installation.
[f you have an installation problem,
contact your dealer or installer.
Youare responsible for providing
adequate electrical, exhausting
and other connecting facilities.
VVarri3~t0r:
General Electric Company
~ Replacementof housefuses
or resetting of circuit breakers.
@Failure of the product if it is
used for other than its intended
purposeor usedcommercially.
~ Damageto product caused
by accident, fire, floods or acts
of God.
WARRANTORIS NOTRE!3PON-
SIBLE FORCONSEQUENTIAl-
DAMAGES.
,:=—.
11L---
jl~:=I~<
II ~x -
l~6%_
Il&=-..
11%:<7
,.;==..,.
-.
-.
 Loading...