

GE JET108, JET114 Use and Care Manual

-i-hisuseand care
Takethetime to readthis book and learn howto enjoy
your new Mkrowave Oven. It contains detailed operating instructions andrecommendedmaintenance,as
well ashandy tips to helpyou gain maximum benefits
from your Microwave Oven. Once you have read the
book, keepit handyto answeranyquestions you may
have,
If you have any additional questions concerning the
operation of your Microwave Oven, write—including
your phone number—to:
ConsumerAffairs
GeneralElectric Company
Appliance Park
Louisville,Kentucky 40225
IFYOU RECEIVEDA DAMAGED OVEN, immediately
contact the dealer (or builder) from whom you purchased it. They have been informed of the proper
procedure to take care of such matters and can
handle it for you.
It is important that we, the manufacturer, know the
location of your MicrowaveOvenshould a needoccur
—
for adjustments.
Please check with your supplier to be sure he has
registered you as the owner; also send in your Purchase Record Card. if you move,or if you are not the
original purchaser please write to us, stating model
and serial numbers. ‘This appliance must be regis-
kmd. Pleasebecertainthatit is.
Write to:
General Electric Company
Range Product Service
AP2-210
Appliance Park
Louisville, Kentucky 40225
Anameplate on which isstamped the model and serial
number is located either inside ovenat top left side, or
on rear outside of case.
Model and serial numbers are also on the Purchase
Record Card which came with your Microwave Oven.
Record the numbers in the spaces below.
Please refer to both model and serial numbers in any
future correspondence or product service calls concerning your Microwave Oven.
..
serial
Date Purchased
KEEP WITH THIS TO
THE PERIOD.
Check“Commcx~Problems”section. (Seepage15.)It
lists many minor causes of operating problems that
you cancorrect yourself and maysave you an unnecessaryservicecall,
H You
In many cities, there’s a General Electric Factory Service Center. Call, and a radio-dispatched truck will
come to your home by appointment—morning or
afternoon. Charge the work, if you like, All the centers
accept both Master Charge and Visa cards.
(Seepage 16,)
Or look for General Electric franchised Customer
Care@servicers. You’ll find them in the Yellow Pages
under “GENERAL ELECTRIC CUSTOMER CARE@
SERVICE” or “GENERAL ELECTRIC-HOTPO!NT
CUSTOMER CARE@SERVICE”.
H you need serwke literature, parts lists, park or
accessories,contact one of the Factory Service Centers, a franchised Customer Care@servicer or your
General Electric dealer.
Extended Sewhx?Contracts:The terms of your warranty provide free service covering failures due to
manufacturing defects for a definite period of time.
After this warranty expires you may purchase an
Extended Service Contract which will enable you to
budget your service needs. This coverage beyond
warranty is availablefrom our Factory Service Centers
and from many franchised Customer Care@servicers.
It isa good ideato apply for this coveragebefore your
warranty expires.
to for
First, contact the people who serviced your microwave oven. Explain why you are dissatisfied. [n most
cases,this will solve the problem.
Next, if you are still dissatisfied, write all the details—
including your phone number—to:
Manager, Consumer Relations
General Electric Company
WCE-312
Appliance Park
Louisville, Kentucky 40225
Finally, if your problem is still not resolved,write:
Major Appliance Consumer Action Panel
20 North Wacker Drive
Chicago, Illinois 60606
This pane!, known as MACAP, is a group of independent consumer experts under the sponsorship of _
several industry associations. Its purpose is to study
practices and advise the industry of ways to improve customer service. Because MACAP is free of industry
control and influence, it is able to make impartial
recommendations, considering each case individually.
fcxservice
..:.$-
.%=:
.—+
c
OI!.J81General Electric Co., U.S.A. All rights reserved.
2
—...—
..——.—.— -—-—
-—------- ----
Before Microwaving ..............I.....,... t. 2
Grounding Instructions & Precautions ...3
Safety Tips .................$............. ......4
krtroduction to Oven .....,..,,.,.,, ~,.$......5
Touch Control Panels....... ......... .t.. t*6,7
Set the Clock .... ......t.... ~DJŠ.....,.........,,,7
Automatic Roasting & Chart .......,,..,.. 8,9
—.
A,
i [me COOK . ..... .. . .... ... ... ... .... ... . ... . ..
4 f>
Iv
13efrost.......... .....~f....,................, +,11
Cook Code’” Control (JET 114 only) ....11
Temp Cook.... ~...,........,.. !..., ?~....... ~.12
Hold/Timer .,...., t,#,,+....... ............~~~?I~
Care of Your Oven ... .........!... ... ........I 4
Problems and Solutions ........ ............15
Factory Service Centers,............,... t.M
warranty. .. .............. t.t~~t.~t, $ack Cover
PREFERRED METNOD
---
--,.
-t
6+
D
I . “ ‘
\l
INSWNPROPERGROUND
Y
Figure 1
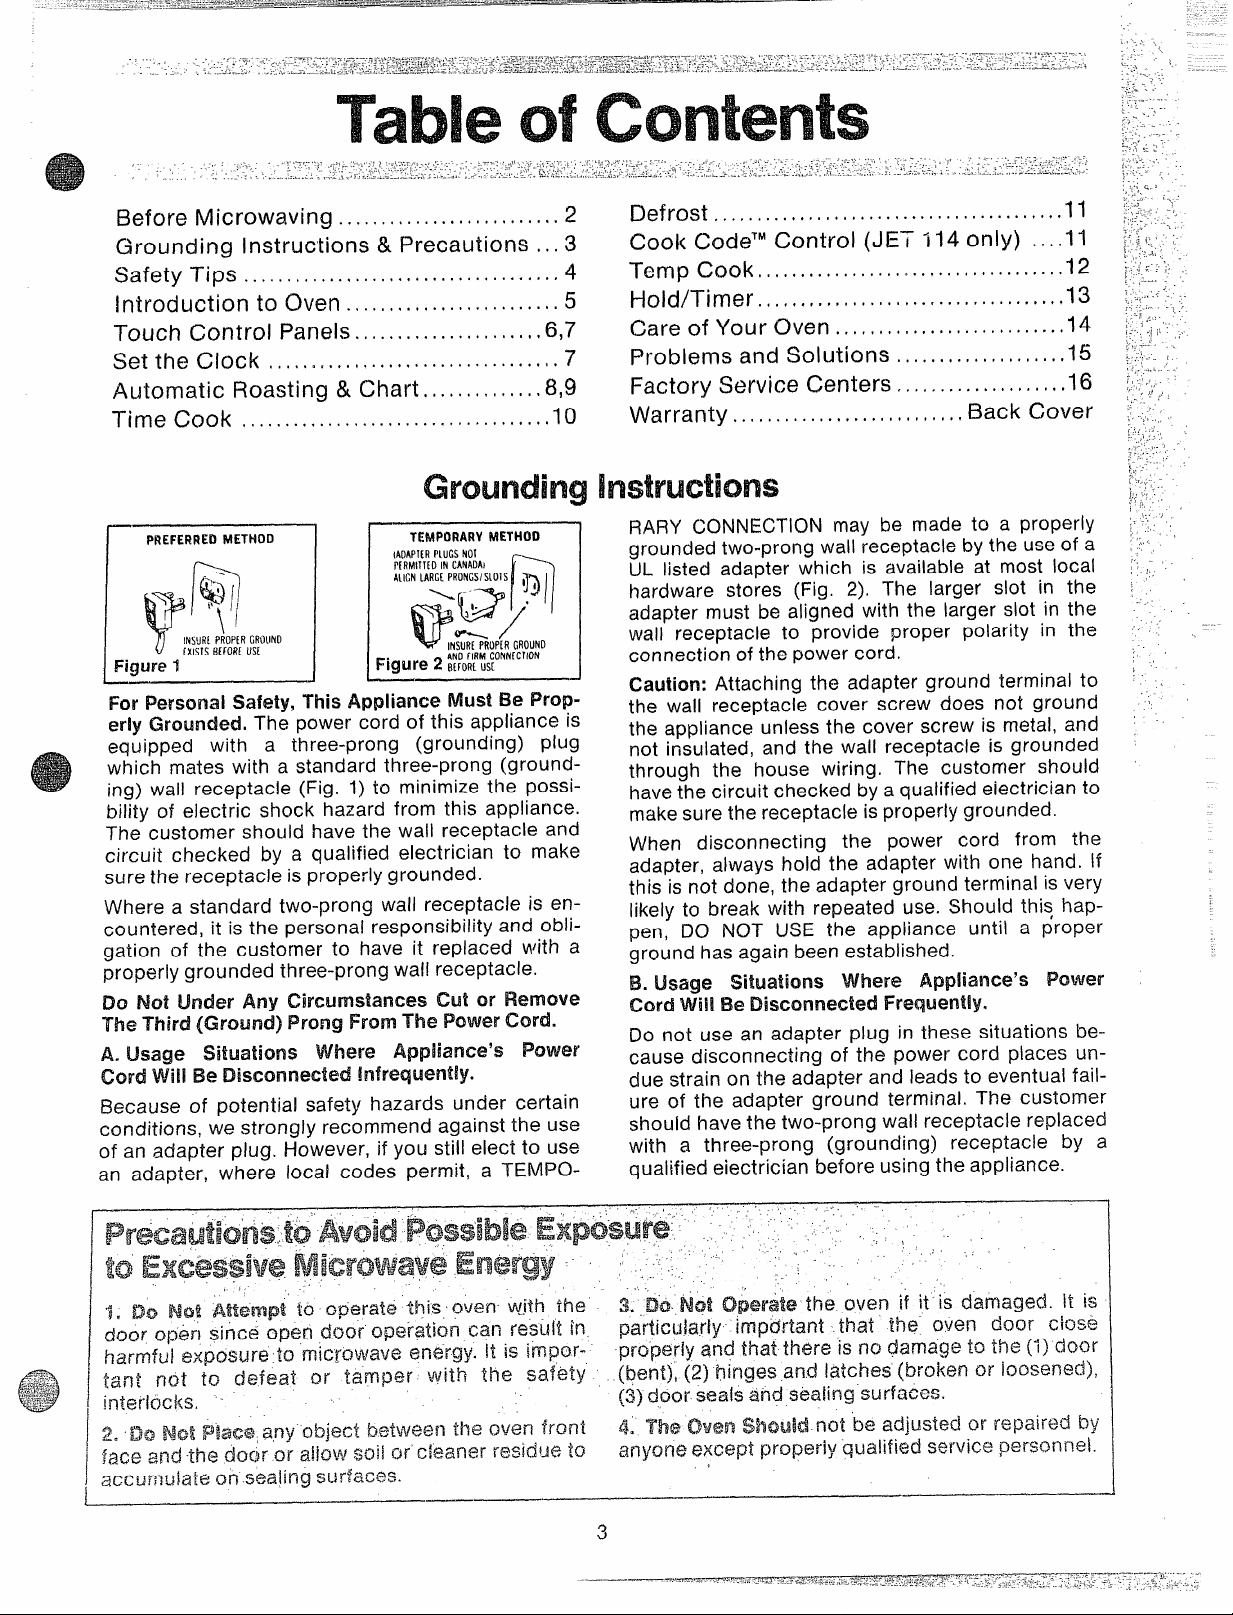
For FWscmai Shfety,This Appliance MtJst Be i%’op
erly Grounded. Th& power cord of this appliance is
equipped with a three-prong (grounding) plug
which mates with a standard three-prong (grounding) wall receptacle (Fig. 1) to minimize the possibility of electric shock hazard from this appliance.
The customer should have the wall receptacle and
circuit checked by a qualified electrician to make
sure the receptacle is properly grounded.
Where a standard two-prong wall receptacle is encountered, it is the personal responsibility and obligation of the customer to have it replaced with a
properly grounded three-prong wail receptacle.
Do Not Lhckr Any Cmurmtances
The Third (Ground) Prong From The PowerCord.
A. Usage Situations Where Appiiance’$ FWfWX
Cord Will Be Disconnected
E3ecauseof potential safety hazards under certain
conditions, we strongly recommend against the use
of an adapter plug. However, if you still elect to use
an adapter, where local codes permit, a TEMPO-
mrs B[roR[US[
TEMPORARYME7HLNI
IAOAPKRPIUGSNO1
PIRMITMDINCANAOAI
‘l’~NMRG[pRONGs’sLO’sI ,
,-
W(T
3‘.
..
%/
V
INSUR[PROPIR
~i~!..!r(? 2 BfFORfUS[
ANDflRMCONNECTION
cm or Remove
n
/“
GROUND
RARY CONNECTION may be made to a properly
grounded two-prong wall receptacle by the use of a
UL listed adapter which is available at most local
hardware stores (Fig. 2). The larger slot in the
adapter must be aligned with the larger slot in the
wall receptacle to provide proper polarity in the
connection of the power cord.
Caution: Attaching the adapter ground terminal to
.
the wall receptacle cover screw does not ground
the appliance unless the cover screw is metal, and
not insulated, and the wall receptacle is grounded
through the house wiring. The customer should
have the circuit checked by a qualified electrician to
make sure the receptacle is properly grounded.
When disconnecting the power cord from the
adapter, always hold the adapter with one hand. If
this is not done, the adapter ground terminal is very
likely to break with repeated use. Should this happen, DO NOT USE the appliance until a proper
ground has again been established.
B. Usage Situations Where Appliance’s Pwwr
Cord W!! Be ‘Disconnected.Frequently.
Do not use an adapter plug in these situations be-
cause disconnecting of the power cord places undue strain on the adapter and leads to eventual failure of the adapter ground terminal. The customer
should have the two-prong wall receptacle replaced
with a three-prong (grounding) receptacle by a
qualified eiectricia~ be~oreusing the appliance.
1. For personal safety the oven must be properly
grounded. See groundinginstructionson page3 of
this book. For best operation, plug this appiiance
into its own electrical outlet, to prevent flickering of
lights, blowing of fuse or tripping of circuit breaker.
2. Use of extension cords. Because of potential
safety hazards under certain conditions we strongly
recommend against the use of an extension cord.
However, if you still elect to use an extension cord,
it is absolutely necessary that it be a UL listed 3-wire
grounding type appliance extension cord and that
the current carrying rating of the cord in amperes
be 15amperes or greater. Such extension cords are
obtainable through General Electric service, if you
do use an extension cord with your microwave
oven, the interior light
may flicker and the blower
sound may vary when oven is in use,
3. Be certain to place Ma front surface of the door
thruminci~,esor more back from the cmtmh!?rbp
edge to avoidaccidentaltipping of the appHancein
normal usage.
4. Use metal only as directed in cookbook. Metal
strips as used on meat roasts are helpful in cooking
food when used as directed, Metal trays may be
used for TV dinners. However, when using metal in
the microwave oven, keep metal at least !-inch
awayfrom sidesof rnimxww.weoven.
5. Do not operate the oven while empty to avoid
damage to the oven and the damp of fire. If by ac-
cident the oven should run empty a minute or two,
no harm is done. However, try to avoid operating
the oven empty at all times–it saves energy and
prolongs life of the oven.
6. Cooking utensils may become hot because of
heat transferred from the heated food. This is espe-
cially true if plastic wrap has been covering the top
and handles of the utensil. Pot holders may be
needed to handle the utensil,
7. Sometimes, the oven shelf can become too hot
to touch. Be carefu! touching the shelf during and
after cooking.
8. Do not use any in food you are
microwaving unless that thermometer is designed
or recommended for use in the microwave oven.
9. Remove the probe from the ‘oven
when not using it to cook with. If you leave the
probe inside the oven without inserting it in food or
liquid, and turn on microwave energy, it can create
electrical arcing in the oven, and damage oven
walls.
10, Remove wire on paper and plastic
bags before placing in oven. Twist-ties sometimes
cause bag to heat, and may cause fire.
11.DQnY~defrc& fWEZen in narrow necked
bottles especial~y carbonated ones, Even if the container is opened, pressure can build up. This can
cause the container to burst, resulting in injury.
12. Don’t OvewcookeEm%%s$ive dehy”
drates and may cause Ml”wmtto catch fire
Causi?lg‘c&m%X&?.
13.It foodsho~idlever ignite: Keep the oven door
WMMd. Turn CM the power immediately: Touch
CLEAR/OFF or disconnect poww cord or shut off
power at the fuse circuit breaker panel.
14. Boilingeggs (in and out of shell) is not recomm-
ended for microwave cooking. Pressure can build
up inside egg yolk and may cause it to burst, resu!ting in injury,
15, Foods with unbrokenouter “skin” such as potatoes, hot dogs or sausages, tomatoes, apples,
chicken livers and other giblets, and eggs (see
above) should be pierced to ailow steam to escape
during cooking.
16.’Y3oWNW2”cooking pouches and t!ghtly closed
plastic bags should be slit, pricked or vented as di-
rected in Cookbook, If they are not, plastic could
burst during or immediately after cooking, possibly
resuiting in injury, Also, plastic storage containers
should be at least partially uncovered because they
form a tight seal. When cooking with containers
tightly covered with plastic wrap, remove covering
carefully and direct steam away from hands and
face.
17. Do not pop popcorn in your rnicrawave oven
unless in a special microwave popcorn accessory
or unless you use popcorn Iabeied for use in microwave ovens. Because of the heat generated without
these precautions, the container could catch fire,
18. Plastic LJR?nsils-Plastic utensils designed for
microwave cooking are very useful, but should be
used carefully. Even microwave plastic may not be
as tolerant of overcooking conditions as are giass
or ceramic materials and may soften or char if subjected to short periods of overcooking. In longer exposures to overcooking, the food and utensils
couid ignite. For these reasons: 1) Use microwave
plastics only “and use them” in strict compliance
with the utensil manufacturer’s recommendations.
2) Do not subject empty utensils to microwaving. 3)
Do not permit children to use plastic utensils without compiete supervision.
19. Do not use your microwave oven to dry news-
papers. If overheated, they can catch fire.
20. ‘i&seof $he!t Accessory. To position shelf so
that it is securely “seated,” insert into the oven cavity above shelf supports and completely to the back
oven wall. Drop into place so that the recessed
areas are over the shelf supports. To remove sheif,
lift shelf above supports and then puii forward and
out. Do not place food on shelf unless it is securely
“seated” on the supports.
21. When cooking pork either conventionality or in
the microwave oven, foliow our dit-ections exactiy
and always cook the meat to at least 170°. This
assures that, in the remote possibility that trichina
may be present in the meat, it wili be killed and
meat will be safe to eat.
4
-#
—====—-——-—.—.—
-k
/@
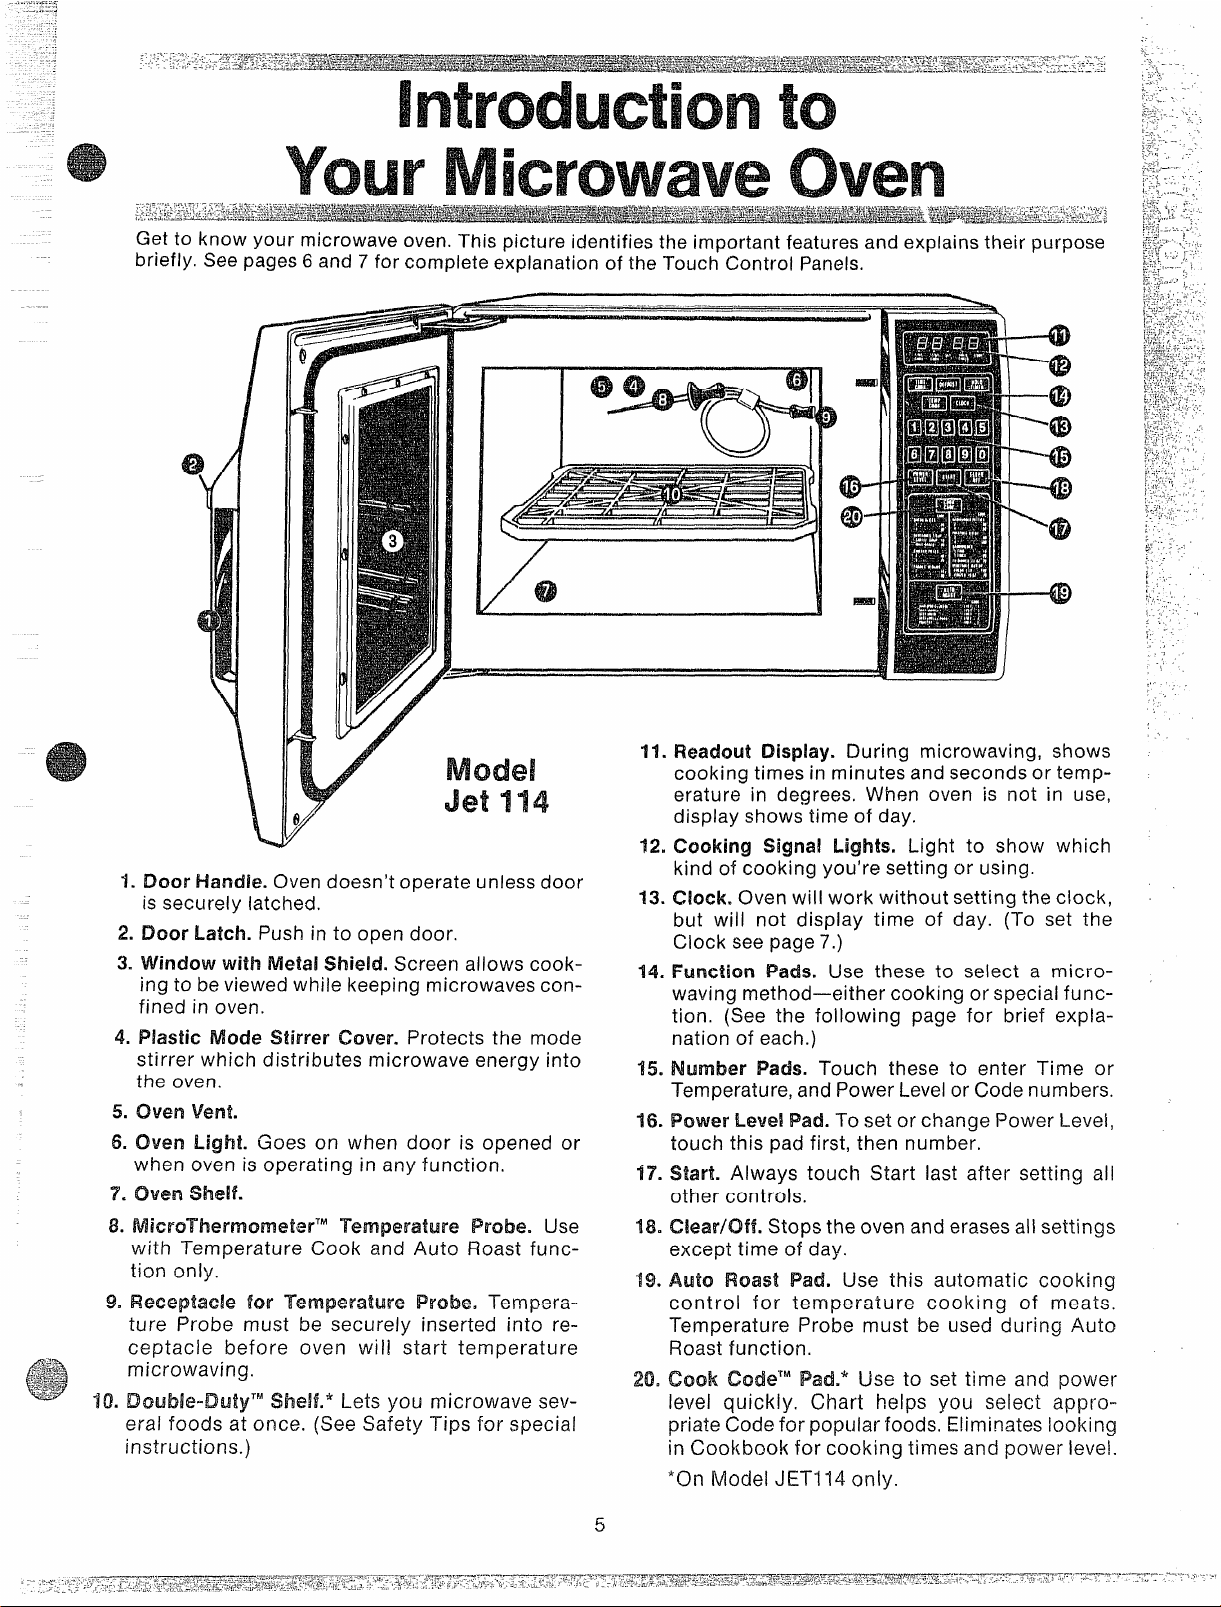
!DoorHandle. Oven doesn’t operate unless door
is securely latched.
2.
Door Latch. Push in to open door.
3.
Window with Metal Shield. Screen allows cooking to be viewed while keeping microwaves con-
fined in oven.
4.
Plastic Mode Stirrer Cover. Protects the mode
stirrer which distributes microwave energy into
the oven.
5.
oven vent.
6.
Oven Light. Goes on when door is opened or
when oven is operating in any function,
oven shelf.
MicroThermometerTM
~~ithTemperature Cook and Auto Roast func-
ion only.
9.”i!
Ieceptaele for Probe, Ternpera-
t
ure Probe must be securely inserted into re-
c
ceptacle before oven wi 11start temperature
eral foods at once. (See Safety Tips for special
instructions. )
Temperature Probe. Use
——
\
-71
/
fll.
Readout Display. During microwaving, shows
cooking times in minutes and seconds or temperature in degrees. When oven is not in use,
display shows time of day,
Cooking Signal Lights. Light to show which
-12#
kind of cooking you’re setting or using.
13.
Clock. Oven will work without setting the clock,
but will not display time of day. (To set the
Clock see page 7.)
Function Pads. Use these to select a micro-
14=
waving method—either cooking or special function. (See the following page for brief explanation of each.)
‘Number Pads. Touch these to enter Time or
15.
Temperature, and Power Level or Code numbers.
Power !Level‘Pad.To set or change Power Level,
16
touch this pad first, then number.
Start. Always touch Start last after setting all
17.
other controls,
180
Clear/Off. Stops the oven and erases all settings
except time of day.
Auto Roast Pad. Use this automatic cooking
19.
con t ro I for temperature cooking of meats.
Temperature Probe must be used during Auto
Roast function.
20.
Cook CodeT” ‘i%@.’Use to set time and power
level quickiy. Chart helps you select appropriate Code for popular foods. Eliminates looking
in Cook boo!<for cooking titmes and power level.
‘On Model JETI 14 only.
,
.0
6P
#’-
-45
---49
\@
----’43
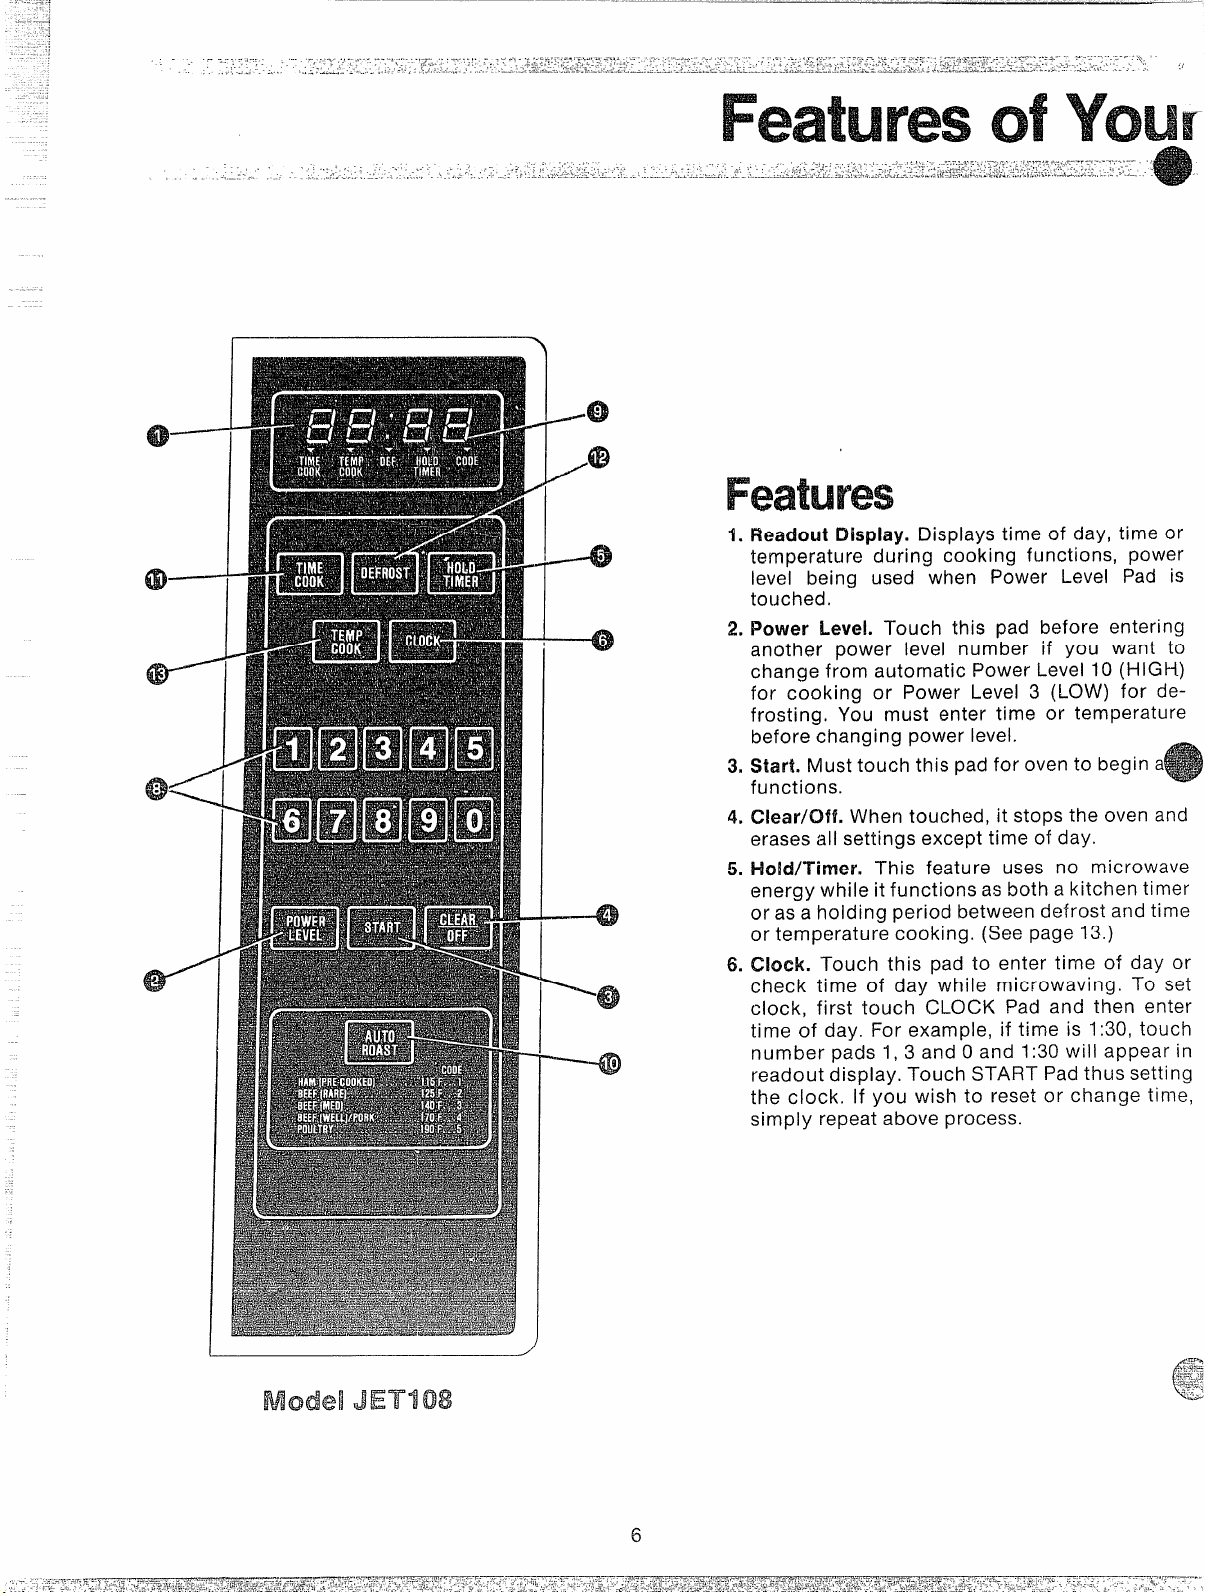
1.
Readouf Display. Displays time of day, time or
temperature during cooking functions, power
level being used when Power Level Pad is
touched.
Power LeveL Touch this pad before entering
2.
another power level number if you want to
change from automatic Power Level 10 (HIGH)
for cooking or Power Level 3 (LOW) for de-
frosting. You must enter time or temperature
before changing power level.
S#arLMust touch this pad for oven to begin a
3n
functions.
4,
C1ear/CMf.When touched, it stops the oven and
erases all settings except time of day.
Hold/Timer. This feature uses no microwave
5,
energy while it functions as both a kitchen timer
or as a holding period between defrost and time
or temperature cooking. (See page 13.)
Clock Touch this pad to enter time of day or
6,
check time of day while microwaving. To set
clock, first touch CLOCK Pad and then enter
time of day. For example, if time is 1:30, touch
number pads 1, 3 and Oand 1:30 will appear in
readout display. Touch START Pad thus setting
the clock. If you wish to reset or change time,
simply repeat above process.
6
 Loading...