

Page 1
,JE”lf112!
EN
CE
.3
Page 2

——.
16k$
Y
Add
Your new microwave oven does so.many things that you’
find this new “verb” handy. Hyou take a look at the Cook
Book, you’ll see the verb “microwave” often. sOmetimeSit
means to bake. Sometimes, to roast, It’s also used to mean
reheating, warming, even defrosting. In other words, all the
things your new microwave oven can do.
Microwaving is a whole new world of cooking. We think
you’ll like it.
Manager–Consumers Institute
General Electric Company
Appliance Park 2/235
Louisville, KY 40225
It is important that we the manufacturer know the location of the microwave
oven you are now using shouid aneed occur for adjustments.
Pleasecheck with your supplier to be sure he has registered you as the owner. If
you move, or if you are not the original purchaser, please write to us, stating
model and serial numbers. Write to:
General Electric Company
Product Service Section
Range Marketing Department
w 2-210
Appliance Park
Louisville, Kentucky 40225
This appliance mustbe registered-please be certain that it is.
Your General Electric microwave oven has a nameplate on which is stamped the
model number and serial number. Nameplate may be located either inside oven
at top left side, or on rear outside of case.
Model and serial numbers are also on the Purchase Record Card which came
with
your microwave oven. Before sending in this card, please record the num-
bers in the space below, or get them from the nameplate described above, and
record here:
Model ~umber
Please
uct service calls
refererics both these numt)ers In any futiire correspondence or prod-
concern tnfj your mIcrowavc oven
Serial Ny~Q@r- -.. . . ... --–—.– —._...
.--:.
,-
Page 3
—
-, ,
l!-
W!!!
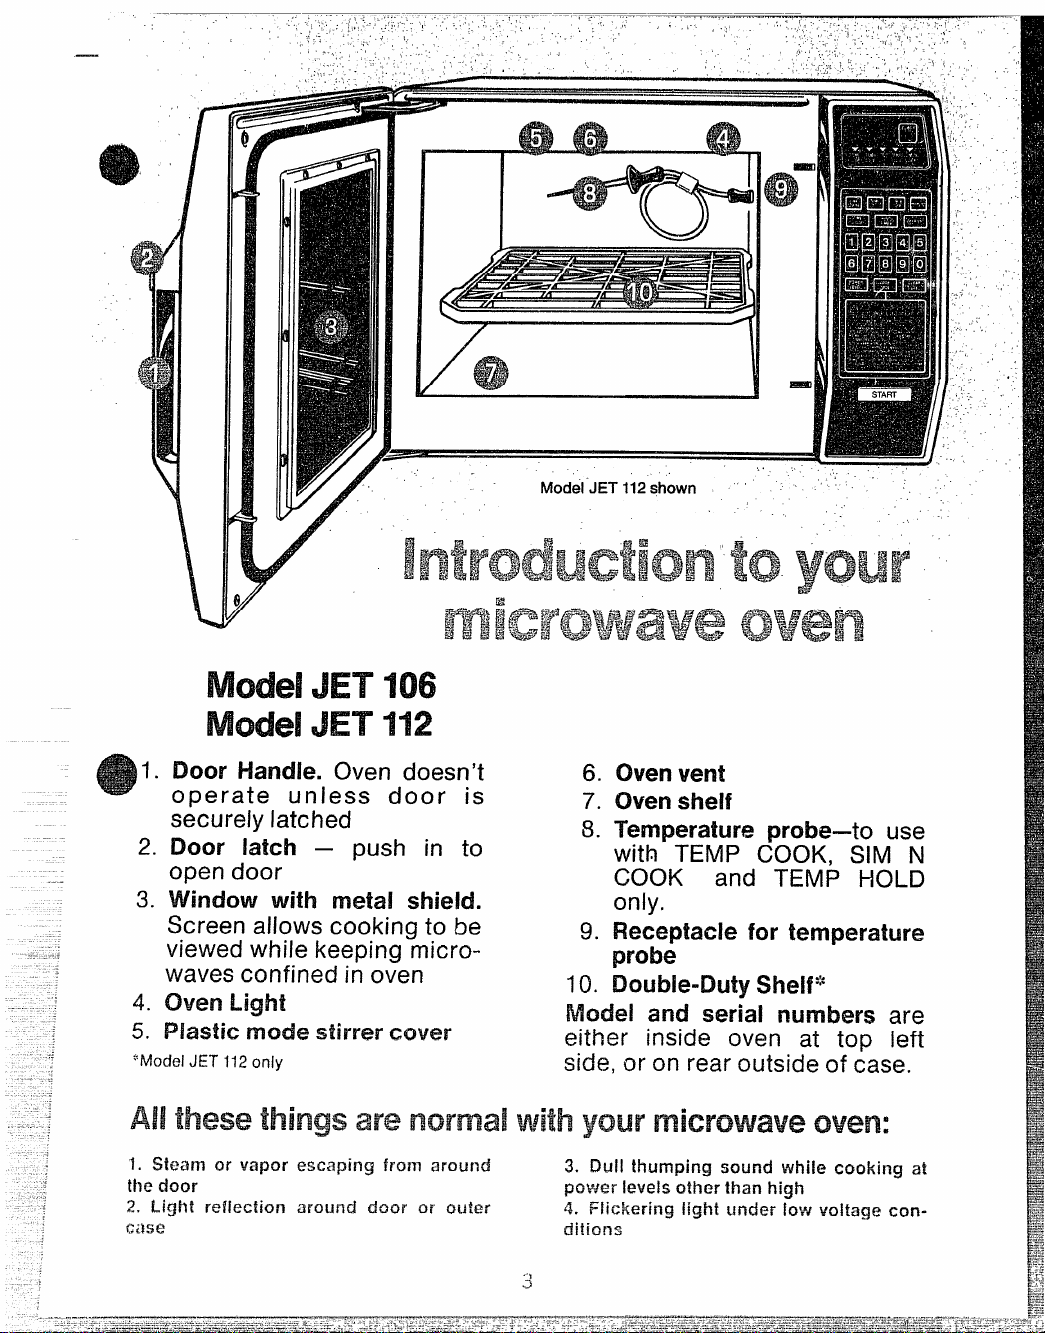
1.
Door Handle. Oven doesn’t
operate unless door is
securely latched
2.
Door latch –
open door
with mekd shield.
Screen allows cooking to be
viewed while keeping micro-
waves confined in oven
4.
oven
5.
“ModelJET112only
push in to
stirrer
Model JET 112shown
OW?l’1 V~?l~
6.
,.
,1 .
,,
7. Oven shelf
8. Temperature probe–to use
with TEMP COOK, Sllv’1N
COOK and TEIVIP HOLD
only.
9. Fleceptade for temperature
probe
10. SI’VM*
and serial are
either inside oven at to~ left
sick,
or on rear outside of ~ase.
~~~
Page 4
——..—.—., .-.-...-.
Important Notice
Introduction to Your Microwave Oven ......
,,,..,.”...,,......................................................................
.......................................
...
All the things you can do with your
.......................................
microwave oven
Grounding Instructions
Precautions for safe use
Safety Tips
............. .....................................
.................................
.............................
............ ................
Easy reference guide to the control panel
,,.
s..
● ✎ ✎ ✎ ✎ ✎ ✎ ✎ ✎ ✎ ✎ ✎ ✎ ✎ ✎✎ ✎✎ ✎ ✎ ✎ ✎ ✎ ✎ ✎ ✎ ✎✎ ✎ ✎ ✎ ✎✎ ✎✎ ✎ ✎ ✎ ✎
✎ ✎ ✎ ✎ ✎✎ ✎ ✎ ✎ ✎✎ ✎ ✎ ✎ ✎ ✎ ✎ ✎ ✎ ✎ ✎ ✎ ✎ ✎✎ ✎ ✎ ✎ ✎ ✎ ✎ ✎ ✎ ✎✎ ✎ ✎ ✎ ✎
. . .
✎ ✎ ✎ ✎ ✎✎ ✎ ✎ ✎ ✎ ✎ ✎✎ ✎ ✎ ✎ ✎ ✎ ✎ ✎ ✎ ✎ ✎ ✎ ✎✎ ✎✎ ✎ ✎ ✎ ✎ ✎ ✎ ✎ ✎ ✎ ✎ ✎
. . . . .
...........................................
Operating Instructions
Setting to microwave by time
–Time Cooking ..........................
–Defrost .....................................
–Hold Timer
...............................
............................................ 10
............................................
............................................
Setting to microwave by temperature
–Temperature probe
–Temperature cooking
Programming with time
Setting to microwave with Temp Hold
Automatic Simmer (Sire n Cook)
Programming with temperature
Defrost as cooking function
Memory
Automatic Setting
.....................................................................................
....................... ... ...........................................
..............................................................
...........................................................
.............................................................
...........................................
...................................................
.....................................................
................... ........................................
Foods recommended with probe ........ .. ....................................... 24
Foods not recommended with probe
Questions and answers
............ ..................... ................................ h.
.............................................
2
3
5
6
6
-7
8
11
11
12
13
14-15
16
17
18
19
20-21
22-23
24
95
Care of your Microwave OverI
Before You Call for Service
Customer Service
MACAP information
Warranty
.-.
........ ................................... ......................................
.............. ....................... .............................................
......... .................................... .................................
............ ..................... ........................
26-2;7
............ ................................. ......................
Back Cover
28
31
31
Page 5
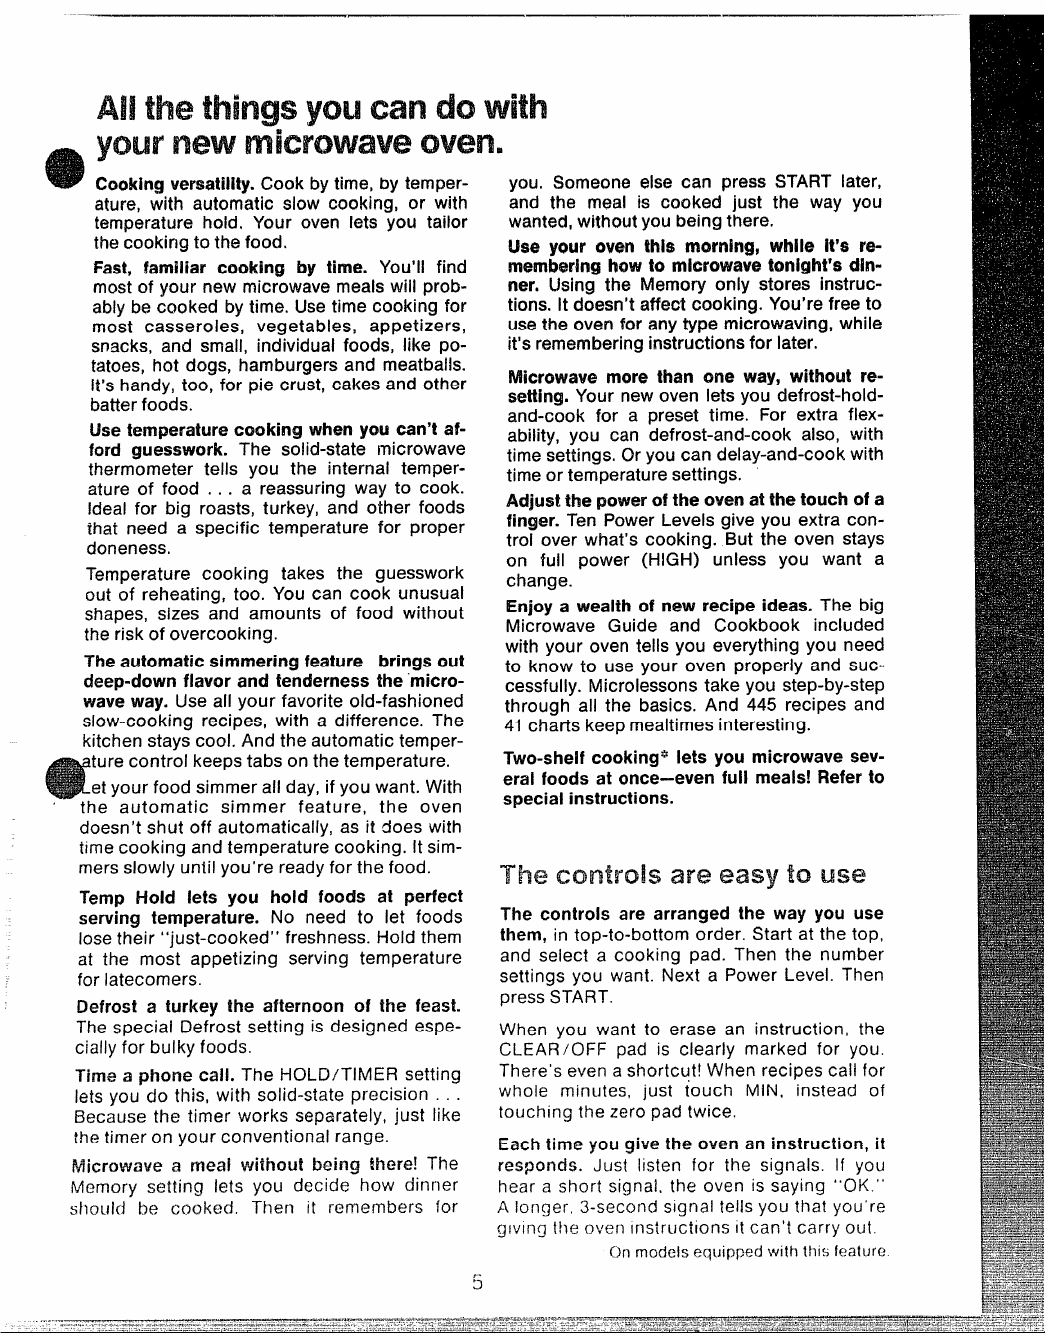
Cookingversatility.Cook by time, by temperature, with automatic slow cooking, or with
temperature hold, Your oven lets you tailor
the cooking to the food,
Fast, familiar cooking by time. You’ll find
most of your new microwave meals will prob-
ably be cooked by time. Usetime cooking for
most casseroles, vegetables, appetizers,
snacks, and small, individual foods, like potatoes, hot dogs, hamburgers and meatballs.
H’s handy, too, for pie crust, cakes and other
batter foods.
t.h temperaturecooking when you can’t af-
ford guesswork. The solid-state microwave
thermometer tells you the internal temperature of food . . .
Ideal for big roasts, turkey, and other foods
that need a specific temperature for proper
doneness.
Temperature cooking takes the guesswork
out of reheating, too. You can cook unusual
shapes, sizes and amounts of food without
the risk of overcooking.
The automatic simmering feature brings out
deep-down flavor and tenderness the “microwaveway. Use all your favorite old-fashioned
slow-cooking recipes, with a difference. The
kitchen stays cool. And the automatic temper-
aturecontrol keeps tabs on the temperature.
et your food simmer all day, if you want. With
,-
the automatic simmer feature, the oven
doesn’t shut off automatically, as it does with
time cooking and temperature cooking. It sim-
mers slowly until you’re ready for the food.
Ternp i-fold lets you hold foods at perfect
serving temperature. No need to let foods
lose their “just-cooked” freshness. Hold them
at the most appetizing serving temperature
for latecomers.
Defrost a turkey the afternoon of the feast.
The special Defrost setting is designed especially for bulky foods.
Time a phone call. The HOLD/TIMER setting
lets you do this, with solid-state precision . . .
Because the timer works separately, just like
the timer on your conventional range.
Microwave a meal without being there! The
Memory setting lets you decide how dinner
should be cooked. Then it remembers for
a reassuring way to cook.
you. Someone else can press
and the meal is cooked just
wanted, without you being there.
Use your oven ?hlsmorning, whiie it’s re-
memberinghow to microwavetonight’s din-
ner. Using the l’vlemory only stores instruc-
tions, It doesn’t affect cooking. You’re free to
use the oven for any type microwaving, while
it’s remembering instructions for later.
Microwave more than one way, without re-
setting. Your new oven lets you defrost-hold-
and-cook for a preset time. For extra flexibility, you can defrost-and-cook also, with
time settings. Or you can delay-and-cook with
time or temperature settings.
Adjustthe powerof the ovenatthe touch of a
finger. Ten Power Levels give you extra con-
trol over what’s cooking. But the oven stays
on full power (HIGH) unless you want a
change.
Enjoy a weaith of new recipe ideas. The big
Microwave Guide and Cookbook included
with your oven tells you everything you need
to know to use your oven properly and successfully. Microlessons take you step-by-step
through all the basics. And 445 recipes and
41 charts keep mealtimes interesting.
Two-shelf cooking* iets you microwave severai foods at once-even fuii meais! Refer to
special instructions.
START later,
the way you
The a?%!easy to!’.!s6$
The controls are arranged the way you use
them, in top-to-bottom order. Start at the top,
and select a cooking pad. Then the number
settings you want. Next a Power Level. Then
press START.
When you want to erase an instruction, the
CLEAR/OFF pad is clearly marked for you.
There’s even a shortcut! When recipes call for
whole minutes, just touch MIN, instead of
touching the zero pad twice.
Each time you give the oven an instruction, it
responds. Just listen for the signals. If you
hear a short signa!, the oven is saying “OK.”
A longer, 3-second signal tells you that you’re
giving the
oven InstructIons II can ‘t carry Out.
C)f]~GdC!S
eq~ji~~ed wth ttlfs ~eatlJfe
Page 6
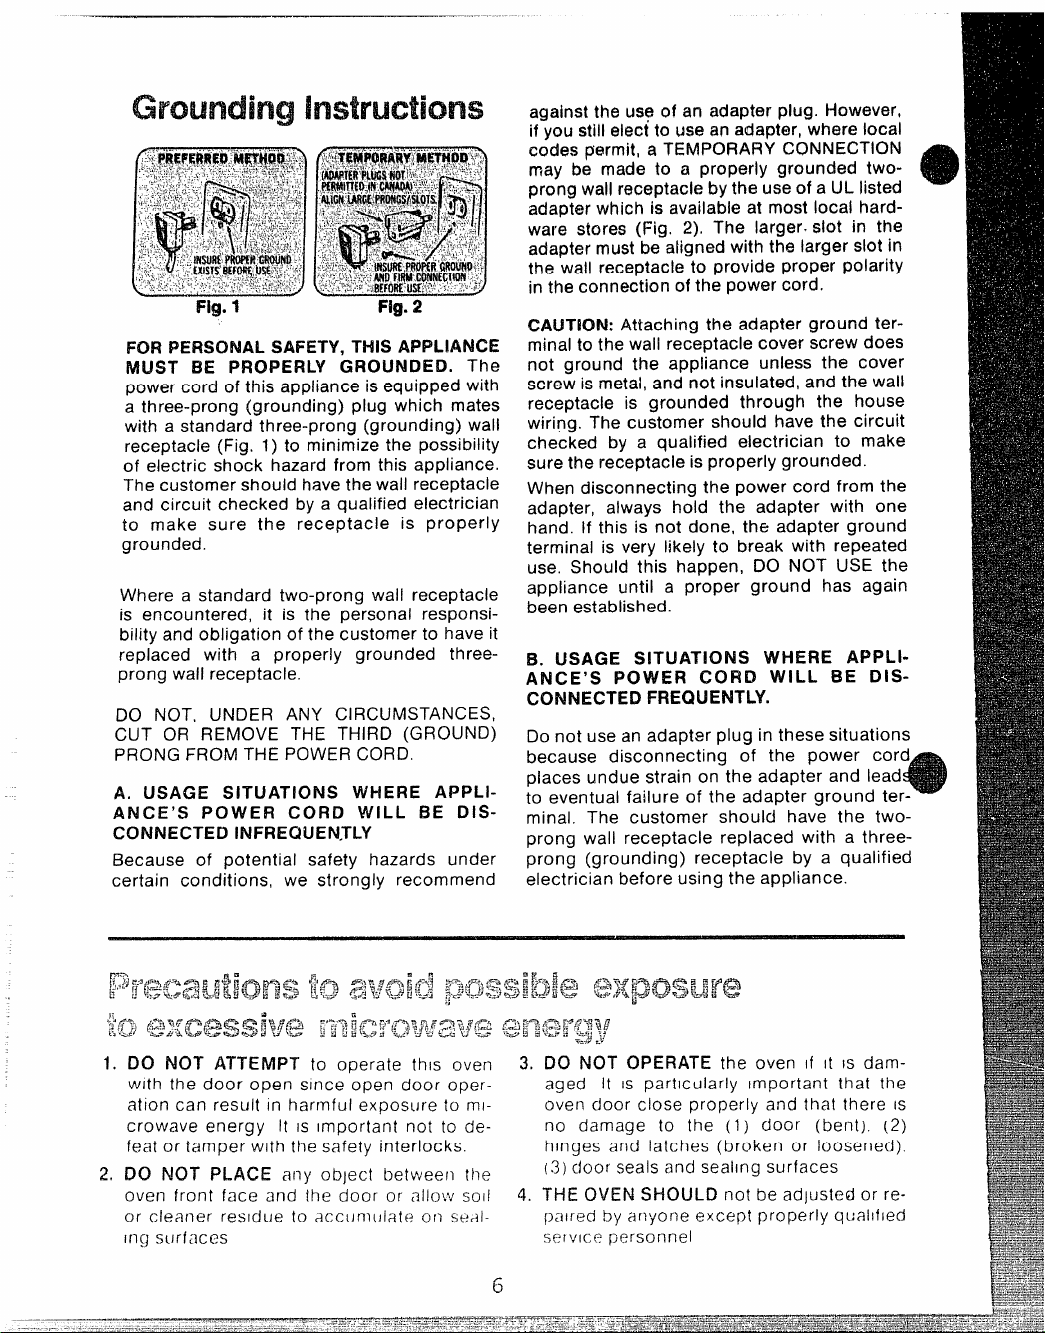
Fig.1
Fig.2
FOR PERSONALSAFETY, T14iSAPPLiANCE
MUST BE PROPERLY GROUNDED. The
power cord of this appliance isequipped with
a three-prong (grounding) plug which mates
with a standard three-prong (grounding) wall
receptacle (Fig, 1) to minimize the possibility
of electric shock hazard from this appliance.
The customer should have the wall receptacle
and circuit checked by a qualified electrician
to make sure the receptacle is properly
grounded.
Where a standard two-prong wall receptacle
is encountered, it is the personal responsibility and obligation of the customer to have it
replaced with a properly grounded three-
prong wall receptacle.
DO NOT, UNDER ANY CIRCUMSTANCES,
CUT OR REMOVE THE THIRD (GROUND)
PRONG FROM THE POWER CORD.
A, USAGE Situations WHERE APPLlANCE’S POWER CORD WiLL BE DISCONNECTED INFREQLJEN.TLY
Because of potential safety hazards under
certain conditions, we strongly recommend
against the us? of an adapter plug. Iiowever,
if you still elect to use an adapter, where local
codes permit, a TEMPORARY CONNECTION
may be made to a properly grounded twoprong wall receptacle bythe use of a UL listed
adapter which is available at most local hard-
ware stores (Fig, 2)0 The larger slot in the
adapter must be aligned with the larger slot in
the wall receptacle to provide proper polarity
in the connection of the power cord.
CALITiQN:Attaching the adapter ground terminal to the wall receptacle cover screw does
not ground the appliance unless the cover
screw is metal, and not insulated, and the wall
receptacle is grounded through the house
wiring. The customer should have the circuit
checked by a qualified electrician to make
sure the receptacle is properly grounded.
When disconnecting the power cord from the
adapter, always hold the adapter with one
hand. If this is not done, the adapter ground
terminal is very likely to break with repeated
use. Should this happen, DO NOT USE the
appliance until a proper ground has again
been established.
B. USAGE Situations WHERE Appli-
ances POWER CORD WiLL BE DIS-
CONNECTED FREQUENTLY.
Do not use an adapter plug in these situations
because disconnecting of the power cord
places undue strain on the adapter and lead
to eventual failure of the adapter ground terminal. The customer should have the two-
prong wall receptacle replaced with a threeprong (grounding) receptacle by a qualified
electrician before using the appliance.
1.
DO
NOT ATTEMPT to operate this oven 3.
with the door
ation can result in harmfu I exposure to microwave energy It IS Important not to defeat or tamper with the safety interlocks.
2.
NOT PLACE any object between the
DO
oven front face and the door or allo~v soil 4.
c/(?~n er resld ue tO ACC (Jm (I la te o n seAl-
or
1[1$]
5LJt_f~CL?S
open since open door oper-
DC) NOT OPERATE the oven If It IS dam-
aged It IS particularly important that the
oven cioor close properly and that there IS
no damage to the ( 1) door (bent). (2)
hinges and latches (broken or loosened),
cloor seals and seallng surfaces
(3)
THE OVEN SHOULD not be adjusted or re-
paired by anyone except properly quallflec~
service personnel
6
Page 7
—
1, For‘Personai safety the “oven fiu$t, bp $.W.)pfdy” , ,11, fMti:t &#~ost frozenUqukts-4sf3eciMy carbpri,: , ,
rounded, So@grounding Instructkm$“onpage 6’of
his book. For best operation, plug this appliance into
its cNvrlelectrical outlet, to prewmt fl(ckering,of lights,
blowing effuse or tripping of~ircuit
2. the Qf extension cords, EN&use of potential
safety ‘hazards under certain conditions we strongly
recommend against the. use of an extension cord,
However, ‘if you stiil elect to use an exterwion’”cord,,it ~
is absolutely necessary that it be a.UL listed 3-wirt?
grounding type ~pptiance extension
current carrying rating of the cord in amperes b$ 15 ,
amperes or greater. Such extension cords are obtainable through General Electric service, If youdo use
an exiension cord with your microwave oven, the in-
terior light may flicker and the blower sound may W@
when oven is in use,
3. Be certain to piace the front surface of the door
three inches or more back from the counte~op edge
M%avoid accidental tipping ofthe appiiance m normal
usage.
4. Use metal only as directed in cookbook. Metal
strips as used on meat roasts are helpful in cooking
food when used as directed. Metal trays may be used
for TV dinners. However, when using metal in the
microwave oven, keep
fromsides of microwave oven.
5. Do not operate the oven while empty to avoid dam-
age to the oven and the danger of fire. If by accident
the oven should run empty a minute or two, no harm is
done. However, try to avoid operating the oven empty
t all times–it saves energy and prolongs life of the
n,
6. Cooking utensils may become hot because of heat
transferred from the heated food, This is especially
true if plastic wrap has been covering the top and
handles of the u~ensil. Pot holders may be needed to
handle the utensil.
7. Sometimes, the oven shelf can become too hot to
touch. Be careful touching the shelf during and after
cooking.
8. Do not use any thermometer ifl food you are
microwaving unless that thermometer is designed or
recommended for use in the microwave oven.
9, Remove the temperature probe from the oven
when not using it to cook with. If YOUleave the probe
inside the oven without inserting it in food or liquid,
afld turnonmicrowaveenergy, it can create electrical
arcing in the oven, and damage oven walls.
10, Remove wire iwist-ties on paper and plastic bags
before placing in oven. Twist-ties sometimes cause
lmg to }IW, xnd may cause fire.
..—.———. —.
>, ,,,,,,
brwa,ker<‘ L :‘“
cord and that$he ~ . ~ ,“ ~‘. ‘‘- . ‘“;“ ‘ ,
metalat least l-inch away
,..
nated, ones-in
Op~n@,pr~sw~~can build up. This can cause-the~‘ ,
container to burst, resulting in injury. 4 ,,- :, , :., ,
12,
&Wt’ e?verexwkfood. Excessive, ‘overcdbking:
dri~s food out; and may cause it to ignit@ in kome -. ‘
cases,
13, if food.shoukt ever ignite: Keepi,the’oven,daqr, ‘ ~
closed;
CLEAR/OFF or, disconnect power ‘cord’ or shut bff
power at the fuse circul!
14, ‘t30ilhIgeggs (in and OW8of stiellj i; not re&n-. ~ ‘
niended’for microwave cooking; Fyessur,e.can buiid ; ,
up inside egg
‘in injury. ,,.:
.15. ‘Foods with unbroken outer “~kin” “such as po~
ttitoes, hot dogs or sausages, toma~oes, apples,
chicken livers and other gibiets, and eggs (seeAbove)
should be pierced to aliow steam to escape during ~
cooking.
,- .
16. “Boilab~e” cooking pouches and tightly closed.
plastic bags or plastic wrap tightiy covering containers should be slit, pricked or vented as otherwise directed in Cookbook. if they are not, plastic could
burst during or immediately after cooking, resulting in
injury. Also, plastic storage containers should be at
least partiaily uncovered because they form such a
tight seal.
17. Do not pop popcorn in your microwave oven unless in a special microwave popcorn accessory or unless you use popcorn labeled for use in microwave
ovens. Because of the heat generated without these
precautions, the container could catch fire.
18. Plastic Utensils–Plastic utensils designed for mi-
crowave cooking are very useful, but should be used
carefully. ,Evenrn~crowaveplastic may not be as tolerant of overcooking conditions as are glass or ceramic
materials and may soften or char if subjected to short
periods of overcooking. In longer exposures to overcooking, the food and utensils could ignite. For these
reasons: 1) Use microwave plastics only “and use
them” in strict compliance with the utensil manufacturer’s recommendations. 2) Do not subject empty
utensils to microwaving. 3) Do not permit children to
use plastic utensils without complete supervision.
19. Do not use your microwave oven to dry news-
papers. If overheated, they can catch fire.
20. Use of Shelf Accessory*.To position shelf so that
it is securely “seated,” insert into the oven cavity
above shelf supports and completely to the back oven
wall. Drop into place so that the recessed areas are
over the shelf supports. To remove shelf, lift shelf
above supports and then pull forward and out. Do not
place food on shelf unless it is securely “seated” on
the ~upporfs.
the oven, Even if the contakmwIs’. ‘
- , ,,
,,.,
Turn,Offthe power,,immediately:Touch ~ ‘
,:4 L.--l-.l.r.. ...,.”...1
UItXNWJI ~~II+SI.
yolk and may cause it to burst, re?d~ing ,
,, ,,
on rnocfc!l$Gauipped with tnis feature.
,’
,,.
, ~. J ‘
,L, ,
. .
I
‘1
‘“.,,
‘!,
Page 8
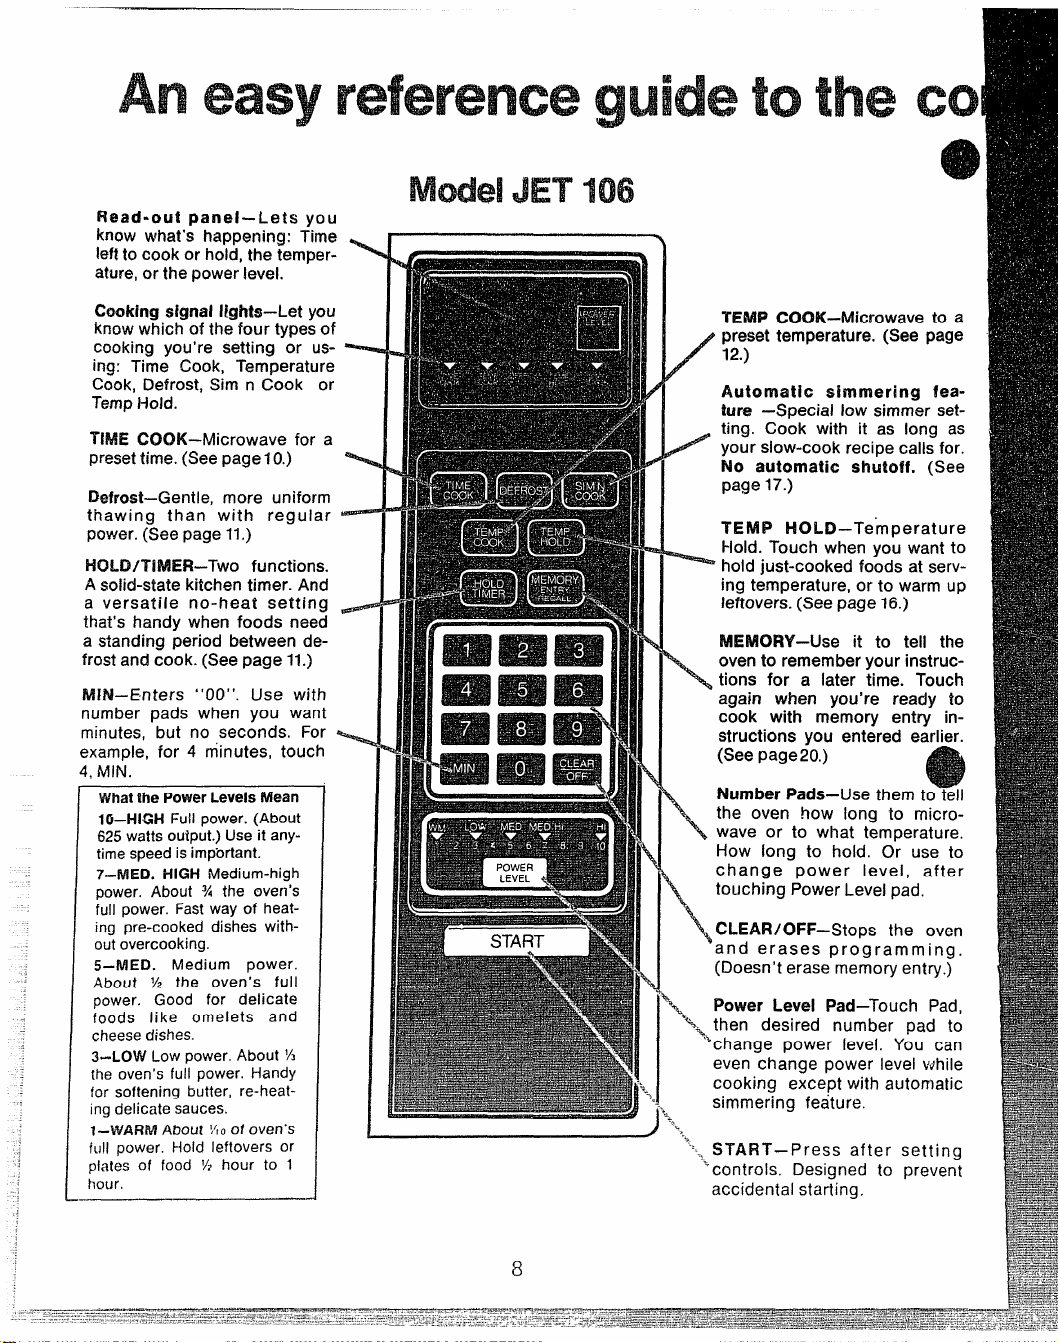
Aneasy
Read-out panel-Lets you
know what’s happening: Time
leftto cook or hold, the temper-
ati,nw,or the power level.
\
Cookingsignalllghts–Let you
know which of the four types of
cooking you’re setting or us- *
ing: Time Cook, Temperature
Cook, Defrost, Sim n Cook or
Temp Hold.
TIME CQOK–Microwave for a
preset time. (See page 1O.)
Defrost–Gentie, more uniform
thawing than with regular
power. (See page 11,)
HQl,.D/TiMER-Two functions.
A solid-state kitchen timer. And
a versatile no-heat setting
that’s handy when foods need
a standing period between de-
frost and cook. [See page 11.)
MlN–Enters “00”. Use with
number pads when you want
minutes, but no seconds, For
example, for 4 rriinutes, touch
4, MIN.
What?he PowerLevelsMean
1(3-HIGH Full power. (About
625watts oulput.) Use it anytime speed is imptwtant.
7-MED. HIGH Medium-high
power. About % the oven’s
full power. Fast way of heating pre-cooked dishes with-
out overcooking.
!5-MED. Medium power.
About % the oven’s full
power. Good for delicate
foods like omelets and
cheesedishes.
3--LOW Low power. About %
the oven’s full power. Handy
for softening butter, re-heating delicate sauces.
I–WARM About
full power. Hold leftovers or
plates of food % hour to 1
hour,
Yto of oven’s
—.
T’EMP
COOK-Microwave to a
preset
temperature. (See page
12.)
Automatic simmering feature –Special low simmer set-
ting. Cook with it as long as
your slow-cook recipe calls for.
No
automatic shutoff. (See
page17.)
TEMP HOLD–Te”mperature
Hold. Touch when you want to
hold just-cooked foods at serv-
ing temperature, or to warm up
leftovers. (See page 16.)
MEMOFW–Use it to tell the
oven to remember your instructions for a later time. Touch
\
again when you’re ready to
cook with memory entry instructions you entered earlier.
(Seepage20.)
Number Pads–Use them to tell
the oven how long to microwave or to what temperature.
\
How long to hold, O; use to
change power level, after
touching Power Level pad.
\
CLEAR/OFF–Stops the oven
\
and erases prog ramming.
(Doesn’t erase memory entry.)
k Power Level Pad–Touch Pad,
‘~%- then desired number pad to
“change power level. You can
even change power level while
cooking except with automatic
simmering feature.
%
>.
‘“:.. START–Press after setting
“’controls. Designed to prevent
accidental starting.
8
...
Page 9
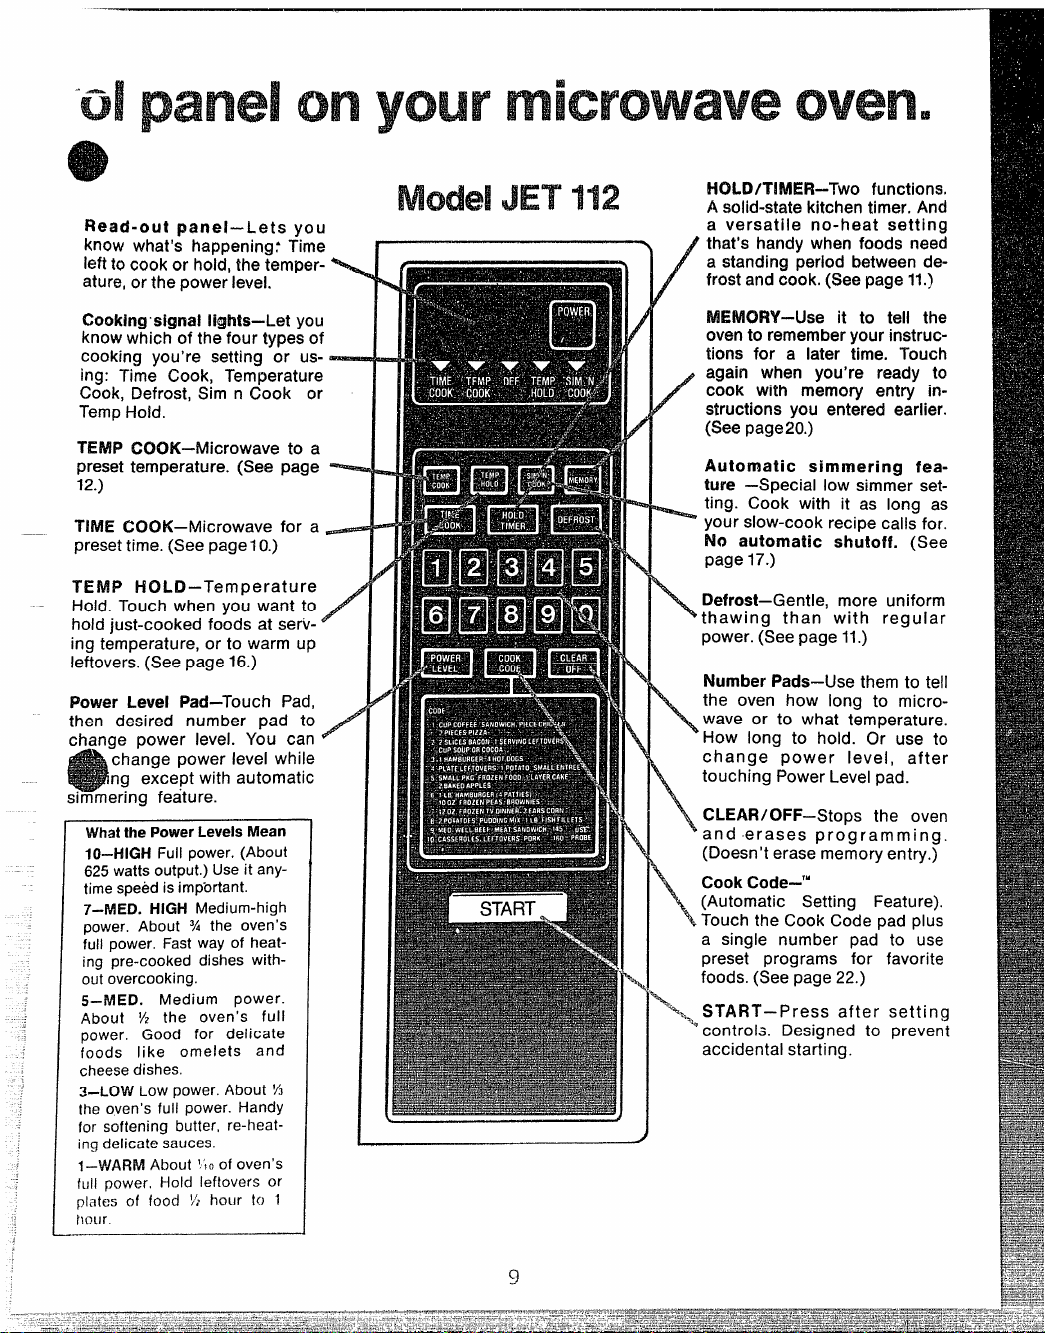
Read-out panel–Lets you
know what’s happening; Time [-
left to cook or hold, the temper-~
ature, or the power level.
ve
HOLD/’lWlWt-’Two functions.
A solid-state kitchen timer. And
a versatile no-heat setting
that’s handy when foods need
a standing period between deW@t
andcook.(Seepage11,)
Cooldngsignai lights–i_et you
know which of the four types of
cooking you’re setting or using: Time Cook, Temperature
Cook, Defrost, Sim n Cook or
Temp Hold.
TEiMPCOOK–fvticrowave to a
preset temperature. (See page
12.)
TIME COOK–Microwave for a _
preset time. (See pagel O.)
TEMP HOLD–Temperature
Hold. Touch when you want to
hold just-cooked foods at serving temperature, or to warm up
leftovers. (See page 16.)
Level Pad–Touch Pad,
Power
then desired number pad to
change power level. You can
change power level while
ng except with automatic
Whatthe PowerLevelsMean
IO–HIGH Full power. (About
625wattsoutput.) Use it anytime speed is impbrtant.
7-MED. HIGH Medium-high
power. About ?4 the oven’s
full power. Fast way of heating pre-cooked dishes without overcooking.
5–MED. Medium power.
About % the oven’s full
power, Gooct for delicate
foods like omelets and
cheesedishes.
3-LOW Low power. About 73
the oven’s full power. Handy
for softening butter, re-heat-
ing delicate sauces.
I–WARM About ‘
full power. Hold leftovers or
plates of food % hour t~~1
hour.
.-—
tO of oven’s
MEMOFW–LLseit to teli the
oven to remember your instructions for a later time. Touch
again when
you’re ready to
cook with memory entry instructions you entered earlier.
(Seepage20.)
Automatic simmering fea-
ture –Speciai
ting. Cook with it as long as
your slow-cook recipe caiis for.
iow simmer set-
No automatic shutoff. (See
page17.)
Defrost–Gentie,
/
\
thawing than with regular
power. (See page 11.)
more uniform
NumberPads–Usethem to tell
the oven how iong to microwave or to what temperature.
/
\
How long to hold. Or use to
change power level, after
touching Power Level pad.
CLEAR/OFF–Stops the oven
\
and erases prog ramming.
(Doesn’t erase memory entry,)
Cook Code-’”
(Automatic Setting Feature).
- Touch the Cook Code pad plus
\
a single number pad to use
preset programs for favorite
foods. (See page 22.)
%>.
-++,%START–Press after setting
“ controis. Designed to prevent
accidental starting.
Page 10

The letters “PF” appear in the readout dis- ~
play whenever power is resumed to oven after
unit has been unplugged or when electrical.
power to the wail outlet has been interrupted,
Touching CLEAR/OFF erases “PF” from the
readout and allows immediate use of oven.
Why not make a cup of coffee (or other hot
drink) while you practice setting your oven?
Use a cup with no metal decoration on it–
even a plastic-coated paper cup. Fill it % full
of water and add a teaspoon of freeze-dried
coffee. Remove the spoon.
1.Place cup of coffee (or food) in oven.
Close door.
The read-out teik you how much tjme k
remajnjng.
2. Touch TIME COOK. The signal light on the
read-out display above TIME COOK comes
on, telling you the oven will microwave with
time. Read-out displays: O.
3. Select the amount of time. For your coffee,
you’ll need about a minute and 20 seconds.
Touch 1, 2 and O (for 1 minute and 20 sec-
onds). The read-out shows 1:20.
4, Select Power Level. The oven is automatically set at HIGH unless you change the
Power Level, For your coffee, leave the oven
at high. (For other foods, see recipes in your
Cook Book for suggested Power Levels. To
change from automatic HIGH (10), touch
Power Level pad, then touch number pad for
power level desired.)
5. Push START. The inside light comes on. A
fan starts,
Box jn read-out dkpiay shows what power
level the oven is using.
can change Power Levels easily while
You
cooking. Just for practice, why not change
Power Levels? Touch Power Level pad, then
the 5 number pad, or use other number pad
from 1-9. You may hear a dull thumping
sound when using a lower Power Level. After
a few seconds, switch back to HIGH, by
touching power level pad again, then touching the number pads “l” and “O” to set
power level 10.
6. The
oven signal tells you when time’s up.
Itsounds for 3 seconds, then the light inside
the oven and the fan shut off. Coffee’s ready!
* Microwave power won ‘t turn on until you’re
ready, Until you press START.
E Touch fhe TIME COOK pad before setting
nuirnber pads.
.... -—,
Page 11

..—.-——-—
-—.
1, Place frozen food in a microwave-safe
containerand set In oven.Closedoor.
2, Touch (DEFROST). The signal lighton the
readout displayabove DEFROST comes on,
Readoutdisplays:0.
3. $ehxt the amountof time. Touchthe num-
ber pads.
4. Don’t select a PowerLevel,The DEFROST
setting has its own, special Power Level. Box
in read-out display shows that DEFROST is
automatically set at Power Level 3.
5.
Push START.The inside light comes on. A
fan starts. You may hear a dull thumping
sound that let~ you know that the oven is
using a Power Level lower than HIGH.
6. The oven signalltells youwhen thne’s up.
It sounds for 3 seconds, Then the light inside
the oven and power shut off,
The Defrost setting is designed for uniform
thawing necessary for larger amounts of food.
For small amounts of frozen foods you can
also use TIME COOK on the HIGH setting.
HIGH thaws faster, but you’ll need to turn the
food several times, stir it and rearrange it to
keep thawing uniform.
Because DEFROST can be changed from its
automatic power level of 3 to other power levels, you can use DEFROST as the first step of
a two-step automatic microwave setting. (See
page
20.)”
The HOLD/TilvlER setting is a solid-state
timer, No microwave power is used, So you
can use it for other things around the kitchen,
like timing a 3-minute long distance phone
call.
1. Touch $40LD/TIMER. Read-out displays:
O.No cooking signal light shows.
2. %Nect
pads.
you set.
3. Don’t select a Power Level. You won’t be
using microwave power.
4, Push START. On some models, you may
hear a fan and see the oven interior light.
amount of time. Touch the number
The read-out panel tells how much time
5. The oven signal telis you when time’s up.
It sounds for 3 seconds.
You can also use HOLD/TlfvlER combined
with microwave cooking, when recipes call
for standing time. (To use with microwave
cooking, see page 14.)
HOLD/TIMER can also be use~
to delay microwaving up to 99 minutes and 9’9
seconds. Pages 14 and 18 of this book, and
the page in your microwave cookbook explain
this feature.
11
Page 12

Your microwaveoven has an
automaticNxrq3eratureprobe.
For many foods, temperature control is important. That’s why your microwave oven comes
with a removable automatic temperature sensor. You can microwave foods like chicken,
turkey, pork and rare roast beef to the temperature you want. The oven shuts off automatically when the food’s done. No guesswork!
The temperature probe is handy when cooking for children. too. Because you can control
the temperature of each portion individually.
Making soup? Serve the children theirs at a
mild 130°,
soup at 170°.
Frozen foods aren’t recommended to use
with the probe.
probe when foods are frozen. Page 24 tells
you which foods work best with the probe.
(And whichones don’t.)
Setfing your microwave oven to cook by temperature is easy. The ovenhelps!
~ The 3-second signal sounds if you set a
temperature outside the oven’s range (below 90 or above 200’ ) or any temperature
lower than the temperature of the food.
while the adults get piping hot
It’s difficult to insert the
e The signal also sounds if you set the oven
to microwave by temperature and forget to
attach the probe to the receptacle inside
the oven. “
e During TEMP COOK you can recall the tem-
perature that you set by touching the TEMP
COOK pad.
Things to remember when setting your oven
to microwavewith temperature:
[
‘tleave the
3on
rted in fo
i
nse
pro!
od .
in the OY
‘revents
fen if it’s not
damage to
oven).
Like any food thermometer, the probe may
slip out of place in cooking. Reposition it,
press START again, and continue cooking.
If you wait to hear the signal sound and find
the probe has slipped out of the food, the
food could be overcooked. Also, the oven
could be damaged.
If you give the oven instructions it can’t
carry out, a 3-second signal sounds when
you press START.
Touch the cooking function pad (TEMP
COOK) before setting number pads.
Recipes in the Cook Book tell you approx-
imate cooking times as well as temperature
settings. Use the times as a guide to planning when to serve food.
.—— --
.-—-L—
.“..-..-.
-.--=:..<
Page 13

Beforeyokastart, insertthe probe
Why not try microwaving with the twnpdrature
probe right now? Start with cold tap water, Fill
a microwave-safe mug % full of water and
make instant soup,
f
1. First, put probe into food. In genera!, insert
probe into centermost part of food (at least one
inch into food.) Insert as horizontally as possible
into meats. Insert as directed in other foods.
length of the cable, it also helps prevent the
probe from slipping out of position,
4. Close oven door firmly. Make sure the
cable isn’t interfering with the door seal.
m COOK:
1. Touch TEMP COOK. The signal light on
the display above TEMP COOK comes on.
Read-out displays: 0.
2. $eiect Ihe temperatureyou want. Use 170
foryour soup.
3. Select Power II-eve!. For now, leave the
oven on HIGH. See recipes and heating instructions in your cookbook for suggested
Power Levels for other foods. To change
power level, touch Power Level pad, then
number pad for power level desired,
4. PressSTART.The inside light comes on. A
fan starts. The read-out automatically indicates temperature.
5. A minussign in the read-out letsyou know
that the internal temperature of the food
hasn’t reached 90°F. yet. Since the water for
your soup came from the cold water tap, it’ll
be less than 90°.
2. Place food with rxobe into oven.
3. Insert cable end into receptde on oven
wall un!ll “sea#ad”. BE SURE PROBE IS ATTACHED SECURELY TO OVEN RECEPTACLE. (if probe is not attached securely, signal will sound when you press START. The
oven will not start.)
I
Tne probe senses temperatures between 90°
and 200°F. Once above ?OO, the read-out
panel shows you the internal temperature of
the food until the temperature you selected is
reached. Then the oven shuts off.
6. The signal tells you when the food
reaches the
oven automatically shuts off. Soup’s ready!
7. Remove the cable end of the probe from
the receptacle. Then remove food and temperature probe together,
temperature you selected. The
Page 14

When you’re mkrowawhg with
time, you can cook additional
ways. resetting.
t3efros&hoM-and-cook-For foods that need
a standing period between defrost and cook,
To defrost-hold-and-cook, use the entire
chart. (For foods that don’t need a standing
period between defrost and cook, you can
skip hold-time.)
Hold-start-and-cook-For times when you
can’t be in the kitchen when it’s time to start
cooking. (The oven holds without resetting
for up to 99 minutes and 99 seconds.) Use
only the area marked to hold-start-and-cook.
The chart shows you how t~ cook all three
ways
When you’re ready to start, just change the
times listed on the chart for times needed for
the food you’re cooking.
—.
/
DEFf?OST-
HOLDANDCOOK
/————’—
/’
HOLD-STARTAND-COOK
‘—
l%~m~s ~0
remember when pm
with time:
If you accidentally reverse the sequence of
~
programming instructions, the oven automatically rearranges your program, Defrosting always comes first, then hold, then
cooking.
0 When instructions conflict, the oven carries
out the last instruction. For example, if you
set the oven to Defrost for 4 minutes, HoldTime for 2 minutes and then Defrost for 6
minutes, the oven would Defrost for 6 min-
utes and Hold-Time for 2 minutes.
/4//ow foods /0
[em<~ll] ai
rc
.
$\%.
--....,...———-.-!.—--
k
‘-%
.—
?.’e.---—..——————
.——-.-..-.——
Page 15

.-
)
WHENYou wAN”rTHE
(2VI3I TO IX) THIS
-. ---.-.,.. m,mm. ==.=,”,,.,+,.+++,,*
Defrost this casserole
for 15Mminutes, then
.—..-..-—+....,..”,—-..-,_—.”+—
let the casserole stand
for 10minutes
Then cook it for
—*,*l.--.w. --.$-.=* --.,..... +w.-*..+.—
..—.
—.——-
,,
TOUCH THIS
,,,mmm—..--.t,.,,.,. ”qp,..”q
..———s..——-—
YOU’LL SEE THIS HAPfV?NINGOfdTHE (XMJTROl.
PANEL
. . .. -—-
—.... -.—..—.,—
——..
Defrost signal light eom@s
on, The read-out panei dis=
piays: 0.
The Defrost signai light remains on, 15:30shows in the
read-out panei. Box in readout shows power ievei has
been automatically set at 3.
:0 shows in read-out panei.
No signal iight shows.
10-00 shows In read-out
panei. No slgnai ilght shows.
Time Cook signai iight
comes on. The read-out
panel changes to :0,
25 minutes
Change power ievei from
autornatic High (10) to
medium-high power (7)
Start now.
m~g:i~::t:l:~:
Time Cook signai iight remains on. 25:00 shows in
read-out panei.
25:00 remains in the readout panei. Time Cook signai
remains on.
if you start from defrost,
oven is now defrosting, your
first instruction.)
Page 16

T’empHold is an especially handy feature of
your microwave oven, It lets you hold foods at
serving temperature, keeping them “just-
cooked” hot and fresh,
With the TernpHold feature:
1. Youcan select a holding Temperaturebe-
tween90° and200”F,
2. Youcan select any PowerLevel youwant.
Because foods tend to stay moist and tender
during microwaving, Temp l-told is the perfect
way to keep vegetables, casseroles, and even
scrambled eggs piping hot and ready to
serve. Roasts, ham and pouitry, too, may be
kept juicy and table ready with this feature.
You can even warm up leftovers!
if you want, you can set your oven to automatically defrost, hold, time or temperature cook,
and then Temp Hold. You must be sure, when
you time cook, that the temperature probe is
placed in the food before starting the microwave oven.
Temp Hold keeps a pre-set temperature level
inside the food for as long as you like. If your
oven does not have an automatic simmer setting, you can achieve the same flavorful, siowcooked tenderness by setting the Temp Hold
cycle to 180° and medium (5) power level.
Use the automatic simmer recipes from your
cookbook.
to when ‘setting
your oven
%N-q3Hold.
o To prevent spoilage, do not hold foods ex-
cept
150° for more than 2 hours.
s Solid (not rolled) roasts may be held below
150° for upto 2 hours.
However, during the microwave roasting
process, a great amount of heat is stored in
the roast. Keeping the roast in the warm
oven cavity during TEMP/HOLD can cause
tomicrowave
solid roasts at temperatures below
a grwder increase in internal temperature
than when aliowing the roast to stand cmtside the oven cma kitchen counter, Temper~
atures of up to 20° to 30° above the TEMP/
HOLD setting are possible. f%wmuseof this
heat storage, it is not possibie to hold roasts
at a rare degree of doneness,
His suggested that you first remove the roast
from the oven and let it stand, uncovered, for
about 10 to 15 minutes before returning to
TEMP/HOL13.or, if you know before cooking
that you intend to hold a solid roast at serving
temperature, you may compensate for the
stored heat by undercooking the roast, See
your Cookbook for details.
TO LEE:
1. Insert probe in food. (If you have just Temp
Cooked your food, steps one and two are
already done).
2. Attach probe to oven. (See probe instruc-
tions underTemperatureCooking.)
3. Touch ‘TEMPHOLD. The signal light on the
display above TEMP HOLD comes on. Read-
out displays :0.
4, Select the holding temperature you want.
Your oven will automatically microwave the
food until it reaches the pre-set temperature
and keeps the food at this temperature.
5. Select Power Level. Your oven will auto-
matically use High unless you seiect another
level. See your cookbook for suggested
power levels for various foods.
6. Push &ART. The inside light comes on. A
fan starts. If you also selected a TIME COOK
or TENIP COOK cycle, together with TEMP
HOLD cycle, the oven will first cook the food
and then automatically go into the TEMP
HOLD cycle. (TIME COOK or TEMP COOK
always precedes TEMP HOLD.)
7. During the WIMP HOLD cycle, the oven
will not shut off until you touch the CLEAR/
OFF pad. (You can interrupt microwaving by
opening the oven door. The cycle resumes
when you c!ose the door and press START.)
Page 17

This setting letsyou slow-cook foods for extra
moistness, extra
an appliance-wit hin-an-appiiance! The
automatic simmer setting brings food rapidly
to a simmer, then holds the simmer at about
180°F for as long as you want, Perfect for old-
-fashioned pot roasts, hearty stews, chili,
baked beans, even mulled drinks. Toautomatically simmer, you can use any microwaveproof casseroles, But do not use a lid,
Instead, stretch plastic wrap over the top of
the casserole. Gather the wrap loosely
around the probe to allow steam to escape,
tenderness, It’s Iiko having
“m CxxM:
1.hwert the probe in liquid in bottomof dish.
(As liquid simmers, steam forms to cook and
tenderize food.) Cover the dish.
The Wornatic simmer feature lets y~u slmv-
coak foods which mmd long, gw?tle cooking
to tet?derb?e or develop flavor, Food is
brought to a simmer r&?pid/y,then the temperature probe maintains simmering at about
780° for as long as you want, Temperature of
food is nut shown on the read-out during
cooking. However, if you wish to check tem-
perature, touch automatic simmer pad; temperature of food and power level being used
wi// show on the read-out as /ong as pad is
touched,
-~—..—-
2. Attach the probe to the oven. (See probe
instructions.)
3. Touch automatic simmer pad. The signal
light on the display above Sim n Cook lights
up.
4. .Don’tselect a time. The oven will be cook-
ing by temperature, not time.
5. Don’t select a temperature or a Power
i-eve!. The automatic simmer feature is auto-
matically pre-set for the correct temperature
and Power Level for automatic simmering.
6. Push START. The inside light comes on. A
fan starts.
7. Simmer as long as your slow-cook recipe
ca!ls for. Five hours, six, even ten hours. The
oven won’t shut off until you touch the
CLEAR/OFF pad or open the door of oven.
To restart oven repeat steps 3 and 6.
Use any microwave-proof cassero/e for
automatic simmer feature. Insert probe in
middle of casserole so that the tip is resting in
liquid in the bottom of the dish. Since liquid is
necessary for this function, steam tenderizes
and brings out the full flavor of the dish.
Do not use a lid on the microwave-proof casserole that you choose. Instead, use stretch
plastic wrap over the top of the casserole.
Cover tightly with plastic wrap, arranging
loosely around the probe to allow steam to
escape.
Page 18

.-r-
When you’re mkmwindng with Tlhlrngs to remtmber when you’re
Can’t be home when it’s time to start dinner?
Let the oven start without you, Using a combination of Hold/Timer and Temperature
Cooking, the oven can delay starting for up to
99 minutes and 99 seconds,
WHEN YOU WANT THE
OVEN TO DO THIS
i’d iike this cooked roast reheated in time for dinner,
but not started yet. . . it
would be ready too soon.
(First insert the probe in the
cooked roast, and attach the
probe to the oven.)
Wait 15minutes before starting to heat.
Then heat it
--—.—.-.—..-....—.......4—
,.r.-#—-..,.—
.S-.—--.xnt., -..-.——
,Alt?mughUSQofth~fiYrn/n CcmkTM’featu~er6sults
Ina iqmpwatureAiNtfn$It’can’tbeprogramined~,
Unl~ke,rbguiar,.Tq@perature-’Cooking, t~e.]:,ati~.
Jgmhti.c$lrnmemfqat,urewH1not-shut:off,,wwn:’it
r~~:hwsdprqmtte~pwature.’r ~~• ,.::,+;-,5,,
~’!.
TOUCH THIS
,,
~,f!:..f-’‘.
,,, ,. “.,~ ‘
+,,,
.;,,
, ‘,,. -i ,, ,,!., (J”
/ -, -,,,, ,,-1,,
YOU’LL SEIE THIS HAPPENING ON THE CONTROL
PANEL
The read-out displays :0. No
signal iight turns on.
The read-out panei shows
15:00.
The read-out panel shows
:0. The signal iight on the
dispiay above TEMP COOK
comes on.
.
.
to about 130°F–just the way
we iike it , . ,
Do it just in”time for dinner
=:ti”~i:rni!%
. ......... .—.------ ,-
-’‘(A1/owfoods to remam at room temperature only as long as safe T/roes vary
. . ... . .- --- -
The TEMP COOK signal
iight remains on. The readout panel shows 130,
temperature to 1300.
-----,,.. .,
-----==--~=..,.#,,..?..... .... .........Z.e.=
Page 19

—
In any cooking program, information entered Level of both the C)@frostand the Time Cook
under the Defrost setting always occurs first
in the cooking cycle, andthe Time Cook entry
occurs last, Since you can change the Power
...——— ——.—..—..
WHEN YOU WANT THE
—
OVti!NTO DO THIS
——-..,.———————
TOUCH THIS
cycles, you can use Defrost to cook at one
power level, then automatically switch to Time
Cook to cook at another poww’ levQl,
——..—.
—-.——.—
YOU’LL SEETHIS HAPPEN!N~
Ml THE CONTROLPANEL
——,—
I wish to make a hearty Vegetabie
Beef Soup (recipe in Cookbook,
page 44) but don’t want to be there
to turn the power level down after the h
initial boiling period.
Signal light on the display above
DEFROST comes on. Read-out displays 60:00. Box in read-out panel
s ows automatic defrost setting of 3.
—.— —.—,.——
POWER
Bring to a boil for one hour at HIGH,
Then automatically switch to simmer
for 99 minutes . , .
at power level 5 (MEDIIJM).
.-.,.ss..--” ....”.,.—.—— ——...—....,.—..—.—
LEVEL
POWER
LEVEL
.,..-. -——-.....
Power ievel changes from 3 to 10.
Signai light on the display above
TIME COOK comes on. Read-out dis-
PlaYS99:00. BOX in read-out Panel
shows power level 10.
Power level changes from 10 to 5,
.
Push START,
Here are some other examples d
at4t0~ath22-st~j3 COQ#Wg:
You can cook dried beans at High for 20 to ~
o
30 minutes, then simmer them until tender
at Medium.
o Microwave a meatioaf at Medium High
(Power Level 7) for 22 minutes, then let it
.—
Appropriate signal lights show that
START
[
oven is carrying out the 2-step cook-
)
ing automatically.
stand using the no-heat Hold/ Deiay Timer
untii ready to serve.
Or cook the meatloaf at HIGH (Power Level
10), let it stand and then keep it at WARM
(Power Level 1) untii you’re ready.
For complete cooking instruction and recipes,
see the cookbook that came with your oven.
Page 20

microwave
has a memow
oven
TheMemorypadallowsyouto storecomplete
2,3, or4-step programsoranyl-step cooking
functionwhich requiresthe entry of time or
temperature.Justset the ovenand pressthe
Memorypadinsteadof Start. As Memorypad
ispressed,readoutbecomesblank,indicating
that oven can now be used for other
programs.
00 THIS
Setthe controlpanel for the way you
want the food cooked. But don’t
pressSTART.Use a singlesettingor
oneoftheprograms on pages14and
18. Defrost, cook by time or temperature . . .
automaticsimmerfunction
memorv.
any settings but the
work with
TOUCHTHIS
Whenthe pre-setcookingfunctionis needed,
touchingMemorypad once again will set the
ovenautomaticallyfor the cookingfunction(s)
youpreviouslystoredin memory.TouchWart
andthe oven beginsmicrowavingthis pre-set
program.,
YOU’LLSEETHIS HAPPENING
ONTHECONTROLPANEL
Before you touch Memory, signal
lightson the readoutabovethe function that you set come on. Lights go
off as soon as Memory pad is
touched.
Leavethese simpleinstructionswiththe babysitter:
SHE’LLSEE THIS HAPPENING
DOTHIS
Put the food in oven and close the
door. Insert probe if TEMP COOK or
TEMP HOLD hasbeenselected.
TOUCH
THIS
ON THE CONTROL PANEL
Signal lights show what kind of
microwavingyou selected. (No light
showswhenusingHOLD/TlfvlER.)
All signal lights go off, except the one that confirms
your first instruction. The
ovencarriesout the cooking
program.
.—...——
Change your mind? It’s easy to clear the Use your oven while it’s remembering. Using
Memory. Just enter a new program, and the the Memory only stores instructions. You’re
old instructionsare automaticallyerased. The free to usethe ovenfor anytype microwaving.
ovenisreadyto remember new instructions.
Remember: If you have any cooking program
set in the oven, ,pressing Memory pad will
store that program in oven’s memory, and will
era$e the previous memory.
——.—
Only when you touch Memory and START
does the oven start carrying out the stored
instructions.
20
Page 21

—.—
Suppose you programmed the oven in the
morning to defrost, hold, then cook, You
stored the information for later, During the
day, while you were using the oven for other
things, you forgot what program you entered.
To ASK BEFORE You
1.
Touch MEMORY. Signal lights of specific
functions light up to show you which type of
cooking you selected.
2. Touchthe cooking function pads youwant
to knowabout.
3. The answersappearin the read-out panel.
WHEN YOU WANTTOASK THK3
i entered a program this morning.
What cooking did it call for?
START’
TOUCH THiS
“
TV ASK WHILE YCW’RE
1. The read-out panel and qooking signai
iightsteii youhowthe oven is microwavingat
#hemoment.
2, Touch the other cooking function pads
you want to know about.
3, The answersappear in the read-out panei.
YOU’LLSEETHisANSWERONTHE
CONTROL PANEL
The signal lights on the display
above TIME COOK and DEFROST
come on.
The read-out panel shows the
amount of total time for defrosting.
How long will defrosting be?
m.-...,-,.,..--w-
How long will cooking be?
.-.--,.=...,,...........,—..:—
Did I ask for any hold-time in
between?
_—e..- .—-.-....——._-.-..”..... .... .. ..-.—.. ———---..—-.-,.—......—-..-—-..-.—-..—... -----..-.-.. .-.--.-,------------ —-......
—..—.....4..—....—.—.-
..-, -..~...~.-a,.....a.a—==..,+>.=-.-.-...=-s-.=—=..—-.-.-=-...-—.
———.—.——
. . ..... .. .------.."-..t.--.--- .-.e.-..--wM.-,.-.7-.sTYHmmc.JR.=..-.V.-—-.Z
(The Defrost signal light stays on until touching TIME COOK in the in-
struction below.)
——.7---
The read-out panel shows the
amount of total time for cooking.
(The Defrost signal light, goes off,)
The Time Cook signal light comes
on.
The read-out panel shows the
amount of HOLD time. (No signal
lights are on.)
21
....-., .
Page 22

a
Model JET 112only
The Cook Code feature, if your oven has it, of-
fers you a quick way to set your oven to cook
some of your most frequently prepared foods.
Instead of having to set a time or temperature
and power level, you can use the automatic
setting feature to automatically choose from
10 predetermined cooking combinations. If
1. Place food in oven.
For settings “9 or “O”, place temperature
probe in food and connect receptacle end.
Touch Cook Code pad. Read-out dis-
2.
plays :0.
Touch number pad which corresponds to
3.
food you are microwaving.
See chart next page. Read-out display
you want to reheat coffee, warm a baby
bottle, bake potatoes, or any of a wide variety
of other microwaving functions, simply
choose the automatic setting cycle and select
the proper number, from “1” to “O”, for the
automatic program you wish.
shows the automatic setting you have chosen by displaying time to cook or temperature selection (depending on setting).
Signal light on read-out above TIME
COOK or TiEMP COOK (whichever is appropriate) colmes on.
4.
Touch START for oven to carry out cooking program shown on dispiay.
Always be sure to set a singie
though
YOUset TIME COOK.
digit setting. if you set two digits or more, the oven will function as
22
Page 23

To use the Cook Code feature for foods
not Il$ted below, select the setting
MNWXI a food similar to the one you wish to
microwave,
Cooking
CookC%de
Setting Temperature LQWA
....——.——.-— —,.———.—
Time or Power $hqgestec!
that
——
,-—-.—.....!!.....,-——.—.— —..!...—.—..
t%od$
1
1 min.
10 Reheat 1 cup of coffee; sandwich; piece of
chicken; 2 pieces of pizza.
2 2 min. 8 Cook 2 slices bacon; cup of soup or cocoa;
reheat 1 serving of leftovers.
3
4 4 min.
3 min. 8 Cook 1 hamburger pattie or 4 hot dogs.
8
Reheat 1 plate leftovers; cook 1 potato or 1small
entree.
5
5 min.
8 Smail package frozen food; 1 layer cake or 2
baked apples.
6
6 min.
10 Cook 1 lb. hamburger (4 patties); 10oz. frozen
peas; brownies.
7 7 min.
10
Cook ~2 oz. frozen TV dinner; 2 ears of corn.
8
9
8 min.
145°
10
7
Cook 2 potatoes; pudding mix; 1 lb, fish fillets.
Temperature cook medium well beef, meat sand-
wich. (Use probe–1450.)
o
160° 10
Temperature cook casseroles, reheat leftovers.
(Use probe–1600.)
23
Page 24

1. Casseroles-1500-160° Internal tamperatwa
fjivesbestdonenesson mixtureof precooked
togatherIntoamaindish,Flawfoodssuoh as
heated
hamburger or other metit, vegetables
startingfrom“scratch” shouldho
combining together into
above temperature, The advantage of the temperature probe: it tells you when casserole is at correct
temperatutb for serving, without checking, peeking
or guessing,
Reheatinglefkwers--thlstypeoffoodisexcellent
2.
precooked beforo
a casserole heat~d to
foods
tmd $wu.mes
to heatwithtemperatureprobebecauseoftenthe
amountof
to cook isonly a guess. Cooking 10a preset temperature (usuaiiy 155°) eliminates the guesswork,
high or Medium High PowerLevel,
leftover food is not known, therefore, time
Use
6,
RoastsandPotRotmta-cook raast~ using your
choice of power settings, Wry spociflc in8tructlonE
are inolud~d In the (look Book,
tlp and rump roast$ are $ucculent and tendw whetj
cooked with automatic simmer or temp/hoid
featurtw
7. Rips-hot dips are a popular appetizer, Using
Low or Medium Power, an internal temperature of
90-130° (depending on the ingredients) is just right
to serve guests,
8. Slow-cooking recipes-any foods that you can
cook in a slow-cooking appliance, you can microwave with the automatic simmer’ setting using an
ovenware casserole,
Potroasted sirloin
3. Plates
probe in largest piece of food, then cover plate with
wax paper (or lightly with piastic wrap), A preset
temperature of 160° gives piping hot food, Use
or MediumHighPower
4.
probe to help stabilize probe in liquids. A preset
temperature of 130° is “warm to drink,” about 170°
is “steaming hot.”
5. Beef, lamb and ham loaves–be sure to piace
probe as horizontally as possibie, and use clip to
stabiiize probe in meat mixture.
—-
1. Delicate butter icings,icecream, frozenwhipped
topping, etc.–these soften rapidiy at warm temper-
atures. Lowest setting on temperature probe is90°.
Manyfoodsinthefrozenstate–because temper-
2.
ature probe should not be forced into rockhard
foods, it could break. However, after defrosting,
many convenience foods may be heated with the
probe to the precise temperature for serving.*
3. individual foods cooked in batches–in cooking
with microwave energy, differences from one food
to another, even of the same type of food can result
in different cooking times of foods in the same
batch. A variation in size (such as in cup cakes,
of Food–in general, place temperature
High
Level,
Beveragesand soups–use ciip on cable of
-—!Jri-&5L ,
*..
9, Stewingand shnmerlng-this type of cooking invoives bringing food to a simmering temperature
and automatically maintaining that temperature for a
long period of time,
simmer setting on your microwave oven for most
stewing, pot roasting and other slow-simmered
cooking.
HoldingFoodsat ServingTemperatures-See
10.
TEMP/HOLDinformationfor
mended (these inciude ieftovers, roasts, and such).
Be sure to hold at recommended internai food temperature and do not exceed recommended food
times.
-- -a
sandwiches, etc.) or moisture content (such as in
potatoes and other vegetables) can cause variation
in cooking speed. Temperature probe in one food in
a batch might not correctiy indicate internai temperature of aii foods cooked together.
Starchyvegefabies–potatoes which cook to
4.
steamy hot temperatures tend to stick to temper-
ature probe due to starchy nature of interior. (Ciean
immediately with soapy cloth, then rub lightly with
piastic scouring baii if necessary.)
5. Batters and doughs which are baked. This type
of food should be observed when cooking to best
judge when done. Also, periodic turning of the dish
is usualiy required on these delicate food types.
We recommend the automatic
types of foods recom-
“,,
, - - ~. -
24
Page 25

~. ~hQ dQf’iWtift~ tin)i3iii hl W tMok BQ@ d~n’1
tobedghtfor my food,
$eem
A, Cook book timtw are werqm, Defrosting time
can vary wxwdlng to the temperature III your
frwzw, Foods from freezers $et at the coldest $cM-
tings may
fresmr section of some single.door rofrlgwwtcm
maybeatahighertemperature.Theymaytakeless
timeto defrost,
Q. Can!
A, Yes,ifyouusetheDEFROSTpad
ing setting, See page 20, The microwave oven is
automatically programmed to go from a defrost, to
hold cooking program, You can also add a second
cooking program after hold, by using TIME COOK
as the third cooking step, The oven will automat-
ically transpose your instructions, It will hold first,
then cook, since this is a more useful combination. If
you want to use I-fold/Timer after cooking, wait to
hear the signal at the end of cooking, Then set the
HOLD/TIMER,
Q. Can I use the Sim ‘N CookThlsetting for timed
cooking?
A. No. You need to use the probe. The probe cooks
by temperature only.
Q. What happens if I accidentally leave the probe in
the ovenwhen I’m setting time cooking?
A, Nothing, if the probe is in food, (When you accidentally instruct the oven to cook by both time and
emperature, the oven uses the last instruction pro-
grammed.)If the probe is left inside, touching an
oven wall, and not inserted in food you may damage
the oven.
Q. The
ispressed,buttf’t~ovenisn’t
A. Read the section on programming again. The
signal will sound if your program can’t be carried
out. If you’re using the probe, check to make sllre
it’s inserted properly.
CanI changePowerLevelswhilecooking?
Q.
A. Yes,if
pads. Just touch the power level pad then the num-
ber pad for the Power Level you want.
C?.Can I program
heat,then
A. Yes, by using DEFROST as the first cooking
function. See page 20.
Q. How long does the Sim ‘N Cook setting cook?
A. Until you shut it off by touching CLEAR/OFF.
takelongerto thaw,FoodsstorodIn the
$etthe ovento cook, then hold?
for your cook-
signalsoundsassoonastheSTARTbutton
cooking.
you’re using T!ME COOK or TEMP COOK
for a roastto be cookedat high
finished at lower heat?
Thisway, you can dmmer foodsasIORQas with a
olowcooker,withoutaffe~tingthemicrowavetimer,
Sore@alc)w-cookingreclposcall for simmering5to
10 hours, Regularmicrowaves~ttln~snlwayau~e
muchshortertimes,
Q. Wh@happensIfIhll th~oven
defrost?
A. The oven only cooks In correct sequence. It
automatically unscrambl~s your message. It defrosts flint.
MayI usethememorysettingtodelaytemper-
C?.
to GOW first,then
aturecooking?
A, Yes,Justfollowthestepsonpage18,
Q.
Can I get the same results as the Sim ‘N Cook
$ettingbyputtingfood In a crock and
usingtheLow
Powersdtlng?
A. Withthe Low Powersetting,youwe limitedto
the amountof timeon the microwavetimer,Also,
sinceyou’dbecookingwithtime,youcouldn’tcontrolthetemperatureof the food.Evenwithregular
temperature
as with the Sim ‘n Cook control,
cooking, the oven automatically shuts off
reaches the preset temperature, The Sim ‘n Cook
control malntalns a simmer temperature for as long
as you want,
You can manually set Temp/Hold to automatically
simmer, using recipes in your Microwave Cookbook.
See page 16 for instructions.
Q. Can I
cooking, you can’t get the same results
With temperature
when it
combinecookingbytimeandbytemper-
ature?
A. Yes, you can combinetime and temperature
microwavingby usingDefrostas a first cooking
function(see
Cook. You can also set a combination of Time Cook
and Temp !-fold.
Q. How
secmndsignal?
A. The shorter signal is a “GO” sign. Your instruction is confirmed. The 3-second signal is a “STOP”
sign. It can mean any of these things:
1. Microwaving is complete.
2. You set the oven to microwave by temperature,
and the probe isn’t inserted securely in the oven.
3. You’re giving the oven instructions it can’t carry
out.
4. You pressed START without setting any instruc-
tions.
Ct. How can!erase
A. A new program automatically erases the old one.
page 20) in combination with Temp
is the shortersignaldifferen~from the 3-
a memory instruction?
Page 26

—
“.-.,..—.—...-.....
—
m
@KWWyour ovenclean and $weet-amelling,
Opening the cwen door a few minutes after
cooking
occasional thorough wiping with a solution
of baking soda
fresh.
~ Don’t use sharp-edged utensils with your
UlkNs,floorand plastic ICOWW
Because there is little heat except in the food,
or sometimes in the utensils, spills and spatters are easy to remove. Some spatters can
be removed with a paper towel, others may
require a damp cloth. Remove greasy spatters
with a sudsy cloth, then rinse, and dry. DOnot
use abrasive cleaners on oven walls. NEVER
USE A COMMERCIAL OVEN CLEANER ON
ANY
PAFIT OF YOUR MICROWAVE OVEN.
Glass–wipe up spatters daily, wash when
soiled with a minimum of sudsy warm water.
Rinse thoroughly and dry.
Metal and Plastic Parts on Door–wipe fre-
quently with a damp cloth to remove all soil,
DO NOT USE ABRASIVES, SUCH AS CLEAN-
ING POWDERS OR STEEL AND PLASTIC
PADS. THEY
THESE PARTS.
Special note WI-WI usingE3rcmm‘N Sear Dish
with Microwave oven.
Scorched-appearing stains on the shelf of
your microwave oven, usually caused by
grease baking onto shelf while preheating
Brown ‘N Sear Dish, may be removed with
DeleteR cleanser, a product of Drackett Co.
(Note: Grease does not normally bake onto
oven interior in microwave operation, however, high heats generated on bottom of
Brown
‘N Sear Dish can cause baked-on con-
dition on shelf only, if grease is present.)
helps “air out” the interior, An
and water keeps the interior
WILL MAR THE SURFACE OF
oven
oven, The interior and exterior oven walls
can be scratched, The control panel can be
damaged,
* Don’tremove the coveroverthe “stirrer”
the top of the oven (microwave feature no,
5 on page 3,) Youwill damage the oven.
Delete cleanser may be purchased from your
local dealer or from your Authorized Service
Center. Check the “yellow pages” for location and phone number,
Delete cleanser may also be sold at local grocery or hardware stores, or at houseware
stores, or at housewares department of some
department stores,
shelf’:
Your shelf accessory is made of polysulfone,
one of the strongest microwave oven-proof —
plastics. R is designed for use in a microwave
oven only; do not use it in a conventional
oven. Do Not operate your microwave oven
with the shelf in place unless you also have
food in the oven.
Never Use a microwave browning dish with
the shelf. Heat from browning dish can damage the shelf.
The easy to clean shelf is dishwasher safe, or
may be washed in hot water with a mild detergent. Do not use abrasive cleansers or scouring pads.
ProIbe
Probe is sturdy, but care should be taken in
handling. Do not twist or bend; avoid dropping temperature probe.
Clean as soon after using as possible. To
clean, wipe with sudsy cloth, then rub lightly
with plastic scouring ball if necessary. Rinse
and dry. (Or wash in dishwasher. )
---
:::Onmodels equipped with this feature.
at
Page 27

———
———
—.
case
The outside surface is woodgrain vinyl. Clean
frequentlywith soapand water,~henrins~anddry.
Wipe clean the outer pane of the window with a
damp cloth. Doriotuseabrasivesor sharpobjects
on the outside surfaces.
\f dust accumulation becomes a problem,
wipe surface of the outer pane with a weak
solution of liquid dishpan detergent (2 teaspoons detergent per quart of water). USE
SPECIAL CAUTION NOT TO SCRATCH THIS
SURFACE.
Chrome trim is best
or cloth, then wiped immediately
towel. Cleaned daily this way, chrome will stay
shiny and spot-free.
Control panel
Wipe with a damp cloth. Dry thoroughly. Do
not use abrasives or sharp objects on panel.
They can damage it.
cord
If the cord becomes soiled, unplug acrdwash
with damp cloth. For stubborn spots, sudsy
water may be used, but be certain to rinse
and dry thoroughly before plugging cord into
outlet.
wiped with a damp towel
with a dry
How to iw?phmelightmm
First, unplug the oven. Then remove lamp
compartment cover by removing screw which
holds cover in place. Cover is located at the
rear of outer case.
To remove bulb, push it inward gently and
turn it to the left or counter clockwise; then
pull outward out of the socket. Replace with
lamp number 25T8DC. (It is available in drug
and hardware stores.) Replace compartment
cover, Plug in the oven.
..
..—
Page 28

——-
Read the book to be certain you understand
how the oven operates. Review “All these
things are normal with your microwave oven”
on page 3. In several other locations in the
book there are points to check on how to determine if you
need service.
U no cooking takes place after
START button is pressed:
If signal doesn’t sound: Make sure power is
on. Check first to see that the 3-prong plug is
inserted firmly into a proper receptacle. Is the
wall receptacle working properly or has it
failed and won’t work until a fuse is replaced?
You can check that easily at the control box.
Check to be certain the door is securely
closed. If a dish touches the door when the
door seems closed, it actually may not be
firmly closed. Unless the door is closed to engage the safety interlocks, the microwave
energy cannot come into the oven.
If signal sounds: Check setting directions. If
you’re using the temperature probe, make
sure cable end is securely “seated” into oven
receptacle. With TEMP COOK, make sure
temperature setting falls between 90° and
200°. Make sure temperature setting is higher
than actual temperature of food in oven. (If
food has reached or exceeds temperature
setting, oven won’t microwave because the
temperature you set has already been
reached.)
H“PF” appears on the read-out
Power has been interrupted. Touch CLEAR/
OFF.Reset the controls. Instructions stored in
the oven’s memory will haveto be replaced.
[f lllliC~OW~W~ Energy GOes CM
Before Set ~he Has Elapsed
Check to be certain the fuse or circuitbreaker protecting the receptacle into which
cord is plugged is operating. If fuse has not
blown and power continues to go off, this signals a problem, so call serviceman.
If C)Ven
See Care Section, page twenty-seven, regarding replacement. The oven can be operated
without the light in place, but it.should be replaced for convenience in seeing the oven interior, and also for safety’s sake because the
socket should not be left open. Hotpoint service does not stock these lights.
Light Burns IOut
TV-FladioInterference
Some TV and radio interference might be no-
ticed while operating the microwave oven. It
is similar to the interference caused by other
sm$$!appliances such as vacuum cleaners,
mixers, etc. It does not indicate a problem
with your oven.
28
Page 29

——.—
?IIC?theEx3
For Professional Maintenance, call
General Electric Franchised Service —it’s nearby. Get telephone
number from your dealer or the
“yellow pages” and write it here.
has
ance with outstanding features. It has been designed, with the
help of home economists, with the homemaker in mind. Our
desire is to offer you a dependable, precision-built and reliable
appliance.
Similarly, intensive efforts have established an efficient, well
trained, nationwide product service organization. No matter
where you live—or move—the network of thousands of General
Electric franchised distributors, dealers and service technicians are happy to serve you and make doubly sure your new
range gives you continued, satisfactory performance.
For serwice after the warranty period:
Even the finest precision-built appliances may require service
from time to time. In some areas, franchised Customer CareR-’
service organizations offer service contracts, beyond the origi-
nal warranty period, which enable you to budget for such pos-
sible occurrences.
Contact your local franchised Customer Care service organiza-
tion to ascertain whether service contracts are available in your
area, and to learn the details of their plan and its terms and
conditions.
General Electric wants you to be pleasedwith
your new GE Appliance. Part of our commitment to keeping you pleased is providing the
best possible service we can.
your GE appliance need servicing, call
Should
your local dealer. He may provide the service
himself, or refer you to a qualified
your area.
servicer in
If you do not have a servicing dealer, call the
Factory Service office in
these offices and telephone numbers is included with your appliance.
If the service you receive is not to your satisfaction, here are three steps you should follow
to make it right:
,.
1. First, contact the people who serviced your
GE appliance. Explain your point of view and
why you are displeased. In most cases, this first
step will solve most problems.
yOLJ stitl have not resolved your problem,
2, If
write all details, including your telephone num-
!’.
,.
-,. , .~ .-,
,.
your area. A list of
,- ~. i.
.
ber and the model and serial number, to General Electric direct.
The address is:
MANAGER—CUSTOMERRELATIONS
GENERAL ELECTRIC CO.
WATTERSON CITY EAST 312
APPLIANCE PARK, LOUISVILLE, KY. 40225
3. If you are dissatisfied with the action taken, ,
the final step would
to: MAJOR APPLIANCE
CONSUMER ACTION PANEL
20 NORTH WACKER DRIVE,
CHICAGO, ILL. 60606
This panel, known as MACAP, is a group of independent consumer experts under the spon- ~+
sorship of several industry associations. Its ;)~~
purpose is to study industry practices and to ;>;
advise the industry of ways to improve cus-
tomer service.
Free of industry control and influence, MACAP ~’
is able to make impartial recommendations,
considering each case individually.
,., .
.,
,.. .
~L ,1,
be to send full information
.“.. .-,. - . --- “,-;
._..,;—.—L:. . L.!-.-.. .,-, :..:! ... , lf ,!.. i .
...,,. . “, .“-.-
..,.-,,-r.- ,., ;-,-,,
31
I
1
1-
!
i}
,–F-
?
!!
la
g
:+
~‘:l
‘;:.7
~;d
:...:
\:;j
,~<>
.;.~
.~’
,1I
Page 30

GENERALIELECTRICMKXCIWAVERANGE
(lnck@es.cooisir@centbrsarmimicrowaveovens)
~FULL@!E-+~AR WARRANTY
FROM GENERAL ELECTRIC TO YOU - This warranty is extended by General Electric to the original purchaser and to any succeeding owner and applies to products purchased in the United
States, retained within the.48 contiguous states, the.state of Hawaii or the District of Columbia,
and employed in ordinary home use.
WHATWEWILL 00 if your General Electric Microwave Range fails because of a manufacturing
defect within one year from the date of original purchase, we will repair the product without
charge to you. Partsand service labor are included. Service will be provided in the home in the 48
contiguous states,’the state of Hawaii or in the District of Columbia.
HOW TO OBT~iN SERViCE – Service will be provided by our local Customer Care’ factory serv.’
ice organization or by one of our franchised -Customer Care servicers during normal business
hours after you notify us of the need for service. Service can be arranged by telephone.
Look up “Service” under General Electric Company or “General Electric Factory Service” in the
White pages of your telephone directory or “General Electric Customer Care Service” in the Yellow pages or write to the address given below.
WHAT IS NOT COVERED - This warranty does not cover the failure of your Microwave Range if it
is damaged while in your possession, used for commercial purposes, or if the failure is caused by
unreasonable use including failure to provide reasonable and necessary maintenance. In no
eventshallthe GeneralElectricCompanybe liablefor consequentialdamages.Thiswarranty
doesnotapplytothestate
Zone or the Commonwealth of Puerto Rico.
Some states do not allow the exclusion or limitation of incidental or consequential damages, so
the abovelimitation or exclusion may not apply to you. This warranty gives you specific legal
rights, and you mayalso have other rights which vary from state to state.
The magnetron tube is covered in the above full warranty. in addition to that warranty, if the mag-
netron tube fails because of a manufacturing defect within the second through fifth year from date
of the original purchase, we will furnish without charge, a replacement magnetron tube. You must
pay the service labor charge for the home call, diagnostic work, and removal, and reinstallation of
the new magnetron tube.
All other provisions of this additional limited warranty are the same as stated in the full warranty
above.
In the state of Alaska free service including parts will be provided to correct manufacturing defects at our nearest service shop location or in ycur home, but we do not cover the cost of trans-
:.-
.+$?s
portation of the product to the shop or for the travel cost of a technician to your home You are
.. -
responsible for those costs. All other provisions of this limited warranty are the same as those
‘.4+
WJ3
stated in the full and limited warranties above.
WHERE TO GET FURTHER HELP – If you wish further help or information concerning this warranty, contact:
Manager–Customer Relations
General Electric Company
*,J
: --
.+
Appliance Park, WCE–Room
Louwwlle, Kentucky 40225 Louisville, Ky. 4uz25
of Alaskanor to the Virgin Islands, Guam, American Samoa, the Canal
Additional LiiVii?EDFOUR-YEARMAGNETRON
TUBEWARRANTY
LiNliTED WARRANTY
Appiicabie to the State of Aiaska
WARRANTOR–
GeneralElectricCompany
316
AppliancePark
.----
A bill of sale, cancelled check or other payment record should be kept to verify the original purchase date and to establish the warranty period,
Pull Fik3.49-4427
GENERAL ELECTRIC COh{PANY
Range Marketing Department
AppliiiIIct? Park ~ Loui~vili&. K~fltucky 40225
Part No. 862A300FW3
 Loading...