

Page 1

—
--
—
.-
—.-—
‘--
——.
.——..---—---=———————
-—.-..-=.—
——. -—
—..—-— ---——
——.
—-——.
—
——.
—
,
Page 2
—
,.,..=.
:;;L-=-
.—
..-
-
.
.
J“. _~ “ ‘
.- -=, - .
ReadThisLlseandcare
Takethetime to readthis book and learnhow to enjoy
your new Microwave Oven. It(contains detailed operating instructions and recommendedmaintenance,as
well &shandytips to helpyou gain maximum benefits
frwn your Microwave Oven. Once you have read the
k?ook,keepit handyto answerany questionsyou may
have.
If you haveany additional questions concerning the
operation of your Microwave Oven,write—including
your phone number—to:
ConsumerAffairs
General Electric Company
Appliance Park
Louisville,Kentucky 40225
!F }’OU RECEIVEDA DAMAGED OVEN, immediately
cordact the dealer (or builder) from whom you purchased it. They have been informed of the proper
procedure to take care of such matters and can
handle it for you.
H is impoflant that we, the manufacturer, know the
Iocatim M your Microwave Ovenshould a needoccur
for adjustments
Please check with your supplier to be sure he has
registered you as the owner; also send in your Purchase Record Card. If you move, or if you are not the
original purchaser piease write to US,stating model
and serial numbers. This appliance must be registered. Plea%?be Cetiaknthat it is.
Write to:
Genera~Electric Company
Range Product Service
AP2-210
App!ianGePark
Lcmisvill%Kentucky 40225
A nameplate on which isstamped the model and serial
number is located either inside oven at top left side, or
on rear outside of case.
Model and serial numbers are also on the Purchase
Record Card which came with your Microwave Oven.
Record the numbers in the spaces below.
Please refer to both model and serial numbers in any
future correspondence or product service calls con-
cerning your Microwave Oven.
Model F&mMX?$’
sedal
L%%%
KEEP REt3EiP~ WITH THIS BOOK T6
THE
BeforeYoucdl for serwice
Check “The Problem Solver”. (Seepage 12.) It lists
many minor causes of operating problems that you
can correct yourself and may saveyou an unnecessary service call.
If You
In many cities, there’s a General Electric Factory
Service Center, Call, and a radio-dispatched truck
will come to your home by appointment—mornin9
or afternoon. Charge the work, if you like. All the
centers accept both Master Card and Visa cards.
(See page 1S.)
Or look for Genera! Electric franchised Customer
Care@ servicers. You’ll find them in the Yellow
Pages under “GENERAL ELECTRIC CUSTOMER
CARE@ SERVICE” or
HO”l_POINTCUSTOMER CAFIE@SERVICE”.
If ye9uneed sewice literature, park lists, parts or
accewm’W contact one of the Factory Service Centers, a franchised Customer Care@servicer or your
General Electric dealer.
ExtendedSewke Contracts:The terms of your war-
ranty provide free service covering failures due to
manufacturing defects for a definite period of time.
After this warranty expires you may purchase an
Extended Service Contract which will enable you to
budget your service needs. This coverage beyond
warranty is availablefrom our Factory ServiceCenters
and from many franchised Customer Care@servicers.
His a good idea to apply for this coveragebefore your
warranty expires.
~0 ~0~
Firsf, contact the people who serviced your microwave oven. Explain why you are dissatisfied. In most
cases,this will solvethe problem.
Next, if you are still dissatisfied, write all the detaiis—
including your phone number—to:
Manager, Consumer Relations
General Electric Company
VWX-312
Appliance Park
Louisville, Kentucky 40225
F’inally,if your problem is still not resolved, write:
Major Appliance Consumer Action Panel
20 North Wacker Drive
Chicago, Illinois 60606
This panel, known as MACAP, is a group of inde-
pendent consumer experts under the sponsorship of
several industry associations. Its purpose is to study
practices and advise the industry of ways to improve
customer service. Because MACAP is free of industry
control and influence, it is able to make impartial
recommendations, considering each case individually.
service
“GENERAL ELECTRIC–
-:*
.%,
<l.
&.@
t
Page 3
.. ...=.
..
Before ldlicr0wavin9 . .
Grounding
Safety
Instructions & Precautions. . 3
Tips . . . . . . . . . . *. -s *. ! . . . . . . . . . . A
lf10’OdLJ~ti~nto QVen
.,*. ,,*, *S**.*.00
,.. **** QOco*Q?.**.
Tuwh Control Panel . . .. . .. . .. . .. .. . ~- 6
Time ~Ook . . . . . . . . . . . . . . . . . . . . . . . . . . . 7
Defrost .. . .. . . .. . . . . . ..
-..—- ..
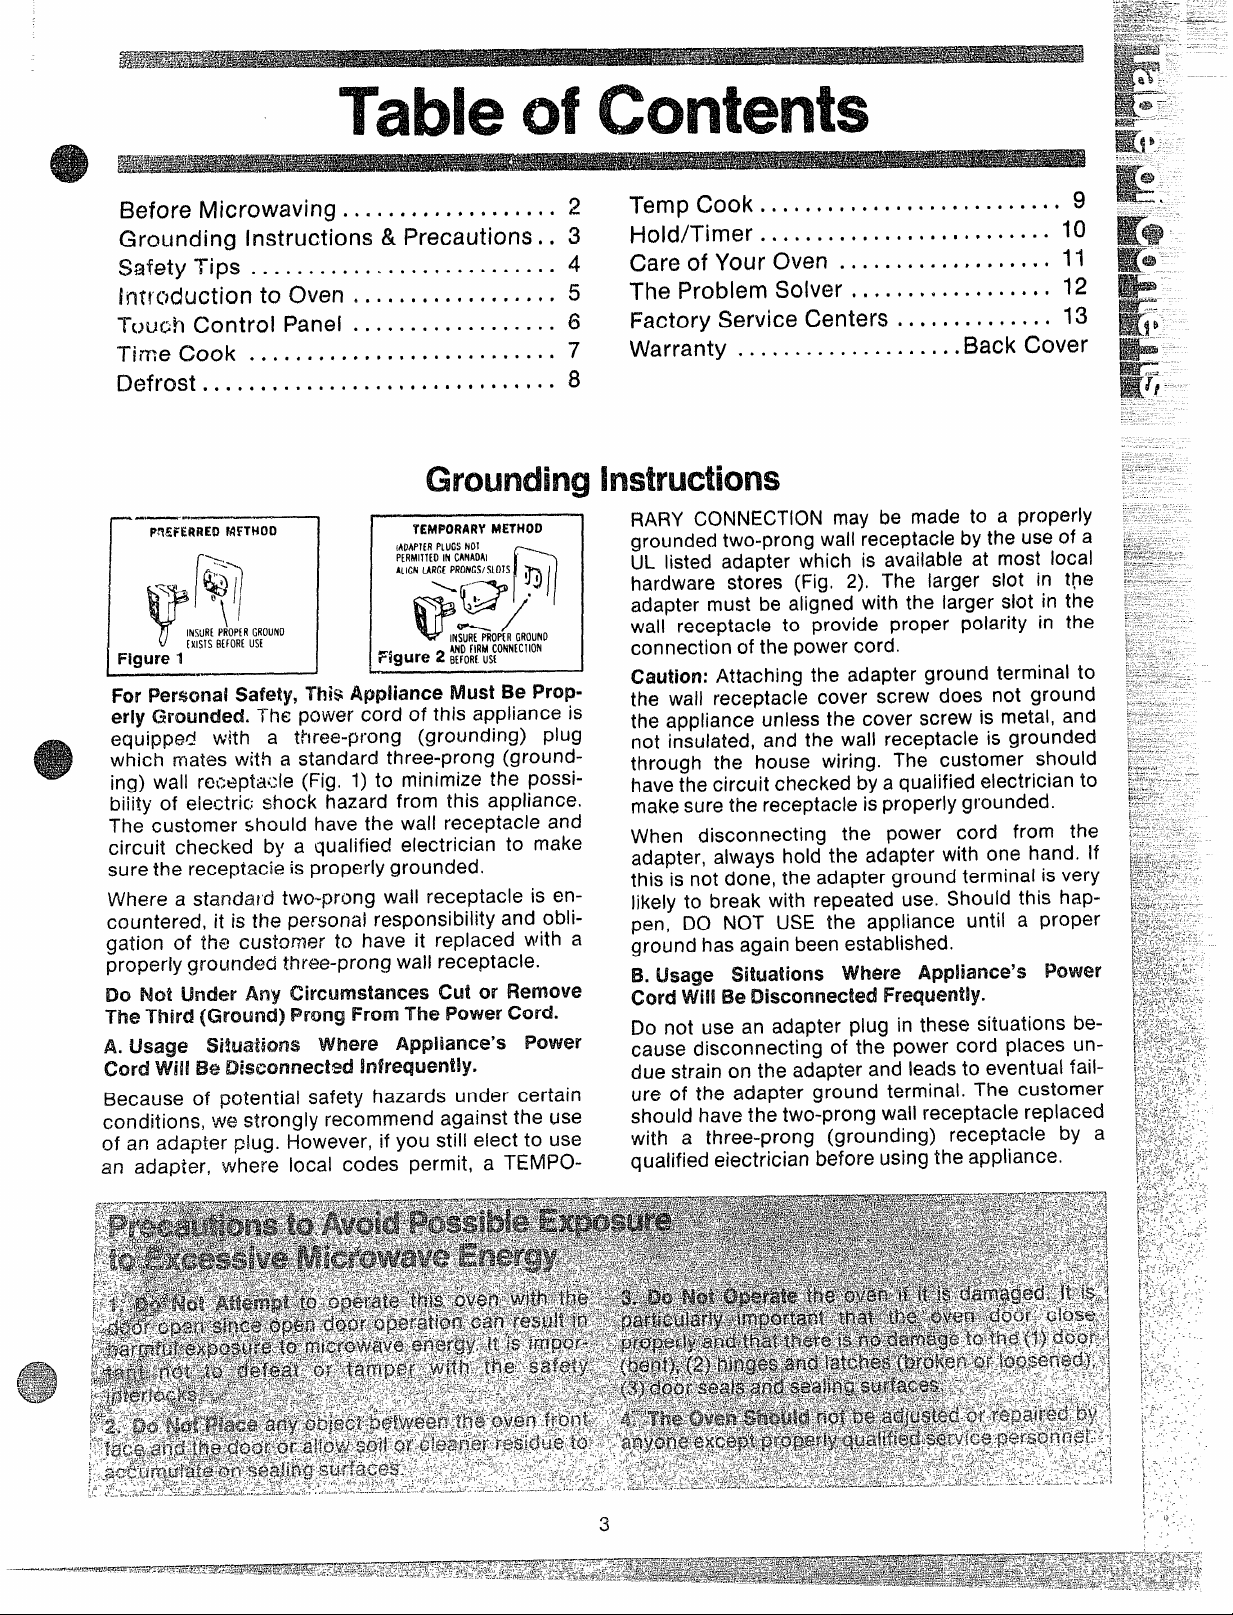
PM?%RRED FdFT~oo
..<
-.
(’~
Q\ . ~’
I
\i
INSUR[ PROPIR GROUNO
v
Figured
FcwPerwma~Safety’, Thi$AppWmcehfhNt BeProp-
erly Grounded. Th~ pc)wercord of this appliance is
equipped with a three-prong (grounding) plug
which mates with a standard three-prong (grounding) wall rati~ptacle (Fig. 1) to minimize the possibi!!~yof elect~c shock hazard from this appliance.
The customer $hould have the wall receptacle and
circuit checked by a qualified electrician to make
sure the receptack? k properly grounded.
Where a standard two-prong wall receptacle is encountered, it is the personal responsibility and obligation of the customer to have it replaced with a
properly grounded three-prong wall receptacle.
Do Not under Any circumstances cut or Remove
The Third (Ground) Prong From -1-hePower cord.
A. Usage Situations Where Appliance’s Power
cord will EMDkxxmnectf?dInfrequently.
Because of potential safety hazards under certain
conditions, we strongly recommend against the use
of an adapter p!ug. However, if you still elect to use
an adapter, where local codes permit, a TEMPO-
IXISISBffORf US[
● ● .. .. . . ~.s. s.. ~
TEMPORARY METHOD
IAI)AP1[RPIUGSNO1
PIRMITKDINCANADAI
AIIGNIARG[ PRONCSIS1O1S
QJl
@./
INSURIPROIIII GROUNO
1,
II
3’-
.
FigllK!2%’OilRIJONwcHoN
~
~ernp Cook..
. .***..***********.****’*
9
Hold/Timer .. . .. .. .. .. . . .. .. c... .. . . . 10
Care of Your Oven . . .. .. ● s...... ~● . . . II
5
The Problem Solver . .. .. .. .. .. . . . . . *, 12
Factory Service Centers . .. .. .. ..
Warranty
RARY CONNECTION may be made to a properly
grounded two-prong wail receptacle by the use of a
UL listed adapter which is available at most local
hardware stores (Fig. 2). The larger slot in the
adapter must be aligned with the larger slot in the
wall receptacle to provide proper polarity in the
connection of the power cord.
Caution: Attaching the adapter ground terminal to
the wall receptacle cover screw does not ground
the appliance unless the cover screw is metal, and
not insulated, and the wall receptacle is grounded
through the house wiring. The customer should
have the circuit checked by a qualified electrician to
make sure the receptacle is properly grounded.
When disconnecting the power cord from the
adapter, always hold the adapter with one hand. If
this is not done, the adapter ground terminal is very
likely to break with repeated use. Should this happen, DO NOT USE the appliance until a proper
ground has again been established.
B. Usage Situations Where .Appliance’S Power
CordVW!!Be Lliscormectd Frequently.
Do not use an adapter plug in these situations because disconnecting of the power cord places undue strain on the adapter and leads to eventual fai!ure of the adapter ground terminal. The customer
should have the two-prong wall receptacle replaced
with a three-prong (grounding) receptacle by a
qualified electrician before using the appliance.
, *****..***.********
● .. ● . 13
Back Cover
Page 4
1. For personal safety the oven must be properly
grounded. See groundingWMructims on page 3 of
this book. For best operation, plug this appliance
into its own electrical outlet, to prevent flickering of
lights, blowing of fuse or tripping of circuit breaker,
2, Use cd extension cords. Because of potential
,M@?yhazards under certain conditions we strongly
‘recommend against the use of an extension cord.
Hbwever, if you still elect to use an extension cord,
it /sabsolutely necessary that it be a UL listed 3-wiie
grounding type appliance extension cord and that
the current carrying rating of the cord in amperes
be 15amperes m“greater. Such extension cords are
obtainable through General Electric service. If you
‘ do use an ,extension cord with your microwave
mmn, the’ interior light may flicker and the blower
sound may w.wywhen oven is in use.
3, Be cwtaln to place the frontsurface ot the door
Nwe* inchm or mom back
tii@gf4to
ncmmdusage.
4. Use metal onByas d;rected in cookbook. Metal
strips as used on meat roasts are helpful in cooking
food when used as dirtmh?d. Metal trays may be
used for TV dinners. However, when using metal in
the microwave oven, keep metal a! least l-inch
awayfrom sidesof mbwwwweoven.
5. DO not operate the oven while empty to avoid
damage b Wmovenand the danger of We, If by ac-
cident the ov$mshould run empty a minute or two,.
no harlm is dorm. However, try to avoid operating
the cwen empty at all times–it saves energy and
prolongs life of the oven.
6. Cooking ?Mwsils may beconap hot because of
heat transferred from the heated food. This is espe-
cially true Hplastic ‘wrap has been covering the top
and Iwmdies cd the utensil. Pot holders may be
needed to handle the utensil.
7. smw?thw?s, the oven shelf can become too hot
to touch. Be careful touching the shelf during and
after cooking.
8. !240not use any in food you are
microwaving Unless that thermometer is designed
or recommended for use in the microwave oven.
9. $Nws probe from the oven
when not using H to cook with. If you leave the
probe inside the oven without inserting it in food or
liquid, and turn orI microwave energy, it can create
electrical arcing in the oven, and damage oven
Waik$i
10. Remove wine on paper and plastic
bags before placing in oven. Twist-ties sometimes
cause bag to heat, and may cause fire.
$1.DQn”tdefrost frozen in narrow necked
bottles especially carbonated ones. Even if the container is opened, pressure can build up. This can
cause the container to burst, resulting in injury.
avoidacckfen!altippingof the appliance in
from the countertop
12. Don’t overcook. Excessiveovercookingdehydratespotatoes,and may cause them to catch fire
causingdamage.
13. H food shouldever ignite: Keepthe ovendoor
closed. Turn off the power immediately: Touch
CLEAR/OFF or disconnect power cord or shut off
power at the fuse circuit breaker panel.
14. Boilingeggs (In andout of shell) is not recom-
mendedfor microwave cooking. Pressure can build
up inside egg yolk and may cause it to burst, resulting in injury.
15. Foods with unbrokenouter “skin” such as potatoes, hot dogs or sausages, tomatoes, apples,
chicken livers and other giblets, and eggs (see
above) should be pierced to allow steam to escape
during cooking.
1&“Boilable” cooking pouches and tight!y closed
plastic bags should bq slit, pricked or vented as di-
rected in Cookbook. If they are not, plastic could
burst during or immediately after cooking, possibly
resulting in injury. Also, plastic storage containers
should be at least partially uncovered because they
form a tight seal. When cooking with containers
tightly covered with plastic wrap, remove covering
carefully and direct steam away from hands and
face.
17. Do not pop popcorn in your microwave oven
unless in a special microwave popcorn accessory
or unless you use popcorn labeled for use in microwave ovens. Because of the heat generated without
these precautions, the container could catch fire.
18. Plastic Utensiis–Plastic utensils designed for
microwave cooking are very useful, but should be
used carefully. Even microwave plastic may not be
as tolerant of overcooking conditions as are glass
or ceramic materials and may soften or char if subjected to short periods of overcooking. In longer ex-
posures to overcooking, the food and utensils
could ignite. For these reasons: 1) Use microwave
plastics only “and use them”
with the utensil manufacturer’s recommendations.
2) Do not subject empty utensils to microwaving. 3)
Do not permit children to use plastic utensils with-
out complete supervision.
19. DOInot use your oven to dry news-
papers. If overheated, they can catch fire.
20. pork either conventionally or in
the microwave oven, follow our directions exactly
and always cook. the meat to at least 170°. This
assures that, in the remote possibility that trichina
may be present in the meat, it will be killed and
meat will be safe to eat.
in strictcmwliane~
Page 5
Oven
Get to know your microwave oven. This picture identifies the important features and explains their purpose
briefly. See the following pagesfor further explanation of cooking features.
.LaJ————
7-
●
0
:
‘0
I
1.
Door l-larwl%?~Oven doesn’t operate unless door
is securely latched.
Door Latch Push in to open door.
2.
WWRKRWJwith Nk’daiWeld. Screen allows cook-
3.
ing to Ix? viewed while keeping microwaves
confined in oven.
Plastic Mode Stirrer
4.
stirrer which distributes microwave energy into
the oven.
Clvenvent>
5.
Oven L!ght. Goes on when door is opened or
6.
when oven is operating in any function.
QYti?n shelf.
7.
8.
WMI ~~w.:)era~ure Cook func~i~n
F%xx@ae!e for Prob@. Tempera-
9.
ture Probe must be securely inserted into
receptacle before oven will start temperature
microwaving.
CXM?W.Protects the mode
~~w$~~~~~~~ ~~~~~” ‘se
~n~Y.
R~adout DiSDkW. During microwaving, shows
.-- -.
!0.
cooking times in minutes and seconds or tem-
perature in degrees.
Cooking Signal Lights. Light to show which
41.
kind of cooking you’re setting or using.
Function Pads. Use these to select a micro-
12.
waving method
function.
Number Pads. Touch these to enter Time or
13.
Temperatures and Power Level.
C!ear/Qff. Stops the oven and erases all settings.
14.
Start. Always touch Start last after setting all
15.
other controls.
Power Level Pad. To set or change Power
16.
Level, touch this pad first, then
.-
—either cooking or special
number.
5
Page 6

—
The Touch Control Panelailows you to set the oven
time or temperature cooking, or defrosting. You
controls electronically with the touch of a finger. may also usethe special function HOLD/TIMER Pad
~~>~d~~ignedto be
With your microwave oven, you have the option of
Readout LW@ay. Displays time o
temperature during cooking func
tions,
and power
Powor Level Pad is touched).
easy to use and understand.
level (whet
for a holding period between other functions or as a
convenient kitchen timer.
Temp Cook. Use the temperature
probe to cook by using a preset
. temperature. Oven shows temper-
/’ ature until preset temperature is
reached and then turn’s off. (See “
page 9.)
Time CXx2kai’vlicrowavefor a prese
amount of time using automatif
Power Level 10 or change powel
levelafter setting tinw+,(Seepage 7.,
Hold/Timer. This feature uses no
microwave energy while it functions as both a kitchen timer or as
a holding period between defrost
and time or temperature cooking.
(See page 1O.)
Ekfrost Gentle, more uniform
thawing with little or no attention
at automatic Power Level 3, or
change power level after entering
time. (See page 8.)
Number Pads. Touch these pads
% t. enter Time, Temperature, and
Power Level.
F
Start. Must touch this pad for oven
to begin any function.
Power Level. Touch this pad before
entering another power level num-
ber if you want to change from
automatic Power Level 10 (HIGH)
for cooking or Power Level 3 (LOW)
far defrosting.
CHear/CMf.When touched, it stops
~ the oven and erases all settings.
6
Page 7

Time Cooking, o:’ cooking your food according to a predetermined amount of time, is probably familiar to you from
conventional cooking. With your microwave oven, however,
you preset the time and the oven turns off automatically.
“to
FollovJthe cooking steps below to
help you learn to Time Cook
properly.
—....—
])$]
4.
Step 1: Fill a cup 2/3 full of water
and 1 teaspoon of freeze dried
coffee. Use a cup that has no metal
decoration. Phce cup in cwenand
I
we door.
c
-1
—.
1
Step 2: Touch T!ME COOK. The
display shows :0. Signal light
above TIME COOK flashes. Power
Levei 10 is automatically set in
oven, but does not appear in
display.
Step 3: Select your time. Touch
1,2 and Ofor a minute and 20 sec-
onds. 1:20 and signal light above
TIME COOK appear on display, If
another Power Level is desired
touch POWER LEVEL and the
number, although Power Level 10
(HIGH) is preferred for this cup of
coffee.
Step 4: Touch START. Time
counting down shows cmdisplay.
Step 5: When time is up, oven
sounds and oven, light, and fan
shut off,
Tips
@Make sure all utensils used in
your microwave oven are labeled
“suitable for microwaving”. Check
your Cookbook for specific test to.
determine “microwave-safe” utensils.
o Paper towels, wax paper, and
plastic wrap can be used to cover
dishes in order to retain moisture
and prevent spattering.
@Most microwaved foods require
stirring, rotating, or rearranging.
Check your Cookbook for specific
instructions for the food you are
microwaving.
@Some foods such as unshelled
eggs and hot dogs must be
pricked to allow steam to escape
during cooking.
Q. I set my CNENIfor the time calied
for in the recipe but at the end of
the time allowed, my dish wasn’t
done. VVhathappened?
k?.Since house power varies due
to time or location,
-$ook recipes give you a time range
.. .~-
.=Eprevent overcooking. Set the
~’=”;ven for minimum time, test the
food for doneness, and cook your
dish a Iittk longer, if necessary.
many Time
Q. 1 want to cook my dish on a
Power Level other than HIGH, what
do I need to do?
A. To change the Power Level,
touch the POWER LEVEL pad after
entering desired cooking time.
Enter the desired number and then
touch START.
Q. Can I interrupt my Time Cook
function to check the food?
A. Yes. To resume cooking, simply
close the door and touch START.
NOTE: Microwave power will not
come on until you are ready. You
must touch START for cooking to
begin.
7
Q. 1touched the number pads and
selected my power ievel. When I
touched START, however, my oven
didn’t come on. Why not?
A. The TIME COOK pad must be
touched before setting the number
pads or else your oven will not begin cooking.
Q. I tried to change Power Level
but the display changed back to
cooking time. Why?
A. After touching Power Level pad
you only have 4 seconds to enter
the number. Try setting controls
again.
Page 8

How
~~e Defrost setting is designed for
even thawing necessary for large
~mounts of food and is one of the
most important advantages of a
microwave oven, making defrosting quick and easy with little atten-
tion. Power Level 3 is automatically
set for defrcwt!ng, but you may
change this for more flexibility. See
your Cookbook for the complete
defrosting chart.
T~ become better acquainted with
your Defrost function, defrost frozen pork chops by following the
steps below.
Step 1: Place package of frozen
chops in the oven and CICNWdoor.
Stiep3:Touch 8, O~andOfor 8 minutes. 8:00 and signal light above
DEF, are displayed. If ‘you wish to
chahge Power Level, touch Power
Level pad and then new number.
CN?fr’osth’ig‘Tips
@Foods frozen in paper or plastic
can be defrosted in the package,
@Foreven defrosting, many foods
need to be turned over, rotated, or
broken up part of the way through
the defrosting time.
o Pre-packaged frozen
can be defrosted and microwave
cooked.
dinners
Step 2: Touch DEFROST. Display
reads :0. Power Level 3 is automatically set in oven but does not
appear on readout. Signal Light
above DEF. flashes.
Q. Can ! Defrost small items in a
hurry?
AmYes, but they will need more frequent attention than usual. Raise
the Power Leve\ after entering the
tirrw by touching P0WE17 LEVEL
and 7 or 10. Power Level 7 cuts the
time in Yz;Power Level 10 cuts the
time to }<. During either, rotate or
stir food frequently.
Step 4: Touch START. Time counts
down on display. When cycle is
completed, the oven signals and
automatically shuts off.
Step 5: Turn package over, close
door and repeat Steps 2, 3 and 4.
Step & When oven signals and
shuts off, remove package and separate chops to finish defrosting.
Q. When I press START, I hear a
dull thumping noise. What is it?
A. This sound is normal. It is letting
you know the oven is using a
Power Level Iowerthan HIGH.
Q. Why don’t the defrosting times
in the Cookbook seem right for my
food?
A. Cookbook times are average.
Defrosting time can vary according
to the temperature in your freezer.
Set your oven for the time indicated in your Cookbook. If your
food is still not completely thawed
at the end of that time, re-set your
oven and adjust the time accordingly.
I
&$Check your Cookbook for other
defrosting tips.
Q. Can I open the door during DE-
FROST to check on the progress
of my food?
A. Yes. You may open the door at
any time during microwaving. To
resume defrosting, close the door
and press START.
Q. Can i select a Power Level other
than automatic Power Level 3 for
defrosting?
A. Yes. Some smaller foods may be
defrosted quicker on higher Power
Levels but for even, carefree defrosting, Power Level 3 is SUggested. Check the chart in the
Cookbook for specific times and
Power Levels.
Page 9

.-
.
For many foods, internal temperature is the best
.-
test of doneness. must be used when using TEMP COOK or AUTO
Roasts or poultry are cooked to perfection wheti
t$wmwature cookinq. Heatirw or reheatina foods
.-. = - ..~
afmiratdyto a ser;ing
temp&ature yoq d>sire is
@wIpiaand easy.
TE~P COOK takes the
because the oven shuts
guesswork out of cooking
off automatically when the
“’:;$G*~&Tg&#~*&g&W.-~~
..’-%!s3 -’
gauges the internal temperature of your food; it
ROAST.To utilize your temperature probe properly,
follow the directions for use and insertion in this
book in the section entitled “Automatic Roasting”.
HANDLE
r- -m-.-a
-=+-WY. .*, ;.k,_
---.*-
food is done.
~~~
The temperature probe is a food thermometer that
Prim?
SENSOR
ciw
$Nep 1: Insert temperature probe
as cfircmted in Cookbook and attach probe securely in oven wall,
Close the door.
Step 2: Touch WIMP COOK. The
readout dispiay shows Cland signal
light above TEMP COOK flashes.
Step 3: Touch 1, 3, 0 or 130°. 130
shows on dispJay. Power Level 10
is automatically set in oven but
does not appear on readout.
Q, Are there any foods ! can’t
TEMF’ COOK?
A. Yes. Delicate butter icings, ice
cream, frozen whipped toppings,
etc., soften rapidly at warm tefnperatures. Batters and doughs as
well as frozen foods are also difficult to cook precisely with the
probe. !t is best to TIME COOK
these foods.
Step 4: Touch POWERLEVEL pad.
Touch 5 for MEDIUM power. P-5
shows on display and then display
reverts back to set finished
temperature.
Step 5: Touch START. Display
shows temperature of food counting up.
Step 6: When 130° is reached, the
oven will sound and automatically
shut off. Remove probe and food
from the oven.
Q. After I followed the steps and
touched START, a signal sounded
and oven did not start. What is
wrong?
A. If you set the temperature either
below 80° or greater than 199° the
oven will not start. To re-enter,
touch CLEAFUOFF pad and begin
steps again.
Q. Oven sounded and would not
start although i entered the temperature correctly. What is wrong?
A. If you have not securely seated
the end of the probe into the
receptacle in the oven wall, if you
touch TEMP COOK and have forgotten to use the probe or if the
actual food temperature is higher
Cmking ‘lvps
@Where you have a choice of
Power Levels, use a lower setting;
it will heat more evenly even
though requiring more time.
@Be sure frozen food has been
completely dqfrosted before inserting probe. Probe may break off
if used in frozen foods.
@Always insert probe into the
center of meaty areas; take care
not to touch the fat or the bone.
@ Insert probe as horizontally as
possible into foods as directed in
the recipes. Make sure the handle
does not touch the food. The probe
is easiest to use when inserted
from the front.
s+Usethe clip to keep the probe in
place while heating.
@ Cover foods as directed in
Cookbook for moisture control and
quick, even heating.
than set temperature, oven will
sound and not start.
Q. Can I leave my probe in the
oven if it’s not inserted in the food?
A. No. [f the probe is left inside the
oven, touching the oven wall, and
not inserted in food, you may damage the oven.
Q. How do I know what temperature to set?
A. Your Cookbook contains sections on all types of foods showing
the temperatures needed to cook
the foods to different degrees of
doneness. For reheating, refer to
Reheating Charts in the front
of the Cookbook for specific
temperatures.
9
Page 10

..
Your l-10LD/TIMER, which operates without microwave energy,
hasthree timinq functions.
!1ope)ates as a Minute Timer, it
cxmbeset to delay cooking or may
m used as a hold setting after defrosting. Hold/Timer can be set up
to 99 minutes.
Step f: Touch HOLC)/T!MER pad.
The display shows :0. Signal light
above HOlJ3/T~MER flashes.
Step 2: Select We amount of time
you desirfi. I’ouch the appropriate
number pads, If, for example, you
are timing a three minute phone
call, touch 3, 0, and 0. The display
shows 3:00.
Step 3: Touch START.The readout
display shows the time asit counts
down.
Step 4: When time is up, a signal
sounds and the timer turns off.
The tlOLD/TIMER can also be
used to program “standing time”
between microwave cooking Func-
tions. The time can range from one
second to 99 minutes and 99 secends. A HOLD, or “standing” time
may be found in some of your own
recipesor Cookbook.
To set the oven to delay cooking
up to 99 minutes follow Steps 1
and 2 to enter hold time, then set
Time Cook and time, or. Temp
Cook and temperature desired
before pressing START. When
holding before temperature
cooking, be sure probe is in food
before pressing START.
toDefrost-Hold/Time-Time
To help You become acquainted with the
Steps below to defrost afrozen casserole for 15 minutes, then hold 10 minutes and then cook 25minutes. If using
Temp Cook after Hold/Timer, be sure to insert probe correctly as shown in Temp Cook section of this book, after
HOLD time.
Step 1: Remove casserol~ from the
freezer and place in oven. Touch
the DEFROST pad. The readout
panel shows :0 and signal light
above DEF.
f{mhes.
1+01..EVTIMERfeature as used with Time COOkOrTemP Cook follow
Step 2: Touch 1, 5, 0 and O for
defrosting tirrm. 15:00 appears on
display panei. (Defrosting is automatically set on Power Level 3 but
can be changed by touching
POWER LEVEL pact and the new
Power Level.)
Q. What will happen if I acciden-
tally reverse the instructions?
A. If you accidentally reverse the
sequence of programming instrL.4c-
tians, your oven automatically
rearranges your program. Defrosting always comes first, then hold,
and then the cooking function.
~~.
..
S@p 3: Set standing or hold time
by touching l-10L13/TIMER. :0 appears on display. Signal light above
HOLD/TIMER flashes.
Step 4: Touch 1, 0, 0 and Oto hold
for ten minutes. 10:00 appears on
display.
Q. I programmed my oven for a
specific defrosting time but it defrosted longer than necessary.
What happened?
A. When instructions conflict, the
oven carries out the last instruction. You may have set the oven to
Defrost for 4 minutes, HoM/Time
for 2 minutes, and then Defrost for
6 minutes. In this case, the oven
would Defrost for 6 minutes and
Flolcf/Time for 2 minutes.
Step 5: Touch the TIME COOK
pad. This display shows :0 and
signal light above TIME COOK
flashes.
Step 6: Touch 2, 5, 0 and O for
twenty-five minutes of cooking
time. 25:00 appears on display.
SteP7: Touch START. 15:00COUnt-
ing down shows on display. As
each function is automatically performed oven display shows entered
information and light above that
function comes on. While cooking,
you may touch appropriate pad to
recall times you set.
Q. Can I Defrost-Hold only on my
oven?
A. Yes, for foods you don’t want
to cook, like frozen fruit, frozen
whipped topping, etc.—r@f@rto
Cookbook.
NOTE: Allow foods to remain at
room temperature only as !ong as
safe. Times will vary.
-m.
~===
--m
Page 11

.
.,
YourNewMicrowaveOvenisa ValuableAppliance,
ProtectIt FromMisuseByFollowingTheseRules:
443$(fx+pyour oven clean and sweet-smelling.
(2w !ing the oven door a few minutes after cooking
hdps “air-out” the interior.
wiping with a solution of baking soda and water
keepsthe interior fresh.
@ Don’t use sharp-edgedutensils with your oven.
The interior and exterior oven walls can be
scratched. The control panel can be damaged.
@IXm’t remove the cover over the “stirrer”at the
top of the oven (microwave feature 4 on page 5.)
You may damage the oven.
An occasional thorough
BE CIERTNNPOWERR OFF BEFORECLEANINGANY PARI’ OFTHIS OVEN.
Wails,floorand plasticcmver.Because there is little
heat except in the food, or sometimes in the uten-
sils, sp!lls and spatters tire easy to remove. Some
spatlc?rsare easy to rwmove.Some spatters can be
removed with a paper towel, others may require a
damp cloth. Remove greasy spatters with a sudsy
cloth, then rinse and dry. Do not use abrasive
cleaners on cwen
MERCIAL OVEN CLEANER ON ANY PART OF
YOUR MICROWAVE OVEN.
Door-inside. G{ass: Wipe up spatters daily, wash
when soiled, with a minimum of sudsy warm water.
Rinse thoroughly and dry.
Metal and plastic parts on door: Wipe frequently
with a damp cloth to remove all soil. DO NOT USE
ABRASIVES, SUCH AS CLEANING POWDERS OR
STEEL AND PLASTIC PADS. THEY WILL MAR THE
SURFACE.
Speciai note when using Brown ‘N Sear Dish: High
heat generated on bottom of Brown ‘N Sear Dish
can cause scorched appearing stains to bake onto
the oven shelf if grease is present. These may be removed with Deletes
Drackett Products Co.
After using Delete Cleanser, rinse and dry thor-
oughly, following instructions on can. Do not use
IXXete Cleanser on the painted surfaces such as the
wails. it will scratch the paint.
Delete Cleanser may be purchased from your local
dealer or from your GE Authorized Service Center.
Check the “yellow pages” for locatio~~ and phone
number.
Delete Cleanser is sold in grocery, hardware stores,
or in the housewares section of some department
stores.
walls. NEVER USE A COM-
Polishing Cleanser by the
AutomaticTemperatureProbe. Probe is sturdy, but
care should be taken in handling. Do not twist or
bend; avoid dropping temperature probe.
Clean as soon after using as possible. To clean,
wipe with sudsy cloth, then rub lightly with plastic
scouring ball if necessary. Rinse and dry, (Or wash
in dishwasher.)
Case. Clean the outside of your oven with soap and
water, then rinse and dry. The outer pane of the
window is glass. Just wipe clean with a damp cloth.
Chrome trim is best wiped with a damp cloth and
then with a dry towel.
Control Pam?!.Wipe with a damp cloth. Dry thoroughly. Do not use abrasives or sharp objects on
the panel. They can damage it,
Cord. If the cord becomes soiled, unplug and wash
with damp cloth. For stubborn spots, sudsy water
may be used, but be certain to rinse and dry thoroughly before plugging cord into outlet.
CWenLamp F@lacement. First, unplug the oven.
Then remove lamp compartment cover by removing
screw which holds cover in place. Cover is located
at the rear of outer case.
To remove bulb, push it inward gently and turn it to
the left or counter clockwise; then pull outward out
of the socket. Replace with lamp number 25T8DC.
(It is available in drug and hardware stores.) Re-
place compartment cover. Plug in the oven.
Page 12

Owm willNot CxN’neon:
...—
@ Main circuit breaker is tripped.
~ On@of house fuses has blown.
o $prong plug isn’tfully inserted into wall receptacle.
l%3ttf31
Lighted, Yet Oven Will
Not start:
Make sure YON!ouched START pad.
IS not $t?i)urely closed,
Door
You hav~ :~~readyentered another program and
not touch CL.EAR/OFF to cancel it.
Temperature Probe not inserted properly or not
being csod during Temp Cook,
“fou !-luvenot entered numbers after Time Cook,
You have not entered desired finished temperature after Temp Cook,
CLEAR/OFF was touched accidentally.
FoodsAre Either Overcooked or
Lhdercooked:
Not enough time set when using Time Cook func-
tion because of variance of starting food tem-
peratures.
The density and amount of foods will vary and
thus may need more time for completion.
Probe not inserted properly into meat or dish.
Check Cookbook for specific probe placement,
Incorrect Power Level entered.
Dish was not rotated, turned or stirred if these
instructions were given in recipe,
Too many dishes in oven at same
You did not enter a different Power Level as suggested in recipe.
“PF” Appears on Readout:
@ When oven is first plugged in.
@ When power to oven has been interrupted, and
then is resumed. Touching CLEAR/OFF erases
“PF”.
—
Page 13

.-l -
,.
“.
J.b..ti’
+-..=,, -.. .
“:!
F+ a
:-+>...3
;,;F5#;,
‘:@&’
e
You’ll find General Electric Factory Service Centers in all these cities.
ALABAMA
Birmingham -35210
2500 Crestwood Boulevard
(205) 956-9333
~:l:;:::;l;::~:::~le)
1209fhrtna~ Drwe
(7~5) 839.0150
‘Aobil& - 3St06
t107 Btdtl;ne Highway So.
(205) 471-1451
ARIZONA
Phorm;x -65031
25 South 51st Avenue
P.O.
BOX 14278
(602) 272-9345
Tuc~on -85705
2!015North Forbes Blvd.
Suite 111
(602) 623-6415
ARKANSAS
Lit,le Flock -72209
8405 Naw 13enton tfwy,
(501! 56e-763c
CALIFORNIA
(San 8arnardino-Rive]’ 9i.fe)
Eiloo!’xington -92316
1619: Cactus A~’enue
(714) 677-3G34
(San FrarwiscO)
Burlingame -94910
1649 Adrian Read
(415) 981-8760
Fresno -93727
1609 North Helm Street
(209) 255-1851
Los Angeles -90058
2r315East 46th Street
(213) 5a6-54ao
Sacramcmto - 95a25
1721
Qr?ll Stieet
(916) 929-2247
San Diego -92101
3554 Kettner Boulevard
(714) 297-3221
San .Jose-95123
5761-B Winfield
(408) 629-3500
Van Nuys -91405
6843 Lennox Avenue
(213) 98S-5710
COLORADCl
Colorado Springs - 809C9
1865 N. Academy - Suiki El
(303) 597-8492
Denver -80207
5390 East 39th Avenue
(303) 320-3301
CONNECTICUT
Bridgeport -06604
615 North Washington Ave,
(203) 367-5311
East Hartford -06108
265 Prestige Park, Plaza 3
(203) 528-9611
DELAWARE
(Brarrdywine - Wilmington)
Glen Mills, PA -19342
R.D. #2.
(215) 358-1500
f31STRiCT OF Cf3Lt.WW31A
Jessu(), MD -20794-0110
8201 Stayton Drive
PO.
i30x 127
(301) 953-9130
FLORIDA
Fort Lauderdala -33309
1101 West McNab Road 2013
(305) 974-6708
Fort Meyers -33901
!970 Courtney Dr.
(613) 939-2812
Jacksonville -32205
5226 Highway Avenue
(904) 783-1330
(Pompano-W. Palm Beach)
Lake Worth -33460
1802 Madrid Avenue
(305) 655-7040
WATCH FOR CHANGES. Addresses and telephone numbers sometimes change.
Rlwf.
BOX 210
Miami -33167
3200 N,W. 110th Street
(305) 685-5144
Orlando -32607
6545 East Colonlal Dr,
(305) 273-6370
Tallahassee -32301
1205 South Adams St.
(904) 222-6931
Tampa -33611
5201 S Westshore Blvd.
Box 13708- Interbay Station
(613) 837-1906
GEORGIA
Atlanta -30325
1695 Marietta Blvd,
P.0. Box 19917
(404) 352-6000
Savannah -31406
211 Television Circle
(912) 925-0445
FIAWAll
Honolulu -96613
404 Cooke Street
(608) 533-7462
IDAHO
(Boise)
Garden City -83704
5250 Chinden Blvd.
(208) 376-5880
ILLINOIS
Champaign - 61E120
1205 North Hagen
(217) 359-4086
Chicago -60638
5600 West 73rd S!reet
(312) 594-2424
Elk Grove V!liage -60007
10 Kin~ Street
(312) 593-2525
LomtmtcJ-60148
837-835 Westmore Ave.
(s12) 629-aolo
Peoria -61614
7708 North Crestline Drive
(339) 692-5070
Rockford -61107
401 North 2nd Street
(815) 962-7200
Sprin field -62702
i2252 outh 15th Street
(217) 753-8088
INDIANA
Evansville -47714
7076-K S. Weinbach Ave,
(812) 476-1341
Fart Wayne -46808
4632 Newaygo Road
(219) 484-9005
Gary -46409
5185 Broadway
[219) 981-2533
f’ndir&apolis -46219
6233 13rookville Road
(317) 356-8861
South Bend -46613
1902 Miami Street
(219) 26L3-0665
lOWA
Cedar Rapids -52405
118 First Street, N.W.
(319) 368-8579
Davenport -52802
1074 South Dittmer
P.O.
BoX 3188
(319) 328-5101
Des Moines -50313
1637 N.E. 58th Avenue
(515) 268-2191
Waterloo -50703
2829 Falls Avenue
(319) 236-1393
KANSAS
Kansas City -66115
2949 Chrysler Road
(913) 371-2242
relephone book Look In the White Pagesunder
Wichita -67211
820 East Indianapolis
(316) 267-3366
KENTUCKY
Lexington - 4C505
1144 Floyd Drive
(606) 255-0846
Louisville -40218
4421 Bishop Lane
P,O.
E!OX 32130
(502) 452-3511
LOUISIANA
Baton Rouge -70614
2935 Crater Lake Drive
(504) 926-5062
(New Orleans)
Harahan -70123
701 Edwards Avenue
(504) 733-7901
Shreveport -71102
1430 Dalzell Street
(318) 425-6654
MAINE
South Portland -04106
54 13arllng Avenue
(20”7)775-6365
MAHYLAND
Salisbury -21801
Twilly Centre
329 Civic Avenue
(301) 742-3900
Jessup -20794-0110
8201 Stayton Drive
P.O.
BOX 127
(301) 953-9130
MASSACHUSETTS
(Cape Cod)
Hyannis -02601
80 Enterprise - Unit 11
(617) 771-5905
Pittsfield -01201
1450 East Street
(413) 499-4391
(Boston-South)
Westwood -02090
346 University Avenue
(617) 329-1250
(Bostor?-North)
Woburn -01601
57 Commerce Way
(617) 944-7500
MICHIGAN
Grand Rapids -49508
350 26th Street, S.E.
(616) 452-9754
Lansing -48912
1004 E. Michigan Ave.
(517) 484-2561
Troy -46064
1150 Rankin
(313) 583-1616
Westland -48185
953 Manufacturer’s Drive
(313) 564-5190
MINNESOTA
(fdinneapOlis-St. Paul)
Edina -55435
7450 Metro Boulevard
(612) 635-5270
MIsslssifm
Jackson -39209
325 Industrial Drive
(601) 352-3371
MISSOURI
Kansas City, KS -66115
2949 Chrysler Rdad
(’313)371-2242
St. Louis -63178
1355 Warson Road, No.
P.o. Box 14559
(314) 993-6200
Springfield -65807
1334 West Sunshine
(417) 831-0511
NEBRASKA
Lincoln -68503
1145 North 47th St.
(402) 464-9146
“GENERAL ELECTRIC COMPANY” OR “GENERAL ELECTRIC FACTORYSERVICE”.
Omaha -66117
6636 “F” Street
(402) 331-4045
NEVADA
Las Vegas -89109
:3$B:, Highland Dr.
(702) 733-1500
heno -69511
6465 S, Virginia Street
(702) 852,.7070
NEWJERSEY
Mount Holiy -06060
Route 38 & Easlick Ava
(609) 261-3500
North Caldweii -07006
5 Fa)-:!c!d Road
(20!, 258-6850
(Asbury Park)
Oakhurst -07712
2111 Highway 35
(201) 493-2100
Vineland -06360
749 North Delsea Drive
(609) 696-1506
NEW MEXICO
Albuquerque -87107
3334 Princeton Dr, NE,
(505) 884-1861
NEW YORK
Albany -12205
2 Interstate Avenue
(516) 438-3571
Brooklyn -11234
5402 Avenue “N”
(212) 253-aial
Buffalo -14225
3637 Union Road
(716) 686-2268
(Westchester Co. Area)
Elmsford -10523
Fairview Industrial Pk.
Route #9-A
(914) 592-4330
Flushing -11354
133-30 39th Avenue
(212) 886-5600
(Binghamton)
Johnson City -13790
278 Main St~eet
(607) 728-9248
(Nassau-& rffolk County)
Melville -11747
336 South Service Road
(516) 293-0700
(Orange County Area)
Newburgh -12550
1135 Union Avenue
(914) 564-2000
Rochester -14622
1900 Ridge Road East
(716) 544-7100
Ronkonkoma -11779
76 Union Avenue
(516) 467-7700
Syracuse -13204
965 West Genesee S?reot
(315) 471-9121
hORTH CAROLINA
Charlotte -26234
700 Tuckaseegee Road
P.O.
(704) 372-8810
Greensboro -27406
2918 Baltic Avenue
(919) 272-7153
Raleiah -27604
Church Road
(919) 876-5603
OHIO
Akron -44319
2262 S. Arlington Road
(216) 773-0361
Memphis -38118
3770South Perkins
(901) 363-1141
Nashville -37204
3607 Trousdale
(615) 634-2150
TEXAS
Austin -76704
2810 S. First Street
(512) 442-7893
Corpus Christi -76415
3225 Ayers Street
(512) 884-4697
Dallas -75247
8949 Diplomacy Row
BOX 47601
P,O,
(214) 631-1380
El Paso -79925
7600 Boeing Drive
(915) 776-5361
(Brownsville)
Harlingen -78550
1204 North Seventh
(512) 423-1204
Houston -77207
P.0,
i30x 26837
2425 Broad Street
(713) 641-0311
Lubbock -79490
4623 Loop 269 We$it
BOX 16X36
PO.
(806) 793-1620
(Odessa)
Midland -79701
BOX 6266
P.O.
Midland Terminal
(915) 563-3463
San Antonio -76216
7622 Jon.ss-Maltsberger
(512) 227-7531
UTAH
Salt Lake City -84125
2425 South 900
P.O. Box 30904
(801) 974-4600
VIRGINIA
Fairfax -22031
2810 Dorr Avenu3
(703) 280-2020
Norfolk -23502
4552 E. Princess Anne Dr.
(804) fJ57-5937
Richmond -23228
2910 Hungary Spring Rd.
(804) 288-6221
WAsHlf4t3T0N
(Tri-City)
Kennewick -99336
Union Square
Suite 206
101 North Union Street
(509) 783-7403
Seattle -98188
401 Tukwila Parkway
(206) 575-2711
Spokane -99206
9624 E. Montgomery St.
(509) 926-9562
WEST VIRGINIA
(Charleston)
Huntington -25704
1217 Adams Avenue
BOX 7516
P:O.
(304) 529-3307
Wheeling -26003
137 North River Road
(304) 283-8511
WISCONSIN
Appleton -54911
343 W, Wisconsin Ave.
(414) 731-9514
Milwaukee -53225
11100 W. Silver Spring Rd.
(414) 462-9225
BOX 34396
k3W Hope
Cincinnati -45242
10001 Alliance Road
(513) 745-5500
Cleveland -44142
20600 Sheldon Road
(216) 362-4200
Columbus -43212
1155West Fifth Avenue
(614) 294-2561
Oayton -45414
5701 Webster Street
(513) 898-7600
Toiedo -43611
3300 Summit Street
(419) 729-1651
OKLAHOMA
Oklahoma City -73116
3228 North Santa Fe
P.0,
BOX 16669
(405) 526-2361
Tulsa -74112
6913 East 13th
(916) 835-9526
OREGON
(Portland Aree)
Beaverton -97005
14305 S.W. Milllkan Way
(503) 646-1176
Eugene -97402
1492 West Sixth Street
(503) 342-7285
PENNSYLVANIA
(Brandy wine-Wilmington)
Glen Mills -19342
RD. #2,
80X 210
(215) 356-1500
Johnstown -15905
214 Westwood Shopping P1.
(814) 255-6721
(Harrisburg)
Camp Hili -17011
2133 Market Street
(717) 761-6185
Monroevllle -15146
150 Seco Road
Monroeville Industrial F’a:k
[412) 665-3700
Philadelphia -19115
9900 Global Road
(215) 696-3270
(Allentown)
Whitehall - 1EI052
1906 MacArthur Road
(215) 437-9671
RHODE ISLAND
East Providence -02914
10?5 Waterman Avenue
(401) 438-0300
SOUTH CAROLINA
Columbia -29602
825 Bluff Road
Box 1210
(ao3) 771-7880
Myrtle Beach -29577
702 Sea Board Street
Sea Board Industrial Park
(803) 628-7411
N. Charleston -29405
7325-B Associate Drive
Pepperdan Industrial Park
(803) 552-5193
(Greenville)
Taylors -29687
25 Hampton Village
(803) 292-0830
‘TENNESSEE
Chattanooga -37403
613 East 1lth Street
(615) 265-8598
Johnson City -37601
2912 Bristol Highway
(615) 282-4545
Knoxville -37919
3250 Mynatt Street, N.W.
(615) 524-7571
And new Centers open. If the numbel”schange, check your
Wwt
13
1,
Page 14

.
(includes microwave cooking centers andovens)
Saveproof of original purchase date such as your sales slip or cancelled checkto establishwarrantyperiod.
Is
FULLONE-YEARWVARHANTY
For one year from date of original
purchase,we will provide,free of
charge, parts and service labor in
your home to repairor replace any
part of the microwave ovenlrange
that fails becauseof a manufacturing defect.
LH’JITEDA13DITIONAL
HXJR=YEARWARRANTY
For the second through fifth year
from date of original purchase,
we wi!i provide, free of charge, a
replacement magnetron tube if the
magnetron tube faiis because of a
manufacturing defect. Youpay for
the service trip to your home and
service labor charges.
This warranty is extended to the ~
original purchaserand any succeeding owner for products purchased
for ordinary home use in the 48
mainiand states, Hawaii and
Washington, DC. In Alaska the
warranty is the same except that it
is LIMITEDbecause you must pay
to ship the product to the service
shop or for the service technician’s
travel costs to your home.
Ail warranty servicewiii be provided
by our Factory Service Centers or
by our franchised Customer Care@
servicers during normal working
hours. Check the White Pages for
GENERALELECTRICCOMPANY
or GENERALELECTRICFACTORY
SERVICE.Look in the Yeliow
Pagesfor GENERALELECTRIC
CUSTOMERCARE@SERVICEor
GENERAL ELECTRIC-HOTPOiNT
CUSTOMERCARE” SERVICE.
k. E =–
“’- - -- z
~g=
,{
:\&:=
It&
;!&
II-Y
Itx..=
IIY:
,.-
—2
~-c=.
——
a&—
r—
. . .
ils
~service
teach you how to use the product.
Readyour Use and Care materiai.
If you then have any questions
about operating the product,
piease contact your deaier or our
Consumer Affairs office at the
address below.
~ improper installation.
If you have an installation problem,
contact your dealer or installer.
You are responsible for providing
trips tO your home ‘0
* Replacement of house fuses
or resetting of circuit breakers.
@Faiiure of the product if it is
used for other than its intended
purpose or used commercially.
@Damage to product caused
by accident, fire, fioods or acts
of God.
WARRANTORIS NOT RESPONSIBLE FOR CONSEQUENTIAL
DAMAGES.
adequate electrical, exhausting
and other connecting facilities.
Some states do not allow the exclusion or limitation of incidental or consequential damages, so the above limitation or exclusion
may not apply to you. This warranty gives you specific legal rights, and you may also have other rights which vary from state to state.
To know what your legal rights are in your state, consult your local or state consumer affairs office or your state’s Attorney General.
El@ctriU2 (X3mpany
H fuw’ler map is fne%?xkm! this warranty, Cxmtact:
Affairs, General Electric company, Park, KY 40225
!1
:.
il!
11:
~~:
Ii
II
ii{
ii
II
If:
ii’
Ijl
II
 Loading...