

GE JES1288SH04, JES1288SH03, JES1288SH02, JES1288SH001 Owner’s Manual

Safety Information ......... 2-6
ge.com
Operating Instruc_tions
Browning Features ........ 16, 17
Convenience Features ..... 14, 15
Grilling Features ......... 18, 19
Microwave Terms ............ 22
Other Features ........... 20, 21
Oven Features ............. 7, 8
Power Levels ................ 9
Timed Features .......... 10-13
Care and Cleaning ......... 2,°,
Troubleshooting Tips ....... 24
Things That Are Normal ...... 24
Consumer Support
Consumer Support .... Back Co_er
Product Registration ...... 25, 26
Warranty .................. 27
j :sz2ss
0
©
Write the model and serial
numbers here:
Model #
Serial #
You can find them on a label
inside the oven.
3513913700 49-40497 01-06JR
IMPORTANTSAFETYINSTRUCTIONS.
READALLINSTRUCTIONSBEFOREUSING.
^.. WARNING- Foryoursafety,theinformationinthismanualmustbefollowedtominimizetherisk
of fire or explosion, electric shock, or to prevent property damage, personal injury, or loss of life.
PRECAUTIONSTOAVOIDPOSSIBLEEXPOSURE
TOEXCESSIVEMICROWAVEENERGY
(a) Do NotAttempt to operate this oven with the door
open since alien<leer operation can result in ham/fill
eN)osui'e m nlicrowave energy', It is iinl)ortant not to
deteat or tamper with the satiety interlocks.
(h) DoNotPlace any object between the oven fl'ont ti_ce
and the door or allow soil or cleaner residue to
accunlulate on sealing suiqfilces.
(c) Do Not Operate the oven if it is dan/aged. It is
i)articularly in/i)ortant that the oven door close
i)roi)erly and that there is no dan/age to the:
(l) door (bent),
(2) hinges and latches (broken or h)osened),
(3) door seals and sealing sui_fi_ces.
(d) The OvenShould Not be a(!iusted or rei)aired by
anyone except l)rol)erly qualified service l)ei_onnel.
IMPORTANTSAFETYINSTRUCTIONS.
When using electrical appfiances basic safety precautions should be followed, including the following.
Use this appfiance only for its intended purpose as described in this Owner's Manual.
• Read and h)lh)w the specific l)re(atltions in the • Do not store this apl)liance ot/tdoois. Do not t/se this
Precautions to Avoid Possible Exposure to Excessive
Microwave Energy section above.
• This al)pliance inust be grotlnded. (:onnect only
to a i)roi)erly grounded outlet. See the Grounding
Instructions section on page 4.
• hlstall or h)cate this api)liance only in accordance
with the provided installation instructions.
• This ()veil n/ust be h)cated at least 3 ft. above floor level.
• Be cert;fin to place the fl'ont surtilce of the door
3" or nlore back fl'onl the counterto l) edge to avoid
accidental ill)ping of the al)pliance in nornlal usage.
• Do not n/aunt this ai)pliance over a sink.
• Do not I//Otlnt the i//ici'ol_;ive ()veil over or near }lliV
poilion of a heating or cooking al)pliance.
• Do not store anything directly oil top of the nlicrowave
oven surti_ce when the n/icrowave oven is in oi)eration.
• Do not operate this ai)pliance if it has a damaged
power cord or phIg, if it is not working l)rol)erly or
if it has been danlaged or drol)ped. If the power caM
is damaged, it n/list be replaced by General Electric
SeIMce or an authorized seiMce agent using a power
cord a\_filable fl'onl General Electric.
• Do not cover or block any oi)enings on the apl)liance.
• Lrse this al)pliance only fin" its intended use as described
in this Ill_lIltl_ll. Do not rise coFi'osive cheI/licals or wlpoi's
in this ai)pliance. This nlicrowave oven is specifically
designed to heat, dry or cook flied, and is not inmnded
fi)r lal)oratorv or industrial rise.
• This n/icrowave oven is not apl)roved or tested tor
I/l}lIJne rise.
i)roduct near watei_t0r exainl)le, in a wet basenlent,
near a swinnning pool, near a sink or in sinlilar locations.
• Kee I) power cord away fl'oin heated suFlilces.
• Do not iininei_e power coId or plug in wateI:
• Do not let power cord hang over edge at table or
Co/In[elL
• To reduce the risk of fire in the oven cavity:
-- Do not overcook fi)od. (:areflillv attend ai)pliance when
papei; plastic or other combustible n/aterials are placed
inside the oven while cooking.
-- Ren/ove wire twist-ties and metal handles fl'oin paper or
plastic containei_ bet)re placing then/in the oven.
-- Do not rise the oven fl)r storage pui])oses. Do not leave
paper products, cooking utensils or ti)od in the ()veil
when not in use.
-- If n/aterials inside the oven ignite, kee I) the oven door
ch)sed, turn the oven off and disconnect the power
cord, or shut off power at the flIse or circuit breaker
panel. If the door is opened, the fire nlay spread.
• See door surfi_ce cleaning instructions in the
Careand cleaning of the microwave oven section
of this nlanual.
• This al)pliance illtlst only be seiMced by qualified service
i)eisonnel. Contact nearest authorized seiMce ti_cilitv fin,
examination, repair or a(!iusnnent.
• _&swith any ai)pliance, ch)se supeiMsion is necessary
when used bv children.
SAVETHESEINSTRUCTIONS
2
WARNING!
ARCING
If you see arcing, press CLEAR/OFFand correct the problem.
g_com
Arcing is tile inicrowa;'e tetin fl)r sparks in tile ()veil.
Arcing is caused by:
• Metal or fifil touching the side of the oven.
• Foil not molded to fi)od (upturned edges act
like antennas).
FOODS
• \._]/en microwaving, place all foods and
containet_ on the glass microwave turntable.
• SUPERHEATEDWATER
Liquids,such as water, coffee or teaareable to
be overheatedbeyondtheboilingpoint without
appearingto beboiling. Visiblebubblingor boiling
whenthecontainer is removedfrom the microwave
ovenis notalwayspresent.THISCOULDRESULT
IN VERYHOTLIQUIDSSUDDENLYBOILING0 VER
WHENTHECONTAINERIS DISTURBEDORA
SPOONOROTHERUTENSILIS INSERTEDINTO
THELIQUID.
To reduce the risk ot iqi mT to persons:
-- Do not overheat the liquid.
-- Stir tile liquid both beflwe and halfway through
heating it.
-- Do not use straight-sided ('ontainet_ with
tl_l ITOW tlec]<s.
--J-_dter heating, allow tile container to stand in
tile microwave oven for a short time heft)re
removing tile container:
--Use extreme care when inserting a spoon or
other utensil into the container:
Do not pop popcorn in your microwave oven
unless in a special microwave I)opcorn accessory
or unless w)u use popcorn labeled fin" use in
microwave ()veils.
• Some products such as whole eggs and sealed
containet_fi)r example, closedjat_--are able
to eN)lode and should not be heated in this
tllict'owave ovetl. Sttch ttse of tile tllict'owave
oveIl could t'esttlt iIl iIljttt')'.
• Metal, such as twist-ties, poultty pins or gold-
rimmed dishes, in the microwave.
• Recycled paper towels containing small metal
pieces being used in the microwave.
Operating tile microwave with no fi)od inside fin,
tl/ot'e than a tllitlHte oF tWO tllay cause damage to
the oven and could start a fire. It increases the
heat around tile magnetron and can shorten tile
life of the oven.
• Foods with unbroken outer "skin" such as
potatoes, hot dogs, sausages, tomatoes, apples,
chicken livet_ and other giblets, and egg p)lks
should be pierced to allow steam to escape
dtuing cooking.
• Avoid heating baby f0od in glass jms, even
with the lid off. Make sure all infimt t0od is
thoroughly cooked. Stir food to distfibum tile
heat evenly: Be carefltl to prevent scalding when
winching flnmula. Tile container may libel cooler
than tile titan ula really is. _wavs test tile titan ula
beflwe feeding tile baby:
• Don't defl'ost fl'ozen beverages in narrot_necked
bottles (espedally carbonated beverages). Even if
the container is opened, i)ressure can build up.
This can cause the container to btust, possibly
resulting in iqjmy:
• Hot foods and steam can cause burns. Be ('arefltl
when opening any containet_ of hot food,
including popcorn bags, cooking i)ouches and
boxes. To prevent possible iqjury, direct steam
away fi'om hands and face.
• Do not overcook potatoes. Thev could dehydrate
and catch fire, causing damage to your oven,
• Cook ineat and poultty thoroughl)_meat to at
least an INTERNAl, temperature of 160°F and
poultt T to at least an INTERNAl, temperature
of 180°E Cooking to these temperatures usually
protects against fi)odborne illness.
• Do not boil eggs in a microwave oven. Pressure
will build up inside egg yolk and will cause it
to butut, possibly resulting in iqjmT:
IMPORTANTSAFETYINSTRUCTIONS.
READALLINSTRUCTIONSBEFOREUSING.
WARNING!
MICROWAVE-SAFECOOKWARE
Make sure to use suitable cookware during
iilicro_zlve cooking. Most glass casseroles, cooking
dishes, measuring cups, custard cups, potmry or
china dinnerware which does not have metallic trim
or glaze with a metallic sheen can be used. Some
cookware is labeled "suitable tot microwaving."
• Place food or microwavable container directly
on tile glass turntable to cook w)m" food.
• Use of tile black metal tray during microwave
cooking will result in inferior cooking
perlimnance.
• If you are not sure it a dish is microwave-sate,
use this test: Place in the oven both the dish you
are testing and a glass measuring cup filled with
1 cup of water--set tile measuring cup either in
or next to the dish. Microwave 30-45 seconds
at high. If the dish heats, it should not be used
for microwaving.
If the dish remains cool and only the water in
the cup heats, then the dish is microwave-sate.
• Ifw)u use a meat them_omemr while cooking,
IIlake S/lI'e it is sate tor rise in ii/ici'owave ovens.
• Do not use recycled paper products. Recycled
paper towels, napkins and waxed paper can
contain metal flecEs which may cause ardng
or ignim. Paper products containing nylon
or IMon filaments should be avoided, as they
may also ignim.
• Some st),rof0am trays (like those that meat
is packaged on) have a thin strip of metal
embedded in tile bottom. \._]/en microwaved,
tile metal can burn tile floor of tile oven or
ignite a paper towel.
• Do not use tile microwave to (h T newspape_.
• Not all plastic wrap is suitable tot use in
micrm_z_ve ovens. Check the package tot
proper use.
• Paper towels, waxed paper and plastic wrap
can be used to cover dishes in order to retain
moisture and prevent spattering. Be sure to
vent plastic wrap so steam can escape.
• Cookware may become hot because of heat
transferred fl'om tile heamd food. Pot holde_
may be needed m handle tile cookware.
"Boilable" cooking pouches and tightly closed
plastic bags should be slit, pierced or vented as
directed by package. If they are not, plastic could
bm_t dm_ing or immediately after cooking,
possibly resulting in injui T. A]so, plastic storage
containet_ should be at least partially uncovered
because they fblm a fight seal. _4]/en cooking
with containe_ tightly covered with plastic wrap,
remove covering careflflly and direct steam away
fi'om hands and e_ce.
Use toil only as directed in this guide. TV dinnet_
may be microwaved in tbil trays less than 3/4"
high; remove tile top foil cover and return tile
troy to tile box. \4lien using foil in tile microwave
oven, kee I) tile foil at least 1" away from tile sides
of tile oven.
• Plastic cookware>--Plasfic cookware designed tot
microwave cooking is ve_y uselifl, but should be
used carefully Even microwave-safe plastic may
not be as tolerant of overcooking conditions as
are glass or ceramic inateiJals, and may st)lien oi"
char if subjected to short periods of overcooking.
In longer exposures to overcooking, the t0od
and cookware could ignim.
Follow those guidelines."
_/Jse microwave-sate plastics only and use
them in strict compliance with the cookware
IIla n t ilil Ct t ii'ei"s I'e COIIlII/e n da finns.
] Do not Illicl'owa_,e ell/l)g ,' containei3.
_'] Do not peru/it children to use plastic
cookware without complete superxision.
4
BROWNINGANDGRILLINGSAFETY
• Use the black metal tray when browning or • Use of the browner rack:
grilling. Use the tray in the same way you would
use a shallow baking pan or baking tray, Place
]'O0(l_ oven-sate cookware or the bi'owner rack
directk on the black metal tray when cooking.
Use of the glass tm'ntable when browning
or grilling will result in inferior cooking
peis{Oi_/ll ance.
Do not cover the black metal tray with metal toil.
This will cause arcing in the oven.
Any non-metal, oven-sate dish can be used when
browning or grilling in the o'_en. •
The oven and door will get hot when browning
or grilling,
Cookware will become hot when browning or
grilling. Pot holders or oven Initts will be needed
to handle the cookware.
• D,,not use paper towels or coveiJngs_ containei_
or cooking/roasting bags inade (>f foil or other
reflective material, plastic, wax or paper when
browning or grilling.
• D,, not place food directly against the top or
bottom heating elements.
-- Place the dish directly on the rack.
-- Remove the rack fl'om the oven when not in use.
-- Use pot holdet_ or oven mitts when handling
the rack. It may be hot.
-- Be sm'e that the rack is positioned i)roperly
inside the oven to prevent product damage.
-- Do not cover the rack or any part of the oven
with metal tbil. This will cause overheating of
the oven.
During and after use, do not much, or let
clothing, pot holde_ or other flammable
materials contact the top heating element or
guard. These sure_ces may be hot enough
to burn even though they are dark in colo_:
/_dlow suflident tiine fi>r cooling fi_t,
Remove cookware completely fl'om the oven
befi we turning tb(>d.
Make sm'e tbod is cooked all the way through
before browning.
ge.com
GROUNDINGINSTRUCTIONS
WARNING:I ro eruseof the grounding plug can result in a risk of electric shock.
This appliance inust be grotmded. In the event of
an electrical short circuit, grotmding reduces the
risk of electric shock by providing an escape wire
forthe electric current.
This appliance is equipped with a power cord
having a grotmding wire with a grotmding plug.
The plug must be plugged into an outlet that is
i)roperly installed and grotmded.
Consult a qualified electrician or se_Mce technician
if the grotmding instructions are not completely
tmdetstood, or if doubt exists as to whether the
appliance is properly grotmded.
If the outlet is a standard 2-prong wall outlet,
it is yore" personal responsibili_, and obligation
to have it replaced with a propedy grotmded
3-prong wall outlet.
Do not under _liiV cii'c/li//st_lnces cut oi" i'elllOVe
the third (grotmd) prong fl'om the power cord.
We do not recommend using an extension cord
with this appliance. If the power cord is too short,
have a qualified electrician or service technidan
install an outlet near the appliance.
(See EXTENSION CORDS section.)
For best operation, plug this appliance into its
own electrical outlet to prevent flickering (ff lights,
blowing of fllse or tripping of circuit breaker.

IMPORTANTSAFETYINSTRUCTIONS.
READALLINSTRUCTIONSBEFOREUSING.
,i__ADAPTERPLUGS
Usage situations where appliance's power cord will be disconnected infrequently.
Because of potential sali_t}' ha/m'ds under certain conditions,
we strongly recommend against the use of an adapter plug. Howevex;
if you still elect to use an adapter, where local codes permit, a
TEMPORARY CONNECTION may be inade to a propedy grounded
2-prong wall receptacle by the tlse of a UI, listed adapter which
is a\;filable at most local hardware stores.
The larger slot in the adapter must be aligned with the larger slot
in the wall receptacle to pro_ide proper polari b in the connection
of the power cord.
^_CAUTION:A_achingtheadaptergroundterminaltothewallreceptaclecoverscrewdoesnotground
the appliance unless the cover screw is metal, and not insulated, and the wall receptacle is grounded through the
house wiring.
You should have the drcuit checked by a qualified electrician to make sure the receptacle is properly
grounded.
When disconnecting the power cord ti'om the adaptor; alwa):s hold the adapter with one hand. If this
is not done, the adapter ground terminal is ve_, ' likely to break with repeated use. Should this hal_pen,
DO NOT USE the appliance until a proper ground has again been established.
{Adapter plugs not
permittedinCanada)
Alignlarge I I i' I
__pron_,ots] I
/fT" Ensureproperground
TEMPORARY andfirmconnection
METHOD beforeuse.
Usage situations where appliance's power cord will be disconnected frequently.
Do not use an adapter plug in these situations because ti'equent disconnection of the power cord places
m_due strain on the adapter and leads to eventual fifilm'e of the adapter ground temfinal. You should have
the 2-prong wall receptacle replaced with a 3-prong (grounding) receptacle by a qualified electrician
befin'e using the appliance.
EXTENSIONCORDS
A short power SUl)ply cord is provided to reduce the _isks resulting ti'om becoming ent;mgled in or t_ipping
over a longer cord.
Extension cords may be used if you are carelifl in using them.
If an extension cord is used--
Ir_The marked electrical rating of the e×tension cord shotfld be at least asgreat asthe electrical radng
of the appliance;
_'_ The extension cord must be a grotmding-t)]_e 3-wire cord and it must be _luo-o-ed into a 3-slot outlet;
_The extension cord should be arranged so that it will not drape o_er the countertop or tabletop where
it can be pulled on by children or tripped o_er tmintentionallv.
]f you use an extension cord, the interior light may flicker and the bh_wer sound nlav wli_,' when the
microwave oven is on. Cooking times may be longe_; too.
READANDFOLLOWTHISSAFETYINFORMATIONCAREFULLY.
SAVETHESEINSTRUCTIONS
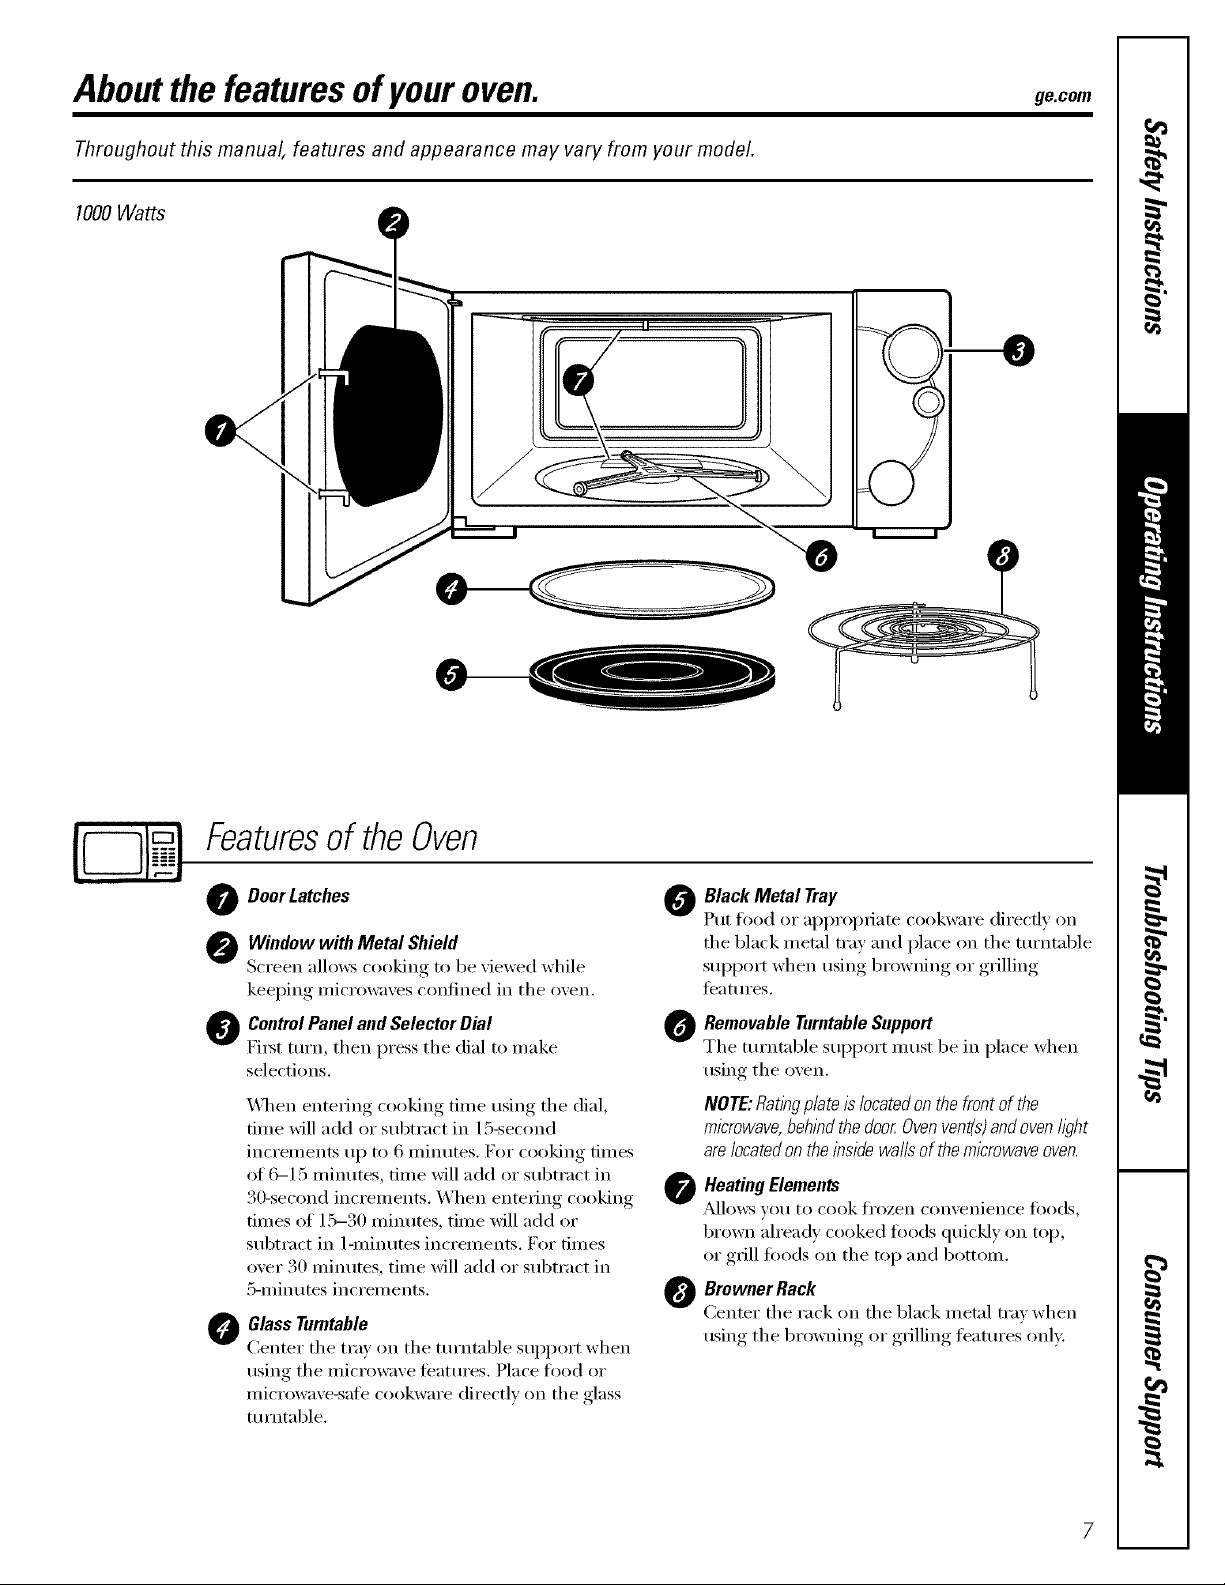
Aboutthe featuresof youroven. gecom
Throughout this manual, features and appearance may vary from your model.
1000Watts
Featuresof theOven
Door Latches 0
Window with Metal Shield
Screen allows cooking to be "dewed while
kee )in,* microwa'_es confined in the oxen.
ControlPanel and Selector Dial @
Fix_t turn, then press the dial to make
selections,
_l_en entering cooking time using the dial,
tim e will add or subtract in 15-second
increments up to 6 nlinutes. For cooking times
of C_I 5 minutes, time will add or subtract in
30-second increments. When entering cooking
times of 15-30 minutes, time will add or
subtract in 1-minutes increments. For times
over 30 nlinutes, time will add or subtract in
5-minutes increments.
Glass Turntable
@
Center the tray on the tm'ntable support when
using the microwaxe teatm'es. Place food or
microwaxe-safe cookware directly on the glass
tm'ntable.
Black Metal Tray
Put food or appropriate cookware direcdy on
the black metal tray and place on the tm'ntable
support when usino,t-.,browning, or ,grilling,
features.
RemovableTurntableSupport
The turntable support must be in place when
using the oven.
NOTE:RatkTgplateIslocatedonthefrontofthe
microwave,behl)_dthedoorOvenvent(s)andovenh)ht
are/ocatedontheinsidewaftsofthemicrowaveoven.
Heating Elements
A]lows VOtl to cook fi'ozen con'_enien('e _()ods,
brown alread_ cooked foods quickly on top,
or grill too(ls on the top and bottom.
Browner Rack
Center the rack on the black metal trax when
usin,* the browning or grilling features only:
7
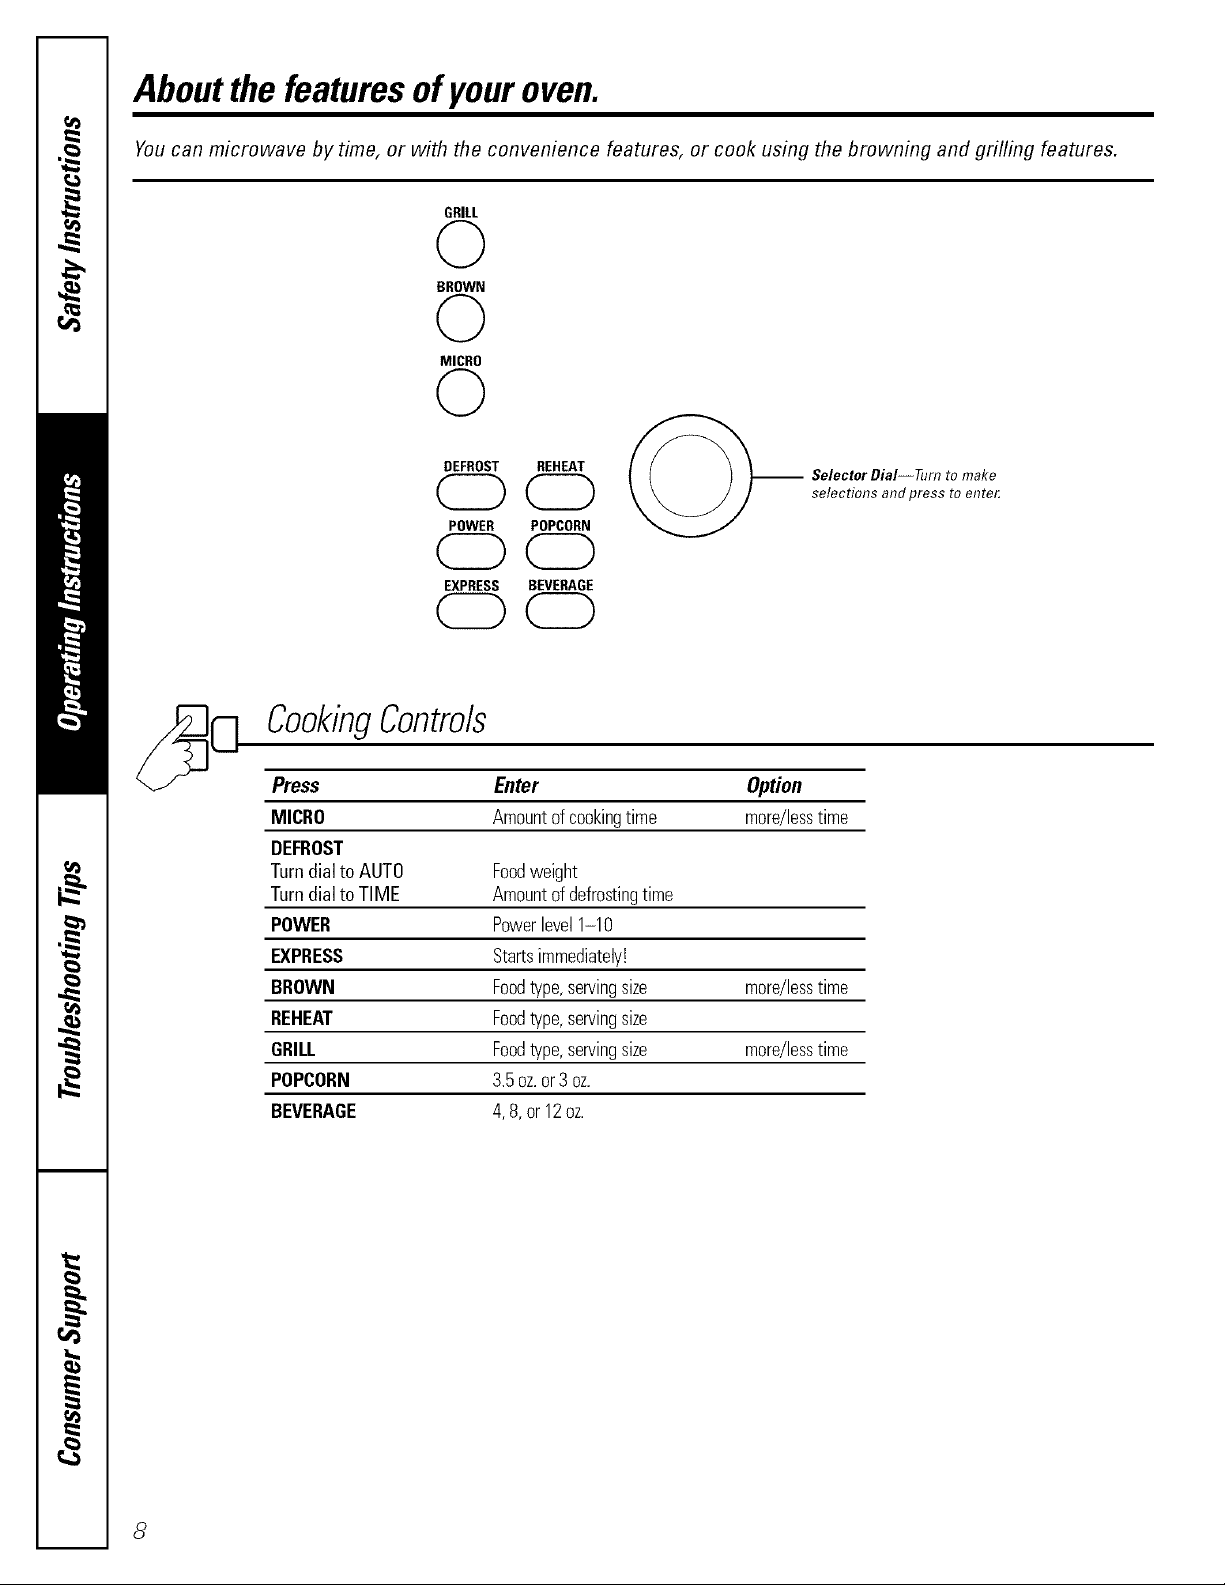
Aboutthe featuresof youroven.
You can microwave by time, or with the convenience features, or cook using the browning and grilling features.
GRILL
0
BROWN
0
MICRO
0
DEFROST REHEAT
CDCD
POWER POPCORN
-- Selector DiaI--Tum to make
selectimTs andpress to ente_
CDCD
EXPRESS BEVERAGE
OCD
CookingControls
Press Enter Option
MICRO Amountof cookingtime more/lesstime
DEFROST
Turndialto AUTO Foodweight
Turndialto TIME Amountof defrostingtime
POWER Powerlevel1-10
EXPRESS Startsimmediately!
BROWN Foodtype,servingsize more/lesstime
REHEAT Foodtype,servingsize
GRILL Foodtype,servingsize more/lesstime
POPCORN 3.5oz.or3 oz.
BEVERAGE 4,8, or12oz.
8
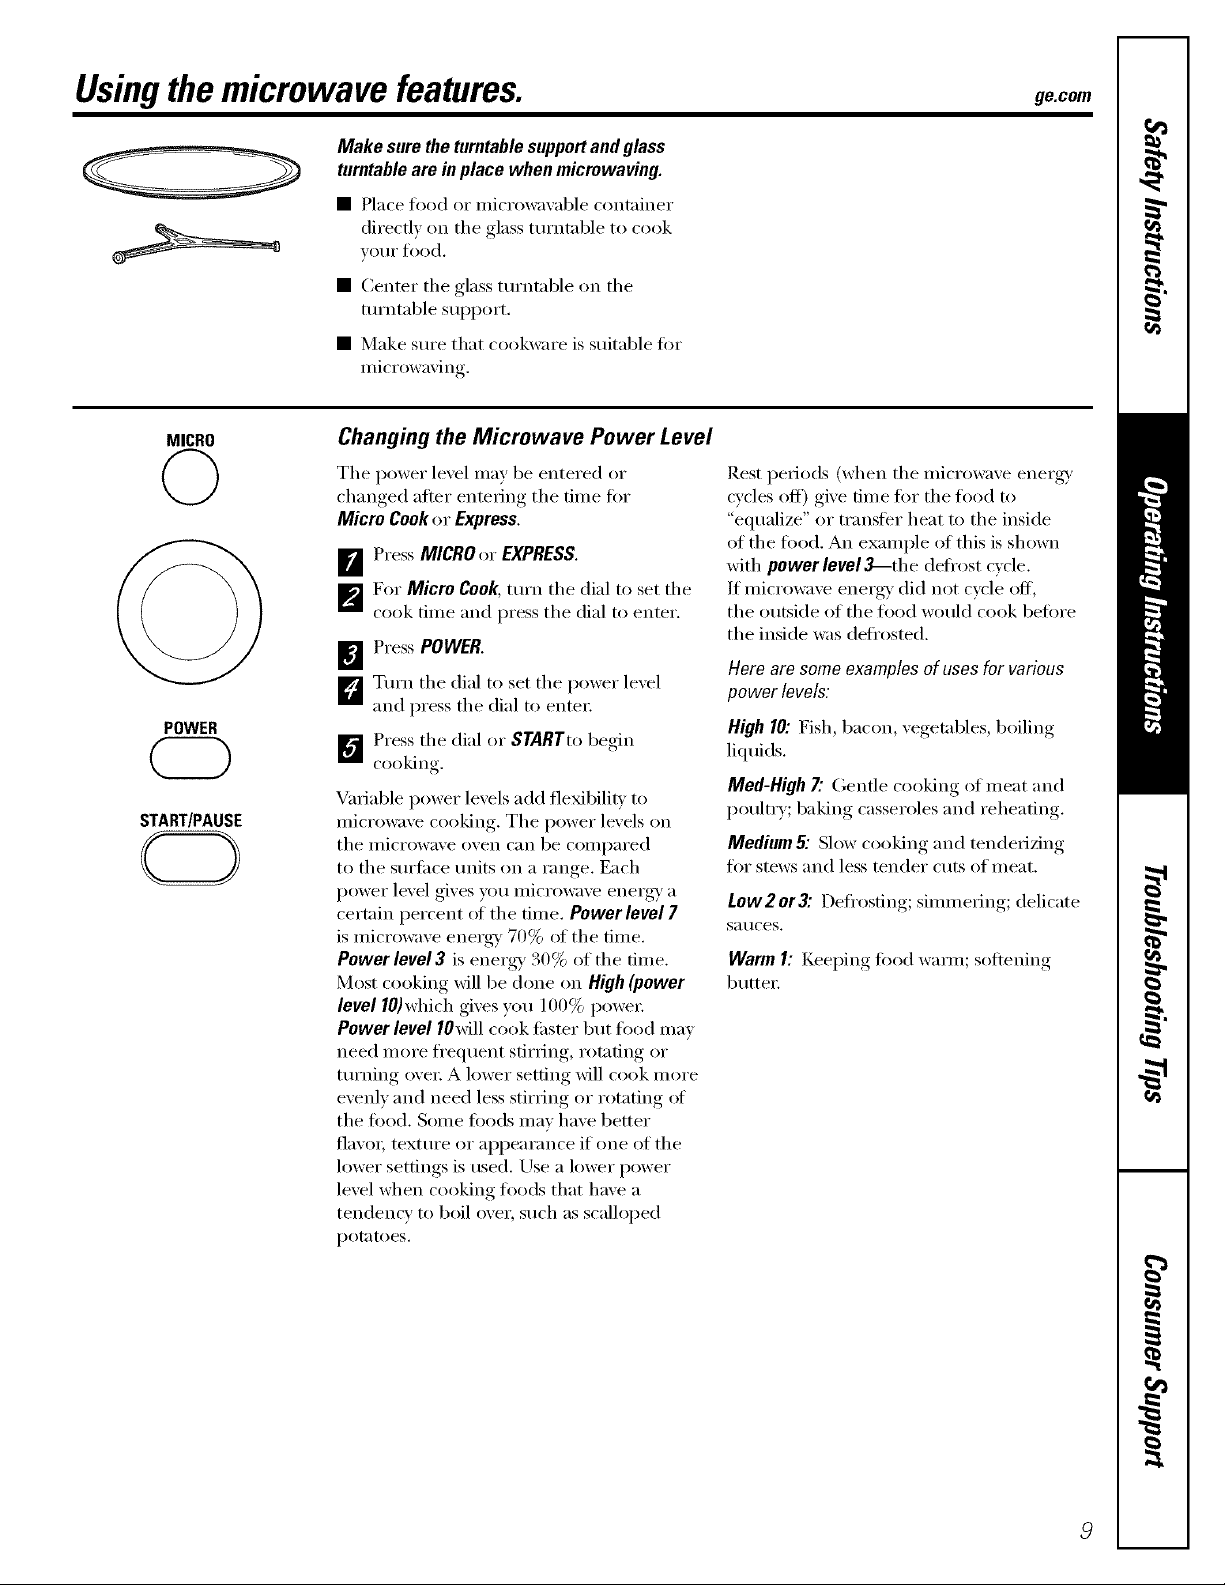
Usingthe microwave features, ge.com
Make sure the turntable support and glass
turntable are in place when micrewaving.
• Place food or microwavable container
directly on the glass turntable to cook
VO/II" fl)od,
• Center the glass turntable on the
turntable support.
• Make sure that cookware is suitable fin.
microwaving.
MICRO
©
POWER
START/PAUSE
CD
Changing the Microwave Power Level
The power level may be entered or
changed after entering the time fi)r
Micro Cookor Express,
[]Press MICROor EXPRESS,
p_For Micro Cook, mrn the dial to set the
cook time and press the dial to enter.
[] Press POWER.
L_Turn the dial to set the power level
and press the dial to entex;
_"_ Press the dial or STARTto begin
cooking
Variable power levels add flexibility to
microwave cooking. The power levels on
tile ii/icrowave oven can be COlili)ai'ed
to the sm'ti_ce milts on a range. Each
power level gives you microwave energy' a
certain percent ot the time. Power level 7
is microwave energy 70% of the time,
Power level 3 is energy' 30% of the time,
Most cooking will be done on High(power
level 10)which gives you 100% powex:
Power level IOMll cook tipster but food may
need more fl'equent stirring, _xm_fing or
turning ove_; A lower setting will cook more
evenly and need less stirring or rotating ot
the food. Some foods may have better
fla\'o_; textm'e or appearance if one of tile
lower settings is used, Use a lower power
level when cooking toods that have a
tendency to boil over, such as scalloped
potatoes.
[lest periods (when tile microwave energy'
cycles off) give time fin" the toed to
"equalize" or transter heat to the inside
of the food. An example of this is shown
with power level_-the deti'ost cycle.
If microwave energy' did not cycle off,
the outside of the toed would cook befin'e
the inside was deti'osted.
Hero am some examples of uses for various
power levels:
High 10: Fish, bacon, vegetables, boiling
liquids.
Med-High7"Gentle cooking of meat and
poultry; baking casseroles and reheating.
Medium & Slow cooking and tenderizing
fin" stews and less tender cuts of ineat.
Low 2 or3".Defl'osfing; simm ering; delicate
Satlces.
Warm I: Keel)ing, fi)od waxm; softening
butte_:
 Loading...