

GE JES1160 Owner's Manual
0
GEAppliances.com
0
Safety Instructions .......... 2-11
Operating Instructions
Care and Cleaning ............ 2/4,25
Changing the Power Level ....... 14
ConvenienceFeatures............ 19
Cook Features ................ 15-18
Featuresof Your
Microwave Oven.............. 12,!3
Microwave Terms ................ 23
Other Features ............... 2!, 22
SensorFeatures .................. 20
Troubleshooting Tips .......... 26
ThingsThatAre Normal
With Your MicrowaveOven ...... 26
Consumer Support
ConsumerSupport ............... 28
Warrantg ......................... 27
0
Z
Write the model and serial numbers here:
Nodel #
Serial #
Find these numbers on u label inside
the oven.
JES1160
DE68-O3642A 49-40599-1 05-09JR
IMPORTANTSAFETYINSTRUCTIONS
READALLINSTRUCTIONSBEFOREUSING
When using electrical appliances basic safety precautions should be
followed, including the following:
ZLWARNING!
To reduce the risk of bums, electric shock, fire, injury to persons
or exposure to excessive microwave energbt:
PRECAUTIONS TO AVOID POSSIBLE EXPOSURE
TO EXCESSIVE MICROWAVE ENERGY
(a) Do NotAttempt to operate this (c)
oven with the door open since
open-door operation can result
in harmful exposure to microwave
energU.It isimportant not to defeat
or tamper with the safetUinterlocks.
(b) Do Not Place any object between
the oven front face and the door
or allow soilor cleaner residueto
accumulate on sealing surfaces. (d)
Do Not Operate the oven if it is
damaged. It is particularl Uimportant
that the oven door close properlU
and that there isno damage to the:
(!) door (bent)
(2)hingesand latches
(brokenor loosened)
(3)door sealsand sealing surfaces.
TheOvenShould Not be adjusted
or repaired by anyone except
properlUqualified service personnel.
: Read and follow the specific
precautions in the Precautions to
Avoid Possible Exposure to Excessive
Microwave Energy section above.
: Thisappliance must begrounded.
Connect onlgto a properlg grounded
outlet. Seethe GroundingInstructions
sectionon page 8.
Install orlocate this appliance onlU
in accordance with the provided
Installation Instructions.
Becertain to placethe front surface
of the door three inches or more back
from the countertop edge to avoid
accidental tipping of the appliance
in normal usage.
Some products such as whole eggs
and sealedcontainers-for example,
closedjars-are able to explode and
should not be heated in this microwave
oven.Such use of the microwave oven
could result in injury.
SAVE THESE INSTRUCTIONS
IMPORTANTSAFETYINSTRUCTIONS
READ ALL INSTRUCTIONSBEFOREUSING GEAppliances.com
Usethisapplianceonly for itsintendedpurposeas describedin this
Owner'sManual.
Thismicrowave oven is not approved
or tested for marine use.
Do not store anything directly on top
of the microwave oven surface when
the microwave oven isin operation.
Do not operate this appliance if it has
a damaged power cord or plug, if it is
not working properly or if it has been
damaged ordropped.
: Donot cover or block any openings
on the appliance.
Usethis appliance only for its intended
useas described inthis manual. Do not
usecorrosive chemicals or vapors in
thisappliance. Thismicrowave oven is
specifically designedto heat, dry or
cook food and isnot intended for
laboratory or industrial use.
Do not store this appliance outdoors.
Do not usethis product nearwater-
for example, in awet basement, near a
swimming pool, near a sinkor in similar
locations.
Keeppower cord away from heated
surfaces.
Do not immerse power cord or
plug in water.
Do not let power cord hang over
edge of table orcounter.
: Thisappliance shall not be installedless
than 36" above the floor to the bottom
of the product. A minimum spacing of
3" must be maintained between the
microwave oven and the sidewalls.
To reduce the riskof fire in the oven
cavity:
Do not overcook food. Carefully attend
appliance when paper,plastic or other
combustible materials are placed inside
the oven while cooking.
Removewire twist-ties and metal
handles from paper or plastic
containers before placing them
in the oven.
Do not usethe oven for storage
purposes. Do not leave paper products,
cooking utensils or food in the oven
when not in use.
Ifmaterials insidethe oven ignite, keep
the oven door closed,turn the oven off
and disconnect the power cord, or shut
off power at the fuse or circuit breaker
panel. Ifthe door is opened,the fire
may spread.
It isimportant to keepthe area clean
where the door sealsagainst the
microwave. Use only mild,non-abrasive
detergents applied with a clean sponge
or soft cloth.Rinsewell.
This appliance should be serviced only
by qualified service personnel. Contact
nearest authorized servicefacility for
examination, repair or adjustment.
Aswith ann appliance, close
supervision isnecessary when used
by children.
Thismicrowave isnot approved for a
built-in installation.
SAVE THESE INSTRUCTIONS
3
IMPORTANTSAFETYINSTRUCTIONS
READALLINSTRUCTIONSBEFOREUSING
WARNING!
ARCING
If gou see orcing, press the Pause/Cancel pad
and correct the problem.
Arcing isthe microwave term
for sparksin the oven. Arcing
iscaused bg:
Metal or foil touching the side
of the oven.
Foilnot molded to food
(upturned edgesact like
antennas).
Metal,such as twist-ties,
poultrg pinsor gold-rimmed
dishes,in the microwave.
Recgcledpaper towels
containing small metal pieces
being usedin the microwave.
FOODS
Do not pop popcorn in gour
microwave oven unless ina
special microwave popcorn
accessorgor unless gou use
popcorn labeled for use in
microwave ovens.
Do not boil eggs in a
microwave oven. Pressure
will build upinside egggolk
and will cause it to burst,
possiblgresulting in injurg.
Operating the microwave
with no food insidefor more
than a minute or two mag
causedamage to theoven
and could start a fire.
It increasesthe heat around
the magnetron and can
shorten the life of the oven.
Foodswith unbroken outer
"skin"such as potatoes, hot
dogs,sausages,tomatoes,
apples,chicken liversand other
giblets and egg golksshould
be piercedto allow steam to
escape during cooking.
SAVE THESE INSTRUCTIONS
IMPORTANTSAFETYINSTRUCTIONS
READ ALL INSTRUCTIONSBEFOREUSING GEAppliances.com
SUPERHEATEDWATER
Liquids,such as water,coffee or
tea are able to be overheated
begond the boiling point
without appearing to be boiling.
Visiblebubbling or boiling when
the container is removed from
the microwave oven isnot
alwags present. THISCOULD
RESULTtN VERYHOTLIQUIDS
SUDDENLYBOILINGOVER
WHENTHECONTAINERtS
DISTURBEDORA SPOONOR
OTHERUTENSILtSINSERTED
INTOTHELIQUID.
Toreduce the risk of injury
to persons:
- Do not overheat the liquid.
- Stirthe liquid both before and
halfwa Uthrough heating it.
- Do not usestraight-sided
containers with narrow necks.
After heating, allow the
container to stand in the
microwave oven for a short
time before removing the
container.
- Useextreme care when
inserting a spoon orother
utensil into the container.
Avoid heating baby food in
glassjars, even with the lid off.
Makesure all infant food is
thoroughlg cooked. Stirfood to
distribute the heat evenlg. Be
careful to prevent scalding
when warming formula. The
container mag feel cooler than
the formula reallgis,Alwags
test the formula before feeding
the babg.
Don't defrostfrozen beverages
in narrow-necked bottles
(especiallUcarbonated
beverages).Evenif the
container isopened, pressure
can build up.This can cause
the container to burst, possiblU
resulting in injury.
Hotfoods and steam can
causeburns. Becareful when
opening anUcontainers of hot
food, including popcorn bags,
cooking pouches and boxes.
To prevent possibleinjury,
direct steam awaU from
hands and face.
Do not overcook potatoes.
Theu could dehydrate and
catch fire, causing damage
to uour oven.
Cookmeat and poultry
thoroughlu-meat to
at least an INTERNAL
temperature of 160°F
and poultry to at least
an INTERNALtemperature
of 180°RCooking to these
temperatures usually protects
against foodborne illness.
SAVE THESE INSTRUCTIONS
5
IMPORTANTSAFETYINSTRUCTIONS
READALLINSTRUCTIONSBEFOREUSING
WARNING!
MICROWAVE-SAFE COOKWARE
Makesure all cookware used in
gour microwave oven issuitable
for microwaving. Most glass
casseroles,cooking dishes,
measuring cups, custard cups,
potterg or china dinnerware
which does not have metallic trim
or glaze with ametallic sheen can
be used.Somecookware is
labeled "suitablefor microwaving."
Ifgou are not sure if adish is
microwave-safe, use thistest:
Placein the oven both the dish
gou aretesting and a glass
measuring cup filled with ! cup
of water-set the measuring
cup either in or next to the dish.
Microwave ! minute at high.
Ifthe dish heats,it should not
be usedfor microwaving.
Ifthe dish remains cool and
onlg the water inthe cup
heats,then the dish is
microwave-safe.
Ifgou use a meat thermometer
while cooking, make sure it is
safe for use inmicrowave
ovens.
Do not use recgcledpaper
products. Recgcledpaper
towels, napkins and waxed
paper can contain metal flecks
which mag cause arcing or
ignite.Paper products
containing nglon or nglon
filaments should be avoided,
astheg mag also ignite.
Somestgrofoam trags (like
those that meat is packaged
on)havea thin strip of metal
embedded in the bottom.
When microwaved, the metal
can burn thefloor of the oven
or ignite a paper towel.
Do not usethe microwave
to drg newspapers.
Not all plastic wrap issuitable
for use in microwave ovens.
Checkthe package for
proper use.
Papertowels, waxed paper
and plastic wrap can be used
to cover dishes inorder to
retain moisture and prevent
spattering. Besureto vent
plastic wrap so steam can
escape.
Cookware mag become hot
because of heattransferred
from the heated food. Pot
holders mag be needed to
handle the cookware.
SAVE THESE INSTRUCTIONS
IMPORTANTSAFETYINSTRUCTIONS
READ ALL INSTRUCTIONSBEFOREUSING GEAppliances.com
"Boilable"cooking pouchesand
tightly closed plastic bags
should be slit,pierced or
vented as directed by package.
Ifthey arenot, plastic could
burst during or immediately
after cooking, possibly resulting
in injury. Also,plastic storage
containers should be at least
partially uncovered because
they form a tight seal.When
cooking with containers tightly
covered with plastic wrap,
remove covering carefully
and direct steam away
from hands and face.
Usefoil only as directed in
thisguide. TVdinners may be
microwaved in foil trays less
than 3/4" high; remove the top
foil cover and return thetray to
the box.When using foil in the
microwave oven, keep the foil
at least 1" away from the sides
of the oven.
Plasticcookware-Plastic
cookware designed for
microwave cooking isvery
usefulbut should be used
carefully. Evenmicrowave-safe
plastic may not be astolerant
of overcooking conditions as
are glassor ceramic materials
and may soften orchar if
subjected to short periods
of overcooking. Inlonger
exposuresto overcooking,
the food and cookware
could ignite.
Follow these guidelines:
Usemicrowave-safe
plasticsonly and use
them in strict compliance
with the cookware
manufacturer's
recommendations.
:_ Do not microwave empty
containers.
Do not permit children
to use plastic cookware
without complete
supervision.
SAVE THESE INSTRUCTIONS
IMPORTANTSAFETYINSTRUCTIONS
READ ALL INSTRUCTIONSBEFOREUSING
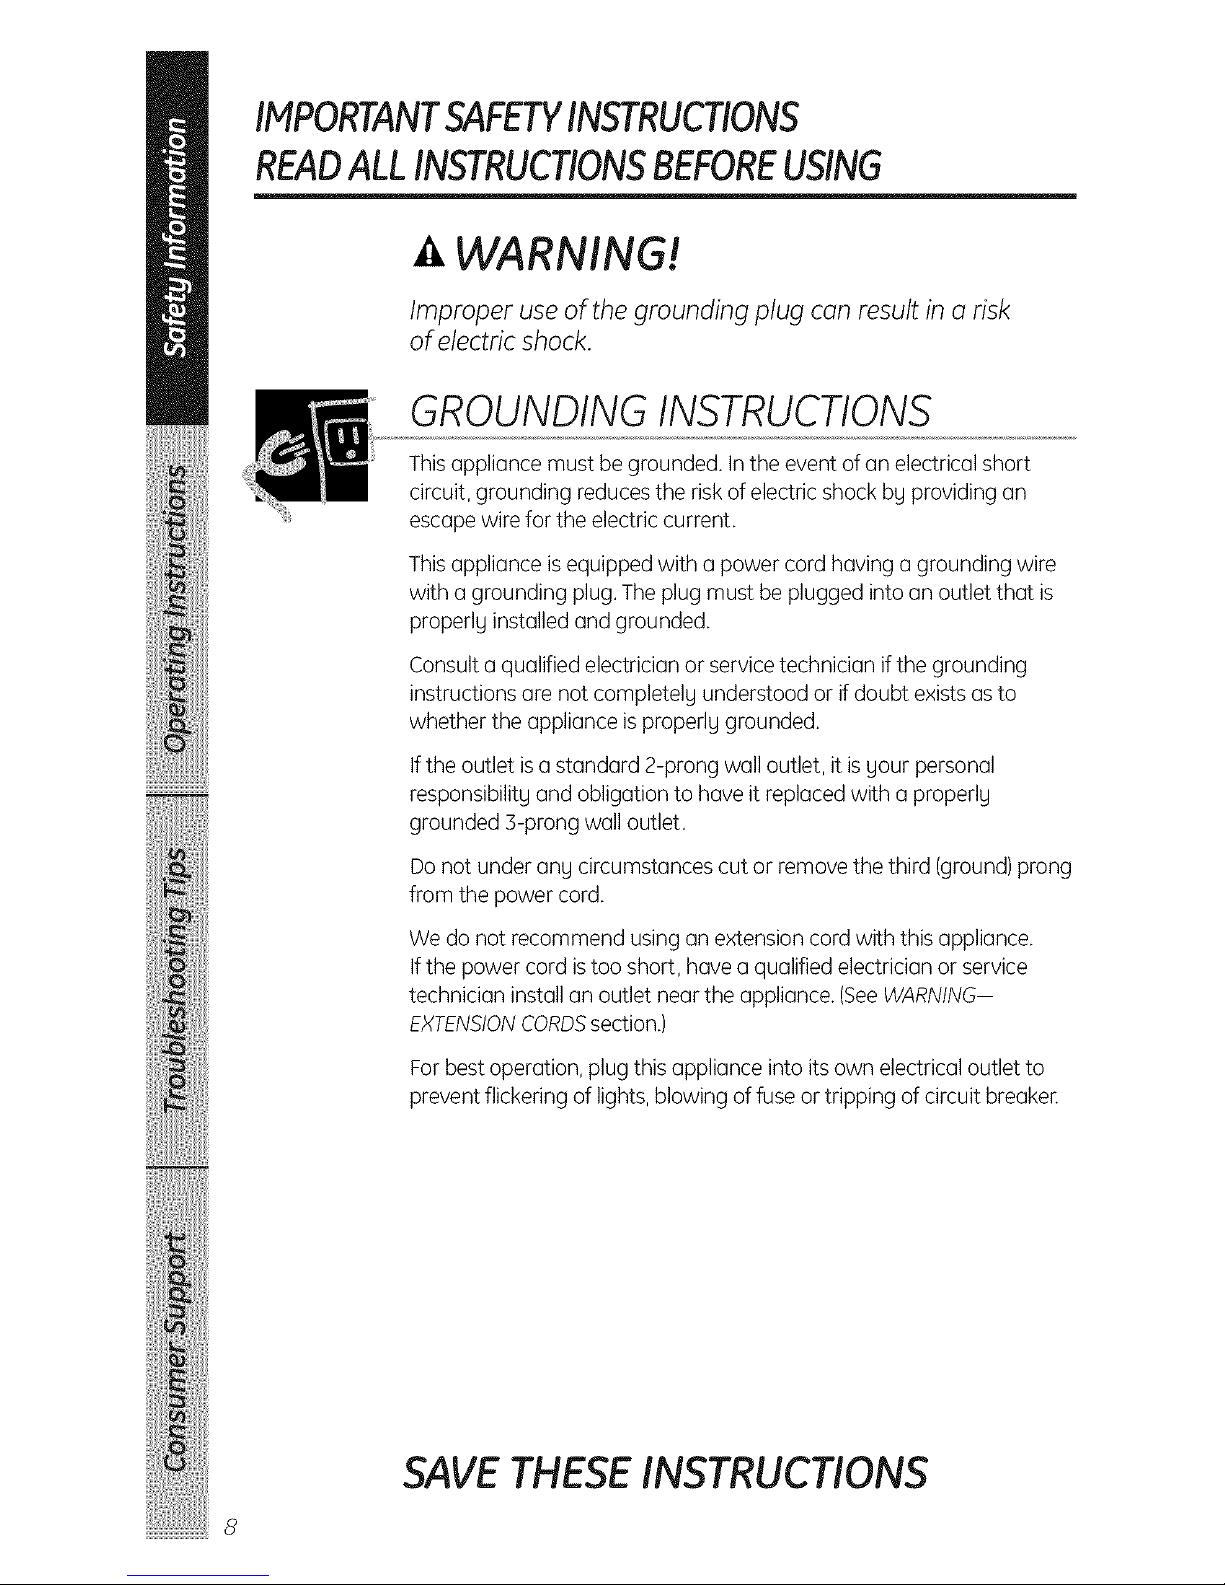
a,WARNING!
Improper use of the grounding plug can result in a risk
of electric shock.
GROUNDING INSTRUCTIONS
Thisappliance must be grounded. In the event of an electrical short
circuit, grounding reducesthe risk of electric shock bUproviding an
escape wirefor the electric current.
Thisappliance isequipped with a power cord having a grounding wire
with a grounding plug.Theplug must be plugged into an outlet that is
properlUinstalled andgrounded.
Consult a qualified electricianor service technician if the grounding
instructions are not completel Uunderstood or if doubt exists as to
whether the appliance isproperlUgrounded.
Ifthe outlet isastandard 2-prong wall outlet, it is uour personal
responsibilitUand obligation to haveit replaced with a properlU
grounded 3-prong wall outlet.
Do not under any circumstances cut or removethe third (ground)prong
from the power cord.
We donot recommend using an extension cord with this appliance.
Ifthe power cord istoo short, have a qualified electricianor service
technician install an outlet nearthe appliance. (SeeWARNING--
EXTENSIONCORDSsection.)
For bestoperation, plug this appliance into its own electrical outlet to
prevent flickering of lights, blowing of fuse or tripping of circuit breaker.
SAVE THESE INSTRUCTIONS
IMPORTANTSAFETYINSTRUCTIONS
READ ALL INSTRUCTIONSBEFOREUSING GEAppliances.com
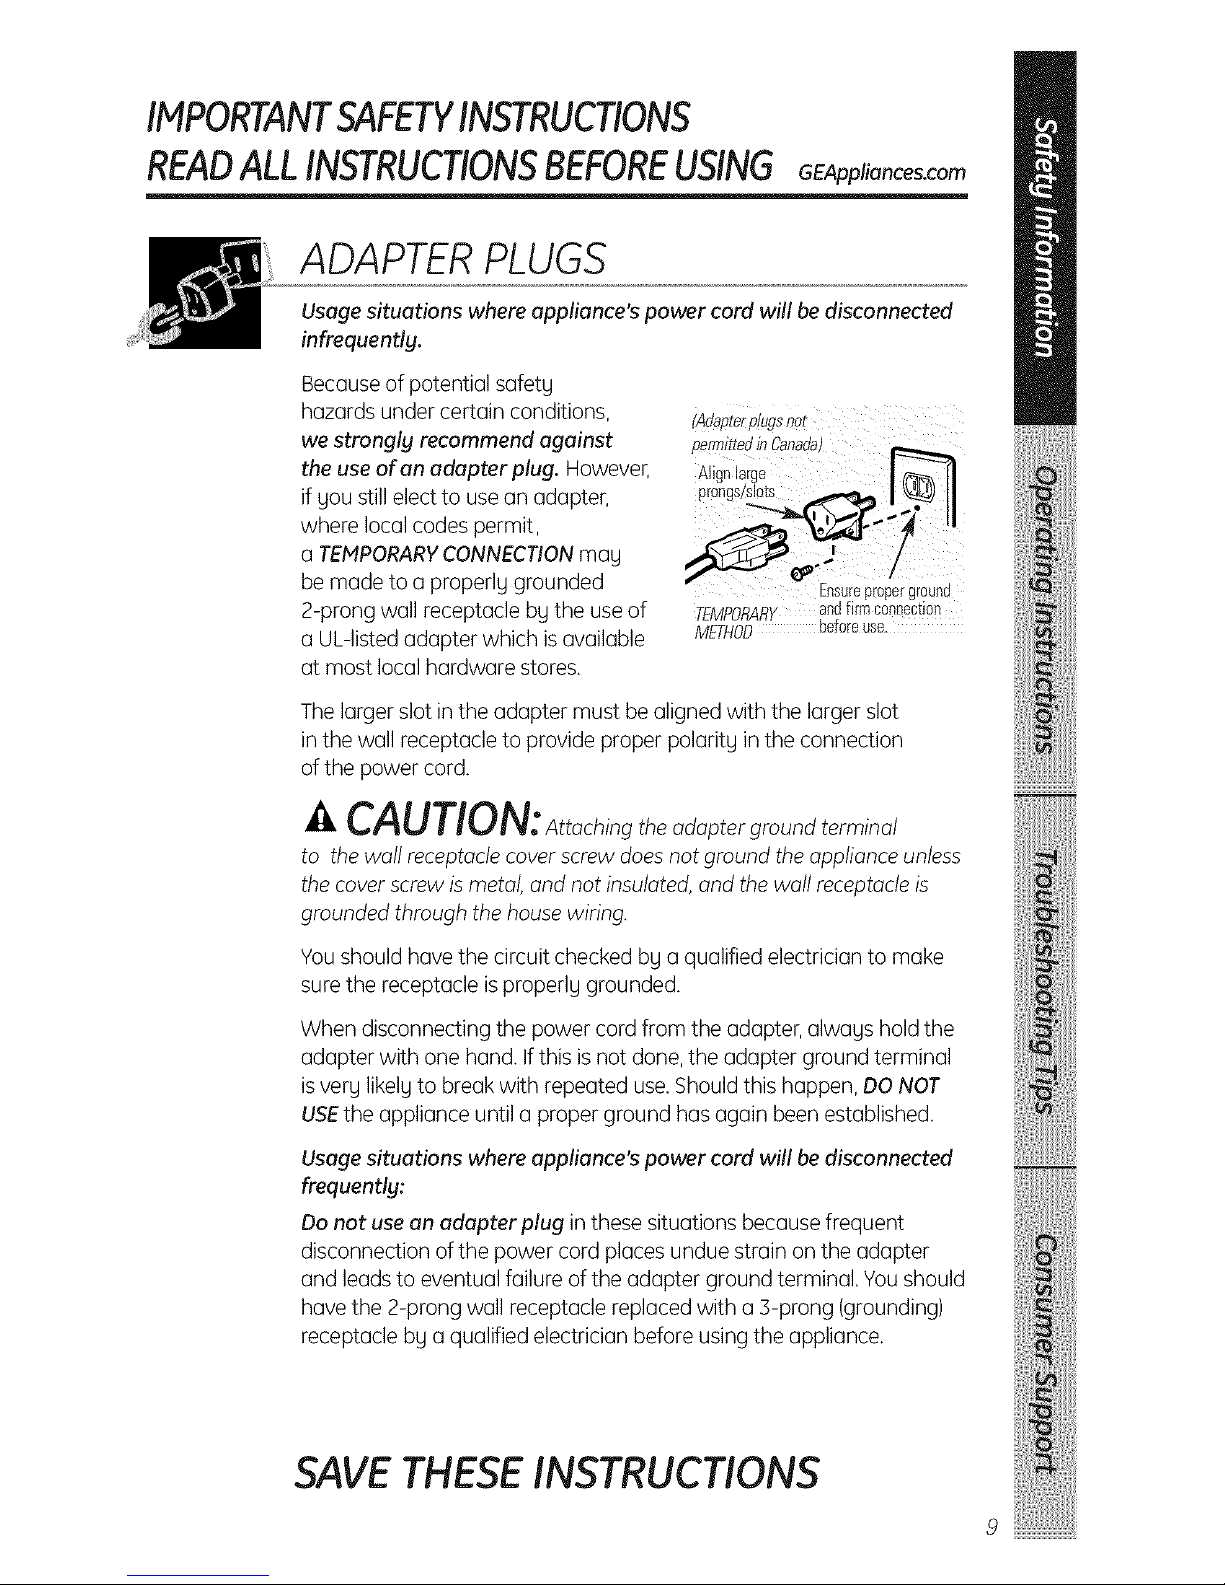
ADAPTER PLUGS
Usage situations where appliance's power cord will be disconnected
infrequently.
Becauseof potential safety
hazards under certain conditions, (Adapte_plugsnot
we strongly recommend against permittedin Canada)
the use of an adapter plug. However, Alignlarge I r_ II
if gou stillelect to usean adapter, pr°ngs/sl°ts_ I _ Jl
_-"I4T'_Y ,.-"Z II
where local codes permit. _-.._ o_S._J-"
a TEIvtPORARYCONNECTIONmag / _
be made to a properlg grounded
Ensurep[operground
2-prong wall receptacle bUthe useof TEMPORARYandfirm conoection
a UL-listed adapter which is available M'ETHOO beforeuse.
at most local hardware stores.
Thelarger slot inthe adapter must bealigned with the larger slot
in the wall receptacle to provide proper polaritUin the connection
of the power cord.
CAUTION: ttach,ngtheadaptergroundterm,nal
to the wall receptaclecoverscrew doesnot ground the applianceunless
the cover screw is metal, and not insulated, and the wall receptacle is
grounded through the house wiring.
Youshould have the circuit checked bg a qualified electrician to make
surethe receptacle isproperlUgrounded.
When disconnecting the power cord from the adapter, alwags hold the
adapter with one hand. Ifthis isnot done, theadapter ground terminal
isverg likelgto break with repeated use.Shouldthis happen, DO NOT
USEthe appliance until a proper ground has again beenestablished.
Usage situations where appliance's power cord will be disconnected
frequently:
Do not use an adapter plug in these situations because frequent
disconnection ofthe power cord places undue strain on the adapter
and leads to eventual failure of the adapter ground terminal. Youshould
have the 2-prong wall receptacle replaced with a 3-prong (grounding)
receptacle bg a qualified electrician before using the appliance.
SAVE THESE INSTRUCTIONS
9
IMPORTANTSAFETYINSTRUCTIONS
READALLINSTRUCTIONSBEFOREUSING
WARNING!
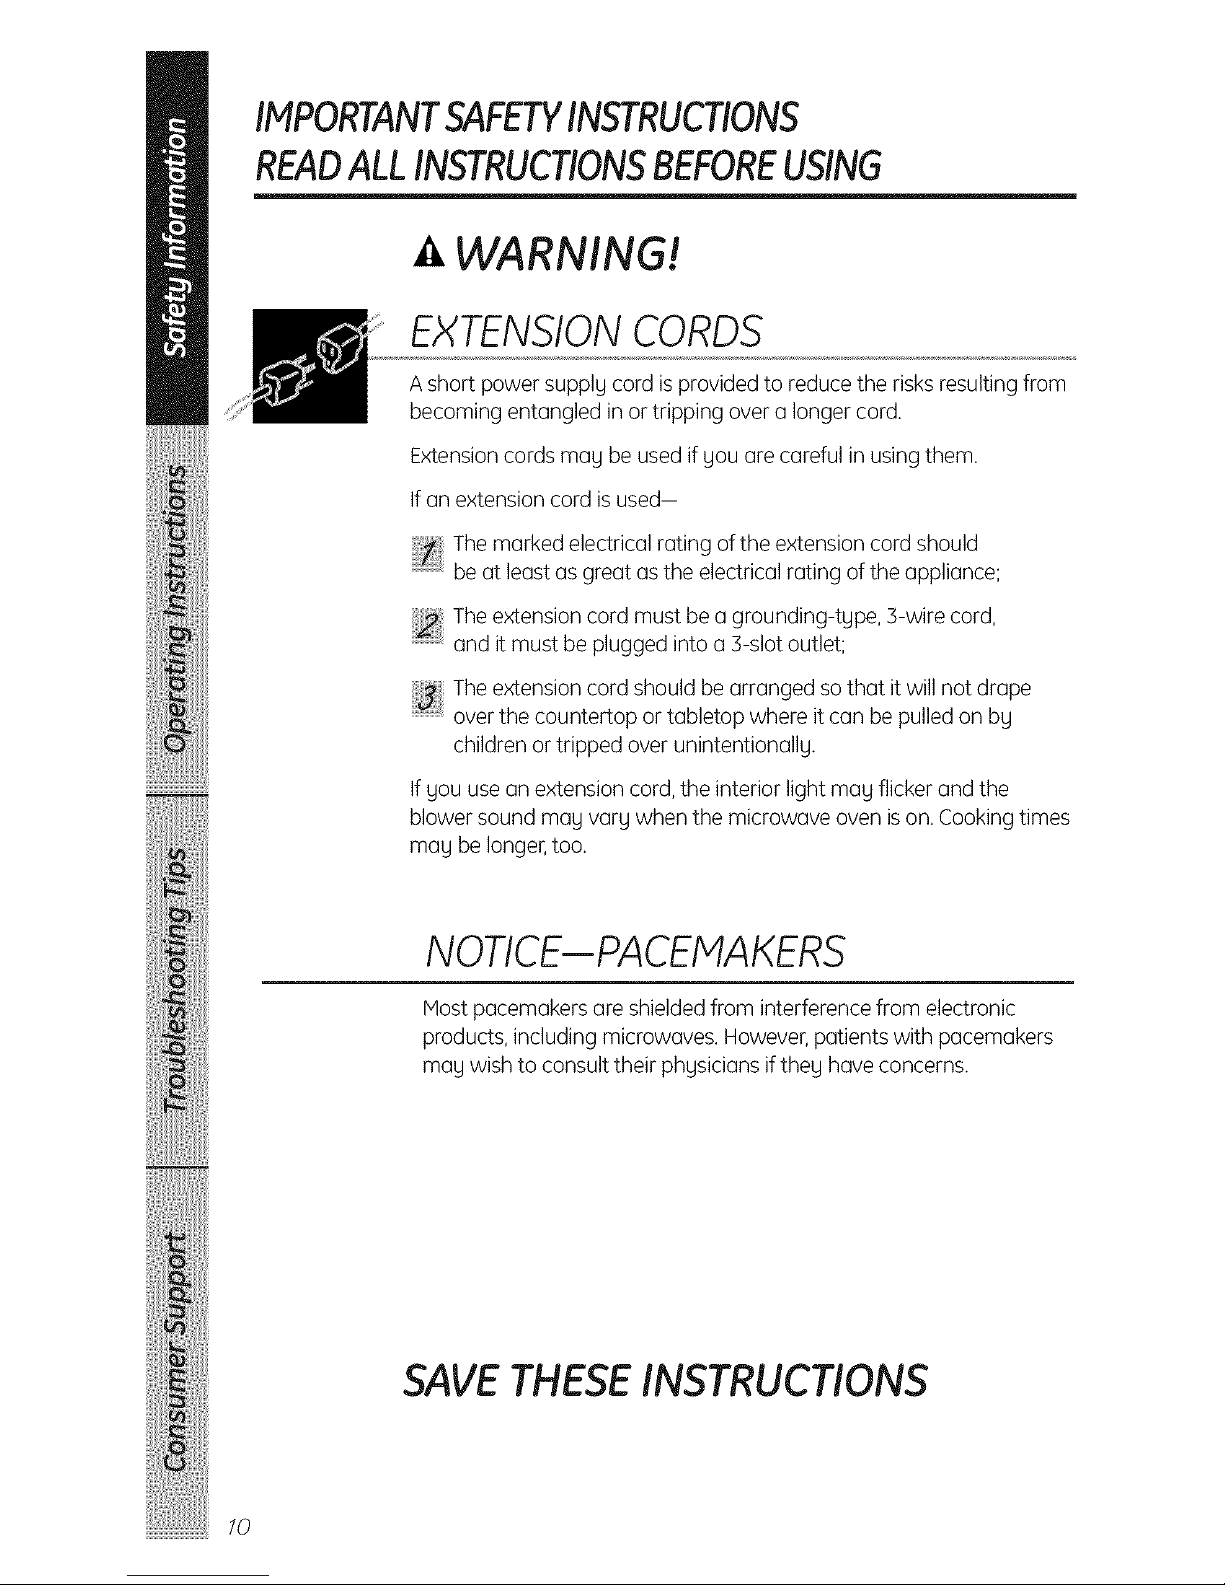
EXTENSION CORDS
Ashort power supply cord is provided to reduce the risks resulting from
becoming entangled in or tripping over a longer cord.
Extensioncords maUbe used if Uouare careful in usingthem.
Ifan extension cord is used-
Themarkedelectricalratingoftheextensioncordshould
........................be at least as great as the electrical rating of the appliance;
:_ Theextensioncord must be a grounding-tupe, 3-wire cord,
and it must be plugged into a 3-slot outlet;
Theextensioncord should be arranged sothat it will not drape
overthe countertop ortabletop where it can be pulledon by
children or tripped over unintentionall U.
Ifyou use an extension cord,the interior light may flicker and the
blower sound maUvary when the microwave oven ison. Cooking times
maUbe longer,too.
NOTICE--PACEMAKERS
Mostpacemakers are shieldedfrom interference from electronic
products, including microwaves. However,patients with pacemakers
maUwish to consult their physicians iftheUhave concerns.
SAVE THESE INSTRUCTIONS
/0
IMPORTANTSAFETYINSTRUCTIONS
READALLINSTRUCTIONSBEFOREUSINGGEAppliances.com
READ AND FOLLOW THIS SAFETY
INFORMATION CAREFULLY.
SAVE THESE INSTRUCTIONS
//
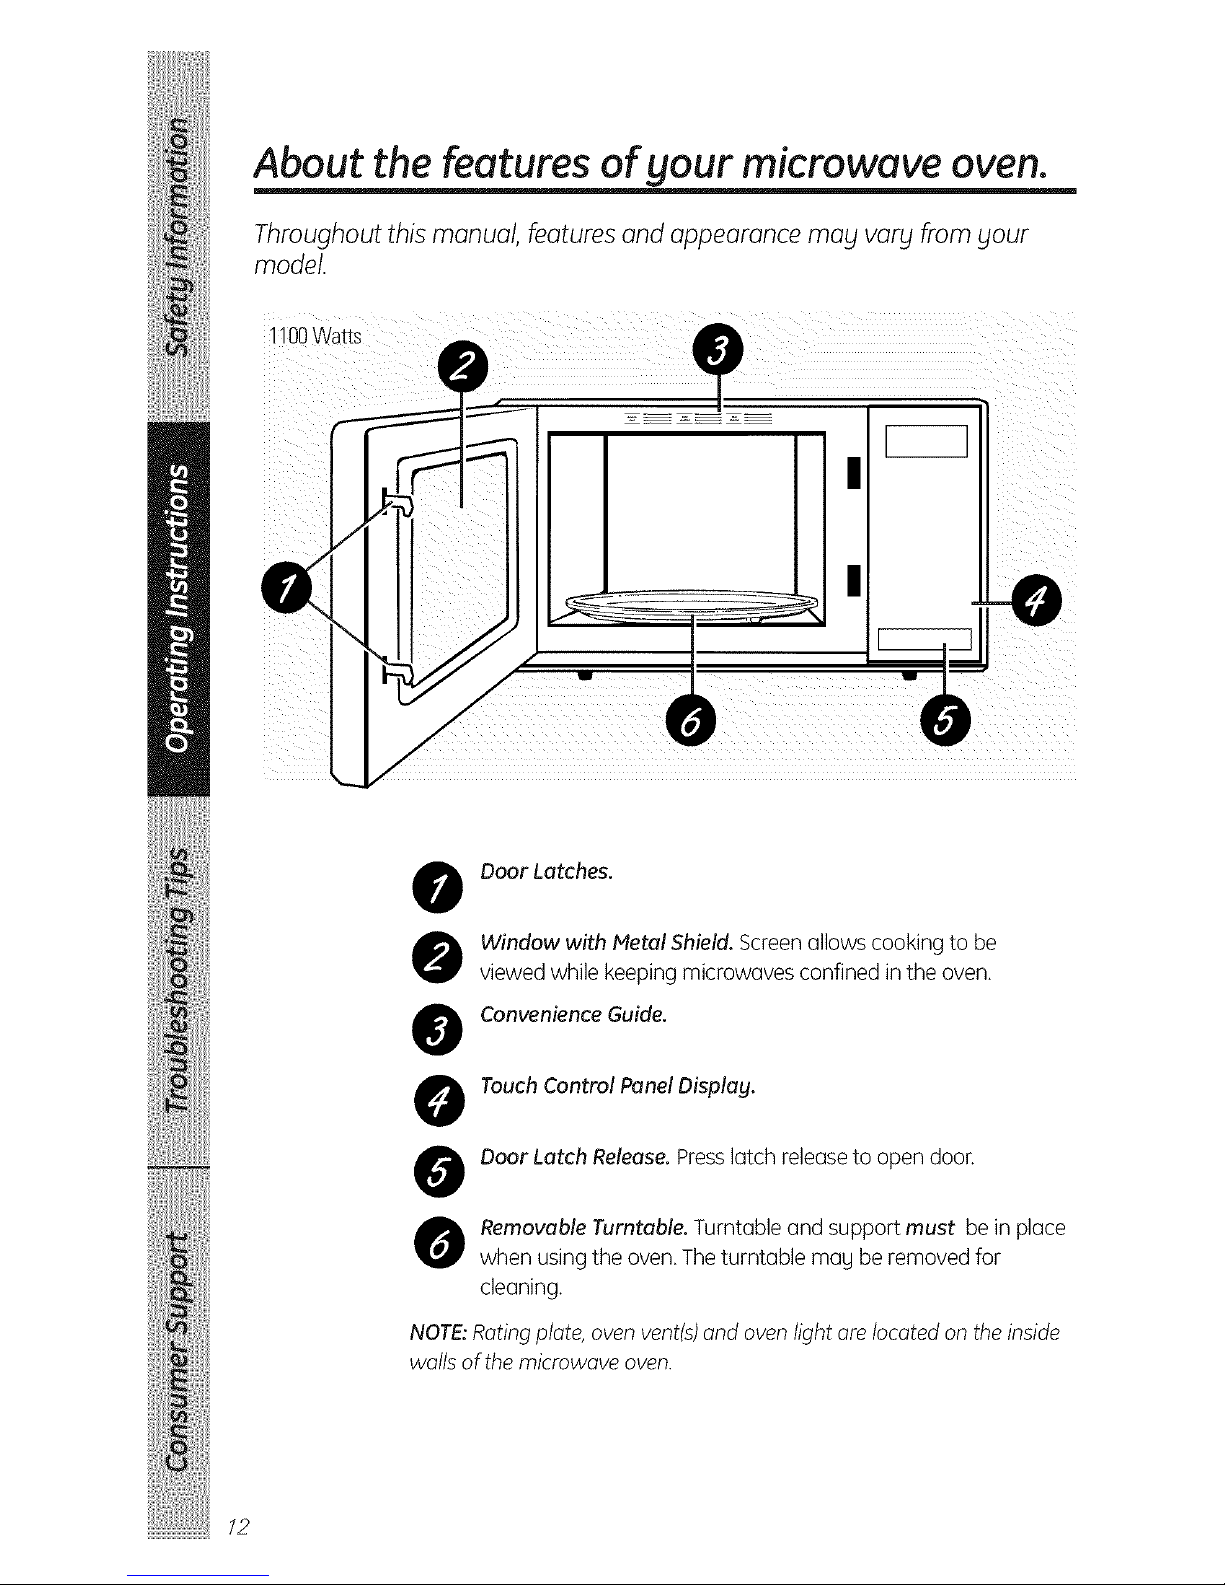
About the features of your microwave oven.
Throughout this manual, features and appearance mabl varg from gour
model.
ii00 watts
_i iI
l
!
!
i_ iiii
-01
x x x x x x x x x x x x x x x
Door Latches.
Window with Metal Shield. Screen allows cooking to be
viewed while keeping microwaves confined in the oven.
Convenience Guide.
Touch Control Panel Display.
Door Latch Release. Press latch release to open door.
O Removable Turntable. Turntable and support must be in place
when using the oven. The turntable mag be removed for
cleaning.
NOTE:Rating plate, oven vent(s) and oven light are located on the inside
walls of the microwave oven.
I2
GEAppliances.com
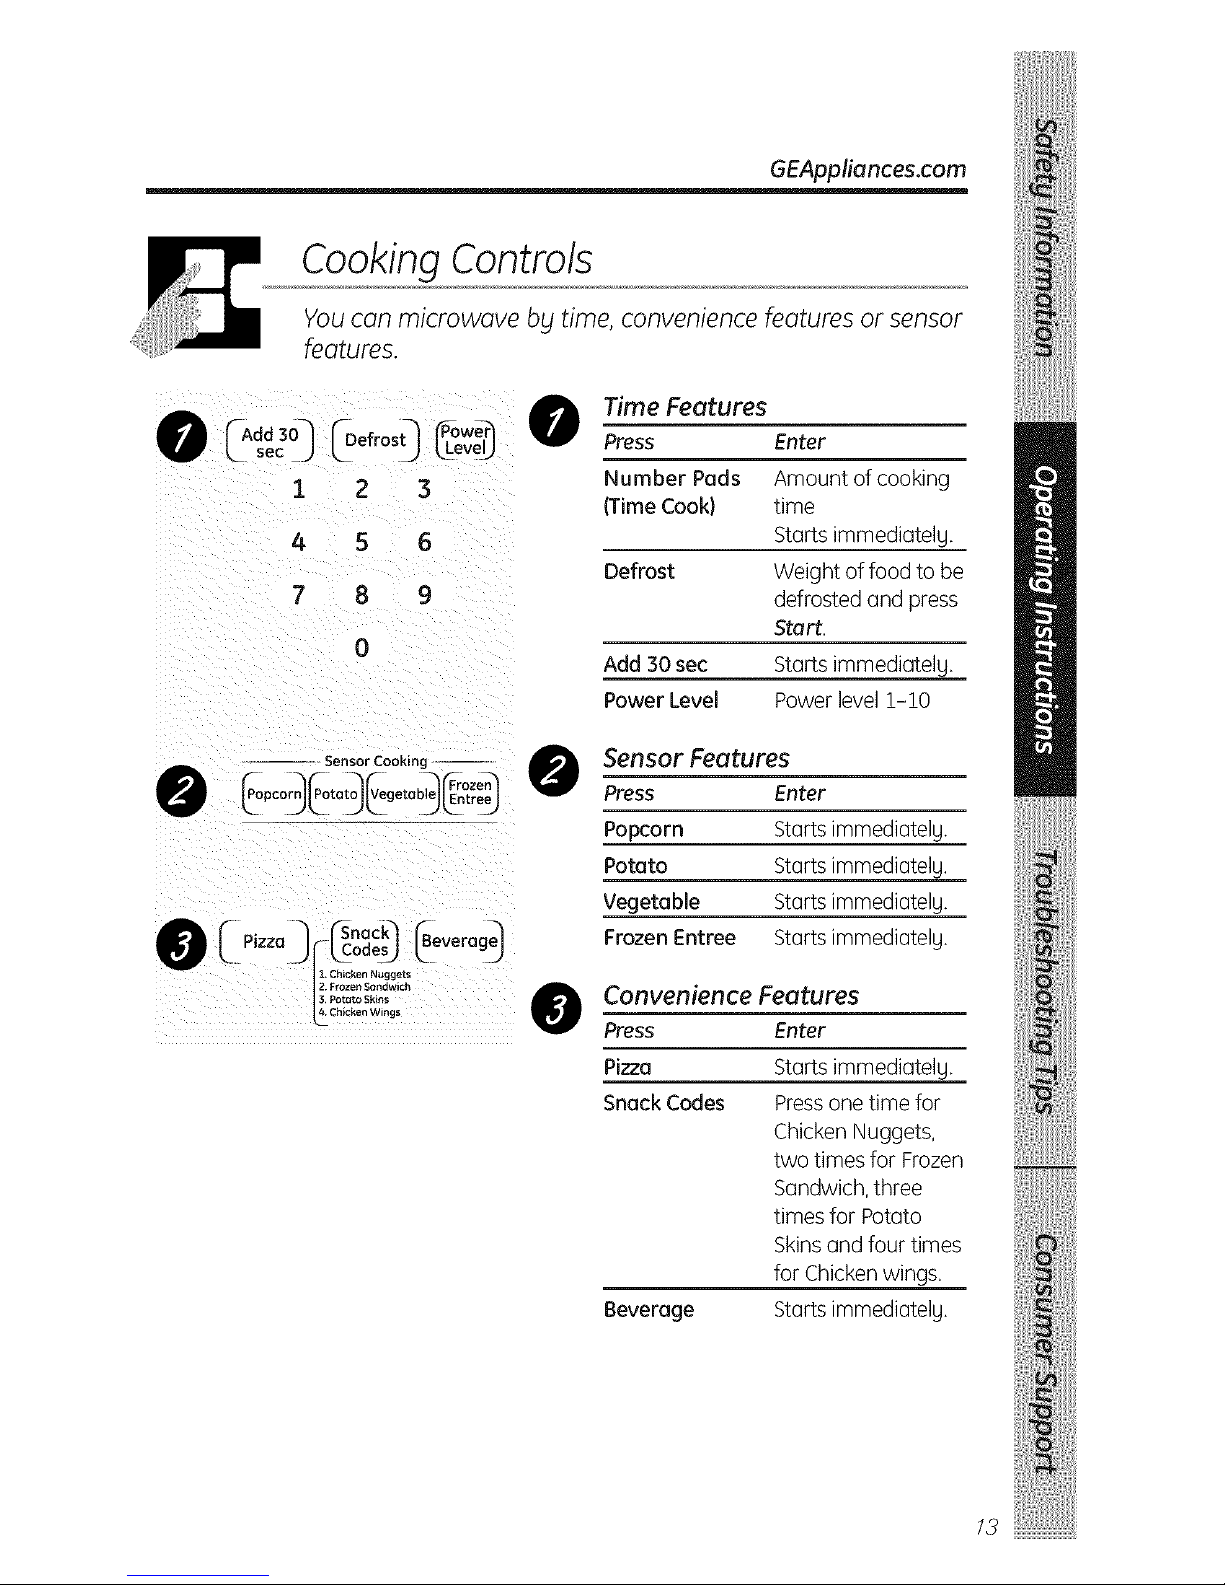
Cooking Controls
You can microwave by time, convenience features or sensor
features.
1
4
7
_ew_ 0 Time Features
veU Press Enter
2 3 Number Pads Amount of cooking
{TimeCook} time
5 6 Starts immediatelg.
Defrost Weight of food to be
8 9 defrosted and press
Start.
0
Add 30 sec Starts immediatelg.
Power Level Power level1-10
-- SensorCooking A Sensor Features
Press Enter
Popcorn Starts immediotelg.
Potato Starts immediotelg.
Vegetable Starts immediotelg.
Frozen Entree Starts immediotelg.
_ii_i_ii i_i_i_iiii:i/iii_ii_i_ i_i_i_iiii ii!i_ ii_i
iil ii i ii__ _ _ iiiiiiii_ iii _ ii
• snac_
@
Convenience Features
Press Enter
Pizza Starts immediatelg.
Snack Codes Pressone time for
Chicken Nuggets,
two times for Frozen
Sandwich,three
times for Potato
Skinsand four times
for Chickenwings.
Beverage Startsimmediotelg.
I3
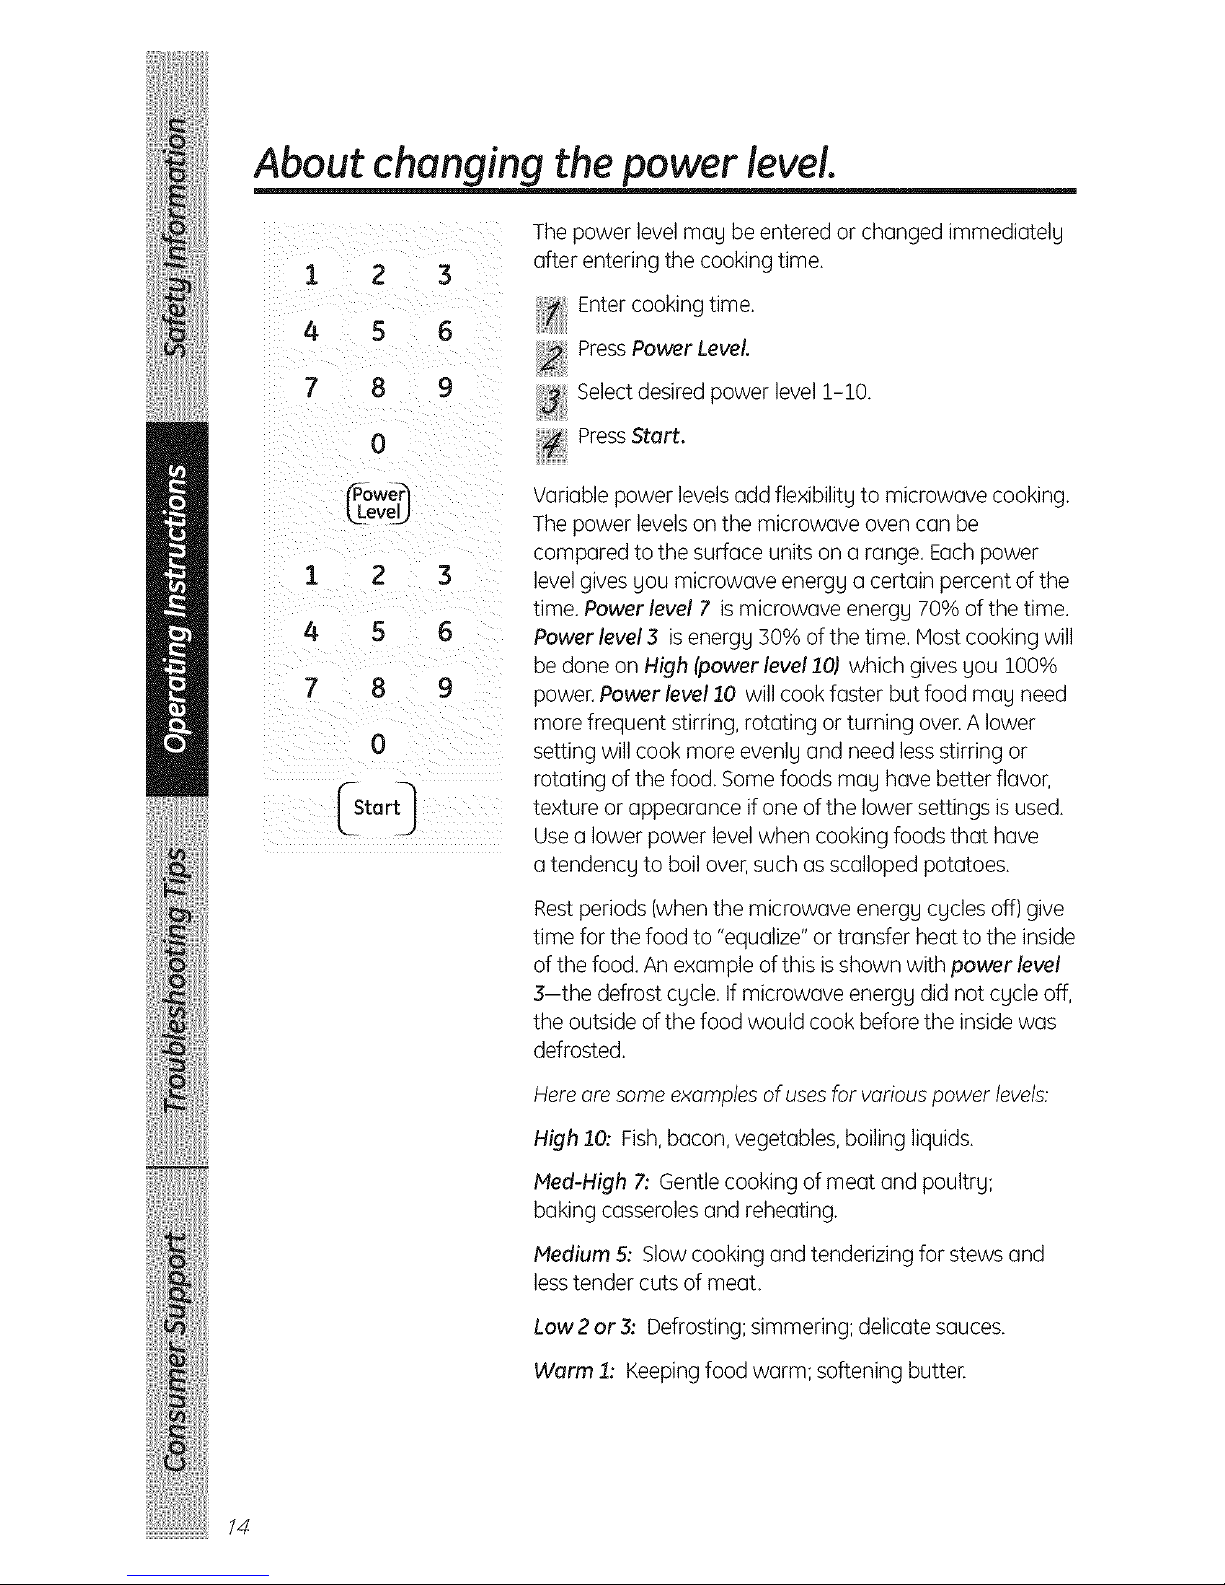
About changing the power level
1 2 3
4 5 6
7 8 9
0
eve_
i 2 3
4 5 6
7 8 g
0
_Start_
Thepower level may beentered or changed immediatelg
after entering the cooking time.
_ Enter cooking time.
_ PressPower Level
_ Selectdesiredpower level !-!0.
_ PressStart.
Variablepower levels add flexibilitg to microwave cooking.
Thepower levelson the microwave oven can be
compared to the surface units on a range. Eachpower
levelgivesgou microwave energg a certain percent of the
time.Power level 7 ismicrowave energg 70% of thetime.
Power level 3 is energg 30% of the time. Most cooking will
be done on High (power level 10) which gives gou !00%
power.Power level10 will cook faster but food mag need
more frequent stirring, rotating orturning over. A lower
setting will cook more evenlgand need lessstirring or
rotating of the food. Somefoods mag have better flavor,
texture or appearance ifone of the lower settings isused.
Usea lower power level when cooking foods that have
atendency to boil over,such asscalloped potatoes.
Restperiods (whenthe microwave energg cgcles off) give
time for the food to "equalize" or transfer heat to the inside
of the food. An example of this isshown with powerlevel
3-the defrost cgcle. If microwave energg did not cgcle off,
the outside ofthe food would cook before the insidewas
defrosted.
Hereare someexamples ofusesfor variouspower levels:
High 10: Fish,bacon, vegetables,boiling liquids.
Med-High 7: Gentle cooking of meat and poultry;
baking casseroles and reheating.
Medium 5: Slow cooking and tenderizing for stews and
lesstender cuts of meat.
Low 2or 3: Defrosting;simmering; delicate sauces.
Warm 1: Keepingfood warm; softening butter.
I4
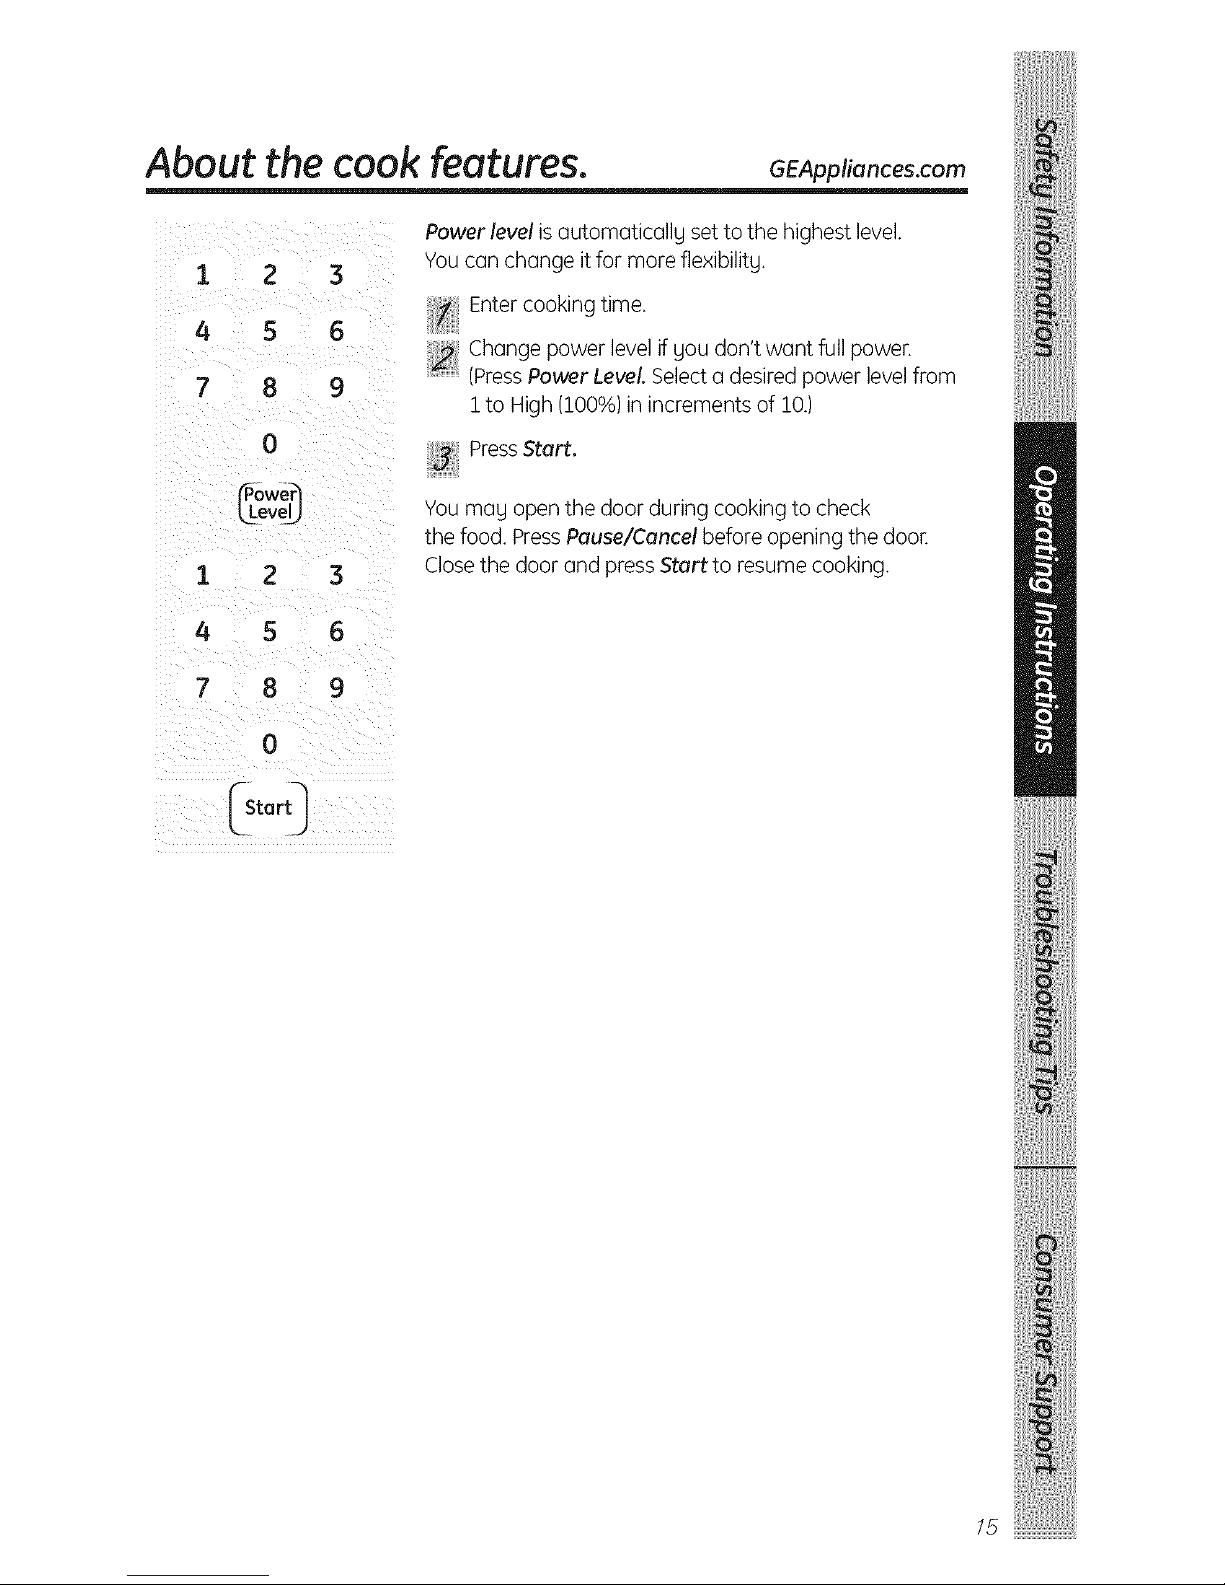
About thecook features. GEAppliances.com
I 2 3
4 5 6
7 8 9
0
eve_
1 2 3
Power level is automaticallg set to the highest level.
Youcan change it for more flexibilitg.
Entercookingtime.
Change power levelif you don't want full power.
..........(PressPower Level.Selecta desired power levelfrom
! to High (100%)inincrements of !0.)
_i PressStart.
Youmag open the door during cooking to check
the food. PressPause/Cancel before opening the door.
Closethe door and pressStart to resume cooking.
4 5 6
7 8 9
15
Aboutthecookfeatures.
Cooking Guide
NOTE:Use power level at 100% unless otherwise noted.
AsParagus
(freshSpears) 1 lb. Sto 8 min., InlY2-qt, oblong glass baking
70% Power dish,place 1/4 cup water.
(frozenSpears) lO-oz, package 4 to 7 min. In!-qt. casserole.
(freshgreen)
1 lb.cutin half
(frozengreen) lO-oz, package
(frozenlima)lO-oz, package
Beets
(fresh,whole) 1 bunch
10 to 15 min.
4 to 8 min.
4 to 8 min.
16 to 22 min.
Broccoli
(freshcut) 1 bunch 5to 9 min.
(1!/4 to 1!/2Ibs.}
(freshspeors) i bunch 7to 11 min.
(11/4to ll/zIbs.}
(frozenl in-oz, package 4to 7 min.
Chopped)
(frozenSpears) lO-oz, package 4 to 7 min.
Cabbage
(fresh) 1 medium head 6to 10 min.
(about 2 Ibs.}
(wedges) 5to 9 min.
InlY2-qt, casserole,place
1/2 cup water.
In1-qt. casserole,place
2tablespoons water.
In1-qt. casserole,place
1//4cup water.
In2-qt. casserole,place
1/2 cup water.
In2-qt. casserole,place
1/2 cup water.
In2-qt. oblong glass baking dish,
place 1//4cup water.
In1-qt. casserole.
In1-qt. casserole,place
3 tablespoons water.
InlY2- or 2-qt. casserole,place
1/4 cup water.
In2- or 3-qt. casserole,place
1//4cup water.
InlY2-qt, casserole,place
1/4 cup water.
carrots
(fresh,Sliced)I lb. 4to 8 min.
(frozen) lO-oz, package 3to 7 min.
Cauliflower
(flowerets) 1 medium head 7 to 11 min.
(fresh,whole)1 medium head 7to 15 min.
(frozen) lO-oz, package 3to 7 min.
In1-qt. casserole,place
2tablespoons water.
In2-qt. casserole,place
1/2 cup water.
In2-qt. casserole,place
1/2 cup water.
In1-qt. casserole,place
2tablespoons water.
I6
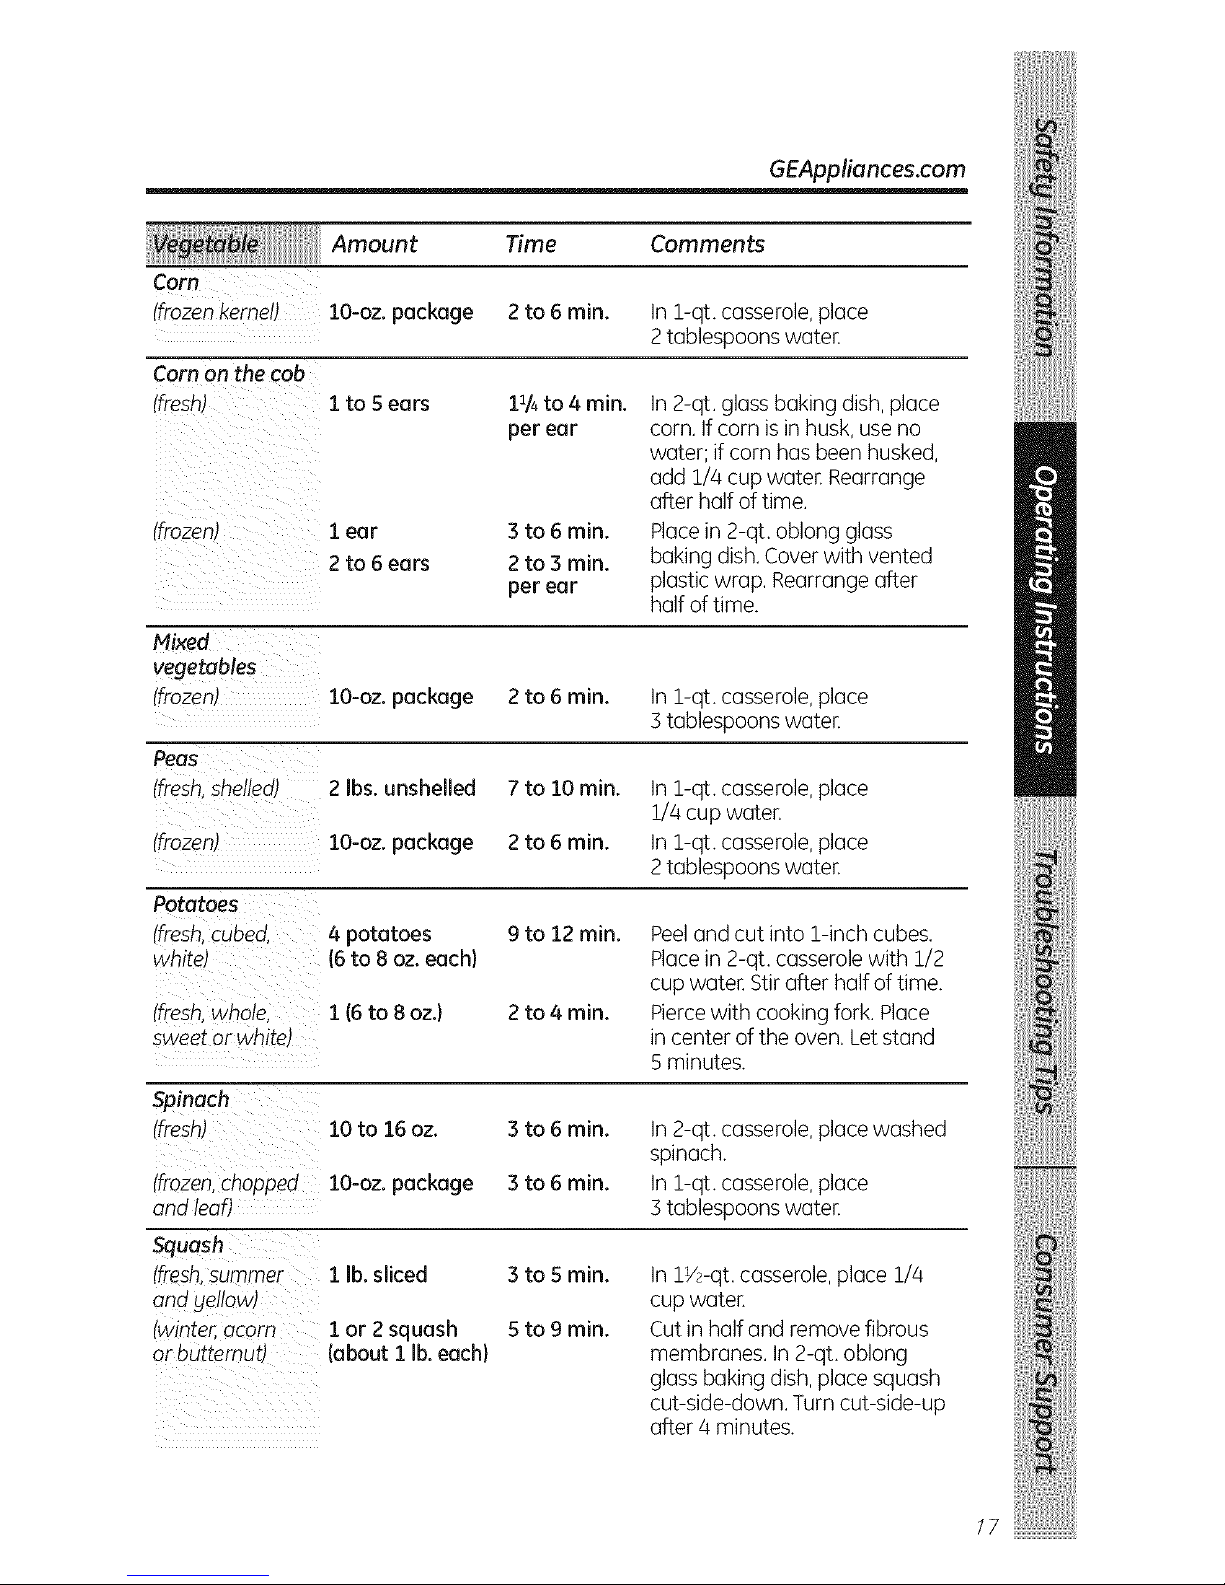
GEAppliances.com
Amount Time Comments
(frozen kernel) lO-oz, package 2 to 6 min. In !-qt. casserole, place
2 tablespoons water.
Cornon the cob
(fresh) 1to 5ears 11/4to4 min.
per ear
(frozen) i ear
2to 6ears
3to 6 min.
2to 3 min.
per ear
In 2-qt. glass baking dish, place
corn. Ifcorn isin husk, use no
water; if corn has been husked,
add 1/4 cup water. Rearrange
after half of time.
Placein 2-qt. oblong glass
baking dish.Cover with vented
plastic wrap. Rearrange after
half of time.
Mixed
vegetables
(frozen) lO-oz, package 2 to 6 min.
In 1-qt. casserole, place
3tablespoons water.
(fresh,Shelled) 2 Ibs.unshelled
(frozen) 1a-oz. package
Potatoes
(fresh,cubed, 4 potatoes
white) (6to 8 oz. each}
(fresh,whole, 1 (6 to 8 oz.}
sweet or white)
7 to 10 min.
2 to 6 min.
9to 12 min.
2 to 4 min.
In 1-qt. casserole, place
1//4cup water.
In 1-qt. casserole, place
2tablespoons water.
Peeland cut into 1-inch cubes.
Placein 2-qt. casserolewith 1/2
cup water. Stirafter half of time.
Piercewith cooking fork. Place
in center of the oven. Let stand
Sminutes.
Spinac h
(fresh)
ifrozen,ChO n d
and leaf)
Squash
(fresh,summer
and yellow)
(winter,acorn
or buttemut)
10to 16oz.
lO-oz, package
1 lb.sliced
1or 2 squash
(abouti lb.each}
3to 6 min.
3to 6 min.
3to 5 min.
5to 9 min.
In 2-qt. casserole, place washed
spinach.
In 1-qt. casserole, place
3tablespoons water.
In l_/2-qt,casserole,place 1/4
cup water.
Cutin half and remove fibrous
membranes. In2-qt. oblong
glass bakingdish, place squash
cut-side-down. Turn cut-side-up
after 4 minutes.
/7
 Loading...