

Page 1
Guide
Turntable
Safe~
Precautions to Avoid Possible Exposure
instructions ....................2-5
to Excessive Microwave Energy .............2
Operating Instructions, Tips
Aluminum Foil
Clock
..................................................................8
Control Panel
Cooking Complete Reminder ......................7
Cooking Guide............,.., . . . . . . . . . . . . . . . . . . . . . .
Defrosting by Time ...............................10, 11
Defrosting Guide . . . . . . . . . . . . . . . . . . . . . . . . . . . . . . . . . .
Delayed Cooking ............................................9
Features . . . . . . . . . . . . . . . . . . . . . . . . . . . . . . . . . . . . . . . . . . . . . . ..............7
Heating or Reheating Guide...............l3, 14
Hold Time
Microwaving Tips ...........................................6
Minute/Second Timer ...........................9, 10
Power Levels ............................................8–2 3
Program Cooking ............................................8
Time Cook. . . . . . . . . . . . . . . . . . . . . . . . . . . . . . . . . . . . . . . . . . . . . . . . . . . . .
Turntable
.................................................4
...............................................7,
.........................................................9
.................................................3,
8
.
17-23
.
15, 16
.
12
4, 7
Problem
More questions
GE Answer
Care and Cleaning ............................24
Control Panel . . . . . . . . . . . . . . . . . . . . . . . . . . . . . . . . . . . . . . . . . ........24
Turntable . . . . . . . . . . . . . . . . . . . . . . . . . . . . . . . . . . . . . . . . . . . . . . . .
Installation ..................................25, 26
Adapter Plugs . . . . . . . . . . . . . . . . . . . . . . . . . . . . . . . . . . . . . . . . . . . . . . 25
Extension Cords ...........................................26
Grounding instructions .......................25, 26
Consumer Services ...................27
Appliance Registration ..................................2
Model and Serial Number Location ...........2
Warranty
Microwave
........................................Back
Solver...............................26
?...call
Center@
800.626.2000
.
.......24
Cover
GE Appliances
Models:
1
JES0601T
JES65T
Microwave power
of
!his oven
I
I I
I
is 625 watts.
(IEC-705 PstProcedure)
ou@ut
I
Page 2

HELP US HELP YOU...
Before using your oven,
read this book carefully.
It is intended to help you operate
and maintain your new microwave
oven properly.
Keep it handy for answers to your
questions. Your supplier is responsible for
If you don’t understand something
or need more help, write (include Please check with your supplier to
your phone number):
Consumer Affairs
GE Appliances
Appliance Park
Louisville, KY 40225
Write down the model and
serial numbers.
You’ll find them on a label inside
the oven.
These numbers are also on the
Consumer Product Ownership
Registration Card that came with
vour
microwave oven. Before similar to the interference caused
,
sending in this card, please write
these numbers here:
Model Number
Serial Number
Use these numbers in any
correspondence or service calls
concerning your microwave oven.
Be sure your microwave
oven is registered.
It is important that we know the
location of your microwave oven
should a need occur for
adjustments.
registering you as the owner.
be sure he has done so; also send
in your Consumer Product
Ownership Registration Card. If
you move, or if you are not the
original purchaser, please write to
us, stating model and serial
numbers.
This appliance must be registered.
Please be certain that it is.
Write to:
GE Appliances
Range Product Service
Appliance Park
Louisville, KY 40225
If you received a
damaged oven...
Immediately contact the dealer (or
builder) that sold you the oven.
Save time and money.
Before you request service...
Check the Problem Solver in the
back of this book. It lists causes of
minor operating problems that you
can correct yourself.
All these things are normal
with your microwave oven.
● Steam or vapor escaping from
around the door.
● Light reflection around door or
outer case.
● Dimming oven light and
in blower sound may occur while
operating at power levels other
than high.
● Dull thumping sound while oven
is operating.
● Some TV-Radio interference
might be noticed while using
your microwave oven. It’s
by other
does not indicate a problem with
your oven.
small
appliances and
change
PRECAUTIONS TO AVOID POSSIBLE EXPOSURE
TO EXCESSIVE MICROWAVE ENERGY
(a) Do Not Attempt to operate this oven with
the door open since open-door operation can
result in harmful exposure to microwave
energy. It is important not to defeat or tamper
with the safety interlocks.
(b) Do Not Place any object between the oven
front face and the door or allow soil or cleaner
residue to accumulate on sealing surfaces.
2
(c) Do Not Operate the oven if it is damaged. It is
particularly important that the oven door close
properly and that there is no damage to the:
(1) door (bent)
(2) hinges and latches (broken or loosened)
(3) door seals and sealing surfaces.
(d) The Oven Should Not be adjusted or repaired
by anyone except properly qualified service
personnel.
Page 3

When using electrical appliances, basic safety
precautions should be followed, including the
following:
A WA~lNG-Toreducetheriskof
burns, electric shock, fire, injury to persons
or exposure to excessive microwave energy:
●
Read and follow the specific “Precautions to
Avoid Possible Exposure to Excessive Microwave
Energy”on previous page.
“
This appliance must be grounded. Connect only
to properly grounded outlet, See “GROUNDING
INSTRUCTIONS.”
●
Use this appliance only for its intended use as
described in this manual. Do not use corrosive
chemicals or vapors in this appliance. This
microwave oven is specifically designed to
heat or cook food, and is not intended for
laboratory or industrial use.
●
For best operation, plug this appliance into
its own electrical outlet, to prevent flickering
of lights, blowing of fuse or tripping of circuit
breaker.
●
Do not immerse power cord or plug in water.
●
Keep power cord away from heated surfaces.
●
Do not let power cord hang over edge of table
or counter.
●
Do not operate this appliance if it has a
damaged power cord or plug, if it is not
working properly, or if it has been damaged
or dropped.
●
Do not operate oven without the turntable and
turntable support seated and in place.
●
Do not allow turntable to be restricted so the
turntable cannot rotate.
●
See door surface cleaning instructions in the Care
and Cleaning section(s) of your book.
●
This appliance should be serviced only by
qualified service personnel. Contact nearest
authorized service facility for examination, repair
or adjustment.
●
As with any appliance, close supervision is
necessary when used by children.
●
Install or locate this appliance only in
accordance with the provided installation
instructions.
●
Be certain to place the front surface of the door
three inches or more back from the countertop
edge to avoid accidental tipping of the
appliance in normal usage.
●
Do not cover or block any openings on the
appliance.
●
Do not store this appliance outdoors. Do not
use this product near water—for example, in
a wet basement, near a swimming pool or near
a sink.
●
To reduce the risk of fire in the oven cavity:
—Do not overcook food. Carefully attend
appliance if paper, plastic or other combustible
materials are placed inside the oven to facilitate
cooking.
—Remove wire twist-ties from paper or plastic
bags before placing bags in oven.
—Do not use your microwave oven to dry
newspapers.
—Do not use recycled paper products. Recycled
paper towels, napkins and waxed paper can
contain metal flecks which may cause arcing
or ignite. Paper products containing nylon or
nylon filaments should be avoided, as they may
also ignite.
(continued next page)
3
Page 4

!
J
WORTANT
SAFE~
(continued)
—Do not pop popcorn in your microwave oven
unless in a special microwave popcorn accessory
or unless you use popcorn labeled for use in
microwave ovens.
—Do not overcook potatoes. They could dehydrate
and catch fire, causing damage to your
oven,
—Do not operate the oven while empty to avoid
damage to the
oven
and the danger of fire. If
by accident the oven should run empty a minute
or two, no harm is done. However, try to avoid
operating the oven empty at all times—it saves
energy and prolongs the life of the oven.
—Do not use the oven for storage purposes.
Do not leave paper products, cooking utensils
or food in the oven when not in use.
—If materials inside oven should ignite, keep
oven door closed, turn oven off, and disconnect
power cord, or shut off power at the fuse or
circuit breaker panel.
~STRUC~ONS
●
Cookware may become hot
because of heat transferred from
the heated food. Pot holders may
be needed to handle the
cookware.
●
Sometimes, the turntable can become too hot to
touch, Be careful touching the turntable during
and after cooking.
●
Foods cooked in liquids (such as pasta) may
tend to boil over more rapidly than foods
containing less moisture. Should this occur,
refer to the Care and Cleaning section(s) for
instructions on how to clean the inside of
the oven.
●
Thermometer—Do not use a thermometer in
food you are microwaving unless the thermometer
is designed or recommended for use in the
microwave oven.
●
Some products such as whole eggs and sealed
containers-for example, closed jars-will
explode and should not be heated in this
microwave
oven,
Such use of the microwave
oven could result in injury.
●
Avoid
without their
heating baby
fids; e~pecidly fieat ~nd
food in
glass iars,
egg
even
mixtures.
●
Don’t
defrost frozen beverages in narrow
necked bottles (especially carbonated beverages).
Even if the container is opened, pressure can build
up.
This can cause the container to burst, possibly
resulting in injury.
●
Use metal only as directed in this book. TV
dinners may be microwaved in foil trays less than
3/4” high; remove top foil cover and return tray
to box. When using metal in the microwave oven,
keep metal at least 1 inch away from sides
of oven.
●
Plastic
cookwar+Plastic
cookware designed for
microwave cooking is very useful, but should be
used carefully. Even microwave-safe plastic may
not be as tolerant of overcooking conditions as are
glass or ceramic materials and may soften or char
if subjected to short periods of overcooking. In
longer exposures to overcooking, the food and
cookware could ignite. For these reasons: 1) Use
microwave-safe plastics only and use them in
strict compliance with the cookware
manufacturer’s recommendations. 2) Do not
subject empty cookware to microwaving. 3) Do
not permit children to use plastic cookware
without complete supervision.
●
When cooking pork, follow the directions
exactly and always cook the meat to an
temperature of at least
170°F.
This assures that, in
intemd
the remote possibility that trichina may be present
in the meat, it will be killed and meat will be safe
to eat.
4
Page 5
●
Do not boil eggs in a microwave oven. Pressure
will build up inside egg yolk and will cause it to
burst, possibly resulting in injury.
●
Foods with unbroken outer
“skin” such as potatoes,
sausages, tomatoes, apples,
chicken livers and other giblets,
and egg yolks (see previous
caution) should be pierced to
allow steam to escape during
cooking.
●
Not all plastic wrap is suitable for use in
microwave ovens. Check the package for
proper use.
●
Spontaneous boiling—Under
certain special circumstances,
liquids may start to boil during
w
or shortly after removal from the
microwave oven. To prevent burns
from splashing liquid, stir the
liquid briefly before removing the
container from the microwave
oven.
●
~~Boilable”
cooking pouches and
tightly
closed
plastic bags should be slit, pierced or vented as
directed by package. If they are not, plastic could
burst during or immediately after cooking,
possibly resulting in injury. Also, plastic storage
containers should be at least partially uncovered
because they form a tight seal. When cooking
with containers tightly covered with plastic wrap,
remove covering carefully and direct steam away
from hands and face.
●
! “.
i
,
( ‘P,
~.~*” .4
e
Hot foods and steam can cause
burns. Be careful when opening
any containers of hot food,
including popcorn bags, cooking
pouches and boxes. To prevent
possible injury, direct steam away
from hands and face.
SAVE THESE
INSTRUCTIONS
5
Page 6
MICROWAVING TIPS
—
● Make sure all cookware used in your microwave
oven is suitable for microwaving.
Most glass
casseroles, cooking dishes, measuring cups, custard
cups, pottery or china dinnerware which does not
have metallic trim or glaze with a metallic sheen
can be used. Some cookware is labeled “suitable
for microwaving.”
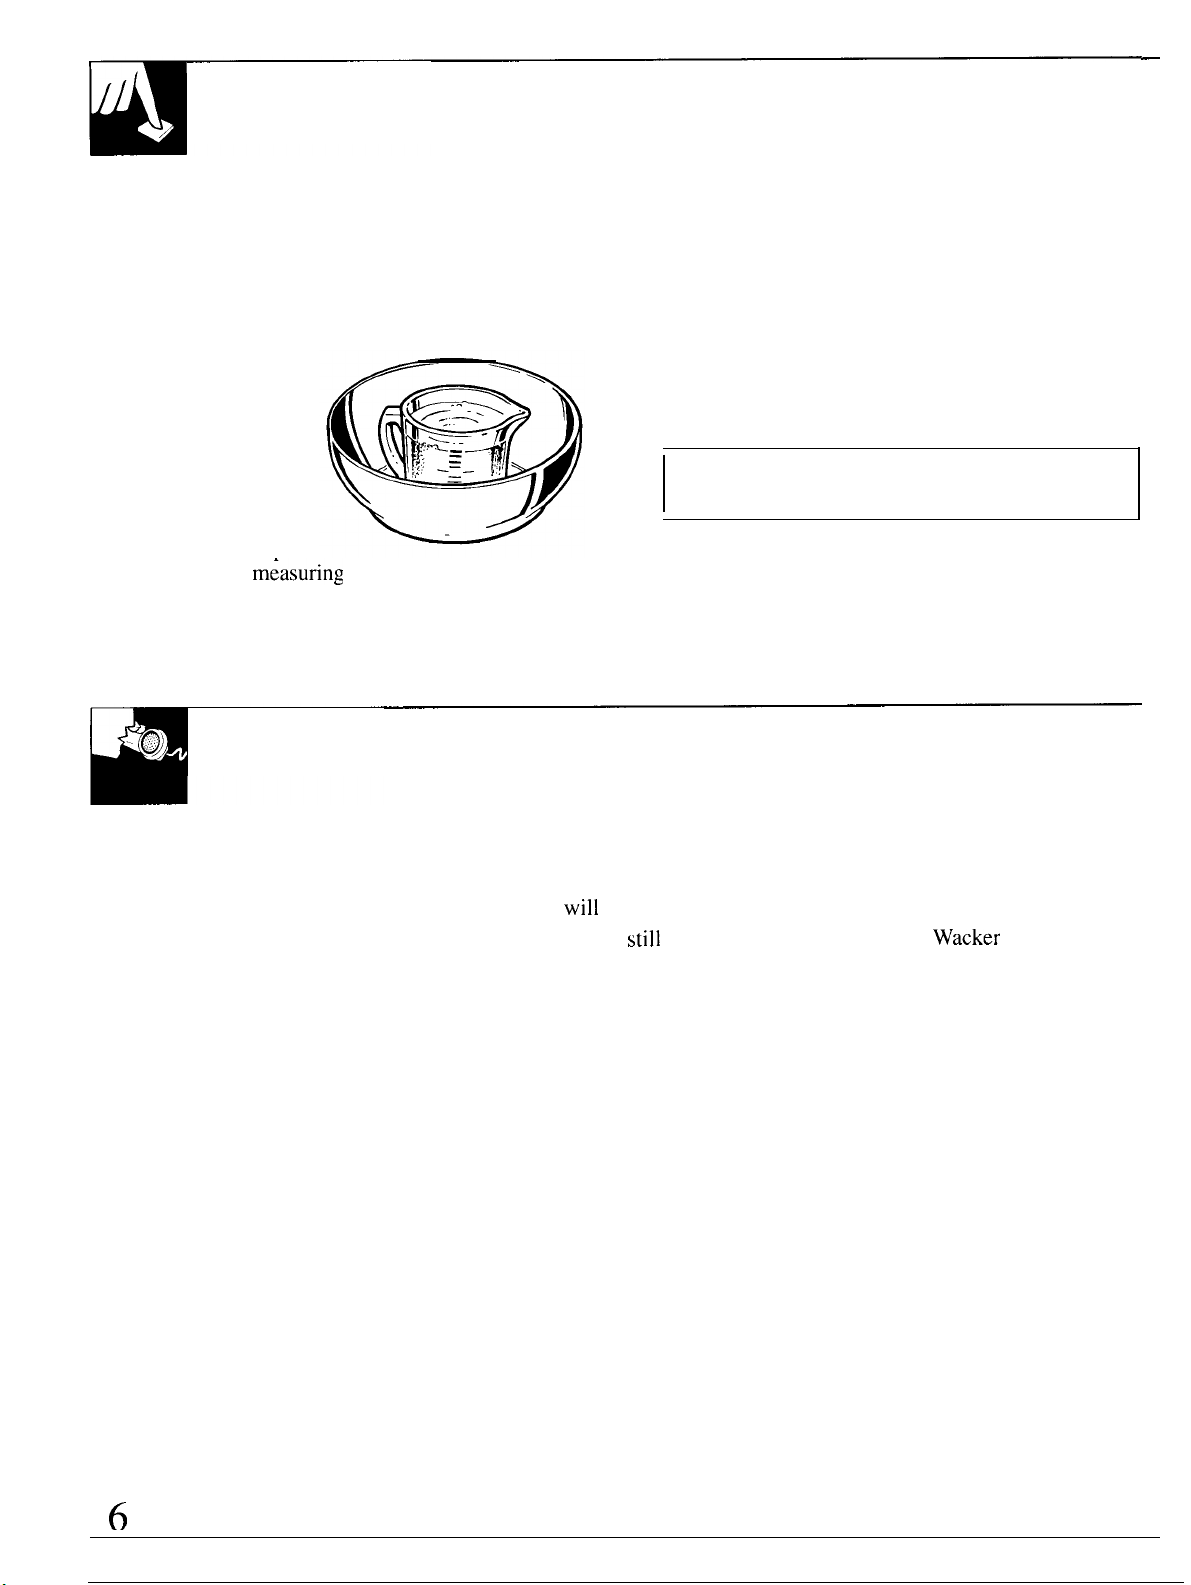
● If you are not
sure if a dish is
microwave-safe,
use this test:
Place
in the oven both
the dish you are
testing and a glass
measuring cup
filled with one
water—set the
CUP
m~asuring
cup either in or next to
the dish. Microwave 1 minute at high. If the dish
heats, it should not be used for microwaving. If
the dish remains cool and only the water in the
cup heats, then the dish is microwave-safe.
IF YOU NEED SERVICE...
● Paper towels, waxed paper and plastic wrap
can be used to cover dishes in order to retain
moisture and prevent spattering. Be sure to vent
plastic wrap so steam can escape.
● Some microwaved foods require stirring, rotating
or rearranging.
● Steam builds up pressure in foods which are
Check the Cooking Guide.
tightly covered by a skin or membrane. Pierce
potatoes, egg yolks and chicken livers to prevent
bursting.
If you use a meat thermometer while cooking, make
sure it is safe for use in microwave ovens.
To obtain service, see the
Consumer Services page in the
back of this book.
We’re proud of our service and
want you to be pleased. If for some
reason you are not happy with the
service you receive, here are three
steps to follow for further help.
FIRST, contact the people who
serviced your appliance. Explain
why you are not pleased. In most
cases, this
NEXT, if you are
will
solve the problem.
still
not pleased,
write all the details—including
your phone number—to:
Manager, Consumer Relations
GE Appliances
Appliance Park
Louisville, KY 40225
FINALLY, if your problem is still
not resolved, write:
Major Appliance Consumer
Action Panel
20 North
Wacker
Drive
Chicago, IL 60606
6
Page 7
mm
mm
11
II
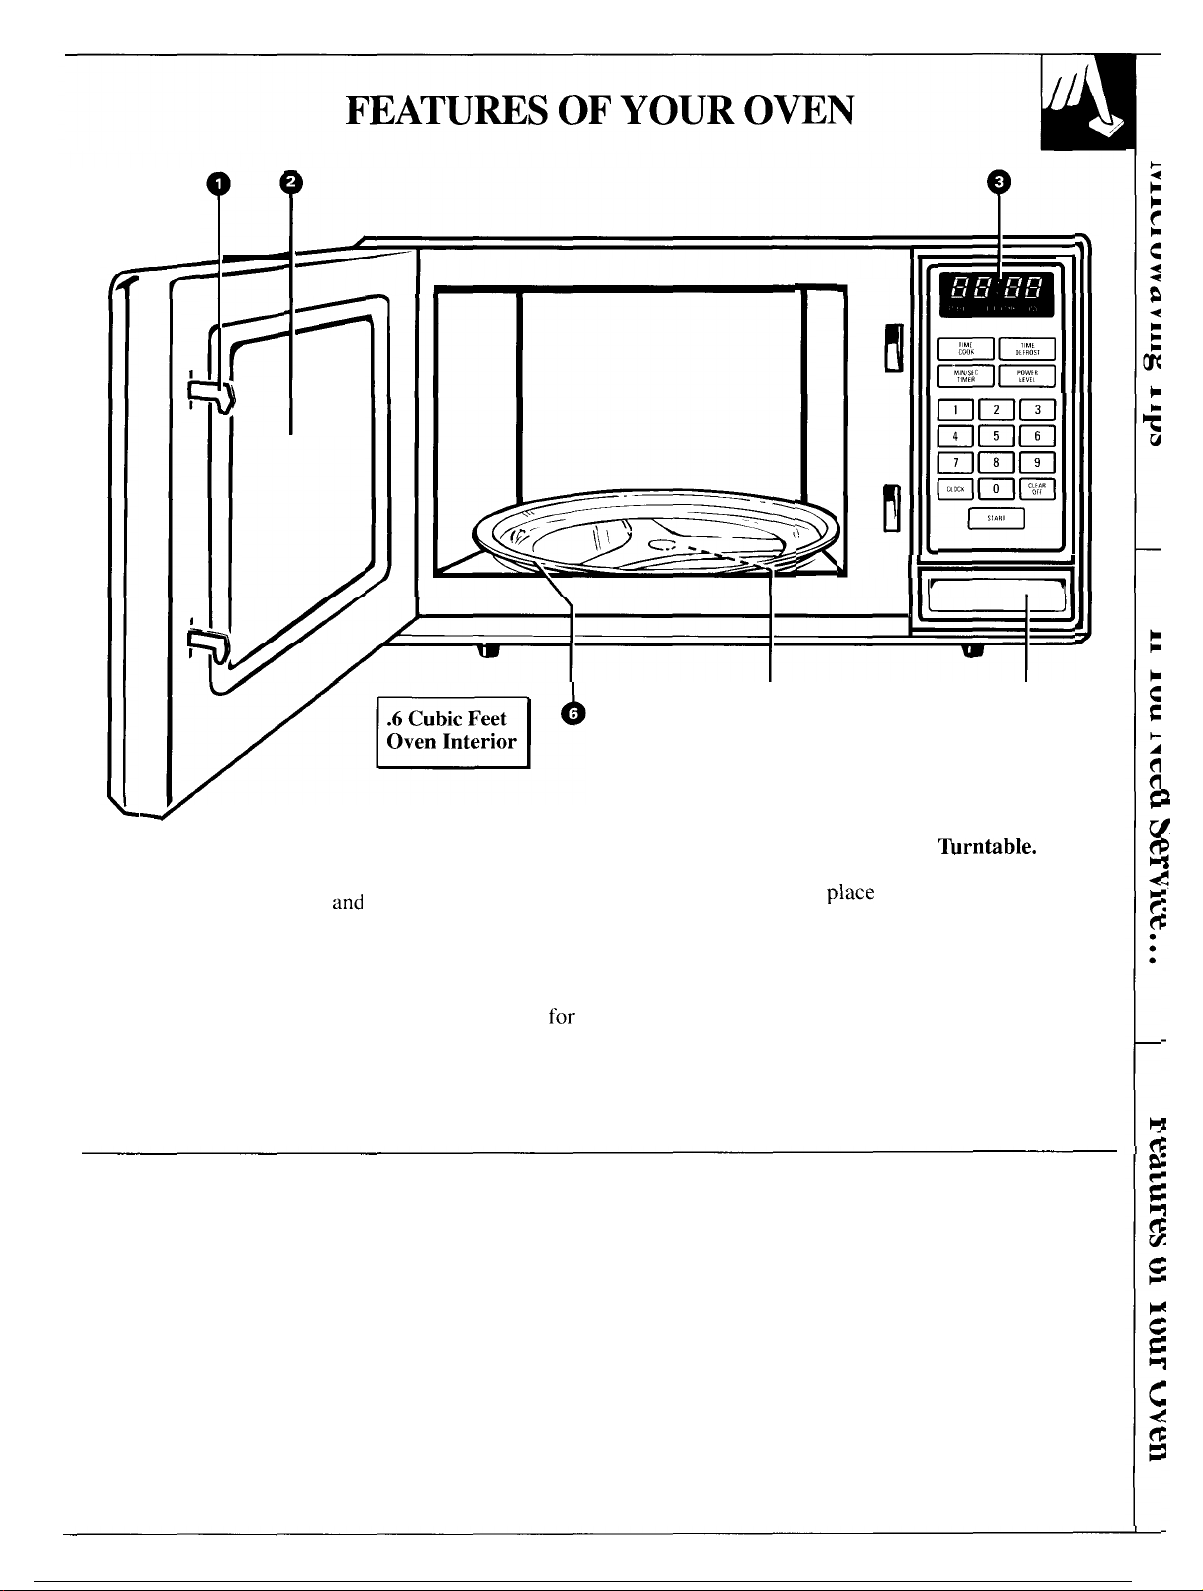
1. Door Latches.
2. Door Screen. Metal screen
permits viewing of foods
keeps microwaves confined
inside oven.
3. Touch Control Panel and
Display. See
Control Panel section for
instructions.
Cooking Complete Reminder
(For Time Cook and Time Defrost cycles)
To remind you that you have food in the oven, the oven will beep once a
minute until you either open the oven door or touch the CLEAR/OFF pad.
Your Touch
and
4. Door Open Bar. Press to open
door. Door must be securely
latched for oven to operate.
5. Removable Turntable
Support. Turntable support
must be in place when using the
turntable. The support may be
removed
for
cleaning.
6. Removable
Turntable must be in
place
when using the oven.
Cooking performance will
be unsatisfactory without
the turntable in place. The
turntable may be removed
for cleaning.
NOTE: Rating plate, oven
vent(s) and oven light are
located on the inside walls
of the microwave oven.
~rntable.
7
Page 8
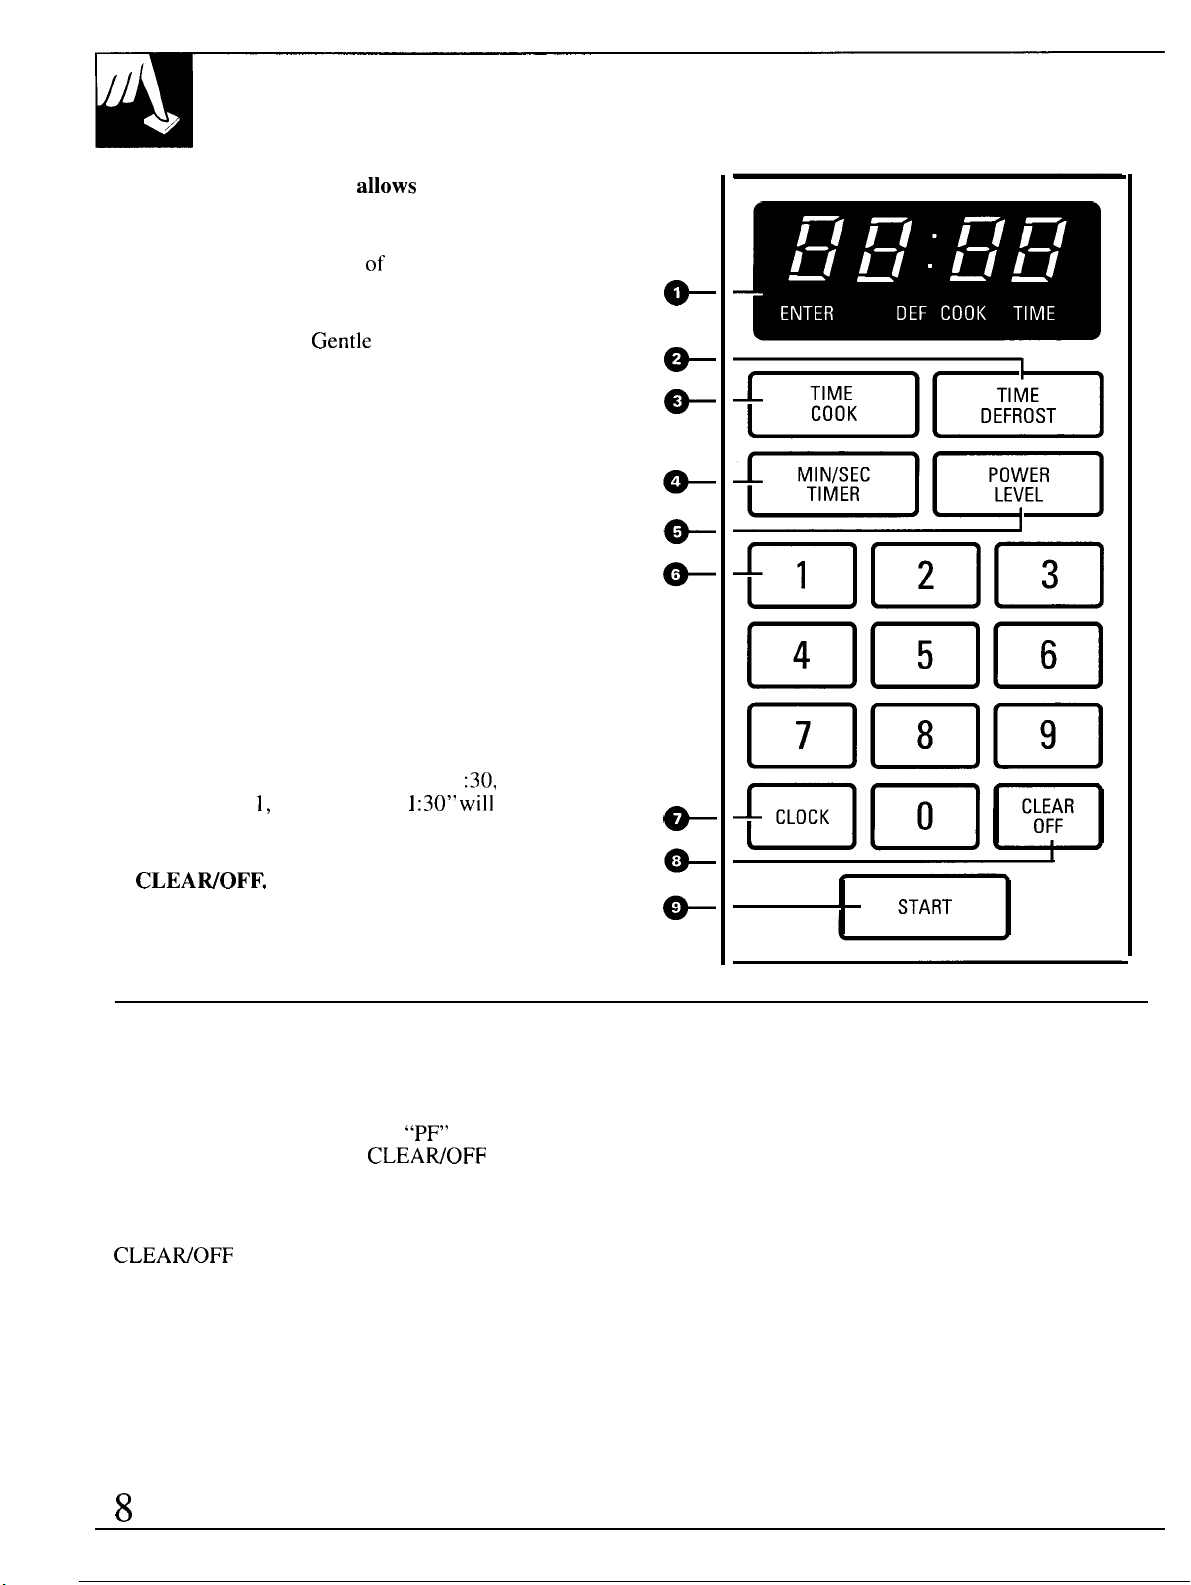
YOUR TOUCH CONTROL PANEL
The Touch Control Panel
controls with the touch of a finger. It’s designed to
be easy to use and understand.
1. DISPLAY.
down during cooking functions (or power level
when POWER LEVEL pad is touched.
2. TIME DEFROST.
power level 3 (Low).
3. TIME COOK. Microwave for a selected amount
of time using automatic power level 10.
4. MINUTE/SECOND TIMER. This feature uses no
microwave energy. It functions as either a kitchen
timer, as a holding period after defrost or as a delay
timer before time cooking.
5. POWER LEVEL. Touch this pad before entering
another power level if you want to change from
automatic power level 10 (High) for cooking or
power level 3 (Low) for defrosting.
6. NUMBER PADS. Touch these pads to enter
cooking/defrosting time and time of day.
7. CLOCK. Touch this pad to enter time of day or
check time of day while microwaving.
To set clock, first touch CLOCK pad and then enter
time of day. For example, if time is 1
number pads 1, 3, and O and “ 1
display. Then touch START pad. To reset or change
time, simply repeat above process.
8.
CLEAWOFF. When touched, it shuts off the oven
and erases all settings (except time of day).
9. START. After all selections are made, touch this
pad to start the oven.
Displays time of day, and time counting
allows
you to set the oven
Gentle
thawing at automatic
:30” will
:30,
touch
appear in
When You Plug in the Oven
The display panel displays four 8’s, and all of the
oven functions on the lower portion. After 15
seconds, all lights disappear and
the upper portion. Touch the
oven is ready for use and the clock can be set.
If power is disrupted at any time, the above sequence
reoccurs, and you must reset Clock after touching the
CLEAWOFF
8
pad.
“PF”
appears in
CLEAWOFF
pad and
Program Cooking
Use your Touch Control Panel to Defrost and
Cook by time using your choice of power levels
from 3 (lowest) to 10 (highest), time kitchen tasks
with the Minute/Second Timer; and set the clock.
Create your own programs to suit your individual
cooking style. For example: use the Minute/Second
Timer to delay the start of Time Cook or program a
hold time between defrosting and cooking.
Page 9
HOW TO USE THE
M~UTE/SECO~
T~ER
u
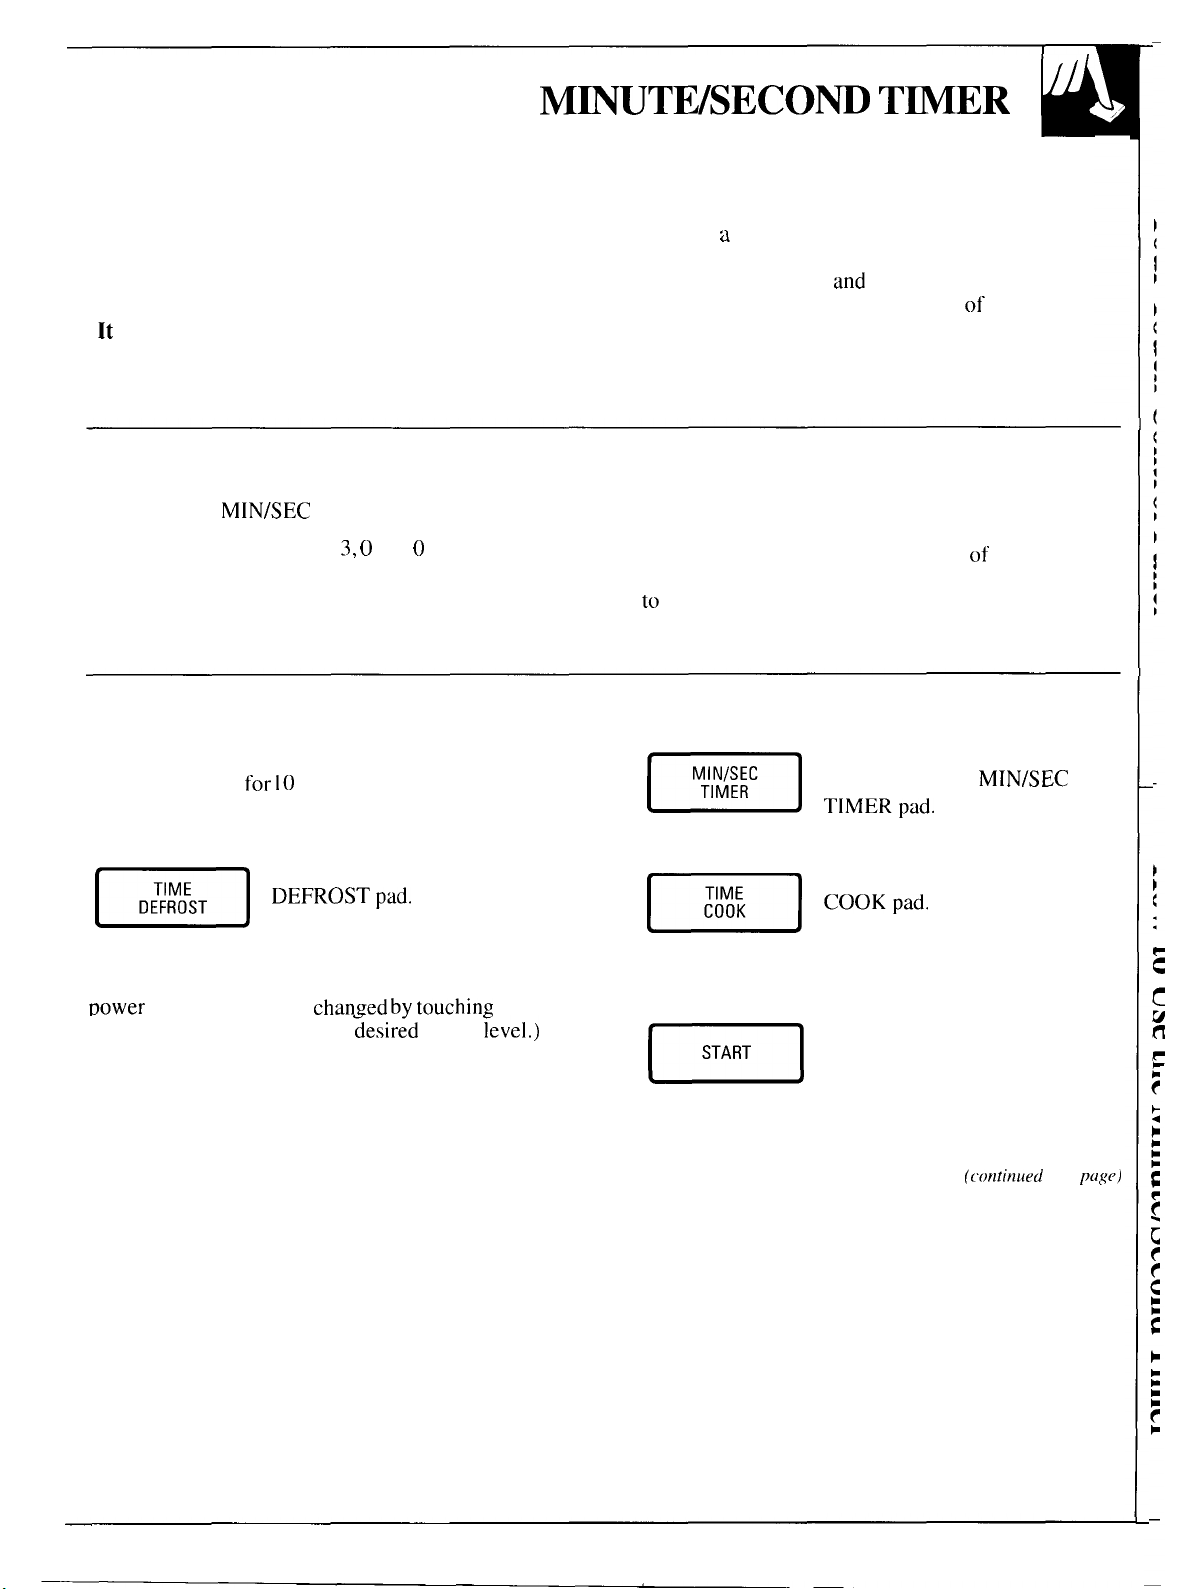
The Minute/Second Timer
The Minute/Second Timer has three timing
functions:
● It operates as a minute timer.
● It can be set to delay cooking.
●
It
can be used as a hold setting after defrosting.
The Minute/Second Timer operates without
microwave energy.
How to Time a 3-Minute Phone Call
Step 1: Touch
Step 2: Touch number pads
and no seconds).
Step 3: Touch START. Display shows time counting
down. The timer signals when time is up.
MIN/SEC
TIMER pad.
3, 0
and O (for 3 minutes
How to Defrost, Hold and Time Cook
Let’s say you want to defrost a frozen casserole for
15 minutes, hold
for 25 minutes. Here’s how to do it:
Step 1: Take casserole from freezer and place in oven.
for 10
minutes and then Time Cook
Step 2: Touch TIME
Using a Holding Time
The Minute/Second Timer can also be used to
program
cooking functions. The time can range from one
second to 99 minutes
standing time may be found in some
recipes or in the Cooking Guide.
a
“holding time” between microwave
and
99 seconds. A holding or
of your own
Programming Delayed Cooking
To delay cooking up to 99 minutes and 99 seconds,
touch TIME COOK pad and enter cook time. Touch
MI N/SEC TIMER and enter number of minutes to
delay cooking. Touch START. Timer will count down
to
zero and cooking will begin.
Step 4: Set standing or hold
time by touching MIN/SEC
=
Step 5: Touch 1,0, 0 and O to hold for ten minutes.
TIMERpad
Step 6: Touch TIME
m
Step
3: Touch pads 1, 5, 0 and O for 15 minutes
defrosting time. (Defrosting is automatically set on
uower level 3 but can be
POWER LEVEL pad and the
‘EFRosTpad
changed bv touching
~esir~d
power
the
revel.)
m
Step 7: Touch 2,5,0 and O for 25 minutes of
cooking time.
m
cooKpad
Step
8: Touch START. As
each function is automatically
performed, oven display shows
instructions entered and the
function. When time is up, the
oven signals and flashes “End.”
(([]nfinued next plIge)
9
Page 10

HOW TO USE THE
Questions and Answers
M~UTE/SECOND T~ER
(continued)
Q. What will happen if I accidentally reverse my
defrost, hold and cook instructions?
A. The oven will automatically rearrange your
program. Defrosting will always come first,
then hold, and then the cooking function.
Q. Can I defrost and hold only?
A. Yes. Sometimes you may only want to defrost a
food, hold it, and cook it later. All you need to do
is program in Time Defrost and amount of time.
Then program Hold and the amount of time. Be
sure to put the thawed dish in the refrigerator
promptly.
DEFROSTING BY
Time Defrost
Time Defrost is designed for speedy thawing of
frozen food and is one of the great advantages of
a microwave oven.
● Power level 3 (Low) is automatically set when you
press TIME DEFROST pad, but you may change
this for more flexibility.
● See the Defrosting Guide for defrosting help.
How to
I
After setting defrosting time, touch POWER
LEVEL pad, then touch desired number for new
power level. Then touch START.
To become better acquainted with the defrost function,
defrost a 10 oz. package of frozen strawberries by
following the steps at right.
Change Power Level
NOTE: Foods that spoil easily, such as milk, eggs,
fish, stuffings, poultry and pork should not be allowed
to sit out for more than one hour after defrosting.
Room temperature promotes the growth of harmful
bacteria.
Q. I programmed my oven for a specific defrosting
time but it defrosted longer than necessary.
What happened?
A. When instructions conflict, the oven carries out
the last instruction. You may have set the oven
to defrost for 4 minutes, hold for 2 minutes, and
then defrost for 6 minutes. In this case, the oven
would defrost for 6 minutes and hold for
2 minutes.
TME
Step 1: Place package of frozen strawberries in
the oven and close door. Be sure package contains
no metal.
Step 2: Touch TIME DEFROST.
m
Step
3: Select one half of the total defrosting time
recommended in the Defrosting Guide. For example,
I
touch pads 4, 0 and O for 4 minutes.
Step 4:
the cycle is completed, the oven
m
Step 5: Turn the package over, close the door and
repeat Steps 2 and 3 to set remaining half of
defrosting time and touch START.
Step 6: When the oven signals and flashes “End,”
open the door, remove the package and separate
strawberries to finish defrosting.
signals and flashes “End,” then
automatically shuts off.
Touch START. When
10
Page 11

Defrosting Tips
m
1
● Foods frozen in paper or plastic can be defrosted in
the package.
● Family-size, pre-packaged frozen dinners can be
defrosted and microwaved. If the food is in a
foil
container, transfer it to a microwave-safe dish.
Questions and Answers
Q. When I press START, I hear a
noise. What is it?
A. This sound is normal. It is letting you know the
oven is using a power level lower than 10 (High).
Q. Can I defrost small items in a hurry?
A. Yes,
but they will need more frequent attention than
usual. Raise the power level after entering the time
by touching the POWER LEVEL pad and then the
desired number. Power level 5 (Medium) cuts the
total defrosting time in about 1/2; power level 10
(High) cuts the total defrosting time in about 1/3.
During either, rotate or stir food frequently.
Q. Why don’t the defrosting times in the
Defrosting Guide seem right for my food?
A. These times are averages. Defrosting time can vary
according to the temperature in your freezer. Set
your oven for the time indicated in the Defrosting
Guide. If your food is still not completely thawed
at the end of that time, reset your oven and adjust
the time accordingly.
dull,
thumping
● For even defrosting, some foods need to be broken
up or separated part of the way through the
defrosting time.
● Check the Defrosting Guide for other defrosting tips.
Q. Should all foods be completely thawed before
cooking?
A. Some foods should not be completely thawed
before cooking. For example, fish cooks so quickly
it is better to begin cooking while it is
still
slightly
frozen.
Q. Can I open the door during defrosting to check
on the progress of my food?
A. Yes. You may open the door at any time during
microwaving. To resume defrosting, close the door
and press START. The oven begins operating if
time is left on timer. If not. reset timer.
11
Page 12

Time Cook
COOmG
BY
T~E
Time Cook allows you to microwave for a preset
amount of time. The oven shuts off automatically.
Power level 10
cooking, but you
See the Cooking Guide.
To become better acquainted with time cooking, make
a cup of coffee by following the steps below.
water, add
1
teaspoon of
instant coffee
and stir to
dissolve. Use a
cup that has no
metal decoration
and is microwave-safe (refer to Microwaving Tips
section). Place cup in oven and
m
(High)
is recommended for most
m~y’
change this for more flexibility.
close
door.
Step 2: Touch TIME COOK pad.
Step 3: Select your time. Touch pads 1,
m
1
Because automatic power
for this cup of coffee, there is no need to change the
power level. (If power level 10 is not appropriate, see
“How to Change Power Level” below.)
Step 5: When time is up, the oven signals and flashes
“End.” The oven, light and fan shut off.
;tep
6: Open the door.
How to Change Power Level
After setting cooking time, touch POWER
LEVEL pad, then touch desired number for new
power level. Then touch START.
3 and O for one minute and 30 seconds.
J
level
10 is recommended
Questions and Answers
Q. I set my oven for the time called for in the
recipe, but at the end of the time allowed, my
food was not done. What happened?
A. Since house power varies due to time or location,
many Time Cook recipes give you a time range to
prevent overcooking. Set the oven for minimum
time, test the food for doneness and cook the food
a
little
longer, if necessary.
Q. I touched the number pads and selected my
power level. When I touched START, however,
my oven didn’t come on. Why not?
A. The TIME COOK pad must be touched before
setting the power level otherwise your oven will
not begin cooking.
Q. I want to cook on a power level other than 10
(High). What do I need to do?
A. To cook on a power level other than 10 (High),
first touch the TIME COOK pad and set the
desired cooking time. Then touch the POWER
LEVEL pad. Enter new power level number and
touch START.
Q. Can I interrupt Time Cook to check the food?
A. Yes. To resume cooking, simply close the door and
press the START pad. The timer must be reset for
cooking to resume unless time is remaining
on timer.
12
Page 13

1. Directions below are for heating or reheating already-cooked
foods stored in refrigerator or at room temperature. Use
microwave-safe cookware.
2. Cover most foods for fastest heating. Exceptions are some
sandwiches, griddle foods and baked items.
3. Bubbling around edges of dish is normal, since the center is the
last to heat. Foods heated to
160°F.
to
165°F.
will provide safe,
palatable results. Adjust temperatures to suit your personal
taste. Let foods stand a few minutes before serving.
4. Be sure foods are heated throughout before serving. Steaming
or bubbling around edges of dish does not necessarily mean
food is heated throughout.
[f you use a meat thermometer while cooking, make sure
it is safe for use in microwave ovens.
Item
Amount
Power Level Time
Appetizers
Dips: cream or processed cheese
Pastry bites: small pizzas,
Saucy: meatballs, riblets,
cocktail franks, etc.
(
1/2
cup per serving)
Tip: Cover saucy appetizers with wax paper. Cover dips with plastic wrap. Microwave pastry bites uncovered to retain
egg
rolls, etc.
1/2
cup Medium (5) 2fi to 3X min.
1
cup
2 to 4 servings
I to 2 servings
3
to 4 servings
Medium (5)
Higb
(10)
High (10)
High (10) 6 to 8 min.
Bakery Foods
Cake, ;offee cake, doughnuts, sweet rolls,
nut or fruit bread
Dinner rolls, muffins
Pie: fruit, nut or custard
1 slice=
1/8
of 9
incb
(use minimum time for custard)
pie
1
piece
2 pieces
4 pieces
9 inch cake or
I 2 rolls or
dougbnuts
1
2
4
6 to
8
I slice
2 slices
4 slices
9 inch pie
Low (3)
Low (3)
Low (3)
Low (3)
Medium (5)
Medium (5)
Medium (5)
Medium (5)
High (10)
High ( 10)
Meal-High (7)
Meal-High (7)
Beverages
Cocoa, other milk based
(6 oz. per cup)
(9 oz. per cup)
Coffee, tea, cider
(6 oz. per cup)
(9 oz. per cup)
1 to 2 cups Med-Higb
I to 2 cups
1 to 2 cups
I to 2 cups
Meal-High (7) 6 to 9 min.
High ( 10) 1 X to 3 min.
High (10) 6 to 7 min.
(7)
3 to 5 min.
2 to 4 min.
3 to 5 min.
tbeir crispness.
1/4 to 1/2 min.
I to I X min.
I X to 2 min.
4 to 5 min.
1/4 to
1/2
1/2
to 1 min.
I to I
X
min.
I to 2 min.
1/2
to I min.
I to I
X
min.
2X
to 3 min.
5 to 7 min.
3 to 6 min.
min.
Gravies and Sauces
Desserts: chocolate, butterscotch, etc.
Gravies: giblet or creamy
Meat or main dish sauces, such as
spagbetti
Tip: Cover food to prevent spattering,
sauce, etc.
Griddle Foods
Pancakes,
Plain, no topping
Syrup and butter
Tip:
Do not cover.
french
toast or waffles:
/2
cup
cup
[2
cup
cup
/2
cup
cup
can (16 oz.
2 or 3 pieces
2 or
3
pieces
High (10)
High (10) 2 to 3 min.
High ( 10)
High ( 10)
High ( 10)
High (10) 3 to 4 min.
High ( 10)
High ( 10)
Higb
( 10)
1 to 2 min.
I to 2 min.
2 to 3 min.
2 to 3 min.
4 to 6 min.
1 to 1
I to I X min.
(c[)ntini~ed
X
min.
next
page)
Page 14

HEATING OR
REHEATmG GU~E
(continued)
Item
Amount
Meats and Main Dishes
Chicken pieces
Hamburgers or meatloaf
(4
oz.
per serving)
Hot dogs and sausages
Rice and pasta
(2/3
to 3/4
cup per serving)
Saucy, main dishes: chop
cretimed
chicken, chili, stew,
cheese, etc. (3/4 to 1 cup per serving)
Steaks, chops, ribs, meat pieces
Thinly-sliced meat
(3
to 4
oz.
per serving)
Topped or mixed with sauce I to 2 servings
(2/3 to
3/4
cup per serving)
Tip: Cover saucy
of meat slices or pieces, rotate dish I/2 turn after half of cooking time.
m~in
suey,
spaghetti,
mticaroni and
dishes with plastic wrap, Cover other main dishes and meats with wax paper. When heating or reheating 3 to 4 servings
1 to 2
3
to
4 pieces
I
to
2 servings
3
to 4 servings
1
102
3
to 4
I to 2 servings
I to 2 servings
3
to 4 servings
1 can (16 oz. ) High ( 10)
1 to 2 servings Meal-High (7)
3
to 4 servings
I
to
2 servings
3
to 4 servings
3
to 4 servings
Plate of Leftovers
Meat plus 2 vegetables
Tip: Cover plate of food with wax paper or plastic wrap.
1
plate
pieces
Power Level
High ( 10)
High (
10)
High (
10)
High ( lo) 4 to 5 min.
High (
10)
High (10)
High ( 10)
High (
10)
High ( lo)
Meal-High (7)
Meal-High (7)
Meal-High (7)
High (10) 4 to 6 min.
High (10) 8 to 12 min.
High (
10)
Time
2 to 3 min.
3
to 4 min.
2 to 3 min.
I to I Y, min.
2 to 3 min.
I to 3 min.
3 to
7 min.
8
to 14 min.
5 to 7 min.
2X
to 4
min
6 to 10 min.
3
to 5 min.
5 to 8 min.
4 to 6 min.
Sandwiches
Meat-cheese filling: with 2 slices of bread
Moist filling: Sloppy
etc. in bun ( 1/3 cup per serving)
Tip: Use paper towel or napkin to cover sandwiches.
Joes,
barbecue, ham salad,
1 to 2 servings Meal-High (7) 2 to 4 min.
3
to 4 servings
1 to 2 servings Meal-High (7)
3 to 4 servings
soups
Mi~k-based
Water-based (6 oz. per serving) I to 2 servings
Tip: Cover soups with wax paper or plastic wrap.
Vegetables
Large pieces or whole: asparagus spears,
corn on the cob, etc.
Mashed potatoes
( 1/2 cup
Small pieces: peas, beans, corn, etc.
(
1/2
Tip: Cover vegetables for most even heating.
(6 oz. per serving)
per serving)
cup per serving)
1 to 2 servings Meal-High (7) 3 to 8 min.
3
to 4 servings
1 can (10 oz.) Meal-High (7) 6 to 8 min.
3 to 4 servings
I can ( 10 oz.) High (10)
1
to 2 servings
3 to 4 servings
I can (16 oz.)
I to 2 servings
3 to 4 servings
1
to 2 servings
3
to 4 servings
I can (I6 oz.)
Meal-High (7) 4 to 6 min.
Meal-High (7) 4 to 6 min.
Meal-High (7)
High (10) 2 to 6 min.
High (10) 6 to 10 min.
High ( 10)
High (10)
High ( 10)
High (10)
High (10)
High ( 10)
High (10)
High (10)
2 to 4 min.
8 to 12 min.
5 to 6 min.
3 to 4 min.
4 to 5 min.
5 to 6 min.
1 to 3 min.
3 to 6 min.
I to 3 min.
3 to
4fi
min.
3fi to 4X min.
14
Page 15

1.
Fond
packaged in paper or plastic
unwrfipping.
in cooking dish
2.
After first half of defrosting time, unwrap
food. Turn
if possible. Shield
If
food
is foil wrapped, remove
for
defrosting.
food
over, if necessary; break
any warm
may
areas with
be defrosted without
toil and place
ptickage
ap~rt
small
and check
or separate
pieces of foil.
First Half Second Half
Food
Time, Min. Time, Min.
Breads, Cakes [Power Level: Defrost (3)]
Bread, buns or rolls
(8 to 16 oz. )
Cake, frosted, 2 to 3 layers
(17 oz.)
Cake, plain, 1 layer
Cheesecake, plain or
fruit-topped (17 to 19 oz. )
Coffee cakes
( I 1 to
14X
oz.)
Cream or custard pie
(14 oz.)
Crunch cakes and cupcakes
Doughnuts ( 1 or 2)
Doughnuts, glazed
(1
box Of
French toast (2 slices)
Fruit or nut pie (8 inch)
Pound cake ( 1 I X oz.)
Sweet rolls
12)
(8X
to 12 oz. )
2
to 3
3
2 to
2 to
3
7 to 10
5 to 7 none
3
to
4
1/2
to
3/4
each
1/2
to
I
2 to
3
2
7 to 9
4 to 6
2 to 3 2 to 3
food
food
I
to 2
none
none
none
3
to 4
none
none
2
to 3
I
none
none
3.
4.
large
Be sure
When defrosted, food should be cool but softened in all areas.
If still slightly icy, return to microwave oven very briefly, or let
stand a few minutes.
meats are completely defrosted before cooking.
Comments
Remove metal twist tie. Turn over after first half of
Let stand 5 minutes, if necessary to
Let stand 20 to
Let stand 5 minutes before serving
Reposition after first half of time. Let stand 5 minutes
before serving.
Turn over after first half of time.
Rearrange after first half of time.
Turn over after first half of time
Let stand 10 minutes before serving.
Rearrange after first half of time.
30
minutes
before
comp]cte
serving.
time.
defrosting.
Fish and Seafood
Fillets:
Pre-packaged (1 lb.)
Freshly frozen (1 lb.)
Steaks (6 oz. to
Shellfish, blocks:
Crab meat
(6-oz.
package)
Oysters (10 to
Scallops ( l-lb. package)
Lobster tails, I to 2
(6
to
9 OZ.)
Shellfish, small pieces
(1 lb.)
12
12
[Power Level: Defrost (3)]
6
6
oz.)
oz.)
2 to 3 2 to 4
3
3%
to 4
5 to 7
3 to 4 3 to 4
4 to 5 3 to 4
Fruit [Power Level: Defrost (3)]
BOX
(10 to
16
Plastic pouch
(10-oz.
package)
OZ.)
6 to 9
3
to 6
6
6 to 9
2 to 4
3N
to 4
5 to 7
none
none
Place unopened package in oven. (If fish is frozen in water, place
in cooking dish. ) Turn package over after first half of time. Let
stand 5 to 10 minutes.
Let stand a few minutes to finish defrosting.
Place block in casserole. Turn over and break up with fork after
first half of time.
Place block in casserole. Break up with fork after first half of time.
Place block in casserole. Turn over and breakup after first half of
time.
Arrange in cooking dish, with meaty-side-down. Turn over for
second half of time. Let stand 15 minutes.
Spread shellfish in single layer in dish. Rearrange pieces
after first half of time.
Place box in oven. Remove foil or metal. After minimum
time, break up with fork. Repeat if necessary.
Place package in oven. Flex package once.
(continued next
page)
15
Page 16

First Half Second Half
Food
Time, Min. Time, Min.
Meat [Power Level: Defrost (3)]
Bacon ( I lb.)
Franks (1 lb.)
Ground: beef and pork
(1 lb.)
(2 lbs.)
(3 lbs.)
Roast: beef, lamb, veal
(3 to 4 lbs.)
Roast, pork
(3 to 4
lbs.)
Sausage,
(l-lb. tray)
( l-lb. roll)
Sausage, links
(1 to Ifi Ibs.)
Sausage,
(12-02. package)
Steaks,
bulk
patties
chops
and cutlets
3
to 5 per lb.
to
3
2
4
7
10
6 to 9 per lb.
6 to 8 per
2 to 3
2 to 3
2
3
4 to 6
per lb.
DEFROST~G GU~E
(continued)
Comments
Place unopened package in oven. Let stand 5 minutes
after defrosting.
Place unopened package in oven. Microwave just until franks can be
separated. Let stand 5 minutes, if necessary, to complete defrosting.
Turn meat over after first 4 minutes. Scrape off softened meat.
Turn meat over after first half of time. Scrape off softened meat
after second
microwave
Turn meat over after first half of time. Scrape off softened meat
after second half of time. Set aside. Microwave 4 to 6 minutes
more. Scrape and set aside. Break up remaining
microwave 2 to 4 minutes more.
Unwrap roast and place in cooking dish. Shield edges and bony
areas with
and shield warm areas. Defrost for second half of time. Let stand
for 1 hour.
Unwrap roast and place in cooking
turn roast over. Defrost for second half of time. Let stand for
30
to 45 minutes.
Turn over after first half of time. Let stand
Turn over after first half of time and scrape off thawed
After second half of time, break apart and let stand 15 minutes.
Rotate package l/4 turn after first half of time. Let stand 5 minutes.
After second half of time, remove
I
minute longer.
Turn over and separate after first half of time. Remove patties as
they thaw.
Place unwrapped meat in cooking dish. Turn over after first half
of time and shield warm areas with
separate pieces with table knife. Let stand to complete defrosting.
balf of time. Set aside. Break up remaining block and
1
to 2 minutes more.
small
pieces of foil. After half of time, turn roast over
lb.
2 to 3
per lb.
2 to 3
4
7
10
6 to 9 per lb.
6
to
8
per lb.
2
to 4
2 to 4
I X to
2X
2
to
3
4 to 6 per lb.
block
and
dish.
After half of time,
15
minutes.
tbawed links and microwave
foil.
After second halt ot
meat.
t[me,
Poultry [Power Level: Defrost (3)]
11
Chicken, broiler-fryer,
cut
Up (2fi
to ~
Ibs. )
Chicken, whole
(2fi to 3 Ibs.)
Cornish
hen
to 13
12 to
14
5 to 6 per lb.
16
11
to
13
5 per lb.
Place wrapped chicken in dish. Turn over after first half of
After
time.
and microwave 2 to 4 minutes more, if necessary.
Let stand
Place wrapped chicken in dish. After first half of time, turn
chicken over. Shield warm areas with foil. Defrost for second
half of time.
until giblets can be removed.
Place unwrapped hen in oven breast-side-up. Turn over after first
half of time. Run cool water in cavity until giblets can be removed.
second half of time, separate pieces, rearrange
15
minutes.
To
complete defrosting, run cool water in cavity
Page 17

Breads
Crust on breads will be soft and the outsides will not brown.
If desired, sprinkle top of batter with cinnamon-sugar mixture,
chopped nuts or other topping for brown color, To increase brown
Food
Coffee cakes
Corn bread 8 to 9
Mu
ffIns Paper-1ined
(1 Muffin)
(2 to 4 Muffins)
(3 to 6 Muffins) foil liners.)
Quick breads,
from a mix
*If tube dish is unavailable, microwave in
Container
8 inch round
dish
inch
tube dish*
muffin
cups
(Do not use
8 to 9
inch
tube dish*
Cover
No
N()
N()
No
8
inch round dish with drinking glass placed open-side-up in center.
Cakes and Desserts
color on upside-down breads, line dish before microwaving with
brown sugar-caramel mixture or savory topping, such as crushed,
canned,
french
fried onion rings.
Power Level & Time
Meal-High (7) 9 to 11 min.
3
min.
Meal-High (7)
High ( 10)
High ( lo)
I I to I
1 to 1 Y, min.
I to 2X min.
2X
to 4fi min.
9 to I 2 min. When done, toothpick inserted near
Comments
Place batter in greased dish.
Sprinkle cooking dish with finely
chopped, canned, French-fried onions
before microwaving. Turn out of pan
upside down to serve.
Use microwave-safe muffin container or
homemade
down hot drink paper cups. Some muffins
may be done before others. Remove
muffins as they are done, and continue
cooking remaining muffins a few
seconds longer.
center will come out clean. Let stand 15
minutes before turning out of dish. Cool.
muffin
cups, made by cutting
1. Always use microwave-safe cookware.
2. Before adding measured amount of batter, grease dishes or line
them with wax paper. (Do not flour.) 5. Crust on cakes will be soft. If cake is to be frosted, refrigerate
3. Cakes are done when toothpick or long skewer inserted into
center comes out clean.
Food
Baked apples Microwaveor pears
Bar cookies 8
Commercial mix
(18 to 20 OZ.)
Cupcakes—6
Pineapple upside
down cake
Container Cover
safe dish or plastic wrap
casserole
inch round
baking dish
X
inch round No High (10)
dish Meal-High (7)
Paper-lined
cupcaker
X inch round No
dish
Lid or
N()
No
Power Level & Time
High ( 10)
High ( 10)
High (10)
High ( 10)
4. Cool cake in dish set directly on heat-proof surface or wooden
board 10 to 15 minutes before inverting.
cake for an hour to firm exterior surface.
6. Chiffon and
microwaving.
Angel
Food cakes are not recommended for
Comments
2 to 4 min.
per piece
7 to 9 min.
2 min.
5 to 7 min.
2X
to 3 min.
10
to I 2 min
Pierce fruit or peel to prevent bursting.
Core and fill center of apple with
2 tablespoons sugar, 1 teaspoon butter
and 1/8 teaspoon cinnamon. Add
2 tablespoons water for each piece
of fruit.
Grease dish before adding batter.
Cut when cool.
Grease dish before adding batter.
Let stand 5 to 10 minutes to cool
before inverting.
When cooking several cupcakes, some
will be done before others. Remove
cupcakes as they are done and continue
cooking remaining cupcakes a few
seconds longer.
When done, toothpick stuck in cake
comes out clean. Invert cake onto plate;
let dish stand over cake a few minutes.
(continued next [Iuge)
17
Page 18

COOmG
Candies
1.
Always
use microwave-safe cookware.
chocolate in paper wrappers seam-side-up, or place chocolate
in paper bowl to melt.
For easy clean-up, melt
(continued)
GU~E
2. Candies which are boiled become very hot; handle cookware
carefully.
Food
Caramel apples
Chocolate bark
Marshmallow crisp Large glass
S’Mores
Container
2-cup measure
I
X-qt.
casserole
or bowl
bowl
Paper napkin
or paper
plate
Cover
No
Yes
Yes
No
Cereal and Rice
1. Always use microwave-safe cookware.
2. For minute rice, use the same amount of water needed for
regular boiling. Add regular amount of salt.
4. Cover rice while microwaving. When using plastic wrap, turn
back one corner to vent.
Power Level & Time
High (
10) 3 min
High (10) 3 to 4 min.
High (10)
High (10)
1 K min. to
melt butter,
2 to 3 min.
to melt
marshmallows
15
to 25
seconds
4. Stir or rearrange after half
5. Microwave time and regular boiling time are about the same.
Comments
Unwrap half of a
caramels into measuring cup. Add 1
tablespoon water. Microwave, stirring
every minute. Dip 4 apples into mixture.
Place 12 oz. semi-sweet chocolate pieces
in container. Microwave to melt.
1 cup whole toasted almonds. Spread
over wax paper on cookie sheet.
Chill
until firm.
[n
large glass bowl, melt
Add
10-oz.
with wax paper and microwave to melt.
Stir in 5 cups crispy rice cereal. Press
firmly into buttered
Cover graham cracker with chocolate and
marshmallow.
of cooking time.
14-oz.
package of
Add
1/4
2-qt.
oblong dish.
cup butter.
package marshmallows, cover
Food
Oatmeal,
old fashioned
Note: To microwave single-serving packet of instant oatmeal, follow package
directions for amount of water and microwave at High (10) for 1/2 to 1 minute.
Rice, minute
( 1 X cups)
Container
l-qt.
casserole No
or bowl
2-qt.
casserole
Cover
Lid or High (10) 5 to 6 min.
plastic wrap
Power Level & Time
High ( 10)
18
3 to 5 min.
per serving
Comments
Increase casserole size for more than one
serving. Increase time about
for each additional serving you are
cooking. Stir after half of cooking time.
Add 1 X cups water. Stir after 2 minutes.
1 M
minutes
Page 19

Cheese and Eggs
1. Eggs may be prepared many ways in the microwave oven.
Always pierce whole yolks before microwaving to prevent
bursting.
2. Never cook eggs in the shell. Do
in the shell. They will explode.
Food
Container
not
reheat hard cooked eggs
Cover
Cheese
Fondue
2-qt.
casserole
Cover or
plastic wrap
Eggs
Basic eggs
Omelet
Poached eggs
(4 maximum)
Quiche
Scrambled
Buttered Pltistic
custard
cup
9
inch pie
plate
I
fi-qt.
casserole
Microwave-safe
I -qt. measure
(filling)
9 inch pie plate
Glass
measuring cup
or casserole
N()
Casserole
cover
No
No
wrap
3. Cook eggs just until set. They are delicate and can toughen if
overcooked.
Power Level & Time
High (
10)
Medium
Medium (5)
High ( 10)
Medium (5)
High ( 10)
Medium (5)
Meal-High (7)
Meal-High (7)
High ( 10)
(5)
To make
5 to 7 min.
6
to 8 min.
I to 1 X min.
per egg
Melt butter
1 min.
7 to 9 min.
7 to 8 min.
Boil 2 cups
water.
1/2 to 1 min.
per
egg
Filling:
2 to 3 min.
Quiche:
I O to
12
min.
3/4 to 1
X
per
min.
egg
Comments
sauce
Make basic white sauce, substituting wine
for
milk. Add cheese and microwave at
Medium (5) for
every 2 minutes.
Puncture membrane of yolk to prevent
bursting.
Sprinkle cheese over omelet. Microwave
1/2 to I minute until cheese is slightly
melted.
Heat 2 cups
on High ( 10). Break eggs onto plate,
puncture membrane. Swirl boiling water
with spoon, slip in eggs gently. Cover.
Microwave at Medium (5) 1/2 to
per egg. Let stand in water a few minutes.
Combine and microwave filling, stirring.
every
I
to 2 minutes. Pour filling into
precooked shell.
Microwave additional time
Scramble eggs with I teaspoon butter and
1 tablespoon milk per egg. Place in oven
and
microwave for half of total time. Stir
set portions from the outside to the center.
Allow to stand I or 2 minutes to
finish cooking.
6
to 8 minutes, whisking
hot
tap water 5 to 6 minutes
sbown
1
minute
at left.
Fish and Seafood
1. Fish is done when it flakes easily when tested with a fork.
Center may still be slightly translucent, but will continue
cooking as fish stands a few minutes after cooking,
Food
Fillets or
steaks (
1
lb. )
Shrim~l
(peeled)
Shrim~l
(unpeeled) plastic wrap
lb.
lb.
Container
Round dish
Pie plate
2-qt.
casserole
Cover
Wax paper or
plastic wrap
Plastic wrap
Lid or
2. Cook fish with or without sauce. A tight cover steams
a lighter cover
3. Do not overcook fish. Check at minimum time.
Power Level & Time
High ( 10)
High (
10)
High (
10)
5 to 7 min. Microwave until fish
6 to 8 min. Brush with garlic butter before cooking.
7 to 9 min.
fisb.
of wax paper or paper towel for less steaming.
Use
Comments
tlakes
steaks over after
Rearrange after 4 minutes.
Place shrimp in casserole. Add 2 cups
hottest
tap
5 minutes.
half of cooking time.
water. Cover. Stir after
easily. Turn
(continued next
I>uge)
19
Page 20

COO~G
Gravies and Sauces
1. Cover thick, chunky
2. Whisk sauces vigorously with wire whisk once or
microwtivirrg.
sauces to
prevent spattering.
lwicc
while
(continued)
GU~E
3.
Vary
basic
wine or herbs.
white
sauce
by
adding
cheese,
egg
yolks,
crefim,
Food
{;ravies
sauces thickened
with
cornstarch ( I cup)
Melted butter
sauces, clarified
butter (
Thick spaghetti,
barbecue or
sweetisour sauces
(2
Thin, liquid sauces
(au jus, clam.
(
floor
cups)
t
CLIP)
and
or
1/2 cup)
etc. )
Container
Casserole
Glass measure
C~.sserole
Casserole
Meats
1.
Always
use a cooking
or
vetil
roasts. See package instructions
cooking
2. After enclosing roast in cooking
safe
bag.
dish.
bug
when cooking beef,
Cover Power Level & Time
N()
No
Yes
N()
Itimb,
fi)r
proper use of
bag,
place in microwave
Medium (5)
High (
10)
High ( 10)
High (
10)
pork 3. Allow
4 to 7 min.
i
5107 min. Prepare as directed in recipe. Microwave,
3
carving.
If
it is
r
Comments
Microwave
melt
cooking. Increase time I to
additional cup of
to 2 min. Microwave butter just to melting. For
to 4 min.
tibout 10
you
use a–meat thermometer while cooking. make sure
safe for
clarified butter, bring to boil then
stand
tind
usc
stirring after
stand
Add
flour-water mixture to heated
ingredients. Stir well
to finish.
minutes standing time
use in microwave ovens.
fat,
flour
and salt
Pour ott
and
microwave
together to
2
minutes
and
blend. Whisk in liquid
suuce.
until
kryers sepzratc,
clear,
top
ltiyer.
half of cooking time. Let
5 to I () minutes to develop
f’or
most roasts before
and
Ict
tlavor.
finish
pcr
I
Food
Beef
Ground, crumbled
(for casseroles
or soup)
( 1
lb.)
(l y?
Ibs.)
Meatballs
(1 lb.)
(2
Ibs.)
Meatloaf
(round
loaf)
Patties
(4 patties
1 to 2 patties
3
to 4 patties
per lb.)
Container
Casserole
Round dish
Pie plate
Ceramic dinner
plate
Cover
N()
Wax paper or
plastic wrap
Plastic wrap
Wax paper
Power Level & Time
10)
High (
5 to 7 min.
7 to 9 min.
High (
10)
Meal-High (7)
High ( 10)
6 to 8 min.
9
to 12 min.
32
to 35 min.
4 to 6 min.
6 to 8 min.
Comments
Stir after half of cooking time.
or casserole ingredients and finish. To
cook frozen block, microwave 10 to
15
minutes, breaking up and stirring
every 5 minutes. Let stand 5 minutes.
Arrange 3/4 to 1 inch apart in circle
around edge of dish.
Make a well between the edge
mixture and dish to eliminate
of juices during cooking. Let stand 10
minutes after cooking.
Cover with wax paper or cook uncovered
and turn patties over. If desired add
browning sauce.
Add
sauce
of meat
spillover
20
Page 21

Meats
Food
Beef (continued,
Pot roasts
(Up to
~
Ibs.
)
Tender roasts (rib.
high quality rump,
sirloin tip)
Lamb
Roast, leg or
shoulder
Container Cover
Pie plate
Pie plate
Pie
plate
Cooking
Cooking
Cookingbag
Power Level & Time
(or Internal Temp.) Comments
bag Medium (5) 22 to 25 min.
bag Medium (5)
Rare
Medium
Well
;;:(5)
per lb.
Minutes Internal
er lb. Tern . ‘F.
10
to
12
to
*
15 to
per
+:arving
140°
12
160°
15
1700
18
lb.
Temp. (°F.) safe dish. Turn over after half of cooking
Add
1/2
cup water to cooking bag. Turn
over after half of time. Add vegetables
if desired after half of cooking time.
Recover and finish.
Turn roasts over
time. Let meat stand
carving.
Place roast fat-side-down in
time. Let roast stand 10 minutes before
after’half of cooking
10
minutes before
microwave-
Chops and cutlets
( 1 inch. thick) 4 chops
Pork
Bacon
(per
slice)
Canadian bacon
2 slices
4 slices
6 slices
Ham, precooked:
canned
Ham, slices
and steaks
( i to 2 inch thick)
Pork
cbops: 3/4
.
Pork roast
Pork sausage,
(raw) link
Pork sausage (raw)
(
1/2
lb.: 4 patties)
inch
Round dish
Microwave-
safe plate
Microwave-
safe cookware
Pie
plate
Round dish
Microwave-
safe cookware
Pie plate
Microwave-
safe cookware
Microwave-
safe cookware
N()
Paper towel
Wax paper
Cooking bag
Wax paper
Plastic wrap
Cooking
Wax paper
Wax paper
bag
Meal-High (7)8 to 1 () min.
3/4
High ( 10)
High ( 10)
Medium (5)
High (
10)
Medium (5)
Medium (5)
High ( 10)
High (
10)
to I min.
1
to I X min.
2 to
2X
min.
2fi to 3 min.
I 5 to 19 min.
per lb.
18
to 27 min.
15
to 18 min.
18 to 20 min.
20 to 23 min.
per lb.
1/2
to 3/4 min.
per link
3
to 5 min.
Brush chops lightly with oil. Turn meat
over after half of cooking time.
Arrange in single layer on paper towels.
Cover with a paper towel.
Arrange in single layer.
Place fat-side-down in dish. Turn ham
over after half of cooking time.
Turn over after 10 minutes.
Brush with barbecue sauce or browning
agent, if desired. Turn over after half of
cooking time. Let stand covered 5 to 10
minutes before serving.
Turn roast over after half of cooking
time. Microwave to an internal
temperature of
Arrange in single layer. If cooking
6 or more links, rearrange after half
of cooking time.
Arrange in single layer. Turn over after
half of cooking time.
170°F.
Veal
Chops
(
1
inch thick)
Roast
(shoulder)
Round dish
2-qt.
oblong
dish per lb.
N()
Cooking bag
Meal-High (7)
Low
(3)
8
to 1 () min.
18 to 22 min.
Brush chops lightly with oil. Turn meat
over after half of cooking time.
Place roast fat- or cut-side-down. Turn
over after half of cooking time. Let roast
stand 10 minutes before carving.
Slice thinly.
(([~ntinued next
page)
21
Page 22

Poultry
If
you
use a meat thermometer
sure it is safe for use in microwave ovens.
while cooking, make
COO~G
(continued)
GU~E
Food
Container
Cover
Chicken
Pieces
Whole
(unstuffed)
(stuffed) Round dish Cooking bag
Cornish
Halves
Whole (stuffed
or unstuffed)
Hens
Plate
or
round dish
Round dish
Round dish Wax paper
Round dish
Wax paper
Cooking
Wax
paper
bag
Vegetables
1.
Always use microwave-safe cookware.
2.
Salt vegetables after cooking. Salting before cooking may cause
darkening and dehydration of surface.
3.
Arrange vegetables, such as asparagus, with the thickest pieces to
the outside of the dish.
Power Level & Time
High (
10)
Meal-High (7)10 to 12 min.
Meal-High (7)
Meal-High (7)
Meal-High (7)
2
to
2Yz
min. Arrange in single layer in cooking dish
per piece thickest meaty pieces are to outside edges
per
lb.
I 7 to 20 min.
per lb.
I 1 to 13 min.
per lb.
9
to I I min. Place breast-side-down in
per lb.
4. Cover vegetables when cooking. If using plastic wrap, turn
back one corner to vent.
5. Larger vegetable pieces will take longer to cook than
smaller pieces.
6. For more even heating, stir or rearrange vegetables
during
cooking.
Comments
of dish. Turn pieces over and rearrange
after half of cooking time.
Slit
bag
near
und
legs with
closure to
securely with plastic tie. Cook breast-
side-down. Turn over after half of
cooking time. Cook to
temperature. Let
Arrange skin-side-up in dish, on bed of
stuffing, if desired.
after half of cooking
wings
vent.
1900F.
stand
5 to 10 minutes.
time.
Shield tips of
foil,
Close
internal
dish.
Turn over
so
—
Vegetable
Asparagus
(fresh cuts)
(fresh spears)
(frozen spears)
Beans
(fresh
green)
(frozen green)
(frozen
Beets
(fresh, whole)
22
lima)
Amount
]
lb. (3 CUPS)
cut into I to
2 inch pieces
1
lb.
10-oz.
package
I
lb,
cut in half
10-oz.
package
1()-oz.
package
1 bunch
Power Level Time
High ( 10)
High (
10)
High ( 10)
High ( 10)
High ( 10)
High (
10)
High (
10)
8
to 10 min.
6
to 8 min.
8
to 10 min.
13
to 17 min. In
7 to 9 min. In
9 to 1 I min. In
25 to 30 min. In
Comments
[n
2-qt. casserole, place
In 2-qt. casserole, place
1
-qt. casserole.
In
X-qt.
casserole, place
-qt. casserole, place 2 tablespoons water.
-qt.
casscrolc, place 1/4 cup water.
X
or 2-qt. casserole, place 1/2 cup water
1/4
cup water.
1/4
cup water.
1/2
cup water.
Page 23

Vegetables
Vegetable
Broccoli
(fresh cut)
(fresh spears)
(frozen, chopped)
(frozen spears)
Cabbage
(fresh wedges)
Carrots
(fresh, sliced)
(frozen)
Cauliflower
(tlowerets)
(fresh, whole)
(frozen)
Corn
(frozen kernel)
Corn on the cob
(fresh)
(frozen) I ear
Mixed vegetables
(frozen)
Peas
(fresh,
shelled)
(frozen)
Potatoes
(fresh, cubed, white)
(fresh, whole,
sweet or white)
Spinach
(fresh)
(frozen, chopped
and
Ieafl
Squash
(fresh, summer
and yellow
(winter, acorn
or butternut)
Amount
1 bunch
(
1 X to I X
i bunch
(1X to I X
1O-OZ. package
1()-oz. package
1 medium head
(about 2
I
lb.
1()-oz. package
I medium head
1 medium head
10-oz.
10-oz,
I to 4 ears
2 to 4 ears
10-oz.
2
Ibs.
1()-oz. package
4 potatoes
(6 to X oz. each)
(6
10 to
10-oz.
I
lb. sliced
1 squash
(about 1 lb.)
package
package
package
unshelled
to 8
oz. each)
16
OZ.
package
lbs.
Ibs.)
Ibs,)
Power Level
High (
10)
)
High
10)
10)
High
lo)
High
1
())
High
High (
10)
High ( 10)
High
(10)
High (10)
High ( 10)
High ( 10)
High ( 10)
High ( 10)
High ( 10)
High ( 10)
High (
10)’
High ( 10)
High ( 10)
High ( 10) 6 to X min.
High ( 10)
High ( IO)
High ( 10)
High ( 10)
Time
I O to 12 min.
I 2 to I 5 min.
6 to 8 min.
6
to 8
min.
18
to 23 min.
I
I to 13 min.
6
to 8 min.
12 to 15 min.
1 () to 17 min.
7 to 9 min.
6 to 8 min.
5 to 6 min.
per ear
4 to 5 min.
per ear
8 to I () min.
10 to 1 I min.
7 to 9 min.
3
to I 5 min.
I
per
potato
7 to 9 min.
X to I () min.
7 to i O min.
10 to I
3
min.
Comments
In 2-qt. casserole, place 1/4 cup water.
In
2-qt. oblong glass baking dish, place
1/4 cup water.
In I-qt, casserole.
In 1 -qt. casserole, place 3 tablespoons water.
In 2-qt. casserole, place 1/4 cup water.
[n
1
X-qt.
In 1 -qt. casserole, place 2 tablespoons water,
In 1
In 2-qt. casserole, place 1/2 cup water.
[n
In I -qt. casserole, place 2 tablespoons water,
In
corn is in husk, use no water; if corn has been
husked, add
of
Place in a round glass baking dish.7 to 8 min.
In I-qt. casserole, place 3 tablespoons water.
In I -qt. casserole, place
In
Peel and cut into I inch cubes. Place in
2-qt. casserole with 1/2 cup water. Stir
after half of time.
Pierce with cooking fork. Place on paper
towel on turntable,
arrangement. Let stand 5 minutes.
In 2-qt, casserole, place washed spinach.
In I -qt. casserole, place 3 tablespoons water.
In I
Cut in half and remove fibrous membranes,
In X inch round glass baking dish, place
squash cut-side-down. Turn cut-side-up
after half of time.
casserole, place
fi-qt.
casserole, place
I-qt. casserole, place 2 tablespoons water.
round
baking dish or pie plate, place corn. If
1/4
time.
I -qt. casserole, place 2 tablespoons water.
fi-qt.
cup water, Rearrange after half
casserole, place
1/4
cup water.
1/2
cup water.
1/4
cup water.
1
inch apart in circular
1/4
cup water.
23
Page 24

How to Clean the Inside
CA~
Am CLEAN~G
Keep your oven clean and sweet- Don’t use sharp-edged utensils
smelling. Opening the oven door a on your oven. The inside and
few minutes after cooking helps air
out the inside. An occasional
thorough wiping with a solution of
baking soda and water keeps the
inside fresh.
outside oven walls can be scratched.
The control panel can be damaged.
BE CERTAIN POWER IS OFF
BEFORE CLEANING ANY
PART OF THIS OVEN.
Walls and floor. Some spatters can be removed
with a paper towel, others may require a damp cloth.
Remove greasy spatters with a
with a damp cloth. Do not use abrasive cleaners on
oven walls. NEVER USE A COMMERCIAL OVEN
CLEANER ON ANY PART OF YOUR
MICROWAVE OVEN.
Door (inside). Window: Wipe up spatters daily
and wash when soiled with a damp cloth. Rinse
thoroughly and dry.
Metal and plastic parts on door: Wipe frequently
with a damp
ABRASIVES, SUCH AS CLEANING POWDERS
OR STEEL AND PLASTIC PADS. THEY WILL
DAMAGE THE SURFACE.
cloth
to remove all soil. DO NOT USE
sudsy
cloth, then rinse
How to Clean the Outside
Case. Clean the outside of your oven with soap and
damp cloth, rinse with a damp cloth and then dry.
Wipe the window clean with a damp cloth. Chrome
trim is best wiped with a damp cloth and then with a
dry
towel.
Control Panel. Wipe with a damp cloth. Dry
thoroughly. Do not use cleaning sprays,
of soap and water, abrasives or sharp objects on the
panel—they can damage it.
large
amounts
Removable
Occasionally it is necessary to remove the turntable
and support for cleaning of the oven floor or
turntable. To prevent breakage, do not place the
turntable into water just after cooking. Wash it
carefully in warm,
The turntable and support can be broken if dropped.
Remember, do not operate the oven without the
turntable and support in place.
Special note when using Brown ‘N Sear Dish: If
grease is present, high heat generated on bottom of
a Brown ‘N Sear dish may cause the grease to burn
onto the oven tray. This may be removed with a
cleanser such as Bon
After using Bon
thoroughly, following instructions on can. Do not use
Bon Ami” brand cleanser on the painted surfaces such
as the walls. It may scratch the paint.
Door Surface. When cleaning surfaces of door and
oven that come together on closing the door, use only
mild,
non-abrasive soaps or detergents applied with a
sponge or soft cloth.
Power Cord. If the cord becomes soiled, unplug and
wash with a damp cloth. For stubborn spots,
water may be used, but be certain to rinse with a
damp cloth and
into outlet.
~rntable
dry
and Turntable Support.
sudsy
water or in the dishwasher.
Ami@
brand cleanser.
Ami@
brand cleanser, rinse and dry
sudsy
thoroughly before plugging cord
24
Page 25

This appliance must be grounded.
In the event of an electrical short
circuit, grounding reduces the risk
of electric shock by providing an
escape wire for the electric current.
This appliance is equipped with a
power cord having a grounding
wire with a grounding plug. The
plug must be plugged into an outlet
that is properly installed and
grounded. (Fig. 1)
Use of Adapter Plugs
PREFERRED METHOD
Fig. 1
Ensure
exists before use
p;oper
ground
WARNING–improper
use
of the grounding
result in a risk of electric shock.
plug’ca~
Consult a qualified electrician or
service technician if the grounding
instructions are not completely
understood, or if doubt exists as to
whether the appliance is properly
grounded.
Where a standard two-prong wall
receptacle is encountered, it is
your personal responsibility and
obligation to have it replaced with
a properly grounded three-prong
wall receptacle.
Do not under any circumstances
cut or remove the third (ground)
prong from the power cord.
Usage situations where
appliance’s power cord
will be disconnected
infrequently.
Because of potential safety hazards
under certain conditions, we
strongly recommend against the
use of an adapter plug. However,
if you still elect to use an adapter,
where local codes permit, a
TEMPORARY CONNECTION
may be made to a properly
grounded two-prong wall
receptacle by the use of a
adapter (Fig. 2) which is available
at most local hardware stores.
TEMPORARY METHOD
(Adapter
permitted In
Align
prongsis ots
Fig.
plu
s not
2
anada)
tar
e
Y
2
I I ,.=
~“n
“
w’
Ensure proper ground
and firm connection
before use
UL
listed
I
m
r
/
The larger slot in the adapter must
be aligned with the larger slot in
the wall receptacle to provide
proper polarity in the connection
of the power cord.
Caution: Attaching the adapter
ground terminal to the wall
receptacle cover screw does not
ground the appliance unless the
cover screw is metal, and not
insulated, and the wall receptacle
is grounded through the house
wiring. You should have the circuit
checked by a qualified electrician
to make sure the receptacle is
properly grounded.
When disconnecting the power
cord from the adapter, always hold
the adapter with one hand. If this
is not done, the adapter ground
terminal is very likely to break
with repeated use. Should this
happen, DO NOT USE the
appliance until a proper ground
has again been established.
Usage situations where
appliance’s power cord
will be disconnected
frequently.
Do not use an adapter plug in
these situations because frequent
disconnection of the power cord
places undue strain on the adapter
and leads to eventual failure of
the adapter ground terminal. You
should have the two-prong wall
receptacle replaced with a
prong (grounding) receptacle by a
qualified electrician before using
the appliance.
(continued next
three-
page)
25
Page 26

GROU~~G
mSTRUCTIONS
(continued)
Use of Extension Cords
A short power-supply cord is provided to reduce the risks
resulting from becoming entangled in or tripping over a
longer cord.
Longer cord sets or extension cords are available and drape over the counter top or
may be used if care is exercised in their use. pulled on by children or tripped over unintentionally.
If a long cord or extension cord is
used—
1. The marked electrical rating of the cord set or and the blower sound may vary when the microwave
extension cord should be at least as great as the
electrical rating of the appliance;
2. The extension cord must be a grounding-type
3-wire cord;
3. The longer cord should be arranged so that it will not
tabletop
where it can be
If you use an extension cord, the interior light may flicker
oven is on. Cooking times may be longer, too.
QUESTIONS?
USE THIS PROBLEM SOLVER
PROBLEM
OVEN WILL NOT
COME ON
CONTROL PANEL
LIGHTED,
YET OVEN WILL
NOT START
FOODS ARE EITHER
OVERCOOKED OR
UNDERCOOKED
POSSIBLE CAUSE
● A fuse in your home may be blown or the circuit breaker tripped. Replace fuse
or reset circuit breaker.
● Unplug your microwave oven, then plug it back in.
● Make sure 3-prong plug on oven is fully inserted into wall receptacle.
● Door not securely closed.
● START pad must be touched after entering cooking selection.
● Another selection entered already in oven and CLEAWOFF pad not touched
to cancel it.
● Make sure you have entered cooking time after touching TIME COOK pad.
● CLEAWOFF pad was touched accidentally. Reset cooking program and touch
START pad.
● Cooking times may vary because of starting food temperature, food density or
amount of foods in oven. Touch TIME COOK pad and additional cooking time
for completion.
●
Incorrect power level entered. Check Cooking Guide for recommended
power level.
●
Some dishes require specific instructions. Check Cooking Guide or recipe for
instructions.
●
Too
manv dishes in oven at same time. Cooking time must be increased when
cooking more than one food item. Check
Cooking Guide time recommendations.
All these things are normal with your microwave oven:
● Steam or vapor escaping from
around the door.
● Light reflection around door or
outer case.
● Dimming oven light and change
in blower sound may occur while
ievels
operating at power
other
than high.
● Dull thumping sound while oven
is operating.
● Some TV-Radio interference
might be noticed while using
yo~r
microwave oven. It’s
similar to the interference
small
caused by other
appliances
and does not indicate a problem
with your oven.
If you need more help...call, toll free: GE Answer Center@/ 800.626.2000/ consumer information service
26
-
Page 27

Wdll
.Cu, ,.,
With the purchase
Be There
ofyour
new GE appliance, receive the
assurance that if you ever need information or assistance
from GE, we’ll be there. All you have to do is call–toll-free!
GEAnswer Center@
80~62&2000
In-Home Repair
Service
80MEXARES
(80M32-2737)
AC, Econsumer service professional”
will
provide
scheduleci al a time
for you.
company-opera(ed
you
service
your convenience
weekdays,
days). Our
know
out-so most
in just
expert repair service,
tbal convenient
Many
(;E (;onsumer
locations oIIkr
today or
tomorrow, or
(7:()()
!1:()()
a.m. to
f’actov-trained
your appliance inside and
repairs can be handled
one
visit.
Service
a.m. to
2:00
p.m. Satur technicians
7:()()
p.m.
at
Service Contracts
80&626-2224
You can
(;E
there after your warranty expires. Purchase a
ranty is still in
a subst>~ntial
year contract, you’re assured of future
service
have the secure feeling that
(;onsumer Service will still be
(1E
contract while
efl’ect
discount. With a
at
today’s prices.
y{>ur
war-
and you’ll receive
multiple-
Wbateveryour
maior appliance,
inf;)rm~tjon service is available
help. Your
will be answered promptly and
courteously.
time.
(;E
open 24
Telecommunication Detice for
question about any
(;E
Answer (;enter”’
call–andyour question-
And you can call any
Answer Center” service is
hours a day, 7 days a week.
tie
Deaf
(1E
tc)
Patis andAccessories
80@626-2002
Individu&
ow
appliances can have needed
parts or
their
vides access to over
all
C,E
fully warranted. VISA, Mastercard
and
Discover cards
User maintenance instructions
contained in this
dures intended to be performed by
auyuser.
shodd
vice personnel. Caution must be
exercised, since improper servicing
may cause unsafe operation.
qufified
accessories sent directly
home. The
Genuine Renewal Parts
Other servicing generfly
be referred to
to service their
C,E
parts system pro-
47,000
parts... and
are
are
accepted.
boo~et
cover proce-
qutified
ser-
to
S. H,.NA.A
,.
LL....”. .,, M,,.., M,....” ~.,.
......,. Tim .,.-.”.”.
hr CustomeB
With
Special Needs...
80~62E2000
Upon request, GE will provide Braille
controls
and a brochure to
barrier-free kitchen
limited mobility. To obtain these items,
free
or
or
call
to
fi~r
a variety of-GE appliances,
assist
in planning a
fbr
persons with
ofcharge, call
~;onsumers
sneech
a’conventional teletypewriter may
800-TDD-GEAC
request information or service.
800.626 .2000.”
with impaired hearing
who have access to a
(800-833-4322)
TDD
Page 28

YOUR GE MICROWAVE OVEN
JES65
WARRANTY
Save
proof of original purchase date such as your sales slip or
cancelled
check to establish warranty period.
WHAT IS COVERED
LIMITED ONE-YEAR WARRANTY
For one year from date of original
purchase, we will provide, free of
charge, parts and service labor to
any
pafi
of
repair or replace
microwave
of a manufacturing defect.
LIMITED ADDITIONAL
FOUR-YEAR WARRANTY
For the second through fifth year
from date of original purchase, we
will provide, free of charge, a
replacement
magnetron tube fails because of a
manufacturing defect. You pay for
sewice
For each of the above
To avoid any trip charges, you must
take the microwave oven to a
General Electric Factory Service
Center or a General Electric
Customer
up following service. In-home
sewice is also available, but you
must pay for the
travel costs to your home.
oven
that fails because
magnetron
labor charges.
Care(”
servicer and pick it
sewice technician’s
the
tube
if the
warranties:
This warranty is extended to
the original purchaser and any
succeeding owner for products
purchased for
the 48 mainland states, Alaska,
Hawaii and Washington,
All warranty service will be provided
Facto~
by our
by our authorized Customer
sewicers during normal working
hours.
Should your appliance need
service, during warranty period
or beyond, call 800-GE CARES
(800-432-2737).
ordinay
Service Centers or
home use in
D.C.
Care”
WHAT IS NOT COVERED
●
Service trips to your home to teach
you how to use the product.
Read your Use and Care material.
If you then have any questions about
operating the product, please contact
your dealer or our Consumer Affairs
office at the address below, or call,
toll free:
GE Answer Center”
800.626.2000
consumer information
Some
may not apply to you. This warranty gives you specific legal rights, and you may also have other rights which
states do not allow the exclusion
To know what your legal rights are in your state, consult your local or state consumer affairs office or your state’s Attorney General.
sewice
I
Manager—Consumer Affairs, GE Appliances, Louisville, KY 40225
Part No. 164 D2588P136
Pub. No. 49-8337
7-92
CG
●
●
Improper installation.
If you have an installation problem,
contact your dealer or installer.
You are responsible for providing ●
adequate electrical, gas,
exhausting and other connecting
facilities.
●
Replacement of house fuses or
resetting of circuit breakers.
or.limitation
Warrantor: General Electric Company
If further help is needed concerning this warranty, write:
of incidental or consequential damages, so the above limitation or exclusion
Failure of the product if it is used
for other than its intended purpose
or used commercially.
Damage to product caused by
accident, fire, floods or acts of God.
WARRANTOR IS NOT
RESPONSIBLE FOR
CONSEQUENTIAL DAMAGES.
va~
from state to state
JES0601
 Loading...