

Page 1
Contents
AdapterPlugs
ApplianceRegistration
Auto Defrost
AutoRoast
AutoSimmer
Care and Cleaning
Control Panel
ConversionGuide
Cook ‘1’+Watch
(hokiw Comdete Reminder 5
DelayedCooking
Double Duty Shelf
EXit5M~C)flCords
4, 16,17,18
Fctitures
Grounding Instructions
Hold Time
Light 13u1bF?cpiaccment
Microwavin: Tips
fVlinu[c/SecondTimer
M(dcl and Scri:~lNumbers
..———
19
12, 13
10,11
11
18
12
19
19
7
18
~
7
~
20
3
UseandCareof
6
Precautions
2
Problem Solver
Program Cooking
RemovalFrom Cabinet Mount 15
Repair Service
SafetyInstructions
6
TemperatureCook
TemperatureProbe
8
Time Cook
Time Defrost
7
Warranty
Back Cover
21
3,4
9-11,18
7,8
M
9
Tileek!m”icoutput
d’thisnlkrowave oven
is600watts.
5
b-.~—--- -’-”-’ “=”--- “- “———”-’
The GEAmvm”funk] o
.. —— . . . . . ,-. . . . . .. . -. ~ — ———. . --——- --- - —
—A.—w’..
‘;
1
Page 2

IL ...
.
.
=“-”---.”--—-’-—=”””-----’”—”----7- -
..
usingyour owm~
readthisbo’ok’carefully.
Ris intendedto helpyouoperate
and maintainyournewmicrowave
ovenproperly.
Keepithandy for answerstoyour
questions.
If youdon’tunderstandsomething
or needmore help,write (include
yourphonenumber):
ConsumerAffairs
GeneralElectric Company
AppliancePark
Louisville,KY40225
downthemodel
andserial
You’llfindthem on a labeiinside
theoven.
These numbersare ako on the
Consumer ProductOwnership
RegistrationCard thatcame with
your microwaveoven.Before
sendingin this card, please write
these numbershere:
ModelNumber
SerialNumber
Usc thesenumbers in any
cmmxpondencc or service calls
concerning your microwaveoven.
Pleasecheck withyoursupplier to
be surehe hasdoneso; also sendin
yourConsumerProductOwnership
RegistrationCard. If youmove,or
ifyouare notthe originalpurchaser
pleasewriteto us, statingmodel
andserialnumbers.This appbrnce
mustberegistered.E%%uX?beaxt.ain
thatit is.
Writeto:
GeneralElectric Company
RangeProduct Service
AppliancePark
Louisville,KY40225
youreceiveda
If
mw!lnt.c
e
Immediatelycontactthe dealer (or
builder)that sold youthe oven.
l%3v~~fi~ ~d!
Beforeyou requestservice...
checktheProblemSolveronpage20.
It listscauses ofminor operating
problemsthat youcancorrectyourself.
Accessories
availableat extracost from your
General Electric supplier.
JX2$
Kitconvertsthis
ovento a built-in walloven.
“WN12$ Kit allowsthis
ovento be mountedon a wall.
Tips
e ~&e sureallcookwareusedin
yourmicrowaveovenissuitablefor
microwaving.Mostglasscasseroles,
cookingdishes,measuringcups,
custard cups,potteryor china
dinnerwarewhich doesnothave
metallictrimor glazewitha metallic
sheencan be used. Somecookware
islabeled“suitableformicrowaving?
If youare unsure, use this dish test:
Measure 1cup waterin a glasscup.
Place in ovenon or besidedish.
Microwave1-1%minutesat HIGH. If
waterbecomeshot, dishismicrowave
safe. If dish heats,it shouldnot be
used for microwaving.
~Paper towels,waxpaper, and
plastic wrap can be usedto cover
dishes in order to retainmoisture
and preventspattering.
* Some microwavedfoodsrequire
stirring, rotating,or rearranging.
Check your cookbook.
QSteambuilds up pressure in foods
which are tightly coveredby a skin
or membrane. Pierce potatoes, egg
yolksand chicken liversto prevent ~
bursting.
-—
—
11is important that we knowthe
locationof your microwaveoven
shmilda nd occur fi)radjustments.
your
microwave oven... youshould find
an installationpackagethat contains
installationinstructions, a template,
and installation hardware for
under-the-cabinet mounting. If
missing, contact yoursupplier.
I
Page 3

m
-:--
.
F:l-:-:=3n~-
F:’mzz.”:”=:
-.:.:”~
?..
-.=
~;:{~’$;:+-:
.%
.=;;,.
,
--
1-—7..
. —
—
.-
.-
M thk ‘
m
(a)Do hTotAttemptto operate
thisovenwith thedoor opensince
opendoor operationcan resultin
harmfulexposureto microwave
energy.It k importantnotto
defeator tamper with thesafety
interlocks.
03jDo Not Place any object
betweenthe ovenfront face
door or aIlowsoil or cleaner
the
r&iW? to accumulateon sealing
~urfacesW Do Not Operate the oven
ifit isdamaged. It is particularly
important[hatthe (3vendoor close
*~rO~e~lY and thattlJCr’Cis no
~-=GGII~clgcto the:
/Ijdoor (bent)
{2)hingesand latches (brokenor
Iomxncd)
(.3j Li(mrseals and
{[I}Tlw (NW] Not bc
;i.!lusted or repaired by anyone
c‘tucptproperly qual iflecl scrvice
pw)nfld .
sealing surfaces.
and
Whenusingelectricalappliances
basicsafetyprecautionsshouldbe
followed,inckxiingthefollowing:
theriskofbums,electricshock,
fire,injurytopersonsorexposure
toexcessivemicrowaveenergy:
~Usethisapplianceonlyforits
intendeduseasdescribedinthis
manual.
@Readandfollowthespecific
“PRECAUTIONSTOAVOID
POSSIBLEEXPOSUREXl
EXCESSIVEMICROWAVE
ENERGY”atleft.
e Thisappliancemustbegrounded.
Connect onlyto properly grounded
outlet. See “GROUNDING
INSTRUCTIONS”onpage19.
~Forbestoperation,
appliance into its own electrical
outlet, to prevent flickering of
lights, blowing of fuse or trip@ng
of circuit breaker.
plug this
~Donotoperatethisappliance —=-——
ifithasadamagedpowercordor --plug,ifit isnotworkingproperly, ==-=orifithasbeendamagedor
dropped.
~Seedoorsurfacecleaning
instructionsonpage18.
~Thisapplianceshouldbe
servicedonlybyqualifiedservice –- _
personnel.Contactnearest
authorizedservicefacilityfor
examination,repairoradjustment.
@Aswithanyappliance,close
-.—
-.
——-
—–
—–
~-
=$==?--
-—— —
-–-
—1
-.
==-..-:--ti–––
y.-.
~wk–
FM#M_..... :
————.
- —.–
M43~---
bz-!s3B%K..
.-
-—-.
supervisionisnecessarywhen ~-“”----‘-usedbychildren.
eTOreducetheriskoffirein.
theovencavity:
–Do notovercookfood.
Care~Y ~~-1-:--j
.-
.- —
-.
attendapplianceNpapq p~astk ;:---=.
orotherco~bustible
placed inside the oven to facili~te ~>-----cooking.
—Removewire twist-ties from ~--=---”. Paper or plastic bags before ~-. _ “-
placing bag in oven.
—Do not use your microwave ~--
oven to dry newspapers.
–Wper towels, ~~~ L%;-a’ .....
wax paper. Recycled paper
products can contain metal flecks
which may cause arcing or ignite.
l?apcrproducts containing nylon
or nylon filaments should be
avoided, as they may also ignite.
–Do not Operate tl%eoven VVllile
empty to avoid damage to the
oven and the danger ‘offire. If
by accident the oven should run , -.,
empty ~ minute or two,noharm ~ :~~ 7
isdone.However,trytoavoid
operating the oven ~m~t~ at ~~~
times-it
prolongs the life oft~l~~Ya~~. ~ &$
savesenergyand
materials are :-’-= ----‘--,
.——
ggf=:~=~-:=---
[=-~—
---------.
p;,~$;_
ks-::W;.---.
~:+-,
.-~$’-:::
,=.,,.,>= - :=
~;:3~:
;:.’~y:-‘ .[=;!g3”
i:>j=;l ~
[...-<>~5~ck>>~-’
[ “[+.:;;
+j.
1-
~“.p?$
1!
\ ;;~
,.,—f..
i ;::<{-’!
!~},.
I +,
,-
(6’c)tlfirllfk’df7fJxt~3c!gc) y
c::> [ z
,.~
o
Page 4
(con~in~ed) .
.
, .
–-Donotpoppopmminyour
microwaveoven unlessinaspecial
microwavepopcornaccessoryor
unlessyouusepopcornlabekdfor
useinmicrowaveovens.
–Do notOvt?reookpotatoes.
Theycoulddehydrateandcatch
fire,causingdamagetoyouroven.
–If materialsinsideovenshould
ignite,keepovendoorclosed,
turnovenoff,anddisconnect
powercord,orshutoffpowerat
fuseorcircuitbreakerpanel.
@some
eggs and sealed
example,closedglassjars—may
explodeandshotddnotbeheated
inthisoven.
@Avoid
glassjars,evenwithouttheirlids;
especiaHymeatandeggmixtures.
e defrostfrozenbeverages
innarrowrwkedbottles(especially
carbonatedbeverages).Evenifthe
containerisopened,pressure
canbuildup.Thiscancausethe
containertoburst,resuhingin
inji!ry,
9~Jse onlyas dirw%xilin
‘N
in fi~iltrays less than
rc~]mwtopfoilcoverandreturn
~MytObOX.When
theIHicr{nwweoven,keepmetal
(MM”i!lnnIM21shelf)at kmst
~~~]gs~~:]$~~:]y:of~~si{!esofo%’el%.
0@@’~~]g~&]~@$}!l:iy
M lwc;iuscofI’M{tf”ansfi:rrcd
I’roil)ihchcalcclfood,i+)!ho[dcrs
mayhcnccdcdiohandle[hc
1Iit:H!;iI.
products such aswhole
containers-for
heating baby food in
dinners may lmmicrowawxl
3/4”high;
using recta] in
*f~
* Foo~s COOkedin liquids (such
aspasta)maytendtoboilover
mo~rapidlythanfoodscontaining
lessmoisture.Shouldthisoccur,
refertopage18forinstructionson
howtocleantheinsideoftheoven.
*T~e~~ome@~_Donot
useathermometerinfoodyou
aremicrowavingunlessthe
thermometerisde’signedor
recommendedforuseinthe
microwaveoven.
~l&MNWethetemperatureprobe
fromtheovenwhennotinuse.If
youleavetheprobeinsidetheoven
withoutinsertingitinfoodorliquid,
andturnonmicrowaveenergy,it
cancreateelectricalarcinginthe
ovenanddamageovenwalls.
@MasticUtensils-Plasticutensils
designedformicrowavecooking
areveryuseful,butshouldbe
usedcarefully.Evenmicrowave
plasticmaynotbeastolerantof
overcookingconditionsasareglass
orceramicmaterialsandmay
softenorcharifsubjectedtoshort
periodsofovercooking.Inlonger
exposurestocwercookmg,thefood
andutensilscouldignite.For
these reasons: 1)Use microwave
plastics only and use them in strict
compliance with the utensil
manufiwturei-’srecommendations.
~)
DO NM subject empty u[ensikto
microwaving.3)Donolpermit
children10uscplasticutensils
wi~h<}[]f
COInpktC supervision.
~lyilellCookingpork follow
ourdirectionsexactlyandalways
cookthemeattom inlernal
temperatureofatleast170°E
l’his
assures that, in the rcmote
possibilitythaltrichiila M4ybe
presentindwmeat,itwillbe
\i~}~c~;j]}~}j)]&lif>I
:+.*?“
.>,,=4
...;;;lg;;g@:$$‘&jj]f)i
:..fl%,*L,~~.>~:;-:7..$>;=l;;,?ir=-=
----L..6,-,..,“.J=m,1......%
..3.:..3:5
~~’(:k;~~~w~’[~1]l-3uildup
-., .-.:. .
...-.
.:
.;
~jj:;j[J1’
!,>,,~.i,,;;,2>}:.;;~~~~~H)aycause
. ..... .
l’~]{3c~fifetoMi.
2 -:..
.
J1:1;]g~}jf.’~y)?;~’~;’~
------
!ii~’~h[lrs;.:“i;:”;:”:t[i!!.yilliHjul”y.
e ~oofj$ ~~~~ ()~@~
46skin’9suchaspotatoes,sausages,
tomatoes,apples,chickenlivers
andothergiblets,andeggyolks
(seepreviouscaution)shouldbe
piercedtoallowsteamtoescape
duringcooking.
~$6~oi~a~le9gcooking
and tightly dosed plastic bags
powhes
shouldbeslit,piercedorvented
asdirectedincookbook.Ifthey
arenot,plasticcouldburstduring
orimmediatelyaftercooking,
possiblyresultingininjury.Also,
plasticstoragecontainersshouldbe
atleastpartiallyuncovertxibecause
theyformatightseal.When
cookingwithcontainerstightly
coveredwithplasticwrap,remove
coveringcarefidlyanddirectsteam
awayfromhandsandface.
~SpontaneousboiHng--IJnder
certainspecialcircumstances,
liquidsmaystarttoboilduringor
shortlyafterremovalfromthe
fromsplashingliquid,stirthe
liquidbrieflybeforeremovingthe
containerfromthemicrowaveove~.
@Useofthe DUTYT1f
shelfaccessory.
—Removetheshelffromoven
whennotinuse.
–Do notstoreorcookwithshelf
onfloorofoven.Productdamage
mayresult.
—Usepotholderswhenhandling
theshelfandutensils.Theymay
bchot.
—Donotusemicrowavebrowning
dishonshelf.Theshelfcould
overheat.
–Be surethattheshelfis
positionedprq.wrlyinsidethe
~~~ento
(seepay 16).
p~”eve~~prO~UCi&llNfl!#2
.
-
-- ---
Page 5
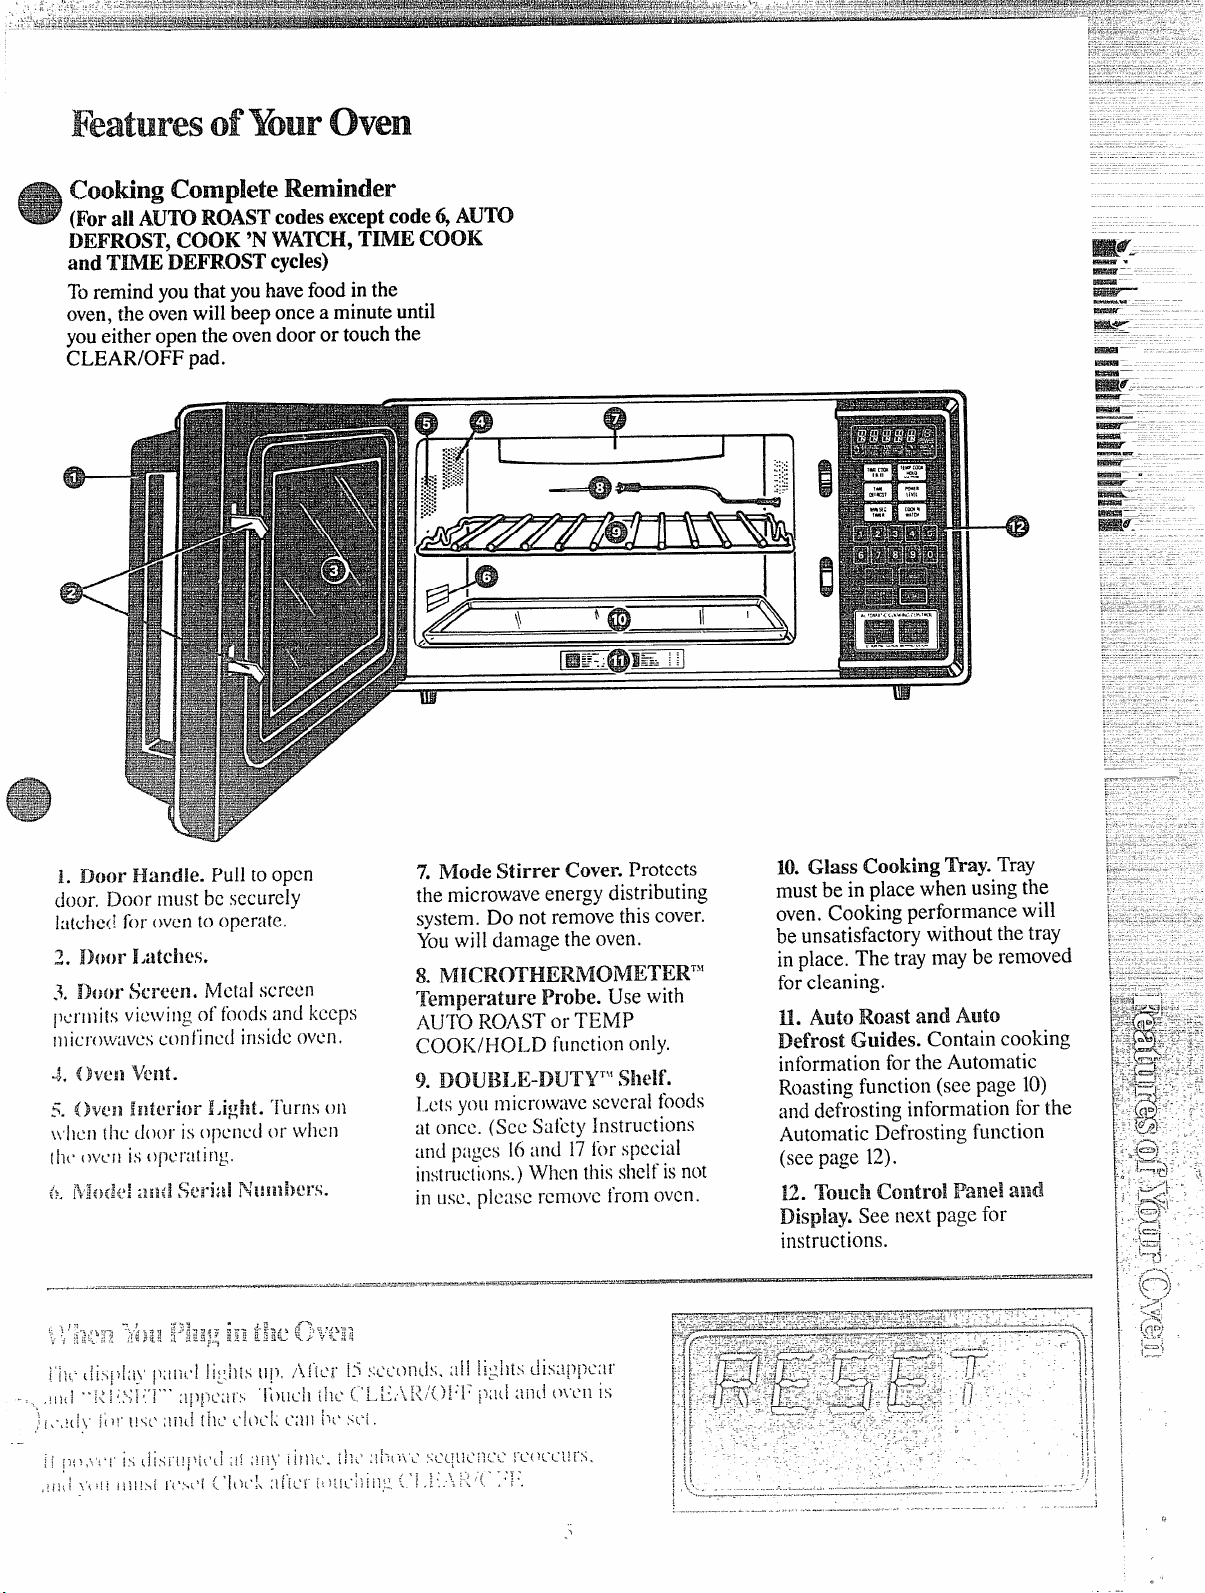
completeReminder
.’
.
(Ford AUTO ROASTcodesexceptcode ~ AUTO
DEI%KMT,COOK ‘NWATCH,TIMECOOK
andTYMEDEFROSTcycles)
Toremindyouthatyouhavefoodin the
oven,t!le ovenwill beep oncea minuteuntil
youeither open theovendoor or touch the
CLEAR/OFF pad.
n#twz––
‘to-
1. Door Handle. Pull to open
door. Door must bc securely
l:Ithx! fortwen tooperate.
n
(1 ~ I
:.
Z:.:::
<.. :..:
: .,: ::::::::.
>:......
p- I
:.%::;
::+:
1
:,..
.
I
.
%\\ ~m il I\
-==#2W.....
I
.
J
.
,
/\.
w
7. Mode Stirrer Cover. Protects
the microwaveenergy distributing
system. Do not removethiscover.
Youwill damage the oven.
8.
%kmperatureProbe. Use with
AU’”f.’~ROAST
COOK/HOLD
9. mm’.
1.ctsyou microwwx severalfoods
at once. (See Safety Instructions
:mdpagm 16and 17for special
instructions.) When thisshelfisnot
in use, plcxx rcmovc fromoven.
or TEI’vIP
flinctiononly.
I
:::..:
U7i?A
.....
H
.-
-ai3
II
10.Glass cooking Tray.Tray
mustbe in place when usingthe
oven.cooking performancewill
be unsatisfactorywithout thetray
inplace. The tray maybe removed
forcleaning.
Il. Auto Roast and Auto
Defrost Guides. Contain cooking
informationfor the Automatic
Roastingfunction (see page lo)
and defrostinginformation for the
AutomaticDefrosting function
(see page 12).
12.TouchControlPanelad
See nextpage for
instructions.
1
Page 6
-.-
*
.r,,:-:~.~:-:e..x.,,...=.=w-=w--
.... .~.:..:,=...-.- .... . ,.
—< .
—.
.
. .
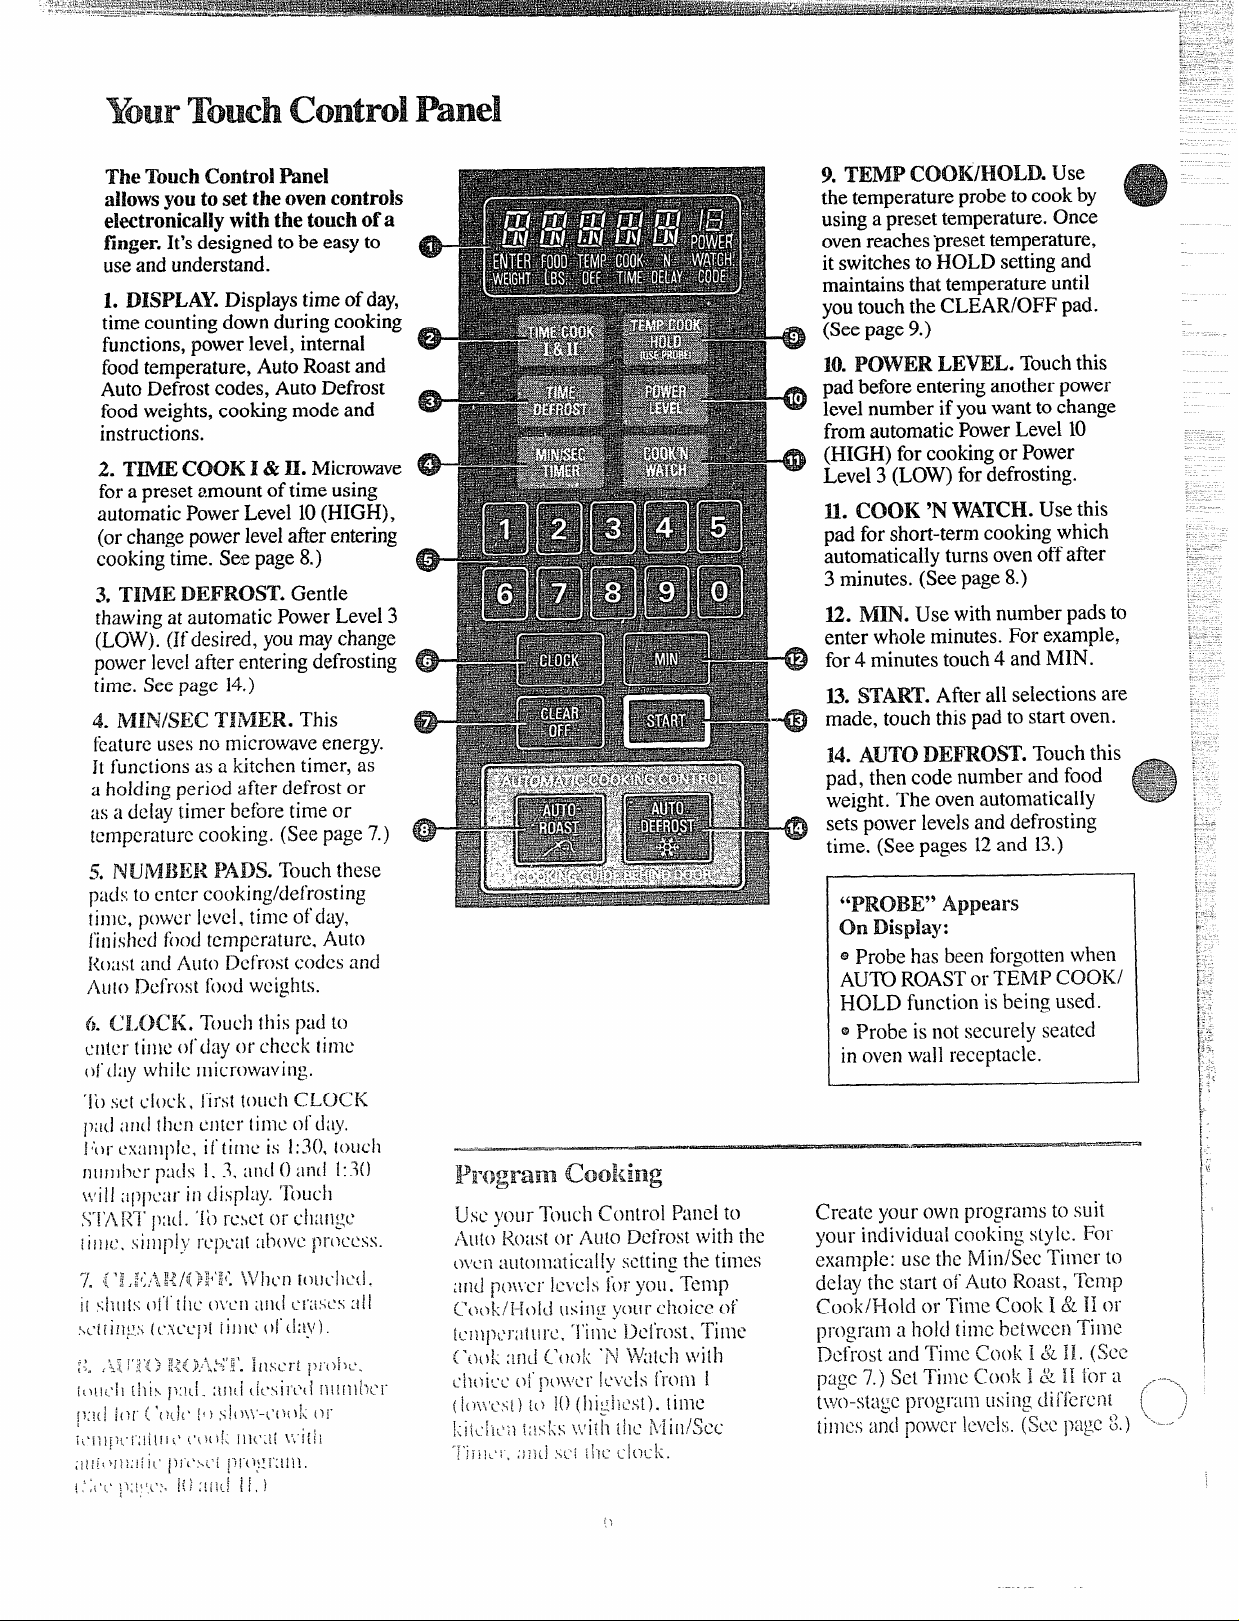
The ‘IbuchControlPad
allowsyouto setthe ovencontrols
ekctronicallywith the touchofa
finger.It’sdesignedto beeasyto
useand understand.
L DISPLAY. Displaystimeof day,
timecountingdownduringcooking
functions, power level,internal
foodtemperature, AutoRoast and
AutcIDefrostcodes, AutoDefrost
foodweights,cookingmodeand
instructions.
2. TIME COOK 1& IL Microwave
fora presetamount oftime using
automaticPowerLevel 10(HIGH),
(orchangepowerlevel afterentering
cookingtime. See page8.)
30TIME Gentle
thawingat automaticPowerLevel3
(LOW).(Ifdesirecl,youmaychange
powerlevelafter enteringdefrosting
time. See page 14.)
4. This
featureusesno microwaveenergy.
11func[ions as a kitchen timer, as
2 holdingperiod after defrost or
as a delaytimer beforetime or
temperaturecooking. (See page7.)
9. TEMP $XX3K/HOLD.Use
thetemperatureprobetocookby
usinga presettemperature.Once
ovenreaches‘presettemperature,
itswitchesto HOLD settingand
maintainsthat temperatureuntil
youtouchthe CLEAR/OFF pad.
(Seepage9.)
10.POVVERLEVEL.Touchthis
pad beforeenteringanotherpower
levelnumber if youwantto change
from automaticPowerLevel 10
(HIGH) for cookingor Power
Level3 (LOW)fordefrosting.
IL COOK ‘NWAT~H. Use this
pad for short-termcookingwhich
automaticallyturns ovenoffafter
3 minutes. (Seepage 8.)
12. IViDN.Use with number padsto
enter whole minutes.For example,
for4 minutestouch4 and MIN.
U. START. After all selectionsare
made, touch thispad to startoven.
EL
AUTODEFROST.Touchthis
pad, then code numberand food
weight. The ovenautomatically
setspower levels and defrosting
-(!3
time. (Seepages 12and 13.)
.-=;~.
--$~+~
-=...Y
@
I
“PROBE” Appears
OnDisplay:
@Probehas been forgottenwhen
AUTOROAST
HOLD functionis being used.
e Probe
in ovenwall receptacle.
I
01.TEMP ~OOK/
is not securelyseated
I
I
I
Page 7
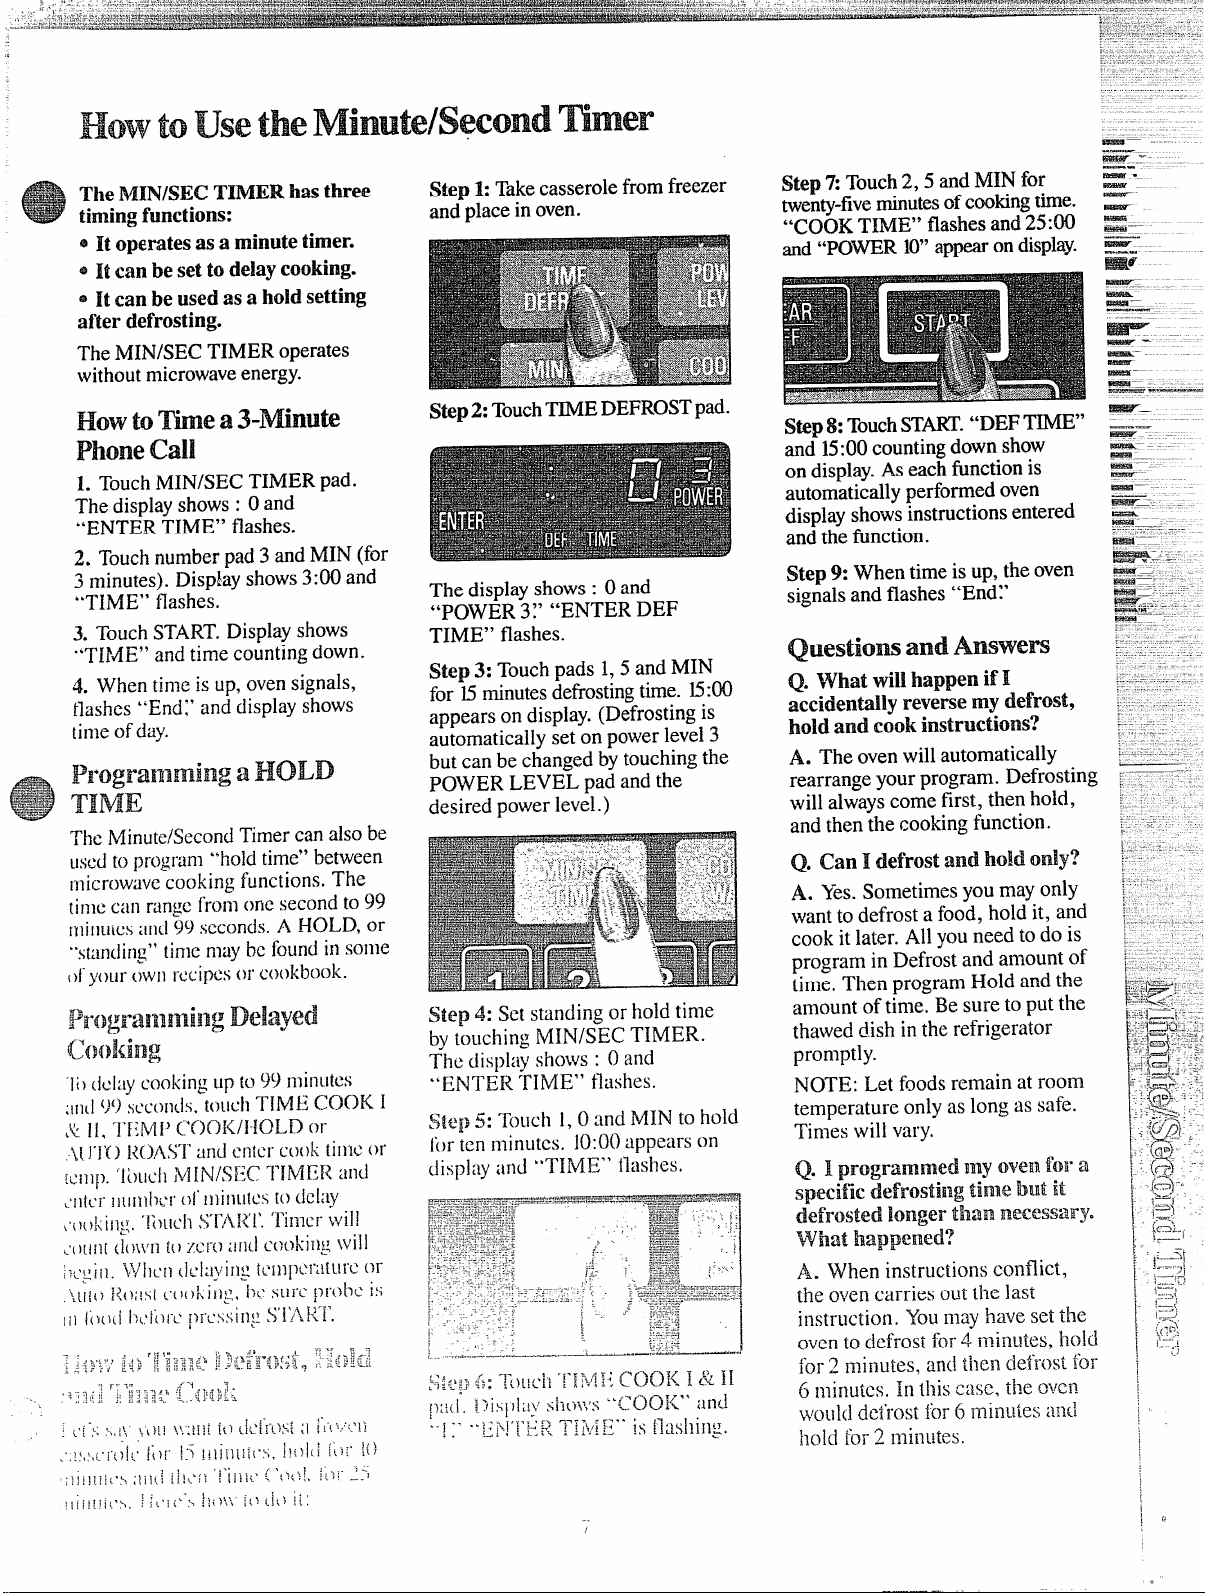
TheMINISECTIMERhasthree
timingfunctions:
Step 1:Takecasserolefromfreezer
and placein oven.
Step 7:Touch2,5 andNIINfor
twenty-fiveminutesofcookingtime.
“COOK TIME” flashesand25:00
and “POIIR 10”appearondisplay.
Step2: Touch~EDEFROSTPad.
The displayshows: Oand
“POWER 3;’ “ENTER DEF
TIME” flashes.
Step 3: Touchpads 1,5 and MIN
for 15minutesdefrostingtime. 15:00
appears on display.(Defrostingis
automaticallyset on powerlevel3
but can be changedby touching the
POWER LEVEL pad andthe
desired power level.)
Step 4: Setstanding or hold time
bytouching MIN/SE~ TIMER.
The display shows : 0 and
“ENTER TIME” t~tidleS.
S;~ellS:
forten minutes. 10:00appears on
display arid
‘foLldl 1,0 and MIN to hold
“TIME” flashes.
Wep8:TouchST~. “DEFTIIvfE”
and 15:00countingdownshow
on display.Aseach fi.mctionis
automaticallyperformed oven
displayshowsinstructionsentered
andthe function.
Step9: When timeis up, the oven
signalsand flashes “End?’
andAmwwxs
Q. What willhappen if I
accidentallyreversemy defrost,
holdand cook instruction?
A. The oven willautomatically
rearrangeyour program. Defrosting
will alwayscome first, then hold,
and then the cookingfunction.
Q. Can I defrostand hold only?
A. Yes.Sometimesyou mayonly
wantto defrost a food, hold it, and
cook it later. All youneed to do is
program in Defrost and amount of
time.
Thenprogranl ~old and the
amount oftime, Be sure to put the
thaweddish inthe refrigerator
promptly.
NOTE: Let foodsremain at room
temperature only as long as safe.
Times will vary.
Q. I my
Cwm i’m”a
specific time but it
longer than
Vi’%at
A. When instructions conflict,
the ovencarries out the last
instruction. YOUmay have set the
ovento defrost for4 minutes, hold
for 2 minutes, and then defrost fm6 minuks. h this case, [he own
\$FOL\~(]~~~’~-os~i~)r~ min~~k~~]~~d
hold for 2 rni12utes.
mxssarye
Page 8

Tm COOKI 4%n allowsyou
~
i’
:.
:~
t
~
[
r
&
~
to microwavefor a presetamount
of timeusingautomaticpower
level10,or changepowerBevel
automatically.
powerhwel10
recommendedfor mostcooking,
butyoumaychangethis formore
flexibility.Seeyour cookbook.
Tobecome betteracquaintedwith
time cooking,make acup ofcoffee
byfollowingthe stepsbelow.
I
Step 1:Fill a cup 2/3 full of
~,aterand add ~teaspoon ofinstant
coffeeand stir to dissolve. Use a
cup that has no metaldecoration
and is microwavesafe (referto
Microwaving“I@ on page2),
Place cup in ovenand close door.
Step 2: ‘I’owhTIME COOKI& H
pad. Displayshows“COOK” tind
.L‘i+$*
ENTER
i.
(HIGH) is
r
Tmm” isfhishing.
Step 4: TouchSTART.“COOK
TIME;’ “POWER 10~’and time
counting down showon display.
Step5: When timeis up, theoven
signals and flashes “End~’Oven,
lightand fanshutoff.
Step6: Open thedoor.
US~W ~~~
meCOOkn
Fk!atw’e
Withthe TimeCook II feature, you
can settwo timecookingfunctions
withinone program. This would
be idealif youdesiredto change
I
powerlevelsduring yourcooking
operations.
The followingis an exampleof how
to changepowerlevelsusing Time
Cook II.
Step 1:RepeatSteps 1,2 and 3.
Step 2: TouchTIME COOK I & II
pad. Display shows“COOK” and
“2~’“ENTER TIME” isflashing.
Step 3: Set yourtime.
Step 4: To changethe powerlevel,
touch POWER LEVEL pad and
desirednumberfor newpowerlevel.
$@ 5: Touch START.
Step 6: “COOK TIME:’ the
selcctcdpower leveland the first
programnletlcook time, counting
down, showon the display.
Step 7: At the cnd of the first
pmgrammcd cook time, the next
sclectcd power level, “COOK
‘I1mIE’landthe swxmdprogrammed
cook time, counting down, show on
the display.
S$eq~8: ~~{}lcn[illleis up, the oven
s
l+{l;il~and fl;ishcs‘bEnd:’ The
txm. !iyhi:~ndl;~nsh~t off.
<;;~,E%<>. ~=?-...
*\>]}Ciiillcdtl(~r.
L.,i.,,,,.,
.
(3MJIK‘N
The Cook‘NWatchfeatureis a
Short-ternrookingprop which
automatica~~yturnstheovenoff
after3 minutes.It’sidealfor
meltingcheeseon foodor other
quickcookingoperationswhere
youwantto stopcookingatjust
the righttime.
Totke Cook ‘NWatch
Step 1: TouchCOOK ‘NWA~H.
“COOK‘NWAICH”and “STAKT”
are flashing.
displayed.
Step2: TouchSTART.“COOK ‘N
WATCH”and timecountingup to
3 minutesare displayed. Power
level 10isautomatic~ly set in oven
but anotherpowerlevelcanbe
selected.
Step3: Open the door or touch the
CLEAR/OFF padto stopcooking.
The ovenwill automaticallysignal,
flash “End” andshut offat the end
of 3 minutes.
Questiom and Answers
Q. I
setmy ovenfor the time
called forin the reeipe~Mat
endof
wasn’tdone. What happened?
A. Sincehouse power variesdue
to time or location manyTime
Cook recipes giveyou a time range
to preventovercooking. Setthe
ovenfor minimum time, test the
foodfor doneness, and cook your
food a littlelonger, if necessary.
Q. I touched the number pads
andselectedmypowm-level.V{hen
I touched START,hwevq my
ovendkm come OH.VU%ynot’?
A.. The TIME COOK I & H pad.
must be touched before settingthe
number pads or eke yoLiroven wi]i
not begin cooking.
“POWER 10”is
the time ahwed? my food
the
--
-.
.
i
,,
..
Page 9

Internaltemperatureisthe best
testof donenessfor manyfoods.
UseTEMPCOOWHOLD
to
cooka varietyof foodsto the
desiredfinishedfoodtemperature.
TheTIME COOKI &II setting
ispreferredfor batters,doughs,
frozenfoodsand foods whichare
diffhdt to cook preciselywith
thepx*obe.
“TEMPCOOK/HOLD”takesthe
guessworkout ofcookingbecause
theovenautomaticallysignalswith
fourbeeps whenthe food reaches
thepreset temperature. The Hold
featurewillmaintainthistemperature
forup to twelvehours or untilyou
touchthe CLEAIUOFF pad.
Note: Ovenautomatically switches
to “Hold” when preset food
temperature is reached.
The Probe
HANDLE
‘1’hctcmpcratui-cprobe is a
lbodthermometer thatgaugesthe
in[wnal tcinpcrature of the fbod;it
inustbe w.xi when using ““I%MP
(’OOK/HOLD’*
or ‘N.J”KIROASTV
CABLE
BeefRib Roastto
Step1:Inserttemperatureprobe
intoroast andattachprobe securely
inovenwall.Close thedoor.
Step2: TouchTEMPCOOWHOLD.
“POWER IO”is displayedand
“ENTER TEMJ?COOK” flashes.
Step3: Touch1,2,5 for 125”F.
“TEMP COOK” is flashingand
“PO”WER10” and “125F” are
displayed.
Step 4: TouchPOWER LEVEL
pad. “ENTER POWER” flashes.
Touch5 formedium power.“TEMP
COOK;’ “POWER 5“ and “125F”
showon display.
Step5: TouchSTART.If internal
temperatureofthe roast isless than
80”F.,displaywill show “COOL”
and “TEMP COOK:’If temperature
is 80°F.or above,displayshows
temperaturecounting up.
Step6: When 125”F.is reached,
theovea will soundand display
“HOLD?’The ovenwill then hold
thetemperature.
S@ 7:Touch theCLEAR/OFF
pad to stopthe cycle.
Step 8: Removeprobe and food
from the oven.
‘llps
@ IJSCa lmverpowerlevel; it will
hc:i~more cvmly men though
r~quiring MOIZ time.
QUestim ii-mulll$mwvers
Q. I insertedthe temperature
probe,closedthe door,touched
TxHWPcoomoLD andentered
my desiredfood temperaturebut
the temperaturedidn’tappearon
the display.
A. Youmayhaveenteredan
incorrecttemperature. Any food
temperaturefrom 90°to 19901?.
maybe entered forTEMP COOK/
HOLD. TouchCLEAR/OFF and
beginagain.
Q. Arethere any foodsIean’t
TempCook?
A. Yes.Delicatebutter icings,ice
cream, frozen whippedtoppings,
etc. softenrapidly atwarm
temperatures. Batters,doughs and
frozen foodsare alsodiff~cultto
cook precisely withthe probe. It’s
best toTime Cook these foods.
Q. why did “P~~~E” fhh on
the display afterI touched the
STARTpad?
A. “PROBE” willflash ifyou
don’tseat the cableend of the probe
securely into the receptaclein the
ovenwallor if youtouch the TEMP
COOK/HOLD padand forgetto
use the probe.
Q. Can I leavemy probe in the
ovenif it’snot inserted in food?
A. No, if ittouches the ovenwall,
you maydamage the oven.
Q. Can I T’empCook diffel*ent
portions of food at different
@Bcsure froz. cnfood has been
con@e&elydefrostedbeforeinserting
prtdw. Pr(}lwmay)break off if used
in frozen fbods.
0 C(W~l’
conlr~}land quick,
f~)[jL]s100SCIV for moisture
.
U“CI1heating.
A. Yes.The temperature probe
gives
you the freedonlto cOOk
different portions of food at
different temperatures to suit
individual eating styles. Simply
place probe in foodand change
temperature setting as needed.
Page 10

AUTOROASTusesthe
temperatureprobetocooktothe
desiredservingtemperature.
U~~likeTEMPCOOK/~O~D,
whichusesa singlepowerlevel,
AUTOROASTusesupto3 power
settingswhichautomatically
switchduringroasting,thus
providingeven,tendercooking
resultswithoutovercooking.
Justasin conventionalroasting,
onlytenderroastsshould beAuto
Roasteduntilspecifiedinternal
temperaturesare reached.Less
tenderroastsshouldbemicrowaved
bytime,accordingtothecookbook
whichcomeswithyouroven.
Roasti for
2. At80°F.,display switches to
showmeat’sinternaltemperature.
Porkor hamroastsneed notrivet.
Add1/2cupwaterto roast dishand
coverwithplasticwrap.
3. When youselect AutoRoast
Codes 1through5,the ovensignals
with4 beeps and “Turn” flashing
onthedisplaywhenit’stime toturn
theroastover.Afteryouturn the
roast, closethedoorand touch
START.Foodtemperature appears
onthedisplay.(Note: Oven
continuesto cookafterthe signal
whetheror not roastisturned over.)
Placemeatinovenwithprobeto
theriglit.Insertcableend ofprobe
firmlyintoreceptacleon ovenwall.
Hw$’toAutoRoast
Bed%
4. After a preprogrammedfood
temperatureis reached,ovenbeeps
4 timesand “Hold”appears on the
display.The ovenwill hold at the
preprogrammedfood temperature
for one hour or until you turn off
the oven and removethe food.
/.- ..
/
I
.
-...... -
.
-..
;
Page 11

AutoRmst Guide
. . - - ------
.
—..
.—
~Use containers and coveringsasdirectedat left. Place probecorrectlyin
roastbeforecooking.
~Recommendedcodesare also showninsideovenon AutoRoast Guide.
Final
Temperature
Food
Code
Beef
TenderRoast
Rare
A4ediurn
Well
Pork
Roast
Loin
Precooked
Poultry
WholeChicken (3 Ibs.)
I“urkcyBreast
(Insertprobehorizontally
intonw.itiest area.)
+Rccommcndcdstanclingtime beforeserving.
Ham
1
2
3
4
1
5
5
120°
130°
145°
175°
120°
185°
185°
Approximate Time
(minutesperpound)
11-13
13-15
15-17
17-20
17-19
16-18
18-22
Minutes
Hold*
10
10
10-15
10
10
5
20
(AutoRoastCOde6)
Yourcookbookhas informationon
AutomaticSimmering,including
guidesandrecipes.
Totaltimeincludestimetobring
foodto 180°F.andholdat that
temperatureuntildone.
SetAutoSimmer likeAuto
Roastas explainedon page 10.
Displayshows“COOL” untilfood
is 80”F.,then switchesto show
foodtemperature until 180°F.
——
—
—
—–
-–
-—
MA’
Pot
(’hili
R(XIS(
(hkk (~11~0Ro8s~ Code 6)
5-7
5-s
4-6
Acidenoughliquid tojust cover meat.
If:idding vegetablesmake sure they are
compktdy covered byliquid.
Precook meat.
top surface. stir after 3 hours, if possibk.
Add4 cups liquid. Inscrl probe into
nlcaticst arc:]of innerthigh from below
Placeprobe 1 inch from
Oven willhold at 180”F.,until you
turn offthe ovenand removethe
food. If stirring is recommended,
youcan reset ovenby retouching
START.TouchCLEAR/OFF after
cooking.
I
4
(3
“
Page 12

with theAutoDefrostfkatmw,
theovenautomaticallysetsthe
defrostingtimesand powerIeveBs
foryou. h choosetheappropriate
Codenumber from 1to 3 forthe
foodyou aredefrosting,then enter
the foodweightin poundsand
tenthsofa pound (seeConversion
Guidebelow)and touch START.
The ovencalculatesdefrostingtime
andchangespower levelsduring
defrostingtogive evendefrosting
results.
HowtosetAuto Defrost
Beforeyoubegin, check me guide
locatedatbottomof ovenwhenyou
open the door.It showsminimum
and maximumFood Weightsfor
each code number. Youwill need
to knowyour FoodWeight and
correspondingCode before
settingAuto Defrost.
L I.&movefoodfrom package,
place in ovenon microwave-safe
dish and closedoor,
3. Enter selectedCode fromAuto
DefrostGuide.Forexample,poultry
callsfor Code2.
“IJ3S”and “CODE2“ aredisplayed
and “ENTER WEIGHT” flashes.
4. Enterweight.Forexample,touch
Number Pads 1and2 for weight of
1.2pounds (1pound, 3 ounces. See
ConversionGuidebelow.)
Onceduring defrosting,the oven
beeps4 times and“turn” flashes.
“Turn” flashesuntilyouopenthe
door, attendyourfood(seeguide
on nextpage), closethedoor and
touchSTART.
Whendefrostingtimeiscompleted,
“End” flashesand ovenbeeps4
times. “End” remainson display
and ovenbeeps once aminuteuntil
door isopened or CLEAR/OFF
pad istouched.
standTime
When usingthe AutODefrost
feature, itis necessary toallow
meatto stand in orderto finish
defrostingtheinterior.Youmaytake
the meatoutof theoven if youwish.
Standtime recommendationsare
givenin the guideon thenextpage.
Displayshows “1.2J’“LBS” and
“CODE 2:’ After 4 seconds,
“START” flashes.
,
%-
S. ‘RwchS“lYJ?Tpad. Display
showsDefrost Time countingdown.
Guide
If weightOffoodis
poundsand ounces, the ounces
mustbe convertedto tenths(.1)
ofa pound.
ounces
I
1-2
3
4-5
6-7
14-15
I
,
I
stated in
Pounds
.1
.*
.3
.4
.9
7
1
...-=-.,
(\’/)
------
,.,
.,-”
.
Page 13

!,
NmN.- MAX.
E
I?cmm
WmM’rI’
SIGNAL
Meat
chops
0.1 -6.0
lbs.
Separateand turn
over.Shieldwhere
slA.NDTm
5 minutes
necessary.
Frankfurters, Sausage
Ground Meat
BeefPatties
Roasts
Ribs
0.1-6.0 lbs.
0.1-6.0 lbs.
0.1-6.0 lbs.
0.1-6.0 lbs.
0.1-6.0 lbs.
Separateand remove
defrostedpieces.
Removedefrosted
areasand break apart.
Turnoverand remove
defrostedpatties.
Turn overand shieid.
Turn overand remove
defrostedpieces.
2 minutes
5 minutes
5 minutes
30to 45 minutes
in refrigerator
10minutes
Shield.
Steak
Chunks, Cubes
0.1-6.0 lbs.
0.1-6.0 lbs.
Turn over.Shield.
Separateand remove
defrostedpieces.
5 minutes
5 minutes
2
—
—..,...-—
3
——.-....”-..
.....,———.--—-
t
—....-_..__....-----—.—”-----
.—.-. -— —-,-
Poultry
Wholc Chicken
Turkey Breast
Chicken Pieces
Cornish Hcns(wh~l~)
Cornish I-icn~(spfit)
$@#ood
Fish Fiilcts
Shrim~,S~~ll~~p~
WholcFisil
—.—”
0.1-6.0 Ibs.
0.1-6.0 lbs.
0.1-6.0 b.
0.1-6.Olbs.
0.1- 6.Olbs.
0.1-3.Olbs.
0.1- 3.Olbs.
0.1- 3.Olbs.
Turn overand shield.
Turn overand shield.
Separateand remove
defrostedpieces.
Turn overandshie~d.
Turn overand shield.
%parateandremove
defrostedpieces.
Separate andre~lOve
d~frostedpicces.
Turnover and
shieid tail.
]I’(Jrb~~s!rcsui{s.meats such USch(}pstimlsic;iksshould bc packaged in a single layer.
~;~i~,c.,;or []1i11~1l-c:i~of !llc;~~~$1i1]dCf-IYXt
Il?(m rapidly than other areas. k~l~el~ovensignals?
},1]i~l~]t:~[!i”[]l~}~”(l:~s\\’i{h~l~];l~~~i~~~sof ibi!.
10minutes; run
cold waterin cavity
20 to 30 minutes
5 minutes
IOminutes;run
cold water incavity
5minutes
5 minutes
5 minutes
I-Ioldundercold
running water.
-..-..
Page 14

by
The TimeDefrostsettingis
designedforspeedy thawingof
frozenfoodandis oneofthe great
advantagesof a microwaveoven.
Usethe TimeDefrost settingto
quicklythawfoodssuchasbread,
rolls,vegetables~fruitsandfrozen
dinners.The AutoDefrostsetting
ispreferredfor meat andpmdtry
becausetheovensetsthedefiwsting
time and powerlevelsfor you.
@JPowerlevel3 is automaticallyset
fordefrosting,but youmaychange
this formore flexibility.
@See yourcookbook for
defrostinghelp.
Tobecomebetter acquaintedwith
thedefrost function,defrosta 1O-OZ.
package offrozen strawberries by
followingthe steps below.
Step 1: Placepackageof frozen
strawberries in the ovenand close
door. Be sure packagecontains
no metul.
----.—.!.-..-.--.--.———
Step4:TouchSTART.‘LDEFTIME”
and “POWER 3“ showandtime
countsdownon display.Whencycle
iscompleted, theovensignalsand
flashes “13ndj’then automatically
shutsOff.
Step 5: Turn packageover,close
door and repeat Steps2 and 3to set
remaininghalf ofdefrosting time
and touchSTART.
Step6: When ovensignalsand
flashes “EndJ’open door, remove
packageand separatestrawberries
to finishdefrosting.
Tips
@Foodsfrozen in paper or plastic
can be defrosted in thepackage.
$Z.. .,,,=,
Q. When I press START,I heara
dull, thumpingnoise. Whatisit?
A. This soundis normal. It is
lettingyouknowtheovenisusinga
powerlevellowerthan 10(HIGH).
Q. CanI defrostsmall itemsin
a hurry?
A. Yes,but theywillneedmore
frequentattentionthan usual. Raise
thepowerlevelafterenteringthe
time bytouchingthe desired power
levelpad. Powerlevel7 cutsthe
totaldefrostingtimeabout in 1/2;
powerlevel 10cutsthe total
defrostingtime toapproximately
1/3.During either, rotateor stir
foodfrequently.
Q. Why don’tthe defrosting
times in the cookbookseem right
for my food?
A. Cookbook timesare averages.
Defrostingtime can vary according
to thetemperature in your freezer.
Setyourovenfor thetime indicated
in yourcookbook. If your foodis
stillnot completelythawed atthe
end ofthat time, reset youroven
and adjustthe time accordingly.
~
l%r even defrosting, some foocis
need to bc broken up or separated
part of the waythrough the
dcfmsting time.
Q. Should ali foodsbe completely
thawedbefore cooking?
A. Somefoodsshould not be
completely thawedbefore cooking.
For example, fish cooks so quickly
it isbetter to begin cooking while it
is stillslightly frozen.
Q. Can 1open the door during
defrosting to check on !iw
progress of’my food?
A. Yes.Youmay open the door at
any time during microwaving.To
resume defrosting. ciosc the door
and press START.The oven begins
operating if tinle is lefton tin~el-.
If not. reset timer.
Page 15

To the
--—.
,-—-—
..——.——-.- -—-.—--—---.—----
—.......
—.—.——.—.
.’
$@ 1:Replacetherubber feet.
Step2: Fullysupportthe
microwavewithsomethingsturdy.
Forexampleusetelephone books
or encyclopedias,stackedevenly
and closeenoughto balancethe
weightofthe oven.
Step 3: (@m yourcabinet andwith
yourscrewdriver.beginto remove
thescrewsholding themicrowave
ovenin place byturningthem
counterclockwise.
(A1tcrnatebetwwmscrewsso that
ovenis loosenedas evenlyas
possible.j
il’ote:Beforefinal removalofthe
screws, check to be surethat the
microwavcovenis beingsuitably
supported{0preventit from f:}lling
L)I-sliding.
-,,
~-,
—
,
,
; -’,
! “-
I
———
ir.7-
.—-
,
Page 16

toLJse
.—
i.-.
--
.
——. .-... ——.-—
.-..-—.——
.--—-, ..-
,.———..—.... .—=
-—
..
43DO ~0~storeor cook with
shelfonfloorofoven.Product
damagemayresult.
~use potholderswhenhanding
metalshelfandcookware.
Theymaybehot.
eDo not storemicrowave
browningdishonmetalshelf.
Thewire shelfisspecifically
designedforaddedcapacityheating
andreheatinginyourmicrowave
oven.Nowmorethanonefoodmay
beheatedor reheatedand readyto
serveatthesame time.
Whenmicrowavingwiththeoven
shelf, sometechniques willdiffer
fromthe cookbookwhich came
withyouroven.It isimportantto
arrangefoods properly (shownon
thenextpage). COOkWareSiZeis
important;selectfrom amongthe
suggestionsbelow.Also, foodsize
shouldbeconsidered; foods over
~~ inches high, or 3
pounds are nOt
recommendedforshelfcooking.
Battersanddoughfoodsaridalso
uncookedfoodswhichneed tobe
prepared fromscratch shouldbe
cookedwithouttheovenshelf,
fc~]iowingcookbookdirections.
CooWareforshelf
Heating and
Beforeplacingfoodinthedishes,
checkto seethattheywillfit
togetheronor undertheshelf.Also,
besurecookwareismicrowavesafe.
Cookwareforheatingor reheating
include1cupmeasuringcup,
8x4x3-inchloafdishes,9x5x3-inch
loafdishesor 9-inchpieplates.
Leftoversmaybe placedinsmall
individual ceramic or plasticbowls
ordivided plates.
shelf
TopositiontheDOUBLE DUTYTh’
shelf,tiptheback slightlyandfitthe
shelfsupportguides onto the
support guideslocatedon eachside
ofthe ovenintherear.
Next, lowerthefronturitiltheshelf
supportguidesfit0~~0thesuPPort
guideslocatedateach sideOfthe
oveninthe front.
Whenproperly positioned,theshelf ~
shouldfitsnuglyinPlacetbelevel
andnottouchtheback wall of
theoven.
..
~..
,
~ ..
~---
,;q ,1
/’/ I
/;”
/
.//
& ..-.-.. ---
-.&L&. ,. -=-.—-=-.=-- -—---— -,..—
USC pothoIdcrswhen handling
....
.“===’”L:==N
1:
I
.---.4
II \
\
+
Use waxpaper or plasticwrap
iils[cad
of lick oil cwwroles. Lids
.. .
0
I
\
I
I
Page 17

I-h’vtoHeat ‘m
I
Two platesofieftoversmaybe
reheatedtogether.Arrangethick
m densefoodstooutsideedgesof
plateandcoverwithplasticwrap.
.MicrowaveatHIGH (10)for2 to3
minutes.Reversepositionofplates
(toptobottom)androtate 1/2turn.
Continue microwavingatHIGH
{10)for2to 3 minutes.Continue
heating,ifnecessary,untiihot.
I
Reheatingtwocasseroles(height
should be lessthan3Viinches)is
nowpossible.Coverwithplastic
wrap. Usestaggeredarrangements
offood,placingfoodon rightsideof
shelfandleftsideoffloor.Referto
HeatingorReheatingGuidein
cookbookforsuggestedmicrowave
timepercasseroleandaddthetimes
together.MicrowaveatHIGH (10)
reversingpositionoffoods(topto.
bottom) after halfof time. Several
smallbowlsofleftoversmaybe
heatedinthesame way,stirringand
reversingposi~ionsafter half
oftime.
Twofrozenindividualentrees
(5to7 oz.each)ortwoTV dinners
(10to 12oz. each)arebothreadyto
serveatthesametime. Remove
traysoffoodfromtheirboxesand
turnbackonecorneroftheplastic
covertovent.Iftherearefoilcovers,
removethemand returnthetraysof
foodtotheirboxes.(Batterfoods
should be removedfromthetrays
andcookedconventionally.)Place
inovenwithoneTV dinneron right
shelfandtheseconddinneron left
floor.MicrowaveatHIGH (10)for
9minutes.Reversepositions (top
tobottom) and rotatefoods1/2turn.
Continue microwavingatHIGH
(10)for9 minutes.Checkdinners
forheating.If onedinnerseemsless
donethandesired, return itto the
boxandcontinueheatingon shelf
1to 2moreminutes.
Howto SH%?rd Types OfFoodsTogether
I-Iea~or reheat different typesof
foodat HIGH (10).TOdetermine
heatingtimes, add timesforall
[oods together. (Seeheatingguide
incookbook.)After halfoftime,
stiror rearrange ibods(donot
reversepositions). Check foods(top
shclfespecially) after 3/4oftotal
tinmand rcmovctiny whicharc
done. Continue cookingothers.
Ewe on Shemrge 01”&m.st?f“ds
which needthe mostheating, such
asleftoverfried chicken, casseroles
ofcannedor leftovervegetables,
rice orpasta. Place onovenf1001.
thosefbodswhich needonly be
warmeci,such asbakery pies, rolls,
muffinsor breads.
. --
..
.. .-
.—
.—-...........-————------
..-—-——.. ---
Page 18

Mu new Microwave Oven is
a valuable appliance. Protect
it frommisuse byfallowing
theserules:
~Keep yourovencleanand
sweet-smelling.Openingtheoven
door a fewminutesafter cooking
helpsair-outthe interior.An
occasionalthorough wipingwith a
solutionof bakingsodaand water
keepstheinterior fresh.
SIDon’tuse sharp-edgedutensils
OrJIyouroven. The inside and
outside ovenwallscan be scratched.
The control panelcan be damaged.
@Don’t removethe mode
stirrercoverat the top ofthe oven
(microwavefeature 7 on page5).
Youwill damagethe oven.
BE CERTAINPOWER1SOFF
BU?ORE CLEANING ANY
PARTOF THIS IOVEN.
CLEANINGPOWDERSORSTEEL
AND PLASTIC PADS.THEY
WILL MAR THE SURFACE.
GlassCookingTray.Occasionally
itisnecessaryto removethecooking
trayforcleaningofthe trayor oven.
Topreventbreakage,do notplace
trayintowaterjust aftercooking.
Washit carefullyinwarm, sudsy
wateror in thedishwasher.The tray
can bebroken ifdropped.
Remember,do notoperatethe oven
withoutthe cookingtrayin place.
Specialnotewhen using
Brown‘NSearDish:If greaseis
present,highheat generatedon
bottomof a Brown‘NSear dish
maycause thegreasetobum onto
the cookingtray.This maybe
removedwith a cleansersuchas
BonAmi@brandcleanser.
Afier usingBon Ami@brand
cleanser,rinse anddry thoroughly,
followinginstructionson can. Do
notuse BonAmi@brand cleanser
on thepaintedsurfacessuchas the
walls.Rmay scratchthe paint.
AutomaticTemperatureProbe.
Probe issturdy,butcare shouldbe
takenin handling.Do nottwistor
bend; avoiddroppingtemperature
probe,
Cleanassoonafterusingaspossible.
Toclean, wipe with sudsycloth,
thenrub lightlywith plasticscouring
ball ifnecessary.Rinse anddry. (Or
wash indishwasher.)
DOUBLE DUTY1’”shelf. Your
shelfaccessory is designed foruse
in a microwaveovenonly; do not
use in a corwcntionaloven. Do not
usc a browning dish with the shelf.
Arcing could occur.
Clean shelf with mild soap and
water or in the dishwasher. Do not
ciemlSiltIf’in 2 oven.
Howtoaeanthe
Case. Cleantheoutsideofyour
ovenwith soapanddampcloth,
rinsewith dampclothandthen dry.
Wipethe windowclean witha
dampcloth. Chrometrim isbest
wipedwith adamp clothand then
witha dry towel.
ControlPaneLWipewith a damp
cloth. Dry thoroughly.Do notuse
cleaningsprays,largeamountsof
soapand water,abrasives,or sharp
objectson thepanel—theycan
damageit.
Door Surface.When cleaning
surfacesof door andoventhat
come togetheron closingthe door,
use onlymild, nonabrasivesoaps
or detergents applied with a sponge
or softcloth.
PowerCord. If the cord becomes
soiled, unplugand washwith damp
cloth. For stubbornspots, sudsy
watermay be used, butbe certain
to rinse with damp clothand dry
thoroughlybefore pluggingcord
intooutlet.
oven hmp
First unplugthe oven. Then remove
lampcompartmentcoverbyremoving
screw which holdscoverin place.
Cover islocated on the sideof the
outer case.
..--
‘-.>
b. .
>= .. -->,
‘???
:1 ‘
7
‘ I;;“ ;
IJ
~’
~ [/:
,I‘
!,I;~:;‘/!~,ji
;- 1?~l /
I 1 Iflll
\
i
i y y’
“ I
‘ \~]~‘
,’‘
IIi1!/,,‘/,
I~ I
1 I
I 1:I /
, lj~1’
j l“
/
+1
.<+ .,.
/;’/,;~I
‘v
1’
/+...
,-
“/
Replacewith25-wattappliancebulb.
(It is availablein drug and hardware
stores.) Replace compartment
cover. Plug in the oven.
Page 19

Thisappliancemustbe grounded.
In theeventofan electricalshort
circuit, groundingreducestherisk
ofelectricshock byprovidingan
escapewire for theelectriccurrent.
This appliance is equippedwith a
powercord havinga grounding
wire witha groundingplug. The
plugmustbe plugged into anoutlet
thatis properly installedand
grounded. (Fig. 1)
useof thegrounding plug;an-result
ina risk ofelectric shock.
use Phqgs
usage where’
appkmce?spowerH9rdwill
be
Becauseof potential safetyhazards
undercertain conditions,we
stronglyrecommendagainstthe
useof an adapterplug. However,
ifyoustillelect to use an adapter,
wherelocal codespermit, a
TEMPORARY COIW?EC’I’ION
maybe madeto aproperlygrounded
two-prongwallreceptaclebytheuse
ofa UL listed adapter(Fig.2)
whichis available-atmos[local
hardwarestores.
usage where
pmwrcordwill
be
Donotuseanadapterpluginthese
situationsbecausedisconnectingof
thepowercord placesunduestrain
onthe adapterand leadsto eventual
hike oftheadaptergroundterminal.
Youshouldhavethetwo-prongwall
receptaclereplacedwith a threeprong(grounding)receptacleby a
qualifiedelectricianbeforeusing
theappliance.
usedml’temioncords
FmEw–.
.—..—
--
-
--
r4Er&i––
ME#r
Consulta quaiiiled electrician or
service technician ifthe grounding
instructionsare not completely
understood, or if doubt ;xists as to
whether the appliance is properly
grOLllldd.
Where a standard two-prong wall
receptacle isencountered, itis
your pcrsorialresponsibility and
{lbiigationto have itrcplaceciwith
:!prOp~l’lygl”OUndCd
I“mp(ack.
wall
1)0 !Mt Under any
Qg]t Or lxjmw’e the third
‘pI”OKB~f’l”om the power Col”d.
thrCC-prOng
TEMPORARYMETHOD
(ADAPiERPLUGSNOT
PERMITTEDIN CANADA)
J
ALIGNLARGE
PRONGWLOTS >-
Fig.
The larger slot inthe adapter must
be alignedwith the largerslotin the
wallreceptacle to provideproper
polarity in the connection ofthe
powercord.
Caution: Attaching the adapter
ground terminal to the wall
receptacle cover screw does not
ground the appliance unlessthe
cover screw is metal, and not
insulated, and the wallreceptacle
is grounded through the house
m
m
R
ION
Becauseof potentialsafetyhazards
undercertainconditions,westrongly
recommendagainstthe use ofan
extensioncord. However,if it is
necessaryto use an extensioncord,
II
useonly a 3-wireextensioncord
thathas a 3-bladegroundingplug,
and a 3-slotreceptaclethat will
acceptthe plug onthe appliance.
The marked ratingof the extension
cord shallbe equalto or greater
thanthe electrical rating ofthe
appliance(15amperes).
Suchextensioncords are obtainable
throughGeneral Electric service.
H you.do use an extension cord
with yourmicrowaveoven?the
interiorlight mayflicker and the
blowersound mayvary when oven
isin use. Cook times may be longer
as well.
...-
>.,
. - -- — . .—--————... -—
———.. . .——..
I
}
I
o
Page 20

—-.——
~-
\—
~
OVENWILLNOT
COME ON
T
POSSIBLECAUSEAND REMEDY
e~
fusein yourhomemaybe blownor the circuit breaker tripped. Replace“fUSeOr
I
resetcircuitbreaker.
~Unplugyourmicrowaveoven,then
Makesure 3-prongplug onovenis fully inserted intowallreceptacle.
IS
plugitba~~iIL
CONTROL PANEL
LIGHTED, YET OVEN
WILL NOT START
FOODSARE EITHER * Cookingtimesmay vary becauseof starringfoodtemperature, food density or
OVERCOOKEDOR
UNDERCOOKED
—
PROBE”’APPEARS
)N DISPLAY
~Door not securelyclosed.
‘@STARTmustbe touchedafterentering cooking sektion.
%Ano&e~selectionentered
@Makesure youhaveentered cookingtime after touchingTIME COOK I & 11.
~CLEAR/~FF wastouched ac~iden~y+ Reset coofing program and touchSTART.
@Makesure youhaveentered a desired finishedtemperature after touchingTEMP
COOWHOLD.
a M~e sure youhaveentered a codenumber after touching AUTO ROASTor
AU’10DEFROST.
amountof foodsin oven. TouchTIME COOK I & 11and additional cooking time for
completion.
@Incorrect powerlevelentered. Check cookbook for recommended power level,or
changingIqvelsduring cooking if necessary.
@Dish was not rotated, turned or stirred. Some dishes require specific instructions.
Check cookbookor recipe for instructions.
~Toomany dishes in ovenat same time. Cooking time must be increased when
cookingmore than one fooditem. Check cookbook time recommendations.
~Probe no! insertedproperly intomeat or dish when using ‘MmpCook/HoM or Auto
Roastfunctions. Check cookbook for specific instructions.
?
@Probe has been forgotten or not seated properly in ovenwall when using Auto Roast
or Temp C’ook/Holdfunctions.
~r~dy in ~ve~ and CLWW(3FF not touched to cancel it.
@Stcanlor wiper escaping from
Moundthe door.
~ I.igh( rc[lwt ion around door or
OLIt~l”
C:/SC.
~Dimming ovenlight and change
in blowersound may occur while
operating at power levelsother
than high.
~ DuI{thumping sound whiic OVeN
isoperating.
2(’J
~Some TV-Radiointerference
mightbe noticed while using your
microwaveoven. It’ssimilar to the ‘ ~
interference caused byother smail
appliances and does not indicatea
problem with your oven.
~..--.
( ‘j
\.L-...‘
)
..
Page 21

Toobtainservice, seeyourwarranty
-.,
on theback pageof thisbook.
We’reproudofour serviceand
wantyouto bepleased. If forsome
reasonyouare nothappywiththe
serviceyou receive,here arethree
stepstofollowfor further help.
FIRST,contactthe people who
servicedyourappliance. Explain
whyyou are notpleased. In most
cases, this willsolvethe problem.
NEXT, ifyou are stillnotpleased,
write allthe details—including
yourphone number—to:
Manager, ConsumerRelations
General Electric
AppliancePark
Louisville,Kentucky40225
FINALLY,ifyour problemis still
notresolved, write:
Major Appliance
Consumer ActionPanel
20 North WackerDrive
Chicago, Illinois60606
E&m14
——..
Er4tEi-
lmm —
—.
_–
ggjf?!?–
——
EEss?r
-
—.
I
!
Page 22

Saveproofoforiginalpurchasedatesuch
)?!
asyour salesslip or cancelledcheckto establishwarrantyperiod.
—.-.—
... —--
1s
FULL-r!-m=lf~~~
Forthreeyearsfromdateoforiginal
purchase;wewill provide,freeof
charge,partsandservicelabor
in yourhome to repairor replace
anypafi of the microwaveoven
thatfailsbecauseofa manufacturing
defect.
Uwrm luxm-lo~~~
-rWc)-lmm
Forthe fourth andfifth yearfrom
dateof original purchase,we
will provide,free of charge,a
replacement
the magnetrontube fails because
of a manufacturingdefect. Youpay
for the servicetrip to yourhome
and servicelabor charges.
~ Servicetrips to your hometo
teach you howto usethe product.
Re&l your Useand Carematerial.
if youthen haveany questions
about operating the product,
pleasecontact your dealer or our
Consumer Affairs office at the
address below,or call, toll free:
The GE AnswerCente@
800.626.2000
consumer information service
@Improper installation.
Ifyou have an installation problem,
contact your dealer or instalier.
Youare responsible for providing
magnetrontube if
Thiswarrantyisextended
the originalpurchaserandany
succeedingownerforproducts
purchasedforordinaryhomeuse
inthe48 mainland states,Hawaii
andWashington,D.C.InAlaskathe
warrantyis the sameexceptthat it is
LIMITEDbecauseyou mustpay-to
shiptheproducttotheserviceshop
orfor the servicetechnician’stravel
coststo your home.
All warrantyservicewill be provided
byour FactoryServiceCentersor
byour authorizedCustomerCare”
servicersduring normalworking
hours.
Lookinthe White orYellowPages
ofyour telephonedirectory for
GENERAL ELECTRICCOMPANY,
GENERALELECTRICFACTORY
SERVICE,GENERALELECTRIC-
HOTPOINTFACTORYSERVICEor
GENERALELECTRICCUSTOMER
CARE” SERVICE.
@Replacement of housefuses or
resettingof circuit breakers.
@Failureof the product if it is used
for otherthan its intended purpose
or used commercially.
~ Damageto product caused
byaccident, fire, floods or acts
of God.
WARRANTORISNOTRESPONSi~LE
FORCONSEQUENTIAL DAMAGES.
to
adequate electrical,exhausting
and other connecting facilities.
— ...———------.---——.-.-:--- ..— ---
Some slates do not allow the exclusion or limitation of incidental orconsequential damages, so the above limitation or exclusion
may not apply to
To know ~,vhatyour legal rights are in your state,consult your local or stateconsumer affairs office or your state’sAttorney Genel”al.
yoti. This warranty gives you specific legal rights, and you may also have other rights which varyfrom stateto state.
———
1
 Loading...