

Page 1
U andCake& Cooking Gui%
Adapter Plugs
Aluminum Fofi 4 Mir~ute/SecondTimer 9
ApplianceRegistration
Auto Defrost
Auto Start
Careand Cleaning
Consumer Services 31
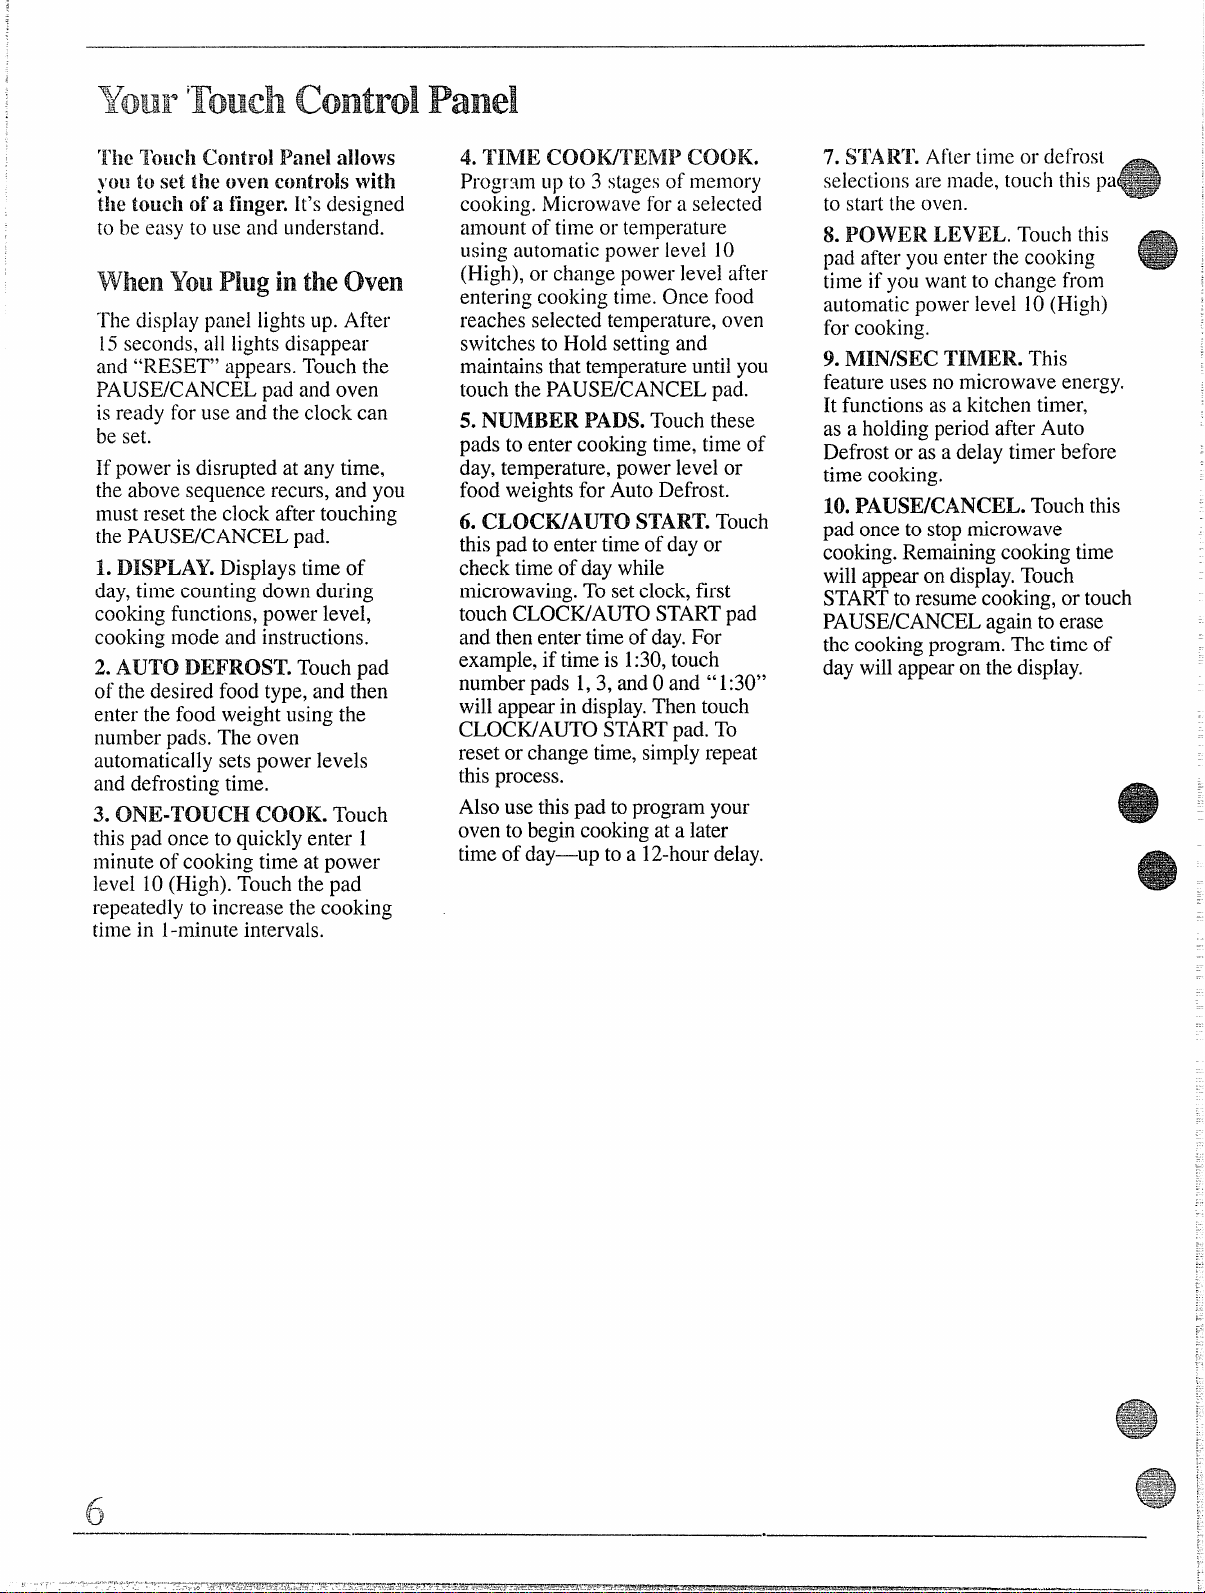
ControlPanel 6,7
CookingCompleteReminder 8 ProgramCooking 5
CookingGuide 20-26 SafetyInstructions
DefrostingGuide
DelayedCooking
ExtensionCords
Features 8 Warranty BackCover
GlossaryofMicrowaveTerms
Grounding Instructions
Heating or Reheating Guide 16,17
Hold Time
Installation
MicrowaveCookwareGuide 15 8470.626.2000
28
2
12,13
9 PowerLevels 10-13
27
18,19
9
28
E
9
28
MicrowavingTips
Model and SerialNumbers
One-TouchCook
Precautions
Probe
Problem Solver
Temperature Cook
TimeCook
Turntable
GEAnswerCenter@
2-5
8,11,27
29
2-5
11
10
3,8,27
3
2
9
Model JE85T
Microwavepoweroutput
ofthis ovenis700 watts.
(IEC-705TestProcedure)
Page 2

It is intended to help you operate
~~
anti maintain your new microwave
oven properly.
I{eep it handy for answers to your
c]uestions.
If you don’t understand something
or need more help, write (include
your phone number):
Consumer Affairs
GE Appliances
Appliance Park
Louisville, KY 40225
writedown themodeland
serialnumbers.
You’11find them on a label inside
the oven,
These numbers are also on the
Consumer Product Ownership
Registration Card that came with
your microwave oven. Before
sending in this card, please write
these numbers here:
Model Number
Serial Number
Use these numbers in any
correspondence or service calls
concerning your microwave oven.
Besure yourmicrowave
ovenis registered.
It is important that we know the
location of your microwave oven
should a need occur for
adjustments.
Yoursupplier is responsible for
registering you as the owner.
Please check with your supplier to
be sure he has done so; also send
in your Consumer Product
Ownership Registration Card. If
yoLlmove, or if yoLlare nOtthe
original purchaser, please write to
LIS,stating model and serial
numbers.
This :applianeemustbe registered.
Please i)? certain t13atit is.
Write to:
GE Appliances
Range Product Service
Appliance Park
Louisville, KY 40225
If
youreceiveda
damagedoven...
Immediately contact the dealer (or
builder) that sold you the oven.
save time and
money.
Beforeyourequestservice...
Check the Problem Solver in the
back of this book. It lists causes of
minor operating problems that you
can correct yourself.
All
thesethingsarenormal
withyollrmicrowaveoven.
Steam or vapor escaping from
e
around the door.
@Light reflection around door or
oute~case.
eDimming oven light and change
in blower sound may occur while
operating at power levels other
than high.
eDull thumping sound while oven
is operating.
0Some TV-Radio interference
might be noticed while using your
microwave oven. It’s similar to the
interference caused by other small
appliances and does not indicate a
problem with your oven.
If
you needservice...
To obtain service, seethe
Consumer Services page in the
back of this book.
We’re proud of our service and
want you to be pleased. If for some
reason you are not happy with the
service you receive, here are three
steps to follow for further help.
FIRST, contact the people who
serviced your appliance. Explain
why yoL~are not pleased. In most
cases, this will solve the problem.
NEXT, if yc~uarc still not pleased,
write all the details—including
your phone number-to:
NJanager,Consumer Relations
GE Appliances
Appliance Park
Louisville, KY 40225
FINALLY,if your problem is still
not resolved, write:
Major Appliance Consumer
Action Panel
20 North Wacker Drive
Chicago, IL 60606
PmcAuTIoNs
To AVOID
POSSIBLE
ExPosum To
EXCESSIVE
MICROWAVE
ENERGY
(a) Do Not Attempt to operate this
oven with the door open since
open-door operation can result in
harmful exposure to microwave
energy.It is important not to defeat
or tarnperwith the safety
interlocks.
(b) Do Not Place any object
between the oven front face and
the door or allow soil or cleaner
residue to accumulate on sealing
surfaces.
(c) Do Not Operate the oven if it
is damaged. It is particularly
important that the oven door close
properly and that there is no
damage to the:
(1) door (bent)
(2) hinges and latches (broken or
loosened)
(3) door seals and sealing surfaces.
(d) The Oven Should Not be
adjusted or repaired by anyone .~~~~.
except properly qualified service
personnel.
.-.
.=,.
o
2
—.
.
Page 3
IMPORTANTSAFETY
INSTRUCTIONS
Readall instructionsbeforeusingthis appliance.
If you are not sllre if a dish is
microwave-safe, use this test:
Place in the oven both the dish you
are testing and a glass measuring
cup filled with one cup water—set
the measuring cup either in or next
o the dish. Micr~wave 1 minute at
~~:~
~+~+-gh. ]f the dish heats, it shotlld not
G
oe used for microwaving. If the
dish remains cool and ofily the
water in the cL~p!leats, then the
dish is microwave-safe.
0 Paper towels? waxed paper and
plastic wrap can be used to cover
dishes in order to retain moisture
and prevent spattering. Be sure to
vent plastic wrap so steam can
escape.
~Some microwaved foods
reqtlire stirring, rotating or
rearranging. Check the Cooking
Guide.
QSteam builds up pressure in
foods which are tightly covered
by a skin or membrane. Pierce
potatoes, cgg yolks and chicken
livers to prevent bllrsting.
Ifyotluse a meat thermometer
whilecooking,makesure it is
safefor use in microwaveovens.
Whenusingelectricalappliances,
basicsafetyprecautionsshouldbe
followed,includingthefollowing:
theriskofburns,electricshock,
fire,injurytopersonsorexposure
toexcessivemicrowaveenergy:
euse thisapplianceonlyfor
itsintendeduseasdescribedin
thismanual,
~Readand fol~owthe
specific
“PRECAUTIONSTOAVOD
~OSS~BLEEXPOSU~ TO
EXCESSIVEMICROWAVE
ENERGY”onpage2.
=Thisappliancemustbe
grounded.Connectonlyto
properlygroundedoutlet.
See“GROUNDING
INSTRUCTIONS”onpage28.
@Usethisapplianceonlyforits
intendeduseasdescribedin
thismanual.Donotuse
corrosivechemicalsorvaporsin
thisappliance.Thismicrowave
ovenisspecificallydesignedto
heatorcookfood,andisnot
intendedforlaboratoryor
industrialuse.
@For bestoperation9plugthis
applianceintoits ownelecfricaI
outlet,topreventflickeringof
lights,blowingoffuse‘or
trippingofcircuitbreaker.
*Instaljor locatethisapp~iance
onlyinaccordancewiththe
providedInstalIatien
Instructions,
@Becertain to p~acethe
front surfaceofthe doorthree
inchesor moreback fromthe
countertopedgeto avoid
accidentaltippingofthe
applianceinnormal usage.
* Donotcover or blockany
openingsontheapp~iance.
=Donot storethisapp!iance
outdoors.Donotusethis
productnearwater-for example,
ina wetbasementorneara
swimmingpool.
~Donotimmersepowercord
or plugin water.
~Keeppowercordawayfrom
heatedsutiaceso
*Donotletpowercordhang
overedgeoftableor counter.
@Donot operatethisappliance
ifit hasa damagedpowercord
or plug,ifit isnot working
properly,or ifit hasbeen
damagedor dropped.
~Donotoperateovenwithoutthe
turntableandturntablesupport
seatedandinplace.
eDonotallowturntabletobe
restrictedsotheturntable
cannotrotate.
~Seedoorsurfacecleaning
instructionsin theCa~eand
Cleaningsection(s)ofyourbook.
@Thisapplianceshouldbe
servicedoIIlybyqualified
servicepersonnel.Contact
nearestauthorizedservice
facilityforexamination,repair
oradjustment.
@Aswithanyappliance?close
supervisionis necessarywhen
usedbychildren.
(colltiil[ie{l ~ze.~fl?age)
——
3
Page 4
...
‘F(1Fedlleethe ris!{offirein
*
tileovencavity:
—DonotOvereoolifood.
Carefullyat[endapplianceif
paper,plasticorothercombustible
]}laterialsare placedinsidethe
~vel~tofi~~ilitateco~king,
—Removewiretwist-tiesfrom
paperorplasticbagsbefore
placingbagsinoven.
—Donot useyourmicrowave
oventodry newspapers.
—Donot userecycledpaper
products.Recycledpapertowels,
napkinsandwaxedpapercan
containmetalfleckswhichmay
causearcingorignite.Paper
productscontainingnylonor
nylonfilamentsshouldbe
avoided,astheymayalsoignite.
—DoIlotpoppopcornin your
n~ierowaveovenunlessin a
specialmicrowavepopcorn
accessoryorunlessyouuse
popcornlabeledforusein
microwaveovens.
—Donot operatethe oven
whileemptyto avoiddamageto
theovenand thedangeroffire.
Ifbyaccidenttheovenshould
runemptyaminuteortwo,no
harmisdone.However,tryto
avoidoperatingtheovenempty
atalltimes-it savesenergyand
prolongsthelifeoftheoven.
—Do~~otovercookpotatoes,
Theycoulddehydrateandcatch
fire,causingdamagetoyouroven.
~ Dol~otusethe ovenforstorage
purposes.Do
products,cookingutensilsorfood
intheovenwhennotinuse.
eIfWlaterialsinsideovenShould
ignite,keepovendoorclosed,
turnovenoff,anddisconnect
powercord,orshutoffpowerat
the fuse or circuitbreakerpanel,
notleavepaper
* Someproductssuchas whole
eggsaxldsealedcon~iners—for
example,closedjars-will
explodeandshouldnotbeheated
inthismicrowaveoven.Suchuse
ofthemicrowaveovencould
resultininjury.
@.4voidheatingbabyfoodin
glassjars,evenwithouttheirlids;
especiallymeatandeggmixtures.
e~~~y~~~f~~s~f~Q~@~
beveragesinnarrownecked
bottles(especiallycarbonated
beverages).Evenifthecontainer
isopened,pressurecanbuildup,
Thiscancausethecontainerto
burst,possiblyresultingininjury.
~Usemetalonlyas directedin
thisbook.TVdinnersmaybe
microwavedinfoiltrayslessthan
3/4”high;removetopfoilcover
andretuimtraytobox.When
usingmetalinthemicrowave
oven,keepmetaIat least 1inch
awayfromsidesofoven.
~cookwaremaybecomehot
becauseofheattransferredfrom
theheatedfood.Potholdersmay
beneededtohandlethecookware.
~S~~e~i~es,the~~r~~able~a~
becometoohot to touch.Be
carefultouchingtheturntable
duringandaftercooking.
~Foodscookedin Biquids(such
aspasta)maytendto boilover
morerapidlythanfoods
containinglessmoisture.Should
thisoccur,refertopage27for
instructionsonhowto cleanthe
insideoftheoven.
sT~~e~m~me~e~_~onotusea
thermometerinfoodyouare
microwavingunlessthe
thermometerisdesignedor
recommendedforusein the
microwaveoven.
~Removethetemperature
probe fromthe ovenwhenno
usingit tocookwith.
Ifyou
leavetheprobeinsidetheoven
withoutinsertingitinfoodor
liquid,andturnonmicrowave
energy,itcancreateelectrical
arcingintheovenanddamage
ovenwalls.
~PIasticcookware—Plastic
cookwaredesignedfor
microwavecookingisvery
useful,butshouldbeused
carefully.Evenmicrowave-safe
plasticmaynotbeastolerantof
overcookingconditionsasare
glassorceramicmaterialsand
~ay softenorcharif subjectedto
shortperiodsofovercooking.k
longerexposurestoovercooking,
thefoodandcookwarecould
ignite.Forthesereasons:1)Use
microwave-safeplasticsonlyand
usethemin strictcompliance
withthecookwaremanufacturer’s
recommendations.2)Donot
subjectemptycookwareto
microwaving.3)Donotpermit
childrentouseplasticcookware
withoutcompletesupervision.
~Whencookingpork9follow
thedirectionsexactlyandalways
cookthemeatto aninternal
temperatureofatleast170°F.
Thisassuresthat,intheremote
possibilitythattrichinamaybe
presentinthemeat,itwillbe
killedandmeatwillbesafetoeat.
~Donot boileggsin a
microwaveoven. Pressurewill
buildupinsideeggyolkandwill
causeittoburst,possibly
resultingininjury.
@F~~dswi~~~~b~~ken~~~e~
66skin99suchaspotatoes,sausages,
tomatoes,apples,chickenlivers
andothergiblets,andeggyolks
(seepreviouscaution)shouldbe
piercedtoallowsteamtoescape
du~ingcooking.
Page 5
. . . .
.
e ~~3Qllbll~OUS boili]lg—Under
- celltli]lspecialcircll]nstallces,
lic!uidsmaystarttoboilduringor
shhrtlyafterremovalfromthe
microwaveoven.Toprevent
burnsfromsplashingliquid,stir
theliquidbrieflybefore
removingthecontainerfromthe
microwaveoven.
‘ “Boilable” Cookingpouches
and
tightlyclosedplastic bags
should be slit, pierced or vented as
directed by package. Mthey are
not, plastic could burst during or
immediately after cooking,
possibly resulting in injury.Also,
plasticstoragecontainersshould
beat leastpartiallyuncovered
becausetheyformatightseal,
Whencookingwithcontainers
tightlycoveredwithplasticwrap,
.~~novecoveringcarefullyand
@
“ect steam away from hands
--=
and face.
whenYouPlugin
theoven
The displaypanel lights up. After
15seconds, all lights disappear and
“RESET” appears. Touch the
PAUSE/CANCELpad and oven
is ready for use and the clock
can be set.
If power is disrupted at any time,
the above sequence recurs and you
must reset clock after touching
PA[JSE/CANCEL.
Programcooking
Use your Touch Control Panel to
Time Cook with choice of power
levels from 1 (lowest,)to 10
(highest); to Auto Defrost, with the
oven setting the power levels and
cooking or heating times; to Temp
Cook, using your choice of
temperatures; to time kitchen tasks
with the Min/Sec Timer; and to set
the clock.
Create your own programs to suit
your individual cooking style. For
example: use the Min/Sec Timer
to delay the start of Time Cook or
set Time Cook for a three-stage
program using different times
and power levels.
Hot foods and steam can
cause burns. Be
carefulwhen
openinganycontainersofhot
food,includingpopcornbags,
cookingpouchesandboxes.To
preventpossibleinjury,direct
steamawayfromhandsandface.
SAVETHESE
INSTRUCTIONS
.. .
,
<
..-
.......—.._... _..
—
—.
5
—
Page 6
whenYouPlulgintheoven
The ciisplay panel lightsup. After
15seconds, all lights disappear
and “RESET” appears. Touch the
PAUSE/CANCEL pad and oven
is ready for use and the clock can
be set.
If power isdisrupted at any time,
the above sequence recurs, and you
must reset the clock after touching
the PAUSE/CANCEL pad.
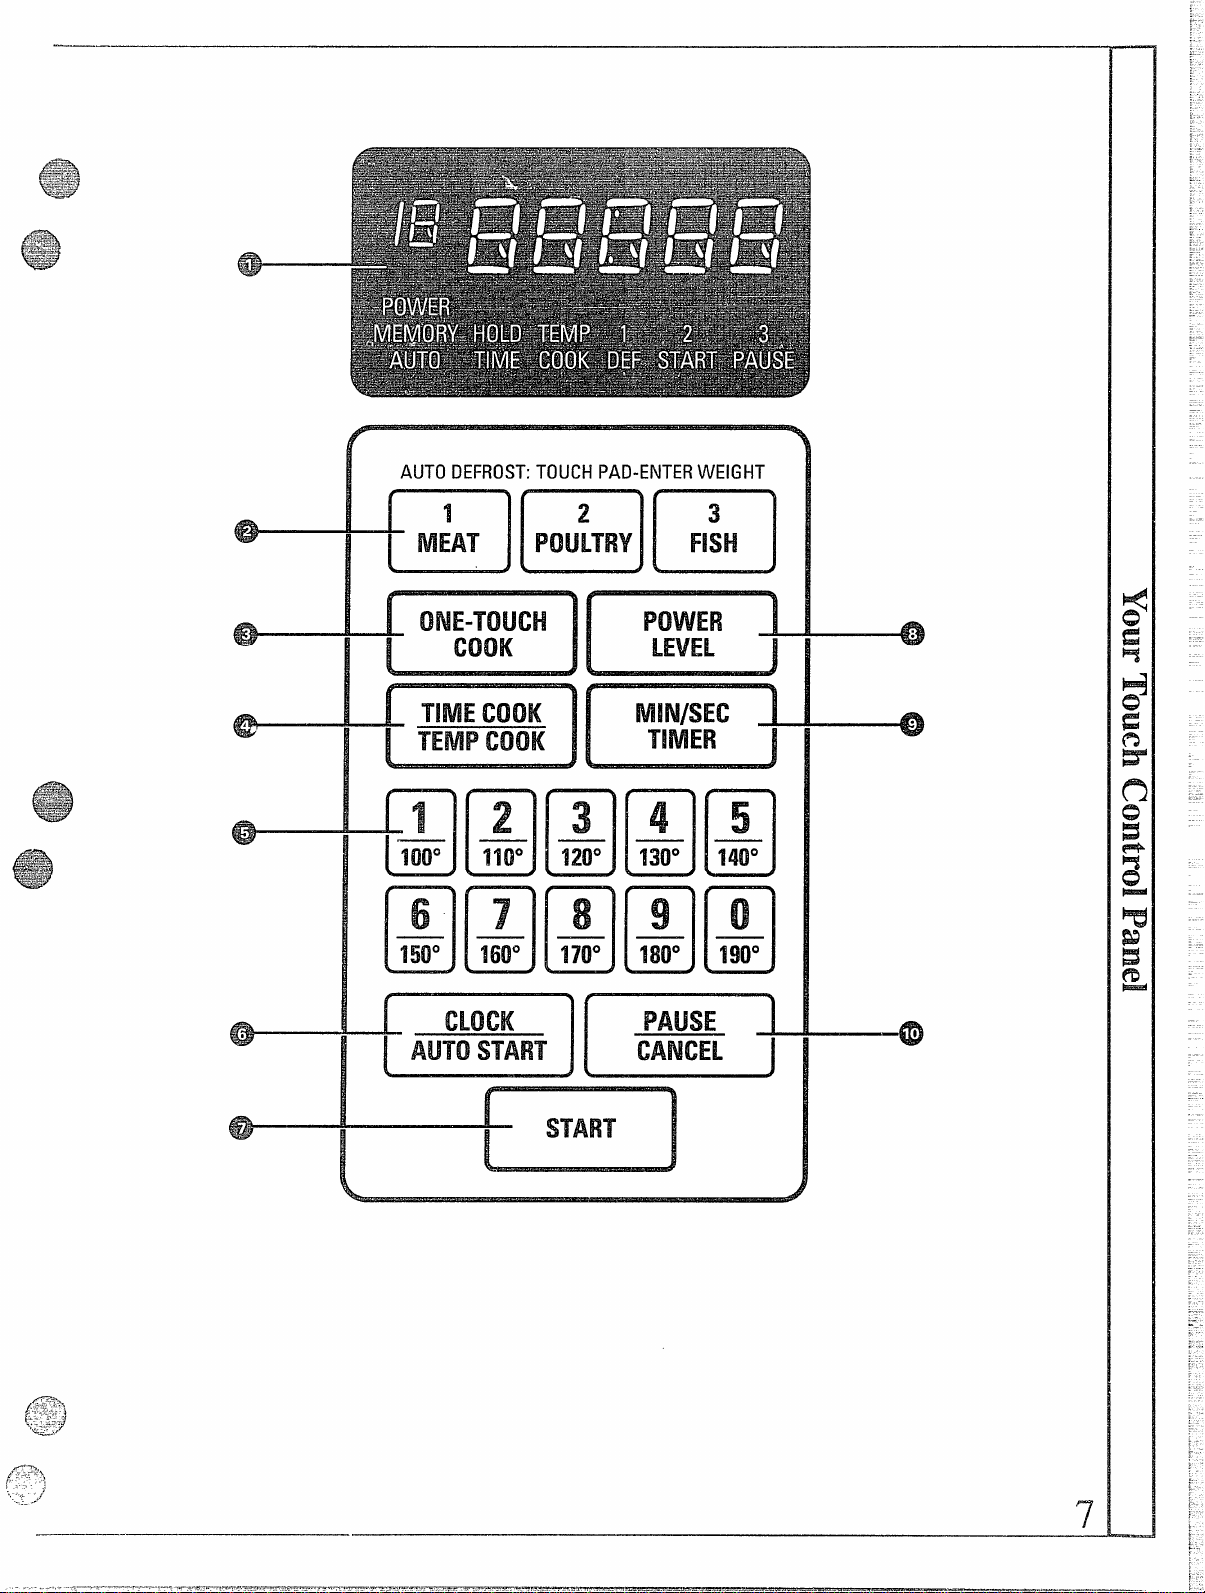
1.DISPLAY. Displays time of
day, time counting down during
cooking functions,power level,
cooking mode and instructions.
2. AUTO DEFROST. Touch pad
of the desired food type, and then
enter the food weight using the
number pads. The oven
automatically setspower levels
and defrosting time.
3. ONE-TOUCH ICOOK.Touch
this pad once to quickly enter 1
minute of cooking time at power
level 10(High). Touch the pad
repeatedly to increase the cooking
time in 1-minuteintervals.
4. TIME coomENII’ COOK.
Progr:~.nlup to 3 stages of memory
cooking. Microwave for a selected
amount of ti121eor temperature
using automatic power level 10
(High), or change power level after
entering cooking time. Once food
reaches selected temperature, oven
switches to Hold setting and
maintainsthat temperatureuntil you
touch the PAUSE/CANCEL pad.
5. NUMBER PADS. Touchthese
pads to enter cooking time, time of
day, temperature, power level or
food weights for Auto Defrost.
6. CLOCWAUTO START.Touch
thispad to enter time of day or
check time of day while
microwaving.To set clock,first
touch CLOCK/AUTO STARTpad
and then enter time of day.For
example, if time is 1:30,touch
number pads 1,3, andOand “1:30”
will appearin display.Then touch
CLOCWAUTO ST.ARTpad. To
reset or change time, simply repeat
this process.
Also use thispad to programyour
oven to begin cookingat a later
time of day—up to a 12-hourdelay.
7. Sr~AI?~.After time or defrost
selections are macie,touch this pa
to start the oven.
8. PQYVER I.EVEL. Touch this
pad after yoLlenter the cooking
time if you want to change from
automatic power level 10 (High)
for cooking.
9. MIN/SEC TIMER. This
feature uses no microwave energy.
It functions asa kitchen timer,
as a holding period after Auto
Defrost or as a delay timer before
time cooking.
10. PAUSE/CANCEL.Touch this
pad onceto stopmicrowave
cooking.Remainingcooking time
will appearon display.Touch
STARTto resumecooking,or touch
PAUSE/CANCEL again to erase
the cookingprogram. The time of
day willappear on the display.
~
——.— ——
.
Page 7
4
AUTODEFROSTTOUCHPAD-ENTERWEIGHT
amm
mm
m x
:$:BBBH
BHBBa
Bm
<
——
o
I
7
Page 8
II
●.*.*...*.*
:.
.
●.*.*.0...*
●... ..... ..
: :.:O:.:+:..
. . . . .
)“~T
:.. :.*. .
.,
I
-
4
I
:
9
II 111!
/
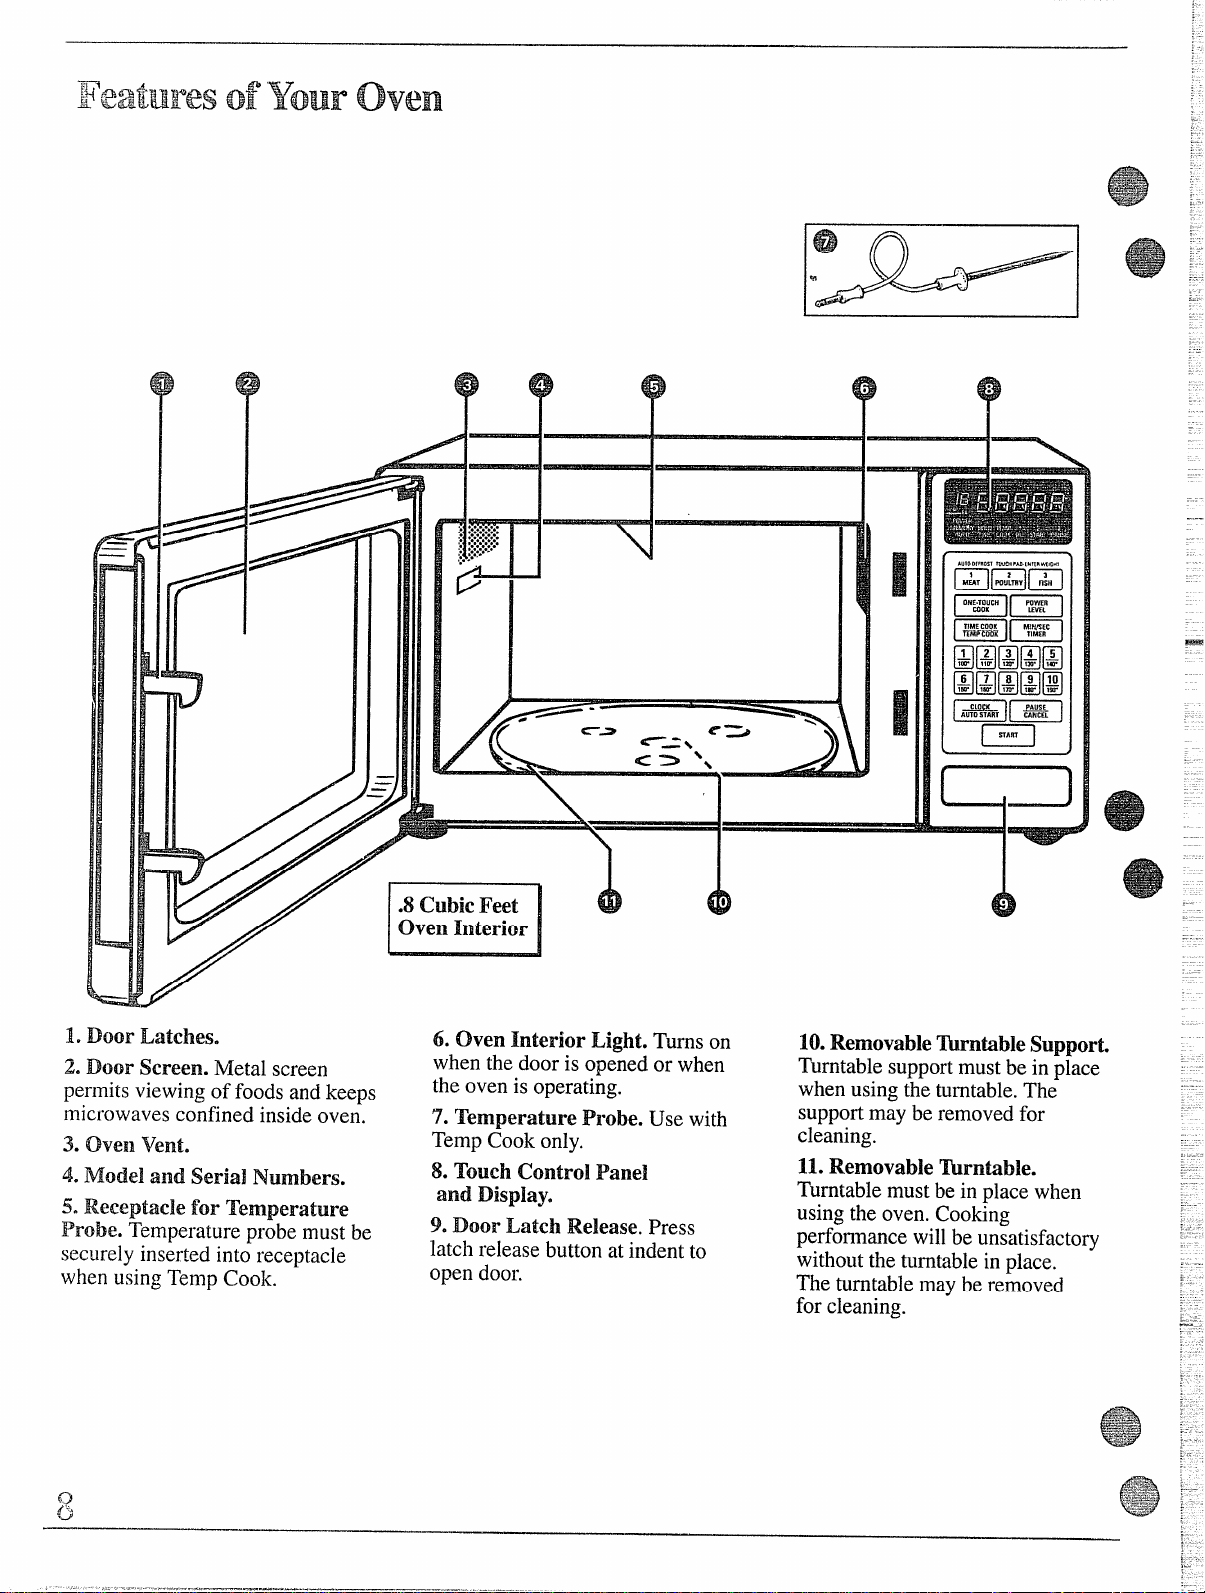
Door Latchese
Door Screen. NIetal screen
permits viewing of foods and keeps
microwaves confined inside oven.
3. Ove~~Vente
4. Model and Seriai Numbers.
50Receptacle for Temperature
Probe. Temperature probe must be
securely inserted into receptacle
when using Temp Cook.
6. Oven Interior Light. Turns on
when the door is opened or when
the oven is operating.
7. Temperature Probe. Use with
Temp Cook only.
8. Touch Control Panel
and DispIay.
9. Door Latch Release. Press
latch release button at indent to
open door.
m
10.Removable~rntible Support.
Turntable support must be in place
when using the turntable.The
supportmay be removed for
cleaning.
11.Removable Wrntible.
Turntable must be in place when
using the oven.
perfo~nnancewill be unsatisfactory
without the turntable in place.
The turntable may be removed
for cleaning.
Cooking
.—-
Page 9
130YvtoUse the Minute/SecondTimer
.....
after defrosting.
—
TheMinute/Second Timer operates
~i~ithoutmicrowave energy.
HowtoTimea 3“Minute
Phonecall
1.Touch MIN/SEC TIMER pad.
2, Touch number pads 3,0 and O
(for 3 minutes and no seconds).
3. Touch START.Display shows
time counting down. The timer
signals when time is up.
usinga HoldingTime
The hfinute/Second Timer can
also be used to program a “holding
time” between microwave cooking
functions. The time can range from
ne second to 99 minutes aid 99
conds. A holding or standing
time may be found in some of-your
own recipes or in the Cooking
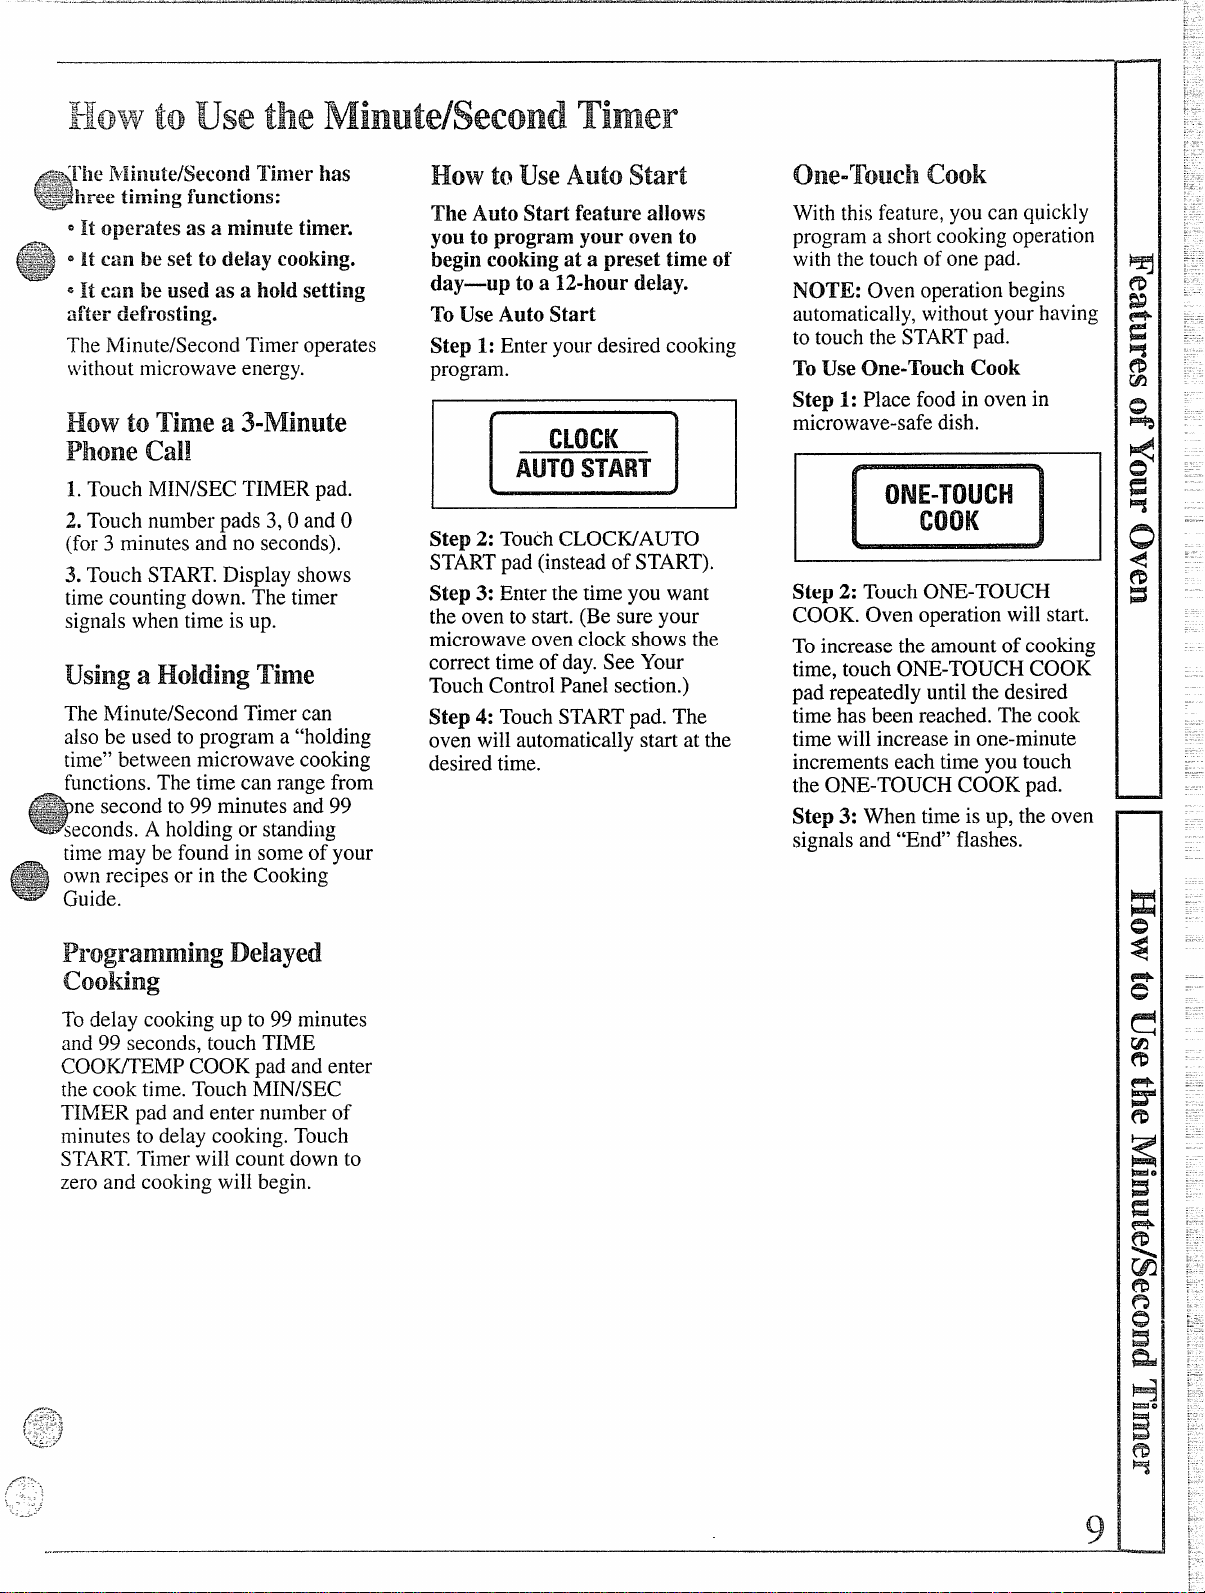
HowtouseAutostart
The Auto Startf’eatureallows
you to program your oven to
begi~leookillg at a preset time of
day—up to a 12-hour delay.
ToUse Auto Start
Step 1: Enter your desired cooking
program.
m
Step 2: Touch CLOCK/AUTO
STARTpad (instead of START).
Step 3: Enter the time you want
the oven to start. (Be sure your
microwave oven clock shows the
correct time of day. See Your
Touch Control Panel section.)
Step 4: Touch STARTpad. The
oven will automatically start at the
desired time.
Olle-rrouchcook
With this feature, you can qt~ickly
program a short cooking operation
with the touch of one pad.
NOTE: Oven operation begins
automatically,without your having
to touch the STARTpad.
TOUse
Step 1: Place food in oven in
microwave-safe dish.
~R~-~OUCh Cook
m
Step 2: Touch ONE-TOUCH
COOK. Oven operation will start.
To increase the amount of cooking
time, touch ONE-TOUCH COOK
pad repeatedly until the desired
time has been reached. The cook
time will increase in one-minute
increments each time you touch
the ONE-TOUCH COOK pad.
Step 3: When time is up, the oven
signals and “End” flashes.
ProgrammingDelayed
cooHng
To delay cooking up to 99 minutes
and 99 seconds, touch TIME
COOK/TEMP COOK pad and enter
the cook time. Touch MIN/SEC
TIMER pad and enter number of
minutes to delay cooking. Touch
START.Timer will count down to
zero and cooking will begin.
...————
Page 10
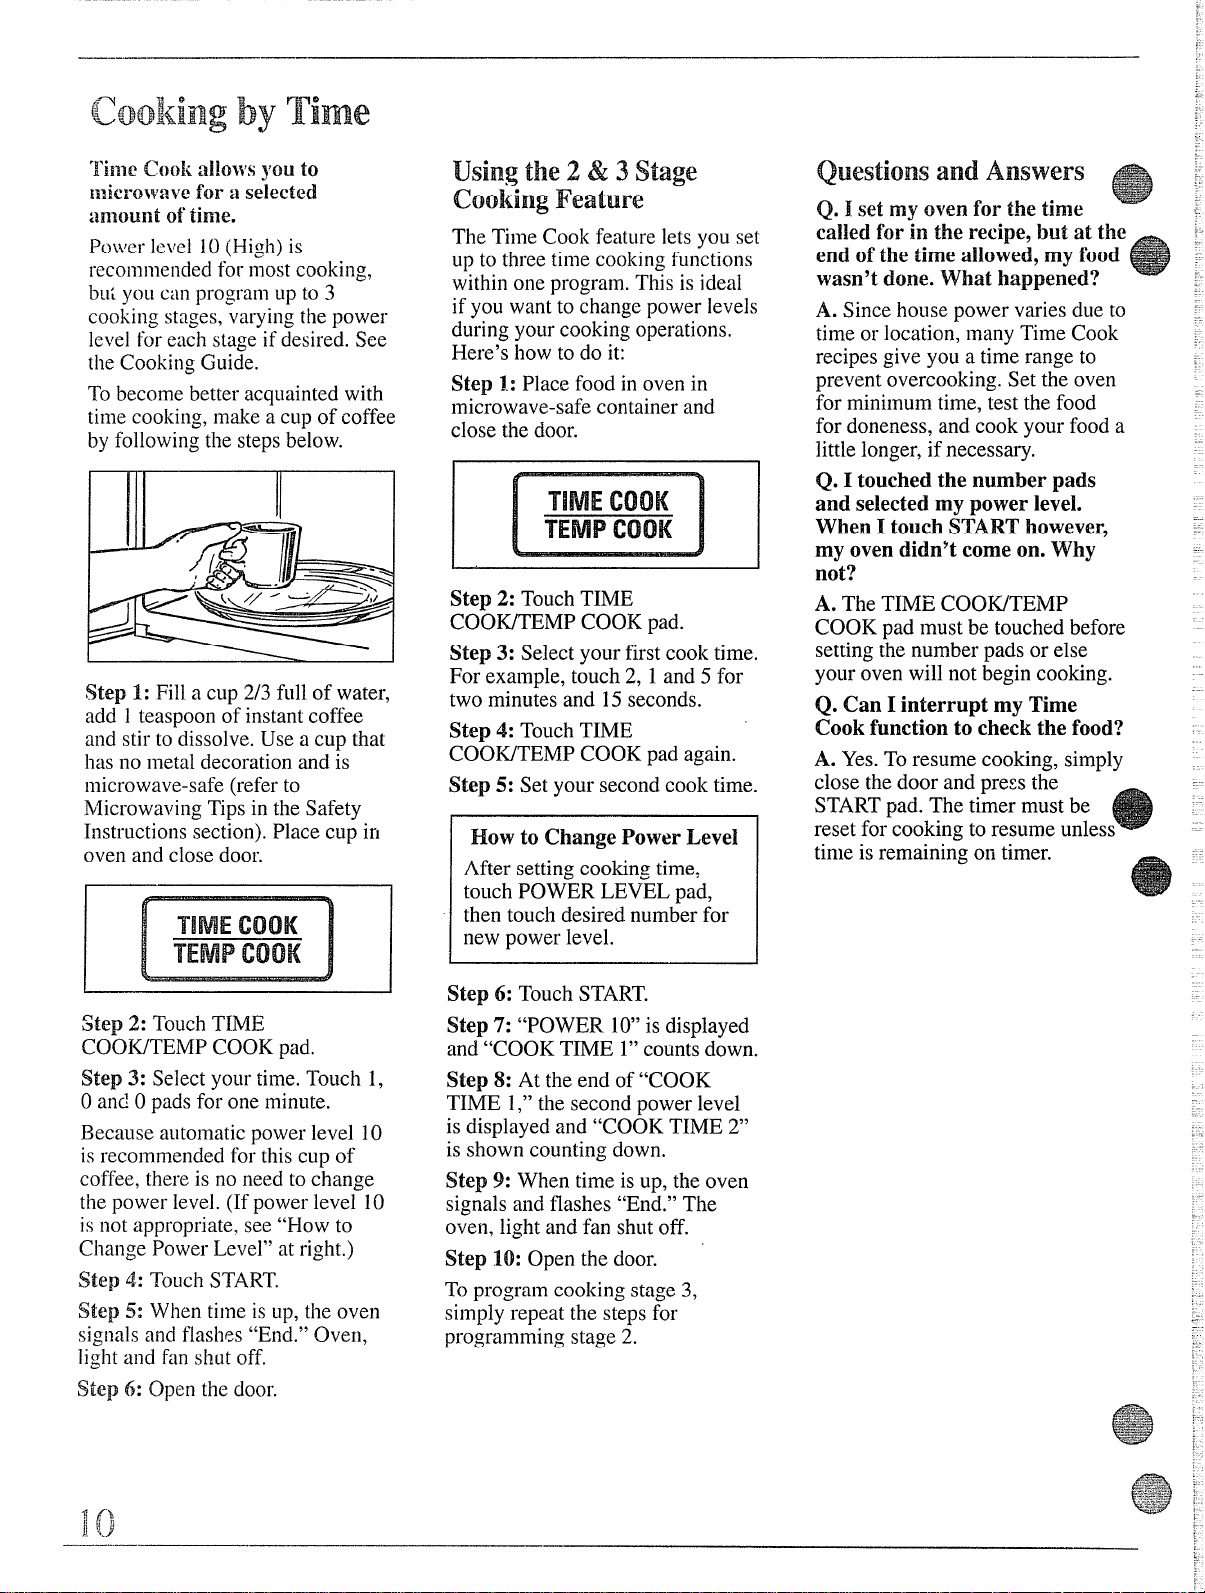
~cookiingby Time
Power level 10 (High) is
recommenced for most cooking,
bu: yoLlc:lnprogl”amLlpto ~
cooking stnges,varying the power
level foreach stage if desired. See
theCooking Guide.
To become better acquainted with
time cooking,make a CLIpof coffee
by followin~ the steps below.
Step ~: Fill a CLIp2/3 full of water,
add 1teaspoon of instant coffee
and stir to dissolve. Use a cup that
has no metal decoration and is
microwave-safe (refer to
Microwaving Tips in the Safety
Instructions section). Place cup in
oven and close door.
Usingthe2& 3stage
cookingreature
The Time Cook feature lets you set
up to three time cooking functions
within one program. This is ideal
if you want to change power levels
during your cooking operations.
Here’s how to do it:
Step 1.:Place food in oven in
microwave-safe container and
close the door.
Step 2: TouchTIME
COOWTEMP COOK pad.
Step 3: Select your first cook time.
For example, touch 2, 1 and 5 for
two minutes and 15seconds.
Step 4: Touch TIME
COOK/TEMP COOK pad again.
Step 5: Set your second cook time.
How toChange Power Level
I
After setting cooking time,
touch POWER LEVEL pad,
then touch desired number for
new power level.
QuestionsandAnswers
Q. I setmy oven for the time ‘““
called for ill the recipe, but at the
end of the time allowed, my food
wasn’t done. What happened?
A. Since house power varies due to
time or location, many Time Cook
recipes give you a time range to
prevent overcooking. Set the oven
for minimum time, test the food
for doneness, and cook your food a
little longer, if necessary.
Q. I touched the number pads
and selected my power level.
When I touch START’however,
my oven didnYtcome on. Why
not?
A. The TIME COOWTEMP
COOK pad must be touched before
setting the number pads or else
your oven will not begin cooking.
Q. Can I interrupt my Time
Cook function to cheek the food?
A. Yes. To resume cooking, simply
close the door and press the STARTpad. The timer must be
reset for cooking to resume unless
I
time is remaining oll timer.
m
Step 2: Touch TIME
COOK/TEMP COOK pad.
Step 3: Select your time. Touch 1,
0 and Opads for one minute.
Because automatic power level 10
is recommended for this cup of
coffee, there is no need to change
the power level. (If power level 10
is not appropriate, see “How to
Change Power Level” at right.)
Step d: TOLIChSTART.
Step ~: When time is Lip,
sigl~~ls and
light and fan shut off.
Step 6: Open the door.
flashes “End.” OveIl,
the oven
Step 6: Touch START.
Step 7: “POWER 10”is displayed
and “COOK TIME 1“counts down.
Step 8: At the end of “COOK
TIME 1,“the second power level
is displayed and “COOK TIME 2“
is shown counting down.
Step 9: When time is up, the oven
signals and flashes “End.” The
oven, light and fan shutoff.
Step 10: Open the door.
To program cooking stage 3,
simply repeat the steps for
programming stage 2.
Page 11

useTemp ‘cook tocoo!<a variety
offoods to the desired finished
food temperature. Tile Time
Cook
setiing is recommended for
batters, doughs, frozen foods and
foods wllieh are d~fficultto cook
precisely with tl~eprobe.
Temp Cook takes the guesswork
out of cooking, because the oven
automatically switches to “Hold”
setting after reaching the preset
food temperature and maintains
that temperature until you touch
the PA?_JSE/CANCELpad or open
the door.
Note: Oven automatically switches
to “Hold” when preset food
temperature is reached.
TheTemperatureProbe
1
- The temperature probe is a food
~“%
e
“~= thermometer that gauges the
internal temperature of your food.
(Its appearance may vary from
picture above.) The probe must be
used when using Temp Cook. To
use your probe properly in a roast,
follow directions below.
Place tender beef roast in cooking
bag on trivet in microwave-safe
dish. (Refer to package instructions
for proper use of cooking bag.)
Insert probe through cooking bag
horizontally into the center meaty
f$~~$eanot touching bone or Pat.
‘~.:,~.;;~akesure the handle does not
t[)uchthe food or top or sides of
~~-”;z’~[l]e~v~n.
{-
..,’
~-.>“
Place pork roast in cooking bag
and place in microwave-safe dish.
I
Place meat in the oven. Insert cable
end of probe firmly into the outlet.
HOW ~0
One-Stage Programming
Step 1: Insert the temperature
probe and attach it securely into
the outlet. Close the door.
Step 2: Touch the TIME COOK/
TEMP COOK pad.
Step 3: Touch the appropriate
number pad to set the temperature
(1OO”F.-195”F.).For example,
touch number pad 2 to set 110”F.
NOTE: To set 115”F.,touch
number pad 2 twice. (110”F.for
the first touch, 115“F.for the
second touch.)
Step 4: Touch POWER LEVEL
pad, then touch the appropriate
number pad.
Note: If you do not want to
program a second stage, touch the
STARTpad to begin cooking.
~o-Stage Programming
If you want to program a second
stage, proceed to Step 5:
Step 5: Touch the TIME COOK/
TEMP COOK pad.
Step 6: TOL~Chthe appropriate
number pad to set the second-stage
temperature (100”F.–195”F.).
w
TempCook
Step 7: Touch the POWER
LEVEL pad, then the appropriate
number pad.
Note: If you do not want to
program a third stage, touch the
START pad to begin cooking.
Three-Stage Programming
If you want to program a third
stage, proceed to Step 8:
Step 8: Touch the TIME COOK/
TEMP COOK pad.
Step 9: Touch the appropriate
number pad to set the third-stage
temperature (1OO”F.–195”F.).
Step 10: Touch the POWER
LEVEL pad, then the appropriate
number pad.
Step 11: Touch START pad.
The current temperatureof the food
being cooked is displayed rising in
5°F.increments. If the start
temperature is lower than 90”F.,
however, “L90” (meaning lower
than 90”F.)will be displayed.
When all cooking ends and the
final stage temperature is reached,
the oven automatically holds the
food temperature for 60 minutes
(or until the door is opened).
Step 12: Touch the PAUSE/
CANCEL pad to stop the cycle.
Step 13: Remove probe and food
from the oven.
QuestionsandAnswers
Q. Are there any foods I can’t
Temp Cook?
A. Yes. YoL~can’t Temp Cook
foods that are not completely
defrosted. Also, do not Temp Cook
delicate butter icings, ice cream,
frozen whipped toppings, etc.,
because they soften rapidly at
warm temperatures. It is also best
to Time Cook batters and doughs
because they are difficult to cook
precisely with the probe.
Q. Can I leave ~nyprobe i~~tl~e
oven if it’s
A. No, if it touches the oven wall,
it may darnage the oven.
not inserted in food?
Page 12

.Auto:Defrost
Yl~itlIthe AtIto Defrost feature,
the oveEIautomaticaliy sets the
def’rosti~lgtimes and power
ieveisforyou.
use the Auto Defrost guide on the
next page. Select the food type by
touching the appropriate pad. Enter
the food weight in pounds and
tenths of a pound (see Conversion
Guide at right). Then touch
STARTpad.
The oven calculates defrosting
time and changes power levels
during defrosting to give even
defrosting results.
HowtosetAutoDefrost
1.Remove food from package,
place in oven on microwave-safe
dish and close door.
I
I
2
POULTRY
D
2
110°
0
6
150°
n
3. Enter weight. For example,
touch number pads 1and 2 for
weight of 1.2pounds (1 pound,
3 ounces. See Conversion Guide
at right.)
4. Touch START pad. Display
shows the oven power level and
the defrost time counting down.
When defrostingtime is completed,
“End” flashes and oven beeps 4
times. Oven, light and fan shut off.
7
160°
n
34
——
120° 130°
on
89
——
on
170°
180°
standTime
AfterAuto Defrosting,meat needs “
to standin orderto le~the inside
defrost.Youmay take the food out
of the oven ifyou wish. Standtime
recommendationsaregiven in the
guideon the nextpage.
conversionGuide
If the weightof food is statedin
poundsand ounces,theounces
mustbe convertedto tenths
(.1)of a pound.
Ounces I Pounds
1-2
6-7
8
9-1o
11
I
I
I
!
t
.1
.4
.5
.6
.7 —
~. Touch the appropriate Auto
Defrost pad for the food that you
are defrosting. For example, touch
2 POULTRY pad.
Page 13

.<3==: LJnwi-api[em[Icingdefrosted.
<
~~ I>]aceroasts and wholepoultryon trivet in microwave-safedish. Check foodfor warm spotshalfway through
-=,
defrosting,and shield these areas with smallpieces of foil.
~+
‘~%F$3
--
REC01MR4ENDED
FOODS
MIN.-MAX.
WEIGHT
INSTRUCTIONS STAND TIME
Chops
Frankfurters, Sausage
Ground Meat
Beef Patties
Roast
Ribs
Steak
Stew
JVholeChicken
-w
Turkey Breast
(breast side up) refrigerator
“+ Chicken Pieces 0.1 -6.0 lbs.
Cornish hens (whole) 0.1 -6.0 lbs. Turn over and shieldwhere necessary.
I
0.1- 6.0 lbs.
0.1 -6.0 Ibs.
0.1 -6.0 Ibs.
0.1 -6.0 lbs.
I 0.1- 6.0 lbs. I Turn over and shield.
0.1 -6.0 Ibs.
I
0.1 -6.0 lbs.
I
0.1 -6.0 lbs.
I
0.1 -6.0 lbs.
0.1 -6.0 lbs.
Separate, turn over and shield where necessary. I 1 5–30 minutes
I
Separate and remove defrosted pieces. 10–15minutes
Turn over,remove defrosted areas and 15–30minutes
break apart.
Turn over and separate patties. Remove 15–30 minutes
defrosted pieces.
I
30–90 minutes
I
Separate, turn over and remove defrosted 15–30minutes
pieces. Shield if necessary.
Turn over and shield.
I
Separate and remove defrosted pieces.
I
TLIrnover and shield. 15–30minutes;
‘rum over and shield.
Separate and remove defrosted pieces. 15–30minutes
15–30minutes
I
15–30minutes
I
run cold water
in cavity.
60–90 minutes in
10–20minutes;
run cold water
in cavity.
Cornish hens (split)
Fish fillets
Shrimp, scallops
Whole fish
Edges or thin areas of meat will defrost more rapidly than other areas. After first or second signal, shield warm areas
lvithsmall pieces of foil.
—.....—-..—-—-.—
0.1 -6.0 lbs.
I
0.1 -6.0 Ibs.
I
0.1 -6.0 lbs. Separate and remove defrosted pieces.
‘
0.1 -6.0 Ibs.
—, —
Turn over and shield.
I
Separate and remove defrosted pieces.
I
Turn over and shield tail and head.
1 0–20 minutes
I
1 5–30 minutes
I
15–30minutes
15–30minutes;
hold under cold
running water.
Page 14

Glossar~IofMicrowaveTerms
JVIIeBIadapfi]]g reci~)esforthe microwaYe, it is best
to st:}rtwit]l a familiar recipe. KnowiIIghow tile
food sllou]d look and taste will help when adapting
recipes for microwaving. Foods that require
~>rowningor crisp, dry surfaces will cook better
co13;’entionally.
~
hfoist foods, sLlchas vegetables, fruits, poultry and
seafood. micl”owavewell.
~Rich foods, such as bar cookies, moist cakes and
candies. are suitable for microwaving because of their
high fat and sugar content.
~Reduce conventional cooking time by one-half to
one-third. Check food after minimum time to avoid
overcooking.
“Small amounts of butter or oil can be used for
flavoring, but are not needed to prevent sticking.
*Seasonings may need to be reduced. Salt meats and
vegetables after
Covering. In
cooking, covers hold in moisture, allow for more even
heating and reduce cooking time. Conventionally,
partial covering allows excess steam to escape. Venting
plastic wrap or covering with wax paper serves the
same purpose when microwaving.
Venting.After covering a dish with plastic wrap, you
vent the plastic wrap by turning back one corner so
excess steam can escape.
Arra]~gingFood in Oven. In conventional baking, you
position foods, such as cake layers or potatoes, so hot
air can flow around them. When microwaving, yoLl
arrange foods in a ring, so that all sides are exposed to
microwave energy.
Stirring.In range-top cooking, you stir foods up from
the bottom to heat them evenly. When microwaving,
yoLlstir cooked portions from the outside to the center.
Foods that require constant stirring conventionally will
need only occasional stirring when microwaving.
~~~rningOver. In range-top cooking, you turn over
foods, sLlchas hamburgers, so both sides can directly
contact the hot pan. When microwaving, turning is
often needed during defrosting or when cooking certain
foods, such as frozen hamburgers,
Standing Time. In conventional cooking, foods such as
roasts or cakes are allowed to stand to finish cocking or
to set. Standing time is especially important in
microwave cooking. Note that a microwaved cake is
not placed on a cooling rack.
Shielding. In a conventions] oven, yoLlshield chicken
breasts or baked foods to prevent over-browning. When
microwaving, you use small strips of foil to shield thin
parts,
SLICkas the tips of wings and legs on poultry,
which woL~]dcook before larger parts.
cooking.
both conventional and microwave
Arci~~g.Sparks c:tuscclby too much metal in the
microwave oven or metal touching the side of the oven
or foil that is not molded to food.
~rick roods to Release Pressure. Steam builds up
pressure in foods that are tightly covered by a skin or
membrane. Prick foods, such as potatoes (OSyou do
conventionally),egg yolks and chicken livers, to
prevent bursting.
Rotating. Occasionally, repositioninga dish in the oven
helps food cook more evenly. To rotate 1/2turn, turn
the dish until the side that was to the back of the oven is
to the front. To rotate 1/4 turn, turn the dish until the
side that was to the back of the oven is to the side.
BasicMicrowaveGuidelines
Density of Food. In both conventional and microwave
cooking, dense foods, such as potatoes,take longer to
cook than light, porous foods, such as rolls, bread or
pieces of cake.
Round Shapes. Since microwaves penetrate foods to
about one inch from top, bottom and sides, round
shapes and rings cook more evenly. Comers receive
more energy and may overcook. This may also happen
when cooking conventionally.
Delicacy. Foods with a delicate texture, sucilas
custards, are best cooked at lower power settings to
avoid toughening.
Natural Moisture of food affects how it cooks. Very
moist foods cook evenly because microwave energy is
attracted to water molecules. Food that is uneven in
moisture should be covered or allowed to stand so heat
can disperse evenly.
Piece Size. Small pieces cook faster than large ones.
Pieces that are similar in size and shape cook more
evenly.With large pieces of food, reduce the power
setting for even cooking.
Shape of Food. In both types of cooking, thin areas
cook faster than thick areas. This can be controlled in
microwaving by placing thick pieces near the outside
edge and thin pieces in the center.
Starting Temperature. Foods taken from the freezer or
refrigerator take longer to cook than foods at room
temperature. Timings in our recipes are based on the
temperatures at which you normally store the foods.
Quantity of Food.
amounts usually take less time than large amounts. This
is most apparent in microwave cooking, where time is
directly related to the number of servings.
Shelf (on models so equipped). Use the shelf to heat
more than one dish at one time. Take the shelf out whe
yoLlare not using it.
Inboth types of cooking, small
Page 15

Avoidusing.
YOL]can use foil trays that are no higher than 3/4-in. (Foil or metal will
reflect microwaves and cause uneven heating.)
is closer than 1 inch to oven walls.
Use for shielding.
Arcing can occur if foil
Metal or partially metal pots, pans,
thermometers, skewers and twist ties
Glassjars and bottIes
Microwave plastics
Paper or Styrofoam plates and cups
Oven glass and ceramic
Dinnerware
Paper towels,
wax paper
Plastic wrap, cooking
bags and storage 13ags
Paperboar[l trays used for frozen
entrees and dinners
paper napkins and
bags, boil-in
Do not use. Microwave-safe thermometers and
Generally, glassjars can be used to warm food. However, do not heat
baby food injars, even without lids, because food will heat unevenly.
Do not warm foods in narrow-necked bottles because pressure can
build up.
Cooking and heating.
Heating and serving of foods and beverages. Styrofoam will melt if
food is too hot or if food is cooked for a long time.
Cooking and heating.
Heating and some cooking. Follow dinnerware manufacturer’s
recommendations. Avoidusing dishes with metal trim.
Absorbing moisture, and preventing spatters. Heating and serving of
sandwiches or appetizers. Light covering to hold in steam. Do not use
paper towels that have syntheticfibers, such as nylon, woven into them.
Synthetic fibers may cause the towel to ignite. Avoid using recycled
paper.
Covering to hold in steam (wrap). Cooking (cooking and boil-in bags).
Heating (storage bags).
Cooking and heating.
skewers are available.
Plastic trays and plates used for frozen
entrees and dinners
Straw, wicker and wood
cookwareTips
~Always check the cookware manufacturer’s
recommendations before using any cookware
in the oven,
~Before purchasing cookware or
cookware, check its size to make
in the oven.
preparing food
sure it will fit
Cooking and heating.
Warming.
in
Page 16

1.Ilircc[ionsbelowareforhealingorreheatingalready-cooked
foodsst(lrcdinref’rigcratororal roomtemperature.Use
microtvavc-safecookware.
Cover m(lst foo[isforfastesthealing.Exceptionsaresome
2.
sandwiches,griddlefoodsandbokcditems,
3. Bubblingaroundedgesof dishis normal,sincethecenteris the
l~sttoheat.Foodsheatedto 160”F.to 165°F.willprovidesafe,
palatableresults.Adjusttemperaturestosuityourpersona]taste.
Letf~)odsstanda fewminutesbeforeserving.
4. Besurefoodsareheatedthroughoutbeforeserving.steamingor
bubblingaroundedgesofdishdoesnotnecessarilymetinfoodis
heatedthroughout.
Ifyouusea meatthermometerwhilecooking,makesure it
issafeforuseinmicrowaveovens.
Item
Appetizers
Dips: creamorprocessedcheese
Pastry bites: smallpizzas,egg rolls,etc.
Saucy: meatballs,riblets,
cocktailfranks,etc.
(Xcupperserving)
Tip:Cover
Cake, coffee cake, doughnuts,sweet rolls,
nut or fruit bread
Dinner rolls, muffins
Pie:fruit,nutor custard
1 slice=%of9-in.pie
(useminimumtimefor custard)
saLIcy appetizerswithwaxpaper.Coverdipswithplasticwrap.Microwavepastrybitesuncoveredto retaintheircrispness.
Amount
Ecup
Power Level Time
Medium(5) 2%to3Xmin.
1 cup Medium(5)
2to4 servings High(10)
1 to 2 servings
3to4 servings
High(10) 2to4 min.
High(10)
1piece Low(3)
2
pieces
4pieces
9-in.cakeor
Low(3)
Low (3)
Low(3) 4 to5 min.
12rollsor
doughnuts
1
2
4
6t08
1 slice
2slices
4 slices
9-in.pie
Medium(5) %to X min.
Medium(5)
Medium(5)
Medium(5)
High(10) k to 1min.
High(10)
Meal-High(7)
Meal-High(7)
3to5 min.
2to4 min.
3to5 min.
Xto X min.
1to 1Xmin.
lfi to2min.
Mto 1min.
1 to 1Xmin.
1to2 min.
1 to 1X min.
2Xto 3 min.
5to 7 min.
Beverages
Cocoa, other milk based
(6OZ./CUp)
OZ,/CLlp)
(9
tea, cider
Coffee,
(6
oz./cup)
(9oz,/cup)
Gravies& sauces
Desserts: chocolate,butterscotch,etc.
Gravies: gibletorcreamy
or main disl~sauces, such as
fileat
spaghettisauce,etc.
Tip:Coverfoodtopreventspattering.
c“riddIeFoods
Pancal{es,french toast or waffles:
Plain,notopping
Syrup&butter
“rip:Donotcover.
—..
1 to
2 cups
1 to 2 cups
1to 2 cups
1 to 2cups
%cup
1 cup
Bcup
1 cup
X cup
CLIP
1
1can(16oz.)
2or3 pieces
2or3 pieces
Meal-High(7)
Meal-High(7)
High(10)
High(10)
High(10)
High(10)
3to6 min.
6to 9 min.
1%to 3 min.
6to7 min.
%to lk min.
1Xto 2X min.
High(10) 1to 2 min.
High(10)
High(10)
High(10)
High(10)
High(10)
High(]0)
2to 3 min.
2to4 min.
3Xto 5 min.
4 to 6 min.
1 to 1Xmin.
1 to 1Xmin.
Page 17

N’leatsandMainDishes
*
WV
Chickei, pieces 1to2 pieces
Hamblgrgersor meatloaf
(4 oz. pcrserving)
Hotdogs and sausages
pieces
3 to 4
1
to2servings High(i0) 1to2Xmin.
3to4 servings High(I0)
lto2
3t04
and pasta
Nce
1
to2 servings
Hjgh ( 10)
High(10)
High(10) 1to 1Xmin.
High(]0)
High(1())
(~’:->~cupperserving)
Saucy,main dishes: chopsuey,spaghetti,
creamedchicken:cilili,stew,macaroniand
cheese,etc.
I to 2 servings High(10)
3to4 servings
1can(16oz.)
High(10)
High(10)
(><-1cupperserving)
Steaks, chops, ribs, meat pieces
1
to2servings
Meal-High(7)
3to4 servings Meal-High(7)
Thinly-sliced meat
(3 to 4 oz.perserving)
Topped or mixed with sauce
(’4-%cupperserving)
Tip: Coversaucymaindisheswithplasticwrap.Coverothermaindishesandmeatswithwaxpaper.Whenheatingorreheating3 to 4 servings
1to 2 servings
3to4 servings
to2 servings High(10)
1
3to4 servings
Meal-High(7)
Meal-High(7)
High(10)
ofmeatslicesor pieces,rotatedish1/2turnafterhalfofcookingtime.
~ to 3 mjfl.
3to 4 min.
3to4 min.
1Xto 3 min.
1to 3 min.
4 to 12min.
12t015 min.
6to 8 min.
2%to 4 min.
6to 10min.
3to5 min.
5to 8min.
4to6 min.
8to 12min.
Plateof Leftovers
R1eatplus2 vegetables
Tip: Coverplateof foodwithwaxpaperor plasticwrap.
1plate
High(10)
3to5 min.
Nfeat-cheese filli~lg: with2 slicesof bread
~~ ‘
-*
a
h~oistfilling: SloppyJoes,barbecue,hamsalad,
>
..- etc.in bun(%cupper serving)
‘rip:Usepapertowelor napkinto coversandwiches.
h~ilk-based(6oz.perserving)
IYater-based(6oz.perserving)
Tip: Coversoupswithwaxpaperorplasticwrap.
vegetables
Large pieces or who~e:asparagusspears,
comonthe cob,etc. 3to4 servings
hlashed
(}!cupper serving)
Small pieces: peas,beans,corn,etc. 1 to 2servings
(Xcupperserving)
‘Fip:Cover vegetablesformostevenheating.
1 to 2servings Meal-High(7)
3to4 servings
1 to 2 servings
3to4 servings
1 to 2 servings
3to4 servings
1can(10oz.)
1to 2 servings
3to4 servings
1can(10oz.)
1 to 2 servings
Meal-High(7)
Meal-High(7)
Meal-High(7)
Meal-High(7)
Meal-High(7)
Meal-High(7)
High(10)
High(10)
High(10)
High(10)
High(10)
1can (16oz.)
to2 servings
1
3to4 servings
High(10)
High(10)
High(10)
High(10)
3to4 servings
1can(16oz.)
High(10)
High(10)
~to4 min.
4to 6 min.
2to4 min.
4to 6 min.
3to 8 min.
Sto 12min.
6to 8 min.
2to6 min.
6to 10min.
5to 6 min.
1Xto 3min.
3to6 min.
5to6 min.
~to 4 min.
6to 8 min.
1to 3 min.
3to4Xmin.
3Xto 4Xmin.
Page 18

1. l;()()(l!):I(\!iiIgtdii}p:IpCI or pliistici~lii~bed~fr~s(cdwilhout
UIl\\”rilppillg.
ill co~~kingdish Ior
1f
fo(~dis foiIWrapped,removefoilillld plticc f[)od
~iefros[ing.MostfooddefrostsWC1lusing
l>cfr(~st(3),Formoreevendefrostingof”Iargcrfoods,suchas
tl~~f.lillllb
2. After
itlld\~CiiI~02StS. useWarm(1).
first hillf of defrostingtime,unwrilp packageandcheck
food.Turnf’oodover,ifnecessary;breakapartor separatefoodif
possible.Shieldany
Food
Wiirm~rciiswithsmallpiecesoffoil.
First Half second Half
Time, Nlin. Time, Min. Comments
~~@~~S9 ~~~~S [Power Level: Defrost (3)]
Bread, buns or rolls 2t03
(8to 16
Cake, frosted,2to3 layer
OZ.)
ztos
(17oz.)
Cake, plain,1layer
Cheesecake, plainor
2t03
3t06
fruit-topped(17to 19oz.)
Coffee
cakes
6t07
(11to 14XOZ.)
Cream or custard pie
(140Z.)
Cruncl~cakes & cupcakes
Doughnuts
(1
or?) fitol
(~to 6)
French
Fruit or nut pie (8 in.)
Pound
Sweet rolls
(8fi to ]~ OZ.)
toast (2 slices)
cake (11 Xoz.)
lto2
X
toZ each
lto2
7t09 none
2t04 none
2t03
~
1t02
none
none
none
none
lto2
none
none
lto2
2t03
3. 13e
sure ]arge meals arc completely defrostedbeforecooking.
4. Whendefros~ed,food
shoLIldbe cool but softened in all iu-cas.If
stillslightlyicy,returnto microwaveovenverybriefly,or let
standa fewminutes.
Removemetaltwisttie.Turnoverafterfirsthalfof time.
Letstand5 to 10 minutesbeforeserving.
Letstand5 minutesbeforeserving.
Repositionafterfirsthalfoftime.Letstand5minutesbeforeserving.
Rearrangeafterfirsthalfoftime.
1
Turnoverafterfirsthalfoftime.
Letstand5 minutesbeforeserving.
Rean-angeafterfirsthalfoftime.
~~$~ & ~~~~~~~ [Power Level: Defrost (3)]
Fillets:
pre-packaged(1lb.)
Freshlyfrozen(1lb.)
Shelifish,blocks:
Crabmeat
(6-oz.package)
Oysters(12-oz.can)
Scallops(l-lb. package)
Shellfish],large:
Crablegs, 1to 2
tO lo OZ.)
(8
Lobstertails, 1to 2
OZ.)
(6to9
SI~ellfish,smallpieces
(1lb.)
Stea!<s(6 to 12oz.)
Wholefish (8 to 10oz.)
4t05 5t07
4t05
5t07
~
4t06
4t06
2t03
3t04
3t04
2t03
3
4t06
4t06
2t03
3t04
3t04
none
2t04
Placeunopenedpackageinoven. (Iffishis frozeninwater,placein
cookingdish.)Turnpackageoverafterfirsthalfoftime.After
secondhalfof time,holdundercoldwatertoseparate.
2
Placeblockin casserole.Turnoverandbreakup withforkafterfirst
halfof time.
Placeblockin casserole.Breakup withforkafterfirsthalfoftime.
Placeblockin casserole.Turnoverandbreakup afterfirsthalfof
time.
Arrangeincookingdishwithlight-underside-up.Turnoverafter
firsthalfoftime.
Arrangeincookingdish,withmeaty-side-down.Turnoverafter
firsthalfoftime.
Spreadshellfishin singlelayerin bakingdish.Rearrangepieces
afterfirsthalfof time.
Letstanda fewminutestofinishdefrosting.
Placefishin cookingdish.Turnoverafterfirsthalfof time.After
secondhalfof time,rinsecavitywithcoldwaterto complete
defrosting.
Page 19

g+%+
=:%<”+ Fruit[Power Level: Defrost (3)]
w
l~resh(I()[0 16oz.)
Plas(icpouch-1 [02
~[03
1103 3t04 Placepackageinoven.Flexpackageonce.
(10-oz.package}
2t03
Placepackageinoven.Removefoilormetal.Afterminimumtime,
breakup withfork.Repeatif necessary.
~~~t
Bacon (1 lb.)
~F~idtS ( 1 lb.)
Ground:
(1lb.)
(~lbs)
(5lbs.)
~{oast:beef,lamb,veal*
(3to 4 lbs.)
Roast, pork
(3[04 lbs.)
Sa~lsage,links
%?$.,
‘.$@
@
(1tO1;lbs.)
Sa~lsage,patties
( 12-02,package)
Spareribs, pork
(2to3 113s.)
Steaks, chops&cutlets
‘Use Warm(1j iorroasts.
[Power Level: Defrost (3)]
2to3 perlb.
~t@3
beef&pork
3t04
6t07
l~to 13
8to 10perlb.
6to 8perlb,
ztos
2t03
2
2
2to4 per lb.
3to5 per lb.
2to3 perlb.
~tos
3t04
6t07
12to 13
8to 10perlb.
4to 6 perlb.
2t04
3t04
lxto2x
2t03
2to4 per lb.
3to5 per lb.
Placeunopenedpackageinoven.Letstand5 minutesafterdefrosting.
Placeunopenedpackagein oven.Microwavejust untilfrankscanbe
separated.Letstand5 minutes,ifnecessary,tocompletedefrosting.
Turnmeatoverafterfirsthalfoftime.
Turnmeatoverafterfirsthalfoftime.Scrapeoffsoftenedmeat
aftersecondhalfoftime.Setaside.Breakupremainingblockand
microwave1to 2 minutesmore.
Turnmeatoverafterfirsthalfoftime.Scrapeoff softenedmeat
aftersecondhalfoftime.Setaside.Microwave6 to 8minutes
more.Scrapeandsetaside.Breakupremainingblockand
microwave3 to 5 minutesmore.
Placeunwrappedroastincookingdish.Turnroastoverafterfirst
halfoftime.Defrostforsecondhalfof time.Letstandfor30
minutesto 1hourinrefrigerator.
Placeunwrappedroastincookingdish.Turnroastover afterfirst
halfof time.Defrostforsecondhalfof time.Letstandfor30
minutesto 1hourinrefrigerator.
Turnoverafterfirsthalfoftime.Let stand5 minutes.
Turnoverafterfirsthalfof time.Let stand15minutes.
Rotatepackage1/4turnafterfirsthalfof time.Letstand5 minutes.
Turnoverandseparateafterfirsthalfoftime,Removepattiesas
theythaw.
Placeunwrappedribsin cookingdish.Turnoverafterfirst halfof
time.Aftersecondhalfoftime,separatepieceswithtableknife.Let
standtocompletedefrosting.
Placeunwrappedmeatin cookingdish.Turnoverafterfirsthalfof
timeandshieldwarmareaswithfoil.Aftersecondhalfof time,
separatepieceswithtableknife.Let standtocompletedefrosting,
~Qu~~~~[PowerLevel:Defrost (3)]
Chicken,broiler-fryer, 9toll 9toll
Up (2X to3Ibs.)
cut
Chicken,whole
(2Xto 3 lbs.)
Cornish Ilen 5to6 perlb.
Dtlckling
Wrkey breast (4to6 lbs.)
g-;j
‘-;:.’9
4
to 6per lb. 4to6 perlb.
4 to 5 perIb. 4to 5 perlb.
12to
15
12to 15
5perlb.
Placewrappedchickenindish,Unwrapandturn overafterfirsthalf
oftilne.Aftersecondhalfof time,separatepiecesand placein
cookingdish.Microwave2 to 4 minutesmore,ifnecessary.Let
standafewminutestofinishdefrosting.
Placewrappedchickenin dish.Afterfirsthalfoftime,unwrapand
turnchickenover.Shieldwarmareaswithfoil.Tocomplete
defrosting,runcoolwaterin cavityuntilgibletscanberemoved.
Placeunwrappedheninoven breast-side-up.Turnoverafterfirst
halfoftime.Runcoolwaterincavityuntilgibletscanbe remotted.
Placeunwrappedducklinginoven,Turnoverafterfirsthalfof
time,Shieldwarmareaswithfoil.Runcoolwaterincavityuntil
gibletsconberemoved.
Placeunwrappedbreastin microwave-safedishbreast-side-down.
Afterfirsthalfoftime,turnbreast-side-upand shieldwarmareas
withfoil.Defrostforsecondhalfoftime.Let stand 1to 2hoursin
refrigeratortocompletedefrosting.
Page 20

Breads
.-
—
Crust[~nbreadswillbesoftandtheoutsicieswillnotbrown.
Ifdesired.sprinkle[opofbatterwithcinnamon-sugarmixture,
choppednutsorothertoppingforbrowncolor.Toincrease
browncoloron upsidedownbreads,linedishbeforemicrowaving
withbrownsugar-caramelmixtureorsavorytopping,suchas
crushed,canned,French-friedonionrings.
e
.-
~~~~
Coffee cakes
Corn bread
Muffins
(1
Muffin)
(2to4 Muffins)
(3to 6 Muffins)
Quick breads,
froma mix
+:Iftubedishis unavailable,microwavein8-in.rounddishwithdrinkingglassplacedopen-end-upin center,
container
8-in.rounddish No
8-to9-in.tube No
dish*
Paper-lined
muffincups
(Donotuse
foilliners.)
8-to 9-in.tube No
dish~
cover
No
Power Level & Time
Meal-High(7) 9 to 11min.
Meal-High(7) 11to 13min.
High(10)
1to 1Xmin.
1 to 2Xmin.
2%to4E
min.
High(10)
.:~
9to12 min.
Commellk
Placebatteringreaseddish.
Sprinklecookingdishwithfinely
chopped,canned,French-friedonions
beforemicrowaving.Turnoutofpan
upsidedownto serve.
Usemicrowave-safemuffincontaineror
homemademufincups,madebycutting
downhotdrinkpapercups.Somemuffins
maybedonebeforeothers.Removemuffins
astheyaredone,andcontinuecooking
remainingmuffinsafewsecondslonger.
Whendone,toothpickinsertednear
centerwillcomeoutclean.Letstand15
minutesbeforeturningoutofdish.Cool.
Cakesand Desserts
1.Alwaysusemicrowave-safecookware.
2.Beforeaddingmeasuredamountofbatter,grease dishes or line
themwithwaxpaper.(Donotflour.)
3.Cakesaredonewhentoothpickorlongskewerinsertedinto
centercomesoutclean.
4.Coolcakeindishset directlyonheat-proofsurfaceorwooden ‘
board10to 15minutesbeforeinverting.
5.Crustoncakeswillbe soft.If cakeis tobefrosted,refrigerate
cakeforanhourtofirmexteriorsurface.
6.Chiffonandangelfoodcakesarenotrecommendedfor
microwaving,
Food
Baked apples or
pears
Bar cookies
Commercial mix
]
8to20OZ.
Cupcakes—(6) Paper-lined
Pineapple upside
down cake
—
—.
containercover PowerLevel&Time
Microwave-safe
dishor
casserole
8-in.round
bakingdish
8-in.rounddish
cupcaker
8-in.round
dish
Lidor High(10) 4 to 5min.
plasticwrap
No High(10) 10to 13min.
No
No High(10)
No
High(10) 2min.
Meal-High(7) 5to 7 min.
High(10)
perpiece Coreandfill centerofapplewith2
3to4 min.
12to 14min.
comments
Piercefruitorpeelto preventbursting.
tablespoonssugar,1teaspoonbutterand
M teaspooncinnamon.Add2
tablespoonswaterfor eachpieceoffruit.
Greasedishbeforeaddingbatter.Cut
whencool.
Greasedishbeforeaddingbatter.Let
stand5 to 10minutestocoolbefore
inverting.
Whencookingseveralcupcakes,some
willbe donebeforeothers.Remove
cupcakesas theyare doneandcontinue
cookingtheresta fewsecondslonger.
Whendone,toothpickinsertedin center
comesoutclean.Invertcakeontoplate;
letdishstandovercakea fewminutes.
——
-.
Page 21

1..41waysLISe microwave-safecookware.170reasyclean-up,melt
,~~~ cllocolatci]lp:lperwrappersseanlsideup,orl]lacechocolatein
..
~&&::-
-..—.
b
paperbowltomelt.
+
2.Candieswhicharcboiledbecomeveryhot;handlecooking
containercarefully.
Food Contalinelt” Cover
Caramel appies
Chocolatebark
Marshmallow crisp Lar.gr:glass
S’Mores Papernapkinor
,,~.
. . Alwaysusemicrowave-safecookware.
es. Forminuterice,usethesan~eamountofwaterneededfor
r.
conventionalboiling.Addregularamountof salt.
,% 3.Coverricewhilemicrowaving.Whenusing~]lasticwrap,
@
. .
,1’
turnbackonecornertovent.
Food
2-cupmeasure
or i-qt.
casserole
1
fi-qt.casserole
orbowl
bowl
paperplate
—— ,———..—-— ..
Containi?r
No
Yes
Yes
No High(10) 15to25
cover
Powler Level& Time ‘Commeknk
Higil(10) 3Xto4 min.
High(10) 4 to 5 min.
High(10) 1Xmin.to
meltbutter,
3%to4 min.
tomelt
marshmallows
seconds
4.Stirorrearra~]geafterhalfofcookingtime.
5.?/Iicrowavetimeandconventionalboilingtimeareabout
thesame.
Power Leve! & Time Ccbm.ments
Unwraphalfofa 14-oz.packageof
caramelsintometisuringcup.Add1
tablespoonwater.Microwave,stirring
everyminute.Dip4 applesintomixture.
Place12oz.semi-sweetchocolatepiecesin
container.Microwavetomelt.Add1 cup
wholetoastedalmonds.Spreadoverwax
paperoncookiesheet.Chilluntilfirm.
Inlargeglassbowl,melt 1/4cupbutter.
Add10-oz.packagemarshmallows,
coverwithwaxpaperandmicrowaveto
melt.Stirin5 cupscrispyricecereal.
Pressfirmlyintobuttered2-qt.oblong
glassdish.
Covergrahamcrackerwithchocolate
and marshmallow.
1
Oatmeal,
oldfashioned orbowi perserving
Note:Tomicrowavesingle-servingpacketof instantoatmeal,followpackagedirections
foramountofwaterandmicrowaveat High(10)for 1/2to 1minute.
Rice, minute
(~Xctlps)
. .
.b~-
-qt.casserole No Higii <10) 3 to 5 min.
2-qc.c:lsserole
Lidor
plasticwrap
High(10) 7to 8min.
...———.—
Increasecasserolesizeformorethanone
serving.Increasetimeabout1‘Aminutez
for eachadditionalservingyouare
cooking.Stirafterhalfofcookingtime.
Add1Xcupswater.Stirafter4 minutes.
21
Page 22

.—— —
CheeseandEggs
i. Eggsmay be preparc(imanywaysinthe microwaveoven.Always
piercewholeyolksbeforemicrowavingtopreventbursting. overcooked.
2.~~c~’crcookeggsintheshe]].Do notreheathardcookedeggsin
theshell.Theywillexp]ocle.
3. Cook eggsjust until se[.They are delicate and will tt>ughenif
Food Co~~tainer cover
cheese
Fondue 2-qt.casserole Coveror
Eggs
Basic Eggs Buttered Plasticwrap
custardcup
omelet
Poached eggs 1X-qt.casserole Casserole
(4maximum) cover
Quiche
Scrambled Glass No
9-in.pieplate No
Microwave-safe No
1-qt.measure
(filling)
9-in.pieplate
measuringcup
orcasserole.
plasticwrap sauce wineformilk.Addcheeseand
PowerLevel&Time Comments
High(10)
Medium(5) 6to 8 min. minutes,whiskingevery2 minutes.
Medium(5)
High(10)
Medium(5)
High(1O)
Medium(5)
Meal-High(7)
Meal-High(7)
High(10)
Tomake
5to7 min. microwaveatMedium(5)for 6 to 8
1
to 1Xmin.
peregg
Meltbutter
1min.
7 to 9 min.
6to 8 min.
Boil2cups
water.
1/2to 1Xmin.
peregg
Filling:
2to 3 min.
Quiche:
10to 12min.
3/4to 1%
min.peregg
MakeBasicWhiteSauce,substituting
Puncturemembraneof yolkto prevent
bursting.
SDrink]echeeseoveromelet.Microwave
1;2to 1minuteuntilcheeseis slightly
melted.
Heat2cupshottapwater5 to 6minutes
onHigh(1O).Breakeggsontoplate,
puncturemembrane.Swirlboilingwater
withspoon,slipineggsgently.Cover.
MicrowaveatMedium(5)1/2to 1 min.
peregg.Letstandin watera few
minutes.
Combineandmicrowavefilling,stirring
every1to 2 minutes.Pour fillinginto
precookedshell,
Microwaveadditionaltime shownat left
Scrambleeggswith1teaspoonbutterand1
tablespoonmilkperegg,Placeinovenand
microwaveforhalfoftotaltime,Stirset
portionsfromtheoutsidetothecenter.Let
stand1or2minutestofinishcooking.
Fish and seafood
1.Fishisdonewhenit flakeseasilywhentestedwitha fork.Center 2.Cookfishwithorwithoutsauce.Atightcoversteamsfish,Usea
maystill be slightlytranslucent,butwillcontinuecookingasfish lightercoverof waxpaperorpapertowelforlesssteaming,
standsa fewminutesaftercooking. 3.Donotovercookfish.Checkat minimumtime.
Food
Fillets or steaks
(1lb.) plasticwrap
Sl~rimp—1lb. Pie plate Plasticwrap
(peeled)
Sl~rimp—1 lb.
(unpeeleci~
Container cover
Rounddish
2-qt.casserole
Waxpaperor
Lidor
plasticwrap
PowerLevel& Time
High(10)
High(10)
High(1O)
5to9 min.
4 to7min.
4 to 7 min.
Comments
Microwaveuntilfishflakeseasily.Turn
steaksoverafterhalfof cookingtime.
Brushwithgarlicbutterbeforecooking.
Rearrangeafter4 minutes.
Placeshrimpincasserole.Add2 ct]ps
hottesttapwater.Cover.Stirafter
5 minutes.
Page 23

&s.*Gravies& sauces
$&@]
-==2.C’o\crthick. chunky sauces(opreventspattering. 3.Varybasicwhitesaucebyaddingcheese,cggyolks,cream,wine
\\~hisk saucesvigorously wi[h wire whiskonceor[wice
2.
orherbs.
Food
Graviesand
Satices
thickenedwith
cornstarch
flouror
(1 cup)
Melted butter
sauces,
clarified
butter(1/2cup)
Thick spaghetti,
barbecue or
s}veetisoursauces
(2
cups)
Thin, liquid sauces
(Au jus, clam. etc.)
(1 cup)
container
Casserole
Glassmeasure No High(10) 1to 2 min. Microwavebutterjusttomelting,For
Casserole Yes High(10) 5to 7 min. Prepareas directedinrecipe.Microwave,
Casserole No
cover
No
Meats
1.Alwaysusea cookingbagwhencookingbeef,lamb,porkorveal
roasts,Seepackageinstructionsforproperuseofcookingbag.
2.Afterenclosingroastincookingbag,placein microwave-safe
dish.
.+.-:&.
..*G.
m
Food
container
Cover
PowerLevel&Time Comments
Medium(5) 5to 8min.
High( 10)
6 to 8 min. Addflour-watermixtureto heated
3.Allowabout10minutesstandingtimeformostroastsbefore
carving.
Ifyouusea meatthermometerwhilecooking,makesl~reitis
safeforuseinmicrowaveovens.
PowerLevel&Time
Microwavefat,
meltandblend.Whiskinliquidand
finishcooking.Increasetime 1to 2
minutesperadditionalcL~pof sauce.
clarifiedbutter,bringtoboilingthenlet
standuntillayersseparate,Pouroffand
useclear,toplayer.
stirringafterhalfof cookingtime.Let
stand5to 10minutestodevelopflavor.
ingredients.Stirwellandmicrowave
tofinish.
Conlments
(orInternal Ten3pe)
floLIr andsalttogetherto
r
A
/,
...-
Ground, crumbled
(forcasseroles
orsoup)
(1
(Ifilbs.)
Meatbal]s
(1
(~lb+)
Meatloaf
(Roundloaf)
Patties
(4
1 to 2 patties
3to4 patties
Pot
(Lip tO ~-lbS.)
Tenderroasts (rib,
highqualityrump.
sirlointip)
---’..
lb.)
lb.)
pattiesperlb.)
roasts
Casserole
Rounddish
Pieplate
Ceramicdinner
plate
Pieplate
Pieplate
.—.
No
Waxpaperor
plasticwrap
Plasticwrap
Waxpaper
Cookingbag
Cookingbag
High(1O)
High(10)
Meal-High(7)
High(10)
Medium(5)
Medium(5)
Medium 12to 15 160°
Minutes /Internal
Rare 10to12
Well 15to18
7 to 9 min.
9to 11min.
8 to 11min.
11to 14min.
26to 29min.
2 to4 min.
6 to 8min.
22to 25min.
perlb.
per lb. I Temp.
140°
170°
Stirafterhalfofcookingtime.Addsauce
orcasseroleingredientsandfinish.To
cookfrozenblock,microwave10to 15
minutes,breakingupandstirringevery
5 minutes.Letstand5 minutes.
Arrange3/4to 1in. apartincirclearound
edgeofdish,
Makea wellbetweentheedgeof meat
mixtureanddishto eliminatespill-over
ofjuicesduringcooking.Letstand 10
minutesaftercooking.
Coverwithwaxpaperor cookuncovered
and turnpattiesover.Ifdesiredadd
browningsauce.
Add 1/2cupwatertocookingbag.Turn
overtafterhalfoftime.Addvegetablesif
desiredafterhalfofcookingtime.Recover
andfinish.
Turnroastsoverafterhalfofcookingtime.
Letmeatstand10minutesbeforeca~wing.
23
—
Page 24

Nood container
-” —-—— ---
.—— .
cover
Power Level &Tinle Commenti
(orInterRaI
Tempo)
LaRlb
Roast, legor Pieplate
shoulder
Chops &cutlets Rounddish
(1in.thick)4 chops overafterhalfofcookingtime.
Cookingbag
No
Medium(5)
Medium 18to22
Well 24t028 170°
Meal-High(7)
Minutes Internal Placeroastfat sidedowninmicrowave-
perlb. Temp. safedish.Turnoverafterhalfofcooking
time.Letroaststand10minutesbefore
160° carving,
+
8to 10min. Brushchopslightlywithoil.Turnmeat
Pork
Bacon
(perslice)
Canadian bacon
~ s]ices
4
slices
6slices
Ham, precooked:
canned
Ham, slices &steaks
(1-to 2-in.thick)
chops: 3/4-in.
Pork
2
4
roast
Pork
Pork sausage
(raw),link
sausage (raw)
Pork
4 patties)
(Xlb.:
Microwavesafeplate
Microwavesafecookware
Pieplate
Rounddish
Microwavesafecookware
Pieplate
Microwavesafecookware
Microwavesafecookware
veal
Chops Seelambchops
above.
Roast
(shoulder)
2-qt.oblong
dish perlb.
Papertowel
Waxpaper
Cookingbag
Waxpaper
Plasticwrap
Cookingbag
Waxpaper
Waxpaper
Cookingbag
High
(10)
3/4to 1min.
High(10)
1 to 1Xmin.
2to 2Xmin.
2%to 3min.
Medium(5)
15to 19min.
perlb.
High(10)
18to27min.
Medium(5)
15to 18min.
18to20min.
Medium(5)
ZOto23min.
perlb.
High(10)
1to 1Mmin.
perlink
High(10)
5to7 min.
Low(3) 18to22min.
Arrangein singlelayeronpapertowels.
Coverwitha papertowel.
Arrangein singlelayer.
Placefat-side-downindish.Turnham
overafterhalfofcookingtime.
Turnoverafter10minutes.
Brushwithbarbecuesauceor browning
agent,ifdesired.Turnoverafterhalfof
cookingtime.Letstandcovered5to 10
minutesbeforeserving.
Turnroastoverafterhalfof cooking
time,Microwavetoan internal
temperatureof 170”F.
Arrangein singlelayer.Ifcooking6or
morelinks,rearrangeafterhalfof
cookingtime.
Arrangein singlelayer.Turnoverafter
halfofcookingtime.
Placeroastfat-orcut-side-down.Turnover
afterhalfofcookingtime,Letroaststand
10minutesbeforecarving.Slicethinly.
.-.
Page 25

gs~youltl”y
zz~;..
.-.>*
.,.>_.-a~..
,.:-:,:s-...
,:=.~.. .~..
-.--..*.=.
-.~&:-&*..
.-—
o
Food Container
chicken
Pieces Plateorround Waxpaper High(10) 3to4 min.
tvhoie
(unstuffed) perlb.
(stuffed) Rounddish
Ifyouusca meatthermometerwhilecooking,makesureitis
safeforusein microwaveovens.
cover
dish perpiece sothickestmeatypiecesareto outside
Rounddish
Cookingbag
Cookingbag Meal-High(7)
Power Level & Time Commenti
Arrangein singlelayerincookingdish
edgesofdish.Turnpiecesoverand
rearrangeafterhalfofcookingtime.
Meal-High(7)
10to 12min.
17to20min. cookingtime.Cookto 190°internal
perlb.
Slitbagnearclosuretovent.Close
securelywithplastictie.Cookbreastside-down.Turnoverafterhalfof
temp.Letstand5 to 10minutes.
Halves Rounddish Waxpaper Meal-High(7)
Who]e(stuffed Rounddish
orunstuffed)
Waxpaper Meal-High(7)
11to 13min. Arrangeskin-side-upin dish,onbedof
perlb. stuffing,ifdesired.
9 to 11min.
perlb.
Placebreast-side-downin dish.Turn
overafterhalfofcookingtime.Shield
tipsofwingsandlegswithfoil.
vegetables
$=$<
-
~~&
=“’.Alwa)’s use microwave-safecookware.
Q
2. Saltvegetablesaftercooking.Saltingbeforecookingmaycause onecornerto vent.
darkeninganddehydrationof surface. 5.Largervegetablepieceswilltakelongertocookthan
3. Arrange.vegetables,suchasasparagus,withthethickestpiecesto
theoutsideofthedish.
vegetabIe Amount
Asparagus
(freshcuts)
(freshspears) 1lb.
(frozenspears) 10-oz.package High(10) 6to 10min. In 1-qt.casserole.
Beans
(freshgreen) 1lb.cutin half
(frozengreen)
(frozenlima)
1 lb. (3CUpS)Cut High(10) 5to9 min. In2-qt.casserole,place1/4cupwater.
into 1to 2in. pieces
10-oz.package
10-oz.package
Power
High(]())
High(10)
High(10) 7to 9min.
High(10) 9to 11min. In 1-qt.casserole,place1/4cupwater.
Level Time comments
4.Covervegetableswhencooking.If using plasticwrap,turnback
smallerpieces.
6.Formoreevenheating,stirorrearrangevegetables
duringcooking.
6to 10min. In2-qt.casserole,place 1/4cupwater.
9X to 11min. In 1‘/~-qt.casserole,place 1/2cup water.
In 1-qt.casserole,place2 tablespoonswater.
Beets
(fresh,whole)
BroceoIi
(freshcut) 1bunch
(freshspears) 1bunch
(frozen,chopped)
(f~~zenspears)
~~:a
,. .>~-J—
t-~ ...2
,;
. =..>
.-.-_..
,.-’
.2
3
_—_
1 bunch
‘/4 to 1‘/zIbs.)
(1
( 1‘/.,to 1‘/zlbs.)
10-oz.package High(1O) 6 to 8 min.
10-oz.package
High(1())
High(10)
High(1O) 12to 15min.
High(10) 6to 8min. In 1-qt.casserole,place3 tablespoonswater.
25to 30min.
10to 12min,
In 1‘/~or 2-qt.casserole, place1/2cupwater.
In2-qt.casserole,place1/4cupwater.
In2-qt,oblongglassbakingdish,place
1/4cupwater.
In l-qt. casserole,
25
Page 26

-.i
vegetables
vegetable Amount Power Level Time
Ci~bb~ge
(fresh \\’ecIges)
Carrots
(fresh,
sliced)
(frozen)
Cauliflower
(flowerets)
(fresh,whole)
(frozen)
Corn
(frozenke~mel)
Corn on the cob
(fresh)
(frozen)
Mixed vegetables
(frozen)
Peas
(fresh,shelled)
(frozen)
I rnediumhead
(about2Ibs.)
1lb.
1O-OZ.package
1 mediumhead
1 mediumhead
10-oz.package
1O-OZ.package
1to4 ears
1ear
2to4 ears
10-oz.package
2Ibs.unshelled
1O-OZ.package
High(10)
High(10)
High(10)
High(10)
High(10)
High(10)
High(10)
High(10)
High(10)
High(10)
High(10)
High(10)
High(10)
11to 13min.
13to 15min. In 1X-qt.casserole,place1/4cupwater.
8XtoIOXmin. In 1-qt.casserole,place2 tablespoonswater.
6to 12min.
7 to 13min.
9Xto 11min.
6to 8 min.
5to 6 min.
perear
7 to 8min.
4 to 5 min.
perear
8to 10min.
10to 11min.
5to7 min.
comments
Ina 2-qt.casserole,place1/4cupwater.
In 1X-qt.casserole,piace1/2cup water.
In2-qt.casserole,place1/2cupwater.
In 1-qt.casserole,place2 tablespoonswater.
In l-qt. casserole,place2 tablespoonswater.
Ina roundbakingdishorpieplate,placecorn.Ifcorn
is in husk,usenowater;if cornhasbeenhusked,add
1/4cupwater.Rearrangeafterhalfoftime.
Placein a roundglassbakingdish.
In 1-qt. casserole,place3 tablespoonswater.
In 1-qt.casserole,place1/4cupwater.
In 1-qt. casserole,place2 tablespoonswater.
Potatoes
(fresh,cubed,white)
4potatoes
(6to 8 oz.each)
(fresh,whole,sweet
(6to 8oz.each)
orwhite)
Spinach
(fresh)
lo to 160z.
(frozen,choppedandleaf) 1O-OZ.package
Squash
(fresh,summerandyellow)1lb.sliced
(winter,acornorbutternut) 1squash
(about1lb.)
High(10)
High(10)
High(10)
High(10)
High(10)
High(10)
12to16min.
6 to 8min.
perpotato
7to9 min.
8to 10min.
7to 10min.
10to 13min.
Peelandcut into 1-in.cubes.Placein 2-qt.casserole
with 1/2cupwater.Stirafterhalfof time.
Piercewithcookingfork.Placeonpapertowelon
turntable,1-inchapartin circular
arrangement.Letstand5 minutes.
In2-qt.casserole,placewashedspinach.
In 1-qt. casserole,place3tablespoonswater.
k-qt. casserole,place1/4cupwater.
In 1
Cutin half andremovefibrousmembranes.In8-in.
round glassbakingdish,placesquashcut-side-down.
Turn cut-side-upafterhalfoftime,
.— ————
Page 27

Your new microwave ove~lis a
valuable appliance. Protect it
fronl n]isuse by following these
rnies:
e Keep yotlr oven cIeanand
sweet-sn~e~ling.Opening the oven
door a few minutes after cooking
helps air out the interior, An
occasional thorough wiping with a
solution of baking soda and water
keeps the interior fresh.
* Don ‘t use sharp-edged utensils
ori your oven. The inside and
outsideoven walls call be scratched.
The control panel can be damaged.
BE CERTAIN POWER
EFORE CLEANING ANY
RT OF THIS OVEN.
.=
$&l;HowtocleantheInside
—-++
@
Wails a~ldfloor. Some spatters
can be removed with a paper
towel, others may require a damp
cloth. Remove greasy spatters with
a sudsy cloth, then rinse with a
damp cloth. Do not use abrasive
cleaners on oven walls. NEVER
USE A COMMERCIAL OVEN
CLEANER ON ANY PARTOF
YOUR MICROWAVEOVEN.
Is OFF
Door (inside). Window:Wipe
Llpspattersdaily and wash when
soiled with a damp cloth. Rinse
thoroughlyand dry.
Metal and plasticparts on door:
Wipefrequently with a damp
cloth to remove all soil. DO NOT
USE ABRASIVES, SUCH AS
CLEANING POWDERS OR
STEEL AND PLASTIC PADS.
THEY WILL MAR THE
SURFACE.
Removable ~rntible and
~rntable Support. Occasionally
it is necessary to remove the
turntable and supportfor cleaning
of the oven floor or turntable.To
prevent breakage, do not place the
turntable into waterjust after
cooking.Wash it carefully in
warm, sudsy water or in the
dishwasher.The turntable and
supportcan be broken if dropped.
Remember, do not operate the
oven without the turntableand
support in place.
Special note when using Brown
‘N Sear Dish: If grease is present,
high heat generated on bottom of
a Brown ‘N Se,ardish may cause
the grease to burn onto the oven
tray.This may be removed with
a cleanser such as Bon Ami@brand
cleanser.
After using Bon Ami@brand
cleanser, rinse and dry thoroughly,
following instructions on can. Do
not use Bon Ami@brand cleanser
on the painted surfaces such as the
walls. It may scratch the paint.
Autonlatic T’ernlperatureProbe.
Probe is sturdy,but care should be
taken in handling. Do not twist or
bend; avoid dropping temperature
probe.
Clean as soon after using as
possible. To clean, wipe with sudsy
cloth, then rub lightly with plastic
scouring ball if necessa~y.Rinse
and dry or wash in dishwasher.
HOM’toCleaatheoutside
Case. Clean the outside of your
oven with soap and damp cloth,
rinse with a damp cloth and then
dry.Wipe the window clean with
a damp cloth, Chrome trim is best
wiped with a damp cloth and then
with a dry towel.
Control Panel. Wipe with a damp
cloth. Dry thoroughly.Do not use
cleaning sprays, large amounts of
soap and water, abrasives or sharp
objects on the panel—they can
damage it.
Door Surface. When cleaning
surfaces of door and oven that
come together on closing the door,
use only mild, non-abrasive soaps
or detergents applied with a sponge
or soft cloth.
Power Cord. If the cord becomes
soiled, unplug and wash with a
damp cloth. For stubborn spots,
sudsy water may be used, but be
certain to rinse with a damp cloth
and dry thoroughly before
plugging cord into outlet.
Page 28

—.
This :]ppliancemust be grounded.
Ii]the event of an electrical short
circuit, grounding reduces the risk
of electric shock by providing an
escape wire for the electric current.
Ti~isappliance is equipped with a
power cord having a grounding
wire with a grounding plug. The
plLlgmust be p]u~ged into an outlet
that is properly installed and
grounded. (Fig. 1)
use of the grounding plug’ca~
result in a risk of electric shock.
PREFERRED METHOD
QQ
%
o
Q
>
D
Fig. 1
Consult a qualified electrician or
service technician if the grounding
instructions are not completely
understood, or if doubt exists as to
whether the appliance is properly
grounded.
Where a standard two-prong wall
receptacle is encountered, it is
your personal responsibility and
obligation to have it replaced with
a properly grounded three-prong
wall receptacle.
Do not under any circumstances
cut or remove the third (ground)
prong fron%the power cord.
Ensure proper ground
exists before use
useofAdapterPlugs
usage situatio~swhere
appliancespowerCordwill
be&eomected Mrequentlyo
Because of potential safety hazards
under certain conditions, we
strotigly recommend against the
use of an adapter plug. However,
if you stillelect to use an adapter,
where local codes permit, a
TEMPORARY CONNECTION
may be made to a properly
groundedtwo-prong wall receptacle
by the use of a UL listed adapter
(Fig. 2) which is available at most
local hardware stores.
TEMPORARY METHOD
(Adapterplu s not
Align lar e
Fig. 2
The larger slotin the adapter must
be aligned with the larger slot in
the wall receptacle to provide
proper polarity in the connection
of the power cord.
Caution: Attaching the adapter
ground terminal to the wall
receptacle cover screw does not
ground the appliance unless the
cover screw is metal, and not
insulated, and the wallreceptacle
is grounded through the house
wiring. Youshould have the circuit
checked by a qualified electrician
to make sure the receptacle is
properly grounded.
When disconnecting the power
cord from the adapter, always hold
the adapter with one hand. If this
is not done, the adapter ground
terminalis very likely to break with
repeated use. Should this happen,
DO NOT USE the appliance until
a proper ground has again been
established.
c?permittedIn anada)
Yprongs/s ots
before use
usagesituationswhere
appliancespowercord
w-ii]bediscinneeted
frequently.
Do not use an adapter plug
in these situations because frequent
disconnection of thepower cord
places undue strain on the adapter
and leads to eventual failure of the
adapter ground terminal. You
should have the two-prong wall
receptacle replaced with a threeprong (grounding)receptacle by a
qualified electrician before using
the appliance.
use of Extension cords
Because of potential safety hazards
under certain conditions, we
strongly recommend against the
use of an extension cord. However,
if it is necessary to use an extension
cord, use only a 3-wire extension
cord that has a 3-blade grounding
plug, and a 3-slot receptacle that
will accept the plug on the
appliance. The marked rating of
the extension cord shall be equal to
or greater than the electrical rating
of the appliance (15 amperes).
If you do use ar~extension cord
with your microwave oven, the
interior light may flicker and the
blower sound may vary when oven
is in use. Cook times may be
longer as well.
A short power-supply cord is
provided to reduce risks of
becoming entangled in or tripping
over a longer cord. Do not drape
the cord over a countertop or table
where it can be pulled on by
children or tripped over
accidentally.
..—.-..— -
Page 29

.-—-e~-==: *---
.,CC . . . . .
;*:_
.—.-—
—————-
...
——..
—.
——.—
.—
.:—7 useThisProblemsolver
Questions?
POSSIBLE CAUSE AND REMEDY
QA fuse in your home may be blown or the circuit breaker tripped. Replace fuse or
reset.circuit breaker.
~Unplug your microwave oven, then plug it back in.
*Make sure 3-prong plug on oven is fully inserted into wall receptacle.
CONTROL PANEL
LIGHTED,
}%T OVEN WILL
NOT START
FOODS ARE EITHER
OVERCOOKED OR
UNDERCOOKED
@Steam or vapor escaping from
around the door.
~Light reflection around door or
outer case.
~Door not securely closed.
●
~Another selection entered already in oven and PAUSE/CANC.ELpad not touched
to cancel it.
~Make sure you have entered cooking time after touching TIME COOK/T’EMP
COOK pad.
- PAUSE/CANCEL pad was touched accidentally.Reset cooking program and touch
STARTpad.
eCooking times may vary because of starting food temperature, food density or
amount of foods in oven. Touch TIME COOK/TEMP COOK pad and additional
cooking time for completion.
~Incorrect power level entered. Check Cooking Guide for recommended power level.
*Dish was not rotated, turned or stirred. Some dishes require specific instructions.
Check Cooking Guide or recipe for instructions.
~Probe not inserted properly into meat or dish when using Temp Cook function. Check
cookbook for specific instructions.
All these things are normal with your microwave oven:
oDimming oven light and change
in blower sound may occur while
operating at power levels other
than high.
oDull thumping sound while oven
is operating.
oSome TV-Radio interference
might be noticed while using your
microwave oven. It’ssimilar to the
interference caused by other small
appliances and does not indicate a
problem with your oven.
If you need more help...caII,toll free: GE Answer Center”/ 800.626.2000/ consumer information service
Page 30

,--------...-..+....-- ......-.————
Whateveryour questionabout anyGE
. .. .. ——.— .— —.”—.-—.-..
majorappliance, GEAnswerCenter@
information senticeisavailableto
help.Yourcall–and your question–
willbeansweredpromptly and
courteously.And youcan callany
time.GEAnswerCenter@se~ticeis
open 24hours aday,7 daysaweek.
..
.-1GE consumer service professional
Ttillprovide expert repair service,
scheduled at a time that’s convenient
r you. Many GE Consumer Service
pany-operated locations offer
ou selwicetoclayor tomorrow, or at
~-ourconvenience (’7:00a.m. to7:00p.m.
-..=-%-.
:$.
t-eekdays,9:00a.m. to2:00p.m. Satur-
~SF+
.
@
da~~s).OLlrfacto~y-trainedtechnicians
knoI$TyoLIrappliance inside and out–
so most repairs can be handled injust
one visit.
Youcan have the securefeeling that
GEConsumer Servicewillstillbe
there after yourwarrantyexpires,Purchasea GEcontractwhile yourwarrantyisstillin effectand yoL~’11receive
asubstantialdiscount.Witha multiple-
yearcontract, you’reassuredoffuture
serviceat today’sprices.
Ixlditidu* qudfiedtosefice tieh
OM a~~fimces canhaveneeded
parts or accessoriessentdirectiyto
their home. The GEparts systempro-
videsaccessto over4’7,000parts...and
allGEGenuine RenewalParts are
fullywarranted. VISA,MasterCard
and Discovercardsare accepted.
User mtitenmce ins~ctions
conttied h tiis
dwes h~tended tObe ~erfome~ by
my user. O*er se~ckg gener~y
shodd be refe~~ed tOq~tified ser-
tice ~ersOnnel. CautiOn mmt be
exercisecl, since k~ro~er seticbg
may cause unsafe O~erationo
boo~et cover ~roce-
TelecommunicationDetice for the Deaf
I
m“
1 .1.
SECTION A-A
“A,,ow.r.m.,.”, {.. WI,” *M” C.IA,.
!.” ,“.UU.AL.O,’““ t“co.,w
c!
.aLm ,.,
Upon request, GEwillprovideBraille
controlsfor avarietyof GE appliances,
and a brochure to assistin planning a
barrier-freekitchen for personswith
limitedmobility.To obtain theseiterns,
freeofcharge,call800.626.2000.
Consumerswith impaired hearing
or speechwho haveaccessto aTDD
or a conventionalteletypewritermay
call800-TDD-GEAC(800-833-4322)
to requestinformation or sen~ice.
Page 31

——
YOURGEMICROWAVEOVEN
\
WARRANTY
Save proofof originalpurchase date such as your sales slip or cancelled checkto establish warranty period.
WHAT IS COVERED
LIMITED ONE”YEAR WARRANTY
Forone yearfrom date oforiginal
purchase,we will provide,free of
charge,partsand servicelaborto
repairor replaceafly pafl of the
microwaveoventhat fails because
of a manufacturingdefect.
LIMITED ADDITIONAL
FOUR-YEARWARRANW
Forthe secondthrough fifth year
from date of originalpurchase,we
will provide,free of charge, a
replacement
magnetrontube fails becauseof a
manufacturingdefect. Youpay for
servicelaborcharges.
each of the above warranties:
For
Toavoidany trip charges,you must
take the microwaveoven to a
GeneralElectricFactorySetvice
Centeror a GeneralElectric
CustomerCare@setvicer and pick it
upfollowingservice. In-home
sewice isalso available,but you
must payfor the servicetechnician’s
travelcoststo yourhome.
magnetrontubeif the
This warrantyis extendedto
the originalpurchaserand any succeedingownerfor products
purchasedfor ordinaryhome use in
the 48 mainlandstates, Hawaiiand
Washington,D.C.
All warrantyservicewill be provided
by our FactoryServiceCentersor
by our authorizedCustomerCare@
servicersduringnormal working
hours.
Should your appliance need
service, during warranty period
or beyond,call 800-GE-CARES
(800-432-2737).
Improperinstallation. ~Failureof theproduct if it is usedf
WHAT!SNOTCOVERED
@Servicetrips to your hometo teach
you howto usethe product.
Read your Useand Care material,
If you then have any questionsabout and other connecting facilities.
operatingthe product,pleasecontact
your dealer or our ConsumerAffairs
otiice at the addressbelow,or call,
toll free:
GE Answer Center”
800.626.2000
consumer information service
Some states do not allow the exclusion or limitation of incidental or consequential dwmages, so the above limitation or exclusion
may not apply to you. This warranty gives you specific legal rights, and you may also have other rights which vary from state to state.
To know what your legal rights are in your state, consult your local or state consumer affairs office or your state’s Attorney General.
Bffurther help is needed concerning this warranty, write:
Manager—Consumer Affairs, GE Appliances, Louisville, KY
—.
Pati [~]0.164D2588P067
-%,x~
——
.:-92
Cci
1
~
If you havean installationproblem,
contactyour dealeror installer,
Youare responsiblefor providing
adequateelectrical,gas, exhausting
eReplacementof housefuses or
resettingof circuitbreakers.
Warrantor: General Electric Company
otherthan its intendedpurposeor
usedcommercially.
~Damageto productcaused by
accident,fire, floodsor acts of God.
WARRANTORISA/OTRESPONSIBLE
FORCONSEQUENTIALDAMAGES.
40225
 Loading...