


vvvvvv.GEAppliances.com
Safety Information ......... 2-6
>
Operating Instructions
Auto Features .............. ] 2
Microwave Terms ............ ] 8
Other Features ........... ] 6-] 8
Oven Features ............. 7, 8
Power Levels ................ 9
Sensor Features .......... ] 3-] 5
Time Features ............ 9-] 2
Care and Cleaning ......... 19
Troubleshooting Tips ....... 90
Things That Are Normal ...... 90
Consumer Support
Consumer Support . . .Back Cover
Product Registrauon ...... 91,92
_'arranty .................. 93
JE2160
©
Write the modelandserial
numbershere:
Model #
Serial #
You can find them on a label
inside the oven.
164D3370P285 49-40355 06-03 dR

IMPORTANTSAFETYINSTRUCTIONS.
READALLINSTRUCTIONSBEFOREUSING.
WARNING!
For your safe_ the information in this manual must be followed to minimize the risk of fire or explosion, electric shock, or
to prevent property damage, personal injury, or loss of life.
PRECAUTIONSTOAVOIDPOSSIBLEEXPOSURE
TOEXCESSIVEMICROWAVEENERGY
(a) Do NotAttempt to operate this oven with tile door
open since open-door operation can result in ham/fill
exposure to microwave energy': It is impommt not to
defeat or tamper with the safety interlocks.
(b) DoNotPlace any object between the oven fl'ont fi_ce
and the door or allow soil or cleaner residue to
accumulate on sealing sm_i_ces.
(c) Do Not Operate the oven if' it is damaged. It is
particularly important that tile oven door close
properly and that there is no damage to the:
(]) door (bent),
(2) hinges and latches (broken or loosened),
(3) door seals and sealing stmfi_ces.
(d) The Oven Should Not be a(!j usted or repaired b)
anyone except properly qualified service pex_onnel,
IMPORTANTSAFETYINSTRUCTIONS.
When using electrical appliances basic safety precautions should be followed, including the following:
• Read and fl)llow tile specific precautions in tile
Precautions to Avoid Possible Exposure to Excessive
Microwave Energy secdon above.
• This appliance inust be grounded. (_onnect only to a
properly grounded outlet, See the GroundingInstructions
section on page 4.
• Install or locate this appliance only in accordance with
tile provided installation instructions.
• Be certain to place tile fl'ont surfi_ce of tile door three
inches or more back fl'om tile co/mtertop edge to avoid
accidental tipping of tile appliance in nomml usage.
• Do not inount this appliance over a sink.
• Do not illOtlnt tile IllicI'owave (wen ovex" or near any
portion of a heating or cooking appliance.
Do not store an)*hing directly on top of tile microwave
oven s/ir_'ilce when tile iilicro_zlve oven is ill oi)ei'ation,
Do not operate this appliance if it has a damaged power
cord or i)lug, if it is not working properly, or if it has
been damaged or dropped. If tile power cord is
damaged, it must be replaced by General Electric
Se_'ice or an authorized service agent using a power
cord a\:filable fl'om General Electric.
Do not cover or block any openings on tile appliance.
Use this appliance only fin" its intended use as described
in this manual. Do not use corrosive chemicals or wq)ox_
in this appliance. This microwave oven is specifically
designed to heat, (hT or cook tbod, and is not intended
for laboratory or industrial use.

IMPORTANTSAFETYINSTRUCTIONS.
Use this appliance only for its intended purpose as described in this Owner's Manual.
www.GEAppliances.com
• This microwave oven is not approved or tested fl:,r
IIla I'ine rise.
• Do not store this appliance outdo(n3. Do not use this
product near wate_fi)r example, in a wet basement,
near a swimming pool, near a sink or in similar
locations.
• Keep power cord away fl'om heated surlhces.
• Do not imme_se power cord or plug in water:
• Do not let power cord hang over edge ot table
oi co/intei:
• To reduce the risk of fire in the oven caviw:
--Do not overcook fi)od, Careflfllv attend appliance
when paper, plastic or other combustible materials are
placed inside the oven while cooking,
--Remove wire twist-ties and metal handles fl'om paper or
plastic containe_ heft)re pladng them in the oven.
--Do not use the oven fin" storage puq)oses. Do not leave
paper products, cooking utensils or toed in the oven
when not in use.
--If materials inside the oven ignite, kee I) the oven door
closed, turn the oven off and disconnect the power cord,
or shut off power at the fllse or drcuit breaker panel.
If the door is opened, the fire may spread.
--Do not use the Sensor Features twice in succession on
the same toed portion. If ti)()cl is undercooked after
the fi_t countdown, use Time Cook ti)r additional
cooking time.
• See door surthce cleaning instructions in the Careand
cleaning of the microwave oven section of this manual.
• This appliance must only be serviced by qualified service
personnel. Contact nearest authorized service ti_cilitv
for examination, repair or a(!jusnnent.
• As with a W appliance, close supervision is necessary
when used by children.
SAVETHESEINSTRUCTIONS
WARNING!
ARCING
If you see arcing press the CLEAR/OFFpadand correct the problem.
Ardng is tile microwave tem_ fi)r sparks in the oven.
Arcing is caused by:
• Metal or foil touching the side of the oven.
• Foil not molded to food (upturned edges act
like anmnnas).
• Metal, such as twist-ties, poult_ y pins or gold-
rimmed dishes, in the microwave.
• Recycled paper tcmvls containing small metal
pieces being used in the microwave.
3

IMPORTANTSAFETYINFORMATION.
READALLINSTRUCTIONSBEFOREUSING.
WARNING!
FOODS• Do not pop l)opcoYn in yo/lr i//ici'ow;:lve oven
unless in a special microwave popcorn accessory
or tlnless yo/l tlse popcorn labeled fi)r rise ill
IllicI'OWaVe ovens.
• Some products such as whole eggs and sealed
containei_--flw example, closed jai!--are able
to eN)lode and should not be heamd in this
I/liCI'OW_lVe oven. _{1cl/ {lse of tile IlliCI'OW_lVe
()veil could result in injury.
• Do not boil eggs in a microwave oven. Pressure
will build tlI) inside egg yolk and will cause it
to bmst, possibly resulting in iqjllI?':
• Operating tile microwave with no food inside for
illOi'e than a Illintlte oF [wo IllaV Catlse danlage
to tile oven and could start a fire. It increases tile
heat arotlnd tile magnetron and can shorten
the life of the oven.
• Foods with unbroken outer "skin" such as
potatoes, hot clogs, sausages, tomatoes, apples,
chicken li\'eI_ and other giblets, and egg )_)lks
should be pierced to allow steam to escape
during cooking.
• SUPERHEATEDWATER
Liquids,such aswater,coffeeortea, are ableto
be overheatedbeyondtheboilingpoint without
appearingtobe boiling.Visiblebubblingor boiling
when the container isremovedfromthe microwave
ovenisnot alwayspresent. THISCOULDRESULT
IN VERYHOTLIQUIDSSUDDENLYBOILINGOVER
WHENTHECONTAINERIS DISTURBEDORA
SPOONOROTHERUTENSILISINSERTEDINTO
THELIQUID.
• Avoid heating baby food in glassjms, even
with tile lid off. Make sure all infimt fi)od is
thoroughly cooked. Stir fi)od to distribute tile
heat evenly: Be careflll to prevent scalding when
wam/ing tommla. Tile container may libel cooler
than tile titan ula really is. _Mwavs test tile fi)rm ula
before teeding the baby:
• Don't defl'ost fl'ozen beverages in narro_necked
bottles (especially carbonamd beverages). Even if
the container is opened, pressure can build ill).
This can cause the container to bulst, possibly
resulting in ii_jur)'.
• Hot foods and steam can cause burns. Be careful
when opening any containei_ of hot food,
including popcorn bags, cooking pouches and
boxes. To prevent possible iI_jtu N direct steam
away fi'om hands and face.
Do not (wercook potatoes. They could dehydrate
and catch fire, causing damage to your oven.
Cook meat and poultry thoroughly--meat to at
least an INTERNAl, temperature of 160°F and
poultI T to at least an INTERNAl, temperature
ot 180°E Cooking to these temperatures usually
protects against fi)odborne illness.
To reduce tile risk of ii_jm y to peisons:
-- Do not overheat the liquid.
-- Sill" tile liquid both beflwe and halfway
through heating it.
-- Do not use straight-sided containei_ with
na rr()w necks.
--_Mter heating, allow tile container to stand in
tile microwave oven fi)r a short time heft)re
removing tile containei:
-- Use extreme care when inserting a spoon or
other utensil into the containei;
4

www.GEAppliances.com
MICROWAVE-SAFECOOKWARE
Make sure all cookware used in your microwave • Cookware ma) 1)e('ome hot because of heat
o;en is suitable for microwaxin , Most glass transferred ti'om the heated food. Pot holde_
casseroles, cooking dishes, measuring cups, custard may be needed to handle the cookware.
cups, potte_ y or china dim_erware which does not • "Boilable" cooking pouches and tightly closed
have metallic trim or glaze with a metallic sheen can plastic bags should be slit, pierced or vented as
be used. Some cookware is labeled "suitable for directed by package. If thev are not, plastic could
microwa\ing." bm_t during or immediately alier cooking,
• If w_u are not sure if a dish is microwave-safe, possibly resulting in iqjury. Mso, plastic storage
use this test: Place in the oven both the dish containe_ should be at least partially uncovered
you are testing and a glass measuring cup filled because thev titan a tight seal. _A]_en cooking
with 1 cup of water--set the measuring cup with containe_ tightly covered with plastic wrap,
either in or next to the dish. Microwave 30-45 remove covering caretidlv and direct steam away
seconds at high. If the dish heats, it should not fl'om hands and ti_ce.
be used fin" microwaving. • Lrse foil only as directed in this guide. TV dinne_
If the dish remains cool and only the water in may be microwaved in f0il trays less than 3/4"
the cup heats, then the dish is microwave-sale, high; remove the m I) f0il cover and return the
• If w)u use a meat them_ometer while cooking, tray to the box. When using t0il in the microwave
make sure it is sale fin" use in microwave ovens, oven, kee I) the f0il at least 1 inch away fl'om the
• Do not use recycled paper products. Recycled
paper towels, napkins and waxed paper can • Plastic cookware--Plastic cookware designed for
contain metal flecks which may cause arcing microwave cooking is very uselill, but should be
or ignite. Paper products containing nyhm or used careflflly. Even microwave-sale plastic may
nvhm filaments should be avoided, as they may not be as tolerant of overcooking conditions as
also ignite, are glass or ceramic materials, and may soften or
• Some styrofoam navs (like those that meat is In longer exposures to oxercooking, the food
packaged on) haxe a thin stil I) of metal embedded and cookware could ignite.
in the bottom. _Aqten microwave(l, the metal can
burn the floor of the oven or ignite a paper t{re'el. Follow these guidelines:
• Do not use the IIliCI'O_;Ive 1o dry newsl)al)ei3.
• Not all plastic wrap is suitable fin" use in InicI'o_;Ive
ovens. Check the package fin" proper use.
• Paper towels, waxed paper and plastic wrap
can be used to cover dishes in order to retain
moisture and prevent spattering. Be sure to
vent plastic wrap so smam can escape.
O
sides ot the oven.
char if subjected to short periods of oxercooking.
B Use microwave-satb plastics only and use
them in strict compliance with the cookware
I/1}1 I1 t I_;I ct t II'eY's i'e COi11111 en datio ns.
Do not iilicrowa'_e ei/li)t}, containers.
Do not pemfit children to use plastic
cookware without complete supervision.
GROUNDINGINSTRUCTIONS
WARNING-I,, o o tt,og,-o,,,,Ji,,g ,l,gco,, i,,o,-i kofoloct,-icst,ock.
This appliance must be grounded. In the event of
an electrical short circuit, grounding reduces the
risk of electric shock by providing an escape wire
fin" the electric current.
This appliance is equil)ped with a power cord
having a grounding wire with a grotmding plug.
The plug must be plugged into an outlet that is
properly installed and grotmded.
Consult a qualified electrician or se_Mce mchnician
if the grounding instructions are not completely
unde_tood, or if doulX eMsts as to whether the
appliance is propedy grounded.
If the outlet is a standard 2-prong wall outlet,
it is your personal responsibility and obligation
to have it replaced with a propedy grounded
3-prong wall outlet.
Do not tinder _liiV cii'ctliilS[Jlnces C/l[ oi" I'eIllOVe
the third (ground) prong ti'om the power cord.
We do not recommend using an extension cord
with this appliance. If the power cord is too
short, have a qualified electrician or se_','ice
technician install an outlet near the appliance.
(See EXTENSION CORDSsection.)
For best operation, l)lug this appliance into its
own electlJcal outlet to l)revent flickelJng of lights,
blowing of fllse or tripping of circuit breaker: g

IMPORTANTSAFETYINFORMATION.
READALLINSTRUCTIONSBEFOREUSING.
ADAPTERPLUGS
Usage situations where appliance's power cord will be disconnected infrequently.
Because of potential safer)' hazards under certain conditions,
we strongly recommend against the use ofan adapter plug.
Howe\'ex; if you still elect to use an a(laptex; where local codes
pemfit, a TEMPORARYCONNECTION mav be made to a pr(>perly
grounded 2-prong wall receptade by the use of a UI, listed adapter
which is a\_filable at most local hardware stores.
The larger slot in the adapter must be aligned with the larger slot in
the wall receptacle to provide proper polarity in the c(mnecfion of
the power cord.
CAUTION:Attaching the adapter ground terminal to the wall receptacle cover screw does not ground
the appfiance unless the cover screw is metal, and not insulated, and the wall receptacle is grounded
through the house wiring.
You should have the circuit checked by a qualified electrician to make sm'e the receptacle is properl)
grotmded.
When disc(mnecting, the I)°wer cord fl'om the adapte_; alwa)s hold the adapter with one hand. If this
is not done, the adapter grotmd temfinal is xerx likely to break with repeated use. Should this hai)pen,
DO NOTOSEthe appliance tmtil a proper grotmd has again been established.
{Adapterplugsnot
permittedinCanada) F_
Alignlarge
prongs/slots _._,_ __L# I
J_ Ensureproperground
TEMPORARY andfirm connection
METHOD beforeuse.
Usage situations where appliance's power cord will be disconnected frequently.
Do not use an adapter plug in these situations because fl'equent disconnection ol the power cord places
tmdue strain on the adapter and leads to eventual fifilm'e of the adapter grotmd temfinal. _)u should have
the 9-prong wall receptacle replaced with a 3-prong (grotmding) receptacle by a qualified electrician
heft)re using the appliance.
EXTENSIONCORDS
A short power sui)ply cord is provided to reduce the risks resuldng ti'om becoming entangled in or tripping
over a longer cord.
Extension cords may be used if you are careflfl in using them.
If an extensioncord is used--
B The marked electrical rating of the extension cord should be at least as great as the electrical rating of
the appliance;
_'_ The extension cord must be a gr()tmding-la )e 3 "
_The extension cord should be arranged so that it will not drape over the cotmtertop or tabletop where
it can be pulled on b) children or tripped oxer tmintentionally.
If you use an extension cord, the interior light may flicker and the blower sotmd may xarv when the
microwaxe oxen is on. Cooking times ma) be longer; too.
, , ,'l " -wn'e cord and it must be l)lugged,, into a S-slot outlet
READANDFOLLOWTHISSAFETYINFORMATIONCAREFULLY.
SAVETHESEINSTRUCTIONS
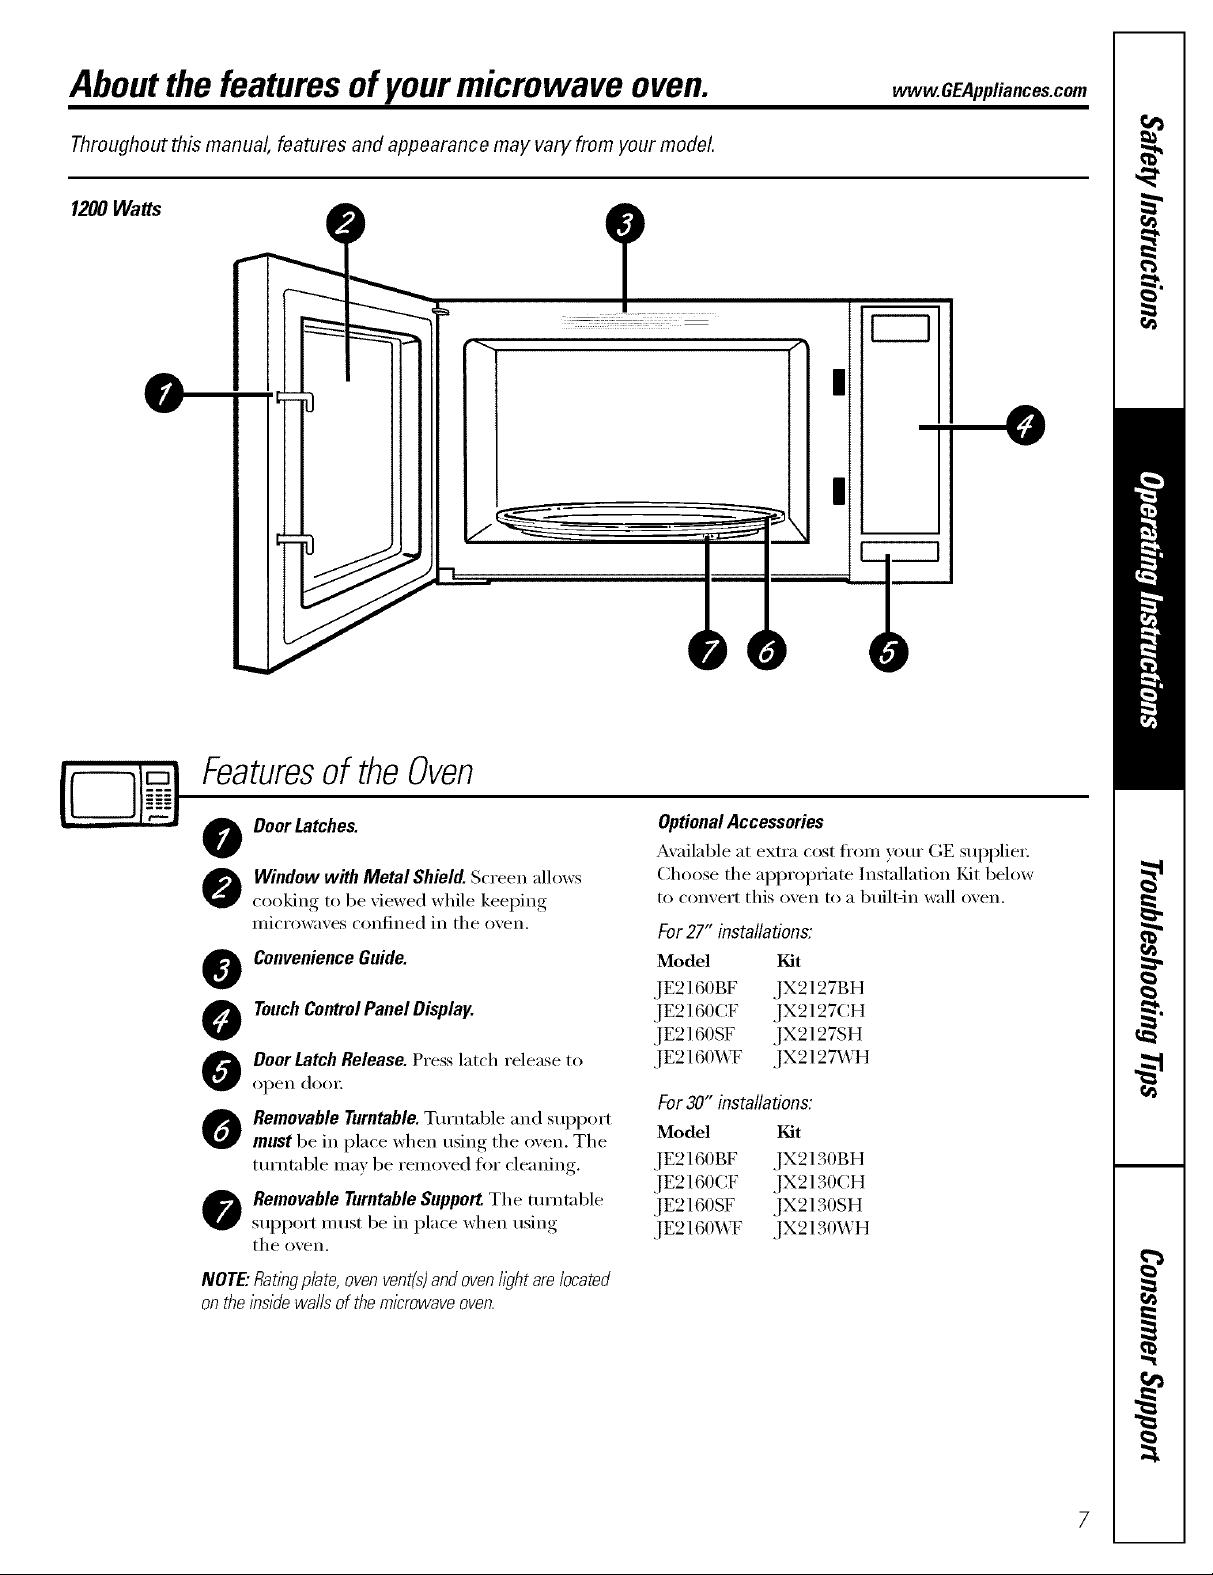
Aboutthe featuresofyourmicrowave oven. vvvvw.GEAppliances.com
Throughout this manual, features and appearance may vary from your model.
1200 Watts
Featuresof theOven
O Door Latches.
Window with Metal Shield. Screen allows
cooking to be "dewed while keeping
illici'owa_es confined in the o_eil.
Convenience Guide.
@
TouchControlPanelDisplay.
0
Door Latch Release. Press latch release to
0
open dooE
Removable Turntable.Turntable and support
0
must be in place when using the oven. The
turntable may be removed fin" cleaning.
Removable Turntable Support.The turntable
0
Stlpport Ill list be in place when using
the oven.
NOTE."Ratingplate,ovenvent(s)andovenhghtarelocated
ontheinsidewallsof themicrowaveoven.
OptionalAccessories
Available at extra cost fl'om yore" GE supplie_:
Choose the appropriate Installation ](it below
to convert this oven to a built-in wall oven,
For27 installations:
Model Kit
JE2160BF JX2127BH
JE2160CF JX2127CH
JE2160SF JX2127SH
JE216OWF Jx2127\,VH
For30" installations:
Model Kit
,IE2160BF ,IX2130BH
,]E21BOCF ,]X21BOCH
,IE21BOSF ,IX2130SH
,IE2160WF ,IX21BOWH

Aboutthe featuresofyourmicrowave oven.
Youcan microwave by time, with the sensor features or with the auto feature.
0
@ @
CookingControls
Check the Convenience Guide before you begin.
Time Features
Press Enter
TIMECOOK Amountof cookingtime
Pressonceortwice
TIMEDEFROST Amountof defrostingtime
EXPRESSCOOK Startsimmediately!
POWERLEVEL Powerlevel1-10
ADD30SEC Startsimmediately!
0
Sensor Features andAuto Features
Press Enter Options
POPCORN Startsimmediately! more/lesstime
VEGETABLE Startsimmediately! more/lesstime
Pressonce(freshvegetables)
Presstwice(frozenvegetables)
Pressthreetimes(cannedvegetables)
REHEAT Startsimmediately!
BEVERAGE Startsimmediately!
POTATO Startsimmediately! more/lesstime
CHICKEN/FISH Startsimmediately! more/lesstime
Pressonce(chickenpieces)
Presstwice(fish)
Press Enter
AUTODEFROST Foodweight

Aboutchangingthepower level www.GEAppliances.com
OD(Z)(E)
@
The power level mm be entered or
changed immediatel} after entering the
time for Time Cook or Express Cook,
B Press TIME COOK
_'_ Enter cooking time.
_€'] Press POWERLEVEL
D Select desired power level 1-10.
_'_ Press START
Variable power levels add fle_bili D' to
illici'o_;l\'e cookhlg. The [)owei" levels on
tile IIlicI'owave oven can be COIIl[)aI'e(1 to
the sm'fi_ce units on a range. Each power
level gives you microgroove ene_ W a certain
percent of the time. Power level 7 is
microwave energy 70% of the time. Power
level 3 is energy 30% ot the time. Most
cooking will be done on High (power level
10) which gives you 100% power A high
setting (10) will cook tipster but tood may
need moxe fl'equent stirring, rotating or
turning ove_: A lower setting will cook mine
evenly and need less stirring or rotating ot
the fi)od. Some foods may have better flavm,
texture or appearance if one of the lower
settings is used. Use a lower power level
when cooking toods that have a tendency
to boil ove_, such as scalloped potatoes.
Rest periods (when the microwave ellei'gr},'
cycles off) give time for the tood to
"equalize" or transter heat to the inside
of the food. An example of this is shown
with power level 3--the deti'ost cycle. If
microwave energy' did not cycle off; the
outside of the fi)od would cook befi)re
the inside was deti'osted.
Hero aro some examples of uses for various
power levels:
High 10: Fish, bacon, vegetables, boiling
liquids.
Med-High7."Gentle cooking of meat and
poult_T; baking casseroles and reheating.
Medium& Slow cooking and tenderizing
for stews and less tender cuts of meat.
Low2or3: Defl'ostin ," simmering; delicate
Sauces.
Warm I: Keeping fl)od waxm; softening
butte_:
Aboutthe timefeatures.
Time Cook
_Mlows you to microwave fi)r any time up
to 99 minutes and 99 seconds.
Powerlevel 10(High)is atmmmticall) set,
but you may change it for more flexibility.
Time CookII
B Press TIMECOOK
_'_ Enter cooking time.
@
_€'] Change the power level if' you d(m't
want flfll power: (Press POWERLEVEL.
Select a desired power lexel 1-10.)
D Press START
You may open the door during Time Cook
to check the food. Ch)se the door and press
START to resume cooking.
Time CookII
I,ets you chmwe_ power lexels automaficall)
dtn'in(, cooking. Here's how to do it:
_ PressTIMeCOOK
_'_ Enter the fi_st cook time.
_ Chan?e the lower lexel if you don't
want fi,ll l,,))ve,: (Press POWERLEVEL
Select a desired power lexel 1-10.)
D Press TIMECOOKagain.
D Enter the second cook time.
_ Chanoe the _ower level if you don't
want fi,ll p())ve_: (Press POWERLEVEL
Select a desired power lexel 1-10.)
_'_ Press START
At the end of Time Cook I, Time Cook fl
co//nts down.

About the time features.
Cooking Guide for time Cook
NOTE." Use High power level (10) unless otherwise noted.
Vegetable Amount Time Comments
Asparagus
(fresh spears) 1 lb. 5 to 8 mhl., In 1½-ttt. casserole, place l/4 cup _ltel:
Med-HNh (7)
(frozen spears) 10-oz. package 4 to 7 mhl. In l<tt. casserole.
Beaus
(fresh green) 1 lb. cut in hail" 10 to 14 mhl. In 1½-tit. casserole, place l/2 cup _*tel:
(frozen green) lO-oz, package 4 to 8 mhl. In l<tt. casserole, place 2 tablespoons _ater.
(frozen lima) lO-oz, package 4 to 8 mbl. In 1-tit. c_sserole, place l/4 cup _ltel:
Beets
(fresh, whole) 1 bunch 16 to 21 mhl. In 2-tit. casserole, place l/2 cup _ltel:
Broccoli
(fresh cut) 1 bunch (1¼ to 1½ lbs.) 5 to 9 mhl. In 2-tit. casserole, place 1/2 cup _ltel:
(fresh spears) 1 bunch (1¼ m 1½ lbs.) 7 to 10 mhl. In 2-tit. casserole, place l/4 cup _ltel:
(frozen, chopped) 10-oz. package 4 to 7 mhl. In 1-tit. c_sserole.
(frozen spears) 10-oz. package 4 to 7 mhl. In 1-tit. casserole, place 3 tablespoons _ltes:
Cabbage
(fresh) 1 medium head (about 2 lbs.) 6 to 9 mhl. In 1 ½- or 2<it. c_sserole, place l/4 cup _ltel:
(wedges) 5 to 9 mhl. In 2- or .9_tt. casserole, place l/4 cup _ltel:
Carrots
(fresh, sliced) 1 lb. 4 to 8 mbl. In 1½-ttt. casserole, place l/4 cup _ltel:
(frozen) 10-oz. package 3 to 7 mhl. In l<tt. c_sserole, place 2 tablespoons _ate_:
Cauliflower
(flowerets) 1 medium head 7 to 10 mh_. In 2<it. casserole, place l/2 cup _te_:
(fresh, whole) 1 medium head 7 to 14 mh_. In 2-tit. casserole, place l/2 cup _te_:
(frozen) 10-oz. package 3 to 7 mh_. In l<tt. c_sserole, place 2 tablespoons _ate_:
Corn
(frozen kernel) 10-oz. package 2 to 6 min. In ]<tt. casserole, place 2 tablespoons water.
Cornon the cob
(fresh) 1to 5 ears
(frozen)
Mixed vegetables
(frozen) 2 to 6 min. In l<t t. casserole, place 3 tablespoons wares:
Peas
(fresh, shelled) 7 to 9 rain. In ]<tt. casserole, place l/4 cup water:
(frozen) 2 to 6 rain. In ]<tt. casserole, place 2 tablespoons water:
Potatoes
(fresh, cubed, white) 9 to l l rain.
(fresh, whole, sweet
or white)
Spiuach
(fresh)
(frozen, choppedand leaf)
Squash
(fresh, summer, andyellow)
(winter, acorn or butternut)
1 ear 3 to 6 min.
2 to 6 ears 2 to 3 min.
lO_)z, package
2 lbs. unshelled
10-oz. package
4 potatoes (6 to 8 oz. each)
1 (6 to 8 oz.) 2 to 4 rain. Pierce with cooking fi)rk. Place in the o_en, l"
10 to 16 oz. 3 to 6 min. In 2-tit. casserole, place washed spinach.
10_)z. package 3 to 6 rain. In l-tit, casserole, place 3 tablespoons water:
1 lb. sliced
1 to 2 squash (about 1 lb. each)
11/4to 4 min.
per ear
per ear
3 to 5 min.
5 to 9 rain.
1532<it. glass baking dish, place com. II corn is in
husk, use no water; if corn has been husked, add
]/4 c up wateL Rearrange after half of time.
Place in 2<it. oblong glass baking dish.
Co_er with vented plastic _Tap. Rearrange after
half of time.
Peel and cut into l-inch cubes. Place in 2<it.
casserole with l / 2 cup _te_: Stir after half of
time.
apart, in circular arrangement. I_et stand 5 minutes.
153l F_tt. casserole, place l/4 cup water:
Cut in half and remove fibrous membranes. In
2<it. glass baking dish, place squash cut-side<lo_m.
Turn cut-side-up after 4 minutes.

vvvvw.GEAppliances.com
@
@@@
@@@
@@@
@
@
Defrosting Guide
TimeDefrost
_Mlows you to defl'ost fi)r a selected length
of time. See tile Defl'osting Guide fi)r
suggested times. (Auto Defrostexplained
in tile About the auto feature section.)
B Press TIME DEFROST
_'_ Enter defl'osfing time.
B Press START
When tile oven signals, turn food over and
break apart or rearrange pieces fin" more
even defl'osfing. Shield any wam_ areas with
small pieces ot fifil. Tile oven will continue
to defrost if you don't open tile door and
ttlrn tile food.
A dull thumlring, noise may be heard
during defrosting. This is nomml when
oxen is not oi)erating, at Highpower:
Defrosting tips
• Foods fl'ozen in I)aper or plastic can be
defl'osted in the package. Closed packages
shoukl be slit, pierced or vented AFTER
fi)od has partially defrosted. Plastic storage
containers should be partially uncovered.
• _mfily-size, prepackaged fl'ozen (linne_
can be deti'osted and microwave(l. If tile
food is in a foil containe_; transfer it to
a microwave-sate dish.
• Foods that spoil easily should not be
allowed to sit otlt for II/ore than one
hour after defl'osfing. Room temperature
promoms tile growth ot hmmflfl bacmfia.
• Dn" more even defl'osting ot larger foods,
such as roasts, use AIItO Defrost. Be sure
large meats are completely defl'osted
befl n'e cooking.
• XA]mn defl'osted, toed should be cool
but softened in all areas. If still slightly
icy; return to tile microwave oven very
briefly; or let it stand a few minutes.
Food Time Comments
Breads,Cakes
Bread,bunsorrolls (I piece) 1/4 rain.
Sweet rolls (approx. 12oz.) 2 to 4 rain. Rear_'ange after half tile time.
FishandSeafood
Fillets,frozen (I lb.) 6 to 9 rain.
Shellfish,smallpieces (I lb.) 3 to 7 rain. Place block in casserole. Turn oxer and break up after half tile time.
Fruit
Plasticpouch--1 or2 1to 5 rain.
(lO-oz. package)
Meat
Bacon (I lb.)
Franks(1lb.)
Groundmeat (I lb.)
Roast:beef,lamb,veal, pork
Steaks, chopsandcutlets
Poultry
Chicken,broiler-fryer,cut up
(2½to 3 Ibs.)
Chicken,whole (2½to 3Ibs.)
Coroishhen
Turkeybreast (4to 6 Ibs.)
2 to 5 rain.
2 to 5 rain.
4 to 6 rain.
9to 12 mhl.
per lb.
4 to 8 rain.
per lb.
14 to 19 rain.
20 to 24 rain.
7to 12 rain.
per lb.
3 to 8 rain.
per lb.
Place unopened package in oven. llet stand 5 minutes after defl'osfing.
Place unopened package in o_en. Microwm_ejust until fl_mks can be separated.
Iet stand 5 rain ores, if necessm3, to complete defl'osting.
Turn meat over after first half of time.
Use power level 1.
Place tmwrapped meat in cooking dish. Turn oxer after first half of time and shield
_a]ln areas with fi)il. _Mter second half of time, separate pieces with table knife.
iet stand to complete defl_osting.
Place _Tapped chicken in dish. Um_Tap and turn oxer after first half of time.
,Mter second half of time, separate pieces and place in cooking dish. Micr(_*_me
2 to 4 minutes more, if necessa D. I_et stand a few rain utes to finish defl'osting.
Place _lpped chicken in dish. _Mter half tile time, tln_vTap and tnrn chicken o\el:
Shield warm areas with fi)il. To complete defl'osting, run cold water in tile ca\it\
until giblets can be removed.
Place UmvTapped hen in the oven breast-side-up. Turn oxer after first half of time.
Rnn cool water in tile croft) until gdblets can be remo\ed.
Place UmvTapped breast in microwm'e-sale dish breast-side<lo_vll. Aiier first half
of time, tnm breast-side-up and shield warm areas with fi)il. Defl'ost for second
half of time. iet stand l to 2 hours in refi'igerator to complete defi'osting.
//

About the time features.
ExpressCook
This is a quick wayto set cooking time for
1-6 minutes.
Press one of the Express Cook pads (fron/
1 to 6) fin" 1 to 6 minutes (ff cooking at
power level I0. For example, press the
2pad fin" 2 minutes of cooking time.
Add30 Seconds
You can use this feature two ways:
• It will add 30 seconds to the time
cotmting down each time the pad
is pressed.
About the auto features.
The power level can be changed as time
is counting down. Press POWERLEVELand
enter 1-10.
• It can be used as an express cook fi)r
30 seconds.
@
Auto Defrost
Use Auto Defrost fin" meat poultry and
fish. Use TimeDefrost for most other
_'i'ozen [i)ods.
Auto Defrost automatically sets the
deli'osting tim es and p()wer levels to give
even defi'osting results tot ineats, poult_ y
and fish weighing up to 6 pounds.
_r_ Press AUTO DEFROST
_p_ Using the Conversion Guide below,
enter fi)od weight. For example,
press pads I and 2 for 1.2 potmds •
(1 potmd, 3 (>maces).
_ Press START
(TimeDefrostis explained in the Aboutthe
time features section.)
ConversionGuide
If the weight of foodis statedinpoundsandounces,theouncesmustbe
convertedto tenths_1)of a pound.
There is a handy guide located on the inside
front of the oven.
Remove meat from I)ackage, and place
on microwave-sate dish.
_._]_en the oven signals, mrn the fl)od
ove_: Remove defi'osted meat or shield
wam_ areas with small pieces of t0il.
_Mter defrosting, most meats need to
stand 5 minutes to complete defl'osting.
Imge roasts should stand tor about
30 minutes.
Guide
12
WeightofFoodin Ounces EnterFoodWeight(tenthsofa pound)
I-2 .I
3 .2
4-5 .3
6-7 .4
8 .5
9-10 .6
11 .7
12-13 .8
14-15 .9

About the sensor features, www.GEAppliances.com
HumiditySensor
The Sensor Features detect the increasing lmmidi_' released during cooking. The oven
automatically a(!justs the cooking time to \_rious t}pes and amounts ot fi_od.
Do not use the Sensor Features twice in succession on the same food portion--it may result
in severely overcooked or burnt ti)o(1. If fi)od is tmdercooked after the countdown, use
Time Cooktin- additional cooking time.
• The proper containe_ and cove_ are essential fin" best sensor cooking.
Covered
• _Mwax's use microwave-sate containers and co'_er them with lids or "_ented plastic wrap.
Nexer use tight sealing plastic containers--they can prexent steam from escaping and
C_l[/Se J[i)od 1o oxei'cook.
Vented
Dry off dishes so they don't mislead
the sensor.
• Be sure the outside of the c kin_ c mtame_ and the inside of the microwave o_en are
(h T before placing tood in the o_en. Beads of moisture turning into steam can mislead
the sensoi _.
OO o" ( " "
13

About the sensor features.
Popcorn
T(> use the Popcorn fbamre:
[]Follow package instructions, usin(,
_me C00R if the package is less than
Use only with prepackaged
microwave popcorn weighing
1.75to 3.5 ounces.
NOTE:Do not use this feature twice
in succession on the same food
portion--it may result f17severely
overcooked or burnt food.
1.75 otmces or larger than 3.5 ounces.
Place the package of popc(wn in the
center ot the microwave.
_'_ Press POPCORN.The o',en starts
imm ediatel_.
If you open the door while POPCORN
is displayed, a SENSOR ERRORmessage will
appem: Close the door and press START
immediately:
If fl)od is tmdercooked after the ctmntdown
use TIME COOKior additional cooking time.
How to Adjust the Popcorn Program to
Provide a Shorter or Longer Cook Time
If wm find that the 1)rand ot popcorn you
use tmdeq)ops or overcooks consistently;
you can add or subtract 20-30 seconds to
the automatic popping tim e.
Tosubtract time:
_dter pressh_g POPCORN, press 1
immediately after the oven starts fi)r
20 seconds less cooking time. Press 1
again to reduce cooking time another
10 seconds (total 30 seconds less time).
Toadd time:
_dter pressing POPCORN,press 9
immediately alier the oven stmls fi)r an
extra 20 seconds. Press 9 again to add
another 10 sec(mds (total 30 sec(mds
additional time).
NOTE:Do not use this feature twice
in succession on the same food
portion--it may result h7severely
overcooked or burnt food.
Beverage
Press Beverage to heat an 8-10 oz. cup el
coffee or other beverage.
Drinks heated with the Beverage feature may
be very hot. Remove the container with care.
If food is tmdercooked after the ctmntdown
use TIME COOKfi)r additional cooking time.
14

Reheat
www.GEAppliances.com
NOTE:Do not use this feature twice
h7succession on the same food
portion--it may result in severely
overcooked or burnt food.
@
@
@@
NOTE:Do not use this feature twice
h7succession on the same food
portion--it may result in severely
overcooked or burnt food.
The Reheat teatm'e reheats 4-36 ounces
of previousl) cooked t0o(ls or a plate of
lettoxeiN.
B Place coxered fi>od in the oxen. Press
REHEAT. The o_en starts immediately.
_'_ The oxen signals when steam is sensed
and the time remainiw, becins
COtlnting down.
Do not open the oven door until filne is
counting down. If the door is opened,
close it and press STARTimmediateh'.
After removing food from the oven, stir,
if possible, to even out the temperature.
Reheated foods may have wide variations
in temperature. Some areas may be
extremely hot.
If fl)od is not hot enough after the
countdown use TIMECOOKfor additional
reheating time.
Sensor Cooking
Vegetables,Potatoes,Fish,Chicken Pieces
Sensor cooking gives you easy, automatic
results with a variety of ti)ods (see the
Cooking Guide below).
B Place coxered food in the oxen.
Press the t0od pad. For xegetables,
press the VEGETABLE pad once tot
fresh vegetables, twice t0r frozen
vegetables or three times fi)r canned
vegetables. For chicken or fish, press
the CHICKEN/FISHpad once fi)r chicken
pieces or twice fl)r fish. The oven starts
immediatelv.
_'_ The oxen signals when steam is
sensed and the time remainin,* be_dns
counting down. Tm'n or stir the ti)od
if necessa_w.
Some FoodsNot Recommended for
Use With Reheat
It is best to use time Cook tor these foods:
• Bread products.
• Foods that i/ltlSt be reheated tlncovered.
• Foods that need to be stirred or rotamd.
• Foods calling for a (h y look or crisp
surti_ce alter reheating.
Do not open the oven door until time is
counting down. If the door is opened,
close it and press STARTimmediatelv.
If ti)od is undercooked alter the countd()wn
use TIMECOOKii>radditional cooking time.
How to ChangetheAutomatic Settings
(automatic settings for canned vegetables
cannot be adjusted)
You can a(!just the cooking time fi)r some
foods to stilt _O/li- pelNonal taste.
Toreduce time by 10%:
_Mter pressing the teatm'e pad, press l
immediatelx after the oxen starts.
Toadd 10%to cooking time:
_Mter pressing the teatm'e pad, press 9
immediately alter the oxen starts.
CookingGuide
Food
Canned Vegetables
Frozen Vegetables
Fresh Vegetables 4-16 oz.
Potatoes 8-32 oz.
Fish 4-16 oz.
Chicken Pieces 2-8 pieces
Amount
4-16 oz.
4-16 oz.
Comments
Co_er with lid or vented plastic _wap.
Follow package instructions Ii)r adding ware1:
Cover with lid or xented plastic _wap.
Add 1/4 cup water per ser\ing. Coxer with lid or
vented plastic _wap.
Pierce skin with lork. Place potatoes on the turntable.
Cover with vented plastic _wap.
Co\er with venmd plastic _lp.
15

About the other features.
He/p
The HELPpad displa):s teatm'e infimnafion
and hell)rid hints. Press HELP,then select a
teatm'e pad.
Scroll Speed
The scroll speed oI the display can be
changed. Press and hold the AM/PM pad
about 3 seconds to bring up the display.
Select 1-5 flw slow to ti_st scroll speed.
Reminder
The Reminderleatme can be used like an
alaxm clock, and can be used at any time,
even when the oven is operating. The
Remindertime can be set ul) to 24 hom_
CE)CE)(Z)
later.
_r_ Press REMINDER.
OD(Z)CE)
_'_ Enter the time you want the oven tod d
remind xou. (Be sure the inicrowaxe
clock shows the correct dine of (la).)
Select _d_/l or PM.
[]
Press REMINDER. X_hen Reminder signal
[]
occm_, press REMINDER to turn it off.
The Reminder time may be displayed
by pressing REMINDER.
NOTE"TheREM indicator wi// remalb/it to show
thatthe Reminder/s set Toc/earthe Reminder
before itoccurs,press REMINDER, thenO.
TheREM indicator wi// no longerbe/&
Delay Start
Delay Startallows you to set the microwax e
to delay, cooking, t:ll) to 24 hom_.
D'_ Press DELAYSTART
Enter the time you want the oxen to
[]
start. (Be sm'e the microwaxe clock
shows the correct time ol day:)
Select _dM or PM.
[]
Select any combination of AutoDefrost,
ea
77meDefrest and 77meCook.
IG
D Press START
The Delay Starttime will be displayed plus
DS. The oven will automatically start at the
delayed time. To cancel the Delay Starttime,
press CLEAR/OFE
The time of (la) ma} be displa) ed by
)ressin,, CLOCK.

Clock
Press to enter the time of day.
D'_ Press CLOCK
_'_ Enter the time oI day.
_'] Select _dVI or PM.
D Press STARTer CLOCK.
To check the time of day while
microwaving,, I)ress CLOCK.
Start/Pause
www. GEAppliances.com
@
CE)(Z)CE)
In addition to starting many flmcfions,
START/PAUSEallows you to stop cooking
without opening tile door or clearing
tile display:
Timer On/Off
TimerO/l/Off operates as a minute timer
and can be used at any time, even when
tile oven is operating.
[] Press TIMER ON/OfF.
_'_ Enter tile tilne xou want to co/int down.
[]Press TIMER ON/OFFto stall.
When tile time is up, tile oven will signal.
To turn off the timer signal, press TIMER
ON/OFF.
NOTE"Thetlknerindicator wil/ be lit whi/e the
timer_2operating.
ChildLock-Out
®
You may lock tile control panel to prevent
the microwaxe fl'om being accidentally
started or used by children.
To lock or unlock tile controls, press and
hold CLEAR/OFFfi)rabout three seconds.
When the control panel is locked, Lwill
appear in tile displa>
/7

About the other features.
Display On/Off
To mrn the clock display on or off, press
and hold 0 fin" about 3 seconds. The
DisplayOn/Offieamrecannot be used
while a cooking teatm'e is in use.
Beeper Volume
The beeper sound level can be a(!iusted.
Press BEEPERVOLUMEChoose 0-3 fin.
II/Ute to loud.
CookingCompleteReminder
To remind wm that you have tood in the
_'en, th e __'en will display FOODIS READg
and beep once a minute tmfil you either
open the oxen door or press CLEAR/OFF,
Microwave terms.
Term
Arcing
Covering
Shielding
StandingTime
Venting
Definition
Arcing is the micro_\'e tem_ fin" sparks in the oven. Arcing is caused by:
• metal or flfil touching the side of the oven.
• fifil that is not molded to fi)od (uptm'ned edges act like _lntenn_ls).
• metal such as twist-ties, i_oultry pins, gold-rimmed dishes.
• recycled paper towels containing small metal pieces.
Cove_ hold in inoisture, allow fin" more even heating and reduce cooking time. Venting plastic wrap or
covering with wax paper allows excess steam to escape.
In a regtflar oven, pm shield chicken breasts or baked toods to prevent ove_q)rowning. _4]_en micro_\'ing,
w)u use small strips of fifil to shield thin parts, such as the tips of wings and legs on poultry, which would
cook befiwe larger parts.
When you cook with regular ovens, fi_ods such as roasts or cakes are allowed to stand to finish cooking or
to set. Standing time is especially important in microwave cooking. Note that a microwaved cake is not
placed on a cooling rack.
_MteI" covering a dish with plastic wrap, you vent the plastic wrap by turning back one corner so excess
ste_lIIl C_III escape.
/8

Careand cleaningofthemicrowave oven. vvvvw.GEAppliances.com
Helpful Hints
An occasional thorough wiping with a solution el baking soda and water keeps
the inside fl'esh.
Unplug the cord before cleaning anypart of this oven.
How to CleantheInside
Walls, Floor,Inside Window,Metal and Plastic Parts on the Door
Some si)attex_ can be removed with a paper towel; othex_ may reqtfire a damp cloth.
]_.elnove greasy si)attex_ with a sudsy cloth, then rinse with a damp cloth. Do not use
abrasive cleane_ or sha_]) utensils on oven walls.
Toclean the surface of the door and the surface of the oven that come together upon
closing, use only mild, nonabrasive soaps or detergents using a sponge or soft cloth.
Rinse with adamp cloth and dry.
Never use a commercial oven cleaner on any part of your microwave oven.
Removable Turntableand TurntableSupport
To prevent breakage, do not place the turntable into water just after cooking. _._ash it
careflfllv in wam_, sudsy water or in the dishwasher: The turntnble and sui)port can be
broken if dropped. Remember; do not operate the oven without the turntable and
supi)ort in place.
How to CleantheOutside
Do not use cleaners containing ammonia or alcohol on the microwave oven.Ammonia or
alcohol can damage the appearance of the microwave oven.
Case
Clean the outside at the microwave oven with a sudsy cloth. Rinse with a damp cloth and
then dry: _._3pe the window clean with a damp cloth.
ControlPanel and Door
Wipe with a (lamp cloth. D_T thoroughly: Do not use cleaning spra):% large amounts at soap
and water; abrasives or sha_]) objects on the panel--they can damage it. Some paper towels
can also scratch the control panel.
Door Surface
It is iml)ort;mt to kee I) the area clean where the door seals against the microwave oven.
Use only mild, non-abrasive detergents applied with a clean sponge or soft cloth. Rinse well.
Power Cord
If the cord becomes soiled, tml)lug and wash Mth a (lamp cloth. For sml)born spots, sudsy
water may be used, but be certain to rinse with a damp cloth and (h T thorotlghly 1)efin'e
i)lugging cord into outlet.
19

Beforeyoucall forservice...
Troubleshooting -tips
Save time and money! Review the chart below and you
may not need to call for service.
Problem Possible Causes What To Do
Oven will not staff A fuse ha your home may be blown * Replace fuse or reset circuit breakex:
or the circuit breaker tripped.
Power s_e. * Unplug the microwave oven, then plug it back in.
Plug not fully haserted bite wail * Make sure tile 3-prong plug on tile oven is flfllv
outlet, inserted into wall outlet.
Door not securely closed. * Open the door and close securely:
Controlpanel lighted, yet Door not securely closed. * Open tile door and close securelx:
oven will not start
STARTpadnot pressed after * Press START
entering cooking selection.
Another selection entered * Press CLEAR/OFF
already in oven and CLEAR/OFF
pad not pressed to cmzcel it.
Cooking time not entered after * Make sure w)u have eutered cookiug fiine after
pressing lIME COOK I/ressin"__ TIME COOK
CLEAR/OFFwas pressed accidentally. * Reset cooking program and press START
Food weight not entered after * Make sure w_u have entered fi_od weight after
selecting AUTO DEFROST selecting AUTO DEFROST
Oven was paused accidentally. * Press STARTto restart tile cooking program.
SENSOR ERRORmessage During the Sensor cooking • Close tile door and press START immediately:
appearson display progrmn, the door was opened
or START/PAUSEwas pressed
before steam could be detected.
Steam was not detected in • Lrse Time Cook to heat for more time.
maxhnum mnom_t of thne.
Controlpanel does The control has been locked. • Press and hold CLEAR/OFFIor about three
not work (When the conlrol pm_d is locked, seconds to Uldock tile COlm-ol.
an £ will be displayed.)
Food amount too large Sensor Reheat is for single • Use Time Cookfi)r large amounts of ti)od.
for Sensor Reheat servings of recommended foods.
Things That Are Normal With YourMicrowave Oven
2O
• Steam or wq)or escaping fl'om aro/md
tile dooi:
• I,ight reflection aro/md door or outer case.
• Dimming oven light and change in
the blower so/md at power levels other
than high.
• Dull thumlfing sound while oven is
operating.
TV/radio iutertereuce might be noticed
while using the microwave, Similar to
the intexYerence caused by other small
al)pliances, it does not indicate a problem
with the microwave. Plug the microwave
into a diflereut electrical drcuit, move tile
radio or TV as tin" away from tile microwave
as possible or check tile position and signal
ot the TV/radio antenna.

GE Service Protection Plus 'M
GE, a name recognized worldwide %r quality' and dependability, oflers y'ou
Service Protection Plus'_'--comprehensive protection on all y'our appliances--
No Matter What Brand!
Benefits Include:
• Backed by GE
• All brmads covered
• Unlimited service calls
• All parts mad labor costs included
• No out-of-pocket expenses
• No hidden deductibles
• One 800 number to call
You will be completely satisfied with our service protection or you ma} request ,your inone,_ back
on the remaining value of 3our contract. No questions asked. It's that simple.
Protect yore" reffigerat(m dishwasher; washer and dryer; range, TV, VCR and much more--rely brand!
Plus there's no extra charge tot eulergency ser;'ice and low inonthly financing is available. Even icelnaker
coverage and tood spoilage protection is ottered. You can rest eas> knowing that all your valuable
household products are protected against expensive repairs.
Place your confidence in (;E and call us in the IU.S. toll-free at _tllt._Z_.ZZZ_
foY UlOI'e inloi'u/ation.
"*Allbrands cmered, up to 2(}years old. in the contin< nlal I_.S.
We71CoverAnyAppliance.
Anywhere. Anytime.*
_.. (2."._22.............
Please place in envelope and mail to:
General Electric Company
Warranty Registration Department
EO. Box 32150
Louisville, KY 40232-2150
21

Consumer Product Ownership Registration
Dear Customer:
Thank you for purchasing our product and thank you for placing your confidence in us.
_A/eare proud to ha_e you as a customer!
Follow these three steps to protect your new appliance investment:
Important: If you did not get a registration card with your
................................................................................................... _,,._ (M111{1-(
Consumer Product Ownership Registration
Complete mid mail
your Consumer
Product Ownership
Registration today.
tlaw' the peace of
mind of knowing w(
call colltact VOl/ ill
tile tmlikely exent era
satbly modification.
Atter mailing tile
registration below,
store this document
in a saib place. It
contains inlormation
you will need should
you require service.
Our selwice number is
800.GE.CARES
(800.432.2737).
Model Number Serial Number
, , , , , I I , , , , , , , I
product, detach and return the form below to
ensure that your product is registered, or register
online at GEAppliances.com.
Read your Owner's
Manual carethllv.
It will help you
operate yol/r lle',_
appliance properly.
I,,,,,, , , , , , I I , , , , , , I
MI: Ms. M*>,. Mix_,
Fir',l I I L:_slI
Name I I I I I I I I I Nain(! I I I I I I I I I I I I
SI r( (!1 I
Addr{ ss I I I I I I I I I I I I I I I I I I I I I I I I
Apt. # I i i
(;i,,I I I
l )ale Placed
hi Use III
Monlh
GE Consumer Products
GenerM Electric Company
Louisville, Kentucky
GEAppliances.com
I I I I I I EqnailAddress*
I I I I
D_,yl , I
GEAppliances
Model Number Serial Number
I ] Code I I I I
_,i!a r [ I [ Phon(
* Please proxide your eqnail ad(tress to receixe, xia eqnail, discounts, special otlbrs and other important
communications fl-om GE Appliances ((;EA).
[ Check here if you do not want to receive communications from (;EA's carefully selected partner',.
FAILURE TO COMt}IA{TE AN[) RETURN TIIIS CARD DOES NOT DIMINISII YOIR
BL\RI_ \N'IY RIGI fFS.
For information al)out (;EA's privacy an(1 data usage policy, go to _a_v.(;l_2Appliances.com and click
on 'Privacy Policy" or call 800.626.2224.
Nulnl)(!r I i I
I-I,, I-I , , ,II
Zip I
22

GEMicrowave Oven Warranty.
All warranty service provided by our Factory Service Centers,
or an authorized Customer Care®technician. Toschedule service,
on-line, 24 hours a day, visit us at www.GEAppliances.com,
or call 800.GE.CARES(800.432.2737).
For The Period Of."
OneYear
Fromthedate ofthe
originalpurchase
TenYears
Fromthesecondthrough
the tenthyear fromthe
GEWill Replace:
Anypartot the microwave oven which tifils due to a (letect in materials or workmanship.
During this full one-year warranty, GE will also provide, free of charge, all labor and related service
costs to repair or replace the defective part.
The magnetron tube, if the magnetron tube fifils due to a (lefect in materials or workmanship.
During this additional nine-year limited warranty, you will be responsible for any labor or related
service costs.
dateoforiginalpurchase
What GEWill Not Cover:
• Service trips to your home to teach you how to use
the product.
• Improper installation, delivery or maintenance.
• Failure of the product if it is abused, misused, or
used for other thaaa the intended purpose or used
commercially.
Staple your receipt here.
Proof of the original purchase
date is needed to obtain service
under the warrant_
• Replacement of house fuses or resetting of circuit
breakers.
• Dmnage to the product caused by accident, f'we, floods
or acts of God.
• Incidental or consequentiaJ dmnage caused by possible
defects with this applim_ce.
• Dmnage caused after delivery.
This warranty is extended to the original purchaser and any succeeding owner for products purchased
for home use within the USA.
Some states do not aflow the exclusion or limitation of incidental or consequential damages. This warranty gives
you specific legal rights, and you may also have other rights which vary from state to state. To know what your
legal rights are, consult your local or state consumer affairs office or your state's Attorney General
Warrantor: General Electric Company. Louisville, KY 40225
23

ConsumerSupport.
gEAppliancesWebsite www.GEAppliances.com
Have a question or need assistance with your appliance? Try the GE Appliances X4'ebsite 24 hom_ a day,
any day of the year'. For greater convenience and faster service, you can now download Owner's Manuals,
order parts, catalogs, or even schedule service ondine. Y_u can also "_sk Our Team of EN)erts .....
your questions, and so much more...
ScheduleService
Expert (;E repair se_Mce is onh one step away fl'om xour doo_: Get on-line and schedule your service at
_our conxenience 24 hom_ any (la_ of the year! Or call 800.GE.CARES (800.432.2737) during n{mnal
business hou_.
www.GEAppliances.com
RealLifeDesignStudio www.GEAppliances.com
GE SUl_ports the Uni\'e_al Design concel)t--products, services and environments that can be used by
people of all ages, sizes and capabilities. We recognize the need to design fin" a wide range of phDical and
mental abilities and impaimmnts. For details of GE's Universal Design applications, including kitchen
design ideas for people with disabilities, check out our Website today. For the hearing impaired, please call
800.TDD.GEAC (800.833.4322).
ExtendedWarranties www.GEAppliances.com
Purchase a (;E extended warrant_ and learn about special discounts that are axailable while your warranty
is still in effect. You can purchase it on-line an) time, or call 800.626.2224 during nomml business hou_.
GE Consumer Home Serxices will still be there after your warran_ expires.
PartsandAccessories www.GEAppliances.com
Indi\iduals qualified to service their own appliances can have parts or accessories sent directh' to their
homes (VISA, MasterCard, and Discover cards are accepted). Order on-line today; 24 hom_ every day or
by phone at 800.626.2002 during nomml business hou_.
Instructions contained in this manual cover procedures to beperformed byany user. Other servicing generally
should be referred to qualified service personnel Cautionmust be exercised, since improper servicing may cause
unsafe operation.
ContactUs www.GEAppliances.com
If you are not satisfied with the service you receive tl"om GE, contact us on our _4'ebsite with all the details
including your phone numbe_; or write to: General Manage_; Customer Relations
GE Appliances, Appliance Park
I,ouisville, KY 40225
RegisterYourAppliance www.GEAppliances.com
Register your new applimlce on-line--at your convellience! Tiinel) product registration will allow for
enhanced communication and prompt service tlll(lei" the terms of_otlr warranty should the need arise.
You may also mail in the pre-p_inted registration card included in the I)ackin_*_material.
Printed in Korea
 Loading...