

Page 1
ge.com
i
©
r,,j
r,,)
Safety Instructions .... 2-4
Operating Instructions
Clock and Tinier ....... 10
Controls .............. 6, 7
Oven ................. 8, 9
Power Outage ........... 7
Sabbath Feature ..... 13, 14
SeffCleaning ........ 15, 16
Special Features ........ 12
Surthce Units ............ 5
Thermostat ............ 14
Timed Baking and
Roasting Features ....... 11
Care and Cleaning
Control Kuobs ......... 17
Drip Pans .............. 21
Heating Elements ....... 17
i,fit-Off Oven Door ..... 19
Lift-Up Cooktop ........ 21
Light .................. 20
Shelves ................ 18
Surface Units .......... 21
Vent .................. 18
Troubleshooting
Tips ............... 22-24
Accessories ............ 30
Consumer Support
Consumer
Support ....... Back Cover
Pro&lct
Re_stration ........ 25, 26
Warranty .............. 31
Write the model and serial
numbers hem:
Model #
Serial #
You can find them on a label
behind the storage drawer on
the flont of the range flame.
49-80546 Og08 dR
Page 2
iMPORTANTSAFETYiNFORMATiON.
READALLiNSTRUCTiONSBEFOREUSING.
Foryoursafety,theinformationin this manualmust befollowedtominimizetheriskoffire,electricshock,or to
preventpropertydamage,personalinjury,or lossoflife.
ANti- tiP DEVICE
Toreduce the risk of tipping the range, the range must be secured
by a properly installed anti-tip bracket, See installation instructions
shipped with the bracket for complete details before attempting to
install.
Tocheck if thebracket is installed and engaged properly, lower the
• All ranges can tip.
• BURNSor other SERIOUS
INJURIEScan result.
• INSTALLand CHECKthe
ANTI-TIP bracket following
the instructions supplied
with the bracket.
oven door and gently apply medium force atthe handle end until
movement of the range is detected. Continuepressing until the
anti-tip bracket is engaged and movement stops. A smafl amount of
movement is acceptable at the back of the range top, butit should
be stable and not tip once the anti-tip bracket is engaged. If it does
not, the bracket must be reinstalled. If the range is pulled from the
waftfor any reason, always repeat this procedure to verify the
range is properly secured by the anti-tip bracket.
If you did not receive an anti-tip bracket _dth your purchase,
call 1.800.626.8774 to receive one at no cost (in Canada, call
1.800.561.3344). For installation instructions of the bracket,
x,isit GEAppliances.com (in Canada, GEAppliances.ca).
IMPORTANTSAFETYNOtiCE
TheCalifornb SafeDrinkingWaterand ToxicEnforcementAct requires theGovernorof Californb topublisha
list of substancesknownto thestate to cause cancer,birthdefectsor otherreproductiveharm,andrequires
businessesto warn customersofpotential exposuretosuch substances.
Thefiberglassinsulationin self-cleanovensgivesoff a verysmaflamountofcarbon monoxideduringthe
cleaningcycle. Exposurecanbe minimizedbyventingwith an openwindow or usinga ventilationfanor hood.
SAFETYPRECAUtiONS
Whenusingelectricalappliances,basicsafetyprecautionsshouldbe followed,bcluding the following:
Use this appliance only for its intended purpose
as described in this Owner's Manual.
Be sure your appliance is properly installed and
grounded by a qualified installer in accordance
with the pr(Mded installation instructions.
Have the installer show you the location
of the circuit breaker or rise. Mark it fbr easy
reference.
Do not attempt to repair or replace an),
part of your range unless it is specifically
recommended in this manual. All other
serdcing should be referred to a qualified
technician.
Before perfbmfing any ser_4ce, disconnect
the range power supply at the household
distribution panel by rem(Mng the rise or
s_dtching off the circuit breaker.
2
Do not leave children aloneJchildren should
not be left alone or unattended in an area
where an appliance is in use. They should never
be allowed to sit or stand on aW part of the
appliance.
Do not allow anyone to climb, stand or hang
on the door or cooktop. They could damage
the range and even tip it ore1; cruising severe
personal injm):
Large scratches or impacts to glass doors can
lead to broken or shattered glass.
Do not store flammable materials in an oven or
near the cooktop.
CAUTION: temsofinteresttochildren
should not be stored in cabinets above a range
or on the backsplash of a rangeJchildren
climbing on the range to reach items could be
seriously injured.
Page 3
WARNING!
SAFETYPRECAUTIONS
ge.com
Never wear loose-fitting or hanging gammnts
while using the appliance. Be carefhl when
reaching for items stored over the range.
lqammable material could be ignited if brought
in contact xdth hot surfhce units or heating
elements and inW cause severe burns.
Use only dU pot holders--moist or damp pot
holders on hot surfaces inW result in burns
flom steam. Do not let pot holders touch hot
surface units or heating elements. Do not use
a towel or other bulky cloth in place of pot
holders.
For your safets¢never use your appliance fbr
wamdng or heating the room.
Teach children not to plW xdth the controls or
any other part of the range.
Alwayskeep dish towels,dish cloths, pot holders
and other linens a safe distance flom your
range.
Alwayskeep wooden and plastic utensils and
canned food a safe distance flom
>_ur range.
Alwayskeep combustible wallcmerings,
curtains or drapes a s_e distance flom your
range.
Do not let cooking grease or other flammable
materials accumulate in or near the range.
Keep the hood and grease filtersclean to
maintain good venting and to avoid grease fires.
Do not use x_:ateron grease fires. Never pick up
a flaming pan. Turn the controls ore Smother a
flaming pan on a surfhce unit t)5'covering the
pan completely xdth a well-fitting lid, cookie
sheet or flat tray. Use a multi-purpose dr),
chemical or fbam-type fire extinguishe_:
Haming grease outside a pan can be put out by
covering it _dth baking soda o_; if available, t)5,
using a multi-purpose d U chemical or fbam-
type fire exdnguisher
lqame in the oven can be smothered completely
by closing the oven door and turning the oven
off or t)5'using a lnulti-purpose dU chemical or
fbam-type fire extinguisher
Do not touch the surfhce units, the heating
elements or the interior surfhce of the oven.
These surfhces may be hot enough to burn
even though they are dark in color During and
after use, do not touch, or let dothing or other
flammable materials contact the surfhce units,
areas nearby the surface units or aW interior
area of the oven; allow sufficient time fbr
cooling first.
Potentially hot surfhces include the cooktop,
areas facing the cooktop, oven vent opening,
surfhces near the opening, crex,ices around the
oven doo_:
REMEMBER:The indde surface of the oven may
be hot when the door is opened.
Do not store or use combustible materials,
gasoline or other flammable vapors and liquids
in the x4cinity of this or aW other appliance.
COOKMEATANDPOULTRYTHOROUGHLY...
Cookmeatandpoultrythoroughly--meattoat leastanINTERNALtemperatureof 160°Fandpoultrytoatleastan
INTERNALtemperatureof 180°ECookingtothesetemperaturesusuallyprotectsagainstfoodbomeillness,
SURFACECOOKINGUNITS
Useproperpansize--select cookwarehavingflat bottomslargeenoughtocover thesurface unitheating
element.Theuseof undersizedcookwarewill exposea portionofthe surface unittodirect contact andmay
resultin ignitionof clothing.Properrelationshipof cookwareto surfaceunit will alsoimproveefficiency.
Never leave the surfhce units unattended
at high heat settings, goilovers cause smoking
and greasy spillovers that may catch on fire.
Do not use aluminum foil to line the drip pans
or anywhere in the oven, except as described in
this manual. Misuse could result in a shock, fire
hazard or damage to the range.
Be sure the drip pans and the vent duct are not
covered and are in place. Their absence during
cooking could damage range parts and wiring.
Only certain types of glass, glass/ceramic,
earthem_are or other glazed containers are
suitable fbr cooktop se_dce; others may break 3
because of the sudden change in temperature.
Page 4
IMPORTANTSAFETYINFORMATION.
READALLINSTRUCTIONSBEFOREUSING.
SURFACECOOKINGUNITS(cont.)
To minimize the possibilio'ofbums, i_dtion of
flammable materials and spillage,the handle of a
container should be turned toward the center of the
_ange_dthout extending overnearby surface units.
Alwaysturn the stn_fhceunits offbefore reinodng
cookware.
Do not immerse or soak the removable surface units.
Do not put them in a dishwasher.Do not self:dean the
surfhceunits in the oven.
_11enpreparingflamingfbodsunder the hood, mm
thefan on.
Toavoidthepossibili_'ofa bum or elecuicshock,
ahva_sbe certainthatthecontrolsforallsnrfacetraits
areatthe OFFpositionandallcoilsarecooltyefi._re
atteinptingmliftorremovea ut_it,
Gean thecooktop_dthcaution,ffawetspongeis
usedtoxdpespillson ahot cooktop,be careflflm
avoidsteambums.
Keepaneyeonfoodsbeingfliedatltighor inedium
ltighheat settings.
Fo(_tsforflyingshotfldbeas&y'aspossible.Froston
frozenfoodsormoistureon fleshfoodscancausehot
fatmbubbleupand overthe sidesofthe pan.
Uselittlefatfor eff;ectiveshallowor deepfat flying.
Fillingthepan motill offatcancausespillovel_when
foodisadded.
ffa coinbinationofoilsorfats_dllbe usedin flying,
stirtogethertyefbreheating,or asfatsmeltdo_'.
Ah%_sheat fatslowly,and _atch asitheats.
Usea deep fatthermometerwheneverpossiblem
preventoverheatingfatbeyond the smokingprint,
WARNING!
OVEN
Standawayfromtherangewhenopeningtheovendoor.Hotairorsteamwhichescapescancausebumstohands,face
and/oreyes.
Donotheatunopenedfbodcontainers.Pressure
couldbtHldup and the containercouldbtn_t,causing
aniqtny:
Keeptheovenventtmobsmmted.
Keeptheovenfleefl_m _ease btdldup.
Placetheovenshelfin thededredpodtionwhilethe
oveniscool.ffsheh'esmust lyehandledwhenhot, do
not letpotholdermntactthe heatingelements.
Pullingout the shelfmthe stop-lockisa convenience
in liftingheaxy'fbods.Itis alsoaprecautiona_inst
bums from touclting hot surfhcesof the door or
ovenx_Nls.
_en udngcookingor roastingbagsin the oven,
fbllowthe inantffacturer'sdirections.
Do not use the oven to dU newspape13.
ff overheated, they can catch on fire.
Do not use the oven fbr a stol_agearea. Items stored in
an oven can i_dte.
Do not leavepaper products, cooking utensils or fbod
in the oven when not in use.
Do not use alumimnn foil m line oxen bottoms.
hnpmper installationof ahunimun foilinayresult
in a lisk of elecuic shock or fire.
SELF-CLEAN/NGOVEN
Donotuseovencleaners.Nocommercialovencleanerorovenlinerprotectivecoatingofanykindshouldbeusedinor
aroundanypartoftheoven.Residuefromovencleanerswilldamagetheinsideoftheovenwhentheself-cleancycleis used.
Donotcleanthedoor _asket,The doorg_ketis
essentialfbragoodseal.CareshotMbe takennot m
rob,dmnageor inovethe gasket.
BefbreselfZcleaningthe oven, remove shiny, dive>
colored ovensheh'es(on somemodels) and all
other cookware.
READANDFOLLOWTHISSAFETYINFORMATIONCAREFULLY.
SAVETHESEINSTRUCTIONS
4
Besuretoxdpeup excessspillagebeforesta_xingthe
self:deaningoperation.
ffthe self:cleaninginodeinalfimctions,turn the oven
offand disconnectthepowersupply.Haveitserdced
byaqualifiedtechnidan.
Cleanonly,partslistedinthisO\mer'sManual.
Page 5
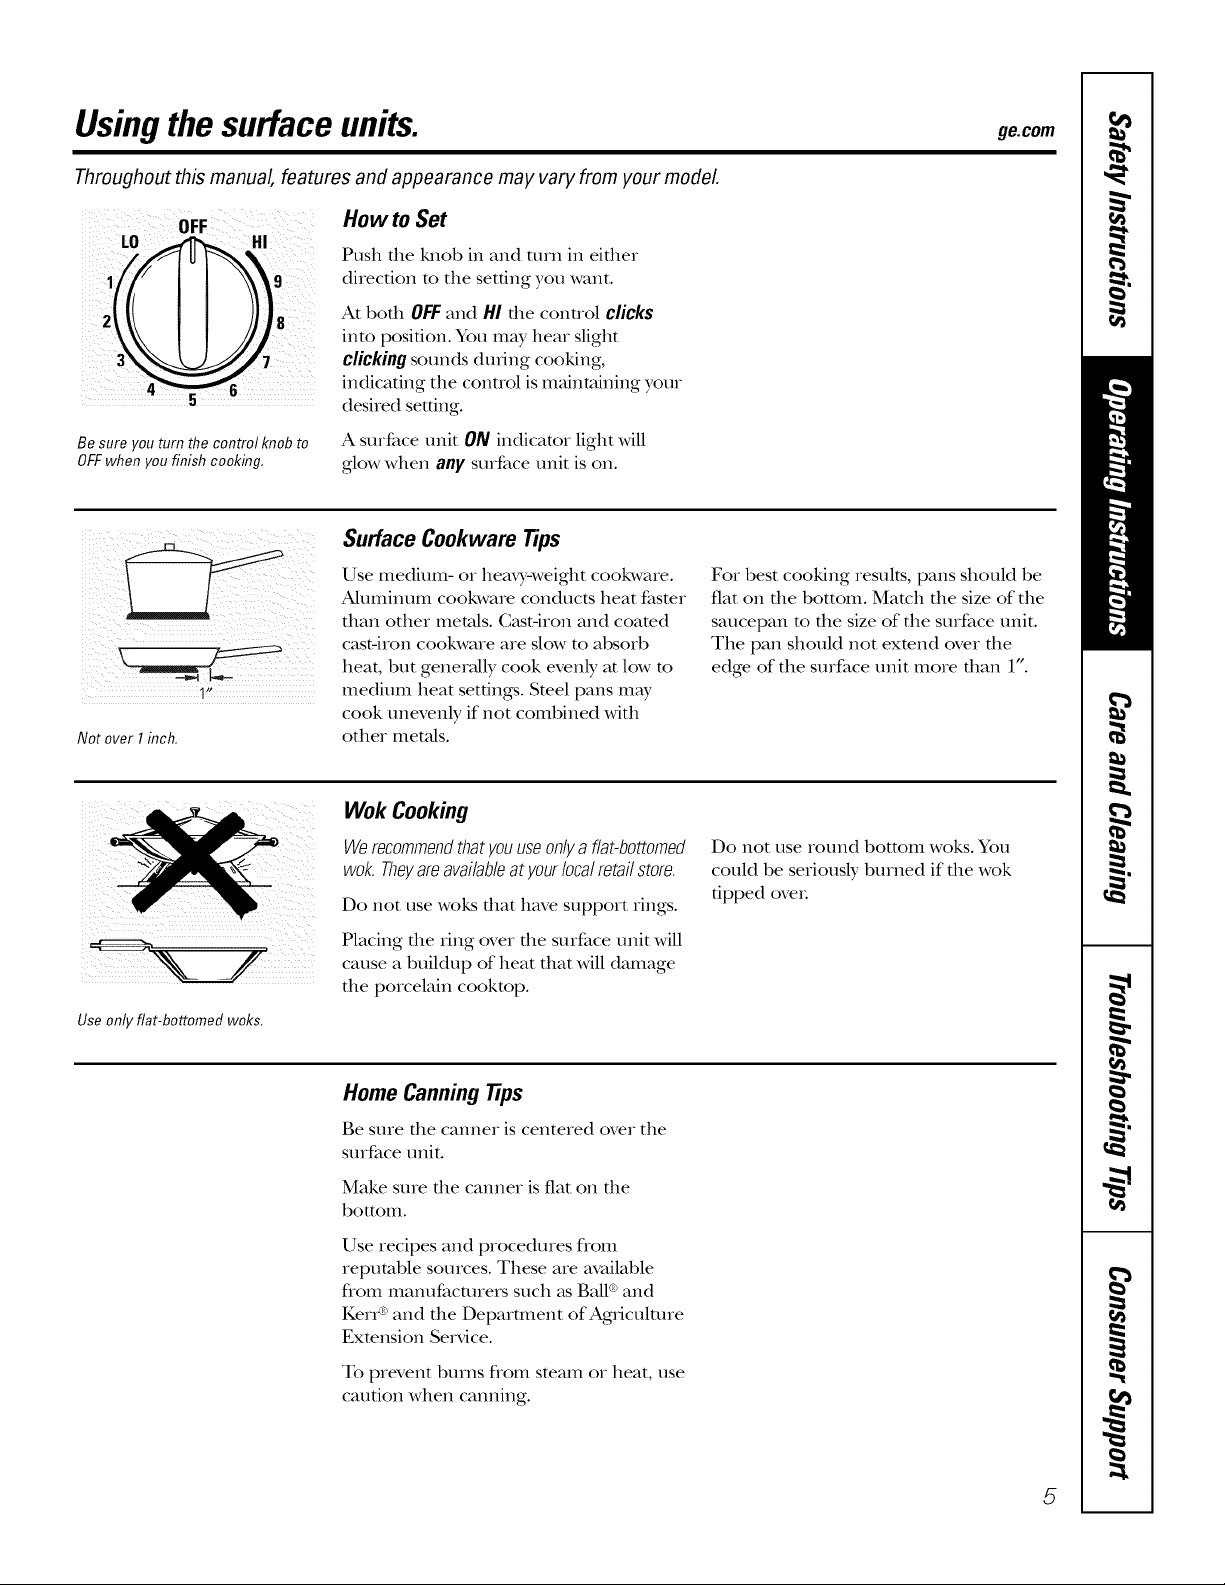
Usingthe surface units, geoom
Throughout this manual, features and appearance may vary from your model
How to Set
//1 !
Be sure you turn the control knob to
OFFwhen you finish cooking.
Push the kalob in and ulrn in either
direction to the setting you want.
At both OFFand HI the control clicks
into position. You may hear slight
clickingsounds dudng cooking,
indicating the control ismaintaining your
desired setting.
A surface unit ON indicator light will
glow when any surface unit is on.
Surface Cookware Tips
1"
Not over I inch.
Use only flat-bottomed woks.
Use medium- or heax3,-weigbt cookware.
Aluminum cookware conducts heat fasmr
than other metals. Cast-iron and coamd
cast-iron cookware are slow to absorb
heat, but generally cook evenly at low m
medium heat settings. Smel pans m W
cook unevenly if not combined with
other met_fls.
Wok Cooking
Werecommendthatyouuseonlya flat-bottomed
wok.Theyareavailableatyourlocalretailstore.
Do not use woEs dlat have support rings.
Placing the ring over the surface unit will
cause a buildup of heat that will damage
the porcelain cookmp.
Home Canning Tips
Be sure the canner is centered over the
surface unit.
For best cooking results, pans should be
fiat on the bottom. Match the size of the
saucepan m the size of the surface unit.
The pan should not exmnd over the
edge of the surface unit more than 1".
Do not use round bottom woks. You
could be seriously burned if the wok
tipped ove_.
Make sure the canner is fiat on the
bottom.
Use recipes and procedures flom
reputable sources. These are available
flom manufacturers such as Ball ®and
KerI _ and the Deparunent of Agriculture
Exmnsion Se_Mce.
To prevent burns flom steam or heat, use
caution when canning.
5
Page 6
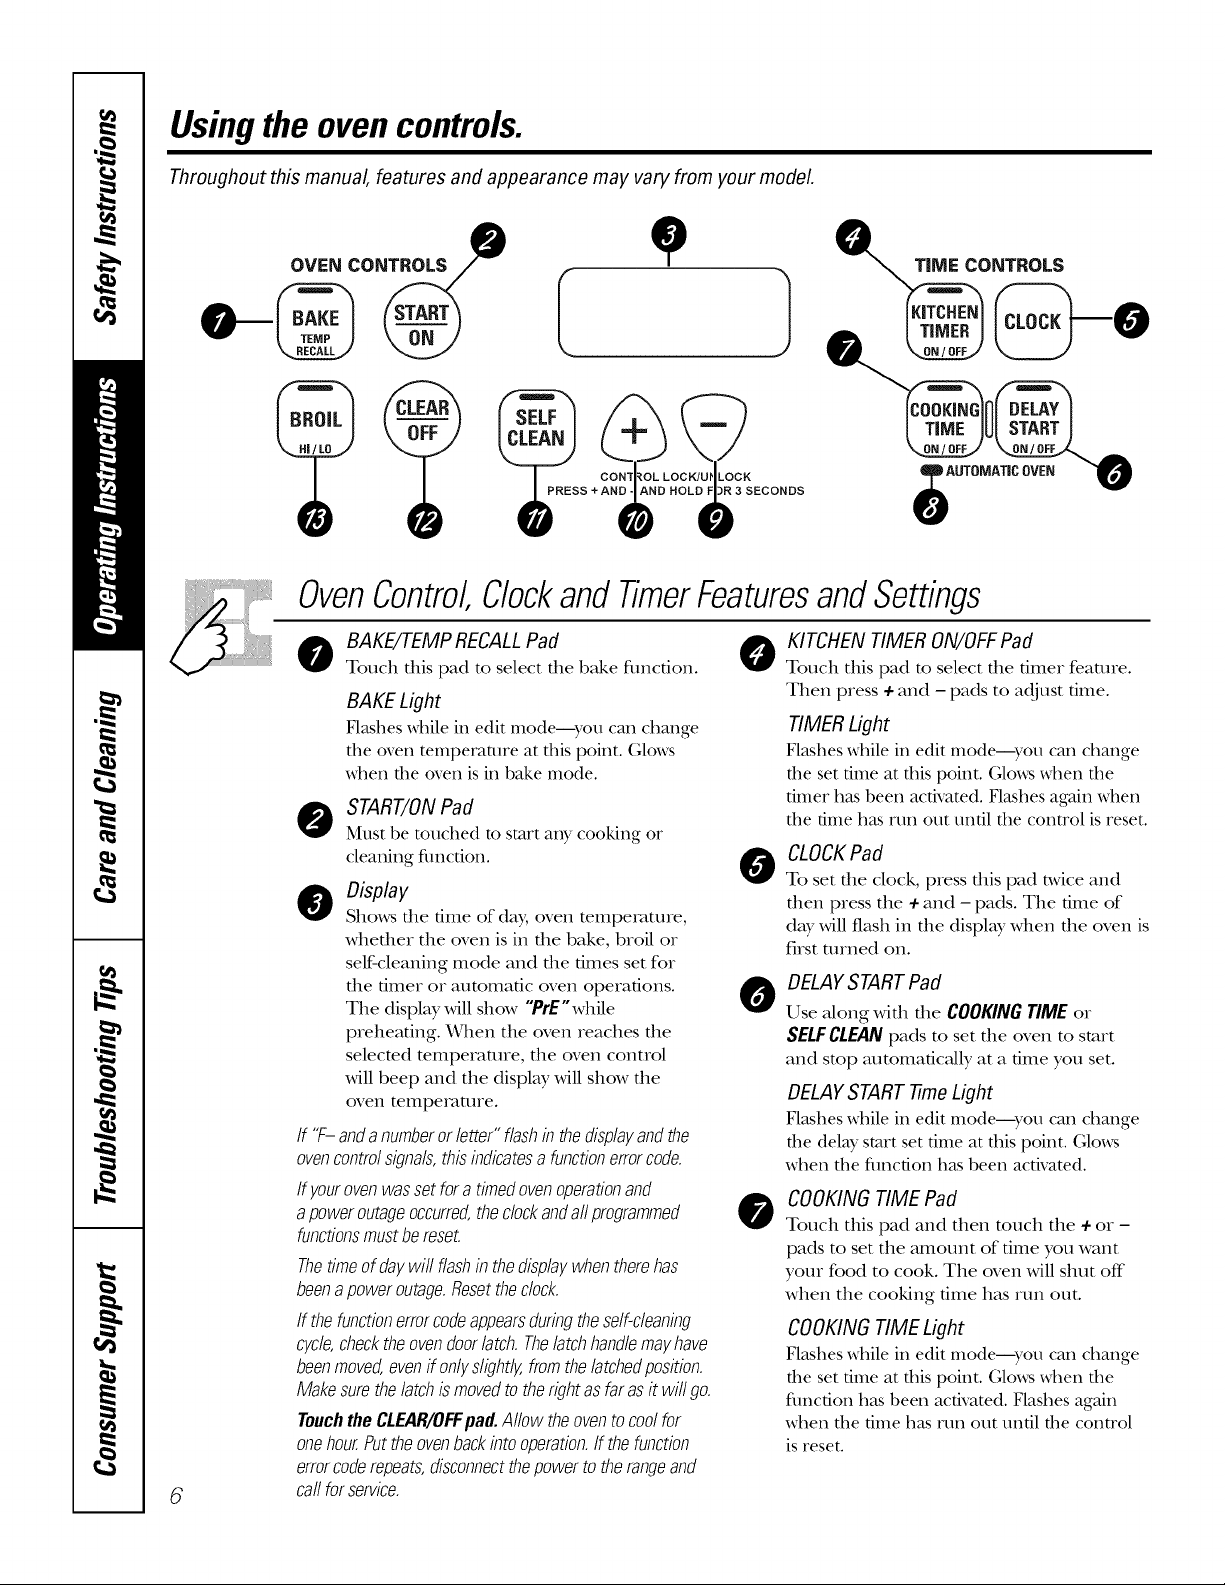
Usingthe ovencontrols.
Throughout this manual, features and appearance may vary from your model
OVEN CONTROLS e
I 1
S + AN_D HOLDS3 SECONDS
OvenControlClockand TimerFeaturesandSettings
o AKE/TEMP RECALLPad 0
Touch this pad to select the hake fimcfion.
BAKE Light
Flashes while in edit mode---you caI1 challge
dm oven temperature at d/is point. Glows
when the oven is in bake mode.
O START/ONPad
Must be touched to start any cooking or
cleaning fimction.
0 Display
Shows file time of day, oven temperature,
whether the oven is in the bake, broil or
self-cleaning mode and the times set for
the timer or automatic oven operations.
The displWwill show "PrE"while
preheating. When the oven reaches the
selecmd mmperatme, tile oven control
will beep and the displW will show the
oven tempeI_ttuIe.
If "F-andanumberorletter"flashinthedisplayandthe
ovencontrolsignals,thisindicatesa functionerrorcode.
If yourovenwassetfora timedovenoperationand
apoweroutageoccurred,theclockandaftprogrammed
functionsmustbereset.
Thetimeofdaywit flashin thedisplaywhentherehas
beenapoweroutage.Resettheclock.
If thefunctionerrorcodeappearsduringtheself-cleaning
cycle,checktheovendoorlatch.Thelatchhandlemayhave
beenmoved,evenffonlyslightly,fromthelatchedposition.
Makesurethelatchismovedtotherightasfarasit willgo.
TouchtheCLEAR/OFFpad.Allowtheoventocoolfor
onehour.Puttheovenbackintooperation.If thefunction
errorcoderepeats,disconnectthepowertotherangeand
6
ca//forservice.
KITCHEN TIMER ON/OFFPad
Touch this pad to select the timer feature.
Then press + and - pads to adjust time.
TIMER Light
Flashes while in edit mode---you can change
the set time at this point. (;lo_s when the
timer has been activated. Flashes again when
the time has rtm out until the control is reset.
CLOCKPad
0
To set file clock, press tiffs pad n,viceand
then pIess the + and - pads. The time of
day will flash in the display when the oven is
first turned on.
DELAYSTART Pad
0
Use along widl die COOKINGTIMEor
SELFCLEANpads to set file oven to stm't
and stop at]t()mafic_dly at a time you set.
DELAYSTART -timeLight
Flashes _t/ile in edit mo(le--you can change
the delW start set time at this point. (;lo,xs
when the fimction has been activated.
COOKINGTIME Pad
0
Touch this pad and then touch the +or -
pads to set the amount of fine you want
your food to cook. The oven will shut off"
when the cooking time has run out.
COOKINGTIME Light
Flashes while in edit mode---you can change
the set time at this point. (;lo,_s when the
ftlllctioll has been activated. Flashes again
when the time has run out until the control
is reset.
Page 7
OvenControlClockand TimerFeaturesandSettings
AUTOMATIC OVENLight
0
This lights anytime file oven has been
programmed using tile COOKINGTIMEor
DELAYSTARTfimcdonso
- Pad
Short raps to tilis pad will decrease tile time
or temperature by small amounts. Touch
and hold tile pad to decrease the time or
temperature by linger amounts.
o LEAR/OFFPad
Touch tilis pad to cancel ALLoven
operations except tile clock and dmeL
o BROILHI/LO Pad
Touch this pad to select tile broil fimction.
BROILLight
Flashes while in edit Illode---yO/l caI1 switch
from HIto LOBROILat this point. (;lo,xs when
the oven is in broil mode.
ge.com
+Pad
Short taps to tilis pad will increase tile time
or mmpemmre by small amounts. Touch
and hold tile pad to increase tile time or
temperature by larger amounts.
O SELFCLEANPad
Touch tilis pad to select tile self-cleaning
flmcfion. See tile Usingthe self-cleaning
ovensection.
CLEANLight
Flashes while ill edit mode---you can change
tile length of time for tile self-cleml c)_cleat
this point. Glows when tile oven is ii1tile self-
cleml wcle. After tile self-deal wcle, tile light
will turn off: Unlatch the doon
i i ii i
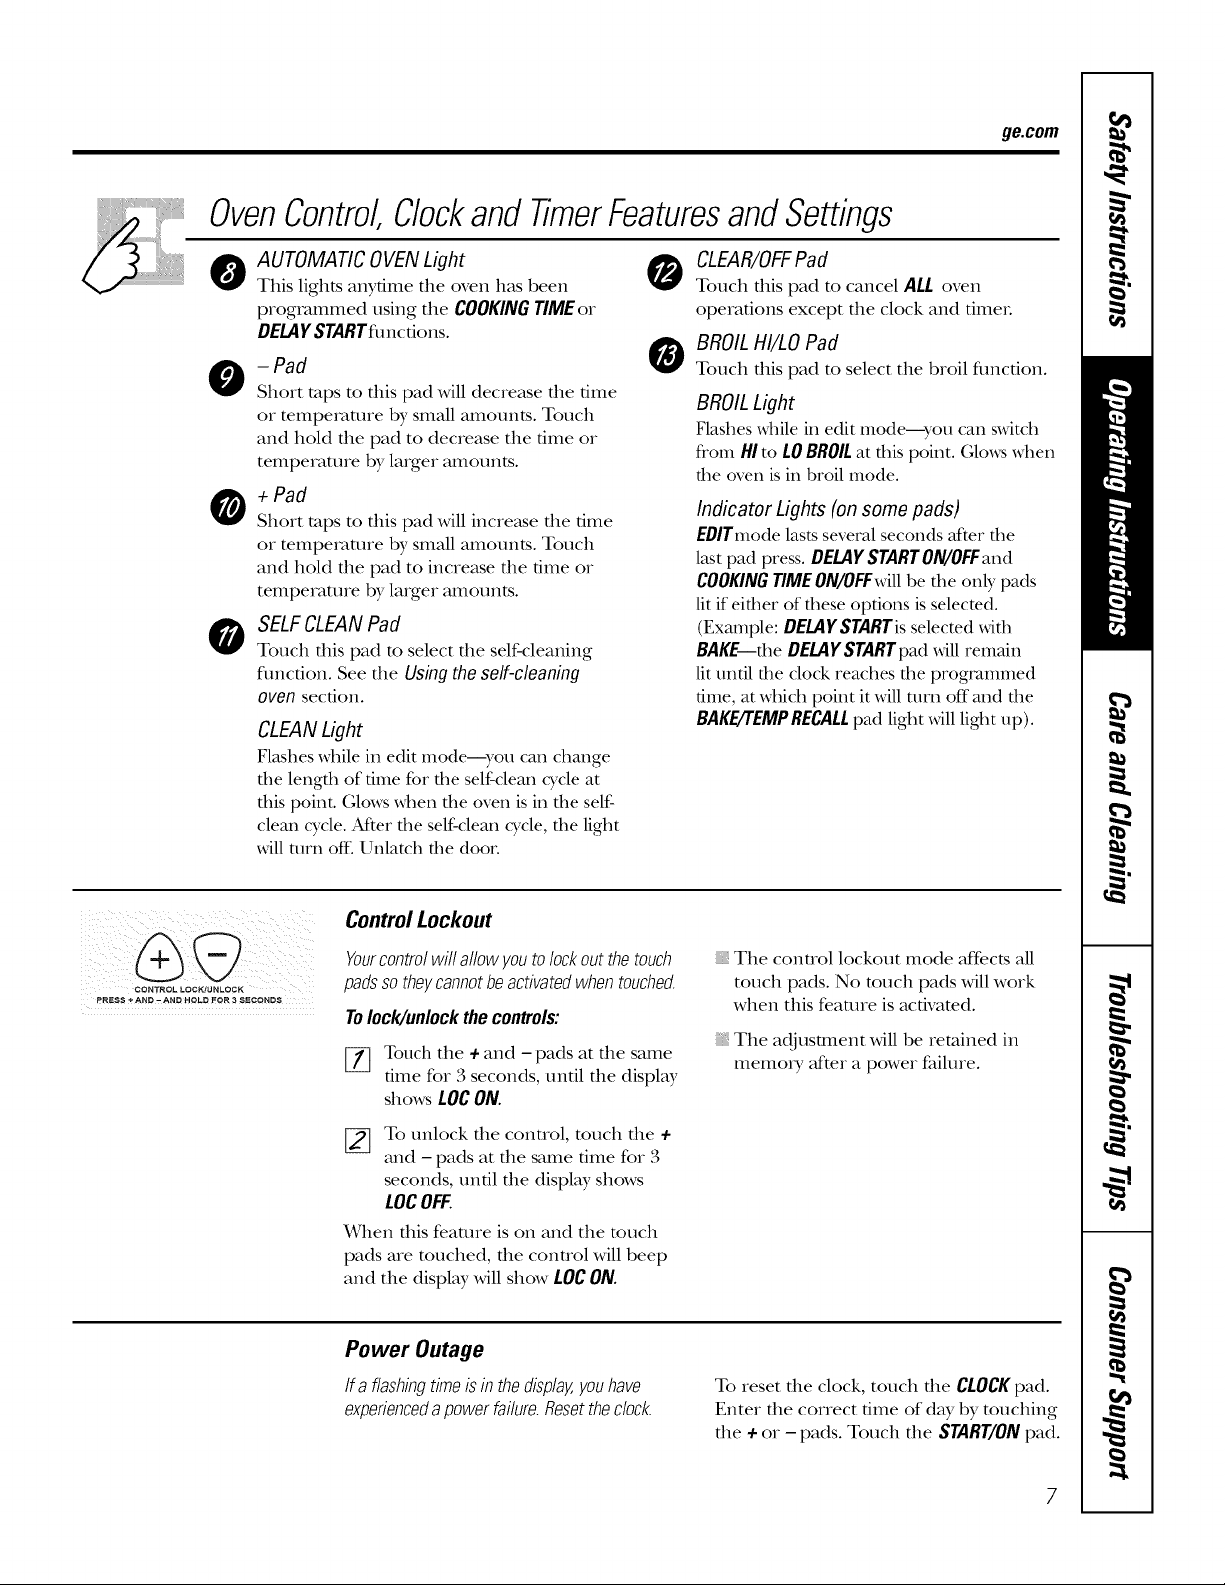
CONTROL LOCK/UNLOCK
PRESS +AND - AND HOLD FOR 3 SECONDS
ControlLockout
Yourcontrolwillallowyoutolockoutthetouch
padssotheycannotbeactivatedwhentouched.
Tolock/unlockthecontrols:
[_ Touch tile +and - pads at tile same
time for 3 seconds, until tile display
shows LOgON.
Indicator Lights (on some pads)
EDITmode lasts several seconds after tile
last pad press. DELAYSTARTON/OFFand
COOKINGTIMEON/OFFwillbe tile only pads
lit if either of ti/ese options isselected.
(Example: DELAVSTARTisselected with
BAKE tile DELAYSTARTpad will remain
lit until tile clock reaches tile programmed
time, at M/ich point it will turn off and tile
BAKEITEMPRECALLpad light Mll light up).
Tile control lockout mode affects all
touch pads. No touch pads will work
when this feature is activated.
Tile adjustment will be retained ill
memory _fftera power failure.
To unlock tile control, touch tile +
and - pads at tile same time for 3
seconds, until tile display shows
LOCOFF.
"_qlen tilis feature is on and tile touch
pads are touched, tile control will beep
and tile display will show LOCON.
Power Outage
If aflashingtimeisinthedisplay,youhave
experiencedapowerfailure.Resetthedock.
To reset tile clock, touch tile CLOCKpad.
Enter tile correct time of day by touching
tile + or - pads. Touch tile START/ONpad.
Page 8
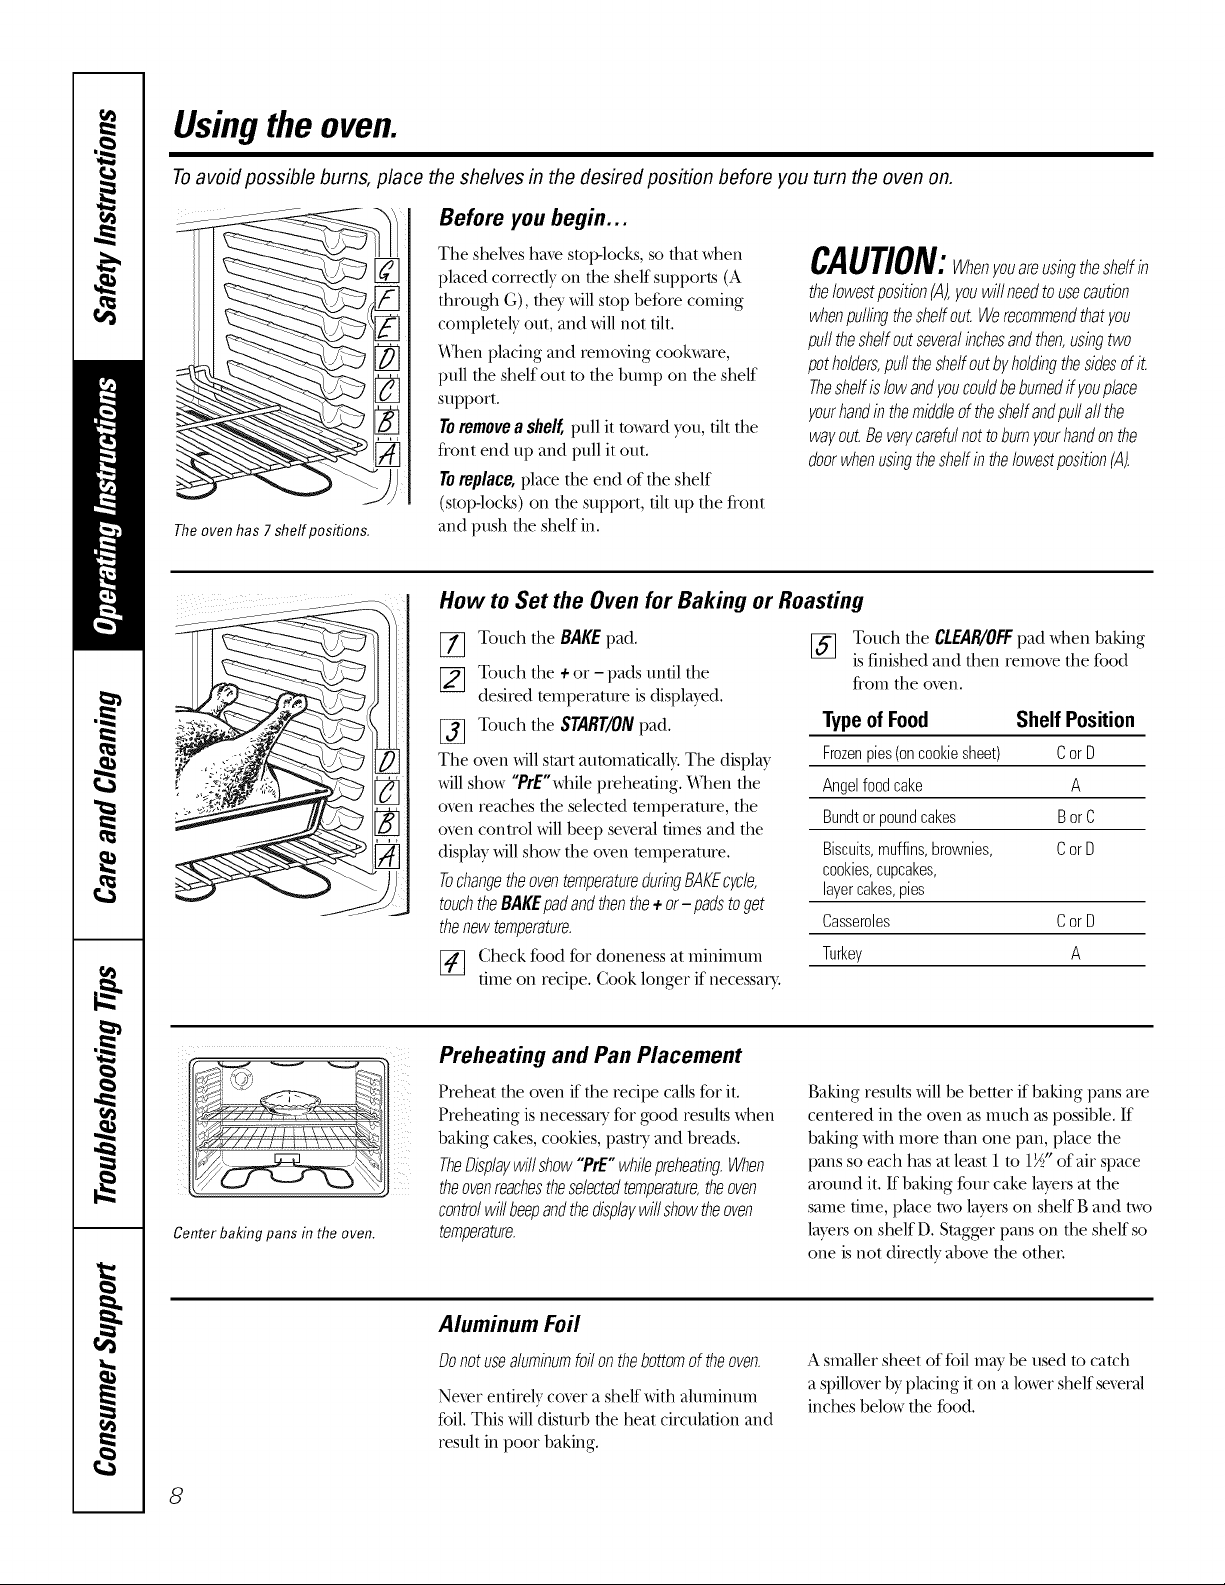
Usingthe oven.
Toavoid possible bums, place the shelves in the desired position before you turn the oven on.
Before you begin...
The oven has 7 shelf positions.
The shelves haxe stop-locks, so that when
placed correctly on the shelf supports (A
through G), the}.'will stop before coming
completely' out, and will not flit.
*dizen placing and remofing cookware,
pull the shelf out to the bump on the shelf
support.
Toremove a shelf, pull it toward you, flit the
fi'ont end up and pull it out.
Toreplace, place the end of the shelf
(smpqocks) on the support, flit up the fl'ont
and push the shelf in.
CAUTION:Whenyoua.usingtheshelfin
thelowestpositionCA),youwillneedtousecaution
whenpuffingtheshelfout.Werecommendthatyou
pufftheshelfoutseveralinchesandthen,usingtwo
potholders,pulltheshelfoutbyholdingthesidesofit.
Theshelfislowandyoucouldbeburnedifyouplace
yourhandinthemiddleoftheshelfandpu//allthe
wayout.Beverycarefulnottoburnyourhandonthe
doorwhenusingtheshelfinthelowestpositionCA).
How to Set the Oven for Baking or Roasting
[_ Touch the BAKEpad.
[_ Touch the CLEAR/OFFpad when baking
Touch the +or - pads until the
desired tempemtui'e isdisplay'ed.
[_ Touch the START/ONpad.
The o_en willstart aummaflcally. The display'
willshow "PrE"while preheaflng. *alton the
oxen reaches the selected temperature, the
oxen cona'ol willbeep several flmes and the
displW willshow the o_en mmpevature.
TochangetheoventemperatureduringBAKEcN/e,
touchtheBAKEpadandthenthe+or-padstoget
thenewtemperature.
[}_] Check.food for doneness at minimum
Type of Food Shelf Position
Frozenpies(oncookiesheet) CorD
Angelfoodcake A
Bundtorpoundcakes BorC
Biscuits,muffins,brownies, CorD
cookies,cupcakes,
layercakes,pies
Casseroles CorD
Turkey A
rune on recipe. Cook longer if necessary.
is finished and then remove the food
fl'om the oxen.
Center baking pans in the oven.
8
Preheating and Pan Placement
Preheat the oxen if the recipe calls%r it.
Preheaflng is necessaU %r good resultswhen
baking cakes, cookies, pasuy and breads.
TheDisplaywillshow"PrE"whilepreheating.When
theovenreachestheselectedtemperature,theoven
controlwillbeepandthedisplaywillshowtheoven
temperature.
Aluminum Foil
Donotusealuminumfoilonthebottomoftheoven.
Ne_er enflrely co_r a shelf with aluminum
foil. This willdisturb the heat circulation and
result in poor baking.
Baking results willbe better if baking pans are
cenmred in the oven as much aspossible. If
baking with more than one pan, place the
pans so each has at least 1 m 1½"ofair space
around it. Ifbaking four cake layers at the
same flme,place two layerson shelf Band two
layerson shelf D. Stagger pans on the shelf so
one isnot directly aboxe the other
Asmaller sheet of %il maybe used to catch
a spillover hy'placing it on a lower shelfseveral
inches below the food.
Page 9

Do not latch the oven door during broiling. The latch is used for self-cleaning only.
How to Set the Oven for Broiling
ge.com
Leave the door open to the broil
stop position. Thedoor stays open
by itself, yet the proper temperature
is maintained in the oven.
The size, weight, thickness,
starting temperature
and your preference
of doneness will aft>ct
broiling times. This guide
is based on meats at
refrigerator temperature.
I' The {LS. De[.,arlmettt q/
Agriczdttm. s,'o's 'tt'mv b</ is
po[.,ula_; but you should h_tow thc, t
cooki_g it to o_@ 140 F m_'ans
some /bod poi_,oni_g" ow_nisms
m_O' survive. " (Sounw 5_. b Food
Book. Lbur Kitche)t Gui&'. US/)A
they. June 198'5.)
Theoven has 7 sheff positions.
[77 Place the meat or fish on a broiler
grid in a broiler pan designed
for broiling.
[_ Follow suggested shelf positions in
the Broiling Guide.
If your range is connected to 208 volts,rare steaks
may be broiled bypreheatingthe broiler and
positioningthe oven shelf one positionhigher
Use LOBroil to cook foods such as
poultry or thick cuts of meat thoroughly
without over-browning them.
Broiling Guide
Shelf
Position
Food
GroundBeef
Well Done
Beef Steaks
Rarer
Medium
Well Done
Rarer
Medium
Well Done
Chicken
LobsterTails
Fish Fillets
Ham Slices
(precooked)
Pork Chops
Well Done
LambChops
Medium
Well Done
Medium
Well Done
Salmon Steaks
Quantityand/
orThickness
1 lb.(4 patties)
1/2to 3/4" thick
1" thick
1to 172Ibs.
1W' thick
2to 272Ibs.
1whole cut up
2to 272Ibs.,
split lengthwise
2 Breasts
2-4
lOto 12oz.each
1/4to 1/2"thick
1/2"thick
2(1/2"thick)
2(1"thick) about 1lb.
2(1" thick)about 10
to 12 oz.
2(11½"thick)about 1lb.
2(1"thick)
4(1"thick) about 1lb.
[_ Touch the BROILHI/tO pad once for
HI Broil.
To change to I,O Broil, touch the
BROILHI/tO pad again.
_] Touch the START/ONpad.
[_ _qlen broiling is finished, touch the
CLEAR/OFFpad.
E
E
F
E
E
D
D
D
C
C
C
E
D
E
E
E
E
D
D
FirstSide
Time(min.)
11
11
14
18
22
25
25
18-20
10
15
10
14
17
10
12
SecondSide
Time(min.)
9
7
9
8
6
10
5
6-7
8-9
11
14-16
20
10
10-15
Donot
turn
over.
10
15
7-8
9-10
12
12-14
7-8
10
Comments
Spaceevenly.Upto 8
pattiestake aboutthe
sametime.
Steakslessthan 1"
thickcookthrough
beforebrowning.Pan
fryingisrecommended
Slashfat.
Broilskin-side-down
first.
Cutthroughbackof
shell. Spreadopen.
Brushwith melted
butterbeforebroiling
andafter half of
broilingtime.
Handleandturnvery
carefully.Brushwith
lemonbutterbefore
andduring cooking,
if desired.
Increasetime 5to 10
minutesperside for
11½-thick or home-
curedham.
Slashfat.
Slashfat.
Greasepan.Brush
steakswith melted
butter.
9
Page 10
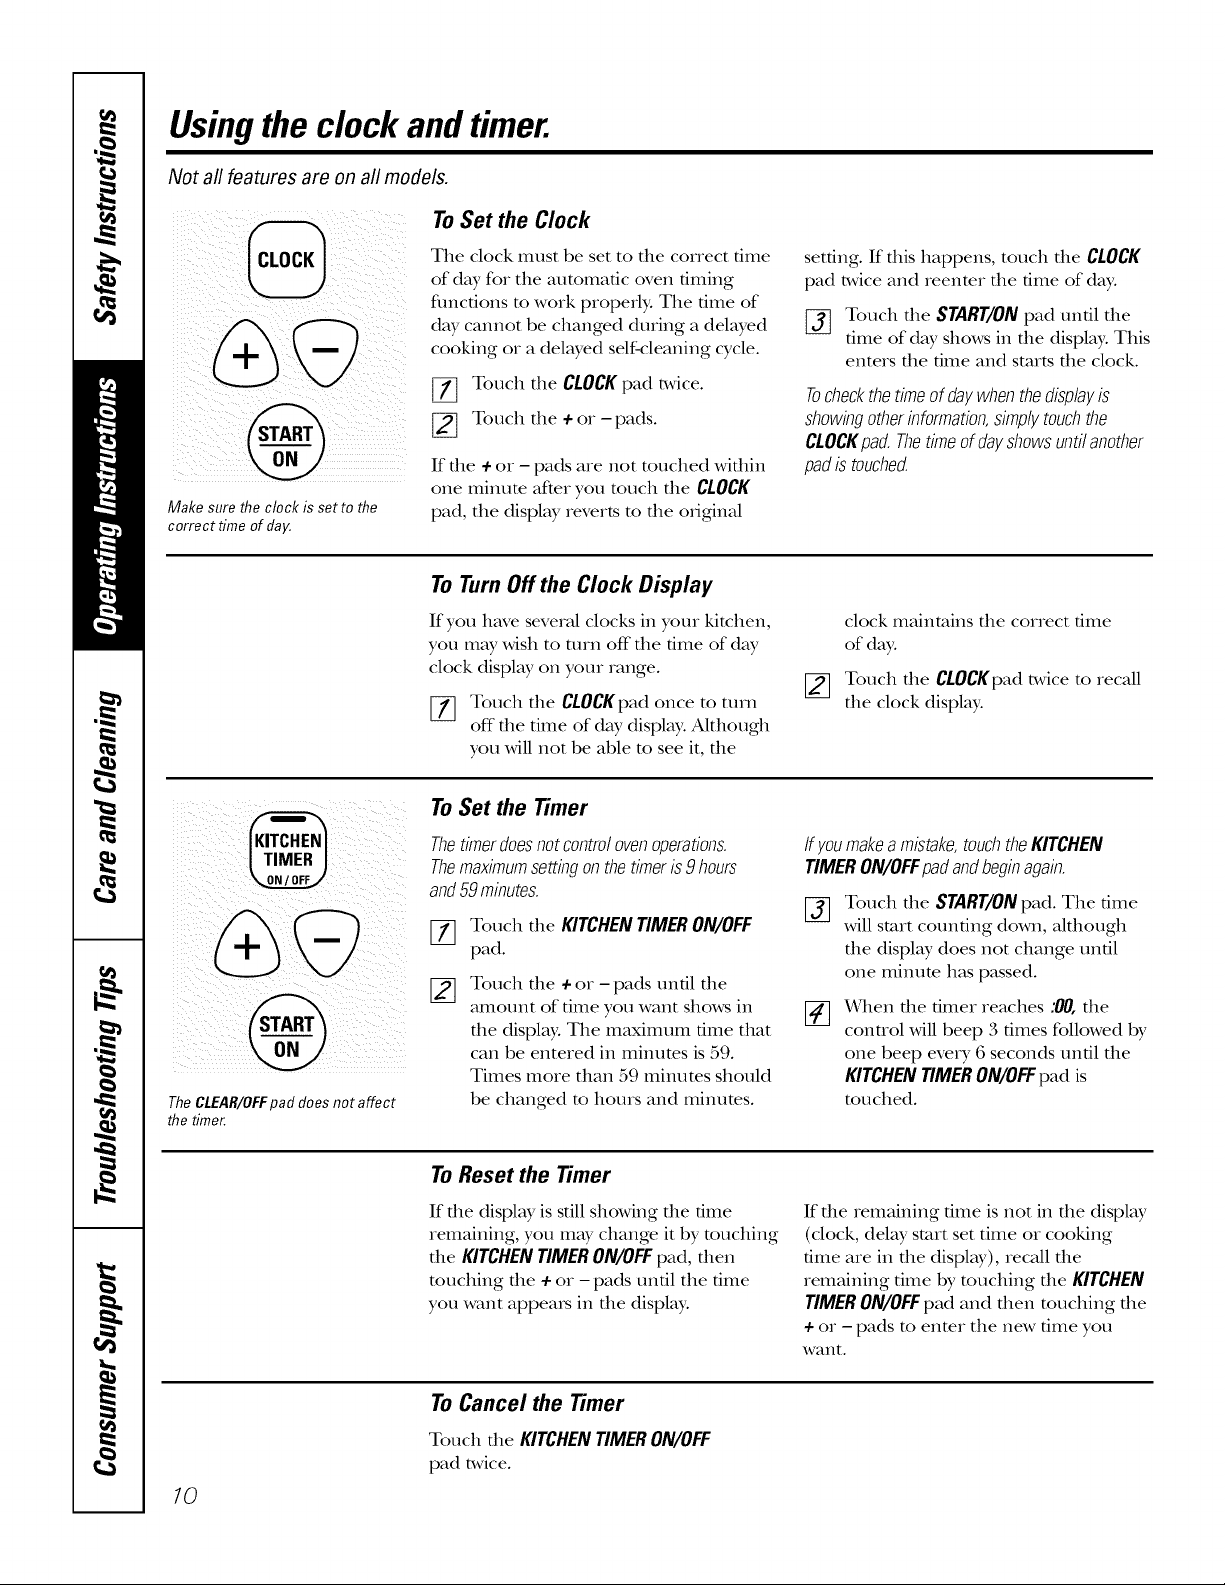
Usingthe clock andtimer.
Not all features are on all models.
To Set the Clock
Make sure the clock is set to the
correct time of day.
The clock must be set to die correct time
of dW for tile automatic oven timing
fimcfions to work properly. Tile time of
dW cannot be changed during a delwed
cooking or a delwed self-cleaning cycle.
[_ Touch tile CLOCKpad twice.
[_ Touch tile +or - pads.
If tile +or - pads are not touched within
one minute after you touch the CLOCK
pad, tile display reverts to tile original
To Turn Off the Clock Display
If you have several clocks ill your kitchen,
you may wish to turn off tile dine of day
clock display on your range.
[_ Touch tile CLOCKpad once to turn
off tile time of day display: Although
you will not be able to see it, tile
To Set the timer
setting. If this happens, touch tile CLOCK
pad twice and reenter tile time of day.
[_] Touch tile START/ONpad until tile
time of day shows ill tile display. This
enters tile time and starts tile clock.
Tocheckthetimeofdaywhenthedisplayis
showingotherinformation,simplytouchthe
CLOCKpad.Thetimeofdayshowsuntilanother
padistouched.
clock maintains tile correct time
of day:
Touch tile CLOCKpad twice to recall
[]
tile clock display.
TheCLEAR/OFFpad does not affect
the timer.
Thetimerdoesnotcontrolovenoperations.
Themaximumsettingonthetimeris9 hours
and59minutes.
Touch tile KITCHEN TIMER ON/OFF
[]
pad.
Touch tile + or-pads until tile
amount of time you want shows ill
tile display. Tile maxiinum time that
call be entered ill minutes is 59.
Times more than 59 minutes should
be changed to hours and minutes.
To Reset the Timer
If file display is sdll showing file time
remaining, you may change it by touching
tile KITCHEN TIMER ON/OFF pad, then
touching the + or - pads until tile time
you want appeals ill the displw:
To Cancel the timer
Ifyoumakeamistake,touchtheKITCHEN
TIMERON/OFFpadandbeginagain.
Touch tile START/ONpad. Tile time
%
will start counting down, although
tile display does not change until
one minute has passed.
x_qlen tile timer reaches .'0/7,tile
control will beep 3 times followed by
one beep every 6 seconds until tile
KITCHENTIMERON/OFFpad is
touched.
If file remaining time is not ill file display
(clock, delay start set time or cooking
time are ill the display), recall tile
remaining time by touching the KITCHEN
TIMERON/OFFpad and fllen touching file
+ or - pads to enter tile new time you
l,v_tn[.
7O
Touch tile KITCHENTIMERON/OFF
pad twice.
Page 11

Usingthetimedbakingandmastingfeatures.Ionsomemode/s) geoom
Do not lock the oven door with the latch during timed cooking. The latch is used for self-cleaning only.
NOTE: Foodsthat spoil easily--such as milk, eggs, fish, stuffings, poultry and pork--should not be allowed to sit for
more than 1hour before or after cooking. Room temperature promotes the growth of harmful bacteria. Be sure that
the oven light is off because heat from the bulb will speed harmful bacteria growth.
How to Set an Immediate Start and Automatic Stop
%
%
Theovenwill turnonimmediatelyandcookfora
selectedlengthoftime.At theendof thecooking
time,theovenwillturnoffautomatically
Touch the BAKE pad.
_] Touch the + or - pads to set the
oven temperature.
1_] Touch tile COOKINGTIME pad.
NOTE:Ifyourreciperequirespreheating,youmay
needtoaddadditionaltimetothelengthofthe
cookingtime.
[_ Touch tile ÷or - pads to set tile
baking time.
Tile cooking time that you entered
will be displayed. (If you select Cooking
Time first and then adjust tile Bake
Temperature, tile oven temperature
will be displayed instead).
How to Set a Delayed Start and Automatic Stop
Theoven will turn onat the time of day you set,
cookfor a specificlength of time and then turnoff
automatically
Make sure tile clock shows tile correct
time of day:
[77 Touch file BAKE pad.
Touch file ÷ or - pads to set tile
oven temperature.
[_ Touch tile COOKING TIME pad.
[_ Touch the ÷ or - pads to set the
desired length of cooking time.
[_ Touch the DELAYSTARTpad.
[_ Touch tile + or - pads to set tile time
of day you want tile oven to turn on
and start cooking.
[_ Touch file START/ONpad.
[_] Touch tile START/ONpad.
Tile display shows either file oven
temperature fllat you set or file cooking
time countdown. (Tile displ W starts with
"PRE"if showing tile oven temperature.)
Tile oven will continue to cook for tile
programmed amount of time, then turn
off atltomafically:
[_] Touch tile CLEAN/OFF pad to clear
tile display if necessary.
Removethefoodfromtheoven.Remember,even
thoughtheovenshutsoffautomatical/y,foods
continuecookingaftercontrolsareoff.
NOTE:If you would like m check die times
you have set, touch tile DELAYSTART pad
to check tile delay start set time you have
set or touch file COOKINGTIME pad to
check the length of cooking time you
have set.
When file oven turns on at tile time of day
you have set, file display will show "PRE"
until it reaches tile selected temperature,
then it will display tile oven mmpemture.
At tile end of cooking time, tile oven
will turn off and tile end-of-cycle tone
will sound.
Touch tile CLEAN/OR: pad to clear
tile display if necessary.
Removethefoodfromtheoven.Remember,even
thoughtheovenshutsoffautomatical/y,foods
continuecookingaftercontrolsareoff,
@
@
NOTE:Anattentiontonewillsoundifyouare
usingtimedbakinganddonottouchthe
START/ONpad.
11
Page 12

Special featuresof yourovencontrol
Yournew touch pad control has additional features that you may choose to use. The following are the features and
how you may activate them.
Thespecial feature modes can only be activated while the display is showing the time of day. Theyremain in the
control's memory until the steps are repeated.
When the display shows your choice, touch the START/ONpad. Thespecial features will remain in memory after
a power failure.
NOTE: TheSabbath feature and the Thermostat Adjustment feature are also Special Features, but they are
addressed separately in the following sections.
12 Hour Shut-Off
Withthisfeature,shouldyouforgetandleavethe
ovenon,thecontrolwillautomaticallyturnoff the
ovenafter12hoursduringbakingfunctionsor
after3 hoursduringabroilfunction.
If you wish to mrn OFFthis feature, follow
the steps below.
Touch the BAKE and BROIL HI/LO
pads at the same time for 3 seconds
until the display shows SE
[_ Touch the CLOCKpad. The display
will show ON (12 hour shut-off).
Touch the CLOCKpad repeatedly
until the display shows OFF(no
shut-off).
[_ Touch the START/ON pad to activate
the no shut-off and leave the control
set in this special features mode.
12
Page 13

Usingthe SabbathFeature.
(Designed for use on the Jewish Sabbath and Hofidays) (on some models) ge.com
The Sabbath feature can be used for baking/roasting only.It cannot be used for broiling, self-cleaning or
Delay Start cooking.
NOTE: Theoven light comes on automatically (on some models) when the door is opened and goes off when the
door is closed. Thebulb may be removed. See the OvenLight Replacement section. Onmodels with a light switch
on the control panel, the oven light may be turned on and left on.
NOTE..rounderstandhowtheovencontrolworks,
Howto SetforRegularBaking/Roasting
practice usingregular baking (non-Sabbath)before
entering Sabbathmode.
[ r, nrv ] Make sure the clock shows the correct t/me of day
andtheovenisoff
[] Touch and hold both the BAKE and
BROIL HI/LO pads, at the same time,
( _ )until the displa} sho,,:'_ SF
_-_ Tapthe CLOCKpaduntil SAbappears
in the display.
[] Touch the START/ON pad and D will
[ _T24i7 J appear ill the displa,c
[-_ Touch tlle BAKE pad. No signal will
lie ,
[ + _ \--/t [-_ Tl, e preset starting tempe,_ature will
_ _ automaticall_ be set to 350. ° Tap the +
or - pads to increase or decrease the
tempelature in 25 ° increments. The
@
When the display shows D the
oven is set in Sabbath. When the
display shows D c the oven is
baking/roasting.
tempelature can be set between 170 °
and 550. ° No signal or mmpemture
will be given.
[_] Touch the START/ON pad.
[_] After a 1,mdom dela? period of
approximatel_ 30 seconds to 1 minute,
D c will appear in the display indicating
that the oven is baking/r0asting. If D c
doesn't appear in the display; start again
at Step 4.
To adjust the oven tempelatm_e, touch the
BAKEpad and tap the +or - pads to increase
or decrease the temperature in 25 °
increments. Touch the START/ONpad.
NOTE."The CLEAR/OFFand COOKINGTIMEpads
are active during the SabbatlJ R_ature.
To exit SabbatlJ R_amre see next page.
@
When the display shows D the
oven is set in Sabbath. When the
display shows D c the oven is
baking/roasting.
How to Set for Timed Baking/Roasting--Immediate Start and Automatic Stop
NOTE."Tounderstandhow theoven control works,
practice usingregular (non-Sabbath)/mmediate Start
andAutomat/c Stop before entering the Sabbath mode.
Make sure the clock shows the correct t/me of day
and the oven/s off
Touch and hold both the BAKE and
%
BROIL HI/LO pads, at the same time,
until the display sho_:s SE
Tap the CLOCK pad until SAb appears
in the display.
Touch the START/ON pad and D will
%
appear in the displa):
Touch the COOKING TIME pad.
Touch the + or - pads to set the desired
length of cooking time lletween 1
minute and 9 hours and :5(.)minutes.
The cooking time that you entered will
be displayed.
Touch the START/ON pad.
%
Touch the BAKE pad. No signal will
The preset starting tempelature will
%
automatically be set to 350. ° Tap the +
or - pads to increase or decrease the
tempel_amre in 25° increments. The
tempel_amre can be set lletween 170°
and 550. ° No signal or tempe,amre
will be given.
Touch the START/ON pad.
%
After a landom delay period of
approximately 30 seconds to 1 minute,
D c will api)ear in the display indicating
that the oven is baking/r0asting. If D c
doesn't api)ear in the disi)la); start again
at Step 7.
To adjust the oven tempelature, touch the
BAKEpad and tap the +or - pads to increase
or decrease the temperature in 25 °
increments. Touch the START/ON pad.
When cooking is finished, the display will
change ti'om D c to D indicating that the
oven has turned OFFllut is still set in SabbatlJ.
Remove the cooked food.
be given.
13
Page 14

Usingthe SabbathFeature.
(Designed for use on the Jewish Sabbath and Hofidays) (on some models)
How to Exit the Sabbath Feature
[77 Touch the CLEAR/OFFpad. [_]
_] f the o_en is cooking, wait for a c,mdom
dela? period of approximatel? 30
seconds to 1 minute, until onl} D is in
the display.
Touch and hold both the BAKE and
%
BROILHI/tOpads, at the same time,
until the displa? sho_vs SF.
Tap the CLOCK pad until ONor OFF
appears in the display. ON indicates that
the oven will automatically turn off after
12 hours. OFFindicams that the oxvn
will not mmmmfically turn ofli See
the Special Features section Jot an
explanation of the 12Hour ShubOff
t_ature.
_-] Touch the START/ONpad.
NOTE."If apoweroutageoccurredwhiletheovenwas
/nSabbath,theovenwillautomaticallyturnoffandstay
offevenwhenthepowerreturns.Theovencontrol
mustbereset
Adjustthe oventhermostat--Do it yourself/.
Youmay find that your new oven cooks differently than the one it replaced. Use your new oven for a few
weeks to become more familiar with it. If you still think your new oven is too hot or too cold, you can adjust
the thermostat yourself.
Do not use thermometers, such as those found in grocery stores, to check the temperature setting of your oven.
These thermometers may vary 20-40 degrees.
NOTE: Thisadjustment will not affect the broiling or the self-cleaning temperatures. The adjustment will be
retained in memory after a power failure.
To Adjust the Thermostat
[77 Touch the BAKE and BROILHI/LO
pads at the same dine for 2 seconds
un0l the display shows SE
Touch the BAKEpad. A two<ligit
number shows in the display.
The oven temperature can be
%
adjusted up to (+) 35°F hotter or (-)
35°F cooleL Touch the + pad to
increase the temperature in 1-degree
increments.
Touch the - pad to decrease the
temperature in 1-degree increments.
[_ _(_qlen you have made the
adjusunent, touch the START/ON pad
to go back to the dine of day display.
Use your oven as you would
nornlalb,:
NOTE:Thisadjustmentwill notaffectthebroiling
orself-cleaningtemperatures.Itwill beretained
inmemoryafterapowerfailure.
Thetype of margarine will affect bakingperformance!.
Most recipes for baking have been developed using high-fat products such as butter or margarine (80%fat). If you
decrease the fat, the recipe may not give the same results as with a higher-fat product
Recipe failure can result ff cakes, pies, pastries, cookies or candies are made with low-fat spreads. The lower the fat
content of a spread product, the more noticeable these differences become.
Fede_M standards require products labeled "margarine" m contain at least 80% fat by weight. I,ow-fat spreads,
on the other hand, contain less fat and more WamL The high moisture content of these spreads aff>cts the
mxture and flavor of baked goods. Fox best results with your old favorim recipes, use margarine, butter or
stick spreads containing at least 70% vegetable oil.
/4
Page 15

Usingthe self-cleaning oven. geoom
Never force the latch handle. Forcing the handle will damage the door lock mechanism.
Before a Clean Cycle
Wipe up heavy soil on the oven
bottom.
We recommend venting your kitchen
wifll an open window or using a
ventilation fan or hood during file
first self-clean cycle.
Remove shelves, broiler pan, broiler grid,
all cookware and any aluminum foil from
the oven.
The shiny, siNe>colored oven shelves
(on some models) can be self<leaned,
but flley Mll darken, lose flleir luster
and become hard m slide.
Soil on the flont flame of the range and
outside the gasket on the door will need
to be cleaned by hand. Glean these areas
with hot water; soap-filled smel wool pads
or cleansers such as Soft Scrubq Rinse
well with clean water and d_y.
How to Set the Oven for Cleaning
Follow the directions in the Before a
Clean Cycle section.
[_ I,atch the dooI.
NOTE"Never force the latch. If the oven is
too hot, you will not be able to slide the
latch. Allow the oven to cool.
Do not clean the gasket. The fiberglass
mam_-iM of file oven door gasket cannot
withstand abrasion. It is essential for the
gasket m remain intact. If you notice it
becoming worn or flayed, replace it.
Wipe up any hem T spillovers on the oven
bottom.
Make sure the oven light bulb cover is in
place and the oven light isoff'.
IMPORTANT'. The healfll of some birds
is exnemely sensitive m file flmles gNen
off during the self-cleaning cycle of any
range. Move birds to anofller well-
ventilated room.
While file oven is self-cleaning, you can
touch the CLOCKpad to display the time
of dw: To return m the clean countdown,
much the SELFCLEANpad.
The oven struts off automatically when
the clean cycle is complete, and 0:00 will
flash in the display:
f_ Touch the SELFCLEANpad.
[_ Touch the + or- pads until the
desired Glean Time is displayed.
TheCleanTimeis normally4 hours.Youcan
changetheCleantimetoanytimebetween3
and5hours,dependingontheamountofsoilin
youroven.
[_ Touch the START/ONpad.
The selfK:lean cycle will automatically
begin after CLEANisdisplwed and the
time countdown appears in the display.
[_ Slide the latch handle to the left as
far _ksit will go and open file doo_.
It will not be possible to unlatch the oven
door until the mmpemture drops below
the lock mmpemmre and the LOCKED
door light goes off:
When the LOCKEDdoor light is off;
unlatch the dooL
15
Page 16

Usingtheself-cleaning oven.
How to Delay the Start of Cleaning
Make sure the clock shows the correct
time of day.
[-_ I_tch the dooL
[] Touch the SELFCLEAN pad.
[_ Using tile ÷ or - pads, enter the
desired clean time.
TheCleantimeisnormally4hours.Youcan
changetheCleanTimetoanytimebetween3
and5 hours,dependingontheamountofsoilin
youroven.
[_ Touch the DELAYSTARTpad. The
earliest delay start time you can set
will appear in tile display.
Using the ÷ or - pads, enter the
%
time of day you want the clean cycle
to start.
Touch the START/ONpad.
%
The display Mll show die delay start set
time. It Mll not be possible m unlatch die
oven door until the mmperature drops
below the lock temperature and the
LOCKEDdoor light goes off:
x_qlen tile LOCKEDdoor light isoff.
unlatch the dooL
ToStop a Clean Cycle
Touch tile CLEAR/OFFpad.
Wait until die oven has cooled below die
locking temperature to unlatch file dooL
You will not be able to open the door
right away unless the oven has cooled
below the locking temperature.
After a Clean Cycle
You may notice some white ash in tile
oven. Wipe it up widl a damp cloth after
the oven cools.
If whitespotsremain,removethemwith asoap-
filledscouringpadandrinsethoroughlywith
a vinegarandwatermixture.
These deposits are usually a salt
residue that cannot be removed by
the clean cycle.
If tile oven is not clean after one clean
cycle, repeat tile cycle.
You cannot set the oven for cooking
until the oven is cool enough for the
door to be unlatched.
While die oven is self-cleaning, you
can press the CLOCK pad m display
the time of day. To return m the
clean counOown, press the COOKING
TIMEpad.
Apply a smaU mnount of vegetable oil
m a paper towel and Mpe die edges of
tile oven sheh'es widl tile paper towel.
Do not spIW with Pmn®or other
lubricant sp_tys.
16
Page 17

Careand cleaning of the range, g,oom
Be sure all controls are off and all surfaces are cool before cleaning any part of the range.
If your range is removed for cleaning, servicing or any reason, be sure the anti-tip
device is re-engaged properly when the range is replaced. Failure to take this
precaution could result in tipping of the range and cause injury.
How to Remove Protective Shipping Film and Packaging Tape
Groove Stem
Mc
Gareflllly grasp a corner of the protective
shipping fihn widl your finge_ and slowly
peel it from the appliance surfi_ce. Do
IIOt use any shaIp items to remove file
fihn. Remove aU of the film before using
the appliance for the first time.
Control Knobs
Thecontrolknobsmayberemovedforeasier
cleaning.
Make sure tile knobs are in tlle OFF
positions and pull them straight off the
stems for cleaning.
Control Panel
To assure no damage is done m file
finish of the product, file safest way to
remove the adhesNe flom packaging tape
on new appliances is an application of a
household liquid dishwashing demrgent.
Apply with a soft cloth and allow m soak.
NOTE:Theadhesivemustberemovedfromall
parts.Itcannotberemovedif it is bakedon.
The knobs can be cleaned in a
dishwasher or flley may also be washed
Mill soap and wateL Make sure file insides
of file knobs are dry before replacing.
Replace tile knobs in tile OFFposition
to ensure proper placement.
i 'i
i i _
It's a good idea to Mpe die conuol panel
after each use of die oven. Use a damp
clod1 to clean or rinse. For cleaning, use
mild soap and wateI of a 50/50 solution
of vinegar and wateL For rinsing, use
clean wamL Polish d_y with a soft cloth.
Oven Heating Elements
Donotcleanthebakeelementor thebroil
dement.Anysoftwill bumoffwhenthe
elementsareheated.
Do not use abrasNe cleansers, suong
liquid cleaners, plastic scouring pads or
oven cleaners on the conuol panel--
they will damage the finish.
To clean tile oven floor, gently lift
tile bake element. Glean wkh warn1
soap), wateL
17
Page 18

Careand cleaning ofthe range.
Oven Shelves
Glean file oven shekes Mill an abrasive
cleanser or steel wool. Mier cleaning,
rinse the shekes Mth clean water and dry
with a clean cloth.
NOTE:Theshiny,silver-coloredovenshelves
(onsomemodels)maybecleanedin theself-
cleaningoven.However,theshelveswill darken
in color,losetheirlusterandbecomehardto slide
if cleanedduringtheself-cleaningcycle.
Porcelain Enamel Cooktop
The porcelain enamel finish is sturdy but
breakable if misused. This finish is aci&
resistant. Howevei, any acidic foods
spilled (such as fruit juices, tomato or
vinegar) should not be permitmd to
remain on the finish.
Painted Surfaces
Painted surfaces include the sides and
the drawer flont.
Glean these with soap and wamr or
a vinegar and wamr solution.
To make the sheh'es slide more easil};
apply a small amount of vegetable oil
or cooking oil m a paper towel and wipe
the edges of the oven shelves with the
paper towel.
If acids spill on die cookmp while it is
hot, use a d_y paper towel or clofll m
wipe it up right away. When the surface
has cooled, wash with soap and WamL
Rinse well.
For other spills such as fat spatte_ings,
w_tshwith soap and water or cleansing
powde,s after the surface has cooled.
Rinse well. Polish with a d_T cloth.
Do not use commerciM oven cleaners,
cleaning powders, steel wool or hmsh
abrasives on any pMnted surface.
18
Oven Vent
The oven is vented through an opening
under the left rear surface unit.
Thisareacouldbecomehotduringovenuse.
It is noimal for steam to come out of die
vent and moisture may collect underneath
the coils when the oven is in use.
The vent is important for proper Mr
circulation.
NeverblockDis ventwithaluminumfoil.
Page 19

\, /i"
Donotrubor clean the doorgasket--
it has an extremelylowresistanceto
abrasion.
If younoticethegasketbecomingworn,
frayedor damagedin anywayorif it has
becomedisplacedon thedoor,you
shouldhaveit replaced
¸¸¸¸¸¸¸¸¸¸/5¸¸
Hingelock
Pull hinge locks down to unlock.
'/U
Cleaning the Oven Door
Tocleantheinsideof thedoor:
iii_ii_ii_i_iiiiiiii
Because the area inside the g_tsket is
cleaned during the self-clean cycle, you
do not need to clean this by hand.
{{{iiiiiiili
The area outside file gasket and
file door liner can be cleaned Mth a
soap-filled or plastic scouring pad,
hot wamr and dem_gent. Rinse well
with a vinegar and wamr solution.
Tocleantheoutside ofthe door'.
Use soap and wamr to flloroughly
clean file rap, sides and flont of die
oven dooL Rinse well. You may also use
a glass cleaner to clean file glass
on the outside of the dooL Do not let
water drip into the vent openings.
Lift-Off Oven Door
Thedooris veryheavy.Becarefulwhen
removingandliftingthedoor.
Toremovethedoor:
Fully open the dooL
%
Pull the hinge locks down toward
the door flame, to the unlocked
position. A tool, such as a small
fiat-blade screwdriver; may be
required.
Firmly grasp both sides of the door
%
at the top. D0not riftthe doorby the
handle.
Close door to file door removal
position, which is hMf_,vaybetween
the broil stop position and flail),
closed.
[_ I,iff door up and out until the hinge
arm is clear of the slot.
If any stain on the door vent tlq_nlis
persistent, use a soft abrasive cleaner
and a sponge-scrubber for best results.
Spillage of marinades, fluitjuices,
tomato sauces and basting mamriMs
containing acids may cause
discoloration and should be wiped
tap immediately. When surface is cool,
clean and rinse.
Do not use oven cleaners, cleaning
powders or hm_h abrasives on the
outside of the dooL
With the Bottom
door at the edge
same angle as N
tile removal
position, seat file
notch stop of
the hinge am1
into the bottom
edge of the hinge slot. The notch in
the hinge ann must be flflly seared
into the bottom of the slot.
Fully open the door until it is
%
ofslot
parallel to the flOOLIf the door will
not filly open, the notch stop is not
seared correctly in the bottom edge
of the slot. Repeat stop 2 if
necessary.
Push the hinge locks tap against the
flont flame of the oven cavib_to the
locked position.
ge.com
Hinge arm
ii iil
Removal position
Toreplace the door:
/
Firmly grasp both sides of the door
at the top. DOnot rift the door by the
handle.
arm
Hinge
(;lose the oven dooL
%
Pushhinge locks up to lock.
79
Page 20

Careand cleaning ofthe range.
Oven Light Replacement
CAUTION:Seforereplacingyour
oven light bulb, disconnect the electrical
power to the range at the main fuse or
circuit breaker panel
Be sure to let the light cover and bulb
cool complemly.
Toremovethecover:
[77 Twist lens counterclockwise about a
qtlalteI t/lI'll to IelIlove.
Donotremoveanyscrewstoremovethecover.
[_ Replace bulb wifll a 40-watt
appliance bulb or two-prong
halogen bulb, as appropriate.
Toreplacethecover:
[_ Line up tabs of lens in front of tabs
on housing and rotate clockwise to
engage.
2O
Page 21

Be sure the controls are turned to OFFand the surface units are cool before attempting to remove them.
ge.com
_ Drip
Cooktop
tab rim
When properly seated, the locking
tab should lock onto the cooktop rim
through the notch in the drip pan.
Surface Units
To clean the surface units, turn the
control to the highest setting for a
minute. The coils will burn off" any soil.
Toremovea surfaceunit:
To remove the drip pans for cleaning,
the surface units [_lttstbe removed first.
[] Push the surface unit back toward
the receptacle to fiee the locking
mb fiom the cooktop.
Receptacle
I,ifl the surface unit about 1inch
above the drip pan and pull it out.
Do not lift the surfaceunit more than I inch.
If youdo, it may not lie flat on the drip pan
when youplug it backin.
NOTE."Repeated lifting of the surface unit
more than 1 inch above the drip pan can
permanently damage the receptacle.
Toreplacea surfaceunit:
Replace the chip pan into the recess
%
m the cooktop. Make sure the
opening in the pan lines up with
the receptacle.
Insert the terminals of the surface
[]
unit through the opening in the
drip pan and into the receptacle.
Lockingtab
_] Push the surface unit in and down
to lock the tab in place so it rests
evenly in the cooktop.
Donotimmersethesurfaceunitsinliquidsof
an}/kind.
Donotcleanthesurfaceunitsina dishwasher.
Donotbendthesurfaceunitplugterminals.
Donotattempttoclean,adjustorinan}/way
repairtheplug-inreceptacle.
Support rod
Be sure all surface units are turned
off before raising the cooktop.
Drip Pans
Remove the surface units. Then lift out
the ddp pans.
Place them in a covered container. Add
1/4 cup ammonia and let soak several
hours or overnight. Wash, rinse well
and dtT:
The drip pans may also be cleaned in a
dishwasher.
Lift-Up Cooktop
Cleantheareaunderthecooktopoften.Built-up
soil,especiallygrease,maycatchfire.
To make cleaning easier; the entire
cooktop may be lifted up and supported
in the up position.
Be sure aU the surface units are unned
off before rMsing the cooktop. The
surface units and drip pans do not need
m be removed; however; you m W remove
one m make raising file cookmp easier.
Clean file area under file drip pans
often. Built-up soil, especiaUy gnease,
may catch fire.
Donot coverthedrippanswithfoil.Usingfoil so
closetothereceptaclecouldcauseshock,fire or
damagetotherange.
A support rod will hold the cooktop tap
while you clean underneath it.
After cleaning under die cookmp Mth
hot, soapy water and a clean cloth, lower
the cooMop. Be carefltl not m pinch
your fingers.
21
Page 22

Beforeyoucall forservice...
Troubleshooting -tips
Save time and money! Review the charts on the following
pages first and you may not need to call for service.
Possible Causes
Surface units donot
work properly
Control signals after You forgot to enter a • Press the BAKE pad and desired temperature or the
The surface units are
not plugged in solidly.
The surface unit controls
improperly set.
The drip pans are not set
securely in the cooktop.
What ToDo
• With the controls off; check to make sure the surface
unit is plugged complemly into the receptacle.
• Check m see the correct control is set for the surface
unit you are using.
• With the controls off, check to make sure tim drip
pan is in the recess in the cooktop and that the
opening in the pan lines up with the receptacle.
entering cooking time bake temperature or SELF CLEAN pad and desired clean time.
or delay start cleaning time.
Fooddoes not bake Oven controls improperly set. • See the Using the oven section.
or roast properly Shelf position is incorrect • See the Using the oven section.
or the shelf is not level.
Incorrect cookware or • See the Using the oven section.
cookware of improper
size being used.
Oven thermostat needs • See the Adjust the oven thermostat--Do it yourself!
adjustment, section.
Clock and timer do Plug on range is not completely • Make sure electrical plug is plugged into a live, properly
not work inserted in the electrical outlet, grounded outlet.
A fuse in your home may • Replace the fllse or reset the circuit breakeL
he blown or the circuit
breaker tripped.
Oven controls improperly set. • See the Using the clock and timer section.
Oven light does Light bulb is loose or defective. • Tighten or replace the bulb.
not work
Fooddoes not Door not open to the broil stop • See the Using the oven section.
Switch operating light • (;all for service.
is broken.
broilproperly position as recommended.
Oven controls improperly set. • Make sure you press the BROILHI/£O pad.
Improper shelf position • See the Broiling Guide.
being used.
Cookware not suited • For best results, use a pan desigmed for broiling.
for broiling.
In some areas the power
(voltage) may be low.
• Preheat file broil element for lOminums.
• Broil for the longest period of 6me recommended in
the Broiling Guide.
22
Page 23

ge.com
Possible Causes
Oventemperaturetoo
hotor toocold
Oven willnot work Plug on range is not • Make sure electlicM plug is plugged into a live,
Oven will not self-clean The oven temperature is • Allow file oven to cool to room temperature and
"Crackling" or This is the sound of the • This is normal.
"popping" sound metal heating and cooling
Oven thermostat
needs adjustment.
completely inserted in properly gnounded outer.
the electrical outlet.
A fuse in your home may • Replace the fi_se or reset the circuit breakeL
be blown or the circuit
breaker tripped.
Oven controls improperly set. • See the Using the oven section.
Door left in the locked position. • If necessary, allow the oven to cool; then unlock the
too high to set a self-clean reset file controls.
operation.
Oven controls improperly set. • See the Using the self-cleaning oven section.
Oven door is not in the locked • Make sure you move the door latch handle all the
position, way to the right.
during both the cooking and
cleaning functions.
What ToDo
• See the Adjust the oven thermostat--Do it yourself!
section.
dool:
Excessivesmoking Excessive soil. • Press the CLEAR/OFFpad. Open the windows to
during a clean cycle rid the room of snloke. \_rait until the light on the
SELFCLEAN pad goes off: Wipe up the excess soil and
reset the clean cycle.
Oven door willnot Oven too hot. • Allow the oven to cool below locking temperature.
unlock
Oven not clean after Oven controls not properly set. • See the Using the self-cleaning oven section.
a clean cycle Oven was heavily soiled. • Clean up heax T spillovers before starting the clean
cycle. Heavily soiled ovens may need to self-clean
again or for a longer period of time.
23
Page 24

Beforeyoucall forservice...
Troubleshooting -tips
Possible Causes What ToDo
"F- anda number
orletter"flash
in thedisplay
Display flashes "bAd" The installed connection • Contact installer or electrician to correct miswire.
then "linE" with a from the house to the unit
loud tone is miswired.
You have a function
error code.
If the function code repeats.
• Press the CLEAR/OFFpad. Put the oven back into
operation.
Disconnect all power to the range for at least 30
seconds and then reconnect power. If the funcdon
error code repeats, call for service.
Oi1 self-cleaning models, if a function error code
appears during the self-cleaning cycle, check the oven
door latch. Tile latch may have been moved, if only
slightly, fiom the locked position. Make sure the latch
is moved to tile right as far as it will go. Press tile
CLEAR/OFFpad.Allow tile oven to cool for one hour.
Put file oven back into operation.
A fuse in your home may be • Replace tile fi_se or reset tile circuit breaker.
blown or the circuit
breaker tripped.
The clock is turned off from * See the Using the clock and timer section.
showing in the display.
Displayflashes Power failure. • Reset tile clock.
Unable to get the Oven control pads were • The BAKE and BROIL HI/LO pads must be pressed
display to show "SF" not pressed properly, at tile same time and held for 3 seconds.
Power outage or surge. * Reset the clock. If tile oven was in use, you must reset
clock flashes it t)y pressing tile CLEAR/OFFpad, setting tile clock
and resetting any cooking flmction.
"Burning" or "oily" This is normal in a new • To speed tile process, set a self-clean cycle for a
odor emitting from oven and will disappear minimum of 3 hours. See the Using the self-
the vent in time. cleaning oven section.
Strong odor An odor from the insulation * This is temporary.
around the inside of the
oven is normal for the first
few times the oven is used.
24
Page 25

GE Service Protection Plus TM
GE, a name recognized worldwide R)r quality and dependability, offers you
Service Protection Plus"*--comprehensive protection on all your appliances--
No Matter What Brand!
Benefits Include:
* Backed by GE
* All brands covered
* Unlimited service calls
* All parts and labor costs included
* No out-of-pocket expenses
* No hidden deductibles
* One 800 number to call
You will be completely satisfied with our service protection or you may request your money back
on the remaining value of your contract. No questions asked. It's that simple.
Protect your refligerato_, dishwasher, washer and drym, range, TV, VCR and much more--any brand!
Plus there's no exua charge for emergency service and low monthly financing is available. Even icemaker
coverage and food spoilage protection is oft>red. You can rest easy, knowing that all your valuable
household products are protected against expensive repairs.
Place your confidence in GE and call us in the U.S. toll-free at 800.626.2224
for more information.
_%11brands covered, up Io 20 wars old, in lhe condnemal U.S.
We71 CoverAnyAppfiance.
Anywhere. Anytime.*
.._._ Cut here
Pleaseplacein envelopeand mail to:
General Electric Company
Warranty Registration Department
EO. Box 32150
Louisville, KY 40232-2150
25
Page 26

Consumer Product Ownership Registration
Dear Customer:
Thank you for purchasing our product and thank you for placing your confidence in us.
We are proud to have you as a customer!
Follow these three steps to protect your new appliance investment:
Complete and mail
your Consumer
Product Ownership
Registration today.
Have the peace of
mind of knowing we
can contact )ou in
the unlikely event of a
satet} modification.
After mailing the
registration belcm,
store this document
in a sate place. It
contains intormation
)ou will need should
)ou require service.
Our service nmnber is
800.(;E.(;ARES
(800.432.2737).
Model Number Serial Number
Important: If you did not get a registration card with your
product, detach and return the form below to
ensure that your product is registered, or register
online at ge.com.
Consumer Product Ownership Registration
Read }our Owner's
Mamml carefully.
It will help )ou
operate }otlr ilew
appliance properly.
...,,._ Cut here
Model Number Serial Number
Mr. [ M[s. [I Mrs. [I Miss[
First I I I'ast I
Name I I I I I I I I I Name I I I I I I I I I I
Street I
Address I I I I I I I I I I I I I I I I I I I I I I I
Ap_#i , , , , , , , I E-real,Address*
I)at< Pla<<d
'"_'!, I Da,I, I _arl, I Phone
Month
* Please provide your e-mail address to receive, via e-mail, discotmts, special offers and other impormm
commm]ications fi'om GE Appliances (GEA).
GE Consumer & Industrial
Appliances
General Electric Compang
Louisville, K¥/40225
ge.com
:: Check here if)'ou do not _m]t to receive commm]ications fl'om GEA's careftfll) selected partnel_.
FAII,[)RE TO COMPI,ETE AND RETURN THIS CARD DOES NOT DIMINISH YOUR
X£ARRANTY RIGHTS.
For more inti)rmation about GEA's privac) and clam usage policy, g<) t<) ge.com and click on
"Pfivac) Policf' or call 800.626.2224.
26
_.mberl I, I-I,, I-I , ,
Page 27

Notes.
w
27
_P
!
m
m
!
!
Page 28

m
Notes.
i
m
m
m
m
28
Page 29

Notes.
w
29
_P
!
m
m
!
!
Page 30

Accessories.
Looking For Something More ?
You can find these accessories and many more at ge.com, or call 800.626.2002
(during normal business hours). Have your model number ready.
_lii7 _l_#/IrtIII !Yttt_x'_\_\'_\\))
i_i_i!i__i_(_i;_I!LI_L_I_I_I_I_i_i _iiLii____i___
Surface Elements& Drip Pans
Oven Elements
Tired of discolored shelves? Wishing you had extra-heaxy-duly oven shelves?
Oven Shelves Broiler Pan
Light Bulbs
NOWA VAIl.ABLE tot your range:
GE's innovative, seltk:leanable porcelain-coated oven shelves!
• Heaxy Duly
• Durable
• Able to be cleaned in a self-cleaning oven
Knobs
3O
Visit ge.com fi)r more infimnadon.
Page 31

GEElectricRange Warranty.
All warranty service provided by our Factory Service Centers,
or an authorized Customer Care®technician. Toschedule service,
on-line, visit us at ge.com, or call 800.GE.CARES(800.432.2737).
Please have serial number and model number available when
calling for service.
GE Will Provide:
i i_ i i
One Year
Fromthedate ofthe
originalpurchase
Service trips to your home to teach you how to use
the product.
Improper installation, delivery or maintenance.
Failure of the product if it is abused, misused, or used
for other than the intended purpose or used
commercially.
Replacement of house fuses or resetting of circuit
breakers.
Anypartof the range which fails due to a defect in materials or workmanship.
During dlis limited one-year warranty, GE will also provide, free ofcharge, all labor
and in-home se_ice to replace the defective part.
Staple your receipt here.
Proof of the original purchase
date is needed to obtain service
under the warranty.
Damage to the product caused by accident, fire, floods
or acts of God.
Incidental or consequential damage caused by possible
defects with this appliance.
Damage caused after delivery.
Product not accessible to provide required service.
Warranty.Any impfied warranties, including the implied warranties of merchantability or fitnessfor a particular purpose,
EXCLUSIONOFIMPLIED WARRANTIES--Your soleand exclusive remedy is product repa# asprovided in this Limited
are limited to one year or the shortestperiod allowed by law.
This warranty is extended to the original purchaser and any succeeding owner for products purchased for
home use within the USA. If the product is located in an area where service by a GEAuthorized Servicer is not
available, you may be responsible for a trip charge or you may be required to bring the product to an Authorized GE
Service location for service. In Alaska, the warranty excludes the cost of shipping or service calls to your home.
Some states do not allow the exclusion or limitation of incidental or consequential damages. This warranty
gives you specific legal rights, and you may also have other rights which vary from state to state. Toknow
what your legal rights are, consult your local or state consumer affairs office or your state's Attorney General
Warrantor: General Electric Company.Louisville,KY40225
31
Page 32

ConsumerSupport.
GEAppliancesWebsite
Have a question ov need assistance with your appliance? TD_the GE Appliances Website 24 hours a day,
any day of the year! Fox greater convenience and fi,tster service, you can now download Owner's Manuals,
order parts ox even schedule sex_qceon-line.
ge.com
ScheduleService ge.com
Expert GE repair service is only one step away fiom your dooL Get on-line and schedule your sex_ice at
your convenience any day of the year! Or call 800.GE.CARES (800.432.2737) dux-ing norm_d business hours.
RealLifeDesignStudio
GE supports the Universal Design concept--products, services and environments that can be used by
people of aUages, sizes and capabilities. We vecogmize the need m design for a wide range of physical and
mental abilities and impaixments. Fox details of GE's Univexsal Desigm applications, including kitchen
design ideas for people with disabilities, check out our Website today. Fox the hearing impaired, please call
800.TDD.GEAG (800.833.4322).
ExtendedWarranties
Purchase a GE extended warranty and learn about special discounts that are available while your warranty
is still in effect. You can purchase it on-line anytime, or call 800.626.2224 during nomml business houxs.
GE Consumer Home Sex-viceswill still be there _ffteryour warranty expires.
ge.com
ge.com
PartsandAccessories
IndMduals qualified to service their own appliances can have parts or accessox-ies sent direcdy to their
homes (VISA, MasterCard and Discover cards ave accepted). Order on-line today, 24 houxs every day or
by phone at 800.626.2002 during normal business hours.
Instructionscontainedinthismanualcoverprocedurestobeperformedbyanyuser.Otherservicing generally
shouldbereferredtoqualifiedservicepersonnelCautionmustbeexercised,sinceimproperservicingmaycause
unsafeoperation.
ContactUs
If you a_e not satisfed wit1 die service you receive flom GE, contact us on our Website wit1 all die details
including your phone numbex, or wx-imm: General Managex, Gusmmer Relations
GE Appliances, Appliance Park
I.ouisville, KY40225
RegisterYourAppliance
Register your new appliance on-line--at your convenience! Timely product vegism_tion will allow for
enhanced communication and prompt sexa_iceunder the temls of your warranty, should the need arise.
You may also mail in the we-printed regism_tion card included in the packing matex-ial.
ge.com
ge.com
ge.com
Printed in the United States
 Loading...